120
Alchemist XF User Guide

Alchemist XF
User Guide

Alchemist XF User Guide
Version Number: 9.1 © 2017 SAM Page 2 of 120
Version History
Date Version Release by Reason for Changes
22/01/2014 1.0 Jon Metcalf Initial release
30/04/2014 2.0 Jon Metcalf Edit for V1.0.4.10 release
20/05/2014 3.0 Jon Metcalf Edit for V1.1.0.6 release
24/06/2014 3.1 Jon Metcalf Added xFile Error String appendix
08/07/2014 4.0 Jon Metcalf Edit for V1.1.1.12 release
05/09/2014 5.0 Jon Metcalf Edit for V1.2.0.14 release
04/11/2014 5.1 Jon Metcalf Edit supported file type table
15/01/2015 6.0 Jon Metcalf Edit for V2.0.0.10 release
03/07/2015 7.0 Jon Metcalf Edit for V2.1.0.12 release
10/08/2015 7.1 Jon Metcalf Edit for V2.1.1.2 release
04/09/2015 7.2 Jon Metcalf Edit for XF rebrand
Jan/2016 8.0 Jon Metcalf Edit for V2.2.0.12 release
04/03/2016 8.1 Jon Metcalf Image updates
30/03/2016 8.2 Jon Metcalf Image updates
08/06/2016 8.3 Jon Metcalf Edit for V2.2.2.10
13/09/2016 8.4 Jon Metcalf Edit for V2.2.3.2
27/09/2016 8.5 Jon Metcalf Add ‘Auto’ Output Cadence table
17/12/2016 9.0 Jon Metcalf Edit for V3.0.0.16
26/05/2017 9.1 Jon Metcalf Edit for V3.0.1.10
Alchemist XF User Guide
Page 3 of 120 © 2017 SAM Version Number: 9.1
Table of Contents
1. Definitions, Acronyms and Abbreviations .............................................................................................................. 7
2. Overview copy ........................................................................................................................................................................ 9
3. Profile Management.......................................................................................................................................................... 11
3.1 Introduction ................................................................................................................................................................................ 11
3.2 Create a New Profile ............................................................................................................................................................ 12
3.3 Copy and Edit an Existing Profile .................................................................................................................................. 15
3.4 Deleting Profiles ..................................................................................................................................................................... 17
3.5 Licensing Check ..................................................................................................................................................................... 18
3.6 Overview Tab ........................................................................................................................................................................... 19
3.6.1 Profile Name ................................................................................................................................................................... 19
3.6.2 Profile Description ........................................................................................................................................................ 19
3.6.3 Trial Feature .................................................................................................................................................................... 19
4. Profile Configuration........................................................................................................................................................ 20
4.1 Output/Output Tab ................................................................................................................................................................. 20
4.1.1 Output/Output/Video Resolution/Resolution: Various ............................................................................... 20
4.1.2 Output/Output/ Video Resolution/Resolution: Custom ............................................................................. 21
4.1.3 Output/Output/ Video Resolution/ Width & Height: Various .................................................................. 21
4.1.4 Output/Output/Video Scan/Scan rate: Various ............................................................................................. 21
4.1.5 Output/ Output/ Video Scan/ Frame Rate: Various .................................................................................... 22
4.1.6 Output/ Output/ Video Scan: 1000/1001 Multiplier.................................................................................... 22
4.1.7 Output/ Output/ Video Scan/Scan Type: Interlaced / PsF / Progressive ........................................ 22
4.1.8 Output/Output/Video Scan/Cadence.................................................................................................................. 23
4.1.9 Duration Adjust .............................................................................................................................................................. 25
4.1.10 Output/ Output/ File Format/ Codec: Various ............................................................................................. 26
4.1.11 Output/ Output/ File Format/ Codec Profile: Various .............................................................................. 26
4.1.12 Output/ Output/ File Format/ Wrapper: various ......................................................................................... 26
4.1.13 Output/Output/ File Format/ Field Order: Various .................................................................................... 27
4.1.14 Output/Output/Colorspace: Auto/REC601/BT709/BT2020 ................................................................. 27
4.1.15 SDR-HDR Range ....................................................................................................................................................... 28
4.1.16 Output/Output/Blanking: Left/Right/Top/Bottom ........................................................................................ 28
4.2 Output/Metadata ..................................................................................................................................................................... 29
4.2.1 Output/Metadata/Display Aspect Ratio: 4x3 / 16x9 / 4x3 Full / 16x9 Full ...................................... 29
4.2.2 QuickTime Track Aperture Mode ......................................................................................................................... 31
4.2.3 Output/Metadata/Start Timecode ......................................................................................................................... 31
4.2.4 Output/Metadata/CDP (SMPTE 334) enable ................................................................................................ 34
4.2.5 Output/Metadata/CEA-608 (Line 21) enable ................................................................................................. 34
4.2.6 Output/Metadata/CEA-608 field 1 line number............................................................................................. 34
4.2.7 Output/Metadata/CEA-608 field 2 line number............................................................................................. 35
4.2.8 Output/Metadata/Active Format Description (SMPTE 2016) ................................................................ 35

Alchemist XF User Guide
Version Number: 9.1 © 2017 SAM Page 4 of 120
4.2.9 Output/Metadata/AFD enable ................................................................................................................................ 35
4.2.10 Output/Metadata/Coded frame aspect ratio ................................................................................................. 36
4.2.11 Output/Metadata/AFD Code ................................................................................................................................. 36
4.3 Video/Input Tab ....................................................................................................................................................................... 37
4.3.1 Video/Input/Source Scan/Scan Rate .................................................................................................................. 37
4.3.2 Video/Input/Source Scan/Frame rate ................................................................................................................. 38
4.3.3 Video/Input/Source Scan/1000/1001 Multiplier ............................................................................................ 38
4.3.4 Video/Input/Source Scan/Scan Type ................................................................................................................. 38
4.3.5 Video/Input/Source Scan/Field order: Auto/Top field first/Bottom field first .................................. 39
4.3.6 Video / Input / Source Cadence / Cadence: Various ................................................................................. 39
4.3.7 Video/Input/Colorspace: Auto/REC601/BT709/BT2020 .......................................................................... 42
4.3.8 Video/Input/Input Blanking: Left/Right/Top/Bottom ..................................................................................... 42
4.3.9 Video/Input/Closed Captions .................................................................................................................................. 43
4.3.10 Video/Input/DPX Inputs only/Reverse SMPTE 268 Datum ................................................................. 43
4.4 Video/Conversion Tab ......................................................................................................................................................... 44
4.4.1 Video/Conversion/Conversion: Various ............................................................................................................ 44
4.4.2 Video/Conversion/Clean-cut: On – Any field / On - Field 1/ On - Field 2/ Off .............................. 45
4.4.3 Video/Conversion/Aperture: Sharp/Normal/Anti-Alias .............................................................................. 46
4.4.4 Video/Conversion/Alias Suppression: Horizontal/Vertical ...................................................................... 46
4.4.5 Video/Conversion/Aspect Ratio: Various ......................................................................................................... 47
4.5 Video/Utilities Tab .................................................................................................................................................................. 49
4.5.1 Video/Utilities/Luma Gain: +/- 6dB....................................................................................................................... 49
4.5.2 Video/Utilities/Chroma Gain: +/- 6 dB ................................................................................................................ 49
4.5.3 Video/Utilities/Black Level: +/- 80mV ................................................................................................................. 49
4.5.4 Video/Utilities/Luma Clipper: Various ................................................................................................................. 50
4.5.5 Video/Utilities/RGB Legalizer: Off/700mV/721mV/735mV/Custom ................................................... 50
4.6 Audio Tab/Input Setup ......................................................................................................................................................... 51
4.6.1 Audio/Input Setup ......................................................................................................................................................... 52
4.6.2 Audio/Input setup/Number of Input Streams .................................................................................................. 52
4.6.3 Audio/Input Setup/Stream Selection................................................................................................................... 52
4.6.4 Audio/Input Setup/Stream Type: Various ........................................................................................................ 53
4.6.5 Audio/Input Setup/Stream Delay: -250ms to 500ms .................................................................................. 54
4.6.6 Audio/Input Setup/Stream Gain: +/- 12dB ....................................................................................................... 54
4.6.7 Audio/Input Setup/Program Selection & Channel Gain: +/- 12dB ...................................................... 55
4.7 Audio Tab/Output Config .................................................................................................................................................... 57
4.7.1 Audio/Output Config/Bit Depth: Auto/16-bit/24-bit ...................................................................................... 57
4.7.2 Audio/Output Config/QuickTime Format .......................................................................................................... 58
4.7.3 Audio/Output Config/QuickTime endianess: Auto/Little endian/Big endian .................................. 58
4.7.4 Audio/Output Config/Off Speed ............................................................................................................................. 59
4.8 Audio/Output Routing ........................................................................................................................................................... 60
4.8.1 Audio/Output Routing: Number of Output Streams .................................................................................... 60

Alchemist XF User Guide
Page 5 of 120 © 2017 SAM Version Number: 9.1
4.8.2 Audio/ Output Routing/Action on Missing Input streams ......................................................................... 64
4.8.3 Audio Routing Process .............................................................................................................................................. 65
4.8.4 Audio/Input Setup/Audio Program Routing .................................................................................................... 67
5. Browser Configuration ................................................................................................................................................... 69
5.1 Introduction ................................................................................................................................................................................ 69
5.1.1 Browser Configuration ............................................................................................................................................... 69
5.1.2 Using the Browser to Select a Source File ..................................................................................................... 73
5.1.3 Using the Browser to Select a Destination Folder ...................................................................................... 75
6. Creating a Job ..................................................................................................................................................................... 76
6.1 Introduction ................................................................................................................................................................................ 76
6.2 Create Job Procedure ......................................................................................................................................................... 76
7. The Job Queue .................................................................................................................................................................... 84
7.1 Description ................................................................................................................................................................................. 84
7.2 History Pane ............................................................................................................................................................................. 85
7.3 Failed Jobs ................................................................................................................................................................................ 85
7.4 Cancelling a Job ..................................................................................................................................................................... 85
7.5 Resubmit a Job ....................................................................................................................................................................... 86
7.6 Delete the Job Queue ......................................................................................................................................................... 86
7.7 Stop the Job Queue .............................................................................................................................................................. 86
7.8 Re-prioritise a Job ................................................................................................................................................................. 86
7.9 Job Info/Overview .................................................................................................................................................................. 87
8. Watch Folders ...................................................................................................................................................................... 89
8.1 Introduction ................................................................................................................................................................................ 89
8.2 Watch Folder Configuration Example ......................................................................................................................... 89
8.3 How to Setup a Watch Folder Configuration ........................................................................................................... 90
8.3.1 Create the Physical Folders.................................................................................................................................... 90
8.3.2 Create the Watch Folder Configuration ............................................................................................................ 91
8.4 Watch Folder Configuration Parameters ................................................................................................................... 93
8.4.1 Name ................................................................................................................................................................................... 93
8.4.2 Description ....................................................................................................................................................................... 93
8.4.3 Watch Folder Path ....................................................................................................................................................... 93
8.4.4 File ready when ............................................................................................................................................................. 94
8.4.5 Drop Folder Path .......................................................................................................................................................... 94
8.4.6 Profile .................................................................................................................................................................................. 94
8.4.7 Manage .............................................................................................................................................................................. 95
8.4.8 Processing Speed ........................................................................................................................................................ 95
8.4.9 Priority ................................................................................................................................................................................ 96
8.4.10 xFile Server ................................................................................................................................................................... 96
8.4.11 Output Filename Pattern ........................................................................................................................................ 96
8.4.12 Process Hidden Files ............................................................................................................................................... 97
8.4.13 Filter Wildcards ........................................................................................................................................................... 97

Alchemist XF User Guide
Version Number: 9.1 © 2017 SAM Page 6 of 120
8.4.14 Filter Expression ......................................................................................................................................................... 98
8.4.15 Process Existing Files.............................................................................................................................................. 98
8.4.16 Watch Folder Enabled ............................................................................................................................................. 99
8.5 Multiple Watch Folder Configurations ...................................................................................................................... 100
8.5.1 Multiple Watch Folder Configurations Using Common Watch Folder ........................................... 100
8.5.2 Multiple Watch Folder Configurations Using Common Watch & Drop Folders ........................ 101
Appendix A. Supported File Types ..................................................................................................................... 102
Appendix B. Glossary ................................................................................................................................................. 106
Appendix C. xFile Error Strings ............................................................................................................................ 109
Appendix D. DPX Support ........................................................................................................................................ 120
List of Tables
Table 1: Table of Terminology ......................................................................................................................................................... 7
Table 2: Output Cadence Auto setting ..................................................................................................................................... 23
Table 3: Output Filename Format ............................................................................................................................................... 81
Table 4: Supported File Types ................................................................................................................................................... 102
Table 5: H264 Long GOP Information ................................................................................................................................... 105
Table 6: Glossary of Terms ......................................................................................................................................................... 106
Table 7: Error Strings ...................................................................................................................................................................... 110

Alchemist XF User Guide
Page 7 of 120 © 2017 SAM Version Number: 9.1
1. Definitions, Acronyms and Abbreviations
Table 1: Table of Terminology
Term Definition
API Application Programming Interface. An API specifies how some software components
should interact with each other
Cadence A method of carrying low frame rate content, in a high frame rate video transport, by
employing a process of repeating field/frames in a predictable sequence.
Destination folder Folder where finished jobs are written to (access and authorisation required)
Drop Folder A folder associated with a Watch Folder Configuration. The folder will act as a repository for
files converted by the associated Watch Folder Configuration
EOTF Electro-Optical Transfer Function. This describes how to turn digital code words into visble
light
Filmic Any video content that has a refresh rate of 30Hz, or less.
FIMS Framework for Interoperable Media Services. A framework of service definitions for
implementing media related operations using a Service Orientated Architecture (SOA)
GPU Graphical Processing Unit. Very efficient, highly parallel compute engine for advanced
image processing techniques.
HDR High Dyncamic Range. Is a representation that allows extended dynamic range (darker
darks, brighter whites) by means of new transfer functions (EOTF/OETF) and Wide Color
Gamut (WCG), which replaces the traditional CRT gamma curve and BT709 colour space.
License file Defines the quantity of products available
License Server An application that manages product licenses
Locking code Lock code based on specific locking criteria. xFile products are locked to host machine the
sentinel service is installed on
OETF Opto-Electronic Transfer Function. Inverse function of EOTF, describes how to turn visible
light into digital code words
Profile A Profile defines how a piece of media is transformed / converted. Default profiles and User
profiles are available
REST Representational state transfer. Rest is a simple way of sending and receiving data
between client and server. A RESTful web service is a web API implemented using HTTP and
REST principles. Request methods include GET, POST, PUT, DELETE
SDR Standard Dynamic range: traditional CRT gamma curve defined by BT709 colour space in
HD and by REC601 in SD.
xFile Browser A service within the Alchemist XF system that allows the User to easily browse to and select a
source file or, browse to a destination folder
xFile Client The User Interface for the xFile framework
xFile Node Service which executes the jobs within the job queue. It performs all data processing (image/audio/metadata). The Node hardware is represented by the GPU

Alchemist XF User Guide
Version Number: 9.1 © 2017 SAM Page 8 of 120
Term Definition
xFile Server The Service that orchastrates all xFile processes.
xFile Watcher Service which monitors user specified Watch Folder and automatically adds them to the job queue. The User specifies a profile to be applied to each asset which is copied to Watch Folder and then drops the output into the specified Drop Folder.
xFile The Snell OD name has been rebranded to xFile. There is no functional difference between xFile and Snell OD.
Watch Folder A repository folder for source files, where the action of moving a file to the folder, will initiate an automated conversion process
WCG Wide Color Gamut. ITU-R BT.2020 works together with the HDR functionality to offer a much wider color gamut than the traditional BT.709.
Video 1:1 A term describing high frame rate video. For example, with regard 50i 1:1, the video content is refreshed 50 times per second.

Alchemist XF User Guide
Page 9 of 120 © 2017 SAM Version Number: 9.1
2. Overview copy
Our xFile Client offers simple system configuration and management with intuitive and clear control of the job queue. At a glance you can track which jobs are in progress, see estimated completion times, view source file metadata and interrogate both source and destination paths. Job creation is simplified through the use of an integrated browser which offers seamless access to assets on both local and remote shares.
Choose from a selection of preconfigured default Profiles or create your own user Profile to be applied to a job. Our Profile creation widget offers intelligence to help the user generate their desired Profile quickly and easily.
Included is a notification system which keeps you up to date with the state of the various framework services and a watch folder configuration widget to quickly and effectively automate the population of your job queue.
Note: Installation guide can be found here: https://s-a-m.com/products/alchemist-xf-%E2%80%93-highest-quality-file-based-format-and-framerate-conversion-software/c-24/p-228#gl-tab-2
The xFile Client is easily launched via the desktop icon, which is created as part of the installation process.
xFile Client Overview
Notifications
Connect to a specified xFile Server
Access Default and User Profiles
Create Job
Create a Watch Folder configuration
Manage the Services within the System
Client About
Job queue
History pane
Connection status

Alchemist XF User Guide
Version Number: 9.1 © 2017 SAM Page 10 of 120
Connect is used to configure a connection to a specified xFile Server.
Selecting the Connect button will open the xFileTM
Connection window. Only one Server can be connected to, at
any one time, but multiple Server configurations can be stored.
Note that multiple Clients may be run on a single work station and each may connect to different xFile Servers.
Confirmation that the xFile Client has successfully connected to the xFile Server, is shown at the bottom of the Client GUI:
The Connect
button
Alchemist XF User Guide
Page 11 of 120 © 2017 SAM Version Number: 9.1
3. Profile Management
3.1 Introduction
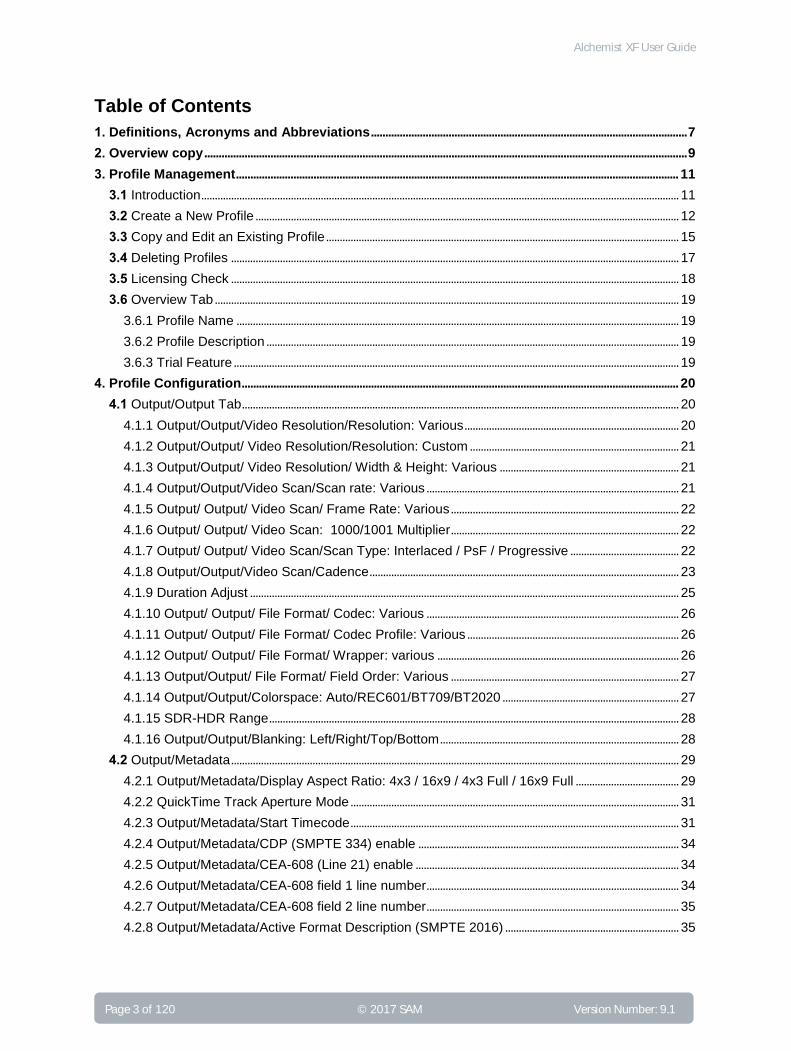
Profiles are used to control the conversion/transformation applied to a job.
The Alchemist XF system is supplied with a number of pre-configured conversion Profiles. These pre-configured Profiles are identified by a Default prefix and these Profiles cannot be edited or deleted.
However, because there are potentially a huge number of video format, video standard, codec and file wrapper combinations, it would be impractical to try and include all combinations as Default Profiles. Therefore, Alchemist XF offers the ability to create custom Profiles.
The Default Profiles can be used as a basis for a User Profile. A User Profile is a Profile that has been custom made by the User.
Once custom Profiles are configured, they will appear alongside the Default Profiles, in the list of available Profiles.
There are two methods that can be employed when building a new Profile:
Create a new Profile – This will create a Profile based on the default settings of the Alchemist XF. The user can
then modify the Profile so that it complies with their specific requirements.
Copy and edit an existing Profile - This method allows the user to duplicate an existing Profile that best
matches the requirements of the new Profile. This can then be modified so that it complies exactly with the requirements.
The Copy method usually offers the fastest approach, since it requires less parameters to be modified.
Alchemist XF User Guide
Version Number: 9.1 © 2017 SAM Page 12 of 120
3.2 Create a New Profile
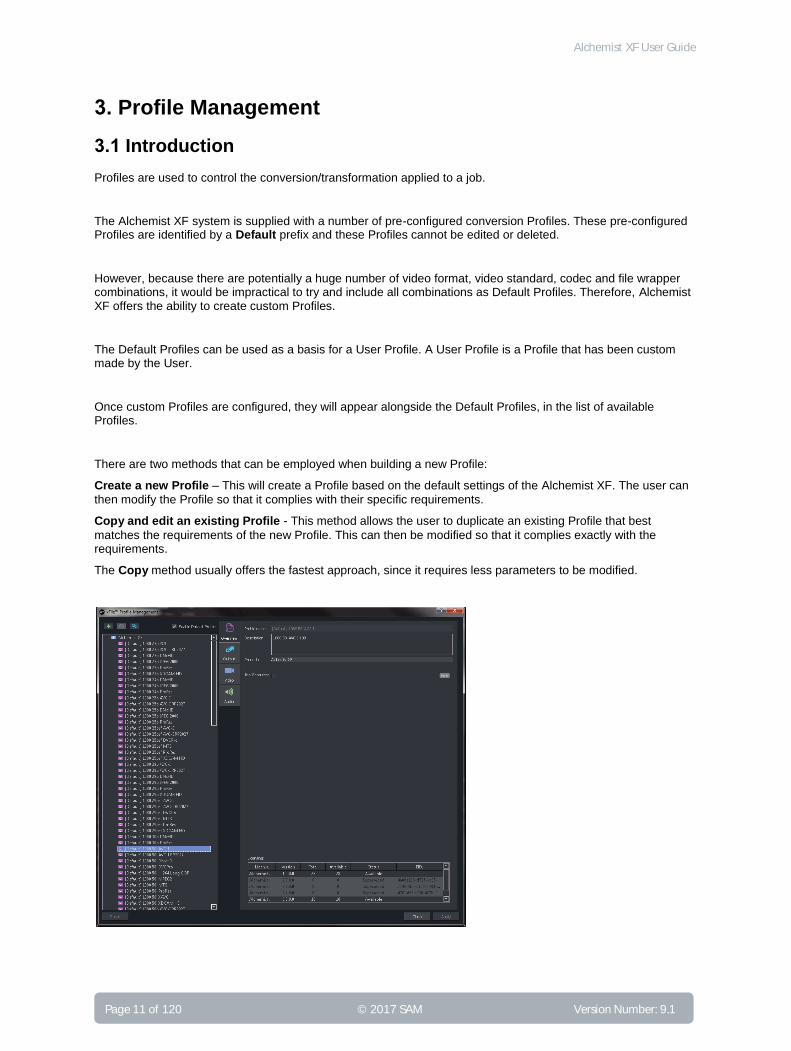
1. Select the Alchemist XF product, in the left-hand pane of the Profile Management window
2. Select the New Profile icon
The Profile Management window will now be in a mode where it can be edited. All parameters will be at their
default value.
You will be prompted to give the new Profile a name. This can be anything the User chooses, but it is often useful for the Profile name to describe the properties of the Profile.
In this example, the output video standard, the video codec and the bit-rate, have all been incorporated into the Profile name. This practice is useful, but not essential. Alternatively, the user could choose to name the Profile by its relevance to a particular customer, or maybe to a particular series of programs.

Alchemist XF User Guide
Page 13 of 120 © 2017 SAM Version Number: 9.1
3. A description may be added if desired. This is useful for future reference.
4. Now the parameters of the new Profile can be edited as per the requirements.
Note: Any parameter adjusted from its default value will set the associated Reset button to red.
A red Reset button means that it is active and when selected will return the particular parameter to its default value. Upon setting a parameter to default value, the associated Reset button will return to grey.
Alchemist XF User Guide
Version Number: 9.1 © 2017 SAM Page 14 of 120
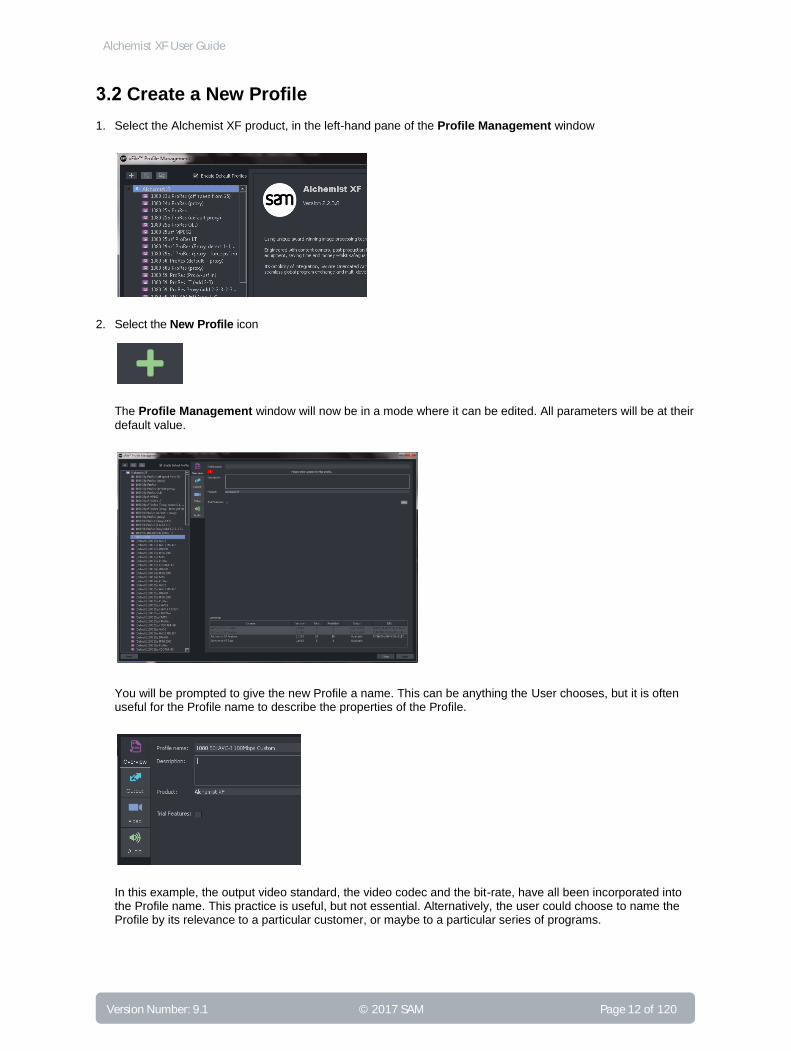
5. When editing is complete, click Apply to save the new Profile.
The new Profile will now appear along side the default Profiles.
The new Profile is now available for any future job. It will remain so until such time as it is deleted.

Alchemist XF User Guide
Page 15 of 120 © 2017 SAM Version Number: 9.1
3.3 Copy and Edit an Existing Profile
As an alternative to building a new Profile from scratch, the Copy feature may be used. This is usually a quicker
method of producing the required Profile.
1. Choose an existing profile that most closely matches the requirements of the required Profile. Click once on the Profile to highlight it.
In this example, one of the default Profiles has been chosen. However, it is also possible to copy a custom Profile if required.
Note: The parameters of the Profile currently have black text. This is because the current Profile is a Default Profile and as such, cannot be edited.
2. Click on the copy symbol
This will make a copy of the selected Profile. Note that the name of the Profile will now be appended with the word ‘copy’ in brackets. Also, note that the parameters within the Profile that the text is now white and can now be edited.
Selected Profile
Alchemist XF User Guide
Version Number: 9.1 © 2017 SAM Page 16 of 120
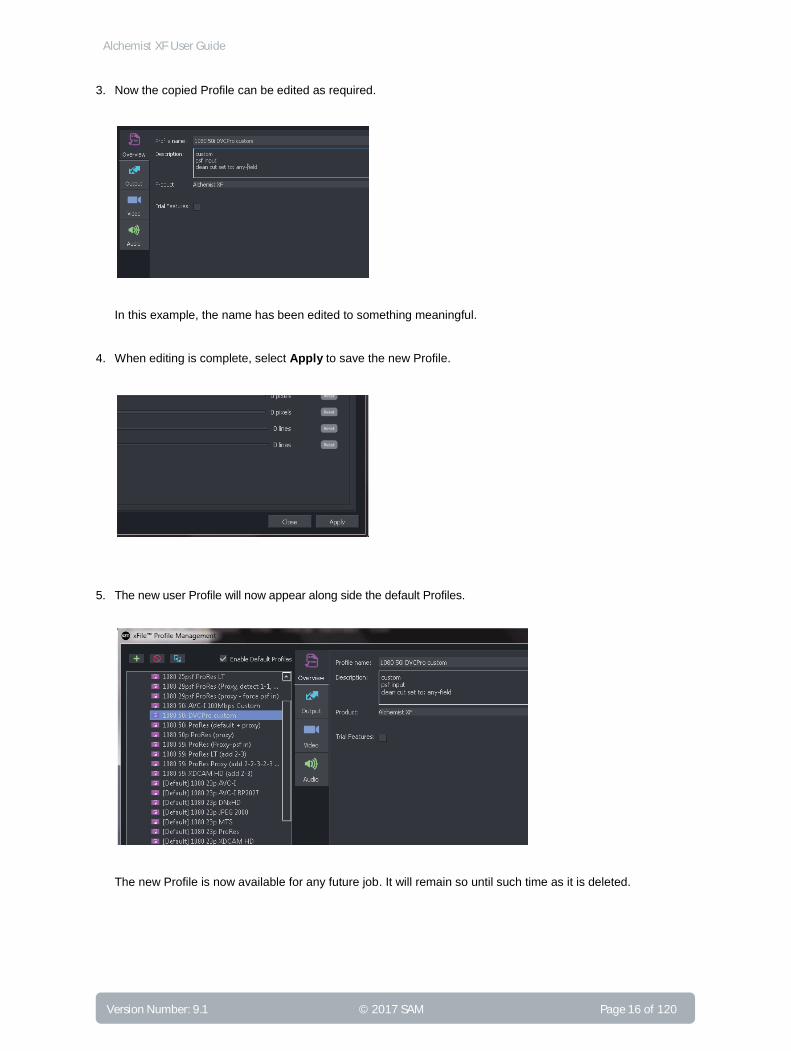
3. Now the copied Profile can be edited as required.
In this example, the name has been edited to something meaningful.
4. When editing is complete, select Apply to save the new Profile.
5. The new user Profile will now appear along side the default Profiles.
The new Profile is now available for any future job. It will remain so until such time as it is deleted.

Alchemist XF User Guide
Page 17 of 120 © 2017 SAM Version Number: 9.1
3.4 Deleting Profiles
Only custom made Profiles can be deleted. Default Profiles cannot be deleted.
1. Click on the Profile that you wish to delete.
2. Click on the Delete symbol.
A Confirm deletion message will appear
Click OK to complete the deletion.

Alchemist XF User Guide
Version Number: 9.1 © 2017 SAM Page 18 of 120
3.5 Licensing Check
Click on the Product to view the License details.
The Product overview window will inform the user of the license type, quantity, status and entitlement ID.
Select
Alchemist XF User Guide
Page 19 of 120 © 2017 SAM Version Number: 9.1
3.6 Overview Tab
3.6.1 Profile Name
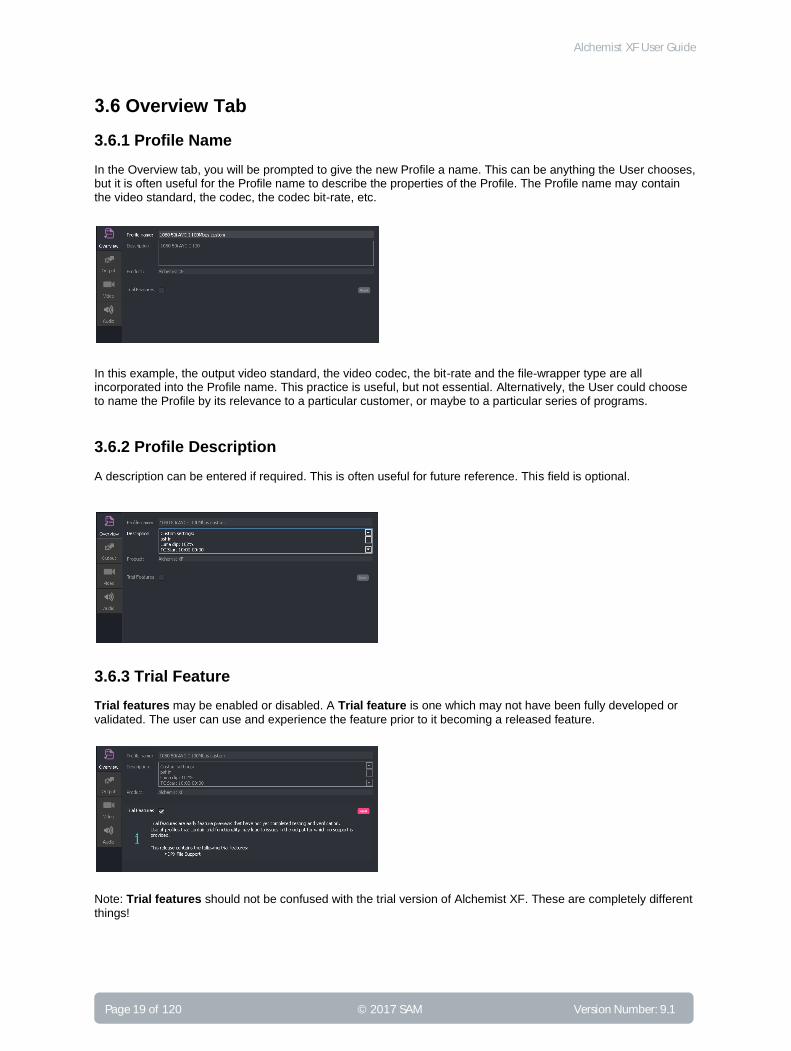
In the Overview tab, you will be prompted to give the new Profile a name. This can be anything the User chooses, but it is often useful for the Profile name to describe the properties of the Profile. The Profile name may contain the video standard, the codec, the codec bit-rate, etc.
In this example, the output video standard, the video codec, the bit-rate and the file-wrapper type are all incorporated into the Profile name. This practice is useful, but not essential. Alternatively, the User could choose to name the Profile by its relevance to a particular customer, or maybe to a particular series of programs.
3.6.2 Profile Description
A description can be entered if required. This is often useful for future reference. This field is optional.
3.6.3 Trial Feature
Trial features may be enabled or disabled. A Trial feature is one which may not have been fully developed or
validated. The user can use and experience the feature prior to it becoming a released feature.
Note: Trial features should not be confused with the trial version of Alchemist XF. These are completely different
things!
Alchemist XF User Guide
Version Number: 9.1 © 2017 SAM Page 20 of 120
4. Profile Configuration
This section describes the parameters available to configure a user profile.
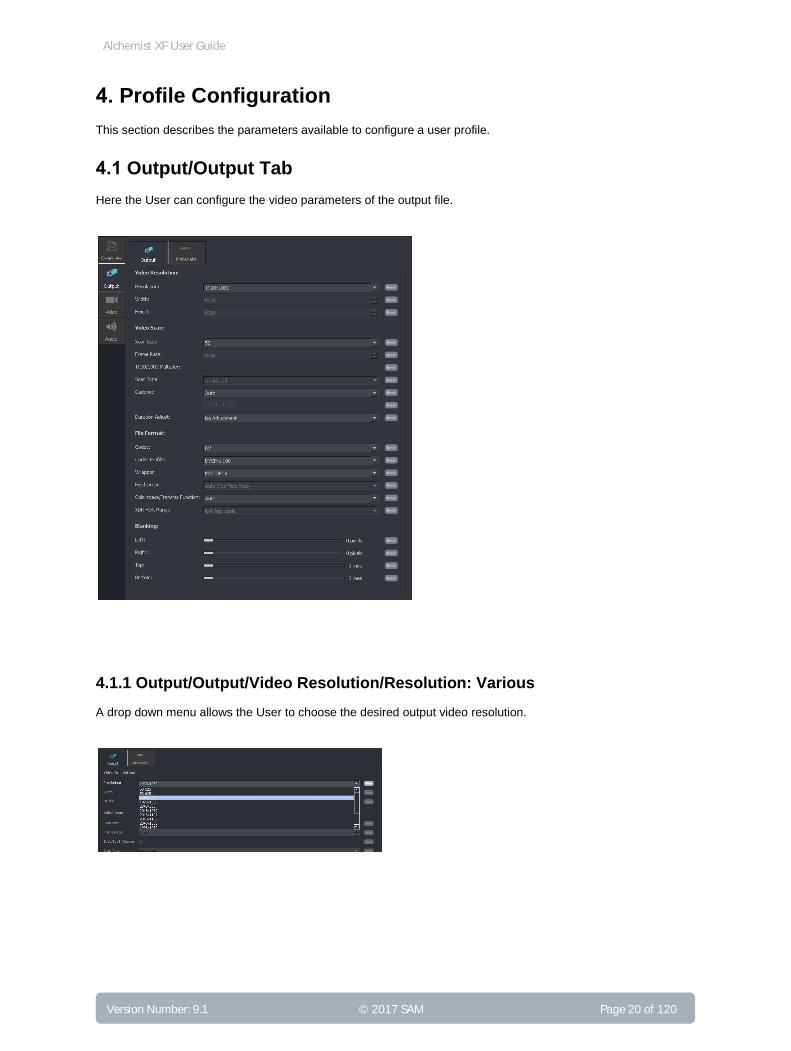
4.1 Output/Output Tab
Here the User can configure the video parameters of the output file.
4.1.1 Output/Output/Video Resolution/Resolution: Various
A drop down menu allows the User to choose the desired output video resolution.
Alchemist XF User Guide
Page 21 of 120 © 2017 SAM Version Number: 9.1
4.1.2 Output/Output/ Video Resolution/Resolution: Custom
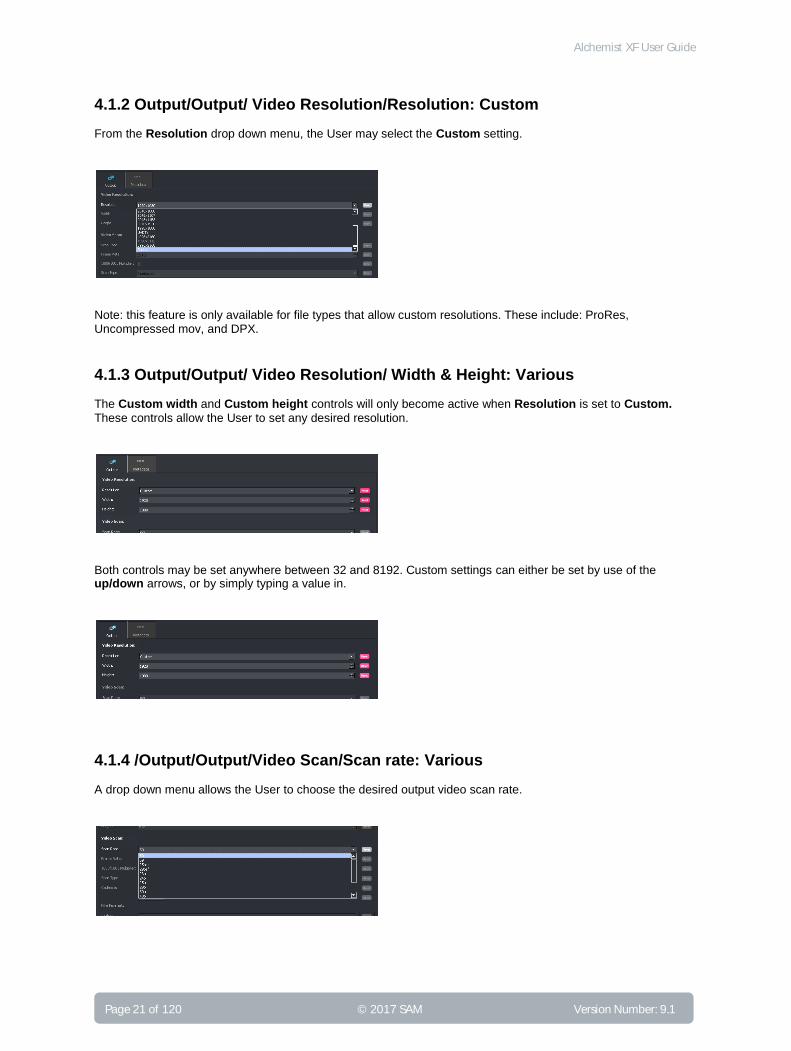
From the Resolution drop down menu, the User may select the Custom setting.
Note: this feature is only available for file types that allow custom resolutions. These include: ProRes, Uncompressed mov, and DPX.
4.1.3 Output/Output/ Video Resolution/ Width & Height: Various
The Custom width and Custom height controls will only become active when Resolution is set to Custom.
These controls allow the User to set any desired resolution.
Both controls may be set anywhere between 32 and 8192. Custom settings can either be set by use of the up/down arrows, or by simply typing a value in.
4.1.4 /Output/Output/Video Scan/Scan rate: Various
A drop down menu allows the User to choose the desired output video scan rate.
Alchemist XF User Guide
Version Number: 9.1 © 2017 SAM Page 22 of 120
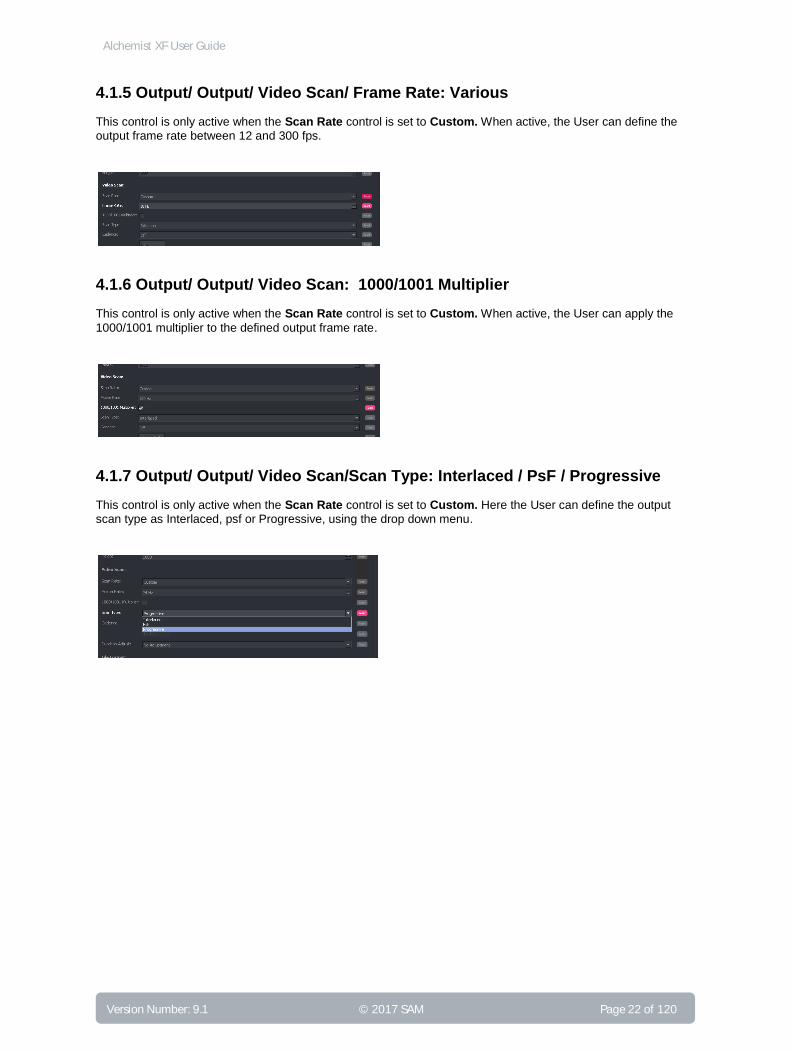
4.1.5 Output/ Output/ Video Scan/ Frame Rate: Various
This control is only active when the Scan Rate control is set to Custom. When active, the User can define the
output frame rate between 12 and 300 fps.
4.1.6 Output/ Output/ Video Scan: 1000/1001 Multiplier
This control is only active when the Scan Rate control is set to Custom. When active, the User can apply the
1000/1001 multiplier to the defined output frame rate.
4.1.7 Output/ Output/ Video Scan/Scan Type: Interlaced / PsF / Progressive
This control is only active when the Scan Rate control is set to Custom. Here the User can define the output
scan type as Interlaced, psf or Progressive, using the drop down menu.

Alchemist XF User Guide
Page 23 of 120 © 2017 SAM Version Number: 9.1
4.1.8 Output/Output/Video Scan/Cadence
This control allows the User to set the desired output cadence. A number of preset values are included. An output cadence can be applied to any temporal resolution. The mixed options allow filmic source segments to maintain the filmic look and higher frame rate (video) segments to maintain the video look.
Auto
Note; the default is Auto. In this mode, the output will maintain the video, or filmic, quality of the source file.
The following table describes the affect of this setting upon low frame rate inputs, when high frame rate outputs are configured:
Table 2: Output Cadence Auto setting
For example if the source file is 23.98p and the output frame rate is configured to be 50i, if the Output Cadence control is set to Auto, the output generated will be 25psf i.e low frame rate in, equals low frame rate out.
This also applies when mixed cadence sources are encountered. If the input has for example, segments of 50i 1:1 and 25psf and an output frame rate of 59.94i; where the input is 50i 1:1, the output will be 59.94i 1:1 and when the input is 25psf, the output will be 29.97psf.
Input file scan-rate
Output Scan Rate
Output Cadence setting
50i
59.94i 60i 50p 59.94p 60p
23.98p Auto 25psf 29.97psf 30psf 50p 2:2 59.95p 2:2 60p 2:2
23.98p off 50i 59.94i 60i 50p 1:1 59.94p 60p
24p Auto 25psf 29.97psf 30psf 50p 2:2 59.95p 2:2 60p 2:2
24p off 50i 59.94i 60i 50p 1:1 59.94p 60p
25p / 25psf Auto 25psf 29.97psf 30psf 50p 2:2 59.95p 2:2 60p 2:2
25p / 25psf off 50i 59.94i 60i 50p 1:1 59.94p 60p
29p / 29psf Auto 25psf 29.97psf 30psf 50p 2:2 59.95p 2:2 60p 2:2
29p / 29psf off 50i 59.94i 60i 50p 1:1 59.94p 60p
30p Auto 25psf 29.97psf 30psf 50p 2:2 59.95p 2:2 60p 2:2
30p off 50i 59.94i 60i 50p 1:1 59.94p 60p

Alchemist XF User Guide
Version Number: 9.1 © 2017 SAM Page 24 of 120
Off
When the Output Cadence control is set to Off, the output scan rate will be dictated by the setting of the Scan Rate control (see 4.1.4), irrespective of the source file properties.
In scenarios where the source content is Filmic and the output frame rate is configured high (i.e 50i, 59i, etc) a low to high frame rate conversion will take place. The Filmic quality of the source will not be maintained in the output.
Film 2:2
This setting will force output content to contain a 2:2 cadence. If the output is interlaced, the output will have a 2:2 F1/2 (PsF) cadence. If the output is progressive, the output will be 2:2 progressive.
Film 2:3
This setting will force output content to contain a continuous 2:3 cadence.
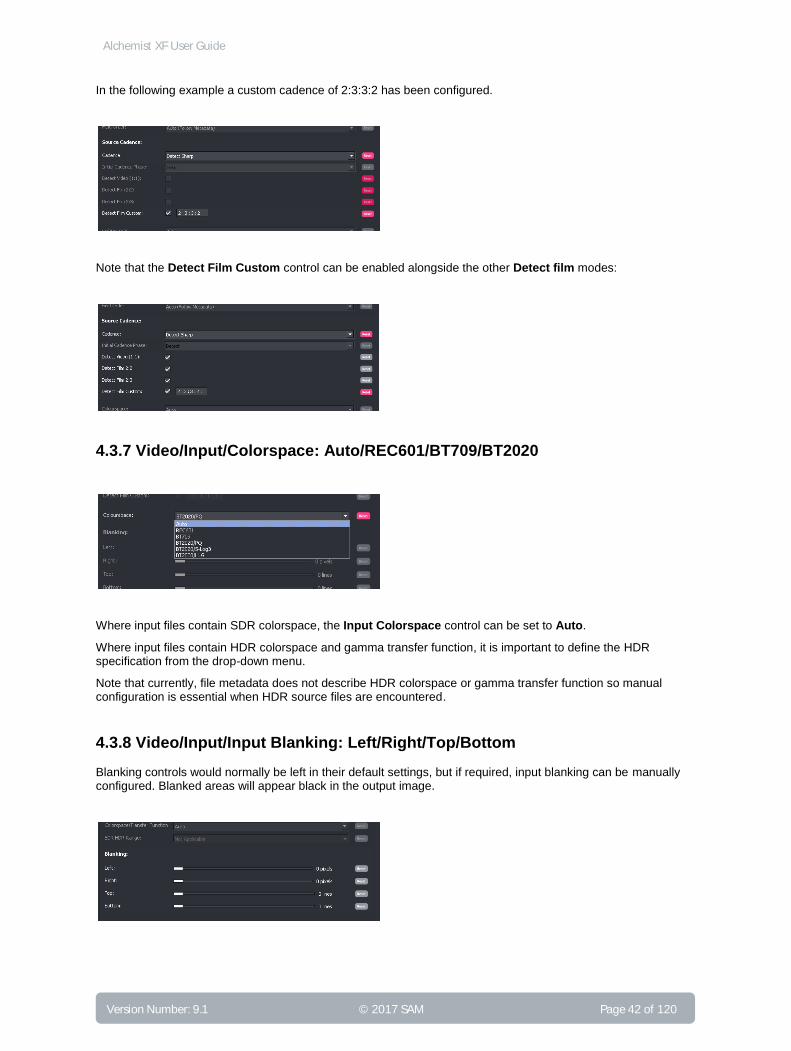
Film Custom
Custom cadences can also be configured.
In this example, a custom cadence of 2:3:3:2 has been configured. This will result in a continuous 2:3:3:2 sequence being applied to the output content. Popular cadences are 2:2:2:4, 5:5, 2:2:3:2:3 etc.
Mixed Video/Film 2:2
This control setting should be used when encountering source content containing a mixture of video and filmic content, when it is desired to maintain the source cadence in the output file.
Note that when Output Cadence control is set to Mixed Video/Film 2:2, the Input/Source Cadence – Cadence control (see section 4.3.6) will automatically be set to Detect Sharp. This is because the detector must be
switched on for this conversion process to work.
When set, where the source is low frame rate filmic content, the output will have a 2:2 cadence applied. So for example if the output file was 50i, the content would have be 25psf.
When the source is high frame rate, the output will correspondingly be high frame rate. i.e. 50i 1:1.
Mixed Video/Film 2:3
This control setting should be used when encountering source content containing a mixture of video and filmic content, when it is desired to maintain the source cadence in the output file. This would normally apply to a 59.94Hz output file.
Note that when Output Cadence control is set to Mixed Video/Film 2:3, the Input/Source Cadence – Cadence control (see section 4.3.6) will automatically be set to Detect Sharp. This is because the detector must be
switched on for this conversion process to work.
When set, where the source is low frame rate filmic content, the corresponding output will have a 2:3 cadence applied. So for example if the output file was 59i, the content would have be 59.94i 2:3.
When the source is high frame rate, the corresponding output will be high frame rate. i.e. 59i 1:1.

Alchemist XF User Guide
Page 25 of 120 © 2017 SAM Version Number: 9.1
Mixed Video/Film Custom
This control setting should be used when encountering source content containing a mixture of video and filmic content, when it is desired to maintain the source cadence in the output file. This would normally apply to a 59.94Hz output file and where an alternative cadence type is desired. The alternative cadence should be entered in the appropriate box:
Note that when Output Cadence control is set to Mixed Video/Film Custom, the Input/Source Cadence – Cadence control (see section 4.3.6) will automatically be set to Detect Sharp. This is because the detector must
be switched on for this conversion process to work.
When the source is filmic, the corresponding output will maintain the filmic quality of the source, by adding the configured custom cadence.
When the source is high frame rate, the output will correspondingly be high frame rate. i.e. 59i 1:1.
4.1.9 Duration Adjust
This control is used specifically where short files are processed, where the output duration defined by timecode, must be the same as the input file length, also defined by timecode.
This control has two possible settings:
No Adjustment
Adjust for DF timecode error
No adjustment: When selected, the actual duration of the output will be as close as possible to
actual duration of the source file. Note that because Alchemist-XF must build
output files with an integer number of frames and it is usually the case, that
when frame rate converting, output files cannot be the exact same duration as
the source file.
Adjust for DF timecode error: When selected, the output file duration as defined by timecode, will be as close
as possible to the input file, as defined by timecode.

Alchemist XF User Guide
Version Number: 9.1 © 2017 SAM Page 26 of 120
4.1.10 Output/ Output/ File Format/ Codec: Various
A drop down menu allows the User to choose the desired output video codec.
Note that some codecs are not available with certain file type configurations (i.e. JPEG is not offered when interlaced scan rates are configured). At such times, the codec will not be offered as a selectable item.
4.1.11 Output/ Output/ File Format/ Codec Profile: Various
A drop down menu allows the User to set the desired bit-rate and bit-depth, of the codec used in the output file.
Note that the dropdown menu for this parameter will be dependent upon the chosen Codec. In this example the various ProRes profiles are shown.
4.1.12 Output/ Output/ File Format/ Wrapper: various
A drop down menu allows the user to set the desired file wrapper. The client will only offer wrappers which are valid for the format, codec and codec profile selected.
Note that the dropdown menu for this parameter will be dependent upon the chosen Codec.
In this example the JPEG profiles has been selected and so the choice is given to wrap the file either as a .MOV, an .MJ2 or as an .MXF OP1a.
Alchemist XF User Guide
Page 27 of 120 © 2017 SAM Version Number: 9.1
4.1.13 Output/Output/ File Format/ Field Order: Various
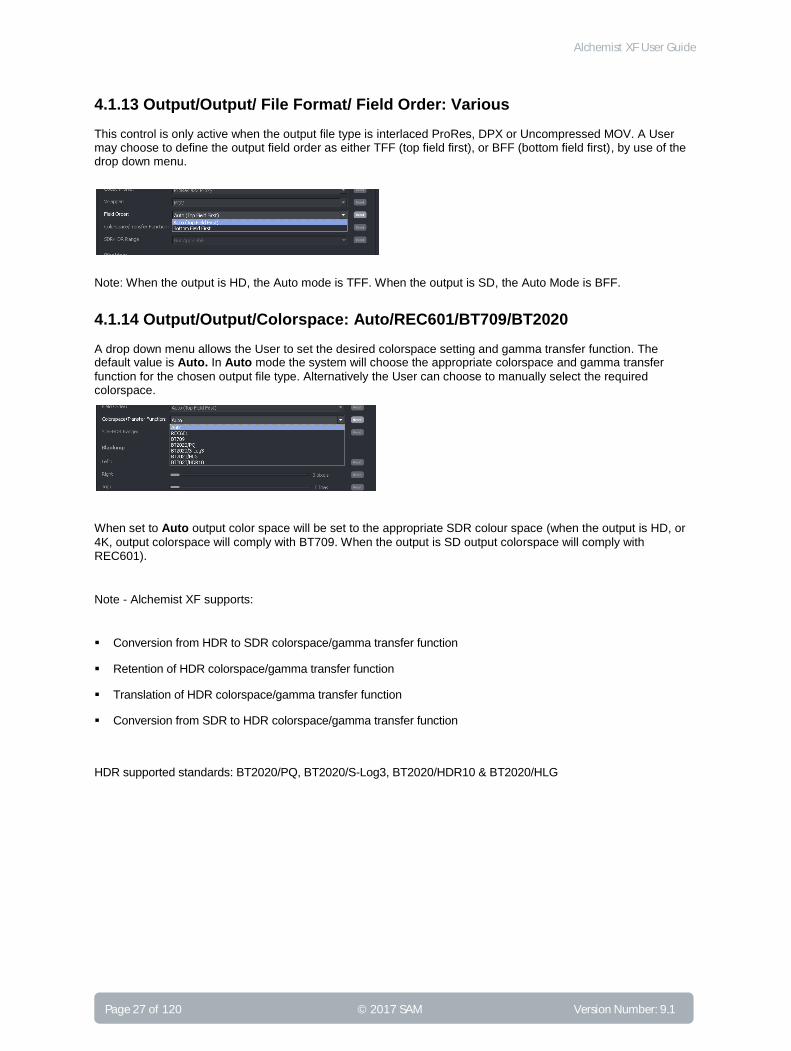
This control is only active when the output file type is interlaced ProRes, DPX or Uncompressed MOV. A User may choose to define the output field order as either TFF (top field first), or BFF (bottom field first), by use of the drop down menu.
Note: When the output is HD, the Auto mode is TFF. When the output is SD, the Auto Mode is BFF.
4.1.14 Output/Output/Colorspace: Auto/REC601/BT709/BT2020
A drop down menu allows the User to set the desired colorspace setting and gamma transfer function. The default value is Auto. In Auto mode the system will choose the appropriate colorspace and gamma transfer
function for the chosen output file type. Alternatively the User can choose to manually select the required colorspace.
When set to Auto output color space will be set to the appropriate SDR colour space (when the output is HD, or
4K, output colorspace will comply with BT709. When the output is SD output colorspace will comply with REC601).
Note - Alchemist XF supports:
Conversion from HDR to SDR colorspace/gamma transfer function
Retention of HDR colorspace/gamma transfer function
Translation of HDR colorspace/gamma transfer function
Conversion from SDR to HDR colorspace/gamma transfer function
HDR supported standards: BT2020/PQ, BT2020/S-Log3, BT2020/HDR10 & BT2020/HLG

Alchemist XF User Guide
Version Number: 9.1 © 2017 SAM Page 28 of 120
4.1.15 SDR-HDR Range
This control is only active if the input Colorspace control is set to an SDR value, and the output
Colorspace/Transfer Function control is set to an HDR value.
When this combination is configured, the control will be enabled.
The control SDR-HDR Range can be used to define how much of the available output HDR nit range the SDR is
mapped into. The User can specify the desired range using the drop down menu.
The default value is: 100 nits
4.1.16 Output/Output/Blanking: Left/Right/Top/Bottom
The Blanking slider controls allow the user to blank areas of the output image. Blanked areas will appear black in the output image.
Alchemist XF User Guide
Page 29 of 120 © 2017 SAM Version Number: 9.1
4.2 Output/Metadata
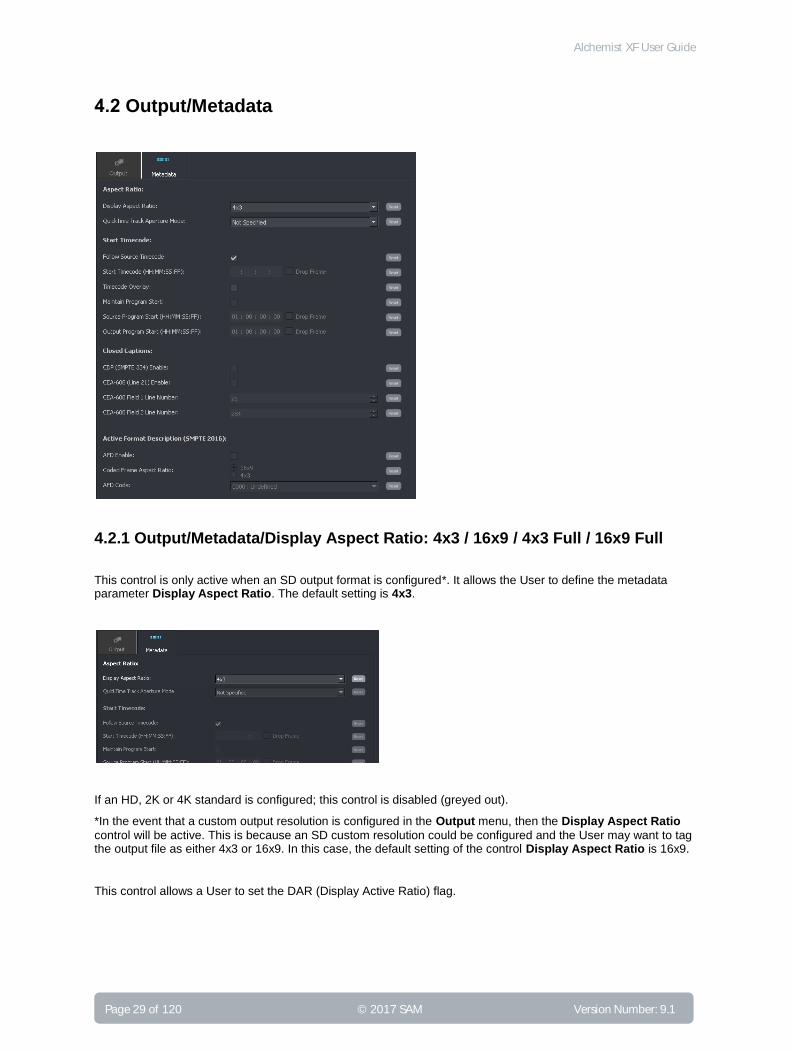
4.2.1 Output/Metadata/Display Aspect Ratio: 4x3 / 16x9 / 4x3 Full / 16x9 Full
This control is only active when an SD output format is configured*. It allows the User to define the metadata parameter Display Aspect Ratio. The default setting is 4x3.
If an HD, 2K or 4K standard is configured; this control is disabled (greyed out).
*In the event that a custom output resolution is configured in the Output menu, then the Display Aspect Ratio
control will be active. This is because an SD custom resolution could be configured and the User may want to tag the output file as either 4x3 or 16x9. In this case, the default setting of the control Display Aspect Ratio is 16x9.
This control allows a User to set the DAR (Display Active Ratio) flag.

Alchemist XF User Guide
Version Number: 9.1 © 2017 SAM Page 30 of 120
The control has four possible settings, selectable from a drop down menu:
4x3 This setting is applicable for when the output program is to be displayed on a 4x3 video
monitor. This setting uses the default values dictated by the specific file format being employed by the output file.
Note that when the output file type utilizes a MOV file wrapper, that default values are based on analogue blanking (625: 702x576 / 525: 702x486). This behaviour is inherent in the MOV file wrapper. All other file types will scale correctly in the digital domain (625: 720x576, 525: 720x486).
16x9 This setting is used if the SD output program is to be displayed on a 16x9 video monitor. When 16x9 is selected, the spatial scaling will be dictated by the specific file format being employed in
the output file.
Note that when the output file type utilizes a MOV file wrapper, that default values are based on analogue blanking values (625: 702x576, 525: 702x486). This will affect scaling to 16x9, where the actual aspect ratio created will be 1.85:1 (true 16x9 = 1.77:1). This behaviour is inherent in the MOV file wrapper. All other file types will scale correctly to 16x9.
4x3 Full This setting is only available when the output file format utilizes a MOV file wrapper. When
selected, the output file will be scaled using digital blanking values (625: 720x576, 525: 720x486), so ensuring the output is exactly 4:3.
16x9 Full This setting is only available when the output file format utilizes a MOV file wrapper. This setting is used if the output program is to be displayed on a 16x9 video monitor. Unlike the 16x9 setting, the 16x9 Full setting will set spatial scaling values to make the output file display
exactly to 16x9.

Alchemist XF User Guide
Page 31 of 120 © 2017 SAM Version Number: 9.1
4.2.2 QuickTime Track Aperture Mode
This control is only active when the output standard is SD, and the output file container is Quicktime.
The Track Aperture Mode is an optional MOV container atom that stores information for video correction by
describing the dimensions of the clean aperture, the production aperture and the encoded pixels.
When MOV files are played in Apple QuickTime player, the DAR setting is ignored unless the Track Aperture
Mode is set to Production Mode.
4.2.3 Output/Metadata/Start Timecode
This control allows the User to define the output timecode count.
The default setting is: Follow Source Timecode.
In this mode output timecode will follow source timecode by preloading the output timecode generator with the start timecode value extracted from the source. The output generator will then free run.
Note: Drop frame timecode is designed to faithfully represent real time as shown on a clock on the wall. It achieves this by dropping 2 frame counts every minute, except every tenth minute. For this reason a drop frame conversion doesn’t contain all the time code frame counts which were present in a non-drop frame source.
Where as, non-drop frame timecode, includes all timecode counts, but a consequence to this is that timecode time does not represent real time.
In circumstances where the input has no timecode and Follow source timecode is enabled, output timecode will
use the default value as a starting point i.e. 01:00:00:00
Note that if the output scan rate is set to 59fps, when Follow source timecode is enabled, the output timecode
will be, by definition, drop frame.

Alchemist XF User Guide
Version Number: 9.1 © 2017 SAM Page 32 of 120
Alternatively, the User can choose to start output timecode from a specific value. Un-checking the Follow source timecode control will make the Start timecode (hh.mm.ss.ff) control active. The default timecode value of 1
hour (01:00:00:00) will be displayed.
The Start timecode (hh.mm.ss.ff) value may be configured to be any timecode value the User chooses, by
simply typing a numerical value:
Note that if a 29.97 or 59.94 fps output format is selected in the Output menu, the Drop Frame control will now
become active, allowing the User to define the output timecode as either drop frame, or non-drop frame.
The default setting is Drop Frame.
Timecode Overlay
When enabled, a timecode overlay will appear within the active picture area (upper left), of the output video content.

Alchemist XF User Guide
Page 33 of 120 © 2017 SAM Version Number: 9.1
Maintain Program Start
This feature is only applicable for Off-speed processes.
Note that Maintain Program Start can only be enabled when Follow Source Timecode is enabled.
When off-speeding the duration of a file is altered. In files that contain a pre-run before program start, this feature allows a User to either:
Maintain the program start TC (same as the source).
Define the program start.
Source Program Start (HH:MM:SS:FF)
This control allows a User to define the program start point, in the source file.
Output Program Start (HH:MM:SS:FF)
This control allows a User to configure the program start point, in the output file.
If it is desired to maintain the program start timecode of the source in the output file, the Output Program Start timecode should be set to the same value as the defined Source Program Start timecode.
An alternative program start timecode may be configured.
In this example, the User has defined the program start as 01:02:34:00.
The output program start timecode is configured to be 01:00:00:00.

Alchemist XF User Guide
Version Number: 9.1 © 2017 SAM Page 34 of 120
4.2.4 Output/Metadata/CDP (SMPTE 334) enable
When enabled, the CDP (SMPTE 334) enable control will allow any Closed Captions in the input to be inserted in
the output as SMPTE 436M ancillary data.
Note – this control is only active when certain output file types are configured. Where the feature is not supported,
the control will be unavailable (greyed out).
4.2.5 Output/Metadata/CEA-608 (Line 21) enable
The CEA-608 (Line 21) enable control set is only active when SD 525 is set as the output format, and the
IMX/D10 codec, or DPX, is configured. In all other cases the control is inactive.
The control CEA-608 (Line 21) enable, when enabled will allow input Closed Captions conforming to CEA 608
to pass to the output, or CEA 708 CB (compatibility byte) to be transposed into the output as CEA608.
4.2.6 Output/Metadata/CEA-608 field 1 line number
The control CEA-608 field 1 line number allows the User to configure an alternative output line to carry the
CEA608 caption. This can be on any line between line 10 and line 25. Default is line 21.

Alchemist XF User Guide
Page 35 of 120 © 2017 SAM Version Number: 9.1
4.2.7 Output/Metadata/CEA-608 field 2 line number
Similarly, the control CEA-608 field 2 line number allows the User to configure an alternative output line to carry
the CEA-608 caption. This can be on any line between line 274 and line 288. Default is line 284.
Note – Alchemist XF only offers output Closed Captions support of CEA608 (line 21) when the output format is either D10/IMX MXF OP1a, or DPX. Whenever an output file type is configured that is not D10/IMX MXF OP1a, or DPX, the CEA-608 (Line 21) enable control will be disabled.
4.2.8 Output/Metadata/Active Format Description (SMPTE 2016)
The User can choose to add SMPTE 2016 signalling information to the output file. AFD codes can be selected from a drop down menu. However, this feature is limited to certain output file formats. When the feature is not supported by the chosen output format, the AFD enable control will be unavailable (greyed out).
4.2.9 Output/Metadata/AFD enable
If an output codec is selected that supports the insertion of SMPTE 2016 AFD codes, the User may choose to enable the feature using the AFD enable checkbox.
The AFD enable control is default off (unchecked).

Alchemist XF User Guide
Version Number: 9.1 © 2017 SAM Page 36 of 120
4.2.10 Output/Metadata/Coded frame aspect ratio
When enabled, the Coded frame aspect ratio, and the AFD code controls become active.
The coded frame may be set to either 16x9, or 4x3, by selecting the appropriate check box.
4.2.11 Output/Metadata/AFD Code
A specific AFD code may be selected from the drop down menu.

Alchemist XF User Guide
Page 37 of 120 © 2017 SAM Version Number: 9.1
4.3 Video/Input Tab
The video menu contains three sub menus: Input, Conversion and Utilities.
4.3.1 Video/Input/Source Scan/Scan Rate
This control has two possible settings: Auto (Follow Metadata) and User Specified, selectable from a drop
down menu.
When set to Auto, the source frame rate will be determined from the source file metadata.
In circumstances where the metadata in the source file is deemed to be incorrect with respect to frame rate, a User can choose to over-ride the metadata and process the file, manually defining the correct source frame rate. Setting this control to User Specified will make the Frame Rate control (below) active.

Alchemist XF User Guide
Version Number: 9.1 © 2017 SAM Page 38 of 120
4.3.2 Video/Input/Source Scan/Frame rate
This control is only visible when the Scan Rate control (above) is set to User Specified. Once active, the User
can manually set the source frame rate.
4.3.3 Video/Input/Source Scan/1000/1001 Multiplier
This control is only visible when the Scan Rate control (above) is set to User Specified. Once active, the User
can use this control to define a frame rate that uses the 1000/1001 multiplier (i.e. 59.94 – set 60Hz and enable multiplier).
4.3.4 Video/Input/Source Scan/Scan Type
This control has three possible settings: Auto, Interlaced, or Progressive/PsF.
In Auto, the system will automatically determine input scan rate from the metadata. This is the default setting.
Alternatively, the User can choose to force the Scan type control to either Interlaced, or to Progressive/PsF.
This is useful if the associated metadata incorrectly describes the actual video essence.
Alchemist XF User Guide
Page 39 of 120 © 2017 SAM Version Number: 9.1
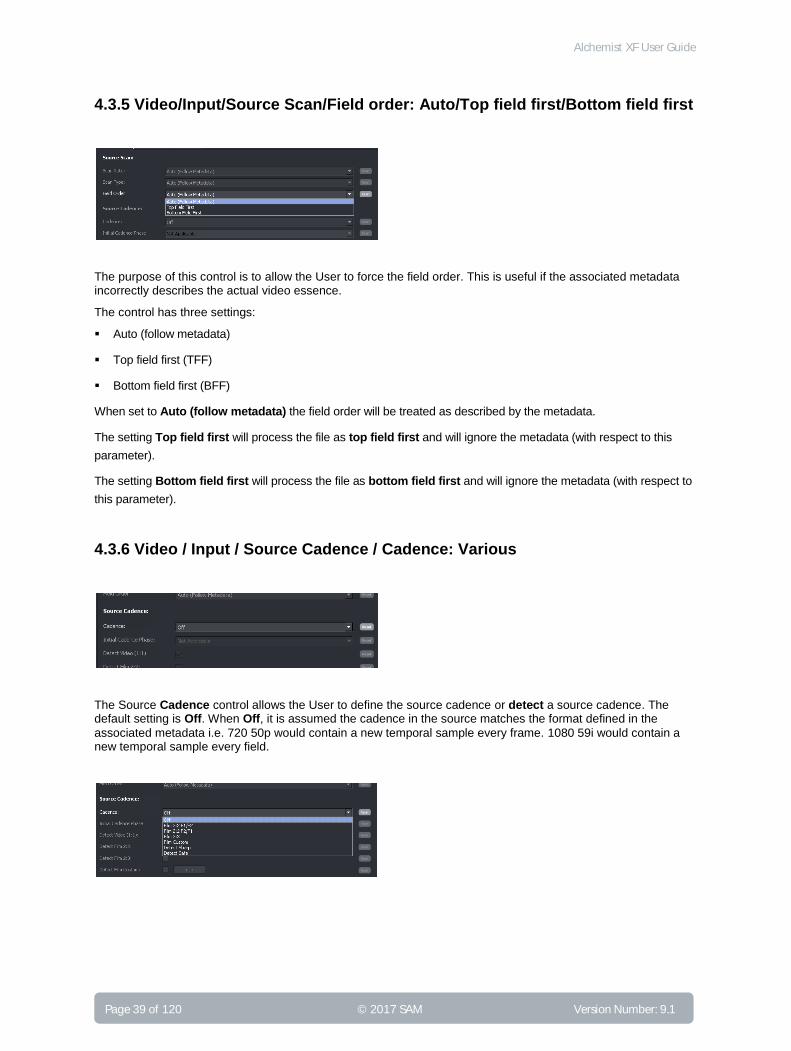
4.3.5 Video/Input/Source Scan/Field order: Auto/Top field first/Bottom field first
The purpose of this control is to allow the User to force the field order. This is useful if the associated metadata incorrectly describes the actual video essence.
The control has three settings:
Auto (follow metadata)
Top field first (TFF)
Bottom field first (BFF)
When set to Auto (follow metadata) the field order will be treated as described by the metadata.
The setting Top field first will process the file as top field first and will ignore the metadata (with respect to this
parameter).
The setting Bottom field first will process the file as bottom field first and will ignore the metadata (with respect to
this parameter).
4.3.6 Video / Input / Source Cadence / Cadence: Various
The Source Cadence control allows the User to define the source cadence or detect a source cadence. The default setting is Off. When Off, it is assumed the cadence in the source matches the format defined in the
associated metadata i.e. 720 50p would contain a new temporal sample every frame. 1080 59i would contain a new temporal sample every field.

Alchemist XF User Guide
Version Number: 9.1 © 2017 SAM Page 40 of 120
In circumstances where the User is confident that their source content conforms to a particular cadence, then the appropriate cadence type can be selected from the drop-down menu.
If the source encountered has a 2:3 cadence associated with it and the User chooses to define the input cadence as Film 2:3, the Initial cadence phase control will become active.
This control allows the User to define the phase of the source 2:3 cadence. In this particular scenario, it is essential that the source content has a continuous, unbroken 2:3 cadence associated with it and that the User correctly configures the Initial Cadence Phase of the source content. In circumstances where these parameters are unknown, the User should configure the mode to be Detect.
The Cadence option Film Custom, allows the User to define an input cadence that is not available as a preset.
There are many different cadence types in use today, usually associated with the 29.97 frame rate. In the following example a custom cadence of 2:3:3:2 has been configured. Where the cadence type configured has a phase sequence, the User must correctly define the phase sequence.

Alchemist XF User Guide
Page 41 of 120 © 2017 SAM Version Number: 9.1
Cadence Detect
Probably the most useful setting for the Cadence control is Detect. In this mode it is not necessary for the User
to define the source cadence. The system will adaptively detect the source cadence and process the content accordingly. When the Cadence control is set to one of the Detect modes, the controls Detect video (1:1), Detect video 2:2, and Detect video 2:3 all become active.
Alchemist XF offers two detect modes:
Detect Sharp
Detect Safe
Detect Sharp
The Detect Sharp mode allows maximum possible vertical resolution. However, this mode is less tolerant of film
sequence detection errors.
Detect Safe
The Detect Safe mode is more more tolerant to film sequence detection errors. This mode is useful for filmic
content that contains mixed cadence regions and also broken cadence regions. Note that this mode does
compromise verticle resolution, so results maybe slightly softer than when using the Detect Sharp mode.
When either Detect mode is selected, the controls Detect video (1:1), Detect video 2:2, and Detect video 2:3
will all be enabled. However, the User can choose to disable any or all of these controls and so configure the detector appropriately for the source content being processed.
Note; in the file-based domain, it is not uncommon for source files to have mixed and non-standard cadences. It is possible, that source content containing multiple cadence types is encountered. For example, 1:1, 2:2 and 2:3 cadences may be present, all within the same program. For such content, the Detect mode should be configured.
The control Detect film custom allows the User to define a source cadence type that is not 1:1, 2:2 or 2:3.
Common alternative cadences include 2:2:2:4, 2:3:3:2, 2:2:3:2:3 or 5:5 (5:5 is usually associated with animation).
Alchemist XF User Guide
Version Number: 9.1 © 2017 SAM Page 42 of 120
In the following example a custom cadence of 2:3:3:2 has been configured.
Note that the Detect Film Custom control can be enabled alongside the other Detect film modes:
4.3.7 Video/Input/Colorspace: Auto/REC601/BT709/BT2020
Where input files contain SDR colorspace, the Input Colorspace control can be set to Auto.
Where input files contain HDR colorspace and gamma transfer function, it is important to define the HDR specification from the drop-down menu.
Note that currently, file metadata does not describe HDR colorspace or gamma transfer function so manual configuration is essential when HDR source files are encountered.
4.3.8 Video/Input/Input Blanking: Left/Right/Top/Bottom
Blanking controls would normally be left in their default settings, but if required, input blanking can be manually configured. Blanked areas will appear black in the output image.

Alchemist XF User Guide
Page 43 of 120 © 2017 SAM Version Number: 9.1
4.3.9 Video/Input/Closed Captions
This control is only applicable when the input format is SD. This control allows the User to define the input line that Closed Captions are present on. This is usually line 21 of field 1, and line 284 of field 2, which are the default values of these controls.
In circumstances where source CEA-608 closed captions are carried on an alternative input line, these controls allow the User to define these alternative lines:
4.3.10 Video/Input/DPX Inputs only/Reverse SMPTE 268 Datum
This control will be disabled unless Trial features are enabled (see section 3.6.3, page 18).
DPX files are not wrapped into a file wrapper which offers metadata describing the frame rate. For this reason the User must specify the input frame rate (part 4.3.1, 4.3.2 above).
DPX files can either conform the SMPTE268, or to an alternative specification, DVS. The control Reverse
SMPTE 268 datum should be selected when source DPX files conform the DVS specification.
For additional information regarding DPX support, see Appendix D at the end of this document (page 101).

Alchemist XF User Guide
Version Number: 9.1 © 2017 SAM Page 44 of 120
4.4 Video/Conversion Tab
The second Video tab relates to Conversion parameters.
4.4.1 Video/Conversion/Conversion: Various
The conversion mode may be selected from a drop down menu.
This control offers a choice of several modes of operation:
Motion Compensated (Ph.C)
Motion Compensated High Effort (PhC)
Linear (Ph.C off)
Synchronize (Ph.C off)
Off-Speed (Ph.C Off, Duration Modified)
Alchemist XF User Guide
Page 45 of 120 © 2017 SAM Version Number: 9.1
Motion Compensated (Ph.C) is the default and applies Motion Compensated Interpolation when
converting from one frame rate to another.
Motion Compensated High Effort (Ph.C) enables a ‘high effort’ motion compensation mode. In many cases the conversion performance is near indistinguishable from Motion Compensated (Ph.C), however it can be beneficial when
converting:
complex moving, small objects (particularly at low frame rates)
moving images which contain burnt in captions
This mode will never result in an inferior quality of conversion (when compared to the default Motion Compensated (Ph.C)), but
it does require more processing resources and hence conversion durations are significantly extended.
Linear (Ph.C off) disables the Motion Compensation, and employs a linear
interpolation when converting from one frame rate to another.
Synchronize (Ph.C off) converts from one frame rate to another by dropping or repeating
input pictures as required. Depending on the conversion requested field or frame based synchronise events could occur.
Off-Speed (Ph.C Off, Duration Modified) this mode simulates a VTR verispeed process. No picture building
takes place and no conversion artefacts are produced. However, the duration of the program content is modified (i.e. 24 to 25 fps, reduces the duration by 4%). In this mode, associated audio maybe; discarded, pitch-shifted or re-sampled (see section 4.6 Audio Processing, below). Note that this mode is only offered
when input/output frame rate configurations allow it.
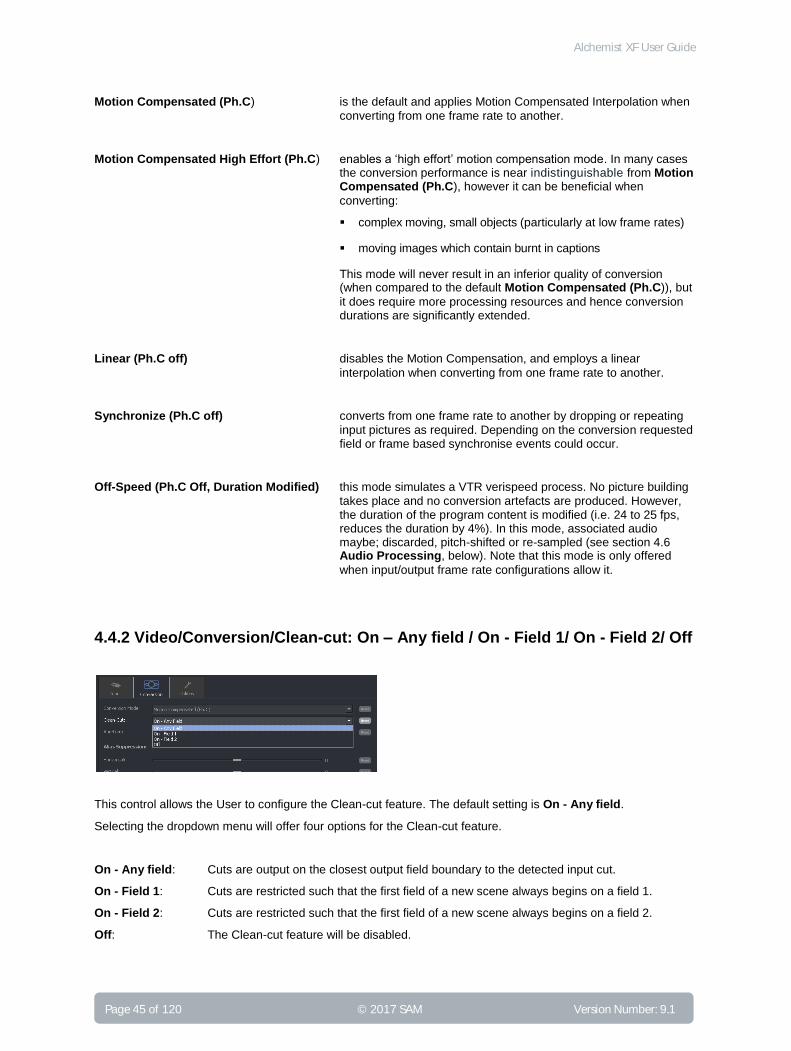
4.4.2 Video/Conversion/Clean-cut: On – Any field / On - Field 1/ On - Field 2/ Off
This control allows the User to configure the Clean-cut feature. The default setting is On - Any field.
Selecting the dropdown menu will offer four options for the Clean-cut feature.
On - Any field: Cuts are output on the closest output field boundary to the detected input cut.
On - Field 1: Cuts are restricted such that the first field of a new scene always begins on a field 1.
On - Field 2: Cuts are restricted such that the first field of a new scene always begins on a field 2.
Off: The Clean-cut feature will be disabled.
Alchemist XF User Guide
Version Number: 9.1 © 2017 SAM Page 46 of 120
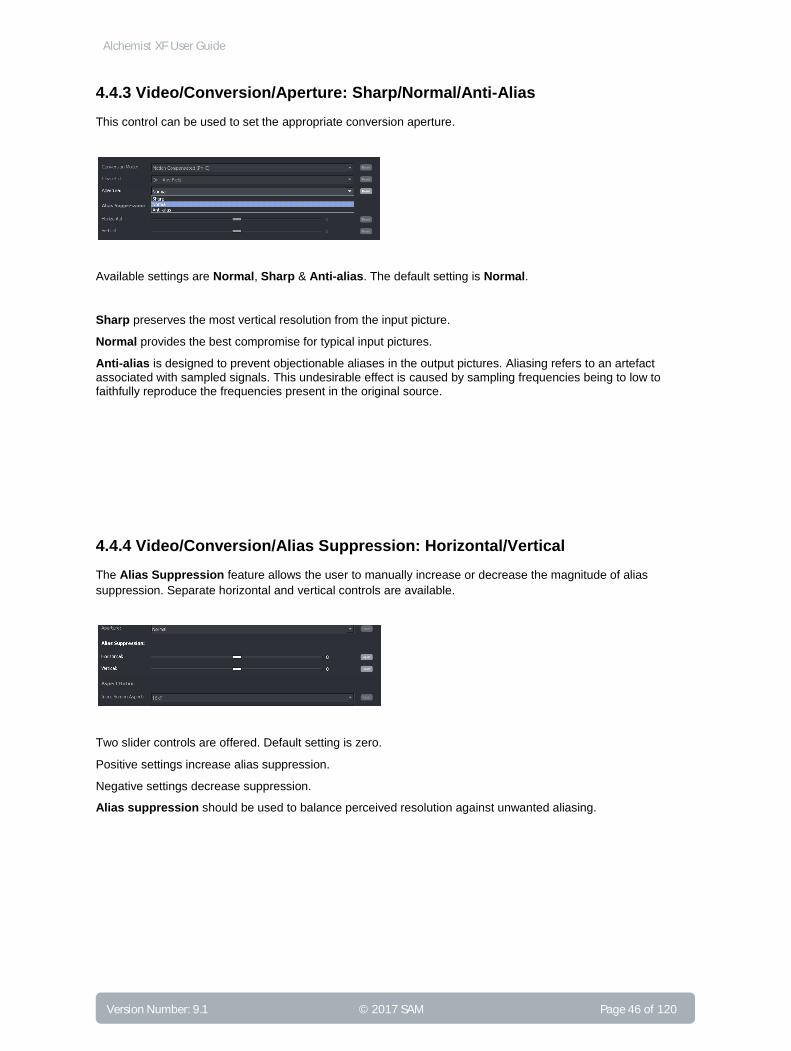
4.4.3 Video/Conversion/Aperture: Sharp/Normal/Anti-Alias
This control can be used to set the appropriate conversion aperture.
Available settings are Normal, Sharp & Anti-alias. The default setting is Normal.
Sharp preserves the most vertical resolution from the input picture.
Normal provides the best compromise for typical input pictures.
Anti-alias is designed to prevent objectionable aliases in the output pictures. Aliasing refers to an artefact
associated with sampled signals. This undesirable effect is caused by sampling frequencies being to low to faithfully reproduce the frequencies present in the original source.
4.4.4 Video/Conversion/Alias Suppression: Horizontal/Vertical
The Alias Suppression feature allows the user to manually increase or decrease the magnitude of alias
suppression. Separate horizontal and vertical controls are available.
Two slider controls are offered. Default setting is zero.
Positive settings increase alias suppression.
Negative settings decrease suppression.
Alias suppression should be used to balance perceived resolution against unwanted aliasing.

Alchemist XF User Guide
Page 47 of 120 © 2017 SAM Version Number: 9.1
4.4.5 Video/Conversion/Aspect Ratio: Various
Note: a more comprehensive document is available for the Alchemist XF ARC feature. Please refer to the User guide: Alchemist XF - How to configure the ARC (available from the xFile micro site).
The user can specify aspect ratio translations using either the drop down fields or the custom fields.
ARC controls include:
Input screen aspect
Output screen aspect
Source image aspect
Source to output translation
Input screen aspect is used to describe the source screen input aspect ratio by selecting the relevant setting
from the drop down list:
Output screen aspect is used to describe the destination screen aspect ratio from the drop down list.
Alchemist XF User Guide
Version Number: 9.1 © 2017 SAM Page 48 of 120
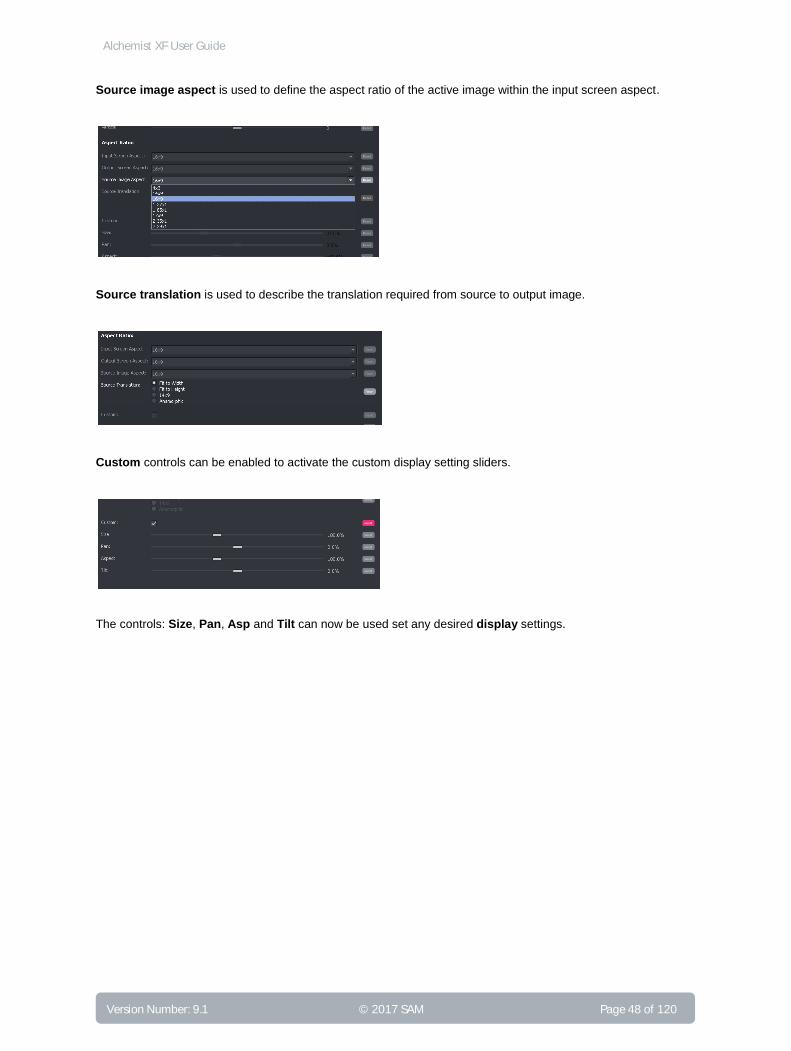
Source image aspect is used to define the aspect ratio of the active image within the input screen aspect.
Source translation is used to describe the translation required from source to output image.
Custom controls can be enabled to activate the custom display setting sliders.
The controls: Size, Pan, Asp and Tilt can now be used set any desired display settings.

Alchemist XF User Guide
Page 49 of 120 © 2017 SAM Version Number: 9.1
4.5 Video/Utilities Tab
The third Video tab relates to the Utilities features.
4.5.1 Video/Utilities/Luma Gain: +/- 6dB
The Luma gain may be adjusted using the slider control. The range is +/- 6dB.
4.5.2 Video/Utilities/Chroma Gain: +/- 6 dB
The Chroma gain may be adjusted using the slider control. The range is +/- 6dB.
4.5.3 Video/Utilities/Black Level: +/- 80mV
The black level may be adjusted using the slider control. The range is +/- 80mV.
Alchemist XF User Guide
Version Number: 9.1 © 2017 SAM Page 50 of 120
4.5.4 Video/Utilities/Luma Clipper: Various
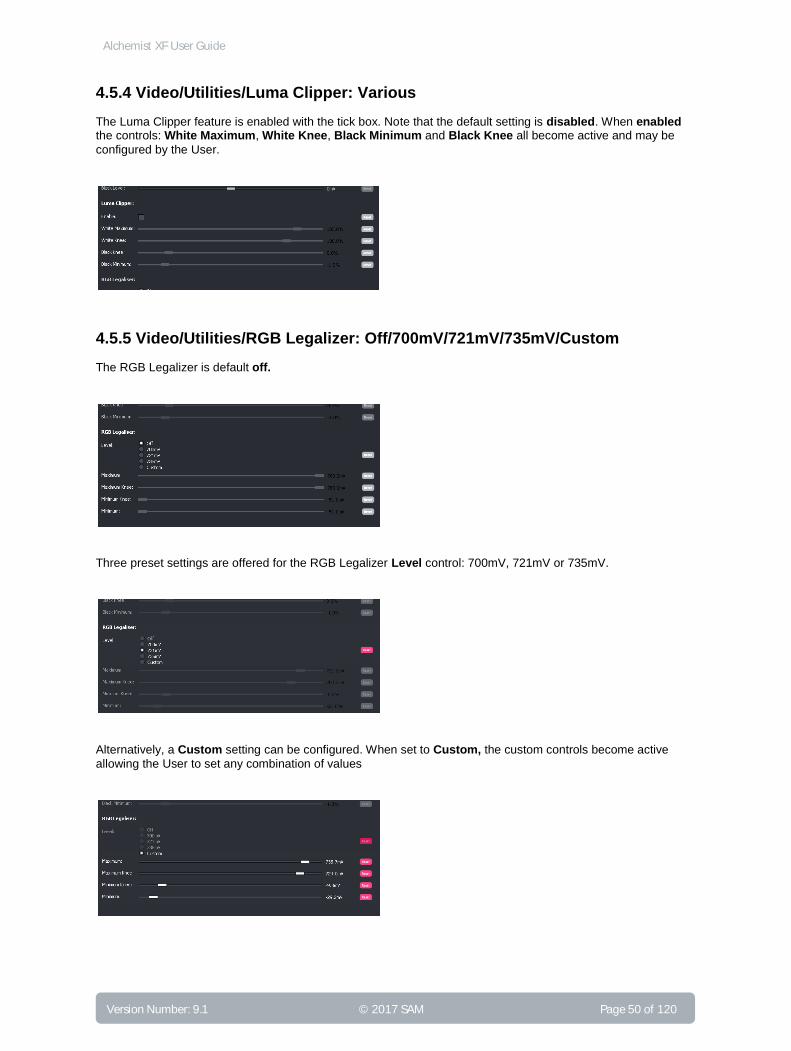
The Luma Clipper feature is enabled with the tick box. Note that the default setting is disabled. When enabled the controls: White Maximum, White Knee, Black Minimum and Black Knee all become active and may be
configured by the User.
4.5.5 Video/Utilities/RGB Legalizer: Off/700mV/721mV/735mV/Custom
The RGB Legalizer is default off.
Three preset settings are offered for the RGB Legalizer Level control: 700mV, 721mV or 735mV.
Alternatively, a Custom setting can be configured. When set to Custom, the custom controls become active
allowing the User to set any combination of values

Alchemist XF User Guide
Page 51 of 120 © 2017 SAM Version Number: 9.1
4.6 Audio Tab/Input Setup
The xFile Client offers the follow audio modes of operation:
Audio pass through
Routing of channels within an audio stream
(doesn’t include XDCAM, AVCHD/MTS, D10/IMX, MPEG2/ MPG/TS)
Routing of audio streams (doesn’t include XDCAM, AVC-HD/MTS, D10/IMX, MPEG2/ MPG/TS)
Audio pitch-shifting (as part of a video off-speeding process).
Audio re-sampling (as part of a video off-speeding process).
Audio stripping/discarding
The Audio menus are split across three separate tabs.
Input Setup
Output Config
Output Routing
It should be appreciated that due to the sheer number of possible audio channels that can be carried in a video file, that fully comprehensive audio routing is not supported. It should considered that an audio file can carry up to 24 streams of audio, and each stream can carry as many 24 channels (depending on the Codec). Therefore, it is theoretically possible for a video file to carry 576 channels of audio.
To offer fully comprehensive audio routing would be extremely difficult and would require complex, unwieldy menu structures. For this reason, a more practical solution is offered by the xFile Client. Audio stream routing is supported and routing of audio channels within a stream is also supported. However, the routing of audio channels from one audio stream to another is not included.

Alchemist XF User Guide
Version Number: 9.1 © 2017 SAM Page 52 of 120
4.6.1 Audio/Input Setup
The Input Setup menu is used to describe the audio distribution of the source file. It should be considered that
the audio distribution in the source file is not fully described by the metadata. Therefore, if a conversion process is to be configured, that includes audio routing, it will be necessary for the User to describe the audio distribution of the source file. This ‘describing’ process is performed in the Input Setup tab.
4.6.2 Audio/Input setup/Number of Input Streams
This control allows the User to define the number of audio streams that are present in the input file.
The number of input audio streams maybe defined using the dropdown menu.
4.6.3 Audio/Input Setup/Stream Selection
This menu allows the User to describe each stream of the input file.
Each stream can be selected from the Stream Selection field. The selected stream will appear with a blue background. The default setting for each stream is Passthrough.
The audio stream type applied here will influence how the User can route channels of audio later.
Alchemist XF User Guide
Page 53 of 120 © 2017 SAM Version Number: 9.1
4.6.4 Audio/Input Setup/Stream Type: Various
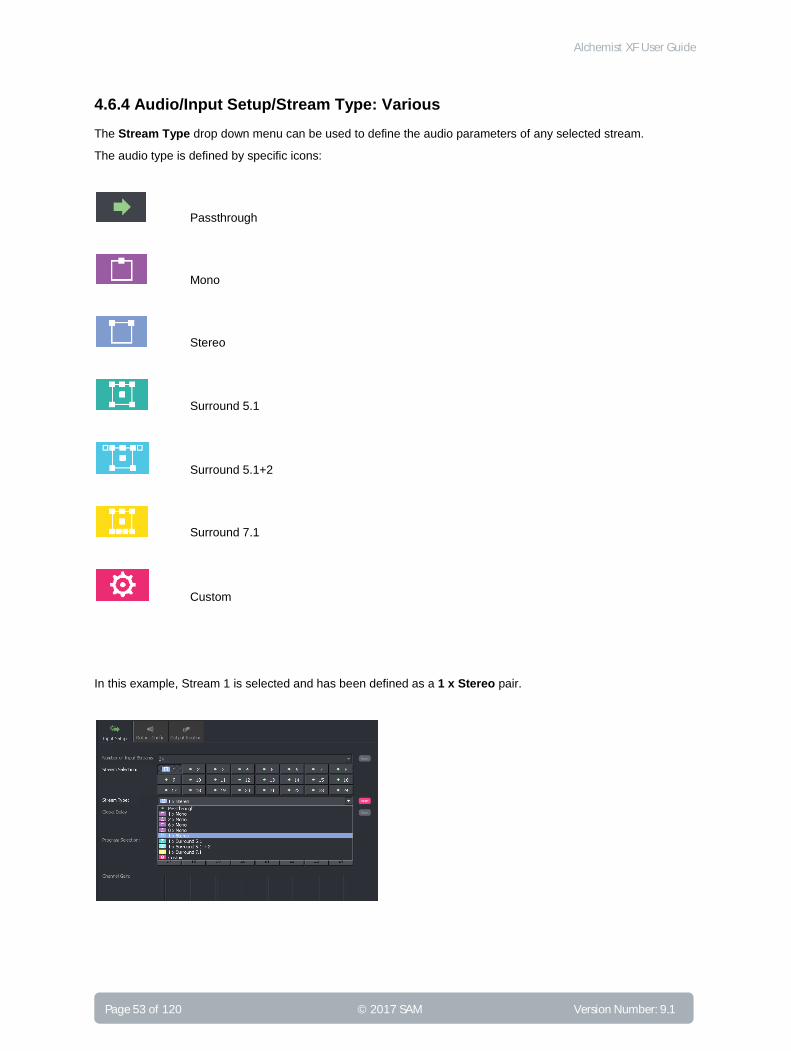
The Stream Type drop down menu can be used to define the audio parameters of any selected stream.
The audio type is defined by specific icons:
Passthrough
Mono
Stereo
Surround 5.1
Surround 5.1+2
Surround 7.1
Custom
In this example, Stream 1 is selected and has been defined as a 1 x Stereo pair.

Alchemist XF User Guide
Version Number: 9.1 © 2017 SAM Page 54 of 120
4.6.5 Audio/Input Setup/Stream Delay: -250ms to 500ms
This control allows a global delay to be configured. This setting will affect all audio channels within the selected stream.
4.6.6 Audio/Input Setup/Stream Gain: +/- 12dB
This control is only visible when the selected input stream is set to Passthrough. This control allows a global
gain setting to be applied to all audio channels carried with the selected stream.

Alchemist XF User Guide
Page 55 of 120 © 2017 SAM Version Number: 9.1
4.6.7 Audio/Input Setup/Program Selection & Channel Gain: +/- 12dB
When an input stream is defined as anything other than Passthrough, a new set of controls will appear. The
actual controls seen will depend upon what the stream is defined as.
Some examples are shown below:
Input Audio stream
defined as:
8 x Mono
Each channel may be selected using
the Program Selection matrix and the
gain of each channel may be
configured using the Channel Gain
control
Input Audio stream
defined as:
1 x Stereo
The stereo program may be selected
using the Program Selection matrix
and the gain of each channel may be
configured using the Channel Gain
control.
The Gang gain controls feature may
be selected so any gain setting is
applied equally to both channels.
The L/R channel swap feature maybe
used to swap the channels within the
stereo pair.

Alchemist XF User Guide
Version Number: 9.1 © 2017 SAM Page 56 of 120
Input Audio stream
defined as:
1 x Surround 7.1
The program may be selected using
the Program Selection matrix and the
gain of each channel may be
configured using the Channel Gain
control.
The Gang gain controls feature may
be selected so any gain setting is
applied equally to all the channels of
the surround sound program.
Input Audio stream
defined as:
Custom
Each program within the selected
stream may be selected using the
Program Selection matrix and
defined using the Program Type drop
down menu.
The gain of each channel may be
configured using the Channel Gain
control.

Alchemist XF User Guide
Page 57 of 120 © 2017 SAM Version Number: 9.1
4.7 Audio Tab/Output Config
4.7.1 Audio/Output Config/Bit Depth: Auto/16-bit/24-bit
This control allows the User to apply a global setting for the bit depth of the audio in the output file. Three settings are available:
Auto
16 bit
24 bit
When set to Auto, the bit depth of the output audio will faithfully follow that of the input. However, the User may
choose to make all output audio channels either 16 or 24 bit. These settings will apply to all output audio streams.
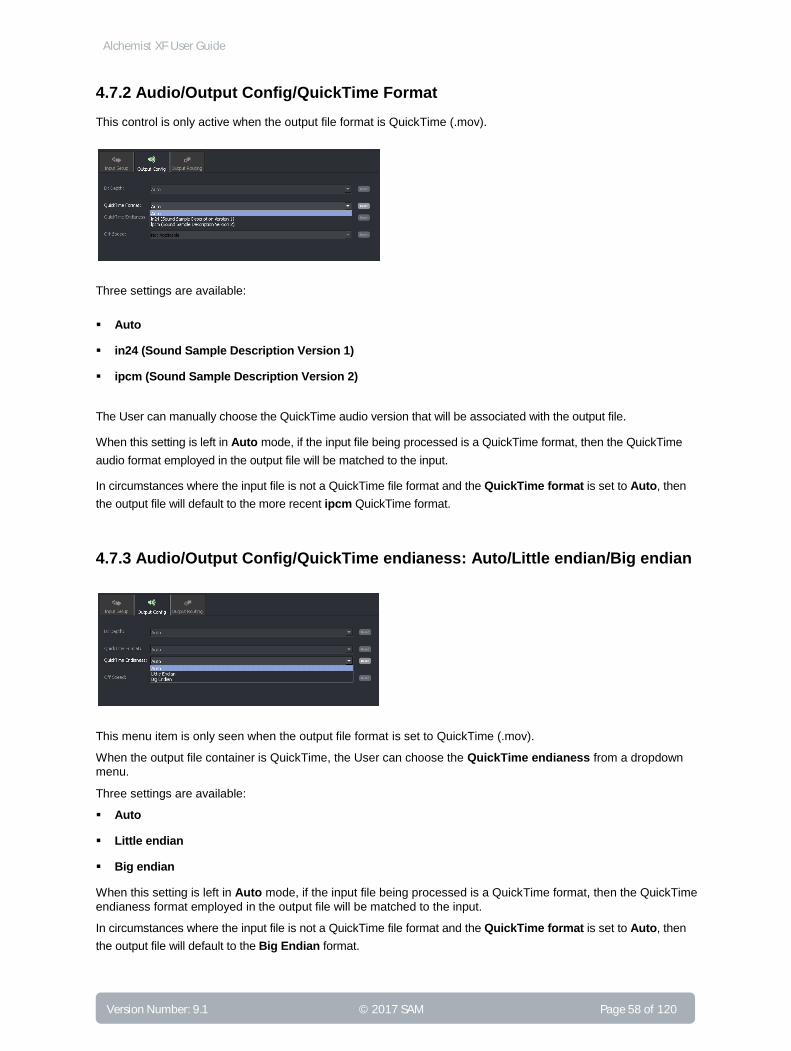
Alchemist XF User Guide
Version Number: 9.1 © 2017 SAM Page 58 of 120
4.7.2 Audio/Output Config/QuickTime Format
This control is only active when the output file format is QuickTime (.mov).
Three settings are available:
Auto
in24 (Sound Sample Description Version 1)
ipcm (Sound Sample Description Version 2)
The User can manually choose the QuickTime audio version that will be associated with the output file.
When this setting is left in Auto mode, if the input file being processed is a QuickTime format, then the QuickTime
audio format employed in the output file will be matched to the input.
In circumstances where the input file is not a QuickTime file format and the QuickTime format is set to Auto, then
the output file will default to the more recent ipcm QuickTime format.
4.7.3 Audio/Output Config/QuickTime endianess: Auto/Little endian/Big endian
This menu item is only seen when the output file format is set to QuickTime (.mov).
When the output file container is QuickTime, the User can choose the QuickTime endianess from a dropdown
menu.
Three settings are available:
Auto
Little endian
Big endian
When this setting is left in Auto mode, if the input file being processed is a QuickTime format, then the QuickTime
endianess format employed in the output file will be matched to the input.
In circumstances where the input file is not a QuickTime file format and the QuickTime format is set to Auto, then
the output file will default to the Big Endian format.

Alchemist XF User Guide
Page 59 of 120 © 2017 SAM Version Number: 9.1
4.7.4 Audio/Output Config/Off Speed
The Off Speed control allows a User to configure what happens to the audio as part of an off-speeding process.
Three settings are offered:
Re-sample audio
Pitch Correct
Discard Audio
Re-sample Audio: This mode mimics what happens to the audio when doing a VTR verispeed process. As
the video is played at a different rate, the pitch of the audio will be affected. For example
a 24 fps to 25 fps off-speed process will make the duration of the program 4% shorter
and this will have the effect of lifting the pitch of the audio by a proportional amount.
Pitch Correct: In this mode, the pitch-shifting of the audio that is associated with the Re-sample method
explained above, is pitch shifted back to the pitch level of the source. The output audio,
sounds exactly the same as the source.
Discard Audio: A User can choose to remove the audio track altogether. This may be desirable if the
associated audio is not pcm, and will be compromised by the off-speeding process.

Alchemist XF User Guide
Version Number: 9.1 © 2017 SAM Page 60 of 120
4.8 Audio/Output Routing
The output audio routing menus allow the User to re-route audio streams in the output. Input audio streams may be routed to alternative positions in the output file, and it is also possible to duplicate audio streams in the output, for example audio stream 1 of the input file could be output as stream 1 of the output file and duplicated as stream 2 of the output file.
It is also possible to re-route audio channels within an audio stream.
4.8.1 Audio/Output Routing: Number of Output Streams
The default setting for this control is Follow number of Input Streams.
In this mode, the number of output streams effectively matches the number of audio streams in the input. In this mode of operation audio routing is disabled.
For an audio routing process, the number of output streams must be configured by the User, using the drop down menu.
Most Codecs allow up to 24 audio streams to be configured, although the actual number depends on the codec of choice. In the above example the output has been configured to have 4 output audio streams.

Alchemist XF User Guide
Page 61 of 120 © 2017 SAM Version Number: 9.1
Note that the ability to define the number of output streams will depend on the particular output file format of choice. Usually, this can be any number up to 24. However there are exceptions to this:
XDCam defined to carry only 2 or 4 or 8 or 16, single channel audio streams. Note that XDCam is
not legally specified to carry 16 channels of audio, but Alchemist XF does allow a User to
configure 16 channels if they so desire.
AVC-HD defined to only carry 1 audio stream containing an even number of channels up to a max
of 8.
D10/IMX is defined to carry only a single audio stream, containing either, 2, 4 or 8 audio channels.
Note that D10/IMX is not legally specified to carry only 2 channels of audio, but Alchemist
XF does allow a User to configure 2 channels if they so desire.
MPEG2 is defined to carry only a single audio stream, containing 2 audio channels.
XDCam
When the output format is configured as XDCam, the User can define the number of output streams to be either:
2, 4, 8, or 16 using the drop down menu.
This drop down menu offers a choice of five settings:
Automatic Audio Routing
Automatic Audio Routing (2)
Automatic Audio Routing (4)
Automatic Audio Routing (8)
Automatic Audio Routing (16) – Non-standard Configuration
Note – due to the nature of XDCam, audio routing is not permitted when XDCam is selected as the output format.

Alchemist XF User Guide
Version Number: 9.1 © 2017 SAM Page 62 of 120
Automatic Audio Routing: When selected, the actual number of output audio streams will be determined by the
audio essence present in the input:
For an input containing either 1 or 2 audio channels, the output will be configured to have 2 single channel audio streams. When the input has just 1 audio channel, the second output stream will be padded with a single muted audio channel.
For an input containing either 3 or 4 audio channels, the output will be configured to have 4 single channel audio streams. When the input has just 3 audio channel, the forth output stream will be padded with a single muted audio channel.
For an input containing either 5, 6, 7 or 8 audio channels, the output will be configured to have 8 single channel audio streams. When the input has less than 8 audio channels, the output will be padded with muted audio channels to make the full compliment of 8.
Where the input contains more than 8 input channels, the extra channels of input audio will be discarded.
Automatic Audio Routing (2): When selected, the output will only ever contain 2 single channel audio streams.
When the input has just 1 audio channel, the second output stream will be padded with a single muted audio channel.
Any additional audio channels in the input will be discarded.
Automatic Audio Routing (4): When selected, the output will only ever contain 4 single channel audio streams.
When the input has just 1, 2, or 3 audio channels, the output streams will be padded with single muted audio channels, to make the full compliment of 4 single channel audio streams.
Any additional audio channels in the input will be discarded.
Automatic Audio Routing (8): When selected, the output will always contain 8 single channel audio streams.
When the input has less than 8 audio channels, the output streams will be padded with single muted audio channels, to make the full compliment of 8 single channel audio streams.
Any additional audio channels in the input will be discarded.
Automatic Audio Routing (16) – Non-standard Configuration: When selected, the output will always contain
16 single channel audio streams.
When the input has less than 16 audio channels, the output streams will be padded with single muted audio channels, to make the full compliment of 16 single channel audio streams.
Any additional audio channels in the input will be discarded.

Alchemist XF User Guide
Page 63 of 120 © 2017 SAM Version Number: 9.1
AVC-HD
When AVC-HD format is selected as an output, by definition, will only have a single output audio stream. Audio
Routing is not available and an Automatic Audio Routing mode will be defined instead.
The output audio stream will either contain 2, 4 or 8 audio channels, dependant upon the number of audio channels
in the input.
Where the number of defined output channels is greater than the number of audio channels in the source, the output will be padded with mute audio channels.
Where the number of defined output channels is less than the number of audio channels in the source, the excess
audio channels in the source will be stripped.
D10/IMX
When the output format is configured to be D10/IMX, the User can define the number of output audio channels that the single audio stream can carry as either: 2, 4, or 8.
Note that the D10/IMX specification does not allow a single audio stream with 2 audio channels, but due to Customer requests, such a configuration is possible.
Where the number of defined output channels is greater than the number of audio channels in the source, the output will be padded with mute audio channels.
Where the number of defined output channels is less than the number of audio channels in the source, the excess audio channels in the source will be stripped.
MPEG2
When the output format is configured to be MPEG2, by definition the output can only have a single output audio stream, which can carry only two audio channels. Only two audio channels in the source (top channels in the top stream) will be passed to the output. All other audio channels in the source will be stripped.
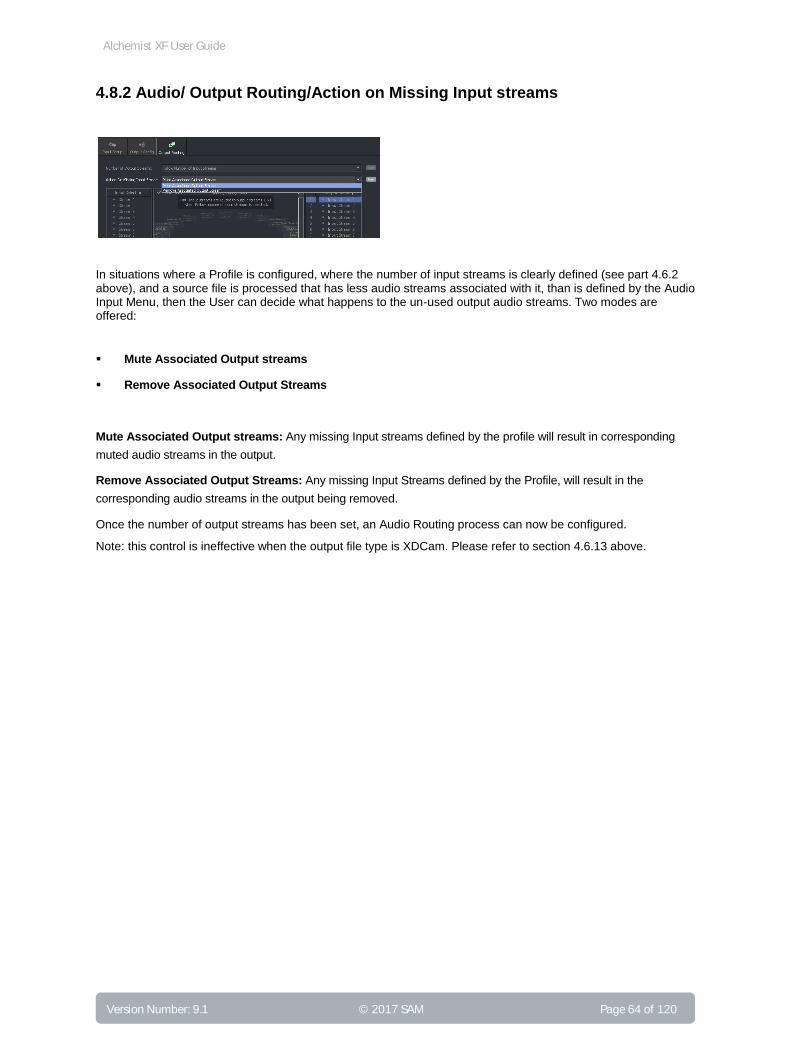
Alchemist XF User Guide
Version Number: 9.1 © 2017 SAM Page 64 of 120
4.8.2 Audio/ Output Routing/Action on Missing Input streams
In situations where a Profile is configured, where the number of input streams is clearly defined (see part 4.6.2 above), and a source file is processed that has less audio streams associated with it, than is defined by the Audio Input Menu, then the User can decide what happens to the un-used output audio streams. Two modes are offered:
Mute Associated Output streams
Remove Associated Output Streams
Mute Associated Output streams: Any missing Input streams defined by the profile will result in corresponding
muted audio streams in the output.
Remove Associated Output Streams: Any missing Input Streams defined by the Profile, will result in the
corresponding audio streams in the output being removed.
Once the number of output streams has been set, an Audio Routing process can now be configured.
Note: this control is ineffective when the output file type is XDCam. Please refer to section 4.6.13 above.
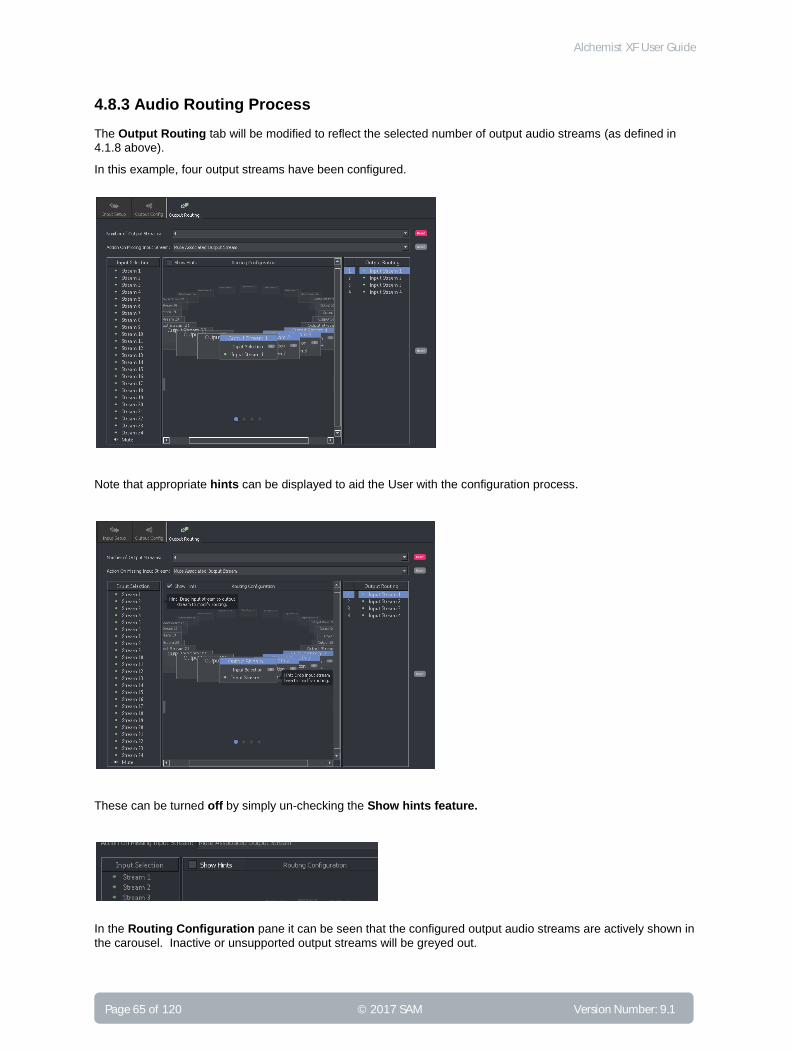
Alchemist XF User Guide
Page 65 of 120 © 2017 SAM Version Number: 9.1
4.8.3 Audio Routing Process
The Output Routing tab will be modified to reflect the selected number of output audio streams (as defined in
4.1.8 above).
In this example, four output streams have been configured.
Note that appropriate hints can be displayed to aid the User with the configuration process.
These can be turned off by simply un-checking the Show hints feature.
In the Routing Configuration pane it can be seen that the configured output audio streams are actively shown in
the carousel. Inactive or unsupported output streams will be greyed out.

Alchemist XF User Guide
Version Number: 9.1 © 2017 SAM Page 66 of 120
By selecting any of the active audio streams, either in the Routing configuration pane, or the Output routing
pane, the carousel will rotate to bring the selected Output stream menu to the front:
The output audio stream, in this example Output Stream 3, will currently have the corresponding stream in the
input file routed to it.
This input stream maybe replaced by any other input stream, by simply selecting the required input stream, in the Input Selection pane, and dragging it to the Output Stream 3 box:
This process maybe repeated for any active output audio stream.
Drag & Drop
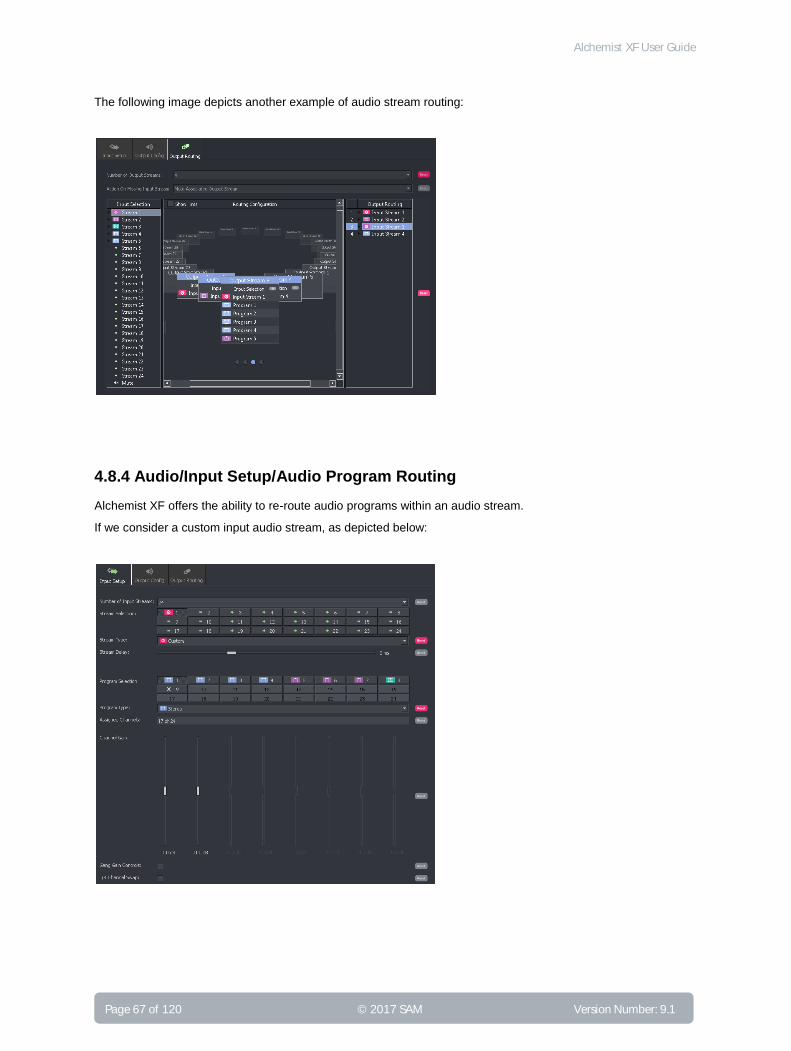
Alchemist XF User Guide
Page 67 of 120 © 2017 SAM Version Number: 9.1
The following image depicts another example of audio stream routing:
4.8.4 Audio/Input Setup/Audio Program Routing
Alchemist XF offers the ability to re-route audio programs within an audio stream.
If we consider a custom input audio stream, as depicted below:

Alchemist XF User Guide
Version Number: 9.1 © 2017 SAM Page 68 of 120
If the Output Routing tab is viewed, this custom input stream will appear pictorially in the carousel.
It is now possible to remap the positions of each audio program within the stream, simply by dragging and dropping within the Output Stream box.
In this way, audio programs within an audio stream can be re-mapped.
Note – it is not possible to duplicate audio programs within an audio stream, or to route audio programs from one audio stream to another.
Drag & Drop
In this example, audio Program 1 has
been moved to position of Program 4. As a
consequence, Program 2 will move to the
former position of Program 1 and
Program 3 moved to the former position of
Program 2.
As a consequence, of moving Program 1
to former position of Program 4, Program
2 will move to the former position of
Program 1 and Program 3 moved to the
former position of Program 2

Alchemist XF User Guide
Page 69 of 120 © 2017 SAM Version Number: 9.1
5. Browser Configuration
5.1 Introduction
The xFile framework benefits from a Service Orientated Architecture (SOA) which has been engineered to support a wide range of deployments from a single node through to a cluster of nodes within a data center.
One of the services in the framework is called the xFile Browser and this enables the user to browse both local
and remote shares. Whilst not a mandatory service, the Browser alleviates the need for the User to type explicit file paths, making job creation a simple and quick process.
Before the Browser can be used, it must first be configured. It is assumed that the xFile Browser has been successfully installed using the Installation Guide.
The following procedure describes how to add a Shared location to the Browser. This location may then easily
be used as a repository for source, or converted files.
Note that a share location may be remote from the server. In such circumstances the location must be identified by a complete URL path. A remote share cannot be identified as a mapped drive on the host machine.
5.1.1 Browser Configuration
1. In the xFile Client click on the System icon.
This will open the System Management window.
Select

Alchemist XF User Guide
Version Number: 9.1 © 2017 SAM Page 70 of 120
2. In the pane on the left hand side, click on the Local Browser. This will bring up the xFile Browser on the right
hand side:
Note: If the xFile Browser has been installed as per the Installation Guide, it will appear in the System Management window as Local Browser. However, an alternative name could have been used in which case the xFile Browser will appear by that alternative name in the System Management window.
3. In the xFile Browser pane, select Configuration.
The view will change:
4. To add share locations:
Consider that two folders have been created on the C: drive of the Alchemist XF Server, called:
CustomerX-Source
CustomerX-Destination
It is desired that these folders can be accessed via the xFile Browser.
Note: The C: drive mentioned above is the C: drive of the Alchemist XF server. If a xFile Client is running on
a remote work station, this work station will have it’s own C: drive. It is important to understand that these are different locations.
Configuration tab
In this example the Browser has been previously configured with the credentials of a Share
location:
Temp
Select

Alchemist XF User Guide
Page 71 of 120 © 2017 SAM Version Number: 9.1
5. In the Browser Configuration tab, select the next name location in the table:
Enter the name of the new share location. In this example: CustomerX Source
Note: The name entered must not contain special characters such as: - , . ( ) # ; : / < >
6. In the Path location, enter the path to the folder being added, in this example: C:/CustomerX-Source
Select the next
name location in
the table
Select next ‘path’
location in the
table.
Enter the folder
name
Enter the ‘path’
location in the
table

Alchemist XF User Guide
Version Number: 9.1 © 2017 SAM Page 72 of 120
7. Repeat the process for the second folder:
In this example: C:/CustomerX-Destination
8. Click Apply to update the Browser.
Now, when creating new jobs, the locations CustomerX-Source and CustomerX-Destination will be available from the Browser tool in the Create job window.
Note: To access remote shares the service must be configured with the correct logon credentials otherwise it will not have permission to browse and serve the directory structure to the Client.
9. To add a remote share where logon credentials have been configured, the full URL path must be entered:
Name and Path entered for
the second folder.
Name and path entered
for the remote share.
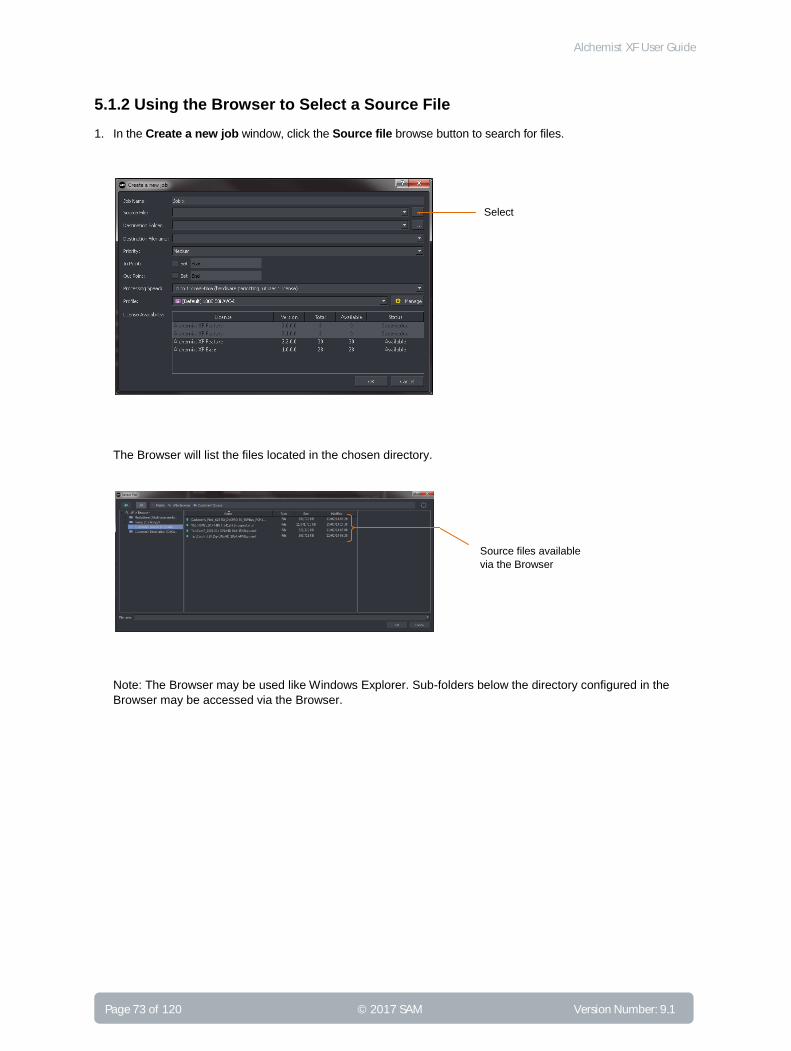
Alchemist XF User Guide
Page 73 of 120 © 2017 SAM Version Number: 9.1
5.1.2 Using the Browser to Select a Source File
1. In the Create a new job window, click the Source file browse button to search for files.
The Browser will list the files located in the chosen directory.
Note: The Browser may be used like Windows Explorer. Sub-folders below the directory configured in the
Browser may be accessed via the Browser.
Select
Source files available
via the Browser

Alchemist XF User Guide
Version Number: 9.1 © 2017 SAM Page 74 of 120
2. To select a file, click on it to highlight it.
Note that the metadata of the source file will be displayed in the right-hand pane of the Select File window.
Click OK to select the file.
3. Now in the Create a new job window, the Source File field will be populated.
Selected source file
metadata
From the metadata, important parameters of the source file such as: video standard, codec, file wrapper, bit rate, etc. can be seen. This metadata can be compared to the table of supported file types (Table 3, Appendix A, below) to confirm compatibility with Alchemist XF.
Note: DPX files do not contain metadata and when selected as a source file, this pane will not populate.
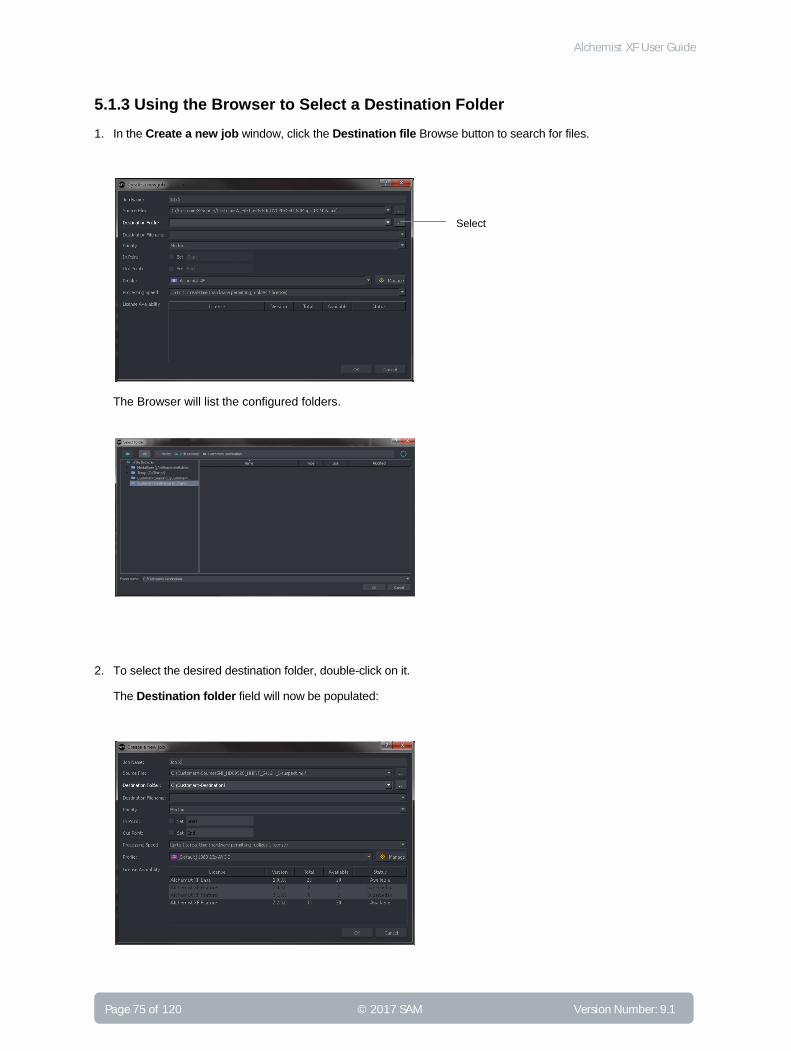
Alchemist XF User Guide
Page 75 of 120 © 2017 SAM Version Number: 9.1
5.1.3 Using the Browser to Select a Destination Folder
1. In the Create a new job window, click the Destination file Browse button to search for files.
The Browser will list the configured folders.
2. To select the desired destination folder, double-click on it.
The Destination folder field will now be populated:
Select

Alchemist XF User Guide
Version Number: 9.1 © 2017 SAM Page 76 of 120
6. Creating a Job
6.1 Introduction
The procedure described below, explains the simple process to manually add a job to the job queue. The procedure assumes that the Browser has been configured (as described above in section 5) and that the source file exists in a location configured in the Browser.
6.2 Create Job Procedure
1. In the xFile Client, click on the Create job icon.
The Create a new job window will now open.
Select

Alchemist XF User Guide
Page 77 of 120 © 2017 SAM Version Number: 9.1
2. Job Name: Enter an appropriate job name. This name will appear when the job is added to the job queue and
is useful for future reference.
3. Source file: The name and path of the source file needs to be entered into the Source file field. The easiest
method to do this is via the Browser. See section 5 above.
Alternatively, the source file can be selected by entering the full URL path and file name.
Click on the Source file browse icon:
The Browser will now open.
Select to initiate source file
Browse feature
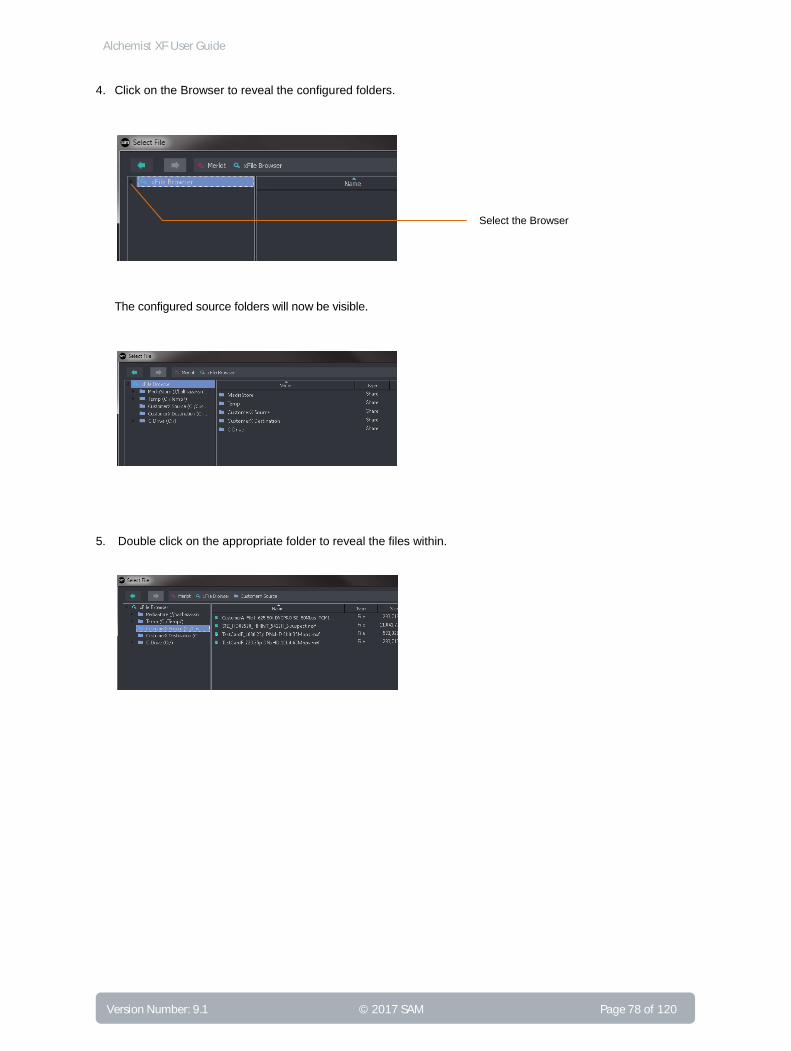
Alchemist XF User Guide
Version Number: 9.1 © 2017 SAM Page 78 of 120
4. Click on the Browser to reveal the configured folders.
The configured source folders will now be visible.
5. Double click on the appropriate folder to reveal the files within.
Select the Browser

Alchemist XF User Guide
Page 79 of 120 © 2017 SAM Version Number: 9.1
6. Select the appropriate source file.
Note that upon selecting the source file, the right hand pane will populate with selected metadata from the
source file.
The Source file field will now be configured.
7. Destination folder: The destination folder needs to be defined. As with the source file, the easiest method of
doing this is to use the Browser.
Click on the Destination folder browse icon.
The Browser window will now open.
Select a
source file
Selected file
metadata
From the metadata we can see important parameters of the source file such as: video standard, codec, file wrapper, bit rate, etc. This metadata can be compared to the table of supported file types (section 5.1 above) to confirm compatibility with Quasar XF.
Note: DPX files do not contain metadata and when selected as a source file, this pane will not populate.
Select Destination folder Browser

Alchemist XF User Guide
Version Number: 9.1 © 2017 SAM Page 80 of 120
8. Select the appropriate destination folder.
Click OK.
The Create a new job window will now be populated with the destination folder configured.
9. Destination filename: Either explicitly add a Destination filename (by simply typing the desired filename in)
or use output filename patterns to automatically label the destination filename.
The various output filenames can be seen in the following table. These can be concatenated or mixed with explicit characters:
Example 1: %Source%_%Profile%
Example 2: CustomerX_%Format%_%Codec%
Filename patterns are chosen by typing ‘%’ in the Destination filename field. A list of available filename pat-
terns will appear.
Select desired destination
folder.
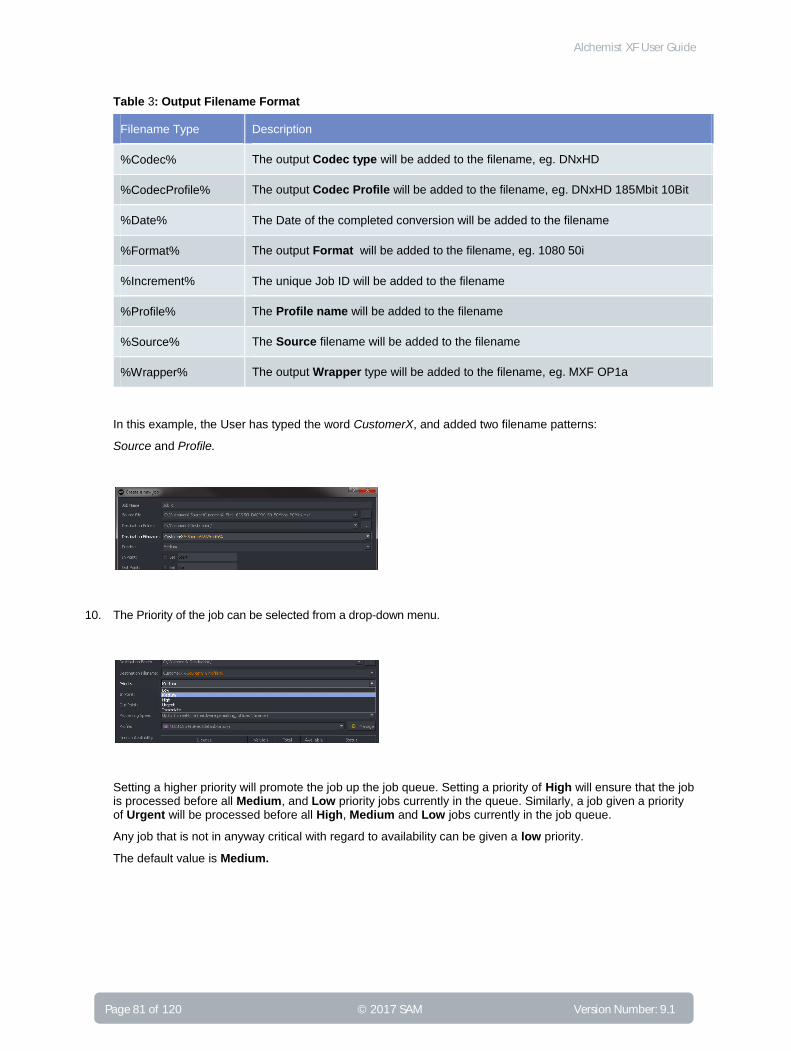
Alchemist XF User Guide
Page 81 of 120 © 2017 SAM Version Number: 9.1
Table 3: Output Filename Format
Filename Type Description
%Codec% The output Codec type will be added to the filename, eg. DNxHD
%CodecProfile% The output Codec Profile will be added to the filename, eg. DNxHD 185Mbit 10Bit
%Date% The Date of the completed conversion will be added to the filename
%Format% The output Format will be added to the filename, eg. 1080 50i
%Increment% The unique Job ID will be added to the filename
%Profile% The Profile name will be added to the filename
%Source% The Source filename will be added to the filename
%Wrapper% The output Wrapper type will be added to the filename, eg. MXF OP1a
In this example, the User has typed the word CustomerX, and added two filename patterns:
Source and Profile.
10. The Priority of the job can be selected from a drop-down menu.
Setting a higher priority will promote the job up the job queue. Setting a priority of High will ensure that the job is processed before all Medium, and Low priority jobs currently in the queue. Similarly, a job given a priority of Urgent will be processed before all High, Medium and Low jobs currently in the job queue.
Any job that is not in anyway critical with regard to availability can be given a low priority.
The default value is Medium.
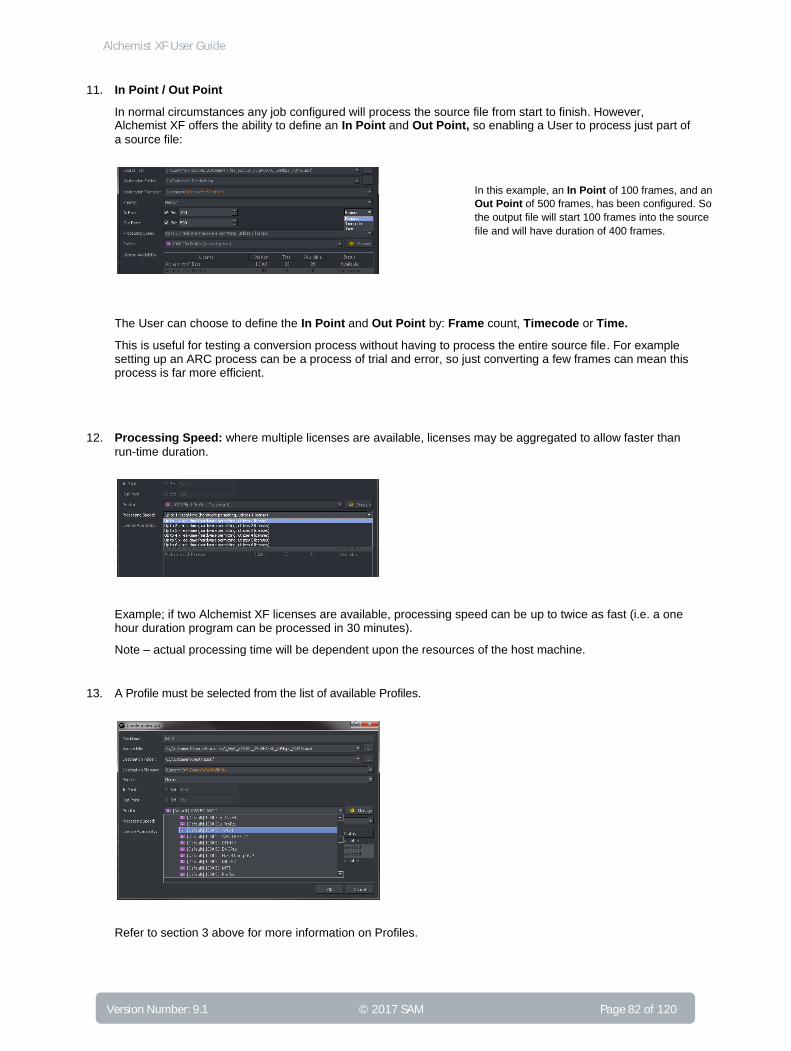
Alchemist XF User Guide
Version Number: 9.1 © 2017 SAM Page 82 of 120
11. 11. In Point / Out Point
In normal circumstances any job configured will process the source file from start to finish. However, Alchemist XF offers the ability to define an In Point and Out Point, so enabling a User to process just part of
a source file:
The User can choose to define the In Point and Out Point by: Frame count, Timecode or Time.
This is useful for testing a conversion process without having to process the entire source file. For example setting up an ARC process can be a process of trial and error, so just converting a few frames can mean this process is far more efficient.
12. Processing Speed: where multiple licenses are available, licenses may be aggregated to allow faster than
run-time duration.
Example; if two Alchemist XF licenses are available, processing speed can be up to twice as fast (i.e. a one hour duration program can be processed in 30 minutes).
Note – actual processing time will be dependent upon the resources of the host machine.
13. 13. A Profile must be selected from the list of available Profiles.
Refer to section 3 above for more information on Profiles.
In this example, an In Point of 100 frames, and an
Out Point of 500 frames, has been configured. So
the output file will start 100 frames into the source
file and will have duration of 400 frames.

Alchemist XF User Guide
Page 83 of 120 © 2017 SAM Version Number: 9.1
14. The Create a new job window has now been configured.
Note: Confirmation of available licensing is displayed in the License availability field.
Click on OK and the job will now be added to the job queue in the xFile Client.
The job will process automatically when it reaches the top of the job queue.
Job added to
the Job queue

Alchemist XF User Guide
Version Number: 9.1 © 2017 SAM Page 84 of 120
7. The Job Queue
7.1 Description
Jobs can be added to the job queue either via manual configuration (described in section 5), or via a Watch Folder Configuration (see section 8 below). There is no limit to the number of jobs that can be added to the job queue.
Jobs may be prioritised, cancelled, resubmitted and the job queue may be stopped at any time.
The following example depicts an xFile Client connected to an Alchemist XF system with a single license.
When only a single license is available, Alchemist XF will process the job queue, one job at a time.
However, if multiple licensed Nodes are available, then Alchemist XF can simultaneously process multiple jobs. In the following example, three licensed Nodes are available and so three jobs are processed simultaneously.
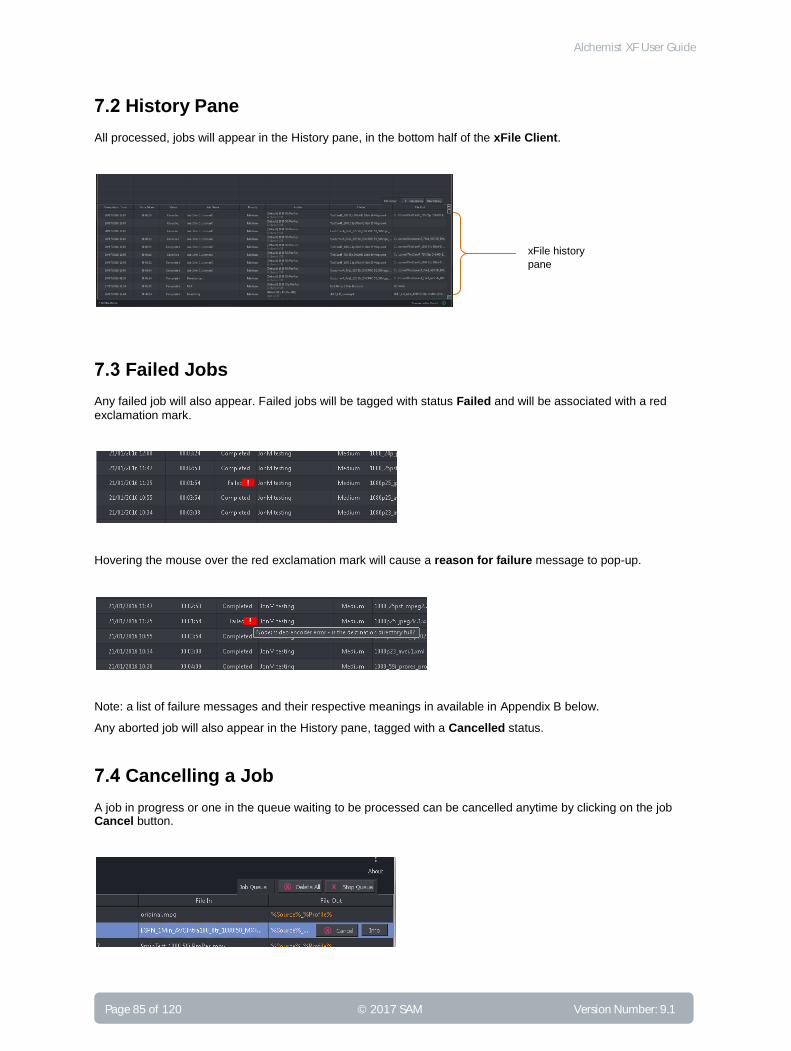
Alchemist XF User Guide
Page 85 of 120 © 2017 SAM Version Number: 9.1
7.2 History Pane
All processed, jobs will appear in the History pane, in the bottom half of the xFile Client.
7.3 Failed Jobs
Any failed job will also appear. Failed jobs will be tagged with status Failed and will be associated with a red
exclamation mark.
Hovering the mouse over the red exclamation mark will cause a reason for failure message to pop-up.
Note: a list of failure messages and their respective meanings in available in Appendix B below.
Any aborted job will also appear in the History pane, tagged with a Cancelled status.
7.4 Cancelling a Job
A job in progress or one in the queue waiting to be processed can be cancelled anytime by clicking on the job Cancel button.
xFile history
pane
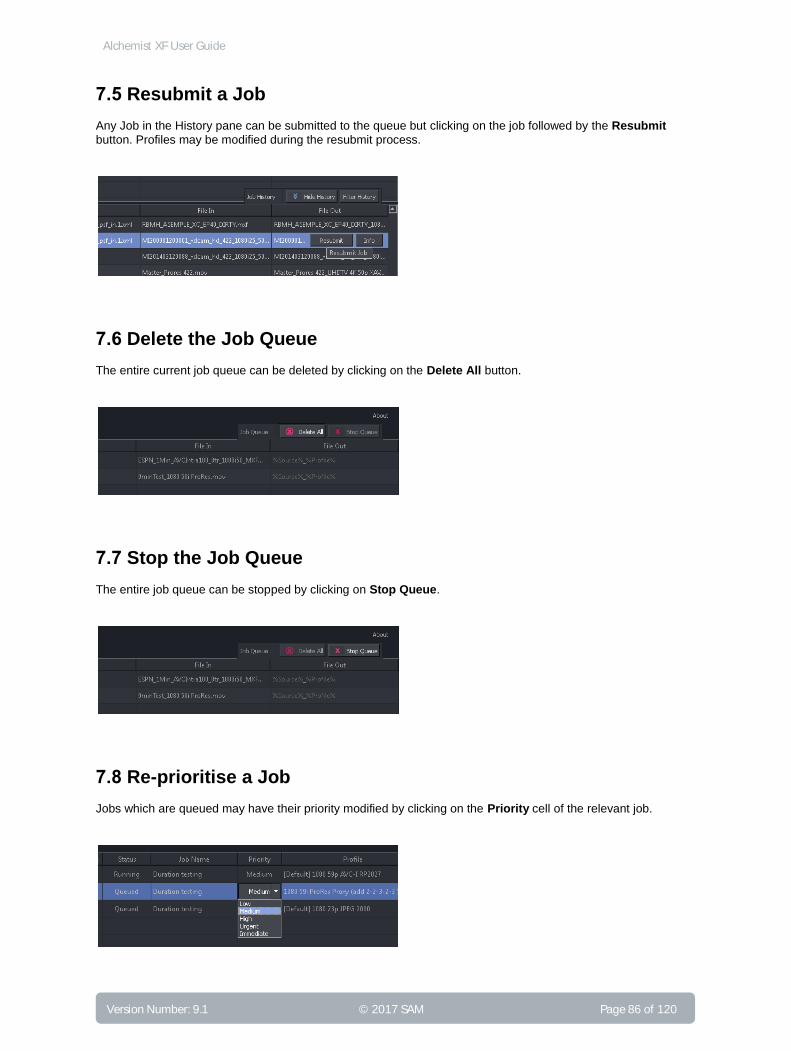
Alchemist XF User Guide
Version Number: 9.1 © 2017 SAM Page 86 of 120
7.5 Resubmit a Job
Any Job in the History pane can be submitted to the queue but clicking on the job followed by the Resubmit
button. Profiles may be modified during the resubmit process.
7.6 Delete the Job Queue
The entire current job queue can be deleted by clicking on the Delete All button.
7.7 Stop the Job Queue
The entire job queue can be stopped by clicking on Stop Queue.
7.8 Re-prioritise a Job
Jobs which are queued may have their priority modified by clicking on the Priority cell of the relevant job.
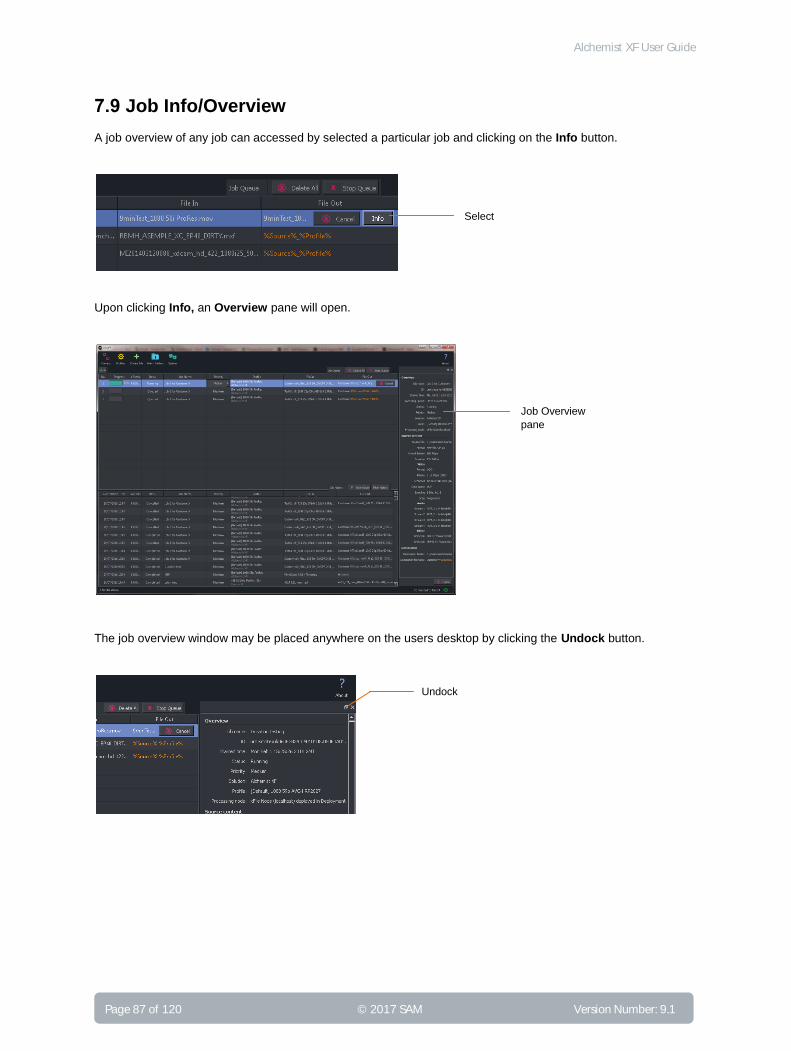
Alchemist XF User Guide
Page 87 of 120 © 2017 SAM Version Number: 9.1
7.9 Job Info/Overview
A job overview of any job can accessed by selected a particular job and clicking on the Info button.
Upon clicking Info, an Overview pane will open.
The job overview window may be placed anywhere on the users desktop by clicking the Undock button.
Undock
Select
Job Overview
pane
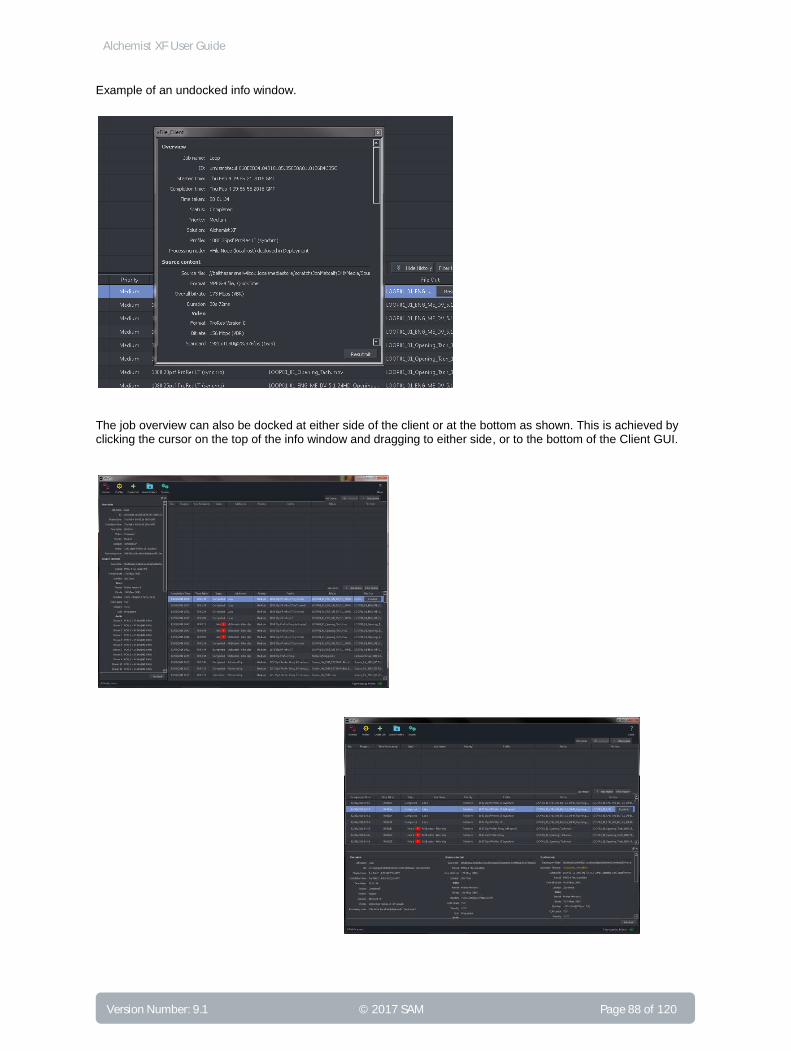
Alchemist XF User Guide
Version Number: 9.1 © 2017 SAM Page 88 of 120
Example of an undocked info window.
The job overview can also be docked at either side of the client or at the bottom as shown. This is achieved by clicking the cursor on the top of the info window and dragging to either side, or to the bottom of the Client GUI.
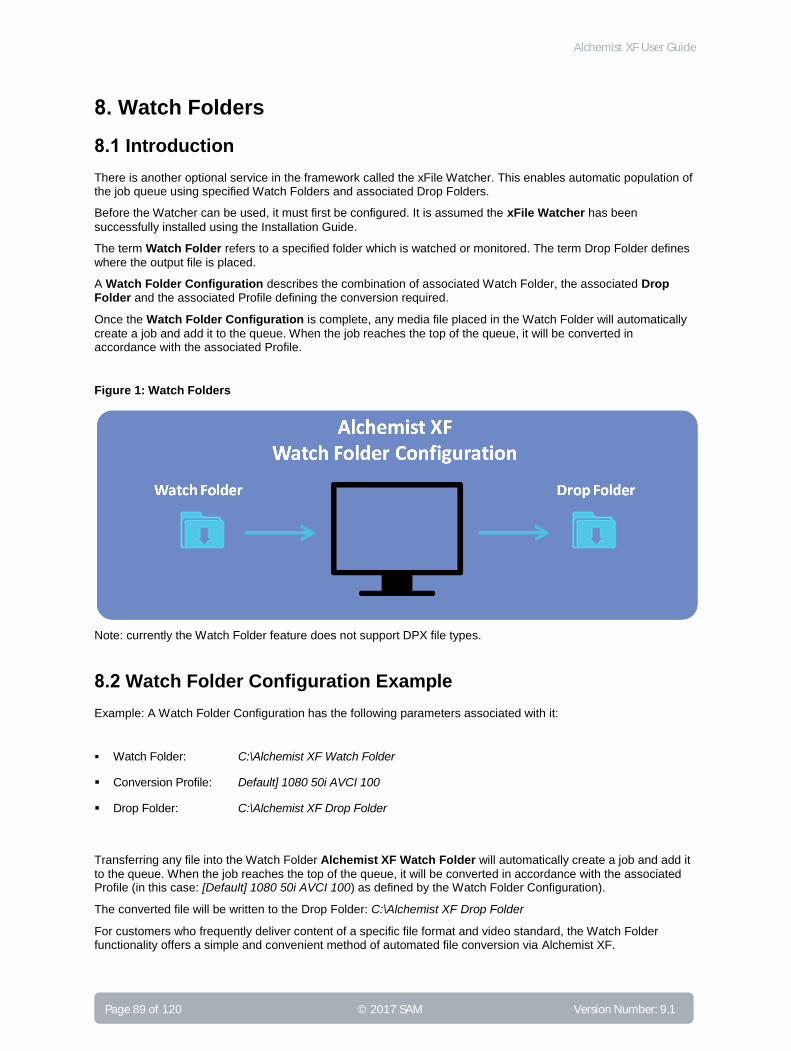
Alchemist XF User Guide
Page 89 of 120 © 2017 SAM Version Number: 9.1
8. Watch Folders
8.1 Introduction
There is another optional service in the framework called the xFile Watcher. This enables automatic population of the job queue using specified Watch Folders and associated Drop Folders.
Before the Watcher can be used, it must first be configured. It is assumed the xFile Watcher has been
successfully installed using the Installation Guide.
The term Watch Folder refers to a specified folder which is watched or monitored. The term Drop Folder defines
where the output file is placed.
A Watch Folder Configuration describes the combination of associated Watch Folder, the associated Drop Folder and the associated Profile defining the conversion required.
Once the Watch Folder Configuration is complete, any media file placed in the Watch Folder will automatically
create a job and add it to the queue. When the job reaches the top of the queue, it will be converted in accordance with the associated Profile.
Figure 1: Watch Folders
Note: currently the Watch Folder feature does not support DPX file types.
8.2 Watch Folder Configuration Example
Example: A Watch Folder Configuration has the following parameters associated with it:
Watch Folder: C:\Alchemist XF Watch Folder
Conversion Profile: Default] 1080 50i AVCI 100
Drop Folder: C:\Alchemist XF Drop Folder
Transferring any file into the Watch Folder Alchemist XF Watch Folder will automatically create a job and add it
to the queue. When the job reaches the top of the queue, it will be converted in accordance with the associated Profile (in this case: [Default] 1080 50i AVCI 100) as defined by the Watch Folder Configuration).
The converted file will be written to the Drop Folder: C:\Alchemist XF Drop Folder
For customers who frequently deliver content of a specific file format and video standard, the Watch Folder functionality offers a simple and convenient method of automated file conversion via Alchemist XF.

Alchemist XF User Guide
Version Number: 9.1 © 2017 SAM Page 90 of 120
8.3 How to Setup a Watch Folder Configuration
The following procedure explains how to setup a Watch Folder Configuration with Watch and Drop Folders existing on the local server.
The Watch and Drop folders will reside on the local C: drive
A folder will be created which will act as the Watch Folder: Alchemist XF Watch Folder 1
A second folder will be created which will act as the Drop Folder: Drop Folder 1
The Watch Folder Configuration will have an associated Profile of: [Default] 1080 50i AVCI 100
8.3.1 Create the Physical Folders
1. Make a folder on the local C: drive called: Alchemist XF Watch Folder 1
2. Make a second folder on the local C: drive called: Alchemist XF Drop Folder
New folder
New folder

Alchemist XF User Guide
Page 91 of 120 © 2017 SAM Version Number: 9.1
8.3.2 Create the Watch Folder Configuration
1. In the xFile Client, click on the Watch folders icon.
The following window will now open.
In this example there is only one Watcher called: xFile Watcher (Merlot:35063)
Note - Merlot is the name of the host computer.
Select
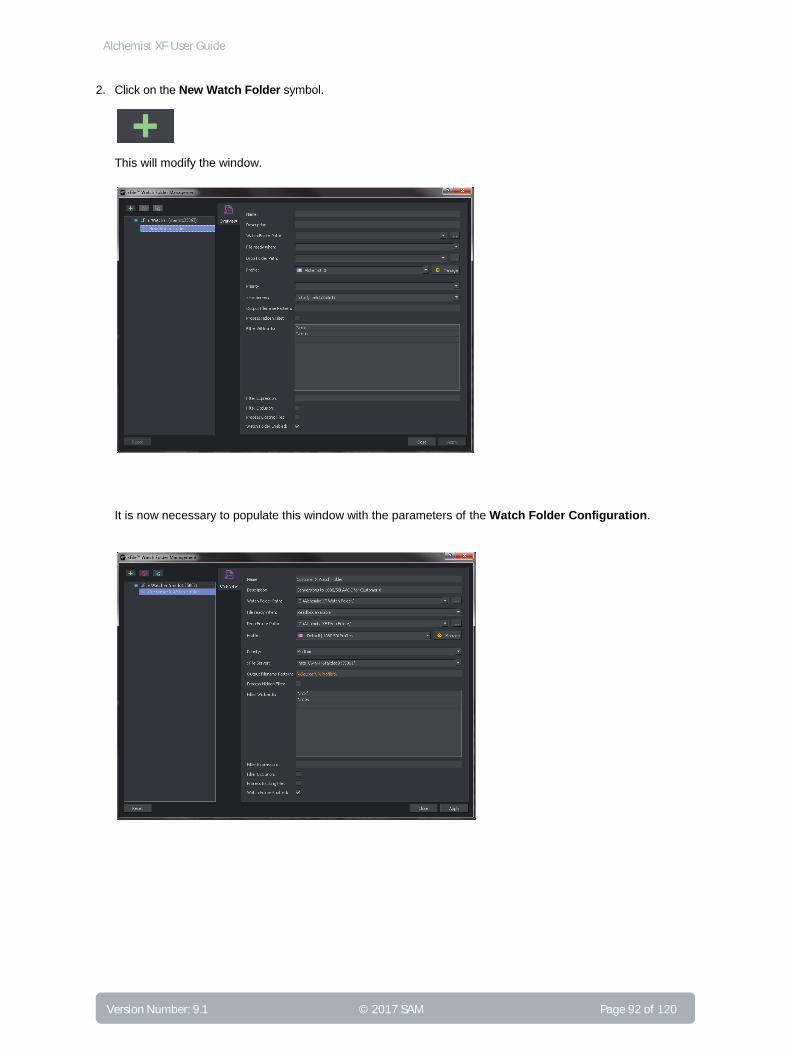
Alchemist XF User Guide
Version Number: 9.1 © 2017 SAM Page 92 of 120
2. Click on the New Watch Folder symbol.
This will modify the window.
It is now necessary to populate this window with the parameters of the Watch Folder Configuration.
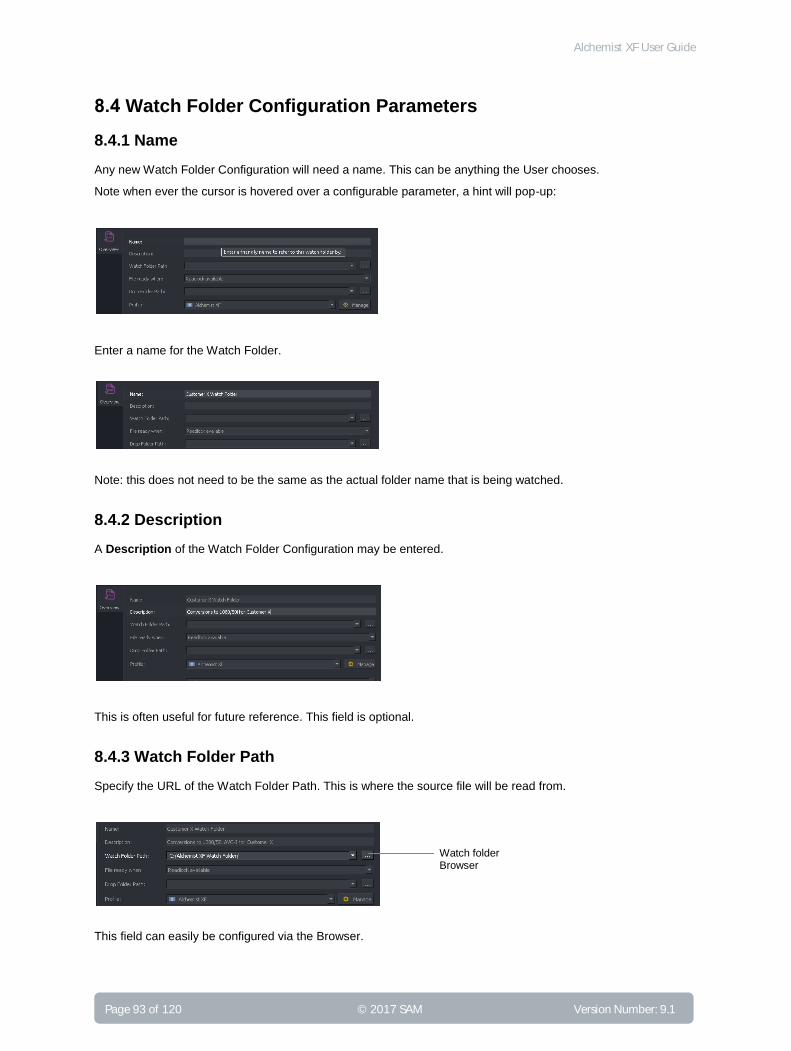
Alchemist XF User Guide
Page 93 of 120 © 2017 SAM Version Number: 9.1
8.4 Watch Folder Configuration Parameters
8.4.1 Name
Any new Watch Folder Configuration will need a name. This can be anything the User chooses.
Note when ever the cursor is hovered over a configurable parameter, a hint will pop-up:
Enter a name for the Watch Folder.
Note: this does not need to be the same as the actual folder name that is being watched.
8.4.2 Description
A Description of the Watch Folder Configuration may be entered.
This is often useful for future reference. This field is optional.
8.4.3 Watch Folder Path
Specify the URL of the Watch Folder Path. This is where the source file will be read from.
This field can easily be configured via the Browser.
Watch folder Browser

Alchemist XF User Guide
Version Number: 9.1 © 2017 SAM Page 94 of 120
8.4.4 File ready when
The File Ready When control is used when large files are moved into the Watch Folder. Two options are offered:
Readlock available
Filesize stable
File available
The Readlock available option is only applicable in a Windows environment. When selected, a conversion can commence once the Readlock code is available.
In a Linux system, there is no concept of a Readlock code, so it is recommended that one of the other options; Filesize Stable or File available is selected in a Linux environment.
8.4.5 Drop Folder Path
Specify the URL of the Drop Folder Path. This is where the converted file will be written to.
8.4.6 Profile
Specify the Profile to be associated with the Watch Folder Configuration.
Drop folder Browser
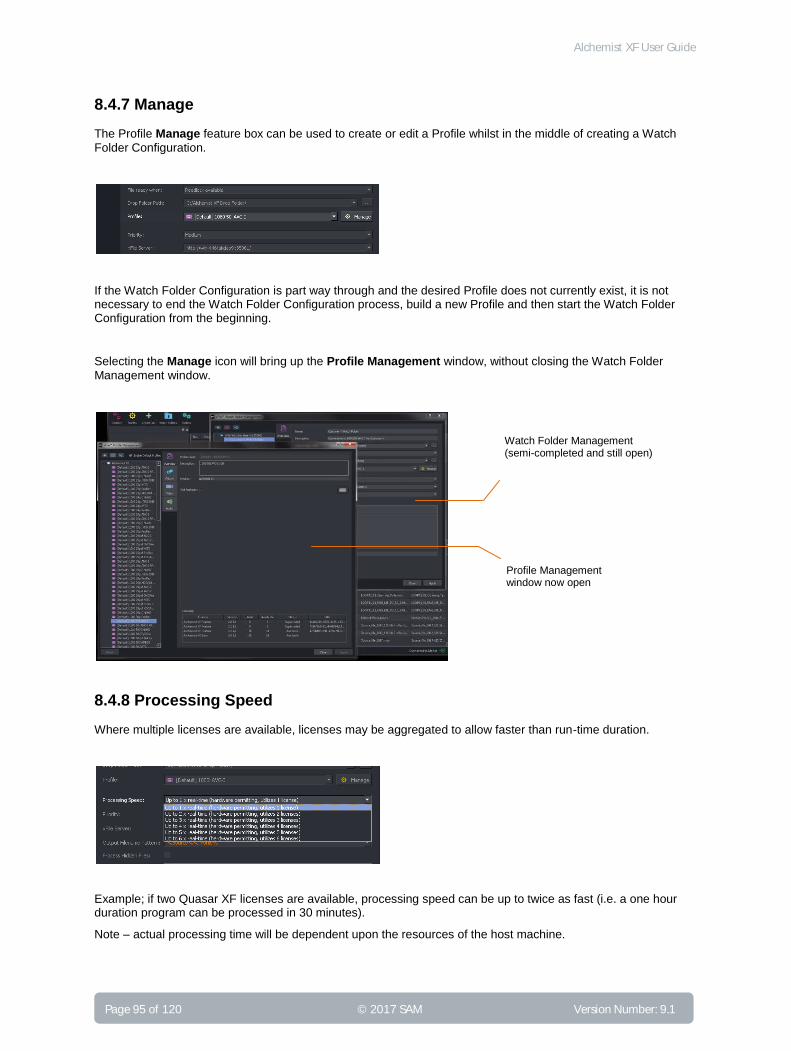
Alchemist XF User Guide
Page 95 of 120 © 2017 SAM Version Number: 9.1
8.4.7 Manage
The Profile Manage feature box can be used to create or edit a Profile whilst in the middle of creating a Watch
Folder Configuration.
If the Watch Folder Configuration is part way through and the desired Profile does not currently exist, it is not necessary to end the Watch Folder Configuration process, build a new Profile and then start the Watch Folder Configuration from the beginning.
Selecting the Manage icon will bring up the Profile Management window, without closing the Watch Folder
Management window.
8.4.8 Processing Speed
Where multiple licenses are available, licenses may be aggregated to allow faster than run-time duration.
Example; if two Quasar XF licenses are available, processing speed can be up to twice as fast (i.e. a one hour duration program can be processed in 30 minutes).
Note – actual processing time will be dependent upon the resources of the host machine.
Watch Folder Management (semi-completed and still open)
Profile Management window now open

Alchemist XF User Guide
Version Number: 9.1 © 2017 SAM Page 96 of 120
8.4.9 Priority
The priority of any job initiated via the Watch Folder Configuration can be set in this field. The default value is Medium. All jobs originating from this particular Watch Folder Configuration will be set to the priority as set in this
field.
8.4.10 xFile Server
This field will be automatically populated.
In systems where multiple xFile Servers have been configured, this control allows a specific xFile Server to be set, with respect to the Watch Folder Configuration.
8.4.11 Output Filename Pattern
Typing % will reveal the output filename pattern options.
File naming pattern concatenations of multiple presets may be configured:
In this example, the output filename will be a concatenation of the source file name and the Profile name.
See Table 2 above for more information on filename patterns.

Alchemist XF User Guide
Page 97 of 120 © 2017 SAM Version Number: 9.1
8.4.12 Process Hidden Files
Some video files have hidden files associated with them. Enable this control if hidden files are to be processed through to the output.
8.4.13 Filter Wildcards
Because a Watch Folder is just a folder on a PC, or server, files may be added to the folder that are not video files and it would be undesirable that such files should initiate an Alchemist XF conversion.
The Filter Wildcard feature allows the User to specify only certain file types to initiate an Alchemist XF process.
In the example below the default wildcards are depicted. Only files with the file extension .mxf or .mov moved
into the Watch Folder, will initiate an automated Alchemist XF process.
Note: currently the Watch Folder feature does not support DPX file types. DPX files are effectively excluded by the default setting of the Filter Wildcards feature, meaning that if DPX files are written to an active Watch Folder, they will not initiate an Alchemist XF process. If the settings of the Filter Wildcards feature are set such that DPX
files are no longer excluded, then DPX files written to the Watch Folder will initiate an Alchemist XF process. However, the results will be very undesirable and it’s important that this scenario is avoided.
Alternatively, the Wildcard Filter may be used to exclude certain file types from initiating an Alchemist XF process.
In the following example, word documents have been excluded.
To make Wildcards excluded, the Filter Exclusion box should be ticked.
Configured Wildcards
Enable for Wildcards to
be excluded
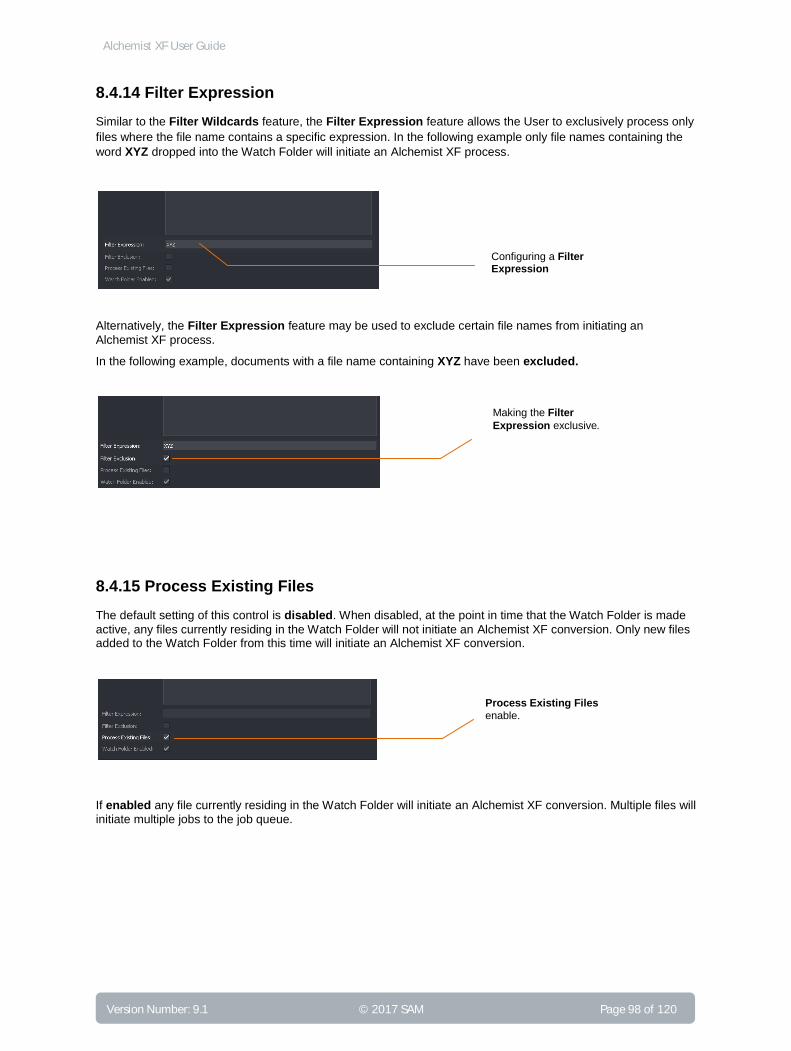
Alchemist XF User Guide
Version Number: 9.1 © 2017 SAM Page 98 of 120
8.4.14 Filter Expression
Similar to the Filter Wildcards feature, the Filter Expression feature allows the User to exclusively process only
files where the file name contains a specific expression. In the following example only file names containing the
word XYZ dropped into the Watch Folder will initiate an Alchemist XF process.
Alternatively, the Filter Expression feature may be used to exclude certain file names from initiating an
Alchemist XF process.
In the following example, documents with a file name containing XYZ have been excluded.
8.4.15 Process Existing Files
The default setting of this control is disabled. When disabled, at the point in time that the Watch Folder is made
active, any files currently residing in the Watch Folder will not initiate an Alchemist XF conversion. Only new files added to the Watch Folder from this time will initiate an Alchemist XF conversion.
If enabled any file currently residing in the Watch Folder will initiate an Alchemist XF conversion. Multiple files will
initiate multiple jobs to the job queue.
Making the Filter
Expression exclusive.
Configuring a Filter Expression
Process Existing Files
enable.
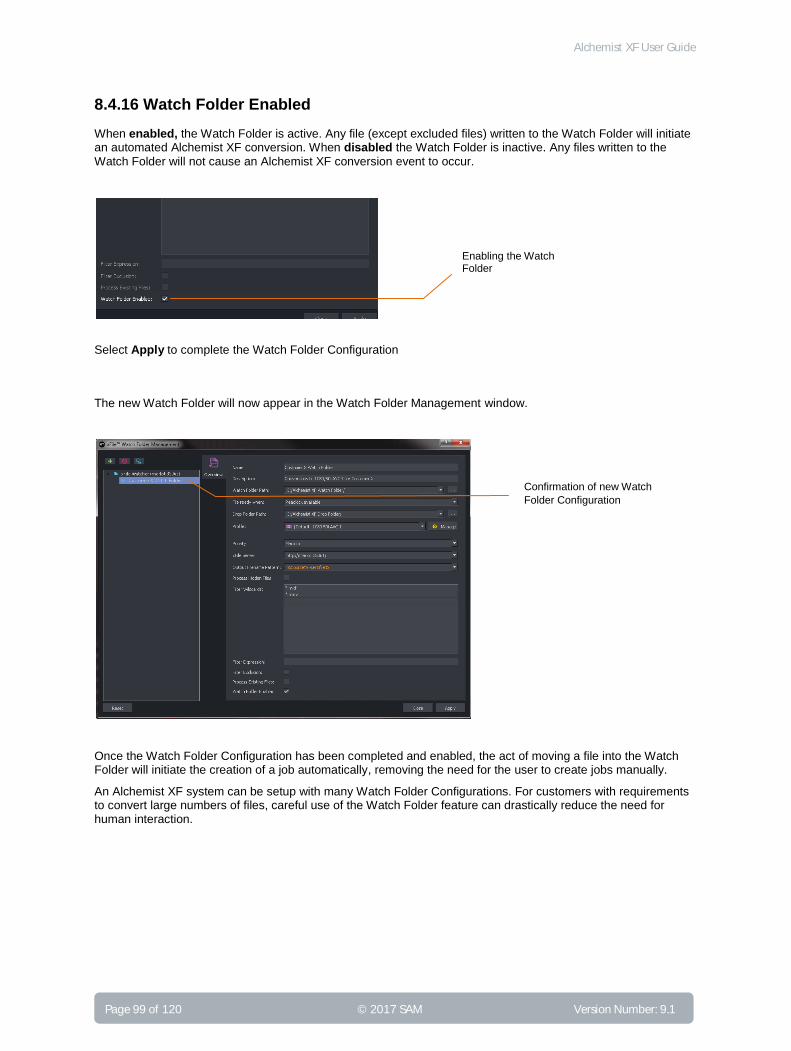
Alchemist XF User Guide
Page 99 of 120 © 2017 SAM Version Number: 9.1
8.4.16 Watch Folder Enabled
When enabled, the Watch Folder is active. Any file (except excluded files) written to the Watch Folder will initiate an automated Alchemist XF conversion. When disabled the Watch Folder is inactive. Any files written to the
Watch Folder will not cause an Alchemist XF conversion event to occur.
Select Apply to complete the Watch Folder Configuration
The new Watch Folder will now appear in the Watch Folder Management window.
Once the Watch Folder Configuration has been completed and enabled, the act of moving a file into the Watch Folder will initiate the creation of a job automatically, removing the need for the user to create jobs manually.
An Alchemist XF system can be setup with many Watch Folder Configurations. For customers with requirements to convert large numbers of files, careful use of the Watch Folder feature can drastically reduce the need for human interaction.
Confirmation of new Watch
Folder Configuration
Enabling the Watch Folder

Alchemist XF User Guide
Version Number: 9.1 © 2017 SAM Page 100 of 120
8.5 Multiple Watch Folder Configurations
It should be appreciated that a single Watch Folder can be used in multiple Watch Folder Configurations.
8.5.1 Multiple Watch Folder Configurations Using Common Watch Folder
Suppose a particular Watch Folder is used in two separate Watch Folder Configurations:
Watch Folder Configuration 1
Parameters:
Watch folder: Customer X Watch Folder
Profile: [Default] 1080 50i AVCI 100
Drop Folder: Customer X HD
Watch Folder Configuration 2
Parameters:
Watch folder: Customer X Watch Folder
Profile: [Default] 625i DVCPro 50
Drop Folder: Customer X SD
In such a scenario, the act of writing a source files into the Watch Folder Customer X Watch Folder will initiate two separate job configurations that will be added to the job queue.
One process will make a 1080/50i AVCI file, which will be placed in the folder Customer X HD.
Second process will make a 625i DVCPro 50 file, that will be placed in the folder Customer X SD
Figure 2: Watch Folder Configuration Using Common Watch Folder

Alchemist XF User Guide
Page 101 of 120 © 2017 SAM Version Number: 9.1
8.5.2 Multiple Watch Folder Configurations Using Common Watch & Drop Folders
Similarly, multiple Watch Folder Configurations can write files to the same Drop Folder. In this scenario, the
act of writing a file to the Watch Folder, will initiate two separate job configurations that will be added to the job queue. Both processed jobs will be written to a common Drop Folder:
One process will make a 1080/50i AVCI 100 file, which will be placed in the folder Customer X Drop.
Second process will make a 625i DVCPro 50 file, which will also be placed in the folder Customer X Drop.
Figure 3: Watch Folder Configuration Using Common Watch & Drop Folder

Alchemist XF User Guide
Version Number: 9.1 © 2017 SAM Page 102 of 120
Appendix A. Supported File Types Table 4: Supported File Types
Resolution Codec File Format Supported Frame Rate Supported Audio CC Support
SD 525 D10 IMX 30 Mbps / 40 Mbps / 50 Mbps MXF OP1a / MOV 59i, 29psf 1 s x 2,4 or 8ch CEA608 L21 in MXF OP1a only
SD 525 MPEG2 DVB / DVD / 80Mbp I-frame Only MPG/TS 59i, 29psf 1 s x 2ch No
SD 525 DV DV25 / DVCPro 25 / DV50 / DVCPro 50 MXF OP1a, MOV 59i, 29psf 24 s x 24ch CEA608 L21 in MXF OP1a only
SD 525 ProRes 422 Proxy / 422 LT / 422 / 422 HQ / 444 / 4444 XQ
(input only) MOV 59i, 29psf, custom 12 to 300 fps 24 s x 24ch No
SD 525 H.264 Long GOP DVB / HQ ** MP4 59i 24 s x 24ch No
SD 525 H.264 Long GOP DVB / Flash / Silverlight / HQ ** MP4 29psf 24 s x 24ch No
SD 525 JPEG 2000 Lossy / Lossless MXF OP1a, MOV,
MJ2
29psf 24 s x 24ch No
SD 525 Uncompressed DPX 59i, 29psf, custom 12 to 300 fps None No
SD 525 Uncompressed YUV2 8bit / 2VUY 8bit / V210 10bit / V216
16bit MOV 59i, 29psf, custom 12 to 300 fps 24 s x 24ch No
SD 625 D10 IMX 30 Mbps / 40 Mbps / 50 Mbps MXF OP1a / MOV 50i, 25psf 1 s x 2,4 or 8ch CEA608 L21 in MXF OP1a only
SD 625 MPEG2 DVB / DVD / 80Mbp I-frame Only MPG/TS 50i, 25psf 1 s x 2ch No
SD 625 DV DV25/ DVCPro 25/ DV50/ DVCPro 50 MXF OP1a, MOV 50i, 25psf 24 s x 24ch CEA608 L21 in MXF OP1a only
SD 625 ProRes 422 Proxy / 422 LT / 422 / 422 HQ / 444 / 4444
XQ (input only) MOV 50i, 25psf, custom 12 to 300 fps 24 s x 24ch No
SD 625 JPEG 2000 Lossy / Lossless MXF OP1a, MOV,
MJ2
25psf 24 s x 24ch No
SD 625 H.264 Long GOP DVB / HQ ** MP4 50i 24 s x 24ch No
SD 625 H.264 Long GOP DVB / Flash / Silverlight / HQ ** MP4 25psf 24 s x 24ch No
SD 625 Uncompressed DPX 50i, 25psf, custom 12 to 300 fps None No
SD 625 Uncompressed YUV2 8bit / 2VUY 8bit / V210 10bit / V216
16bit MOV 50i, 25psf, custom 12 to 300 fps 24 s x 24ch No
HD 720 ProRes 422 Proxy / 422 LT / 422 / 422 HQ / 444/ 4444
XQ (input only) MOV 23p, 24p, 25p, 29p, 30p, 48p, 50p, 59p, 60p,
custom 12 to 300 fps
24 s x 24ch No
HD 720 MPEG2 MP2 HDV / 80Mbp I-frame Only MPG/TS 23p, 25p, 29p 1 s x 2ch No
HD 720 MPEG2 80Mbp I-frame Only MPG/TS 50p, 59p 1 s x 2ch No
HD 720 AVC-I 50 Mbps / 100 Mbps MXF OP1a 23p, 25p, 29p, 50p, 59p 24 s x 24ch Yes
HD 720 AVC-I RP2027 50 Mbps / 100 Mbps / 200 Mbps MXF OP1a 23p, 25p, 29p, 50p, 59p 24 s x 24ch Yes
HD 720 AVCHD MTS 23p, 25p, 29p, 50p, 59p 1s x 2,4 or 8ch No
HD 720 DNxHD 60Mbps 8bit / 90Mbps 8 bit / 90Mbps 10bit MXF OP1a, MOV 23p, 24p, 25p 24 s x 24ch VANC CEA 608 CB & CEA708 in
MXF OP1a only
HD 720 DNxHD 75Mbps 8bit / 110Mbps 8bit / 110Mbps 10bit MXF OP1a, MOV 29p, 30p 24 s x 24ch VANC CEA 608 CB & CEA708 in
MXF OP1a only
HD 720 DNxHD 120Mbps 8bit / 185Mbps 8bit / 185Mbps 10bit MXF OP1a, MOV 50p 24 s x 24ch VANC CEA 608 CB & CEA708 in
MXF OP1a only
HD 720 DNxHD 145Mbps 8bit / 220Mbps 8bit / 220Mbps 10bit MXF OP1a, MOV 59p, 60p 24 s x 24ch VANC CEA 608 CB & CEA708 in
MXF OP1a only
HD 720 JPEG 2000 Lossy / Lossless MXF OP1a /
MOV/ MJ2
23p, 24p, 25p, 29p, 30p, 48p, 50p, 59p, 60p 24 s x 24ch No
HD 720 DV DVCPro 100 Mbps MXF OP1a, MOV 50p, 59p 24 s x 24ch VANC CEA 608 CB & CEA708 in
MXF OP1a only
HD 720 XDCam HD 50 Mbps/50 Mbps Closed GOP MXF OP1a, MOV 50p, 59p 1s x 2,4, 8, or 16ch VANC CEA 608 CB & CEA708 in
MXF OP1a only
HD 720 H.264 Long GOP DVB / HQ ** MP4 23p, 24p, 25p, 29p, 30p, 60p 24 s x 24ch No
HD 720 H.264 Long GOP DVB / IPTVFJ STD-0004 / Blu-ray Disc / HQ ** MP4 50p, 59p 24 s x 24ch No
HD 720 XAVC CBG Class 100 / XAVC Long GOP MXF OP1a 50p, 59p
24 s x 24ch No

Alchemist XF User Guide
Page 103 of 120 © 2017 SAM Version Number: 9.1
Resolution Codec File Format Supported Frame Rate Supported Audio CC Support
HD 720 Uncompressed DPX 23p, 24p, 25p, 29p, 30p, 48p, 50p, 59p, 60p,
custom 12 to 300 fps
None No
HD 720 Uncompressed YUV2 8bit / 2VUY 8bit / V210 10bit /
V216 16bit MOV 23p, 24p, 25p, 29p, 30p, 48p, 50p, 59p, 60p,
custom 12 to 300 fps
24 s x 24ch No
HD 1080 DNxHD 35 Mbps 8bit / 115 Mbps 8bit / 175 Mbps
8bit/ 175 Mbps 10bit MXF OP1a, MOV 23p, 24p 24 s x 24ch VANC CEA 608 CB & CEA708 in
MXF OP1a only
HD 1080 DNxHD 40 Mbps 8bit / 75 Mbps 8bit / 185 Mbps 8bit/
185 Mbps 10bit MXF OP1a, MOV 25p 24 s x 24ch VANC CEA 608 CB & CEA708 in
MXF OP1a only
HD 1080 DNxHD 45Mbps 8bit/ 145Mbps 8bit/ 220 Mbps 8bit/
220 Mbps 10bit MXF OP1a, MOV 29p, 30p 24 s x 24ch VANC CEA 608 CB & CEA708 in
MXF OP1a only
HD 1080 DNxHD 145Mbps 8bit /220 Mbps 8bit / 220 Mbps 10bit MXF OP1a, MOV 29psf 24 s x 24ch VANC CEA 608 CB & CEA708 in
MXF OP1a only
HD 1080 DNxHD 120Mbps 8bit / 185Mbps 8bit / 185Mbps 10bit MXF OP1a, MOV 25psf, 50i 24 s x 24ch VANC CEA 608 CB & CEA708 in
MXF OP1a only
HD 1080 DNxHD 75Mbps 8bit / 240 Mbps 8bit / 365 Mbps 8bit /
365 Mbps 10bit MXF OP1a, MOV 50p 24 s x 24ch VANC CEA 608 CB & CEA708 in
MXF OP1a only
HD 1080 DNxHD 90 Mbps 8bit /290 Mbps 8bit/ 440 Mbps 8bit /
440 Mbps 10bit MXF OP1a, MOV 59p, 60p 24 s x 24ch VANC CEA 608 CB & CEA708 in
MXF OP1a only
HD 1080 MPEG2 MP2 HDV / 80Mbp I-frame Only MPG/TS 23p, 25psf, 25p, 29psf, 29p, 50i, 59i 1 s x 2ch No
HD 1080 AVC-I 50 Mbps / 100 Mbps MXF OP1a 23p, 25p, 25psf, 29p, 29psf, 50i, 59i 24 s x 24ch No
HD 1080 AVC-I RP2027 50 Mbps / 100 Mbps / 200 Mbps MXF OP1a 23p, 25p, 25psf, 29p, 29psf, 50i, 59i, 50p,
59p
24 s x 24ch No
HD 1080 AVC-HD MTS 23p, 25p, 29p, 50i, 59i, 50p, 59p 1 s x 2,4 or 8ch No
HD 1080 DV DVCPro 100 Mbps MXF OP1a, MOV 25psf, 29psf, 50i, 59i 24 s x 24ch VANC CEA 608 CB & CEA708 in
MXF OP1a only
HD 1080 XDCam HD 50 Mbps/50 Mbps Closed GOP MXF OP1a, MOV 25psf, 29psf, 50i, 59i 1s x 2,4, 8, or 16ch VANC CEA 608 CB & CEA708 in
MXF OP1a only
HD 1080 XAVC CBG Class 50 MXF OP1a 23p, 25psf, 25p, 29psf, 29p, 50i, 59i 24 s x 24ch No
HD 1080 XAVC CBG Class 100/ CBG Class 200 / Long GOP MXF OP1a 23p, 25psf, 25p, 29psf, 29p, 50i, 59i, 50p,
59p
24 s x 24ch No
HD 1080 ProRes 422 Proxy / 422 LT / 422 / 422 HQ / 444 / 4444
XQ (input only) MOV 23p, 24p, 25psf, 25p, 29psf, 29p, 30p, 48p,
50i, 59i, 50p, 59p, 60p, custom 12 to 300 fps
24 s x 24ch No
HD 1080 JPEG 2000 Lossy / Lossless MXF OP1a / MOV
/ MJ2
23p, 24p, 25p, 25psf, 29p, 29psf, 30p, 48p,
50p, 59p, 60p
24 s x 24ch No
HD 1080 H.264 Long GOP DVB / Blu-ray / HQ ** MP4 23p, 24p 24 s x 24ch No
HD 1080 H.264 Long GOP DVB / Flash / HQ ** MP4 25p, 29p 24 s x 24ch No
HD 1080 H.264 Long GOP DVB/ Blu-ray Disc/ IPTVFJ/ Flash / HQ ** MP4 50i, 59i 24 s x 24ch No
HD 1080 Uncompressed DPX 23p, 24p, 25p, 25psf, 29p, 29psf, 30p, 48p,
50i, 59i, 50p, 59p, 60p, custom 12 to 300 fps
None No
HD 1080 Uncompressed YUV2 8bit / 2VUY 8bit / V210 10bit / V216 16bit MOV 23p, 24p, 25p, 25psf, 29p, 29psf, 30p, 48p,
50i, 59i, 50p, 59p, 60p, custom 12 to 300 fps
24 s x 24ch No
2K 1998x1080 ProRes 422 Proxy / 422 LT / 422 / 422 HQ / 444 /
4444 XQ (input only) MOV 23p, 24p, 25p, 30p, 29p, 48p, 50p, 59p, 60p,
custom 12 to 300 fps
24 s x 24ch No
2K 1998x1080 DNxHR 422LB / 422SQ / 422HQ / 422HQX MOV 23p, 24p, 25p, 29p, 30p, 48p, 50p, 59p, 60p, 24 s x 24ch No
2K 1998x1080 JPEG 2000 Lossy / Lossless MXF OP1a / MOV
/ MJ2
23p, 24p, 25p, 30p, 29p, 48p, 50p, 59p, 60p 24 s x 24ch No
2K 1998x1080 Uncompressed DPX 23p, 24p, 25p, 30p, 29p, 48p, 50p, 59p, 60p
custom 12 to 300 fps
24 s x 24ch No
2K 1998x1080 Uncompressed YUV2 8bit / 2VUY 8bit / V210 10bit /
V216 16bit MOV 23p, 24p, 25p, 30p, 29p, 48p, 50p, 59p, 60p,
custom 12 to 300 fps
24 s x 24ch No
2K 2048x858 ProRes 422 Proxy / 422 LT / 422 / 422 HQ / 444 /
4444 XQ (input only) MOV 23p, 24p, 25p, 30p, 29p, 48p, 50p, 59p, 60p
custom 12 to 300 fps
24 s x 24ch No
2K 2048x858 DNxHR 422LB / 422SQ / 422HQ / 422HQX MOV 23p, 24p, 25p, 29p, 30p, 48p, 50p, 59p, 60p 24 s x 24ch No
2K 2048x858 JPEG 2000 Lossy / Lossless MXF OP1a /
MOV/ MJ2
23p, 24p, 25p, 30p, 29p, 48p, 50p, 59p, 60p 24 s x 24ch No

Alchemist XF User Guide
Version Number: 9.1 © 2017 SAM Page 104 of 120
Resolution Codec File Format Supported Frame Rate Supported Audio CC Support
2K 2048x858
Uncompressed DPX 23p, 24p, 25p, 30p, 29p, 48p, 50p, 59p, 60p
custom 12 to 300 fps
None No
2K 2048x858 Uncompressed YUV2 8bit / 2VUY 8bit / V210 10bit /
V216 16bit MOV 23p, 24p, 25p, 30p, 29p, 48p, 50p, 59p, 60p,
custom 12 to 300 fps
24 s x 24ch No
2K 2048x1080 ProRes 422 Proxy / 422 LT / 422 / 422 HQ / 444 /
4444 XQ (input only) MOV 23p, 24p, 25p, 30p, 29p, 48p, 50p, 59p, 60p,
custom 12 to 300 fps
24 s x 24ch No
2K 2048x1080 DNxHR 422LB / 422SQ / 422HQ / 422HQX MOV 23p, 24p, 25p, 29p, 30p, 48p, 50p, 59p, 60p 24 s x 24ch No
2K 2048x1080 JPEG 2000 Lossy / Lossless MXF OP1a / MOV
/ MJ2
23p, 24p, 25p, 30p, 29p, 48p, 50p, 59p, 60p 24 s x 24ch No
2K 2048x1080 XAVC CBG Class 100 / VBG Class 100 MXF OP1a 23p, 24p, 25p, 29p, 50p, 59p 24 s x 24ch No
2K 2048x1080 Uncompressed DPX 23p, 24p, 25p, 30p, 29p, 48p, 50p, 59p, 60p
custom 12 to 300 fps
None No
2K 2048x1080 Uncompressed YUV2 8bit / 2VUY 8bit / V210 10bit /
V216 16bit MOV 23p, 24p, 25p, 30p, 29p, 48p, 50p, 59p, 60p,
custom 12 to 300 fps
24 s x 24ch No
2K 2048x1107 ProRes 422 Proxy / 422 LT / 422 / 422 HQ / 444 / 4444
XQ (input only) MOV 23p, 24p, 25p, 30p, 29p, 48p, 50p, 59p, 60p,
custom 12 to 300 fps
24 s x 24ch No
2K 2048x1107 DNxHR 422LB / 422SQ / 422HQ / 422HQX MOV 23p, 24p, 25p, 29p, 30p, 48p, 50p, 59p, 60p, 24 s x 24ch No
2K 2048x1107 JPEG 2000 Lossy / Lossless MXF OP1a /
MOV/ MJ2
23p, 24p, 25p, 30p, 29p, 48p, 50p, 59p, 60p 24 s x 24ch No
2K 2048x1107 Uncompressed DPX 23p, 24p, 25p, 30p, 29p, 48p, 50p, 59p, 60p,
custom 12 to 300 fps
None No
2K 2048x1107 Uncompressed YUV2 8bit / 2VUY 8bit / V210 10bit/ V216 16bit MOV 23p, 24p, 25p, 30p, 29p, 48p, 50p, 59p, 60p,
custom 12 to 300 fps
24 s x 24ch No
2K 2048x1152 ProRes 422 Proxy / 422 LT / 422 / 422 HQ / 444 / 4444
XQ (input only) MOV 23p, 24p, 25p, 30p, 29p, 48p, 50p, 59p, 60p,
custom 12 to 300 fps
24 s x 24ch No
2K 2048x1152 DNxHR 422LB / 422SQ / 422HQ / 422HQX MOV 23p, 24p, 25p, 29p, 30p, 48p, 50p, 59p, 60p 24 s x 24ch No
2K 2048x1152 JPEG 2000 Lossy / Lossless MXF OP1a / MOV
/ MJ2
23p, 24p, 25p, 30p, 29p, 48p, 50p, 59p, 60p 24 s x 24ch No
2K 2048x1152 Uncompressed DPX 23p, 24p, 25p, 30p, 29p, 48p, 50p, 59p, 60p,
custom 12 to 300 fps
None No
2K 2048x1152 Uncompressed YUV2 8bit / 2VUY 8bit / V210 10bit /
V216 16bit MOV 23p, 24p, 25p, 30p, 29p, 48p, 50p, 59p, 60p,
custom 12 to 300 fps
24 s x 24ch No
2K 2048x1536 ProRes 422 Proxy / 422 LT / 422 / 422 HQ / 4444 /
4444 XQ (input only) MOV 23p, 24p, 25p, 30p, 29p, 48p, 50p, 59p, 60p,
custom 12 to 300 fps
24 s x 24ch No
2K 2048x1536 DNxHR 422LB / 422SQ / 422HQ / 422HQX MOV 23p, 24p, 25p, 29p, 30p, 48p, 50p, 59p, 60p 24 s x 24ch No
2K 2048x1536 JPEG 2000 Lossy / Lossless MXF OP1a / MOV
/ MJ2
23p, 24p, 25p, 30p, 29p, 48p, 50p, 59p, 60p 24 s x 24ch No
2K 2048x1536 Uncompressed DPX 23p, 24p, 25p, 30p, 29p, 48p, 50p, 59p, 60p,
custom 12 to 300 fps
None No
2K 2048x1536 Uncompressed YUV2 8bit / 2VUY 8bit / V210 10bit /
V216 16bit MOV 23p, 24p, 25p, 30p, 29p, 48p, 50p, 59p, 60p,
custom 12 to 300 fps
24 s x 24ch No
4K UHDTV ProRes 422 Proxy / 422 LT / 422 / 422 HQ / 444 /
4444 XQ (input only)
MOV 23p, 24p, 25p, 29p, 30p, 48p, 50p, 59p, 60p,
custom 12 to 300 fps
24 s x 24ch No
4K UHDTV DNxHR 422LB / 422SQ / 422HQ / 422HQX MOV 23p, 24p, 25p, 29p, 30p, 48p, 50p, 59p, 60p 24 s x 24ch No
4K UHDTV JPEG 2000 Lossy / Lossless MXF OP1a / MOV
/ MJ2
23p, 24p, 25p, 29p, 30p, 48p, 50p, 59p, 60p 24 s x 24ch No
4K UHDTV XAVC CBG Class 300 / CBG Class 480 / VBR Class 300/
VBR Class480/ Long GOP MXF OP1a 23p, 25p, 29p, 50p, 59p 24 s x 24ch No
4K UHDTV Uncompressed DPX 23p, 24p, 25p, 29p, 30p, 48p, 50p, 59p,
60p,custom 12 to 300 fps
24 s x 24ch No
4K UHDTV Uncompressed YUV2 8bit / 2VUY 8bit / V210 10bit / V216 16bit MOV 23p, 24p, 25p, 29p, 30p, 48p, 50p, 59p, 60p,
custom 12 to 300 fps
24 s x 24ch No
4K 3996x2160 ProRes 422 Proxy / 422 LT / 422 / 422 HQ / 444 / 4444
XQ (input only) MOV 23p, 24p, 25p, 29p, 30p, 48p, 50p, 59p, 60p,
custom 12 to 300 fps
24 s x 24ch No
4K 3996x2160 DNxHR 422LB / 422SQ / 422HQ / 422HQX MOV 23p, 24p, 25p, 29p, 30p, 48p, 50p, 59p, 60p 24 s x 24ch No

Alchemist XF User Guide
Page 105 of 120 © 2017 SAM Version Number: 9.1
Resolution Codec File Format Supported Frame Rate Supported Audio CC Support
4K 3996x2160 DNxHR 422LB / 422SQ / 422HQ / 422HQX MOV 23p, 24p, 25p, 29p, 30p, 48p, 50p, 59p, 60p 24 s x 24ch No
4K 3996x2160 JPEG 2000 Lossy / Lossless MXF OP1a / MOV
/ MJ2
23p, 24p, 25p, 29p, 30p, 48p, 50p, 59p, 60p 24 s x 24ch No
4K 3996x2160 Uncompressed DPX 23p, 24p, 25p, 29p, 30p, 48p, 50p, 59p, 60p,
custom 12 to 300 fps
None No
4K 3996x2160 Uncompressed YUV2 8bit / 2VUY 8bit / V210 10bit / V216 16bit MOV 23p, 24p, 25p, 29p, 30p, 48p, 50p, 59p, 60p,
custom 12 to 300 fps
24 s x 24ch No
4K 4096x2160 ProRes 422 Proxy / 422 LT / 422 / 422 HQ /444 /
4444 XQ (input only) MOV 23p, 24p, 25p, 29p, 30p, 48p, 50p, 59p,
60p, custom 12 to 300 fps
24 s x 24ch No
4K 4096x2160 DNxHR 422LB / 422SQ / 422HQ / 422HQX MOV 23p, 24p, 25p, 29p, 30p, 48p, 50p, 59p,
60p
24 s x 24ch No
4K 4096x2160 XAVC CBG Class 300/ CBG Class 480/ VBR Class 300 /
VBR Class 480 / Long GOP MXF OP1a 23p, 24p, 25p, 29p, 50p, 59p 24 s x 24ch No
Custom ProRes 422 Proxy / 422 LT / 422 / 422 HQ / 444 /
4444 XQ (input only) MOV 12 to 300 fps 24 s x 24ch No
Custom Uncompressed DPX 12 to 300 fps None No
Custom Uncompressed YUV2 8bit / 2VUY 8bit / V210 10bit / V216 16bit MOV 12 to 300 fps 24 s x 24ch No
** For more information regarding H264 Long GOP/MP4 parameters, see Table 4 below
s = audio streams
ch = audio channels
Apple ProRes - Windows: Due to licensing requirements, the encoding and decoding of Apple ProRes will only be enabled when the xFile Node
is installed on a Windows Server operating system.
Apple ProRes – Linux: Due to licensing requirements, the encoding and decoding of Apple ProRes file formats is not permitted when an X
Window system is running a local session i.e. if an X server is running on the xFile Node host machine, Apple ProRes jobs will not be processed.
Linux distributions offering a graphical environment will default to run level 5. Console/server operating systems will default to run level 3.
Table 5: H264 Long GOP Information
M = I or P frame interval
N = GOP length

Alchemist XF User Guide
Version Number: 9.1 © 2017 SAM Page 106 of 120
Appendix B. Glossary
Table 6: Glossary of Terms
Term Definition
Aliasing An artefact associated with sampled signals. This undesirable effect is caused by sampling
frequencies being too low to faithfully reproduce the frequencies present in the original signal.
AVC-Intra Advanced Video Codec - Intra: A professional, high efficient, codec developed by
Panasonic
AVC-HD A consumer version of the AVC codec, developed by Panasonic for consumer camcorders. Usually wrapped in an MTS container
Bit-rate A phrase used to describe the data density of a video or audio file. Usually expressed in Mbps (10
6 bits of data per second)
Cadence The pattern of video fields that create a net frame rate lower than the video frame rate that carries them. Typical cadences would include 2:2 & 2:3
Closed Captions
Closed captioning is a term describing several systems developed to display text on a
television or video screen to provide additional or interpretive information to viewers who wish to access it
Codec Codec is derived from the words ‘Compression’ and ‘Decoder’. A codec performs the task of
video compression
Color-space Color-space is a system where the color of an individual pixel is defined by the percentage of
its component colors. For example RGB color space defines a pixel’s color by the percentages of red, green and blue contained there in
Container A file encapsulation system where separate elements (also called ‘Essence’) are combined into a single file. Also known as a File-Wrapper
DNxHD Digital Nonlinear Extensible High Definition. DNxHD is a professional HD video codec
developed by AVID. DNxHD has a maximum bit-rate of 220Mbps
DVCPro Is a professional video codec developed by Panasonic. DVCPro has a maximum bit-rate of 100Mbps
Essence
(video essence).
Essence files are the actual video and audio files contained within the video file. The essence files may be compressed using a codec, or maybe uncompressed, prior to wrapping in the container file
Fallback A term associated with motion compensated conversion. On the rare occassion complex motion may not yield useable motion vectors. Fallback allows such content to fall back to a
more appropriate algorithm to create output frames. Advance solutions offer adaptive fallback modes
File Wrapper See Container
Filmic Any video content that has a refresh rate of 30Hz, or less.
GPU Graphical Processing Unit. Very efficient, highly parallel compute engine for advanced
image processing techniques.
Alchemist XF User Guide
Page 107 of 120 © 2017 SAM Version Number: 9.1
Term Definition
H.264 H.264 is a common video codec. H.264 is only ever wrapped with an MP4 container.
Interlace Interlaced video is a technique of doubling the perceived frame rate of a video signal without consuming extra bandwidth. Since the interlaced signal contains the two fields of a video frame captured at two different times, it enhances motion perception to the viewer
JPEG 2000 A file compression system developed by the Joint Photographic Experts Group in year
2000
Linear
(conversion)
Is a technique used for video standards conversion, where output field/frames are made by
basic blending of input fields/frames. The technique is much simpler than motion prediction
and is less demanding upon hardware, but yields inferior results
Motion Estimation
Is the process of deriving motion vectors, ususally from adjacent frames in a video sequence. For frame rate conversion these motion vectors are used to generation new output frames
MPEG IMX Is an SD video codec developed by Sony. It is a development of the Sony Betacam tape format and can have a bit-rate up to 50Mbps
.mj2 Is a JPEG2000 file wrapper
.mov Is the file extension for Apple QuickTime files
.mp4 MPEG-4 is a common video and audio container
.mts Is a video file-wrapper (also known as a container) usually associated with AVC-HD. Very
similar to MT2S
.mt2s Is a video file-wrapper (also known as a container) usually associated with AVC-HD. Very
similar to MTS
.mxf MXF is an acronym of Material eXchange Format. MXF is a container format for
professional digital video and audio media defined by a set of SMPTE standards
MXF OP1a Is a specific video file-wrapper (also known as a container) type based on the MXF format
NAS Is an acronym for Network Attached Storage. A NAS offers both storage and a file system
and appears to a client OS as a file server which drives can be mapped to
Native (resolution)
The actual resolution of a video signal. If the native resolution is not supported by a display device, a form of rescaling maybe applied to make it viewable. Native resolution describes the resolution prior to any scaling.
OS An Operating System is the software that manages computer hardware and software
resources
Phase Correlation
An advance method of motion estimation, based on the spectral analysis of two successive fields / frames. For frame rate conversion, phases correlation has proven to be the most reliable and robust technique of motion estimation, ensuring the output is near indistinguisable from the source
Progressive Method of scanning a video picture where each line is scanned sequentially
Psf Psf: an acrynme for ‘Progressive Segmented Frame’. Is a method of transporting a
progressive video frame, in an interlaced video system. Both fields of a psf frame represent
the same temporal event. Pairing the interlaced fields will form a perfect progressive frame.
Alchemist XF User Guide
Version Number: 9.1 © 2017 SAM Page 108 of 120
Term Definition
SAN Is an acronym for Storage Area Network. A SAN offers block based storage which appears
to the client OS as a disk
SD Acronym for Standard Definition. A standard definition television system usually refers to a
PAL 625 or NTSC 525 interlaced systems
Source file Location of the source file. Path can be entered explicitly or via the browse feature (access
and authorisation is required)
Slow-PAL A PAL television standard defined as having a temporal resolution of less than 25 Hz. Usually applied to film originated content of 24, or 23.98 fps
Telecine A process that converts optical film frames into video
Teletext Teletext is a television information retrieval service created in the UK in the early 1970s. Teletext is a means of sending text and diagrams to a properly equipped television screen. It offers a range of text-based information, typically including news, weather and TV schedules. Subtitle information is also transmitted within the television signal
TCC NVIDIA Tesla Compute Cluster Mode. Professional NVIDIA GPUs which offer a graphics output need to have TCC mode enabled if they are to be used as a compute engine. Enabling TCC will disable the graphical output
XAVC Is Sony’s version of the AVC codec
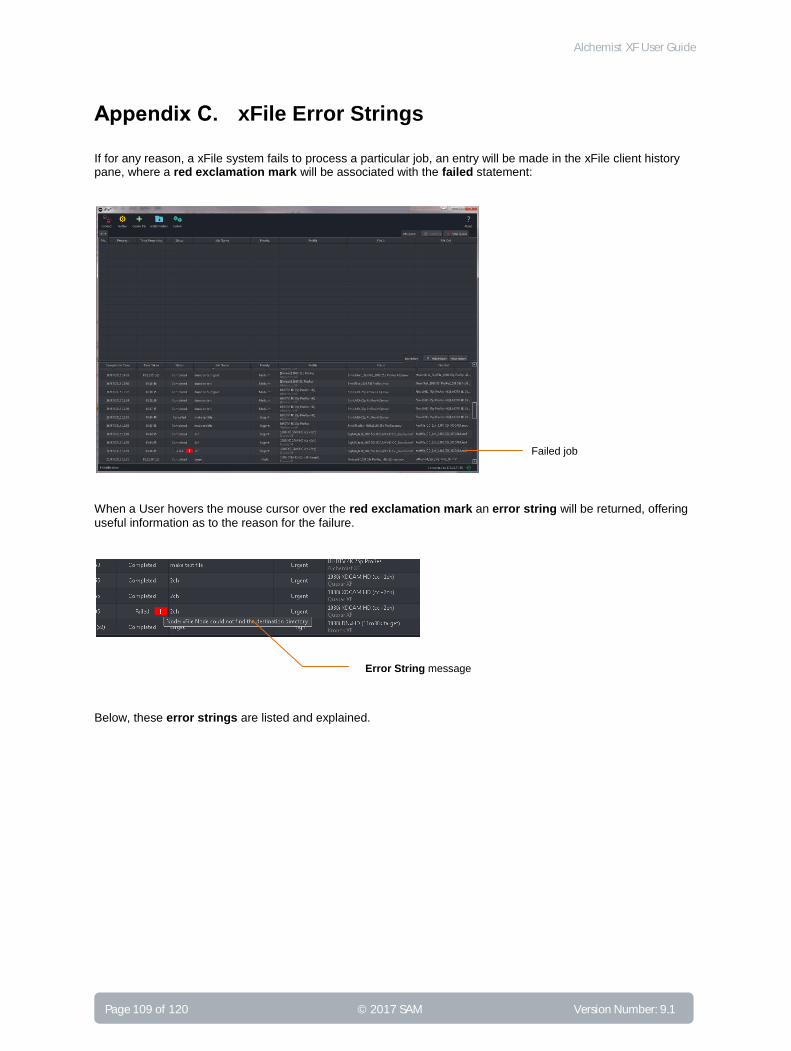
Alchemist XF User Guide
Page 109 of 120 © 2017 SAM Version Number: 9.1
Appendix C. xFile Error Strings
If for any reason, a xFile system fails to process a particular job, an entry will be made in the xFile client history pane, where a red exclamation mark will be associated with the failed statement:
When a User hovers the mouse cursor over the red exclamation mark an error string will be returned, offering
useful information as to the reason for the failure.
Below, these error strings are listed and explained.
Failed job
Error String message

Alchemist XF User Guide
Version Number: 9.1 © 2017 SAM Page 110 of 120
Table 7: Error Strings
No Error String
1. xFile Node received an invalid parameter in the FIMS Transform request
2. xFile Node received a request to process an unknown video format in the FIMS Transform request
3. The capability of the xFile Node is unknown, cannot process FIMS Transform request
4. The xFile Node does not have sufficient OpenCL resources to process the job request.
5. xFile Node encountered an unexpected error when processing FIMS Transform request.
6. xFile Node has encountered an unexpected error.
7. xFile Node could not find the Solution Profile
8. xFile Node could not find the Job Profile
9. xFile Node could not find the Sink Profile
10. xFile Node could not find the source file
11. xFile Node could not find the destination directory
12. xFile Node failed to apply job specific settings
13. xFile Node Worker failed to initialise
14. xFile Node service was stopped during a running job
15. xFile Node was unable to retrieve all profiles from the xFile Server
16. xFile Node unable to obtain all required licenses
17. xFile Node detected a Licensing Error during processing
18. xFile Node Worker encountered an unexpected error during processing
19. xFile Node could not start xFile Node Worker
20. xFile Node Worker failed.
21. Instance of xFile Node Worker already running
22. xFile Node failed to create the Job Profile
23. xFile Node cannot process the source file because it is an unsupported format
24. Apple ProRes CODEC is only supported on a xFile Node running server grade OS
25. Internal Error. Failed to cancel
26. The file extension may not be valid or the file could be corrupt
27. Node: Video encoder error – is the destination directory full?
Alchemist XF User Guide
Page 111 of 120 © 2017 SAM Version Number: 9.1
The xFile Node returns errors as a string to the xFile Client to enable the client to display error hints to the user.
1. Error Message:
xFile Node received an invalid parameter in the FIMS Transform request
Reason:
This failure message should only be seen if Alchemist XF is being controlled via a third party application through the FIMS Transform Service API.
While processing a FIMS Transform Request the xFile Node detected an invalid parameter and could not continue.
Suggestions:
i. Check the parameters of the 3rd
party application request.
ii. Run the same job from the xFile client to check validity.
2. Error message:
xFile Node received a request to process an unknown video format in the FIMS Transform request
Reason:
This failure message should only be seen if Alchemist XF is being controlled via a third party application through the FIMS Transform Service API.
The FIMS Transform Request contained a request to process a video format that the xFile Node does not support.
Suggestions:
i. Check the parameters of the 3rd
party application request.
ii. Run the same job from the xFile client to check validity.
3. Error message:
The capability of the xFile Node is unknown, cannot process FIMS Transform request
Reason:
It was not possible to detect the capability of the underlying hardware. Therefore the xFile Node is unable to process the FIMS Transform request.
It could be a problem with the permissions of the profiles directory in the xFile Node installation, which prevented the xFile Node service from writing the Node Capability XML file. Or the xFile node has encountered unsupported hardware
Suggestions:
i. Check log file xFile Node Info.log in Snell logs directory.
ii. Check the permissions of the directory <install path>/xFile Node/nodeinfo
iii. Confirm the target hardware meets the target hardware specification.
Alchemist XF User Guide
Version Number: 9.1 © 2017 SAM Page 112 of 120
4. Error message:
The xFile Node does not have sufficient OpenCL resources to process the job request.
Reason:
The xFile Node does not have sufficient OpenCL resources to process the job request. This could be because the solution requires GPU acceleration and none were found on the xFile Node.
Suggestions:
i. Check that the GPU type is supported.
ii. If the GPU is an NVIDIA Tesla or Quadro, check that it is currently configured to be in TCC mode and not WDDM (Windows Platform only).
iii. Confirm that a GPU with sufficient resources is installed.
5. Error message:
xFile Node encountered an unexpected error when processing FIMS Transform request.
Reason:
This failure message should only be seen if Alchemist XF is being controlled via a third party application through the FIMS Transform Service API.
While processing the FIMS Transform request the xFile Node encountered an unexpected error.
Suggestions:
i. Check the parameters of the 3rd
party application request.
ii. Run the same job from the xFile client to check validity.
6. Error Message:
xFile Node has encountered an unexpected error.
Reason:
The xFile Node encountered an expected error either before or during processing.
Suggestions:
i. Try running the job again.
ii. If job persistently fails contact Snell Support

Alchemist XF User Guide
Page 113 of 120 © 2017 SAM Version Number: 9.1
7. Error message:
xFile Node could not find the Solution Profile
Reason:
The xFile Node has not been able to load the Solution Profile from the <install path>/xFile Node/profiles directory. This may happen in a system where the xFile Node is running on a different PC/Server from the xFile Server and comms between the two has been lost. Or, the permissions of the <install path>/xFile Node/profiles directory have been modified.
Suggestion:
i. Check comms between xFile Server and xFile Node.
ii. Check the permissions of the <install path>/xFile Node/profiles directory.
8. Error Message
xFile Node could not find the Job Profile
Reason:
The xFile Node has not been able to load the Solution Profile from the <install path>/xFile Node/profiles directory. This may happen in a system where the xFile Node is running on a different PC/Server from the xFile Server and comms between the two has been lost. Or, the permissions of the <install path>/xFile Node/profiles directory have been modified.
Suggestion:
i. Check comms between xFile Server and xFile Node.
ii. Check the permissions of the <install path>/xFile Node/profiles directory.
9. Error Message:
xFile Node could not find the Sink Profile
Reason:
The xFile Node has not been able to load the Solution Profile from the <install path>/xFile Node/profiles directory. This may happen in a system where the xFile Node is running on a different PC/Server from the xFile Server and comms between the two has been lost. Or, the permissions of the <install path>/xFile Node/profiles directory have been modified.
Suggestion:
i. Check comms between xFile Server and xFile Node.
ii. Check the permissions of the <install path>/xFile Node/profiles directory.

Alchemist XF User Guide
Version Number: 9.1 © 2017 SAM Page 114 of 120
10. Error Message
xFile Node could not find the source file
Reason:
The xFile Node has not been able to find the source file defined in the FIMS Transform request.
Suggestions:
i. The path entered for the Source File, in the Create Job window is incorrect.
ii. The source file has been deleted or moved between time of configuration and running the job.
iii. The source file is on an associated share which is no longer reachable from the host PC/Server.
11. Error Message:
xFile Node could not find the destination directory
Reason:
The xFile Node has not been able to find the configured destination directory defined in the FIMS Transform request.
Suggestions:
i. The path entered for the Destination Folder, in the Create Job window is incorrect.
ii. The Destination Folder has been deleted or moved between time of configuration and running the job.
iii. The Destination Folder is located on an associated share which is no longer reachable from the host PC/Server.
12. Error message:
xFile Node failed to apply job specific settings
Reason:
This failure message should only be seen if Alchemist XF is being controlled via a third party application through the FIMS Transform Service API.
The xFile Node has failed to set job specific settings. Providing all files are available and the job specific setting conform to our API this should not occur.
Suggestions:
i. Check the parameters of the 3rd
party application request.
ii. Run the same job from the xFile client to check validity.

Alchemist XF User Guide
Page 115 of 120 © 2017 SAM Version Number: 9.1
13. Error message:
xFile Node Worker failed to initialise.
Reason:
The xFile Node failed to initialise the xFile Node Worker. This could be due to running a solution that is not compatible with the version of the xFile Node, or the underlying hardware is not capable of supporting the desired solution.
Suggestions:
i. Confirm source file is a supported file type. Example; although XDCam codec is supported and QuickTime file-wrapper is also supported, however XDCam with a QuickTime wrapper as a combination is not supported at the present time.
14. Error message:
xFile Node service was stopped during a running job
Reason:
The xFile Node service was stopped, by the User, during a running job. As this prevents the license from being checked, the xFile Node Worker will also be stopped and the job terminated.
15. Error message:
xFile Node was unable to retrieve all profiles from the xFile Server
Reason:
The xFile Node was unable to retrieve all of the required profiles from the xFile Server. This may happen in a system where the xFile Node is running on a different PC/Server from the xFile Server and comms between the two has been lost.
Suggestion:
i. Check comms between xFile Server and xFile Node.
16. Error message:
xFile Node unable to obtain all required licenses
Reason:
The xFile Node has not been able to check out all of the licenses defined in the Solution Profile. Or, a valid license is not present.

Alchemist XF User Guide
Version Number: 9.1 © 2017 SAM Page 116 of 120
17. Error Message:
xFile Node detected a Licensing Error during processing.
Reason:
The xFile Node has detected a licensing problem therefore the job will be terminated. This could be because the license server has become un-reachable, mid-job.
Suggestion:
i. If the license server is on a separate PC/Server, from the xFile Server, check comms link between the two.
18. Error Message:
xFile Node Worker encountered an unexpected error during processing
Reason:
The xFile Node Worker has encountered an unexpected error. The error is written to the xFile Node log and a customer facing message is sent to the client. This is because the error message could be a low level system message such as an exception.
Suggestion:
i. Try running the job again.
ii. If job persistently fails, make into Support issue.
19. Error Message:
xFile Node could not start xFile Node Worker
Reason:
The xFile Node Worker failed to start the xFile Node Worker, maybe the program is missing or the permissions are not set correctly.
Suggestion:
i. Check the application <install path>/xFile Node/SnellOD_NodeWorker.exe exists and has the correct permissions to execute.
ii. Check that there isn’t already a SnellOD_NodeWorker application running.
Alchemist XF User Guide
Page 117 of 120 © 2017 SAM Version Number: 9.1
20. Error Message:
xFile Node Worker failed.
Reason:
The xFile Node Worker has failed. This is most likely caused by a crash due to an unhandled exception.
Suggestion:
i. Try running the job again.
ii. If job persistently fails contact Snell Support
21. Error Message:
Instance of xFile Node Worker already running.
Reason:
The xFile Node Worker has failed to start. This is due to an instance of the xFile Node Worker already running.
Suggestion:
i. This shouldn’t happen in the field. If seen contact xFile Support.
ii. Check that there isn’t already a SnellOD_NodeWorker application running. If there is, try to terminate the SnellOD_NodeWorker application and try to run the job again.
22. Error Message:
xFile Node failed to create the Job Profile
Reason:
The xFile Node failed to create the Job Profile. This could be due to permissions on the profile directory in the xFile Node installation or an invalid parameter.
Suggestion:
i. Check the permissions of the <install path>/xFile Node/profiles directory
ii. If using a third party application test the job using the xFile Client
Alchemist XF User Guide
Version Number: 9.1 © 2017 SAM Page 118 of 120
23. Error Message:
xFile Node cannot process the source file because it is an unsupported format
Reason:
The xFile Node cannot process the source file because it does not have a suitable de-multiplexer available. The xFile Node cannot process the source file as it is in a format that is not supported.
Suggestions:
i. Check if the source file is a supported file type.
ii. Check the source file is a supported combination of Codec and File Wrapper
iii. Check the source file contains a supported video format.
24. Error Message:
Apple ProRes CODEC is only supported on a xFile Node running server grade OS
Reason:
The licence for Apple ProRes stipulates that only server grade operating systems can be used. This is a licensing restriction imposed by Apple Inc. Therefore ProRes processing can only be performed on Linux OS that is running headless and Windows Server operating systems. Systems based on Windows XP, Windows 7 and Windows 8, will not support processing or creating Apple ProRes files.
25. Error Message:
Internal Error. Failed to cancel
Reason:
Failed to cancel the job, use this error to try again.
26. Error Message:
The file extension may not be valid or the file could be corrupt
Reason:
The source file may not be a compatible file type, or possibly the source is corrupt.
Suggestions:
i. Check that the source file is a supported file type (see supported file types table in the Alchemist User Guide)
ii. If the file is a supported format, try running the file on a 3rd
party application, to check the integrity of the file.
2
6

Alchemist XF User Guide
Page 119 of 120 © 2017 SAM Version Number: 9.1
27. Error Message:
Node: Video encoder error – is the destination directory full?
Reason:
The Directory containing the configured destination folder does not have enough free space for the output file to
be written to.
Suggestions: Change directory or make space on chosen directory.

Alchemist XF User Guide
Version Number: 9.1 © 2017 SAM Page 120 of 120
Appendix D. DPX Support
Input DPX support:
RGBA planar
Y Cb,Cr planar (4:2:2)
RGB interleaved
RGBA interleaved
ARGB interleaved
CbYACrYA interleaved (4:2:2:4)
CyYCr interleaved (4:4:4)
CbYCrA (4:4:4:4)
Bit depths of 8, 10, 12, 16 and 32 are supported. Conversions from RGB to YUV assume Rec.709 colour space.
The character limit on the source file would be governed by the OS in use. For example Windows has a filename character limit of 260.
Output DPX support:
RGB 10bit (little endian)
Other rules for DPX
Underscores are not required. Our reader looks for the last number in the filename and uses this as the index
number. For example “1080_50i_Test_0000001.dpx” the last number would be “0000001”.
Source files do not need to start at zero, but the sequence must be sequential – a break in the sequence will
stop the conversion
At present all conversions from RGB to Rec.709 assume Rec.709 colour space.


