46
TOLKIN System End User Guide TOLKIN System End User Guide Information Management and Analytical Bioinformatics All Modules 1 of 46

TOLKIN System End User Guide
TOLKIN System End User Guide
Information Management and Analytical Bioinformatics
All Modules
1 of 46

TOLKIN System End User Guide
TOLKIN System User Guide Table of ContentsAbout This End User Guide ....................................................................................................................... 3 TOLKIN Introduction ................................................................................................................................ 4 Web Browser Interface ............................................................................................................................... 5 TOLKIN Projects Page .............................................................................................................................. 6 Portal Page Notes ....................................................................................................................................... 7
Module Introduction: Taxonomy ...................................................................................................... 8 I. Logging into Tolkin ............................................................................................................. 9 II. Navigation and Search Filters ........................................................................................... 10 III. Taxon Catalog Navigation ............................................................................................... 12 IV. Taxon Tree View Navigation ........................................................................................... 13 IV. Otus Navigation ............................................................................................................... 14
Module Introduction: Collections ................................................................................................... 16 I. Logging into Tolkin ........................................................................................................... 17 II. Creating a Collection ........................................................................................................ 18 III. Editing a Collection ......................................................................................................... 20 IV. Deleting a Collection ....................................................................................................... 21
Module Introduction: Library ......................................................................................................... 22 I. Logging into Tolkin ........................................................................................................... 23 II. Creating a Citation ............................................................................................................ 24 III. Inspecting/Editing/Deleting a Citation ............................................................................ 25 Appendix A. Selecting/Adding/Removing Authors/Journal/Publisher/Books and Series Titles .... 26 Appendix B. Citations Bulk Upload ..................................................................................... 27
Module Introduction: Chromosome ............................................................................................... 28 I. Logging into Tolkin ........................................................................................................... 29 II. Creating/Inspecting/Editing/Deleting a Probe .................................................................. 30 III. Creating/Inspecting/Editing/Deleting a Sequence .......................................................... 32 IV. Creating/Downloading/Inspecting/Editing/Deleting a ZVI File ..................................... 36 Appendix A. Managing Dyes and ZVI Files from the Probes Detail Page ........................... 39
Module Introduction: Morphology ................................................................................................. 42 I. Logging into Tolkin ........................................................................................................... 43 II. Navigation and Search Filters ........................................................................................... 44 III. Characters Listing Navigation ......................................................................................... 46
2 of 46

TOLKIN System End User Guide
About This End User Guide
This End User Guide offers guidance on the various features and functions within each of the TOLKIN modules. This guide is intended to aid in becoming a more confident and skilled user of the system.
For users to continuously improve and progress throughout the system, Help topics are also available online within the TOLKIN web application and can be accessed through the Help menu.
It's important to note that Tolkin is under active development and this document serves as a guide to the features that were available at the time of this writing. This document is also under active development.
3 of 46

TOLKIN System End User Guide
TOLKIN Introduction
TOLKIN is an information management and analytical web application to provide informatics support for phylodiversity and biodiversity research projects. As a web-based application, TOLKIN is able to support collaborative projects by providing shared access to a variety of data on voucher specimens, taxonomy, bibliography, morphology, DNA samples and sequences.
4 of 46

TOLKIN System End User Guide
Web Browser Interface
The browser has control over the appearance and functionality of the browser window use to launch the system. The following diagram explains the elements of the web browser interface.
1. Title bar – displays the web pages title
2. Address bar – displays the Uniform Resource Locator (URL) of the Internet File (protocol, server, path, and filename).
3. System Interface – appearance specific to the application
4. Message bar – displays any events occurring on the browser page, such as Downloading picture…also, if the mouse pointer is moved over a link, the link’s URL is displayed
5 of 46
4
3
2
1

TOLKIN System End User Guide
TOLKIN Projects Page
The TOLKIN Projects Page is a portal that displays the projects within the system that are in-progress. This page displays upon login.
Keywords and Application Definitions
6 of 46
The Projects and Login, User/Session frame gives
the option to navigate/select through projects, gives user
and logout information.
The Navigation Menu displays all the modules that are a part of the TOLKIN system. All the
modules have sub-menus delineating the different
components of each module.
The Projects pane provides the links for the different
areas, called projects, that the user has permission to browse or to edit based on
permission and roles.
The Interact Mode Switch frame provides the ability to
interchange the user interaction with the system.
This is based on user permissions and roles.

TOLKIN System End User Guide
Portal Page Notes
The initial page loaded following login, a project must be chosen from the list.
After a project is chosen the application Home Page is displayed with Taxonomy information associated with the chosen project. Based on the user permissions profile, different module tabs will be displayed at the top of the frame. The sections expand into sub-tabs upon mouse-overs displaying the features associated with each of the modules.
7 of 46

TOLKIN System End User Guide
Module Introduction: Taxonomy
The Taxonomy manages taxonomic information. It allows the user to manage the species names as an informatics tool. Taxonomy being the science that describes organisms.
Definitions:
Taxon – Any group of organisms, at any level of the hierarchical representation
Taxon Tree – Hierarchical representation of the relationship between species via their names
Otu – Operational Taxonomic Unit, an informal group of organisms for the purpose of study. Most times the names of Otus are arbitrary for ease of work within an organization.
8 of 46

TOLKIN System End User Guide
I. Logging into Tolkin
1. Launch your browser (Firefox, Chrome, Safari, etc.) | Go to http://app.tolkin.org/login |
enter Username and Password | click on the button
2. The Tolkin Projects page is displayed | Select the adequate project (i.e. Euphorbia PBI)
**Note** After the project is selected, the Taxonomy count in the Launch page is displayed and Tab menus are made available
If the mouse hovers on the Taxonomy tab, a sub menu appears displaying the options.
3. Click the Taxonomy tab or click the Taxon Tree Icon
4. Click the Home tab | Logout of the application
9 of 46
**Note** To change the project in which work is being performed, you can also select from the top User/Session Frame Project drop-down menu.
TOLKIN System End User Guide
II. Navigation and Search Filters
1. After the user is logged into the TOLKIN application | From the Projects Page select Euphorbia PBI
2. From the Home/Taxonomy Details page click the Taxonomy tab
**Note** Whenever the user clicks the Taxonomy tab, the frame will display the Taxon Catalog by default
::Tip:: In Tolkin the pages that display the list of items is called Index Pages (i.e. Taxon Index Page)
**Note** The bottom of the catalog contains the pagination bar with the buttons to browse through all the records
3. To search for a specific Taxon, click/expand the Filter by: drop-down menu | Select criteria (i.e. Subgenus) | Fill out the information desired | Click the button
4. Click the Edit button in the Interact Mode Switch (top right-hand corner) | The
, , , buttons
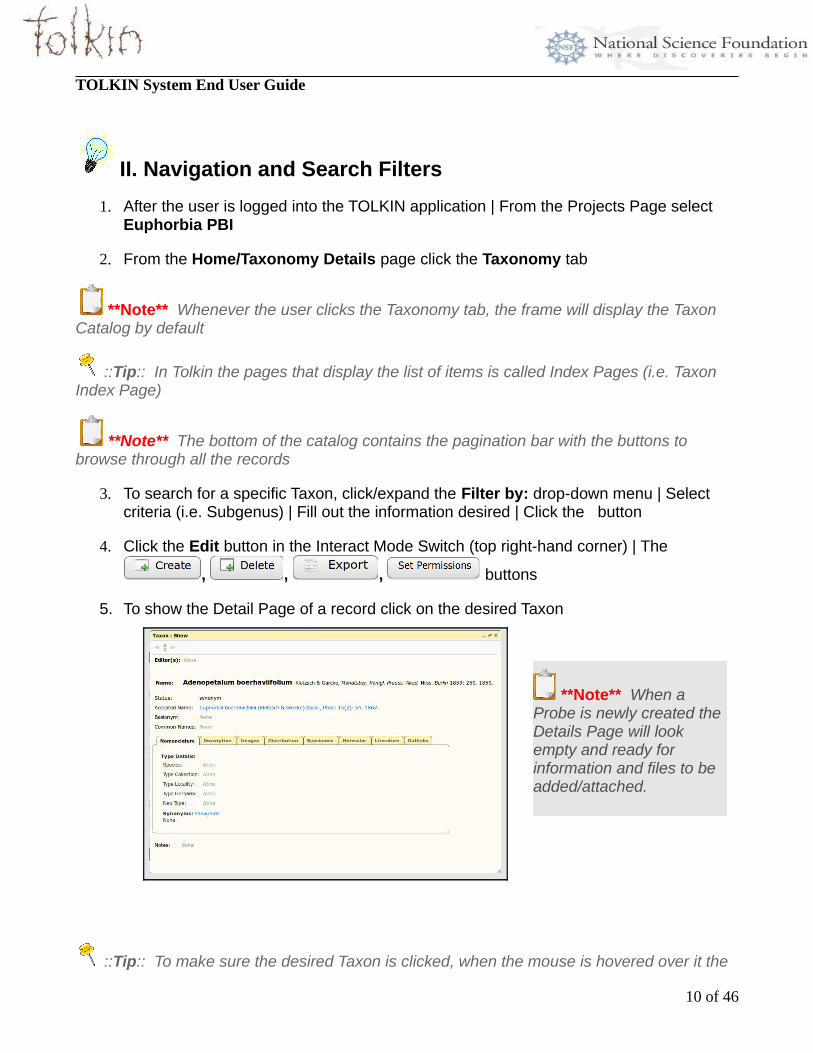
5. To show the Detail Page of a record click on the desired Taxon
::Tip:: To make sure the desired Taxon is clicked, when the mouse is hovered over it the
10 of 46
**Note** When a Probe is newly created the Details Page will look empty and ready for information and files to be added/attached.

TOLKIN System End User Guide
row should change color to yellow.
6. To create, edit, delete, export the meta-data associated of a Taxon, make sure that Edit is selected in the Interact Mode Switch (top right-hand corner)
**Note** Only users that have the appropriate matrix of roles and permissions associated with them will be able to create/modify information.
7. To reach the Index Catalog, click the Taxonomy sub-menu option to return to the Probes Index page or “X” out the page, on the top right of the window
8. To delete a Taxon, select the check-box | Click the button
9. When the confirmation alert box appears click OK
11 of 46

TOLKIN System End User Guide
III. Taxon Catalog Navigation
1. After the user is logged into the TOLKIN application | The Euphorbia PBI project is selected | when Taxon Catalog is being displayed
2. From the Taxonomy Catalog page click the record to be viewed/inspected
**Note** Whenever the user clicks the record to be viewed, a frame will pop-up displaying the Taxon
::Tip:: All the information regarding a Taxon can be found by clicking on the tabs within this window: Nomenclature, Distribution, Specimens, etc.
12 of 46

TOLKIN System End User Guide
IV. Taxon Tree View Navigation
1. After the user is logged into the TOLKIN application | The Euphorbia PBI project is selected | when Taxon Tree View is being displayed
**Note** Whenever the user clicks the record to be viewed a frame will pop-up window will display the Taxon
13 of 46
::Tip:: In the Taxonomy Tree View page Instructions can be found on the top right-hand corner of the frame

TOLKIN System End User Guide
IV. Otus Navigation
1. After the user is logged into the TOLKIN application | The Euphorbia PBI project is selected | when Otus page is being displayed in Catalog form
2. To add Otu(s) to a group, select the records and click the button | Fill
out the information desired | Select or Create group and click the button
3. To display the details click on a particular Otu
**Note** To add Taxons and/or Images to the Otu click the respective links in the top left-hand corner of the screen.
14 of 46

TOLKIN System End User Guide
V. Otu Groups
1. After the user is logged into the TOLKIN application | The Euphorbia PBI project is selected | when Otu Groups page is being displayed in Catalog form | click on a particular Otu Group to edit the name
**Note** Otu Groups can be added through the Otus section as well.
15 of 46

TOLKIN System End User Guide
Module Introduction: Collections
The Tolkin end user will need to enter, process and retrieve research information/data regarding the collection of specimens for further study. Information about the specimen helps to define the species that it pertains to.
16 of 46

TOLKIN System End User Guide
I. Logging into Tolkin
5. Launch your browser (Firefox, Chrome, Safari, etc.) | Go to 10.243.11.94:3000/login |
enter Username and Password | click on the button
6. The Tolkin Projects page is displayed | Select the adequate project (i.e. Gymnosperm ATOL)
**Note** After the project is selected, the Taxonomy count in the Launch page is displayed and Tab menus are made available
If the mouse hovers on the Taxonomy tab a sub menu appears displaying the options.
7. Click the Collections tab or click the Taxon Tree Icon to display the Taxon Catalog
8. Click the Home tab | Logout of the application
17 of 46
**Note** To change the project in which work is being performed, you can also select from the top User/Session Frame Project drop-down menu.

TOLKIN System End User Guide
II. Creating a Collection
10. Launch your browser (Firefox, Chrome, Safari, etc.) | Go to 10.243.11.94:3000/login | enter Username and Password | click on the Login button
11. From the Projects Page select Gymnosperm ATOL
12. From the Home/Taxonomy Details page click the Collections tab
**Note** Whenever the user clicks the Collections tab, the frame will display the catalog by default
::Tip:: In Tolkin the pages that display the list of items is called Index Pages (i.e. Collections Index Page)
13. To search for a specific Collection, click/expand the Filter by: drop-down menu | Select
criteria (i.e. Value) | Fill out the information desired | Click the button
14. Click the Edit button in the Interact Mode Switch (top right-hand corner) | In the
Collections catalog click the button
15. Enter the Collector Name | Enter as much information as needed/provided
16. To enter Annotations, scroll to the respective section | Enter Taxon, Determiner, etc. |
Click the button
**Note** Red asterisks (*) by a field means that this field is required
18 of 46

TOLKIN System End User Guide
**Note** After adding Annotations, the catalog under the form is populated with the information provided
17. To remove Annotations, select the record | Click the button
18. Click the button
19. After saving the information the Detail Page of the Collection is displayed
::Tip:: To make sure the desired Collection is clicked, when the mouse is hovered over it the row should change color to yellow.
19 of 46
**Note** When a Collection is newly created the Details Page will have the open fields for information to be updated.

TOLKIN System End User Guide
III. Editing a Collection
3. Launch your browser (Firefox, Chrome, Safari, etc.) | Go to 10.243.11.94:3000/login | enter Username and Password | click on the Login button
4. From the Projects Page select Gymnosperm ATOL
5. With the mouse, hover over the Collections tab
6. Click the Edit button in the Interact Mode Switch (top right-hand corner) | Hover over the Collection required to be edited/updated and click
7. Enter the the information required | click the button
8. For ease of use, to copy the information already entered to another new record click
the button
**Note** When a Collection is edited/updated the frame window will remain open until it is closed.
20 of 46
**Note** When clicked the Collection will be displayed in a frame window

TOLKIN System End User Guide
IV. Deleting a Collection
2. To Delete a Collection, go to the Collections Index Page by clicking the Collections menu tab
3. Select the check-box for a Collection | Click the button
4. When the confirmation alert box appears click OK
V. Exporting a Collection
4. To Delete a a Collection, go to the Collections Index Page by clicking the Collections menu tab
5. Select the check-box for a Collection | Click the button
6. Select the parameters required to be exported from the dialog box | Click the
button
7. Choose the appropriate options in the browser dialog box
21 of 46

TOLKIN System End User Guide
Module Introduction: Library
The Library provides research information/data regarding Tolkin database. It allows the user to find literatures related to the species.
22 of 46

TOLKIN System End User Guide
I. Logging into Tolkin
9. Launch your browser (Firefox, Chrome, Safari, etc.) | Go to 10.243.11.94:3000/login |
enter Username and Password | click on the button
10.The Tolkin Projects page is displayed | Select the adequate project (i.e. Euphorbia PBI)
**Note** After the project is selected, the Taxonomy information is displayed and Tab menus are made available
If the mouse hovers on the Library tab, a sub menu appears displaying the options.
11. Click the Library tab
12. Click the Home tab | Logout of the application
23 of 46
**Note** To change the project in which work is being performed, you can also select from the top User/Session Frame Project drop-down menu.

TOLKIN System End User Guide
II. Creating a Citation
20. Launch your browser (Firefox, Chrome, Safari, etc.) | Go to 10.243.11.94:3000/login | enter Username and Password | click on the Login button
21. From the Projects Page select Euphorbia PBI
22. From the Home/Taxonomy Details page | Click the Library tab
**Note** Whenever the user clicks the Library tab, the frame will display the Citations by default
::Tip:: In Tolkin the pages that display the list of items are called Index Pages (i.e. Citations Index Page)
23. To search for a specific Citation, click/expand the Filter by: drop-down menu | Select
criteria (i.e. Authors) | Enter information | Click the button
24. Click the Edit button in the Interact Mode Switch (top right-hand corner) | In the
Citations catalog click the button
25. Select the Citation Type from the drop-down menu (i.e. Journal) | click the button
26. Enter the all the information required | Select the Author(s), see Appendix A for instructions | Select a Journal, see appendix for instructions
27. Click the Browse button to attach a file to the citation
24 of 46

TOLKIN System End User Guide
28. Click the button
**Note** When a Citation is created, the Create Window will close itself and the Citation catalog will refresh itself to display the updated list of Citations
III. Inspecting/Editing/Deleting a Citation
8. To show the Detail Page of a Citation, click on the desired Citation
::Tip:: To make sure the desired Citation is clicked, when the mouse is hovered over it the row should change color to yellow.
9. To edit the meta-data associated of a Citation, make sure that Edit is selected in the Interact Mode Switch (top right-hand corner) | Click the Citation
25 of 46

TOLKIN System End User Guide
10. Edit/Change the Citation Information | Click the button
**Note** When a record is created, updated and/or deleted, a notification will appear advising that the record has been successfully processed
11. Close the window to return to the Citations Index Page/Catalog
12. To delete a Probe, select the check-box | Click the button
13. When the confirmation alert box appears, click OK
Appendix A. Selecting/Adding/Removing Authors/Journal/Publisher/Books and Series Titles
9. From the Collections Create Page, click the button to see the list of available Authors | start typing the name to search the Authors table
10. Click the Author to populate the field | Click the button
**Note** When an author is added to the collection, the table will be automatically populated and there will be a notification indication the operation was successful.
26 of 46

TOLKIN System End User Guide
11. To remove the author, select the checkbox | click the button
Appendix B. Citations Bulk Upload
5. When provided with a Citations Bulk Upload (XML) File, click the button
6. Click the Browse button to attach/upload the file
27 of 46

TOLKIN System End User Guide
Module Introduction: Chromosome
The Tolkin end user will need to enter, process and retrieve research information/data regarding chromosomal study. Associated with a particular molecular DNA sequence, the strands are broken into Sequences, sectioned into Probes, stained with dyes and the expressions are captured in images.
Definitions:
Sequence – The precious ordering of the nucleotides (A, C, G, and T) based on DNA composition
Contig - Contiguous sequence of DNA by assembling derived from a single genetic source
Probe - especially one designed to investigate and obtain information on a specific region
Dye – Composition of colors used to recognize the different expressions within a Probe
ZVI File - microscope image file to save multidimensional images (multichannel fluorescence, time lapse, z-stacks etc.)
28 of 46

TOLKIN System End User Guide
I. Logging into Tolkin
13. Launch your browser (Firefox, Chrome, Safari, etc.) | Go to 10.243.11.94:3000/login |
enter Username and Password | click on the button
14.The Tolkin Projects page is displayed | Select the adequate project (i.e. Basal Fishes)
**Note** After the project is selected, the Taxonomy information is displayed and Tab menus are made available
If the mouse hovers on the Chromosome tab a sub, menu appears displaying the options.
15. Click the Chromosome tab
16. Click the Home tab | Logout of the application
29 of 46
**Note** To change the project in which work is being performed, you can also select from the top User/Session Frame Project drop-down menu.

TOLKIN System End User Guide
II. Creating/Inspecting/Editing/Deleting a Probe
29. Launch your browser (Firefox, Chrome, Safari, etc.) | Go to 10.243.11.94:3000/login | enter Username and Password | click on the Login button
30. From the Projects Page select Basal Fishes
31. From the Home/Taxonomy Details page click the Chromosome tab
**Note** Whenever the user clicks the Chromosome tab, the frame will display the Probes by default
::Tip:: In Tolkin the pages that display the list of items are called Index Pages (i.e. Probes Index Page)
32. To search for a specific Probe, click/expand the Filter by: drop-down menu | Select
criteria (i.e. Value) | Click the button
33. Click the Edit button in the Interact Mode Switch (top right-hand corner) | In the Probes
catalog click the button
34. Enter the Probe Name | Select the Type | Enter a Sequence Description
35. Click the button
**Note** When a Probe is created, the Create Window will close itself and the Probe catalog will refresh itself to display the updated Index of Probes
36. To show the Detail Page of a Probe, click on the desired Probe
30 of 46

TOLKIN System End User Guide
::Tip:: To make sure the desired Probe is clicked, when the mouse is hovered over it the row should change color to yellow.
37. To edit the meta-data associated of a Probe, make sure that Edit is selected in the
Interact Mode Switch (top right-hand corner) | Click the button
38.Edit/Change the Probe Information | To manage the Dyes and ZVI Files from the Probe Details page see Appendix A.
39. Click the button
**Note** When a record is created, updated and/or deleted, a notification will appear advising that the record has been successfully processed
40. Click the Probes sub-menu option to return to the Probes Index page or press the Back link at the bottom of the Details page
31 of 46
**Note** When a Probe is newly created, the Details Page will look empty and ready for information and files to be added/attached.

TOLKIN System End User Guide
41. To delete a Probe, select the check-box | Click the button
42. When the confirmation alert box appears click OK
III. Creating/Inspecting/Editing/Deleting a Sequence
12. Launch your browser (Firefox, Chrome, Safari, etc.) | Go to 10.243.11.94:3000/login | enter Username and Password | click on the Login button
13. From the Projects Page select Basal Fishes
14. With the mouse, hover over the Chromosome tab | Click the Sequences sub-menu
::Tip:: In Tolkin the pages that display the list of items are called Index Pages (i.e. Sequences Index Page)
15. To search for a specific Sequence, click/expand the Filter by: drop-down menu |
Select criteria (i.e. Locus) | Click the button
16. Click the Edit button in the Interact Mode Switch (top right-hand corner) | In the
Sequences catalog click the button
32 of 46

TOLKIN System End User Guide
17. Enter the Locus | Enter the Sequence | Enter a Definition
18. Click the button
____________________________________________________________
**Note** When a Sequence is created, the catalog will refresh itself to display the updated Index of Sequences
19. To show the Detail Page of a Sequence, click on the desired Sequence
33 of 46
**Note** When a Sequence is newly created, the Details Page will look empty and ready for information and files to be added/attached.
**Note** To create a Sequence all that is required is to enter the Locus, Sequence and the Definition. The rest of the information associated with the Sequence can be entered within the Details page.

TOLKIN System End User Guide
::Tip:: To make sure the desired record is clicked within a catalog, when the mouse is hovered over it the row should change color to yellow.
20.To edit the meta-data associated of a Sequence, make sure that Edit is selected in the Interact Mode Switch (top right-hand corner) | Enter the information that needs to be added
21. Click the button
**Note** When a record is created, updated and/or deleted, a notification will appear advising that the record has been successfully processed
22. If there are Probes that need to be associated with the particular Sequence, scroll to the bottom of page and find the Probe association panel
23. From the All Probes section select the check box of the appropriate record | click the
button
::Tip:: To see preliminary information about a particular Probe within the Probes Panel, hover the mouse over a record and a “tooltip” will appear displaying information.
24. To dis-associate a Probe, select the check-box | Click the button
::Tip:: A Probe Details Page can be accessed by clicking the Probe in the catalog
25. To Delete a Sequence, go to the Sequences Index Page by clicking the Sequences
sub-menu | Select the check-box for a Sequence | Click the button
34 of 46

TOLKIN System End User Guide
26. When the confirmation alert box appears click OK
35 of 46

TOLKIN System End User Guide
IV. Creating/Downloading/Inspecting/Editing/Deleting a ZVI File
7. Launch your browser (Firefox, Chrome, Safari, etc.) | Go to 10.243.11.94:3000/login | enter Username and Password | click on the Login button
8. From the Projects Page select Basal Fishes
9. With the mouse hover over the Chromosome tab | Click the ZVI Files sub-menu
10. To search for a specific ZVI File, click/expand the Filter by: drop-down menu | Select
criteria (i.e. Caption) | Click the button
11. Click the Edit button in the Interact Mode Switch (top right-hand corner) | In the ZVI
Files catalog click the button
36 of 46

TOLKIN System End User Guide
12. Select the file to be uploaded by clicking the Browse button | Select the Dye Color | Provide text in the Caption field | Click the Upload button
13. To save a file, select the check-box of the record | Click the button
14. In dialog window, select options regarding downloading (browser specific) | Click OK
15.To show the Detail Page of a ZVI File, click on the desired ZVI File
::Tip:: To make sure the desired record is clicked, when the mouse is hovered over it the row should change color to yellow.
16. To edit the meta-data associated of a ZVI File, make sure that Edit is selected in the
Interact Mode Switch (top right-hand corner) | Click the button
17. Edit/Change the ZVI File Information | Click the button
37 of 46
**Note** When a ZVI File is newly created from the Index page, the Details Page no Images or Probes will be associated with this record.

TOLKIN System End User Guide
18. To attach Images to the ZVI File, from the Details Page click the Browse button below
the Images panel | Select the Image to upload | Click the button
19. If there are Probes that need to be associated with this particular ZVI File, scroll to the bottom of page and find the Probe association panel
20. From the All Probes section select the check box of the appropriate record | click the
button
::Tip:: To see preliminary information about a particular Probe within the Probes Panel, hover the mouse over a record and a “tooltip” will appear displaying information.
21. To dis-associate a Probe, select the check-box | Click the button
38 of 46

TOLKIN System End User Guide
::Tip:: A Probe Details Page can be accessed by clicking the Probe in the catalog
22. To Delete a ZVI File, go to the ZVI Files Index Page by clicking the ZVI Files sub-
menu | Select the check-box for a ZVI File | Click the button
23. When the confirmation alert box appears, click OK
Appendix A. Managing Dyes and ZVI Files from the Probes Detail Page
Once in the Probes Detail Page...
14. To Create a Dye, while in Edit Interaction Mode, click the button in the Dyes catalog
39 of 46

TOLKIN System End User Guide
15. Select the Dye or combination of Dyes | Click the button
16. To Edit a Dye, select the check-box of the record | Click the button
17. Select the new combination | Click the button
18. To Delete a Dye, select the check-box of the record | click the button
19. When the confirmation alert box appears, click OK
20. To Upload a ZVI File, while in Edit Interaction Mode, click the button in the ZVI File's catalog
21. Select the file to be uploaded by clicking the Browse button | Select the Dye Color | Provide text in the Caption field | Click the Upload button
40 of 46

TOLKIN System End User Guide
22. To save a file, select the check-box of the record | Click the button
23. In dialog window, select options regarding downloading (browser specific) | Click OK
24. To Delete a ZVI File, go to the ZVI Files Index Page by clicking the ZVI Files sub-
menu | Select the check-box for a ZVI File | Click the button
25. When the confirmation alert box appears click OK
41 of 46

TOLKIN System End User Guide
Module Introduction: Morphology
The Taxonomy manages taxonomic information. It allows the user to manage the species names as an informatics tool. Taxonomy being the science that describes organisms.
Definitions:
Taxon – Any group of organisms, at any level of the hierarchical representation
Taxon Tree – Hierarchical representation of the relationship between species via their names
Otu – Operational Taxonomic Unit, an informal group of organisms for the purpose of study. Most times the names of Otus are arbitrary for ease of work within an organization.
42 of 46

TOLKIN System End User Guide
I. Logging into Tolkin
17. Launch your browser (Firefox, Chrome, Safari, etc.) | Go to 10.243.11.94:3000/login |
enter Username and Password | click on the button
18.The Tolkin Projects page is displayed | Select the adequate project (i.e. Gymnosperm ATOL)
**Note** After the project is selected, the Taxonomy count in the Launch page is displayed and Tab menus are made available
If the mouse hovers on the Taxonomy tab a sub menu appears displaying the options.
19. Click the Morphology tab or click the Taxon Tree Icon
20. Click the Home tab | Logout of the application
43 of 46
**Note** To change the project in which work is being performed, you can also select from the top User/Session Frame Project drop-down menu.

TOLKIN System End User Guide
II. Navigation and Search Filters
43. After the user is logged into the TOLKIN application | From the Projects Page select Gymnosperm ATOL
44. From the Home/Taxonomy Details page click the Morphology tab
**Note** Whenever the user clicks the Morphology tab the frame will display the Matrices Catalog by default
::Tip:: Within the Morphology module the pages that display the list of items is called a Listing (i.e. Characters Listing)
**Note** The bottom of the catalog contains the pagination bar with the buttons to browse through all the records
45. To search for a specific Matrix/Character/Character Group, click/expand the Filter by:
drop-down menu | Select criteria (i.e. Name) | Click the button
46. Click the Edit button in the Interact Mode Switch (top right-hand corner), buttons will be displayed
47.To show the Detail Page of a record click on the desired Matrix
::Tip:: To make sure the desired Matrix is clicked, when the mouse is hovered over it the row should change color to yellow.
44 of 46
**Note** When a Matrix is newly created the Details Page will look empty and ready for information and files to be added/attached.

TOLKIN System End User Guide
**Note** Only users that have the appropriate matrix of roles and permissions associated with them will be able to create/modify information.
48.To reach the Matrices Listing Catalog, click the Morphology menu option or the Matrices sub-menu option to return to the Matrices Listing page
49. To delete a Matrix, select the check-box | Click the button
50. When the confirmation alert box appears click OK
45 of 46

TOLKIN System End User Guide
III. Characters Listing Navigation
27. After the user is logged into the TOLKIN application | The Gymnosperm ATOL project is selected | navigate to Morphology/Characters to display the Characters
28. From the Characters Listing catalog page click the record to be viewed/inspected
46 of 46


