73 CHAPTER 4 Alternative Boot Solutions Using a software disk manager is a popular solution for maintaining high availability for /boot/root/swap. However, alternatives exist that are commonly unknown or misconfigured. The configuration example in this chapter provides the steps that enable you to configure your boot disk to use Alternate Pathing (AP) in conjunction with SEVM. This solution is almost identical to the previous chapters on mirroring your boot drive, given that the mirrors exist on separate physical paths. The addition, AP software in this specific scenario adds the flexibility of being able to control which physical path from which you will access your boot drive. When a boot drive is under the mirrored configuration of Solstice DiskSuite (SDS) or SEVM, then the volume manager controls which path to the data is used. AP is a software layer which lies beneath the volume manager, giving you the ability to switch between primary and alternate paths to the data. Alternate Pathing and Sun Enterprise Volume Manager AP software provides controller redundancy, and SEVM software provides data redundancy. If you plan to use AP software for making your boot disk highly available, you should also plan to use a compatible volume manager. The main purpose of AP software is to help protect against I/O controller failures. For disk controllers, this switch occurs automatically whenever a path failure is detected during normal operation.
Transcript
73
CHAPTER
4
Alternative Boot Solutions
Using a software disk manager is a popular solution for maintaining high availability for /boot/root/swap. However, alternatives exist that are commonly unknown or misconfigured. The configuration example in this chapter provides the steps that enable you to configure your boot disk to use Alternate Pathing (AP) in conjunction with SEVM. This solution is almost identical to the previous chapters on mirroring your boot drive, given that the mirrors exist on separate physical paths. The addition, AP software in this specific scenario adds the flexibility of being able to control which physical path from which you will access your boot drive. When a boot drive is under the mirrored configuration of Solstice DiskSuite (SDS) or SEVM, then the volume manager controls which path to the data is used. AP is a software layer which lies beneath the volume manager, giving you the ability to switch between primary and alternate paths to the data.
Alternate Pathing and Sun Enterprise Volume Manager
AP software provides controller redundancy, and SEVM software provides data redundancy. If you plan to use AP software for making your boot disk highly available, you should also plan to use a compatible volume manager. The main purpose of AP software is to help protect against I/O controller failures. For disk controllers, this switch occurs automatically whenever a path failure is detected during normal operation.
74
Guide to High Availability: Configuring boot/root/swap
Overview of Alternate Pathing
In setting up the AP software, you set up a metadisk name and a metadisk pathgroup. The metadisk provides a means for you to access a disk, whereas the metadisk pathgroup provides a means for you to manipulate the path used to access that disk, such as in running AP commands to perform a switch from one path to another.
One of the alternate paths is the primary path which is initially the active alternate. The active alternate changes with a switch, but the primary path remains constant. You reference a disk pathgroup by specifying the
sf
port (for example,
sf1
) or for the SPARCstorage™ Array, the
pln
port (for example,
pln1
) that corresponds to the primary path. The command-line utility to switch paths is
apconfig
.
AP 2.1 software supports the Solaris 2.6 operating environment and Sun StorEdge A5000 subsystems attached to
sf
ports. AP software is compatible with SEVM 2.4 or later versions, but version 2.5 or later is preferred.
If you alternately path disks and also use a volume manager with those disks, the disks must be known to the volume manager by their AP software metadisk names. This requirement enables AP software to switch the active path without interfering with the volume manager.
You can place the boot disk interface under AP control. AP software makes it possible for the system to boot unattended even if the primary network or boot disk controller is not accessible, as long as viable alternate paths for these devices are defined.
Hardware Configuration
The hardware configuration in this chapter was created using one Sun StorEdge A5000 system and two I/O controllers. This was used as a test platform to emulate a
portion
of the configuration seen in
FIGURE 4-1
. The configuration in
FIGURE 4-1
is representative of
full
redundancy, and is the suggested configuration. With the configuration represented in
FIGURE 4-1
, we would be able to survive a power failure to one of the Sun StorEdge A5000 subsystems, a failed I/O board, or a failed component.
Chapter 4 Alternative Boot Solutions
75
FIGURE 4-1
Sun StorEdge A5000 System with One I/O Controller Board Mirrored
Note –
FIGURE 4-1
shows the suggested configuration. When configuring a completely redundant system, the physical and metadisk names will differ from the
example in this chapter. The following paragraph gives a detailed scenario.
In the sample configuration which follows, both the root (
/
), and its mirror are contained in the same A5000, in a single loop configuration. We thus obtain two physical paths to the data, creating a simulation environment. Note that the metadisk names for root (
/
) and its mirror
both
begin with controller two, mc2txd0. In
FIGURE 4-1
, we have root (
/
) located on the left A5000, and its mirror on the right A5000, giving four physical paths to two disks. In this case, if we chose the first disk in each enclosure, the physical paths for the left A5000 would be c1t32d0s0 (primary) and c3t32d0s0, and for the right c2t64d0s0 (primary), and c4t64d0s0. Therefore, the metadisk names for the primary root might start with controller one, mc1txd0, and the metadisk name for its mirror would start with a different controller, for example mc2txd0.
Software Configuration
To create the example used in this chapter, Solaris 2.6 5/98 software and AP 2.1 from the Solaris 2.6 5/98 SMCC Supplement CD were installed. The required host packages for AP 2.1 for Sun Enterprise Servers, SUNWapdoc, SUNWapu, SUNWapr,
Ex00
I/O Board1 I/O Board2
SBusSBus
c2c1 c3 c4
Fibre channels
Mirrored
SBuscontrollers
A0 B0 A1 B1 A0 B0 A1 B1
76
Guide to High Availability: Configuring boot/root/swap
were also installed. Refer to the Sun Enterprise Server Release Notes for installation instructions. The
patch_cluster,
dated Feb/10/99, and the AP patch 106511-03 were also installed.
The system snapshot before installing AP or SEVM software is shown in
CODE EXAMPLE 4-1
and
CODE EXAMPLE 4-2
.
CODE EXAMPLE 4-2
displays that there are two paths to the data, on two separate controllers. The device names c2t32s0s0 and c1t32d0s0 both point to the same device. Although the second digit of the WWN differs, these are the same devices as seen through any disk format utility.
CODE EXAMPLE 4-1
System Snapshot Before AP and SEVM
# cat /etc/vfstab
#device device mount FS fsck mount mount#to mount to fsck point type pass at boot options##/dev/dsk/c1d0s2 /dev/rdsk/c1d0s2 /usr ufs 1 yes -fd - /dev/fd fd - no -/proc - /proc proc - no -/dev/dsk/c2t32d0s1 - - swap - no -/dev/dsk/c2t32d0s0 /dev/rdsk/c2t32d0s0 / ufs 1 no -/dev/dsk/c2t32d0s6 /dev/rdsk/c2t32d0s6 /usr ufs 1 no -/dev/dsk/c2t32d0s5 /dev/rdsk/c2t32d0s5 /opt ufs 2 yes -swap - /tmp tmpfs - yes
Guide to High Availability: Configuring boot/root/swap
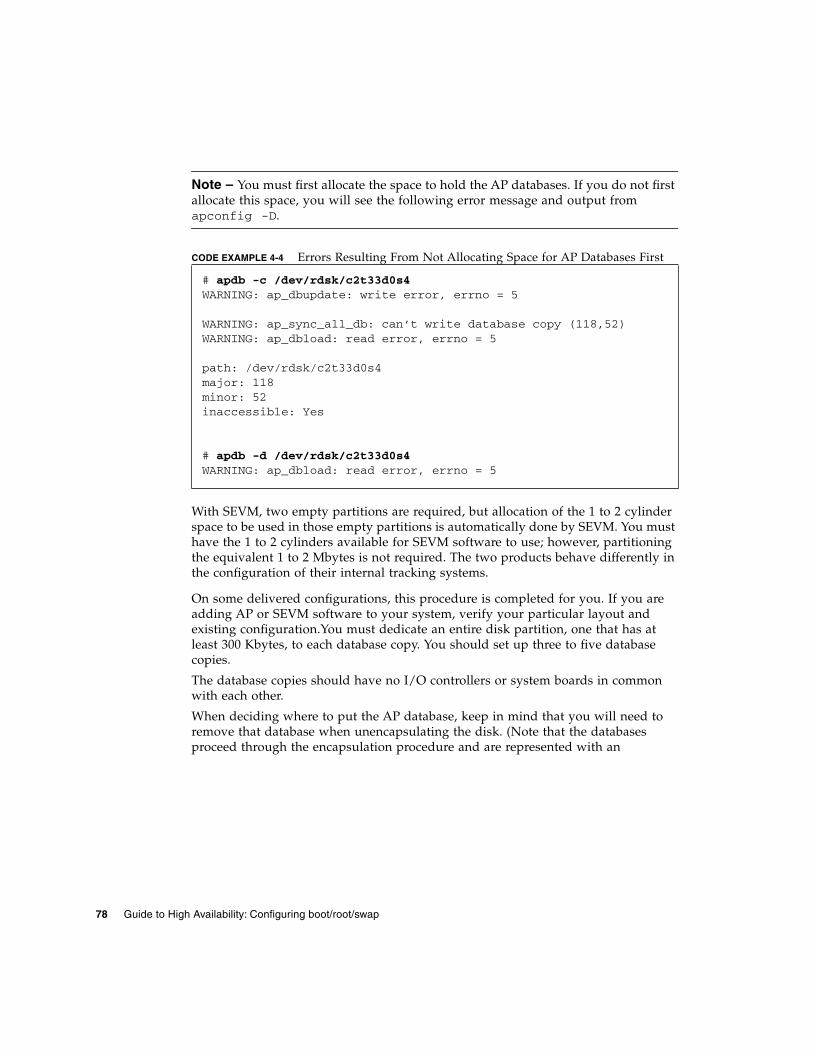
Note –
You must first allocate the space to hold the AP databases. If you do not first allocate this space, you will see the following error message and output from
apconfig -D
.
With SEVM, two empty partitions are required, but allocation of the 1 to 2 cylinder space to be used in those empty partitions is automatically done by SEVM. You must have the 1 to 2 cylinders available for SEVM software to use; however, partitioning the equivalent 1 to 2 Mbytes is not required. The two products behave differently in the configuration of their internal tracking systems.
On some delivered configurations, this procedure is completed for you. If you are adding AP or SEVM software to your system, verify your particular layout and existing configuration.You must dedicate an entire disk partition, one that has at least 300 Kbytes, to each database copy. You should set up three to five database copies.
The database copies should have no I/O controllers or system boards in common with each other.
When deciding where to put the AP database, keep in mind that you will need to remove that database when unencapsulating the disk. (Note that the databases proceed through the encapsulation procedure and are represented with an
CODE EXAMPLE 4-4
Errors Resulting From Not Allocating Space for AP Databases First
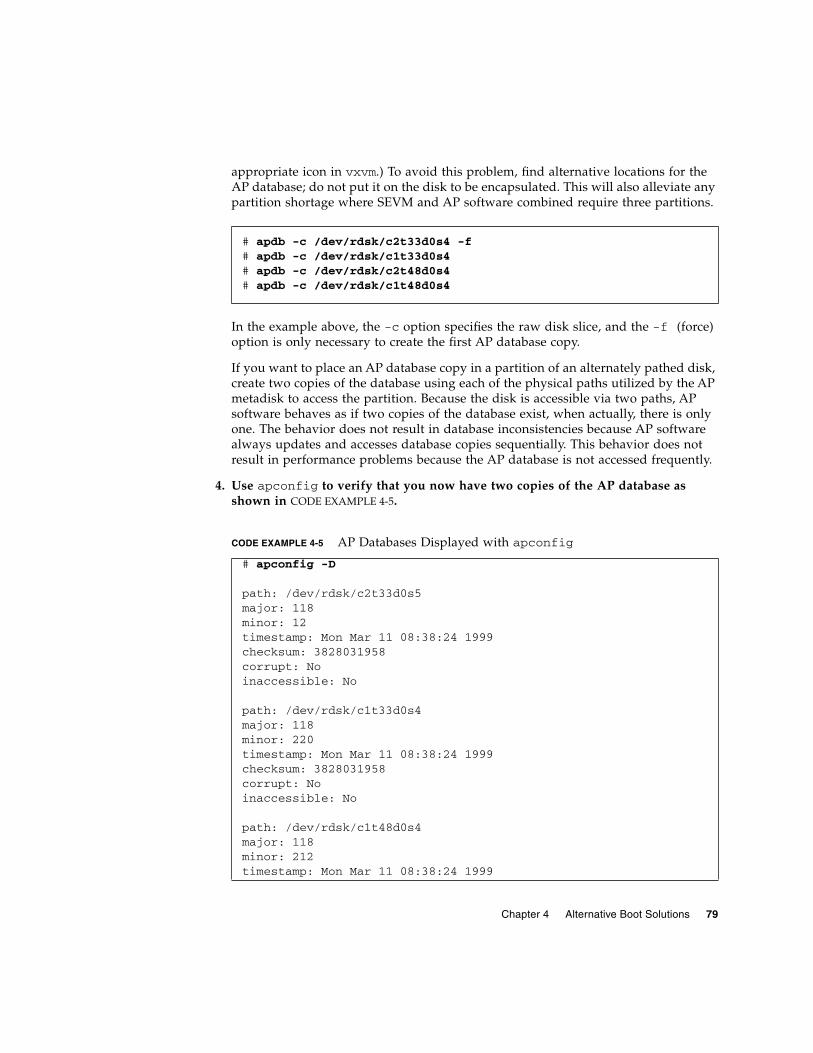
.) To avoid this problem, find alternative locations for the AP database; do not put it on the disk to be encapsulated. This will also alleviate any partition shortage where SEVM and AP software combined require three partitions.
In the example above, the
-c
option specifies the raw disk slice, and the
-f
(force) option is only necessary to create the first AP database copy.
If you want to place an AP database copy in a partition of an alternately pathed disk, create two copies of the database using each of the physical paths utilized by the AP metadisk to access the partition. Because the disk is accessible via two paths, AP software behaves as if two copies of the database exist, when actually, there is only one. The behavior does not result in database inconsistencies because AP software always updates and accesses database copies sequentially. This behavior does not result in performance problems because the AP database is not accessed frequently.
4. Use
apconfig
to verify that you now have two copies of the AP database as shown in
CODE EXAMPLE 4-5
.
#
apdb -c /dev/rdsk/c2t33d0s4 -f
#
apdb -c /dev/rdsk/c1t33d0s4
#
apdb -c /dev/rdsk/c2t48d0s4
#
apdb -c /dev/rdsk/c1t48d0s4
CODE EXAMPLE 4-5
AP Databases Displayed with
apconfig
#
apconfig -D
path: /dev/rdsk/c2t33d0s5major: 118minor: 12timestamp: Mon Mar 11 08:38:24 1999checksum: 3828031958corrupt: Noinaccessible: No
path: /dev/rdsk/c1t33d0s4major: 118minor: 220timestamp: Mon Mar 11 08:38:24 1999checksum: 3828031958corrupt: Noinaccessible: No
path: /dev/rdsk/c1t48d0s4major: 118minor: 212timestamp: Mon Mar 11 08:38:24 1999
80
Guide to High Availability: Configuring boot/root/swap
Caution –
Do not create an AP database using a metadisk path (rather than a physical path to the disk slice.) If you use a metadisk path, the
apdb
command will
succeed, but you may experience unpredictable behavior at a later time.
Note –
AP software does not modify data when the disk is placed under AP control or when a pathgroup is deleted (except for AP database data). AP software does not
repartition a disk.
checksum: 3827963697corrupt: Noinaccessible: No
path: /dev/rdsk/c2t48d0s4major: 118minor: 4timestamp: Mon Mar 11 08:38:24 1999checksum: 3827963697corrupt: Noinaccessible: No
CODE EXAMPLE 4-5
AP Databases Displayed with
apconfig
(Continued)
Chapter 4 Alternative Boot Solutions 81
5. Determine which controllers are connected to the same devices in your system.
In CODE EXAMPLE 4-6, the c numbers are associated with the sf numbers. In this case, sf10 and sf6 point to the same devices, and they are attached to controllers c1 and c2.
6. To alternately path the two sf controllers, create the metadisk with apdisk:
CODE EXAMPLE 4-6 apinst Used to View List of Attached Controllers
82 Guide to High Availability: Configuring boot/root/swap
The primary path has been chosen to be sf10, since that corresponds to the physical device path that you would normally boot on.
7. Before committing the new metadisk in the AP database, verify that the uncommitted entry is correct by looking at the uncommitted SCSI disk entries.
CODE EXAMPLE 4-7 apconfing -S -u Command Used to View Uncommitted Entries
# apconfig -S -uc1 sf6c2 sf10 P A metadiskname(s): mc2t33d0 U mc2t48d0 U mc2t38d0 U mc2t52d0 U mc2t37d0 U mc2t36d0 U mc2t32d0 U mc2t51d0 U mc2t35d0 U mc2t50d0 U mc2t54d0 U mc2t53d0 U mc2t34d0 U mc2t49d0 U
Chapter 4 Alternative Boot Solutions 83
8. If everything looks fine, proceed with the commit, and then verify the database contents by looking at the committed SCSI entries.
The AP metadisk is built, but there are no devices corresponding with it in the Solaris device tree yet.
9. Run the drvconfig command for the ap_dmd AP disk driver:
# ls -l /devices/pseudo/ap_dmd* | grep 72,blkbrw-rw-rw- 1 root sys 136, 72 Mar 11 08:41 /devices/pseudo/ap_dmd@0:7 2,blk# ls -l /devices/pseudo/ap_dmd* | grep 72,rawcrw-rw-rw- 1 root sys 136, 72 Mar 11 08:41 /devices/pseudo/ap_dmd@0:72,raw
84 Guide to High Availability: Configuring boot/root/swap
11. Finally, create the appropriate links in /dev/ap/[r]dsk for the AP metadisks with the apconfig -R command:
12. Use the ls -ltr command to see that the appropriate links have been made:
In CODE EXAMPLE 4-9, you again see the name of the device created in Step 9.
13. Use apboot to define the new AP boot device.
The apboot command modifies the /etc/vfstab and /etc/system files. In CODE EXAMPLE 4-10, mc2t32d0 is the metadisk name of the boot disk. apboot examines the/etc/vfstab file and replaces the physical device name of the disk with the metadisk name. apboot also adds the kernel drivers to the system file, as shown in CODE EXAMPLE 4-10, so that they are loaded at boot time.
# apconfig -R
CODE EXAMPLE 4-9 ls-ltr Command Used to Verify the New Links
# ls -ltr /dev/ap/dsk/* | grep mc2t32d0s0lrwxrwxrwx 1 root root 39 Mar 11 08:42 /dev/ap/dsk/mc2t32d0s0 ->../../../devices/pseudo/ap_dmd@0:72,blk
# ls -ltr /dev/ap/rdsk/* | grep mc2t32d0s0lrwxrwxrwx 1 root root 39 Mar 11 08:42 /dev/ap/rdsk/mc2t32d0s0 -> ../../../devices/pseudo/ap_dmd@0:72,raw
CODE EXAMPLE 4-10 Replacing the Physical Device Namewith the Metadisk Name
# apboot mc2t32d0# apconfig -S
c1 sf6c2 sf10 P A metadiskname(s): mc2t33d0 mc2t48d0 mc2t38d0 mc2t52d0 mc2t37d0 mc2t36d0 mc2t32d0 R mc2t51d0 mc2t35d0 mc2t50d0 mc2t54d0
Chapter 4 Alternative Boot Solutions 85
CODE EXAMPLE 4-11 shows how AP software has changed the vfstab file path after executing the apboot command.
CODE EXAMPLE 4-12 shows how AP software has changed the /etc/system file.
If you have any file systems that have metadevices but do not live on the boot disk, you must edit the /etc/vfstab file. For example, if your system has an
mc2t53d0 mc2t34d0 mc2t49d0
CODE EXAMPLE 4-11 /etc/vfstab File Showing Metadisk Name
# cat /etc/vfstab#device device mount FS fsck mount mount#to mount to fsck point type pass at boot options##/dev/dsk/c1d0s2# /dev/rdsk/c1d0s2 /usr ufs 1 yes -fd - /dev/fd fd - no -/proc - /proc proc - no -/dev/ap/dsk/mc2t32d0s1 - - swap - no -/dev/ap/dsk/mc2t32d0s0 /dev/ap/rdsk/mc2t32d0s0 / ufs 1 no -/dev/ap/dsk/mc2t32d0s6 /dev/ap/rdsk/mc2t32d0s6 /usr ufs 1 no -/dev/ap/dsk/mc2t32d0s5 /dev/ap/rdsk/mc2t32d0s5 /opt ufs 2 yes -swap - /tmp tmpfs - yes -
CODE EXAMPLE 4-12 AP root Information Found in the /etc/system File
# cat /etc/system
. . .
* Begin AP root info (do not edit)forceload: drv/ssdforceload: drv/sfforceload: drv/SUNW,socalforceload: drv/sbusforceload: drv/ap_dmdforceload: drv/apforceload: drv/pseudorootdev:/pseudo/ap_dmd@0:72,blk* End AP root info (do not edit)
CODE EXAMPLE 4-10 Replacing the Physical Device Namewith the Metadisk Name (Continued)
86 Guide to High Availability: Configuring boot/root/swap
independent boot device as described in Chapter 3, /dev/rdsk/c2t2d0 would not be automatically replaced by a metadisk. You must edit the /etc/vfstab file and replace /dev/[r]dsk/c2t2d0 with /dev/ap/[r]dsk/mc2t2d0.
14. Set the OpenBoot PROM devalias variable boot-device to the physical path most likely to be used for booting luxadm:
15. Define a devalias for the alternate boot device path as a convenience in case you have to perform a manual boot:
16. Reboot the system:
17. Install SEVM and patches, then configure SEVM to encapsulate the boot drive.
Note – It may be simpler to put the controllers where you have created meta-devices for AP into the /etc/vx/cntrls.exclude file. This will cause SEVM to present only the metadevices and not the additional physical pathnames to those devices. Do this before installing SEVM. The file may look similar to CODE EXAMPLE 4-13.
This allows you to mirror volumes as well as alternately path the I/O controllers to the disk arrays that make up those volumes.
SEVM 2.5 software contains dynamic multi-pathing (DMP), which provides an alternate pathing solution similar to AP software. AP software and DMP are not compatible and can not be used simultaneously within the same server or domain. You must decide which alternate pathing solution to use.
CODE EXAMPLE 4-13 cntrls.exclude File, Forcing Only AP Metadevices to be Displayed
# cat /etc/vx/cntrls.excludec1c2
Chapter 4 Alternative Boot Solutions 87
DMP supports automatic path switching for disks that are under control of SEVM. AP software supports disks that are under control of SEVM as well as disks that are not under control of SEVM. AP software also supports networks. AP 2.1 software supports automatic disk failover. AP 2.1 software does not, however, support automatic network failover, except at boot time.
If you install SEVM software while AP software is already configured, the SEVM installation script does not install DMP.
Note – I tested with SEVM patch 105463-06 and this patch broke AP. I backed up one patch, and patch 105463-05 worked for this example.
18. Install Volume Manager using the vxinstall command.
CODE EXAMPLE 4-14 vxinstall Command used to Install Volume Manager
# vxinstallMenu: VolumeManager/Install
The Volume Manager names disks on your system using the controller and disk number of the disk, substituting them into the following pattern:
c<controller>t<disk>d<disk>
If the Multipathing driver is installed on the system then for the disk devices with multiple access paths, the controller number represents a multipath pseudo controller number. For example, if a disk has 2 paths from controllers c0 and c1, then the Volume Manager displays only one of them such as c0 to represent both the controllers.
Some examples would be:
c0t0d0 - first controller, first target, first disk c1t0d0 - second controller, first target, first disk c1t1d0 - second controller, second target, first disk
The Volume Manager has detected the following controllers on your system:
Hit RETURN to continue.Volume Manager InstallationMenu: VolumeManager/Install
88 Guide to High Availability: Configuring boot/root/swap
19. Choose Custom Installation:
20. Choose to encapsulate the boot drive:
You will now be asked if you wish to use Quick Installation or Custom Installation. Custom Installation allows you to select how the Volume Manager will handle the installation of each disk attached to your system.
Quick Installation examines each disk attached to your system and attempts to create volumes to cover all disk partitions that might be used for file systems or for other similar purposes.
If you do not wish to use some disks with the Volume Manager, or if you wish to reinitialize some disks, use the Custom Installation option Otherwise, we suggest that you use the Quick Installation option.Hit RETURN to continue.
The mc2t32d0 disk is your Boot Disk. You can not add it as a new disk. If you encapsulate it, you will make your root filesystem and other system areas on the Boot Disk into volumes. This is required if you wish to mirror your root filesystem or system swap area.
Encapsulate Boot Disk [y,n,q,?] (default: n) y
Enter disk name for mc2t32d0 [<name>,q,?] (default: rootdisk)
CODE EXAMPLE 4-14 vxinstall Command used to Install Volume Manager (Continued)
Chapter 4 Alternative Boot Solutions 89
21. Initialize drive for mirror.
For this example, I encapsulated the boot drive and initialized the disk for the mirror, while ignoring all other drives.
The mc2t32d0 disk has been configured for encapsulation.
Hit RETURN to continue.
Volume Manager Custom InstallationMenu: VolumeManager/Install/Custom/mc2Generating list of attached disks on mc2....
<excluding root disk mc2t32d0>
The Volume Manager has detected the following disks on controller mc2:
Hit RETURN to continue.Installation options for controller mc2Menu: VolumeManager/Install/Custom/mc2
1 Install all disks as pre-existing disks. (encapsulate) 2 Install all disks as new disks. (discards data on disks!) 3 Install one disk at a time. 4 Leave these disks alone.
? Display help about menu ?? Display help about the menuing system q Exit from menus
Select an operation to perform: 3Installation options for disk mc2t33d0Menu: VolumeManager/Install/Custom/mc2/mc2t33d0
1 Install as a pre-existing disk. (encapsulate) 2 Install as a new disk. (discards data on disk!) 3 Leave this disk alone.
? Display help about menu ?? Display help about the menuing system q Exit from menus
Select an operation to perform: 3
Volume Manager Custom Installation
90 Guide to High Availability: Configuring boot/root/swap
Note – If you had an independent swap device, which would also be displayed as a metadisk, you would choose to encapsulate it also under the vxinstall menu item, Menu: VolumeManager/Install/Custom/mc2/mc2txxd0. Reboot the system.
FIGURE 4-2 shows the GUI display of the root encapsulation we have just completed through vxinstall. In this snapshot, notice that the disk names are the metadisk names assigned by AP software.
[ ... disks go by ... ]Installation options for disk mc2t54d0Menu: VolumeManager/Install/Custom/mc2/mc2t54d0
1 Install as a pre-existing disk. (encapsulate) 2 Install as a new disk. (discards data on disk!) 3 Leave this disk alone.
? Display help about menu ?? Display help about the menuing system q Exit from menus
Select an operation to perform: 2
Are you sure (destroys data on mc2t54d0) [y,n,q,?] (default: n) y
Enter disk name for mc2t54d0 [<name>,q,?] (default: disk01) rootmirVolume Manager Custom InstallationMenu: VolumeManager/Install/Custom
The following is a summary of your choices.
mc2t32d0 Encapsulate mc2t54d0 New Disk
Is this correct [y,n,q,?] (default: y) yThe system now must be shut down and rebooted in order to continuethe reconfiguration.
Shutdown and reboot now [y,n,q,?] (default: n) y
Shutdown started. Thu Mar 11 12:06:00 PST 1999
Volume Manager Custom Installation
Chapter 4 Alternative Boot Solutions 91
FIGURE 4-2 GUI (VxVA) View of rootdg
� To Mirror the Boot Disk1. Notify AP about your boot disk mirror:
# apboot -m mc2t54d0# apconfig -S
c1 sf6c2 sf10 P A metadiskname(s): mc2t33d0 mc2t48d0 mc2t38d0 mc2t52d0 mc2t37d0 mc2t36d0 mc2t32d0 R mc2t51d0 mc2t35d0 mc2t50d0 mc2t54d0 M
92 Guide to High Availability: Configuring boot/root/swap
Initially, when running vxinstall you may or may not have added extra disks to your configuration for the purpose of mirroring your boot drive. If you did not add an extra disk while using vxinstall, you would be able to add the disk for the mirror by issuing the following commands after the machine reboots. In FIGURE 4-2, you can see that I have already performed step two since the rootmir object, mc2t54d0 already appears in the rootdg group.
2. Set up and add disks to hold the mirrors:
3. Create the mirrors of your boot disk through the use of the following SEVM command-line options:
Note – Make sure that you have changed the OPB boot-device to the proper physical device from which you would normally choose to boot.You may choose to boot from any of the valid physical pathnames, which correspond to the boot device’s AP meta-devices.
FIGURE 4-3 Depiction of the Fully-Mirrored System Disk
The following diagram shows that the SPARCstorage Array (SSA) encapsulation would look the same as above, and also shows how the AP database would appear if it existed on the system boot disk.