231
Altova FlowForce User and Reference Manual

Altova FlowForce
User and Reference Manual

All rights reserved. No parts of this work may be reproduced in any form or by anymeans - graphic, electronic, or mechanical, including photocopying, recording, taping, orinformation storage and retrieval systems - without the written permission of thepublisher.
Products that are referred to in this document may be either trademarks and/orregistered trademarks of the respective owners. The publisher and the author make noclaim to these trademarks.
While every precaution has been taken in the preparation of this document, thepublisher and the author assume no responsibility for errors or omissions, or fordamages resulting from the use of information contained in this document or from theuse of programs and source code that may accompany it. In no event shall the publisherand the author be liable for any loss of profit or any other commercial damage caused oralleged to have been caused directly or indirectly by this document.
Published: 2014
© 2014 Altova GmbH
Altova FlowForce User & Reference Manual

1Altova FlowForce
Table of Contents
1 Altova FlowForce Server® 3
2 Administrator Guide 6
................................................................................................................................... 72.1 Upgrading FlowForce 2013 to FlowForce 2014
................................................................................................................................... 102.2 Architecture
................................................................................................................................... 122.3 FlowForce Server concepts
................................................................................................................................... 142.4 Getting started
..................................................................................................................... 16Installation Windows 2.4.1
........................................................................................................... 17Initial setup - Windows
..................................................................................................................... 22Installation Linux 2.4.2
........................................................................................................... 24Initial setup - Linux
..................................................................................................................... 29Installation Mac OS X 2.4.3
........................................................................................................... 30Initial setup - Mac OS X
................................................................................................................................... 322.5 Altova LicenseServer
..................................................................................................................... 34Network Information 2.5.1
..................................................................................................................... 35Installation (Windows) 2.5.2
..................................................................................................................... 36Installation (Linux) 2.5.3
..................................................................................................................... 38Installation (Mac OS X) 2.5.4
..................................................................................................................... 39Altova ServiceController 2.5.5
..................................................................................................................... 40How to Assign Licenses 2.5.6
........................................................................................................... 40Start LicenseServer
........................................................................................................... 42Open LicenseServer Config Page (Windows)
........................................................................................................... 45Open LicenseServer Config Page (Linux)
........................................................................................................... 47Open LicenseServer Config Page (Mac OS X)
........................................................................................................... 49Upload Licenses to LicenseServer
........................................................................................................... 52Register FlowForce Server with LicenseServer
........................................................................................................... 56Register MapForce Server with LicenseServer
........................................................................................................... 58Register StyleVision Server with LicenseServer
........................................................................................................... 60Register RaptorXML(+XBRL) Server with LicenseServer
........................................................................................................... 61Assign Licenses to Registered Products
..................................................................................................................... 66Configuration Page Reference 2.5.7
........................................................................................................... 66License Pool
........................................................................................................... 70Server Management
........................................................................................................... 75Server Monitoring

Altova FlowForce2
........................................................................................................... 75Settings
........................................................................................................... 78Messages, Log Out
................................................................................................................................... 792.6 FlowForce Server data storage
................................................................................................................................... 802.7 FlowForce Administration Interface
................................................................................................................................... 822.8 FlowForce access control
..................................................................................................................... 83Users and Roles 2.8.1
........................................................................................................... 83How to add Users
........................................................................................................... 86How to add Roles
........................................................................................................... 88Renaming Users and Roles
........................................................................................................... 90Renaming containers/objects
........................................................................................................... 92Defining restricted user rights
..................................................................................................................... 94Privileges 2.8.2
..................................................................................................................... 96Permissions 2.8.3
........................................................................................................... 98How to add Permissions
..................................................................................................................... 101Credentials 2.8.4
................................................................................................................................... 1042.9 Settings
................................................................................................................................... 1052.10 Command Line Usage
..................................................................................................................... 107help 2.10.1
..................................................................................................................... 108createdb 2.10.2
..................................................................................................................... 109debug 2.10.3
..................................................................................................................... 110exportresourcestrings 2.10.4
..................................................................................................................... 112foreground 2.10.5
..................................................................................................................... 113initdb 2.10.6
..................................................................................................................... 114install 2.10.7
..................................................................................................................... 115licenseserver 2.10.8
..................................................................................................................... 116migratedb 2.10.9
..................................................................................................................... 117repair 2.10.10
..................................................................................................................... 118setdeflang (sdl) 2.10.11
..................................................................................................................... 119start 2.10.12
..................................................................................................................... 120uninstall 2.10.13
..................................................................................................................... 121upgradedb 2.10.14
................................................................................................................................... 1222.11 RaptorXML Server
..................................................................................................................... 123RaptorXML Commands 2.11.1
3 FlowForce Tutorial - Automated Processing 126
................................................................................................................................... 1293.1 Deploying a MapForce mapping
................................................................................................................................... 1323.2 Defining a job - triggers & execution steps
................................................................................................................................... 1363.3 Defining a subjob
................................................................................................................................... 1403.4 Directory polling - acting on a trigger file

3Altova FlowForce
................................................................................................................................... 1433.5 Using parameters to query a database
................................................................................................................................... 1463.6 Using a deployed mapping as a web service
................................................................................................................................... 1503.7 Deploying a StyleVision transformation
................................................................................................................................... 1543.8 Using RaptorXML Server to validate a document
................................................................................................................................... 1573.9 RaptorXML - passing key/value parameter pairs
4 User Guide 162
................................................................................................................................... 1634.1 FlowForce Administration Interface
................................................................................................................................... 1644.2 FlowForce concepts
................................................................................................................................... 1664.3 Job configuration
..................................................................................................................... 168Job input parameters 4.3.1
..................................................................................................................... 169Execution steps 4.3.2
........................................................................................................... 169Execution step
........................................................................................................... 172Choose step
........................................................................................................... 174Error/success handling step
........................................................................................................... 177For-each step
........................................................................................................... 177Step results
..................................................................................................................... 178Step expressions 4.3.3
........................................................................................................... 178Step Result Functions
........................................................................................................... 179Stream Functions
........................................................................................................... 180File system Functions
........................................................................................................... 180File path Functions
........................................................................................................... 181List Functions
........................................................................................................... 182String Functions
........................................................................................................... 184Boolean Functions
........................................................................................................... 184Runtime information Functions
........................................................................................................... 185Operators
..................................................................................................................... 186Execution Result 4.3.4
..................................................................................................................... 187Caching Result 4.3.5
........................................................................................................... 189Cache example
..................................................................................................................... 195Triggers 4.3.6
........................................................................................................... 195Timer trigger types & common settings
........................................................................................................... 196Run Once
........................................................................................................... 197Run Daily
........................................................................................................... 197Run On days of week
........................................................................................................... 198Run On days of months
........................................................................................................... 198Run On days in weeks of months
........................................................................................................... 199File system trigger
........................................................................................................... 200HTTP trigger

Altova FlowForce4
..................................................................................................................... 202Service 4.3.7
........................................................................................................... 203Technical details
..................................................................................................................... 205Queue settings 4.3.8
................................................................................................................................... 2064.4 Credentials
................................................................................................................................... 2094.5 Built-in functions
..................................................................................................................... 210filesystem - File system functions 4.5.1
..................................................................................................................... 212ftp - FTP client 4.5.2
..................................................................................................................... 215mail - Sending E-mail 4.5.3
..................................................................................................................... 216maintenance - archive and cleanup 4.5.4
..................................................................................................................... 217shell - Command line execution 4.5.5
..................................................................................................................... 218compute - Evaluating expressions 4.5.6
Index
Chapter 1
Altova FlowForce Server®


© 2014 Altova GmbH
3Altova FlowForce Server®
Altova FlowForce
1 Altova FlowForce Server®
FlowForce Server® is a new Altova product that allows you to automate and schedule theexecution of MapForce mappings, StyleVision transformations and other tasks on dedicated high-speed servers. Windows, Linux, and Mac OS X operating systems are supported.
Upgrading FlowForce version 2013 with FlowForce version 2014
The FlowForce Server system consists of the following modules, which can be installedindividually:
FlowForce Server (including FlowForce Server Administration Interface)License ServerMapForce ServerStyleVision ServerRaptorXML Server
For an overview please see: FlowForce Server Architecture
This documentation is in multiple parts:
The Administrator Guide describes how to install, setup and maintain the server, as wellas how to define the access control settings.
The Tutorial shows you how to deploy a mapping from MapForce, define a scheduled jobin FlowForce Server Administration Interface, and execute that job to produce outputfiles.
The RaptorXML Server page describes the various RaptorXML editions and how to use itfrom within FlowForce Server.
The User Guide describes the browser application in more detail; the different triggertypes and the various execution steps. It also describes how you can change the input/output files supplied by the deployed mapping when the job executes.
Note:The FlowForce Server administration interface does not support SSL.
What's new in Altova FlowForce Server® 2014 R2Enhancements to FlowForce cachingAbility to rename users and rolesAbility to rename containers/objectsNew Step expression functionsList parameters for RaptorXML (key/value parameter pairs)
What's new in Altova FlowForce Server® 2014New server maintenance functionsAbility to cache job results and use them in other jobs
4 Altova FlowForce Server®
© 2014 Altova GmbHAltova FlowForce
Extended RaptorXML support
What's new in Altova FlowForce Server® 2013R2
Integration with RaptorXML Server editionJob flow control allowing the execution of job steps based on conditionsAbility to repeat execution steps any number of timesDefinition of step variables allowing the results of one step to be used in following jobstepsAn expanded set of built-in steps allowing mail notifications, FTP server interaction, andthe ability to compute expressions
Last updated 04/18/2014 at 10:21 AM

Chapter 2
Administrator Guide

6 Administrator Guide
© 2014 Altova GmbHAltova FlowForce
2 Administrator Guide
The Administrator guide focuses on the specifics of FlowForce Server namely:
Upgrading FlowForce version 2013 with FlowForce version 2014 (if necessary)
Getting started with FlowForce Server, i.e. how to install and start FlowForce Server
Data storage and the various configuration files of FlowForce Server
How to define the Access Control settings
The architecture of the FlowForce Server system
The FlowForce Server concepts
Please note:You must install LicenseServer to be able to work with FlowForce Server.
Accessing network drives - drive lettersIf the FlowForce Server service is to access a network resource, i.e. mapped network drives,please make sure that you use the Universal Naming Convention to do so. This is necessarybecause drive letters are not global to the system, and each logon session is assigned its owndrive letters.
The UNC syntax is in the form:
//server/sharedfolder/filepath
Where:server references the server name in the network (defined by the DNS)sharedfolder references a label defined by the administrator, admin$ is generally the rootdirectory of the operating system installation.filepath refers to the subdirectories below the share.
Note:Microsoft Windows treat the delimiters slash "/" and backslash "\" as equivalent.

© 2014 Altova GmbH
Upgrading FlowForce 2013 to FlowForce 2014 7Administrator Guide
Altova FlowForce
2.1 Upgrading FlowForce 2013 to FlowForce 2014
Automatic data migration: Windows If FlowForce Server 2013 was installed at the default location (shown below) then this will beautomatically detected by the installer when installing FlowForce Server 2014. An option in theinstaller allows you to choose if you want to migrate your data to the newer version.
If FlowForce Server 2013 was installed in any other directory, you will have to manually migratethe data, as discussed below.
Manual data migration: Windows Vista, Windows 7/8The FlowForceServer 2013 default installation stores its data in "...\ProgramData\Altova\FlowForceServer2013\data".
The FlowForceServer 2014 default installation stores its data in "...\ProgramData\Altova\FlowForceServer2014\data".
1. Install FlowForce Server 2014 and any of the other server products. This automaticallyincludes Altova ServiceController.
2. Start Altova ServiceController, Start Menu | All programs | Altova LiceneServer | Altova
ServiceController, if it was not automaticlly started. It runs as an icon in the systemnotification area.
3. Click the Altova ServiceController icon and stop the Altova FlowForce Server and AltovaFlowForce Web services, by selecting "Stop service" from the popup menu for each ofthese services.
4. Delete or rename the data folder installed by the 2014 release, normally located at C:\ProgramData\Altova\FlowForceServer2014\data. This deletes all objects/data of the new version created during the installation process.
5. Start a command prompt, and enter the following command:
"C:\Program Files\Altova\FlowForceServer2014\bin\FlowForceServer.exe"migratedb--datadir=C:\ProgramData\Altova\FlowForceServer2014\data --olddatadir=C:\ProgramData\Altova\FlowForceServer2013\data
Data migration copies the old data (to the new location) and performs upgrade of thedatabase. All objects/items are preserved by the upgrade.
6. Start Altova FlowForce Server service using Altova ServiceController, i.e. click the
ServiceController application icon in the system notification area.
Manual data migration: Windows Vista 64-bit, Windows 7/8 64-bit, FlowForceServer 32-bitFollow the steps above but replace:
C:\Program Files with C:\Program Files(x86)
Manual data migration: Windows XP and Windows Server 2003Follow the steps above but replace:
C:\ProgrammData with C:\Documents And Settings\All Users

8 Administrator Guide Upgrading FlowForce 2013 to FlowForce 2014
© 2014 Altova GmbHAltova FlowForce
Manual data migration from Version 2013 to 2014 - LinuxFlowForceServer 2013 stores its data in "/var/opt/Altova/FlowForceServer2013/data".
FlowForceServer 2014 uses "/var/opt/Altova/FlowForceServer2014/data" after installation.
The migration must be done as the root user. If you are logged in as root, leave out the "sudo"prefix when typing the following commands.
1. Stop the FlowForceServer daemon using:
[Debian]: sudo /etc/init.d/flowforcewebserver stop
[Ubuntu]: sudo initctl stop flowforcewebserver
[CentOS,RedHat]:
sudo initctl stop flowforcewebserver
2. Remove or rename the data directory that was created during installation. This will deleteany objects in the new version that were created after installation prior to performing thismanual upgrade:
[Debian, Ubuntu]:sudo rm -rf /var/opt/Altova/FlowForceServer2014/data
[CentOS, RedHat]:sudo rm -rf /var/opt/Altova/FlowForceServer2014/data
3. Execute FlowForceServer with command "migratedb" e.g.:
sudo /opt/Altova/FlowForceServer2014/bin/flowforceserver migratedb--olddatadir=/var/opt/Altova/FlowForceServer2013/data --datadir=/var/opt/Altova/FlowForceServer2014/data
4. Start Altova FlowForce Server service using the start command.
Manual data migration from Version 2013 to 2014 - Mac OSFlowForceServer 2013 stores its data in "/var/Altova/FlowForceServer2013/data".
FlowForceServer 2014 uses "/var/Altova/FlowForceServer2014/data" after installation.
1. Stop the FlowForceServer daemon using:
sudo launchctl unload /Library/LaunchDaemons/
com.altova.FlowForceServer.plist
2. Remove or rename the data directory that was created during installation. This will deleteany objects in the new version that were created after installation prior to performing thismanual upgrade:

© 2014 Altova GmbH
Upgrading FlowForce 2013 to FlowForce 2014 9Administrator Guide
Altova FlowForce
sudo rm -rf /var/Altova/FlowForceServer2014/data
3. Execute FlowForceServer with command "migratedb" e.g.:
sudo /usr/local/Altova/FlowForceServer2014/bin/FlowForceServer migratedb--olddatadir=/var/Altova/FlowForceServer2013/data --datadir=/var/Altova/FlowForceServer2014/data
4. Start the Altova FlowForce Server daemon:
sudo launchctl load /Library/LaunchDaemons/com.altova.FlowForceServer.plist
See Starting FlowForce Server for more information.

10 Administrator Guide Architecture
© 2014 Altova GmbHAltova FlowForce
2.2 Architecture
A FlowForce Server installation consists of several server modules and other components, thatcan be selected during the installation process.
FlowForce Server Web Administration InterfaceThis is the module that acts as the front-end to FlowForce Server. It is a standalone webapplication that is installed on the same machine as FlowForce Server.
The user interface runs in an internet browser and allows administrators to configure accesscontrol settings as well as the specific server operations including jobs, triggers, etc.
FlowForce Server supports the current versions of Mozilla Firefox, Google Chrome, and MicrosoftInternet Explorer 9 and 8. Note: When using Internet Explorer 9 as your browser, please disablethe "Show friendly HTTP error messages" in the Advanced tab, to view the HTML form when usingFlowForce jobs as web services.
FlowForce ServerFlowForce Server is the core of the FlowForce Server system and runs as a background servicewithout a graphical user interface. FlowForce Server continuously checks for trigger conditions,starts and monitors job execution, and writes detailed logs. To execute job steps that use a

© 2014 Altova GmbH
Architecture 11Administrator Guide
Altova FlowForce
deployed MapForce mapping, FlowForce Server sends an execution request to MapForce Server.
Altova LicenseServerLicenseServer is a service that allows you to manage Altova licenses from one central locationusing a browser. The license server is installed on a server that all other servers and clients canaccess. Server licenses can be bound to specific machines and clients can be bound to specificservers.
Note:LicenseServer must be installed to use FlowForce Server as well as any of the other server-basedproducts (MapForce Server, Stylevision Server, or RaptorXML Server).
MapForce The MapForce graphical mapping application has been enhanced with an integrated deploymentfeature. Once a mapping has been tested and debugged, MapForce lets you deploy it toFlowForce Server. The newly deployed mapping is then immediately available for use in any jobon the server.
An administrator or developer runs MapForce on a personal Windows workstation to develop anddeploy mappings onto the high-speed server.
Please note: when deploying a mapping to FlowForce, make sure that your target language is
Built-in, i.e. click the Built-In icon .
MapForce ServerMapForce Server is an implementation of the MapForce Built-in execution engine that executesmappings previously deployed via the MapForce graphical environment. MapForce Server isalways installed on the same machine as FlowForce Server.
Stylevision StyleVision allows you to design reports and forms based on XML, SQL database, and XBRLinputs. Once a stylesheet has been tested and debugged it can be deployed to FlowForce Server.The deployed files are then available for use in any transformation job on the server.
Stylevision ServerStyleVision Server is an implementation of the stand-alone version of StyleVision that executestransformations previously deployed via the StyleVision graphical environment. StyleVision Serveris always installed on the same machine as FlowForce Server.
RaptorXML (+XBRL) ServerAltova RaptorXML Server is Altova's third-generation, super-fast XML and XBRL processor andvalidates XML documents, checks the well-formedness of XML documents, and transforms XSLTand XQuery documents. RaptorXML Server is always installed on the same machine asFlowForce Server.

12 Administrator Guide FlowForce Server concepts
© 2014 Altova GmbHAltova FlowForce
2.3 FlowForce Server concepts
ConfigurationConfiguration data in FlowForce Server's database are comprised of various objects that define theoperation of FlowForce Server. This includes jobs, credentials, functions, triggers, and otherobjects.
Configuration objects are organized in a freely defined hierarchy of containers. Some configurationsettings are edited together (e.g. jobs include triggers), and other settings can also be stored asstandalone objects under their own name (e.g. credentials and functions).
ContainerA container is similar to a folder in a commonly used file system. It is used to create ahierarchical structure for storing configuration objects and other containers. Containers can beassigned access permissions.
Two predefined containers exist in FlowForce Server: /system which contains system functions,e.g. copy, move, etc., and /public which is the default container when deploying a mapping toFlowForce Server from MapForce. Other containers can be created as needed, e.g. fordepartments or user groups.
FunctionA FlowForce Server function performs a specific operation when used in a job execution step. Itmay have input parameters that need to be passed to it by the caller. Available functions includethe system functions delivered with FlowForce Server, deployed MapForce mappings orStyleVision transformations, and the execution steps of other jobs.
JobA Job consists of Triggers, Execution steps, input parameters, and other settings. Triggers definewhen a job will be executed, and the execution steps define what the job actually does when itexecutes. Multiple triggers and execution steps can be defined per job.
TriggerTriggers define under which circumstances a job will be executed. Three types of triggers cancurrently be defined: Timer triggers, File system triggers, and HTTP triggers. Multiple triggers canbe defined per job.
ServiceFlowForce Server permits exposing jobs as web services via the HTTP protocol. This allowsinteractive or automated access to these jobs.
CredentialCredentials are stored login data used to execute FlowForce Server jobs. Credentials can bedefined as standalone "objects" and be assigned to various jobs, or they can be manually enteredfor a specific job.
QueueThe queue settings in a FlowForce Server job allow limiting the number of parallel job executionsto control use of server resources.
Access Control

© 2014 Altova GmbH
FlowForce Server concepts 13Administrator Guide
Altova FlowForce
All important operations in FlowForce Server are linked to permissions or privileges which need tobe assigned to the user to successfully execute them.
UserFlowForce Server users are persons that have been added to FlowForce Server by the FlowForceServer administrator with a login name and a password. Depending on the assigned rights andprivileges, users can define FlowForce Server jobs, deploy mappings, or view logs.
Two special users are predefined by FlowForce Server: "root" is the initial administrator user, and"anonymous" is a special user account used for FlowForce Server services that should beavailable to users without explicit log in to FlowForce Server.
RoleRoles are used to manage privileges and object permissions for user groups as opposed toindividual users.
Having defined users, you can assign them to a role thus creating user groups. The usersbecome "members" assigned to the specific role.
PermissionPermissions control access to containers and configurations. Unlike privileges they can beredefined on every level of the container hierarchy, and are by default inherited from parentcontainers.
Permissions, like privileges, are inherited from all roles the user is a member of, as well as frompermissions directly assigned to the user.
PrivilegePrivileges control user rights globally. This means privilege settings cannot be overridden in thecontainer hierarchy of FlowForce Server.
When a user logs into FlowForce Server, the set of effective privileges is determined by the userprivileges and all role privileges the user is member of.

14 Administrator Guide Getting started
© 2014 Altova GmbHAltova FlowForce
2.4 Getting started
This section deals with what the first-time user of FlowForce, the administrator, has to do to setup the software and configure it for multiple users. Note, it is not necessary to add new users,roles etc. when you work through the tutorial. The tutorial makes use of default users and roles,built-in to FlowForce.
Install the softwareTo install FlowForce, LicenseServer and other Altova Server products, see: InstallationWindows, Installation Linux, or Installation Max OS X
Register FlowForce Server and other Altova Server productsTo register FlowForce Server and all other Altova Server products with AltovaLicenseServer, see LicenseServer.
Start FlowForce Server To start FlowForce Server and change your default password to something new, see: Initial setup - Windows, Initial setup - Linux, or Initial setup - Mac OS X
Request evaluation licenseTo request evaluation licenses for the Altova Server products, see: Server Management(LicenseServer)
Add new usersTo add new users, see: Users.
Users are persons that are allowed to define and/or start jobs.Note that users inherit privileges from all their roles in addition to the privileges definedhere, so it is better to define them in the roles page.
Add new roles and define the role privileges To add new roles and define privileges, see: Roles.
The Role page lets you create new roles and define the role privileges.Roles are used to manage privileges and object permissions for user groups instead ofindividual users.This is the place that you define role privileges, as the privileges defined here areautomatically inherited by users when you assign a role to a user.
Having defined the users in the previous step, you can now assign users to a role, thuscreating user groups assigned to the various roles. (The users become "members"assigned to the role).
To assign users to a role, see: Assigning a user to a role.
Define the work environment (container structure) and the read/write/use permissions ofyour users
To add new permissions to the permission list see: Permissions.

© 2014 Altova GmbH
Getting started 15Administrator Guide
Altova FlowForce
Containers are used to organize jobs, deployed MapForce mappings and StyleVisiontransformations into a hierarchy similar to that of a file system composed of folders.Read/Write/Use permissions should generally only be assigned to roles, not to individualusers (although this is possible).
Define the necessary credentials, i.e. the login data needed for FlowForce Server toaccess your operating system user accounts
To add new credentials, see: Credentials.
Credentials are stored login data used to execute FlowForce Server jobs, and are storedin the FlowForce Server database as separate objects.Jobs are started automatically by FlowForce server, when the defined trigger conditionsare met. FlowForce server then runs these jobs using a specific operating system useraccount, ensuring that execution steps do not access unauthorized data.Every job MUST have a credential assigned to it for the execution steps to be executed.This defines the operating system user account used to run the job execution steps. Itis vital for the success of the job execution that the operating system user which isreferenced by this credential has sufficient access permissions.

16 Administrator Guide Getting started
© 2014 Altova GmbHAltova FlowForce
2.4.1 Installation Windows
Note: All Altova Server products running under Windows have a minimum requirement: Windows XP withService Pack 3.
Having downloaded FlowForce Server from the Altova website download page, making sure toselect the correct operating system:
1. Double click the installation file to start the installation process.2. Select the extra servers that you also want to install: MapForce Server, StyleVision
Server, or RaptorXML Server.
3. Make sure that you also install and start the LicenseServer licensing process, wheninstalling FlowForce Server. This step is not necessary if LicenseServer is already runningsomewhere in your network.
4. Follow the wizard instructions to install the software.
Note:You can select the installation language using the combo box in the bottom left of thewizard. The currently supported languages are: English, German, Spanish, andJapanese.
The language you select here also determines the language of the FlowForce Server userinterface in the web browser.
File paths in Windows

© 2014 Altova GmbH
Getting started 17Administrator Guide
Altova FlowForce
File paths given in this documentation will not be the same for all operating systems. You shouldnote the following locations:
FlowForce Server stores all data in the following locations:
Windows XP C:\Documents and Settings\All Users\Application Data\Altova\FlowForceServer2014
Windows Vista, Windows 7/8 C:\ProgramData\Altova\FlowForceServer2014
Application folder: The Application folder is the folder where your Altova application islocated. The path to the Application folder is, by default, the following.
Windows XP C:\Program Files\Altova
Windows Vista, Windows 7/8 C:\Program Files\Altova
32 bit Version on 64-bit OS C:\Program Files (x86)\Altova
Next: Starting FlowForce
Initial setup - Windows
To register FlowForce Server with LicenseServer1. Click the Windows "Start" button and select All Programs | Altova FlowForceServer |
FlowForceServer Setup Page. You can also open the Setup page by clicking the Altova ServiceController icon in thesystem tray, mouse over Altova FlowForce Web in the menu that pops up (seescreenshot below), and then select Setup from the submenu.

18 Administrator Guide Getting started
© 2014 Altova GmbHAltova FlowForce
The Setup page appears in a browser window.
2. Click the browse button of the LicenseServer group and select your LicenseServerfrom the list.
3. Click the "Register with LicenseServer" button to register with LicenseServer.This opens the Altova Server Software License Agreement.
4. Click the "Accept" button of the agreement page if you agree to the license terms.5. Click into the LicenseServer password field, enter the default password "default", and
click the "Login" button.This opens the Server Management tab of LicenseServer where you can assign a licenseto FlowForce server, please see Assign licenses to registered products.
To configure network interfaces and ports
The default address and port will usually work fine, except if other services on the machinealready use one of the ports, in which case you can change the ports used by FlowForce here.
© 2014 Altova GmbH
Getting started 19Administrator Guide
Altova FlowForce
1. Return to the FlowForce setup page.2. Configure the bind address and port for the FlowForce Web Server. By default, the web
interface is available to users on all network interfaces on port 8082.3. Set the default time zone to use in the web interface.4. Configure the bind address and port for the FlowForce Server. The default setting for the
server accepts only requests from the same machine (127.0.0.1). If you intend to startjobs as web services via HTTP from remote machines, select "All interfaces (0.0.0.0)"from the Bind address combo box.
5. Click "Apply settings and restart FlowForce services". The FlowForce services willrestart, and your browser will be redirected to the Login page.
Note:TheFlowForce Server services are automatically started on every machine startup. Use theWindows control panel to disable the services if necessary. The "Services" management consolecan be found in "Administrative Tools", and can also be started using Start | Run | services.msc.
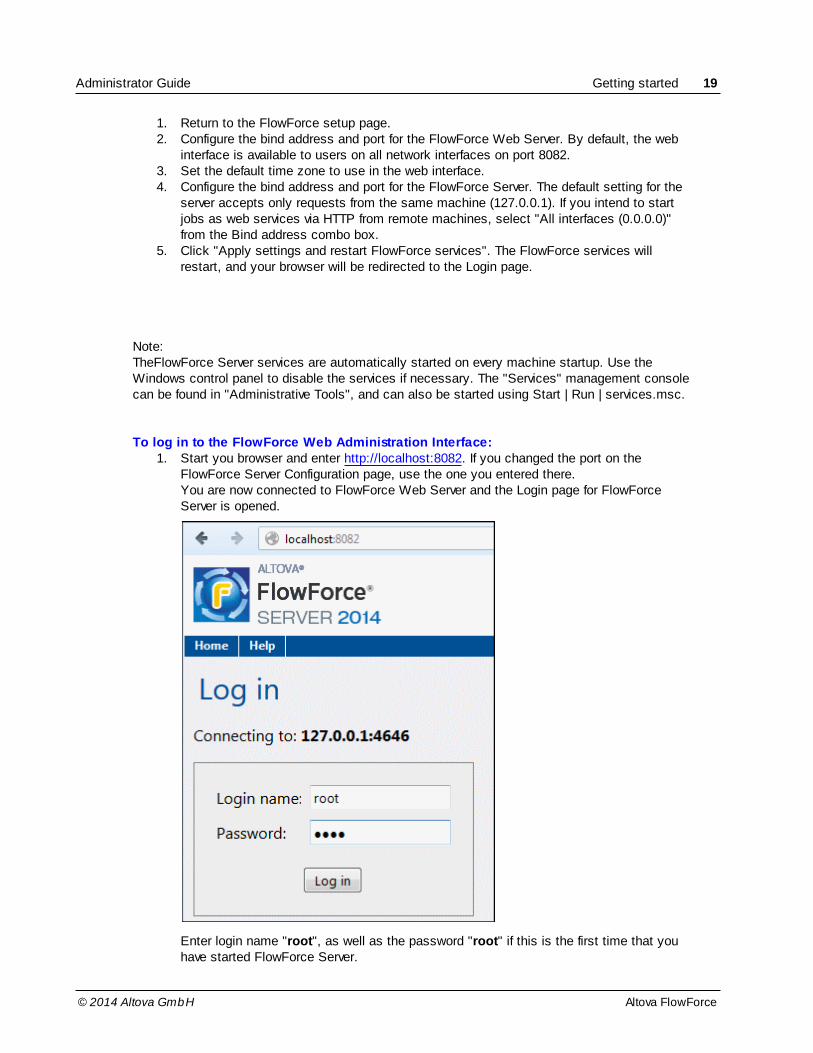
To log in to the FlowForce Web Administration Interface:1. Start you browser and enter http://localhost:8082. If you changed the port on the
FlowForce Server Configuration page, use the one you entered there.You are now connected to FlowForce Web Server and the Login page for FlowForceServer is opened.
Enter login name "root", as well as the password "root" if this is the first time that youhave started FlowForce Server.

20 Administrator Guide Getting started
© 2014 Altova GmbHAltova FlowForce
2. Click the "Log in" button to log in.You have now logged onto FlowForce Server.Connection information, as well as any running jobs and active triggers are visible on theHome screen.
Logging out:Click the "Log out" button at the far right of the browser window to log out.
To change your default password:From the Home page shown above:
1. Click the "Administration" button, then the "Users" button.
2. Click the "root" user entry in the Users table.3. Click the "Change password" button and enter your old and new passwords.

© 2014 Altova GmbH
Getting started 21Administrator Guide
Altova FlowForce
4. Click Save to complete the process.

22 Administrator Guide Getting started
© 2014 Altova GmbHAltova FlowForce
2.4.2 Installation Linux
PackagesInstallation packages are available for:
Distribution Packageextension
Debian 6 .deb
Ubuntu 12.04 .deb
CentOS 6, RedHat 6 .rpm
The components of FlowForce Server are provided in separate packages and can be downloadedfrom the Altova website:
Package name Description
flowforceserver Required for all FlowForce Server installations. Contains the FlowForceServer engine and the FlowForce Web Administration Interface.
licenseserver Required if you do not already have an Altova LicenseServer running inyour network
mapforceserver Required to run deployed MapForce mappings
stylevisionserver Required to run deployed StyleVision transformations
Download the appropriate packages from the Altova website to your Linux computer and storethem in any directory.
InstallationThe installation must be done as the root user. If you are logged in as root, leave out the "sudo"prefix when typing the following commands.
Uninstalling old versionsOn the Linux command line, you can check which Altova server products are installed with thefollowing command:
[Debian,Ubuntu]:
dpkg --list | grep Altova
[CentOS,RedHat]:
rpm -qa | grep server
If FlowForce Server is not installed, go ahead with the installation as documented in the nextsteps. If FlowForce Server is installed and you wish to install a newer version of FlowForce Server,uninstall the old version with the command:
[Debian,Ubuntu]:
sudo dpkg --remove flowforceserver
[CentOS,RedHat]:
sudo rpm -e flowforceserver

© 2014 Altova GmbH
Getting started 23Administrator Guide
Altova FlowForce
If you need to uninstall other packages, use the same command as above and replace"flowforceserver" with the package name of the package you want to remove. For example:
[Debian,Ubuntu]:
sudo dpkg --remove licenseserver
[CentOS,RedHat]:
sudo rpm -e licenseserver
Installing FlowForce ServerIn a terminal window, switch to the directory where you have downloaded the Linux package. Forexample, if you downloaded it to a directory called MyAltova (that is located, say, in the /home/User directory), then switch to this directory as follows:
cd /home/User/MyAltova
Install FlowForce Server with the following command:
[Debian]: sudo dpkg --install flowforceserver-2014-debian.deb
[Ubuntu]: sudo dpkg --install flowforceserver-2014-ubuntu.deb
[CentOS,RedHat]:
sudo rpm -ivh flowforceserver-2014-1.x86_64.rpm
Installing Altova LicenseServerIn order for FlowForce Server to run, it must be licensed via an Altova LicenseServer on yournetwork. Download Altova LicenseServer package from the Altova website to any directory on theLinux system. Install it just like you did FlowForce Server (see previous step).
[Debian]: sudo dpkg --install licenseserver-1.8-debian.deb
[Ubuntu]: sudo dpkg --install licenseserver-1.8-ubuntu.deb
[CentOS,RedHat]:
sudo rpm -ivh licenseserver-1.8-1.x86_64.rpm
Installing MapForce Server and StyleVision ServerInstall these packages just like you did FlowForce Server (see previous step).
Setting services to start automaticallyOn Ubuntu and CentOS, RedHat, the services are set to start automatically by default. OnDebian, use the update-rc.d command to configure the runlevels.
The next step is the initial setup to link FlowForce Server to LicenseServer, and to configureservice interfaces and ports.
File paths in Linux
Application path
Linux /opt/Altova/FlowForceServer2014/bin
Data folder
Linux /var/opt/Altova/FlowForceServer2014

24 Administrator Guide Getting started
© 2014 Altova GmbHAltova FlowForce
Initial setup - Linux
Starting LicenseServer as a serviceIf LicenseServer is not already running on a different server in your network, LicenseServer mustbe installed and running as a service on the same machine as FlowForce Server. StartLicenseServer as a service with the following command:
[Debian]: sudo /etc/init.d/licenseserver start
[Ubuntu]: sudo initctl start licenseserver [CentOS,RedHat]:
sudo initctl start licenseserver
(If you need to stop LicenseServer, replace start with stop in the above command)
Starting FlowForce Web Administration Interface The initial setup can be performed in a browser-based interface. Start FlowForce Web Server as aservice with the following command:
[Debian]: sudo /etc/init.d/flowforcewebserver start
[Ubuntu]: sudo initctl start flowforcewebserver
[CentOS,RedHat]:
sudo initctl start flowforcewebserver
On first run and without any custom configuration files FlowForceWebServer will start on a randomport and provide a setup page.
If your server machine has a GUI web browser, you can then open the setup page using thefollowing URL:
file:///var/opt/Altova/FlowForceServer2014/flowforceweb.html
Note: you need to have "root" permissions to be able to open this file.
If your browser is running on a different machine:
On Debian, the URL to the setup page appears in the terminal window. On other distributions, youneed to extract the URL to the setup page from the log file using the following command:
grep running /var/opt/Altova/FlowForceServer2014/data/ffweb.log
The output is similar to:
FlowForceWeb running on http://127.0.0.1:34597/setup?key=52239315203
Type this link into the address bar of your browser (and replace "127.0.0.1" with the host name ofyour server machine).
FirewallIf you use the setup page for your first time FlowForceServer configuration please make sure the

© 2014 Altova GmbH
Getting started 25Administrator Guide
Altova FlowForce
random port address FlowForceWebServer was started on is not blocked from your firewall.
To register FlowForce Server with LicenseServerHaving followed the Linux installation procedure and started LicenseServer and FlowForce WebServer:
1. Open the setup page in your web browser as described above.
The Setup page appears in a browser window.
2. Click the browse button of the LicenseServer group and select your LicenseServerfrom the list.
3. Click the "Register with LicenseServer" button to register with LicenseServer.This opens the Altova Server Software License Agreement.
4. Click the "Accept" button of the agreement page if you agree to the license terms.
26 Administrator Guide Getting started
© 2014 Altova GmbHAltova FlowForce
5. Click into the LicenseServer password field, enter the default password "default", andclick the "Login" button.This opens the Server Management tab of LicenseServer where you can assign a licenseto FlowForce server, please see Assign licenses to registered products.
To configure network interfaces and ports
The default address and port will usually work fine, except if other services on the machinealready use one of the ports, in which case you can change the ports used by FlowForce here.
1. Return to the FlowForce setup page.2. Configure the bind address and port for the FlowForce Web Server. By default, the web
interface is available to users on all network interfaces on port 8082.3. Set the default time zone to use in the web interface.4. Configure the bind address and port for the FlowForce Server. The default setting for the
server accepts only requests from the same machine (127.0.0.1). If you intend to startjobs as web services via HTTP from remote machines, select "All interfaces (0.0.0.0)"from the Bind address combo box.
5. Click "Apply settings and restart FlowForce services". The FlowForce services willrestart, and your browser will be redirected to the Login page.
To log in to the FlowForce Web Administration Interface:1. Start you browser and enter http://localhost:8082. If you changed the port on the
FlowForce Server Configuration page, use the one you entered there.You are now connected to FlowForce Web Server and the Login page for FlowForceServer is opened.

© 2014 Altova GmbH
Getting started 27Administrator Guide
Altova FlowForce
Enter login name "root", as well as the password "root" if this is the first time that youhave started FlowForce Server.
2. Click the "Log in" button to log in.You have now logged onto FlowForce Server.Connection information, as well as any running jobs and active triggers are visible on theHome screen.

28 Administrator Guide Getting started
© 2014 Altova GmbHAltova FlowForce
Logging out:Click the "Log out" button at the far right of the browser window to log out.
To change your default password:From the Home page shown above:
1. Click the "Administration" button, then the "Users" button.
2. Click the "root" user entry in the Users table.3. Click the "Change password" button and enter your old and new passwords.
4. Click Save to complete the process.

© 2014 Altova GmbH
Getting started 29Administrator Guide
Altova FlowForce
2.4.3 Installation Mac OS X
FlowForce Server can be installed on Mac OS X systems (version 10.7 or higher). Since youmight need to uninstall a previous version, uninstalling is described first.
Uninstalling old versions of FlowForce Server and LicenseServerBefore uninstalling FlowForce Server, stop the service with the following command:
sudo launchctl unload /Library/LaunchDaemons/com.altova.FlowForceServer.plist
To check whether the service has been stopped, open the Activity Monitor terminal and makesure that FlowForce Server is not in the list.
In the Applications terminal, right-click theFlowForce Server icon and select Move to Trash. Theapplication will be moved to Trash. You will, however, still need to remove the application from the usr folder. Do this with the command:
sudo rm -rf /usr/local/Altova/FlowForceServer2014/
If you need to uninstall an old version of Altova LicenseServer, use the same procedure outlinedabove for FlowForce Server.
sudo launchctl unload /Library/LaunchDaemons/com.altova.LicenseServer.plist
Downloading the Mac OS X packageAfter downloading the Linux package from the Altova website, copy the package to any directoryon the Linux system.
Since you will need an Altova LicenseServer in order to run FlowForce Server, you may want todownload LicenseServer from the Altova website at the same time as you download FlowForceServer, rather than download it at a later time. The Mac OS X installer file has a .pkg fileextension.
Installing FlowForce ServerIn a terminal window, switch to the directory where you have copied the installer file, and double-click it. Go through the successive steps of the installer wizard. These are self-explanatory andinclude one step in which you have to agree to the license agreement before being able toproceed.
The FlowForce Server package will be installed in the folder:
/usr/local/Altova/FlowForceServer2014/
Clicking the FlowForce Server icon in the Application terminal pops up the onscreen help (thisdocumentation).
Installing Altova LicenseServer

30 Administrator Guide Getting started
© 2014 Altova GmbHAltova FlowForce
For FlowForce Server to run, it must be licensed via an Altova LicenseServer on your network. OnMac OS X systems, Altova LicenseServer will need to be installed separately.
Download Altova LicenseServer from the Altova website and double-click the installer package topstart the installation. Follow the on-screen instructions. You will need to accept the licenseagreement for installation to proceed.
The LicenseServer package will be installed in the folder:
/usr/local/Altova/LicenseServer
For information about how to register FlowForce Server with Altova LicenseServer and license it,see the section, Initial setup - Mac OS X.
Initial setup - Mac OS X
Licensing procedureTo license FlowForce Server on Mac OS X systems, do the following:
1. If LicenseServer is not already running as a service, start it as a service.2. Start FlowForce Server as a service.3. Register FlowForce Server with LicenseServer.4. In the configuration page of LicenseServer, assign a license to FlowForce Server
machine. How to do this is described in the Altova LicenseServer documentation.
Note: You must have both FlowForce Server and Altova LicenseServer installed and running asservices. See the section Installation on Mac OS X for information about installing thesepackages.
You must have administrator (root) privileges to be able to register FlowForce Server withLicenseServer.
Starting LicenseServer as a serviceTo correctly register and licenseFlowForce Server with LicenseServer, LicenseServer must berunning as a service. Start LicenseServer as a service with the following command:
sudo launchctl load /Library/LaunchDaemons/com.altova.LicenseServer.plist
If at any time you need to stop LicenseServer, use:
sudo launchctl unload /Library/LaunchDaemons/com.altova.LicenseServer.plist
Starting FlowForce Server as a serviceStart FlowForce Server as a service with the following command:
sudo launchctl load /Library/LaunchDaemons/com.altova.FlowForceServer.plist
If at any time you need to stop FlowForce Server, use:
sudo launchctl unload /Library/LaunchDaemons/com.altova.FlowForceServer.plist

© 2014 Altova GmbH
Getting started 31Administrator Guide
Altova FlowForce
Registering FlowForce ServerBefore assigning a license to FlowForce Server from LicenseServer, FlowForce Server must beregistered with LicenseServer. You can register FlowForce Server by using the licenseservercommand of its CLI. Note that FlowForce Server must be started with root rights.
sudo /usr/local/Altova/FlowForceServer2014/bin/FlowForceServer licenseserver
localhost
In the command above, localhost is the name of the server on which LicenseServer is installed.Notice also that the location of the FlowForce Server executable is:
/usr/local/Altova/FlowForceServer2014/bin
After successfully registering FlowForce Server, you can go to LicenseServer and assign alicense to FlowForceServer. How to do this is described in the Altova LicenseServerdocumentation.

32 Administrator Guide Altova LicenseServer
© 2014 Altova GmbHAltova FlowForce
2.5 Altova LicenseServer
Altova LicenseServer (hereafter also called LicenseServer) provides a central location for themanagement of licenses for Altova products. Altova applications running in a network can havelicenses assigned to them from the LicenseServer, thus giving administrators the flexibility tomanage and monitor licenses.
Licensing process with Altova LicenseServerTo assign an Altova server product a license using Altova LicenseServer, you need to do thefollowing:
1. Start LicenseServer.2. Open the LicenseServer Configuration page, which is the administrator's interface with
LicenseServer, on Windows, Linux, or Mac OS X.3. Upload the license/s you have received from Altova to the license pool of your Altova
LicenseServer. Do this in the License Pool tab of the LicenseServer Configuration page.4. Register the Altova server product (FlowForce Server, MapForce Server, StyleVision
Server, RaptorXML(+XBRL) Server) with LicenseServer. Depending on the product's type,the method of registering it with LicenseServer will be different: either via the product'sGUI or its command line. See the documentation of your Altova server product forinformation about how to register it with LicenseServer.
5. In the Server Management tab of the LicenseServer Configuration page, assign a licenseto the Altova server product according to the number of cores on the product machine.
Licenses can thereafter be conveniently monitored and managed centrally with LicenseServer.See the Configuration Page Reference for available functionality.
Note: The LicenseServer Configuration page does not support SSL.
LicenseServer versions and their compatibility with Altova server productsNew versions of Altova server products can only be licensed with the version of LicenseServer thatis the latest at the time of the server product's release. However, older versions of Altova serverproducts will work with newer versions of LicenseServer.
So, if you are installing a new version of an Altova server product and if your current LicenseServerversion is not the latest, de-install the older version of LicenseServer and install the latest versionavailable on the Altova website. All registration and licensing information held in your older versionof LicenseServer will be saved at the time of de-installation to a database on your server machine,and will be imported automatically into the newer version.
Current version: 1.8

© 2014 Altova GmbH
Altova LicenseServer 33Administrator Guide
Altova FlowForce
About this documentationThis documentation is organized into the following parts:
Introductory information about: network requirements; installation on Windows and Linux;and Altova ServiceController.How to Assign Licenses, which describes in a step-by-step way how to assign licenseswith Altova LicenseServer.Configuration Page Reference: A description of the administrator's interface withLicenseServer.
Last updated: 04-18-2014

34 Administrator Guide Altova LicenseServer
© 2014 Altova GmbHAltova FlowForce
2.5.1 Network Information
Altova LicenseServer must be installed on a server machine that is accessible by all clientsrunning Altova products that require a license. Any firewall on both the client and server mustallow the network traffic to and from the LicenseServer that is necessary for the LicenseServer tooperate correctly.
On the LicenseServer, port 35355 is used to distribute licenses, and therefore it must be open fornetwork traffic with client machines.
The following are the default networking parameters and requirements of LicenseServer:
For LicenseServer license distribution:Either one or both ofIPv4 TCP connection on port 35355 IPv6 TCP connection on port 35355
For administrative tasks, The LicenseServer is accessed by a web interface that uses port 8088.The port used can be configured to suit your requirements.
Connection to the Master Licensing Server at altova.comThe Altova LicenseServer needs to be able to communicate with the Master Licensing Serverat altova.com to validate and authenticate license-related data and to ensure continuouscompliance with the Altova license agreements. This communication occurs over HTTPSusing port 443. If the Altova LicenseServer, after making the initial verification with the altova.com Master Licensing Server, is unable to again connect with altova.com for aduration of more than 5 days (= 120 hours), then the Altova LicenseServer will no longerpermit the usage of any Altova software products connected to the Altova LicenseServer.
Any such loss of connection with the altova.com master servers will be logged in theMessages tab of the Configuration page of the Altova LicenseServer. In addition, theadministrator can configure the Altova LicenseServer to automatically send an alert emailwhen the connection to altova.com is lost. Alert Mail settings are available in the Settingstab of the Configuration page.

© 2014 Altova GmbH
Altova LicenseServer 35Administrator Guide
Altova FlowForce
2.5.2 Installation (Windows)
Altova LicenseServer can be installed on Windows systems in one of two ways:
As an independent installation.As part of an Altova server product installation. (Altova server products are: AltovaFlowForce Server, Altova MapForce Server, and Altova SyleVision Server.)
If LicenseServer is not installed on your system at the time an Altova server product is installed,the option to install LicenseServer is selected by default during installation setup. If LicenseServeris already installed, the option to install it is deselected by default. You can change the defaultoption if you like.
For information about how to proceed with assigning licenses, see the section How to AssignLicenses.
LicenseServer versions and their compatibility with Altova server productsNew versions of Altova server products can only be licensed with the version of LicenseServer thatis the latest at the time of the server product's release. However, older versions of Altova serverproducts will work with newer versions of LicenseServer.
So, if you are installing a new version of an Altova server product and if your current LicenseServerversion is not the latest, de-install the older version of LicenseServer and install the latest versionavailable on the Altova website. All registration and licensing information held in your older versionof LicenseServer will be saved at the time of de-installation to a database on your server machine,and will be imported automatically into the newer version.
Current version: 1.8
The version number of the currently installed LicenseServer is given at the bottom of the LicenseServer configuration page. The version number of the LicenseServer that is appropriate forany particular version of a server product is displayed during the installation of that version of theserver product. You can choose to install this version of LicenseServer along with the serverproduct, or you can install the newer version of LicenseServer separately. Note, however, that youmust de-install the older version of LicenseServer before installing the new version.

36 Administrator Guide Altova LicenseServer
© 2014 Altova GmbHAltova FlowForce
2.5.3 Installation (Linux)
Altova LicenseServer can be installed on Linux systems (Debian, Ubuntu, CentOS, RedHat).
Uninstalling old versions of LicenseServerOn the Linux command line interface (CLI), you can check whether LicenseServer is installed withthe following command:
[Debian, Ubuntu]: dpkg --list | grep Altova
[CentOS, RedHat]: rpm -qa | grep server
If LicenseServer is not installed, go ahead with the installation as documented in the next steps. IfLicenseServer is installed and you wish to install a newer version of it, uninstall the old versionwith the command:
[Debian, Ubuntu]: sudo dpkg --remove licenseserver
[CentOS, RedHat]: sudo rpm -e licenseserver
Installing Altova LicenseServerOn Linux systems, LicenseServer must be installed independently of other Altova server products.It is not included as part of the installation packages of Altova server products. Download AltovaLicenseServer from the Altova website and copy the package to any directory on the Linuxsystem.
Distribution Installer extension
Debian .deb
Ubuntu .deb
CentOS .rpm
RedHat .rpm
In a terminal window, switch to the directory where you have copied the Linux package. Forexample, if you copied it to a user directory called MyAltova (that is located, say, in the /home/User directory), then switch to this directory as follows:
cd /home/User/MyAltova
Install LicenseServer with the following command:
[Debian]: sudo dpkg --install licenseserver-1.8-debian.deb
[Ubuntu]: sudo dpkg --install licenseserver-1.8-ubuntu.deb
[CentOS]: sudo rpm -ivh licenseserver-1.8-1.x86_64.rpm
[RedHat]: sudo rpm -ivh licenseserver-1.8-1.x86_64.rpm

© 2014 Altova GmbH
Altova LicenseServer 37Administrator Guide
Altova FlowForce
The LicenseServer package will be installed in:
/opt/Altova/LicenseServer
For information about how to proceed with assigning licenses, see the section How to AssignLicenses.
LicenseServer versions and their compatibility with Altova server productsNew versions of Altova server products can only be licensed with the version of LicenseServer thatis the latest at the time of the server product's release. However, older versions of Altova serverproducts will work with newer versions of LicenseServer.
So, if you are installing a new version of an Altova server product and if your current LicenseServerversion is not the latest, de-install the older version of LicenseServer and install the latest versionavailable on the Altova website. All registration and licensing information held in your older versionof LicenseServer will be saved at the time of de-installation to a database on your server machine,and will be imported automatically into the newer version.
Current version: 1.8
38 Administrator Guide Altova LicenseServer
© 2014 Altova GmbHAltova FlowForce
2.5.4 Installation (Mac OS X)
Altova LicenseServer can be installed on Mac OS X systems (version 10.7 or higher). Since youmight need to uninstall a previous version, uninstalling is described first.
Uninstalling old versions of LicenseServerBefore uninstalling LicenseServer, stop the service with the following command:
sudo launchctl unload /Library/LaunchDaemons/com.altova.LicenseServer.plist
To check whether the service has been stopped, open the Activity Monitor terminal and makesure that LicenseServer is not in the list.
In the Applications terminal, right-click the LicenseServer icon and select Move to Trash. Theapplication will be moved to Trash. You will, however, still need to remove the application from the usr folder. Do this with the command:
sudo rm -rf /usr/local/Altova/LicenseServer
Installing Altova LicenseServerDownload Altova LicenseServer from the Altova website (the installer file has a .pkg fileextension), and double-click the installer package to start the installation. Follow the on-screeninstructions. You will need to accept the license agreement for installation to proceed.
The LicenseServer package will be installed in the folder:
/usr/local/Altova/LicenseServer

© 2014 Altova GmbH
Altova LicenseServer 39Administrator Guide
Altova FlowForce
2.5.5 Altova ServiceController
The Altova ServiceController (hereafter also called ServiceController) is an application forconveniently starting, stopping and configuring Altova services on Windows systems. It is notavailable on Linux systems.
Altova ServiceController is installed with Altova LicenseServer, and can be started by clicking itscommand in the Altova LicenseServer folder of the Start menu. After the ServiceController hasbeen started, it can be accessed via the system tray (screenshot below).
To run the ServiceController after logging in to the system, click the ServiceController icon in thesystem tray to pop up the ServiceController menu (screenshot below), and then toggle on thecommand Run Altova ServiceController at Startup. (This command is toggled on by default.)To exit ServiceController, click the ServiceController icon in the system tray and, in the menu thatpops up (see screenshot below), click Exit Altova ServiceController.
Starting and stopping Altova servicesEach installed Altova service component will have an entry in the ServiceController menu (seescreenshot above). An Altova service can be started or stopped via a command in itsServiceController sub-menu. Additionally, important administration tasks of individual services canbe accessed via the ServiceController menu. In the screenshot above, for example, the AltovaFlowForce Web service has a sub-menu in which you can choose to access its Setup page.

40 Administrator Guide Altova LicenseServer
© 2014 Altova GmbHAltova FlowForce
2.5.6 How to Assign Licenses
To assign an Altova server product a license using Altova LicenseServer, you need to do thefollowing:
1. Start LicenseServer.2. Open the LicenseServer Configuration page, which is the administrator's interface with
LicenseServer, on Windows or Linux.3. Upload the license/s you have received from Altova to the license pool of your Altova
LicenseServer. Do this in the License Pool tab of the LicenseServer Configuration page.4. Register the Altova server product (FlowForce Server, MapForce Server, StyleVision
Server) with LicenseServer. Depending on the product's type, the method of registering itwith LicenseServer will be different: either via the product's GUI or its command line. Seethe documentation of your Altova server product for information about how to register itwith LicenseServer.
5. In the Server Management tab of the LicenseServer Configuration page, assign a licenseto the Altova server product according to the number of cores on the product machine.
Note on cores and licensesThe licensing of Altova server products is based on the number of processor cores available on theproduct machine. For example, a dual-core processor has two cores, a quad-core processor fourcores, a hexa-core processor six cores, and so on. The number of cores licensed for a product ona particular server machine must be greater than or equal to the number of cores available on thatserver, whether it's a physical or virtual machine.
For example, if a server has eight cores (an octa-core processor), you must purchase at least an8-core license. You can also combine licenses to achieve the core count. So, two 4-core licensescan also be used for an octa-core server instead of an 8-core license.
If you are using a computer server with a large number of CPU cores but only have a low volumeto process, you may also create a virtual machine that is allocated a smaller number of cores,and purchase a license for that number. Such a deployment, of course, will have less processingspeed than if all available cores on the server were utilized.
Note: Each license can be used for only one client machine at a time, even if it has unusedlicensing capacity. For example, if a 10-core license is used for a client machine that has6 CPU cores, then the remaining 4 cores of the license cannot be used simultaneouslyfor another client machine.
Start LicenseServer
This section:
How to start LicenseServer on Windows systemsHow to start LicenseServer on Linux systems How to start LicenseServer on Mac OS X systems Note about Connection to altova.com

© 2014 Altova GmbH
Altova LicenseServer 41Administrator Guide
Altova FlowForce
Windows systemsYou can start LicenseServer via the Altova ServiceController, which is available in the system tray.
First, click Start | All Programs | Altova LicenseServer | Altova ServiceController to startAltova ServiceController and display its icon in the system tray (see screenshot below). If youselect the Run Altova ServiceController at Startup option, Altova ServiceController will start up onsystem start and its icon will be available in the system tray from then onwards.
To start LicenseServer, click the Altova ServiceController icon in the system tray, mouse overAltova LicenseServer in the menu that pops up (see screenshot above), and then select StartService from the LicenseServer submenu. If LicenseServer is already running, the Start Serviceoption will be disabled.
Linux systemsTo start LicenseServer as a service on Linux systems, run the following command in a terminalwindow.
[Debian]: sudo /etc/init.d/licenseserver start
[Ubuntu]: sudo initctl start licenseserver
[CentOS]: sudo initctl start licenseserver
[RedHat]: sudo initctl start licenseserver
(If you need to stop LicenseServer, replace start with stop in the above command.)
Mac OS X systemsTo start LicenseServer as a service on Mac OS X systems, run the following command in aterminal window:
sudo launchctl load /Library/LaunchDaemons/com.altova.LicenseServer.plist
42 Administrator Guide Altova LicenseServer
© 2014 Altova GmbHAltova FlowForce
If at any time you need to stop LicenseServer, use:
sudo launchctl unload /Library/LaunchDaemons/com.altova.LicenseServer.plist
Connection to the Master Licensing Server at altova.comThe Altova LicenseServer needs to be able to communicate with the Master Licensing Serverat altova.com to validate and authenticate license-related data and to ensure continuouscompliance with the Altova license agreements. This communication occurs over HTTPSusing port 443. If the Altova LicenseServer, after making the initial verification with the altova.com Master Licensing Server, is unable to again connect with altova.com for aduration of more than 5 days (= 120 hours), then the Altova LicenseServer will no longerpermit the usage of any Altova software products connected to the Altova LicenseServer.
Any such loss of connection with the altova.com master servers will be logged in theMessages tab of the Configuration page of the Altova LicenseServer. In addition, theadministrator can configure the Altova LicenseServer to automatically send an alert emailwhen the connection to altova.com is lost. Alert Mail settings are available in the Settingstab of the Configuration page.
Open LicenseServer Config Page (Windows)
This section:
Opening the Configuration page if LicenseServer is on the same machine Opening the Configuration page if LicenseServer is on another machine Logging in with the initial password Setting a fixed port for the Configuration page
Opening the Configuration page if LicenseServer is on the same machineOn Windows systems, if LicenseServer is on the same machine, you can open the Configurationpage of LicenseServer in one of two ways:
Click Start | All Programs | Altova LicenseServer | LicenseServer ConfigurationPage. The Configuration page opens in a new tab of your Internet browser.
Click the Altova ServiceController icon in the system tray, mouse over AltovaLicenseServer in the menu that pops up (see screenshot below), and then selectConfigure from the LicenseServer submenu.

© 2014 Altova GmbH
Altova LicenseServer 43Administrator Guide
Altova FlowForce
The Configuration page opens in a new browser window, and its login mask is displayed(screenshot below).
Opening the Configuration page if LicenseServer is on another machineTo open the LicenseServer Configuration page from some other Windows machine on the localnetwork (than that on which LicenseServer is installed), enter the URL of the LicenseServer Configuration page in the address bar of a browser and press Enter. By default, the URL of theConfiguration page will be:
http://<serverIPAddressOrName>:8088/
The URL is present in the HTML code of the Configuration page itself, which is named WebUI.html and is located at:
C:/ProgramData/Altova/LicenseServer/WebUI.html
If you have set the URL of the Configuration page to be generated dynamically (in the Settings tabof the Configuration page), then a new URL is generated each time LicenseServer is started. Youwill need to check the current version of WebUI.html to find out the current URL of the
Configuration page.
The dynamically generated URL in WebUI.html will have a form something like:
http://127.0.0.1:55541/optionally-an-additional-string, and it is located in the
function checkIfServiceRunning()in a script near the end of the <head> element. While the portnumber in the URL is dynamically assigned, the IP address part identifies the server on whichLicenseServer has been installed. If you wish to access the LicenseServer Configuration pagefrom another machine, make sure that the IP address part of the URL has the correct IP addressor name of the server on which LicenseServer has been installed. For example, the URL could besomething like: http://MyServer:55541.
Logging in with the initial passwordAfter going through the steps above, the Configuration page is opened with the login maskdisplayed (screenshot below). You can log in with the initial password of default. After you havelogged in, you can change your password in the Settings tab.

44 Administrator Guide Altova LicenseServer
© 2014 Altova GmbHAltova FlowForce
Setting a fixed or dynamic port for the Configuration pageThe port of the Configuration page (and consequently its address) can be specified in the Settingspage. By default the port is 8088. You can set any other port you want for the LicenseServerConfiguration page (see screenshot below). Alternatively, you allow the port to be selecteddynamically each time LicenseServer starts up. In this case, you will need to find out the URL ofthe Configuration page from the file WebUI.html (see Open LicenseServer Config Page (Windows)and Open LicenseServer Config Page (Linux)).
The advantage of a fixed port is that the page URL is known in advance and therefore can beaccessed easily. If the port is assigned dynamically, the port part of the URL will have to belooked up in the file WebUI.html each time LicenseServer is started.

© 2014 Altova GmbH
Altova LicenseServer 45Administrator Guide
Altova FlowForce
Open LicenseServer Config Page (Linux)
This section:
Opening the Configuration page for the first time with the returned URL URL of the LicenseServer Configuration page Logging in with the initial password Setting a fixed port for the Configuration page
Opening the Configuration page for the first time with the returned URLOn Linux systems, when you register your Altova server product with LicenseServer via the CLI,the URL of the LicenseServer Configuration page is returned. On opening this URL in a browser,you are prompted to read and accept the license agreement. After accepting the licenseagreement, the Configuration page's login mask is displayed (screenshot below).
URL of the LicenseServer Configuration pageTo open the LicenseServer Configuration page at any time, enter its URL in the address bar of abrowser and press Enter. By default, the URL of the Configuration page will be:
http://<serverIPAddressOrName>:8088/
The URL is present in the HTML code of the Configuration page itself, which is named webUI.html and is located at:
/var/opt/Altova/LicenseServer/webUI.html
If you have set the URL of the Configuration page to be generated dynamically (in the Settings tabof the Configuration page), then a new URL is generated each time LicenseServer is started. Youwill need to check the current version of webUI.html to find out the current URL of the
Configuration page.
The dynamically generated URL in webUI.html will have a form something like:
http://127.0.0.1:55541, and it is located in the function checkIfServiceRunning() in a scriptnear the end of the <head> element. While the port number in the URL is dynamically assigned,the IP address part identifies the server on which LicenseServer has been installed. If you wish toaccess the LicenseServer Configuration page from another machine, make sure that the IPaddress part of the URL has the correct IP address or name of the server on which LicenseServerhas been installed. For example, the URL could be something like: http://MyServer:55541.
Logging in with the initial passwordAfter going through the steps above, the Configuration page is opened with the login maskdisplayed (screenshot below). You can log in with the initial password of default. After you havelogged in, you can change your password in the Settings tab.

46 Administrator Guide Altova LicenseServer
© 2014 Altova GmbHAltova FlowForce
Setting a fixed or dynamic port for the Configuration pageThe port of the Configuration page (and consequently its address) can be specified in the Settingspage. By default the port is 8088. You can set any other port you want for the LicenseServerConfiguration page (see screenshot below). Alternatively, you allow the port to be selecteddynamically each time LicenseServer starts up. In this case, you will need to find out the URL ofthe Configuration page from the file WebUI.html (see Open LicenseServer Config Page (Windows)and Open LicenseServer Config Page (Linux)).
The advantage of a fixed port is that the page URL is known in advance and therefore can beaccessed easily. If the port is assigned dynamically, the port part of the URL will have to belooked up in the file WebUI.html each time LicenseServer is started.

© 2014 Altova GmbH
Altova LicenseServer 47Administrator Guide
Altova FlowForce
Open LicenseServer Config Page (Mac OS X)
This section:
Opening the Configuration page for the first time with the returned URL URL of the LicenseServer Configuration page Logging in with the initial password Setting a fixed port for the Configuration page
Opening the Configuration page for the first time with the returned URLOn Mac OS X systems, when you register your Altova server product with LicenseServer via theCLI, the URL of the LicenseServer Configuration page is returned. On opening this URL in abrowser, you are prompted to read and accept the license agreement. After accepting the licenseagreement, the Configuration page's login mask is displayed (screenshot below).
URL of the LicenseServer Configuration pageTo open the LicenseServer Configuration page at any time, enter its URL in the address bar of abrowser and press Enter. By default, the URL of the Configuration page will be:
http://<serverIPAddressOrName>:8088/
The URL is present in the HTML code of the Configuration page itself, which is named webUI.html and is located at:
/var/Altova/LicenseServer/webUI.html
If you have set the URL of the Configuration page to be generated dynamically (in the Settings tabof the Configuration page), then a new URL is generated each time LicenseServer is started. Youwill need to check the current version of webUI.html to find out the current URL of the
Configuration page.
The dynamically generated URL in webUI.html will have a form something like:
http://127.0.0.1:55541, and it is located in the function checkIfServiceRunning() in a scriptnear the end of the <head> element. While the port number in the URL is dynamically assigned,the IP address part identifies the server on which LicenseServer has been installed. If you wish toaccess the LicenseServer Configuration page from another machine, make sure that the IPaddress part of the URL has the correct IP address or name of the server on which LicenseServerhas been installed. For example, the URL could be something like: http://MyServer:55541.
Note: The Configuration page can also be accessed directly via the Finder | Applications |Altova License Server icon.
Logging in with the initial password

48 Administrator Guide Altova LicenseServer
© 2014 Altova GmbHAltova FlowForce
After going through the steps above, the Configuration page is opened with the login maskdisplayed (screenshot below). You can log in with the initial password of default. After you havelogged in, you can change your password in the Settings tab.
Setting a fixed or dynamic port for the Configuration pageThe port of the Configuration page (and consequently its address) can be specified in the Settingspage. By default the port is 8088. You can set any other port you want for the LicenseServerConfiguration page (see screenshot below). Alternatively, you allow the port to be selecteddynamically each time LicenseServer starts up. In this case, you will need to find out the URL ofthe Configuration page from the file WebUI.html (see Open LicenseServer Config Page (Windows)and Open LicenseServer Config Page (Linux)).
The advantage of a fixed port is that the page URL is known in advance and therefore can be

© 2014 Altova GmbH
Altova LicenseServer 49Administrator Guide
Altova FlowForce
accessed easily. If the port is assigned dynamically, the port part of the URL will have to belooked up in the file WebUI.html each time LicenseServer is started.
Upload Licenses to LicenseServer
This section:
Uploading a license file to the license pool of LicenseServer License status Activating the licenses you wish to use Next steps
Uploading a license file to the license pool of LicenseServerAfter you have obtained a license file from Altova, you must upload it to the Altova LicenseServer.(How to do this is described below.) Each license file can contain one or more licenses anddepends on your purchase. When you upload a license file, all the licenses in it will be uploadedto LicenseServer and can be assigned to an Altova product that has been registered with thatLicenseServer. All the uploaded licenses, from one or more license files and for all Altovaproducts, are collected in a license pool on the LicenseServer. The license pool is displayed inthe License Pool tab of the LicenseServer Configuration page (screenshot below).
License files are uploaded to the LicenseServer using the Upload function of the License Pool tab(see screenshot below).
Click the Browse button and select the license file you want. The license file will appear in theUpload License File text field and the Upload button will be enabled. Click the Upload button toupload the license file. All the licenses in the file are uploaded and displayed in the License Pooltab. The screenshot below shows multiple licenses, uploaded from multiple license files.

50 Administrator Guide Altova LicenseServer
© 2014 Altova GmbHAltova FlowForce
License statusLicense status values are as follows:
Activating: When a license is uploaded into the license pool of LicenseServer, the serverwill transmit license-related data to the altova.com master licensing server to validate,authenticate, and activate the license that was supplied. This is necessary to ensurecompliance with the Altova license agreements. During this initial activation andauthentication transaction—which typically lasts between 30 seconds and a couple ofminutes, depending on your Internet connection, speed, and overall network traffic—thestatus of the license will be indicated as Activating....
Failed Verification: If a connection with the altova.com master licensing server cannot bemade, then the status of the license in the pool will be shown as Failed Verification. Ifthis happens, check your Internet connection and firewall rules to ensure thatLicenseServer is able to communicate with the altova.com master licensing server.
Active: Once the license has been authenticated and activated, the status in the pool willchange to Active.
Inactive: If a license has been verified, but is present on another LicenseServer on thenetwork, the status in the pool will be shown as Inactive. An Inactive status also resultswhen a license is manually deactivated in the license pool by the administrator.
Blocked: A license is shown in the license pool as Blocked if there was a problemauthenticating the license and the altova.com master licensing server has not grantedpermission to the LicenseServer to use this license. This could be the result of a licenseagreement violation, over-usage of a license, or other compliance issues. Should you seea license showing up as Blocked, please contact Altova Support with your license

© 2014 Altova GmbH
Altova LicenseServer 51Administrator Guide
Altova FlowForce
information and any other relevant data.
These statuses are summarized in the table below:
Status Meaning
Activating... On upload, license information is sent to altova.com for verification.Refresh the browser to view the updated status. Verification and activationcan take a few minutes.
Failed Verification A connection to altova.com could not be made. After establishing aconnection, either restart the service or activate the license (with the Activate button).
Active Verification was successful, the license is active.
Inactive Verification was successful, but the license is on another LicenseServer onthe network. Licenses can be made inactive with the Deactivate button.
Blocked Verification was not successful. License is invalid and is blocked. Contact Altova Support.
Note: After a license has been sent to altova.com for verification, the browser must berefreshed to see the updated status. Verification and activation can take a few minutes.
Note: If a connection to altova.com could not be made, the status will be Failed Verification.After establishing a connection, either restart the service or try activating the license withthe Activate button.
Note: When a license is given a status of Inactive or Blocked, a message explaining the statusis also added to the Messages log.
Only an active license can be assigned to a product installation. An inactive license can beactivated or deleted from the license pool. If a license is deleted from the license pool, it can beuploaded again to the pool by uploading the license file containing it. When a license file isupdated, only those licenses in it that are not already in the pool will be uploaded to the pool. Toactivate, deactivate, or delete a license, select it and then click the Activate, Deactivate, orDelete button, respectively.
Activate the license/s you wish to useBefore you can assign a license to an Altova product, it must be active. So do ensure it is active.If it is inactive, select it and click Activate.
Next StepsAfter you have uploaded the license file to the LicenseServer and checked that the license youwant is active, do the following:

52 Administrator Guide Altova LicenseServer
© 2014 Altova GmbHAltova FlowForce
1. Register the Altova server product (FlowForce Server, MapForce Server, StyleVisionServer) with LicenseServer. (If you have already done this prior to uploading the licensefile, you can now start assigning licenses.)
2. Assign a license to your Altova product that has been registered with the LicenseServer.
Register FlowForce Server with LicenseServer
This section:
Methods of registering FlowForce Server with LicenseServer Accessing the FlowForce Server Setup page (Windows) Accessing the FlowForce Server Setup page (Linux) Registering FlowForce Server via the Setup page (Windows and Linux) Registering FlowForce Server via the FlowForce CLI (Windows) Registering FlowForce Server via the FlowForce CLI (Linux) Next steps
Methods of registering FlowForce ServerFlowForce Server can be registered with LicenseServer using any of the following methods:
Via the FlowForce Server Setup page (Windows and Linux) Via the FlowForce CLI (Windows) Via the FlowForce CLI (Linux)
Accessing the FlowForce Server Setup page (Windows)The FlowForce Server Setup page can be accessed in one of the following ways:
Via the Start menu:Start | Altova FlowForce Server 2014 | FlowForce Server Setup Page
Via Altova ServiceController: Click the ServiceController icon in the system tray. In themenu that pops up, select Altova FlowForce Web | Setup.
This pops up the FlowForce Server Setup page (screenshot above).
Accessing the FlowForce Server Setup page (Linux)After you have installed FlowForce Server on Linux (see the FlowForce Server user documentationfor information about how to do this), start FlowForce Web Server as a service with the followingcommand:
sudo /etc/init.d/flowforcewebserver start
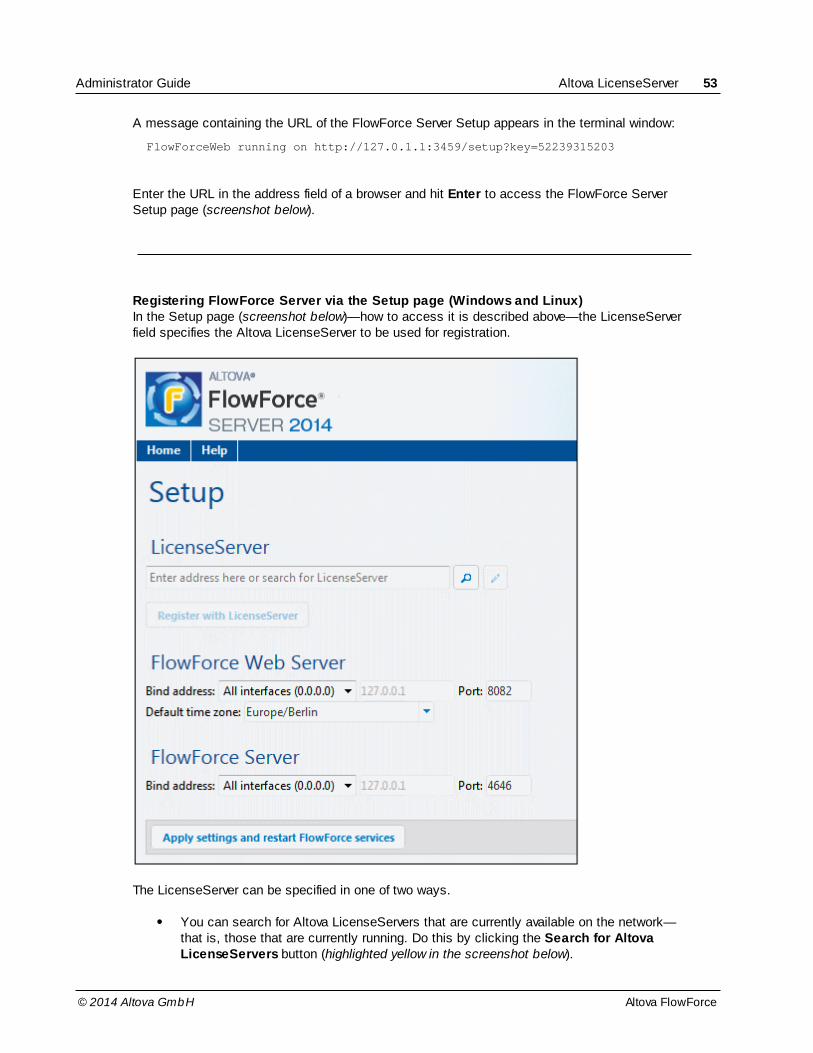
© 2014 Altova GmbH
Altova LicenseServer 53Administrator Guide
Altova FlowForce
A message containing the URL of the FlowForce Server Setup appears in the terminal window:
FlowForceWeb running on http://127.0.1.1:3459/setup?key=52239315203
Enter the URL in the address field of a browser and hit Enter to access the FlowForce ServerSetup page (screenshot below).
Registering FlowForce Server via the Setup page (Windows and Linux)In the Setup page (screenshot below)—how to access it is described above—the LicenseServerfield specifies the Altova LicenseServer to be used for registration.
The LicenseServer can be specified in one of two ways.
You can search for Altova LicenseServers that are currently available on the network—that is, those that are currently running. Do this by clicking the Search for AltovaLicenseServers button (highlighted yellow in the screenshot below).

54 Administrator Guide Altova LicenseServer
© 2014 Altova GmbHAltova FlowForce
The search returns a list of available Altova LicenseServers on the network. OneLicenseServer will be selected (screenshot below) and the others will be available in thedropdown list of the combo box. Select the LicenseServer on which your FlowForcelicense is stored.
Alternatively, you can enter the address of the LicenseServer in the LicenseServer field. Ifthe currently running LicenseServers are available as a dropdown list, you must click the Manually Enter Address button to be able to enter an address in the LicenseServerfield.
After you have specified the LicenseServer, click Register with LicenseServer. The Altovaserver application will be registered with the specified LicenseServer, and that LicenseServer's Configuration page will open in a browser with its Server Management tab active (screenshotbelow).
Note: You may need to allow pop-ups in order for the LicenseServer Configuration page to bedisplayed.

© 2014 Altova GmbH
Altova LicenseServer 55Administrator Guide
Altova FlowForce
In the screenshot below, three Altova products have been registered with the Altova LicenseServerat DOC.altova.com. How to assign licenses is described in the next section, Assign Licenses toRegistered Products.
Registering FlowForce Server via the FlowForce CLI (Windows)On Windows machines, FlowForce Server can also be registered with an Altova LicenseServer onyour network via the command line (CLI) by using the licenseserver command:
FlowForceServer licenseserver Server-Or-IP-Address
For example, if LicenseServer is running on http://localhost:8088, then register FlowForceServer with:
FlowForceServer licenseserver localhost
If FlowForce Server was installed with other Altova server products as sub-packages, registeringFlowForce Server will automatically also register the Altova server products. After successfully
56 Administrator Guide Altova LicenseServer
© 2014 Altova GmbHAltova FlowForce
registering FlowForce Server, you can go to LicenseServer and assign a license to FlowForceServer. How to do this is described in the section Assign Licenses to Registered Products.
Registering FlowForce Server via the FlowForce CLI (Linux)On Linux machines, FlowForce Server can be registered with LicenseServer by using the licenseserver command of the FlowForce Server CLI. Note that FlowForce Server must bestarted with root rights.
sudo /opt/Altova/FlowForceServer2014/bin/flowforceserver licenseserver
localhost
In the command above, localhost is the name of the server on which LicenseServer is installed.Notice also that the location of the FlowForce Server executable is:
/opt/Altova/MapForceServer2014/bin
After successfully registering FlowForce Server, you can go to LicenseServer and assign alicense to FlowForce Server. How to do this is described in the section Assign Licenses toRegistered Products.
Next StepsAfter you have registered your Altova product with LicenseServer, do the following:
1. If you have not already uploaded your license file/s to the LicenseServer (see previoussection, Upload Licenses to LicenseServer), upload the license file now and check thatthe license you want is active. If you have already done this, carry on to the next step,Assign Licenses.
2. Assign a license to your Altova product that has been registered with the LicenseServer.
Register MapForce Server with LicenseServer
This section:
Registering MapForce Server from FlowForce Server (Windows) Registering a standalone MapForce Server (Windows) Registering MapForce Server (Linux) Next steps
MapForce Server can be installed as part of the FlowForce Server package or as a standaloneserver product. In either case, it must be registered with Altova LicenseServer. Only after it hasbeen registered with LicenseServer can a license be assigned to it from LicenseServer. OnWindows systems, if MapForce Server was installed as part of the FlowForce Server package, it

© 2014 Altova GmbH
Altova LicenseServer 57Administrator Guide
Altova FlowForce
will automatically be registered when FlowForce is registered. On Linux systems, only ifMapForce Server is installed after FlowForce Server will it be registered automatically whenFlowForce Server is registered subsequently.
Registering MapForce Server from FlowForce Server (Windows)MapForce Server is packaged with FlowForce Server, so when FlowForce Server is registered withan Altova LicenseServer on your network, MapForce Server will automatically also be registeredwith LicenseServer. How to register FlowForce Server is described in the FlowForce Serverdocumentation and in the section, Register FlowForce Server with LicenseServer.
After the registration, you can go to LicenseServer and assign a MapForce Server license toMapForce Server. How to do this is described in the section, Assign Licenses to RegisteredProducts.
Registering a standalone MapForce Server (Windows)If you have installed MapForce Server as a standalone package, you must register it with anAltova LicenseServer on your network and then license it from the Altova LicenseServer. You canregister MapForce Server via its command line interface (CLI) by using the licenseservercommand:
MapForceServer licenseserver Server-Or-IP-Address
For example, if LicenseServer is running on http://localhost:8088, then register MapForceServer with:
MapForceServer licenseserver localhost
After successfully registering MapForce Server, you can go to LicenseServer and assign a licenseto MapForce Server. How to do this is described in the section, Assign Licenses to RegisteredProducts.
Registering MapForce Server (Linux)On Linux machines, MapForce Server can be registered with LicenseServer by using the licenseserver command of the MapForce Server CLI. Note that MapForce Server must bestarted with root rights.
sudo /opt/Altova/MapForceServer2014/bin/mapforceserver licenseserver localhost
In the command above, localhost is the name of the server on which LicenseServer is installed.Notice also that the location of the MapForce Server executable is:

58 Administrator Guide Altova LicenseServer
© 2014 Altova GmbHAltova FlowForce
/opt/Altova/MapForceServer2014/bin
After successfully registering MapForce Server, you can go to LicenseServer and assign a licenseto MapForce Server. How to do this is described in the section Assign Licenses to RegisteredProducts.
Next StepsAfter you have registered your Altova product with LicenseServer, do the following:
1. If you have not already uploaded your license file/s to the LicenseServer (see previoussection, Upload Licenses to LicenseServer), upload the license file now and check thatthe license you want is active. If you have already done this, carry on to the next step,Assign Licenses.
2. Assign a license to your Altova product that has been registered with the LicenseServer.
Register StyleVision Server with LicenseServer
This section:
Registering StyleVision Server from FlowForce Server (Windows) Registering a standalone StyleVision Server (Windows) Registering StyleVision Server (Linux) Next steps
StyleVision Server can be installed as part of the FlowForce Server package or as a standaloneserver product. In either case, it must be registered with Altova LicenseServer. Only after it hasbeen registered with LicenseServer can a license be assigned to it from LicenseServer. OnWindows systems, if StyleVision Server was installed as part of the FlowForce Server package, itwill automatically be registered when FlowForce is registered. On Linux systems, only ifStyleVision Server is installed after FlowForce Server will it be registered automatically whenFlowForce Server is registered subsequently.
Registering StyleVision Server from FlowForce (Windows)StyleVision Server is packaged with FlowForce Server, so when FlowForce Server is registeredwith an Altova LicenseServer on your network, StyleVision Server will automatically also beregistered with LicenseServer. How to register FlowForce Server is described in the FlowForceServer documentation and in the section, Register FlowForce Server with LicenseServer.
After the registration, you can go to LicenseServer and assign a StyleVision Server license toStyleVision Server. How to do this is described in the section Assign Licenses to RegisteredProducts.

© 2014 Altova GmbH
Altova LicenseServer 59Administrator Guide
Altova FlowForce
Registering a standalone StyleVision Server (Windows)If you have installed StyleVision Server as a standalone package on Windows, you must registerit with an Altova LicenseServer on your network and then license it from the Altova LicenseServer.You can register StyleVision Server via its command line interface (CLI) by using the licenseserver command:
StyleVisionServer licenseserver Server-Or-IP-Address
For example, if LicenseServer is running on http://localhost:8088, then register StyleVisionServer with:
StyleVisionServer licenseserver localhost
After successfully registering StyleVision Server, you can go to LicenseServer and assign alicense to StyleVision Server. How to do this is described in the section Assign Licenses toRegistered Products.
Registering StyleVision Server (Linux)On Linux machines, StyleVision Server can be registered with LicenseServer by using the licenseserver command of the StyleVision Server CLI. Note that StyleVision Server must bestarted with root rights.
sudo /opt/Altova/StyleVisionServer2014/bin/stylevisionserver licenseserver
localhost
In the command above, localhost is the name of the server on which LicenseServer is installed.Notice also that the location of the StyleVision Server executable is:
/opt/Altova/StyleVisionServer2014/bin
After successfully registering StyleVision Server, you can go to LicenseServer and assign alicense to StyleVision Server. How to do this is described in the section Assign Licenses toRegistered Products.
Next StepsAfter you have registered your Altova product with LicenseServer, do the following:
1. If you have not already uploaded your license file/s to the LicenseServer (see previoussection, Upload Licenses to LicenseServer), upload the license file now and check thatthe license you want is active. If you have already done this, carry on to the next step,
60 Administrator Guide Altova LicenseServer
© 2014 Altova GmbHAltova FlowForce
Assign Licenses.2. Assign a license to your Altova product that has been registered with the LicenseServer.
Register RaptorXML(+XBRL) Server with LicenseServer
This section:
Registering RaptorXML(+XBRL) Server (Windows) Registering RaptorXML(+XBRL) Server (Linux) Next steps
RaptorXML(+XBRL) Server must be installed on the server machine or network to whichLicenseServer is connected and then be started as a service. It must then be registered withLicenseServer. Only after registration can a license be assigned to it from LicenseServer. Thissection describes how to register RaptorXML(+XBRL) Server with LicenseServer.
Registering RaptorXML(+XBRL) Server (Windows)You can register RaptorXML(+XBRL) Server via its command line interface (CLI) by using the licenseserver command:
RaptorXML Server: RaptorXML licenseserver Server-Or-IP-Address
RaptorXML+XBRLServer:
RaptorXMLXBRL licenseserver Server-Or-IP-Address
For example, if LicenseServer is running on http://localhost:8088, then register RaptorXML(+XBRL) Server with:
RaptorXML Server: RaptorXML licenseserver localhost
RaptorXML+XBRLServer:
RaptorXMLXBRL licenseserver localhost
After successfully registering RaptorXML(+XBRL) Server, you can go to LicenseServer and assigna license to RaptorXML(+XBRL) Server. How to do this is described in the section AssignLicenses to Registered Products.
Registering RaptorXML(+XBRL) Server (Linux)On Linux machines, RaptorXML(+XBRL) Server can be registered with LicenseServer by usingthe licenseserver command of the RaptorXML(+XBRL) Server CLI. Note that RaptorXML(+XBRL)Server must be started with root rights.

© 2014 Altova GmbH
Altova LicenseServer 61Administrator Guide
Altova FlowForce
sudo /opt/Altova/RaptorXMLServer2014/bin/raptorxmlserver licenseserver
localhost sudo /opt/Altova/RaptorXMLXBRLServer2014/bin/raptorxmlxbrlserver licenseserver
localhost
In the command above, localhost is the name of the server on which LicenseServer is installed.Notice also that the location of the RaptorXML(+XBRL) Server executable is:
/opt/Altova/RaptorXMLServer2014/bin
/opt/Altova/RaptorXMLXBRLServer2014/bin
After successfully registering RaptorXML(+XBRL) Server, you can go to LicenseServer and assigna license to RaptorXML(+XBRL) Server. How to do this is described in the section AssignLicenses to Registered Products.
Next StepsAfter you have registered your Altova product with LicenseServer, do the following:
1. If you have not already uploaded your license file/s to the LicenseServer (see previoussection, Upload Licenses to LicenseServer), upload the license file now and check thatthe license you want is active. If you have already done this, carry on to the next step,Assign Licenses.
2. Assign a license to your Altova product that has been registered with the LicenseServer.
Assign Licenses to Registered Products
This section:
Before assigning a license The Server Management tab Icons in the Server Management tab Note on cores and licenses Assigning a license Unregistering products from LicenseServer
Before assigning a licenseBefore you assign a license to an Altova product, make sure that:
The relevant license has been uploaded to the license pool of LicenseServer and that thelicense is active.Your Altova product has been registered with LicenseServer.

62 Administrator Guide Altova LicenseServer
© 2014 Altova GmbHAltova FlowForce
The Server Management tabLicenses are assigned in the Server Management tab of the LicenseServer Configuration page(screenshot below). The screenshot shows that three Altova products have been registered withLicenseServer. (Since MapForce Server and StyleVision Server are bundled with FlowForceServer, registering FlowForce Server with LicenseServer automatically also registers MapForceServer and StyleVision Server. No additional registration of the latter two products are required ifFlowForce Server is registered.)
Note the following points about the Server Management tab:
Each product is listed under the name of its client machine. In the screenshot above, oneclient machine, named Doc.altova.com, is listed. This client machine (Doc.altova.com)has three Altova products registered with the LicenseServer. If an Altova product on adifferent client machine is registered with this LicenseServer, then that client machine,with its registered products, will also be listed in the Server Management tab.Each registered Altova product on a client machine has its own Key Code entry, whichtakes the key code of a license. A registered product's key code is assigned by clickingits Edit Assigned Licenses button (see icon list below) and selecting the requiredlicense from those available for that product (for example, FlowForce Server) in thelicense pool. This procedure is explained in more detail below.Each product also has a line stating how many CPU cores need to be licensed to run

© 2014 Altova GmbH
Altova LicenseServer 63Administrator Guide
Altova FlowForce
that product on that client. If the number of licensed cores is less than the numberrequired, then the information is marked in red (see screenshot above). (The number ofCPU cores that need to be licensed is the number of CPU cores on that client and isobtained from the client machine by LicenseServer.) If multiple versions of a single product (for example, StyleVision Server 2013 andStyleVision Server 2014) have been installed on one machine and if each of theseinstallations has been registered with a single LicenseServer, then the multipleregistrations are consolidated in a single registration in the Server Management tab anddisplayed as a single registration. When a license is assigned to this single registration,all the installations indicated by that registration will be licensed. However, multipleinstances of only one installation can be run simultaneously on the client machine. Forexample, multiple instances of StyleVision Server 2013 or multiple instances ofStyleVision Server 2014 can be run simultaneously, but not one instance of StyleVisionServer 2013 and one instance of StyleVision Server 2014. Note that newly installedversions must be registered for them to run.New versions of Altova server products can only be licensed with the latest version ofLicenseServer at the time of the product's release. Older Altova server products will workwith newer versions of LicenseServer. So, if you are installing a new version of an Altovaserver product and if your current LicenseServer version is not the latest, de-install theolder version of LicenseServer and install the latest version. All registration and licensinginformation held in your older version of LicenseServer will be saved, at the time of de-installation, to a database on the server, and will be imported automatically into the newerversion. (The version number of the LicenseServer that is appropriate for any particularversion of a server product is displayed during the installation of that server product. Youcan choose to install this version along with the server product. The version of thecurrently installed LicenseServer is given at the bottom of the LicenseServer configurationpage.)
Icons in the Server Management tab
Edit Assigned Licenses. Available with each product. Pops up the Manage Licensesdialog, in which new licenses can be assigned to the product and already assignedlicenses can be edited.
Show Licenses. Appears with each license. Switches to the License Pool tab andhighlights the selected license, so that license details can be read.
Unregister This Product. Available with each product. The selected product (on theselected client machine) will be unregistered from LicenseServer.
Note on cores and licensesThe licensing of Altova server products is based on the number of processor cores available on theproduct machine. For example, a dual-core processor has two cores, a quad-core processor fourcores, a hexa-core processor six cores, and so on. The number of cores licensed for a product ona particular server machine must be greater than or equal to the number of cores available on thatserver, whether it's a physical or virtual machine.

64 Administrator Guide Altova LicenseServer
© 2014 Altova GmbHAltova FlowForce
For example, if a server has eight cores (an octa-core processor), you must purchase at least an8-core license. You can also combine licenses to achieve the core count. So, two 4-core licensescan also be used for an octa-core server instead of an 8-core license.
If you are using a computer server with a large number of CPU cores but only have a low volumeto process, you may also create a virtual machine that is allocated a smaller number of cores,and purchase a license for that number. Such a deployment, of course, will have less processingspeed than if all available cores on the server were utilized.
Note: Each license can be used for only one client machine at a time, even if it has unusedlicensing capacity. For example, if a 10-core license is used for a client machine that has6 CPU cores, then the remaining 4 cores of the license cannot be used simultaneouslyfor another client machine.
Assigning a licenseTo assign a license to a registered product, click the Edit Assigned Licenses button of thatproduct. This pops up the Manage Licenses dialog (screenshot below).
Note the following points about the licenses displayed in the Manage Licenses dialog:
The product to be licensed is listed at the top left of the dialog. In the screenshot abovethe product is Altova FlowForce Server 2013.The dialog displays all the currently active licenses for that product in the license pool. Inour screenshot, four currently active FlowForce Server licenses are in the license pool.

© 2014 Altova GmbH
Altova LicenseServer 65Administrator Guide
Altova FlowForce
LicenseServer will automatically detect from each license in the pool the product forwhich it has been issued. The licenses in the screenshot above have been licensed, respectively, for 3 CPU cores,2 CPU cores, 4 CPU cores, and 4 CPU cores.You need to know the number of processor cores on the server on which the Altova serverproduct has been installed. If the machine has a dual-core processor, you need a two-core (the CPU Cores count) license. This license could be, for example, the secondlicense in the list shown in the screenshot above. You can also combine licenses. So, ifthe machine's processor is octa-core (eight-core), you can combine two 4-core licenses;for example, the third and fourth licenses in the list shown in the screenshot above.The Manage Licenses dialog will list only currently active licenses for that product.Licenses for other Altova products will not be listed.Licenses that have been assigned already—for example, to another installation of theproduct on the network—will have their check boxes checked. So only uncheckedlicenses may be selected.CPU cores indicates for how many CPU cores a license is valid.If you wish to make modifications to the license pool—for example, to upload, activate,deactivate, or delete a license—click the Go to License Pool button.
Select the license you wish to assign. The license's check box will be checked. Also, the totalnumber of CPU cores licensed for that product on that client is listed near the top left of the dialogas Max licensed CPU cores (see screenshot above). You can select more licenses if you wish toincrease the number of licensed CPU cores for that product on that client. The Max licensed CPUcores in this case will be the sum of the CPU cores of all the selected licenses.
After selecting the license/s, click Apply Changes. The license/s will be assigned to that productand displayed in the Server Management tab (see screenshot below). The screenshot belowshows that a 2-CPU-core license for Altova FlowForce Server has been assigned (to the clientmachine Doc.altova.com).
Unregistering productsEach Altova product registered with LicenseServer is listed in the Server Management tab underits client machine name and has an Unregister icon to its right. Click this icon to unregister theproduct. If a license was assigned to the product, the assignment will be terminated when theproduct is unregistered. To unregister all products, click the Unregister Server and AllProducts button at the bottom of the Server Management tab (see first screenshot in thissection).
To re-register a product, go to the product's pre-configuration page.

66 Administrator Guide Altova LicenseServer
© 2014 Altova GmbHAltova FlowForce
2.5.7 Configuration Page Reference
The LicenseServer Configuration page is the administrator's interface with LicenseServer. It allowsthe management of LicenseServer and the licensing of Altova products that have been registeredwith LicenseServer (FlowForce Server, MapForce Server, StyleVision Server, RaptorXML(+XBRL)Server).
The LicenseServer Configuration page is opened via a web browser. How to open the Configurationpage is described in the sections, Open LicenseServer Config Page (Windows) and OpenLicenseServer Config Page (Linux).
This section is a user's reference for the Configuration page and is organized by the tabs of theConfiguration page:
License Pool Server Management Server Monitoring Settings Messages, Log Out
For a step-by-step guide of how to assign licenses with LicenseServer, see the section How toAssign Licenses.
License Pool
This section:
Uploading a license License status Activating, de-activating, and deleting a license Icons in the License Pool tab License information Note on cores and licenses
The License Pool tab displays all the licenses that are currently on the LicenseServer (seescreenshot below). When a license file is uploaded to the LicenseServer with the Upload buttonon this page, all the licenses contained in the license file are placed in the license pool on theserver and are displayed on the License Pool page.
The License Pool page displays information about all the licenses currently on the LicenseServerand thus provides a convenient overview of all Altova product licenses. On this page you can alsoactivate, deactivate, and delete selected licenses.

© 2014 Altova GmbH
Altova LicenseServer 67Administrator Guide
Altova FlowForce
Uploading a licenseTo upload a license file (which you receive from Altova GmbH for your Altova product), click the Browse button, browse for the license file and select it. On clicking Upload, all the licensescontained in the license file are placed in the license pool and displayed on the License Pool page(screenshot above).
License statusLicense status values are as follows:
Activating: When a license is uploaded into the license pool of LicenseServer, the serverwill transmit license-related data to the altova.com master licensing server to validate,authenticate, and activate the license that was supplied. This is necessary to ensurecompliance with the Altova license agreements. During this initial activation andauthentication transaction—which typically lasts between 30 seconds and a couple ofminutes, depending on your Internet connection, speed, and overall network traffic—thestatus of the license will be indicated as Activating....
Failed Verification: If a connection with the altova.com master licensing server cannot bemade, then the status of the license in the pool will be shown as Failed Verification. Ifthis happens, check your Internet connection and firewall rules to ensure thatLicenseServer is able to communicate with the altova.com master licensing server.
Active: Once the license has been authenticated and activated, the status in the pool will

68 Administrator Guide Altova LicenseServer
© 2014 Altova GmbHAltova FlowForce
change to Active.
Inactive: If a license has been verified, but is present on another LicenseServer on thenetwork, the status in the pool will be shown as Inactive. An Inactive status also resultswhen a license is manually deactivated in the license pool by the administrator.
Blocked: A license is shown in the license pool as Blocked if there was a problemauthenticating the license and the altova.com master licensing server has not grantedpermission to the LicenseServer to use this license. This could be the result of a licenseagreement violation, over-usage of a license, or other compliance issues. Should you seea license showing up as Blocked, please contact Altova Support with your licenseinformation and any other relevant data.
These statuses are summarized in the table below:
Status Meaning
Activating... On upload, license information is sent to altova.com for verification.Refresh the browser to view the updated status. Verification and activationcan take a few minutes.
Failed Verification A connection to altova.com could not be made. After establishing aconnection, either restart the service or activate the license (with the Activate button).
Active Verification was successful, the license is active.
Inactive Verification was successful, but the license is on another LicenseServer onthe network. Licenses can be made inactive with the Deactivate button.
Blocked Verification was not successful. License is invalid and is blocked. Contact Altova Support.
Note: After a license has been sent to altova.com for verification, the browser must berefreshed to see the updated status. Verification and activation can take a few minutes.
Note: If a connection to altova.com could not be made, the status will be Failed Verification.After establishing a connection, either restart the service or try activating the license withthe Activate button.
Note: When a license is given a status of Inactive or Blocked, a message explaining the statusis also added to the Messages log.
Only an active license can be assigned to a product installation. An inactive license can beactivated or deleted from the license pool. If a license is deleted from the license pool, it can beuploaded again to the pool by uploading the license file containing it. When a license file isupdated, only those licenses in it that are not already in the pool will be uploaded to the pool. Toactivate, deactivate, or delete a license, select it and then click the Activate, Deactivate, orDelete button, respectively.
Connection to the Master Licensing Server at altova.com

© 2014 Altova GmbH
Altova LicenseServer 69Administrator Guide
Altova FlowForce
The Altova LicenseServer needs to be able to communicate with the Master Licensing Serverat altova.com to validate and authenticate license-related data and to ensure continuouscompliance with the Altova license agreements. This communication occurs over HTTPSusing port 443. If the Altova LicenseServer, after making the initial verification with the altova.com Master Licensing Server, is unable to again connect with altova.com for aduration of more than 5 days (= 120 hours), then the Altova LicenseServer will no longerpermit the usage of any Altova software products connected to the Altova LicenseServer.
Any such loss of connection with the altova.com master servers will be logged in theMessages tab of the Configuration page of the Altova LicenseServer. In addition, theadministrator can configure the Altova LicenseServer to automatically send an alert emailwhen the connection to altova.com is lost. Alert Mail settings are available in the Settingstab of the Configuration page.
Activating, deactivating, and deleting a licenseAn active license can be deactivated by selecting the license and clicking Deactivate. Aninactive license can be activated (Activate button) or deleted (Delete button). When a license isdeleted it is removed from the license pool. A deleted license can be added again to the licensepool by uploading the license file containing it. If a license file is re-uploaded, only licenses thatare not already in the license pool will be added to the license pool; licenses that are already inthe pool will not be re-added.
Icons in the License Pool tab
Edit Assigned Licenses. Appears with each license (in the Assignments column). Popsup the Manage Licenses dialog, in which new licenses can be assigned to the productand already assigned licenses can be edited.
Show License Information. Appears with each license (in the Assignments column).Provides information about the currently active clients.
License informationThe following license information is displayed:
Status: There are five values: Failed Verification | Activating | Active | Inactive | Blocked.See License status above.Name, Company: The name and company of the licensee. This information wassubmitted at the time of purchase.Product, Edition, Version: The version and edition of the licensed products.Key, Expires in days, SMP (days left): The license key to unlock the product, and thenumber of days left before the license expires. Each licensed purchase comes with a

70 Administrator Guide Altova LicenseServer
© 2014 Altova GmbHAltova FlowForce
Support & Maintenance Package, which is valid for a certain number of days. The SMPcolumn notes how many SMP days are still left.CPU Cores: The number of CPU cores that the license allows.Assignments: Access to editing dialogs and information of individual licenses.
Note on cores and licensesThe licensing of Altova server products is based on the number of processor cores available on theproduct machine. For example, a dual-core processor has two cores, a quad-core processor fourcores, a hexa-core processor six cores, and so on. The number of cores licensed for a product ona particular server machine must be greater than or equal to the number of cores available on thatserver, whether it's a physical or virtual machine.
For example, if a server has eight cores (an octa-core processor), you must purchase at least an8-core license. You can also combine licenses to achieve the core count. So, two 4-core licensescan also be used for an octa-core server instead of an 8-core license.
If you are using a computer server with a large number of CPU cores but only have a low volumeto process, you may also create a virtual machine that is allocated a smaller number of cores,and purchase a license for that number. Such a deployment, of course, will have less processingspeed than if all available cores on the server were utilized.
Note: Each license can be used for only one client machine at a time, even if it has unusedlicensing capacity. For example, if a 10-core license is used for a client machine that has6 CPU cores, then the remaining 4 cores of the license cannot be used simultaneouslyfor another client machine.
Server Management
This section:
Icons in the Server Management tab Assigning licenses One client machine under different names Requesting an evaluation license Unregistering products
In the Server Management tab (screenshot below), you can assign licenses to registeredproducts.
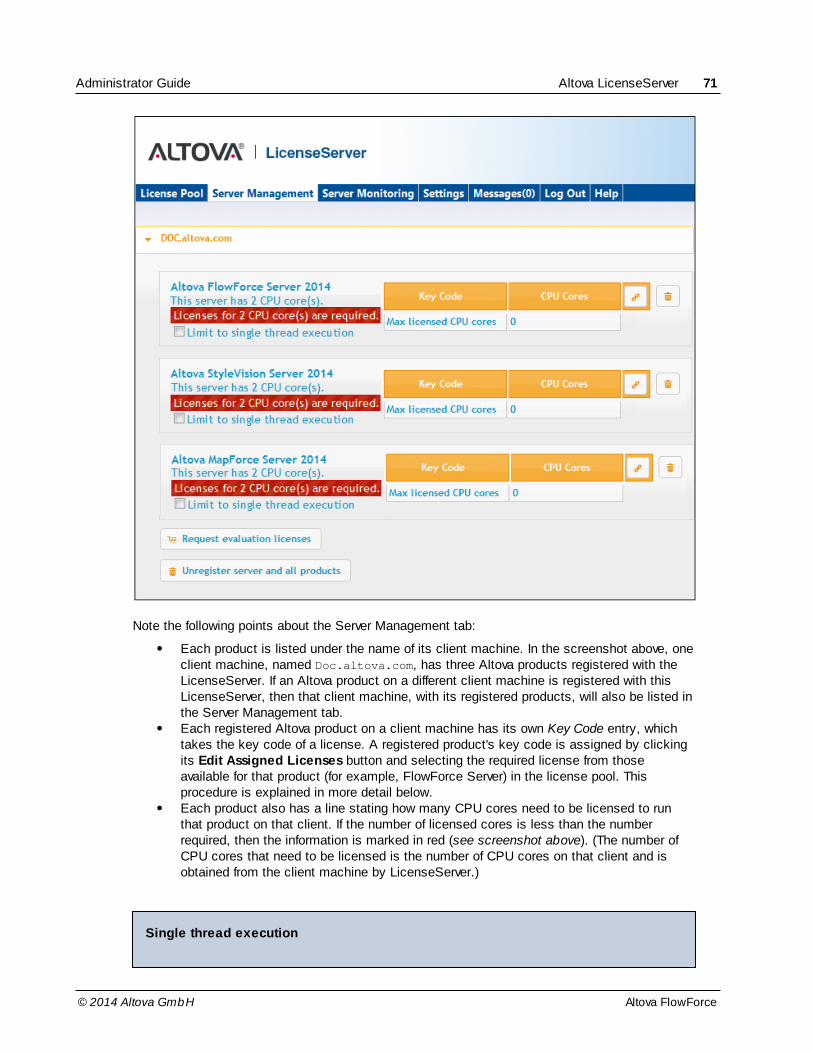
© 2014 Altova GmbH
Altova LicenseServer 71Administrator Guide
Altova FlowForce
Note the following points about the Server Management tab:
Each product is listed under the name of its client machine. In the screenshot above, oneclient machine, named Doc.altova.com, has three Altova products registered with theLicenseServer. If an Altova product on a different client machine is registered with thisLicenseServer, then that client machine, with its registered products, will also be listed inthe Server Management tab.Each registered Altova product on a client machine has its own Key Code entry, whichtakes the key code of a license. A registered product's key code is assigned by clickingits Edit Assigned Licenses button and selecting the required license from thoseavailable for that product (for example, FlowForce Server) in the license pool. Thisprocedure is explained in more detail below.Each product also has a line stating how many CPU cores need to be licensed to runthat product on that client. If the number of licensed cores is less than the numberrequired, then the information is marked in red (see screenshot above). (The number ofCPU cores that need to be licensed is the number of CPU cores on that client and isobtained from the client machine by LicenseServer.)
Single thread execution
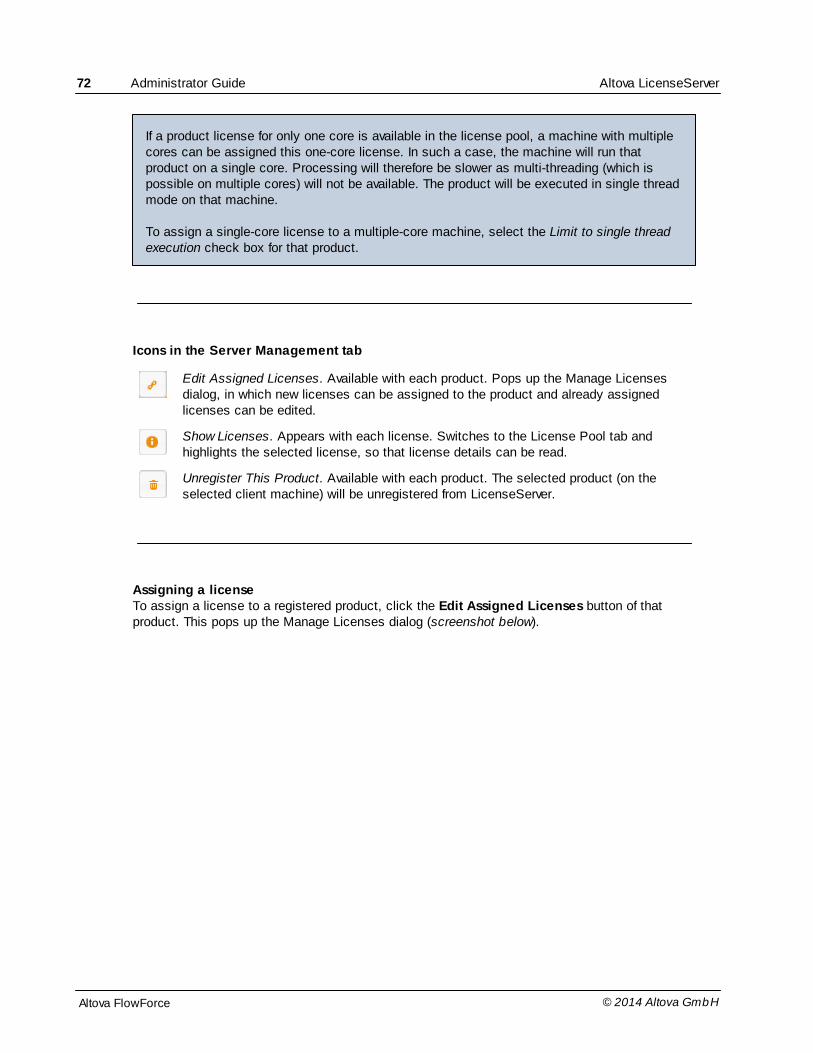
72 Administrator Guide Altova LicenseServer
© 2014 Altova GmbHAltova FlowForce
If a product license for only one core is available in the license pool, a machine with multiplecores can be assigned this one-core license. In such a case, the machine will run thatproduct on a single core. Processing will therefore be slower as multi-threading (which ispossible on multiple cores) will not be available. The product will be executed in single threadmode on that machine.
To assign a single-core license to a multiple-core machine, select the Limit to single threadexecution check box for that product.
Icons in the Server Management tab
Edit Assigned Licenses. Available with each product. Pops up the Manage Licensesdialog, in which new licenses can be assigned to the product and already assignedlicenses can be edited.
Show Licenses. Appears with each license. Switches to the License Pool tab andhighlights the selected license, so that license details can be read.
Unregister This Product. Available with each product. The selected product (on theselected client machine) will be unregistered from LicenseServer.
Assigning a licenseTo assign a license to a registered product, click the Edit Assigned Licenses button of thatproduct. This pops up the Manage Licenses dialog (screenshot below).
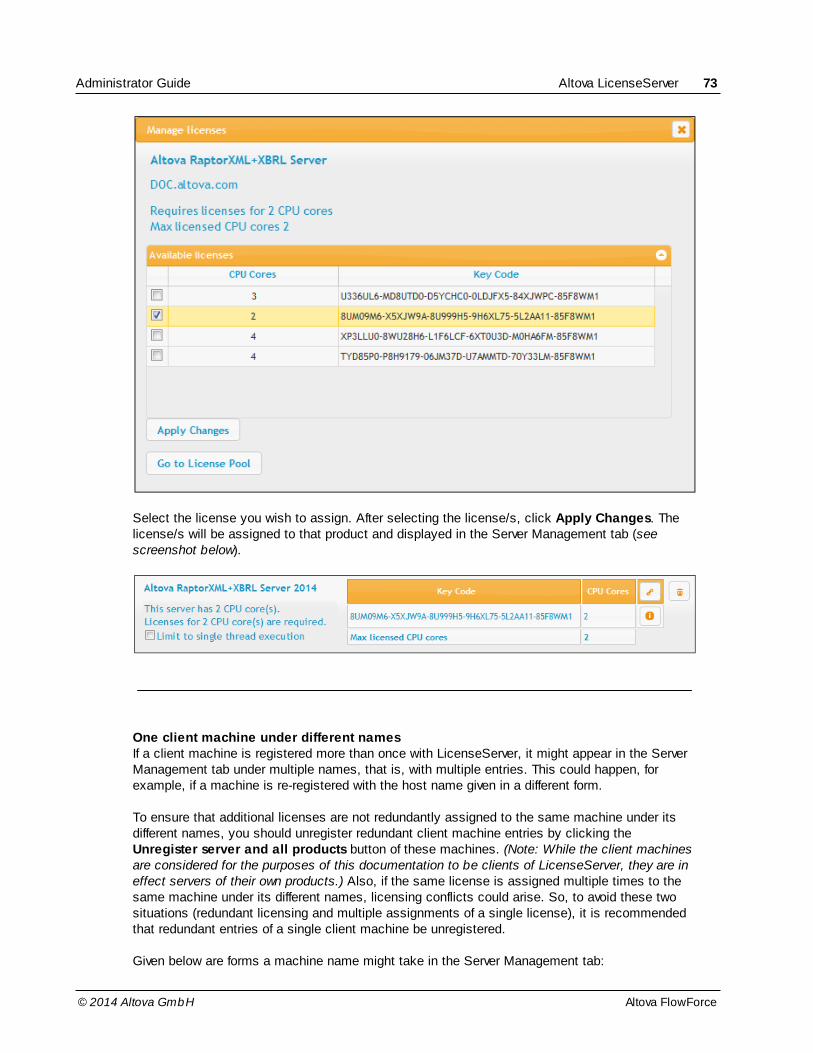
© 2014 Altova GmbH
Altova LicenseServer 73Administrator Guide
Altova FlowForce
Select the license you wish to assign. After selecting the license/s, click Apply Changes. Thelicense/s will be assigned to that product and displayed in the Server Management tab (seescreenshot below).
One client machine under different namesIf a client machine is registered more than once with LicenseServer, it might appear in the ServerManagement tab under multiple names, that is, with multiple entries. This could happen, forexample, if a machine is re-registered with the host name given in a different form.
To ensure that additional licenses are not redundantly assigned to the same machine under itsdifferent names, you should unregister redundant client machine entries by clicking the Unregister server and all products button of these machines. (Note: While the client machinesare considered for the purposes of this documentation to be clients of LicenseServer, they are ineffect servers of their own products.) Also, if the same license is assigned multiple times to thesame machine under its different names, licensing conflicts could arise. So, to avoid these twosituations (redundant licensing and multiple assignments of a single license), it is recommendedthat redundant entries of a single client machine be unregistered.
Given below are forms a machine name might take in the Server Management tab:

74 Administrator Guide Altova LicenseServer
© 2014 Altova GmbHAltova FlowForce
Host name with domain name (the fully qualified domain name, FQDN), such as: "win80-x64_1.my.domain.com" or "Doc3.my.domain.com". This happens when the host name ofthe machine (with or without the domain information) is passed as the argument of the licenseserver CLI command that is used to register the server product withLicenseServer. For example: <AltovaServerProduct> licenseserver Doc3. This
produces an FQDN such as: Doc3.my.domain.com.
An FQDN is also produced when localhost is supplied on Windows 7 systems as thehost name.
Host name without domain name. For example: "win80-x64_1" or "Doc3". This happenson Windows 8 systems when localhost is given as the machine name.
localhost. In some cases, localhost is also displayed as a machine name.
Note: If, during installation of the Altova server product on Windows machines, the machine isautomatically registered with LicenseServer, localhost is used by the installer as themachine name.
Requesting an evaluation licenseYou can obtain a 30-day free evaluation license for each of a client's installed Altova products thathave been registered with LicenseServer. Click the Request Evaluation Licenses button nearthe bottom of the Server Management tab. A dialog pops up containing a list of the Altova serverproducts (on that client machine) which have been registered with LicenseServer. Make sure thatthe products for which you want an evaluation license are checked, then fill in the registrationfields, and send the request. You will receive an e-mail from Altova containing the 30-dayevaluation license/s. The number of cores for which the license will be valid per product will beexactly the number required by the product at the time the request is sent. Save the license/s todisk and upload to the license pool.
Unregistering productsEach Altova product registered with LicenseServer is listed in the Server Management tab underits client machine name and has an Unregister icon to its right. Click this icon to unregister theproduct. If a license was assigned to the product, the assignment will be terminated when theproduct is unregistered. To unregister all products, click the Unregister Server and AllProducts button at the bottom of the Server Management tab (see first screenshot in thissection).
To re-register a product with LicenseServer, go to the product's Setup page or its CLI and registerit. See: Register FlowForce Server, Register MapForce Server, Register StyleVision Server, andRegister RaptorXML(+XBRL) Server.
For more information, see the section, Assigning Licenses to Registered Products.

© 2014 Altova GmbH
Altova LicenseServer 75Administrator Guide
Altova FlowForce
Server Monitoring
The Server Monitoring tab provides an overview of servers currently running licensed Altovaproducts. It contains product information along with information about users and licenses.
Settings
This section:
Network settings Alert Mail settings Show hints for receiving and deploying evaluation licenses
The Settings tab is as shown below. You can set the following:
The password for logging in to LicenseServer. Enter the desired password and click Change Password.Network settings for the web-based configuration page (Web UI), the proxy server used toconnect to the Internet (if any), for and for LicenseServer (License Service). Thesesettings are described below the screenshot.Email server settings and the alert mail recipient to contact in the event of a significantLicenseServer occurrence. These settings are described below the screenshot.Test the settings by clicking Test Connection to Altova. Note that you must save newsettings (by clicking the Save button at the bottom of the pane) before testing theconnection. The Test Connection to Altova button is disabled while the test is inprogress, and becomes enabled again when the test has been completed.
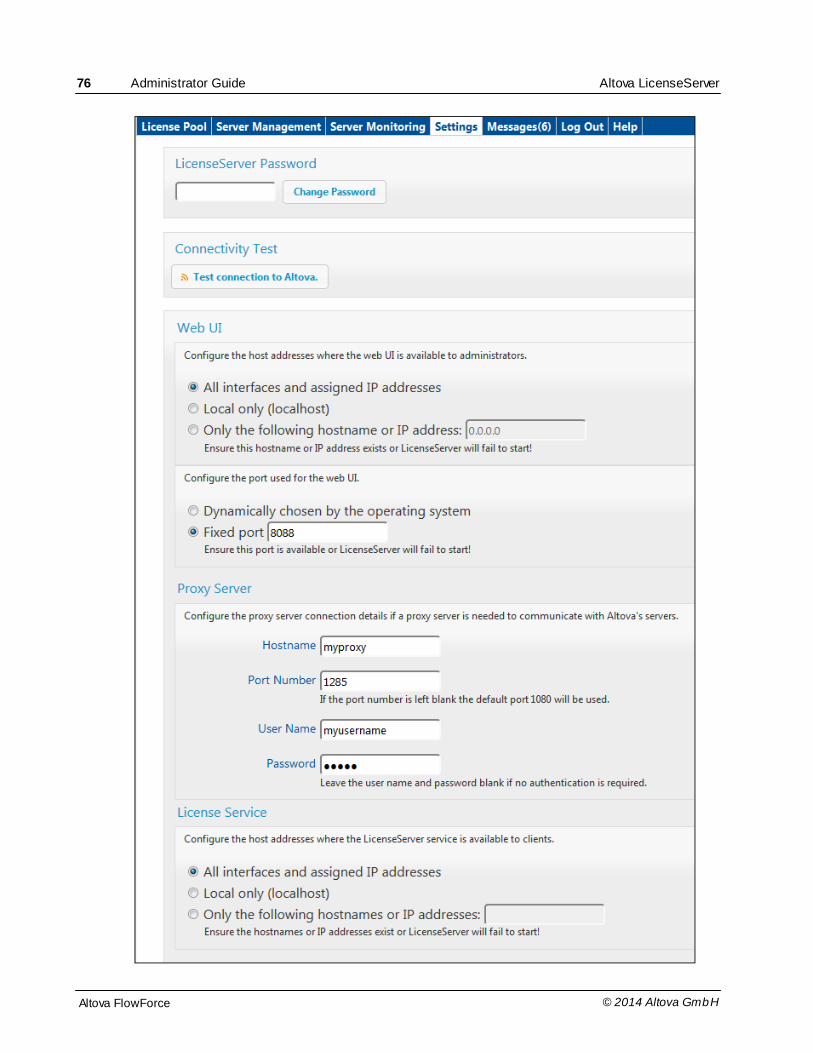
76 Administrator Guide Altova LicenseServer
© 2014 Altova GmbHAltova FlowForce

© 2014 Altova GmbH
Altova LicenseServer 77Administrator Guide
Altova FlowForce
Network settingsAdministrators can specify network access points to the LicenseServer configuration page and toLicenseServer:
Web UI: Allowed IP addresses can vary from all interfaces and IP addresses on thatmachine to a fixed address, and ports can be either dynamically calculated or fixed. Thisallows a wide range of allowed IP-Address:Port settings. The default port setting is 8088.Proxy Server (available from v1.3 onwards): If a proxy server is being used to connect tothe Internet, the details of the proxy server must be entered in the Proxy Server pane (seescreenshot above). These fields need to be filled in only if a proxy server is being used.Also, proxy servers often do not need authentication (a user-name and password), inwhich case these two fields can be left blank. To configure LicenseServer for the proxyserver, enter the proxy server's host name, and, if required, a port number.License Service: IP addresses can vary from all interfaces and IP addresses on thatmachine to a fixed address. If you list hostnames and/or IP addresses, use a comma-separated list without any spaces (for example: hostname1,IPAddress1,hostname2).Theport number is fixed at 35355.
By default, these settings allow unrestricted access to LicenseServer and its configuration pagefrom within the networks to which LicenseServer is connected. If you wish to restrict access toeither LicenseServer or its configuration page, enter the appropriate settings and click Save.
Run a connectivity test (see above) to check that the settings are correct.
Alert Mail settingsAltova LicenseServer needs to be connected to the altova.com server. If the connection is brokenfor more than 24*5 hours (5 days), LicenseServer will not allow licenses. As a result, worksessions with Altova products licensed by LicenseServer could be disrupted.
In order to alert the administrator that a connection is broken, an alert mail can be sent to anemail address. The Alert Mail pane (see screenshot below) is where you enter settings forsending alert mails to an administrator's email address.

78 Administrator Guide Altova LicenseServer
© 2014 Altova GmbHAltova FlowForce
SMTP Host and SMTP Port are the access details of the email server from which the email alertwill be sent. User Authentication and User Password are the user's credentials for accessing theemail server. The From field takes the address of the email account from which the email will besent. The To field takes the recipient's email address.
Click Save when done. After saving the Alert Mail settings, email alerts will be sent to theaddress specified whenever a significant event occurs, such as when connection to altova.comis lost. Note that such events are also recorded in the Messages tab, and can be looked up there.
Show hints for receiving and deploying evaluation licenses Checking this box (see secreenshot above) displays, at the top of the configuration page, briefinstructions about how to evaluate and deploy evaluation licenses.
Messages, Log Out
The Messages tab displays all messages relevant to licenses in the license pool of theLicenseServer. Each message has a Delete button that allows you to delete that particularmessage.
The Log Out tab serves as the Log Out button. Clicking the tab logs you out immediately andthen displays the Login mask.
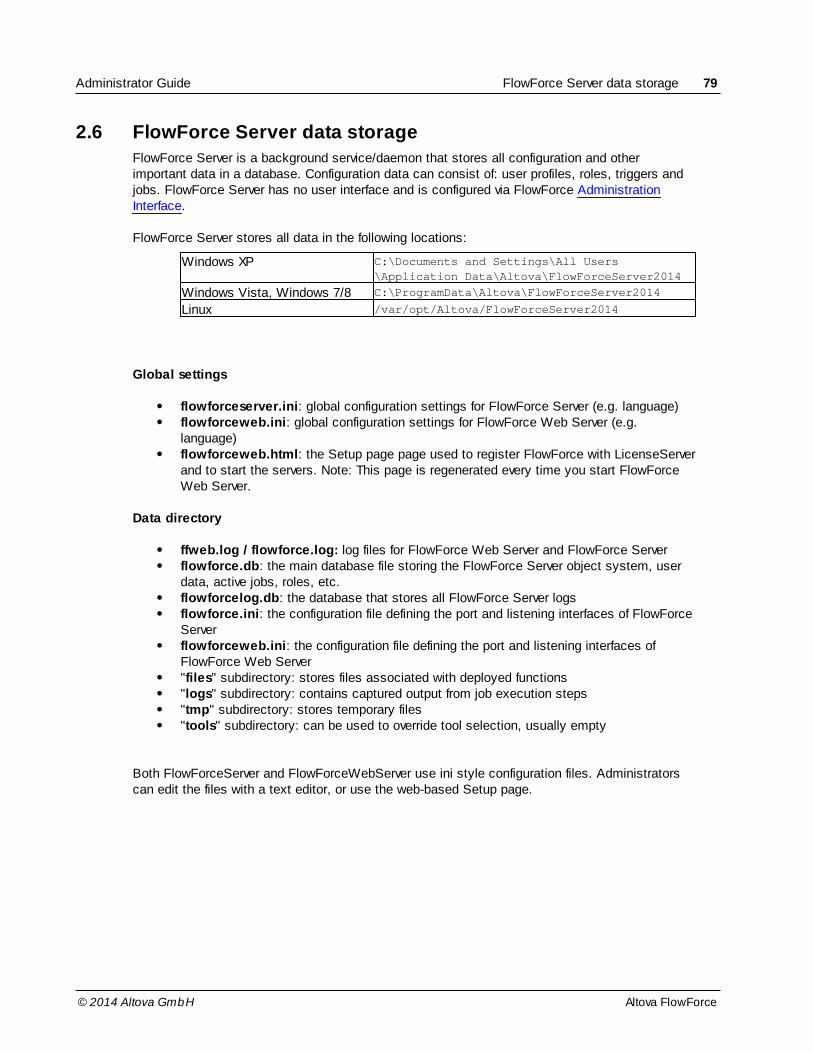
© 2014 Altova GmbH
FlowForce Server data storage 79Administrator Guide
Altova FlowForce
2.6 FlowForce Server data storage
FlowForce Server is a background service/daemon that stores all configuration and otherimportant data in a database. Configuration data can consist of: user profiles, roles, triggers andjobs. FlowForce Server has no user interface and is configured via FlowForce AdministrationInterface.
FlowForce Server stores all data in the following locations:
Windows XP C:\Documents and Settings\All Users\Application Data\Altova\FlowForceServer2014
Windows Vista, Windows 7/8 C:\ProgramData\Altova\FlowForceServer2014
Linux /var/opt/Altova/FlowForceServer2014
Global settings
flowforceserver.ini: global configuration settings for FlowForce Server (e.g. language)flowforceweb.ini: global configuration settings for FlowForce Web Server (e.g.language)flowforceweb.html: the Setup page page used to register FlowForce with LicenseServerand to start the servers. Note: This page is regenerated every time you start FlowForceWeb Server.
Data directory
ffweb.log / flowforce.log: log files for FlowForce Web Server and FlowForce Serverflowforce.db: the main database file storing the FlowForce Server object system, userdata, active jobs, roles, etc.flowforcelog.db: the database that stores all FlowForce Server logsflowforce.ini: the configuration file defining the port and listening interfaces of FlowForceServerflowforceweb.ini: the configuration file defining the port and listening interfaces ofFlowForce Web Server"files" subdirectory: stores files associated with deployed functions"logs" subdirectory: contains captured output from job execution steps"tmp" subdirectory: stores temporary files"tools" subdirectory: can be used to override tool selection, usually empty
Both FlowForceServer and FlowForceWebServer use ini style configuration files. Administratorscan edit the files with a text editor, or use the web-based Setup page.

80 Administrator Guide FlowForce Administration Interface
© 2014 Altova GmbHAltova FlowForce
2.7 FlowForce Administration Interface
FlowForce Server Administration Interface is the module that acts as the front-end of FlowForceServer. FlowForce Server Administration Interface can be accessed using an internet browser andallows you to configure the specific server actions such as: jobs, triggers, etc.
FlowForce Server supports the current versions of Mozilla Firefox, Google Chrome, and MicrosoftInternet Explorer 9 and 8. Note: When using Internet Explorer 9 as your browser, please disablethe "Show friendly HTTP error messages" in the Advanced tab, to view the HTML form.
There are several menu items available in the browser window:
HomeDisplays the connection details as well as a list of currently running/aborted jobs and activetriggers.
ConfigurationDisplays the contents of the container hierarchy, and allows you to access containers, jobs,credentials, and functions by clicking them in the list. New containers, jobs, and credentials, areadded using the "Create " button. See the User Guide for more details.
LogDisplays the log table. Can be filtered by time, job name and severity.
AdministrationLets you view and edit/access server-wide configuration, such as user accounts, roles and othersettings.
UsersAllows you to create, remove, and maintain users.
RolesAllows you to create, remove, and maintain access control roles.
Settings

© 2014 Altova GmbH
FlowForce Administration Interface 81Administrator Guide
Altova FlowForce
Allows you to define the global settings of FlowForce, i.e. the default time zone and thedefault mail server settings.
HelpOpens the FlowForce Server documentation in a separate browser tab or window.

82 Administrator Guide FlowForce access control
© 2014 Altova GmbHAltova FlowForce
2.8 FlowForce access control
FlowForce Server grants access control to containers and configurations. Logged-in users aregranted privileges and permissions based on explicit assignments to their user account, as wellas the roles the user is a member of.
Privileges are global rights, independent of the FlowForce Server container hierarchy, whereaspermissions are inherited down the hierarchy and can be refined at each level.
Users and Roles:Users are persons that have been added to FlowForce Server by the FlowForce Serveradministrator. Depending on the assigned rights and privileges, users can define or run FlowForceServer jobs.
Roles are used to manage privileges and object permissions for user groups as opposed toindividual users.
Privileges:Privileges control user rights globally and can be defined in the Users and Roles pages.
Permissions:Permissions control access to containers and configurations. Unlike privileges they can beredefined on every level of the container hierarchy, and are by default inherited from parentcontainers.
Credentials:Credentials are stored login data used to execute FlowForce jobs.
The same system used for Linux.
© 2014 Altova GmbH
FlowForce access control 83Administrator Guide
Altova FlowForce
2.8.1 Users and Roles
A user account defines a log-in name and has a set of roles the user is a member of. A role canbe a member of another, broader role, which makes all members of the narrower role alsomembers of the broader role.
This enables the definition of hierarchical access rights, the role Director of Marketing may be amember of Marketing, which in turn may be a member of Employees. Assigning a user, e.g. Bob,the role Director of Marketing, automatically makes him a member of Marketing and of Employeesas well. When Bob logs into FlowForce Server he will be granted all privileges and permissionsgranted to any of his roles.
Two special users are predefined by FlowForce:root is the initial administrator user. It is by default all-powerful and allows tasks such as adding other users and roles, as well as setting up privileges and permissions.
anonymous is a special user account for users that do not explicitly log in. Anonymousaccess to the FlowForce Server Administration Interface is not possible, but you canenable anonymous access for certain services exposed via the HTTP service interface.
Two special roles are also predefined by FlowForce:authenticated is the role automatically assigned to every user except anonymous. Ittherefore includes every user who is authenticated using an existing user name andpassword.
all is the role automatically assigned to every user including anonymous.
While any users you create will be members of both all and authenticated, any roles you createare not by default members of any other role.
See also:PrivilegesPermissionsCredentials
Defining restricted user rights
How to add Users
This page allows Administrators to define users and assign them user roles. The user name andpassword needed to access the web administration interface, or to deploy MapForce mappings,are defined here.
To add a user to FlowForce:1. Click the "Create User" button on the Users page (of the Administration tab).
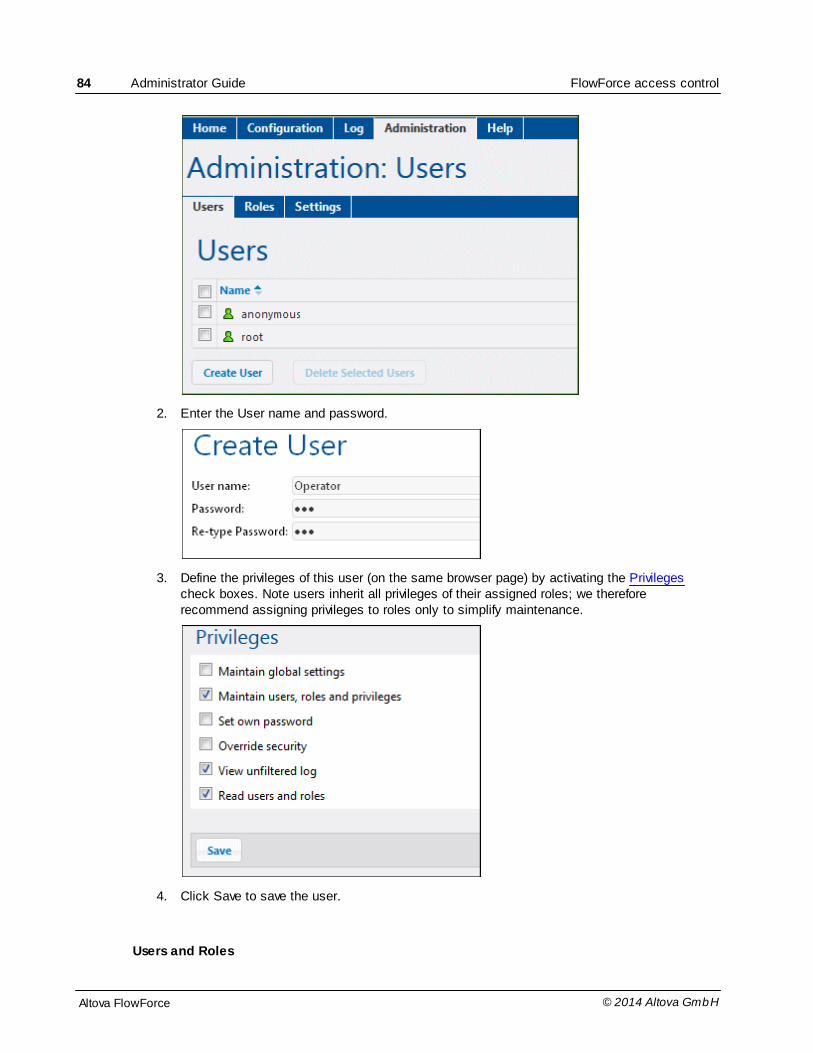
84 Administrator Guide FlowForce access control
© 2014 Altova GmbHAltova FlowForce
2. Enter the User name and password.
3. Define the privileges of this user (on the same browser page) by activating the Privilegescheck boxes. Note users inherit all privileges of their assigned roles; we thereforerecommend assigning privileges to roles only to simplify maintenance.
4. Click Save to save the user.
Users and Roles

© 2014 Altova GmbH
FlowForce access control 85Administrator Guide
Altova FlowForce
Roles make it easy to define user groups such as project teams, branch offices etc. To assignroles to a user on this page, roles must have been previously defined on the Roles page. Notethat two default roles have already been assigned to this user, i.e. "all" and "authenticated".
You can however assign a user to a role on the Roles page if you want to.
To assign one or more roles to a user:1. Click the role name check box(es) of the role(s) you want to assign (e.g. Deploy_mapping
which is added in the following Roles topic).2. Click the "Assign" button to assign the role(s) to this user.
Role assignments are saved immediately.

86 Administrator Guide FlowForce access control
© 2014 Altova GmbHAltova FlowForce
The Deploy_mapping role has now been assigned to the user "Operator".
Note that the roles "all" and "authenticated" are default roles supplied with FlowForce.
See also: How to add Roles
How to add Roles
To add a role to FlowForce:1. Click the "Create Role" button on the Roles page.
2. Enter the Role name (e.g. Deploy_mapping) and define the privileges the members of thisrole should have, by activating the Privileges check boxes, then click Save to save therole.

© 2014 Altova GmbH
FlowForce access control 87Administrator Guide
Altova FlowForce
Note: Users and roles cannot have the same names in FlowForce.
Roles and UsersTo assign a user to a role on this page (Role Deploy_mapping), users must have been previouslydefined on the Users page.
To assign a user to a role:1. Click the user (or role) check box that you want to assign the role to, in the "Users/Roles
available" table.2. Click the "Assign" button to assign the user(s) to this role.
The user "Operator" has now been added to the Deploy_mapping role.

88 Administrator Guide FlowForce access control
© 2014 Altova GmbHAltova FlowForce
Assigning roles to rolesFlowForce Server makes it possible for you to assign roles to roles. What this does is allowindirect inheritance of permissions/privileges.
If user A is a member of role B, and role B is a member of role C, then user A is also anindirect member of C.
See also: Defining restricted user rights
Renaming Users and Roles
Users and Roles can now be renamed/edited at any time by the "root" user and by other usersthat have been given the privileges to do so by the root user. Please see Privileges for moreinformation on the specific privileges.
The user name "root" cannot be changed.
To rename a user:1. Click Administration | Users, then click the User name you want to change, e.g.
Operator.
2. Click in the "User name" field and change the name of the user, e.g. IT group, then clickSave.

© 2014 Altova GmbH
FlowForce access control 89Administrator Guide
Altova FlowForce
Note: you can still change the privileges assigned to the user before you click Save.
Notes:When a user name is changed, the currently assigned user password is retained. If a user changes their own name, (providing the correct privileges were assigned) there isno need to log in to the session again. The changed name will automatically be visible inthe "logged-in as:" field.
To rename a role:1. Click Administration | Roles, then click the Role name you want to change, e.g.
Deploy_mapping. 2. Click in the "Role name" field and change the name of the role, e.g. ProductionDeploy,
then click Save.
Notes:The members of the renamed role are retained. The "Members of role" entry is updated tothe new name of the role. The default roles "all" and "authenticated" cannot be changed.

90 Administrator Guide FlowForce access control
© 2014 Altova GmbHAltova FlowForce
Renaming containers/objects
Containers and the objects they contain (jobs etc.) can now be renamed/edited at any time by the"root" user and by other users that have been given the privileges to do so by the root user.Please see Privileges for more information on the specific privileges.
Containers at the root level, i.e. at the level of /public and /system can only be added, deleted, ormoved by the "root" user. Containers below this hierarchical level, can be manipulated by otherusers if they have been given the privileges to do so by user "root".
To rename a container or job:1. Click the Configuration button, then navigate to the container/job that you want to rename,
e.g. /public.2. Click the check box next to the container, or job name, e.g. Copy to Production.
The "Move or Rename Selected Object" button becomes active at this point. 3. Clicking the button allows you to choose between two options at this point.
To rename the job:
- Click in the "Name" field and edit the name of the object, e.g. Copy to Prod.The currently inactive "Move or Rename" button, changes into "Rename" at this point.
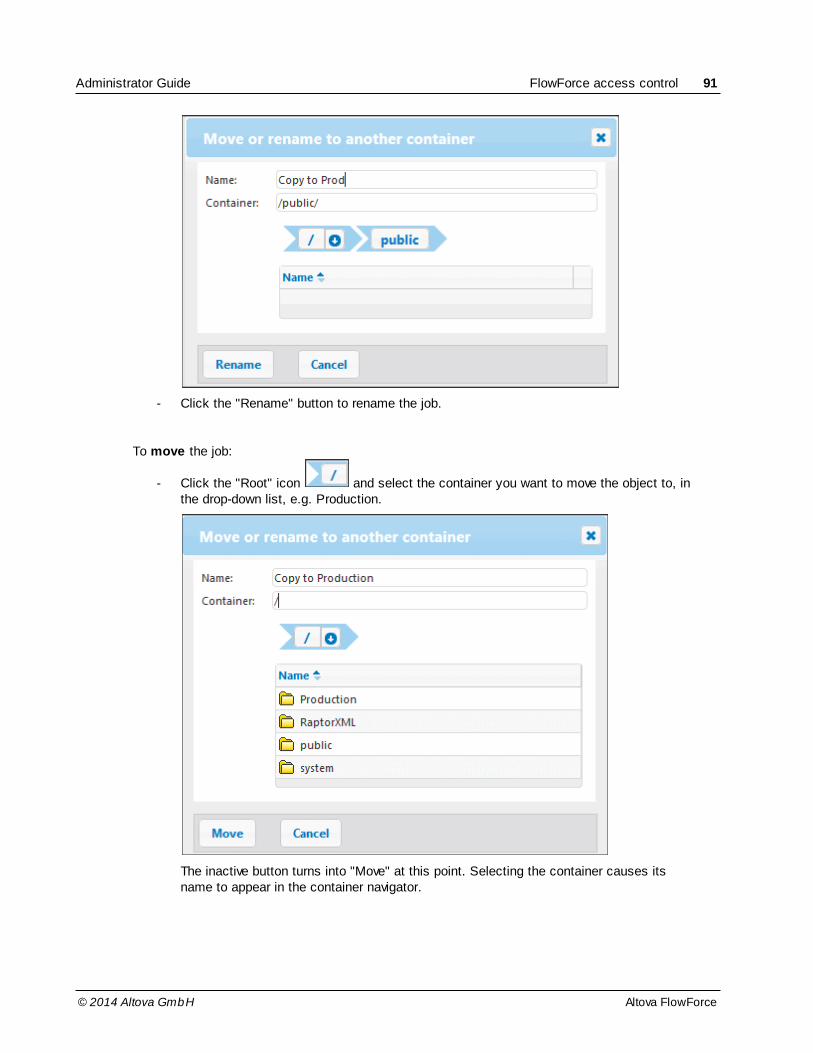
© 2014 Altova GmbH
FlowForce access control 91Administrator Guide
Altova FlowForce
- Click the "Rename" button to rename the job.
To move the job:
- Click the "Root" icon and select the container you want to move the object to, inthe drop-down list, e.g. Production.
The inactive button turns into "Move" at this point. Selecting the container causes itsname to appear in the container navigator.

92 Administrator Guide FlowForce access control
© 2014 Altova GmbHAltova FlowForce
- Click Move the job to its destination.
To move multiple objects:1. Click the check boxes next to the object/job names you want to move.
The button changes to "Move Selected Objects" at this point.
2. Click the button and use the container navigator to select the destination of the objects,then click the Move button to move them.
Note:The top-most check box, next to the Name text, lets you select/deselect all the objectsin the container.
Defining restricted user rights
To restrict access to the FlowForce Server /public container, it is recommended to perform thefollowing steps:
Take away permissions and privileges from the authenticated role.Group users requiring extra permissions in a new role.Assign extra permissions to the new role.

© 2014 Altova GmbH
FlowForce access control 93Administrator Guide
Altova FlowForce
To take away permissions and privileges from the authenticated role:1. Go to the Configuration page.2. Click the "Permissions" button to the right of the /public container. 3. Click the "Change" button for authenticated.4. Define the permissions that should apply to all users.5. Click "Save Changes" to commit your changes.
To group users requiring extra permissions in a new role:1. Go to the Administration page.2. Click Roles to go to see the roles list.3. Click the "Create Role" button to create a new role.4. Enter a descriptive role name, e.g. Operators.5. Click "Save" to save your changes.6. Select the users you want to assign to the role from the list on the left (Users/Roles
available).7. Click "Assign" to assign them to the new role.
To assign extra permissions to the new role:1. Go to Configuration page.2. Click the "Permissions" button next to the /public container.3. Click "Add Permissions". 4. Select the role from the combo box.5. Define the extra permissions for this role. 6. Click "Save Changes" to commit your changes.
See also:Privileges

94 Administrator Guide FlowForce access control
© 2014 Altova GmbHAltova FlowForce
2.8.2 Privileges
Privileges control several user rights globally. This means privilege settings cannot be overriddenin the container hierarchy of FlowForce. When a user logs into FlowForce, the set of effectiveprivileges is determined by the user privileges and all role privileges the user is member of.
It is recommended to assign privileges only to roles, and have the assignment to users take placevia role membership.
Privileges are assigned on the user and role pages of the FlowForce Server AdministrationInterface.
Maintain global settings A user having this privilege can change the global settings of FlowForce Server that are to befound on the Administration | Settings page. These are the time zone and SMTP settings set upby the administrator.
Maintain users, roles and privilegesAny user having this privilege can create, delete and edit users and roles, their privilegeassignments and passwords.
This is an administrative privilege and should only be assigned to FlowForce Serveradministrators.
By default, only the user "root" possesses this privilege.
Set own passwordAny user having this privilege can change his own password. Users who do not have this privilegeneed to have their password set by a FlowForce Server administrator.
By default the "authenticated" role, and hence every user account except "anonymous",possesses this privilege.
Override securityAny user having this privilege can change permissions in the container hierarchy without needing "write" security permission. This allows FlowForce Server administrators to regain access to

© 2014 Altova GmbH
FlowForce access control 95Administrator Guide
Altova FlowForce
resources accidentally rendered inaccessible.
This is an administrative privilege and should only be assigned to FlowForce Serveradministrators.
By default, only "root" possesses this privilege.
View unfiltered logBy default users can only see log entries related to Configurations they have "read" access to. Bygranting this privilege a user can read all log entries, including those not associated with aspecific configuration.
By default, only "root" possesses this privilege.
Read users and rolesBy default users will only see their own user account and any roles they are member of. Bygranting this privilege a user can read all defined users and roles.
By default, only "root" possesses this privilege.
See also:Permissions

96 Administrator Guide FlowForce access control
© 2014 Altova GmbHAltova FlowForce
2.8.3 Permissions
Permissions control access to containers and configurations. Unlike privileges they can beredefined on every level of the container hierarchy, and are by default inherited from parentcontainers. Click the Configuration tab and the Permissions button (of that row, e.g. public) to seethe container permissions.
Permissions, like privileges, are inherited from all roles the user is a member of, as well as frompermissions directly assigned to the user.
This inheritance takes precedence over container hierarchy inheritance. If a permission isredefined for any role the user is a member of, container hierarchy inheritance for this particularpermission is overridden.
Permission checks are performed on every user interaction. A user can only successfully edit a

© 2014 Altova GmbH
FlowForce access control 97Administrator Guide
Altova FlowForce
Configuration when all required permissions are granted. Permissions are not evaluated upon jobexecution, therefore any permission changes will not retroactively apply to already previously jobs.
FlowForce Server assigns permissions in several groups:
ContainerThe container permissions define what a user can do with objects in a container.
If the container has "read" access, the user can list the contents and find an object in thecontainer.
If the container has "read"/"write" access, the user can additionally create new (and deleteexisting) objects within the container, depending on other permissions that may apply.
ConfigurationThe configuration permissions define what a user can do with a configuration (job, credential).
If the configuration has "read" access, the user can look at the details of that configuration, suchas the defined execution steps or the defined triggers.
If the configuration has "read"/"write" access, the user can additionally modify that configuration.To successfully create a new configuration, or delete an existing one, the user must be permitted"write" access for the container and the configuration.
CredentialThe credential permission defines what a user can do with a credential. This makes it possible tosupply credentials for reuse.
If the credential has "use" access, the user is permitted to refer to this credential from anotherconfiguration.
ServiceThe service permission defines access to a job via the HTTP request interface.
If the service has "use" access, the user is permitted to access the service and thus execute thejob via the request interface.
Note that service permission checks skip any container hierarchy checks. If a user is permitted touse a service he may do so without having "read" access to the container the corresponding job isdefined in.
Also note that by granting service use to "anonymous", it becomes possible to use that servicewithout any authentication.
FunctionThe function permission defines whether a user can invoke a function as an execution step inanother function.
If the function has "use" access, it is permitted to call this function from another function.
SecurityThe security permission controls access to the container's child permission lists.

98 Administrator Guide FlowForce access control
© 2014 Altova GmbHAltova FlowForce
If security has "read" access, the user is permitted to read the permission list of any child of thecontainer.
If security has "read"/"write" access, the user can additionally change the permission list of anychild of the container.
By default users are permitted to read only permissions applicable to them. That means anypermissions assigned to themselves or any role they are a member of. If the "Read Users andRoles" privilege is granted, users can read all permission entries.
See also:How to add Permissions
How to add Permissions
Permissions can be assigned to both a user and a role. Read/Write/Use permissions shouldgenerally only be assigned to roles and not to individual users, to simplify maintenance.
Permissions are accessed by clicking the "Permissions" button at the bottom of the right of thepage, or next to the container that you want to define the permissions for. The screenshot belowshows the permissions overview for the /public container.

© 2014 Altova GmbH
FlowForce access control 99Administrator Guide
Altova FlowForce
Permissions can be inherited from containers above the current container, if "Inherit" is selected(shown as the forward slash character / for the root container) on the Permissions overview pageshown above.
To add a new Permission to a user or role:Having clicked the "Permissions" button on the Container page:
1. Click the "Add Permissions" button on the Permission overview page of the container youwant the permission to be added to, e.g. Container /public.
2. Select a previously defined role (or user) from the "User or Role" combo box e.g."Deploy_mapping (role)".

100 Administrator Guide FlowForce access control
© 2014 Altova GmbHAltova FlowForce
3. Change the "Configuration" permission to "Read/Write" and leave the other permissionsas they are currently defined (Inherit for all), then click "Save Changes".
The Deploy_mapping permission list has now been added to the container "/public".
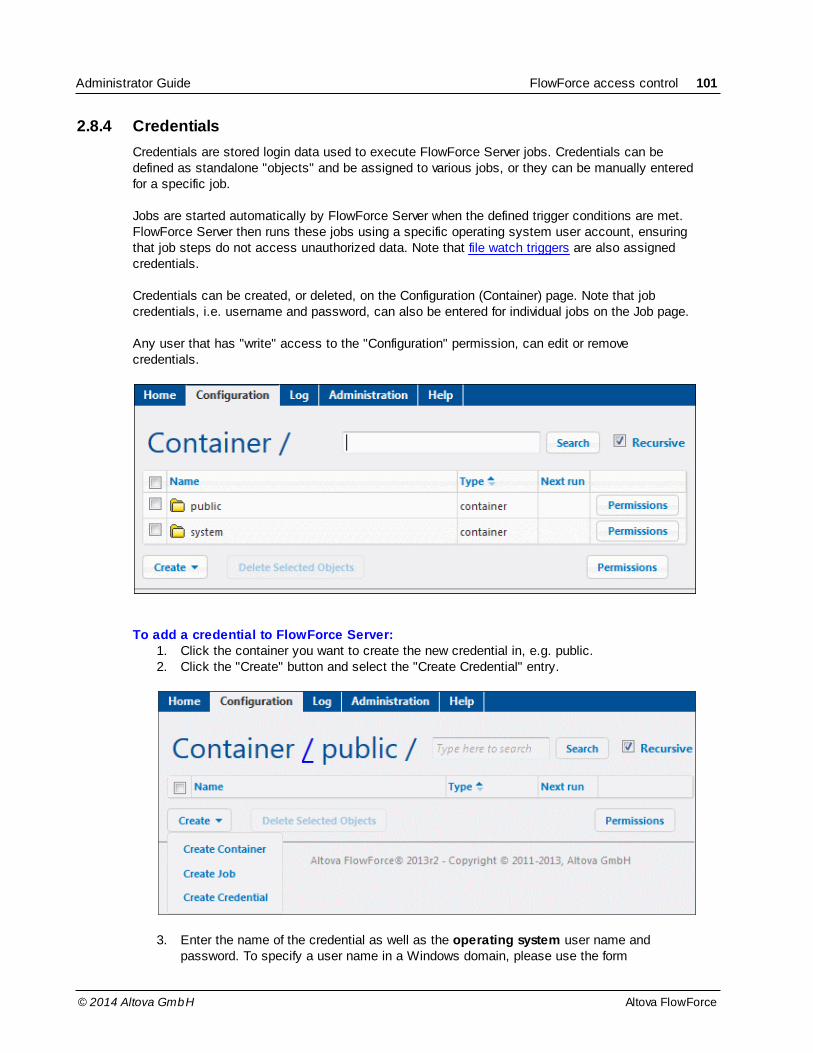
© 2014 Altova GmbH
FlowForce access control 101Administrator Guide
Altova FlowForce
2.8.4 Credentials
Credentials are stored login data used to execute FlowForce Server jobs. Credentials can bedefined as standalone "objects" and be assigned to various jobs, or they can be manually enteredfor a specific job.
Jobs are started automatically by FlowForce Server when the defined trigger conditions are met.FlowForce Server then runs these jobs using a specific operating system user account, ensuringthat job steps do not access unauthorized data. Note that file watch triggers are also assignedcredentials.
Credentials can be created, or deleted, on the Configuration (Container) page. Note that jobcredentials, i.e. username and password, can also be entered for individual jobs on the Job page.
Any user that has "write" access to the "Configuration" permission, can edit or removecredentials.
To add a credential to FlowForce Server:1. Click the container you want to create the new credential in, e.g. public.2. Click the "Create" button and select the "Create Credential" entry.
3. Enter the name of the credential as well as the operating system user name andpassword. To specify a user name in a Windows domain, please use the form

102 Administrator Guide FlowForce access control
© 2014 Altova GmbHAltova FlowForce
username@domain.
4. Click Save. The new credential "Cred_production" has been saved in the /public container.
5. Click the "Configuration" button to return to the Container page.
Please see Permissions for information on the container permissions that can be defined.
Credentials and jobsEvery job MUST have a credential assigned to it for the job steps to be executed. This definesthe operating system user account used to run the job steps.

© 2014 Altova GmbH
FlowForce access control 103Administrator Guide
Altova FlowForce
A predefined credential can be selected using the "existing credential" combo box, or the localcredential can be manually entered in the "User name" and "Password" fields. This is done on the"Create job..." page.
Note: If you manually enter the user name and password, as shown above, you will have to updatethem for those specific jobs, whenever your server credentials are changed.
Credentials:Credentials can be created in any container a user has access to.
The credential password may be an empty string.
As the clear text password needs to be sent to the operating system's login function,passwords are stored in a reversible encrypted form in the FlowForce Server database.The administrator should make sure to restrict access to the FlowForce Server databasefile.
FTP credentialsWhen using FTP system functions, e.g. ftp/retrieve, in the "Execute function" field you must alsoenter your FTP login credentials for the FTP server. You can select an existing credential or entera local one.
Required Permissions for a user to execute a jobSince a job is defined to run with a certain credential, it is vital for the success of the jobexecution that the operating system user which is referenced by this credential has sufficientaccess permissions.
The operating system user needs the following file system permissions:
Execution permission for the used server executables and all referred DLLs (implicitlyset).
Read permission for all paths used in the input files of the job.
Write permission for all paths used in the output files of the job.
Read and/or Write permission for the working directory, depending on the specific job.

104 Administrator Guide Settings
© 2014 Altova GmbHAltova FlowForce
2.9 Settings
This page contains the system-wide global settings of FlowForce Server.
Input formatlets you select your local time zone.
System function /system/mail/send parameterslets you define your SMTP server settings and enter the user authentication for the SMTP serverused by the built-in function /system/mail/send.
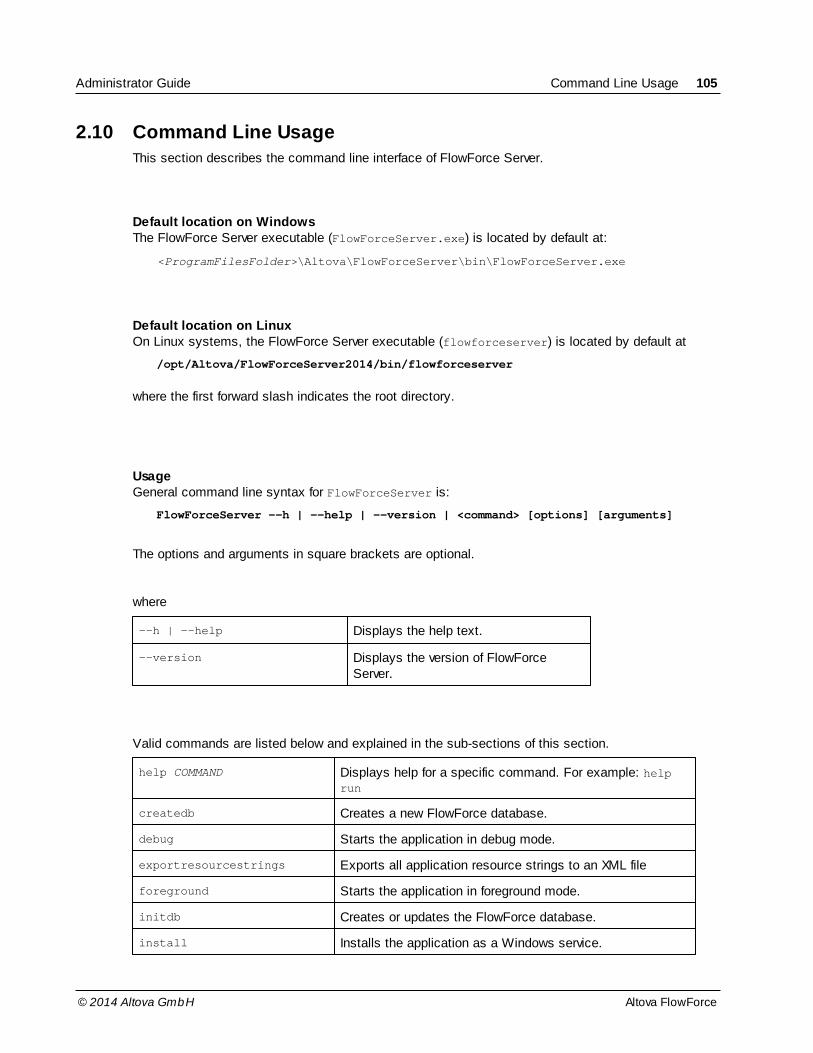
© 2014 Altova GmbH
Command Line Usage 105Administrator Guide
Altova FlowForce
2.10 Command Line Usage
This section describes the command line interface of FlowForce Server.
Default location on WindowsThe FlowForce Server executable (FlowForceServer.exe) is located by default at:
<ProgramFilesFolder>\Altova\FlowForceServer\bin\FlowForceServer.exe
Default location on LinuxOn Linux systems, the FlowForce Server executable (flowforceserver) is located by default at
/opt/Altova/FlowForceServer2014/bin/flowforceserver
where the first forward slash indicates the root directory.
UsageGeneral command line syntax for FlowForceServer is:
FlowForceServer --h | --help | --version | <command> [options] [arguments]
The options and arguments in square brackets are optional.
where
--h | --help Displays the help text.
--version Displays the version of FlowForceServer.
Valid commands are listed below and explained in the sub-sections of this section.
help COMMAND Displays help for a specific command. For example: helprun
createdb Creates a new FlowForce database.
debug Starts the application in debug mode.
exportresourcestrings Exports all application resource strings to an XML file
foreground Starts the application in foreground mode.
initdb Creates or updates the FlowForce database.
install Installs the application as a Windows service.

106 Administrator Guide Command Line Usage
© 2014 Altova GmbHAltova FlowForce
licenseserver Register FlowForce Server with the Altova LicenseServer onthe local network.
repair Starts the application in repair mode.
setdeflang | sdl Sets the default language.
start Starts the application as a service.
uninstall Uninstalls the Windows service.
upgradedb Upgrades the FlowForce database with the latest version
© 2014 Altova GmbH
Command Line Usage 107Administrator Guide
Altova FlowForce
2.10.1 help
The help command takes a single argument: the name of the command for which help is
required. It displays the correct syntax of the command and other information relevant to thecorrect execution of the command.
FlowForceServer help Command
Note: On Linux systems, use an all-lowercase flowforceserver to call the executable.
ExampleHere's an example of the help command:
FlowForceServer help createdb
The command above contains one argument: the command creatdb, for which help is required.
When this command is executed, it will display information about the creatdb command.
The --help option
Help information about a command is also available by using the --help option with thatcommand. For example, using the --help option with the run command, as follows:
FlowForceServer run --help
achieves the same result as does using the help command with an argument of generate:
FlowForceServer help run
In both cases, help information about the run command is displayed.

108 Administrator Guide Command Line Usage
© 2014 Altova GmbHAltova FlowForce
2.10.2 createdb
The createdb command creates a new database. If the database already exists then the
command will fail.
FlowForceServer createdb [options]
Note: On Linux systems, use an all-lowercase flowforceserver to call the executable.
The default database is created at installation time, so it is usually not necessary to use thiscommand.
OptionsThe single option is shown below.
--datadir=VALUE VALUE is the path of the data directory.

© 2014 Altova GmbH
Command Line Usage 109Administrator Guide
Altova FlowForce
2.10.3 debug
The debug command starts FlowForce Server in debug mode, i.e. not as a service. To stop this
mode press CTRL+C.
FlowForceServer debug [options]
Note: On Linux systems, use an all-lowercase flowforceserver to call the executable.
Not for general use.
OptionsThe single option is shown below.
--datadir=VALUE VALUE is the path of the data directory.

110 Administrator Guide Command Line Usage
© 2014 Altova GmbHAltova FlowForce
2.10.4 exportresourcestrings
The exportresourcestrings command outputs an XML file containing the resource strings of the
FlowForceServer application. It takes two arguments: (i) the language of the resource strings inthe output XML file, and (ii) the path and name of the output XML file. Allowed export languages(with their language codes in parentheses) are: English (en), German, (de), Spanish (es), andJapanese (ja).
FlowForceServer exportresourcestrings Language XMLOutput
Note: On Linux systems, use an all-lowercase flowforceserver to call the executable.
ArgumentsThe exportresourcestrings command takes the following arguments:
Language Specifies the language of resource strings in the exported XML file.Allowed languages are: en, de, es, ja
XMLOutput Specifies the location and name of the exported XML file.
ExampleHere's an example of the exportresourcestrings command:
FlowForceServer exportresourcestrings en c:\Strings.xml
This command creates a file called Strings.xml at c:\ that contains all the resource strings ofthe FlowForce Server application in English.
Creating localized versions of FlowForceServerCreate a localized version of FlowForce Server as follows:
1. Generate an XML file containing the resource strings by using the exportresourcestrings command (see command syntax above).
2. Translate the resource strings into the target language. The resource strings are thecontents of the <string> elements in the XML file. Do not translate variables in curlybrackets, such as {option} or {product}.
3. Contact Altova Support to generate a localized DLL file from your translated XML file.4. After you receive your localized DLL file from Altova Support, save the DLL in the C:
\Program Files (x86)\Altova\FlowForceServer2014\bin folder. Your DLL file willhave a name of the form FlowForceServer2014_lc.dll. The _lc part of the namecontains the language code. For example, in FlowForceServer2013_de.dll, the de partis the language code for German (Deutsch).
5. Run the setdeflang command to set your localized DLL file as the FlowForce Server appto use. Use the language code that is part of the DLL name as the argument of the setdeflang command.

© 2014 Altova GmbH
Command Line Usage 111Administrator Guide
Altova FlowForce
Note: Altova FlowForce Server is delivered with support for four languages: English, German,Spanish, and Japanese. So you do not need to create a localized version of theselanguages. To set any of these four languages as the default language, use FlowForceServer's setdeflang command.

112 Administrator Guide Command Line Usage
© 2014 Altova GmbHAltova FlowForce
2.10.5 foreground
The foreground command starts Altova FlowForce Server in the foreground. It is used internally
by the startup scripts for Linux and should not specified by a user.

© 2014 Altova GmbH
Command Line Usage 113Administrator Guide
Altova FlowForce
2.10.6 initdb
The initdb command creates a new database, or updates an existing one to the latest version.
FlowForceServer initdb [options]
Note: On Linux systems, use an all-lowercase flowforceserver to call the executable.
The default database is created at installation time, so it is usually not necessary to use thiscommand.
OptionsThe single option is shown below.
--datadir=VALUE VALUE is the path of the database directory.

114 Administrator Guide Command Line Usage
© 2014 Altova GmbHAltova FlowForce
2.10.7 install
The install command installs Altova FlowForce Server as a Windows service.
FlowForceServer install [options]
The service is installed at installation time, so it is usually not necessary to use this command.
OptionsThe single option is shown below.
--datadir=VALUE VALUE is the path of the database directory.

© 2014 Altova GmbH
Command Line Usage 115Administrator Guide
Altova FlowForce
2.10.8 licenseserver
The licenseserver command specifies the name of the machine on the network running theAltova LicenseServer. Alternatively, you can specify the machine's IP address.
The licenseserver command registers FlowForceServer with LicenseServer. Once this is done,you can, on LicenseServer, assign a license to FlowForceServer. How to do this is described inthe LicenseServer documentation.
FlowForceServer licenseserver [options] Server-Or-IP-Address
Note: On Linux systems, use an all-lowercase flowforceserver to call the executable.
You must have Administrator privileges (root) to be able to register FlowForce Server withLicenseServer!
ExampleHere's an example of the licenseserver command in its simplest form:
FlowForceServer licenseserver DOC.altova.com
The command above specifies that the machine named DOC.altova.com is the machine runningAltova LicenseServer. If the LicenseServer is running on the user's machine, the followingcommands would also be valid:
FlowForceServer licenseserver localhost
FlowForceServer licenseserver 127.0.0.1
OptionsThe options are listed below, in their short forms (first column) and long forms (second column),together with their descriptions. On the command line, one or two dashes can be used for bothshort and long forms.
--j --json Prints the result of the registration attempt as a machine-parsableJSON object.Form: --json=true|false

116 Administrator Guide Command Line Usage
© 2014 Altova GmbHAltova FlowForce
2.10.9 migratedb
The migratedb command upgrades and transforms the database to the latest version.
E.g. If FlowForce Server 2013 was installed at the default location then this will be automaticallydetected by the installer when installing FlowForce Server 2014. An option in the installer allowsyou to choose if you want to migrate your data to the newer version.
If FlowForce Server 2013 was installed in any other directory, you will have to manually migratethe data, as discussed in the section Upgrading FlowForce 2013 to FlowForce 2014.
FlowForceServer migratedb [options]
Note: On Linux systems, use an all-lowercase flowforceserver to call the executable.
ExampleHere's an example of the migratedb command for MS Windows:
"C:\Program Files(x86)\Altova\FlowForceServer2014\bin\FlowForceServer.exe"migratedb--datadir=C:\ProgramData\Altova\FlowForceServer2014\data --olddatadir=C:\ProgramData\Altova\FlowForceServer2013\data
OptionsThe options are shown below.
--datadir=VALUE VALUE is the path of the database directory.
--olddatadir=VALUE VALUE is the path of the database directory

© 2014 Altova GmbH
Command Line Usage 117Administrator Guide
Altova FlowForce
2.10.10 repair
The repair command starts Altova FlowForce Server with all triggers and job execution
processes disabled, to enable troubleshooting.
FlowForceServer repair [options]
Note: On Linux systems, use an all-lowercase flowforceserver to call the executable.
ExampleHere's an example of the repair command:
FlowForceServer repair --datadir=C:\ProgramData\Altova
\FlowForceServer2014\data
OptionsThe single option is shown below.
--datadir=VALUE VALUE is the path of the database directory.

118 Administrator Guide Command Line Usage
© 2014 Altova GmbHAltova FlowForce
2.10.11 setdeflang (sdl)
The setdeflang command (short form is sdl) sets the default language:
FlowForceServer setdeflang | sdl LanguageCode
Note: On Linux systems, use an all-lowercase flowforceserver to call the executable.
ExampleHere's an example of the setdeflang command:
FlowForceServer setdeflang de
The command above sets the default language for messages to German.
Supported languagesThe table below lists the languages currently supported together with their language codes.
en English
de German
es Spanish
ja Japanese

© 2014 Altova GmbH
Command Line Usage 119Administrator Guide
Altova FlowForce
2.10.12 start
The start command starts Altova FlowForce Server as a service.
FlowForceServer start [options]
Note: On Linux systems, use an all-lowercase flowforceserver to call the executable.
This command is used internally by the startup scripts or by the Windows service installation. Itshould not be used directly.
OptionsThe single option is shown below.
--datadir=VALUE VALUE is the path of the database directory.
120 Administrator Guide Command Line Usage
© 2014 Altova GmbHAltova FlowForce
2.10.13 uninstall
The uninstall command uninstalls the service Altova FlowForce Server.
FlowForceServer uninstall
Note: On Linux systems, use an all-lowercase flowforceserver to call the executable.
ExampleHere's an example of the uninstall command:
FlowForceServer uninstall

© 2014 Altova GmbH
Command Line Usage 121Administrator Guide
Altova FlowForce
2.10.14 upgradedb
The upgradedb command upgrades the database to the latest version.
FlowForceServer upgradedb [options]
Note: On Linux systems, use an all-lowercase flowforceserver to call the executable.
ExampleHere's an example of the upgradedb command:
FlowForceServer upgradedb --datadir=C:\ProgramData\Altova
\FlowForceServer2014\data
The default database is upgraded automatically at installation time, so it is usually not necessaryto run this command manually.
OptionsThe single option is shown below.
--datadir=VALUE VALUE is the path of the database directory.

122 Administrator Guide RaptorXML Server
© 2014 Altova GmbHAltova FlowForce
2.11 RaptorXML Server
Altova RaptorXML Server (hereafter also called RaptorXML for short) is Altova's third-generation,super-fast XML and XBRL processor. It has been built to be optimized for the latest standards andparallel computing environments. Designed to be highly cross-platform capable, the engine takesadvantage of today's ubiquitous multi-core computers to deliver lightning fast processing of XMLand XBRL data.
Note: XBRL processing is available only in RaptorXML+XBRL Server and not in RaptorXML Server.
RaptorXML is available in two editions:
RaptorXML Server is a very fast XML processing engine with support for XML, XMLSchema, XSLT, XPath, XQuery and is integrated into the FlowForce Server package.
RaptorXML+XBRL Server supports all the features of RaptorXML Server with the additionalcapability of processing and validating the XBRL family of standards. This installer needsto be installed from the Altova website.
RaptorXML Server limitations:XML Signatures are not supportedGlobal resources are not supported via the COM interfaceODBC and ADO database connections are only supported by Windows. Other operatingsystems automatically connect via JDBC
DownloadingRaptorXML Server is part of the FlowForce Server installation package, please see Getting startedfor more information. All other editions need to be downloaded from the Altova website.
LicensingPlease see the Getting started page on how to register and license RaptorXML Server.
UsagePlease see Using RaptorXML Server to validate a document in the tutorial section on how to useRaptorXML with FlowForce Server.
Please see RaptorXML Commands for an explanation of all the RaptorXML functions available to aFlowForce execution step.
© 2014 Altova GmbH
RaptorXML Server 123Administrator Guide
Altova FlowForce
2.11.1 RaptorXML Commands
The following RaptorXML functions are available in FlowForce Server to be used as functions in ajob execution step.
The XBRL functions are only available (from the RaptorXMLXBRL container) if you havedownloaded and installed/registered RaptorXML (+XBRL) Server from the Altova website.
The parameter names of the FlowForce functions approximate the command line parameternames of the RaptorXML command line interface. Explanations of each of the parameters isavailable by clicking the supplied links.
RaptorXML functions:
valany
valdtd
valxml-withdtd
valxml-withxsd
valxquery
valxsd
valxslt
wfany
wfdtd
wfxml
xquery
xslt


Chapter 3
FlowForce Tutorial - Automated Processing

126 FlowForce Tutorial - Automated Processing
© 2014 Altova GmbHAltova FlowForce
3 FlowForce Tutorial - Automated Processing
The aim of the tutorial is to:
Deploy a MapForce mapping to FlowForce Server, and create and execute a job at aspecific time.
Create a subjob that copies the previously generated output files into an archive directory.
Check a directory for new files to be passed on to a job, that uses the new file as an inputfile.
Supply job parameters at runtime, to a deployed mapping, that queries a database.
Use a deployed mapping as a web service, and view the mapping results in a browser.
Deploy a StyleVision transformation file to FlowForce Server and have it run at a specifictime each day.
Using RaptorXML Server to validate a document.
Passing key/value parameters to RaptorXML.
Both FlowForce Server and FlowForce Administration Interface need to be started to deploymappings or to manage the server.
This tutorial assumes that FlowForce Server and MapForceServer have been installed andregistered with LicenseServer, and have also been assigned the correct licenses by yourAdministrator. The browser interface is identical from this point on for Windows and Linux.
To log in to the FlowForce Web Administration Interface:1. Start you browser and enter http://localhost:8082. If you changed the port on the
FlowForce Server Configuration page, use the one you entered there.You are now connected to FlowForce Web Server and the Login page for FlowForceServer is opened.

© 2014 Altova GmbH
127FlowForce Tutorial - Automated Processing
Altova FlowForce
Enter login name "root", as well as the password "root" if this is the first time that youhave started FlowForce Server.
2. Click the "Log in" button to log in.You have now logged onto FlowForce Server.Connection information, as well as any running jobs and active triggers are visible on theHome screen.

128 FlowForce Tutorial - Automated Processing
© 2014 Altova GmbHAltova FlowForce
Accessing network drives - drive lettersIf the FlowForce Server service is to access a network resource, i.e. mapped network drives,please make sure that you use the Universal Naming Convention to do so. This is necessarybecause drive letters are not global to the system, and each logon session is assigned its owndrive letters.
The UNC syntax is in the form:
//server/sharedfolder/filepath
Where:server references the server name in the network (defined by the DNS)sharedfolder references a label defined by the administrator, admin$ is generally the rootdirectory of the operating system installation.filepath refers to the subdirectories below the share.
Note:Microsoft Windows treat the delimiters slash "/" and backslash "\" as equivalent.

© 2014 Altova GmbH
Deploying a MapForce mapping 129FlowForce Tutorial - Automated Processing
Altova FlowForce
3.1 Deploying a MapForce mapping
Aim: to deploy a MapForce mapping.
Deploying a mapping means that MapForce organizes all the mapping resources, used by thespecific mapping, into an object and passes it on to the server/machine running FlowForce.
Please note: when deploying a mapping to FlowForce, make sure that your target language is
Built-in, i.e. click the Built-In icon .
To deploy a mapping in MapForce1. Open a mapping in MapForce e.g. ChainedPersonList.mfd.
2. Select the menu option File | Deploy to FlowForce Server.3. Enter the Server name and Port of the web administration interface in the respective
fields, e.g. localhost and 8082 if FlowForce Server is running on the same machine andthe default port is used.
4. Enter the User Name and Password needed to access the server, e.g. "root" and "root".

130 FlowForce Tutorial - Automated Processing Deploying a MapForce mapping
© 2014 Altova GmbHAltova FlowForce
5. Optionally, click on the "Browse" button to define where the mappings are going to beplaced inside the FlowForce Server's object system ("public" is selected by default), thenclick Save. Make sure the "Open web browser to create new job" check box is active.
7. Click OK to deploy.
The messages window shows if the mapping deployed successfully. The FlowForceServer Administration Interface is automatically opened in your web browser, and apartially filled in job page is displayed.

© 2014 Altova GmbH
Deploying a MapForce mapping 131FlowForce Tutorial - Automated Processing
Altova FlowForce
The next thing to do is to define the rest of the job, i.e. the Job Triggers, the JobCredentials, and the Execution Steps.
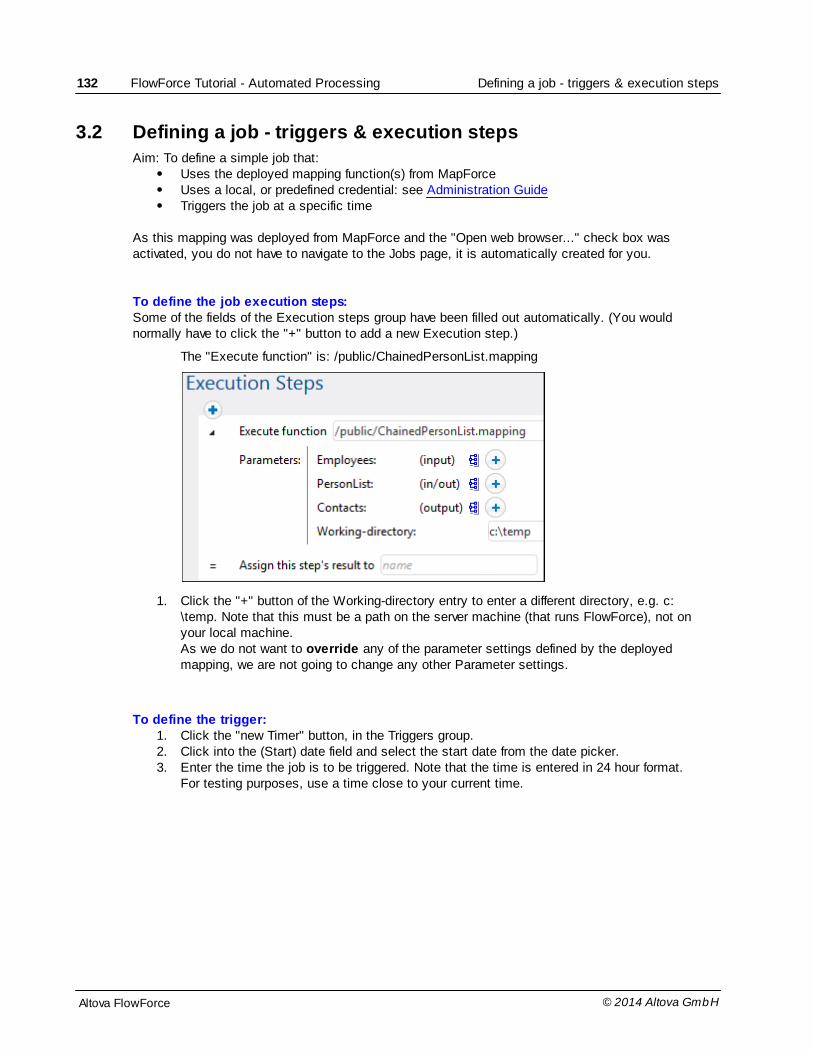
132 FlowForce Tutorial - Automated Processing Defining a job - triggers & execution steps
© 2014 Altova GmbHAltova FlowForce
3.2 Defining a job - triggers & execution steps
Aim: To define a simple job that:Uses the deployed mapping function(s) from MapForceUses a local, or predefined credential: see Administration GuideTriggers the job at a specific time
As this mapping was deployed from MapForce and the "Open web browser..." check box wasactivated, you do not have to navigate to the Jobs page, it is automatically created for you.
To define the job execution steps:Some of the fields of the Execution steps group have been filled out automatically. (You wouldnormally have to click the "+" button to add a new Execution step.)
The "Execute function" is: /public/ChainedPersonList.mapping
1. Click the "+" button of the Working-directory entry to enter a different directory, e.g. c:\temp. Note that this must be a path on the server machine (that runs FlowForce), not onyour local machine.As we do not want to override any of the parameter settings defined by the deployedmapping, we are not going to change any other Parameter settings.
To define the trigger:1. Click the "new Timer" button, in the Triggers group.2. Click into the (Start) date field and select the start date from the date picker. 3. Enter the time the job is to be triggered. Note that the time is entered in 24 hour format.
For testing purposes, use a time close to your current time.

© 2014 Altova GmbH
Defining a job - triggers & execution steps 133FlowForce Tutorial - Automated Processing
Altova FlowForce
As soon as the trigger time is reached, the job is executed and the output files,generated by the mapping, appear in the c:\temp directory. The output files arePersonList.xml and Contacts.xml.
To define the credentials:There are two ways that you can define job credentials:
In the Credential group, click the "Select existing credential" combo box and select apreviously defined credential e.g. "Cred_production".Manually enter you personal server credentials in the User name and Password fields ofthe local credential group.
Note:Entering credentials manually, forces you to update the credentials of this job if your server login changes.
To save your job:1. Click the Save button.
A save confirmation message appears at this point. If any mandatory fields were left out,you will be shown where this is the case.
Running the job:As soon as the trigger time has been reached, (i.e. 11:32) the trigger wil fire and the job will beexecuted. Two XML files are placed in the c:\temp folder: Contacts.xml and PersonList.xml.
Viewing the job log
Click the button near the top of the left of the Job page, to open the Log View

134 FlowForce Tutorial - Automated Processing Defining a job - triggers & execution steps
© 2014 Altova GmbHAltova FlowForce
filtered for the current job.
The execution parameters and the execution status are displayed in the Log View table.
Viewing the defined job1. Click the ChainedPersonListJob link in the Message column.
This opens the previously executed job definition page.
Notes:Click the "Configuration" button to see the various containers. Click a folder e.g. public, tosee its contents. To see the root container contents, click "/".
Each container object, i.e. function, job, credential, etc., has a check box to the left of itsname to select it. The topmost check box, to the left of the column header "Name",selects/deselects all objects in the list.
The "Create" button lets you create Containers, Jobs, and Credentials.
The "Delete Selected Objects" button becomes active when objects have been selectedin the list; clicking it deletes the selected objects.

© 2014 Altova GmbH
Defining a job - triggers & execution steps 135FlowForce Tutorial - Automated Processing
Altova FlowForce
See: Defining a subjob

136 FlowForce Tutorial - Automated Processing Defining a subjob
© 2014 Altova GmbHAltova FlowForce
3.3 Defining a subjob
Aim: To create and integrate a separate job that:
Copies the mapping result files of the previous job into an archive directory.
This job will act as a subjob to the calling job "ChainedPersonListJob".
To create a new job:1. Click the "Configuration" button, then click the container "public".2. Click the "Create" button and select "Create Job" from the popup menu.3. Enter the name of the job, e.g. "copy2archive".
There is no need to define a trigger for this job, as it will be called by another job.
Defining the subjob execution steps:1. In the Execution Steps group click the New Execution step button, then click into the
"Execute function" field.A popup window opens allowing you to select the function (or job) from the public folder.
2. Click the down arrow of the left-hand tag and select "system".Another popup window is opened.
3. Select /filesystem/copy.4. Enter the name of the file that you want to copy in the Source field, e.g. c:\temp
\Contacts.xml.5. Enter the name of the destination directory, e.g. c:\archive. (Click the "+" button next to
the Overwrite field, and activate the check box, if you want to be able to overwrite thesame file at the destination.)
6. Enter the name of the working directory, e.g. c:\temp.7. Click the "new Execution step" button under the previously defined Execution function to
add a second copy function.Source c:\temp\PersonList.xml, destination c:\archive, and working directory, c:\temp.
8. Click "Save" to save the job.

© 2014 Altova GmbH
Defining a subjob 137FlowForce Tutorial - Automated Processing
Altova FlowForce
9. Select an existing credential or enter your local credentials.
Calling a job from another job:1. Click the "Configuration" button, then the public container, and select
ChainedPersonList.job.2. Scroll down to the Execution Steps group and click the "New Execution step" button to
add a new execution step.3. Click the Execute function combo box and select copy2archive from the popup.

138 FlowForce Tutorial - Automated Processing Defining a subjob
© 2014 Altova GmbHAltova FlowForce
4. Update the timer trigger and click the "Save" button.5. After the job has been triggered, click the "View Log" button at the top of the job page.
You can now see the status of the job and its subjob.
The two XML files generated by the first job have been copied to the archive directory.
Note:If you want to rename a file when it is copied, enter the new file name in the "Destination"field.

© 2014 Altova GmbH
Defining a subjob 139FlowForce Tutorial - Automated Processing
Altova FlowForce
See: Directory polling - acting on a trigger file
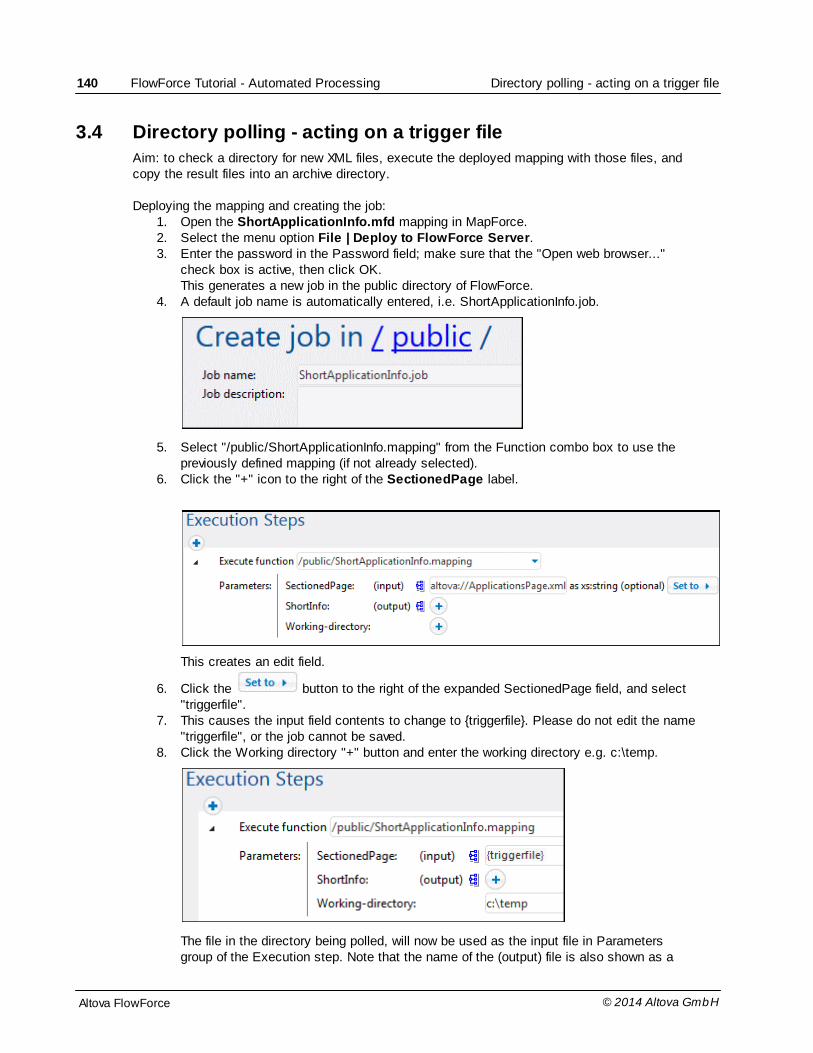
140 FlowForce Tutorial - Automated Processing Directory polling - acting on a trigger file
© 2014 Altova GmbHAltova FlowForce
3.4 Directory polling - acting on a trigger file
Aim: to check a directory for new XML files, execute the deployed mapping with those files, andcopy the result files into an archive directory.
Deploying the mapping and creating the job:1. Open the ShortApplicationInfo.mfd mapping in MapForce.2. Select the menu option File | Deploy to FlowForce Server.3. Enter the password in the Password field; make sure that the "Open web browser..."
check box is active, then click OK.This generates a new job in the public directory of FlowForce.
4. A default job name is automatically entered, i.e. ShortApplicationInfo.job.
5. Select "/public/ShortApplicationInfo.mapping" from the Function combo box to use thepreviously defined mapping (if not already selected).
6. Click the "+" icon to the right of the SectionedPage label.
This creates an edit field.
6. Click the button to the right of the expanded SectionedPage field, and select"triggerfile".
7. This causes the input field contents to change to {triggerfile}. Please do not edit the name"triggerfile", or the job cannot be saved.
8. Click the Working directory "+" button and enter the working directory e.g. c:\temp.
The file in the directory being polled, will now be used as the input file in Parametersgroup of the Execution step. Note that the name of the (output) file is also shown as a

© 2014 Altova GmbH
Directory polling - acting on a trigger file 141FlowForce Tutorial - Automated Processing
Altova FlowForce
parameter in this group, i.e. "ShortInfo.xml".
Note:The working directory is used to resolve relative paths that occur during the executionof any type of step. When a relative path is encountered, it is resolved with respect to thepath of the current working directory.
If no working directory is specified, a temporary directory will be used.
Creating the polling trigger:1. In the Triggers section, click the "new File System" trigger button.2. Select Modified Date in the Check field.3. Enter the directory name and file types that you want to check for, e.g. c:\temp\*.xml.4. Enter the polling interval, e.g. 60 seconds.
5. Select the credential you want to use for this job, or enter your local credentials.
Note:When you select "File system trigger", the "triggerfile" entry is automatically added to the"Job input parameters" group.
The "triggerfile" parameter will contain the absolute path of the triggering file. If you wantto extract portions of the path, please use the File system functions to do so.
E.g. {extension(triggerfile)} retrieves the extension of the triggering file.
Adding a second job execution step:1. Click the "new Execution step" button below the execution step that was just created.2. Use the Execute function combo box to select "/system/filesystem/move".3. In the Source field, enter the path/file name of file that you want to move, e.g. c:\temp
\ShortInfo.xml.4. Enter the location of the Destination directory, e.g. c:\archive.5. Enter the working directory c:\temp.

142 FlowForce Tutorial - Automated Processing Directory polling - acting on a trigger file
© 2014 Altova GmbHAltova FlowForce
6. Click the "Save" button to save the job.
As soon as the trigger start time has been reached, the trigger will be active and c:\tempfolder will be polled every 60 seconds.
Note:When entering file names in the Source and Destination fields be aware that the entriesare case sensitive! (e.g. shortinfo.xml will not work as the name of the source file, as thefile name generated by the mapping deployment is ShortInfo.xml).
To start the dirPolling job:Navigate to your ...\Altova\source folder and copy the file that starts the mapping processto the c:\temp folder (e.g. ApplicationsPage.xml)
Result:
As soon as a new XML file is found, that XML file becomes the input file for the deployedmapping.
The job is started and the result of the processed input file (ShortInfo.xml) is moved to thearchive directory.
See: Using parameters to query a database
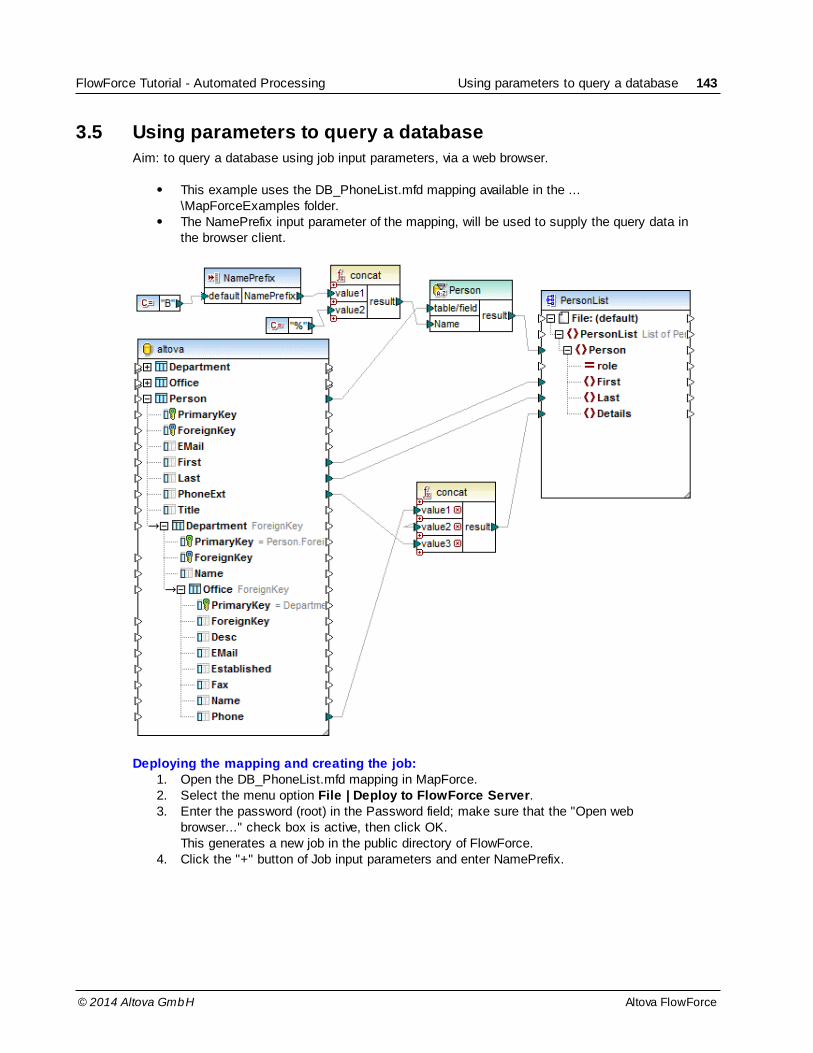
© 2014 Altova GmbH
Using parameters to query a database 143FlowForce Tutorial - Automated Processing
Altova FlowForce
3.5 Using parameters to query a database
Aim: to query a database using job input parameters, via a web browser.
This example uses the DB_PhoneList.mfd mapping available in the ...\MapForceExamples folder. The NamePrefix input parameter of the mapping, will be used to supply the query data inthe browser client.
Deploying the mapping and creating the job:1. Open the DB_PhoneList.mfd mapping in MapForce.2. Select the menu option File | Deploy to FlowForce Server.3. Enter the password (root) in the Password field; make sure that the "Open web
browser..." check box is active, then click OK.This generates a new job in the public directory of FlowForce.
4. Click the "+" button of Job input parameters and enter NamePrefix.

144 FlowForce Tutorial - Automated Processing Using parameters to query a database
© 2014 Altova GmbHAltova FlowForce
5. Click the "+" button to the right of the NamePrefix entry in the Execution steps group.6. Click the "Set to" button and select NamePrefix (the parameter name is automatically
available).
7. Click the check box in the Service group and enter myURL in the text box.8. Select the credential you want to use for this job, e.g. cred_production.9. Click the "Save" button to save the job.
Note: No triggers were defined because the web browser is used to access the service.
Using the browser to run the job and query the database:1. Open your browser and enter http://localhost:4646/service/myURL in the URL text box. If
you changed the port number for FlowForce Server, please use that one.
2. Enter the letter of the last name of the person(s) you are looking for, e.g. "F".

© 2014 Altova GmbH
Using parameters to query a database 145FlowForce Tutorial - Automated Processing
Altova FlowForce
3. Click the "Submit" button to send the query to the server.
The resulting XML file is now displayed in the browser.
Please note:You can press the "Back" button and reenter a query for a different Last name.
See: Using a deployed mapping as a web service

146 FlowForce Tutorial - Automated Processing Using a deployed mapping as a web service
© 2014 Altova GmbHAltova FlowForce
3.6 Using a deployed mapping as a web service
Aim: to supply various XML files as source files, and view the mapping result via a browser client.
This example uses the Tut-ExpReport.mfd file available in the ...\MapForceExamples\Tutorial folder.The XML source file, mf-ExpReport.xml, will be replaced at runtime in the browser client.
Deploying the mapping and creating the job:1. Open the Tut-ExpReport.mfd mapping in MapForce.2. Select the menu option File | Deploy to FlowForce Server.3. Enter the password (root) in the Password field; make sure that the "Open web
browser..." check box is active, then click OK.This generates a new job in the /public directory of FlowForce.
4. Click the "+" button of the "Job Input Parameters" group and enter Expenses. 5. Click the "Type" combo box and select stream. This defines the parameter to represent a
file uploaded to the server with the HTTP POST request.

© 2014 Altova GmbH
Using a deployed mapping as a web service 147FlowForce Tutorial - Automated Processing
Altova FlowForce
6. Click the "+" button to the right of the mf-ExpReport entry in the "Execution Steps"group.
7. Enter the expression {as-file(Expenses)} in the Execute function field. Please see:Streaming functions for more information.
8. Click the check box in the "Service" group and enter myExpenses in the text box.
9. Select the credential you want to use for this job.10. Click the "Save" button to save the job.
Note: No triggers were defined because the browser is used to access the service.
Using the browser to run the job and choose different XML input files:1. Open your browser and enter http://localhost:4646/service/myExpenses in the URL text
box.2. Click the "Browse" button.

148 FlowForce Tutorial - Automated Processing Using a deployed mapping as a web service
© 2014 Altova GmbHAltova FlowForce
3. Select mf-ExpReport.xml in the ...\MapForceExamples\Tutorial folder from the dialogbox, and click "Submit".
4. Click the browser "Back" button, then the myExpenses link, and click the "Browse"button.
5. Select mf-ExpReport2.xml from the dialog box, and click "Submit".

© 2014 Altova GmbH
Using a deployed mapping as a web service 149FlowForce Tutorial - Automated Processing
Altova FlowForce
Two completely different Expense reports were processed by the deployed mapping andoutput to the browser.
Note:The path of the XML output instance file is saved with the deployed mapping. There is therefore noneed to supply the working directory.

150 FlowForce Tutorial - Automated Processing Deploying a StyleVision transformation
© 2014 Altova GmbHAltova FlowForce
3.7 Deploying a StyleVision transformation
The File | Deploy to FlowForce command of Altova StyleVision enables you to deploy a.transformation file from StyleVision to your Altova FlowForce Server. The .transformationfile contains all the files and information required to carry out transformations as designed in theSPS (stylesheet) you created with Altova StyleVision.
After the .transformation file has been deployed to the FlowForce Server, you can create jobsin Altova FlowForce Server that use the .transformation file to generate transformationsaccording to triggers specified in the job definition.
In this section, we describe how to deploy a StyleVision transformation to FlowForce Server andimportant points related to deployment. You can try out the deployment process described belowby using the AutoCalc.sps file in the StyleVisionExamples folder as your starting point. Thefile AutoCalc.sps can also be opened from the Basics folder of StyleVision's Examples project.
A .transformation file is generated from a Portable XML Format (PXF) file. So, the File |Deploy to FlowForce command of StyleVision can be used when a PXF file is active. (If an SPSfile is active, the Deploy to FlowForce command will be active, but clicking it will prompt you tosave the SPS file as a PXF file. To create a PXF file from an SPS file, use the File | Save Ascommand and select PXF as the format to save as.)
Note: When a PXF file is saved, an option is provided for including external files (such as imagefiles) in it. If an external file is not included in the PXF file but is required for thetransformation, then the external file must be saved on the FlowForce Server. Since theexternal files will be accessed from the working directory (specified in the FlowForceServer job definition), they should be placed relative to the working directory, in such away that links originating in the working directory will correctly access them.
Note: Designs containing a database schema source are currently not supported, and cannotbe deployed to FlowForce Server.
Note: When a FlowForce Server job requiring a StyleVision transformation is executed, the jobis passed to StyleVision Server, and StyleVision Server will extract the contents of thePXF file to the working directory that was specified in the job's parameters. To ensure thatthere is no filename collision when this extraction occurs, there should be no file in theworking directory that has the same name as a file contained in the PXF file.
Before running the Deploy to FlowForce command in StyleVision, make sure that AltovaFlowForce Server and Altova StyleVision Server are correctly licensed and running. (StyleVisionServer is packaged with FlowForce Server.)
The File | Deploy to FlowForce command in StyleVision pops up the Deploy Transformationdialog (screenshot below).

© 2014 Altova GmbH
Deploying a StyleVision transformation 151FlowForce Tutorial - Automated Processing
Altova FlowForce
In this dialog, you specify the following:
The address and port number of the FlowForce Web Server (not the FlowForce Server),together with access details (user and password) for the FlowForce Server.The filename of the transformation file and the location on the FlowForce Server where itis to be saved. The filepath must start with a slash, which represents the root directory ofthe FlowForce Server. If changes have been made to the design since the file was last saved, the Save designchanges before deploying check box will be enabled. Check the box if you wish to savethese changes; otherwise uncheck the box.
On clicking OK, the .transformation file is deployed to the FlowForce Server at the locationspecified. If you have checked the Open web browser to create new job check box (seescreenshot above), a web browser is opened in which the draft job created during the deploymentstep can be edited (see screenshot below). The next section describes how to configure atransformation job.
Configuring the transformation jobThe transformation job specifies the name of the job, the input files and parameters for thetransformation, the output files of the transformation, triggers and security credentials.
The screenshot below shows the top half of the job configuration page.

152 FlowForce Tutorial - Automated Processing Deploying a StyleVision transformation
© 2014 Altova GmbHAltova FlowForce
Notice the following points:
The job name is AutoCalc.transformation.job. You could give the job any name youlike.Execution: A function is being executed, namely the transformationAutoCalc.transformation that was deployed to the FlowForce Server from StyleVision.Compare the file name and location given when the transformation was deployed toFlowForce Server (see screenshot above). The Working directory is the location on the FlowForce Server where StyleVision Serverwill unpack the input files and save the output file.
In the bottom half of the job configuration page, you set up the triggers for the job and/or set upthe job as a service. The credentials are your user name and password on the current clientmachine.

© 2014 Altova GmbH
Deploying a StyleVision transformation 153FlowForce Tutorial - Automated Processing
Altova FlowForce
A trigger is an event that starts execution of the job. In the screenshot above, we have used atimer event as the trigger: The job will be executed once a day at the specified time. We have alsospecified that the job will be available as a service at the URL:
http://<FlowForce Server>/service/AutoCalc
To view the result of the job execution (in this case, the transformation), enter the URL of theservice in a web browser. If, for example, the FlowForce Server is on the current machine and itsport is 4646, then the URL for the service would be:
http://localhost:4646/service/AutoCalc or
http://127.0.0.1:4646/service/AutoCalc
After you have finished configuring the job, click Save. The job will now be executed according tothe triggers and when the service is called. You can view the log of FlowForce Server activity byclicking the View Log button at top left of the job configuration page.

154 FlowForce Tutorial - Automated Processing Using RaptorXML Server to validate a document
© 2014 Altova GmbHAltova FlowForce
3.8 Using RaptorXML Server to validate a document
Aim: to validate an XML Schema file supplied with RaptorXML Server.
This example uses the address.xsd file available in the .../RaptorXMLServer2014 folder (ifyou used the default installation path).
To create a new job:1. Click the "Configuration" button, then click the container "RaptorXML".
This opens the container and displays all the default functions available for RaptorXML.
2. Click the valany entry. This displays a window showing all the Function InputParameters along with their types and default values.
3. Click the "Create Job" button at the bottom of the page.This creates a job with the default name "valany.job". Edit the job name if necessary.
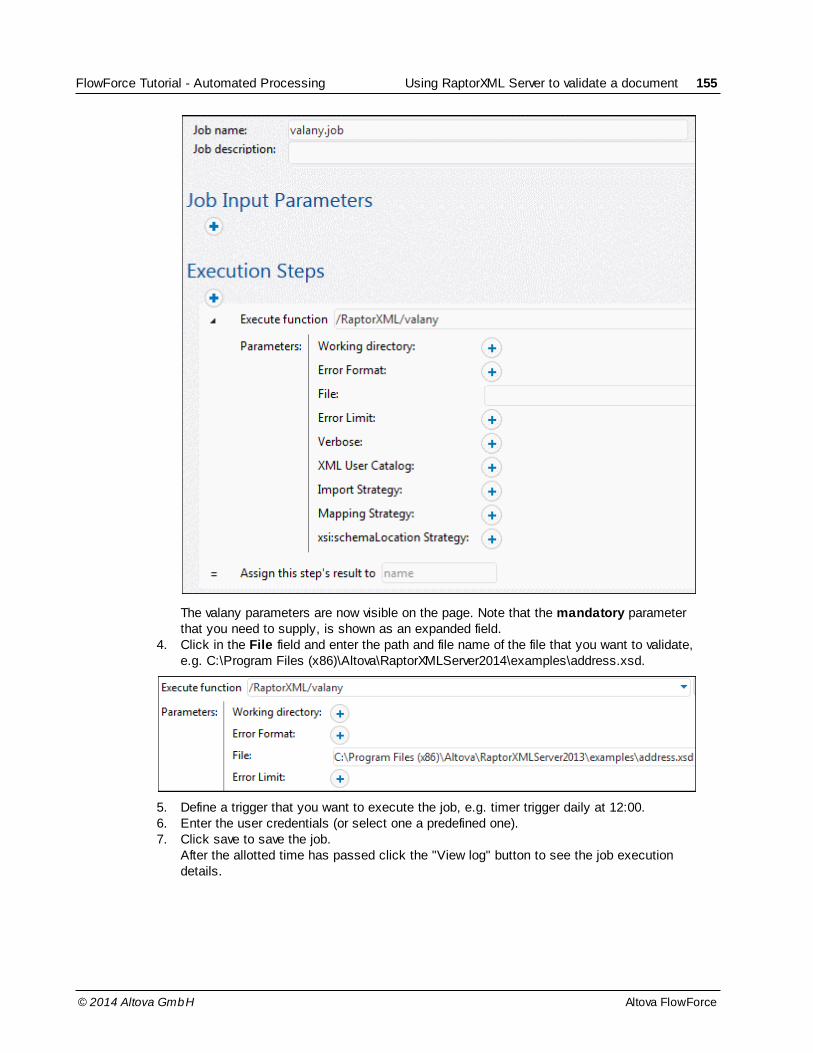
© 2014 Altova GmbH
Using RaptorXML Server to validate a document 155FlowForce Tutorial - Automated Processing
Altova FlowForce
The valany parameters are now visible on the page. Note that the mandatory parameterthat you need to supply, is shown as an expanded field.
4. Click in the File field and enter the path and file name of the file that you want to validate,e.g. C:\Program Files (x86)\Altova\RaptorXMLServer2014\examples\address.xsd.
5. Define a trigger that you want to execute the job, e.g. timer trigger daily at 12:00.6. Enter the user credentials (or select one a predefined one).7. Click save to save the job.
After the allotted time has passed click the "View log" button to see the job executiondetails.

156 FlowForce Tutorial - Automated Processing Using RaptorXML Server to validate a document
© 2014 Altova GmbHAltova FlowForce
If the validation process was successful you will see result="OK". If the file did notvalidate you will see "FAIL".
Note:To see an explanation of all the RaptorXML functions and their associated parameters,please see: RaptorXML Commands.
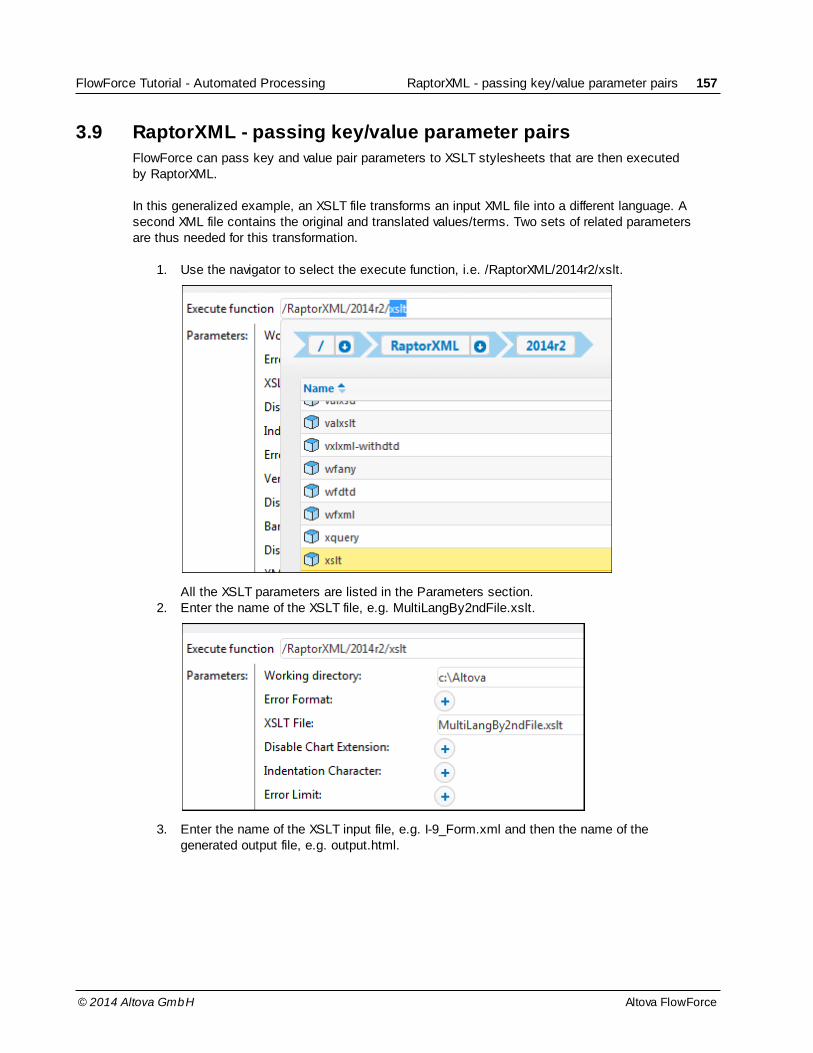
© 2014 Altova GmbH
RaptorXML - passing key/value parameter pairs 157FlowForce Tutorial - Automated Processing
Altova FlowForce
3.9 RaptorXML - passing key/value parameter pairs
FlowForce can pass key and value pair parameters to XSLT stylesheets that are then executedby RaptorXML.
In this generalized example, an XSLT file transforms an input XML file into a different language. Asecond XML file contains the original and translated values/terms. Two sets of related parametersare thus needed for this transformation.
1. Use the navigator to select the execute function, i.e. /RaptorXML/2014r2/xslt.
All the XSLT parameters are listed in the Parameters section.2. Enter the name of the XSLT file, e.g. MultiLangBy2ndFile.xslt.
3. Enter the name of the XSLT input file, e.g. I-9_Form.xml and then the name of thegenerated output file, e.g. output.html.

158 FlowForce Tutorial - Automated Processing RaptorXML - passing key/value parameter pairs
© 2014 Altova GmbHAltova FlowForce
4. Click the "+" button to the right of the Parameters label to create the first parameter pair.
5. Enter the "key" and then the "value" of that parameter in the field to the right. E.g.Language and 'G'.
6. Click the "+" button below these two fields and enter the second key and value pair, e.g.Translation and 'FormTranslation.xml'. The Translation element contains both languagevalues of the FormTranslation.xml file.
All you need to do now is create a trigger that is to start the XSLT transformation.
Please note:

© 2014 Altova GmbH
RaptorXML - passing key/value parameter pairs 159FlowForce Tutorial - Automated Processing
Altova FlowForce
The contents of the "value" fields are XPath expressions and both must therefore beenclosed in quotes to define them as of type "string" (single, or double quotes are ok).
Alternatively:If you click the "Set to" button at the right of the parameters block you can enter the XSLTexpression in a single field, i.e.
list(("Language","'G'"),("Translation","'FormTranslation.xml'"))


Chapter 4
User Guide

162 User Guide
© 2014 Altova GmbHAltova FlowForce
4 User Guide
Object SystemJobs, functions, triggers, etc. are stored in the object system inside the FlowForce Serverdatabase in a hierarchical structure.
The properties and capabilities of the FlowForce Server object system are similar to those ofcommonly used file systems. File systems use folders, while FlowForce Server uses containers.
Containers can have access permissions assigned to them, or inherit permissions from theirparent container(s).
The root of the object system is the "/" container (the root container) which can containother containers, or other user-defined objects.
The predefined container "/system" contains the system functions(s) and should not beused for user-defined objects.
The predefined container "/public" is the default location to create user-defined objectslike jobs, functions, credentials and other containers. You can of course create anynumber of containers.
Deploying mappings / transformationsDeploying a mapping means MapForce organizes all the mapping resources, used by the specificmapping, into a FlowForce Server function and passes it on to the server/machine runningFlowForce, where it will be processed.
A deployed mapping function can then be used in a job execution step.
JobsJobs consist of triggers, execution steps and various other settings. The triggers define when thejob will be executed, and the execution steps define what the job actually does when it executes.Multiple triggers and execution steps can be defined per job.
Jobs can call other jobs allowing you to create subjobs.
Jobs can contain placeholder values that can be passed to the job at runtime. These placeholdersare called "Job input values" and can supply values through a default, or through manual input viaan HTTP client, e.g. internet browser.
Please see Job configuration for more information.

© 2014 Altova GmbH
FlowForce Administration Interface 163User Guide
Altova FlowForce
4.1 FlowForce Administration Interface
The FlowForce Server Administration Interface is used to define jobs and triggers and to displaythe log table.
There are several menu items available in the browser window:Home shows you the connection details and any active jobs.Configuration shows containers and the objects they contain: jobs, credentials,functions, etc.Log shows you the server logs. The Log View contents can be configured.Administration shows you the Users, Roles, and SettingsHelp shows this help file
Configuration FlowForce Server has a hierarchy of "items" visible in the Configuration page.
The top-level is the "Container". Containers can contain "objects".
Objects can be other Containers, Jobs, Instances, or Functions. Clicking the "Name"check box (top left corner of the table) selects/deselects all the objects in the list.
Clicking a container displays the objects that it contains.
Clicking a job displays the job definition page, showing the triggers, execution steps, andother settings that make up the job.

164 User Guide FlowForce concepts
© 2014 Altova GmbHAltova FlowForce
4.2 FlowForce concepts
ConfigurationConfiguration data in FlowForce Server's database are comprised of various objects that define theoperation of FlowForce Server. This includes jobs, credentials, functions, triggers, and otherobjects.
Configuration objects are organized in a freely defined hierarchy of containers. Some configurationsettings are edited together (e.g. jobs include triggers), and other settings can also be stored asstandalone objects under their own name (e.g. credentials and functions).
ContainerA container is similar to a folder in a commonly used file system. It is used to create ahierarchical structure for storing configuration objects and other containers. Containers can beassigned access permissions.
Two predefined containers exist in FlowForce Server: /system which contains system functions,e.g. copy, move, etc., and /public which is the default container when deploying a mapping toFlowForce Server from MapForce. Other containers can be created as needed, e.g. fordepartments or user groups.
FunctionA FlowForce Server function performs a specific operation when used in a job execution step. Itmay have input parameters that need to be passed to it by the caller. Available functions includethe system functions delivered with FlowForce Server, deployed MapForce mappings orStyleVision transformations, and the execution steps of other jobs.
JobA Job consists of Triggers, Execution steps, input parameters, and other settings. Triggers definewhen a job will be executed, and the execution steps define what the job actually does when itexecutes. Multiple triggers and execution steps can be defined per job.
TriggerTriggers define under which circumstances a job will be executed. Three types of triggers cancurrently be defined: Timer triggers, File system triggers, and HTTP triggers. Multiple triggers canbe defined per job.
ServiceFlowForce Server permits exposing jobs as web services via the HTTP protocol. This allowsinteractive or automated access to these jobs.
CredentialCredentials are stored login data used to execute FlowForce Server jobs. Credentials can bedefined as standalone "objects" and be assigned to various jobs, or they can be manually enteredfor a specific job.
QueueThe queue settings in a FlowForce Server job allow limiting the number of parallel job executionsto control use of server resources.
Access Control

© 2014 Altova GmbH
FlowForce concepts 165User Guide
Altova FlowForce
All important operations in FlowForce Server are linked to permissions or privileges which need tobe assigned to the user to successfully execute them.
UserFlowForce Server users are persons that have been added to FlowForce Server by the FlowForceServer administrator with a login name and a password. Depending on the assigned rights andprivileges, users can define FlowForce Server jobs, deploy mappings, or view logs.
Two special users are predefined by FlowForce Server: "root" is the initial administrator user, and"anonymous" is a special user account used for FlowForce Server services that should beavailable to users without explicit log in to FlowForce Server.
RoleRoles are used to manage privileges and object permissions for user groups as opposed toindividual users.
Having defined users, you can assign them to a role thus creating user groups. The usersbecome "members" assigned to the specific role.
PermissionPermissions control access to containers and configurations. Unlike privileges they can beredefined on every level of the container hierarchy, and are by default inherited from parentcontainers.
Permissions, like privileges, are inherited from all roles the user is a member of, as well as frompermissions directly assigned to the user.
PrivilegePrivileges control user rights globally. This means privilege settings cannot be overridden in thecontainer hierarchy of FlowForce Server.
When a user logs into FlowForce Server, the set of effective privileges is determined by the userprivileges and all role privileges the user is member of.

166 User Guide Job configuration
© 2014 Altova GmbHAltova FlowForce
4.3 Job configuration
The job page lets you define how the job will be processed and when it will be executed. Thetriggers define when the job will be executed, and the execution steps define what the job actuallydoes when it executes. Multiple triggers and execution steps can be defined per job.
You can create a job from scratch, or you can deploy a mapping from MapForce (or atransformation from StyleVision) that generates a partially filled in job in FlowForce Server.
Jobs can be created in any container/folder where you have sufficient access permissions.
Structure of a jobThe job name and job description fields make it easy to administer your jobs.
Job input parameters are placeholders for values (or files) that can be supplied at runtime.
Execution Steps define what the job does when it runs.
Execution Result lets you define the execution result type.
Caching Result lets you define that the result of the current job will be cached, and used by adifferent calling job.
Triggers let you define how, or when, a job will be executed. The following triggers are currentlyavailable: Timer triggers, File system triggers, and HTTP triggers.
The Service option makes it possible to access jobs as webservices via the HTTP protocol.
Credentials are stored login data that define the operating system user account used to executeFlowForce Server jobs.
Queue settings let you define how many parallel jobs can run in parallel and the minimum timebetween runs.

© 2014 Altova GmbH
Job configuration 167User Guide
Altova FlowForce

168 User Guide Job configuration
© 2014 Altova GmbHAltova FlowForce
4.3.1 Job input parameters
Job input parameters are placeholders for values (or files) that can be supplied at runtime.
Creating an input parameter, e.g. NamePrefix, automatically makes it available for selection in the"Set to" popup window, of any of the execution step parameters.
For an example please see: Using a deployed mapping as a web service, or Using parameters toquery a database.
When adding a file system or HTTP trigger to a job, FlowForce Server automatically creates aparameter named "triggerfile" that contains the name of the file that activated the trigger. Pleasedo not edit the name "triggerfile", or the job cannot be saved.
Type: stringUse the string type for most parameters that you use.
Type: stream Allows you to select files when using the job as a service.
DefaultAllows you to specify a default value for the parameter that is used when no value is passed to thejob at runtime.
Job parameter values are determined at runtime as follows:
File system and HTTP triggers set the parameter "triggerfile".If a job is called as service via HTTP, all parameters are passed from the HTTP request. Please see the Service section for more information.If a job is called from an execution step in another job, parameters are passed from thestep definition in the calling job.Parameters that are not supplied any value get the default value defined in the "Default"field.

© 2014 Altova GmbH
Job configuration 169User Guide
Altova FlowForce
4.3.2 Execution steps
The execution steps define what actions the job executes when it is started by a trigger or anHTTP request.
A job can have one or more execution steps. The list of execution steps is processed from top tobottom. FlowForce Server can also execute job steps conditionally and can use expressions todefine flow control sequences.
New Execution stepLets you execute specific system calls, MapForce mappings, or StyleVision transformations, thatwere deployed to the respective server.
New Choose step Lets you define specific conditions that will apply to individual job steps.
New For-Each step Lets you execute one or more job steps repeatedly.
New error/success handling stepLets you define actions (cleanup actions, notifications/emails) depending on the final state of athe enclosed steps, i.e. on error, on success, or always.
Execution step
The standard "Execute function" lets you execute a specific FlowForce function. Availablefunctions include the system functions delivered with FlowForce Server, deployed MapForcemappings or StyleVision transformations, and the execution steps of other jobs.
Clicking in the "Execute function" field opens a popup from which you can select a built-infunction from the /system container, or deployed mappings/transformations from any othercontainer. You can also select another job here, in which case the job steps of the selected jobwill be executed as subjob.
Execute function:The combo box initially displays a popup window allowing you to select system functions, orMapForce mappings (StyleVision transformations) from the configuration containers.
MapForce mapping
Parameters for MapForce actions are defined by the specific mappings.
Parameters are defined by:input componentsin/out componentsoutput components

170 User Guide Job configuration
© 2014 Altova GmbHAltova FlowForce
Parameters allow you to override the input and output file names that were defined when themapping was deployed from MapForce. When the job executes, the new files will be used insteadof the ones defined in the mapping. Note that all file paths in job execution steps must be a pathon the server machine (that runs FlowForce), not on your local machine.
E.g. Using the deployed ChainedPersonList as an example:
Employees (input) is the source component with Employees.xml as the instance document.
PersonList (in/out) is the intermediate document and therefore shown as in/out, because it isused as both a source and target document in the chained mapping.
Contacts (output) is the target document
To change the source/destination files:Click the "+" button next to the list of parameters to expand the optional fields.
Click in the Employees (input) field and delete the "altova://packagedfile/C:/Documents andSettings.../Employees.xml" file and replace it with the file you want to use instead (e.g.PersonList.xml).

© 2014 Altova GmbH
Job configuration 171User Guide
Altova FlowForce
Note:Any path starting with "altova://packagedfile/" refers to the file content that was deployedtogether with the mapping, and not to the current version of that file in any path on the server.
Acting on files that cause the trigger to fireIf you create a "File system trigger" (by clicking the "new File system trigger" button) thisautomatically adds the "triggerfile" entry into the Job input parameters field. Please do not edit thename "triggerfile", or the job cannot be saved.
Select the deployed mapping file you want to use in the Execute function field (e.g.ShortApplicationInfo.mapping).Clicking the "+" icon to the right of SectionedPage creates an edit field.
Click the button to the right of the expanded SectionedPage field, and select"triggerfile" entry.
This causes the input field contents to change to {triggerfile}. The file, in the directory being polled, will then be used as the input file for the execution step.
Note:Using a file that caused the trigger to fire, does not work with time-based triggers.
Please see: Directory change - act on trigger file

172 User Guide Job configuration
© 2014 Altova GmbHAltova FlowForce
Function - SubjobOnce a job has been defined it can be used in an execution step of another job as a subjob. In thescreen shot below, the subjob is added as an extra execution step, by clicking the Functioncombo box and selecting /public/copy2archive. If the selected subjob has job input parameters,they appear below the function and can be filled with values.
Assign this step's result toAllows you to use the result of the current execution step for a following step. Please see StepResult Functions and the Cache example for more information.
Choose step
The "new Choose step" button allows you to define conditions under which specific job stepsshould be executed.
The condition expression is entered in the "When" field and the step(s) to be executed can beselected by clicking the "+" button (below the When field). This opens a popup allowing you toselect the specific step to insert: Execution step, Choose step, For-each, or error/successhandling step.
Any number of conditions can be defined, and as soon as one of the conditions is true, thatconditional step is executed and the remaining conditions of that conditional group are ignored.The execution sequence is then continued with the step following the successful conditionalgroup.

© 2014 Altova GmbH
Job configuration 173User Guide
Altova FlowForce
The "Otherwise" group lets you define what will be executed if all the previous choices fail.
Note: Placing the mouse cursor on the arrow-up, or arrow-down icons to the right of theblock allow you to move each individual step within the step group. The step to be moved is alsohighlighted when the mouse is over the icon.
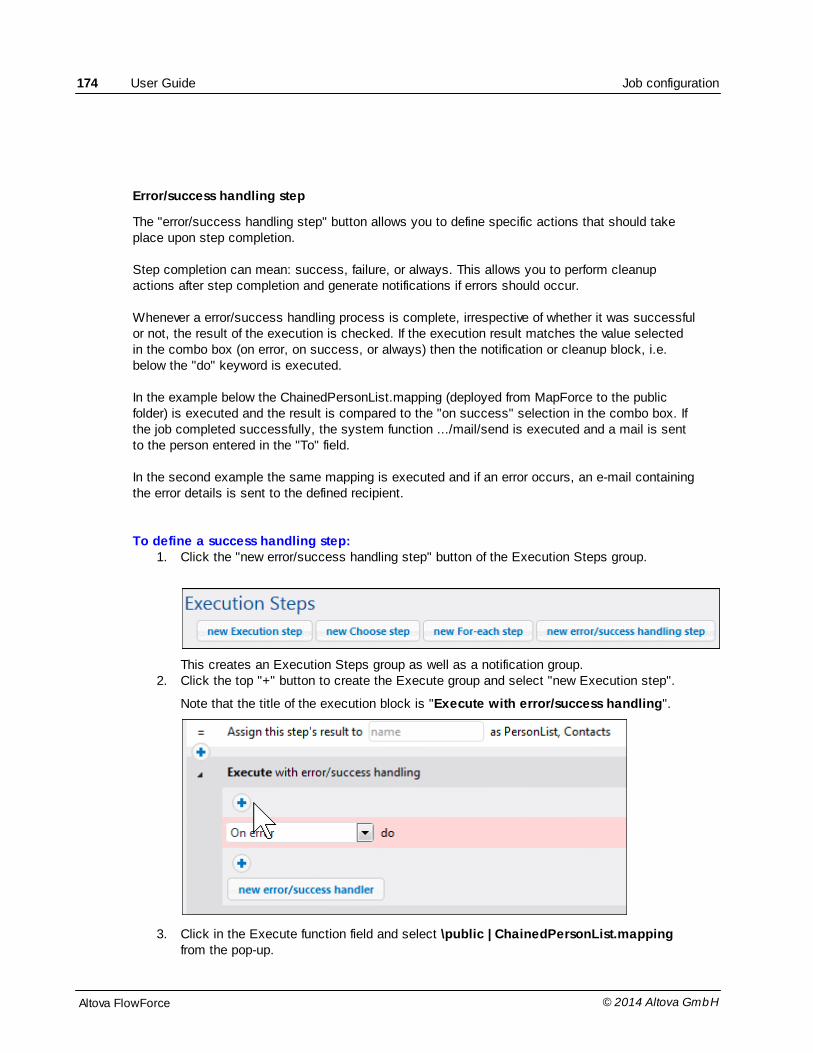
174 User Guide Job configuration
© 2014 Altova GmbHAltova FlowForce
Error/success handling step
The "error/success handling step" button allows you to define specific actions that should takeplace upon step completion.
Step completion can mean: success, failure, or always. This allows you to perform cleanupactions after step completion and generate notifications if errors should occur.
Whenever a error/success handling process is complete, irrespective of whether it was successfulor not, the result of the execution is checked. If the execution result matches the value selectedin the combo box (on error, on success, or always) then the notification or cleanup block, i.e.below the "do" keyword is executed.
In the example below the ChainedPersonList.mapping (deployed from MapForce to the publicfolder) is executed and the result is compared to the "on success" selection in the combo box. Ifthe job completed successfully, the system function .../mail/send is executed and a mail is sentto the person entered in the "To" field.
In the second example the same mapping is executed and if an error occurs, an e-mail containingthe error details is sent to the defined recipient.
To define a success handling step:1. Click the "new error/success handling step" button of the Execution Steps group.
This creates an Execution Steps group as well as a notification group.2. Click the top "+" button to create the Execute group and select "new Execution step".
Note that the title of the execution block is "Execute with error/success handling".
3. Click in the Execute function field and select \public | ChainedPersonList.mappingfrom the pop-up.
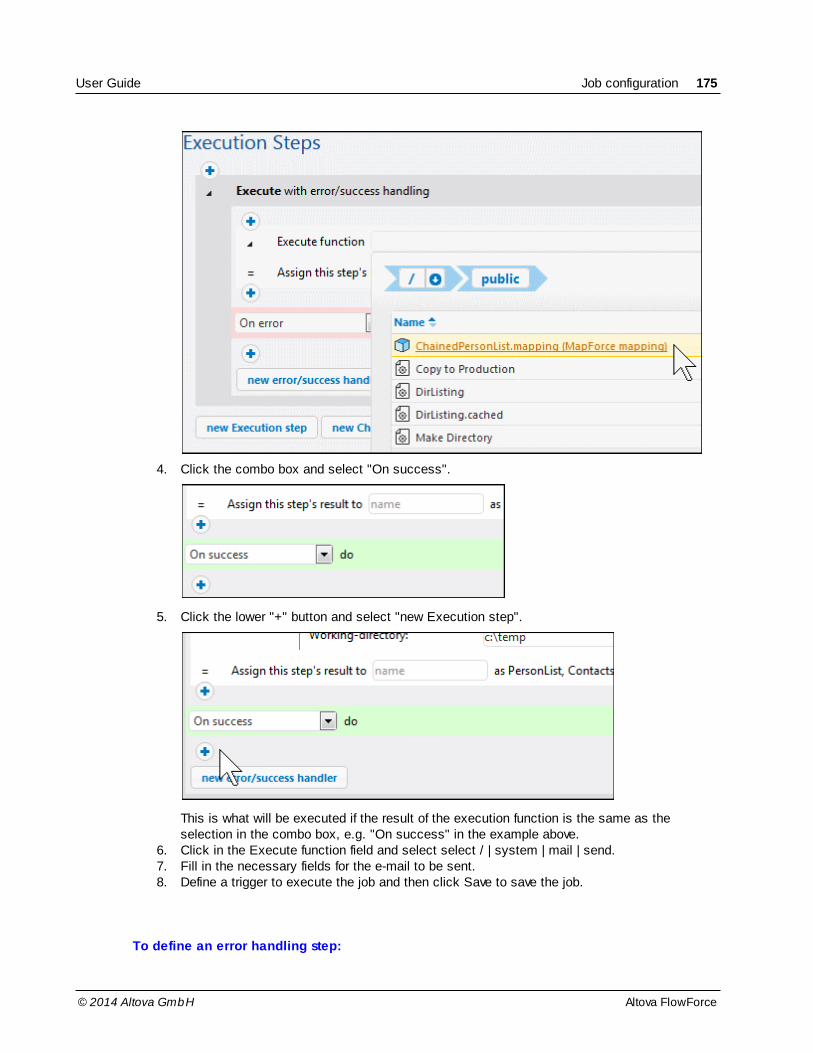
© 2014 Altova GmbH
Job configuration 175User Guide
Altova FlowForce
4. Click the combo box and select "On success".
5. Click the lower "+" button and select "new Execution step".
This is what will be executed if the result of the execution function is the same as theselection in the combo box, e.g. "On success" in the example above.
6. Click in the Execute function field and select select / | system | mail | send.7. Fill in the necessary fields for the e-mail to be sent.8. Define a trigger to execute the job and then click Save to save the job.
To define an error handling step:

176 User Guide Job configuration
© 2014 Altova GmbHAltova FlowForce
Follow the steps 1 to 3 from above and then:4. Click the combo box and select "On error", then /system/mail/send.
This is what will be executed if the result of the execution function is the same as theselection in the combo box, e.g. "On error" in the example above.
5. Enter the e-mail addresses in the From/To fields. 6. Enter {content(stderr(failed-step()))} into the Message body field.
This function outputs the generated error messages into the e-mail body text.
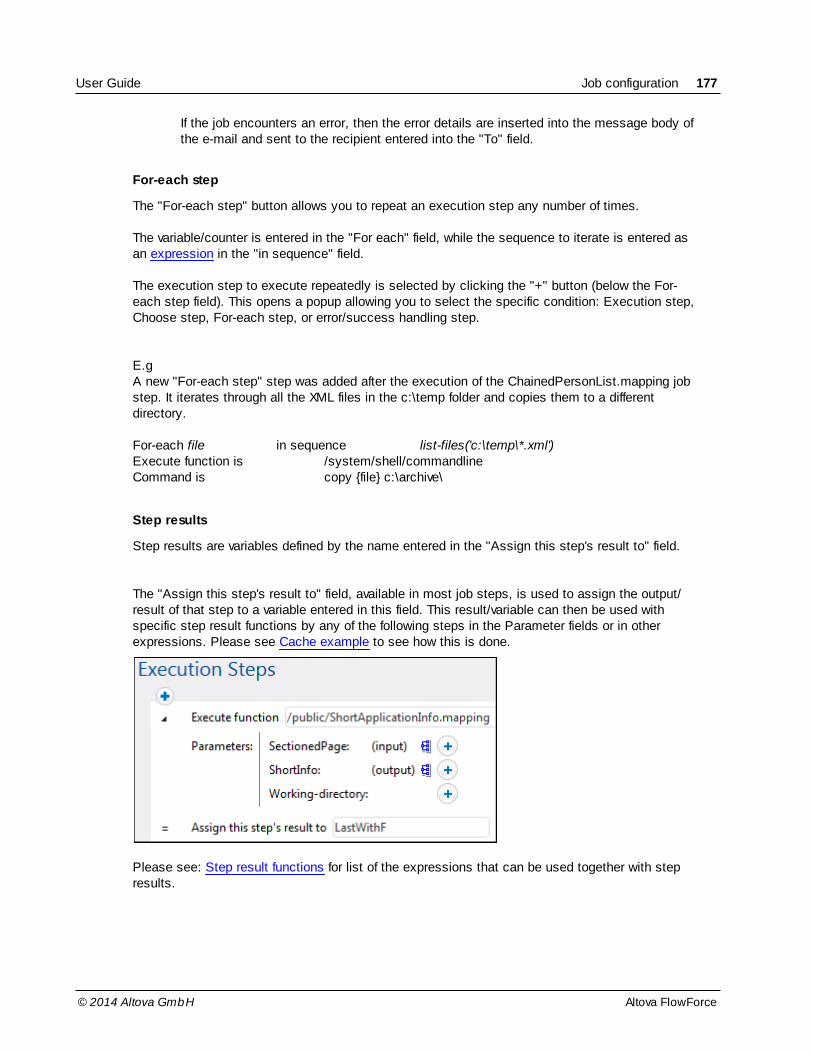
© 2014 Altova GmbH
Job configuration 177User Guide
Altova FlowForce
If the job encounters an error, then the error details are inserted into the message body ofthe e-mail and sent to the recipient entered into the "To" field.
For-each step
The "For-each step" button allows you to repeat an execution step any number of times.
The variable/counter is entered in the "For each" field, while the sequence to iterate is entered asan expression in the "in sequence" field.
The execution step to execute repeatedly is selected by clicking the "+" button (below the For-each step field). This opens a popup allowing you to select the specific condition: Execution step,Choose step, For-each step, or error/success handling step.
E.g A new "For-each step" step was added after the execution of the ChainedPersonList.mapping jobstep. It iterates through all the XML files in the c:\temp folder and copies them to a differentdirectory.
For-each file in sequence list-files('c:\temp\*.xml')Execute function is /system/shell/commandlineCommand is copy {file} c:\archive\
Step results
Step results are variables defined by the name entered in the "Assign this step's result to" field.
The "Assign this step's result to" field, available in most job steps, is used to assign the output/result of that step to a variable entered in this field. This result/variable can then be used withspecific step result functions by any of the following steps in the Parameter fields or in otherexpressions. Please see Cache example to see how this is done.
Please see: Step result functions for list of the expressions that can be used together with stepresults.

178 User Guide Job configuration
© 2014 Altova GmbHAltova FlowForce
4.3.3 Step expressions
FlowForce uses a simple expression language similar to that of Microsoft Excel, to computevalues, create streams, create/disassemble lists, etc. The expression functions are grouped asshown below:
Step Result FunctionsStream FunctionsFile System FunctionsFile path FunctionsList FunctionsString FunctionsBoolean FunctionsRuntime information FunctionsOperators
Step Result Functions
Step result functions are applicable to results from steps like the command line step. To obtain aresult, use the name entered in a previous step's "Assign this step's result to" field. You cannotapply step result functions to the result of steps which do not provide it; doing so gives an errorwhen saving the job.
stdout stdout(result) of type stream
Returns the standard output of result, fails if the result does not provide standard output.
Example: If you use the /system/shell/commandline step with the command cmd.exe /c echo "hello world"
Then the stdout of this step result is a stream containing "hello world", see also cache example
stderr stderr(result) of type stream
Returns the standard error of result, fails if the result does not provide a standard error. See Error/success handling step for an example.
exitcode exitcode(result) of type number
Returns the exit code of result, as returned by the executed program.
results results(result, name) of type stream results(result) of type stream
Returns an array/list of streams of the specified result, optionally filtered by name. Use thefunction "nth" to access a particular one.
E.g. If a MapForce component CompletePO produces a result and you intend to access aspecific stream, you could use the following expression to access the first one:

© 2014 Altova GmbH
Job configuration 179User Guide
Altova FlowForce
{as-file(nth(results(MapForceMapping, "CompletePO"), 0))}
E.g. 2 an SPS stylesheet created in StyleVision outputs the result to HTML, with the step resultbeing assigned to a variable "StyleVision" in the "Assign this step's result" field. To pick the firstresult you could enter:
Execute function: /system/computeExpression: nth(results(StyleVision, "ReturnTypeHtml"), 0)
Stream Functions
Streams can be passed to FlowForce Server via the service interface, and also during jobexecution within the various step results.
as-file as-file(stream) of type string
Creates a file if the stream source is a file. Creates a temporary file if the stream source is not afile.
as-file(stream-open(myFile.txt)) returns myFile.txt
This is useful to pass the output of one step as a parameter to another: If MapForce componentCompletePO produces a result and you intend to further process it via some other tool, you canuse
{as-file(results(MapForceMapping, "CompletePO"))} as the command line.
Note: It is also possible to pass a stream from a Job Input Parameter to any function that expects a filename. In the tutorial example a Job Input Parameter named Expenses (of type stream) has beendefined. This input parameter is then used with the function "as-file" to define the input parameterof the MapForce mapping:
{as-file(Expenses)}
content content(stream, encoding = 'UTF-8') of type string
Reads the content of the specified stream as text in the specified encoding.
empty-stream()The function creates an empty stream.
stream-from-stringstream-from-string (string, encoding = "UTF-8", contenttype="text/plain") of type stream
This function creates a stream from a string using the supplied encoding. The content type isassociated to the stream.

180 User Guide Job configuration
© 2014 Altova GmbHAltova FlowForce
This type of stream is not automatically saved as a file.
stream-openstream-open(name, contenttype="application/octet-stream") of type stream
This function creates a stream from an exisiting file. E.g. content(stream-open("C:\files\textfile.txt") and reads the text file as a UTF-8 coded text file into the string.
File system Functions
File system functions permit access to the file system. Note: The access restrictions of thespecified user credential always apply.
list-files list-files(path) of type "list of string"
Lists the files in the path (which may terminate with a wildcard) and returns the resulting string list.
If the path does not end with a path separator and is not a wildcard, a search is made for exactlythe specified item in the parent directory.
list-directories list-directories(path) of type "list of string"
Lists the subdirectories in the path (which may terminate with a wildcard) and returns the resulting string list.
read-lines read-lines(file name, encoding="UTF-8") of type "list of string"
Reads the lines from the given file and returns them as a list of strings.
File path Functions
File path functions allow you to extract specific portions of paths and file names.
parent-directoryparent-directory(path) of type string
Extracts the directory portion of a path, e.g. parent-directory("c:\temp\my.txt") is "c:\temp\".
filenamefilename(path) of type string
Extracts the file name portion of a path, e.g. filename("c:\temp\my.txt") is "my".
filename-with-extension

© 2014 Altova GmbH
Job configuration 181User Guide
Altova FlowForce
filename-with-extension(path) of type string
Extracts the file name and extension portions of a path, e.g. filename-with-extension("c:\temp\my.txt") is "my.txt".
extensionextension(path) of type string
Extracts the extension portion of a path, e.g. extension("c:\temp\my.txt") is ".txt".
If you are polling a directory, i.e. checking to see if changes occur there, the "triggerfile"parameter will contain the absolute path of the triggering file. If you want to extract portions of thepath, use the File path functions to do so.
E.g. {extension(triggerfile)} retrieves the extension of the triggering file.
List Functions
List functions are used to create and disassemble lists. Lists always contain items of a singletype, e.g. only strings, only number, or only nested lists with the same item type, there are nomixed type lists.
char(number)char(number) of type string
Returns a string that contains the unicode character of "number". E.g. char(10) is line feed.
code(string)code(string) of type number
Returns the unicode value of the first character of "string".
list list(item1, item2, ...) of type list
Builds a list from single items. All items must be of the same type, the resulting list is a list of items of that type.
join join(list of lists, separator = empty list) of type list
Concatenates the lists given by the first argument using the second argument as separator between each pair of lists.
nth nth(list, index) of type item
Returns the specified item from the list. The index is zero-based. Fails if the index is out ofbounds.
182 User Guide Job configuration
© 2014 Altova GmbHAltova FlowForce
from-to from-to(from, to) of type list of number
Produces the list of integers between "from" and "to" inclusive. If "from" > "to", this list is empty.
length length(list) of type number
Returns the number of items in the list.
sliceslice(list, start, end=length(list)) of type list
Selects a partial list from a list. E.g. slice(list(1,2,3,4),1,3) returns list(2,3).
Note:"Start" is the zero-based index of the first list item to include in the slice (i.e. 2), "end" is the zero-based index of the first item to ignore in the slice (i.e. 4).
String Functions
The string functions deal with basic string operations.
concat concat(string1, string2, ...) of type string
Concatenates/joins all of the separate strings into one string.
Same as string-join(list(string1, string2, ...)).
string-join string-join(list of strings, separator = an empty string) of type string
Joins the "list of strings", inserts the separator in between each.
numbernumber(string) of type number
Computes the number representation of the string, i.e. converts the string into a number.
string string(number) of type string
Computes the string representation of the given number, i.e. converts the number into a string.
split split(string, separator) of type list of string

© 2014 Altova GmbH
Job configuration 183User Guide
Altova FlowForce
Splits the string at each occurrence of separator.
find-all find-all(string, pattern) of type list of string
Extracts all occurrences of pattern in the string, where pattern is a regular expression.
trim trim(string) of type string
Removes leading and trailing whitespace from the string (space, tab, linefeed, carriage return,form-feed and vertical tab).
trim-start trim-start(string) of type string
Removes leading whitespace, (see trim).
trim-end trim-end(string) of type string
Removes trailing whitespace, (see trim).
contains contains(string, substring) of type boolean
Returns true if the first string contains at least one occurrence of substring, otherwise false.
starts-with starts-with(string, start) of type boolean
Returns true if the first string starts off with the string "start".
ends-with ends-with(string, end) of type boolean
Returns true if the first string ends with the string "end".
string-length string-length(string) of type number
Returns the number of characters in the string.
substring substring(string, start, end = string-length(string)) of type string
Returns the speficied substring. Start and end are zero-based character positions.

184 User Guide Job configuration
© 2014 Altova GmbHAltova FlowForce
Boolean Functions
not not(boolean) of type boolean
Returns the negation of the boolean.
all all(boolean1, boolean2, ...) of type boolean
Returns true if all boolean values are true; stops evaluation after the first false value and returnsfalse.
any any(boolean1, boolean2, ...) of type boolean
Returns true if any boolean value is true; stops evaluation after the first true value. Returns false ifall values are false.
if if(boolean, valueTrue, valueFalse) of type ...
Returns valueTrue if the boolean is true, and valueFalse if false. Only the selected subexpressionis evaluated. Both subexpressions must be of the same type, which is also the return type.
Example: To pass a boolean as XML Schema conformant value, use
if(b, "true", "false") or if(b, "1", "0")
true true() of type boolean
Returns true.
false false() of type boolean
Returns false.
Runtime information Functions
instance-id()instance-id() of type string
Returns a unique string for every job execution. This can be used to create a unique directory foreach job execution, where the string is used to define the directory name.
slot-number()slot-number() of type number

© 2014 Altova GmbH
Job configuration 185User Guide
Altova FlowForce
Returns the execution slot number of the queue currently running the job. This number should notbe used as a file name. The number can be used to access different servers to execute paralleljobs (simple load balancing).
The slot number depends on the queue in which the slot execution was started. If the current jobis called by another job, then it inherits the slot number of the calling job.
Operators
Basic mathematical operators can be used to work on strings and numbers.
a == b checks if a and b are equal (numerically equal for numbers, code-point equal for strings)
a != b is equivalent to not (a == b). a <> b is another variation.
a < b checks if a is less than b (numerically less for numbers, see below for strings)
a >= b is equivalent to not (a < b)
a > b is equivalent to b < a
a <= b is equivalent to b >= a.
String comparisons are performed as follows: The common prefix of the two strings are ignored (evaluated on codepoints)If both remaining strings are non-empty, their first codepoints are compared numericallyEmpty strings are less than non-empty strings
Operators on numbers: a + b, a - b, a * b, a / b
All compute the normal arithmetic results.
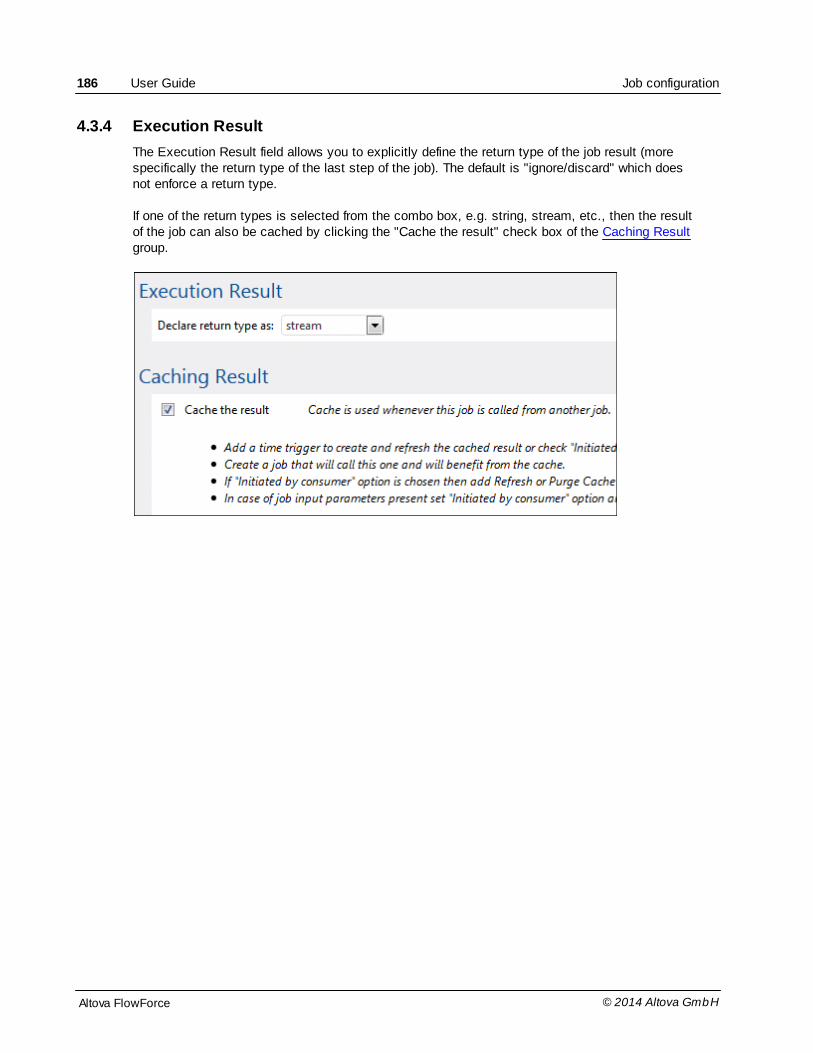
186 User Guide Job configuration
© 2014 Altova GmbHAltova FlowForce
4.3.4 Execution Result
The Execution Result field allows you to explicitly define the return type of the job result (morespecifically the return type of the last step of the job). The default is "ignore/discard" which doesnot enforce a return type.
If one of the return types is selected from the combo box, e.g. string, stream, etc., then the resultof the job can also be cached by clicking the "Cache the result" check box of the Caching Resultgroup.

© 2014 Altova GmbH
Job configuration 187User Guide
Altova FlowForce
4.3.5 Caching Result
The cache option allows FlowForce to reduce the response time of web-service jobs and to alsoreduce the server load. This is achieved by caching the results of one job and using the cachedresult in another job step.
FlowForce fills the cache whenever a job is executed by a defined trigger or web service call. If the"Initiated by consumer" check box is active, FlowForce also fills the cache on-demand, i.e. whenthe job is called from another job.
Cache results are defined by the job parameters used to create them. When a particularparameter combination is manually refreshed (by clicking the "Refresh Cache Timer" button, or bya web service call) the cache entries are recomputed. FlowForce uses the cached result toimprove response times.
The cache (result) is queried by a second job that contains the first job as a job step within it.Instead of rerunning the first job, as would normally be the case, the cache result is used. Pleasesee the Cache example for more information.
Notes:Both of the jobs must use identical job credentials. If the credentials differ, then the jobexecutes as if no cache were defined.Making changes to the configuration of the cached job invalidate/flush the cache data. The cache can be manually refreshed by clicking the "Save and Refresh the cache"button at the bottom of the page, or whenever the job is triggered.
Initiated by consumerActivating this check box allows the cache to be filled by any other execution of the job, not justby a trigger.

188 User Guide Job configuration
© 2014 Altova GmbHAltova FlowForce
Maximum number of cache entriesThis cache limit restricts the number of cached job results per job. FlowForce limits the number ofcached results to the specified number; this limit can be temporarily exceeded e.g. during heavyserver loads.
Auto create a new cache consumer job Activating the check box adds a new URL field below the check box.
new Refresh Cache timerClicking this button lets you to define when the cache contents will be refreshed, e.g. daily, daysof week, etc.
FlowForce recomputes the cache when the cache timer fires.
new Purge Cache timerClicking this button lets you to define when the cache contents will be purged, e.g. daily, days ofweek, etc.
Please see the Cache example for how this is set up.

© 2014 Altova GmbH
Job configuration 189User Guide
Altova FlowForce
Cache example
The aim of this simple example is to recursively list the contents of c:\windows, and then use thecache result in a different job.
Defining the initial job:1. Define a new job with a single execution step, e.g. click in the Execute function field and
select system/shell/command line.2. Enter the command line in the Command field, e.g. dir c:\windows /s.
3. Enter a webservice name/binding in the Service group, e.g. WindowsDir.4. Enter the credentials needed to run the job in the Credentials field, then click Save to
save it.
5. Enter the URL http://localhost:4646/service/WindowsDir in your browser to access andstart the job, this might take a few seconds. You might have to enter your login details atthis point.A directory listing will now be visible in the browser window.

190 User Guide Job configuration
© 2014 Altova GmbHAltova FlowForce
Defining the cache settings:1. Click the "Cache the result" check box in the Caching Result group to enable the cache.
You are prompted to create a time trigger and a job that will call this one. The red information icon, of the Execution Result group, also prompts you to define thereturn type.
2. Click the "Declare return type as:" combo box and select "stream".

© 2014 Altova GmbH
Job configuration 191User Guide
Altova FlowForce
3. Click the "new Timer" button and define a trigger that will fire every 10 minutes, forexample.
4. Click into the "Assign this step's result to..." field of the Execution Steps group, andenter "dir" as the step result.
To be able to use the "dir" result, we need to add an extra step to the job.5. Click the "new Execution step" button and enter /system/compute with the parameter
stdout(dir).

192 User Guide Job configuration
© 2014 Altova GmbHAltova FlowForce
6. Click Save to complete the definition of the cached job.
We now need to define the calling job that will make use of the cached result.
Defining the calling job:1. Click the "Auto create a new cache consumer job..." check box.
This adds a new "at URL:" field below the check box.
2. Scroll to the Service group and copy the URL from there (WindowsDir) into the newlycreated URL field.
3. Click the "Save" button at the bottom of the page.

© 2014 Altova GmbH
Job configuration 193User Guide
Altova FlowForce
The job is saved and the page is refreshed.
Note: the "Auto create a new cache consumer job..." check box has now been removedand the cache consumer job is visible as a hyperlink.
4. Click the /public/DirListing.cached hyperlink to open the calling job in FlowForce.
The job will execute every 10 minutes and produce a listing of all files on the computer. 6. Click the View Log button to see the log files.
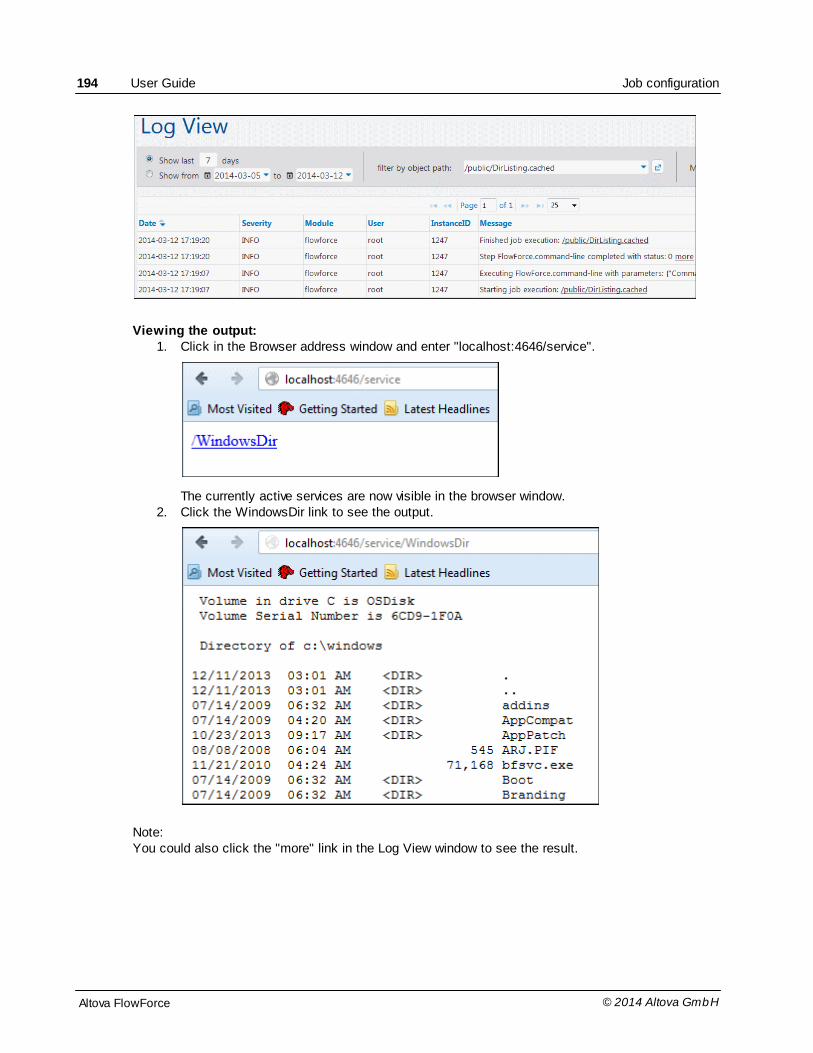
194 User Guide Job configuration
© 2014 Altova GmbHAltova FlowForce
Viewing the output:1. Click in the Browser address window and enter "localhost:4646/service".
The currently active services are now visible in the browser window.2. Click the WindowsDir link to see the output.
Note:You could also click the "more" link in the Log View window to see the result.

© 2014 Altova GmbH
Job configuration 195User Guide
Altova FlowForce
4.3.6 Triggers
Three types of triggers can currently be defined: Timer, File system triggers, and HTTP triggers.
Timer triggerThis type of trigger allows you to schedule your jobs. Timer triggers have a Start date/time, Expiredate/time and period of recurrence (daily, weekly etc.).
File system triggerThis type of trigger lets you check a specified directory, as well as check the content of a specificfile(s).
HTTP triggerThis type of trigger lets you poll a specified URI for changes.
You do not need to define any triggers if you intend to make the job available as a service viaHTTP.
Timer trigger types & common settings
Multiple triggers can be defined per job allowing maximum flexibility. This means that severaltriggers can be active simultaneously, and that whenever any of the triggers is fired, all executionsteps of the job associated with the trigger are processed.
RunThe "Run" combo box allows you to define the specific days that the trigger can be activated. Thisoption only refers to dates! There is no time component when you make this selection.
Run period options:OnceDailyOn days of weekOn days of monthsOn days of weeks of months
Common trigger properties:

196 User Guide Job configuration
© 2014 Altova GmbHAltova FlowForce
RepeatThe Repeat options define the interval between successive trigger firings, per day. The days whenthis will occur, are defined by the selection made with the "Run" combo box.
The "every" field lets you define the period between the job runs, in minutes.
The "from" and "to" fields define the time range between which the triggers will fire.
Start - date and timeStart date/time entries are only mandatory for a timer trigger that uses the "Run - Once option.
Start date/time are optional for file system and HTTP triggers. Clicking in the Date field opens apop-up calendar from which you can select the start date.
E.g. Repeat every "60" minutes from "08:00" to "20:00" with start time at 09:33. This means thatthe trigger will become active at 09:33, and as the repeat interval is 60 minutes, it will fire for thefirst time at 10:00, with repeats at every full hour.
Expires date - time. The Expires fields allows you to define the date/time from when the job is to expire. The triggerwill not fire after this date/time.
Time ZoneThis field allows you to define timers that will fire at the same time of day, even if there aredaylight saving time switches. Clicking in the field opens a pop-up time zone picker. The defaulttime zone is defined in the server administration settings.
EnabledThe "enabled" check box allows you to enable/disable each individual trigger in the trigger list.This option is useful when creating and testing new jobs.
Waste basket The waste basket allows you to delete the whole trigger, or any of the sub elements that are partof it.
Note: Triggers and defaultsIf you use job parameters with triggers, make sure that all parameters have defaults or the job willnot execute.
Run Once
This type of trigger will fire once on the day specified, at the exact time given in the time field.
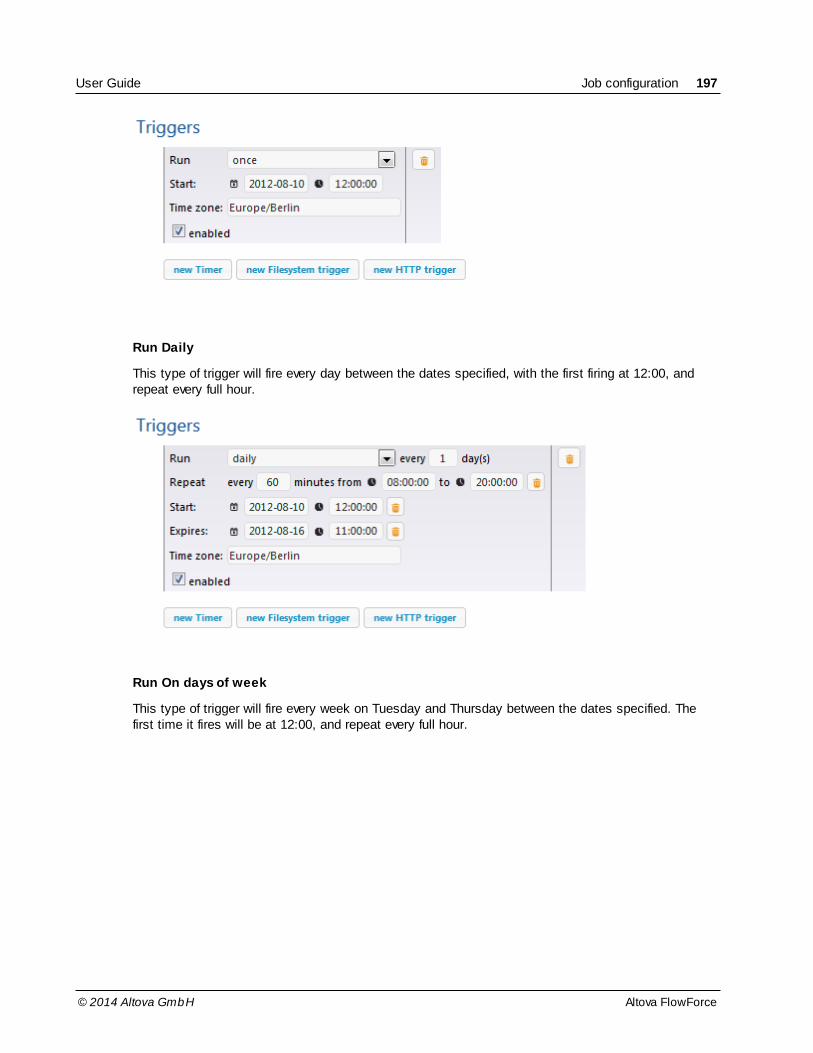
© 2014 Altova GmbH
Job configuration 197User Guide
Altova FlowForce
Run Daily
This type of trigger will fire every day between the dates specified, with the first firing at 12:00, andrepeat every full hour.
Run On days of week
This type of trigger will fire every week on Tuesday and Thursday between the dates specified. Thefirst time it fires will be at 12:00, and repeat every full hour.

198 User Guide Job configuration
© 2014 Altova GmbHAltova FlowForce
Run On days of months
This type of trigger will fire on the 1st and 15th every month between the dates specified. The firsttime it fires will be at 12:00, and repeat every full hour.
Run On days in weeks of months
This type of trigger will be fired on Monday, and Wednesday of every second week, of every monthbetween the dates specified. The first time it fires will be at 12:00, and repeat every full hour.

© 2014 Altova GmbH
Job configuration 199User Guide
Altova FlowForce
File system trigger
File system trigger:This type of trigger lets you check a specified directory, as well as check the content of a specificfile(s). A directory can be checked for updated or new files (you cannot check for deleted files).Wildcards can be used to filter specific files of the directory.
Check - Modified date: The trigger checks the last modification timestamp of all the specified files. If any dates havechanged, or a new file has been added, then the trigger fires.
Check - Content:This option computes and stores a hash code for the specified file. After the polling interval haspassed, the hash code is recomputed and compared to the stored value. If there is a differencethen the trigger fires. Note that this can place considerable load on the server.
If any dates have changed, or a new file has been added, then the trigger also fires.
Wait 'S' seconds to settle: Defines the time in seconds that the server will wait before starting the next job.

200 User Guide Job configuration
© 2014 Altova GmbHAltova FlowForce
When adding a file system trigger, FlowForce Server automatically adds the "triggerfile" parameterto the job. This parameter is set at runtime to the name of the file that triggered the job execution.This file name can then be passed to an execution step to process the file.
HTTP trigger
HTTP triggerThis type of trigger lets you poll a specified URI for changes.
Check - Modified date: If a URI is being polled, then the "Last-Modified" HTTP header is checked.If the HTTP header is missing, then "Check Content" is used.
Check - Content: If a URI is being polled, then the "Content-MD5" optional header field ischecked. This is a 128 bit "digest" used as a message integrity check. If the MD5 header haschanged after the polling interval has passed, then the trigger fires. If the header is not provided bythe server, the content is retrieved and hashed locally.
When adding an HTTP trigger, FlowForce Server automatically adds the "triggerfile" parameter tothe job. This parameter is set at runtime to the name of a temporary file that contains thedownloaded content at the URI that triggered the job execution. This file name can then bepassed to an execution step to process the file.

© 2014 Altova GmbH
Job configuration 201User Guide
Altova FlowForce

202 User Guide Job configuration
© 2014 Altova GmbHAltova FlowForce
4.3.7 Service
FlowForce Server permits exposing jobs as web services via the HTTP protocol. This allowsprogrammatic and interactive access to these jobs, making it possible to use them on-demand.
All job parameters automatically become parameters for the service. If a job parameter does nothave a default, it is mandatory and must be provided when invoking the service; otherwise it isoptional and can be provided, taking the default value if it is not provided.
FlowForce Server checks if all mandatory parameters are provided when the service is invoked. Ifsome are missing the service execution fails. For testing purposes FlowForce Server supplies asimple HTML form allowing parameters to entered manually. Note: When using Internet Explorer 9as your browser, please disable the option "Show friendly HTTP error messages" in the Advancedtab, to view the form.
This form allows you to enter a value for all parameters.
Please see the tutorial example: Using parameters to query a database.
Streams need a file to be uploaded using the "Browse" button. When clicking "Submit" the data istransferred to FlowForce, and if accepted, FlowForce Server starts the job and waits for the result.

© 2014 Altova GmbH
Job configuration 203User Guide
Altova FlowForce
After the job has finished executing FlowForce Server delivers a response. If the job failed for anyreason, FlowForce Server will return an error message, otherwise it will return the first result file ofthe last execution step executed, or the last execution step's standard output, if no result file isavailable.
Services remain active as long as FlowForce server is running.
Please see the tutorial example: Using a deployed mapping as a web service.
To access FlowForce Server services through your browser:1. Open your browser and enter http://localhost:4646/service/* in the URL text box. If you
are using a remote FlowForce server installation, make sure it accepts connections fromother machines.This command shows all the services currently running on the server.
See also:Technical details
Technical details
The service interface is primarily meant for machine consumption. At the request URL specified,FlowForce Server starts a listener service which accepts HTTP GET and POST requests.
It then runs the job execution steps specified and returns the first result file of the last step or the

204 User Guide Job configuration
© 2014 Altova GmbHAltova FlowForce
standard output of the last step, if no result files are produced (e.g. for FlowForce Server systemcommands).
A valid result is returned with a HTTP 200 status, with the Content-Type header set according tothe result.
The Content-Type header depends on the actual result. A MapForce mapping will result in text/xml if it has XML output, or text/plain for text output. Standard output of other functions is alsoreturned as text/plain. The result is returned as the response body, without any embellishments.
Authentication:FlowForce Server uses HTTP Basic authentication as the means of user authentication. If youwant a service available without credentials, you have to grant "use service" permission to thedefault "anonymous" user. Any other user credentials are checked against the FlowForce Serveruser database (so you can use the same usernames and passwords you use for logging into theFlowForce Server configuration GUI).
You can still supply HTTP credentials when a service is available for anonymous use. Thecredentials are then checked against the FlowForce Server user database and the serviceexecution is attributed to the authenticated user instead of user anonymous.
Invalid credentialsIf you supply invalid credentials, the request interface will return an HTTP status of 401. If you didnot supply credentials and service use has not been granted to anonymous on this service, therequest interface will also return an HTTP status of 401.
If you supplied valid credentials, but the authenticated user is not granted "use" access on thisservice, the request interface will return an HTTP 4xx failure status . If you try accessing a servicethat does not exist, an HTTP 4xx failure status is returned.
When the client is permitted to use the service, FlowForce Server will verify the supplied requestparameters against the defined parameters of the job. Every parameter that does not have adefault must be specified, parameters having a default may also be specified. If parametervalidation fails, FlowForce Server will return a 5xx HTTP status. For debugging and testingpurposes FlowForce Server also returns a simple HTML parameter form in this case.
The built-in parameter named showform, when present (regardless of value), will display thetesting HTTP form regardless of any parameter validation errors.
Requests can generally be sent as both HTTP GET or HTTP POST (with multipart/form-dataContent-Type), with the exception of parameters of type stream, which are only supported forHTTP POST requests.
Service execution behaves like execution via trigger, and is subject to the same queueconstraints. You should set the queue limits accordingly.
Execution errors are reported as HTTP 5xx status with a generic error message; detailedinformation can be found in the FlowForce Server log.

© 2014 Altova GmbH
Job configuration 205User Guide
Altova FlowForce
4.3.8 Queue settings
Each Job has a queue assigned to it allowing you to define how many instances of the same jobcan be run in parallel.
Maximum parallel runs:Enter the number of times the same job may be executed in parallel on the server.
Minimum time between runs:Enter the time in seconds that must pass after each of the parallel jobs starts before another onemay start.
Also see: Runtime information Functions

206 User Guide Credentials
© 2014 Altova GmbHAltova FlowForce
4.4 Credentials
Credentials are stored login data used to execute FlowForce Server jobs. Credentials can bedefined as standalone "objects" and be assigned to various jobs, or they can be manually enteredfor a specific job.
Jobs are started automatically by FlowForce Server when the defined trigger conditions are met.FlowForce Server then runs these jobs using a specific operating system user account, ensuringthat job steps do not access unauthorized data. Note that file watch triggers are also assignedcredentials.
Credentials can be created, or deleted, on the Configuration (Container) page. Note that jobcredentials, i.e. username and password, can also be entered for individual jobs on the Job page.
Any user that has "write" access to the "Configuration" permission, can edit or removecredentials.
To add a credential to FlowForce Server:1. Click the container you want to create the new credential in, e.g. public.2. Click the "Create" button and select the "Create Credential" entry.
3. Enter the name of the credential as well as the operating system user name and

© 2014 Altova GmbH
Credentials 207User Guide
Altova FlowForce
password. To specify a user name in a Windows domain, please use the form username@domain.
4. Click Save. The new credential "Cred_production" has been saved in the /public container.
5. Click the "Configuration" button to return to the Container page.
Please see Permissions for information on the container permissions that can be defined.
Credentials and jobsEvery job MUST have a credential assigned to it for the job steps to be executed. This defines

208 User Guide Credentials
© 2014 Altova GmbHAltova FlowForce
the operating system user account used to run the job steps.
A predefined credential can be selected using the "existing credential" combo box, or the localcredential can be manually entered in the "User name" and "Password" fields. This is done on the"Create job..." page.
Note: If you manually enter the user name and password, as shown above, you will have to updatethem for those specific jobs, whenever your server credentials are changed.
Credentials:Credentials can be created in any container a user has access to.
The credential password may be an empty string.
As the clear text password needs to be sent to the operating system's login function,passwords are stored in a reversible encrypted form in the FlowForce Server database.The administrator should make sure to restrict access to the FlowForce Server databasefile.
FTP credentialsWhen using FTP system functions, e.g. ftp/retrieve, in the "Execute function" field you must alsoenter your FTP login credentials for the FTP server. You can select an existing credential or entera local one.

© 2014 Altova GmbH
Built-in functions 209User Guide
Altova FlowForce
4.5 Built-in functions
The /system container contains various file system, ftp, and mail functions that can be used in jobexecution steps. This allows you to copy or move files, create directories, or execute arbitrarycommand lines.
Note that all file paths in job execution steps must be a path on the server machine (thatruns FlowForce), not on your local machine.
File systemFTPMailMaintenanceShellCompute

210 User Guide Built-in functions
© 2014 Altova GmbHAltova FlowForce
4.5.1 filesystem - File system functions
Note that all file paths in job execution steps must be a path on the server machine (that runsFlowForce), not on your local machine.
Note:The working directory is used to resolve relative paths that occur during the executionof any type of step. When a relative path is encountered, it is resolved with respect to thepath of the current working directory.
If no working directory is specified, a temporary directory will be used.
/system/filesystem/copy - copy file(s)
Parameters:
Source Enter the path and file name of the source file that you want to copy.
Destination Enter the path and file name of the destination directory. You can enter adifferent file name in the destination field if you want to rename it as well.
Overwrite Clicking generates a check box. Activation causes destination file to beoverwritten
Working - directory Enter a working directory, e.g. C:\Temp. If this is empty, a temporarydirectory is used.
/system/filesystem/delete - delete file(s)
Path The path and file name of the file you want to delete.
Working -directory
Enter a working directory, e.g. C:\Temp. If this is empty, a temporary directoryis used.
/system/filesystem/mkdir - create directory
Parameters:
Path Enter the path/location of the new directory
MakeParents Clicking generates a check box. Activation allows a hierarchical path to becreated in one step.
E.g. working directory is c:\temp, and path is temp2\temp3. Creates the newdirectory c:\temp\temp2\temp3.
Working -directory
Enter a working directory, e.g. C:\Temp. If this is empty, a temporary directoryis used.
/system/filesystem/move - move or rename file(s)
Parameters:

© 2014 Altova GmbH
Built-in functions 211User Guide
Altova FlowForce
Source Enter the path and file name of the source file that you want to move.
Destination Enter the path and file name of the destination directory. If you only supply thedirectory name in this field, then the original file name will be retained.
Overwrite Clicking generates a check box. Activation causes destination file to beoverwritten.
Working -directory
Enter a working directory, e.g. C:\Temp. If this is empty, a temporary directoryis used.
Note - Working directory:This entry must be a path on the server machine (that runs FlowForce), not on your localmachine.
/system/filesystem/rmdir - remove directory
Path Enter the path/location of the directory/folder you want to delete
Working -directory
Enter a working directory, e.g. C:\Temp. If this is empty, a temporary directoryis used.

212 User Guide Built-in functions
© 2014 Altova GmbHAltova FlowForce
4.5.2 ftp - FTP client
Allows you to use FTP commands on remote servers.
system/ftp/deleteParameters:
FTP server Address of the remote FTP server, either as a URL or IP address.
Port The port number used to connect to the FTP server
Directory on host The name of the directory, on the host, from which you want to deletea file.
Login username User name needed to connect to the host.
Login password Password needed to connect to the host.
Use passive mode Use the passive mode FTP connection, if connection problems occur,e.g. routers or firewalls may be set up to avoid active connections.
Target file The name of the file that you want delete from the server.
Account The FTP account name of the user allowed access to the files on theremote server.
system/ftp/mkdirParameters:
FTP server Address of the remote FTP server, either as a URL or IP address.
Port The port number used to connect to the FTP server
Directory on host The name of the directory, on the host, from within which you want tocreate a new directory.
Login username User name needed to connect to the host.
Login password Password needed to connect to the host.
Use passive mode Use the passive mode FTP connection, if connection problems occur,e.g. routers or firewalls may be set up to avoid active connections.
Target directory The name of the directory that you want create on the server.
Account The FTP account name of the user allowed access to the files on theremote server.
system/ftp/moveParameters:
FTP server Address of the remote FTP server, either as a URL or IP address.

© 2014 Altova GmbH
Built-in functions 213User Guide
Altova FlowForce
Port The port number used to connect to the FTP server
Directory on host The name of the directory, on the host, from where you want to movethe file.
Login username User name needed to connect to the host.
Login password Password needed to connect to the host.
Use passive mode Use the passive mode FTP connection, if connection problems occur,e.g. routers or firewalls may be set up to avoid active connections.
Source file Name of the source file that you want to move to a different location.
Target file Name of the copied file at the target location. Use a different name ifyou want to rename the copied file.
Account The FTP account name of the user allowed access to the files on theremote server.
system/ftp/retrieve (file from server)
Parameters:
FTP server Address of the remote FTP server, either as a URL or IP address.
Port The port number used to connect to the FTP server
Directory on host The name of the directory, on the host, from where you want to retrievethe file.
Login username User name needed to connect to the host.
Login password Password needed to connect to the host.
Use passive mode Use the passive mode FTP connection, if connection problems occur,e.g. routers or firewalls may be set up to avoid active connections.
Source file Name of the source file that you want to retrieve.
Target file Name the file should have once it has been retrieved (change the nameto rename it).
Overwrite target Clicking generates a check box. Activation causes destination file tobe overwritten.
Working directory Directory you want to retrieve the file from. Note that this must be apath on the server machine (that runs FlowForce), not on your localmachine.
Account The FTP account name of the user allowed access to the files on theremote server.

214 User Guide Built-in functions
© 2014 Altova GmbHAltova FlowForce
system/ftp/rmdirParameters:
FTP server Address of the remote FTP server, either as a URL or IP address.
Port The port number used to connect to the FTP server
Directory on host The name of the directory, on the host, from within which you want toremove a directory.
Login username User name needed to connect to the host.
Login password Password needed to connect to the host.
Use passive mode Use the passive mode FTP connection, if connection problems occur,e.g. routers or firewalls may be set up to avoid active connections.
Target directory The name of the directory that you want to remove on the server.
Account The FTP account name of the user allowed access to the files on theremote server.
system/ftp/storeParameters:
FTP server Address of the remote FTP server, either as a URL or IP address.
Port The port number used to connect to the FTP server
Directory on host The name of the directory, on the host, where you want to store thefile.
Login username User name needed to connect to the host.
Login password Password needed to connect to the host.
Use passive mode Use the passive mode FTP connection, if connection problems occur,e.g. routers or firewalls may be set up to avoid active connections.
Source file Name of the file that you want to store.
Target file Name of the file to be stored at the target location. Use a differentname if you want to rename the copied file.
Working directory Directory where you want to store the transferred file. Note that thismust be a path on the server machine (that runs FlowForce), not onyour local machine.
Account The FTP account name of the user allowed access to the files on theremote server.
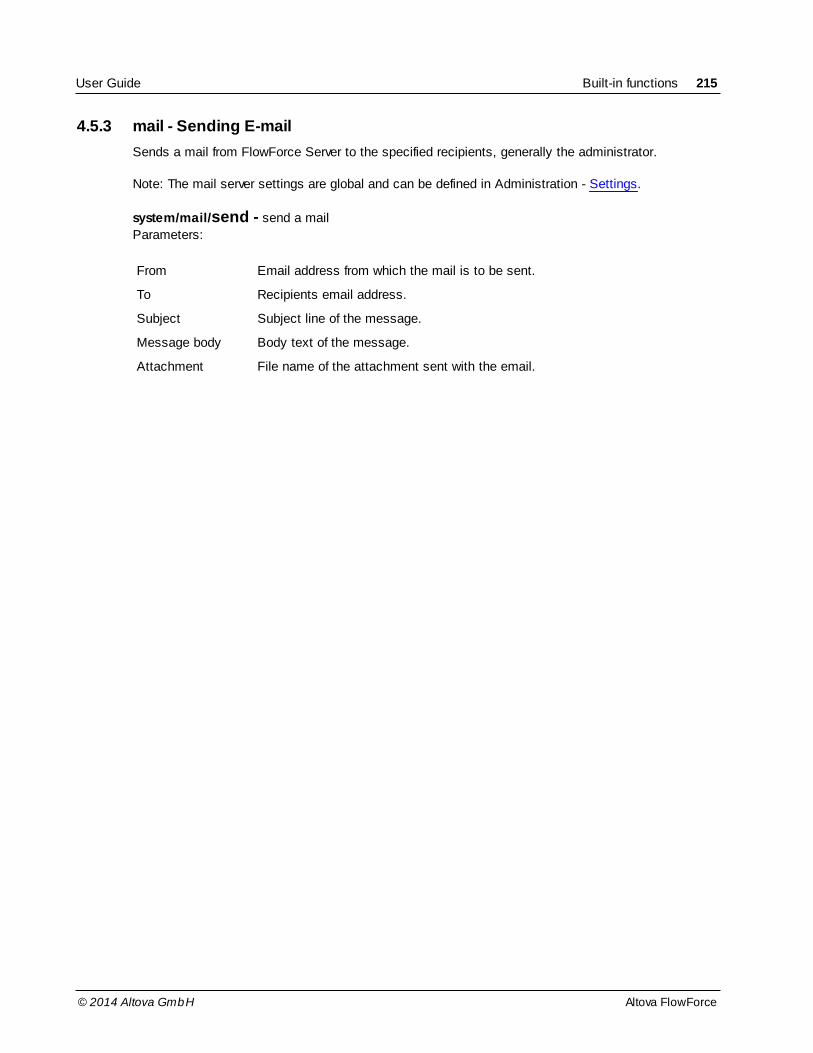
© 2014 Altova GmbH
Built-in functions 215User Guide
Altova FlowForce
4.5.3 mail - Sending E-mail
Sends a mail from FlowForce Server to the specified recipients, generally the administrator.
Note: The mail server settings are global and can be defined in Administration - Settings.
system/mail/send - send a mail
Parameters:
From Email address from which the mail is to be sent.
To Recipients email address.
Subject Subject line of the message.
Message body Body text of the message.
Attachment File name of the attachment sent with the email.

216 User Guide Built-in functions
© 2014 Altova GmbHAltova FlowForce
4.5.4 maintenance - archive and cleanup
Allows you to perform maintenance functions on the server.
/system/maintenance/archive-logParameters
Older than, days Archives files older than the number of days entered here. Default=30
Archive directory Archive directory name, e.g. C:\Temp. Mandatory.
Archive file prefix Prefix of the archive file. Default is "flowforcelog".
Delete archivedrecords
Deletes the archived records from the FlowForce database.
Working directory Enter a working directory, e.g. C:\Temp. If this is empty, a temporarydirectory is used.
Moves the older log records to an archive file on the server. Returns the name of the archive filethat was created.
/system/maintenance/cleanup-filesDeletes those files that are not in use, or referenced, by any deployed mappings on the server. No parameters.
/system/maintenance/truncate-logParameters
Older than, days truncates/deletes records older than the number of days entered here.Default=30
Deletes log records older than the date supplied. Returns the number of records that weredeleted.

© 2014 Altova GmbH
Built-in functions 217User Guide
Altova FlowForce
4.5.5 shell - Command line execution
Allows you to execute a shell command line.
Note:The working directory is used to resolve relative paths that occur during the executionof any type of step. When a relative path is encountered, it is resolved with respect to thepath of the current working directory.
If no working directory is specified, a temporary directory will be used.
/system/shell/commandline - execute any command line
Parameters:
Command Enter any command line command to execute, e.g. batch files or otherexecutables.
Working-directory
Enter a working directory, e.g. C:\Temp. If this is empty, a temporary directoryis used. Note that this must be a path on the server machine (that runsFlowForce), not on your local machine.

218 User Guide Built-in functions
© 2014 Altova GmbHAltova FlowForce
4.5.6 compute - Evaluating expressions
This step function computes the result of an expression and returns the computed value.
system/compute - compute an expression
By assigning a step result name to the compute step, the computed value can be used inparameters or expressions of following execution steps.
You can also use this function as the last step to define the output of a job that is used as aservice. In the screenshot shown below the result of the first step is assigned to "hello". Thecompute function then evaluates the expression and outputs its value to the caller.
E.g.Using the execute function system/shell/commandline
Command echo "hello world"Assign step's result to hello
Execute function system/computeexpression content(stdout(hello))
system/compute-string - output an expression result as a string
This step function does essentially the same at the compute function, with the main differencebeing that the input format is a string template instead of an expression.
Example, the job shown in the screenshot below, evaluates the expression "Both expressions areidentical".
/system/compute-string {filename(inputname)}.txtcompute-string is easier to use when several placeholders are needed and a string is to be

© 2014 Altova GmbH
Built-in functions 219User Guide
Altova FlowForce
computed.
For all other cases use "compute", e.g. system/compute concat(filename(inputname),".txt")
The inputname parameter is supplied by the "Job Input Parameters" group.


© 2014 Altova GmbH
Index 221
Index
88082,
TCP port - defining, 17
AAccessing,
setup page from any machine, 17
Act,
on triggering file, 209
Action, 209
on trigger file, 140
Administration Interface,
FlowForce Server, 80
starting and using, 17
Administrator guide, 6
Administrator interface, 66
Alert emails, 75
Altova LicenseServer,
(see LicenseServer), 32
Altova ServiceController, 39
Always, 174
Architecture,
FlowForce and servers, 10
archive, 216
Assign step result,
to, 169
Assigning licenses, 61, 70
BBatch file,
DoTransform.bat, 122
CCall,
function, 169
Choice,
conditions, 172
cleanup, 216
Concepts, 12, 164
Condition,
test, 177
Conditions,
choice, 172
Configuration files,
FlowForce Server, 79
Configuration page, 66
opening on Linux, 45
opening on Mac OS X, 47
opening on Windows, 42
URL of, 42
URL of (Linux), 45
URL of (Mac OS X), 47
Configuration tool,
starting, 17
Container,
and objects, 163
navigating, 132
public/system, 163
rename/move, 90
Credential,
adding to job, 132
FTP, 101, 206
local credential, 101, 206
Credentials, 206
DDays of months, 198
Days of week, 197
Days of weeks of months, 198
Default,
containers, 163
Default password, 42
Deploy,

Index
© 2014 Altova GmbH
222
Deploy,
MapForce mapping, 129
Deployed mapping,
function, 163
Deployed package,
changing input/output files, 209
Directory change,
polling for, 140
Domain,
user name entry, 101
DoTransform,
batch file, 122
EEditing,
user and role names, 88
Enabled,
trigger definition, 195
Error,
send e-mail with details, 174
Execution,
for each, 177
Expressions, 178
results, 178
step, 178
FFailed,
step, 174
Failed step,
send error details, 174
File path,
UNC, 6
File system,
file system trigger, 140
File system trigger - trigger types, 195
FlowForce,
Administrator guide, 6
deploy MapForce mapping, 129
Introduction, 3
job and triggers - defining, 132
modules, 10
starting, 17
Tutorial, 126
FlowForce Administration Interface, 10
starting and using, 17
FlowForce Architecture, 10
FlowForce Server, 10
configuration files, 79
data storage, 79
registering with LicenseServer, 52
For each,
counter, 177
FTP,
credential, 101, 206
Function, 209
call, 169
deployed mapping / OS function, 163
Functions,
adding system functions to a step, 136
GGetting starting, 14
HHome, 80
HTTP trigger, 195, 200
IInput parameters,
job input parameters, 168
Input/Output,
changing from deployed package, 209
Installation,
paths - Windows XP, Vista, Windows 7, 16
Interface,
FlowForce Administration, 80
Interval,
polling interval, 140
Interval counted from,
trigger definition, 195
Introduction,

© 2014 Altova GmbH
Index 223
Introduction,
to FlowForce, 3
JJob,
credential for, 132
input parameters, 168
steps, 209
steps - defining, 132
Store result in, 169
Job log,
viewing, 132
Job step,
adding additional to job, 136
Jobs, 80
and triggers - defining, 132
KKey and value,
parameters, 157
LLicense Pool, 49, 66
Licenses,
assigning, 61, 70
uploading, 49, 66
LicenseServer,
Configuration page, 66
installation on Mac OS X, 38
installation on Windows, 35, 36
interface with, 66
registering FlowForce Server with, 52
registering MapForce Server with, 56
registering StyleVision Server with, 58
settings, 75
starting, 40
steps for assigning licenses, 40
LicenseServer configuration page,
(see Configuration page), 42, 45, 47
Local credential, 101, 206
Log, 80
job log - viewing, 132
Login, 17
Logout, 78
MMail,
send on error/success, 174
maintenance, 216
MapForce, 10
MapForce Server, 10
registering with LicenseServer, 56
Mapping,
Deploy to FlowForce, 129
Messages, 78
Modules,
FlowForce installation, 10, 16
Move,
containers/objects, 90
Multiple,
parameters, 157
NName,
updating users and roles, 88
Network,
dirves accessing with UNC, 6
Network information, 34
Network settings, 75
OObject,
rename/move, 90
Object system,
jobs, packages, triggers, 162
Objects,
and containers, 163
On error, 174
On success, 174
Output/Input,

Index
© 2014 Altova GmbH
224
Output/Input,
changing from deployed package, 209
PPackage,
system/sys, 209
Packages, 80
Pair of parameters, 157
Parameter,
adding, 143
Parameters,
job input parameters, 168
multiple, 157
Password,
default at startup, 42
Path,
accessing network resource - UNC, 6
Permission,
adding, 98
Permissions,
restricting, 96
Polling,
directories, 140
Port, 17
Privileges, 94
Properties,
common to triggers, 195
Protected,
step, 174
Public,
container, 163
QQuery,
database, 143
Queue settings, 205
RRaptorXML Server, 122
Registering FlowForce Server with LicenseServer, 52
Registering MapForce Server with LicenseServer, 56
Registering StyleVision Server with LicenseServer, 58
Rename,
containers/objects, 90
users and roles, 88
Repeat,
trigger definition, 195
Resticting,
permissions, 96
Restricing user rights, 92
Rights,
restricting, 92
Role, 86
Roles, 80
renaming, 88
Roles and Users, 83
Root,
container, 162
Run daily, 197
Run on,
trigger definition, 195
Run once, 196
SSecurity, 82
Server Management tab, 61, 70
Server Monitoring tab, 75
Service, 202
ServiceController, 39
Settings, 75, 80
Setup page,
URL of, 17
Source,
files - changing from deployed package, 209
Source file,
use trigger file, 140
Starting,
FlowForce, 17
Stderr,
failed-step, 174
Step,
adding to an existing job, 136
Step protected, 174
Steps,
defining job steps, 132

© 2014 Altova GmbH
Index 225
Steps,
error/success, 174
store result in,
variable, 169
StyleVision Server,
registering with LicenseServer, 58
Success,
send mail, 174
System,
container, 163
functions - adding (copy/move etc.), 136
System action, 209
System/ sys package, 209
TTarget,
files - changing from deployed package, 209
TCP port - defining, 17
Technical details, 203
Timer trigger, 195
Timer trigger periods, 195
Trigger file,
use as source file, 140
Triggering file,
act on, 209
Triggers,
and jobs - defining, 132
common properties, 195
truncate, 216
Tutorial,
FlowForce, 126
UUNC,
accessing network drives, 6
Uploading licenses, 49, 66
URL of Setup page, 17
User,
adding, 83
User guide, 162
User name,
domain use, 101
Users, 80
renaming, 88
Users and Roles, 83
VValue and key,
parameters, 157
View,
job log view, 132
WWeb service, 146


