Page 1
An Evaluation of Decorative Techniques on a Red-Figure Attic Vase from the Worcester
Art Museum using Reflectance Transformation Imaging (RTI) and Confocal Microscopy
with a Special Focus on the “Relief Line”
Paula Artal-Isbrand¹, Philip Klausmeyer², Winifred Murray³ 1,2,3
Worcester Art Museum, 55 Salisbury Street, Worcester, MA 01609, U.S.A.
ABSTRACT
Decorative features on a Greek red-figure stamnos in the collection of the Worcester Art
Museum were examined using Reflectance Transformation Imaging (RTI) and scanning laser
confocal microscopy. These two surface examination tools helped to answer questions relating to
the decorative process, particularly the tools and techniques that Attic painters used to create the
so-called glossy black “relief lines” and “relief dots.” This research also incorporated fabricated
mock-ups to help understand the ancient technology. It was determined that the relief line was
not produced by an extruded method, but with a brush made of one or very few hairs, an idea
first proposed by Gérard Seiterle in 1976 and termed Linierhaar. It was observed that not one but
two distinct types of relief lines exist: the “laid” line (proposed by Seiterle) characterized by a
ridge running through the middle of the line and the “pulled” line (proposed in this paper) which
has a furrowed profile. Both line types were reproduced with a Linierhaar. Additionally, relief
dots were replicated using a conventional brush. Surface examinations of other red-figure vessels
using RTI and the confocal microscope suggest these conclusions apply to vessels of this genre
as a whole.
INTRODUCTION
Greek black- and red-figure pottery production started around the first half of the 6th
-
century BCE and lasted a little over three centuries through the first third of the 4th
- century BCE
[1]. Black-figure technique characterizes the first part of this period, which later gives way to the
red-figure technique around 520 BCE with an overlap of both for about 30 years [2].
The method used to produce the distinctive red and black color of Greek Attic vases is
one of the milestones in the history of ceramic technology. According to this ceramic tradition,
the black portions on the vessels are the painted sections. The paint is technically a glaze,
referred to as “glossy black glaze” or “black gloss,” consisting of dilute clay rich in iron, oxygen,
silicon and potassium [3]. The unpainted parts of the vessel reveal the natural red color of the
fired clay body. After decorating the vessel with the glaze, it was fired in three stages—first
under oxidizing, then under reducing and finally under re-oxidizing conditions to achieve the red
and black colors of these ceramics. This ingenious process was only rediscovered 70 years ago
by the German chemist Theodor Schumann [4].
Today there is consensus regarding the materials and the three-stage firing technique used
to make these vessels, but an ongoing debate remains over the sequence of the decoration
process and especially over the tools and methods used to create certain decorative features such
as the so-called glossy black “relief lines” and “relief dots.”
Page 2
EXPERIMENT
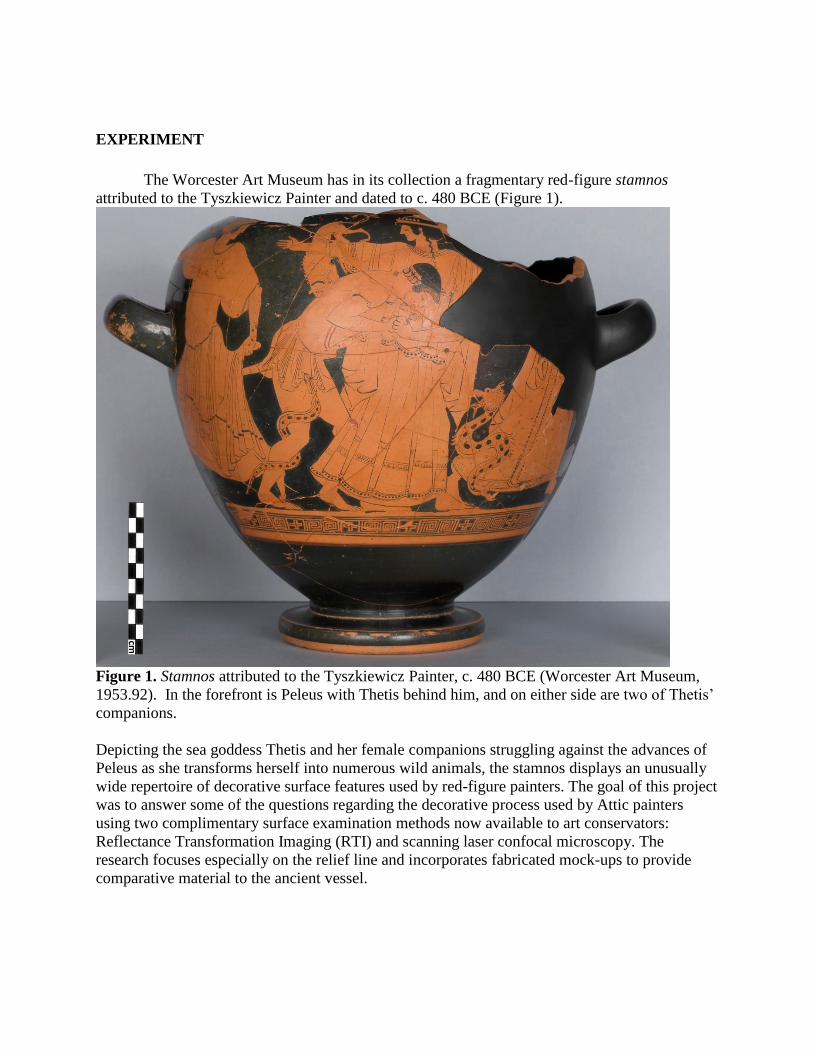
The Worcester Art Museum has in its collection a fragmentary red-figure stamnos
attributed to the Tyszkiewicz Painter and dated to c. 480 BCE (Figure 1).
Figure 1. Stamnos attributed to the Tyszkiewicz Painter, c. 480 BCE (Worcester Art Museum,
1953.92). In the forefront is Peleus with Thetis behind him, and on either side are two of Thetis’
companions.
Depicting the sea goddess Thetis and her female companions struggling against the advances of
Peleus as she transforms herself into numerous wild animals, the stamnos displays an unusually
wide repertoire of decorative surface features used by red-figure painters. The goal of this project
was to answer some of the questions regarding the decorative process used by Attic painters
using two complimentary surface examination methods now available to art conservators:
Reflectance Transformation Imaging (RTI) and scanning laser confocal microscopy. The
research focuses especially on the relief line and incorporates fabricated mock-ups to provide
comparative material to the ancient vessel.
Page 3
Figure 2. Reflectance Transformation Imaging Figure 3. Olympus LEXT-4000 scanning laser
light array (“dome”). confocal microscope.
The RTI instrument used for this project consists of a fixed light array, also referred to as
the “dome,” and high-resolution digital camera (Figure 2). To generate an RTI file, forty
individual digital images are taken of the same surface detail on an art object as it appears under
various angles of illumination. Fitting software is used to combine the forty images into one
interactive file, resulting in a high-resolution, 2-dimensional representation of an object’s
intricate 3-dimensional surface. Upon opening the file on the computer, the viewer can
manipulate the angle of illumination using the mouse and apply various transformation
algorithms to optimize the conditions for viewing surface topography and discern features not
otherwise visible. One such function is the “specular enhancement” feature, which is particularly
useful to characterize topography. For the purpose of this publication, relevant still-captures from
these interactive files were selected.
Use of the Olympus Lext-4000 scanning laser confocal microscope was generously
provided by the Surface Metrology Department at Worcester Polytechnic Institute (WPI) (Figure
3). This instrument produces images and surface measurements for a range of metrology
functions in a number of formats including topography and 3D elevation maps.
DISCUSSION
Decorative Features on the Worcester Stamnos and the Sequence of Application
The decorative features on the Worcester stamnos will be discussed in the sequence that
they were likely applied by the vase painter in Antiquity. Figure 4 shows recessed lines produced
with a hard tool on the unfired surface to serve as a preliminary sketch for a figure’s leg.
Page 4
Figure 4. RTI still-capture with specular enhancement showing a detail of the stamnos in Fig. 1
with preliminary sketch lines defining Peleus’ right leg.
These lines were probably made with a stick of charcoal [5], a slate pencil [6] or a small, blunt
tool made of wood or metal [7].
Following a possible pre-firing [8], the glazing process on the vessel started with defining
the figures by outlining them with either a dilute glaze or directly with the relief line (some
figures are only partially defined with relief lines). The relief line was then used for painting the
details within the figures such as faces, hair, body parts and folds in garments; curly hair or fancy
trim on garments were depicted with raised dots, also referred to as relief dots (Figure 5).
Page 5
Figure 5. RTI still-capture showing a detail of Theits’ face in Fig. 1 with relief lines used to
outline the face and to depict facial features, and with relief dots for curly hair.
Both the relief line and relief dots will be discussed in depth later in this paper. Other details in
the figures as well as the decorative border below the figural composition were then painted
more broadly, likely with a brush using a glaze more dilute than the glaze used for the relief lines
(Figure 6).
Page 6
Figure 6. Detail of the border in Fig. 1 painted with dilute glaze.
Unlike the relief lines, these lines are flush with the surface, and depending on the degree of
dilution their color ranges from black where thick, to brown to a faint golden honey color where
thin.
The next step in the decorative process was to paint the background with glaze in two
stages. First the broad contour line was applied with the purpose of creating a safe margin around
the delicate and complex edges of the figures to protect them from being disrupted by the thicker
brush used for painting in the background, an action probably executed at a relatively fast pace
compared to the other techniques (Figure 7).
Page 7
Figure 7. RTI still-capture with specular enhancement showing the head in upper left of Fig. 1
and the corresponding contour line in the black background.
Figure 8 is a detail of the head in Figure 7 showing how the black contour line covers the relief
lines outlining this head and how some relief lines extend into the background—their appearance
is more rounded and less crisp then the relief lines within the red figure, indicating that the
contour line was applied after the relief lines.
Page 8
Figure 8. Detail of Figure 7 at a different angle of illumination showing how the relief lines that
outline the figure are painted over with background glaze. The white arrow points at the edge of
the contour line glaze on top of a relief line.
The next stage was to paint in the remaining large area of background with glaze. This
glaze covered part of the contour line resulting in an overlap area, which is clearly visible in
Figure 9.
Page 9
Figure 9. Detail of Figure 7 at yet another angle of illumination showing the overlap of contour
line and background glaze: (A) contour line layer only, (B) background glaze only, (C) overlap
of contour line and background glaze.
Scholars have conflicting opinions as to which came first in the sequence of the
decorative process: the relief line or the contour line. While Greek vase scholar Beth Cohen also
suggests the sequence proposed here, Joseph V. Noble believes that the contour line actually
preceded the outlining relief line [9]. By describing the sequence that applies to this vessel, the
authors are not suggesting that there is a rule followed by all vase painters in their work.
Ongoing research using RTI and laser scanning confocal microscopy will provide more evidence
of similarities or variations in the ancient vase painting sequence.
Finally, a limited use of an applied dark red colorant is discernable in a few hair (Figure
10)
Page 10
Figure 10. Detail of the head of a figure on the reverse side of the Worcester stamnos with a
decorative head band painted with a red colorant.
and clothing details, as well as in a partial inscription over the black background (κ [...] ο ς, most
likely the letters from the word “kalos” occasionally found on Greek vessels), probably applied
as a last step in the decorative process.
It is also evident that at some point the unpainted sections were coated with an extremely
dilute version of the glaze in order to saturate the red color and make the surface shiny [10]. A
contrast between glazed and unglazed surfaces is visible in Figure 11
Page 11
Figure 11. This angle of the the stamnos shows the difference in appearance between the glazed
red-figural parts of the vessel and the unglazed underside of the foot.
where the underside of the foot of the stamnos, which did not receive a glaze, is matte and less
saturated than the area with the red figures. Elemental analysis could be used to confirm the
presence of the components of this dilute glaze on the red parts of the vessel. The decorated
vessel was then fired in the three-stage process mentioned above.
The Relief Line
In light of the conflicting views about how the relief lines were made, research focused
on answering questions about the manufacture of this particular decorative feature. The related
relief dots were examined as well. Central to this research was the topographic study of the relief
lines using RTI and confocal microscopy, allowing the topography of the lines to be distinctly
characterized, which ultimately was the key to determining what tools and techniques were used
to produce them.
As the name indicates, the relief lines exist in relief; they are three-dimensional and have
volume (Figure 12).
Page 12
Figure 12. RTI still-capture showing a detail of a hand painted with various relief lines, some of
which are exceptionally three-dimensional rising about 1 mm from the surface.
Page 13
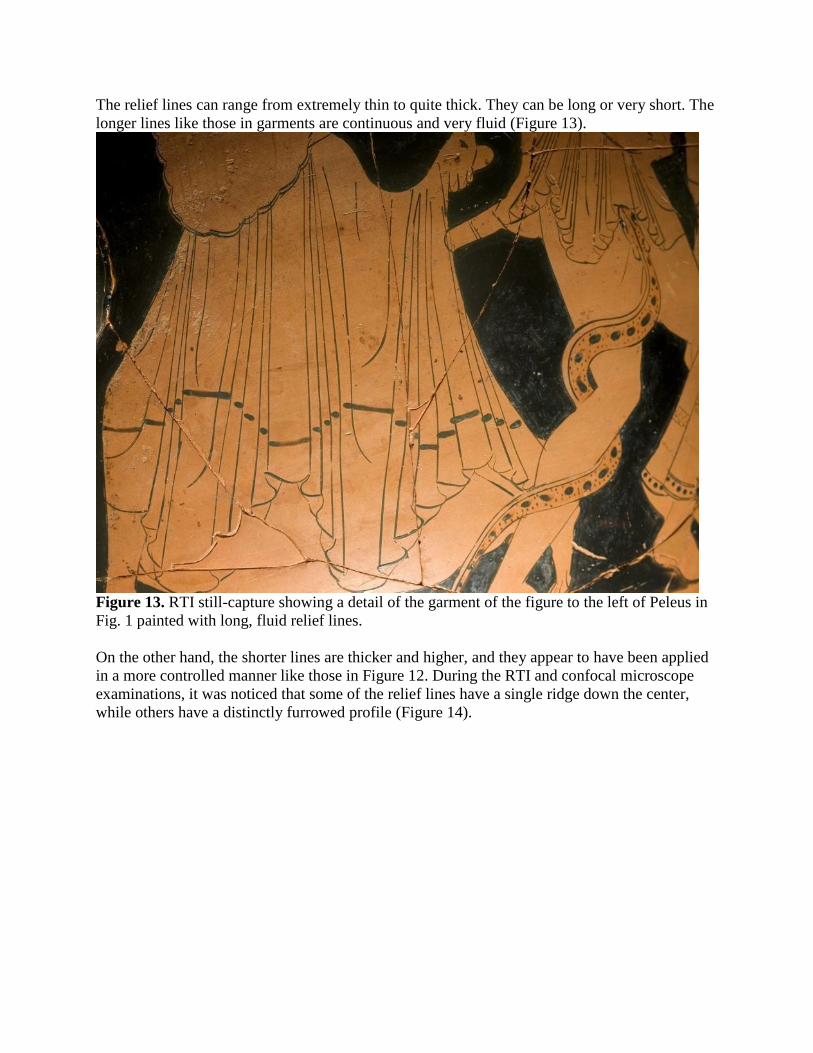
The relief lines can range from extremely thin to quite thick. They can be long or very short. The
longer lines like those in garments are continuous and very fluid (Figure 13).
Figure 13. RTI still-capture showing a detail of the garment of the figure to the left of Peleus in
Fig. 1 painted with long, fluid relief lines.
On the other hand, the shorter lines are thicker and higher, and they appear to have been applied
in a more controlled manner like those in Figure 12. During the RTI and confocal microscope
examinations, it was noticed that some of the relief lines have a single ridge down the center,
while others have a distinctly furrowed profile (Figure 14).
Page 14
Figure 14. RTI still-capture with specular enhancement of a detail from Fig. 13 showing ridged
and furrowed lines. For example, the line down the middle of the snake’s head and the lines
above the snake’s eyes are ridged and the long straight lines in the garment are furrowed.
Informed by the insights of these examination tools, mock-ups were made using some of
the tools and techniques proposed for creating the relief lines in order to determine if they could
indeed create lines with the same topographical features observed on the ancient stamnos.
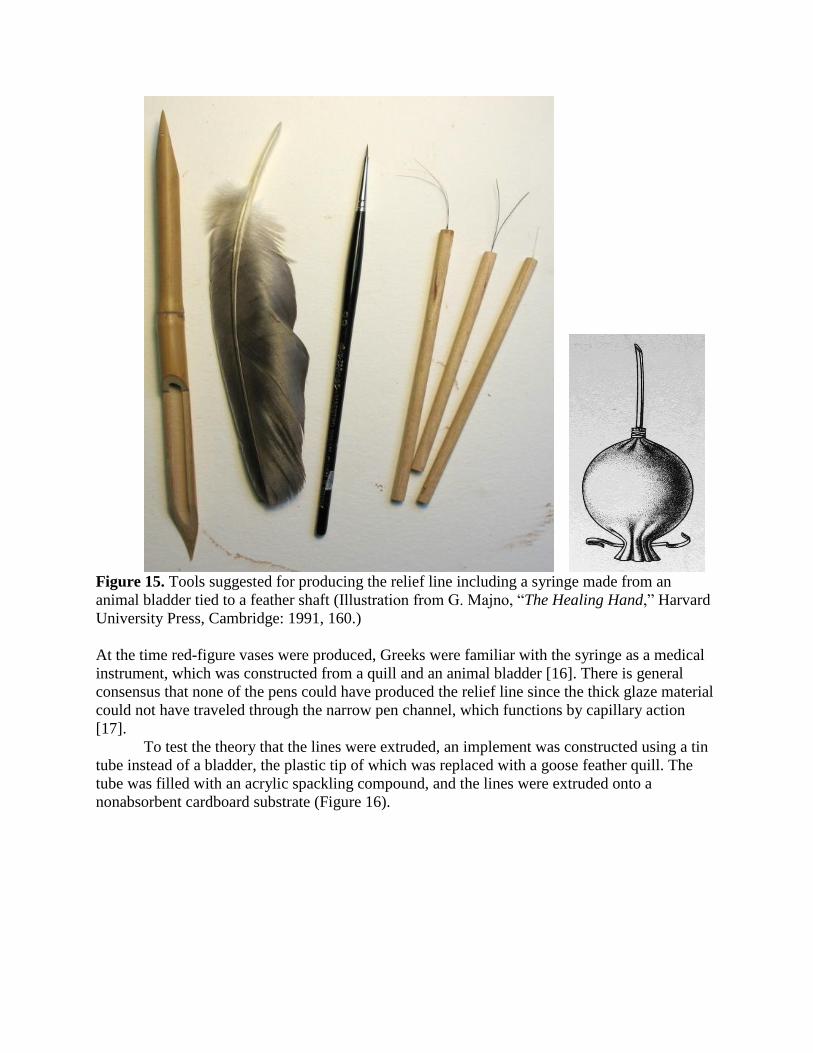
Tools that have been suggested for creating these relief lines include a reed, quill or metal
pen [11], the tip of a feather [12], a thin brush [13], a brush with a single or only a few hairs, and
a syringe-like instrument, which would have extruded the glaze (Figure 15) [15].
Page 15
Figure 15. Tools suggested for producing the relief line including a syringe made from an
animal bladder tied to a feather shaft (Illustration from G. Majno, “The Healing Hand,” Harvard
University Press, Cambridge: 1991, 160.)
At the time red-figure vases were produced, Greeks were familiar with the syringe as a medical
instrument, which was constructed from a quill and an animal bladder [16]. There is general
consensus that none of the pens could have produced the relief line since the thick glaze material
could not have traveled through the narrow pen channel, which functions by capillary action
[17].
To test the theory that the lines were extruded, an implement was constructed using a tin
tube instead of a bladder, the plastic tip of which was replaced with a goose feather quill. The
tube was filled with an acrylic spackling compound, and the lines were extruded onto a
nonabsorbent cardboard substrate (Figure 16).
Page 16
Figure 16. Modern tube with feather quill tip used to replicate an ancient syringe.
This method could produce very thin lines but typically made a disproportionally large
deposit of medium at the beginning of each line that was not observed on the ancient vase. Also,
none of the modern extruded lines displayed the characteristic furrows that were observed on the
ancient work. Examination of these extruded lines with the confocal microscope confirmed that
they did not have the topography of the ancient lines on the stamnos (Figure 17).
Page 17
Figure 17. Confocal image of modern extruded line (left) and the same as a 3D elevation map
(right) with the threshold setting adjusted to remove the majority of measurements associated
with the substrate.
Later on towards the end of the Classical Period, Attic vase decoration sometimes included
gilded clay features that were indeed created using the extrusion method. Examples of this can be
seen on vases produced by the Xenophantos Painter from around 420 BCE, about 180 years after
the Worcester stamnos was made [18]. This observation could make an argument for the
presence of extruded relief lines on earlier vases since it could have been a logical progression of
the relief line technique.
A range of fine conventional brushes was tested next. The use of the spackling compound
was discontinued because of its relative coarseness and because it is not designed to be used with
a brush. Instead, an extra-fine commercial clay bole manufactured for gilding was used as it
probably resembled the ancient glaze more in consistency and texture (Figure 18). The
consistency of this bole is thick and pasty and the texture extremely fine and smooth.
Figure 18. Clay bole used for mock-ups.
At the necessary consistency to make a three-dimensional line, the clay bole did not flow
or easily transfer from the brushes to the substrate. When diluted to increase the fluidity, the line
lacked the unique relief quality. Also, it was not possible to create short lines with a sharp turn in
them like loops, a decorative feature used frequently on the stamnos and other Attic red-figure
vases.
Page 18
A brush first proposed by the Greek Art scholar Gérard Seiterle in 1976 was tested next.
Referred to as a Linierhaar, this brush is made with only one or very few hairs. Linierhaar
translates from the German as “a hair that produces lines.” For this research, a series of one-,
two- or few-haired brushes of different lengths, thicknesses, and consistencies were constructed
using horse tail hair, horse mane hair, pig bristles, and human hair as is shown to the right of the
traditional brush in Figure 15.
According to Seiterle, the brush was dipped into the glaze, laid down onto the surface of
the vessel, and then lifted straight up to create a relief line (Figures 19 and 20) [19].
Figure 19. Linierhaar brush loaded with clay bole (left) and used to produce a laid relief line
(right).
Page 19
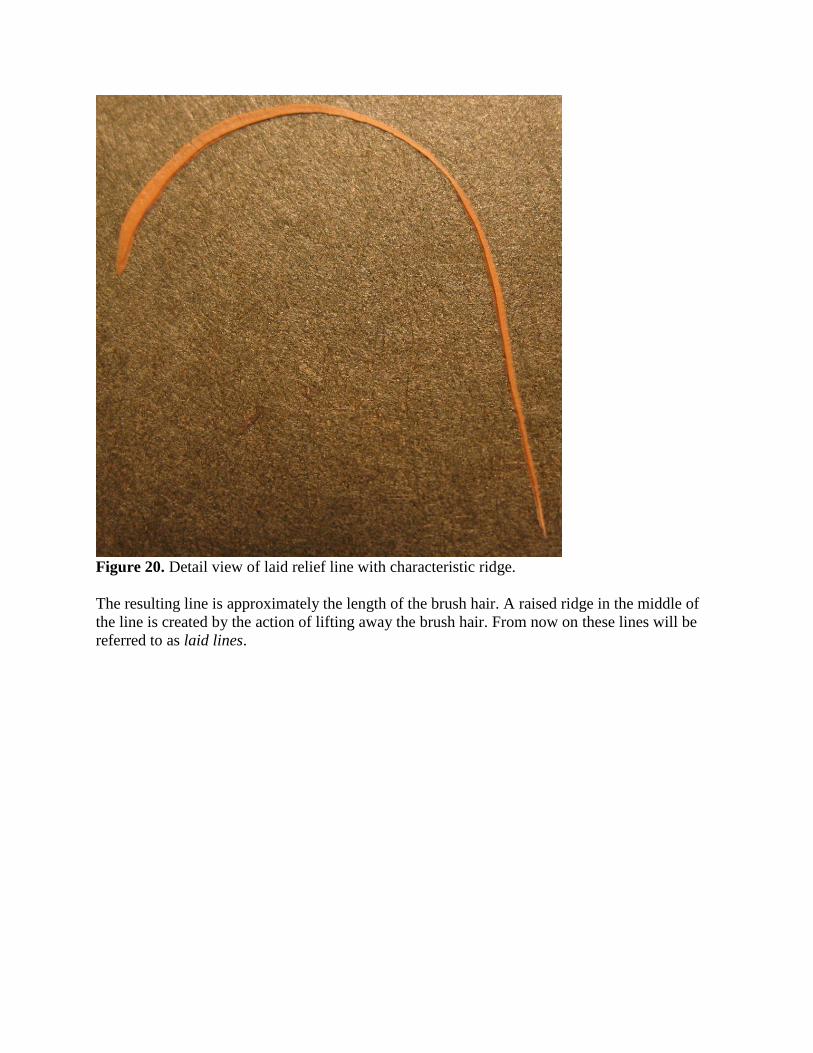
Figure 20. Detail view of laid relief line with characteristic ridge.
The resulting line is approximately the length of the brush hair. A raised ridge in the middle of
the line is created by the action of lifting away the brush hair. From now on these lines will be
referred to as laid lines.
Page 20
An especially soft and short brush is needed to create small loop-shaped lines such as the
ones in Thetis’ headdress or short lines for eyes, mouths, ears, etc. (Figure 21). Ancient and
Figure 21. Linierhaar brush producing loop-shaped laid relief lines.
modern loops were examined with the confocal microscope, and the close resemblance of them
suggests that Seiterle’s proposed tool and technique that produces these curved lines with tight
turns is correct. The laying-down and lifting-up motion is crucial in the resulting topography of
the ridged line. Modern and ancient loops are characterized by a curved line that becomes wider
in the middle and then tends to become narrower again. It also has a central ridge running the
length of the loop starting at the tip of the line (which is the beginning of the line where the brush
hair touches the substrate for the first time) and reaching its maximum height at the end of the
line. These characteristics can be observed in the two loops on the left of Figure 21. However, if
the brush hair shifts slightly during the motion of laying the brush down then the central ridge is
interrupted. This scenario can be observed on the far right loop that is being laid down in Figure
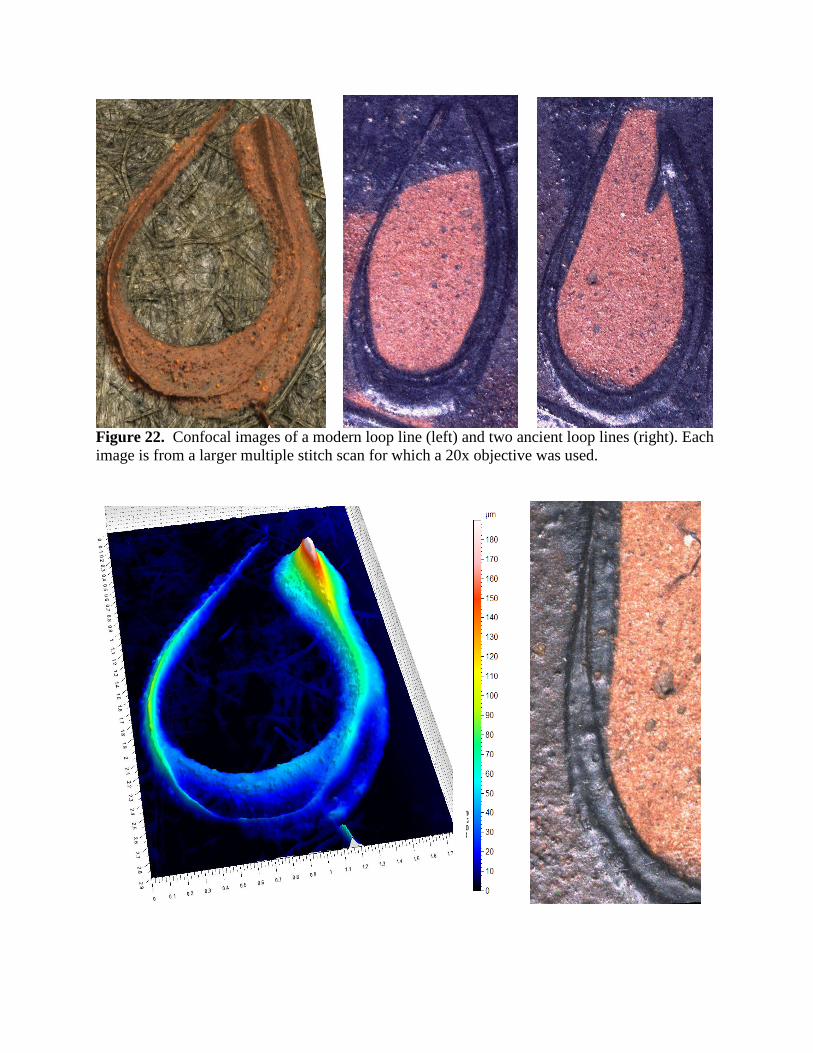
21 and in the right loop in Figure 22.
Page 21
Figure 22. Confocal images of a modern loop line (left) and two ancient loop lines (right). Each
image is from a larger multiple stitch scan for which a 20x objective was used.
Page 22
Figure 23. 3D elevation map of the modern loop (threshold adjusted to remove the majority of
measurements associated with the substrate) and a detail confocal image of far right loop in
Figure 22.
Examination of Thetis’ proper left eye with the confocal microscope suggests that the
short lines that make up the eye are also ridged, and were made with Seiterle’s tool as well.
(Figure 24).
Page 23
Figure 24. Confocal image (top) and the corresponding 3D elevation map (bottom) of Thetis’
proper left eye. The area shown is 2.3 x 3.5 mm and the images were stitched from 32 individual
area scans using a 20x objective. The lines defining the outline of the eye were painted first
followed by the ones making up the iris. Both the confocal image and the 3D elevation map in
Figure 24 clearly show how the latter “pile” on top of the former. Also visible is the shallow
pupil painted with dilute glaze. Note the faint eye-shaped feature above—a recessed line from
the preliminary sketch of the eye drawn into the surface with a hard tool.
Seiterle claims that all relief lines were made in the same manner, including the long
straight lines used to depict the folds in the garments [20]. The technique of laying very long
Linierhaar lines down not only requires a lot of precision and control, but it does not create the
fluid lines that can be seen in the ancient garments. It was also found that all laid lines done
according to this technique produced lines with one ridge in the middle but not the furrowed
lines. Consequently, a modification of the technique was tested in order to better replicate the
ancient long lines. The lines were created by setting down the tip of the brush, and while leaving
all or some of the hair in contact with the vessel, it was pulled along the surface to produce a line
longer than the length of the brush hair. Therefore, long lines were made with the Linierhaar, but
they were not laid, they were pulled. The action of the brush hair plowing through the medium as
it is dragged across the surface produces the characteristic furrowed profile observed on the
Page 24
longer pulled lines of the stamnos (Figure 25).
Figure 25. Linierhaar brush producing a pulled line (left) and the tip of the brush hair plowing
through the clay bole producing a furrowed relief line (right).
Greek vase scholar John Boardman mentions having observed the groove in the relief lines and
suggested that a thin brush probably produced it; however, he dismisses Seiterle’s Linierhaar as
being the tool except for producing repetitive loops using a loop of hair [21].
A modern and an ancient pulled line were examined using the laser scanning confocal
microscope, and their resemblance was striking. (Figures 26).
Figure 26. Confocal 3D elevation maps of modern pulled line (left) and two ancient pulled lines
(right). The map on the left was stitched from 6 scans and the map on the right from 16 scans,
each using a 20X objective.
Page 25
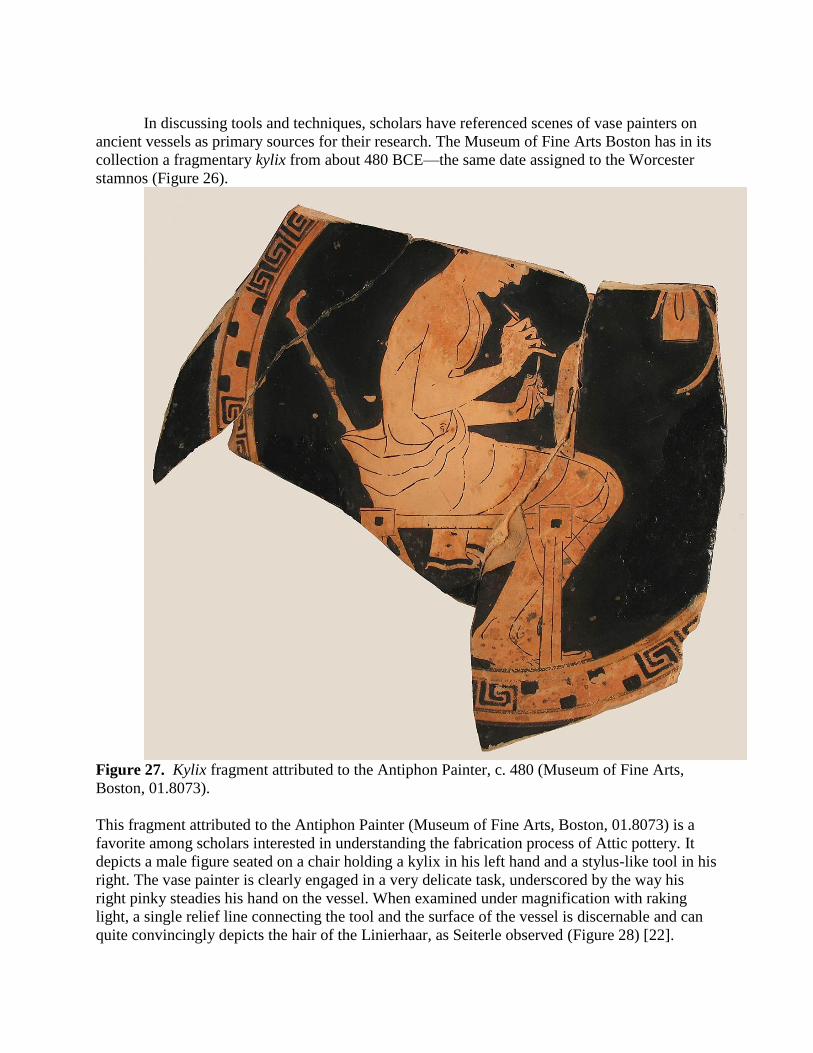
In discussing tools and techniques, scholars have referenced scenes of vase painters on
ancient vessels as primary sources for their research. The Museum of Fine Arts Boston has in its
collection a fragmentary kylix from about 480 BCE—the same date assigned to the Worcester
stamnos (Figure 26).
Figure 27. Kylix fragment attributed to the Antiphon Painter, c. 480 (Museum of Fine Arts,
Boston, 01.8073).
This fragment attributed to the Antiphon Painter (Museum of Fine Arts, Boston, 01.8073) is a
favorite among scholars interested in understanding the fabrication process of Attic pottery. It
depicts a male figure seated on a chair holding a kylix in his left hand and a stylus-like tool in his
right. The vase painter is clearly engaged in a very delicate task, underscored by the way his
right pinky steadies his hand on the vessel. When examined under magnification with raking
light, a single relief line connecting the tool and the surface of the vessel is discernable and can
quite convincingly depicts the hair of the Linierhaar, as Seiterle observed (Figure 28) [22].
Page 26
Figure 28. Detail of MFA Boston kylix showing the Linierhaar in the painter’s right hand and
the small implement (probably a reservoir for the glaze) in his left.
In addition, one can see that the vase painter steadies the kylix stem between his left pinky and
ring finger, while with his left thumb and index finger carefully holds a small, pointy implement.
Seiterle thinks that it was a brush functioning as a holder for the glaze while Noble believed that
it was an extruder [23]. The authors of this paper would like to propose that it is a reservoir for
the glaze close at hand. Because the consistency of the glaze for the relief lines had to be thick
without being too dry, the painter could only use small batches before it would be unusable.
The Relief Dots
The relief dots are another feature debated by scholars in the field. Greek vase scholar
John D. Beazley described them as “raised black dots—or rather bubbles [that] often burst” [24].
Noble believes that these dots, like the relief lines, were extruded [25].
Page 27
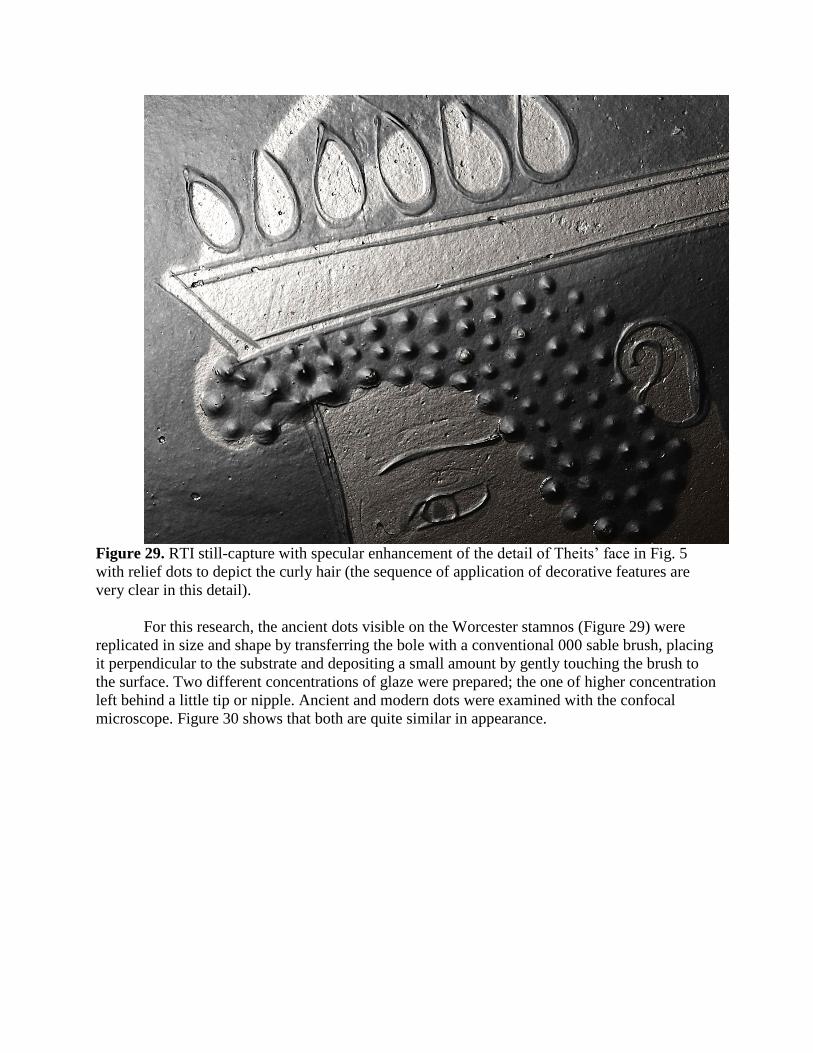
Figure 29. RTI still-capture with specular enhancement of the detail of Theits’ face in Fig. 5
with relief dots to depict the curly hair (the sequence of application of decorative features are
very clear in this detail).
For this research, the ancient dots visible on the Worcester stamnos (Figure 29) were
replicated in size and shape by transferring the bole with a conventional 000 sable brush, placing
it perpendicular to the substrate and depositing a small amount by gently touching the brush to
the surface. Two different concentrations of glaze were prepared; the one of higher concentration
left behind a little tip or nipple. Ancient and modern dots were examined with the confocal
microscope. Figure 30 shows that both are quite similar in appearance.
Page 28
Figure 30. Confocal 3D image of a modern dot (left) and confocal image of an ancient dot
(right).
Each dot is approximately 0.25-0.75 mm wide. It is likely that when air gets trapped in the glaze
during the application process, it expands during firing, resulting in the “burst bubble”
appearance noted by Beazley.
CONCLUSIONS
RTI and scanning laser confocal microscopy, two complimentary surface examination
methods not previously used for the study of Attic Greek vases, led to new insights in the study
of a stamnos in the collection of the Worcester Art Museum. Findings from this research advance
our current understanding of debated decorative techniques used in Attic pottery.
The decorative features observed on the stamnos can be described in the following
application sequence. The preliminary sketch lines were drawn onto the leather-hard vessel first.
Then the figures were outlined with the relief line using thick glaze and details within the figures
such as faces, hair, body parts and folds in garments were painted next. Also the curly hair or
fancy trim on garments were done with relief dots at this time using the same glaze than for the
relief lines. RTI images clearly show in what sequence these lines and dots were placed relative
to each other. After this step other details in the figures as well as the decorative border below
the figural composition were painted more broadly with a brush using a glaze more dilute than
the glaze used for the relief lines. Then the contour line was painted as the first step in the
process of completing the background. It was applied with the purpose of creating a safe margin
around the complex outlines of the figures, thereby protecting them from being disturbed by the
thick brush used for filling in the black background. As a last step, a dark red colorant was
selectively applied in some design details and for the inscription. It is also evident that at some
point the unpainted sections were coated with an extremely dilute version of the glaze in order to
saturate the red color and make the surface shiny. However, it was not determined at what point
in the decorative sequence this step was performed.
Page 29
Two types of relief lines were identified in this study: one that is characterized by a ridge
running through the middle of the line and a second with a furrowed profile. Both line types were
reproduced with modern materials and tools. These lines were produced with a brush made of
one or very few hairs that had been proposed by Seiterle. Two different application techniques
were used to produce these two types of lines. The laid line was, as the word indicates, laid down
onto the surface of the vessel followed by lifting the brush straight up, creating the distinctive
ridge during this action. The pulled line was created by setting down the tip of the brush, and
while leaving some of the hair in contact with the vessel it was pulled along the surface as the tip
of the brush plowed through the medium creating the characteristic furrow. Additionally, relief
dots were replicated using a conventional brush. All mock-ups were examined and compared to
the ancient lines with RTI and the confocal microscope.
Finally, ancient relief dots were reproduced with a conventional brush. Both ancient and
modern dots were imaged with the laser scanning confocal microscope and their similarity
suggests that a conventional brush was probably the tool used to produce them.
This research is ongoing and has expanded beyond the Worcester stamnos to include
other red-figure vessels and fragments. Preliminary findings appear to support the conclusions
presented here. Publication of the ongoing research is anticipated.
ACKNOWLEDGMENTS
The authors would like to thank Professor Christopher A. Brown from WPI’s Surface
Metrology Laboratory and Doug Kennedy from Olympus America Inc. for making the confocal
microscope available for this research as well as WPI students Brendan Powers, Joon-Ho Lee
and Steven Chung for their assistance. The authors’ gratitude also goes to Dr. Christine
Kondoleon, Dr. Phoebe Segal, Flavia Perugini, Abigail Hykin and Susanne Gänsicke from the
Museum of Fine Arts, Boston for making the kylix fragment accessible for examination and
photography. Thanks also to Dr. Kenneth Lapatin from the J.Paul Getty Museum for his help
with the accuracy of the art historical content in this paper. The authors thank Dr. David Acton
from WAM for providing his horse Lisby’s hair to make Linierhaar brushes to produce relief
lines in the mock-ups. Additional acknowledgement goes to Cultural Heritage Imaging. Two of
the authors (PK and WM) were generously funded through the Andrew W. Mellon Foundation.
REFERENCES
1. J. Boardman, The History of Greek Vases: Potters, Painters and Pictures (Thames &
Hudson, London, 2001) pp. 48 & 105.
2. J. Boardman, The History of Greek Vases: Potters, Painters and Pictures, (Thames &
Hudson, London, 2001) pp. 66.
3. R. Newman, “Ferrous and Ferric: A Review of Scientific Research on the Iron in Attic
Greek Glazes,” Papers on Special Techniques in Athenian Vases, ed. K. Lapatin (Getty,
Los Angeles, 2006) pp. 106.
4. T. Schumann, “Oberflächenverziehrung in der antiken Töpferkunst: Terra sigilata und
griechische Schwarzrotmalerei,” Berichte der Deutschen Keramischen Gesellschaft 23
408-426 (1942).
5. B. Cohen, “Outline as a Special Technique in Black- and Red-figure Vase-painting,” The
Page 30
Colors of Clay: Special Techniques in Athenian Vases, ed. B. Cohen (Getty, Los Angeles,
2006) pp. 151.
6. G. Seiterle, “Die Zeichentechnik in der rotfigurigen Vasenmalerei,” Antike Welt 7.2 3
(1976).
7. P.E. Corbett, “Preliminary Sketch in Greek Vase-Painting,” Journal of Hellenistic Studies
85 16 (1965).
8. E. Aloupi-Siotis, “Recovery and Revival of Attic Vase-Decoration Techniques: What
Can They Offer Archaeological Research?” Papers on Special Techniques in Athenian
Vases, ed. K. Lapatin (Getty, Los Angeles, 2006) pp. 123.
9. B. Cohen, “Outline as a Special Technique in Black- and Red-figure Vase-painting,” The
Colors of Clay: Special Techniques in Athenian Vases, ed. B. Cohen (Getty, Los Angeles,
2006) pp. 151; J. Noble, The Techniques of Painted Attic Pottery (Thames & Hudson,
New York, 1988) pp. 105-107.
10. G. Seiterle, “Die Zeichentechnik in der rotfigurigen Vasenmalerei,” Antike Welt 7.2 4
(1976).
11. P. Hartwig, “Die Anwendung der Federfahne bei den Griechischen Vasenmalern,”
Jahrbuch des Kaiserlichen Deutschen Archäologischen Instituts 14 147-167 (1887).
12. P. Hartwig, “Die Anwendung der Federfahne bei den Griechischen Vasenmalern,”
Jahrbuch des Kaiserlichen Deutschen Archäologischen Instituts 14 148 (1887).
13. J. Boardman, The History of Greek Vases: Potters, Painters and Pictures (Thames &
Hudson, London, 2001) pp. 286.
14. G. Seiterle, “Die Zeichentechnik in der rotfigurigen Vasenmalerei,” Antike Welt 7.2 6
(1976).
15. J. Noble, The Techniques of Painted Attic Pottery, second revised edition, (Thames &
Hudson, New York, 1988) pp. 119-120.
16. F. Adams, The Genuine Works by Hippocrates (Sydenham Society, London, 1849) p.
819.
17. P. Hartwig, “Die Anwendung der Federfahne bei den Griechischen Vasenmalern,”
Jahrbuch des Kaiserlichen Deutschen Archäologischen Instituts 14 147-167 (1887).
18. A. Lezzi-Hafter, “Clay, Gold, and Craft: Special Techniques in Three Vases by the
Eretria Painter and Their Apotheosis in Xenophantos,” Papers on Special Techniques in
Athenian Vases, ed. K. Lapatin (Getty, Los Angeles, 2006) pp. 180-81.
19. G. Seiterle, “Die Zeichentechnik in der rotfigurigen Vasenmalerei,” Antike Welt 7.2 6
(1976).
20. G. Seiterle, “Die Zeichentechnik in der rotfigurigen Vasenmalerei,” Antike Welt 7.2 6
(1976).
21. J. Boardman, The History of Greek Vases: Potters, Painters and Pictures, (Thames &
Hudson, London, 2001) pp. 286.
22. G. Seiterle, “Die Zeichentechnik in der rotfigurigen Vasenmalerei,” Antike Welt 7.2 9
(1976).
23. G. Seiterle, “Die Zeichentechnik in der rotfigurigen Vasenmalerei,” Antike Welt 7.2 9
(1976); J. Noble, The Techniques of Painted Attic Pottery, second revised edition,
(Thames & Hudson, New York, 1988) pp. 118-120.
24. L. Caskey and J. Beazley, Attic Vase Paintings in the Museum of Fine Arts Boston
(Humphrey Milford Oxford University Press, Boston, 1963) Vol. III, pp. 35 pl.76.
Page 31
25. J. Noble, The Techniques of Painted Attic Pottery, second revised edition, (Thames &
Hudson, New York, 1988)
pp. 139 & 142.