Friday 2-5 Lab 3 An investigation of the relationship between internal pressure and degree of carbonation of soda drinks Tamanna Islam Urmi Lab Partner: Jack Greenfield 12/11/14 2.671 Measurement and Instrumentation Dr. Andrew James Barnabas Milne
Transcript
Friday 2-5
Lab 3
An investigation of the relationship between internal pressure and degree of
carbonation of soda drinks
Tamanna Islam Urmi
Lab Partner: Jack Greenfield
12/11/14
2.671 Measurement and Instrumentation
Dr. Andrew James Barnabas Milne
Tamanna Islam Urmi, 12/11/20142014
1
Abstract
Spillage right after opening a soda can is a common occurrence. The sudden effervescence of
fizz from the drink occurs after opening the can due to the difference of pressure inside the can
and in the atmosphere. The drinks with higher internal pressure are therefore more likely to cause
the spillage. The question we explored in our experiment is whether the internal pressure of a can
depend on the amount of CO2 in the drink or not. Using strain gauge the change in strain on the
wall of a Lemonade, less carbonated drink and a Sprite can, highly carbonated drink at opening
the can was measured. The result led us to find the internal pressure. The Lemonade can had an
internal pressure of 72.47 ± 0.94 kPa and the Sprite can had an internal pressure of 352.6 ± 4.11
kPa. By comparing our results with data for internal pressure of Lemonade and soda can from the
last 10 years, we estimated the consistency of our results. We then concluded that the can of the
less carbonated drink has a significantly lower internal pressure than that of a more carbonated
drink. Because of the less internal pressure of the less carbonated drink, it will cause less vigorous
spillage at opening compared to the highly carbonated drink that has a higher internal pressure.
1. Introduction
The question answered in this experiment is: Is the internal pressure of can of lemonade, a
less carbonated drink, different from a regular soda that is more carbonated? Opening the can of
carbonated drink often cause high effervescence and spillage of drink. If we had information about
the internal pressure based on the amount of CO2 in it, we could save some trouble and anticipate
the degree of spillage likely to happen at opening the can. One strain gauge was attached to the
circumference of each can. The change in resistance across the strain gauge was found by
measuring the voltage across the strain gauge using a Wheatstone bridge and amplifier circuit
connected to the strain gauge. The voltage change was then used to find the strain incurred on the
strain gauge; the calculated strain was used to find the internal pressure. This method was the most
suitable for our laboratory conditions and is sufficiently reliable to show us the difference in
internal pressures of the two cans. The result obtained was compared to the historical data on strain
and internal pressure of Sprite and lemonade can from 10 years.
The rest of the paper is divided into four parts. Section 2 gives detailed theory behind each
component of the experiment and how these will allow us to find the internal pressures of the cans.
Section 3 gives a detailed description of the experimental setup, including important information
to make the experiment repeatable. The fourth section discusses the results from the analyzed data.
Lastly, section 5 draws the conclusion of our experiment.
2. Theory of using strain gauge and Wheatstone bridge to get internal pressure
In this section we will find out what the relation between mechanical properties of a can with the
internal pressure is and we will also find out how a Wheatstone bridge can measure voltage
difference that can ultimately be used to calculate strain, hence internal pressure.
2.1 Relationships between stress, strain and internal pressure
The derivation of internal pressure using stress and strain is done by modelling the cylinder using
the approximation that the thickness of the wall is much smaller that the diameter of the can and
the height of the can is more than the diameter. The thickness of both the cans are less than 2% of
the diameter hence the approximation is valid. The hoop stress of the can, 𝜎ℎ, in the container wall
Tamanna Islam Urmi, 12/11/20142014
2
is given by the tension per unit length divided by wall thickness, 𝑡. The tension per unit length is 𝑝𝐷
2. The free-body diagrams showing the forces acting on the circumferential direction and axial
direction are given below:
Figure 11: Free body diagram to show the force actin on the wall of the can circumferentially
𝜎ℎ =𝑝𝐷
2𝑡 where 𝐷 = 2𝑟
(1)
Figure 21: Free body diagram to show the force acting on the can axially
The axial stress of the can, 𝜎𝑙, is given by2
𝜎𝑙 =𝑝𝐷
4𝑡
(2)
The induced hoop strain along the circumference of the can is2
𝜀ℎ =1
𝐸(𝜎ℎ − 𝜈𝜎𝑙),
(3)
Tamanna Islam Urmi, 12/11/20142014
3
Combining equations (1)-(3) we get expressions for internal pressure of the can in terms of
For our experiment, we will only measure strain induced circumferentially on the can to find the
hoop strain. The cans are made of Aluminum. It has a Young modulus of 69.0 GPa and a
poisson’s ratio of 0.35. These values along with the strain measured by the strain gauge will be
used to find the internal pressure of the can.
2.2 Finding strain using Wheatstone Bridge and strain gauge
A strain gauge experiences change in resistance as it experiences a mechanical strain. The
proportion of change in resistance and the initial resistance of the gauge is proportional to the
strain the gauge is experiencing. That is2,
∆𝑅
𝑅= 𝐹𝑔𝜀
(5)
𝐹𝑔, the proportionality constant, is the gauge factor which is 2.1±0.5%. We used the gauge factor
value from the specifications sheet of the strain gauge provided by the manufacturer. We have to
address two issues for measuring 𝜀 correctly. Firstly, the ratio ∆𝑅
𝑅 will be in the order of
miliohms. That is too small to precisely measure using a digital multimeter. Secondly, to make
our results accurate we need to know the scaling factor of the amplification. So, we will use a
Wheatstone Bridge circuit connected to an amplifier to get amplified value of resistance change.
The scaling factor of magnification will be found by changing the resistance by a known value
and calculate the magnification.
Figure 3: Wheatstone bridge circuit
Tamanna Islam Urmi, 12/11/20142014
4
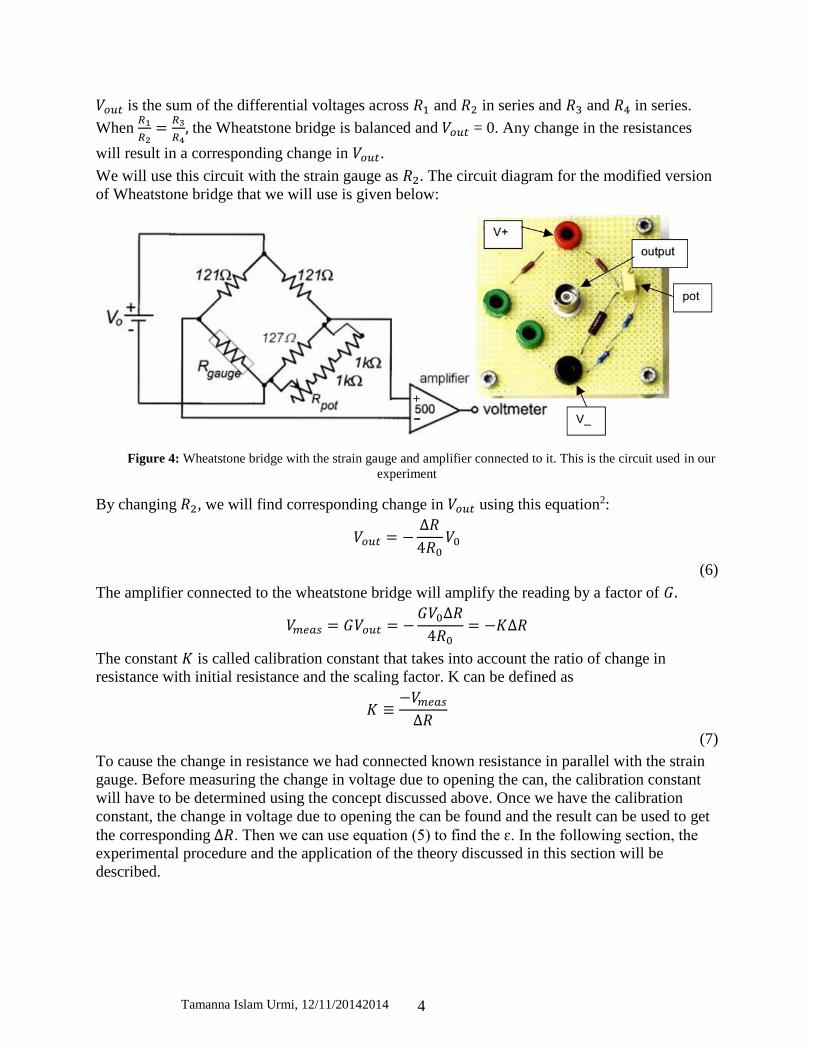
𝑉𝑜𝑢𝑡 is the sum of the differential voltages across 𝑅1 and 𝑅2 in series and 𝑅3 and 𝑅4 in series.
When 𝑅1
𝑅2=
𝑅3
𝑅4, the Wheatstone bridge is balanced and 𝑉𝑜𝑢𝑡 = 0. Any change in the resistances
will result in a corresponding change in 𝑉𝑜𝑢𝑡.
We will use this circuit with the strain gauge as 𝑅2. The circuit diagram for the modified version
of Wheatstone bridge that we will use is given below:
Figure 4: Wheatstone bridge with the strain gauge and amplifier connected to it. This is the circuit used in our
experiment
By changing 𝑅2, we will find corresponding change in 𝑉𝑜𝑢𝑡 using this equation2:
𝑉𝑜𝑢𝑡 = −∆𝑅
4𝑅0𝑉0
(6)
The amplifier connected to the wheatstone bridge will amplify the reading by a factor of 𝐺.
𝑉𝑚𝑒𝑎𝑠 = 𝐺𝑉𝑜𝑢𝑡 = −𝐺𝑉0∆𝑅
4𝑅0= −𝐾∆𝑅
The constant 𝐾 is called calibration constant that takes into account the ratio of change in
resistance with initial resistance and the scaling factor. K can be defined as
𝐾 ≡−𝑉𝑚𝑒𝑎𝑠
∆𝑅
(7)
To cause the change in resistance we had connected known resistance in parallel with the strain
gauge. Before measuring the change in voltage due to opening the can, the calibration constant
will have to be determined using the concept discussed above. Once we have the calibration
constant, the change in voltage due to opening the can be found and the result can be used to get
the corresponding ∆𝑅. Then we can use equation (5) to find the ɛ. In the following section, the
experimental procedure and the application of the theory discussed in this section will be
described.
Tamanna Islam Urmi, 12/11/20142014
5
3. Setup of experiment
In this section, the apparatus used to carry the experiment out will be described in section 3.1. In
section 3.2, the complete method of the experiment is explained. In the second section it is
explained how the theories mentioned in the previous section is used in the experiment.
3.1 Apparatus used
We used the apparatus from the laboratory of course 2.671 at MIT. The amplifier serial number
was 2671-09. We used HP 973A digital micrometer, digital calipers, digital micrometers, HP
power supply, a can of Sprite, a can of Lemonade, strain gauge made of constantan with a gauge
factor of 2.10±0.5%, Wheatstone Bridge, BNC cables, resistors of 147kΩ, 33.3 kΩ, 100 kΩ, 49.9
kΩ, 68 kΩ resistances, soldering equipment, cable and wires.
Figure 5: Experimental setup showing how the soda cans, wheatstone bridge, digital micrometer and amplifier
were connected
3.2 Methods
In this section the detailed procedure we followed to measure the internal pressure of the soda cans
will be discussed. At first we cleaned the surface of the cans and attached the strain gauge along
the circumference. Piece of wires were soldered to the strain gauge. The loose ends of the wire
were connected to the digital multimeter to find the initial resistance of the strain gauge. The
resistance of the strain gauge on Lemonade was 120.421 ± 0.022𝛺 and that on the Sprite can read
120.061 ± 0.022Ω. The circuit of power supply, soda can, Wheatstone bridge, amplifier and
digital micrometer was set up. A supply of 10V was provided from the power supply. The setup
Amplifier
Wheatstone Bridge
Digital Micrometer
Tamanna Islam Urmi, 12/11/20142014
6
was then used to calibrate the circuitry. A resistor of known resistance was connected in parallel
to the soda can with strain gauge and the change in 𝑉𝑜𝑢𝑡 was measured using the DMM.
The final 𝑅2 was found by
𝑅2,𝑓𝑖𝑛𝑎𝑙 = (1
𝑅𝑔𝑎𝑢𝑔𝑒+
1
𝑅𝑝𝑎𝑟𝑎𝑙𝑙𝑒𝑙)
−1
(8)
Here 𝑅𝑔𝑎𝑢𝑔𝑒 is the resistance of the strain gauge initially and 𝑅𝑝𝑎𝑟𝑎𝑙𝑙𝑒𝑙 is the resistance of the
resistor added in parallel. Then we will have ∆𝑅
∆𝑅 = 𝑅2,𝑓𝑖𝑛𝑎𝑙 − 𝑅𝑔𝑎𝑢𝑔𝑒 = (1
𝑅𝑔𝑎𝑢𝑔𝑒+
1
𝑅𝑝𝑎𝑟𝑎𝑙𝑙𝑒𝑙)
−1
− 𝑅𝑔𝑎𝑢𝑔𝑒
We were using a HP 973A digital multi-meter. Before each measurement the Wheatstone bridge
is balanced by rotating the potentiometer in it until the voltage output is within 0.1mV of zero. An
amplifier is used in this process because the change in voltage is too small to detect. Amplifying
the output allowed us to amplify the error and get a higher accuracy in both balancing the
Wheatstone bridge and measuring the change in output Voltage. This was repeated four times for
four different known resistors of known resistance. Using the results, we were able to find five
values of K, the mean of which gave us a calibration constant, interval K of 10.648 ± 0.114A
with 95% confidence interval. The plot below shows how 𝑉𝑚𝑒𝑎𝑠 varied with ∆𝑅. The slope of this
line is the calibration constant, K.
Figure 1: Plot of voltage measured as the resistance of one leg of the Wheatstone bridge was varied using
resistors of known resistance
We then used digital calipers to measure the diameters of the cans. The tip of the calipers were
very sharp so we had to be careful to avoid puncturing the can. Four measurements were taken for
each can. The diameters of Lemonade and Sprite can were 65.84 ± 0.119𝑚𝑚 and 66.10 ±0.119𝑚𝑚 respectively and the thicknesses of the cans were (1.05 ± 0.30) × 10−1𝑚𝑚 and
The slope
gives K
Tamanna Islam Urmi, 12/11/20142014
7
(1.09 ± 0.30) × 10−1𝑚𝑚 for Lemonade and Sprite can respectively. There measurements were
done with 95% confidence interval.
Next, we had to find the voltage change due to opening the can to use the value to find the
resistance change which can then give us the strain acting on the strain gauge. After balancing the
circuit each can is carefully opened while still connected to the circuit. The change in voltage as
shown in the multi-meter was recorded. The Lemonade can was opened with the strain gauge
connected to the circuit and the digital multi-meter displayed a voltage right after opening the can.
This is the change in voltage due to opening the can. It gave a voltage of 0.735 ± 0.002V. The
Sprite can gave a voltage of 3.483 ± 0.004V.
After this step we emptied the can and cut a small section of the cans to measure thickness. Using
digital micrometers, the thickness of the can wall at four different locations were measured. The
mean of the four measurements were found for each of the can. The wall of Lemonade can was (1.05 ± 0.30) × 10−1mm thick and the wall of Sprite can was (1.09 ± 0.30) × 10−1mm thick.
All these measurements have 95% confidence interval.
The results are shown in tabulated form below:
Table 1: Results obtained for the diameter, thickness and voltage at opening for the lemonade and Sprite cans