29
1 Analysis and Recommendation Document by Henson Group for Client X THE HENSON GROUP, INC. (THG) Analysis & Recommendation Document For CLIENT X Consultant: X

1 Analysis and Recommendation Document by Henson Group for Client X
THE HENSON GROUP, INC. (THG)
Analysis & Recommendation Document
For
CLIENT X
Consultant: X

2 Analysis and Recommendation Document by Henson Group for Client X
Table of Contents
Report Overview ................................................................................................................................................................... 3
Storage management ............................................................................................................................................................ 5
1. Azure storage accounts ............................................................................................................................................. 5
2. Storage account replication types ............................................................................................................................ 5
3. Standard storage account ......................................................................................................................................... 6
4. Premium Storage account ......................................................................................................................................... 6
Cool & Hot Storage ........................................................................................................................................................... 7
Virtual Machines ................................................................................................................................................................... 8
Using Premium disk with D-series VMs instead of Standard disk .................................................................................... 8
Backup & BCDR ..................................................................................................................................................................... 9
Availability Sets ................................................................................................................................................................... 10
Auto-Scaling Azure VMs ...................................................................................................................................................... 11
Create a Windows Virtual Machine Scale Set using Azure PowerShell .......................................................................... 11
Billing Alerts ........................................................................................................................................................................ 12
Set up billing alerts for your Microsoft Azure subscriptions ........................................................................................... 12
Set the alert threshold and email recipients .................................................................................................................. 12
Check on your alerts ....................................................................................................................................................... 14
Security ............................................................................................................................................................................... 15
ACL in Azure firewall ....................................................................................................................................................... 16
Using Network ACLs, you can do the following: ......................................................................................................... 16
Adding ports to Azure Firewall........................................................................................................................................ 16
Other recommendations..................................................................................................................................................... 17
Services that don’t need any specific recommendation ..................................................................................................... 17
Storage Service limits .......................................................................................................................................................... 18
How to move VMs to Premium Disk (Storage Account) ..................................................................................................... 20
Execution steps ........................................................................................................................................................... 20
Create a Windows Virtual Machine Scale Set using Azure PowerShell .............................................................................. 21
Step 1: Install Azure PowerShell ................................................................................................................................. 21
Step 2: Create resources ............................................................................................................................................. 21
Step 3: Explore resources ............................................................................................................................................ 25
How to add IPs to ACL in Azure firewall .............................................................................................................................. 26

3 Analysis and Recommendation Document by Henson Group for Client X
Report Overview This report and its recommendation have been build keeping the following objectives in mind: Cost Savings, Optimum
use of Azure capabilities and Security.
The below table summarizes the scope of improvements with respect to each of these objectives.
Service Cost Savings Optimal use Security
High Med Low None High Med Low None High Med Low None
Storage Accounts
Virtual Machines
Virtual Network
Monitoring & Analytics
Backup & Recovery
Since CLIENT X’s usage grew exponentially over the last few months, we recommend investing time & effort at:
Optimizing utilization of each resource: since its cloud you can always allocate more resources, upscale &
downscale your applications with a click, unlike forecasting resource utilization for 3-4 years and capacity
planning for it. Be it a new VM, a VM being used for only few hours or running huge batch processes on
weekly/monthly basis, choose a size that suits you right now and stop/delete what is not needed.
Proper categorization of various types of resources like Dev, Test, UAT and PROD. Azure has specific low cost
services and plans for the low priority resources and Premium options for those mission critical ones. Different
servers & data have different compliance, backup & recovery needs. In a disaster situation, a PROD server
needs to be back and running within minutes maybe a different location, but Dev server can wait a few hours.
User data backup should be at a faraway location, maybe a different continent (if compliance allows).
Regular monitoring & cleanup: we highly recommend your System Admins to check Azure diagnostics and
remove/archive unwanted resources. Some resources just need to stopped like VMs and Backups while others
need to be deleted or achieved like blobs, networks, gateways,
Estimated Cost Saving based on recommendations
Storage Accounts Vitual Machines Backups Monitoring

4 Analysis and Recommendation Document by Henson Group for Client X
IaaS to PaaS movement: everyone starts with basic services like VM and storage disks. This does reduces
management effort but the true potential of cloud remains in the PaaS and SaaS services. Pre-configured and
immediate auto-scaling for web apps & databases, auto-recovery in case of failure, point-in-time restore of
data, threat detection and alerts etc. A good cloud roadmap and the right execution can help you with long
term gains, reduced costs, higher performance and easier manageability.
Plan development for Cloud and not traditional IT: Azure highly supports DevOps scenarios where your Dev
team can directly publish code to their Dev site and databases from their development studio. Testing can
happen at realtime and the same environment can be reset for UAT thus saving time. Deploy new code without
any downtime in PROD or do A/B testing and check how your customers responded using highly integrated
telemetry services for your web, mobile or IOT apps.

5 Analysis and Recommendation Document by Henson Group for Client X
Storage management We analyzed each storage account in depth and the following needs to be highlighted:
1. Azure storage accounts actually consist of multiple services. Each has its own price, limits and usage. Refer
to Appendix 1 for more details on limits.
a. Blobs – these can be files of any type.
Max size 195 GB. This affects few use cases eg. a SQL backup of a huge database being saved
directly to Storage account as a blob but the backup file is larger than 195GB, then backup job
will fail.
These are billed as per total size of all the blobs in a storage account.
All blobs need to be contained in a “Container”.
There is not concept of nested containers, however to organize data you can use a folder
structure by using a “/” in the file name at the end of each folder name.
b. Page Blobs – these are all the VHD files used by Azure VMs
Max size – 1 TB
The billing for Standard Storage account and Premium storage account is different. Explained
later.
If you need a disk bigger than 1 TB then utilize the “Spanned volume” option in Windows Disk
manager. Please note this has disadvantages too as data recovery or moving disks to a different
VM has to be done very carefully and is prone to errors.
c. File Share – these are SMB shares
Max size – 5 TB
Maz IOPS – 1000
They have higher IOPS (nearly twice) than a standard VHD disk and even a P10 premium disk.
This is billed on the allocated size of the File Share and not on its consumption. Eg. a 5TB file
share with 200GB data will be billed for the complete 5TB.
d. Tables – these are NoSQL tables. Can be used for Big Data, logs or any other non-relational data types.
It is billed as per usage and doesn’t need a size to be allocated.
Max size of a table entity – 1 MB
Max size of a table – 500TB
e. Queues – these are data queues that can be used by applications to store small data packets. This is out
of scope for this document.
2. Storage account replication types
LOCALLY REDUNDANT STORAGE (LRS)
ZONE REDUNDANT STORAGE (ZRS)
GEOGRAPHICALLY REDUNDANT STORAGE
(GRS)
READ-ACCESS GEOGRAPHICALLY
REDUNDANT STORAGE (RA-GRS)
Makes multiple synchronous copies of your data within a single datacenter
Stores three copies of data across multiple datacenters within or across regions. For block blobs only.
Same as LRS, plus multiple asynchronous copies to a second datacenter hundreds of miles away
Same as GRS, plus read access to the secondary datacenter

6 Analysis and Recommendation Document by Henson Group for Client X
3. Standard storage account a. It has all the different Storage account services mentioned above.
b. This supports all 4 types of storage account replications – LRS, ZRS (some locations), GRS and RA-GRS.
c. The VHDs are billed as per as per data consumption on them and not the size allocated. Eg. if we create
1 TB VHDs disk but it only have 200GB data on it, then you shall be billed for 200GB + few GBs extra for
the partition tables but not for the complete 1 TB.
d. VHDs have a limit of 500 IOPS per disk and the storage account has a limit of 20,000 IOPS. Hence do not
create more than 40 disks on a single storage account to avoid performance issues.
e. Recommendation, never create more than 20 disks on a single storage account.
4. Premium Storage account a. It only supports Blobs and Page Blobs.
b. The VHDs are billed are per their size allocated, irrespective of consumption. Eg. a 1TB VHD with 200GB
data will be billed for the complete 1TB.
c. It only supports the LRS replication type.
d. The IOPS limits of disk depends on its size. Refer table below:
Premium Storage Disk Type P10 P20 P30
Disk size 128 GB 512 GB 1024 GB (1 TB)
Max IOPS per disk 500 2300 5000
Max throughput per disk 100 MB per second 150 MB per second 200 MB per second
Max number of disks per storage account
280 70 35
We can categories your storage into multiple usage classes but the ones that need immediate attention are below:
Accounts with RA-GRS replication type
o This is a very expensive replication method, 240% of LRS and 20% more than GRS.
o Should be used only for specific use cases where all the data on the storage account needs to be read-
only at the secondary data location.
o Account ‘finfe2stdgClient X’ needs attention.
Accounts with huge File Shares
o File Shares as explained earlier get billed for the allocated size.
o There can be increased and reduced easily from the portal without any loss of data.
o Accounts ‘iinfe2stdgClient X’ and ‘iinfe2stdlClient X’ needs attention.
Accounts with many 1TB VHDs
o As mentioned above, there is a limit to the maximum number of disk per storage account.
o Reduce empty disks, move disks to another premium or standard storage accounts.

7 Analysis and Recommendation Document by Henson Group for Client X
o Accounts ‘iinfe2prem5Client X, iinfe2prem6Client X, iinfe2premClient X, iinfe2stdgClient X,
iinfe2stdlClient X’ needs attention.
Accounts with GRS replication type
o This replication type is 200% more expensive than LRS.
o Should be used only for data that needs high redundancy.
Some good practices are being followed and need more push:
0. Backup SQL databases as Blobs to a storage account instead of a drive or file share. It helps in easy and direct
access to backup files.
1. Use of GRS type storage account for backups. This gives an extra level of redundancy.
Not Recommended: Saving SQL to a Local disk on GRS type storage account and also setting up File Backup of the same
files on a LRS or GRS Recovery Vault. Although this increases the redundancy to 4 times but is an overkill with high cost
and low benefit.
Cool & Hot Storage This is new specialized Storage account type for Cool (data with low access needs) and Hot (data with high access
needs).
This storage account will only support blobs and not the other storage account services.
This only supports LRS, GRS and RA-GRS replication types.
Cool Storage – low data cost than standard blobs, higher access cost
Hot Storage – higher data cost than standard blobs, lower access cost
All API are compatible with this storage account type.
It supports on Azure Resource Manager (ARM) model and doesn’t exists in Classic storage accounts.
Refer https://azure.microsoft.com/en-us/pricing/details/storage/blobs/ for a detailed pricing comparison between
Cool & Hot storage with each replication type.
Approx. Cost Savings: $3000 - $4500
8 Analysis and Recommendation Document by Henson Group for Client X
Virtual Machines We analyzed your VMs and based on the information available as of now, the following needs to be highlighted:
Using Premium disk with D-series VMs instead of Standard disk 1. Azure Premium Storage delivers high-performance, low-latency disk support for virtual machines running I/O-
intensive workloads.
2. VM disks that use Premium Storage store data on solid state drives (SSDs).
3. You can migrate your application's VM disks to Azure Premium Storage to take advantage of the speed and
performance of these disks.
4. An Azure VM supports attaching several Premium Storage disks, so that your applications can have up to 64 TB
of storage per VM. With Premium Storage, your applications can achieve 80,000 IOPS (input/output operations
per second) per VM and 2000 MB per second disk throughput per VM with extremely low latencies for read
operations.
5. Azure Premium Storage disks can be attached to supported Azure VMs (DS, DSv2, GS, or Fs series).
6. A Premium Storage account only supports Locally Redundant Storage (LRS) as the replication option and keeps
three copies of the data within a single region.
The following needs attention in your environment:
1. D-series VMs with Disk on Standard Storage account
a. This refers to VMs that have been configured as DS-series but their disks are hosted on a Standard
storage account. This is a common mistake and leads to lower performance than expected.
b. Please refer to “Appendix: How to move VMs to Premium Disk(Storage Account)” for steps to correct
this issue.
c. VM “admin10” needs attention.
2. Multiple VMs with disks on same Standard account thus exhausting IOPS limits
a. Bad overall performance on the VM
b. Degraded performance multiple VMs sharing the storage account.
c. VMs ‘bu30, bu31, bu35’ need attention.
3. Multiple VMs with disks on same Premium account thus exhausting IOPS limits –
a. Bad overall performance on the VM
b. Degraded performance multiple VMs sharing the storage account.
c. VMs ‘FS30, FS31’ maybe need changes if you are facing slow performance as currently they have 16
P30 (1TB) disks. Adding more than 20 P30 disks is not recommended by us.
The following Best Practices could also be adopted:
1. Identify VMs with adhoc or scheduled usages
2. For Adhoc usage, users can be given access to specific VMs or a PowerShell script that will start the VM when
needed and shutdown after usage. Eg. Test VMs.

9 Analysis and Recommendation Document by Henson Group for Client X
3. For scheduled usage, Azure Automation can be used to start VMs only for a specific time period daily, weekly or
monthly and shutdown after the period is over. Eg. Dev VMs start at 9am daily on weekdays and shutdown at
6pm.
4. Use Dev-Test labs for managing Dev & Test VMs, templates, easier scheduling & helps keep Production and
other environments untouched on the same subscription.
Approx. Cost Savings: $1200 - $2000
Backup & BCDR Currently backup is setup on the below VMs with different configurations:
GRS – 110 TB across 5 VMs and 4 set of File & Folders.
LRS – 6.8 TB across 2 VMs
Another service to be considered for future use could be the Azure Site Recovery (ASR). Although it doesn’t support
Azure-to-Azure failover currently but this feature is expected to be available soon.
This can help a quicker and structured failover to a new data center or secondary location in case of data center failure.
Major ASR advantages:
1. Higher frequency of backups unlike once a day with Azure Backup service
2. Ability of failover a specific pre-configured network at a secondary physical or Azure location.
3. Ability to failback to the original Azure location (yet to be released for public preview)
Above mentioned storage optimization will lead to cost savings on backup as well.
Note: implementation of ASR is a complex procedure and hence out of scope for this report. Please let us know if you
are interested in using this service.
Assuming the backup data reduces to 60% of current, then approx. Cost Saving: $2000

10 Analysis and Recommendation Document by Henson Group for Client X
Availability Sets Configure multiple virtual machines in an availability set for redundancy
To provide redundancy to your application, we recommend that you group two or more virtual
machines in an availability set. This configuration ensures that during either a planned or unplanned
maintenance event, at least one virtual machine will be available and meet the 99.95% Azure SLA.
Configure each application tier into separate availability sets
If your VMs are all nearly identical and serve the same purpose for your application, we recommend
that you configure an availability set for each tier of your application. By configuring at least two
virtual machines in an availability set for each tier, you guarantee that at least one virtual machine in
each tier will be available.
For example, you could put all the virtual machines in the front-end of your application running IIS or
SQL Server cluster in a single availability set. Make sure that only front-end virtual machines are
placed in the same availability set. Similarly, only data-tier virtual machines are placed in their own
availability set. In your case you can use it for all File Servers too so atleast 1 of them is running even
during planned Azure maintenance.
Combine a load balancer with availability sets
Combine the Azure Load Balancer with an availability set to get the most application resiliency. The
Azure Load Balancer distributes traffic between multiple virtual machines.
11 Analysis and Recommendation Document by Henson Group for Client X
If the load balancer is not configured to balance traffic across multiple virtual machines, then any
planned maintenance event will affect the only traffic-serving virtual machine, causing an outage to
your application tier. Placing multiple virtual machines of the same tier under the same load balancer
and availability set enables traffic to be continuously served by at least one instance.
Auto-Scaling Azure VMs In every environment we can find VMs that are subjected to conditions where scale-up or scale-out for short period is
needed. This can be either done manually by changing the VM size for Scale-up or create multiple copied manually to
scale-out.
For web applications, Azure Website provided an easy scale-up and scale-out service but for VMs its not currently
possible. However, an auto-scaling out of Azure VMs can be configured for similar VMs using the below method
without any pre-provision on VMs.
Create a Windows Virtual Machine Scale Set using Azure PowerShell Virtual machine scale sets are an Azure Compute resource you can use to deploy and manage a set of identical VMs.
With all VMs configured the same, VM scale sets are designed to support true autoscale – no pre-provisioning of VMs is
required – and as such makes it easier to build large-scale services targeting big compute, big data, and containerized
workloads.
Please see “Appendix: Create a Windows Virtual Machine Scale Set using Azure PowerShell” for a step-by-step
walkthrough of the process.
Note: there is also another method to achieve auto-scaling but that needs pre-provisioned VMs. We don’t recommend
that method due extra storage needs, high maintenance of VM images (any change on the Primary VM needs to be
manually done to each pre-provisioned copy) and unreliable Windows updates & patch management.

12 Analysis and Recommendation Document by Henson Group for Client X
Billing Alerts
Set up billing alerts for your Microsoft Azure subscriptions If you’re the account administrator for an Azure subscription, you can use the Azure Billing Alert Service to create
customized billing alerts that help you monitor and manage billing activity for your Azure accounts.
This service is a preview service, so the first thing you have to do is sign up for it. Visit the Preview Features page in the
Azure account management portal to do enable this feature.
Set the alert threshold and email recipients After you receive the email confirmation that the billing service is turned on for your subscription, visit the
Subscriptions page in the account portal. Click the subscription you want to monitor, and then click Alerts.
Next, click Add Alert to create your first one - you can set up a total of five billing alerts per subscription, with a
different threshold and up to two email recipients for each alert.
13 Analysis and Recommendation Document by Henson Group for Client X
When you add an alert, you give it a unique name, choose a spending threshold, and choose the email addresses where
alerts will be sent. When setting up the threshold, you can choose either a Billing Total or a Monetary Credit from the
Alert For list. For a billing total, an alert is sent when subscription spending exceeds the threshold. For a monetary
credit, an alert is sent when monetary credits drop below the limit. Monetary credits usually apply to free trials and
subscriptions associated with MSDN accounts.
Azure supports any email address but doesn’t verify that the email address works, so double-check for typos.

14 Analysis and Recommendation Document by Henson Group for Client X
Check on your alerts After you set up alerts, the Account Center lists them and shows how many more you can set up. For each alert, you
see the date and time it was sent, whether it’s an alert for Billing Total or Monetary Credit, and the limit you set up. The
date and time format is 24-hour Universal Time Coordinate (UTC) and the date is yyyy-mm-dd format. Click the plus
sign for an alert in the list to edit it, or click the trash-can to delete it.
15 Analysis and Recommendation Document by Henson Group for Client X
Security We observed that there are security best practices lagging in the environment and the following needs to be done:
1. Use Network Security Group (NSG) with each NIC
2. Configure NSG for specific ports
3. Configure NSG rules for specific IP addressed that need access, do not leave it open to all.
4. Do not add a Public IP for backend servers unless there is a specific requirement.
5. Access backend servers using a secure Point-to-site, Site-to-site VPN or ExpressRoute.
6. Use static Private IPs
7. Use Static Public IPs for all web and front end servers especially those bound to a public domain name.
Dynamic IPs change every time the server is restarted manually or during maintenance.
8. Enable Virtual Network monitoring using OMS (solution pack is in Public Preview) to detect any threats and
configure alerts for suspicious activities reaching your network.
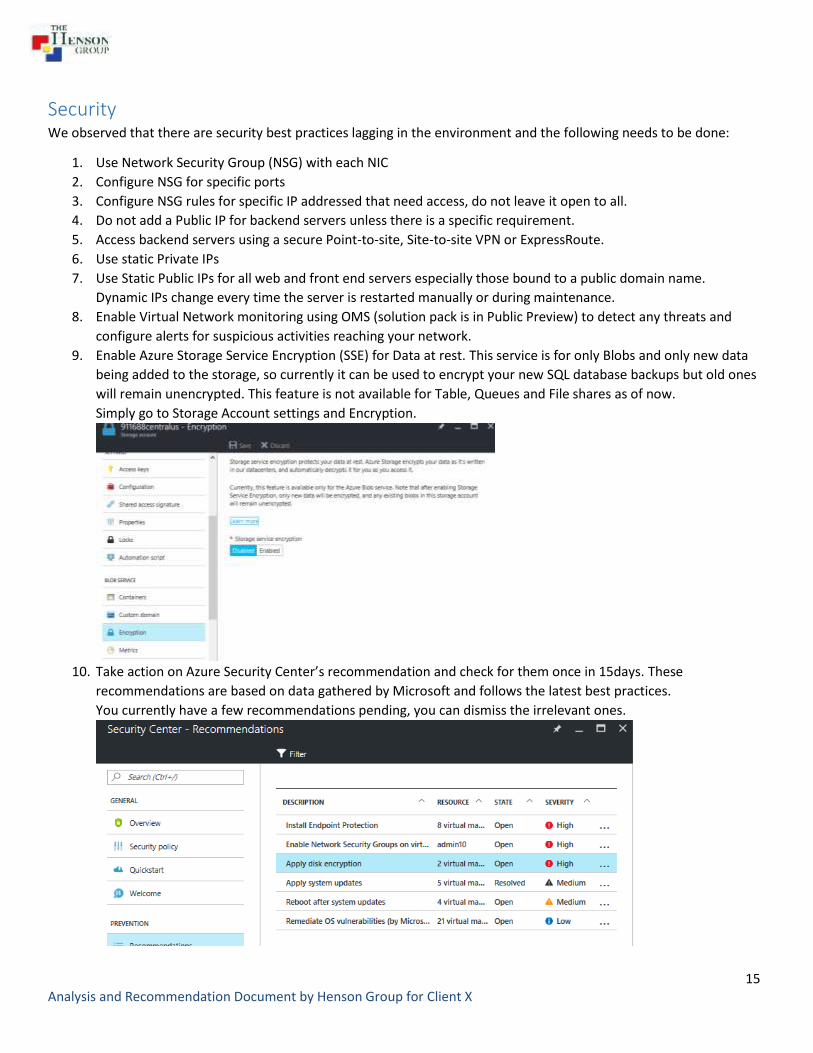
9. Enable Azure Storage Service Encryption (SSE) for Data at rest. This service is for only Blobs and only new data
being added to the storage, so currently it can be used to encrypt your new SQL database backups but old ones
will remain unencrypted. This feature is not available for Table, Queues and File shares as of now.
Simply go to Storage Account settings and Encryption.
10. Take action on Azure Security Center’s recommendation and check for them once in 15days. These
recommendations are based on data gathered by Microsoft and follows the latest best practices.
You currently have a few recommendations pending, you can dismiss the irrelevant ones.

16 Analysis and Recommendation Document by Henson Group for Client X
Below are a few steps to help setup some of the above recommendations.
ACL in Azure firewall An endpoint Access Control List (ACL) is a security enhancement available for your Azure deployment. An ACL provides
the ability to selectively permit or deny traffic for a virtual machine endpoint. This packet filtering capability provides an
additional layer of security. You can specify network ACLs for endpoints only. You can't specify an ACL for a virtual
network or a specific subnet contained in a virtual network.
Using Network ACLs, you can do the following:
Selectively permit or deny incoming traffic based on remote subnet IPv4 address range to a virtual machine
input endpoint.
Blacklist IP addresses
Create multiple rules per virtual machine endpoint
Specify up to 50 ACL rules per virtual machine endpoint
Use rule ordering to ensure the correct set of rules are applied on a given virtual machine endpoint (lowest to
highest)
Specify an ACL for a specific remote subnet IPv4 address.
Please check “Appendix: How to add IPs to ACL in Azure firewall“
Adding ports to Azure Firewall When you create a Window’s virtual machine in the Azure portal, common endpoints like those for Remote Desktop
and Windows PowerShell Remoting are typically created for you automatically in Network Security Group. You can
configure additional endpoints while creating the virtual machine or later on as needed.
1. To change or to add port, follow the same procedure to go to Inbound security rules. And click on Add.
2. In new portal, you can select the port from list of services that you need. You can add custom too.
3. After giving Name and Priority click on OK. Port will be added to your Azure Firewall.

17 Analysis and Recommendation Document by Henson Group for Client X
Other recommendations 1. Enable diagnostics of all VMs and resources for auditing and analysis purpose. We have currently implemented
the same for all your existing VMs but this needs to be followed as a regular
2. If possible, use only 1-2 Standard storage accounts for all collecting & storing diagnostics data from all VMs and
resources in a data center. It will be easier to configure them with a monitoring/log analytics solution like
Splunk or OMS.
Services that don’t need any specific recommendation The following services have been checked but are not being discussed in this report in detail:
1. VM extensions –AntiMalware extension to be enabled on all VMs. Already enabled for most VMs.
2. VPN – not configured nor any specific requirement mentioned.
3. ExpressRoute – already configured with help from a service provider
4. Classic Resources – no classic resources were found.
5. OMS/Log analytics – currently Splunk is being used for monitoring purpose. It’s a 3rd party tool and hence out of
scope for this analysis. OMS has various solution packs for specialized monitoring of SQL Servers, Networks,
Active Directory, Windows & Linux servers etc.

18 Analysis and Recommendation Document by Henson Group for Client X
Appendix
Storage Service limits
Resource Default Limit
Number of storage accounts per subscription 2001
TB per storage account 500 TB
Max number of blob containers, blobs, file shares,
tables, queues, entities, or messages per storage
account
Only limit is the 500 TB storage account
capacity
Max size of a single blob container, table, or queue 500 TB
Max number of blocks in a block blob or append blob 50,000
Max size of a block in a block blob or append blob 4 MB
Max size of a block blob or append blob 50,000 X 4 MB (approx. 195 GB)
Max size of a page blob 1 TB
Max size of a table entity 1 MB
Max number of properties in a table entity 252
Max size of a message in a queue 64 KB
Max size of a file share 5 TB
Max size of a file in a file share 1 TB
Max number of files in a file share Only limit is the 5 TB total capacity of the
file share

19 Analysis and Recommendation Document by Henson Group for Client X
Resource Default Limit
Max 8 KB IOPS per share 1000
Max number of files in a file share Only limit is the 5 TB total capacity of the
file share
Max number of blob containers, blobs, file shares,
tables, queues, entities, or messages per storage
account
Only limit is the 500 TB storage account
capacity
Max number of stored access policies per container,
file share, table, or queue
5
Total Request Rate (assuming 1KB object size) per
storage account
Up to 20,000 IOPS, entities per second,
or messages per second
Target throughput for single blob Up to 60 MB per second, or up to 500
requests per second
Target throughput for single queue (1 KB messages) Up to 2000 messages per second
Target throughput for single table partition (1 KB
entities)
Up to 2000 entities per second
Target throughput for single file share Up to 60 MB per second
Max ingress2 per storage account (US Regions) 10 Gbps if GRS/ZRS3 enabled, 20 Gbps
for LRS
Max egress2 per storage account (US Regions) 20 Gbps if RA-GRS/GRS/ZRS3enabled, 30
Gbps for LRS
Max ingress2 per storage account (European and Asian
Regions)
5 Gbps if GRS/ZRS3 enabled, 10 Gbps for
LRS

20 Analysis and Recommendation Document by Henson Group for Client X
Resource Default Limit
Max egress2 per storage account (European and Asian
Regions)
10 Gbps if RA-GRS/GRS/ZRS3enabled, 15
Gbps for LRS
How to move VMs to Premium Disk (Storage Account) If you currently have an Azure VM that uses Standard Storage disks, follow the process below for migrating that to
Premium Storage. At a high-level, the migration involves two stages: - Migrating the disks from Standard Storage
account to a Premium Storage account - Converting the VM size from A/D/G to DS, DSv2 or GS needed for using
Premium Storage disks.
Execution steps 1. Stop the VM. As explained above, the VM needs to be fully down in order to migrate a clean state. There will be
a downtime until the migration completes.
2. Once the VM has stopped, copy each of the VHDs of that VM to your new Premium Storage account. You have
to copy the OS disk VHD blob as well as all the data disk VHD blobs. For migrating we recommend use of
AzCopy. Using AzCopy you can easily upload the VHD over the Internet. Depending on the size of the VHDs, this
may take time.
a. Download and install AzCopy from here: Latest version of AzCopy
b. Open Azure PowerShell and go to the folder where AzCopy is installed.
c. Use the following command to copy the VHD file from "Source" to "Destination".
AzCopy /Source: <source> /SourceKey: <source-account-key> /Dest: <destination> /DestKey:
<dest-account-key> /BlobType:page /Pattern: <file-name>
Example:
AzCopy.exe" /Source:"https://petrimigstd.blob.core.windows.net/vhds"
/Dest:"https://petrimigpre.blob.core.windows.net/vhds" /SourceKey:<SecretKey1> /DestKey:
<SecretKey2> /Pattern:PetriMigData.vhd
3. Verify if the copying is complete. Wait until all the disks are copied. Once all the disks are copied over, you are
ready to proceed to the next steps, for creating the new VM.
4. The following PowerShell script will create a new ARM virtual machine from an existing OS disk and data disk.
Change the names and URI’s to suit your requirements.
## Environment - same region and resource group as old VM
$LocationName = "northeurope"
$ResourceGroupName = "PetriMig"
## VM - reusing the old VM details
$ComputerName = "PetriMig"
$VMName = "PetriMig"

21 Analysis and Recommendation Document by Henson Group for Client X
## OS Disk - using the old disk
$OSDiskName = "PetriMig"
$OSDiskUri = "https://petrimigstd.blob.core.windows.net/vhds/PetriMig2016325104259.vhd"
$VMSize = "Standard_DS1"
## DataDisk - using the new disk
$DataDiskUri = "https://petrimigpre.blob.core.windows.net/vhds/PetriMigData.vhd"
## Networking - reuse the old machine's network connection
$NICObjectName = "PetriMig513"
$NIC = Get-AzureRmNetworkInterface -ResourceGroupName PetriMig -Name $NICObjectName
## Build up the VM configuration using the existing disks
$VirtualMachine = New-AzureRmVMConfig -VMName $VMName -VMSize $VMSize
$VirtualMachine = Add-AzureRmVMNetworkInterface -VM $VirtualMachine -Id $NIC.Id
$VirtualMachine = Set-AzureRmVMOSDisk -VM $VirtualMachine -VhdUri $OSDiskUri -name
$OSDiskName -CreateOption attach -Windows -Caching "ReadWrite"
$VirtualMachine = Add-AzureRmVMDataDisk -VM $VirtualMachine -Name "PetriMigData" -VhdUri
$DataDiskUri -Lun 0 -CreateOption attach -DiskSizeInGB $null -Caching "ReadOnly"
## Deploy the new VM from the configuration
# You can comment out the next line to test the above without creating a machine, saving
loads of time.
New-AzureRmVM -ResourceGroupName $ResourceGroupName -Location $LocationName -VM
$VirtualMachine -Verbose
Create a Windows Virtual Machine Scale Set using Azure PowerShell
Step 1: Install Azure PowerShell
See How to install and configure Azure PowerShell for information about how to install the latest version of Azure
PowerShell, select the subscription that you want to use, and sign in to your Azure account.
Step 2: Create resources Create the resources that are needed for your new virtual machine scale set.
Resource group
A virtual machine scale set must be contained in a resource group.
1. Get a list of available locations and the services that are supported: Get-AzureLocation | Sort Name | Select Name, AvailableServicesGet-
AzureLocation | Sort Name | Select Name, AvailableServices
2. Pick a location that works best for you, replace the value of $locName with that location name, and then create
the variable: $locName = "location name from the list, such as Central US"
3. Replace the value of $rgName with the name that you want to use for the new resource group and then create
the variable:

22 Analysis and Recommendation Document by Henson Group for Client X
$rgName = "resource group name"
4. Create the resource group: New-AzureRmResourceGroup -Name $rgName -Location $locName
Storage account
A storage account is used by a virtual machine to store the operating system disk and diagnostic data used for scaling.
When possible, it is best practice to have a storage account for each virtual machine created in a scale set. If not
possible, plan for no more than 20 VMs per storage account. The example in this article shows 3 storage accounts being
created for 3 virtual machines in a scale set.
1. Replace the value of saName with the name that you want to use for the storage account and then create the
variable: $saName = "storage account name"
2. Test whether the name that you selected is unique: Test-AzureName -Storage $saName
If the answer is False, your proposed name is unique.
3. Replace the value of $saType with the type of the storage account and then create the variable: $saType = "storage account type"
Possible values are: Standard_LRS, Standard_GRS, Standard_RAGRS, or Premium_LRS.
4. Create the account: New-AzureRmStorageAccount -Name $saName -ResourceGroupName $rgName –Type
$saType -Location $locName
5. Repeat steps 1 through 4 to create 3 storage accounts, for example myst1, myst2, and myst3.
Virtual network
A virtual network is required for the virtual machines in the scale set.
1. Replace the value of $subName with the name that you want to use for the subnet in the virtual network and
then create the variable: $subName = "subnet name"
2. Create the subnet configuration: $subnet = New-AzureRmVirtualNetworkSubnetConfig -Name $subName -
AddressPrefix 10.0.0.0/24
3. Replace the value of $netName with the name that you want to use for the virtual network and then create the
variable: $netName = "virtual network name"

23 Analysis and Recommendation Document by Henson Group for Client X
4. Create the virtual network: $vnet = New-AzureRmVirtualNetwork -Name $netName -ResourceGroupName $rgName
-Location $locName -AddressPrefix 10.0.0.0/16 -Subnet $subnet
Public IP address
Before a network interface can be created, you need to create a public IP address.
1. Replace the value of $domName with the domain name label that you want to use with your public IP address
and then create the variable: $domName = "domain name label"
The label can contain only letters, numbers, and hyphens, and the last character must be a letter or number.
2. Test whether the name is unique: Test-AzureRmDnsAvailability -DomainQualifiedName $domName -Location
$locName
If the answer is True, your proposed name is unique.
3. Replace the value of $pipName with the name that you want to use for the public IP address and then create
the variable. $pipName = "public ip address name"
4. Create the public IP address: $pip = New-AzureRmPublicIpAddress -Name $pipName -ResourceGroupName $rgName
-Location $locName -AllocationMethod Dynamic -DomainNameLabel $domName
Network interface
Now that you have the public IP address, you can create the network interface.
1. Replace the value of $nicName with the name that you want to use for the network interface and then create
the variable: $nicName = "network interface name"
2. Create the network interface: $nic = New-AzureRmNetworkInterface -Name $nicName -ResourceGroupName
$rgName -Location $locName -SubnetId $vnet.Subnets[0].Id -PublicIpAddressId
$pip.Id
Configuration of the scale set
You have all the resources that you need for the scale set configuration, so let's create it.
1. Replace the value of $ipName with the name that you want to use for the IP configuration and then create the
variable: $ipName = "IP configuration name"
24 Analysis and Recommendation Document by Henson Group for Client X
2. Create the IP configuration: $ipConfig = New-AzureRmVmssIpConfig -Name $ipName -
LoadBalancerBackendAddressPoolsId $null -SubnetId $vnet.Subnets[0].Id
3. Replace the value of $vmssConfig with the name that you want to use for the scale set configuration and then
create the variable: $vmssConfig = "Scale set configuration name"
4. Create the configuration for the scale set: $vmss = New-AzureRmVmssConfig -Location $locName -SkuCapacity 3 -SkuName
"Standard_A0" -UpgradePolicyMode "manual"
5. Add the network interface configuration to the scale set configuration: Add-AzureRmVmssNetworkInterfaceConfiguration -VirtualMachineScaleSet $vmss
-Name $vmssConfig -Primary $true -IPConfiguration $ipConfig
Operating system profile
1. Replace the value of $computerName with the computer name prefix that you want to use and then create the
variable: $computerName = "computer name prefix"
2. Replace the value of $adminName the name of the administrator account on the virtual machines and then
create the variable: $adminName = "administrator account name"
3. Replace the value of $adminPassword with the account password and then create the variable: $adminPassword = "password for administrator accounts"
4. Create the operating system profile: Set-AzureRmVmssOsProfile -VirtualMachineScaleSet $vmss -ComputerNamePrefix
$computerName -AdminUsername $adminName -AdminPassword $adminPassword
Storage profile
1. Replace the value of $storageProfile with the name that you want to use for the storage profile and then create
the variable: $storageProfile = "storage profile name"
2. Create the variables that define the image to use: $imagePublisher = "MicrosoftWindowsServer"
$imageOffer = "WindowsServer"
$imageSku = "2012-R2-Datacenter"
25 Analysis and Recommendation Document by Henson Group for Client X
3. Replace the value of $vhdContainers with a list that contains the paths where the virtual hard disks are stored,
such as "https://mystorage.blob.core.windows.net/vhds", and then create the variable: $vhdContainers =
@("https://myst1.blob.core.windows.net/vhds","https://myst2.blob.core.windo
ws.net/vhds","https://myst3.blob.core.windows.net/vhds")
4. Create the storage profile:Create the storage profile: Set-AzureRmVmssStorageProfile -VirtualMachineScaleSet $vmss -
ImageReferencePublisher $imagePublisher -ImageReferenceOffer $imageOffer -
ImageReferenceSku $imageSku -ImageReferenceVersion "latest" -Name
$storageProfile -VhdContainer $vhdContainers -OsDiskCreateOption
"FromImage" -OsDiskCaching "None"
Virtual machine scale set
Finally, you can create the scale set.
1. Replace the value of $vmssName with the name of the virtual machine scale set and then create the variable:
$vmssName = "scale set name"
2. Create the scale set: New-AzureRmVmss -ResourceGroupName $rgName -Name $vmssName -
VirtualMachineScaleSet $vmss
Step 3: Explore resources
Get-AzureRmVmss -ResourceGroupName "resource group name" -VMScaleSetName "scale
set name"
Or
Get-AzureRmVmssVM -ResourceGroupName "resource group name" -VMScaleSetName "scale
set name"

26 Analysis and Recommendation Document by Henson Group for Client X
How to add IPs to ACL in Azure firewall
Use the following steps in the Azure portal to create a firewall rule that allow connections from an individual IP address
(your client computer) or an entire IP address range to the VM.
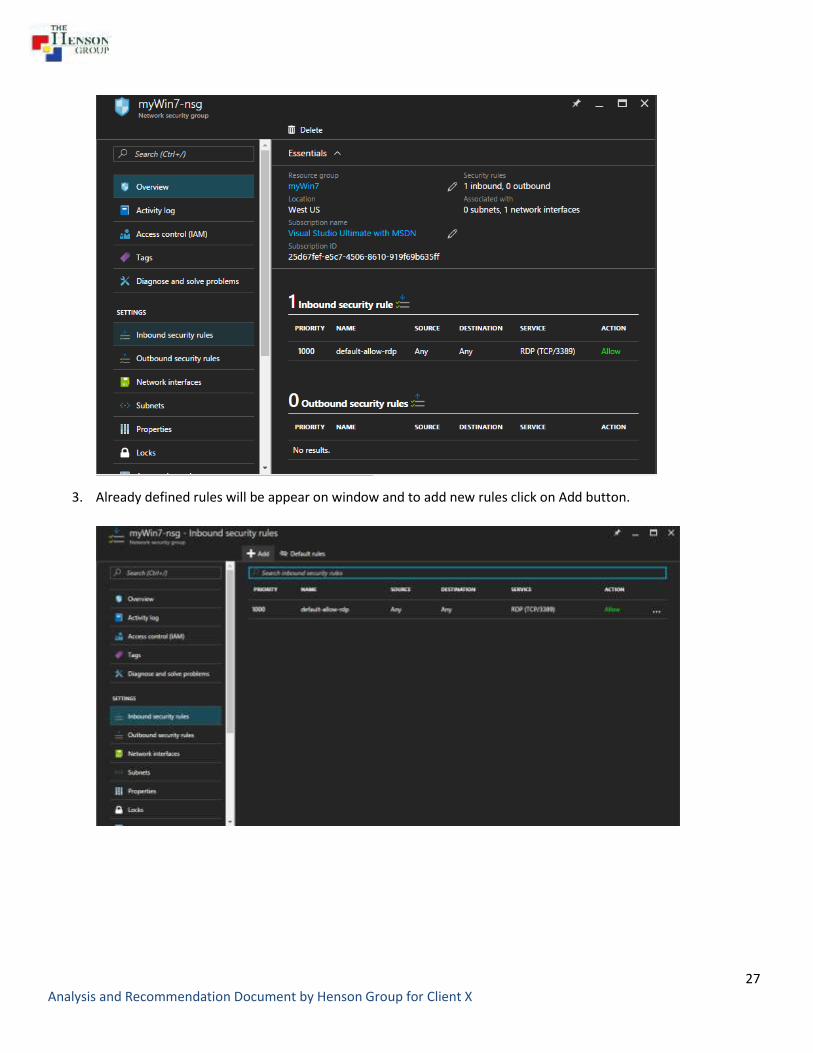
1. Select the NSG(Network Security Group) of your VM.
2. Select Inbound security rules.
27 Analysis and Recommendation Document by Henson Group for Client X
3. Already defined rules will be appear on window and to add new rules click on Add button.

28 Analysis and Recommendation Document by Henson Group for Client X
4. In this box, you define custom rules to your Azure Firewall or you can choose predefined rules.
5. You can click on CIDR button to allow only one IP to access VM using RDP.

29 Analysis and Recommendation Document by Henson Group for Client X
Here above, we added 40.52.88.32/32 IP address to access VM using RDP. /32 defines that only one IP will be able to
access the VM. If you want block/allow certain IP range, you can do that.
** End of Report **


