Statement of Disclaimer Since this project is a result of a class assignment, it has been graded and accepted as fulfillment of the course requirements. Acceptance does not imply technical accuracy or reliability. Any use of information in this report is done at the risk of the user. These risks may include catastrophic failure of the device or infringement of patent or copyright laws. California Polytechnic State University at San Luis Obispo and its staff cannot be held liable for any use or misuse of the project.
ii
Table of Contents List of Figures ............................................................................................................................................................. vi
List of Tables .............................................................................................................................................................. vi
4 Method of Approach .......................................................................................................................................... 6
5 Management Plan .............................................................................................................................................. 6
6 Design Development .......................................................................................................................................... 7
7 Description of the Final Design ......................................................................................................................... 16
8 Manufacturing Plan .......................................................................................................................................... 21
9 Supporting Information / Cost Analysis ............................................................................................................ 21
11 Test Plan ....................................................................................................................................................... 28
12 Design Verification & Test Procedure .......................................................................................................... 30
12.1 Installing and running the app ................................................................................................................. 30
12.10 Test Results .......................................................................................................................................... 39
12.10.1 Test Results: X-Plane ............................................................................................................................ 39
12.10.2 Test Results: Displays ........................................................................................................................... 39
12.10.3 Test Results: Weight and Balance ........................................................................................................ 41
iv
12.10.4 Test Results: Multi-Aircraft .................................................................................................................. 41
12.10.5 Test Results: Runway Database ........................................................................................................... 42
13 Project Conclusions & Next Steps ................................................................................................................ 43
13.2 Future Work ............................................................................................................................................. 43
Gantt Chart ...................................................................................................................................... 45 Appendix A
House of Quality .............................................................................................................................. 46 Appendix B
ICD ................................................................................................................................................... 47 Appendix C
C.1 Variables used in app ............................................................................................................................... 47
Test Plan .......................................................................................................................................... 49 Appendix D
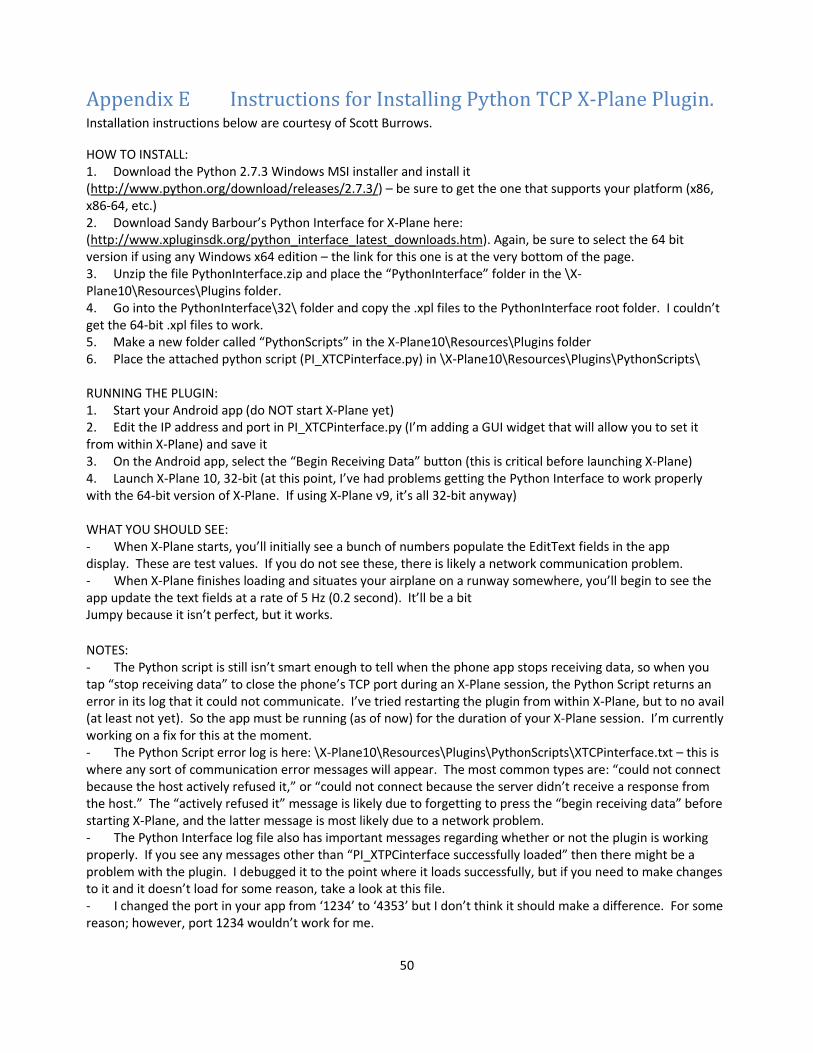
Instructions for Installing Python TCP X-Plane Plugin. .................................................................... 50 Appendix E
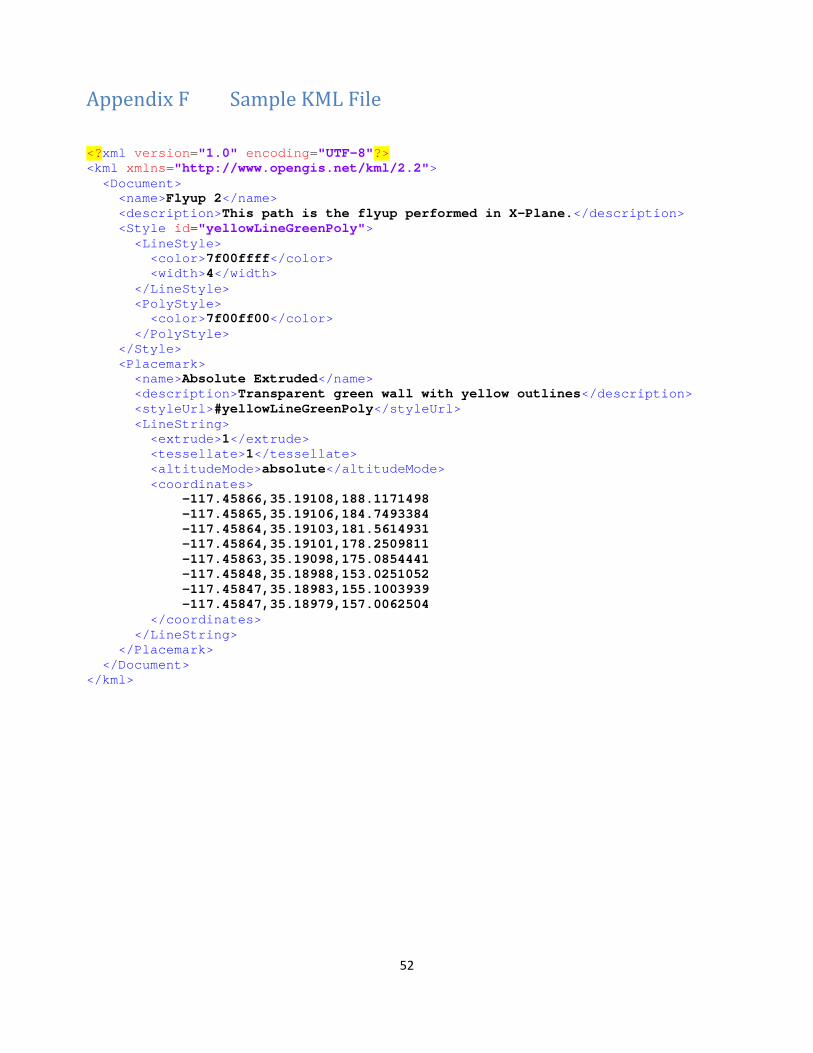
Sample KML File............................................................................................................................... 52 Appendix F
Sample XML File for Aircraft Parameters ........................................................................................ 53 Appendix G
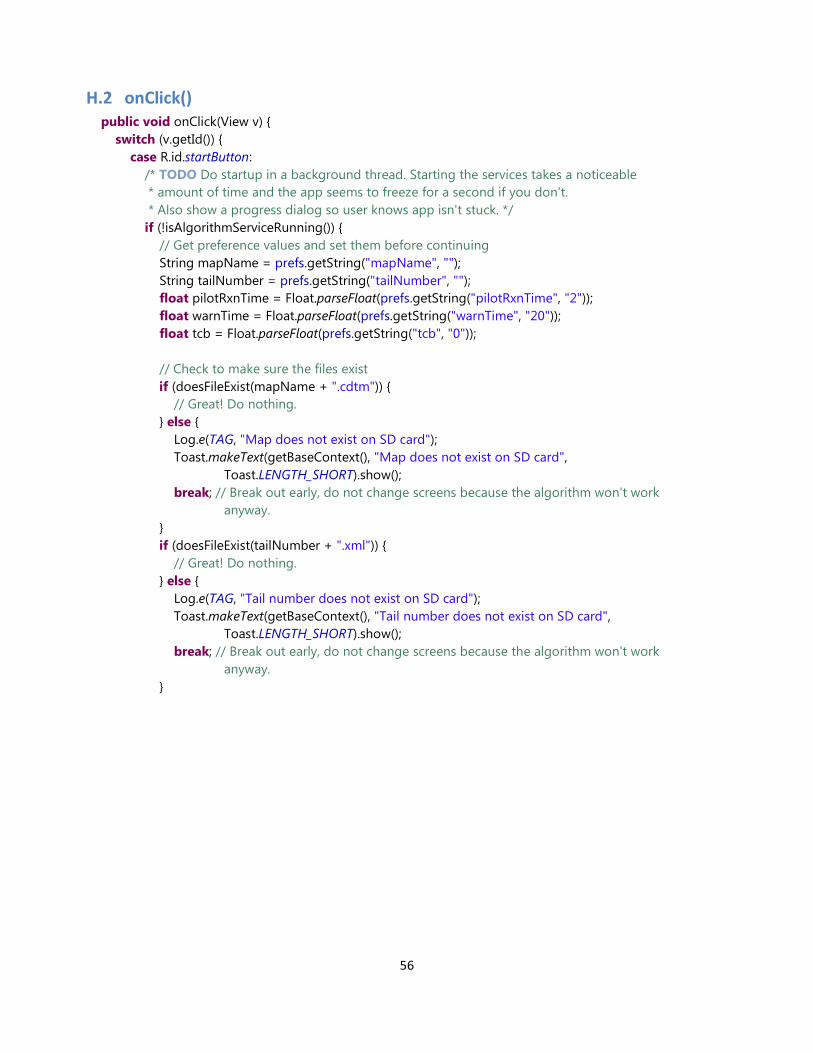
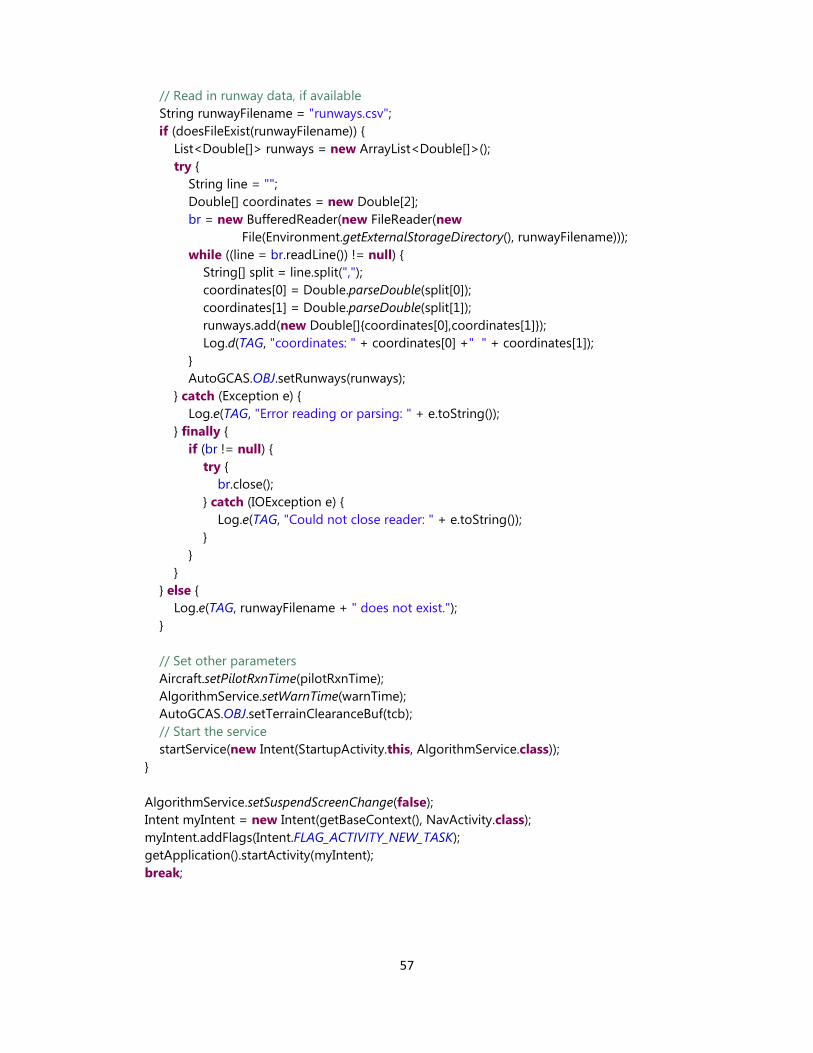
StartupActivity.java ......................................................................................................................... 54 Appendix H
VmdActivity.java .............................................................................................................................. 62 Appendix I
Aircraft.java ..................................................................................................................................... 71 Appendix K
AutoGCAS.java ................................................................................................................................. 72 Appendix L
DeviceLed.java ................................................................................................................................. 74 Appendix M
M.1 Class Methods .......................................................................................................................................... 74
AlgorithmService.java ...................................................................................................................... 78 Appendix N
N.1 New Class Variables ................................................................................................................................. 78
XplaneSocketService.java ................................................................................................................ 81 Appendix O
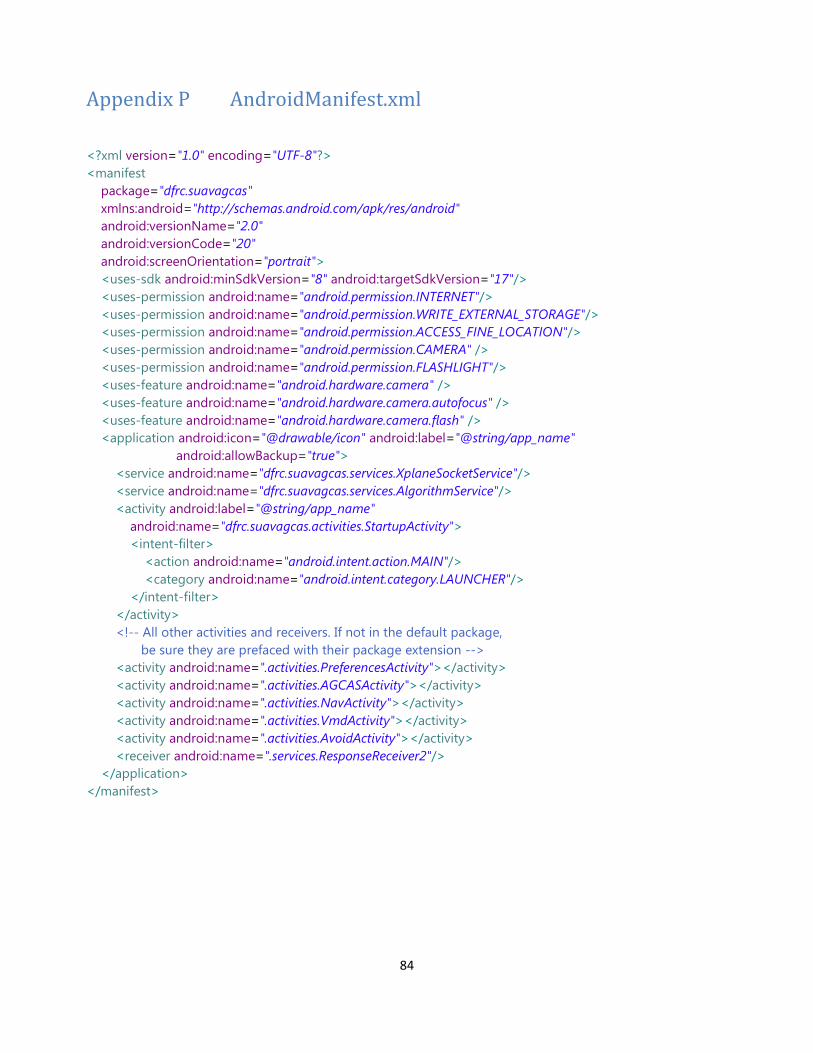
AndroidManifest.xml ....................................................................................................................... 84 Appendix P
1 Introduction In recent decades, advances in the fields of materials and aerospace have served to bolster general aviation to new heights and numbers. Providing Americans with more than 1.3 million jobs, the field of general aviation accounts for over 1% of the national GDP1. With more than 6300 airports in North America available for general aviation use, GA pilots operate over a large area and under an even larger number of conditions. Between 2007 and 2009, there was almost 5000 general aviation plane crashes is the United States alone, resulting in over 1600 deaths. The 2009 Review of U.S. Civil Aviation Accidents lists power plant failures, low altitude operation, loss of control in flight, hard landing on approach, and ferry and positioning follies as the leading causes of general aviation accidents. The majority of these accidents involve personal single-engine aircraft, with aerial agricultural applications trending toward higher total and fatal accident rates and personal business aviation trending toward lower average accident rates2. The majority of General Aviation collision can be characterized under two common occurrences, collision due to aircraft dysfunction and collision due to CFIT (Controlled Flight Into Terrain).
Minimizing CFIT risk in North America has been a primary endeavor for commercial airlines for the past 30 years, successfully reducing aircraft loss statistics from one commercial jet per 0.8 million departures in 1974 to less than one aircraft lost in 91 million departures in 20033; however, CFIT still remains a fundamental concern within general aviation. Under limited visibility conditions, obstacles such as radio and electrical towers, tall buildings, and changes in local topography can become even more hazardous.
Here at the CTP Avoidance Systems group, we have been tasked by NASA’s Dryden Flight Research Center to develop and modify a java based small aircraft collision avoidance algorithm. Our code will take given sensor inputs and, along with real time flight path analysis, determine if local topography poses a CFIT hazard for the current trajectory. This algorithm will be mountable on an Android cell phone or tablet in application form with an intuitive and minimally intrusive operating interface. When path collision is imminent, the application will issue a visual and audible warning, prompting the pilot to perform an avoidance maneuver in the appropriate direction. The pre-existing integrated Collision Avoidance Software for General Avionics (iCAS-GA) algorithms are in the forms of an interactive Excel workbook and a non-optimized Java file. The scope of the CTP Avoidance Systems group will be to modify the existing Java code structure to match the intuitive and modular Excel algorithm format. Additionally, we will reduce false warnings by incorporating landing phase functionality and an airfield database. Finally, we will increase avoidance probability by including an obstacle database and improving wind modeling.
1 Federal Aviation Administration. (March 2010).Administrator's fact book. Assistant Administrator for Financial Services. 2 National Transportation and Safety Board. (2009). Review of u.s. civil aviation accidents. Review of Aircraft Accident Data 2007-2009, Retrieved from http://www.ntsb.gov/doclib/reports/2011/ARA1101.pdf 3 Honeywell. Just how effective is egpws. http://www51.honeywell.com/aero/common/documents/EGPWS-Effectiveness.pdf
2 Background The prominence of smartphone use in the civil aviation market has grown significantly just in the past few years. The combination of a large, versatile touchscreen display, ease of use, and low cost (when compared to standalone dedicated aviation units) make products like the Droid and iPhone popular choices for a simple, quickly installed dash-mounted computer. There are currently numerous apps that make use of the myriad of sensors in these small devices to assist pilots with everything from flight planning, in-flight navigation, and even viewing digital versions of aircraft manuals.
The iCAS is another foray into this market, but fills a niche not currently being pursued. It will implement the phone’s internal sensors to calculate the aircraft’s position, attitude, and trajectory. Using this information, it will warn the pilot when a terrain collision is imminent. Current navigation apps work by using the GPS sensor to calculate the phone’s 3D location on the earth, then downloading or decompressing from the phone’s memory the required map and street information the phone will need in order to give directions.
Current avoidance systems do not calculate multiple alternate routes or take into account flight characteristics specific to the aircraft (max speed, climb rate, etc.). These systems also have a major drawback of being expensive; low-end portable units start around $1000. This creates a potential niche for accurate, low-cost avoidance systems that are easily downloaded and installed in small civilian craft.
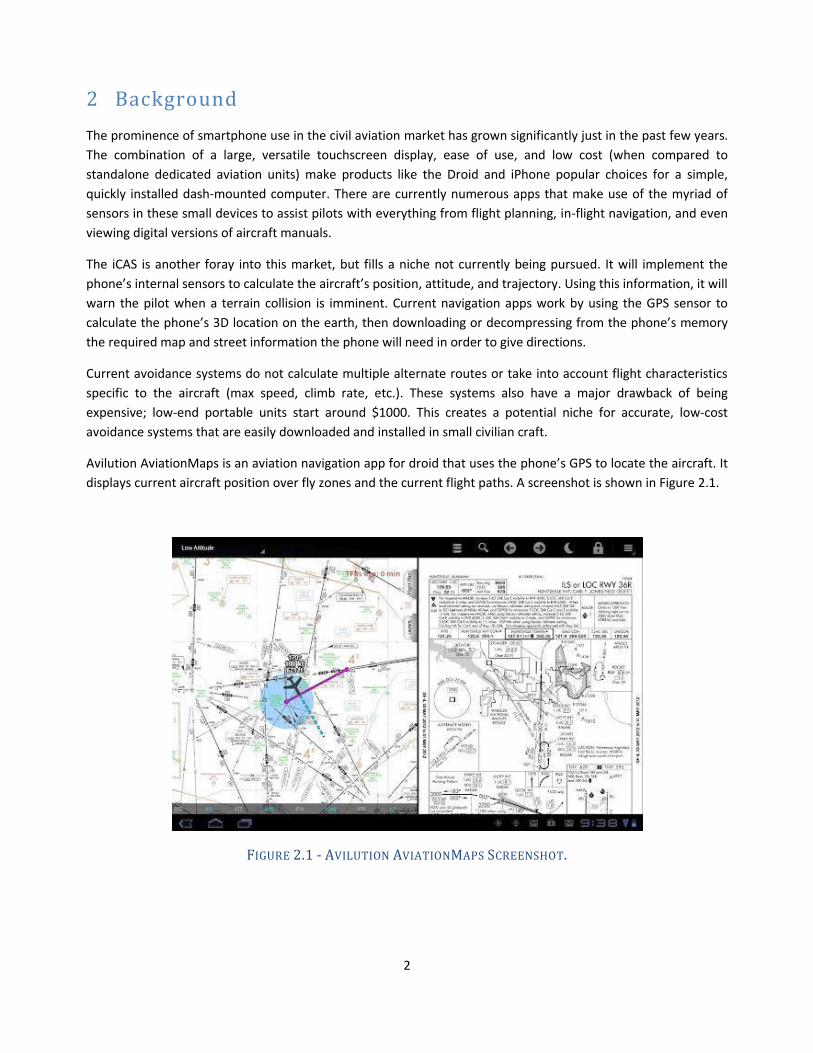
Avilution AviationMaps is an aviation navigation app for droid that uses the phone’s GPS to locate the aircraft. It displays current aircraft position over fly zones and the current flight paths. A screenshot is shown in Figure 2.1.
Since many pilots will not want an app that simply sits blank 99% of the time, the iCAS screen will look similar to the one shown above, with flight waypoints, airports, and other critical information clearly displayed around the aircraft. The terrain will be colored in a similar way to the terrain in the screen shown in Figure 2.2 below.
FIGURE 2.2 - A SCREENSHOT OF THE GARMIN AERA 796.
4
3 Objectives The objective for this project is to have a working version of a collision avoidance system running on an android smartphone. We will use sensor inputs from X-Plane, a flight simulation program, to test our avoidance algorithms against simulation flight paths at various locations and situations. This will allow us to test the functionality of the collision avoidance warning system, as well as the effectiveness of the app to generate suitable alternative flight paths.
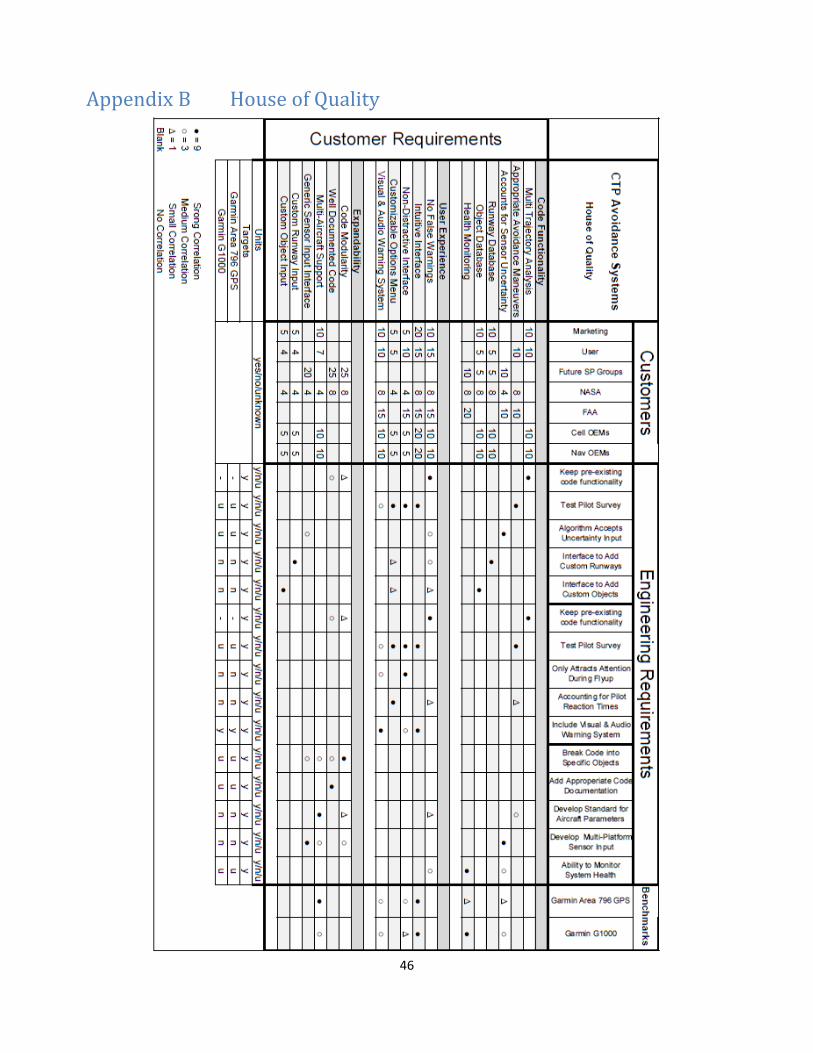
To detail how we will meet our objectives, we built a House of Quality using Quality Function Deployment. This house includes customer requirements on the left, engineering requirements on top, and existing products to use as benchmarks on the right. The left-middle shows which requirements each customer will find the most appealing. The right-middle section is where we compare customer requirements with the engineering requirements to see if any engineering requirements overlap and are needed for the same customer requirement. The last section is the roof of the house. This is where you compare the engineering requirements and check to see if any of them are correlated with each other. The house can be seen in Appendix B.
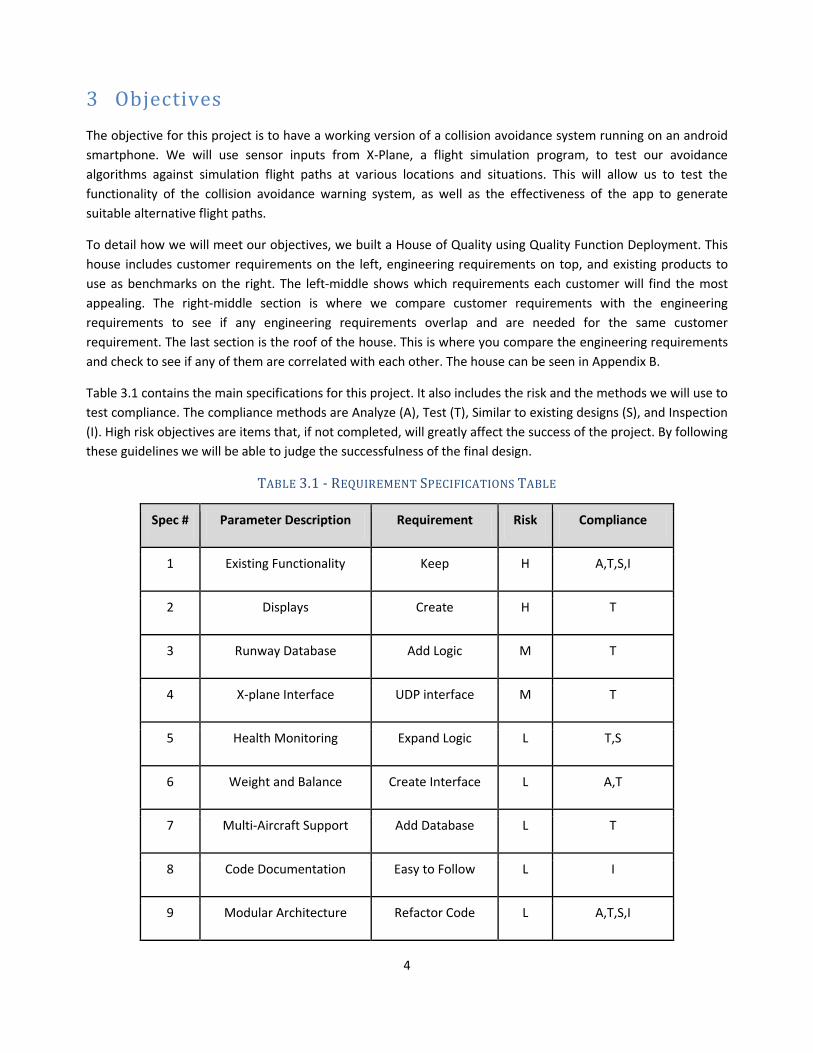
Table 3.1 contains the main specifications for this project. It also includes the risk and the methods we will use to test compliance. The compliance methods are Analyze (A), Test (T), Similar to existing designs (S), and Inspection (I). High risk objectives are items that, if not completed, will greatly affect the success of the project. By following these guidelines we will be able to judge the successfulness of the final design.
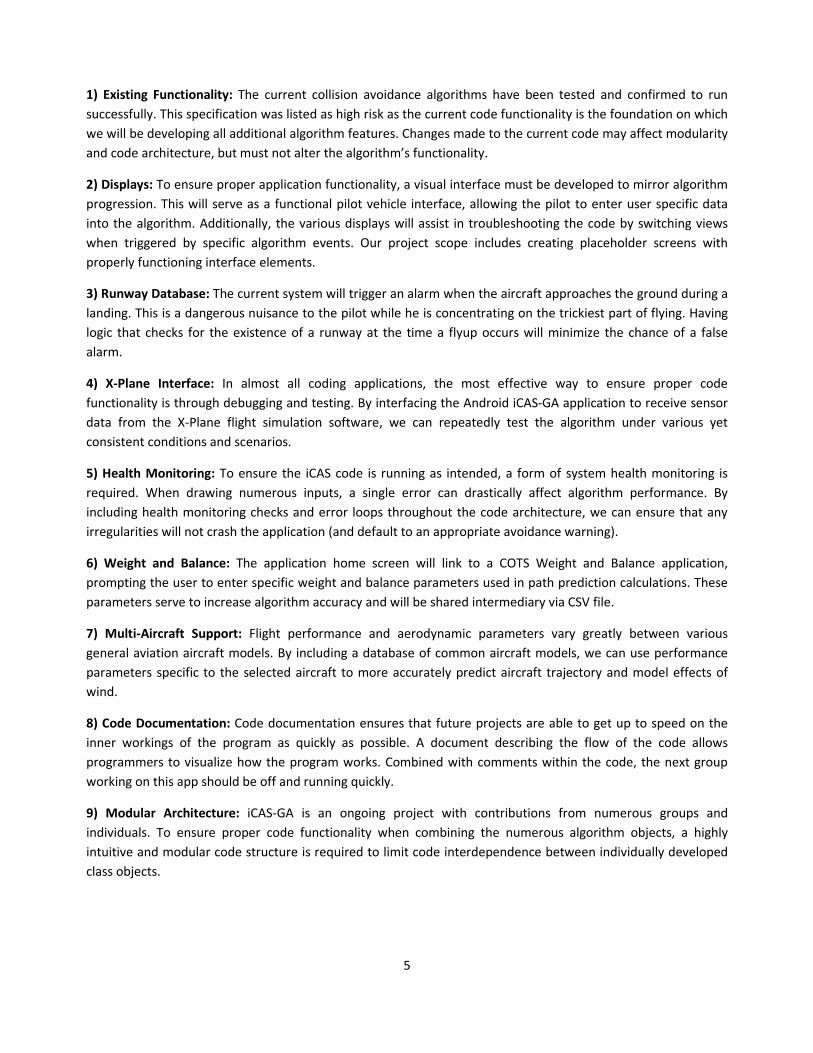
1) Existing Functionality: The current collision avoidance algorithms have been tested and confirmed to run successfully. This specification was listed as high risk as the current code functionality is the foundation on which we will be developing all additional algorithm features. Changes made to the current code may affect modularity and code architecture, but must not alter the algorithm’s functionality.
2) Displays: To ensure proper application functionality, a visual interface must be developed to mirror algorithm progression. This will serve as a functional pilot vehicle interface, allowing the pilot to enter user specific data into the algorithm. Additionally, the various displays will assist in troubleshooting the code by switching views when triggered by specific algorithm events. Our project scope includes creating placeholder screens with properly functioning interface elements.
3) Runway Database: The current system will trigger an alarm when the aircraft approaches the ground during a landing. This is a dangerous nuisance to the pilot while he is concentrating on the trickiest part of flying. Having logic that checks for the existence of a runway at the time a flyup occurs will minimize the chance of a false alarm.
4) X-Plane Interface: In almost all coding applications, the most effective way to ensure proper code functionality is through debugging and testing. By interfacing the Android iCAS-GA application to receive sensor data from the X-Plane flight simulation software, we can repeatedly test the algorithm under various yet consistent conditions and scenarios.
5) Health Monitoring: To ensure the iCAS code is running as intended, a form of system health monitoring is required. When drawing numerous inputs, a single error can drastically affect algorithm performance. By including health monitoring checks and error loops throughout the code architecture, we can ensure that any irregularities will not crash the application (and default to an appropriate avoidance warning).
6) Weight and Balance: The application home screen will link to a COTS Weight and Balance application, prompting the user to enter specific weight and balance parameters used in path prediction calculations. These parameters serve to increase algorithm accuracy and will be shared intermediary via CSV file.
7) Multi-Aircraft Support: Flight performance and aerodynamic parameters vary greatly between various general aviation aircraft models. By including a database of common aircraft models, we can use performance parameters specific to the selected aircraft to more accurately predict aircraft trajectory and model effects of wind.
8) Code Documentation: Code documentation ensures that future projects are able to get up to speed on the inner workings of the program as quickly as possible. A document describing the flow of the code allows programmers to visualize how the program works. Combined with comments within the code, the next group working on this app should be off and running quickly.
9) Modular Architecture: iCAS-GA is an ongoing project with contributions from numerous groups and individuals. To ensure proper code functionality when combining the numerous algorithm objects, a highly intuitive and modular code structure is required to limit code interdependence between individually developed class objects.
6
4 Method of Approach One of the current objectives in the iCAS-GA project scope is to refactor the existing Java code to more closely model the Excel algorithm architecture. The first quarter was primarily dedicated to identifying the project scope and gathering sufficient background knowledge in object oriented coding and collision avoidance technologies. Once we possess a fundamental understanding of the existing code provided by NASA, we will take on the algorithm development from three fronts. The first will focus on integrating an airfield database. The airfield database will help minimize false avoidance warnings during takeoffs and landing. The second will interface X-Plane’s sensor outputs with the iCAS algorithm. This will allow us to test our code with repeatable flights over the same topographical data to ensure proper functionality. The third focus will be on developing the graphical user interface. We will create a series of displays to be triggered by specific events in the algorithm. This both simplifies the testing procedure by giving visual cues that the algorithm is functioning properly and assists in the transition into a functioning application. These features will be developed while increasing existing code modularity. By spring quarter of 2013, the algorithm progress, as well as airfield database and X-Plane functionality, will be far enough developed that the systems can be incorporated and tested, allowing for fine-tuning of the avoidance algorithm.
5 Management Plan A management plan is an essential part of finishing this project on schedule. While each member on the team should be familiar with every aspect of the project, it makes no sense for each person to be an expert in every area. Because of this, we have given each member responsibilities that are similar in order to limit the amount of time it will take to become familiar enough to contribute to the project.
For the code we have identified subsystems that require a dedicated member to oversee. Tim will work on the X-plane interface and sensor interface. These two interfaces will be crucial in testing the code. Being able to test code in X-plane will be a major convenience as pre-programmed routes can be run over and over to test new functionality. Corey will work on refactoring the existing code and developing an aircraft performance database. The existing code needs to be restructured and made more modular. This will allow the code to be understood more easily by future groups. Developing a standard way to input aircraft performance will allow companies to provide performance details for their aircraft. Preston will develop logic to implement both an object and a runway database. The addition of an object database will enable private pilots to have more control while flying in their local area. The runway database will eliminate false warning when a pilot comes in to land.
There are also general tasks that need to be done outside of the code itself. Tim will handle any research or information gathering that we might need. Corey will work with NASA to develop a testing plan that will cover the majority of the situations leading to CFIT accidents. Preston will document the entire process so that future groups working on this project will have a detailed account of how the code was developed. This management plan will help us meet all of the deadlines shown in the previous section’s timeline.
7
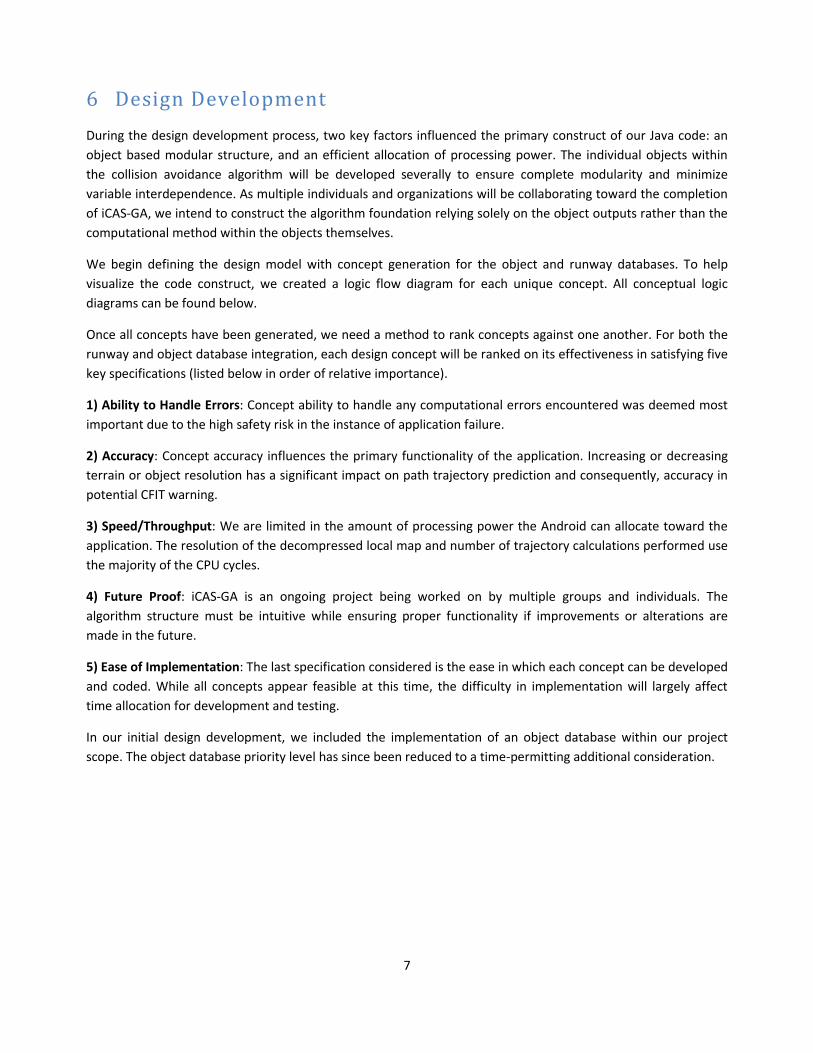
6 Design Development During the design development process, two key factors influenced the primary construct of our Java code: an object based modular structure, and an efficient allocation of processing power. The individual objects within the collision avoidance algorithm will be developed severally to ensure complete modularity and minimize variable interdependence. As multiple individuals and organizations will be collaborating toward the completion of iCAS-GA, we intend to construct the algorithm foundation relying solely on the object outputs rather than the computational method within the objects themselves.
We begin defining the design model with concept generation for the object and runway databases. To help visualize the code construct, we created a logic flow diagram for each unique concept. All conceptual logic diagrams can be found below.
Once all concepts have been generated, we need a method to rank concepts against one another. For both the runway and object database integration, each design concept will be ranked on its effectiveness in satisfying five key specifications (listed below in order of relative importance).
1) Ability to Handle Errors: Concept ability to handle any computational errors encountered was deemed most important due to the high safety risk in the instance of application failure.
2) Accuracy: Concept accuracy influences the primary functionality of the application. Increasing or decreasing terrain or object resolution has a significant impact on path trajectory prediction and consequently, accuracy in potential CFIT warning.
3) Speed/Throughput: We are limited in the amount of processing power the Android can allocate toward the application. The resolution of the decompressed local map and number of trajectory calculations performed use the majority of the CPU cycles.
4) Future Proof: iCAS-GA is an ongoing project being worked on by multiple groups and individuals. The algorithm structure must be intuitive while ensuring proper functionality if improvements or alterations are made in the future.
5) Ease of Implementation: The last specification considered is the ease in which each concept can be developed and coded. While all concepts appear feasible at this time, the difficulty in implementation will largely affect time allocation for development and testing.
In our initial design development, we included the implementation of an object database within our project scope. The object database priority level has since been reduced to a time-permitting additional consideration.
8
6.1 Runway Concept 1 The top runway concept waits until a flyup has been issued before it checks for the aircraft’s proximity to a runway. It first checks to see if a runway database is installed. This helps avoid errors on phones that have not downloaded this feature. The next step is to check the area along the predicted trajectory for a runway. If there is a runway, the runway direction must match the aircraft’s heading in order to ignore the flyup command.
If at any time the program runs into a problem loading the runway database or executing some logic, the program will default to issuing the flyup command and warning the pilot. This ensures that the app will not get stuck checking for runways and miss a legitimate avoidance situation.
FIGURE 6.1 - RUNWAY DATABASE CONCEPT 1 – TOP CONCEPT
9
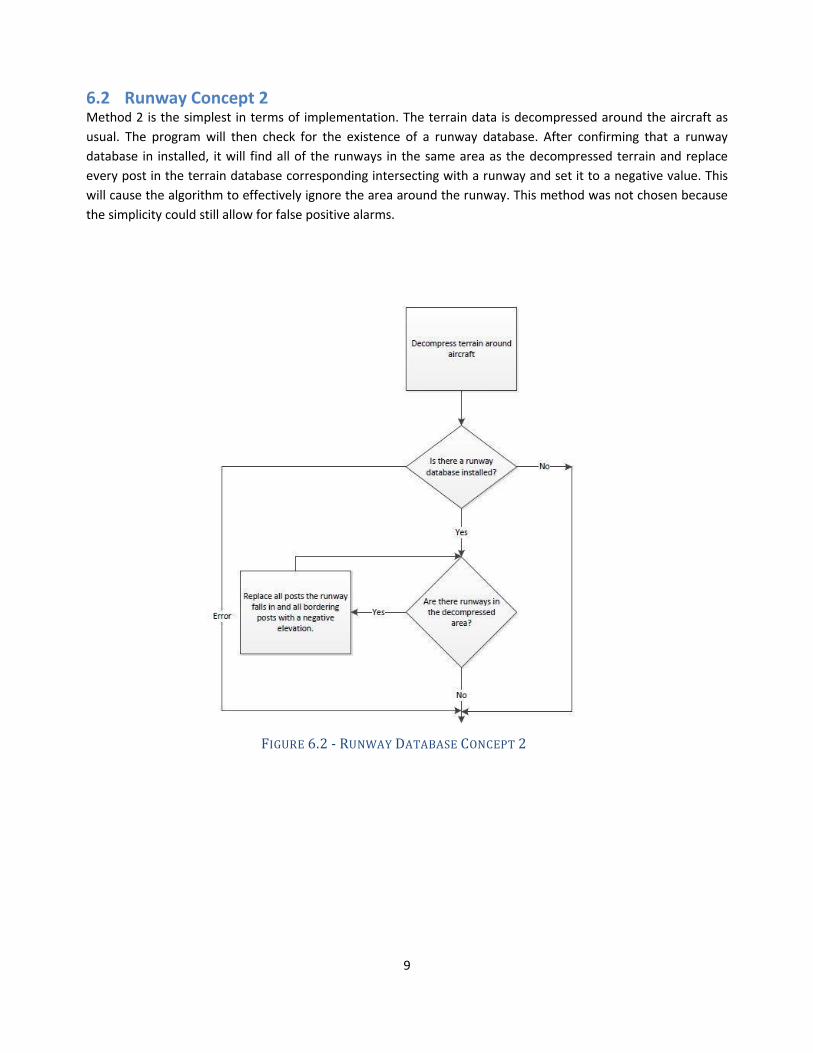
6.2 Runway Concept 2 Method 2 is the simplest in terms of implementation. The terrain data is decompressed around the aircraft as usual. The program will then check for the existence of a runway database. After confirming that a runway database in installed, it will find all of the runways in the same area as the decompressed terrain and replace every post in the terrain database corresponding intersecting with a runway and set it to a negative value. This will cause the algorithm to effectively ignore the area around the runway. This method was not chosen because the simplicity could still allow for false positive alarms.
FIGURE 6.2 - RUNWAY DATABASE CONCEPT 2
10
6.3 Runway Concept 3 Method 3 begins checking for runways when two of the three trajectory predictions are blocked. The reasoning behind this is that the program will begin checking for runways before an actual flyup is issued. It would essentially eliminate the possibility that the program would take too long checking for a runway that could occur using Method 1. We ultimately decided that it was not worth the computational power required to check more often.
FIGURE 6.3 - RUNWAY DATABASE CONCEPT 3
11
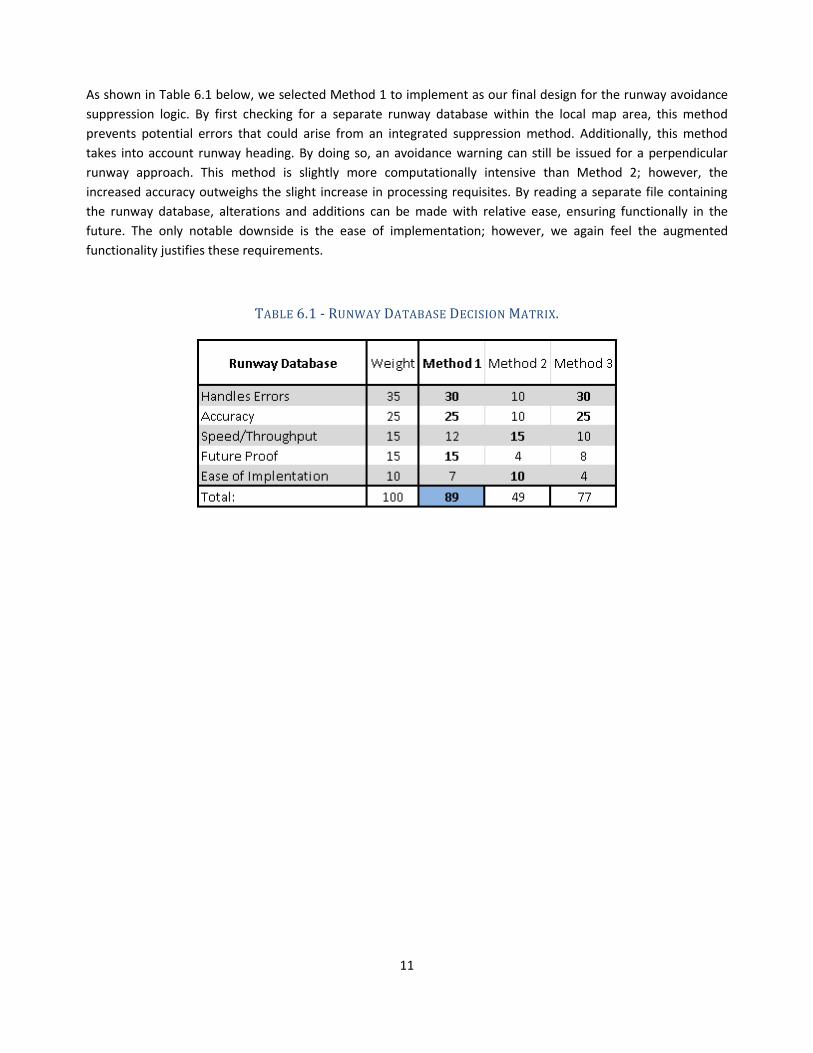
As shown in Table 6.1 below, we selected Method 1 to implement as our final design for the runway avoidance suppression logic. By first checking for a separate runway database within the local map area, this method prevents potential errors that could arise from an integrated suppression method. Additionally, this method takes into account runway heading. By doing so, an avoidance warning can still be issued for a perpendicular runway approach. This method is slightly more computationally intensive than Method 2; however, the increased accuracy outweighs the slight increase in processing requisites. By reading a separate file containing the runway database, alterations and additions can be made with relative ease, ensuring functionally in the future. The only notable downside is the ease of implementation; however, we again feel the augmented functionality justifies these requirements.
TABLE 6.1 - RUNWAY DATABASE DECISION MATRIX.
12
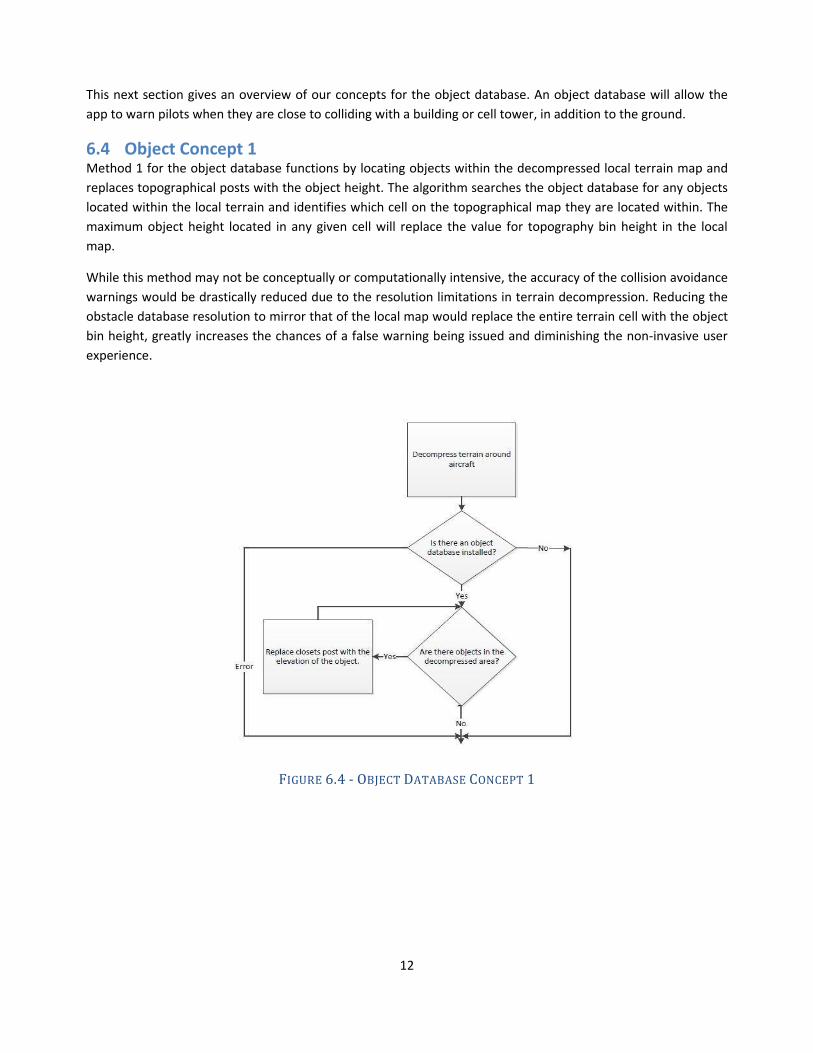
This next section gives an overview of our concepts for the object database. An object database will allow the app to warn pilots when they are close to colliding with a building or cell tower, in addition to the ground.
6.4 Object Concept 1 Method 1 for the object database functions by locating objects within the decompressed local terrain map and replaces topographical posts with the object height. The algorithm searches the object database for any objects located within the local terrain and identifies which cell on the topographical map they are located within. The maximum object height located in any given cell will replace the value for topography bin height in the local map.
While this method may not be conceptually or computationally intensive, the accuracy of the collision avoidance warnings would be drastically reduced due to the resolution limitations in terrain decompression. Reducing the obstacle database resolution to mirror that of the local map would replace the entire terrain cell with the object bin height, greatly increases the chances of a false warning being issued and diminishing the non-invasive user experience.
FIGURE 6.4 - OBJECT DATABASE CONCEPT 1
13
6.5 Object Concept 2
Decompressed terrain and object local maps are analyzed independently to determine potential CFIT risk, allowing for variations in decompressed resolution, trajectory analysis method and database format. Two local maps will be created from the compressed terrain and object databases respectively prior to performing flight path predictions.
Once the decompressed local maps have been created, the algorithm will compute flight path trajectory calculate the potential risk of CFIT for each map independently. This allows for trajectory and CFIT comparison on maps of differing resolutions. One issue with this concept is the high CPU requirement brought on by analyzing two local maps simultaneously; however, the tradeoffs are a highly modular computational structure and increased accuracy in flight path and CFIT predictions. This segment of code will not be laborious to develop as it uses the same CFIT prediction logic as the current code.
FIGURE 6.5 - OBJECT DATABASE CONCEPT 2 – TOP CONCEPT
14
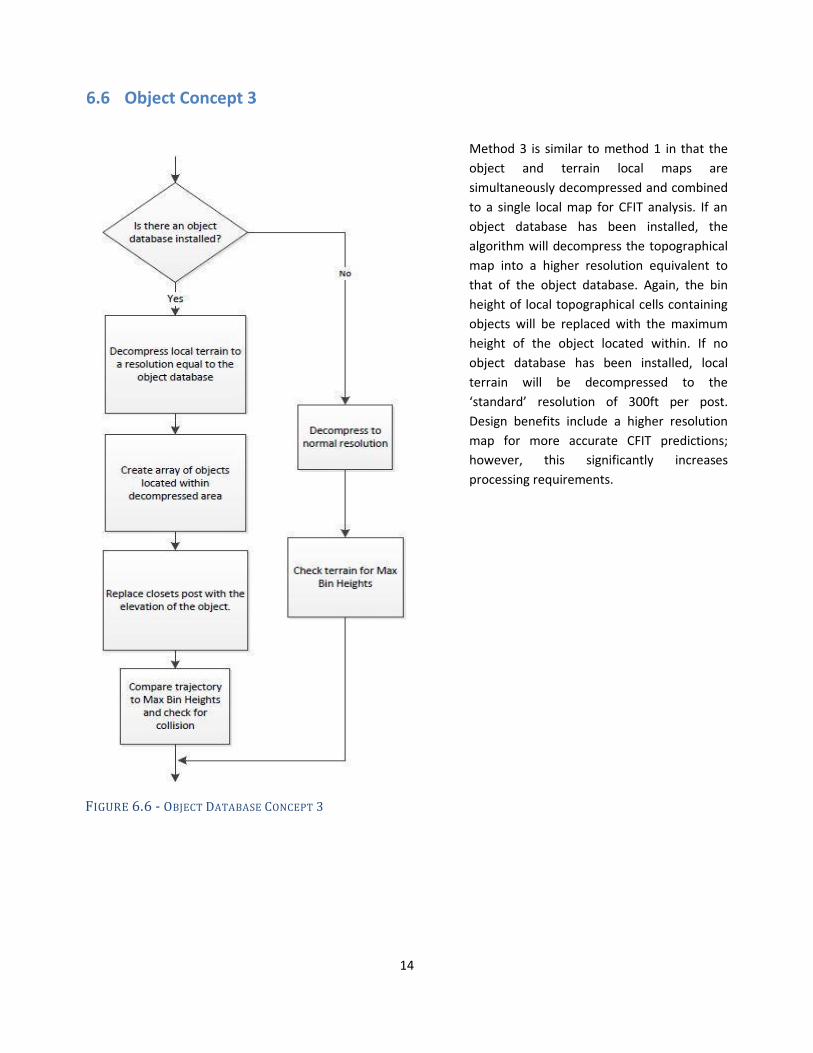
6.6 Object Concept 3
Method 3 is similar to method 1 in that the object and terrain local maps are simultaneously decompressed and combined to a single local map for CFIT analysis. If an object database has been installed, the algorithm will decompress the topographical map into a higher resolution equivalent to that of the object database. Again, the bin height of local topographical cells containing objects will be replaced with the maximum height of the object located within. If no object database has been installed, local terrain will be decompressed to the ‘standard’ resolution of 300ft per post. Design benefits include a higher resolution map for more accurate CFIT predictions; however, this significantly increases processing requirements.
FIGURE 6.6 - OBJECT DATABASE CONCEPT 3
15
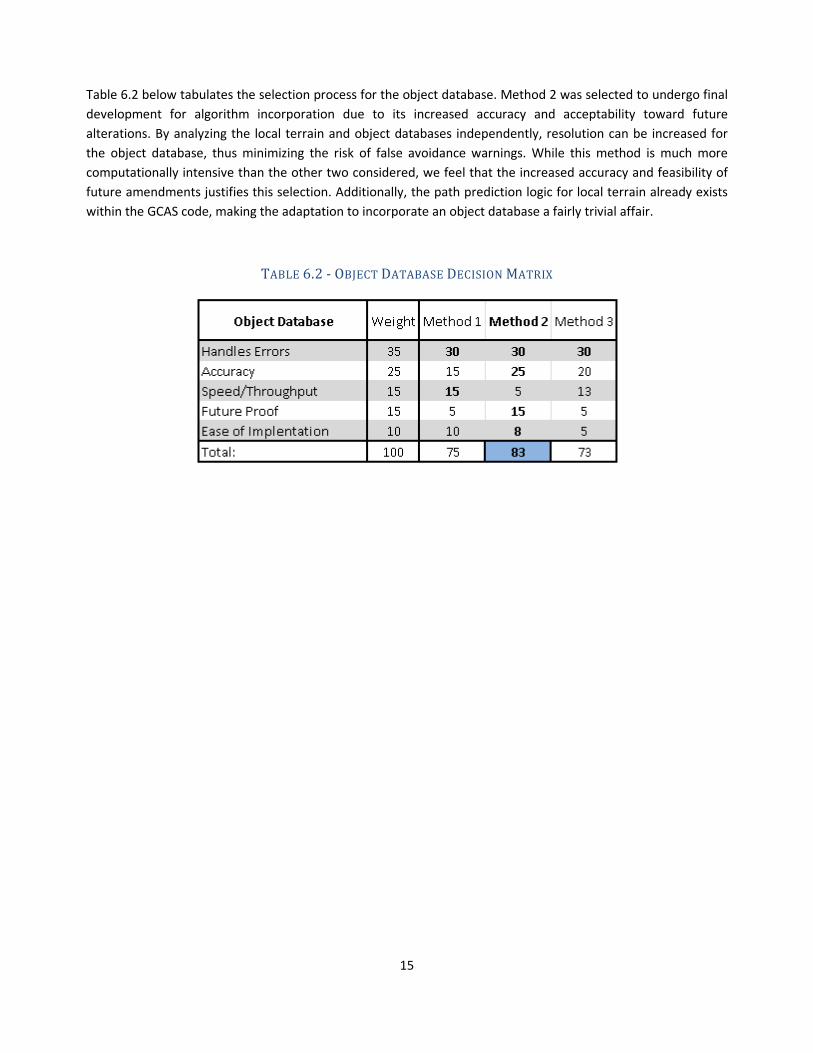
Table 6.2 below tabulates the selection process for the object database. Method 2 was selected to undergo final development for algorithm incorporation due to its increased accuracy and acceptability toward future alterations. By analyzing the local terrain and object databases independently, resolution can be increased for the object database, thus minimizing the risk of false avoidance warnings. While this method is much more computationally intensive than the other two considered, we feel that the increased accuracy and feasibility of future amendments justifies this selection. Additionally, the path prediction logic for local terrain already exists within the GCAS code, making the adaptation to incorporate an object database a fairly trivial affair.
TABLE 6.2 - OBJECT DATABASE DECISION MATRIX
16
7 Description of the Final Design The user interface consists of a series of Activities (displays) that let the pilot know if any action needs to be taken. Within our project scope, we will construct the foundation of the graphical user interface and ensure that the algorithm is working properly; however, some screens will be simple images used as placeholders. In future work, NASA will hire dedicated software engineers to make fully functional maps and indicators that are more aesthetically pleasing. They will also be able to add on more complex functionality.
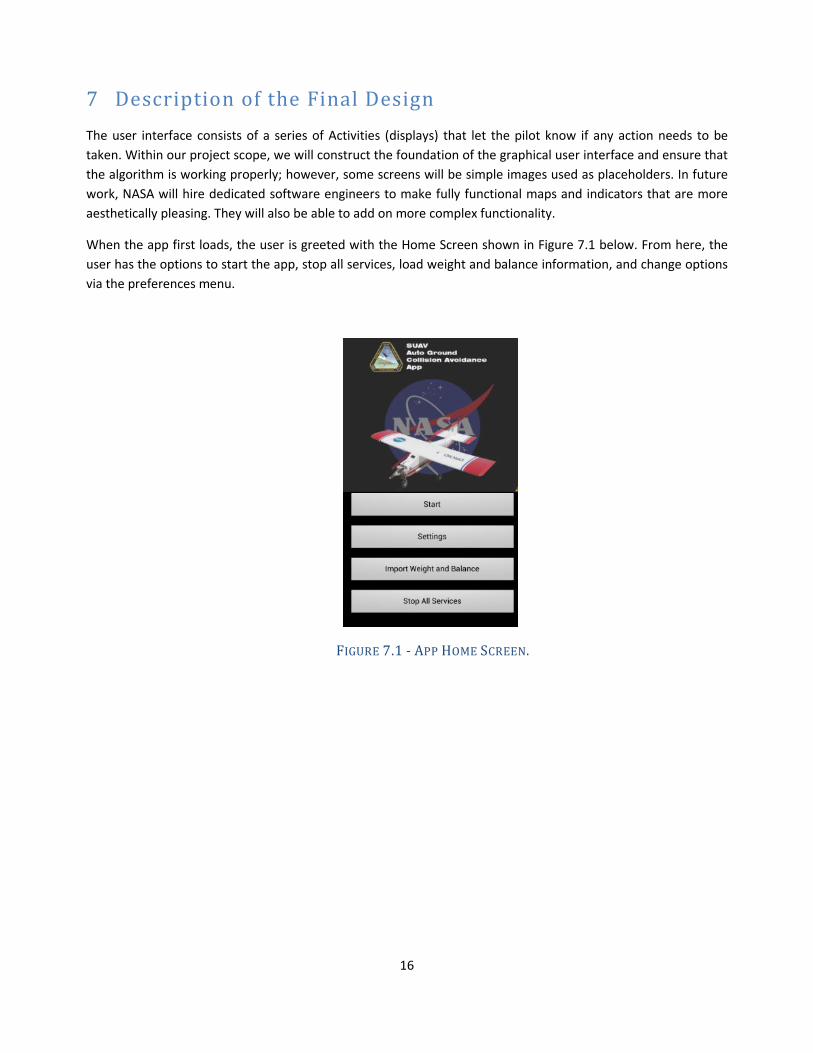
When the app first loads, the user is greeted with the Home Screen shown in Figure 7.1 below. From here, the user has the options to start the app, stop all services, load weight and balance information, and change options via the preferences menu.
FIGURE 7.1 - APP HOME SCREEN.
17
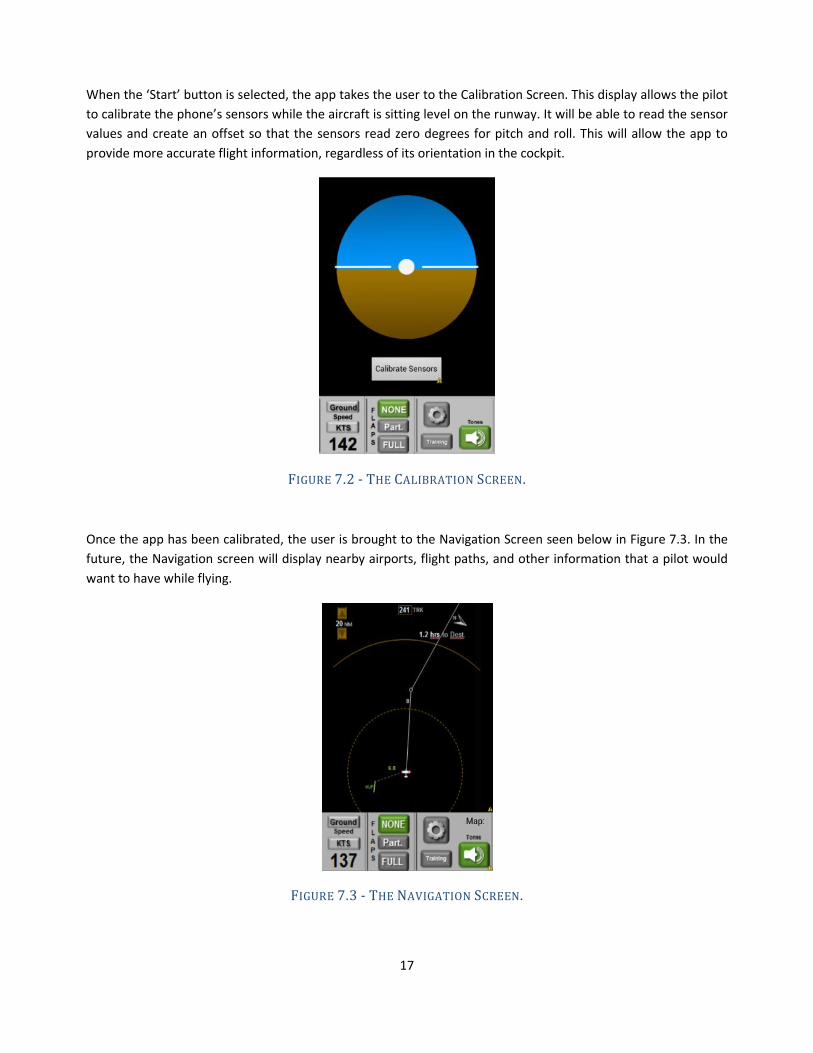
When the ‘Start’ button is selected, the app takes the user to the Calibration Screen. This display allows the pilot to calibrate the phone’s sensors while the aircraft is sitting level on the runway. It will be able to read the sensor values and create an offset so that the sensors read zero degrees for pitch and roll. This will allow the app to provide more accurate flight information, regardless of its orientation in the cockpit.
FIGURE 7.2 - THE CALIBRATION SCREEN.
Once the app has been calibrated, the user is brought to the Navigation Screen seen below in Figure 7.3. In the future, the Navigation screen will display nearby airports, flight paths, and other information that a pilot would want to have while flying.
FIGURE 7.3 - THE NAVIGATION SCREEN.
18
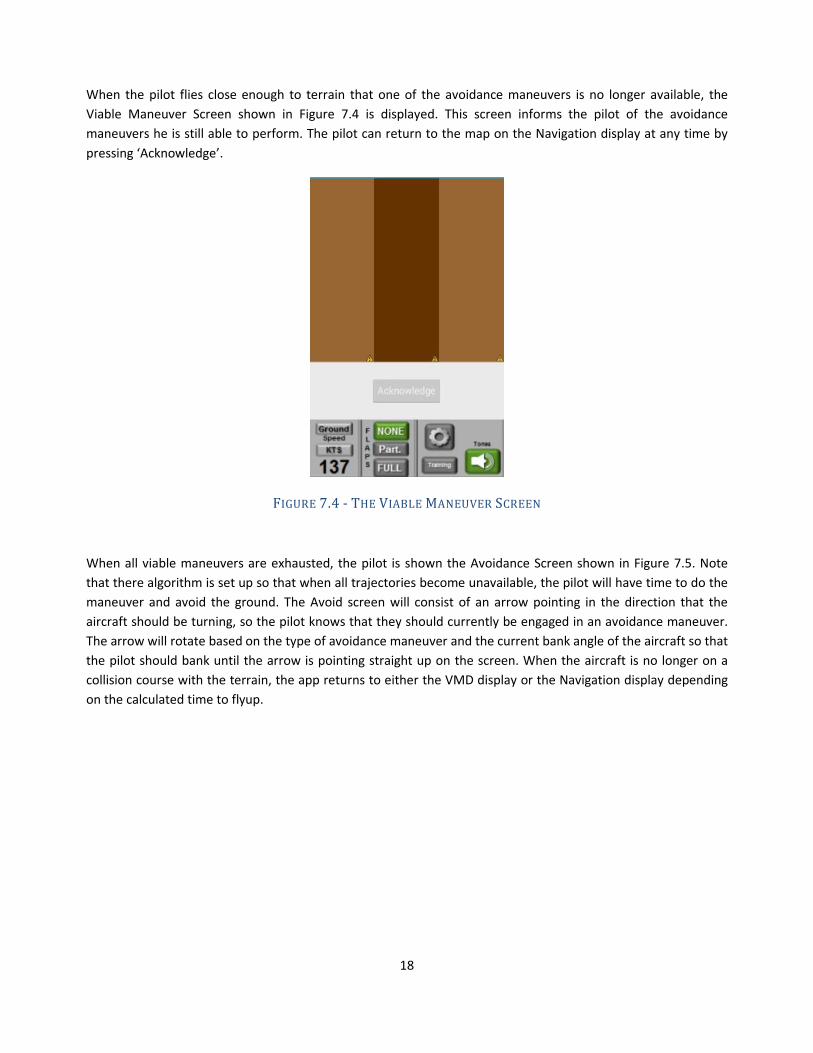
When the pilot flies close enough to terrain that one of the avoidance maneuvers is no longer available, the Viable Maneuver Screen shown in Figure 7.4 is displayed. This screen informs the pilot of the avoidance maneuvers he is still able to perform. The pilot can return to the map on the Navigation display at any time by pressing ‘Acknowledge’.
FIGURE 7.4 - THE VIABLE MANEUVER SCREEN
When all viable maneuvers are exhausted, the pilot is shown the Avoidance Screen shown in Figure 7.5. Note that there algorithm is set up so that when all trajectories become unavailable, the pilot will have time to do the maneuver and avoid the ground. The Avoid screen will consist of an arrow pointing in the direction that the aircraft should be turning, so the pilot knows that they should currently be engaged in an avoidance maneuver. The arrow will rotate based on the type of avoidance maneuver and the current bank angle of the aircraft so that the pilot should bank until the arrow is pointing straight up on the screen. When the aircraft is no longer on a collision course with the terrain, the app returns to either the VMD display or the Navigation display depending on the calculated time to flyup.
19
FIGURE 7.5 - THE AVOIDANCE SCREEN.
When the ‘Preferences’ button is selected from the Home Screen, the user is greeted with the screen shown in Figure 7.6 below. From here, the user can update their preferences such as pilot reaction time, aircraft tail number, and the terrain clearance buffer. The preferences are automatically saved to the app’s shared preferences where they are remembered and can be retrieved at any time in the future. New preferences can easily be added in the future if required.
FIGURE 7.6 - THE PREFERENCES SCREEN.
20
The last button accessible from the Startup Display is the ‘Weight and Balance’ button. This allows the pilot to interface with a 3rd party application to specify weight and balance information (shown in Figure 7.7 below). The algorithm does not currently take aircraft weight into account, but this sets up the framework to import this information in the future. The two applications will communicate data via an intermediary CSV file. When the button is pressed on the GCAS application, the last weight and balance entry will be loaded by the app. A toast will pop up letting the user know whether or not the import was successful. Figure 7.7 shows an example application created for this purpose. It saves a CSV file to the SD card where it can be read by the collision avoidance app.
FIGURE 7.7 - 3RD PARTY WEIGHT & BALANCE APP
21
8 Manufacturing Plan As the developing iCAS project is an application for phones, there are no manufacturing costs involved. The end product will consist of an android phone running the app, and a computer running the X-Plane simulator. The objective is to demonstrate the effectiveness of both the collision avoidance algorithm and the communication between the app and X-Plane.
9 Supporting Information / Cost Analysis Most of the resources and components for this project have no real cost associated with them. An X-Plane license is the only thing a consumer would need to purchase in order to test the application. The critical components for the iCAS project are listed as follows.
9.1 Eclipse: Free Eclipse is a software development environment that allows for coding primarily in Java. Eclipse is where all of the algorithm building, manipulation, and tuning during testing will happen. Eclipse has a built-in emulator for Android apps, which will allow for testing our end-user interface without having to upload the new app build to the phone for every change we make. Eclipse is free for download.
9.2 Git: Free Git is another application aimed at assisting software developers. It is source code management aimed at projects with multiple collaborators. Git allows each member to work independently on the code and can easily merge new work with changes made by other members. Because it is decentralized, members have a complete version history stored locally, allowing them to commit changes while offline. Git is also free for download.
9.3 Android SDK: Free Eclipse has the ability to run a phone emulator running Android and therefore a phone is not required for testing purposes. However, since the application will mostly be used while running on a physical device we will be testing with an actual Android phone.
9.4 X-Plane 10 Global Software: $69.99 In order to test the reliability of the avoidance algorithm, a license for X-Plane is required. NASA has provided CTP with licenses for X-Plane, which was the only upfront cost of the project. For more information on what X-Plane is and how it will be used in the project, refer to the Design Verification and Testing section.
22
10 Final Code Design
10.1 Displays One of the fundamental contributions tasked to CTP for the progression of the GCAS application was the development of an end user interface. The production of an interactive UI provides both a visual medium for testing the algorithm constituents and grants functionality to the existing code construct. Below are detailed descriptions of the final displays, following a flowchart of the end user interface.
10.1.1 AGCASActivity.java AGCASActivity was removed because it no longer fit in anywhere in the app. All of the features previously contained here were moved to other classes.
10.1.2 StartupActivity.java When the iCAS-GA application is started, the user is first greeted with the StartupActivity home screen. Here the pilot is given the option to open the settings and edit user preferences, start the application, read the weight and balance app, or to stop all algorithm services. Upon pressing start, the AlgorithmService is started, loading the local map and initiating trajectory calculations. Additionally, clicking the start button will bring up the calibration screen, described in further detail in the next section.
In the onStart method of the StartupActivity, the algorithm first checks if the algorithm service is currently running. If so, the start button will display ‘Resume’ rather than ‘Start’. In the onBackPressed method, the algorithm will stop all services prior to exiting to the home screen of the Android. Note that all screens redirect the user back to the StartupActivity when the back button is pressed, rather than the last screen displayed. This is done so to ensure the application will not crash, as well as provide the user with options to stop the AlgorothmService or edit user preferences.
When the start button is pressed, the algorithm retrieves the local map name, aircraft tail number, pilot reaction time, warn time (which controls when the screen switch time from EGPWS display to VMD), and the terrain clearance buffer. If the desired local map does not exist, a small dialog pops up in the form of a toast to inform the user the desired data is not located on the SD card. This is done for the desired aircraft tail number as well. In addition to the local map, the algorithm will load a database of local runways in the form of a CSV file, if the file exists.
Pressing the settings button brings up the PreferencesActivity, prompting the user to enter or alter the desired user preferences, which consist of map name, tail number, pilot reaction time, warn time, terrain clearance buffer, use with X-Plane, and the option to turn on or off the flashing camera light during an avoid situation. Finally, when selecting ‘Weight and Balance’ from the home screen, the application will look at the SD card for a weight and balance CSV file for the current aircraft tail number. A toast will be displayed indicating whether the CSV file was successfully located.
10.1.3 CalibrationActivity.java The function of the calibration screen is to ensure the aircraft wings are level prior to zeroing the aircraft bank angle variable, allowing for more accurate path predictions. The algorithm currently receives aircraft orientation parameters from X-Plane rather than the phone sensors themselves; therefore, no initial calibration is required at this time. The calibration screen currently consists of a static image, indicating the orientation of the phone relative to the aircraft. Pressing the ‘Calibrate’ button switches the display to the navigation screen.
23
10.1.4 NavActivity.java The ultimate purpose of the navigation display is to provide the pilot with a moving map that shades nearby terrain relative to aircraft altitude. This is the primary screen to be displayed during standard operation in an aesthetically non-invasive manner. Currently the moving map functionality is non-existent, so a static image of a flight path map is displayed as the background.
In the onCreate method, the layout is set to activity_nav, and the handler and TextView for the map load percentage are identified. When AlgorithmService is first started, the local map must be loaded prior to any trajectory calculations being performed. The updateScreenThread called in onCreate pulls and displays the map load percentage from AlgorithmService class, updating once every second. The mapLoad percentage computation is performed separately in the updateScreenThread as a safeguard against the user interface entering an unresponsive state. An onClickListener is set for the button bar at the bottom of the screen, which will display a user preferences dialog when clicked. When pressed, a new settings dialog is created, bringing up a small window at the bottom of the screen with the layout of the dialog_settings XML file. Here, the pilot has the option to manually enter and change the pilot reaction time and the terrain clearance buffer. The pilot reaction time is the time it takes for the pilot to initiate the avoidance maneuver after being issued, and the terrain clearance buffer artificially raises the elevation of the ground. Upon pressing save, the new parameters are converted to floats and committed back to the algorithm.
10.1.5 VmdActivity.java The viable maneuver display serves to alert the pilot of the relative time to flyup for the left, center, and right trajectories. These three parameters are used to control three moving bars that are translated vertically as the time to flyup decreases. By the time a respective time to flyup has reached zero, the bar will have reached the top of the screen and turn yellow. Once all three paths have a time to flyup of zero or less, the algorithm will switch to the avoidance display.
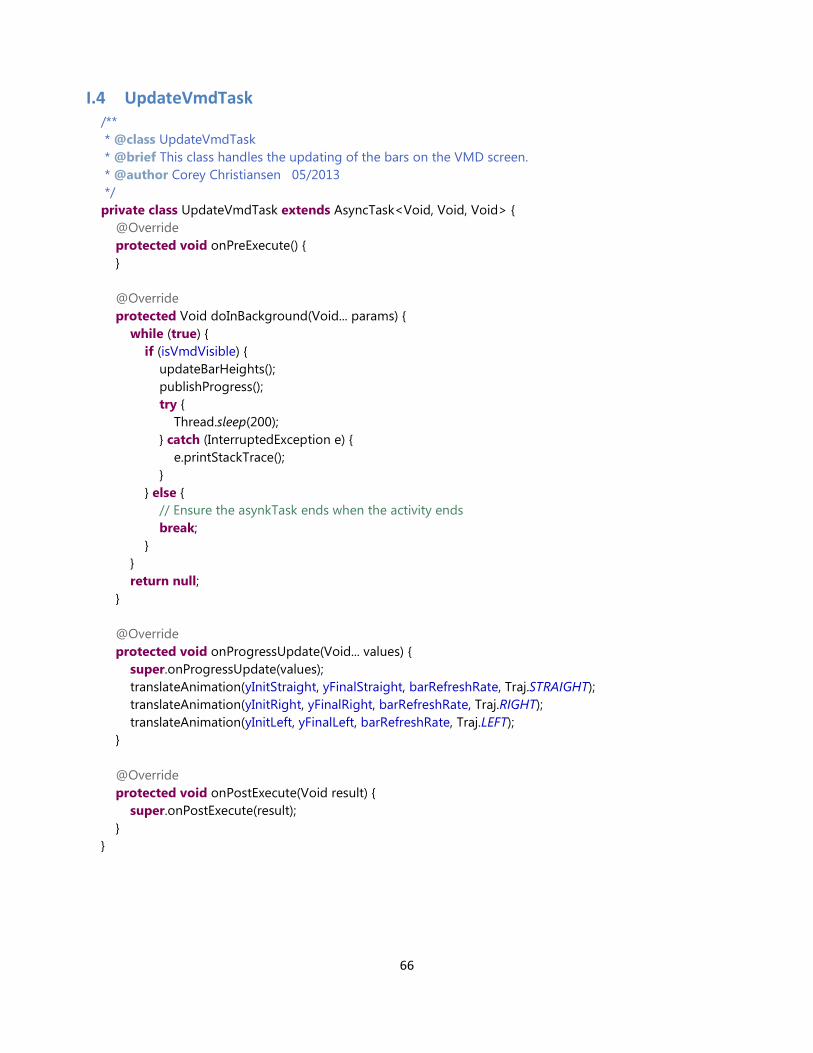
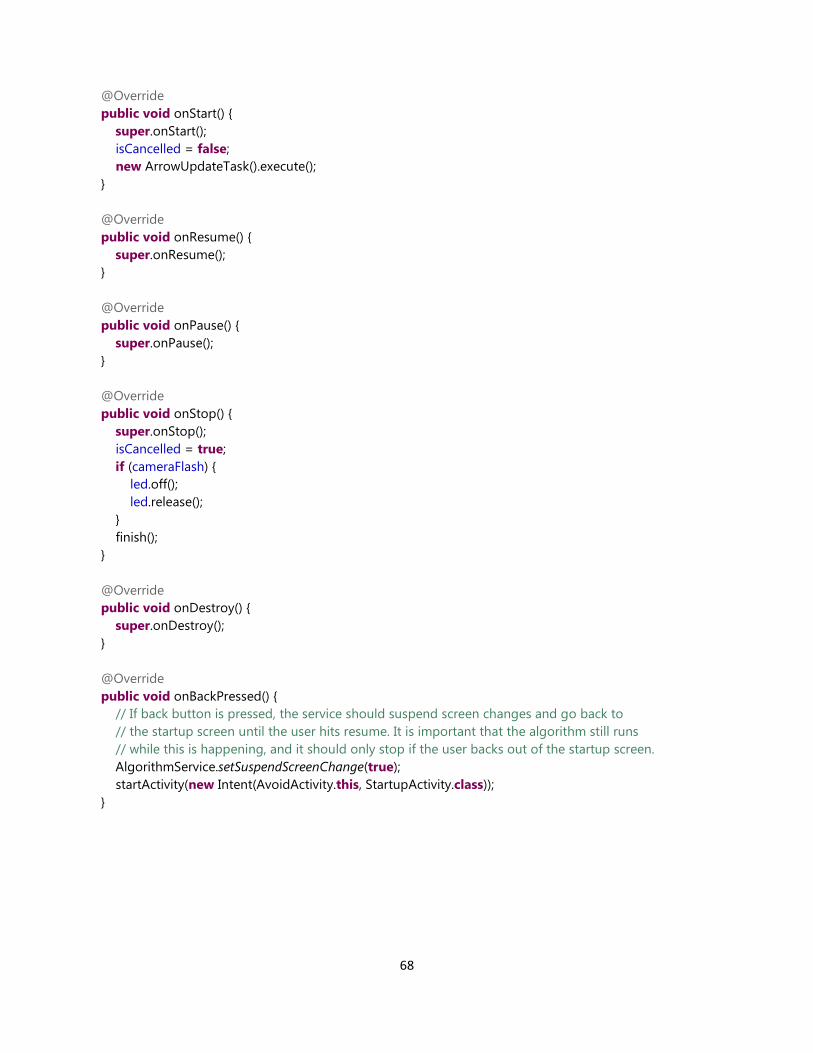
In the onCreate method of the VmdActivity, the content view is set to its respective VMD XML layout file, activity_vmd. The translating VMD three bars are defined as TextViews with a background fill, each located within a separate linear layout in the XML file. We chose to use TextViews rather than images to minimize processing requirements while the bars are being translated. We next define the acknowledge button, which will allow the user to manually switch from the viable maneuver display back to the EGPWS screen. An onClickListner is set for the acknowledge button to switch from the VmdActivity to the NavActivity class via an intent. Located next are the lifecycle methods onStart, onResume, onPause, onStop, onDestroy, and onBackPressed. When the back button on the Android phone is pressed, the algorithm switches to the StartupActivity class rather than the last screen displayed. Within onStart, the UpdateVmdTask method is executed, beginning a new AsyncTask. While on the VMD display, the UpdateVmdTask calls the updateBarHeights and publishProgress methods every 200 milliseconds. We again chose to implement an AsyncTask for the UI thread to run the translation computations in the background, allowing for other methods to be implemented without forcing the application into an unresponsive state during the translation process.
The updateBarHeights method gets the time to flyup variables (tupl, tupc, tupr) for the left, center, and right trajectories, respectively, from the AutoGCAS class. The final position which the bars are translated to is set using the following equation: yFinalLeft = barHeights - (barTime - tupl)*barHeights/barTime, where barHeights is the max size the bars can be on the display (the height of the vmdBarLayout), barTime is the flyup time that will trigger the algorithm to switch to the viable maneuver display (set equal to warnTime from the AlgorithmService class), and tupl is the time to flyup (left in this case). To keep the TextViews from translating outside of the
24
display area when the issued time to flyup is too large or negative, we implemented logic that sets the yFinal value to 0 when calculated to be negative, and to barHeights when calculated as a value larger than the display area.
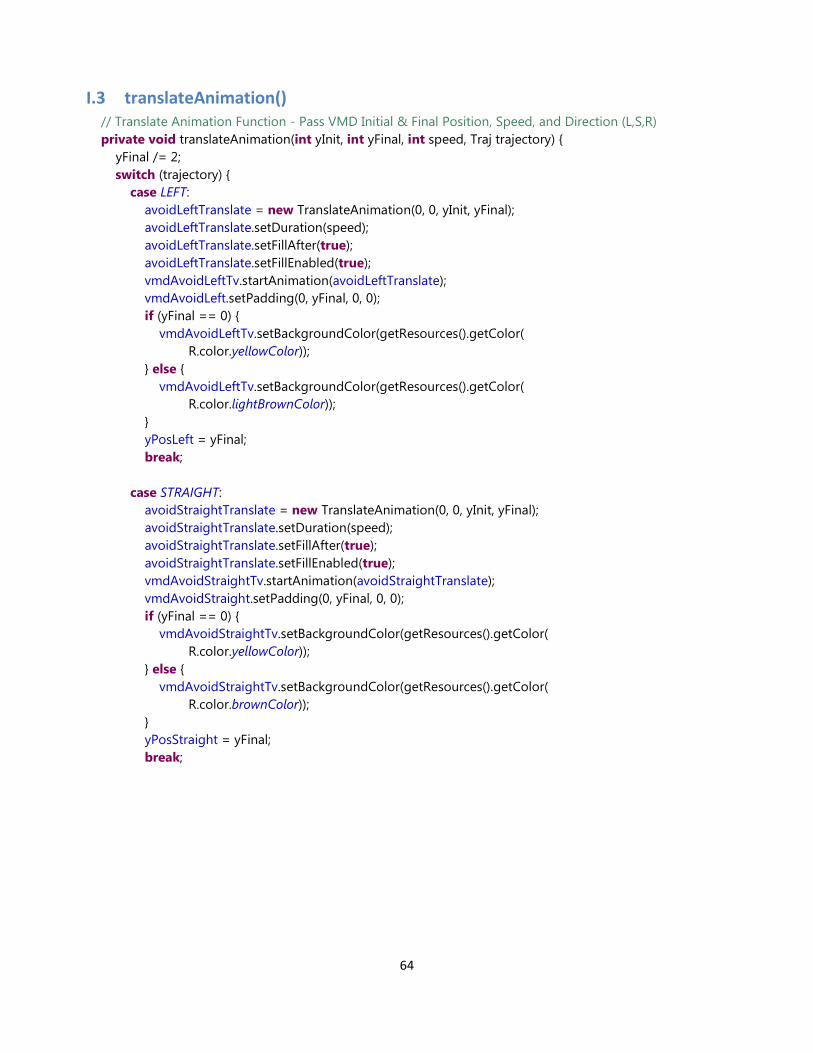
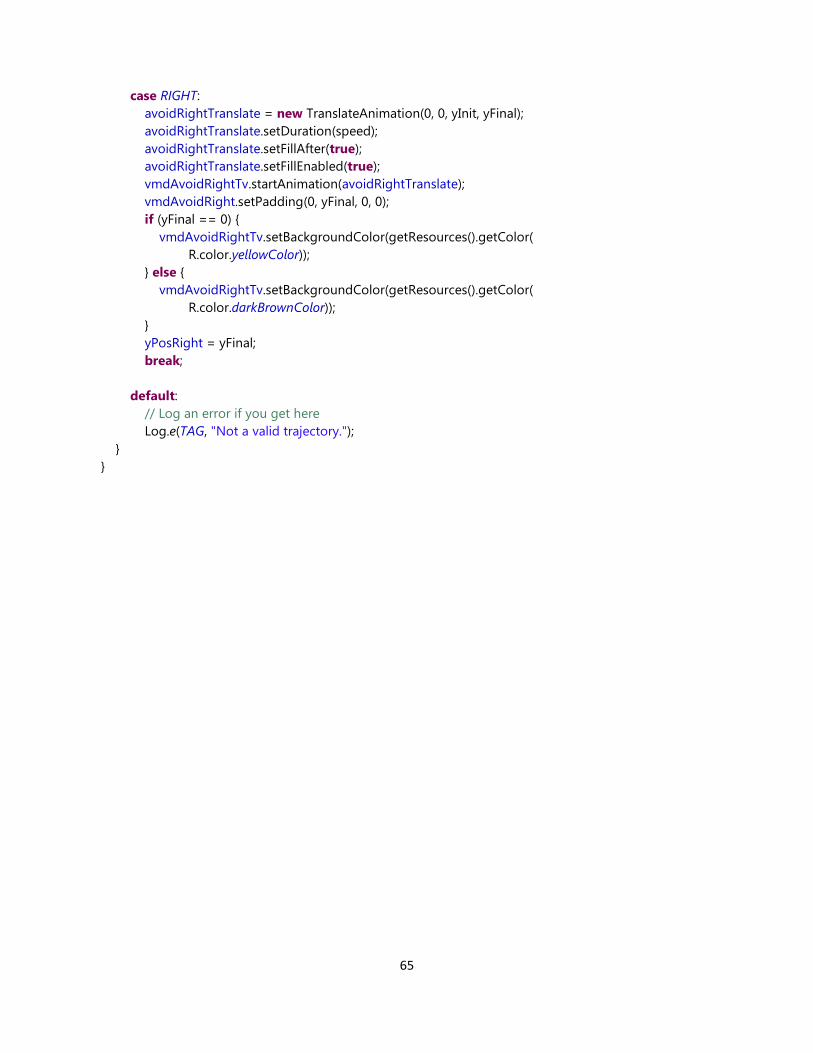
The onProgressUpdate method passes the parameters yInit, yFinal, barRefreshRate, and the specific case (Left, Right, or Straight) to translateAnimation, which serves to dynamically translate the three VMD trajectory bars. The yInit parameter defines the starting position of the VMD bar, whereas yFinal sets the final location for the bar to translate to. The barRefreshRate determines the total time it will take for the bar to translate from the yInit location to yFinal. The assigned case identifies which bar will be translated using these parameters. If yFinal is equal to 0 (meaning the time to flyup is zero or less), the bar color is set to yellow, warning the pilot that this trajectory will no longer be available.
10.1.6 AvoidActivity.java The avoidance screen is displayed when the left, center, and right time to flyup from the viable maneuver display all reach zero or less. This display appears only in an immanent avoid situation, and consists of a large arrow prompting the pilot which direction to bank in order to perform the required avoidance maneuver. As the pilot banks the aircraft, the arrow will rotate with respect to the current aircraft bank angle until oriented vertical on the screen. At this point, the pilot is to bank the plane upwards until clear of the potential CFIT situation, indicated when the avoidance display is no longer visible. For an additional visual impact, the camera flash on the Android phone is prompted to pulse on and off throughout the duration of the maneuver, which can be turned on or off in the user preferences.
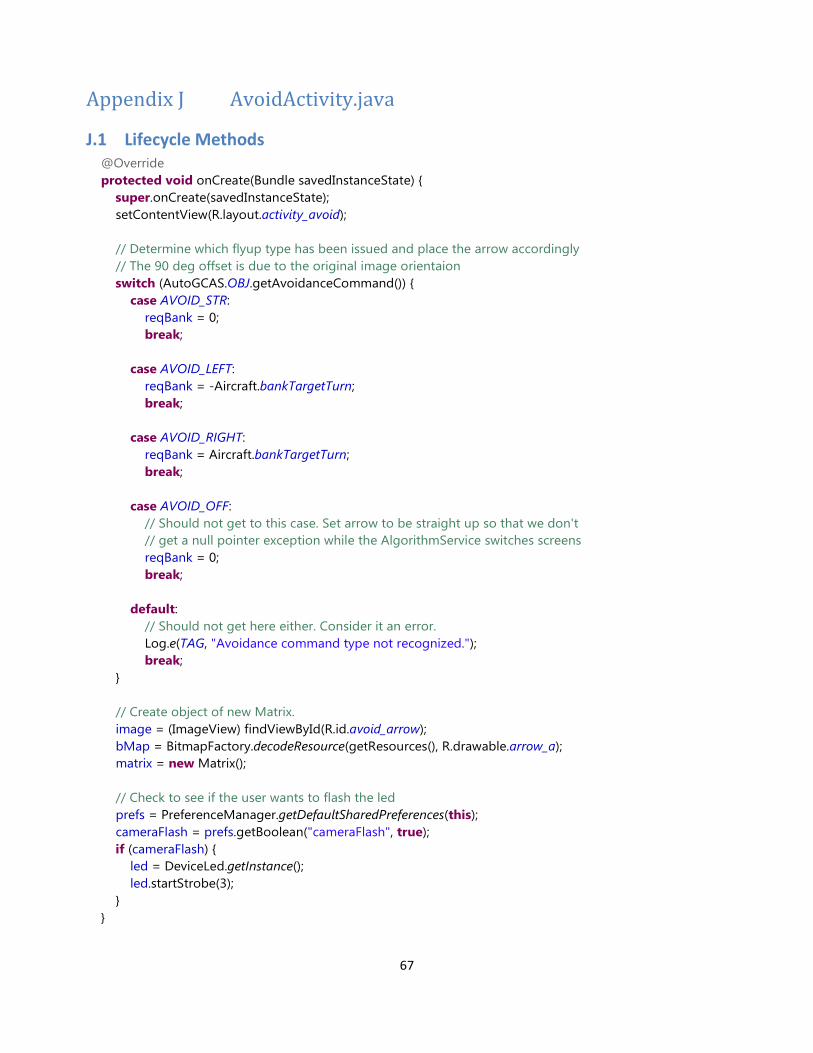
In the onCreate method of the AvoidActivity, the layout is set to activity_avoid. To determine which flyup case has been issued, a switch case is implemented to decipher between a left, straight, or right avoid situation. If a straight avoid is issued (meaning the pilot should bank upward to fly directly over any precarious terrain), the required bank angle is set to zero, indicating that the arrow will be oriented vertically. For a right avoid situation, the required bank angle is set to the bankTargetTurn angle, retrieved from the Aircraft class. Comparably for a left avoid situation, the required bank is set equal to the negative of the bankTargetTurn angle. To prepare the arrow for rotation, the avoid_arrow image is decoded into a bitmap and a new matrix is created.
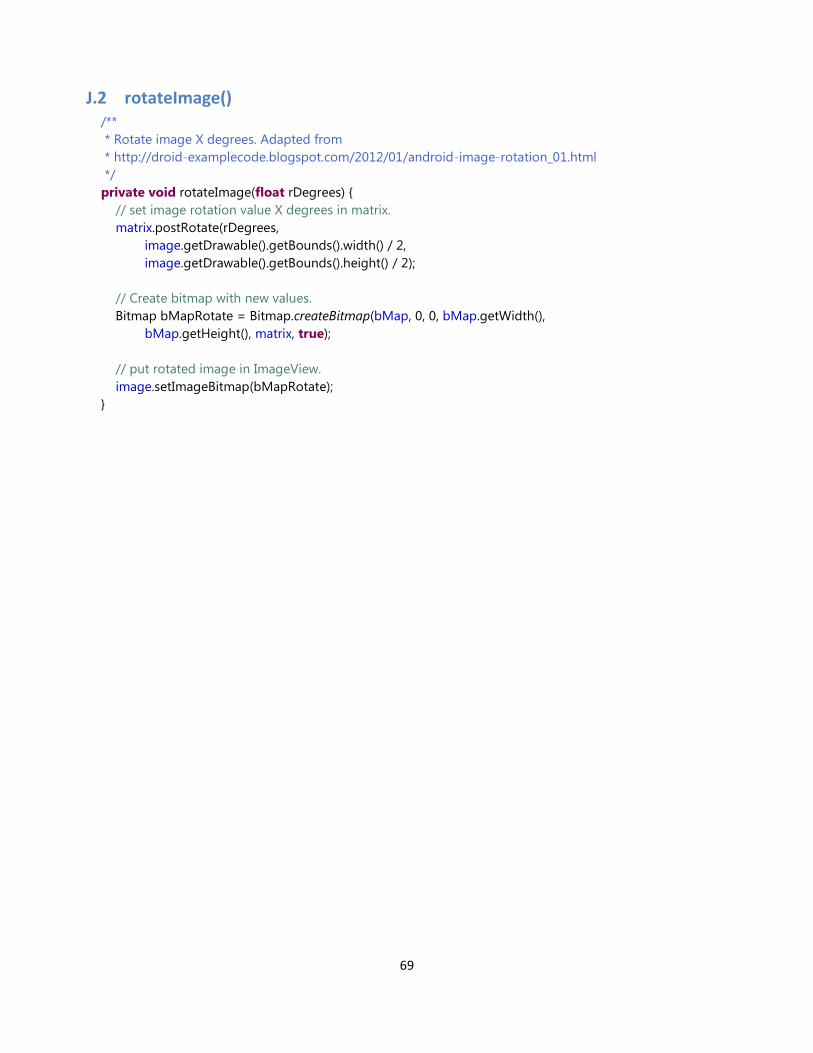
In the onStart lifecycle method, the ArrorwUpdateTask is executed, beginning a new AsyncTask to run the arrow rotation in the background. The update arrow task functions by receiving the current aircraft bank angle from the Aircraft class and implementing the following equation to determine the number of degrees the arrow should be rotated: rotate = reqBank - curAngle - Aircraft.getBankAngle. Once the rotate angle has been calculated, the publishProgress function is called, prompting the onProgressUpdate method to pass the rotate angle to the rotateImage method. To ensure the arrow rotates about its center, the image width and height are retrieved and divided by 2 within matrix postRotate. After the magnitude of the image rotation has been set, a new bitmap is created with these new values and the newly rotated image is placed in the ImageView via the setImageBitmap function. We again chose to switch to the StartupActivity under the onBackPressed method rather than the last screen displayed. The algorithm will continue to run in the background; however, service will suspend screen changes until the user presses resume.
25
10.2 Core Classes The core classes contain the logic that runs the collision avoidance algorithm.
10.2.1 AcDataRecorder.java The AcDataRecorder class was unchanged during this project.
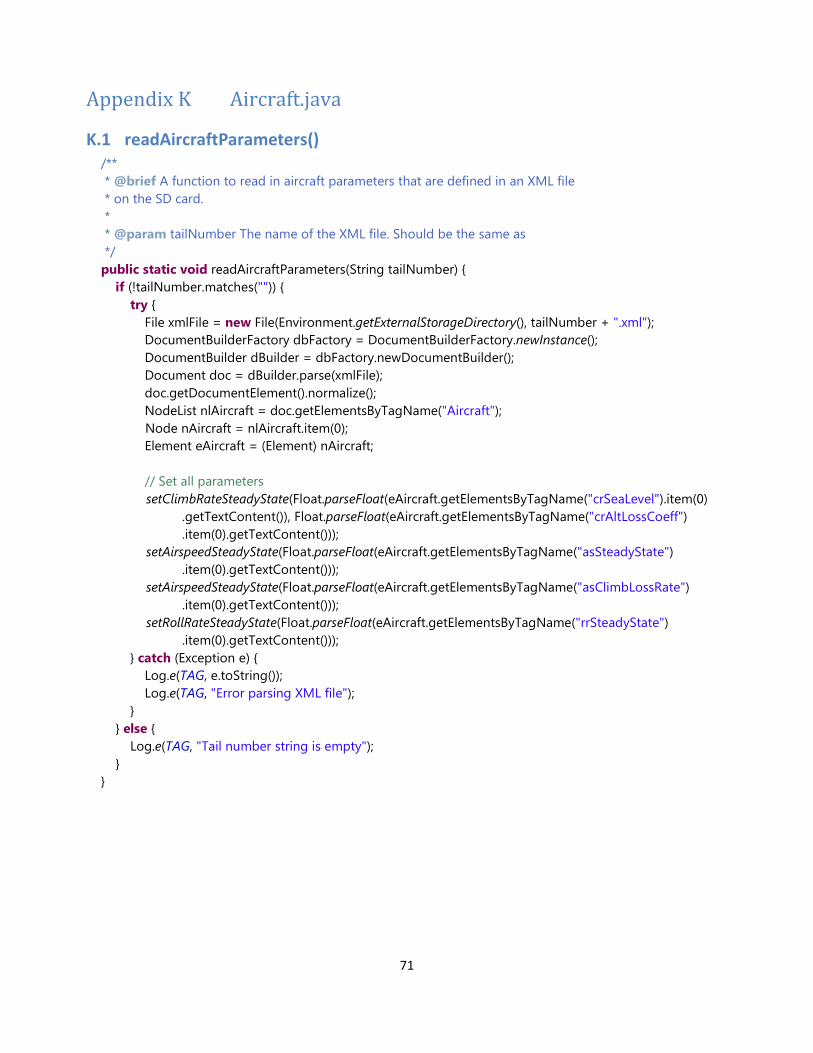
10.2.2 Aircraft.java The Aircraft class contains the parameters specific to the aircraft. It originally had parameters such as steady state airspeed, roll rate, and climb rate hardcoded in the program. Now that the app has the ability to load aircraft specific parameters, we made these variables private and gave them getter and setter functions. The class has a new function, readAircraftParameters, which reads in an XML file that defines parameters for a specific tail number. XML was chosen so that new parameters could be added without breaking existing code. An example file can be found in Appendix G. Adding new parameters is as simple as adding a new element to the XML file, parsing the element in readAircraftParameters, and passing the value to a setter method. An example XML file can be seen in Appendix K.
A variable for pilot reaction time was added to take into account the time it takes the pilot to recognize the avoid screen and react. The time was added to compLag because the algorithm keeps the trajectory prediction in delay phase until that time has elapsed. At first we switched to the avoid screen when the time to flyup became less than the pilot reaction time, but this artificially raises the terrain. It is more accurate to change the trajectory prediction by continuing along the current path for a longer time than simply raising the terrain.
One thing to note is that the TrajPrediction class was using the public variables in Aircraft directly. We changed the variables that changed based on the specific aircraft to private variables and had to change TrajPrediction to call the getter methods instead.
10.2.3 AppStatus.java The AppStatus class was unchanged during this project.
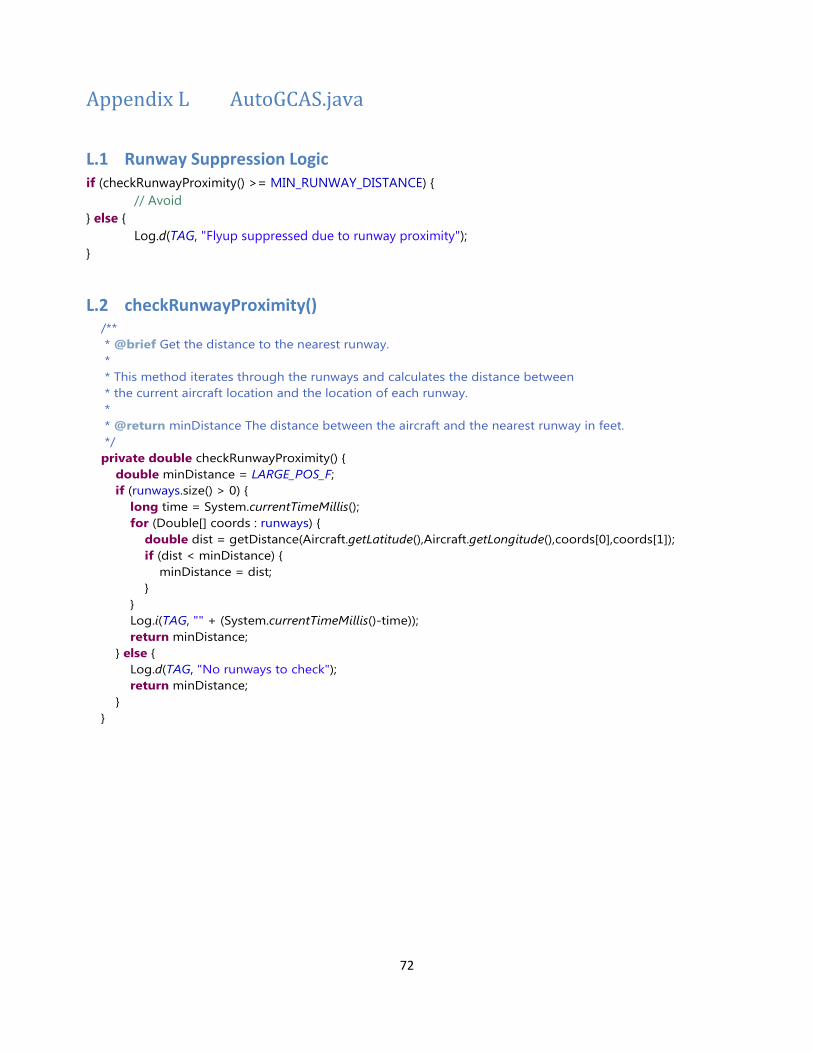
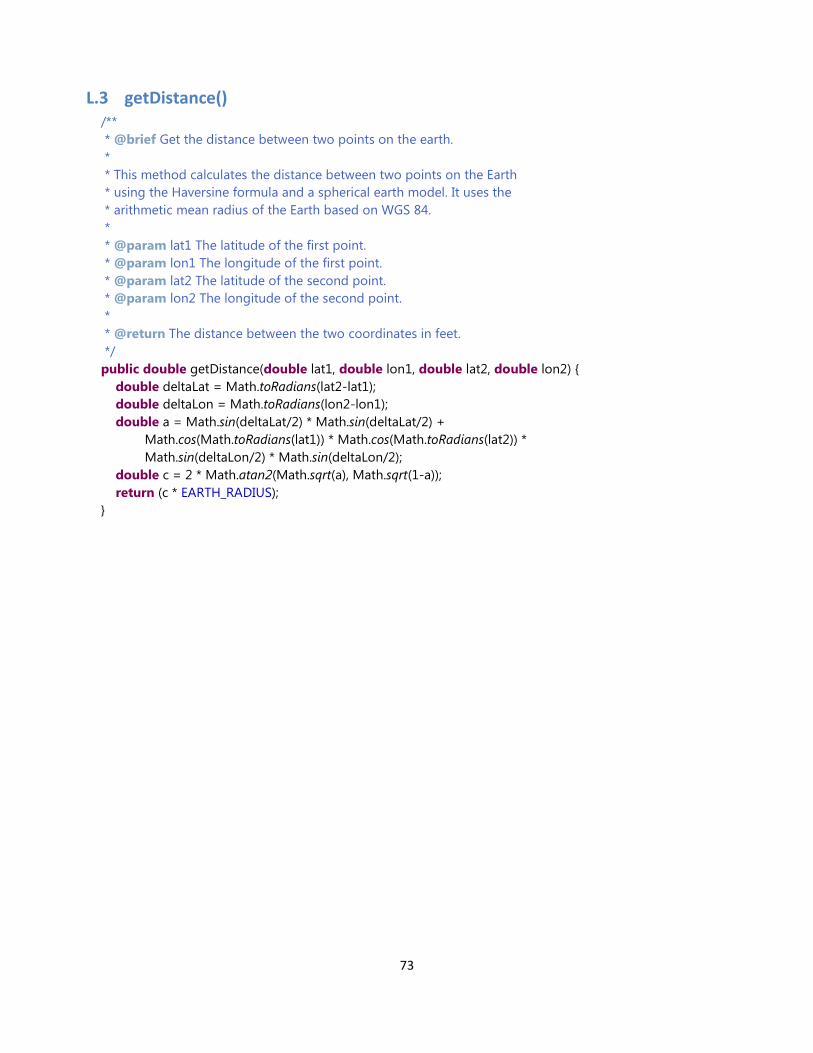
10.2.4 AutoGCAS.java The ability to check for runways was added to the AutoGCAS class. This check occurs in the doDetermineNeedToAvoid method. When a flyup would normally occur, we first call checkRunwayProximity and see if there are any runways within a preset distance. If you are landing, then a runway will be close enough to suppress the avoidance warning.
Runways are read in from a CSV file when the user presses the start button. The coordinates are stored in an array in AutoGCAS so that they can be accessed quickly. It calculates the distance between the aircraft and each runway, returning the lowest value. It uses the Haversine formula to calculate the great-circle distance between the aircraft and runway coordinates. This method assumes a spherical Earth, so the radius used is the arithmetic mean radius from WGS 84. Vincenty’s formulae could be used to get more accurate distances, but these operations need to be performed very quickly. The time it takes to calculate the distances delays the avoidance display if a flyup is required.
10.2.5 DataRecorder.java The DataRecorder class was unchanged during this project.
26
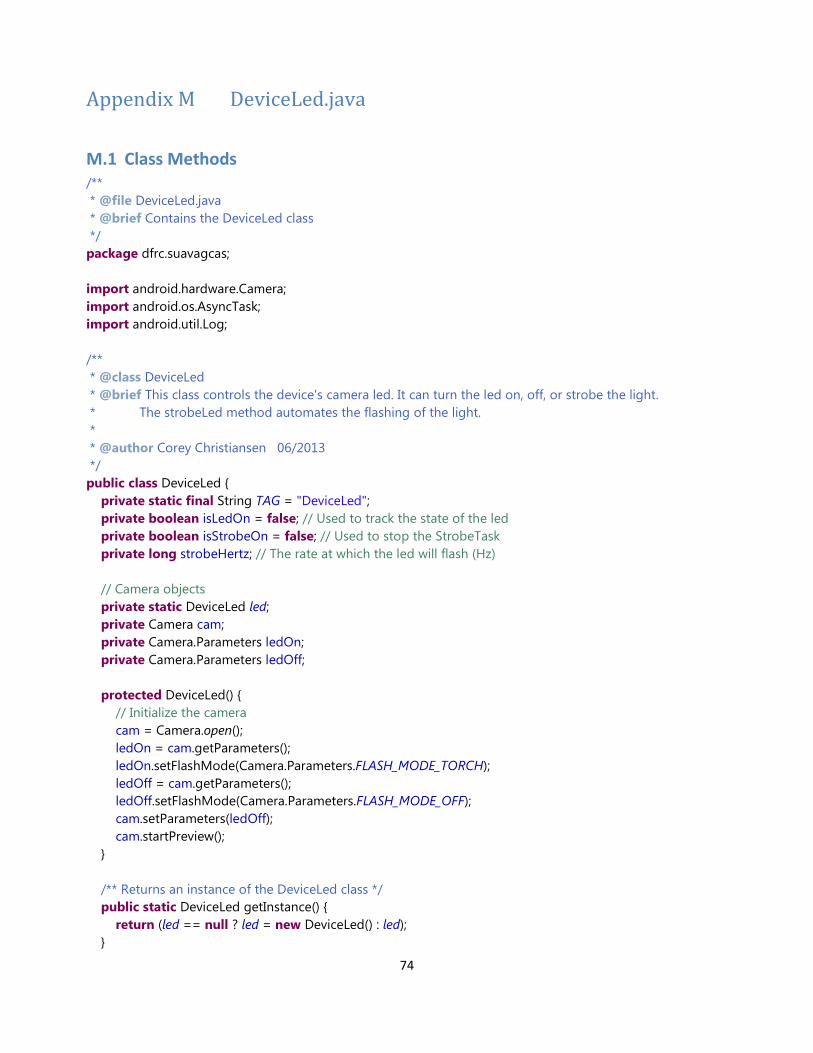
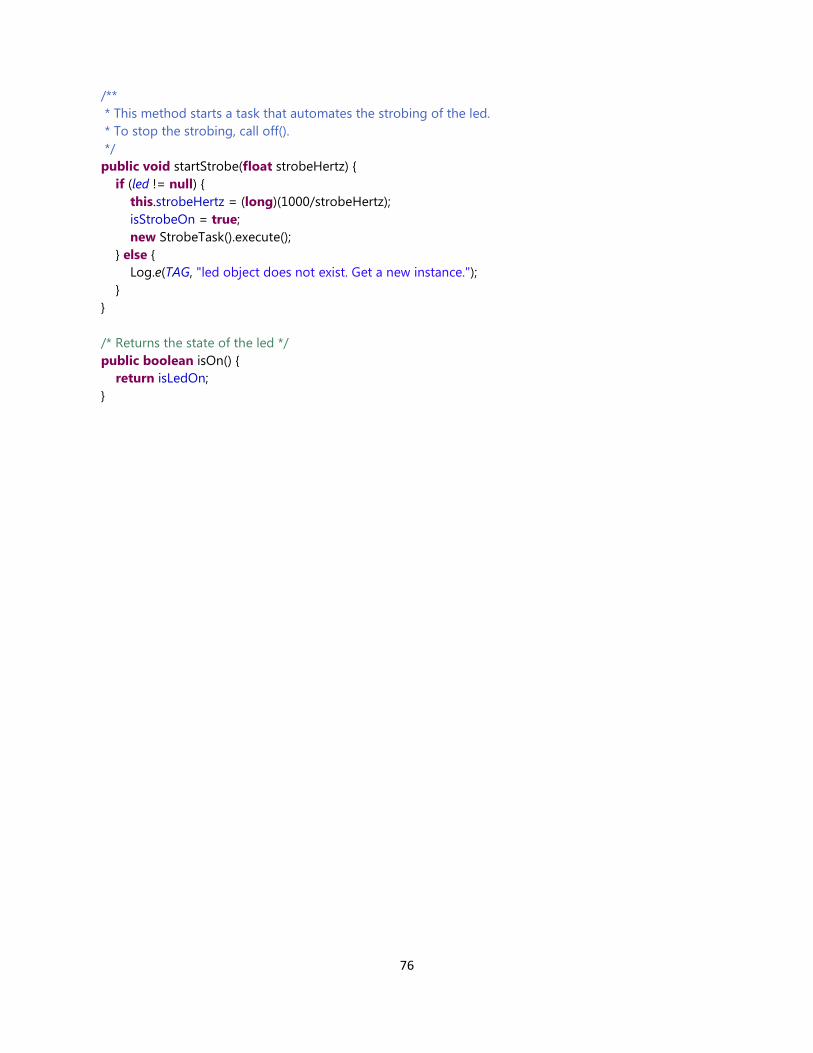
10.2.6 DeviceLed.java The DeviceLed class was created so that the user has the option of having a flashing light when the avoid screen is displayed. The class controls the phone’s camera LED and has a method that strobes the light at any rate you choose. It also has methods that turn the LED on and off, so it could be used as a flashlight as well.
10.2.7 ExecModeControl.java The ExecModeControl class was unchanged during this project.
10.2.8 GPSdata.java The GPSdata class was unchanged during this project.
10.2.9 GroundTrack.java The GroundTrack class was unchanged during this project.
10.2.10 LocalMap.java The LocalMap class originally read an XML file located on the SD card that contained the map filename. It would use this filename to search for the CDTM map, also on the SD card. We added an option to the preferences screen where you can set the map’s filename. The XML file was no longer needed, so we removed the code that read it to set the map name.
10.2.11 Logger.java The AppStatus class was unchanged during this project.
10.2.12 ModelState.java The ModelState class was unchanged during this project.
10.2.13 ModeState.java The ModeState class was unchanged during this project.
10.2.14 TrackState.java The TrackState class was unchanged during this project.
10.2.15 TrajDirection.java The TrajDirection class was unchanged during this project.
10.2.16 TrajPrediction.java The TrajPrediction class was functionally unchanged during this project. Some of the methods were directly accessing variables from the Aircraft class, and we changed it so that they call getter methods instead. This was only done for the variables in the Aircraft class that are now read in from the aircraft’s XML file.
TrajPrediction also accessed the static localMap variable stored in AGCASActivity. We pulled all of the algorithm code out of AGCASActivity and put it into AlgorithmService. So it now points to the localMap variable in AlgorithmService.
27
10.3 Services These two services perform all of the work that needs to be done continuously, regardless of which display is showing. They also need to run asynchronously so that the app’s UI thread is not blocked, causing the app to seem unresponsive.
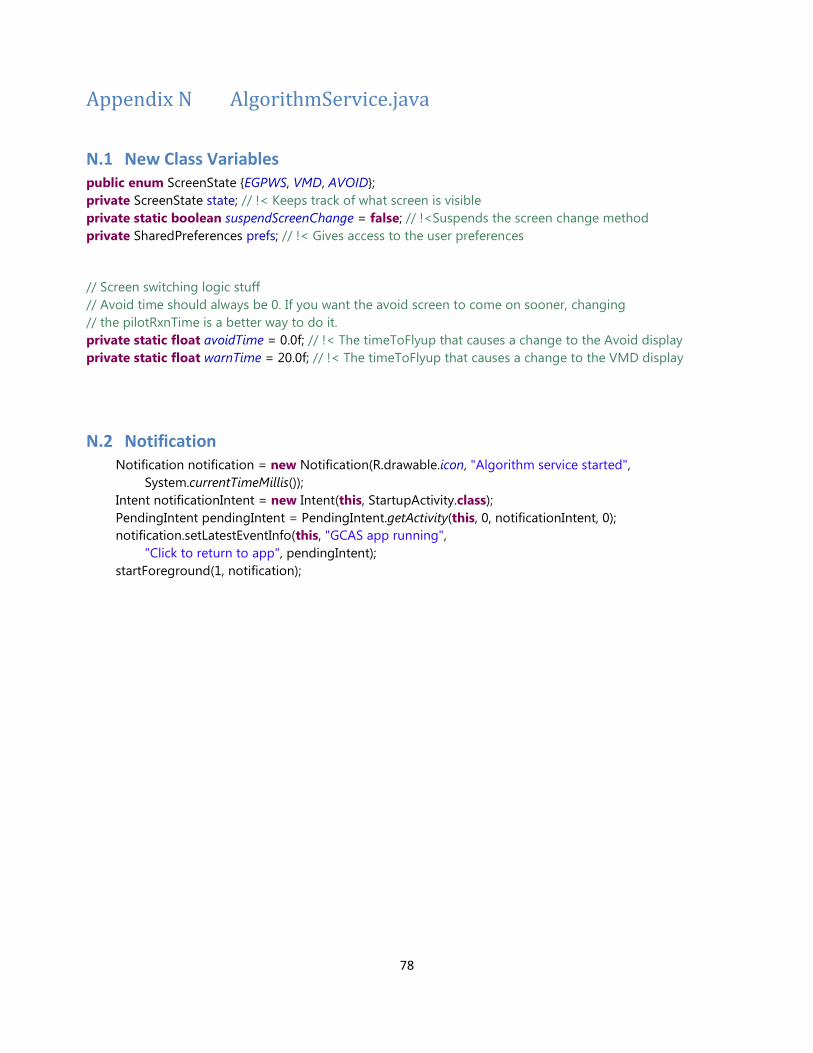
10.3.1 AlgorithmService.java AlgorithmService contains all of the logic to run the algorithm. This logic was originally in AGCASActivity, but we had to put it into its own service so that it could run in the background regardless of which activity was visible. It is a foreground service, meaning that while it is running an ongoing notification is visible in the phone’s notification bar. Clicking on the notification will bring the user back to the app. This also has the benefit of letting the pilot know if he has accidently left the app running, as it would drain the battery very quickly if unplugged. Foreground services cannot easily be killed by the operating system and can run in the background regardless of what app is open. This will allow the user to answer a phone call or text message without interfering with the algorithm’s calculations. The screen change logic will still work as well, so if the pilot is texting while the time to flyup is approaching zero, the VMD or Avoid display will interrupt and be shown.
The AgcasTask class contains all of the new logic. The other tasks, AcDataRecorderTask, DataDumpTask, and CDTMBuilderTask, have not been changed. AgcasTask is responsible for performing the collision avoidance calculations and determining which screen should be displayed based on the three time to flyup variables. It uses data that is sent in a bundle by the XplaneSocketService class. This bundle contains current aircraft data such as location, speed, and attitude.
The first change we made was to change the filename of the log files. They had previously been linked to the flight number, which was set on the ground station. The app does not allow you to fly with the same flight number twice since you would overwrite the previous log file. Because we cannot send the phone a new flight number each time, we used the date and time for the filename. This ensured that each flight had a unique filename without having to manually change the flight number. One issue with this method is that the data analysis tool used to read the BIN files requires a three digit flight number. We did not have access to the tool’s source code, but we were able to simply rename the log file, replacing the date with a flight number.
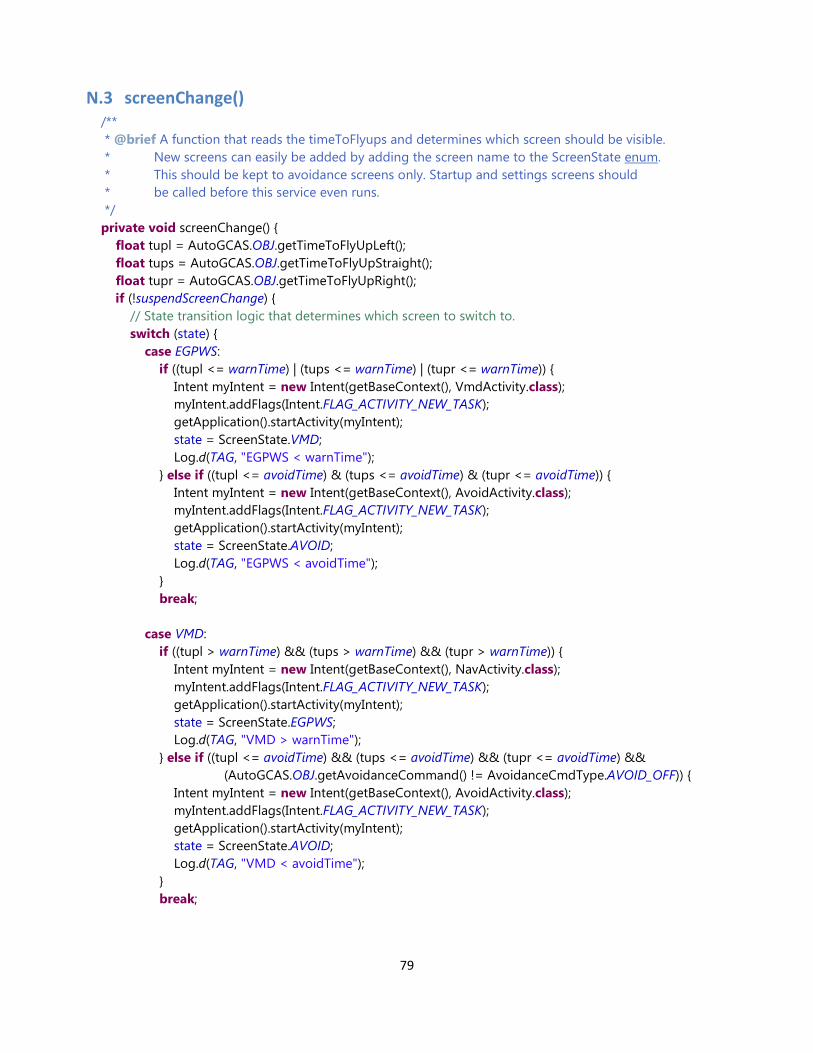
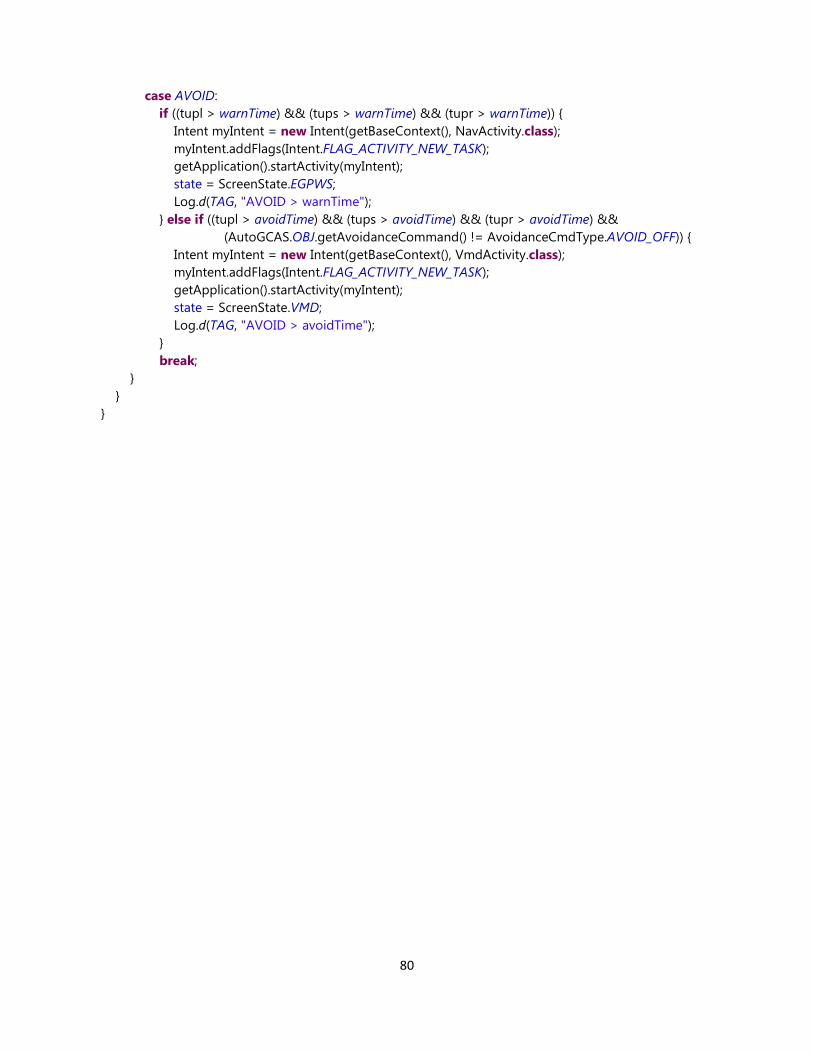
The new screenChange method gets called within AgcasTask each time it computes a frame. It uses the three time to flyup variables to determine which screen should be visible at any given time. It compares them with warnTime, which the pilot can change in the preferences, and avoidTime, which is always equal to zero. If the time to flyups are all greater than warnTime, then the Navigation display is shown. If one or more of the time to flyups is less than warn time, but at least one is greater than avoid time, then the VMD display is shown. When all time to flyups are less than avoid time, the Avoid display is shown. We created an enum called ScreenState so the algorithm can keep track of which screen is currently visible. The method is set up as a state machine so that the transition logic can be kept to a minimum. New screens can be added by creating a new value in ScreenState.
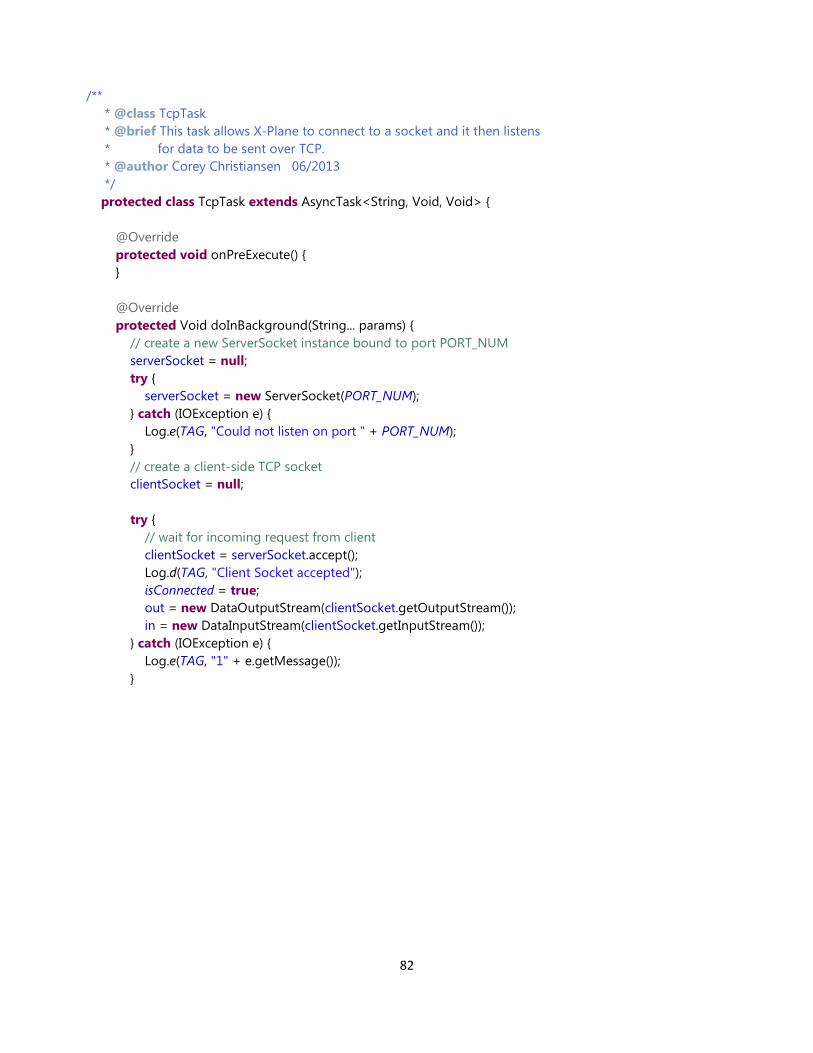
10.3.2 XplaneSocketService.java XplaneSocketService was based on SocketService from the original app. SocketService was an IntentService type service, which is designed to run through its code and terminate itself. This was causing problems because it used a while loop to listen to the network for X-Plane data, and you cannot stop it externally. To fix this we changed it to be a regular service. Services run on the UI thread by default, so an AsyncTask was created that handled the blocking TCP/IP connection.
28
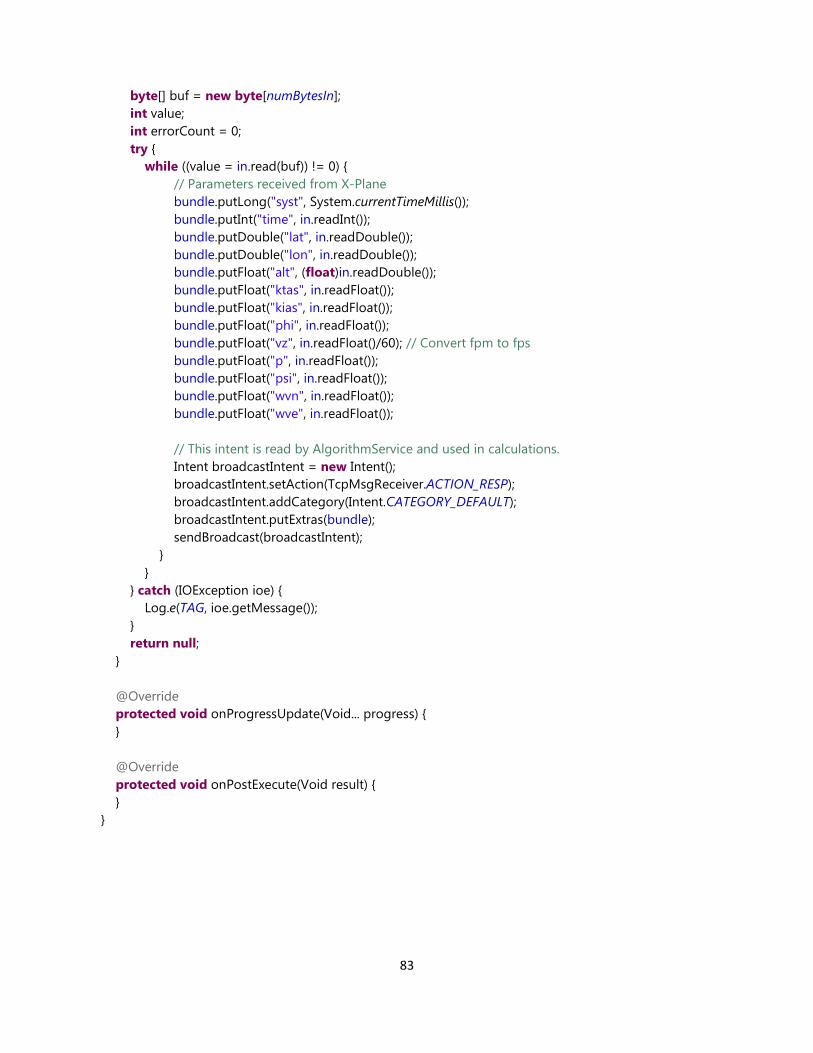
The majority of the code that reads the data and broadcasts it to AlgorithmService stayed the same. Many of the variables that were used in the logger were specific to the Piccolo system. Any variable that was not sent by X-Plane was given a default value of 0. We could not delete these extraneous variables because the logger and the tool that parses the flyup data depended on having these variables. A few variables were meant to be sent from the ground station, such as “multi”, “valid”, and “vuncert”. These had to be hardcoded because we were not able to send these parameters to the phone while it was running. In order for the algorithm to run, “multi” and “valid” must be set to 1. “uiModeReq” must continuously be set to ON in order to get the algorithm out of IDLE state. This causes it to switch from IDLE to ON as soon as the local map is finished loading.
11 Test Plan The algorithm will be tested using the X-Plane flight simulator software for personal computers, an engineering tool used by professionals to provide an accurate model of how real as well as experimental aircraft will fly. X-plane retains realistic flight characteristics for a myriad of aircraft; however, for testing we will be focusing primarily on the flight performance of the Cessna 172 Skyhawk, the most produced light aircraft in history.
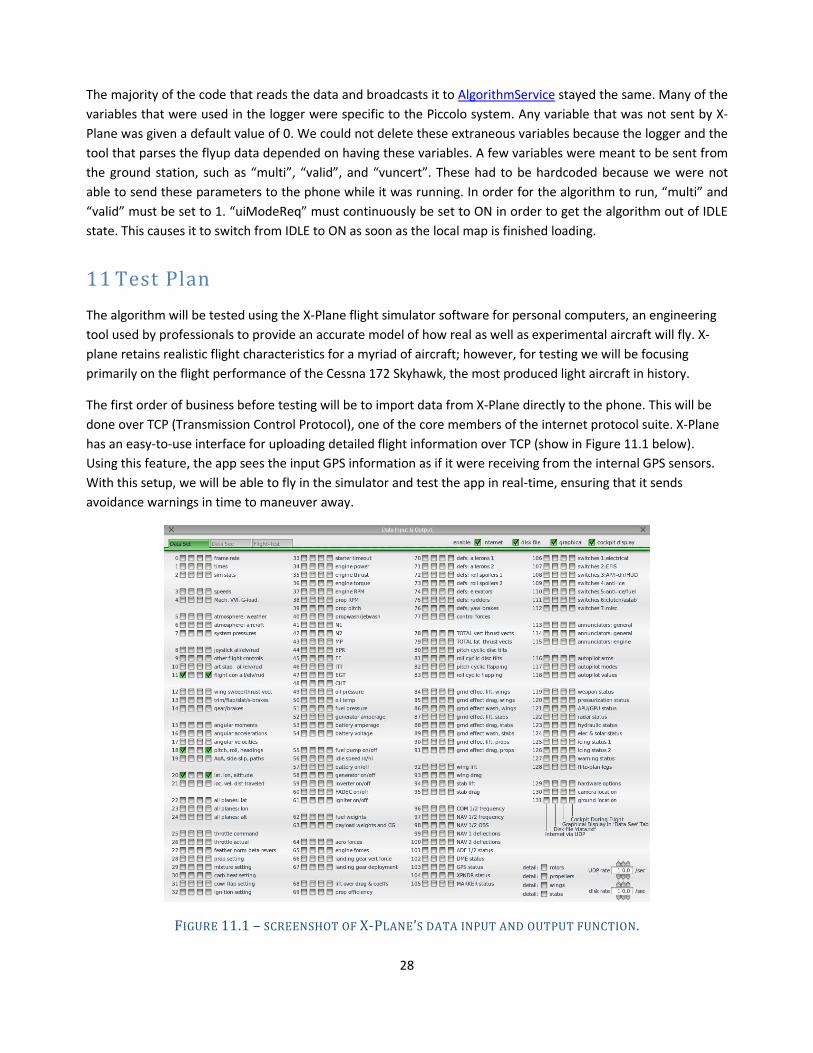
The first order of business before testing will be to import data from X-Plane directly to the phone. This will be done over TCP (Transmission Control Protocol), one of the core members of the internet protocol suite. X-Plane has an easy-to-use interface for uploading detailed flight information over TCP (show in Figure 11.1 below). Using this feature, the app sees the input GPS information as if it were receiving from the internal GPS sensors. With this setup, we will be able to fly in the simulator and test the app in real-time, ensuring that it sends avoidance warnings in time to maneuver away.
FIGURE 11.1 – SCREENSHOT OF X-PLANE’S DATA INPUT AND OUTPUT FUNCTION.
29
Testing will consist of three main phases: validation of X-Plane and Java communication, terrain validation and avoidance maneuver consistency, and simulated controlled flight into terrain situations.
For the first phase X-Plane and Java communication will be tested by simply running X-Plane while the phone algorithm is receiving data from it. For an arbitrary period of time, Java will periodically write data to a text file for each run. All data received by the Java program will be collected and exported to an excel spreadsheet. This will let us know the flight parameters when the app receives a flyup warning.
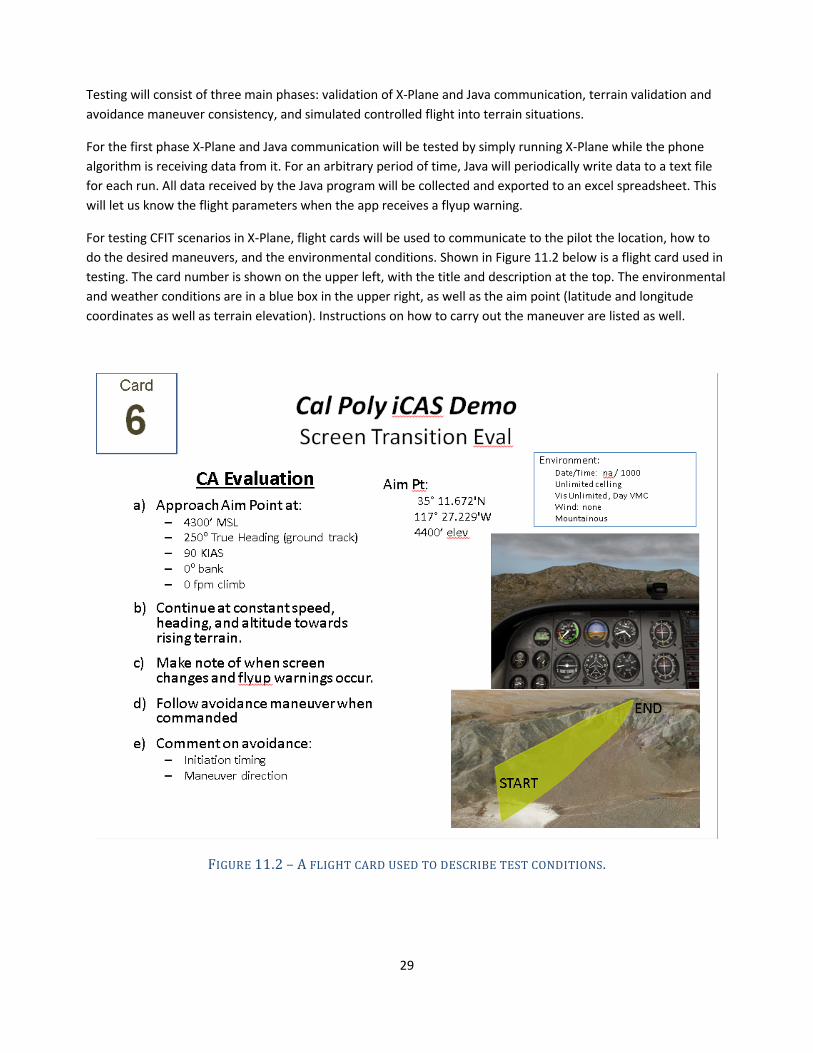
For testing CFIT scenarios in X-Plane, flight cards will be used to communicate to the pilot the location, how to do the desired maneuvers, and the environmental conditions. Shown in Figure 11.2 below is a flight card used in testing. The card number is shown on the upper left, with the title and description at the top. The environmental and weather conditions are in a blue box in the upper right, as well as the aim point (latitude and longitude coordinates as well as terrain elevation). Instructions on how to carry out the maneuver are listed as well.
FIGURE 11.2 – A FLIGHT CARD USED TO DESCRIBE TEST CONDITIONS.
30
12 Design Verification & Test Procedure Phone: Motorola Droid X2 running Android Version 2.3.3 Flight Simulator Software: X-Plane Version 10.21 (64-bit Windows install) Integrated Development Environment: Eclipse Version 3.8
12.1 Installing and running the app To test the iCAS graphical interface and verify that screen changes were occurring at the appropriate times, the app can be run as if in flight, with flight data being sent from the X-Plane flight simulator software to the app. The version of X-Plane being used is 10.21 in a 64-bit install. For more information on the specific data being sent from X-Plane to the phone, refer to the ICD attached in Appendix C.
Before attempting to run the phone with X-Plane input, the TCP interface plugin must first be installed. For more information on how to install the python plugin, refer to the directions in Appendix E.
Once all of the setup procedures have been completed, the following directions detail how to run through a test run using our default values. The app is first loaded onto an Android phone. The following files should be in the root folder of the phone’s SD card: N12345.xml, N12345-WeightBalance.csv, runways.csv, and the terrain map file. N12345.xml contains the aircraft specific parameters; N12345-WeightBalance.csv contains the weights that were entered in the third party weight and balance app; and runways.csv contains a list of latitude/longitude pairs for each end of a few of the runways around Edwards Air Force Base. These files can be found in the ‘Downloads’ section of the online repository. Once this is completed, open the app and set the map name and tail number (N12345). These should be set on the settings screen. Back on the startup screen, press ‘Start’ to create the socket that X-Plane will communicate with. You can also press calibrate to go to the Navigation display. Once the app is started, X-Plane can be opened and a situation loaded. On the top right of the toolbar is text that allows you to see the map loading progress. When the progress reaches 100% you are ready to fly around and trigger flyups.
Data of the aircraft during flight is recorded into a CSV file named with the date and time that the app was started. This prevents duplicate filenames and accidental erasure. This file contains system time, latitude, longitude, altitude, both true and indicated airspeed, bank angle, climb rate, roll rate, and heading all in comma separated values. In addition, this file contains the time to flyup for straight, left, and right trajectories.
The flight path data can be mapped in Google Earth by taking the longitude, latitude, and altitude values of the flyup in question in excel and saving this as a CSV file. This CSV file can then be opened with notepad (or any similar text editing program), and the location data copy and pasted into a KML file that maps the path to Google Maps. A sample KML file can be found in Appendix F.
Following describes the flight cards used and the results of the tests performed. The tests were performed on our sponsor’s flight simulator at Dryden Flight Research Center at Edwards Air Force Base. Note that the number of the flight cards does not necessarily correlate to the order at which the tests were conducted at Dryden.
31
12.2 Flight Card 1
FIGURE 12.1 - FLIGHT CARD #1
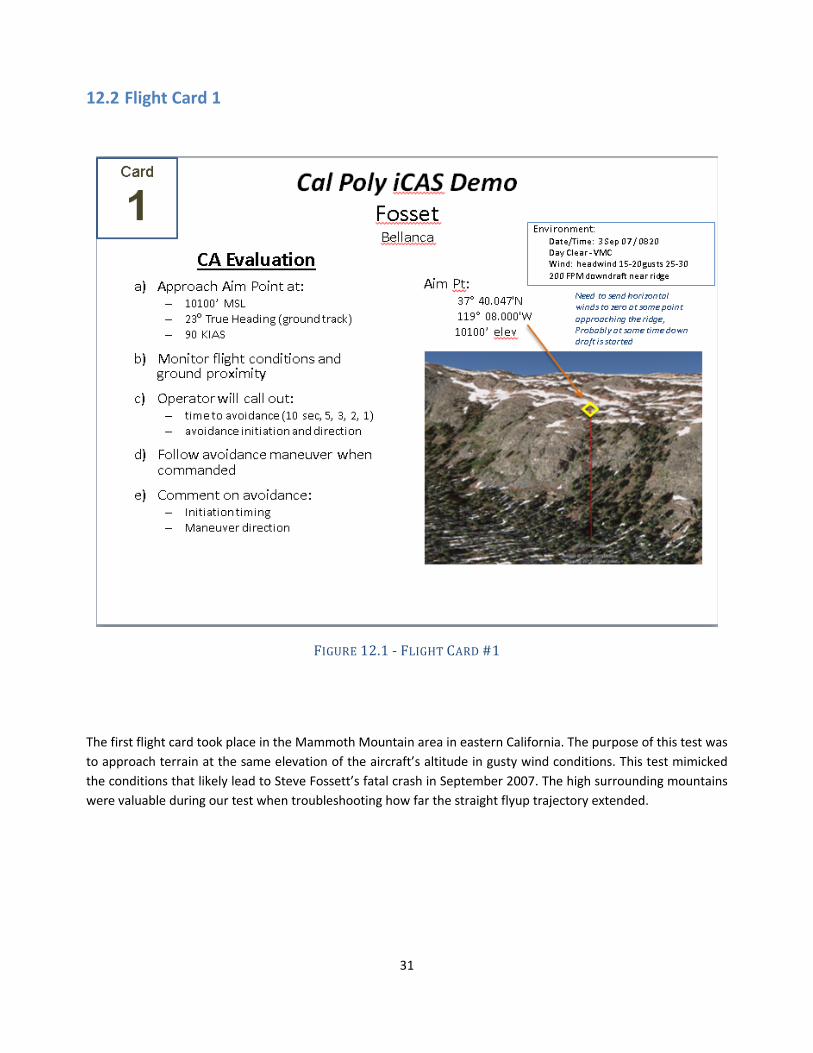
The first flight card took place in the Mammoth Mountain area in eastern California. The purpose of this test was to approach terrain at the same elevation of the aircraft’s altitude in gusty wind conditions. This test mimicked the conditions that likely lead to Steve Fossett’s fatal crash in September 2007. The high surrounding mountains were valuable during our test when troubleshooting how far the straight flyup trajectory extended.
32
12.3 Flight Card 2
FIGURE 12.2 - FLIGHT CARD #2
The second flight card took place in Alaska, under overcast weather and light rain which were similar conditions as the 2010 Alaska Turbo Otter crash that killed senator Ted Stevens and 4 others. This situation returned feedback on warnings triggered while flying towards a shallow rise of terrain. This would also return valuable feedback on the behavior of the straight trajectory.
33
12.4 Flight Card 3
FIGURE 12.3 - FLIGHT CARD #3
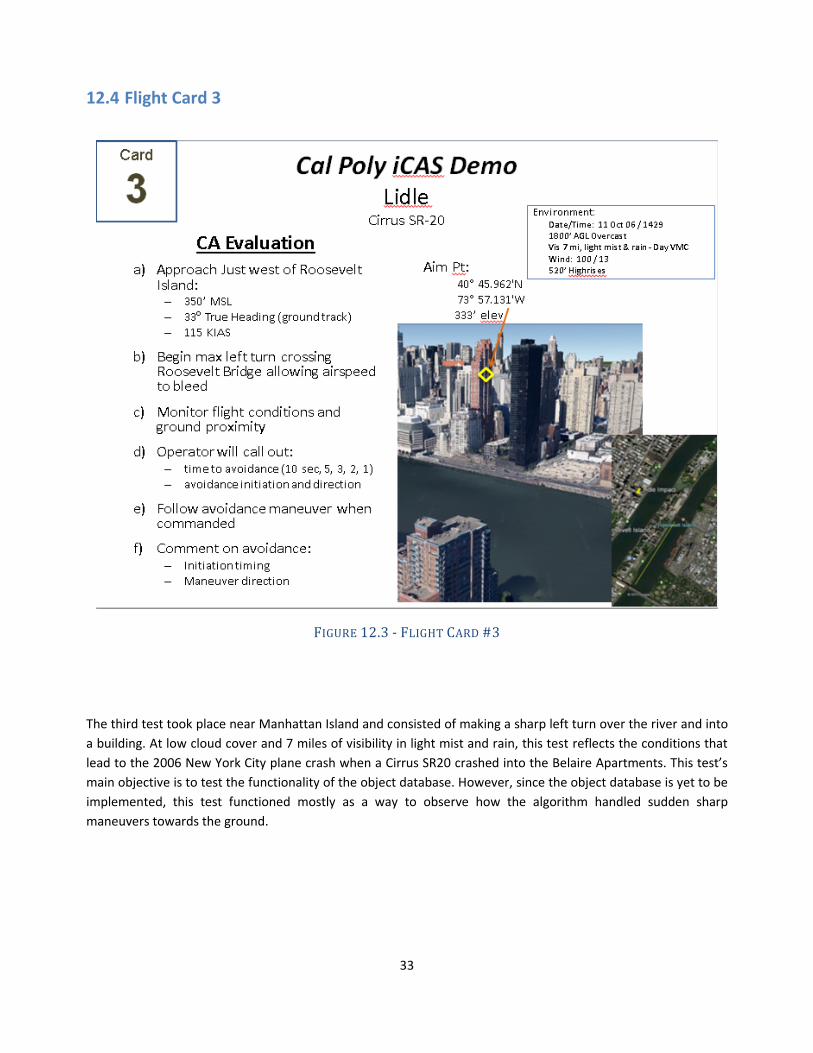
The third test took place near Manhattan Island and consisted of making a sharp left turn over the river and into a building. At low cloud cover and 7 miles of visibility in light mist and rain, this test reflects the conditions that lead to the 2006 New York City plane crash when a Cirrus SR20 crashed into the Belaire Apartments. This test’s main objective is to test the functionality of the object database. However, since the object database is yet to be implemented, this test functioned mostly as a way to observe how the algorithm handled sudden sharp maneuvers towards the ground.
34
12.5 Flight Card 4
FIGURE 12.4 - FLIGHT CARD #4
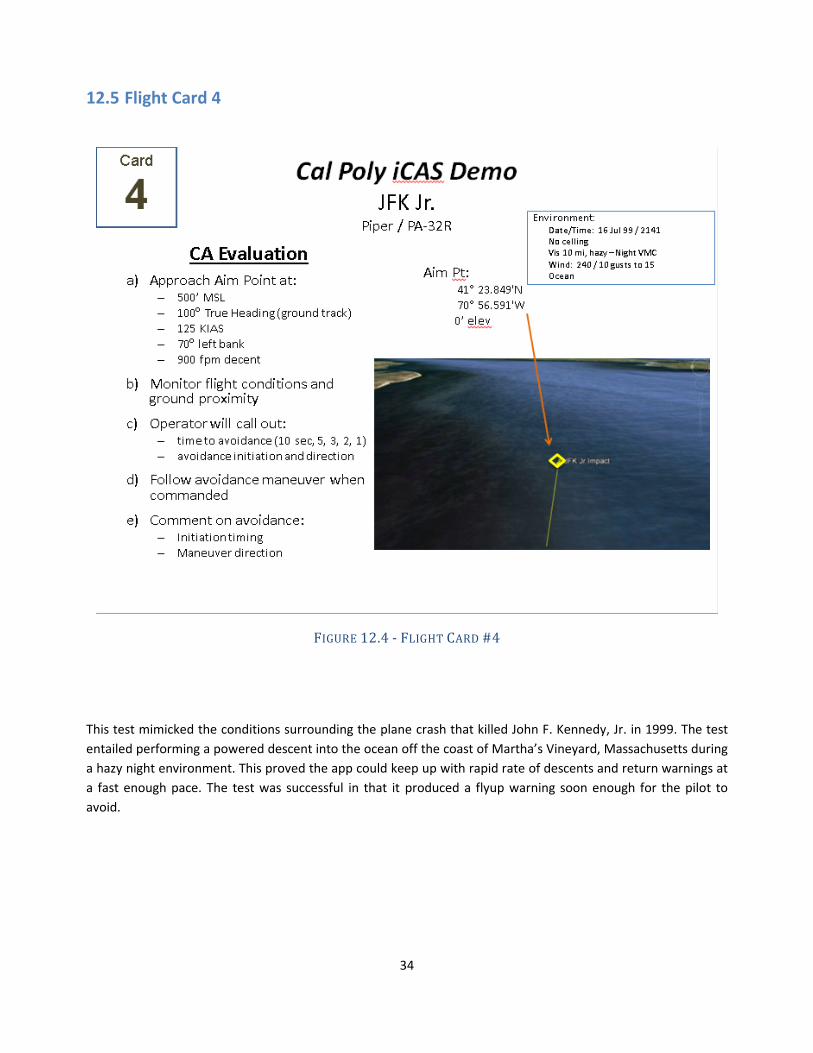
This test mimicked the conditions surrounding the plane crash that killed John F. Kennedy, Jr. in 1999. The test entailed performing a powered descent into the ocean off the coast of Martha’s Vineyard, Massachusetts during a hazy night environment. This proved the app could keep up with rapid rate of descents and return warnings at a fast enough pace. The test was successful in that it produced a flyup warning soon enough for the pilot to avoid.
35
12.6 Flight Card 5
FIGURE 12.5 - FLIGHT CARD #5
The fifth test revolved around circumstances when a Dryden employee crashed into a mountain range west of Las Vegas, Nevada in November of 2007 during low visibility at night. The aircraft starts the situation in a 400 ft / min climb towards the mountain range to the west. This tested the iCAS app’s straight trajectory and if it would still produce a warning despite being in a positive climb. The test resulted in a late warning, as the pilot didn’t have enough time to maneuver once he received the warning.
36
12.7 Flight Card 6
FIGURE 12.6 - FLIGHT CARD #6
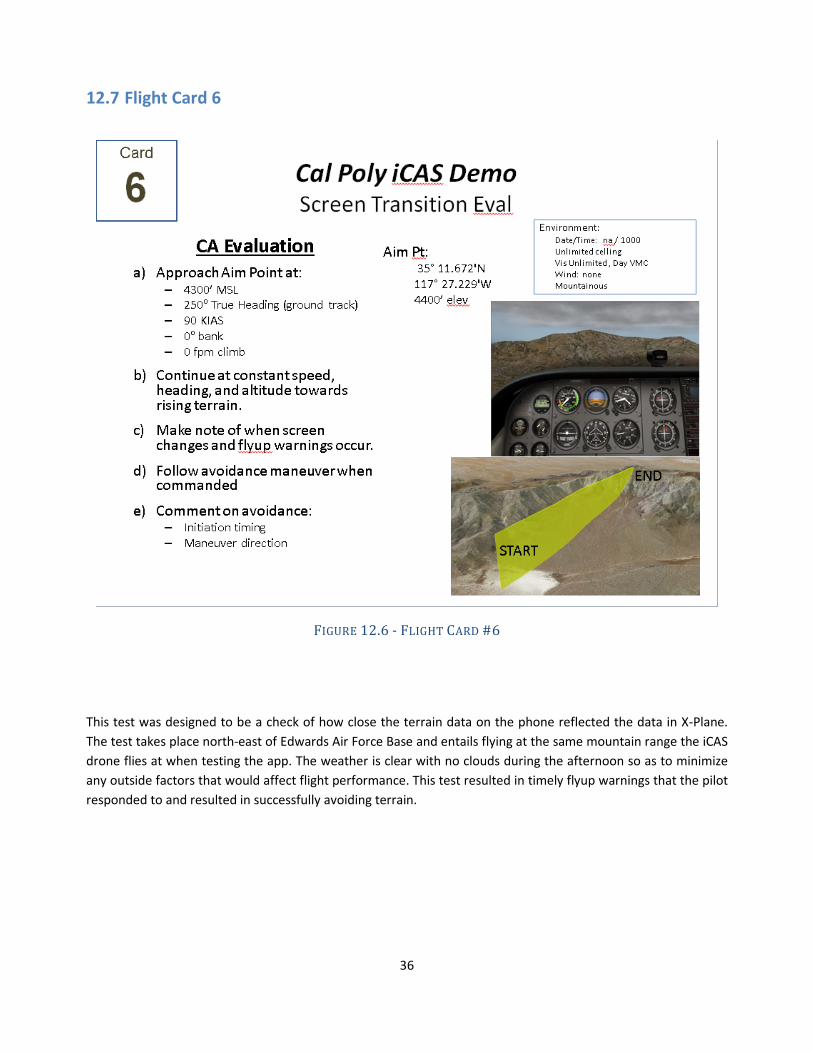
This test was designed to be a check of how close the terrain data on the phone reflected the data in X-Plane. The test takes place north-east of Edwards Air Force Base and entails flying at the same mountain range the iCAS drone flies at when testing the app. The weather is clear with no clouds during the afternoon so as to minimize any outside factors that would affect flight performance. This test resulted in timely flyup warnings that the pilot responded to and resulted in successfully avoiding terrain.
37
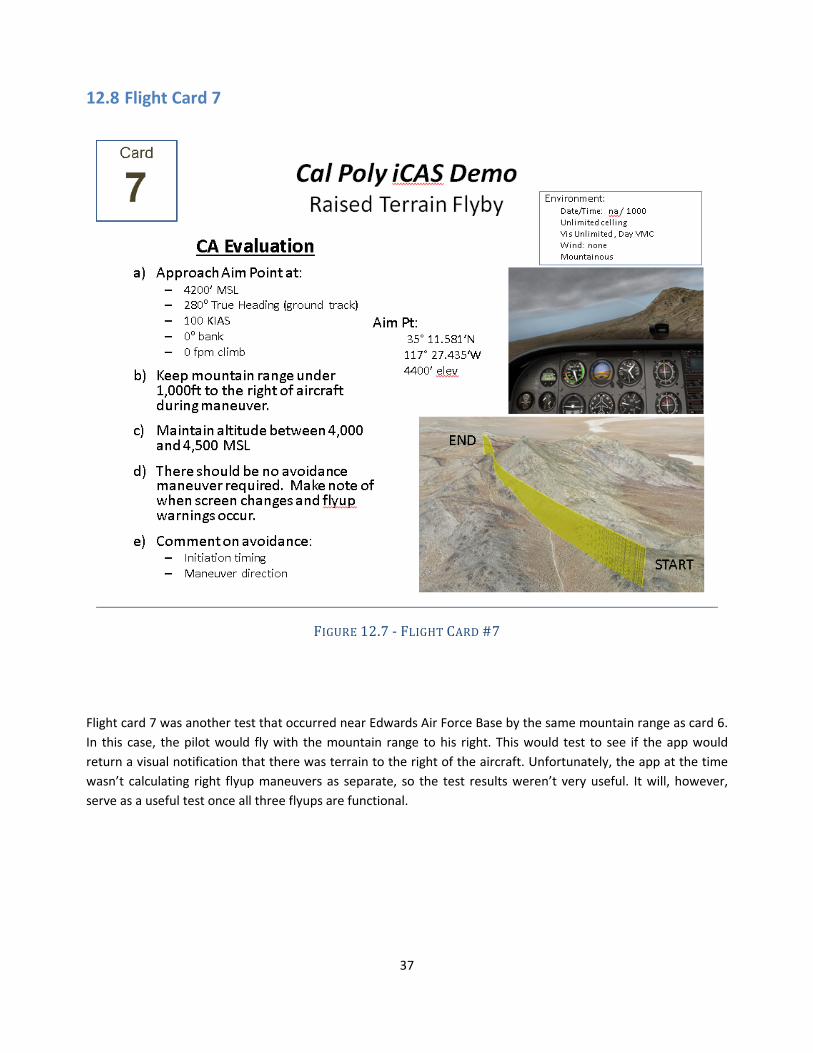
12.8 Flight Card 7
FIGURE 12.7 - FLIGHT CARD #7
Flight card 7 was another test that occurred near Edwards Air Force Base by the same mountain range as card 6. In this case, the pilot would fly with the mountain range to his right. This would test to see if the app would return a visual notification that there was terrain to the right of the aircraft. Unfortunately, the app at the time wasn’t calculating right flyup maneuvers as separate, so the test results weren’t very useful. It will, however, serve as a useful test once all three flyups are functional.
38
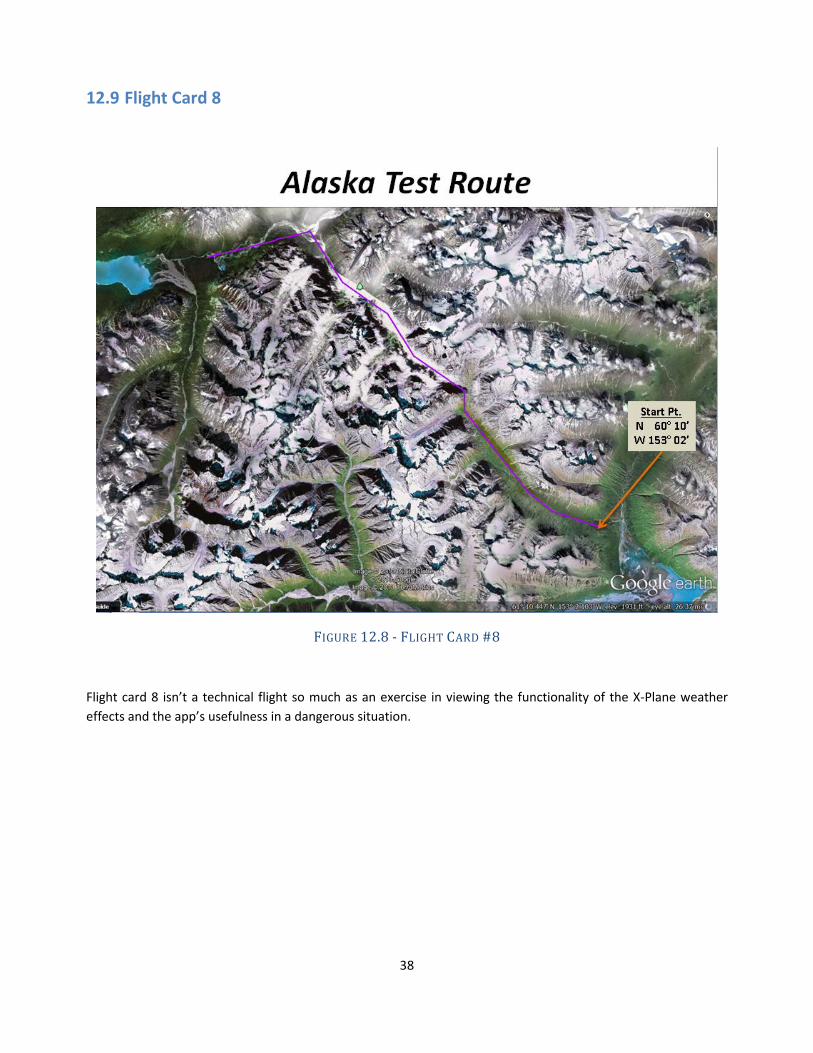
12.9 Flight Card 8
FIGURE 12.8 - FLIGHT CARD #8
Flight card 8 isn’t a technical flight so much as an exercise in viewing the functionality of the X-Plane weather effects and the app’s usefulness in a dangerous situation.
39
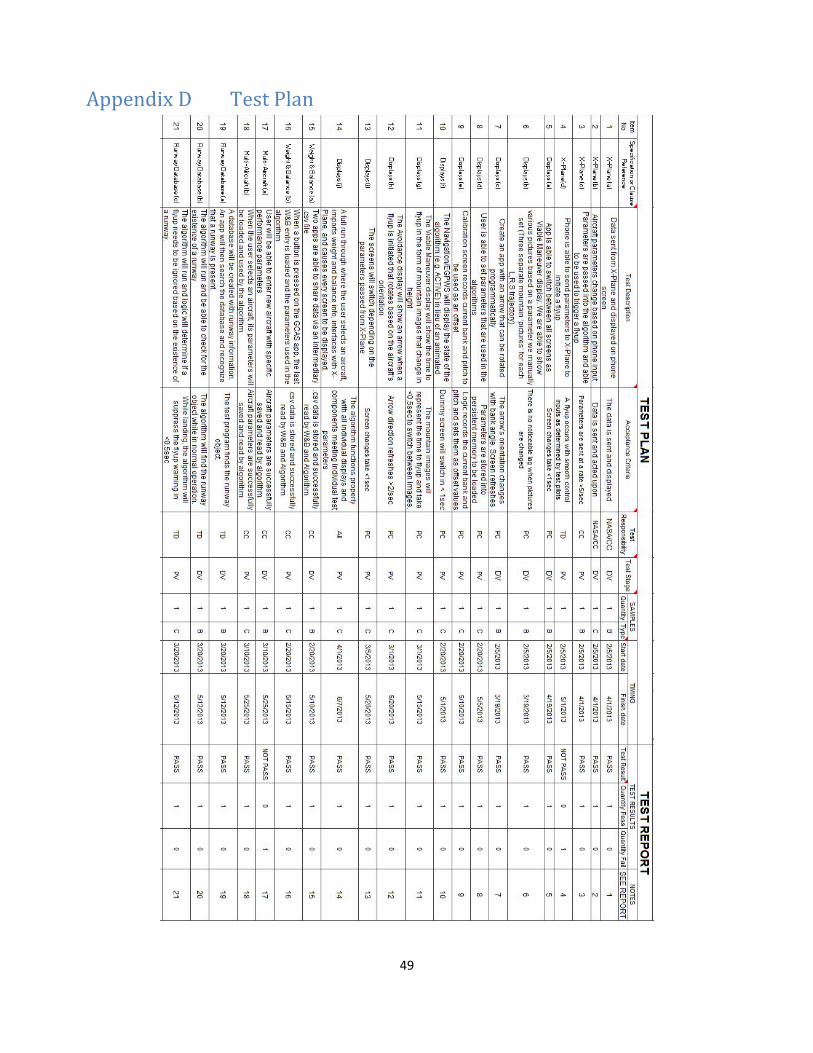
12.10 Test Results This section details the results of our test plan which can be seen in Appendix D. It is split up by category: X-Plane, Displays, Weight and Balance, and Runway Database. There is as much quantitative data as possible for a project of this type. Some things, like time between displays switching, cannot be tested using code in the program. This is because of the way Android renders the display. Visual clues and non-quantifiable things like jerkiness and responsiveness were used to determine the success of those tests. In the test plan DV stands for design verification, and PV stands for the final product verification.
12.10.1 Test Results: X-Plane 1. Data sent from X-Plane and displayed on phone screen: PASS
To first communicate between the phone and X-Plane, an app was developed that simply displayed aircraft information sent over TCP. This test was successful, and was a valuable first step to getting the X-Plane to phone interface working.
2. Aircraft parameters change based on phone input: PASS A main intended feature of the app was to change constants such as time buffers for flyup warnings in the app preferences. It was verified that the user could go in and change certain constants from the phone and have them updated in the algorithm.
3. Parameters are passed into the algorithm and able to be used to trigger a flyup: PASS Once the phone was able to receive data from X-Plane, the next step required the iCAS app taking this data and using it as algorithm inputs. To test this, the app was run with an X-Plane CFIT situation. If a warning was triggered before the aircraft collided with terrain, then the app would be confirmed to be receiving data from X-Plane. The app was able to receive data at a rate of 5 per second, which meant it passed this test.
4. Phone is able to send parameters to X-Plane to initiate a flyup: NOT PASS Initially, our test plan included incorporating an autopilot that would be triggered when a flyup occurred. We produced a working program that could send control inputs to X-Plane and successfully maneuver the aircraft in a straight, left, or right flyup. This program was coded in Java using the UDP protocol which is also supported by X-Plane. Unfortunately, the plugin received from NASA for phone to X-Plane communication was a Python plugin and used a different method of sending and receiving data. The plugin would have needed to be changed to allow for inputs to be sent from the phone. Due to a lack of both time and experience with Python, an auto pilot was not incorporated in the final version.
12.10.2 Test Results: Displays 5. App is able to switch between all screens as required: PASS
A significant portion of our app development revolved around avoidance screen changes happening at the right time. Screen changes were triggered by the time to flyup variable going below certain values. Our test plan stated that the screen changes should take less than one second. This is difficult to measure due to the way Android renders the displays. We visually measured the screen transitions to see that they took less than one second. More importantly, we watched to see if there were any visible hiccups while the screens changed.
40
6. Viable Maneuver Display functions properly: PASS The VMD consists of 3 vertical LinearLayouts that rose and fell in relation to how close the aircraft is to a flyup in each direction. We decided to use this method instead of pictures because it is a less intensive process, allowing for smoother animations. The bars may seem to jump around sporadically, but they only act on information they get from the algorithm. When the time to flyup times change smoothly, so do the bars.
7. Create an app with an arrow that can be rotated programmatically: PASS The avoid screen consisted of an arrow that points in the direction the pilot should fly in order to avoid the terrain. It was desired that this arrow change orientation in real-time as a result of the aircraft’s current orientation, which was received from X-Plane as the roll angle variable. It was verified in testing that the screen refreshes every 200ms, the rate at which X-Plane sent data to the phone during testing.
8. User is able to set parameters that are used in the algorithm: PASS A main feature of the app was to change constants such as time buffers for flyup warnings in the app preferences. It was verified that the user could go in and change certain constants from the phone and have them updated in the algorithm.
9. Calibration screen records current bank and pitch to be used as an offset: PASS The calibration screen zeros out the sensors when the app is first started. This is intended for use on a runway before flight to give the x-, y-, and z-axes zero values to compensate for the phone not being completely level with the plane once mounted. The calibration screen is currently in place and ready for code to be dropped in once it is developed for phone sensors. Currently there is no need for an orientation screen for use with X-Plane.
10. The Navigation/EGPWS will display the state of the algorithm: PASS Although this test was intended to display the current state of the algorithm, we decided that it would be more useful to show the map loading percentage. There is no ground station like there was for SUAV testing, so our algorithm state is always ON. When the app is first started the state is IDLE, and when the map is finished loading it changes to ON. If something goes wrong with the map loading process, the app will remain in IDLE mode. Because the map takes a couple minutes to load, this would result in uncertainty of what was going on inside the algorithm. To fix this problem, we put a map loading text in the top left of the toolbar. This will allow the user to see the progress of the map. Any problems will be immediately known as the percentage will stay at zero.
11. The Viable Maneuver Display graphically shows the time to flyup: PASS
The Viable Maneuver Display was set to use the time to flyup variable from the avoidance algorithm as an input after the animation was tested to be operational with a dummy variable input. Time to flyup numerical values for left, right, and straight flyups were output in Eclipse’s debug display as the app was running. The movement of the vertical bars was observed in relation to the time to flyup values, and found to relate exactly with them.
41
12. The Avoidance display will show an arrow when a flyup is initiated that rotates based on the aircraft’s orientation: PASS Once the app was receiving data from X-Plane, the roll value was used to calculate the orientation of the arrow instead of being determined by a dummy value. A 200ms period was verified in testing with the algorithm’s value as well as functionality with left, right, and straight flyup maneuvers.
13. The screens will switch depending on the parameters passed from X-Plane: PASS AlgorithmService processes the information from X-Plane and determines the time to flyup for each direction. After it calculates these numbers, it
14. A full run through where the user selects an aircraft, imports weight and balance info, interfaces with X-Plane, and causes every screen to be displayed: PASS Once the app was receiving data from X-Plane, the roll value was used to calculate the orientation of the arrow instead of being determined by a dummy value. A 200ms period was verified in testing with the algorithm’s value as well as functionality with left, right, and straight flyup maneuvers.
12.10.3 Test Results: Weight and Balance 15. Two apps are able to share data via an intermediary CSV file: PASS
An example weight and balance app was created that could write a CSV file to the phone’s SD card. A second app was made that would read a CSV file with the same parameters. The second app was able to successfully read the data. Each app must use the same filename and the same order for the data for this method to work.
16. When a button is pressed on the GCAS app, the last weight and balance entry is loaded, and the parameters are used in the algorithm: PASS The code that reads the CSV file was placed into the collision avoidance app. The app was able to read in the weights from the CSV file. The algorithm currently does not take aircraft weights into account, so this was as far as we could go; however, the data is ready to be used in the algorithm when required.
12.10.4 Test Results: Multi-Aircraft 17. User will be able to enter new aircraft with specific performance parameters: NOT PASS
The ability for the user to enter parameters for a new aircraft was not implemented in the final version of the app. We had trouble finding a method to create and delete aircraft on the fly. ListViews and SQLite seemed to be the way to go for storing the information, but we never got a working implementation. A more experienced app developer should be able to complete this portion of the app with little difficulty. A test XML file was placed on the SD card to simulate loading the parameters instead.
18. When the user selects an aircraft, its parameters will be loaded and used by the algorithm: PASS A method was added that would read a sample XML file located on the SD card. This file contains parameters specific to the aircraft, and the algorithm is updated with the new numbers.
42
12.10.5 Test Results: Runway Database 19. A database will be created with runway information. An app will then search the database and recognize
that a runway is present: PASS A test program was created that could manipulate runway data. Latitudes and longitudes for various runways were added to a CSV file on the phone’s SD card. The program was able to read in the coordinates and create an ArrayList of coordinates. The program could then check this array to see if any runways are present.
20. The algorithm will run and be able to check for the existence of a runway: PASS Latitudes and longitudes for various runways were added to a CSV file on the phone’s SD card. The algorithm was able to read in the coordinates and create an ArrayList of coordinates. The algorithm then checks this array to see if any runways are present and calculates the distances between the aircraft and each runway.
21. The algorithm will run and logic will determine if a flyup needs to be ignored based on the existence of a runway: PASS A sample runway database, stored in a CSV file on the SD card, was stored in memory. When a flyup was triggered, the app calculated the distance between the aircraft’s current position and the position of each runway. If any of the runways were closer than some minimum distance then the app suppressed the flyup. Calculating the distances of 15 runways (30 calculations, one for each end) took approximately 8ms. This is within the acceptable range for our test, but steps must be taken to make sure that the app does not try to calculate thousands of runways at once.
43
13 Project Conclusions & Next Steps
13.1 Conclusions While we wish we were able to add more feature, the application is fully functional as a test platform for NASA’s ground collision avoidance software. The user can import aircraft parameters specific to their aircraft, interface with a 3rd party weight and balance app, and change settings such as reaction time and terrain clearance buffer. It cycles through intuitive screens that direct the pilot in safely avoiding the terrain below. The tests conducted in NASA’s flight simulator reaffirmed both the functionality of the graphical user interface and the communication between X-Plane and the GCAS application. At this point, the algorithm can be tested for a variety aircraft and avoidance situations. We are happy with the way the app functions, but there are a number of improvements that we feel would greatly add to the user experience. These improvements are listed in the following section.
13.2 Future Work The next steps in the progression of the user interface should focus primarily on developing the functionality behind the EGPWS display, generating a common preferences bar for the application screens, and adding image translation to the avoidance arrow, thus allowing the user to better visualize the progression throughout the avoidance maneuver. While the essential employability behind the GCAS interface has been developed, minor aesthetic adjustments to the existing displays should still be implemented.
13.2.1 Interface Improvements The toolbar layout should remain relatively constant throughout the screens. To prevent having to rewrite the layout code multiple times for each change, a single toolbar XML layout file can be created. Then in each layout file that uses a toolbar you would add an <include /> to add the toolbar code. A similar method can be used for the activity part of the toolbar. You can create a class called ToolbarActivity that extends Activity. Add in all of the methods, dialogs, and onClick’s using the toolbar XML id names. Now any new activity that uses the toolbar can extend ToolbarActivity instead of Activity. This allows you to only write the code once and still gives you the ability to override the parent methods if required. You should also be able to hide elements of the toolbar for the avoid screen by setting the setVisibility() method of each element to invisible.
As mentioned in the testing section, the ability for the user to see which aircraft are available, add and delete tail numbers, and choose which aircraft to fly was not implemented in this project. We used CSV and XML files on the SD card to store data. This is fine if you are editing the files externally but is inelegant when trying to iterate through random files on the SD card to determine which is an aircraft file. After some research it seems like an SQLite database would be the easiest way to store the aircraft information. This allows you to add, delete, and sort aircraft. Each application has the ability to create a database that remains private to the app.
When the ‘Start’ button is pressed on the startup screen a lot of things need to happen before the calibration screen can be displayed. All of the services need to be created and the files need to be read in for the runways and aircraft parameters. This takes a noticeable amount of time, and the UI looks frozen for a split second. All of this startup code should be placed in an AsyncTask and a progress bar should be displayed so the user knows that work is happening. We attempted to implement this but we ran into issues with the lifecycle of the AsyncTask. The app still functions fine, but it would make the user experience better to get this section of code working.
44
The last interface improvement would be the acknowledge button logic. As of now the button switches the display from the VMD display to the navigation display. The AlgorithmService uses a state machine to determine when to switch screens, so the algorithm thinks we are still on the VMD display. This behavior means that we will not get another screen change until the algorithm switches to the avoid screen or it switches to the navigation screen and then back to the VMD screen again. There are only one case where this behavior needs to be improved. If the acknowledge button is pressed while one trajectory is unavailable, then the navigation screen should be displayed until a second trajectory becomes unavailable too. This logic was not added to this project as it was not necessary to test the main logic.
13.2.2 Algorithm Improvements We could not figure out why the algorithm was not calculating the left and right flyup trajectories. Every frame showed that the time to flyup was the same for each direction. This problem should be tackled first because it affects the testing of the entire app. We were in contact with NASA about fixing this issue but it was never solved.
While testing the runway database we thought of a better solution to handle the distance calculations. We used airport information from X-Plane. The airport file gives the coordinates of the start and end points for the runway. We added in each coordinate point as a runway because you don’t know which direction you will be landing. You also don’t want to set the minimum distance to suppress a flyup to be a very large number. The downside to this is that twice the number of calculations needs to be run. One way to limit this is to change the structure of the way runways are stored. In the runways.csv file you can store two sets of coordinates on each line (one for each end of the runway). The code that reads in the runways in StartupActivity should be changed accordingly. Next, the checkRunwayProximity method should iterate through the runways as normal, but with one change. It should calculate the distance to the first coordinate for the runway and compare it to some value. This value should be the distance of the longest runway you would expect to encounter. If the first point is farther away than this distance, then you don’t need to bother checking the other end of that runway. If it is within this distance then check the second point. This will half the time it takes to iterate through the runways as only a few runways will ever be within that distance at any one time.
The last interface improvement is the TCP connection between X-Plane and the phone. Right now the app must be started before X-Plane can be opened. X-Plane takes a long time to load and is often the limiting factor in the number of tests that can be performed. If there was a way to simply stop the connection to the phone while X-Plane was running and then restart the connection once the app was restarted, testing would take much less time.
45
Gantt Chart Appendix A
46
House of Quality Appendix B
47
ICD Appendix C
C.1 Variables used in app
48
C.2 Unused variables
49
Test Plan Appendix D
50
Instructions for Installing Python TCP X-Plane Plugin. Appendix EInstallation instructions below are courtesy of Scott Burrows.
HOW TO INSTALL: 1. Download the Python 2.7.3 Windows MSI installer and install it (http://www.python.org/download/releases/2.7.3/) – be sure to get the one that supports your platform (x86, x86-64, etc.) 2. Download Sandy Barbour’s Python Interface for X-Plane here: (http://www.xpluginsdk.org/python_interface_latest_downloads.htm). Again, be sure to select the 64 bit version if using any Windows x64 edition – the link for this one is at the very bottom of the page. 3. Unzip the file PythonInterface.zip and place the “PythonInterface” folder in the \X-Plane10\Resources\Plugins folder. 4. Go into the PythonInterface\32\ folder and copy the .xpl files to the PythonInterface root folder. I couldn’t get the 64-bit .xpl files to work. 5. Make a new folder called “PythonScripts” in the X-Plane10\Resources\Plugins folder 6. Place the attached python script (PI_XTCPinterface.py) in \X-Plane10\Resources\Plugins\PythonScripts\ RUNNING THE PLUGIN: 1. Start your Android app (do NOT start X-Plane yet) 2. Edit the IP address and port in PI_XTCPinterface.py (I’m adding a GUI widget that will allow you to set it from within X-Plane) and save it 3. On the Android app, select the “Begin Receiving Data” button (this is critical before launching X-Plane) 4. Launch X-Plane 10, 32-bit (at this point, I’ve had problems getting the Python Interface to work properly with the 64-bit version of X-Plane. If using X-Plane v9, it’s all 32-bit anyway) WHAT YOU SHOULD SEE: - When X-Plane starts, you’ll initially see a bunch of numbers populate the EditText fields in the app display. These are test values. If you do not see these, there is likely a network communication problem. - When X-Plane finishes loading and situates your airplane on a runway somewhere, you’ll begin to see the app update the text fields at a rate of 5 Hz (0.2 second). It’ll be a bit Jumpy because it isn’t perfect, but it works. NOTES: - The Python script is still isn’t smart enough to tell when the phone app stops receiving data, so when you tap “stop receiving data” to close the phone’s TCP port during an X-Plane session, the Python Script returns an error in its log that it could not communicate. I’ve tried restarting the plugin from within X-Plane, but to no avail (at least not yet). So the app must be running (as of now) for the duration of your X-Plane session. I’m currently working on a fix for this at the moment. - The Python Script error log is here: \X-Plane10\Resources\Plugins\PythonScripts\XTCPinterface.txt – this is where any sort of communication error messages will appear. The most common types are: “could not connect because the host actively refused it,” or “could not connect because the server didn’t receive a response from the host.” The “actively refused it” message is likely due to forgetting to press the “begin receiving data” before starting X-Plane, and the latter message is most likely due to a network problem. - The Python Interface log file also has important messages regarding whether or not the plugin is working properly. If you see any messages other than “PI_XTPCinterface successfully loaded” then there might be a problem with the plugin. I debugged it to the point where it loads successfully, but if you need to make changes to it and it doesn’t load for some reason, take a look at this file. - I changed the port in your app from ‘1234’ to ‘4353’ but I don’t think it should make a difference. For some reason; however, port 1234 wouldn’t work for me.
- When I was testing this, I had notepad++ to edit the script on the left display, and X-Plane in the right display. I also had the main task manager running in the left display in case I needed to shut down X-Plane when it got to the quick-flight screen (the one that allows you to select an aircraft, location, weather, and time of day). The main reason for shutting down X-Plane when it gets to this point is that it takes forever to finish loading after you select an airplane, location, weather, and time of day (it is generally not a good idea to stop X-Plane while it is actively loading). If I had gotten to this screen and realized that either the plugin wasn’t working (i.e., I didn’t see the first set of static numbers in the app) or I had forgotten to press the “begin receiving data” button in the app, I could close X-Plane from here (I run X-Plane in full screen, so I don’t see the ‘X’ for closing the app in the window). - In the phone app, sometimes “closing server” will appear after you tap the “begin receiving data” button, and then you have to tap “begin receiving data” again. Before you start X-Plane, be sure the phone app is running and is actively listening. - To change the data update rate in the app, go to the end of the Python Script, where it says “return 0.2” and change it to whatever you need it to be. This is the number of seconds that the script waits before it sends out data again (should be in the FlightLoopCallback definition). HARDWARE USED: - Dell XPS 8500 PC (Windows 8 Pro x64) - Linksys WRT310N home-based WiFi router, encrypted with WPA2-PSK (no other fancy settings – just plain ol’ encrypted WiFi) (Any B/G/N 2.4/5.0 GHz router should work, but you may have to disable any software firewalls, or at least set firewall rules) Also, there are a few altitude discrepancies: 1. X-Plane does not record WGS84 altitudes – only MSL, AGL and indicated (instrument readout) altitudes are recorded. 2. The altitude I’ve passed to the phone is the corrected MSL altitude adjusted for changes in barometric pressure. 3. The indicated altitude on the aircraft instruments may be different from what is in the phone display. In fact, they will always be different unless you set the correct barometric altimeter setting on the altimeter – for example, if the altimeter is set to display the altitude at pressure of 29.92 inHg, but the actual air pressure Is, say, 30.14 inches, then the indicated altitude and the altitude displayed on the phone will disagree. - I passed in the true heading, not the magnetic heading (let me know which one you need) - Winds in X-Plane are given in direction and speed. I converted them to North and East speeds, but feel free to check the math. The X-Plane data reference is here (these are all the X-Plane variables): http://www.xsquawkbox.net/xpsdk/docs/DataRefs.html
<?xml version="1.0" encoding="UTF-8"?> <kml xmlns="http://www.opengis.net/kml/2.2"> <Document> <name>Flyup 2</name> <description>This path is the flyup performed in X-Plane.</description> <Style id="yellowLineGreenPoly"> <LineStyle> <color>7f00ffff</color> <width>4</width> </LineStyle> <PolyStyle> <color>7f00ff00</color> </PolyStyle> </Style> <Placemark> <name>Absolute Extruded</name> <description>Transparent green wall with yellow outlines</description> <styleUrl>#yellowLineGreenPoly</styleUrl> <LineString> <extrude>1</extrude> <tessellate>1</tessellate> <altitudeMode>absolute</altitudeMode> <coordinates> -117.45866,35.19108,188.1171498 -117.45865,35.19106,184.7493384 -117.45864,35.19103,181.5614931 -117.45864,35.19101,178.2509811 -117.45863,35.19098,175.0854441 -117.45848,35.18988,153.0251052 -117.45847,35.18983,155.1003939 -117.45847,35.18979,157.0062504 </coordinates> </LineString> </Placemark> </Document> </kml>
53
Sample XML File for Aircraft Parameters Appendix G
<?xml version="1.0" encoding="utf-8"?> <Aircraft tailNumber="N12345"> <model>Cirrus SR20</model> <!-- Climb rate information --> <crSeaLevel>1132</crSeaLevel> <!-- Climb rate at sea level (ft/min) --> <crAltLossCoeff>-0.057642857</crAltLossCoeff> <!-- The rate at which climb rate decreases due to an increase in altitude ((ft/min)/ft) --> <!-- Airspeed information --> <asSteadyState>110</asSteadyState> <!-- Typical operating speed at sea level (knots) --> <asClimbLossRate>2.5</asClimbLossRate> <!-- The rate that speed decreases during a flyup maneuver (knots) --> <!-- Roll rate information --> <rrSteadyState>52</rrSteadyState> <!-- Roll rate (deg/s) --> </Aircraft>
54
StartupActivity.java Appendix H
H.1 Lifecycle Methods /** * @class StartupActivity * @brief This is the first screen that the user sees when starting the app. * If the back button is pressed on any screen, the user will return here * first before exiting the app. * * @author Corey Christiansen 05/2013 */ public class StartupActivity extends Activity implements OnClickListener { private static final String TAG = "StartupActivity"; private Button startButton; private Button settingsButton; private Button weightBalanceButton; private Button stopServicesButton; private SharedPreferences prefs; private BufferedReader br; //private ProgressDialog dialog; @Override protected void onCreate(Bundle savedInstanceState) { super.onCreate(savedInstanceState); setContentView(R.layout.activity_startup); // Set layout items startButton = (Button)findViewById(R.id.startButton); startButton.setOnClickListener(this); settingsButton = (Button)findViewById(R.id.settingsButton); settingsButton.setOnClickListener(this); weightBalanceButton = (Button)findViewById(R.id.weightBalanceButton); weightBalanceButton.setOnClickListener(this); stopServicesButton = (Button)findViewById(R.id.stopServicesButton); stopServicesButton.setOnClickListener(this); // Get preferences prefs = PreferenceManager.getDefaultSharedPreferences(StartupActivity.this); } @Override public void onStart() { super.onStart(); if (isAlgorithmServiceRunning()) { startButton.setText("Resume"); } else { startButton.setText("Start"); } }
55
@Override public void onResume() { super.onResume(); } @Override public void onPause() { super.onPause(); } @Override public void onStop() { super.onStop(); finish(); } @Override public void onDestroy() { super.onDestroy(); }
@Override public void onBackPressed() { // If the user backs out of the app, assume they want it to end and stop all services. // If they press the home button, the services should continue running. // TODO add a dialog to make sure user wants to exit if (isAlgorithmServiceRunning()) { stopService(new Intent(this, AlgorithmService.class)); } if (isXplaneSocketServiceRunning()) { stopService(new Intent(this, XplaneSocketService.class)); } finish(); }
56
H.2 onClick() public void onClick(View v) { switch (v.getId()) { case R.id.startButton: /* TODO Do startup in a background thread. Starting the services takes a noticeable * amount of time and the app seems to freeze for a second if you don't. * Also show a progress dialog so user knows app isn't stuck. */ if (!isAlgorithmServiceRunning()) { // Get preference values and set them before continuing String mapName = prefs.getString("mapName", ""); String tailNumber = prefs.getString("tailNumber", ""); float pilotRxnTime = Float.parseFloat(prefs.getString("pilotRxnTime", "2")); float warnTime = Float.parseFloat(prefs.getString("warnTime", "20")); float tcb = Float.parseFloat(prefs.getString("tcb", "0")); // Check to make sure the files exist if (doesFileExist(mapName + ".cdtm")) { // Great! Do nothing. } else { Log.e(TAG, "Map does not exist on SD card"); Toast.makeText(getBaseContext(), "Map does not exist on SD card",
Toast.LENGTH_SHORT).show(); break; // Break out early, do not change screens because the algorithm won't work
anyway. } if (doesFileExist(tailNumber + ".xml")) { // Great! Do nothing. } else { Log.e(TAG, "Tail number does not exist on SD card"); Toast.makeText(getBaseContext(), "Tail number does not exist on SD card",
Toast.LENGTH_SHORT).show(); break; // Break out early, do not change screens because the algorithm won't work
anyway. }
57
// Read in runway data, if available String runwayFilename = "runways.csv"; if (doesFileExist(runwayFilename)) { List<Double[]> runways = new ArrayList<Double[]>(); try { String line = ""; Double[] coordinates = new Double[2]; br = new BufferedReader(new FileReader(new
File(Environment.getExternalStorageDirectory(), runwayFilename))); while ((line = br.readLine()) != null) { String[] split = line.split(","); coordinates[0] = Double.parseDouble(split[0]); coordinates[1] = Double.parseDouble(split[1]); runways.add(new Double[]{coordinates[0],coordinates[1]}); Log.d(TAG, "coordinates: " + coordinates[0] +" " + coordinates[1]); } AutoGCAS.OBJ.setRunways(runways); } catch (Exception e) { Log.e(TAG, "Error reading or parsing: " + e.toString()); } finally { if (br != null) { try { br.close(); } catch (IOException e) { Log.e(TAG, "Could not close reader: " + e.toString()); } } } } else { Log.e(TAG, runwayFilename + " does not exist."); } // Set other parameters Aircraft.setPilotRxnTime(pilotRxnTime); AlgorithmService.setWarnTime(warnTime); AutoGCAS.OBJ.setTerrainClearanceBuf(tcb); // Start the service startService(new Intent(StartupActivity.this, AlgorithmService.class)); } AlgorithmService.setSuspendScreenChange(false); Intent myIntent = new Intent(getBaseContext(), NavActivity.class); myIntent.addFlags(Intent.FLAG_ACTIVITY_NEW_TASK); getApplication().startActivity(myIntent); break;
58
case R.id.settingsButton: Intent settingsIntent = new Intent(getBaseContext(), PreferencesActivity.class); settingsIntent.addFlags(Intent.FLAG_ACTIVITY_NEW_TASK); getApplication().startActivity(settingsIntent); break; case R.id.weightBalanceButton: /* * This button reads the weight and balance csv file created by the weight and balance app * and stores the total weight into the app's shared preferences to be used later. Take note * of the naming scheme; each tail number will have its own unique file. It can be condensed * into a single file, but you'd have to parse the csv more carefully to keep track of the tail * numbers. */ String tailNumber = prefs.getString("tailNumber", ""); String filename = tailNumber + "-WeightBalance.csv"; if (doesFileExist(filename)) { int totalWeight = 0; String[] data = null; long time = 0; try { String line = ""; br = new BufferedReader(new FileReader(new
File(Environment.getExternalStorageDirectory(), filename))); while ((line = br.readLine()) != null) { data = line.split(","); // Overwrite data until we get to the end } // Parse the last line of the file totalWeight = Integer.parseInt(data[3]); time = Long.parseLong(data[2]); } catch (Exception e) { Log.e(TAG, "Error reading or parsing: " + e.toString()); } finally { if (br != null) { try { br.close(); } catch (IOException e) { Log.e(TAG, "Could not close reader: " + e.toString()); } } } SharedPreferences.Editor prefsEdit = prefs.edit(); prefsEdit.putInt("totalWeight", totalWeight); prefsEdit.commit();
59
// Display the date of the entry SimpleDateFormat fileFormatter = new SimpleDateFormat("MMM dd yyyy HH:mm:ss",
Locale.US); fileFormatter.setTimeZone(TimeZone.getDefault()); Date date = new Date(time); String entryDate = fileFormatter.format(date); Toast.makeText(getBaseContext(), "Total weight: " + totalWeight + "lbs\n\nEntry date: " +
entryDate, Toast.LENGTH_SHORT).show(); } else { Toast.makeText(getBaseContext(), "File does not exist for that tail number",
Toast.LENGTH_LONG).show(); } break;
case R.id.stopServicesButton: if (isAlgorithmServiceRunning()) { stopService(new Intent(this, AlgorithmService.class)); } if (isXplaneSocketServiceRunning()) { stopService(new Intent(this, XplaneSocketService.class)); } startButton.setText("Start"); Toast.makeText(getBaseContext(), "All services have been stopped",
Toast.LENGTH_SHORT).show(); break; } }
H.3 isAlgorithmServiceRunning() /** * This method checks to see if AlgrithmService is currently running. * * @return Returns true if AlgorithmService is running, false if not. */ private boolean isAlgorithmServiceRunning() { ActivityManager manager = (ActivityManager) getSystemService(Context.ACTIVITY_SERVICE); for (RunningServiceInfo service : manager.getRunningServices(Integer.MAX_VALUE)) { if (AlgorithmService.class.getName().equals(service.service.getClassName())) { return true; } } return false; }
60
H.4 onCreateDialog() @Override protected Dialog onCreateDialog(int id) { switch (id) { case SETTINGS: final View layout = View.inflate(this, R.layout.dialog_settings, null); final EditText etPilotRxnTime = ((EditText) layout.findViewById(R.id.pilotRxnTime)); final EditText etTcb = ((EditText) layout.findViewById(R.id.tcb)); // Set hints so pilot knows current values String curPilotRxnTime = prefs.getString("pilotRxnTime", "2"); etPilotRxnTime.setHint(curPilotRxnTime + "s - Current pilot reaction time."); String curTcb = prefs.getString("tcb", "0"); etTcb.setHint(curTcb + "ft - Current TCB."); AlertDialog.Builder builder = new AlertDialog.Builder(this); builder .setIcon(0) .setMessage("Click to change values") .setCancelable(true) .setPositiveButton("Save", new DialogInterface.OnClickListener() { public void onClick(DialogInterface dialog,int id) { // Grab what was entered String sPilotRxnTime = etPilotRxnTime.getText().toString(); String sTcb = etTcb.getText().toString(); // Only care about fields that have data in them if (!sPilotRxnTime.matches("")) { float pilotRxnTime = Float.parseFloat(sPilotRxnTime); Aircraft.setPilotRxnTime(pilotRxnTime); prefsEdit.putString("pilotRxnTime", Float.toString(pilotRxnTime)); } if (!sTcb.matches("")) { float tcb = Float.parseFloat(sTcb); AutoGCAS.OBJ.setTerrainClearanceBuf(tcb); prefsEdit.putString("tcb",Float.toString(tcb)); } prefsEdit.commit(); } })
61
.setNegativeButton("Cancel", new DialogInterface.OnClickListener() { public void onClick(DialogInterface dialog, int id) { dialog.dismiss(); } }); builder.setView(layout); return builder.create(); default: return null; } }
I.1 Lifecycle Methods @Override protected void onCreate(Bundle savedInstanceState) { super.onCreate(savedInstanceState); setContentView(R.layout.activity_vmd); // Text Views act as mountain images vmdAvoidLeft = (LinearLayout) findViewById(R.id.vmdAvoidLeft); vmdAvoidStraight = (LinearLayout) findViewById(R.id.vmdAvoidStraight); vmdAvoidRight = (LinearLayout) findViewById(R.id.vmdAvoidRight); vmdBarLayout = (LinearLayout) findViewById(R.id.vmdBarLayout); vmdAvoidRightTv = (TextView) findViewById(R.id.vmdAvoidRightTv); vmdAvoidLeftTv = (TextView) findViewById(R.id.vmdAvoidLeftTv); vmdAvoidStraightTv = (TextView) findViewById(R.id.vmdAvoidStraightTV); // Acknowledge Button - Switches to Nav Display ackButton = (Button) findViewById(R.id.ackButton); ackButton.setOnClickListener(new OnClickListener() { public void onClick(View v) { startActivity(new Intent(VmdActivity.this, NavActivity.class)); } }); } @Override public void onStart() { super.onResume(); isVmdVisible = true; new UpdateVmdTask().execute(); } @Override public void onStop() { super.onStop(); isVmdVisible = false; finish(); } @Override public void onDestroy() { super.onDestroy(); } @Override public void onBackPressed() { // If back button is pressed, the service should suspend screen changes and go back to // the startup screen until the user hits resume. It is important that the algorithm still runs // while this is happening, and it should only stop if the user backs out of the startup screen. AlgorithmService.setSuspendScreenChange(true); startActivity(new Intent(VmdActivity.this, StartupActivity.class)); }
63
I.2 updateBarHeights() // Controls Image Translations private void updateBarHeights() { /* If the layout has not been drawn yet, this will return 0. Once it is known, it never changes so only call it while waiting for the value. */ if (barHeights == 0) { barHeights = vmdBarLayout.getHeight(); } else { // Get time-to-flyups so we can update the bars. Cast to ints here so it's only done once. int tupl = (int)AutoGCAS.OBJ.getTimeToFlyUpLeft(); int tups = (int)AutoGCAS.OBJ.getTimeToFlyUpStraight(); int tupr = (int)AutoGCAS.OBJ.getTimeToFlyUpRight(); barTime = AlgorithmService.getWarnTime(); // Translate animation (Right) yInitRight = yPosRight; yFinalRight = (int)(barHeights - ((barTime - tupr)*barHeights/barTime)); if (yFinalRight < 0) { yInitRight = 0; yFinalRight = 0; } else if (yFinalRight > barHeights) { yInitRight = (int)barHeights; yFinalRight = (int)barHeights; } // Translate animation (Left) yInitLeft = yPosLeft; yFinalLeft = (int)(barHeights - (barTime - tupl)*barHeights/barTime); yPosLeft = yFinalLeft; if (yFinalLeft < 0) { yInitLeft = 0; yFinalLeft = 0; } else if (yFinalLeft > barHeights) { yInitLeft = (int)barHeights; yFinalLeft = (int)barHeights; } // Translate animation (Straight) yInitStraight = yPosStraight; yFinalStraight = (int)(barHeights - (barTime - tups)*barHeights/barTime); yPosStraight = yFinalStraight; if (yFinalStraight < 0) { yInitStraight = 0; yFinalStraight = 0; } else if (yFinalStraight > barHeights) { yInitStraight = (int)barHeights; yFinalStraight = (int)barHeights; } } }
64
I.3 translateAnimation() // Translate Animation Function - Pass VMD Initial & Final Position, Speed, and Direction (L,S,R) private void translateAnimation(int yInit, int yFinal, int speed, Traj trajectory) { yFinal /= 2; switch (trajectory) { case LEFT: avoidLeftTranslate = new TranslateAnimation(0, 0, yInit, yFinal); avoidLeftTranslate.setDuration(speed); avoidLeftTranslate.setFillAfter(true); avoidLeftTranslate.setFillEnabled(true); vmdAvoidLeftTv.startAnimation(avoidLeftTranslate); vmdAvoidLeft.setPadding(0, yFinal, 0, 0); if (yFinal == 0) { vmdAvoidLeftTv.setBackgroundColor(getResources().getColor( R.color.yellowColor)); } else { vmdAvoidLeftTv.setBackgroundColor(getResources().getColor( R.color.lightBrownColor)); } yPosLeft = yFinal; break; case STRAIGHT: avoidStraightTranslate = new TranslateAnimation(0, 0, yInit, yFinal); avoidStraightTranslate.setDuration(speed); avoidStraightTranslate.setFillAfter(true); avoidStraightTranslate.setFillEnabled(true); vmdAvoidStraightTv.startAnimation(avoidStraightTranslate); vmdAvoidStraight.setPadding(0, yFinal, 0, 0); if (yFinal == 0) { vmdAvoidStraightTv.setBackgroundColor(getResources().getColor( R.color.yellowColor)); } else { vmdAvoidStraightTv.setBackgroundColor(getResources().getColor( R.color.brownColor)); } yPosStraight = yFinal; break;
65
case RIGHT: avoidRightTranslate = new TranslateAnimation(0, 0, yInit, yFinal); avoidRightTranslate.setDuration(speed); avoidRightTranslate.setFillAfter(true); avoidRightTranslate.setFillEnabled(true); vmdAvoidRightTv.startAnimation(avoidRightTranslate); vmdAvoidRight.setPadding(0, yFinal, 0, 0); if (yFinal == 0) { vmdAvoidRightTv.setBackgroundColor(getResources().getColor( R.color.yellowColor)); } else { vmdAvoidRightTv.setBackgroundColor(getResources().getColor( R.color.darkBrownColor)); } yPosRight = yFinal; break; default: // Log an error if you get here Log.e(TAG, "Not a valid trajectory."); } }
66
I.4 UpdateVmdTask /** * @class UpdateVmdTask * @brief This class handles the updating of the bars on the VMD screen. * @author Corey Christiansen 05/2013 */ private class UpdateVmdTask extends AsyncTask<Void, Void, Void> { @Override protected void onPreExecute() { } @Override protected Void doInBackground(Void... params) { while (true) { if (isVmdVisible) { updateBarHeights(); publishProgress(); try { Thread.sleep(200); } catch (InterruptedException e) { e.printStackTrace(); } } else { // Ensure the asynkTask ends when the activity ends break; } } return null; } @Override protected void onProgressUpdate(Void... values) { super.onProgressUpdate(values); translateAnimation(yInitStraight, yFinalStraight, barRefreshRate, Traj.STRAIGHT); translateAnimation(yInitRight, yFinalRight, barRefreshRate, Traj.RIGHT); translateAnimation(yInitLeft, yFinalLeft, barRefreshRate, Traj.LEFT); } @Override protected void onPostExecute(Void result) { super.onPostExecute(result); } }
67
AvoidActivity.java Appendix J
J.1 Lifecycle Methods @Override protected void onCreate(Bundle savedInstanceState) { super.onCreate(savedInstanceState); setContentView(R.layout.activity_avoid); // Determine which flyup type has been issued and place the arrow accordingly // The 90 deg offset is due to the original image orientaion switch (AutoGCAS.OBJ.getAvoidanceCommand()) { case AVOID_STR: reqBank = 0; break; case AVOID_LEFT: reqBank = -Aircraft.bankTargetTurn; break; case AVOID_RIGHT: reqBank = Aircraft.bankTargetTurn; break; case AVOID_OFF: // Should not get to this case. Set arrow to be straight up so that we don't // get a null pointer exception while the AlgorithmService switches screens reqBank = 0; break; default: // Should not get here either. Consider it an error. Log.e(TAG, "Avoidance command type not recognized."); break; } // Create object of new Matrix. image = (ImageView) findViewById(R.id.avoid_arrow); bMap = BitmapFactory.decodeResource(getResources(), R.drawable.arrow_a); matrix = new Matrix(); // Check to see if the user wants to flash the led prefs = PreferenceManager.getDefaultSharedPreferences(this); cameraFlash = prefs.getBoolean("cameraFlash", true); if (cameraFlash) { led = DeviceLed.getInstance(); led.startStrobe(3); } }
68
@Override public void onStart() { super.onStart(); isCancelled = false; new ArrowUpdateTask().execute(); } @Override public void onResume() { super.onResume(); } @Override public void onPause() { super.onPause(); } @Override public void onStop() { super.onStop(); isCancelled = true; if (cameraFlash) { led.off(); led.release(); } finish(); } @Override public void onDestroy() { super.onDestroy(); } @Override public void onBackPressed() { // If back button is pressed, the service should suspend screen changes and go back to // the startup screen until the user hits resume. It is important that the algorithm still runs // while this is happening, and it should only stop if the user backs out of the startup screen. AlgorithmService.setSuspendScreenChange(true); startActivity(new Intent(AvoidActivity.this, StartupActivity.class)); }
69
J.2 rotateImage() /** * Rotate image X degrees. Adapted from * http://droid-examplecode.blogspot.com/2012/01/android-image-rotation_01.html */ private void rotateImage(float rDegrees) { // set image rotation value X degrees in matrix. matrix.postRotate(rDegrees, image.getDrawable().getBounds().width() / 2, image.getDrawable().getBounds().height() / 2); // Create bitmap with new values. Bitmap bMapRotate = Bitmap.createBitmap(bMap, 0, 0, bMap.getWidth(), bMap.getHeight(), matrix, true); // put rotated image in ImageView. image.setImageBitmap(bMapRotate); }
K.1 readAircraftParameters() /** * @brief A function to read in aircraft parameters that are defined in an XML file * on the SD card. * * @param tailNumber The name of the XML file. Should be the same as */ public static void readAircraftParameters(String tailNumber) { if (!tailNumber.matches("")) { try { File xmlFile = new File(Environment.getExternalStorageDirectory(), tailNumber + ".xml"); DocumentBuilderFactory dbFactory = DocumentBuilderFactory.newInstance(); DocumentBuilder dBuilder = dbFactory.newDocumentBuilder(); Document doc = dBuilder.parse(xmlFile); doc.getDocumentElement().normalize(); NodeList nlAircraft = doc.getElementsByTagName("Aircraft"); Node nAircraft = nlAircraft.item(0); Element eAircraft = (Element) nAircraft; // Set all parameters
} catch (Exception e) { Log.e(TAG, e.toString()); Log.e(TAG, "Error parsing XML file"); } } else { Log.e(TAG, "Tail number string is empty"); } }
72
AutoGCAS.java Appendix L
L.1 Runway Suppression Logic if (checkRunwayProximity() >= MIN_RUNWAY_DISTANCE) { // Avoid } else { Log.d(TAG, "Flyup suppressed due to runway proximity"); }
L.2 checkRunwayProximity() /** * @brief Get the distance to the nearest runway. * * This method iterates through the runways and calculates the distance between * the current aircraft location and the location of each runway. * * @return minDistance The distance between the aircraft and the nearest runway in feet. */ private double checkRunwayProximity() { double minDistance = LARGE_POS_F; if (runways.size() > 0) { long time = System.currentTimeMillis(); for (Double[] coords : runways) { double dist = getDistance(Aircraft.getLatitude(),Aircraft.getLongitude(),coords[0],coords[1]); if (dist < minDistance) { minDistance = dist; } } Log.i(TAG, "" + (System.currentTimeMillis()-time)); return minDistance; } else { Log.d(TAG, "No runways to check"); return minDistance; } }
73
L.3 getDistance() /** * @brief Get the distance between two points on the earth. * * This method calculates the distance between two points on the Earth * using the Haversine formula and a spherical earth model. It uses the * arithmetic mean radius of the Earth based on WGS 84. * * @param lat1 The latitude of the first point. * @param lon1 The longitude of the first point. * @param lat2 The latitude of the second point. * @param lon2 The longitude of the second point. * * @return The distance between the two coordinates in feet. */ public double getDistance(double lat1, double lon1, double lat2, double lon2) { double deltaLat = Math.toRadians(lat2-lat1); double deltaLon = Math.toRadians(lon2-lon1); double a = Math.sin(deltaLat/2) * Math.sin(deltaLat/2) + Math.cos(Math.toRadians(lat1)) * Math.cos(Math.toRadians(lat2)) * Math.sin(deltaLon/2) * Math.sin(deltaLon/2); double c = 2 * Math.atan2(Math.sqrt(a), Math.sqrt(1-a)); return (c * EARTH_RADIUS); }
74
DeviceLed.java Appendix M
M.1 Class Methods /** * @file DeviceLed.java * @brief Contains the DeviceLed class */ package dfrc.suavagcas; import android.hardware.Camera; import android.os.AsyncTask; import android.util.Log; /** * @class DeviceLed * @brief This class controls the device's camera led. It can turn the led on, off, or strobe the light. * The strobeLed method automates the flashing of the light. * * @author Corey Christiansen 06/2013 */ public class DeviceLed { private static final String TAG = "DeviceLed"; private boolean isLedOn = false; // Used to track the state of the led private boolean isStrobeOn = false; // Used to stop the StrobeTask private long strobeHertz; // The rate at which the led will flash (Hz) // Camera objects private static DeviceLed led; private Camera cam; private Camera.Parameters ledOn; private Camera.Parameters ledOff; protected DeviceLed() { // Initialize the camera cam = Camera.open(); ledOn = cam.getParameters(); ledOn.setFlashMode(Camera.Parameters.FLASH_MODE_TORCH); ledOff = cam.getParameters(); ledOff.setFlashMode(Camera.Parameters.FLASH_MODE_OFF); cam.setParameters(ledOff); cam.startPreview(); } /** Returns an instance of the DeviceLed class */ public static DeviceLed getInstance() { return (led == null ? led = new DeviceLed() : led); }
75
/** Releases the camera object so other apps can use it. * You should call this method when you are done using the led. * For now it sets led to null so that each time you want to get * an instance it creates a new object and opens the camera.. */ public void release() { if (led != null) { isLedOn = false; isStrobeOn = false; cam.setParameters(ledOff); cam.stopPreview(); cam.release(); led = null; } else { Log.e(TAG, "led object does not exist. Get a new instance."); } } /** This method turns the led on and the strobing off. */ public void on() { if (led != null) { cam.setParameters(ledOn); isLedOn = true; isStrobeOn = false; } else { Log.e(TAG, "led object does not exist. Get a new instance."); } } /** This method turns off the led */ public void off() { if (led != null) { cam.setParameters(ledOff); isLedOn = false; isStrobeOn = false; } else { Log.e(TAG, "led object does not exist. Get a new instance."); } }
76
/** * This method starts a task that automates the strobing of the led. * To stop the strobing, call off(). */ public void startStrobe(float strobeHertz) { if (led != null) { this.strobeHertz = (long)(1000/strobeHertz); isStrobeOn = true; new StrobeTask().execute(); } else { Log.e(TAG, "led object does not exist. Get a new instance."); } } /* Returns the state of the led */ public boolean isOn() { return isLedOn; }
77
M.2 StrobeTask /** * @class StrobeTask * @brief This class handles the flashing of the device's camera led. StrobeTask is * meant to automate the flashing of the light when the avoid screen comes * up to get the pilot's attention. */ protected class StrobeTask extends AsyncTask<Void, Void, Void> { @Override protected void onPreExecute() { super.onPreExecute(); } @Override protected Void doInBackground(Void... Position) { while (isStrobeOn) { try { /* Must wrap the on/off lines to make sure isStobeOn is true. If * release() is called and one of these methods executes, the app will crash. */ if (isStrobeOn) { cam.setParameters(ledOn); isLedOn = true; } Thread.sleep(strobeHertz/2); if (isStrobeOn) { cam.setParameters(ledOff); isLedOn = false; } Thread.sleep(strobeHertz/2); } catch (Exception e) { Log.e(TAG, "StrobeTask error: " + e.toString()); } } return null; } @Override protected void onProgressUpdate(Void... progress) { } @Override protected void onPostExecute(Void result) { if (isStrobeOn) { cam.setParameters(ledOff); isLedOn = false; } } } }
78
AlgorithmService.java Appendix N
N.1 New Class Variables public enum ScreenState {EGPWS, VMD, AVOID}; private ScreenState state; // !< Keeps track of what screen is visible private static boolean suspendScreenChange = false; // !<Suspends the screen change method private SharedPreferences prefs; // !< Gives access to the user preferences
// Screen switching logic stuff // Avoid time should always be 0. If you want the avoid screen to come on sooner, changing // the pilotRxnTime is a better way to do it. private static float avoidTime = 0.0f; // !< The timeToFlyup that causes a change to the Avoid display private static float warnTime = 20.0f; // !< The timeToFlyup that causes a change to the VMD display
N.2 Notification Notification notification = new Notification(R.drawable.icon, "Algorithm service started", System.currentTimeMillis()); Intent notificationIntent = new Intent(this, StartupActivity.class); PendingIntent pendingIntent = PendingIntent.getActivity(this, 0, notificationIntent, 0); notification.setLatestEventInfo(this, "GCAS app running", "Click to return to app", pendingIntent); startForeground(1, notification);
79
N.3 screenChange() /** * @brief A function that reads the timeToFlyups and determines which screen should be visible. * New screens can easily be added by adding the screen name to the ScreenState enum. * This should be kept to avoidance screens only. Startup and settings screens should * be called before this service even runs. */ private void screenChange() { float tupl = AutoGCAS.OBJ.getTimeToFlyUpLeft(); float tups = AutoGCAS.OBJ.getTimeToFlyUpStraight(); float tupr = AutoGCAS.OBJ.getTimeToFlyUpRight(); if (!suspendScreenChange) { // State transition logic that determines which screen to switch to. switch (state) { case EGPWS: if ((tupl <= warnTime) | (tups <= warnTime) | (tupr <= warnTime)) { Intent myIntent = new Intent(getBaseContext(), VmdActivity.class); myIntent.addFlags(Intent.FLAG_ACTIVITY_NEW_TASK); getApplication().startActivity(myIntent); state = ScreenState.VMD; Log.d(TAG, "EGPWS < warnTime"); } else if ((tupl <= avoidTime) & (tups <= avoidTime) & (tupr <= avoidTime)) { Intent myIntent = new Intent(getBaseContext(), AvoidActivity.class); myIntent.addFlags(Intent.FLAG_ACTIVITY_NEW_TASK); getApplication().startActivity(myIntent); state = ScreenState.AVOID; Log.d(TAG, "EGPWS < avoidTime"); } break; case VMD: if ((tupl > warnTime) && (tups > warnTime) && (tupr > warnTime)) { Intent myIntent = new Intent(getBaseContext(), NavActivity.class); myIntent.addFlags(Intent.FLAG_ACTIVITY_NEW_TASK); getApplication().startActivity(myIntent); state = ScreenState.EGPWS; Log.d(TAG, "VMD > warnTime"); } else if ((tupl <= avoidTime) && (tups <= avoidTime) && (tupr <= avoidTime) &&
/** * @class XplaneSocketService * @brief This class handles the TCP connection from X-Plane * @author Corey Christiansen 06/2013 */ public class XplaneSocketService extends Service { public static final String TAG = "XplaneSocketService"; private DataInputStream in; private DataOutputStream out; private Socket clientSocket; private ServerSocket serverSocket; private Bundle bundle; private TcpTask tcpTask = new TcpTask(); @Override public void onCreate() { super.onCreate(); Log.d(TAG, "XplaneSocketService created"); tcpTask.execute(""); } @Override public void onDestroy() { super.onDestroy(); tcpTask.cancel(true); Log.d(TAG, "XplaneSocketService stopped"); }
82
/** * @class TcpTask * @brief This task allows X-Plane to connect to a socket and it then listens * for data to be sent over TCP. * @author Corey Christiansen 06/2013 */ protected class TcpTask extends AsyncTask<String, Void, Void> { @Override protected void onPreExecute() { } @Override protected Void doInBackground(String... params) { // create a new ServerSocket instance bound to port PORT_NUM serverSocket = null; try { serverSocket = new ServerSocket(PORT_NUM); } catch (IOException e) { Log.e(TAG, "Could not listen on port " + PORT_NUM); } // create a client-side TCP socket clientSocket = null; try { // wait for incoming request from client clientSocket = serverSocket.accept(); Log.d(TAG, "Client Socket accepted"); isConnected = true; out = new DataOutputStream(clientSocket.getOutputStream()); in = new DataInputStream(clientSocket.getInputStream()); } catch (IOException e) { Log.e(TAG, "1" + e.getMessage()); }
83
byte[] buf = new byte[numBytesIn]; int value; int errorCount = 0; try { while ((value = in.read(buf)) != 0) { // Parameters received from X-Plane bundle.putLong("syst", System.currentTimeMillis()); bundle.putInt("time", in.readInt()); bundle.putDouble("lat", in.readDouble()); bundle.putDouble("lon", in.readDouble()); bundle.putFloat("alt", (float)in.readDouble()); bundle.putFloat("ktas", in.readFloat()); bundle.putFloat("kias", in.readFloat()); bundle.putFloat("phi", in.readFloat()); bundle.putFloat("vz", in.readFloat()/60); // Convert fpm to fps bundle.putFloat("p", in.readFloat()); bundle.putFloat("psi", in.readFloat()); bundle.putFloat("wvn", in.readFloat()); bundle.putFloat("wve", in.readFloat()); // This intent is read by AlgorithmService and used in calculations. Intent broadcastIntent = new Intent(); broadcastIntent.setAction(TcpMsgReceiver.ACTION_RESP); broadcastIntent.addCategory(Intent.CATEGORY_DEFAULT); broadcastIntent.putExtras(bundle); sendBroadcast(broadcastIntent); } } } catch (IOException ioe) { Log.e(TAG, ioe.getMessage()); } return null; } @Override protected void onProgressUpdate(Void... progress) { } @Override protected void onPostExecute(Void result) { } }
android:allowBackup="true"> <service android:name="dfrc.suavagcas.services.XplaneSocketService"/> <service android:name="dfrc.suavagcas.services.AlgorithmService"/> <activity android:label="@string/app_name" android:name="dfrc.suavagcas.activities.StartupActivity"> <intent-filter> <action android:name="android.intent.action.MAIN"/> <category android:name="android.intent.category.LAUNCHER"/> </intent-filter> </activity> <!-- All other activities and receivers. If not in the default package, be sure they are prefaced with their package extension --> <activity android:name=".activities.PreferencesActivity"></activity> <activity android:name=".activities.AGCASActivity"></activity> <activity android:name=".activities.NavActivity"></activity> <activity android:name=".activities.VmdActivity"></activity> <activity android:name=".activities.AvoidActivity"></activity> <receiver android:name=".services.ResponseReceiver2"/> </application> </manifest>