Ankeny SummerFest Grand Parade Float Builder’s Guide Introduction Welcome to the Ankeny Summerfest Grand Parade. This document was assembled to help you get the most out of your parade experience. Please use this guide to make your entry have the greatest impact on our eager spectators. Parade Entrants, Please Note: The SummerFest parade is first and foremost a place to showcase the relationships between Ankeny, its area businesses and organizations, and the public. Therefore, it is important for all organizations and businesses to demonstrate this relationship, as well as the SummerFest theme, within their floats and parade entries. The parade is not simply a venue for rote advertising; it is designed to be entertaining and fun for both Ankeny’s citizens and parade participants. Interesting and creative floats and entries decorated by organizations should in some way reflect the SummerFest theme. Simply entering a business vehicle does not constitute a parade entry that spectators will find enjoyable. Themes are developed so that float builders will be able to employ their own tag lines and visualizations that relate their business or organization to the theme. We hope to see very original and creative ideas that display the interests and concepts of your organization. This guide is intended to offer suggestions and tips on how to make your parade entry the most impactful to the spectators. While we allow undecorated entries, we give staging preference to decorated floats that are competing in our judged categories. We hope you take the time to express your organization’s unique character by customizing your entry toward this year’s theme. Please use this guide to assist you in the design and construction of your entry. The information provided in this guide will help your entry have greater impact as you travel along the 2.5 mile, spectator filled streets during the parade. Judging There are two main categories for general entries into the parade, Judged and not-Judged. The entries are segregated in the staging lots. Upon parade release, the judged entries are released onto the parade route in higher ratios than the non-judged entries so there is a clear advantage to being a judged entry.
Transcript
Ankeny SummerFest Grand Parade Float Builder’s Guide
Introduction
Welcome to the Ankeny Summerfest Grand Parade. This document was assembled to help you
get the most out of your parade experience. Please use this guide to make your entry have the
greatest impact on our eager spectators.
Parade Entrants, Please Note: The SummerFest parade is first and foremost a place to showcase the relationships between
Ankeny, its area businesses and organizations, and the public. Therefore, it is important for all
organizations and businesses to demonstrate this relationship, as well as the SummerFest theme,
within their floats and parade entries. The parade is not simply a venue for rote advertising;
it is designed to be entertaining and fun for both Ankeny’s citizens and parade
participants. Interesting and creative floats and entries decorated by organizations should in
some way reflect the SummerFest theme. Simply entering a business vehicle does not constitute
a parade entry that spectators will find enjoyable.
Themes are developed so that float builders will be able to employ their own tag lines and
visualizations that relate their business or organization to the theme. We hope to see very original
and creative ideas that display the interests and concepts of your organization. This guide is
intended to offer suggestions and tips on how to make your parade entry the most impactful to
the spectators.
While we allow undecorated entries, we give staging preference to decorated floats that are
competing in our judged categories. We hope you take the time to express your organization’s
unique character by customizing your entry toward this year’s theme.
Please use this guide to assist you in the design and construction of your entry. The information
provided in this guide will help your entry have greater impact as you travel along the 2.5 mile,
spectator filled streets during the parade.
Judging
There are two main categories for general entries into the parade, Judged and not-Judged. The
entries are segregated in the staging lots. Upon parade release, the judged entries are released
onto the parade route in higher ratios than the non-judged entries so there is a clear advantage to
being a judged entry.
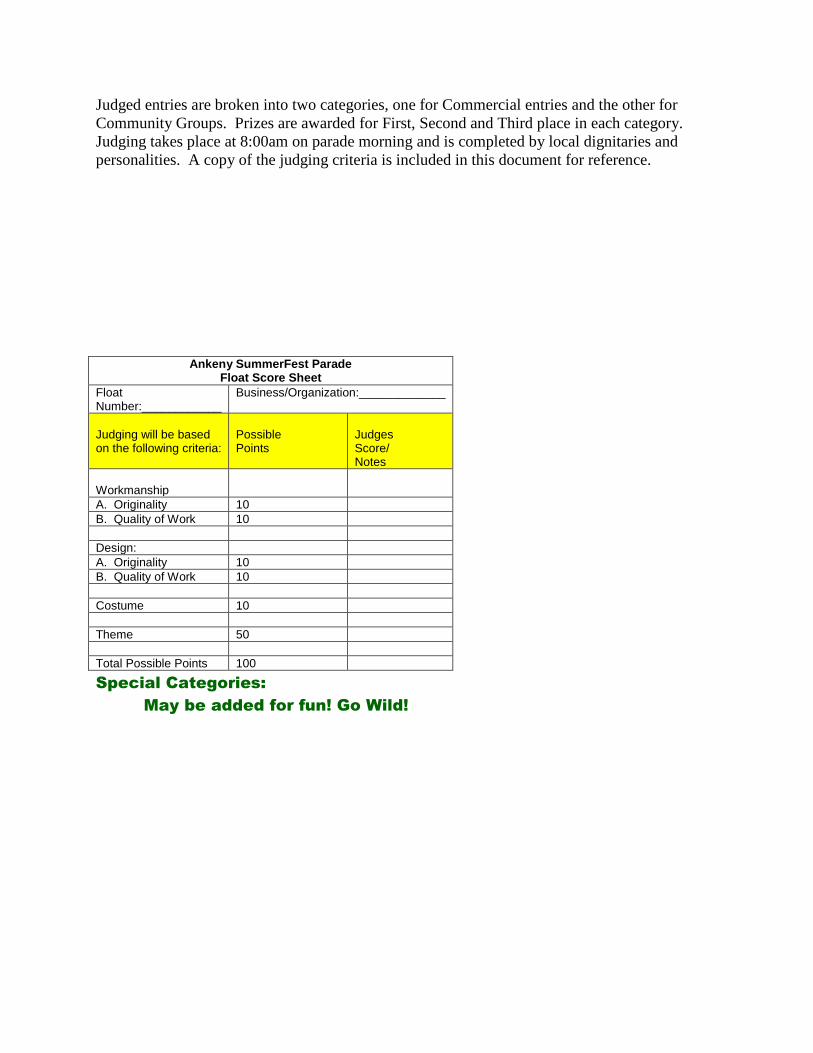
Judged entries are broken into two categories, one for Commercial entries and the other for
Community Groups. Prizes are awarded for First, Second and Third place in each category.
Judging takes place at 8:00am on parade morning and is completed by local dignitaries and
personalities. A copy of the judging criteria is included in this document for reference.
Ankeny SummerFest Parade Float Score Sheet
Float Number:____________
Business/Organization:_____________
Judging will be based on the following criteria:
Possible Points
Judges Score/ Notes
Workmanship
A. Originality 10
B. Quality of Work 10
Design:
A. Originality 10
B. Quality of Work 10
Costume 10
Theme 50
Total Possible Points 100
Special Categories:
May be added for fun! Go Wild!
Drivers and Operators
Give some thought to who will drive the vehicle. Select someone with experience at driving while towing a trailer
and maneuvering same in tight spaces. The parade is not the place to obtain "on-the- job training".
Floats can be built on a variety of beds: hay wagons, semi-trailers, low-boy trailers or any number of things.
Float Construction
GETTING STARTED The best first step is to get a steering group organized. You may already know two or three friends or a group who
would love to get involved. Make a few calls and see if they are interested. The success of your committee will
depend on the commitment and dependability of those who will be working with you. You can organize the
committee in any way you think will work, but these are some responsibilities you need to have covered: float
chairperson, treasurer, theme and concept, structural design, decorating, and communications. Split up the work:
one group can be in charge of props or costumes that will be used on the float. Another group can be in charge of the
lettering or signage that will be displayed on the float. Another group can be in charge of the frame-work used
underneath the decorating materials. Building a float is a team effort, so make sure everyone understands their part
in building the float.
CREATING YOUR FLOAT Now that you have a solid organization, it’s time to get down to the real fun of deciding what you are going to build.
Have a brainstorming session. Kick around the theme and have everyone share their own ideas. REMEMBER: No
ideas are thrown out here. That's the concept of brainstorming. Everyone will feed off the thoughts of everyone else.
Before you know it, a great idea will begin to emerge. Be sure that your float concept is in some way consistent
with the theme of the parade. Try to design a float concept that will be uniquely yours. Look for variations on
shapes, materials, special effects, and anything else that will make your entry stand out from the pack. Determine
the message you want to convey, staying within the parameters of the theme. If your theme is humorous, make sure
no one will be offended by it. Also, remember that blatant advertising is boring, so try to keep your message subtle
and positive.
FLOAT DESIGN
When you decide on a concept, draw a rough pencil sketch. Most floats use a stair step effect with the most height at
the rear of the float. After you have worked out the details, a drawing done to scale is very helpful. In your sketch,
include the placement of your slogan, colors and designs for your decorations. For example, if you want the fringe
to be green and the trim to be gold, label this on your sketch.
All entries must adhere to height, width, and length restrictions shown in the rules, and all must be able to navigate
the parade route and make all turns required by the parade route.
Other important design considerations are your equipment and the capabilities of your float builders. If you plan to
include elaborate props or woodwork, make sure that you have access to a capable technician who has the proper
tools and equipment. If your float has electrical requirements, make sure you have consulted someone who is a
qualified electrician.
LOCATION, LOCATION, LOCATION
Before you begin, you need to identify a place where you can actually build your float. There should be enough
room for both your float and off-float work areas. Make sure you can use a nearby garage or another covered space.
Be certain your workspace has clear access to electrical outlets. You are also going to need a variety of tools. Here
are a few you’ll want to plan for: a table saw or circular saw, saber saw, handsaws, hammers, staple guns, well-
stocked tool box with screwdrivers, pliers, wrenches, utility knife, etc., a long tape measure and carpenter’s square.
Other stuff will certainly be needed if you’re going to add animation, special effects or other features to your float.
You will need to plan for protection from the weather, especially in the later stages of construction. When moving
your float, be sure that you have a roll of plastic sheeting with you; after you put in a lot of work, the last thing you
want is to have your float ruined by a quick and unexpected five-minute rainstorm. Before that, you will probably
be able to pull the float back into a garage each night for protection.
VEHICLE SELECTION
Floats can be built on a variety of beds: trucks, hay wagons, semi-trailers, flatbed trailers, low-boy trailers or any
number of things. Select a vehicle that will be suitable for your towing needs.
When you have determined the style of your float and reserved your wagon, you can plan around the exact
measurements of the wagon you have reserved. You can certainly begin some pre-fabrication before that time, but
the major construction will be done once the wagon arrives.
SAFETY CONSIDERATIONS People riding on your float should have a safe place to sit, or clear areas to stand and have stanchions or hand-holds
in case of sudden braking. Even brakes at 5 mph can send riders tumbling. Have adults to supervise if small
children are riding the float. If children are allowed to ride, they should be seated and belted - no legs dangling over
the edge of the float. Handrails can be incorporated in the design of your float if they are needed for safety,
especially if you have high stages for riders.
BUILDING TECHNIQUES
BASIC FRAMEWORK
The first stop after you have your wagon is to build the basic framework. You have to decide just how elaborate
your float frame must be based on your intended use. You will need more floor strength if you plan to have riders on
the float than if you do not. Also, floats with large structures on the wagon will also need extra strength.
The first step of construction is to “skirt” or make the foundation. Next, it is time to build and decorate the different
structures that are present on your float. Final procedures include any painting and/or touch-ups.
Float construction should be a paramount concern. Remember: people have to ride on the float, so watch for
sharp corners, dangerous objects, and protruding nails.
If you will have people riding on the float, you’ll now want to lay a floor of inexpensive sheathing plywood over
your frame. The plywood will also add strength and stability to the frame. Now you’ll begin to construct the part of
your float that is more for show. At this point you’ll definitely start working with lighter lumber in areas that won’t
be supporting much weight. This superstructure will generally be used to support chicken wire, cardboard or other
light decorating items. Depending on the type of design you have planned, you may now add a framework around
the side of the wagon to flare out and down. This can help to hide the fact that you are building on a hay wagon.
This can be built from 2x2s and 1x2s. Be certain that you allow for free movement of the wagon tongue and wheels.
The front wheels move quite a bit when you turn, so be particularly careful there.
Now is the time to add lattice strips to the floor. These are easily “ripped” from cheap 2x4s. They can be made more
flexible for bending around curves by soaking them in wire prior to installation.
FRAMING: Set up platforms or stages. If you are building a multilevel float, you will want to build frames to
support each "stage", or deck. This can be done using 2x4 lumber framing with a plywood decking, and should use
material strong enough to support anything which will set upon this deck or be built above it. Usually each tier, or
stage, will have its own skirt or wall of sorts around it.
Working from the design you made in the planning step, there will be objects or elements of your float you’ll want
to build. For example, you might have a big snowman on your float. You can build a frame out of the 1x3s in the
approximate shape of a decoration you want to create. The shape of the wood doesn’t have to be perfect. Or, you
can also cut wooden “ribs” or “frames” from plywood (much like the ribs of a boat) into the shape of the object you
want to create. This allows you to create more complex shapes with more curves. In this fashion you can create a
float that looks like a rolling section of earth, more rounded and natural.
You’ll need to buy an adequate supply of chicken wire. This wire can be easily cut with tin snips and molded over
the wooden superstructure into a wide variety of flexible shapes. You will find that it won’t take long to understand
how to cut the wire and then join the pieces with staples or other short lengths of wire or plastic electrical ties.
Fasten the wire to the wooden framework with staples wherever it crosses a brace. Shape the chicken wire into the
form of your decoration and attach it to the frame with a staple gun. You can find chicken wire at local hardware and
farm supply stores.
You are only limited by your imagination. But if it is your first time building a float, or if you need some inspiration
to get started, we’ve included some suggestions and ideas for more simple, yet professional looking floats below.
Beginning Construction Using a Low-Boy
Trailer
Many float builders build a frame over the
existing wagon. Other designs simply use the
wagon bed as is and add the superstructure needed
for your design. If you are going to build a new
floor over the wagon that people will ride on, use
2x6s on edge for the outer framework and then run
2x4s between them side to side. In general, place
these stringers no more than 16” apart for strength
if you are actually going to stand on the floor. The
edges of the wagons are protected with steel
bands, so you’ll have to plan your frame to fasten
solidly to the wagon bed. You can toenail the
frame to the wagon bed. This part of the float
should be very solid.
Instead of framing a box, pallets can also be used
to build a partial or full sub-structure to elevate the
platform of the float. It can be a good idea to build
a partial or full deck that will be even with the top
rails of the float. Make sure the pallets are firmly
fastened to the bed of the float. Next, lay sheet
plywood over the pallets. Now you will have a
platform for your props and an area in the bed
where float riders can stand or sit. If your float
riders will be standing, make a stanchion and
secure it to the trailer bed so that they have
something to hold onto while traveling the parade
route. Remember…safety first!
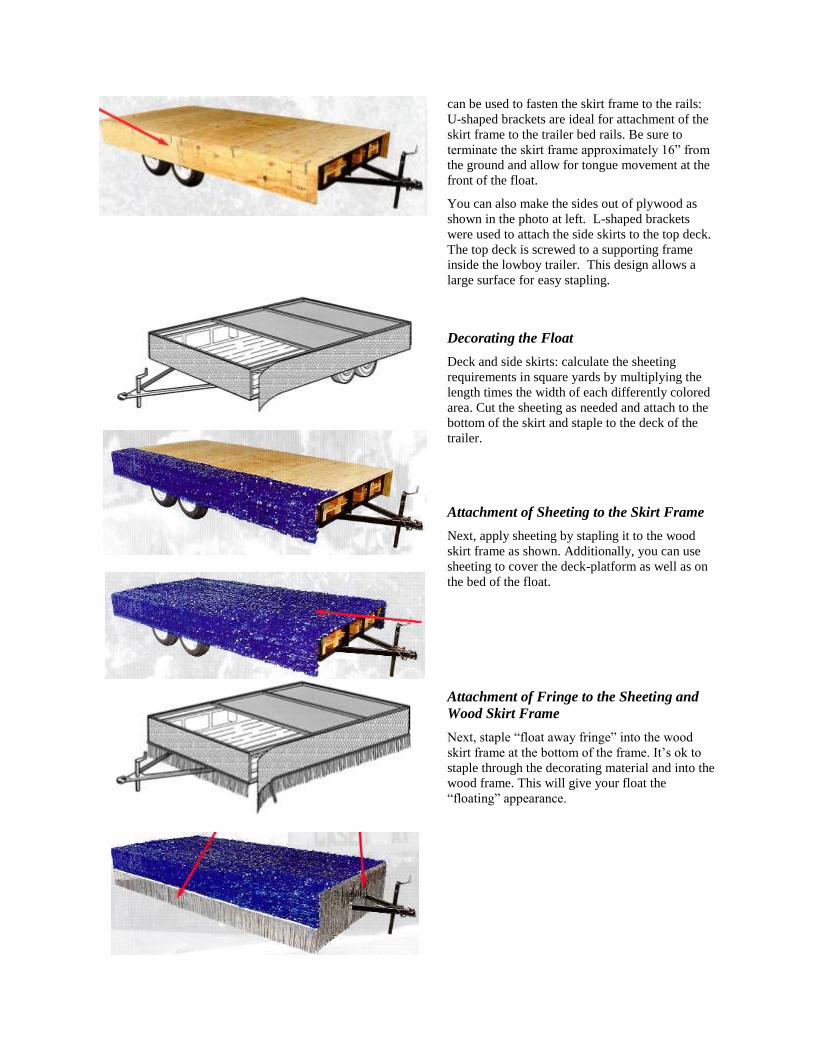
Attachment of Skirt Frame and Sheet
Plywood
After the plywood is laid over the pallets, build a
skirt frame using 1” X 1” or 2” X 2” pieces of
wood and fasten the frame to the trailer rails and
the plywood. The skirt frame is used to hide the
wheels and undercarriage. Any number of items
can be used to fasten the skirt frame to the rails:
U-shaped brackets are ideal for attachment of the
skirt frame to the trailer bed rails. Be sure to
terminate the skirt frame approximately 16” from
the ground and allow for tongue movement at the
front of the float.
You can also make the sides out of plywood as
shown in the photo at left. L-shaped brackets
were used to attach the side skirts to the top deck.
The top deck is screwed to a supporting frame
inside the lowboy trailer. This design allows a
large surface for easy stapling.
Decorating the Float
Deck and side skirts: calculate the sheeting
requirements in square yards by multiplying the
length times the width of each differently colored
area. Cut the sheeting as needed and attach to the
bottom of the skirt and staple to the deck of the
trailer.
Attachment of Sheeting to the Skirt Frame
Next, apply sheeting by stapling it to the wood
skirt frame as shown. Additionally, you can use
sheeting to cover the deck-platform as well as on
the bed of the float.
Attachment of Fringe to the Sheeting and
Wood Skirt Frame
Next, staple “float away fringe” into the wood
skirt frame at the bottom of the frame. It’s ok to
staple through the decorating material and into the
wood frame. This will give your float the
“floating” appearance.
Using Festooning to Hide the Seam Between
the Sheeting and Fringe
To hide the seam between the float fringe and sheeting, use festooning (a stiff-wire garland). The festooning colour you choose allows you to add even more colour to your float! Festooning can be stapled through the fringe and sheeting materials and into the wood frame.
Fringe Panels
As an alternative to using sheeting, you can also
use “fringe panels”. The sketch uses a longer
fringe-skirt instead of a sheeting product. This
skirt is approximately 30” tall and is designed to
give the float a taller “floating” appearance. Many
float builders like to use fringe-panels because of
the ease of decorating.
Attachment of Festooning to Top of Fringe
Panels
Whether you use sheeting or fringe-panels on the sides of your float, it is a good idea to use festooning to finish the edges of the float. You can use festooning in a colour other than your fringe panels to add more colour to your float!
This float concept uses the longer fringe panels
and pallets across the entire trailer bed to create a
level deck area. Lettering can be made from
Styrofoam, poster board, etc., and a birthday cake
can be made out of cardboard, upside-down
garbage cans, etc. But this is just one example—
there are many others! You will build your float
with your materials, float-builders, weather,
timing, safety issues, etc., in mind.
Beginning Construction Using a Hay
Trailer or Flatbed Trailer
There are a few items you will want to have on
hand before building your float. A staple gun,
nails, wire, chicken-wire, 1” X 1” and 2” X 2”
construction grade wood and plywood can be
purchased at your local hardware store.
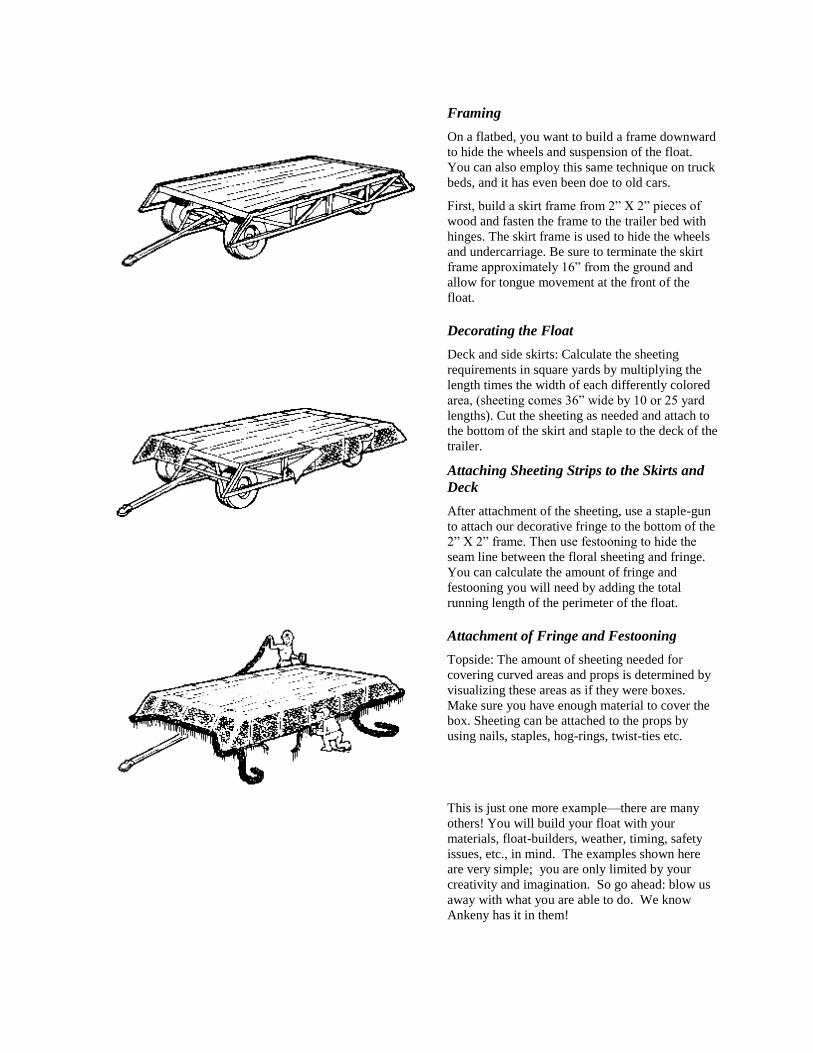
Framing
On a flatbed, you want to build a frame downward
to hide the wheels and suspension of the float.
You can also employ this same technique on truck
beds, and it has even been doe to old cars.
First, build a skirt frame from 2” X 2” pieces of
wood and fasten the frame to the trailer bed with
hinges. The skirt frame is used to hide the wheels
and undercarriage. Be sure to terminate the skirt
frame approximately 16” from the ground and
allow for tongue movement at the front of the
float.
Decorating the Float
Deck and side skirts: Calculate the sheeting
requirements in square yards by multiplying the
length times the width of each differently colored
area, (sheeting comes 36” wide by 10 or 25 yard
lengths). Cut the sheeting as needed and attach to
the bottom of the skirt and staple to the deck of the
trailer.
Attaching Sheeting Strips to the Skirts and
Deck
After attachment of the sheeting, use a staple-gun
to attach our decorative fringe to the bottom of the