28
Quick Start Guide Connection and Set-up UFT 930 English IMPORTANT Read carefully before use!
Quick Start GuideConnection and Set-up
UFT 930 English
IMPORTANT
Read carefully
before use!

2 of 28
Contents1 About This Guide ..................................................................3
2 Explanation of Symbols and Signal Words .............................32.1 Symbols and Signal Words ............................................................................... 3
2.2 Safety Instructions ............................................................................................ 5
2.3 General Notes .................................................................................................... 7
2.4 Abbreviations and Technical Terms ................................................................. 8
3 Scope of Delivery ..................................................................9
4 Controls and Connections ..................................................104.1 Front View ........................................................................................................ 10
4.2 Back Panel ....................................................................................................... 11
4.3 Remote Control ............................................................................................... 12
5 Inserting Batteries into the Remote Control .......................14
6 Connecting the Receiver ....................................................146.1 Requirements ................................................................................................... 14
6.2 Selecting the Installation Location ................................................................ 15
6.3 Connecting the Antenna Cable ...................................................................... 16
6.4 Connecting the TV set ..................................................................................... 16
7 Initial Set-up .......................................................................177.1 Remote Control ............................................................................................... 17
7.2 Performing the Initial Set-up .......................................................................... 18
8 Accessories (not included in the scope of delivery) ...........22
9 Troubleshooting ..................................................................23
10 Cleaning .............................................................................26
11 Disposal .............................................................................26
12 Copyright and Licence Conditions ......................................27

3 of 28
1 About This GuideThis Quick Start Guide describes a quick and easy procedure for connecting the receiver to the most popular TV sets and DVB-T/T2 antennas and then setting it up. Furthermore, the guide describes the buttons of the remote control and their functions.
For further details, see the comprehensive instructions for use at www.kathrein.com.
► www.kathrein.com ▶ SAT ▶ Product Overview ▶ Receiver (see QR code)
➯ The instructions for use are available for download at the product page of your receiver model.
2 Explanation of Symbols and Signal Words
2.1 Symbols and Signal Words
Symbols
General warning sign
Risk of damage to property
Signal Words
Warning This signal word indicates a hazard with a medium level of risk which can lead to death or severe injuries.
Caution This signal word indicates a hazard with a low level of risk which can lead to minor or moderate injuries.
Notice This signal word indicates a hazard which can lead to damage to property.
Tip This signal word indicates useful tips and recommendations.

Explanation of Symbols and Signal Words
4 of 28
Other Symbols
Symbol Meaning
► Operating instruction
1, 2, 3...n Operating instructions in a fixed o der
➯ Result of an operating instruction
✔ Condition for the execution of an operating instruction
● List/list entry
–– List/list entry second level
OK Buttons of the remote control or elements in the receiver menu
Presentation of Operating Instructions
The operating instructions in this document are shown either in the short form or the long form.
Short form
Step 1 ▶ Step 2 ▶ Step 3 ▶ ...Example: Menu ▶ System Setting ▶ AV Setting ▶ 5 V Output
Long form
1. Step 1 Example: 1. Press Menu.
2. Step 2 2. Select System Setting.
3. Step 3 3. Select AV Setting.
4. ... 4. ...

5 of 28
2.2 Safety Instructions
WARNING
Danger to life from electric shock!
► Do not open the unit.
► Make sure that, for example, children do not insert any objects into the ventilation slots.
► Make sure that any repairs on the unit are carried out by qualified sta f.
► Make sure that the power supply cable is not damaged.
► Disconnect a unit with a damaged power supply cable from the mains (unplug it at the socket).
► Make sure that a unit with a damaged power supply cable is repaired by an electrical specialist before being used again.
Danger to life when operating the unit in inappropriate ambient condi-tions or due to improper cleaning!
Moisture in the unit can lead to electric shock or fi e hazard due to spark formation.
► Use the receiver and power supply indoors only.
► Protect the unit from moisture, dripping and splash water.
► Do not operate the unit in damp areas.
► Only use the unit in a moderate climate, not in tropical conditions.
► Do not place any liquid-filled items on top of the unit.
► Disconnect the mains plug before cleaning the unit.
► Restrict cleaning to only the outer surface of the unit.
► Use a dry cloth for cleaning.
WARNING
Danger to life due to improper use of batteries!
When used improperly, batteries can be damaged and can explode. Damaged batteries release caustic substances or can form explosive compounds.
► Do not expose batteries to sources of heat, direct sunlight or fi e.
► Comply with safety instructions stated on the batteries.
► Replace batteries only with identical or equivalent types.
Explanation of Symbols and Signal Words
6 of 28
NOTICE
Material damage due to:
Incorrect supply voltage!
► Operate the unit only at the specified mains voltage. It is stated at the back of the unit or on the external power supply unit.
Incorrectly earthed antenna system!
► Earth the antenna system in accordance with regulations or connect an equipotential bonding conductor.
► Comply with EN 60728/11 and, where applicable, with national regulations.
Overheating!
► Do not cover or block the ventilation slots and the fan of the unit by, for example, other equipment, magazines, table cloths, clothing or curtains.
► Do not place any objects on top of the unit.
► Do not place naked flames on top of the unit, e.g. candles
► Do not expose the unit to direct sunlight.
Long periods of absence or storms!
► If you are going to be absent for a long time or if there is a storm, always switch off the receiver by pressing the ON/OFF switch.
► Pull the plug out of the mains socket to completely disconnect the unit from the mains.
► Disconnect other devices connected with the unit from the mains.
Incorrect connections!
► Connect the unit as it is described in the enclosed instructions for use.
NOTICE
Loss of data and software corruption due to the receiver being discon-nected from the mains whilst in use!
► Always switch the receiver into stand-by mode by pressing the standby button on the remote control before disconnecting it from the mains.
➯ Altered and new data are saved.

7 of 28
2.3 General Notes
Effects of the heat generated by the unit
All electronic equipment generates heat. Although the temperature rise of the unit lies within the permissible range, sensitive furniture surfaces and veneers may, however, become discoloured by the effects of constant heat over time.
The feet of the unit can cause changes to the colour of treated furniture surfaces.
► To avoid possible discolouration, place the unit on a suitable stable flatunderlay.
Product return/original packaging
Due to the nature of their construction, receivers are fragile, and only the original packaging can be relied on to provide adequate protection. If the receiver is not shipped correctly the guarantee/warranty on it will be voided.
► Keep the original packaging in case you need to return the product at any time.
Updates
The information in this manual was correct at the time of going to press. However, we reserve the right to make changes at any time and without prior notice. If new software which affects the information in this manual (e.g. changes to the menus and/or functions) is released for your receiver, where we believe it necessary we will make available a new manual for download under www.kathrein.com.
► Note the basic settings that you make when setting up the receiver for the first time, so that you can estore them later, if necessary.
Tip Keep these instructions for further reference, and if the unit passes to another owner, pass them on to the new owner.

Explanation of Symbols and Signal Words
8 of 28
2.4 Abbreviations and Technical Terms
EPG EPG (Electronic Programme Guide) is an electronic programme guide which the receiver displays on the TV set.
HbbTV HbbTV (Hybrid broadcast broadband TV) – together with Teletext – provides additional information from the programme providers. This information can be received via the TV signal and also via the Internet.
HDMI HDMI (High Definition Multimedia Interface) is a digital interface for video and audio.
Live mode In Live mode the TV set shows a programme that is currently being broadcast. Another operating mode is playing content from the internet, e.g. HbbTV.
Pay TV Subscription TV channels. For reception of pay-TV channels, a subscription must be paid to the pay-TV provider.
S/PDIF S/PDIF (Sony/Philips Digital Interface Format) is a digital interface for elec-trical or optical transmission of digital audio signals, such as Dolby Digital AC-3.
GMT GMT (Greenwich Mean Time) is the mean solar time based on the London Greenwich zero meridian. Central European Time (CET) corresponds to GMT+1:00. In summer, the time used is Central European Summer Time (CEST) which corresponds to GMT+2:00.

9 of 28
3 Scope of Delivery
1
2
3 4 65
➊ UFS 930 receiver
➋ Quick Start Guide
➌ Remote control
➍ HDMI cable
➎ Power supply unit
➏ 2 batteries AAA 1.5 V
The accessories supplied may differ in appearance from those illustrated.
Fig. 1: Scope of delivery (with packaging)
Controls and Connections
10 of 28
4 Controls and Connections
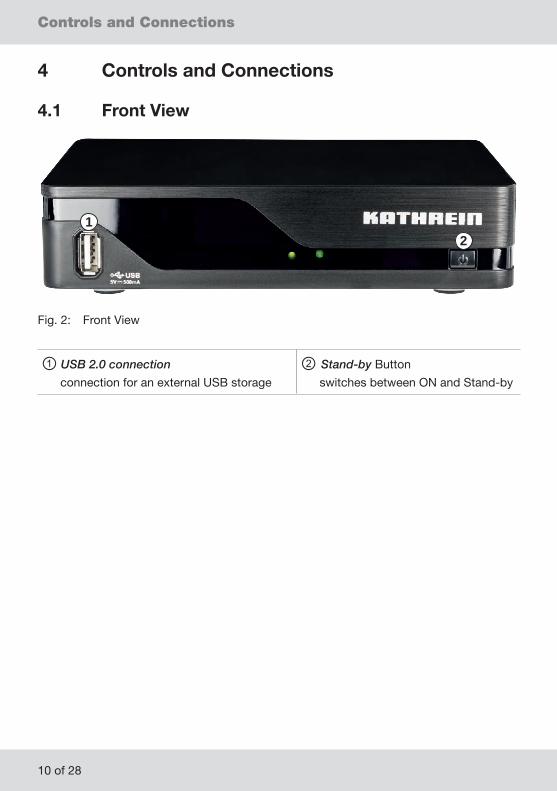
4.1 Front View
12
Fig. 2: Front View
① USB 2.0 connection
connection for an external USB storage
② Stand-by Button
switches between ON and Stand-by

11 of 28
4.2 Back Panel
12
34 5
698
7
Fig. 3: Back Panel
① ANT IN
DVB-T/T2 antenna input
⑥ Ethernet port
Network connection
② no function ⑦ USB 2.0 Port
connection for an external USB storage
③ S/PDIF
optical digital audio output
⑧ ON/OFF switch a)
turns the receiver on and off
④ AV OUT
audio and video output
⑨ Power supply connection (12 V)
⑤ HDMI connection
TV connection
—
a) This does not achieve complete disconnection from the mains (see section Long periods of absence or storms!, p. 6)
Controls and Connections
12 of 28
4.3 Remote Control
Tip ● This section describes the basic functions of the remote control for displaying broadcast TV programmes (live mode). For further information, see the comprehensive instructions for use at www.kathrein.com.
● Many buttons have one or several context-dependent functions described either at the bottom of the user interface or at the bottom/top of the main menu.
● Use the remote control to switch the receiver to stand-by to minimise the power consumption.
● For longer breaks in use, disconnect the receiver from the mains so as to avoid possible damage due to power surges (lightning strikes). A switchable multi-way socket extension allows you to do this for both the TV set and other associated devices with a single switch.

13 of 28
17
164
515
14
13
12 10
8
9
6
3
1
2
7
11
① On / stand-by
② Number pad
③ Show teletext
④ Volume higher (Vol +) and lower (Vol –)
⑤ Switch channels
⑥ Show channel information
⑦ context-dependent functions in live TV/radio, EPG
⑧ no function
⑨ ● Open the channel list ● Open menus ● Confirm inpu
⑩ no function
⑪ Control playback functions within the HbbTV applications1) (see instructions for use)
Only : Function will be available after a software update at a later date and requires accessories2)
⑫ Step back in menus and displays
⑬ ● Change settings ● Navigate in menus
● Change settings ● Navigate in menus
⑭ Show EPG
⑮ Mute sound
⑯ Show menu
⑰ Switch between TV and radio3)
1) Some HbbTV functions require an Internet connection.2) This function requires an optional external hard disk; see
8, p. 223) In Germany, currently no radio channels are broadcast
over DVB-T/T2.

Inserting Batteries into the Remote Control
14 of 28
5 Inserting Batteries into the Remote Control1. Remove the cover from the remote control. To do this, press gently on the point ②,
slide the cover ① to the rear ③ and lift it off (Fig. 4).
2. Insert the batteries supplied ④ into the battery compartment ⑤. Ensure correct pola-rity of the batteries (the polarity is marked inside the battery compartment).
3. Fit the cover again and slide it forward to the stop.
4 3
2 1
4
5
Fig. 4: Inserting batteries into the remote control (showing the principle)
6 Connecting the Receiver
6.1 RequirementsThis Quick Start Guide describes how to connect and commission the UFT 930.
For further information, see the comprehensive instructions for use at www.kathrein.com. Contact your specialist dealer directly if you have questions or encounter problems.
DVB-T/T2-TV was developed to be able to receive a good quality TV picture anywhere, provided the signal is strong enough.
► To do so, connect the receiver either to your conventional stand-alone or community antenna through which you receive all VHF/UHF signals, or use an antenna developed for DVB-T/T2 e.g the Kathrein BZD 30 for direct reception indoors or the BZD 40 for outdoors.
You may encounter problems in concrete buildings if you are using only an indoor antenna.

15 of 28
If you are using (or have to use) an active antenna – that is, an antenna with a pre-amplifie , you can power it from the receiver's antenna input.
► Make sure to use an antenna designed for a 5 Volt supply, e.g. the Kathrein BZD 30.
The default setting in the receiver sub-menu 5 V Output is OFF, to prevent any damage from occurring.
To Provide Power Supply to an Active Antenna:
1. Go to Menu ▶ System Setting ▶ AV Setting ▶ 5 V Output .
2. In the 5 V Output sub menu, press .
➯ A drop-down menu opens.
3. Press to select the setting ON .
4. Press to confirm the selection
➯ The active antenna is supplied with voltage via the receiver antenna input.
6.2 Selecting the Installation Location
NOTICE
Risk of material damage due to improper installation site!
Follow the following instructions to avoid material damage:
► Maintain at least the following clearance around the unit: 10 cm above, 5 cm behind, 2 cm to each side.
► Never install the unit in a cupboard or on shelves with inadequate ventilation.
► Do not install the unit close to the sources of heat.
► Do not expose the unit to direct sunlight.
► Install the unit close to an easily accessible mains socket to be able to disconnect the unit from the mains at any time.
► Do not place any heavy objects on the receiver, e.g. a TV set.
Connecting the Receiver
16 of 28
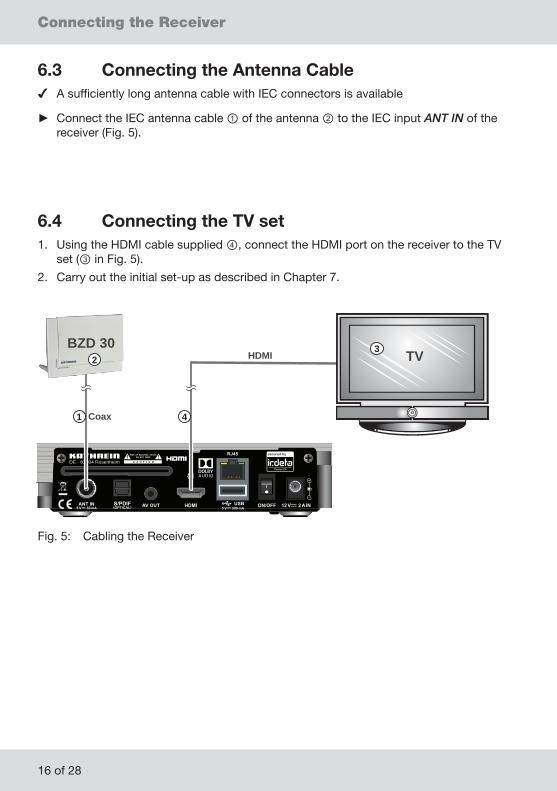
6.3 Connecting the Antenna Cable ✔ A sufficiently long antenna cable with IEC connectors is available
► Connect the IEC antenna cable ① of the antenna ② to the IEC input ANT IN of the receiver (Fig. 5).
6.4 Connecting the TV set1. Using the HDMI cable supplied ④, connect the HDMI port on the receiver to the TV
set (③ in Fig. 5).
2. Carry out the initial set-up as described in Chapter 7.
DE - 83004 Rosenheim
HDMI TV2
5
4
3
Coax
BZD 30
1
Fig. 5: Cabling the Receiver

17 of 28
7 Initial Set-up
NOTICE
Risk of material damage due to improper cable connection!
► Only connect the unit to the mains and perform the initial set-up after the installation work has been properly carried out as described in the previ-ous chapters.
Tip Nothing you do during the initial set-up can damage your reception system. Contact your specialist dealer directly if you have questions or encounter problems.
7.1 Remote ControlFor the initial set-up you need to use the following buttons on the remote control:
(red) channel scan in the complete frequency range
(green) channel scan in the selected frequency range
● aborts input
● takes one step back
● closes menu
(on ) select an entry from the menu or from a list
(on ) select an entry from the menu or from a list
(on ) ● adds an entry to a list/removes an entry from a list
● confirms the settin
Initial Set-up
18 of 28
7.2 Performing the Initial Set-up
Switching on the Receiver
1
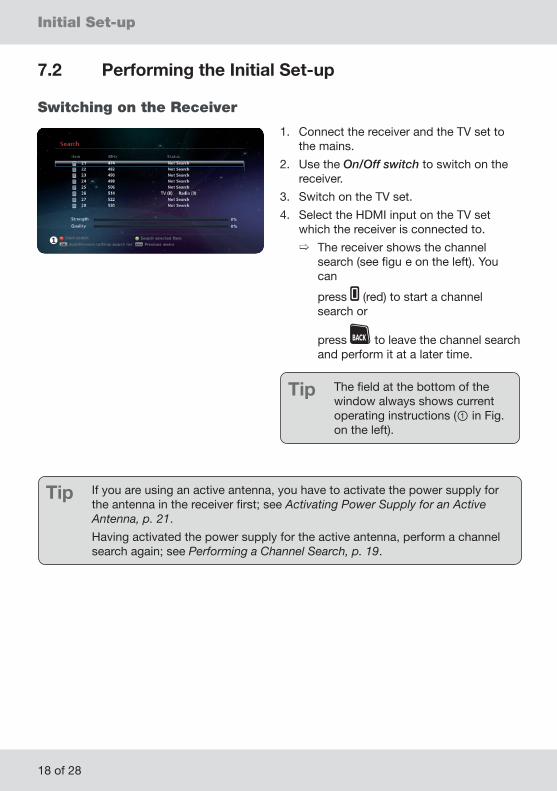
1. Connect the receiver and the TV set to the mains.
2. Use the On/Off switch to switch on the receiver.
3. Switch on the TV set.
4. Select the HDMI input on the TV set which the receiver is connected to.
➯ The receiver shows the channel search (see figu e on the left). You can
press (red) to start a channel search or
press to leave the channel search and perform it at a later time.
Tip The field at the bottom of thewindow always shows current operating instructions (① in Fig. on the left).
Tip If you are using an active antenna, you have to activate the power supply for the antenna in the receiver first; see Activating Power Supply for an Active Antenna, p. 21.
Having activated the power supply for the active antenna, perform a channel search again; see Performing a Channel Search, p. 19.
19 of 28
Performing a Channel Search
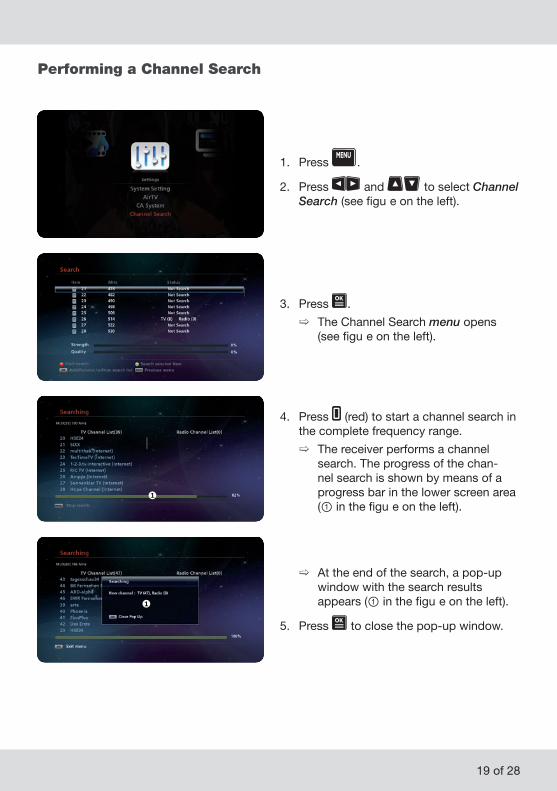
1. Press .
2. Press and to select Channel Search (see figu e on the left).
3. Press .
➯ The Channel Search menu opens (see figu e on the left).
1
4. Press (red) to start a channel search in the complete frequency range.
➯ The receiver performs a channel search. The progress of the chan-nel search is shown by means of a progress bar in the lower screen area (① in the figu e on the left).
1
➯ At the end of the search, a pop-up window with the search results appears (① in the figu e on the left).
5. Press to close the pop-up window.

Initial Set-up
20 of 28
6. Press to leave the menu.
➯ A live TV programme is shown (see figu e on the left).
Selecting a Channel
1a
Selecting a Channel from the Channel List
1. Press to show the channel list (① in the figu e on the left).
2. Press to select a different channel.
3. Press to confirm the selection
➯ The selected channel is shown.
Switching between Channels
✔ The channel list is not shown.
► Press to show the next/previous chan-nel in the channel list.
Selecting a Channel Using the Number Pad
✔ The channel list is not shown.
► Enter the channel number ⓐ using the number pad to show the channel.

21 of 28
Establishing Internet Connection (optional)
If you would like to use HbbTV, it is necessary to connect the receiver to the internet using an Ethernet cable.
► Connect an Ethernet cable to the Ethernet port of the receiver (⑥ in Fig. 3, p. 11).
➯ The connection to the internet is being established. An IP address is assigned automatically.
Tip The default setting of the receiver during the network login is DHCP, and the internet connection is established automatically as soon as the receiver is connected to the Ethernet cable.
If there is no internet connection after you have connected the receiver to the Ethernet cable, make sure that the setting in the sub menu DHCP is set to DHCP. To do so:
1. Go to Menu ▶ System Setting ▶ Network ▶ DHCP .
2. Make sure that DHCP ① is set to DHCP:
1
In case DHCP is set to another setting:
1. At DHCP, press .
➯ A drop-down menu opens.
2. Press to select DHCP.
3. Press to confirm the selection
➯ The connection to the internet is being established. An IP address is assigned automatically.
Activating Power Supply for an Active Antenna
1. Go to Menu ▶ System Setting ▶ AV Setting.
2. Press and to mark 5 V Output.
3. Press and to select On .
4. Press and to confirm and leave the menu
Accessories (not included in the scope of delivery)
22 of 28
8 Accessories (not included in the scope of delivery)
The following accessories are available for the receiver1):
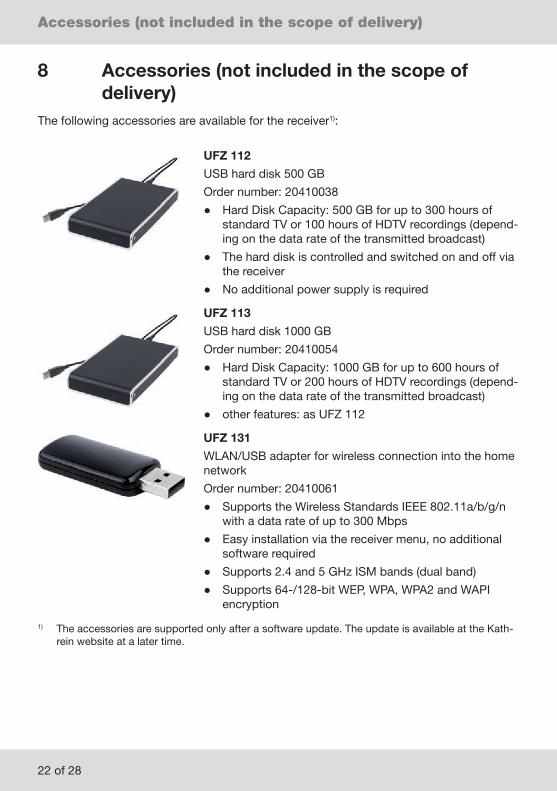
UFZ 112
USB hard disk 500 GB
Order number: 20410038
● Hard Disk Capacity: 500 GB for up to 300 hours of standard TV or 100 hours of HDTV recordings (depend-ing on the data rate of the transmitted broadcast)
● The hard disk is controlled and switched on and off via the receiver
● No additional power supply is required
UFZ 113
USB hard disk 1000 GB
Order number: 20410054
● Hard Disk Capacity: 1000 GB for up to 600 hours of standard TV or 200 hours of HDTV recordings (depend-ing on the data rate of the transmitted broadcast)
● other features: as UFZ 112
UFZ 131
WLAN/USB adapter for wireless connection into the home network
Order number: 20410061
● Supports the Wireless Standards IEEE 802.11a/b/g/n with a data rate of up to 300 Mbps
● Easy installation via the receiver menu, no additional software required
● Supports 2.4 and 5 GHz ISM bands (dual band)
● Supports 64-/128-bit WEP, WPA, WPA2 and WAPI encryption
1) The accessories are supported only after a software update. The update is available at the Kath-rein website at a later time.
23 of 28
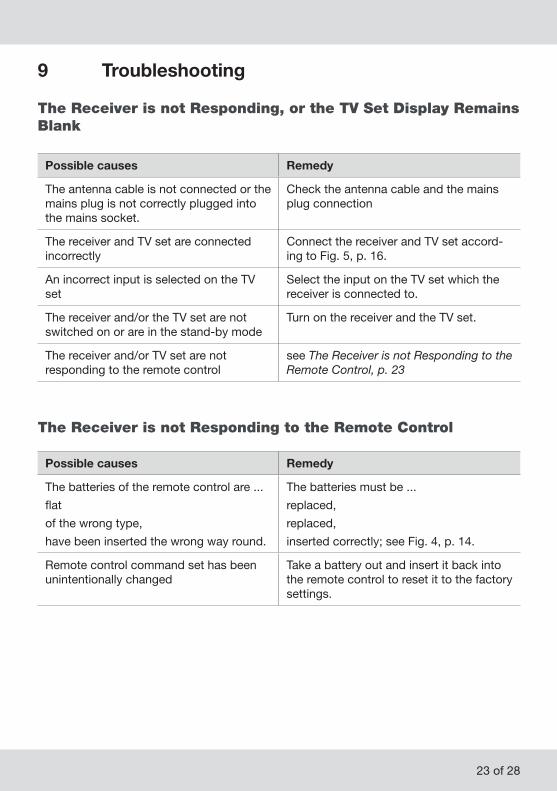
9 Troubleshooting
The Receiver is not Responding, or the TV Set Display Remains Blank
Possible causes Remedy
The antenna cable is not connected or the mains plug is not correctly plugged into the mains socket.
Check the antenna cable and the mains plug connection
The receiver and TV set are connected incorrectly
Connect the receiver and TV set accord-ing to Fig. 5, p. 16.
An incorrect input is selected on the TV set
Select the input on the TV set which the receiver is connected to.
The receiver and/or the TV set are not switched on or are in the stand-by mode
Turn on the receiver and the TV set.
The receiver and/or TV set are not responding to the remote control
see The Receiver is not Responding to the Remote Control, p. 23
The Receiver is not Responding to the Remote Control
Possible causes Remedy
The batteries of the remote control are ...
flat
of the wrong type,
have been inserted the wrong way round.
The batteries must be ...
replaced,
replaced,
inserted correctly; see Fig. 4, p. 14.
Remote control command set has been unintentionally changed
Take a battery out and insert it back into the remote control to reset it to the factory settings.

Troubleshooting
24 of 28
The Message Poor or no signal! Is Displayed
Possible causes Remedy
● The DVB-T/T2 antenna is aligned incorrectly and the antenna signal is too weak
● The antenna cable is incorrectly connected or damaged
Consult an antenna specialist.
No Connection to the Network is Possible
Possible causes Remedy
Network cable Check the network cable and replace it, if necessary.
The network or router/modem is...
● switched off
● is not operating correctly
● defective
● switch the router/modem on.
● Check the network and if necessary reboot the router/modem and other components. To do this, disconnect the router/modem from the power supply for approx. 1 minute and reconnect them.
● Consult a PC or network specialist or have the unit replaced.

25 of 28
None of the Above Points Describes my Problem
Contact your specialist dealer if after reading the Quick Start Guide and the instructions for use you still have outstanding questions or cannot solve a problem.
The Kathrein customer hotline is also available on 0180 5 122240 *)
Tip Device information required for a claim under warranty
If a claim under warranty is made we require as much information as possible about your device, such as
● Device name
● Serial number
● Order number
● MAC address of the LAN interface (network port)
You can find this information on the sticker on the underside of the device.
*) 0,14 €/minute on Deutsche Telekom AG land lines, calls from mobile phones may cost more

Cleaning
26 of 28
10 CleaningFollow the following instructions to avoid material damage:
► Disconnect the mains plug before cleaning the unit.
► Do not open the unit.
► Do not insert any objects into the ventilation slots.
► Use a dry cloth for cleaning.
► Restrict cleaning to only the outer surface of the unit.
11 DisposalElectronic devices
Electronic equipment is not domestic waste – in accordance with directive 2002/96/EC OF THE EUROPEAN PARLIAMENT AND THE COUNCIL dated 27th January 2003 concerning used electrical and electronic appliances, it must be disposed of properly. At the end of its service life, take this unit for disposal at a designated public collection point.
Spent batteries
Spent batteries are special waste. Do not throw used batteries into your household waste; take them to a collection point for old batteries.

27 of 28
12 Copyright and Licence ConditionsAudio MPEG Inc. and Sisvel S.p.A.
This unit makes use of legally protected technologies, which are protected by patents in the USA and also by other intellectual property rights in other countries. KATHREIN-Werke KG has obtained licences from Audio MPEG Inc. and Societa‘ Italiana per lo sviluppo dell‘elettronica, S.I.SV.EL, S.P.A to use these technologies. These licences carry certain restrictions, which apply also to you as the customer. Accordingly this unit may only be used by the end customer for private non-commercial purposes and for the licensed content. It may not be used for commercial purposes. The use of products or processes that are sold or used with this unit is not included in this statement. The use of reverse engineering is not permitted in respect of the licensed technologies, nor is disassembly.
Software changes/use of applications
Any modifications to the eceiver software, or the use of applications not provided by Kathrein will invalidate the warranty: You will have to bear the costs yourself for dispatch-ing and repairing any receiver that requires attention due to modifications to the softwa e and use of applications other than those provided by Kathrein. Therefore, use exclusively software and applications provided by Kathrein for your receiver. These are available by downloading from the satellite or from the Internet (www.kathrein.com). Kathrein assumes no liability for the loss of recordings/data on internal hard disks or external storage media. The software installed on the device/product before dispatch from the factory is suita-ble for its function and is of the quality usual for this type of software. It has not been technically possible to fully eliminate all bugs during the software development process. However the software as delivered is considered to be defective only if it fails to perform the functions usual for the device/product. A shortcoming that causes only an insignificantreduction in quality does not rank as a defect. Functional shortcomings in the software or program that result from hardware defects, ambient conditions, incorrect operation or the like do not rank as software defects.
Manufactured under licence from Dolby Laboratories. Dolby, Dolby Audio and the double-D symbol are registered trademarks of Dolby Laboratories.
® HDMI, the HDMI logo and High-Definition Multimedia Interface a e trademarks or registered trademarks of HDMI Licensing LLC in the United States and in other countries.

936.5148/-/VMPT/0616/GB | Subject to change.www.kathrein.com | [email protected]
KATHREIN-Werke KG, Anton-Kathrein-Straße 1-3, 83022 Rosenheim, Germany, Phone +49 8031 184-0, Fax +49 8031 184-52360


