12
Accelerated Biology
| Date post: | 29-Mar-2018 |
| Category: |
Documents |
| Upload: | duongxuyen |
| View: | 216 times |
| Download: | 4 times |

Accelerated Biology


Molecular Biology
AP BIOLOGY
Lab 6: Molecular Biology
Concepts covered Restriction endonucleases Gel electrophoresis Bacterial transformation Competent cell preparation Engineering plasmids Plasmid vectors Antibiotic resistance Genetic engineering
The ability to isolate and manipulate genetic material was one of the most powerful changes in the field of molecular biology in the late 20th century. Today, this knowledge of the structure of DNA and its chemical properties has enabled scientists to study, identify, and transform DNA to improve life. DNA can be used in a variety of different ways, but first it must be removed from the cell. DNA can be isolated from cells with common chemical procedures. Cells can be opened up and DNA separated from other parts based on its solubility. Once DNA is removed from the cell, it is often useful to fragment the DNA into manageable sizes that can be analyzed by scientists. This can be achieved with the use of restriction enzymes, which are specialized proteins that cleave DNA. These enzymes are called restriction endonucleases, enzymes that fragment DNA in almost every organism at specific target sequences. Typically, restriction endonucleases are used to cut DNA into individual genes. There are different versions of these enzymes that can be used to target different loci to accomplish gene‐specific isolations. These enzymes can have several modes of action. Some restriction enzymes digest both strands of DNA at the same position, resulting in blunt ends on the DNA fragments. Other endonucleases cleave each strand in different locations, which produces sticky ends (overhangs). In order to secure a proper fit between the inserted gene and the plasmid, scientists must choose enzymes that make the same type of cut in the donor organism DNA as the recipient DNA [(sticky to sticky and blunt to blunt (Figure 6.1)].
Figure 6.1 Restriction endonucleases can snip DNA in two ways, leaving either blunt ends or
sticky ends.
66

Once a segment of DNA is obtained, a number of different practices can be used to study it. Electrophoresis is a molecular technique that uses an electric current to separate macromolecules (i.e. DNA segments, proteins, oligonucleotides) of varying sizes through a permeable gel (Figure 6.2). This technique takes advantage of the charged molecules by using an electric field to separate the molecules based on size. The gel is a three‐dimensional matrix with a chosen porosity and composition to capture specific sizes of the molecules targeted. The gel has a
special loading zone, containing wells that samples of DNA, RNA, or proteins can be transferred to. Loading an electrophoresis gel with the sample requires patience and practice. The sample must be carefully and slowly pipetted into the wells created at the top of the gel. When an electric current is applied to the gel, the molecules will travel through the gel at different rates toward the cathode of opposite charge. The rate is determined by mass, charge, density of the gel, and strength of the electric field. As the sample is forced through the gel,
components are separated into bands down the length of the gel. Larger molecules will move more slowly through the gel. The result is distinct bands (Figure 6.3) that can be correlated to a molecular marker to determine the molecular weight of the molecules in each band, thus providing a positive identification of each component. Electrophoresis can be used to compare genomes of different organisms or individuals, as well as to locate and identify a specific gene of interest.
Scientists can also “read” the sequence of nucleotides that constitutes the DNA fragment. Once the sequence is known, DNA can be modified and re‐inserted into the source, or even inserted into another organism. DNA molecules that come from one organism and are inserted into another are called recombinant DNA. Plasmids are small, circular , extra‐chromosomal, pieces of DNA (2000‐10,000 base pairs) that are naturally found in bacteria. They became useful molecular biology tools when it was discovered that a foreign gene could be inserted into the plasmid and the bacteria will produce the product of that gene (Figure 6.4). This technique has enabled huge advances in the fields of molecular biology and genomics.
Molecular Biology
Figure 6.2 Filling the wells of an electrophoresis gel
Figure 6.3 A fluorescent dye that binds DNA, can be used to visualize bands after the gel has been run.
67

But first, the bacteria must be made competent in order to pass the hydrophobic DNA across the cell’s membrane. This is accomplished by permeablizing the cell membrane, which creates small holes the DNA can pass through.
Bacteria are able to acquire genetic information three different ways: conjugation, transduction, and transformation. Conjugation is the transfer of DNA through direct cell‐to‐cell contact. Transduction is the movement of DNA from one bacterium to another by a virus. Lastly, transformation results from the uptake and expression of foreign DNA.
Figure 6.4 Scientists are able to engineer plasmids so they contain a gene of interest from another organism.
Molecular Biology
Figure 6.5 Incorporation of a foreign gene can lead to cells with new characteristics.
68

In order to clone a gene, its DNA sequence must be attached to some kind of carrier, also made of DNA, which can transport it into the cell. Such a molecular tool is called a vector, which also contains the information that directs the host cell to replicate the transformed sequence (origin of replication, or ori), and contains a selective marker that allows scientists to track the vector in transformed cells. One way scientists are able to identify which cells have been transformed is to add an antibiotic resistance gene to the plasmid sequence. By culturing cells in antibiotics, scientists can ensure all of the cells that remain have taken up the plasmid carrying the resistance gene, and calculate the transformation efficiency. Another method is to use a selective marker that makes transformed cells a different color, or even glow! These methodologies allow precise control over the incorporation of plasmids into cells. Plasmids may remain extra‐chromosomal and self‐replicate, or they can insert into the DNA of the cell harboring the plasmid. Through an astute understanding of genetics, plasmids, and restriction endonucleases, scientists are able to engineer plasmids to amend the molecular portrait of organisms (Figure 6.5).
Pre-Laboratory Questions
1. Transformation, conjugation, and transduction were discovered in the laboratory. How important are these mechanisms of genetic recombination in nature?
2. Use the internet to investigate DNA fingerprinting. What is this process, and how is electrophoresis used in criminal forensics?
3. How can plasmids be used to manufacture proteins such as insulin for diabetic patients, or antibiotics for bacterial infections?
4. Research a genetic disease that may be cured through the use of genetic engineering. What techniques are being explored to correct the problem? How do concerns of designer embryos stem from this technology? (Use additional paper as necessary)
Molecular Biology
69

Molecular Biology
Figure 6.6
Experiment 6.1: Restriction Endonucleases and Electrophoresis
The objective of this lab is to understand the role of restriction enzymes in fragmenting a strand of DNA, and how those fragments can be separated using electrophoresis.
Materials 9 Red pop‐it beads 8 Yellow pop‐it beads 6 Green pop‐it beads 12 Blue pop‐it beads *Colored pencils
* You must provide
Procedure
1. Use the diagram above as a reference to construct a string of pop‐it beads with the same color pattern (Figure 6.6).
2. Use ‘enzyme 1’ to fragment the strand of DNA (pop‐it beads) based on the ligation information provided in Table 6.1.
3. Use the colored pencils to draw the fragment sizes in the appropriate cell of Table 6.1.
4. Line up the fragments as they would separate if run through an electrophoresis gel. Use the colored pencils to draw them in the appropriate cell of Table 6.1.
Table 6.1
70

5. Repeat this procedure for each enzyme (Note: Enzyme 2 and 3 means that first, enzyme 2 fragments the DNA, then enzyme 3 cuts the fragments made by enzyme 2).
6. Login to the eScience Labs website (www.esciencelabs.com) and perform electrophoresis with the virtual lab under the Advanced Placement Biology Molecular Biology section.
Questions 1. How can DNA be fragmented into very specific sections?
2. Where do restriction enzymes come from? What is their function in nature?
3. How do molecules of varying sizes separate in electrophoresis? What is the purpose of the gel? What about the electricity?
4. Investigate one way in which electrophoresis is used in medicine today. Write one or two paragraphs to explain your findings.
Molecular Biology
71

Lab 6.2: Electrophoresis In this lab, you will prepare an agarose gel and use an electric current to separate dyes of different molecular weights and charges. You will also have to analyze two dyes of unknown composition and determine what mixture they are based on results from your known samples. Define for this experiment: Hypothesis:
Control(s): Independent Variable(s): Dependent Variable(s):
Materials Mini gel electrophoresis chamber 6 Tooth comb Aligator clips 9V Battery (1) 100ml Beaker Carbon fabric 6 Micro‐pipettes 10X TBE Buffer *Boiling water bath or microwave oven Bromophenol blue Methyl orange Ponceau G Xylene cyanol Pyronin Unknown #1 Unknown #2 0.8% Agarose *Water Ruler *You must provide
Note: Gels must be analyzed immediately after electrophoresis.
Color bands will diffuse and bleed over time.
1. To prepare a 1X solution of TBE (Tris‐borate EDTA), mix 10ml of the 10X TBE with 90 ml water in a 100ml beaker. Note: If the 10X solution has precipitated, place the bottle in a hot water bath and swirl until precipitant dissolves.
Molecular Biology
72

2. To prepare the agarose, loosen the cap on the bottle of 0.8% agarose and heat in the microwave or boiling water bath. Monitor the bottle closely and remove the bottle from the heat every 15 seconds and swirl the contents to mix. Note: The agarose will become clear when melted, about 4045 seconds.
3. Remove the bottle from heat and let cool to a safe handling temperature (it should still feel warm ~60°C).
4. Insert the comb into the slots in the gel compartment to mold the wells when the gel is formed.
5. Carefully pour 12ml of the viscous agarose into the gel compartment of the mini‐gel chamber. The container holds more agarose than what is needed to fill the chamber, so do not pour all the agarose in, only fill in between the two raised grooves on the bottom of the chamber (Figure 6.7). Hint: The grooves are noticeable from above and from the side, about 1/4 inch from the top and bottom of the chamber. If you prefer, it may be helpful to be eye level with the chamber when pouring the agarose. When looking straight on, from a lateral view, you can see the height of the grooves and where to stop when pouring the agarose.
6. While the gel is still liquid, it is important to remove any air bubbles that may have been introduced while pouring. Hint: Use a pipette tip to “poke” the bubbles or move them to the side.
7. Once the gel has solidified (10 –15 minutes), pour enough 1X TBE buffer to completely submerge the gel, about 20ml.
8. Carefully remove the comb. Hint: You may have to softly jiggle the comb out of the gel.
9. Once the comb is removed you will see six troughs, or wells, in the gel. This is where you will pipette the samples. Note: The dyes have been mixed with a sucrose solution to increase their density and insure your sample will fall gently into the well. However, it is still important to run the gel relatively quickly so the dyes do not diffuse out of the wells.
10. Cut the carbon fabric to about 1.5 sq. inch, one for the red clip and one for the black clip. Fold the carbon fabric so that you can drape it over the top and bottom edges of the gel chamber. The fabric should be submerged in the TBE. Clamp the black alligator clip to the top (closest to where you loaded samples), and the red clip to the bottom (Figure 6.8).
Molecular Biology
73
Use caution when pouring the gel so that you do not introduce air bubbles,
which will affect how your samples travel through the
agarose.
Molecular Biology
11. Shake down the dye from the top of each tube so it collects at the bottom of the tube.
12. Load the dye samples from left to right following the order listed below in Table 6.1.
13. With a steady hand, pick up 20µl with the needle‐point pipette (You should fill the narrow portion of the pipette to the bottom of the squeeze bubble. This is about 7/8 inch.)
14. Expel any air that is at the tip of the pipette so that it is not introduced into the well. Remove excess dye off the outside of the pipette so as to not introduce any excess to the 1X TBE.
15. Submerge the tip into the buffer targeting the desired well, and slowly dispense the dye sample into the well.
16. Repeat this process for each dye sample, including the two unknowns. Remember to use a clean pipette for each sample!
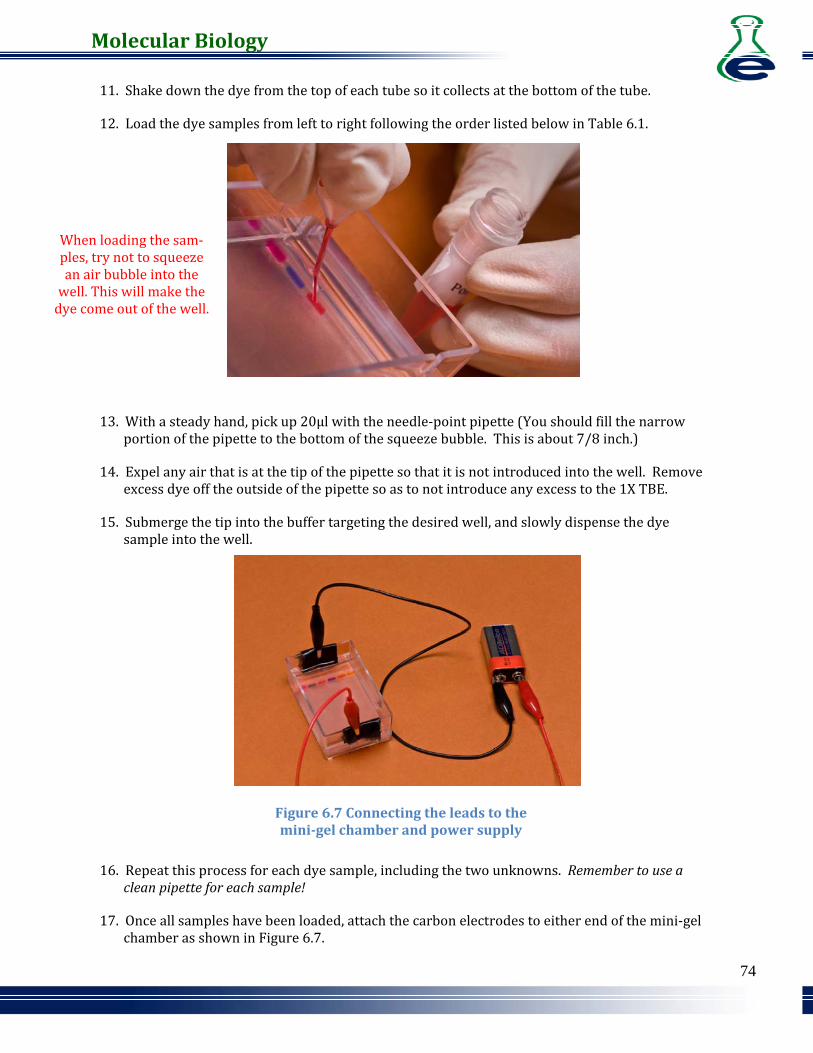
17. Once all samples have been loaded, attach the carbon electrodes to either end of the mini‐gel chamber as shown in Figure 6.7.
74
When loading the sam‐ples, try not to squeeze an air bubble into the well. This will make the dye come out of the well.
Figure 6.7 Connecting the leads to the minigel chamber and power supply

Molecular Biology
18. Connect the alligator clips to the electrodes so that the negative (black) is connected to the end where you loaded the samples, and the positive (red) is connected to the opposite end.
19. Attach the other ends of the alligator clips to the 9V battery. Watch carefully for five hours. Note: DO NOT let the dyes move off the gel!
20. Once separation of the dyes has been achieved, disconnect the alligator clips from the battery.
21. Measure the distance from the wells to the center of the bands and record this measurement in Table 6.2.
22. Also in Table 6.2, record the number of bands visible for each dye sample.
Table 6.2
Questions 1. What is in each of the unknown samples? 2. Why is electrical current necessary to separate molecules using electrophoresis? 3. Why is agarose an appropriate medium to use for separating molecules? Research another type of gel and provide a brief explanation regarding why it could be used rather than an agarose gel.
4. What is the charge of the samples? What do you think would happen if the molecules were the opposite charge?
Electrophoresis of Dye Samples Well Sample # Bands Migration (cm)
1 Bromophenol Blue 2 Methyl Orange 3 Ponceau G 4 Xylene Cyanol 5 Unknown 1 6 Unknown 2
75


