APAC Shipping Tool User Guide Contents 1. Introduction ......................................................................................................................................... 2 2. How to login into the Shipping Tool .............................................................................................. 4 3. Preference Settings ........................................................................................................................... 4 3.1. Address Preference Settings .............................................................................................. 4 2.1.1 How to set default ship from address ................................................................... 4 2.1.2 What is Pick Up Address and why do I have to specify it................................ 6 3.2. Print Preference Settings ..................................................................................................... 6 3.3. Preset Preference Settings .................................................................................................. 7 3.4. Account Preference Settings .............................................................................................. 8 4. Order Operation .................................................................................................................................. 9 4.1. Information Required............................................................................................................. 9 4.1.1. How to provide customs information / edit shipping label ............................. 9 4.1.2. How to create a new preset.................................................................................... 11 4.1.3. How to apply preset to your listings ................................................................... 12 4.2. Print Label .............................................................................................................................. 14 4.3. Ready to ship......................................................................................................................... 17 4.3.1. How to send pickup request .................................................................................. 17 4.3.2. How to replicate order ............................................................................................. 18 4.3.3. How to print list ......................................................................................................... 19 4.4. Deleted .................................................................................................................................... 20 5. Shipping history ............................................................................................................................... 21 5.1. How to replicate order ......................................................................................................... 21
Transcript
APAC Shipping Tool User Guide
Contents
1. Introduction ......................................................................................................................................... 2 2. How to login into the Shipping Tool .............................................................................................. 4 3. Preference Settings ........................................................................................................................... 4
4. Order Operation .................................................................................................................................. 9
4.1. Information Required ............................................................................................................. 9
4.1.1. How to provide customs information / edit shipping label ............................. 9
4.1.2. How to create a new preset .................................................................................... 11
4.1.3. How to apply preset to your listings ................................................................... 12
5. Shipping history ............................................................................................................................... 21
5.1. How to replicate order ......................................................................................................... 21
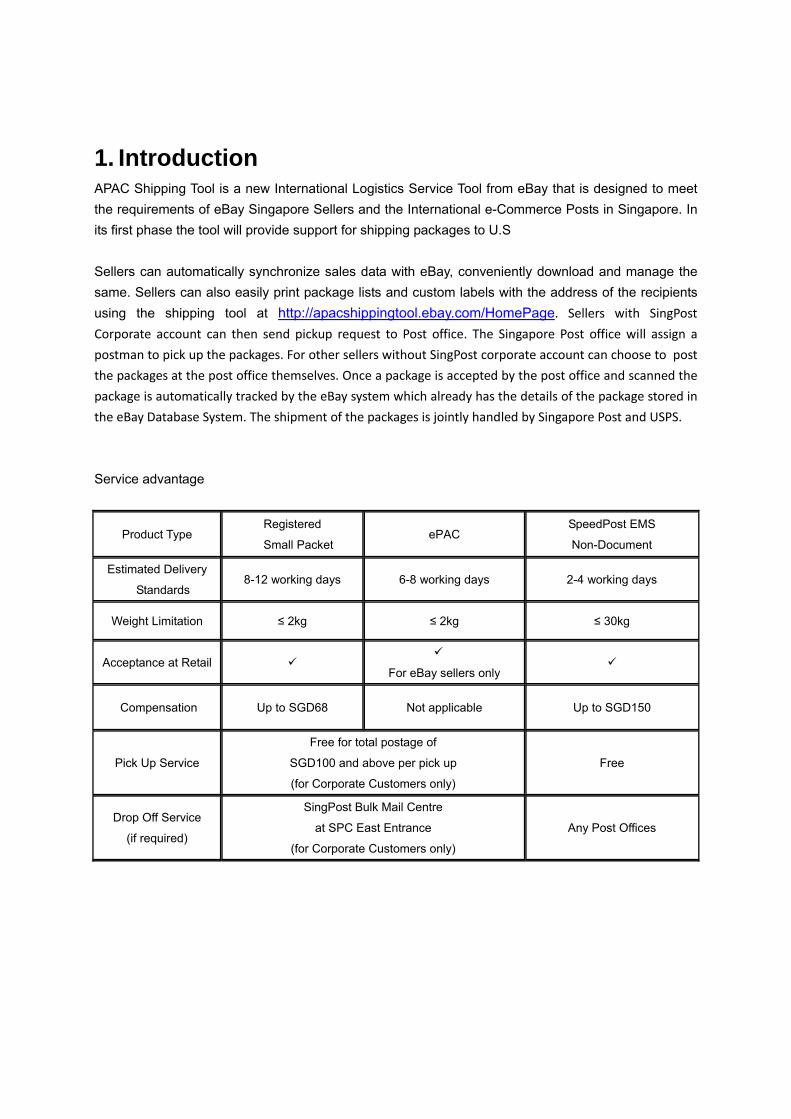
1. Introduction APAC Shipping Tool is a new International Logistics Service Tool from eBay that is designed to meet the requirements of eBay Singapore Sellers and the International e-Commerce Posts in Singapore. In its first phase the tool will provide support for shipping packages to U.S Sellers can automatically synchronize sales data with eBay, conveniently download and manage the same. Sellers can also easily print package lists and custom labels with the address of the recipients using the shipping tool at http://apacshippingtool.ebay.com/HomePage. Sellers with SingPost Corporate account can then send pickup request to Post office. The Singapore Post office will assign a
postman to pick up the packages. For other sellers without SingPost corporate account can choose to post
the packages at the post office themselves. Once a package is accepted by the post office and scanned the
package is automatically tracked by the eBay system which already has the details of the package stored in
the eBay Database System. The shipment of the packages is jointly handled by Singapore Post and USPS.
Service advantage
Product Type Registered
Small Packet ePAC
SpeedPost EMS
Non-Document
Estimated Delivery
Standards 8-12 working days 6-8 working days 2-4 working days
Weight Limitation ≤ 2kg ≤ 2kg ≤ 30kg
Acceptance at Retail
For eBay sellers only
Compensation Up to SGD68 Not applicable Up to SGD150
Pick Up Service
Free for total postage of
SGD100 and above per pick up
(for Corporate Customers only)
Free
Drop Off Service
(if required)
SingPost Bulk Mail Centre
at SPC East Entrance
(for Corporate Customers only)
Any Post Offices
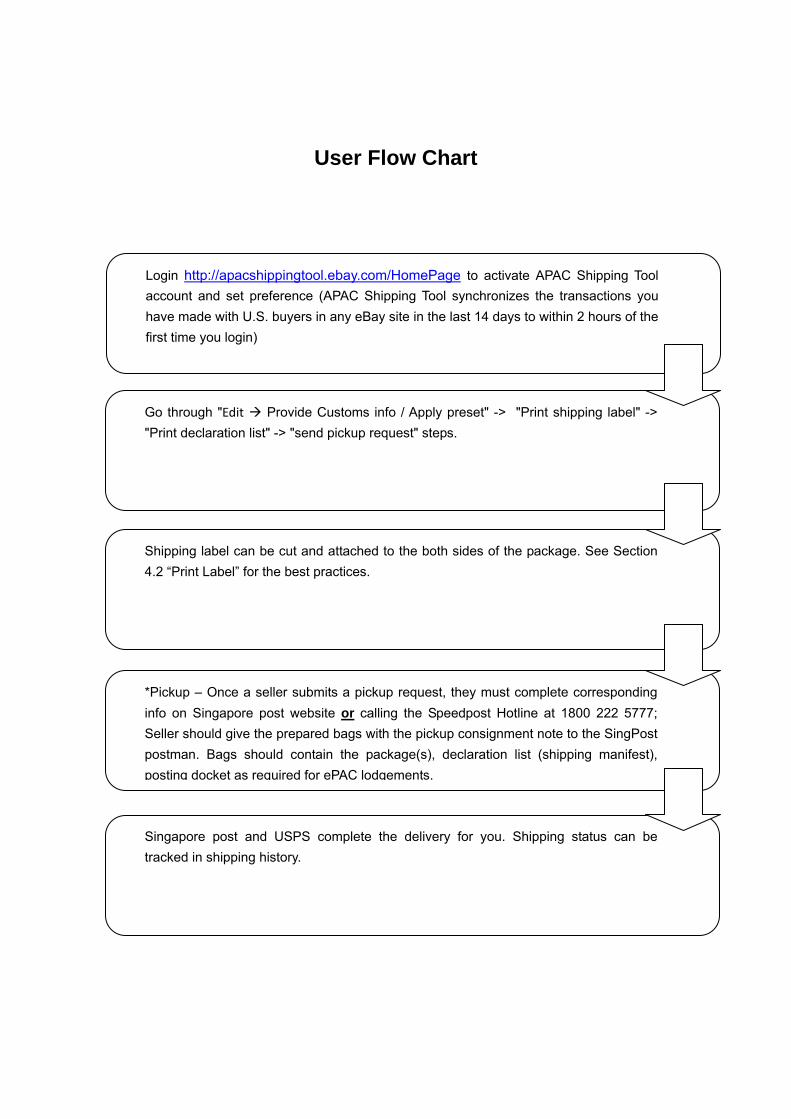
User Flow Chart
Login http://apacshippingtool.ebay.com/HomePage to activate APAC Shipping Tool account and set preference (APAC Shipping Tool synchronizes the transactions you have made with U.S. buyers in any eBay site in the last 14 days to within 2 hours of the first time you login)
Go through "Edit Provide Customs info / Apply preset" -> "Print shipping label" -> "Print declaration list" -> "send pickup request" steps.
Shipping label can be cut and attached to the both sides of the package. See Section 4.2 “Print Label” for the best practices.
*Pickup – Once a seller submits a pickup request, they must complete corresponding info on Singapore post website or calling the Speedpost Hotline at 1800 222 5777; Seller should give the prepared bags with the pickup consignment note to the SingPost postman. Bags should contain the package(s), declaration list (shipping manifest), posting docket as required for ePAC lodgements.
Singapore post and USPS complete the delivery for you. Shipping status can be tracked in shipping history.
2. How to login into the Shipping Tool Please enter http://apacshippingtool.ebay.com/HomePage in your browser location bar (APAC Shipping Tool team recommends using Firefox 3.0 or above, IE 7 or above) use your eBay ID and password to login your APAC Shipping Tool. After you accept the user agreement, the first time you login the tool will automatically synchronize your transactions with U.S. buyers in any site in the latest 14 days to within 2 hours of your first login into the tool. After this first sync up the tool will continue to regularly sync up with your eBay transactions.
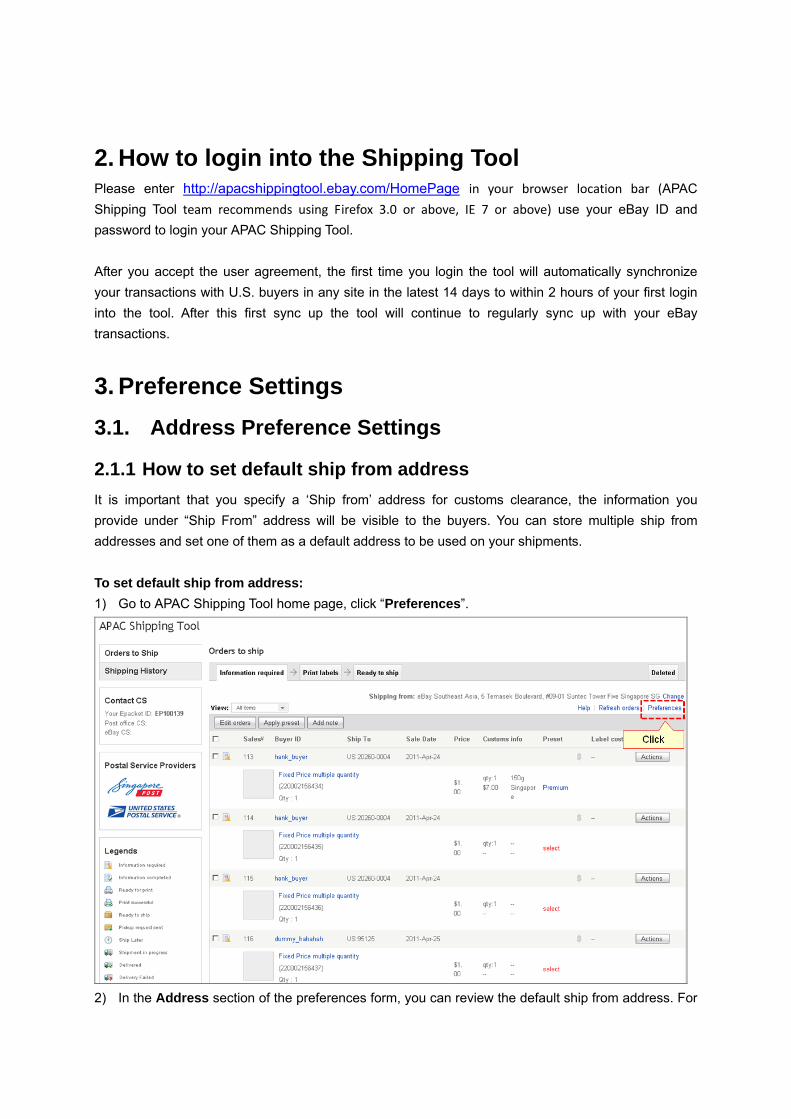
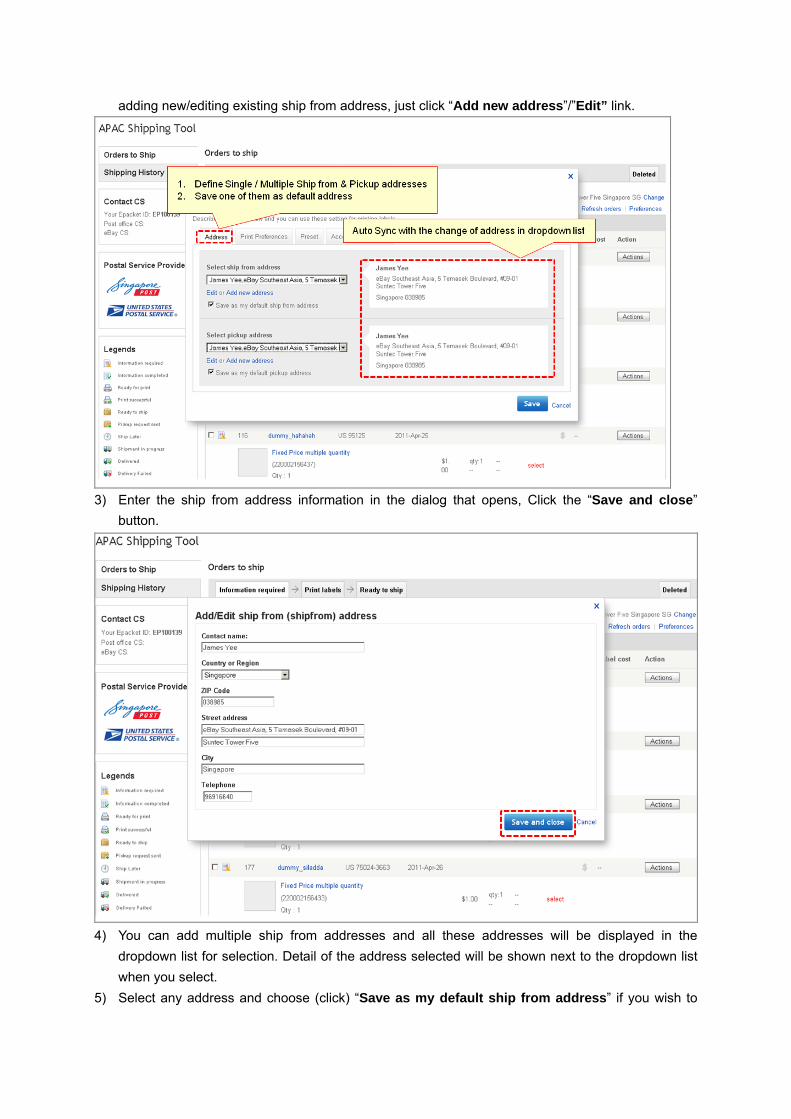
2.1.1 How to set default ship from address It is important that you specify a ‘Ship from’ address for customs clearance, the information you provide under “Ship From” address will be visible to the buyers. You can store multiple ship from addresses and set one of them as a default address to be used on your shipments. To set default ship from address: 1) Go to APAC Shipping Tool home page, click “Preferences”.
2) In the Address section of the preferences form, you can review the default ship from address. For
adding new/editing existing ship from address, just click “Add new address”/”Edit” link.
3) Enter the ship from address information in the dialog that opens, Click the “Save and close”
button.
4) You can add multiple ship from addresses and all these addresses will be displayed in the
dropdown list for selection. Detail of the address selected will be shown next to the dropdown list when you select.
5) Select any address and choose (click) “Save as my default ship from address” if you wish to
store that address as your default ship from address
2.1.2 What is Pick Up Address and why do I have to specify it 3 Applicable to existing SingPost Corporate customers only: Pickup address is the address from where you want the post staff to pick up the package. This can be different from your “Ship From” address. <<Feature to be added in future>> Specifying a pickup address will helps the post staff to pick up your package on time. The pickup acceptance information will be imported to postal system after postman picks up the packages. You can set multiple pickup addresses and set one of them as the default address. To set default pickup address: 1) Go to APAC Shipping Tool home page, click “Preferences”. 2) In the Address section of the preferences form, click “Add new address” link in Select pickup
address section, enter the pickup address information. 3) Click the “Save and close” button. 4) You can add multiple pickup addresses and all the addresses will be displayed in the dropdown list
for selection. Detail of address is shown next to the dropdown list when you select. Select any address and choose (click) “Save as my default ship pickup address” if you wish to store that address as your default pickup address
3.2. Print Preference Settings The tool supports two kinds of page sizes for label printing: A4 and Thermal. The page also displays 2 label samples (A4 and Thermal) on the right side, these label samples are a preview of how the printed label will look like.
To set print preferences: 1) Click on “Preferences” link on the top right of the page and Go to “Print Preferences” section. 2) Select one of the page sizes: A4 or Thermal. 3) If you select A4 printing, then you can also choose to print additional information by optionally
choosing "Item Number", "Item Title", "Buyer ID", SKU Label", "eBay Account" or "Transaction ID" from the “Information to be displayed” section.
4) Click the “Save” button to store your preferences.
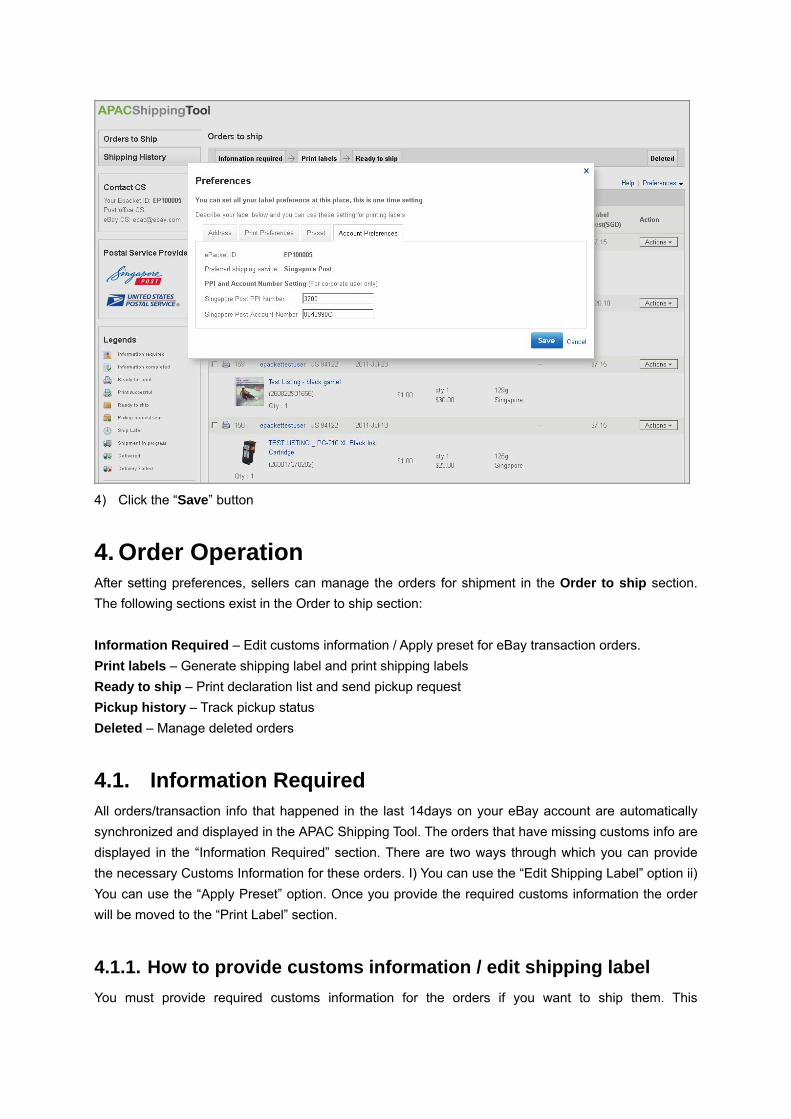
3.3. Preset Preference Settings Presets allow you to predefine customs information such as Description, Weight, Value, and Origin for your sold items. Once your items are sold and you want to ship them, you can apply a preset to the item instead of manually filling up the above mentioned details. Applying a preset will automatically update the Description, Weight, Value and Origin of your item. To create new presets: 1) Click on “Preferences” link on the top right of the page and Go to Preset Preferences section. 2) Click “Add new” button. 3) Fill in the Preset name, Description, Weight, Value and Origin for your listings.
4) Click the “Save” button
3.4. Account Preference Settings To set Account preferences: 1) Go to Account Preferences tab of the Preferences section. 2) Find your ePacket ID. 3) If you have Singapore Post PPI number, enter the same too. When you print a shipping label the
same will be printed with your PPI details if you store the PPI details.
4) Click the “Save” button
4. Order Operation After setting preferences, sellers can manage the orders for shipment in the Order to ship section. The following sections exist in the Order to ship section: Information Required – Edit customs information / Apply preset for eBay transaction orders. Print labels – Generate shipping label and print shipping labels Ready to ship – Print declaration list and send pickup request Pickup history – Track pickup status Deleted – Manage deleted orders
4.1. Information Required All orders/transaction info that happened in the last 14days on your eBay account are automatically synchronized and displayed in the APAC Shipping Tool. The orders that have missing customs info are displayed in the “Information Required” section. There are two ways through which you can provide the necessary Customs Information for these orders. I) You can use the “Edit Shipping Label” option ii) You can use the “Apply Preset” option. Once you provide the required customs information the order will be moved to the “Print Label” section.
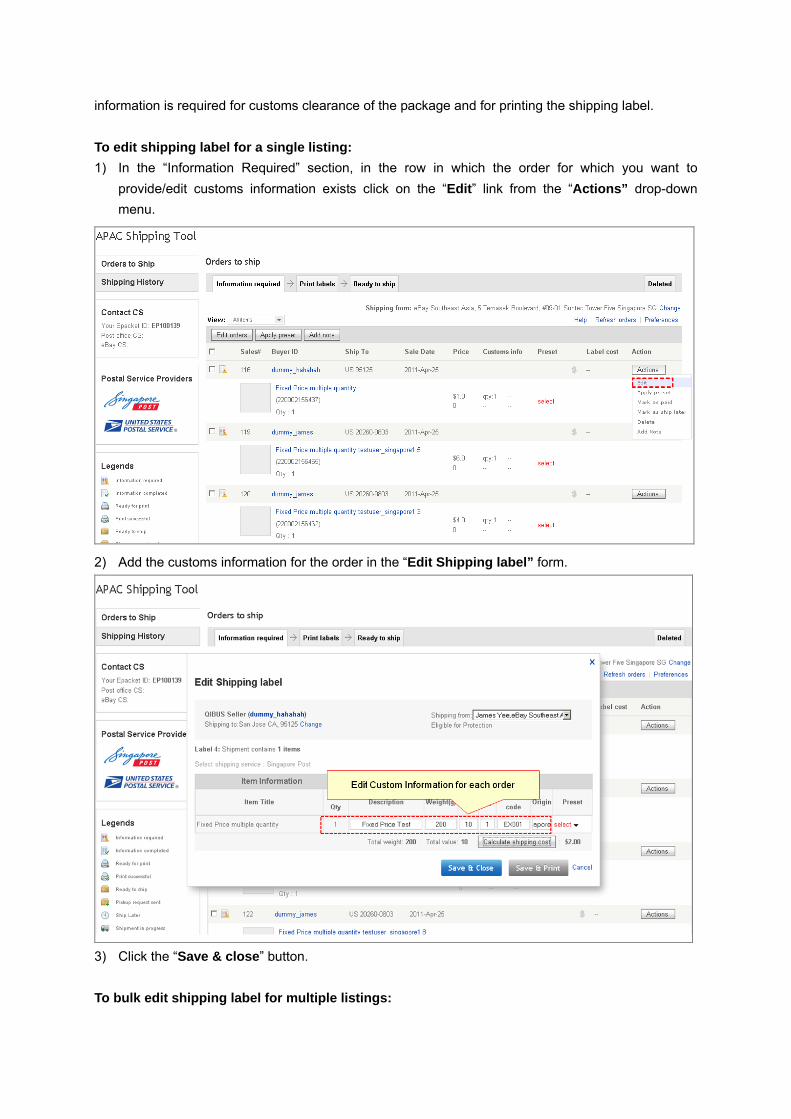
4.1.1. How to provide customs information / edit shipping label You must provide required customs information for the orders if you want to ship them. This
information is required for customs clearance of the package and for printing the shipping label. To edit shipping label for a single listing: 1) In the “Information Required” section, in the row in which the order for which you want to
provide/edit customs information exists click on the “Edit” link from the “Actions” drop-down menu.
2) Add the customs information for the order in the “Edit Shipping label” form.
3) Click the “Save & close” button. To bulk edit shipping label for multiple listings:
1) Click the checkbox against the orders to select all the orders you want to edit the shipping label for in the Information required section.
2) Click the “Edit orders” button at the top of the listings. 3) Add the customs information for each order in the Edit shipping label form. Click the “Save”
button to save the current order and click “Next” button to edit until complete all selected orders. 4.1.2. How to create a new preset Preset is a convenient and quick way for sellers to fill in customs information. You can store the following details in a preset: Item Description, Value, Qty, Weight, Tariff Code. When you apply this stored preset to an order the above mentioned details automatically get filled into the customs information section of the order for customs clearance. When a Shipping Label is printed the preset information will be displayed in it. Currently Preset doesn't contain Tariff Code To create a new preset: 1) In the Information required section, In the row for the order you want to apply preset for, click
Add new link from drop-down menu in the Preset column.
2) Click “Add new” button.
3) Fill in the Preset name, Description, Weight, Value and Origin for your listings. 4) Click the “Save” button.
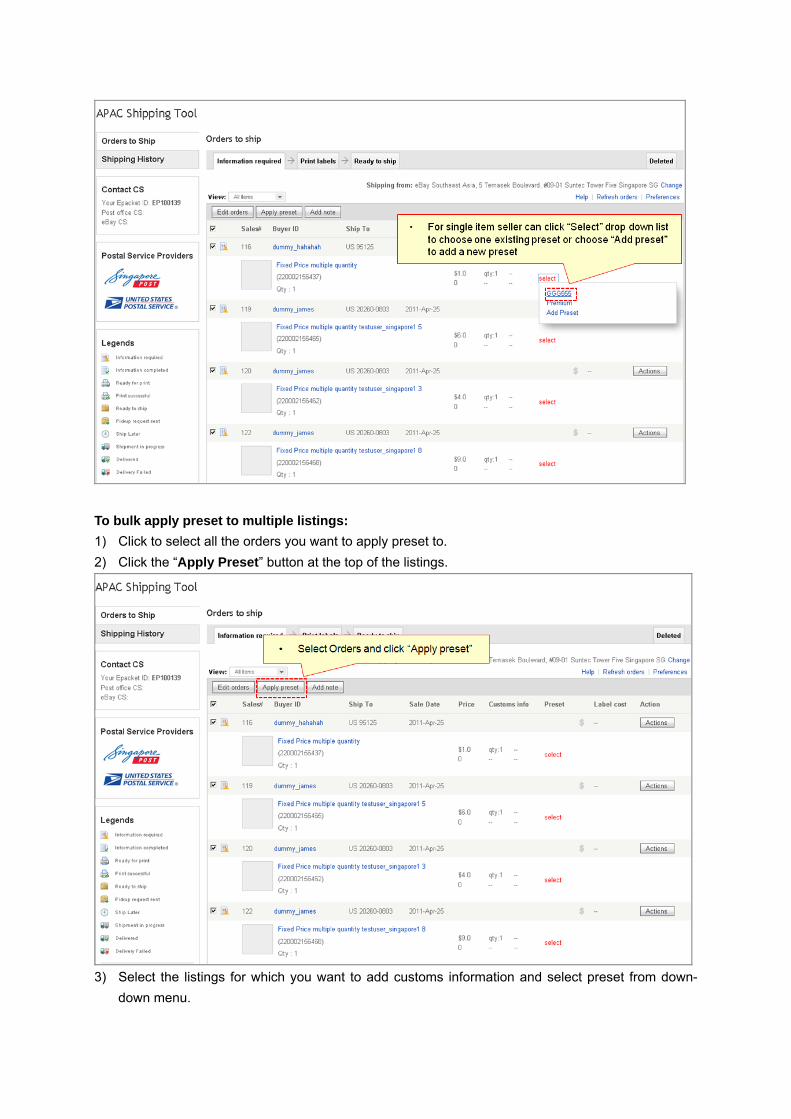
4.1.3. How to apply preset to your listings Applying a preset to your listings is a convenient way to add the customs information to the listings. You can apply preset to your listings using the “Edit Shipping Label” and “Apply Preset” actions To apply preset to a single listing using the edit shipping label form: 1) Click the “Edit” link from the “Actions” drop-down menu against the order in the Information
required section. 2) Select the preset from the Preset drop-down list in the Edit shipping label form to apply the
preset to your listing. 3) Click the “Save & close” button. To apply preset to a single listing using the apply preset action: 1) In the row for the item you want to apply preset to, select preset name from the drop-down menu
in the Preset column.
To bulk apply preset to multiple listings: 1) Click to select all the orders you want to apply preset to. 2) Click the “Apply Preset” button at the top of the listings.
3) Select the listings for which you want to add customs information and select preset from down-
down menu.
4) Click the “Submit” button.
5) Click the “Submit” button. The order will go to Print label section after you apply preset successfully and refresh the page.
4.2. Print Label After a seller applies a preset (or fills up customs information) and refresh orders, the orders will be moved to Print label section. A tracking number for the item is generated and applied to the item when the seller clicks the “print shipping label” button. Shipping labels can be printed in A4 or Thermal page sizes, the size can be set in the print preferences. The shipping label must be attached to two sides of the package for local post office and USPS to scan. Note: The shipping label is generated in PDF format, sellers must install a PDF compatible file reader software to read and print the labels properly. To print label: 1) For single order: In the row for the order you want to print shipping label for, click the “Print Label”
link from drop-down Action menu.
2) A PDF file containing the shipping label with tracking number is generated. Click the print button on the PDF overlay to print the shipping label.
The tracking number will be displayed in the row of the order after you print label. At this moment all the customs and tracking information of the order is required. It will go to Ready to ship section after you refresh the order. *Note: If package size doesn’t permit the shipping label to be attached in a single piece, the shipping label can be split and attached as below.
Front View of Package Back View of Package
*The bar code must be pasted completely on one of the flat surfaces of the package. Wrong packing sample: (Note how the Bar Code goes from one side of the package to the other, this is INCORRECT the complete Bar Code must lie on one side of the package)
After you print a label for an order the tracking number is shown in the same row as the order. Since at this moment all the customs and tracking information of the order have been completed. The order is moved to Ready to ship section after you refresh the page.
4.3. Ready to ship After a seller prints label successfully, the orders will go to Ready to ship section. With all the customs and tracking information completed, the order is qualified for shipping. You can either choose to send a pickup request to the post office or drop off the package at the post office yourself. Note: If you choose to drop off the package at the post office, you need not send a pickup request .The status of the package is displayed in shipping history section after your local post office accepts it.
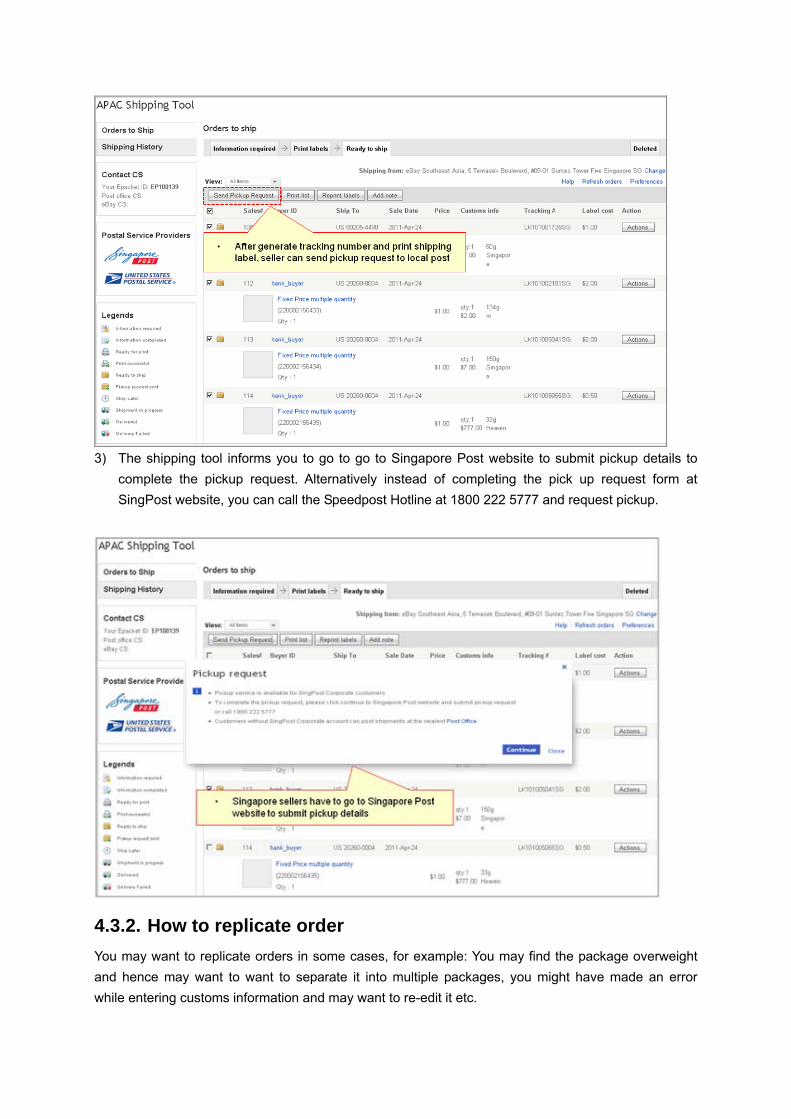
4.3.1. How to send pickup request You must confirm your pickup address before you send a pickup request. Singapore sellers have to go to go to Singapore Post website to submit pickup details to complete the pickup request. *Note: The order cannot be edited after a pickup request for the order has been sent. To send pickup request for a single order: 1) In the Ready to ship section. In the row for the order you want to send pickup request, select the
“Pickup request” option from drop-down Action menu. 2) The shipping tool informs you to go to go to Singapore Post website to submit pickup details to
complete the pickup request. To send pickup request for multiple orders: 1) Click and select all the orders you want to send pickup request for from the Ready to ship
section. 2) Click the “Send Pickup Request” button at the top of all the orders.
3) The shipping tool informs you to go to go to Singapore Post website to submit pickup details to
complete the pickup request. Alternatively instead of completing the pick up request form at SingPost website, you can call the Speedpost Hotline at 1800 222 5777 and request pickup.
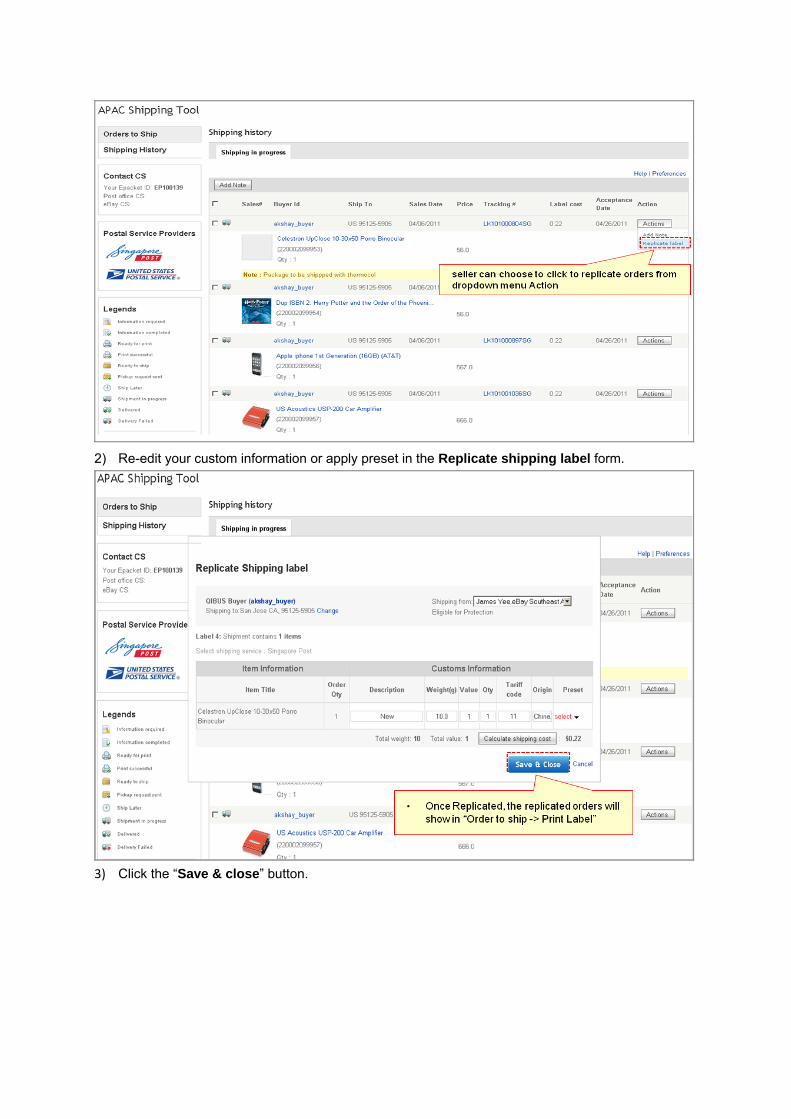
4.3.2. How to replicate order You may want to replicate orders in some cases, for example: You may find the package overweight and hence may want to want to separate it into multiple packages, you might have made an error while entering customs information and may want to re-edit it etc.
Choosing to replicate an order will make the order go back to the Print label section. If you still want to ship the packages, you have to print the shipping label and generate new tracking number for the package. The tracking number that was previously generated for the package is rendered invalid once you choose to replicate the order. To replicate order: 1) In the Ready to ship section, in the row for the order you want to replicate, select the “Replicate
order” option from drop-down Action menu.
2) Re-edit your custom information or apply preset in the Replicate shipping label form. 3) Click the “Save & close” button.
4.3.3. How to print list The customs declaration list is required for international shipping. The item information that you have provided must be consistent with the items that you have submitted. Note: The shipping label is generated in PDF format, sellers must install a PDF compatible file reader software to read and print the labels properly. To print list: 1) Click to select all the orders you want to submit to ship that day in the Ready to ship section. 2) Click the “Print list” button at the top of all the orders.
3) Review the PDF customs declaration list and click to print it
4.4. Deleted Once a seller deletes an order, the order will go to Deleted section. You can choose to recover orders from this section if necessary. When you recover the order it will go back to the section from where
you deleted it.
5. Shipping history Once the post office accepts your shipments, the orders will be moved to the shipping history section. Seller can find the tracking details from shipping history.
5.1. How to replicate order To replicate order in shipping history: 1) In the row for the order you want to replicate, select “Replicate order” from the drop-down
“Action” menu .
2) Re-edit your custom information or apply preset in the Replicate shipping label form.