43
Apeos™ C7070 Apeos C6570 Apeos C5570 Apeos C4570 Apeos C3570 Apeos C3070 Apeos C2570 Reference Guide Main Unit April 2021 GM1046E1-1 Ver. 1 FUJIFILM Business Innovation Corp.
Apeos™ C7070 Apeos C6570Apeos C5570 Apeos C4570Apeos C3570 Apeos C3070Apeos C2570Reference GuideMain Unit
April 2021 GM1046E1-1 Ver. 1 FUJIFILM Business Innovation Corp.
2 Reference Guide Main Unit
1 PrefaceA guide describing the basic operations, maintenance and precautions for use of the main unit.
Caution In this manual, safety instructions are preceded by the symbol . Always read and follow the
instructions before performing the required procedures. As the copying device contains a feature designed to prevent forging of certain documents, there
may be rare instances where copies or scanned images do not achieve the desired results. If a malfunction occurs with the machine's storage media, any received or stored data including
registered configurations may be lost. Our company is not responsible for any direct or indirect damages arising from or caused by such data loss.
Our company is not responsible for any breakdown of machines due to infection of computer virus or computer hacking.
Before sending a Fax, check to make sure the recipients are the correct, intended recipients. When you use a reflective projector to project transparencies printed in color onto a screen, the
projected images may appear darker. This problem can be resolved by using a projector with higher brightness levels.
The printed image may fade or peel off due to moisture caused by water, rain or vapor. For more information, contact your local representative.
TrademarkMicrosoft, Active Directory, Azure, Excel, Internet Explorer, Outlook, Windows, Windows Server, and Wingdings are registered trademarks of US Microsoft Corporation in the U.S. and other countries.Adobe, Acrobat, PostScript, PostScript 3, and PostScript logo are either registered trademarks or trademarks of Adobe in the United States and/or other countries.Apple, AirPrint, App Store, Bonjour, iBeacon, iPad, iPhone, Mac, macOS, and OS X are trademarks of Apple Inc., registered in the U.S. and other countries. The trademark "iPhone" is used in Japan with a license from Aiphone K.K.IOS is a registered trademark or trademark of Cisco in the U.S. and other countries and used based on a license.Mopria and the Mopria Logo are registered trademarks and service marks of Mopria Alliance, Inc. in the United States and other countries. Unauthorized use is strictly prohibited.This product uses eT-Kernel. eT-Kernel is a trademark of eSOL Co., Ltd. in Japan and other countries.
Other company names or product names are registered trademarks or trademarks of each company. FUJIFILM and FUJIFILM logo are registered trademarks or trademarks of FUJIFILM Corporation.Apeos, ApeosWiz, DocuWorks, PaperSecurity, Smart WelcomEyes and TrustMarkingBasic are registered trademarks or trademarks of FUJIFILM Business Innovation Corp.Microsoft product screen shots reprinted with permission from Microsoft Corporation.
This manual may not be edited, modified or copied in whole or part without the written consent of the publisher.
Parts of this manual is subject to change without prior notice. The screen shots and the illustrations in this manual are used as examples. They may differ from
yours depending on the model, the software, or the OS.
31 Preface
Notations in ManualThe following symbols are used in this manual.
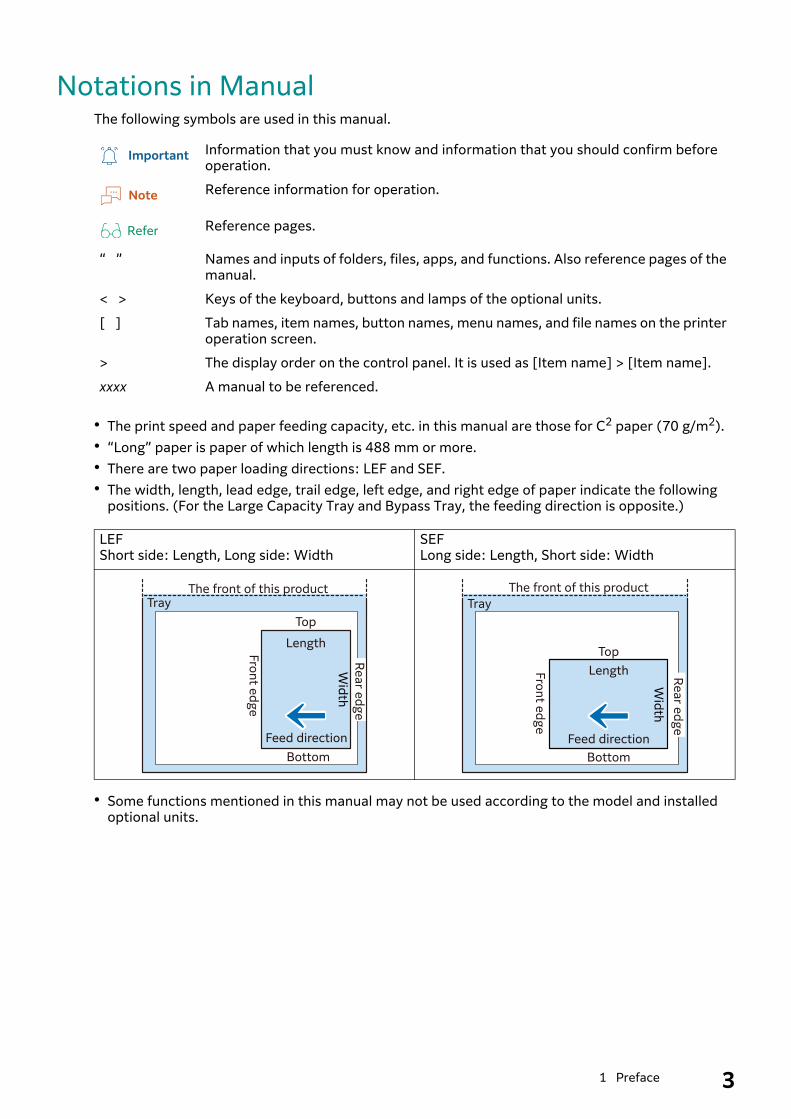
The print speed and paper feeding capacity, etc. in this manual are those for C2 paper (70 g/m2). “Long” paper is paper of which length is 488 mm or more. There are two paper loading directions: LEF and SEF. The width, length, lead edge, trail edge, left edge, and right edge of paper indicate the following
positions. (For the Large Capacity Tray and Bypass Tray, the feeding direction is opposite.)
Some functions mentioned in this manual may not be used according to the model and installed optional units.
Information that you must know and information that you should confirm before operation.
Reference information for operation.
Reference pages.
“ ” Names and inputs of folders, files, apps, and functions. Also reference pages of the manual.
< > Keys of the keyboard, buttons and lamps of the optional units.
[ ] Tab names, item names, button names, menu names, and file names on the printer operation screen.
> The display order on the control panel. It is used as [Item name] > [Item name].
xxxx A manual to be referenced.
LEFShort side: Length, Long side: Width
SEFLong side: Length, Short side: Width
Important
Note
Refer
TrayThe front of this product
Length
Width
Feed directionBottom
Top
Front edge
Rear edge
Tray
The front of this product
Bottom
Feed direction
Fro
nt e
dg
e
Wid
th
Length
Top
Re
ar e
dg
e
4 Reference Guide Main Unit
2 Before Using the Machine
2.1 Device Components
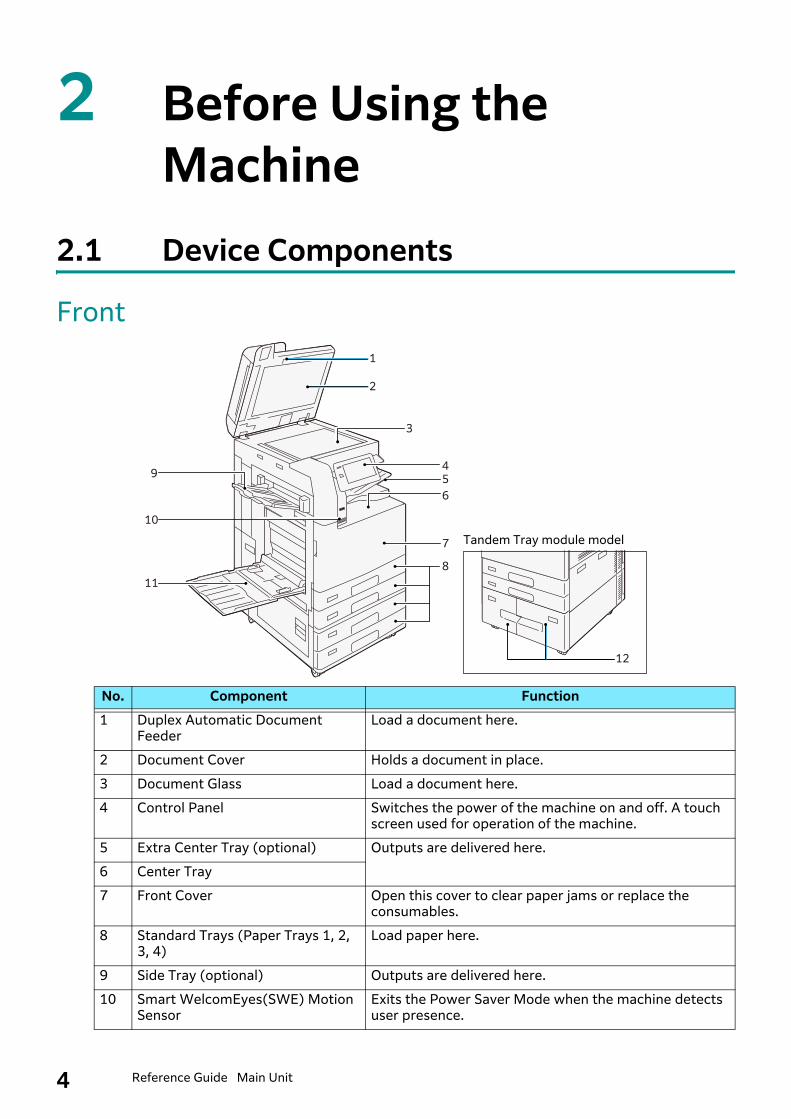
Front
No. Component Function1 Duplex Automatic Document
FeederLoad a document here.
2 Document Cover Holds a document in place.
3 Document Glass Load a document here.
4 Control Panel Switches the power of the machine on and off. A touch screen used for operation of the machine.
5 Extra Center Tray (optional) Outputs are delivered here.
6 Center Tray
7 Front Cover Open this cover to clear paper jams or replace the consumables.
8 Standard Trays (Paper Trays 1, 2, 3, 4)
Load paper here.
9 Side Tray (optional) Outputs are delivered here.
10 Smart WelcomEyes(SWE) Motion Sensor
Exits the Power Saver Mode when the machine detects user presence.
2
3
11
1
6
7
8
10
45
9
12
Tandem Tray module model

52 Before Using the Machine
Left Side and Rear
LAN connectionWhen connecting to the network port, keep the machine power switched off.
11 Bypass Tray (Paper Tray 5) Load paper here.
12 Tandem Trays (Paper Trays 3, 4)
No. Component Function1 Telephone line connectors Use “TEL” to call when using the telephone or handset
(optional).Use “LINE 1” for calls using a handset connected to the TEL jack.
2 Upper Left Cover Open this cover to clear paper jams.
3 Lower Left Cover
4 Right Rear Cover Open this cover to access each connector.
5 Reset button Automatically switches the machine off when a current leakage is detected.6
7 Network Port (optional) Connects to a network cable.
8 USB 2.0 interface connector
Connects to a memory card reader, an optional component or a peripheral with a USB cable.
9 USB 3.0 interface connector
Connects to a USB cable for printing.
10 Network Port Connects to a network cable.
11 Wireless Network Kit (optional)
Used for connecting wireless network (Wi-Fi/Bluetooth) to the machine.
No. Component Function
6
4
3
2
910
8
5
11
7
1

6 Reference Guide Main Unit
Note
When a connection failure occurs, it may be improved by setting [Disabled] in > [Settings] > [Network Settings] > [Protocol Settings] > [Ethernet Settings]> [Energy Efficient Ethernet] in the System Administrator mode.
USB connectionWhen connecting to a USB connector, keep the machine power switched off.
Inside
No. Component Function1 Toner Cartridge Contains Black (K), Cyan (C), Magenta (M), and Yellow (Y) toners.
2 Waste Toner Container (R5)
Collects waste toner.
3 Conveyance Box Remove this box when replacing a Drum Cartridge.
4 Fusing Unit (R8) Fuses toner on paper.Do not touch this unit as it is extremely hot.
1
2
3
4

72 Before Using the Machine
Control PanelReferFor Control Panel, refer to the Reference Guide - Operations.
No. Component Function1 Built-in IC Card
Reader (optional)Used to authenticate a user using an IC card.
2 Power / Power Saving Button
The power switches on.
Note When “Please wait...” is displayed, the machine is warming up.
The use of machine is not available during this time. If the power does not switch on, confirm that the Reset button
is in the reset position (button is pushed in) and the power plug is connected.
3 Home Button Pressing this button displays the Home screen.
NoteWhen the Home button is pressed, the settings of all applications in operation are reset.
4 Touch Panel Display Displays messages required for operation, and buttons for various features.
NoteAn antibacterial protection film is used for the Touch Panel Display.
5 Status Display Indicator
The indicator lights up in green at an instant of operation reception.When an error occurs, the lamp blinks in orange.
6 Data Indicator This indicator blinks while data is being sent from the machine or data is being received from the client computer.Also, this indicator lights up when documents are saved in the machine or the fax is stored in a local folder.
7 NFC touch area This is an area for you to hold up your NFC-supported mobile devices over. To communicate interactively, the NFC function of this machine needs to be enabled.
91 2 3 4
56
78
8 Reference Guide Main Unit
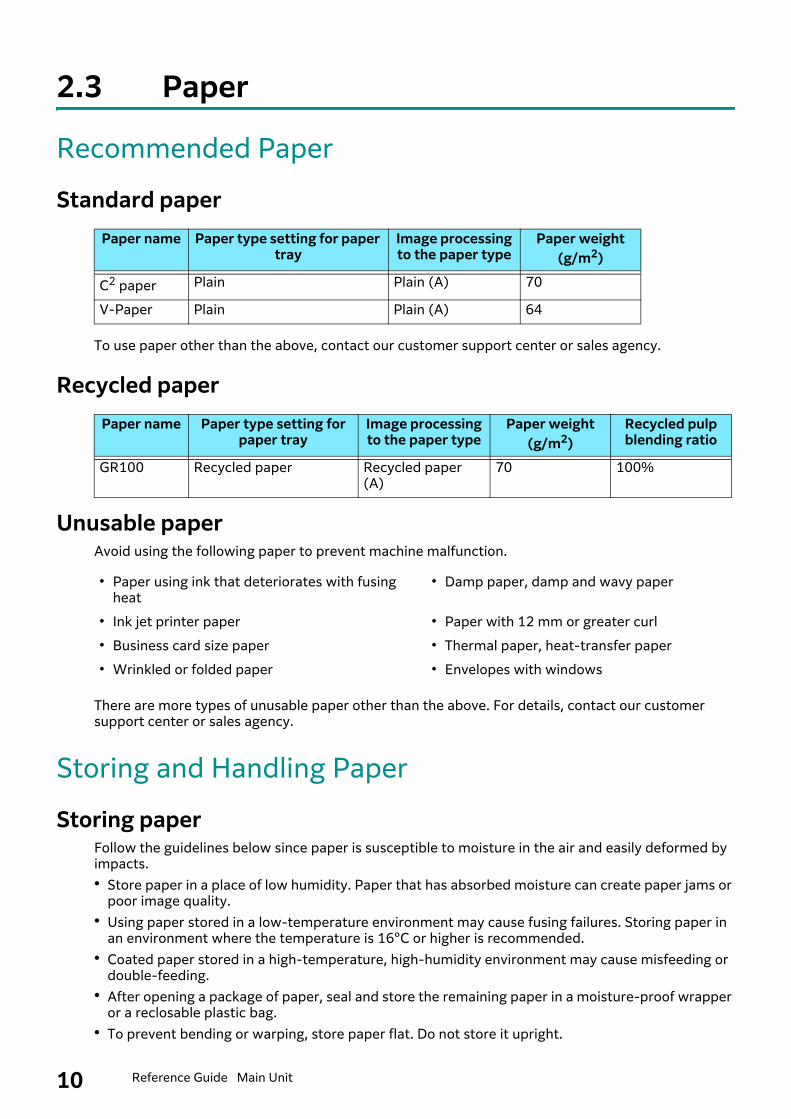
2.2 Print AreaA3 size (297 x 420 mm)
Guaranteed Print Area (mm)The following are the areas for which the image quality is guaranteed.
Image Loss Width (mm)There is an unprintable area (image loss area) along all four edges of the paper.
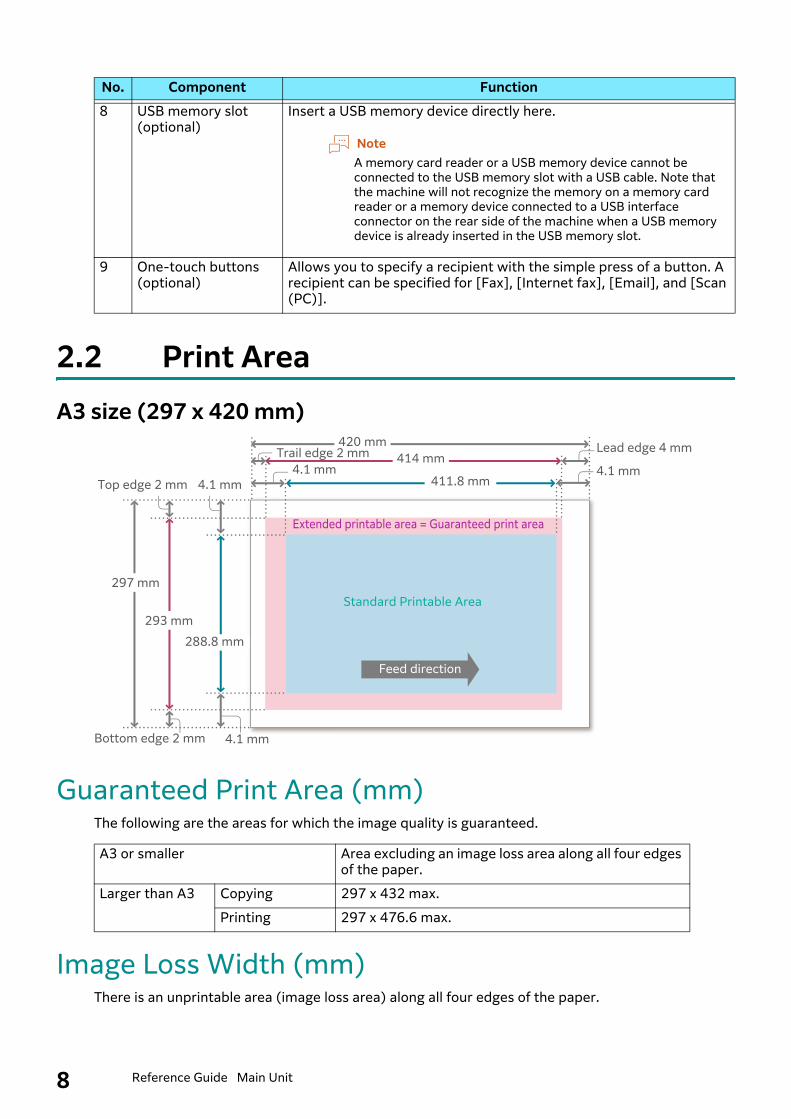
8 USB memory slot(optional)
Insert a USB memory device directly here.
NoteA memory card reader or a USB memory device cannot be connected to the USB memory slot with a USB cable. Note that the machine will not recognize the memory on a memory card reader or a memory device connected to a USB interface connector on the rear side of the machine when a USB memory device is already inserted in the USB memory slot.
9 One-touch buttons (optional)
Allows you to specify a recipient with the simple press of a button. A recipient can be specified for [Fax], [Internet fax], [Email], and [Scan (PC)].
A3 or smaller Area excluding an image loss area along all four edges of the paper.
Larger than A3 Copying 297 x 432 max.
Printing 297 x 476.6 max.
No. Component Function
Extended printable area = Guaranteed print area
Standard Printable Area
Feed direction
420 mm
4.1 mm414 mmTrail edge 2 mm
411.8 mm
Lead edge 4 mm
4.1 mm4.1 mmTop edge 2 mm
297 mm
288.8 mm293 mm
4.1 mmBottom edge 2 mm

92 Before Using the Machine
Standard Printable Area (mm)
Extended Printable Area (mm)Changing the printable area settings enables you to print over a margin (4.1 mm) for the standard printable area.
Changing the extended printable area settings1. Login to the System Administrator Mode.
2. Tap > [Settings] > [App Settings] > [Print Settings] > [Other Settings] > [Print Area] > [Extended].You can change the settings from [Tray / Output] > [Edge Erase / Print Position] > [Margins] of the ART EX printer driver.
Paper size Lead edge
Trail edge
Left edge Right edge
A3 or smaller 4 2 2 2
Larger than A3 4 2 2Paper larger than 309 mm: (Paper size - 305) ÷ 2Long paper 4 2
A3 or smaller Area excluding a margin (4.1 mm) along all four edges of the paper.
Larger than A3 Standard size 305 x 480 max.
Custom Size Area excluding a margin (4.1 mm) along all four edges of the paper.
Long paper 305 x 1,194 max.
A3 or smaller Area excluding an image loss area along all four edges of the paper.
Larger than A3 Copying 297 x 432 max.
Printing 305 x 476.6 max.
Long paper 305 x 1,194 max.
10 Reference Guide Main Unit
2.3 Paper
Recommended Paper
Standard paper
To use paper other than the above, contact our customer support center or sales agency.
Recycled paper
Unusable paperAvoid using the following paper to prevent machine malfunction.
There are more types of unusable paper other than the above. For details, contact our customer support center or sales agency.
Storing and Handling Paper
Storing paperFollow the guidelines below since paper is susceptible to moisture in the air and easily deformed by impacts. Store paper in a place of low humidity. Paper that has absorbed moisture can create paper jams or
poor image quality. Using paper stored in a low-temperature environment may cause fusing failures. Storing paper in
an environment where the temperature is 16°C or higher is recommended. Coated paper stored in a high-temperature, high-humidity environment may cause misfeeding or
double-feeding. After opening a package of paper, seal and store the remaining paper in a moisture-proof wrapper
or a reclosable plastic bag. To prevent bending or warping, store paper flat. Do not store it upright.
Paper name Paper type setting for paper tray
Image processing to the paper type
Paper weight (g/m2)
C2 paper Plain Plain (A) 70
V-Paper Plain Plain (A) 64
Paper name Paper type setting for paper tray
Image processing to the paper type
Paper weight (g/m2)
Recycled pulp blending ratio
GR100 Recycled paper Recycled paper (A)
70 100%
Paper using ink that deteriorates with fusing heat
Damp paper, damp and wavy paper
Ink jet printer paper Paper with 12 mm or greater curl Business card size paper Thermal paper, heat-transfer paper Wrinkled or folded paper Envelopes with windows

112 Before Using the Machine
Do not store paper under direct sunlight.
Handling paper Do not use collected pieces of paper. Do not use wrinkled or folded paper. Do not load paper of different sizes or types in the same tray. Before loading paper into the tray, fan a stack of paper well to prevent paper jams and double-
feeding (multiple sheets of paper are being fed simultaneously) of transparency films, films and coated paper.

12 Reference Guide Main Unit
3 Basic Operations of the Machine
3.1 Loading PaperAfter loading paper, configure the Paper Tray settings on the Home screen.
Important Do not place paper or other objects in the reserved space of the tray. It may cause paper jams or machine
malfunction. While the printer is processing a job, do not remove the Paper Tray used for the job.
Note Before loading the paper into the Paper Tray, fan a stack of paper well. This will separate the sheets, and it can prevent paper jamming.
ReferFor details, refer to “Setup” in Reference Guide - Operations.
Standard Trays The paper feeding method is the same for Paper Trays 1 (top tray) through 4 (bottom tray).The top face of loaded paper is the surface printed on.
Loadable
1. Pull out the Paper Tray until it stops.
2. When paper is already loaded in the tray, take out the paper.
C3570/C3070/C2570 C7070/C6570/C5570/C4570Paper size (mm) Width 100 to 320 (Tray 1: 297) 100 to 320 (Tray 1: 297)
Length 148 to 457 (Tray 1: 215) 148 to 457 (Tray 1: 432)
Paper weight (g/m2)
Single side printing
52 to 300
Maximum number of sheets (sheets)(C2 paper)
600
133 Basic Operations of the Machine
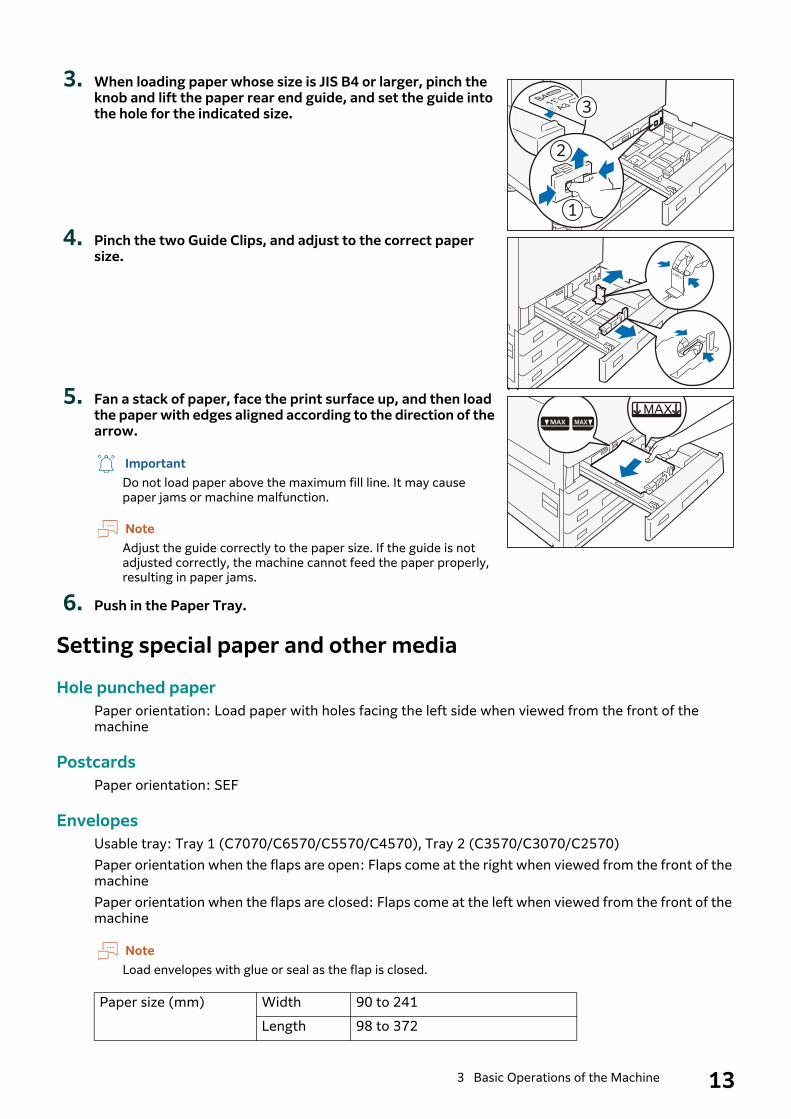
3. When loading paper whose size is JIS B4 or larger, pinch the knob and lift the paper rear end guide, and set the guide into the hole for the indicated size.
4. Pinch the two Guide Clips, and adjust to the correct paper size.
5. Fan a stack of paper, face the print surface up, and then load the paper with edges aligned according to the direction of the arrow.
ImportantDo not load paper above the maximum fill line. It may cause paper jams or machine malfunction.
NoteAdjust the guide correctly to the paper size. If the guide is not adjusted correctly, the machine cannot feed the paper properly, resulting in paper jams.
6. Push in the Paper Tray.
Setting special paper and other media
Hole punched paperPaper orientation: Load paper with holes facing the left side when viewed from the front of the machine
PostcardsPaper orientation: SEF
EnvelopesUsable tray: Tray 1 (C7070/C6570/C5570/C4570), Tray 2 (C3570/C3070/C2570)Paper orientation when the flaps are open: Flaps come at the right when viewed from the front of the machinePaper orientation when the flaps are closed: Flaps come at the left when viewed from the front of the machine
NoteLoad envelopes with glue or seal as the flap is closed.
Paper size (mm) Width 90 to 241
Length 98 to 372
1
2
3

14 Reference Guide Main Unit
The paper feeding method is the same for Paper Trays 1 and 2.
1. Pull out the Paper Tray 1 until it stops.
2. Slightly lift the front side of Paper Tray 1 and remove Paper Tray 1.
3. Push in the Envelope Tray.
4. Login to the System Administrator Mode.
5. Enable > [Settings] > [System Settings] > [Other Settings] > [Use Envelope Feeder].
Tandem Trays The paper feeding method is the same for Paper Trays 3 (left side) and 4 (right side).The top face of loaded paper is the surface printed on.
Loadable paper
Paper weight (g/m2) Envelopes 75 to 90
Postcards 106 to 220
Maximum number of sheets (sheets) (Papers specified by our company)
50
Paper size JIS B5 , A4 , Letter
1
153 Basic Operations of the Machine
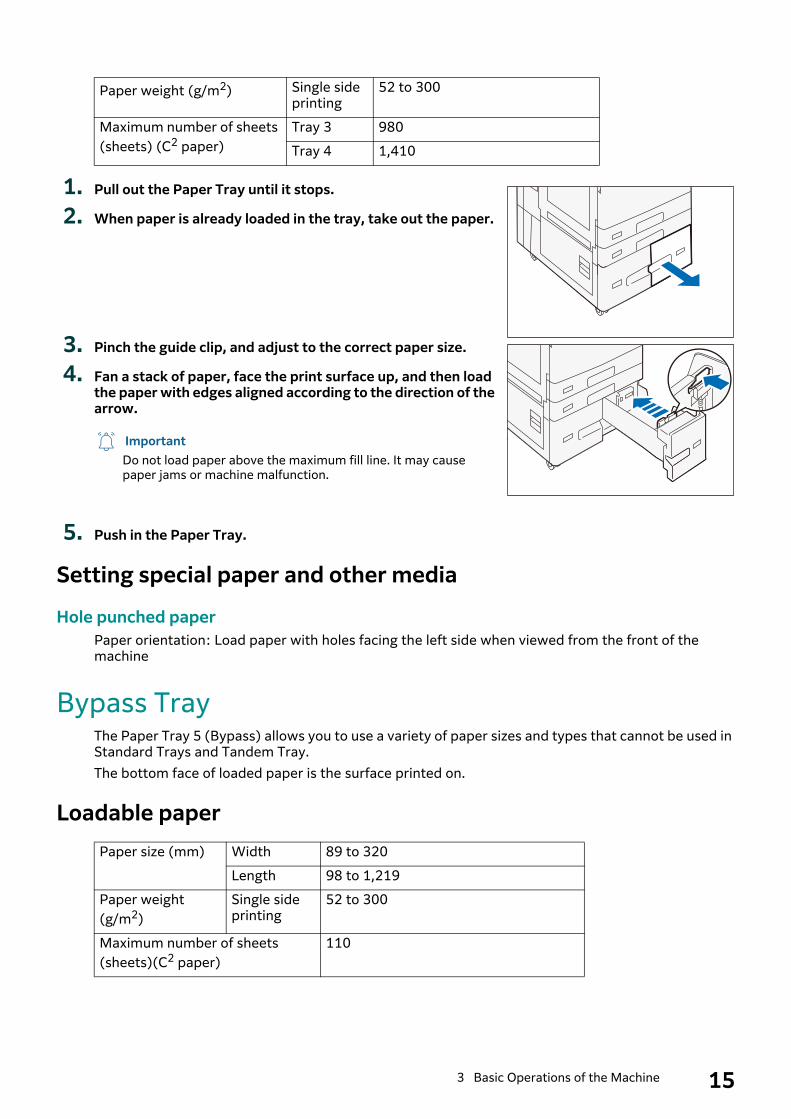
1. Pull out the Paper Tray until it stops.
2. When paper is already loaded in the tray, take out the paper.
3. Pinch the guide clip, and adjust to the correct paper size.
4. Fan a stack of paper, face the print surface up, and then load the paper with edges aligned according to the direction of the arrow.
ImportantDo not load paper above the maximum fill line. It may cause paper jams or machine malfunction.
5. Push in the Paper Tray.
Setting special paper and other media
Hole punched paperPaper orientation: Load paper with holes facing the left side when viewed from the front of the machine
Bypass TrayThe Paper Tray 5 (Bypass) allows you to use a variety of paper sizes and types that cannot be used in Standard Trays and Tandem Tray.The bottom face of loaded paper is the surface printed on.
Loadable paper
Paper weight (g/m2) Single side printing
52 to 300
Maximum number of sheets (sheets) (C2 paper)
Tray 3 980
Tray 4 1,410
Paper size (mm) Width 89 to 320
Length 98 to 1,219
Paper weight (g/m2)
Single side printing
52 to 300
Maximum number of sheets (sheets)(C2 paper)
110

16 Reference Guide Main Unit
1. Open the Paper Tray.
2. Fan a stack of paper, face the print surface down, and insert the paper gently along the Paper Guide until it stops.
ImportantDo not set documents above the maximum fill line. It may cause paper jams or machine malfunction.
3. Slide the Paper Guide to the correct paper size.
Setting special paper and other media
Hole punched paperPaper orientation: Load paper with holes facing the right side when viewed from the front of the machine
PostcardsPaper orientation: SEF
EnvelopesPaper orientation when the flaps are open: Flaps come at the left when viewed from the front of the machinePaper orientation when the flaps are closed: Flaps come at the right when viewed from the front of the machine
Long paperLoad paper one sheet at a time.Using an optional Long Paper Inserter prevents skewed feeding and the paper from falling.Install the Long Paper Inserter according to the steps described below.
Note Remove output paper one by one to prevent paper jam. When you finish printing, make sure to remove the Long Paper Inserter and keep it in a safe place.

173 Basic Operations of the Machine
1. Open the Paper Tray.
2. Extend the Paper Guide to the maximum.
3. Install the Long Paper Inserter.
4. Open the Paper Tray.
5. Face the print surface down, and insert the paper gently under the Paper Tray until it stops.
6. Insert the trail edge of the paper into the Paper Tray.

18 Reference Guide Main Unit
7. Adjust the Paper Guide to the correct paper size.
3.2 Loading Documents
Document Feeder
Loadable paper
Note When the Fax Kit is equipped, the loadable paper size is up to 600 mm for the length. When B2-PC is equipped, the loadable business card size is up to 55 mm for the width and 91 mm for the
length. The paper weight is up to 209 g/m2.
1. Open the Document Cover.
2. Wipe off any dirt adhering to the glass strip and white plastic area located in the left side of the Document Glass.
3. Close the Document Cover.
4. Confirm that the document is free of tag paper, adhesive tape, staples, and clips, and stretch out the document if it is wrinkled or folded.
5. Align the upper left corner of the document so that the original size is correctly detected.
B2-PC C2-PCPaper size (mm) Width 49 to 297 140 to 297
Length 85 to 432 84 to 432
Paper weight (g/m2)
Single side printing 38 to 128 38 to 200
Double side printing 50 to 128 50 to 200
Maximum number of sheets (sheets) (C2 paper)
130 250

193 Basic Operations of the Machine
6. Load the document face up (when the document is 2-sided,place the front side up) in the center of Document Feeder.
ImportantDo not set documents above the maximum fill line. It may cause paper jams or machine malfunction.
7. When the confirmation indicator lights up, move thedocument guide to align with both edges of the document.
8. Open the Document Stopper.
Document Glass
Loadable paper
1. Open the Document Cover, and wipe off any dirt from theDocument Glass.
2. Load the document face down with the document alignedwith the upper left corner of the Document Glass.
3. Close the Document Cover.
Paper size (mm) Width Up to 297
Length Up to 432
20 Reference Guide Main Unit
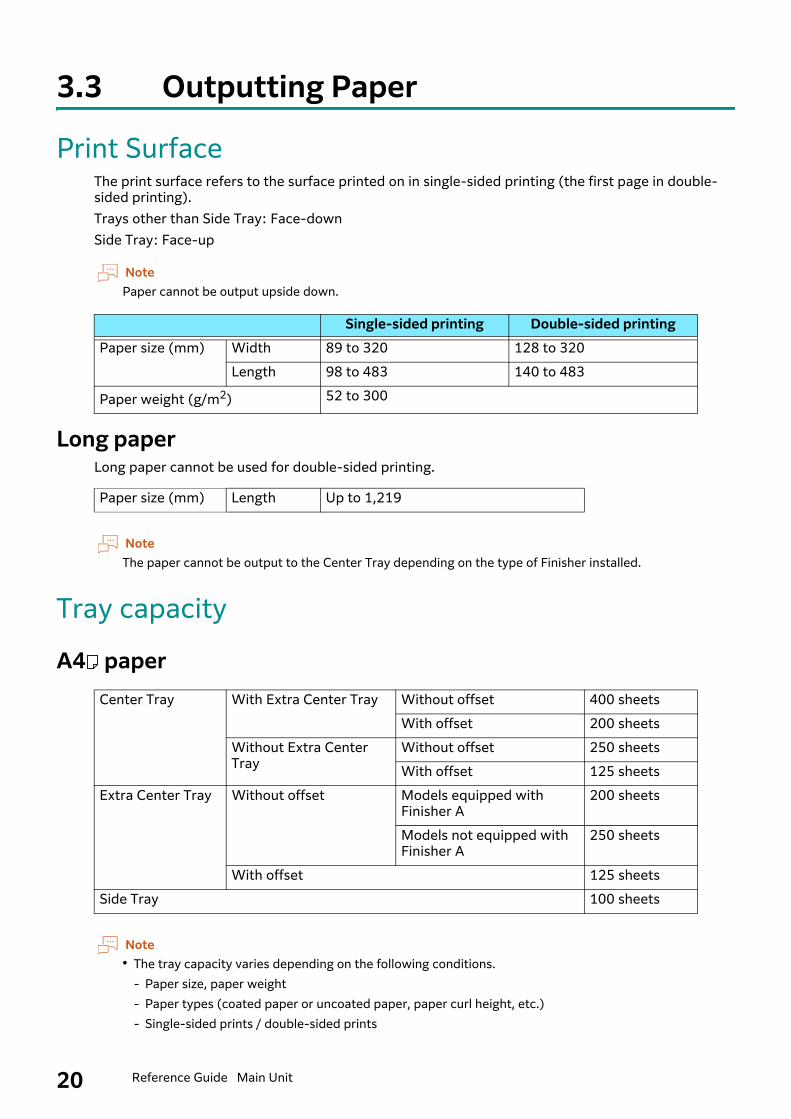
3.3 Outputting Paper
Print SurfaceThe print surface refers to the surface printed on in single-sided printing (the first page in double-sided printing).Trays other than Side Tray: Face-downSide Tray: Face-up
NotePaper cannot be output upside down.
Long paperLong paper cannot be used for double-sided printing.
NoteThe paper cannot be output to the Center Tray depending on the type of Finisher installed.
Tray capacity
A4 paper
Note The tray capacity varies depending on the following conditions.
- Paper size, paper weight- Paper types (coated paper or uncoated paper, paper curl height, etc.)- Single-sided prints / double-sided prints
Single-sided printing Double-sided printingPaper size (mm) Width 89 to 320 128 to 320
Length 98 to 483 140 to 483
Paper weight (g/m2) 52 to 300
Paper size (mm) Length Up to 1,219
Center Tray With Extra Center Tray Without offset 400 sheets
With offset 200 sheets
Without Extra Center Tray
Without offset 250 sheets
With offset 125 sheets
Extra Center Tray Without offset Models equipped with Finisher A
200 sheets
Models not equipped with Finisher A
250 sheets
With offset 125 sheets
Side Tray 100 sheets

213 Basic Operations of the Machine
- Image density The output operation stops when the Center Tray becomes full.
OffsetNoteOffset on the Extra Center Tray is optional. Offset cannot be performed on the Side Tray.
The paper is output with offset stacking for easy separation.Use the printer driver to set the offset of outputs.
Attention LightCenter Tray
Center Tray Attention Light starts blinking after a print job is started and lights up after the printing is finished. So, you can check the printing progress even when you are away from the machine.Also, the Center Tray Attention Light remains lit when ejected paper is still remaining on the Center Tray or Side Tray.
Note Center Tray Attention Light may not blink or light up depending
on the output tray used and method of finishing the job. In the Power Saver Mode, the Center Tray Attention Light does not turn on.
Refer From > [Settings] > [Maintenance] > [NVM Read/Write], ON/OFF of the Center Tray Attention Light
can be changed for each paper output tray. For details, refer to “Settings” in Reference Guide - Operations.
Duplex Automatic Document FeederThe light is turned ON when a document is read and notifies the document position.
NoteThe light is not turned ON when a document is jammed or a job is canceled.
Inhibiting the light from lighting1. Login to the System Administrator Mode.
Paper size (mm) Width 128 to 297
Length 210 to 432
Paper weight (g/m2) 52 to 256

22 Reference Guide Main Unit
Center Tray
Tap > [Settings] > [System Settings] > [Other Settings] >[Center Tray Attention Light] > [Disabled].
Duplex Automatic Document Feeder
Tap > [Settings] > [System Settings] > [Other Settings] >[Document Feeder Attention Light] > [Disabled].
Changing the Light Lighting DurationYou can change the lighting duration of the Center Tray Attention Light.
1. Login to the System Administrator Mode.
2. Tap > [Settings] > [System Settings] > [Power SaverSettings] > [Power Saver Timers], input time of [Low PowerMode] and [Sleep Mode], and tap [OK].

234 Maintenance
4 Maintenance4.1 Consumables
Consumables recommended by our company are manufactured under the standards suitable for this machine. Using consumables not recommended by our company may affect print quality or performance provided by the product. Use consumables that our company recommends for this machine.
Handling consumables Do not store boxes of consumables upright. Do not unpack consumables before use. Avoid storing consumables in the following locations:
- In high temperature and humid locations- Near heat-generating devices- Areas exposed to direct sunlight- Dusty areas
When using consumables, carefully read precautions for use instructed on their bodies orpackages.
We recommend keeping spare consumables in stock. When calling your local Representative to order consumables, have the product codes ready.
Replacing consumablesTo display the consumables progress, tap > [Device Status]> [Supplies].When the end of life for a consumable is reached, a message appears on the Touch Panel Display. Replace the consumable indicated in the message.For the replacement method, refer to the steps provided on the box of the consumable.
Note When replacing Toner Cartridges, keep the machine power switched on.
Consumable typesToner Cartridge [K] (Black)
Toner Cartridge [C] (Cyan)
Toner Cartridge [M] (Magenta)
Toner Cartridge [Y] (Yellow)
Drum Cartridge (YMCK)
Waste Toner Container (C5570/C4570/C3570/C3070/C2570)
Waste Toner Container (C7070/C6570)
Stamp Replacement Kit
24 Reference Guide Main Unit
When replacing a toner cartridge or Waste Toner Container, toner may spill and soil the floor. We recommend laying a piece of paper or a sheet on the floor beforehand.
Do not take out or shake the Waste Toner Container before it is filled up.Accurate detection can become no longer possible, and the toner may be spilled from the Waste Toner Container.
With C7070/C6570, do not touch the filter surface at the leading end of Waste Toner Container. You can get toner on your fingers.
A trouble with image quality results if the Drum Cartridge is placed under a direct sunlight or intense fluorescent light, or if the drum surface is touched and scratched.
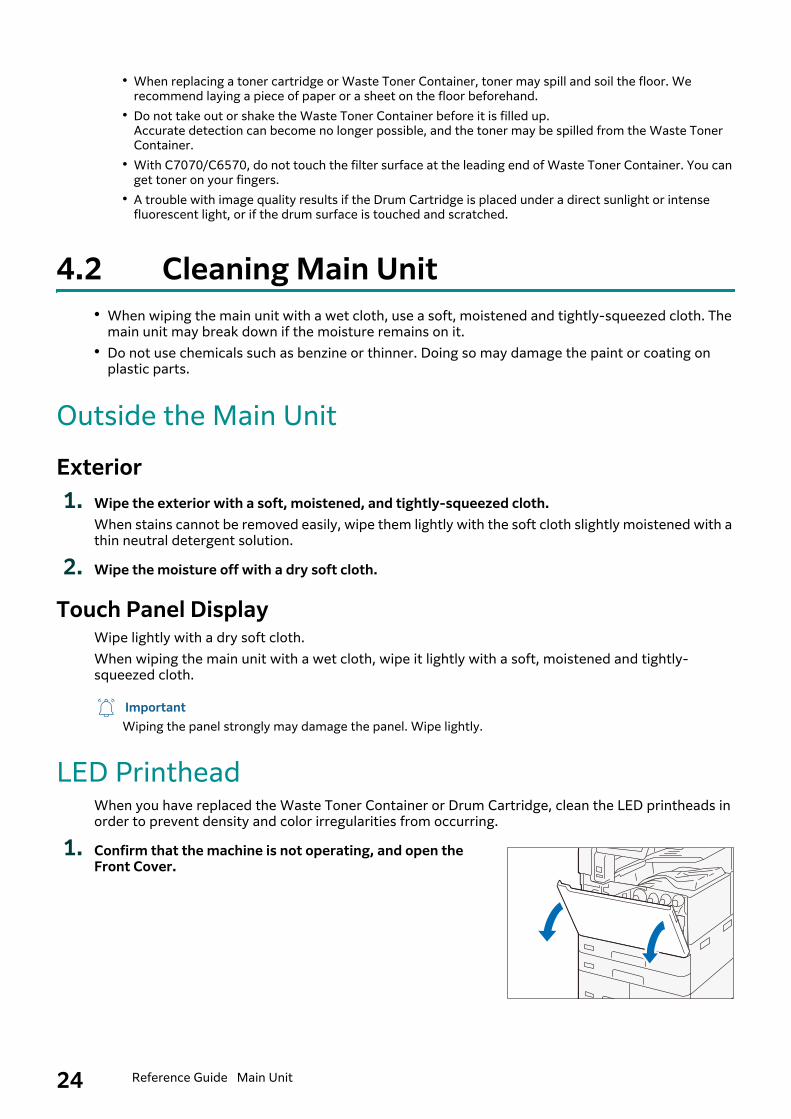
4.2 Cleaning Main Unit When wiping the main unit with a wet cloth, use a soft, moistened and tightly-squeezed cloth. The
main unit may break down if the moisture remains on it. Do not use chemicals such as benzine or thinner. Doing so may damage the paint or coating on
plastic parts.
Outside the Main Unit
Exterior1. Wipe the exterior with a soft, moistened, and tightly-squeezed cloth.
When stains cannot be removed easily, wipe them lightly with the soft cloth slightly moistened with a thin neutral detergent solution.
2. Wipe the moisture off with a dry soft cloth.
Touch Panel DisplayWipe lightly with a dry soft cloth.When wiping the main unit with a wet cloth, wipe it lightly with a soft, moistened and tightly-squeezed cloth.
ImportantWiping the panel strongly may damage the panel. Wipe lightly.
LED PrintheadWhen you have replaced the Waste Toner Container or Drum Cartridge, clean the LED printheads in order to prevent density and color irregularities from occurring.
1. Confirm that the machine is not operating, and open the Front Cover.
254 Maintenance
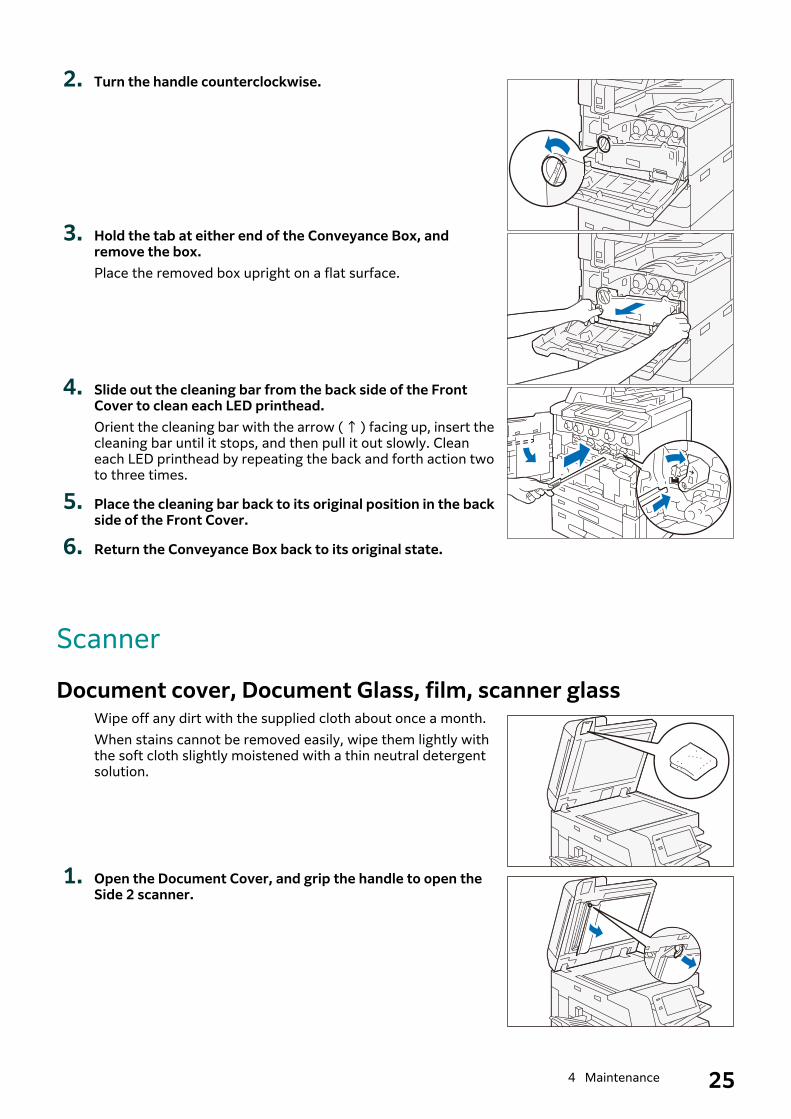
2. Turn the handle counterclockwise.
3. Hold the tab at either end of the Conveyance Box, and remove the box.Place the removed box upright on a flat surface.
4. Slide out the cleaning bar from the back side of the Front Cover to clean each LED printhead.Orient the cleaning bar with the arrow ( ↑ ) facing up, insert the cleaning bar until it stops, and then pull it out slowly. Clean each LED printhead by repeating the back and forth action two to three times.
5. Place the cleaning bar back to its original position in the back side of the Front Cover.
6. Return the Conveyance Box back to its original state.
Scanner
Document cover, Document Glass, film, scanner glassWipe off any dirt with the supplied cloth about once a month.When stains cannot be removed easily, wipe them lightly with the soft cloth slightly moistened with a thin neutral detergent solution.
1. Open the Document Cover, and grip the handle to open the Side 2 scanner.

26 Reference Guide Main Unit
2. Wipe off any dirt from the film.
3. Wipe off any dirt from the glass.
4. Close the Side 2 scanner, then close the Document Cover.
Document Feeder rollersClean the Document Feeder rollers about once a month.
1. Pull up the front handle of the Top Cover of the Document Feeder, and open the cover until it stops.
2. While turning the rollers, wipe them with a soft cloth slightly moistened with water.
3. Close the Top Cover of the Document Feeder and make sure that there is no gap on the front or rear of the cover.
4.3 Paper JamsIf paper is jammed, the machine stops and an alarm sounds. A message also appears on the control panel. Follow the instructions displayed to remove the jammed paper.Gently remove the paper being careful not to tear it. If paper is torn while it is being removed from the machine, remove all the torn pieces making sure that none remain inside the machine.When you have finished clearing the paper jam, printing is resumed from the state before the paper jam occurred. If a paper jam occurred during copying, tap on [Start]. Copying is resumed from the state before the paper jam occurred.
Note If a paper jam occurred, check the paper jam position before pulling out a Paper Tray.

274 Maintenance
Clear the paper jams while the machine is on. Do not touch components inside the machine. This may cause print defects.
Side Tray1. Remove the jammed paper.
Inside Upper Left Cover
Important Do not touch the machine’s transfer belt (black film-like belt) inside the Upper Left Cover when you remove the jammed paper. The image quality may be deteriorated or the transfer belt may be damaged and need replacement.
1. While lifting up the Release Handle, open the Upper Left Cover.
Note When the Side Tray is installed, remove the paper in the Side
Tray, close the Side Tray, and then open the Upper Left Cover. When High Capacity Feeder (1 tray) is installed, hold the handle
and fully move the unit to the left.
Fusing Unit
1)Remove the jammed paper.
NoteWhen the lead edge of the jammed paper protrudes toward the Top Output Tray, pull the paper downward to remove it.
WarningThe Fusing Unit is hot. It may cause burn injury. Do not touch this unit.

28 Reference Guide Main Unit
2)Pull the handle [A1].
3)Remove the jammed paper.
4)Return the handle [A1] to the original position.
Center Tray Exit
1)Pull the handle [A2].
2)While holding the handle [A2], remove the jammed paper.
3)Return the handle [A2] to the original position.
Duplex Unit
1)Remove the jammed paper.
A2

294 Maintenance
2)Pull the handle [A3].
3)While holding the handle [A3], remove the jammed paper.
4)Return the handle [A3] to the original position.
2. Close the Upper Left Cover.
Inside Lower Left Cover1. Open the Lower Left Cover.
NoteWhen High Capacity Feeder (1 tray) is installed, hold the handle and fully move the unit to the left.
2. Remove the jammed paper.
3. Close the Lower Left Cover.
Standard Trays 1. Pull out the Paper Tray where the paper jam occurred until it
stops.
A3

30 Reference Guide Main Unit
2. Remove the jammed paper.
3. Push in the Paper Tray.
Tandem Trays 1. Pull out the Paper Tray where the paper jam occurred until it
stops.
2. Remove the jammed paper.
3. If paper is jammed in the paper feed section, pull out [C].
4. Open the cover and remove the jammed paper.
5. Close the cover and push in the Paper Tray.
C1
2

314 Maintenance
Bypass Tray1. Remove the jammed paper.
Duplex Automatic Document Feeder
B2-PC1. Remove all documents from the Document Tray.
2. Pull up the front handle of the cover and open the cover until it stops.
3. Remove the document.
4. Close the cover.
5. If you cannot find the document, open the Document Cover, grip the handle to open the Side 2 scanner, and then remove the document.
6. Close the Side 2 scanner, then close the Document Cover.

32 Reference Guide Main Unit
7. Lift the Document Feeder Tray and remove the document.
8. Put the Document Feeder Tray back into position.
C2-PC1. Remove all documents from the Document Tray.
2. Pull up the front handle of the Top Cover and open the cover until it stops.
3. Open the Left Cover until it stops.
4. Remove the document.
5. If the document is caught in the entry, remove the jammed paper from the Left Cover.
6. If the document is caught in the exit area, lift the Document Feeder Tray and pull the document toward the exit.
7. Put the Document Feeder Tray back into position.
8. Close the Upper Cover.
9. Close the Left Cover.
Left Cover

334 Maintenance
10. Open the Document Cover, pull down the handle to open the Side 2 scanner, and then remove the document.
11. Close the Side 2 scanner, then close the Document Cover.

34 Reference Guide Main Unit
5 Appendix5.1 Main Specifications
This section lists the main specifications of the machine. Note that the specifications and the appearance of the product may change without prior notice.
Note The specifications are not intended to guarantee the image quality performance and feeding
performance of all papers. Use of our brand paper is recommended. To use other paper, contact your local representative.
Wireless Network Kit (optional) is sold separately. It has obtained certification separately from the main unit.
Certified model name of Wireless Network Kit (optional): Titan2020 Certified model name of FAX: FX2A-FAX
Refer For specifications of optional units, refer to the chapter of the concerned unit in Reference Guide -
Optional Units. For specifications of the print server, refer to the manual supplied with the print server.
Basic Specifications/Copy FunctionItem Specification
Type Console type
Memory capacity 4 GB (Max. 4 GB)
Storage device capacity 128 GB
Color capability Full color
Scanning resolution 600 x 600 dpi
Printing resolution 1,200 x 2,400 dpi (Text-Photo / Photo), 600 x 600 dpi (Text / Map)
Halftone/printable colors
256 halftones for each color (16,700,000 colors)
Warm-up time Embedded Plug-ins / Custom ServicesWhen enabled: 30 seconds or less (23 degrees Celsius room temperature) When disabled: 24 seconds or less (23 degrees Celsius room temperature)
Recovery time(Recovery time from Sleep Mode)
C7070/C6570 C5570/C4570 C3570/C3070/C2570
13 seconds or less (23 degrees Celsius room temperature)
6 seconds or less (23 degrees Celsius room temperature)
5 seconds or less (23 degrees Celsius room temperature)

355 Appendix
First copy output time (A4 )
C7070/C6570 C5570 C4570 C3570/C3070
C2570
Monochrome(monochrome priority mode)
3.3 seconds or less 3.7 seconds or less
4.4 seconds or less
4.9 seconds or less
6.3 seconds or less
Color(Color priority mode)
4.1 seconds or less 5.2 seconds or less
5.7 seconds or less
6.7 seconds or less
8.7 seconds or less
Reduction/enlargement Size-for-size:1: 1 ± 0.7%Preset: 50%, 70%, 81%, 86%, 115%, 122%, 141%, 200%Variable: 25 - 400% (1% increments)
Continuous copy speed (sheets/minute)(continuous 1-sided copy/same magnification, monochrome/color)
Paper size JIS B5 /A4 A4/JIS B5 JIS B4 A3
C7070 70 50 41 35
C6570 65 47 38 32
C5570 55 40 32 27
C4570 45 32 26 22
C3570 35 27 23 19
C3070 30 23 20 17
C2570 25 19 16 14
Paper Tray Capacity (Maximum number ofsheets of paper)
C7070/C6570 7070 (Standard + High Capacity Feeder B2)
C5570/C4570/C3570/C3070/C2570
Model-P/Model-PFS/Model-PFS-C: 5880 (Standard + High Capacity Feeder B2)
Model-PFS-2TS: 1310 (Standard)
Continuous copy 999 sheets
Power supplyMaximum power consumption
C7070/C6570 C5570/C4570/C3570/C3070/C2570
Power supply AC 100 V ± 10%, 13 A + 7 A, 50/60 Hz common (2 power supplies)
AC 100 V ± 10%, 15 A, 50/60 Hz common
Maximum power consumption (kW)
2.0 1.5
Standby Mode (W) 96 64
Low Power Mode (W)
75 48
Sleep Mode (W) 0.5 0.5
NoteThe Low Power Mode is not set at the time of shipment from the factory.
Energy consumption efficiency
C5570 C4570 C3570 C3070 C2570
Annual power consumption (kWh/year)
120 94 69 60 44
Category MFD b MFD b MFD a MFD a MFD a
Item Specification
36 Reference Guide Main Unit
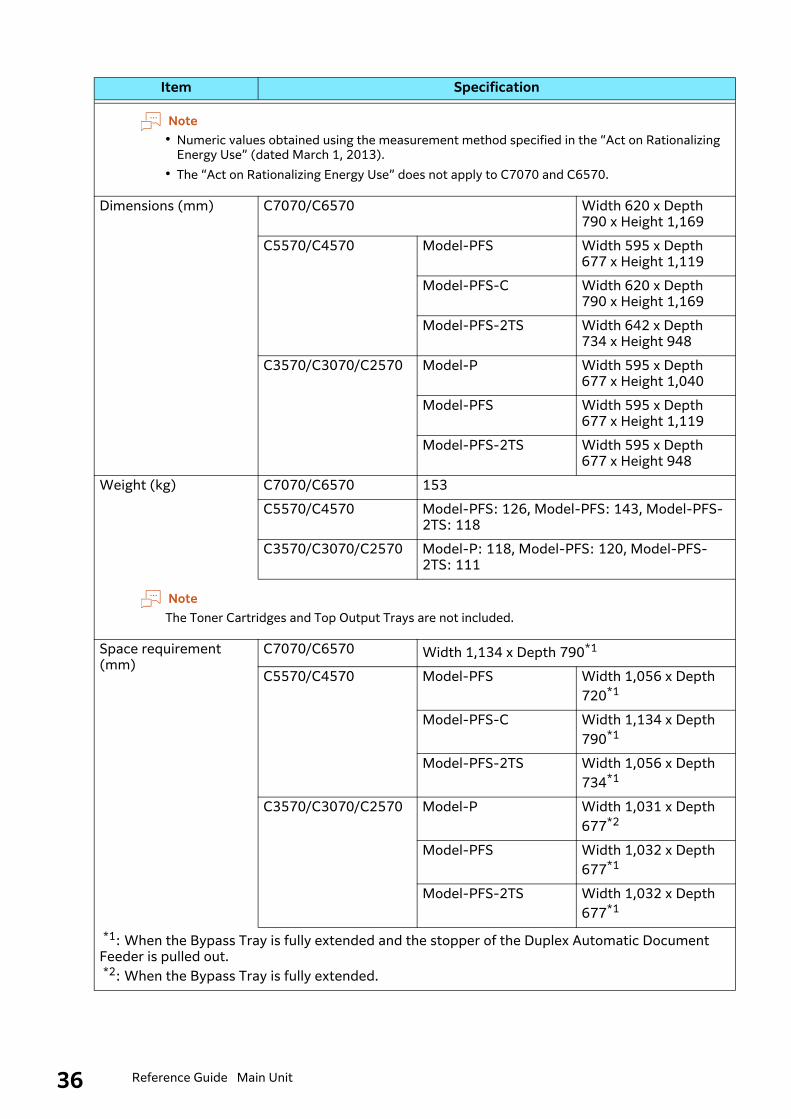
Note Numeric values obtained using the measurement method specified in the “Act on Rationalizing
Energy Use” (dated March 1, 2013). The “Act on Rationalizing Energy Use” does not apply to C7070 and C6570.
Dimensions (mm) C7070/C6570 Width 620 x Depth 790 x Height 1,169
C5570/C4570 Model-PFS Width 595 x Depth 677 x Height 1,119
Model-PFS-C Width 620 x Depth 790 x Height 1,169
Model-PFS-2TS Width 642 x Depth 734 x Height 948
C3570/C3070/C2570 Model-P Width 595 x Depth 677 x Height 1,040
Model-PFS Width 595 x Depth 677 x Height 1,119
Model-PFS-2TS Width 595 x Depth 677 x Height 948
Weight (kg) C7070/C6570 153
C5570/C4570 Model-PFS: 126, Model-PFS: 143, Model-PFS-2TS: 118
C3570/C3070/C2570 Model-P: 118, Model-PFS: 120, Model-PFS-2TS: 111
NoteThe Toner Cartridges and Top Output Trays are not included.
Space requirement (mm)
C7070/C6570 Width 1,134 x Depth 790*1
C5570/C4570 Model-PFS Width 1,056 x Depth 720*1
Model-PFS-C Width 1,134 x Depth 790*1
Model-PFS-2TS Width 1,056 x Depth 734*1
C3570/C3070/C2570 Model-P Width 1,031 x Depth 677*2
Model-PFS Width 1,032 x Depth 677*1
Model-PFS-2TS Width 1,032 x Depth 677*1
*1: When the Bypass Tray is fully extended and the stopper of the Duplex Automatic Document Feeder is pulled out. *2: When the Bypass Tray is fully extended.
Item Specification

375 Appendix
Print FunctionItem Specification
Type Built-in
Continuous print speed
Same as the Basic Specifications/Copy Function
Note This speed may be reduced due to image quality adjustment. The productivity may be reduced depending on the document type.
Printing resolution (dpi)
Standard: ART EX driver
Standard 1,200 x 2,400
Fine 1,200 x 2,400
Superfine 1,200 x 1,200
Optional:Adobe® PostScript® 3™ driver
High speed (standard) 600 x 600
Fine 1,200 x 2,400
Superfine 1,200 x 1,200
PDL Standard: ART EX Optional: Adobe PostScript 3
Supported protocol
Ethernet : TCP/IP (lpd, IPP, Port9100, WSD, ThinPrint)
Note“WSD” stands for “Web Services on Devices”.
Supported operating system
For information about the latest supported OS, refer to the Download page of our official website for your model.
Built-in fonts Standard 2 Japanese (Heisei Mincho W3, Heisei Kaku Gothic W5), 19 Western fonts
Optional Adobe® PostScript® 3™kitHeisei 2 font version :2 Japanese fonts (Heisei Mincho W3, Heisei Kaku Gothic W5), 136 Western fonts Morisawa 2 font version :2 Japanese fonts (Ryumin L-KL, Gothic BBB Medium), 136 Western fonts
Emulation kitStroke fonts (Japanese fonts, Western fonts : For HP-GL), 82 Western fonts, 37 symbol sets
Emulation Standard PDF, XPS, DocuWorks, TIFF, JPEG, ART IV, ESC/P (VP-1000)
Note“XPS” stands for “XML Paper Specification”.
Optional PC-PR201H, HP-GL (HP7586B), HP-GL2/RTL (HP Designjet 750C Plus), PCL5/PCL6
Interface Standard Ethernet 1000BASE-T/100BASE-TX/10BASE-T, USB 3.0
Optional Wireless LAN (IEEE 802.11 a/b/g/n/ac)
38 Reference Guide Main Unit
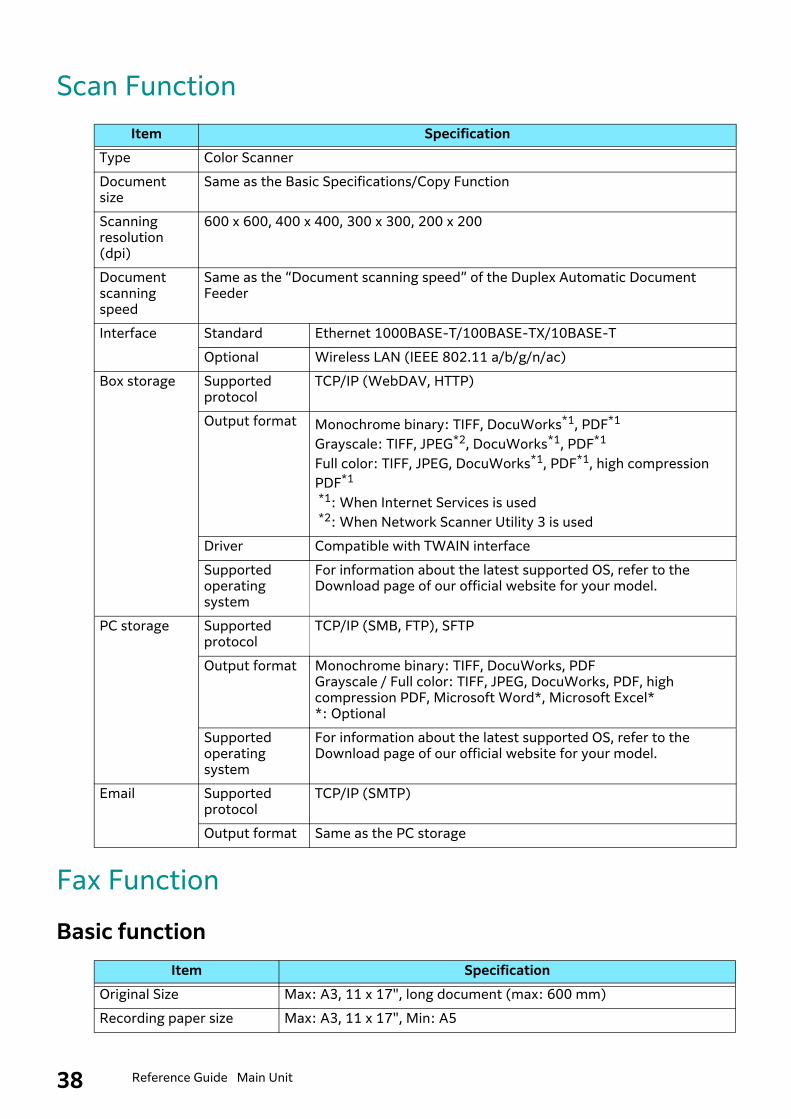
Scan Function
Fax Function
Basic function
Item SpecificationType Color Scanner
Document size
Same as the Basic Specifications/Copy Function
Scanning resolution (dpi)
600 x 600, 400 x 400, 300 x 300, 200 x 200
Document scanning speed
Same as the “Document scanning speed” of the Duplex Automatic Document Feeder
Interface Standard Ethernet 1000BASE-T/100BASE-TX/10BASE-T
Optional Wireless LAN (IEEE 802.11 a/b/g/n/ac)
Box storage Supported protocol
TCP/IP (WebDAV, HTTP)
Output format Monochrome binary: TIFF, DocuWorks*1, PDF*1
Grayscale: TIFF, JPEG*2, DocuWorks*1, PDF*1
Full color: TIFF, JPEG, DocuWorks*1, PDF*1, high compression PDF*1
*1: When Internet Services is used *2: When Network Scanner Utility 3 is used
Driver Compatible with TWAIN interface
Supported operating system
For information about the latest supported OS, refer to the Download page of our official website for your model.
PC storage Supported protocol
TCP/IP (SMB, FTP), SFTP
Output format Monochrome binary: TIFF, DocuWorks, PDFGrayscale / Full color: TIFF, JPEG, DocuWorks, PDF, high compression PDF, Microsoft Word*, Microsoft Excel**: Optional
Supported operating system
For information about the latest supported OS, refer to the Download page of our official website for your model.
Email Supported protocol
TCP/IP (SMTP)
Output format Same as the PC storage
Item SpecificationOriginal Size Max: A3, 11 x 17", long document (max: 600 mm)
Recording paper size Max: A3, 11 x 17", Min: A5

395 Appendix
Direct fax
Internet fax
Transmission time 2 seconds or more but below 3 seconds
NoteWhen transmitting an A4 size 700-character document in the standard quality (8 x 3.85 lines/mm) and high speed mode (28.8 kbps or above: JBIG). This is only the transmission speed for image information and does not include the controlling time for the communication. Note that the actual transmission time depends on the content of documents, the machine that the recipient uses, and the status of the communication line.
Transmission mode ITU-T G3
Scanning resolution
Standard 8 x 3.85 lines/mm, 200 x 100 dpi
Fine 8 x 7.7 lines/mm, 200 x 200 dpi
Superfine (400 dpi)
16 x 15.4 lines/mm, 400 x 400 dpi
Superfine (600 dpi)
600 x 600 dpi
Coding method MH, MR, MMR, JBIG
Transmission speed G3: 33.6/31.2/28.8/26.4/24.0/21.6/19.2/16.8/14.4/12.0/9.6/7.2/4.8/2.4 kbps
Applicable lines Telephone subscriber line, PBX, fax communication network (PSTN), 3 ports maximum (G3: 3 ports)
NoteA maximum of 3 lines can be connected. The number of ports indicates the number of channels that can be used for communication.
Item SpecificationDocument size A3, JIS B4 , A4
Transmission resolution Same as the scanning resolution of the Basic Function
Transmission speed Same as the Basic Function
Applicable lines Same as the Basic Function
Supported operating system
For information about the latest supported OS, refer to the Download page of our official website for your model.
Item SpecificationDocument size A3, JIS B4 , A4
Scanning resolution Same as the Basic Function
Output format Format: TIFF-FX, Compression method: MH, MMR, JBIG
Profile TIFF-S, TIFF-F, TIFF-J
Supported protocol Transmission: SMTP, Reception: SMTP, POP3
Item Specification

40 Reference Guide Main Unit
IP fax (SIP)
Duplex Automatic Document Feeder
B2-PC
C2-PC
Interface Ethernet 1000BASE-T/100BASE-TX/10BASE-T
Item SpecificationDocument size Same as the Basic Function
Scanning resolution Same as the Basic Function
Supported protocol SIP, JT-T.38
Coding method Same as the Basic Function
Interface Ethernet 1000BASE-T/100BASE-TX/10BASE-T
Item SpecificationDocument feeder type Single-pass Duplex Automatic Document Feeder
Document scanning speed (when copying)
Same as the continuous copy speed
Document scanning speed (when scanning)
Monochrome: 80 sheets/minute, Color: 80 sheets/minute(Single-pass duplex scanning: Monochrome 160 sheets/minute, Color 160 sheets/minute)
NoteThe values above apply when our standard document (A4) is saved in the folder at 200 dpi.
Item SpecificationDocument feeder type 1 pass, 2 sided scanning Duplex Automatic Document Feeder
Document scanning speed (when copying)
Same as the continuous copy speed
Document scanning speed (when scanning)
Monochrome: 135 sheets/minute, Color: 135 sheets/minute(Single-pass duplex scanning: Monochrome 270 sheets/minute, Color 270 sheets/minute)
NoteThe values above apply when our standard document (A4) is saved in the folder at 200 dpi.
Item Specification

415 Appendix
Envelope Tray
Side Tray
Item SpecificationDimensions/Weight C7070/C6570/C5570/C4570 Width 620 x Depth 566 x Height
87 mm, 3 kg
C3570/C3070/C2570 Width 595 x Depth 566 x Height 87 mm, 3 kg
Item SpecificationDimensions Width 324 x Depth 567 x Height 228 mm

42 Reference Guide Main Unit
5.2 Safety NotesReferAlso refer to User's Manual.
Location of Warning and Caution Labels
Finisher B

435 Appendix
Symbols Marked on the MachineDANGER, CAUTION, AND WARNING
DO NOT USE ENVELOPE
DO NOT THROW A TONER CARTRIDGE INTO AN OPEN FLAME
CAUTION (HEATED SURFACE)
DO NOT USE POSTCARDS
DO NOT THROW WASTE TONER CONTAINER INTO AN OPEN FLAME
DO NOT INSERT A FINGER
DO NOT USE FOLDED, CREASED, OR CURLED PAPER
Power / Power Saving Button
DO NOT TOUCH DO NOT USE PAPER WITH STAPLES OR CLIPS
PAPER JAM
DO NOT INSERT A FINGER
DO NOT COPY MONEY
HEAVY OBJECT
USB COOLING
DO NOT USE INK JET PRINTER PAPER
LAN ELAPSED TIME
CLEANING OF SCANNER
DO NOT USE FOLDED, CREASED, OR TORN DOCUMENT
DO NOT USE CUT AND PASTED DOCUMENT
DO NOT USE THIN DOCUMENT
DO NOT USE CURLED DOCUMENT
DO NOT USE BACK CARBON PAPER


