38
Athena Device Explorer User Guide DRAFT Page i Odyssey Software, Inc. AppCenter™ WINDOWS CE ADMINISTRATOR GUIDE
Athena Device Explorer User Guide DRAFT
Page i Odyssey Software, Inc.
AppCenter™
WINDOWS CE
ADMINISTRATOR GUIDE
AppCenter Windows CE Administrator Guide
Page ii Odyssey Software, Inc.
Document Information
Version: 1
Date: 2/23/2009
© 2009, Odyssey Software, Inc. All Rights reserved. Athena and AppCenter are trademarks of Odyssey Software, Inc. Microsoft, Windows, and ActiveSync are
registered trademarks of Microsoft Corporation in the United States and other countries. Motorola is registered in the U.S. Patent and Trademark Office. Symbol, Spectrum24, and AirBEAM are registered trademarks of Symbol Technologies,
Inc. eConnect is a trademark of InVision Software, Inc. Other product or service names may be trademarks or registered trademarks of their respective owners.
This document contains material that is proprietary of Odyssey Software, Inc. and is protected by copyright. Copying, reproducing, or disclosure of this document, or
any part of this document is prohibited without the written permission of Odyssey Software, Inc.
Odyssey Software, Inc. shall not be held liable for technical or editorial errors, or for any consequential or incidental damages caused or allegedly caused by
information contained in this document.
For specific information on the software or our packages, please contact us at [email protected].
AppCenter Windows CE Administrator Guide
Odyssey Software, Inc. Page iii
Table of Contents
1 Introduction ........................................................................................ 1-1 2 Installation .......................................................................................... 2-1
Installation Procedure ........................................................................... 2-1 Add AppCenter to Hotkey ...................................................................... 2-2 Command Line Options ......................................................................... 2-2
3 User Mode ........................................................................................... 3-1 Overview ............................................................................................ 3-1 AppCenter Launch Screen ..................................................................... 3-1 Tools Menu ......................................................................................... 3-2 About ............................................................................................... 3-2
4 Administration Mode ............................................................................. 4-1 Overview ............................................................................................ 4-1 Accessing Administration Mode .............................................................. 4-1 Administrator Tools .............................................................................. 4-2 New Program ..................................................................................... 4-3 Edit Program ..................................................................................... 4-3 Delete Program .................................................................................. 4-4 Create Registry File ............................................................................ 4-4 Logout .............................................................................................. 4-5 Exit .................................................................................................. 4-5 About ............................................................................................... 4-5 Options ............................................................................................. 4-6 Taskbar Icons .................................................................................... 4-8
5 Adding Approved Programs ................................................................... 5-1 Overview ............................................................................................ 5-1 Adding New Programs Procedure ........................................................... 5-1 Defining Program Attributes .................................................................. 5-3 Configuring Application Windows............................................................ 5-5 Approving Sub-Applications ................................................................. 5-5 Approving System Applications and Windows ......................................... 5-6
Create System Windows 2 Application .................................................... 5-7 Control Panel Launches ....................................................................... 5-8 Approving MFC Applications ............................................................... 5-10 Approving the Terminal Services Client ............................................... 5-10 Approving .NET Compact Framework Applications ................................ 5-11 Approving Unresponsive Applications .................................................. 5-12
6 Debug Mode ........................................................................................ 6-1 Using Debug Mode ............................................................................... 6-1 Debugging Control Panel Applets ........................................................... 6-2
7 Registry Entries ................................................................................... 7-1 Default Administration Mode Entries ....................................................... 7-1 AppCenter Title .................................................................................... 7-1 Time and Battery ................................................................................. 7-2 Mobile Companion ................................................................................ 7-3
AppCenter Windows CE Administrator Guide
Page iv Odyssey Software, Inc.
Fusion ................................................................................................ 7-4 Key Status Display ............................................................................... 7-4 Administration Login Hotkey .................................................................. 7-5 Home Hotkey ...................................................................................... 7-5 Re-launch Interval ............................................................................... 7-5 Hide Taskbar ....................................................................................... 7-6 Browse ............................................................................................... 7-6

AppCenter Windows CE Administrator Guide
Odyssey Software, Inc. Page 1-1
1 Introduction AppCenter is an application used to restrict user activity on mobile devices to a set of authorized programs and configurations. AppCenter replaces the desktop graphical user interface of a device with a secure launch screen that displays only
approved programs and options. Any unauthorized program that attempts to start (either automatically or by user control) is immediately terminated.
AppCenter is intended for use on mobile devices where only specific programs are
allowed to be used. It can be configured to lock users out of critical and sensitive areas of the device. For example, a kiosk application where the user can only run a specified information application. The application is auto-started whenever the
kiosk hardware is rebooted or the application is terminated.
AppCenter works in two main modes: User Mode and Administration Mode. User Mode presents users with the AppCenter Launch Screen which lists applications that are approved for use. The user can only access the applications that are
approved and configured for use.
In Administration Mode, administrators can configure AppCenter by adding or removing programs, enabling or disabling features for use or accessing Debug Mode for verifying the configuration.
AppCenter Windows CE Administrator Guide
Page 1-2 Odyssey Software, Inc.
This page intentionally left blank
AppCenter Windows CE Administrator Guide
Odyssey Software, Inc. Page 2-1
2 Installation This chapter discusses the installation procedure for Windows CE devices. Note: For Motorola devices, each installation must be accompanied with a Motorola supplied device specific registry (.reg) file. The Motorola AppCenter
executable requires this file and uses it in place of the AppCenterlicense.reg file.
Installation Procedure
This procedure enables AppCenter to re-install when a cold reset is done on
devices that support the re-installation feature.
1. Copy the appropriate AppCenter executable file (.exe) for the device
platform to the /Application folder.
2. Copy AppCenter.lnk to the /Application folder.
3. Copy the AppCenter CPY file (.cpy) to the /Application folder. The file
contains the following:
\application\AppCenter.lnk > \windows\startup\AppCenter.lnk
\application\AppCenter.exe > \windows\programs\AppCenter.exe
4. For Motorola devices, copy the device specific registry file (Motorola supplied) to the /Application folder. The registry files are located in the
PlatformReg folder.
5. Copy any AppCenter saved preferences registry file to the /Application
folder. This file can be created from Administration Mode to save the current settings. The file will be automatically saved to the /Application folder.
6. Cold reset the device.
Note: Some device and operating system combinations do not process the
Windows/StartUp folder correctly. For example, the MC9000 running CE 4.1. For these devices, perform the following additional steps to launch AppCenter at start up:
1. Place the AppCenter RUN file (AppCenter.run) in the /Application/StartUp folder before cold booting.
2. Remove the StartMenu RUN file (StartMenu.run) from the /Application/StartUp folder.
AppCenter Windows CE Administrator Guide
Page 2-2 Odyssey Software, Inc.
Add AppCenter to Hotkey
To make it easier to launch AppCenter or to bring it to the foreground, it can be added to one of the hardware buttons (Hotkeys) on the device.
For devices that have hardware buttons:
1. Select Start > Settings > Control Panel > Keyboard.
2. Select the Program Buttons tab.
3. Select the hardware button to use for AppCenter.
4. Change the button assignment to AppCenter.
Note: Remove the default settings for the buttons (typically set to Calendar,
Address Book, Tasks, etc.) to disable the associated applications from launching while AppCenter is running.
Note: The Hotkey assignments are usually set in Administration Mode or before AppCenter is loaded on a device. Place the registry file with the Hotkey
assignments in the /Application folder. This will ensure that when the device is cold reset, the Hotkey values will be restored.
Command Line Options
Command line options can be specified when starting AppCenter. Launching the application with command line arguments requires the creation of a shortcut and then editing the shortcut (.lnk file) or modifying a RUN file to include the
command line options.
The following arguments can be used when configuring AppCenter:
-terminate– stops the current AppCenter process.
-restart– stops the current AppCenter process and then starts a new
AppCenter process.
AppCenter Windows CE Administrator Guide
Odyssey Software, Inc. Page 3-1
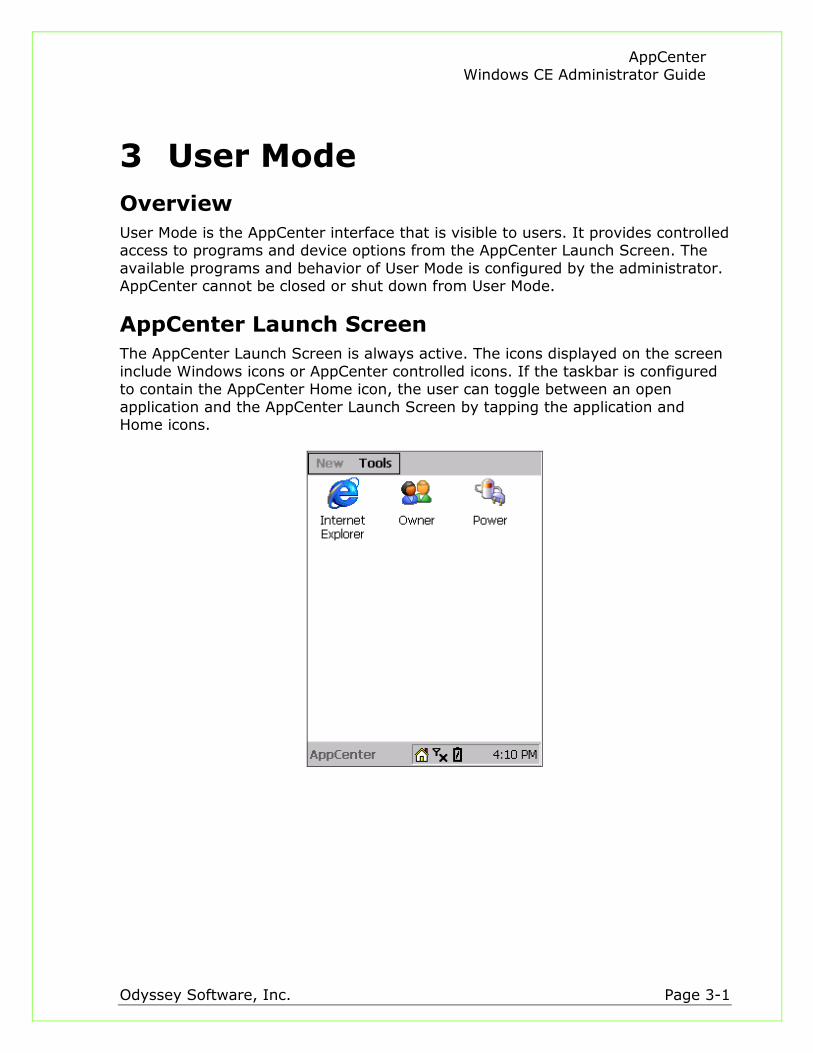
3 User Mode
Overview
User Mode is the AppCenter interface that is visible to users. It provides controlled access to programs and device options from the AppCenter Launch Screen. The
available programs and behavior of User Mode is configured by the administrator. AppCenter cannot be closed or shut down from User Mode.
AppCenter Launch Screen
The AppCenter Launch Screen is always active. The icons displayed on the screen
include Windows icons or AppCenter controlled icons. If the taskbar is configured to contain the AppCenter Home icon, the user can toggle between an open
application and the AppCenter Launch Screen by tapping the application and Home icons.
AppCenter Windows CE Administrator Guide
Page 3-2 Odyssey Software, Inc.
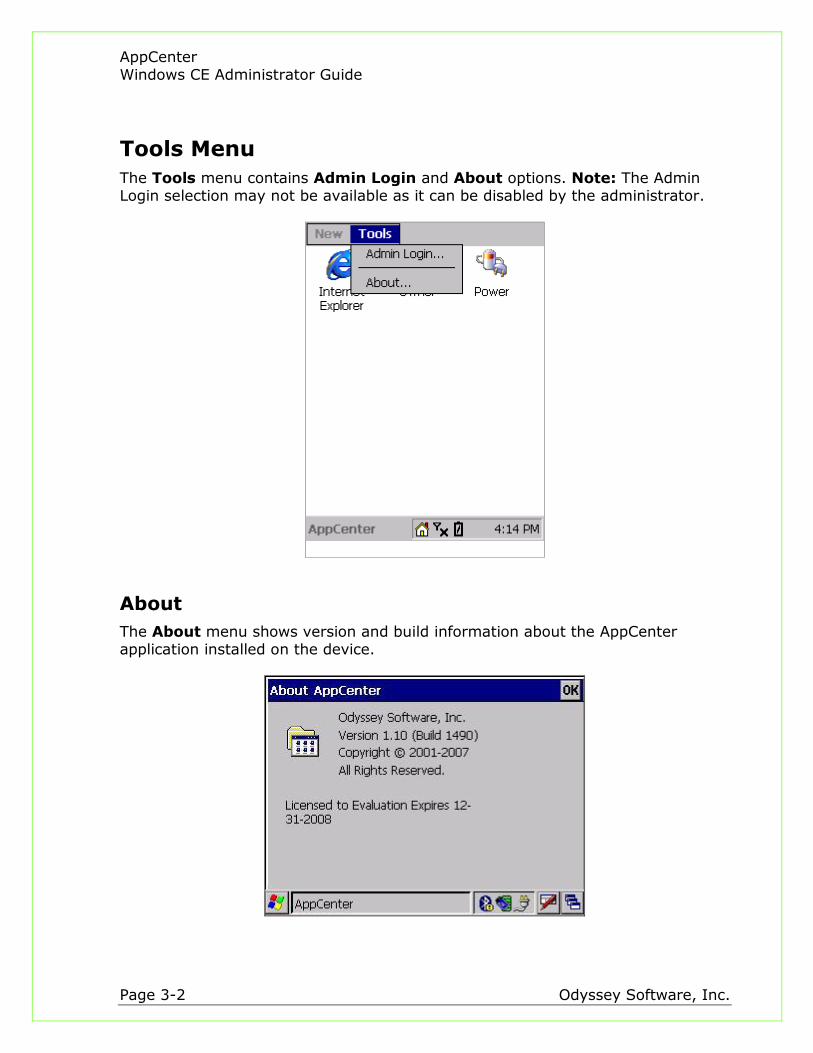
Tools Menu
The Tools menu contains Admin Login and About options. Note: The Admin Login selection may not be available as it can be disabled by the administrator.
About
The About menu shows version and build information about the AppCenter application installed on the device.
AppCenter Windows CE Administrator Guide
Odyssey Software, Inc. Page 4-1
4 Administration Mode
Overview
Administration Mode provides access to the Administration Options and Tools. It is password protected to allow only administrator access. This mode allows
administrators to add, change and/or remove programs from the list of approved programs. User Mode also enables configuring the taskbar to display or hide the Windows Start Menu, AppCenter settings or device status information.
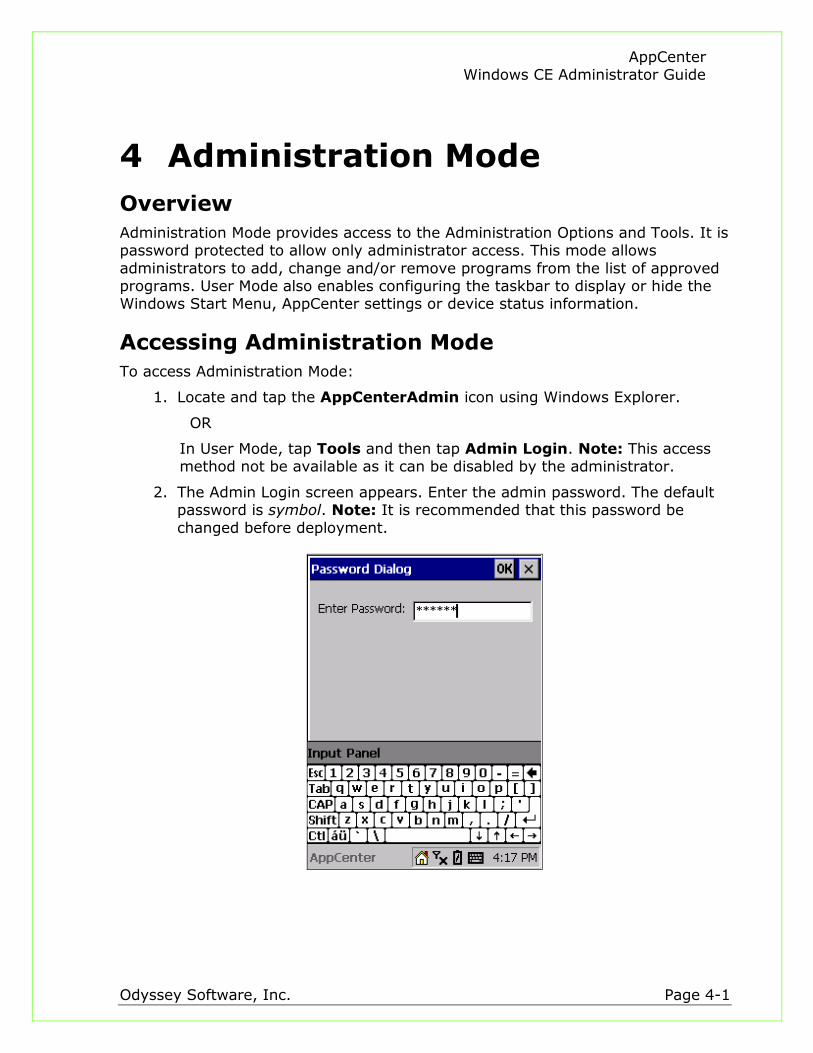
Accessing Administration Mode
To access Administration Mode:
1. Locate and tap the AppCenterAdmin icon using Windows Explorer.
OR
In User Mode, tap Tools and then tap Admin Login. Note: This access method not be available as it can be disabled by the administrator.
2. The Admin Login screen appears. Enter the admin password. The default password is symbol. Note: It is recommended that this password be
changed before deployment.
AppCenter Windows CE Administrator Guide
Page 4-2 Odyssey Software, Inc.
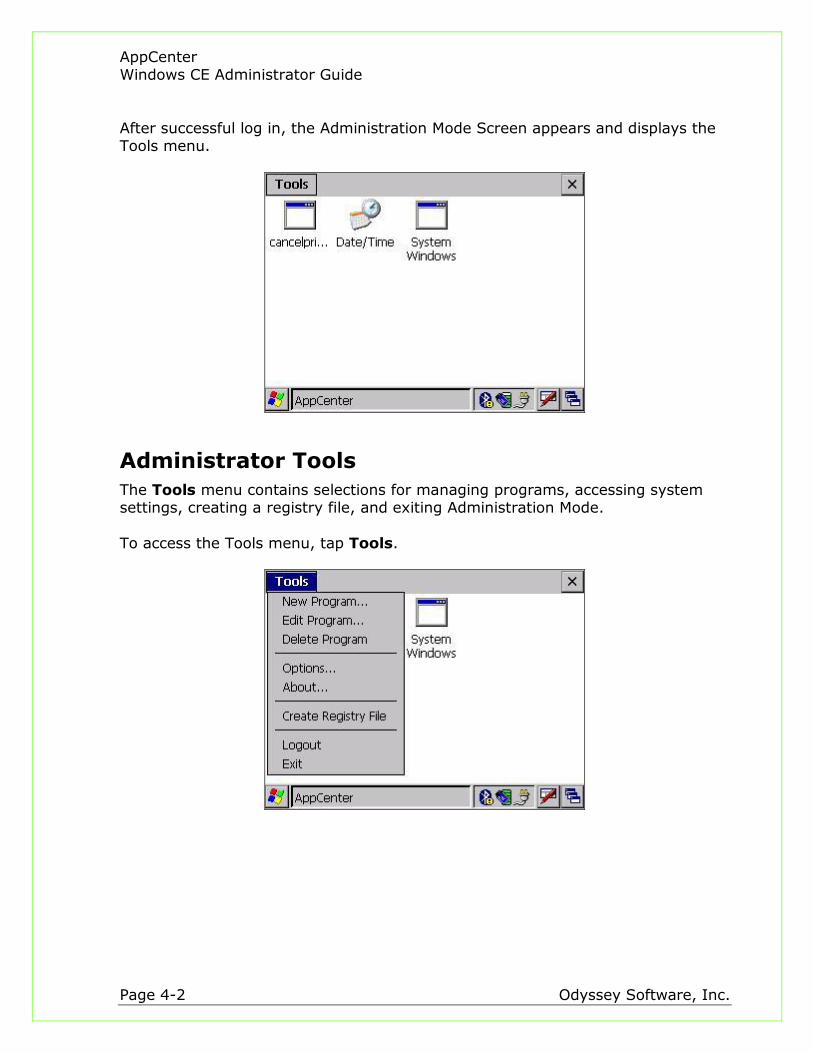
After successful log in, the Administration Mode Screen appears and displays the Tools menu.
Administrator Tools
The Tools menu contains selections for managing programs, accessing system settings, creating a registry file, and exiting Administration Mode.
To access the Tools menu, tap Tools.
AppCenter Windows CE Administrator Guide
Odyssey Software, Inc. Page 4-3
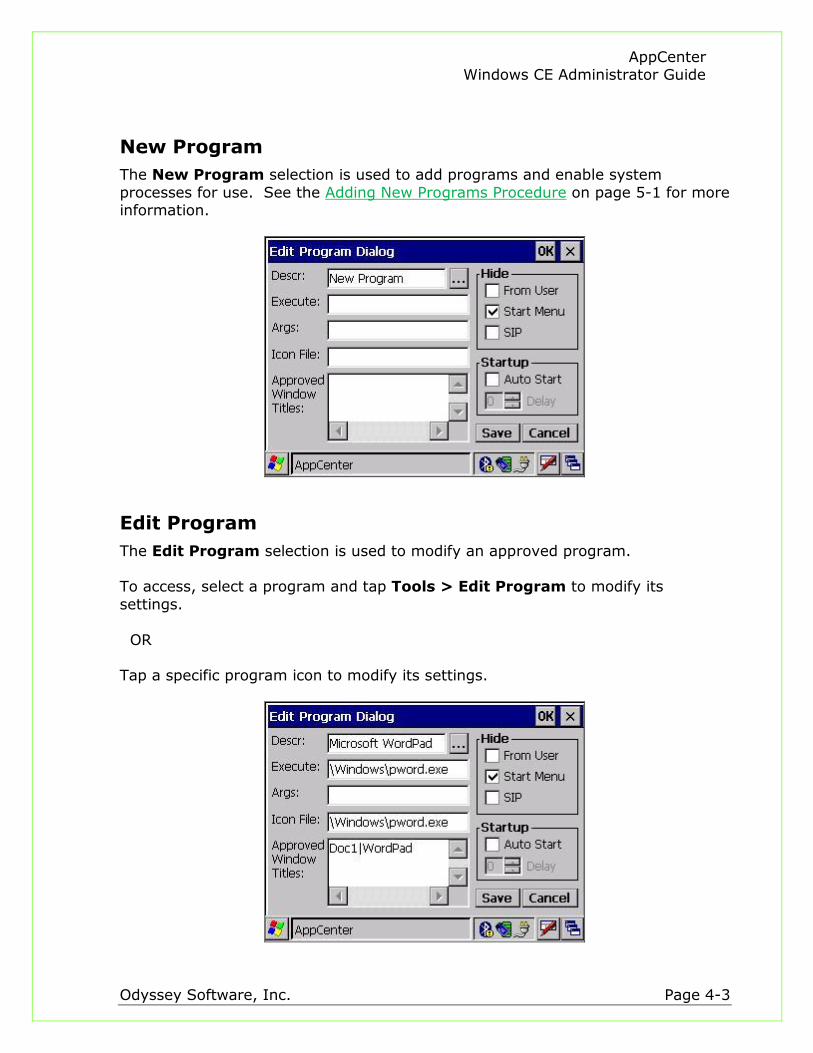
New Program
The New Program selection is used to add programs and enable system
processes for use. See the Adding New Programs Procedure on page 5-1 for more information.
Edit Program
The Edit Program selection is used to modify an approved program. To access, select a program and tap Tools > Edit Program to modify its
settings.
OR Tap a specific program icon to modify its settings.
AppCenter Windows CE Administrator Guide
Page 4-4 Odyssey Software, Inc.
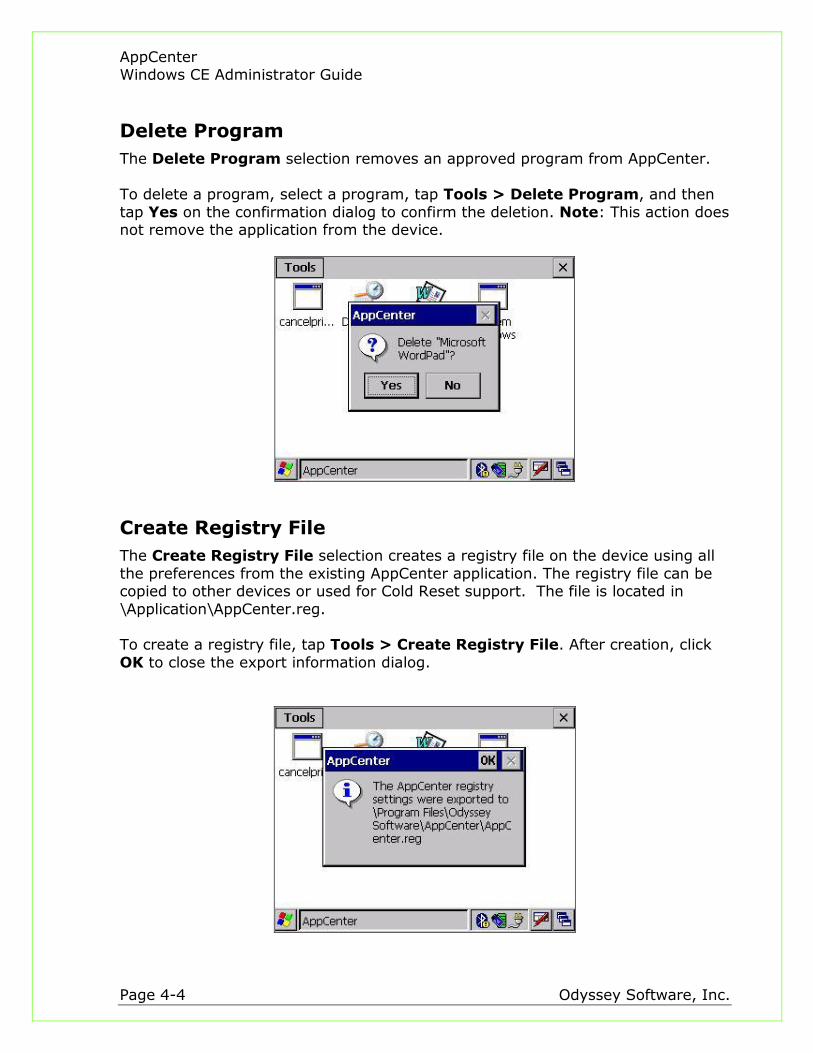
Delete Program
The Delete Program selection removes an approved program from AppCenter.
To delete a program, select a program, tap Tools > Delete Program, and then
tap Yes on the confirmation dialog to confirm the deletion. Note: This action does not remove the application from the device.
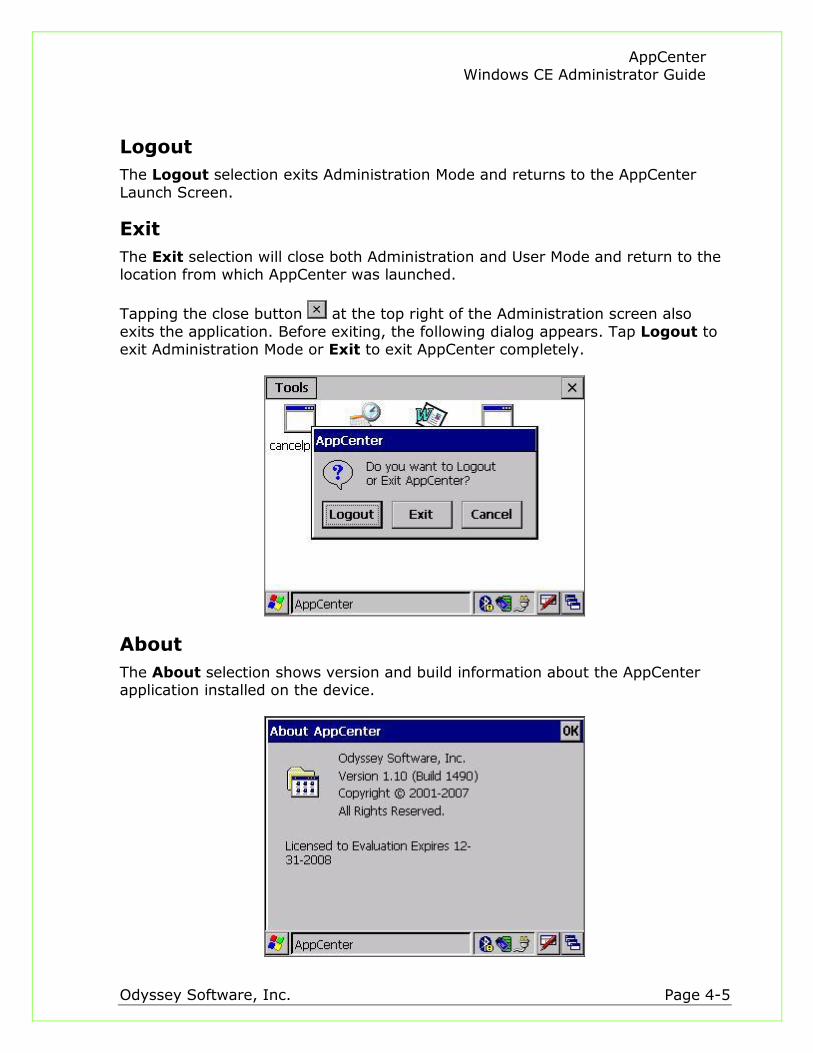
Create Registry File
The Create Registry File selection creates a registry file on the device using all
the preferences from the existing AppCenter application. The registry file can be copied to other devices or used for Cold Reset support. The file is located in
\Application\AppCenter.reg. To create a registry file, tap Tools > Create Registry File. After creation, click
OK to close the export information dialog.
AppCenter Windows CE Administrator Guide
Odyssey Software, Inc. Page 4-5
Logout
The Logout selection exits Administration Mode and returns to the AppCenter
Launch Screen.
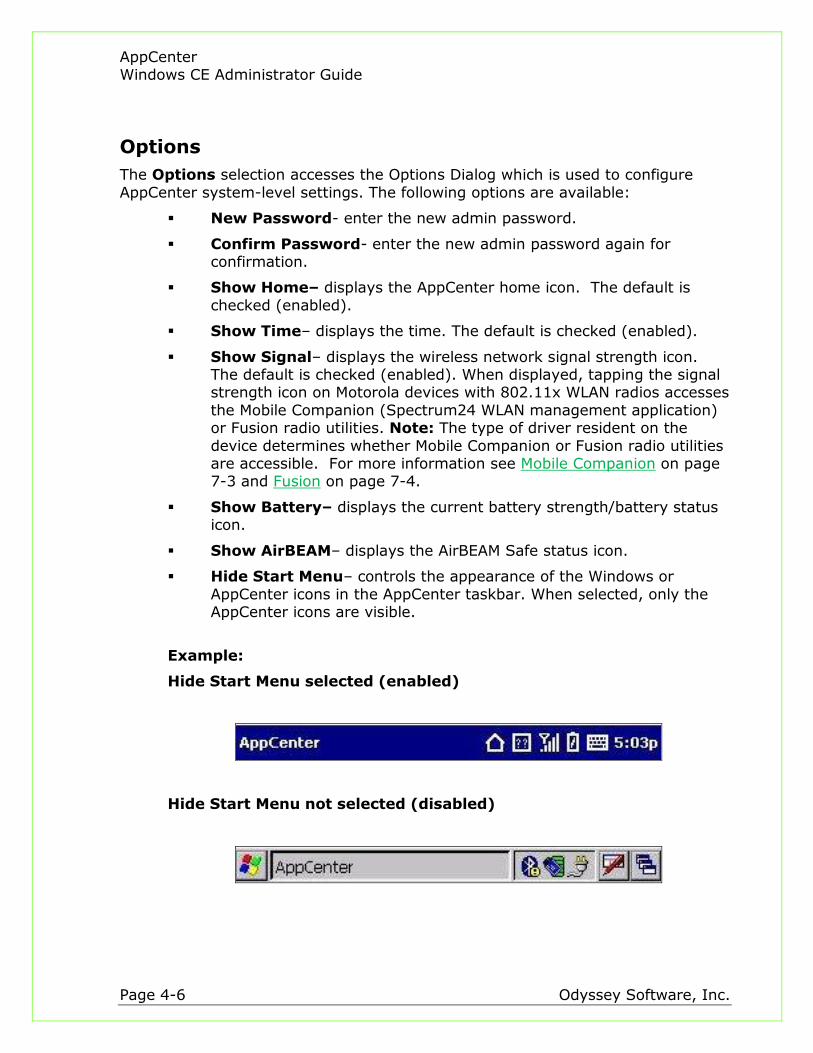
Exit
The Exit selection will close both Administration and User Mode and return to the location from which AppCenter was launched.
Tapping the close button at the top right of the Administration screen also
exits the application. Before exiting, the following dialog appears. Tap Logout to exit Administration Mode or Exit to exit AppCenter completely.
About
The About selection shows version and build information about the AppCenter application installed on the device.
AppCenter Windows CE Administrator Guide
Page 4-6 Odyssey Software, Inc.
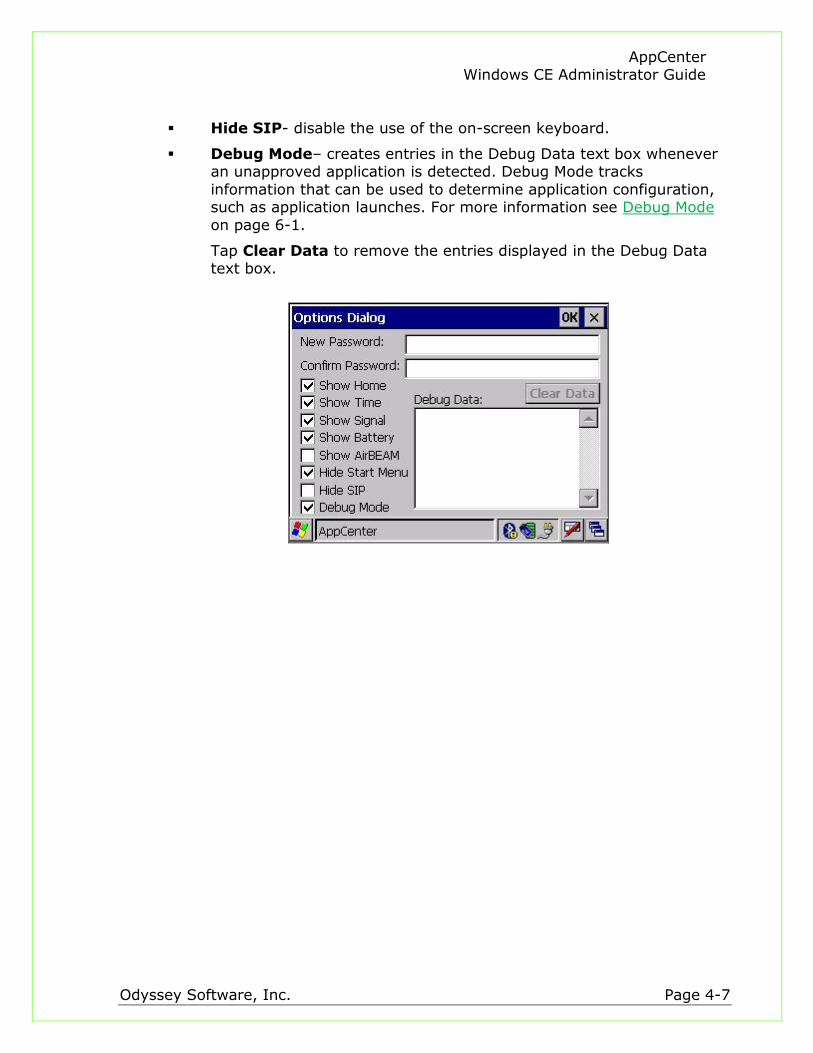
Options
The Options selection accesses the Options Dialog which is used to configure
AppCenter system-level settings. The following options are available:
New Password- enter the new admin password.
Confirm Password- enter the new admin password again for confirmation.
Show Home– displays the AppCenter home icon. The default is
checked (enabled).
Show Time– displays the time. The default is checked (enabled).
Show Signal– displays the wireless network signal strength icon. The default is checked (enabled). When displayed, tapping the signal strength icon on Motorola devices with 802.11x WLAN radios accesses
the Mobile Companion (Spectrum24 WLAN management application) or Fusion radio utilities. Note: The type of driver resident on the
device determines whether Mobile Companion or Fusion radio utilities are accessible. For more information see Mobile Companion on page 7-3 and Fusion on page 7-4.
Show Battery– displays the current battery strength/battery status icon.
Show AirBEAM– displays the AirBEAM Safe status icon.
Hide Start Menu– controls the appearance of the Windows or
AppCenter icons in the AppCenter taskbar. When selected, only the AppCenter icons are visible.
Example:
Hide Start Menu selected (enabled)
Hide Start Menu not selected (disabled)
AppCenter Windows CE Administrator Guide
Odyssey Software, Inc. Page 4-7
Hide SIP- disable the use of the on-screen keyboard.
Debug Mode– creates entries in the Debug Data text box whenever an unapproved application is detected. Debug Mode tracks
information that can be used to determine application configuration, such as application launches. For more information see Debug Mode
on page 6-1.
Tap Clear Data to remove the entries displayed in the Debug Data text box.

AppCenter Windows CE Administrator Guide
Page 4-8 Odyssey Software, Inc.
Taskbar Icons
The following table shows the icons that can be displayed in the taskbar:
Battery Charging
Battery Fully Charged
Battery Good
Battery Low
Battery Very Low
Battery Status UNKNOWN
AirBEAM Status UNKNOWN
AirBEAM Status CONNECTED
AirBEAM Status NOT CONNECTED
AirBEAM Status ROAMING
or
WLAN / Signal STRONG
or
WLAN / Signal GOOD
or
WLAN / Signal MEDIUM
or
WLAN / Signal FAIR
or
WLAN / Signal POOR
or
WLAN / Signal NO SIGNAL
Return to AppCenter (HOME)
AppCenter Windows CE Administrator Guide
Odyssey Software, Inc. Page 5-1
5 Adding Approved Programs
Overview
This chapter discusses adding programs and applications that users are allowed to access. The approved programs display as icons on the AppCenter Launch Screen.
Approved programs may also allow other applications to run in background or run application sub-processes. All applications that launch other sub-applications or windows must be approved for use.
Adding New Programs Procedure
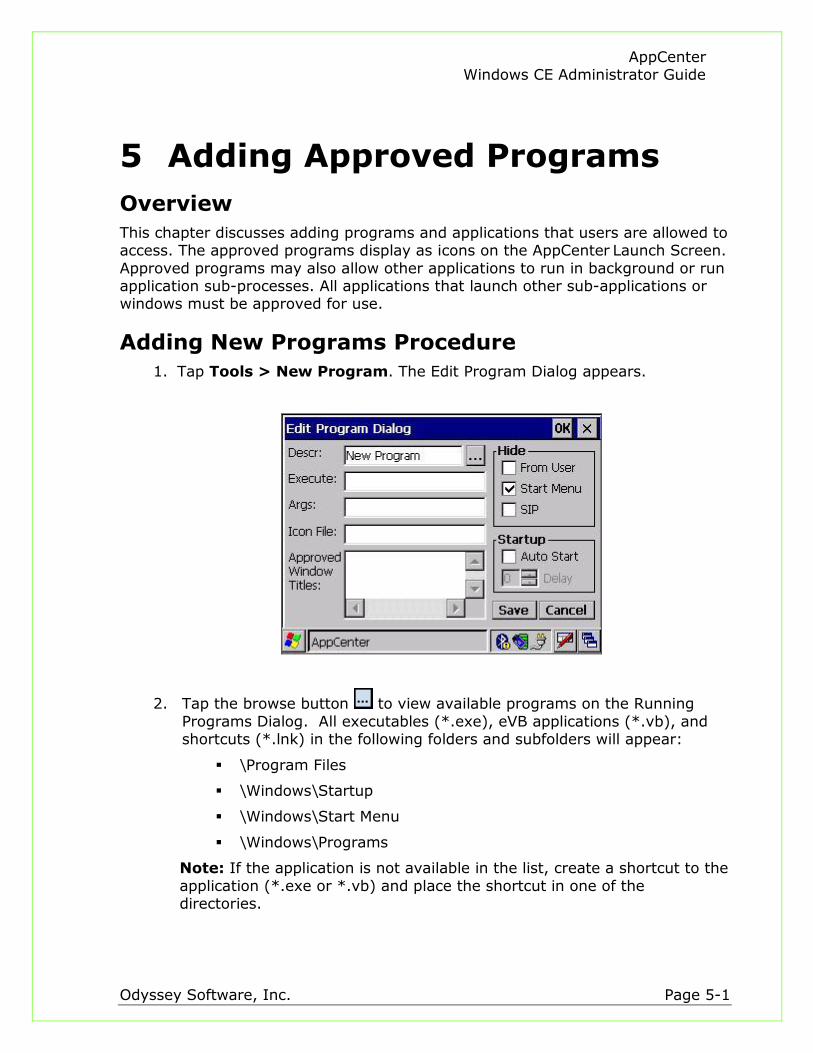
1. Tap Tools > New Program. The Edit Program Dialog appears.
2. Tap the browse button to view available programs on the Running
Programs Dialog. All executables (*.exe), eVB applications (*.vb), and shortcuts (*.lnk) in the following folders and subfolders will appear:
\Program Files
\Windows\Startup
\Windows\Start Menu
\Windows\Programs
Note: If the application is not available in the list, create a shortcut to the
application (*.exe or *.vb) and place the shortcut in one of the directories.
AppCenter Windows CE Administrator Guide
Page 5-2 Odyssey Software, Inc.
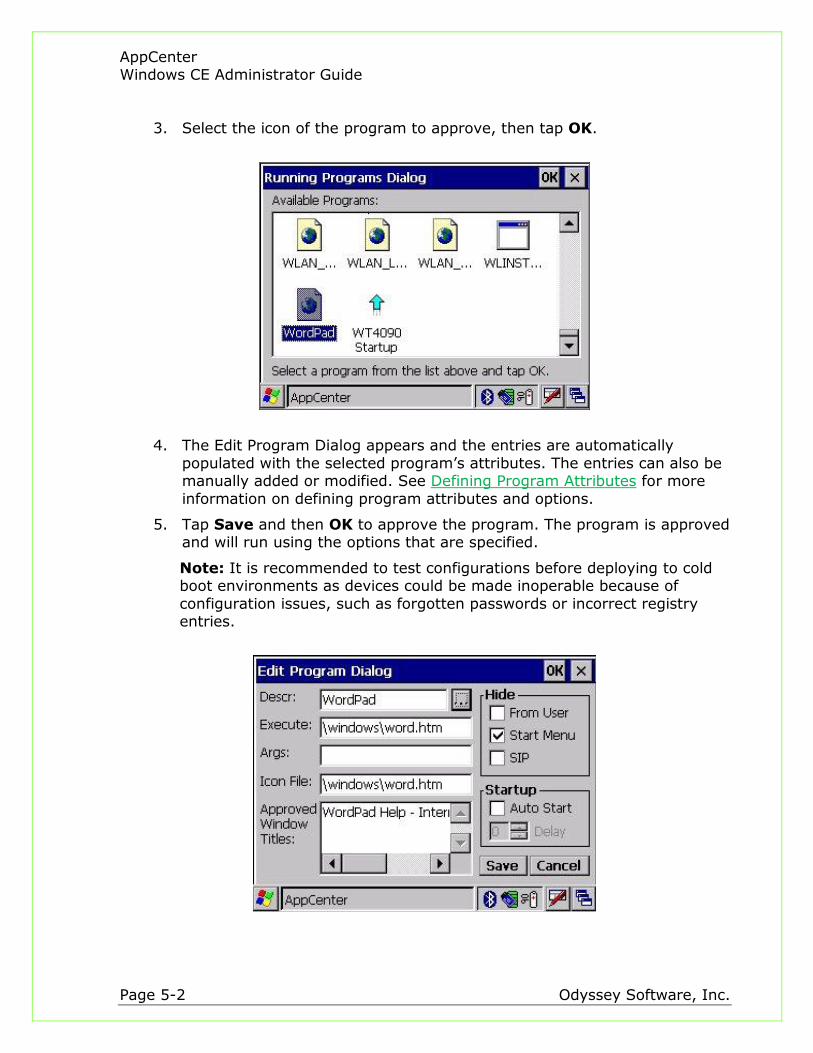
3. Select the icon of the program to approve, then tap OK.
4. The Edit Program Dialog appears and the entries are automatically
populated with the selected program’s attributes. The entries can also be manually added or modified. See Defining Program Attributes for more
information on defining program attributes and options.
5. Tap Save and then OK to approve the program. The program is approved and will run using the options that are specified.
Note: It is recommended to test configurations before deploying to cold boot environments as devices could be made inoperable because of
configuration issues, such as forgotten passwords or incorrect registry entries.
AppCenter Windows CE Administrator Guide
Odyssey Software, Inc. Page 5-3
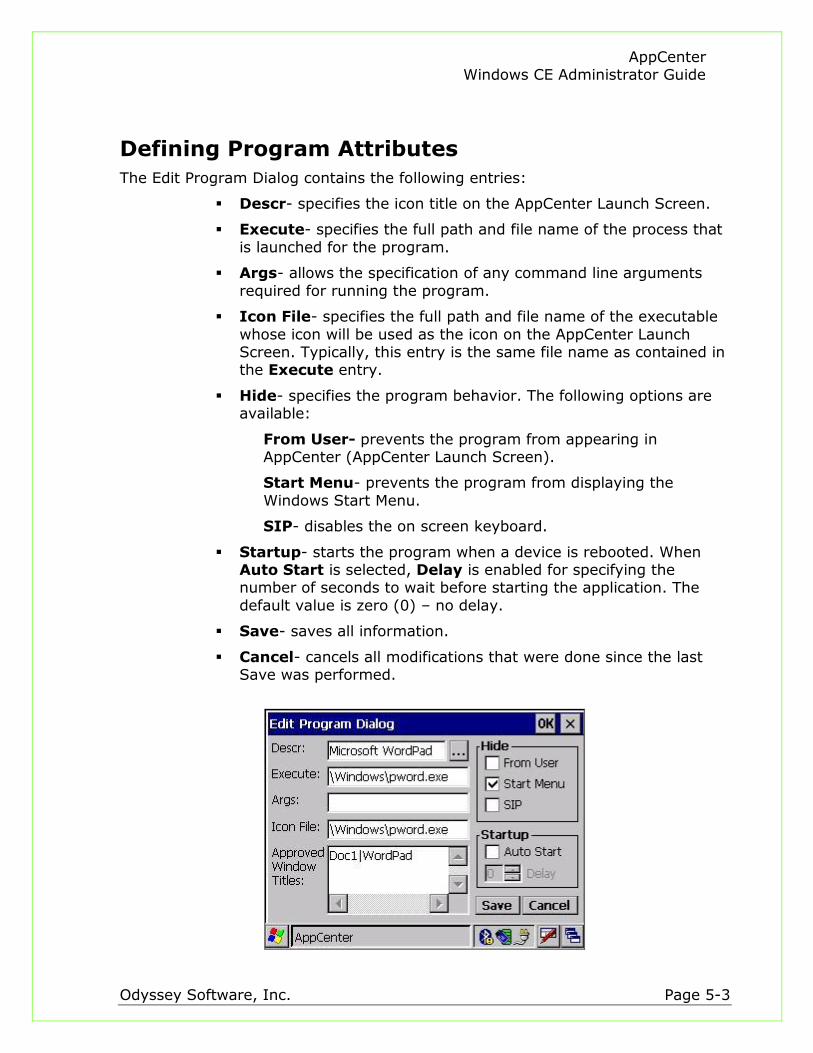
Defining Program Attributes
The Edit Program Dialog contains the following entries:
Descr- specifies the icon title on the AppCenter Launch Screen.
Execute- specifies the full path and file name of the process that
is launched for the program.
Args- allows the specification of any command line arguments
required for running the program.
Icon File- specifies the full path and file name of the executable
whose icon will be used as the icon on the AppCenter Launch Screen. Typically, this entry is the same file name as contained in the Execute entry.
Hide- specifies the program behavior. The following options are available:
From User- prevents the program from appearing in AppCenter (AppCenter Launch Screen).
Start Menu- prevents the program from displaying the
Windows Start Menu.
SIP- disables the on screen keyboard.
Startup- starts the program when a device is rebooted. When Auto Start is selected, Delay is enabled for specifying the number of seconds to wait before starting the application. The
default value is zero (0) – no delay.
Save- saves all information.
Cancel- cancels all modifications that were done since the last Save was performed.
AppCenter Windows CE Administrator Guide
Page 5-4 Odyssey Software, Inc.
Approved Window Titles- lists window and dialog names to use for the selected program. The format for the entry is {WindowsTitle}|{WindowClass}. See Configuring Application
Windows on page 5-5 for more information.
The following characters can be used in an approved window string:
|- divides Title from Class.
*– wildcard. Match up to the first occurrence of *. Characters
after * are ignored.
?– match for one character position.
\- match the next character exactly. For example, if a window title contains a backslash enter \\ or enter \| if the title contains a | character.
The following table shows the formats that can be used for approved windows:
Format Definition
Title or Title| or Title|* Match title. Any class allowed.
Title|Class Match title and match class.
|Class Match blank title and match class.
| Match blank title and any class.
*|Class Any title allowed. Match class.
abc*|xyz* Match any title starting with abc and match any class starting with xyz.
AppCenter Windows CE Administrator Guide
Odyssey Software, Inc. Page 5-5
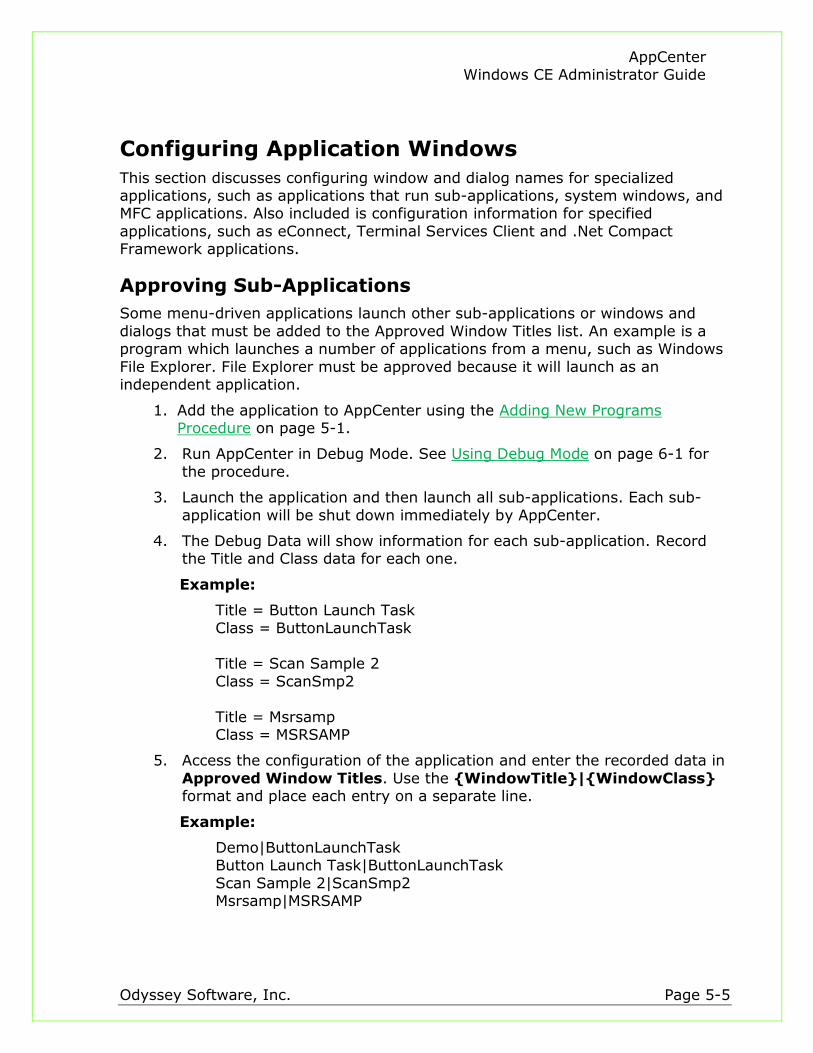
Configuring Application Windows
This section discusses configuring window and dialog names for specialized applications, such as applications that run sub-applications, system windows, and MFC applications. Also included is configuration information for specified
applications, such as eConnect, Terminal Services Client and .Net Compact Framework applications.
Approving Sub-Applications
Some menu-driven applications launch other sub-applications or windows and
dialogs that must be added to the Approved Window Titles list. An example is a program which launches a number of applications from a menu, such as Windows
File Explorer. File Explorer must be approved because it will launch as an independent application.
1. Add the application to AppCenter using the Adding New Programs Procedure on page 5-1.
2. Run AppCenter in Debug Mode. See Using Debug Mode on page 6-1 for
the procedure.
3. Launch the application and then launch all sub-applications. Each sub-
application will be shut down immediately by AppCenter.
4. The Debug Data will show information for each sub-application. Record the Title and Class data for each one.
Example:
Title = Button Launch Task
Class = ButtonLaunchTask Title = Scan Sample 2
Class = ScanSmp2
Title = Msrsamp Class = MSRSAMP
5. Access the configuration of the application and enter the recorded data in
Approved Window Titles. Use the {WindowTitle}|{WindowClass} format and place each entry on a separate line.
Example:
Demo|ButtonLaunchTask Button Launch Task|ButtonLaunchTask
Scan Sample 2|ScanSmp2 Msrsamp|MSRSAMP
AppCenter Windows CE Administrator Guide
Page 5-6 Odyssey Software, Inc.
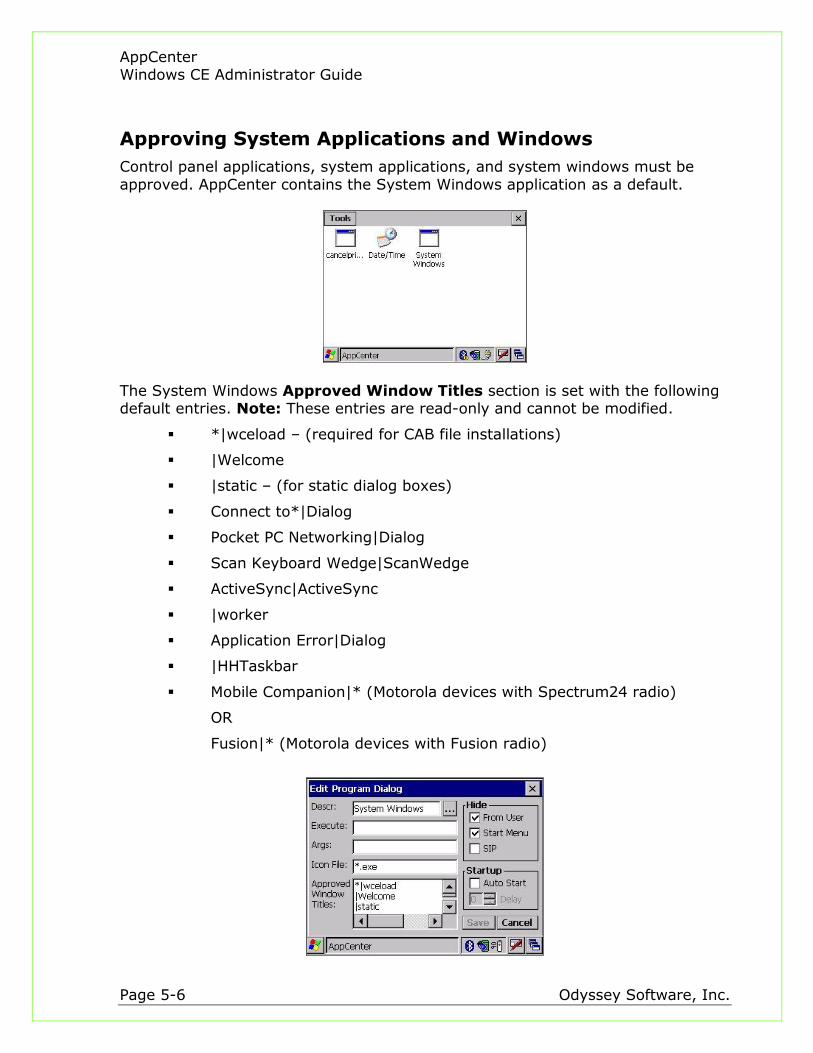
Approving System Applications and Windows
Control panel applications, system applications, and system windows must be
approved. AppCenter contains the System Windows application as a default.
The System Windows Approved Window Titles section is set with the following default entries. Note: These entries are read-only and cannot be modified.
*|wceload – (required for CAB file installations)
|Welcome
|static – (for static dialog boxes)
Connect to*|Dialog
Pocket PC Networking|Dialog
Scan Keyboard Wedge|ScanWedge
ActiveSync|ActiveSync
|worker
Application Error|Dialog
|HHTaskbar
Mobile Companion|* (Motorola devices with Spectrum24 radio)
OR
Fusion|* (Motorola devices with Fusion radio)
AppCenter Windows CE Administrator Guide
Odyssey Software, Inc. Page 5-7
Create System Windows 2 Application
To approve additional system applications or windows, create an application named System Windows 2 to contain the specific application windows and dialogs required for your deployment. For example, if using eConnect.
Note: To hide the System Windows 2 icon in User Mode, select the Hide From
User check box when creating the System Windows 2 approved application.
Approving eConnect
eConnect is a Control Panel applet that enables the terminal to automatically connect via TCP/IP to the corporate network using a Motorola Ethernet cradle. eConnect requires a modification to the standard approved application settings.
If you are adding eConnect to the System Windows 2 approved application,
include the following entries in the Approved Window Titles section of the Edit Program Dialog:
Settings - eConnect|Dialog
eConnect - Connection Detected|Dialog
To launch eConnect from User Mode, establish eConnect as an approved
application and use the following entries:
Execute- \Windows\eConnect.cpl
Icon File- \Windows\eConnect.exe
Approved Window Titles:
Settings- eConnect|Dialog
eConnect- Connection Detected|Dialog
AppCenter Windows CE Administrator Guide
Page 5-8 Odyssey Software, Inc.
Control Panel Launches
The settings and individual settings applets can be made available while
AppCenter is running using the following two methods. Generally, only approve windows for settings the user is allowed to change.
Method 1
The first method enables Windows Start Menu Settings so that the Control Panel
applets can be launched from the Settings menu. Use the Systems Windows 2 application for this method. See Create System Windows 2 Application on page 5-7 for more information.
Enter the following entries in the Systems Windows 2 Approved Window Titles
section of the Edit Program Dialog:
Control Panel|CONTROLEXE_MAIN- enables Start Menu > Settings. This must be approved to allow the user to launch the
individual Control Panel applets.
Power Properties|Dialog- adds the Power Control Panel.
Stylus Properties|Dialog- adds the Stylus Control Panel.
Volume & Sounds Properties|Dialog- adds the Volume Control Panel.
Date/Time Properties|Dialog- adds the Clock (Date and Time) Control Panel.
Method 2
The second method enables Control Panel applets within AppCenter to create an
icon for the specific applets that can be accessed. Icons can be added to the Launch Screen for specific Control Panels that have an
associated CPL or executable file by browsing to the specific file from the Edit Program Dialog.
For Password, Owner Info, and Power applets that do not have a corresponding CPL or executable file, the following listing shows the entries that are required for
approving each applet.
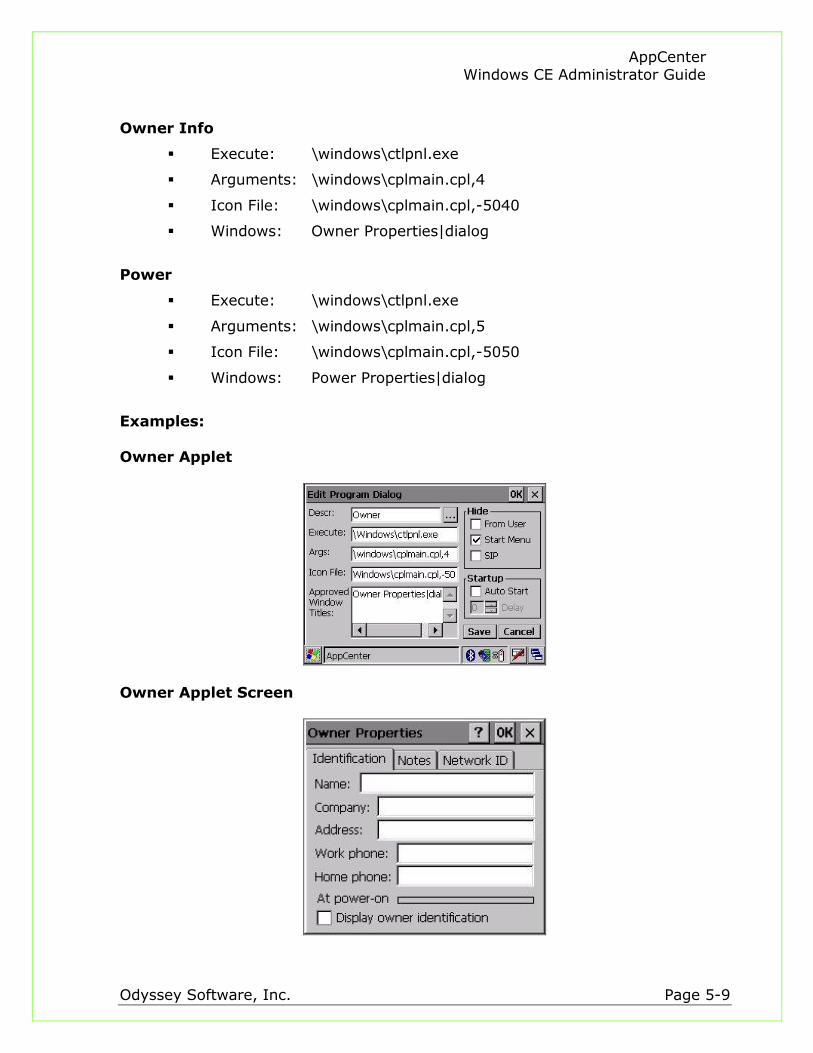
Password
Execute: \windows \ctlpnl.exe
Arguments: \windows\cplmain.cpl,3
Icon File: \windows\cplmain.cpl,-6000
Windows: Password Properties|dialog
AppCenter Windows CE Administrator Guide
Odyssey Software, Inc. Page 5-9
Owner Info
Execute: \windows\ctlpnl.exe
Arguments: \windows\cplmain.cpl,4
Icon File: \windows\cplmain.cpl,-5040
Windows: Owner Properties|dialog
Power
Execute: \windows\ctlpnl.exe
Arguments: \windows\cplmain.cpl,5
Icon File: \windows\cplmain.cpl,-5050
Windows: Power Properties|dialog
Examples:
Owner Applet
Owner Applet Screen
AppCenter Windows CE Administrator Guide
Page 5-10 Odyssey Software, Inc.
Approving MFC Applications
MFC applications may change the class name of the windows within an
application. The operating system will assign window class names that are unique each time the MFC application runs.
To enable MFC applications for AppCenter, enter the application title followed by | or |* in the Approved Window Titles section of the Edit Program Dialog for
any MFC application. AppCenter will now detect this behavior and create this setting automatically when configuring a new approved program.
Example:
PocketQuery|
OR
PocketQuery|*
Approving the Terminal Services Client
When using Terminal Services Client in AppCenter, enter the following approved windows:
Terminal Services Client|*
Server name to connect - Terminal Services Client|*
To use Terminal Services Client with a full screen in AppCenter, configure the Terminal Services Client in AppCenter to use the Hide Start Menu option. The
remote application will appear in the upper left corner of the screen. Note: Do not select the Limit size of server desktop to fit on this screen
check box when connecting to the server.
AppCenter Windows CE Administrator Guide
Odyssey Software, Inc. Page 5-11
Approving .NET Compact Framework Applications
.NET Compact Framework applications have an AppCenter class name that is
controlled by .NET. This class name must be used when setting the Approved Windows Titles entry of the application. The class name is
#NETCF_AGL_BASE_. To approve all .NET Compact Framework applications for AppCenter, enter the
following:
*|#NETCF_AGL_BASE_ To approve specific .NET Compact Framework applications, define all individual
window titles with the #NETCF_AGL_BASE_ class name.
Example: WindowTitle1|#NETCF_AGL_BASE_
WindowTitle2|#NETCF_AGL_BASE_
Note: .NET Compact Framework applications can be slow during initial loading. If an application is having difficulty running, run Debug Mode and check if
UnresponsiveApp|UnresponsiveApp entries are shown. See Using Debug Mode on page 6-1 and Approving Unresponsive Applications on page 5-12 for more information.
Note: If the Debug Mode shows data for a window without a title or class name,
define an additional approved window. Use the entry |* to approve all windows with no title but with any class name.
AppCenter Windows CE Administrator Guide
Page 5-12 Odyssey Software, Inc.
Approving Unresponsive Applications
AppCenter may declare applications as unresponsive if the application does not
display a form immediately upon execution.
If the entry UnresponsiveApp|UnresponsiveApp was manually entered (previous versions of AppCenter) in the Approved Windows Titles section for an application, try removing and replacing it with the window title and class name for
the application. Also try deleting and then recreating the application entry to have AppCenter automatically detect the window title and class.
The UnresponsiveAppTimeout registry entry controls how long AppCenter waits before declaring an application as unresponsive. The default is 5 seconds. The
minimum allowed setting is 1 second. The setting is located in HKEY_LOCAL_MACHINE\SOFTWARE\Symbol\AppCenter.
If an application takes longer than 5 seconds to load, increase the UnresponsiveAppTimeout value to correctly load the application.
AppCenter Windows CE Administrator Guide
Odyssey Software, Inc. Page 6-1
6 Debug Mode This chapter discusses Debug Mode, which records and tracks information about unapproved applications that are launched. Debug Mode can be used to determine what applications are launched during User Mode or view window titles for entry
during the program approval procedure. Before deploying programs using AppCenter, Debug Mode enables administrators to check and verify the current
AppCenter configuration.
Note: It is recommended to test configurations before deploying to cold boot environments as devices could be made inoperable because of configuration issues, such as forgotten passwords or incorrect registry entries.
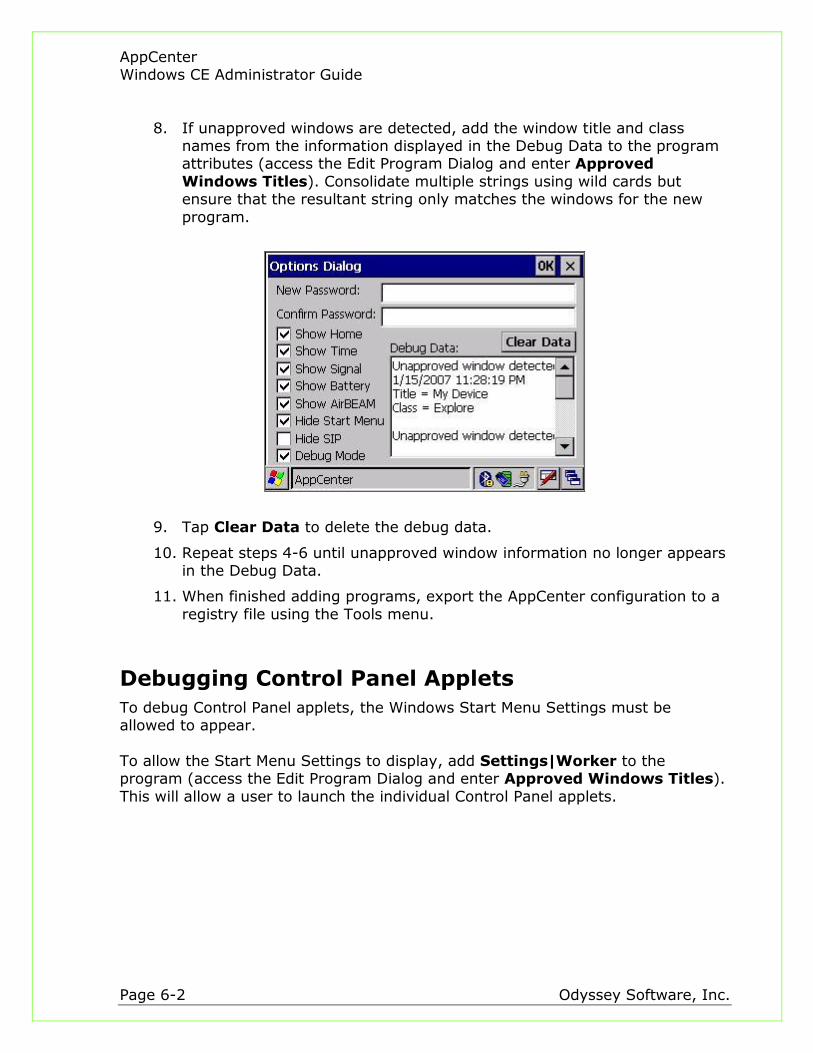
The following is a sample violation that is displayed when an unapproved
application attempts to launch: Unapproved window detected.
1/15/2007 11:28:19 PM Title = My Device
Class = Explore Each violation consists of the following:
general description of the violation.
date and time (PDT’s time) when the violation occurred.
Window Title of the unapproved window (if present).
Window Class of the unapproved window (if present).
Using Debug Mode
The following procedure enables Debug Mode:
1. Access Administration Mode.
2. Select the Debug Mode check box.
3. Ensure that all current programs can run in User Mode without generating any Debug Data.
4. Add a new program.
5. Access User Mode and launch the new program.
6. Test all program features.
7. Access Administration Mode and check the Debug Data area for any unapproved window information.
AppCenter Windows CE Administrator Guide
Page 6-2 Odyssey Software, Inc.
8. If unapproved windows are detected, add the window title and class names from the information displayed in the Debug Data to the program attributes (access the Edit Program Dialog and enter Approved
Windows Titles). Consolidate multiple strings using wild cards but ensure that the resultant string only matches the windows for the new
program.
9. Tap Clear Data to delete the debug data.
10. Repeat steps 4-6 until unapproved window information no longer appears in the Debug Data.
11. When finished adding programs, export the AppCenter configuration to a
registry file using the Tools menu.
Debugging Control Panel Applets
To debug Control Panel applets, the Windows Start Menu Settings must be allowed to appear.
To allow the Start Menu Settings to display, add Settings|Worker to the program (access the Edit Program Dialog and enter Approved Windows Titles).
This will allow a user to launch the individual Control Panel applets.
AppCenter Windows CE Administrator Guide
Odyssey Software, Inc. Page 7-1
7 Registry Entries This chapter discusses changing the default AppCenter settings by modifying the device registry entries. The first time AppCenter is run, the registry settings are created with the default values. Note: These values are only accessible through
the registry.
Default Administration Mode Entries
The following registry entries are automatically created in the registry file when
using the Administration Mode Options dialog:
[HKEY_CURRENT_USER\SOFTWARE\Symbol\AppCenter] “ShowHome”=dword:00000001 "ShowBatteryLevel"=dword:00000001
"ShowSignalStrength"=dword:00000001 "ShowAirBEAM"=dword:00000000
"ShowTime"=dword:00000001 "HideStartMenu"=dword:00000001
AppCenter Title
The following registry entries are used to change the default AppCenter title and
appearance. When AppCenter is initially run, these registry settings are created with the default values.
AlternateTitle is used to change the default title displayed in the AppCenter taskbar.
[HKEY_LOCAL_MACHINE\SOFTWARE\Symbol\AppCenter]
"AlternateTitle"="My AppCenter"
TitleFontSize defaults to 11. Depending on the AppCenter options that are enabled, a long title may not completely display in the AppCenter taskbar. Reducing the font size will allow more of the title to display. Values in the range of
9-14 are recommended. Values of 6-36 are allowed but may produce undesirable results. If a value outside the allowed range is used, the font size is reset to the
default of 11. TitleBold defaults to true (1). Set to false (0) to reduce the weight of the font
used in the AppCenter taskbar.
[HKEY_LOCAL_MACHINE\SOFTWARE\Symbol\AppCenter] "TitleFontSize"=dword:0000000B "TitleBold"=dword:00000001
AppCenter Windows CE Administrator Guide
Page 7-2 Odyssey Software, Inc.
The device IP or MAC address can be displayed in the taskbar instead of the AppCenter title. The following settings override the AlternateTitle setting:
DisplayIpAddress defaults to false (0). Set to true (1) to display the device IP address as the AppCenter taskbar title. If a device does not have an IP address,
the normal AppCenter title is displayed. DisplayMacAddress defaults to false (0). Set to true (1) to display the device
MAC address as the AppCenter taskbar title. If a device has no MAC address, the AppCenter title is displayed. If both DisplayMacAddress and
DisplayIpAddress are set to true, the MAC address is displayed. AdapterName defaults to NETWLAN1. AdapterName is used in conjunction with
DisplayIpAddress and DisplayMacAddress and controls which adapter is used to retrieve the IP or MAC address. Partial matches are supported. For example,
an AdapterName of NETWLAN1 would match an adapter named NETWLAN1 or CTIP\NETWLAN1. If no match is found for AdapterName, the AppCenter title is
displayed regardless of how DisplayIpAddress and DisplayMacAddress are set.
[HKEY_LOCAL_MACHINE\SOFTWARE\Symbol\AppCenter] "DisplayMacAddress"=dword:00000000
"DisplayIpAddress"=dword:00000000 "AdapterName"="NETWLAN1"
Time and Battery
The following registry settings can be used to modify the default behavior of the time and battery strength icons on the AppCenter title bar.
BatteryPercentFormat defaults to false (0). Set to true (1) to display the device battery strength as a percentage instead of as an icon.
24HourTimeFormat defaults to false (0). Set to true (1) to display the device
current time in 24-hour format instead of the default 12-hour format. [HKEY_LOCAL_MACHINE\SOFTWARE\Symbol\AppCenter]
"BatteryPercentFormat"=dword:00000000 "24HourTimeFormat"=dword:00000000
AppCenter Windows CE Administrator Guide
Odyssey Software, Inc. Page 7-3
Mobile Companion
On Motorola devices with 802.11x WLAN radios, when ShowSignalStrength is enabled, tapping the signal strength icon accesses the Mobile Companion utility (Spectrum24 WLAN management application).
Note: The type of driver resident on the device determines whether Mobile
Companion or Fusion radio utilities are accessible.
To successfully run Mobile Companion on devices that already have AppCenter installed, add the following entry to the AppCenter System Windows registry settings:
[HKEY_CURRENT_USER\SOFTWARE\Symbol\AppCenter\System Windows]
"Window10"="Mobile Companion|*" The MobileCompanionMode entry controls the action taken when the signal
strength icon is tapped.
The following values are supported:
0- No action is taken.
1- The Mobile Companion status dialog is launched.
2- The Mobile Companion menu is displayed (default).
[HKEY_LOCAL_MACHINE\SOFTWARE\Symbol\AppCenter] "MobileCompanionMode"=dword:00000002
AppCenter Windows CE Administrator Guide
Page 7-4 Odyssey Software, Inc.
Fusion
On Motorola devices with 802.11x WLAN radios, when ShowSignalStrength is enabled, tapping the signal strength icon accesses the Fusion radio utility.
Note: The type of driver resident on the device determines whether Mobile Companion or Fusion radio utilities are accessible.
The FusionMode entry controls the action taken when the signal strength icon.
The following values are supported:
0- No action is taken (default setting).
1- Run the Fusion status application.
2- Run the Fusion diagnostics application.
3- Show a menu for status or diagnostics.
4- Show the full Fusion menu.
Note: If the FusionMode setting is greater than zero (0), it will override the
MobileCompanionMode setting.
[HKEY_LOCAL_MACHINE\SOFTWARE\Symbol\AppCenter] "FusionMode"=dword:00000003
Key Status Display
This registry entry can be used to display taskbar icons showing the current state of the Alpha, Function, Shift and Control keys.
ShowKeyStates defaults to false (0). Set true (1) to display the current key status on the taskbar.
[HKEY_LOCAL_MACHINE\SOFTWARE\Symbol\AppCenter]
"ShowKeyStates"=dword:00000000
AppCenter Windows CE Administrator Guide
Odyssey Software, Inc. Page 7-5
Administration Login Hotkey
This registry entry can be used to assign a Hotkey to the Admin Login dialog. AdminLoginHotKey defaults to 0 (disabled). To enable, change the setting to
any valid virtual key code. When enabled, pressing the specified key will bring AppCenter to the foreground and display the Admin Login dialog. The key will
access the Admin Login regardless of the application that is currently in the foreground.
This setting can also be defined to use the Alt, Control or Shift keys. Add 1000 for Alt, add 2000 for Control and add 4000 for Shift.
[HKEY_LOCAL_MACHINE\SOFTWARE\Symbol\AppCenter]
"AdminLoginHotKey"=dword:00000000
Home Hotkey
This registry setting enables the return to the AppCenter screen using a keystroke rather than tapping the Home icon. HomeHotKey defaults to Ctrl+F10 (2121).
The setting is located at HKEY_LOCAL_MACHINE\Software\Symbol\AppCenter. There is no user interface for this setting. When AppCenter is run, this registry
setting is created with the default value if it does not already exist. The Home Hotkey can be changed to any valid virtual key code. For example the
F1-F10 keys have virtual key codes of 112-121. All virtual key codes are documented in MSDN (http://msdn.microsoft.com). Search for virtual key codes.
To disable this setting, enter 0. To combine a key with the Alt, Control or Shift keys, add 1000 for Alt, add 2000 for Control and add 4000 for Shift.
Note: The documented values are in hexadecimal and should be converted to
decimal.
Re-launch Interval
This registry entry can be used to disable an approved application icon for a
period of time after it has been initially tapped. RelaunchInterval prevents an application from launching multiple times. For example, when launching .NET Compact Framework applications that take a long time to initialize and load. Enter
the interval in hexadecimal format.
[HKEY_CURRENT_USER\SOFTWARE\Symbol\AppCenter\APPNAME] "RelaunchInterval"=dword:00000014

AppCenter Windows CE Administrator Guide
Page 7-6 Odyssey Software, Inc.
Hide Taskbar
This registry setting can be used to disable both the Windows and AppCenter taskbar from displaying when programs require the use of the entire screen. Note: The program controls the window size setting to use the full screen size.
HideAllTaskBars defaults to false (0). Set to true (1) to remove the Windows
and AppCenter taskbar.
[HKEY_CURRENT_USER\SOFTWARE\Symbol\AppCenter\APPNAME] "HideAllTaskBars"=dword:00000001
Browse
The list of directories to search and the extensions to display during program
approval can be modified from the default values by accessing values in the device registry.
HKEY_LOCAL_MACHINE\Software\Symbol\AppCenter\
BrowseFolders- overrides the folders searched when browsing for an approved application. The following is the default value:
\Windows\Start Menu|\Windows\Startup| \Windows\Programs|\Program Files
BrowseExtensions- overrides the file extensions searched when browsing for an approved application. The default value is exe|vb.
BrowseAllShortcuts- adds shortcuts to the browse list view. If set to false (0), only shortcuts whose target file extension is contained in the BrowseExtensions
setting will be included. The default value is true (1).


