19
Leica D I ISTO ™ Plu s sDraw ™ User Manual v1.0 A A P P E E X X S SO O F F T TW W A A R R E E
| Date post: | 25-May-2018 |
| Category: |
Documents |
| Upload: | vuonghuong |
| View: | 213 times |
| Download: | 0 times |

LLeeiiccaa DDIISSTTOO™™ PPlluussDDrraaww™™
UUsseerr MMaannuuaall vv11..00
AAPPEEXX SSOOFFTTWWAARREE

Copyright © 2004 Randall H. Garrett, dba Apex IV, Limited. All Rights Reserved PlusDraw End-User License Agreement (EULA) Apex IV, Limited hereby grants the customer a personal, non-transferable and non-exclusive license to use the program under the terms stated in this Agreement. Title, ownership and/or rights in and to the program and the related documentation remain with Apex IV, Limited. Installation and use of this program is limited to the original customer in accordance with the terms of distribution. You and your employees and agents are required to protect the confidentiality of the program. You may not transfer, distribute or otherwise make the program or documentation available to any third party, by any time-sharing or otherwise, without the prior written consent of Apex IV, Limited. You may not alter or modify the program. You may not copy or reproduce the program or documentation for any purpose except with the written permission of Apex IV, Limited. You acknowledge that you are receiving a LIMITED LICENSE TO USE the program and related documentation and that Apex IV, Limited retains all rights to the program and documentation. This license remains effective until terminated. You may terminate this license at any time by returning to Apex IV, Limited, at your expense, the software and related documentation together with all copies and merged portions in any form. This license will also terminate immediately upon conditions set forth elsewhere in the Agreement or if you fail to comply with any term or condition contained herein.
Table of Contents
Preface.......................................................................................... 1 About PlusDraw........................................................................... 1 System Requirements................................................................. 1 Required Hardware.................................................................... 2 Preferred Hardware.................................................................... 2 Required Software ...................................................................... 2 Preferred Software ...................................................................... 2 Installation..................................................................................... 2 Establishing the Bluetooth Connection..................................... 2 Manual Setup................................................................................ 5 First Time Communications Setup ............................................. 5 Determine Outbound COM Settings........................................... 5 Set COM Settings in PlusDraw................................................... 5 User Interface................................................................................ 6 Document List............................................................................. 6 View Tabs................................................................................... 6 Tab A: Drawing View............................................................ 7 Tab B: Comments View........................................................ 7 Tab C: Results View............................................................. 7 Wall Height Input Dialog............................................................. 9 Page Management Dialog........................................................... 9 Drawing Using the DISTO............................................................ 10 Drawing a Bay Window...........................................…................. 12 Direct Angle Method (45°).....................................…................. 12 Rise-and-Run Method...........................................….................. 13 Editing Lines............................................................…................. 14 Editing with the DISTO....................…........................................ 14 Editing with the PlusDraw KeyPad ........................…................ 14 Deleting Lines..........................................................…................. 15 Open Area...............................................................…............... 15 Closed Area..............................................................…............... 16 Saving and Exporting Files.........................................…............ 16
1
Preface PlusDraw™ is distributed free-of-charge with the Leica DISTO™ plus laser distancemeter. This software was created by Apex Software in cooperation with Leica Geosystems and is based on the Microsoft® .NET Compact Framework. Most Pocket PC (PPC) devices running Microsoft Pocket PC 2000, 2002, or Window Mobile 2003 can utilize this application. PlusDraw is designed to demonstrate an effective integration between a Pocket PC and the distancemeter. Neither Leica Geosystems nor Apex Software makes any warranties with respect to the free software and related documentation, nor on its functionality, and does not offer any support. Please contact Apex Software for additional information regarding availability of our full-reatured software or specialized integration with DISTO devices. Apex Software 6363 De Zavala Road, Suite 200 San Antonio, Texas 78249 USA 210-699-6666 within USA; 011 2106996666 [email protected] www.apexwin.com
About PlusDraw PlusDraw is designed to provide a simple, yet effective tool to record and process measurements made with a DISTO plus laser distancemeter. Distances measured with the DISTO plus are transmitted to the Pocket PC through a Bluetooth wireless connection. This two way communication between a Pocket PC and the distancemeter permits the simultaneous use of several technologies to quickly provide perimeter, surface area and volume calculations for any industry. Use both technologies simultaneously to quickly calculate areas for appraisals, tiling/carpeting, painting, etc. Using the DISTO, measure a distance and input a direction. This information is automatically transferred and graphically displayed on a connected PPC. Once an area is completely drawn, the calculations are automatic. System Requirements PlusDraw is typically installed to the PPC through a host computer such as a desktop PC or notebook PC. The host must have Microsoft® ActiveSync® or its equivalent present and properly configured prior to installing the software to a PPC. ActiveSync is usually included on a CD supplied with the Pocket PC and can also be downloaded here. PlusDraw uses the latest Microsoft technology available for mobile computers and thus requires the .NET Compact Framework for correct operation. Pocket PCs using operating systems prior to Windows Mobile 2003 will require the installation of the Compact Framework if it is not already present. The Compact Framework and installation instruction are available without charge from Microsoft here. If the links provided are no longer valid, visit http://www.microsoft.com for information.

2
Note: Older devices may require updated drivers (e.g. cummunication drivers) to function properly with the DISTO plus. Visit the PPC manufacturer's web site for information and driver updates. Required Hardware n Pocket PC (PPC) with the ability to use Bluetooth ® technology. Preferred Hardware n PPC with built-in Bluetooth technology. Required Software n Microsoft® ActiveSync®. n Microsoft® .NET Compact Framework. n Operating system: Microsoft® Pocket PC 2000, 2002, or Windows Mobile 2003.
Preferred Software n Operating system: Windows Mobile 2003.
Installation Installing PlusDraw n Synchronize the PPC with the desktop PC using Microsoft ActiveSync. n Insert the PlusDraw CD and follow the onscreen instructions on the desktop PC and the PPC.
Establishing the Bluetooth Connection PlusDraw will automatically attempt to determine the proper connection settings to allow the hardware (PPC) to properly communicate with the DISTO device using the Bluetooth technology. If PlusDraw is unable to establish the connection automatically or through any method(s) described in this section, refer to the section titled Manual Setup. Each time PlusDraw is used in conjunction with the DISTO, a connection between the PPC and the DISTO will need to be established.

3
Open the PlusDraw program (Start | Programs | PlusDraw). Depending on the PPC device and the drivers that are installed, one of these three scenarios will occur:
1) The PPC will automatically display a list of nearby Bluetooth devices to which it may connect.
2) The PPC will automatically connect to the DISTO device (assuming the DISTO is on and the Bluetooth symbol is flashing). A beeping sound can be heard and the Bluetooth image will stop flashing on the DISTO.
3) Nothing visible happens. For scenario 1, if the DISTO device is on and the Bluetooth symbol is blinking, DISTO will be listed as an available connection (Image 2). Simply tap on the DISTO selection in the Bluetooth Browser (Image 2) to make the connection. Once the PPC is connected to the DISTO, the Bluetooth symbol will stop flashing and a new sketch file will open (Image 3). Begin drawing.
Turn on the DISTO. Turn on Bluetooth: The Bluetooth symbol will be visible and flashing. Turn on 2nd Function Layer: ‘2nd’ will be visible on the DISTO display.
Select DISTO to make the connection
2nd indicates that the device is in the 2nd Function Layer*: All blue colored items are active and usable. *Refer to the DISTO manual for more information.
n A solid Bluetooth symbol indicates that the DISTO is connected to the PPC.
n A flashing Bluetooth symbol indicates that the DISTO is waiting to connect to the PPC.
Image 1
Image 2 Image 3
4
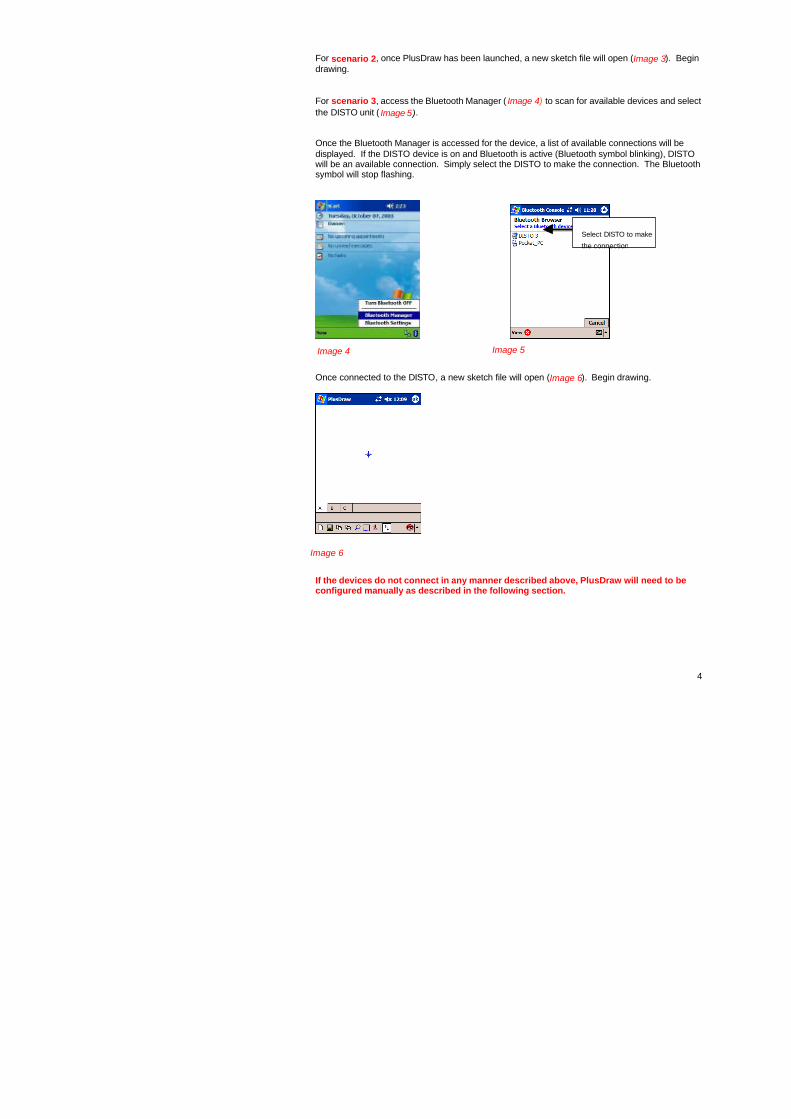
For scenario 2, once PlusDraw has been launched, a new sketch file will open (Image 3). Begin drawing. For scenario 3, access the Bluetooth Manager ( Image 4) to scan for available devices and select the DISTO unit ( Image 5). Once the Bluetooth Manager is accessed for the device, a list of available connections will be displayed. If the DISTO device is on and Bluetooth is active (Bluetooth symbol blinking), DISTO will be an available connection. Simply select the DISTO to make the connection. The Bluetooth symbol will stop flashing.
Once connected to the DISTO, a new sketch file will open (Image 6). Begin drawing.
If the devices do not connect in any manner described above, PlusDraw will need to be configured manually as described in the following section.
Select DISTO to make
the connection
Image 4 Image 5
Image 6
5
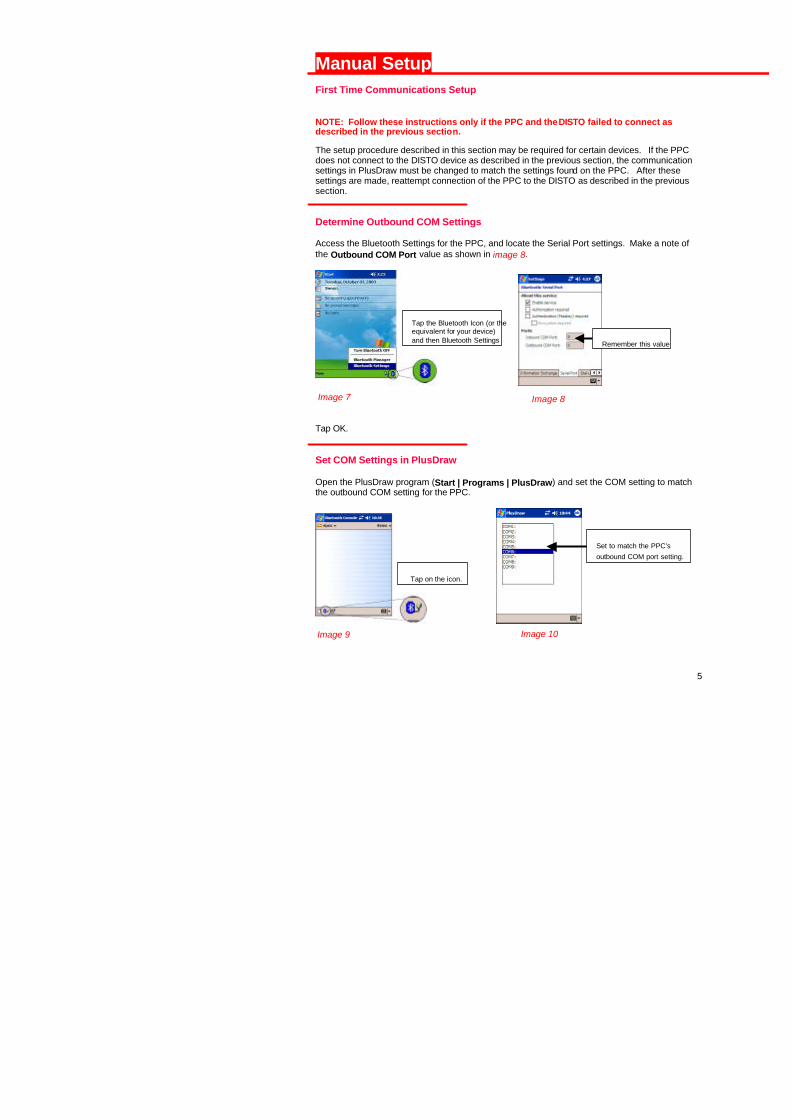
Manual Setup First Time Communications Setup NOTE: Follow these instructions only if the PPC and the DISTO failed to connect as described in the previous section. The setup procedure described in this section may be required for certain devices. If the PPC does not connect to the DISTO device as described in the previous section, the communication settings in PlusDraw must be changed to match the settings found on the PPC. After these settings are made, reattempt connection of the PPC to the DISTO as described in the previous section. Determine Outbound COM Settings Access the Bluetooth Settings for the PPC, and locate the Serial Port settings. Make a note of the Outbound COM Port value as shown in image 8.
Tap OK. Set COM Settings in PlusDraw Open the PlusDraw program (Start | Programs | PlusDraw) and set the COM setting to match the outbound COM setting for the PPC.
Tap the Bluetooth Icon (or the equivalent for your device) and then Bluetooth Settings Remember this value
Tap on the icon.
Set to match the PPC’s outbound COM port setting.
Image 7 Image 8
Image 9 Image 10

6
Tap OK. Once the COM port settings match, the previously described manual setup procedure will not be required.
User Interface The term User Interface refers to all of the visible features and controls (toolbars, buttons, tabs, etc.) that allow you to interact with the software. This section describes the different display views, buttons, and tools that respond to your input(s). Document List If at least one sketch file has been created, the Document List will be the first screen that opens when PlusDraw is started (Image 11). This screen displays saved sketch files, allows new sketch files to be created, and allows changing of the communication ports. Saved sketches are located in \My Documents\Apex folder on the PPC.
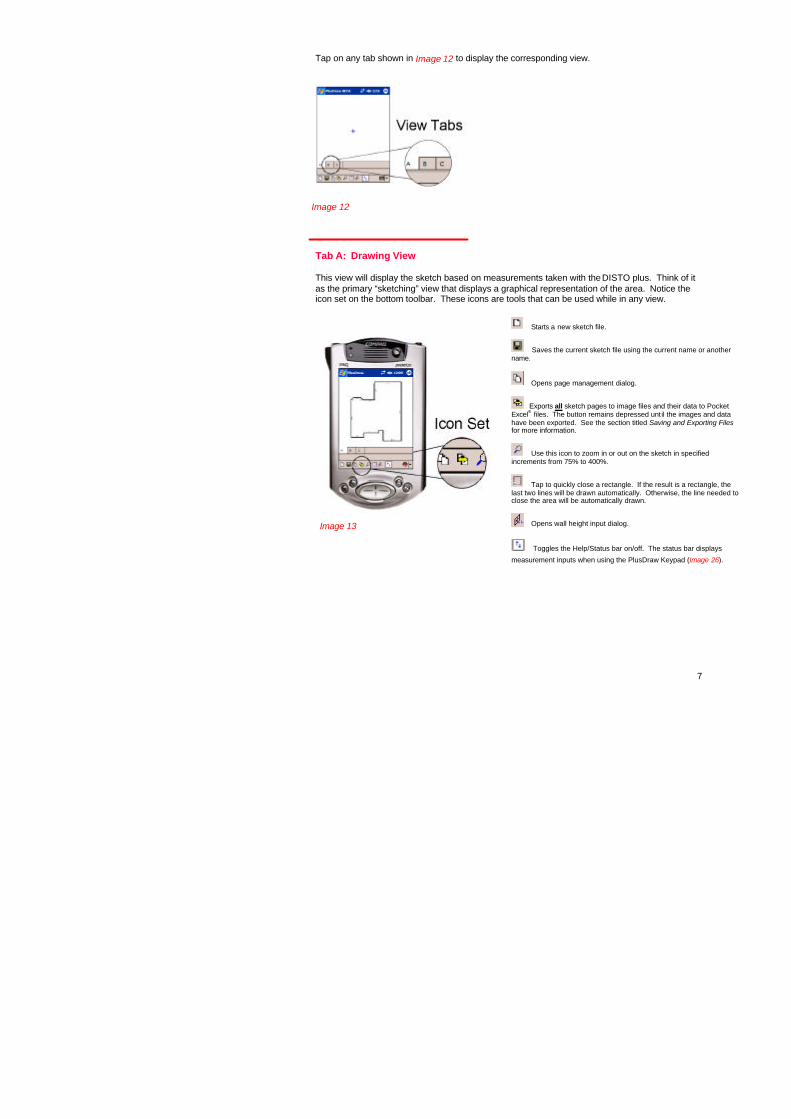
View Tabs The data for an opened sketch can be seen in three distinct views. Each view can be accessed by tapping on any of the three available tabs shown in Image 12. All three tabs display information about a single sketch. The tabs are as follows: Tab A: Drawing View – displays a graphical drawing of the area. Tab B: Comments View – displays textual information about the area (e.g. comments). Tab C: Results View – displays the calculations for the area.
-Tap here to create a new sketch file. -Tap here to access PlusDraw’s COM settings. -Tap here for information on PlusDraw.
Image 11
7
Tap on any tab shown in Image 12 to display the corresponding view.
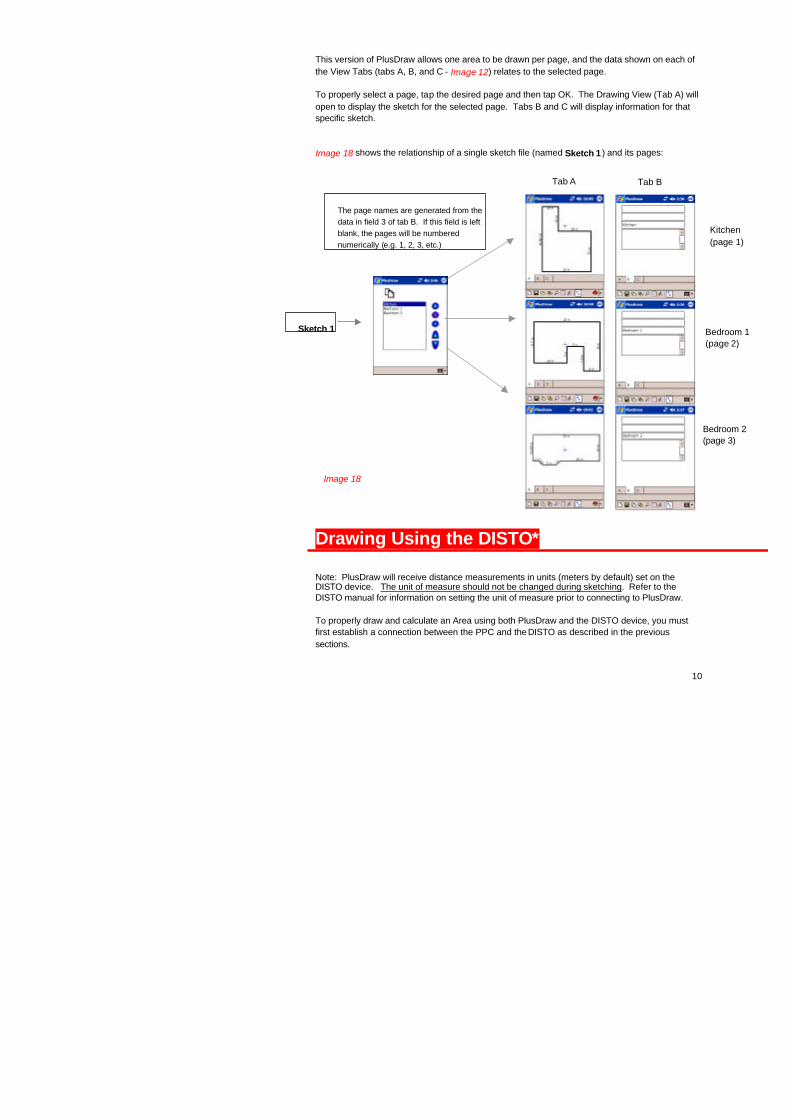
Tab A: Drawing View This view will display the sketch based on measurements taken with the DISTO plus. Think of it as the primary “sketching” view that displays a graphical representation of the area. Notice the icon set on the bottom toolbar. These icons are tools that can be used while in any view.
Image 12
Image 13
Starts a new sketch file.
Saves the current sketch file using the current name or another name.
Opens page management dialog.
Exports all sketch pages to image files and their data to Pocket Excel® files. The button remains depressed until the images and data have been exported. See the section titled Saving and Exporting Files for more information.
Use this icon to zoom in or out on the sketch in specified increments from 75% to 400%.
Tap to quickly close a rectangle. If the result is a rectangle, the last two lines will be drawn automatically. Otherwise, the line needed to close the area will be automatically drawn.
Opens wall height input dialog.
Toggles the Help/Status bar on/off. The status bar displays
measurement inputs when using the PlusDraw Keypad (Image 26).

8
Tab B: Comments View This view will allow information about the sketch page to be entered. Any information can be entered in the fields shown in Image 14; however, their intended use is described below:
Tab C: Results View This view will display calculation information gathered from measurement inputs.
Displays surface area.
Displays perimeter.
Displays wall height.
Displays wall surface area.
Displays cubic volume. Note: If a wall height is not provided, wall surface area and volume will not be calculated. In addition, calculations that display a tilde (~) indicate that the value has been rounded to the nearest hundredths place.
n The first field is intended for the name (example: customer name, property name).
n The second field is intended for the floor or level name (example: first floor, second floor).
n The third field is intended for room name (example: kitchen, bedroom 1, bedroom 2). If the field is left blank, the page number will be inserted in the field automatica lly.
n The fourth field is intended for additional comments or observations.
Image 14
Image 15 Image 15

9
Wall Height Input Dialog Tapping on the toolbar will open the wall height input dialog (Image 16 ). From within this dialog, specify the wall height for the current area. This value will be used to calculate the cubic volume and the wall surface area. Once the dialog opens, measure the wall height using the DISTO and press the Enter key using the 2nd function layer on the DISTO device. The measured value will be entered for the wall height, and the dialog window will close. Note: If the PlusDraw keyboard is used to input the wall height, tap OK to close the dialog window.
Page Management Dialog Use pages to organize multiple rooms or areas in a single sketch file. Each sketch file can contain a virtually infinite number of pages, depending on the PPC’s available resources. Tapping on the toolbar will open the page management dialog (Image 17). From within this dialog, pages can be added, deleted, inserted, or sorted.
Adds a blank page to the current sketch file. The page is added to the end of the list. Deletes the se lected page from the sketch file. Allows a sketch page to be inserted. The page will be inserted before (above) the highlighted page. Allows the pages to be sorted based on the direction selected.
DISTO measurement will be automatically entered.
Image 16
Image 17
10
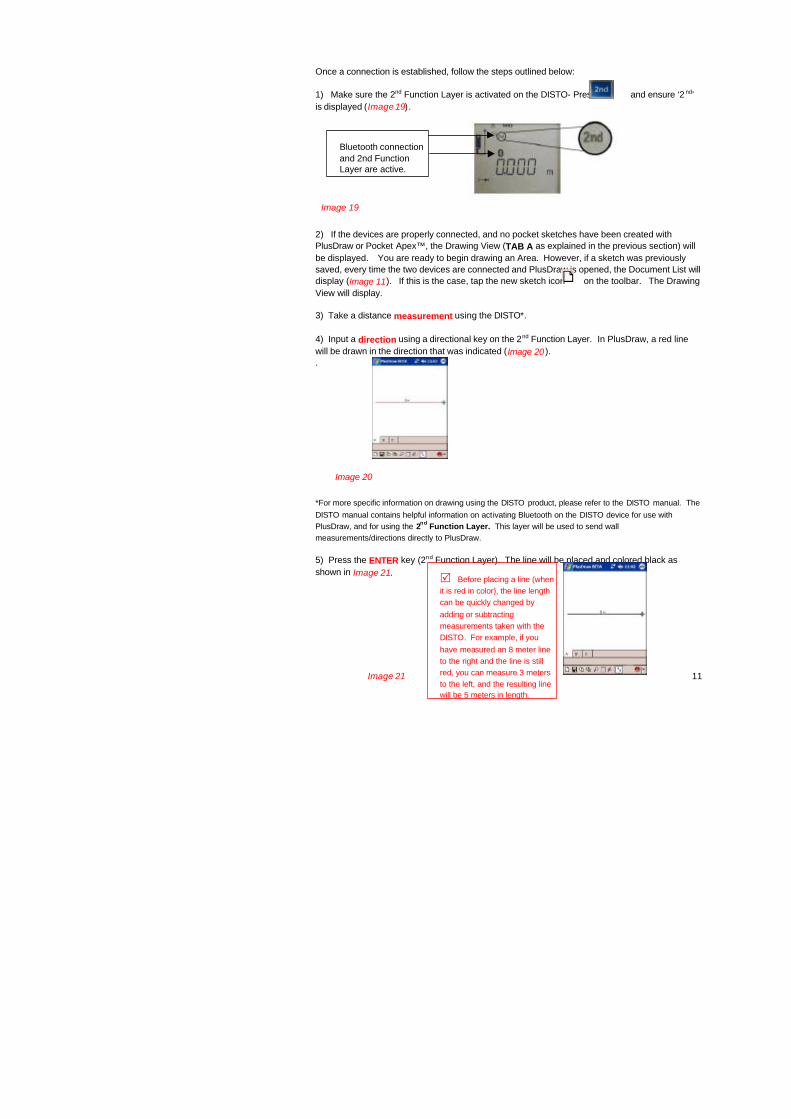
This version of PlusDraw allows one area to be drawn per page, and the data shown on each of the View Tabs (tabs A, B, and C - Image 12) relates to the selected page. To properly select a page, tap the desired page and then tap OK. The Drawing View (Tab A) will open to display the sketch for the selected page. Tabs B and C will display information for that specific sketch. Image 18 shows the relationship of a single sketch file (named Sketch 1 ) and its pages:
Drawing Using the DISTO* Note: PlusDraw will receive distance measurements in units (meters by default) set on the DISTO device. The unit of measure should not be changed during sketching. Refer to the DISTO manual for information on setting the unit of measure prior to connecting to PlusDraw. To properly draw and calculate an Area using both PlusDraw and the DISTO device, you must first establish a connection between the PPC and the DISTO as described in the previous sections.
Image 18
Kitchen (page 1)
Bedroom 1 (page 2)
Bedroom 2 (page 3)
Sketch 1
Tab A Tab B
The page names are generated from the data in field 3 of tab B. If this field is left blank, the pages will be numbered numerically (e.g. 1, 2, 3, etc.)
11
Once a connection is established, follow the steps outlined below: 1) Make sure the 2nd Function Layer is activated on the DISTO- Press and ensure ‘2 nd’ is displayed (Image 19). 2) If the devices are properly connected, and no pocket sketches have been created with PlusDraw or Pocket Apex™, the Drawing View (TAB A as explained in the previous section) will be displayed. You are ready to begin drawing an Area. However, if a sketch was previously saved, every time the two devices are connected and PlusDraw is opened, the Document List will display (Image 11). If this is the case, tap the new sketch icon on the toolbar. The Drawing View will display. 3) Take a distance measurement using the DISTO*. 4) Input a direction using a directional key on the 2nd Function Layer. In PlusDraw, a red line will be drawn in the direction that was indicated (Image 20 ). . *For more specific information on drawing using the DISTO product, please refer to the DISTO manual. The DISTO manual contains helpful information on activating Bluetooth on the DISTO device for use with PlusDraw, and for using the 2nd Function Layer. This layer will be used to send wall measurements/directions directly to PlusDraw. 5) Press the ENTER key (2nd Function Layer). The line will be placed and colored black as shown in Image 21.
Bluetooth connection and 2nd Function Layer are active.
Image 19
Image 20
Image 21
R Before placing a line (when it is red in color), the line length can be quickly changed by adding or subtracting measurements taken with the DISTO. For example, if you have measured an 8 meter line to the right and the line is still red, you can measure 3 meters to the left, and the resulting line will be 5 meters in length.

12
6) Continue drawing the Area in the same manner as described in steps 3-5 above. To properly calculate the area measurements, the area will need to be completely closed. Assuming all other measurements are accurate, the last line of the area does not need to be measured. Tap the Close icon on the PlusDraw toolbar to automatically draw the last line and close the area. In this version, once an area is closed, it can not be reopened. Note: Dependent on the scale (size) of the area, line dimensions may not display at the default zoom level to avoid crowding of the text. Zooming into a line may display its dimension, but some lines may not display dimensions at any zoom level. To see a list of all dimensions, use the export feature . The dimensions will be listed in the Pocket Excel (see section titled Saving and Exporting Files) file in order, from the leftmost top corner and continuing clockwise.
Drawing a Bay Window Direct Angle Method (45°)
Angles of 45° can be drawn quickly by using the diagonal buttons on the 2nd Function Layer* (Image 22) . Follow the steps below to draw the bay window shown in the example: n Verify that the 2 nd Function Layer* on the DISTO is enabled. n Measure the length of wall A. n Press the up-right angle button. The line will be red. n Press Enter on the DISTO. The line is black to denote that the line has been placed and input
for the next wall is expected. Now, continue drawing the bay window in a similar fashion: n Measure and draw wall B as normal. n Measure wall C in the same manner as outlined above for wall A.
R Measurement ¨ Direction ¨ Enter
Diagonal buttons are used to draw 45° angles.
Drawing direction
R Smaller measurements can be directly entered using the PlusDraw keyboard shown in the section titled Editing with the PlusDraw Keypad. Use the number pad to input measurements, and use the directional arrows keys to denote the line direction.

13
* Refer to the DISTO manual for more information on measuring and the 2nd Function Layer. Rise-and-Run Method Note: Rise-and-run measurements are generally less precise than direct angle measurements.
Using the DISTO, begin drawing the bay window by drawing wall A (or the first angled wall). Follow these steps: n Verify that the 2nd Function Layer* on the DISTO is enabled. n Measure the rise (also shown as Y above). n Input the direction (i.e. upward direction). The line is red and ready for the ‘run’ measurement
shown above (X). n Measure the run. n Input the direction (i.e. right). The line is red and angled. n Press Enter on the DISTO. The line is black to denote that the line has been placed and input
for the next wall is expected. Now, continue drawing the bay window in a similar fashion: n Measure and draw wall B as normal. n Measure wall C in the same manner as outlined above for wall A. * Refer to the DISTO manual for more information on measuring and the 2nd Function Layer.
Editing Lines Lines may be edited by using either the DISTO or the PlusDraw KeyPad. Note: In this version of PlusDraw, closed areas can not be reopened.
Editing with the DISTO The DISTO may be used to directly edit drawn lines in PlusDraw. To do so, the PPC must be connected to the DISTO device and the 2nd Function Layer must be active.
Drawing direction
Image 23 X = Run
Y = Rise

14
If the area has been completed and closed, the line may be edited by tapping the specific line with a stylus. The line will be highlighted in red ( Image 24). This indicates that the line length may be edited. Next, to properly edit the selected line, re-measure the correct distance using the DISTO. Input the appropriate direction* and press ENTER on the DISTO.
Editing with the PlusDraw KeyPad Alternatively, the selected line (Image 24) may be edited using the PlusDraw KeyPad. After selecting a line, access the KeyPad by tapping the keyboard selection icon ( Image 25). Select PlusDraw KeyPad from the available choices. The KeyPad will appear and the sketch will automatically adjust to the largest viewable size in the drawing area ( Image 26).
Image 23
Tap a line to select it.
Tap here to access the menu.
Image 24
Help Status bar displays
keyboard measurement
inputs as they are entered.
Use the Backspace
button (Image 27) to
correct a mis-type.
15
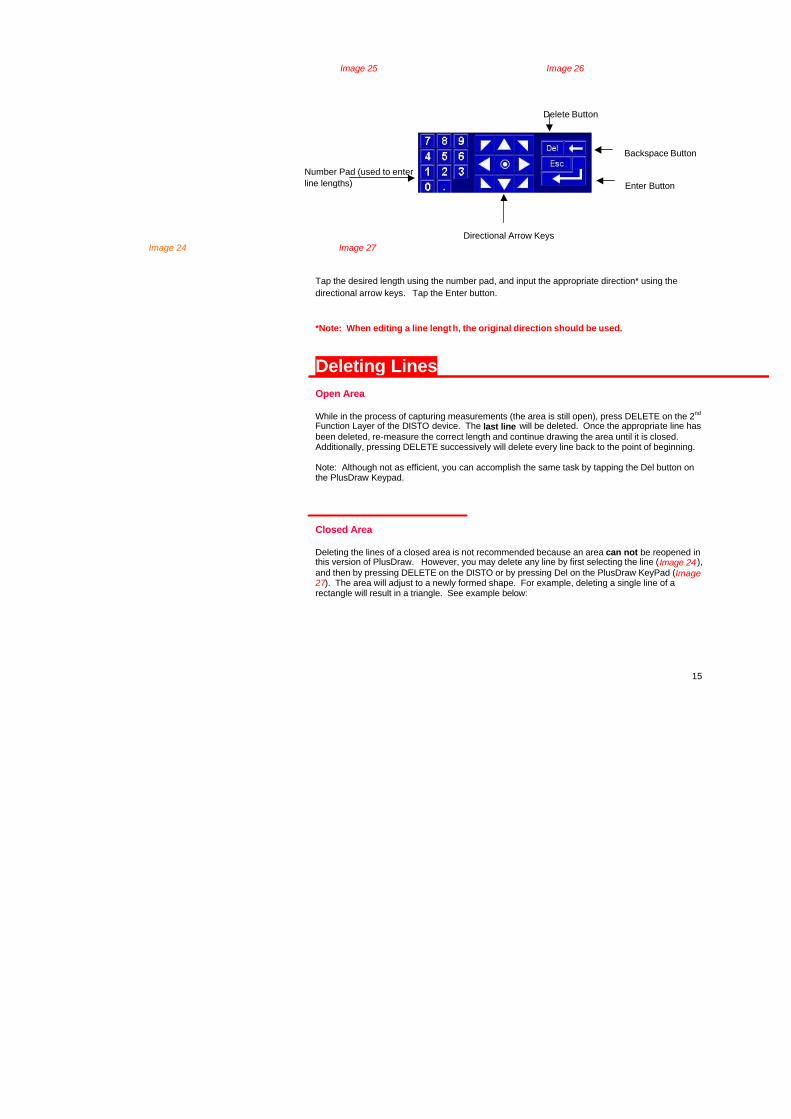
Tap the desired length using the number pad, and input the appropriate direction* using the directional arrow keys. Tap the Enter button. *Note: When editing a line length, the original direction should be used.
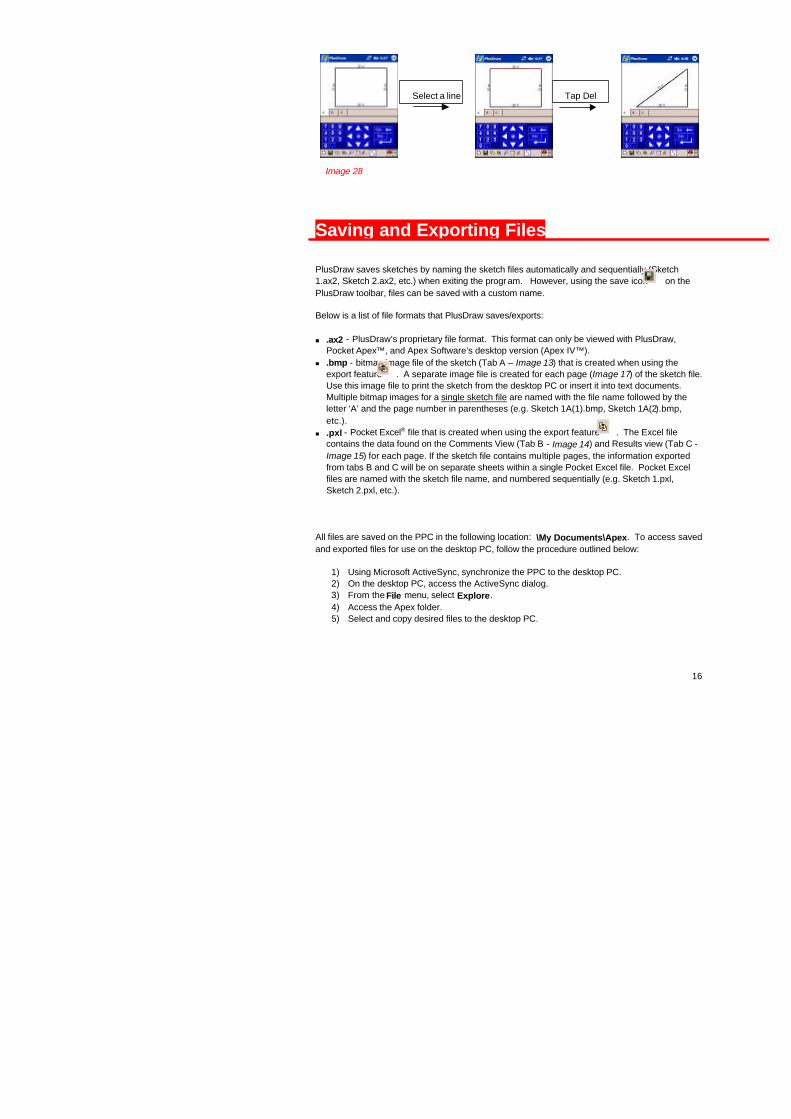
Deleting Lines Open Area While in the process of capturing measurements (the area is still open), press DELETE on the 2nd Function Layer of the DISTO device. The last line will be deleted. Once the appropriate line has been deleted, re-measure the correct length and continue drawing the area until it is closed. Additionally, pressing DELETE successively will delete every line back to the point of beginning. Note: Although not as efficient, you can accomplish the same task by tapping the Del button on the PlusDraw Keypad. Closed Area Deleting the lines of a closed area is not recommended because an area can not be reopened in this version of PlusDraw. However, you may delete any line by first selecting the line (Image 24 ), and then by pressing DELETE on the DISTO or by pressing Del on the PlusDraw KeyPad (Image 27). The area will adjust to a newly formed shape. For example, deleting a single line of a rectangle will result in a triangle. See example below:
Image 25 Image 26
Enter Button
Directional Arrow Keys
Number Pad (used to enter line lengths)
Image 24 Image 27
Backspace Button
Delete Button
16
Saving and Exporting Files PlusDraw saves sketches by naming the sketch files automatically and sequentially (Sketch 1.ax2, Sketch 2.ax2, etc.) when exiting the program. However, using the save icon on the PlusDraw toolbar, files can be saved with a custom name. Below is a list of file formats that PlusDraw saves/exports: n .ax2 - PlusDraw’s proprietary file format. This format can only be viewed with PlusDraw,
Pocket Apex™, and Apex Software’s desktop version (Apex IV™). n .bmp - bitmap image file of the sketch (Tab A – Image 13) that is created when using the
export feature . A separate image file is created for each page (Image 17) of the sketch file. Use this image file to print the sketch from the desktop PC or insert it into text documents. Multiple bitmap images for a single sketch file are named with the file name followed by the letter ‘A’ and the page number in parentheses (e.g. Sketch 1A(1).bmp, Sketch 1A(2).bmp, etc.).
n .pxl - Pocket Excel® file that is created when using the export feature . The Excel file contains the data found on the Comments View (Tab B - Image 14) and Results view (Tab C - Image 15) for each page. If the sketch file contains multiple pages, the information exported from tabs B and C will be on separate sheets within a single Pocket Excel file. Pocket Excel files are named with the sketch file name, and numbered sequentially (e.g. Sketch 1.pxl, Sketch 2.pxl, etc.).
All files are saved on the PPC in the following location: \My Documents\Apex. To access saved and exported files for use on the desktop PC, follow the procedure outlined below:
1) Using Microsoft ActiveSync, synchronize the PPC to the desktop PC. 2) On the desktop PC, access the ActiveSync dialog. 3) From the File menu, select Explore. 4) Access the Apex folder. 5) Select and copy desired files to the desktop PC.
Select a line Tap Del
Image 28


