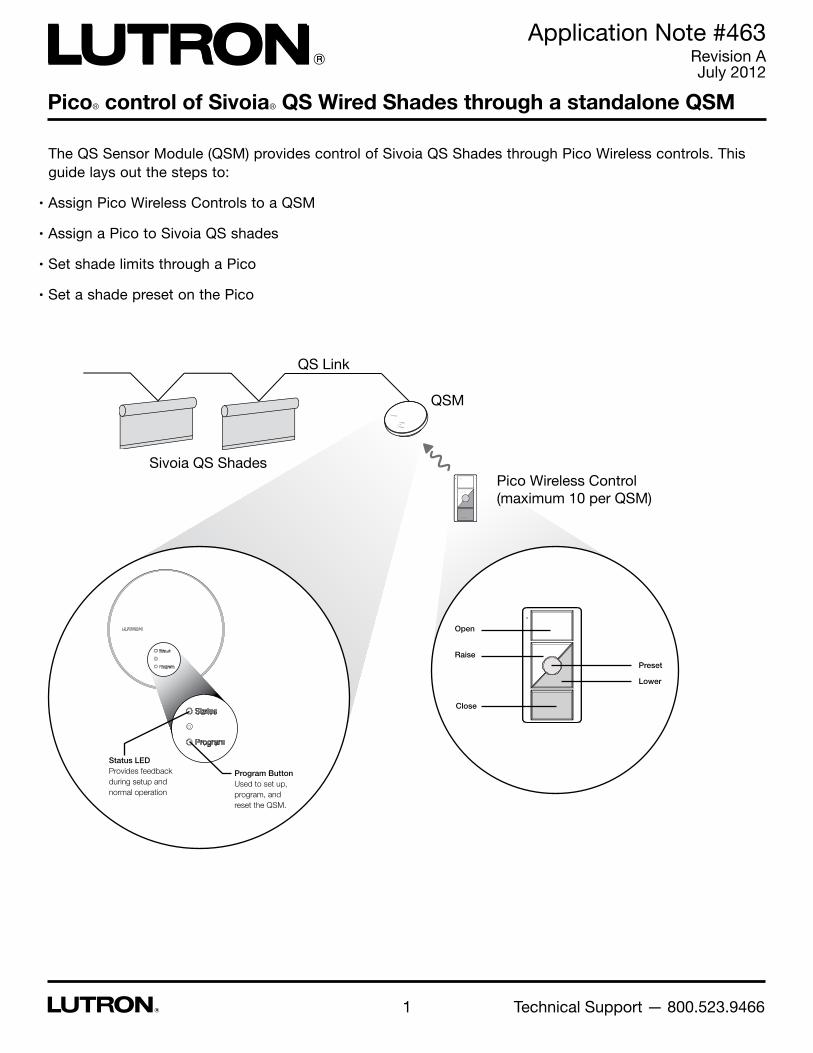
Pico® control of Sivoia® QS Wired Shades through a standalone QSM Application Note #463 Revision A July 2012 1 Technical Support — 800.523.9466 The QS Sensor Module (QSM) provides control of Sivoia QS Shades through Pico Wireless controls. This guide lays out the steps to: • Assign Pico Wireless Controls to a QSM • Assign a Pico to Sivoia QS shades • Set shade limits through a Pico • Set a shade preset on the Pico QS Link QSM Sivoia QS Shades Pico Wireless Control (maximum 10 per QSM) Status LED Provides feedback during setup and normal operation Program Button Used to set up, program, and reset the QSM. Open Raise Preset Lower Close
Transcript
Pico® control of Sivoia® QS Wired Shades through a standalone QSM
Application Note #463Revision AJuly 2012
1 Technical Support — 800.523.9466
The QS Sensor Module (QSM) provides control of Sivoia QS Shades through Pico Wireless controls. This guide lays out the steps to:
• Assign Pico Wireless Controls to a QSM
• Assign a Pico to Sivoia QS shades
• Set shade limits through a Pico
• Set a shade preset on the Pico
QS Link
QSM
Sivoia QS ShadesPico Wireless Control(maximum 10 per QSM)
Status LEDProvides feedback during setup and normal operation
Program ButtonUsed to set up, program, and reset the QSM.
Open
RaisePreset
Lower
Close
Application Note #463
2 www.lutron.com
Pico® control of Sivoia® QS Wired Shades through a standalone QSM
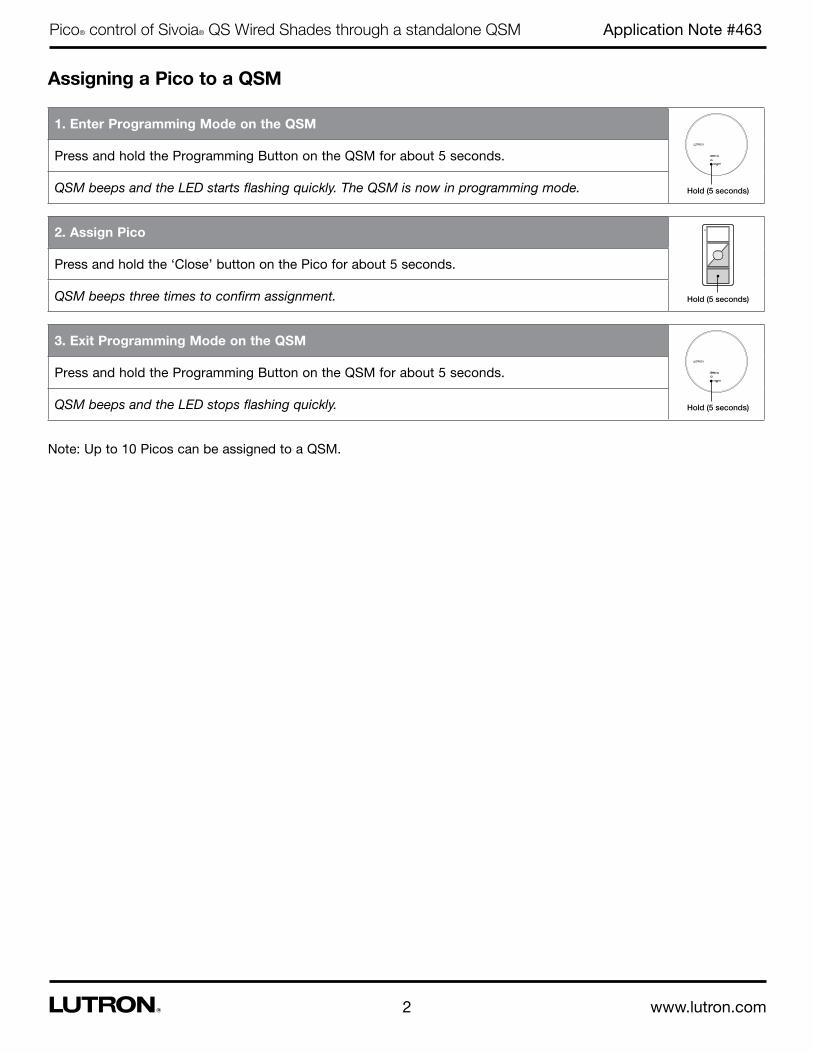
Assigning a Pico to a QSM
1. Enter Programming Mode on the QSM
Press and hold the Programming Button on the QSM for about 5 seconds.
QSM beeps and the LED starts flashing quickly. The QSM is now in programming mode. Hold (5 seconds)
2. Assign Pico
Press and hold the ‘Close’ button on the Pico for about 5 seconds.
QSM beeps three times to confirm assignment. Hold (5 seconds)
3. Exit Programming Mode on the QSM
Press and hold the Programming Button on the QSM for about 5 seconds.
QSM beeps and the LED stops flashing quickly. Hold (5 seconds)
Note: Up to 10 Picos can be assigned to a QSM.
Application Note #463
3 www.lutron.com
Pico® control of Sivoia® QS Wired Shades through a standalone QSM
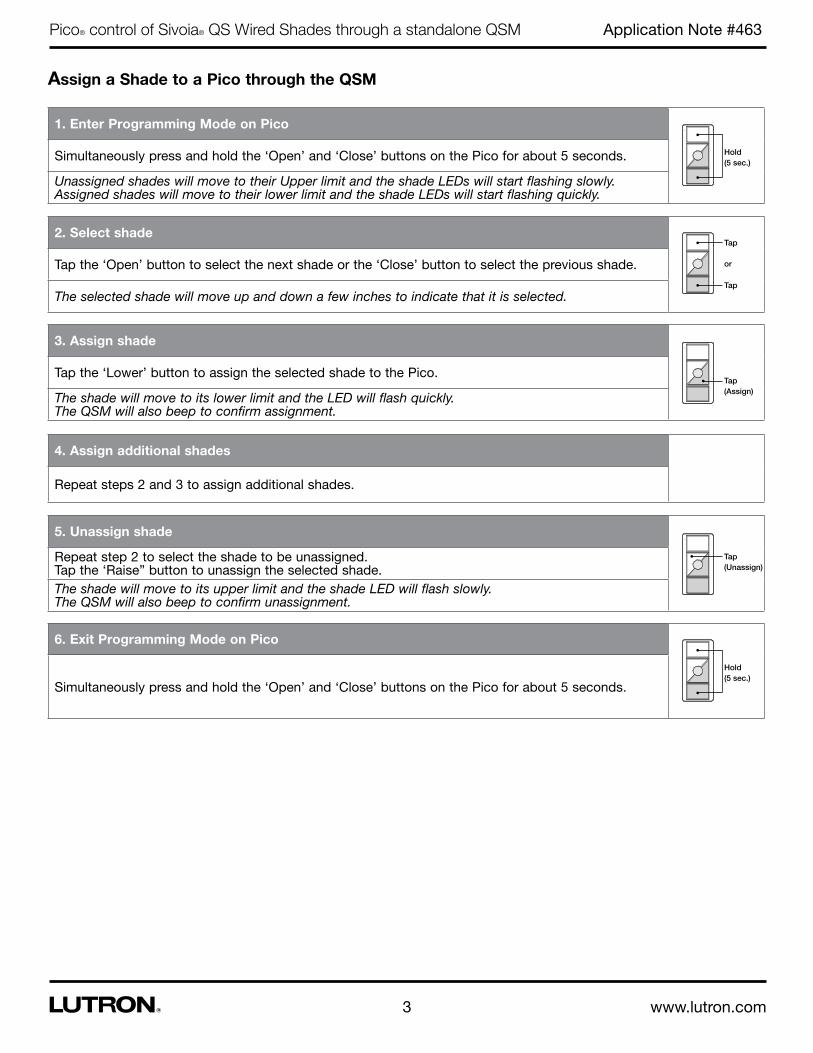
Assign a Shade to a Pico through the QSM
1. Enter Programming Mode on Pico
Simultaneously press and hold the ‘Open’ and ‘Close’ buttons on the Pico for about 5 seconds.
Unassigned shades will move to their Upper limit and the shade LEDs will start flashing slowly.Assigned shades will move to their lower limit and the shade LEDs will start flashing quickly.
Hold (5 sec.)
2. Select shade
Tap the ‘Open’ button to select the next shade or the ‘Close’ button to select the previous shade.
The selected shade will move up and down a few inches to indicate that it is selected.
Tap
3. Assign shade
Tap the ‘Lower’ button to assign the selected shade to the Pico.
The shade will move to its lower limit and the LED will flash quickly. The QSM will also beep to confirm assignment.
4. Assign additional shades
Repeat steps 2 and 3 to assign additional shades.
Tap (Assign)
or
Tap
6. Exit Programming Mode on Pico
Simultaneously press and hold the ‘Open’ and ‘Close’ buttons on the Pico for about 5 seconds.
Hold (5 sec.)
5. Unassign shade
Repeat step 2 to select the shade to be unassigned. Tap the ‘Raise” button to unassign the selected shade.The shade will move to its upper limit and the shade LED will flash slowly. The QSM will also beep to confirm unassignment.
Tap (Unassign)
Application Note #463
4 www.lutron.com
Pico® control of Sivoia® QS Wired Shades through a standalone QSM
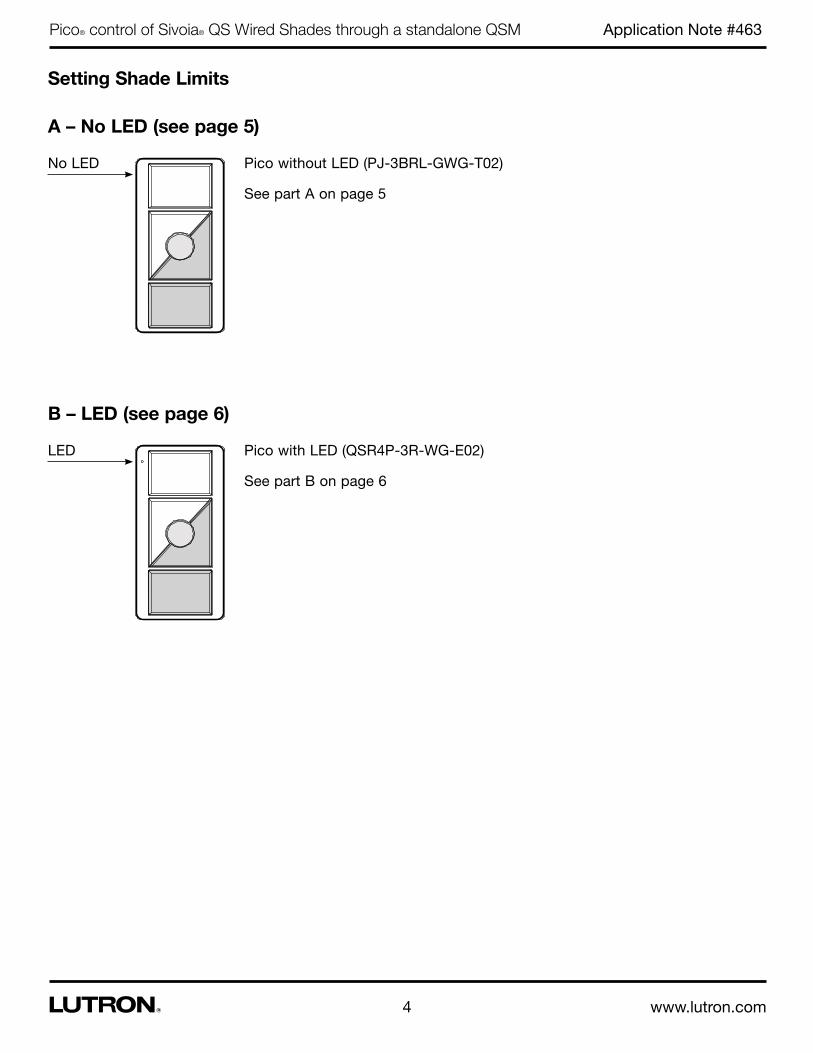
Setting Shade Limits
Pico without LED (PJ-3BRL-GWG-T02)
See part A on page 5
A – No LED (see page 5)
No LED
Pico with LED (QSR4P-3R-WG-E02)
See part B on page 6
B – LED (see page 6)
LED
Application Note #463
5 www.lutron.com
Pico® control of Sivoia® QS Wired Shades through a standalone QSM
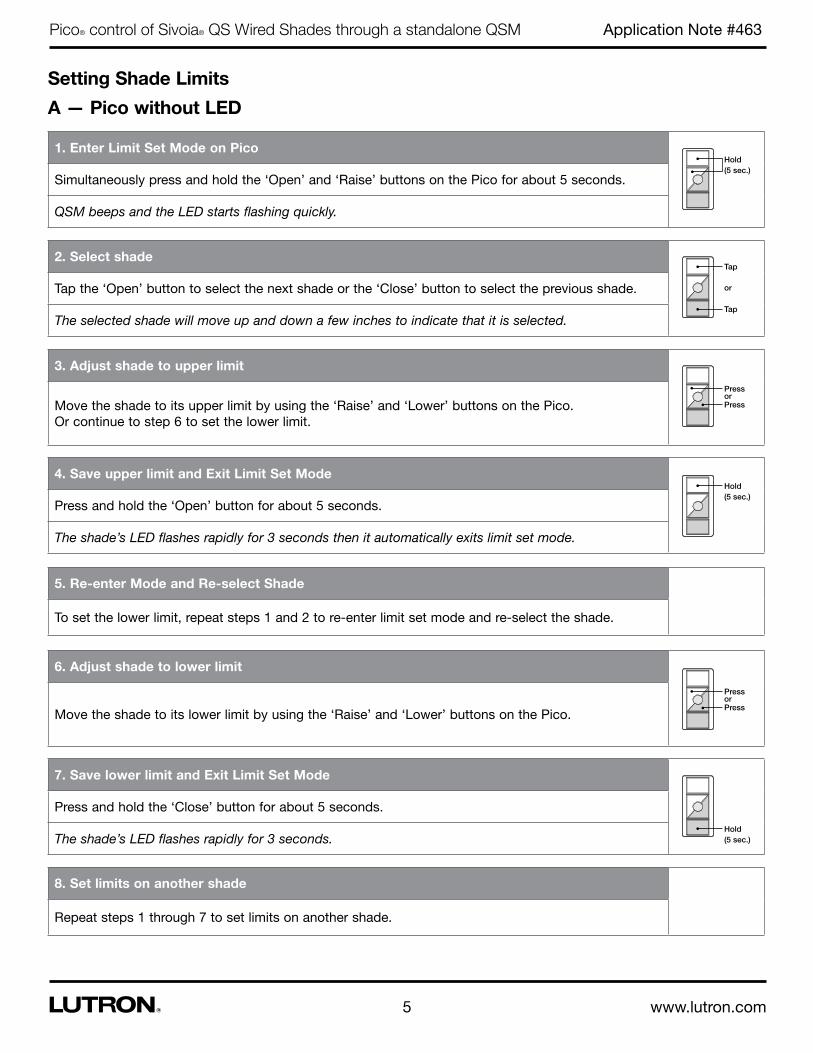
1. Enter Limit Set Mode on Pico
Simultaneously press and hold the ‘Open’ and ‘Raise’ buttons on the Pico for about 5 seconds.
QSM beeps and the LED starts flashing quickly.
Hold (5 sec.)
3. Adjust shade to upper limit
Move the shade to its upper limit by using the ‘Raise’ and ‘Lower’ buttons on the Pico. Or continue to step 6 to set the lower limit.
Press
4. Save upper limit and Exit Limit Set Mode
Press and hold the ‘Open’ button for about 5 seconds.
The shade’s LED flashes rapidly for 3 seconds then it automatically exits limit set mode.
6. Adjust shade to lower limit
Move the shade to its lower limit by using the ‘Raise’ and ‘Lower’ buttons on the Pico.
7. Save lower limit and Exit Limit Set Mode
Press and hold the ‘Close’ button for about 5 seconds.
The shade’s LED flashes rapidly for 3 seconds.Hold (5 sec.)
Setting Shade Limits
A — Pico without LED
Pressor
8. Set limits on another shade
Repeat steps 1 through 7 to set limits on another shade.
Hold (5 sec.)
Press
Pressor
2. Select shade
Tap the ‘Open’ button to select the next shade or the ‘Close’ button to select the previous shade.
The selected shade will move up and down a few inches to indicate that it is selected.
Tap
or
Tap
5. Re-enter Mode and Re-select Shade
To set the lower limit, repeat steps 1 and 2 to re-enter limit set mode and re-select the shade.
Application Note #463
6 www.lutron.com
Pico® control of Sivoia® QS Wired Shades through a standalone QSM
1. Enter Limit Set Mode on Pico
Simultaneously press and hold the ‘Open’ and ‘Raise’ buttons on the Pico for about 5 seconds.
QSM beeps and the LED starts flashing quickly.
Hold (5 sec.)
3. Adjust shade to upper limit
Move the shade to its upper limit by using the ‘Raise’ and ‘Lower’ buttons on the Pico. Or continue to step 5 to set the lower limit.
Press
4. Save upper limit
Press and hold the ‘Open’ button for about 5 seconds.
The shade’s LED flashes rapidly for 3 seconds.
5. Adjust shade to lower limit
Move the shade to its lower limit by using the ‘Raise’ and ‘Lower’ buttons on the Pico.
6. Save lower limit
Press and hold the ‘Close’ button for about 5 seconds.
The shade’s LED flashes rapidly for 3 seconds.Hold (5 sec.)
Setting Shade Limits
B — Pico with an LED
Pressor
7. Set limits on another shade
Repeat steps 2 thru 6 to set limits on another shade.
8. Exit Limit Set Mode on Pico
Once all limits are set for the shades assigned to this control, exit limit set mode from the Pico by simultaneously pressing and holding the ‘Open’ and ‘Raise’ buttons for about 5 seconds.
The QSM will beep and the LED will stop flashing quickly.
Hold (5 sec.)
Press
Pressor
Hold (5 sec.)
2. Select shade
Tap the ‘Open’ button to select the next shade or the ‘Close’ button to select the previous shade.
The selected shade will move up and down a few inches to indicate that it is selected.
Tap
or
Tap
Application Note #463
7 www.lutron.com
Pico® control of Sivoia® QS Wired Shades through a standalone QSM
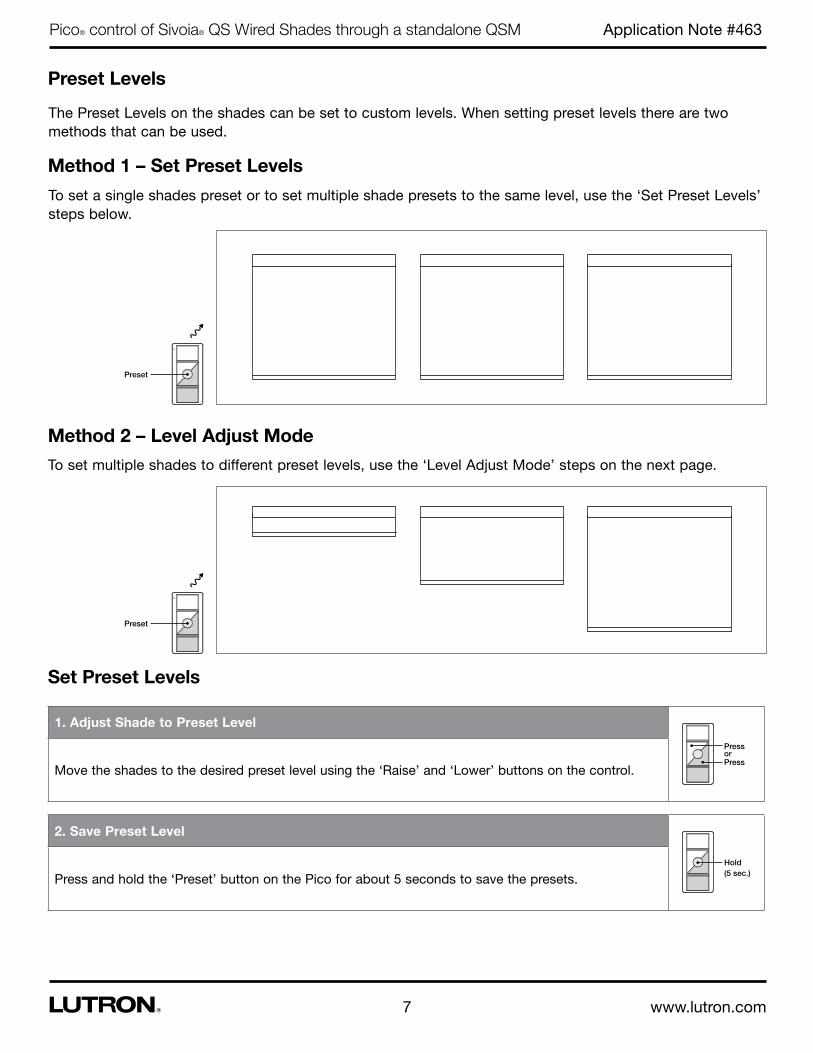
Preset Levels
1. Adjust Shade to Preset Level
Move the shades to the desired preset level using the ‘Raise’ and ‘Lower’ buttons on the control.
2. Save Preset Level
Press and hold the ‘Preset’ button on the Pico for about 5 seconds to save the presets.Hold(5 sec.)
Set Preset Levels
Press
Pressor
The Preset Levels on the shades can be set to custom levels. When setting preset levels there are two methods that can be used.
To set a single shades preset or to set multiple shade presets to the same level, use the ‘Set Preset Levels’ steps below.
To set multiple shades to different preset levels, use the ‘Level Adjust Mode’ steps on the next page.
Method 1 – Set Preset Levels
Method 2 – Level Adjust Mode
Preset
Preset
Application Note #463
8 www.lutron.com
Pico® control of Sivoia® QS Wired Shades through a standalone QSM
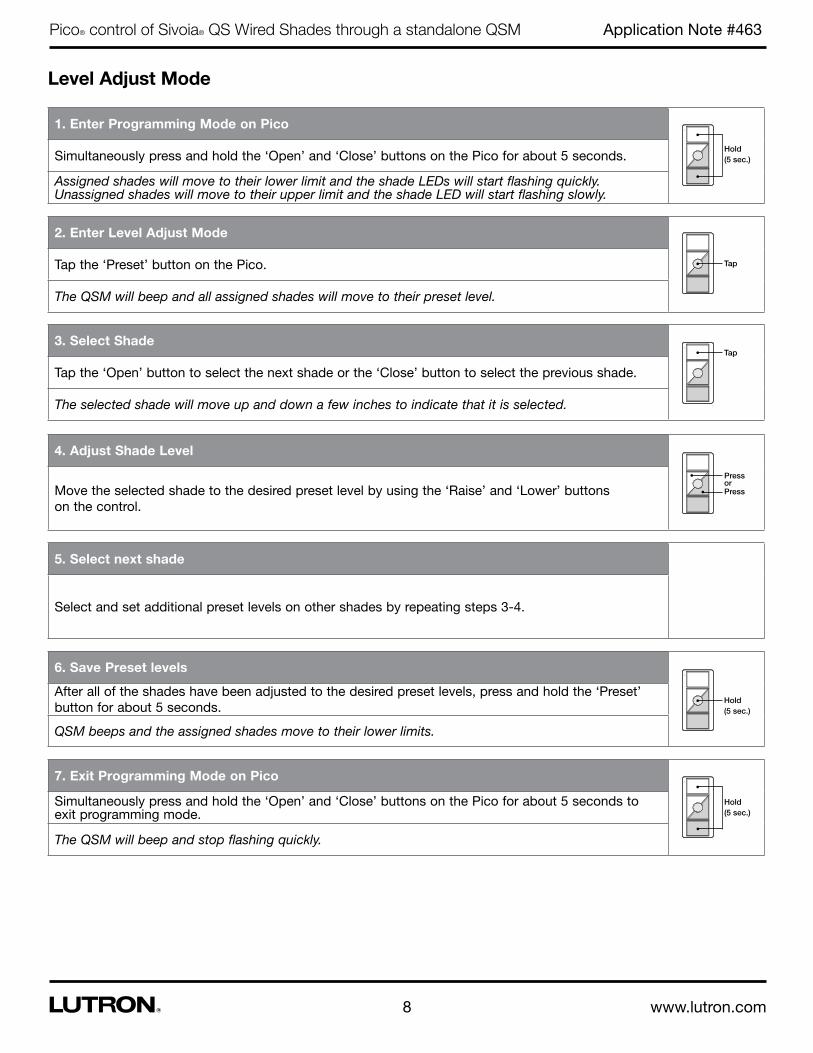
1. Enter Programming Mode on Pico
Simultaneously press and hold the ‘Open’ and ‘Close’ buttons on the Pico for about 5 seconds.
Assigned shades will move to their lower limit and the shade LEDs will start flashing quickly. Unassigned shades will move to their upper limit and the shade LED will start flashing slowly.
Hold (5 sec.)
2. Enter Level Adjust Mode
Tap the ‘Preset’ button on the Pico.
The QSM will beep and all assigned shades will move to their preset level.
3. Select Shade
Tap the ‘Open’ button to select the next shade or the ‘Close’ button to select the previous shade.
The selected shade will move up and down a few inches to indicate that it is selected.
4. Adjust Shade Level
Move the selected shade to the desired preset level by using the ‘Raise’ and ‘Lower’ buttons on the control.
5. Select next shade
Select and set additional preset levels on other shades by repeating steps 3-4.
Level Adjust Mode
6. Save Preset levels
After all of the shades have been adjusted to the desired preset levels, press and hold the ‘Preset’ button for about 5 seconds.
QSM beeps and the assigned shades move to their lower limits.
7. Exit Programming Mode on Pico
Simultaneously press and hold the ‘Open’ and ‘Close’ buttons on the Pico for about 5 seconds to exit programming mode.
The QSM will beep and stop flashing quickly.
Hold (5 sec.)
Press
Pressor
Hold (5 sec.)
Tap
Tap
Lutron Electronics Co., Inc.7200 Suter RoadCoopersburg, PA 18036-1299 U.S.A.P/N 048-463 Rev. A 07/2012
Application Note #463
9
Pico® control of Sivoia® QS Wired Shades through a standalone QSM
Lutron Contact Numbers
Lutron, Pico, and Sivoia are registered trademarks of Lutron Electronics Co., Inc.
WORLD HEADQUARTERS USA
Lutron Electronics Co., Inc. 7200 Suter Road Coopersburg, PA 18036-1299 TEL: +1.610.282.3800 FAX: +1.610.282.1243 Toll-Free: 1.888.LUTRON1 Technical Support: 1.800.523.9466