Application Notes for Packaging and Deploying Avaya Communications Process Manager Sample SDK Web Application on Apache Geronimo – Issue 1.0 Abstract These Application Notes describe the steps required to package and deploy Avaya Communications Process Manager (CPM) sample Software Development Kit web application on an Apache Geronimo application server. Apache Geronimo is an open source Java Enterprise Edition 5.0 application server. It supports web and Java 2 Enterprise Edition (J2EE) applications. For these Application Notes, a sample Avaya Communications Process Manager web client application available in the CPM SDK was deployed to Apache Geronimo. This client application was used to verify the Avaya CPM Simple Object Access Protocol (SOAP) web services interaction between the Avaya CPM and Apache Geronimo.
1. Introduction These Application Notes describe the steps required to package and deploy Avaya Communications Process Manager (CPM) sample SDK web application on an Apache Geronimo application server. Apache Geronimo is an open source Java Enterprise Edition 5.0 application server. It supports web and Java 2 Enterprise Edition (J2EE) applications. For these Application Notes, a sample Avaya CPM web client application available in the Avaya CPM SDK was recompiled and deployed to Apache Geronimo. This web client application was used to verify the CPM Simple Object Access Protocol (SOAP) Web services interaction between the Avaya CPM and Apache Geronimo. The CPM sample web client application project was written in Java code and is generic to all platforms. These Application Notes illustrate how to recompile and deploy this sample CPM web client application to Apache Geronimo. The Avaya CPM SDK sample web client application supports the following Avaya Communication Enabled Business Process web services:
• Advisory: This web client application initiates an outbound advisory request to a list of recipients for them to acknowledge receipt of the notification.
• Notify and Respond: This web client application initiates an outbound notification with
a set of questions to a list of recipients and waits for them to respond to the notification.
• Notify and Conference: This web client application initiates an outbound notification to a list of recipients. When a notified user answers the phone, the service provides contextual information about the exception conference and asks if the caller wants to join the conference.
• Find and Call: This web client application uses a recipient list to create either a two-
party call or an on demand conference. For detailed information on the sample Avaya SDK web client application refer to [1] in the Additional References section. For these Application Notes, the Avaya CPM SDK web client application was used to verify the interoperability between Apache Geronimo and the Avaya CPM via web services.
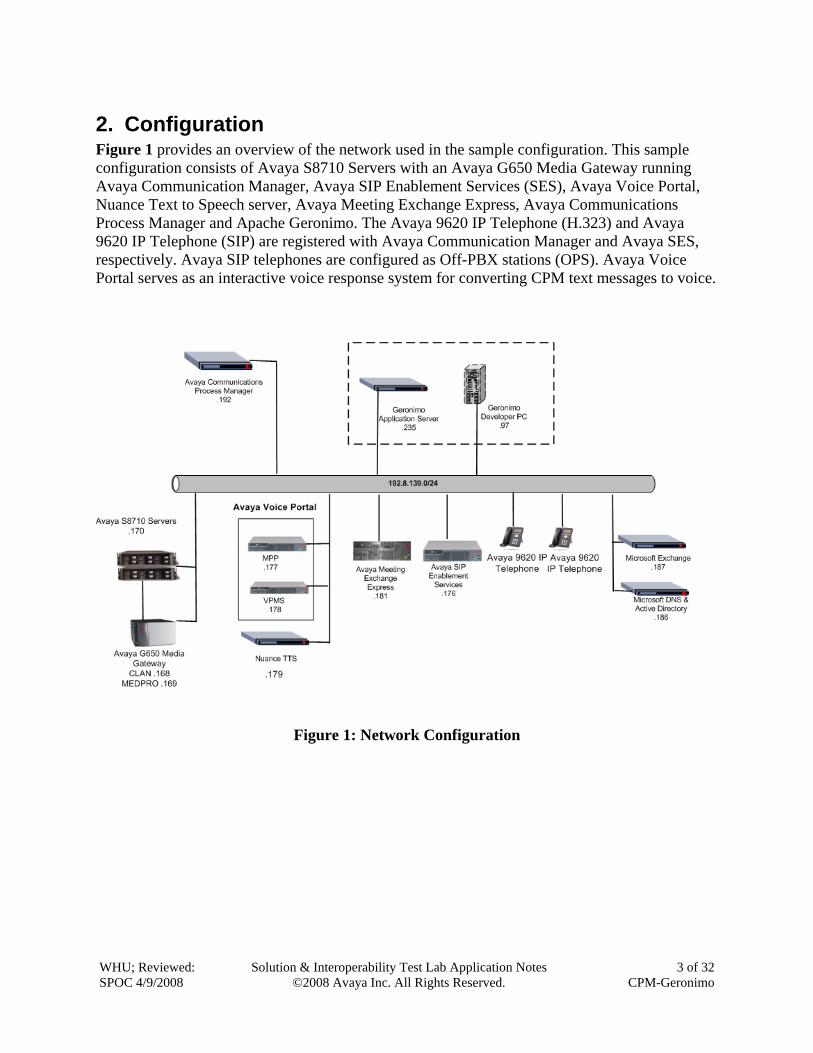
2. Configuration Figure 1 provides an overview of the network used in the sample configuration. This sample configuration consists of Avaya S8710 Servers with an Avaya G650 Media Gateway running Avaya Communication Manager, Avaya SIP Enablement Services (SES), Avaya Voice Portal, Nuance Text to Speech server, Avaya Meeting Exchange Express, Avaya Communications Process Manager and Apache Geronimo. The Avaya 9620 IP Telephone (H.323) and Avaya 9620 IP Telephone (SIP) are registered with Avaya Communication Manager and Avaya SES, respectively. Avaya SIP telephones are configured as Off-PBX stations (OPS). Avaya Voice Portal serves as an interactive voice response system for converting CPM text messages to voice.
Avaya 9620 IP Telephone 2.0.1.34 (SIP) Avaya 9620 IP Telephone 1.5 (H.323) Avaya Communications Process Manager Release 2.1 Avaya Communications Process Manager SDK Release 2.1 Apache Geronimo • Microsoft Windows 2003 Server • Sun Microsystems Java JDK
Release 2.1 Service Pack 2 1.5_0_14
Developer PC Windows XP Professional • Sun Microsystems Java JDK • Eclipse • Geronimo Eclipse Plugin
2002 SP 2 1_5_14 3.3.1.1 v2.0.0
Microsoft Active Directory and DNS Server Microsoft Windows Server 2003
4. Configure Avaya Communications Process Manager In these Application Notes, it is assumed that the Avaya CPM software and the license file have already been previously installed. These Application Notes further assume that Avaya Communication Manager, Avaya SES, Avaya Voice Portal, and Avaya Meeting Exchange Express (as shown in Fig. 1) have already been configured and are operational with Avaya CPM. For additional information on these installation tasks, refer to [3] – [6] in the Additional References section. This section describes the steps that are required for adding users to the Avaya CPM for use with the sample SDK web application described in later sections.
Step Description 1. On the Avaya CPM server, launch a web browser and enter the URL http://<Name or IP
address of CPM server>/VIA. When prompted for a user name and password, enter the credentials of the administrator account.
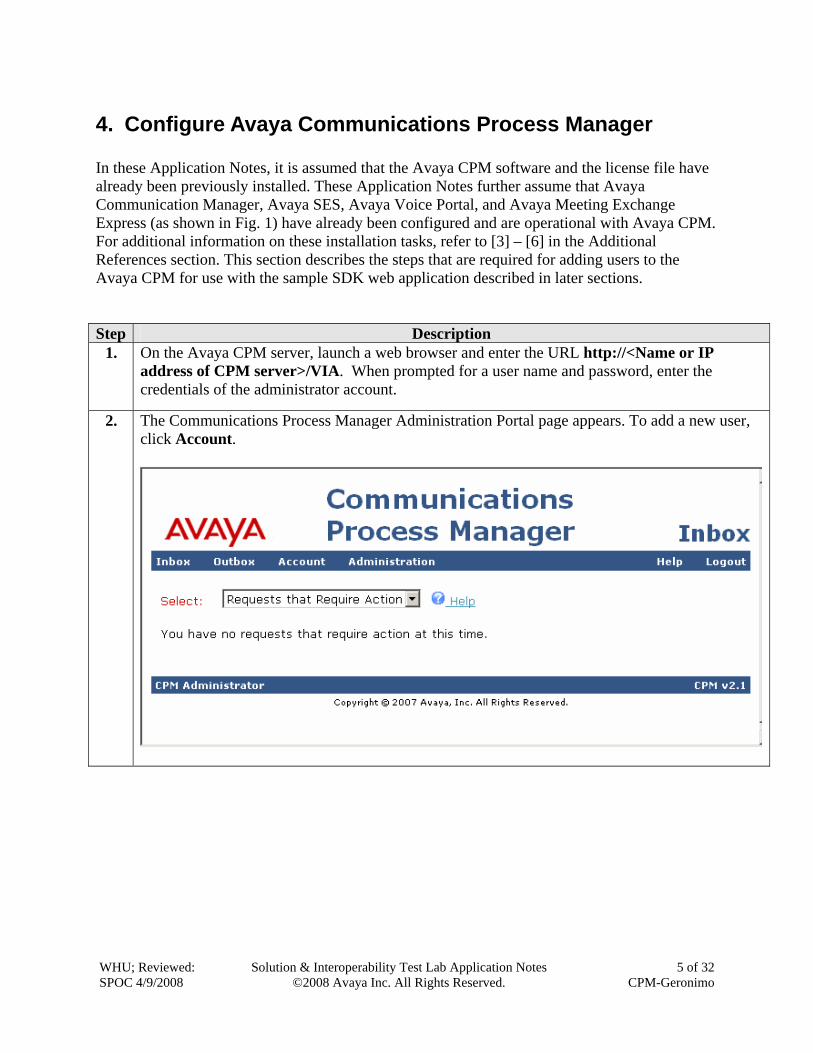
2. The Communications Process Manager Administration Portal page appears. To add a new user, click Account.
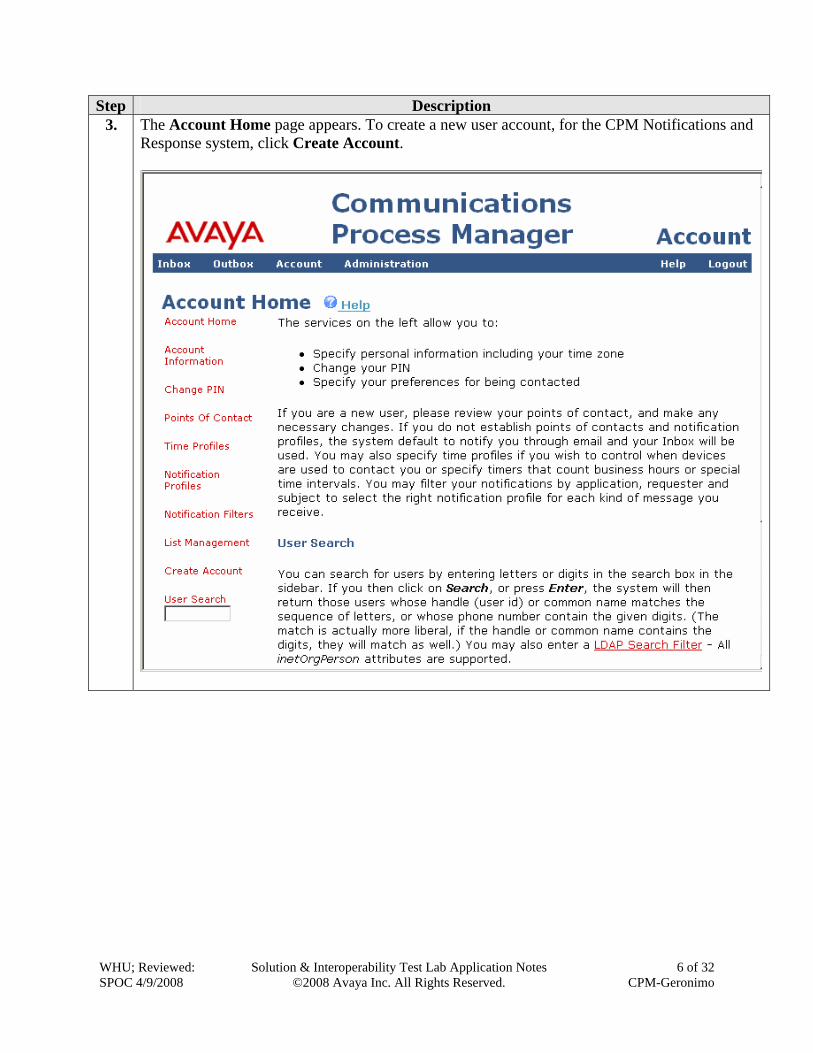
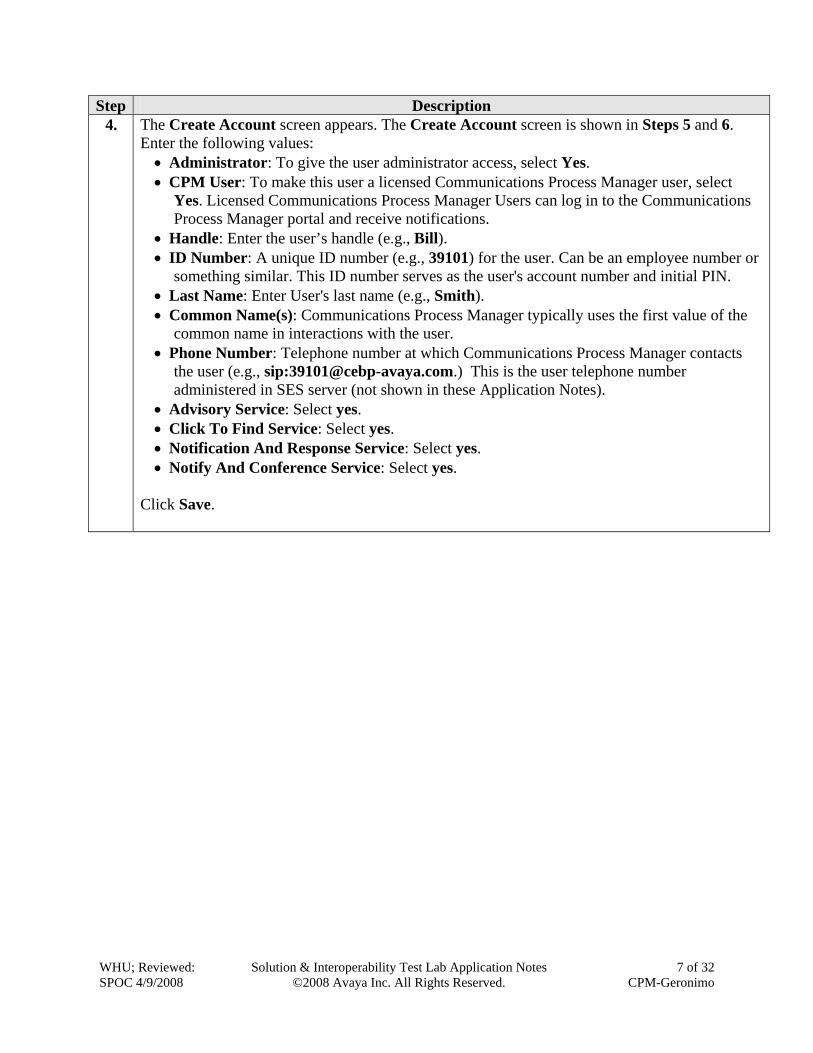
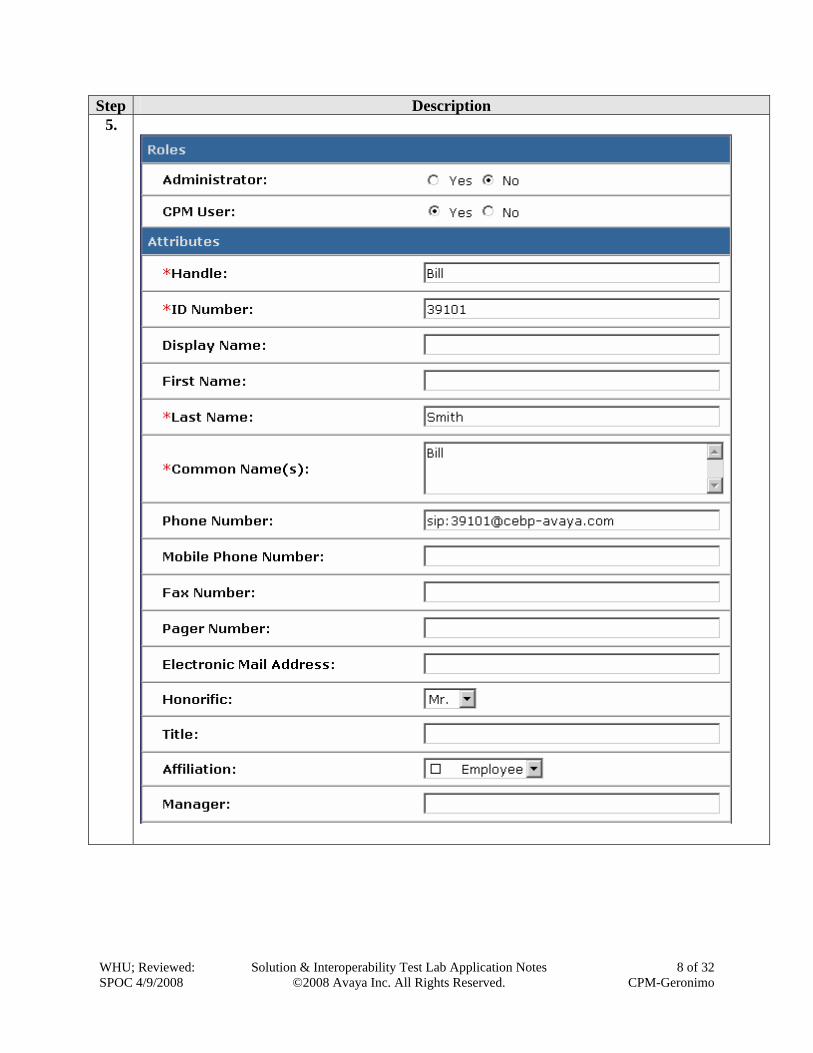
Step Description 4. The Create Account screen appears. The Create Account screen is shown in Steps 5 and 6.
Enter the following values: • Administrator: To give the user administrator access, select Yes. • CPM User: To make this user a licensed Communications Process Manager user, select
Yes. Licensed Communications Process Manager Users can log in to the Communications Process Manager portal and receive notifications.
• Handle: Enter the user’s handle (e.g., Bill). • ID Number: A unique ID number (e.g., 39101) for the user. Can be an employee number or
something similar. This ID number serves as the user's account number and initial PIN. • Last Name: Enter User's last name (e.g., Smith). • Common Name(s): Communications Process Manager typically uses the first value of the
common name in interactions with the user. • Phone Number: Telephone number at which Communications Process Manager contacts
the user (e.g., sip:[email protected].) This is the user telephone number administered in SES server (not shown in these Application Notes).
• Advisory Service: Select yes. • Click To Find Service: Select yes. • Notification And Response Service: Select yes. • Notify And Conference Service: Select yes.
5. Compile Sample Avaya Communications Process Manager Web Client Application
This section illustrates how to compile the Avaya CPM SDK web client application on a developer PC running on Windows XP. These Application Notes assume that the Eclipse Geronimo plugin is already installed on the developer PC. Refer to [8] in the Additional References section for detailed installation information. The CPM Client SDK can be downloaded from the following URL: http://www.avaya.com/devconnect. For more information on the sample Avaya SDK web client application refer to [7] in the Additional References section.
Step Description 1. From the developer PC launch Eclipse. The Eclipse page appears.
Step Description 4. Verify that the clientsdk-webui project appears in the Project Explorer pane.
Note: The red “x” next to clientsdk-webui indicates the clientsdk-webui project has not been successfully built. Steps 5 – 6 will clear the error indication.
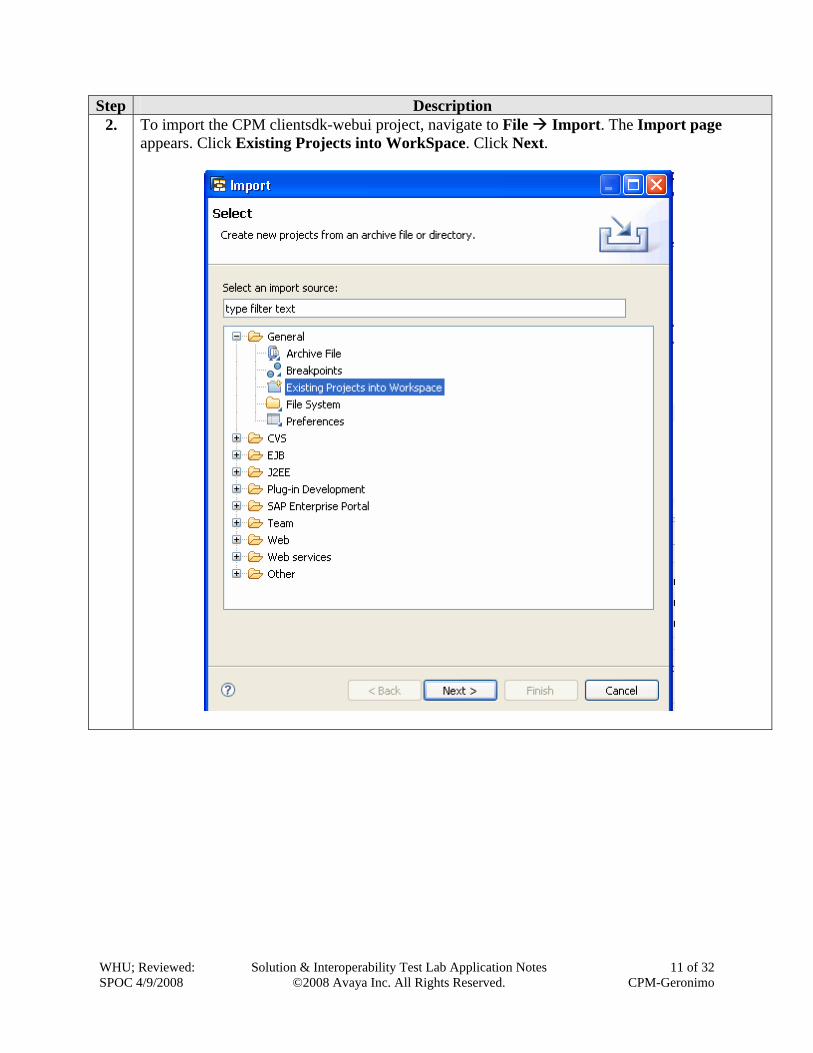
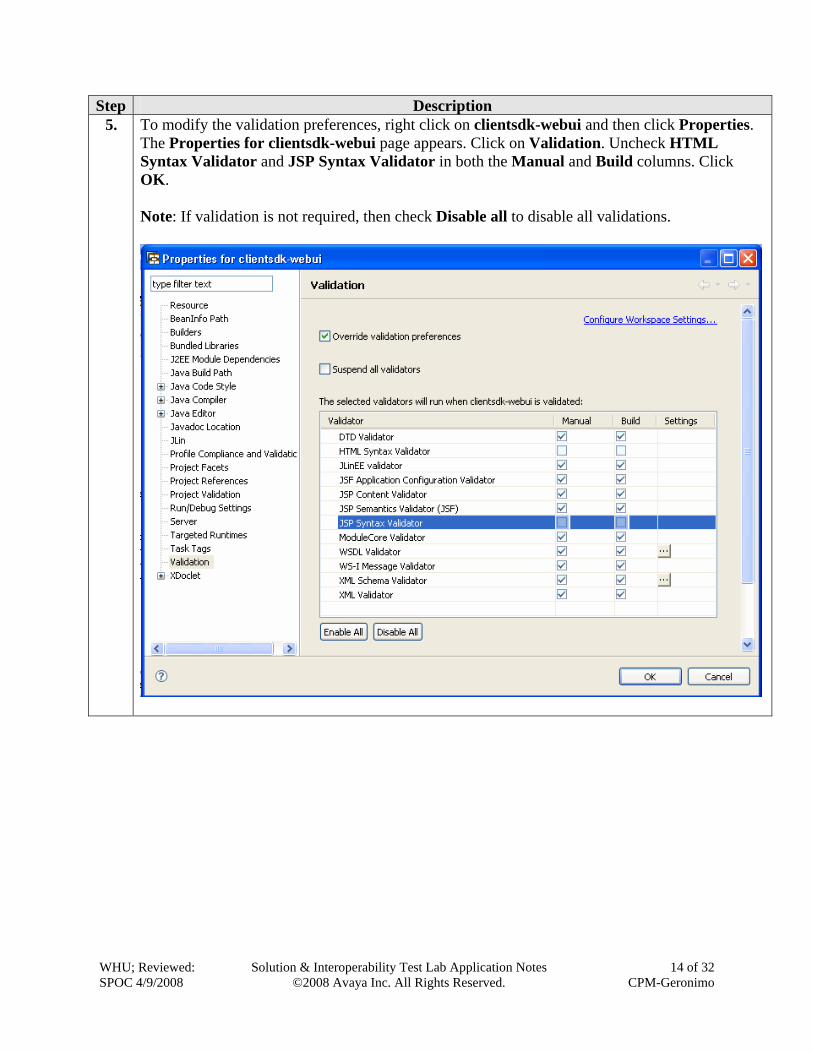
Step Description 5. To modify the validation preferences, right click on clientsdk-webui and then click Properties.
The Properties for clientsdk-webui page appears. Click on Validation. Uncheck HTML Syntax Validator and JSP Syntax Validator in both the Manual and Build columns. Click OK. Note: If validation is not required, then check Disable all to disable all validations.
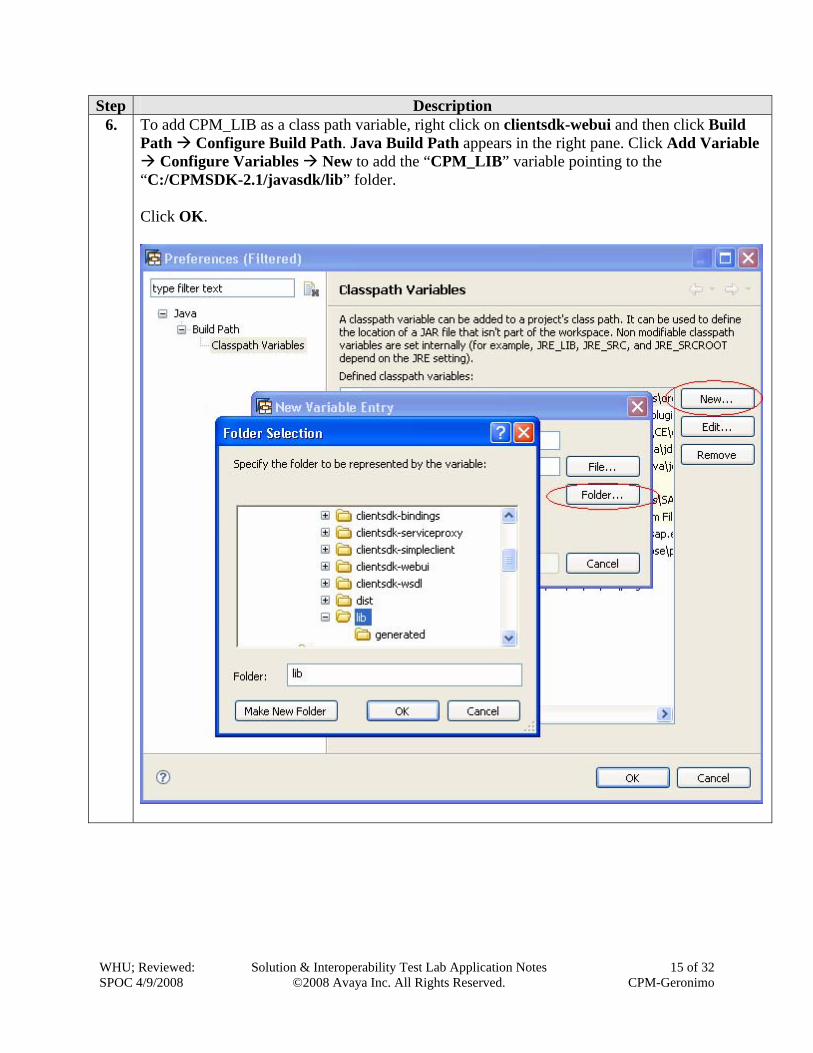
Step Description 6. To add CPM_LIB as a class path variable, right click on clientsdk-webui and then click Build
Path Configure Build Path. Java Build Path appears in the right pane. Click Add Variable Configure Variables New to add the “CPM_LIB” variable pointing to the
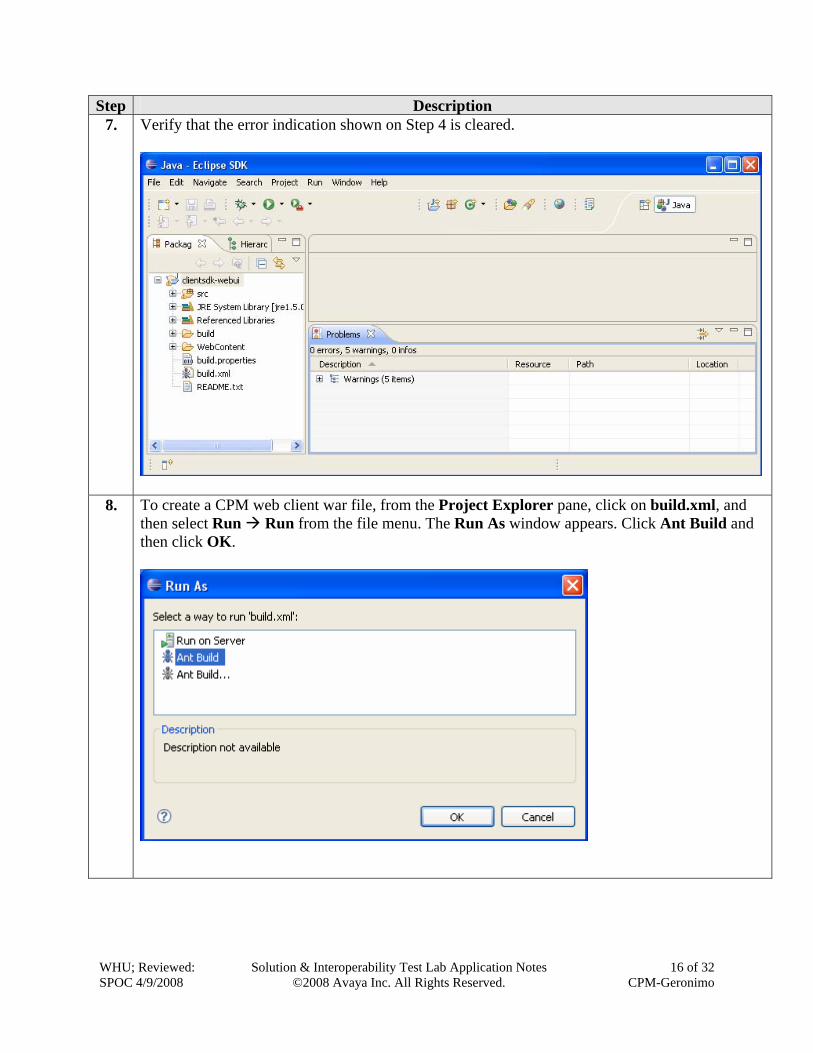
Step Description 7. Verify that the error indication shown on Step 4 is cleared.
8. To create a CPM web client war file, from the Project Explorer pane, click on build.xml, and then select Run Run from the file menu. The Run As window appears. Click Ant Build and then click OK.
6. Deploy the Sample Avaya Communications Process Manager Client Application to Apache Geronimo
This section illustrates how to deploy the CPM SDK client application WAR file1, created in Section 5 Step 9, to Apache Geronimo. These Application Notes assume that Apache Geronimo is already installed on a Microsoft Windows 2003 server. Refer to [8] in the Additional References section for the installation. These Application Notes further assume that a proper version of the Sun JDK is downloaded and configured.
Step Description 1. Launch a web browser and enter the URL http://<Name or IP address of Apache Geronimo
Server>:8080/console. When prompted for a user name and password, enter the credentials of the Apache Geronimo Tomcat administrator account.
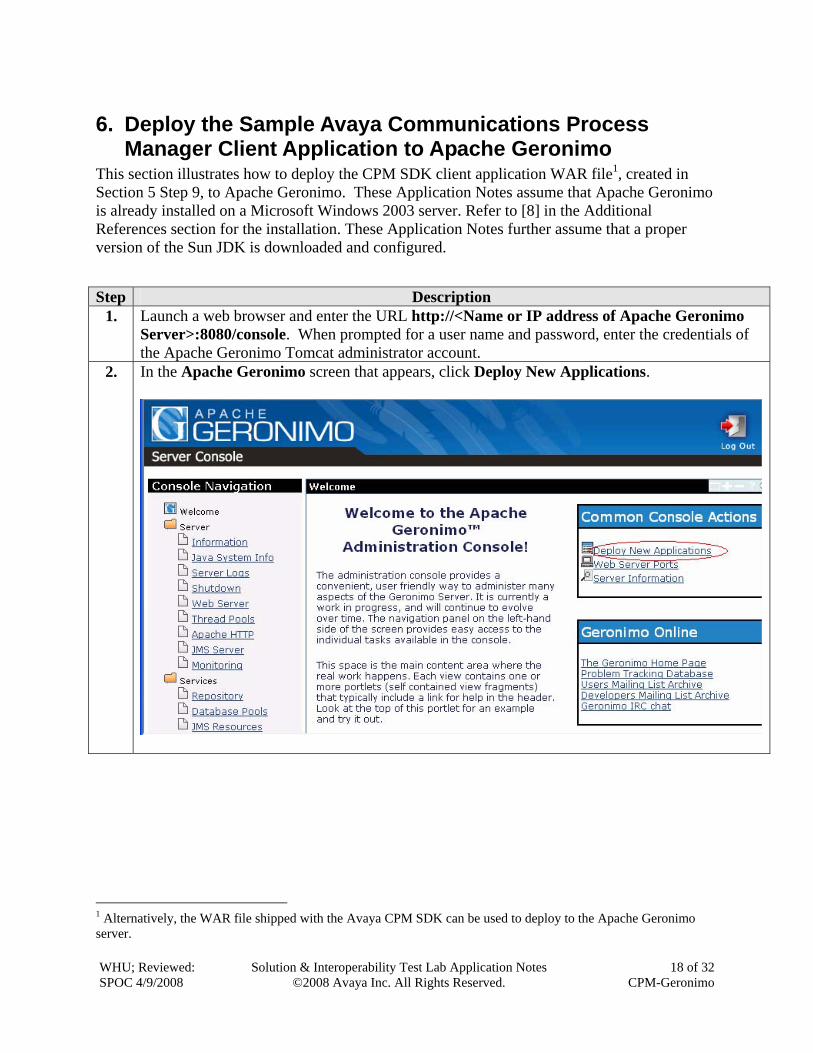
2. In the Apache Geronimo screen that appears, click Deploy New Applications.
1 Alternatively, the WAR file shipped with the Avaya CPM SDK can be used to deploy to the Apache Geronimo server.
7. Verification Steps The following steps may be used to verify proper configuration of Avaya CPM and Apache Geronimo:
• Verify that the sample Avaya CPM Web Client application is deployed to Apache Geronimo.
• Verify that the CPM Advisory service can be launched and acknowledged by all the recipients.
• Verify that CPM Notify and Conference service can be launched and the recipients can join the conference.
• Verify that CPM Notify and Respond service can be launched and the recipients can respond to the notification.
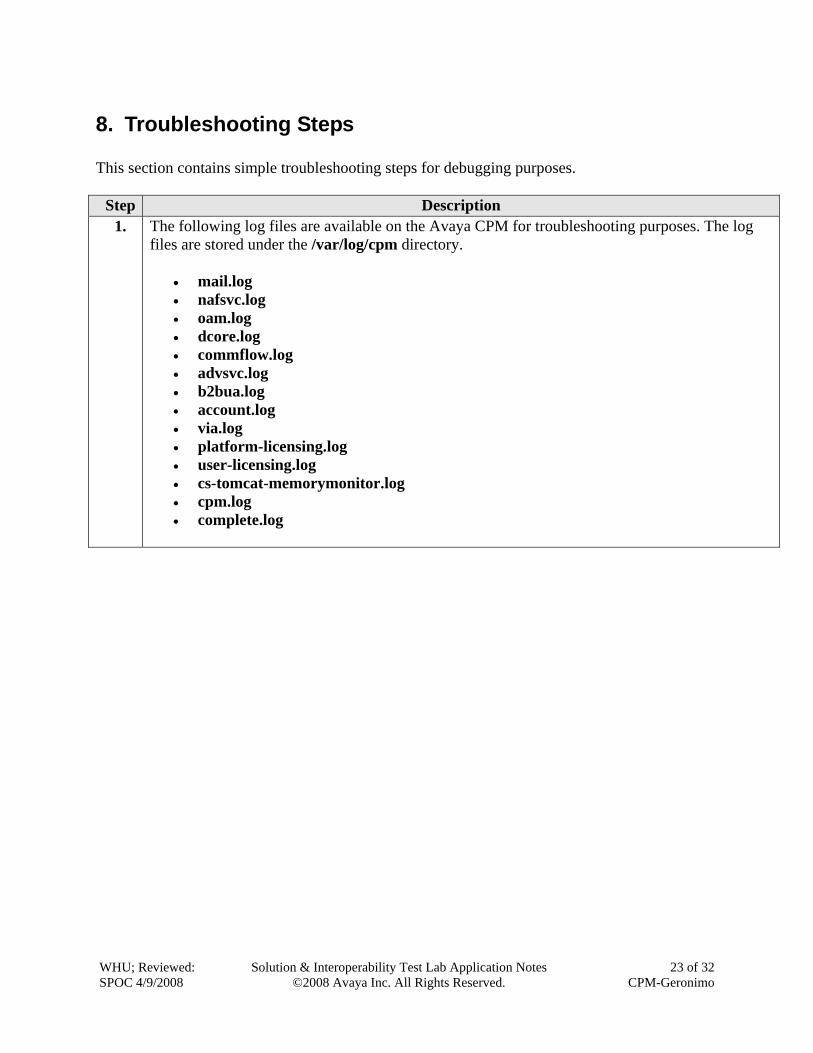
• Verify that CPM Find and Call service can be launched and conference the recipients. • Verify Avaya CPM & Apache Geronimo log files do not show any errors.
Step Description 1. Verify that the CPMClient web application can be started from Apache Geronimo.
• Launch a web browser, enter the URL http://<IP address of Apache Geronimo>:8080/CPMClient-2.1.
• Verify that the Communications Process Manager Client screen appears.
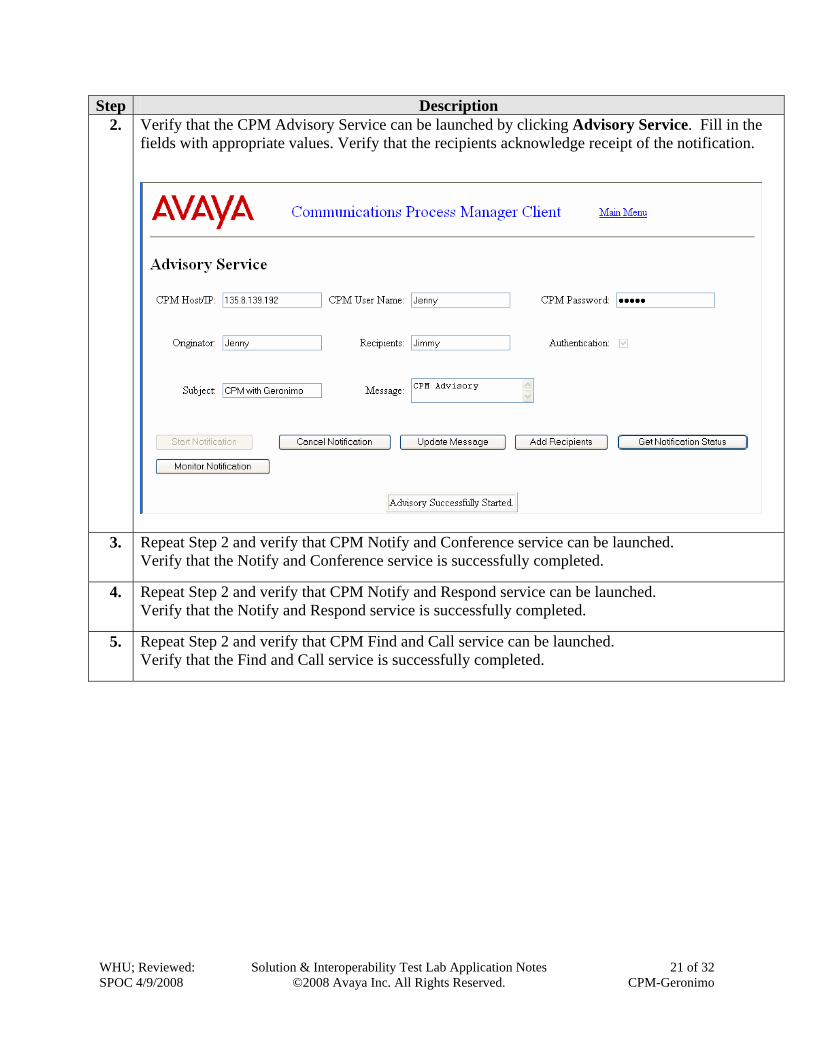
Step Description 2. Verify that the CPM Advisory Service can be launched by clicking Advisory Service. Fill in the
fields with appropriate values. Verify that the recipients acknowledge receipt of the notification.
3. Repeat Step 2 and verify that CPM Notify and Conference service can be launched. Verify that the Notify and Conference service is successfully completed.
4. Repeat Step 2 and verify that CPM Notify and Respond service can be launched. Verify that the Notify and Respond service is successfully completed.
5. Repeat Step 2 and verify that CPM Find and Call service can be launched. Verify that the Find and Call service is successfully completed.
Step Description 6. Launch a web browser and enter the URL http://<Name or IP address of CPM server>/VIA to
view the debug screen as necessary for verifying the web client application execution. When prompted for a user name and password, enter the credentials of the CPM user account. The Communications Process Manager Inbox screen appears. Click Outbox. Select the following fields to view the completed notifications.
• Select “Completed” from the Select field to view the completed notifications. The completed notifications are displayed as shown below. To view the contents of a notification, click the subject of the notification.
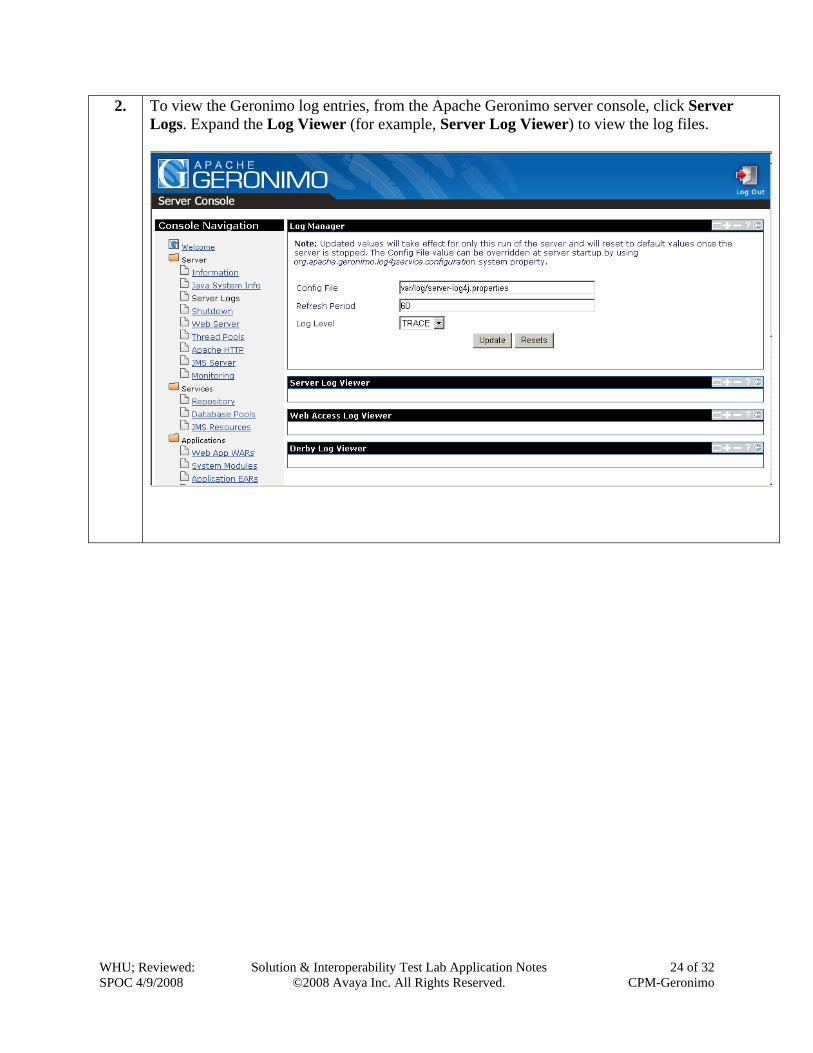
2. To view the Geronimo log entries, from the Apache Geronimo server console, click Server Logs. Expand the Log Viewer (for example, Server Log Viewer) to view the log files.
9. Conclusion As illustrated in these Application Notes, Apache Geronimo can be used to successfully interoperate with Avaya Communications Process Manager via web services.
10. Additional References The following document may be obtained from http://support.avaya.com.
[1] “Avaya Communications Process Manager Release 2.1 Application Programmer’s Guide”, Issue 1, Doc ID: 04-602358, Nov 2007.
[2] “Avaya Communications Process Manager Installation and Configuration Guide Release 2.1”, Issue 1, Oct 2007, Document Number 04-601158
[3] “Administrator Guide for Avaya Communication Manager”, Issue 3.1, Doc ID: 03-300509, February 2007.
[4] “SIP Enablement Services (SES) Implementation Guide”, Issue 4, Doc ID : 16-300140, May 2007
11. Appendix A – build.xml file This section shows the build.xml file, (used in Section 5, Step 8), as a reference on how to build the sample SDK web application into CPMClient-2.1.war file. <?xml version="1.0" encoding="UTF-8"?> <!-- General purpose build script for web applications and web services, including enhanced support for deploying directly to a Tomcat 5 based server. This build script assumes that the source code of your web application is organized into the following subdirectories underneath the source code directory from which you execute the build script: docs Static documentation files to be copied to the "docs" subdirectory of your distribution. src Java source code (and associated resource files) to be compiled to the "WEB-INF/classes" subdirectory of your web applicaiton. web Static HTML, JSP, and other content (such as image files), including the WEB-INF subdirectory and its configuration file contents. $Id: build.xml.txt 302898 2004-05-23 19:50:44Z markt $ --> <!-- A "project" describes a set of targets that may be requested when Ant is executed. The "default" attribute defines the target which is executed if no specific target is requested, and the "basedir" attribute defines the current working directory from which Ant executes the requested task. This is normally set to the current working directory. --> <project name="CPMClientSdkWUI" default="dist" basedir="."> <!-- ==================== File and Directory Names ======================== --> <!-- These properties generally define file and directory names (or paths) that affect where the build process stores its outputs. app.name Base name of this application, used to construct filenames and directories. Defaults to "myapp". app.path Context path to which this application should be deployed (defaults to "/" plus the value of the "app.name" property). app.version Version number of this iteration of the application. build.home The directory into which the "prepare" and
"compile" targets will generate their output. Defaults to "build". catalina.home The directory in which you have installed a binary distribution of Tomcat 5. This will be used by the "deploy" target. dist.home The name of the base directory in which distribution files are created. Defaults to "dist". --> <property name="app.name" value="CPMClient"/> <property name="app.path" value="/${app.name}"/> <property name="build.home" value="${basedir}/build"/> <property name="catalina.home" value="../../../.."/> <property name="dist.home" value="${basedir}/dist"/> <property name="docs.home" value="${basedir}/docs"/> <property name="src.home" value="${basedir}/src"/> <property name="src.lib" value="${basedir}/../lib"/> <property name="web.home" value="${basedir}/WebContent"/> <property name="app.version" value="2.1"/> <!-- ==================== Compilation Control Options ==================== --> <!-- These properties control option settings on the Javac compiler when it is invoked using the <javac> task. compile.debug Should compilation include the debug option? compile.deprecation Should compilation include the deprecation option? compile.optimize Should compilation include the optimize option? --> <property name="compile.debug" value="true"/> <property name="compile.deprecation" value="false"/> <property name="compile.optimize" value="true"/> <!-- ==================== External Dependencies =========================== --> <!-- Use property values to define the locations of external JAR files on which your application will depend. In general, these values will be used for two purposes: * Inclusion on the classpath that is passed to the Javac compiler * Being copied into the "/WEB-INF/lib" directory during execution of the "deploy" target. Because we will automatically include all of the Java classes that Tomcat 5 exposes to web applications, we will not need to explicitly list any of those dependencies. You only need to worry about external dependencies for JAR files that you are going to include inside your "/WEB-INF/lib" directory. --> <!-- Dummy external dependency -->
<!-- <property name="foo.jar" value="/path/to/foo.jar"/> --> <!-- ==================== Compilation Classpath =========================== --> <!-- Rather than relying on the CLASSPATH environment variable, Ant includes features that makes it easy to dynamically construct the classpath you need for each compilation. The example below constructs the compile classpath to include the servlet.jar file, as well as the other components that Tomcat makes available to web applications automatically, plus anything that you explicitly added. --> <path id="compile.classpath"> <!-- Include all JAR files that will be included in /WEB-INF/lib --> <!-- *** CUSTOMIZE HERE AS REQUIRED BY YOUR APPLICATION *** --> <!-- <pathelement location="${foo.jar}"/> --> <!-- Include all elements that Tomcat exposes to applications --> <!--pathelement location="${catalina.home}/common/classes"/> <fileset dir="${catalina.home}/common/endorsed"> <include name="*.jar"/> </fileset> <fileset dir="${catalina.home}/common/lib"> <include name="*.jar"/> </fileset> <pathelement location="${catalina.home}/shared/classes"/> <fileset dir="${catalina.home}/shared/lib"> <include name="*.jar"/> </fileset--> <fileset dir="${src.lib}"> <include name="**/*.jar"/> </fileset> </path> <!-- ==================== Prepare Target ================================== --> <!-- The "prepare" target is used to create the "build" destination directory, and copy the static contents of your web application to it. If you need to copy static files from external dependencies, you can customize the contents of this task. Normally, this task is executed indirectly when needed. --> <target name="prepare"> <!-- Create build directories as needed --> <mkdir dir="${build.home}"/> <mkdir dir="${build.home}/WEB-INF"/>
<mkdir dir="${build.home}/WEB-INF/classes"/> <mkdir dir="${dist.home}"/> <!-- Generate the service proxy > <ant antfile="../clientsdk-serviceproxy/build.xml" inheritAll="false" target="dist"/--> <!-- Copy static content of this web application --> <copy todir="${build.home}"> <fileset dir="${web.home}"/> </copy> <!-- Copy external dependencies as required --> <!-- *** CUSTOMIZE HERE AS REQUIRED BY YOUR APPLICATION *** --> <mkdir dir="${build.home}/WEB-INF/lib"/> <!-- <copy todir="${build.home}/WEB-INF/lib" file="${foo.jar}"/> --> <copy todir="${build.home}/WEB-INF/lib"> <fileset dir="${src.lib}"> <include name="*.jar"/> <exclude name="junit-3.8.1.jar"/> <exclude name="catalina-ant.jar"/> <exclude name="servlet-api.jar"/> <exclude name="generated"/> </fileset> <fileset dir="${src.lib}/generated"> <include name="*.jar"/> </fileset> </copy> <!-- Copy static files from external dependencies as needed --> <!-- *** CUSTOMIZE HERE AS REQUIRED BY YOUR APPLICATION *** --> </target> <!-- ==================== Clean Target ==================================== --> <!-- The "clean" target deletes any previous "build" and "dist" directory, so that you can be ensured the application can be built from scratch. --> <target name="clean" description="Delete old build and dist directories"> <delete dir="${build.home}"/> <delete dir="${dist.home}"/> </target> <!-- ==================== Compile Target ================================== --> <!-- The "compile" target transforms source files (from your "src" directory) into object files in the appropriate location in the build directory. This example assumes that you will be including your classes in an unpacked directory hierarchy under "/WEB-INF/classes". -->
<target name="compile" depends="prepare" description="Compile Java sources"> <!-- Compile Java classes as necessary --> <mkdir dir="${build.home}/WEB-INF/classes"/> <javac srcdir="${src.home}" destdir="${build.home}/WEB-INF/classes" debug="${compile.debug}" deprecation="${compile.deprecation}" optimize="${compile.optimize}"> <classpath refid="compile.classpath"/> </javac> <!-- Copy application resources --> <copy todir="${build.home}/WEB-INF/classes"> <fileset dir="${src.home}" excludes="**/*.java"/> </copy> </target> <!-- ==================== All Target ====================================== --> <!-- The "all" target is a shortcut for running the "clean" target followed by the "compile" target, to force a complete recompile. --> <target name="all" depends="clean,compile" description="Clean build and dist directories, then compile"/> <!-- ==================== Dist Target ===================================== --> <!-- The "dist" target creates a binary distribution of your application in a directory structure ready to be archived in a tar.gz or zip file. Note that this target depends on two others: * "compile" so that the entire web application (including external dependencies) will have been assembled * "javadoc" so that the application Javadocs will have been created --> <target name="dist" depends="compile, javadoc" description="Create binary distribution"> <!-- Copy documentation subdirectories > <mkdir dir="${dist.home}/docs"/> <copy todir="${dist.home}/docs"> <fileset dir="${docs.home}"/> </copy--> <jar jarfile="${dist.home}/${app.name}-${app.version}.war" basedir="${build.home}"/> <!-- Copy additional files to ${dist.home} as necessary --> </target>
<!-- ==================== Source Dist Target ============================== --> <!-- The "src-dist" target creates a source distribution of your application in a directory structure ready to be archived in a tar.gz or zip file. Note that this target depends on two others: * "compile" so that the entire web application (including external dependencies) will have been assembled --> <target name="src-dist" depends="compile" description="Create source distribution"> <zip destfile="${dist.home}/${app.name}-${app.version}-src.zip" update="ture"> <fileset dir="${basedir}"> <include name="**/*"/> <exclude name="ant-build/**"/> <exclude name=".settings/**"/> <exclude name="build/**"/> <exclude name="dist/**"/> <exclude name="**/.svn/**"/> </fileset> </zip> <!-- Copy additional files to ${dist.home} as necessary --> </target> <!-- ==================== Javadoc Target ================================== --> <!-- The "javadoc" target creates Javadoc API documentation for the Java classes included in your application. Normally, this is only required when preparing a distribution release, but is available as a separate target in case the developer wants to create Javadocs independently. --> <target name="javadoc" depends="compile" description="Create Javadoc API documentation"> <mkdir dir="${dist.home}/docs/api"/> <javadoc sourcepath="${src.home}" destdir="${dist.home}/docs/api" packagenames="*"> <classpath refid="compile.classpath"/> </javadoc> </target> </project>