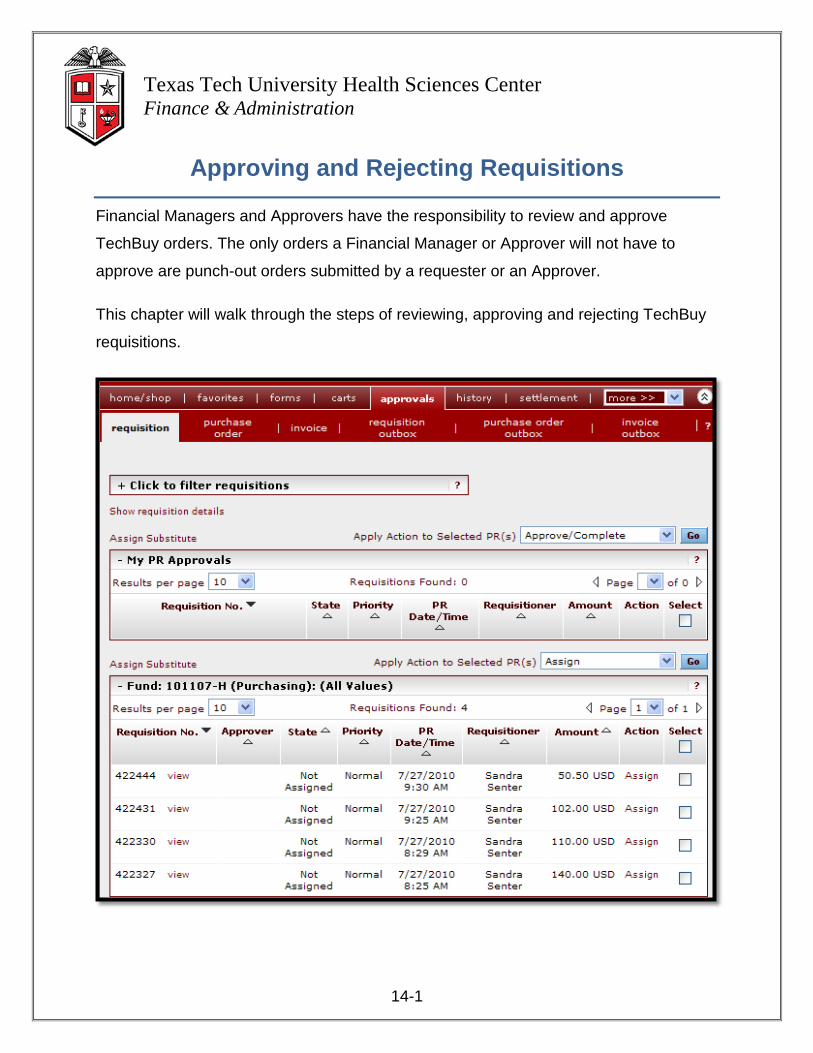
Texas Tech University Health Sciences Center Finance & Administration 14-1 Approving and Rejecting Requisitions Financial Managers and Approvers have the responsibility to review and approve TechBuy orders. The only orders a Financial Manager or Approver will not have to approve are punch-out orders submitted by a requester or an Approver. This chapter will walk through the steps of reviewing, approving and rejecting TechBuy requisitions.
Transcript
Texas Tech University Health Sciences Center Finance & Administration
14-1
Approving and Rejecting Requisitions
Financial Managers and Approvers have the responsibility to review and approve
TechBuy orders. The only orders a Financial Manager or Approver will not have to
approve are punch-out orders submitted by a requester or an Approver.
This chapter will walk through the steps of reviewing, approving and rejecting TechBuy
requisitions.
14-2
Locating the Requisitions Requiring your Approval
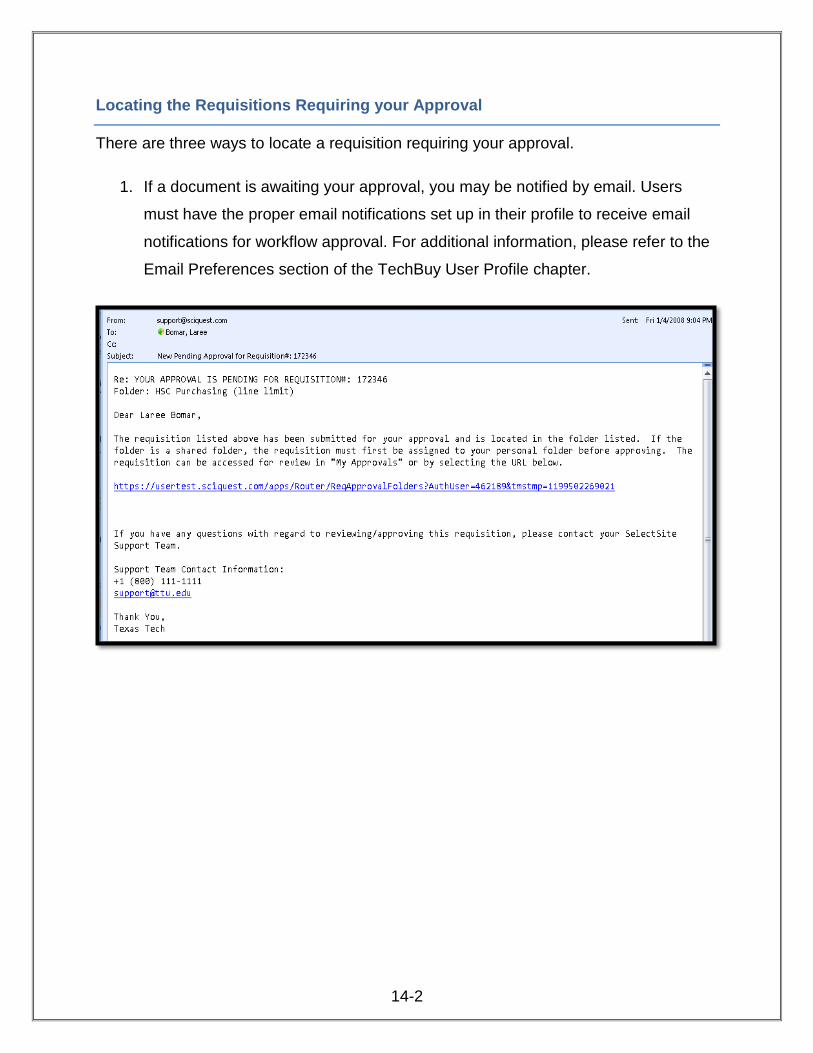
There are three ways to locate a requisition requiring your approval.
1. If a document is awaiting your approval, you may be notified by email. Users
must have the proper email notifications set up in their profile to receive email
notifications for workflow approval. For additional information, please refer to the
Email Preferences section of the TechBuy User Profile chapter.
14-3
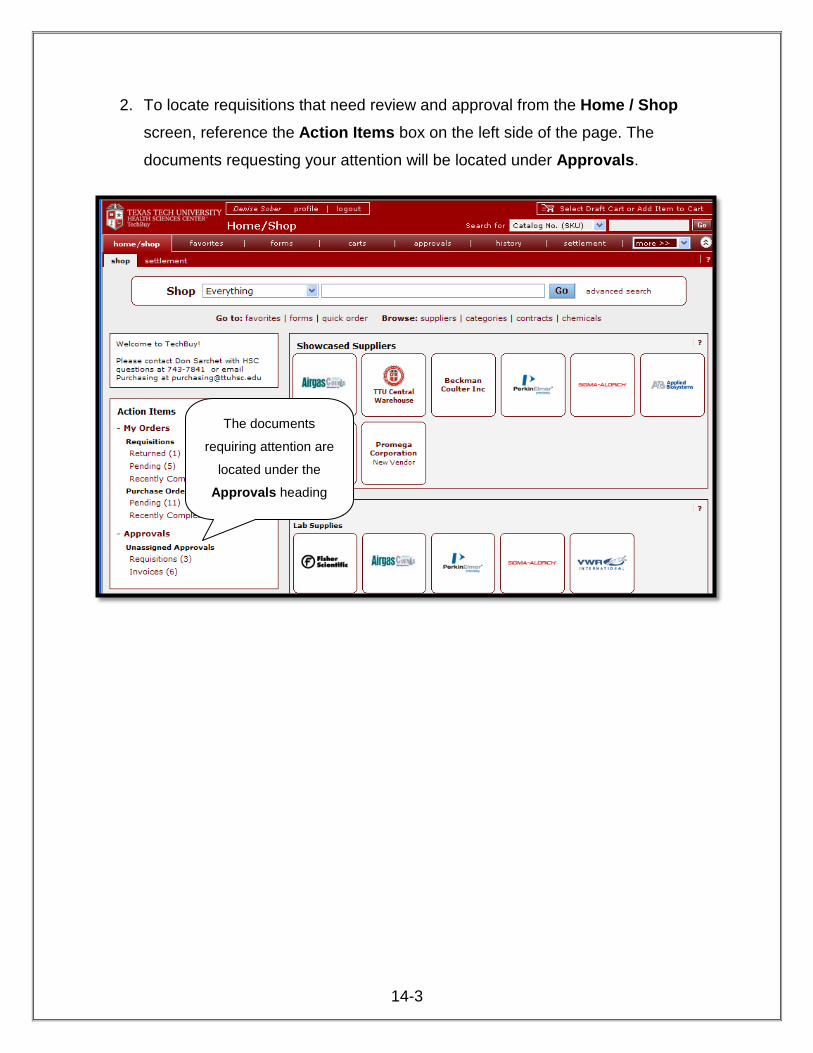
2. To locate requisitions that need review and approval from the Home / Shop
screen, reference the Action Items box on the left side of the page. The
documents requesting your attention will be located under Approvals.
The documents
requiring attention are
located under the
Approvals heading
14-4
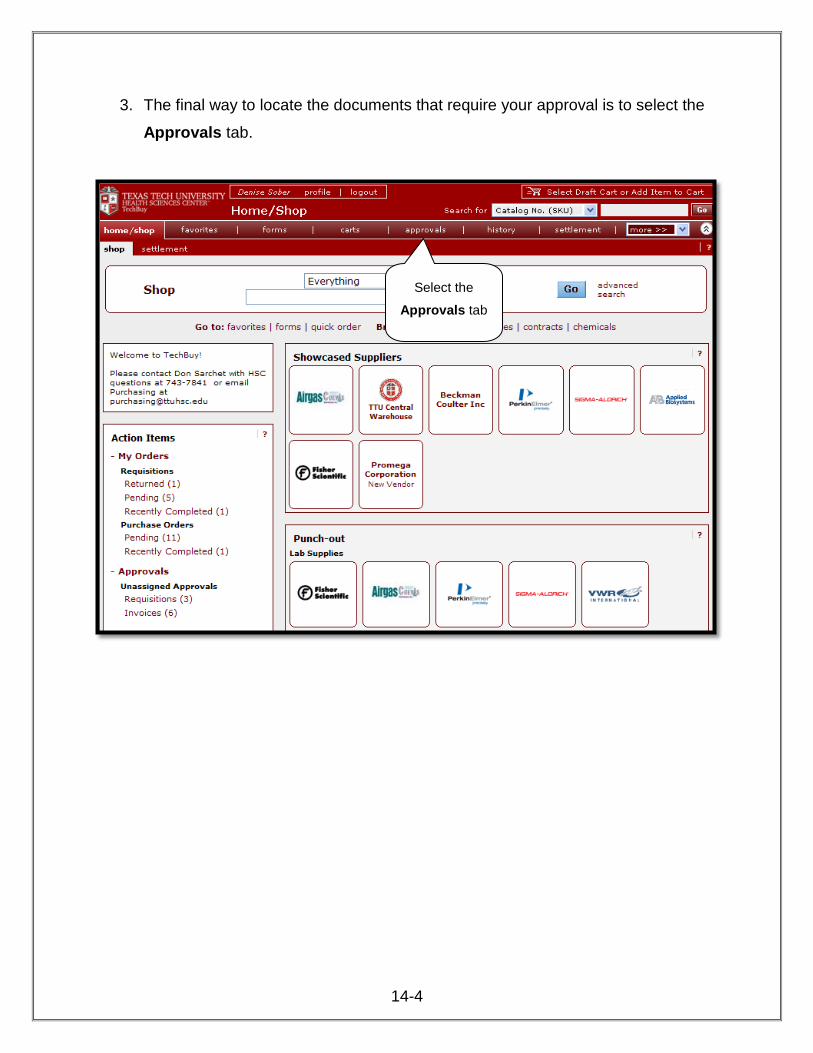
3. The final way to locate the documents that require your approval is to select the
Approvals tab.
Select the
Approvals tab
14-5
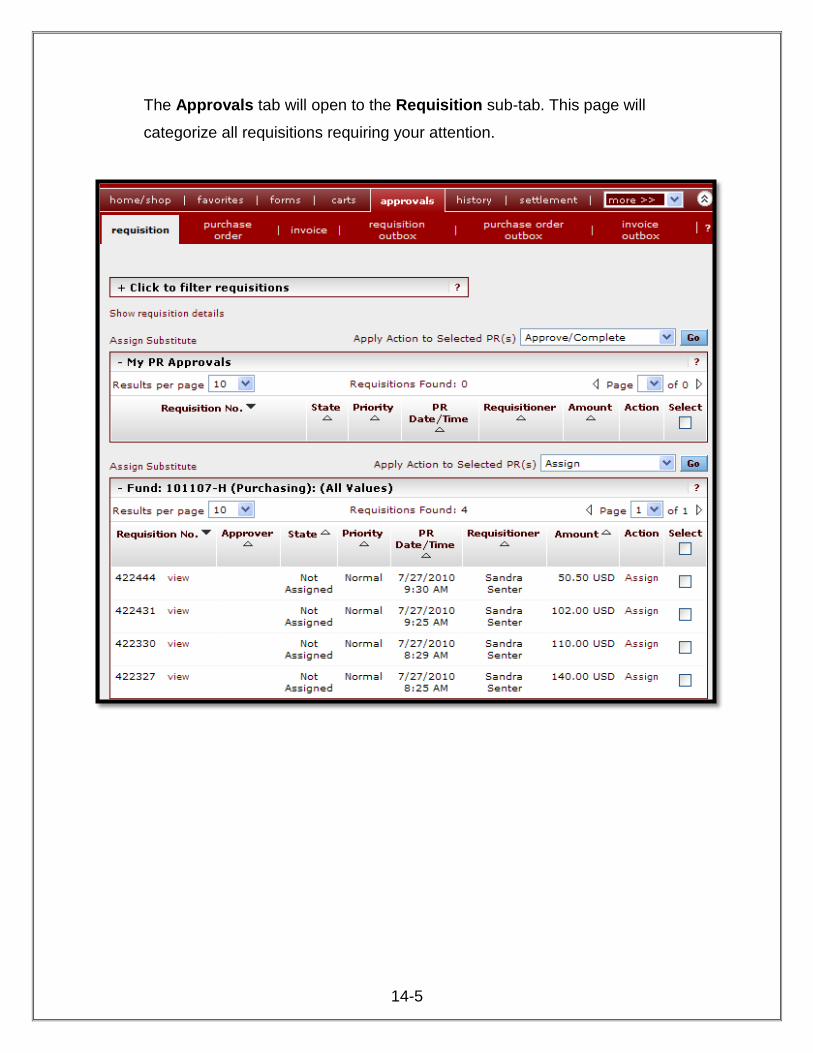
The Approvals tab will open to the Requisition sub-tab. This page will
categorize all requisitions requiring your attention.
14-6
Assigning a Requisition to Yourself to Approve
If an approval step can be approved by more than one person, you must assign the
requisition to yourself prior to approving. Assigning the document to yourself signifies
that you are responsible for the review and approval of the requisition. Once you assign
the requisition to yourself, it will populate in your My PR Approvals folder and cannot
be approved by anyone but you. If you are the only person with authority to approve the
requisition, the document will automatically populate in your My PR Approvals folder
and it will not be necessary to assign it to you.
Select the Approvals tab and the Requisition sub-tab. This will populate your approval
folders.
Select the
Approvals tab Select the
Requisition sub-tab
14-7
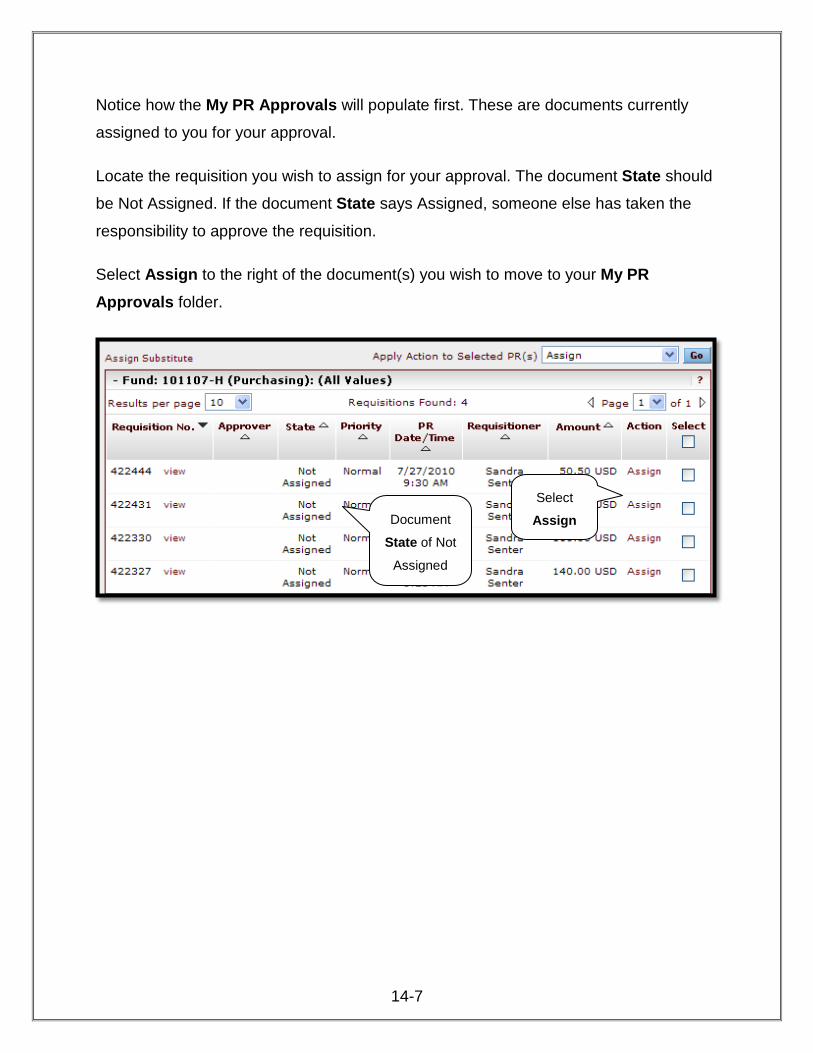
Notice how the My PR Approvals will populate first. These are documents currently
assigned to you for your approval.
Locate the requisition you wish to assign for your approval. The document State should
be Not Assigned. If the document State says Assigned, someone else has taken the
responsibility to approve the requisition.
Select Assign to the right of the document(s) you wish to move to your My PR Approvals folder.
Document
State of Not
Assigned
Select
Assign
14-8
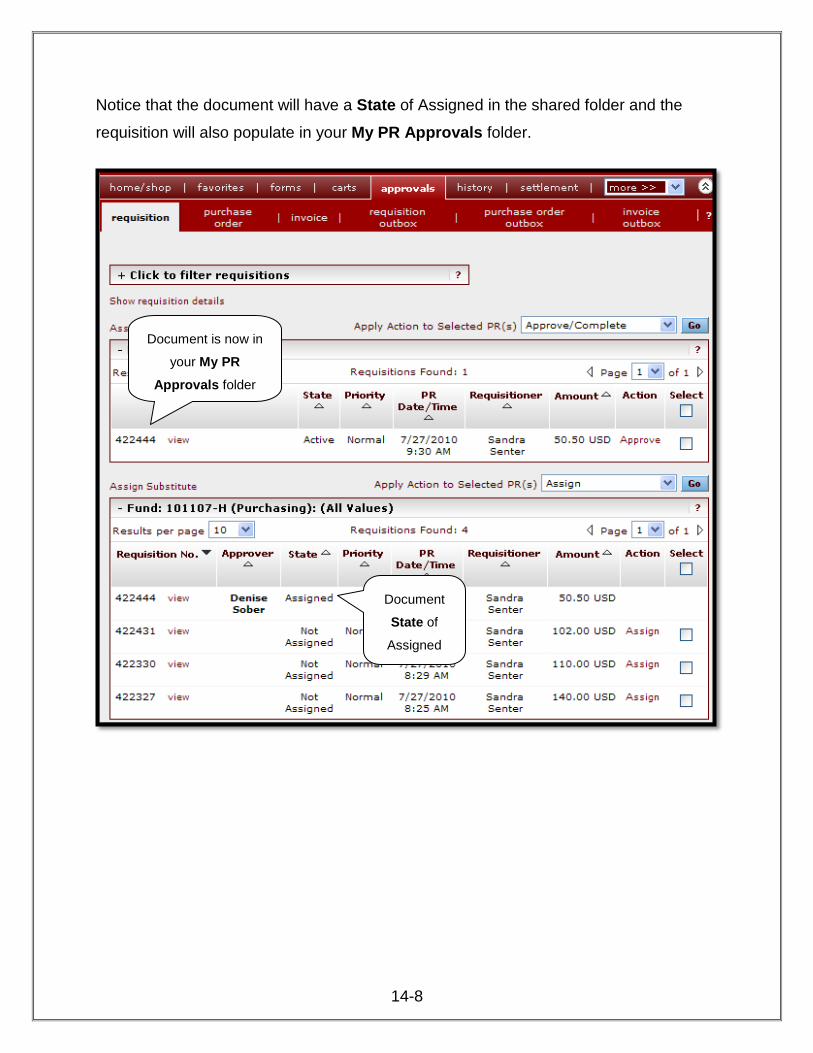
Notice that the document will have a State of Assigned in the shared folder and the
requisition will also populate in your My PR Approvals folder.
Document
State of
Assigned
Document is now in
your My PR Approvals folder
14-9
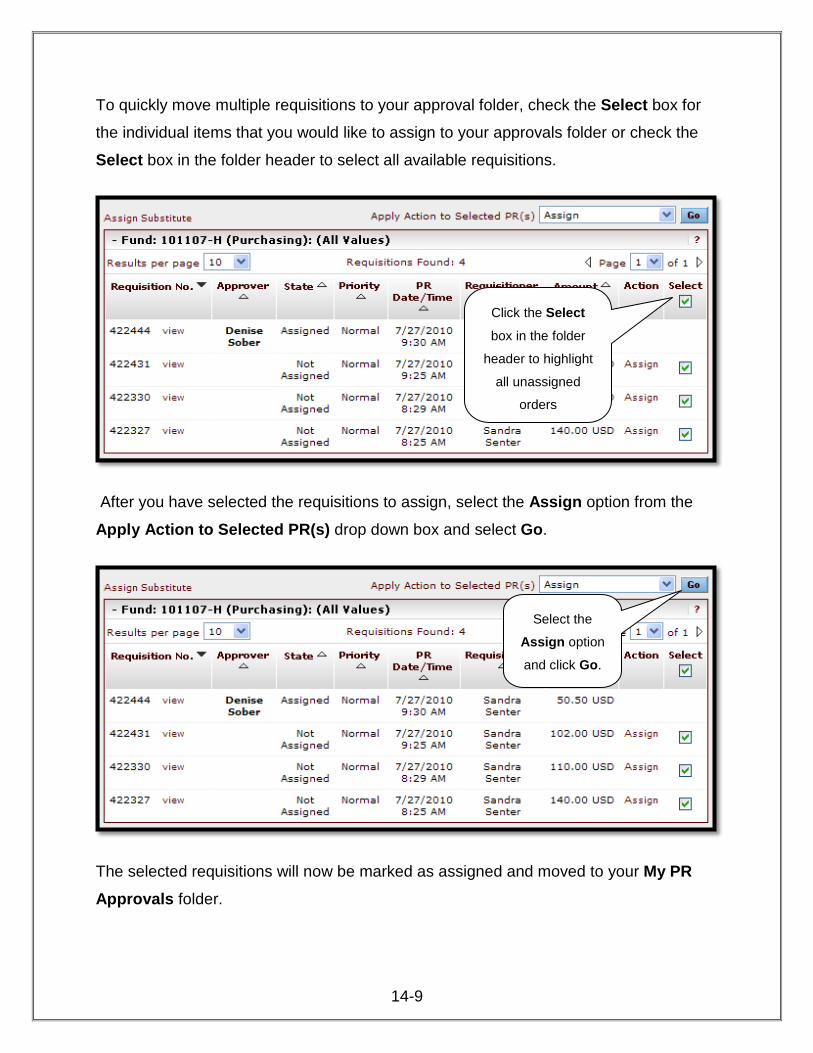
To quickly move multiple requisitions to your approval folder, check the Select box for
the individual items that you would like to assign to your approvals folder or check the
Select box in the folder header to select all available requisitions.
After you have selected the requisitions to assign, select the Assign option from the
Apply Action to Selected PR(s) drop down box and select Go.
The selected requisitions will now be marked as assigned and moved to your My PR Approvals folder.
Click the Select
box in the folder
header to highlight
all unassigned
orders
Select the
Assign option
and click Go.
14-10
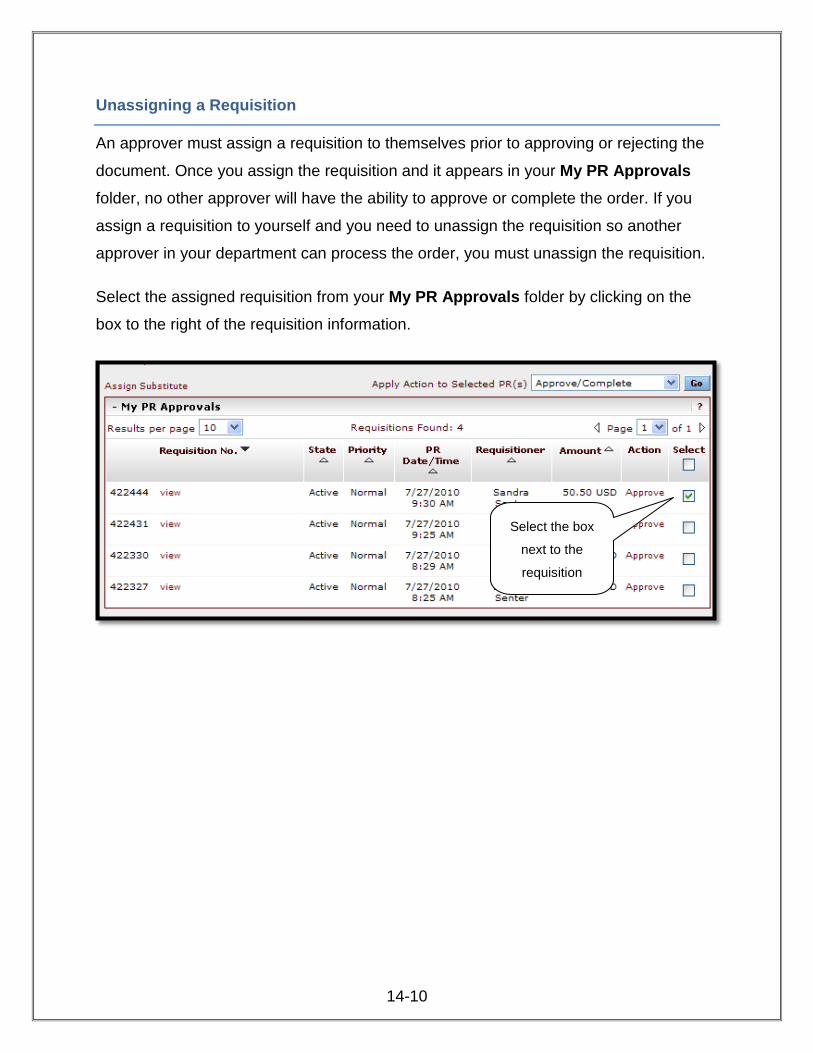
Unassigning a Requisition
An approver must assign a requisition to themselves prior to approving or rejecting the
document. Once you assign the requisition and it appears in your My PR Approvals
folder, no other approver will have the ability to approve or complete the order. If you
assign a requisition to yourself and you need to unassign the requisition so another
approver in your department can process the order, you must unassign the requisition.
Select the assigned requisition from your My PR Approvals folder by clicking on the
box to the right of the requisition information.
Select the box
next to the
requisition
14-11
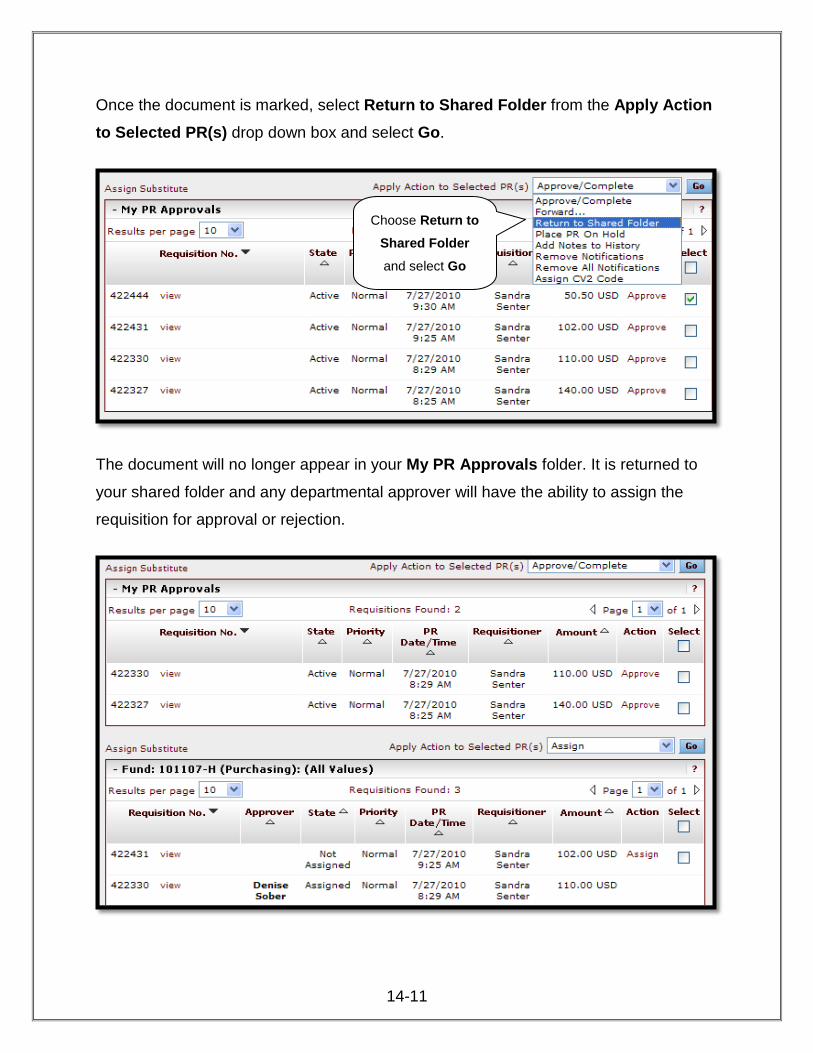
Once the document is marked, select Return to Shared Folder from the Apply Action to Selected PR(s) drop down box and select Go.
The document will no longer appear in your My PR Approvals folder. It is returned to
your shared folder and any departmental approver will have the ability to assign the
requisition for approval or rejection.
Choose Return to Shared Folder and select Go
14-12
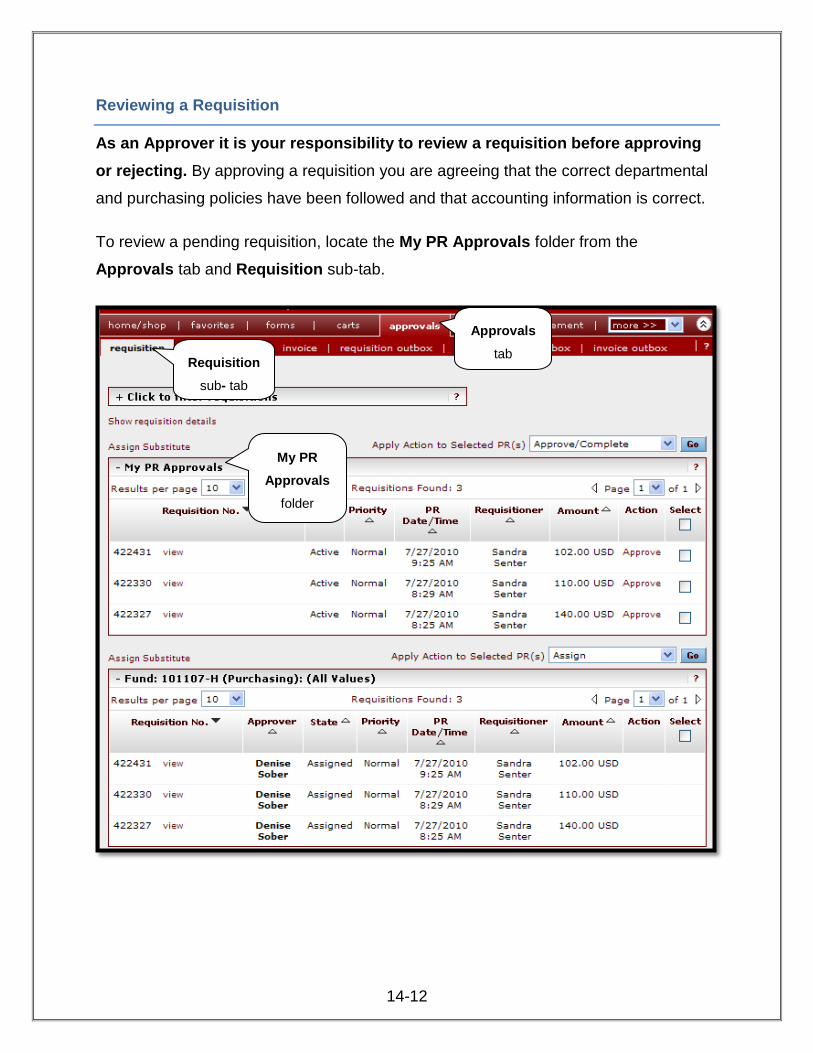
Reviewing a Requisition
As an Approver it is your responsibility to review a requisition before approving or rejecting. By approving a requisition you are agreeing that the correct departmental
and purchasing policies have been followed and that accounting information is correct.
To review a pending requisition, locate the My PR Approvals folder from the
Approvals tab and Requisition sub-tab.
Approvals
tab Requisition sub- tab
My PR Approvals
folder
14-13
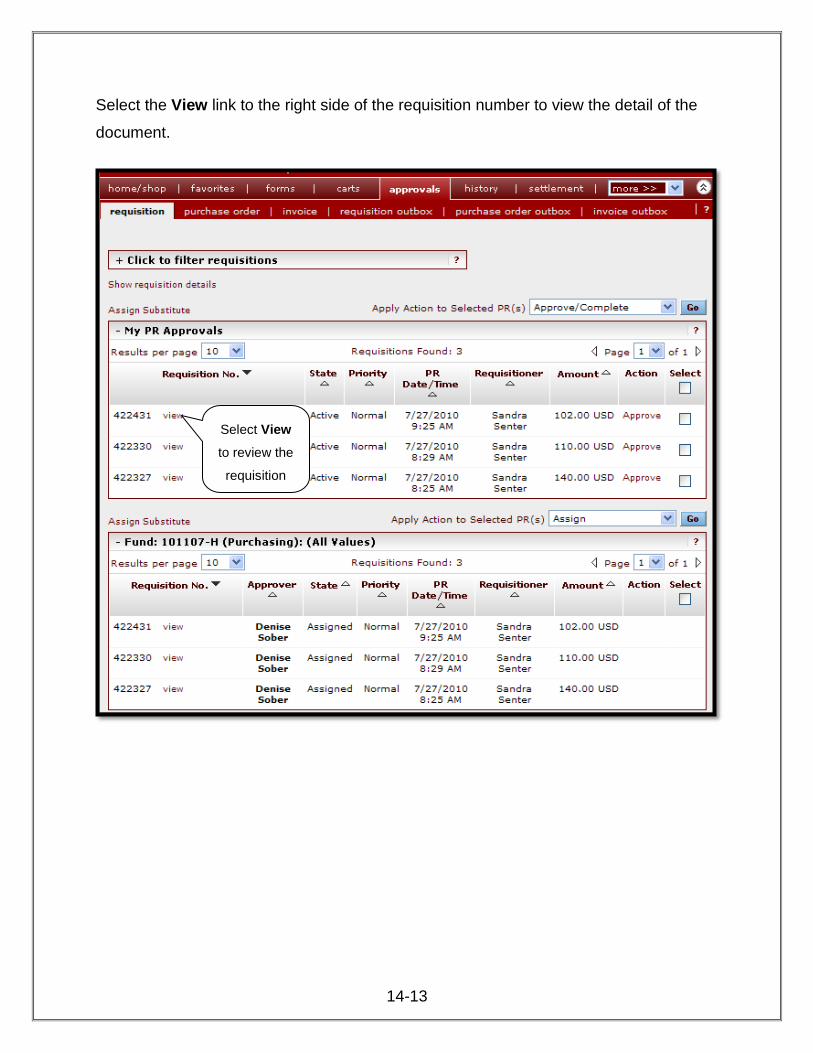
Select the View link to the right side of the requisition number to view the detail of the
document.
Select View to review the
requisition
14-14
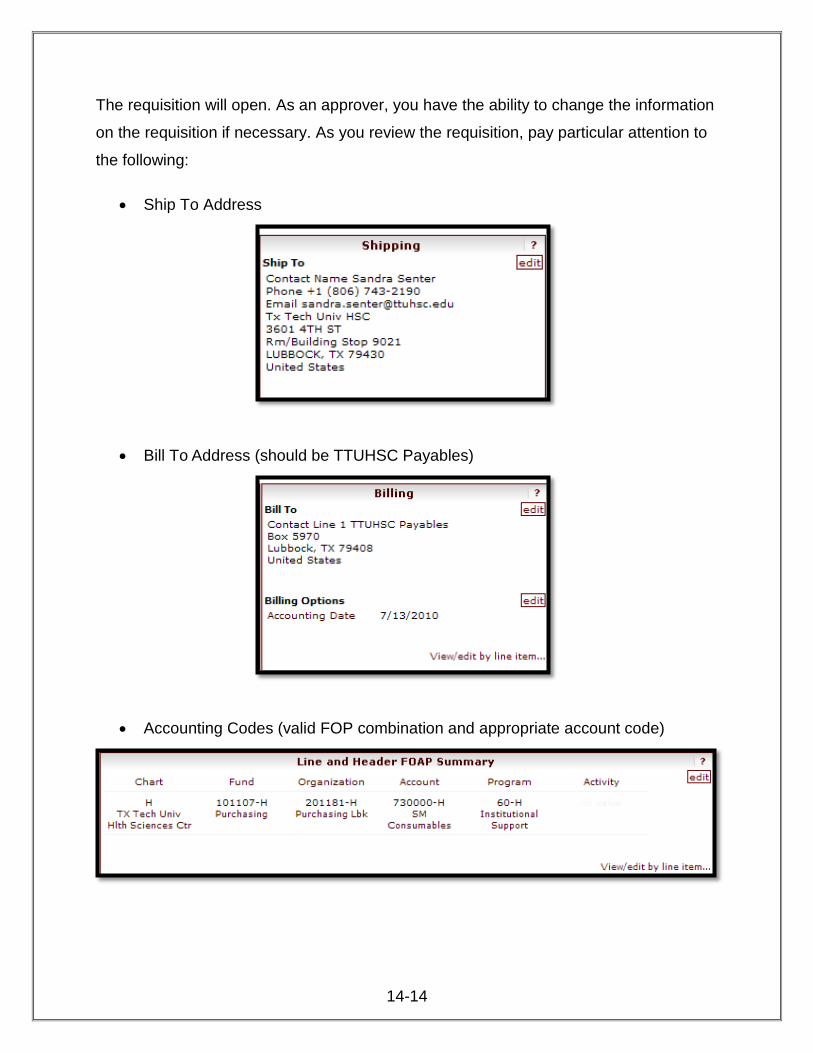
The requisition will open. As an approver, you have the ability to change the information
on the requisition if necessary. As you review the requisition, pay particular attention to
the following:
• Ship To Address
• Bill To Address (should be TTUHSC Payables)
• Accounting Codes (valid FOP combination and appropriate account code)
14-15
• Billing Options / Accounting Date
• Header Level Notes and Attachments
• Line Level Notes and Attachments
14-16
• Supplier / Line Item Detail (review the items on the order)
After items have been reviewed and edited as necessary, you can approve, reject,
return, forward, or unassign the requisition.
14-17
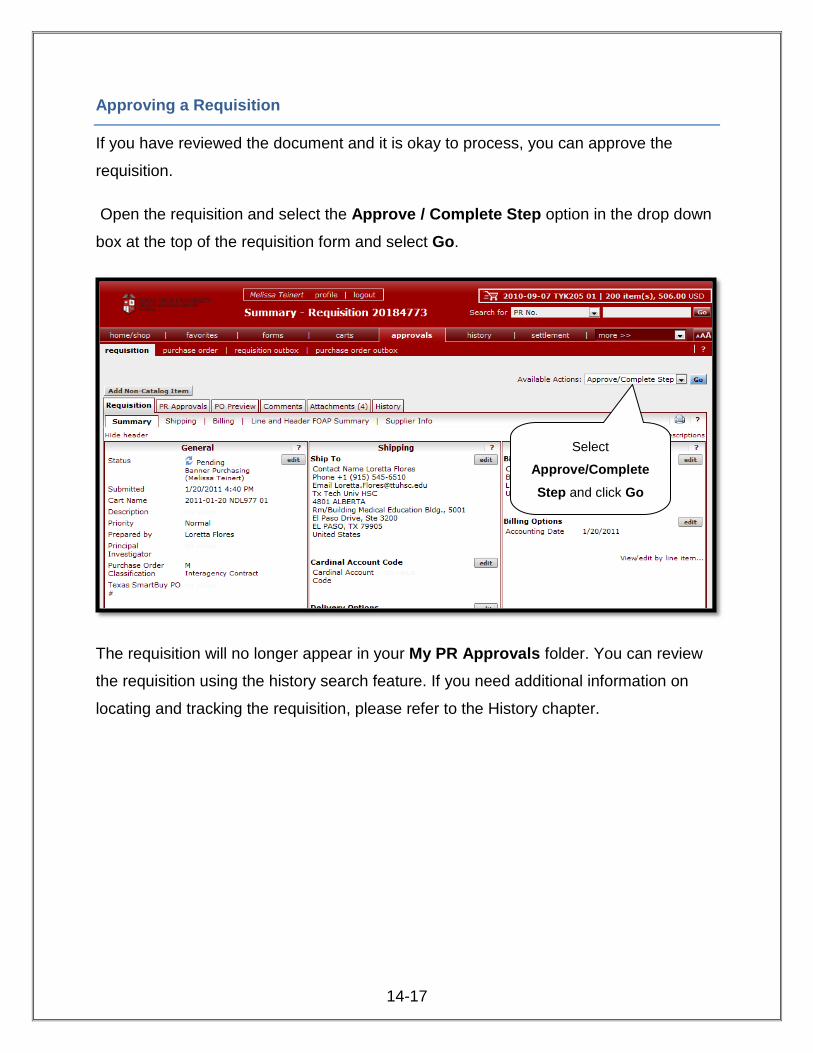
Approving a Requisition
If you have reviewed the document and it is okay to process, you can approve the
requisition.
Open the requisition and select the Approve / Complete Step option in the drop down
box at the top of the requisition form and select Go.
The requisition will no longer appear in your My PR Approvals folder. You can review
the requisition using the history search feature. If you need additional information on
locating and tracking the requisition, please refer to the History chapter.
Select Approve/Complete Step and click Go
14-18
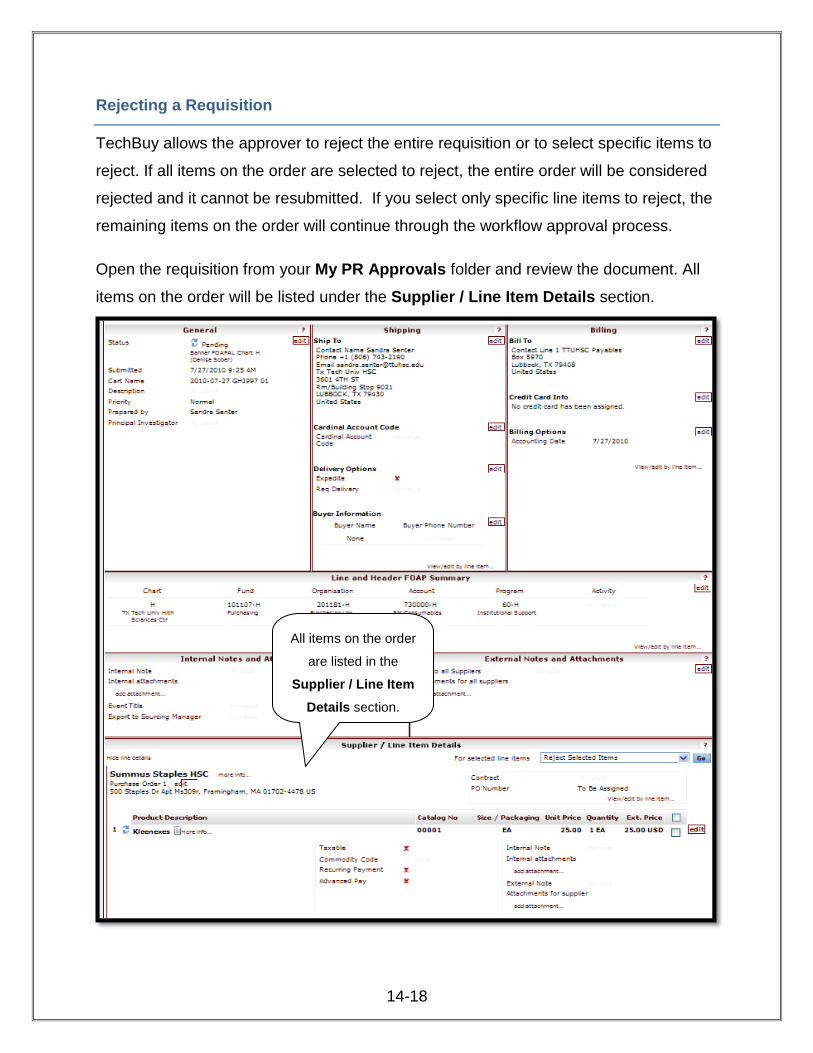
Rejecting a Requisition
TechBuy allows the approver to reject the entire requisition or to select specific items to
reject. If all items on the order are selected to reject, the entire order will be considered
rejected and it cannot be resubmitted. If you select only specific line items to reject, the
remaining items on the order will continue through the workflow approval process.
Open the requisition from your My PR Approvals folder and review the document. All
items on the order will be listed under the Supplier / Line Item Details section.
All items on the order
are listed in the
Supplier / Line Item Details section.
14-19
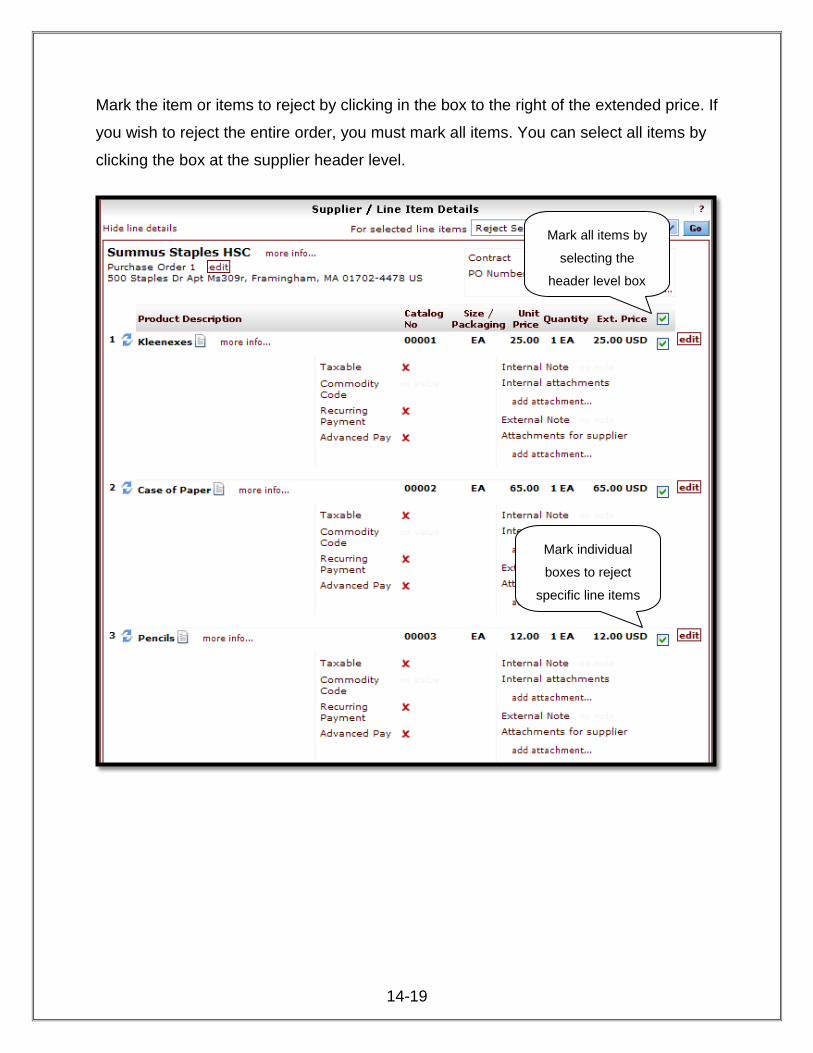
Mark the item or items to reject by clicking in the box to the right of the extended price. If
you wish to reject the entire order, you must mark all items. You can select all items by
clicking the box at the supplier header level.
Mark all items by
selecting the
header level box
Mark individual
boxes to reject
specific line items
14-20
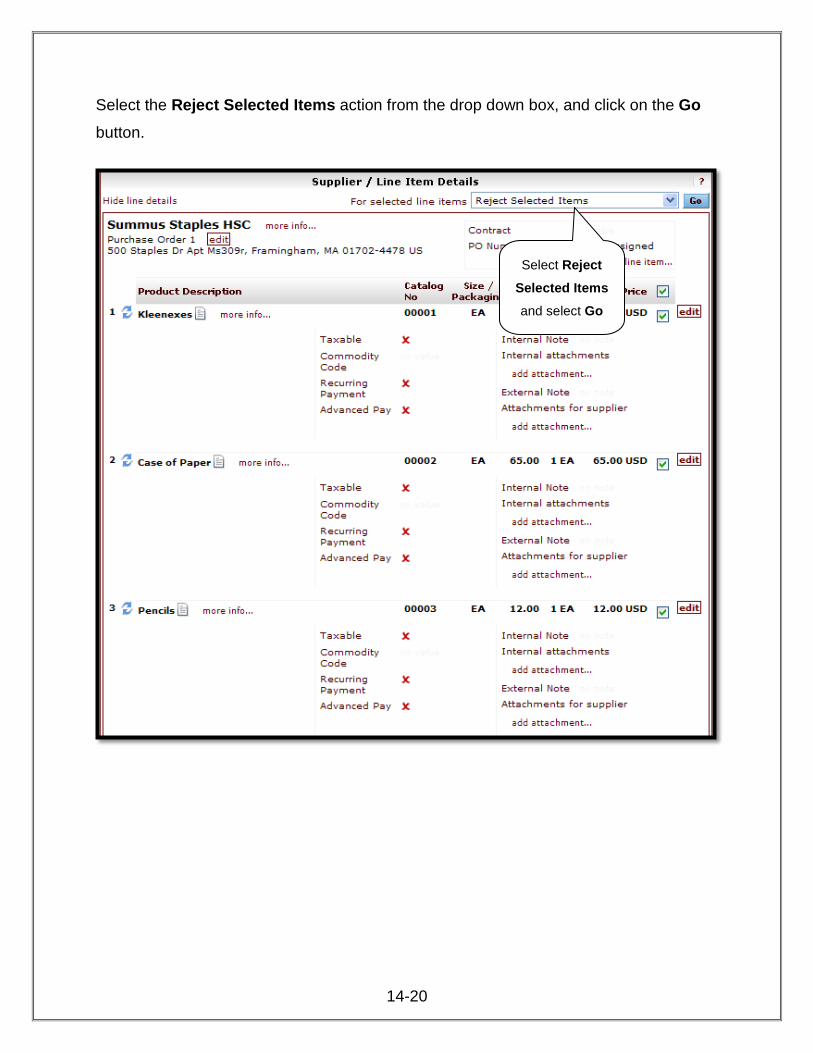
Select the Reject Selected Items action from the drop down box, and click on the Go
button.
Select Reject Selected Items
and select Go
14-21
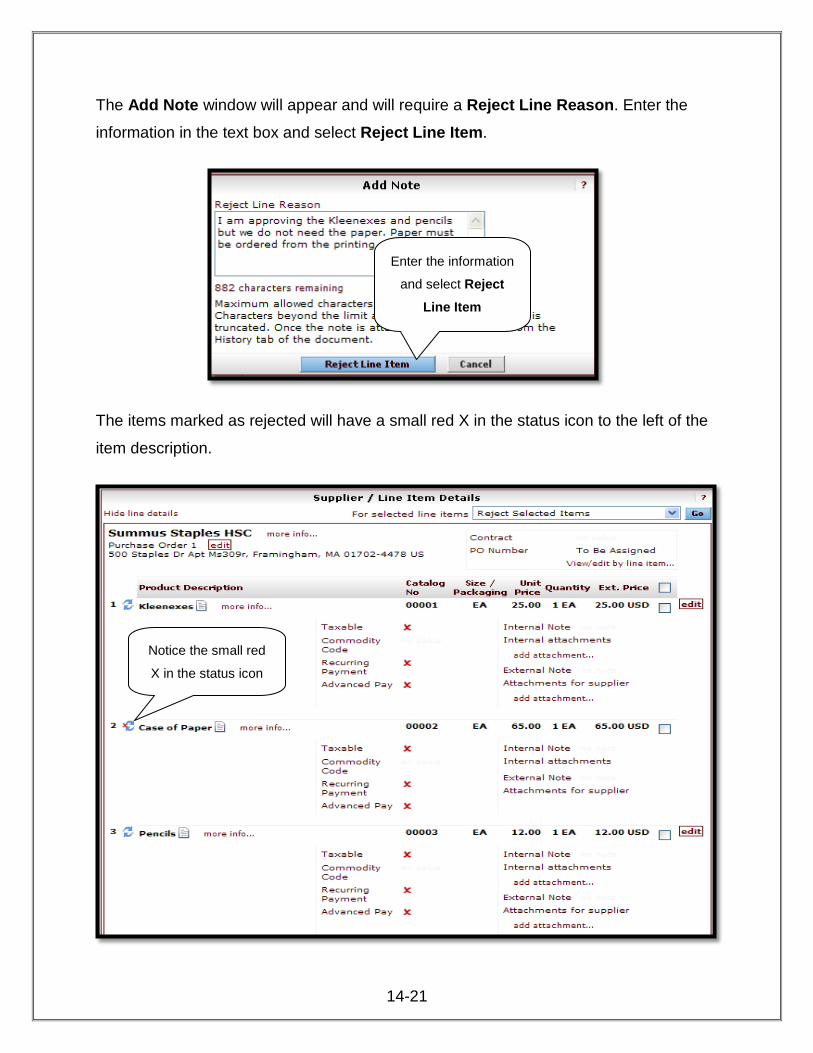
The Add Note window will appear and will require a Reject Line Reason. Enter the
information in the text box and select Reject Line Item.
The items marked as rejected will have a small red X in the status icon to the left of the
item description.
Enter the information
and select Reject Line Item
Notice the small red
X in the status icon
14-22
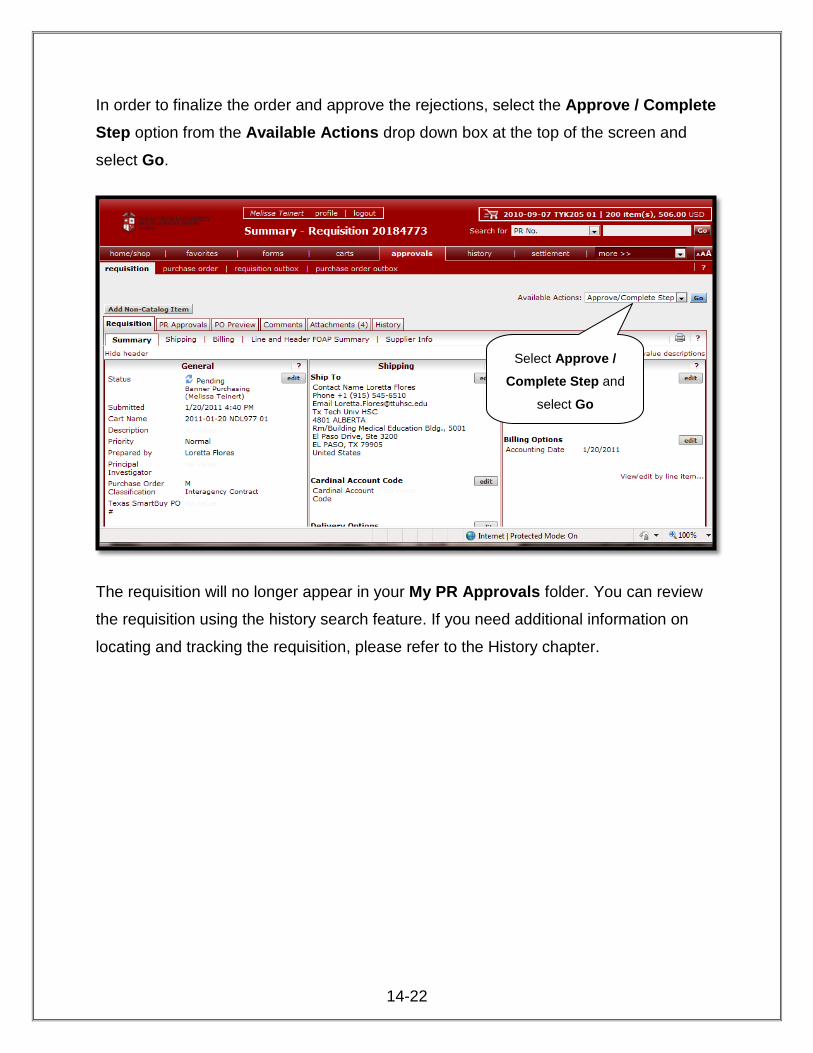
In order to finalize the order and approve the rejections, select the Approve / Complete Step option from the Available Actions drop down box at the top of the screen and
select Go.
The requisition will no longer appear in your My PR Approvals folder. You can review
the requisition using the history search feature. If you need additional information on
locating and tracking the requisition, please refer to the History chapter.
Select Approve / Complete Step and
select Go
14-23
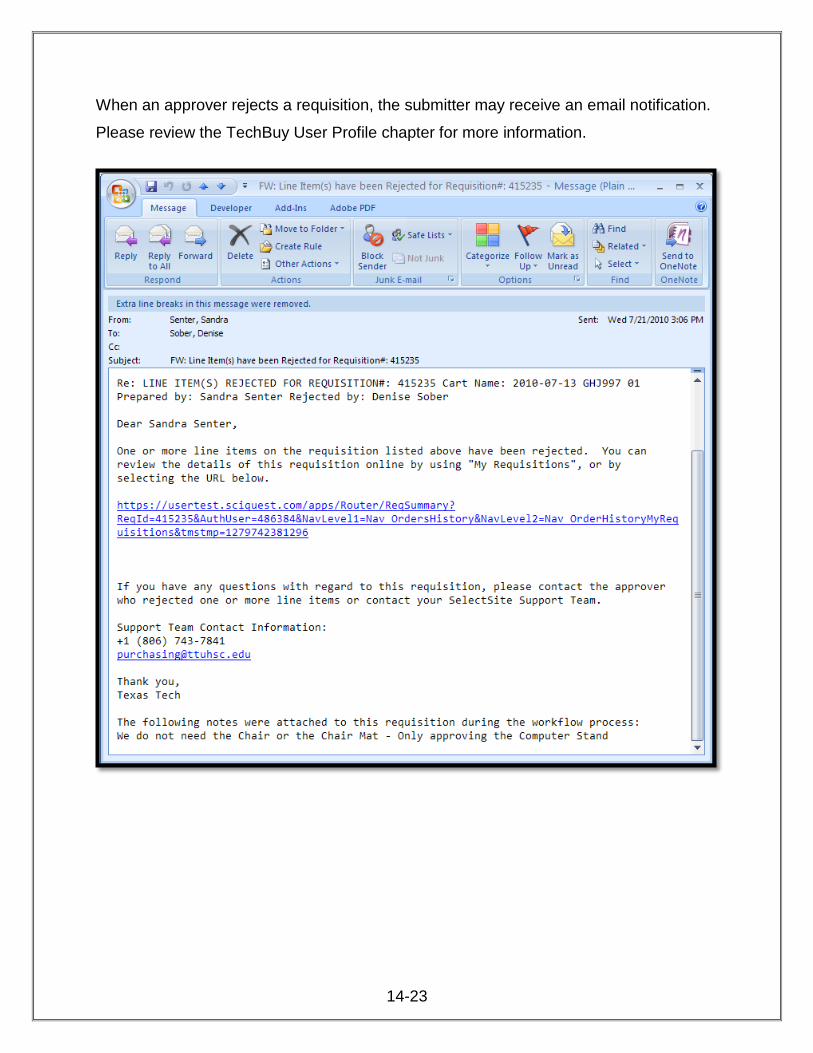
When an approver rejects a requisition, the submitter may receive an email notification.
Please review the TechBuy User Profile chapter for more information.
14-24
Returning a Requisition
TechBuy allows an approver to return a requisition to the submitter. This will permit the
submitter to make corrections to the order and resubmit into the workflow approval
process. In order to return a requisition, you must first assign the requisition to yourself
and open it for review.
14-25
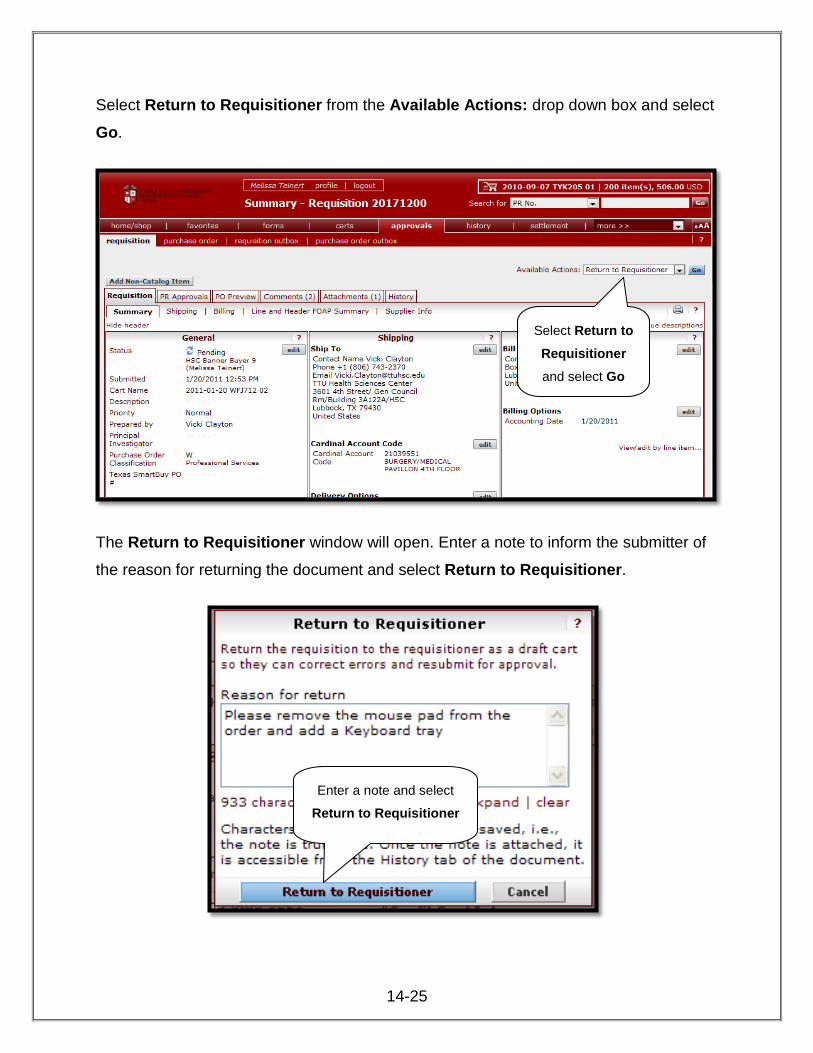
Select Return to Requisitioner from the Available Actions: drop down box and select
Go.
The Return to Requisitioner window will open. Enter a note to inform the submitter of
the reason for returning the document and select Return to Requisitioner.
Select Return to Requisitioner and select Go
Enter a note and select
Return to Requisitioner
14-26
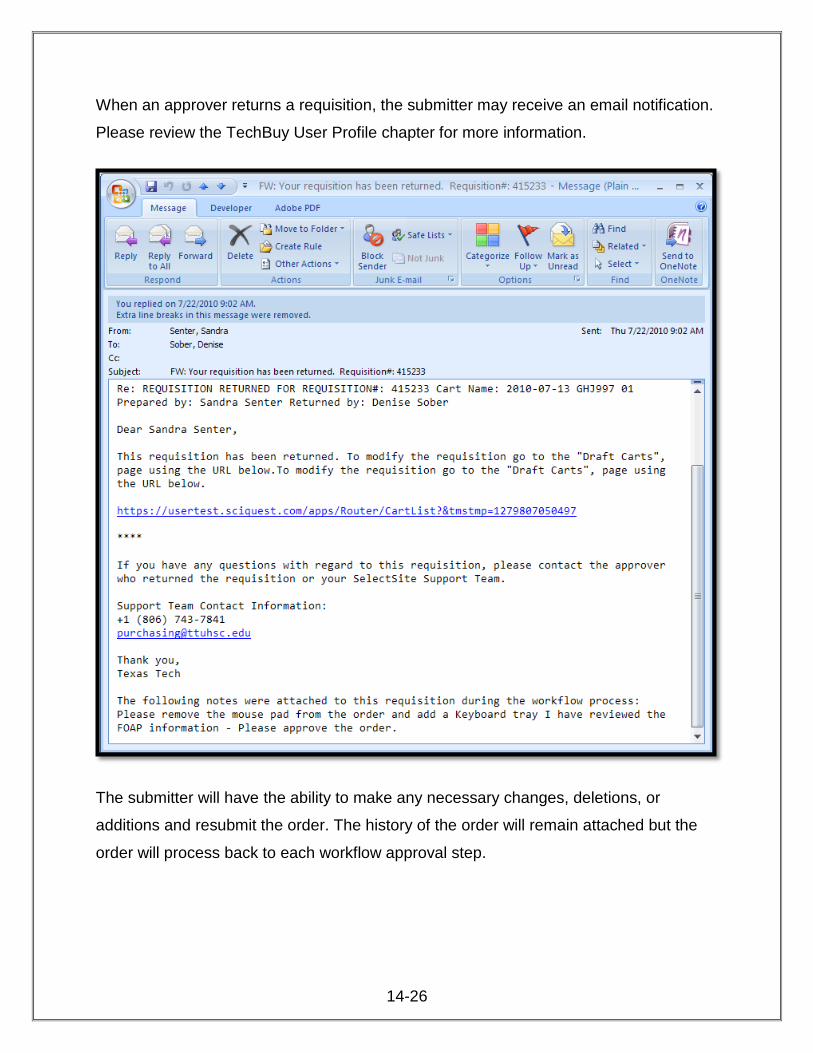
When an approver returns a requisition, the submitter may receive an email notification.
Please review the TechBuy User Profile chapter for more information.
The submitter will have the ability to make any necessary changes, deletions, or
additions and resubmit the order. The history of the order will remain attached but the
order will process back to each workflow approval step.
14-27
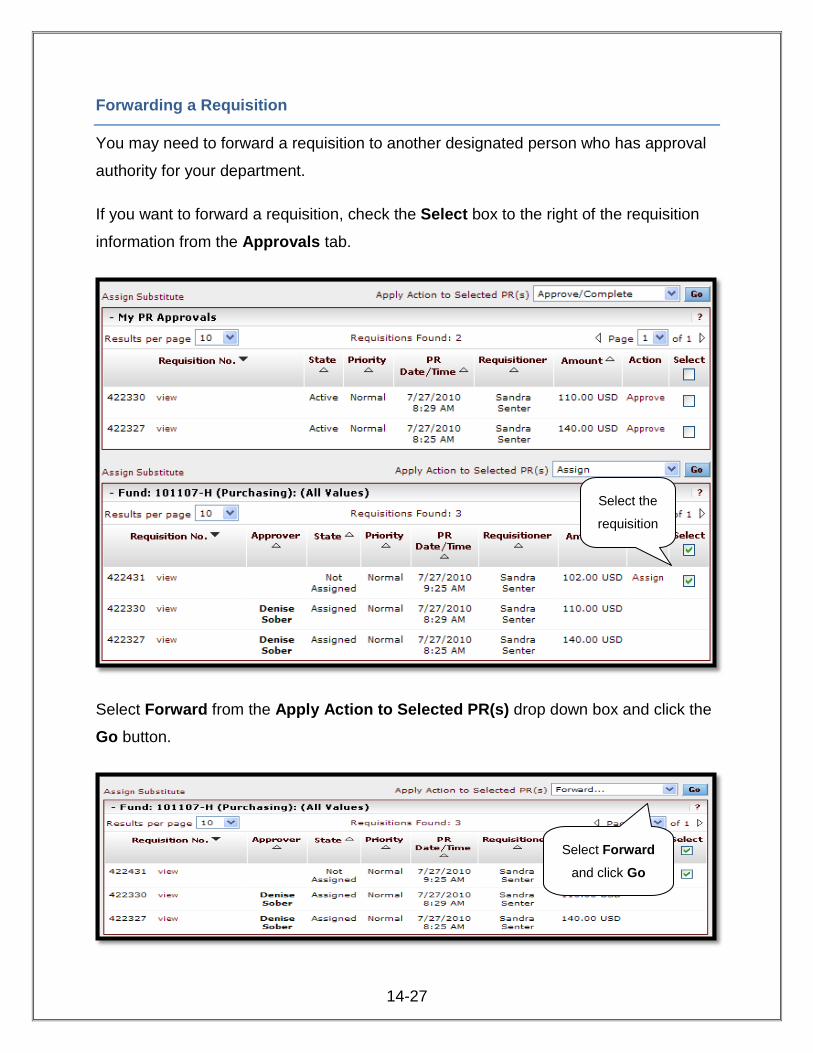
Forwarding a Requisition
You may need to forward a requisition to another designated person who has approval
authority for your department.
If you want to forward a requisition, check the Select box to the right of the requisition
information from the Approvals tab.
Select Forward from the Apply Action to Selected PR(s) drop down box and click the
Go button.
Select the
requisition
Select Forward and click Go
14-28
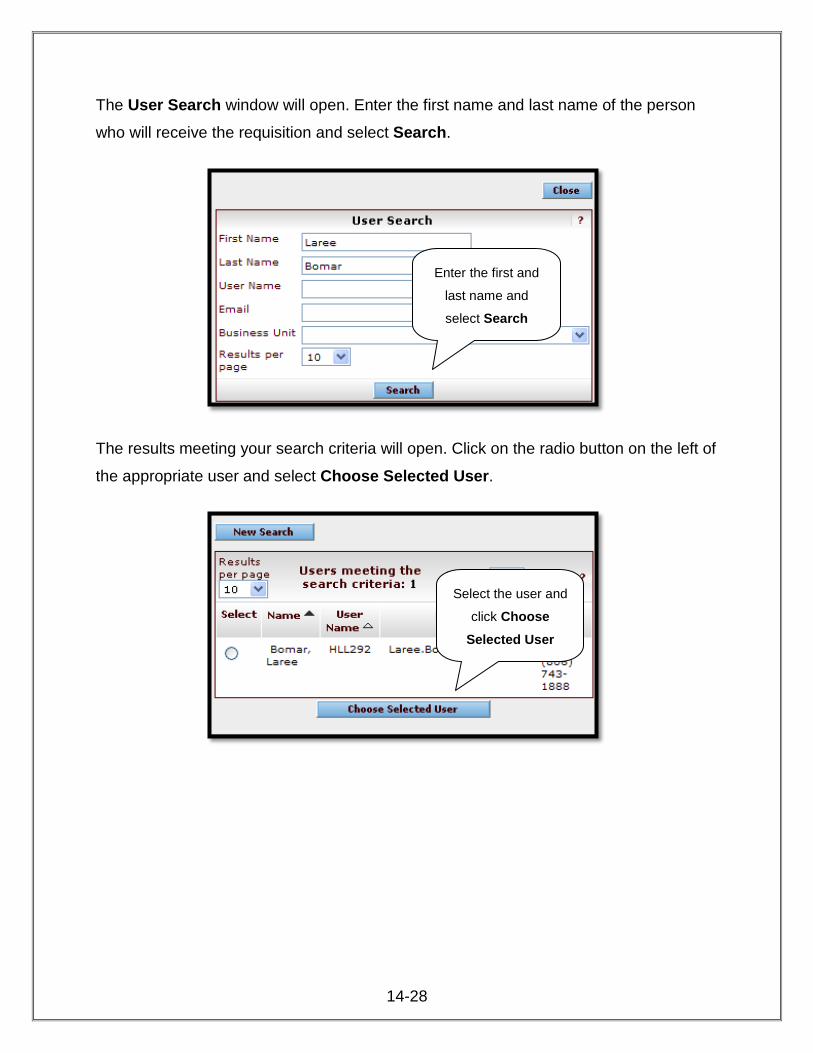
The User Search window will open. Enter the first name and last name of the person
who will receive the requisition and select Search.
The results meeting your search criteria will open. Click on the radio button on the left of
the appropriate user and select Choose Selected User.
Enter the first and
last name and
select Search
Select the user and
click Choose Selected User
14-29
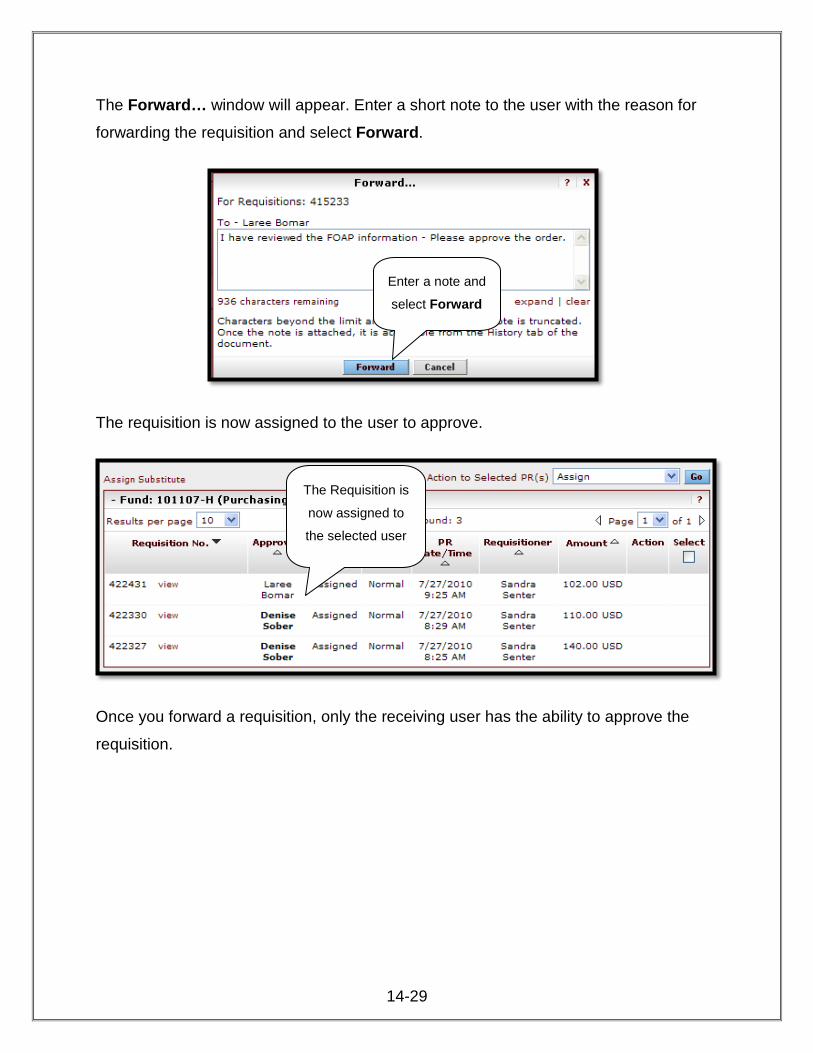
The Forward… window will appear. Enter a short note to the user with the reason for
forwarding the requisition and select Forward.
The requisition is now assigned to the user to approve.
Once you forward a requisition, only the receiving user has the ability to approve the