43
Apttus Adobe Sign Services on Salesforce Spring 2020 Integration Guide

Apttus Adobe Sign Services on Salesforce
Spring 2020 Integration Guide
Table of Contents
About this Guide............................................................................................................................................................................ 3What's New ...................................................................................................................................................................................... 4About Apttus Adobe Sign Services ....................................................................................................................................7
Apttus Adobe Sign Integration Life cycle ....................................................................................................................................... 7
Rebranding .......................................................................................................................................................................................................... 7
Key Terminology ..............................................................................................................................................................................................8
Installing Apttus Adobe Sign Services ........................................................................................................................... 9Installing the Apttus Adobe Sign Packages .................................................................................................................................9To install Adobe Sign packages................................................................................................................................................................................... 10
To install Apttus EchoSign Integration packages ........................................................................................................................................... 10
Post-Installation Configuration .......................................................................................................................................................... 11Configuring Adobe Sign Admin Settings................................................................................................................................................................... 11
Basic Customization............................................................................................................................................................................................................. 12
System Properties ................................................................................................................................................................................................................... 14
Upgrading Apttus Adobe Sign Services.......................................................................................................................................... 16Preparing for Upgrade......................................................................................................................................................................................................... 17
Upgrading to Apttus Adobe Sign Services on Salesforce Spring 2020 ............................................................................................... 17
Creating Agreement Templates..................................................................................................................................... 20To create an agreement template..................................................................................................................................................20
Adding the Audit Trail............................................................................................................................................................ 25To disable audit trail setting...............................................................................................................................................................25
To set up file mapping for audit trail ............................................................................................................................................25
Configuring Mappings ............................................................................................................................................................27Sending for eSignature .......................................................................................................................................................... 28
Adding Attachments..................................................................................................................................................................................28To attach a document manually...............................................................................................................................................................................28
Selecting Attachments and Templates .......................................................................................................................................29To select attachment and template.......................................................................................................................................................................29
Managing Adobe Sign Actions ............................................................................................................................................................34To manage Adobe Sign actions...................................................................................................................................................................................35
FAQs................................................................................................................................................................................................... 40Apttus Copyright Disclaimer ............................................................................................................................................ 42

Apttus Adobe Sign Services on Salesforce Spring 2020 Integration Guide
3
Copyright ©2011-2021 Apttus Corporation. All rights reserved.
About this GuideThe Apttus Adobe Sign Integration enables customers to electronically sign any type of document associated with Apttus quotes or contracts. By integrating Apttus with Adobe Sign, customers can streamline the Quote-to-Cash process, improve responsiveness, and eliminate errors. The adapter allows users to obtain electronic signatures for documents associated with quotes or contracts and automatically update the status - all inside Salesforce.
When it's time to obtain final approvals for a quote or contract in Apttus, the Apttus Adapter provides a streamlined point-and-click way for users to send attachments for electronic signature. Within the Apttus quote or contract, the Send for eSignature feature allows users to dramatically shorten approval cycles by quickly compiling the necessary documents, selecting the right contacts from their Salesforce instance and easily sending personalized emails. As documents are routed, the Apttus Adapter ensures that documents adhere to the appropriate workflows defined in Apttus. When legal documents are approved via Adobe Sign, the signature status is automatically updated inside Salesforce, and final signed documents are automatically attached to the Apttus quote or contract. With the Apttus Adapter, you have a fully secure, auditable and trackable view of who has approved your documents for Apttus quotes or contracts.
Apttus Adobe Sign Services on Salesforce Spring 2020 Integration Guide
4 Copyright ©2011-2021 Apttus Corporation. All rights reserved.
What's NewThe following table lists changes in the documentation to support each release.

Apttus Adobe Sign Services on Salesforce Spring 2020 Integration Guide
5
Copyright ©2011-2021 Apttus Corporation. All rights reserved.
•
•
Document Topic Description
Spring 2020 Rev B Upgrading Apttus Adobe Sign Services
Modified topic.
Spring 2020 Rev A
Installing the Apttus Adobe Sign Packages
Modified topic. Updated the topic for language and style changes.
Post-Installation Configuration
Modified topic. eSign Services Admin Settings is renamed to Adobe Sign Admin Settings.
Configuring Adobe Sign Admin Settings
Modified topic. eSign Services Admin Settings is renamed to Adobe Sign Admin Settings.
Basic Customization Modified topic.
eSign Services Admin Settings is renamed to Adobe Sign Admin Settings.Updated the screenshot
Creating Agreement Templates
Modified topic. Updated the topic to include the UI changes.
Adding the Audit Trail Modified topic. Updated the steps to disable the audit trail setting.
Selecting Attachments and Templates
Modified topic. Updated the Custom Settings table.
Managing Adobe Sign Actions Modified topic. Updated the topic for language and style changes.
Spring 2020 Upgrading Apttus Adobe Sign Services
New topic. Contains information about upgrading from the previous two releases to the current release.
System Properties Modified topic. Updated the topic to include the system property, Bypass Sharing.
Winter 2019 N/A No new features were added for this release. The guide was updated to reflect product name changes.

Apttus Adobe Sign Services on Salesforce Spring 2020 Integration Guide
6 Copyright ©2011-2021 Apttus Corporation. All rights reserved.
Document Topic Description
Summer 2019 N/A No new features were added for this release. The guide was updated to reflect product name changes.
Winter 2018 N/A No new features were added for this release. The guide was updated to reflect product name changes.

Apttus Adobe Sign Services on Salesforce Spring 2020 Integration Guide
7
Copyright ©2011-2021 Apttus Corporation. All rights reserved.
••
About Apttus Adobe Sign ServicesApttus Adobe Sign Integration helps collect signatures and close deals quickly by making it easy for approvers inside and outside your organization to sign documents.
Apttus Adobe Sign Integration Life cycleA document can be sent for electronic signature from an agreement. Click the Send for eSignature button to go to Attachment Selection page from where you can select the documents to be sent to the recipient. If you select multiple documents then you will be directed to Order Attachments page, or, you will be directed to Adobe Sign Actions page. On the Order Attachments page, you can reorder the attachments and the final document contains more than one attachments as ordered by you. The final document is sent for signature. After the recipient signs the document, the user can retrieve the signed document via email. The Apttus eSignature Stage/Status field changes according to the activities. The signature stages/statuses are shown in the Apttus Adobe Sign Integration Life cycle. The activities that you perform are stored in the Activity History related list.
RebrandingPreviously, the product was called Adobe EchoSign (Adobe eSign Services or Adobe Document Cloud). Now, it's called Adobe Sign. Hence, our connector is now called Apttus Adobe Sign Integration.
Apttus Adobe Sign Services allows a user to perform the following tasks:
Create agreement templatesEnable or disable audit trail
Apttus Adobe Sign Services on Salesforce Spring 2020 Integration Guide
8 Copyright ©2011-2021 Apttus Corporation. All rights reserved.
••
••
••••
Configure mappingsSend an agreement for eSignature
Add or delete attachmentsAdd attachments from related agreements
Add or delete recipientsAdd multiple signersView Signed documentsFinalize in eSign
Key TerminologyIt is important to understand how terms are used when working with Apttus Adobe Sign Services application.
Term Definition
Agreement The set of terms and conditions agreed between two or more parties. An Apttus Agreement consists of structured Salesforce data and stored language dynamically generated into a static document.
Finalize in eSign Server
A feature that allows you to open the envelope inside the Adobe Sign console.

Apttus Adobe Sign Services on Salesforce Spring 2020 Integration Guide
9
Copyright ©2011-2021 Apttus Corporation. All rights reserved.
•
•
•
Installing Apttus Adobe Sign ServicesApttus Adobe Sign Integration Packages Required The required packages to run Apttus Adobe Sign Integration.Post-Installation Configuration After you have installed the packages and ensured that the correct users have access to the functionality, you should configure the options that are generally set once and then left alone.Upgrading Apttus Adobe Sign Services The steps required to upgrade Apttus Adobe Sign Services.
Installing the Apttus Adobe Sign PackagesMultiple packages must be installed to implement the complete Adobe Sign solution. Packages for Adobe Sign must be installed in the order indicated in the table in this section. You begin with the Apttus base packages and then install the integration packages that enable the various products to function together.
Install the packages in the following order.
Order Package Install Center tab to access the package
Required?
1 Apttus Contract Management Contract Management Y
2 Apttus Proposal Management CPQ Y
3 Adobe Sign NA Y
4 Apttus Contract EchoSign Integration
Echosign Integration Y
5 Apttus Quote/Proposal EchoSign Integration
Echosign Integration Y
Apttus recommends downloading and upgrading Apttus packages in a Salesforce sandbox before installing them in your production environment. For information on installing and upgrading in a sandbox, please contact Apttus Support before you install any packages.

Apttus Adobe Sign Services on Salesforce Spring 2020 Integration Guide
10 Copyright ©2011-2021 Apttus Corporation. All rights reserved.
1.2.3.
4.5.
6.
7.
•
•
8.9.
1.2.
3.
To install Adobe Sign packagesGo to appexchange.salesforce.com.Navigate to Adobe Sign and click Get It Now.Click the environment where you want to install the package and follow the instructions on the page.Verify the package installation details and click Continue.Review the package API access and click Next.
Select the profile for which you want to install the package. Apttus recommends that you select Install for All Users.If you want to Install for Specific Profiles, you must define the access level for all profiles. Select from one of the following options.
No Access - This is the default setting. Apply this access level to disable all object permissions.Full Access - Apply this access level to assign users permissions to Read, Create, Edit, Delete, View All, and Modify All for all objects.
Click Set. Click Install.
To install Apttus EchoSign Integration packages
Go to the Resources > Install Center tab on the Apttus Community Portal.In My Packages navigation link, click Echosign Integration. From the VERSION drop- down, select the version that you want to install.Click Install Now.
You must have Apttus-provided login credentials to the Apttus Community Portal to be able to download packages.
Ensure you have checked the I have read and agree to the terms and conditions checkbox.
For agreement, you must install the Apttus Contracts Management package 8.325 or higher.For quotes, you must install the Apttus Proposal Management package 8.99 or higher.
Apttus Adobe Sign Services on Salesforce Spring 2020 Integration Guide
11
Copyright ©2011-2021 Apttus Corporation. All rights reserved.
4.••
5.6.7.
8.
•
•
9.10.
•
•
•
Select the environment in which you want to install the packages. Click Install in Production to install the packages in your production org.Click Install in Sandbox to install the packages in your sandbox org.
In the Salesforce login screen, enter your login credentials and click Log In.Enter the Password provided by Apttus.Select the profile for which you want to install the package. Apttus recommends that you select Install for All Users.If you want to Install for Specific Profiles, you must define the access level for all profiles. Select from one of the following options.
No Access - This is the default setting. Apply this access level to disable all object permissions.Full Access - Apply this access level to assign users permissions to Read, Create, Edit, Delete, View All, and Modify All for all objects.
Click Set. Click Install.
A message is displayed indicating the installation is underway. Once installed, repeat this procedure for each of the packages.
Post-Installation ConfigurationAfter installing the Adobe Sign packages, you must configure the following Adobe Sign Admin Settings.
Configuring Adobe Sign Admin Settings Before you begin to create agreements, it is essential to configure the Adobe Sign Admin Settings.Basic Customization Customizing basic layout of the page like adding a Send button or adding a related list to the page can be performed. System Properties Customizing basic configurations as per your business requirements. Includes enabling features as well.
Configuring Adobe Sign Admin SettingsBefore you begin to create agreement templates, it is essential to configure the Adobe Sign Admin Settings.
Apttus Adobe Sign Services on Salesforce Spring 2020 Integration Guide
12 Copyright ©2011-2021 Apttus Corporation. All rights reserved.
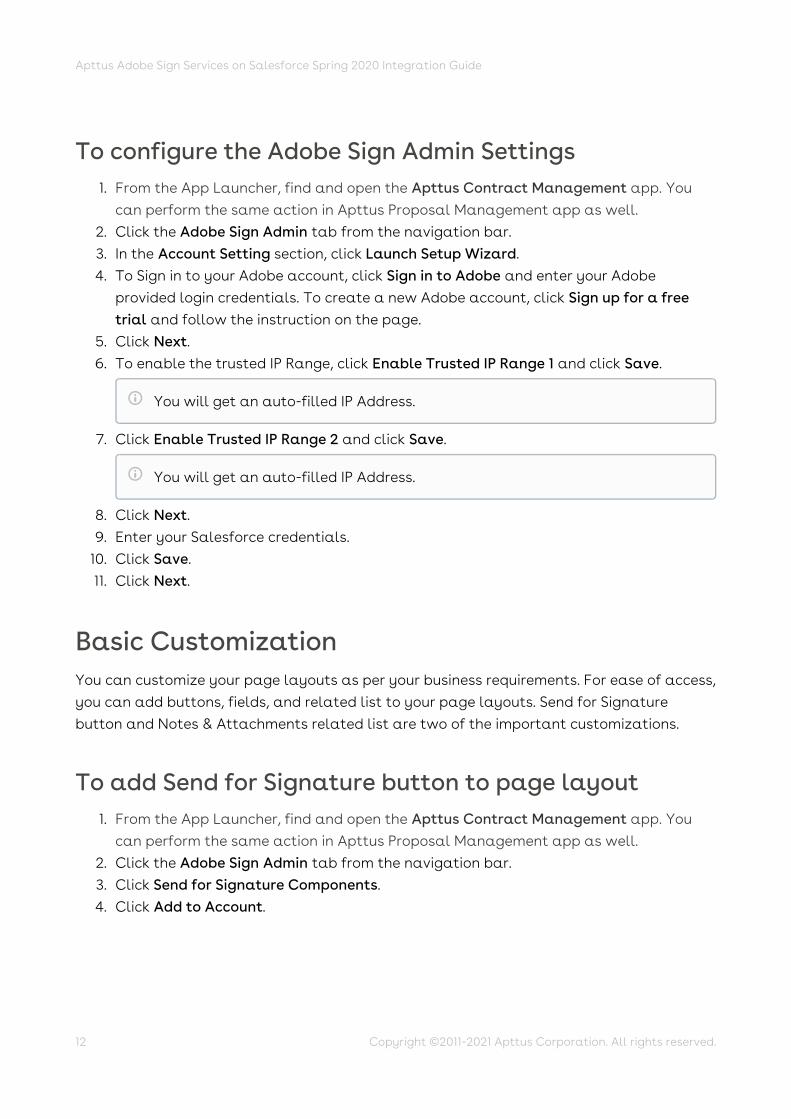
1.
2.3.4.
5.6.
7.
8.9.
10.11.
1.
2.3.4.
To configure the Adobe Sign Admin SettingsFrom the App Launcher, find and open the Apttus Contract Management app. You can perform the same action in Apttus Proposal Management app as well. Click the Adobe Sign Admin tab from the navigation bar. In the Account Setting section, click Launch Setup Wizard.To Sign in to your Adobe account, click Sign in to Adobe and enter your Adobe provided login credentials. To create a new Adobe account, click Sign up for a free trial and follow the instruction on the page.Click Next.To enable the trusted IP Range, click Enable Trusted IP Range 1 and click Save.
Click Enable Trusted IP Range 2 and click Save.
Click Next.Enter your Salesforce credentials.Click Save.Click Next.
Basic CustomizationYou can customize your page layouts as per your business requirements. For ease of access, you can add buttons, fields, and related list to your page layouts. Send for Signature button and Notes & Attachments related list are two of the important customizations.
To add Send for Signature button to page layoutFrom the App Launcher, find and open the Apttus Contract Management app. You can perform the same action in Apttus Proposal Management app as well. Click the Adobe Sign Admin tab from the navigation bar. Click Send for Signature Components.Click Add to Account.
You will get an auto-filled IP Address.
You will get an auto-filled IP Address.

Apttus Adobe Sign Services on Salesforce Spring 2020 Integration Guide
13
Copyright ©2011-2021 Apttus Corporation. All rights reserved.
5.6.7.8.
9.
1.2.
3.4.5.
Click Page Layouts.Click Edit next to the Account Layout you want to customize.Click Buttons on the layout editor.Drag and drop Send for Signature to the Custom Buttons section on the page layout below.
Click Save.
To add a related list to page layoutFrom the App Launcher, find and open the Apttus Contract Management app.Click the Agreements tab from the navigation bar. You can perform the same action on the Proposals tab in Apttus Proposal Management app as well.
Select an agreement and click the Edit Layout link.From the layout pane, click Related Lists.Drag and drop the appropriate related list to the appropriate location. It is recommended to have eSignatures, Document Versions, and Notes & Attachments related lists in the page layout for agreement or quote/proposal.
Note
Page Layout customizations can be applied to Contacts, Contracts, Opportunities, and Leads or any custom object as well. Select the appropriate option.
Note
Select the appropriate object. You can add a related list to objects like Contacts, Proposals, Opportunities, and more.

Apttus Adobe Sign Services on Salesforce Spring 2020 Integration Guide
14 Copyright ©2011-2021 Apttus Corporation. All rights reserved.
6.
1.
2.3.4.
5.
Click Save.
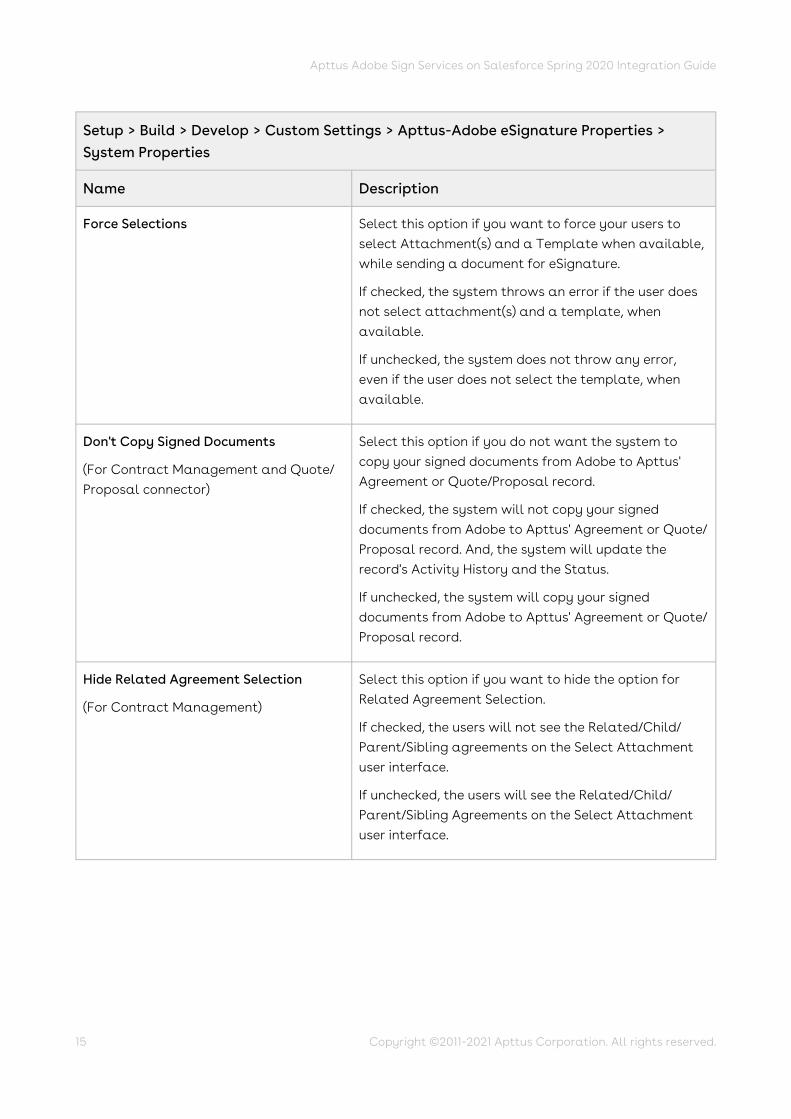
System PropertiesYou must create the System Properties record under the Apttus-Adobe eSignature Properties custom setting with the API Name ApttusAdobeESignatureProperties__c.
To create system properties recordGo to Setup > Build > Develop > Custom Settings and click Manage for Apttus-Adobe eSignature Properties.Click New.Enter the Name as System Properties.Select the Force Selections check box if you want to force your users to select Attachment(s) and a Template when available, while sending a document for eSignature. Click Save.
The following managed properties are used throughout this document.
Apttus Adobe Sign Services on Salesforce Spring 2020 Integration Guide
15
Copyright ©2011-2021 Apttus Corporation. All rights reserved.
Setup > Build > Develop > Custom Settings > Apttus-Adobe eSignature Properties > System Properties
Name Description
Force Selections Select this option if you want to force your users to select Attachment(s) and a Template when available, while sending a document for eSignature.
If checked, the system throws an error if the user does not select attachment(s) and a template, when available.
If unchecked, the system does not throw any error, even if the user does not select the template, when available.
Don't Copy Signed Documents
(For Contract Management and Quote/ Proposal connector)
Select this option if you do not want the system to copy your signed documents from Adobe to Apttus' Agreement or Quote/Proposal record.
If checked, the system will not copy your signed documents from Adobe to Apttus' Agreement or Quote/ Proposal record. And, the system will update the record's Activity History and the Status.
If unchecked, the system will copy your signed documents from Adobe to Apttus' Agreement or Quote/ Proposal record.
Hide Related Agreement Selection
(For Contract Management)
Select this option if you want to hide the option for Related Agreement Selection.
If checked, the users will not see the Related/Child/ Parent/Sibling agreements on the Select Attachment user interface.
If unchecked, the users will see the Related/Child/ Parent/Sibling Agreements on the Select Attachment user interface.
Apttus Adobe Sign Services on Salesforce Spring 2020 Integration Guide
16 Copyright ©2011-2021 Apttus Corporation. All rights reserved.
Setup > Build > Develop > Custom Settings > Apttus-Adobe eSignature Properties > System Properties
Name Description
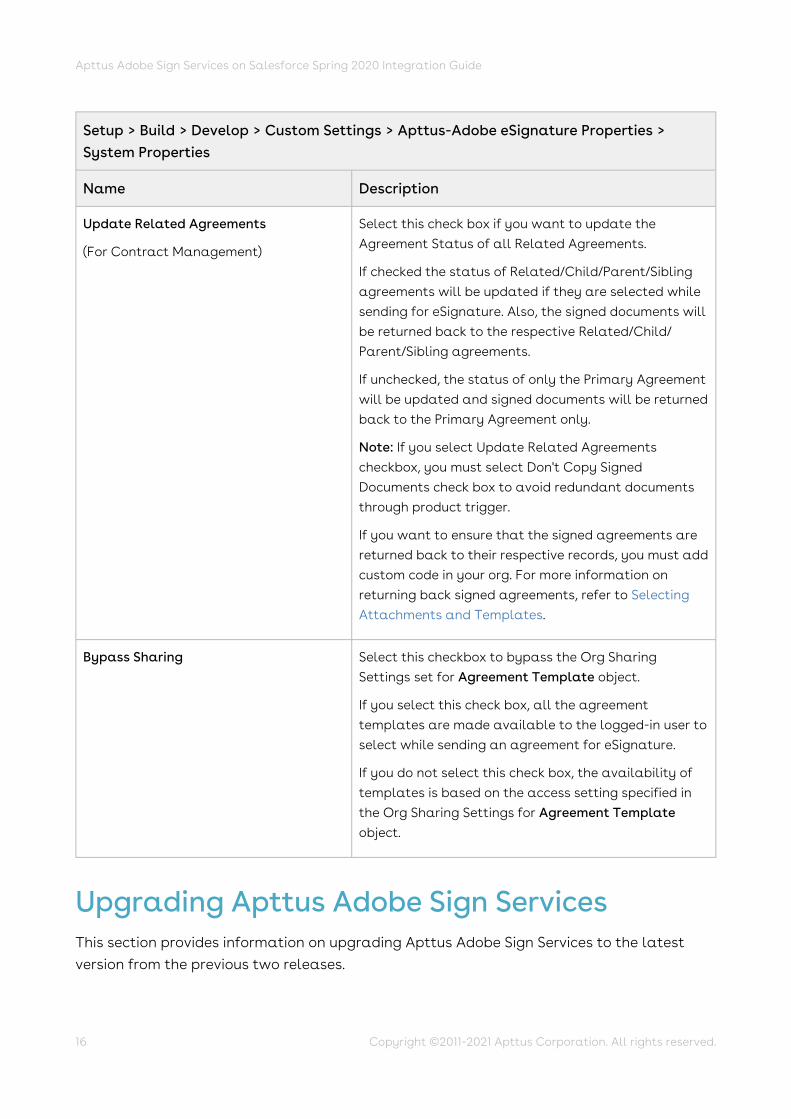
Update Related Agreements
(For Contract Management)
Select this check box if you want to update the Agreement Status of all Related Agreements.
If checked the status of Related/Child/Parent/Sibling agreements will be updated if they are selected while sending for eSignature. Also, the signed documents will be returned back to the respective Related/Child/ Parent/Sibling agreements.
If unchecked, the status of only the Primary Agreement will be updated and signed documents will be returned back to the Primary Agreement only.
Note: If you select Update Related Agreements checkbox, you must select Don't Copy Signed Documents check box to avoid redundant documents through product trigger.
If you want to ensure that the signed agreements are returned back to their respective records, you must add custom code in your org. For more information on returning back signed agreements, refer to Selecting Attachments and Templates.
Bypass Sharing Select this checkbox to bypass the Org Sharing Settings set for Agreement Template object.
If you select this check box, all the agreement templates are made available to the logged-in user to select while sending an agreement for eSignature.
If you do not select this check box, the availability of templates is based on the access setting specified in the Org Sharing Settings for Agreement Template object.
Upgrading Apttus Adobe Sign ServicesThis section provides information on upgrading Apttus Adobe Sign Services to the latest version from the previous two releases.
Apttus Adobe Sign Services on Salesforce Spring 2020 Integration Guide
17
Copyright ©2011-2021 Apttus Corporation. All rights reserved.
•
•••
1.
Preparing for UpgradeBefore you upgrade to Apttus Adobe Sign Services on Salesforce Spring 2020, you must ensure the following:
You go through Adobe Sign Services Features by Release to know about the new features, enhancements, and deprecated features in Apttus Adobe Sign Services since your existing release. After you upgrade Apttus Adobe Sign Services to Spring 2020, you cannot roll back to any previous release.You have the supported platforms and system requirements. You have access to the Install Center on the Apttus Community Portal.You have administrator privileges to your Salesforce org
You need not back up your configurations. All configurations you performed since you installed your existing release will remain intact after the upgrade.
Upgrading to Apttus Adobe Sign Services on Salesforce Spring 2020This section describes step-by-step instructions to upgrade from Winter 2019 and Summer 2019 to Spring 2020.
Upgrading Apttus Adobe Sign Services from Winter 2019 to Spring 2020
Go to Setup > Installed Packages and ensure that your current Salesforce org has the following Winter 2019 packages installed.
Product Package Version (Name | Number)
Adobe Sign 21.5
Apttus EchoSign Integration 7.2.0030 | 7.30
Apttus Quote/Proposal EchoSign Integration 1.0.12 | 1.12
If you have not installed Apttus Adobe Sign Services, you can contact Apttus Support to request for an installation link, then perform the standard installation as described in Installing Apttus Adobe Sign Services.

Apttus Adobe Sign Services on Salesforce Spring 2020 Integration Guide
18 Copyright ©2011-2021 Apttus Corporation. All rights reserved.
2.
3.
1.
2.
Ensure that you have the following packages and dependent packages to upgrade to Spring 2020. These packages are required to utilize the new features and enhancements of Spring 2020.
Product Package Version (Name | Number)
Adobe Sign 21.5
Apttus Contract Management 11.0.0519 | 11.519
Apttus Contract EchoSign Integration 8.0.0034 | 8.34
Apttus Quote/Proposal EchoSign Integration 1.0.12 | 1.12
Apttus Proposal Management 9.2.0206 | 9.206
Perform the upgrade. The upgrade procedure is the same as the installation procedure. For detailed information on installing Apttus Adobe Sign Services managed packages, see Installing the Apttus Adobe Sign Services Packages.
Upgrading Apttus Adobe Sign Services from Summer 2019 to Spring 2020
Go to Setup > Installed Packages and ensure that your current Salesforce org has the following Summer 2019 packages installed.
Product Package Version (Name | Number)
Adobe Sign 21.5
Apttus EchoSign Integration 6.0.0024 | 6.0.0024
Apttus Quote/Proposal EchoSign Integration 1.0.0010 | 1.10
Ensure that you have the following packages and dependent packages to upgrade to Spring 2020. These packages are required to utilize the new features and enhancements of Spring 2020.
Product Package Version (Name | Number)
Adobe Sign 21.5
Apttus Contract Management 11.0.0519 | 11.519
Apttus Contract EchoSign Integration 8.0.0034 | 8.34

Apttus Adobe Sign Services on Salesforce Spring 2020 Integration Guide
19
Copyright ©2011-2021 Apttus Corporation. All rights reserved.
3.
Product Package Version (Name | Number)
Apttus Quote/Proposal EchoSign Integration 1.0.12 | 1.12
Apttus Proposal Management 9.2.0206 | 9.206
Perform the upgrade. The upgrade procedure is the same as the installation procedure. For detailed information on installing Apttus Adobe Sign Services managed packages, see Installing the Apttus Adobe Sign Services Packages.

Apttus Adobe Sign Services on Salesforce Spring 2020 Integration Guide
20 Copyright ©2011-2021 Apttus Corporation. All rights reserved.
1.
2.3.4.5.
•
•
Creating Agreement TemplatesAgreement Templates provide an efficient way of setting up the default values and settings for your agreements. Agreement Templates include predefining agreement fields like Agreement Name, Message, Signature Type, Language, various Agreement Options, various Agreement Security options, and Mapping Options. You can preset the recipient details, file attachments, expiration date, days until expiration, reminders as well.
To create an agreement templateFrom the App Launcher, find and open the Apttus Contract Management app. You can perform the same action in Apttus Proposal Management app as well. Click the Agreement Templates tab from the navigation bar. Click New.Enter the Template Name and click Save.Provide requisite information for the fields pertaining to the Template Details tab. The Template Details has the core details that relate the agreements created by the template with the referencing Salesforce object.
Field Name Description
Agreement Name Enter a name for the agreement or accept the default name. All agreements are initially created with this name.
Salesforce Object Select the Salesforce Master Object to be referenced for this agreement template (e.g. Account, Opportunity, Agreement).
Mapped Data Click Map data into agreement fields to define the mapping of fields. Select one of the following Mapping Method:
Select from Object - Select this option to map a field of selected Salesforce object to an agreement field. Input Specific Value - Select this option to map a specific field to an agreement field.
Click Save.
Apttus Adobe Sign Services on Salesforce Spring 2020 Integration Guide
21
Copyright ©2011-2021 Apttus Corporation. All rights reserved.
•
•
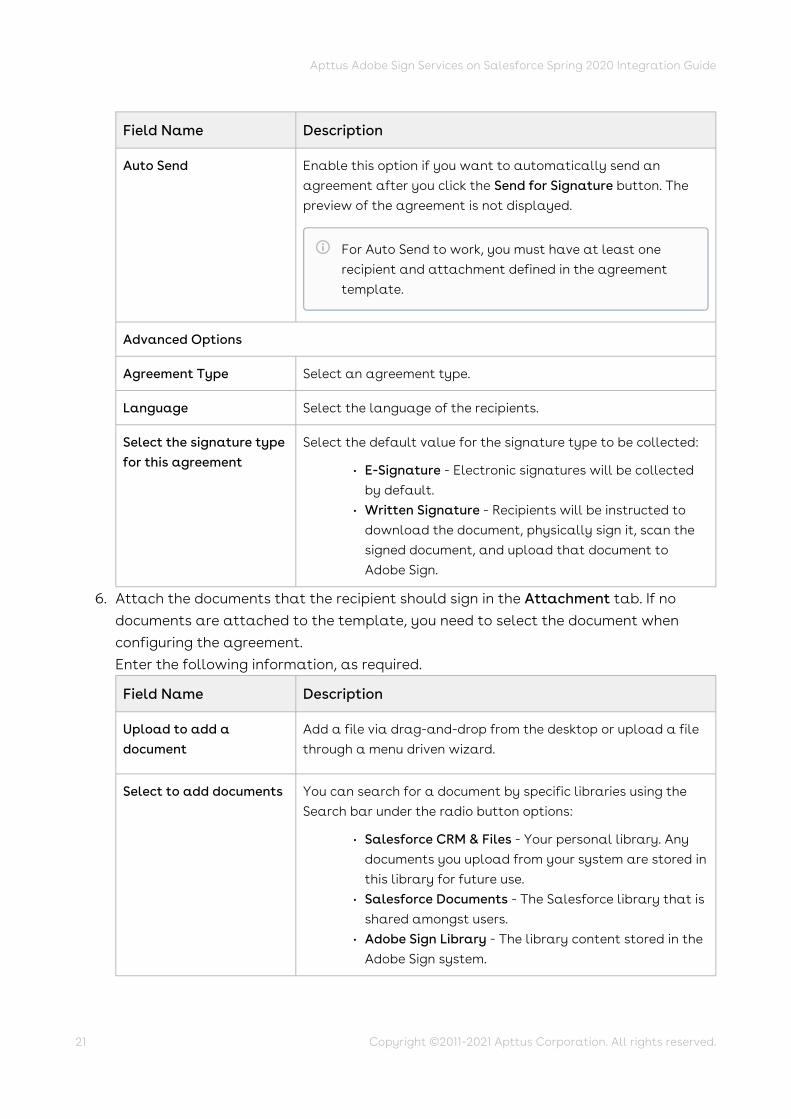
6.
•
•
•
Field Name Description
Auto Send Enable this option if you want to automatically send an agreement after you click the Send for Signature button. The preview of the agreement is not displayed.
Advanced Options
Agreement Type Select an agreement type.
Language Select the language of the recipients.
Select the signature type for this agreement
Select the default value for the signature type to be collected:
E-Signature - Electronic signatures will be collected by default.Written Signature - Recipients will be instructed to download the document, physically sign it, scan the signed document, and upload that document to Adobe Sign.
Attach the documents that the recipient should sign in the Attachment tab. If no documents are attached to the template, you need to select the document when configuring the agreement. Enter the following information, as required.
Field Name Description
Upload to add a document
Add a file via drag-and-drop from the desktop or upload a file through a menu driven wizard.
Select to add documents You can search for a document by specific libraries using the Search bar under the radio button options:
Salesforce CRM & Files - Your personal library. Any documents you upload from your system are stored in this library for future use.Salesforce Documents - The Salesforce library that is shared amongst users.Adobe Sign Library - The library content stored in the Adobe Sign system.
For Auto Send to work, you must have at least one recipient and attachment defined in the agreement template.

Apttus Adobe Sign Services on Salesforce Spring 2020 Integration Guide
22 Copyright ©2011-2021 Apttus Corporation. All rights reserved.
••
•
•••
•
•
•
•
•
•••
•
•
Field Name Description
Advanced Options
Add a document from object or runtime variable
Select a document or object from a Salesforce object or runtime variable.
There are three options:
Add from Salesforce ObjectSource Type - Choose the object type for the document between File or Attachment.Document Selection - Select the document to attach based on one of these criteria:
Latest Document Oldest Document All Documents
Document Selection Determined By - Select how the file selection is determined for latest or oldest files.
Add from Opportunity Quote - Define the following fields, as required.
Quote Type - Select which quote object to use for document selection.Quote Type Determined By - Select how the quote selection is determined for latest or oldest files.Quote Document Type - Select which quote document to add from:
Latest Document Oldest Document All Documents
Runtime Variable - Dynamically add an attachment from an object.
Add a runtime variable name - Specify the variable and ID type from your Salesforce object.
Some salesforce master objects offer additional options for the source of the document (e.g., If the Salesforce Object defined on the Template Details tab is Opportunity, you will have an additional source option of Add from Opportunity Quote).

Apttus Adobe Sign Services on Salesforce Spring 2020 Integration Guide
23
Copyright ©2011-2021 Apttus Corporation. All rights reserved.
7.
•
•
•••
8.
Field Name Description
Add Form Field Template Import a field template from the Adobe Sign library.
Configure the recipients in the Recipients tab.
Field Name Description
Signing Workflow Select one of the following option:
All Recipients Sign - All of the recipients defined in the template will be required to participate in the process, according to the roles applied to them. This is the setting for all agreements that aren't expected to be signed by the sender only.Only Sender Signs - Enable this option to add the "Only | Sign" functionality to the template.
Recipients Recipients can be added by:
Salesforce Object Email Runtime Variable
Message Enter the message that you want to deliver to the recipients. The Message section imports the Agreement Name from the Template Details tab.
Advanced Options
Enable Hosted Signature (in-person signature)
Enable to facilitate hosted, in-person signing if the signer is available.
Enable Preview and Position Fields
Enable this option to allow you to preview the agreement and to drag-and-drop form fields on to it before sending it out for signature.
Send on Behalf of Enter the user on behalf of whom you want to send the agreement if it is sent automatically; else the agreement will be sent on behalf of the current user.
Advanced Verification Methods
You can configure the verification methods for recipients if you are controlling signer verification based on Internal / External recipient status.
Configure the merge mapping or data mapping in the Data Mapping tab.

Apttus Adobe Sign Services on Salesforce Spring 2020 Integration Guide
24 Copyright ©2011-2021 Apttus Corporation. All rights reserved.
•
•
9.
10.
Merge Mapping - Select a data mapping to merge Salesforce fields into an agreement before sending it.Data Mapping - Select a data mapping to be used to map inputs from a signed agreement back into Salesforce.
Configure any additional Rules to automate common agreement tasks.
Field Name Description
Automatic Reminders Select an option for automatic reminders. The options are Never, Every Day, Until Signed; or Every Week, Until Signed.
Days Until Expiration Enter the number of days until the signature request expires.
Post Sign Redirect URL Enter a URL to automatically redirect the signers of an agreement to a specified URL after they sign.
Post Sign Redirect Delay If the Enable Post Sign Options setting is enabled and a Post Sign Redirect URL is specified, enter the number of seconds that should elapse before executing the redirect.
Password protect the signed document
Enable this option to encrypt the signed PDF that is sent to signers.
Set as default template for all agreements
Enable this option if you want to set this as the Default agreement template for your new agreements.
Enabled as a Chatter Publisher Actions
If you have enabled Chatter Publisher Actions on your Org, then you can check this box to enable this Agreement Template. The Chatter Publisher Action allows you to send agreements from Chatter.
Click Save.

Apttus Adobe Sign Services on Salesforce Spring 2020 Integration Guide
25
Copyright ©2011-2021 Apttus Corporation. All rights reserved.
1.2.3.
1.2.3.4.
1.
2.3.4.5.6.7.8.9.
10.
Adding the Audit TrailAudit Trail is a separate document that Adobe provides when generating the final signed document. Once the agreement is signed, a signed copy of the PDF is stored within our application. Apttus Connector grabs the last generated document from Adobe. If the custom setting for the audit trail is enabled, then either the audit trail document will be generated last, or the final signed document will be generated last. In either case, only the last document is grabbed.
To add the audit trail document, you must
Disable Audit Trail settingSet up File Mapping for audit trail Send for Signature
To disable audit trail settingGo to Setup > Develop > Custom Settings.Click Manage for Adobe Sign Settings.Deselect Add Audit PDF to Attachment List checkbox.Click Save.
To set up file mapping for audit trailFrom the App Launcher, find and open the Apttus Contract Management app. You can perform the same action in Apttus Proposal Management app as well. Click the Data Mappings tab from the navigation bar.Click New.Enter the Data Mapping Name. Select Default Data Mapping check box.Under the Fields Mapping section, click Add Mapping.Click Selected Object link and select Apttus Agreement from the picklist menu.Click Select.Under the File Mapping section, click Add Mapping.From Which File to Add? picklist menu, select Audit Trail.

Apttus Adobe Sign Services on Salesforce Spring 2020 Integration Guide
26 Copyright ©2011-2021 Apttus Corporation. All rights reserved.
11. Click Save.
For more information on sending a document for eSignature, refer to Sending for eSignature.

Apttus Adobe Sign Services on Salesforce Spring 2020 Integration Guide
27
Copyright ©2011-2021 Apttus Corporation. All rights reserved.
Configuring MappingsAdobe Sign enables you to map data back and forth between the agreement and the Salesforce org. For detailed information on Mappings, refer to.
Mapping Link
Merge Mappings https://helpx.adobe.com/content/dam/help/en/sign/ Adobe_Sign_Best_Practices_SFDC.PDF
Data Mappings https://helpx.adobe.com/content/dam/help/en/sign/ Adobe_Sign_Best_Practices_SFDC.PDF

Apttus Adobe Sign Services on Salesforce Spring 2020 Integration Guide
28 Copyright ©2011-2021 Apttus Corporation. All rights reserved.
•••
•
•
1.2.
Sending for eSignatureAgreements or Quote/Proposals can be sent for eSignature using Apttus Adobe Integration. You must have an existing agreement template, a word file or an existing document on Salesforce to send your document for eSignature to your recipients.
Adding AttachmentsSelecting Attachments and TemplatesManaging Adobe Sign Actions
Adding AttachmentsIn order to send a document for eSignature, you first need to have a document attached to the record. When you send the documents for eSignature, you can add the document to be sent for eSignature manually or auto attach it with agreement. You can manually attach a document using the Salesforce attachment process, or you can use Apttus Document Generation.
You can add an attachment in one of the following ways.
Manually attach one or more documents You can manually attach the document using Salesforce attachment process. Attach a document using Apttus Document Generation You can use templates to generate a document using Salesforce field values. You can use this feature only if your system admin has configured Add Attachments Enabled.
To attach a document manuallySelect the agreement that you want to attach the document.Under the Notes & Attachments related list, click Attach File.

Apttus Adobe Sign Services on Salesforce Spring 2020 Integration Guide
29
Copyright ©2011-2021 Apttus Corporation. All rights reserved.
3.
4.5.
1.
2.
Click Choose File and select the agreement that you want to upload.
Click Attach File.Click Done.
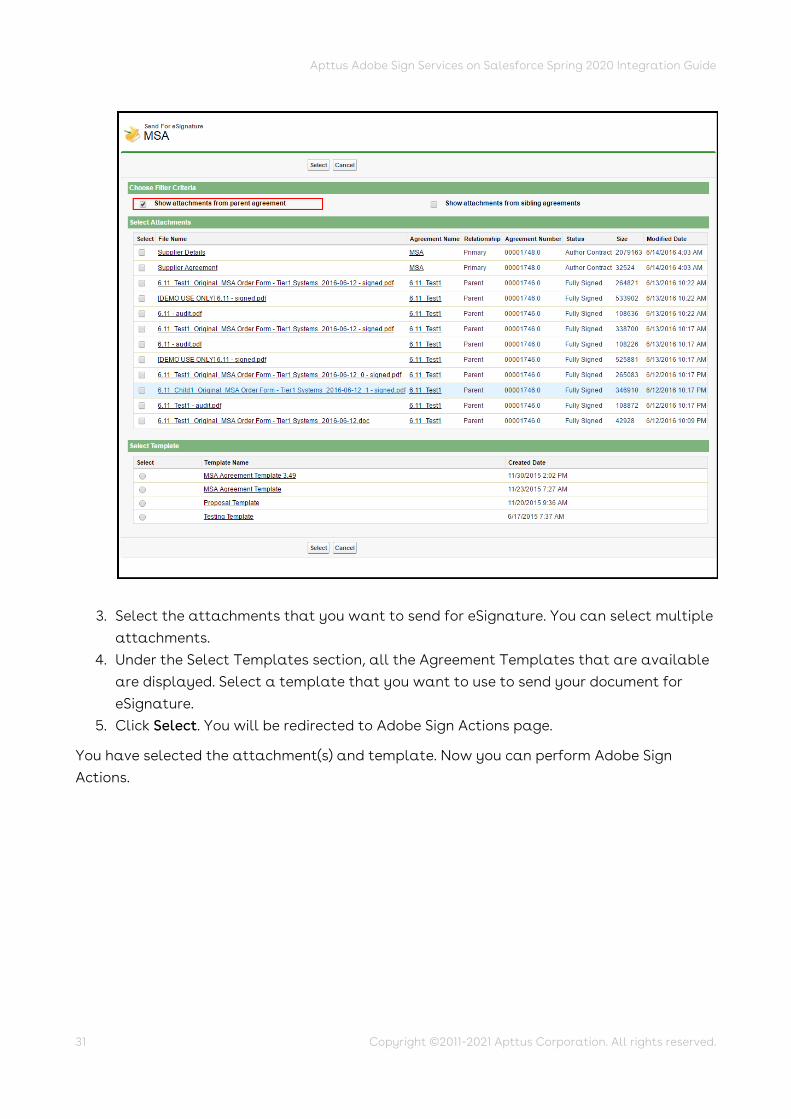
Selecting Attachments and TemplatesAfter adding the attachments manually to the Notes & Attachments related list, you must click eSignature button. Once you click eSignature button, you are redirected to Attachments and Template selection page.
To select attachment and templateClick the eSignature button. All the attachments that you have added in the Notes & Attachments related list are displayed in the Select Attachments section, on Attachments and Template Selection page. Select the Show attachments from parent agreement check box to display the documents, added in Notes & Attachments related list, in the Select Attachments section.
Note
Ensure that you do not upload a file of size over 12 MB. You can attach a file larger than 12 MB, but it will not be included in the envelope being sent for eSignature.

Apttus Adobe Sign Services on Salesforce Spring 2020 Integration Guide
30 Copyright ©2011-2021 Apttus Corporation. All rights reserved.
-or- Select the Show attachments from sibling agreements check box to display the documents, added in Notes & Attachments related list, in the Select Attachments section. -or- Select the Show attachments from child agreements check box to display the documents, added in Notes & Attachments related list, in the Select Attachments section.
Note
The visibility of Show attachments from parent agreement and Show attachments from sibling agreements depends on the Hide Related Agreement Selection custom setting. For more information on custom settings, refer to System Properties.
Apttus Adobe Sign Services on Salesforce Spring 2020 Integration Guide
31
Copyright ©2011-2021 Apttus Corporation. All rights reserved.
3.
4.
5.
Select the attachments that you want to send for eSignature. You can select multiple attachments. Under the Select Templates section, all the Agreement Templates that are available are displayed. Select a template that you want to use to send your document for eSignature. Click Select. You will be redirected to Adobe Sign Actions page.
You have selected the attachment(s) and template. Now you can perform Adobe Sign Actions.
Apttus Adobe Sign Services on Salesforce Spring 2020 Integration Guide
32 Copyright ©2011-2021 Apttus Corporation. All rights reserved.
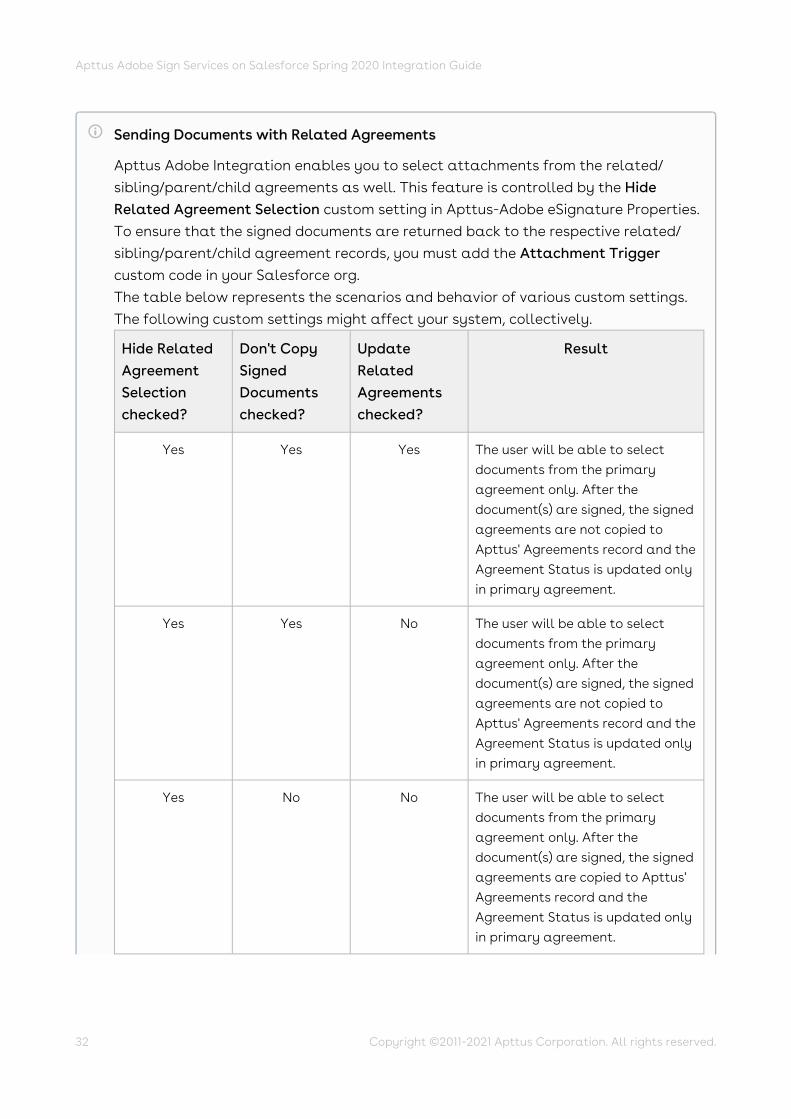
Sending Documents with Related Agreements
Apttus Adobe Integration enables you to select attachments from the related/ sibling/parent/child agreements as well. This feature is controlled by the Hide Related Agreement Selection custom setting in Apttus-Adobe eSignature Properties. To ensure that the signed documents are returned back to the respective related/ sibling/parent/child agreement records, you must add the Attachment Trigger custom code in your Salesforce org.The table below represents the scenarios and behavior of various custom settings. The following custom settings might affect your system, collectively.
Hide Related Agreement Selection checked?
Don't Copy Signed Documents checked?
Update Related Agreements checked?
Result
Yes Yes Yes The user will be able to select documents from the primary agreement only. After the document(s) are signed, the signed agreements are not copied to Apttus' Agreements record and the Agreement Status is updated only in primary agreement.
Yes Yes No The user will be able to select documents from the primary agreement only. After the document(s) are signed, the signed agreements are not copied to Apttus' Agreements record and the Agreement Status is updated only in primary agreement.
Yes No No The user will be able to select documents from the primary agreement only. After the document(s) are signed, the signed agreements are copied to Apttus' Agreements record and the Agreement Status is updated only in primary agreement.

Apttus Adobe Sign Services on Salesforce Spring 2020 Integration Guide
33
Copyright ©2011-2021 Apttus Corporation. All rights reserved.
Hide Related Agreement Selection checked?
Don't Copy Signed Documents checked?
Update Related Agreements checked?
Result
No Yes Yes The user will be able to select documents from both primary and related/parent/sibling/child agreements. After the document(s) are signed, the signed agreements are not copied to Apttus' Agreements record and the Agreement Status is updated in both primary and related/parent/ sibling/child agreements.
No Yes No The user will be able to select documents from both primary and related/parent/sibling/child agreements. After the document(s) are signed, the signed agreements are not copied to Apttus' Agreements record and the Agreement Status is updated only in primary agreement.
No No Yes The user will be able to select documents from both primary and related/parent/sibling/child agreements. After the document(s) are signed, the signed agreements are copied to Apttus' Agreements record and the Agreement Status is updated in both primary and related/parent/sibling/child agreements.
Apttus Adobe Sign Services on Salesforce Spring 2020 Integration Guide
34 Copyright ©2011-2021 Apttus Corporation. All rights reserved.
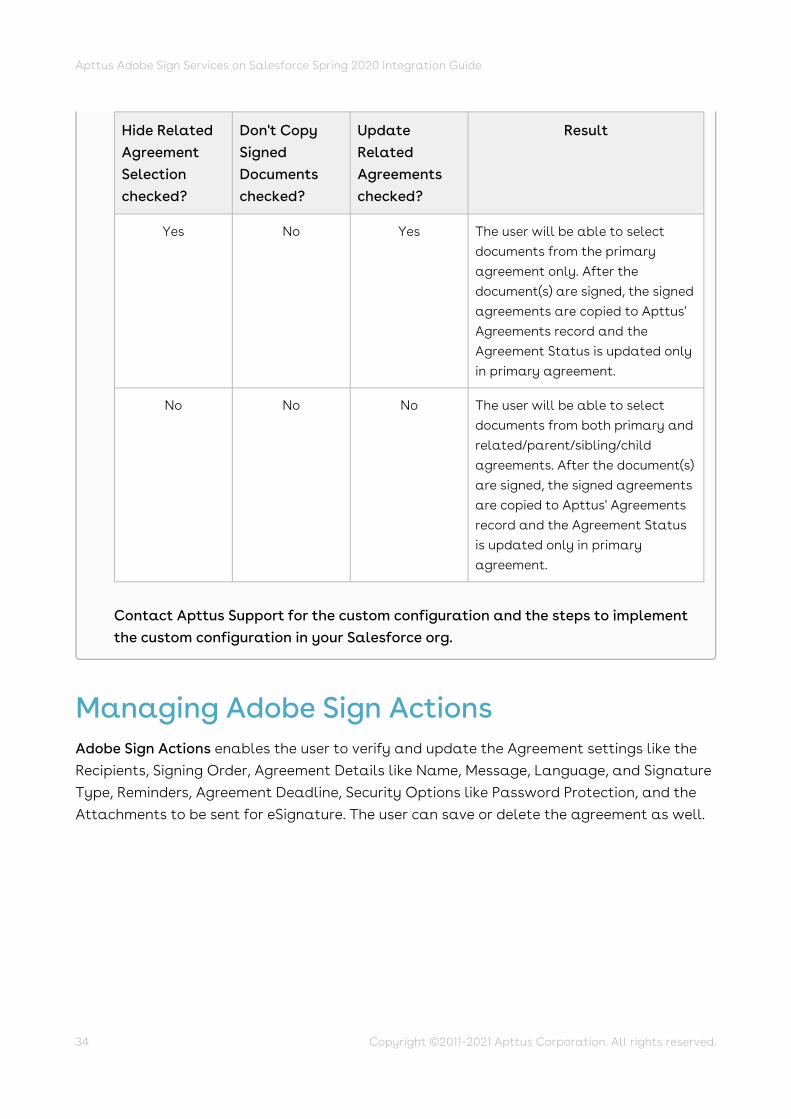
Managing Adobe Sign ActionsAdobe Sign Actions enables the user to verify and update the Agreement settings like the Recipients, Signing Order, Agreement Details like Name, Message, Language, and Signature Type, Reminders, Agreement Deadline, Security Options like Password Protection, and the Attachments to be sent for eSignature. The user can save or delete the agreement as well.
Hide Related Agreement Selection checked?
Don't Copy Signed Documents checked?
Update Related Agreements checked?
Result
Yes No Yes The user will be able to select documents from the primary agreement only. After the document(s) are signed, the signed agreements are copied to Apttus' Agreements record and the Agreement Status is updated only in primary agreement.
No No No The user will be able to select documents from both primary and related/parent/sibling/child agreements. After the document(s) are signed, the signed agreements are copied to Apttus' Agreements record and the Agreement Status is updated only in primary agreement.
Contact Apttus Support for the custom configuration and the steps to implement the custom configuration in your Salesforce org.

Apttus Adobe Sign Services on Salesforce Spring 2020 Integration Guide
35
Copyright ©2011-2021 Apttus Corporation. All rights reserved.
1.
To manage Adobe Sign actionsUnder the Recipients section, select the Recipient Type. The available options are.
Option Description
Contact Select this option if you want to select an existing Contact as a recipient.

Apttus Adobe Sign Services on Salesforce Spring 2020 Integration Guide
36 Copyright ©2011-2021 Apttus Corporation. All rights reserved.
2.
3.
4.
••
•
•
•
•
•
5.
6.7.
••
Option Description
User Select this option if you want to select an existing User as a recipient.
Email Select this option if you want to enter the name and email address manually.
Lead Select this option if you want to enter an existing Lead as a recipient.
Click the icon for Recipient to look up the recipient. -or- Enter the email address of the recipient in the Email text box, if you have selected Email as the Recipient Type. Click Add Recipient and perform steps 2 and 3, if there is a requirement to add more recipients.If you have entered multiple recipients, you can perform any of the following steps, if required.
Drag and drop the recipient to change the signing order. For Recipients Sign in, select any of the following options.
Any Order - Select this option if you want to allow the recipients to sign the document in any order.Order Entered - Select this option if you want to allow the recipients to sign the document in the order mentioned above.
Select the Sender Signs Only, if you want only your recipient to sign the document. Select the I also need to sign this document, if you, as a user, want to sign the document as well. If you select this option, you will have the option of selecting whether you want to sign the document first or last. Click First if you want to sign the document before your recipient signs the document. Click Last if you want to sign the document after your recipients sign the document. Enter the email address of the recipients in the Send email copies to to send the copies of the document to the mentioned email addresses.
Under the Agreement Detail section, enter the Agreement Name and Message (if any) for the recipient. Select Language.Select the Signature Type. The available options are:
eSignature Fax Signature

Apttus Adobe Sign Services on Salesforce Spring 2020 Integration Guide
37
Copyright ©2011-2021 Apttus Corporation. All rights reserved.
8.
9.
10.
11.
12.
For Opportunity, click the icon and select an opportunity that you want to associate with this agreement. Under the Agreement Options section, select the appropriate Signing Deadline Date for the agreement.Select the Remind the Recipient to Sign to enable the reminder for the document you want to send. You can select the frequency of reminders as well. The available options are.
Option Description
Never Select this option if you do not want to send any reminder to your recipient(s).
Every Day, Until Signed Select this option if you want to send a reminder to your recipient to sign the document, every day.
Every Week, Until Signed Select this option if you want to send a reminder to your recipient to sign the document, every week.
Select the Preview document or position signature fields , If you want to preview the document or update the position of signature fields before the document is sent for eSignature. Under the Security Options section, select the Verify signer identity,if you want to verify the identity of your recipients. Further, the available options are.
Option Description
Password to sign agreement - Select this option if you want your recipients to enter a password for the document that you send.
Password Enter the password for your document.
Confirm Password Re-enter the password for your document.
Knowledge-based authentication - Select this option if you want your recipients to answer a question for the document that you send.
Question Enter a question for the recipient(s) to answer.
Answer Enter the answer to the question that recipients must answer to open the document that you have sent.
Web-based authentication - Select this option if you want your recipients to log in with their social media account, such as Google, LinkedIn, Facebook before viewing and signing the document.

Apttus Adobe Sign Services on Salesforce Spring 2020 Integration Guide
38 Copyright ©2011-2021 Apttus Corporation. All rights reserved.
13.
14.
15.16.17.18.
Option Description
Social Select the social media account that you wish to use for web-based authentication.
Select the Password Protect the signed document to force users to enter the password before they open the document that you have sent. You must enter the password in Password text box. If you want to add more documents to the existing attachments, for eSignature, click Upload File and upload the document that you want to send.
Click Choose File and choose the document that you want to upload.Click Attach File.Click Done. Click Send for Signature. -or- Click Save Agreement to save the agreement for now and sent it later on. -or- Click Cancel to go back to the agreements screen.
Note
Salesforce documents and content files can also be added as agreements. To do so click on Salesforce Content or CRM Files and search for the appropriate document. Click Salesforce Documents if your agreement already exists as any Salesforce documents.

Apttus Adobe Sign Services on Salesforce Spring 2020 Integration Guide
39
Copyright ©2011-2021 Apttus Corporation. All rights reserved.
Apttus Adobe Sign Integration enables you to use Adobe Approvals to perform C2A (click- to-accept) on the agreement/proposal. When you approve a quote/proposal or agreement using Adobe Approvals, the status of the quote/proposal or agreement is automatically updated to Fully Signed.
If Preview document or position signature fields checkbox is selected, a pop- up is displayed which allows you to position the signature fields. Drag the required fields to the intended area.
Click Next to send the document for eSignature.Click Close after you review the document that you have sent.
Apttus Adobe Sign Services on Salesforce Spring 2020 Integration Guide
40 Copyright ©2011-2021 Apttus Corporation. All rights reserved.
1.2.3.
4.5.6.
7.8.
1.2.3.
FAQsThis section contains frequently asked questions. It also provides the solution to frequently occurring errors.
How do I set up a user?
You can set up a user from the Adobe Sign Admin Settings tab.
For more information on setting up a user, refer to Configuring Adobe Sign Admin Settings.
How do I add multiple signers in the document?
You can add multiple signers in the document. The order of the signers can also be specified.
To add multiple signers,
Click the Agreements tab.Select the agreement that you want to send for signature.Click eSignature. Ensure that you have attached at least one file in Notes & Attachments section.Select the attachment and template.Click Select.On the Document Cloud Actions page, click Add Recipient and add as many recipients that you want.Provide requisite information for other fields.To send the agreement for signature, click Send for Signature. -or- To save the agreement, click Save Agreement.
How do I check the status of the document?
To check the status of the document that is send for signature, you must have configured the eSignature related list.
To check the status of the document,
Click the Agreements tab.Select the agreement that you want to view the agreement status for.Scroll down to eSignatures related list.

Apttus Adobe Sign Services on Salesforce Spring 2020 Integration Guide
41
Copyright ©2011-2021 Apttus Corporation. All rights reserved.
4. You can view the status of the agreement under Agreement Status column.
How do I merge data from Salesforce into my Document Cloud agreements before sending for signature?
You can merge data from Salesforce into your Document Cloud agreements using Merge Mappings.
For more information on Merge Mappings, refer to Configuring Mappings.
How do I push data from signed Document Cloud agreements back to Salesforce?
You can push data from signed Document Cloud agreements back to Salesforce using Data Mappings.
For more information on Data Mappings, refer to Configuring Mappings.
Apttus Adobe Sign Services on Salesforce Spring 2020 Integration Guide
42 Copyright ©2011-2021 Apttus Corporation. All rights reserved.
Apttus Copyright DisclaimerCopyright © 2021 Apttus Corporation (“Apttus”) and/or its affiliates. All rights reserved.
No part of this document, or any information linked to or referenced herein, may be reproduced, distributed, or transmitted in any form or by any means, including photocopying, recording, or other electronic or mechanical methods, without the prior written consent of Apttus. All information contained herein is subject to change without notice and is not warranted to be error free.
This document may describe certain features and functionality of software that Apttus makes available for use under a license agreement containing restrictions on use and disclosure and are protected by intellectual property laws. Except as expressly permitted in your license agreement or allowed by law, you may not, in any form, or by any means, use, copy, reproduce, translate, broadcast, modify, license, transmit, distribute, exhibit, perform, publish, or display any part of the software. Reverse engineering, disassembly, decompilation of, or the creation of derivative work(s) from, the software is strictly prohibited. Additionally, this document may contain descriptions of software modules that are optional and for which you may not have purchased a license. As a result, your specific software solution and/or implementation may differ from those described in this document.
U.S. GOVERNMENT END USERS: Apttus software, including any operating system(s), integrated software, any programs installed on the hardware, and/or documentation, delivered to U.S. Government end users are “commercial computer software” pursuant to the applicable Federal Acquisition Regulation and agency-specific supplemental regulations. As such, use, duplication, disclosure, modification, and adaptation of the programs, including any operating system, integrated software, any programs installed on the hardware, and/or documentation, shall be subject to license terms and license restrictions applicable to the programs. No other rights are granted to the U.S. Government.
Neither the software nor the documentation were developed or intended for use in any inherently dangerous applications, including applications that may create a risk of personal injury. If you use this software or hardware in dangerous applications, then you shall be responsible to take all appropriate fail-safe, backup, redundancy, and other measures to ensure its safe use. Apttus and its affiliates disclaim any liability for any damages caused by use of this software or hardware in dangerous applications.
Apttus and X-Author are registered trademarks of Apttus and/or its affiliates.
The documentation and/or software may provide links to Web sites and access to content, products, and services from third parties. Apttus is not responsible for the availability of, or any content provided by third parties. You bear all risks associated with the use of such content. If you choose to purchase any products or services from a third party, the

Apttus Adobe Sign Services on Salesforce Spring 2020 Integration Guide
43
Copyright ©2011-2021 Apttus Corporation. All rights reserved.
relationship is directly between you and the third party. Apttus is not responsible for: (a) the quality of third-party products or services; or (b) fulfilling any of the terms of the agreement with the third party, including delivery of products or services and warranty obligations related to purchased products or services. Apttus is not responsible for any loss or damage of any sort that you may incur from dealing with any third party.
For additional resources and support, please visit https://community.conga.com.
DOC ID: ESIGNSFSPR20IGREVB20200908


