Operation Data Owner's Manual AquaLink ® RS PDA - Pool Digital Assistant H 0 5 7 2 3 0 0 B WARNING FOR YOUR SAFETY : This product must be installed and serviced by a pro fessional pool/spa service technician. The procedures in this manual must be followed exactly. Failure to follow warning notices and instructions may result in property damage, serious injury, or death. ATTENTION This device complies with part 15 of the FCC Rules. Operation is subject to the following two conditions: (1) This device may not cause harmful interference, and (2) this device must accept any interference received, including interference that may cause undesired operation. NOTE: This equipment has been tested and found to comply with the limits for a Class B digital device, pursuant to part 15 of the FCC Rules. These limits are designed to provide reasonable protection against harmful interference in a residential installation. This equipment generates, uses and can radiate radio frequency energy and, if not installed and used in accordance with the instructions, may cause harmful interference to radio communications. However, there is no guarantee that interference will not occur in a particular installation. If this equipment does cause harmful interference to radio or television reception, which can be determined by turning the equipment off and on, the user is encouraged to try to correct the interference by one or more of the following measures: • Reorient or relocate the receiving antenna. • Increase the separation between the equipment and receiver . • Connect the equipment to an electrical so urce on a circuit different from that to which the receiver is connected. • Consult the dealer or an experienced radio/TV technician for help. Modifications made to this equipment, which are not authorized by the manufacturer, may void the user’s authority to operate this equipment. Pool/Spa Combination Systems and Pool Only/Spa Only Systems (Models PS4, PS6, PS8, P4, and P8) Firmware Revision 2.6
WARNINGFOR YOUR SAFETY: This product must be installed and serviced by a professional pool/spa servicetechnician. The procedures in this manual must be followed exactly. Failure to follow warning noticesand instructions may result in property damage, serious injury, or death.
ATTENTION
This device complies with part 15 of the FCC Rules. Operation is subject to the following two conditions: (1) This
device may not cause harmful interference, and (2) this device must accept any interference received, including
interference that may cause undesired operation.
NOTE: This equipment has been tested and found to comply with the limits for a Class B digital device, pursuant to
part 15 of the FCC Rules. These limits are designed to provide reasonable protection against harmful interference in
a residential installation. This equipment generates, uses and can radiate radio frequency energy and, if not installed
and used in accordance with the instructions, may cause harmful interference to radio communications. However,
there is no guarantee that interference will not occur in a particular installation. If this equipment does cause
harmful interference to radio or television reception, which can be determined by turning the equipment off and on,
the user is encouraged to try to correct the interference by one or more of the following measures:
• Reorient or relocate the receiving antenna.
• Increase the separation between the equipment and receiver.
• Connect the equipment to an electrical source on a circuit different from that to which the receiver is connected.
• Consult the dealer or an experienced radio/TV technician for help.
Modifications made to this equipment, which are not authorized by the manufacturer, may void the user’s authority
All electrical work must be performed by a licensed electrician and conform to all national, state, and local codes.
When installing and using this electrical equipment, basic safety precautions should always be followed, including the
following:
WARNING
Prolonged immersion in hot water may induce hyperthermia. Hyperthermia occurs when the internal temperature
of the body reaches a level several degrees above the normal body temperature of 98.6° F. The symptoms of
hyperthermia include dizziness, fainting, drowsiness, lethargy, and an increase in the internal temperature of the
body. The effects of hyperthermia include: 1) unawareness of impending danger; 2) failure to perceive heat; 3)
failure to recognize the need to exit spa; 4) physical inability to exit spa; 5) fetal damage in pregnant women; 6)
unconsciousness resulting in a danger of drowning.
DANGER
To reduce the risk of injury, do not remove the suction fittings of your spa or hot tub. Never operate a spa or hot
tub if the suction fittings are broken or missing. Never replace a suction fitting with one rated less than the flow rate
marked on the equipment assembly.
WARNING
To Reduce the Risk of Injury -
a) The water in a spa should never exceed 104°F (40°C). Water temperatures between 100°F (38°C) and
104°F (40°C) are considered safe for a healthy adult. Lower water temperatures are recommended for young
children and when spa use exceeds 10 minutes.
b) Since excessive water temperatures have a high potential for causing fetal damage during the early months of
pregnancy, pregnant or possibly pregnant women should limit spa water temperatures to 100°F (38°C).
c) Before entering a spa or hot tub, the user should measure the water temperature with an accurate
thermometer since the tolerance of water temperature-regulating devices varies.d) The use of alcohol, drugs, or medication before or during spa or hot tub use may lead to unconsciousness with
the possibility of drowning.
e) Obese persons and persons with a history of heart disease, low or high blood pressure, circulatory system
problems, or diabetes should consult a physician before using a spa.
f) Persons using medication should consult a physician before using a spa or hot tub since some medication
may induce drowsines while other medication may affect heart rate, blood pressure, and circulation.
WARNING
Risk of electric shock - Install the power center at least five (5) feet (152.4cm) from the inside wall of the pool
and/or hot tub using non-metallic plumbing. Canadian installations must be at least three (3) meters from the
water.Children should not use spas or hot tubs without adult supervision.
Do not use spas or hot tubs unless all suction guards are installed to prevent body and hair entrapment.
People using medications and/or having an adverse medical history should consult a physician before using a spa
or hot tub.
AVERTISSEMENT
Danger d'electrocution - Les installations Canadiennes doivent se trouver à au moins trois (3) mètres de l’eau.
Ne pas laisser les enfants utiliser une cuve de relaxation sans surveillance.
Pour éviter que les cheveux ou une partie du corps puissent être aspirés, ne pas utiliser une cuve de relaxation si
les grilles de prise d'aspiration ne sont pas toutes en place.
Les personnes qui prennent des médicaments ou ont des problèmes de santé devraient consulter un médecin
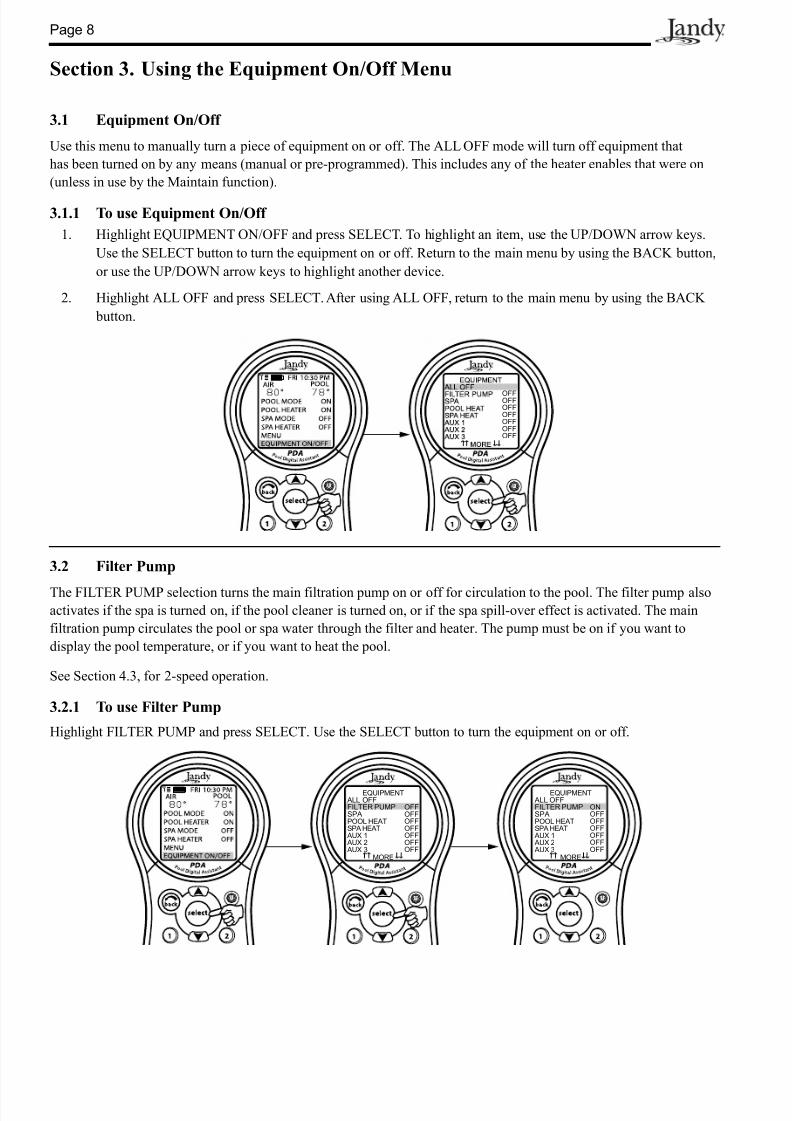
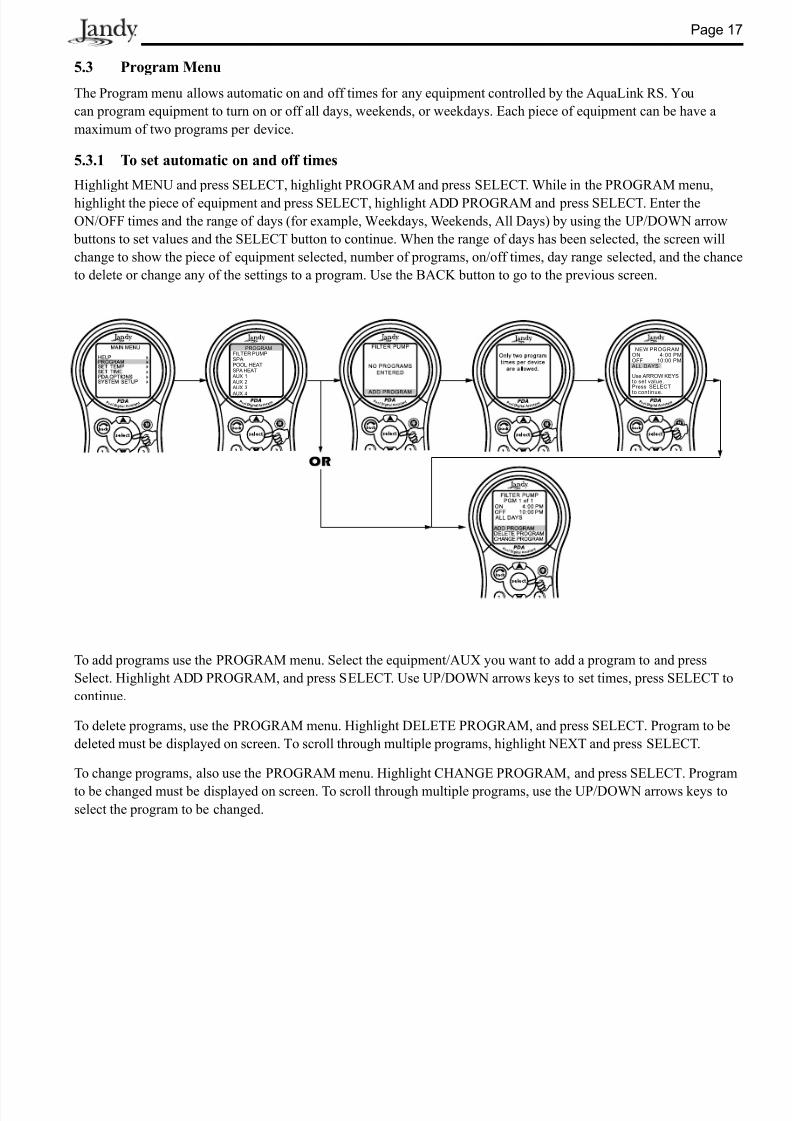
Use this menu to manually turn a piece of equipment on or off. The ALL OFF mode will turn off equipment that
has been turned on by any means (manual or pre-programmed). This includes any of the heater enables that were on
(unless in use by the Maintain function).
3.1.1 To use Equipment On/Off
1. Highlight EQUIPMENT ON/OFF and press SELECT. To highlight an item, use the UP/DOWN arrow keys.
Use the SELECT button to turn the equipment on or off. Return to the main menu by using the BACK button,
or use the UP/DOWN arrow keys to highlight another device.
2. Highlight ALL OFF and press SELECT. After using ALL OFF, return to the main menu by using the BACK
button.
3.2 Filter Pump
The FILTER PUMP selection turns the main filtration pump on or off for circulation to the pool. The filter pump alsoactivates if the spa is turned on, if the pool cleaner is turned on, or if the spa spill-over effect is activated. The main
filtration pump circulates the pool or spa water through the filter and heater. The pump must be on if you want to
display the pool temperature, or if you want to heat the pool.
See Section 4.3, for 2-speed operation.
3.2.1 To use Filter Pump
Highlight FILTER PUMP and press SELECT. Use the SELECT button to turn the equipment on or off.
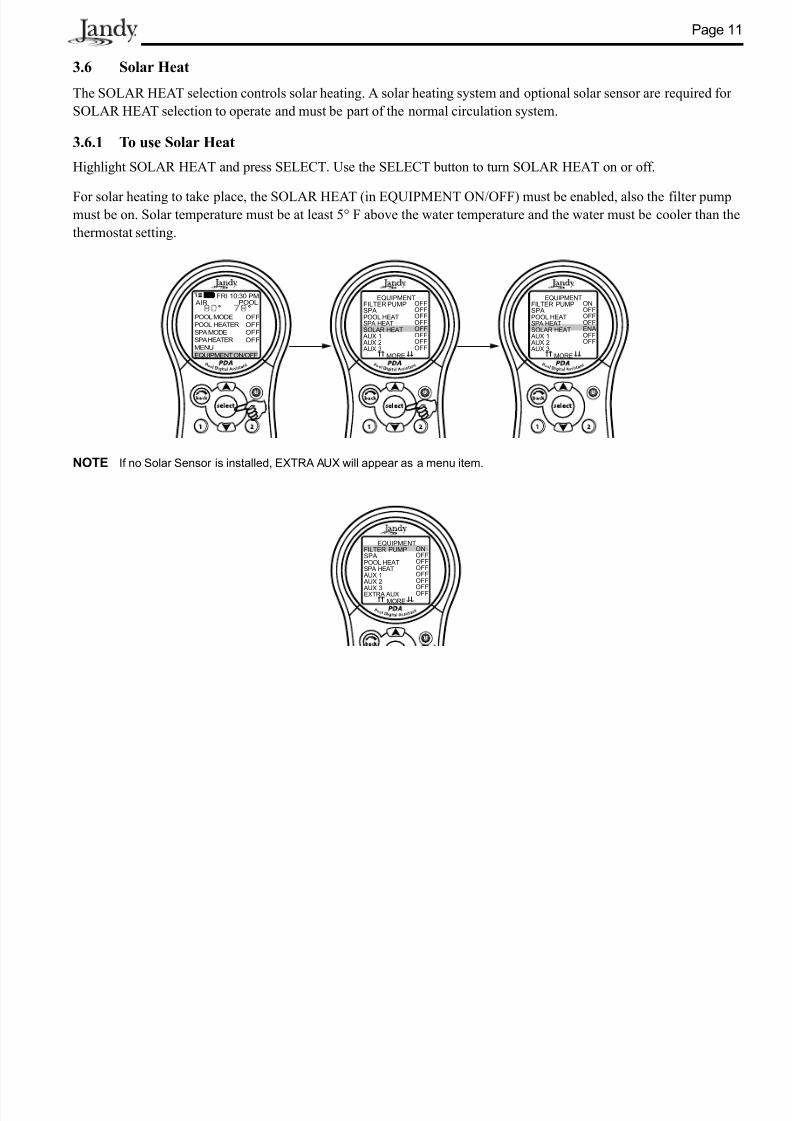
The SOLAR HEAT selection controls solar heating. A solar heating system and optional solar sensor are required for
SOLAR HEAT selection to operate and must be part of the normal circulation system.
3.6.1 To use Solar Heat
Highlight SOLAR HEAT and press SELECT. Use the SELECT button to turn SOLAR HEAT on or off.
For solar heating to take place, the SOLAR HEAT (in EQUIPMENT ON/OFF) must be enabled, also the filter pumpmust be on. Solar temperature must be at least 5° F above the water temperature and the water must be cooler than the
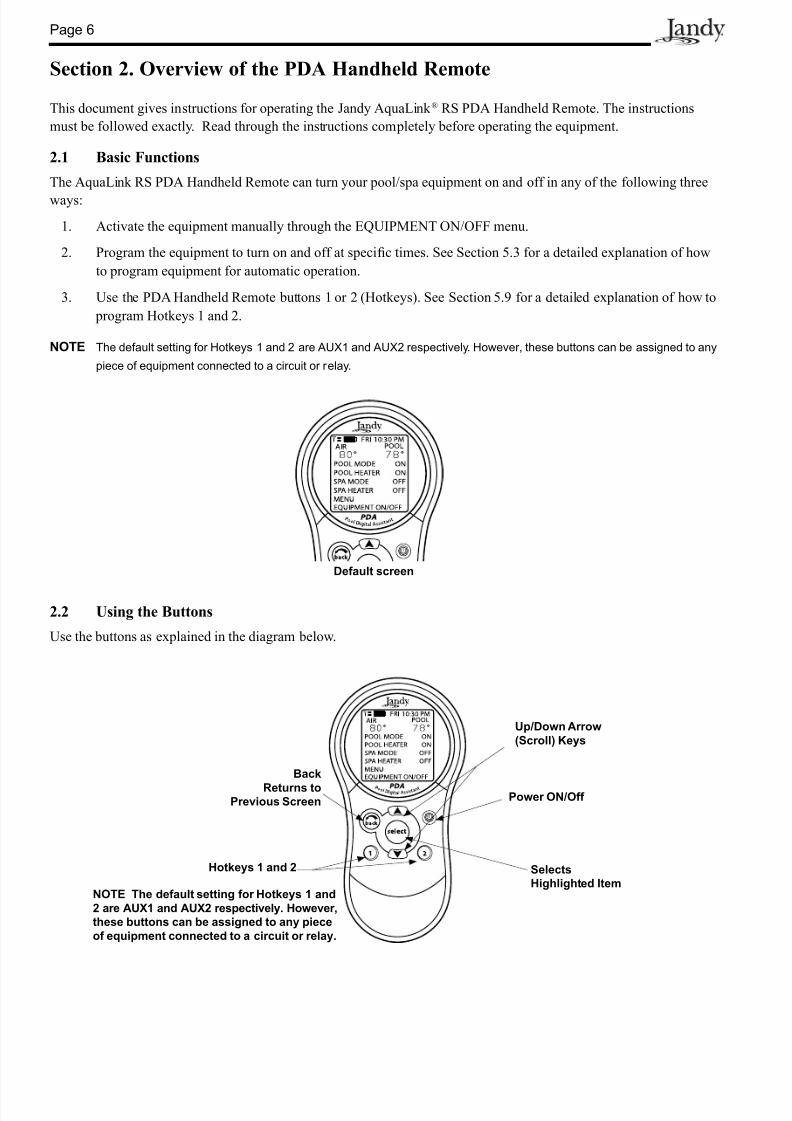
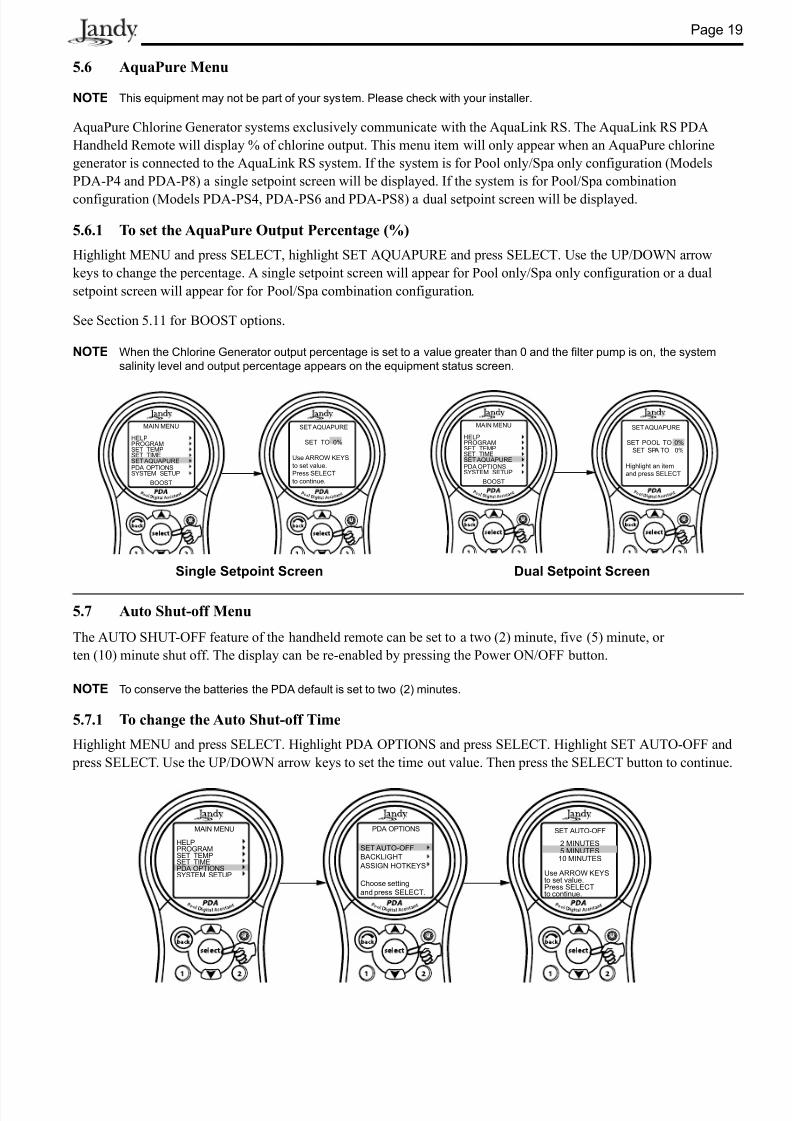
NOTE This equipment may not be part of your system. Please check with your installer.
Optional TWO SPEED RELAY required.
4.3.1 Two Speed Manual Operation
1. For Pool and Spa Combination Units
If your control is a POOL and SPA combination with a 2-speed filtration pump, the control will operate as
follows: HIGH SPEED (Filter Pump) must be on before LOW SPEED. Filter Pump button, as well as the Spa
button, turns it to HIGH SPEED. LOW SPEED (AUX 2) button toggles back and forth from LOW to HIGH.
2. For Pool or Spa Only Units
To use HIGH/LOW Speeds, Filter Pump turns on HIGH SPEED, AUX 2 turns on LOW SPEED. Whatever
mode last used is the off button. To toggle, press whichever speed is not on.
3. Two Speed Programming for All Units
When programming HIGH and LOW Speeds to operate together, think of HIGH SPEED (Filter Pump) astotal duration of filtration time, then set Low Speed (AUX 2) to operate within that duration. For example,
if you want High Speed on for 2 hours and Low Speed for 10 hours, program the Filter Pump (High Speed)
from 8 AM to 8 PM and Low Speed from 10 AM to 8 PM.
NOTE It is not necessary to program both HIGH and LOW Speeds, even with a Combo Control System. If only LOW SPEED is
programmed, HIGH SPEED will turn on at the LOW SPEED on time to prime the pump. After 3 minutes the system will
switch to LOW SPEED for the remainder of its programmed time.
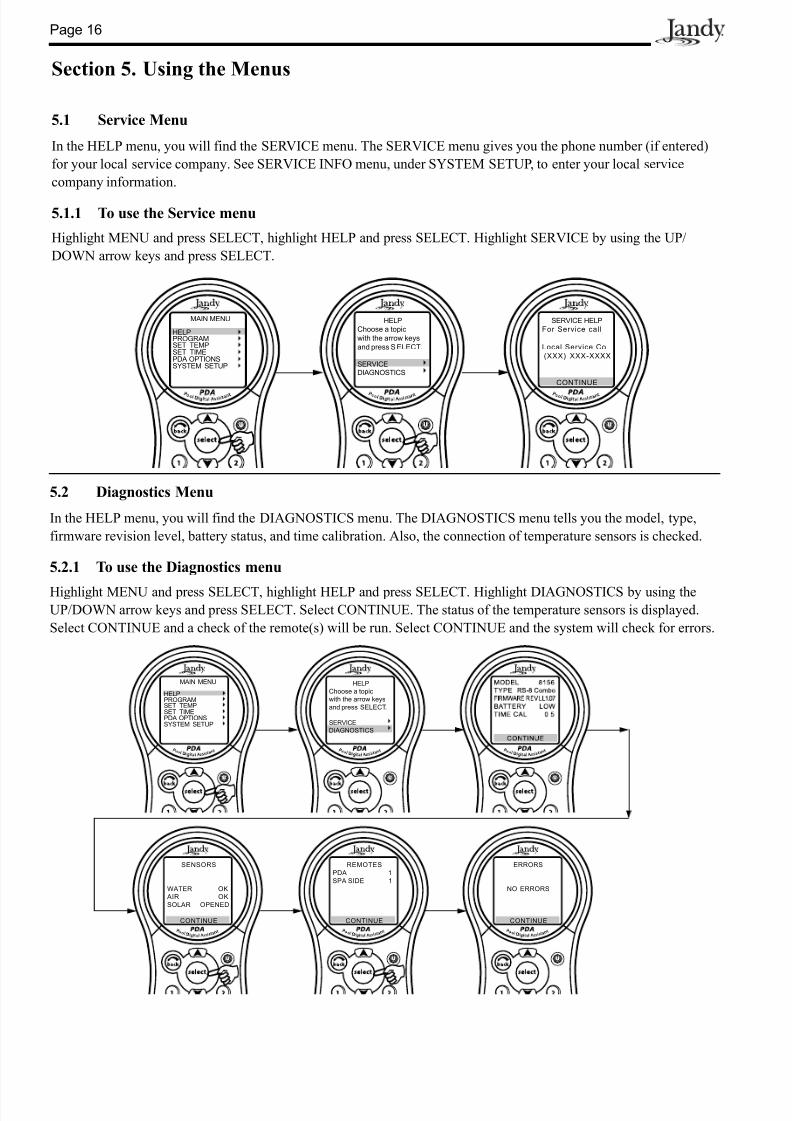
In the HELP menu, you will find the SERVICE menu. The SERVICE menu gives you the phone number (if entered)
for your local service company. See SERVICE INFO menu, under SYSTEM SETUP, to enter your local service
company information.
5.1.1 To use the Service menu
Highlight MENU and press SELECT, highlight HELP and press SELECT. Highlight SERVICE by using the UP/
DOWN arrow keys and press SELECT.
5.2 Diagnostics Menu
In the HELP menu, you will find the DIAGNOSTICS menu. The DIAGNOSTICS menu tells you the model, type,
firmware revision level, battery status, and time calibration. Also, the connection of temperature sensors is checked.
5.2.1 To use the Diagnostics menu
Highlight MENU and press SELECT, highlight HELP and press SELECT. Highlight DIAGNOSTICS by using theUP/DOWN arrow keys and press SELECT. Select CONTINUE. The status of the temperature sensors is displayed.
Select CONTINUE and a check of the remote(s) will be run. Select CONTINUE and the system will check for errors.
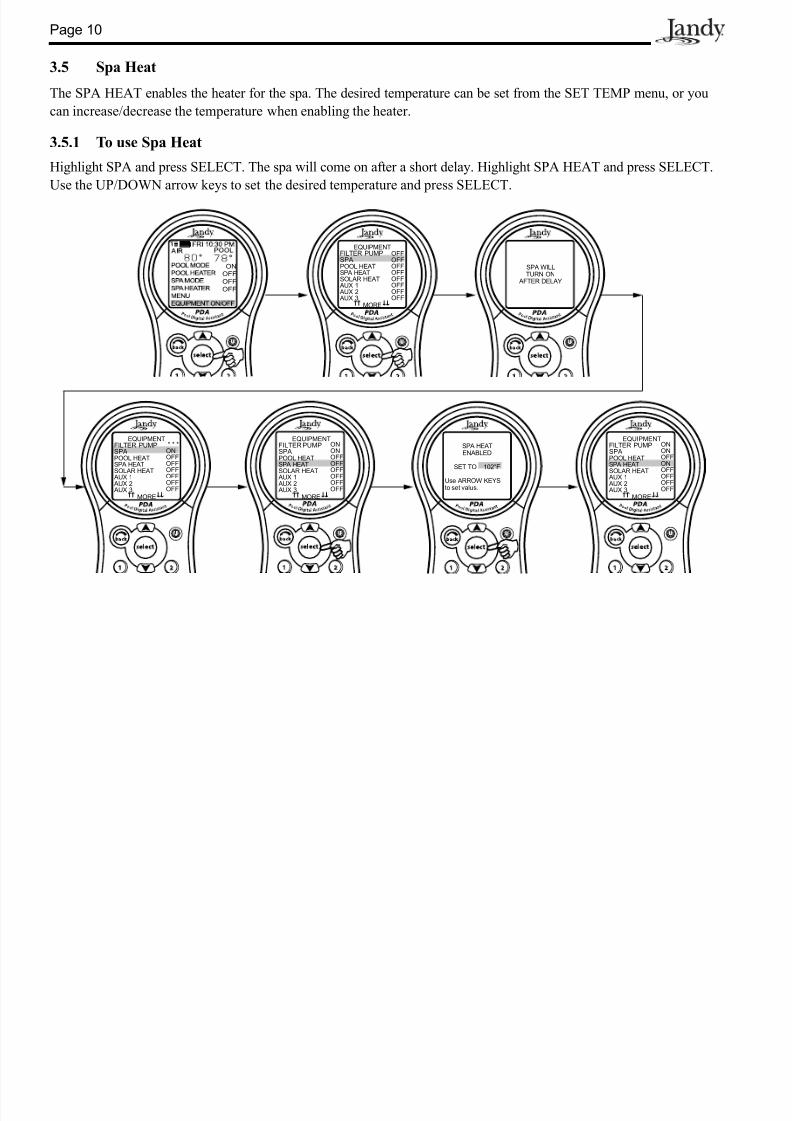
The SET TEMP menu allows you to preset the pool and spa thermostats.
NOTE For pool/spa combination systems, the default pool temperature is 80°F and the default spa temperature is 102°F. For
pool only/spa only systems, the default TEMP1 temperature is 80°F and the default TEMP2 temperature is 60°F.
5.4.1 To set Pool/Spa Temperatures
Highlight MENU and press SELECT, highlight SET TEMP and press SELECT. Inside the SET TEMP menu, use theUP/DOWN arrow keys to highlight either POOL (TEMP1) or SPA (TEMP2) and press SELECT. Use the UP/DOWN
arrow keys to increase or decrease the temperature and press SELECT to apply.
The CLEAR MEMORY menu will clear all stored values from the AquaLink RS memory. All settings will be reset to
their default settings. Stored values include auxiliary labels, all programs, freeze protection settings, remote settings,
and thermostat settings. The time and date will not be cleared.
6.13.1 To use the Clear Memory menu
Highlight MENU and press SELECT, highlight SYSTEM SETUP and press SELECT, highlight CLEAR MEMORY
and press SELECT. Press SELECT. Use the UP/DOWN arrow keys to select either YES or NO. There will be a delayof 15 seconds before you see the FINISHED screen, select CONTINUE to return to SYSTEM SETUP.
Pool/Spa Switching Filter Pump Delay - The filter pump turns off while valves rotate between pool and spa to prevent damage
to the pool equipment. The valves take 35 seconds to rotate between pool and spa; the filter pump will activate as soon as the
valves have finished turning.
Heater Cool Down Delay - When the system is heating (water is circulating to the spa) and the Spa button is pressed, the system
will remain in Spa Mode for five minutes, and will continue to circulate the water. This delay allows water to cool the heater down
by circulating water through it, preventing equipment damage. The five minute delay starts counting down when the heater goes
off. If the heater has been off for five minutes or more, prior to turning off the Spa, there will not be a delay.
Heater Start-up - The heater will only come on if the water is circulating (for example, the filter pump is on and has been
circulating for 15 seconds) to the corresponding body of water (for example, spa for spa heater) and the actual water temperature
is below the temperature you set with TEMP SET in the Menu. If these conditions are not met, the heater will be enabled (ready to
go), but will not fire.
Heater “Short Cycling” Prevention - When the heater is activated and the desired temperature is reached, heater will turn off and
remain off for 3 minutes, even if the temperature falls below the desired temperature. This feature prevents heater short cycling
(in other words, the heater turning off and on in rapid succession).
Cleaner Lockout - The pool cleaner will only activate if the system is in pool mode and water is circulating. The pool cleaner
requires that water is circulating to the pool in order for it to operate. Return to pool mode to activate the cleaner.
Spillover Lockout - The spillover will only activate if the system is in pool mode and water is circulating. The spillover requires
that water is circulating to the pool in order for it to operate. Return to pool mode to activate the waterfall. Also, if the pool
cleaner is on, it will turn off during spillover operation.
Spillover - When Dip Switch 3 is in the ON position, the Aux. 3 relay socket is activated and the return valve actuator turns.
The spillover is disabled while the spa is on. A message is displayed when spillover is turned on while in spa mode (water is
cir culating to spa). The spillover requires that water cir culation is to pool in order to oper ate. The spillover will activate when the
system switches back to pool mode.
Enabled - When activated allows the function to work.
Disabled - When activated does not allow the function to work.
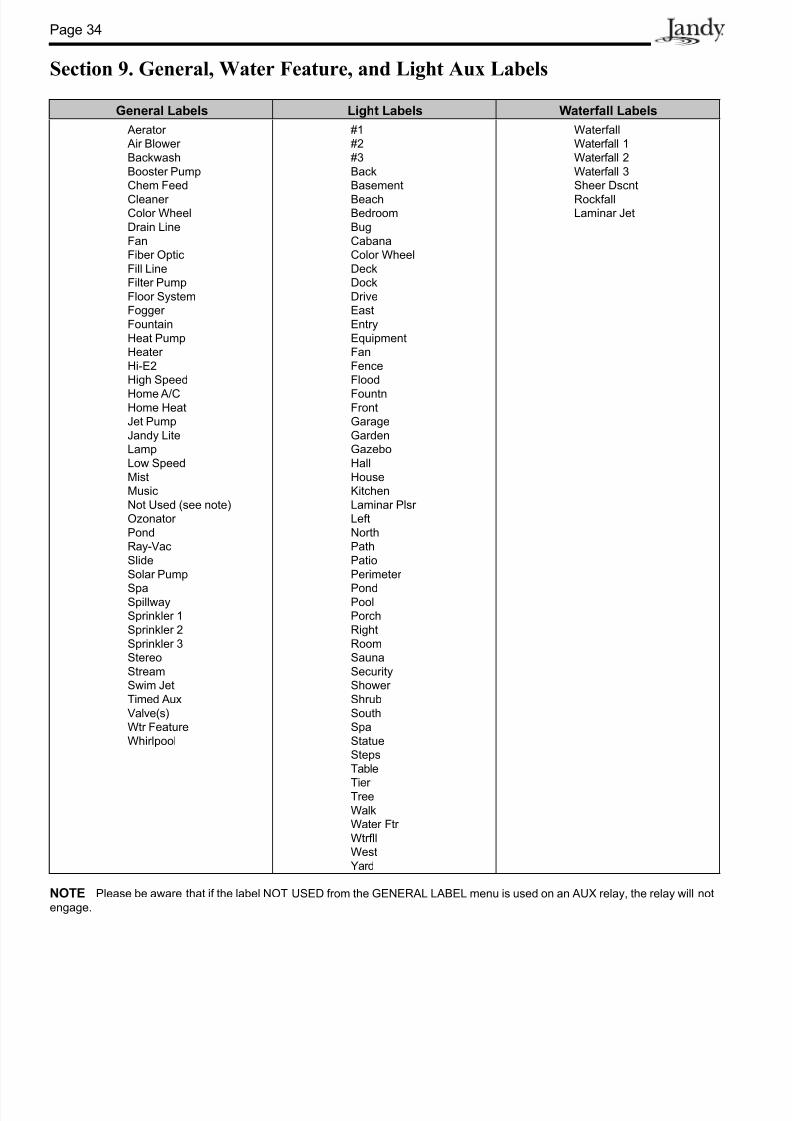
7.2 Glossary of Special Auxiliary Labels
Spare AUX- Operates only with Pool/Spa combination units.
Extra AUX- System features (for example, software labeling and timed aux) can be assigned to the EXTRA AUX button. Only
freeze protection cannot be assigned to the extra auxiliary.
Air Blower - When an AUX button labeled “Air Blower” is pressed, it will turn on the air blower for 30 minutes, then
automatically turn it off. An air blower may be programmed like any other auxiliary, except that you can program only the ON
time. The air blower will turn on at the programmed ON time, and turn off 30 minutes later. This is to protect the blower motor
from overheating during extended operation.
Fill Line - When an AUX button labeled “Fill Line” is pressed, it will turn on the fill line for 30 minutes, and then automatically
turn it off. A fill line may be programmed like any other auxiliary, except that you can program only the ON time. The fill line willturn on at the programmed ON time, and turn off 30 minutes later. This is to avoid over filling the pool. Choose the appropriate
number of "fill" programs during the week to keep your pool at the appropriate level.
BATTERY is LOW - This message (located in DIAGNOSTICS under the MENU) indicates that the battery supplying power
to the Power Center clock (in case of power outage) is low, and should be replaced. The battery is a standard 9V, and may be
replaced by removing the battery door (marked on the Power Center - Power Center is located by the pool equipment).
CLEANER CANNOT BE TURNED ON WHILE SPA IS ON - This message is displayed if the pool cleaner is activated when
in spa mode and water is circulating to the spa. The pool cleaner requires that water be circulating to the pool in order for it to
operate. Return to pool mode to activate the cleaner.
CLEANER CANNOT BE TURNED ON WHILE SPILLOVER IS ON - The return valve has been rotated to the spa positionto give the spa spillover effect.
FREEZE PROTECT - This message indicates that freezing conditions have been detected by the freeze protection sensor, and
that equipment assigned to freeze protection are active (for example, the filter pump). See Section 6.3, Freeze Protection Menu for
more information.
NOTE The filter pump is always protected; spa and auxiliary circuits can be assigned to freeze protection. If a freeze protected
Auxiliary is turned off during freeze protection, a message will be displayed indicating that item is off but will turn on in X
amount of minutes. The minutes will vary depending on how long freeze mode has been active from 1 to 15 minutes.
SENSOR OPEN - This error message indicates that the sensor is not installed properly or is malfunctioning. Call your pool
service person to resolve this problem.
NOTE If the message reads WATER TEMP OPEN, the heater will not fire. If message AIR TEMP OPEN is displayed, freezeprotection will not operate correctly.
POOL HEATER ENABLED - This message indicates that the pool heater is ready to use but is not actually firing. The filter
pump must be on, and the water temperature must be below the setting for the heater to fire.
PUMP WILL REMAIN ON WHILE SPILLOVER IS ON - This message is displayed when you attempt to turn off the filter
pump while a spa spillover is on. Since the filter pump is necessary for spillover operation, the pump will remain on until the
spillover is turned off.
PUMP WILL TURN OFF AFTER COOL DOWN CYCLE - This message indicates that the filter pump is circulating water to
cool down the heater. The filter pump will continue to run for five minutes to protect the heater from damage, whenever the heater
has fired and has been off for less than 5 minutes.
PUMP WILL TURN ON AFTER DELAY - This message is displayed during pool/spa switching. The AquaLink RS waits 35
seconds while the valves turn from pool position to spa position (or vice-versa) before activating the filter pump.
SERVICE MODE - This message indicates that the PDA Handheld Remote has been locked out from the Power Center and is
not operational. Service mode is used by the pool service person to aid them in servicing the pool. The PDA Handheld Remote
will not be functional until the switch at the Power Center is moved back to AUTO mode.
SENSOR SHORT - This error message indicates that the sensor is not installed properly or is malfunctioning. Call your pool
service person to resolve this problem.
NOTE If the message reads WATER TEMP SHORT, the heater will not fire. If the message AIR TEMP SHORT is displayed,
freeze protection will not operate correctly.
SPA WILL TURN OFF AFTER COOL DOWN CYCLE - When the system is in Spa Mode (water is circulating to the spa)
and the Spa button is pressed to switch water circulation to the pool, the system will not switch to Pool Mode for five minutes, and
will continue to circulate the water (if the heater has fired and has been off for less than five minutes). This delay allows water tocool the heater down by circulating water through it, preventing equipment damage.
TIMEOUT MODE - This message indicates that the PDA Handheld Remote has been locked out from the Power Center and
is not operational. TIME OUT mode is used by the pool service person to aid them in servicing the pool. The PDA Handheld
Remote will not be functional for three hours, or until the switch at the Power Center is turned back to AUTO mode. The time
remaining of TIME OUT mode will appear at the bottom of the PDA screen.
SPILLOVER DISABLED WHILE SPA IS ON - This message is displayed when the spa spillover is pressed while in spa mode
(water circulation is to spa). The spillover requires that water circulation is to pool in order to operate. The spillover will activate
LIMITED WARRANTYThank you for purchasing Jandy® pool and spa products. Jandy Pool Products, Inc. warrants all parts to be free
from manufacturing defects in materials and workmanship for a period of one year from the date of retail
purchase, with the following exceptions:
• AquaLink® RS units installed with Jandy® Surge Protection Kits will be covered for two years.
• NeverLube® valves are warranted for the life of pool and/or spa on which they were originally installed.
• AquaPureTM Electronic Chlorine Generator Electrolytic Cells carry a 5 year limited warranty on a prorated basis.
This warranty is limited to the first retail purchaser, is not transferable, and does not apply to products that have
been moved from their original installation sites. The liability of Jandy Pool Products, Inc. shall not exceed the
repair or replacement of defective parts and does not include any costs for labor to remove and reinstall the
defective part, transportation to or from the factory, and any other materials required to make the repair. This
warranty does not cover failures or malfunctions resulting from the following:
1. Failure to properly install, operate or maintain the product(s) in accordance with our published Installation,
Operation and Maintenance Manuals provided with the product(s).
2. The workmanship of any installer of the product(s).
3. Not maintaining a proper chemical balance in your pool and/or spa [pH level between 7.2 and 7.8, TotalAlkalinity (TA) between 80 to 120 ppm, Total Dissolved Solids (TDS) less than 2000 not including salt ppm].
4. Abuse, alteration, accident, fire, flood, lightning, rodents, insects, negligence or acts of God.
5. Scaling, freezing, or other conditions causing inadequate water circulation.
6. Operating the product(s) at water flow rates outside the published minimum and maximum specifications.
7. Use of non-factory authorized parts or accessories in conjunction with the product(s).
8. Chemical contamination of combustion air or improper use of sanitizing chemicals, such as introducing
sanitizing chemicals upstream of the heater and cleaner hose or through the skimmer.
9. Overheating; incorrect wire runs; improper electrical supply; collateral damage caused by failure of O-Rings,
DE grids, or cartridge elements; or damage caused by running the pump with insufficient quantities of water.
LIMITATION OF LIABILITY:
This is the only warranty given by Jandy Pool Products, Inc. No one is authorized to make any other warranties
on behalf of Jandy Pool Products, Inc. THIS WARRANTY IS IN LIEU OF ALL OTHER WARRANTIES,
EXPRESSED OR IMPLIED, INCLUDING BUT NOT LIMITED TO ANY IMPLIED WARRANTIES OF FITNESS
FOR A PARTICULAR PURPOSE AND MERCHANTABILITY. JANDY POOL PRODUCTS, INC. EXPRESSLY
DISCLAIMS AND EXCLUDES ANY LIABILITY FOR CONSEQUENTIAL, INCIDENTAL, INDIRECT OR
PUNITIVE DAMAGES FOR BREACH OF ANY EXPRESSED OR IMPLIED WARRANTY. This warranty gives
you specific legal rights. You may also have other rights which vary by state or province.
WARRANTY CLAIMS:
For prompt warranty consideration, contact your dealer and provide the following information: proof of purchase,
model number, serial number and date of installation. The installer will contact the factory for instructions
regarding the claim and to determine the location of the nearest designated service center. If the dealer is not
available, you can locate a service center in your area by visiting www.jandy.com or by calling our technical
support department at (707) 776-8200 extension 260. All returned parts must have a Returned Material
Authorization number to be evaluated under the terms of this warranty.