ARAID 3000 User’s Manual 1 Accordance Systems Inc. ARAID® Model 3000 User’s Manual – V0.1b Table of Contents Thank you for your purchase of ARAID 3000 ................................................................................................... 2 Unpacking ARAID 3000 ....................................................................................................................................... 3 Mobile Racks........................................................................................................................................................ 3 ARAID 3000 Features .......................................................................................................................................... 4 Specifications .................................................................................................................................................... 4 System requirements ........................................................................................................................................ 4 Front View of ARAID 3000................................................................................................................................... 5 Rear View and Jumper Settings of ARAID 3000 ............................................................................................... 5 How to use A.R.F. Properly ................................................................................................................................. 6 Compatible Large Capacity Drives for ARAID 3000 (2009) .............................................................................. 6 Operating with “Dual” Mode (RAID 1) ............................................................................................................... 7 Operating with “Single” Mode (RAID 1) ............................................................................................................ 8 Switching from "Single" Mode to "Dual" Mode (RAID 1) (Performing a Manual Mirror-On-Demand)…………………………………………………………………………...8 Fan, Temperature and RAID Management ........................................................................................................ 9 ARAID T3000 Family Products………………………………………………………………………………………...10 ARAID T3000 For eSATA/USB/1394/IDE………………………………………………………………………………11 Failure and Troublesooting Guide for RAID ………………………………………………………………………..12 Questions & Answers (for RAID 1 Users) ....................................................................................................... 12 Power failure while disk rebuild is in progress ................................................................................................ 12 Preventing and recovering from an unexpected virus attack .......................................................................... 12 Replacing and Upgrading Hard Drives ........................................................................................................... 13 Appendix A ......................................................................................................................................................... 14 _________________________________________________________________________ Accordance and ARAID are registered trade marks of Accordance Systems Inc. Accordance Systems Inc. www.accordancesystems.com www.accordance.com.tw
Transcript
ARAID 3000 User’s Manual
1
Accordance Systems Inc.
ARAID® Model 3000 User’s Manual – V0.1b
Table of Contents
Thank you for your purchase of ARAID 3000 ................................................................................................... 2
Mobile Racks........................................................................................................................................................ 3
ARAID 3000 Features .......................................................................................................................................... 4
Specifications .................................................................................................................................................... 4 System requirements ........................................................................................................................................ 4
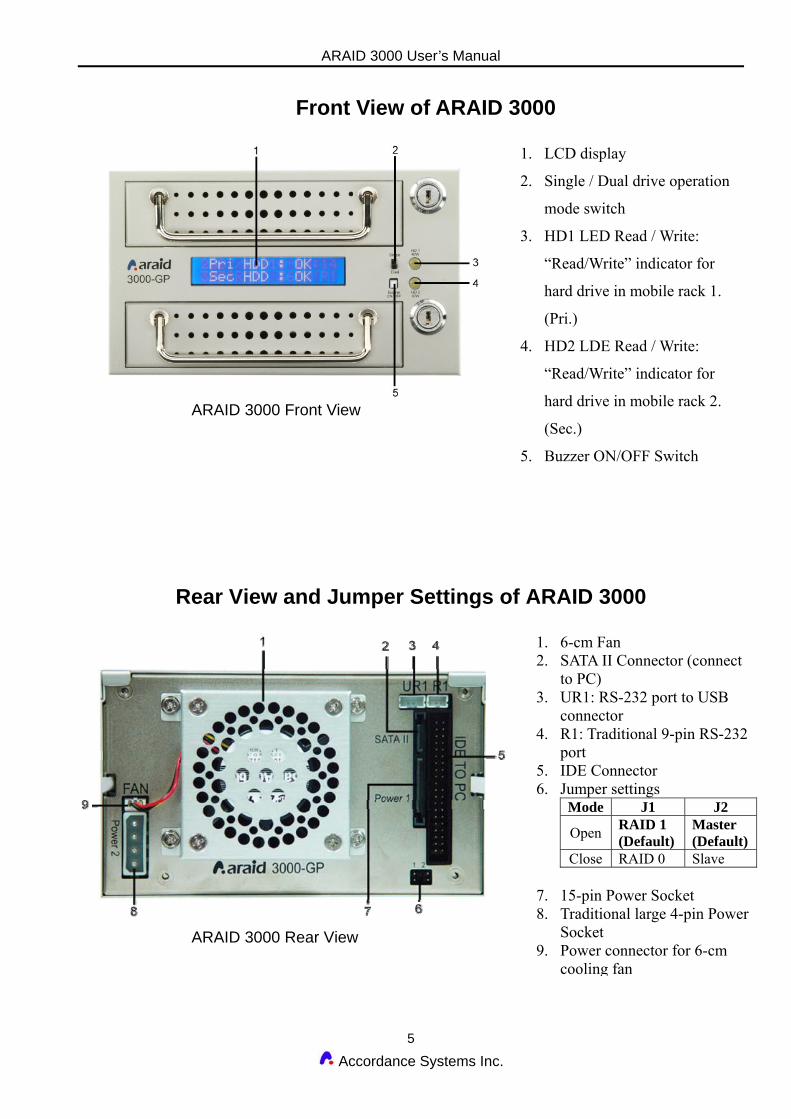
Front View of ARAID 3000................................................................................................................................... 5
Rear View and Jumper Settings of ARAID 3000 ............................................................................................... 5
How to use A.R.F. Properly ................................................................................................................................. 6
Compatible Large Capacity Drives for ARAID 3000 (2009) .............................................................................. 6
Operating with “Dual” Mode (RAID 1) ............................................................................................................... 7
Operating with “Single” Mode (RAID 1) ............................................................................................................ 8
Switching from "Single" Mode to "Dual" Mode (RAID 1) (Performing a Manual Mirror-On-Demand)…………………………………………………………………………...8
Fan, Temperature and RAID Management ........................................................................................................ 9
ARAID T3000 Family Products………………………………………………………………………………………...10
ARAID T3000 For eSATA/USB/1394/IDE………………………………………………………………………………11
Failure and Troublesooting Guide for RAID ………………………………………………………………………..12
Power failure while disk rebuild is in progress ................................................................................................ 12 Preventing and recovering from an unexpected virus attack.......................................................................... 12 Replacing and Upgrading Hard Drives ........................................................................................................... 13
Appendix A ......................................................................................................................................................... 14
Accordance and ARAID are registered trade marks of Accordance Systems Inc. Accordance Systems Inc. www.accordancesystems.com www.accordance.com.tw
ARAID 3000 User’s Manual
2
Accordance Systems Inc.
Thank you for purchasing ARAID 3000 Before you begin, please read the following:
ARAID 3000 complies with standard RAID 1 (disk mirroring) and RAID 0 (disk striping) definitions.
Important Please set both Primary and Secondary drives at SATA II(3.0Gb) mode before installation.
Note: 3.0Gb is the factory default setting when you purchase drives from market.
Please DO NOT mix SATA II(3.0G) with SATA I(1.5G) drives on this device.
Use Two Identical Hard Drives as possible We recommend that two or more identical drives (same brand, model, capacity, place of production, firmware version) be used with this product for optimal performance and convenience. The drives used must be brand new or in excellent condition. Accordance also recommends using the drive manufacturer’s testing tool to scan the drives for bad sectors and correct mechanical and electrical operation.
Purchase Spare Drives With new types of drives rolling out to the market at a fast pace, you may not be able to obtain the same model of the drive in the future. Therefore, we recommend users purchase a number of identical brand new drives in advance, so ARAID 3000 can be used to its full extent. However, if users cannot obtain identical types of drives, users may use newer drives made by same manufacturer.
No Need to pre-FORMATTING Brand New Drives When use ARAID 3000, you do not need to do FDISK and FORMAT steps for brand new drives. You can directly use “Auto-Rebuild” feature to duplicate/clone new Target drive.
Heat Dissipation ARAID 3000 is designed with a 6cm high quality cooling fan with long life. It provides excellent heat dissipation for two 7200 RPM drives. With two 7200 RPM drives, it is best to use a PC enclosure with excellent overall reinforced heat dissipation design. It prevents PC or disk array failures caused by long durations of poor heat dissipation..
Notice for RAID 1 Users (Front Panel Switch Setting)
Dual: Dual drive mode – This is the default normal operating mode for RAID 1. ARAID 3000 accesses both Primary and Secondary drives. Content on two drives are remained synchronized.
Single: Single drive mode – In this mode, power of Secondary drive is shut down. ARAID 3000 only accesses Primary drive. Mirror-On-Demand: You can perform a manual Mirror-On-Demand(duplicate Primary drive to Secondary drive) by switching from “Single” mode to “Dual” mode.
Notice for RAID 0 Users (Front Panel Switch Setting)
Dual: Dual drive mode – This is the default normal operating mode for RAID 0. RAID 0 (Disk Stripe) employs two drives to increase disk capacity and access performance.
Single: DO NOT set switch to this mode for RAID 0 operation. Although RAID 0 operation requires two on-line drives, so the “Single” mode is not allowed.
Warning: If users mistakenly switch to “Single” mode then turn off and power on ARAID, it may cause data loss of drives.
ARAID 3000 User’s Manual
3
Accordance Systems Inc.
Unpacking ARAID 3000
1. Please remove ARAID 3000 from the package.
2. Check the package for the following items. Contact your retailer immediately for any missing or damaged items.
Mobile Rack 1 (in Upper Bay) Mobile Rack 2 (in Lower Bay) Two Security Keys (4pcs) Bag of Screws
User’s Manual RS232 Cables (one set) Software CD
3. Optional Management Software:
a. AraidEye for Linux b. SNMP Agent for ARAID 3000 c. SNMP Network Server Software: Accordance OpManager
Mobile Racks (Note: Drive as optional item)
(a) ARAID 3000 Tray with drive.
ARAID 3000 User’s Manual
4
Accordance Systems Inc.
ARAID 3000 Features
ARAID 3000 complies with standard RAID Level 1 and RAID Level 0 definitions.
Supports most PC operating systems without installation of drivers.
Connects to SATA II host port of PC. Add-on cards not required, true plug-and-play design.
● Supports major brands SATA II (3G) drives, such as Seagate, Hitachi, and W.D.
● Supports Disk Hot Swap and Automatic Rebuild Function. There is no need to turn off PC when replacing a new drive.
● User Interface 1: LCD shows drives, fan and temperature status.
● User Interface 2: LED indicator shows drive’s “Read/Write” status.
● User Interface 3: Buzzer alerts of drive failure, fan failure or temperature over-heating.
● Monitoring Interface 4: Supports COM & USB ports for physical or virtual RS-232 communication.
● Monitoring Interface 5: Supports SNMP function for standard network management.
● Equipped with a quiet, powerful 6-cm Japan cooling fan with durability, strong suction and silent sound. Supports 7200 RPM drives.
System Requirements IBM-compatible PCs (Intel-based) (Pentium IV, III or compatibles) Host Interface: Standard Serial ATA II(3G) interface and IDE port. Hard Disk Drive Interface: Standard Serial SATA II(3G) interface. Supported Operating Systems (no need for drivers): Windows Vista, XP, Server 2008/2003,
Close RAID 0 Slave 7. 15-pin Power Socket 8. Traditional large 4-pin Power
Socket 9. Power connector for 6-cm
cooling fan
ARAID 3000 User’s Manual
6
Accordance Systems Inc.
How to Use A.R.F. Properly Please use A.R.F. (Auto Rebuild Function)-compatible hard drives and operating systems to ensure normal operation. Also, please note that different operation modes are available when the switch on the front panel is set to “Single” or “Dual”. 1. Please turn on your PC with only one drive installed in the Upper Bay. 2. When the operating system (e.g. Windows-series or RedHat Linux) completes the start-up process,
set the switch to “Dual” and correctly insert the second drive at the same time. A.R.F. will become available immediately. (If the switch is set to “Single”, the LCD message will show that the second drive is still “OFF” even after the insertion of second drive.)
3. After few seconds, the disk A.R.F. will start. 4. A.R.F. progress is shown in percentage on the LCD display. 5. Maximum A.R.F. rate currently reaches 80~120 GB/hour under optimal conditions. 6. After the new drive is rebuild completely, the LCD display will again show both drives are “OK”.
LCD Display: After completing Auto Rebuild Function
Compatible Large Capacity Drives for ARAID 3000 (2009):
Serial ATA Seagate Family Hitachi Family Western Digital Family i.e.:
Operating with “Dual” Mode (RAID 1) Note: The “Dual” mode is the default RAID 1 operating mode.
Set the front panel switch at “DUAL” mode, ARAID would work as followings:
(1) ARAID can boot the system with one hard drive from either drive. However, we strongly recommend to put the only drive in Upper Bay as Primary (Pri.).
When an only drive is installed in the upper bay (HD1):
◎Switch in Dual mode
(2) When dual drives are installed, ARAID 3000 will boot the system from primary HDD. But when the Primary drive fails, ARAID then will boot the system from Secondary HDD.
(a) Dual drives are installed:
◎Switch in Dual mode
(b) System boots from only one drive installed:
◎Switch in Dual mode
then install a new secondary drive and Disk Rebuild will auto-start.
Disk Rebuilding progress 02% Rebuilding Completed
◎Switch in Dual mode
Note: Do not change operating mode from Dual to Single while dual drives are operating. Otherwise, power of Secondary drive will be shut down immediately and the real-time backup (mirroring) function will be terminated. ARAID then will only work with single drive(Primary HDD).
ARAID 3000 User’s Manual
8
Accordance Systems Inc.
Operating with “Single” Mode (RAID 1) Set the front panel switch as “SINGLE” mode, ARAID would work as followings:
(1) If you want to operate ARAID with one single drive, place the only drive in the upper bay. ARAID
can only access this drive only in this mode.
◎Switch in Single mode (OFF indicates power for secondary drive is OFF)
If you place an only drive in the lower bay, ARAID would not be able to access it.
◎Switch in Single mode (OFF indicates power for secondary drive is OFF)
(2) Even two drives are installed, ARAID only access the Primary drive, because the power of
Secondary drive is still OFF.
◎Switch in Single mode (OFF indicates power for secondary drive is OFF)
Switching from “Single” Mode to “Dual” Mode (RAID 1) (Performing a Manual Mirror-On-Demand)
When you switch the operation mode switch from Single to Dual, the disk Auto-Rebuild Function will start automatically.
◎Change mode from Single to Dual, Auto-Rebuild Starts
Warning: Do not remove any drive while Disk Rebuilding is in progress.
ARAID 3000 User’s Manual
9
Accordance Systems Inc.
Fan, Temperature and RAID Management
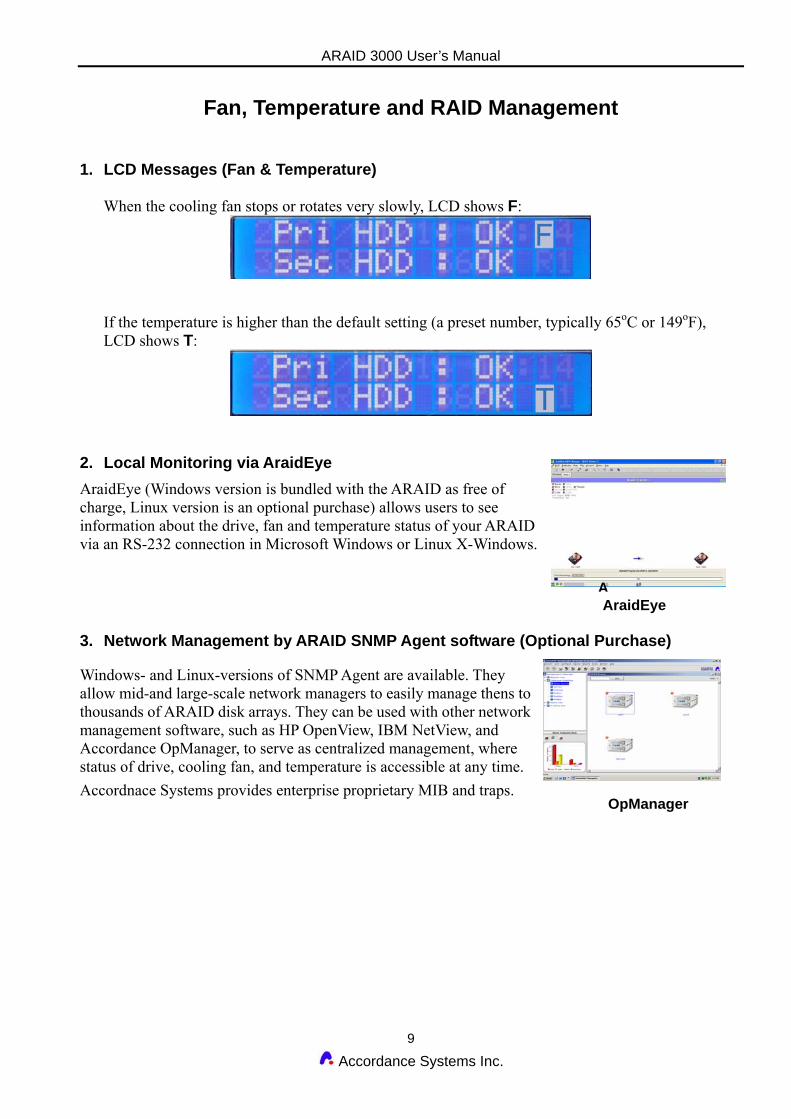
1. LCD Messages (Fan & Temperature)
When the cooling fan stops or rotates very slowly, LCD shows F:
If the temperature is higher than the default setting (a preset number, typically 65oC or 149oF), LCD shows T:
2. Local Monitoring via AraidEye
AraidEye (Windows version is bundled with the ARAID as free of charge, Linux version is an optional purchase) allows users to see information about the drive, fan and temperature status of your ARAID via an RS-232 connection in Microsoft Windows or Linux X-Windows.
A
3. Network Management by ARAID SNMP Agent software (Optional Purchase)
Windows- and Linux-versions of SNMP Agent are available. They allow mid-and large-scale network managers to easily manage thens to thousands of ARAID disk arrays. They can be used with other network management software, such as HP OpenView, IBM NetView, and Accordance OpManager, to serve as centralized management, where status of drive, cooling fan, and temperature is accessible at any time.
Accordnace Systems provides enterprise proprietary MIB and traps.
OpManager
AraidEye
ARAID 3000 User’s Manual
10
Accordance Systems Inc.
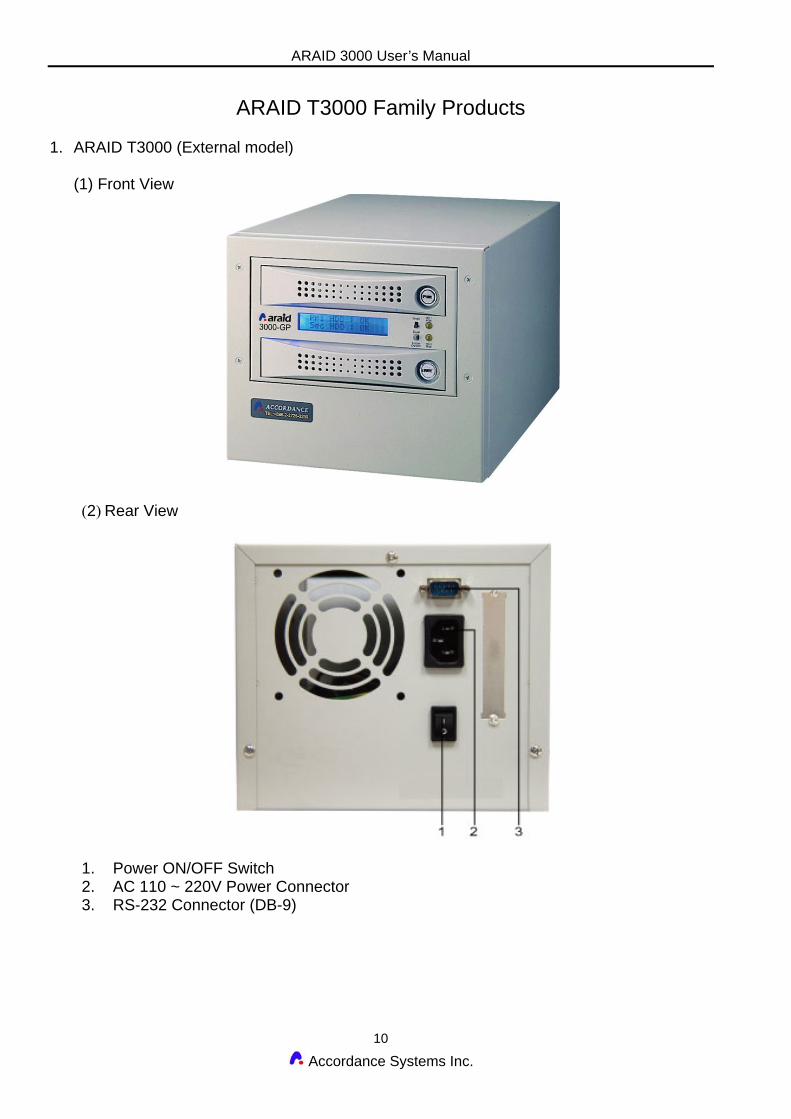
ARAID T3000 Family Products 1. ARAID T3000 (External model)
(1) Front View
(2) Rear View
1. Power ON/OFF Switch 2. AC 110 ~ 220V Power Connector 3. RS-232 Connector (DB-9)
ARAID 3000 User’s Manual
11
Accordance Systems Inc.
ARAID T3000 For eSATA/USB/1394/IDE 2. ARAID T3000 Rear View
Interface Cable Description
eSATA Interface
1. Connect eSATA port of motherboard to the Rear slot of PC
USB 2.0 Interface
1. USB Connector
1394a(400MB) Interface
1. 1394a Connector
USB+1394a Interface
1. USB Connector 2. 1394a Connector
IDE Interface
1. IDE connector 2. Connect IDE port of
motherboard to the Rear slot of PC
3. Connect from PC enclosure to an External model ARAID T3000
ARAID 3000 User’s Manual
12
Accordance Systems Inc.
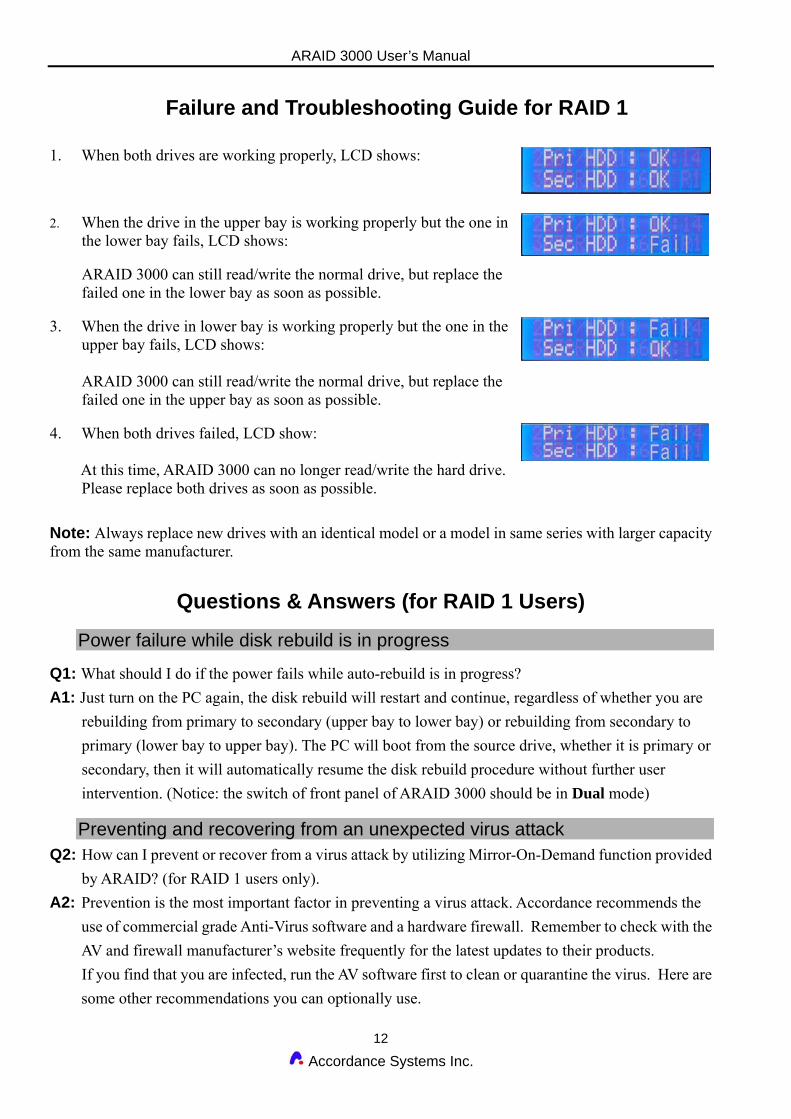
Failure and Troubleshooting Guide for RAID 1 1. When both drives are working properly, LCD shows:
2. When the drive in the upper bay is working properly but the one in
the lower bay fails, LCD shows:
ARAID 3000 can still read/write the normal drive, but replace the failed one in the lower bay as soon as possible.
3. When the drive in lower bay is working properly but the one in the upper bay fails, LCD shows:
ARAID 3000 can still read/write the normal drive, but replace the failed one in the upper bay as soon as possible.
4. When both drives failed, LCD show: At this time, ARAID 3000 can no longer read/write the hard drive.
Please replace both drives as soon as possible.
Note: Always replace new drives with an identical model or a model in same series with larger capacity from the same manufacturer.
Questions & Answers (for RAID 1 Users)
Power failure while disk rebuild is in progress
Q1: What should I do if the power fails while auto-rebuild is in progress?
A1: Just turn on the PC again, the disk rebuild will restart and continue, regardless of whether you are
rebuilding from primary to secondary (upper bay to lower bay) or rebuilding from secondary to
primary (lower bay to upper bay). The PC will boot from the source drive, whether it is primary or
secondary, then it will automatically resume the disk rebuild procedure without further user
intervention. (Notice: the switch of front panel of ARAID 3000 should be in Dual mode)
Preventing and recovering from an unexpected virus attack Q2: How can I prevent or recover from a virus attack by utilizing Mirror-On-Demand function provided
by ARAID? (for RAID 1 users only).
A2: Prevention is the most important factor in preventing a virus attack. Accordance recommends the
use of commercial grade Anti-Virus software and a hardware firewall. Remember to check with the
AV and firewall manufacturer’s website frequently for the latest updates to their products.
If you find that you are infected, run the AV software first to clean or quarantine the virus. Here are
some other recommendations you can optionally use.
ARAID 3000 User’s Manual
13
Accordance Systems Inc.
Method 1: Generate a grandfather/father/son, multi-generation backup. Use the ARAID on-the-fly
disk rebuild and disk hot swap function to duplicate a clone periodically as you require.
Keep the archive of your generated backup drives in safe place. If both drives in an
ARAID are affected by a virus, remove them and replace with the latest unaffected
archived drive and rebuild a clean drive.
Method 2: Use Accordance the mirror-on-demand function on the front panel operation
mode switch to initiate a disk duplication whenever you need. While the system
is clean and virus-free, make sure to generate clone drives and keep them in
safe place.
Replacing and Upgrading Hard Drives Q3: What should I do if I need to replace a defective hard drive? A3: 1. To minimize the risk of losing data, make it a practice to keep a spare hard drive of the same brand and model for the next three to five years. Always restock your spare inventory with new hard drive(s) of the same model whenever a defective hard drive is replaced.
2. If your replacement drives are the same manufacturer as the original drives but are a larger capacity, place the surviving drive in the upper bay where it will be designated as the source drive. Boot the PC from the upper bay source drive. When the operating system is ready to serve, insert the replacement drive into lower bay. The disk auto rebuild procedure will now start. If it fails to start, switch the front panel operation mode switch from “Single” to “Dual”.
For normal operation, always put the smaller capacity drive in upper bay and larger capacity drive in lower bay. Never place the larger capacity drive in the upper bay.
Tip: Label each tray with the disk capacity, brand, and model for future reference.
3. CASE STUDY: Company ABC uses two Seagate Family ST3250823AS (Seagate250GB) drives on one
ARAID disk array. Company ABC should keep an inventory of spare ST3250823AS drives. Company ABC experiences a Seagate250GB disk crash and has no more ST3250823AS to
replace. Instead a new Seagate Family ST3300622AS (Seagate250GB) is available for replacement. For daily operation, the smaller drive, the Seagate250GB, needs to be put in Upper Bay and the larger drive, the Seagate300GB, must be put in the Lower Bay as a mirrored couple. In this scenario, the mirror couple of Seage250GB + Seagate300GB, its effective capacity is 250GB. RAID 1 disk array capacity is always defined by the capacity of the smaller drive.
For Windows User ONLY: If at some later point the 2nd drive Seagate250GB malfunctions and the Seagate300GB is the surviving drive, you can enlarge the Seagate300GB’s partition size from 250GB to 300GB by using a third party’s program, such as Symantec's Ghost or Partition Magic. Then mirror it to another Seagate300GB and gather a 300GB disk capacity.
ARAID 3000 User’s Manual
14
Accordance Systems Inc.
Appendix A Product Question Report
ARAID Series No. Date: / / / Company Name: Your Name:
Accordance Product Name & Model
Firmware Revision
Manufactured Date or Purchase Date
Equipment & Environment
PC or Motherboard Brand & Model (**) BIOS (**) Phoenix or Award or AMI Chipset (**) HDD 1(**) Brand/Model/Series number HDD 2(**) Brand/Model/Series number IDE operation Mode (*) CPU RAM Version of Windows, Linux, other Benchmark / Application if available
(**) Mandatory (*) Optional, but it helps to identify problem.