For 360 exams completed via Telehealth, the vitals section and physical exam
section of the form are no longer considered required fields prior to submission. For exams completed in an in-person setting, these are required for completeness, per CMS guidelines.
It is imperative the end user indicate Telehealth on the form by following these steps:
1. In the Location drop down, select Other
1. In the Other Location field that appears, type Telehealth
Due to the current landscape of healthcare, the following information will guide
Arcadia users completing 360s through telehealth. Please ensure to read the
below carefully. The original steps for completion and checklist are included for
exams completed in a face-to-face office or home setting.
All screenshots are de-identified and do not contain PHI
HELPFUL HINT!
360s without vitals and physical exam that do not indicate
Telehealth in the above field will be returned for correction.
Ste
ps f
or
Com
ple
tion
Arcadia 360 User Guide
1. Access the Arcadia Analytics platform
2. Utilize the Search Bar in the middle of the home page to locate the desired patient by typing
First or Last Name, Member ID or Date of Birth
3. Select the appropriate name to navigate to the Patient Chart
4. Upon review of the pertinent patient information, navigate to the Arcadia 360 using the E360
button in the top right of the Patient Chart
5. The user is routed to the Arcadia Forms portal. Select Login to proceed to the Arcadia Forms
portal to access the 360
The Arcadia 360 exam provides a full-circle picture of a patient's current health and risk factors. The
goal is to improve the health of your Medicare Advantage patients by identifying and managing
health conditions. The 360 comprehensive exam must be completed during a single face-to-face
encounter and by an acceptable health care professional (MD, DO, PA, NP). The form is designed to
provide a high quality health care experience while addressing preventive opportunities and chronic
condition management needs of the patient. The PCP should complete the 360 exam for all paneled
Cigna-HealthSpring patients once per calendar year. Termed and deceased patients will be available
to end users for form completion for 90 days post their term date.
All screenshots are de-identified and do not contain PHI
The Patient Chart is the
longitudinal health record of
the patient. This chart will help
orient the clinician to the
following information:
medications
utilization history
eligible and outstanding
quality measure gaps
chronic condition history
Role: Clinician/Provider
HELPFUL HINT!
The most accurate search results come from using the exact member number or full name.
Ste
ps f
or
Com
ple
tion
Arcadia 360 User Guide
6. The Arcadia 360 home page will reveal a patient card for the appropriate patient most recently
selected in the core platform. Navigate to the Period dropdown near the upper right corner of the
form. The period will default to the most recent year. (i.e. 2020) If access to the 2019 form is
needed, select 2019 from the dropdown and proceed to the patient card.
Select the patient card. It will expand and show additional detail including Person Chart and
Form History tabs within the patient card.
7. Select Start at the bottom of the expanded Person Chart
Person Chart - This tab contains patient data similar to the Patient Chart such as quality
measures, chronic conditions within the last two years, the 50 most recent utilization events
and medications filled within the last 24 months.
Form History - This tab contains data pertaining to the 360 form history including relevant
form status, dates and associated users editing the form. Form history will update each
time the form status changes. Also, a PDF link to the form for downloading and printing will
be available with each status change. By selecting the PDF link, a new browser tab will
open with the file.! Important Note: Users may need to change their browser settings to allow pop-ups within
the application in order for the PDF tab to open as designed
HELPFUL HINT!
After 15 minutes of inactivity, users will be automatically
logged out and required to login before proceeding.
All screenshots are de-identified and do not contain PHI
Ste
ps f
or
Com
ple
tion
Arcadia 360 User Guide
8. The 360 will open and the user will notice three primary areas of the form
9. Complete the 360 exam in its entirety
Patient Demographics: the card in the upper left corner of the form is a static card
providing basic demographic information about the patient, including attributed PCP
and a SNP indicator, if applicable
Form Sections and Navigation: the card in the bottom left corner displays the
different sections of the form. The user may navigate through the form by either
selecting each section or using the forward and back arrows beneath the card.
Arcadia 360 Form: the 360 itself will appear in the middle of the screen. Selecting
different sections of the form will generate the associated questions for the user to
complete.
All screenshots are de-identified and do not contain PHI
HELPFUL HINT!
This is also where the user will find the Quality Check. Users can click the Quality
Check button at any time while editing the 360. A pop-up will appear calling out
any areas that need addressing before the form can be signed and submitted.
Red text will appear for items that
must be addressed in order to
pass the Quality Check.
Ste
ps f
or
Com
ple
tion
Arcadia 360 User Guide
10. Select the blue Quality Check button in the lower left navigation card. Any quality checks that
fail will trigger a message describing the issue. Select each individual message to navigate
directly to the required item for updating or completion. Once all items have been addressed,
the user will receive a 'All quality checks have been addressed' message when the Quality
Check button is selected.
All screenshots are de-identified and do not contain PHI
HELPFUL HINT!
See the Helpful Hints page in the User Guide for additional tips on completing the Arcadia 360
11. Sign the form in the final section of the 360. Authorized users should select the
acknowledgement checkbox on the form. It will save the electronic signature with a date, time
stamp and user credentials.
A form can only be signed once the 360 satisfies all quality checks.
If the form requires multiple signatures, the first user may sign and the status will
update reflecting that it is ready for final signature. The oversight physician will see
the previous user's signature upon navigating to this page, if appropriate.
Ste
ps f
or
Com
ple
tion
Arcadia 360 User Guide
12. Review the Submission Checklist handout to ensure all items have been satisfied
Note: ensure the form is within 180 days from date of service before submitting
13. Submit the form. Select the Save/Submit text in the lower right of the navigation card. A pop
up box will prompt asking for final confirmation to submit. Select Confirm to submit the form.
The form status will change to 'Submitted' and it will route to the queue for auditor review.
14. Once the form is Approved or Rejected, use the Patient Card: Form History tab on the 360
homepage to generate the PDF and save into the medical record for the patient.
All screenshots are de-identified and do not contain PHI
Help
ful H
ints
for
Com
ple
tion
Arcadia 360 User Guide
Annual Assessment
The Date of Service must be within 180 days of the form submission date.
Attributed provider is the PCP of record with Cigna-HealthSpring and will pre-populate on the
form. Rendering provider is the clinician performing the face-to-face encounter.
Patient History
The past medical history section is reserved for those conditions that have resolved and no
longer have a treatment plan.
Medications: if applicable, select the Medications Reconciled checkbox and attach the
medication list from the medical record or free text into the available space. If attaching the
medication list, also select the ‘A signed and dated medication list’ checkbox.
Include prescriptions and OTC’s, with dosage and frequency.
An attached medication list must include provider’s name and signature, credentials and
date (same as DOS on the Arcadia 360)
Physical Exam
Please enter height in inches and weight in pounds. The BMI will automatically calculate. If the
auto-calculated BMI does not match your records you may manually enter the BMI. A weight
and a BMI must be present.
Blood pressure should be entered as follows: systolic / diastolic. There is a field for systolic
and a field for diastolic.
At least 9 systems must be documented in the physical exam (7 required as noted by an asterisk
plus 2 additional). The defer option does not satisfy as documentation of a system. Once a
system is addressed with either “Normal’ or ‘Abnormal’, that particular system must be
addressed to reflect the most accurate information and will not be able to be unaddressed.
Diabetic Foot Exam: select abnormal to reveal the image of the feet and applicable
documentation questions. Patients diagnosed with diabetes and/or suspected conditions
require a thorough foot exam.
Preventive Care
The depression screening is the industry standard PHQ-3. A PHQ-9 may appear elsewhere in
the form, dependent on the patient.
Pain Screening: please document appropriate treatment plan if pain is greater than zero
Review of Systems: at least 8 systems must be documented (6 required as noted by an asterisk,
plus 2 additional).
The Quality Interventions section allows the user to document any known and pertinent
information for quality gaps in care. If a particular intervention corresponds to an open gap in
care, the section will auto expand to alert the user. However, all sections may be expanded for
complete quality
documentation.
All screenshots are de-identified and do not contain PHI
Help
ful H
ints
for
Com
ple
tion
Arcadia 360 User Guide
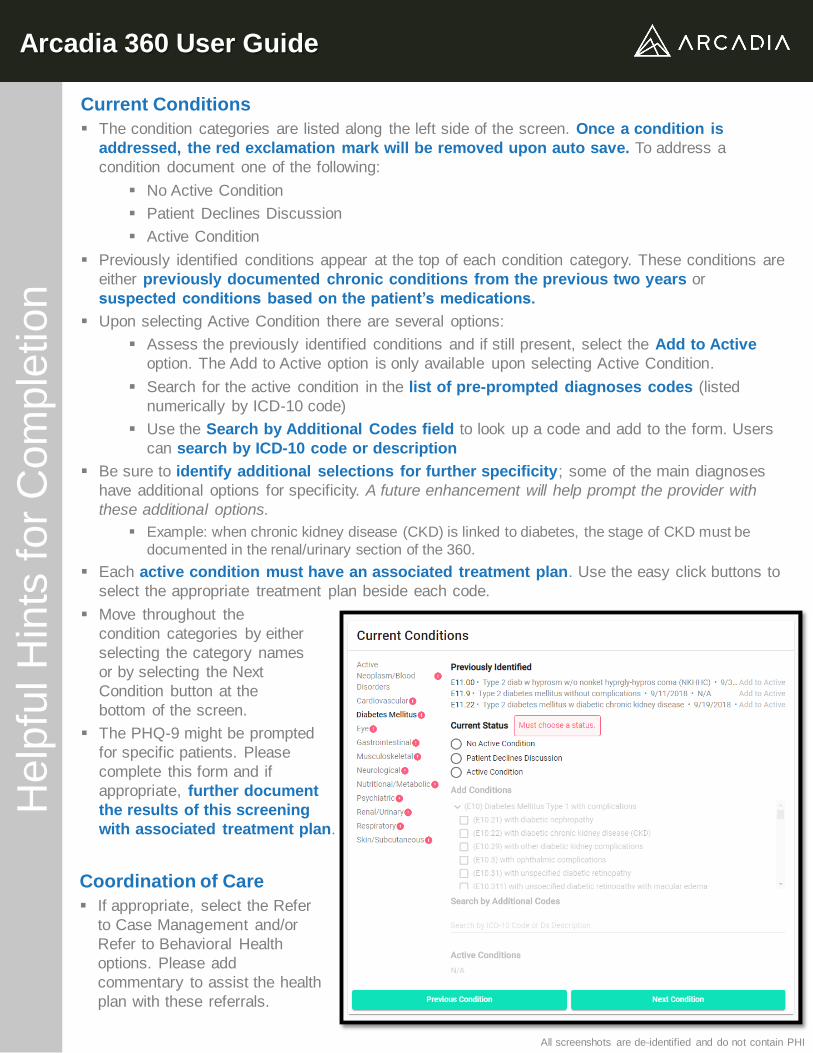
Current Conditions
The condition categories are listed along the left side of the screen. Once a condition is
addressed, the red exclamation mark will be removed upon auto save. To address a
condition document one of the following:
No Active Condition
Patient Declines Discussion
Active Condition
Previously identified conditions appear at the top of each condition category. These conditions are
either previously documented chronic conditions from the previous two years or
suspected conditions based on the patient’s medications.
Upon selecting Active Condition there are several options:
Assess the previously identified conditions and if still present, select the Add to Active
option. The Add to Active option is only available upon selecting Active Condition.
Search for the active condition in the list of pre-prompted diagnoses codes (listed
numerically by ICD-10 code)
Use the Search by Additional Codes field to look up a code and add to the form. Users
can search by ICD-10 code or description
Be sure to identify additional selections for further specificity; some of the main diagnoses
have additional options for specificity. A future enhancement will help prompt the provider with
these additional options.
Example: when chronic kidney disease (CKD) is linked to diabetes, the stage of CKD must be
documented in the renal/urinary section of the 360.
Each active condition must have an associated treatment plan. Use the easy click buttons to
select the appropriate treatment plan beside each code.
Move throughout the
condition categories by either
selecting the category names
or by selecting the Next
Condition button at the
bottom of the screen.
The PHQ-9 might be prompted
for specific patients. Please
complete this form and if
appropriate, further document
the results of this screening
with associated treatment plan.
All screenshots are de-identified and do not contain PHI
Coordination of Care
If appropriate, select the Refer
to Case Management and/or
Refer to Behavioral Health
options. Please add
commentary to assist the health
plan with these referrals.
Capabili
ties O
verv
iew
Arcadia 360 User Guide
The 360 Home Page
Users will find a list of patients, their 360 status and a period filter, based on individual user
permissions, on the Arcadia 360 home page. The period filter will default to the most recent year.
(i.e. 2020) If access to the 2019 form is desired, users can select 2019 from the dropdown. Patients
are ordered by Arcadia's default sort methodology that prioritizes certain 360 statuses, most of
which require action. The default sort order will return patients with a 360 status of:
Returned
Ready to Submit
Submitted
In Progress
Following the above statuses, the default sort order presents patients with the most clinical
opportunity use a combined count of open quality gaps and unconfirmed conditions in descending
order. Selecting the patient's name will expand the Patient Card to display the open gaps and
unconfirmed conditions.
Select the blue Sort button in the top right to change the sort method from Default to other
available options:
Date of Birth
Name
Assessment Status
Arcadia 360 Administration
The Arcadia 360 exam allows for a number of administrative processes including:
identifying patients still eligible for a 360 exam in the current calendar year with option
to prioritize by open opportunities
identifying patients with forms in a final status of "Approved" or "Rejected"
form prep ahead of the patient's face-to-face encounter
Below is information to help users understand the full suite of operational capabilities within the
Arcadia 360 program.
All screenshots are de-identified and do not contain PHI
Capabili
ties O
verv
iew
Arcadia 360 User Guide
Filtering
Users may apply different filters to view specific groups of patients.
Use the Status Filter to return forms for a specified status. More than one status may be
selected at a time.
Use the Providers Filter to refine the patient list further for a specific PCP or group of PCPs
Patient Search & Selection
Users may search for a specific patient in the Search Bar at the top of the page using the following:
Name (Last Name, First Name)
Member Number
Date of Birth (YYYY-MM-DD)
Once the desired patient is identified, the user may select the Patient Card which will expand and
show additional detail on two tabs: the Person Chart and Form History. For patients in a Not Started
status, the card will expand and show Person Chart. For patients with a 360 in other statuses, the
card will expand and show the Form History.
All screenshots are de-identified and do not contain PHI
HELPFUL HINT!
Filtering by a form status of ‘not started’ for a particular provider will return a list of users
who are still eligible for a 360 exam this year. Appropriate end users can leverage this
list to outreach to patients for scheduling
HELPFUL HINT!
The most accurate search results come from using the exact member number or full name.
Capabili
ties O
verv
iew
Arcadia 360 User Guide
Person Chart
This tab contains patient data similar to the Patient Chart such as quality measures, chronic
conditions within the last two years, the 50 most recent utilization events and medications filled
within the last 24 months.
Form History
Form History - This tab contains data pertaining to the 360 form history including relevant form
status, dates and associated users editing the form. Form history will update each time the form
status changes. Also, a PDF link to the form for full form preview, downloading and printing will be
available with each status change. By selecting the PDF link, a new browser tab will open with the
file.
All screenshots are de-identified and do not contain PHI
! Important Note: Users may need to change their browsersettings to allow pop-ups within the application in order for the
PDF tab to open as designed
Capabili
ties O
verv
iew
Arcadia 360 User Guide
Starting or Updating a 360
Once a patient is selected, users will have the option to Start or Update the 360 depending on the
current status.
The 360 will open and the user will notice three primary areas of the form
All screenshots are de-identified and do not contain PHI
Patient Demographics: the card in the upper left corner of the form is a static
card providing basic demographic information about the patient, including
attributed PCP and a SNP indicator, if applicable
Form Sections and Navigation: the card in the bottom left corner displays the
different sections of the form. The user may navigate through the form by either
selecting each section or using the forward and back arrows beneath the card.
Arcadia 360 Form: the 360 itself will appear in the middle of the screen.
Selecting different sections
HELPFUL HINT!
Clinical staff in the provider office may start a form to prep with specific information prior to a visit,
such as date of service, medical and surgical history
Capabili
ties O
verv
iew
Arcadia 360 User Guide
Quality Check
The Quality Check will address all portions of the form required before it may be signed and
submitted. Any quality checks that fail will trigger a message describing the issue. Select each
individual message to navigate directly to the required item for updating or completion. Once all
items have been addressed, the user will receive a 'All quality checks have been addressed'
message when the Quality Check button is selected.
All screenshots are de-identified and do not contain PHI
Throughout the form:
Red text will appear for items that must be addressed in order to pass
the Quality Check
Form
Sta
tus D
efinitio
ns
Arcadia 360 User Guide
360 STATUS STATUS DESCRIPTION
Not Started Patient is eligible for a 360 exam in the current year, but a 360 has not yet
been started
In Progress Patient's 360 has been started and is in progress
Ready to
Submit
Patient's 360 is completed and ready to submit. This status may be used if
another member of the care team is completing the form. The form must
ultimately be signed by the provider or a designee with signing permissions.
Submitted Patient's 360 has been signed and submitted for review. In this status, the
form is still editable if any updates are required
In Review Patient's 360 is not editable and is being reviewed by an auditor for
accuracy and completeness.
Rejected Patient's 360 has been reviewed and rejected by the auditor. Forms are not
editable when in this status. Reasons for rejection usually mean a new face-
to-face encounter would be required.
Returned Patient's 360 has been returned to the provider for editing and/or additional
information.
Imported Patients with 2019 Enhanced Encounters in Lumeris with an Accepted
status
Approved Patient's 360 has been reviewed and approved by the auditor. Please save
the PDF into the medical record for the patient
All screenshots are de-identified and do not contain PHI
Arcadia 360 Submission Checklist
Once the Arcadia 360 is complete, it must be signed and submitted by a clinician with valid
credentials. Comprehensiveness and accuracy of the form is critical in ensuring the form will not
require amendment in the future. Arcadia’s Quality Check will help ensure required data has been
addressed. Before submitting the form, please ensure all items in the checklist below are complete.
All screenshots are de-identified and do not contain PHI
Submission date is within 180 days of the date of service
All sections of the form are addressed
Consistent and detailed information throughout the 360
Appropriate documentation is attached
the only allowed attachment to the Arcadia 360 is the Medication List from the
medical record. It should be printed legibly and be signed, service dated, with the
clinician’s credentials
All chronic conditions are addressed with associated treatment plans
The form has been appropriately signed with electronic signature and valid credentials
Once the form is in a final status of 'Approved' or
'Rejected' please save the PDF in your electronic
health record.
Overv
iew
Arcadia 360 Returned Forms Process
Health Plan coders will review all Arcadia 360s in a Submitted status. Providers may update
forms in a Submitted status until the status is changed to In Review. Following review, forms will
be noted with one of three statuses: Approved, Rejected, or Returned.
All screenshots are de-identified and do not contain PHI
Approved forms are complete forms that are ready to be saved into the official
medical record for the patient
Rejected forms are unable to be amended and would require a new face-to-face
encounter with the patient. These forms are in final state and should be saved into the
official medical record.
Returned forms require additional information and re-submission. Users will see
Returned forms in the patient list on the Arcadia 360 home page. An email will also be
sent to the user once the coder has finished the review and marked the form as
returned. A hyperlink is included in the email and will direct providers to the
appropriate patient upon selecting.
Returned forms will include notes indicating why it was returned and which section needs
attention. This is found on the Form History tab of the Patient Card under Return History.
Follow the steps below to ensure returned 360s are updated and submitted for re-review:
1. On the homepage of the Arcadia 360, filter to see 360s with Returned status
2. Select the Patient Card and see Return History comments which will indicate which
section needs updating
3. Navigate to the 360 section that required amendment reflected in the comments.
4. Update the 360 section as needed. Add as much detail as necessary to address the
Return History comments.
5. Re-sign and submit the 360. This will update the status back to 'Submitted'.
6. The coder will review for approval and the 360 status will update throughout the
process.
All CareAllies products and services are provided exclusively by or through operating subsidiaries of Cigna Corporation, including
CareAllies, Inc. The CareAllies and Cigna names, logos, and other CareAllies and Cigna marks are owned by Cigna Intellectual
Property, Inc.
CareAllies is licensed by Arcadia to bring you this provider communication