24
Archery 101 By Paul O’Brien

Archery 101 By Paul O’Brien

Version 0.81 Page 2 May 2013
Introduction Greetings one and all and can I welcome you to the world of archery. This archery 101 guide is aimed at members of the SCA but also should be useful for anyone interested in archery. This 101 guide to archery does not deal with hunting with bow, modern recurves bows or compound bows. What this guide does deal with is bows from the pre-1600s (with maybe the odd mention of Victorian archery which will be clearly labelled as such). When I first sat down to write this book I has intended to write a very basic guide to archery but I kept running into issues I just couldn’t leave out. Some were due to safety and others because of bad practices within archery that could be easy corrected with just a tiny bit of knowledge. I hope that beginner and experienced archers alike gain something from this book. Should you come across as mistakes please feel free to contact me so that they can be corrected. Please bear in mind this is not meant to cover everything there is to know about archery but to be a good guide to get started and to help you improve.
About the author Paul O’Brien, known within the SCA as Pól ó Briain is from Northern Ireland and is a longbow archer but has been know to shoot with other types bows. Paul is a member of GNAS (Grand National Archery Society), BLBS (British Longbow Society) as well as the SCA (Society for Creative Anachronism). He is an archery marshal within the SCA and holds a ‘Leader award’ within GNAS.
Version 0.81 Page 3 May 2013
Table of Contents Introduction 2 About the author 2 Table of Contents 3 Introduction to archery Equipment 5 Rules of the Line & Safety 6
Archery Commands 6 Archery does and don’ts 6 Other Archery Etiquette 6 Clothing 7 Health 7
How to Shoot 8 Eye Dominance 8 Bow poundage 8 Check Arrow Length for safety 9 How to measuring your arrow length (not for beginners) 10 Warms ups 10 Archery Stance (Footing) 10 How to grip a bow 11 Nocking a arrow 12 How to grip the string 12 Drawing the Bow 13 Anchor Point 14 Aiming 14 Release 15 Follow Through 16 Relax 16 Scoring your Arrows 16 Collecting your Arrows 17 Returning to the Shooting Line 17
Refining your shooting 18 Stringing your bow 18
With a bow stringer, Longbows & Recurves 18 Without a bow stringer, Longbows & Recurves 18
Warming up your the bow 18 Gap Shooting 18 Face Walking 18 String Walking 18 Controlling your breathing 18
Common Problems 19 Why am I hitting my arm/chest? 19 Why is my Bow hand being scraped by arrow? 19 Why are all my arrows not going where they are meant too? 19
Care and Maintenance of Kit 20 Inspecting your kit (Arrows, Bow, String) 20 Waxing your String 20 Storing your Bow 21 Other Points of care 21
Archery Knowledge 22 String Brace Height 22 Big or small fletchings 22 Refining your Nock Point 22 Bow poundage (performance) 22 Refining your Arrow Length/weight 22 What causes stacking? 22 What is the bow Set? 22 Longbows Vs Recurves 22

Version 0.81 Page 4 May 2013
Making Archery Equipment 23 Making a target stand 23 Making Arrows 23 Self Nocking your Arrows 23 Making a bow string 23 Making a bow bag 23
Thanks & Acknowledgements 24

Version 0.81 Page 5 May 2013
Introduction to archery Equipment This page will show Bow (long bow and recurved bow), Arrow, Bracer, Tab, Glove, Quiver and the parts that make them up.

Version 0.81 Page 6 May 2013
Rules of the Line & Safety
Archery Commands “HOLD” is shouted when there is a serious safety problem on the range. Anyone can give
this command if noticing a serious problem. All archers are to stop shooting, ‘come down’ and remove all arrows from their bows. Outside of the SCA you may hear the command “HOLD FAST” or just “FAST”. They mean the same thing.
“Come Down”, when this command is given to an archer, that archer should slowly undrawn their bow and lower it so that the arrow is pointing at the ground.
“Archers to the line”, all those archers shooting should take their place on the line. “Clear Down Range” or “Range Clear”, this to ensure that no one is in the target range.
Should you hear this command and you are down range of the shooting line shout out at once and make your presence know to the marshal.
“Nock when ready”, used when shooting a timed round. This means an archer and put an arrow on the string but not loose it.
“Loose at will” or “loose”, this is the command to tell you it is now safe to start shooting arrows.
"Bows down” or "cease" this means stop shooting. Do not loose any arrows after this command.
"Retrieve arrows" or the equivalent. This means it is now safe to start to cross the shooting line to collect arrows.
Archery does and don’ts Carefully follow the instructions of the marshal. Always wait until you are told it is safe to start shooting. Only nock an arrow when on the shooting line. Never aim a bow at someone, even if there is not an arrow in the bow (from a distance they
can not see if there is or is not an arrow nocked) Never shoot straight up in the air. Never shoot into an area that you can not see is clear of people. Never step in front of the shooting line unless told to do so. Never shoot an arrow when someone is still in front of the shooting line. Only ever practice archery at an SCA event or practice when a marshal is present on the
line. No Marshal, No archery. Never ‘dry shoot’ your bow. This is where you draw the string back and loose the string
without having an arrow nocked. Always walk towards the target. Never run. Beware of arrows in the ground when walking towards the target. Approach the target boss from either side. Never from straight on. You can end up walking
into arrows in the boss or be hurt should the boss fall over. Stand well back from anyone drawing arrows. Never walk close behind them. If you see a potential problem, you should report it to the Marshal. If you see a serious problem, shout “HOLD”. When not shooting themselves, people should remain at least 10 feet behind the shooting
line.
Other Archery Etiquette Refrain from distracting other archers when they are shooting. Don’t remove your arrows from the target until you are told to do so by the archery marshal. Don’t remove other people arrows from the target or boss without first seeking their
permission. Never touch anyone else equipment without first seeking their permission. Don’t shoot broad head arrows into a target boss without first seeking the permission of the
target boss owner.
Version 0.81 Page 7 May 2013
Should you damage someone else equipment you should offer to pay for it without being asked. This includes arrows but not those stuck by your arrows when in the target face.
Thank the Marshal at the end of the shoot.
Clothing Wear clothing that is suitable for your surrounding. If shooting in snow, make sure you wrap up warm. If you are shooting somewhere warm wear light airy clothes. Make sure you have nothing that can be catch up with the arrow or string. Remove or place necklaces under clothing and tie back any long hair. Also remove any body or facial piecing that may catch on the string. Use a bracer to hold back clothing on the bow arm. Also remove any bracelets/watches from your bow arm. Ensure you wear appropriate footwear for the terrain and weather. Also ensure you do not wear open footwear that leave any flesh of your feet exposed as this could lead to injury from arrows in the ground.
Health Are you physically able to shoot archery? If you ask yourself that question and the answer is no, don’t shoot. Common areas that may stop or limit your shooting of archery are problems with your back, hips, neck, shoulder, arms, wrist and hands. Other areas such as problem with you legs, feet, etc can sometimes be overcome by someone else collecting your arrows for you so you never have to leave the shooting line (often seen with wheel chair archers). This may not always work for some shoots like some field archery where the shooting line itself is on uneven ground and half way up a hill though trees. People with vision impairment can sometimes be easily accommodated on the shooting time but may need a one-on-one marshalling. Again with beginners and very young children; they may require marshalling or supervision by a parent. Health issues everyone should be aware of;
Never shoot under the influence of alcohol or drugs. During sunny, raining or cold weather ensure that you are dressed appropriately, you have
sun screen and drink enough water should you need it and it can also be a good idea to wear a hat.
If weather gets too bad to continue to shoot then the marshal will stop the shoot until it improves enough so that archery can be safety resumed.
If in doubt about any of the above, then talk to your marshal.
Version 0.81 Page 8 May 2013
How to Shoot
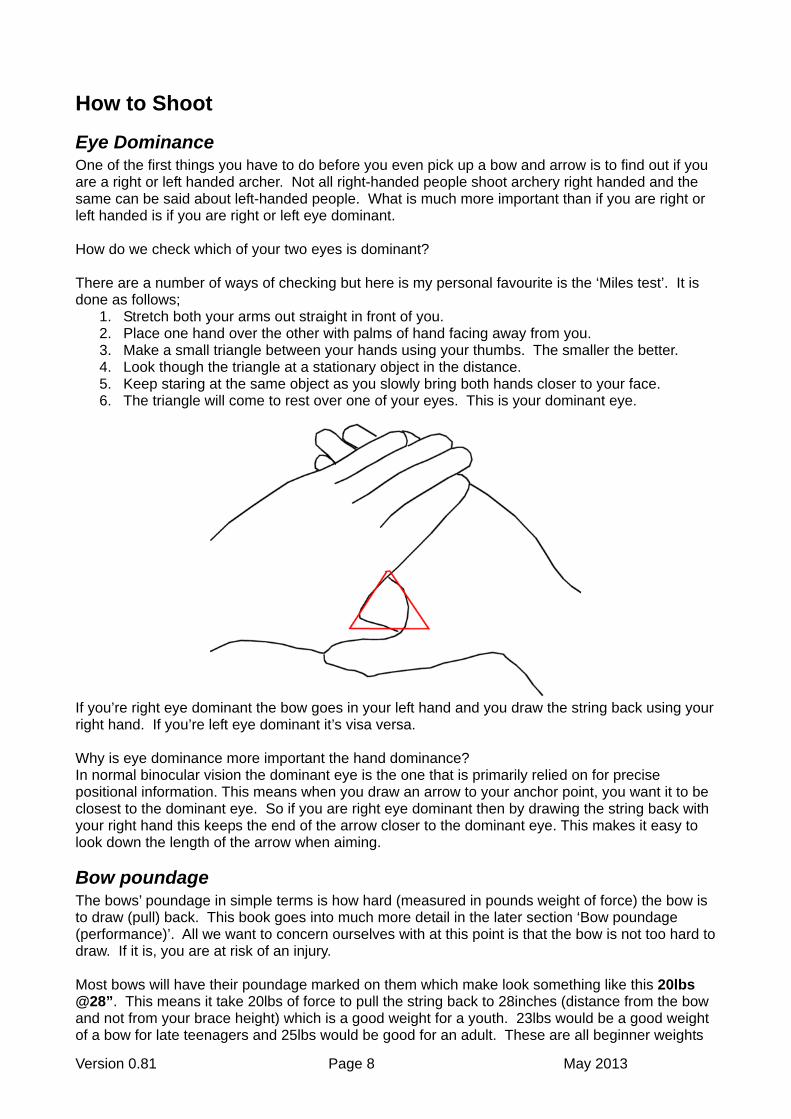
Eye Dominance One of the first things you have to do before you even pick up a bow and arrow is to find out if you are a right or left handed archer. Not all right-handed people shoot archery right handed and the same can be said about left-handed people. What is much more important than if you are right or left handed is if you are right or left eye dominant. How do we check which of your two eyes is dominant? There are a number of ways of checking but here is my personal favourite is the ‘Miles test’. It is done as follows;
1. Stretch both your arms out straight in front of you. 2. Place one hand over the other with palms of hand facing away from you. 3. Make a small triangle between your hands using your thumbs. The smaller the better. 4. Look though the triangle at a stationary object in the distance. 5. Keep staring at the same object as you slowly bring both hands closer to your face. 6. The triangle will come to rest over one of your eyes. This is your dominant eye.
If you’re right eye dominant the bow goes in your left hand and you draw the string back using your right hand. If you’re left eye dominant it’s visa versa. Why is eye dominance more important the hand dominance? In normal binocular vision the dominant eye is the one that is primarily relied on for precise positional information. This means when you draw an arrow to your anchor point, you want it to be closest to the dominant eye. So if you are right eye dominant then by drawing the string back with your right hand this keeps the end of the arrow closer to the dominant eye. This makes it easy to look down the length of the arrow when aiming.
Bow poundage The bows’ poundage in simple terms is how hard (measured in pounds weight of force) the bow is to draw (pull) back. This book goes into much more detail in the later section ‘Bow poundage (performance)’. All we want to concern ourselves with at this point is that the bow is not too hard to draw. If it is, you are at risk of an injury. Most bows will have their poundage marked on them which make look something like this 20lbs @28”. This means it take 20lbs of force to pull the string back to 28inches (distance from the bow and not from your brace height) which is a good weight for a youth. 23lbs would be a good weight of a bow for late teenagers and 25lbs would be good for an adult. These are all beginner weights

Version 0.81 Page 9 May 2013
for learning archery on and you may find that you quickly move to a heavier poundage bow. Remember, more poundage does not always mean better but more about that later. How to test if a bow is to heavy poundage for you;
Take your place on the line. Draw the String back ½ of the way and then ‘come down’ again. Should you feel
comfortable with that move onto next step, if not, STOP. Draw the String back ¾ of the way and then ‘come down’ again. Should you feel
comfortable with that move onto next step, if not, STOP. Draw the String back to full draw of the way and then ‘come down’ again.
If you are comfortable with the bow at full draw then the bow is fine for you. Never pick bow that that you can barely pull to full draw. You may be able to shoot 3 or 4 arrows with it but you won’t be able to safely shot 30 or 40 arrows. Please note that extra care should be taken with children with the bow poundage. Too heavy a draw weight for children can easily damage bones and joints. As a good guide for children, find out their draw length in inches and then ¾ of that number should be the correct maximum poundage for them. This is only a guide and not a hard and fast rule. If they find the bow too hard to draw use a lighter bow.
Check Arrow Length for safety Not everyone is built in the same way. Some people have longer arms, different size torsos and longer jaw lines. Because of this, different people have different draw lengths which in turn means that they need different lengths of arrows. When you are starting in archery the first thing to worry about in reference to arrow length is to ensure that the arrows are not too short. Arrows being too long you can live with. Arrows being too short can spell disaster. When beginners are at full draw you want at least an extra 2 inches of arrow length beyond the front of the bow for safety. To get a quick check to make sure the arrows you are planning on shooting are not too short, fully stretch out both of your arms out in front of you and place the palms of your hands together with finger tips fully extended. Measure the arrow length against the distance from your chest to 2 inches beyond your finger tips and that should be your starting MINIMUM arrow length.
Most target archery marshals will have beginner archers shooting full length arrows (normally 32 inches long) which have a number of advantages.
As they are full length arrows, you don’t normally have to worry about them being too short (be warned, there are some people with really long arms that this will not work for and people that may try to over draw the bow).
Beginners should be shooting short distances so the excess arrow length should have little to no effect on performance.
Because most beginners should also be using the pile of the arrow to aim with, using a longer arrow means the archer is more likely to shoot lower. This means you have less arrows shooting over the target.
When the piles break off the arrows, you can remove ½ an inch or so and make another set of 30 inch arrows giving them a second life.

Version 0.81 Page 10 May 2013
Please note, care should always be taken not to over draw the bow.
How to measuring your arrow length (not for beginners) To get a more actuate arrow length you can measure it one of two ways. Both ways need a second person at hand to help. The first way is to nock an old arrow when standing on the shooting line and aim down range and draw the string back to your normal anchoring point. With a marker, a second person makes a vertical line on the arrow where it meets the front of the bow. You then measure the length between the inside of the arrow’s nock to that mark and that is your arrow length. The second way is done in much the same way as the first except you use a measuring arrow. This is an arrow that has the length in inches marked up the cock feather side of the arrow already. When you draw the arrow back the second person has only to read the length off the arrow. No need to being out a measuring tape. A measuring arrow should be marked 5 inches from the inside of the nock to the pile.
In both of the above cases you should never shoot the arrow. Simply ‘come down’. Why should I use arrows the same as my draw length (or rather my draw length plus 2 inches for extra safety)? In brief, making an arrow shorter makes the arrow lighter. The less an arrow weights, the faster it will shoot which in turn will make the arrow travel most distance. It also means that you have to correct less then shooting longer distances as it will fly straighter for longer before the arrow starts to drop.
Warms ups (for Archery 102)
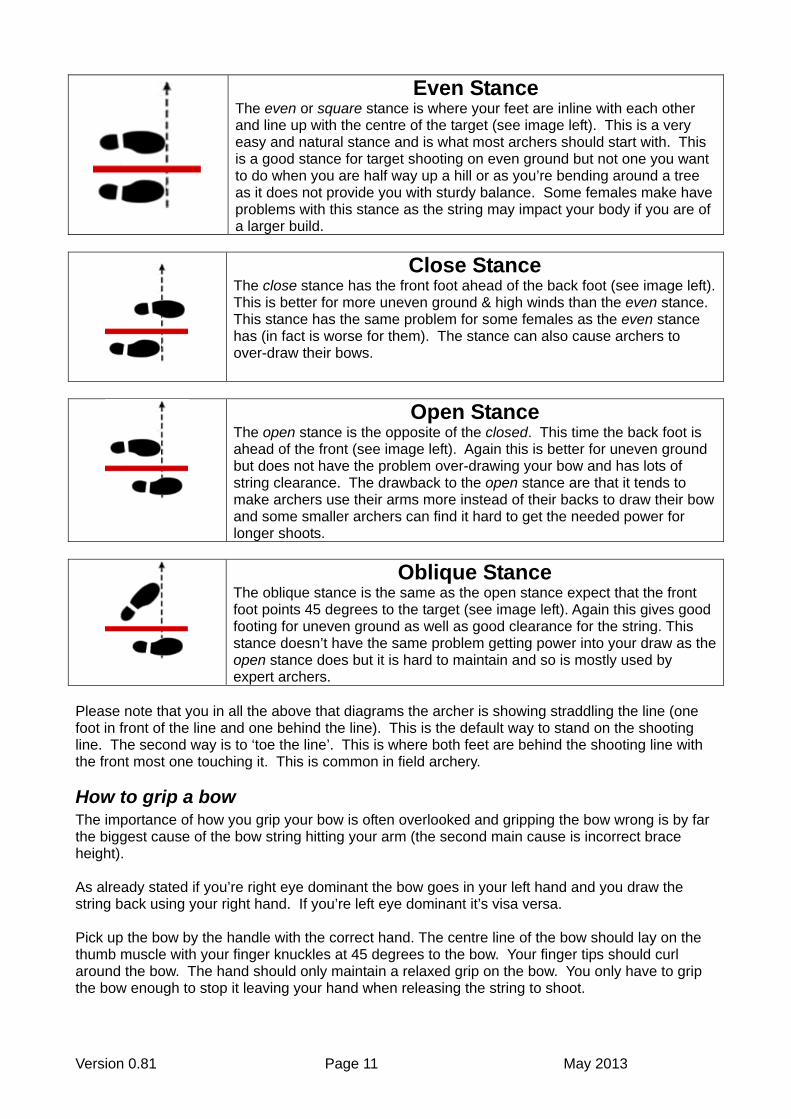
Archery Stance (Footing) Moving your feet between shoots can mess with your aim and you can find your arrows going all over the place (no consistency or bad grouping). For this reason, once you start shooting don’t move your feet until you have finished shooting that end of arrows. To improve things even more you can mark where your feet are so that for every end your feet are in the same place. If you are shooting in grass golf tees are useful for doing this. If indoors you can use masking tape (please remember to remove at the end of the shoot). Having a correct stance is one of the most important and overlooked parts of archery. It helps ensure you have your weight distributed as evenly as possible and all so makes you’re shooting more consistent. If your stance is not correct you will find it very hard to improve your archery no matter how much you practice. Like a building, you want good foundations. There are 4 main archery stances. You should in ALL of them have you weight evenly distributed between both feet and roughly shoulder width apart. Not every stance works for everyone and each stance have their own advantages and disadvantages.
Version 0.81 Page 11 May 2013
Even Stance The even or square stance is where your feet are inline with each other and line up with the centre of the target (see image left). This is a very easy and natural stance and is what most archers should start with. This is a good stance for target shooting on even ground but not one you want to do when you are half way up a hill or as you’re bending around a tree as it does not provide you with sturdy balance. Some females make have problems with this stance as the string may impact your body if you are of a larger build.
Close Stance The close stance has the front foot ahead of the back foot (see image left). This is better for more uneven ground & high winds than the even stance. This stance has the same problem for some females as the even stance has (in fact is worse for them). The stance can also cause archers to over-draw their bows.
Open Stance The open stance is the opposite of the closed. This time the back foot is ahead of the front (see image left). Again this is better for uneven ground but does not have the problem over-drawing your bow and has lots of string clearance. The drawback to the open stance are that it tends to make archers use their arms more instead of their backs to draw their bow and some smaller archers can find it hard to get the needed power for longer shoots.
Oblique Stance
The oblique stance is the same as the open stance expect that the front foot points 45 degrees to the target (see image left). Again this gives good footing for uneven ground as well as good clearance for the string. This stance doesn’t have the same problem getting power into your draw as the open stance does but it is hard to maintain and so is mostly used by expert archers.
Please note that you in all the above that diagrams the archer is showing straddling the line (one foot in front of the line and one behind the line). This is the default way to stand on the shooting line. The second way is to ‘toe the line’. This is where both feet are behind the shooting line with the front most one touching it. This is common in field archery.
How to grip a bow The importance of how you grip your bow is often overlooked and gripping the bow wrong is by far the biggest cause of the bow string hitting your arm (the second main cause is incorrect brace height). As already stated if you’re right eye dominant the bow goes in your left hand and you draw the string back using your right hand. If you’re left eye dominant it’s visa versa. Pick up the bow by the handle with the correct hand. The centre line of the bow should lay on the thumb muscle with your finger knuckles at 45 degrees to the bow. Your finger tips should curl around the bow. The hand should only maintain a relaxed grip on the bow. You only have to grip the bow enough to stop it leaving your hand when releasing the string to shoot.

Version 0.81 Page 12 May 2013
Never let go or change your grip on your bow during an end of arrows unless done so for safety reasons. Doing so will change more than you think, for one it can change where the pile rests before being released (which is really important if you are using the pile for aiming).
Nocking a arrow Firstly, your arrow goings on the same side of the bow as your arm does. If you hold your bow with your left hand then the arrow should be placed on the left hand side of the bow (please note there is an exception for when shooting with the use of thumb rings). If you hold the bow with your right hand then the arrow is placed on the right hand side of the bow. Your arrow should normally have three fletchings* which are attached 120 degree apart. Normally one of these is a different colour; this is known as the ‘cock fletching’. The other two are both known as the ‘hen fletchings’. The cock fletching should be facing away from the bow. This will allow the arrow to slide past the bow without the cock fletching impacting with the bow and sending your arrow off on a course you had not intended. Should you be shooting arrows that are all the same colour you can tell the cock fletching by looking at the arrow from behind. On one side of the nock you should have a single fletching and on the other side you should have two. The fletching by itself is the cock fletching.
*some arrows have four fletching and there is no cock fletching. The arrow will slide past the bow no matter which way you knock it.
How to grip the string There are two main modern ways to hold the string. The first way is to place three fingers below the arrow’s nock. All three fingers should curl around the string so that it rests on the first joint (closest to the finger tips). This way is good for shooting at close targets.

Version 0.81 Page 13 May 2013
The second method used is known as a split release. This is where your index finger is above the arrow nock and your second and third fingers are below the arrow nock. This is best used for shooting at targets at a greater distance. For both of the above, care should be taken not to ‘pinch’ the arrow or to twist the string. This can be avoided if you
1. Leave a small gap between your fingers and the arrow 2. All three fingers are aligned with the bow string 3. Each finger draws the string with an equal amount of pressure.
The rest of your hand should remain relaxed as possible and not curled up. Your thumb or little finger should not make contact with the string.
Please note that you can use either a tab or an archery glove for both grips. Please also note that there is a third way to grip the string with only two fingers. It is done the same as the split release with the exception that you do not place your third finger on the string.
Drawing the Bow Drawing the bow is how you pull back the bow string to your chosen anchor point. The main point to keep in mind when drawing the bow is your ‘Draw Force Line’ (DFL). What is your DFL? If you where to imagine a straight line that runs from your bow hand (where you feel the pressure of the bow against your hand most), through the hand drawing the string and back to your elbow. All three of these points should always be in line. You should also take care that your shoulder of your bow arm is not raised. If it is, ‘come down’, lower your shoulder and redraw the bow.
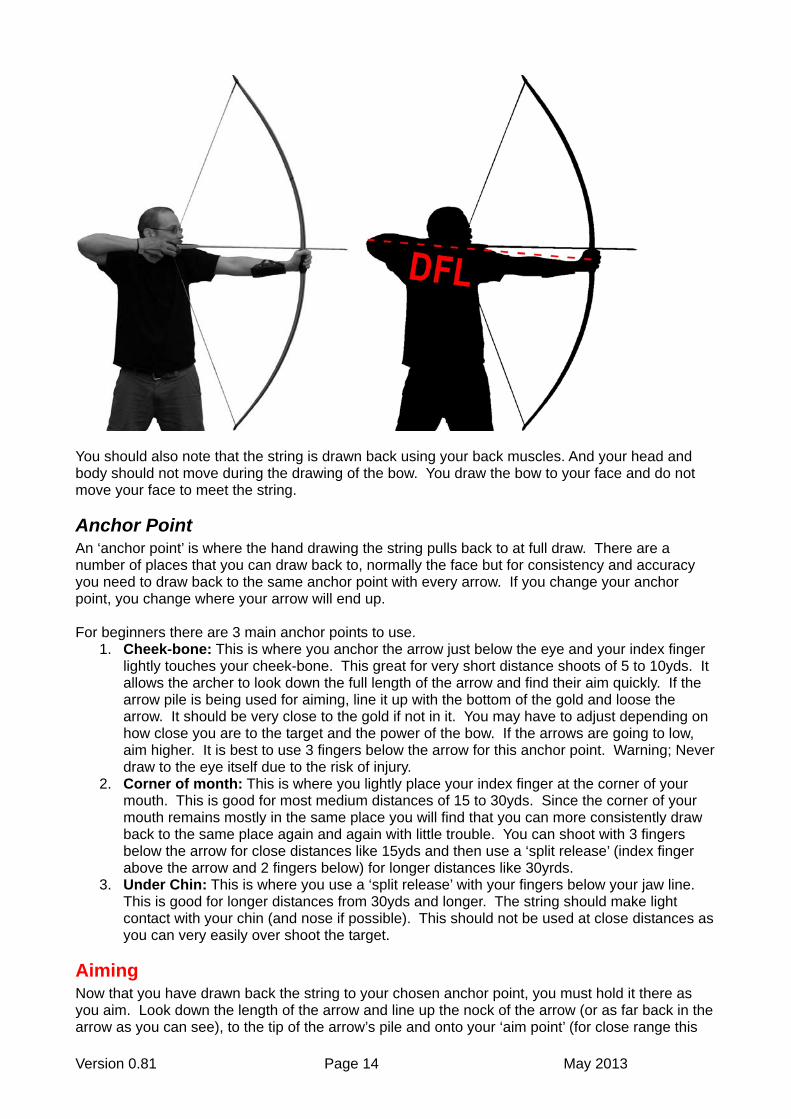
Version 0.81 Page 14 May 2013
You should also note that the string is drawn back using your back muscles. And your head and body should not move during the drawing of the bow. You draw the bow to your face and do not move your face to meet the string.
Anchor Point An ‘anchor point’ is where the hand drawing the string pulls back to at full draw. There are a number of places that you can draw back to, normally the face but for consistency and accuracy you need to draw back to the same anchor point with every arrow. If you change your anchor point, you change where your arrow will end up. For beginners there are 3 main anchor points to use.
1. Cheek-bone: This is where you anchor the arrow just below the eye and your index finger lightly touches your cheek-bone. This great for very short distance shoots of 5 to 10yds. It allows the archer to look down the full length of the arrow and find their aim quickly. If the arrow pile is being used for aiming, line it up with the bottom of the gold and loose the arrow. It should be very close to the gold if not in it. You may have to adjust depending on how close you are to the target and the power of the bow. If the arrows are going to low, aim higher. It is best to use 3 fingers below the arrow for this anchor point. Warning; Never draw to the eye itself due to the risk of injury.
2. Corner of month: This is where you lightly place your index finger at the corner of your mouth. This is good for most medium distances of 15 to 30yds. Since the corner of your mouth remains mostly in the same place you will find that you can more consistently draw back to the same place again and again with little trouble. You can shoot with 3 fingers below the arrow for close distances like 15yds and then use a ‘split release’ (index finger above the arrow and 2 fingers below) for longer distances like 30yrds.
3. Under Chin: This is where you use a ‘split release’ with your fingers below your jaw line. This is good for longer distances from 30yds and longer. The string should make light contact with your chin (and nose if possible). This should not be used at close distances as you can very easily over shoot the target.
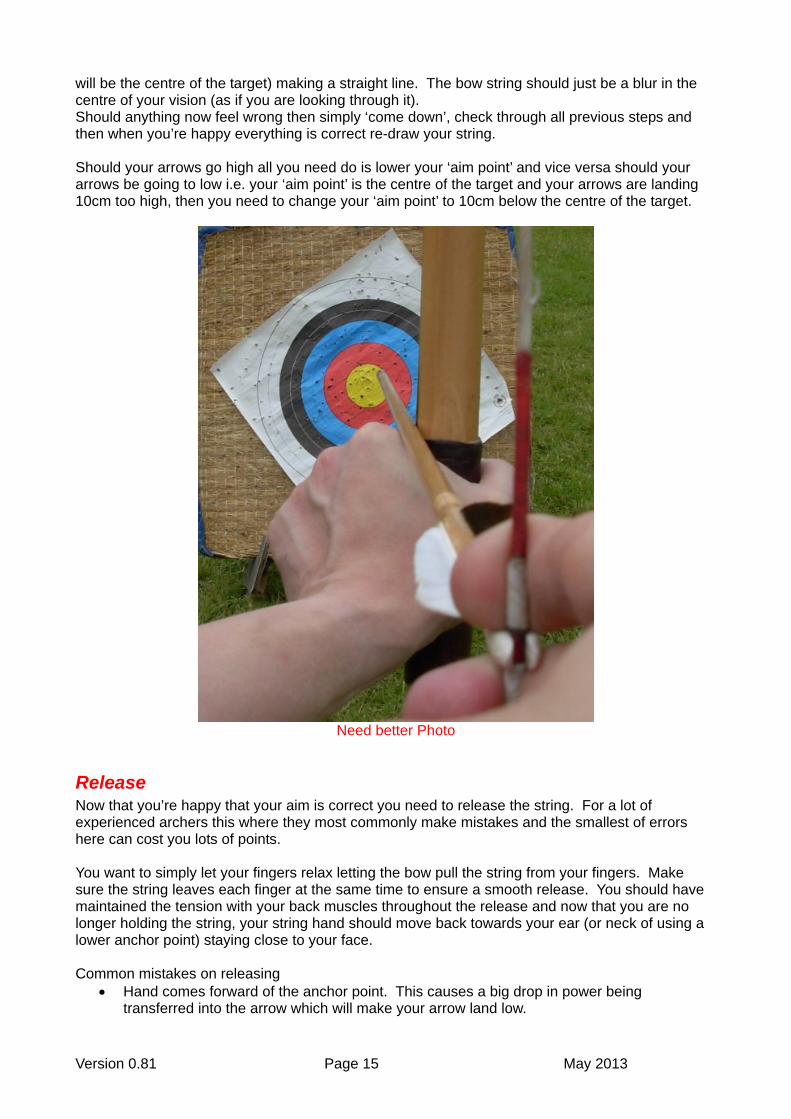
Aiming Now that you have drawn back the string to your chosen anchor point, you must hold it there as you aim. Look down the length of the arrow and line up the nock of the arrow (or as far back in the arrow as you can see), to the tip of the arrow’s pile and onto your ‘aim point’ (for close range this
Version 0.81 Page 15 May 2013
will be the centre of the target) making a straight line. The bow string should just be a blur in the centre of your vision (as if you are looking through it). Should anything now feel wrong then simply ‘come down’, check through all previous steps and then when you’re happy everything is correct re-draw your string. Should your arrows go high all you need do is lower your ‘aim point’ and vice versa should your arrows be going to low i.e. your ‘aim point’ is the centre of the target and your arrows are landing 10cm too high, then you need to change your ‘aim point’ to 10cm below the centre of the target.
Need better Photo
Release Now that you’re happy that your aim is correct you need to release the string. For a lot of experienced archers this where they most commonly make mistakes and the smallest of errors here can cost you lots of points. You want to simply let your fingers relax letting the bow pull the string from your fingers. Make sure the string leaves each finger at the same time to ensure a smooth release. You should have maintained the tension with your back muscles throughout the release and now that you are no longer holding the string, your string hand should move back towards your ear (or neck of using a lower anchor point) staying close to your face. Common mistakes on releasing
Hand comes forward of the anchor point. This causes a big drop in power being transferred into the arrow which will make your arrow land low.

Version 0.81 Page 16 May 2013
Hand comes away from the face. This causes arrows to go left or right way from your chosen target.
Flexing your finger open rather then just relaxing them. This again causes arrows to go left or right way from your chosen target.
Again I need better photo
Follow Through Now that you have done all the hard work you of course want to see where your arrow lands but wait, maintain your position as moving before your arrow has fully cleared the bow will still change where the arrow lands. Lots of archers lower their bow arm causing the arrow to land lower than it should, others move their head left or right which causes the arrow to again go off its flight path. You should be able to see where your arrow goes while maintaining your release position.
Relax Now that your arrow should be safely in the target you need to relax, take a short breather and reflect on your last arrow. Did the arrow go where it was meant too? If not, why not? Think through all the above steps and correct any mistake you made with your next arrow. If you can’t find any fault then you just simply need to change your aim point to correct.
Scoring your Arrows Now that you have finished shooting your arrow you need to go score them. You need to keep the following things in mind;
Remember do not cross the shooting line until told to do so by the archery marshal. Always walk towards the target. Never run. Be aware of arrows in the ground. When approaching the archery target, do so from either side, not straight on as you end up
getting an arrow nock into your eye very easily. Don’t touch arrows until after they have had their scores recorded and told to do so by an
archery marshal How do you score your of arrows? Well this depends on the archery shoot that you are taking part in. For an IKAC (Inter-Kingdom Archery Competition) you use a 60cm FITA target face (five colour face) where the scoring is showing below.

Version 0.81 Page 17 May 2013
Please note that for an IKAC you ignore the lines inside the colours i.e. the outer and inter white circles are both only worth 1 point. Also note that ‘Lines Breakers’ (where an arrow is partly in one colour and partly in another) count as the higher score i.e. an arrow is 99% in the black but is 1% in the Blue then that arrow scores you 3 points. Always read the rules of the shoot which will list the scoring to be used.
Collecting your Arrows After all arrows have had their scores recorded you now need to get your arrows out of the target. If you are the person pulling the arrows out of the target ensure that everyone else is standing well back (at least the length of your arm plus the length of the longest arrow). To remove an arrow place one hand on the target face close to the arrow you are pulling out. This is to stop the target falling over and to help supply you with something to lever against. With your other hand grab the arrow as close to the pile as possible and have your forearm run along the length of the arrow. Look over your shoulder to ensure that the area around you is still clear and then pull the arrow straight out. Do not twist or bend the arrow as you pull out. Arrows should always be pulled out of the target or the ground at the same angle in which they entered it. Should you be unable to remove an arrow ask the marshal for help. You should now put the freed arrow into the hand that is pressed against the target face leaving your other hand free to pull the remaining arrows. Remember to look over your shoulder for every arrow you pull and not just the first one.
Returning to the Shooting Line When returning to the shooting line it is important that you carry your arrows correctly. If you have a quiver, use it. If you don’t have a quiver, gather all your arrows together and ensure they are all pointing in the same direction. Grip the arrows close to the piles and have the shafts of the arrows run in line with your arm going under your shoulder so that the fletchings are behind you. Remember when you get back behind the shooting line only take your place at the shooting line when told to do so and NEVER shoot when someone is still down range. …and most importantly, have fun and remain safe!
54321
Version 0.81 Page 18 May 2013
Refining your shooting
Stringing your bow (for Archery 102)
With a bow stringer, Longbows & Recurves Use a bow stringer when stringing your bow when possible. This will help prevent your bow’s limbs from becoming twisted and damaged which will shorten the life of your bow.
Without a bow stringer, Longbows & Recurves
Warming up your the bow Warming up your bow is commonly overlooked even by experienced archers. The reason for warming up your bow is to reduce the amount hysteresis. Put simply the amount of power you put into the bow drawing it back is not returned when the bow is loosed due to internal friction in the bow. This can be as much as a 15% drop in power in a ‘COLD’ bow. Simply by warming up the bow this can figure can be reduced to a 3% drop in power (please note they are at the extreme end of the curve and more commonly it is 7% down to below 1%). To warm up your bow do the following;
½ draw your bow and ‘come down’, ¾ draw your draw your bow and ‘come down’ draw back your bow to your chosen anchor point and then ‘come down’. Repeat this a few
times and this will warm up your bow.
Gap Shooting (for Archery 102)
Face Walking (for Archery 102)
String Walking (for Archery 102)
Controlling your breathing (for Archery 102)
Version 0.81 Page 19 May 2013
Common Problems
Why am I hitting my arm/chest? This is one of the most common problems with beginner archers and it has a number of causes. The most common of these is an incorrect grip of the bow. To double check that your grip is correct go to the section ‘How to grip a bow’. This will fix 90% of people that hit their arm with the string. If you are still having problems it may be time to change your archery stance from an ‘even stance’ to an ‘open stance’. To learn how to do this, go to the ‘Archery Stance’ section.
Why is my Bow hand being scraped by arrow? This is nearly always caused by your bow hand holding the bow to high or your arrow nocking point being too low. To correct make sure the top your hand does not go above the top of the handle. To check your arrow nocking point, go to the ‘Creating a Nock Point on your bow string’ section
Why are all my arrows not going where they are meant too? Arrows are going to one side of the target;
Using wrong eye when aiming (see ‘Eye Dominance’ section) Arrows are not matched to your bow i.e. Too heavy or light of a spine weight. Incorrect ‘Release’ of string i.e. hand is coming away from your face. Incorrect anchor point.
Arrows are going low; Bow arm is down as you loose Incorrect ‘Release’ of string i.e. hand is coming forwards. Incorrect anchor point.
Arrows are going high Incorrect ‘Release’ of string i.e. hand is dropping. Incorrect anchor point.
Version 0.81 Page 20 May 2013
Care and Maintenance of Kit
Inspecting your kit (Arrows, Bow, String) (for Archery 102)
Waxing your String It is important to keep your bow string well waxed. Should your string appear fuzzy then it needs waxing. This will extend the life of your string several times over. Which wax to use? You can get bowstring wax from any good archery store or you can use bees wax. Never use candle wax. Candle wax can damage your string. To apply the wax simply extend the wax over the string and keep it away from your servings. Take a small bit of clothing leather and wrap it around your string and rub it up and down the string to spread the wax evenly and into the string until any fuzzy appearance in the string has disappeared. The leather should also help remove any excess of wax should you have applied too much.
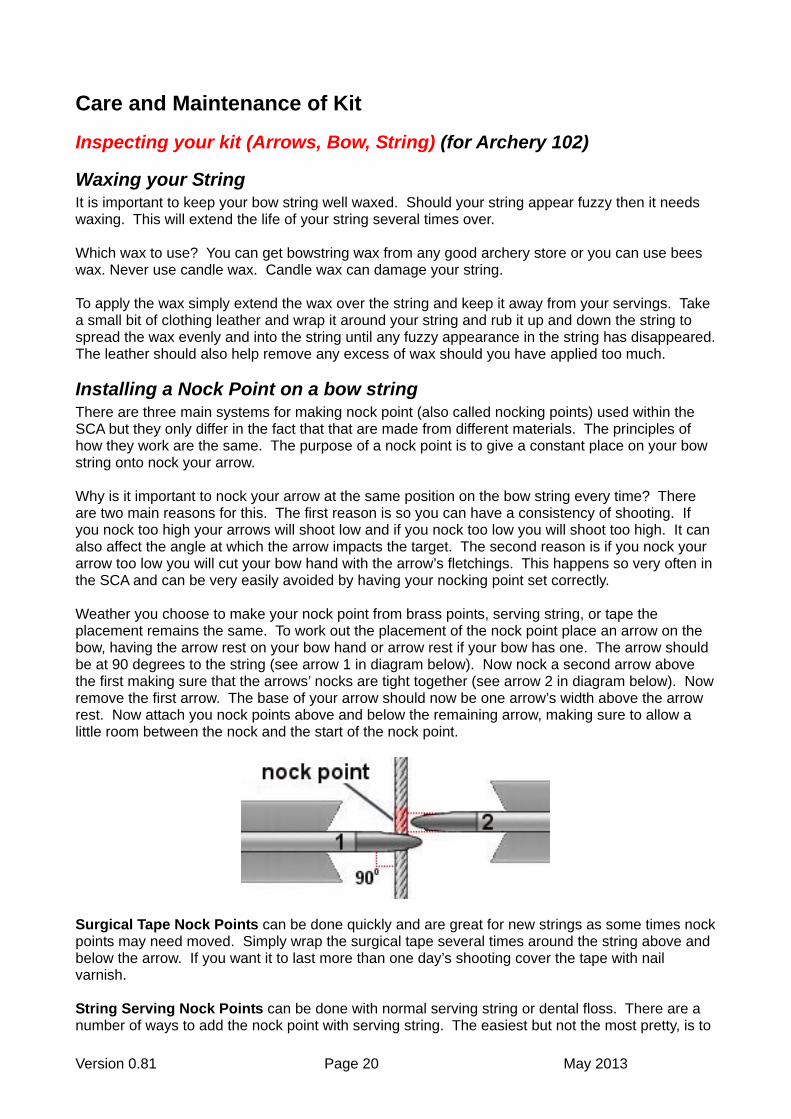
Installing a Nock Point on a bow string There are three main systems for making nock point (also called nocking points) used within the SCA but they only differ in the fact that that are made from different materials. The principles of how they work are the same. The purpose of a nock point is to give a constant place on your bow string onto nock your arrow. Why is it important to nock your arrow at the same position on the bow string every time? There are two main reasons for this. The first reason is so you can have a consistency of shooting. If you nock too high your arrows will shoot low and if you nock too low you will shoot too high. It can also affect the angle at which the arrow impacts the target. The second reason is if you nock your arrow too low you will cut your bow hand with the arrow’s fletchings. This happens so very often in the SCA and can be very easily avoided by having your nocking point set correctly. Weather you choose to make your nock point from brass points, serving string, or tape the placement remains the same. To work out the placement of the nock point place an arrow on the bow, having the arrow rest on your bow hand or arrow rest if your bow has one. The arrow should be at 90 degrees to the string (see arrow 1 in diagram below). Now nock a second arrow above the first making sure that the arrows’ nocks are tight together (see arrow 2 in diagram below). Now remove the first arrow. The base of your arrow should now be one arrow’s width above the arrow rest. Now attach you nock points above and below the remaining arrow, making sure to allow a little room between the nock and the start of the nock point.
Surgical Tape Nock Points can be done quickly and are great for new strings as some times nock points may need moved. Simply wrap the surgical tape several times around the string above and below the arrow. If you want it to last more than one day’s shooting cover the tape with nail varnish. String Serving Nock Points can be done with normal serving string or dental floss. There are a number of ways to add the nock point with serving string. The easiest but not the most pretty, is to

Version 0.81 Page 21 May 2013
tie a simple overhand knot around the string and repeat the process up and down the bow string working away from the arrow. Brass Nock Points can simply be added using a set of pliers. There are pliers that are designed for doing this which can also remove them. Most good archery stores sell both the pliers and the brass nock points.
Storing your Bow Ensure your bow is unstrung when being stored. Store your bow in a cool and dry place. You should avoid too much exposure to excessive
heat and dampness. Never put your bow into storage when its’ wet. You need to dry it first with a cloth to remove any excess water. Never use heat to dry your bow as this will damage it.
Never leave your bow in the car on a sunny day. The heat inside the car will seriously damage your bow.
.
Other Points of care Unstring your bow when not in use. Should you get your bow wet; dry it off immediately. Never use bow strings that are too short or too long for your bow. You can easily confirm
this by checking the brace height. For more info check out ‘String Brace Height’ section listed under ‘Archery Knowledge’.
Never shoot a bow with a damaged string. Should the string break when the bow is at full draw; it can not only break or severely damage your bow but you can badly injure yourself.
Never shoot a damaged arrow.
Version 0.81 Page 22 May 2013
Archery Knowledge (for Archery 102)
String Brace Height (for Archery 102)
Big or small fletchings (for Archery 102)
Refining your Nock Point (for Archery 102)
Bow poundage (performance) (for Archery 102) Most bows’ poundage is measured at 28 inches of draw. This means that the distance between the bow and the string when pulled back is 28 inches. While this is a good guild for most bows it in no means prefect unless your draw length happens to be 28”. On a bow that is 35lbs at 28” you may find that you only draws the string back 25” meaning that you may only get 30lbs and not the 35lbs draw weight. Please also note that bows with the same poundage at 28” are not always the same poundage at different draw lengths i.e. 50lbs @ 28” longbow when drawn to 25” may give 30lbs; where as a 50lbs @ 28” recurves when drawn to 25” may give 35lbs. So you if you want to know how much poundage you are drawing then you will need to measure your draw length and then measure the bow draw weight at that length. Once you know your draw length you can compare different bows draw weight Remember, more poundage does not always mean better
Refining your Arrow Length/weight (for Archery 102)
What causes stacking? (for Archery 102)
What is the bow Set? (for Archery 102)
Longbows Vs Recurves (for Archery 102)

Version 0.81 Page 23 May 2013
Making Archery Equipment
Making a target stand (for Archery 102)
Making Arrows (for Archery 102)
Self Nocking your Arrows (for Archery 102)
Making a bow string (for Archery 102)
Making a bow bag (for Archery 102)

Version 0.81 Page 24 May 2013
Thanks & Acknowledgements I would like to thank my wife Caitriona for help with proof reading and fact checking. A really big thank you goes to Roy Kane for teaching me how to shoot right and showing me how much fun archery can be and also the joy found in teaching others.


