114
Learning portfolio MAURICIO GUEVARA ARCH20 GOGGLE SKETCH UP WORK TEACHER: JERRY LUM
| Date post: | 22-Jul-2016 |
| Category: |
Documents |
| Upload: | mauricio-m-guevara |
| View: | 216 times |
| Download: | 0 times |

Learning portfolioMAURICIO GUEVARA ARCH20 GOGGLE SKETCH UP WORK TEACHER:
JERRY LUM

Table of content: exercises and
projects
week 10.1: dog house pg. 3-9
Week 11: circular stair pg. 9-18
Week 12:Malevich model pg. 19-27
week 14:finding ,intersect, sand box studies pg. 28 -42
Week 15:interior studies pg. 43-54
Week 16:photo matching gallery pg. 55-67
Week 17:cabin home pg. 68-100

Week 10:Dog house
In week 1 we started with the dog house
which was simple and easy project to form
and make but it had challenges. This week it
allow to explore some tools in google sketch
up and to have fun building dog house for
various kind of dogs.

Week 10.1: dog house


Dog house
STRENGTH
• Push/ pull tool: this
was a fun tool to use
and easy to mange.
• Rectangle tool: this
tool my base to make
the has helped to
build the base to
make a solid to start
building.
• Import from 3d
warehouse: I
imported the dogs
from there which was
easy.
WEAKNESS
• tape measure/guides:
this week this tool got
me a little confused
on how to make the
guide lines going with
the red axis and blue
axis.
• Scale tool: this tool
was easy but
sometimes it was
hard to switch the
object t o the other
side.
CHALLENGEThis week challenge
was to make a doghouse
an some of the
challenges that I learn
to beat was to rotate
and use the tape
measure guide to make
the door opening for the
dogs and also to
duplicate a lot the
square as I had as
foundation and to fit the
dogs right in place by
scaling them. Also
making circles shape
were hard.

SLO 1: Create accurate drawings that communicate
simple architectural design intentions. 8
Apply graphic conventions and standards appropriately
8
Relate each drawing within a set to each other to
fully describe significant aspects of a design from the general to the specific
7
Demonstrate a correspondence between the
design intentions to be communicated and the
graphic representations produced to communicate them
8
Produce drawing that are readable and meaningful to others
8
SLO 2: Analyze the specific intentions communicated
by analog and digital modes of graphic
communication.
8
Identify the intended message(s) behind the graphic
communication, whether produced by analog or digital
means
8
Assess the integrity of the message(s) – identify the
strengths and weaknesses of the represented
intentions
8
Assess the efficacy of the related graphic representa-
tion(s) 8
Propose enhancements to what is being graphically
communicated 8
(insert project name here): SLO Progress Report
ARCH 20 / SPRING 2015 SLO ASSESSMENT v.2.0

SLO 3: Apply use of scales, line quality, graphic
conventions, and drawing systems and techniques. 8
Create clear and appropriately ordered hierarchies of
visual information 5
Compose elements of a drawing in a clear organized
manner that relates visual information on each drawing
and between sets of related drawings
7
SLO 4: Demonstrate an understanding of the purposes
of various architectural graphic techniques. 8
Identify the similarities and differences between: 8
Orthographic projections: plan, section,
elevations, and details
8
Paraline drawing: isometric and oblique8
Perspective drawing: 1-, 2- and 3-point3
Compare and contrast the graphic systems describe
directly above6
Demonstrate an integrated use of analog and digital
tools in the process of developing a set of design
intentions
7
( dog house): SLO Progress Report – continued
ARCH 20 / SPRING 2015 SLO ASSESSMENT v.2.0

Week 11:circular stairs
This week we work in stairs. This was very fun but
sometimes got really challenging.it was a medium level
project. In this project I had many challenge and learn how
to do a spiral stair by scratch which was really easy but
then it got a little difficult when I did the other steps such
as Making the stairs and each tread of it, then rising them
spirally. The rails were really fun to builds. In this week I
had the chance to do build one and experiment with
making stairs for any future projects and also learn new
tools which were really interesting, that can help for any
project in sketch up and to amply my design knowledge to
make it more efficient.

Week 11: circular stairs


Week 11: strength
.one of my strength was the circle tool which was really fun and easy to use, which gave the opportunity to learn that a simple shape can be anything and be base for a building..
.another strength in this week was that “make component” which helped worked with the 24 treads to move the up to make them into a spiral shape stairs.
.line tool was really fun and good to helped make one the treads so that I could make it a origin tread for the others.
.shadows was really easy and it helped make a more realistic and convincing presentation for any other projects.

weakness
.I had hard time struggling with making a radius
inside my original circle to make treads.
. Another struggle was the rails and follow me tool
which when I tried to use it didn’t work or it didn’t
the way I expect it to go.
.the rotate tool was in the beginning hard to use to
make the rest of treads which was not my favorite
part of the project but necessary to make it into a
spiral stairs.

Challenges
.One of the many challenges was to move up each of
the treads up so could build the stair, it was
challenging because it was time consuming and it had
to go certain way.
.Making the hand railway was very challenging because
I had to select the many objects and use the follow me
tool which was not easy and fun but it got good results.
.Final challenge of week 1,was the wedges form which
was I had hard time to do because I got stuck in some
steps into making this shape for the tread.

SLO 1: Create accurate drawings that communicate
simple architectural design intentions. 7
Apply graphic conventions and standards appropriately
5
Relate each drawing within a set to each other to
fully describe significant aspects of a design from the general to the specific
4
Demonstrate a correspondence between the
design intentions to be communicated and the
graphic representations produced to communicate them
5
Produce drawing that are readable and meaningful to others
8
SLO 2: Analyze the specific intentions communicated
by analog and digital modes of graphic
communication.
6
Identify the intended message(s) behind the graphic
communication, whether produced by analog or digital
means
5
Assess the integrity of the message(s) – identify the
strengths and weaknesses of the represented
intentions
6
Assess the efficacy of the related graphic representa-
tion(s) 6
Propose enhancements to what is being graphically
communicated 5
(Circular stairs): SLO Progress Report
ARCH 20 / SPRING 2015 SLO ASSESSMENT v.2.0

SLO 3: Apply use of scales, line quality, graphic
conventions, and drawing systems and techniques. 9
Create clear and appropriately ordered hierarchies of
visual information 8
Compose elements of a drawing in a clear organized
manner that relates visual information on each drawing
and between sets of related drawings
7
SLO 4: Demonstrate an understanding of the purposes
of various architectural graphic techniques. 6
Identify the similarities and differences between: 7
Orthographic projections: plan, section,
elevations, and details
8
Paraline drawing: isometric and oblique8
Perspective drawing: 1-, 2- and 3-point2
Compare and contrast the graphic systems describe
directly above6
Demonstrate an integrated use of analog and digital
tools in the process of developing a set of design
intentions
6
(Circular stairs): SLO Progress Report – continued
ARCH 20 / SPRING 2015 SLO ASSESSMENT v.2.0

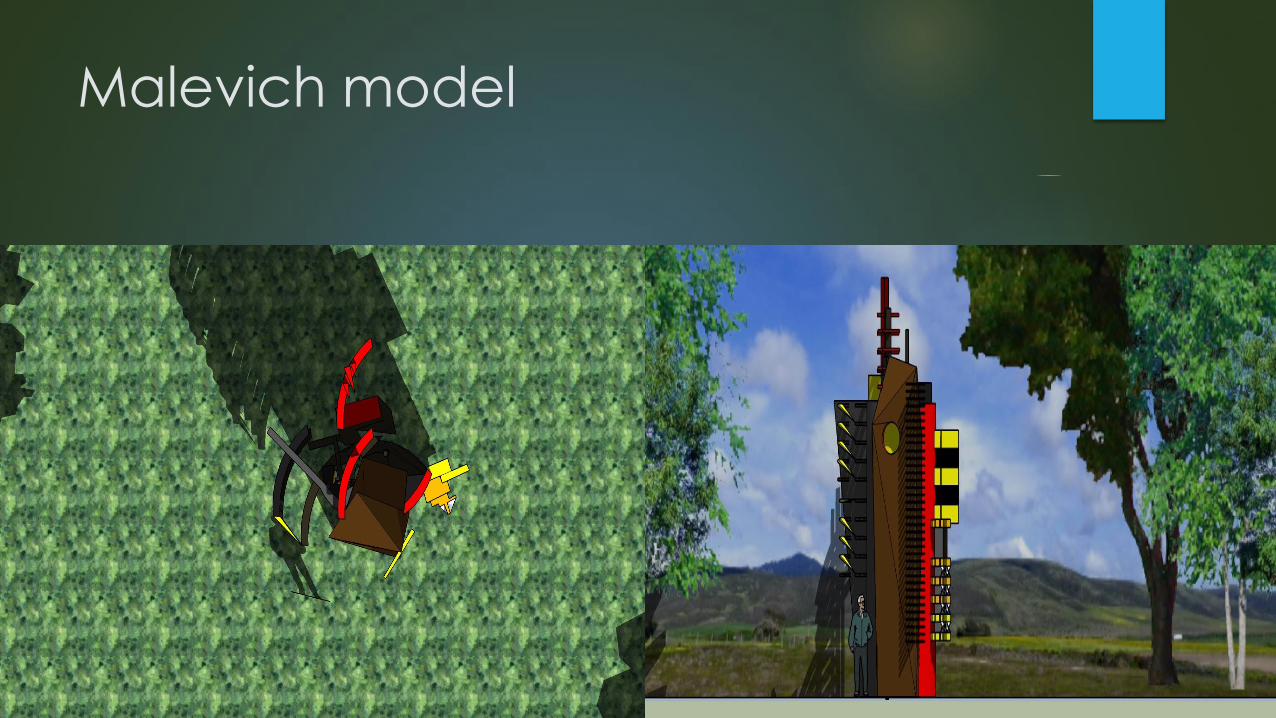
Week 12: Malevich model
Malevich model was really inspiring and artistic
project to do in sketch up. This project was
inspired by a painting move to a Malevich template
in the software. It has a hierarchal complex style
this building, which come from Russian
constructiusm. This was really fun and easy to do
and it wasn’t so difficult at all. There were few
challenges but overall it was fun experienced to
build this in google sketch up and play around with
tools.

Week 12: Malevich model
Malevich model


Week 12: Strength
. One of the strength for the Malevich model was importing
the file with the image into google sketch up which permitted
me to make the building and get pieces to make something
monumental and that defies gravity.
.the push and pull tool was fun because I got pieces and
design them to make a building that heroic and to combine
pieces of the painting that I wanted .
. The line and 2 point arc tool was very useful in this model
because once I lay down my the image I got to trace pieces
if the painting that I wanted to make what I have in my
images.
.also using the x-ray style was big help to see through the
painting while I was tracing and pushing the pieces I wanted
to make my building.
.finally importing, the blue sky backroad image was fun and
also a thing I learned that I can add a background to the
project/model and this make it more realistic.

Weakness
.Making scenes was one of the weakness I had
because it was new and also I had to get good shot of
the scenes.
.rotation: the rotating was kind hard in this case
because sometimes I rotate it the wrong direction and
other times I had to play with this tool to learn how to
rotate it to position I wanted and to fit the image.

Challenges
.One of the challenges I had was tracing and doing
as approximately as each piece ended and
guessing where they ended.
.Layering each group and this building was another
challenge, it was new and I didn’t know how to use
this tool but it gave a chance to use it.
.Finding a design for the building was hard and
difficult and I had to play around with these
building to make it heroic, monumental, and
complex structure element.

SLO 1: Create accurate drawings that communicate
simple architectural design intentions. 8
Apply graphic conventions and standards appropriately
7
Relate each drawing within a set to each other to
fully describe significant aspects of a design from the general to the specific
5
Demonstrate a correspondence between the
design intentions to be communicated and the
graphic representations produced to communicate them
7
Produce drawing that are readable and meaningful to others
7
SLO 2: Analyze the specific intentions communicated
by analog and digital modes of graphic
communication.
6
Identify the intended message(s) behind the graphic
communication, whether produced by analog or digital
means
7
Assess the integrity of the message(s) – identify the
strengths and weaknesses of the represented
intentions
5
Assess the efficacy of the related graphic representa-
tion(s) 5
Propose enhancements to what is being graphically
communicated 5
(Malevich model): SLO Progress Report
ARCH 20 / SPRING 2015 SLO ASSESSMENT v.2.0

SLO 3: Apply use of scales, line quality, graphic
conventions, and drawing systems and techniques. 8
Create clear and appropriately ordered hierarchies of
visual information 10
Compose elements of a drawing in a clear organized
manner that relates visual information on each drawing
and between sets of related drawings
7
SLO 4: Demonstrate an understanding of the purposes
of various architectural graphic techniques. 8
Identify the similarities and differences between: 7
Orthographic projections: plan, section,
elevations, and details
7
Paraline drawing: isometric and oblique7
Perspective drawing: 1-, 2- and 3-point1
Compare and contrast the graphic systems describe
directly above4
Demonstrate an integrated use of analog and digital
tools in the process of developing a set of design
intentions
6
(Malevich model): SLO Progress Report – continued
ARCH 20 / SPRING 2015 SLO ASSESSMENT v.2.0

Week 14:folding, intersect,
sandbox studies
Week 14 we work on using tools such us
folding, intersect and the sandbox studies.
This were tools that were challenging to
use and fun at the same time. Also, it added
to my sketch up knowledge new tools that
I can use and play around. This week I learn
a lot, as adding landscape and other new
things. We work in making paper airplanes
and putting them in sketch up virtually and
also making a building block with style and
a stairs going around.

Week 14:finding,intersect, sand box
studies


Week 14: Strength
.duplicating was easy and good tool to show
how I did my paper airplane and the process
it took and also to make my original airplane
and copying it to make an army of airplanes.
.another tool that was my strength is using
guide lines which help determine were I
should precisely fold each piece my airplanes
and give the guide to make it into an airplane.
.the group tool was really easy and helped
duplicate one airplane into many airplanes
.fog was unique feature that enhance my
model to feel really realistic.

weakness.one of the weakness was using the
rotate tool in this week because in the
beginning I was rotating the airplanes
into wrong direction and had to figure
it out and play with it to make my
airplane into the right direction.
.the mirror tool was a struggle in this
model because I had to figure out in
the beginning how to make the half of
the airplane exactly as the mirror one
and it took along time to use it.

Challenges.a challenge this week for me was folding and the
reason is that I had never used this and also it
took me awhile to get used to folding the airplanes
and sometimes I got stuck and folded into the
wrong direction.
.Another challenge was reversing faces so the line
couldn’t been seen of the airplane and it would
been a solid faces hic was time consuming
reversing each faces of the airplanes and at
certain point it got stressful.
.repeating the process wasn’t fun and it was
sometimes a challenge, remembering each step
and the measures were the guide lines had to go
and were to fold exactly.

SLO 1: Create accurate drawings that communicate
simple architectural design intentions. 8
Apply graphic conventions and standards appropriately
7
Relate each drawing within a set to each other to
fully describe significant aspects of a design from the general to the specific
5
Demonstrate a correspondence between the
design intentions to be communicated and the
graphic representations produced to communicate them
7
Produce drawing that are readable and meaningful to others
8
SLO 2: Analyze the specific intentions communicated
by analog and digital modes of graphic
communication.
7
Identify the intended message(s) behind the graphic
communication, whether produced by analog or digital
means
7
Assess the integrity of the message(s) – identify the
strengths and weaknesses of the represented
intentions
5
Assess the efficacy of the related graphic representa-
tion(s) 7
Propose enhancements to what is being graphically
communicated 5
(folding ,intersect, sandbox studies): SLO Progress
ReportARCH 20 / SPRING 2015 SLO ASSESSMENT v.2.0

SLO 3: Apply use of scales, line quality, graphic
conventions, and drawing systems and techniques. 7
Create clear and appropriately ordered hierarchies of
visual information 7
Compose elements of a drawing in a clear organized
manner that relates visual information on each drawing
and between sets of related drawings
6
SLO 4: Demonstrate an understanding of the purposes
of various architectural graphic techniques. 8
Identify the similarities and differences between: 6
Orthographic projections: plan, section,
elevations, and details
8
Paraline drawing: isometric and oblique8
Perspective drawing: 1-, 2- and 3-point3
Compare and contrast the graphic systems describe
directly above6
Demonstrate an integrated use of analog and digital
tools in the process of developing a set of design
intentions
7
(folding, intersect, sandbox studies ): SLO Progress
Report – continued
ARCH 20 / SPRING 2015 SLO ASSESSMENT v.2.0

Week 15: interior studiesInterior studies was a cool challenge and a
fun week because I learn a lot how the light
through a widow can make impact to
environment and this project help build
windows, skylight and various rooms to
show this impact. Also it this week I learn
how the colors can impact a room and
other materials. This was really fun
experienced and I could apply different
materials that I could used. There were a
lot of challenges that helped improved and
play around building this model. I have to
say overall this was a learning week.

Week 14 :interior studies


Week 15: strength
.One of the strength was this week is using the
offset tool which permitted me to build the outside
walls with thickness and add a design with
windows.
.Guidelines were really helpful in this project to
make each of the windows equally sized and to
make a door with windows that contributed to
make the environment fill with sunlight.
.group tool was a big help to create the right
opening to put my windows and add sunlight a
peaceful environment.
.square tool was a fundamental help to create the
base of my rooms an with it w.as the push an pull

weakness
.A weakness that I had was using
layering which still was hard to get
used to.

challenges
. A challenge was in this week was making the
skylight in the roof because sometimes it didn't
went through to make sunlight come to the room.
.making the windows were kind of difficult and
time consuming of all the details I had to paint and
push and pull and other steps I had to take to make
it visible to see through and to see the room.
. Another challenge I had was that sometimes it
stop and took a while to load which slow me to
finish this model.
. The windows opening was really hard to make.

SLO 1: Create accurate drawings that communicate
simple architectural design intentions. 6
Apply graphic conventions and standards appropriately
6
Relate each drawing within a set to each other to
fully describe significant aspects of a design from the general to the specific
5
Demonstrate a correspondence between the
design intentions to be communicated and the
graphic representations produced to communicate them
7
Produce drawing that are readable and meaningful to others
7
SLO 2: Analyze the specific intentions communicated
by analog and digital modes of graphic
communication.
7
Identify the intended message(s) behind the graphic
communication, whether produced by analog or digital
means
7
Assess the integrity of the message(s) – identify the
strengths and weaknesses of the represented
intentions
7
Assess the efficacy of the related graphic representa-
tion(s)
Propose enhancements to what is being graphically
communicated 8
(Interior studies): SLO Progress Report
ARCH 20 / SPRING 2015 SLO ASSESSMENT v.2.0

SLO 3: Apply use of scales, line quality, graphic
conventions, and drawing systems and techniques. 7
Create clear and appropriately ordered hierarchies of
visual information 8
Compose elements of a drawing in a clear organized
manner that relates visual information on each drawing
and between sets of related drawings
7
SLO 4: Demonstrate an understanding of the purposes
of various architectural graphic techniques. 9
Identify the similarities and differences between: 7
Orthographic projections: plan, section,
elevations, and details
7
Paraline drawing: isometric and oblique8
Perspective drawing: 1-, 2- and 3-point2
Compare and contrast the graphic systems describe
directly above7
Demonstrate an integrated use of analog and digital
tools in the process of developing a set of design
intentions
7
(Interior studies): SLO Progress Report – continued
ARCH 20 / SPRING 2015 SLO ASSESSMENT v.2.0

Week 16:photo match gallery
In week 16, we work in photo match gallery. This
project was hard and I had to apply a lot of tools
into bringing to life this building from a picture. It
was fun and I learn new things such as from a
photograph I can make the exact building that is in
the picture. This help improve a lot on the use on
tool in sketch up and use my horizon line because,
including practice on layers which was fun. This
took a while to build it in sketch up because I had
to guess how approximately were each line finish.
Overall this help learn a lot and got the chance to
play around with tool and the design of the
building.

Week 16: photo match
galley


Week 16: Strength.On camera>match new photo was and easy
step and also useful to transport and image
work in the image and also position the
image.
.windows>styles>edit was a good tool that
help see where each lines went and making
it to translucent help me see if my lines
were going parallel edges so they can
create a solid.
. The orbit tool was big help to see the how
was my building was going along and if I
had to fix anything and see the whole
building.

weakness
.scale tool was a hard tool in this building
cause I had to scale to a size in which I
could trace my building to make it into
solid and also from the picture, the model
had to be like the picture.
.using the match dialog box was really
confusing and difficult. It was new tool and
in the beginning I didn’t know how to use it
but then a became a good element to
resized my photo.

challenges
.tracing was a challenge in this project because I
had to make the lines parallel to the edges and It
had to snap to crated a solid surface which was
my objective.
.making the stair s were really challenging in this
building because I had to guess aproximately how
the measurement of the stairs were and it had to
connect so it would be visible and walkable.
.The rails in the stairs were time confusing and I
had hard building the to make it and so it can add
life to the building and be more realistic.
.waiting was a challenge because sometimes it
had and slow me down to complete my building.

SLO 1: Create accurate drawings that communicate
simple architectural design intentions. 8
Apply graphic conventions and standards appropriately
7
Relate each drawing within a set to each other to
fully describe significant aspects of a design from the general to the specific
6
Demonstrate a correspondence between the
design intentions to be communicated and the
graphic representations produced to communicate them
7
Produce drawing that are readable and meaningful to others
9
SLO 2: Analyze the specific intentions communicated
by analog and digital modes of graphic
communication.
7
Identify the intended message(s) behind the graphic
communication, whether produced by analog or digital
means
6
Assess the integrity of the message(s) – identify the
strengths and weaknesses of the represented
intentions
5
Assess the efficacy of the related graphic representa-
tion(s) 8
Propose enhancements to what is being graphically
communicated 7
(Photo match gallery): SLO Progress Report
ARCH 20 / SPRING 2015 SLO ASSESSMENT v.2.0

SLO 3: Apply use of scales, line quality, graphic
conventions, and drawing systems and techniques. 9
Create clear and appropriately ordered hierarchies of
visual information 5
Compose elements of a drawing in a clear organized
manner that relates visual information on each drawing
and between sets of related drawings
7
SLO 4: Demonstrate an understanding of the purposes
of various architectural graphic techniques. 8
Identify the similarities and differences between: 6
Orthographic projections: plan, section,
elevations, and details
8
Paraline drawing: isometric and oblique7
Perspective drawing: 1-, 2- and 3-point3
Compare and contrast the graphic systems describe
directly above6
Demonstrate an integrated use of analog and digital
tools in the process of developing a set of design
intentions
8
(Photo match gallery): SLO Progress Report –
continued
ARCH 20 / SPRING 2015 SLO ASSESSMENT v.2.0

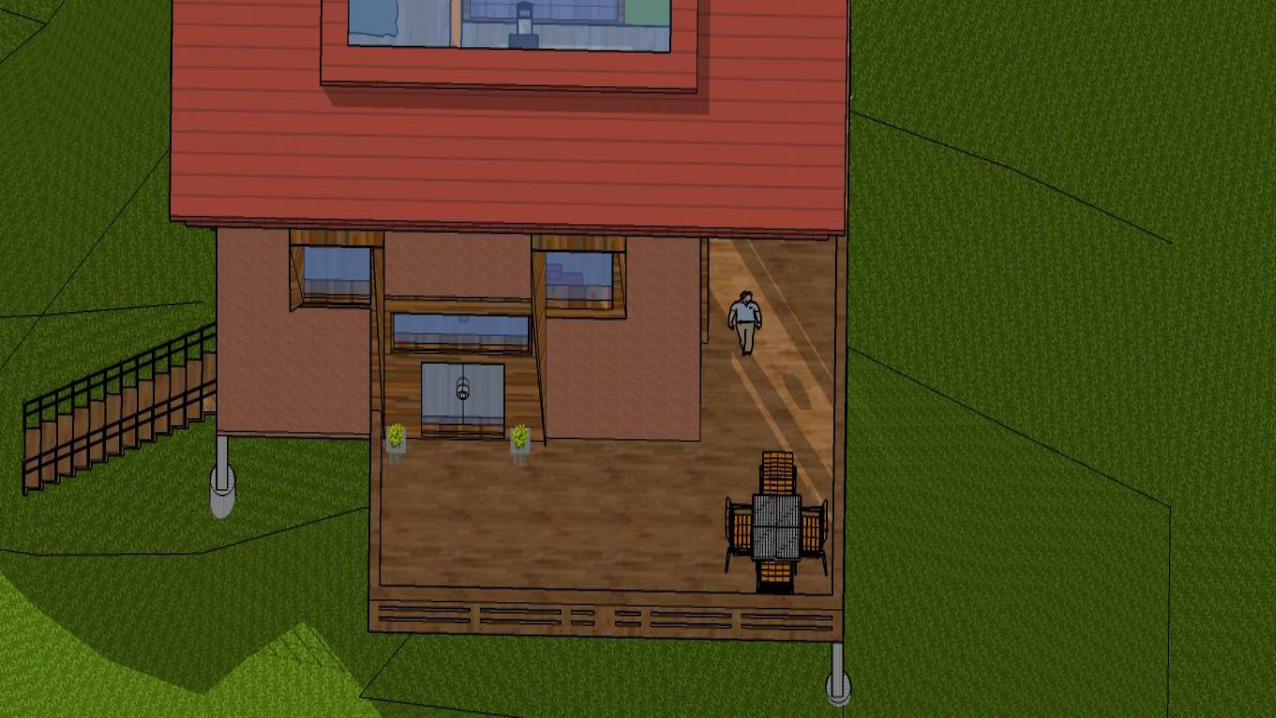
Week 17: cabin house This week was really exhausting and challenging. I
worked in cabin house that I had to design and it
was fun experience but sometimes it got really
challenging. This project, I described as using all
my knowledge that I learn from the previous
models and using all the tools that I know and
learn through this class and make a nice cabin.
While working in this cabin I was thinking who do I
want to sell this and I thought and a couple with no
kids. In words, I would decried my cabin: modern,
unique, and from the inside very custom made. It
wasn’t easy it took a bunch of hours to design this
and work in this. I had my weaknesses but overall
it helped learn more about what kind of designer I
am and want to be.

Week 17: final project: cabin
house


Week 17: Strength .Guidelines were a big help to create the design
of the exterior were my windows were going to
come in and also it help make the doors to the
house.
.the sandbox was a fun tool and playful. I got to
play with it and decide how I wanted my house to
go and how I wanted my landscape to go.
.stamp and drape was easy going and it help create
a path for my home to the stairs.
.importing a image as my background my favorite
part because I it got a sense of environment into
the building and felt like a real cabin and look like
one.
.group tool was a help to move the whole cabin.

weakness.ladder was stressful making it and
also it was ha hard in the beginning
to find how I was going to form it and
make it to life.
.the roof was hard to find a design
that suit my building and to fit in for
the style of building I choose for my
cabin.
.organizing the animations were a
weakness and took a lot of time to
make them into story.

Challenges.The windows were a challenge because I did them
from scratch and sometimes I had to go the interior
to make it visible and see through the house.
.the beams were hard to make, even I had to go to
YouTube to see videos tutorial on how to make the
beams.
.finding a design was one of the biggest challenges
I had in this project because I wanted something
unique modern with old style cabin feel.
.sometimes sketch up stop and I had to wait a lot
to get back to work on my cabin and once it got
stuck and deleted some of the work I had done on
my cabin and had to redo it again the next day
which was really stressful.

SLO 1: Create accurate drawings that communicate
simple architectural design intentions. 8
Apply graphic conventions and standards appropriately
5
Relate each drawing within a set to each other to
fully describe significant aspects of a design from the general to the specific
5
Demonstrate a correspondence between the
design intentions to be communicated and the
graphic representations produced to communicate them
5
Produce drawing that are readable and meaningful to others
7
SLO 2: Analyze the specific intentions communicated
by analog and digital modes of graphic
communication.
7
Identify the intended message(s) behind the graphic
communication, whether produced by analog or digital
means
5
Assess the integrity of the message(s) – identify the
strengths and weaknesses of the represented
intentions
8
Assess the efficacy of the related graphic representa-
tion(s) 8
Propose enhancements to what is being graphically
communicated 5
(Cbin house): SLO Progress Report
ARCH 20 / SPRING 2015 SLO ASSESSMENT v.2.0

SLO 3: Apply use of scales, line quality, graphic
conventions, and drawing systems and techniques. 8
Create clear and appropriately ordered hierarchies of
visual information 6
Compose elements of a drawing in a clear organized
manner that relates visual information on each drawing
and between sets of related drawings
8
SLO 4: Demonstrate an understanding of the purposes
of various architectural graphic techniques. 8
Identify the similarities and differences between: 5
Orthographic projections: plan, section,
elevations, and details
8
Paraline drawing: isometric and oblique7
Perspective drawing: 1-, 2- and 3-point3
Compare and contrast the graphic systems describe
directly above6
Demonstrate an integrated use of analog and digital
tools in the process of developing a set of design
intentions
7
(Cabin house): SLO Progress Report – continued
ARCH 20 / SPRING 2015 SLO ASSESSMENT v.2.0


