Measurement Lesson Sequence: Area Lehrer, R. & Knapp, N. (2008) 1 AREA MEASURE Richard Lehrer & Nina Knapp Vanderbilt University 2008 This is a series of lessons designed to support the growth of students’ understanding of area measure. The first lesson, Comparing Rectangles, is intended to provoke spatial structuring of a 2- dimensional space as students compare the space covered (area) by 3 different looking rectangles. By folding and re-arranging pieces, students discover that despite appearances, all three rectangles enclose the same space. Unit of measure emerges as a privileged partition—the same subdivision of space can be counted and used to compare the space enclosed by each figure. Either rectangular or square units typically emerge during this activity. After establishing the equivalence of the space enclosed by each figure (by equivalent counts of the same units), students are further challenged to construct many different space figures of equal area. The perimeters and area of each figure are recorded. The aim is to help children differentiate length and area measure. The next lesson, Whose Hand Covers the Most Space? provokes consideration of the qualities of a suitable unit of area measure, and introduces the need to label and combine partitions of units. Students trace an outline of their hand, and they propose means to rank order the space covered by each handprint. Tools provided include beans, buttons (because their contour resembles that of the hand), spaghetti, rope and square grid paper. Students work in pairs to develop a strategy to determine the space covered (the area). They can use any of the tools that are provided. As students compare strategies, the teacher selects strategies for comparison that will make evident qualities such as identical units (are the beans all of the same size?) and space- filling (are there any “cracks?”). After students have a chance to consider the qualities of their choice of unit, the teacher either introduces square grid paper or asks students who have chosen square grid paper to demonstrate their solution. This sets the stage for using partial units, because the measure using squares of the grid is not a whole number. The third lesson, Classroom Space, introduces the notion of comparing the areas of different enclosures (classrooms) by coordinating units of length measure to constitute units of area measure. The enclosures are rectangular or are formed by combinations of rectangular units. Students can use rulers to measure the length of the sides, and they are challenged to consider how knowing the length of each side can be used to create a unit of area measure. Students then partition a few of the enclosures and count the number of units formed by these partitions. The lesson culminates in the development of a formula for finding the area of any rectangle.
Transcript
Measurement Lesson Sequence: Area Lehrer, R. & Knapp, N. (2008)
1
AREA MEASURE
Richard Lehrer & Nina Knapp
Vanderbilt University
2008
This is a series of lessons designed to support the growth of students’ understanding of area measure.
The first lesson, Comparing Rectangles, is intended to provoke spatial structuring of a 2-dimensional space as students compare the space covered (area) by 3 different looking rectangles. By folding and re-arranging pieces, students discover that despite appearances, all three rectangles enclose the same space. Unit of measure emerges as a privileged partition—the same subdivision of space can be counted and used to compare the space enclosed by each figure. Either rectangular or square units typically emerge during this activity. After establishing the equivalence of the space enclosed by each figure (by equivalent counts of the same units), students are further challenged to construct many different space figures of equal area. The perimeters and area of each figure are recorded. The aim is to help children differentiate length and area measure.
The next lesson, Whose Hand Covers the Most Space? provokes consideration of the qualities of a suitable unit of area measure, and introduces the need to label and combine partitions of units. Students trace an outline of their hand, and they propose means to rank order the space covered by each handprint. Tools provided include beans, buttons (because their contour resembles that of the hand), spaghetti, rope and square grid paper. Students work in pairs to develop a strategy to determine the space covered (the area). They can use any of the tools that are provided. As students compare strategies, the teacher selects strategies for comparison that will make evident qualities such as identical units (are the beans all of the same size?) and space-filling (are there any “cracks?”). After students have a chance to consider the qualities of their choice of unit, the teacher either introduces square grid paper or asks students who have chosen square grid paper to demonstrate their solution. This sets the stage for using partial units, because the measure using squares of the grid is not a whole number. The third lesson, Classroom Space, introduces the notion of comparing the areas of different enclosures (classrooms) by coordinating units of length measure to constitute units of area measure. The enclosures are rectangular or are formed by combinations of rectangular units. Students can use rulers to measure the length of the sides, and they are challenged to consider how knowing the length of each side can be used to create a unit of area measure. Students then partition a few of the enclosures and count the number of units formed by these partitions. The lesson culminates in the development of a formula for finding the area of any rectangle.
Measurement Lesson Sequence: Area Lehrer, R. & Knapp, N. (2008)
2
The fourth lesson, Sweeping Space, emphasizes area as constituted by motion. Given a fixed length, children sweep that length through another length (see Figure i below). The lesson poses problems with rectangles and concludes with a challenge involving the surface area of a cylinder.
Figure i. Sweeping Area Two lengths, with one pulled along the length of the other, construct a planar region. The area is measured by finding the ratio of a unit (or a unit sweep) to the total area swept.
The fifth lesson, Parts and Wholes, suggests that length need not be considered only as measured in whole numbers, so problems like those posed in the third and fourth lesson are revisited from the perspective of lengths involving fractional quantities. The sixth lesson, Finding and Comparing Areas of Triangles, capitalizes on the formula for the area of the rectangle to develop the area of any triangle. The seventh lesson, Polygon Area, employs the area for the formula of a triangle to find the area of other polygons, such as quadrilaterals and hexagons. Students are challenged to develop a general formula for area.
The eight lesson, Area of a Circle, considers a circle as an n-gon and develops the formula for the area of a circle as an extension of the general polygon area formula as the number of sides
becomes infinite.
Measurement Lesson Sequence: Area Lehrer, R. & Knapp, N. (2008)
3
LESSON 1: Which Covers the Most Space?
Comparing Rectangles Overview & Big Idea: The lesson is intended to provoke spatial structuring of a 2-dimensional space as students compare the space covered (area) by 3 different looking rectangles. By folding and re-arranging pieces, students can establish that the three figures are in fact additively congruent—meaning that the pieces of one rectangle can be used to completely cover a second rectangle. (The assumption is that students understand that congruent figures cover the same amount of space.) Unit of measure emerges as a privileged partition (usually a square or a rectangle) that allows a student to more efficiently compare the space enclosed by each figure, simply by counting. Rather than giving students a unit to use to cover and count, this problem asks that the student invent the unit, because this invention requires the student to structure the space by partitioning it. Because area measure is a ratio of the space enclosed by a plane figure and the unit, the experience of inventing the unit is a practical introduction to this relationship. The lesson concludes with the problem of drawing different space figures using the same collection of units. This further elaborates the notion that despite appearances, figures can have the same area measure. Furthermore, the length around each figure (the perimeter) is found. The aim is to help students differentiate length from area measure. Extensions of the last part of the lesson might include investigation of the configuration that results in the least perimeter and the greatest. This extension investigation requires that students first consider rules for joining the units. For instance, must the units share a side? Materials: Three rectangles constructed from large, unmarked chart paper with (horizontal x vertical) dimensions of: 12 x 1, 4 x 3, and 2 x 6 labeled A, B, and C (See Figure 1). Rectangles must be constructed so there are no folds or tape lines. Do not laminate or use paper with lines, grids, or other markings. If working with a whole group, make large rectangles with the dimensions scaled as: A = 48” x 4”; B = 16” x 12”; C = 8” x 24”. A B C
Figure 1. Rectangles A, B, and C Activity Structure: Whole Group Discussion. Present the rectangles to the class, showing them one at a time. If possible, attach them to the board with magnets or tape so children can see all three at once and make comparisons across the rectangles. Tell the students you are making a
Measurement Lesson Sequence: Area Lehrer, R. & Knapp, N. (2008)
4
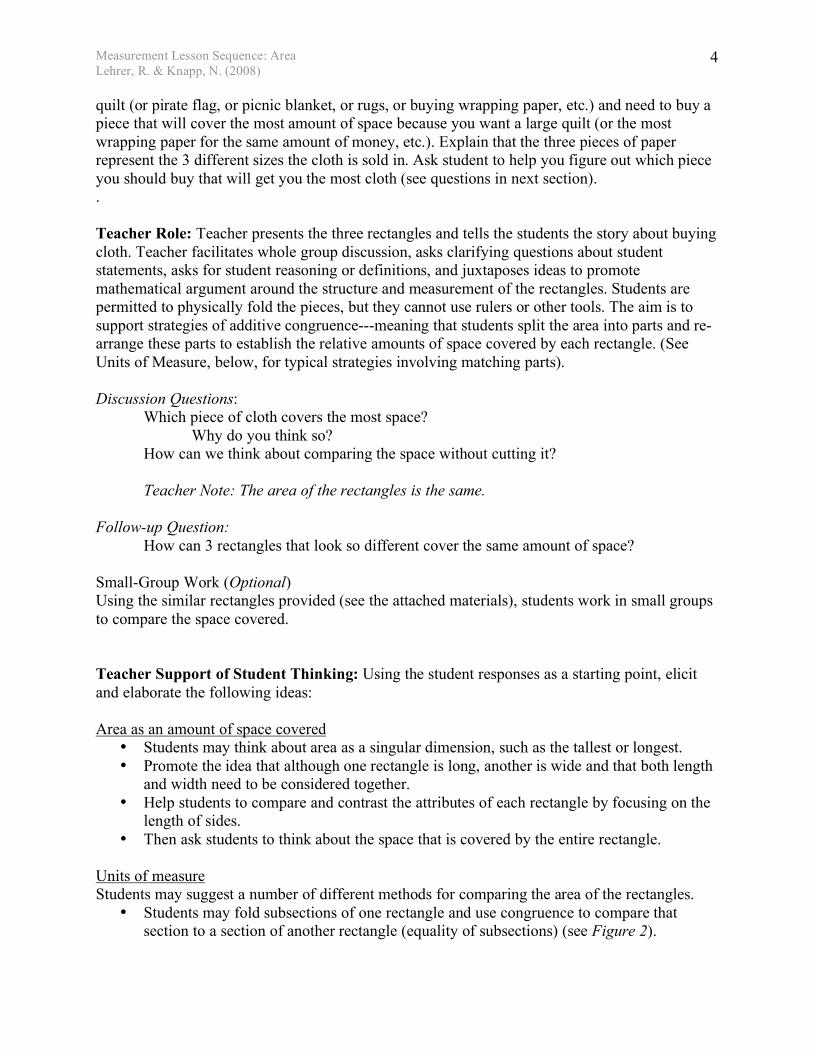
quilt (or pirate flag, or picnic blanket, or rugs, or buying wrapping paper, etc.) and need to buy a piece that will cover the most amount of space because you want a large quilt (or the most wrapping paper for the same amount of money, etc.). Explain that the three pieces of paper represent the 3 different sizes the cloth is sold in. Ask student to help you figure out which piece you should buy that will get you the most cloth (see questions in next section). . Teacher Role: Teacher presents the three rectangles and tells the students the story about buying cloth. Teacher facilitates whole group discussion, asks clarifying questions about student statements, asks for student reasoning or definitions, and juxtaposes ideas to promote mathematical argument around the structure and measurement of the rectangles. Students are permitted to physically fold the pieces, but they cannot use rulers or other tools. The aim is to support strategies of additive congruence---meaning that students split the area into parts and re-arrange these parts to establish the relative amounts of space covered by each rectangle. (See Units of Measure, below, for typical strategies involving matching parts). Discussion Questions:
Which piece of cloth covers the most space? Why do you think so?
How can we think about comparing the space without cutting it? Teacher Note: The area of the rectangles is the same.
Follow-up Question: How can 3 rectangles that look so different cover the same amount of space?
Small-Group Work (Optional) Using the similar rectangles provided (see the attached materials), students work in small groups to compare the space covered. Teacher Support of Student Thinking: Using the student responses as a starting point, elicit and elaborate the following ideas: Area as an amount of space covered
�• Students may think about area as a singular dimension, such as the tallest or longest. �• Promote the idea that although one rectangle is long, another is wide and that both length
and width need to be considered together. �• Help students to compare and contrast the attributes of each rectangle by focusing on the
length of sides. �• Then ask students to think about the space that is covered by the entire rectangle.
Units of measure Students may suggest a number of different methods for comparing the area of the rectangles.
�• Students may fold subsections of one rectangle and use congruence to compare that section to a section of another rectangle (equality of subsections) (see Figure 2).
Measurement Lesson Sequence: Area Lehrer, R. & Knapp, N. (2008)
5
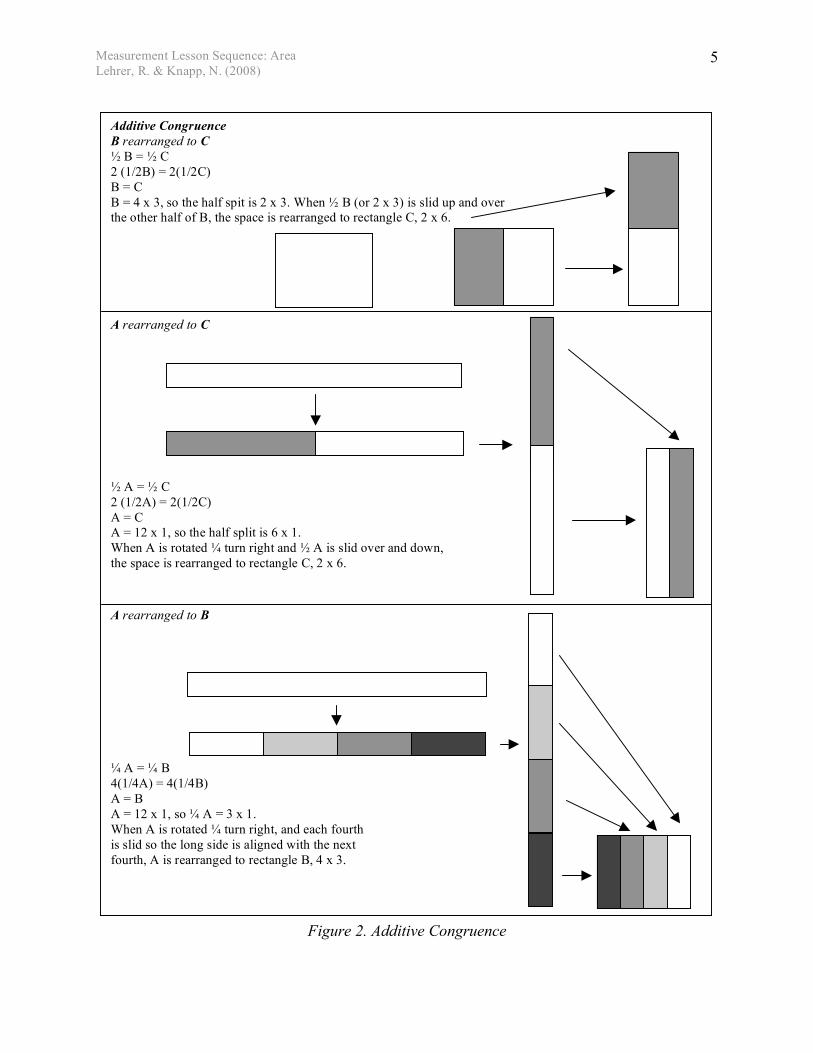
Figure 2. Additive Congruence
Additive Congruence B rearranged to C
B = C 2 (1/2B) = 2(1/2C) B = C B = 4 x 3, so the half spit is 2 x 3. When B (or 2 x 3) is slid up and over the other half of B, the space is rearranged to rectangle C, 2 x 6. A rearranged to C
A = C 2 (1/2A) = 2(1/2C) A = C A = 12 x 1, so the half split is 6 x 1. When A is rotated turn right and A is slid over and down, the space is rearranged to rectangle C, 2 x 6. A rearranged to B
A = B 4(1/4A) = 4(1/4B) A = B A = 12 x 1, so A = 3 x 1. When A is rotated turn right, and each fourth is slid so the long side is aligned with the next fourth, A is rearranged to rectangle B, 4 x 3.
Measurement Lesson Sequence: Area Lehrer, R. & Knapp, N. (2008)
6
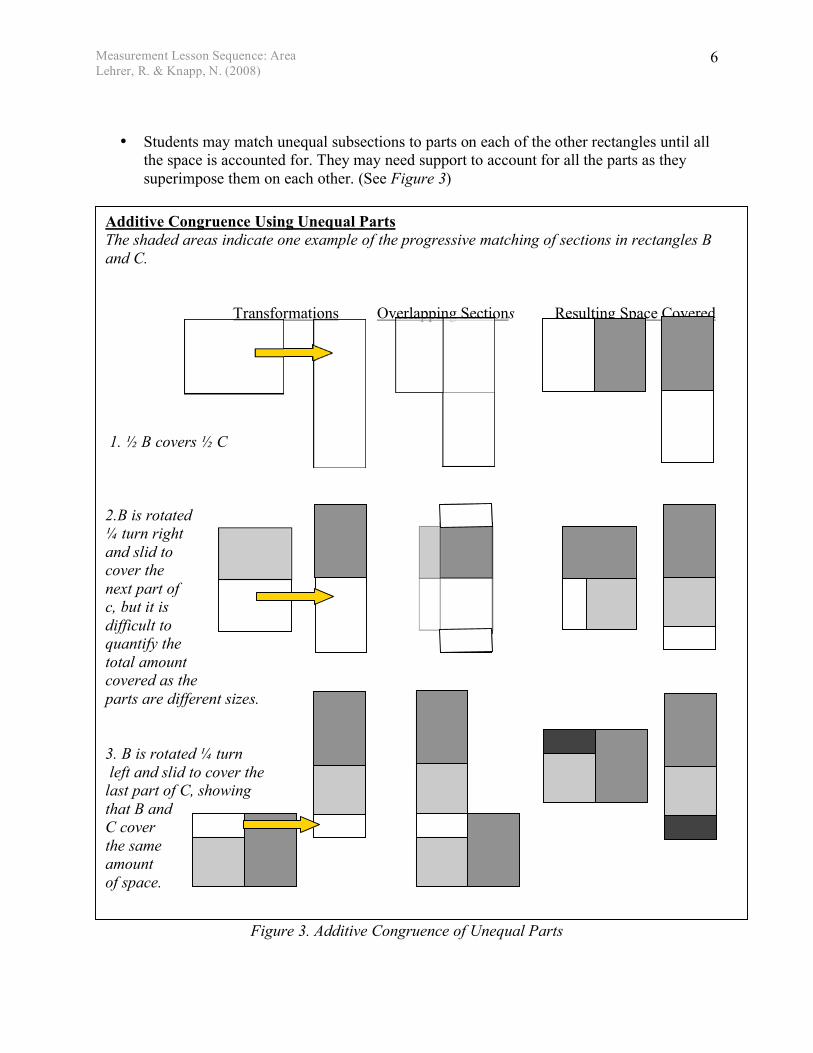
�• Students may match unequal subsections to parts on each of the other rectangles until all the space is accounted for. They may need support to account for all the parts as they superimpose them on each other. (See Figure 3)
in
Figure 3. Additive Congruence of Unequal Parts
Additive Congruence Using Unequal Parts The shaded areas indicate one example of the progressive matching of sections in rectangles B and C. Transformations Overlapping Sections Resulting Space Covered 1. B covers C 2.B is rotated
turn right and slid to cover the next part of c, but it is difficult to quantify the total amount covered as the parts are different sizes. 3. B is rotated turn left and slid to cover the last part of C, showing that B and C cover the same amount of space.
Measurement Lesson Sequence: Area Lehrer, R. & Knapp, N. (2008)
7
�• As students reconfiguring the space by folding and comparing one piece to another, units
may emerge. Folds may create an array of identical squares that can be used as units to find the measure of any space (Units may result in squares or rectangles). Support action of unit creation and use it to discuss “privileging a partition.” (See Figure 4).
Figure 4. Measurement Congruence
�• Allow students to explore these various methods (without cutting or physically disassembling the rectangles- and have them share and compare strategies.
�• After students have shared their strategies, ask them to consider which methods would work all of the time or with any rectangle.
Exploration & Extension (Optional): Partner Exploration- Give pairs of students small sets of the three rectangles (same dimensions, but scaled down) and allow them to discuss their ideas for finding which rectangle covers the most space. Reconvene as a class and share strategies. Extension Activity- After students create a unit of measure and agree to privilege that unit, give everyone 12 identical units (if squares, or 6 if rectangles). Ask students to find at least 5 different ways the same amount of space can be covered. For each configuration of units, students should record the perimeter. Which configuration has the least perimeter? The most? Why? Record findings in math journal.
Measurement Congruence (Structuring a Square Measurement Unit from Rectangular Folds) Students may: Fold thirds of B and use the 1/3 of B for measuring, for example, A. Then rotate and fold fourths of B and used for measuring, for example, A. How can it be that when you split rectangle B into thirds it covered rectangle A and when you split rectangle B into fourths it also covers rectangle A? Unfold rectangle B and it is composed of 12 squares
Measurement Lesson Sequence: Area Lehrer, R. & Knapp, N. (2008)
8
Blackline Masters for Rectangles A, B, & C The first rectangle doesn’t fit the page
Measurement Lesson Sequence: Area Lehrer, R. & Knapp, N. (2008)
9
Measurement Lesson Sequence: Area Lehrer, R. & Knapp, N. (2008)
10
LESSON 2: Whose Hand Covers the Most Space? Important features of the unit
(And what do we do about parts?) Overview & Big Idea: This lesson is designed to help students begin to understand the utility of measure as they explore qualities of different prospective units of measure, such as beans or square grid paper. Students “rank order” their hands according to the amount of space they cover. This activity is an opportunity for students to employ their previous understanding of additive congruence by superimposing pairs of hands to find which one covers the most space. This method will prove difficult as students struggle to order the hands of the whole class and discover that all hands are not scaled versions of one another. Students revisit measurement principles as they struggle with the difference between filling space with “resemblance units” and measuring space with a “privileged unit.” Students are also asked to consider parts of units as a means to account for all the space covered. Materials: Students’ hands, construction paper, black felt-tip markers, scissors, a variety of materials such as beans, spaghetti, buttons, plastic discs, area tiles, grid paper (1” square and, 1cm square), color pencils, chart paper, marker.
LESSON 2: PART 1 COMPARING HANDS & MEASURING HAND REPRESENTATIONS
Qualities of a suitable unit of area measure
Activity Structure: Whole Group Discussion & Measurement Exploration. Ask students to work as a class to rank order their hands according to area and record their findings on a class chart. Students will most likely decide that they can determine a rank order by physically superimposing one hand to another. Allow them to explore this idea. Use the discussion prompts to begin the activity. After students have initial results (and frustrations) gather the class together for a discussion of their findings, including ideas about “what worked and what didn’t work.” Use these ideas to revise the method and move toward measuring representations of each student’s hand.
Teacher Role: After giving students initial instructions, rove the room and observe students’ methods of comparison. Note student difficulties and discoveries to prompt a later discussion. Help students note parts of the fingers or hand that do not precisely match up and challenge them to think about a comparison when the two hands are not exactly the same shape. Initial Discussion Prompts- Today I want you to think about putting your hands in order from biggest to smallest.
�• What do we mean by biggest? �• What part of the hand are we thinking about? �• Whose hand do you think covers the least amount of space? Explain. �• Whose hand do you think covers the most amount of space? Explain. �• How might we put all the hands in order? �• How will we record our order?
Measurement Lesson Sequence: Area Lehrer, R. & Knapp, N. (2008)
11
Post-Exploration Prompts-
�• What did you find out? �• Were you able to put your hands in order? �• What problems did you have? �• What did you discover?
Ask students to consider a different way for finding out the amount of space their hands cover. Use questioning to work toward a measurement strategy. Shift the discussion from the comparison of hands to the measurement of hands by asking students to think about past activities they have done where they have had to find out how big or small something is in order to compare the items (draw on class experiences from linear measure). Have materials available to promote the idea of representing the hand and using units to measure it- construction paper, scissors, and various items for measuring space (see materials list) including grid paper. Discussion Prompts-
�• What problems did we have when comparing our hands? (I.e., parts didn’t match, didn’t know how to order the middle-sized hands)
�• I’ve collected some materials on the table. Could we use any of these things to find out how much space our hands cover so we can put them in order? (Discuss the materials students see as viable choices)
After students establish some ideas for measuring their hands (tools they could use, how they might use them, how they might record their measurements), invite students to trace their hand (decide on left or right, open or closed), cut out handprint, and use any of the available materials they think would work to complete the measurement task. Give students approximately 30 minutes to complete the task. Let them know they will be asked to share their findings with the whole group. Teacher Role: Rove the room to support student reasoning about unit choice and discoveries they make while measuring (What works? What doesn’t? Explain. Do students consider any of the measurement principles learned during linear measure unit?). Record student thinking and use that thinking during a follow-up discussion (Lesson 2, Part 2). Teacher Support of Student Thinking: As students use various materials to “measure” the area of their hands, help them reason about the relationship between their unit choice and the necessary qualities of a suitable unit of area measure.
�• Why did you choose that unit?(See Figure 5 for example of student unit choice) �• Did you measure all of the space? �• What did you do about the curved parts? �• What did you do when a unit hung over the edge of your hand/finger? �• What did you call this space that is only covered by part of a unit? �• How did you keep track of all the parts?
Measurement Lesson Sequence: Area Lehrer, R. & Knapp, N. (2008)
12
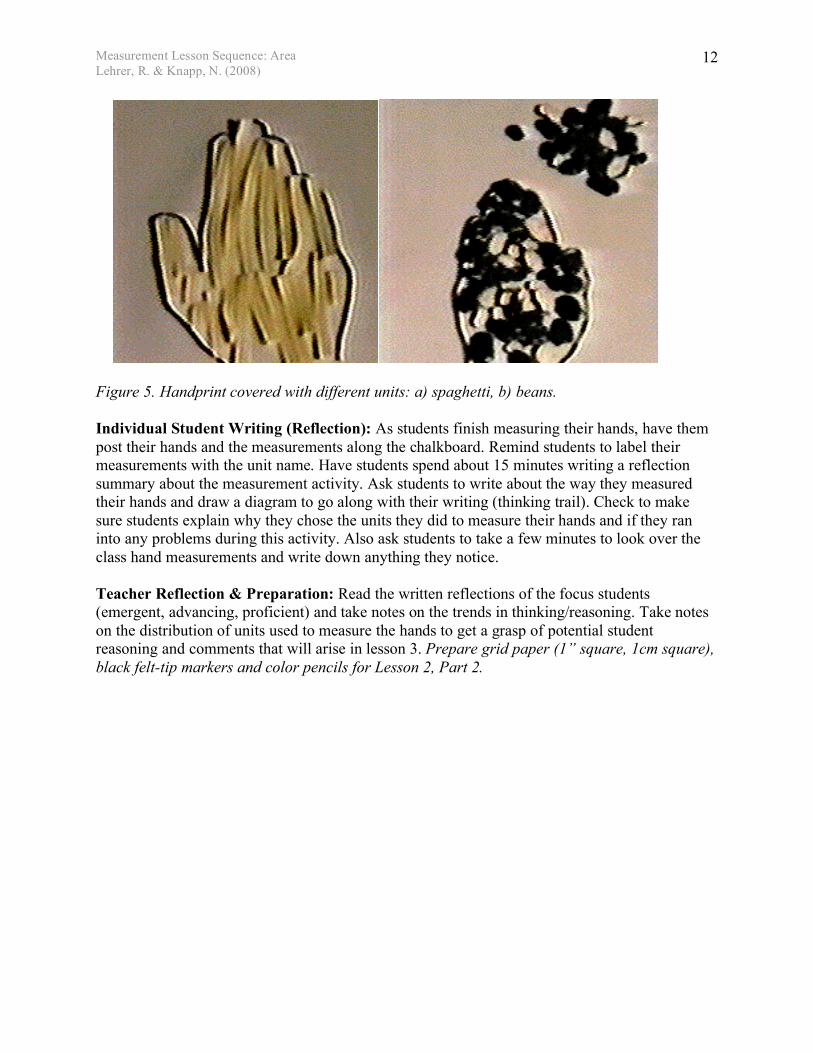
Figure 5. Handprint covered with different units: a) spaghetti, b) beans. Individual Student Writing (Reflection): As students finish measuring their hands, have them post their hands and the measurements along the chalkboard. Remind students to label their measurements with the unit name. Have students spend about 15 minutes writing a reflection summary about the measurement activity. Ask students to write about the way they measured their hands and draw a diagram to go along with their writing (thinking trail). Check to make sure students explain why they chose the units they did to measure their hands and if they ran into any problems during this activity. Also ask students to take a few minutes to look over the class hand measurements and write down anything they notice. Teacher Reflection & Preparation: Read the written reflections of the focus students (emergent, advancing, proficient) and take notes on the trends in thinking/reasoning. Take notes on the distribution of units used to measure the hands to get a grasp of potential student reasoning and comments that will arise in lesson 3. Prepare grid paper (1” square, 1cm square), black felt-tip markers and color pencils for Lesson 2, Part 2.
Measurement Lesson Sequence: Area Lehrer, R. & Knapp, N. (2008)
13
LESSON 2: PART 2- MEASURING WITH SQUARE UNITS
Privileging the Square and Partitioning Units
Activity Structure: Whole Group Review- Ask students to take a “Gallery Tour” of the hand measurements that are posted along the chalkboard and decide if they are ready to order the hands. Promote a discussion by again asking students, “Are we ready to put the hands in order? Explain.” This question provides the opportunity for students to address measurement principles such as identical unit, and tiling while reasoning about the ordering task. Option 1 (Reasoning from Activity)- If the students all feel they are ready to order the hands, proceed by having students choose the first 5 hands that they think are the biggest and put them in order. If students have used different units, this task will become difficult early on. Question students about the reasons behind task difficulty. Make a list of problems they encounter and use these questions to promote a discussion about measurement principles/rules. It is often helpful to have two different students measure the same handprint with the same units, such as beans or spaghetti. Students can consider why they did not obtain the same measure. Option 2 (Reasoning from Representations)- If immediately after the gallery tour students express that ordering the hands will be problematic, take 10- 15 minutes to talk about their observations with the class. Record student observations on chart paper. When all comments have been recorded, discuss student ideas that address the use of identical units to measure individual hands, the need to tile so all space is measured, and the difficulty of comparing measurements when students used different units from each other. Potential Discussion Prompts:
�• What did you observe about the class measurements of your hands? (List ideas) �• What problems might we have ordering the hands using these tools?
Shifting to a Privileged Measurement Unit- One of the ideas students should mention in their observation of the hand measurements is that individuals in the class chose different units of measure from each other resulting in a difficulty comparing areas. This is an important idea that can be used to promote the use of a particular unit of area measure- the square. Ask students to consider alternative measurement tools. If no one suggests (or no one has used) grid paper, use the following prompt questions:
Present grid paper and ask (promoting identical units): o Could we use this as a tool? o If we use the grid paper, what is the unit we are using to measure? o Which of our measurement rules can we follow if we use the grid paper to
measure the area of our hands? o What problems might we encounter? o Which size grid paper should we use? (Inch squares or cm squares) Explain.
Measurement Lesson Sequence: Area Lehrer, R. & Knapp, N. (2008)
14
Inverse relation between unit size and count Discussion about accuracy
o How should we position our hands? (Fingers together or spread apart) Explain. (Work toward agreement on the above 2 questions)
After the class agrees upon the open or closed hands and the size of graph paper, have each student trace his/her hand on the paper and begin to measure the area by counting the number of square units the hand covers. Support students in reasoning about how to account for partial units. When the students finish measuring the area of their hands, have them post their hand tracings with their measurements. Use these measurements to order the hands. List all the hand measurements, ask students to arrange the data using the numerical measurements, and then check on the rank order by using the measurements to order the actual hand representations. Ordering according to the data first and then ordering the actual hand representations will provide an opportunity for students to compare the data to the actual object being measured and look for discrepancies between the two (a nice introduction to causes of measurement error and finding discrepancies in naming fractional parts). Teacher support of student thinking: The introduction of grid paper may seem problematic to students who continue to reason that the unit must resemble the attribute they are measuring. For example, students who are thinking about a single dimension, such as length of hand may argue that they cannot use the square because it is not long like the hand, or that it is not curved like the fingers. Students may also reason that the curved shape of the fingers leaves parts of the square unit unfilled. This is an opportunity to look at the measurement rules that privileging the square will support and then problem solve about partial units as students begin to quantify square units. Strategies for Accounting for Partial Units in Irregular Figures:
o Fractional parts & naming fractions Find an example on a student page where the hand does not cover the
space of a complete square. Ask: What did you call this? Explain. About how much of a square is
covered? Why do you think that? Folding squares of paper may support students in estimating partitions and
naming the part covered in relation to the whole square (1/2 is 1 part covered of a total of 2 parts).
o Key coding fractional parts (consistency in naming) Students may decide it is necessary to create a “key” (such as the key on a
map) of fractional parts to help them name rational values more consistently. If a student develops a key, have that student explain how she/he came up with the code and how it helps with naming parts.
If a student does not see a need for a fractional part key, promote the idea of consistency in naming rational values by asking:
�• What are you calling ? ? �• How do we know your is like my ? �• Is there something we could do to help us be more consistent in
naming fractional parts? o Compensation Strategies (adding fractions to make a whole)
Measurement Lesson Sequence: Area Lehrer, R. & Knapp, N. (2008)
15
Students may choose from several different strategies to account for all the fractional parts.
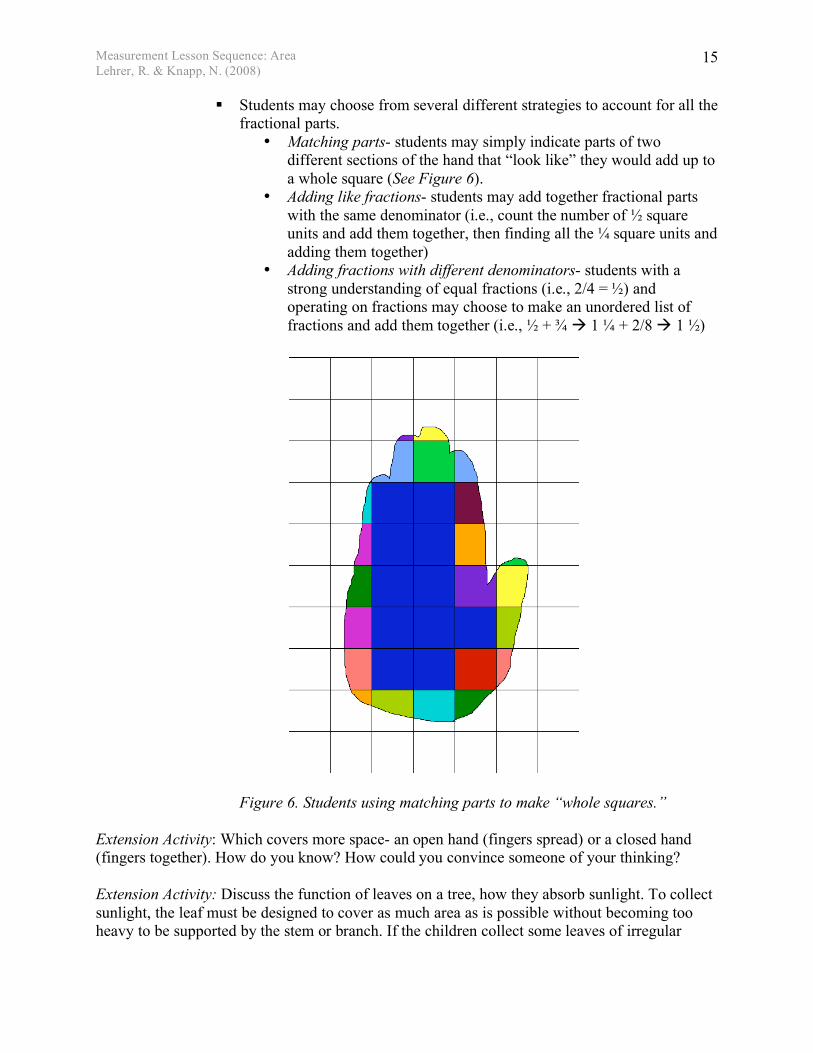
�• Matching parts- students may simply indicate parts of two different sections of the hand that “look like” they would add up to a whole square (See Figure 6).
�• Adding like fractions- students may add together fractional parts with the same denominator (i.e., count the number of square units and add them together, then finding all the square units and adding them together)
�• Adding fractions with different denominators- students with a strong understanding of equal fractions (i.e., 2/4 = ) and operating on fractions may choose to make an unordered list of fractions and add them together (i.e., + 1 + 2/8 1 )
Figure 6. Students using matching parts to make “whole squares.” Extension Activity: Which covers more space- an open hand (fingers spread) or a closed hand (fingers together). How do you know? How could you convince someone of your thinking? Extension Activity: Discuss the function of leaves on a tree, how they absorb sunlight. To collect sunlight, the leaf must be designed to cover as much area as is possible without becoming too heavy to be supported by the stem or branch. If the children collect some leaves of irregular
Measurement Lesson Sequence: Area Lehrer, R. & Knapp, N. (2008)
16
shape, such as ivy or sycamore, we can discuss the amount of leaf (or area of leaf) exposed to the sun and air. Rank order the area covered by different leaves or find the area covered by one leaf and then determine the total area covered by all of the leaves of the plant/tree (Figure 7). You might wish to switch to cm squares.
Figure 7. Revisiting Area measurement with an irregular shape
Measurement Lesson Sequence: Area Lehrer, R. & Knapp, N. (2008)
17
LESSON 3: Classroom Space Coordinating units of length measure
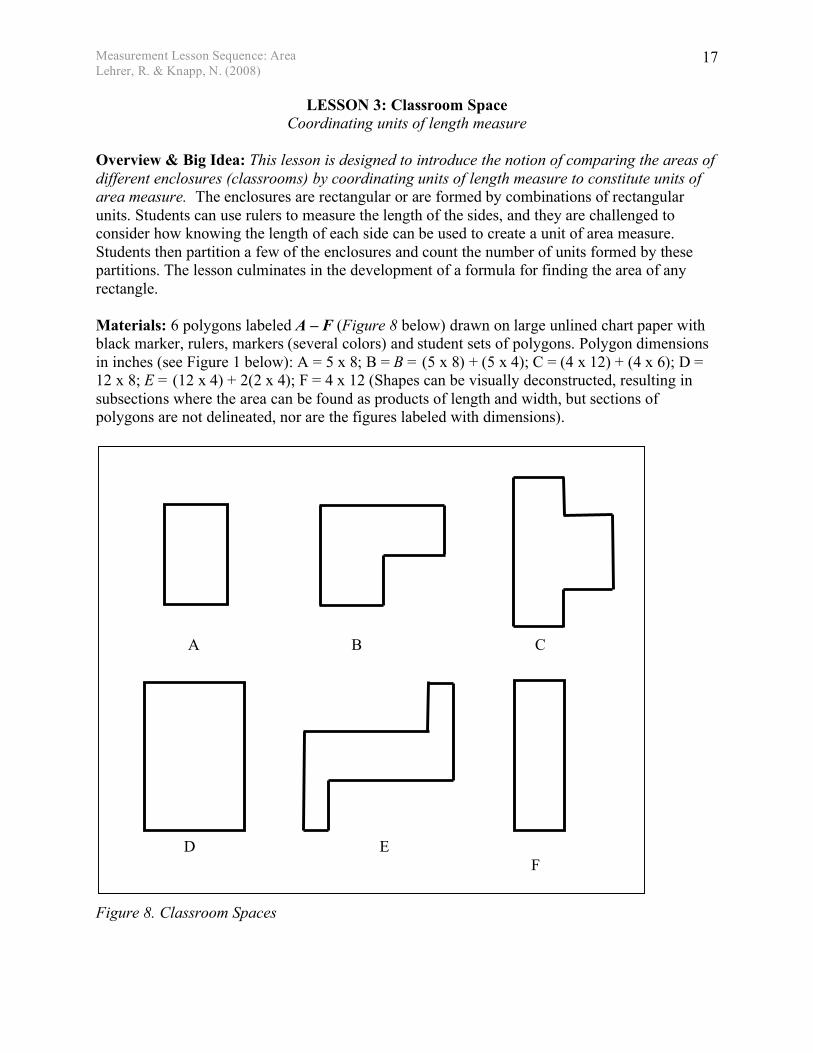
Overview & Big Idea: This lesson is designed to introduce the notion of comparing the areas of different enclosures (classrooms) by coordinating units of length measure to constitute units of area measure. The enclosures are rectangular or are formed by combinations of rectangular units. Students can use rulers to measure the length of the sides, and they are challenged to consider how knowing the length of each side can be used to create a unit of area measure. Students then partition a few of the enclosures and count the number of units formed by these partitions. The lesson culminates in the development of a formula for finding the area of any rectangle.
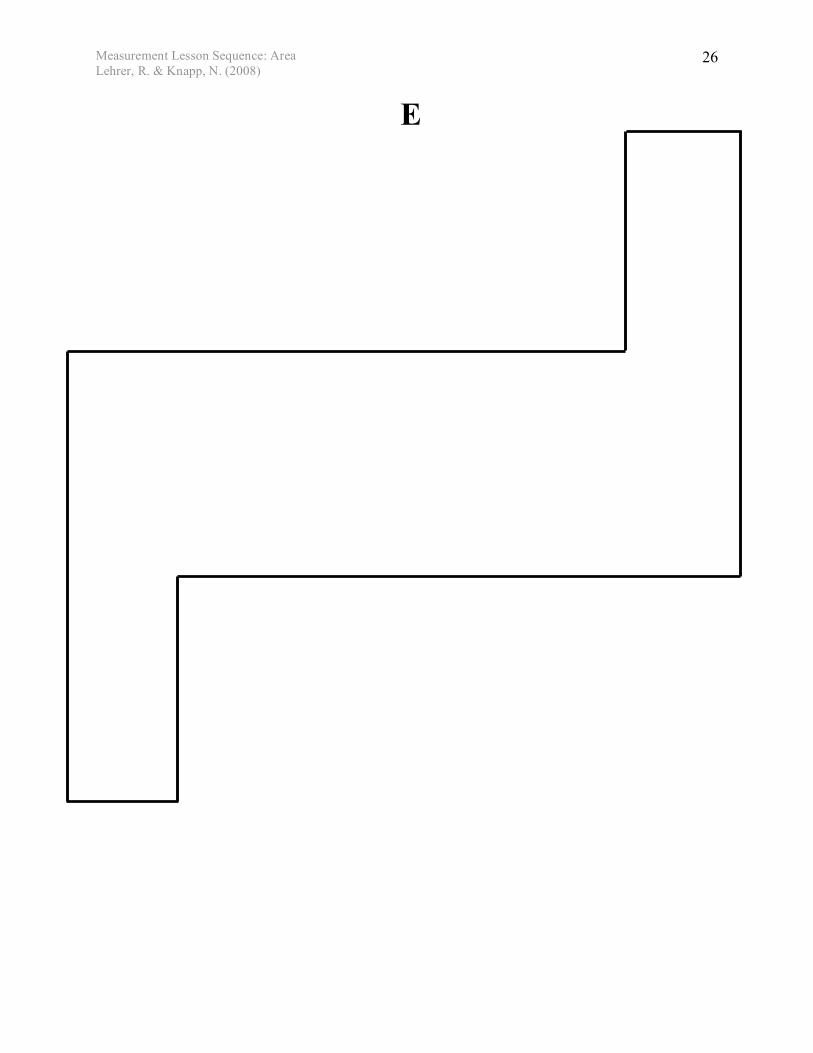
Materials: 6 polygons labeled A – F (Figure 8 below) drawn on large unlined chart paper with black marker, rulers, markers (several colors) and student sets of polygons. Polygon dimensions in inches (see Figure 1 below): A = 5 x 8; B = B = (5 x 8) + (5 x 4); C = (4 x 12) + (4 x 6); D = 12 x 8; E = (12 x 4) + 2(2 x 4); F = 4 x 12 (Shapes can be visually deconstructed, resulting in subsections where the area can be found as products of length and width, but sections of polygons are not delineated, nor are the figures labeled with dimensions). Figure 8. Classroom Spaces
A B C D E F
Measurement Lesson Sequence: Area Lehrer, R. & Knapp, N. (2008)
18
Lesson 3: Part 1- MEASURING REGULAR SHAPES Coordinating Dimensions to Create Units
Activity Structure: Whole Group Discussion. Present the class with the poster showing 6 polygons (Figure 8). Explain to the class that the figures on the poster represent floor plans for shapes and sizes of classrooms in a new elementary school. Tell the students that their job is to figure out the area (space covered) of the classrooms so the teachers can decide where to put each grade level -- younger students will get the smaller classrooms and older students will be assigned to the rooms with more area. Ask the students to find the area of each shape, but tell them they may not cut or fold the shapes. They may, however, use a ruler. Activate Thinking about Previous Area Measurement Experiences:
What activities have we done where we have talked about space covered? �• Listen for ideas about the three rectangles and measuring area of hands
activities. What did we think about when we compared the three rectangles?
�• Listen for ideas about comparing length and width. �• Listen for ideas about developing square or rectangular units used for
comparison of areas. What did we think about when we found the area of our hands? How did we figure out the amount of space our hands covered? What tools did we use? How did we use them?
�• Listen for ideas about covering and counting units arranged on the handprints. �• Listen for ideas about issues that arose when students used various units to
measure the handprint area. �• Listen for ideas that relate to measurement principles.
Discussion Prompts: Look at the poster on the board. Each one of these shapes represents a classroom in a new elementary school. Our job is to figure out the area of each classroom so we can assign the rooms to different grade levels. Which classroom do you think is the biggest? Why do you think so? Which classroom do you think is the smallest? Why do you think so?
�• These questions are designed to help students begin to compare the classrooms and consider the length and width of the different polygons in order to compare them. Listen for reasoning about the length of the sides and the relationship between the lengths of the sides on different polygons.
�• Can you order the classrooms from smallest to biggest? Initial Comparison: Rectangles A and F How could we use the ruler to figure out the area of each classroom? How can the length of the sides help us figure out the area of a classroom?
�• Listen for ideas about measuring the lengths of the sides and delineating those lengths (marking inch lengths).
�• Listen for ideas about delineating and comparing long sides or short sides on two different shapes
Measurement Lesson Sequence: Area Lehrer, R. & Knapp, N. (2008)
19
�• Make sure to label the sides measures. How can we use the measurements of the short side and long side to figure out the space covered?
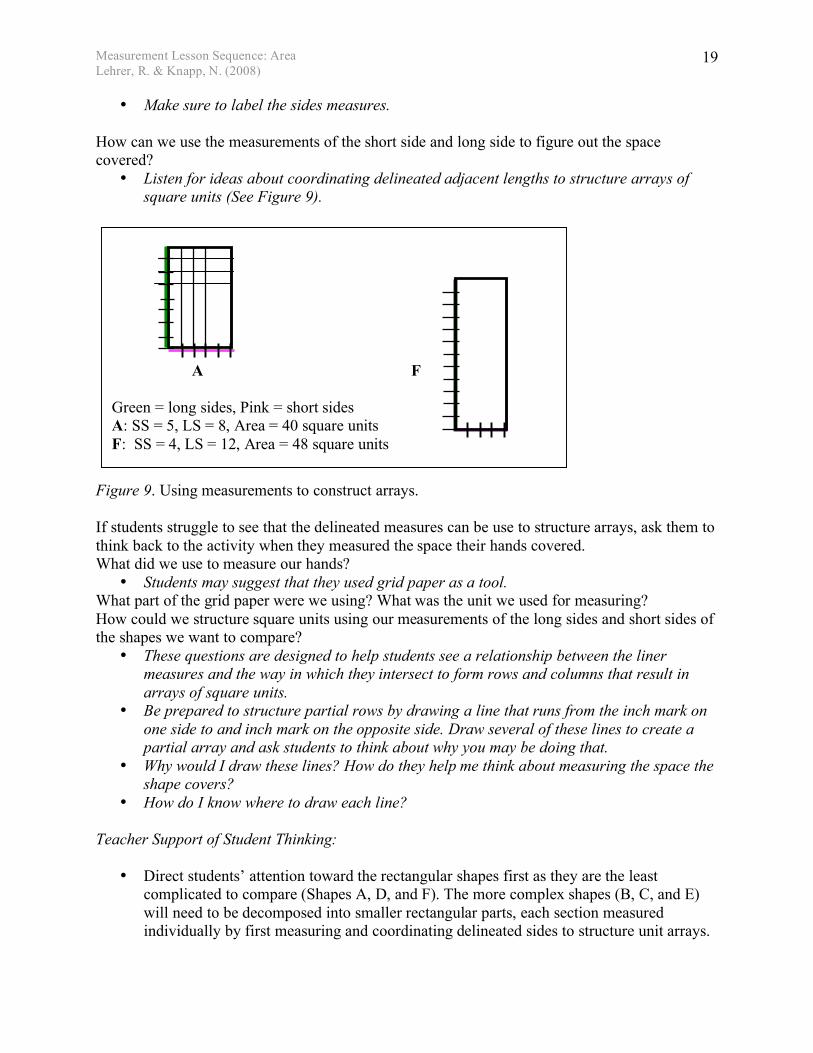
�• Listen for ideas about coordinating delineated adjacent lengths to structure arrays of square units (See Figure 9).
Figure 9. Using measurements to construct arrays. If students struggle to see that the delineated measures can be use to structure arrays, ask them to think back to the activity when they measured the space their hands covered. What did we use to measure our hands?
�• Students may suggest that they used grid paper as a tool. What part of the grid paper were we using? What was the unit we used for measuring? How could we structure square units using our measurements of the long sides and short sides of the shapes we want to compare?
�• These questions are designed to help students see a relationship between the liner measures and the way in which they intersect to form rows and columns that result in arrays of square units.
�• Be prepared to structure partial rows by drawing a line that runs from the inch mark on one side to and inch mark on the opposite side. Draw several of these lines to create a partial array and ask students to think about why you may be doing that.
�• Why would I draw these lines? How do they help me think about measuring the space the shape covers?
�• How do I know where to draw each line? Teacher Support of Student Thinking:
�• Direct students’ attention toward the rectangular shapes first as they are the least complicated to compare (Shapes A, D, and F). The more complex shapes (B, C, and E) will need to be decomposed into smaller rectangular parts, each section measured individually by first measuring and coordinating delineated sides to structure unit arrays.
A F Green = long sides, Pink = short sides A: SS = 5, LS = 8, Area = 40 square units F: SS = 4, LS = 12, Area = 48 square units
Measurement Lesson Sequence: Area Lehrer, R. & Knapp, N. (2008)
20
Then the smaller rectangle measurements will need to be added together to find a total measurement before shapes can be compared.
�• It may be helpful to highlight the sides being compared on each shape with the same
color in order to support the comparisons and help students think along with the conversation (I.e., long side of shapes is highlighted in green and short side of shapes is highlighted in pink).
�• Students might suggest that after measuring the length of a side, they also need to
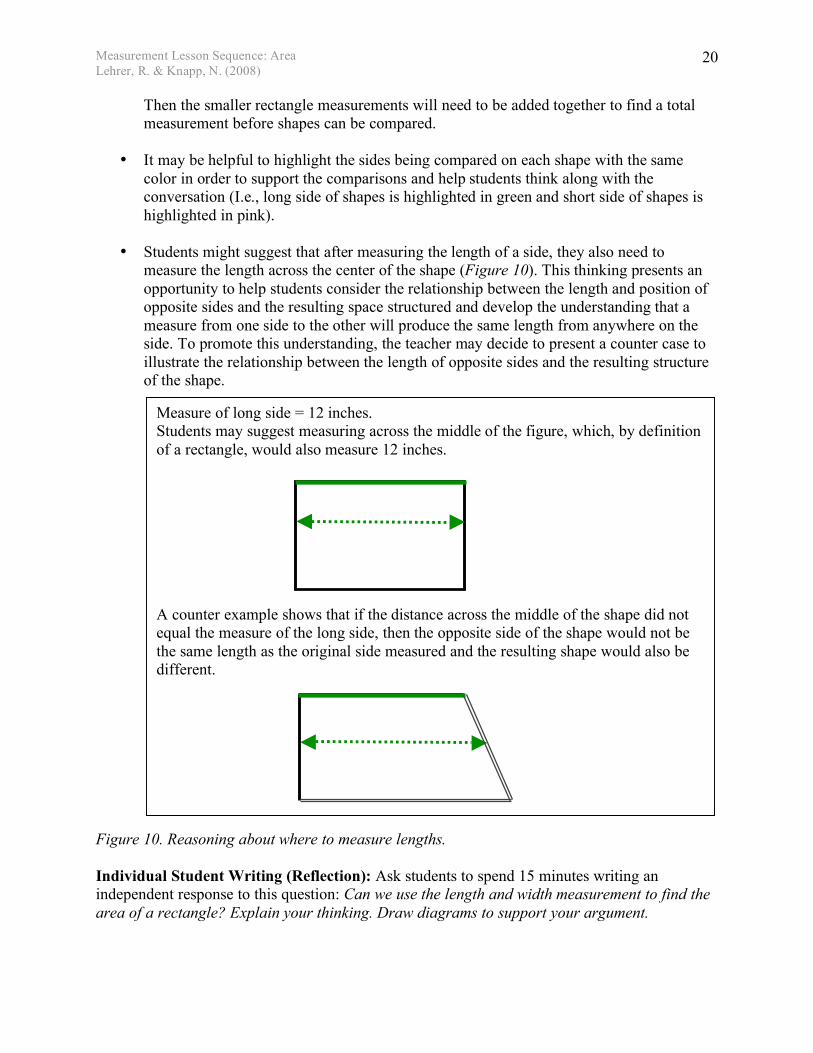
measure the length across the center of the shape (Figure 10). This thinking presents an opportunity to help students consider the relationship between the length and position of opposite sides and the resulting space structured and develop the understanding that a measure from one side to the other will produce the same length from anywhere on the side. To promote this understanding, the teacher may decide to present a counter case to illustrate the relationship between the length of opposite sides and the resulting structure of the shape.
Figure 10. Reasoning about where to measure lengths. Individual Student Writing (Reflection): Ask students to spend 15 minutes writing an independent response to this question: Can we use the length and width measurement to find the area of a rectangle? Explain your thinking. Draw diagrams to support your argument.
Measure of long side = 12 inches. Students may suggest measuring across the middle of the figure, which, by definition of a rectangle, would also measure 12 inches. A counter example shows that if the distance across the middle of the shape did not equal the measure of the long side, then the opposite side of the shape would not be the same length as the original side measured and the resulting shape would also be different.
Measurement Lesson Sequence: Area Lehrer, R. & Knapp, N. (2008)
21
Teacher Reflection and Preparation: Read students’ journal responses to the reflection question. Note the variety of responses and make conjectures about next steps with these students. Prepare enough copies of the classroom spaces blackline masters (below) so each pair of students can work with their own set.
Lesson 3: Part 2- MEASURING IRREGULAR SHAPES Coordinating Dimensions to Create Units
Activity Structure: (Partner Work) Students will work together to find the areas of the remaining 4 classroom shapes, make comparisons between the areas, and write a summary about their findings to present to the class. Ask students to work in pairs to find the measurements of the remaining 4 classes. Explain that similar to the first part of the lesson, they may not fold, cut, use congruency, or any other objects to complete the measurements. They may, however, use an inch ruler and a pencil. Partners will need to record their process and findings in their journals and be prepared to present their measurements to the rest of the class. Tell the students to be ready to defend their argument about the areas of the classrooms. Extension Activities
1. For each figure, show the relation of its area to that of the area enclosed by Figure A. Use symbols to represent the relations of less than (<), equal to (=), or greater than (>).
2. Show, with rectangles and area measurement, why it must be true that 3 x (5 +3) = (3 x 5) + (3 x 3) Is this relationship true for all numbers that are greater than or equal to zero? Why do you think so?
Measurement Lesson Sequence: Area Lehrer, R. & Knapp, N. (2008)
22
Classroom Shape Blackline Masters
A
Measurement Lesson Sequence: Area Lehrer, R. & Knapp, N. (2008)
23
B
Measurement Lesson Sequence: Area Lehrer, R. & Knapp, N. (2008)
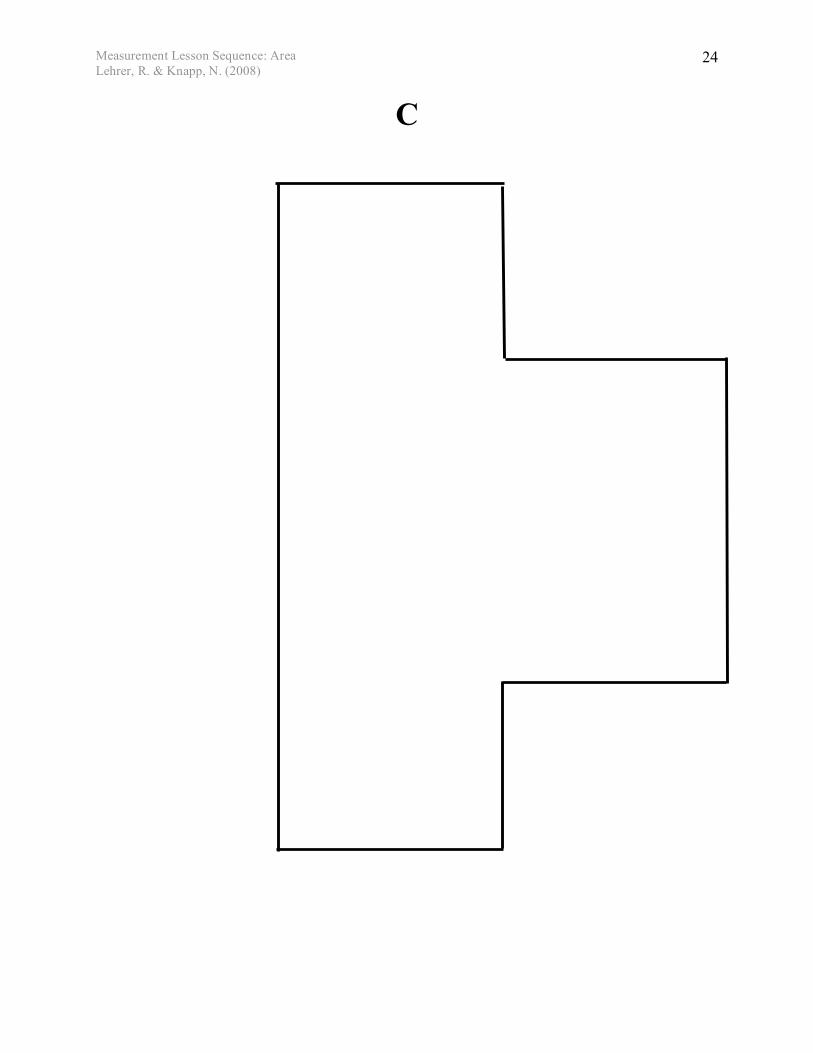
24
C
Measurement Lesson Sequence: Area Lehrer, R. & Knapp, N. (2008)
25
D
Measurement Lesson Sequence: Area Lehrer, R. & Knapp, N. (2008)
26
E
Measurement Lesson Sequence: Area Lehrer, R. & Knapp, N. (2008)