62
ARENA Installation Guide Copyright © 2016 Honeywell GmbH All Rights Reserved EN1Z-0906GE51 R0116

ARENA Installation Guide
Copyright © 2016 Honeywell GmbH All Rights Reserved EN1Z-0906GE51 R0116

ARENA INSTALLATION GUIDE
EN1Z-0906GE51 R0116
INSTALLATION GUIDE ARENA
5 EN1Z-0906GE51 R0116
ARENA 3.00.02
INSTALLATION GUIDE Software License Advisory This document supports software that is proprietary to Honeywell GmbH, Honeywell
Control Systems Ltd. and/or to third party software vendors. Before software delivery, the end user must execute a software license agreement that governs software use. Software license agreement provisions include limiting use of the software to equipment furnished, limiting copying, preserving confidentiality, and prohibiting transfer to a third party. Disclosure, use, or reproduction beyond that permitted in the license agreement is prohibited.
Trademark Information CentraLine and 'close to you' are trademarks of Honeywell Inc. Windows Server 2008, Windows 7, Windows 8 and Word are registered trademarks
of Microsoft Corp

ARENA INSTALLATION GUIDE
EN1Z-0906GE51 R0116

ARENA INSTALLATION GUIDE
7 EN1Z-0909GE51 R0116
CONTENTS
SYSTEM REQUIREMENTS ........................................................................................................................... 9 Hardware Requirements..................................................................................... 9
LonWorks Network Interfaces ........................................................................ 9 C-BUS Interfaces ........................................................................................... 9
Software Requirements ...................................................................................... 10 Internet Explorer ............................................................................................ 10 Installation of Internet Information Services (IIS) ........................................... 13
Font Size Setting ................................................................................................ 14
ARENA INSTALLATION ........................................................................................................................... 14 Installation of the SQL server ............................................................................. 14 Installation of ARENA ......................................................................................... 15 ARENA Operation with Non-Administrator Privileges ......................................... 23 Client Configuration Test / Client Setup Tool ...................................................... 28
How to operate ARENA on a ARENA Server PC .......................................... 28 How to install a Client PC and operate ARENA from Remote Client PC ....... 30
ARENA and DSL Routers................................................................................... 33 Parallel Use of old ARENA Versions .................................................................. 33 ARENA and COACH Installations with different Versions on Same PC ............. 34
48BCCCLIF2 –ARENA C-BUS NETWORK INTERFACE ................................................................................................................. 34
ARENA VERSIONS ........................................................................................................................... 44 How to use ARENA as Demo Version ................................................................ 44 Site Prerequisites ............................................................................................... 44
LICENSING ........................................................................................................................... 47 Upgrading an ARENA2 to ARENA3 ................................................................... 47 Licensing Of A New ARENA3 ............................................................................. 55 Upgrades ............................................................................................................ 57 Nodes count in ARENA3 .................................................................................... 57
NOTES FOR I.T. ADMINISTRATORS ........................................................................................................................... 58 For a Successful Start in an existing LAN .......................................................... 58 Security .............................................................................................................. 58 Proxy Server Settings ......................................................................................... 60
Updating ARENA ........................................................................................... 62
INSTALLATION ERROR MESSAGES ........................................................................................................................... 62

ARENA INSTALLATION GUIDE
EN1Z-0906GE51 R0116 8
ARENA INSTALLATION GUIDE
9 EN1Z-0906GE51 R0116
SYSTEM REQUIREMENTS
Hardware Requirements PC with the following minimum specification for Windows 7, Professional or Ultimate, 32- or 64-Bit • PC with Dual Core processor, 1,8 GHz • 4 GB RAM or more • 80 GB free hard disk space • 2MB VGA supporting 64k colors at 1024 x 768 resolution • LONWorks Network Interfaces, see “LON Interfaces” section • Serial or USB port for modem connection • Pointing Device – Mouse (serial, PS/2, or USB) PC with the following minimum specification for Windows Server, R2 Standard 64-Bit • PC with Dual Core processor, 3,0 GHz • 4 GB RAM or more • 80 GB free hard disk space • 2MB VGA supporting 64k colors at 1024 x 768 resolution • LONWorks Network Interfaces, see “LON Interfaces” section • Serial or USB port for modem connection • Pointing Device – Mouse (serial, PS/2, or USB)
CAUTION We do not recommend to install ARENA on Windows XP operating systems. As Windows XP is discontinued by Microsoft, this is a security hazard to the installation.
LonWorks Network Interfaces In order to connect to the LON network, one of the following interfaces must be installed: • Echelon PCC-10 PCMCIA Card (Laptop, 32-Bit only) • Echelon PCLTA-21 PCI Card (Desktop, 32-Bit only) • Echelon U10 (USB) • Loytec NIC709-USB • Loytec NIC709-IP (LAN) • Loytec LIP The function of ARENA is supported for these LON interfaces, however other cards may work also. Please install the LON interfaces and the corresponding drivers. For relevant documentation and driver please refer to corresponding websites at http://www.echelon.com and http://www.loytec.com. IMPORTANT
For Echelon LON interfaces, install the driver before the installation of the physical device. For all LON interfaces, perform a test after installation for proper function of the installed interface.
C-BUS Interfaces There are two C-Bus interfaces: • CLIF2-CBUS1-PC: for one C-Bus and • CLIF2-CBUS2-PC: for two C-Busses

ARENA INSTALLATION GUIDE
EN1Z-0906GE51 R0116 10
Baudrate and Termination Settings Depending on the speed of the C-Bus and on the location where the interface device is connected (middle or end of the bus), the termination must be adjusted via hardware switch as follows:
Baud Rate Switch Position on CLIF2-CBUS
Termination Setting
9600 baud normal OFF 76 kbaud middle OFF 76 kbaud end ON
Software Requirements Software Packages As prerequisites for a successful installation of the ARENA software, the following
software need to be installed on your PC: • Microsoft Windows:
– 7 Professional and Ultimate (64-Bit) – Server 2008 R2 Standard (64-Bit) – 8 (64-Bit)
• Microsoft Internet Explorer 8.0, 9.0,10, or 11 (in compatibility mode only)
for details, see “Internet Explorer“ section
• Microsoft Internet Information Services (IIS) for details, see “Internet Information Services (IIS)“ section
• SQL Server – Express 2008R2 (max 4.6 GB database size) – Full SQL Server Version 2008R2 (max. 10 GB database size)
for details, see “Operation with Non-Administrator Privilege” section IMPORTANT
It is recommended to run ARENA as stand-alone application on a newly installed Windows operating system. After ARENA has been success-fully installed, appropriate programs such as anti-virus programs and firewalls, etc. can be added.
Make sure that Microsoft security updates will not be installed automatically in order to prevent a restart of the PC.
CAUTION Changes or de-installation made to any of those prerequisite software packages after ARENA has been installed, may cause malfunction and result in a new installation of ARENA. If necessary, please contact your I.T. department for the relevant information and advice. We do not recommend to install ARENA on Windows XP operating systems. As Windows XP is discontinued by Microsoft, this is a security hazard to the installation.
Internet Explorer ARENA requires Microsoft Internet Explorer installed on your PC to display its pages. Supported versions are 8.0, 9.0, 10 and 11 (in compatibility mode).
NOTE: Firefox or other browsers will not display ARENA pages correctly.

ARENA INSTALLATION GUIDE
11 EN1Z-0906GE51 R0116
In order to run ARENA 3.0 under Internet Explorer 11 it must be run in "Compatibility Mode“. To enable ARENA running in Compatibility Mode, do the following: 1. In Internet Explorer 11, select Tools, and then Compatibility View Settings. 2. In the Compatibility View Settings dialog box, enter the URL of the
ARENA website in Add this website, and then click the Add button.
General Settings
NOTE: Do not enable proxy servers. Please refer to the “Notes for I.T. Administrators section”.
1. In Internet Explorer, click menu item Tools, then submenu item Internet
Options.
ARENA INSTALLATION GUIDE
EN1Z-0906GE51 R0116 12
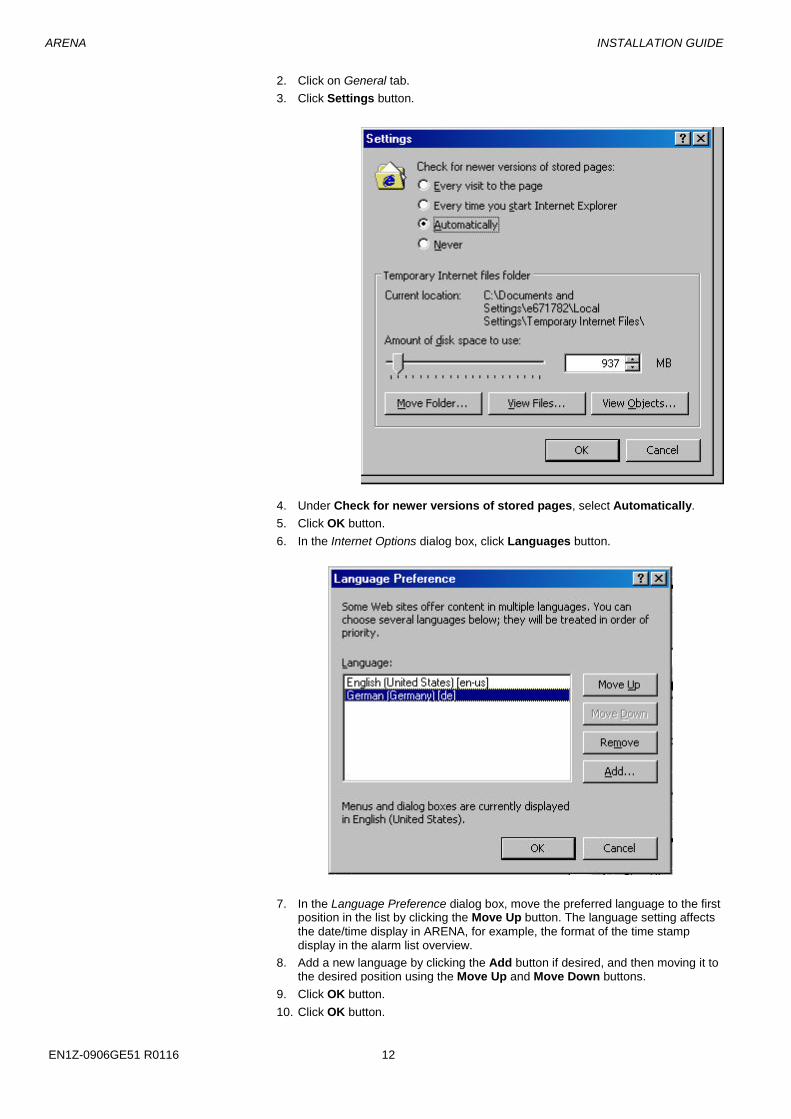
2. Click on General tab. 3. Click Settings button.
4. Under Check for newer versions of stored pages, select Automatically. 5. Click OK button. 6. In the Internet Options dialog box, click Languages button.
7. In the Language Preference dialog box, move the preferred language to the first position in the list by clicking the Move Up button. The language setting affects the date/time display in ARENA, for example, the format of the time stamp display in the alarm list overview.
8. Add a new language by clicking the Add button if desired, and then moving it to the desired position using the Move Up and Move Down buttons.
9. Click OK button. 10. Click OK button.

ARENA INSTALLATION GUIDE
13 EN1Z-0906GE51 R0116
Security Settings
For both, local and remote ARENAs, the web address of the ARENA, you want to display, must be added to the trusted sites list. This setting will be done automatically by the client setup tool upon the first connection of ARENA. For more details, please refer to the “Client Configuration Test / Client Setup Tool” section.
Installation of Internet Information Services (IIS) IIS Includes WEB and FTP support, along with support for FrontPage, active server pages, transactions and database connections.
Windows 7 Procedure
1. Click the Start button, click Settings, and then click Control Panel. 2. In the Control Panel window, click Programs. 3. In Programs and Features, click Turn Windows features on or off.
4. If you are prompted for an administrator password or confirmation, type the password or provide confirmation. The User Account Control message box displays.
5. In the User Account Control message box, click Continue. The Windows Features dialog box displays.

ARENA INSTALLATION GUIDE
EN1Z-0906GE51 R0116 14
6. If not already enabled, turn on Internet Information Services by checking its check box.
7. Click OK. The Internet Information Services are configured which might take several minutes.
Font Size Setting For proper display of custom graphics created with ARENA Editor do not change the font size from Normal size (96 DPI) to Large size (120 DPI) under Settings – Control Panel – Display – Settings – Advanced – DPI Setting.
ARENA INSTALLATION
Installation of the SQL server Depending on the ARENA data volume that needs to be stored in SQL either MS SQL Server Express 2008 (included in the ARENA setup) can be used or the standard SQL Server 2008. MS SQL Server Express 2008 has a database size
ARENA INSTALLATION GUIDE
15 EN1Z-0906GE51 R0116
theoretical limitation of 4.6 GB and should be used only for small and medium projects that do not collect trend values of more than about 100 datapoints over a long time. By default, in the ARENA config file, the SQL Server Express database limit is defined to 4.6 GB. If this database size limit is almost reached, a system alarm message ´Database size is close to defined limit (xxx GB)` will be raised requesting you to export and delete trends/alarms. If this limit is exceeded by omitting the requested export, and the final emergency limit of 4.6 GB defined in ARENA config file is reached, trending is automatically stopped and the system alarm message ´Database size limit (xxx GB) reached, Trend data collection stopped. Please export and delete trends/alarms` will be raised. If any of those system alarms are shown, it is strongly recommended to follow the instructions and to export trend/alarm values as described in the “Export Trend- and Alarm Database Entries” and “Scheduled Export“ sections in the ARENA user guide.
If the database size is below the defined limit(s) again, a clearing alarm is raised and trending will automatically restart. If the hard disk is full, trend- and alarm data collection is also stopped. In this case, clean up the database in the same way and/ or delete not required data on the hard disk. IMPORTANT • Check the PC name before installing SQL. After SQL has been installed the
PC name must not be changed. Changing the PC name will cause that ARENA cannot be started any more.
• Please ensure you are logged onto Windows as a user with Administrator privilege having a username and a password in order to be able to install SQL. You must enter a password, otherwise SQL is installed incompletely.
• For a proper SQL installation the user has to have a logon with user and password.
• MS SQL Server Express 2008 (comes with the installation package) NOTE: If Full SQL Server is to be used, Microsoft SQL Server 2008 Service
Pack 2 must be installed for proper operation. ARENA installs the following prerequisite software packages for proper operation: • Windows Installer • Microsoft .Net 4.0 Framework (comes with the installation package) • MS SQL Server Express 2008 (comes with the installation package) During installation, the ARENA setup checks whether any of these software packages are already installed or not. Any software not installed, will be automatically installed by ARENA. NOTE: Some installation steps take long, for example the database creation may
take up to 15 minutes. Do not shutdown the PC or do any other actions which may interrupt the installation.
Installation of ARENA 1. If not already done, download the ARENA installation package from the Partner
web. 2. If previously installed, uninstall an ARENA 2.0 software version using the Add
or Remove function in the Windows Control Panel. 3. Disable automatic Windows logon 4. Reboot the PC 5. Log on with username and password. Please do not leave the Password field
blank (see IMPORTANT hint above). 6. Close all running applications. 7. Start the ARENA installation from the downloaded ARENA package. 8. Open the Setup folder and then double-click on Setup.exe.
In the following, the most important screens and steps are shown:

ARENA INSTALLATION GUIDE
EN1Z-0906GE51 R0116 16
If IIS is not installed, a message displays.
9. Install IIS as described in the “Installation of Internet Information Services (IIS)” section.
10. After IIS has been successfully installed, re-start ARENA setup. The InstallShield Wizard displays.
IMPORTANT Note that during installation, some steps may take up to 15 minutes and some windows will stay open. Do not shutdown the PC or do any other actions which may interrupt or cancel the installation.
11. To start installation, click Next button.

ARENA INSTALLATION GUIDE
17 EN1Z-0906GE51 R0116
12. Accept the license agreement terms and continue with the installation by clicking Next button.
13. Select the product, Arena 2 or Client Software, you want to install. The Client Software option means: In order to avoid long downloads on slow DSL and modem lines, this option provides the installation of all necessary components for the client PC, which would otherwise be downloaded at the first connection from the Arena server PC.
14. Click Next button.
15. Select the features, Arena 2 and/or Arena Editor, you want to install. NOTE: For installing only Arena Editor, you need an Arena license too.

ARENA INSTALLATION GUIDE
EN1Z-0906GE51 R0116 18
16. Click Next button. Depending on the current PC configuration, i.e. which software is already installed on the PC, the screens displayed next may be different.
17. Click Next button.
18. Click Next button. ARENA installs the prerequisite software packages, for example, the Windows Installer.

ARENA INSTALLATION GUIDE
19 EN1Z-0906GE51 R0116
The installation of the prerequisite software packages requires the reboot of the PC multiple times dependent on the necessary prerequisite software that must be installed.
NOTE: If SQL Server 2008 Express can not be installed, restart the ARENA setup or install Windows SP3 if not already done (see “Software Requirements” section).
19. After a prerequisite software package has been installed, click Finish button. ARENA setup restarts (see previous screens)
20. Click through the screens. The next prerequisite software package will be installed, e.g. SQL Express Server 2008.

ARENA INSTALLATION GUIDE
EN1Z-0906GE51 R0116 20
21. Click Next button.

ARENA INSTALLATION GUIDE
21 EN1Z-0906GE51 R0116
22. After the last prerequisite software package has been installed, click Finish button. PC is rebooting and ARENA continues the installation.
Various major steps will be executed as the following examples display.

ARENA INSTALLATION GUIDE
EN1Z-0906GE51 R0116 22

ARENA INSTALLATION GUIDE
23 EN1Z-0906GE51 R0116
IMPORTANT! Note that creating the database may take up to 15 minutes. Do not shutdown the PC or do any other actions which may interrupt or cancel the installation.
23. When setup is complete, keep the Yes, I want to restart my computer now
restart option and click Finish. The PC will be restarted. ARENA is successfully installed.
24. A successful ARENA installation is indicated by the green color of the running ARENA service application in the system tray. If the service icon shows a red exclamation mark on white background, ARENA must be newly installed.
25. When the ARENA service is running, launch the program from the ARENA icon on the desktop. Note that ARENA will be installed as unregistered demo version with restricted functionality (see "How to Use ARENA as Demo Version" section).
26. To get full functionality, register the ARENA demo version as described in the "Licensing" section.
ARENA Operation with Non-Administrator Privileges On Windows 7 and Windows Server 2008 PCs, users with non-admin rights have by default no access to the ARENA service application in the system tray. With the installation of ARENA on a Windows 7 or Windows Server 2008 PC, a new Windows user group named ´CentraLine_Arena` is automatically created in the Windows computer management console. All non-admin users belonging to this user group will have access to the ARENA service application in the system tray. For users not belonging to this group, the service application is not available. For enabling a user to gain access to the service application, add the user to the CentraLine_Arena group as described in the following procedure. 1. Make sure that none of the existing users are logged into Windows, and then
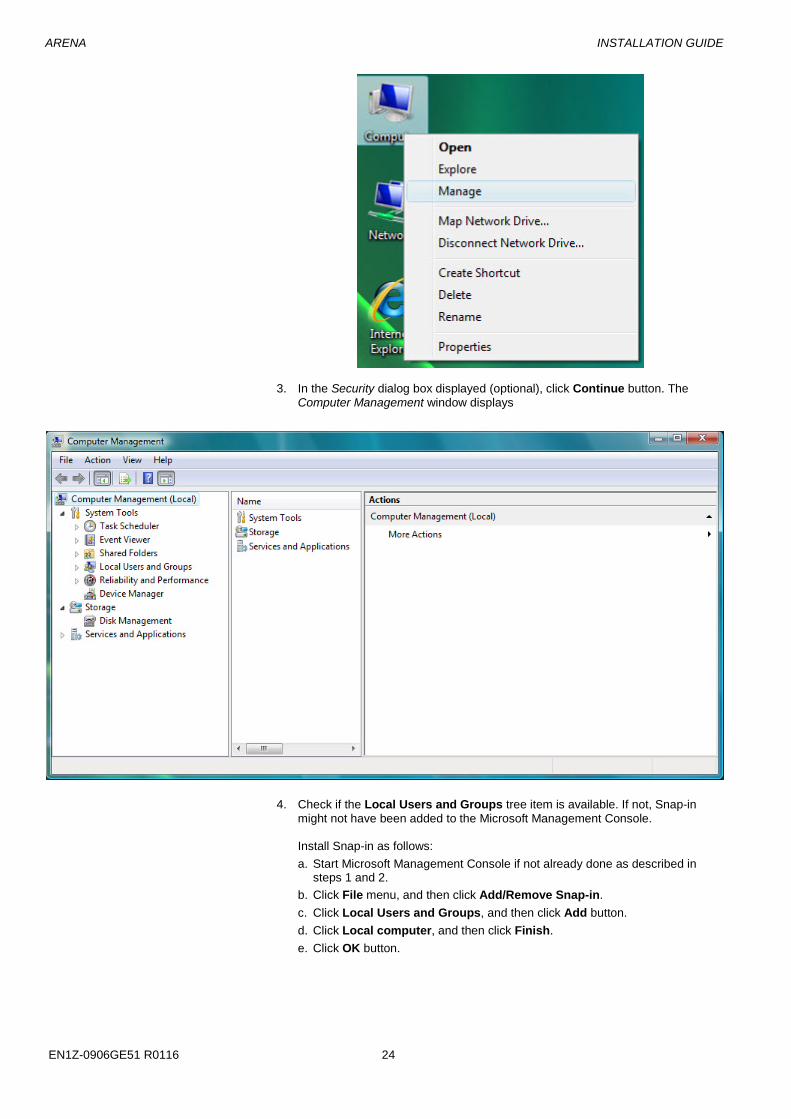
login with Administrator privileges. 2. On the desktop displayed, right click the My Computer icon, and select Manage
in the context menu.
ARENA INSTALLATION GUIDE
EN1Z-0906GE51 R0116 24
3. In the Security dialog box displayed (optional), click Continue button. The Computer Management window displays
4. Check if the Local Users and Groups tree item is available. If not, Snap-in
might not have been added to the Microsoft Management Console. Install Snap-in as follows: a. Start Microsoft Management Console if not already done as described in
steps 1 and 2. b. Click File menu, and then click Add/Remove Snap-in. c. Click Local Users and Groups, and then click Add button. d. Click Local computer, and then click Finish. e. Click OK button.

ARENA INSTALLATION GUIDE
25 EN1Z-0906GE51 R0116
5. In the tree, expand Local Users and Groups by double-clicking. 6. Right-click Users, and then click New User in the context-menu. The New User
dialog box displays.
7. In User name, enter the user name, in abbreviated format if desired. 8. In Full name, enter the full name of the user (optional). 9. In Password, enter the password for the user. 10. In Confirm password, enter the same password. 11. Keep the default setting User must change password at next logon. 12. Click Create button, and then click Close button. 13. The new user is added to the user list in the middle pane.
ARENA INSTALLATION GUIDE
EN1Z-0906GE51 R0116 26
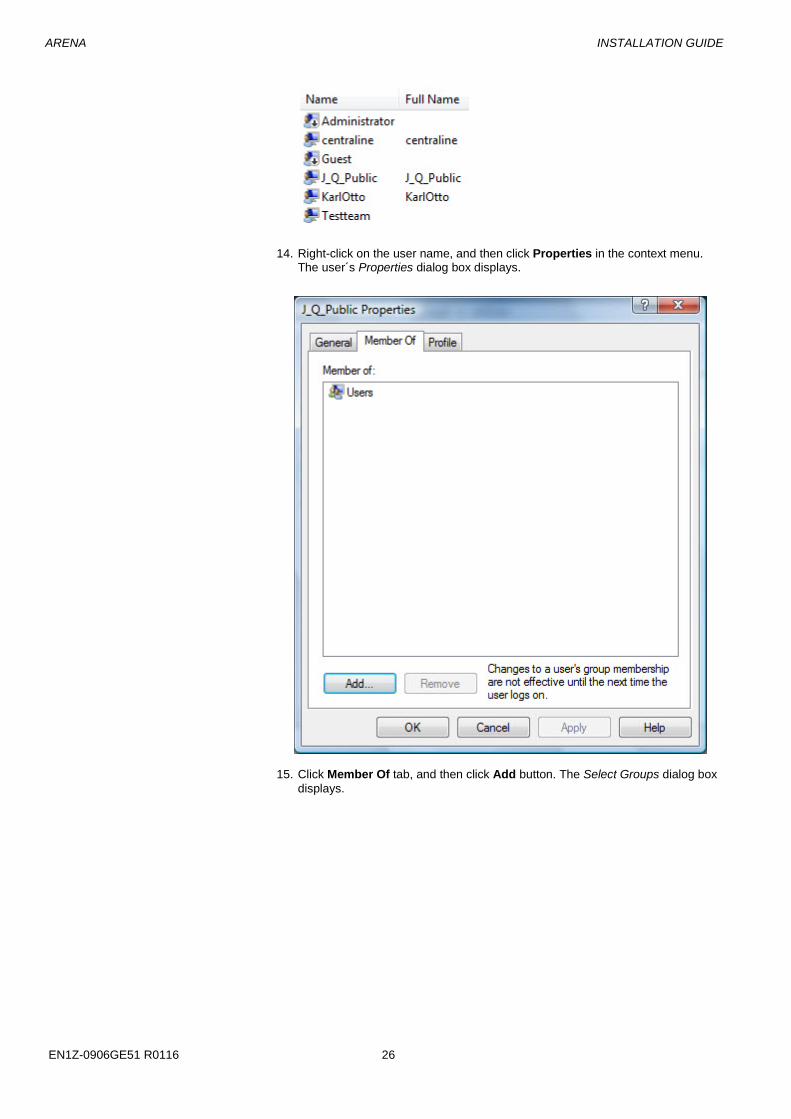
14. Right-click on the user name, and then click Properties in the context menu.
The user´s Properties dialog box displays.
15. Click Member Of tab, and then click Add button. The Select Groups dialog box displays.

ARENA INSTALLATION GUIDE
27 EN1Z-0906GE51 R0116
16. In Enter the object names to select, enter the object name in the following format: <location name>\CentraLine_Arena, for example CL_PC\CentraLine_Arena. Note that the location name displayed in From this location is variable.
17. Click Check Names, and then click OK button. The user is added to the list as
displayed on the Member of tab.
18. If you want to assign additional users as a member of the CentraLine_Arena group, repeat steps 5 through 18 for each user to be added. NOTE: The user´s new group membership is not effective until the next time
the user logs on.

ARENA INSTALLATION GUIDE
EN1Z-0906GE51 R0116 28
Client Configuration Test / Client Setup Tool Upon the first start of the ARENA web browser, either on the ARENA server PC or on the ARENA client PC, ARENA software performs a client (PC) configuration test and checks if: • .Net 4.0 Framework is installed properly • Trusted sites are entered properly In order to run the ARENA software properly, Internet Explorer must be configured accordingly. This is done by the manual execution of the client setup tool after the automatic configuration test. Depending on the operating PC, ARENA server or ARENA client, the prerequisites and necessary procedure for the user is slightly different. For the procedure when working on the ARENA server PC, please refer to “How to operate ARENA on an ARENA Server PC” section. For the procedure when working on the ARENA client PC, please refer to “How to install and operate ARENA from Remote Client PC” section.
How to operate ARENA on a ARENA Server PC In order to successfully operate an ARENA server PC, the client setup tool must be executed at least once to configure .Net framework and trusted sites accordingly. By default, ARENA software prompts for executing the client setup tool after finishing the configuration test upon the first start of the ARENA web browser.
Win 7 and 2008 Server For Windows 7 and Windows 2008 Server, make sure that the following prerequisites are given: • All Windows users who should be able to operate the ARENA server PC must be
assigned to the CentraLine_Arena user group. For each user which is part of that group, the .Net and trusted sites settings are adjusted when executing the client setup tool.
• Make sure that any user that is not intended to be assigned to the CentraLine_Arena group, has administrator privilege.
Procedure 19. Right click to the ARENA desktop icon
RESULT: ARENA performs the client configuration test.
20. If .Net Framework is not configured yet or trusted sites are not entered properly, click the Client Setup Tool link in the test result window of the Client Configuration Test.

ARENA INSTALLATION GUIDE
29 EN1Z-0906GE51 R0116
RESULT: ARENA adjusts all required settings in the MS Internet Explorer (trusted sites) and .Net Framework for all users assigned to the CentraLine_ARENA user group.
21. If the client setup tool has configured the trusted site properly, it is displayed in
the lower right corner of the Internet Explorer window. 22. If the automatic trusted site configuration failed, add the trusted site manually on
the Security tab in the Internet Options dialog box in the Internet Explorer.
NOTE: Each user of the CentraLine_Arena user group can open the ARENA service application in the system tray. To deny access to the service application, the user must be removed from the CentraLine_Arena user group.
1. Click Skip Test on next login if automatic trusted site configuration was
successful.

ARENA INSTALLATION GUIDE
EN1Z-0906GE51 R0116 30
How to install a Client PC and operate ARENA from Remote Client PC For the usage of ARENA as client version, Microsoft .Net 4.0 Framework must be installed on the PC. When entering the IP address of the ARENA PC you want to access, ARENA performs the client configuration test and checks if .Net Framework is properly configured and if the trusted sites are entered correctly. If the test fails, one of the following can be the cause: • .Net 4.0 Framework is not installed properly • Trusted sites are not entered correctly • Newer ARENA version is installed on the server PC To solve each of these problems, please follow the procedure described below.
IMPORTANT
For each Windows user that should run the ARENA web browser on the client PC, ARENA requires the client setup tool to be executed.
Please deactivate energy saving options for the Server PC to ensure that the PC is constantly running.
Procedure 1. Close all running applications. 2. Insert CentraLine Software CD in CD-ROM drive or use the downloaded
installation folder. 3. Install the Microsoft .Net Framework software which can be found on the
ARENA CD by double-clicking the following program icon. 4. In the File Download – Security dialog box, click Run button.
The .NET Framework installation will start.
5. Follow the installation steps and finish the .NET Framework installation by clicking the appropriate buttons.
6. For configuring the trusted sites on the client PC click Client Setup Tool in the Client Configuration Test window (see screenshot above).

ARENA INSTALLATION GUIDE
31 EN1Z-0906GE51 R0116
7. After you have executed the client setup tool or have configured the trusted sites manually, logon to the ARENA server PC as follows: a. Open Internet Explorer if not already done. b. In the address field, enter the IP address of the ARENA server PC. c. Enter username and password.
8. The Client Configuration Test will be executed again. If it fails again, either .Net framework and or the trusted sites are still not properly configured.
IMPORTANT
If the Client Configuration Test keeps failing, check if the Windows user has administrator privileges. For each Windows user trying to connect remotely to an ARENA server PC, ARENA software executes the client configuration test. In order to pass this test successfully, the user must have administrator privilege. Otherwise .NET and trusted sites will not be configured properly when running the Client Setup Tool.
NOTE: If you cannot logon to the ARENA server PC and the Client Configuration
Test is not executed, open Internet Explorer and select Tools, and then Internet Options. Select the General tab, and then click Delete Files. In the Delete Files dialog box, check Delete all offline content, and then click OK. Exit Internet Explorer and logon again to the ARENA server PC. The Client Configuration Test should now be executed.
ARENA INSTALLATION GUIDE
EN1Z-0906GE51 R0116 32
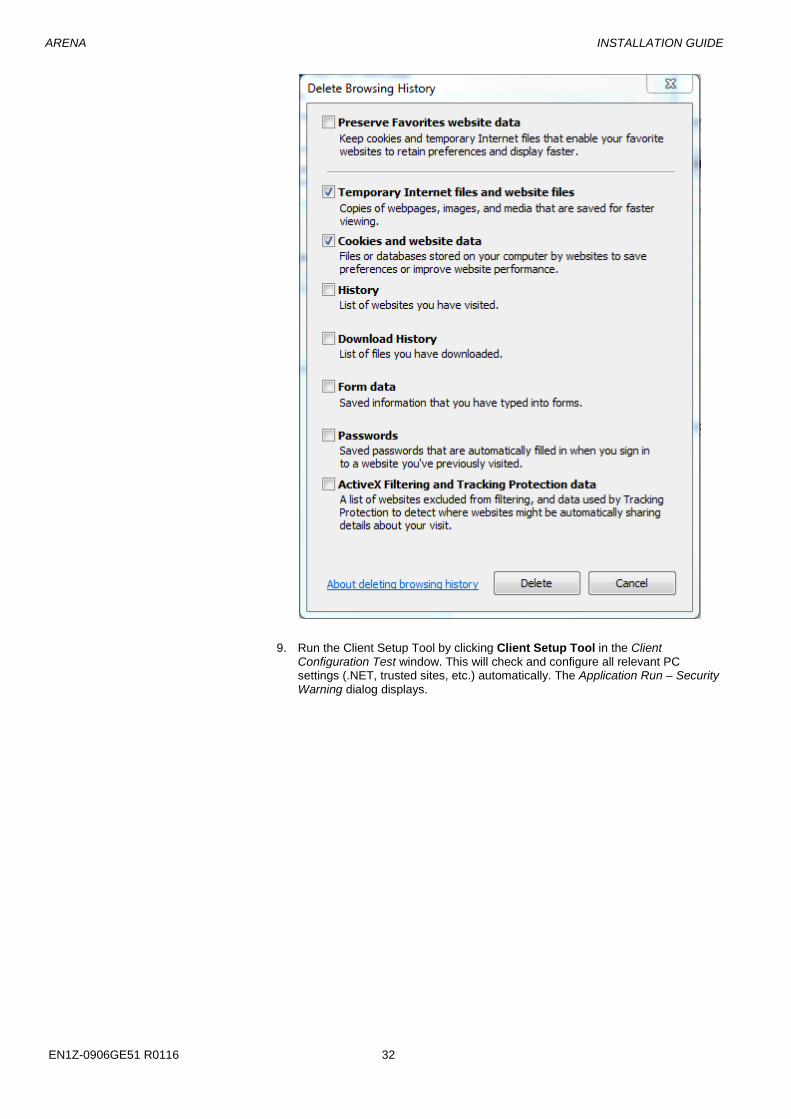
9. Run the Client Setup Tool by clicking Client Setup Tool in the Client Configuration Test window. This will check and configure all relevant PC settings (.NET, trusted sites, etc.) automatically. The Application Run – Security Warning dialog displays.

ARENA INSTALLATION GUIDE
33 EN1Z-0906GE51 R0116
10. Click Run. The security settings will be applied during this step. If successfully done, the following message box displays.
11. Click Close. 12. Close and restart Internet Explorer and logon to the ARENA server PC. The
Client Configuration Test will run again but this time with no errors. Full access to graphics, trends etc should now be available.
13. If a newer version of ARENA has been installed on the server PC, the downloaded files by the client do not match. Proceed as follows.
14. Clear the Download cache by entering the DOS command ´GACUTIL–cdl` in the Command Prompt and delete temporary internet files in Internet Explorer.
15. If step 17 does not help, contact your system administrator, tell him the URL of the ARENA Server, and advise him to delete old versions of these files in the global Web cache.
ARENA and DSL Routers Please find a detailed description of the remote operation with DSL and GSM routers in the ARENA user guide.
Parallel Use of old ARENA Versions ARENA 3.00.00 cannot be installed in parallel to another ARENA version on the same PC. You have to uninstall the old ARENA version using the Add or Remove

ARENA INSTALLATION GUIDE
EN1Z-0906GE51 R0116 34
function in the Windows Control Panel. The new default installation folder will be ARENA3 in the CentraLine folder. The existing ARENA folder will remain untouched.
ARENA and COACH Installations with different Versions on Same PC If ARENA and COACH with different versions must be installed for the first time on the same PC, it is strongly recommended to first install the older version of both.
48BCCCLIF2 –ARENA C-BUS NETWORK INTERFACE Purpose The ARENA-C-Bus network Interface (CLIF2) can be configured with the 48BC-Bus
Network Interface Configurator (CLIF-Configurator). The configuration includes the following main tasks:
• IP address configuration by assigning or changing an IP address • Firmware update (download) By default, every new CLIF2 is delivered with actual firmware and a default IP address.
Prerequisites The following prerequisites should be fulfilled in order to perform all the provided functions of the CLIF-Configurator
• The network infrastructure must support the IP address settings (IP address,
subnet mask, gateway) to be foreseen for the CLIF2. Make sure that no hubs or switches block the target IP address of the CLIF2. All hubs, switches and routers must provide port definition to 10/100MHz half/full duplex for the CLIF-Configurator. Contact your I.T. administrator in this manner if changes are necessary.
• The FTP-Server feature must be enabled on the Exceptions tab in the Windows firewall.
• For firmware download, any other FTP-Server (service) must be stopped in the Windows Computer Management.
• The PC is running. • CLIF2 is running • PC and CLIF2 are connected via COM and/or LAN using the appropriate cables.
For detailed description on the connection of the CLIF2, please refer to the CLIF-ARENA C-Bus Interfaces Installation Instructions EN1Z-1014GE51.
General Typically the default IP address is different to the target IP address of the CLIF2 in
the network and hence, must be changed to the corresponding IP address that fits into the customer´s network. The CLIF2 can be accessed via the following two connection types:
• COM
Direct access. Allows IP address configuration, password handling, and diagnosis (optional). In particular, this connection type is necessary if the IP address has been lost or the firmware is missing. Recommended for the local startup using PCs or laptops featuring COM ports.
• LAN Remote Access. Allows IP address configuration, password handling, diagnosis (optional), and firmware download. In particular, this connection type is necessary if a firmware download must be executed. Recommended in general for remote startup and maintenance using PCs or laptops with LAN jack but without COM ports.
Procedures The main procedures are the IP address configuration (steps 1 through 6) and the firmware download (steps 7 through 14). While performing these procedures, the following functions can be mandatory part of them or be done explicitly (steps 15 through 23):

ARENA INSTALLATION GUIDE
35 EN1Z-0906GE51 R0116
• login • read • password input/change • diagnosis • restart
IP Address Configuration This procedure allows changing the IP Address of the CLIF2 as it may be necessary
when delivered as default factory-aligned device. 1. Start the CLIF-Configurator by clicking Start>Programs>CentraLine>Clif
Configurator. The CLIF Configurator window displays.
2. Optional: in the menu bar, click Settings, and then check Show Terminal
Window if you want to view process information on the Terminal tab. The information displayed on the Terminal tab can be used for diagnostic purpose while performing any of the functions described in the following. For any function executed (login, read, change, etc.), CLIF2 initially selects the Terminal tab and displays the corresponding process steps. Then CLIF2 redisplays the corresponding original tab from which the action has been started.
3. In Interface, select the interface you want to use for the connection (see usage scenarios in the previous “General” section for appropriate selection). In Username, the default user name ´root` is displayed. In Password, by default no password is issued and necessary to enter.
4. Click the IP Configuration tab. The current configuration is read from the device.

ARENA INSTALLATION GUIDE
EN1Z-0906GE51 R0116 36
5. Set the IP address to the target IP address of the C-bus interface as follows:
a. In New IP address, enter the new IP address. b. In Subnet Mask, enter the subnet mask. c. In Gateway, enter the gateway address.
6. Click Change. Software is logging in, is changing the IP (network) address and is rebooting if the change has been successful. If LAN has been selected as interface, the changed IP address in displayed in IP Address at the top under CLIF Connection. This will be the IP address when logging in the next time.
Fig. 1 IP Address Configuration via COM Connection

ARENA INSTALLATION GUIDE
37 EN1Z-0906GE51 R0116
Fig. 2 IP Address Configuration via LAN Connection
Fig. 3 Successful IP Address Change (Example: COM interface)

ARENA INSTALLATION GUIDE
EN1Z-0906GE51 R0116 38
Fig. 4 Successful IP Address Change (Example: LAN interface) Firmware Download The firmware must be downloaded via LAN and can not be downloaded directly via
COM interface.
7. To download firmware, select a LAN interface in Interface. 8. Select the Firmware Download tab. If an FTP Server is still running, a message
box displays.
9. Confirm the message by clicking OK. The Firmware Download tab is redisplayed. The FTP Server of the C-bus interface is stopped. The Start button is disabled.
10. Stop any other FTP server in the Windows Computer Management and return to the Firmware Download tab.
11. Click the Add firewall exception for FTP link. The FTP server is enabled in the windows firewall as indicated by a message box.

ARENA INSTALLATION GUIDE
39 EN1Z-0906GE51 R0116
12. Confirm the message box by clicking OK. The Firmware Download tab is redisplayed. The FTP server of the C-bus interface is started as the green status line and the checked FTP Server checkbox indicates. The Start button is now enabled.
13. In Susi SW File, click “Browse” button and select the firmware file from the Arena installation folder named “Clif”
14. Click Start. The firmware download starts. Information on the ongoing login download process steps are displayed on the Terminal tab (if enabled).
The successful download is indicated in the green status line, and the Firmware Download tab redisplays.

ARENA INSTALLATION GUIDE
EN1Z-0906GE51 R0116 40
Login - Read When logging in via Login button, device information is read and displayed under
Version Information. At any time, device information can be read explicitly by using the Read button. 15. Click Login. Software reads information from the device and displays detailed
information on the Terminal tab. The status line at the bottom displays the current process status and finally the result. If the login is not successful, an error message is shown in the red status line and no version information is displayed. In this case, check if
• you have selected the right COM or LAN interface in Interface • the connection cables are defective • the PC and the C-bus interface are connected properly • the C-bus interface is powered on Use also the C-Bus Interface Installation Instructions EN1Z-1014GE51 for troubleshooting.
16. Retry to connect by clicking Login again. If the login is successful, the result is shown in the green status line and the version information (C-bus interface type, firmware version, and boot loader version) is displayed under Version Information).
ARENA INSTALLATION GUIDE
41 EN1Z-0906GE51 R0116
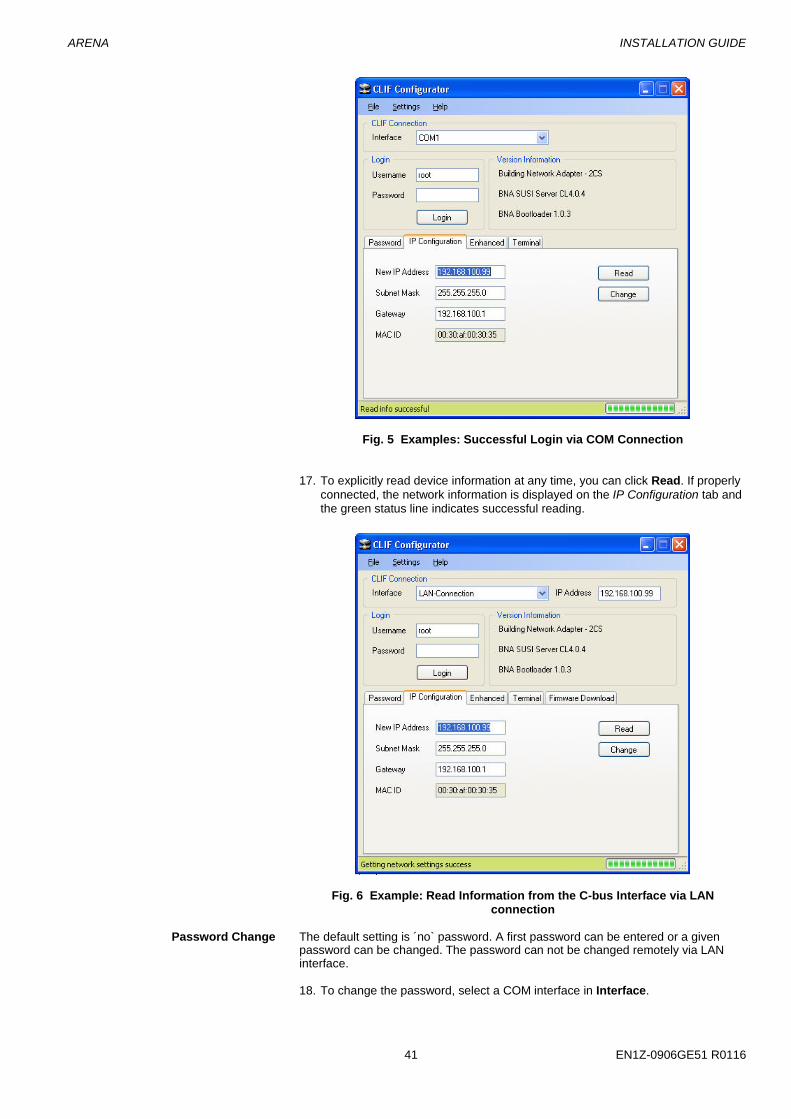
Fig. 5 Examples: Successful Login via COM Connection
17. To explicitly read device information at any time, you can click Read. If properly connected, the network information is displayed on the IP Configuration tab and the green status line indicates successful reading.
Fig. 6 Example: Read Information from the C-bus Interface via LAN connection
Password Change The default setting is ´no` password. A first password can be entered or a given
password can be changed. The password can not be changed remotely via LAN interface.
18. To change the password, select a COM interface in Interface.
ARENA INSTALLATION GUIDE
EN1Z-0906GE51 R0116 42
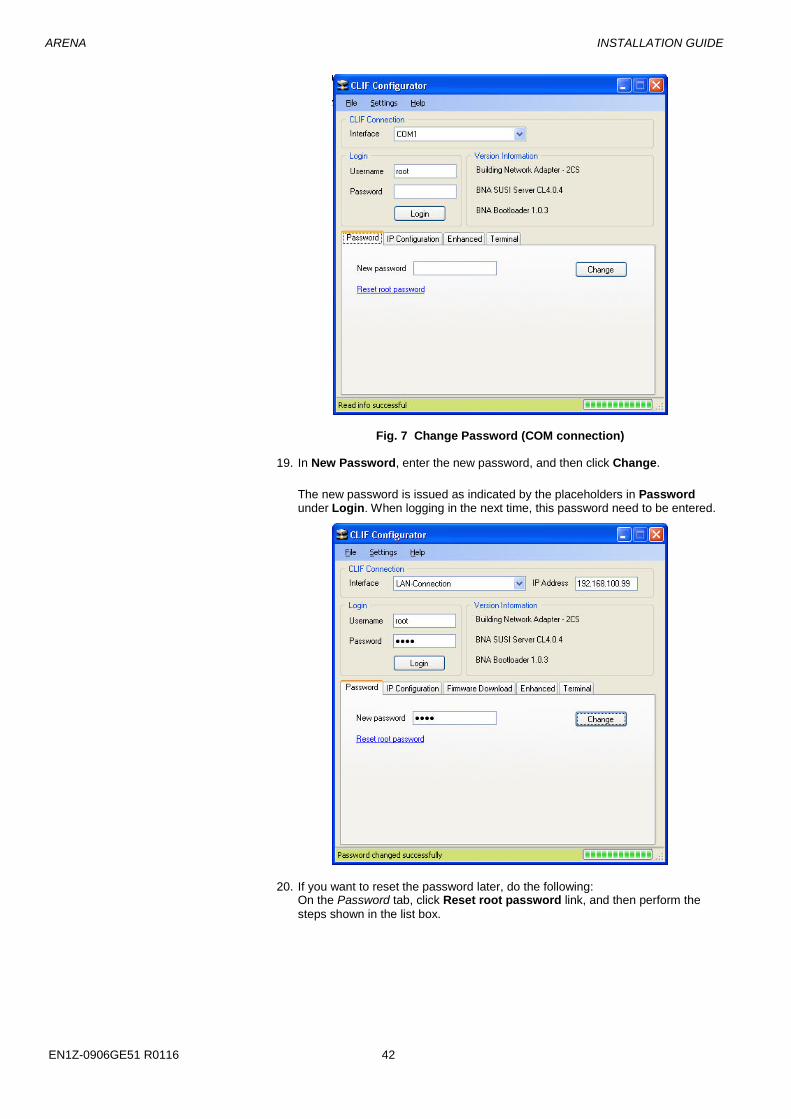
Fig. 7 Change Password (COM connection) 19. In New Password, enter the new password, and then click Change.
The new password is issued as indicated by the placeholders in Password under Login. When logging in the next time, this password need to be entered.
20. If you want to reset the password later, do the following: On the Password tab, click Reset root password link, and then perform the steps shown in the list box.
ARENA INSTALLATION GUIDE
43 EN1Z-0906GE51 R0116
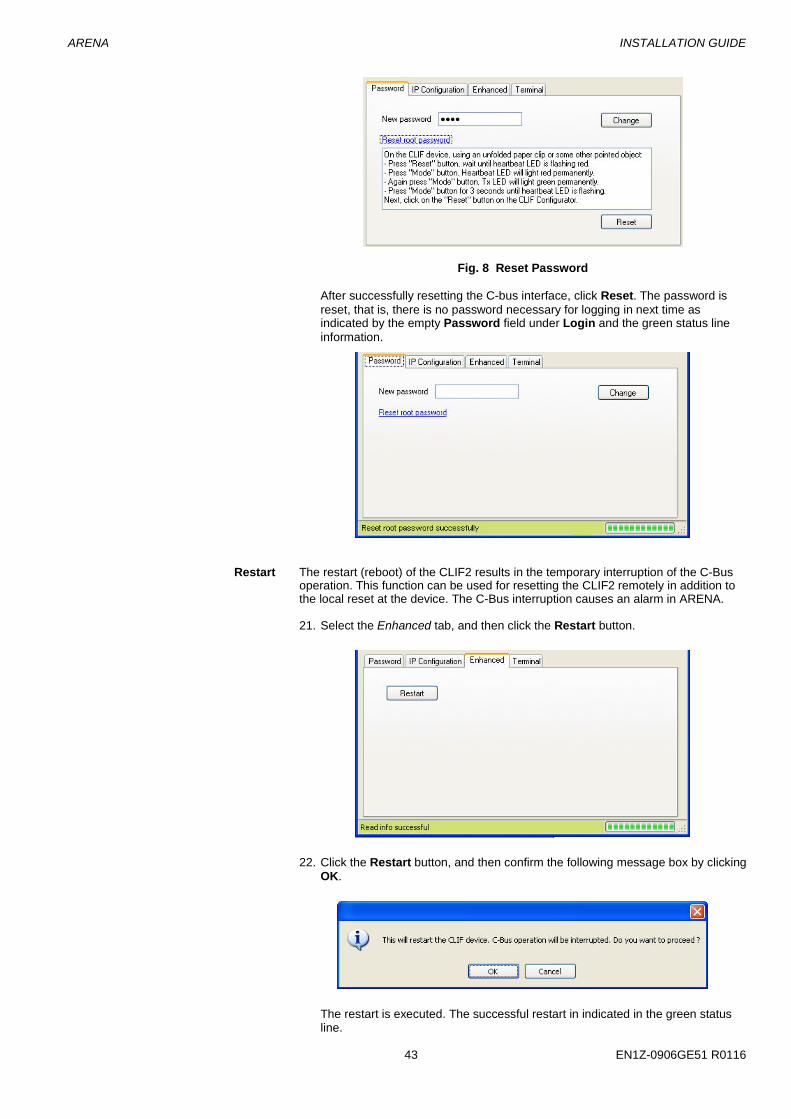
Fig. 8 Reset Password
After successfully resetting the C-bus interface, click Reset. The password is reset, that is, there is no password necessary for logging in next time as indicated by the empty Password field under Login and the green status line information.
Restart The restart (reboot) of the CLIF2 results in the temporary interruption of the C-Bus
operation. This function can be used for resetting the CLIF2 remotely in addition to the local reset at the device. The C-Bus interruption causes an alarm in ARENA. 21. Select the Enhanced tab, and then click the Restart button.
22. Click the Restart button, and then confirm the following message box by clicking
OK.
The restart is executed. The successful restart in indicated in the green status line.

ARENA INSTALLATION GUIDE
EN1Z-0906GE51 R0116 44
Diagnosis – Terrminal Window The information displayed on the Terminal tab can be used for diagnostic purpose while performing any function selected (IP configuration, firmware download, login, etc. (see step 2).
23. When finishing with the desired operations in the CLIF-Configurator, click File in
the menu bar, and then click Exit.
ARENA VERSIONS Based on the licensed features, ARENA is available in specific versions as the following table shows.
Order Number License Features Upgrade
CLAR3S10 Existing base-license for 10 devices/controllers including C-Bus, LON-bus and BACnet driver
CLAR3DRV-A2A Driver for ARENA toARENA connections x CLAR3U20 Upgrade for 20 additional Honeywell devices x CLAR3U50 Upgrade for 50 additional Honeywell devices x CLAR3U100 Upgrade for 100 additional Honeywell devices x
Order Number Description CL CentraLine AR3 ARENA Version 3.0 DRV Driver S Standard version with basic functions including all drivers
except the ARENA-to-ARENA driver U Upgrade 10, 20, 50, 100 number of devices/controllers operated in ARENA
All ARENA installations can be used as demo version without licensing function. The ARENA Editor demo version can be used to create graphics but not for exporting files for ARENA 3.00.00 (see “How to use ARENA as Demo Version” section).
How to use ARENA as Demo Version After the ARENA software has been installed, this version will automatically be a demo version if it is not registered. There is no possibility to connect a site with the unregistered version. This version can however be used to demonstrate the various functions and operations possible in Offline mode by restoring a previously backed up ARENA project. 1. In the system tray, right-click on the green Service application icon. 2. In the context menu, click Backup / Restore. 3. For backups, click the Backup tab, for restores, click the Restore tab. 4. Browse to the folder where you want to save/open the database. 5. For backups, click Backup button, for restores, click Restore button. 6. In case a message box displays, confirm the message by clicking OK. NOTE: The Demo ARENA can be used to display exported trend and alarm data,
automatic and custom graphic pages and other settings and logs.
Site Prerequisites

ARENA INSTALLATION GUIDE
45 EN1Z-0906GE51 R0116
iLON Sites
1. Take care that the site is installed and commissioned. The relevant project must be engineered with COACH or with CARE.
2. Remember to upgrade the controller firmware to the latest version that supports dial-out if necessary.
3. Install the iLON10 device: 4. Connect the FTT port of the iLON10 to the LON bus 5. Connect the communication line. Note that a remote site can either be
connected via Dial-Up or via LAN, but not via both.
NOTE: Dial-In and Dial-Out for iLon10 modem sites is only supported under Windows XP. Due to changes in Windows 7 and Windows XP 2008 Server, the Dial-In from the remote site to the ARENA PC is not supported.
For Dial-Up:
6. Connect the serial port of the iLON10 to the modem. Connect the modem to the phone line.
7. First, power up the modem, 8. Then power up the iLON10 9. Check the communication:
a. For Dial-Up, check if the modem works by using a standard phone to call the modem. The modem should pick up the line. NOTE:
Sometimes, it may happen that the modem does not pick up the line after installation. Try to power down the iLON10 (remove power cord) and power it on again, while the modem remains switched on.
NOTE:
It’s a best practice that a 2nd person sets up and configures the site in ARENA and checks the communication while still a person is at the remote site to assist in troubleshooting.
For LAN:
10. Connect the 10BaseT port of the iLON10 to the Ethernet. 11. Connect the power supply:
Remote ARENA Sites
NOTE: ARENA must be Version 2.0 or higher and must support the Remote feature.
1. Install the modem(s) on the PC by following the installation instructions of the
modem. Note that more than one modem can be used to increase the system availability. IMPORTANT!
Always install a modem on the ARENA PC before installing ARENA software. If you install modems after ARENA installation, you need to perform additional steps to the standard installation. The COM port to be used for the modems must not be used for other connections. Remove connections, e.g. "Communication cable between two computers" in the Phone and Modems Options dialog of Windows XP.
Connect the communication line(s) to the ARENA PC. Note that the PC can support LAN and Dial-Up in parallel:
For Dial-Up:
a. Connect the phone line(s) to the modem(s)

ARENA INSTALLATION GUIDE
EN1Z-0906GE51 R0116 46
For LAN:
b. Connect the network card of the PC to the LAN. Make sure that TCT/IP protocol is installed on the network card.
For Dial-Up:
c. Check the modem communication as follows: d. In the Windows Control Panel, select the modem, click the Properties button,
and then the Diagnostics tab. Query the modem and check its response. NOTE:
It’s a best practice that a 2nd person is available on the remote site while ARENA is set up to assist in troubleshooting.
If you want to use an alarm printer, make sure that it is properly installed (including installation of the correct driver) and configured.

ARENA INSTALLATION GUIDE
47 EN1Z-0906GE51 R0116
LICENSING NOTE: You need internet access for the licensing process.
ARENA will be installed as unregistered version.
License Scenarios Licensing must be done when:
• installing a new license of ARENA 3.00.00 • upgrading an ARENA 2.xx.xx license to an ARENA 3.00.00 license
In both cases, you will need a CentraLine protection plug with a new or an upgraded license.
Upgrading an ARENA2 to ARENA3 Prerequisites The CentraLine protection plug and the ARENA2 license is available. The ARENA
PC is connected to the internet. The upgrade license includes the following features:
Old Order Number Upgrade License Features CLAR2SL10 CLAR2SL99 CLAR2DRV-A2A
All upgraded ARENA versions include C-Bus, LON-bus and BACnet
CLAR2SL10 Upgrade to 40 Honeywell devices CLAR2SL99 Upgrade to 500 Honeywell devices CLAR2DRV-A2A Driver for ARENA to ARENA connections remains the same
Procedure
1. Enter http://license.centraline.com into the Web browser. RESULT: The CentraLine License Server is invoked.
2. Login to the License server.
RESULT: After successful login, the License Overview screen is displayed showing all licenses of the user.

ARENA INSTALLATION GUIDE
EN1Z-0906GE51 R0116 48
3. Click the ARENA2 license, you want to upgrade. RESULT: The License Details screen is displayed.
4. Click Prepare License for Protection Plug.
RESULT: The Prepare License for Protection Plug screen is displayed.

ARENA INSTALLATION GUIDE
49 EN1Z-0906GE51 R0116
5. Complete the license transfer by clicking Send.
RESULT: The license will be transferred. An email is sent to the user´s email
account.
6. In the Prepare License for Protection Plug screen click Back to Overview.
ARENA INSTALLATION GUIDE
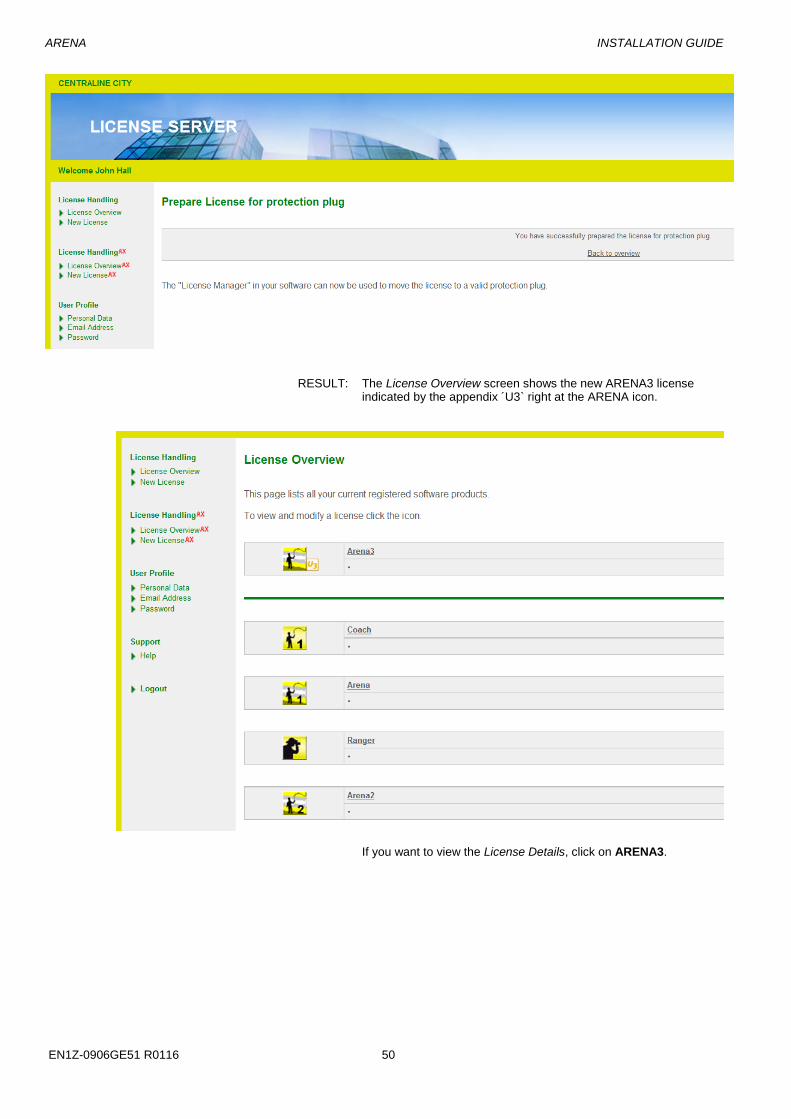
EN1Z-0906GE51 R0116 50
RESULT: The License Overview screen shows the new ARENA3 license indicated by the appendix ´U3` right at the ARENA icon.
If you want to view the License Details, click on ARENA3.

ARENA INSTALLATION GUIDE
51 EN1Z-0906GE51 R0116
In the details you see that the license (reference code, serial
number) is not assigned to the protection plug yet. This will be done in the next steps.
7. To continue, insert the protection plug into an USB jack of the ARENA3 PC. 8. In the system tray, right-click on the Service application icon, and then select
Licensing in the context menu.
RESULT: The License Manager is invoked and shows a blank protection plug in the Protection plugs folder.

ARENA INSTALLATION GUIDE
EN1Z-0906GE51 R0116 52
9. In the menu bar, click Account, and then Login.
RESULT: The User login dialog box displays.
10. Enter user name and password for your license server account.
11. Click OK. RESULT: The unregistered ARENA3 license (key) is displayed under the
user´s name in the License Manager.

ARENA INSTALLATION GUIDE
53 EN1Z-0906GE51 R0116
12. Transfer the license to the protection plug via drag&drop.
RESULT: The License Agreement screen is displayed.
13. Click Accept.
RESULT: The License comment dialog box is displayed.
14. Enter a comment if desired, and then click OK.
RESULT: The license is transferred to the protection plug and registered on the license server respectively. In the left tree of the license

ARENA INSTALLATION GUIDE
EN1Z-0906GE51 R0116 54
manager the transferred license name is shown below the protection plug icon with key and green lock.
15. To view the license details, click the license in the left tree. RESULT: The license details are displayed on the right pane.
NOTE: The license overview on the license server shows that the transferred license is now registered. This is indicated by a green lock at the ARENA icon. The ARENA2 license cannot be used anymore.
ARENA INSTALLATION GUIDE
55 EN1Z-0906GE51 R0116
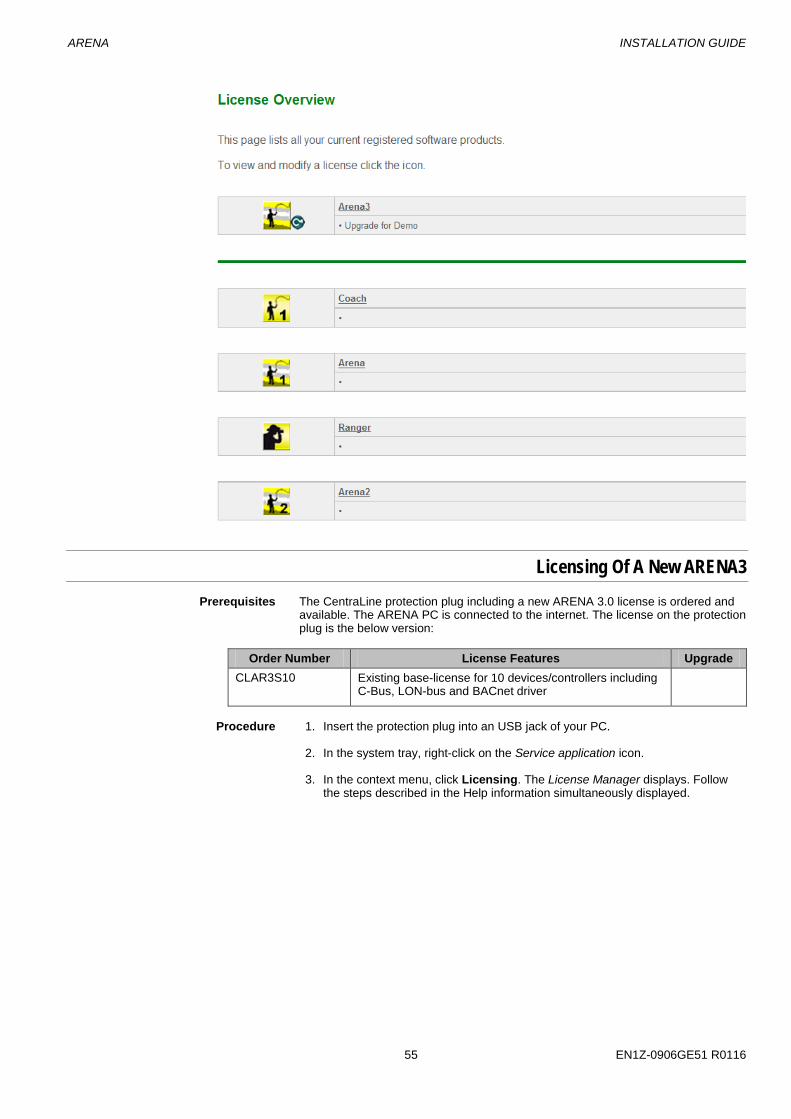
Licensing Of A New ARENA3 Prerequisites The CentraLine protection plug including a new ARENA 3.0 license is ordered and
available. The ARENA PC is connected to the internet. The license on the protection plug is the below version:
Order Number License Features Upgrade
CLAR3S10 Existing base-license for 10 devices/controllers including C-Bus, LON-bus and BACnet driver
Procedure 1. Insert the protection plug into an USB jack of your PC. 2. In the system tray, right-click on the Service application icon. 3. In the context menu, click Licensing. The License Manager displays. Follow
the steps described in the Help information simultaneously displayed.

ARENA INSTALLATION GUIDE
EN1Z-0906GE51 R0116 56
4. If you are already registered as user on the License Server, follow the initial
steps described in "How to activate a New License" of the Help information (see figure above).
5. If you are not registered as user on the License Server, create a new user
account as described in the "The User Account" drop-down list item of the Help information. Then continue by activating the license as described in "How to activate a New License" drop-down list item (see figure above).
RESULT: The ARENA license is stored on the protection plug and you can start working with ARENA and ARENA Editor.

ARENA INSTALLATION GUIDE
57 EN1Z-0906GE51 R0116
Upgrades In order to upgrade the number of Honeywell devices three upgrade vouchers are available:
Order Number License Features CLAR3U20 Upgrade for 20 additional Honeywell devices CLAR3U50 Upgrade for 50 additional Honeywell devices CLAR3U100 Upgrade for 100 additional Honeywell devices
These upgrade vouchers will be delivered on paper and have to be registered with the existing USB stick license using the ARENA Licensing menu. For ARENA to ARENA connections the following special license is required:
Order Number License Features CLAR3DRV-A2A Driver for ARENA to ARENA connections
This upgrade can be licensed in the same way.
Nodes count in ARENA3 ARENA handles the count of nodes for LON and BACnet devices as follows: • ARENA LON Driver:
– Each displayed device counts as one node • ARENA C-Bus Driver:
– Each displayed device counts as one node • ARENA BACnet Driver:
– Each displayed Honeywell device counts as one node – ARENA allows adding 3rd party BACnet / -LON devices
Counting of 3rd party devices is as follows: 1 x 3rd party device ≙ 2 Honeywell devices 1 x 3rd party device >250 DPs ≙ 3 Honeywell devices 1 x 3rd party device >500 DPs ≙ 4 Honeywell devices 1 x 3rd party device >1000 DPs ≙ 6 Honeywell devices
• Once the maximum number of devices is exceeded during network scan:
– ARENA will add only the found controllers until the limit is reached – A message in the system event log will state those controllers which will
not be added – Only devices which are displayed in the site tree will be considered for
device counting – A site connection will not be possible during database backup/restore or
database import activities of an old project

ARENA INSTALLATION GUIDE
EN1Z-0906GE51 R0116 58
NOTES FOR I.T. ADMINISTRATORS
For a Successful Start in an existing LAN For the initial installation and start of the ARENA, please take care of the following: • you have to be administrator • firewalls and anti-virus software should be switched off • there should be no proxy server set up • standard settings of the IIS shall apply From this situation gradually increase the security by adding the functions described in the following sections. ARENA - ARENA Connection In order to establish an ARENA - ARENA connection, the pinging of each of both PCs must be possible. The communication between the two PCs occurs via port 2200. If a fire wall is active on the ARENA server PC, the port 2200 on this PC must be enabled. Remote ARENA Site connection between Windows XP and Windows 7 PC When creating an ARENA – ARENA operation via LAN on a system consisting of a Windows XP and Windows 7 PC, enable the WWW Service (HTTP) exception in the firewall of the Windows7 PC to ensure the ARENA – ARENA connection from the Windows 7 PC to the XP PC. Installation with ports different from port 80 If port 80 has been changed to 85 in an installation, the following steps must be done in order to display alarm popups properly: 1. Before changing the port, in the Windows registry enter the document entry:
[HKEY_LOCAL_MACHINE\SOFTWARE\CentraLine\Arena]"VirtualFolderPath"="C:\\Program Files\\CentraLine\\Arena2\\Website" "IISPort"="80"
2. When starting ARENA, enter Http:\\localhost:85/ARENA in the Internet Explorer.
Security Firewall IIS needs Port 80 to be opened. The ARENA installation automatically opens Port 80. When using firewalls other than from Microsoft, port 80 must be opened manually. Anti-Virus Software Tools and Ports It may happen, that an anti-virus software may block the ports 25 and/or 110 which are necessary for sending and receiving emails. In this case, you must change configuration settings of the anti-virus software in order to allow ARENA forwarding alarms. The re-configuration must be done as follows (see McAffee Example below) : 1. Open Port 25 for outgoing email connections via SMTP. 2. Open Port 110 for incoming email connections via POP3. Remote LAN connection between ARENA and iLON10 The LON communication via LAN is using Port 1628 and 1629 for TCP and UDP.
ARENA INSTALLATION GUIDE
59 EN1Z-0906GE51 R0116
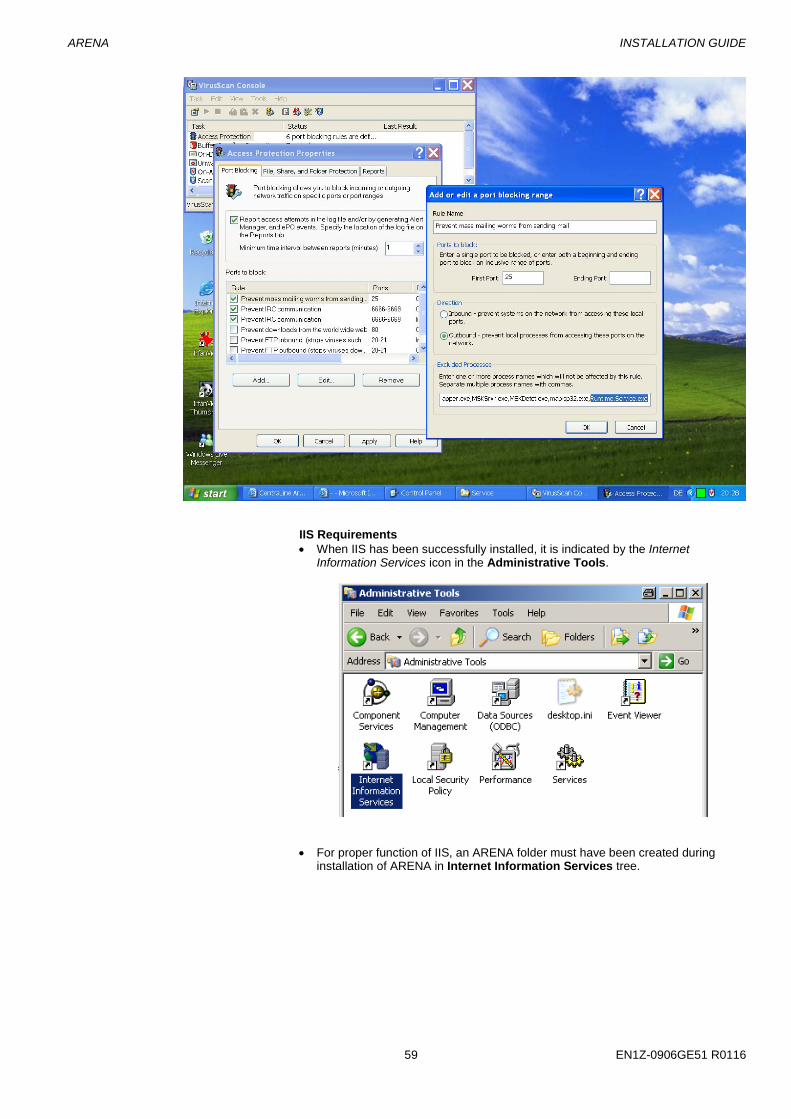
IIS Requirements • When IIS has been successfully installed, it is indicated by the Internet
Information Services icon in the Administrative Tools.
• For proper function of IIS, an ARENA folder must have been created during
installation of ARENA in Internet Information Services tree.

ARENA INSTALLATION GUIDE
EN1Z-0906GE51 R0116 60
• Port 80 of the firewall must be opened. • Word Wide Web Publishing service must be running
Proxy Server Usage When using a Proxy server for connections, the localhost address ´http://localhost/Arena` must be entered as exception (see also ”Proxy Server Settings” section). IP Address Management If a DHCP server is used instead of static IP addresses, enter the hostname in the Trusted sites dialog.
Proxy Server Settings Web Publishing Rule for ARENA In case a proxy server is part of the network, then this server must publish the ARENA URL on port 80. Then it is possible to reach the ARENA on the network from an outside client PC. NOTE: Some proxy server software is allocating all IIS connections that causes
that the IIS will be overloaded. Having the proxy server enabled will cause that the ARENA browser access will not work.

ARENA INSTALLATION GUIDE
61 EN1Z-0906GE51 R0116
Port Forwarding Rule for iLon10 In case a proxy server is part of the network, then this server must have a port forwarding rule for port 1628 and 1629 TCP and UDP. Then it is possible to reach the iLON(s) on the network from an outside ARENA PC.
ARENA INSTALLATION GUIDE
EN1Z-0906GE51 R0116 62
Updating ARENA When updating an older ARENA version to the current ARENA version in a system with a proxy server installed, the following steps must be performed after the update: 1. Delete cockies. This invokes the Assembly Installer Tool. 2. Follow the steps executed by the Assembly Installer Tool. 3. Ensure that global caching for the Arena PC is disabled, or execute Clear
Download Cache in the Centraline program group.
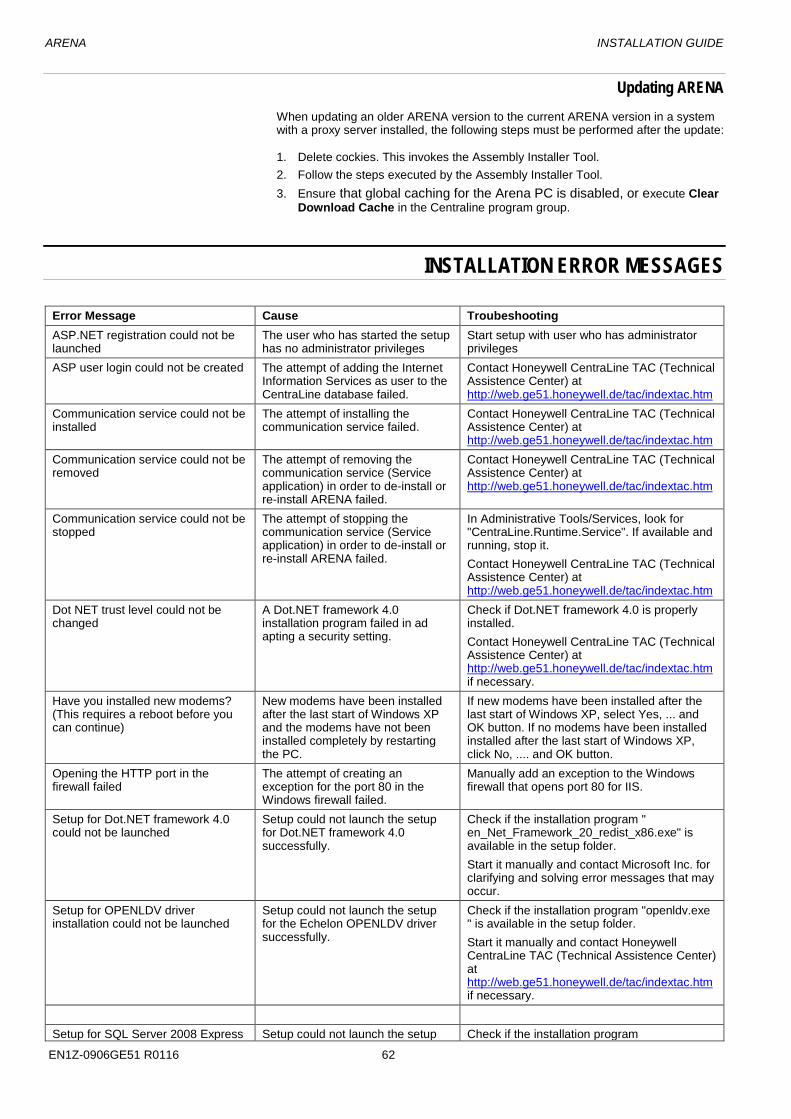
INSTALLATION ERROR MESSAGES
Error Message Cause Troubeshooting ASP.NET registration could not be launched
The user who has started the setup has no administrator privileges
Start setup with user who has administrator privileges
ASP user login could not be created The attempt of adding the Internet Information Services as user to the CentraLine database failed.
Contact Honeywell CentraLine TAC (Technical Assistence Center) at http://web.ge51.honeywell.de/tac/indextac.htm
Communication service could not be installed
The attempt of installing the communication service failed.
Contact Honeywell CentraLine TAC (Technical Assistence Center) at http://web.ge51.honeywell.de/tac/indextac.htm
Communication service could not be removed
The attempt of removing the communication service (Service application) in order to de-install or re-install ARENA failed.
Contact Honeywell CentraLine TAC (Technical Assistence Center) at http://web.ge51.honeywell.de/tac/indextac.htm
Communication service could not be stopped
The attempt of stopping the communication service (Service application) in order to de-install or re-install ARENA failed.
In Administrative Tools/Services, look for "CentraLine.Runtime.Service". If available and running, stop it. Contact Honeywell CentraLine TAC (Technical Assistence Center) at http://web.ge51.honeywell.de/tac/indextac.htm
Dot NET trust level could not be changed
A Dot.NET framework 4.0 installation program failed in ad apting a security setting.
Check if Dot.NET framework 4.0 is properly installed. Contact Honeywell CentraLine TAC (Technical Assistence Center) at http://web.ge51.honeywell.de/tac/indextac.htm if necessary.
Have you installed new modems? (This requires a reboot before you can continue)
New modems have been installed after the last start of Windows XP and the modems have not been installed completely by restarting the PC.
If new modems have been installed after the last start of Windows XP, select Yes, ... and OK button. If no modems have been installed installed after the last start of Windows XP, click No, .... and OK button.
Opening the HTTP port in the firewall failed
The attempt of creating an exception for the port 80 in the Windows firewall failed.
Manually add an exception to the Windows firewall that opens port 80 for IIS.
Setup for Dot.NET framework 4.0 could not be launched
Setup could not launch the setup for Dot.NET framework 4.0 successfully.
Check if the installation program " en_Net_Framework_20_redist_x86.exe" is available in the setup folder. Start it manually and contact Microsoft Inc. for clarifying and solving error messages that may occur.
Setup for OPENLDV driver installation could not be launched
Setup could not launch the setup for the Echelon OPENLDV driver successfully.
Check if the installation program "openldv.exe " is available in the setup folder. Start it manually and contact Honeywell CentraLine TAC (Technical Assistence Center) at http://web.ge51.honeywell.de/tac/indextac.htm if necessary.
Setup for SQL Server 2008 Express Setup could not launch the setup Check if the installation program

ARENA INSTALLATION GUIDE
63 EN1Z-0906GE51 R0116
Error Message Cause Troubeshooting could not be launched for SQL Server 2008 Express
successfully. "sqlexpr32.exe " is available in the setup folder. Start it manually and contact Microsoft Inc. for clarifying and solving error messages that may occur.
Setup for SQL Server 2008 Express was not successful and will be restarted to get problem report
Setup could not launch the setup for SQL Server 2008 Express successfully.
Check if the installation program "sqlexpr32.exe " is available in the setup folder. Start it manually and contact Microsoft Inc. for clarifying and solving error messages that may occur.
Setup for SQL Server 2008 Express was not successful. Setup cannot continue.
Setup could not launch the setup for SQL Server 2008 Express successfully.
Check if the installation program "sqlexpr32.exe " is available in the setup folder. Start it manually and contact Microsoft Inc. for clarifying and solving error messages that may occur.
Setup for Windows installer could not be launched
Setup could not launch the setup for Windows Installer successfullyy.
Check if the installation program "WindowsInstaller-KB893803-v2-x86.exe" is available in the setup folder. Start it manually and contact Microsoft Inc. for clarifying and solving error messages that may occur.
Target directory is not empty and all data will be lost! Continue?
The target directory includes files and sub directories which will be deleted if the installation will be excuted.
If you are sure that the target directory and its subdirectories can be deleted, click OK. Otherwise click Cancel and select another target directory.
The selected directory cannot be used as target directory.
You have selected one of the following forbidden directories as installation directory: Root directory, e.g. C:\ Operating system directories and their subdirectories, e.g. C:\WINDOWS C:\WINNT
Use the default directory or use an allowed directory.
You need to have Administrator rights to execute this Setup!
The user who has started the setup has no administrator privileges
Start setup with user who has administrator privileges
You need to install the Internet Information Services (IIS) first
The setup needs Internet Information Services (IIS) first but cannot install it.
Install Internet Information Services manually as described in the ”Installation of Internet Information Services (IIS)” section. Then start setup again.

Manufactured for and on behalf of the Environmental and Combustion Controls Division of Honeywell Technologies Sàrl, Rolle, Z.A. La Pièce 16, Switzerland by its Authorized Representative: CentraLine Honeywell GmbH Böblinger Strasse 17 71101 Schönaich, Germany Phone +49 (0) 7031 637 845 Fax +49 (0) 7031 637 740 [email protected] www.centraline.com
Subject to change without notice EN1Z-0906GE51 R0116


