15
Arizona State University NanoFab LESKER #1 STANDARD OPERATION PROCEDURE Rev D
Arizona State University NanoFab
LESKER #1 STANDARD OPERATION PROCEDURE
Rev D
ASU NanoFab Title: LESKER #1 STANDARD OPERATION PROCEDURE Issue: Rev D
Page 1
Table of Contents
Contents Table of Contents .........................................................................................................................................1 1. Purpose / Scope ....................................................................................................................................2 2. Reference Documents ..........................................................................................................................2 3. Equipment / Supplies / Material ..........................................................................................................2 4. Safety ...................................................................................................................................................3 5. Set Up Procedures ................................................................................................................................3 6. Operation Procedures ...........................................................................................................................8 7. Process Data .......................................................................................................................................12 8. Revision History ................................................................................................................................14

ASU NanoFab Title: LESKER #1 STANDARD OPERATION PROCEDURE Issue: Rev D
Page 2
1. Purpose / Scope 1.1 This document covers the procedure that should be followed for normal operation of the
Lesker PVD75 sputter coater for the purpose of depositing metals & dielectrics on substrate materials that might be used for research purposes. It is suggested that you review this document thoroughly before proceeding with the operation of this tool & always check with staff when using a new target material, to verify if special precautions need to be taken for safety or cross contamination issues.
2. Reference Documents 2.1 Chemical Safety & Hazardous Waste Management Rules & Procedures Handbook 2.2 PVD Series Operation Manual 2.3 Kurt J Lesker Circular Sputtering Source Torus 3” HV operations manual
3. Equipment / Supplies / Material 3.1 Clean room vacuum 3.2 Clean wipes 3.3 Touch screen stylus 3.4 Target material that you wish to deposit In the table below are the current targets and their owners. To make use of a target other
than those provided by the NanoFab, please obtain permission from the owner (an email is preferred if staff is going to install the target for you). For safety reasons the purchase and planned use of any new material not on the list must be discussed with the NanoFab staff prior to placing an order.
Material Owner notes
Aluminum Tao Aluminum NanoFab used Aluminum NanoFab used Aluminum NanoFab new Chrome Tao Chrome MBE - Zhang Chrome Hongbin Yu Cobalt Steve Goodnick Copper H. Xie Copper Hongyu Yu Copper Hongbin Yu Gold NanoFab Pay by weight loss Indium Tin Oxide SPL Iron Hongbin Yu Nickel Jagan
ASU NanoFab Title: LESKER #1 STANDARD OPERATION PROCEDURE Issue: Rev D
Page 3
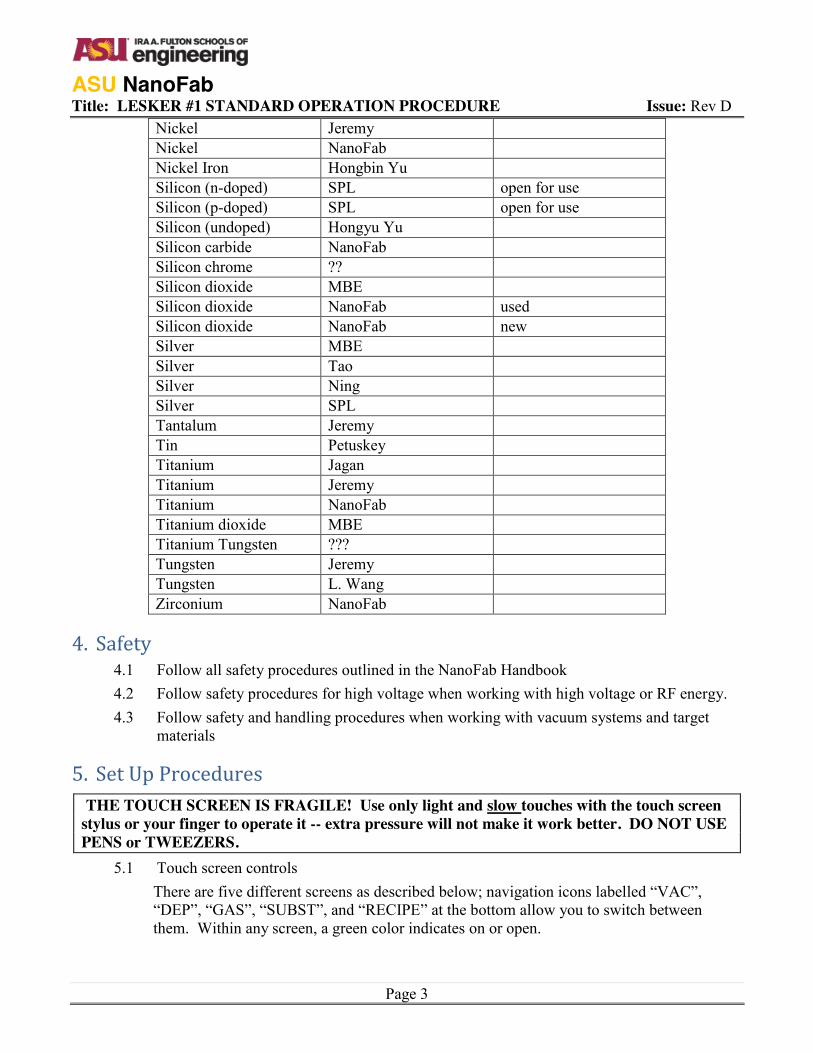
Nickel Jeremy Nickel NanoFab Nickel Iron Hongbin Yu Silicon (n-doped) SPL open for use Silicon (p-doped) SPL open for use Silicon (undoped) Hongyu Yu Silicon carbide NanoFab Silicon chrome ?? Silicon dioxide MBE Silicon dioxide NanoFab used Silicon dioxide NanoFab new Silver MBE Silver Tao Silver Ning Silver SPL Tantalum Jeremy Tin Petuskey Titanium Jagan Titanium Jeremy Titanium NanoFab Titanium dioxide MBE Titanium Tungsten ??? Tungsten Jeremy Tungsten L. Wang Zirconium NanoFab
4. Safety 4.1 Follow all safety procedures outlined in the NanoFab Handbook 4.2 Follow safety procedures for high voltage when working with high voltage or RF energy. 4.3 Follow safety and handling procedures when working with vacuum systems and target
materials
5. Set Up Procedures THE TOUCH SCREEN IS FRAGILE! Use only light and slow touches with the touch screen stylus or your finger to operate it -- extra pressure will not make it work better. DO NOT USE PENS or TWEEZERS.
5.1 Touch screen controls There are five different screens as described below; navigation icons labelled “VAC”, “DEP”, “GAS”, “SUBST”, and “RECIPE” at the bottom allow you to switch between them. Within any screen, a green color indicates on or open.

ASU NanoFab Title: LESKER #1 STANDARD OPERATION PROCEDURE Issue: Rev D
Page 4
5.1.1 Vacuum screen (“VAC”): The status of the rough pump and turbo pump are indicated, the system pressure as measured by the Wide Range Gauge (WRG) is shown in two places, and the turbo pump speed is shown as a percentage of full speed. The turbo pump speed is changed by selecting the indicator box; a numeric keypad popup will appear, and a new speed can be entered.
5.1.2 Deposition screen (“DEP”): The status of the three gun shutters is shown (currently
closed) and is changed by touching the related icon; the green flow switch (FLOW SW) indicators confirm that cooling water is flowing to the guns; and the system pressure as measured by the WRG is indicated in the upper right corner.
5.1.3 Gas screen (“GAS”): The status and mode for each of the two mass flow controllers (MFC) are shown in the upper two rows of data, with the upper MFC controlling the argon that is used for most processes. The lower MFC controls either nitrogen or oxygen which is mixed with argon for reactive sputtering. On the lower right just above the Lesker name is the icon for the main gas valve (currently off); this must be open for any gas to be admitted to the chamber. Most users will use automatic pressure control such that the MFC is adjusted to maintain a set pressure as measured by a capacitance manometer. Selecting the control (“CTRL”) mode for the MFC and entering a setpoint pressure (“SETP) will instruct the MFC to flow gas

ASU NanoFab Title: LESKER #1 STANDARD OPERATION PROCEDURE Issue: Rev D
Page 5
as needed to achieve that pressure, with the readout in the CAPMAN box indicating when that pressure has been reached.
5.1.4 Substrate screen (“SUBST”): Controls the substrate shutter (green = open)
5.1.5 Recipe screen (“RECIPE”): The user can select either the pump down or vent recipes. When a recipe is running, the user is locked out of the screen controls.
ASU NanoFab Title: LESKER #1 STANDARD OPERATION PROCEDURE Issue: Rev D
Page 6
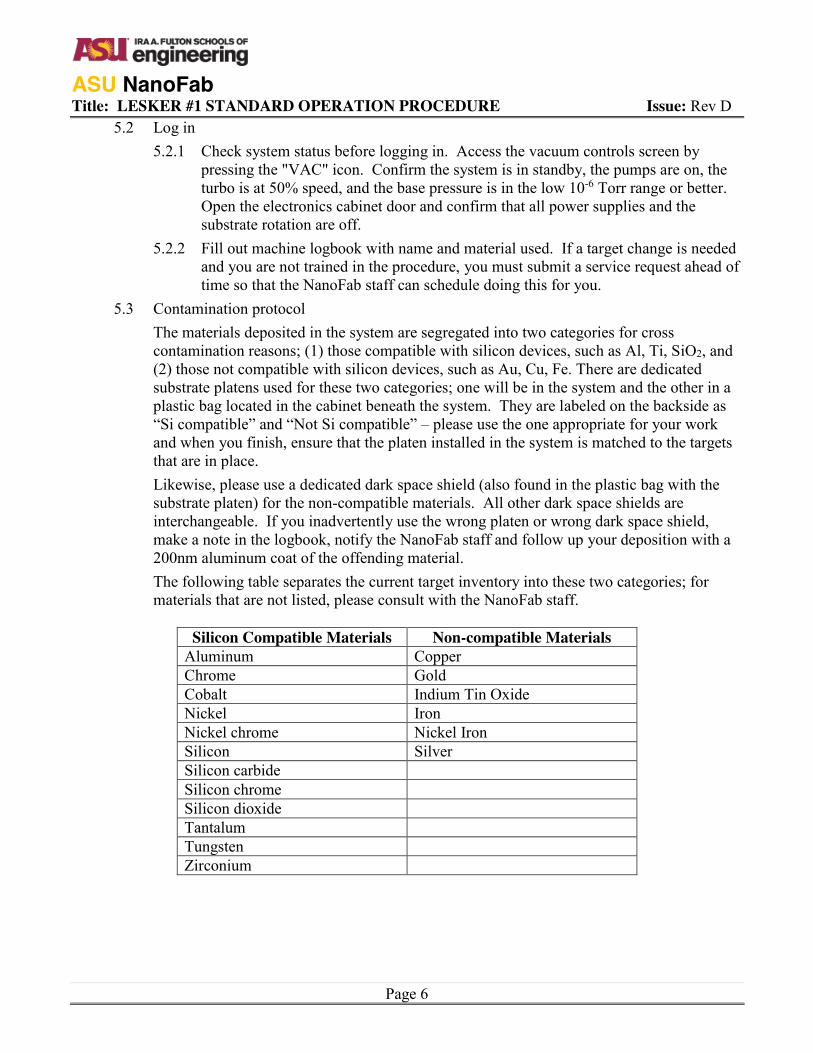
5.2 Log in 5.2.1 Check system status before logging in. Access the vacuum controls screen by
pressing the "VAC" icon. Confirm the system is in standby, the pumps are on, the turbo is at 50% speed, and the base pressure is in the low 10-6 Torr range or better. Open the electronics cabinet door and confirm that all power supplies and the substrate rotation are off.
5.2.2 Fill out machine logbook with name and material used. If a target change is needed and you are not trained in the procedure, you must submit a service request ahead of time so that the NanoFab staff can schedule doing this for you.
5.3 Contamination protocol The materials deposited in the system are segregated into two categories for cross contamination reasons; (1) those compatible with silicon devices, such as Al, Ti, SiO2, and (2) those not compatible with silicon devices, such as Au, Cu, Fe. There are dedicated substrate platens used for these two categories; one will be in the system and the other in a plastic bag located in the cabinet beneath the system. They are labeled on the backside as “Si compatible” and “Not Si compatible” – please use the one appropriate for your work and when you finish, ensure that the platen installed in the system is matched to the targets that are in place. Likewise, please use a dedicated dark space shield (also found in the plastic bag with the substrate platen) for the non-compatible materials. All other dark space shields are interchangeable. If you inadvertently use the wrong platen or wrong dark space shield, make a note in the logbook, notify the NanoFab staff and follow up your deposition with a 200nm aluminum coat of the offending material. The following table separates the current target inventory into these two categories; for materials that are not listed, please consult with the NanoFab staff.
Silicon Compatible Materials Non-compatible Materials
Aluminum Copper Chrome Gold Cobalt Indium Tin Oxide Nickel Iron Nickel chrome Nickel Iron Silicon Silver Silicon carbide Silicon chrome Silicon dioxide Tantalum Tungsten Zirconium

ASU NanoFab Title: LESKER #1 STANDARD OPERATION PROCEDURE Issue: Rev D
Page 7
5.4 Target changes Additional training is needed and only highly qualified users are allowed to change targets. Many users will have to request staff help for target changes by submitting a service request. Lesker has a video on how to change a target in a Torus sputter gun but it is for a sputter up system: (https://www.youtube.com/watch?v=dU8Can9yxfo) It is useful to view but note that (1) we do not use the spacer rings around the target and (2) our gun shutters are not removed as shown in the video. There are 2 standard magnetron S-guns (stations 2&3) & 1 hi-field magnetron S-gun (station 1) for ferromagnetic target materials. Only NanoFab staff may change the magnetic material targets used with Gun #1. These are unusually difficult to remove and install, with significant risk of injury to the installer or damage to the target or the gun. Gun #1 has a high field magnet required for magnetic material targets; all four screws have to be removed from the retaining ring so you can slide (do not use a tool to pry) the target from the cooling plate. Please ask for help if these have to be changed. 5.4.1 Open the shutter for the gun whose target is to be changed. 5.4.2 Loosen (do not remove) the three cap screws that hold the dark space shield on the
gun using the Allen wrench in the tool kit. Slide the dark space shield from the gun and inspect it for any film flaking or bubbling – put the tool down and submit a service request if extensive cleaning is needed. Loose debris can be removed using a cleanroom wipe and IPA.
5.4.3 There are four screws and a retaining ring holding the target against the water cooled gun. For guns 2 and 3, use the small flat bladed screwdriver to loosen all four screws but remove just one, which will allow you to slide the target from the gun. Store the removed target in the correct box in the original packaging. Be careful with target identity since many targets are not labelled!
5.4.4 Install the desired target in the reverse manner. Inspect the back surface of the target and the front surface of the cooling plate for particles or debris which would prevent intimate contact. Tighten the four screws gently and then loosen them slightly, re-tightening them in a star pattern so all exert equal pressure on the target. Do not over tighten, especially with brittle targets (such as silicon dioxide) as you will crack the target, but make sure the target is firmly held against the cooling plate.
5.4.5 Install the dark space shield. As shown in the picture below, use the correct slot according to the target thickness. Tighten the three cap screws with the Allen wrench.

ASU NanoFab Title: LESKER #1 STANDARD OPERATION PROCEDURE Issue: Rev D
Page 8
Note that there are different shields for rf and dc magnetron sputtering. The shield not in use is stored in the cabinet below the system vacuum door in a plastic bag. 5.4.5.1 For dc magnetron sputtering, use the dark space shield with the chimney
installed. 5.4.5.2 For rf magnetron sputtering, use the dark space shield without the
chimney installed. 5.4.6 Use the digital voltmeter set to the resistance measurement scale to measure the
target resistance to ground. With metal targets, you can probe directly from the target front surface to the ground shield and with the power supply cable connected the resistance should be greater than 1.5 megohms. For insulating targets, you will have to disconnect the power cable from the gun and probe from the center pin in the connector to ground, and the readings should be 5 megohms or greater. If the target is shorted, remove and inspect the dark space shield and if necessary, clean, reinstall, and remeasure the resistance. If the short remains, contact NanoFab staff.
5.4.7 Close the target shutter and confirm the correct power supply cable is attached.
6. Operation Procedures 6.1 Depositions
6.1.1 From the Recipe screen select “VENT” and wait for the pressure to rise to atmosphere. When the vent is complete, select “DONE”.
6.1.2 Open the chamber door. 6.1.3 Replace the Mylar sheet that shields the view port with a new one. Failure to do so
will cause buildup on the view port during sputtering. Place all used sheets in the container labeled metal waste.
6.1.4 Install the desired target(s) following the procedure in section 3.4 of this document or arrange for the NanoFab staff to do so for you.
6.1.5 Confirm that the correct power supply cable is attached to the gun(s) that will be used. Never leave any of the power supply cables unconnected.

ASU NanoFab Title: LESKER #1 STANDARD OPERATION PROCEDURE Issue: Rev D
Page 9
6.1.6 Inspect the chamber for particles or flakes. If present, gently clean the inside base plate with the cleanroom vacuum. If necessary, wipe down the chamber seal and O-ring and check to make sure the O-ring is fully seated in the O-ring groove. Do not use IPA on the O-ring.
6.1.7 If you are going to use substrate heating, you must remove the metal covers from both lamps at this time. The maximum allowed heater temperature is 350C.
6.1.8 Load your samples by changing to the "SUBST" screen and press the "SBST" icon. Place as desired on the holder and close the substrate shutter. On the “DEP” screen check that all target shutters are closed (icons should be grey).
6.1.9 To evacuate the system, close the chamber door, go to the "RECIPE" screen, and press the “PUMP DOWN” button. Please observe the system's progress until the pressure reaches the 10-4 Torr scale and then it is ok to leave. Wait for the tool to achieve below 5 x10^-6 Torr, which should take approximately 90 minutes. Once the system has reached 5x10⁻⁵ Torr, a “DONE” icon will appear and by acknowledging this the user is given screen control.
6.1.10 Turn on the sample rotation to 30 RPM. 6.1.11 If you are using substrate heating (make sure you have removed the lamp covers
when the chamber was vented), begin ramping the temperature while watching the pressure which will rise because of outgassing. Wait for the system to return to the 1x10⁻⁵ Torr or better before proceeding.
6.1.12 On the “VAC” screen set the Turbo Speed to 50%. 6.1.13 Program the Inficon rate monitor for the material that you will be using. Press the
"Program" button to enter programming mode, and use the "Next" button to cycle through the film parameters, using the dial to change each one. Press "Program" again to exit. Use "Zero" to re-zero the thickness display.
6.1.14 Establish the sputtering gas pressure and mixture. Select the “GAS” control screen and press the GAS valve icon; it will change to green, indicating the main gas valve is open. In the row labeled MFC 1, select the “CTRL” mode. Enter the pressure set point by selecting the “SETP” box and entering the desired pressure in the popup that appears. For reactive sputtering, open the electronics cabinet door and select either oxygen or nitrogen. Then on the touch screen in the row labeled MFC 2, select the "SLV" mode, which slaves MFC 2 to MFC 1. Enter the desired argon and reactive gas ratio for the process. Verify that the pressure rises to the set point, and that both MFC's are indicating flows (as a percentage of full scale) that are as expected. DC magnetron depositions typically run at 3 to 4 mT; RF magnetron depositions may require higher pressures to be stable (on the order of 5 mT).
6.1.15 If using the bias sputter or presputter clean feature, set this up now. Open the substrate shutter. Turn on the RF power supply for the sputter clean (do not accidentally turn on the Gun RF power supply). Increase the power to the desired level using the up arrow and turn on the RF. Check reflected power and tune if necessary.

ASU NanoFab Title: LESKER #1 STANDARD OPERATION PROCEDURE Issue: Rev D
Page 10
Typical conditions and sputter etch rates for SiO2: 100W RF power / 4 mT / Vdc = 620 volts results in 2.2 nm/minute. Once the clean is complete, turn off the RF and close the substrate shutter. If using bias sputter, leave the power supply mains on at this time - otherwise, turn the supply off.
6.1.16 DC magnetron depositions: x Turn on the appropriate station power supply and use the “Set point” and “Actual”
buttons on the right side to display power. x Turn on the "Output" button and use the "Level" dial to slowly ramp the power to
the desired level. Maximum target power varies with target material and non-metallic targets require slower ramp rates. Excessive power will destroy the target and potentially damage the magnetron. Guidelines are as follows:
o Metallic targets: ramp up at 100 W/min, most important for poorly conductive metals like Ti, less so for aluminum. No ramp down required.
o Bonded/pressed/delicate targets: ramp up and down at 50W/min. o Maximum target power (delicate targets): 20-25W/in2 = < 140 - 175 watts
for 3 in target. x Confirm the expected rate on the Inficon. Verify that the plasma is stable and not
arcing. x On the "DEP" control screen, open the gun shutter for the target. It is good practice
to "burn off" or condition the target before you open the substrate shutter for the best quality film. Monitor the target voltage and wait until it is stable – time should be on the order of 3 minutes.
6.1.17 RF magnetron depositions: RF sputtering will deposit at a slower rate than DC sputtering but is necessary for
the deposition of dielectric materials. x On the "DEP" control screen, open the gun shutter for the target that will be used. x Turn on the RF power supply (R301). x Turn on the Auto Match Network (MC2). x Increase the power setpoint on the power supply using the up arrow. Set the power
to an appropriate level for your material. Turn on the RF on the R301 supply. During the sputter process, monitor the reflected power on the MC2 to assure it does not go above 10 Watts. Confirm the expected rate on the Inficon. Verify that the plasma is stable and not arcing.
x Note: It may take a higher pressure to ignite the material being used initially but once the plasma glow discharge has been attained the pressure can be dropped to 4 or 5 mtorr for best results. If the plasma does not form, try momentarily using an adjacent DC powered gun as a striker. Turn the DC power off as soon as the plasma is formed to minimize contamination.
ASU NanoFab Title: LESKER #1 STANDARD OPERATION PROCEDURE Issue: Rev D
Page 11
x It is good practice to "burn off" or condition the target before you open the substrate shutter for the best quality film. There is no dc voltage to monitor, so a 3 minute condition time is used.
6.1.18 Perform the deposition. Open the substrate shutter and press the "Zero" button on the Inficon. Halfway through to the desired thickness, record the power, deposition rate, pressure, and reflected power. When the desired thickness is reached, turn off the output and the main gun power on the gun power supply and close both shutters. Caution: Some targets should be ramped down slowly to prevent thermal gradients that can lead to damage. When in doubt, close the shutter to terminate deposition and decrease the power supply setting by 50 watts/minute.
6.1.19 Record gun operating conditions in the log. Make sure that the output power is returned to zero on the appropriate power supply set point display.
6.1.20 Repeat the above steps if using a different gun for an additional metal layer 6.1.21 If using substrate heating, turn off the heater output but monitor the temperature
until it drops below 80C. Turn off the sample rotation only after the temperature decreases below 80C.
6.1.22 Go to the “GAS” control screen. Change the pressure setpoint back to 0 mTorr, turn off the CTRL mode for the MFC, and then close the gas valve.
6.1.23 On the “RECIPE” screen, select “VENT”. 6.1.24 When the tool has vented, open the sputter chamber; then from the “SUBST” screen
open the substrate shutter & remove your sample. 6.1.25 If you used the heater, replace the lamp covers. 6.1.26 Complete entries in the log book and carefully record the target materials that are in
each gun. 6.1.27 From the “RECIPE” screen, select pump down and wait for the tool to reach 5x10⁻⁵
Torr. Select “DONE” and set the turbo speed to 50 %. 6.1.28 The tool should be left in a good state for the next person to use. If you have any
problems with machine, make a note in the log, contact NanoFab staff, and submit an online service request.
6.2 RF Back Sputter Process 6.2.1 Once the tool has reached base vacuum, set the chamber pressure to 4 mT with the
turbo speed at 50%. 6.2.2 Turn on the sample rotation to 30 RPM. 6.2.3 Turn on the RF power supply for the sputter clean. Do not accidentally turn on the
Gun 3 power supply. 6.2.4 Increase the power to 100 watts using the up arrow key. 6.2.5 Place the manual matching networks Load & Tune knob positions to 5. 6.2.6 Open the substrate shutter and turn on the RF. If the plasma does not form near the
sample holder, temporarily increase the pressure to 7-9mtorr.
ASU NanoFab Title: LESKER #1 STANDARD OPERATION PROCEDURE Issue: Rev D
Page 12
6.2.7 Adjust the Load & Tune knobs to minimize the reflected power – typically zero watts can be achieved.
6.2.8 The etch rate of thermal silicon dioxide is 2.2 nm/min. A suggested etch time of 5 minutes will remove about 10 nm of material.
6.3 New Target Conditioning x On the "DEP" control screen, open the gun shutter for the target that will be used. x Turn on the appropriate station power supply and use the "Set point" and "Actual" buttons
on the right side to display power if necessary. x Turn on the "Output" button and use the "Level" dial to slowly ramp the power to the point
where a glow discharge is visible but no more than 75watts for a minimum of 5 minutes. x Now slowly increase the power to 200watts for a minimum of 5 minutes x Further slowly increase the power/wattage until you have reached the maximum power for
the target you are conditioning. You will notice the voltage start to drop as the wattage is increased, until it is about 300 - 400 volts. At this point the target surface should be conditioned enough for you to begin normal depositions.
7. Process Data 7.1 Typical settings & rates for common materials:
(* Denotes DC Hi-Field & ** Denotes RF Sputter) Material Max
Power1 (W)
Suggested Power (W)
Ramp rate (W/min)
Pressure (mT)2
Dep. Rate Å/sec.
Aluminum 600 400 100 4 1.5
Titanium 350 250 100 4 1.2 *Nickel 600 150 100 3 0.9
Gold 600 55 - 3 1.6 Silver 600 100 100 4 4.5
Chrome 600 200 100 4 1.5
**Silicon Dioxide 250 250 100 4 0.5
Note 1: Max power taken from Lesker recommendations and often assumes the material is bonded to a backing plate. Use caution; monitor voltage during use and reduce power if voltage begins to change.
Note 2: A lower pressure results in a higher sputter rate, but as the targets wear, the plasma may become unstable and extinguish. The pressure can be set in increments of 0.1 mT, so there may be an advantage in operating at the minimum pressure at which the plasma will be stable.
7.2 Standard recipes (reactive sputtering) 7.2.1 TiN Recipe:

ASU NanoFab Title: LESKER #1 STANDARD OPERATION PROCEDURE Issue: Rev D
Page 13
� Pump to less than 5x10^-6 Torr. Set MFC selector switch to nitrogen. � Preheat substrate to 200C. Make sure lamp covers are removed before initiating
pumpdown; wait for base pressure to reduce to 1x10^-5 Torr or better before proceeding.
� RF backsputter clean the substrate 100W/4mT/60 seconds � Deposit 20 nm of pure Ti:
Pressure = 3 mT argon (may need to increase slightly for target to run); Power = 250W. Ramp target to set-point over 3 minutes and clean target at 250W for 3 minutes (gun shutter open). Open substrate shutter for 20 nm film. Rate is about 1.2 A/sec
� Deposit 100 nm of TiN: Pressure = 3 mT (argon + 20% nitrogen). Condition target for 3 minutes (gun shutter open). Set bias sputter supply to 50 W. Open substrate shutter and turn on bias sputter supply for 100 nm film. Rate is about 0.5 to 0.7 A/sec. Close substrate shutter and turn off bias supply.
� Turn off heater now and monitor temperature while proceeding. It will take about 20 minutes to cool to 80C at which time it is safe to vent.
� While waiting, clean/condition target for next user 3mT/argon/250W/2minutes (may need to increase the pressure slightly to get the plasma to run)
7.2.2 Ta2O5 Recipe: � Pump to less than 5x10^-6 Torr. Set MFC selector switch to oxygen. � Preheat substrate to 100C. Make sure lamp covers are removed before initiating
pumpdown; wait for base pressure to reduce to 1x10^-5 Torr or better before proceeding.
� Deposit desired thickness of Ta2O5: Pressure = 4 mT (argon + 30% oxygen). Ramp and condition target at 150W for 3 minutes (gun shutter open). Set bias sputter supply to 50 W. Open substrate shutter and turn on bias sputter supply; deposit desired thickness. Rate is about 1.0A/sec. Close substrate shutter and turn off bias supply.
� Turn off heater now and wait for temperature to cool to 80C at which time it is safe to vent.
� While waiting, clean/condition target for next user 4mT/argon only/150W/2minutes

ASU NanoFab Title: LESKER #1 STANDARD OPERATION PROCEDURE Issue: Rev D
Page 14
8. Revision History Effective Date Originator DESCRIPTION OF REVISION Issue
4/11/06 Paul Boland Initial Release A
4/11/07 Jon Martin Updates & improvements due to new materials B
03/27/15 Clarence Tracy Updates and change in contamination protocol C
10/23/15 Clarence Tracy New touch screen control system D
E
F
G
H


