72
Aruba 200, 800, and 6000 Mobility Controller with ArubaOS FIPS Firmware Non-Proprietary Security Policy FIPS 140-2 Level 2 Release Supplement Version 23

Aruba 200, 800,and 6000
Mobility Controller withArubaOS FIPS FirmwareNon-Proprietary Security
Policy
FIPS 140-2 Level 2 ReleaseSupplement
Version 23

Copyright© 2011 Aruba Networks, Inc. AirWave®, Aruba Networks®, Aruba Mobility Management System®, Bluescanner, For Wireless That Works®, Mobile Edge Architecture, People Move. Networks Must Follow., RFProtect®, The All Wireless Workplace Is Now Open For Business, and The Mobile Edge Company® are trademarks of Aruba Networks, Inc. All rights reserved. All other trademarks are the property of their respective owners.
Open Source CodeCertain Aruba products include Open Source software code developed by third parties, including software code subject to the GNU General Public License ("GPL"), GNU Lesser General Public License ("LGPL"), or other Open Source Licenses. The Open Source code used can be found at this site:
http://www.arubanetworks.com/open_source
Legal NoticeThe use of Aruba Networks, Inc. switching platforms and software, by all individuals or corporations, to terminate other vendors’ VPN client devices constitutes complete acceptance of liability by that individual or corporation for this action and indemnifies, in full, Aruba Networks, Inc. from any and all legal actions that might be taken against it with respect to infringement of copyright on behalf of those vendors.
WarrantyThis hardware product is protected by the standard Aruba warranty of one year parts/labor. For more information, refer to the ARUBACARE SERVICE AND SUPPORT TERMS AND CONDITIONS.
Altering this device (such as painting it) voids the warranty.
ii Aruba 200, 800, and 6000 0510142-21FIPS 140-2 Level 2 Release Supplement April 2011

Contents
Preface . . . . . . . . . . . . . . . . . . . . . . . . . . . . . . . . . . . . . . . . . . . . . . . . . . . . . . vPurpose of this Document . . . . . . . . . . . . . . . . . . . . . . . . . . . . . . . . . . . . . vRelated Documents . . . . . . . . . . . . . . . . . . . . . . . . . . . . . . . . . . . . . . . . . . . v
Product Manuals . . . . . . . . . . . . . . . . . . . . . . . . . . . . . . . . . . . . . . . . . . . . vAdditional Product Information . . . . . . . . . . . . . . . . . . . . . . . . . . . . . . . vi
Text Conventions . . . . . . . . . . . . . . . . . . . . . . . . . . . . . . . . . . . . . . . . . . . . viContacting Aruba Networks . . . . . . . . . . . . . . . . . . . . . . . . . . . . . . . . . . viii
Chapter 1 The Aruba 200, 800, 6000 Mobility Controller . . . . . . . . . . . . . . . . . . . . 1Overview . . . . . . . . . . . . . . . . . . . . . . . . . . . . . . . . . . . . . . . . . . . . . . . . . . . 1Physical Description . . . . . . . . . . . . . . . . . . . . . . . . . . . . . . . . . . . . . . . . . 2
Dimensions . . . . . . . . . . . . . . . . . . . . . . . . . . . . . . . . . . . . . . . . . . . . . . . 2Cryptographic Module Boundaries . . . . . . . . . . . . . . . . . . . . . . . . . . . . 3Chassis . . . . . . . . . . . . . . . . . . . . . . . . . . . . . . . . . . . . . . . . . . . . . . . . . . . 4
Interfaces . . . . . . . . . . . . . . . . . . . . . . . . . . . . . . . . . . . . . . . . . . . . . . . . . . 6Aruba 6000 Line Card Interfaces. . . . . . . . . . . . . . . . . . . . . . . . . . . . . . 6Aruba 6000 Supervisor Card Interfaces . . . . . . . . . . . . . . . . . . . . . . . . 7Aruba 6000 Power Supply Interfaces. . . . . . . . . . . . . . . . . . . . . . . . . . 7Aruba 6000 Indicator LEDs . . . . . . . . . . . . . . . . . . . . . . . . . . . . . . . . . . 8Aruba 800-series Interfaces. . . . . . . . . . . . . . . . . . . . . . . . . . . . . . . . . 10Aruba 200 Interfaces . . . . . . . . . . . . . . . . . . . . . . . . . . . . . . . . . . . . . . 11
Intended Level of Security . . . . . . . . . . . . . . . . . . . . . . . . . . . . . . . . . . . 13Physical Security . . . . . . . . . . . . . . . . . . . . . . . . . . . . . . . . . . . . . . . . . . . 13
Chapter 2 FIPS 140-2 Level 2 Features . . . . . . . . . . . . . . . . . . . . . . . . . . . . . . . . . . 13
Operational Environment . . . . . . . . . . . . . . . . . . . . . . . . . . . . . . . . . . . . 14Logical Interfaces . . . . . . . . . . . . . . . . . . . . . . . . . . . . . . . . . . . . . . . . . . . 14Roles and Services. . . . . . . . . . . . . . . . . . . . . . . . . . . . . . . . . . . . . . . . . . 16
Crypto Officer Role . . . . . . . . . . . . . . . . . . . . . . . . . . . . . . . . . . . . . . . . 16User Role . . . . . . . . . . . . . . . . . . . . . . . . . . . . . . . . . . . . . . . . . . . . . . . . 19Authentication Mechanisms . . . . . . . . . . . . . . . . . . . . . . . . . . . . . . . . 20Unauthenticated Services . . . . . . . . . . . . . . . . . . . . . . . . . . . . . . . . . . 20
Cryptographic Key Management . . . . . . . . . . . . . . . . . . . . . . . . . . . . . . 21Implemented Algorithms . . . . . . . . . . . . . . . . . . . . . . . . . . . . . . . . . . . 21Critical Security Parameters. . . . . . . . . . . . . . . . . . . . . . . . . . . . . . . . . 22Encryption Keys and Passwords . . . . . . . . . . . . . . . . . . . . . . . . . . . . 24
Self-Tests . . . . . . . . . . . . . . . . . . . . . . . . . . . . . . . . . . . . . . . . . . . . . . . . . 26Alternating Bypass State . . . . . . . . . . . . . . . . . . . . . . . . . . . . . . . . . . . . 27Mitigation of Other Attacks . . . . . . . . . . . . . . . . . . . . . . . . . . . . . . . . . . 28
XSec . . . . . . . . . . . . . . . . . . . . . . . . . . . . . . . . . . . . . . . . . . . . . . . . . . . . 28Wireless Intrusion Detection . . . . . . . . . . . . . . . . . . . . . . . . . . . . . . . . 30
Aruba 200, 800, and 6000 iiiFIPS 140-2 Level 2 Release Supplement

Contents
Pre-Installation Checklist . . . . . . . . . . . . . . . . . . . . . . . . . . . . . . . . . . . . 33Precautions . . . . . . . . . . . . . . . . . . . . . . . . . . . . . . . . . . . . . . . . . . . . . . . . 33
Chapter 3 Installing the Controller . . . . . . . . . . . . . . . . . . . . . . . . . . . . . . . . . . . . . 33
The Security Kit . . . . . . . . . . . . . . . . . . . . . . . . . . . . . . . . . . . . . . . . . . . . 34Product Examination. . . . . . . . . . . . . . . . . . . . . . . . . . . . . . . . . . . . . . . 34Package Contents . . . . . . . . . . . . . . . . . . . . . . . . . . . . . . . . . . . . . . . . . 35Minimum Configuration for the Aruba 6000 . . . . . . . . . . . . . . . . . . . 35Additional Modules for the Aruba 6000 . . . . . . . . . . . . . . . . . . . . . . . 35
Selecting a Location . . . . . . . . . . . . . . . . . . . . . . . . . . . . . . . . . . . . . . . . 36Mounting the Aruba 6000 Chassis . . . . . . . . . . . . . . . . . . . . . . . . . . . . 38
Connecting Power . . . . . . . . . . . . . . . . . . . . . . . . . . . . . . . . . . . . . . . . 40Verify Installation. . . . . . . . . . . . . . . . . . . . . . . . . . . . . . . . . . . . . . . . . . 42
Mounting the Aruba 800 Chassis . . . . . . . . . . . . . . . . . . . . . . . . . . . . . 44Connecting Power . . . . . . . . . . . . . . . . . . . . . . . . . . . . . . . . . . . . . . . . 46Verify Installation. . . . . . . . . . . . . . . . . . . . . . . . . . . . . . . . . . . . . . . . . . 47
Mounting the Aruba 200 Chassis . . . . . . . . . . . . . . . . . . . . . . . . . . . . . 48Connecting Power . . . . . . . . . . . . . . . . . . . . . . . . . . . . . . . . . . . . . . . . 49Verify Installation. . . . . . . . . . . . . . . . . . . . . . . . . . . . . . . . . . . . . . . . . . 50
Tamper-Evident Labels . . . . . . . . . . . . . . . . . . . . . . . . . . . . . . . . . . . . . . 51Reading TELs . . . . . . . . . . . . . . . . . . . . . . . . . . . . . . . . . . . . . . . . . . . . . 51Required TEL Locations . . . . . . . . . . . . . . . . . . . . . . . . . . . . . . . . . . . . 52Applying TELs . . . . . . . . . . . . . . . . . . . . . . . . . . . . . . . . . . . . . . . . . . . . 54
Crypto Officer Management . . . . . . . . . . . . . . . . . . . . . . . . . . . . . . . . . . 55
Chapter 4 Ongoing Management . . . . . . . . . . . . . . . . . . . . . . . . . . . . . . . . . . . . . . . 55
User Guidance . . . . . . . . . . . . . . . . . . . . . . . . . . . . . . . . . . . . . . . . . . . . . 56Connecting to the Switch . . . . . . . . . . . . . . . . . . . . . . . . . . . . . . . . . . . . 57Logging in with the CLI . . . . . . . . . . . . . . . . . . . . . . . . . . . . . . . . . . . . . . 57
Chapter 5 Set Up and Configuration . . . . . . . . . . . . . . . . . . . . . . . . . . . . . . . . . . . . 57
Privileged Mode . . . . . . . . . . . . . . . . . . . . . . . . . . . . . . . . . . . . . . . . . . . . 58Enabling FIPS Mode. . . . . . . . . . . . . . . . . . . . . . . . . . . . . . . . . . . . . . . . . 58
FIPS Commands . . . . . . . . . . . . . . . . . . . . . . . . . . . . . . . . . . . . . . . . . . 59Logging in with the WebUI . . . . . . . . . . . . . . . . . . . . . . . . . . . . . . . . . . . 61
Appendix A Acronyms . . . . . . . . . . . . . . . . . . . . . . . . . . . . . . . . . . . . . . . . . . . . . . . . . . . 63
iv Aruba 200, 800, and 6000 0510142-21FIPS 140-2 Level 2 Release Supplement April 2011

Preface
This security policy document can be copied and distributed freely.
Purpose of this DocumentThis release supplement provides information regarding the Aruba 200, 800, 6000 Mobility Controller with FIPS 140-2 Level 2 validation from Aruba Networks. The material in this supplement modifies the general Aruba hardware and firmware documentation included with this product and should be kept with your Aruba product documentation.
This supplement primarily covers the non-proprietary Cryptographic Module Security Policy for the Aruba Mobility Controller. This security policy describes how the switch meets the security requirements of FIPS 140-2 Level 2 and how to place and maintain the switch in a secure FIPS 140-2 mode. This policy was prepared as part of the FIPS 140-2 Level 2 validation of the product.
FIPS 140-2 (Federal Information Processing Standards Publication 140-2, Security Requirements for Cryptographic Modules) details the U.S. Government requirements for cryptographic modules. More information about the FIPS 140-2 standard and validation program is available on the National Institute of Standards and Technology (NIST) Web-site at:
http://csrc.nist.gov/groups/STM/cmvp/index.html
Related Documents
Product Manuals
The following items are part of the complete installation and operations documentation included with this product:
Aruba 200, 800, and 6000 Mobility Controller with ArubaOS FIPS Firmware Non-Proprietary Security Policy (this document)
Aruba 6000 Mobility Controller Installation Guide Aruba 800-series Mobility Controller Installation Guide Aruba 200 Mobility Controller Installation Guide ArubaOS 2.4.8 FIPS User Guide
Aruba 200, 800, and 6000 vFIPS 140-2 Level 2 Release Supplement

Preface
Aruba AP Installation Guides
Additional Product Information
More information is available from the following sources:
The Aruba Networks Web-site contains information on the full line of products from Aruba Networks:
http://www.arubanetworks.com
The NIST Validated Modules Web-site contains contact information for answers to technical or sales-related questions for the product:
http://csrc.nist.gov/groups/STM/cmvp/index.html
Text ConventionsThe following conventions are used throughout this manual to emphasize important concepts:
TABLE 1 Text Conventions
Type Style Description
Italics This style is used to emphasize important terms and to mark the titles of books.
System items This fixed-width font depicts the following:
Sample screen output System prompts Filenames, firmware devices, and certain
commands when mentioned in the text.
Commands In the command examples, this bold font depicts text that the User must type exactly as shown.
vi Aruba 200, 800, and 6000 0510142-21FIPS 140-2 Level 2 Release Supplement April 2011

Preface
<Arguments> In the command examples, italicized text within angle brackets represents items that the User should replace with information appropriate to their specific situation. For example:
# send <text message>
In this example, the User would type “send” at the system prompt exactly as shown, followed by the text of the message they wish to send. Do not type the angle brackets.
[ Optional ] In the command examples, items enclosed in brackets are optional. Do not type the brackets.
{ Item A | Item B } In the command examples, items within curled braces and separated by a vertical bar represent the available choices. Enter only one choice. Do not type the braces or bars.
TABLE 1 Text Conventions
Aruba 200, 800, and 6000 viiFIPS 140-2 Level 2 Release Supplement

Preface
Contacting Aruba Networks
Web Site
Main Site http://www.arubanetworks.com
Support Site http://www.arubanetworks.com/support
Software Licensing Site https://licensing.arubanetworks.com
Wireless Security Incident Response Team (WSIRT)
http://www.arubanetworks.com/support/wsirt
Support Email [email protected]
WSIRT Email
Please email details of any security problem found in an Aruba product.
Telephone Numbers
Aruba Corporate +1 (408) 227-4500
FAX +1 (408) 227-4550
Support
United States 800-WI-FI-LAN (800-943-4526)
France +33 (0) 1 70 72 55 59
United Kingdom +44 (0) 20 7127 5989
Germany +49 (0) 69 38 09 77 22 8
All other countries +1 (408) 754-1200
viii Aruba 200, 800, and 6000 0510142-21FIPS 140-2 Level 2 Release Supplement April 2011

The Aruba 200, 800, 6000 Mobility Controller
1
This chapter introduces the Aruba 200, 800, 6000 Mobility Controller with FIPS 140-2 Level 2 validation. It describes the purpose of the controller, its physical attributes, and its interfaces.
OverviewAruba Networks has developed a purpose-built Wireless LAN voice and data switching solution designed to specifically address the needs of large-scale WiFi network deployments for Government agencies and global enterprises. The Aruba Mobility Controller solution provides advanced security and management of the corporate RF environment and enforces User security and service policies to both wired and wireless users.
The Aruba Wireless FIPS 140-2 Level 2 validated Mobility Controlling platform serves value-add high speed data and QoS assured voice services to thousands of mobile wireless users simultaneously from a single, cost effective, redundant and scalable solution that performs centralized functionality for:
Uncompromised User security, authentication and encryption
Stateful LAN-speed firewalling
VPN termination
Wireless intrusion detection, prevention and rogue containment
RF Air monitoring
Powerful packet processing switching
Mobility management
Advanced RF management
Advanced User and network service / element management
The Aruba FIPS 140-2 Level 2 validated Mobility Controller solution is a highly available, modular and upgradeable switching platform which connects, controls, secures, and intelligently integrates wireless Access Points and Air Monitors into the wired LAN, serving as a gateway between a wireless network and the wired network. The wireless network traffic from the APs is securely tunneled over a L2/L3 network and is terminated centrally on the switch via 10/100/1000 Ethernet physical interfaces where it is authenticated, assigned the appropriate security policies and VLAN assignments and up-linked onto the wired network.
The Aruba Mobility Controller solution consists of the three major components:
Aruba 200, 800, and 6000 1FIPS 140-2 Level 2 Release Supplement

The Aruba 200, 800, 6000 Mobility Controller
Aruba Mobility Controller. This is an enterprise-class switch into which multiple Access Points (APs) and Air Monitors (AMs) may be directly or in-directly (tunneled over a L2/L3 network) connected and controlled.
Aruba Wireless Access Point. This is a next-generation wireless transceiver which functions as an AP or AM. Although third-party APs can be used with the Aruba WLAN system, the Aruba AP provides the most comprehensive features and simpler integration.
Aruba ArubaOS Switch firmware. This firmware intelligently integrates the Mobility Controller and APs to provide load balancing, rate limiting, self healing, authentication, mobility, security, firewalls, encryption, and centralization for monitoring and upgrades.
The switch configurations tested during the cryptographic module testing included:
Aruba 200 (200-6-AOS-STD-FIPS-US)
Aruba 800-16 (800-16-TX-AOS-STD-FIPS, 800-16-SX-AOS-STD-FIPS)
Aruba 6000 (6000-BASE-2PSU-200-FIPS, 6000-BASE-2PSU-400-FIPS, SC-48-C1-1, SC-128-C1-1, SC-256-C2-1, LC-2G-1, LC-2G24F-1, LC-2G24FP-1)
The exact firmware versions tested were A200_2.4.8.22-FIPS, A800_2.4.8.22-FIPS, A5000_2.4.8.22-FIPS, A200_2.4.8.23-FIPS, A800_2.4.8.23-FIPS, A5000_2.4.8.23-FIPS, A200_2.4.8.24-FIPS, A800_2.4.8.24-FIPS, A5000_2.4.8.24-FIPS, A200_2.4.8.25-FIPS, A800_2.4.8.25-FIPS, A5000_2.4.8.25-FIPS, A200_2.4.8.26-FIPS, A800_2.4.8.26-FIPS, A5000_2.4.8.26-FIPS, A200_2.4.8.27-FIPS, A800_2.4.8.27-FIPS, A5000_2.4.8.27-FIPS.
Physical DescriptionSee page 35 for a list of what ships with this product.
Dimensions
The Aruba 6000 Mobility Controller has the following physical dimensions:
3 RU chassis is designed to fit in a standard 19" rack. A separate mounting kit is needed for a 23" rack.
Size:
Width 17.4" (19" rack width)
Height 5.25" (3 RU)—3.5" for the card slots plus 1 RU for the power supply slots
Depth 14"
2 Aruba 200, 800, and 6000 0510142-21FIPS 140-2 Level 2 Release Supplement April 2011

The Aruba 200, 800, 6000 Mobility Controller
Maximum weight: Up to 58 lbs (26.5 kg)
The Aruba 800-series Mobility Controller has the following physical dimensions:
1 RU chassis is designed to fit in a standard 19" rack. A separate mounting kit is needed for a 23" rack.
Size:
Width 17.4" (19" rack width)
Height 1.75" (1 RU)
Depth 13.1"
Maximum weight: Up to 10 lbs (4.5 kg)
The Aruba 200-series Mobility Controller has the following physical dimensions:
Size:
Width 9.30"
Height 1.10"
Depth 6.63"
Weight: 2 lbs (2.04 kg)
Cryptographic Module Boundaries
For FIPS 140-2 Level 2 validation, the Mobility Controller has been validated as a multi-processor standalone cryptographic module. The steel chassis physically encloses the complete set of hardware and firmware components and represents the cryptographic boundary of the switch. The cryptographic boundary is defined as encompassing the top, front, left, right, rear, and bottom surfaces of the case.
Aruba 200, 800, and 6000 3FIPS 140-2 Level 2 Release Supplement

The Aruba 200, 800, 6000 Mobility Controller
Chassis
The Aruba 6000 Mobility Controller chassis is designed to be modular. All of the modular components, consisting of the switching supervisor and network line cards, the fan tray, and the power supplies, are accessible from the front of the chassis and are field replaceable and hot-swappable.
Figure 1-1 The Aruba 6000 Mobility Controller Chassis
Figure 1-1 shows the front panel of the Aruba 6000 Mobility Controller, and illustrates the following:
Slot 0/0 is for the required Line Card that provides network ports for connecting wireless Access Points, as well as wired LAN segments.
Slots 0/1 and 1/1 are for optional Line Card or Supervisor Card modules to provide extra port capacity.
Slot 1/0 is for the Supervisor Card. The Supervisor Card processes all traffic from the Line Cards, performs cryptographic functions, and controls all management features.
The hot-swappable fan tray cools the switch. The fan tray pulls air from right to left, as viewed from the front of the chassis, across the installed cards.
PS1, PS2, and PS3 are for Power Supply modules. The number of power supplies required for the system depends on the number and type of Line Cards installed, and whether to include redundancy for fault tolerance.
4 Aruba 200, 800, and 6000 0510142-21FIPS 140-2 Level 2 Release Supplement April 2011

The Aruba 200, 800, 6000 Mobility Controller
The Aruba 800-series Mobility Controller chassis is a 1U not-modular chassis.
Figure 1-2 The Aruba 800-series Mobility Controller Chassis
Figure 1-2 shows the front panel of the Aruba 800-series Mobility Controller, and illustrates the following:
System indicator LEDs 1 indicate power state and status of the device.
Eight Fast Ethernet ports 2 provide network connectivity.
Gigabit Ethernet uplink port 3 is used for high-speed connection to the wired LAN. Standard chassis model HW-800-CHAS-SPOE-T employs a copper connector. Optional chassis model HW-800-CHAS-SPOE-SX employs a fiber-optic connector.
Serial Console port 4 is for connecting to a local management console.
Aruba 200, 800, and 6000 5FIPS 140-2 Level 2 Release Supplement

The Aruba 200, 800, 6000 Mobility Controller
The Aruba 200 Mobility Controller chassis is a stand-alone chassis.
Figure 1-3 The Aruba 200 Mobility Controller
Figure 1-3 shows the front panel of the Aruba 200 Mobility Controller, and illustrates the following:
System indicator LEDs 1 indicate power state and status of the device.
Fast Ethernet port 2 provides network connectivity.
Gigabit Ethernet uplink port 3 is used for high-speed connection to the wired LAN with a copper connector.
Serial Console port 4 is for connecting to a local management console.
Power connector 5 accepts the DC power connector from the power adapter (included).
4 rubber mounting feet 6 stabilize and prevent slippage for placing the Aruba 200 on a flat surface.
Interfaces
Aruba 6000 Line Card InterfacesThe Line Card contains the following interfaces:
24 FE ports on the standard Aruba 6000 Mobility Controller Line Card (LC-2G24F (3300026 Rev. 01))
WAN
LNK/ACT 100
LAN
LNK/ACT 1000
SERIAL
POWER
STATUS
Power
12VDC 1A
C +-
GELAN port
2 3 4FE
WAN port
1Status indicators
Front View
Rear View
Serial port
5Power connector
(4)Rubber feet
6
6 Aruba 200, 800, and 6000 0510142-21FIPS 140-2 Level 2 Release Supplement April 2011

The Aruba 200, 800, 6000 Mobility Controller
FE ports are used to connect Access Points and Wired LAN segments to the switch. These ports provide 10/100 Mbps Ethernet connectivity.
These FE ports accept 4- or 8-conductor Category 5 UTP Ethernet cables with an RJ-45 male connector and automatically adjust for straight-through or crossover cables.
24 FE + SPOE ports on the optional SPOE Line Card (LC-2G24FP(3300024 Rev. 01))
When connected directly to an IEEE 802.3af POE compatible device, the port provides 10/100 Mbps Ethernet connectivity, as well as operational power through same cable.
When using SPOE, an 8-conductor straight-through Category 5 UTP Ethernet cable with an RJ-45 male connector is required.
2 Gigabit Ethernet (GE) ports
The GE port provides high-bandwidth uplinks between the Aruba 6000 Mobility Controller and the wired LAN. The GE socket accepts a variety of Gigabit Interface Converters for versatility in selecting optical and electrical interfaces.
The optional GE-only Line Card (LC-2G (3300029-01)) has 2 GE ports only.
Aruba 6000 Supervisor Card InterfacesThe Supervisor Card contains the following interfaces:
One 10/100 Mbps Ethernet (FE) management port
This port provides access to the Command Line Interface (CLI) and a Web Interface for complete system management and troubleshooting; or for connecting a separate management network.
The port accepts a 4- or 8- conductor Category 5 UTP Ethernet cable with an RJ-45 male connector and automatically adjusts for straight-through or crossover cables.
Recessed reset used to reset the switch if necessary.
NOTE: The Supervisor Card also includes a PCMCIA drive and serial port, but these interfaces are disabled in FIPS mode.
Aruba 6000 Power Supply InterfacesThe Aruba 6000 Mobility Controller supports up to three independent, load balancing, and redundant power supplies. Each power supply has its own independent toggle-switch to control the power.
Aruba 200, 800, and 6000 7FIPS 140-2 Level 2 Release Supplement

The Aruba 200, 800, 6000 Mobility Controller
Aruba 6000 Indicator LEDs
The Aruba 6000 Mobility Controller modules contain a number of LEDs to indicate physical status conditions. A description of the various LEDs is given in the following tables.
Line Card LEDs
Table 1-1 Line Card LED Definitions
LED Color & State Set by Significance
Power Solid Green HW Normal—Card has power
Off HW No power
Status Solid Green SW Normal—Card is OK
Solid Yellow Reset Normal during reset—Card being initialized by firmware
Solid Red SW Not normal—Card has failed
Off SW No power or FPGA initializing
FELnk/Act
Solid Green HW Normal—FE link is established
Blink Green HW Normal—FE activity
Solid Yellow SW Not normal—Failures on the link
Off SW No link or no power
POE Solid Green SW Normal—Power over Ethernet (POE) is being delivered
Solid Yellow SW Not normal—POE was requested but denied
Off SW POE was not requested and is not being provided, or no power
AP Status Solid Green SW Normal— The AP is OK.
Blink Green SW Normal—Shows AP activity, can do blink with a HW counter
Solid Yellow SW Not normal— There is an AP error
Solid Red SW Not normal—AP is not OK
Off SW No power
GELnk/Act
Solid Green SW Normal—GE link is established
Blink Green HW Normal—Indicates GE activity
Solid Yellow SW Not normal—There are failures on the link
Off SW No link or no power
8 Aruba 200, 800, and 6000 0510142-21FIPS 140-2 Level 2 Release Supplement April 2011

The Aruba 200, 800, 6000 Mobility Controller
Supervisor Card LEDs
Fan Tray LED
Table 1-2 Supervisor Card LED Definitions
LED Color & State Set By Significance
Power Solid Green HW Normal—Card has power
Off HW No power
Status Solid Green SW Normal—Card is OK
Solid Yellow SW Normal—Card is booting
Solid Red SW Not normal—Card failure
Off SW No power
Active/Standby
Solid Green SW Normal—Active Supervisor Card
Solid Yellow SW Normal—Standby Supervisor Card
Off SW No power
Utilization Green (solid &blinking)
SW Five LEDs in a row indicate processing activity. Each LED indicates an additional 20% activity level has been reached. The right-most lit LED should blink.
Off SW No power
PCMCIA Solid Green HW Normal—Indicates PCMCIA card is being accessed
Off HW No activity or no power
FELnk/Act
Solid Green HW Normal—FE link established
Blink Green HW Normal—FE activity
Off HW No link or no power
Table 1-3 Fan Tray LED Definitions
LED Color & State Set by Significance
Fan Status Solid Green HW Normal—Fan Tray is OK
Solid Yellow HW Not normal—Single fan failure
Solid Red HW Not normal—Multiple fan failure
Off HW No power
Aruba 200, 800, and 6000 9FIPS 140-2 Level 2 Release Supplement

The Aruba 200, 800, 6000 Mobility Controller
Power Supply LEDs
Aruba 800-series InterfacesThe Aruba 800-series device has the following interfaces:
8 FE + SPOE ports used to connect Access Points and Wired LAN segments to the switch. These ports provide 10/100 Mbps Ethernet connectivity.
When connected directly to an IEEE 802.3af POE compatible device, the port provides 10/100 Mbps Ethernet connectivity, as well as operational power through same cable.
When using SPOE, an 8-conductor straight-through Category 5 UTP Ethernet cable with an RJ-45 male connector is required.
The network ports also provide serial connectivity over the same Ethernet cable, allowing convenient access to device console interfaces.
Gigabit Ethernet (GE) port provides high-bandwidth uplinks between the Aruba 800-series Mobility Controller and the wired LAN. Standard model HW-800-CHAS-SPOE-T employs a copper connector. Optional model HW-800-CHAS-SPOE-SX employs a fiber-optic connector.
Serial Console port is used for connecting to a local management console.
Power Input Socket on the back of the switch accepts a power cord with a standard IEC320 connector.
Power Indicator LED is on when the switch is receiving proper power.
Status Indicator LED is on when the switch is booted and functioning properly, and off when the switch is booting or has failed.
Each FE network port and the GE uplink port has its own LNK/ACT LED. The LED is off when there is no link on the port, green when a link is established and no activity is detected, and flashing green when the port is transmitting or receiving data.
Table 1-4 Power Supply LED Definitions
LED Color & StateSet by
Significance
AC OK Solid Green HW Normal—Power Supply is OK
Off HW Not normal—Not OK or no power
O.T.P. Solid Red HW Not normal—Failure detected
Off HW Normal—No failure detected or no power
DC OK Solid Green HW Normal—Primary output OK
Off HW Not normal—Primary output not OK or no power
10 Aruba 200, 800, and 6000 0510142-21FIPS 140-2 Level 2 Release Supplement April 2011

The Aruba 200, 800, 6000 Mobility Controller
Each FE network port has its own POE LED. The LED is off, when the port is disabled or the attached device has not requested power, green when POE is provided to the attached device, and amber when the attached device has requested power, but POE is not being provided by the port.
Aruba 200 InterfacesThe Aruba 200 has the following interfaces:
An FE port used to connect Access Points and Wired LAN segments to the controller. These ports provide 10/100 Mbps Ethernet connectivity.
A Gigabit Ethernet (GE) port provides high-bandwidth uplinks between the Aruba 200 Mobility Controller and the wired LAN.
Serial Console port is used for connecting to a local management console.
Power Input Socket on the back of the controller accepts the connector from the DC power adapter (included).
Power Indicator LED is on when the switch is receiving proper power.
Status Indicator LED is on when the switch is booted and functioning properly, and off when the switch is booting or has failed.
The FE port and the GE port have their own LNK/ACT LED. The LED is off when there is no link on the port, green when a link is established and no activity is detected, and flashing green when the port is transmitting or receiving data.
Aruba 200, 800, and 6000 11FIPS 140-2 Level 2 Release Supplement

The Aruba 200, 800, 6000 Mobility Controller
This page intentionally left blank.
12 Aruba 200, 800, and 6000 0510142-21FIPS 140-2 Level 2 Release Supplement April 2011

2FIPS 140-2 Level 2 Features
Intended Level of SecurityThe Aruba 200, 800, 6000 Mobility Controller and its modules are intended to meet overall FIPS 140-2 Level 2 requirements as shown in Table 2-1.
Physical SecurityThe Aruba Mobility Controller is a scalable, multi-processor standalone network device and is enclosed in a robust steel housing. The switch enclosure is resistant to probing and is opaque within the visible spectrum. The enclosure of the switch has been designed to satisfy FIPS 140-2 Level 2 physical security requirements.
For the Aruba 6000 the left, top, right, and bottom surfaces are irremovable. The rear panel can be removed by unscrewing fifteen screws. The switch has a number of hot-swappable components at front side, including four slots for supervisor and line cards, one fan tray, and three power supplies. Each of the components is attached with two screws. The supervisor card has a PCMCIA slot which provides a clear view of the module's internal components.
Table 2-1 Intended Level of Security
Section Section Title Level
1 Cryptographic Module Specification 2
2 Cryptographic Module Ports and Interfaces
2
3 Roles, Services, and Authentication 2
4 Finite State Model 2
5 Physical Security 2
6 Operational Environment N/A
7 Cryptographic Key Management 2
8 EMI/EMC 2
9 Self-tests 2
10 Design Assurance 2
11 Mitigation of Other Attacks 2
Aruba 200, 800, and 6000 13FIPS 140-2 Level 2 Release Supplement

FIPS 140-2 Level 2 Features
For the Aruba 800-series the left, right, front, rear, and bottom surfaces are irremovable. The top panel can be removed by unscrewing nine screws.
For the Aruba 200 the left, right, front, and bottom surfaces are irremovable. The top and back panel can be removed by unscrewing two screws.
For physical security, the Aruba 6000 switch requires Tamper-Evident Labels (TELs) to allow the detection of the opening of the chassis covers; the removal or replacement of any module or cover plate, and to block the PCMCIA slot and the Serial console port.
The Aruba 200 and 800-series Mobility Controllers require Tamper-Evident Labels (TELs) to allow the detection of the opening of the chassis cover and to block the Serial console port.
To protect the Aruba 200, 800, 6000 Mobility Controller from any tampering with the product, TELs should be applied by the Crypto Officer as covered under “Tamper-Evident Labels” on page 51.
Operational EnvironmentThe operational environment is non-modifiable. The control plane Operating System (OS) is Linux, a real-time, multi-threaded operating system that supports memory protection between processes. Access to the underlying Linux implementation is not provided directly. Only Aruba Networks provided interfaces are used, and the CLI is a restricted command set.
Logical InterfacesAll of these physical interfaces are separated into logical interfaces defined by FIPS 140-2, as described in the following table.
14 Aruba 200, 800, and 6000 0510142-21FIPS 140-2 Level 2 Release Supplement April 2011

FIPS 140-2 Level 2 Features
Data input and output, control input, status output, and power interfaces are defined as follows:
Data input and output are the packets that use the firewall, VPN, and routing functionality of the modules.
Control input consists of manual control inputs for power and reset through the power and reset switch. It also consists of all of the data that is entered into the switch while using the management interfaces.
Status output consists of the status indicators displayed through the LEDs, the status data that is output from the switch while using the management interfaces, and the log file.
LEDs indicate the physical state of the module, such as power-up (or rebooting), utilization level, activation state (including fan, ports, and power). The log file records the results of self-tests, configuration errors, and monitoring data.
A power supply is used to connect the electric power cable. Operating power is also provided to a compatible Power Over Ethernet (POE) device when connected. The power is provided through the connected Ethernet cable.
Table 2-2 FIPS 140-2 Logical Interfaces
FIPS 140-2 Logical Interface Module Physical Interface
Data Input Interface 10/100 Mbps Ethernet (FE) ports
Gigabit Ethernet (GE) port(s)
Data Output Interface 10/100 Mbps Ethernet (FE) ports
Gigabit Ethernet (GE) port(s)
Control Input Interface Power switch (Aruba 6000 only)
Reset button (Aruba 6000 only)
10/100 Mbps Ethernet (FE) ports
PCMCIA drive (disabled) (Aruba 6000 only)
Serial console port (disabled)
Status Output Interface 10/100 Mbps Ethernet (FE) ports
LEDs
Serial console port (disabled)
Power Interface Power Supply
POE
Aruba 200, 800, and 6000 15FIPS 140-2 Level 2 Release Supplement

FIPS 140-2 Level 2 Features
The switch distinguishes between different forms of data, control, and status traffic over the network ports by analyzing the packets header information and contents.
Roles and ServicesThe Aruba Mobility Controller supports role-based authentication. There are two main roles in the switch (as required by FIPS 140-2 Level 2) that operators may assume: a Crypto Officer role and User role. The Administrator maps to the Crypto-Officer role and the client Users map to the User role.
Crypto Officer RoleThe Crypto Officer role has the ability to configure, manage, and monitor the switch. Three management interfaces can be used for this purpose:
CLI
The Crypto Officer can use the CLI to perform non-security-sensitive and security-sensitive monitoring and configuration. The CLI can be accessed remotely by using the SSHv2 secured management session over the Ethernet ports or locally over the serial port. In FIPS mode, the serial port is disabled.
Web Interface
The Crypto Officer can use the Web Interface as an alternative to the CLI. The Web Interface provides a highly intuitive, graphical interface for a comprehensive set of switch management tools. The Web Interface can be accessed from a TLS-enabled Web browser using HTTPS (HTTP with Secure Socket Layer) on logical port 4343.
Bootrom Monitor Mode
In Bootrom monitor mode, the Crypto Officer can reboot, update the Bootrom, issue file system-related commands, modify network parameters, and issue various show commands. The Crypto Officer can only enter this mode by pressing any key during the first four seconds of initialization. Bootrom Monitor Mode is disabled in FIPS mode.
The Crypto Officer can also use SNMPv1 to remotely perform non-security-sensitive monitoring and use get and getnext commands. See the table below for descriptions of the services available to the Crypto Officer role.
16 Aruba 200, 800, and 6000 0510142-21FIPS 140-2 Level 2 Release Supplement April 2011

FIPS 140-2 Level 2 Features
Table 2-3 Crypto-Officer Services
Service Description Input Output CSP Access
SSH Provide authenticated and encrypted remote management sessions while using the CLI
SSH key agreement parameters, SSH inputs, and data
SSH outputs and data
Diffie-Hellman key pair (read/ write access), session key for SSH (read/write access), PRNG keys (read access); Crypto Officer's password (read access)
IKE/IPSec Provide authenticated and encrypted remote management sessions to access the CLI functionality
IKE inputs and data; IPSec inputs, commands, and data
IKE outputs, status, and data; IPSec outputs, status, and data
RSA key pair for IKE (read access), Diffie-Hellman key pair for IKE (read/write access), pre- shared keys for IKE (read access); Session keys for IPSec (read/write access)
Bootrom Monitor Mode
Reboot, update the Bootrom, issue file system-related commands, modify network parameters, and issue various show commands (disabled in FIPS mode)
Commands and configuration data
Status of commands, configuration data
None
Configuring Network Management
Create management Users and set their password and privilege level; configure the SNMP agent
Commands and configuration data
Status of commands and configuration data
Crypto Officer's password for CLI (read/write access)
Configuring the module Platform
Define the platform subsystem firmware of the module by entering Bootrom Monitor Mode, File System, fault report, message logging, and other platform related commands
Commands and configuration data
Status of commands and configuration data
None
Configuring Hardware Controllers
Define synchronization features for module
Commands and configuration data
Status of commands and configuration data
None
Configuring the Internet Protocol
Set IP functionality Commands and configuration data
Status of commands and configuration data
None
Configuring Quality of Service (QoS)
Configure QOS values for module
Commands and configuration data
Status of commands and configuration data
None
Aruba 200, 800, and 6000 17FIPS 140-2 Level 2 Release Supplement

FIPS 140-2 Level 2 Features
Configuring the VPN
Configure Public Key Infrastructure (PKI); configure the Internet Key Exchange (IKE) Security Protocol; configure the IPSec protocol
Commands and configuration data
Status of commands and configuration data
RSA keys pair (read/write access), Pre-shared key (read/write access)
Configuring DHCP
Configure DHCP on module
Commands and configuration data
Status of commands and configuration data
None
Configuring Security
Define security features for module, including Access List, AAA, and firewall functionality
Commands and configuration data
Status of commands and configuration data
AAA User password (read/write access), RADIUS password (read/ write access)
HTTPS over TLS
Secure browser connection over Transport Layer Security acting as a Crypto Officer service (web management interface).
TLS inputs, commands, and data
TLS outputs, status, and data
RSA key pair for TLS
Table 2-3 Crypto-Officer Services (Continued)
Service Description Input Output CSP Access
18 Aruba 200, 800, and 6000 0510142-21FIPS 140-2 Level 2 Release Supplement April 2011

FIPS 140-2 Level 2 Features
User Role
The User role can access the switch’s IPSec and IKE services. Service descriptions and inputs/outputs are listed in the following table:
Table 2-4 User Service
Service Description Input Output CSP Access
IKE/IPSec Access the module's IPSec services in order to secure network traffic
IPSec inputs, commands, and data
IPSec outputs, status, and data
RSA key pair for IKE (read access); Diffie-Hellman key pair for IKE (read and write access); pre-shared keys for IKE (read access)
HTTPS over TLS
Access the module’s TLS services in order to secure network traffic
TLS inputs, commands, and data
TLS outputs, status, and data
RSA key pair for TLS
EAP-TLS termination
Provide EAP-TLS termination
EAP-TLS inputs, commands and data
EAP-TLS outputs, status and data
EAP-TLS public key (read)
EAP-TLS private key (read)
802.11i Shared Key Mode
Access the module’s 802.11i services in order to secure network traffic
802.11i inputs, commands and data
802.11i outputs, status and data
802.11i Pre-Shared Key (read)
802.11i Session key (read/write)
802.11i with EAP-TLS
Access the module’s 802.11i services in order to secure network traffic
802.11i inputs, commands and data
802.11i outputs, status, and data
EAP-TLS public key (read)
EAP-TLS private key (read)
802.11i Pair-Wise Master Key (read/write)
802.11i Session key (read/write)
Data link (Layer 2) Encryption
Access the module’s Layer 2 encrypted tunnel services to secure network traffic
Data link encryption inputs, commands and data
Data link encryption, status, and data
Data link encryption AES key (read)
Aruba 200, 800, and 6000 19FIPS 140-2 Level 2 Release Supplement

FIPS 140-2 Level 2 Features
Authentication Mechanisms
The Aruba Mobility Controller supports role-based authentication. Role-based authentication is performed before the Crypto Officer enters privileged mode using admin password via Web Interface and SSH or by entering enable command and password in console. Role-based authentication is also performed for User authentication.
This includes password and RSA-based authentication mechanisms. The strength of each authentication mechanism is described below.
Unauthenticated ServicesThe Aruba Mobility Controller can perform SNMP management, VLAN, bridging, firewall, routing, and forwarding functionality without authentication. These services do not involve any cryptographic processing.
Table 2-5 Estimated Strength of Authentication Mechanisms
Authentication Type Role Strength
Password-based authentication (CLI and Web Interface)
Crypto Officer
Passwords are required to be at least six characters long. Numeric, alphabetic (upper and lowercase), and keyboard and extended characters can be used, which gives a total of 95 characters to choose from. Therefore, the number of potential six-character passwords is 956 (735091890625).
RSA-based authentication (IKE)
User RSA signing and verification is used to authenticate to the module during IKE. This mechanism is as strong as the RSA algorithm using a 1024 bit key pair.
Pre-shared key-based authentication (IKE)
User Pre-shared keys must be at least six characters long and up to 64 bytes long. Even if only uppercase letters were used without repetition for a six character pre-shared key, the probability of randomly guessing the correct sequence is one in 165,765,600.
Pre-shared key based authentication (802.11i)
User 32-byte (256-bit) PSK key corresponds to 2256 potential combinations.
EAP-TLS authentication
User 1024-bit RSA key corresponds to effective strength of 280
20 Aruba 200, 800, and 6000 0510142-21FIPS 140-2 Level 2 Release Supplement April 2011

FIPS 140-2 Level 2 Features
The SNMPv1 can be used to remotely perform non-security-sensitive monitoring. SNMP uses a clear text community string for authentication. Also, the Bootrom Monitor mode is disabled in FIPS mode by placing a Tamper Evident Label (TEL) over the serial port.
Cryptographic Key Management
Implemented Algorithms
FIPS-approved cryptographic algorithms have been implemented in hardware and firmware. Hardware encryption acceleration is provided for bulk cryptographic operations for the following FIPS approved algorithms:
AES (Cert. #649, #650, #651) - CBC; 128,192,256 bits - CCM; 128 bits, Assoc. Data Len Range: 15 - 30, Payload Length Range: 0 - 32, Nonce Length(s): 13, Tag Length(s): 8
TDES (Cert. #600, #601 #602) - CBC; 192 bits (168 used)/1,2,3 keys keying option
SHA-1 (Cert. #682, #683, #684) - BYTE oriented
HMAC SHA-1 (Cert. #334, #335, #336)
RSA (Cert. #298, #299, #300)
Hardware encryption is provided for the following non-FIPS-approved algorithms.
MD5
RC4
RSA (key wrapping; key establishment methodology provides 80 bits of encryption strength)
The firmware implementation is performed using OpenSSL crypto library version 0.9.7m. The firmware implements the following FIPS-approved algorithms:
AES (Cert. #700) - CBC: 128, 192, 256 bits
Triple-DES (Cert. #631)- CBC key options Keying Options 1,2,3 used
SHA-1 (Cert. #728) - BYTE oriented
HMAC SHA-1 (Cert. #378)
RSA (Cert. #326)
RNG (Cert. #411)
The firmware implementation using OpenSSL v0.9.m is also used to implement the following non-FIPS-approved algorithms in the controller firmware:
MD5
Aruba 200, 800, and 6000 21FIPS 140-2 Level 2 Release Supplement

FIPS 140-2 Level 2 Features
RC4
Diffie-Hellman (allowed for key agreement)
RSA (key wrapping; key establishment methodology provides 80 bits of encryption strength)
DES
Diffie-Hellman key establishment methodology provides 80-bits of encryption strength. Note: Only 1024 bit Diffie-Hellman keys are supported by the module.
Critical Security Parameters
The following are the Critical Security Parameters (CSPs) used in the switch.
Table 2-6 CSPs Used in Aruba Mobility Controllers
CSPs CSPs type GenerationStorage and Zeroization
Use
Key Encryption Key (KEK)
TDES key Hard Coded Stored in Flash and zeroized by using the CLI command wipe out flash.
Encrypts IKE, pre-shared keys, and database file
Pre-shared keys
64 character pre-shared key
External Stored encrypted in Flash with the KEK. Zeroized by changing (updating) the pre-shared key through the User interface.
User and module authentication during IKE
IPSec session keys
168-bit TDES or 128/192/256-bit AES keys; HMAC SHA-1 key
Established during the Diffie-Hellman key agreement
Stored in plaintext in volatile memory. Zeroized when the session is closed.
Secure IPSec traffic
IKE Diffie-Hellman private key
768/1024-bit Diffie-Hellman private key. Note: Key size 768 bits is not allowed in FIPS mode.
Generated internally during IKE negotiations
Stored in the volatile memory. Zeroized after the session is closed.
Used in establishing the session key for an IPSec session
IKE Diffie-Hellman public key
768/1024-bit Diffie-Hellman public key
Generated internally during IKE negotiations
Stored in plaintext in memory.
Key agreement during IKE
22 Aruba 200, 800, and 6000 0510142-21FIPS 140-2 Level 2 Release Supplement April 2011

FIPS 140-2 Level 2 Features
SSH session keys
168-bit TDES or 128/192/256-bit AES keys; HMAC SHA-1 keys
Established during the SSH key exchange using the Diffie-Hellman key agreement
Stored in plaintext in volatile memory. Zeroized when the session is closed.
Secure SSH traffic
SSH Diffie-Hellman Public Key
768/1024-bit Diffie-Hellman public key
Generated internally during the SSH session negotiations
Stored in the volatile memory. Zeroized after the session is closed.
Used in establishing the session key for an SSH session.
SSH Diffie-Hellman Private Key
768/1024-bit Diffie-Hellman private key
Generated internally during the SSH session negotiations
Stored in the volatile memory. Zeroized after the session is closed.
Used in establishing the session key for an SSH session.
TLS session key
AES 128, 192, 256
Generated in the module
Stored in plaintext in volatile memory. Zeroized when the session is closed.
Key agreement during 802.1x connection
TLS session key
RC4 Generated in the module. This is not a FIPS approved mechanism and is not considered a CSP. The information is given here for sake of completeness.
Stored in plaintext in volatile memory. Zeroized when the session is closed.
Key agreement during 802.1x connection
RSA Public Key
RSA 1024 bit key
External Stored in flash memory
Used by TLS and EAP-TLS protocols during the handshake
RSA Private Key
RSA 1024 bit key
External Stored in flash memory encrypted with KEK
Used by TLS and EAP-TLS protocols during the handshake
Table 2-6 CSPs Used in Aruba Mobility Controllers (Continued)
CSPs CSPs type GenerationStorage and Zeroization
Use
Aruba 200, 800, and 6000 23FIPS 140-2 Level 2 Release Supplement

FIPS 140-2 Level 2 Features
Encryption Keys and Passwords Key Encryption Key (KEK)–The KEK is hard-coded in the image. The KEK
encrypts IKE RSA keys pairs, pre-shared keys, and User database. The KEK can be zeroized by erasing the image.
Preshared keys can be used instead of certificates during IKE authentication. The preshared key must be entered by the Crypto Officer with the username being the IP address and the password being the preshared key. The preshared keys are stored encrypted in flash and can be zeroized by either overwriting them with new ones or by erasing the flash.
802.11i Pre-Shared Key (PSK)
802.11i pre-shared secret key (256-bit)
External Stored in flash memory encrypted with KEK
Used by the 802.11i protocol
802.11i Pair-Wise Master key (PMK)
802.11i secret key (256-bit)
Derived during the EAP-TLS handshake
Stored in the volatile memory. Zeroized on reboot.
Used by the 802.11i protocol
802.11i session key
AES-CCM key (128 bit)
Derived from 802.11 PSK
Stored in plaintext in volatile memory. Zeroized on reboot
Used for 802.11i encryption
Data link (Layer 2) encryption key
AES key (128/256 bit)
Derived during the EAP-TLS handshake
Stored in plaintext in volatile memory. Zeroized on reboot
Used to encrypt Layer 2 tunneling frames
Passwords 6-character password
External Stored encrypted in Flash with KEK. Zeroized by either deleting the password configuration file or by overwriting the password with a new one.
Authentication for accessing the management interfaces, RADIUS authentication
PRNG seeds Seed key (24 bytes, TDES 2-keying option) and seed (8 bytes)
Seeded using non-approved OpenSSL random number generator
In volatile memory only. Zeroized on reboot.
Seed PRNGs
Table 2-6 CSPs Used in Aruba Mobility Controllers (Continued)
CSPs CSPs type GenerationStorage and Zeroization
Use
24 Aruba 200, 800, and 6000 0510142-21FIPS 140-2 Level 2 Release Supplement April 2011

FIPS 140-2 Level 2 Features
IPSec Session key are used to protect IKE phase 1 & 2 protocol messages. Session keys are generated using the Diffi-Hellman key agreement. IPSec session keys is visible only in process space, and zeroized when the session is closed, in a matter of a few milliseconds.
The IKE Diffie-Hellman private key is generated during IKE for use for the key establishment during IKE. The key is generated internally and is an ephemeral key that is stored in plaintext in memory. The IKE Diffie-Hellman key pair can be zerorized by using the OPENSSL_cleanse() function, followed by OPENSSL_free() to free up the memory. The key pairs also can be zeroized in a few milliseconds by rebooting the module.
The IKE User Diffie-Hellman public key is used during the IKE key establishment. The public key is used by the module to establish a shared secret with the user. The public key is an ephemeral key and is stored in plaintext in memory. It can be zeroized by rebooting the module. IKE Diffie-Hellman key pairs can be zerorized in a few milliseconds by using the OPENSSL_cleanse() function, followed by OPENSSL_free() to free up the memory.
SSH Session keys are used to protect SSH protocol messages. Session keys are generated using the Diffi-Hellman key agreement. SSH session keys are visible only in the process space, and zeroized in a matter of a few milliseconds when the session is closed.
The SSH Diffie-Hellman private key is generated internally and is used during the SSH key establishment. This key is an ephemeral key and is stored in plaintext in memory. It can be zeroized by rebooting the module. The SSH Diffie-Hellman key pair is zerorized in a few milliseconds by using the OPENSSL_cleanse() function, followed by OPENSSL_free() to free up the memory.
The SSH User Diffie-Hellman public key is used during the SSHv2 key establishment. The public key is used by the module to establish a shared secret with the user. The public key is an ephemeral key and is stored in plaintext in memory. It can be zeroized by rebooting the module.
The TLS session keys are used during the key establishment. The AES key is used by the module to generate another encryption key. The new encryption key then encrypts the RADIUS Server key (sent from the RADIUS Server to the controller) using RC4. TLS Keys are stored in plaintext in memory. They can be zeroized by rebooting the module. Upon closing a session, the session keys are zerorized by using the OPENSSL_cleanse() function, followed by OPENSSL_free() to free up the memory.
The RSA public key is used primarily for user EAP-TLS authentication. The public key is externally generated and stored in flash memory encrypted with KEK.
The RSA private key is used primarily for user EAP-TLS authentication. The private key is externally generated and stored in flash memory encrypted with KEK.
Aruba 200, 800, and 6000 25FIPS 140-2 Level 2 Release Supplement

FIPS 140-2 Level 2 Features
The 802.11i Pre-Shared Key (PSK) is a pre-shared key used to derive session keys for the 802.11i wireless security protocol. The key is stored in flash memory encrypted with KEK.
The 802.11i Pair-Wise Master Key (PMK) is established during the EAP-TLS handshake and is used to derive session keys for the 802.11i wireless security protocol. The key is stored in volatile memory in plaintext. It can be zeroized in a few milliseconds by rebooting the switch.
The 802.11i session key is used to encrypt 802.11i communications and is derived from the PSK using the key derivation function specified in the IEEE 802.11i standard. The key is stored in volatile memory in plaintext and is zeroized in a few milliseconds on reboot.
The data link (Layer 2) encryption key is established during the EAP-TLS handshake and is used to encrypt Layer 2 tunneling frames. It is stored in volatile memory in plaintext. It can be zeroized by rebooting the switch.
Passwords are used for authentication. The Crypto Officer will not be able to access the CLI and management interfaces until authenticated successfully. SNMPv1 can be used to remotely perform non-security-sensitive monitoring. SNMP uses a clear text community string for authentication. Passwords are also used to remotely authenticate users during RADIUS and to authenticate AAA users.
All passwords are stored encrypted (database files are encrypted with the key encryption key) in flash, except for the Crypto Officer passwords. The Crypto Officer password is stored encrypted in the configuration file (default.cfg).
All passwords can be zeroized by overwriting them with new ones or erasing the flash.
PRNG Seeds are used to seed PRNGs, stored as plaintext in volatile memory and zeroized on reboot in a few milliseconds.
Self-TestsThe Aruba Mobility Controller performs both power-up and conditional self-tests. In the event any self-test fails, the switch will enter an error state, log the error, and reboot automatically.
The switch performs the following power-up self-tests:
Firmware Integrity Test–The switch checks the integrity of its firmware using an error detection code. The CRC-32 checksum is used to verify that the operational image and the boot image have not been modified.
Cryptographic Algorithm Tests–These tests are run at power-up for the Triple-DES encryption/decryption, AES and AES-CCM encryption/decryption, HMAC SHA-1 calculation/verification, RSA signing/verifying, and the PRNG random data generation.
26 Aruba 200, 800, and 6000 0510142-21FIPS 140-2 Level 2 Release Supplement April 2011

FIPS 140-2 Level 2 Features
RSA Pair-wise Consistency Test (sign/verify)–The RSA pair-wise consistency test takes a RSA private key and signs the hash of some data. The resulting signed data is compared to the hashed data before it was signed. If the two values are equal, then the test fails. If the two values differ, the public key is used to verify the signed data and the resulting value is compared to the original hashed data. If the two values are not equal the test fails.
RSA Pair-wise Consistency Test (encrypt/decrypt) - The RSA pair-wise consistency test takes a RSA private key and encrypts some data. The resulting cipher is compared to the hashed data before it was encrypted. If the two values are equal, then the test fails. If the two values differ, the public key is used to decrypt the cipher and the resulting value is compared to the original plaintext. If the two values are not equal the test fails.
The controller implements alternating bypass mode.
Following Conditional Self-tests are performed in the switch:
Continuous Random Number Generator Test—This test is run upon generation of random data by the switch’s random number generators to detect failure to a constant value. The module stores the first random number for subsequent comparison, and the module compares the value of the new random number with the random number generated in the previous round and enters an error state if the comparison is successful. The test is performed for approved as well as non-approved RNGs.
The controller implements alternating bypass mode.
Self-test results are logged in a log file. Upon successful completion of the power-up self tests, the module logs a KATS: passed message into a log file. Confirm the file update by checking the associated time of the file. The status can be view by using the show log crypto all CLI command.
In the event of a hardware KATs failure, the log file records:
In the event of a firmware tests failure, the log file records:
Alternating Bypass StateThe controller implements an alternating bypass state when:
HW Crypto POST: FAILEDSibyte HW Crypto Failed[Date]@[Time] The POST Test failed!!!!
Rebooting…
SW Crypto POST: FAILEDSibyte HW Crypto Failed[Date]@[Time] The POST Test failed!!!!
Rebooting…
Aruba 200, 800, and 6000 27FIPS 140-2 Level 2 Release Supplement
FIPS 140-2 Level 2 Features
a port is configured in trusted mode to provide unauthenticated services
a configuration provides wireless access without encryption
The alternating bypass status can be identified by retrieving the port configuration or the wireless network configuration.
Mitigation of Other AttacksArubaOS includes two modules that provide protection from attacks. These are:
XSec
Wireless Intrusion Protection
XSecxSec is a highly secure data link layer (Layer 2) protocol that provides a unified framework for securing all wired and wireless connections using strong encryption and authentication. xSec provides greater security than Layer 3 encryption technologies through the use of FIPS (Federal Information Processing Standard)-validated encryption algorithms (AES-CBC-256 with HMAC-SHA1) to secure Layer 2 traffic, as well as the encryption of Layer 2 header information including MAC addresses. xSec was jointly developed by Aruba Networks and Funk Software.
The Need for Layer 2 EncryptionTraditionally, encryption has been performed at Layer 3 (Network Layer) in the form of IPSec. IPSec uses Triple-DES or AES encryption and can encrypt the IP packet including the source and destination IP addresses in the header.
IPSec provides a commonly accepted, secure method of communication over untrusted networks since the only information left unencrypted are packet headers and pure Layer 2 traffic such as ARP (Address Resolution Protocol) and DHCP (Dynamic Host Configuration Protocol) packets.
While the confidentiality of IPSec-encrypted data is not in question, the possibility exists that an attacker with direct link-layer access to other devices on a network could carry out attacks against those devices. For example, a wireless network secured with WEP and IPSec could have client devices at risk if an attacker obtains the WEP key and gains Layer 2 access to the network. In addition, there is concern among many security groups that exposure of any packet header information could disclose information that an attacker could use as the basis of an attack.
For this reason, many government agencies and commercial entities that transmit highly sensitive information over wireless networks mandate that strong Layer 2 encryption technologies be deployed to ensure absolute data privacy. U.S. DoD
28 Aruba 200, 800, and 6000 0510142-21FIPS 140-2 Level 2 Release Supplement April 2011

FIPS 140-2 Level 2 Features
Directive 8100.2 requires that all data transmitted using commercial wireless devices be encrypted at Layer 2 or Layer 3. The U.S. Navy and Army are requiring Layer 2 encryption, and cryptographic engines used for all sensitive government communications must be validated as meeting FIPS 140-2 requirements.
xSec has been designed to address this requirement and provide a number of additional benefits.
A Unified Security FrameworkxSec enables universal authentication and encryption regardless of access method. Every client that connects to the network, wired or wireless, can authenticate to an Aruba mobility controller using an xSec client. Authentication inside the xSec protocol is accomplished using standard 802.1x EAP (Extensible Authentication Protocol) and utilizes a standard RADIUS server to validate credentials. xSec supports authentication using passwords, certificates, smart cards, token cards, and other credentials supported by the chosen EAP type.
FIPS 140-2 ValidationThrough the use of AES-CBC with a 256-bit key length for encryption, xSec provides a COTS (Commercial Off-the-Shelf) Layer 2 protocol that is implemented in a FIPS 140-2 validated module. As a result, xSec is an ideal solution for security-sensitive applications in the government, finance, and healthcare markets. FIPS 140-2 is a more stringent security standard than those required in the commercial sector, assuring compliance with commercial regulations such as HIPAA and GLBA.
NOTE: The xSec protocol provides 80 bits of security strength.
Legacy Investment ProtectionMost legacy equipment cannot be upgraded to support the latest security standards such as 802.11i and WPA2. xSec encryption, however, is performed in hardware by the Aruba mobility controller, and in firmware at the client level. This means that an existing network can be upgraded to support the latest security technology without the need to replace older access points or wireless NICs (network interface cards).
Designed for CompatibilityxSec is based on the IEEE security standard 802.1x. Secure EAP methods supported include EAP-TLS, TTLS and PEAP, allowing compatibility with existing security mechanisms such as RSA Tokens and PKI certificates. xSec is designed to be transparent to the Layer 2 infrastructure and can operate through a switched Ethernet network without the risk of EAP frames being intercepted by 802.1x-aware Ethernet switches. Funk Software’s Odyssey Client with xSec support is available for Windows 2000 and Windows XP.
Aruba 200, 800, and 6000 29FIPS 140-2 Level 2 Release Supplement

FIPS 140-2 Level 2 Features
Wireless Intrusion Detection
Aruba’s Wireless Intrusion Protection (WIP) module eliminates the need for a separate system of RF sensors and security appliances. The WIP module provides extraordinary capabilities to Aruba’s enterprise mobility system, giving administrators visibility into the network, along with the power to thwart malicious wireless attacks, impersonations and unauthorized intrusions.
Wireless intrusion detection is only the first step in securing the corporate environment from unwanted wireless access. Without adequate measures to quickly shut down intrusions, detection is almost worthless. Without accurate classification of APs and stations (e.g., valid, rogue, or neighbor), providing an automated response to possible intrusion is impossible.
Aruba access points constantly scan all channels of the RF spectrum, capturing all 802.11 traffic and locally examining the captured data. Only policy violations are sent to the central mobility controller to ensure minimal impact on wired network performance. While scanning the environment, the Aruba system learns about all wireless APs and stations and classifies these devices based on traffic flows seen on the wire and in the air. This traffic is collected and correlated on the mobility controller.
Aruba’s WIP module provides both detection and prevention capabilities. Users and devices are detected and classified so administrators can react to both unintentional and malicious WLAN access. No other system on the market provides such capabilities.
Unique Station and User ClassificationAruba’s patent-pending classification system automatically identifies and classifies all APs and stations connected to the network. The system works by comparing traffic seen in the air with traffic seen on the wire. When a match is found, it is known with certainty that the device belongs to the local network rather than a neighboring network. This avoids false alarms for the administrator, because only true rogue devices are classified as such.
Detecting and Disabling Rogue APs
Aruba’s classification algorithms allow the system to accurately determine who is a threat and who is not. Once classified as rogue, these APs can be automatically disabled. Administrators are also notified of the presence of rogue devices, along with their precise physical location on a floorplan, so that they may be removed from the network.
Denial of Service and Impersonation ProtectionWireless networks, by their nature, make an attractive target for denial of service attacks. Such attacks include firmware that floods the network with association requests, attacks that make a laptop look like thousands of APs, and
30 Aruba 200, 800, and 6000 0510142-21FIPS 140-2 Level 2 Release Supplement April 2011

FIPS 140-2 Level 2 Features
deauthentication floods. Aruba mobility controllers equipped with the Aruba WIP module maintain signatures of many different wireless attacks and are able to block them so service is not disrupted.
Advanced Denial of Service (DoS) protection keeps enterprises safe against a variety of wireless attacks, including association and de- authentication floods, honeypots and AP and station impersonations. Based on location signatures and client classification, Aruba access points will drop illegal requests and generate alerts to notify administrators of the attack.
Man-in-the-Middle ProtectionOne of the common attacks possible in wireless networks is the “man-in-the-middle” attack. During a man-in-the-middle attack, a hacker masquerades as a legitimate AP. Then, acting as a relay point, this man-in-the-middle fools users and other APs into sending data through the unauthorized device. An attacker can then modify or corrupt data or conduct password-cracking routines.
Aruba access points monitor the air to detect other wireless stations masquerading as valid APs. When such masquerading is detected, appropriate defense mechanisms are put into place. Aruba mobility controllers also track unique “signatures” for each wireless client in the network. If a new station is introduced claiming to be a particular client, but without the proper signature, a station impersonation attack is detected.
Policy Definition and EnforcementAruba WIP provides a number of policies that can be configured to take automatic action when a policy is violated. Examples of wireless policies include weak WEP implementation detection, AP misconfiguration protection, ad-hoc network detection and protection, unauthorized NIC type detection, wireless bridge detection and more.
Using Wireless to Protect your Wired NetworkEven if wireless LANs are not sanctioned at this time, no security conscious company can afford to do nothing. Aruba’s WIP will keep wireless traffic from working its way into the wired network through rogue APs unknowingly attached to a network port. With Aruba’s mobility system equipped with WIP, the enterprise network is protected against wireless security holes. And when the enterprise is ready to deploy wireless LANs, the Aruba system can be easily reconfigured to provide a scalable and secure wireless LAN infrastructure.
Aruba 200, 800, and 6000 31FIPS 140-2 Level 2 Release Supplement

FIPS 140-2 Level 2 Features
Using Wireless to Protect your Existing Wireless NetworkAruba’s mobility system with WIP delivers the detection and protection necessary to keep your existing wireless network safe from undesirable wireless access. ArubaOS WIP complements and enhances any existing WLAN deployment, including Cisco deployments, by providing advanced RF security and control features not found in first-generation wireless products.
32 Aruba 200, 800, and 6000 0510142-21FIPS 140-2 Level 2 Release Supplement April 2011
3Installing the Controller
This chapter covers the physical installation of the Aruba 200, 800, 6000 Mobility Controller with FIPS 140-2 Level 2 validation. The Crypto Officer is responsible for ensuring that the following procedures are used to place the switch in a FIPS-approved mode of operation.
This chapter covers the following installation topics:
Precautions to be observed during installation
Requirements for the switch components and rack mounting gear
Selecting a proper environment for the switch
Mounting the switch in a rack
Connecting power to the switch
Pre-Installation ChecklistYou will need the following during installation:
Aruba 200, 800, and 6000 Mobility Controller components. Aruba 200, 800, and 6000 rack mounting kit. Phillips or cross-head screwdriver. 19-inch equipment rack, or equivalent. 3U rack space for the Aruba 6000 and 1U rack space for the Aruba 800-series
and Aruba 200 with 10 cm (4 inches) clearance to the left, right, front, and rear of the rack.
Another person to help position the switch. Aruba power cord for each power supply, rated to at least 10 A with IEC320
connector. Adequate power supplies and electrical power. Cool, non-condensing air 0 to 40 ºC (32 to 104 ºF). May require air condition-
ing. Management Station (PC) with 10/100 Mbps Ethernet port and SSH software. A 4- or 8-conductor Category 5 UTP Ethernet cable.
Precautions Installation should be performed only by a trained technician.
Aruba 200, 800, and 6000 33FIPS 140-2 Level 2 Release Supplement

Installing the Controller
Dangerous voltage in excess of 240 VAC is always present while the Aruba Power Supply is plugged into an electrical outlet. Remove all rings, jewelry, and other potentially conductive material before working with this product.
Never insert foreign objects into the chassis, the power supply, or any other component, even when the power supplies have been turned off, unplugged, or removed.
Main power is fully disconnected from the switch only by unplugging all power cords from their power outlets. For safety reasons, make sure the power outlets and plugs are within easy reach of the operator.
Do not handle electrical cables that are not insulated. This includes any network cables.
Keep water and other fluids away from the product.
Comply with electrical grounding standards during all phases of installation and operation of the product. Do not allow the switch chassis, network ports, power supplies, or mounting brackets to contact any device, cable, object, or person attached to a different electrical ground. Also, never connect the device to external storm grounding sources.
Installation or removal of the chassis or any module must be performed in a static-free environment. The proper use of anti-static body straps and mats is strongly recommended.
Keep modules in anti-static packaging when not installed in the chassis.
Do not ship or store this product near strong electromagnetic, electrostatic, magnetic or radioactive fields.
Do not disassemble chassis or modules. They have no internal user-serviceable parts. When service or repair is needed, contact Aruba Networks.
The Security KitThe Aruba Mobility Controller FIPS 140-2 Level 2 Security Kit modifies the standard Aruba Mobility Controller hardware, firmware, and documentation to assure FIPS 140-2 Level 2 validation.
Product Examination
The Crypto Officer receives the switch in a carton. The Crypto Officer should examine the carton for evidence of tampering. Tamper-evidence includes tears, scratches, and other irregularities in the packaging.
34 Aruba 200, 800, and 6000 0510142-21FIPS 140-2 Level 2 Release Supplement April 2011

Installing the Controller
Package Contents
The product carton should include the following:
Aruba 200, 800, and 6000 Mobility Controller Rack mounting kit Aruba User Documentation CD Tamper-Evident Labels
Minimum Configuration for the Aruba 6000
The Aruba 6000 Mobility Controller must include the following basic components (as shown in Figure 1-1 on page 4):
One modular switch chassis One fan tray One Supervisor Card in Slot 1/0 One Line Card in Slot 0/0 Power Supply
Note: The number and type of power supplies required depends on the number and type of line cards installed in the chassis (refer to the Aruba 6000 Mobility Controller Installation Guide).
The switch is shipped with all required modules installed.
Note: The Aruba 800-series and Aruba 200 do not have minimum configurations, as they are fixed configuration chassis.
Additional Modules for the Aruba 6000
Additional modules are available for expanding the Aruba 6000 Mobility Controller or as replacements. Only the following modules should be used with the switch in a FIPS-approved mode:
TABLE 3-1 FIPS-Approved Components
Component Name Model Number
Aruba 6000 Mobility Controller chassis (with security kit)
HW-CHASF (3300028 Rev. 01)
Aruba 6000 Mobility Controller Fan tray (with security kit)
HW-FTF (3300031 Rev. 01)
Aruba 6000 Mobility Controller Supervisor Card II (256 AP support)
SC-256-C2 (3300027 Rev. 01)
Aruba 6000 Mobility Controller Supervisor Card I (48 AP support)
SC-48-C1 (3300025-01)
Aruba 200, 800, and 6000 35FIPS 140-2 Level 2 Release Supplement

Installing the Controller
If you have received replacement or expansion modules separately from the chassis, refer to the Aruba 6000 Mobility Controller Installation Guide for instructions on installing each module.
Note: By adding modules, you are increasing the switch’s total power load. Depending on the modules installed, you may be required to add power supplies to the switch and/or increase the capacity of your site’s electrical systems. For details, refer to the Aruba 6000 Mobility Controller Installation Guide.
Selecting a LocationThe Aruba Mobility Controller, like other network and computing devices, requires an “electronics friendly environment. The Crypto Officer should select a location to mount the switch where the switch is assured of the following considerations:
Reliable power
Make sure that your electrical outlet is compatible with the switch power supplies.
The power supplies HW-PSU-200 rated at 200 W total and HW-PSU-400 rated at 400 W total are auto-ranging to accept 85 to 264 VAC, at 50 to 60 Hz.
The power cords must be rated to 10 A and conform to grounded electrical standards in the country where the product is operated.
Use of a power line conditioner or Uninterruptable Power Supply (UPS) can decrease or mitigate problems caused by power service fluctuations. Make sure that the output of any power shaping device is compatible with the switch power supplies.
Aruba 6000 Mobility Controller Supervisor Card I (128 AP support)
SC-128-C1 (3300025-01)
Aruba 6000 Mobility Controller Line Card LC-2G24F (3300026 Rev. 01)
Aruba 6000 Mobility Controller Line Card 2GE LC-2G (3300029-01)
Aruba 6000 Mobility Controller SPOE Line Card LC-2G24FP (3300024 Rev. 01)
Aruba 6000 Mobility Controller Power Supply 200W
HW-PSU-200 (HW-PSU-200)
Aruba 6000 Mobility Controller Power Supply 400W
HW-PSU-400 (HW-PSU-400)
TABLE 3-1 FIPS-Approved Components
Component Name Model Number
36 Aruba 200, 800, and 6000 0510142-21FIPS 140-2 Level 2 Release Supplement April 2011

Installing the Controller
Note: Up to three HW-PSU-400 power supplies can be installed in any power supply bay on the Aruba 6000 Mobility Controller.
A maximum of two HW-PSU-200 power supplies can be installed in the Aruba 6000 Mobility Controller. Because of the chassis design, these power supplies cannot be installed next to each other. If two of these power supplies are being installed, they must be located in the two outside bays, leaving the middle bay unpopulated.
To maintain proper ventilation as well as physical security, install a blanking panel (included) to cover the vacant bay.
Cool, non-condensing ventilation
For proper operation, the switch requires a controlled environment with a regulated nominal temperature range between 10 and 35 °C (52 to 95 °F). Humidity must be kept at non-condensing levels between 5 and 95%.
Where a large number of electrical devices are working in the same area, additional air conditioning or air circulation equipment may be required.
Ample space
For proper air circulation, leave at least 10 cm (4 inches) clearance for the vents on the left, right, front, and rear of the chassis.
Leave additional space in front of the chassis to access power cords, network cables, and indicator LEDs.
Limited electromagnetic interference
For best operation, keep the switch and all cords and cables at least 0.7 meters (2 feet) from fluorescent lighting fixtures, and 2 meters (6 feet) from photocopiers, radio transmitters, electric generators, and other sources of strong electromagnetic interference.
Aruba 200, 800, and 6000 37FIPS 140-2 Level 2 Release Supplement

Installing the Controller
Mounting the Aruba 6000 ChassisUsing the included rack mounting kit, the switch can be mounted in a standard 19-inch network equipment rack. The rack mounting kit contains the following parts:
Figure 3-1 Aruba 6000 Rack Mounting Kit
To install the chassis in an equipment rack:
1. Make sure that your rack environment meets requirements (see “Selecting a Location” on page 36).
38 Aruba 200, 800, and 6000 0510142-21FIPS 140-2 Level 2 Release Supplement April 2011
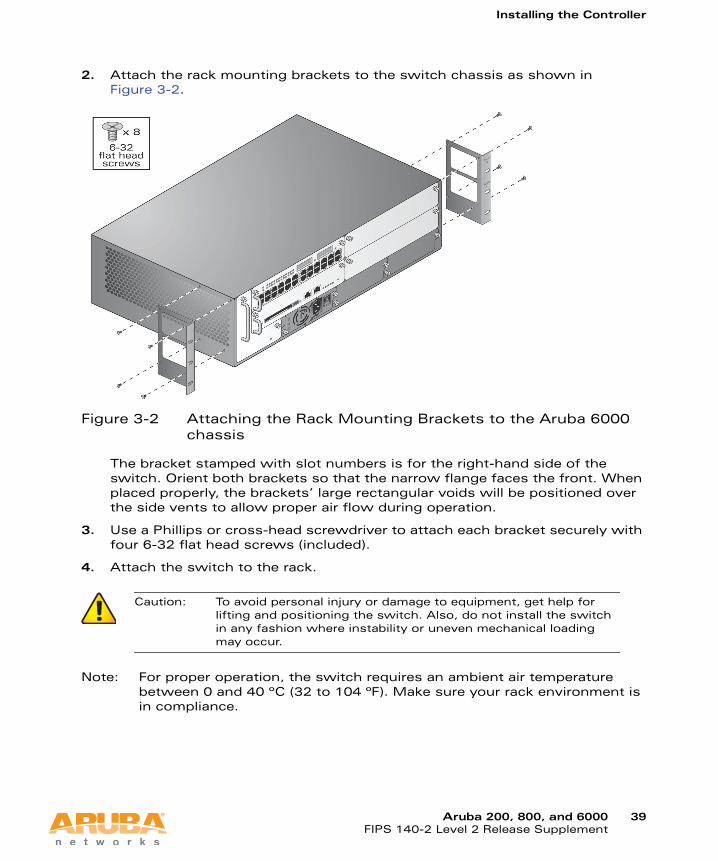
Installing the Controller
2. Attach the rack mounting brackets to the switch chassis as shown in Figure 3-2.
Figure 3-2 Attaching the Rack Mounting Brackets to the Aruba 6000 chassis
The bracket stamped with slot numbers is for the right-hand side of the switch. Orient both brackets so that the narrow flange faces the front. When placed properly, the brackets’ large rectangular voids will be positioned over the side vents to allow proper air flow during operation.
3. Use a Phillips or cross-head screwdriver to attach each bracket securely with four 6-32 flat head screws (included).
4. Attach the switch to the rack.
Note: For proper operation, the switch requires an ambient air temperature between 0 and 40 ºC (32 to 104 ºF). Make sure your rack environment is in compliance.
Caution: To avoid personal injury or damage to equipment, get help for lifting and positioning the switch. Also, do not install the switch in any fashion where instability or uneven mechanical loading may occur.
Aruba 200, 800, and 6000 39FIPS 140-2 Level 2 Release Supplement

Installing the Controller
5. Position the switch chassis in the equipment rack and align the brackets’ mounting holes with the corresponding holes in your rack frame.
Figure 3-3 Mounting the Aruba 6000 Mobility Controller
6. Use a Phillips screwdriver to secure the switch to the rack with 12-24 screws (included) for each mounting bracket.
Note: Some cabinets require different screws which are not included. Make sure that you use the correct screws or fasteners for your rack system.
Connecting Power
1. Before beginning, read the entire procedure. Make sure you understand all the precautions in these steps as well as those on page 33.
2. Make sure that the installed power supplies can handle the switch’s power load.
3. Make sure that your site’s electrical systems can handle the switch’s power load.
Caution: This procedure should be performed only by a trained technician.
40 Aruba 200, 800, and 6000 0510142-21FIPS 140-2 Level 2 Release Supplement April 2011
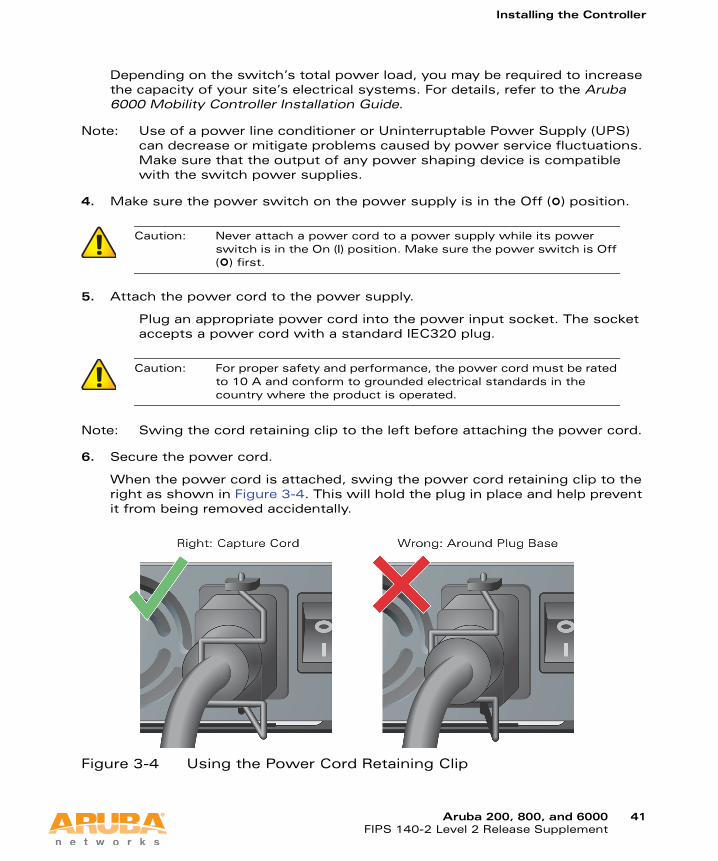
Installing the Controller
Depending on the switch’s total power load, you may be required to increase the capacity of your site’s electrical systems. For details, refer to the Aruba 6000 Mobility Controller Installation Guide.
Note: Use of a power line conditioner or Uninterruptable Power Supply (UPS) can decrease or mitigate problems caused by power service fluctuations. Make sure that the output of any power shaping device is compatible with the switch power supplies.
4. Make sure the power switch on the power supply is in the Off () position.
5. Attach the power cord to the power supply.
Plug an appropriate power cord into the power input socket. The socket accepts a power cord with a standard IEC320 plug.
Note: Swing the cord retaining clip to the left before attaching the power cord.
6. Secure the power cord.
When the power cord is attached, swing the power cord retaining clip to the right as shown in Figure 3-4. This will hold the plug in place and help prevent it from being removed accidentally.
Figure 3-4 Using the Power Cord Retaining Clip
Caution: Never attach a power cord to a power supply while its power switch is in the On (|) position. Make sure the power switch is Off () first.
Caution: For proper safety and performance, the power cord must be rated to 10 A and conform to grounded electrical standards in the country where the product is operated.
Aruba 200, 800, and 6000 41FIPS 140-2 Level 2 Release Supplement

Installing the Controller
7. Attach the power cord to a proper electrical outlet.
Repeat Step 4 through Step 7 for each installed power supply.
Once power is connected, you can perform the power-on test.
Power-On Test
Once the switch is physically installed, the Crypto Officer should run the power-on test.
8. Turn on all installed power supplies in quick succession.
For each power supply, place the power switch in the on (|) position.
Note: To avoid overloading the first power supplies to be turned on while using line cards that provide Power Over Ethernet to attached devices, all required power supplies should be turned on at roughly the same time (within about three seconds).
Verify Installation1. Check for the proper power indicators.
Immediately upon power up, you should observe the following:
All power supply AC OK and DC OK LEDs light solid green
The fan tray Fan Status LED lights solid green and you should be able to feel significant airflow blowing from the chassis vents at each of the three fan positions
The line card Power LED lights solid green
The supervisor card Power LED lights solid green
The supervisor card utilization LEDs begin blinking sequentially from left to right and then right to left
2. Connect a management station to a network port on the switch.
Connect one end of a 4- or 8-conductor Category 5 UTP Ethernet cable to your management PC or laptop FE port. Attach the other end of the cable to one of the FE ports.
Note: The FE management port on the Supervisor Card cannot be used for the initial power-on test.
3. Initiate an SSH connection to the switch.
Caution: For safety reasons, make sure the power outlets and plugs are within easy reach of the operator and can be quickly disconnected if necessary.
42 Aruba 200, 800, and 6000 0510142-21FIPS 140-2 Level 2 Release Supplement April 2011

Installing the Controller
From the management station, connect to the switch’s default management IP address, 172.16.0.254. Once the connection is established, the switch will prompt for a User log in:
When the User prompt appears, the switch has successfully booted.
4. Check for the appropriate operation indicators.
Once the system has successfully booted, you should observe the following:
The power supply AC OK and DC OK LEDs are still lit solid green
The fan tray Fan Status LED is still solid green
On the line card:
– The Power LED is still solid green
– The Status LED lights solid green
On the supervisor card:
– The power LED is still solid green
– The Status and Active/Standby LEDs are solid green
– The Utilization LED panel reflects the expected level of usage.
In a typical power-on test performed after initial installation, a single blinking LED will indicate utilization of under 1%.
Once the controller has passed the initial power-up test, attach the Tamper-Evident Labels (TELs) as described on page 51.
(aruba)User: _
Aruba 200, 800, and 6000 43FIPS 140-2 Level 2 Release Supplement

Installing the Controller
Mounting the Aruba 800 ChassisUsing the included rack mounting kit, the switch can be mounted in a standard 19-inch network equipment rack. The rack mounting kit contains the following parts:
Figure 3-5 Aruba 800-series Rack Mounting Kit
To install the chassis in an equipment rack:
1. Make sure that your rack environment meets requirements (see “Selecting a Location” on page 36).
2. Attach the rack mounting brackets to the switch chassis as shown in Figure 3-6.
44 Aruba 200, 800, and 6000 0510142-21FIPS 140-2 Level 2 Release Supplement April 2011

Installing the Controller
Figure 3-6 Attaching the Rack Mounting Brackets to the Aruba 800-series Chassis
3. Use a Phillips screwdriver to attach each bracket securely with the 6-32 flat head screws (included).
4. Attach the switch to the rack.
Note: For proper operation, the switch requires an ambient air temperature between 0 and 40 ºC (32 to 104 ºF). Make sure your rack environment is in compliance.
Caution: To avoid personal injury or damage to equipment, get help for lifting and positioning the switch. Also, do not install the switch in any fashion where instability or uneven mechanical loading may occur.
Aruba 200, 800, and 6000 45FIPS 140-2 Level 2 Release Supplement

Installing the Controller
5. Position the switch chassis in the equipment rack and align the brackets’ mounting holes with the corresponding holes in your rack frame.
Figure 3-7 Mounting the Aruba 800-series Mobility Controller
6. Use a Phillips screwdriver to secure the switch to the rack with 12-24 screws (included) for each mounting bracket.
Note: Some cabinets require different screws, which are not included. Make sure that you use the correct screws or fasteners for your rack system.
Connecting Power
1. Before beginning, read the entire procedure. Make sure you understand all the precautions in these steps as well as those on page 33.
2. Make sure that your site’s electrical systems can handle the switch’s power load.
You may be required to increase the capacity of your site’s electrical systems. For details, refer to the Aruba 800-series Mobility Controller Installation Guide.
Note: Use of a power line conditioner or Uninterruptable Power Supply (UPS) can decrease or mitigate problems caused by power service fluctuations. Make sure that the output of any power shaping device is compatible with the switch power supplies.
Caution: This procedure should be performed only by a trained technician.
46 Aruba 200, 800, and 6000 0510142-21FIPS 140-2 Level 2 Release Supplement April 2011

Installing the Controller
3. Attach the power cord to the power input socket at the back of the chassis.
Plug an appropriate power cord into the power input socket. The socket accepts a power cord with a standard IEC320 plug.
4. Attach the power cord to a proper electrical outlet.
Verify Installation
1. Check for the proper power indicators.
Immediately upon power up, you should observe the following:
The system Power LED lights solid green
The system Status LED is initially off
2. Connect a management station to a network port on the switch.
Connect one end of a 4- or 8-conductor Category 5 UTP Ethernet cable to your management PC or laptop FE port. Attach the other end of the cable to one of the FE ports.
3. Initiate an SSH connection to the switch.
From the management station, connect to the switch’s default management IP address, 172.16.0.254. Once the connection is established, the switch will prompt for a User log in:
When the User prompt appears, the switch has successfully booted.
4. Check for the appropriate operation indicators.
Once the system has successfully booted, you should observe the following:
The system Power LED is still lit solid green
The system Status LED is solid green
In a typical power-on test performed after initial installation, a single blinking LED will indicate utilization of under 1%.
Caution: For proper safety and performance, the power cord must be rated to 10 A and conform to grounded electrical standards in the country where the product is operated.
Caution: For safety reasons, make sure the power outlets and plugs are within easy reach of the operator and can be quickly disconnected if necessary.
(aruba)User: _
Aruba 200, 800, and 6000 47FIPS 140-2 Level 2 Release Supplement

Installing the Controller
Once the controller has passed the initial power-up test, attach the Tamper-Evident Labels (TELs) as described on page 51.
Mounting the Aruba 200 ChassisThis section provides instructions for installing the Aruba 200 Mobility Controller in an equipment rack with the optional 19-inch rack mount kit (Aruba part number HW-200-MNT-19).
To install the chassis in an equipment rack:
1. Make sure that your rack environment meets requirements (see “Selecting a Location” on page 36).
2. Slide the mounting faceplate onto the front of the Aruba 200 Mobility Controller chassis. Align the three holes on the bottom flange of the mounting faceplate with the holes on the bottom of the chassis.
3. To attach the chassis to the mounting faceplate, insert the provided nylon push rivets into the holes.
4. Attach the chassis to the rack.
NOTE: For proper operation, make sure your rack environment is in compliance with the operating temperatures described in “Selecting a Location” on page 36.
Position the chassis in the equipment rack and align the faceplate’s mounting holes with the corresponding holes in your rack frame.
Use a Phillips or cross-head screwdriver to secure the mounting faceplate to the rack with four 12-24 screws (included).
NOTE: Some racks require different screws which are not included. Make sure that you use the correct screws or fasteners for your rack system.
5. Ensure that there is adequate clearance around the chassis. See “Selecting a Location” on page 36.
CAUTION: To avoid personal injury or damage to equipment, get help in positioning the chassis. Also, do not install the Mobility Controller where instability or uneven mechanical loading may occur.
48 Aruba 200, 800, and 6000 0510142-21FIPS 140-2 Level 2 Release Supplement April 2011
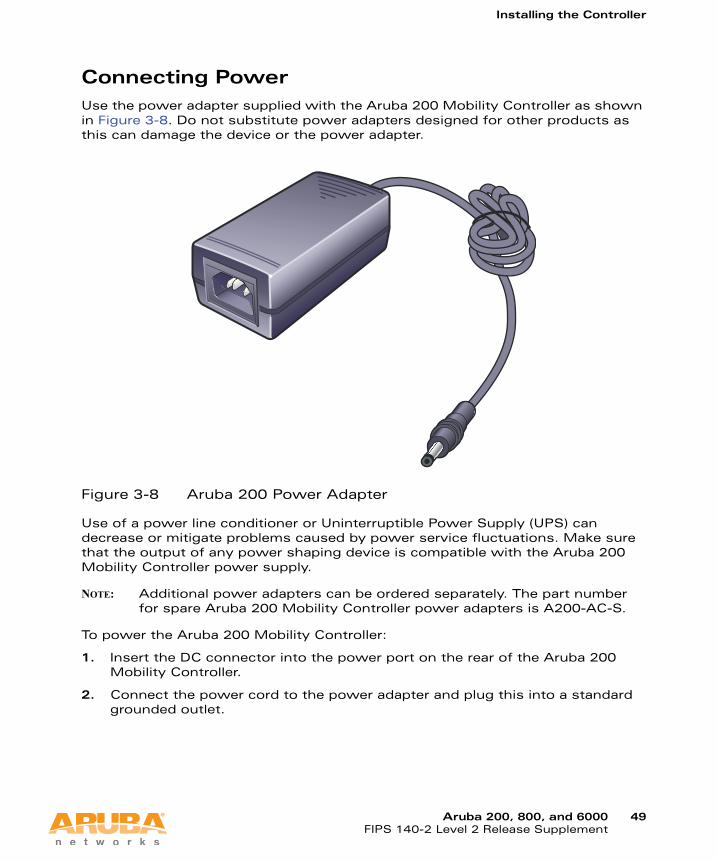
Installing the Controller
Connecting Power
Use the power adapter supplied with the Aruba 200 Mobility Controller as shown in Figure 3-8. Do not substitute power adapters designed for other products as this can damage the device or the power adapter.
Figure 3-8 Aruba 200 Power Adapter
Use of a power line conditioner or Uninterruptible Power Supply (UPS) can decrease or mitigate problems caused by power service fluctuations. Make sure that the output of any power shaping device is compatible with the Aruba 200 Mobility Controller power supply.
NOTE: Additional power adapters can be ordered separately. The part number for spare Aruba 200 Mobility Controller power adapters is A200-AC-S.
To power the Aruba 200 Mobility Controller:
1. Insert the DC connector into the power port on the rear of the Aruba 200 Mobility Controller.
2. Connect the power cord to the power adapter and plug this into a standard grounded outlet.
Aruba 200, 800, and 6000 49FIPS 140-2 Level 2 Release Supplement

Installing the Controller
NOTE: Aruba ships a country appropriate cable with the Aruba 200 Mobility Controller. However, any power cord rated for the Aruba 200 Mobility Controller power consumption and which conforms to grounded electrical standards in the country where the product will be operated can be used.
Verify Installation
1. Check for the proper power indicators.
Immediately upon power up, you should observe the following:
The system Power LED lights solid green
The system Status LED is initially off
2. Connect a management station to a network port on the switch.
Connect one end of a 4- or 8-conductor Category 5 UTP Ethernet cable to your management PC or laptop FE port. Attach the other end of the cable to one of the FE ports.
3. Initiate an SSH connection to the switch.
From the management station, connect to the switch’s default management IP address, 172.16.0.254. Once the connection is established, the switch will prompt for a User log in:
When the User prompt appears, the switch has successfully booted.
4. Check for the appropriate operation indicators.
Once the system has successfully booted, you should observe the following:
The system Power LED is still lit solid green
The system Status LED is solid green
In a typical power-on test performed after initial installation, a single blinking LED will indicate utilization of under 1%.
Once the controller has passed the initial power-up test, attach the Tamper-Evident Labels (TELs) as described on page 51.
(aruba)User: _
50 Aruba 200, 800, and 6000 0510142-21FIPS 140-2 Level 2 Release Supplement April 2011

Installing the Controller
Tamper-Evident LabelsAfter testing, the Crypto Officer must apply Tamper-Evident Labels (TELs) to the switch. When applied properly, the TELs allow the Crypto Officer to detect the opening of the chassis cover, the removal or replacement of modules or cover plates, or physical access to restricted ports. Vendor provides FIPS 140 designated TELs which have met the physical security testing requirements for tamper evident labels under the FIPS 140-2 Standard. TELs are not endorsed by the Cryptographic Module Validation Program (CMVP).
Reading TELsOnce applied, the TELs included with the switch cannot be surreptitiously broken, removed, or reapplied without an obvious change in appearance:
Figure 3-9 Tamper-Evident Labels
Each TELs also has a unique serial number to prevent replacement with similar labels.
Aruba 200, 800, and 6000 51FIPS 140-2 Level 2 Release Supplement

Installing the Controller
Required TEL Locations
The Aruba 6000 Mobility Controller requires a minimum of 12 TELs to be applied as follows:
Figure 3-10 Required TELs for the Aruba 6000 Mobility Controller
To Detect Opening the Chassis Cover1. Spanning the left side and rear of the chassis
2. Spanning the right side and rear of the chassis
To Detect the Removal of Any Module or Cover Plate3. Spanning the Slot 0/0 Line Card faceplate and the top of the chassis
4. Spanning the Slot 0/1 Line Card (or blank) faceplate and the top of the chassis
5. Spanning the Slot 1/0 Supervisor Card faceplate and the Slot 0/0 faceplate
6. Spanning the Slot 1/1 Line Card (or blank) faceplate and the Slot 0/1 faceplate
7. Spanning the fan tray faceplate and the bottom of the chassis
8. Spanning the PS1 handle (or blank faceplate) and the bottom of the chassis
9. Spanning the PS2 handle (or blank faceplate) and the bottom of the chassis
52 Aruba 200, 800, and 6000 0510142-21FIPS 140-2 Level 2 Release Supplement April 2011

Installing the Controller
10. Spanning the PS3 handle (or blank faceplate) and the bottom of the chassis
To Detect Access to Restricted Ports11. Spanning the PCMCIA slot on the Supervisor Card
12. Spanning the Serial port on the Supervisor Card
The Aruba 800-series Mobility Controller requires a minimum of 3 TELs to be applied as follows:
Figure 3-11 Required TELs for the Aruba 800-series Mobility Controller
To Detect Opening the Chassis Cover1. Spanning the left side and top of the chassis
2. Spanning the right side and top of the chassis
To Detect Access to Restricted Port3. Spanning the Serial port
3
1
2
Aruba 200, 800, and 6000 53FIPS 140-2 Level 2 Release Supplement

Installing the Controller
The Aruba 200 Mobility Controller requires a minimum of 2 TELs to be applied as follows:
Figure 3-12 Required TELs for the Aruba 200 Mobility Controller
To Detect Opening the Chassis Cover1. Spanning the front and top panels
To Detect Access to Restricted Port2. Spanning the Serial port
Applying TELs
The Crypto Officer should employ TELs as follows:
Before applying a TEL, make sure the target surfaces are clean and dry.
Do not cut, trim, punch, or otherwise alter the TEL.
Apply the wholly intact TEL firmly and completely to the target surfaces.
Ensure that TEL placement is not defeated by simultaneous removal of multiple modules.
Allow 24 hours for the TEL adhesive seal to completely cure.
Record the position and serial number of each applied TEL in a security log.
Once the TELs are applied, the Crypto Officer (CO) should perform initial setup and configuration as described in the next chapter.
arun_015
12
54 Aruba 200, 800, and 6000 0510142-21FIPS 140-2 Level 2 Release Supplement April 2011

4Ongoing Management
The Aruba 200, 800, 6000 Mobility Controller meets FIPS 140-2 Level 2 requirements. The information below describe how to keep the switch in FIPS-approved mode of operation. The Crypto Officer must ensure that the switch is kept in a FIPS-approved mode of operation.
Crypto Officer ManagementThe Crypto Officer must ensure that the switch is always operating in a FIPS-approved mode of operation. This can be achieved by ensuring the following:
FIPS mode must be enabled on the switch before Users are permitted to use the switch (see “Enabling FIPS Mode” on page 58)
The admin role must be root.
Passwords must be at least six characters long.
VPN services can only be provided by IPSec or L2TP over IPSec.
Access to the switch Web Interface is permitted only using HTTPS over a TLS tunnel. Basic HTTP and HTTPS over SSL are not permitted.
Only SNMP read-only may be enabled.
If cryptographic algorithms can be set for services (such as HTTPS, L2 AES-CBC, SSH, and IKE/IPSec), only FIPS-approved algorithms can be specified, which include AES, Triple-DES, SHA-1, HMAC SHA-1, and RSA signature and verification.
TFTP can only be used to load backup and restore files. These files are: Configuration files (system setup configuration), the WMS database (radio network configuration), and log files. (FTP and TFTP over IPSec can be used to transfer configuration files.)
The switch logs must be monitored. If a strange activity is found, the Crypto Officer should take the switch off line and investigate.
The Tamper-Evident Labels (TELs) must be regularly examined for signs of tampering.
Switch firmware upgrades are not allowed in FIPS mode.
Aruba 200, 800, and 6000 55FIPS 140-2 Level 2 Release Supplement

Ongoing Management
When installing expansion or replacement modules for the Aruba 6000, use only FIPS-approved modules (see “Additional Modules for the Aruba 6000” on page 35), replace TELs affected by the change, and record the reason for the change, along with the new TEL locations and serial numbers, in the security log.
The Crypto Officer shall not configure the Diffie-Hellman algorithm with 768-bits (Group 1) in FIPS mode for IKE/IPSec and SSH.
User GuidanceThe User accesses the switch VPN functionality as an IPSec client. The user can also access the switch 802.11i functionality as an 802.11 client. Although outside the boundary of the switch, the User should be directed to be careful not to provide authentication information and session keys to others parties.
56 Aruba 200, 800, and 6000 0510142-21FIPS 140-2 Level 2 Release Supplement April 2011

5Set Up and Configuration
The Aruba 200, 800, 6000 Mobility Controller meets FIPS 140-2 Level 2 requirements. The sections below describe how to place and keep the switch in FIPS-approved mode of operation. The Crypto Officer (CO) must ensure that the switch is kept in a FIPS-approved mode of operation.
Connecting to the SwitchStep 1Power up the Aruba Mobility Controller.
1. Connect a management station to a network port on the switch.
Connect one end of a 4- or 8-conductor Category 5 UTP Ethernet cable to your management PC or laptop FE port. Attach the other end of the cable to one of the FE ports.
Note: For the Aruba 6000 the FE management port on the Supervisor Card cannot be used for initial setup.
2. Initiate an SSH connection to the switch.
From the management station, connect to the switch’s default management IP address, 172.16.0.254. Once the connection is established, the switch will prompt for a User log in:
Logging in with the CLIOnce connected to the switch, the CO should log in as an Administrator:
(aruba)User: _
(aruba)User: adminpassword: **********
(aruba) >
Aruba 200, 800, and 6000 57FIPS 140-2 Level 2 Release Supplement

Set Up and Configuration
The default Administrator User name is admin. As shown, the administrator will be prompted to enter their password. The default password is fipsadmin. and is masked by asterisks ( * ) while entered.
When properly logged in, the CLI User prompt ( > ) will be displayed. The CLI User mode has a very limited command set. To access the full CLI command set, the CO should enter the privileged mode.
Privileged ModeTo access the full CLI command set from the initial CLI User prompt ( > ), the administrator must enter the privileged mode using the enable command:
As shown, the Administrator will be prompted to enter the privileged password. The default password for the privileged mode is fipsenable. The password is masked by asterisks ( * ) while entered.
Once enabled, the CLI privileged prompt ( # ) will be displayed. In this mode, the switch can be configured and managed via the CLI.
Note: The CLI supports all administration functions. Other management options (such as the Aruba Web Interface) are also available, but support a subset of the CLI functions.
See the appropriate Users Guide for complete configuration information.
Enabling FIPS ModeThe switch can operate in two modes: the FIPS-approved mode, and the standard non-FIPS mode. By default, the switch operates in non-FIPS mode.
For FIPS compliance, User cannot be allowed to access the switch until after the CO changes the mode of operation to FIPS mode.
In order to place the switch into the FIPS-approved operating mode, the CO must enter the following commands from the privileged CLI prompt:
Note: All WEP features are disabled when FIPS mode is enabled.
(aruba) > enablepassword: ***********
(aruba) #
(aruba) # configure terminal(aruba) (config) # fips enable
58 Aruba 200, 800, and 6000 0510142-21FIPS 140-2 Level 2 Release Supplement April 2011

Set Up and Configuration
Refer to “Ongoing Management” on page 55 for more information on conditions that have to be met in order to operate an Aruba Mobility Controller in FIPS mode.
FIPS Commands
When you enable FIPS mode, the following configuration options are disallowed:
Bridge mode SSID
WPA
TKIP mixed mode
Any combination of DES, MD5, and PPTP
The following FIPS-related commands are supported in this release of ArubaOS:
fips enable/disable
tar
wipe
fipsA config command (configure terminal) that controls FIPS mode.
To turn on FIPS, enter:
(Aruba) (config)# fips enable
To turn off FIPS, enter:
(Aruba) (config)# fips disable
The error messages, their meanings, and the recommended actions are listed in Table 5-1.
Table 5-1 fips Command Error Messages
Error Message Meaning Action
% Invalid input detected at '^' marker. You specified a value that is out of range, a paremeter that does not exist, or a configuration that is not supported in FIPS mode.
Specify a valid value or parameter.
Error: opmode static/dynamic wep/wpa/tkip is not availble when "FIPS" is enabled.
When FIPS mode is enabled, WPA is disallowed.
Do not configure WPA.
Error: opmode requires a pre-shared key. Either wpa-hexkey or wpa-passphrase must be set.
When FIPS mode is enabled, WPA is disallowed.
Do not configure WPA.
Aruba 200, 800, and 6000 59FIPS 140-2 Level 2 Release Supplement

Set Up and Configuration
tarA general purpose, enable mode command used to manage file archives. The syntax for the tar command is:
(Aruba) (config) # tar ?clean remove a tar filecrash tar the crash directory to crash.tarflash tar and compress the /flash directory to flash.tar.gzlogs tar the logs directory to logs.tar
The tar clean command takes the following options:
(Aruba) (config) # tar clean ?crash remove crash.tarflash remove flash.tar.gzlogs remove logs.tar
wipeThe wipe command is an enable mode command that erases flash.
To delete the entire flash from the Aruba Mobility Controller, enter:
(Aruba) (config) # wipe
Error: opmode static/dynamic wep/tkip is not availble when "FIPS" is enabled.
When FIPS mode is enabled, TKIP mixed mode is disallowed.
Do not configure TKIP mixed mode.
Error: WPA passphrase must be 8-63 characters.
When FIPS mode is enabled, TKIP mixed mode is disallowed.
Do not configure TKIP mixed mode.
Error: opmode static/dynamic wep/tkip is not availble when "FIPS" is enabled.
When FIPS mode is enabled, TKIP mixed mode is disallowed.
Do not configure TKIP mixed mode.
ESP-DES is not available when "FIPS" mode is enabled
When FIPS mode is enabled, any combination of DES, MD5, and PPTP is disallowed.
Do not configure a combination of DES, MD5, and PPTP.
ESP-MD5-HMAC is not available when "FIPS" mode is enabled
When FIPS mode is enabled, any combination of DES, MD5, and PPTP is disallowed.
Do not configure a combination of DES, MD5, and PPTP.
MD5 is not available when "FIPS" mode is enabled
When FIPS mode is enabled, any combination of DES, MD5, and PPTP is disallowed.
Do not configure a combination of DES, MD5, and PPTP.
pptp is not available when "FIPS" mode is enabled
When FIPS mode is enabled, any combination of DES, MD5, and PPTP is disallowed.
Do not configure a combination of DES, MD5, and PPTP.
pptp is not available when "FIPS" mode is enabled
When FIPS mode is enabled, any combination of DES, MD5, and PPTP is disallowed.
Do not configure a combination of DES, MD5, and PPTP.
Table 5-1 fips Command Error Messages (Continued)
Error Message Meaning Action
60 Aruba 200, 800, and 6000 0510142-21FIPS 140-2 Level 2 Release Supplement April 2011

Set Up and Configuration
Use caution when applying this command. A wipe operation cannot be undone.
Logging in with the WebUIThe default IP address of the controller is 172.16.0.254. When you connect a PC or workstation to a line port on the controller, you can connect to this IP address through a Web browser. The system must either be configured to obtain its IP address via DHCP or configured to have a static IP address on the 172.16.0.0/24 subnetwork.
To log in with the WebUI:
1. Open a Web browser and connect to http://172.16.0.254.
2. Log in when you see a screen similar to the following:
Aruba 200, 800, and 6000 61FIPS 140-2 Level 2 Release Supplement

Set Up and Configuration
This page intentionally left blank.
62 Aruba 200, 800, and 6000 0510142-21FIPS 140-2 Level 2 Release Supplement April 2011

Acronyms A
AAA Accounting, Authentication, Authorization
AES Advanced Encryption Standard
AM Air Monitor
ANSI American National Standards Institute
AP Access Point
CBC Cipher Block Chaining
CLI Command Line Interface
CMVP Cryptographic Module Validation Program
CO Crypto Officer
CSE Communications Security Establishment
CSP Critical Security Parameter
EDC Error Detection Code
EMC Electromagnetic Compatibility
EMI Electromagnetic Interference
FCC Federal Communication Commission
FE Fast Ethernet
FIPS Federal Information Processing Standard
FTP File Transfer Protocol
GE Gigabit Ethernet
GUI Graphic User Interface
HMAC Hashed Message Authentication Code
HTTP Hyper Text Transfer Protocol
HTTPS Hyper Text Transfer Protocol Secure
Hz Hertz
IKE Internet Key Exchange
IPSec Internet Protocol Security
KAT Known Answer Test
KEK Key Encryption Key
Aruba 200, 800, and 6000 63FIPS 140-2 Level 2 Release Supplement

Acronyms
L2 Layer 2
L2TP Layer-2 Tunneling Protocol
LAN Local Area Network
LED Light Emitting Diode
LC Line Card
MAC Message Authentication Code
MD5 Message Digest 5
NIST National Institute of Standards and Technology
NVLAP National Voluntary Laboratory Accreditation Program
OS Operating System
PCMCIA Personal Computer Memory Card International Association
PKCS Public-Key Cryptography Standards/Public Key Cryptographic System
PRNG Pseudo Random Number Generator
PS Power Supply
QoS Quality of Service
RAM Random Access Memory
RC4 Ron's Code 4 (Ron being Ron Rivest of RSA)
RJ Registered Jack
RSA Rivest Shamir and Adleman
SC Supervisor Card
SHA Secure Hash Algorithm
SNMP Simple Network Management Protocol
SP Security Parameters
SPOE Serial & Power Over Ethernet
SSH Secure Shell
SSL Secure Sockets Layer
TEL Tamper-Evident Label
TFTP Trivial File Transfer Protocol
TLS Transport Layer Security
UTP Unshielded Twisted Pair
VPN Virtual Private Network
WLAN Wireless Local Area Network
64 Aruba 200, 800, and 6000 0510142-21FIPS 140-2 Level 2 Release Supplement April 2011


![Aruba Networks - cyber.gov.au · [MIB] ArubaOS 6.3 MIB Reference Guide, Ref 0511323-01 [FIPS] Aruba 600/3000/6000/7200 FIPS 140-2 Security Policy . Aruba Networks Security Target](https://static.documents.pub/doc/80x56/5ea29c799d065e039132c511/aruba-networks-cybergovau-mib-arubaos-63-mib-reference-guide-ref-0511323-01.jpg)


