368
ClearPass Policy Manager 6.2 User Guide
ClearPass PolicyManager 6.2
UserG
uide
2 | ClearPassPolicyManager 6.2 | User Guide
Copyright InformationCopyright © 2013 Aruba Networks, Inc. Aruba Networks trademarks include the Aruba Networks logo, Aruba Networks®,Aruba Wireless Networks®, the registered Aruba the Mobile Edge Company logo, Aruba Mobility Management System®,Mobile Edge Architecture®, People Move. Networks Must Follow®, RFProtect®, Green Island®. All rights reserved. All othertrademarks are the property of their respective owners.
Open Source Code
Certain Aruba products include Open Source software code developed by third parties, including software code subject tothe GNU General Public License (GPL), GNU Lesser General Public License (LGPL), or other Open Source Licenses.Includes software from Litech Systems Design. The IF-MAP client library copyright 2011 Infoblox, Inc. All rightsreserved.This product includes software developed by Lars Fenneberg et al. The Open Source code used can be found atthis site:
http://www.arubanetworks.com/open_source
Legal Notice
The use of Aruba Networks, Inc. switching platforms and software, by all individuals or corporations, to terminate othervendors’ VPN client devices constitutes complete acceptance of liability by that individual or corporation for this action andindemnifies, in full, Aruba Networks, Inc. from any and all legal actions that might be taken against it with respect toinfringement of copyright on behalf of those vendors.
Warranty
This hardware product is protected by the standard Aruba warranty of one year parts/labor. For more information, refer tothe ARUBACARE SERVICE AND SUPPORT TERMS AND CONDITIONS.
Altering this device (such as painting it) voids the warranty.
ClearPassPolicyManager 6.2 | User Guide About ClearPassPolicyManager | 3
Chapter 1
About ClearPass Policy Manager
The ClearPass Policy Manager platform provides role- and device-based network access control across any wired,wireless and VPN. Software modules for the ClearPass Policy Manager platform, such as Guest, Onboard, Profile,OnGuard, QuickConnect, and Insight simplify and automate device configuration, provisioning, profiling, healthchecks, and guest access.
With built-in RADIUS, SNMP and TACACS+ protocols, ClearPass Policy Manager provides device registration,device profiling, endpoint health assessments, and comprehensive reporting to automatically enforce user and endpointaccess policies as devices connect to the network.
Common Tasks in Policy ManagerAs you work in Policy Manager, you'll encounter many things that work similarly in different places. For example,importing or exporting from a list of items. This section explains how to do these common tasks.
l "Importing" on page 3
l "Exporting" on page 4.
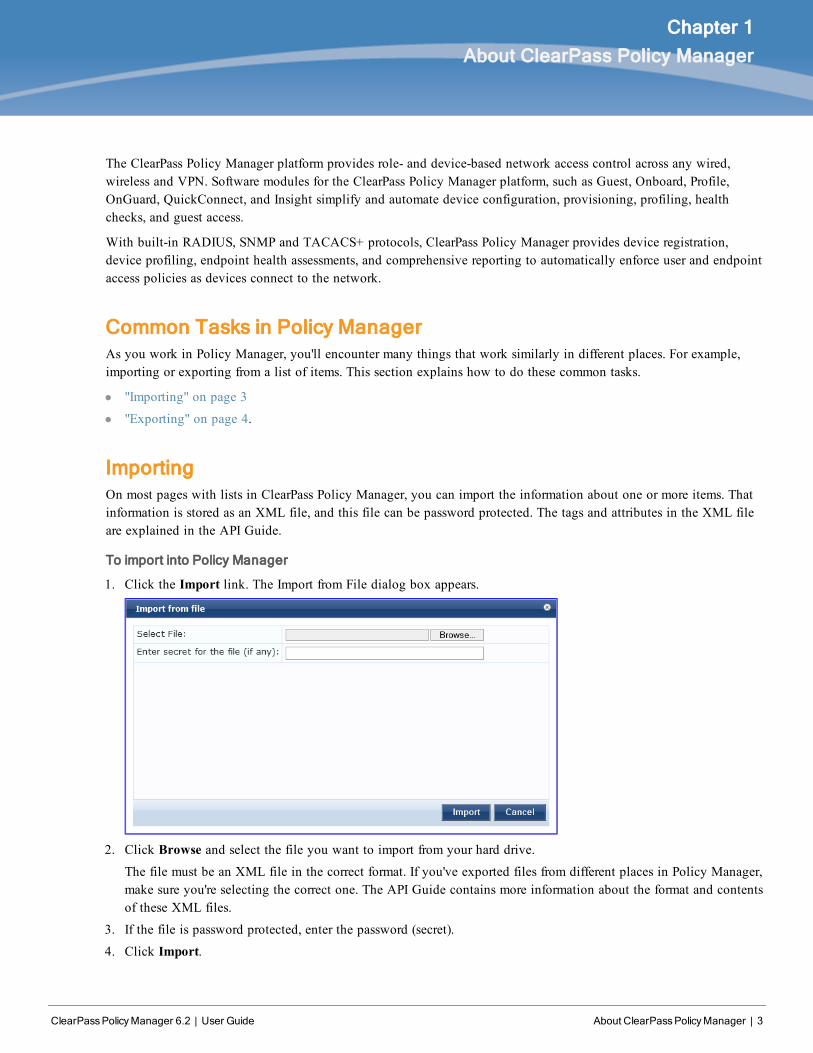
ImportingOn most pages with lists in ClearPass Policy Manager, you can import the information about one or more items. Thatinformation is stored as an XML file, and this file can be password protected. The tags and attributes in the XML fileare explained in the API Guide.
To import into Policy Manager
1. Click the Import link. The Import from File dialog box appears.
2. Click Browse and select the file you want to import from your hard drive.
The file must be an XML file in the correct format. If you've exported files from different places in Policy Manager,make sure you're selecting the correct one. The API Guide contains more information about the format and contentsof these XML files.
3. If the file is password protected, enter the password (secret).
4. Click Import.
4 | About ClearPassPolicyManager ClearPassPolicyManager 6.2 | User Guide
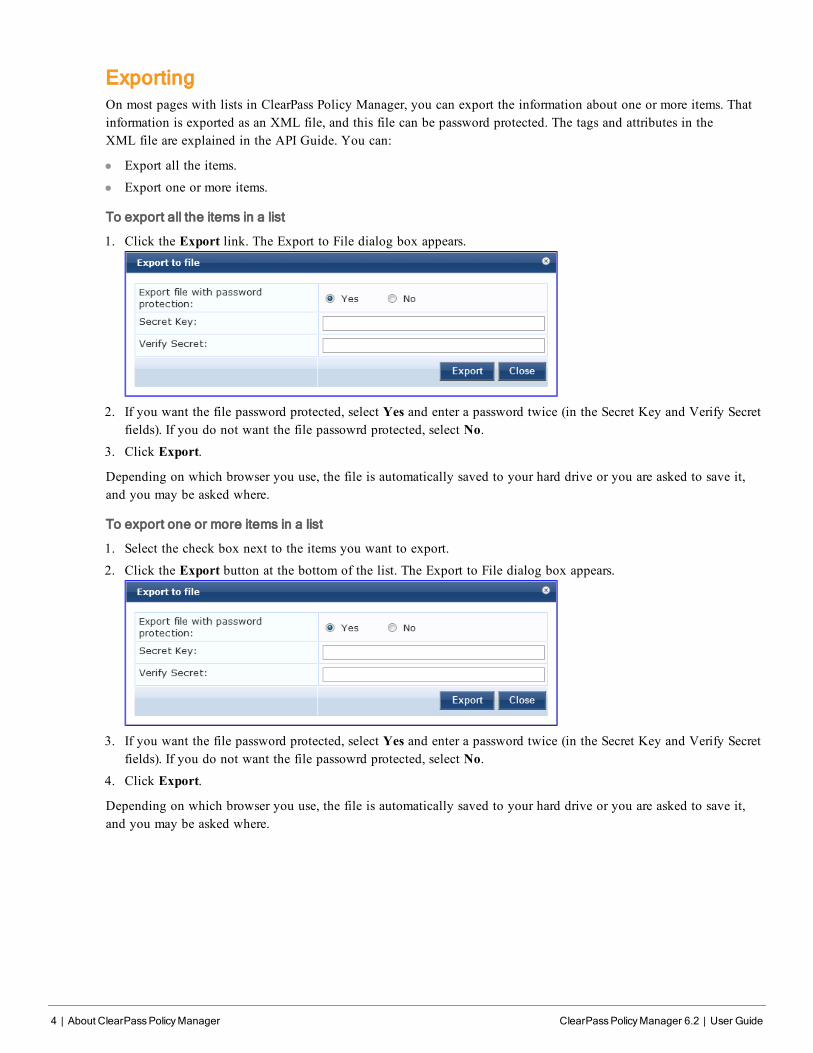
ExportingOn most pages with lists in ClearPass Policy Manager, you can export the information about one or more items. Thatinformation is exported as an XML file, and this file can be password protected. The tags and attributes in theXML file are explained in the API Guide. You can:
l Export all the items.
l Export one or more items.
To export all the items in a list
1. Click the Export link. The Export to File dialog box appears.
2. If you want the file password protected, select Yes and enter a password twice (in the Secret Key and Verify Secretfields). If you do not want the file passowrd protected, select No.
3. Click Export.
Depending on which browser you use, the file is automatically saved to your hard drive or you are asked to save it,and you may be asked where.
To export one or more items in a list
1. Select the check box next to the items you want to export.
2. Click the Export button at the bottom of the list. The Export to File dialog box appears.
3. If you want the file password protected, select Yes and enter a password twice (in the Secret Key and Verify Secretfields). If you do not want the file passowrd protected, select No.
4. Click Export.
Depending on which browser you use, the file is automatically saved to your hard drive or you are asked to save it,and you may be asked where.
ClearPassPolicyManager 6.2 | User Guide Powering Up and Configuring PolicyManager Hardware | 5
Chapter 2
Powering Up and Configuring PolicyManager Hardware
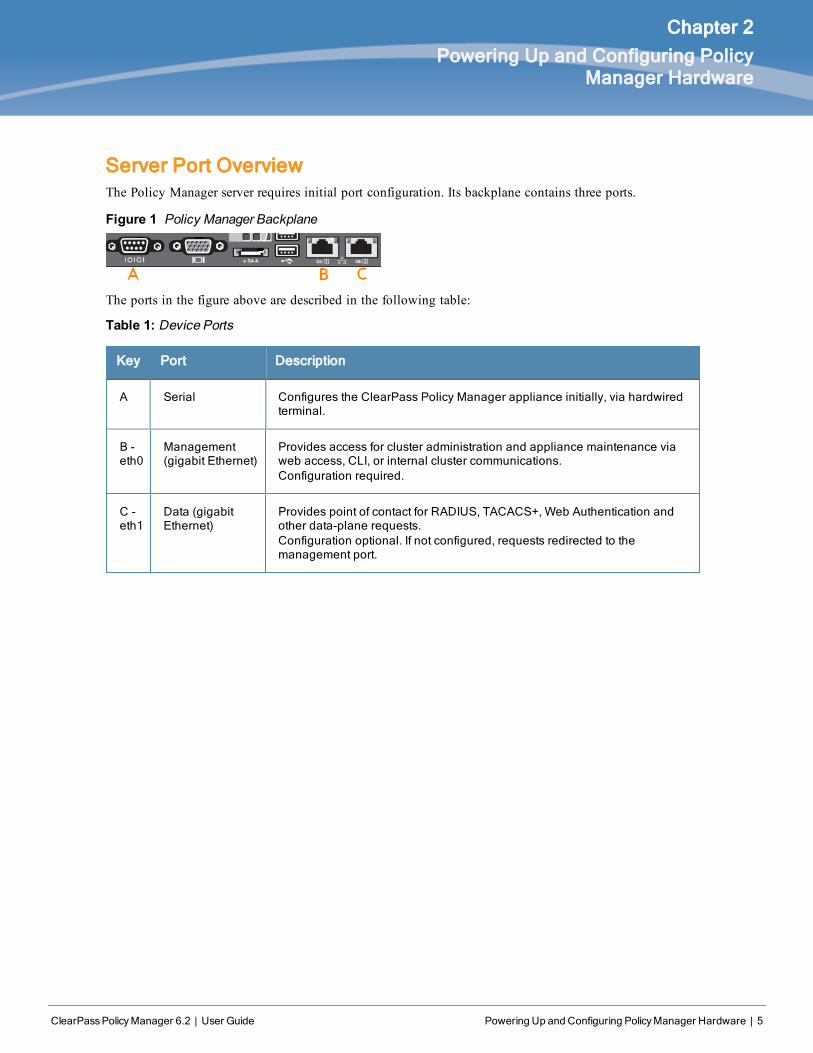
Server Port OverviewThe Policy Manager server requires initial port configuration. Its backplane contains three ports.
Figure 1 Policy Manager Backplane
The ports in the figure above are described in the following table:
Table 1: Device Ports
Key Port Description
A Serial Configures the ClearPass Policy Manager appliance initially, via hardwiredterminal.
B -eth0
Management(gigabit Ethernet)
Provides access for cluster administration and appliance maintenance viaweb access, CLI, or internal cluster communications.Configuration required.
C -eth1
Data (gigabitEthernet)
Provides point of contact for RADIUS, TACACS+, Web Authentication andother data-plane requests.Configuration optional. If not configured, requests redirected to themanagement port.
6 | Powering Up and Configuring PolicyManager Hardware ClearPassPolicyManager 6.2 | User Guide
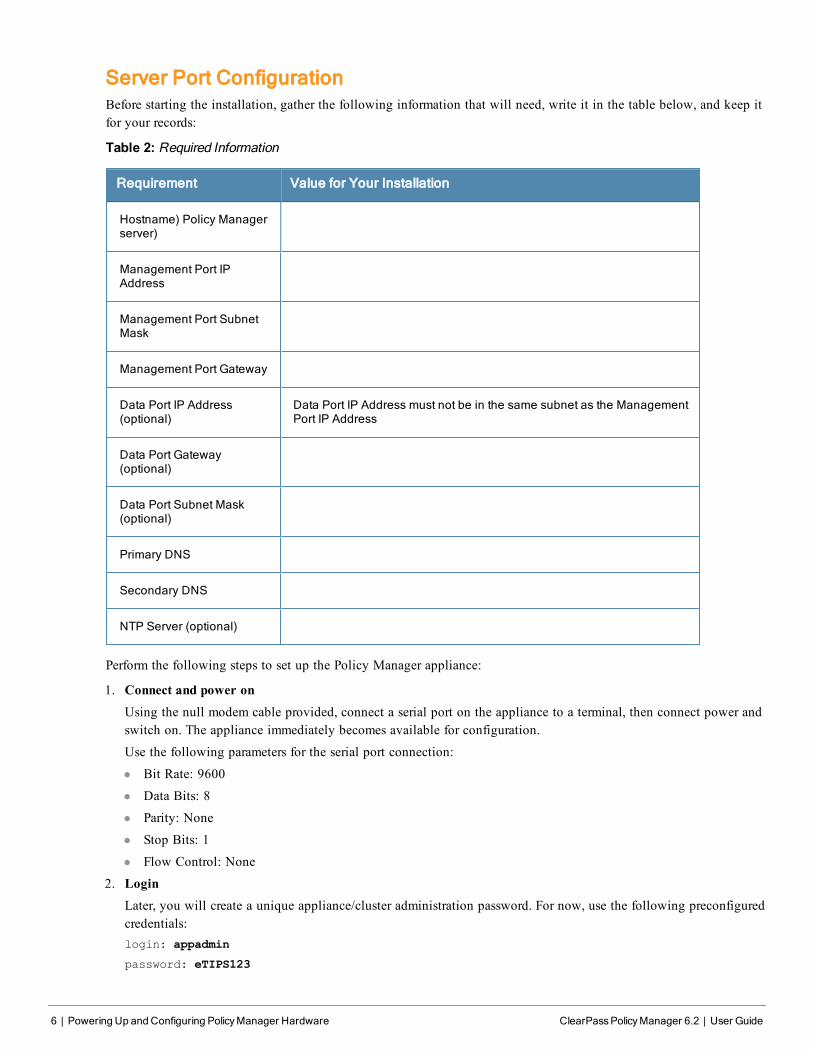
Server Port ConfigurationBefore starting the installation, gather the following information that will need, write it in the table below, and keep itfor your records:
Table 2: Required Information
Requirement Value for Your Installation
Hostname) Policy Managerserver)
Management Port IPAddress
Management Port SubnetMask
Management Port Gateway
Data Port IP Address(optional)
Data Port IP Address must not be in the same subnet as the ManagementPort IP Address
Data Port Gateway(optional)
Data Port Subnet Mask(optional)
Primary DNS
Secondary DNS
NTP Server (optional)
Perform the following steps to set up the Policy Manager appliance:
1. Connect and power onUsing the null modem cable provided, connect a serial port on the appliance to a terminal, then connect power andswitch on. The appliance immediately becomes available for configuration.
Use the following parameters for the serial port connection:
l Bit Rate: 9600
l Data Bits: 8
l Parity: None
l Stop Bits: 1
l Flow Control: None
2. LoginLater, you will create a unique appliance/cluster administration password. For now, use the following preconfiguredcredentials:login: appadmin
password: eTIPS123
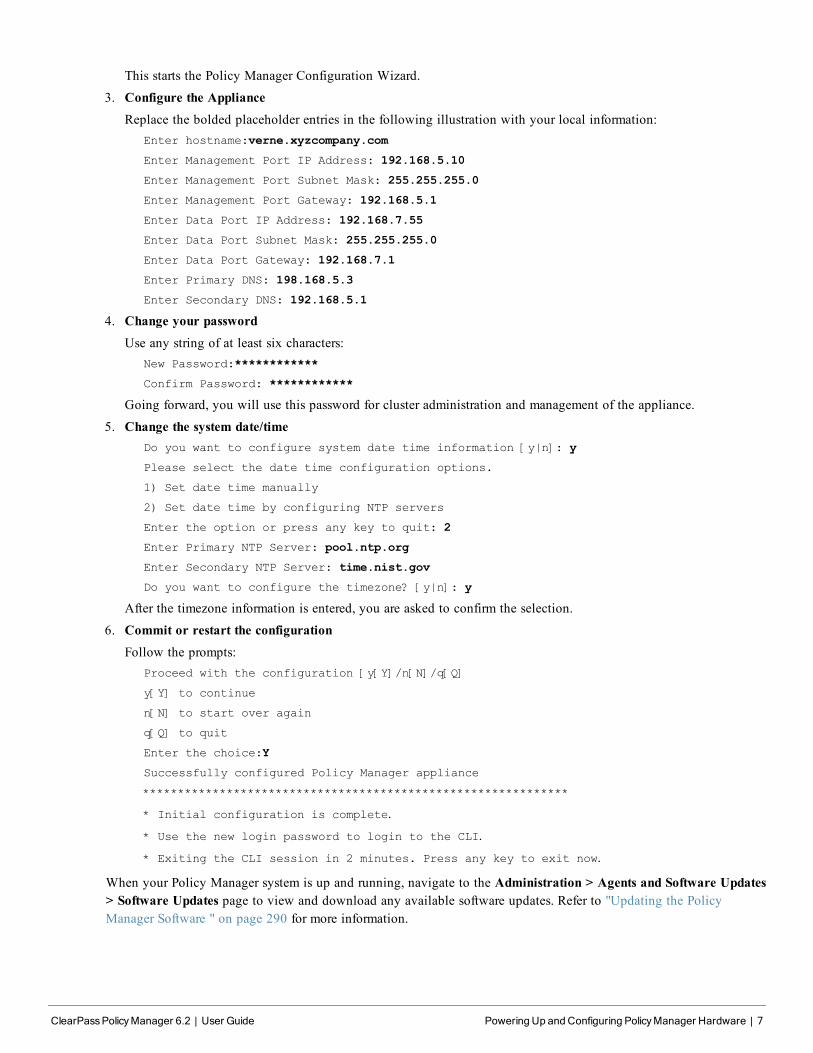
This starts the Policy Manager Configuration Wizard.
3. Configure the ApplianceReplace the bolded placeholder entries in the following illustration with your local information:
Enter hostname:verne.xyzcompany.com
Enter Management Port IP Address: 192.168.5.10
Enter Management Port Subnet Mask: 255.255.255.0
Enter Management Port Gateway: 192.168.5.1
Enter Data Port IP Address: 192.168.7.55
Enter Data Port Subnet Mask: 255.255.255.0
Enter Data Port Gateway: 192.168.7.1
Enter Primary DNS: 198.168.5.3
Enter Secondary DNS: 192.168.5.1
4. Change your passwordUse any string of at least six characters:
New Password:************
Confirm Password: ************
Going forward, you will use this password for cluster administration and management of the appliance.
5. Change the system date/timeDo you want to configure system date time information [y|n]: y
Please select the date time configuration options.
1) Set date time manually
2) Set date time by configuring NTP servers
Enter the option or press any key to quit: 2
Enter Primary NTP Server: pool.ntp.org
Enter Secondary NTP Server: time.nist.gov
Do you want to configure the timezone? [y|n]: y
After the timezone information is entered, you are asked to confirm the selection.
6. Commit or restart the configurationFollow the prompts:
Proceed with the configuration [y[Y]/n[N]/q[Q]
y[Y] to continue
n[N] to start over again
q[Q] to quit
Enter the choice:Y
Successfully configured Policy Manager appliance
*************************************************************
* Initial configuration is complete.
* Use the new login password to login to the CLI.
* Exiting the CLI session in 2 minutes. Press any key to exit now.
When your Policy Manager system is up and running, navigate to the Administration > Agents and Software Updates> Software Updates page to view and download any available software updates. Refer to "Updating the PolicyManager Software " on page 290 for more information.
ClearPassPolicyManager 6.2 | User Guide Powering Up and Configuring PolicyManager Hardware | 7
8 | Powering Up and Configuring PolicyManager Hardware ClearPassPolicyManager 6.2 | User Guide
Powering Off the SystemPerform the following to power off the system gracefully without logging in:
l Connect to the CLI from the serial console via the front serial port and enter the following:login: poweroff
password: poweroff
This procedure gracefully shuts down the appliance.
Resetting Passwords to Factory DefaultAdministrator passwords in Policy Manager can be reset to factory defaults by logging into the CLI as the apprecoveryuser. The password to log in as the apprecovery user is dynamically generated.
Perform the following steps to generate the recovery password:
1. Connect to the Policy Manager appliance via the front serial port (using any terminal program). See "Server PortConfiguration " on page 6 for details.
2. Reboot the system. See the restart command.
3. When the system restarts, it waits at the following prompt for 10 seconds:Generate support keys? [y/n]:
Enter ‘y’ at the prompt. The system prompts you with the following choices:Please select a support key generation option.
1) Generate password recovery key
2) Generate a support key
3) Generate password recovery and support keys
Enter the option or press any key to quit:
4. To generate the recovery key, select option 1 (or 3, if you want to generate a support key, as well).
5. Once the password recovery key is generated, email the key to Aruba technical support. A unique password will begenerated from the recovery key and emailed back to you.
6. Enter the following at the command prompt:
[apprecovery] app reset-passwd
*******************************************************
* WARNING: This command will reset the system account *
* passwords to factory default values *
*******************************************************
Are you sure you want to continue? [y/n]: y
INFO - Password changed on local node
INFO - System account passwords have been reset to
factory default values
Generating Support Key for Technical SupportTo troubleshoot certain critical system level errors, Aruba technical support might need to log into a support shell.Perform the following steps to generate a dynamic support password:
1. Log into the Command Line Interface (CLI) and enter the command: system gen-support-key. See "gen-support-key" on page 307 for details.

2. Connect to the Policy Manager appliance via the front serial port (using any terminal program). See "Server PortConfiguration " on page 6 for details.
3. Reboot the system. See the restart command.
4. When the system restarts it waits at the following prompt for 10 seconds:Generate support keys? [y/n]:
Enter ‘y’ at the prompt. The system prompts with the following choices:Please select a support key generation option.
1) Generate password recovery key
2) Generate a support key3) Generate password recovery and support keys
Enter the option or press any key to quit:
5. To generate the support key, select option 2 (or 3, if you want to generate a password recovery key, as well).
6. Once the password recovery key is generated, email the key to Aruba technical support. A unique password cannow be generated by Aruba technical support to log into the support shell.
Flag/Parameter Description
<domain-controller.domain-name>
Required.Host to be joined to the domain.
[domain NETBIOS name]Optional.
ClearPassPolicyManager 6.2 | User Guide Powering Up and Configuring PolicyManager Hardware | 9

10 | Powering Up and Configuring PolicyManager Hardware ClearPassPolicyManager 6.2 | User Guide
ClearPassPolicyManager 6.2 | User Guide PolicyManager Dashboard | 11
Chapter 3
Policy Manager Dashboard
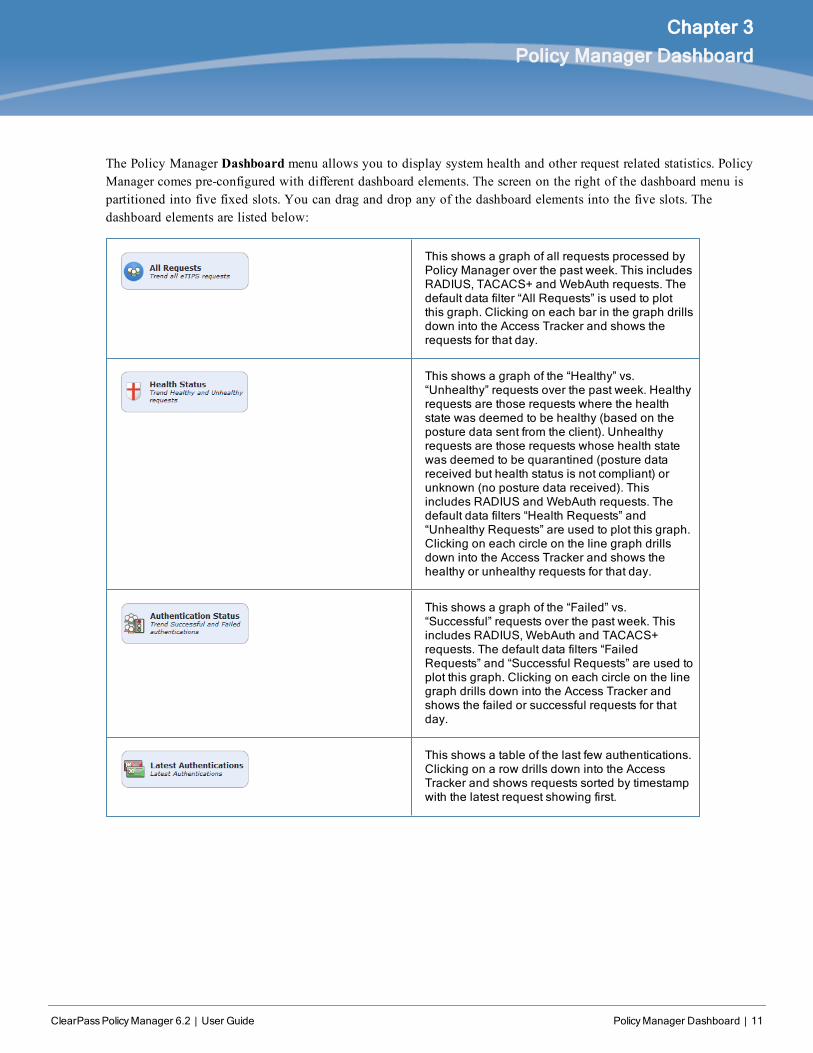
The Policy Manager Dashboard menu allows you to display system health and other request related statistics. PolicyManager comes pre-configured with different dashboard elements. The screen on the right of the dashboard menu ispartitioned into five fixed slots. You can drag and drop any of the dashboard elements into the five slots. Thedashboard elements are listed below:
This shows a graph of all requests processed byPolicy Manager over the past week. This includesRADIUS, TACACS+ and WebAuth requests. Thedefault data filter “All Requests” is used to plotthis graph. Clicking on each bar in the graph drillsdown into the Access Tracker and shows therequests for that day.
This shows a graph of the “Healthy” vs.“Unhealthy” requests over the past week. Healthyrequests are those requests where the healthstate was deemed to be healthy (based on theposture data sent from the client). Unhealthyrequests are those requests whose health statewas deemed to be quarantined (posture datareceived but health status is not compliant) orunknown (no posture data received). Thisincludes RADIUS and WebAuth requests. Thedefault data filters “Health Requests” and“Unhealthy Requests” are used to plot this graph.Clicking on each circle on the line graph drillsdown into the Access Tracker and shows thehealthy or unhealthy requests for that day.
This shows a graph of the “Failed” vs.“Successful” requests over the past week. Thisincludes RADIUS, WebAuth and TACACS+requests. The default data filters “FailedRequests” and “Successful Requests” are used toplot this graph. Clicking on each circle on the linegraph drills down into the Access Tracker andshows the failed or successful requests for thatday.
This shows a table of the last few authentications.Clicking on a row drills down into the AccessTracker and shows requests sorted by timestampwith the latest request showing first.
12 | PolicyManager Dashboard ClearPassPolicyManager 6.2 | User Guide
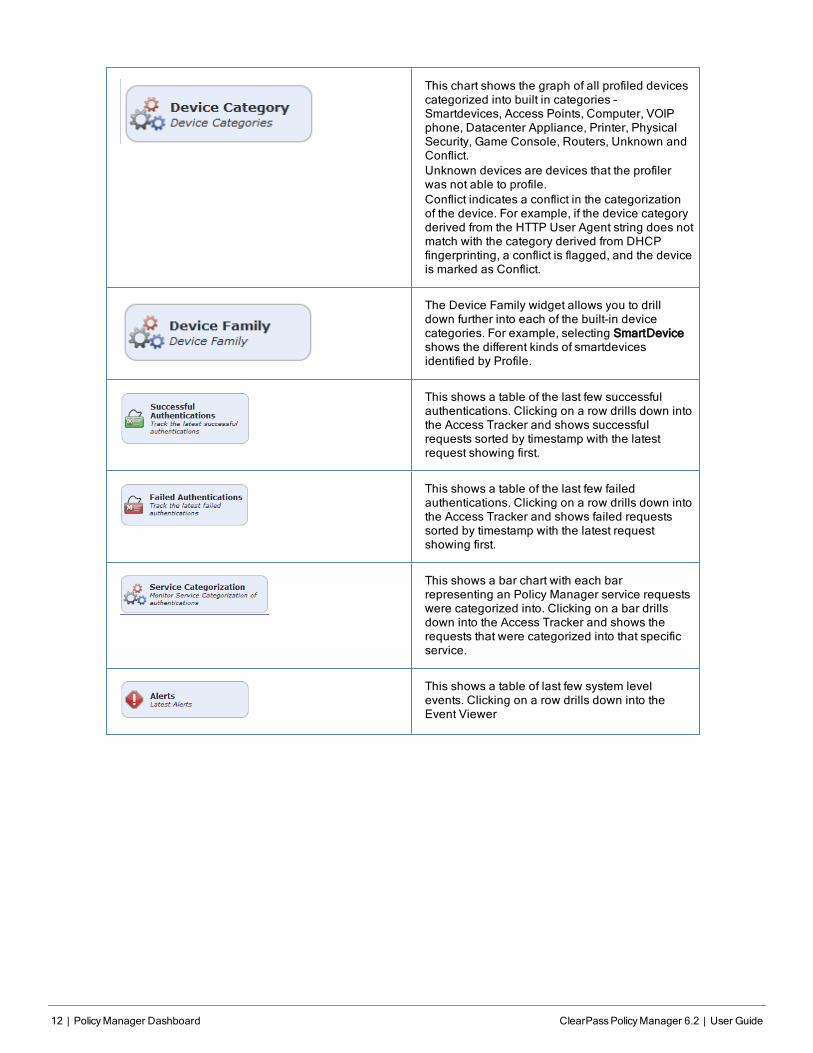
This chart shows the graph of all profiled devicescategorized into built in categories –Smartdevices, Access Points, Computer, VOIPphone, Datacenter Appliance, Printer, PhysicalSecurity, Game Console, Routers, Unknown andConflict.Unknown devices are devices that the profilerwas not able to profile.Conflict indicates a conflict in the categorizationof the device. For example, if the device categoryderived from the HTTP User Agent string does notmatch with the category derived from DHCPfingerprinting, a conflict is flagged, and the deviceis marked as Conflict.
The Device Family widget allows you to drilldown further into each of the built-in devicecategories. For example, selecting SmartDeviceshows the different kinds of smartdevicesidentified by Profile.
This shows a table of the last few successfulauthentications. Clicking on a row drills down intothe Access Tracker and shows successfulrequests sorted by timestamp with the latestrequest showing first.
This shows a table of the last few failedauthentications. Clicking on a row drills down intothe Access Tracker and shows failed requestssorted by timestamp with the latest requestshowing first.
This shows a bar chart with each barrepresenting an Policy Manager service requestswere categorized into. Clicking on a bar drillsdown into the Access Tracker and shows therequests that were categorized into that specificservice.
This shows a table of last few system levelevents. Clicking on a row drills down into theEvent Viewer

Quick Links shows links to common configurationtasks:l Start Configuring Policies links to the Start
Here Page under Configuration menu. Startconfiguring Policy Manager Services fromhere.
l Manage Services links to the Services pageunder Configuration menu. Shows a list ofconfigured services.
l Access Tracker links to the Access Trackerscreen under Reporting & Monitoring menu.
l Analysis & Trending links to the Analysis &Trending screen under Reporting &Monitoring menu.
l Network Devices links to the Network Devicesscreen under Configuration menu. Configurenetwork devices from here.
l Server Manager links to the ServerConfiguration screen under Administrationmenu.
l ClearPass Guest links to the ClearPass Guestapplication. This application opens in a newtab.
l ClearPass Onboard links to the ClearPassOnboard screen within the ClearPass Guestapplication. This application opens in a newtab.
This shows links to the Aruba applications thatare integrated with Policy Manager, such asGuest or Insight.
This shows the status of all nodes in the cluster.The following fields are shown for each node:l Status This shows the overall health status of
the system. Green indicates healthy and redindicates connectivity problems or high CPUor memory utilization. The status also showsred when a node is out-of-sync with the rest ofthe cluster.
l Host Name Host name and IP address of thenode
l CPU Util Snapshot of the CPU utilization inpercentage
l Mem Util Snapshot of the memory utilizationin percentage
l Server Role Publisher or subscriber
ClearPassPolicyManager 6.2 | User Guide PolicyManager Dashboard | 13

14 | PolicyManager Dashboard ClearPassPolicyManager 6.2 | User Guide
ClearPassPolicyManager 6.2 | User Guide Monitoring | 15
Chapter 4
Monitoring
The Policy ManagerMonitoring menu provides the following interfaces:
l Live Monitoring
n "Access Tracker" on page 15
n "Accounting" on page 17
n "OnGuard Activity " on page 24
n "Analysis and Trending" on page 26
n "Endpoint Profiler " on page 27
n "System Monitor" on page 28
l "Audit Viewer" on page 30
l "Event Viewer " on page 32
l "Data Filters " on page 33
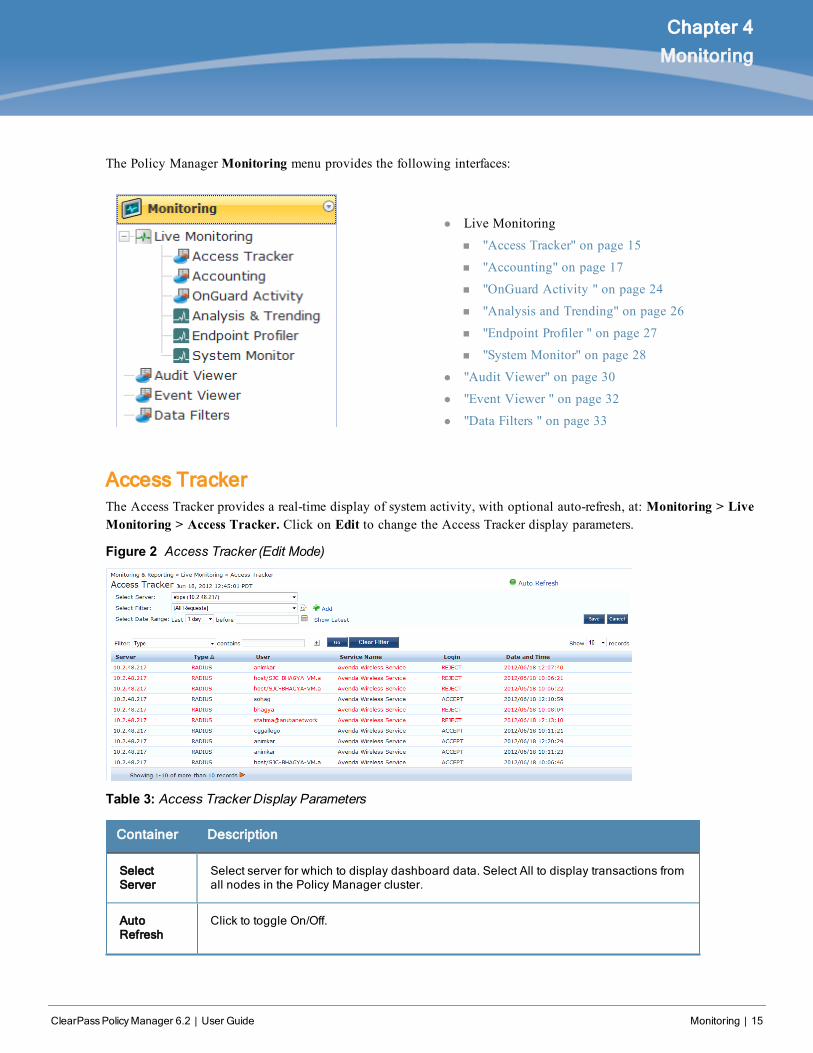
Access TrackerThe Access Tracker provides a real-time display of system activity, with optional auto-refresh, at: Monitoring > LiveMonitoring > Access Tracker. Click on Edit to change the Access Tracker display parameters.
Figure 2 Access Tracker (Edit Mode)
Table 3: Access Tracker Display Parameters
Container Description
SelectServer
Select server for which to display dashboard data. Select All to display transactions fromall nodes in the Policy Manager cluster.
AutoRefresh
Click to toggle On/Off.
16 | Monitoring ClearPassPolicyManager 6.2 | User Guide
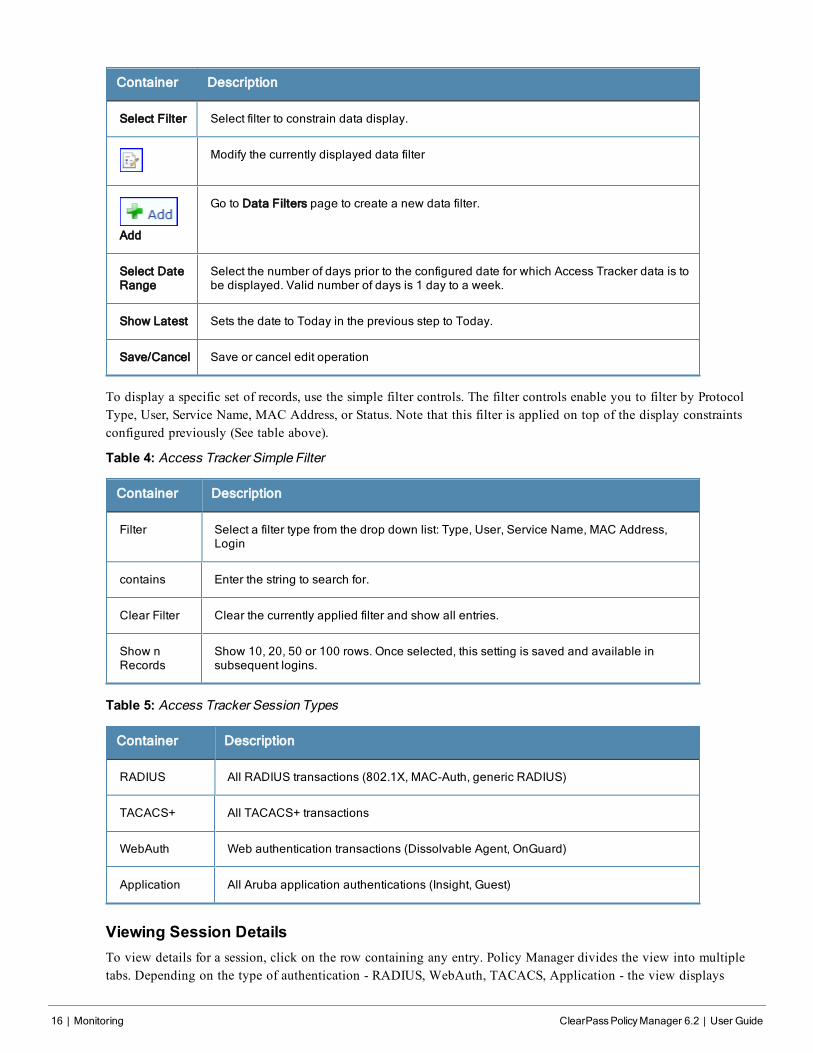
Container Description
Select Filter Select filter to constrain data display.
Modify the currently displayed data filter
Add
Go to Data Filters page to create a new data filter.
Select DateRange
Select the number of days prior to the configured date for which Access Tracker data is tobe displayed. Valid number of days is 1 day to a week.
Show Latest Sets the date to Today in the previous step to Today.
Save/Cancel Save or cancel edit operation
To display a specific set of records, use the simple filter controls. The filter controls enable you to filter by ProtocolType, User, Service Name, MAC Address, or Status. Note that this filter is applied on top of the display constraintsconfigured previously (See table above).
Table 4: Access Tracker Simple Filter
Container Description
Filter Select a filter type from the drop down list: Type, User, Service Name, MAC Address,Login
contains Enter the string to search for.
Clear Filter Clear the currently applied filter and show all entries.
Show nRecords
Show 10, 20, 50 or 100 rows. Once selected, this setting is saved and available insubsequent logins.
Table 5: Access Tracker Session Types
Container Description
RADIUS All RADIUS transactions (802.1X, MAC-Auth, generic RADIUS)
TACACS+ All TACACS+ transactions
WebAuth Web authentication transactions (Dissolvable Agent, OnGuard)
Application All Aruba application authentications (Insight, Guest)
Viewing Session DetailsTo view details for a session, click on the row containing any entry. Policy Manager divides the view into multipletabs. Depending on the type of authentication - RADIUS, WebAuth, TACACS, Application - the view displays
different tabs.
l Summary - This tab shows a summary view of the transaction, including policies applied.
l Input - This tab shows protocol specific attributes that Policy Manager received in the transaction request; thisincludes authentication and posture details (if available). It also shows Compute Attributes, which are attributesthat were derived from the request attributes. All of the attributes can be used in role mapping rules.
l Output - This tab shows the attributes that were sent to the network device and the (posture capable) endpoint.
l Alerts - This tab shows the reason for authentication or authorization failure.
l Accounting - This tab is only available for RADIUS sessions. This shows the RADIUS accounting details for thesession, including re authentication details.
l Authorizations - This tab is only available for TACACS+ sessions. This shows the commands entered at thenetwork device, and the authorization status.
l RADIUS CoA - This tab is only available for RADIUS transactions for which a RADIUS Change of Authorizationcommand was sent to the network device by Policy Manager. The view shows the RADIUS CoA actions sent tothe network device in chronological order.
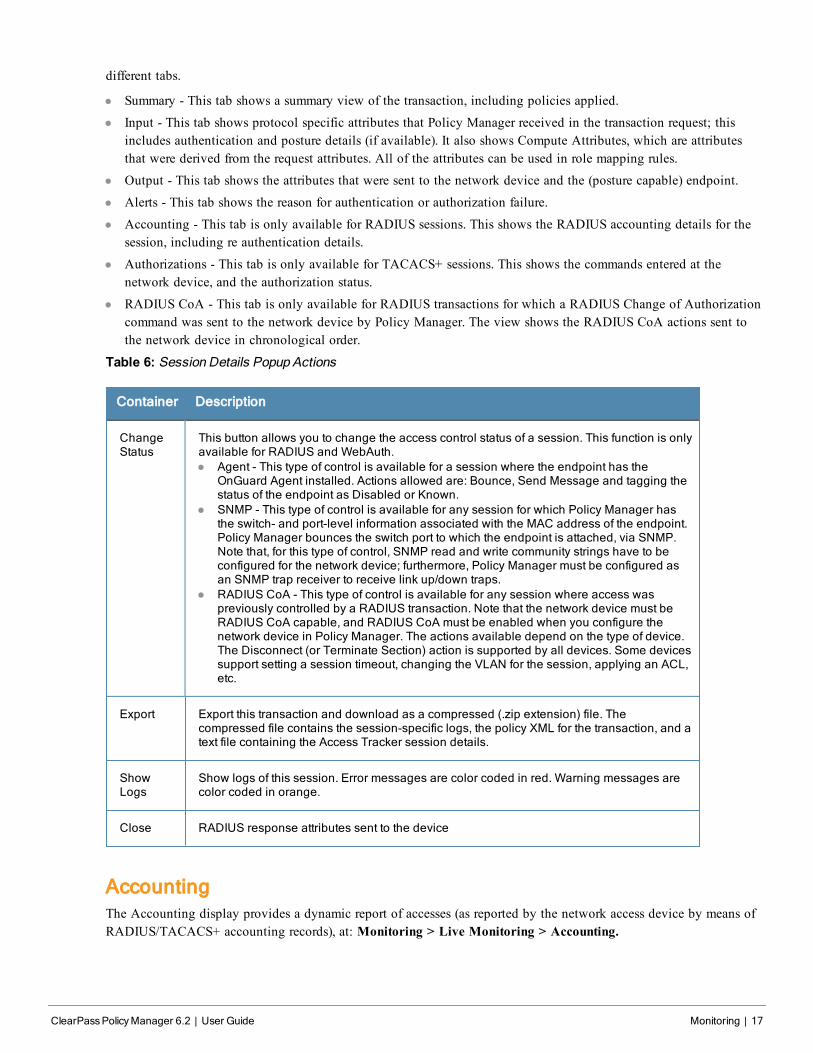
Table 6: Session Details Popup Actions
Container Description
ChangeStatus
This button allows you to change the access control status of a session. This function is onlyavailable for RADIUS and WebAuth.l Agent - This type of control is available for a session where the endpoint has the
OnGuard Agent installed. Actions allowed are: Bounce, Send Message and tagging thestatus of the endpoint as Disabled or Known.
l SNMP - This type of control is available for any session for which Policy Manager hasthe switch- and port-level information associated with the MAC address of the endpoint.Policy Manager bounces the switch port to which the endpoint is attached, via SNMP.Note that, for this type of control, SNMP read and write community strings have to beconfigured for the network device; furthermore, Policy Manager must be configured asan SNMP trap receiver to receive link up/down traps.
l RADIUS CoA - This type of control is available for any session where access waspreviously controlled by a RADIUS transaction. Note that the network device must beRADIUS CoA capable, and RADIUS CoA must be enabled when you configure thenetwork device in Policy Manager. The actions available depend on the type of device.The Disconnect (or Terminate Section) action is supported by all devices. Some devicessupport setting a session timeout, changing the VLAN for the session, applying an ACL,etc.
Export Export this transaction and download as a compressed (.zip extension) file. Thecompressed file contains the session-specific logs, the policy XML for the transaction, and atext file containing the Access Tracker session details.
ShowLogs
Show logs of this session. Error messages are color coded in red. Warning messages arecolor coded in orange.
Close RADIUS response attributes sent to the device
AccountingThe Accounting display provides a dynamic report of accesses (as reported by the network access device by means ofRADIUS/TACACS+ accounting records), at: Monitoring > Live Monitoring > Accounting.
ClearPassPolicyManager 6.2 | User Guide Monitoring | 17
18 | Monitoring ClearPassPolicyManager 6.2 | User Guide
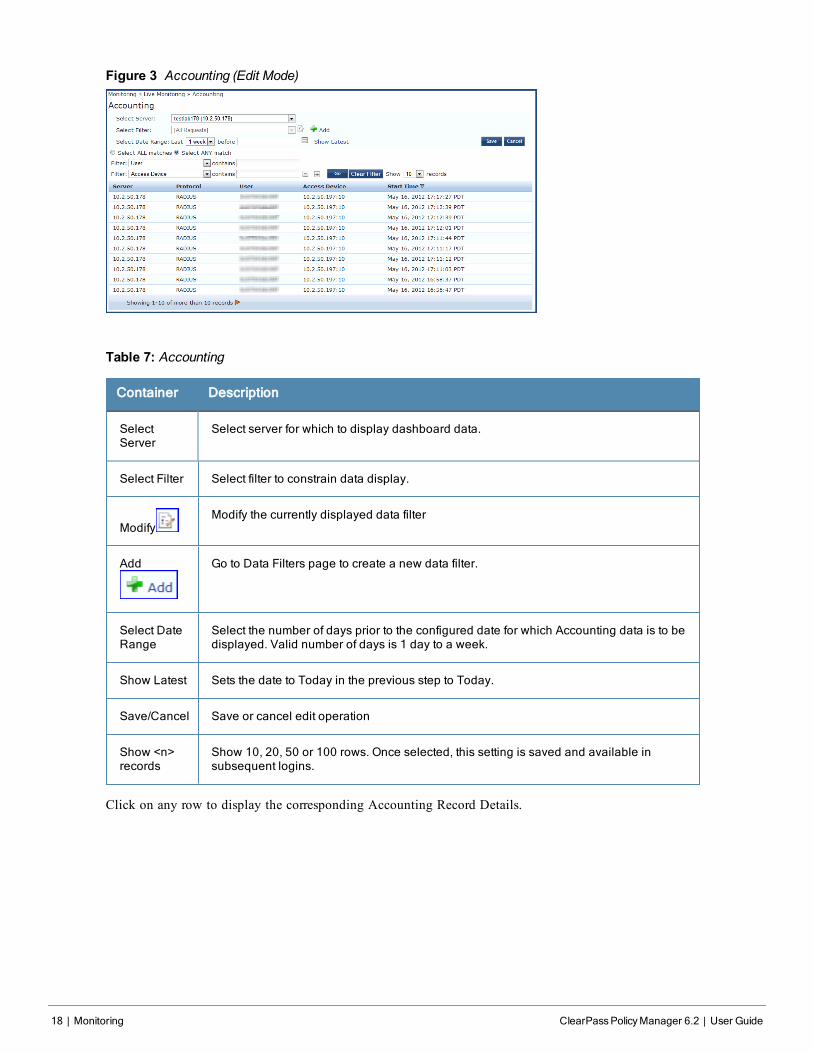
Figure 3 Accounting (Edit Mode)
Table 7: Accounting
Container Description
SelectServer
Select server for which to display dashboard data.
Select Filter Select filter to constrain data display.
ModifyModify the currently displayed data filter
Add Go to Data Filters page to create a new data filter.
Select DateRange
Select the number of days prior to the configured date for which Accounting data is to bedisplayed. Valid number of days is 1 day to a week.
Show Latest Sets the date to Today in the previous step to Today.
Save/Cancel Save or cancel edit operation
Show <n>records
Show 10, 20, 50 or 100 rows. Once selected, this setting is saved and available insubsequent logins.
Click on any row to display the corresponding Accounting Record Details.
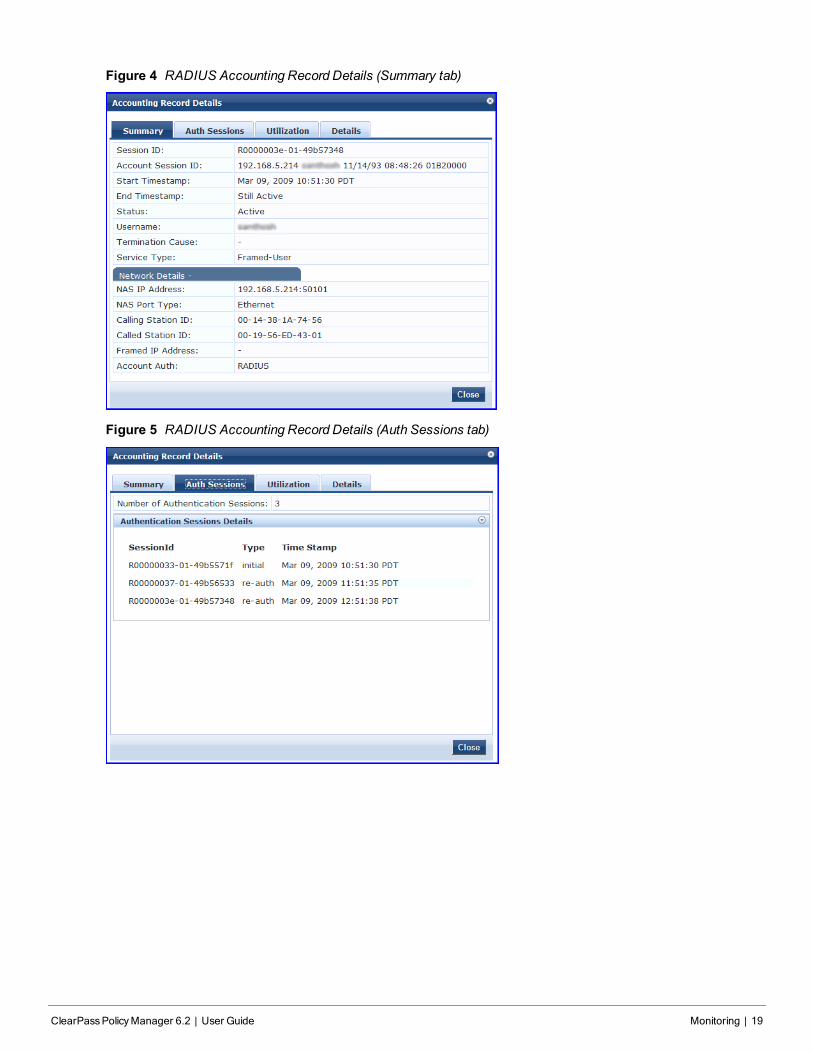
Figure 4 RADIUS Accounting Record Details (Summary tab)
Figure 5 RADIUS Accounting Record Details (Auth Sessions tab)
ClearPassPolicyManager 6.2 | User Guide Monitoring | 19
20 | Monitoring ClearPassPolicyManager 6.2 | User Guide
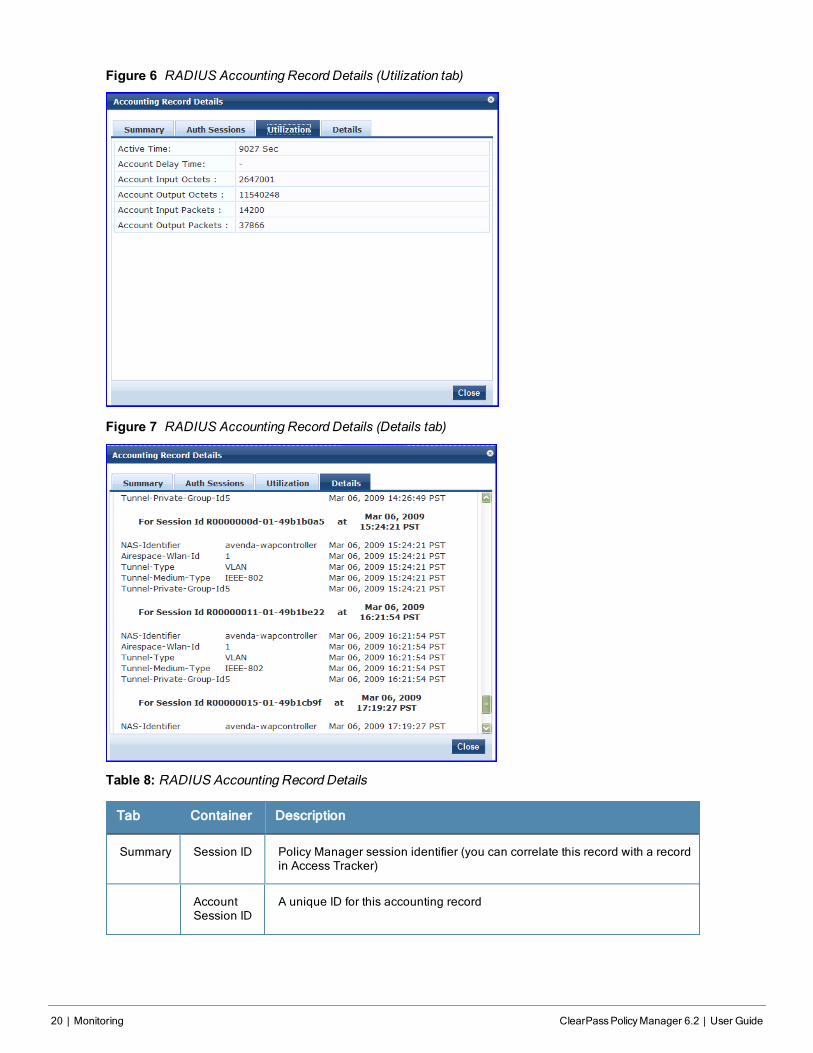
Figure 6 RADIUS Accounting Record Details (Utilization tab)
Figure 7 RADIUS Accounting Record Details (Details tab)
Table 8: RADIUS Accounting Record Details
Tab Container Description
Summary Session ID Policy Manager session identifier (you can correlate this record with a recordin Access Tracker)
AccountSession ID
A unique ID for this accounting record
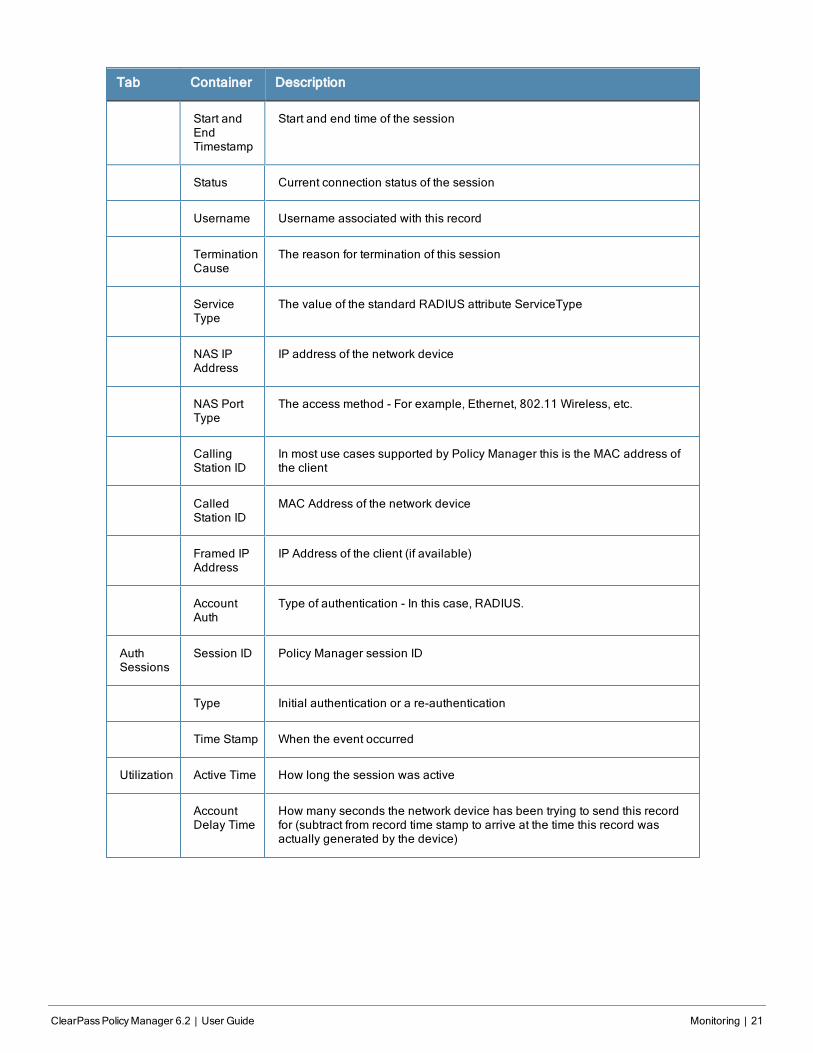
Tab Container Description
Start andEndTimestamp
Start and end time of the session
Status Current connection status of the session
Username Username associated with this record
TerminationCause
The reason for termination of this session
ServiceType
The value of the standard RADIUS attribute ServiceType
NAS IPAddress
IP address of the network device
NAS PortType
The access method - For example, Ethernet, 802.11 Wireless, etc.
CallingStation ID
In most use cases supported by Policy Manager this is the MAC address ofthe client
CalledStation ID
MAC Address of the network device
Framed IPAddress
IP Address of the client (if available)
AccountAuth
Type of authentication - In this case, RADIUS.
AuthSessions
Session ID Policy Manager session ID
Type Initial authentication or a re-authentication
Time Stamp When the event occurred
Utilization Active Time How long the session was active
AccountDelay Time
How many seconds the network device has been trying to send this recordfor (subtract from record time stamp to arrive at the time this record wasactually generated by the device)
ClearPassPolicyManager 6.2 | User Guide Monitoring | 21
22 | Monitoring ClearPassPolicyManager 6.2 | User Guide
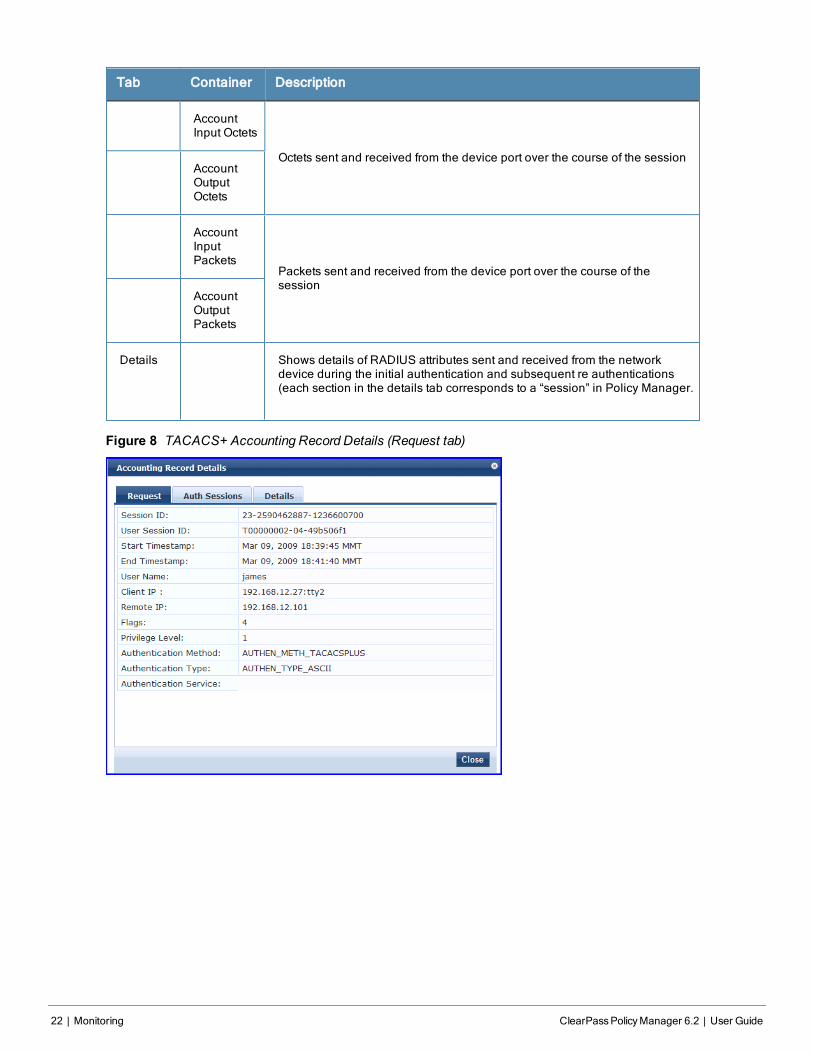
Tab Container Description
AccountInput Octets
Octets sent and received from the device port over the course of the sessionAccountOutputOctets
AccountInputPackets
Packets sent and received from the device port over the course of thesession
AccountOutputPackets
Details Shows details of RADIUS attributes sent and received from the networkdevice during the initial authentication and subsequent re authentications(each section in the details tab corresponds to a “session” in Policy Manager.
Figure 8 TACACS+ Accounting Record Details (Request tab)
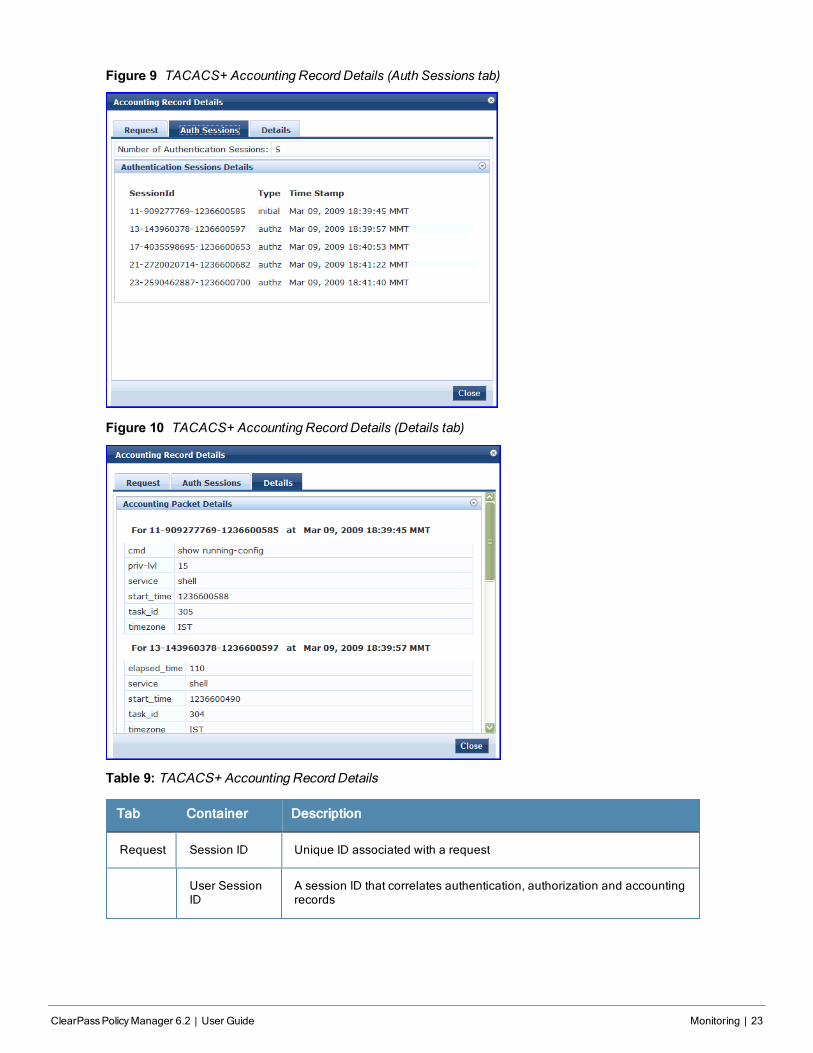
Figure 9 TACACS+ Accounting Record Details (Auth Sessions tab)
Figure 10 TACACS+ Accounting Record Details (Details tab)
Table 9: TACACS+ Accounting Record Details
Tab Container Description
Request Session ID Unique ID associated with a request
User SessionID
A session ID that correlates authentication, authorization and accountingrecords
ClearPassPolicyManager 6.2 | User Guide Monitoring | 23
24 | Monitoring ClearPassPolicyManager 6.2 | User Guide
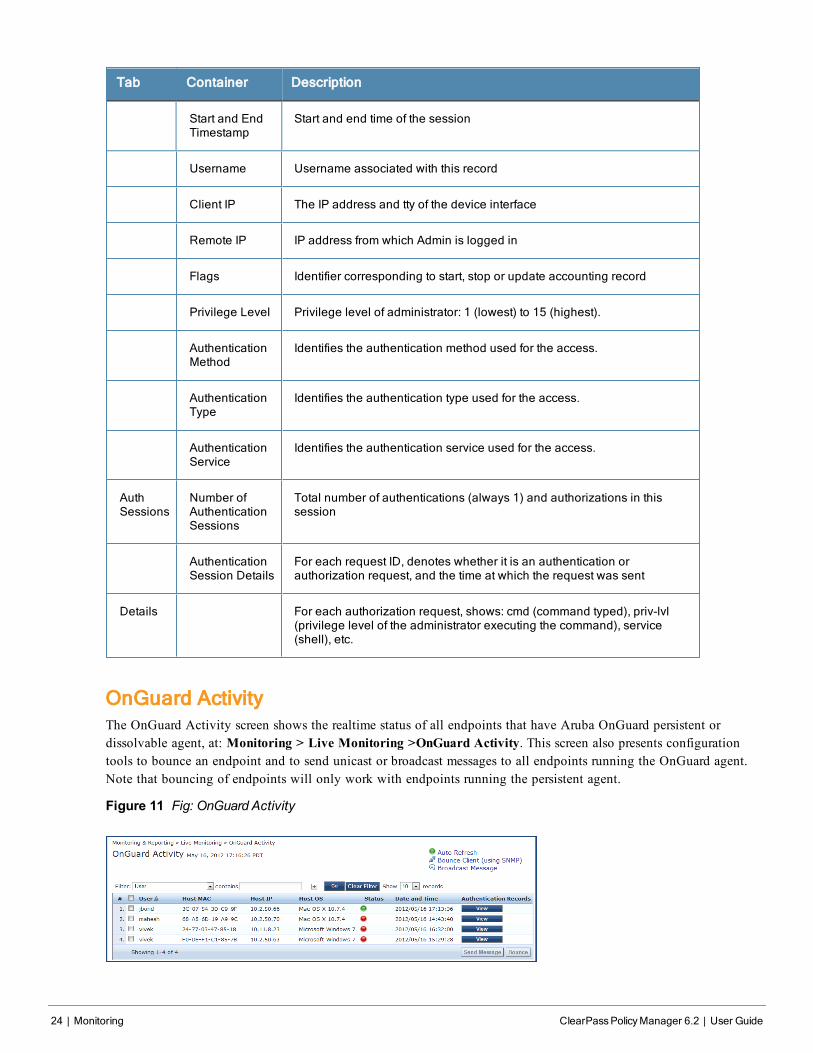
Tab Container Description
Start and EndTimestamp
Start and end time of the session
Username Username associated with this record
Client IP The IP address and tty of the device interface
Remote IP IP address from which Admin is logged in
Flags Identifier corresponding to start, stop or update accounting record
Privilege Level Privilege level of administrator: 1 (lowest) to 15 (highest).
AuthenticationMethod
Identifies the authentication method used for the access.
AuthenticationType
Identifies the authentication type used for the access.
AuthenticationService
Identifies the authentication service used for the access.
AuthSessions
Number ofAuthenticationSessions
Total number of authentications (always 1) and authorizations in thissession
AuthenticationSession Details
For each request ID, denotes whether it is an authentication orauthorization request, and the time at which the request was sent
Details For each authorization request, shows: cmd (command typed), priv-lvl(privilege level of the administrator executing the command), service(shell), etc.
OnGuard ActivityThe OnGuard Activity screen shows the realtime status of all endpoints that have Aruba OnGuard persistent ordissolvable agent, at: Monitoring > Live Monitoring >OnGuard Activity. This screen also presents configurationtools to bounce an endpoint and to send unicast or broadcast messages to all endpoints running the OnGuard agent.Note that bouncing of endpoints will only work with endpoints running the persistent agent.
Figure 11 Fig: OnGuard Activity
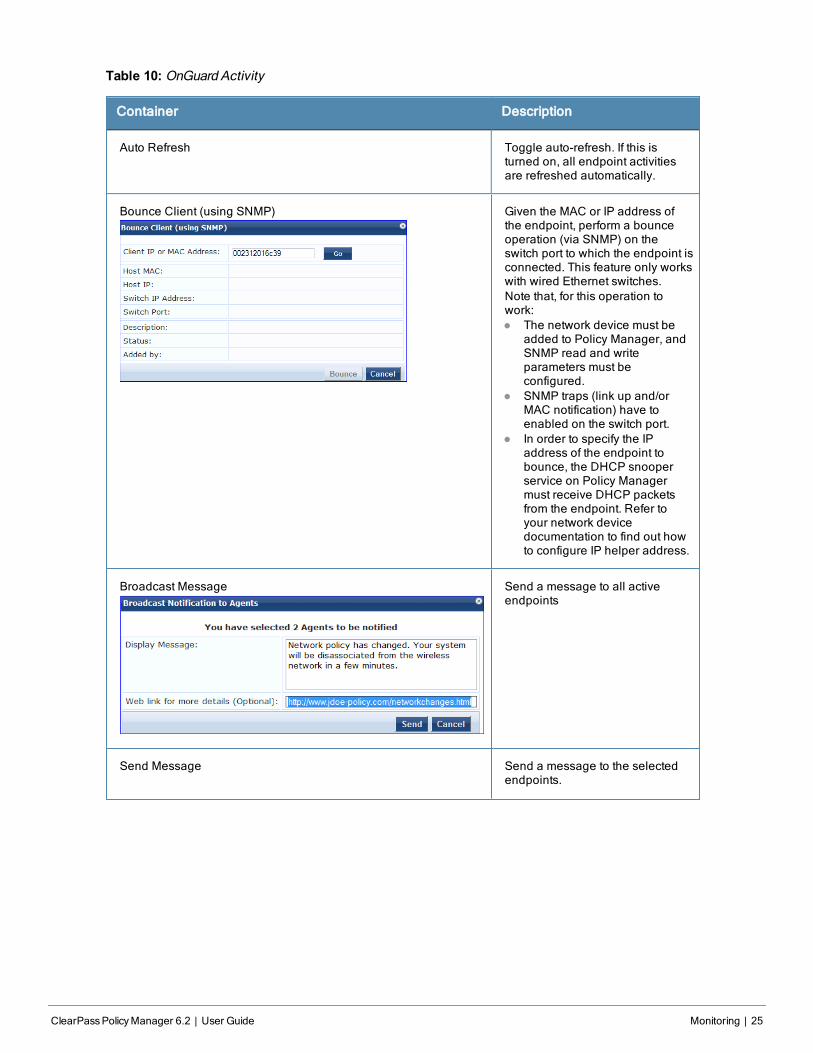
Table 10: OnGuard Activity
Container Description
Auto Refresh Toggle auto-refresh. If this isturned on, all endpoint activitiesare refreshed automatically.
Bounce Client (using SNMP) Given the MAC or IP address ofthe endpoint, perform a bounceoperation (via SNMP) on theswitch port to which the endpoint isconnected. This feature only workswith wired Ethernet switches.Note that, for this operation towork:l The network device must be
added to Policy Manager, andSNMP read and writeparameters must beconfigured.
l SNMP traps (link up and/orMAC notification) have toenabled on the switch port.
l In order to specify the IPaddress of the endpoint tobounce, the DHCP snooperservice on Policy Managermust receive DHCP packetsfrom the endpoint. Refer toyour network devicedocumentation to find out howto configure IP helper address.
Broadcast Message Send a message to all activeendpoints
Send Message Send a message to the selectedendpoints.
ClearPassPolicyManager 6.2 | User Guide Monitoring | 25
26 | Monitoring ClearPassPolicyManager 6.2 | User Guide
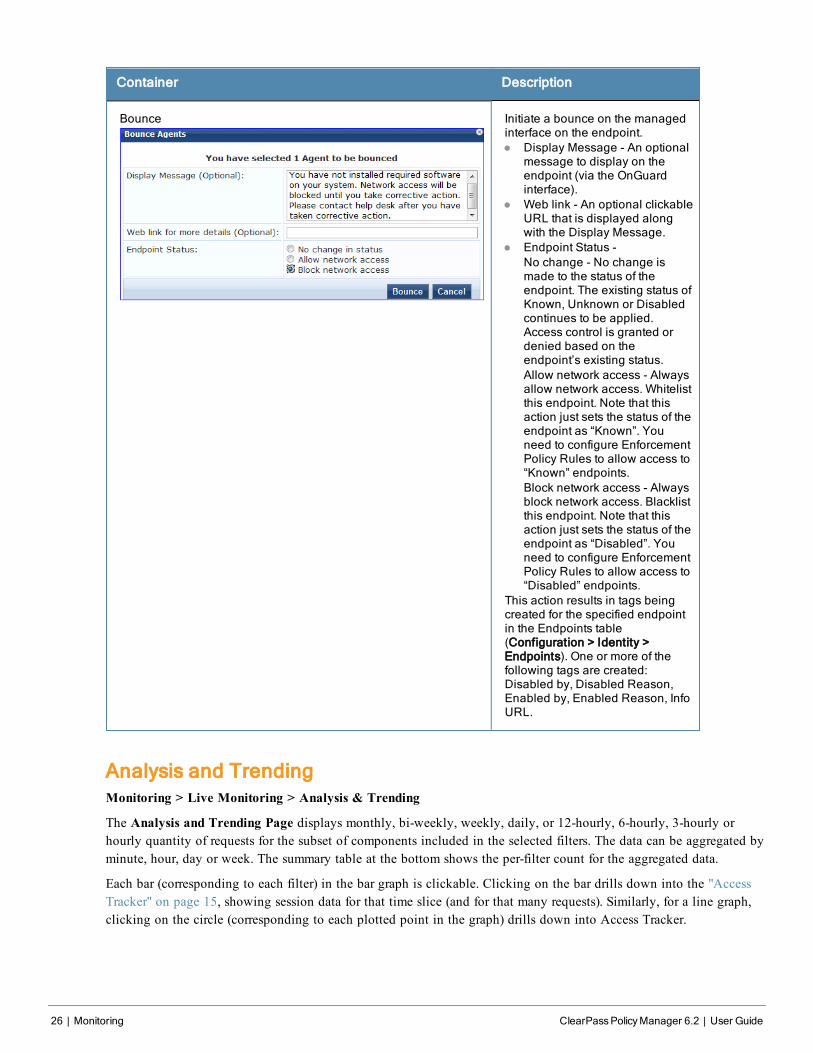
Container Description
Bounce Initiate a bounce on the managedinterface on the endpoint.l Display Message - An optional
message to display on theendpoint (via the OnGuardinterface).
l Web link - An optional clickableURL that is displayed alongwith the Display Message.
l Endpoint Status -No change - No change ismade to the status of theendpoint. The existing status ofKnown, Unknown or Disabledcontinues to be applied.Access control is granted ordenied based on theendpoint’s existing status.Allow network access - Alwaysallow network access. Whitelistthis endpoint. Note that thisaction just sets the status of theendpoint as “Known”. Youneed to configure EnforcementPolicy Rules to allow access to“Known” endpoints.Block network access - Alwaysblock network access. Blacklistthis endpoint. Note that thisaction just sets the status of theendpoint as “Disabled”. Youneed to configure EnforcementPolicy Rules to allow access to“Disabled” endpoints.
This action results in tags beingcreated for the specified endpointin the Endpoints table(Configuration > Identity >Endpoints). One or more of thefollowing tags are created:Disabled by, Disabled Reason,Enabled by, Enabled Reason, InfoURL.
Analysis and TrendingMonitoring > Live Monitoring > Analysis & Trending
The Analysis and Trending Page displays monthly, bi-weekly, weekly, daily, or 12-hourly, 6-hourly, 3-hourly orhourly quantity of requests for the subset of components included in the selected filters. The data can be aggregated byminute, hour, day or week. The summary table at the bottom shows the per-filter count for the aggregated data.
Each bar (corresponding to each filter) in the bar graph is clickable. Clicking on the bar drills down into the "AccessTracker" on page 15, showing session data for that time slice (and for that many requests). Similarly, for a line graph,clicking on the circle (corresponding to each plotted point in the graph) drills down into Access Tracker.
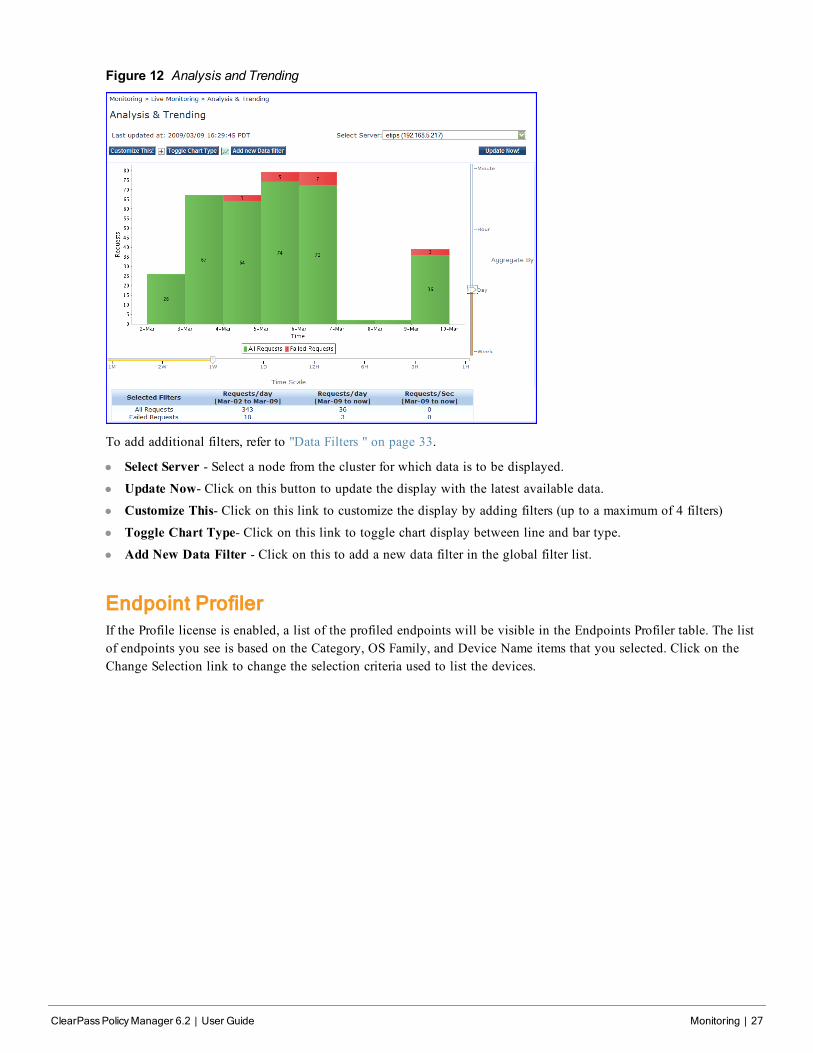
Figure 12 Analysis and Trending
To add additional filters, refer to "Data Filters " on page 33.
l Select Server - Select a node from the cluster for which data is to be displayed.
l Update Now- Click on this button to update the display with the latest available data.l Customize This- Click on this link to customize the display by adding filters (up to a maximum of 4 filters)
l Toggle Chart Type- Click on this link to toggle chart display between line and bar type.l Add New Data Filter - Click on this to add a new data filter in the global filter list.
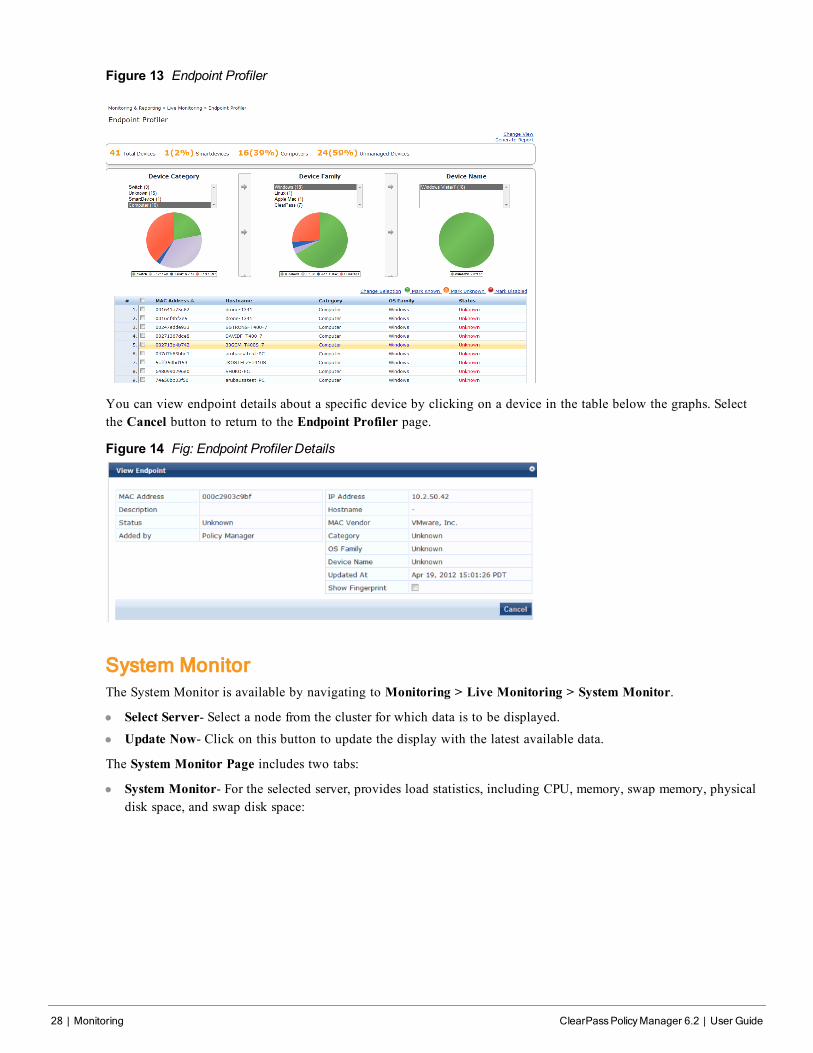
Endpoint ProfilerIf the Profile license is enabled, a list of the profiled endpoints will be visible in the Endpoints Profiler table. The listof endpoints you see is based on the Category, OS Family, and Device Name items that you selected. Click on theChange Selection link to change the selection criteria used to list the devices.
ClearPassPolicyManager 6.2 | User Guide Monitoring | 27
28 | Monitoring ClearPassPolicyManager 6.2 | User Guide
Figure 13 Endpoint Profiler
You can view endpoint details about a specific device by clicking on a device in the table below the graphs. Selectthe Cancel button to return to the Endpoint Profiler page.
Figure 14 Fig: Endpoint Profiler Details
System MonitorThe System Monitor is available by navigating to Monitoring > Live Monitoring > System Monitor.
l Select Server- Select a node from the cluster for which data is to be displayed.
l Update Now- Click on this button to update the display with the latest available data.
The System Monitor Page includes two tabs:
l System Monitor- For the selected server, provides load statistics, including CPU, memory, swap memory, physicaldisk space, and swap disk space:

Figure 15 SystemMonitor Graphs
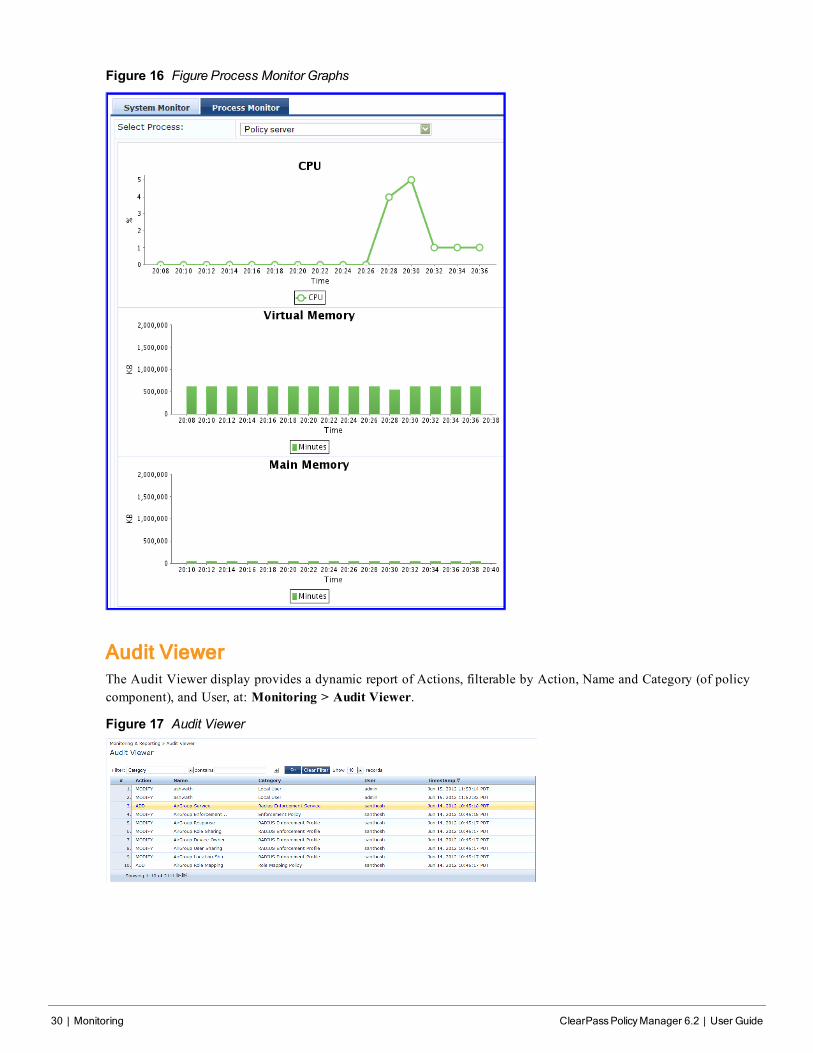
l Process Monitor- For the selected server and process, provides critical usage statistics, including CPU, VirtualMemory, and Main Memory. Use Select Process to select the process for which you want to see the usage statistics.
ClearPassPolicyManager 6.2 | User Guide Monitoring | 29
30 | Monitoring ClearPassPolicyManager 6.2 | User Guide
Figure 16 Figure Process Monitor Graphs
Audit ViewerThe Audit Viewer display provides a dynamic report of Actions, filterable by Action, Name and Category (of policycomponent), and User, at: Monitoring > Audit Viewer.
Figure 17 Audit Viewer
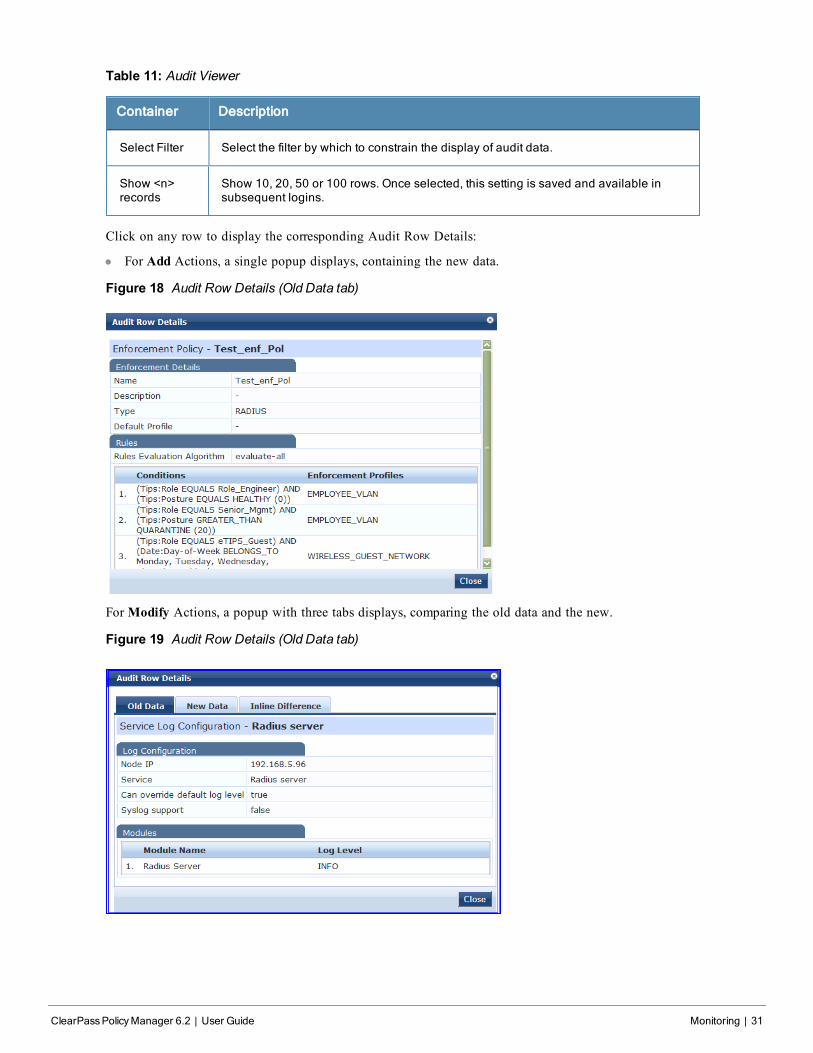
Table 11: Audit Viewer
Container Description
Select Filter Select the filter by which to constrain the display of audit data.
Show <n>records
Show 10, 20, 50 or 100 rows. Once selected, this setting is saved and available insubsequent logins.
Click on any row to display the corresponding Audit Row Details:
l For Add Actions, a single popup displays, containing the new data.
Figure 18 Audit Row Details (Old Data tab)
ForModify Actions, a popup with three tabs displays, comparing the old data and the new.
Figure 19 Audit Row Details (Old Data tab)
ClearPassPolicyManager 6.2 | User Guide Monitoring | 31
32 | Monitoring ClearPassPolicyManager 6.2 | User Guide
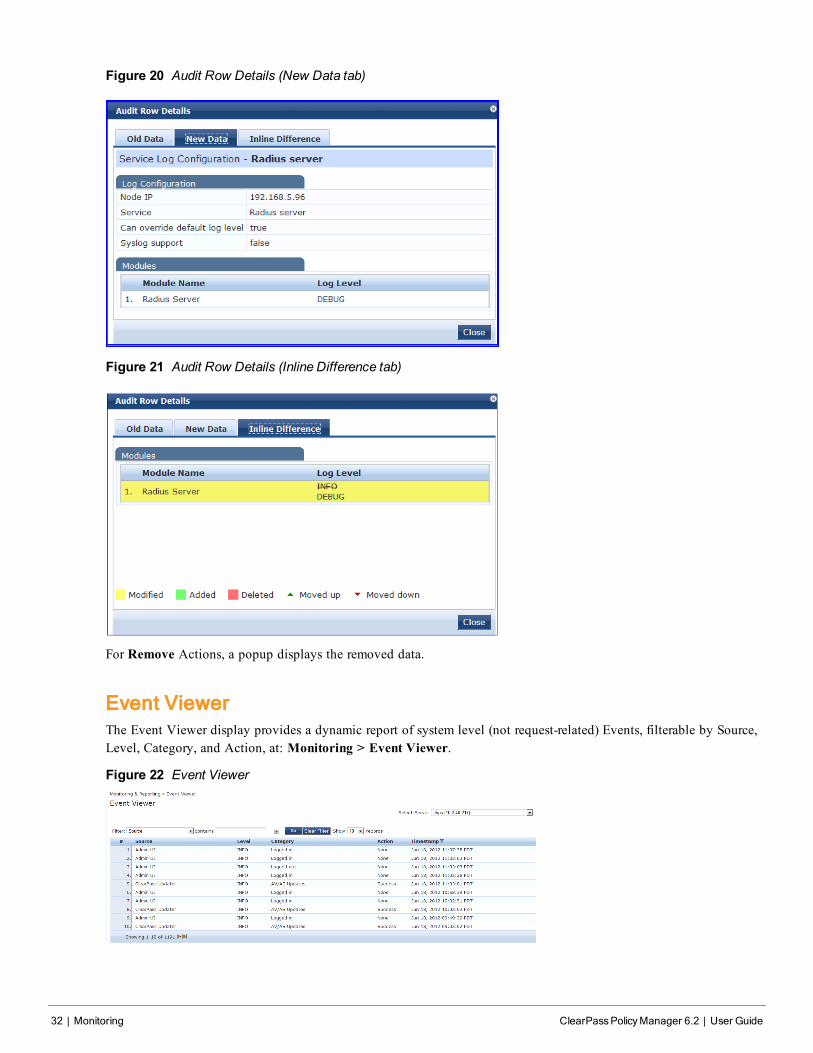
Figure 20 Audit Row Details (New Data tab)
Figure 21 Audit Row Details (Inline Difference tab)
For Remove Actions, a popup displays the removed data.
Event ViewerThe Event Viewer display provides a dynamic report of system level (not request-related) Events, filterable by Source,Level, Category, and Action, at: Monitoring > Event Viewer.
Figure 22 Event Viewer
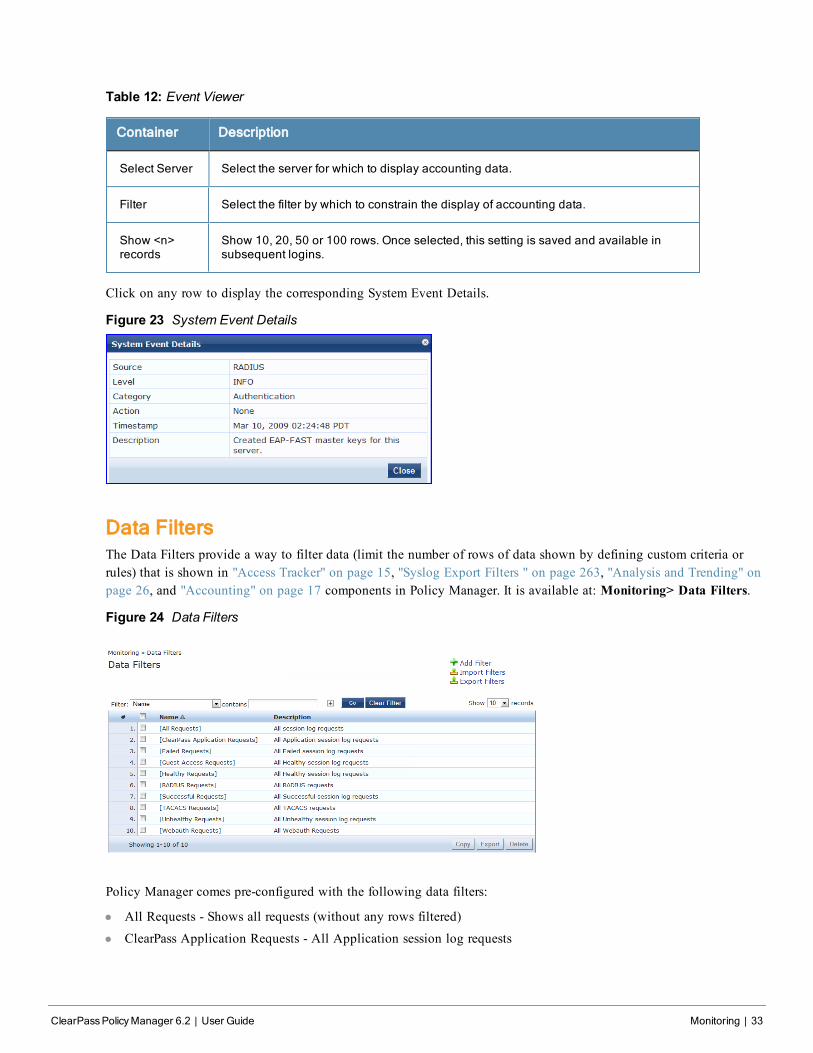
Table 12: Event Viewer
Container Description
Select Server Select the server for which to display accounting data.
Filter Select the filter by which to constrain the display of accounting data.
Show <n>records
Show 10, 20, 50 or 100 rows. Once selected, this setting is saved and available insubsequent logins.
Click on any row to display the corresponding System Event Details.
Figure 23 System Event Details
Data FiltersThe Data Filters provide a way to filter data (limit the number of rows of data shown by defining custom criteria orrules) that is shown in "Access Tracker" on page 15, "Syslog Export Filters " on page 263, "Analysis and Trending" onpage 26, and "Accounting" on page 17 components in Policy Manager. It is available at: Monitoring> Data Filters.
Figure 24 Data Filters
Policy Manager comes pre-configured with the following data filters:
l All Requests - Shows all requests (without any rows filtered)
l ClearPass Application Requests - All Application session log requests
ClearPassPolicyManager 6.2 | User Guide Monitoring | 33
34 | Monitoring ClearPassPolicyManager 6.2 | User Guide
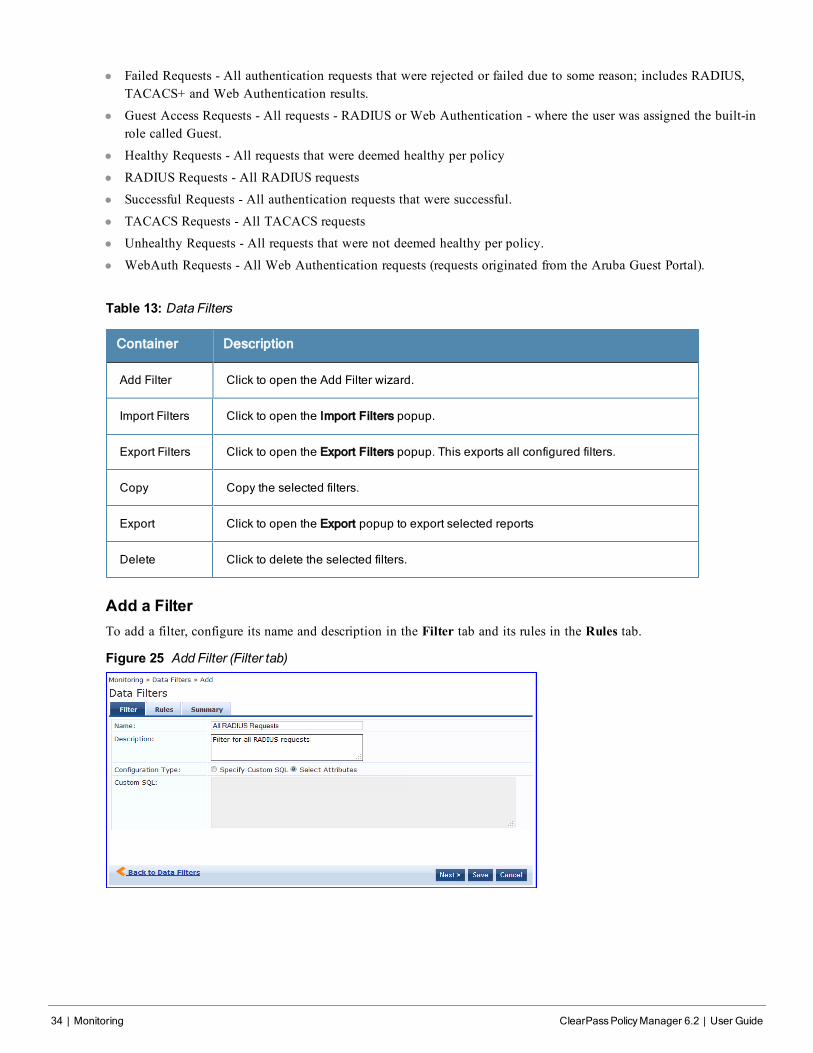
l Failed Requests - All authentication requests that were rejected or failed due to some reason; includes RADIUS,TACACS+ and Web Authentication results.
l Guest Access Requests - All requests - RADIUS or Web Authentication - where the user was assigned the built-inrole called Guest.
l Healthy Requests - All requests that were deemed healthy per policy
l RADIUS Requests - All RADIUS requests
l Successful Requests - All authentication requests that were successful.
l TACACS Requests - All TACACS requests
l Unhealthy Requests - All requests that were not deemed healthy per policy.
l WebAuth Requests - All Web Authentication requests (requests originated from the Aruba Guest Portal).
Table 13: Data Filters
Container Description
Add Filter Click to open the Add Filter wizard.
Import Filters Click to open the Import Filters popup.
Export Filters Click to open the Export Filters popup. This exports all configured filters.
Copy Copy the selected filters.
Export Click to open the Export popup to export selected reports
Delete Click to delete the selected filters.
Add a FilterTo add a filter, configure its name and description in the Filter tab and its rules in the Rules tab.
Figure 25 Add Filter (Filter tab)
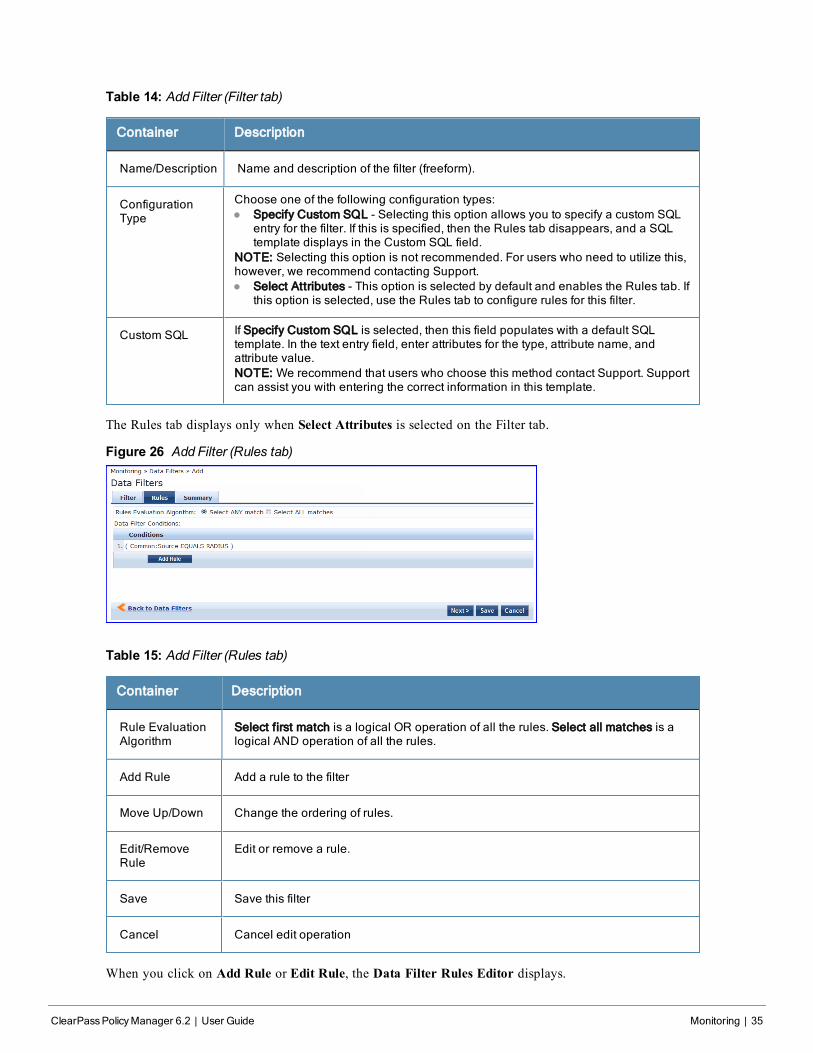
Table 14: Add Filter (Filter tab)
Container Description
Name/Description Name and description of the filter (freeform).
ConfigurationType
Choose one of the following configuration types:l Specify Custom SQL - Selecting this option allows you to specify a custom SQL
entry for the filter. If this is specified, then the Rules tab disappears, and a SQLtemplate displays in the Custom SQL field.
NOTE: Selecting this option is not recommended. For users who need to utilize this,however, we recommend contacting Support.l Select Attributes - This option is selected by default and enables the Rules tab. If
this option is selected, use the Rules tab to configure rules for this filter.
Custom SQL If Specify Custom SQL is selected, then this field populates with a default SQLtemplate. In the text entry field, enter attributes for the type, attribute name, andattribute value.NOTE: We recommend that users who choose this method contact Support. Supportcan assist you with entering the correct information in this template.
The Rules tab displays only when Select Attributes is selected on the Filter tab.
Figure 26 Add Filter (Rules tab)
Table 15: Add Filter (Rules tab)
Container Description
Rule EvaluationAlgorithm
Select first match is a logical OR operation of all the rules. Select all matches is alogical AND operation of all the rules.
Add Rule Add a rule to the filter
Move Up/Down Change the ordering of rules.
Edit/RemoveRule
Edit or remove a rule.
Save Save this filter
Cancel Cancel edit operation
When you click on Add Rule or Edit Rule, the Data Filter Rules Editor displays.
ClearPassPolicyManager 6.2 | User Guide Monitoring | 35
36 | Monitoring ClearPassPolicyManager 6.2 | User Guide
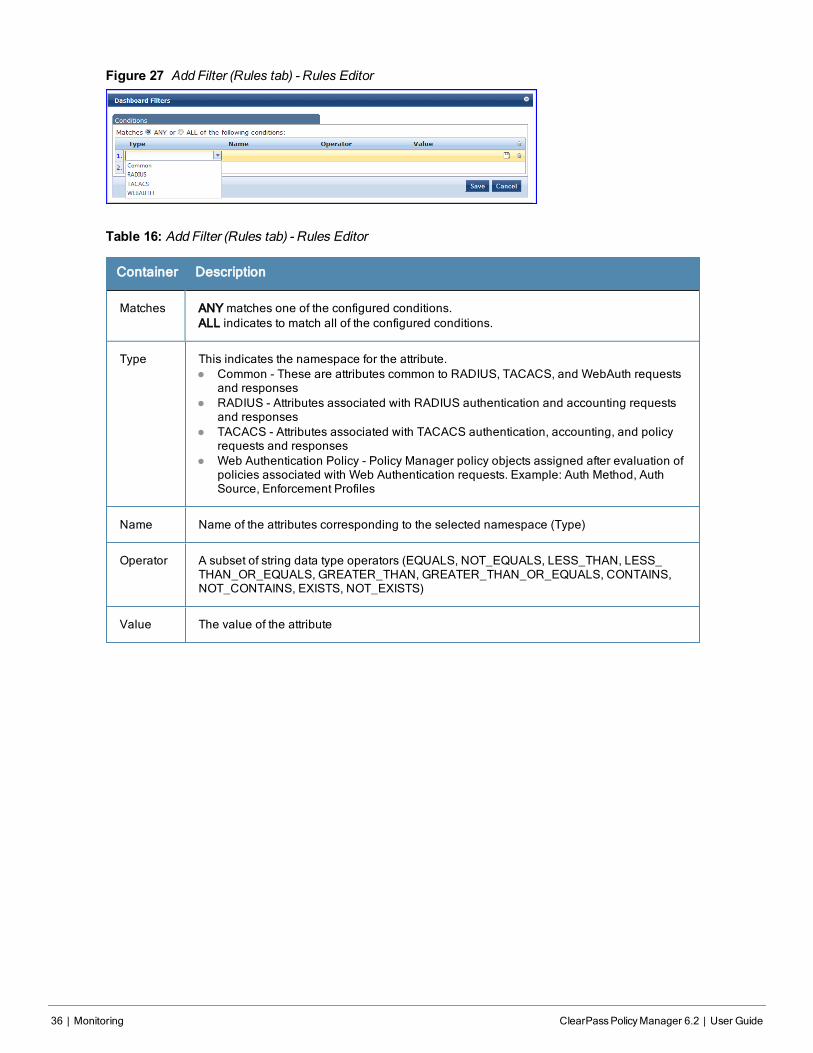
Figure 27 Add Filter (Rules tab) - Rules Editor
Table 16: Add Filter (Rules tab) - Rules Editor
Container Description
Matches ANY matches one of the configured conditions.ALL indicates to match all of the configured conditions.
Type This indicates the namespace for the attribute.l Common - These are attributes common to RADIUS, TACACS, and WebAuth requests
and responsesl RADIUS - Attributes associated with RADIUS authentication and accounting requests
and responsesl TACACS - Attributes associated with TACACS authentication, accounting, and policy
requests and responsesl Web Authentication Policy - Policy Manager policy objects assigned after evaluation of
policies associated with Web Authentication requests. Example: Auth Method, AuthSource, Enforcement Profiles
Name Name of the attributes corresponding to the selected namespace (Type)
Operator A subset of string data type operators (EQUALS, NOT_EQUALS, LESS_THAN, LESS_THAN_OR_EQUALS, GREATER_THAN, GREATER_THAN_OR_EQUALS, CONTAINS,NOT_CONTAINS, EXISTS, NOT_EXISTS)
Value The value of the attribute
ClearPassPolicyManager 6.2 | User Guide PolicyManager PolicyModel | 37
Chapter 5
Policy Manager Policy Model
From the point of view of network devices or other entities that need authentication and authorization services, PolicyManager appears as a RADIUS, TACACS+ or HTTP/S based Authentication server; however, its rich and extensiblepolicy model allows it to broker security functions across a range of existing network infrastructure, identity stores,health/posture services and client technologies within the Enterprise.
Refer to the following topics for additional information.
l "Services Paradigm" on page 37
n "Viewing Existing Services " on page 40
n "Adding and Removing Services " on page 40
n "Links to Use Cases and Configuration Instructions " on page 41
l "Policy Simulation" on page 43
n "Add Simulation Test" on page 44
n "Import and Exporting Simulations " on page 49
Services ParadigmServices are the highest level element in the Policy Manager policy model. They have two purposes:
l Unique Categorization Rules (per Service) enable Policy Manager to test Access Requests (“Requests”) againstavailable Services to provide robust differentiation of requests by access method, location, or other network vendor-specific attributes.
Policy Manager ships configured with a number of basic Service types. You can flesh out these Service types, copythem for use as templates, import other Service types from another implementation (from which you have previouslyexported them), or develop new Services from scratch
l By wrapping a specific set of Policy Components, a Service can coordinate the flow of a request, fromauthentication, to role and health evaluation, to determination of enforcement parameters for network access.
The following image illustrates and describe the basic Policy Manager flow of control and its underlying architecture.
38 | PolicyManager PolicyModel ClearPassPolicyManager 6.2 | User Guide
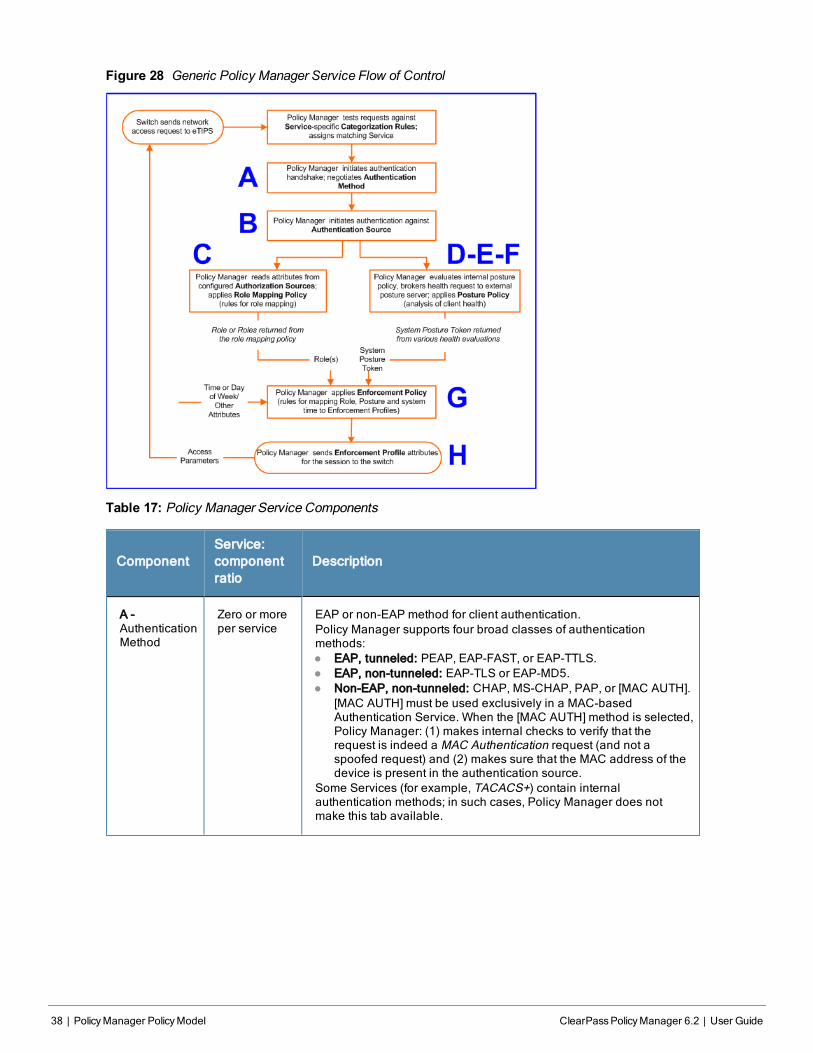
Figure 28 Generic Policy Manager Service Flow of Control
Table 17: Policy Manager Service Components
ComponentService:componentratio
Description
A -AuthenticationMethod
Zero or moreper service
EAP or non-EAP method for client authentication.Policy Manager supports four broad classes of authenticationmethods:l EAP, tunneled: PEAP, EAP-FAST, or EAP-TTLS.l EAP, non-tunneled: EAP-TLS or EAP-MD5.l Non-EAP, non-tunneled: CHAP, MS-CHAP, PAP, or [MAC AUTH].
[MAC AUTH] must be used exclusively in a MAC-basedAuthentication Service. When the [MAC AUTH] method is selected,Policy Manager: (1) makes internal checks to verify that therequest is indeed a MAC Authentication request (and not aspoofed request) and (2) makes sure that the MAC address of thedevice is present in the authentication source.
Some Services (for example, TACACS+) contain internalauthentication methods; in such cases, Policy Manager does notmake this tab available.
ComponentService:componentratio
Description
B -AuthenticationSource
Zero or moreper service
An Authentication Source is the identity repository against whichPolicy Manager verifies identity. It supports these AuthenticationSource types:l Microsoft® Active Directory®
l any LDAP compliant directoryl RSA or other RADIUS-based token serversl SQL database, including the local user store.l Static Host Lists, in the case of MAC-based Authentication of
managed devices.
C -AuthorizationSource
One or moreperAuthenticationSource andzero or moreper service
An Authorization Source collects attributes for use in Role MappingRules. You specify the attributes you want to collect when youconfigure the authentication source. Policy Manager supports thefollowing authorization source types:l Microsoft Active Directoryl any LDAP compliant directoryl RSA or other RADIUS-based token serversl SQL database, including the local user store.
C - RoleMappingPolicy
Zero or oneper service
Policy Manager evaluates Requests against Role Mapping Policyrules to match Clients to Role(s). All rules are evaluated and PolicyManager may return more than one Role. If no rules match, therequest takes the configured Default Role.Some Services (for example, MAC-based Authentication) may handlerole mapping differently:l For MAC-based Authentication Services, where role information is
not available from an authentication source, an Audit Server candetermine role by applying post-audit rules against the clientattributes gathered during the audit.
D - InternalPosturePolicies
Zero or moreper service
An Internal Posture Policy tests Requests against internal Posturerules to assess health. Posture rule conditions can contain attributespresent in vendor-specific posture dictionaries.
E - PostureServers
Zero or moreper service
Posture servers evaluate client health based on specified vendor-specific posture credentials, typically posture credentials that cannotbe evaluated internally by Policy Manager (that is, not by internalposture policies).Currently, Policy Manager supports two forms of posture serverinterfaces: RADIUS, and GAMEv2 posture servers.
F - AuditServers
Zero or moreper service
Audit servers evaluate the health of clients that do not have aninstalled agent, or which cannot respond to Policy Managerinteractions. Audit servers typically operate in lieu of authenticationmethods, authentication sources, internal posture policies andposture server.In addition to returning posture tokens, Audit Servers can containpost-audit rules that map results from the audit into Roles.
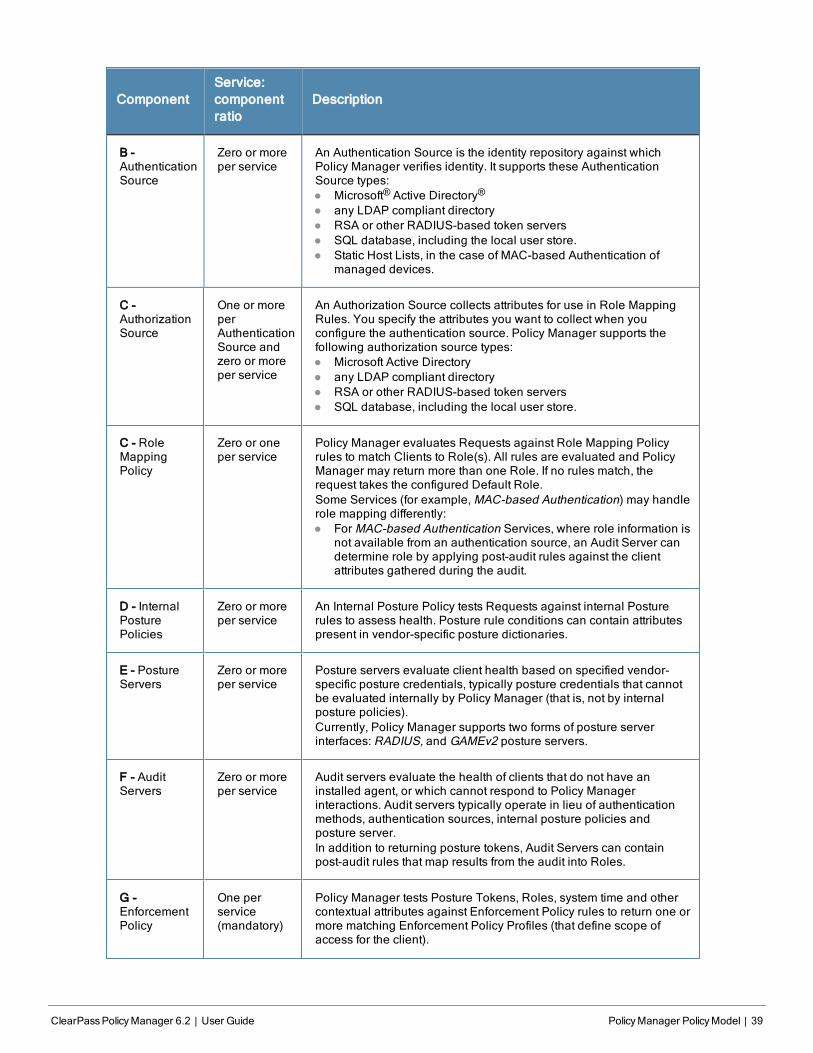
G -EnforcementPolicy
One perservice(mandatory)
Policy Manager tests Posture Tokens, Roles, system time and othercontextual attributes against Enforcement Policy rules to return one ormore matching Enforcement Policy Profiles (that define scope ofaccess for the client).
ClearPassPolicyManager 6.2 | User Guide PolicyManager PolicyModel | 39
40 | PolicyManager PolicyModel ClearPassPolicyManager 6.2 | User Guide
ComponentService:componentratio
Description
H -EnforcementProfile
One or moreper service
Enforcement Policy Profiles contain attributes that define a client’sscope of access for the session. Policy Manager returns theseEnforcement Profile attributes to the switch.
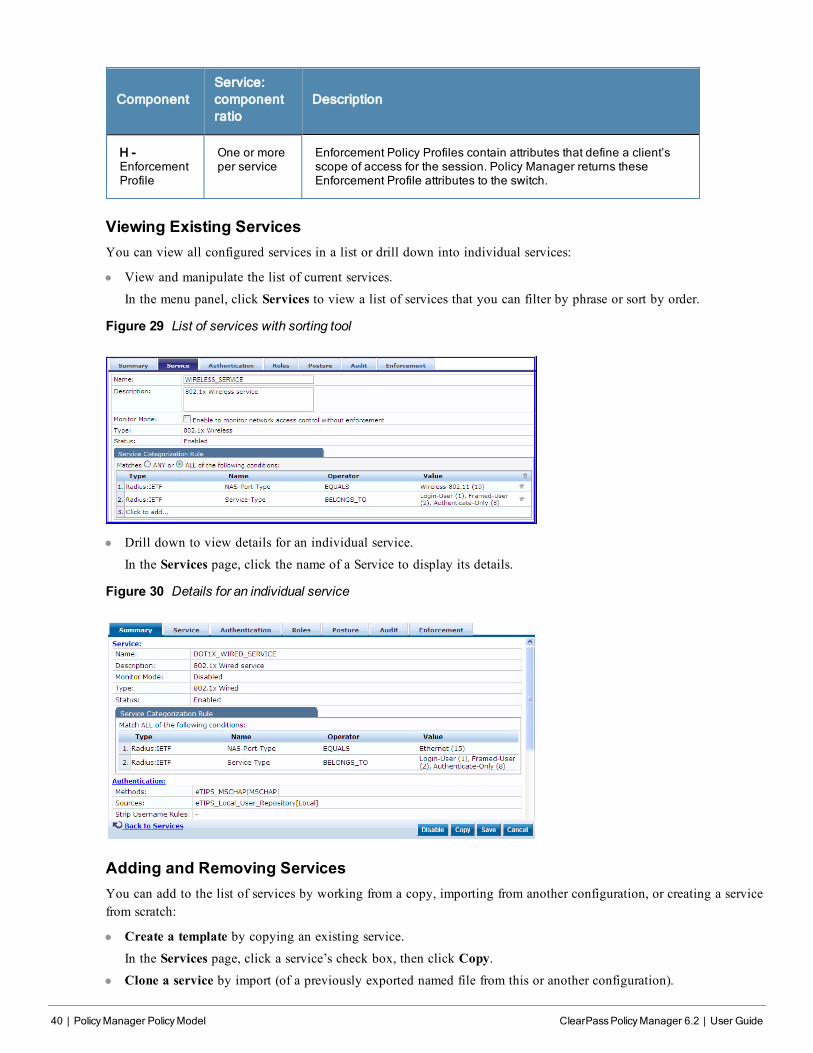
Viewing Existing ServicesYou can view all configured services in a list or drill down into individual services:
l View and manipulate the list of current services.
In the menu panel, click Services to view a list of services that you can filter by phrase or sort by order.
Figure 29 List of services with sorting tool
l Drill down to view details for an individual service.
In the Services page, click the name of a Service to display its details.
Figure 30 Details for an individual service
Adding and Removing ServicesYou can add to the list of services by working from a copy, importing from another configuration, or creating a servicefrom scratch:
l Create a template by copying an existing service.In the Services page, click a service’s check box, then click Copy.
l Clone a service by import (of a previously exported named file from this or another configuration).
In the Services page, click a service’s check box, then click the Export a Service link and provide the outputfilepath. Later, you can import this service by clicking Import a Service and providing the filepath.
l Create a new service that you will configure from scratch.
In the Services page, click Add a Service, then follow the configuration wizard from component to component byclicking Next as you complete each tab.
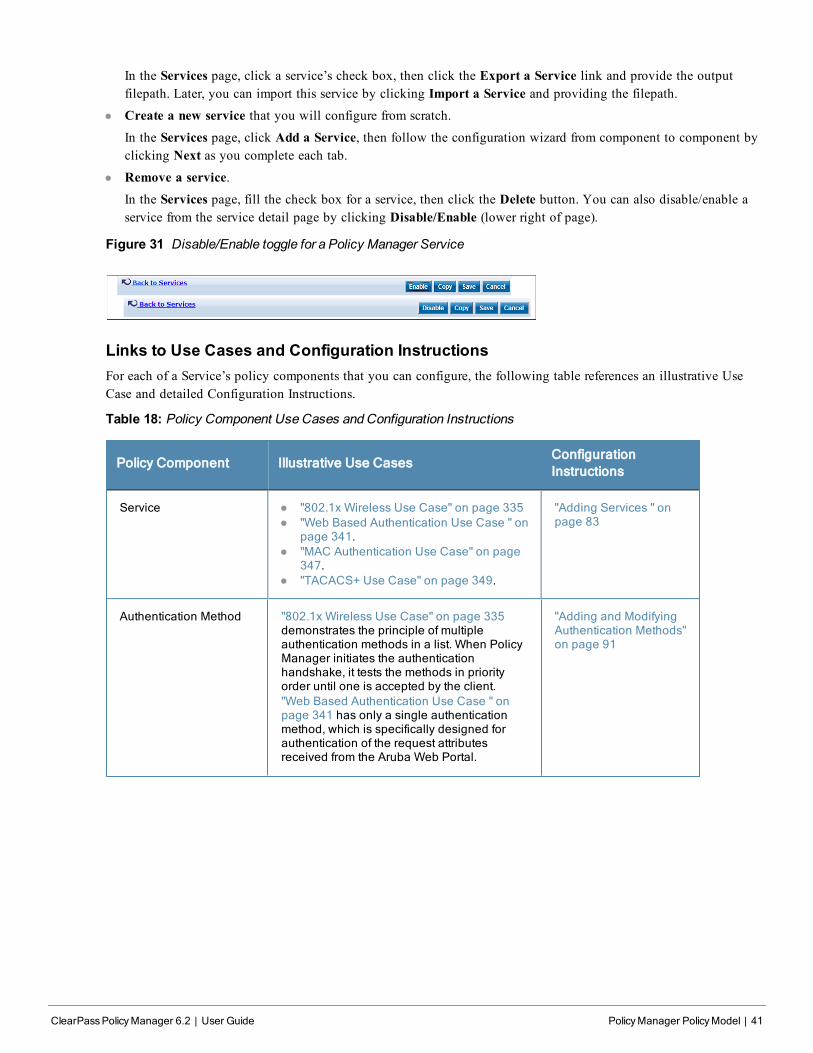
l Remove a service.In the Services page, fill the check box for a service, then click the Delete button. You can also disable/enable aservice from the service detail page by clicking Disable/Enable (lower right of page).
Figure 31 Disable/Enable toggle for a Policy Manager Service
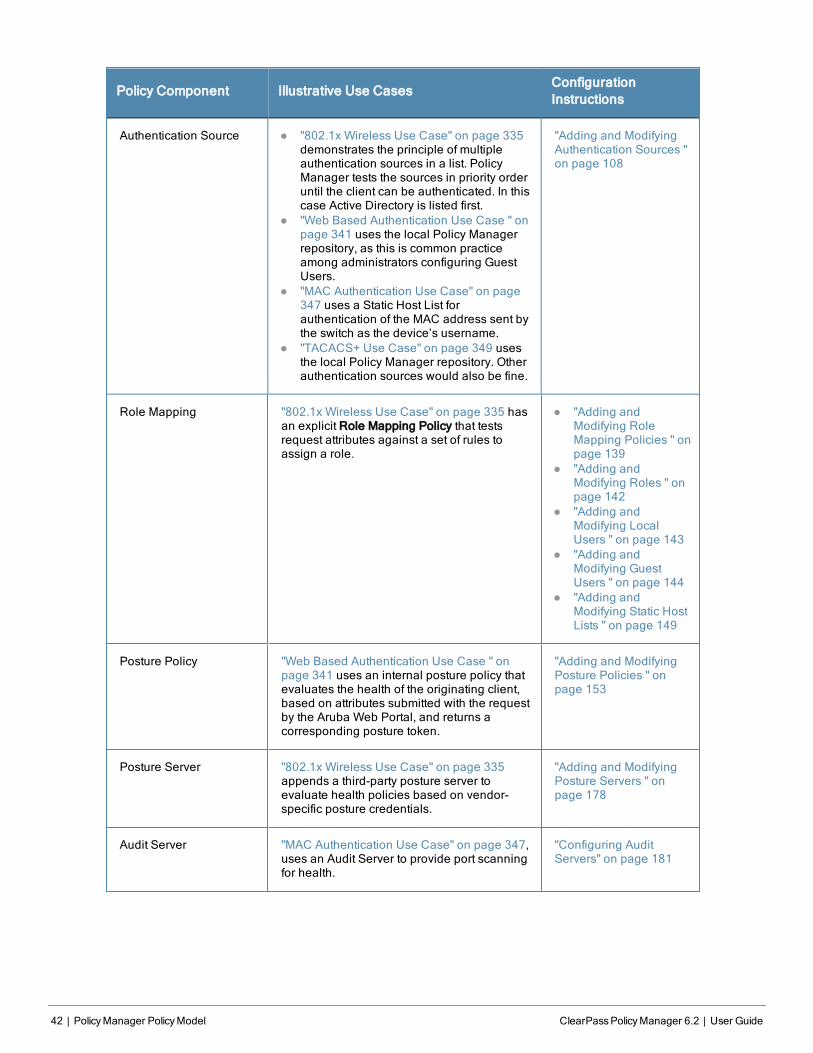
Links to Use Cases and Configuration InstructionsFor each of a Service’s policy components that you can configure, the following table references an illustrative UseCase and detailed Configuration Instructions.
Table 18: Policy Component Use Cases and Configuration Instructions
Policy Component Illustrative Use CasesConfigurationInstructions
Service l "802.1x Wireless Use Case" on page 335l "Web Based Authentication Use Case " on
page 341.l "MAC Authentication Use Case" on page
347.l "TACACS+ Use Case" on page 349.
"Adding Services " onpage 83
Authentication Method "802.1x Wireless Use Case" on page 335demonstrates the principle of multipleauthentication methods in a list. When PolicyManager initiates the authenticationhandshake, it tests the methods in priorityorder until one is accepted by the client."Web Based Authentication Use Case " onpage 341 has only a single authenticationmethod, which is specifically designed forauthentication of the request attributesreceived from the Aruba Web Portal.
"Adding and ModifyingAuthentication Methods"on page 91
ClearPassPolicyManager 6.2 | User Guide PolicyManager PolicyModel | 41
42 | PolicyManager PolicyModel ClearPassPolicyManager 6.2 | User Guide
Policy Component Illustrative Use CasesConfigurationInstructions
Authentication Source l "802.1x Wireless Use Case" on page 335demonstrates the principle of multipleauthentication sources in a list. PolicyManager tests the sources in priority orderuntil the client can be authenticated. In thiscase Active Directory is listed first.
l "Web Based Authentication Use Case " onpage 341 uses the local Policy Managerrepository, as this is common practiceamong administrators configuring GuestUsers.
l "MAC Authentication Use Case" on page347 uses a Static Host List forauthentication of the MAC address sent bythe switch as the device’s username.
l "TACACS+ Use Case" on page 349 usesthe local Policy Manager repository. Otherauthentication sources would also be fine.
"Adding and ModifyingAuthentication Sources "on page 108
Role Mapping "802.1x Wireless Use Case" on page 335 hasan explicit Role Mapping Policy that testsrequest attributes against a set of rules toassign a role.
l "Adding andModifying RoleMapping Policies " onpage 139
l "Adding andModifying Roles " onpage 142
l "Adding andModifying LocalUsers " on page 143
l "Adding andModifying GuestUsers " on page 144
l "Adding andModifying Static HostLists " on page 149
Posture Policy "Web Based Authentication Use Case " onpage 341 uses an internal posture policy thatevaluates the health of the originating client,based on attributes submitted with the requestby the Aruba Web Portal, and returns acorresponding posture token.
"Adding and ModifyingPosture Policies " onpage 153
Posture Server "802.1x Wireless Use Case" on page 335appends a third-party posture server toevaluate health policies based on vendor-specific posture credentials.
"Adding and ModifyingPosture Servers " onpage 178
Audit Server "MAC Authentication Use Case" on page 347,uses an Audit Server to provide port scanningfor health.
"Configuring AuditServers" on page 181
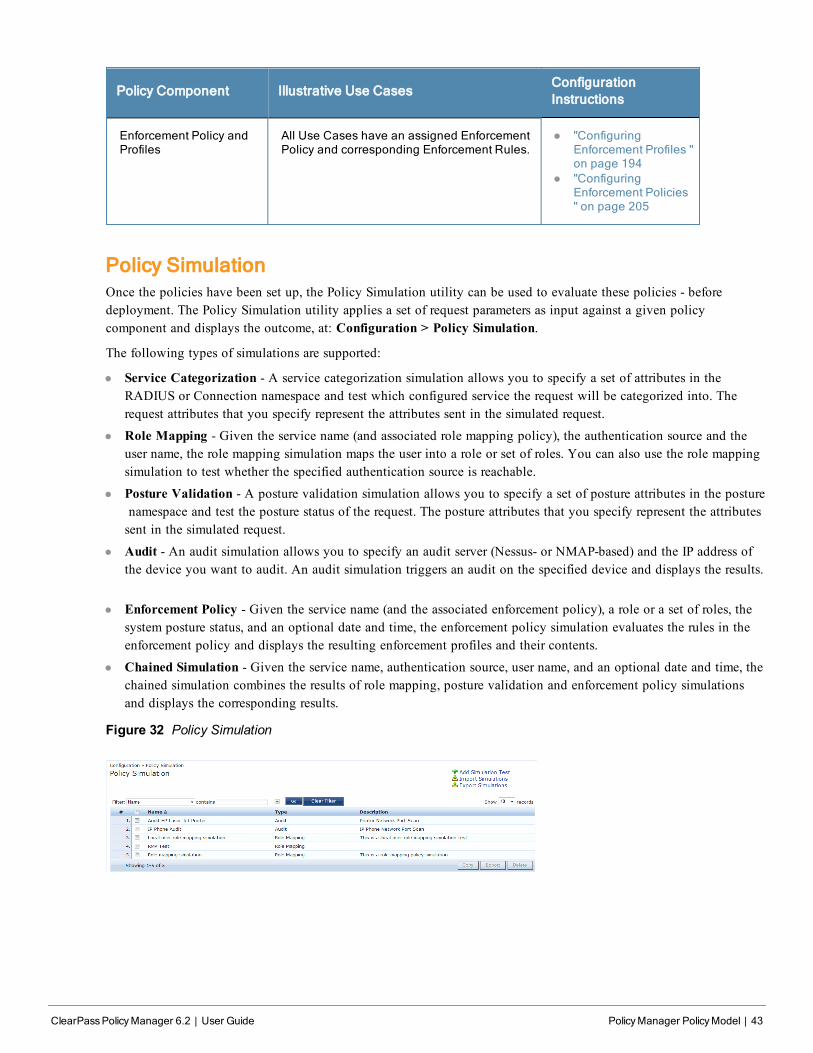
Policy Component Illustrative Use CasesConfigurationInstructions
Enforcement Policy andProfiles
All Use Cases have an assigned EnforcementPolicy and corresponding Enforcement Rules.
l "ConfiguringEnforcement Profiles "on page 194
l "ConfiguringEnforcement Policies" on page 205
Policy SimulationOnce the policies have been set up, the Policy Simulation utility can be used to evaluate these policies - beforedeployment. The Policy Simulation utility applies a set of request parameters as input against a given policycomponent and displays the outcome, at: Configuration > Policy Simulation.
The following types of simulations are supported:
l Service Categorization - A service categorization simulation allows you to specify a set of attributes in theRADIUS or Connection namespace and test which configured service the request will be categorized into. Therequest attributes that you specify represent the attributes sent in the simulated request.
l Role Mapping - Given the service name (and associated role mapping policy), the authentication source and theuser name, the role mapping simulation maps the user into a role or set of roles. You can also use the role mappingsimulation to test whether the specified authentication source is reachable.
l Posture Validation - A posture validation simulation allows you to specify a set of posture attributes in the posturenamespace and test the posture status of the request. The posture attributes that you specify represent the attributessent in the simulated request.
l Audit - An audit simulation allows you to specify an audit server (Nessus- or NMAP-based) and the IP address ofthe device you want to audit. An audit simulation triggers an audit on the specified device and displays the results.
l Enforcement Policy - Given the service name (and the associated enforcement policy), a role or a set of roles, thesystem posture status, and an optional date and time, the enforcement policy simulation evaluates the rules in theenforcement policy and displays the resulting enforcement profiles and their contents.
l Chained Simulation - Given the service name, authentication source, user name, and an optional date and time, thechained simulation combines the results of role mapping, posture validation and enforcement policy simulationsand displays the corresponding results.
Figure 32 Policy Simulation
ClearPassPolicyManager 6.2 | User Guide PolicyManager PolicyModel | 43

44 | PolicyManager PolicyModel ClearPassPolicyManager 6.2 | User Guide
Table 19: Policy Simulation
Container Description
Add SimulationTest
Opens the Add Simulation Test page.
ImportSimulations
Opens the Import Simulations popup.
ExportSimulations
Opens the Export Simulations popup.
Filter Select the filter by which to constrain the display of simulation data.
Copy Make a copy the selected policy simulation. The copied simulation is renamed with aprefix of Copy_Of_.
Export Opens the Export popup.
Delete Click to delete a selected (check box on left) Policy Simulation.
Add Simulation TestNavigate to Configuration > Policy Simulation and click on the Add Simulation link. Depending on the simulationtype selected the contents of the Simulation tab changes.
Table 20: Add Policy Simulation (Simulation Tab)
Container Description
Name/Description Specify name and description (freeform).
TypeServiceCategorization.
l Input (Simulation tab): Select Date and Time. (optional - use if you have timebased service rules)
l Input (Attributes tab): Use the Rules Editor to create a request with the attributesyou want to test. All namespaces relevant to service rules creation are loaded inthe Attributes editor.
l Returns (Results tab): Service Name (or status message in case of no match)
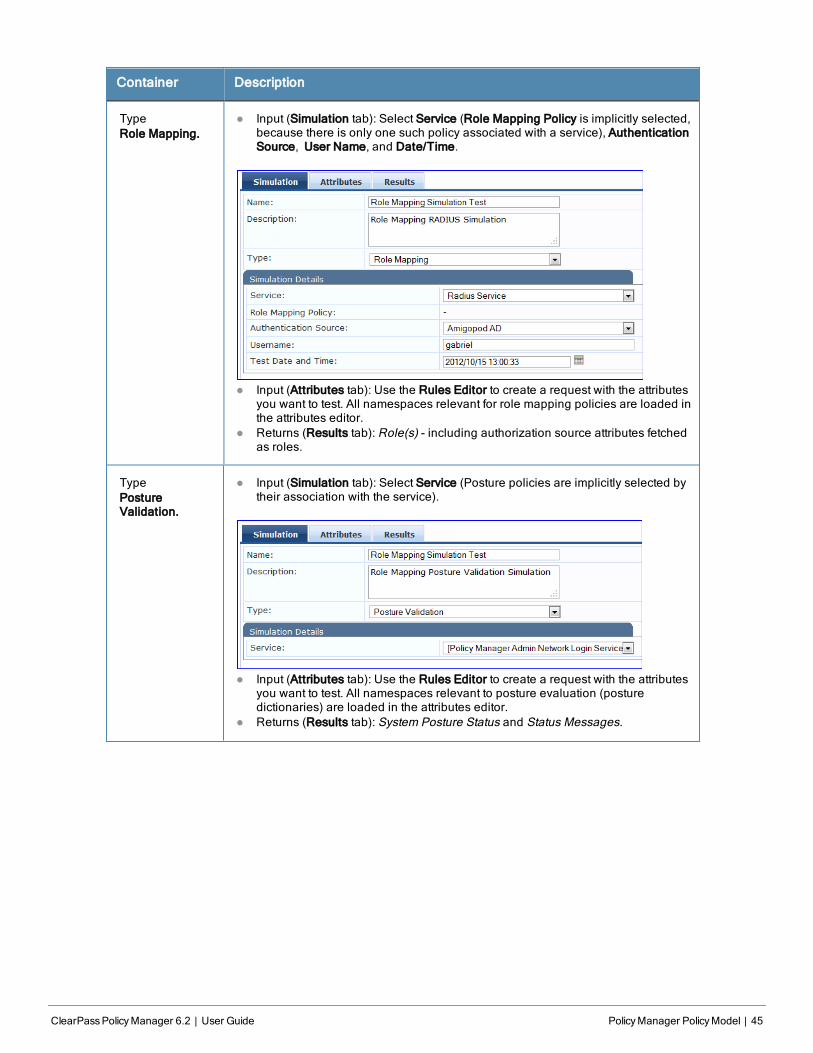
Container Description
TypeRole Mapping.
l Input (Simulation tab): Select Service (Role Mapping Policy is implicitly selected,because there is only one such policy associated with a service), AuthenticationSource, User Name, and Date/Time.
l Input (Attributes tab): Use the Rules Editor to create a request with the attributesyou want to test. All namespaces relevant for role mapping policies are loaded inthe attributes editor.
l Returns (Results tab): Role(s) - including authorization source attributes fetchedas roles.
TypePostureValidation.
l Input (Simulation tab): Select Service (Posture policies are implicitly selected bytheir association with the service).
l Input (Attributes tab): Use the Rules Editor to create a request with the attributesyou want to test. All namespaces relevant to posture evaluation (posturedictionaries) are loaded in the attributes editor.
l Returns (Results tab): System Posture Status and Status Messages.
ClearPassPolicyManager 6.2 | User Guide PolicyManager PolicyModel | 45
46 | PolicyManager PolicyModel ClearPassPolicyManager 6.2 | User Guide
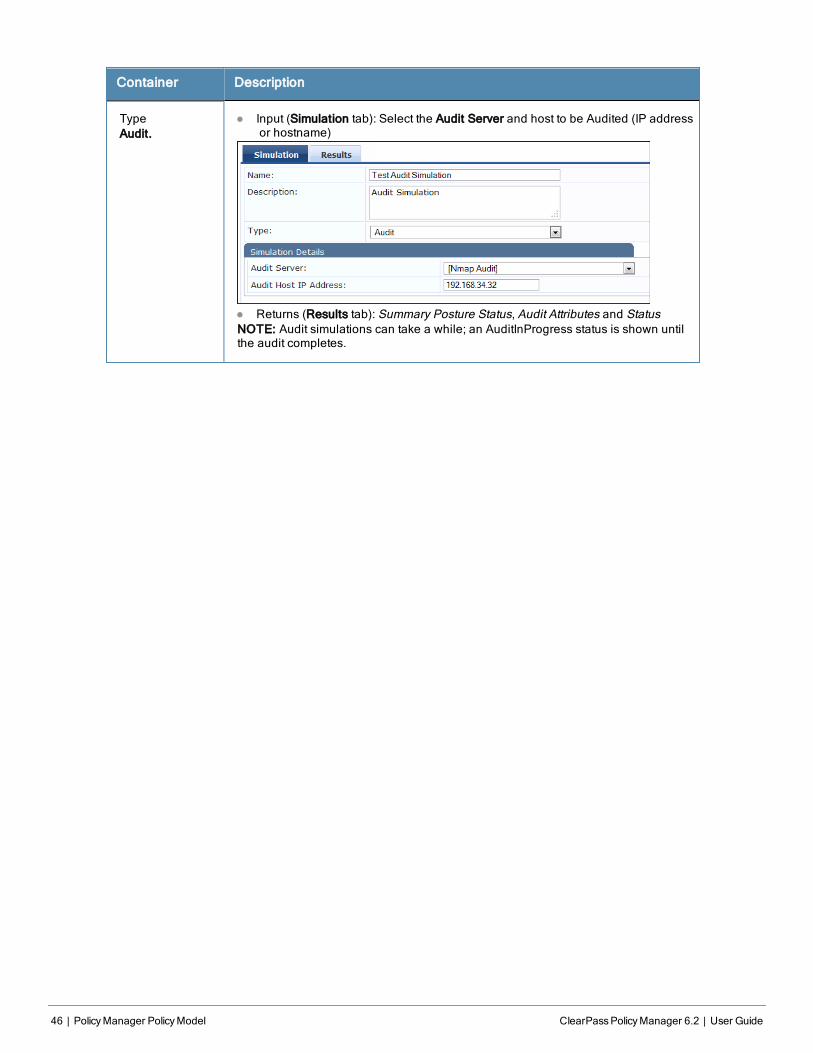
Container Description
TypeAudit.
l Input (Simulation tab): Select the Audit Server and host to be Audited (IP addressor hostname)
l Returns (Results tab): Summary Posture Status, Audit Attributes and StatusNOTE: Audit simulations can take a while; an AuditInProgress status is shown untilthe audit completes.
Container Description
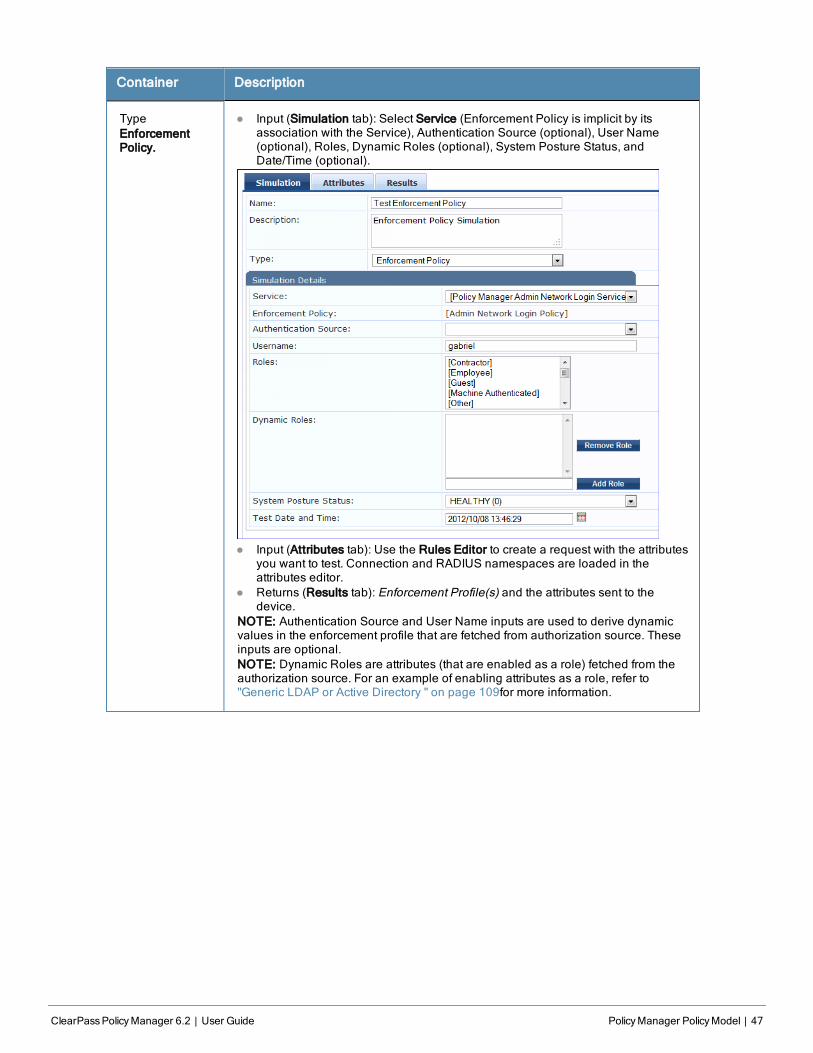
TypeEnforcementPolicy.
l Input (Simulation tab): Select Service (Enforcement Policy is implicit by itsassociation with the Service), Authentication Source (optional), User Name(optional), Roles, Dynamic Roles (optional), System Posture Status, andDate/Time (optional).
l Input (Attributes tab): Use the Rules Editor to create a request with the attributesyou want to test. Connection and RADIUS namespaces are loaded in theattributes editor.
l Returns (Results tab): Enforcement Profile(s) and the attributes sent to thedevice.
NOTE: Authentication Source and User Name inputs are used to derive dynamicvalues in the enforcement profile that are fetched from authorization source. Theseinputs are optional.NOTE: Dynamic Roles are attributes (that are enabled as a role) fetched from theauthorization source. For an example of enabling attributes as a role, refer to"Generic LDAP or Active Directory " on page 109for more information.
ClearPassPolicyManager 6.2 | User Guide PolicyManager PolicyModel | 47
48 | PolicyManager PolicyModel ClearPassPolicyManager 6.2 | User Guide
Container Description
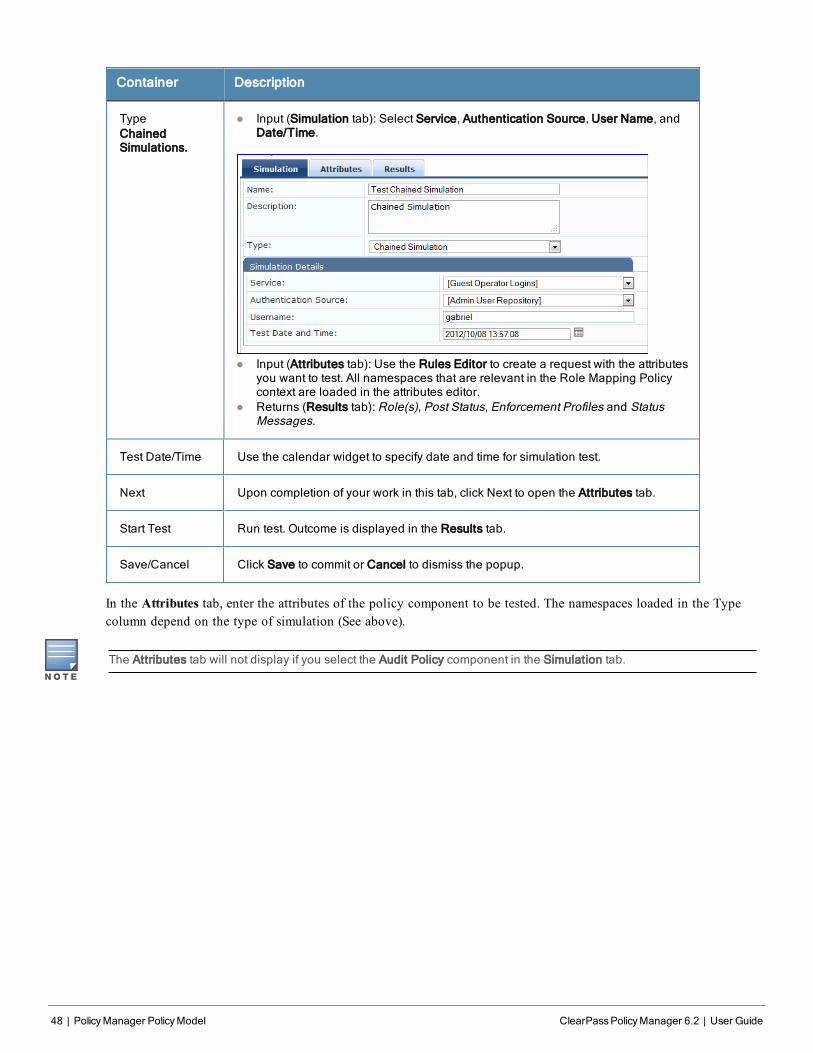
TypeChainedSimulations.
l Input (Simulation tab): Select Service, Authentication Source, User Name, andDate/Time.
l Input (Attributes tab): Use the Rules Editor to create a request with the attributesyou want to test. All namespaces that are relevant in the Role Mapping Policycontext are loaded in the attributes editor.
l Returns (Results tab): Role(s), Post Status, Enforcement Profiles and StatusMessages.
Test Date/Time Use the calendar widget to specify date and time for simulation test.
Next Upon completion of your work in this tab, click Next to open the Attributes tab.
Start Test Run test. Outcome is displayed in the Results tab.
Save/Cancel Click Save to commit or Cancel to dismiss the popup.
In the Attributes tab, enter the attributes of the policy component to be tested. The namespaces loaded in the Typecolumn depend on the type of simulation (See above).
The Attributes tab will not display if you select the Audit Policy component in the Simulation tab.
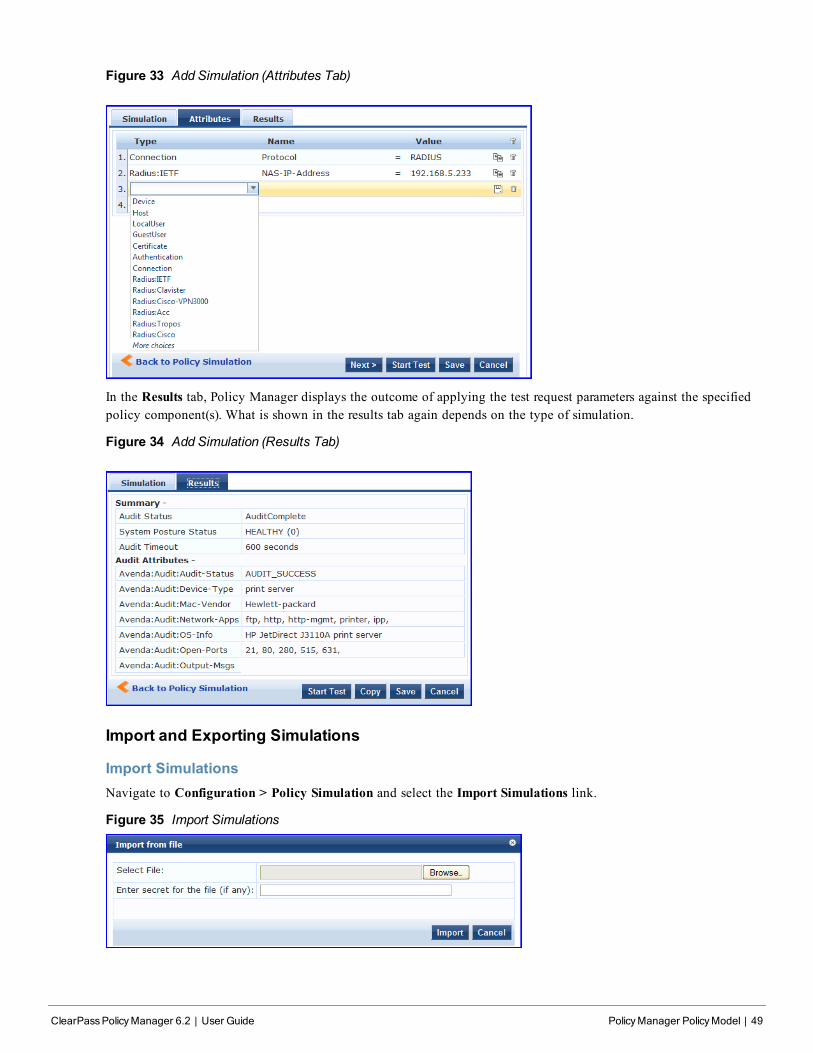
Figure 33 Add Simulation (Attributes Tab)
In the Results tab, Policy Manager displays the outcome of applying the test request parameters against the specifiedpolicy component(s). What is shown in the results tab again depends on the type of simulation.
Figure 34 Add Simulation (Results Tab)
Import and Exporting Simulations
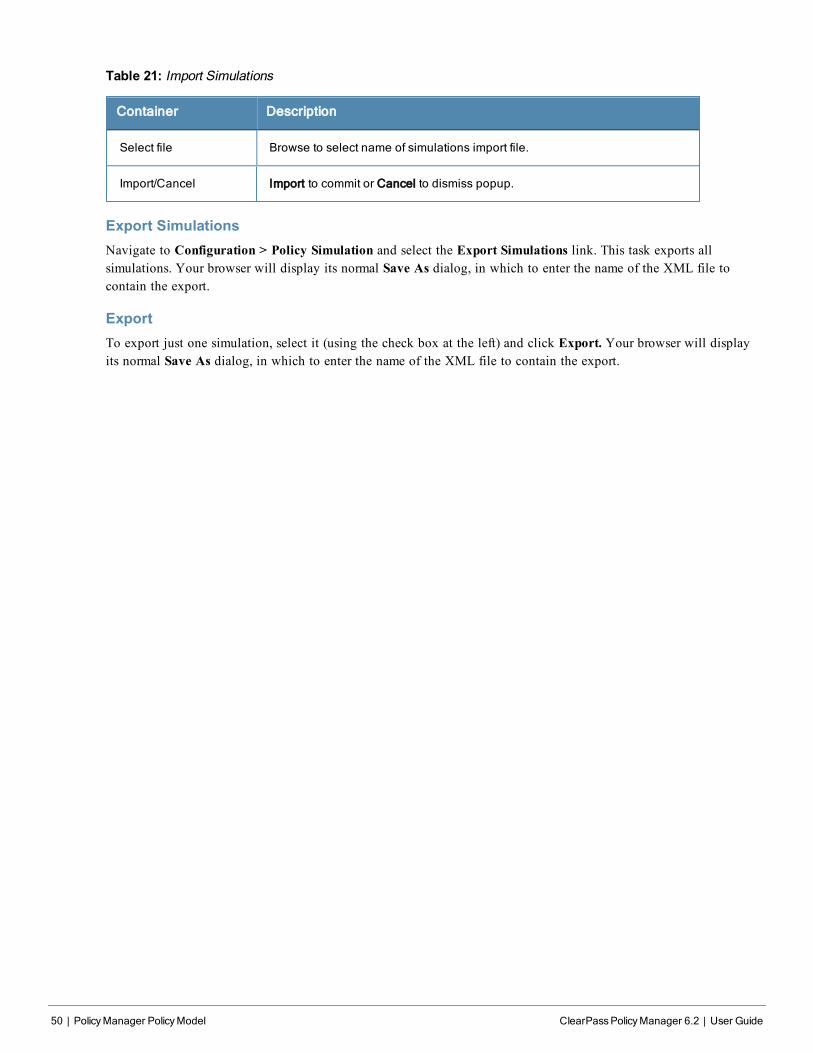
Import SimulationsNavigate to Configuration > Policy Simulation and select the Import Simulations link.
Figure 35 Import Simulations
ClearPassPolicyManager 6.2 | User Guide PolicyManager PolicyModel | 49
50 | PolicyManager PolicyModel ClearPassPolicyManager 6.2 | User Guide
Table 21: Import Simulations
Container Description
Select file Browse to select name of simulations import file.
Import/Cancel Import to commit or Cancel to dismiss popup.
Export SimulationsNavigate to Configuration > Policy Simulation and select the Export Simulations link. This task exports allsimulations. Your browser will display its normal Save As dialog, in which to enter the name of the XML file tocontain the export.
ExportTo export just one simulation, select it (using the check box at the left) and click Export. Your browser will displayits normal Save As dialog, in which to enter the name of the XML file to contain the export.
ClearPassPolicyManager 6.2 | User Guide ClearPassPolicyManager Profile | 51
Chapter 6
ClearPass Policy Manager Profile
Profile is a ClearPass Policy Manager module that automatically classifies endpoints using attributes obtained fromsoftware components called Collectors. It can be used to implement “Bring Your Own Device” (BYOD) flows, whereaccess has to be controlled based on the type of the device and the identity of the user. While offering a more efficientand accurate way to differentiate access by endpoint type (laptop versus tablet), ClearPass Profile associates anendpoint with a specific user or location and secures access for devices like printers and IP cameras. Profile can be setup in a network with minimal amount of configuration.
Device ProfileA device profile is a hierarchical model consisting of 3 elements - DeviceCategory, DeviceFamily, and DeviceNamederived by Profile from endpoint attributes.
l DeviceCategory - This is the broadest classification of a device. It denotes the type of the device. Examples includeComputer, Smartdevice, Printer, Access Point, etc.
l DeviceFamily - This element classifies devices into a category and is organized based on the type of operatingsystem or vendor. For example, when the category is Computer, ClearPass Policy Manager could show aDeviceFamily of Windows, Linux, or Mac OS X, and when the Category is Computer, ClearPass Policy Managercould show a DeviceFamily of Apple or Android.
l DeviceName - Devices in a family are further organized based on more granular details, such as operating systemversion. For example, in a DeviceFamily of Windows, ClearPass Policy Manager could show a DeviceName ofWindows 7 or Windows 2008 Server.
This hierarchical model provides a structured view of all endpoints accessing the network.
In addition to the these, Profile also collects and stores the following:
l IP Address
l Hostname
l MAC Vendor
l Timestamp when the device was first discovered
l Timestamp when the device was last seen
CollectorsCollectors are network elements that provide data to profile endpoints. The following collectors send endpointattributes to Profile.
l DHCP
l ClearPass Onboard
l HTTP User Agent
l MAC OUI - Acquired via various authentication mechanisms such as 802.1X, MAC authentication, etc.
l ActiveSync plugin
l CPPM OnGuard
l SNMP
l Subnet Scanner
52 | ClearPassPolicyManager Profile ClearPassPolicyManager 6.2 | User Guide
DHCPDHCP attributes such as option55 (parameter request list), option60 (vendor class) and options list from DISCOVERand REQUEST packets can uniquely fingerprint most devices that use the DHCP mechanism to acquire an IP addresson the network. Switches and controllers can be configured to forward DHCP packets such as DISCOVER, REQUESTand INFORM to CPPM. These DHCP packets are decoded by CPPM to arrive at the device category, family, and name.Apart from fingerprints, DHCP also provides hostname and IP address.
Sending DHCP Traffic to CPPMPerform the following steps to configure your Aruba Controller and Cisco Switch to send DHCP Traffic to CPPM.
interface <vlan_name>
ip address <ip_addr> <netmask>
ip helper-address <dhcp_server_ip>
ip helper-address <cppm_ip>end
end
Notice that multiple “ip helper-address” statements can be configured to send DHCP packets to servers other thanthe DHCP server.
ClearPass OnboardClearPass Onboard collects rich and authentic device information from all devices during the onboarding process.Onboard then posts this information to Profile via the Profile API. Because the information collected is definitive,Profile can directly classify these devices into their Category, Family, and Name without having to rely on any otherfingerprinting information.
HTTP User-AgentIn some cases, DHCP fingerprint alone cannot fully classify a device. A common example is the Apple® family ofsmart devices; DHCP fingerprints cannot distinguish between an iPad® and an iPhone®. In these scenarios, User-Agentstrings sent by browsers in the HTTP protocol are useful to further refine classification results.
User-Agent strings are collected from the following:
l ClearPass Guest (Amigopod)
l ClearPass Onboard
l Aruba controller through IF-MAP interface (future)
ConfigurationNavigate to the Administrator > Network Setup > ClearPass page to configure ClearPass Onboard and ClearPassGuest to send HTTP User Agent string to Profile. The screenshot below shows how the CPPM publisher and Profilenodes configured in ClearPass Guest.
MAC OUIMAC OUI can be useful in some cases to better classify endpoints. An example is Android™ devices where DHCPfingerprints can only classify a device as generic android, but it cannot provide more details regarding vendor.Combining this information with MAC OUI, profiler can classify a device as HTC™ Android, Samsung™ Android,Motorola® Android etc. MAC OUI is also useful to profile devices like printers which may be configured with staticIP addresses.
ActiveSync PluginActiveSync plugin is software provided by Aruba to be installed on Microsoft Exchange servers. When a devicecommunicates with exchange server using active sync protocol, it provides attributes like device-type and user-agent.
These attributes are collected by the plugin software and is send to CPPM profiler. Profiler uses dictionaries to deriveprofiles from these attributes.
CPPMOnGuardClearPass Onguard agents perform advanced endpoint posture assessment. It could collect and send OS details fromendpoints during authentication. Profiler uses os_type attribute from Onguard to derive a profile.
SNMPEndpoint information obtained by reading SNMP MIBs of network devices is used to discover and profile static IPdevices in the network. The following information read via SNMP is used:
l sysDescr information from RFC1213 MIB is used to profile the device. This is used both for profilingswitches/controllers/routers configured in CPPM, and for profiling printers and other static IP devices discoveredthrough SNMP or subnet scans.
l cdpCacheTable information read from CDP (Cisco Discovery Protocol) capable devices is used to discoverneighbour devices connected to switch/controller configured in CPPM
l lldpRemTable information read from LLDP (Link Layer Discovery Protocol) capable devices is used to discoverand profile neighbour devices connected to switch/controller configured in CPPM
l ARPtable read from network devices is used as a means to discover endpoints in the network.
Note that the SNMP based mechanism is only capable of profiling devices if they respond to SNMP, or if the deviceadvertises its capability via LLDP. When performing SNMP reads for a device, CPPM uses SNMP Read credentialsconfigured in Network Devices, or defaults to using SNMP v2c with "public" community string.
Network Devices configured with SNMP Read enabled are polled periodically for updates based on the time intervalconfigured in Administration > Server Configuration > Service Parameters tab > ClearPass network servicesoption > Device Info Poll Interval.
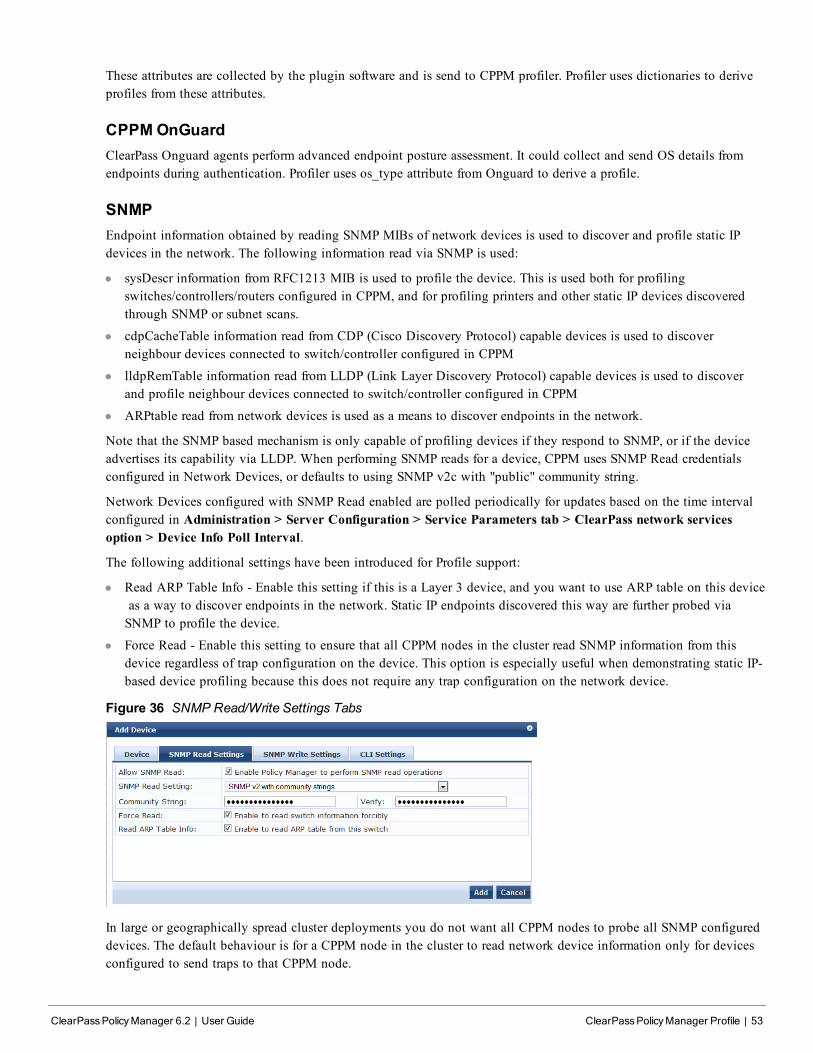
The following additional settings have been introduced for Profile support:
l Read ARP Table Info - Enable this setting if this is a Layer 3 device, and you want to use ARP table on this deviceas a way to discover endpoints in the network. Static IP endpoints discovered this way are further probed viaSNMP to profile the device.
l Force Read - Enable this setting to ensure that all CPPM nodes in the cluster read SNMP information from thisdevice regardless of trap configuration on the device. This option is especially useful when demonstrating static IP-based device profiling because this does not require any trap configuration on the network device.
Figure 36 SNMP Read/Write Settings Tabs
In large or geographically spread cluster deployments you do not want all CPPM nodes to probe all SNMP configureddevices. The default behaviour is for a CPPM node in the cluster to read network device information only for devicesconfigured to send traps to that CPPM node.
ClearPassPolicyManager 6.2 | User Guide ClearPassPolicyManager Profile | 53
54 | ClearPassPolicyManager Profile ClearPassPolicyManager 6.2 | User Guide
Subnet Scan
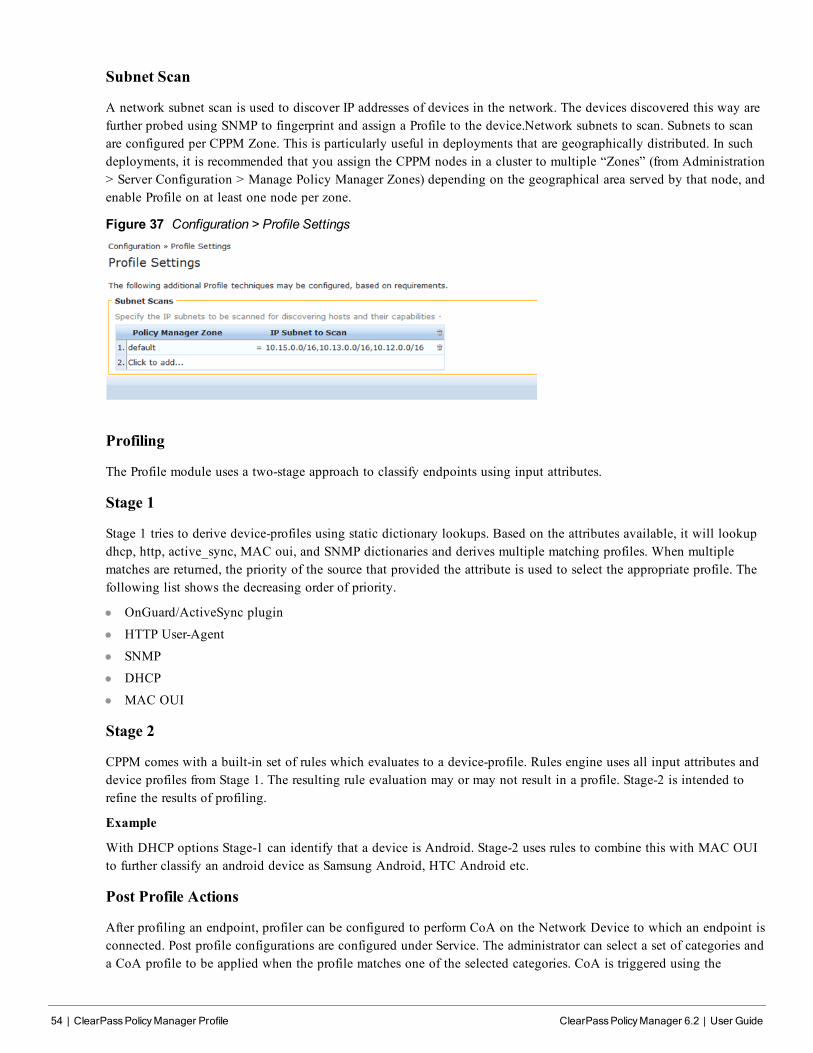
A network subnet scan is used to discover IP addresses of devices in the network. The devices discovered this way arefurther probed using SNMP to fingerprint and assign a Profile to the device.Network subnets to scan. Subnets to scanare configured per CPPM Zone. This is particularly useful in deployments that are geographically distributed. In suchdeployments, it is recommended that you assign the CPPM nodes in a cluster to multiple “Zones” (from Administration> Server Configuration > Manage Policy Manager Zones) depending on the geographical area served by that node, andenable Profile on at least one node per zone.
Figure 37 Configuration > Profile Settings
Profiling
The Profile module uses a two-stage approach to classify endpoints using input attributes.
Stage 1
Stage 1 tries to derive device-profiles using static dictionary lookups. Based on the attributes available, it will lookupdhcp, http, active_sync, MAC oui, and SNMP dictionaries and derives multiple matching profiles. When multiplematches are returned, the priority of the source that provided the attribute is used to select the appropriate profile. Thefollowing list shows the decreasing order of priority.
l OnGuard/ActiveSync plugin
l HTTP User-Agent
l SNMP
l DHCP
l MAC OUI
Stage 2
CPPM comes with a built-in set of rules which evaluates to a device-profile. Rules engine uses all input attributes anddevice profiles from Stage 1. The resulting rule evaluation may or may not result in a profile. Stage-2 is intended torefine the results of profiling.
Example
With DHCP options Stage-1 can identify that a device is Android. Stage-2 uses rules to combine this with MAC OUIto further classify an android device as Samsung Android, HTC Android etc.
Post Profile Actions
After profiling an endpoint, profiler can be configured to perform CoA on the Network Device to which an endpoint isconnected. Post profile configurations are configured under Service. The administrator can select a set of categories anda CoA profile to be applied when the profile matches one of the selected categories. CoA is triggered using the
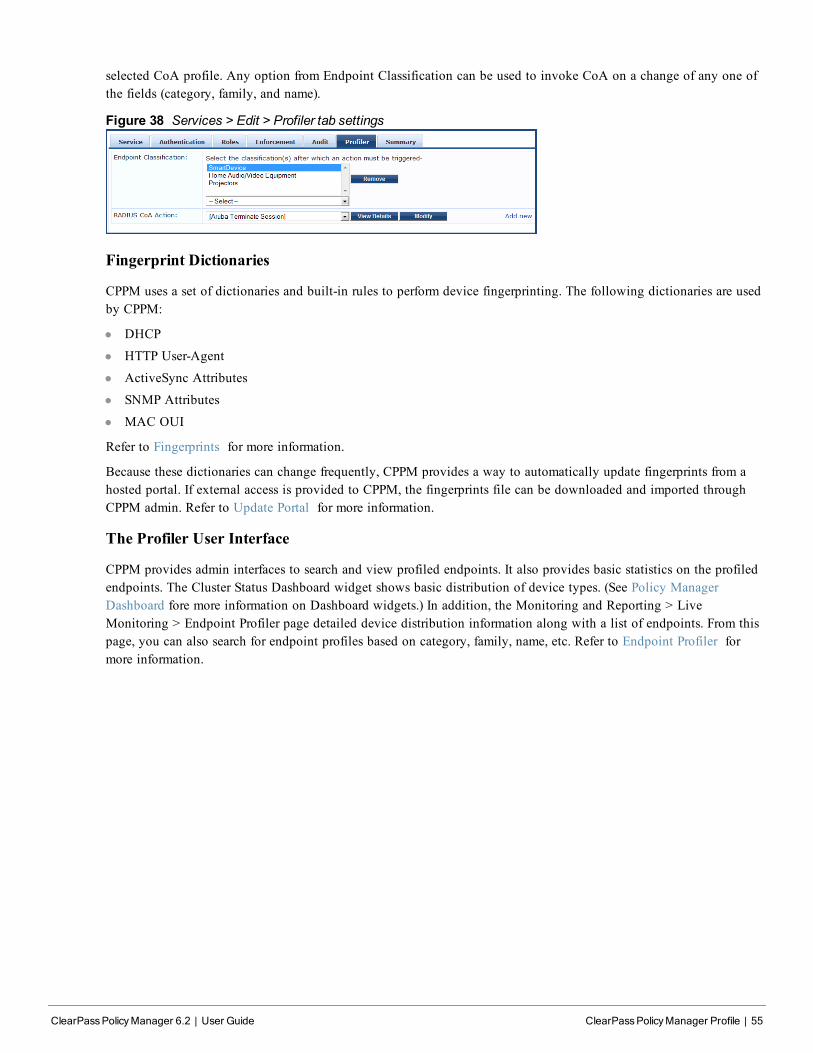
selected CoA profile. Any option from Endpoint Classification can be used to invoke CoA on a change of any one ofthe fields (category, family, and name).
Figure 38 Services > Edit > Profiler tab settings
Fingerprint Dictionaries
CPPM uses a set of dictionaries and built-in rules to perform device fingerprinting. The following dictionaries are usedby CPPM:
l DHCP
l HTTP User-Agent
l ActiveSync Attributes
l SNMP Attributes
l MAC OUI
Refer to Fingerprints for more information.
Because these dictionaries can change frequently, CPPM provides a way to automatically update fingerprints from ahosted portal. If external access is provided to CPPM, the fingerprints file can be downloaded and imported throughCPPM admin. Refer to Update Portal for more information.
The Profiler User Interface
CPPM provides admin interfaces to search and view profiled endpoints. It also provides basic statistics on the profiledendpoints. The Cluster Status Dashboard widget shows basic distribution of device types. (See Policy ManagerDashboard fore more information on Dashboard widgets.) In addition, the Monitoring and Reporting > LiveMonitoring > Endpoint Profiler page detailed device distribution information along with a list of endpoints. From thispage, you can also search for endpoint profiles based on category, family, name, etc. Refer to Endpoint Profiler formore information.
ClearPassPolicyManager 6.2 | User Guide ClearPassPolicyManager Profile | 55

56 | ClearPassPolicyManager Profile ClearPassPolicyManager 6.2 | User Guide
ClearPassPolicyManager 6.2 | User Guide Services | 57
Chapter 7
Services
The Policy Manager policy model groups policy components that serve a particular type of request into Services,which sit at the top of the policy hierarchy. Aruba Networks offers the following default services:
l 802.1X Wireless
l 802.1X Wired
l MAC Authentication
l Web-based Authentication
l Web based Health Check Only
l Web-based Open Network Access
l 802.1X Wireless - Identity Only
l 802.1X Wired - Identity Only
l RADIUS Enforcement (Generic)
l RADIUS Proxy
l TACACS+ Enforcement
l Aruba Application Authentication
l Aruba Application Authorization
l Cisco Web Authentication Proxy
Refer to the following sections for more detailed information:
l Architecture and Flow
l "Start Here Page " on page 58
l Policy Manager Service Types
l Services
n "Adding Services " on page 83
n "Modifying Services" on page 85
n Reordering Services
Architecture and FlowArchitecturally, Policy Manager Services are:
l Parents of their policy components, which they wrap (hierarchically) and coordinate in processing requests.l Siblings of other Policy Manager Services, within an ordered priority that determines the sequence in which they
are tested against requests.
l Children of Policy Manager, which tests requests against their Rules, to find a matching Service for each request.
The flow-of-control for requests parallels this hierarchy:
l Policy Manager tests for the first Request-to-Service-Rule matchl The matching Service coordinates execution of its policy components
l Those policy components process the request to return Enforcement Profiles to the network access device and,optionally, posture results to the client.
There are two approaches to creating a new Service in Policy Manager:
58 | Services ClearPassPolicyManager 6.2 | User Guide
l Bottom-Up Approach - Create all policy components (Authentication Method, Authentication Source, RoleMapping Policy, Posture Policy, Posture Servers, Audit Servers, Enforcement Profiles, Enforcement Policy) first, asneeded, and then create the Service from using Service creation Wizard.
l Top-Down Approach - Start with the Service creation wizard, and create the associated policy components as andwhen you need them, all in the same flow.
To help you get started, Policy Manager comes pre-configured with 14 different Service types or templates. If theseservice types do not suit your needs, you can roll your own service with custom service rules.
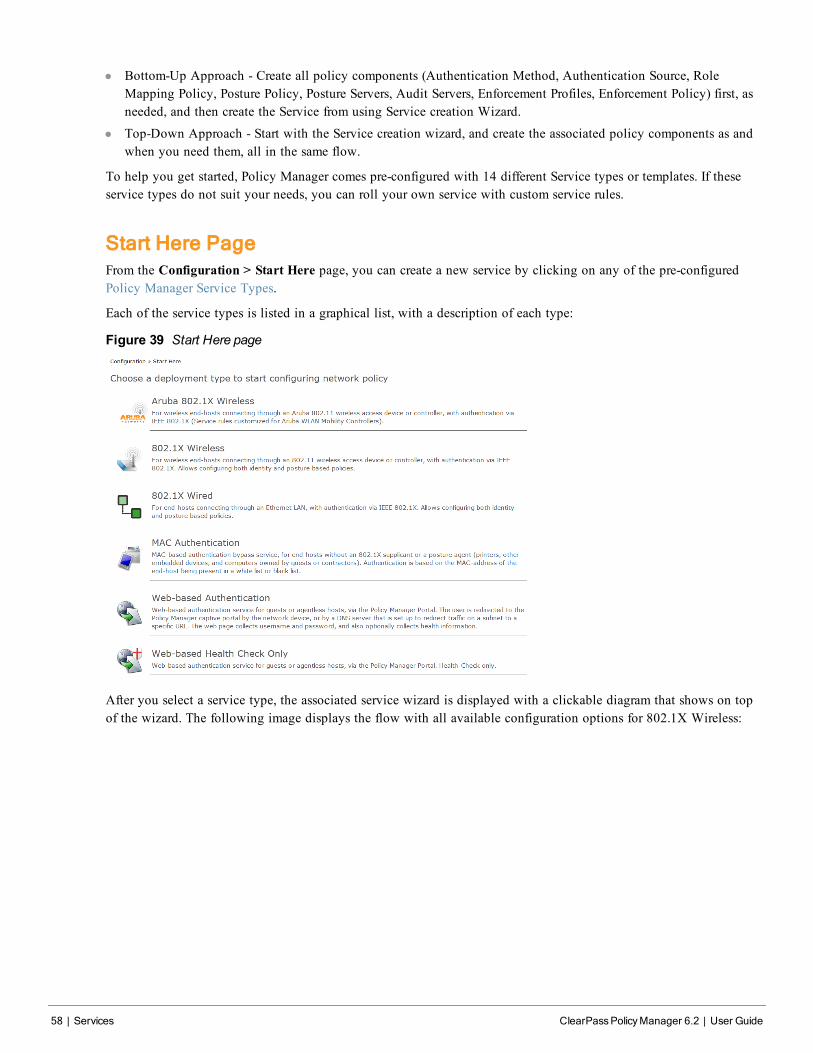
Start Here PageFrom the Configuration > Start Here page, you can create a new service by clicking on any of the pre-configuredPolicy Manager Service Types.
Each of the service types is listed in a graphical list, with a description of each type:
Figure 39 Start Here page
After you select a service type, the associated service wizard is displayed with a clickable diagram that shows on topof the wizard. The following image displays the flow with all available configuration options for 802.1X Wireless:
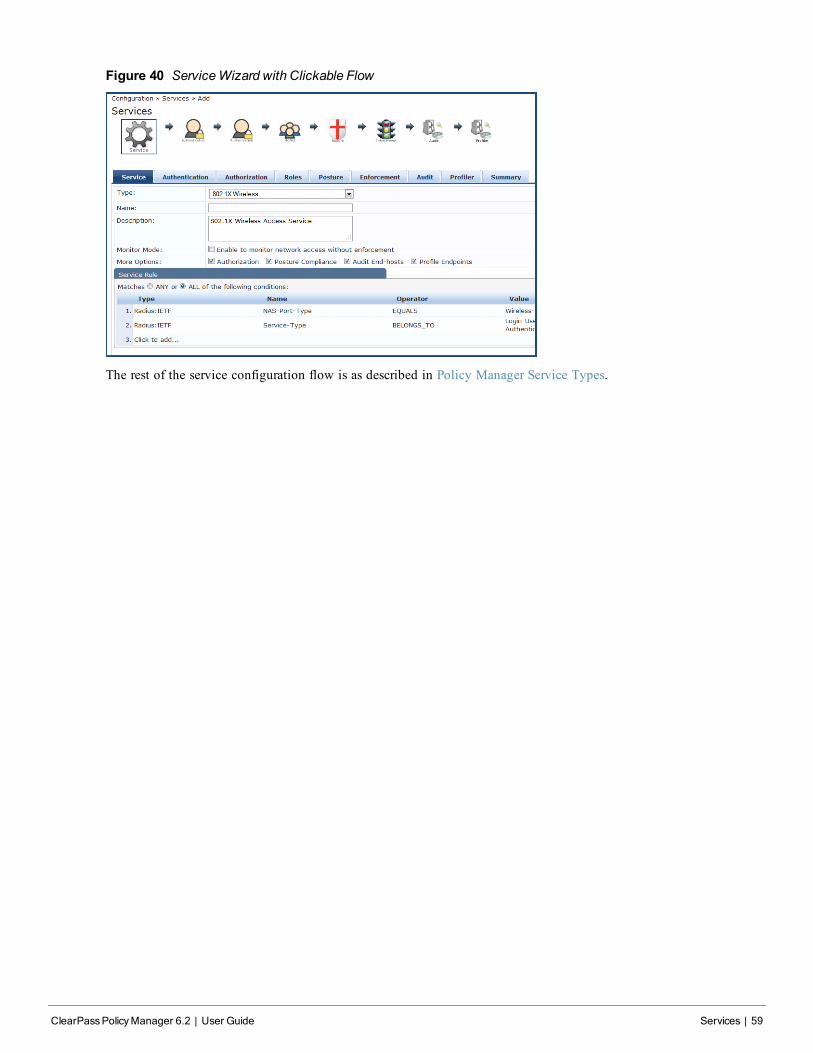
Figure 40 ServiceWizard with Clickable Flow
The rest of the service configuration flow is as described in Policy Manager Service Types.
ClearPassPolicyManager 6.2 | User Guide Services | 59
60 | Services ClearPassPolicyManager 6.2 | User Guide
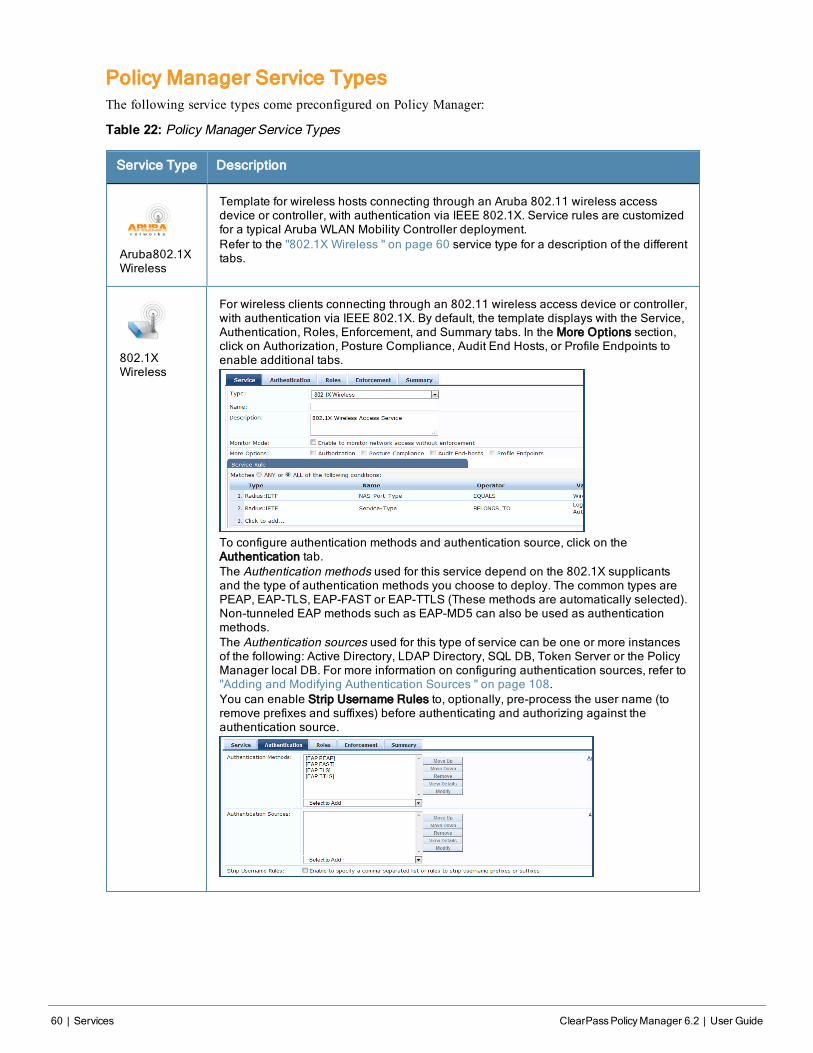
Policy Manager Service TypesThe following service types come preconfigured on Policy Manager:
Table 22: Policy Manager Service Types
Service Type Description
Aruba802.1XWireless
Template for wireless hosts connecting through an Aruba 802.11 wireless accessdevice or controller, with authentication via IEEE 802.1X. Service rules are customizedfor a typical Aruba WLAN Mobility Controller deployment.Refer to the "802.1X Wireless " on page 60 service type for a description of the differenttabs.
802.1XWireless
For wireless clients connecting through an 802.11 wireless access device or controller,with authentication via IEEE 802.1X. By default, the template displays with the Service,Authentication, Roles, Enforcement, and Summary tabs. In the More Options section,click on Authorization, Posture Compliance, Audit End Hosts, or Profile Endpoints toenable additional tabs.
To configure authentication methods and authentication source, click on theAuthentication tab.The Authentication methods used for this service depend on the 802.1X supplicantsand the type of authentication methods you choose to deploy. The common types arePEAP, EAP-TLS, EAP-FAST or EAP-TTLS (These methods are automatically selected).Non-tunneled EAP methods such as EAP-MD5 can also be used as authenticationmethods.The Authentication sources used for this type of service can be one or more instancesof the following: Active Directory, LDAP Directory, SQL DB, Token Server or the PolicyManager local DB. For more information on configuring authentication sources, refer to"Adding and Modifying Authentication Sources " on page 108.You can enable Strip Username Rules to, optionally, pre-process the user name (toremove prefixes and suffixes) before authenticating and authorizing against theauthentication source.
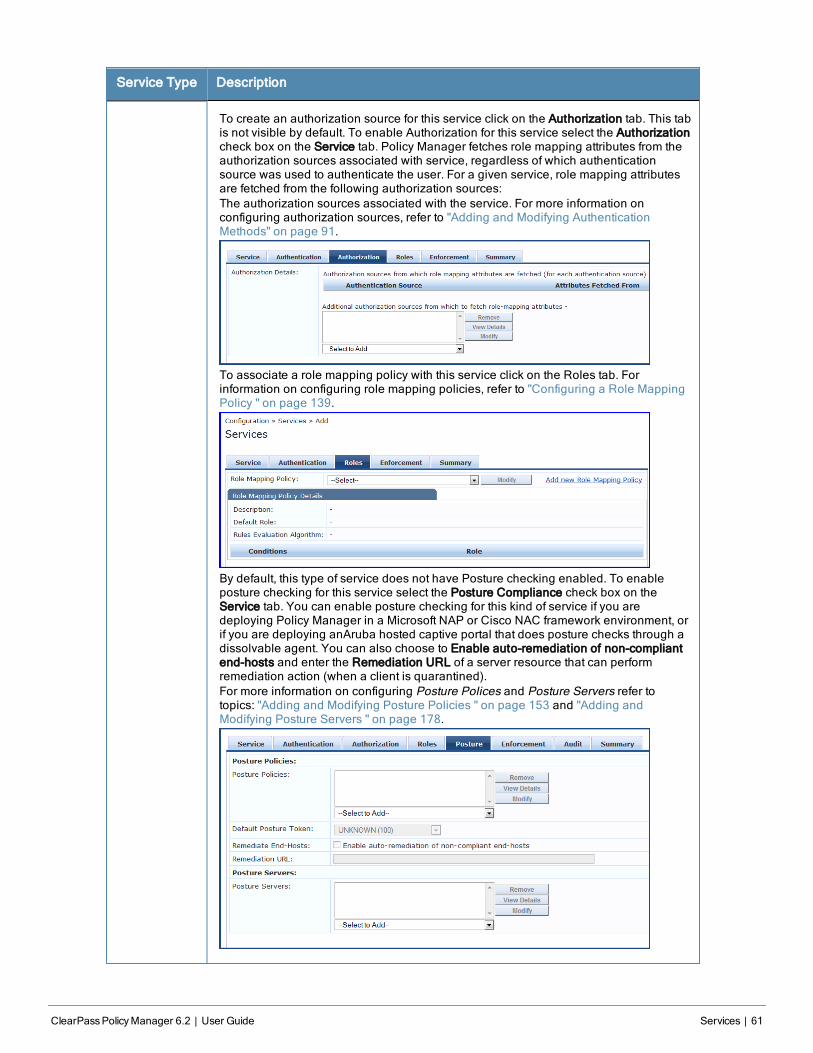
Service Type Description
To create an authorization source for this service click on the Authorization tab. This tabis not visible by default. To enable Authorization for this service select the Authorizationcheck box on the Service tab. Policy Manager fetches role mapping attributes from theauthorization sources associated with service, regardless of which authenticationsource was used to authenticate the user. For a given service, role mapping attributesare fetched from the following authorization sources:The authorization sources associated with the service. For more information onconfiguring authorization sources, refer to "Adding and Modifying AuthenticationMethods" on page 91.
To associate a role mapping policy with this service click on the Roles tab. Forinformation on configuring role mapping policies, refer to "Configuring a Role MappingPolicy " on page 139.
By default, this type of service does not have Posture checking enabled. To enableposture checking for this service select the Posture Compliance check box on theService tab. You can enable posture checking for this kind of service if you aredeploying Policy Manager in a Microsoft NAP or Cisco NAC framework environment, orif you are deploying anAruba hosted captive portal that does posture checks through adissolvable agent. You can also choose to Enable auto-remediation of non-compliantend-hosts and enter the Remediation URL of a server resource that can performremediation action (when a client is quarantined).For more information on configuring Posture Polices and Posture Servers refer totopics: "Adding and Modifying Posture Policies " on page 153 and "Adding andModifying Posture Servers " on page 178.
ClearPassPolicyManager 6.2 | User Guide Services | 61
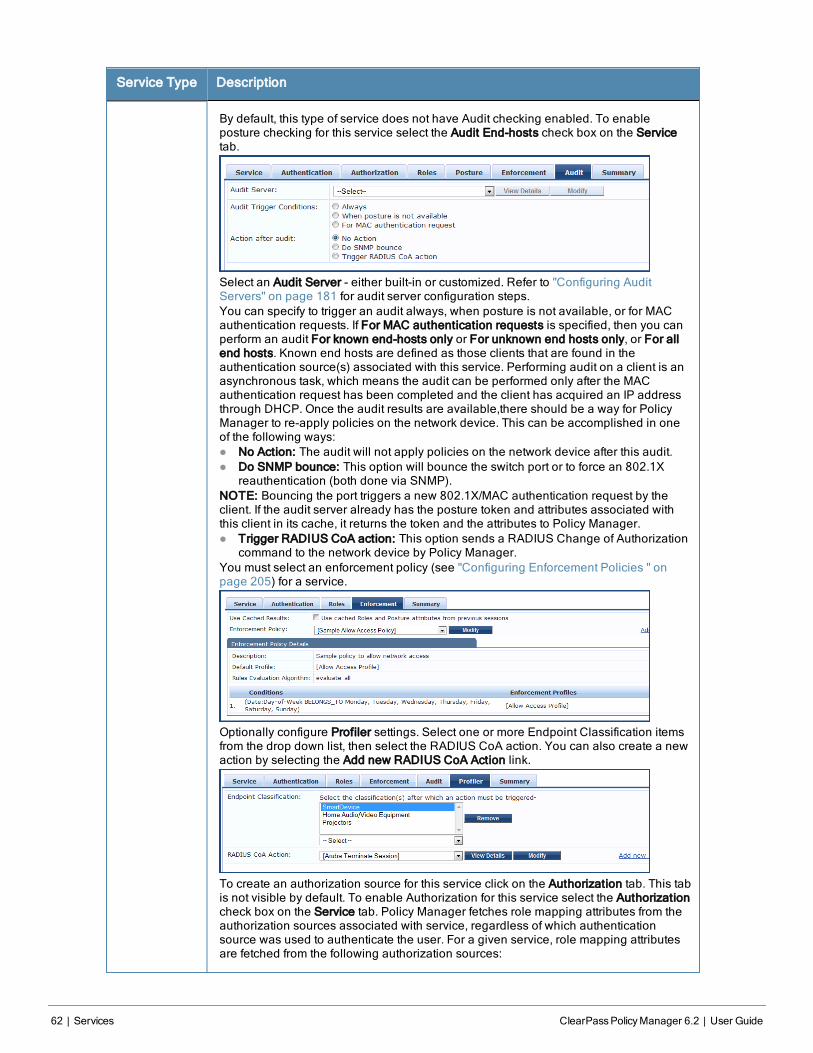
62 | Services ClearPassPolicyManager 6.2 | User Guide
Service Type Description
By default, this type of service does not have Audit checking enabled. To enableposture checking for this service select the Audit End-hosts check box on the Servicetab.
Select an Audit Server - either built-in or customized. Refer to "Configuring AuditServers" on page 181 for audit server configuration steps.You can specify to trigger an audit always, when posture is not available, or for MACauthentication requests. If For MAC authentication requests is specified, then you canperform an audit For known end-hosts only or For unknown end hosts only, or For allend hosts. Known end hosts are defined as those clients that are found in theauthentication source(s) associated with this service. Performing audit on a client is anasynchronous task, which means the audit can be performed only after the MACauthentication request has been completed and the client has acquired an IP addressthrough DHCP. Once the audit results are available,there should be a way for PolicyManager to re-apply policies on the network device. This can be accomplished in oneof the following ways:l No Action: The audit will not apply policies on the network device after this audit.l Do SNMP bounce: This option will bounce the switch port or to force an 802.1X
reauthentication (both done via SNMP).NOTE: Bouncing the port triggers a new 802.1X/MAC authentication request by theclient. If the audit server already has the posture token and attributes associated withthis client in its cache, it returns the token and the attributes to Policy Manager.l Trigger RADIUS CoA action: This option sends a RADIUS Change of Authorization
command to the network device by Policy Manager.You must select an enforcement policy (see "Configuring Enforcement Policies " onpage 205) for a service.
Optionally configure Profiler settings. Select one or more Endpoint Classification itemsfrom the drop down list, then select the RADIUS CoA action. You can also create a newaction by selecting the Add new RADIUS CoA Action link.
To create an authorization source for this service click on the Authorization tab. This tabis not visible by default. To enable Authorization for this service select the Authorizationcheck box on the Service tab. Policy Manager fetches role mapping attributes from theauthorization sources associated with service, regardless of which authenticationsource was used to authenticate the user. For a given service, role mapping attributesare fetched from the following authorization sources:
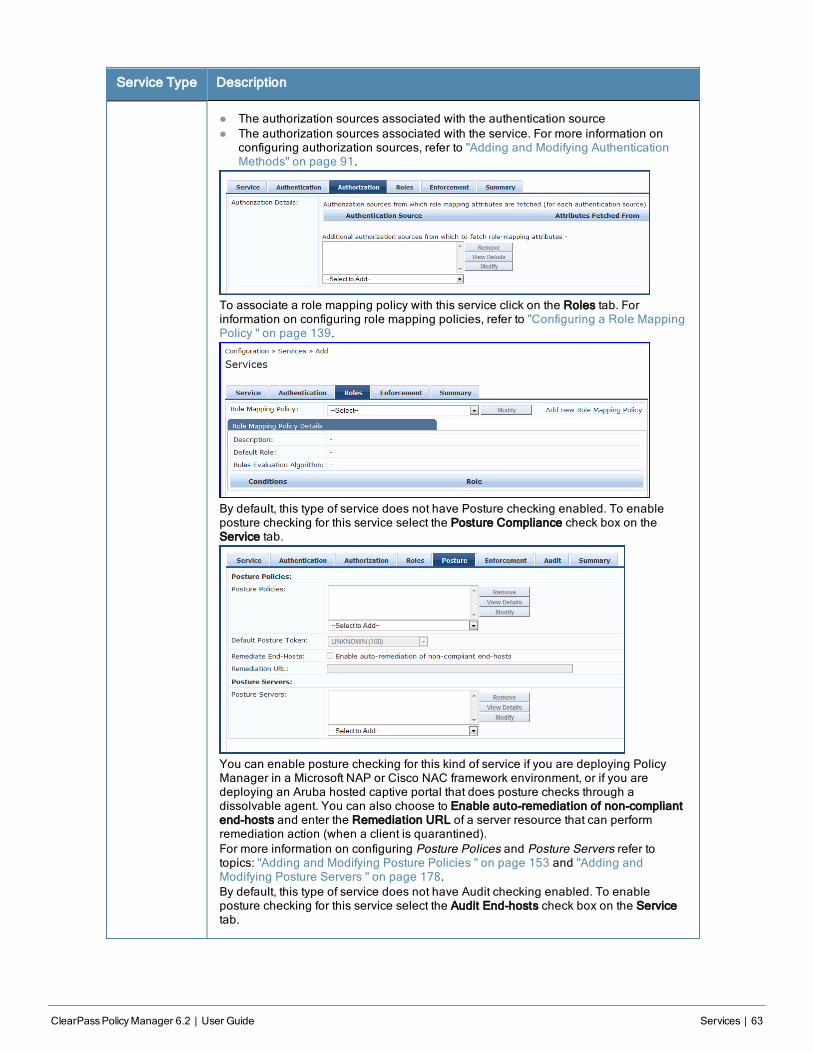
Service Type Description
l The authorization sources associated with the authentication sourcel The authorization sources associated with the service. For more information on
configuring authorization sources, refer to "Adding and Modifying AuthenticationMethods" on page 91.
To associate a role mapping policy with this service click on the Roles tab. Forinformation on configuring role mapping policies, refer to "Configuring a Role MappingPolicy " on page 139.
By default, this type of service does not have Posture checking enabled. To enableposture checking for this service select the Posture Compliance check box on theService tab.
You can enable posture checking for this kind of service if you are deploying PolicyManager in a Microsoft NAP or Cisco NAC framework environment, or if you aredeploying an Aruba hosted captive portal that does posture checks through adissolvable agent. You can also choose to Enable auto-remediation of non-compliantend-hosts and enter the Remediation URL of a server resource that can performremediation action (when a client is quarantined).For more information on configuring Posture Polices and Posture Servers refer totopics: "Adding and Modifying Posture Policies " on page 153 and "Adding andModifying Posture Servers " on page 178.By default, this type of service does not have Audit checking enabled. To enableposture checking for this service select the Audit End-hosts check box on the Servicetab.
ClearPassPolicyManager 6.2 | User Guide Services | 63
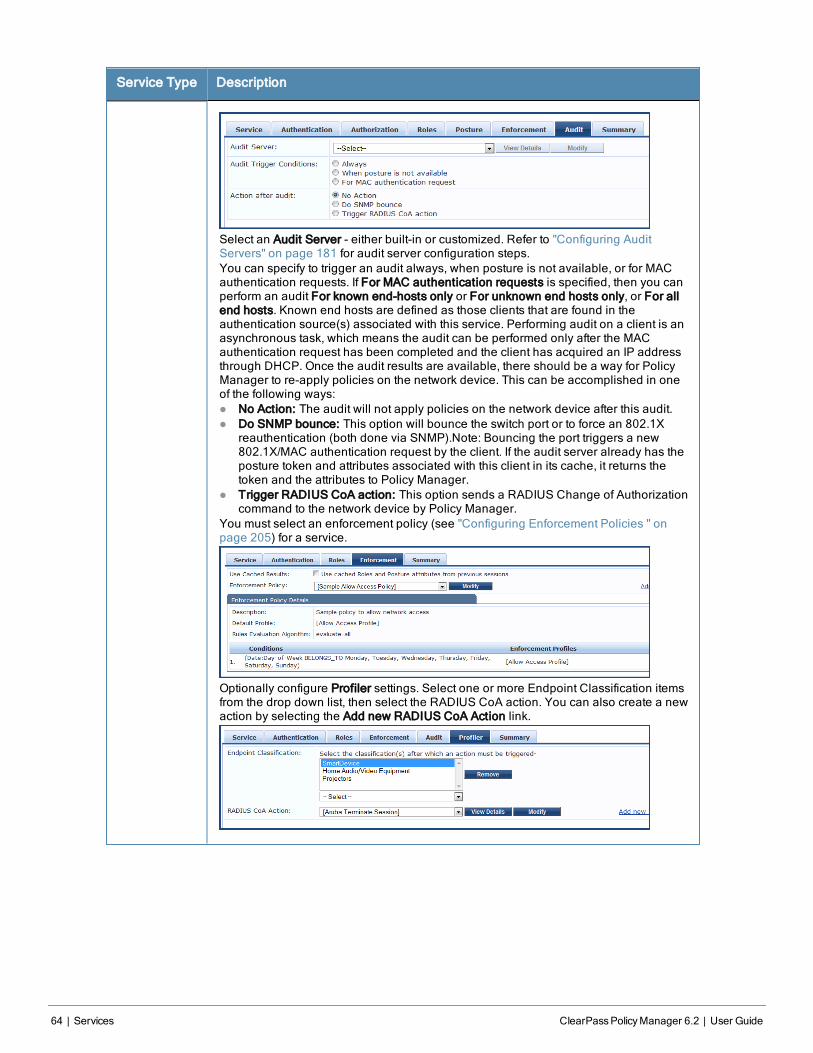
64 | Services ClearPassPolicyManager 6.2 | User Guide
Service Type Description
Select an Audit Server - either built-in or customized. Refer to "Configuring AuditServers" on page 181 for audit server configuration steps.You can specify to trigger an audit always, when posture is not available, or for MACauthentication requests. If For MAC authentication requests is specified, then you canperform an audit For known end-hosts only or For unknown end hosts only, or For allend hosts. Known end hosts are defined as those clients that are found in theauthentication source(s) associated with this service. Performing audit on a client is anasynchronous task, which means the audit can be performed only after the MACauthentication request has been completed and the client has acquired an IP addressthrough DHCP. Once the audit results are available, there should be a way for PolicyManager to re-apply policies on the network device. This can be accomplished in oneof the following ways:l No Action: The audit will not apply policies on the network device after this audit.l Do SNMP bounce: This option will bounce the switch port or to force an 802.1X
reauthentication (both done via SNMP).Note: Bouncing the port triggers a new802.1X/MAC authentication request by the client. If the audit server already has theposture token and attributes associated with this client in its cache, it returns thetoken and the attributes to Policy Manager.
l Trigger RADIUS CoA action: This option sends a RADIUS Change of Authorizationcommand to the network device by Policy Manager.
You must select an enforcement policy (see "Configuring Enforcement Policies " onpage 205) for a service.
Optionally configure Profiler settings. Select one or more Endpoint Classification itemsfrom the drop down list, then select the RADIUS CoA action. You can also create a newaction by selecting the Add new RADIUS CoA Action link.
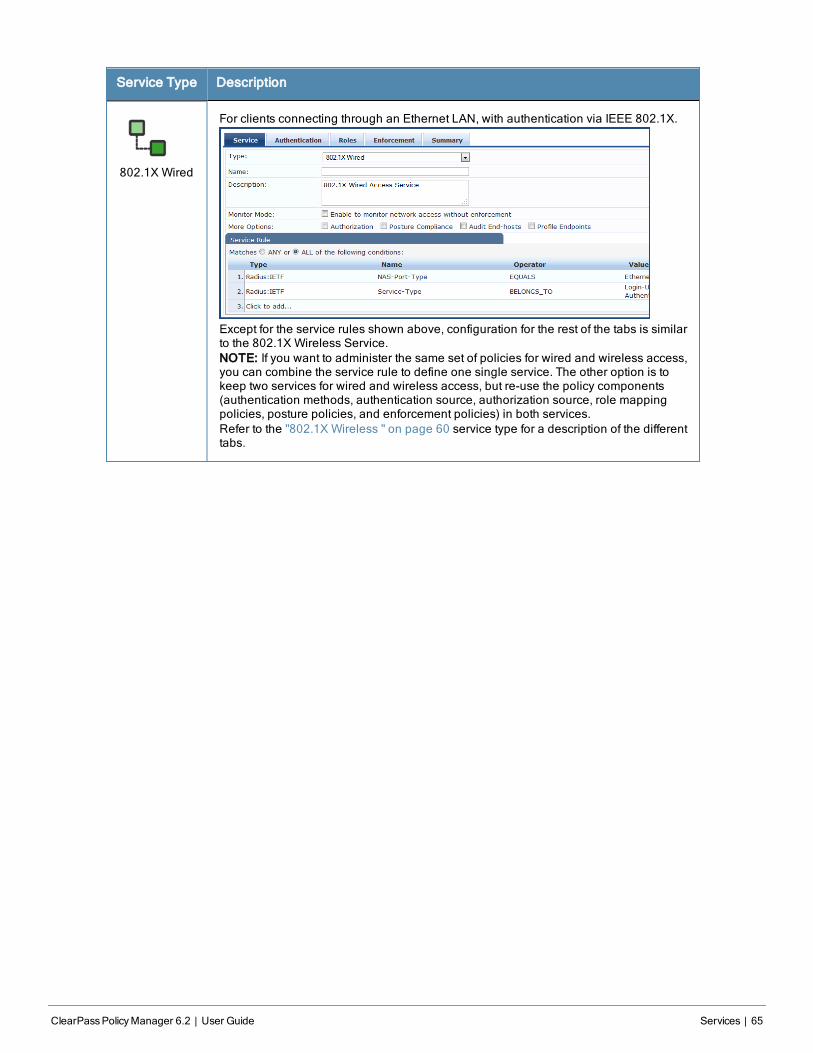
Service Type Description
802.1X Wired
For clients connecting through an Ethernet LAN, with authentication via IEEE 802.1X.
Except for the service rules shown above, configuration for the rest of the tabs is similarto the 802.1X Wireless Service.NOTE: If you want to administer the same set of policies for wired and wireless access,you can combine the service rule to define one single service. The other option is tokeep two services for wired and wireless access, but re-use the policy components(authentication methods, authentication source, authorization source, role mappingpolicies, posture policies, and enforcement policies) in both services.Refer to the "802.1X Wireless " on page 60 service type for a description of the differenttabs.
ClearPassPolicyManager 6.2 | User Guide Services | 65
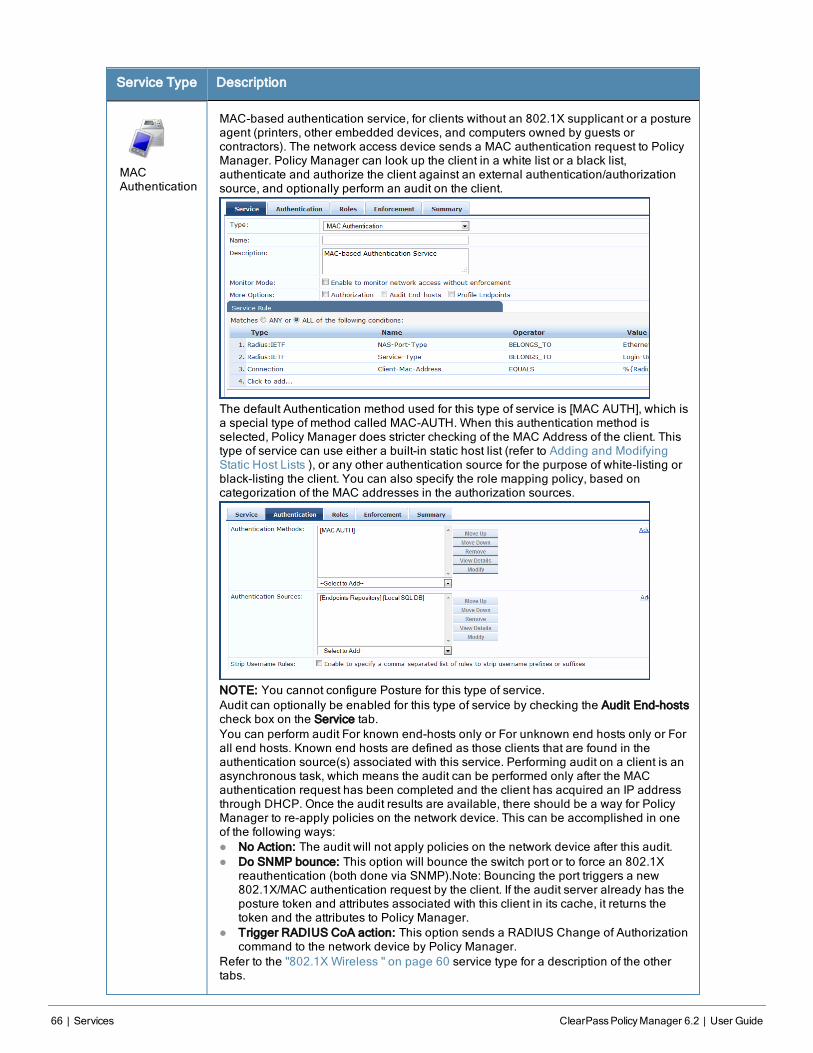
66 | Services ClearPassPolicyManager 6.2 | User Guide
Service Type Description
MACAuthentication
MAC-based authentication service, for clients without an 802.1X supplicant or a postureagent (printers, other embedded devices, and computers owned by guests orcontractors). The network access device sends a MAC authentication request to PolicyManager. Policy Manager can look up the client in a white list or a black list,authenticate and authorize the client against an external authentication/authorizationsource, and optionally perform an audit on the client.
The default Authentication method used for this type of service is [MAC AUTH], which isa special type of method called MAC-AUTH. When this authentication method isselected, Policy Manager does stricter checking of the MAC Address of the client. Thistype of service can use either a built-in static host list (refer to Adding and ModifyingStatic Host Lists ), or any other authentication source for the purpose of white-listing orblack-listing the client. You can also specify the role mapping policy, based oncategorization of the MAC addresses in the authorization sources.
NOTE: You cannot configure Posture for this type of service.Audit can optionally be enabled for this type of service by checking the Audit End-hostscheck box on the Service tab.You can perform audit For known end-hosts only or For unknown end hosts only or Forall end hosts. Known end hosts are defined as those clients that are found in theauthentication source(s) associated with this service. Performing audit on a client is anasynchronous task, which means the audit can be performed only after the MACauthentication request has been completed and the client has acquired an IP addressthrough DHCP. Once the audit results are available, there should be a way for PolicyManager to re-apply policies on the network device. This can be accomplished in oneof the following ways:l No Action: The audit will not apply policies on the network device after this audit.l Do SNMP bounce: This option will bounce the switch port or to force an 802.1X
reauthentication (both done via SNMP).Note: Bouncing the port triggers a new802.1X/MAC authentication request by the client. If the audit server already has theposture token and attributes associated with this client in its cache, it returns thetoken and the attributes to Policy Manager.
l Trigger RADIUS CoA action: This option sends a RADIUS Change of Authorizationcommand to the network device by Policy Manager.
Refer to the "802.1X Wireless " on page 60 service type for a description of the othertabs.
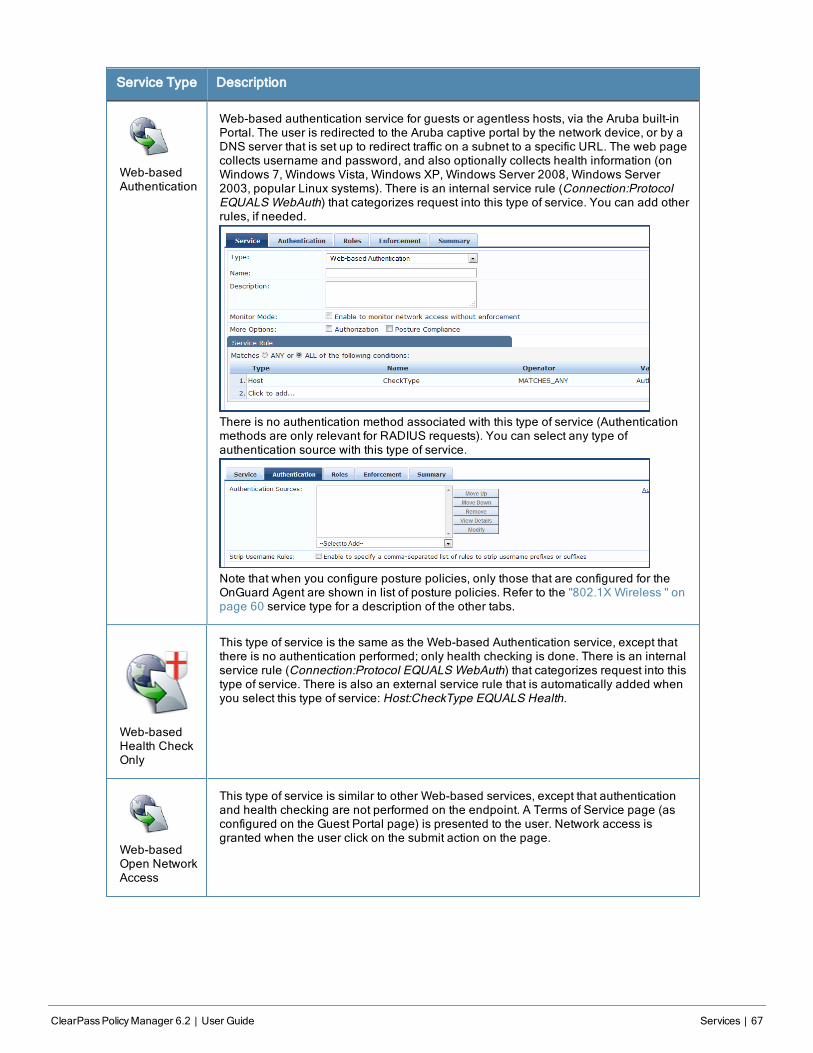
Service Type Description
Web-basedAuthentication
Web-based authentication service for guests or agentless hosts, via the Aruba built-inPortal. The user is redirected to the Aruba captive portal by the network device, or by aDNS server that is set up to redirect traffic on a subnet to a specific URL. The web pagecollects username and password, and also optionally collects health information (onWindows 7, Windows Vista, Windows XP, Windows Server 2008, Windows Server2003, popular Linux systems). There is an internal service rule (Connection:ProtocolEQUALS WebAuth) that categorizes request into this type of service. You can add otherrules, if needed.
There is no authentication method associated with this type of service (Authenticationmethods are only relevant for RADIUS requests). You can select any type ofauthentication source with this type of service.
Note that when you configure posture policies, only those that are configured for theOnGuard Agent are shown in list of posture policies. Refer to the "802.1X Wireless " onpage 60 service type for a description of the other tabs.
Web-basedHealth CheckOnly
This type of service is the same as the Web-based Authentication service, except thatthere is no authentication performed; only health checking is done. There is an internalservice rule (Connection:Protocol EQUALS WebAuth) that categorizes request into thistype of service. There is also an external service rule that is automatically added whenyou select this type of service: Host:CheckType EQUALS Health.
Web-basedOpen NetworkAccess
This type of service is similar to other Web-based services, except that authenticationand health checking are not performed on the endpoint. A Terms of Service page (asconfigured on the Guest Portal page) is presented to the user. Network access isgranted when the user click on the submit action on the page.
ClearPassPolicyManager 6.2 | User Guide Services | 67
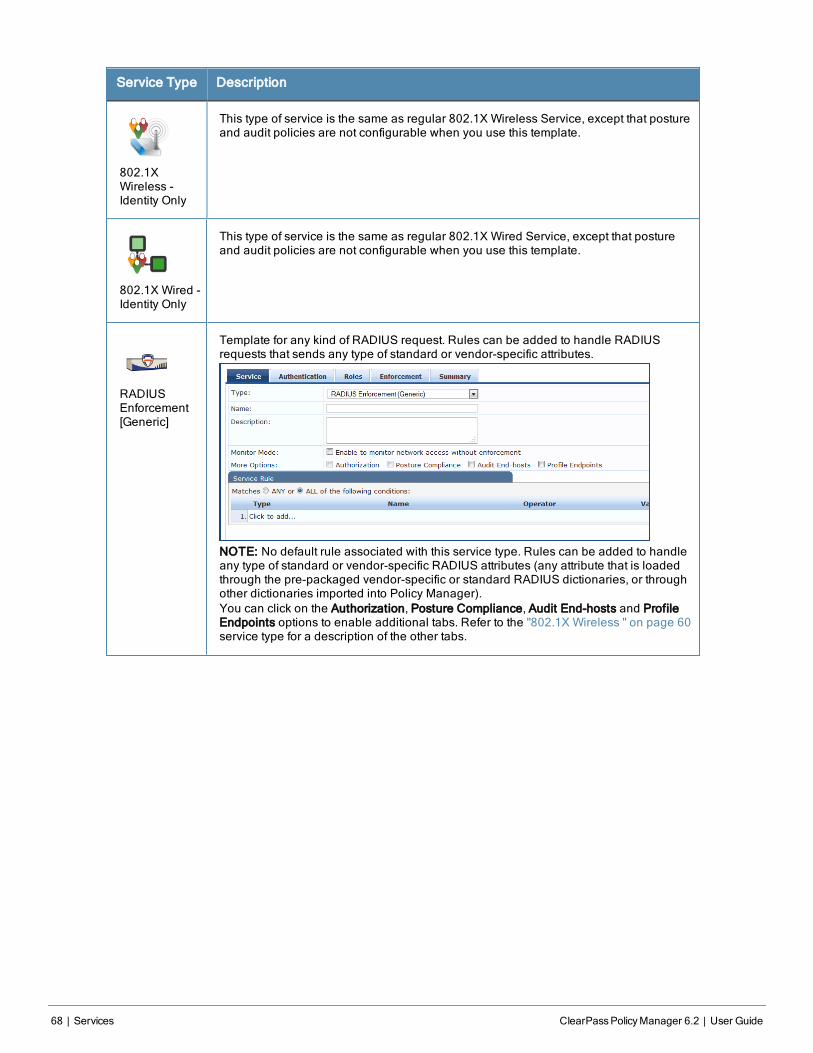
68 | Services ClearPassPolicyManager 6.2 | User Guide
Service Type Description
802.1XWireless -Identity Only
This type of service is the same as regular 802.1X Wireless Service, except that postureand audit policies are not configurable when you use this template.
802.1X Wired -Identity Only
This type of service is the same as regular 802.1X Wired Service, except that postureand audit policies are not configurable when you use this template.
RADIUSEnforcement[Generic]
Template for any kind of RADIUS request. Rules can be added to handle RADIUSrequests that sends any type of standard or vendor-specific attributes.
NOTE: No default rule associated with this service type. Rules can be added to handleany type of standard or vendor-specific RADIUS attributes (any attribute that is loadedthrough the pre-packaged vendor-specific or standard RADIUS dictionaries, or throughother dictionaries imported into Policy Manager).You can click on the Authorization, Posture Compliance, Audit End-hosts and ProfileEndpoints options to enable additional tabs. Refer to the "802.1X Wireless " on page 60service type for a description of the other tabs.
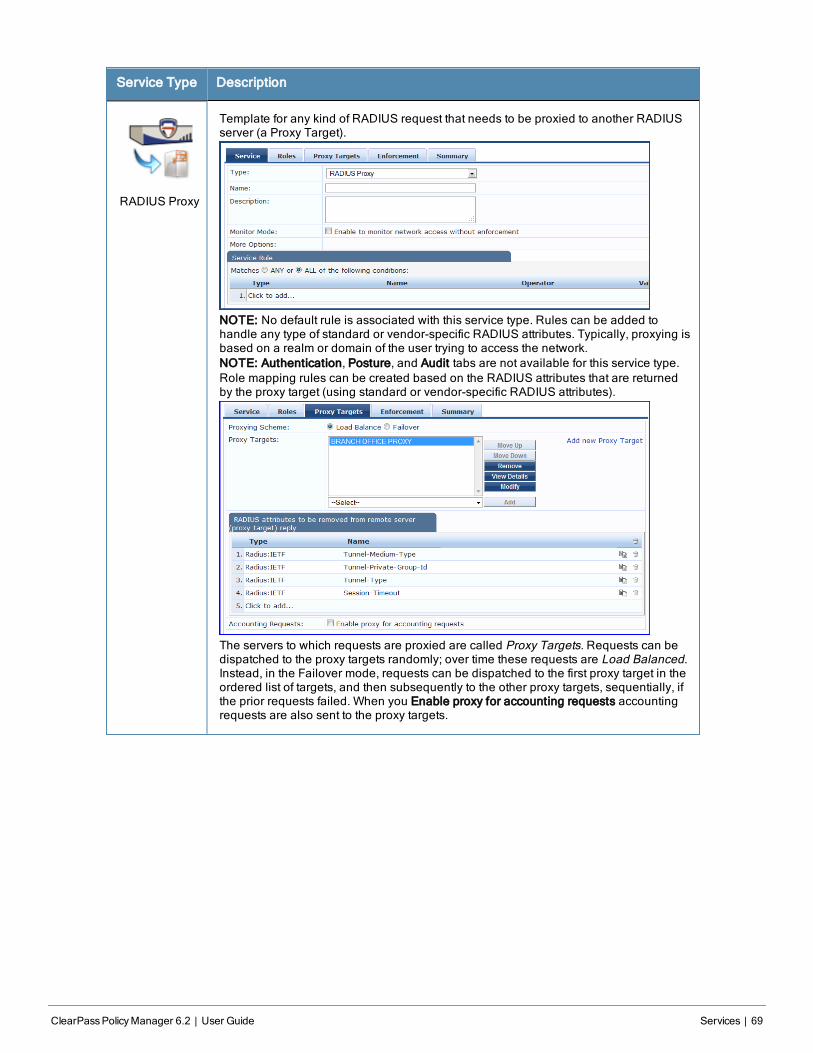
Service Type Description
RADIUS Proxy
Template for any kind of RADIUS request that needs to be proxied to another RADIUSserver (a Proxy Target).
NOTE: No default rule is associated with this service type. Rules can be added tohandle any type of standard or vendor-specific RADIUS attributes. Typically, proxying isbased on a realm or domain of the user trying to access the network.NOTE: Authentication, Posture, and Audit tabs are not available for this service type.Role mapping rules can be created based on the RADIUS attributes that are returnedby the proxy target (using standard or vendor-specific RADIUS attributes).
The servers to which requests are proxied are called Proxy Targets. Requests can bedispatched to the proxy targets randomly; over time these requests are Load Balanced.Instead, in the Failover mode, requests can be dispatched to the first proxy target in theordered list of targets, and then subsequently to the other proxy targets, sequentially, ifthe prior requests failed. When you Enable proxy for accounting requests accountingrequests are also sent to the proxy targets.
ClearPassPolicyManager 6.2 | User Guide Services | 69
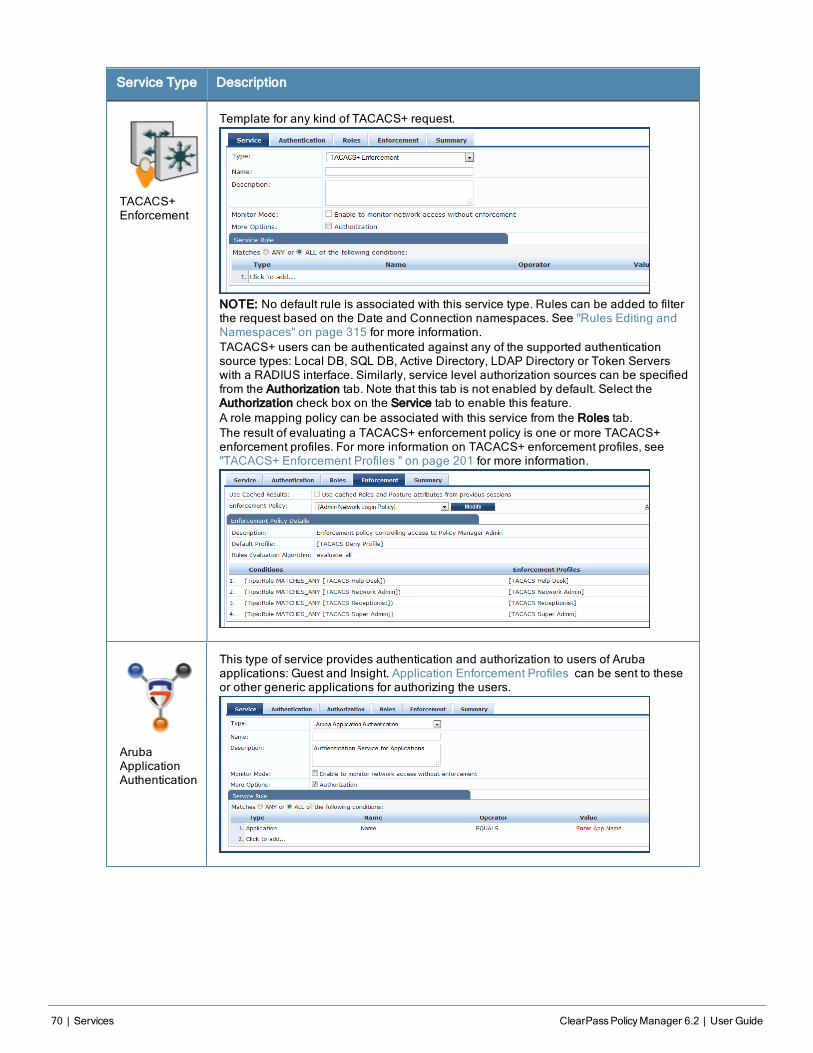
70 | Services ClearPassPolicyManager 6.2 | User Guide
Service Type Description
TACACS+Enforcement
Template for any kind of TACACS+ request.
NOTE: No default rule is associated with this service type. Rules can be added to filterthe request based on the Date and Connection namespaces. See "Rules Editing andNamespaces" on page 315 for more information.TACACS+ users can be authenticated against any of the supported authenticationsource types: Local DB, SQL DB, Active Directory, LDAP Directory or Token Serverswith a RADIUS interface. Similarly, service level authorization sources can be specifiedfrom the Authorization tab. Note that this tab is not enabled by default. Select theAuthorization check box on the Service tab to enable this feature.A role mapping policy can be associated with this service from the Roles tab.The result of evaluating a TACACS+ enforcement policy is one or more TACACS+enforcement profiles. For more information on TACACS+ enforcement profiles, see"TACACS+ Enforcement Profiles " on page 201 for more information.
ArubaApplicationAuthentication
This type of service provides authentication and authorization to users of Arubaapplications: Guest and Insight. Application Enforcement Profiles can be sent to theseor other generic applications for authorizing the users.
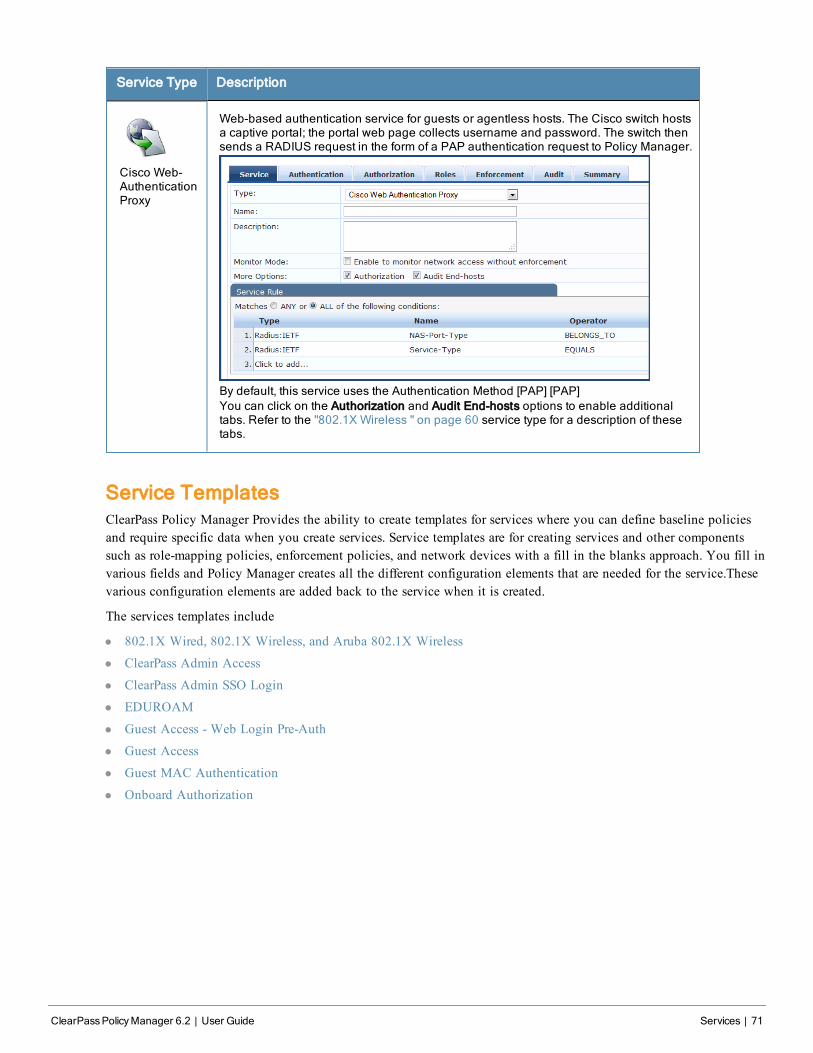
Service Type Description
Cisco Web-AuthenticationProxy
Web-based authentication service for guests or agentless hosts. The Cisco switch hostsa captive portal; the portal web page collects username and password. The switch thensends a RADIUS request in the form of a PAP authentication request to Policy Manager.
By default, this service uses the Authentication Method [PAP] [PAP]You can click on the Authorization and Audit End-hosts options to enable additionaltabs. Refer to the "802.1X Wireless " on page 60 service type for a description of thesetabs.
Service TemplatesClearPass Policy Manager Provides the ability to create templates for services where you can define baseline policiesand require specific data when you create services. Service templates are for creating services and other componentssuch as role-mapping policies, enforcement policies, and network devices with a fill in the blanks approach. You fill invarious fields and Policy Manager creates all the different configuration elements that are needed for the service.Thesevarious configuration elements are added back to the service when it is created.
The services templates include
l 802.1X Wired, 802.1X Wireless, and Aruba 802.1X Wireless
l ClearPass Admin Access
l ClearPass Admin SSO Login
l EDUROAM
l Guest Access - Web Login Pre-Auth
l Guest Access
l Guest MAC Authentication
l Onboard Authorization
ClearPassPolicyManager 6.2 | User Guide Services | 71
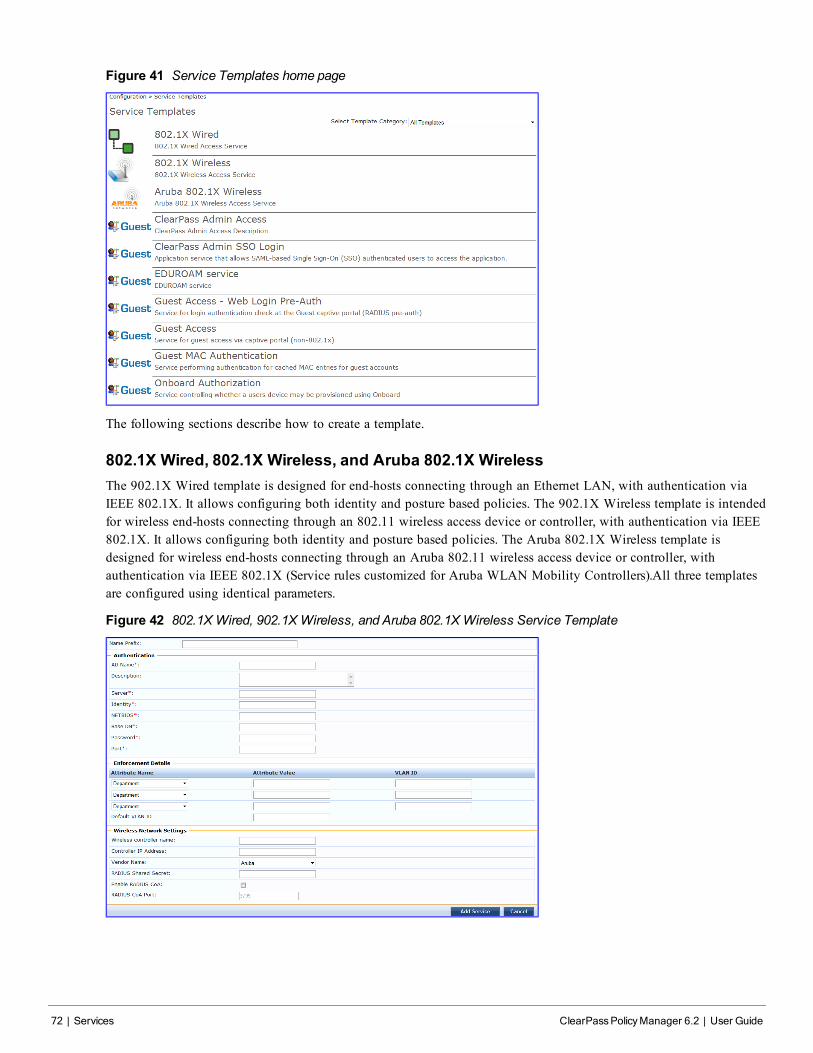
72 | Services ClearPassPolicyManager 6.2 | User Guide
Figure 41 Service Templates home page
The following sections describe how to create a template.
802.1X Wired, 802.1X Wireless, and Aruba 802.1X WirelessThe 902.1X Wired template is designed for end-hosts connecting through an Ethernet LAN, with authentication viaIEEE 802.1X. It allows configuring both identity and posture based policies. The 902.1X Wireless template is intendedfor wireless end-hosts connecting through an 802.11 wireless access device or controller, with authentication via IEEE802.1X. It allows configuring both identity and posture based policies. The Aruba 802.1X Wireless template isdesigned for wireless end-hosts connecting through an Aruba 802.11 wireless access device or controller, withauthentication via IEEE 802.1X (Service rules customized for Aruba WLAN Mobility Controllers).All three templatesare configured using identical parameters.
Figure 42 802.1X Wired, 902.1X Wireless, and Aruba 802.1X Wireless Service Template
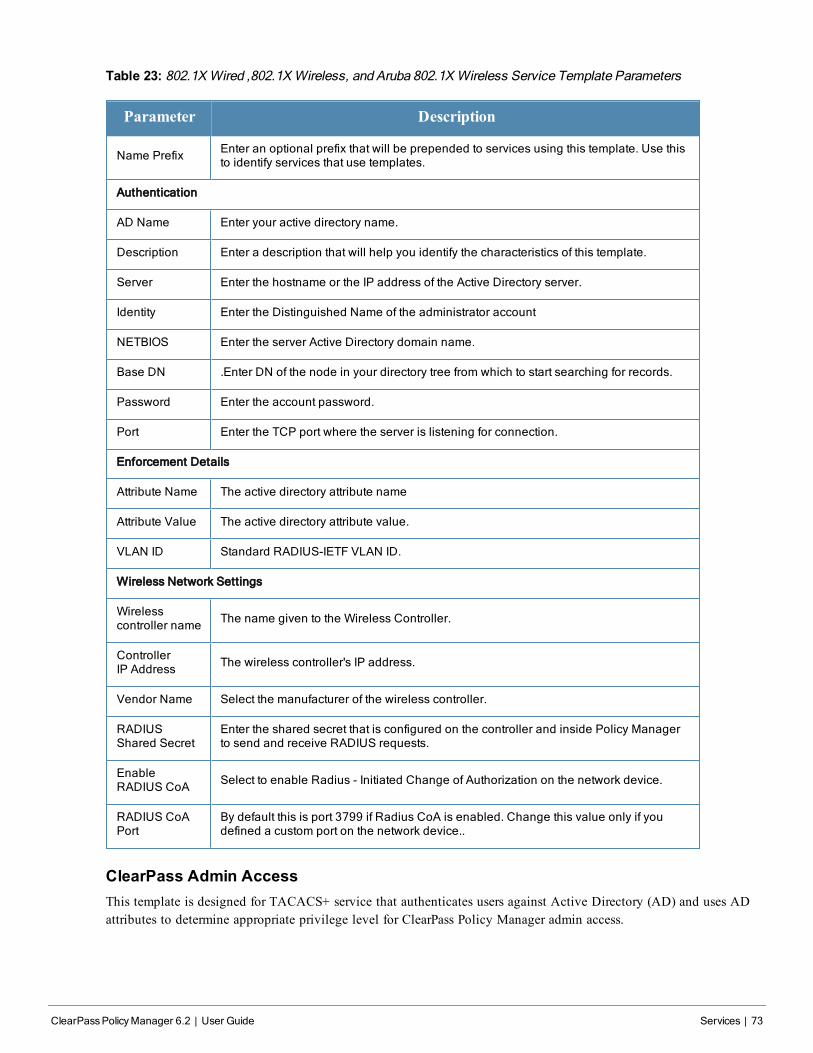
Table 23: 802.1X Wired ,802.1X Wireless, and Aruba 802.1X Wireless Service Template Parameters
Parameter Description
Name Prefix Enter an optional prefix that will be prepended to services using this template. Use thisto identify services that use templates.
Authentication
AD Name Enter your active directory name.
Description Enter a description that will help you identify the characteristics of this template.
Server Enter the hostname or the IP address of the Active Directory server.
Identity Enter the Distinguished Name of the administrator account
NETBIOS Enter the server Active Directory domain name.
Base DN .Enter DN of the node in your directory tree from which to start searching for records.
Password Enter the account password.
Port Enter the TCP port where the server is listening for connection.
Enforcement Details
Attribute Name The active directory attribute name
Attribute Value The active directory attribute value.
VLAN ID Standard RADIUS-IETF VLAN ID.
Wireless Network Settings
Wirelesscontroller name The name given to the Wireless Controller.
ControllerIP Address The wireless controller's IP address.
Vendor Name Select the manufacturer of the wireless controller.
RADIUSShared Secret
Enter the shared secret that is configured on the controller and inside Policy Managerto send and receive RADIUS requests.
EnableRADIUS CoA Select to enable Radius - Initiated Change of Authorization on the network device.
RADIUS CoAPort
By default this is port 3799 if Radius CoA is enabled. Change this value only if youdefined a custom port on the network device..
ClearPass Admin AccessThis template is designed for TACACS+ service that authenticates users against Active Directory (AD) and uses ADattributes to determine appropriate privilege level for ClearPass Policy Manager admin access.
ClearPassPolicyManager 6.2 | User Guide Services | 73
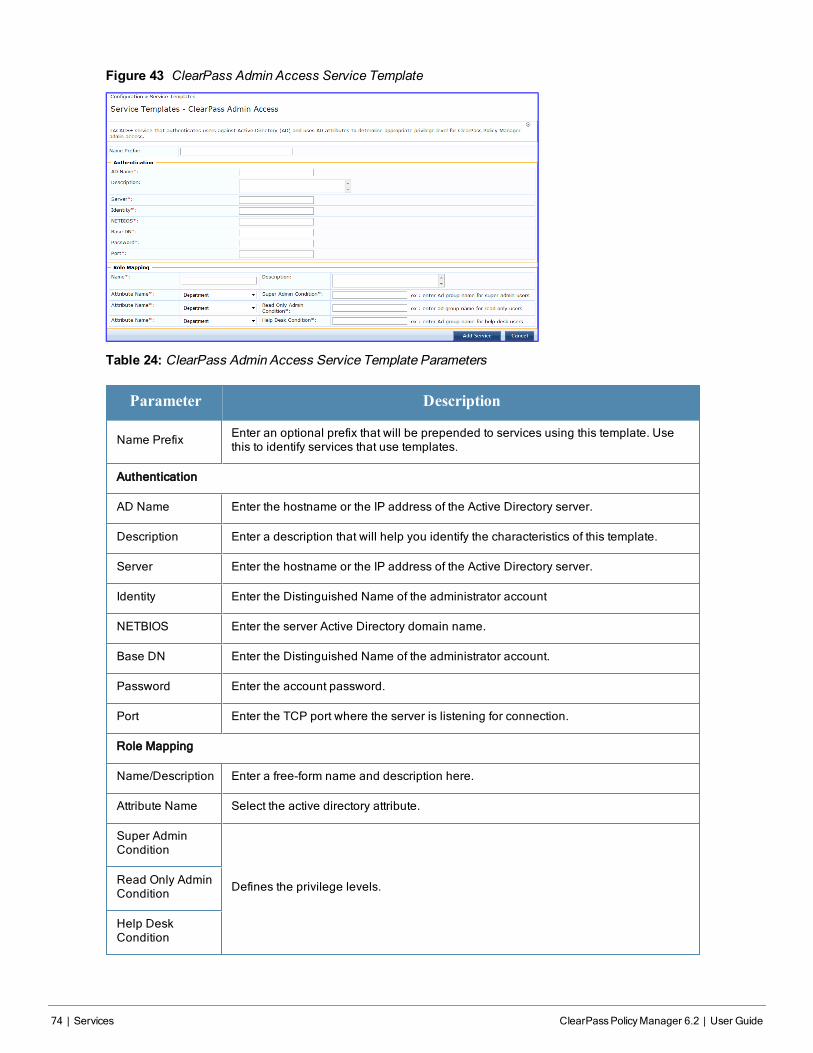
74 | Services ClearPassPolicyManager 6.2 | User Guide
Figure 43 ClearPass Admin Access Service Template
Table 24: ClearPass Admin Access Service Template Parameters
Parameter Description
Name Prefix Enter an optional prefix that will be prepended to services using this template. Usethis to identify services that use templates.
Authentication
AD Name Enter the hostname or the IP address of the Active Directory server.
Description Enter a description that will help you identify the characteristics of this template.
Server Enter the hostname or the IP address of the Active Directory server.
Identity Enter the Distinguished Name of the administrator account
NETBIOS Enter the server Active Directory domain name.
Base DN Enter the Distinguished Name of the administrator account.
Password Enter the account password.
Port Enter the TCP port where the server is listening for connection.
Role Mapping
Name/Description Enter a free-form name and description here.
Attribute Name Select the active directory attribute.
Super AdminCondition
Defines the privilege levels.Read Only AdminCondition
Help DeskCondition
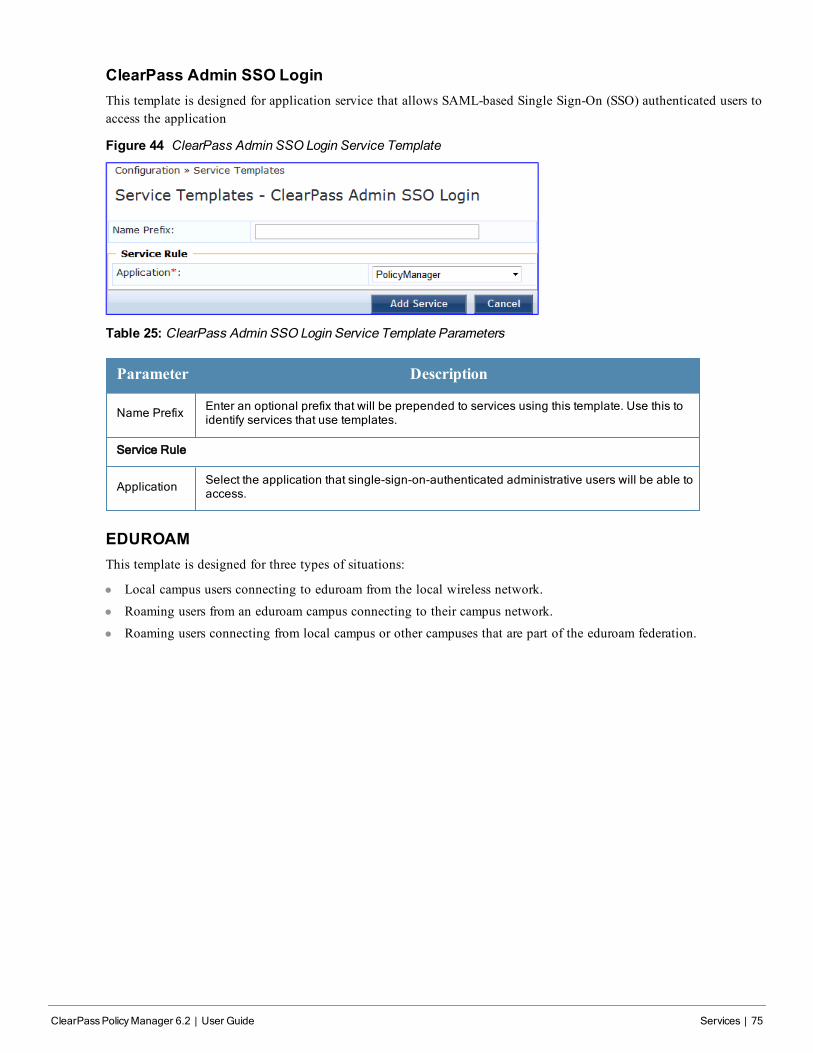
ClearPass Admin SSO LoginThis template is designed for application service that allows SAML-based Single Sign-On (SSO) authenticated users toaccess the application
Figure 44 ClearPass Admin SSO Login Service Template
Table 25: ClearPass Admin SSO Login Service Template Parameters
Parameter Description
Name Prefix Enter an optional prefix that will be prepended to services using this template. Use this toidentify services that use templates.
Service Rule
Application Select the application that single-sign-on-authenticated administrative users will be able toaccess.
EDUROAMThis template is designed for three types of situations:
l Local campus users connecting to eduroam from the local wireless network.
l Roaming users from an eduroam campus connecting to their campus network.
l Roaming users connecting from local campus or other campuses that are part of the eduroam federation.
ClearPassPolicyManager 6.2 | User Guide Services | 75
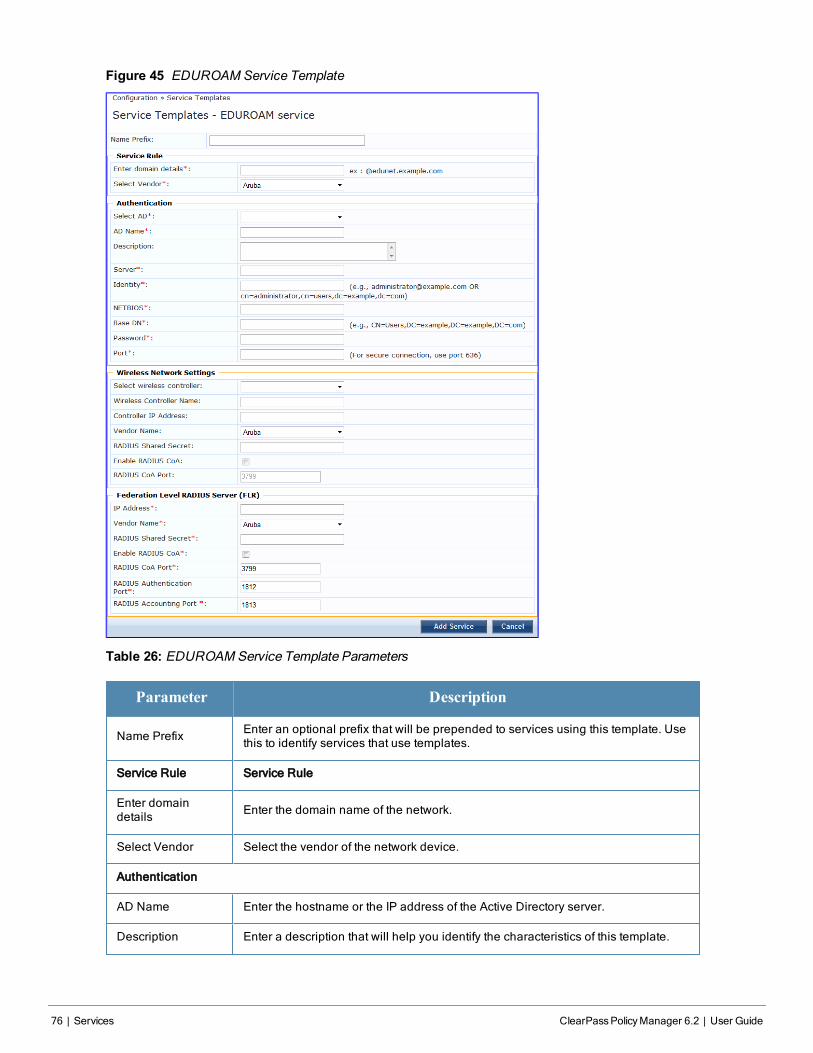
76 | Services ClearPassPolicyManager 6.2 | User Guide
Figure 45 EDUROAM Service Template
Table 26: EDUROAM Service Template Parameters
Parameter Description
Name Prefix Enter an optional prefix that will be prepended to services using this template. Usethis to identify services that use templates.
Service Rule Service Rule
Enter domaindetails Enter the domain name of the network.
Select Vendor Select the vendor of the network device.
Authentication
AD Name Enter the hostname or the IP address of the Active Directory server.
Description Enter a description that will help you identify the characteristics of this template.
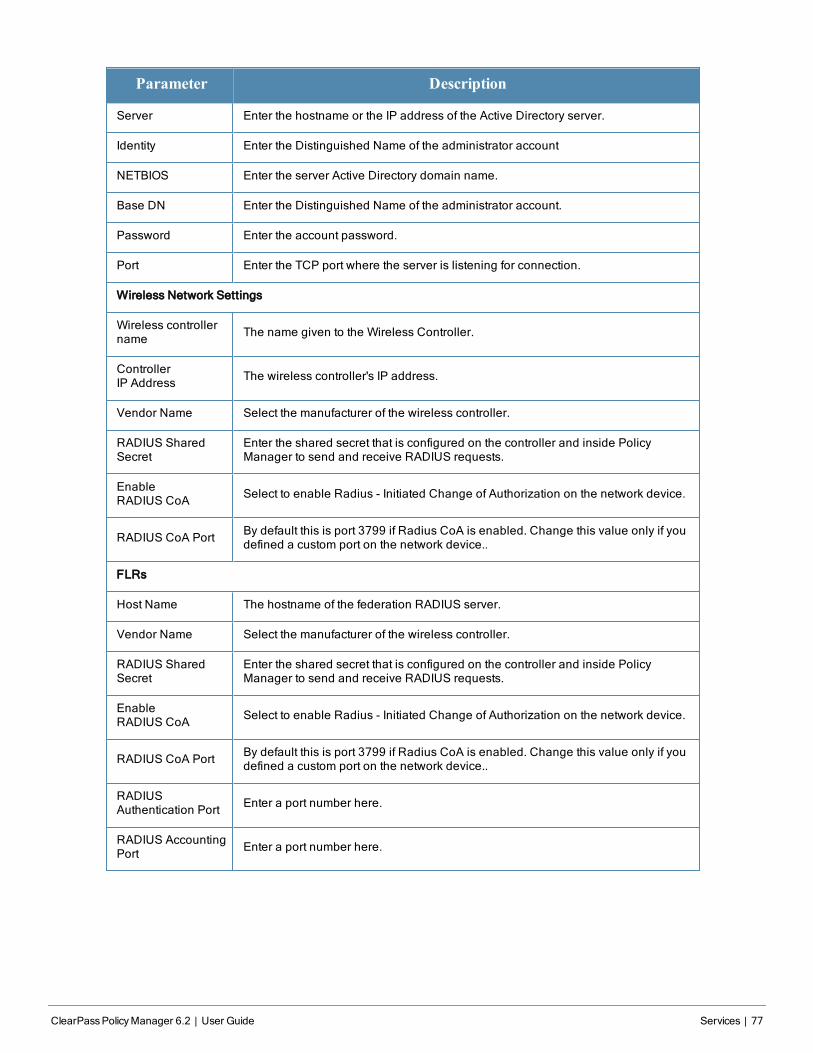
Parameter Description
Server Enter the hostname or the IP address of the Active Directory server.
Identity Enter the Distinguished Name of the administrator account
NETBIOS Enter the server Active Directory domain name.
Base DN Enter the Distinguished Name of the administrator account.
Password Enter the account password.
Port Enter the TCP port where the server is listening for connection.
Wireless Network Settings
Wireless controllername The name given to the Wireless Controller.
ControllerIP Address The wireless controller's IP address.
Vendor Name Select the manufacturer of the wireless controller.
RADIUS SharedSecret
Enter the shared secret that is configured on the controller and inside PolicyManager to send and receive RADIUS requests.
EnableRADIUS CoA Select to enable Radius - Initiated Change of Authorization on the network device.
RADIUS CoA Port By default this is port 3799 if Radius CoA is enabled. Change this value only if youdefined a custom port on the network device..
FLRs
Host Name The hostname of the federation RADIUS server.
Vendor Name Select the manufacturer of the wireless controller.
RADIUS SharedSecret
Enter the shared secret that is configured on the controller and inside PolicyManager to send and receive RADIUS requests.
EnableRADIUS CoA Select to enable Radius - Initiated Change of Authorization on the network device.
RADIUS CoA Port By default this is port 3799 if Radius CoA is enabled. Change this value only if youdefined a custom port on the network device..
RADIUSAuthentication Port Enter a port number here.
RADIUS AccountingPort Enter a port number here.
ClearPassPolicyManager 6.2 | User Guide Services | 77
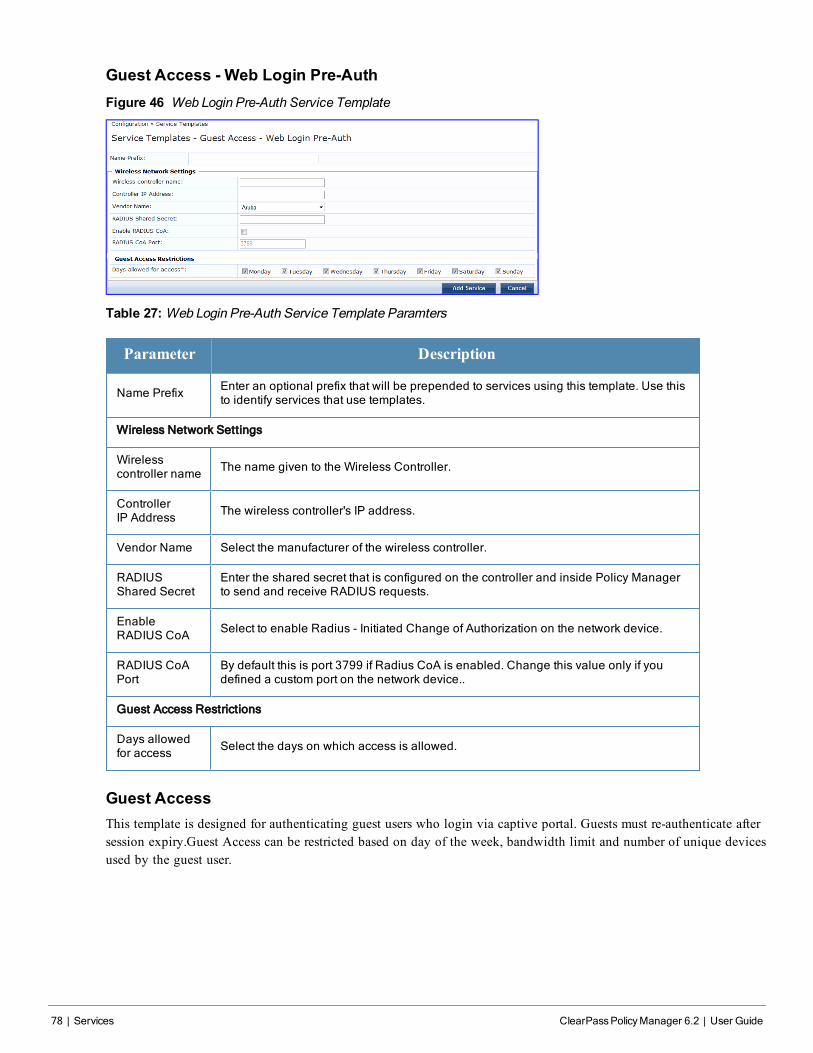
78 | Services ClearPassPolicyManager 6.2 | User Guide
Guest Access - Web Login Pre-AuthFigure 46 Web Login Pre-Auth Service Template
Table 27:Web Login Pre-Auth Service Template Paramters
Parameter Description
Name Prefix Enter an optional prefix that will be prepended to services using this template. Use thisto identify services that use templates.
Wireless Network Settings
Wirelesscontroller name The name given to the Wireless Controller.
ControllerIP Address The wireless controller's IP address.
Vendor Name Select the manufacturer of the wireless controller.
RADIUSShared Secret
Enter the shared secret that is configured on the controller and inside Policy Managerto send and receive RADIUS requests.
EnableRADIUS CoA Select to enable Radius - Initiated Change of Authorization on the network device.
RADIUS CoAPort
By default this is port 3799 if Radius CoA is enabled. Change this value only if youdefined a custom port on the network device..
Guest Access Restrictions
Days allowedfor access Select the days on which access is allowed.
Guest AccessThis template is designed for authenticating guest users who login via captive portal. Guests must re-authenticate aftersession expiry.Guest Access can be restricted based on day of the week, bandwidth limit and number of unique devicesused by the guest user.
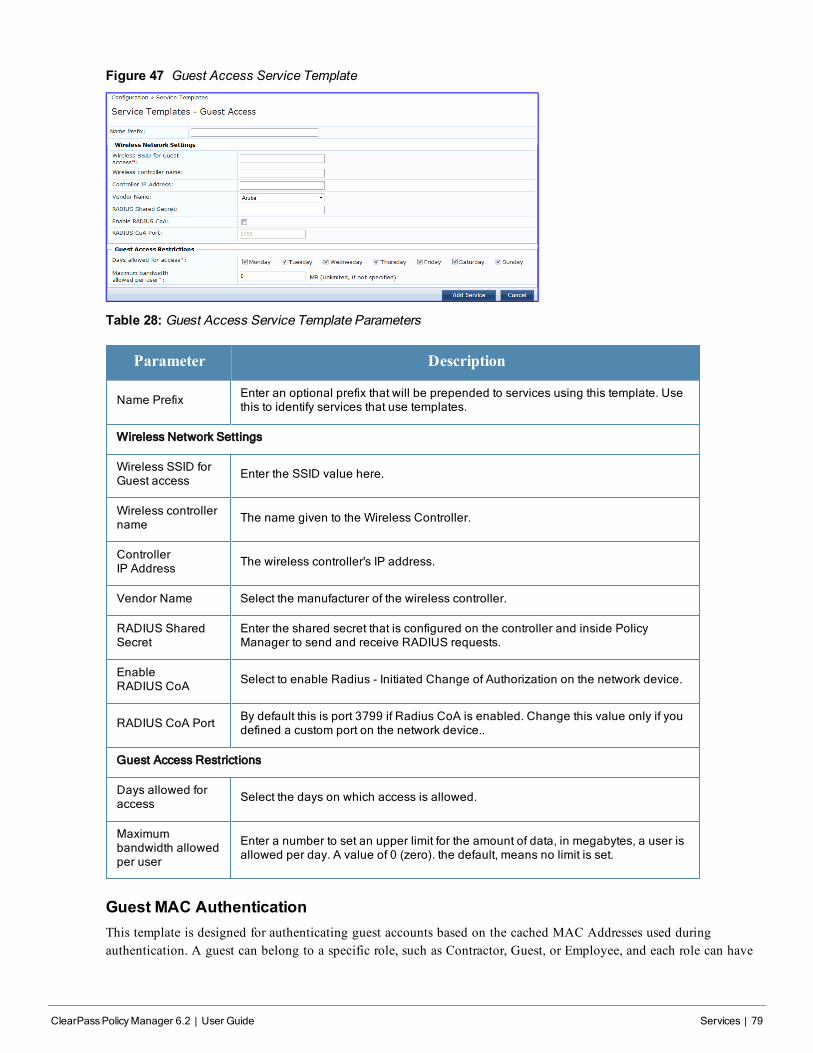
Figure 47 Guest Access Service Template
Table 28: Guest Access Service Template Parameters
Parameter Description
Name Prefix Enter an optional prefix that will be prepended to services using this template. Usethis to identify services that use templates.
Wireless Network Settings
Wireless SSID forGuest access Enter the SSID value here.
Wireless controllername The name given to the Wireless Controller.
ControllerIP Address The wireless controller's IP address.
Vendor Name Select the manufacturer of the wireless controller.
RADIUS SharedSecret
Enter the shared secret that is configured on the controller and inside PolicyManager to send and receive RADIUS requests.
EnableRADIUS CoA Select to enable Radius - Initiated Change of Authorization on the network device.
RADIUS CoA Port By default this is port 3799 if Radius CoA is enabled. Change this value only if youdefined a custom port on the network device..
Guest Access Restrictions
Days allowed foraccess Select the days on which access is allowed.
Maximumbandwidth allowedper user
Enter a number to set an upper limit for the amount of data, in megabytes, a user isallowed per day. A value of 0 (zero). the default, means no limit is set.
Guest MAC AuthenticationThis template is designed for authenticating guest accounts based on the cached MAC Addresses used duringauthentication. A guest can belong to a specific role, such as Contractor, Guest, or Employee, and each role can have
ClearPassPolicyManager 6.2 | User Guide Services | 79
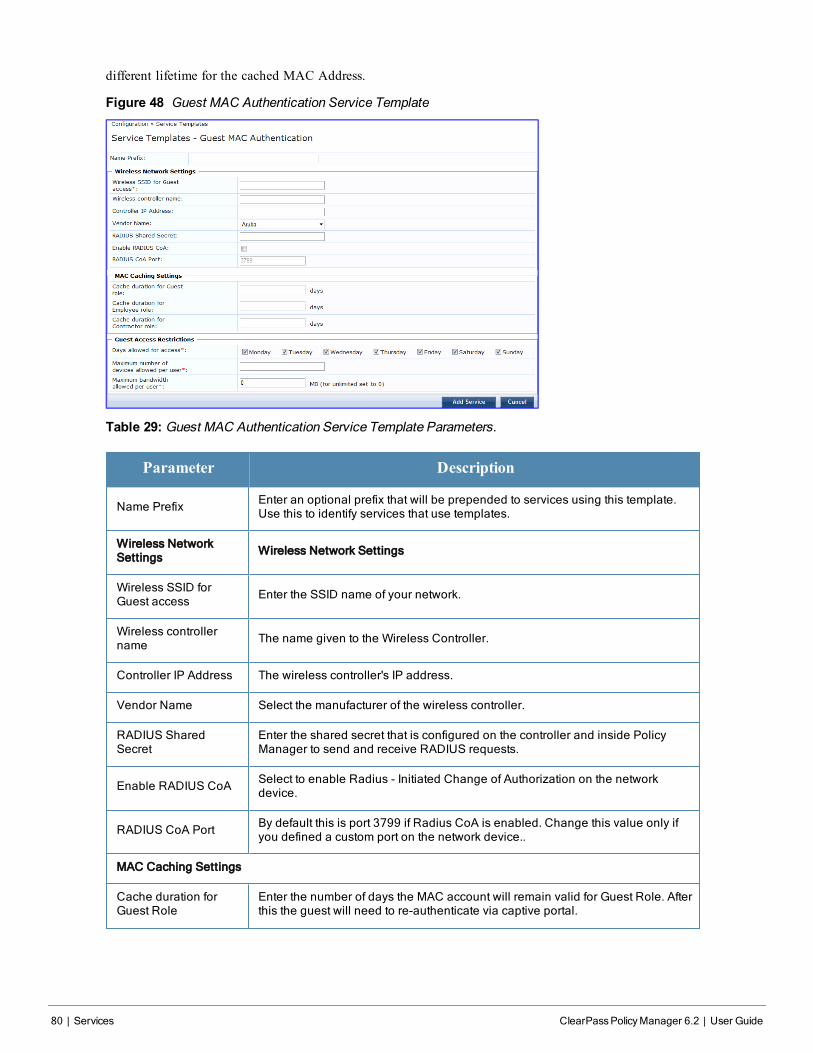
80 | Services ClearPassPolicyManager 6.2 | User Guide
different lifetime for the cached MAC Address.
Figure 48 Guest MAC Authentication Service Template
Table 29: Guest MAC Authentication Service Template Parameters.
Parameter Description
Name Prefix Enter an optional prefix that will be prepended to services using this template.Use this to identify services that use templates.
Wireless NetworkSettings Wireless Network Settings
Wireless SSID forGuest access Enter the SSID name of your network.
Wireless controllername The name given to the Wireless Controller.
Controller IP Address The wireless controller's IP address.
Vendor Name Select the manufacturer of the wireless controller.
RADIUS SharedSecret
Enter the shared secret that is configured on the controller and inside PolicyManager to send and receive RADIUS requests.
Enable RADIUS CoA Select to enable Radius - Initiated Change of Authorization on the networkdevice.
RADIUS CoA Port By default this is port 3799 if Radius CoA is enabled. Change this value only ifyou defined a custom port on the network device..
MAC Caching Settings
Cache duration forGuest Role
Enter the number of days the MAC account will remain valid for Guest Role. Afterthis the guest will need to re-authenticate via captive portal.
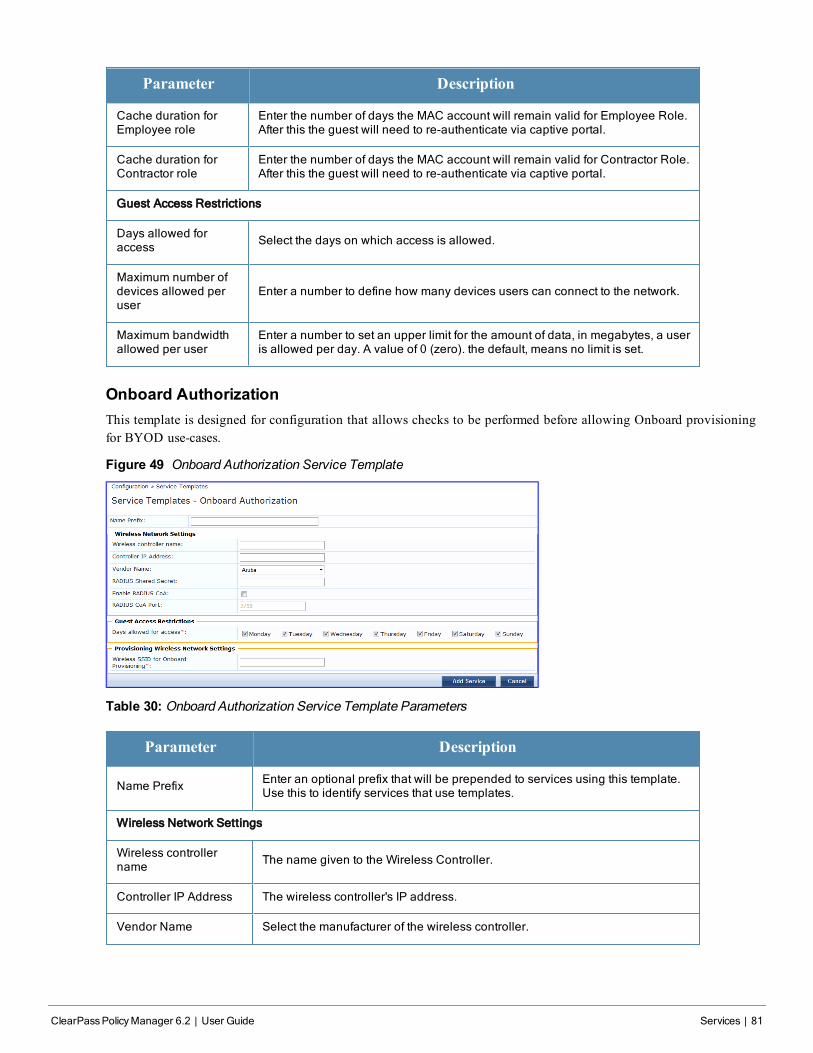
Parameter Description
Cache duration forEmployee role
Enter the number of days the MAC account will remain valid for Employee Role.After this the guest will need to re-authenticate via captive portal.
Cache duration forContractor role
Enter the number of days the MAC account will remain valid for Contractor Role.After this the guest will need to re-authenticate via captive portal.
Guest Access Restrictions
Days allowed foraccess Select the days on which access is allowed.
Maximum number ofdevices allowed peruser
Enter a number to define how many devices users can connect to the network.
Maximum bandwidthallowed per user
Enter a number to set an upper limit for the amount of data, in megabytes, a useris allowed per day. A value of 0 (zero). the default, means no limit is set.
Onboard AuthorizationThis template is designed for configuration that allows checks to be performed before allowing Onboard provisioningfor BYOD use-cases.
Figure 49 Onboard Authorization Service Template
Table 30: Onboard Authorization Service Template Parameters
Parameter Description
Name Prefix Enter an optional prefix that will be prepended to services using this template.Use this to identify services that use templates.
Wireless Network Settings
Wireless controllername The name given to the Wireless Controller.
Controller IP Address The wireless controller's IP address.
Vendor Name Select the manufacturer of the wireless controller.
ClearPassPolicyManager 6.2 | User Guide Services | 81
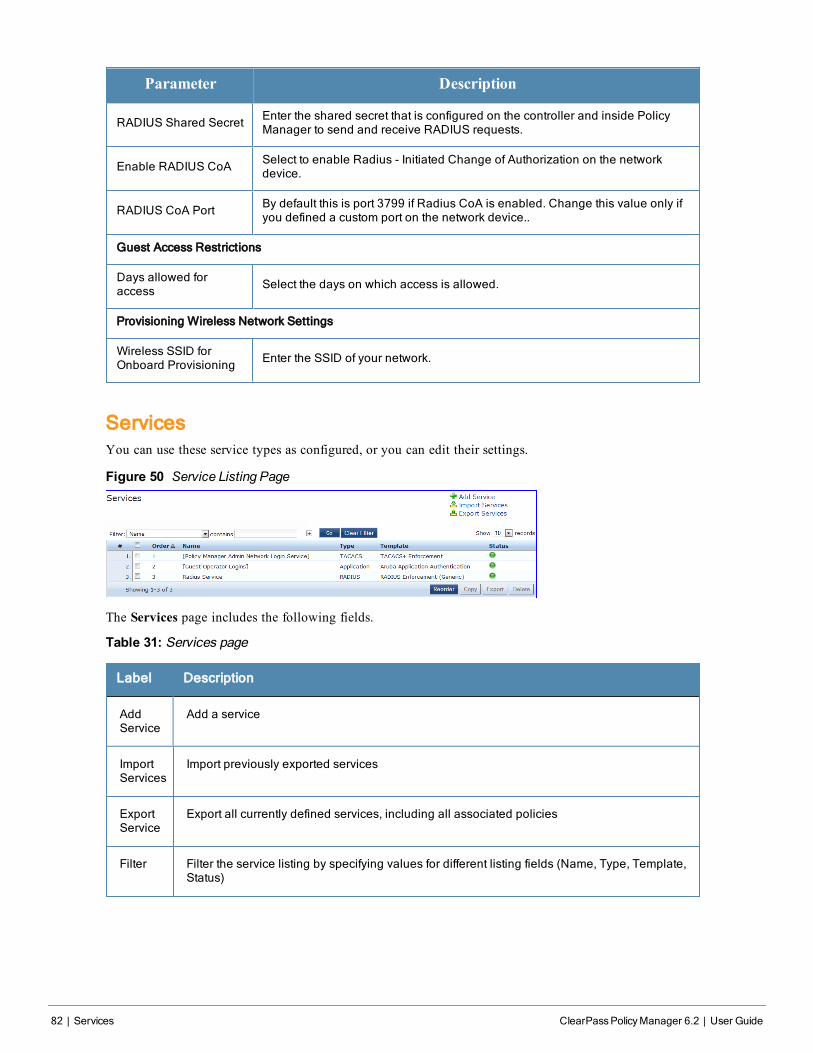
82 | Services ClearPassPolicyManager 6.2 | User Guide
Parameter Description
RADIUS Shared Secret Enter the shared secret that is configured on the controller and inside PolicyManager to send and receive RADIUS requests.
Enable RADIUS CoA Select to enable Radius - Initiated Change of Authorization on the networkdevice.
RADIUS CoA Port By default this is port 3799 if Radius CoA is enabled. Change this value only ifyou defined a custom port on the network device..
Guest Access Restrictions
Days allowed foraccess Select the days on which access is allowed.
Provisioning Wireless Network Settings
Wireless SSID forOnboard Provisioning Enter the SSID of your network.
ServicesYou can use these service types as configured, or you can edit their settings.
Figure 50 Service Listing Page
The Services page includes the following fields.
Table 31: Services page
Label Description
AddService
Add a service
ImportServices
Import previously exported services
ExportService
Export all currently defined services, including all associated policies
Filter Filter the service listing by specifying values for different listing fields (Name, Type, Template,Status)
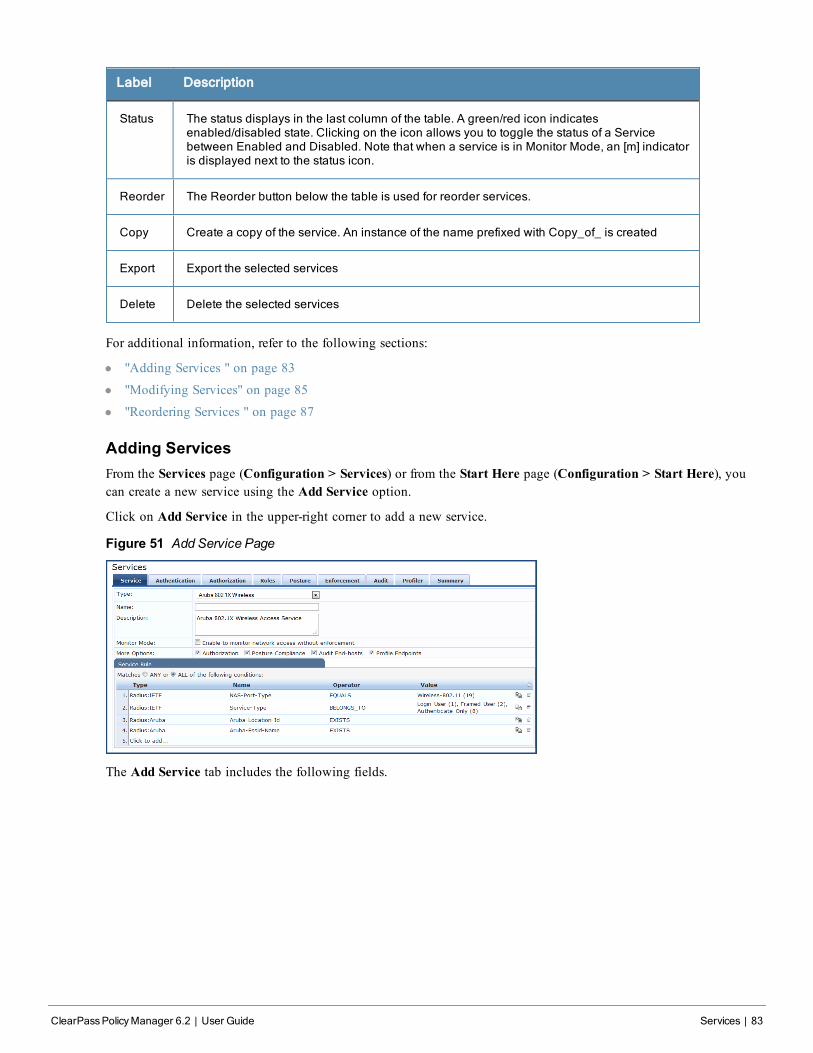
Label Description
Status The status displays in the last column of the table. A green/red icon indicatesenabled/disabled state. Clicking on the icon allows you to toggle the status of a Servicebetween Enabled and Disabled. Note that when a service is in Monitor Mode, an [m] indicatoris displayed next to the status icon.
Reorder The Reorder button below the table is used for reorder services.
Copy Create a copy of the service. An instance of the name prefixed with Copy_of_ is created
Export Export the selected services
Delete Delete the selected services
For additional information, refer to the following sections:
l "Adding Services " on page 83
l "Modifying Services" on page 85
l "Reordering Services " on page 87
Adding ServicesFrom the Services page (Configuration > Services) or from the Start Here page (Configuration > Start Here), youcan create a new service using the Add Service option.
Click on Add Service in the upper-right corner to add a new service.
Figure 51 Add Service Page
The Add Service tab includes the following fields.
ClearPassPolicyManager 6.2 | User Guide Services | 83
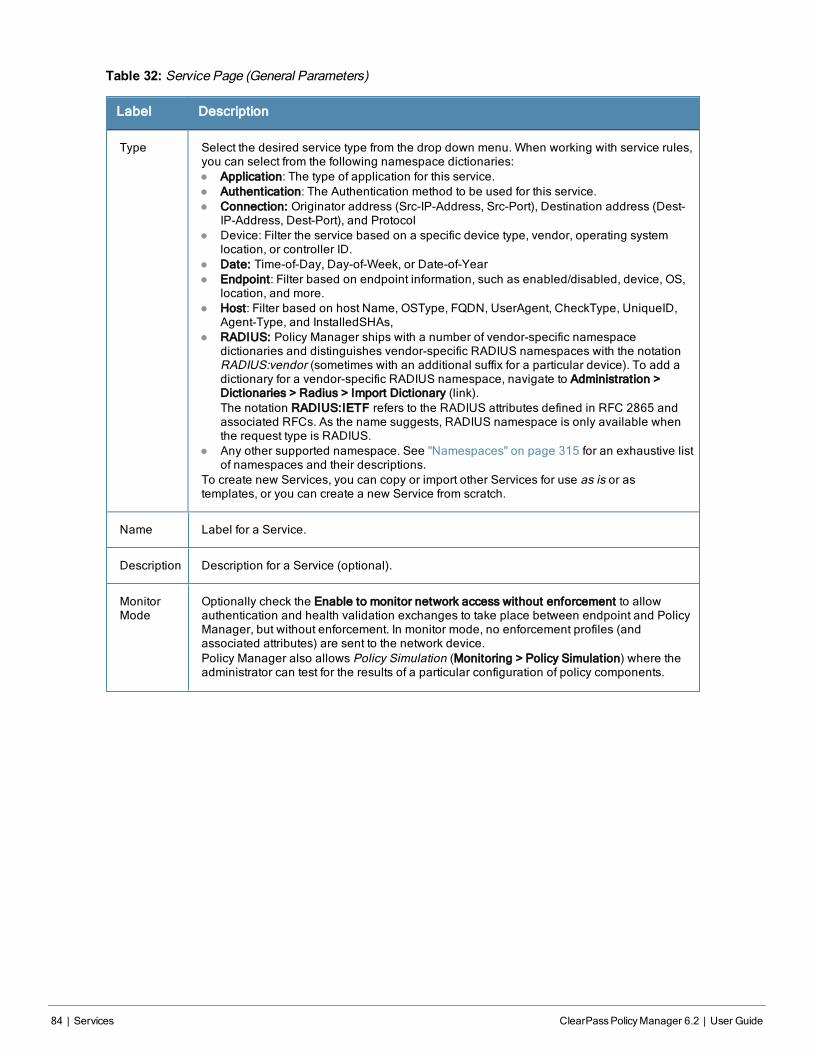
84 | Services ClearPassPolicyManager 6.2 | User Guide
Table 32: Service Page (General Parameters)
Label Description
Type Select the desired service type from the drop down menu. When working with service rules,you can select from the following namespace dictionaries:l Application: The type of application for this service.l Authentication: The Authentication method to be used for this service.l Connection: Originator address (Src-IP-Address, Src-Port), Destination address (Dest-
IP-Address, Dest-Port), and Protocoll Device: Filter the service based on a specific device type, vendor, operating system
location, or controller ID.l Date: Time-of-Day, Day-of-Week, or Date-of-Yearl Endpoint: Filter based on endpoint information, such as enabled/disabled, device, OS,
location, and more.l Host: Filter based on host Name, OSType, FQDN, UserAgent, CheckType, UniqueID,
Agent-Type, and InstalledSHAs,l RADIUS: Policy Manager ships with a number of vendor-specific namespace
dictionaries and distinguishes vendor-specific RADIUS namespaces with the notationRADIUS:vendor (sometimes with an additional suffix for a particular device). To add adictionary for a vendor-specific RADIUS namespace, navigate to Administration >Dictionaries > Radius > Import Dictionary (link).The notation RADIUS:IETF refers to the RADIUS attributes defined in RFC 2865 andassociated RFCs. As the name suggests, RADIUS namespace is only available whenthe request type is RADIUS.
l Any other supported namespace. See "Namespaces" on page 315 for an exhaustive listof namespaces and their descriptions.
To create new Services, you can copy or import other Services for use as is or astemplates, or you can create a new Service from scratch.
Name Label for a Service.
Description Description for a Service (optional).
MonitorMode
Optionally check the Enable to monitor network access without enforcement to allowauthentication and health validation exchanges to take place between endpoint and PolicyManager, but without enforcement. In monitor mode, no enforcement profiles (andassociated attributes) are sent to the network device.Policy Manager also allows Policy Simulation (Monitoring > Policy Simulation) where theadministrator can test for the results of a particular configuration of policy components.
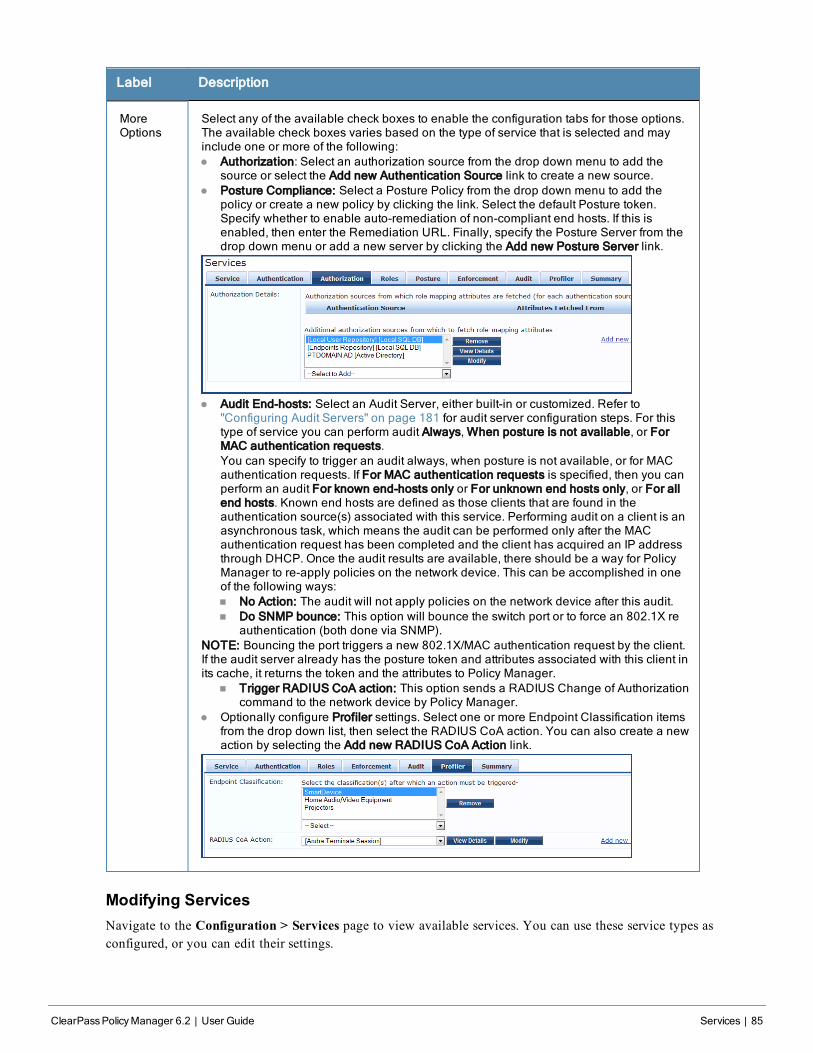
Label Description
MoreOptions
Select any of the available check boxes to enable the configuration tabs for those options.The available check boxes varies based on the type of service that is selected and mayinclude one or more of the following:l Authorization: Select an authorization source from the drop down menu to add the
source or select the Add new Authentication Source link to create a new source.l Posture Compliance: Select a Posture Policy from the drop down menu to add the
policy or create a new policy by clicking the link. Select the default Posture token.Specify whether to enable auto-remediation of non-compliant end hosts. If this isenabled, then enter the Remediation URL. Finally, specify the Posture Server from thedrop down menu or add a new server by clicking the Add new Posture Server link.
l Audit End-hosts: Select an Audit Server, either built-in or customized. Refer to"Configuring Audit Servers" on page 181 for audit server configuration steps. For thistype of service you can perform audit Always, When posture is not available, or ForMAC authentication requests.You can specify to trigger an audit always, when posture is not available, or for MACauthentication requests. If For MAC authentication requests is specified, then you canperform an audit For known end-hosts only or For unknown end hosts only, or For allend hosts. Known end hosts are defined as those clients that are found in theauthentication source(s) associated with this service. Performing audit on a client is anasynchronous task, which means the audit can be performed only after the MACauthentication request has been completed and the client has acquired an IP addressthrough DHCP. Once the audit results are available, there should be a way for PolicyManager to re-apply policies on the network device. This can be accomplished in oneof the following ways:n No Action: The audit will not apply policies on the network device after this audit.n Do SNMP bounce: This option will bounce the switch port or to force an 802.1X re
authentication (both done via SNMP).NOTE: Bouncing the port triggers a new 802.1X/MAC authentication request by the client.If the audit server already has the posture token and attributes associated with this client inits cache, it returns the token and the attributes to Policy Manager.
n Trigger RADIUS CoA action: This option sends a RADIUS Change of Authorizationcommand to the network device by Policy Manager.
l Optionally configure Profiler settings. Select one or more Endpoint Classification itemsfrom the drop down list, then select the RADIUS CoA action. You can also create a newaction by selecting the Add new RADIUS CoA Action link.
Modifying ServicesNavigate to the Configuration > Services page to view available services. You can use these service types asconfigured, or you can edit their settings.
ClearPassPolicyManager 6.2 | User Guide Services | 85
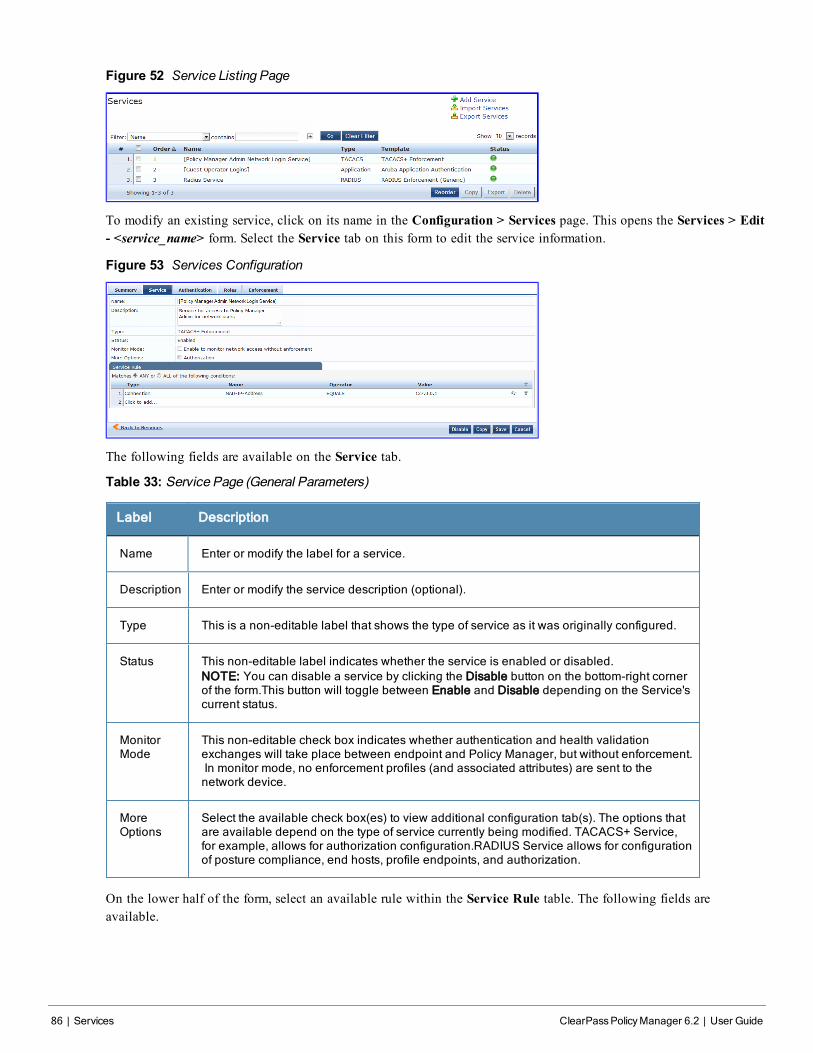
86 | Services ClearPassPolicyManager 6.2 | User Guide
Figure 52 Service Listing Page
To modify an existing service, click on its name in the Configuration > Services page. This opens the Services > Edit- <service_name> form. Select the Service tab on this form to edit the service information.
Figure 53 Services Configuration
The following fields are available on the Service tab.
Table 33: Service Page (General Parameters)
Label Description
Name Enter or modify the label for a service.
Description Enter or modify the service description (optional).
Type This is a non-editable label that shows the type of service as it was originally configured.
Status This non-editable label indicates whether the service is enabled or disabled.NOTE: You can disable a service by clicking the Disable button on the bottom-right cornerof the form.This button will toggle between Enable and Disable depending on the Service'scurrent status.
MonitorMode
This non-editable check box indicates whether authentication and health validationexchanges will take place between endpoint and Policy Manager, but without enforcement.In monitor mode, no enforcement profiles (and associated attributes) are sent to thenetwork device.
MoreOptions
Select the available check box(es) to view additional configuration tab(s). The options thatare available depend on the type of service currently being modified. TACACS+ Service,for example, allows for authorization configuration.RADIUS Service allows for configurationof posture compliance, end hosts, profile endpoints, and authorization.
On the lower half of the form, select an available rule within the Service Rule table. The following fields areavailable.
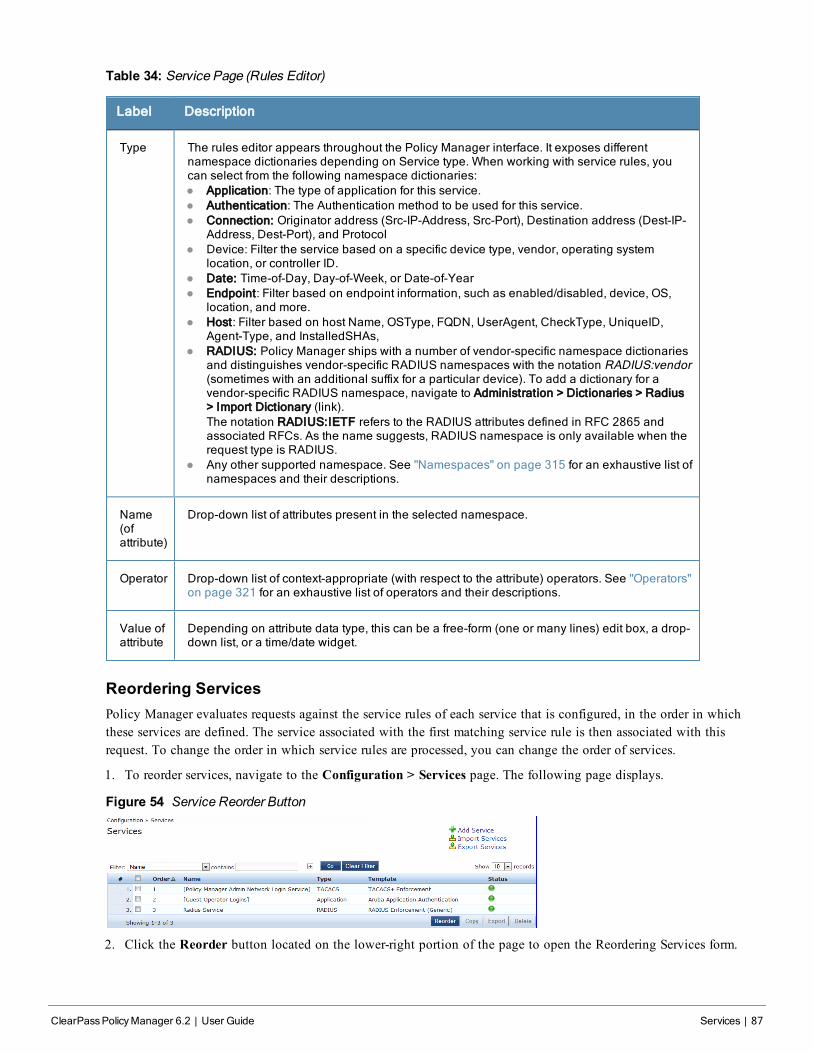
Table 34: Service Page (Rules Editor)
Label Description
Type The rules editor appears throughout the Policy Manager interface. It exposes differentnamespace dictionaries depending on Service type. When working with service rules, youcan select from the following namespace dictionaries:l Application: The type of application for this service.l Authentication: The Authentication method to be used for this service.l Connection: Originator address (Src-IP-Address, Src-Port), Destination address (Dest-IP-
Address, Dest-Port), and Protocoll Device: Filter the service based on a specific device type, vendor, operating system
location, or controller ID.l Date: Time-of-Day, Day-of-Week, or Date-of-Yearl Endpoint: Filter based on endpoint information, such as enabled/disabled, device, OS,
location, and more.l Host: Filter based on host Name, OSType, FQDN, UserAgent, CheckType, UniqueID,
Agent-Type, and InstalledSHAs,l RADIUS: Policy Manager ships with a number of vendor-specific namespace dictionaries
and distinguishes vendor-specific RADIUS namespaces with the notation RADIUS:vendor(sometimes with an additional suffix for a particular device). To add a dictionary for avendor-specific RADIUS namespace, navigate to Administration > Dictionaries > Radius> Import Dictionary (link).The notation RADIUS:IETF refers to the RADIUS attributes defined in RFC 2865 andassociated RFCs. As the name suggests, RADIUS namespace is only available when therequest type is RADIUS.
l Any other supported namespace. See "Namespaces" on page 315 for an exhaustive list ofnamespaces and their descriptions.
Name(ofattribute)
Drop-down list of attributes present in the selected namespace.
Operator Drop-down list of context-appropriate (with respect to the attribute) operators. See "Operators"on page 321 for an exhaustive list of operators and their descriptions.
Value ofattribute
Depending on attribute data type, this can be a free-form (one or many lines) edit box, a drop-down list, or a time/date widget.
Reordering ServicesPolicy Manager evaluates requests against the service rules of each service that is configured, in the order in whichthese services are defined. The service associated with the first matching service rule is then associated with thisrequest. To change the order in which service rules are processed, you can change the order of services.
1. To reorder services, navigate to the Configuration > Services page. The following page displays.
Figure 54 Service Reorder Button
2. Click the Reorder button located on the lower-right portion of the page to open the Reordering Services form.
ClearPassPolicyManager 6.2 | User Guide Services | 87
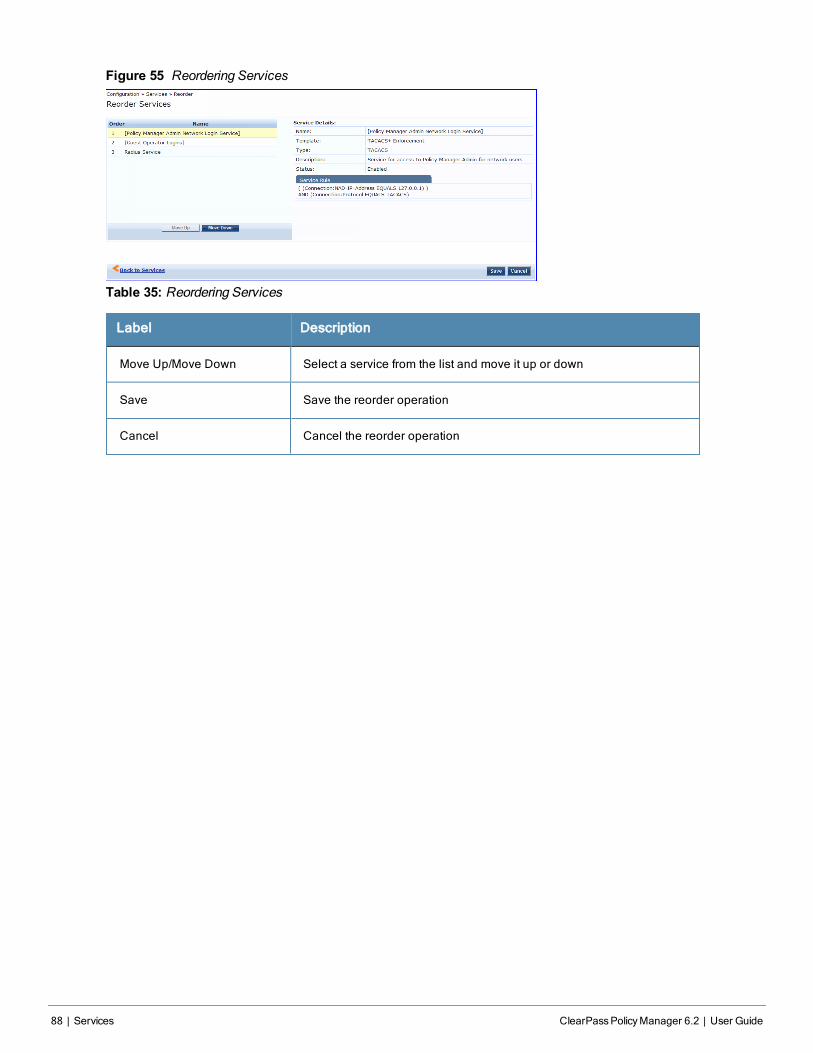
88 | Services ClearPassPolicyManager 6.2 | User Guide
Figure 55 Reordering Services
Table 35: Reordering Services
Label Description
Move Up/Move Down Select a service from the list and move it up or down
Save Save the reorder operation
Cancel Cancel the reorder operation
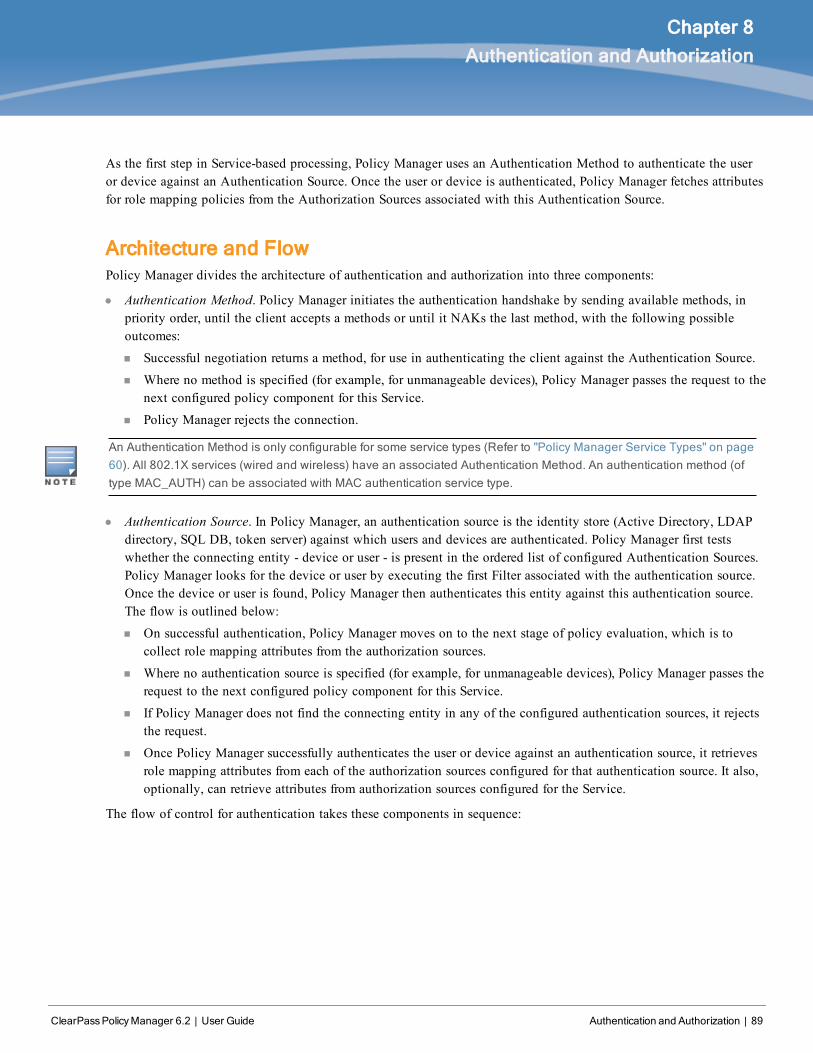
ClearPassPolicyManager 6.2 | User Guide Authentication and Authorization | 89
Chapter 8
Authentication and Authorization
As the first step in Service-based processing, Policy Manager uses an Authentication Method to authenticate the useror device against an Authentication Source. Once the user or device is authenticated, Policy Manager fetches attributesfor role mapping policies from the Authorization Sources associated with this Authentication Source.
Architecture and FlowPolicy Manager divides the architecture of authentication and authorization into three components:
l Authentication Method. Policy Manager initiates the authentication handshake by sending available methods, inpriority order, until the client accepts a methods or until it NAKs the last method, with the following possibleoutcomes:
n Successful negotiation returns a method, for use in authenticating the client against the Authentication Source.
n Where no method is specified (for example, for unmanageable devices), Policy Manager passes the request to thenext configured policy component for this Service.
n Policy Manager rejects the connection.
An Authentication Method is only configurable for some service types (Refer to "Policy Manager Service Types" on page60). All 802.1X services (wired and wireless) have an associated Authentication Method. An authentication method (oftype MAC_AUTH) can be associated with MAC authentication service type.
l Authentication Source. In Policy Manager, an authentication source is the identity store (Active Directory, LDAPdirectory, SQL DB, token server) against which users and devices are authenticated. Policy Manager first testswhether the connecting entity - device or user - is present in the ordered list of configured Authentication Sources.Policy Manager looks for the device or user by executing the first Filter associated with the authentication source.Once the device or user is found, Policy Manager then authenticates this entity against this authentication source.The flow is outlined below:
n On successful authentication, Policy Manager moves on to the next stage of policy evaluation, which is tocollect role mapping attributes from the authorization sources.
n Where no authentication source is specified (for example, for unmanageable devices), Policy Manager passes therequest to the next configured policy component for this Service.
n If Policy Manager does not find the connecting entity in any of the configured authentication sources, it rejectsthe request.
n Once Policy Manager successfully authenticates the user or device against an authentication source, it retrievesrole mapping attributes from each of the authorization sources configured for that authentication source. It also,optionally, can retrieve attributes from authorization sources configured for the Service.
The flow of control for authentication takes these components in sequence:
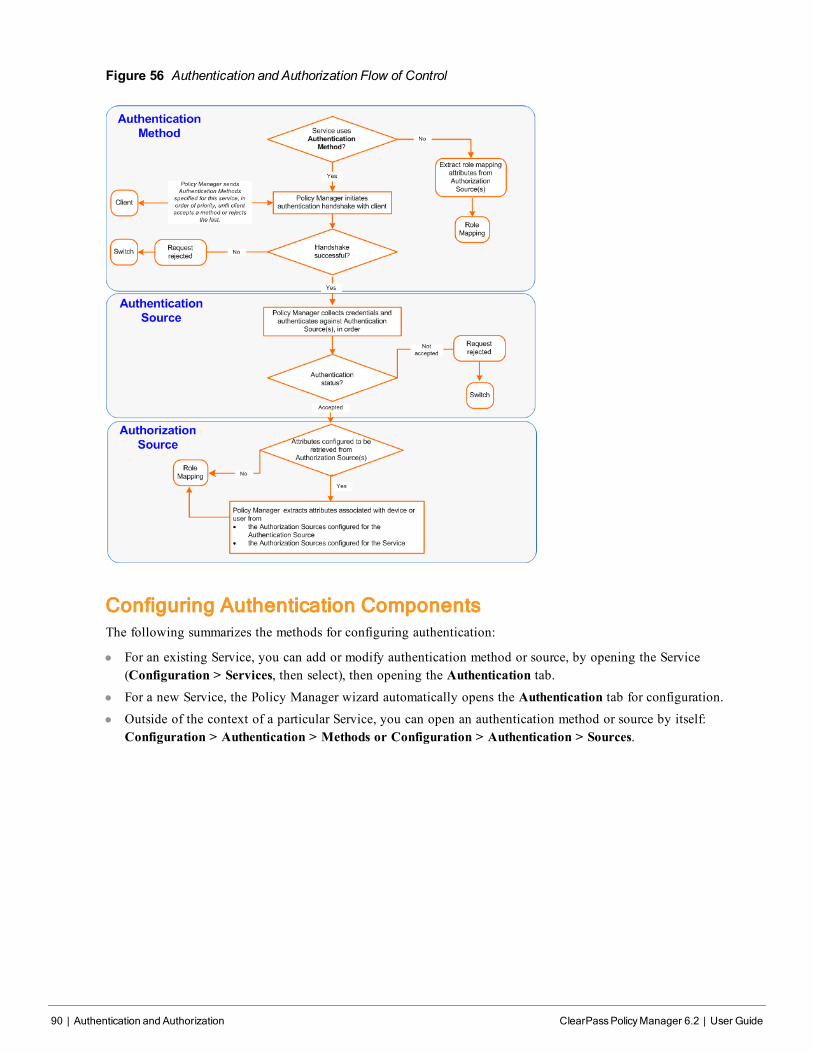
90 | Authentication and Authorization ClearPassPolicyManager 6.2 | User Guide
Figure 56 Authentication and Authorization Flow of Control
Configuring Authentication ComponentsThe following summarizes the methods for configuring authentication:
l For an existing Service, you can add or modify authentication method or source, by opening the Service(Configuration > Services, then select), then opening the Authentication tab.
l For a new Service, the Policy Manager wizard automatically opens the Authentication tab for configuration.l Outside of the context of a particular Service, you can open an authentication method or source by itself:
Configuration > Authentication > Methods or Configuration > Authentication > Sources.
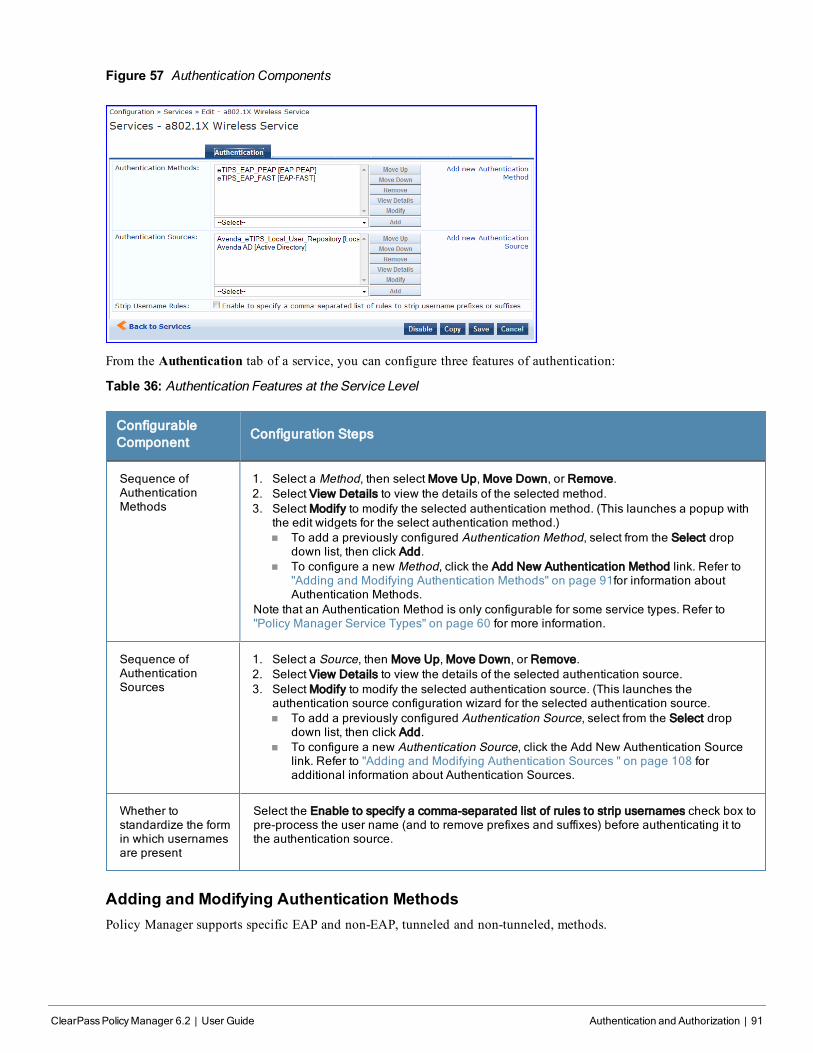
Figure 57 Authentication Components
From the Authentication tab of a service, you can configure three features of authentication:
Table 36: Authentication Features at the Service Level
ConfigurableComponent
Configuration Steps
Sequence ofAuthenticationMethods
1. Select a Method, then select Move Up, Move Down, or Remove.2. Select View Details to view the details of the selected method.3. Select Modify to modify the selected authentication method. (This launches a popup with
the edit widgets for the select authentication method.)n To add a previously configured Authentication Method, select from the Select drop
down list, then click Add.n To configure a new Method, click the Add New Authentication Method link. Refer to
"Adding and Modifying Authentication Methods" on page 91for information aboutAuthentication Methods.
Note that an Authentication Method is only configurable for some service types. Refer to"Policy Manager Service Types" on page 60 for more information.
Sequence ofAuthenticationSources
1. Select a Source, then Move Up, Move Down, or Remove.2. Select View Details to view the details of the selected authentication source.3. Select Modify to modify the selected authentication source. (This launches the
authentication source configuration wizard for the selected authentication source.n To add a previously configured Authentication Source, select from the Select drop
down list, then click Add.n To configure a new Authentication Source, click the Add New Authentication Source
link. Refer to "Adding and Modifying Authentication Sources " on page 108 foradditional information about Authentication Sources.
Whether tostandardize the formin which usernamesare present
Select the Enable to specify a comma-separated list of rules to strip usernames check box topre-process the user name (and to remove prefixes and suffixes) before authenticating it tothe authentication source.
Adding and Modifying Authentication MethodsPolicy Manager supports specific EAP and non-EAP, tunneled and non-tunneled, methods.
ClearPassPolicyManager 6.2 | User Guide Authentication and Authorization | 91
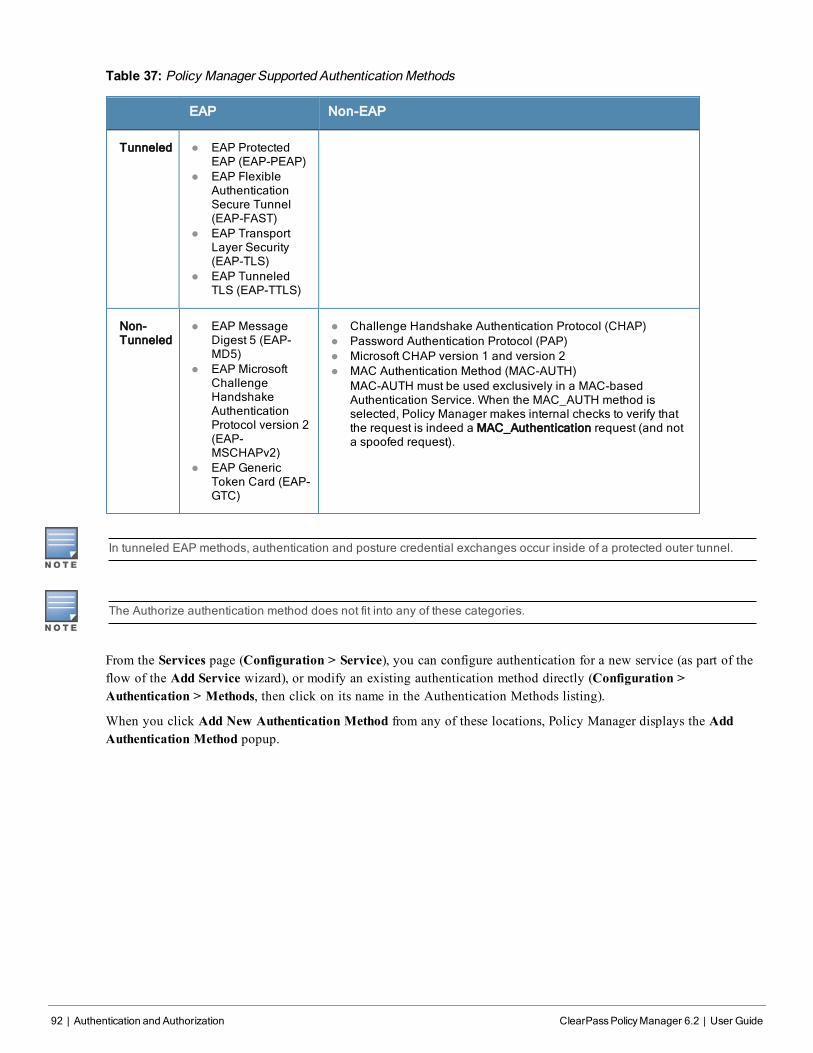
92 | Authentication and Authorization ClearPassPolicyManager 6.2 | User Guide
Table 37: Policy Manager Supported AuthenticationMethods
EAP Non-EAP
Tunneled l EAP ProtectedEAP (EAP-PEAP)
l EAP FlexibleAuthenticationSecure Tunnel(EAP-FAST)
l EAP TransportLayer Security(EAP-TLS)
l EAP TunneledTLS (EAP-TTLS)
Non-Tunneled
l EAP MessageDigest 5 (EAP-MD5)
l EAP MicrosoftChallengeHandshakeAuthenticationProtocol version 2(EAP-MSCHAPv2)
l EAP GenericToken Card (EAP-GTC)
l Challenge Handshake Authentication Protocol (CHAP)l Password Authentication Protocol (PAP)l Microsoft CHAP version 1 and version 2l MAC Authentication Method (MAC-AUTH)
MAC-AUTH must be used exclusively in a MAC-basedAuthentication Service. When the MAC_AUTH method isselected, Policy Manager makes internal checks to verify thatthe request is indeed a MAC_Authentication request (and nota spoofed request).
In tunneled EAP methods, authentication and posture credential exchanges occur inside of a protected outer tunnel.
The Authorize authentication method does not fit into any of these categories.
From the Services page (Configuration > Service), you can configure authentication for a new service (as part of theflow of the Add Service wizard), or modify an existing authentication method directly (Configuration >Authentication > Methods, then click on its name in the Authentication Methods listing).
When you click Add New Authentication Method from any of these locations, Policy Manager displays the AddAuthentication Method popup.
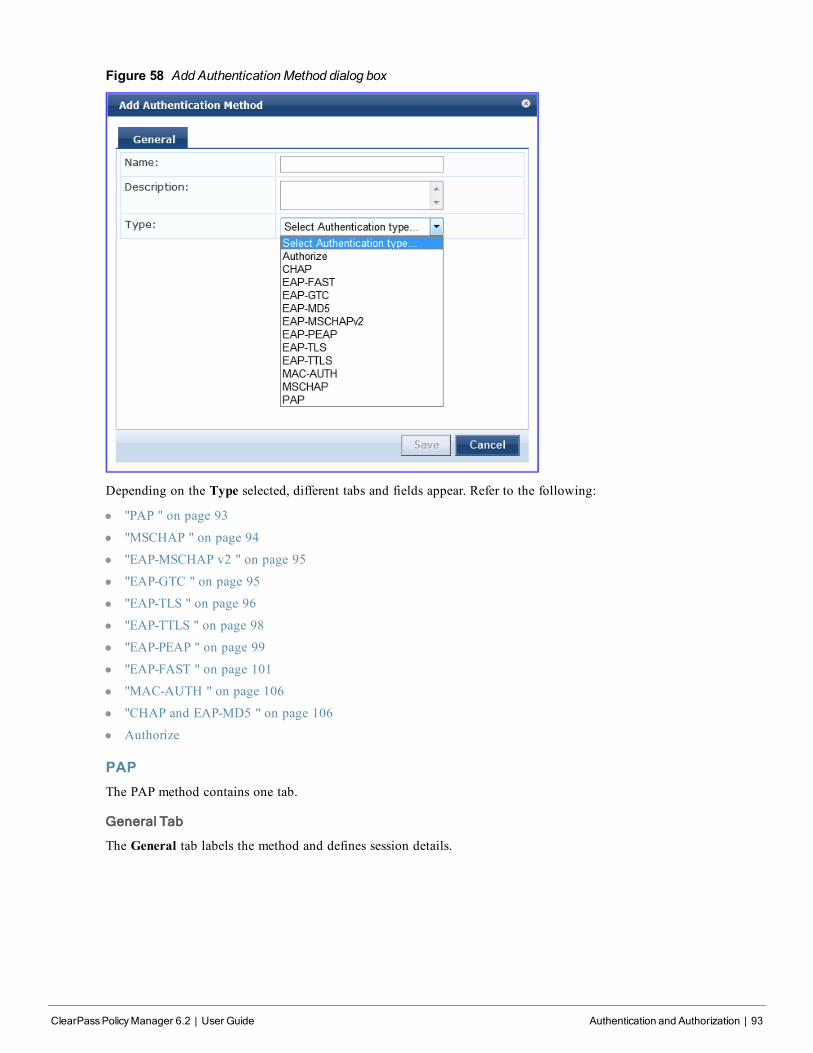
Figure 58 Add AuthenticationMethod dialog box
Depending on the Type selected, different tabs and fields appear. Refer to the following:
l "PAP " on page 93
l "MSCHAP " on page 94
l "EAP-MSCHAP v2 " on page 95
l "EAP-GTC " on page 95
l "EAP-TLS " on page 96
l "EAP-TTLS " on page 98
l "EAP-PEAP " on page 99
l "EAP-FAST " on page 101
l "MAC-AUTH " on page 106
l "CHAP and EAP-MD5 " on page 106
l Authorize
PAPThe PAP method contains one tab.
General Tab
The General tab labels the method and defines session details.
ClearPassPolicyManager 6.2 | User Guide Authentication and Authorization | 93
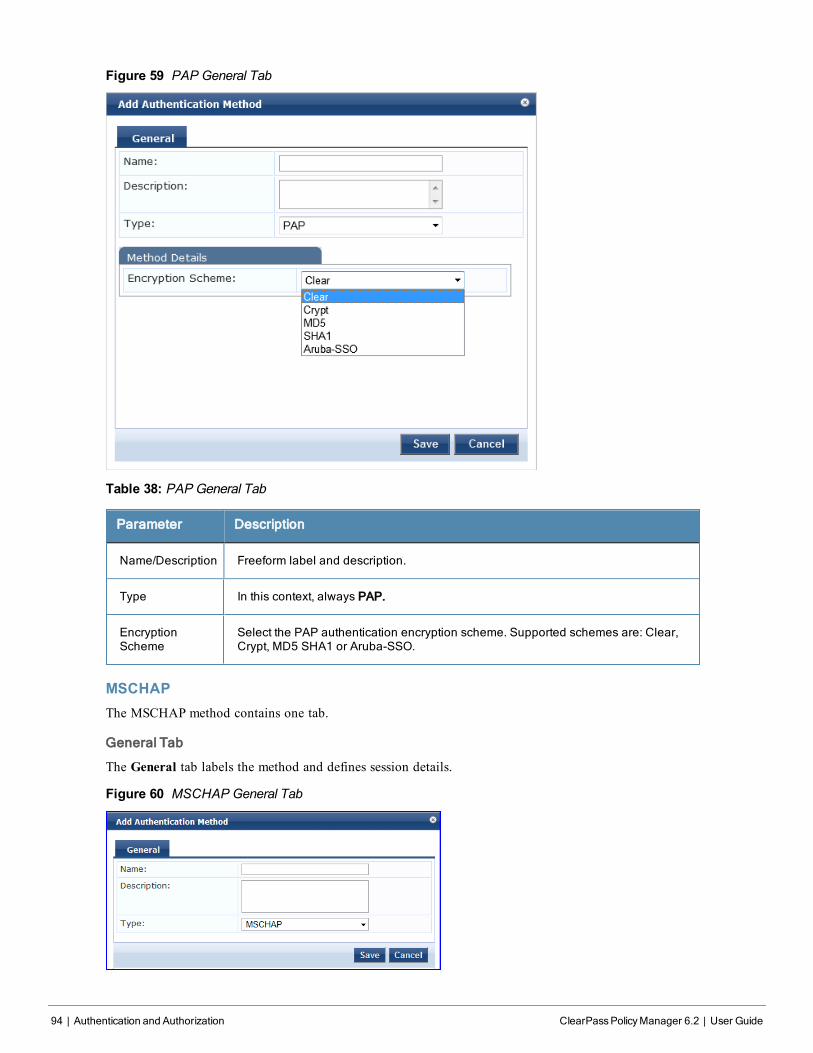
94 | Authentication and Authorization ClearPassPolicyManager 6.2 | User Guide
Figure 59 PAP General Tab
Table 38: PAP General Tab
Parameter Description
Name/Description Freeform label and description.
Type In this context, always PAP.
EncryptionScheme
Select the PAP authentication encryption scheme. Supported schemes are: Clear,Crypt, MD5 SHA1 or Aruba-SSO.
MSCHAPThe MSCHAP method contains one tab.
General Tab
The General tab labels the method and defines session details.
Figure 60 MSCHAP General Tab
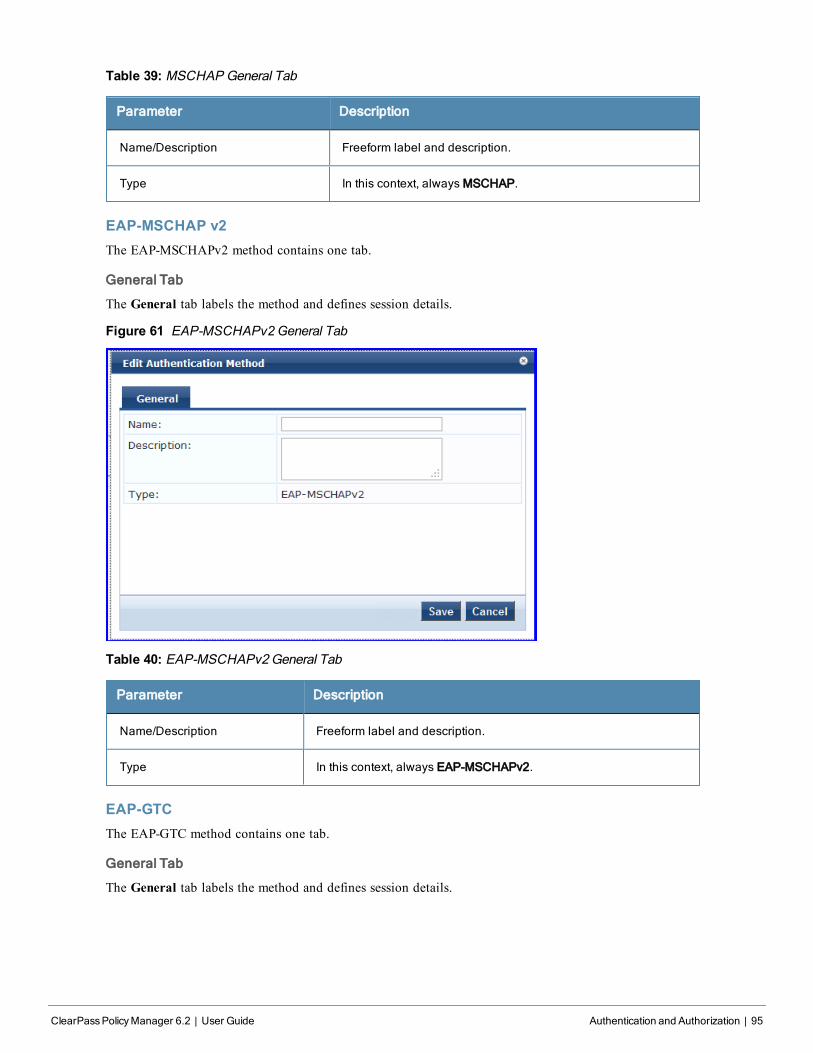
Table 39: MSCHAP General Tab
Parameter Description
Name/Description Freeform label and description.
Type In this context, always MSCHAP.
EAP-MSCHAP v2The EAP-MSCHAPv2 method contains one tab.
General Tab
The General tab labels the method and defines session details.
Figure 61 EAP-MSCHAPv2General Tab
Table 40: EAP-MSCHAPv2General Tab
Parameter Description
Name/Description Freeform label and description.
Type In this context, always EAP-MSCHAPv2.
EAP-GTCThe EAP-GTC method contains one tab.
General Tab
The General tab labels the method and defines session details.
ClearPassPolicyManager 6.2 | User Guide Authentication and Authorization | 95

96 | Authentication and Authorization ClearPassPolicyManager 6.2 | User Guide
Figure 62 EAP-GTC General Tab
Table 41: EAP-GTCGeneral Tab
Parameter Description
Name/Description Freeform label and description.
Type In this context, always EAP-GTC.
Challenge Specify an optional password.
EAP-TLSThe EAP-TLS method contains one tab.
General Tab
The General tab labels the method and defines session details.
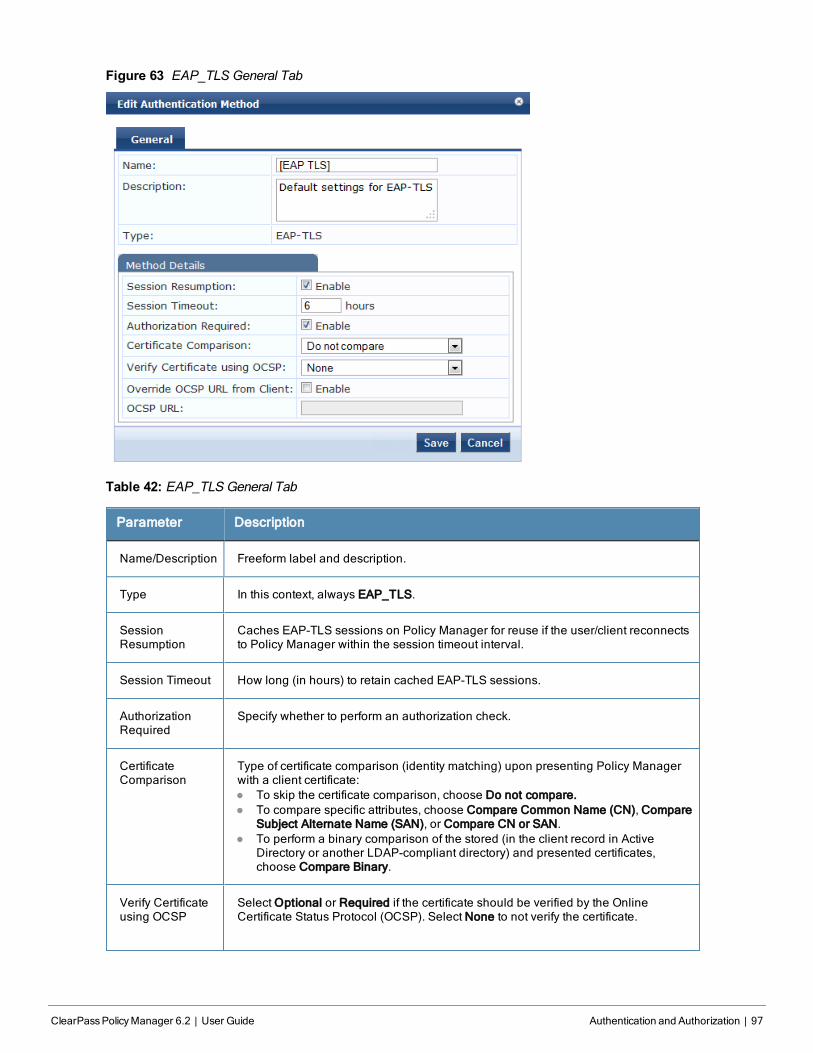
Figure 63 EAP_TLS General Tab
Table 42: EAP_TLS General Tab
Parameter Description
Name/Description Freeform label and description.
Type In this context, always EAP_TLS.
SessionResumption
Caches EAP-TLS sessions on Policy Manager for reuse if the user/client reconnectsto Policy Manager within the session timeout interval.
Session Timeout How long (in hours) to retain cached EAP-TLS sessions.
AuthorizationRequired
Specify whether to perform an authorization check.
CertificateComparison
Type of certificate comparison (identity matching) upon presenting Policy Managerwith a client certificate:l To skip the certificate comparison, choose Do not compare.l To compare specific attributes, choose Compare Common Name (CN), Compare
Subject Alternate Name (SAN), or Compare CN or SAN.l To perform a binary comparison of the stored (in the client record in Active
Directory or another LDAP-compliant directory) and presented certificates,choose Compare Binary.
Verify Certificateusing OCSP
Select Optional or Required if the certificate should be verified by the OnlineCertificate Status Protocol (OCSP). Select None to not verify the certificate.
ClearPassPolicyManager 6.2 | User Guide Authentication and Authorization | 97
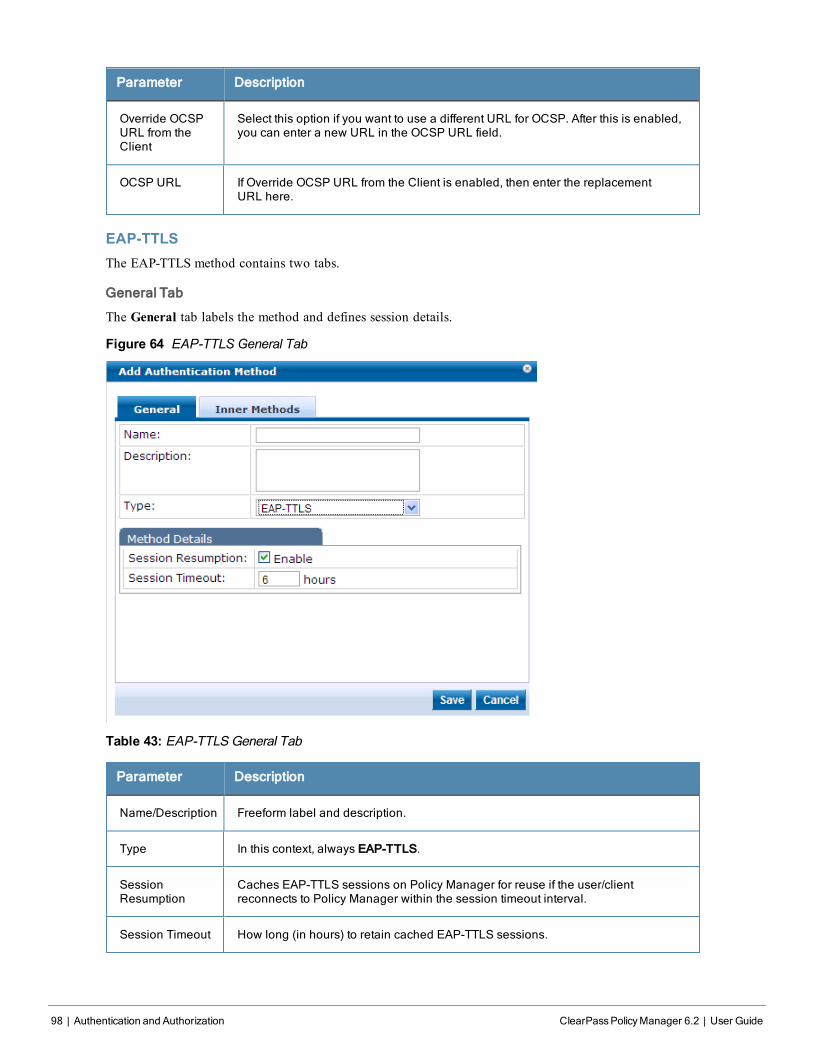
98 | Authentication and Authorization ClearPassPolicyManager 6.2 | User Guide
Parameter Description
Override OCSPURL from theClient
Select this option if you want to use a different URL for OCSP. After this is enabled,you can enter a new URL in the OCSP URL field.
OCSP URL If Override OCSP URL from the Client is enabled, then enter the replacementURL here.
EAP-TTLSThe EAP-TTLS method contains two tabs.
General Tab
The General tab labels the method and defines session details.
Figure 64 EAP-TTLS General Tab
Table 43: EAP-TTLS General Tab
Parameter Description
Name/Description Freeform label and description.
Type In this context, always EAP-TTLS.
SessionResumption
Caches EAP-TTLS sessions on Policy Manager for reuse if the user/clientreconnects to Policy Manager within the session timeout interval.
Session Timeout How long (in hours) to retain cached EAP-TTLS sessions.
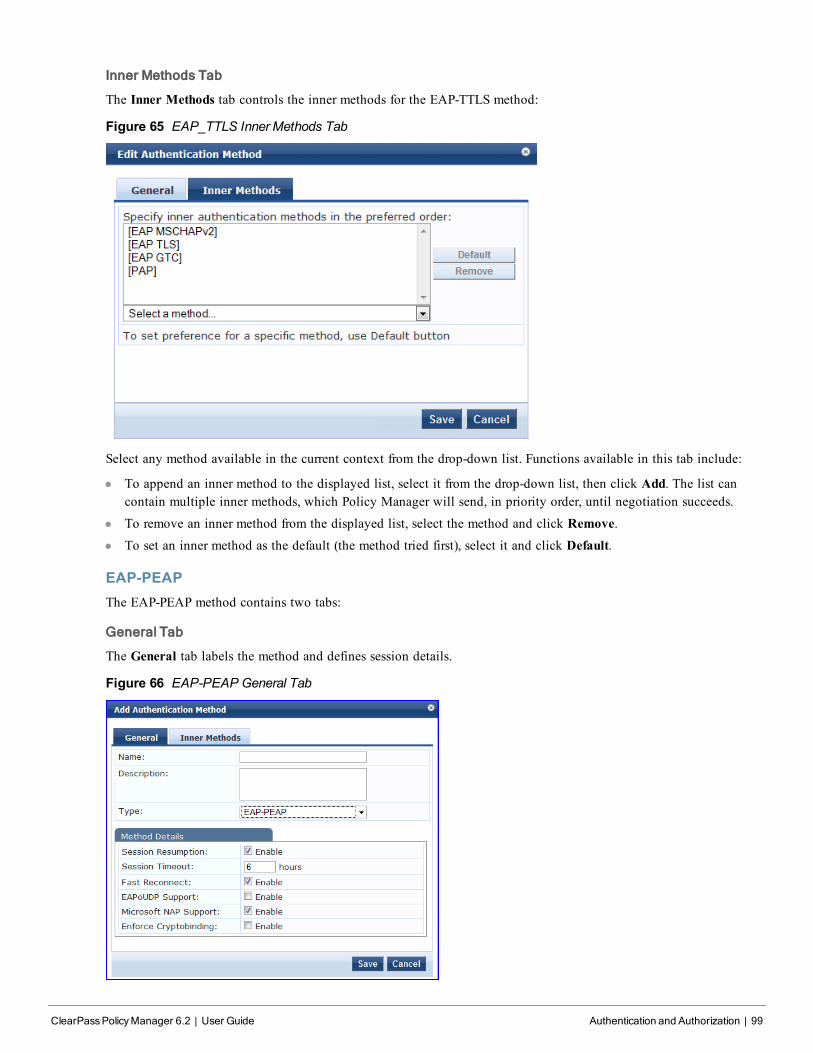
Inner Methods Tab
The Inner Methods tab controls the inner methods for the EAP-TTLS method:
Figure 65 EAP_TTLS Inner Methods Tab
Select any method available in the current context from the drop-down list. Functions available in this tab include:
l To append an inner method to the displayed list, select it from the drop-down list, then click Add. The list cancontain multiple inner methods, which Policy Manager will send, in priority order, until negotiation succeeds.
l To remove an inner method from the displayed list, select the method and click Remove.l To set an inner method as the default (the method tried first), select it and click Default.
EAP-PEAPThe EAP-PEAP method contains two tabs:
General Tab
The General tab labels the method and defines session details.
Figure 66 EAP-PEAP General Tab
ClearPassPolicyManager 6.2 | User Guide Authentication and Authorization | 99
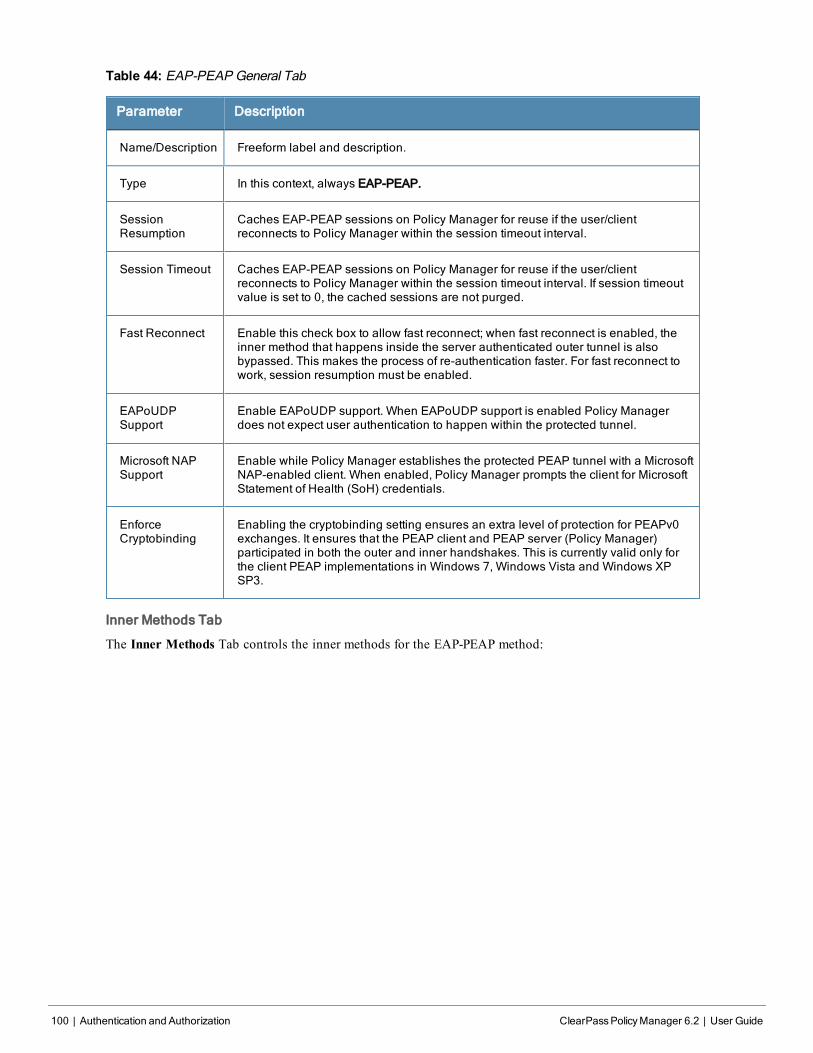
100 | Authentication and Authorization ClearPassPolicyManager 6.2 | User Guide
Table 44: EAP-PEAP General Tab
Parameter Description
Name/Description Freeform label and description.
Type In this context, always EAP-PEAP.
SessionResumption
Caches EAP-PEAP sessions on Policy Manager for reuse if the user/clientreconnects to Policy Manager within the session timeout interval.
Session Timeout Caches EAP-PEAP sessions on Policy Manager for reuse if the user/clientreconnects to Policy Manager within the session timeout interval. If session timeoutvalue is set to 0, the cached sessions are not purged.
Fast Reconnect Enable this check box to allow fast reconnect; when fast reconnect is enabled, theinner method that happens inside the server authenticated outer tunnel is alsobypassed. This makes the process of re-authentication faster. For fast reconnect towork, session resumption must be enabled.
EAPoUDPSupport
Enable EAPoUDP support. When EAPoUDP support is enabled Policy Managerdoes not expect user authentication to happen within the protected tunnel.
Microsoft NAPSupport
Enable while Policy Manager establishes the protected PEAP tunnel with a MicrosoftNAP-enabled client. When enabled, Policy Manager prompts the client for MicrosoftStatement of Health (SoH) credentials.
EnforceCryptobinding
Enabling the cryptobinding setting ensures an extra level of protection for PEAPv0exchanges. It ensures that the PEAP client and PEAP server (Policy Manager)participated in both the outer and inner handshakes. This is currently valid only forthe client PEAP implementations in Windows 7, Windows Vista and Windows XPSP3.
Inner Methods Tab
The Inner Methods Tab controls the inner methods for the EAP-PEAP method:
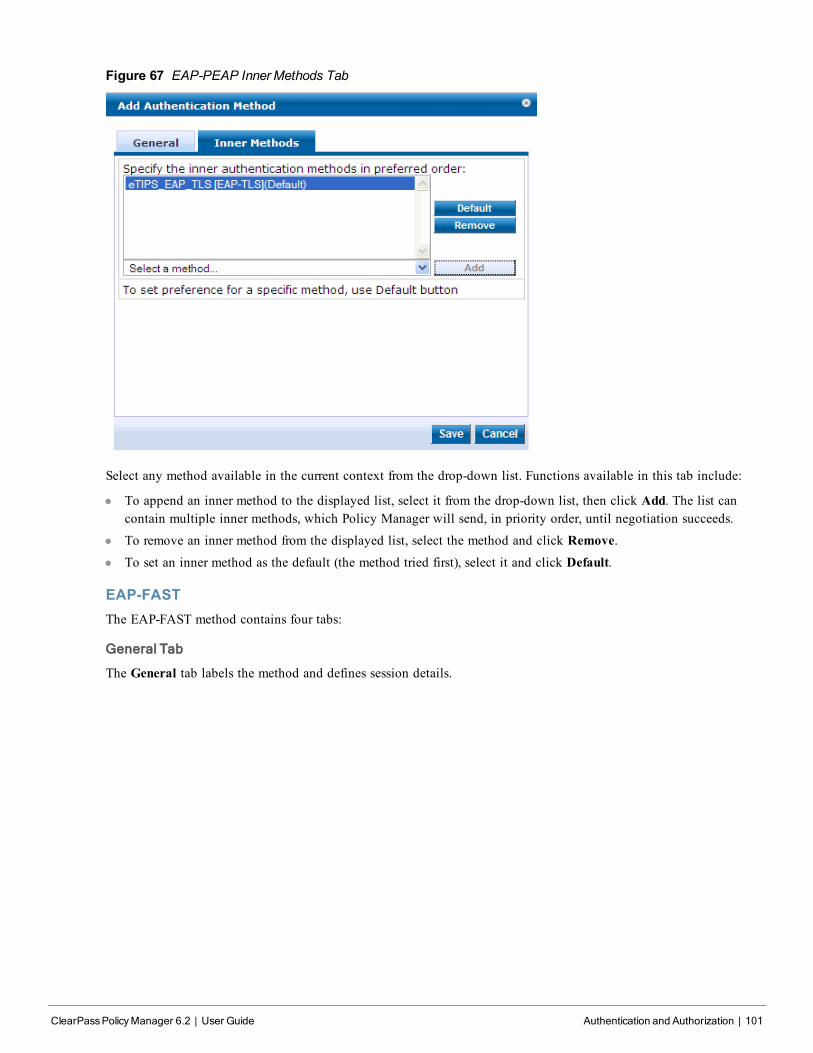
Figure 67 EAP-PEAP Inner Methods Tab
Select any method available in the current context from the drop-down list. Functions available in this tab include:
l To append an inner method to the displayed list, select it from the drop-down list, then click Add. The list cancontain multiple inner methods, which Policy Manager will send, in priority order, until negotiation succeeds.
l To remove an inner method from the displayed list, select the method and click Remove.l To set an inner method as the default (the method tried first), select it and click Default.
EAP-FASTThe EAP-FAST method contains four tabs:
General Tab
The General tab labels the method and defines session details.
ClearPassPolicyManager 6.2 | User Guide Authentication and Authorization | 101
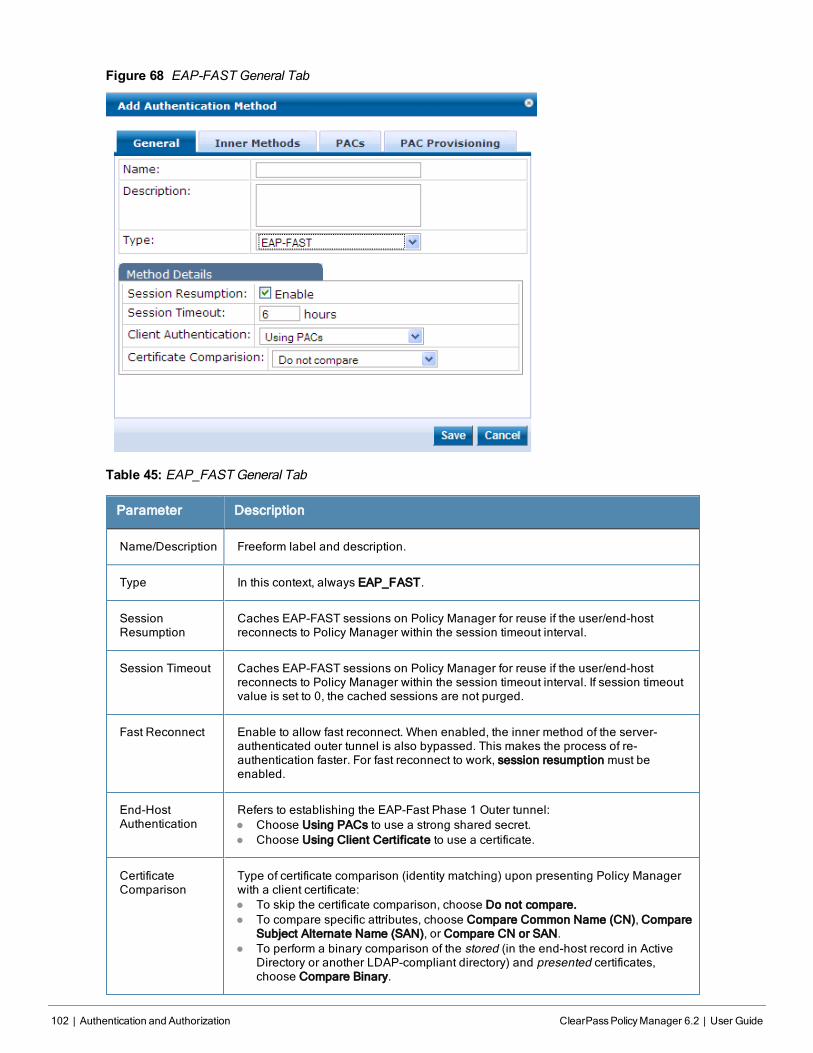
102 | Authentication and Authorization ClearPassPolicyManager 6.2 | User Guide
Figure 68 EAP-FAST General Tab
Table 45: EAP_FAST General Tab
Parameter Description
Name/Description Freeform label and description.
Type In this context, always EAP_FAST.
SessionResumption
Caches EAP-FAST sessions on Policy Manager for reuse if the user/end-hostreconnects to Policy Manager within the session timeout interval.
Session Timeout Caches EAP-FAST sessions on Policy Manager for reuse if the user/end-hostreconnects to Policy Manager within the session timeout interval. If session timeoutvalue is set to 0, the cached sessions are not purged.
Fast Reconnect Enable to allow fast reconnect. When enabled, the inner method of the server-authenticated outer tunnel is also bypassed. This makes the process of re-authentication faster. For fast reconnect to work, session resumption must beenabled.
End-HostAuthentication
Refers to establishing the EAP-Fast Phase 1 Outer tunnel:l Choose Using PACs to use a strong shared secret.l Choose Using Client Certificate to use a certificate.
CertificateComparison
Type of certificate comparison (identity matching) upon presenting Policy Managerwith a client certificate:l To skip the certificate comparison, choose Do not compare.l To compare specific attributes, choose Compare Common Name (CN), Compare
Subject Alternate Name (SAN), or Compare CN or SAN.l To perform a binary comparison of the stored (in the end-host record in Active
Directory or another LDAP-compliant directory) and presented certificates,choose Compare Binary.
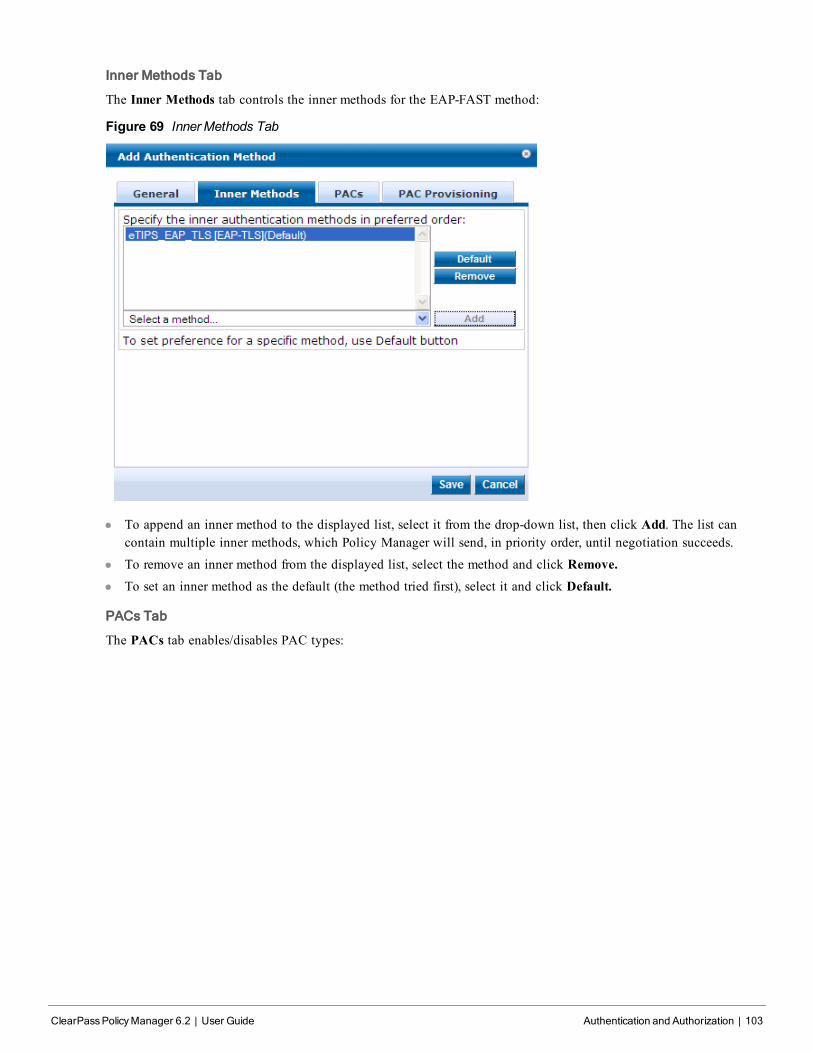
Inner Methods Tab
The Inner Methods tab controls the inner methods for the EAP-FAST method:
Figure 69 Inner Methods Tab
l To append an inner method to the displayed list, select it from the drop-down list, then click Add. The list cancontain multiple inner methods, which Policy Manager will send, in priority order, until negotiation succeeds.
l To remove an inner method from the displayed list, select the method and click Remove.l To set an inner method as the default (the method tried first), select it and click Default.
PACs Tab
The PACs tab enables/disables PAC types:
ClearPassPolicyManager 6.2 | User Guide Authentication and Authorization | 103
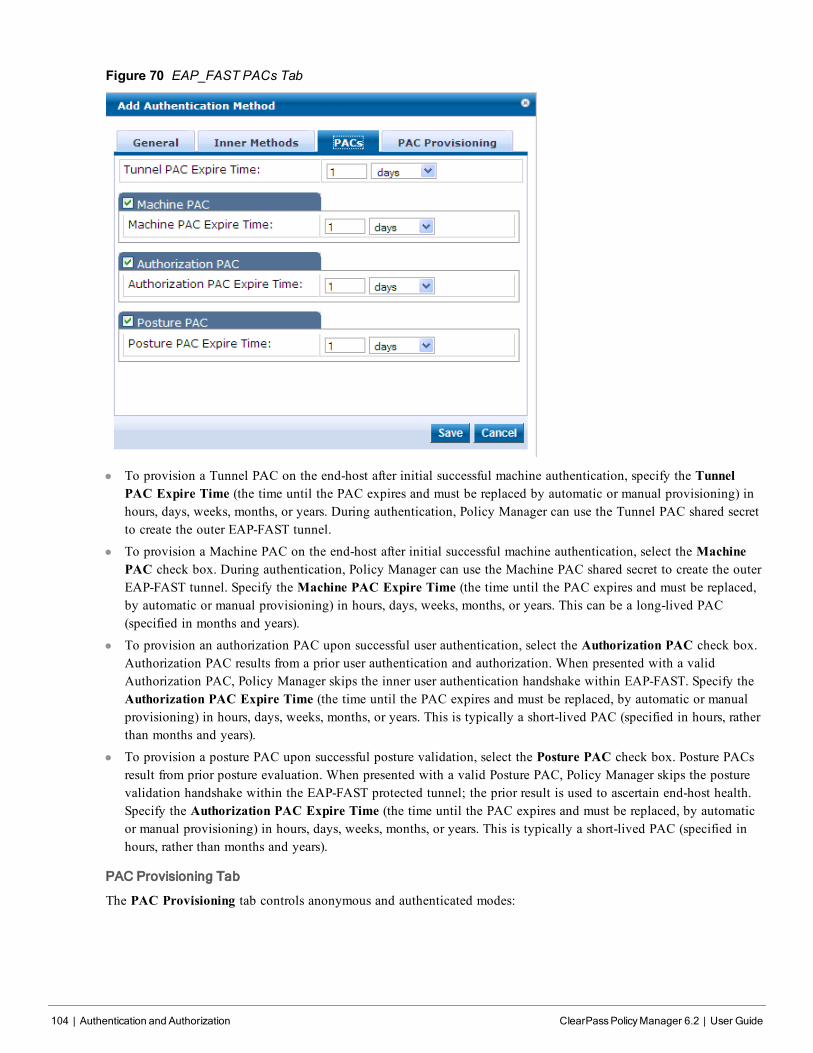
104 | Authentication and Authorization ClearPassPolicyManager 6.2 | User Guide
Figure 70 EAP_FAST PACs Tab
l To provision a Tunnel PAC on the end-host after initial successful machine authentication, specify the TunnelPAC Expire Time (the time until the PAC expires and must be replaced by automatic or manual provisioning) inhours, days, weeks, months, or years. During authentication, Policy Manager can use the Tunnel PAC shared secretto create the outer EAP-FAST tunnel.
l To provision a Machine PAC on the end-host after initial successful machine authentication, select the MachinePAC check box. During authentication, Policy Manager can use the Machine PAC shared secret to create the outerEAP-FAST tunnel. Specify the Machine PAC Expire Time (the time until the PAC expires and must be replaced,by automatic or manual provisioning) in hours, days, weeks, months, or years. This can be a long-lived PAC(specified in months and years).
l To provision an authorization PAC upon successful user authentication, select the Authorization PAC check box.Authorization PAC results from a prior user authentication and authorization. When presented with a validAuthorization PAC, Policy Manager skips the inner user authentication handshake within EAP-FAST. Specify theAuthorization PAC Expire Time (the time until the PAC expires and must be replaced, by automatic or manualprovisioning) in hours, days, weeks, months, or years. This is typically a short-lived PAC (specified in hours, ratherthan months and years).
l To provision a posture PAC upon successful posture validation, select the Posture PAC check box. Posture PACsresult from prior posture evaluation. When presented with a valid Posture PAC, Policy Manager skips the posturevalidation handshake within the EAP-FAST protected tunnel; the prior result is used to ascertain end-host health.Specify the Authorization PAC Expire Time (the time until the PAC expires and must be replaced, by automaticor manual provisioning) in hours, days, weeks, months, or years. This is typically a short-lived PAC (specified inhours, rather than months and years).
PAC Provisioning Tab
The PAC Provisioning tab controls anonymous and authenticated modes:
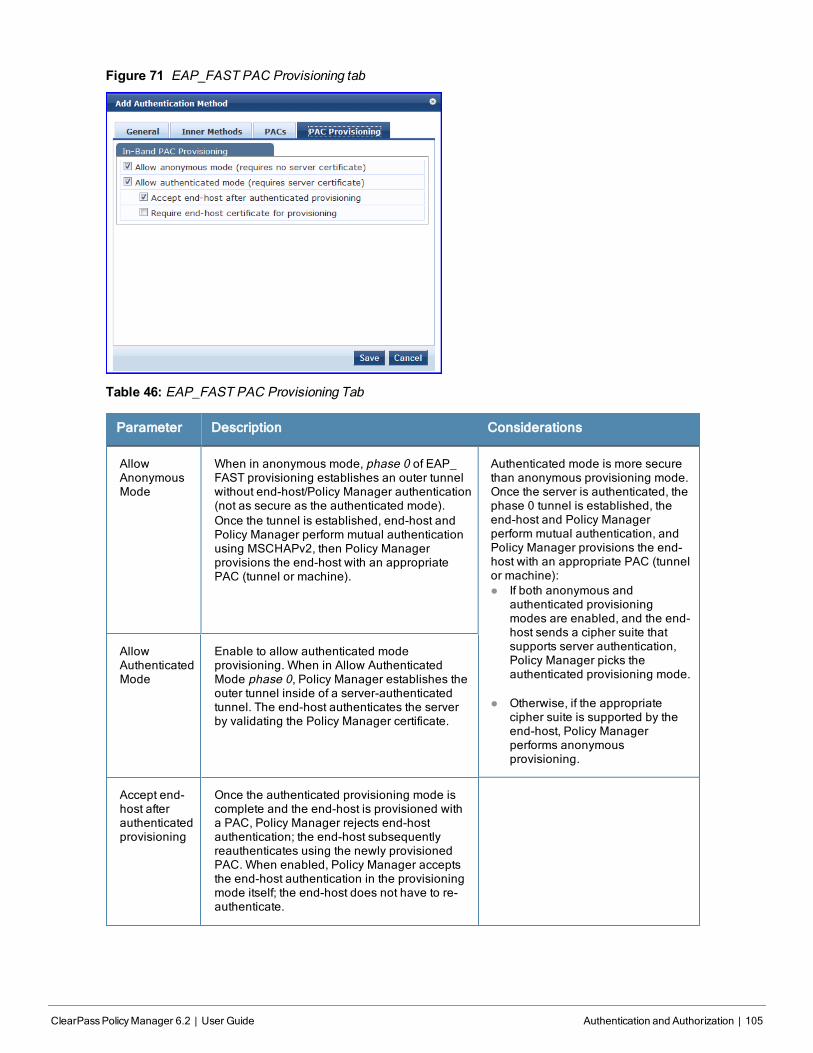
Figure 71 EAP_FAST PAC Provisioning tab
Table 46: EAP_FAST PAC Provisioning Tab
Parameter Description Considerations
AllowAnonymousMode
When in anonymous mode, phase 0 of EAP_FAST provisioning establishes an outer tunnelwithout end-host/Policy Manager authentication(not as secure as the authenticated mode).Once the tunnel is established, end-host andPolicy Manager perform mutual authenticationusing MSCHAPv2, then Policy Managerprovisions the end-host with an appropriatePAC (tunnel or machine).
Authenticated mode is more securethan anonymous provisioning mode.Once the server is authenticated, thephase 0 tunnel is established, theend-host and Policy Managerperform mutual authentication, andPolicy Manager provisions the end-host with an appropriate PAC (tunnelor machine):l If both anonymous and
authenticated provisioningmodes are enabled, and the end-host sends a cipher suite thatsupports server authentication,Policy Manager picks theauthenticated provisioning mode.
l Otherwise, if the appropriatecipher suite is supported by theend-host, Policy Managerperforms anonymousprovisioning.
AllowAuthenticatedMode
Enable to allow authenticated modeprovisioning. When in Allow AuthenticatedMode phase 0, Policy Manager establishes theouter tunnel inside of a server-authenticatedtunnel. The end-host authenticates the serverby validating the Policy Manager certificate.
Accept end-host afterauthenticatedprovisioning
Once the authenticated provisioning mode iscomplete and the end-host is provisioned witha PAC, Policy Manager rejects end-hostauthentication; the end-host subsequentlyreauthenticates using the newly provisionedPAC. When enabled, Policy Manager acceptsthe end-host authentication in the provisioningmode itself; the end-host does not have to re-authenticate.
ClearPassPolicyManager 6.2 | User Guide Authentication and Authorization | 105

106 | Authentication and Authorization ClearPassPolicyManager 6.2 | User Guide
Parameter Description Considerations
Requiredend-hostcertificate forprovisioning
In authenticated provisioning mode, the end-host authenticates the server by validating theserver certificate, resulting in a protected outertunnel; the end-host is authenticated by theserver inside this tunnel. When enabled, theserver can require the end-host to send acertificate inside the tunnel for the purpose ofauthenticating the end-host.
MAC-AUTHThe MAC-AUTH method contains one tab.
General Tab
The General tab labels the method and defines session details.
Figure 72 MAC-AUTH General Tab
Table 47: MAC-Auth General Tab
Parameter Description
Name/Description Freeform label and description.
Type In this context, always MAC-AUTH.
Allow UnknownEnd-Hosts
Enables further policy processing of MAC authentication requests of unknownclients.If this is not enabled, Policy Manager automatically rejects a request whose MACaddress is not in a configured authentication source. This setting is enabled, forexample, when you want Policy Manager to trigger an audit for an unknown client.By turning on this check box and enabling audit (See "Configuring Audit Servers" onpage 181), you can trigger an audit of an unknown client.
CHAP and EAP-MD5In addition the methods listed above, Policy Manager also comes packaged with CHAP and EAP-MD5 methods. Theseare named [CHAP] and [EAP-MD5], respectively. You can add methods of this type with a custom name. Thesemethods can also be associated to a Service as authentication methods.
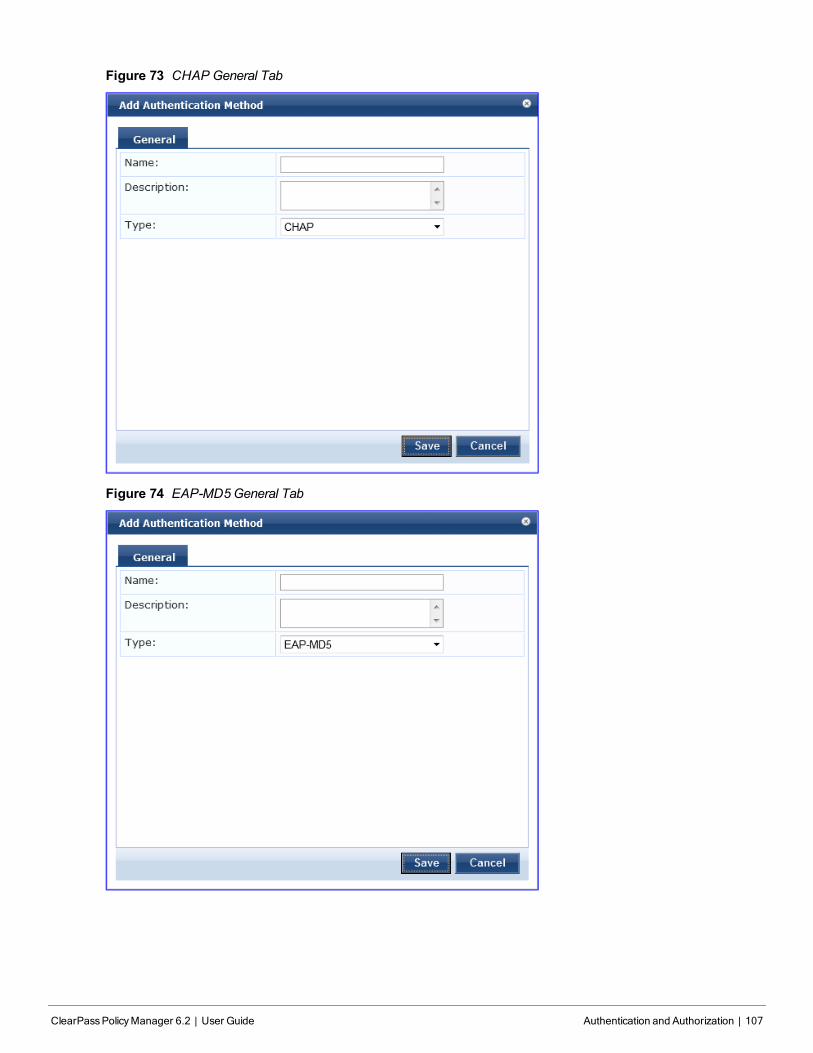
Figure 73 CHAP General Tab
Figure 74 EAP-MD5General Tab
ClearPassPolicyManager 6.2 | User Guide Authentication and Authorization | 107
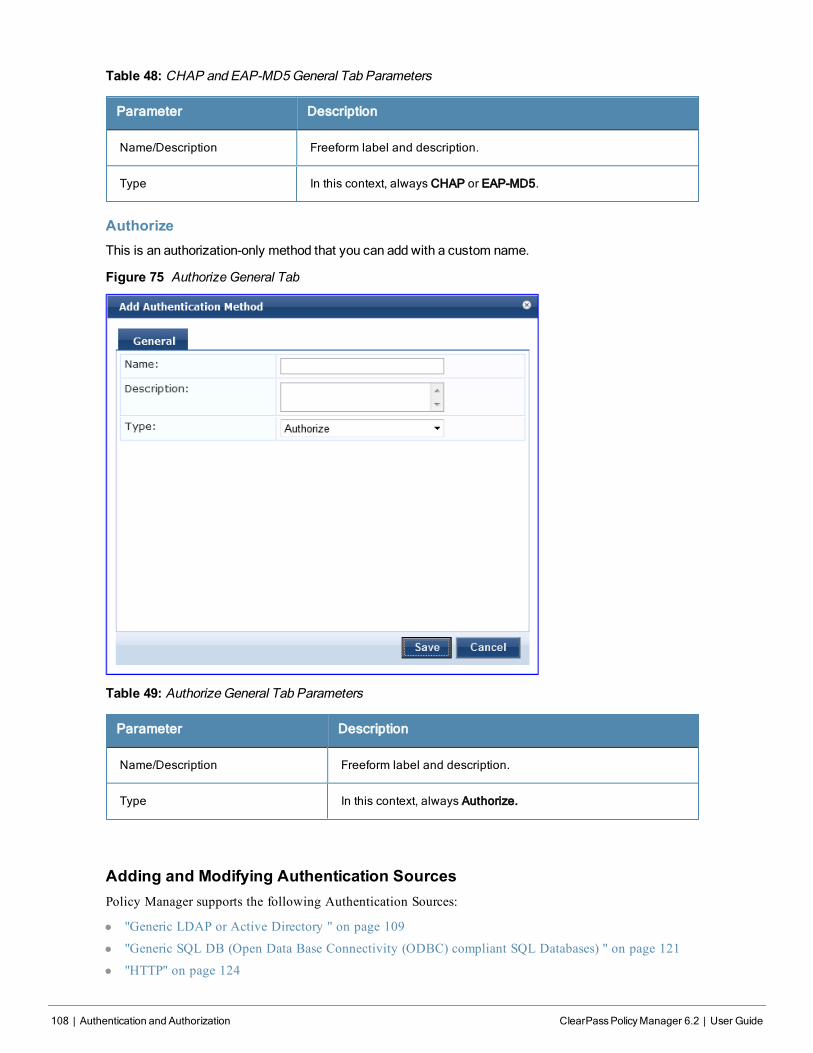
108 | Authentication and Authorization ClearPassPolicyManager 6.2 | User Guide
Table 48: CHAP and EAP-MD5General Tab Parameters
Parameter Description
Name/Description Freeform label and description.
Type In this context, always CHAP or EAP-MD5.
AuthorizeThis is an authorization-only method that you can add with a custom name.
Figure 75 Authorize General Tab
Table 49: Authorize General Tab Parameters
Parameter Description
Name/Description Freeform label and description.
Type In this context, always Authorize.
Adding and Modifying Authentication SourcesPolicy Manager supports the following Authentication Sources:
l "Generic LDAP or Active Directory " on page 109
l "Generic SQL DB (Open Data Base Connectivity (ODBC) compliant SQL Databases) " on page 121
l "HTTP" on page 124
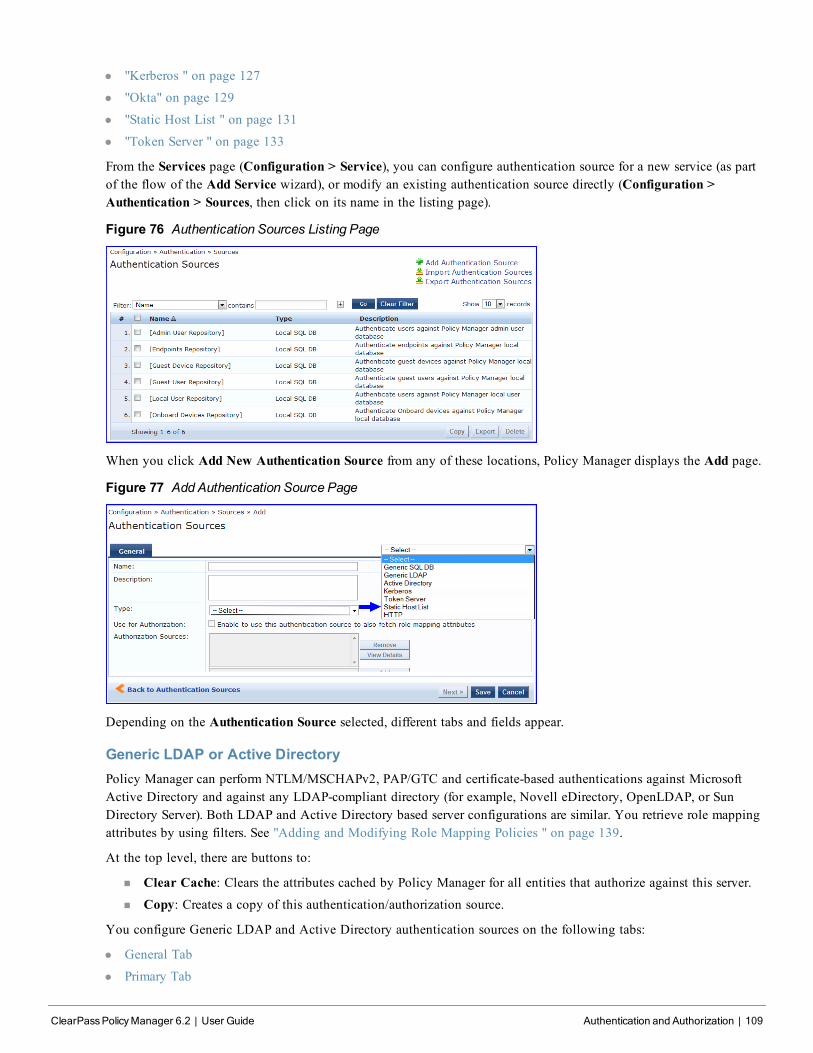
l "Kerberos " on page 127
l "Okta" on page 129
l "Static Host List " on page 131
l "Token Server " on page 133
From the Services page (Configuration > Service), you can configure authentication source for a new service (as partof the flow of the Add Service wizard), or modify an existing authentication source directly (Configuration >Authentication > Sources, then click on its name in the listing page).
Figure 76 Authentication Sources Listing Page
When you click Add New Authentication Source from any of these locations, Policy Manager displays the Add page.
Figure 77 Add Authentication Source Page
Depending on the Authentication Source selected, different tabs and fields appear.
Generic LDAP or Active DirectoryPolicy Manager can perform NTLM/MSCHAPv2, PAP/GTC and certificate-based authentications against MicrosoftActive Directory and against any LDAP-compliant directory (for example, Novell eDirectory, OpenLDAP, or SunDirectory Server). Both LDAP and Active Directory based server configurations are similar. You retrieve role mappingattributes by using filters. See "Adding and Modifying Role Mapping Policies " on page 139.
At the top level, there are buttons to:
n Clear Cache: Clears the attributes cached by Policy Manager for all entities that authorize against this server.
n Copy: Creates a copy of this authentication/authorization source.
You configure Generic LDAP and Active Directory authentication sources on the following tabs:
l General Tab
l Primary Tab
ClearPassPolicyManager 6.2 | User Guide Authentication and Authorization | 109
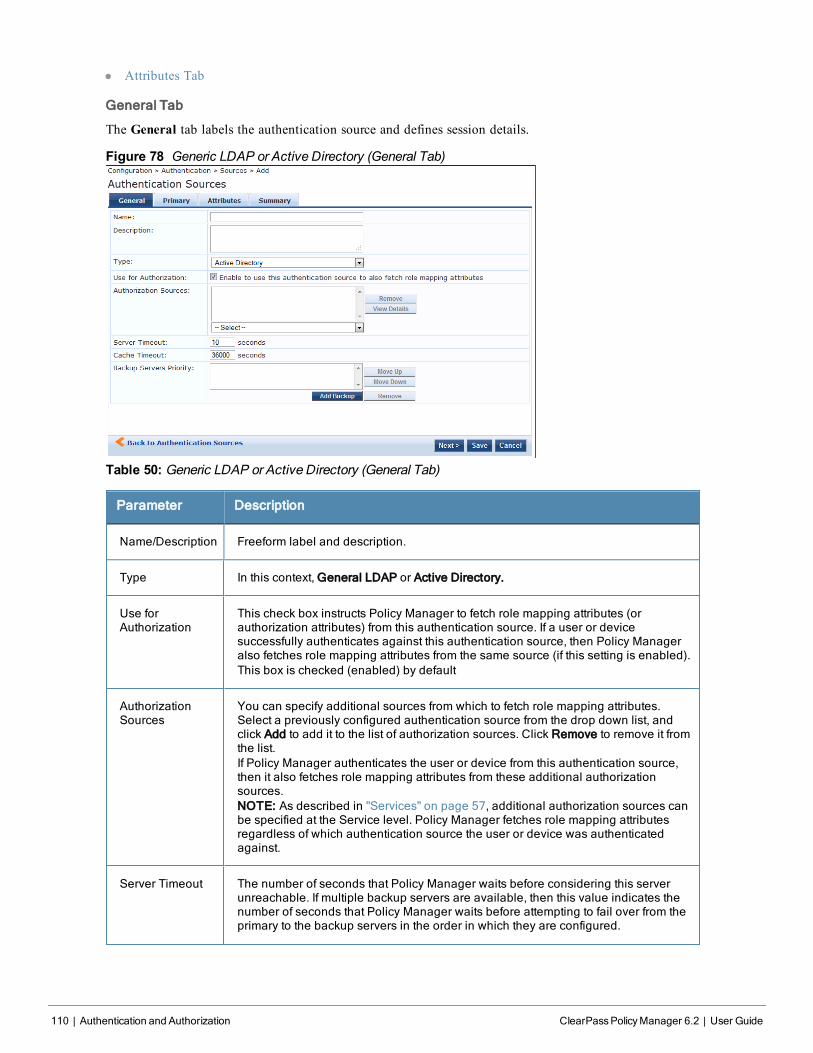
110 | Authentication and Authorization ClearPassPolicyManager 6.2 | User Guide
l Attributes Tab
General Tab
The General tab labels the authentication source and defines session details.
Figure 78 Generic LDAP or Active Directory (General Tab)
Table 50: Generic LDAP or Active Directory (General Tab)
Parameter Description
Name/Description Freeform label and description.
Type In this context, General LDAP or Active Directory.
Use forAuthorization
This check box instructs Policy Manager to fetch role mapping attributes (orauthorization attributes) from this authentication source. If a user or devicesuccessfully authenticates against this authentication source, then Policy Manageralso fetches role mapping attributes from the same source (if this setting is enabled).This box is checked (enabled) by default
AuthorizationSources
You can specify additional sources from which to fetch role mapping attributes.Select a previously configured authentication source from the drop down list, andclick Add to add it to the list of authorization sources. Click Remove to remove it fromthe list.If Policy Manager authenticates the user or device from this authentication source,then it also fetches role mapping attributes from these additional authorizationsources.NOTE: As described in "Services" on page 57, additional authorization sources canbe specified at the Service level. Policy Manager fetches role mapping attributesregardless of which authentication source the user or device was authenticatedagainst.
Server Timeout The number of seconds that Policy Manager waits before considering this serverunreachable. If multiple backup servers are available, then this value indicates thenumber of seconds that Policy Manager waits before attempting to fail over from theprimary to the backup servers in the order in which they are configured.
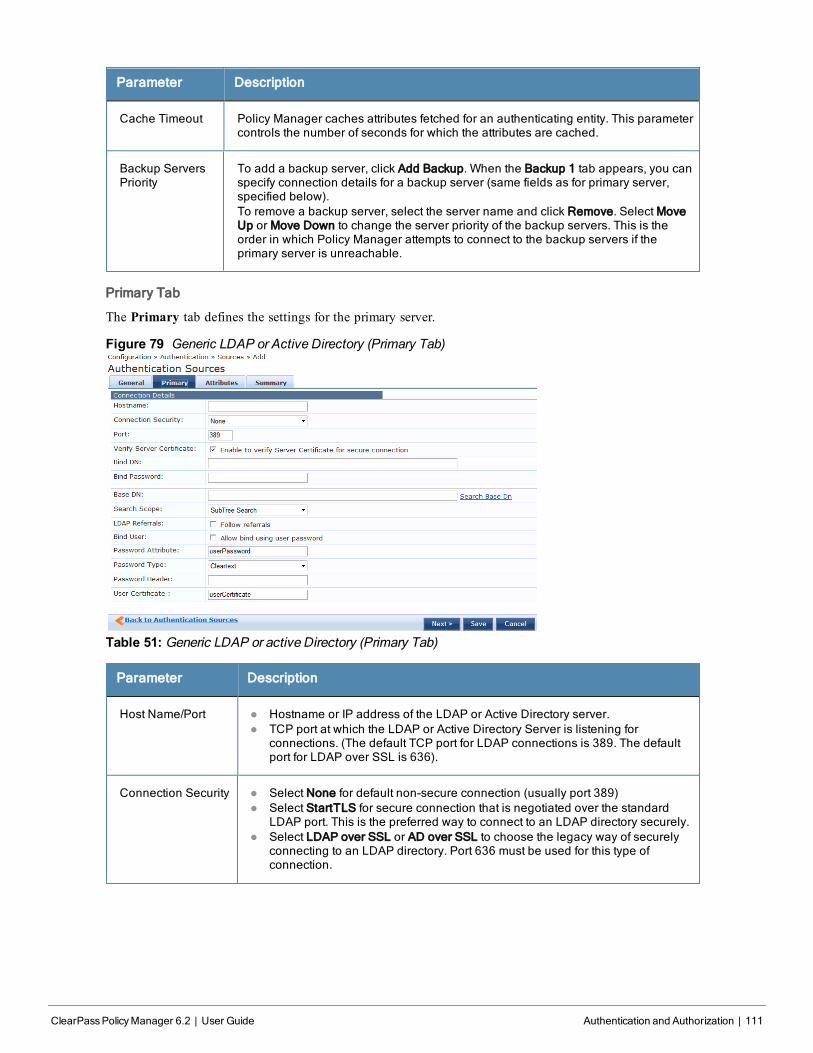
Parameter Description
Cache Timeout Policy Manager caches attributes fetched for an authenticating entity. This parametercontrols the number of seconds for which the attributes are cached.
Backup ServersPriority
To add a backup server, click Add Backup. When the Backup 1 tab appears, you canspecify connection details for a backup server (same fields as for primary server,specified below).To remove a backup server, select the server name and click Remove. Select MoveUp or Move Down to change the server priority of the backup servers. This is theorder in which Policy Manager attempts to connect to the backup servers if theprimary server is unreachable.
Primary Tab
The Primary tab defines the settings for the primary server.
Figure 79 Generic LDAP or Active Directory (Primary Tab)
Table 51: Generic LDAP or active Directory (Primary Tab)
Parameter Description
Host Name/Port l Hostname or IP address of the LDAP or Active Directory server.l TCP port at which the LDAP or Active Directory Server is listening for
connections. (The default TCP port for LDAP connections is 389. The defaultport for LDAP over SSL is 636).
Connection Security l Select None for default non-secure connection (usually port 389)l Select StartTLS for secure connection that is negotiated over the standard
LDAP port. This is the preferred way to connect to an LDAP directory securely.l Select LDAP over SSL or AD over SSL to choose the legacy way of securely
connecting to an LDAP directory. Port 636 must be used for this type ofconnection.
ClearPassPolicyManager 6.2 | User Guide Authentication and Authorization | 111
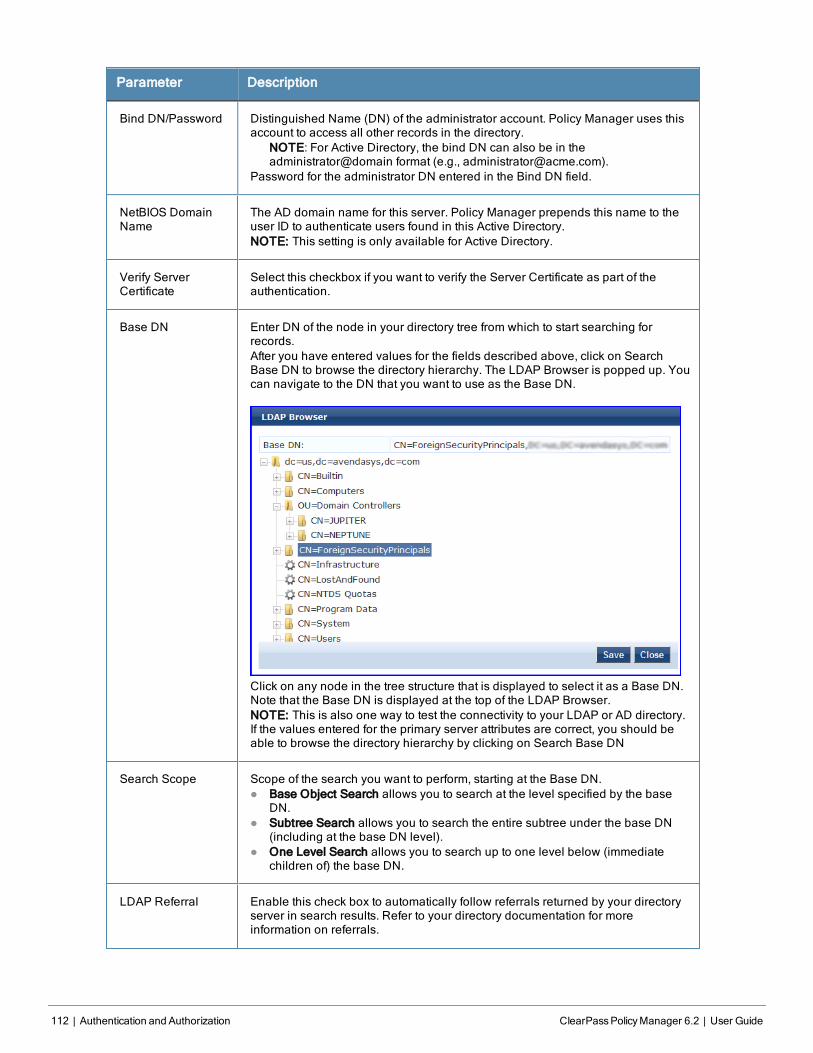
112 | Authentication and Authorization ClearPassPolicyManager 6.2 | User Guide
Parameter Description
Bind DN/Password Distinguished Name (DN) of the administrator account. Policy Manager uses thisaccount to access all other records in the directory.
NOTE: For Active Directory, the bind DN can also be in theadministrator@domain format (e.g., [email protected]).
Password for the administrator DN entered in the Bind DN field.
NetBIOS DomainName
The AD domain name for this server. Policy Manager prepends this name to theuser ID to authenticate users found in this Active Directory.NOTE: This setting is only available for Active Directory.
Verify ServerCertificate
Select this checkbox if you want to verify the Server Certificate as part of theauthentication.
Base DN Enter DN of the node in your directory tree from which to start searching forrecords.After you have entered values for the fields described above, click on SearchBase DN to browse the directory hierarchy. The LDAP Browser is popped up. Youcan navigate to the DN that you want to use as the Base DN.
Click on any node in the tree structure that is displayed to select it as a Base DN.Note that the Base DN is displayed at the top of the LDAP Browser.NOTE: This is also one way to test the connectivity to your LDAP or AD directory.If the values entered for the primary server attributes are correct, you should beable to browse the directory hierarchy by clicking on Search Base DN
Search Scope Scope of the search you want to perform, starting at the Base DN.l Base Object Search allows you to search at the level specified by the base
DN.l Subtree Search allows you to search the entire subtree under the base DN
(including at the base DN level).l One Level Search allows you to search up to one level below (immediate
children of) the base DN.
LDAP Referral Enable this check box to automatically follow referrals returned by your directoryserver in search results. Refer to your directory documentation for moreinformation on referrals.
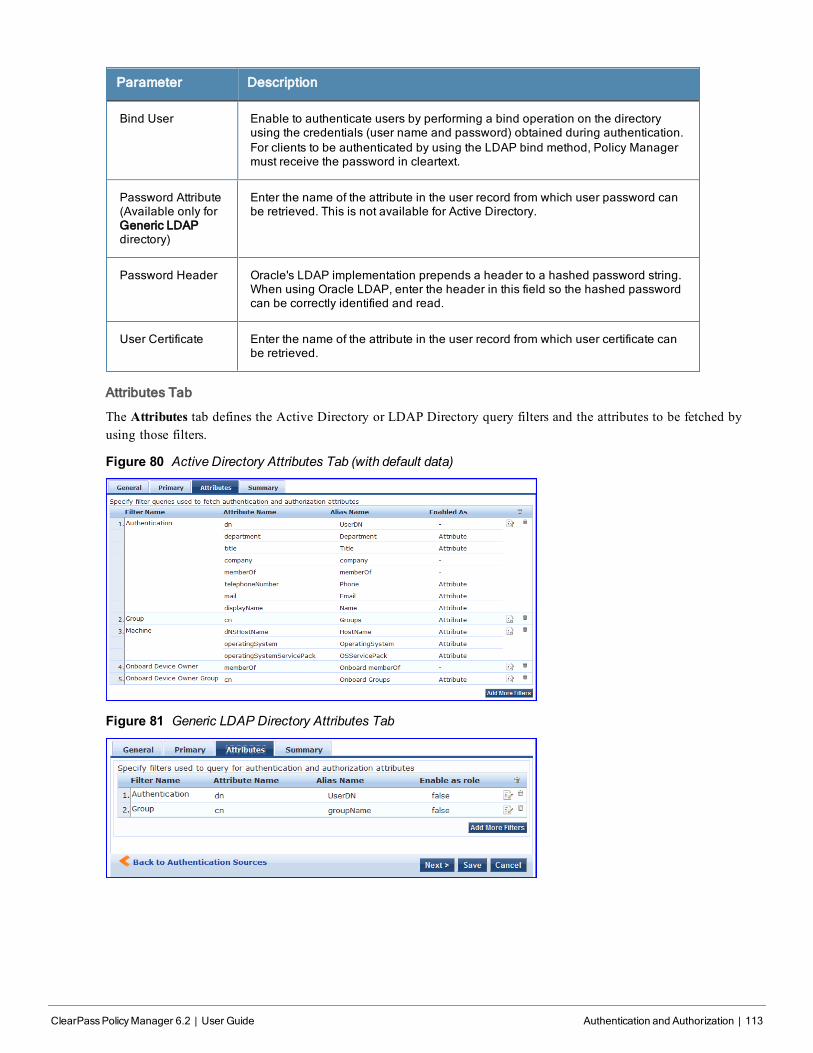
Parameter Description
Bind User Enable to authenticate users by performing a bind operation on the directoryusing the credentials (user name and password) obtained during authentication.For clients to be authenticated by using the LDAP bind method, Policy Managermust receive the password in cleartext.
Password Attribute(Available only forGeneric LDAPdirectory)
Enter the name of the attribute in the user record from which user password canbe retrieved. This is not available for Active Directory.
Password Header Oracle's LDAP implementation prepends a header to a hashed password string.When using Oracle LDAP, enter the header in this field so the hashed passwordcan be correctly identified and read.
User Certificate Enter the name of the attribute in the user record from which user certificate canbe retrieved.
Attributes Tab
The Attributes tab defines the Active Directory or LDAP Directory query filters and the attributes to be fetched byusing those filters.
Figure 80 Active Directory Attributes Tab (with default data)
Figure 81 Generic LDAP Directory Attributes Tab
ClearPassPolicyManager 6.2 | User Guide Authentication and Authorization | 113
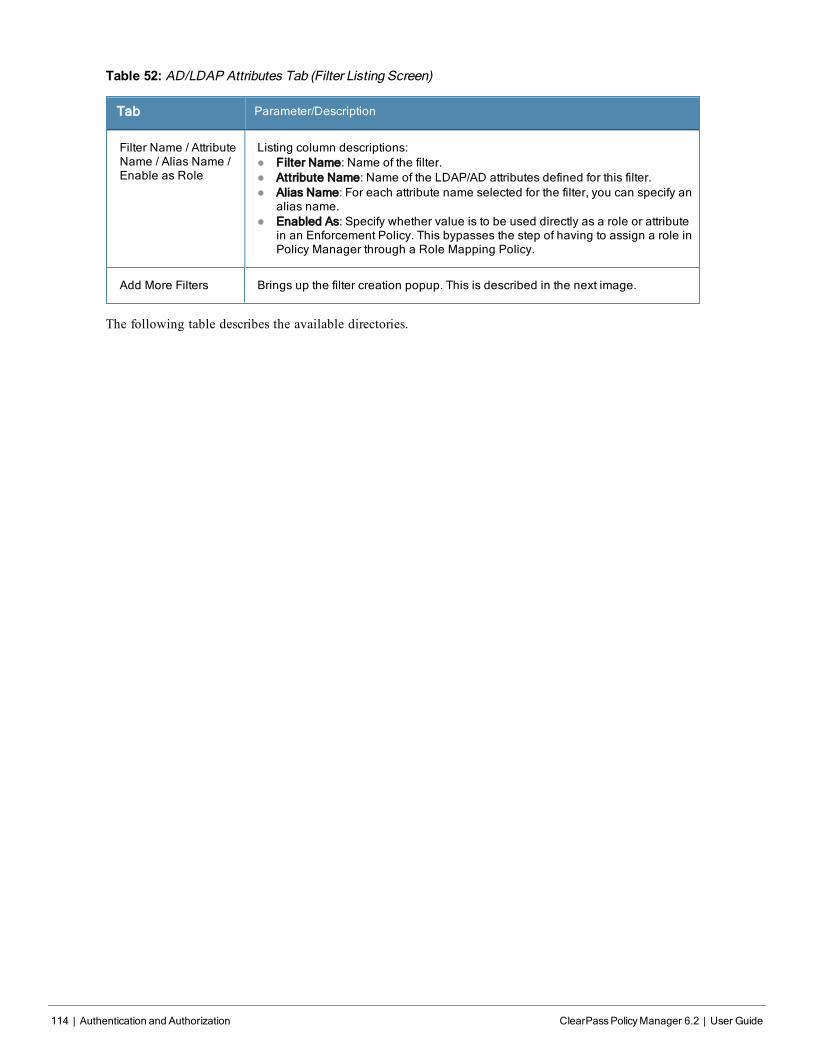
114 | Authentication and Authorization ClearPassPolicyManager 6.2 | User Guide
Table 52: AD/LDAP Attributes Tab (Filter Listing Screen)
Tab Parameter/Description
Filter Name / AttributeName / Alias Name /Enable as Role
Listing column descriptions:l Filter Name: Name of the filter.l Attribute Name: Name of the LDAP/AD attributes defined for this filter.l Alias Name: For each attribute name selected for the filter, you can specify an
alias name.l Enabled As: Specify whether value is to be used directly as a role or attribute
in an Enforcement Policy. This bypasses the step of having to assign a role inPolicy Manager through a Role Mapping Policy.
Add More Filters Brings up the filter creation popup. This is described in the next image.
The following table describes the available directories.
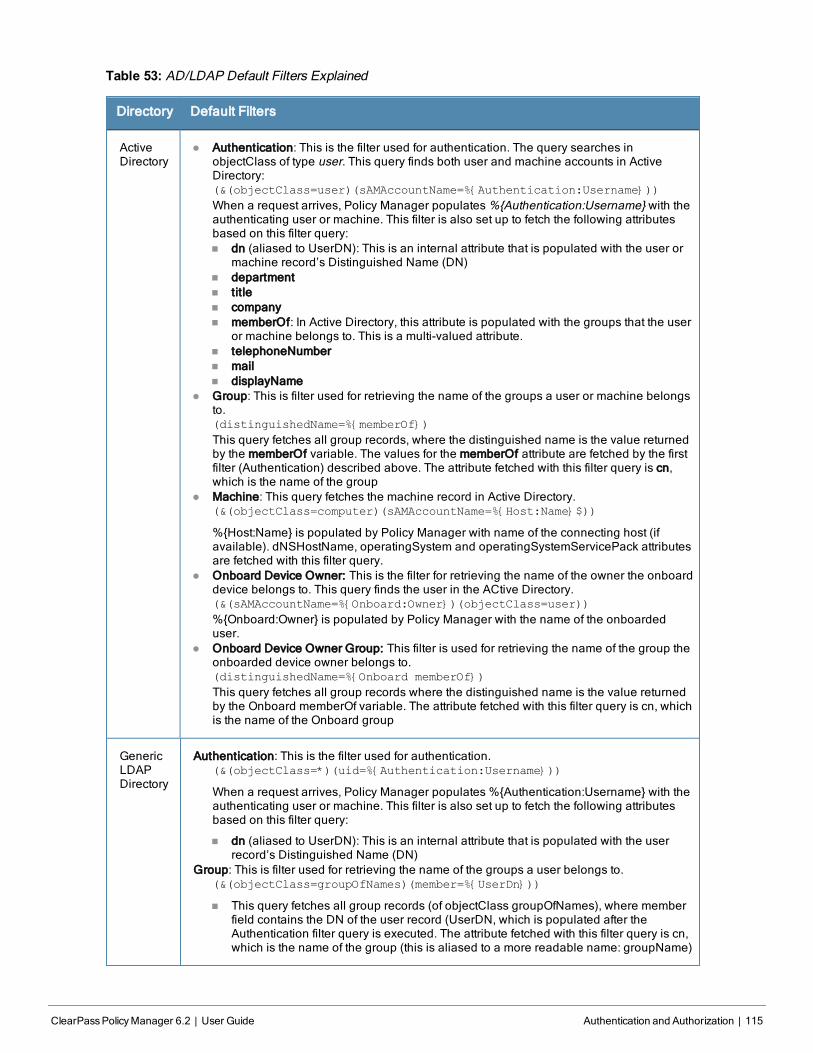
Table 53: AD/LDAP Default Filters Explained
Directory Default Filters
ActiveDirectory
l Authentication: This is the filter used for authentication. The query searches inobjectClass of type user. This query finds both user and machine accounts in ActiveDirectory:(&(objectClass=user)(sAMAccountName=%{Authentication:Username}))
When a request arrives, Policy Manager populates %{Authentication:Username} with theauthenticating user or machine. This filter is also set up to fetch the following attributesbased on this filter query:n dn (aliased to UserDN): This is an internal attribute that is populated with the user or
machine record’s Distinguished Name (DN)n departmentn titlen companyn memberOf: In Active Directory, this attribute is populated with the groups that the user
or machine belongs to. This is a multi-valued attribute.n telephoneNumbern mailn displayName
l Group: This is filter used for retrieving the name of the groups a user or machine belongsto.(distinguishedName=%{memberOf})
This query fetches all group records, where the distinguished name is the value returnedby the memberOf variable. The values for the memberOf attribute are fetched by the firstfilter (Authentication) described above. The attribute fetched with this filter query is cn,which is the name of the group
l Machine: This query fetches the machine record in Active Directory.(&(objectClass=computer)(sAMAccountName=%{Host:Name}$))
%{Host:Name} is populated by Policy Manager with name of the connecting host (ifavailable). dNSHostName, operatingSystem and operatingSystemServicePack attributesare fetched with this filter query.
l Onboard Device Owner: This is the filter for retrieving the name of the owner the onboarddevice belongs to. This query finds the user in the ACtive Directory.(&(sAMAccountName=%{Onboard:Owner})(objectClass=user))
%{Onboard:Owner} is populated by Policy Manager with the name of the onboardeduser.
l Onboard Device Owner Group: This filter is used for retrieving the name of the group theonboarded device owner belongs to.(distinguishedName=%{Onboard memberOf})
This query fetches all group records where the distinguished name is the value returnedby the Onboard memberOf variable. The attribute fetched with this filter query is cn, whichis the name of the Onboard group
GenericLDAPDirectory
Authentication: This is the filter used for authentication.(&(objectClass=*)(uid=%{Authentication:Username}))
When a request arrives, Policy Manager populates %{Authentication:Username} with theauthenticating user or machine. This filter is also set up to fetch the following attributesbased on this filter query:
n dn (aliased to UserDN): This is an internal attribute that is populated with the userrecord’s Distinguished Name (DN)
Group: This is filter used for retrieving the name of the groups a user belongs to.(&(objectClass=groupOfNames)(member=%{UserDn}))
n This query fetches all group records (of objectClass groupOfNames), where memberfield contains the DN of the user record (UserDN, which is populated after theAuthentication filter query is executed. The attribute fetched with this filter query is cn,which is the name of the group (this is aliased to a more readable name: groupName)
ClearPassPolicyManager 6.2 | User Guide Authentication and Authorization | 115
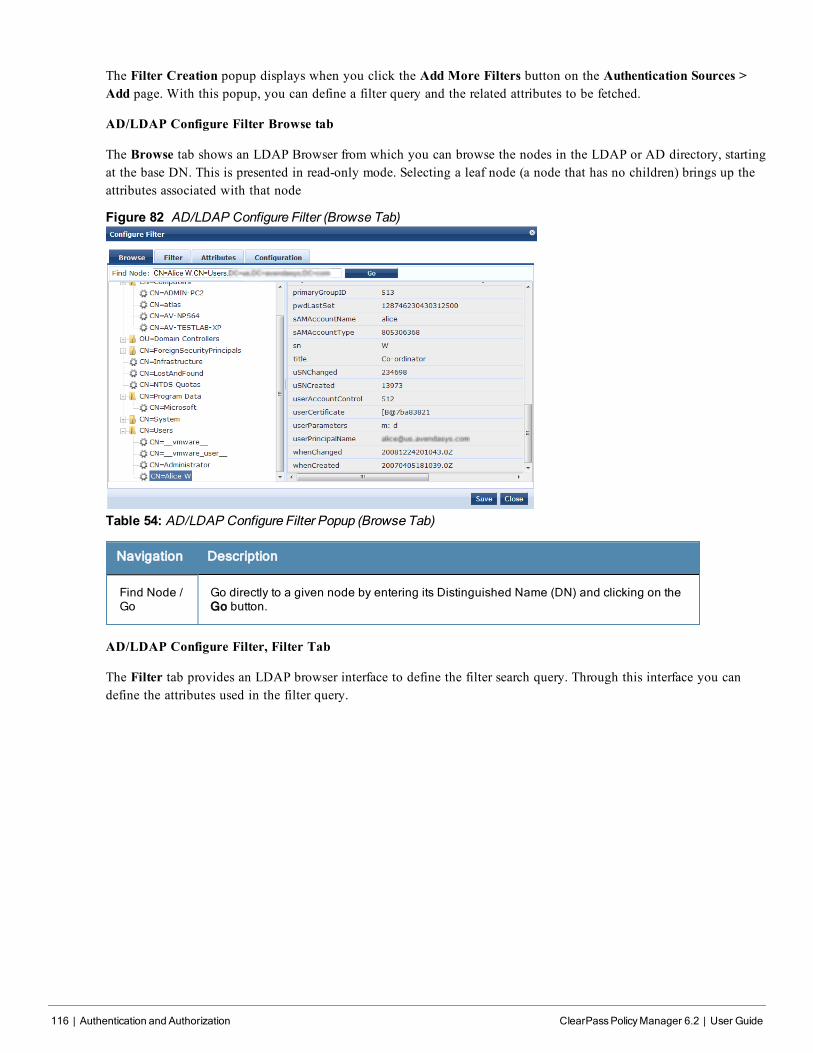
116 | Authentication and Authorization ClearPassPolicyManager 6.2 | User Guide
The Filter Creation popup displays when you click the Add More Filters button on the Authentication Sources >Add page. With this popup, you can define a filter query and the related attributes to be fetched.
AD/LDAP Configure Filter Browse tab
The Browse tab shows an LDAP Browser from which you can browse the nodes in the LDAP or AD directory, startingat the base DN. This is presented in read-only mode. Selecting a leaf node (a node that has no children) brings up theattributes associated with that node
Figure 82 AD/LDAP Configure Filter (Browse Tab)
Table 54: AD/LDAP Configure Filter Popup (Browse Tab)
Navigation Description
Find Node /Go
Go directly to a given node by entering its Distinguished Name (DN) and clicking on theGo button.
AD/LDAP Configure Filter, Filter Tab
The Filter tab provides an LDAP browser interface to define the filter search query. Through this interface you candefine the attributes used in the filter query.
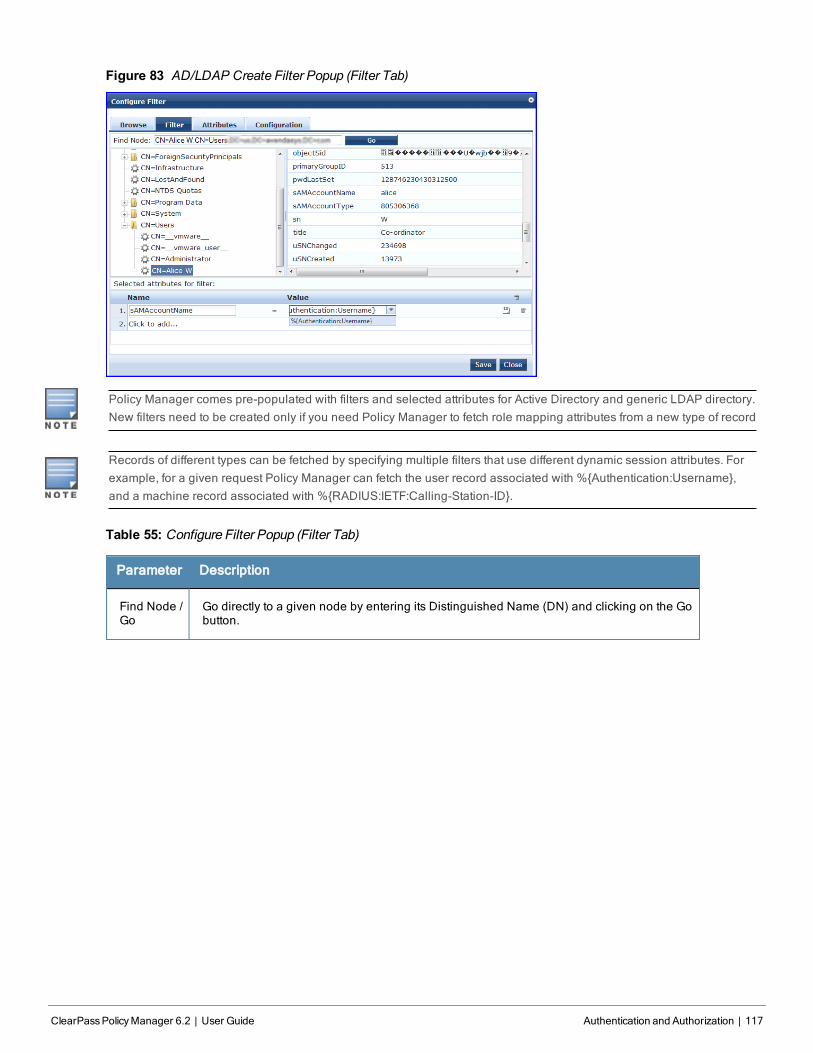
Figure 83 AD/LDAP Create Filter Popup (Filter Tab)
Policy Manager comes pre-populated with filters and selected attributes for Active Directory and generic LDAP directory.New filters need to be created only if you need Policy Manager to fetch role mapping attributes from a new type of record
Records of different types can be fetched by specifying multiple filters that use different dynamic session attributes. Forexample, for a given request Policy Manager can fetch the user record associated with %{Authentication:Username},and a machine record associated with %{RADIUS:IETF:Calling-Station-ID}.
Table 55: Configure Filter Popup (Filter Tab)
Parameter Description
Find Node /Go
Go directly to a given node by entering its Distinguished Name (DN) and clicking on the Gobutton.
ClearPassPolicyManager 6.2 | User Guide Authentication and Authorization | 117
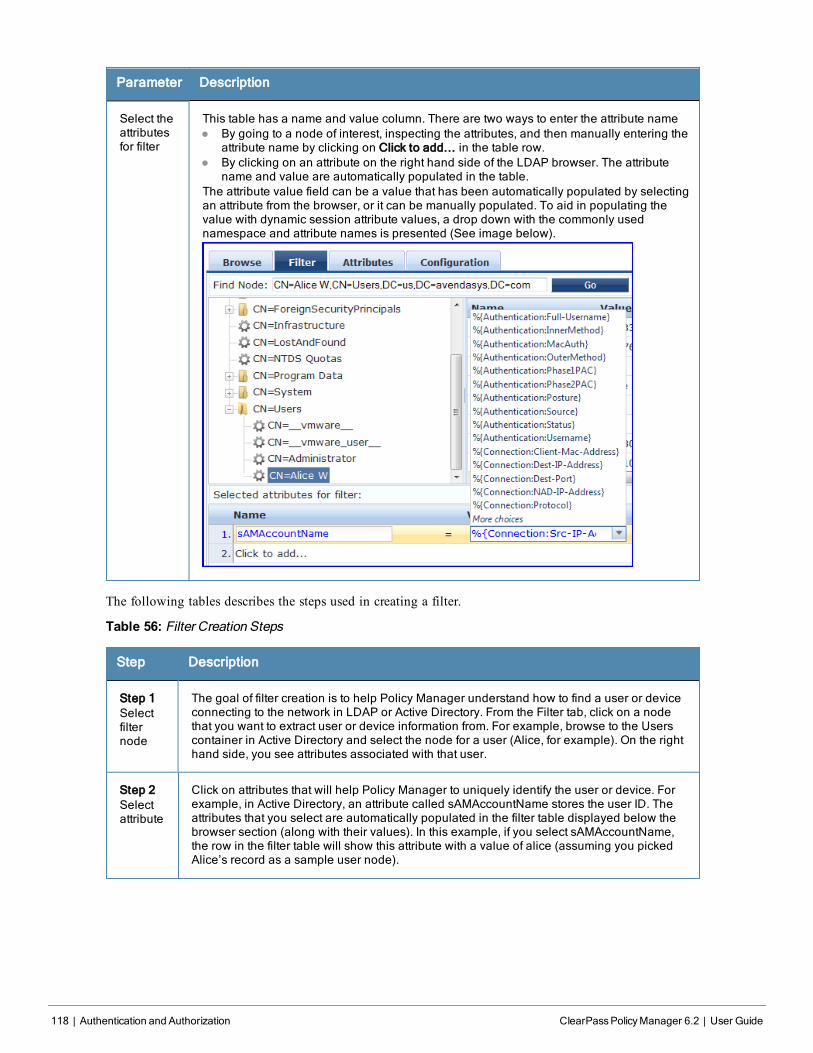
118 | Authentication and Authorization ClearPassPolicyManager 6.2 | User Guide
Parameter Description
Select theattributesfor filter
This table has a name and value column. There are two ways to enter the attribute namel By going to a node of interest, inspecting the attributes, and then manually entering the
attribute name by clicking on Click to add... in the table row.l By clicking on an attribute on the right hand side of the LDAP browser. The attribute
name and value are automatically populated in the table.The attribute value field can be a value that has been automatically populated by selectingan attribute from the browser, or it can be manually populated. To aid in populating thevalue with dynamic session attribute values, a drop down with the commonly usednamespace and attribute names is presented (See image below).
The following tables describes the steps used in creating a filter.
Table 56: Filter Creation Steps
Step Description
Step 1Selectfilternode
The goal of filter creation is to help Policy Manager understand how to find a user or deviceconnecting to the network in LDAP or Active Directory. From the Filter tab, click on a nodethat you want to extract user or device information from. For example, browse to the Userscontainer in Active Directory and select the node for a user (Alice, for example). On the righthand side, you see attributes associated with that user.
Step 2Selectattribute
Click on attributes that will help Policy Manager to uniquely identify the user or device. Forexample, in Active Directory, an attribute called sAMAccountName stores the user ID. Theattributes that you select are automatically populated in the filter table displayed below thebrowser section (along with their values). In this example, if you select sAMAccountName,the row in the filter table will show this attribute with a value of alice (assuming you pickedAlice’s record as a sample user node).
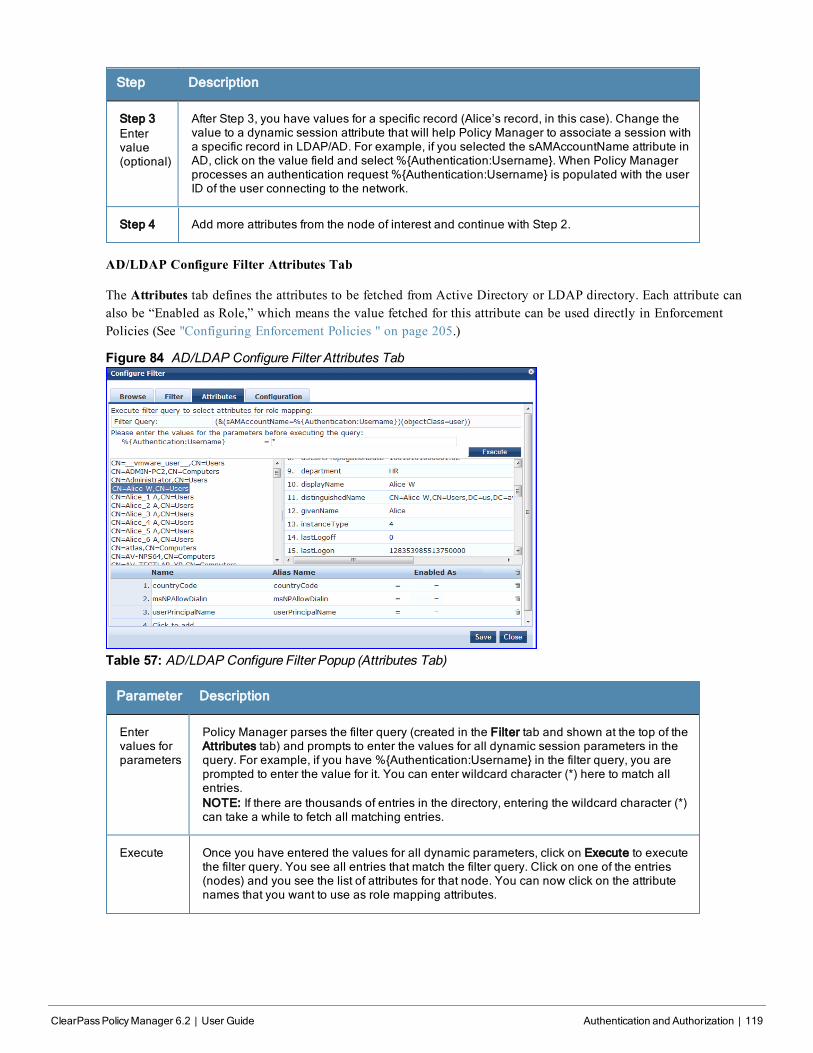
Step Description
Step 3Entervalue(optional)
After Step 3, you have values for a specific record (Alice’s record, in this case). Change thevalue to a dynamic session attribute that will help Policy Manager to associate a session witha specific record in LDAP/AD. For example, if you selected the sAMAccountName attribute inAD, click on the value field and select %{Authentication:Username}. When Policy Managerprocesses an authentication request %{Authentication:Username} is populated with the userID of the user connecting to the network.
Step 4 Add more attributes from the node of interest and continue with Step 2.
AD/LDAP Configure Filter Attributes Tab
The Attributes tab defines the attributes to be fetched from Active Directory or LDAP directory. Each attribute canalso be “Enabled as Role,” which means the value fetched for this attribute can be used directly in EnforcementPolicies (See "Configuring Enforcement Policies " on page 205.)
Figure 84 AD/LDAP Configure Filter Attributes Tab
Table 57: AD/LDAP Configure Filter Popup (Attributes Tab)
Parameter Description
Entervalues forparameters
Policy Manager parses the filter query (created in the Filter tab and shown at the top of theAttributes tab) and prompts to enter the values for all dynamic session parameters in thequery. For example, if you have %{Authentication:Username} in the filter query, you areprompted to enter the value for it. You can enter wildcard character (*) here to match allentries.NOTE: If there are thousands of entries in the directory, entering the wildcard character (*)can take a while to fetch all matching entries.
Execute Once you have entered the values for all dynamic parameters, click on Execute to executethe filter query. You see all entries that match the filter query. Click on one of the entries(nodes) and you see the list of attributes for that node. You can now click on the attributenames that you want to use as role mapping attributes.
ClearPassPolicyManager 6.2 | User Guide Authentication and Authorization | 119
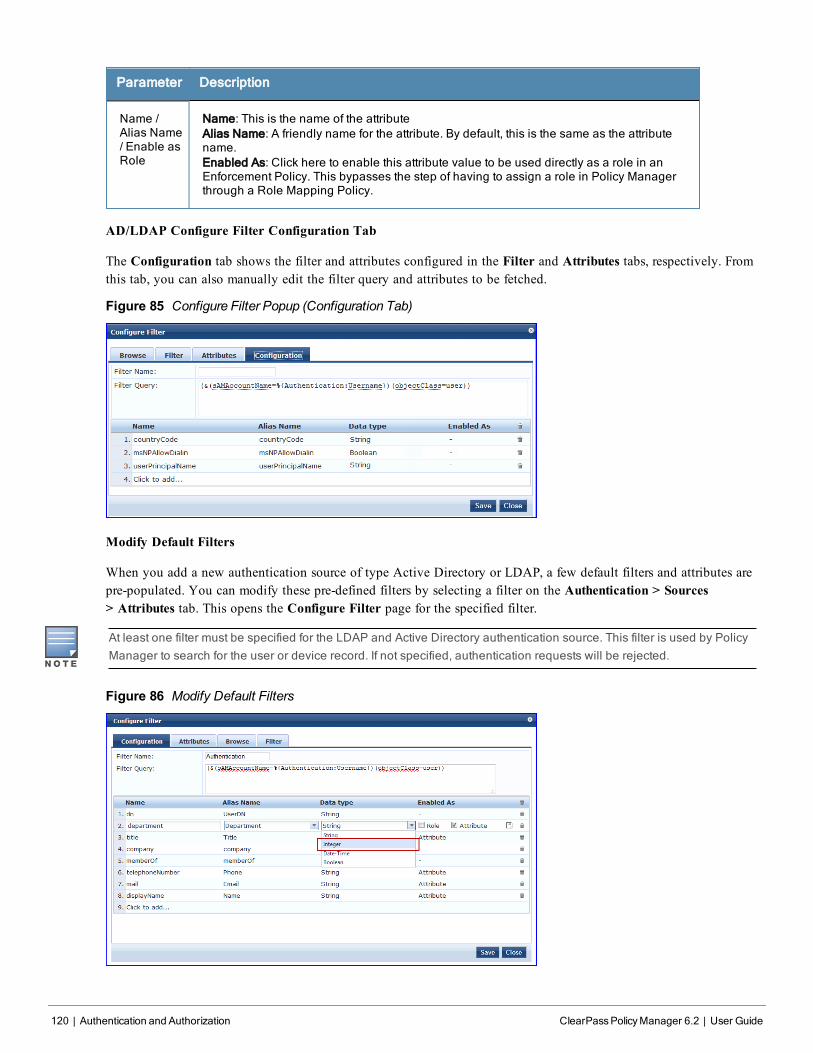
120 | Authentication and Authorization ClearPassPolicyManager 6.2 | User Guide
Parameter Description
Name /Alias Name/ Enable asRole
Name: This is the name of the attributeAlias Name: A friendly name for the attribute. By default, this is the same as the attributename.Enabled As: Click here to enable this attribute value to be used directly as a role in anEnforcement Policy. This bypasses the step of having to assign a role in Policy Managerthrough a Role Mapping Policy.
AD/LDAP Configure Filter Configuration Tab
The Configuration tab shows the filter and attributes configured in the Filter and Attributes tabs, respectively. Fromthis tab, you can also manually edit the filter query and attributes to be fetched.
Figure 85 Configure Filter Popup (Configuration Tab)
Modify Default Filters
When you add a new authentication source of type Active Directory or LDAP, a few default filters and attributes arepre-populated. You can modify these pre-defined filters by selecting a filter on the Authentication > Sources> Attributes tab. This opens the Configure Filter page for the specified filter.
At least one filter must be specified for the LDAP and Active Directory authentication source. This filter is used by PolicyManager to search for the user or device record. If not specified, authentication requests will be rejected.
Figure 86 Modify Default Filters
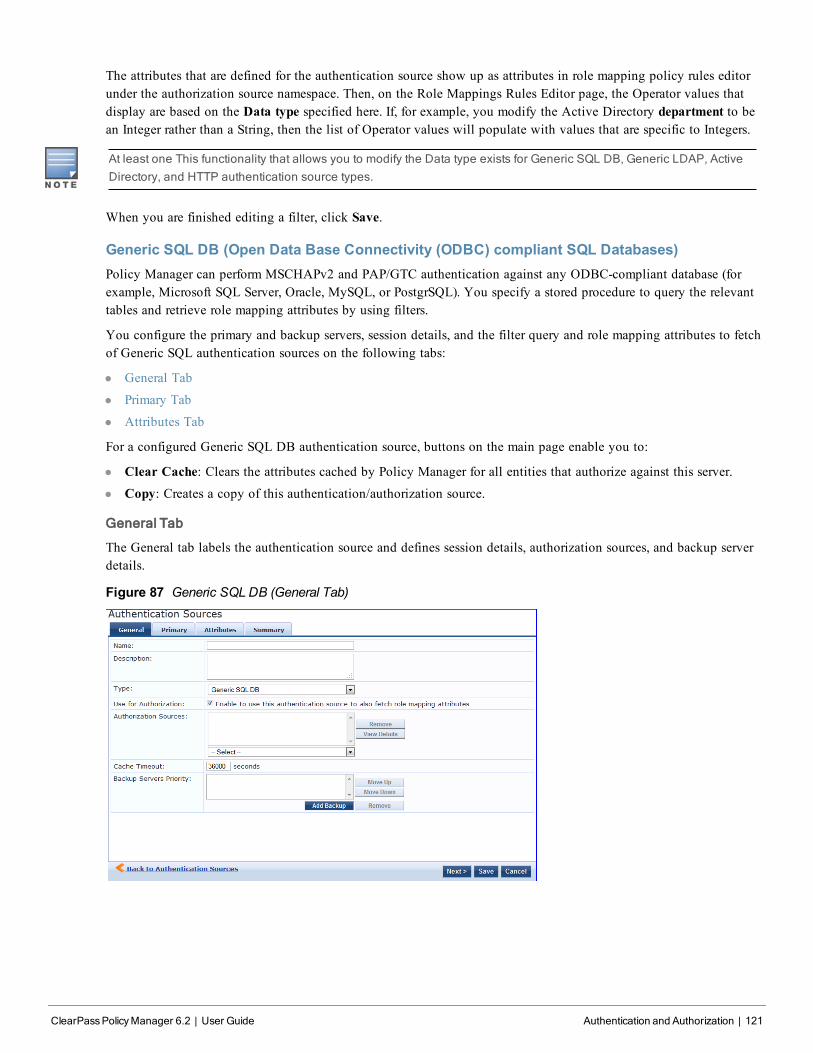
The attributes that are defined for the authentication source show up as attributes in role mapping policy rules editorunder the authorization source namespace. Then, on the Role Mappings Rules Editor page, the Operator values thatdisplay are based on the Data type specified here. If, for example, you modify the Active Directory department to bean Integer rather than a String, then the list of Operator values will populate with values that are specific to Integers.
At least one This functionality that allows you to modify the Data type exists for Generic SQL DB, Generic LDAP, ActiveDirectory, and HTTP authentication source types.
When you are finished editing a filter, click Save.
Generic SQL DB (Open Data Base Connectivity (ODBC) compliant SQL Databases)Policy Manager can perform MSCHAPv2 and PAP/GTC authentication against any ODBC-compliant database (forexample, Microsoft SQL Server, Oracle, MySQL, or PostgrSQL). You specify a stored procedure to query the relevanttables and retrieve role mapping attributes by using filters.
You configure the primary and backup servers, session details, and the filter query and role mapping attributes to fetchof Generic SQL authentication sources on the following tabs:
l General Tab
l Primary Tab
l Attributes Tab
For a configured Generic SQL DB authentication source, buttons on the main page enable you to:
l Clear Cache: Clears the attributes cached by Policy Manager for all entities that authorize against this server.
l Copy: Creates a copy of this authentication/authorization source.
General Tab
The General tab labels the authentication source and defines session details, authorization sources, and backup serverdetails.
Figure 87 Generic SQL DB (General Tab)
ClearPassPolicyManager 6.2 | User Guide Authentication and Authorization | 121
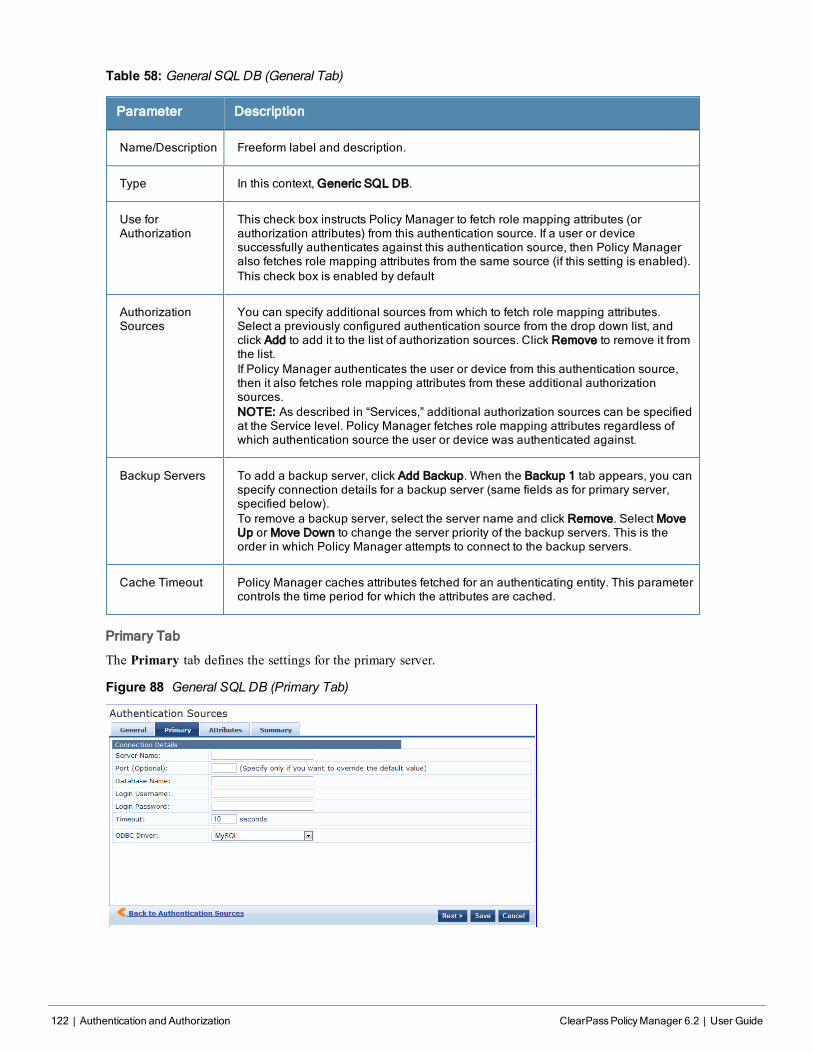
122 | Authentication and Authorization ClearPassPolicyManager 6.2 | User Guide
Table 58: General SQL DB (General Tab)
Parameter Description
Name/Description Freeform label and description.
Type In this context, Generic SQL DB.
Use forAuthorization
This check box instructs Policy Manager to fetch role mapping attributes (orauthorization attributes) from this authentication source. If a user or devicesuccessfully authenticates against this authentication source, then Policy Manageralso fetches role mapping attributes from the same source (if this setting is enabled).This check box is enabled by default
AuthorizationSources
You can specify additional sources from which to fetch role mapping attributes.Select a previously configured authentication source from the drop down list, andclick Add to add it to the list of authorization sources. Click Remove to remove it fromthe list.If Policy Manager authenticates the user or device from this authentication source,then it also fetches role mapping attributes from these additional authorizationsources.NOTE: As described in “Services,” additional authorization sources can be specifiedat the Service level. Policy Manager fetches role mapping attributes regardless ofwhich authentication source the user or device was authenticated against.
Backup Servers To add a backup server, click Add Backup. When the Backup 1 tab appears, you canspecify connection details for a backup server (same fields as for primary server,specified below).To remove a backup server, select the server name and click Remove. Select MoveUp or Move Down to change the server priority of the backup servers. This is theorder in which Policy Manager attempts to connect to the backup servers.
Cache Timeout Policy Manager caches attributes fetched for an authenticating entity. This parametercontrols the time period for which the attributes are cached.
Primary Tab
The Primary tab defines the settings for the primary server.
Figure 88 General SQL DB (Primary Tab)
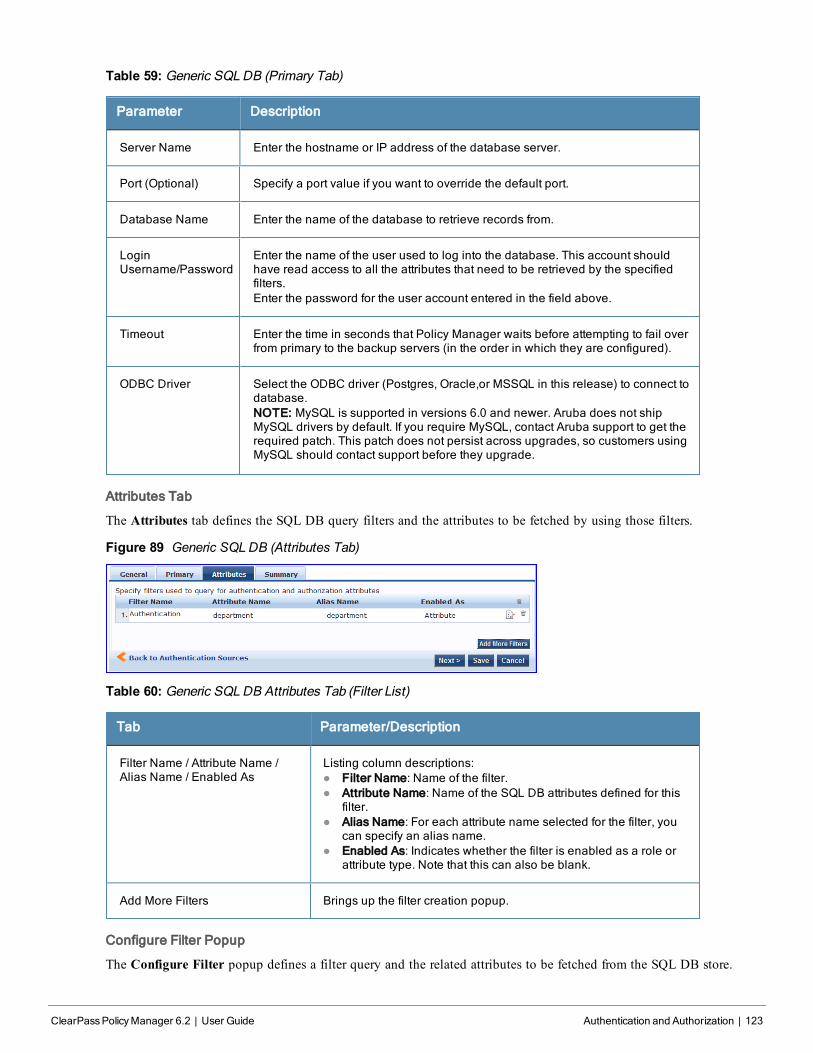
Table 59: Generic SQL DB (Primary Tab)
Parameter Description
Server Name Enter the hostname or IP address of the database server.
Port (Optional) Specify a port value if you want to override the default port.
Database Name Enter the name of the database to retrieve records from.
LoginUsername/Password
Enter the name of the user used to log into the database. This account shouldhave read access to all the attributes that need to be retrieved by the specifiedfilters.Enter the password for the user account entered in the field above.
Timeout Enter the time in seconds that Policy Manager waits before attempting to fail overfrom primary to the backup servers (in the order in which they are configured).
ODBC Driver Select the ODBC driver (Postgres, Oracle,or MSSQL in this release) to connect todatabase.NOTE: MySQL is supported in versions 6.0 and newer. Aruba does not shipMySQL drivers by default. If you require MySQL, contact Aruba support to get therequired patch. This patch does not persist across upgrades, so customers usingMySQL should contact support before they upgrade.
Attributes Tab
The Attributes tab defines the SQL DB query filters and the attributes to be fetched by using those filters.
Figure 89 Generic SQLDB (Attributes Tab)
Table 60: Generic SQLDB Attributes Tab (Filter List)
Tab Parameter/Description
Filter Name / Attribute Name /Alias Name / Enabled As
Listing column descriptions:l Filter Name: Name of the filter.l Attribute Name: Name of the SQL DB attributes defined for this
filter.l Alias Name: For each attribute name selected for the filter, you
can specify an alias name.l Enabled As: Indicates whether the filter is enabled as a role or
attribute type. Note that this can also be blank.
Add More Filters Brings up the filter creation popup.
Configure Filter Popup
The Configure Filter popup defines a filter query and the related attributes to be fetched from the SQL DB store.
ClearPassPolicyManager 6.2 | User Guide Authentication and Authorization | 123
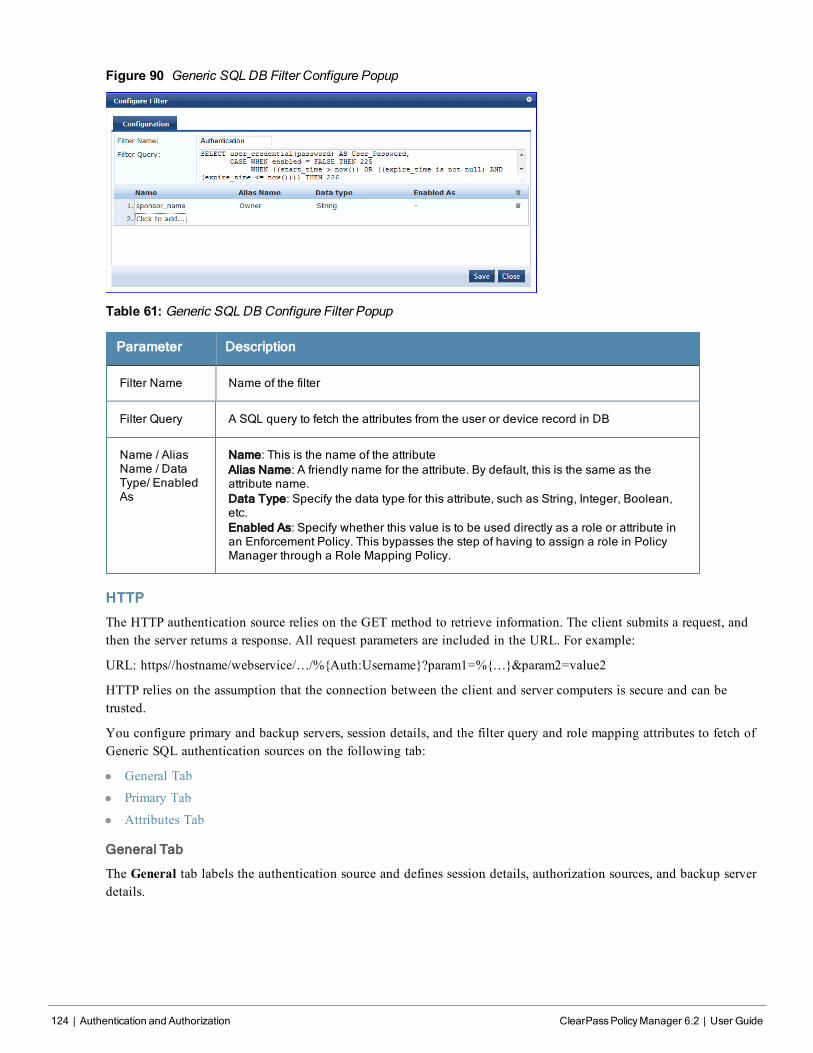
124 | Authentication and Authorization ClearPassPolicyManager 6.2 | User Guide
Figure 90 Generic SQLDB Filter Configure Popup
Table 61: Generic SQLDB Configure Filter Popup
Parameter Description
Filter Name Name of the filter
Filter Query A SQL query to fetch the attributes from the user or device record in DB
Name / AliasName / DataType/ EnabledAs
Name: This is the name of the attributeAlias Name: A friendly name for the attribute. By default, this is the same as theattribute name.Data Type: Specify the data type for this attribute, such as String, Integer, Boolean,etc.Enabled As: Specify whether this value is to be used directly as a role or attribute inan Enforcement Policy. This bypasses the step of having to assign a role in PolicyManager through a Role Mapping Policy.
HTTPThe HTTP authentication source relies on the GET method to retrieve information. The client submits a request, andthen the server returns a response. All request parameters are included in the URL. For example:
URL: https//hostname/webservice/…/%{Auth:Username}?param1=%{…}¶m2=value2
HTTP relies on the assumption that the connection between the client and server computers is secure and can betrusted.
You configure primary and backup servers, session details, and the filter query and role mapping attributes to fetch ofGeneric SQL authentication sources on the following tab:
l General Tab
l Primary Tab
l Attributes Tab
General Tab
The General tab labels the authentication source and defines session details, authorization sources, and backup serverdetails.
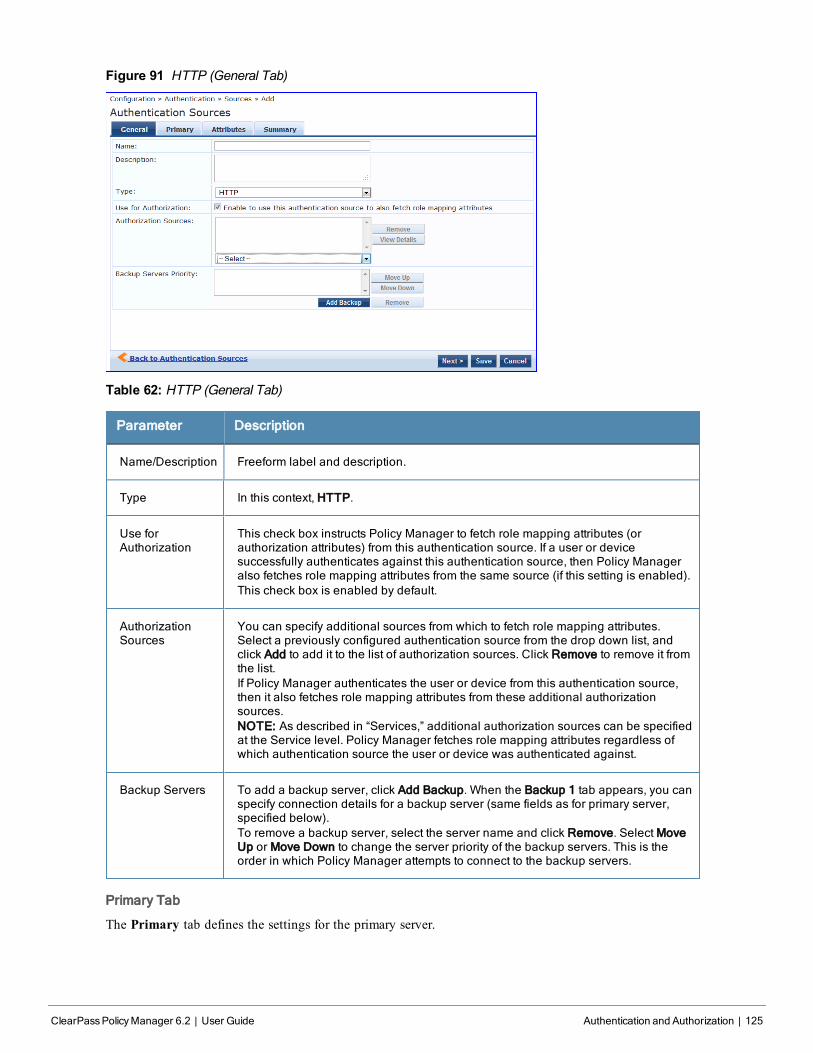
Figure 91 HTTP (General Tab)
Table 62: HTTP (General Tab)
Parameter Description
Name/Description Freeform label and description.
Type In this context, HTTP.
Use forAuthorization
This check box instructs Policy Manager to fetch role mapping attributes (orauthorization attributes) from this authentication source. If a user or devicesuccessfully authenticates against this authentication source, then Policy Manageralso fetches role mapping attributes from the same source (if this setting is enabled).This check box is enabled by default.
AuthorizationSources
You can specify additional sources from which to fetch role mapping attributes.Select a previously configured authentication source from the drop down list, andclick Add to add it to the list of authorization sources. Click Remove to remove it fromthe list.If Policy Manager authenticates the user or device from this authentication source,then it also fetches role mapping attributes from these additional authorizationsources.NOTE: As described in “Services,” additional authorization sources can be specifiedat the Service level. Policy Manager fetches role mapping attributes regardless ofwhich authentication source the user or device was authenticated against.
Backup Servers To add a backup server, click Add Backup. When the Backup 1 tab appears, you canspecify connection details for a backup server (same fields as for primary server,specified below).To remove a backup server, select the server name and click Remove. Select MoveUp or Move Down to change the server priority of the backup servers. This is theorder in which Policy Manager attempts to connect to the backup servers.
Primary Tab
The Primary tab defines the settings for the primary server.
ClearPassPolicyManager 6.2 | User Guide Authentication and Authorization | 125

126 | Authentication and Authorization ClearPassPolicyManager 6.2 | User Guide
Figure 92 HTTP (Primary Tab)
Table 63: HTTP (Primary Tab)
Parameter Description
Base URL Enter the base URL(host name) or IP address of the HTTP server.For example: http://<hostname> or <fully-qualified domain name>:xxxx wherexxxx is the port to access the HTTP Server
LoginUsername/Password
Enter the name of the user used to log into the database. This account shouldhave read access to all the attributes that need to be retrieved by the specifiedfilters.Enter the password for the user account entered in the field above.
Attributes Tab
The Attributes tab defines the HTTP query filters and the attributes to be fetched by using those filters.
Figure 93 HTTP (Attributes Tab)
Table 64: HTTP Attributes Tab (Filter List)
Tab Parameter/Description
Filter Name / Attribute Name / AliasName / Enabled As
Listing column descriptions:l Filter Name: Name of the filter.l Attribute Name: Name of the SQL DB attributes defined for
this filter.l Alias Name: For each attribute name selected for the filter,
you can specify an alias name.l Enabled As: Indicates whether an attribute has been
enabled as a role.
Add More Filters Brings up the filter creation popup.
Configure Filter Popup
The Configure Filter popup defines a filter query and the related attributes to be fetched from the SQL DB store.
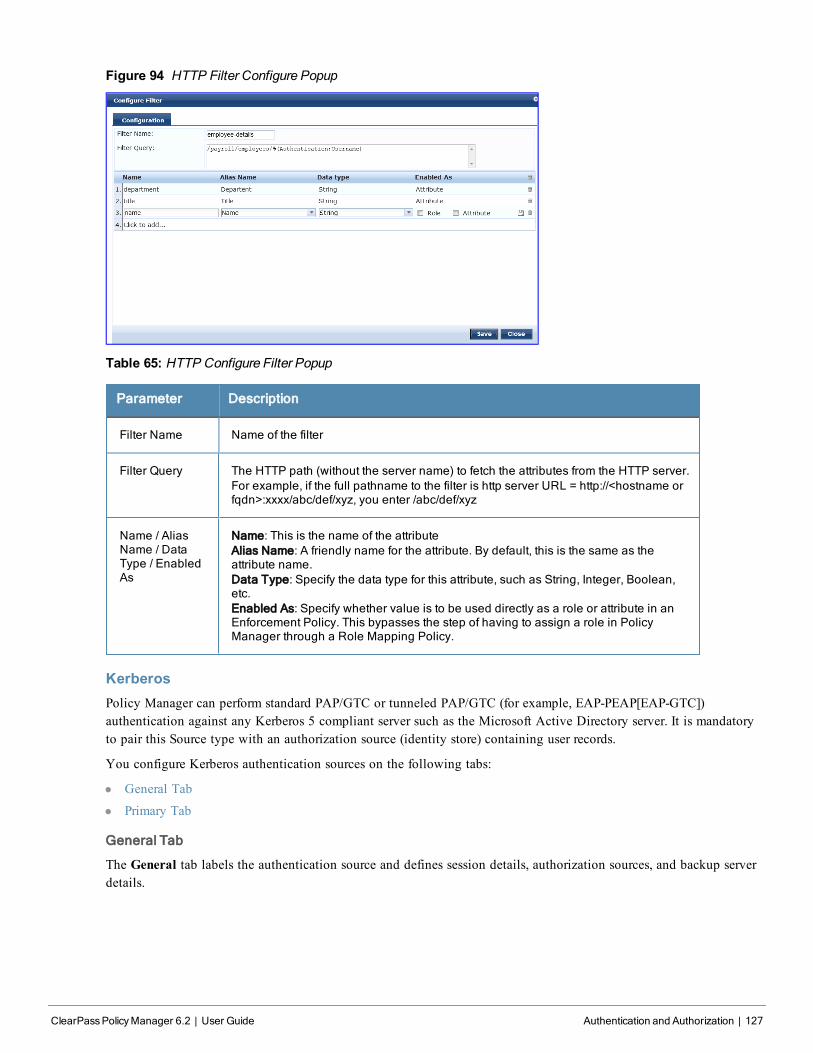
Figure 94 HTTP Filter Configure Popup
Table 65: HTTP Configure Filter Popup
Parameter Description
Filter Name Name of the filter
Filter Query The HTTP path (without the server name) to fetch the attributes from the HTTP server.For example, if the full pathname to the filter is http server URL = http://<hostname orfqdn>:xxxx/abc/def/xyz, you enter /abc/def/xyz
Name / AliasName / DataType / EnabledAs
Name: This is the name of the attributeAlias Name: A friendly name for the attribute. By default, this is the same as theattribute name.Data Type: Specify the data type for this attribute, such as String, Integer, Boolean,etc.Enabled As: Specify whether value is to be used directly as a role or attribute in anEnforcement Policy. This bypasses the step of having to assign a role in PolicyManager through a Role Mapping Policy.
KerberosPolicy Manager can perform standard PAP/GTC or tunneled PAP/GTC (for example, EAP-PEAP[EAP-GTC])authentication against any Kerberos 5 compliant server such as the Microsoft Active Directory server. It is mandatoryto pair this Source type with an authorization source (identity store) containing user records.
You configure Kerberos authentication sources on the following tabs:
l General Tab
l Primary Tab
General Tab
The General tab labels the authentication source and defines session details, authorization sources, and backup serverdetails.
ClearPassPolicyManager 6.2 | User Guide Authentication and Authorization | 127
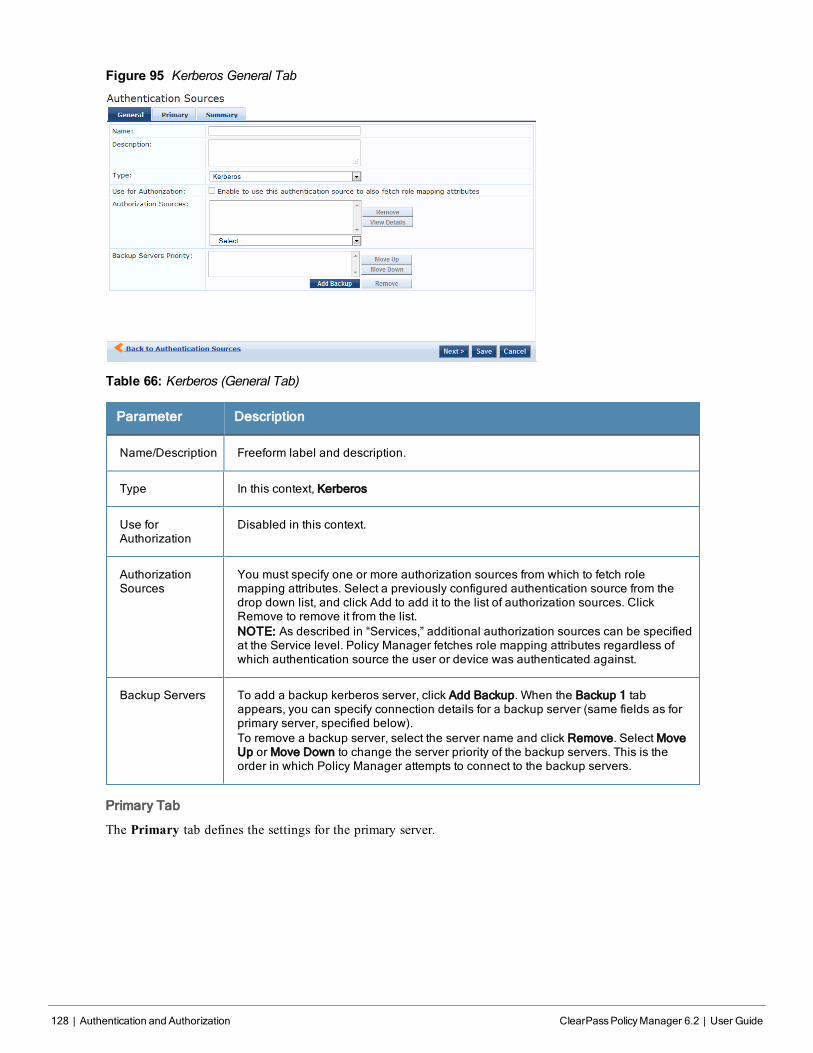
128 | Authentication and Authorization ClearPassPolicyManager 6.2 | User Guide
Figure 95 Kerberos General Tab
Table 66: Kerberos (General Tab)
Parameter Description
Name/Description Freeform label and description.
Type In this context, Kerberos
Use forAuthorization
Disabled in this context.
AuthorizationSources
You must specify one or more authorization sources from which to fetch rolemapping attributes. Select a previously configured authentication source from thedrop down list, and click Add to add it to the list of authorization sources. ClickRemove to remove it from the list.NOTE: As described in “Services,” additional authorization sources can be specifiedat the Service level. Policy Manager fetches role mapping attributes regardless ofwhich authentication source the user or device was authenticated against.
Backup Servers To add a backup kerberos server, click Add Backup. When the Backup 1 tabappears, you can specify connection details for a backup server (same fields as forprimary server, specified below).To remove a backup server, select the server name and click Remove. Select MoveUp or Move Down to change the server priority of the backup servers. This is theorder in which Policy Manager attempts to connect to the backup servers.
Primary Tab
The Primary tab defines the settings for the primary server.

Figure 96 Kerberos (Primary Tab)
Table 67: Kerberos (Primary Tab)
Parameter Description
Hostname/Port Host name or IP address of the kerberos server, and the port at which the token serverlistens for kerberos connections. The default port is 88.
Realm The domain of authentication. In the case of Active Directory, this is the AD domain.
ServicePrincipal Name
The identity of the service principal as configured in the Kerberos server.
ServicePrincipalPassword
Password for the service principal.
OktaOkta can be used as an authentication source only for servers of the type Aruba Application Authentication. Youconfigure Okta authentication sources on the following tabs:
l General Tab
l Primary Tab
l Attributes Tab
ClearPassPolicyManager 6.2 | User Guide Authentication and Authorization | 129
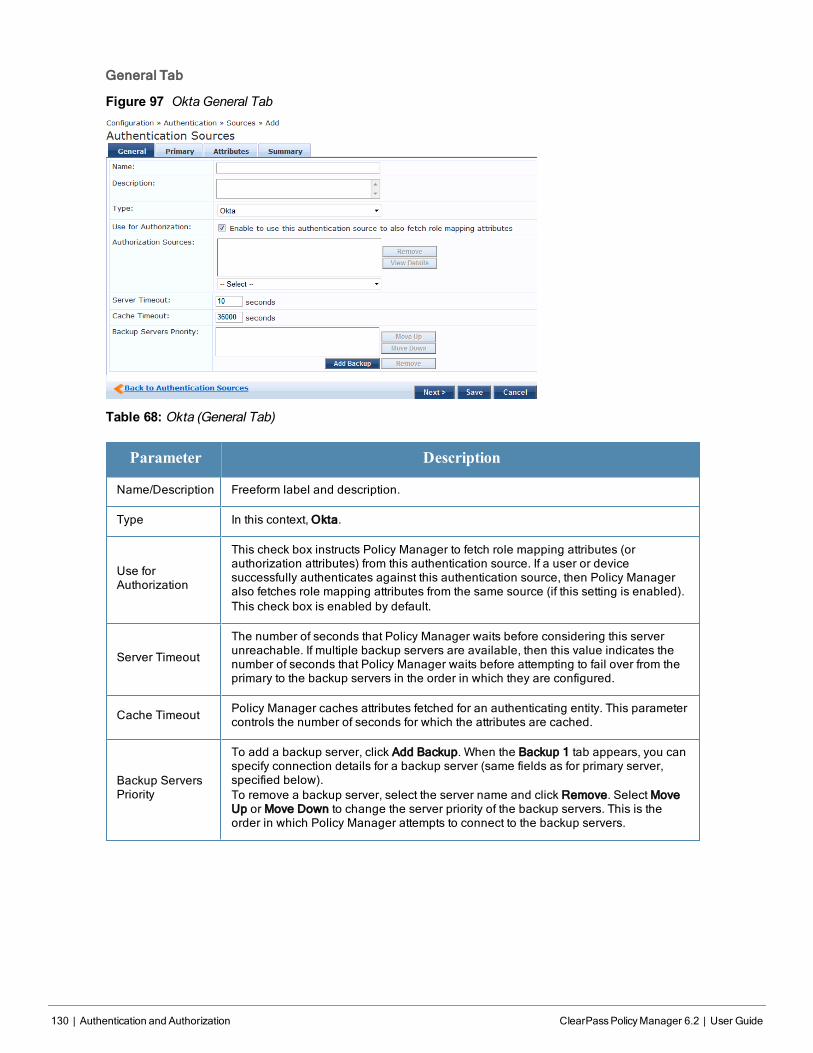
130 | Authentication and Authorization ClearPassPolicyManager 6.2 | User Guide
General Tab
Figure 97 Okta General Tab
Table 68: Okta (General Tab)
Parameter Description
Name/Description Freeform label and description.
Type In this context, Okta.
Use forAuthorization
This check box instructs Policy Manager to fetch role mapping attributes (orauthorization attributes) from this authentication source. If a user or devicesuccessfully authenticates against this authentication source, then Policy Manageralso fetches role mapping attributes from the same source (if this setting is enabled).This check box is enabled by default.
Server Timeout
The number of seconds that Policy Manager waits before considering this serverunreachable. If multiple backup servers are available, then this value indicates thenumber of seconds that Policy Manager waits before attempting to fail over from theprimary to the backup servers in the order in which they are configured.
Cache Timeout Policy Manager caches attributes fetched for an authenticating entity. This parametercontrols the number of seconds for which the attributes are cached.
Backup ServersPriority
To add a backup server, click Add Backup. When the Backup 1 tab appears, you canspecify connection details for a backup server (same fields as for primary server,specified below).To remove a backup server, select the server name and click Remove. Select MoveUp or Move Down to change the server priority of the backup servers. This is theorder in which Policy Manager attempts to connect to the backup servers.
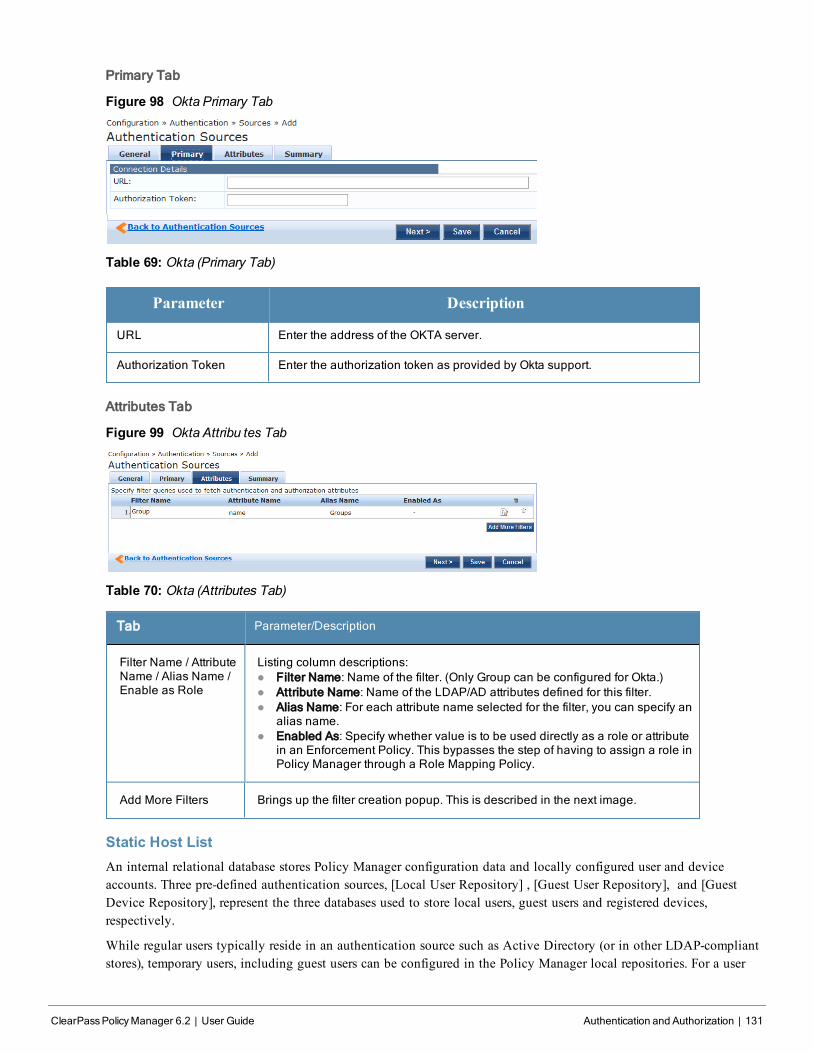
Primary Tab
Figure 98 Okta Primary Tab
Table 69: Okta (Primary Tab)
Parameter Description
URL Enter the address of the OKTA server.
Authorization Token Enter the authorization token as provided by Okta support.
Attributes Tab
Figure 99 Okta Attribu tes Tab
Table 70: Okta (Attributes Tab)
Tab Parameter/Description
Filter Name / AttributeName / Alias Name /Enable as Role
Listing column descriptions:l Filter Name: Name of the filter. (Only Group can be configured for Okta.)l Attribute Name: Name of the LDAP/AD attributes defined for this filter.l Alias Name: For each attribute name selected for the filter, you can specify an
alias name.l Enabled As: Specify whether value is to be used directly as a role or attribute
in an Enforcement Policy. This bypasses the step of having to assign a role inPolicy Manager through a Role Mapping Policy.
Add More Filters Brings up the filter creation popup. This is described in the next image.
Static Host ListAn internal relational database stores Policy Manager configuration data and locally configured user and deviceaccounts. Three pre-defined authentication sources, [Local User Repository] , [Guest User Repository], and [GuestDevice Repository], represent the three databases used to store local users, guest users and registered devices,respectively.
While regular users typically reside in an authentication source such as Active Directory (or in other LDAP-compliantstores), temporary users, including guest users can be configured in the Policy Manager local repositories. For a user
ClearPassPolicyManager 6.2 | User Guide Authentication and Authorization | 131
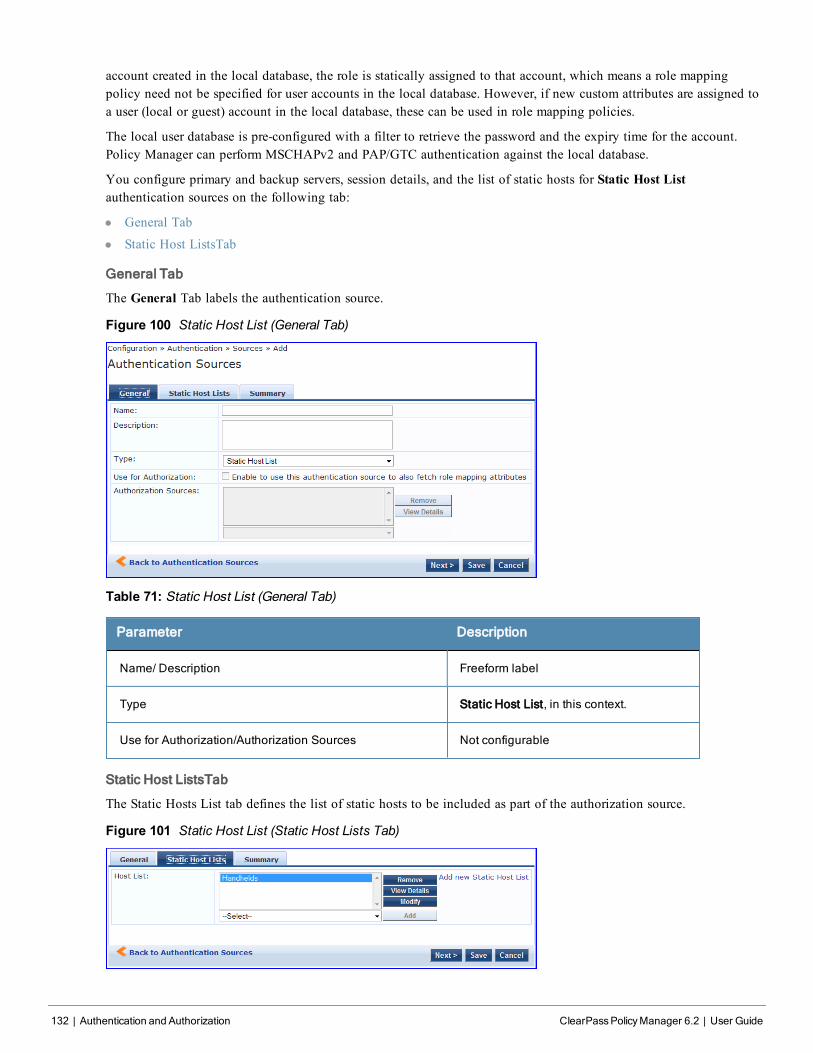
132 | Authentication and Authorization ClearPassPolicyManager 6.2 | User Guide
account created in the local database, the role is statically assigned to that account, which means a role mappingpolicy need not be specified for user accounts in the local database. However, if new custom attributes are assigned toa user (local or guest) account in the local database, these can be used in role mapping policies.
The local user database is pre-configured with a filter to retrieve the password and the expiry time for the account.Policy Manager can perform MSCHAPv2 and PAP/GTC authentication against the local database.
You configure primary and backup servers, session details, and the list of static hosts for Static Host Listauthentication sources on the following tab:
l General Tab
l Static Host ListsTab
General Tab
The General Tab labels the authentication source.
Figure 100 Static Host List (General Tab)
Table 71: Static Host List (General Tab)
Parameter Description
Name/ Description Freeform label
Type Static Host List, in this context.
Use for Authorization/Authorization Sources Not configurable
Static Host ListsTab
The Static Hosts List tab defines the list of static hosts to be included as part of the authorization source.
Figure 101 Static Host List (Static Host Lists Tab)
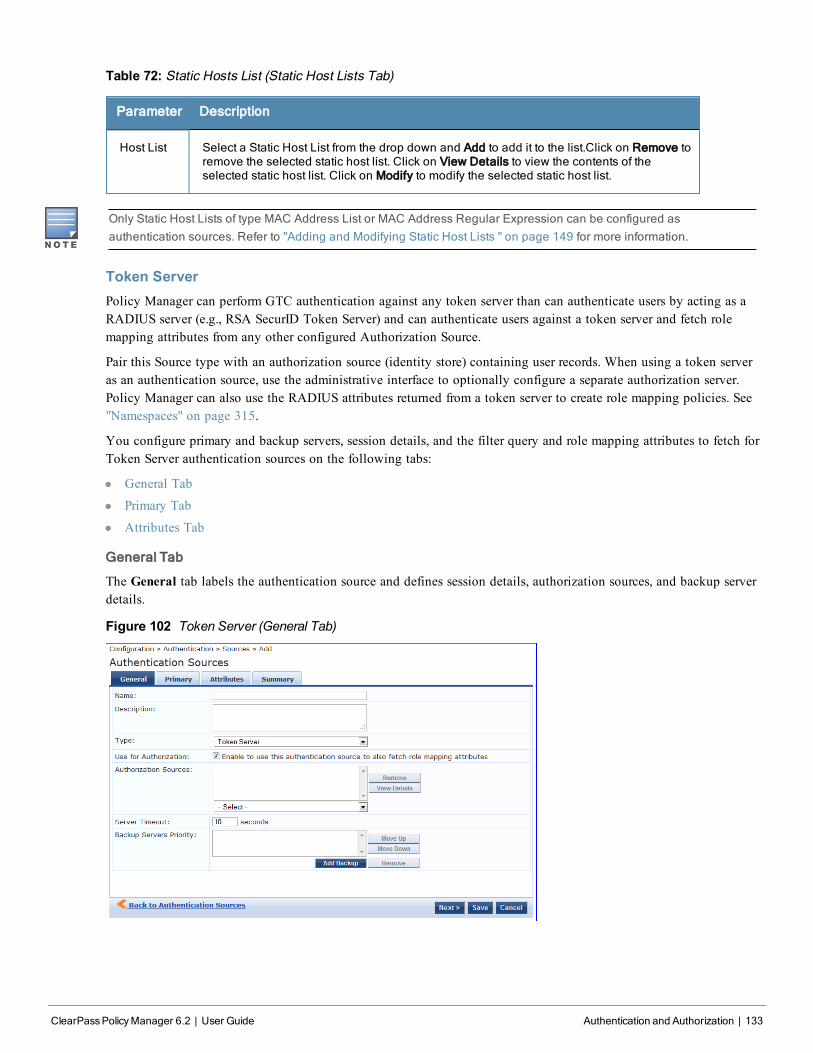
Table 72: Static Hosts List (Static Host Lists Tab)
Parameter Description
Host List Select a Static Host List from the drop down and Add to add it to the list.Click on Remove toremove the selected static host list. Click on View Details to view the contents of theselected static host list. Click on Modify to modify the selected static host list.
Only Static Host Lists of type MAC Address List or MAC Address Regular Expression can be configured asauthentication sources. Refer to "Adding and Modifying Static Host Lists " on page 149 for more information.
Token ServerPolicy Manager can perform GTC authentication against any token server than can authenticate users by acting as aRADIUS server (e.g., RSA SecurID Token Server) and can authenticate users against a token server and fetch rolemapping attributes from any other configured Authorization Source.
Pair this Source type with an authorization source (identity store) containing user records. When using a token serveras an authentication source, use the administrative interface to optionally configure a separate authorization server.Policy Manager can also use the RADIUS attributes returned from a token server to create role mapping policies. See"Namespaces" on page 315.
You configure primary and backup servers, session details, and the filter query and role mapping attributes to fetch forToken Server authentication sources on the following tabs:
l General Tab
l Primary Tab
l Attributes Tab
General Tab
The General tab labels the authentication source and defines session details, authorization sources, and backup serverdetails.
Figure 102 Token Server (General Tab)
ClearPassPolicyManager 6.2 | User Guide Authentication and Authorization | 133
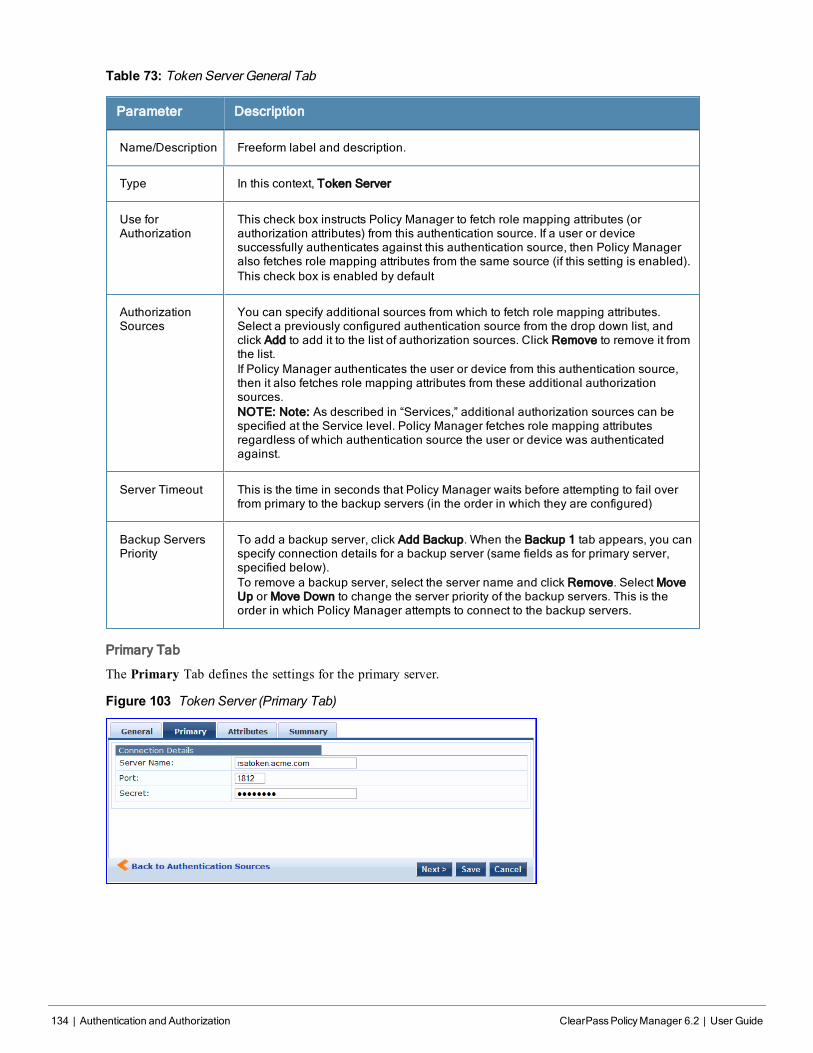
134 | Authentication and Authorization ClearPassPolicyManager 6.2 | User Guide
Table 73: Token Server General Tab
Parameter Description
Name/Description Freeform label and description.
Type In this context, Token Server
Use forAuthorization
This check box instructs Policy Manager to fetch role mapping attributes (orauthorization attributes) from this authentication source. If a user or devicesuccessfully authenticates against this authentication source, then Policy Manageralso fetches role mapping attributes from the same source (if this setting is enabled).This check box is enabled by default
AuthorizationSources
You can specify additional sources from which to fetch role mapping attributes.Select a previously configured authentication source from the drop down list, andclick Add to add it to the list of authorization sources. Click Remove to remove it fromthe list.If Policy Manager authenticates the user or device from this authentication source,then it also fetches role mapping attributes from these additional authorizationsources.NOTE: Note: As described in “Services,” additional authorization sources can bespecified at the Service level. Policy Manager fetches role mapping attributesregardless of which authentication source the user or device was authenticatedagainst.
Server Timeout This is the time in seconds that Policy Manager waits before attempting to fail overfrom primary to the backup servers (in the order in which they are configured)
Backup ServersPriority
To add a backup server, click Add Backup. When the Backup 1 tab appears, you canspecify connection details for a backup server (same fields as for primary server,specified below).To remove a backup server, select the server name and click Remove. Select MoveUp or Move Down to change the server priority of the backup servers. This is theorder in which Policy Manager attempts to connect to the backup servers.
Primary Tab
The Primary Tab defines the settings for the primary server.
Figure 103 Token Server (Primary Tab)
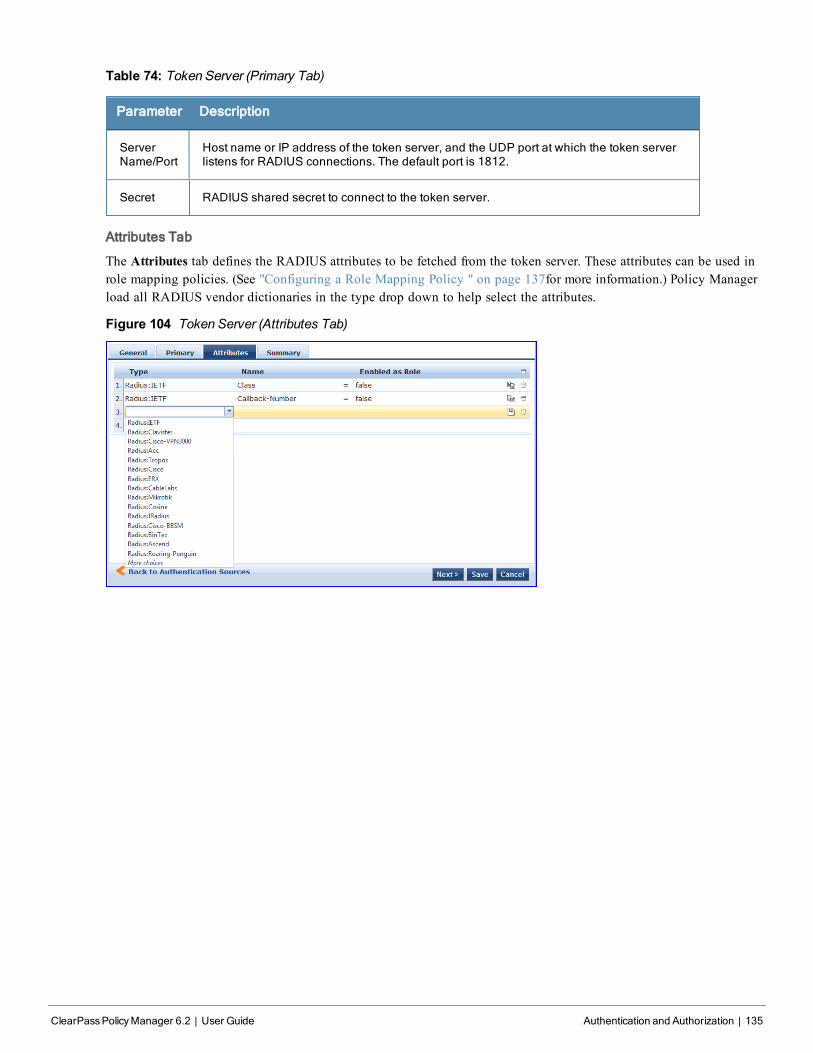
Table 74: Token Server (Primary Tab)
Parameter Description
ServerName/Port
Host name or IP address of the token server, and the UDP port at which the token serverlistens for RADIUS connections. The default port is 1812.
Secret RADIUS shared secret to connect to the token server.
Attributes Tab
The Attributes tab defines the RADIUS attributes to be fetched from the token server. These attributes can be used inrole mapping policies. (See "Configuring a Role Mapping Policy " on page 137for more information.) Policy Managerload all RADIUS vendor dictionaries in the type drop down to help select the attributes.
Figure 104 Token Server (Attributes Tab)
ClearPassPolicyManager 6.2 | User Guide Authentication and Authorization | 135

136 | Authentication and Authorization ClearPassPolicyManager 6.2 | User Guide
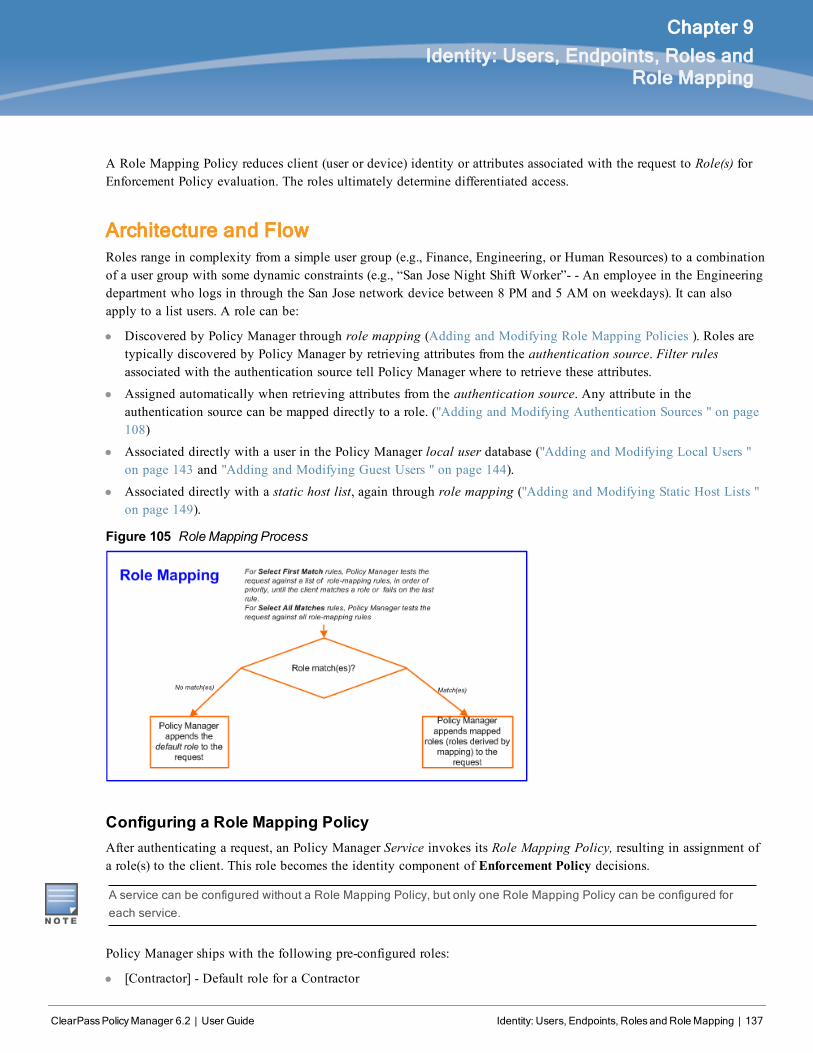
ClearPassPolicyManager 6.2 | User Guide Identity: Users, Endpoints, Rolesand RoleMapping | 137
Chapter 9
Identity: Users, Endpoints, Roles andRole Mapping
A Role Mapping Policy reduces client (user or device) identity or attributes associated with the request to Role(s) forEnforcement Policy evaluation. The roles ultimately determine differentiated access.
Architecture and FlowRoles range in complexity from a simple user group (e.g., Finance, Engineering, or Human Resources) to a combinationof a user group with some dynamic constraints (e.g., “San Jose Night Shift Worker”- - An employee in the Engineeringdepartment who logs in through the San Jose network device between 8 PM and 5 AM on weekdays). It can alsoapply to a list users. A role can be:
l Discovered by Policy Manager through role mapping (Adding and Modifying Role Mapping Policies ). Roles aretypically discovered by Policy Manager by retrieving attributes from the authentication source. Filter rulesassociated with the authentication source tell Policy Manager where to retrieve these attributes.
l Assigned automatically when retrieving attributes from the authentication source. Any attribute in theauthentication source can be mapped directly to a role. ("Adding and Modifying Authentication Sources " on page108)
l Associated directly with a user in the Policy Manager local user database ("Adding and Modifying Local Users "on page 143 and "Adding and Modifying Guest Users " on page 144).
l Associated directly with a static host list, again through role mapping ("Adding and Modifying Static Host Lists "on page 149).
Figure 105 RoleMapping Process
Configuring a Role Mapping PolicyAfter authenticating a request, an Policy Manager Service invokes its Role Mapping Policy, resulting in assignment ofa role(s) to the client. This role becomes the identity component of Enforcement Policy decisions.
A service can be configured without a Role Mapping Policy, but only one Role Mapping Policy can be configured foreach service.
Policy Manager ships with the following pre-configured roles:
l [Contractor] - Default role for a Contractor
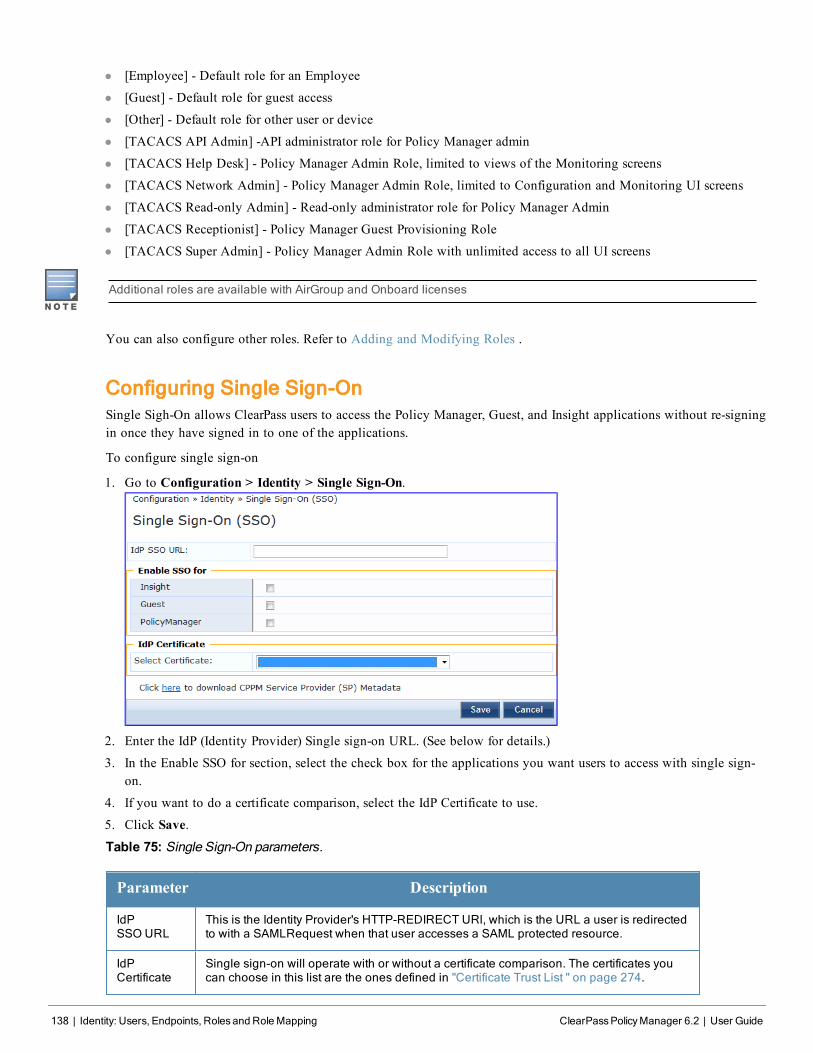
138 | Identity: Users, Endpoints, Rolesand RoleMapping ClearPassPolicyManager 6.2 | User Guide
l [Employee] - Default role for an Employee
l [Guest] - Default role for guest access
l [Other] - Default role for other user or device
l [TACACS API Admin] -API administrator role for Policy Manager admin
l [TACACS Help Desk] - Policy Manager Admin Role, limited to views of the Monitoring screens
l [TACACS Network Admin] - Policy Manager Admin Role, limited to Configuration and Monitoring UI screens
l [TACACS Read-only Admin] - Read-only administrator role for Policy Manager Admin
l [TACACS Receptionist] - Policy Manager Guest Provisioning Role
l [TACACS Super Admin] - Policy Manager Admin Role with unlimited access to all UI screens
Additional roles are available with AirGroup and Onboard licenses
You can also configure other roles. Refer to Adding and Modifying Roles .
Configuring Single Sign-OnSingle Sigh-On allows ClearPass users to access the Policy Manager, Guest, and Insight applications without re-signingin once they have signed in to one of the applications.
To configure single sign-on
1. Go to Configuration > Identity > Single Sign-On.
2. Enter the IdP (Identity Provider) Single sign-on URL. (See below for details.)
3. In the Enable SSO for section, select the check box for the applications you want users to access with single sign-on.
4. If you want to do a certificate comparison, select the IdP Certificate to use.
5. Click Save.
Table 75: Single Sign-On parameters.
Parameter Description
IdPSSO URL
This is the Identity Provider's HTTP-REDIRECT URl, which is the URL a user is redirectedto with a SAMLRequest when that user accesses a SAML protected resource.
IdPCertificate
Single sign-on will operate with or without a certificate comparison. The certificates youcan choose in this list are the ones defined in "Certificate Trust List " on page 274.
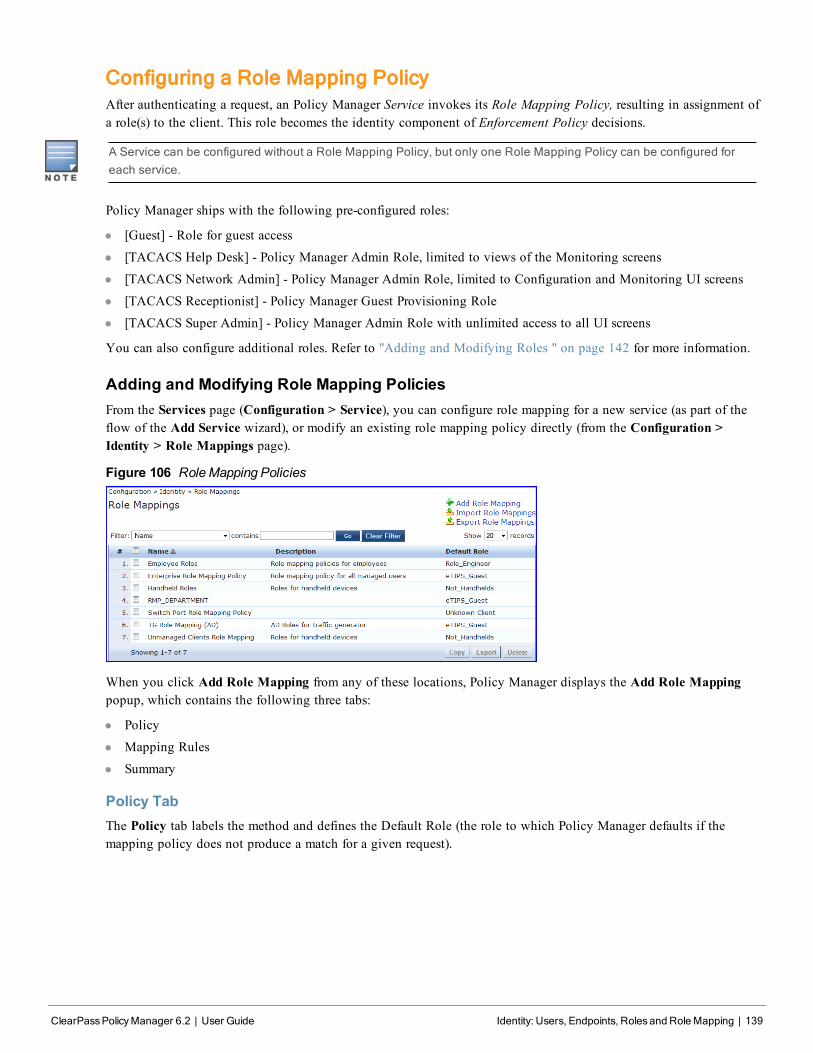
Configuring a Role Mapping PolicyAfter authenticating a request, an Policy Manager Service invokes its Role Mapping Policy, resulting in assignment ofa role(s) to the client. This role becomes the identity component of Enforcement Policy decisions.
A Service can be configured without a Role Mapping Policy, but only one Role Mapping Policy can be configured foreach service.
Policy Manager ships with the following pre-configured roles:
l [Guest] - Role for guest access
l [TACACS Help Desk] - Policy Manager Admin Role, limited to views of the Monitoring screens
l [TACACS Network Admin] - Policy Manager Admin Role, limited to Configuration and Monitoring UI screens
l [TACACS Receptionist] - Policy Manager Guest Provisioning Role
l [TACACS Super Admin] - Policy Manager Admin Role with unlimited access to all UI screens
You can also configure additional roles. Refer to "Adding and Modifying Roles " on page 142 for more information.
Adding and Modifying Role Mapping PoliciesFrom the Services page (Configuration > Service), you can configure role mapping for a new service (as part of theflow of the Add Service wizard), or modify an existing role mapping policy directly (from the Configuration >Identity > Role Mappings page).
Figure 106 RoleMapping Policies
When you click Add Role Mapping from any of these locations, Policy Manager displays the Add Role Mappingpopup, which contains the following three tabs:
l Policy
l Mapping Rules
l Summary
Policy TabThe Policy tab labels the method and defines the Default Role (the role to which Policy Manager defaults if themapping policy does not produce a match for a given request).
ClearPassPolicyManager 6.2 | User Guide Identity: Users, Endpoints, Rolesand RoleMapping | 139
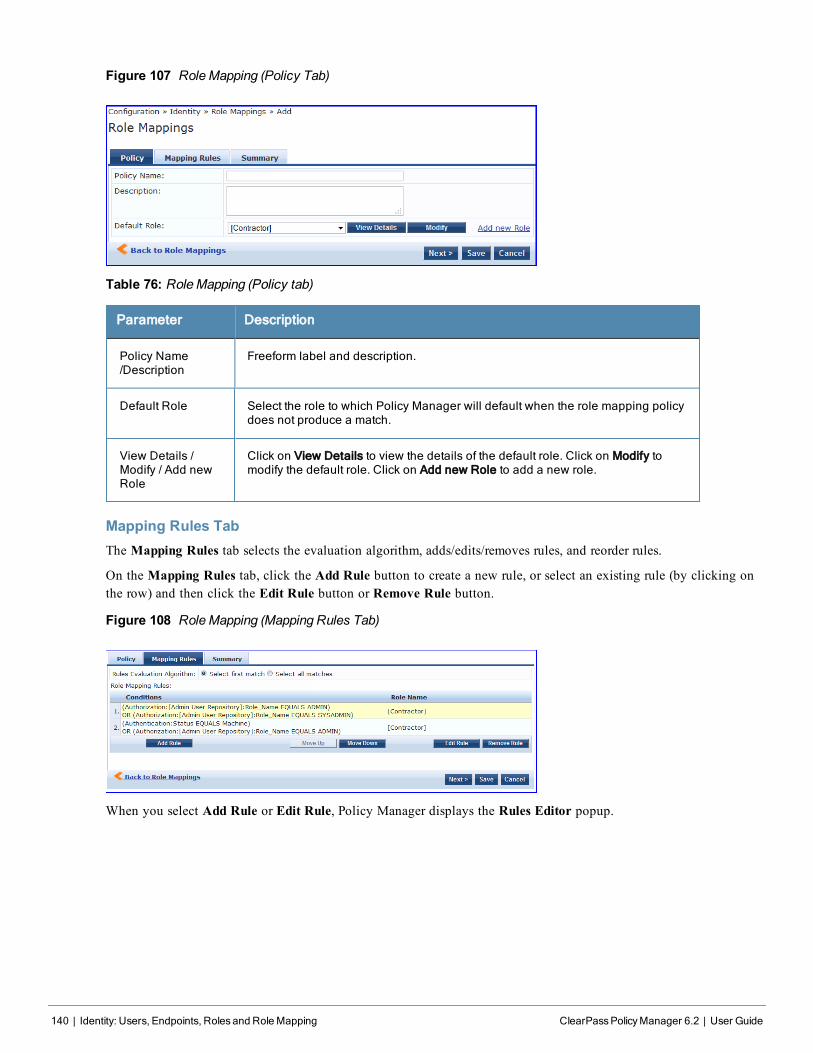
140 | Identity: Users, Endpoints, Rolesand RoleMapping ClearPassPolicyManager 6.2 | User Guide
Figure 107 RoleMapping (Policy Tab)
Table 76: RoleMapping (Policy tab)
Parameter Description
Policy Name/Description
Freeform label and description.
Default Role Select the role to which Policy Manager will default when the role mapping policydoes not produce a match.
View Details /Modify / Add newRole
Click on View Details to view the details of the default role. Click on Modify tomodify the default role. Click on Add new Role to add a new role.
Mapping Rules TabThe Mapping Rules tab selects the evaluation algorithm, adds/edits/removes rules, and reorder rules.
On the Mapping Rules tab, click the Add Rule button to create a new rule, or select an existing rule (by clicking onthe row) and then click the Edit Rule button or Remove Rule button.
Figure 108 RoleMapping (Mapping Rules Tab)
When you select Add Rule or Edit Rule, Policy Manager displays the Rules Editor popup.
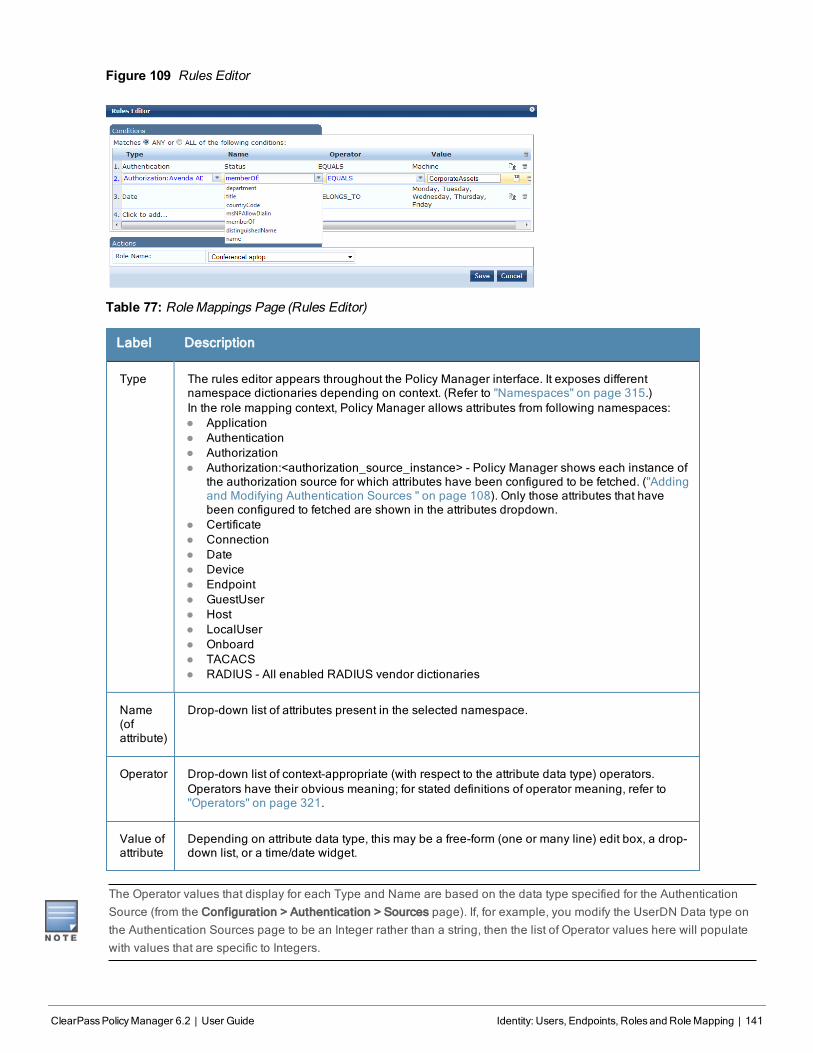
Figure 109 Rules Editor
Table 77: RoleMappings Page (Rules Editor)
Label Description
Type The rules editor appears throughout the Policy Manager interface. It exposes differentnamespace dictionaries depending on context. (Refer to "Namespaces" on page 315.)In the role mapping context, Policy Manager allows attributes from following namespaces:l Applicationl Authenticationl Authorizationl Authorization:<authorization_source_instance> - Policy Manager shows each instance of
the authorization source for which attributes have been configured to be fetched. ("Addingand Modifying Authentication Sources " on page 108). Only those attributes that havebeen configured to fetched are shown in the attributes dropdown.
l Certificatel Connectionl Datel Devicel Endpointl GuestUserl Hostl LocalUserl Onboardl TACACSl RADIUS - All enabled RADIUS vendor dictionaries
Name(ofattribute)
Drop-down list of attributes present in the selected namespace.
Operator Drop-down list of context-appropriate (with respect to the attribute data type) operators.Operators have their obvious meaning; for stated definitions of operator meaning, refer to"Operators" on page 321.
Value ofattribute
Depending on attribute data type, this may be a free-form (one or many line) edit box, a drop-down list, or a time/date widget.
The Operator values that display for each Type and Name are based on the data type specified for the AuthenticationSource (from the Configuration > Authentication > Sources page). If, for example, you modify the UserDN Data type onthe Authentication Sources page to be an Integer rather than a string, then the list of Operator values here will populatewith values that are specific to Integers.
ClearPassPolicyManager 6.2 | User Guide Identity: Users, Endpoints, Rolesand RoleMapping | 141

142 | Identity: Users, Endpoints, Rolesand RoleMapping ClearPassPolicyManager 6.2 | User Guide
When you save your Role Mapping configuration, it appears in the Mapping Rules tab list. In this interface, you canselect a rule (click and the background changes color), and then use the various widgets to Move Up, Move Down,Edit the rule, or Remove the rule.
Adding and Modifying RolesPolicy Manager lists all available roles in the Roles page. From the menu, select Configuration > Identity > Roles.
Figure 110 Roles
You can configure a role from within a Role Mapping Policy (Add New Role), or independently from the menu(Configuration > Identity > Roles > Add Roles). In either case, roles exist independently of an individual Service andcan be accessed globally through the Role Mapping Policy of any Service.
When you click Add Roles from any of these locations, Policy Manager displays the Add New Role popup.
Figure 111 AddNew Role
Table 78: AddNew Role
Parameter Description
Role Name /Description Freeform label and description.
Local Users, Guest Users, Onboard Devices, Endpoints, and StaticHost List ConfigurationThe internal Policy Manager database ([Local User Repository], [Guest User Repository]) supports storage of userrecords, when a particular class of users is not present in a central user repository (e.g., neither Active Directory norother database); by way of an example of such a class of users, guest or contractor records can be stored in the localuser repository.

To authenticate local users from a particular Service, include [Local User Repository] among the AuthenticationSources.
The endpoints table lists the endpoints that have authenticated requests to Policy Manager. These entries areautomatically populated from the 802.1X, MAC-based authentications, and web authentications processed by PolicyManager. These can be further modified to add tags, known/unknown, disabled status.
A static host list comprises of list of MAC and IP addresses. These can be used as white or black lists to control accessto the network.
Refer to "Adding and Modifying Local Users " on page 143 for information on how to configure Local Users.
Adding and Modifying Local UsersPolicy Manager lists all local users in the Local Users page (Configuration > Identity > Local Users):
Figure 112 Fig: Local Users Listing
To add a local user, click Add User to display the Add Local User popup.
Figure 113 Add Local User
ClearPassPolicyManager 6.2 | User Guide Identity: Users, Endpoints, Rolesand RoleMapping | 143
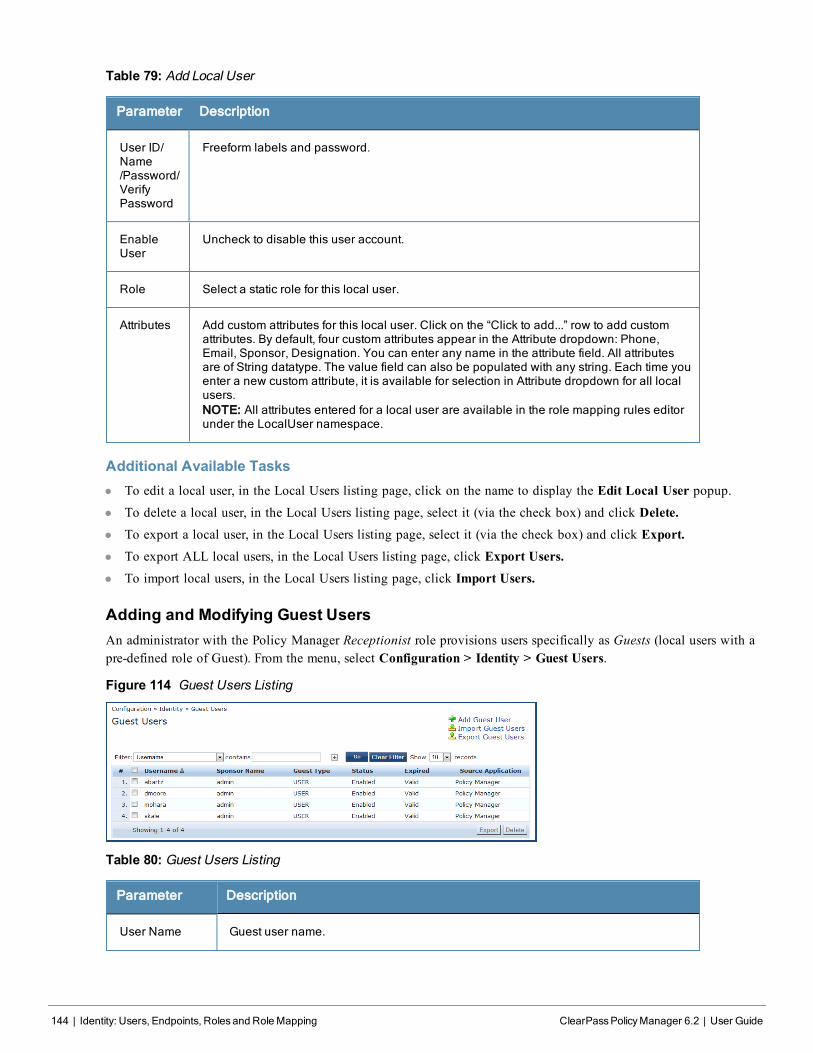
144 | Identity: Users, Endpoints, Rolesand RoleMapping ClearPassPolicyManager 6.2 | User Guide
Table 79: Add Local User
Parameter Description
User ID/Name/Password/VerifyPassword
Freeform labels and password.
EnableUser
Uncheck to disable this user account.
Role Select a static role for this local user.
Attributes Add custom attributes for this local user. Click on the “Click to add...” row to add customattributes. By default, four custom attributes appear in the Attribute dropdown: Phone,Email, Sponsor, Designation. You can enter any name in the attribute field. All attributesare of String datatype. The value field can also be populated with any string. Each time youenter a new custom attribute, it is available for selection in Attribute dropdown for all localusers.NOTE: All attributes entered for a local user are available in the role mapping rules editorunder the LocalUser namespace.
Additional Available Tasksl To edit a local user, in the Local Users listing page, click on the name to display the Edit Local User popup.l To delete a local user, in the Local Users listing page, select it (via the check box) and click Delete.l To export a local user, in the Local Users listing page, select it (via the check box) and click Export.l To export ALL local users, in the Local Users listing page, click Export Users.l To import local users, in the Local Users listing page, click Import Users.
Adding and Modifying Guest UsersAn administrator with the Policy Manager Receptionist role provisions users specifically as Guests (local users with apre-defined role of Guest). From the menu, select Configuration > Identity > Guest Users.
Figure 114 Guest Users Listing
Table 80: Guest Users Listing
Parameter Description
User Name Guest user name.
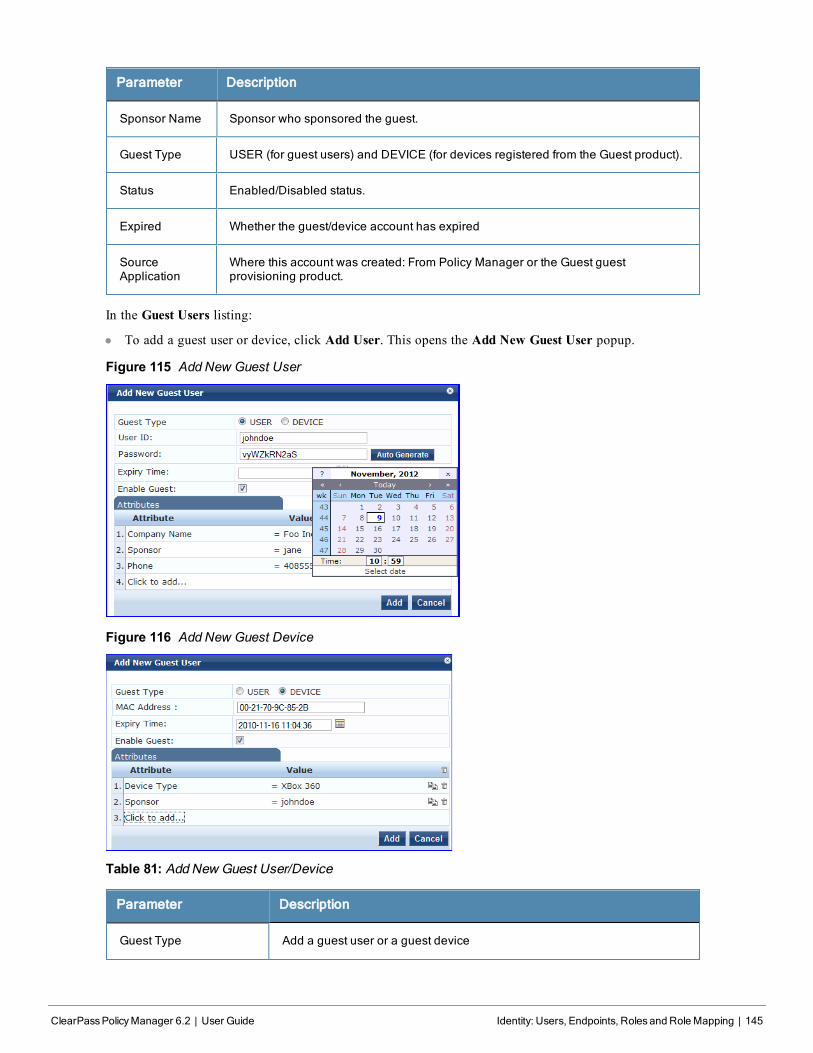
Parameter Description
Sponsor Name Sponsor who sponsored the guest.
Guest Type USER (for guest users) and DEVICE (for devices registered from the Guest product).
Status Enabled/Disabled status.
Expired Whether the guest/device account has expired
SourceApplication
Where this account was created: From Policy Manager or the Guest guestprovisioning product.
In the Guest Users listing:
l To add a guest user or device, click Add User. This opens the Add New Guest User popup.
Figure 115 AddNew Guest User
Figure 116 AddNew Guest Device
Table 81: AddNew Guest User/Device
Parameter Description
Guest Type Add a guest user or a guest device
ClearPassPolicyManager 6.2 | User Guide Identity: Users, Endpoints, Rolesand RoleMapping | 145
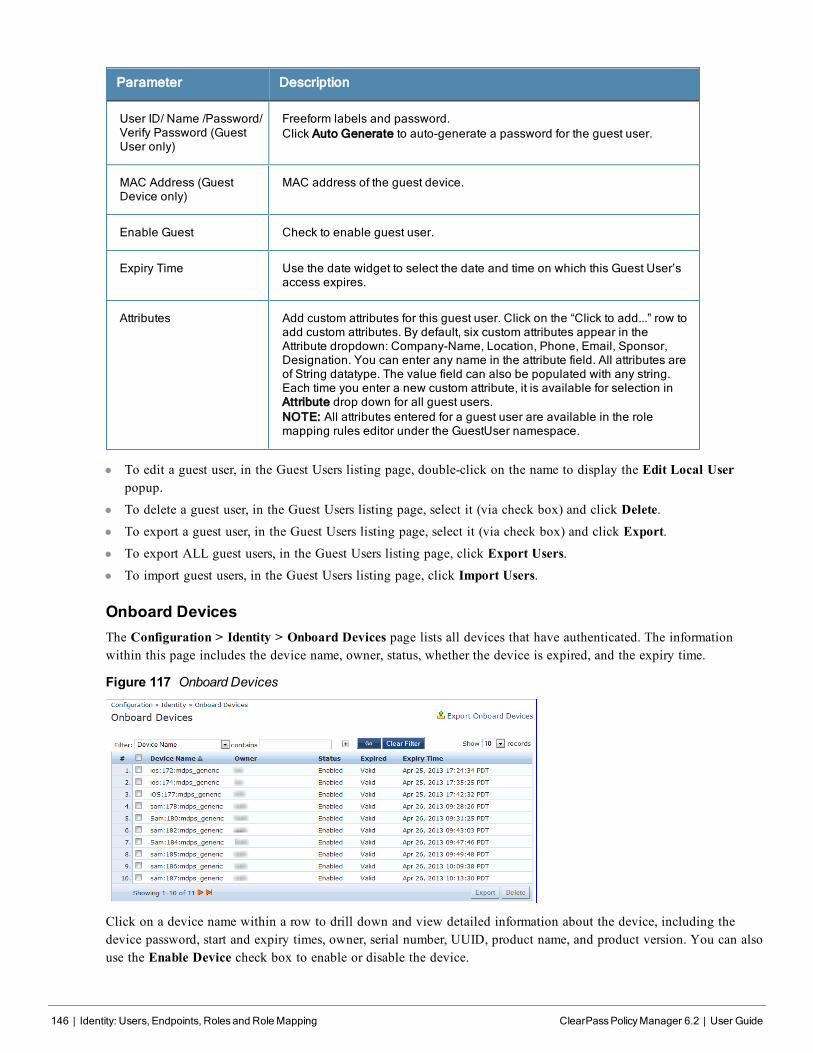
146 | Identity: Users, Endpoints, Rolesand RoleMapping ClearPassPolicyManager 6.2 | User Guide
Parameter Description
User ID/ Name /Password/Verify Password (GuestUser only)
Freeform labels and password.Click Auto Generate to auto-generate a password for the guest user.
MAC Address (GuestDevice only)
MAC address of the guest device.
Enable Guest Check to enable guest user.
Expiry Time Use the date widget to select the date and time on which this Guest User’saccess expires.
Attributes Add custom attributes for this guest user. Click on the “Click to add...” row toadd custom attributes. By default, six custom attributes appear in theAttribute dropdown: Company-Name, Location, Phone, Email, Sponsor,Designation. You can enter any name in the attribute field. All attributes areof String datatype. The value field can also be populated with any string.Each time you enter a new custom attribute, it is available for selection inAttribute drop down for all guest users.NOTE: All attributes entered for a guest user are available in the rolemapping rules editor under the GuestUser namespace.
l To edit a guest user, in the Guest Users listing page, double-click on the name to display the Edit Local Userpopup.
l To delete a guest user, in the Guest Users listing page, select it (via check box) and click Delete.l To export a guest user, in the Guest Users listing page, select it (via check box) and click Export.l To export ALL guest users, in the Guest Users listing page, click Export Users.l To import guest users, in the Guest Users listing page, click Import Users.
Onboard DevicesThe Configuration > Identity > Onboard Devices page lists all devices that have authenticated. The informationwithin this page includes the device name, owner, status, whether the device is expired, and the expiry time.
Figure 117 Onboard Devices
Click on a device name within a row to drill down and view detailed information about the device, including thedevice password, start and expiry times, owner, serial number, UUID, product name, and product version. You can alsouse the Enable Device check box to enable or disable the device.
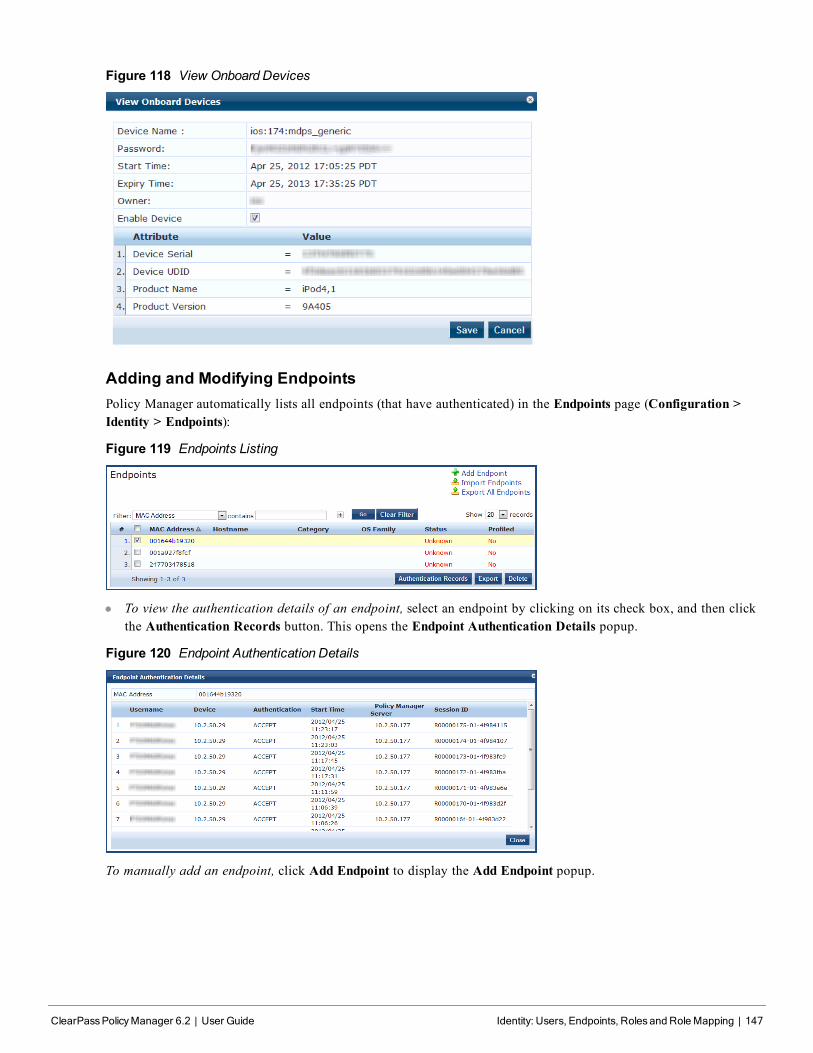
Figure 118 View Onboard Devices
Adding and Modifying EndpointsPolicy Manager automatically lists all endpoints (that have authenticated) in the Endpoints page (Configuration >Identity > Endpoints):
Figure 119 Endpoints Listing
l To view the authentication details of an endpoint, select an endpoint by clicking on its check box, and then clickthe Authentication Records button. This opens the Endpoint Authentication Details popup.
Figure 120 Endpoint Authentication Details
To manually add an endpoint, click Add Endpoint to display the Add Endpoint popup.
ClearPassPolicyManager 6.2 | User Guide Identity: Users, Endpoints, Rolesand RoleMapping | 147
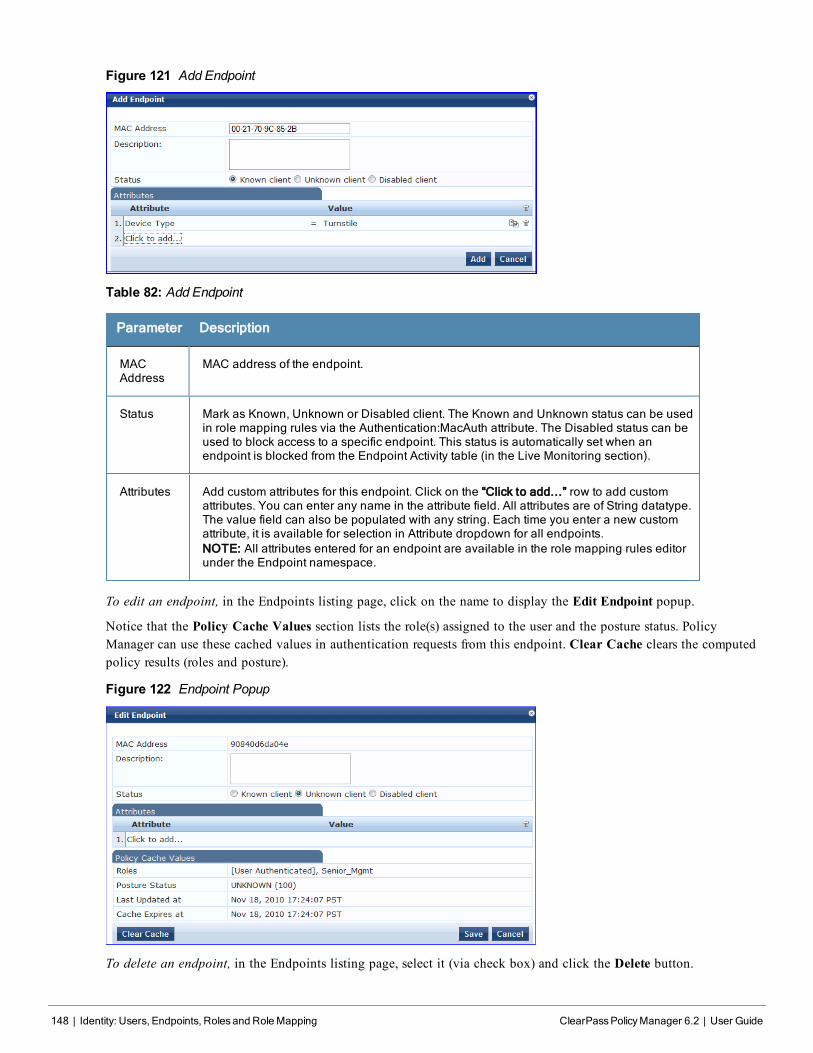
148 | Identity: Users, Endpoints, Rolesand RoleMapping ClearPassPolicyManager 6.2 | User Guide
Figure 121 Add Endpoint
Table 82: Add Endpoint
Parameter Description
MACAddress
MAC address of the endpoint.
Status Mark as Known, Unknown or Disabled client. The Known and Unknown status can be usedin role mapping rules via the Authentication:MacAuth attribute. The Disabled status can beused to block access to a specific endpoint. This status is automatically set when anendpoint is blocked from the Endpoint Activity table (in the Live Monitoring section).
Attributes Add custom attributes for this endpoint. Click on the “Click to add...” row to add customattributes. You can enter any name in the attribute field. All attributes are of String datatype.The value field can also be populated with any string. Each time you enter a new customattribute, it is available for selection in Attribute dropdown for all endpoints.NOTE: All attributes entered for an endpoint are available in the role mapping rules editorunder the Endpoint namespace.
To edit an endpoint, in the Endpoints listing page, click on the name to display the Edit Endpoint popup.
Notice that the Policy Cache Values section lists the role(s) assigned to the user and the posture status. PolicyManager can use these cached values in authentication requests from this endpoint. Clear Cache clears the computedpolicy results (roles and posture).
Figure 122 Endpoint Popup
To delete an endpoint, in the Endpoints listing page, select it (via check box) and click the Delete button.
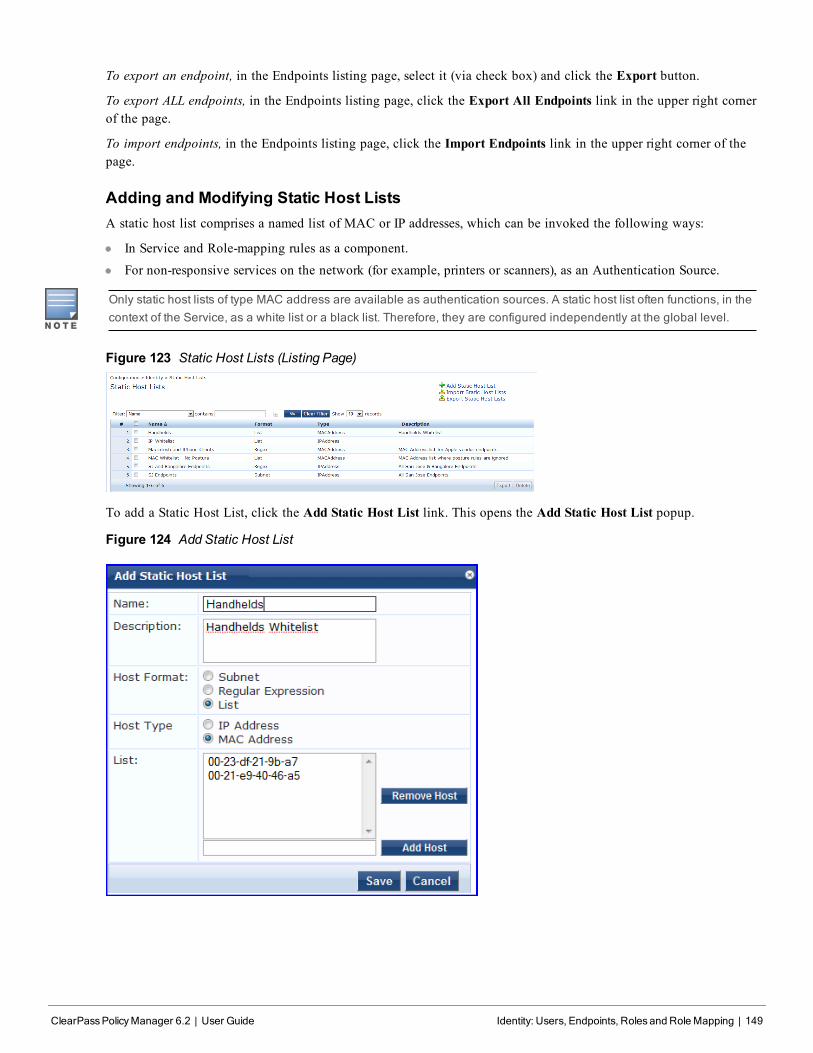
To export an endpoint, in the Endpoints listing page, select it (via check box) and click the Export button.
To export ALL endpoints, in the Endpoints listing page, click the Export All Endpoints link in the upper right cornerof the page.
To import endpoints, in the Endpoints listing page, click the Import Endpoints link in the upper right corner of thepage.
Adding and Modifying Static Host ListsA static host list comprises a named list of MAC or IP addresses, which can be invoked the following ways:
l In Service and Role-mapping rules as a component.
l For non-responsive services on the network (for example, printers or scanners), as an Authentication Source.
Only static host lists of type MAC address are available as authentication sources. A static host list often functions, in thecontext of the Service, as a white list or a black list. Therefore, they are configured independently at the global level.
Figure 123 Static Host Lists (Listing Page)
To add a Static Host List, click the Add Static Host List link. This opens the Add Static Host List popup.
Figure 124 Add Static Host List
ClearPassPolicyManager 6.2 | User Guide Identity: Users, Endpoints, Rolesand RoleMapping | 149
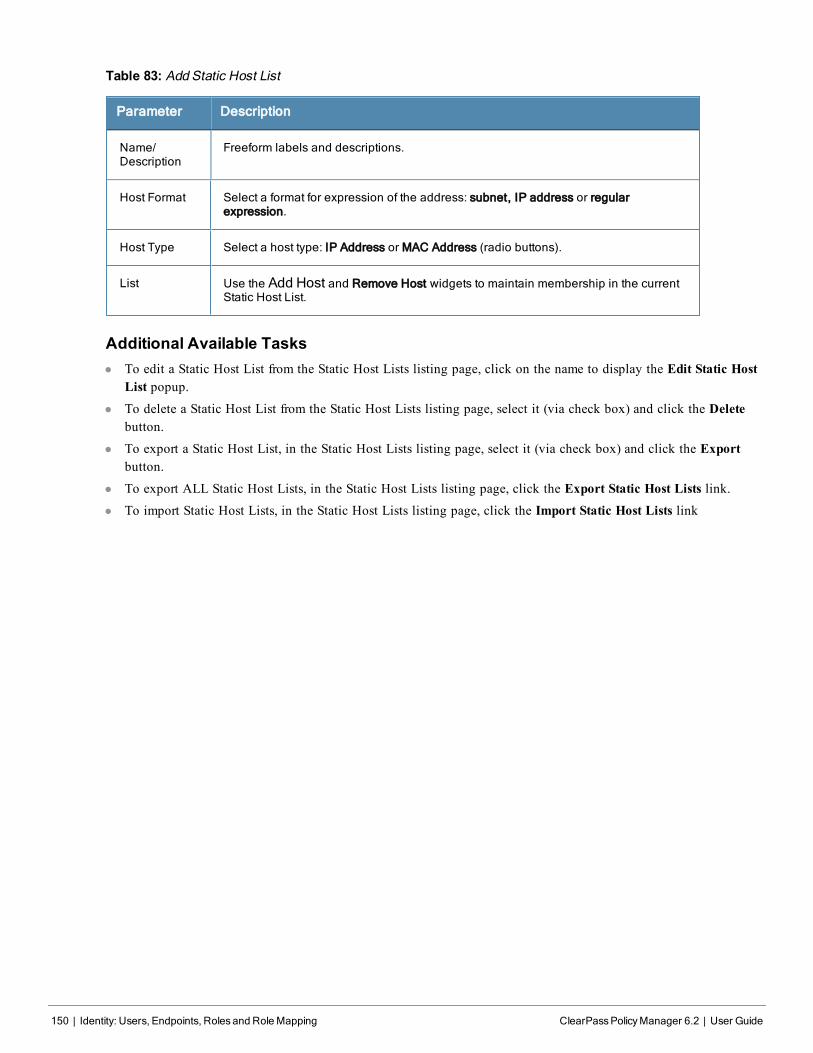
150 | Identity: Users, Endpoints, Rolesand RoleMapping ClearPassPolicyManager 6.2 | User Guide
Table 83: Add Static Host List
Parameter Description
Name/Description
Freeform labels and descriptions.
Host Format Select a format for expression of the address: subnet, IP address or regularexpression.
Host Type Select a host type: IP Address or MAC Address (radio buttons).
List Use the Add Host and Remove Host widgets to maintain membership in the currentStatic Host List.
Additional Available Tasksl To edit a Static Host List from the Static Host Lists listing page, click on the name to display the Edit Static Host
List popup.l To delete a Static Host List from the Static Host Lists listing page, select it (via check box) and click the Delete
button.
l To export a Static Host List, in the Static Host Lists listing page, select it (via check box) and click the Exportbutton.
l To export ALL Static Host Lists, in the Static Host Lists listing page, click the Export Static Host Lists link.l To import Static Host Lists, in the Static Host Lists listing page, click the Import Static Host Lists link
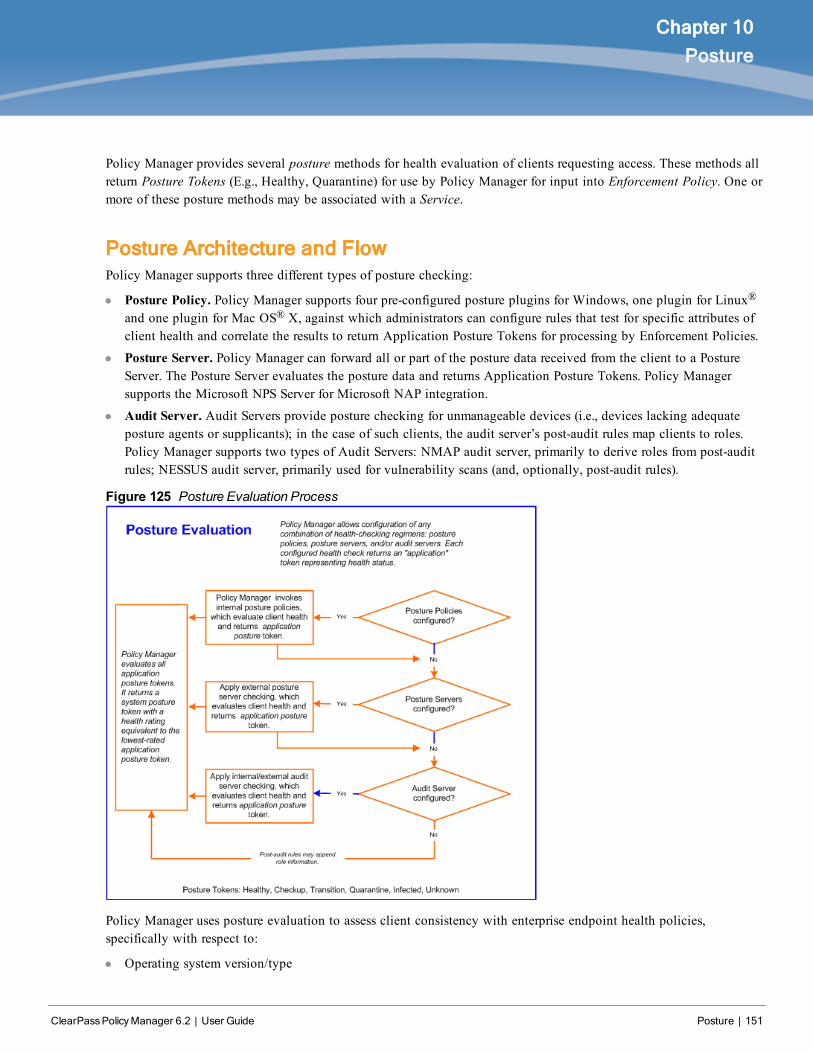
ClearPassPolicyManager 6.2 | User Guide Posture | 151
Chapter 10
Posture
Policy Manager provides several posture methods for health evaluation of clients requesting access. These methods allreturn Posture Tokens (E.g., Healthy, Quarantine) for use by Policy Manager for input into Enforcement Policy. One ormore of these posture methods may be associated with a Service.
Posture Architecture and FlowPolicy Manager supports three different types of posture checking:
l Posture Policy. Policy Manager supports four pre-configured posture plugins for Windows, one plugin for Linux®
and one plugin for Mac OS® X, against which administrators can configure rules that test for specific attributes ofclient health and correlate the results to return Application Posture Tokens for processing by Enforcement Policies.
l Posture Server. Policy Manager can forward all or part of the posture data received from the client to a PostureServer. The Posture Server evaluates the posture data and returns Application Posture Tokens. Policy Managersupports the Microsoft NPS Server for Microsoft NAP integration.
l Audit Server. Audit Servers provide posture checking for unmanageable devices (i.e., devices lacking adequateposture agents or supplicants); in the case of such clients, the audit server’s post-audit rules map clients to roles.Policy Manager supports two types of Audit Servers: NMAP audit server, primarily to derive roles from post-auditrules; NESSUS audit server, primarily used for vulnerability scans (and, optionally, post-audit rules).
Figure 125 Posture Evaluation Process
Policy Manager uses posture evaluation to assess client consistency with enterprise endpoint health policies,specifically with respect to:
l Operating system version/type
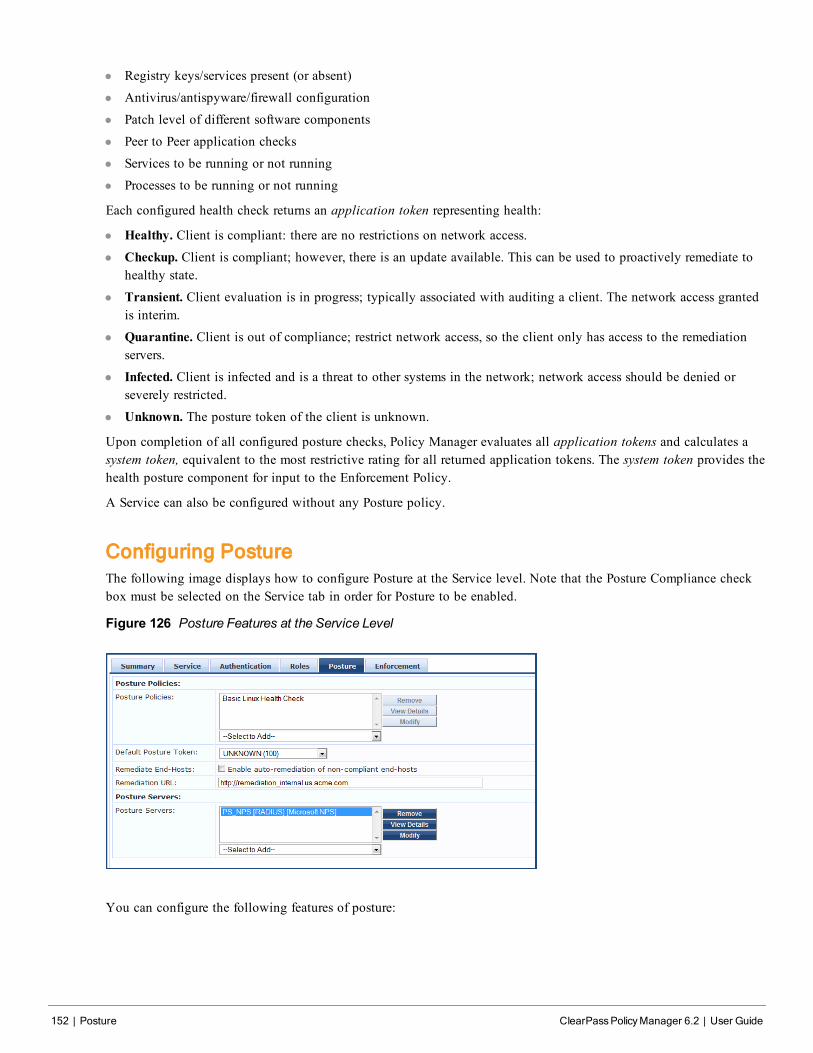
152 | Posture ClearPassPolicyManager 6.2 | User Guide
l Registry keys/services present (or absent)
l Antivirus/antispyware/firewall configuration
l Patch level of different software components
l Peer to Peer application checks
l Services to be running or not running
l Processes to be running or not running
Each configured health check returns an application token representing health:
l Healthy. Client is compliant: there are no restrictions on network access.l Checkup. Client is compliant; however, there is an update available. This can be used to proactively remediate to
healthy state.
l Transient. Client evaluation is in progress; typically associated with auditing a client. The network access grantedis interim.
l Quarantine. Client is out of compliance; restrict network access, so the client only has access to the remediationservers.
l Infected. Client is infected and is a threat to other systems in the network; network access should be denied orseverely restricted.
l Unknown. The posture token of the client is unknown.
Upon completion of all configured posture checks, Policy Manager evaluates all application tokens and calculates asystem token, equivalent to the most restrictive rating for all returned application tokens. The system token provides thehealth posture component for input to the Enforcement Policy.
A Service can also be configured without any Posture policy.
Configuring PostureThe following image displays how to configure Posture at the Service level. Note that the Posture Compliance checkbox must be selected on the Service tab in order for Posture to be enabled.
Figure 126 Posture Features at the Service Level
You can configure the following features of posture:
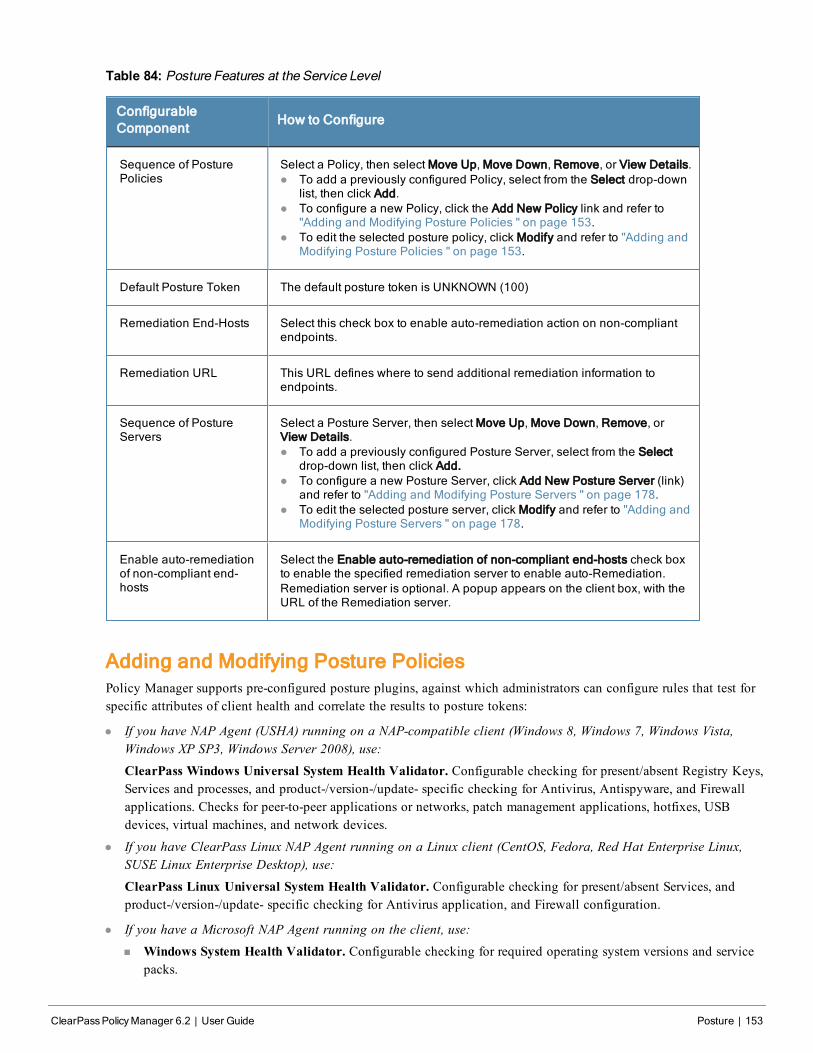
Table 84: Posture Features at the Service Level
ConfigurableComponent
How to Configure
Sequence of PosturePolicies
Select a Policy, then select Move Up, Move Down, Remove, or View Details.l To add a previously configured Policy, select from the Select drop-down
list, then click Add.l To configure a new Policy, click the Add New Policy link and refer to
"Adding and Modifying Posture Policies " on page 153.l To edit the selected posture policy, click Modify and refer to "Adding and
Modifying Posture Policies " on page 153.
Default Posture Token The default posture token is UNKNOWN (100)
Remediation End-Hosts Select this check box to enable auto-remediation action on non-compliantendpoints.
Remediation URL This URL defines where to send additional remediation information toendpoints.
Sequence of PostureServers
Select a Posture Server, then select Move Up, Move Down, Remove, orView Details.l To add a previously configured Posture Server, select from the Select
drop-down list, then click Add.l To configure a new Posture Server, click Add New Posture Server (link)
and refer to "Adding and Modifying Posture Servers " on page 178.l To edit the selected posture server, click Modify and refer to "Adding and
Modifying Posture Servers " on page 178.
Enable auto-remediationof non-compliant end-hosts
Select the Enable auto-remediation of non-compliant end-hosts check boxto enable the specified remediation server to enable auto-Remediation.Remediation server is optional. A popup appears on the client box, with theURL of the Remediation server.
Adding and Modifying Posture PoliciesPolicy Manager supports pre-configured posture plugins, against which administrators can configure rules that test forspecific attributes of client health and correlate the results to posture tokens:
l If you have NAP Agent (USHA) running on a NAP-compatible client (Windows 8, Windows 7, Windows Vista,Windows XP SP3, Windows Server 2008), use:ClearPass Windows Universal System Health Validator. Configurable checking for present/absent Registry Keys,Services and processes, and product-/version-/update- specific checking for Antivirus, Antispyware, and Firewallapplications. Checks for peer-to-peer applications or networks, patch management applications, hotfixes, USBdevices, virtual machines, and network devices.
l If you have ClearPass Linux NAP Agent running on a Linux client (CentOS, Fedora, Red Hat Enterprise Linux,SUSE Linux Enterprise Desktop), use:ClearPass Linux Universal System Health Validator. Configurable checking for present/absent Services, andproduct-/version-/update- specific checking for Antivirus application, and Firewall configuration.
l If you have a Microsoft NAP Agent running on the client, use:n Windows System Health Validator. Configurable checking for required operating system versions and service
packs.
ClearPassPolicyManager 6.2 | User Guide Posture | 153
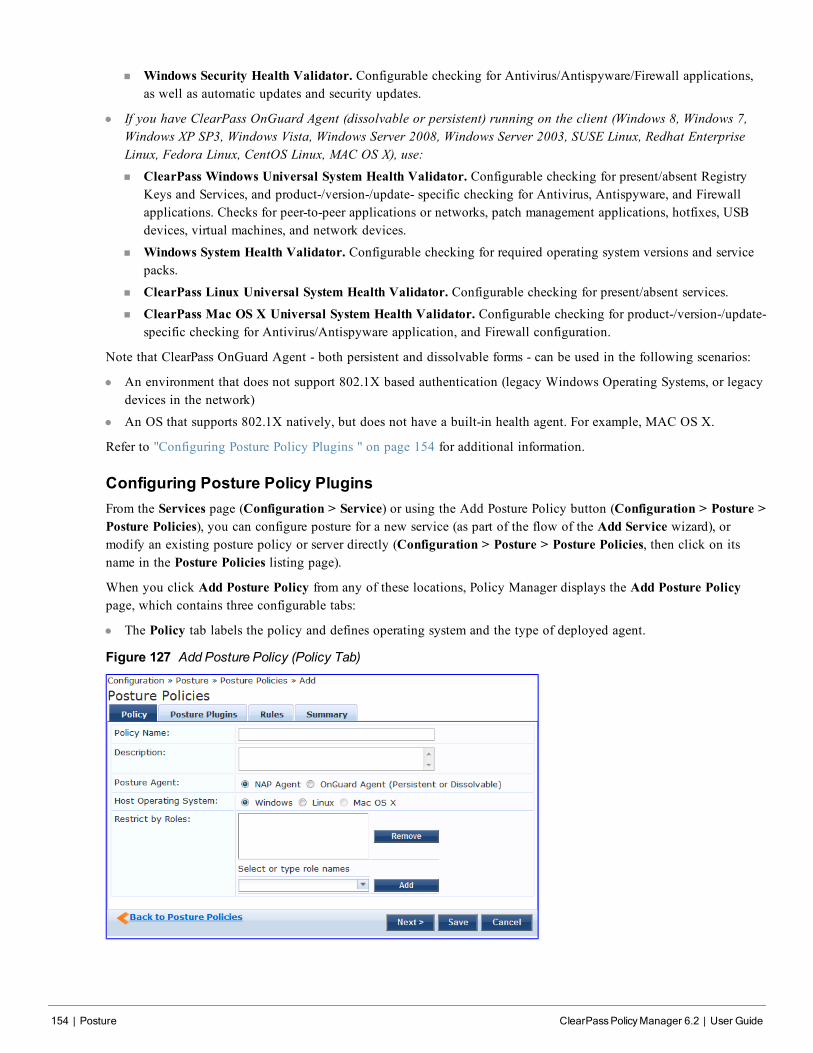
154 | Posture ClearPassPolicyManager 6.2 | User Guide
n Windows Security Health Validator. Configurable checking for Antivirus/Antispyware/Firewall applications,as well as automatic updates and security updates.
l If you have ClearPass OnGuard Agent (dissolvable or persistent) running on the client (Windows 8, Windows 7,Windows XP SP3, Windows Vista, Windows Server 2008, Windows Server 2003, SUSE Linux, Redhat EnterpriseLinux, Fedora Linux, CentOS Linux, MAC OS X), use:n ClearPass Windows Universal System Health Validator. Configurable checking for present/absent Registry
Keys and Services, and product-/version-/update- specific checking for Antivirus, Antispyware, and Firewallapplications. Checks for peer-to-peer applications or networks, patch management applications, hotfixes, USBdevices, virtual machines, and network devices.
n Windows System Health Validator. Configurable checking for required operating system versions and servicepacks.
n ClearPass Linux Universal System Health Validator. Configurable checking for present/absent services.n ClearPass Mac OS X Universal System Health Validator. Configurable checking for product-/version-/update-
specific checking for Antivirus/Antispyware application, and Firewall configuration.
Note that ClearPass OnGuard Agent - both persistent and dissolvable forms - can be used in the following scenarios:
l An environment that does not support 802.1X based authentication (legacy Windows Operating Systems, or legacydevices in the network)
l An OS that supports 802.1X natively, but does not have a built-in health agent. For example, MAC OS X.
Refer to "Configuring Posture Policy Plugins " on page 154 for additional information.
Configuring Posture Policy PluginsFrom the Services page (Configuration > Service) or using the Add Posture Policy button (Configuration > Posture >Posture Policies), you can configure posture for a new service (as part of the flow of the Add Service wizard), ormodify an existing posture policy or server directly (Configuration > Posture > Posture Policies, then click on itsname in the Posture Policies listing page).
When you click Add Posture Policy from any of these locations, Policy Manager displays the Add Posture Policypage, which contains three configurable tabs:
l The Policy tab labels the policy and defines operating system and the type of deployed agent.
Figure 127 Add Posture Policy (Policy Tab)
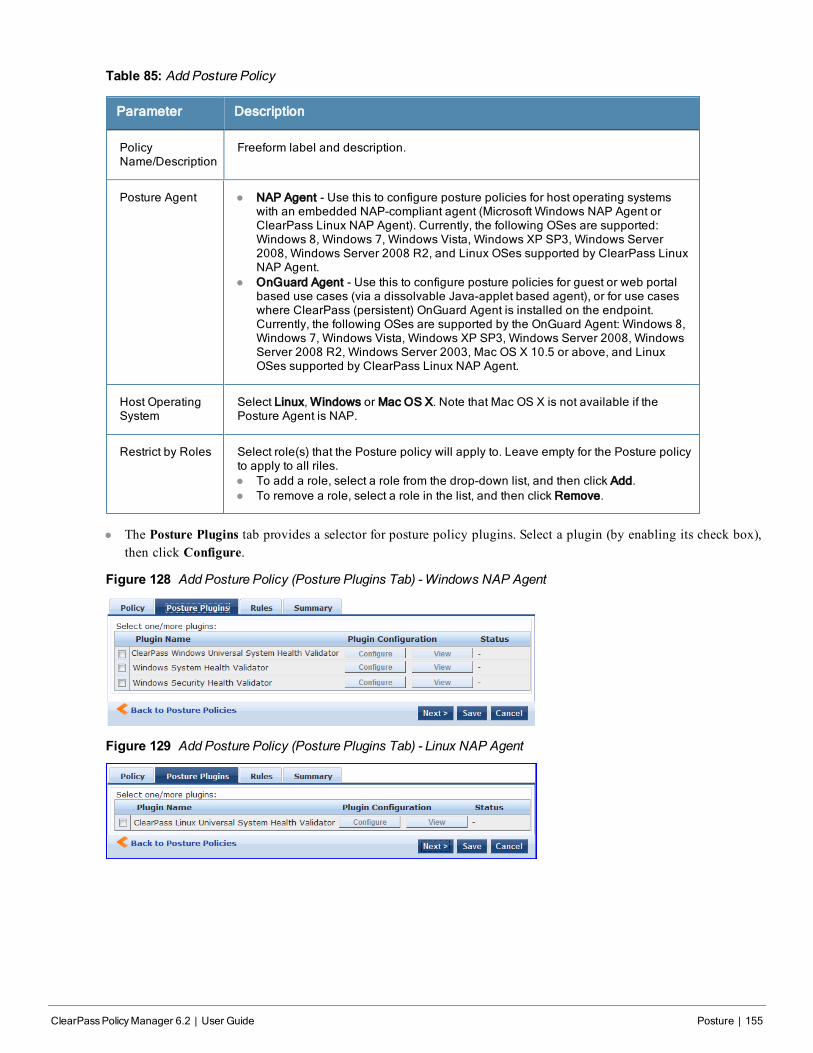
Table 85: Add Posture Policy
Parameter Description
PolicyName/Description
Freeform label and description.
Posture Agent l NAP Agent - Use this to configure posture policies for host operating systemswith an embedded NAP-compliant agent (Microsoft Windows NAP Agent orClearPass Linux NAP Agent). Currently, the following OSes are supported:Windows 8, Windows 7, Windows Vista, Windows XP SP3, Windows Server2008, Windows Server 2008 R2, and Linux OSes supported by ClearPass LinuxNAP Agent.
l OnGuard Agent - Use this to configure posture policies for guest or web portalbased use cases (via a dissolvable Java-applet based agent), or for use caseswhere ClearPass (persistent) OnGuard Agent is installed on the endpoint.Currently, the following OSes are supported by the OnGuard Agent: Windows 8,Windows 7, Windows Vista, Windows XP SP3, Windows Server 2008, WindowsServer 2008 R2, Windows Server 2003, Mac OS X 10.5 or above, and LinuxOSes supported by ClearPass Linux NAP Agent.
Host OperatingSystem
Select Linux, Windows or Mac OS X. Note that Mac OS X is not available if thePosture Agent is NAP.
Restrict by Roles Select role(s) that the Posture policy will apply to. Leave empty for the Posture policyto apply to all riles.l To add a role, select a role from the drop-down list, and then click Add.l To remove a role, select a role in the list, and then click Remove.
l The Posture Plugins tab provides a selector for posture policy plugins. Select a plugin (by enabling its check box),then click Configure.
Figure 128 Add Posture Policy (Posture Plugins Tab) -Windows NAP Agent
Figure 129 Add Posture Policy (Posture Plugins Tab) - Linux NAP Agent
ClearPassPolicyManager 6.2 | User Guide Posture | 155
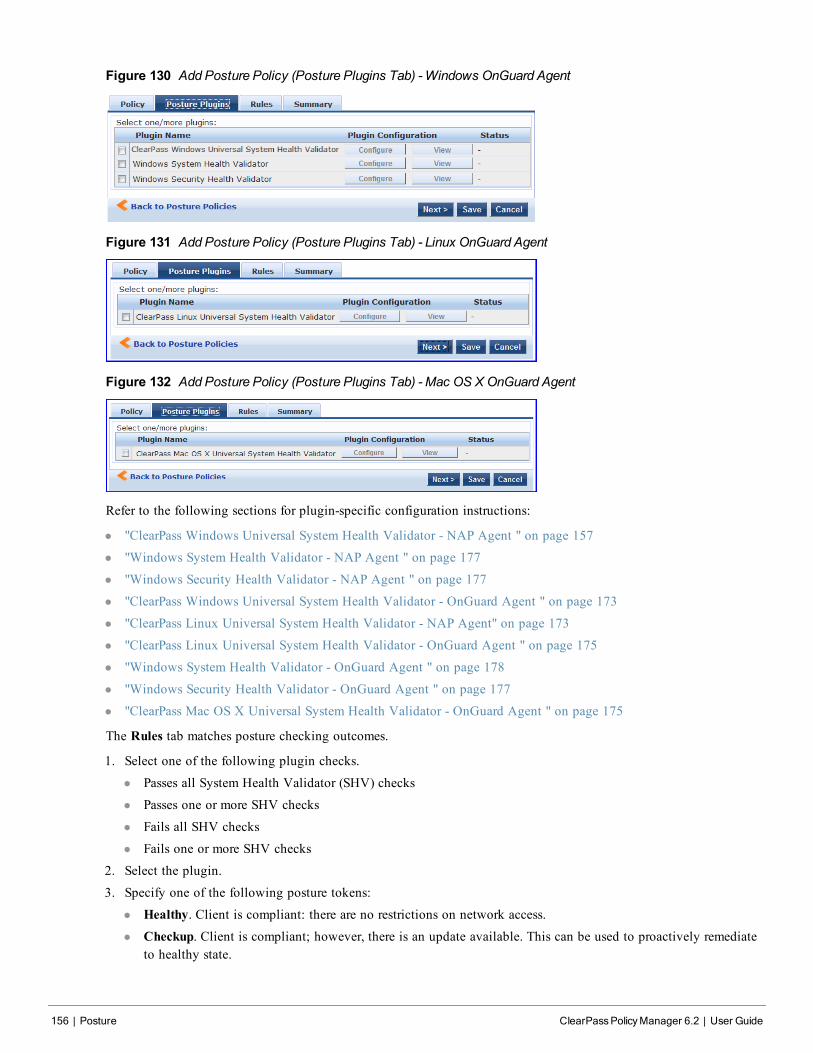
156 | Posture ClearPassPolicyManager 6.2 | User Guide
Figure 130 Add Posture Policy (Posture Plugins Tab) -Windows OnGuard Agent
Figure 131 Add Posture Policy (Posture Plugins Tab) - Linux OnGuard Agent
Figure 132 Add Posture Policy (Posture Plugins Tab) - Mac OS X OnGuard Agent
Refer to the following sections for plugin-specific configuration instructions:
l "ClearPass Windows Universal System Health Validator - NAP Agent " on page 157
l "Windows System Health Validator - NAP Agent " on page 177
l "Windows Security Health Validator - NAP Agent " on page 177
l "ClearPass Windows Universal System Health Validator - OnGuard Agent " on page 173
l "ClearPass Linux Universal System Health Validator - NAP Agent" on page 173
l "ClearPass Linux Universal System Health Validator - OnGuard Agent " on page 175
l "Windows System Health Validator - OnGuard Agent " on page 178
l "Windows Security Health Validator - OnGuard Agent " on page 177
l "ClearPass Mac OS X Universal System Health Validator - OnGuard Agent " on page 175
The Rules tab matches posture checking outcomes.
1. Select one of the following plugin checks.
l Passes all System Health Validator (SHV) checks
l Passes one or more SHV checks
l Fails all SHV checks
l Fails one or more SHV checks
2. Select the plugin.
3. Specify one of the following posture tokens:
l Healthy. Client is compliant: there are no restrictions on network access.l Checkup. Client is compliant; however, there is an update available. This can be used to proactively remediate
to healthy state.
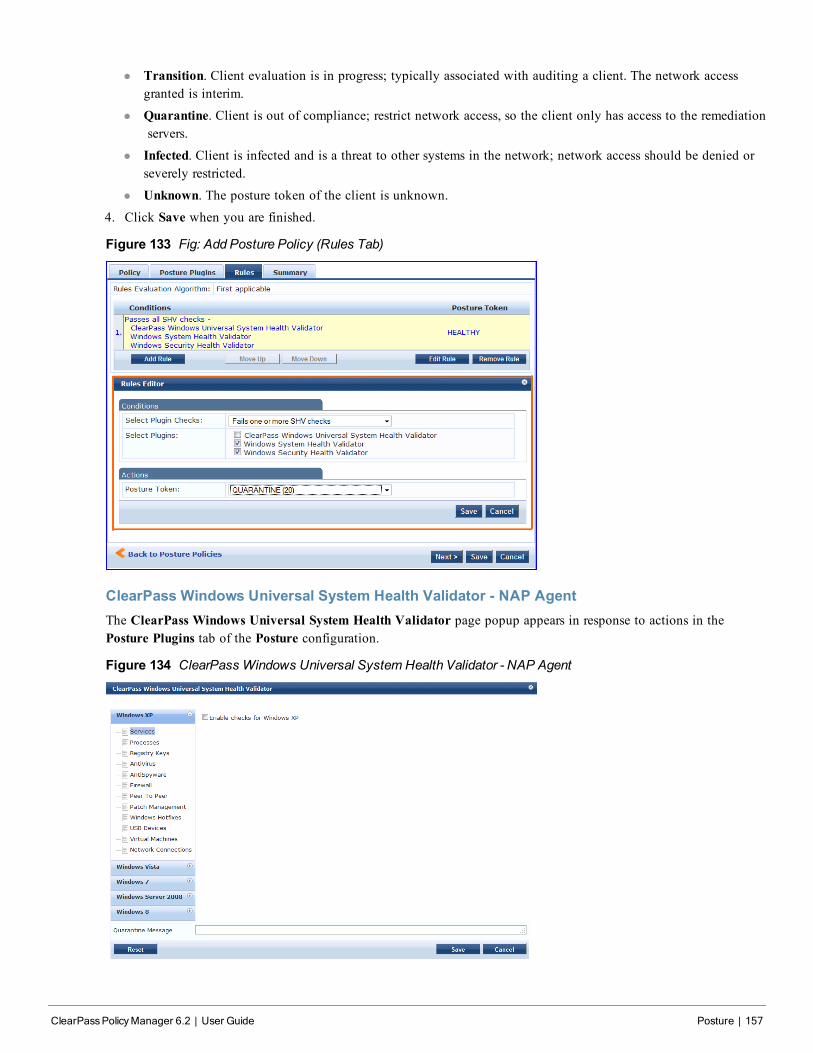
l Transition. Client evaluation is in progress; typically associated with auditing a client. The network accessgranted is interim.
l Quarantine. Client is out of compliance; restrict network access, so the client only has access to the remediationservers.
l Infected. Client is infected and is a threat to other systems in the network; network access should be denied orseverely restricted.
l Unknown. The posture token of the client is unknown.4. Click Save when you are finished.
Figure 133 Fig: Add Posture Policy (Rules Tab)
ClearPass Windows Universal System Health Validator - NAP AgentThe ClearPass Windows Universal System Health Validator page popup appears in response to actions in thePosture Plugins tab of the Posture configuration.
Figure 134 ClearPass Windows Universal System Health Validator - NAP Agent
ClearPassPolicyManager 6.2 | User Guide Posture | 157
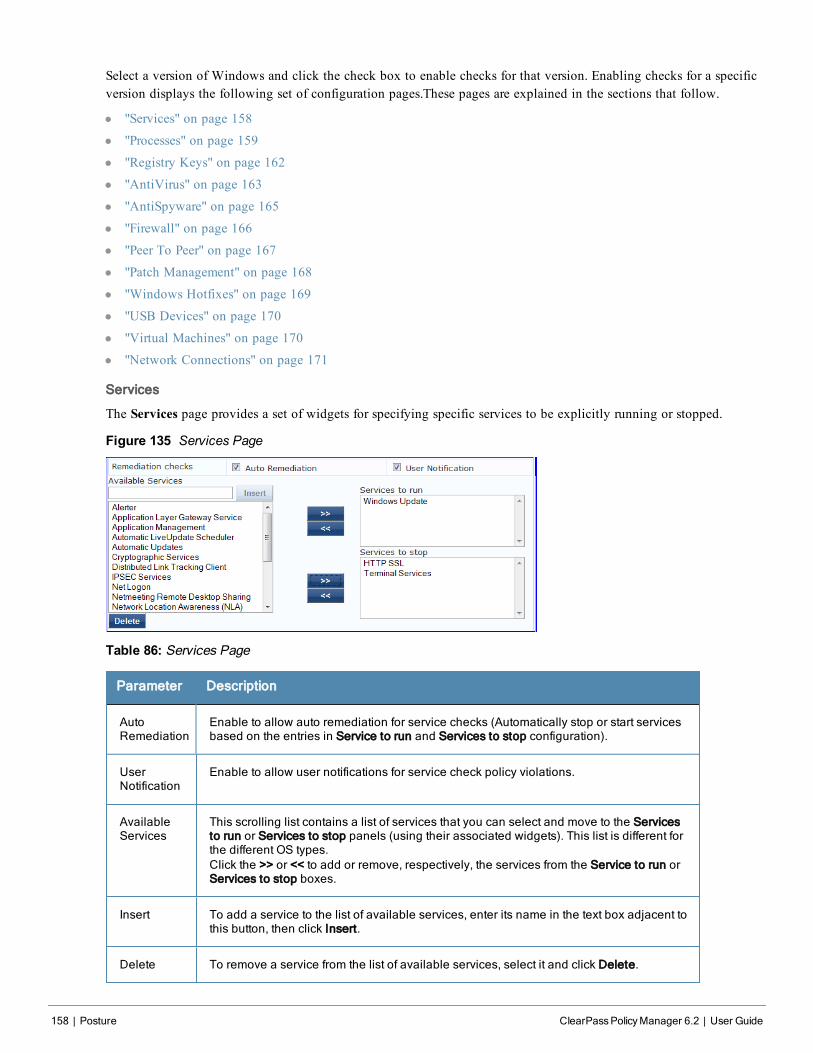
158 | Posture ClearPassPolicyManager 6.2 | User Guide
Select a version of Windows and click the check box to enable checks for that version. Enabling checks for a specificversion displays the following set of configuration pages.These pages are explained in the sections that follow.
l "Services" on page 158
l "Processes" on page 159
l "Registry Keys" on page 162
l "AntiVirus" on page 163
l "AntiSpyware" on page 165
l "Firewall" on page 166
l "Peer To Peer" on page 167
l "Patch Management" on page 168
l "Windows Hotfixes" on page 169
l "USB Devices" on page 170
l "Virtual Machines" on page 170
l "Network Connections" on page 171
Services
The Services page provides a set of widgets for specifying specific services to be explicitly running or stopped.
Figure 135 Services Page
Table 86: Services Page
Parameter Description
AutoRemediation
Enable to allow auto remediation for service checks (Automatically stop or start servicesbased on the entries in Service to run and Services to stop configuration).
UserNotification
Enable to allow user notifications for service check policy violations.
AvailableServices
This scrolling list contains a list of services that you can select and move to the Servicesto run or Services to stop panels (using their associated widgets). This list is different forthe different OS types.Click the >> or << to add or remove, respectively, the services from the Service to run orServices to stop boxes.
Insert To add a service to the list of available services, enter its name in the text box adjacent tothis button, then click Insert.
Delete To remove a service from the list of available services, select it and click Delete.
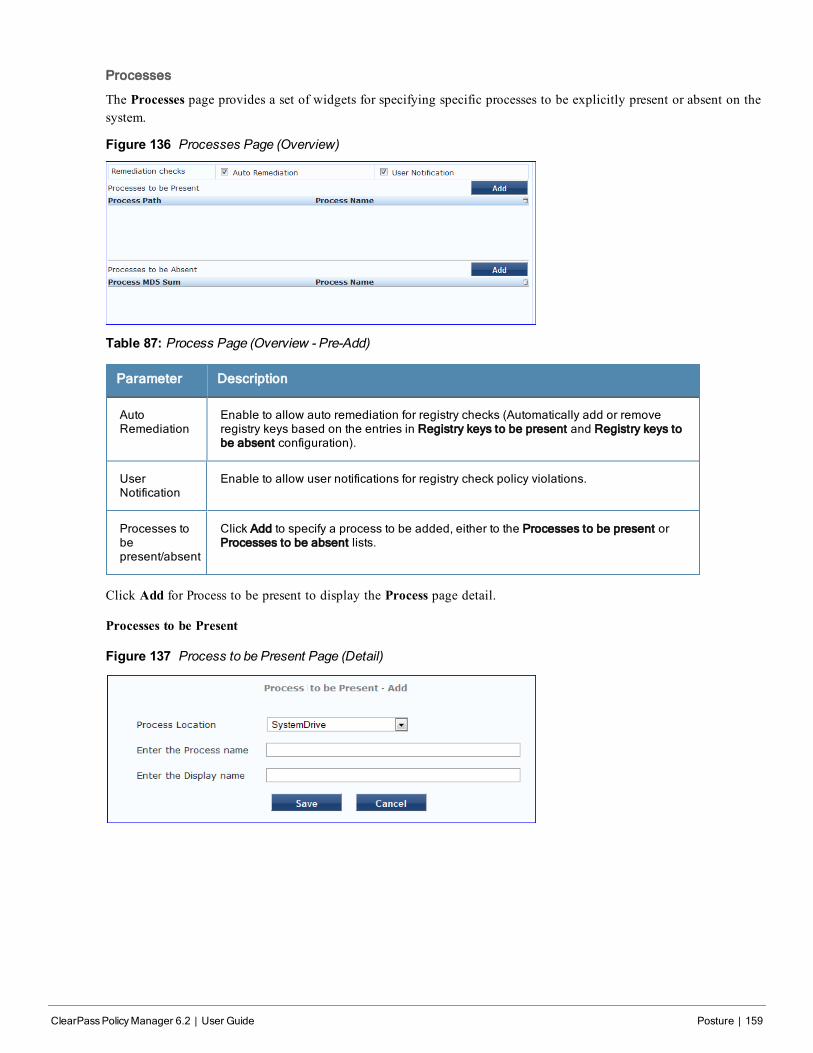
Processes
The Processes page provides a set of widgets for specifying specific processes to be explicitly present or absent on thesystem.
Figure 136 Processes Page (Overview)
Table 87: Process Page (Overview - Pre-Add)
Parameter Description
AutoRemediation
Enable to allow auto remediation for registry checks (Automatically add or removeregistry keys based on the entries in Registry keys to be present and Registry keys tobe absent configuration).
UserNotification
Enable to allow user notifications for registry check policy violations.
Processes tobepresent/absent
Click Add to specify a process to be added, either to the Processes to be present orProcesses to be absent lists.
Click Add for Process to be present to display the Process page detail.
Processes to be Present
Figure 137 Process to be Present Page (Detail)
ClearPassPolicyManager 6.2 | User Guide Posture | 159

160 | Posture ClearPassPolicyManager 6.2 | User Guide
Table 88: Process to be Present Page (Detail)
Parameter Description
ProcessLocation
Choose from one of the pre-defined paths, or choose None.l SystemDrive - For example, C:l SystemRoot - For example, C:\Windowsl ProgramFiles - For example, “C:\Program Files”l HOMEDRIVE - For example, C:l HOMEPATH - For example, \Users\JohnDoel None - By selecting None, you can enter a custom path name in the Process Name
field.
Enter theProcessname
A pathname containing the process executable name. Some valid examples are listedbelow:l If SystemRoot is specified in the Process Location field, then entering notepad.exe in
this field specifies that the following full pathname for the process should be checked:%SystemRoot%\notepad.exe. Typically, this expands to: C:\Windows\notepad.exe
l If ProgramFiles is specified in the Process Location field, then entering “MozillaFirefox\firefox.exe” in this field specifies that the following full pathname for the processshould be checked: “%ProgramFiles%\Mozilla Firefox\firefox.exe”. Typically, thisexpands to: “C:\Program Files\Mozilla Firefox\firefox.exe”
l If None is specified in the Process Location field, then entering “\temp\usurf.exe” in thisfield specifies that the following full pathname for the process should be checked:“c:\temp\foo.exe”
Note that when the agent looks for running processes on the system, it looks for a processstarted from the specified location. For example, if the process to be running is specified tobe C:\Windows\notepad.exe, the agent checks to see if there is a process running on thesystem that was started from the location C:\Windows. Even if the agent finds anotherprocess with the same name (notepad.exe) but started from a different location (C:\Temp),it will not match with what it is looking for. In this case, it will still start the processC:\Windows\notepad.exe.
Enter theDisplayname
Enter a user friendly name for the process. This is displayed in end-user facing messages.
When you save your Process details, the key information appears in the Processes to be present page list.
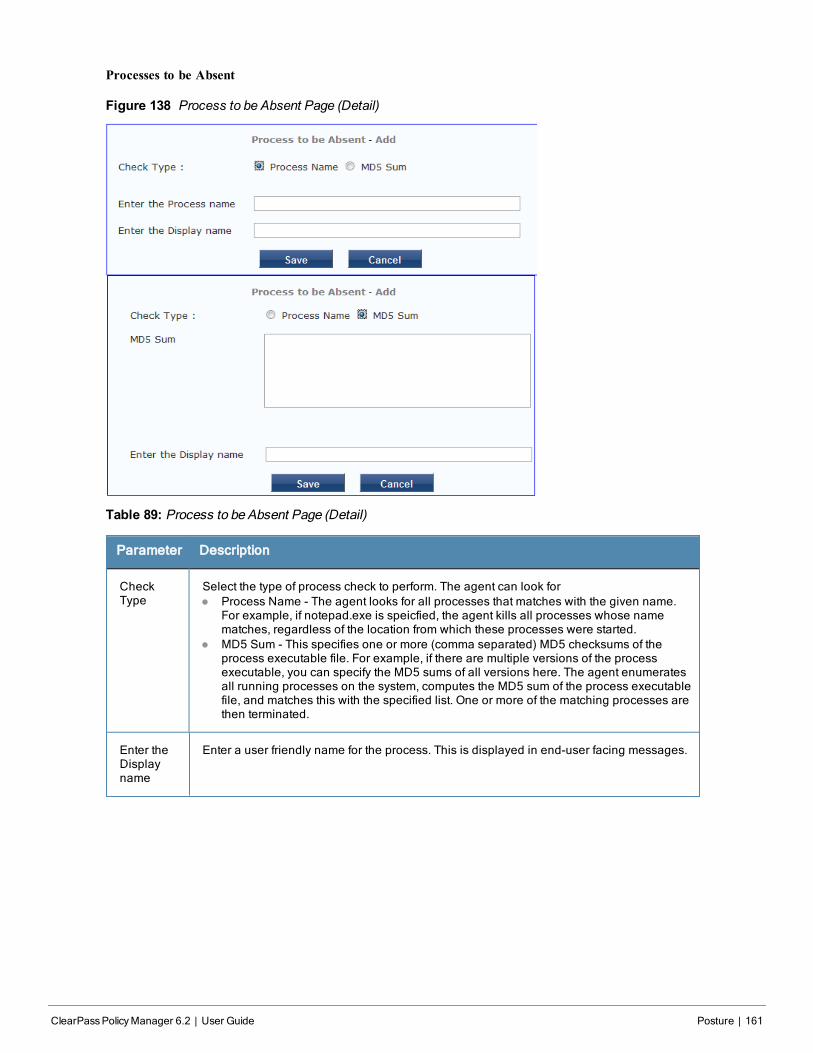
Processes to be Absent
Figure 138 Process to be Absent Page (Detail)
Table 89: Process to be Absent Page (Detail)
Parameter Description
CheckType
Select the type of process check to perform. The agent can look forl Process Name - The agent looks for all processes that matches with the given name.
For example, if notepad.exe is speicfied, the agent kills all processes whose namematches, regardless of the location from which these processes were started.
l MD5 Sum - This specifies one or more (comma separated) MD5 checksums of theprocess executable file. For example, if there are multiple versions of the processexecutable, you can specify the MD5 sums of all versions here. The agent enumeratesall running processes on the system, computes the MD5 sum of the process executablefile, and matches this with the specified list. One or more of the matching processes arethen terminated.
Enter theDisplayname
Enter a user friendly name for the process. This is displayed in end-user facing messages.
ClearPassPolicyManager 6.2 | User Guide Posture | 161
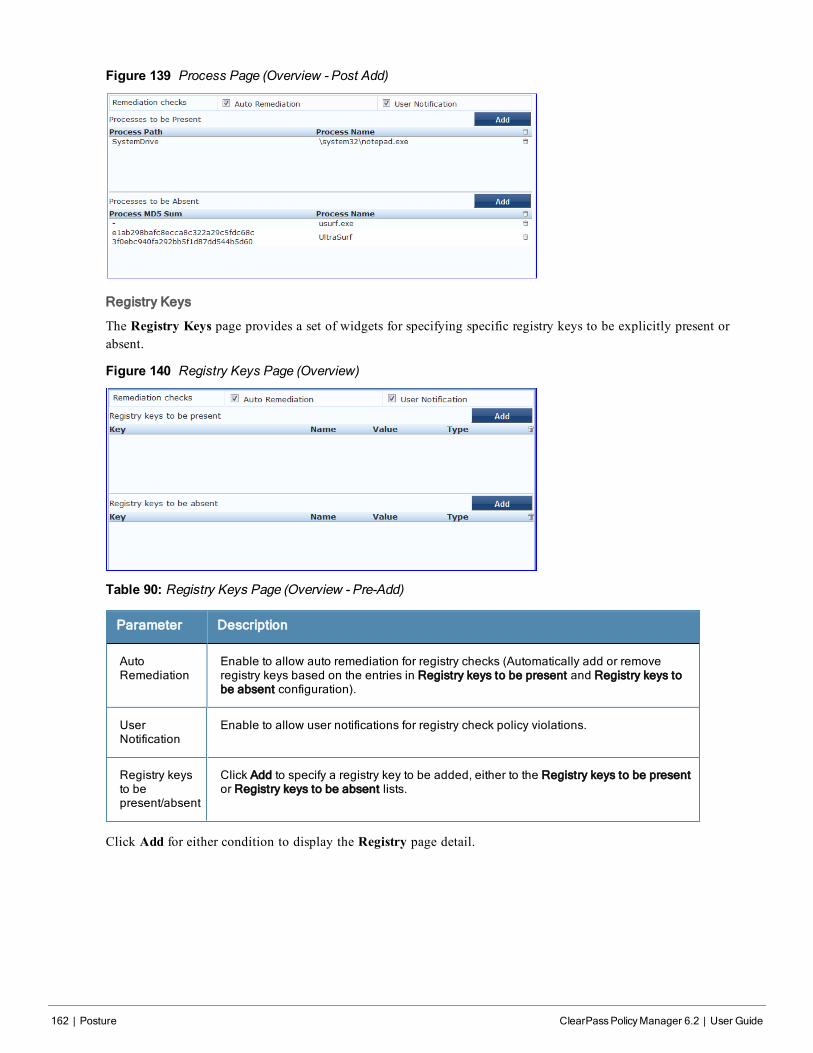
162 | Posture ClearPassPolicyManager 6.2 | User Guide
Figure 139 Process Page (Overview - Post Add)
Registry Keys
The Registry Keys page provides a set of widgets for specifying specific registry keys to be explicitly present orabsent.
Figure 140 Registry Keys Page (Overview)
Table 90: Registry Keys Page (Overview - Pre-Add)
Parameter Description
AutoRemediation
Enable to allow auto remediation for registry checks (Automatically add or removeregistry keys based on the entries in Registry keys to be present and Registry keys tobe absent configuration).
UserNotification
Enable to allow user notifications for registry check policy violations.
Registry keysto bepresent/absent
Click Add to specify a registry key to be added, either to the Registry keys to be presentor Registry keys to be absent lists.
Click Add for either condition to display the Registry page detail.
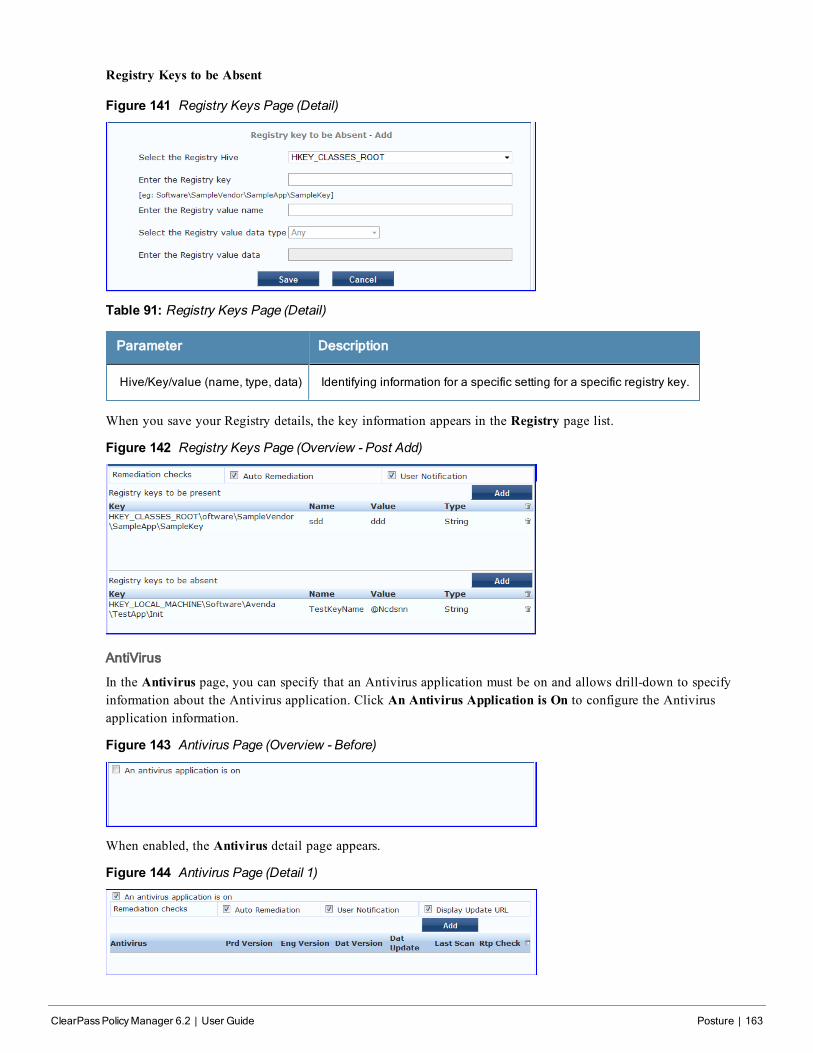
Registry Keys to be Absent
Figure 141 Registry Keys Page (Detail)
Table 91: Registry Keys Page (Detail)
Parameter Description
Hive/Key/value (name, type, data) Identifying information for a specific setting for a specific registry key.
When you save your Registry details, the key information appears in the Registry page list.
Figure 142 Registry Keys Page (Overview - Post Add)
AntiVirus
In the Antivirus page, you can specify that an Antivirus application must be on and allows drill-down to specifyinformation about the Antivirus application. Click An Antivirus Application is On to configure the Antivirusapplication information.
Figure 143 Antivirus Page (Overview - Before)
When enabled, the Antivirus detail page appears.
Figure 144 Antivirus Page (Detail 1)
ClearPassPolicyManager 6.2 | User Guide Posture | 163
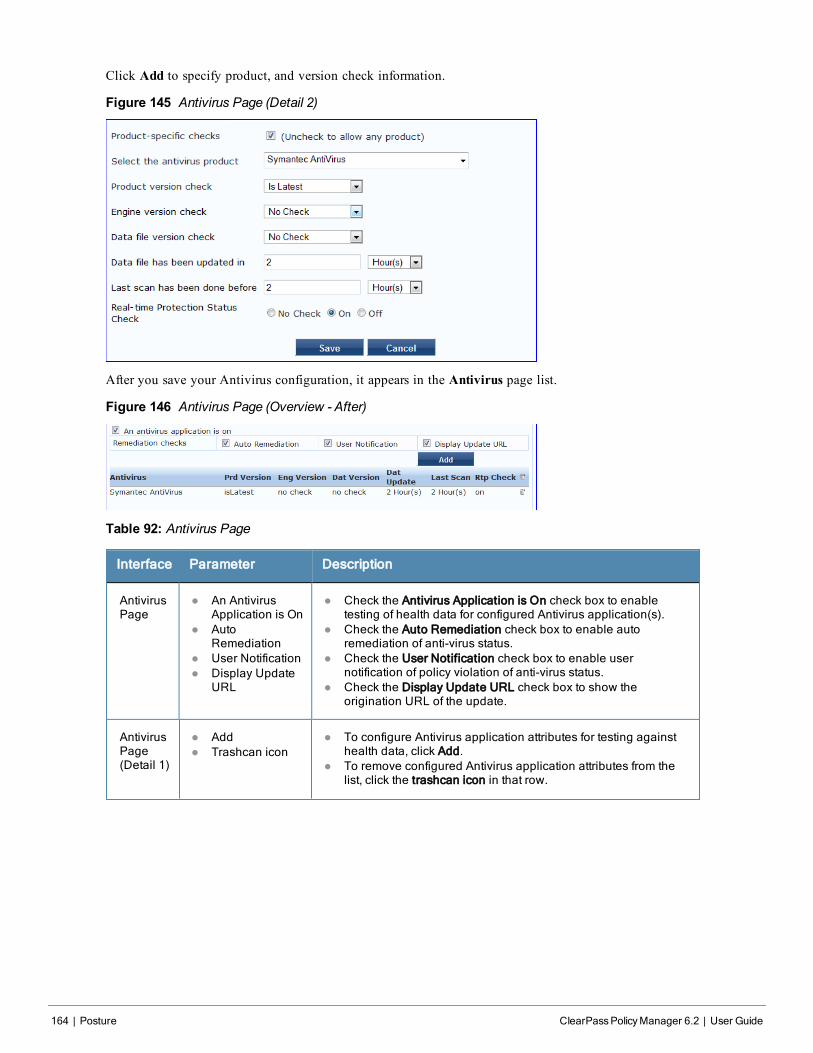
164 | Posture ClearPassPolicyManager 6.2 | User Guide
Click Add to specify product, and version check information.
Figure 145 Antivirus Page (Detail 2)
After you save your Antivirus configuration, it appears in the Antivirus page list.
Figure 146 Antivirus Page (Overview - After)
Table 92: Antivirus Page
Interface Parameter Description
AntivirusPage
l An AntivirusApplication is On
l AutoRemediation
l User Notificationl Display Update
URL
l Check the Antivirus Application is On check box to enabletesting of health data for configured Antivirus application(s).
l Check the Auto Remediation check box to enable autoremediation of anti-virus status.
l Check the User Notification check box to enable usernotification of policy violation of anti-virus status.
l Check the Display Update URL check box to show theorigination URL of the update.
AntivirusPage(Detail 1)
l Addl Trashcan icon
l To configure Antivirus application attributes for testing againsthealth data, click Add.
l To remove configured Antivirus application attributes from thelist, click the trashcan icon in that row.
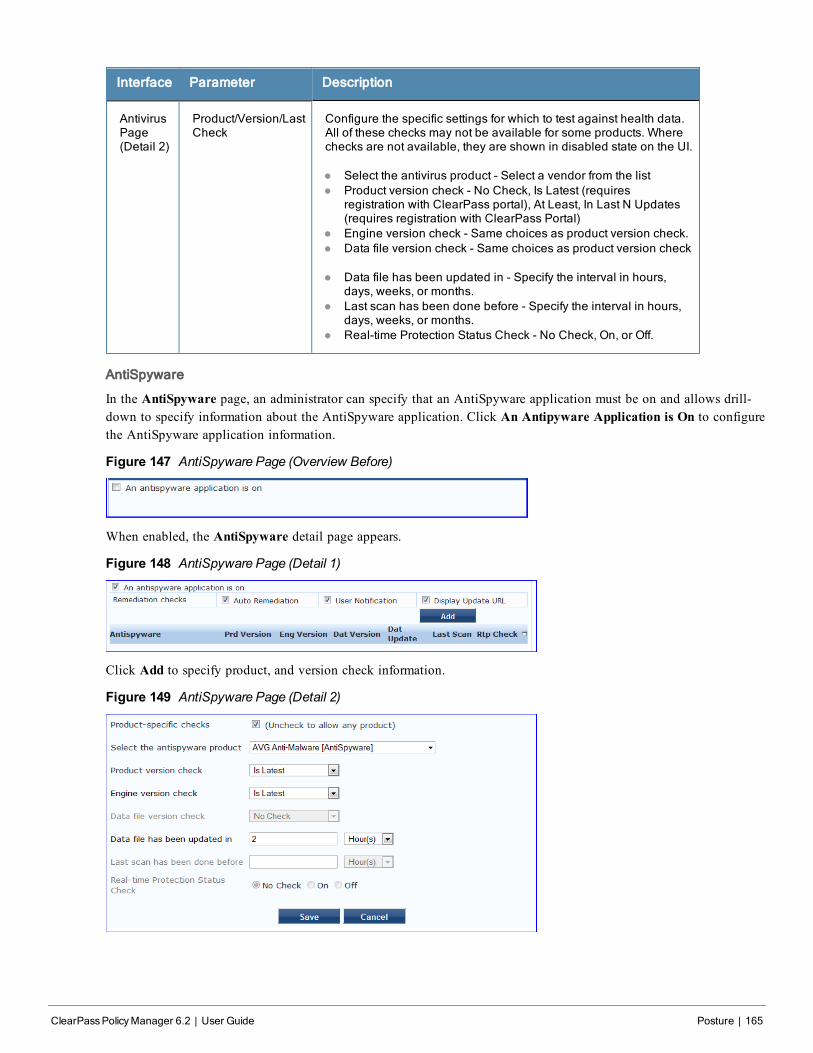
Interface Parameter Description
AntivirusPage(Detail 2)
Product/Version/LastCheck
Configure the specific settings for which to test against health data.All of these checks may not be available for some products. Wherechecks are not available, they are shown in disabled state on the UI.
l Select the antivirus product - Select a vendor from the listl Product version check - No Check, Is Latest (requires
registration with ClearPass portal), At Least, In Last N Updates(requires registration with ClearPass Portal)
l Engine version check - Same choices as product version check.l Data file version check - Same choices as product version check
l Data file has been updated in - Specify the interval in hours,days, weeks, or months.
l Last scan has been done before - Specify the interval in hours,days, weeks, or months.
l Real-time Protection Status Check - No Check, On, or Off.
AntiSpyware
In the AntiSpyware page, an administrator can specify that an AntiSpyware application must be on and allows drill-down to specify information about the AntiSpyware application. Click An Antipyware Application is On to configurethe AntiSpyware application information.
Figure 147 AntiSpyware Page (Overview Before)
When enabled, the AntiSpyware detail page appears.
Figure 148 AntiSpyware Page (Detail 1)
Click Add to specify product, and version check information.
Figure 149 AntiSpyware Page (Detail 2)
ClearPassPolicyManager 6.2 | User Guide Posture | 165
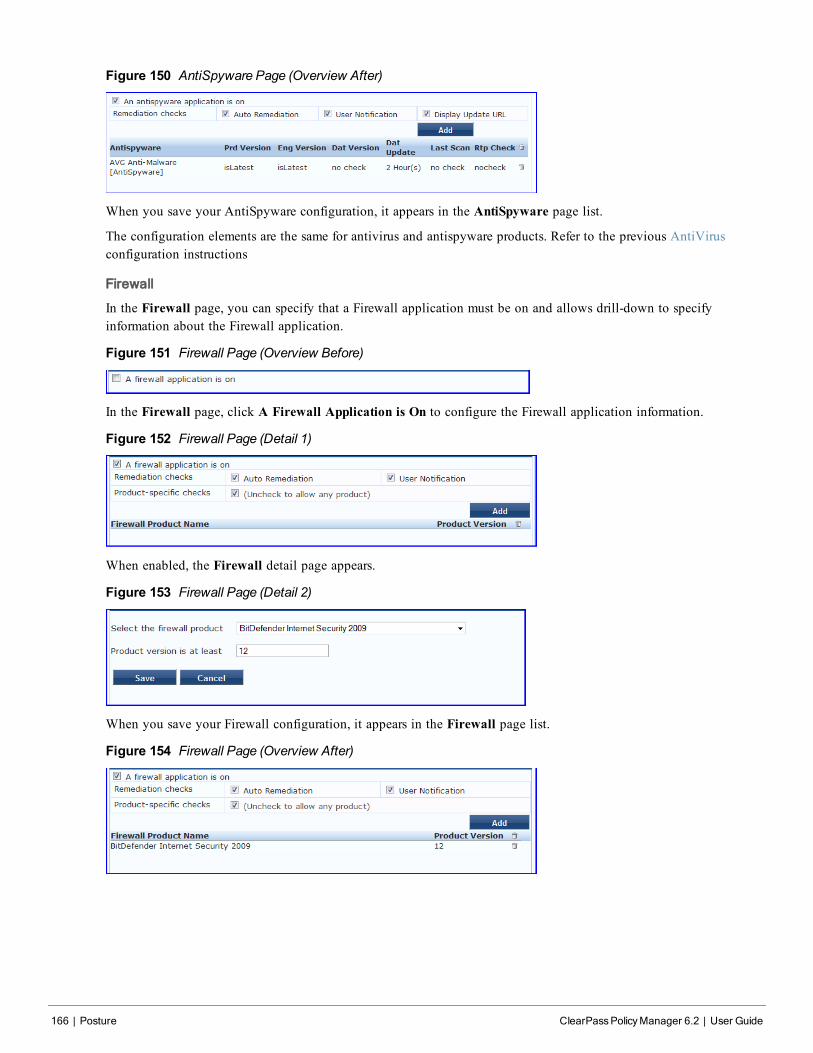
166 | Posture ClearPassPolicyManager 6.2 | User Guide
Figure 150 AntiSpyware Page (Overview After)
When you save your AntiSpyware configuration, it appears in the AntiSpyware page list.
The configuration elements are the same for antivirus and antispyware products. Refer to the previous AntiVirusconfiguration instructions
Firewall
In the Firewall page, you can specify that a Firewall application must be on and allows drill-down to specifyinformation about the Firewall application.
Figure 151 Firewall Page (Overview Before)
In the Firewall page, click A Firewall Application is On to configure the Firewall application information.
Figure 152 Firewall Page (Detail 1)
When enabled, the Firewall detail page appears.
Figure 153 Firewall Page (Detail 2)
When you save your Firewall configuration, it appears in the Firewall page list.
Figure 154 Firewall Page (Overview After)
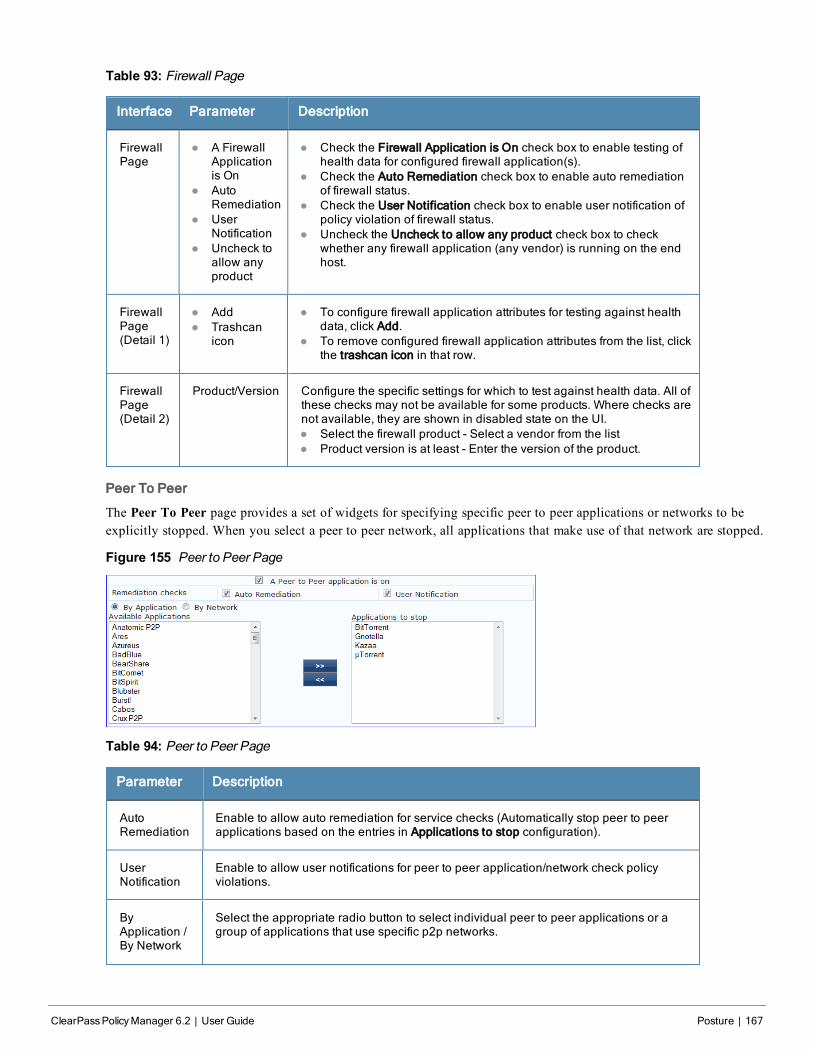
Table 93: Firewall Page
Interface Parameter Description
FirewallPage
l A FirewallApplicationis On
l AutoRemediation
l UserNotification
l Uncheck toallow anyproduct
l Check the Firewall Application is On check box to enable testing ofhealth data for configured firewall application(s).
l Check the Auto Remediation check box to enable auto remediationof firewall status.
l Check the User Notification check box to enable user notification ofpolicy violation of firewall status.
l Uncheck the Uncheck to allow any product check box to checkwhether any firewall application (any vendor) is running on the endhost.
FirewallPage(Detail 1)
l Addl Trashcan
icon
l To configure firewall application attributes for testing against healthdata, click Add.
l To remove configured firewall application attributes from the list, clickthe trashcan icon in that row.
FirewallPage(Detail 2)
Product/Version Configure the specific settings for which to test against health data. All ofthese checks may not be available for some products. Where checks arenot available, they are shown in disabled state on the UI.l Select the firewall product - Select a vendor from the listl Product version is at least - Enter the version of the product.
Peer To Peer
The Peer To Peer page provides a set of widgets for specifying specific peer to peer applications or networks to beexplicitly stopped. When you select a peer to peer network, all applications that make use of that network are stopped.
Figure 155 Peer to Peer Page
Table 94: Peer to Peer Page
Parameter Description
AutoRemediation
Enable to allow auto remediation for service checks (Automatically stop peer to peerapplications based on the entries in Applications to stop configuration).
UserNotification
Enable to allow user notifications for peer to peer application/network check policyviolations.
ByApplication /By Network
Select the appropriate radio button to select individual peer to peer applications or agroup of applications that use specific p2p networks.
ClearPassPolicyManager 6.2 | User Guide Posture | 167
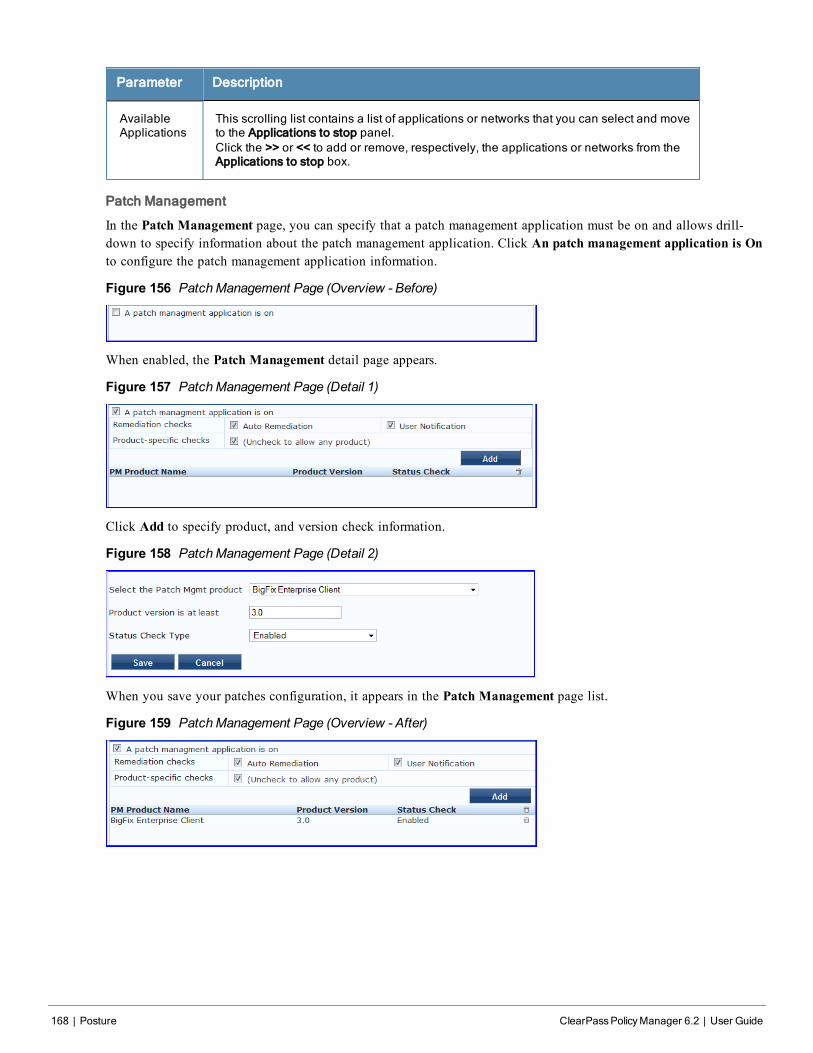
168 | Posture ClearPassPolicyManager 6.2 | User Guide
Parameter Description
AvailableApplications
This scrolling list contains a list of applications or networks that you can select and moveto the Applications to stop panel.Click the >> or << to add or remove, respectively, the applications or networks from theApplications to stop box.
Patch Management
In the Patch Management page, you can specify that a patch management application must be on and allows drill-down to specify information about the patch management application. Click An patch management application is Onto configure the patch management application information.
Figure 156 PatchManagement Page (Overview - Before)
When enabled, the Patch Management detail page appears.
Figure 157 PatchManagement Page (Detail 1)
Click Add to specify product, and version check information.
Figure 158 PatchManagement Page (Detail 2)
When you save your patches configuration, it appears in the Patch Management page list.
Figure 159 PatchManagement Page (Overview - After)
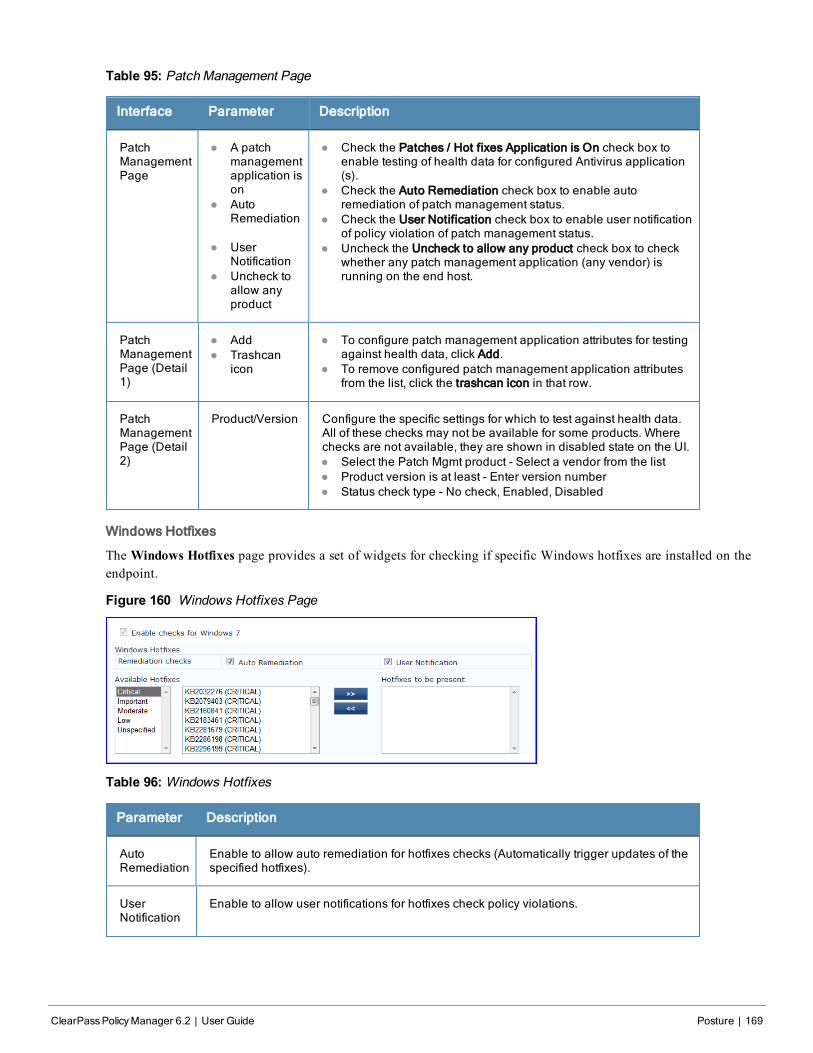
Table 95: PatchManagement Page
Interface Parameter Description
PatchManagementPage
l A patchmanagementapplication ison
l AutoRemediation
l UserNotification
l Uncheck toallow anyproduct
l Check the Patches / Hot fixes Application is On check box toenable testing of health data for configured Antivirus application(s).
l Check the Auto Remediation check box to enable autoremediation of patch management status.
l Check the User Notification check box to enable user notificationof policy violation of patch management status.
l Uncheck the Uncheck to allow any product check box to checkwhether any patch management application (any vendor) isrunning on the end host.
PatchManagementPage (Detail1)
l Addl Trashcan
icon
l To configure patch management application attributes for testingagainst health data, click Add.
l To remove configured patch management application attributesfrom the list, click the trashcan icon in that row.
PatchManagementPage (Detail2)
Product/Version Configure the specific settings for which to test against health data.All of these checks may not be available for some products. Wherechecks are not available, they are shown in disabled state on the UI.l Select the Patch Mgmt product - Select a vendor from the listl Product version is at least - Enter version numberl Status check type - No check, Enabled, Disabled
Windows Hotfixes
The Windows Hotfixes page provides a set of widgets for checking if specific Windows hotfixes are installed on theendpoint.
Figure 160 Windows Hotfixes Page
Table 96:Windows Hotfixes
Parameter Description
AutoRemediation
Enable to allow auto remediation for hotfixes checks (Automatically trigger updates of thespecified hotfixes).
UserNotification
Enable to allow user notifications for hotfixes check policy violations.
ClearPassPolicyManager 6.2 | User Guide Posture | 169
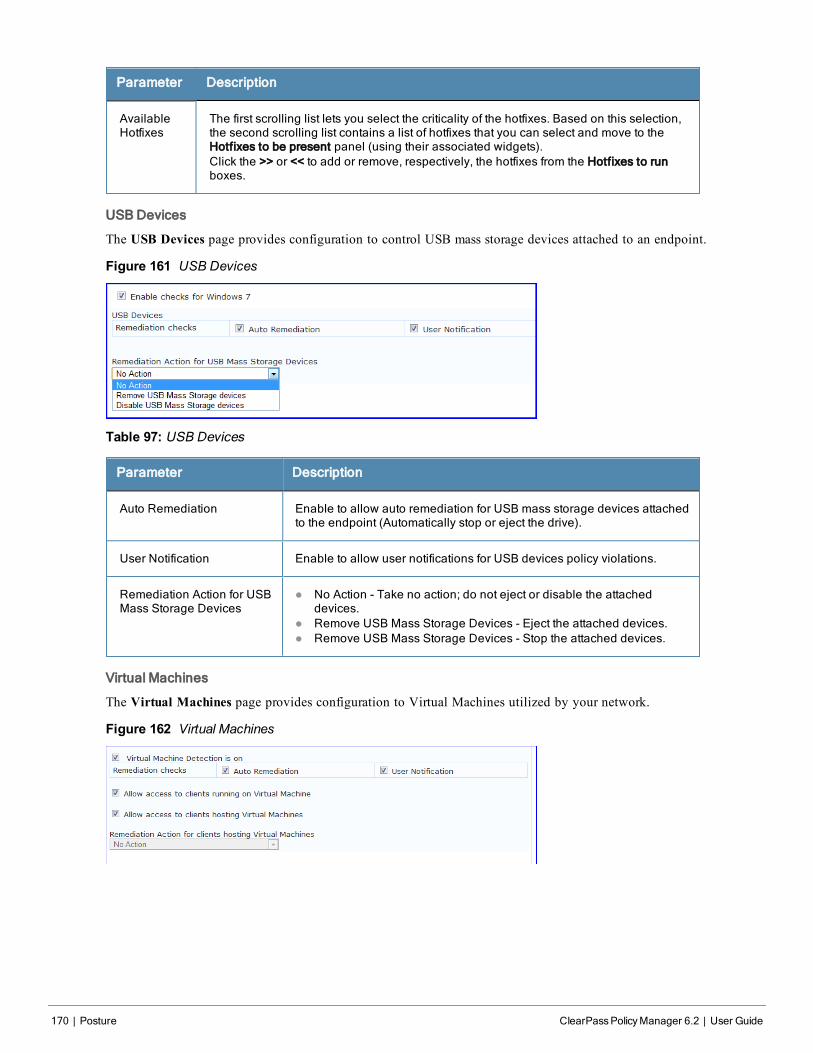
170 | Posture ClearPassPolicyManager 6.2 | User Guide
Parameter Description
AvailableHotfixes
The first scrolling list lets you select the criticality of the hotfixes. Based on this selection,the second scrolling list contains a list of hotfixes that you can select and move to theHotfixes to be present panel (using their associated widgets).Click the >> or << to add or remove, respectively, the hotfixes from the Hotfixes to runboxes.
USB Devices
The USB Devices page provides configuration to control USB mass storage devices attached to an endpoint.
Figure 161 USB Devices
Table 97: USB Devices
Parameter Description
Auto Remediation Enable to allow auto remediation for USB mass storage devices attachedto the endpoint (Automatically stop or eject the drive).
User Notification Enable to allow user notifications for USB devices policy violations.
Remediation Action for USBMass Storage Devices
l No Action - Take no action; do not eject or disable the attacheddevices.
l Remove USB Mass Storage Devices - Eject the attached devices.l Remove USB Mass Storage Devices - Stop the attached devices.
Virtual Machines
The Virtual Machines page provides configuration to Virtual Machines utilized by your network.
Figure 162 Virtual Machines
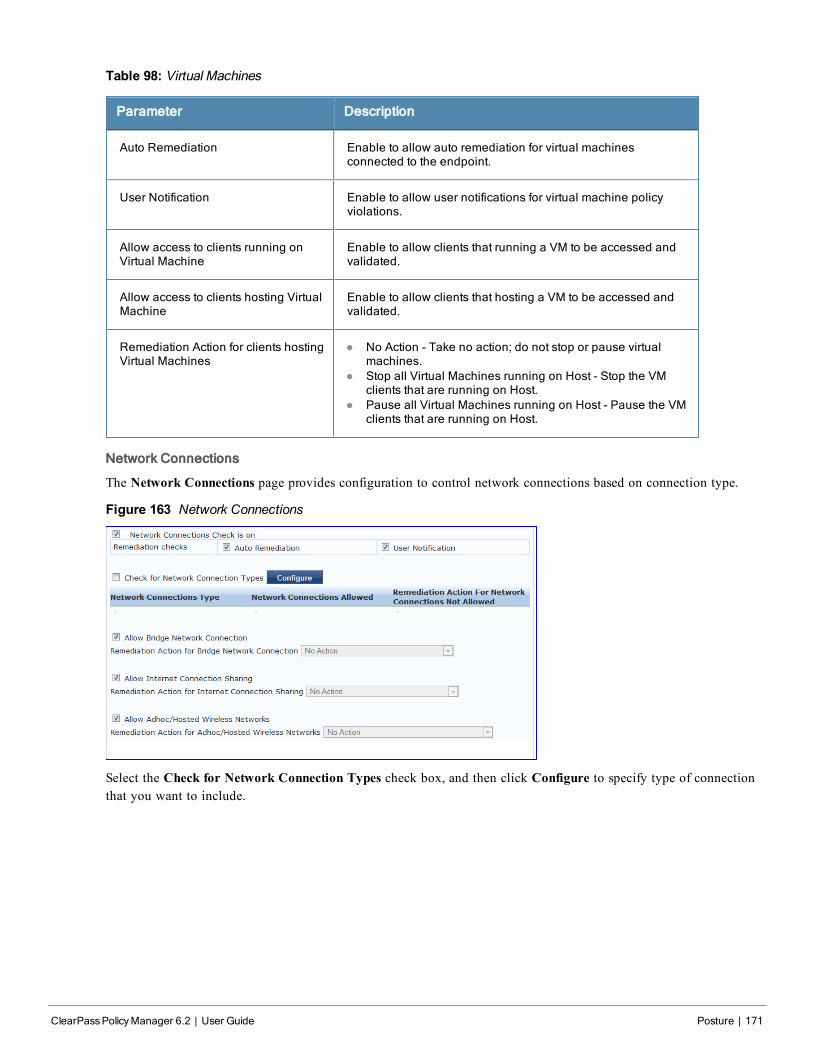
Table 98: Virtual Machines
Parameter Description
Auto Remediation Enable to allow auto remediation for virtual machinesconnected to the endpoint.
User Notification Enable to allow user notifications for virtual machine policyviolations.
Allow access to clients running onVirtual Machine
Enable to allow clients that running a VM to be accessed andvalidated.
Allow access to clients hosting VirtualMachine
Enable to allow clients that hosting a VM to be accessed andvalidated.
Remediation Action for clients hostingVirtual Machines
l No Action - Take no action; do not stop or pause virtualmachines.
l Stop all Virtual Machines running on Host - Stop the VMclients that are running on Host.
l Pause all Virtual Machines running on Host - Pause the VMclients that are running on Host.
Network Connections
The Network Connections page provides configuration to control network connections based on connection type.
Figure 163 Network Connections
Select the Check for Network Connection Types check box, and then click Configure to specify type of connectionthat you want to include.
ClearPassPolicyManager 6.2 | User Guide Posture | 171
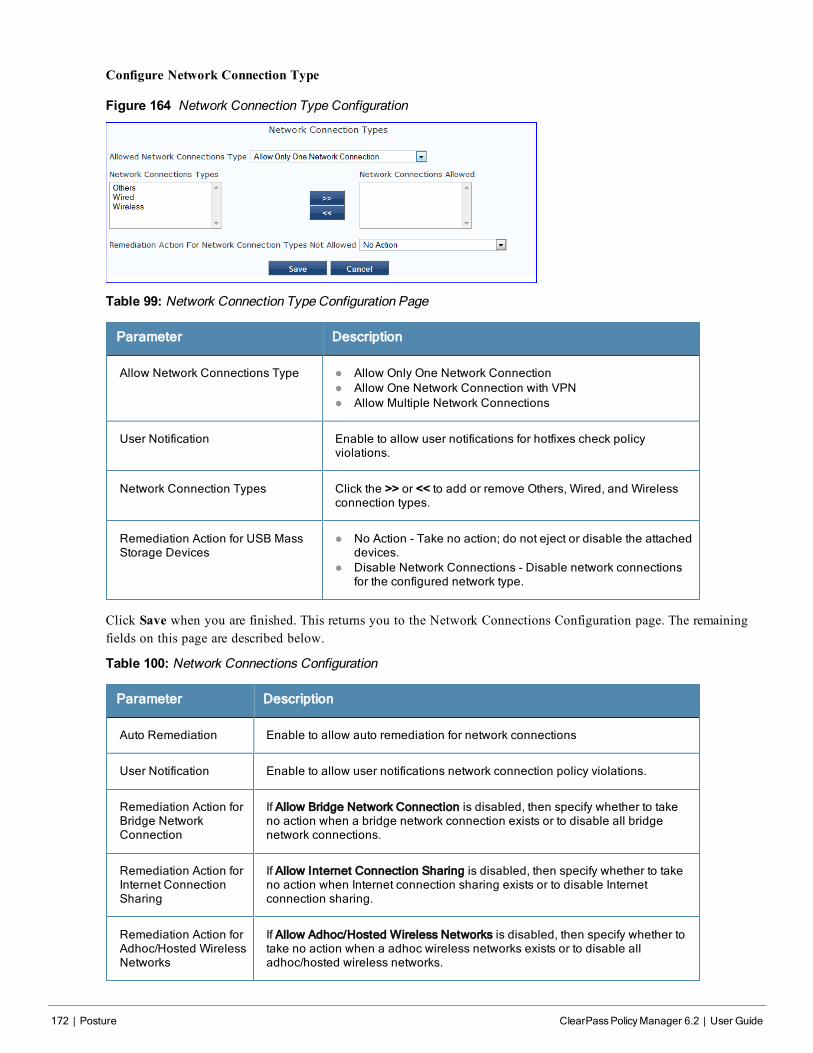
172 | Posture ClearPassPolicyManager 6.2 | User Guide
Configure Network Connection Type
Figure 164 Network Connection Type Configuration
Table 99: Network Connection Type Configuration Page
Parameter Description
Allow Network Connections Type l Allow Only One Network Connectionl Allow One Network Connection with VPNl Allow Multiple Network Connections
User Notification Enable to allow user notifications for hotfixes check policyviolations.
Network Connection Types Click the >> or << to add or remove Others, Wired, and Wirelessconnection types.
Remediation Action for USB MassStorage Devices
l No Action - Take no action; do not eject or disable the attacheddevices.
l Disable Network Connections - Disable network connectionsfor the configured network type.
Click Save when you are finished. This returns you to the Network Connections Configuration page. The remainingfields on this page are described below.
Table 100: Network Connections Configuration
Parameter Description
Auto Remediation Enable to allow auto remediation for network connections
User Notification Enable to allow user notifications network connection policy violations.
Remediation Action forBridge NetworkConnection
If Allow Bridge Network Connection is disabled, then specify whether to takeno action when a bridge network connection exists or to disable all bridgenetwork connections.
Remediation Action forInternet ConnectionSharing
If Allow Internet Connection Sharing is disabled, then specify whether to takeno action when Internet connection sharing exists or to disable Internetconnection sharing.
Remediation Action forAdhoc/Hosted WirelessNetworks
If Allow Adhoc/Hosted Wireless Networks is disabled, then specify whether totake no action when a adhoc wireless networks exists or to disable alladhoc/hosted wireless networks.
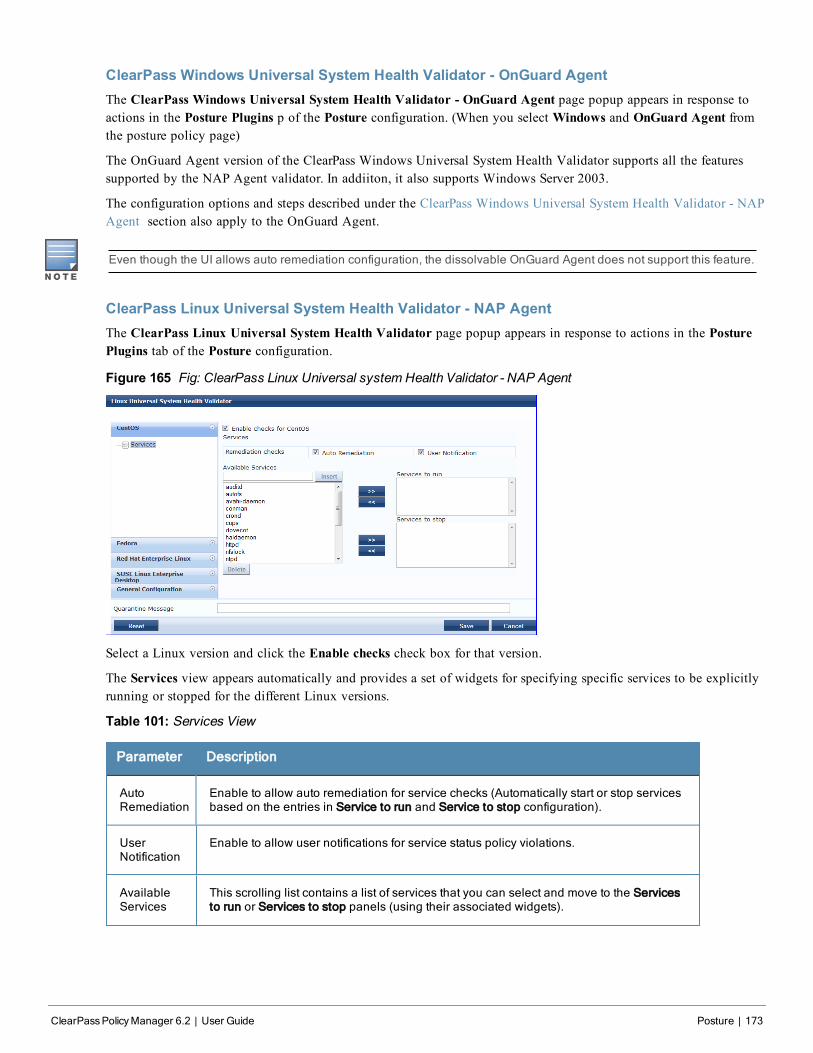
ClearPass Windows Universal System Health Validator - OnGuard AgentThe ClearPass Windows Universal System Health Validator - OnGuard Agent page popup appears in response toactions in the Posture Plugins p of the Posture configuration. (When you select Windows and OnGuard Agent fromthe posture policy page)
The OnGuard Agent version of the ClearPass Windows Universal System Health Validator supports all the featuressupported by the NAP Agent validator. In addiiton, it also supports Windows Server 2003.
The configuration options and steps described under the ClearPass Windows Universal System Health Validator - NAPAgent section also apply to the OnGuard Agent.
Even though the UI allows auto remediation configuration, the dissolvable OnGuard Agent does not support this feature.
ClearPass Linux Universal System Health Validator - NAP AgentThe ClearPass Linux Universal System Health Validator page popup appears in response to actions in the PosturePlugins tab of the Posture configuration.
Figure 165 Fig: ClearPass Linux Universal system Health Validator - NAP Agent
Select a Linux version and click the Enable checks check box for that version.
The Services view appears automatically and provides a set of widgets for specifying specific services to be explicitlyrunning or stopped for the different Linux versions.
Table 101: Services View
Parameter Description
AutoRemediation
Enable to allow auto remediation for service checks (Automatically start or stop servicesbased on the entries in Service to run and Service to stop configuration).
UserNotification
Enable to allow user notifications for service status policy violations.
AvailableServices
This scrolling list contains a list of services that you can select and move to the Servicesto run or Services to stop panels (using their associated widgets).
ClearPassPolicyManager 6.2 | User Guide Posture | 173
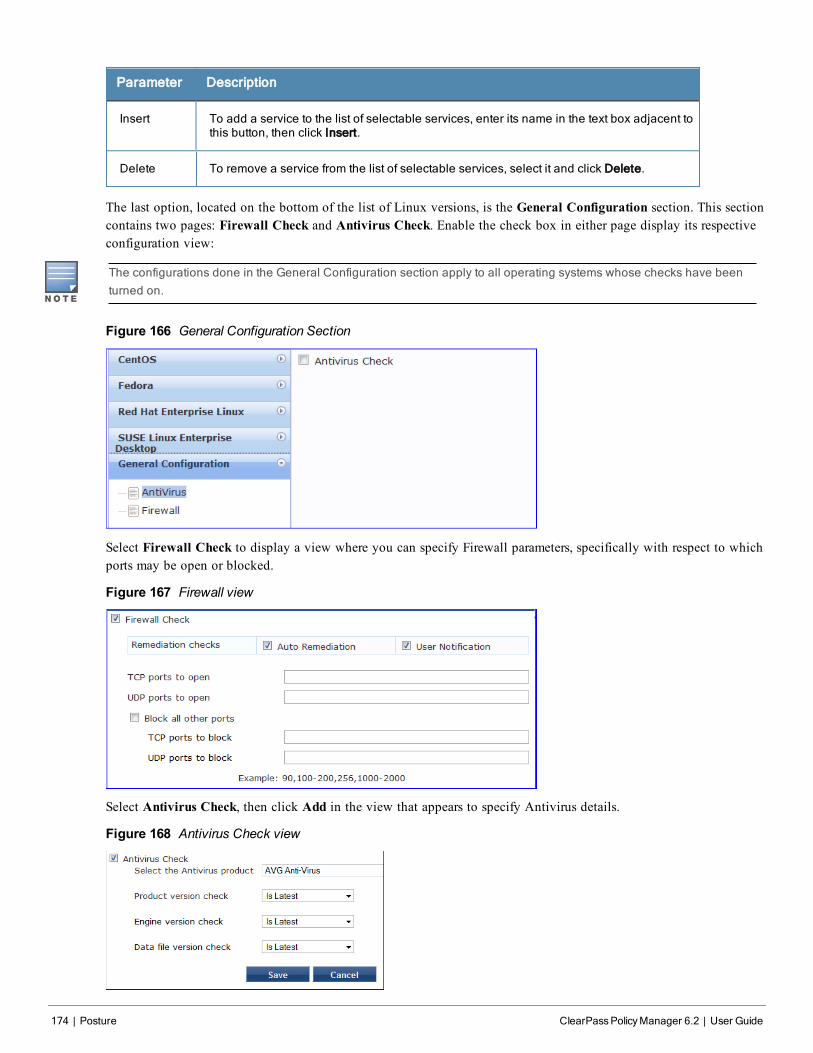
174 | Posture ClearPassPolicyManager 6.2 | User Guide
Parameter Description
Insert To add a service to the list of selectable services, enter its name in the text box adjacent tothis button, then click Insert.
Delete To remove a service from the list of selectable services, select it and click Delete.
The last option, located on the bottom of the list of Linux versions, is the General Configuration section. This sectioncontains two pages: Firewall Check and Antivirus Check. Enable the check box in either page display its respectiveconfiguration view:
The configurations done in the General Configuration section apply to all operating systems whose checks have beenturned on.
Figure 166 General Configuration Section
Select Firewall Check to display a view where you can specify Firewall parameters, specifically with respect to whichports may be open or blocked.
Figure 167 Firewall view
Select Antivirus Check, then click Add in the view that appears to specify Antivirus details.
Figure 168 Antivirus Check view
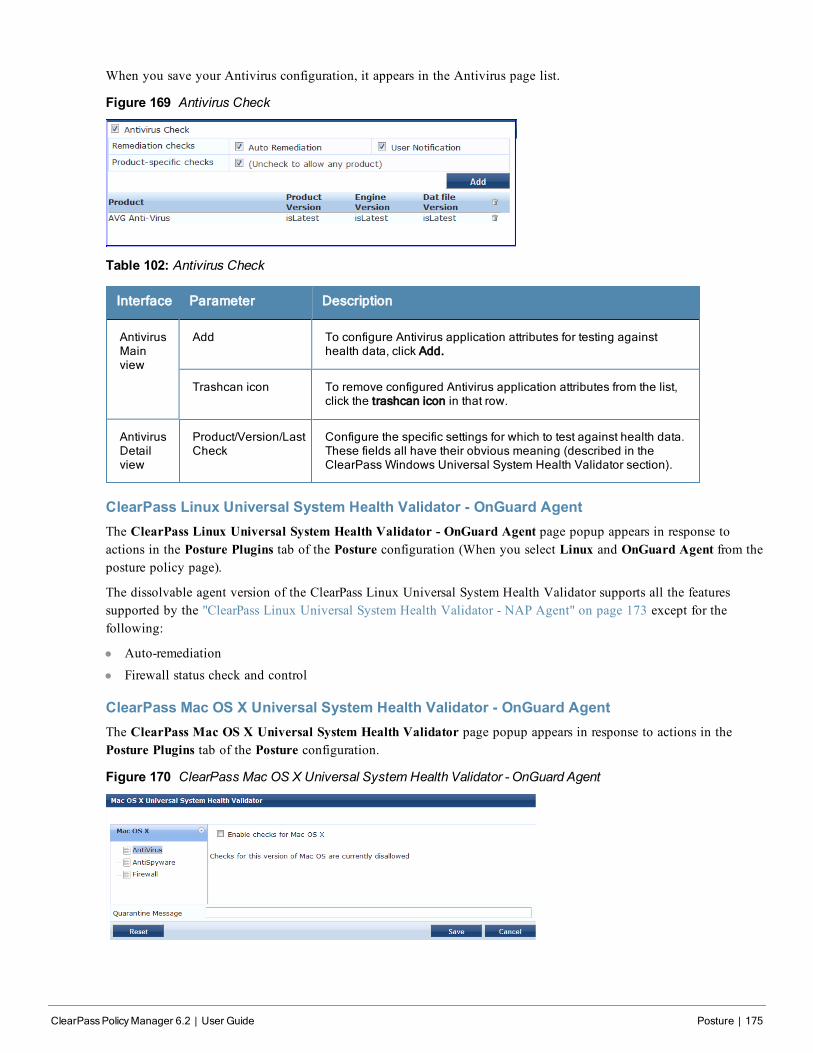
When you save your Antivirus configuration, it appears in the Antivirus page list.
Figure 169 Antivirus Check
Table 102: Antivirus Check
Interface Parameter Description
AntivirusMainview
Add To configure Antivirus application attributes for testing againsthealth data, click Add.
Trashcan icon To remove configured Antivirus application attributes from the list,click the trashcan icon in that row.
AntivirusDetailview
Product/Version/LastCheck
Configure the specific settings for which to test against health data.These fields all have their obvious meaning (described in theClearPass Windows Universal System Health Validator section).
ClearPass Linux Universal System Health Validator - OnGuard AgentThe ClearPass Linux Universal System Health Validator - OnGuard Agent page popup appears in response toactions in the Posture Plugins tab of the Posture configuration (When you select Linux and OnGuard Agent from theposture policy page).
The dissolvable agent version of the ClearPass Linux Universal System Health Validator supports all the featuressupported by the "ClearPass Linux Universal System Health Validator - NAP Agent" on page 173 except for thefollowing:
l Auto-remediation
l Firewall status check and control
ClearPass Mac OS X Universal System Health Validator - OnGuard AgentThe ClearPass Mac OS X Universal System Health Validator page popup appears in response to actions in thePosture Plugins tab of the Posture configuration.
Figure 170 ClearPass Mac OS X Universal System Health Validator - OnGuard Agent
ClearPassPolicyManager 6.2 | User Guide Posture | 175
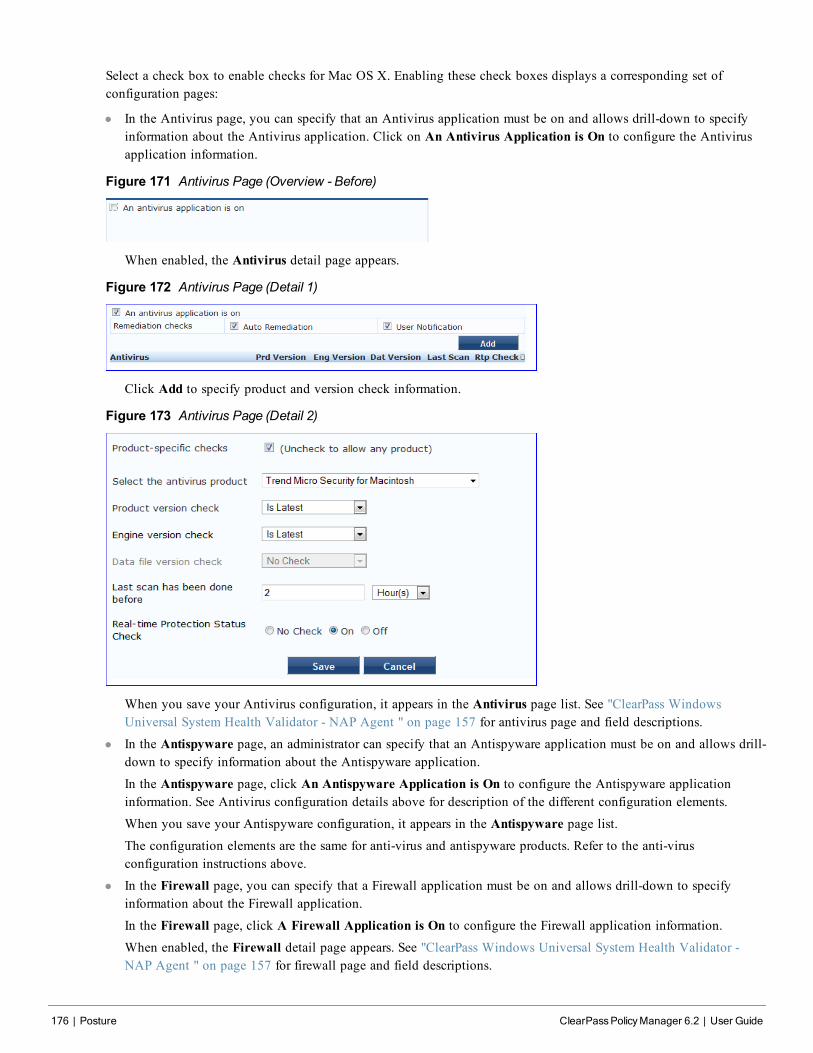
176 | Posture ClearPassPolicyManager 6.2 | User Guide
Select a check box to enable checks for Mac OS X. Enabling these check boxes displays a corresponding set ofconfiguration pages:
l In the Antivirus page, you can specify that an Antivirus application must be on and allows drill-down to specifyinformation about the Antivirus application. Click on An Antivirus Application is On to configure the Antivirusapplication information.
Figure 171 Antivirus Page (Overview - Before)
When enabled, the Antivirus detail page appears.
Figure 172 Antivirus Page (Detail 1)
Click Add to specify product and version check information.
Figure 173 Antivirus Page (Detail 2)
When you save your Antivirus configuration, it appears in the Antivirus page list. See "ClearPass WindowsUniversal System Health Validator - NAP Agent " on page 157 for antivirus page and field descriptions.
l In the Antispyware page, an administrator can specify that an Antispyware application must be on and allows drill-down to specify information about the Antispyware application.
In the Antispyware page, click An Antispyware Application is On to configure the Antispyware applicationinformation. See Antivirus configuration details above for description of the different configuration elements.
When you save your Antispyware configuration, it appears in the Antispyware page list.The configuration elements are the same for anti-virus and antispyware products. Refer to the anti-virusconfiguration instructions above.
l In the Firewall page, you can specify that a Firewall application must be on and allows drill-down to specifyinformation about the Firewall application.
In the Firewall page, click A Firewall Application is On to configure the Firewall application information.When enabled, the Firewall detail page appears. See "ClearPass Windows Universal System Health Validator -NAP Agent " on page 157 for firewall page and field descriptions.
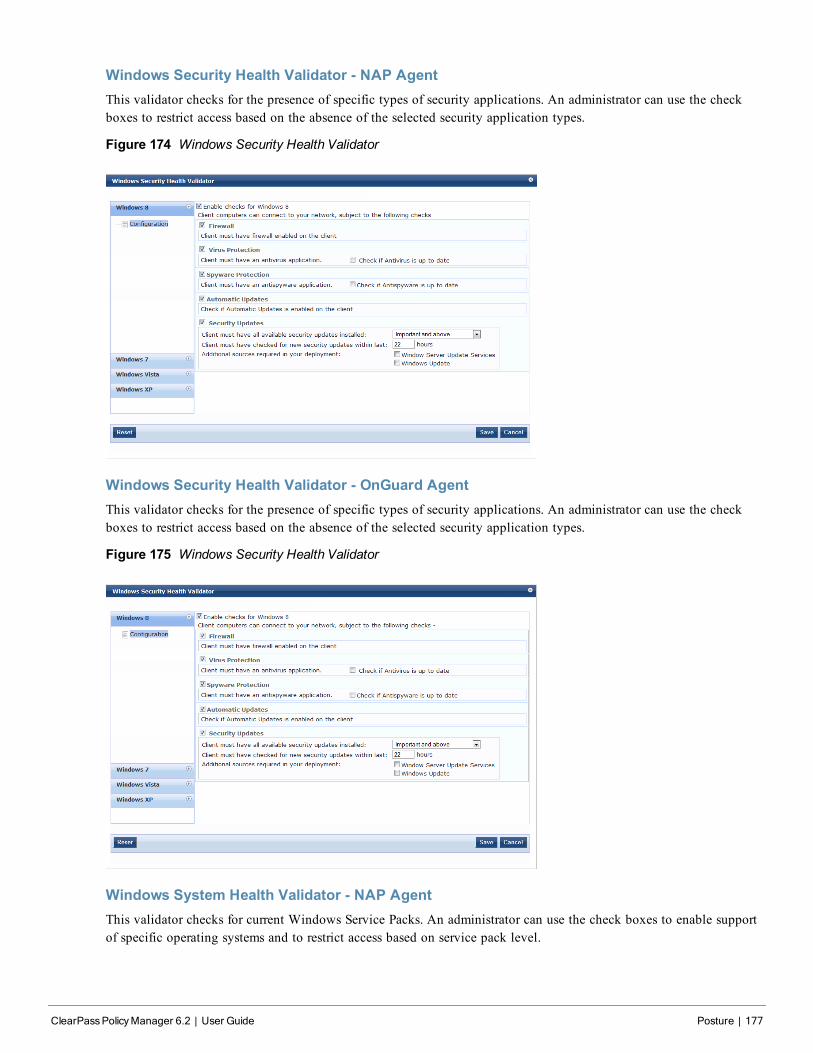
Windows Security Health Validator - NAP AgentThis validator checks for the presence of specific types of security applications. An administrator can use the checkboxes to restrict access based on the absence of the selected security application types.
Figure 174 Windows Security Health Validator
Windows Security Health Validator - OnGuard AgentThis validator checks for the presence of specific types of security applications. An administrator can use the checkboxes to restrict access based on the absence of the selected security application types.
Figure 175 Windows Security Health Validator
Windows System Health Validator - NAP AgentThis validator checks for current Windows Service Packs. An administrator can use the check boxes to enable supportof specific operating systems and to restrict access based on service pack level.
ClearPassPolicyManager 6.2 | User Guide Posture | 177
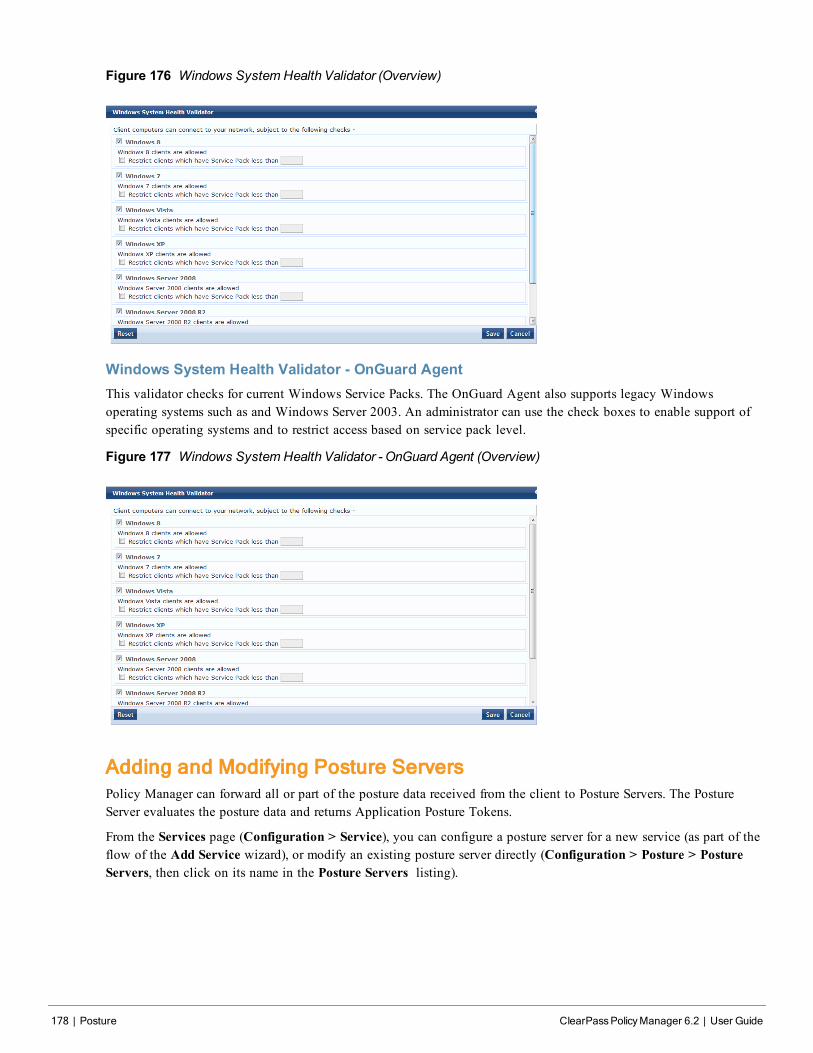
178 | Posture ClearPassPolicyManager 6.2 | User Guide
Figure 176 Windows System Health Validator (Overview)
Windows System Health Validator - OnGuard AgentThis validator checks for current Windows Service Packs. The OnGuard Agent also supports legacy Windowsoperating systems such as and Windows Server 2003. An administrator can use the check boxes to enable support ofspecific operating systems and to restrict access based on service pack level.
Figure 177 Windows System Health Validator - OnGuard Agent (Overview)
Adding and Modifying Posture ServersPolicy Manager can forward all or part of the posture data received from the client to Posture Servers. The PostureServer evaluates the posture data and returns Application Posture Tokens.
From the Services page (Configuration > Service), you can configure a posture server for a new service (as part of theflow of the Add Service wizard), or modify an existing posture server directly (Configuration > Posture > PostureServers, then click on its name in the Posture Servers listing).
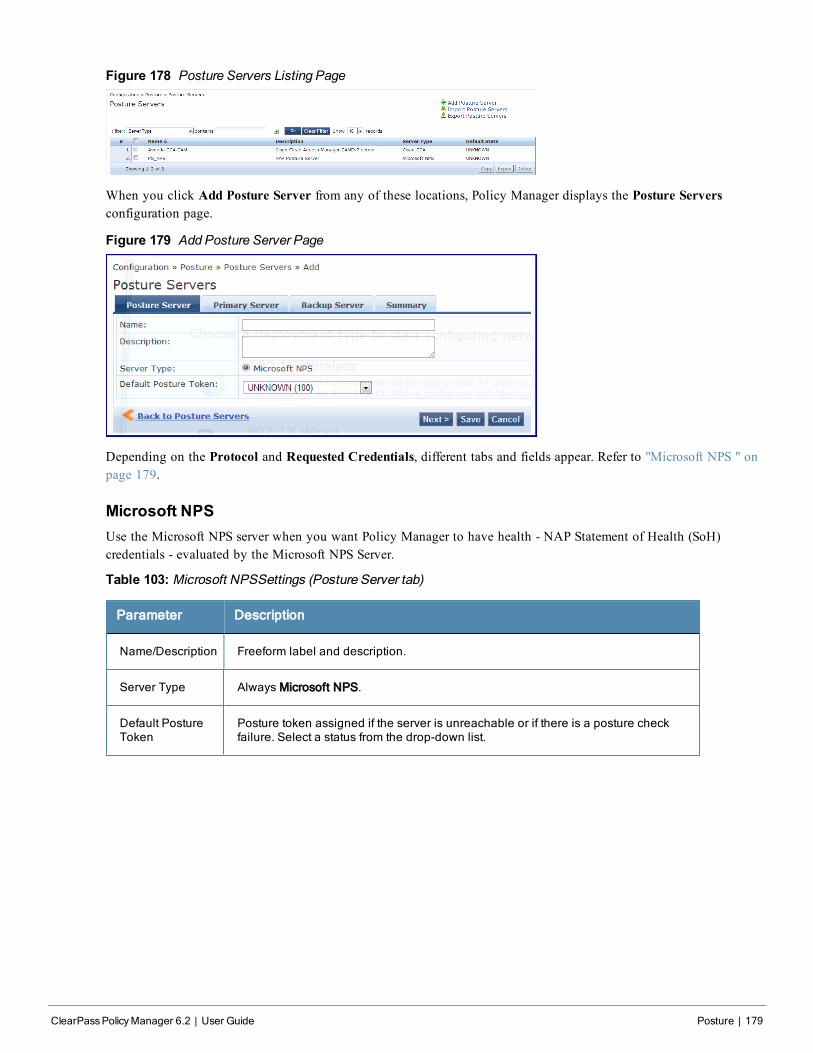
Figure 178 Posture Servers Listing Page
When you click Add Posture Server from any of these locations, Policy Manager displays the Posture Serversconfiguration page.
Figure 179 Add Posture Server Page
Depending on the Protocol and Requested Credentials, different tabs and fields appear. Refer to "Microsoft NPS " onpage 179.
Microsoft NPSUse the Microsoft NPS server when you want Policy Manager to have health - NAP Statement of Health (SoH)credentials - evaluated by the Microsoft NPS Server.
Table 103: Microsoft NPSSettings (Posture Server tab)
Parameter Description
Name/Description Freeform label and description.
Server Type Always Microsoft NPS.
Default PostureToken
Posture token assigned if the server is unreachable or if there is a posture checkfailure. Select a status from the drop-down list.
ClearPassPolicyManager 6.2 | User Guide Posture | 179

180 | Posture ClearPassPolicyManager 6.2 | User Guide
Figure 180 Microsoft NPS Settings (Primary and Backup Server tabs)
Table 104: Microsoft NPS Settings (Primary and Backup Server tabs)
Parameter Description
RADIUSServerName/Port
Hostname or IP address and RADIUS server UDP port
SharedSecret
Enter the shared secret for RADIUS message exchange; the same secret has to beentered on the RADIUS server (Microsoft NPS) side
Timeout How many seconds to wait before deeming the connection dead; if a backup isconfigured, Policy Manager will attempt to connect to the backup server after this timeout.For the backup server to be invoked on primary server failover, check the Enable to usebackup when primary does not respond check box.

ClearPassPolicyManager 6.2 | User Guide Audit Servers | 181
Chapter 11
Audit Servers
Audit Servers evaluate posture and/or role for unmanaged or unmanageable clients; that is, clients that lack anadequate posture agent or 802.1X supplicant (for example, printers, PDAs, or guest users may not be able to sendposture credentials or identify themselves.) A Policy Manager Service can trigger an audit by sending a client ID to apre-configured Audit Server, which returns attributes for role mapping and posture evaluation.
Architecture and FlowAudit servers are configured at a global level. Only one audit server may be associated with a Service. The flow-of-control of the audit process occurs as follows:
Figure 181 Flow of Control of Policy Manager Auditing
Refer to "Configuring Audit Servers" on page 181 for additional information.
Configuring Audit ServersThe Policy Manager server contains built-in Nessus (version 2.X) and NMAP servers. For enterprises with existingaudit server infrastructure, or otherwise preferring external audit servers, Policy Manager supports these serversexternally.
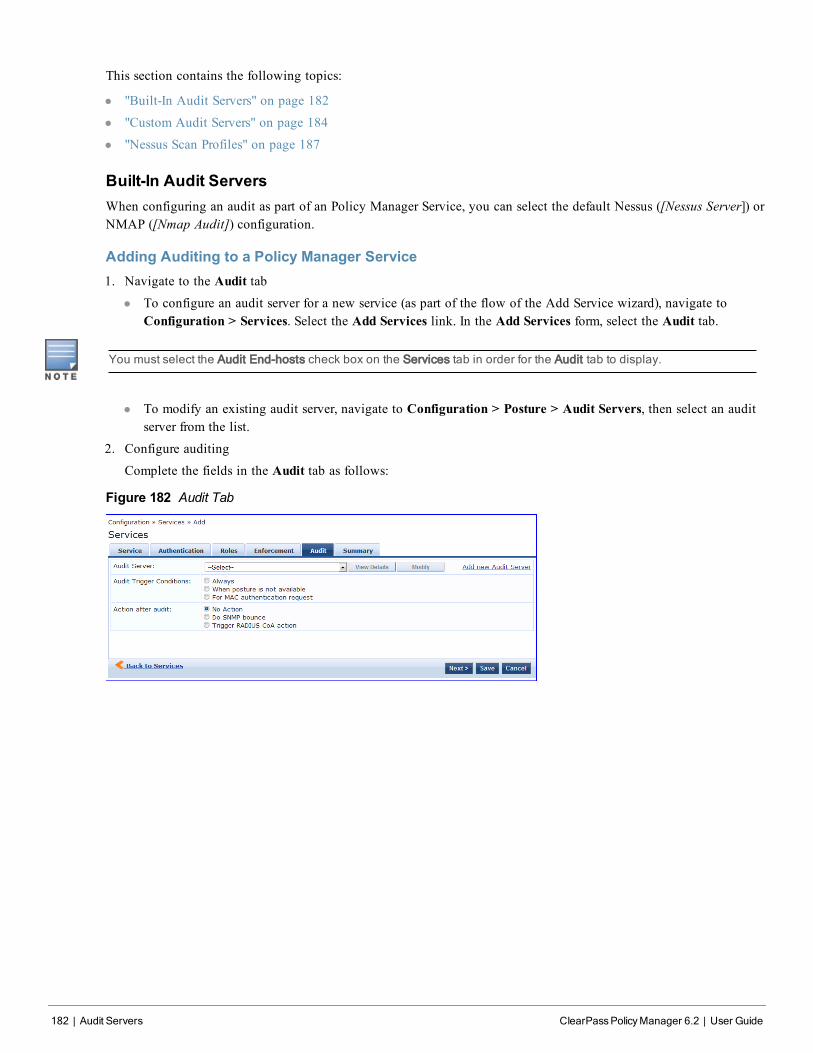
182 | Audit Servers ClearPassPolicyManager 6.2 | User Guide
This section contains the following topics:
l "Built-In Audit Servers" on page 182
l "Custom Audit Servers" on page 184
l "Nessus Scan Profiles" on page 187
Built-In Audit ServersWhen configuring an audit as part of an Policy Manager Service, you can select the default Nessus ([Nessus Server]) orNMAP ([Nmap Audit]) configuration.
Adding Auditing to a Policy Manager Service1. Navigate to the Audit tab
l To configure an audit server for a new service (as part of the flow of the Add Service wizard), navigate toConfiguration > Services. Select the Add Services link. In the Add Services form, select the Audit tab.
You must select the Audit End-hosts check box on the Services tab in order for the Audit tab to display.
l To modify an existing audit server, navigate to Configuration > Posture > Audit Servers, then select an auditserver from the list.
2. Configure auditing
Complete the fields in the Audit tab as follows:
Figure 182 Audit Tab
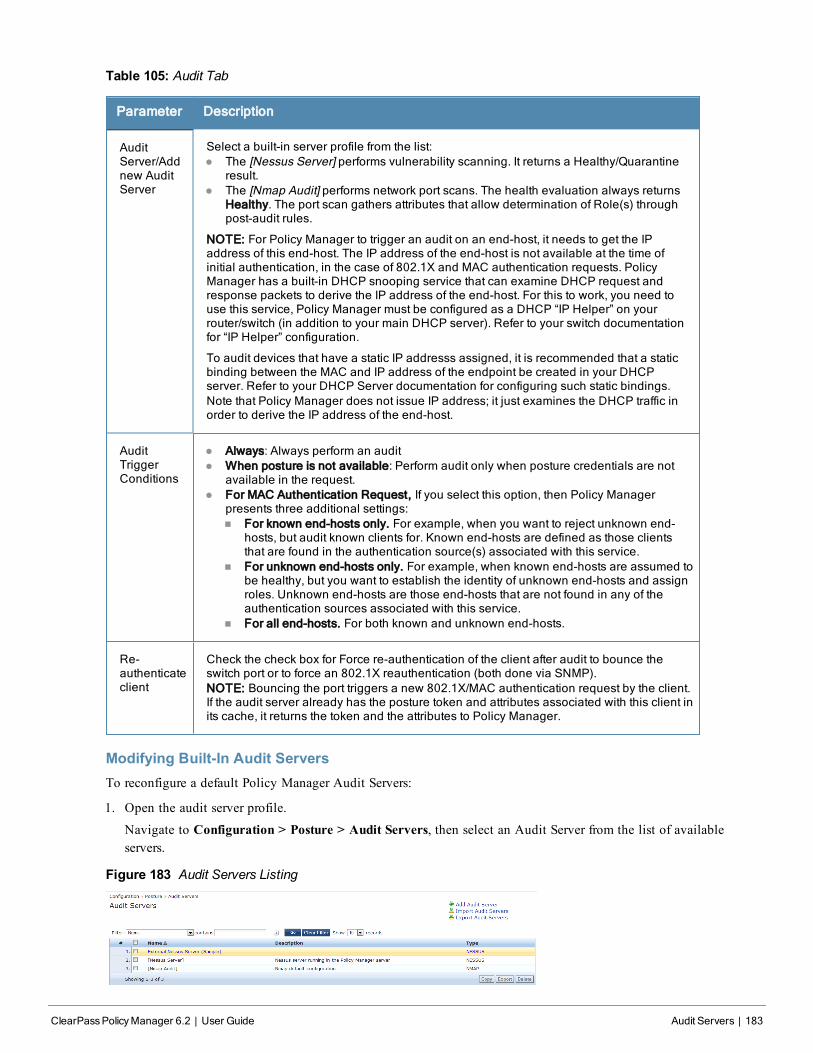
Table 105: Audit Tab
Parameter Description
AuditServer/Addnew AuditServer
Select a built-in server profile from the list:l The [Nessus Server] performs vulnerability scanning. It returns a Healthy/Quarantine
result.l The [Nmap Audit] performs network port scans. The health evaluation always returns
Healthy. The port scan gathers attributes that allow determination of Role(s) throughpost-audit rules.
NOTE: For Policy Manager to trigger an audit on an end-host, it needs to get the IPaddress of this end-host. The IP address of the end-host is not available at the time ofinitial authentication, in the case of 802.1X and MAC authentication requests. PolicyManager has a built-in DHCP snooping service that can examine DHCP request andresponse packets to derive the IP address of the end-host. For this to work, you need touse this service, Policy Manager must be configured as a DHCP “IP Helper” on yourrouter/switch (in addition to your main DHCP server). Refer to your switch documentationfor “IP Helper” configuration.
To audit devices that have a static IP addresss assigned, it is recommended that a staticbinding between the MAC and IP address of the endpoint be created in your DHCPserver. Refer to your DHCP Server documentation for configuring such static bindings.Note that Policy Manager does not issue IP address; it just examines the DHCP traffic inorder to derive the IP address of the end-host.
AuditTriggerConditions
l Always: Always perform an auditl When posture is not available: Perform audit only when posture credentials are not
available in the request.l For MAC Authentication Request, If you select this option, then Policy Manager
presents three additional settings:n For known end-hosts only. For example, when you want to reject unknown end-
hosts, but audit known clients for. Known end-hosts are defined as those clientsthat are found in the authentication source(s) associated with this service.
n For unknown end-hosts only. For example, when known end-hosts are assumed tobe healthy, but you want to establish the identity of unknown end-hosts and assignroles. Unknown end-hosts are those end-hosts that are not found in any of theauthentication sources associated with this service.
n For all end-hosts. For both known and unknown end-hosts.
Re-authenticateclient
Check the check box for Force re-authentication of the client after audit to bounce theswitch port or to force an 802.1X reauthentication (both done via SNMP).NOTE: Bouncing the port triggers a new 802.1X/MAC authentication request by the client.If the audit server already has the posture token and attributes associated with this client inits cache, it returns the token and the attributes to Policy Manager.
Modifying Built-In Audit ServersTo reconfigure a default Policy Manager Audit Servers:
1. Open the audit server profile.
Navigate to Configuration > Posture > Audit Servers, then select an Audit Server from the list of availableservers.
Figure 183 Audit Servers Listing
ClearPassPolicyManager 6.2 | User Guide Audit Servers | 183
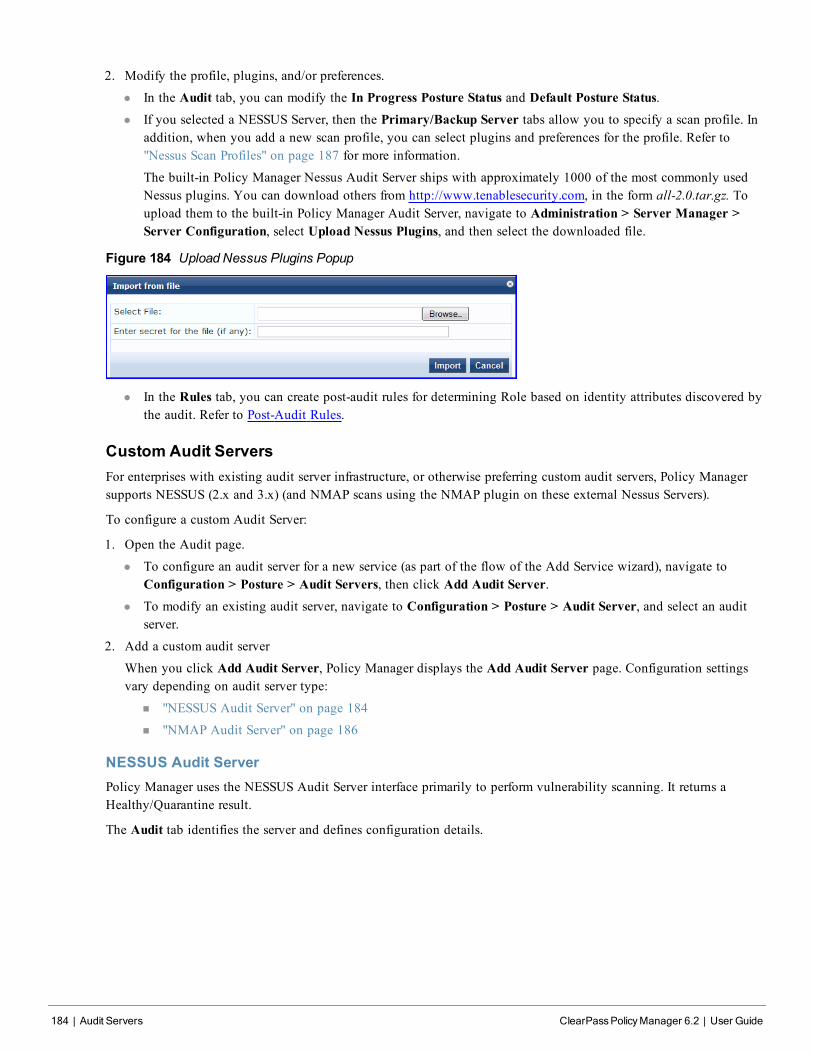
184 | Audit Servers ClearPassPolicyManager 6.2 | User Guide
2. Modify the profile, plugins, and/or preferences.
l In the Audit tab, you can modify the In Progress Posture Status and Default Posture Status.l If you selected a NESSUS Server, then the Primary/Backup Server tabs allow you to specify a scan profile. In
addition, when you add a new scan profile, you can select plugins and preferences for the profile. Refer to"Nessus Scan Profiles" on page 187 for more information.
The built-in Policy Manager Nessus Audit Server ships with approximately 1000 of the most commonly usedNessus plugins. You can download others from http://www.tenablesecurity.com, in the form all-2.0.tar.gz. Toupload them to the built-in Policy Manager Audit Server, navigate to Administration > Server Manager >Server Configuration, select Upload Nessus Plugins, and then select the downloaded file.
Figure 184 Upload Nessus Plugins Popup
l In the Rules tab, you can create post-audit rules for determining Role based on identity attributes discovered bythe audit. Refer to Post-Audit Rules.
Custom Audit ServersFor enterprises with existing audit server infrastructure, or otherwise preferring custom audit servers, Policy Managersupports NESSUS (2.x and 3.x) (and NMAP scans using the NMAP plugin on these external Nessus Servers).
To configure a custom Audit Server:
1. Open the Audit page.
l To configure an audit server for a new service (as part of the flow of the Add Service wizard), navigate toConfiguration > Posture > Audit Servers, then click Add Audit Server.
l To modify an existing audit server, navigate to Configuration > Posture > Audit Server, and select an auditserver.
2. Add a custom audit server
When you click Add Audit Server, Policy Manager displays the Add Audit Server page. Configuration settingsvary depending on audit server type:
n "NESSUS Audit Server" on page 184
n "NMAP Audit Server" on page 186
NESSUS Audit ServerPolicy Manager uses the NESSUS Audit Server interface primarily to perform vulnerability scanning. It returns aHealthy/Quarantine result.
The Audit tab identifies the server and defines configuration details.
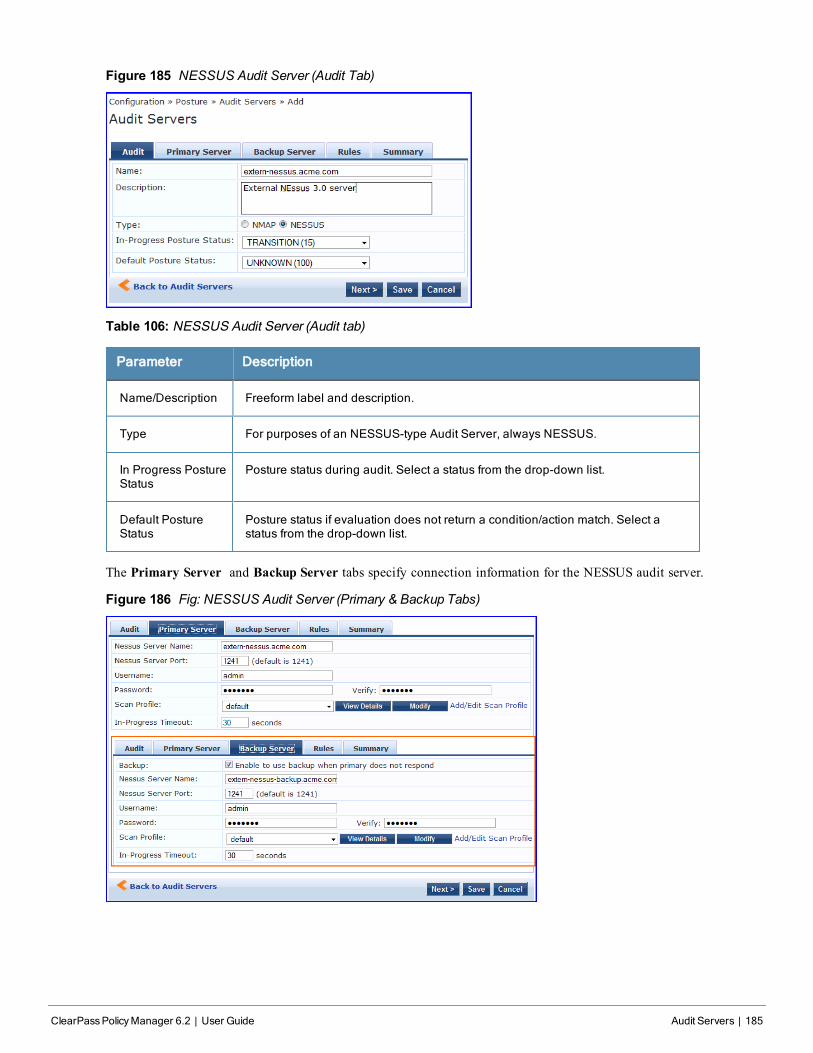
Figure 185 NESSUS Audit Server (Audit Tab)
Table 106: NESSUS Audit Server (Audit tab)
Parameter Description
Name/Description Freeform label and description.
Type For purposes of an NESSUS-type Audit Server, always NESSUS.
In Progress PostureStatus
Posture status during audit. Select a status from the drop-down list.
Default PostureStatus
Posture status if evaluation does not return a condition/action match. Select astatus from the drop-down list.
The Primary Server and Backup Server tabs specify connection information for the NESSUS audit server.
Figure 186 Fig: NESSUS Audit Server (Primary & Backup Tabs)
ClearPassPolicyManager 6.2 | User Guide Audit Servers | 185
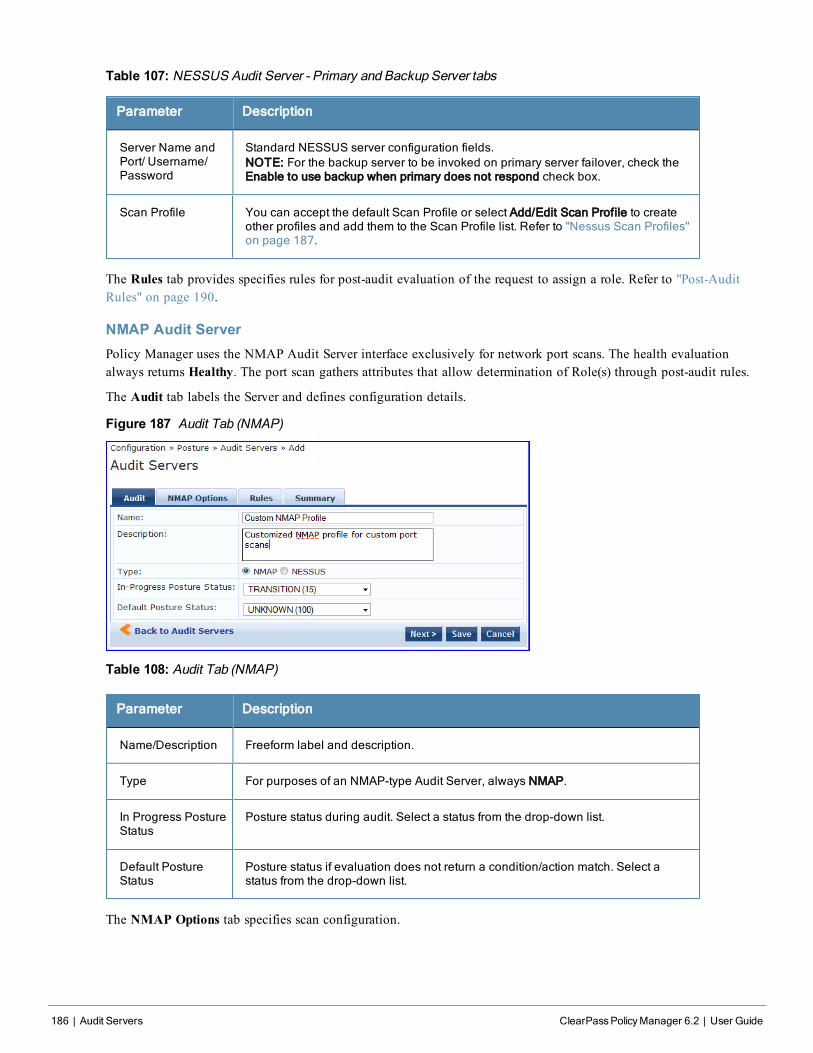
186 | Audit Servers ClearPassPolicyManager 6.2 | User Guide
Table 107: NESSUS Audit Server - Primary and Backup Server tabs
Parameter Description
Server Name andPort/ Username/Password
Standard NESSUS server configuration fields.NOTE: For the backup server to be invoked on primary server failover, check theEnable to use backup when primary does not respond check box.
Scan Profile You can accept the default Scan Profile or select Add/Edit Scan Profile to createother profiles and add them to the Scan Profile list. Refer to "Nessus Scan Profiles"on page 187.
The Rules tab provides specifies rules for post-audit evaluation of the request to assign a role. Refer to "Post-AuditRules" on page 190.
NMAP Audit ServerPolicy Manager uses the NMAP Audit Server interface exclusively for network port scans. The health evaluationalways returns Healthy. The port scan gathers attributes that allow determination of Role(s) through post-audit rules.
The Audit tab labels the Server and defines configuration details.
Figure 187 Audit Tab (NMAP)
Table 108: Audit Tab (NMAP)
Parameter Description
Name/Description Freeform label and description.
Type For purposes of an NMAP-type Audit Server, always NMAP.
In Progress PostureStatus
Posture status during audit. Select a status from the drop-down list.
Default PostureStatus
Posture status if evaluation does not return a condition/action match. Select astatus from the drop-down list.
The NMAP Options tab specifies scan configuration.
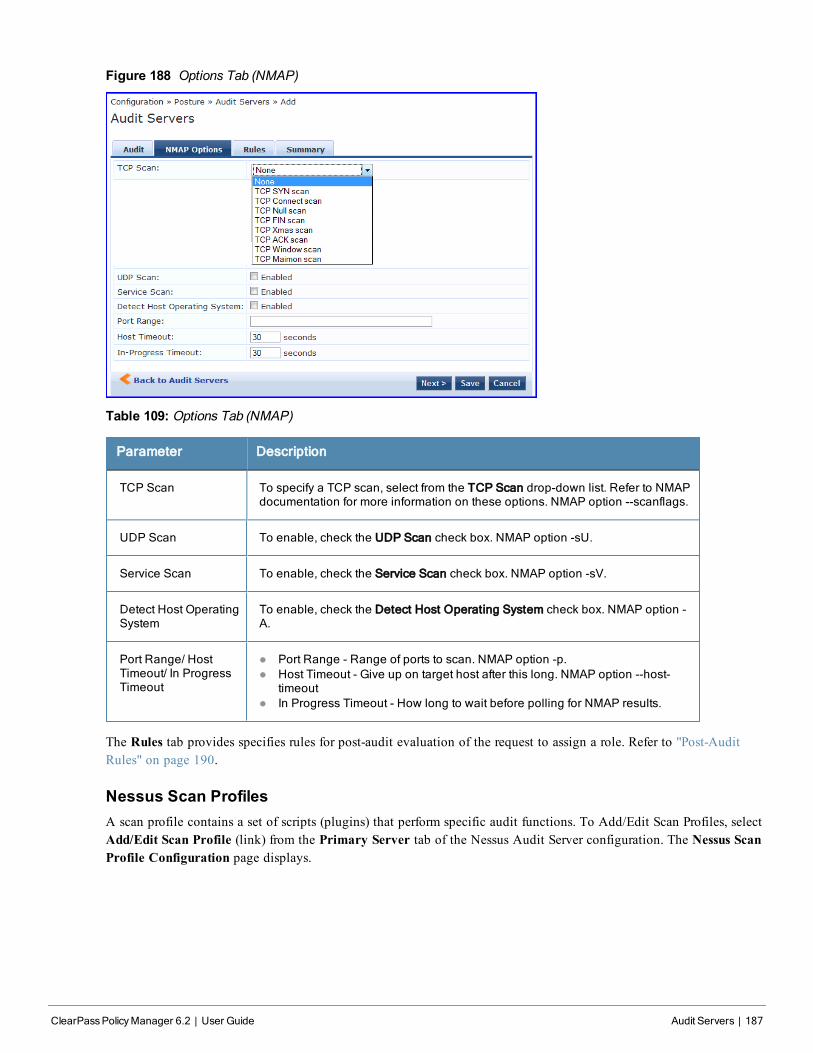
Figure 188 Options Tab (NMAP)
Table 109: Options Tab (NMAP)
Parameter Description
TCP Scan To specify a TCP scan, select from the TCP Scan drop-down list. Refer to NMAPdocumentation for more information on these options. NMAP option --scanflags.
UDP Scan To enable, check the UDP Scan check box. NMAP option -sU.
Service Scan To enable, check the Service Scan check box. NMAP option -sV.
Detect Host OperatingSystem
To enable, check the Detect Host Operating System check box. NMAP option -A.
Port Range/ HostTimeout/ In ProgressTimeout
l Port Range - Range of ports to scan. NMAP option -p.l Host Timeout - Give up on target host after this long. NMAP option --host-
timeoutl In Progress Timeout - How long to wait before polling for NMAP results.
The Rules tab provides specifies rules for post-audit evaluation of the request to assign a role. Refer to "Post-AuditRules" on page 190.
Nessus Scan ProfilesA scan profile contains a set of scripts (plugins) that perform specific audit functions. To Add/Edit Scan Profiles, selectAdd/Edit Scan Profile (link) from the Primary Server tab of the Nessus Audit Server configuration. The Nessus ScanProfile Configuration page displays.
ClearPassPolicyManager 6.2 | User Guide Audit Servers | 187
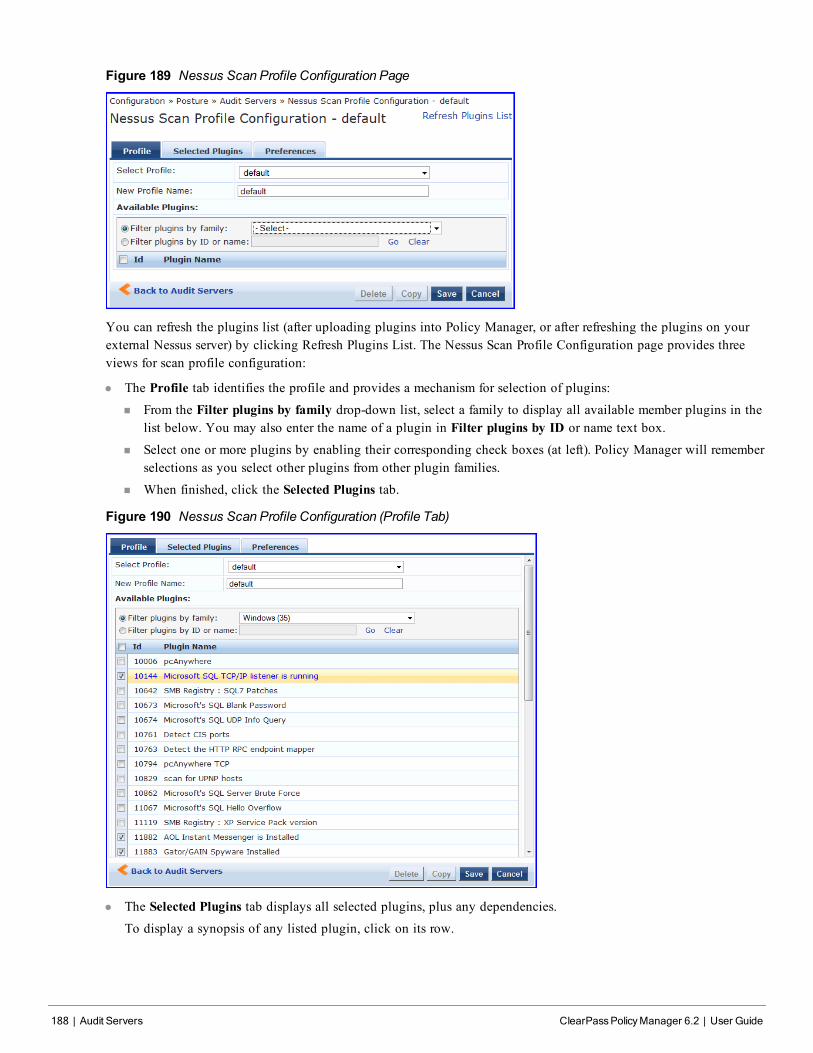
188 | Audit Servers ClearPassPolicyManager 6.2 | User Guide
Figure 189 Nessus Scan Profile Configuration Page
You can refresh the plugins list (after uploading plugins into Policy Manager, or after refreshing the plugins on yourexternal Nessus server) by clicking Refresh Plugins List. The Nessus Scan Profile Configuration page provides threeviews for scan profile configuration:
l The Profile tab identifies the profile and provides a mechanism for selection of plugins:
n From the Filter plugins by family drop-down list, select a family to display all available member plugins in thelist below. You may also enter the name of a plugin in Filter plugins by ID or name text box.
n Select one or more plugins by enabling their corresponding check boxes (at left). Policy Manager will rememberselections as you select other plugins from other plugin families.
n When finished, click the Selected Plugins tab.
Figure 190 Nessus Scan Profile Configuration (Profile Tab)
l The Selected Plugins tab displays all selected plugins, plus any dependencies.To display a synopsis of any listed plugin, click on its row.
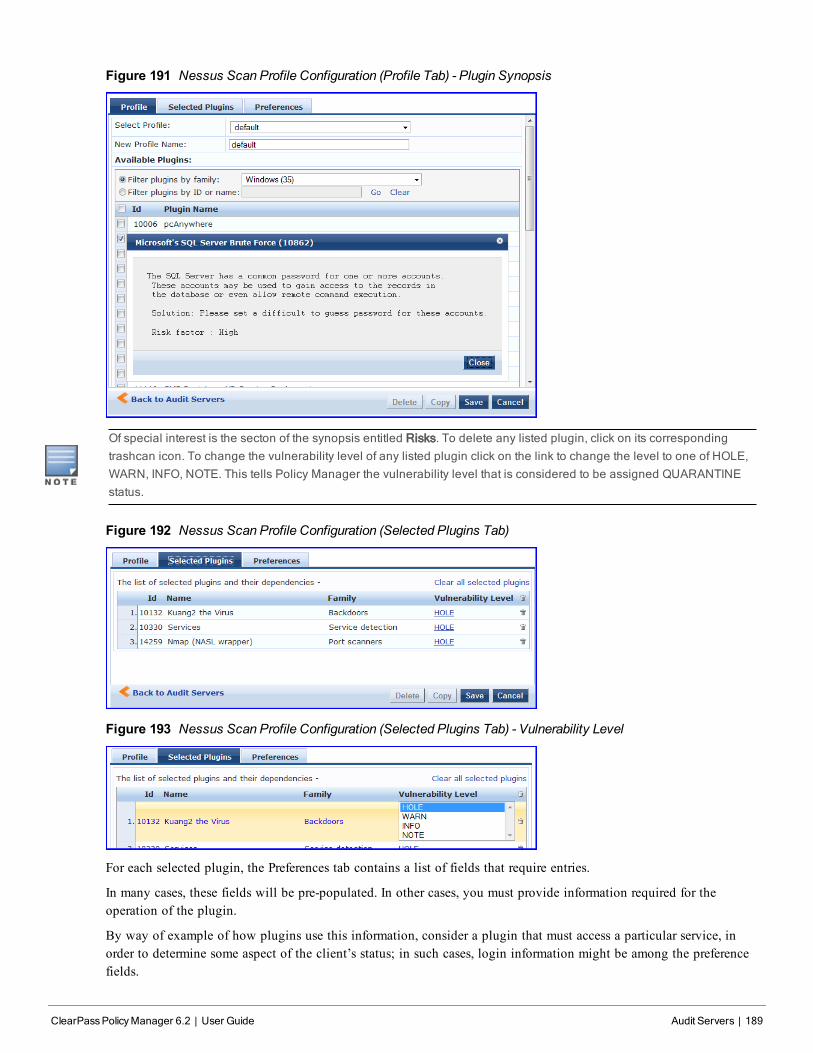
Figure 191 Nessus Scan Profile Configuration (Profile Tab) - Plugin Synopsis
Of special interest is the secton of the synopsis entitled Risks. To delete any listed plugin, click on its correspondingtrashcan icon. To change the vulnerability level of any listed plugin click on the link to change the level to one of HOLE,WARN, INFO, NOTE. This tells Policy Manager the vulnerability level that is considered to be assigned QUARANTINEstatus.
Figure 192 Nessus Scan Profile Configuration (Selected Plugins Tab)
Figure 193 Nessus Scan Profile Configuration (Selected Plugins Tab) - Vulnerability Level
For each selected plugin, the Preferences tab contains a list of fields that require entries.
In many cases, these fields will be pre-populated. In other cases, you must provide information required for theoperation of the plugin.
By way of example of how plugins use this information, consider a plugin that must access a particular service, inorder to determine some aspect of the client’s status; in such cases, login information might be among the preferencefields.
ClearPassPolicyManager 6.2 | User Guide Audit Servers | 189
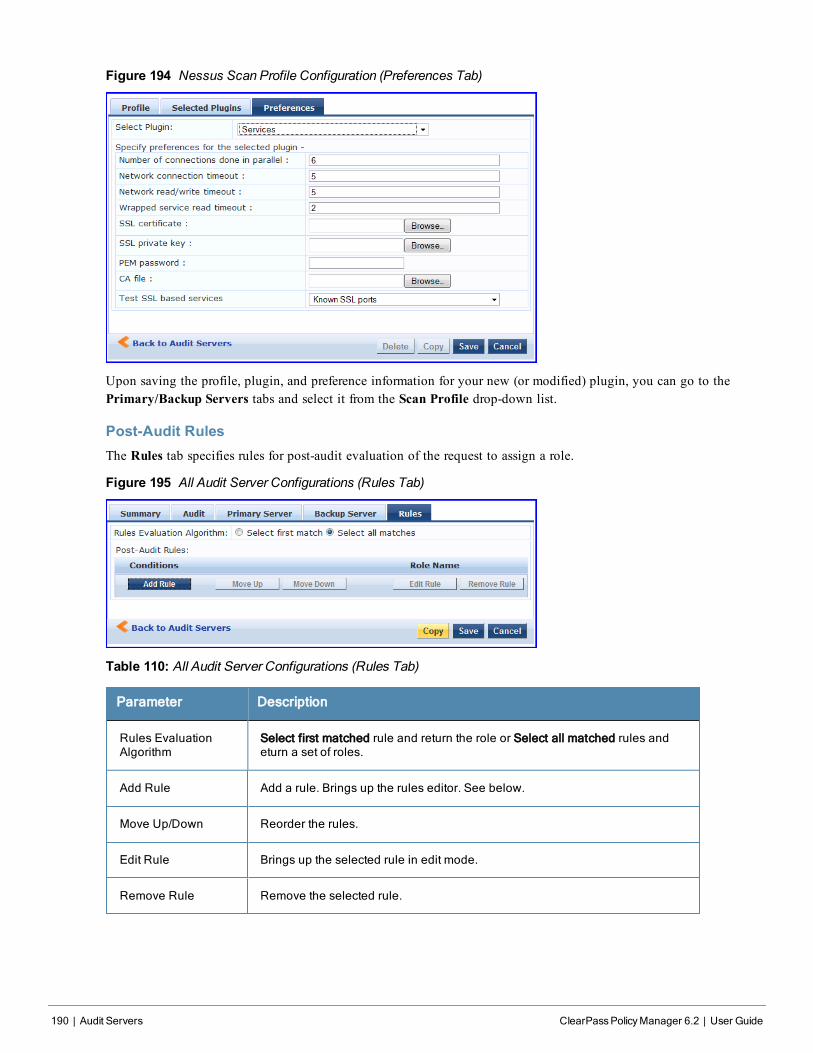
190 | Audit Servers ClearPassPolicyManager 6.2 | User Guide
Figure 194 Nessus Scan Profile Configuration (Preferences Tab)
Upon saving the profile, plugin, and preference information for your new (or modified) plugin, you can go to thePrimary/Backup Servers tabs and select it from the Scan Profile drop-down list.
Post-Audit RulesThe Rules tab specifies rules for post-audit evaluation of the request to assign a role.
Figure 195 All Audit Server Configurations (Rules Tab)
Table 110: All Audit Server Configurations (Rules Tab)
Parameter Description
Rules EvaluationAlgorithm
Select first matched rule and return the role or Select all matched rules andeturn a set of roles.
Add Rule Add a rule. Brings up the rules editor. See below.
Move Up/Down Reorder the rules.
Edit Rule Brings up the selected rule in edit mode.
Remove Rule Remove the selected rule.
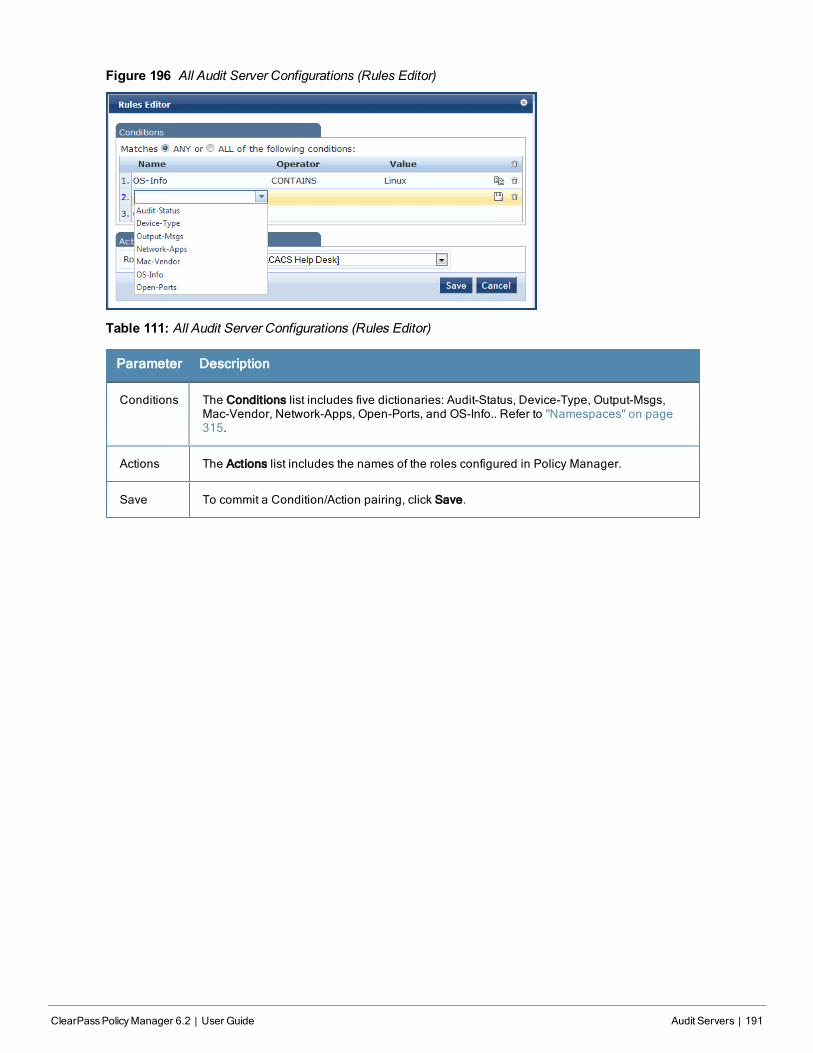
Figure 196 All Audit Server Configurations (Rules Editor)
Table 111: All Audit Server Configurations (Rules Editor)
Parameter Description
Conditions The Conditions list includes five dictionaries: Audit-Status, Device-Type, Output-Msgs,Mac-Vendor, Network-Apps, Open-Ports, and OS-Info.. Refer to "Namespaces" on page315.
Actions The Actions list includes the names of the roles configured in Policy Manager.
Save To commit a Condition/Action pairing, click Save.
ClearPassPolicyManager 6.2 | User Guide Audit Servers | 191

192 | Audit Servers ClearPassPolicyManager 6.2 | User Guide
ClearPassPolicyManager 6.2 | User Guide Enforcement | 193
Chapter 12
Enforcement
Policy Manager controls network access by sending a set of access-control attributes to the request-originatingNetwork Access Device (NAD).
Policy Manager sends these attributes by evaluating an Enfocement Policy associated with the service. The evaluationof Enforcement Policy results in one or more Enforcement Profiles; each Enforcement Profile wraps the access controlattributes sent to the Network Access Device. For example, for RADIUS requests, commonly used Enforcement Profilesinclude attributes for VLAN, Filter ID, Downloadable ACL and Proxy ACL.
Enforcement Architecture and FlowTo evaluate a request, a Policy Manager Application assembles the request’s client roles, client posture (system posturetoken), and system time. The calculation that matches these components to a pre-defined Enforcement Profile occursinside of a black box called an Enforcement Policy.
Each Enforcement Policy contains a rule or set of rules for matching Conditions (role, posture and time) to Actions(Enforcement Profiles). For each request, it yields one or more matches, in the form of Enforcement Profiles, from whichPolicy Manager assembles access-control attributes for return to the originating NAD, subject to the followingdisambiguation rules:
l If an attribute occurs only once within an Enforcement Profile, transmit as is.
l If an attribute occurs multiple times within the same Enforcement Profile, transmit as a multi-valued attribute.
l If an attribute occurs in more than one Enforcement Profile, only transmit the value from the first EnforcementProfile in priority order.
Optionally, each Enforcement Profile can have an associated group of NADs; when this occurs, Enforcement Profilesare only sent if the request is received from one of the NADs in the group. For example, you can have the same rule forVPN, LAN and WLAN access, with enforcement profiles associated with device groups for each type of access. If adevice group is not associated with the enforcement profile, attributes in that profile are sent regardless of where therequest originated.
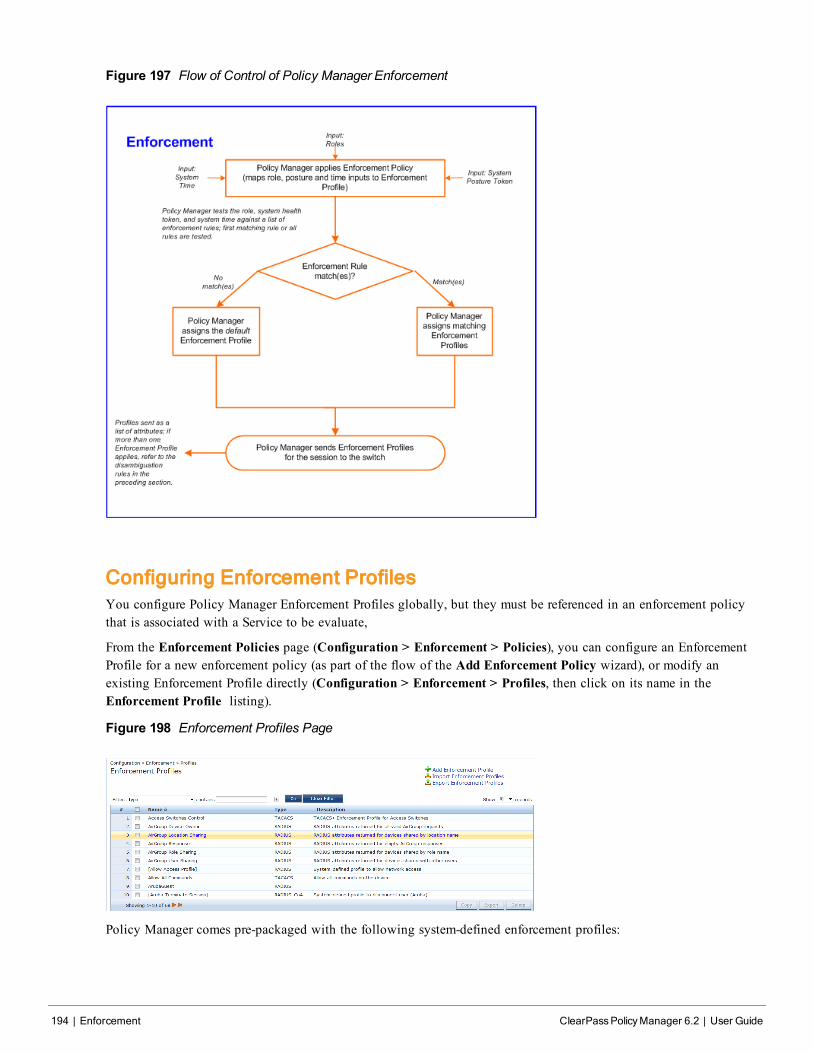
194 | Enforcement ClearPassPolicyManager 6.2 | User Guide
Figure 197 Flow of Control of Policy Manager Enforcement
Configuring Enforcement ProfilesYou configure Policy Manager Enforcement Profiles globally, but they must be referenced in an enforcement policythat is associated with a Service to be evaluate,
From the Enforcement Policies page (Configuration > Enforcement > Policies), you can configure an EnforcementProfile for a new enforcement policy (as part of the flow of the Add Enforcement Policy wizard), or modify anexisting Enforcement Profile directly (Configuration > Enforcement > Profiles, then click on its name in theEnforcement Profile listing).
Figure 198 Enforcement Profiles Page
Policy Manager comes pre-packaged with the following system-defined enforcement profiles:
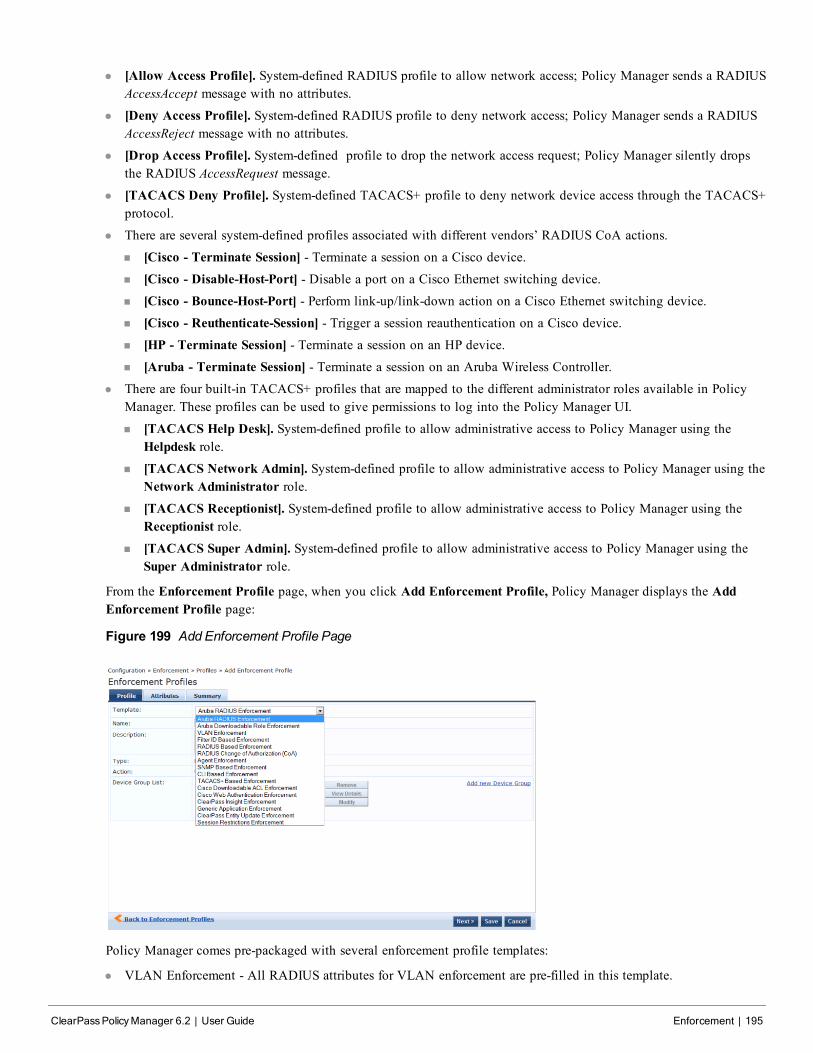
l [Allow Access Profile]. System-defined RADIUS profile to allow network access; Policy Manager sends a RADIUSAccessAccept message with no attributes.
l [Deny Access Profile]. System-defined RADIUS profile to deny network access; Policy Manager sends a RADIUSAccessReject message with no attributes.
l [Drop Access Profile]. System-defined profile to drop the network access request; Policy Manager silently dropsthe RADIUS AccessRequest message.
l [TACACS Deny Profile]. System-defined TACACS+ profile to deny network device access through the TACACS+protocol.
l There are several system-defined profiles associated with different vendors’ RADIUS CoA actions.
n [Cisco - Terminate Session] - Terminate a session on a Cisco device.n [Cisco - Disable-Host-Port] - Disable a port on a Cisco Ethernet switching device.n [Cisco - Bounce-Host-Port] - Perform link-up/link-down action on a Cisco Ethernet switching device.
n [Cisco - Reuthenticate-Session] - Trigger a session reauthentication on a Cisco device.n [HP - Terminate Session] - Terminate a session on an HP device.n [Aruba - Terminate Session] - Terminate a session on an Aruba Wireless Controller.
l There are four built-in TACACS+ profiles that are mapped to the different administrator roles available in PolicyManager. These profiles can be used to give permissions to log into the Policy Manager UI.
n [TACACS Help Desk]. System-defined profile to allow administrative access to Policy Manager using theHelpdesk role.
n [TACACS Network Admin]. System-defined profile to allow administrative access to Policy Manager using theNetwork Administrator role.
n [TACACS Receptionist]. System-defined profile to allow administrative access to Policy Manager using theReceptionist role.
n [TACACS Super Admin]. System-defined profile to allow administrative access to Policy Manager using theSuper Administrator role.
From the Enforcement Profile page, when you click Add Enforcement Profile, Policy Manager displays the AddEnforcement Profile page:
Figure 199 Add Enforcement Profile Page
Policy Manager comes pre-packaged with several enforcement profile templates:
l VLAN Enforcement - All RADIUS attributes for VLAN enforcement are pre-filled in this template.
ClearPassPolicyManager 6.2 | User Guide Enforcement | 195
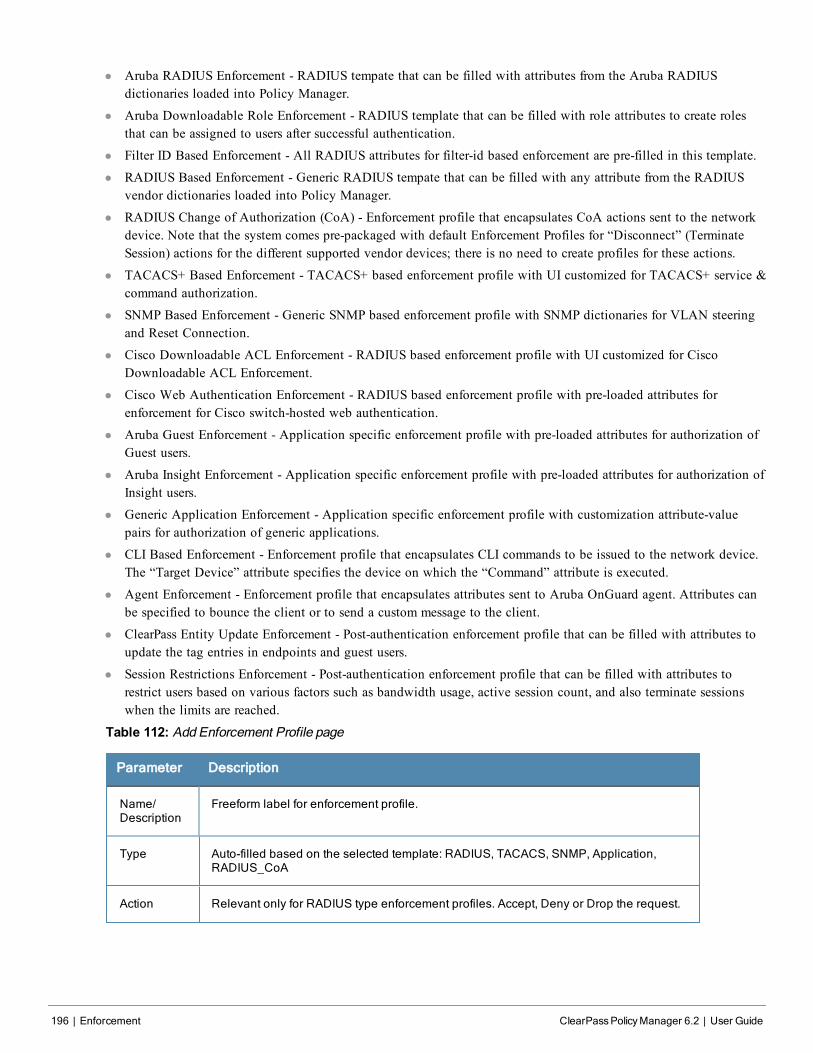
196 | Enforcement ClearPassPolicyManager 6.2 | User Guide
l Aruba RADIUS Enforcement - RADIUS tempate that can be filled with attributes from the Aruba RADIUSdictionaries loaded into Policy Manager.
l Aruba Downloadable Role Enforcement - RADIUS template that can be filled with role attributes to create rolesthat can be assigned to users after successful authentication.
l Filter ID Based Enforcement - All RADIUS attributes for filter-id based enforcement are pre-filled in this template.
l RADIUS Based Enforcement - Generic RADIUS tempate that can be filled with any attribute from the RADIUSvendor dictionaries loaded into Policy Manager.
l RADIUS Change of Authorization (CoA) - Enforcement profile that encapsulates CoA actions sent to the networkdevice. Note that the system comes pre-packaged with default Enforcement Profiles for “Disconnect” (TerminateSession) actions for the different supported vendor devices; there is no need to create profiles for these actions.
l TACACS+ Based Enforcement - TACACS+ based enforcement profile with UI customized for TACACS+ service &command authorization.
l SNMP Based Enforcement - Generic SNMP based enforcement profile with SNMP dictionaries for VLAN steeringand Reset Connection.
l Cisco Downloadable ACL Enforcement - RADIUS based enforcement profile with UI customized for CiscoDownloadable ACL Enforcement.
l Cisco Web Authentication Enforcement - RADIUS based enforcement profile with pre-loaded attributes forenforcement for Cisco switch-hosted web authentication.
l Aruba Guest Enforcement - Application specific enforcement profile with pre-loaded attributes for authorization ofGuest users.
l Aruba Insight Enforcement - Application specific enforcement profile with pre-loaded attributes for authorization ofInsight users.
l Generic Application Enforcement - Application specific enforcement profile with customization attribute-valuepairs for authorization of generic applications.
l CLI Based Enforcement - Enforcement profile that encapsulates CLI commands to be issued to the network device.The “Target Device” attribute specifies the device on which the “Command” attribute is executed.
l Agent Enforcement - Enforcement profile that encapsulates attributes sent to Aruba OnGuard agent. Attributes canbe specified to bounce the client or to send a custom message to the client.
l ClearPass Entity Update Enforcement - Post-authentication enforcement profile that can be filled with attributes toupdate the tag entries in endpoints and guest users.
l Session Restrictions Enforcement - Post-authentication enforcement profile that can be filled with attributes torestrict users based on various factors such as bandwidth usage, active session count, and also terminate sessionswhen the limits are reached.
Table 112: Add Enforcement Profile page
Parameter Description
Name/Description
Freeform label for enforcement profile.
Type Auto-filled based on the selected template: RADIUS, TACACS, SNMP, Application,RADIUS_CoA
Action Relevant only for RADIUS type enforcement profiles. Accept, Deny or Drop the request.
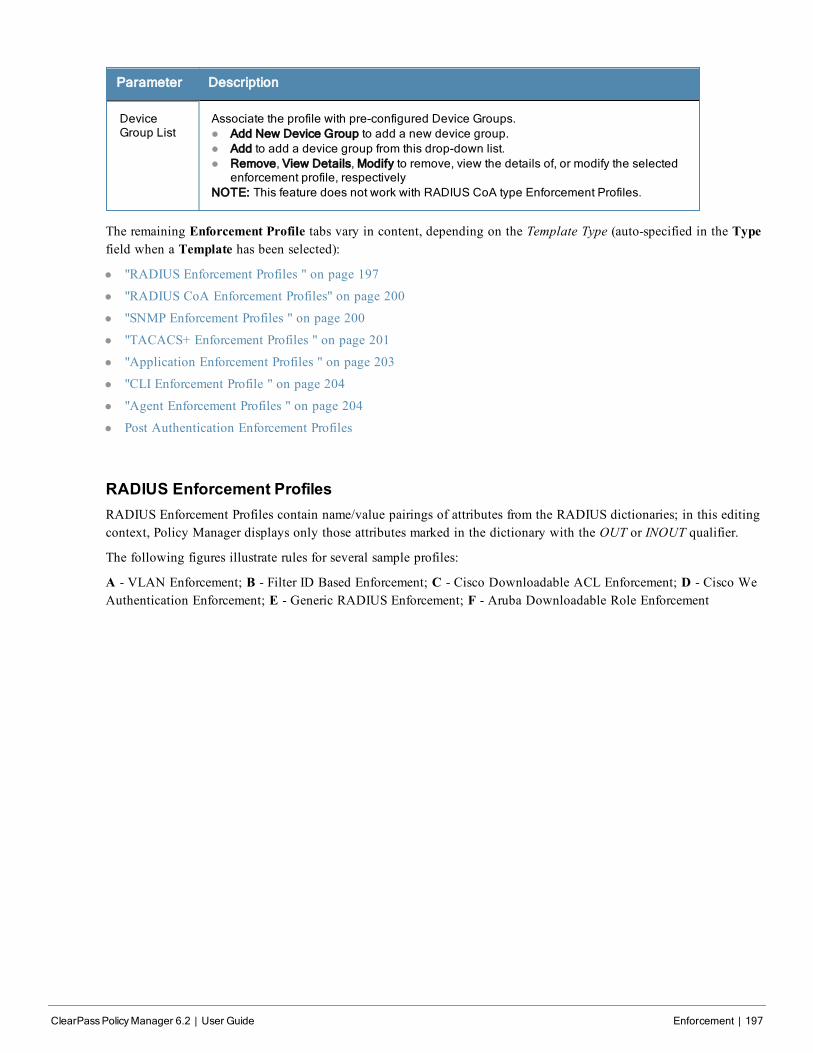
Parameter Description
DeviceGroup List
Associate the profile with pre-configured Device Groups.l Add New Device Group to add a new device group.l Add to add a device group from this drop-down list.l Remove, View Details, Modify to remove, view the details of, or modify the selected
enforcement profile, respectivelyNOTE: This feature does not work with RADIUS CoA type Enforcement Profiles.
The remaining Enforcement Profile tabs vary in content, depending on the Template Type (auto-specified in the Typefield when a Template has been selected):
l "RADIUS Enforcement Profiles " on page 197
l "RADIUS CoA Enforcement Profiles" on page 200
l "SNMP Enforcement Profiles " on page 200
l "TACACS+ Enforcement Profiles " on page 201
l "Application Enforcement Profiles " on page 203
l "CLI Enforcement Profile " on page 204
l "Agent Enforcement Profiles " on page 204
l Post Authentication Enforcement Profiles
RADIUS Enforcement ProfilesRADIUS Enforcement Profiles contain name/value pairings of attributes from the RADIUS dictionaries; in this editingcontext, Policy Manager displays only those attributes marked in the dictionary with the OUT or INOUT qualifier.
The following figures illustrate rules for several sample profiles:
A - VLAN Enforcement; B - Filter ID Based Enforcement; C - Cisco Downloadable ACL Enforcement; D - Cisco WeAuthentication Enforcement; E - Generic RADIUS Enforcement; F - Aruba Downloadable Role Enforcement
ClearPassPolicyManager 6.2 | User Guide Enforcement | 197
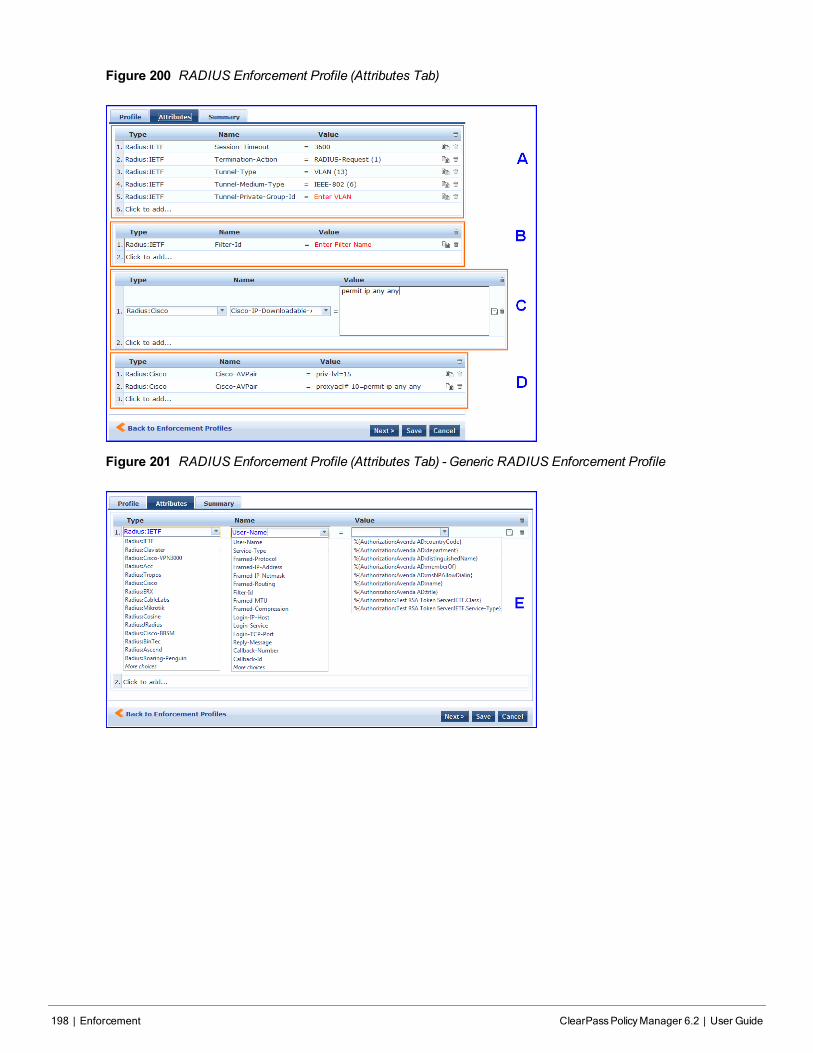
198 | Enforcement ClearPassPolicyManager 6.2 | User Guide
Figure 200 RADIUS Enforcement Profile (Attributes Tab)
Figure 201 RADIUS Enforcement Profile (Attributes Tab) - Generic RADIUS Enforcement Profile
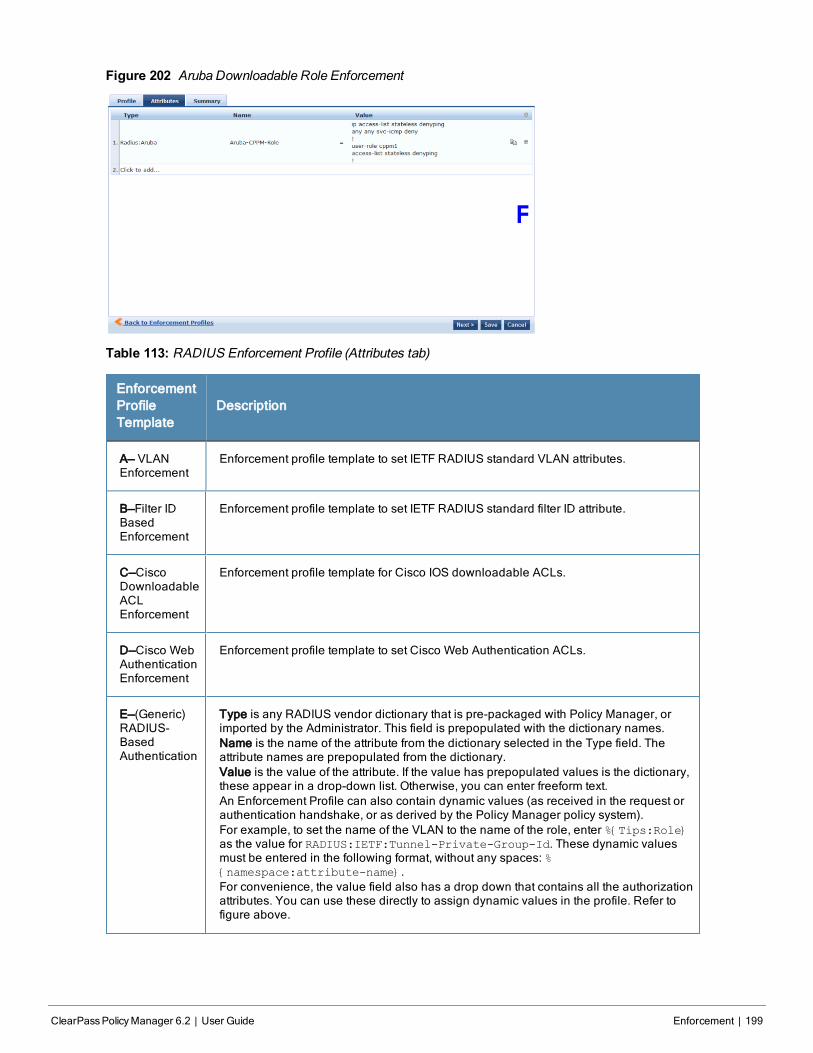
Figure 202 Aruba Downloadable Role Enforcement
Table 113: RADIUS Enforcement Profile (Attributes tab)
EnforcementProfileTemplate
Description
A— VLANEnforcement
Enforcement profile template to set IETF RADIUS standard VLAN attributes.
B—Filter IDBasedEnforcement
Enforcement profile template to set IETF RADIUS standard filter ID attribute.
C—CiscoDownloadableACLEnforcement
Enforcement profile template for Cisco IOS downloadable ACLs.
D—Cisco WebAuthenticationEnforcement
Enforcement profile template to set Cisco Web Authentication ACLs.
E—(Generic)RADIUS-BasedAuthentication
Type is any RADIUS vendor dictionary that is pre-packaged with Policy Manager, orimported by the Administrator. This field is prepopulated with the dictionary names.Name is the name of the attribute from the dictionary selected in the Type field. Theattribute names are prepopulated from the dictionary.Value is the value of the attribute. If the value has prepopulated values is the dictionary,these appear in a drop-down list. Otherwise, you can enter freeform text.An Enforcement Profile can also contain dynamic values (as received in the request orauthentication handshake, or as derived by the Policy Manager policy system).For example, to set the name of the VLAN to the name of the role, enter %{Tips:Role}as the value for RADIUS:IETF:Tunnel-Private-Group-Id. These dynamic valuesmust be entered in the following format, without any spaces: %{namespace:attribute-name}.For convenience, the value field also has a drop down that contains all the authorizationattributes. You can use these directly to assign dynamic values in the profile. Refer tofigure above.
ClearPassPolicyManager 6.2 | User Guide Enforcement | 199
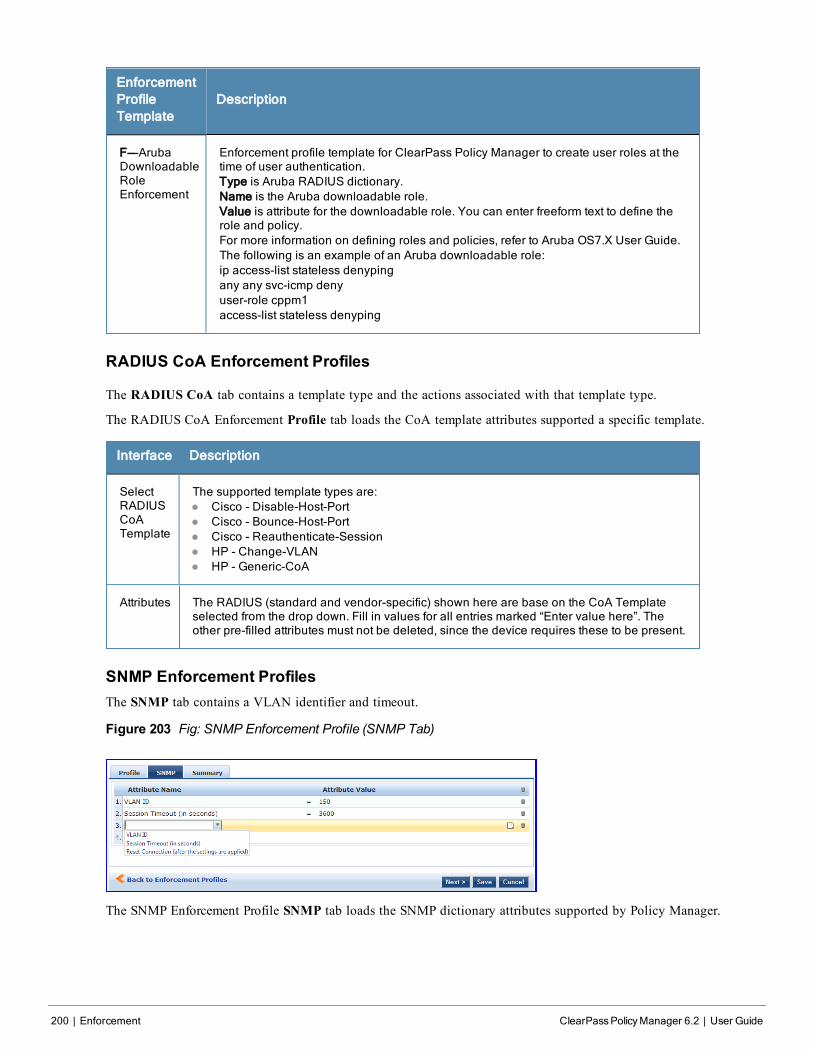
200 | Enforcement ClearPassPolicyManager 6.2 | User Guide
EnforcementProfileTemplate
Description
F—-ArubaDownloadableRoleEnforcement
Enforcement profile template for ClearPass Policy Manager to create user roles at thetime of user authentication.Type is Aruba RADIUS dictionary.Name is the Aruba downloadable role.Value is attribute for the downloadable role. You can enter freeform text to define therole and policy.For more information on defining roles and policies, refer to Aruba OS7.X User Guide.The following is an example of an Aruba downloadable role:ip access-list stateless denypingany any svc-icmp denyuser-role cppm1access-list stateless denyping
RADIUS CoA Enforcement Profiles
The RADIUS CoA tab contains a template type and the actions associated with that template type.
The RADIUS CoA Enforcement Profile tab loads the CoA template attributes supported a specific template.
Interface Description
SelectRADIUSCoATemplate
The supported template types are:l Cisco - Disable-Host-Portl Cisco - Bounce-Host-Portl Cisco - Reauthenticate-Sessionl HP - Change-VLANl HP - Generic-CoA
Attributes The RADIUS (standard and vendor-specific) shown here are base on the CoA Templateselected from the drop down. Fill in values for all entries marked “Enter value here”. Theother pre-filled attributes must not be deleted, since the device requires these to be present.
SNMP Enforcement ProfilesThe SNMP tab contains a VLAN identifier and timeout.
Figure 203 Fig: SNMP Enforcement Profile (SNMP Tab)
The SNMP Enforcement Profile SNMP tab loads the SNMP dictionary attributes supported by Policy Manager.

Table 114: SNMP Enforcement Profile (SNMP tab)
Interface Description
VLAN Id VLAN ID to be sent to the device
SessionTimeout
Session timeout in seconds.
ResetConnection(after thesettings areapplied)
Reset Connection is a primitive that does different actions based on the capabilities ofthe network device. For devices that support the 802.1X re-authentication, PolicyManager triggers a re-authentication; in other cases, it bounces the port.
TACACS+ Enforcement ProfilesTACACS+ Enforcement Profiles contain attribute-value pairs and other permissions related to administrative access toa network device. The built-in TACACS+ enforcement profiles can also be used to log into the Policy Manager UI.TACACS+ enforcement profiles use ARAP, Policy Manager:HTTP, PIX Shell, PPP:IP, PPP:IPX, PPP:LCP, Wireless-WCS:HTTP, CiscoWLC:Common and Shell namespaces to define service attributes.
Figure 204 TACACS+ Enforcement Profiles (Services Tab)
Table 115: TACACS+ Enforcement Profile (Services tab)
Container Description
PrivilegeLevel
Enter a value, from 0 to 15.NOTE: Refer to your network device documentation for definitions of the different privilegelevels.
ClearPassPolicyManager 6.2 | User Guide Enforcement | 201
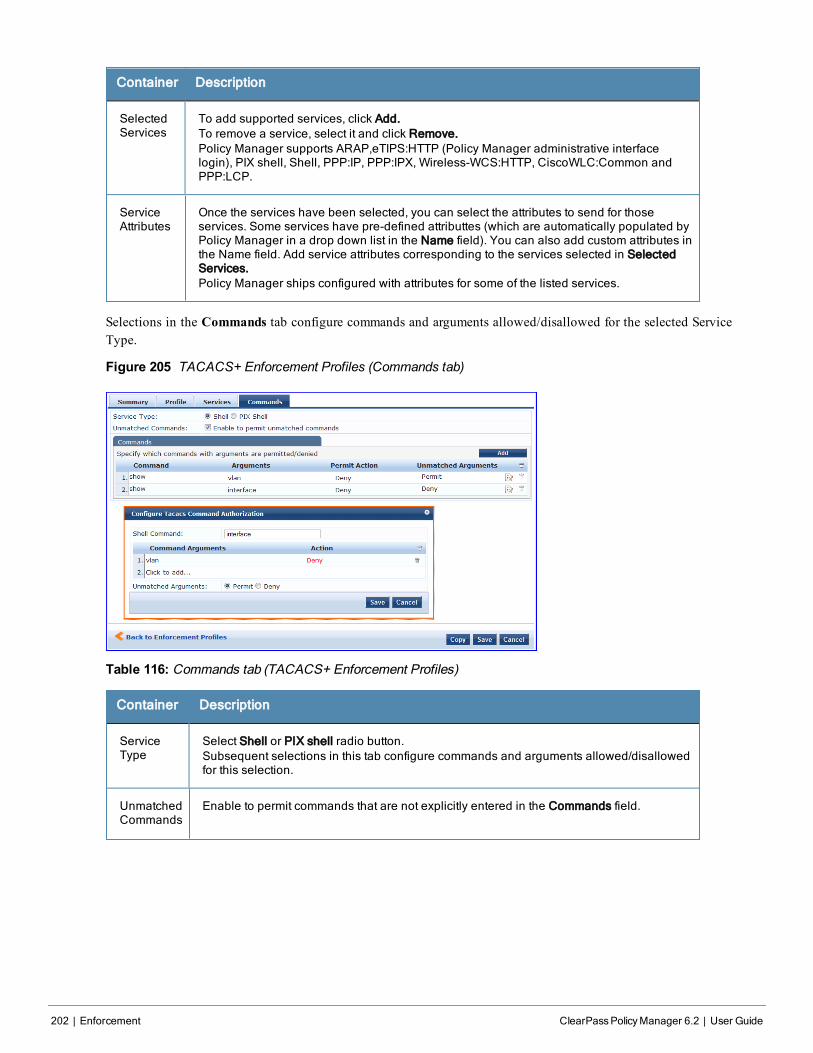
202 | Enforcement ClearPassPolicyManager 6.2 | User Guide
Container Description
SelectedServices
To add supported services, click Add.To remove a service, select it and click Remove.Policy Manager supports ARAP,eTIPS:HTTP (Policy Manager administrative interfacelogin), PIX shell, Shell, PPP:IP, PPP:IPX, Wireless-WCS:HTTP, CiscoWLC:Common andPPP:LCP.
ServiceAttributes
Once the services have been selected, you can select the attributes to send for thoseservices. Some services have pre-defined attributtes (which are automatically populated byPolicy Manager in a drop down list in the Name field). You can also add custom attributes inthe Name field. Add service attributes corresponding to the services selected in SelectedServices.Policy Manager ships configured with attributes for some of the listed services.
Selections in the Commands tab configure commands and arguments allowed/disallowed for the selected ServiceType.
Figure 205 TACACS+ Enforcement Profiles (Commands tab)
Table 116: Commands tab (TACACS+ Enforcement Profiles)
Container Description
ServiceType
Select Shell or PIX shell radio button.Subsequent selections in this tab configure commands and arguments allowed/disallowedfor this selection.
UnmatchedCommands
Enable to permit commands that are not explicitly entered in the Commands field.
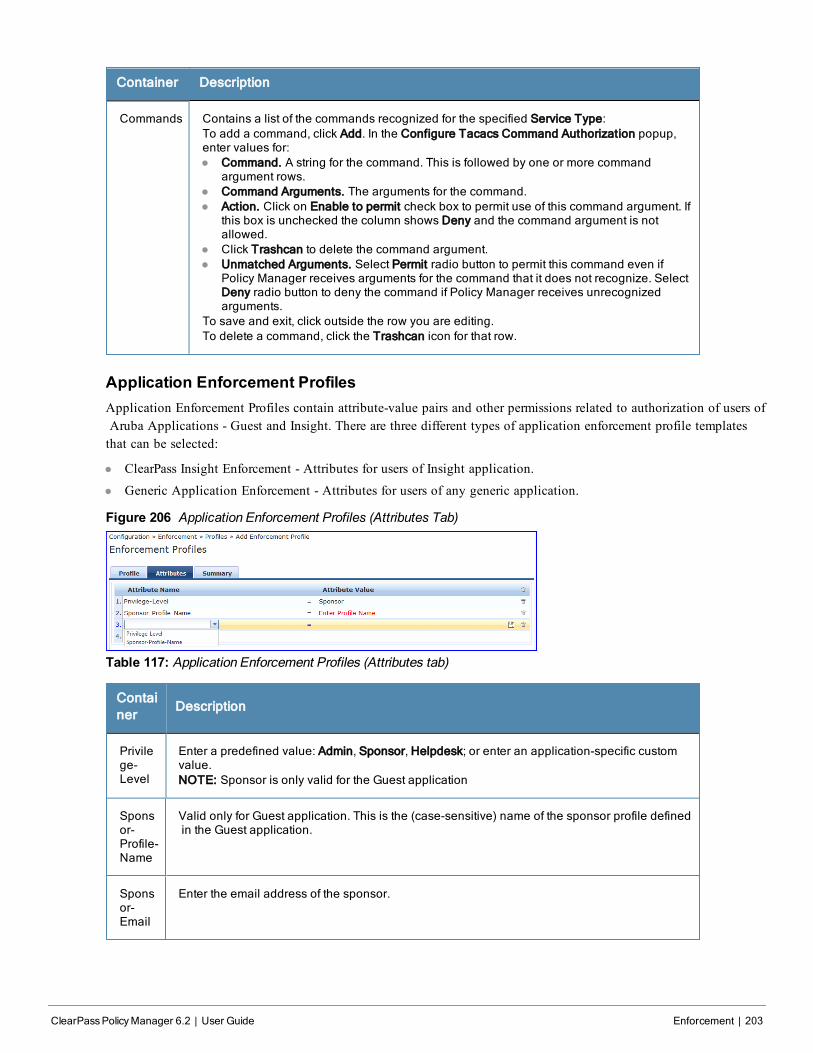
Container Description
Commands Contains a list of the commands recognized for the specified Service Type:To add a command, click Add. In the Configure Tacacs Command Authorization popup,enter values for:l Command. A string for the command. This is followed by one or more command
argument rows.l Command Arguments. The arguments for the command.l Action. Click on Enable to permit check box to permit use of this command argument. If
this box is unchecked the column shows Deny and the command argument is notallowed.
l Click Trashcan to delete the command argument.l Unmatched Arguments. Select Permit radio button to permit this command even if
Policy Manager receives arguments for the command that it does not recognize. SelectDeny radio button to deny the command if Policy Manager receives unrecognizedarguments.
To save and exit, click outside the row you are editing.To delete a command, click the Trashcan icon for that row.
Application Enforcement ProfilesApplication Enforcement Profiles contain attribute-value pairs and other permissions related to authorization of users ofAruba Applications - Guest and Insight. There are three different types of application enforcement profile templatesthat can be selected:
l ClearPass Insight Enforcement - Attributes for users of Insight application.
l Generic Application Enforcement - Attributes for users of any generic application.
Figure 206 Application Enforcement Profiles (Attributes Tab)
Table 117: Application Enforcement Profiles (Attributes tab)
Container
Description
Privilege-Level
Enter a predefined value: Admin, Sponsor, Helpdesk; or enter an application-specific customvalue.NOTE: Sponsor is only valid for the Guest application
Sponsor-Profile-Name
Valid only for Guest application. This is the (case-sensitive) name of the sponsor profile definedin the Guest application.
Sponsor-Email
Enter the email address of the sponsor.
ClearPassPolicyManager 6.2 | User Guide Enforcement | 203
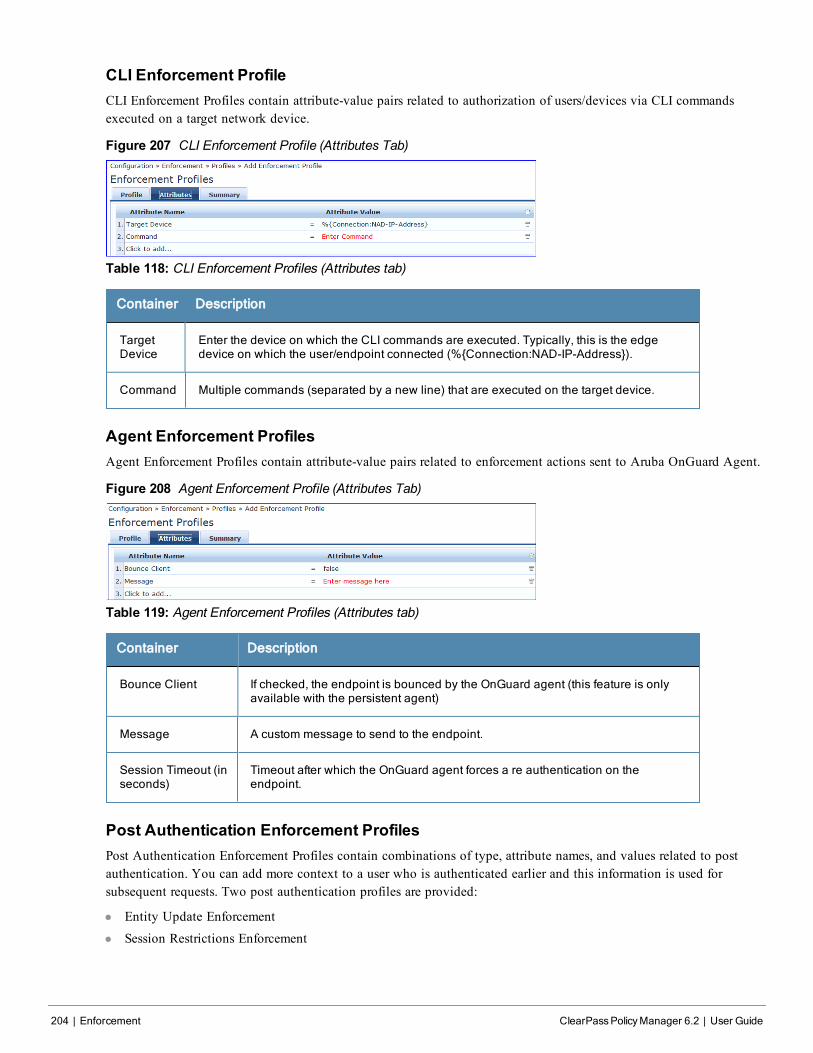
204 | Enforcement ClearPassPolicyManager 6.2 | User Guide
CLI Enforcement ProfileCLI Enforcement Profiles contain attribute-value pairs related to authorization of users/devices via CLI commandsexecuted on a target network device.
Figure 207 CLI Enforcement Profile (Attributes Tab)
Table 118: CLI Enforcement Profiles (Attributes tab)
Container Description
TargetDevice
Enter the device on which the CLI commands are executed. Typically, this is the edgedevice on which the user/endpoint connected (%{Connection:NAD-IP-Address}).
Command Multiple commands (separated by a new line) that are executed on the target device.
Agent Enforcement ProfilesAgent Enforcement Profiles contain attribute-value pairs related to enforcement actions sent to Aruba OnGuard Agent.
Figure 208 Agent Enforcement Profile (Attributes Tab)
Table 119: Agent Enforcement Profiles (Attributes tab)
Container Description
Bounce Client If checked, the endpoint is bounced by the OnGuard agent (this feature is onlyavailable with the persistent agent)
Message A custom message to send to the endpoint.
Session Timeout (inseconds)
Timeout after which the OnGuard agent forces a re authentication on theendpoint.
Post Authentication Enforcement ProfilesPost Authentication Enforcement Profiles contain combinations of type, attribute names, and values related to postauthentication. You can add more context to a user who is authenticated earlier and this information is used forsubsequent requests. Two post authentication profiles are provided:
l Entity Update Enforcement
l Session Restrictions Enforcement
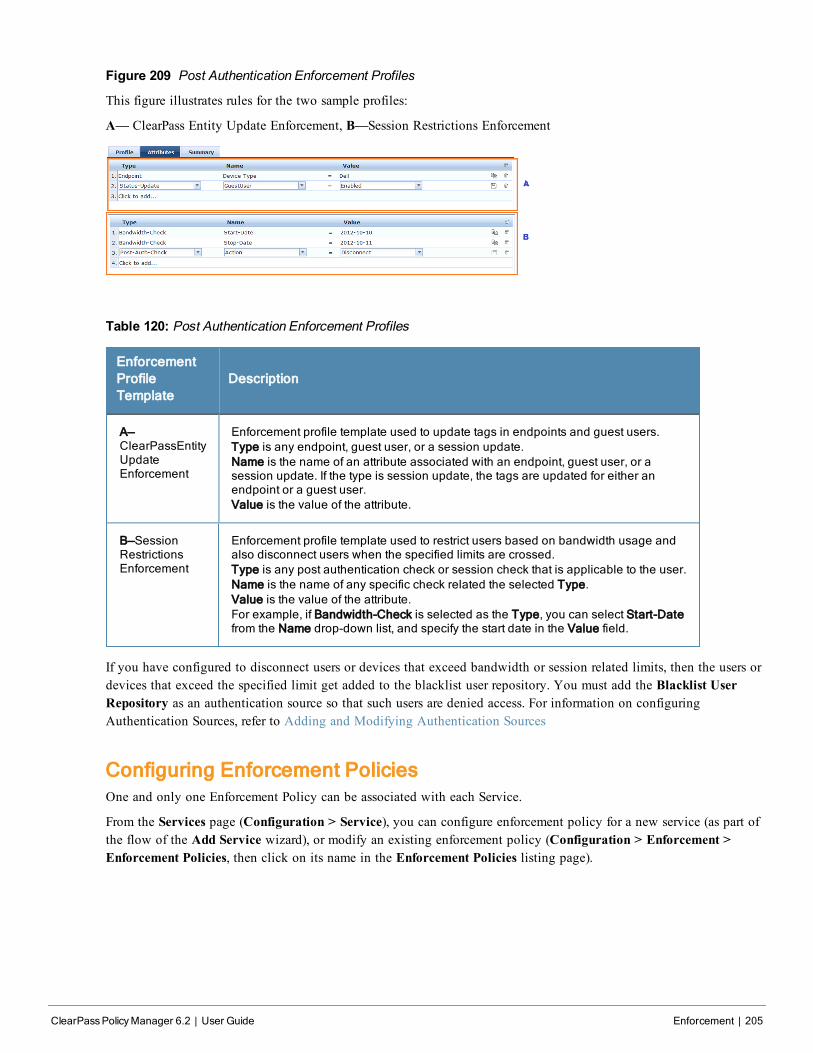
Figure 209 Post Authentication Enforcement Profiles
This figure illustrates rules for the two sample profiles:
A— ClearPass Entity Update Enforcement, B—Session Restrictions Enforcement
Table 120: Post Authentication Enforcement Profiles
EnforcementProfileTemplate
Description
A—ClearPassEntityUpdateEnforcement
Enforcement profile template used to update tags in endpoints and guest users.Type is any endpoint, guest user, or a session update.Name is the name of an attribute associated with an endpoint, guest user, or asession update. If the type is session update, the tags are updated for either anendpoint or a guest user.Value is the value of the attribute.
B—SessionRestrictionsEnforcement
Enforcement profile template used to restrict users based on bandwidth usage andalso disconnect users when the specified limits are crossed.Type is any post authentication check or session check that is applicable to the user.Name is the name of any specific check related the selected Type.Value is the value of the attribute.For example, if Bandwidth-Check is selected as the Type, you can select Start-Datefrom the Name drop-down list, and specify the start date in the Value field.
If you have configured to disconnect users or devices that exceed bandwidth or session related limits, then the users ordevices that exceed the specified limit get added to the blacklist user repository. You must add the Blacklist UserRepository as an authentication source so that such users are denied access. For information on configuringAuthentication Sources, refer to Adding and Modifying Authentication Sources
Configuring Enforcement PoliciesOne and only one Enforcement Policy can be associated with each Service.
From the Services page (Configuration > Service), you can configure enforcement policy for a new service (as part ofthe flow of the Add Service wizard), or modify an existing enforcement policy (Configuration > Enforcement >Enforcement Policies, then click on its name in the Enforcement Policies listing page).
ClearPassPolicyManager 6.2 | User Guide Enforcement | 205
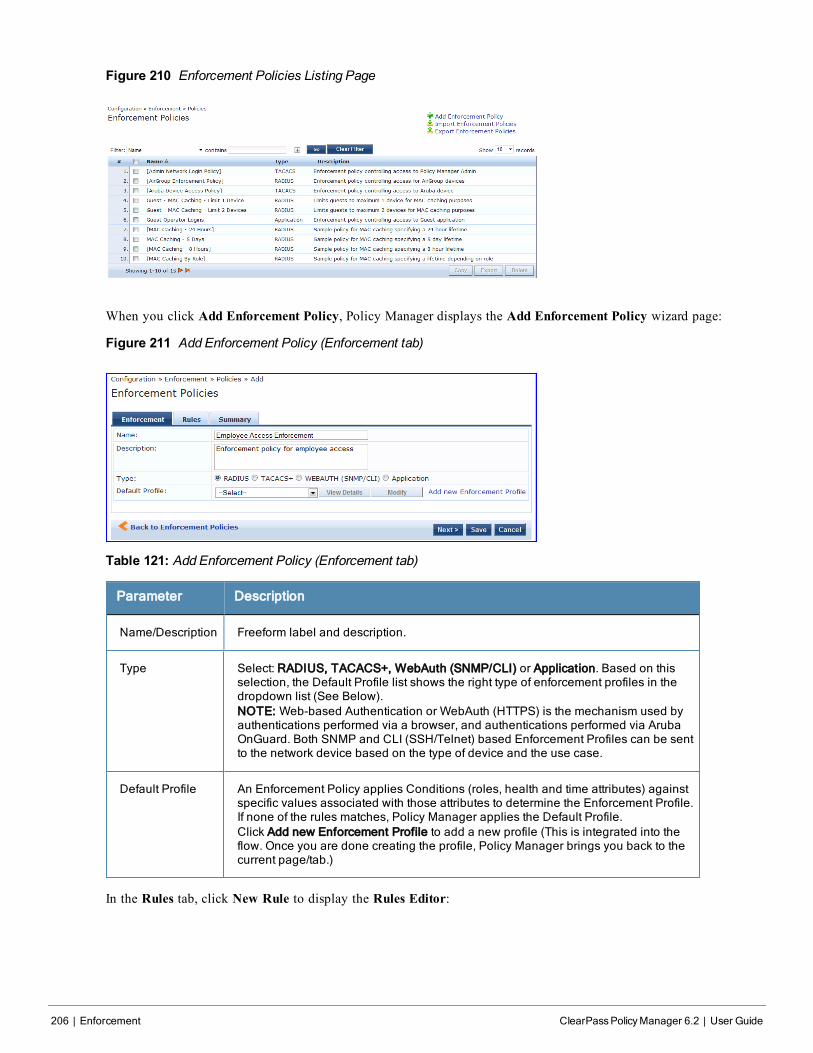
206 | Enforcement ClearPassPolicyManager 6.2 | User Guide
Figure 210 Enforcement Policies Listing Page
When you click Add Enforcement Policy, Policy Manager displays the Add Enforcement Policy wizard page:
Figure 211 Add Enforcement Policy (Enforcement tab)
Table 121: Add Enforcement Policy (Enforcement tab)
Parameter Description
Name/Description Freeform label and description.
Type Select: RADIUS, TACACS+, WebAuth (SNMP/CLI) or Application. Based on thisselection, the Default Profile list shows the right type of enforcement profiles in thedropdown list (See Below).NOTE: Web-based Authentication or WebAuth (HTTPS) is the mechanism used byauthentications performed via a browser, and authentications performed via ArubaOnGuard. Both SNMP and CLI (SSH/Telnet) based Enforcement Profiles can be sentto the network device based on the type of device and the use case.
Default Profile An Enforcement Policy applies Conditions (roles, health and time attributes) againstspecific values associated with those attributes to determine the Enforcement Profile.If none of the rules matches, Policy Manager applies the Default Profile.Click Add new Enforcement Profile to add a new profile (This is integrated into theflow. Once you are done creating the profile, Policy Manager brings you back to thecurrent page/tab.)
In the Rules tab, click New Rule to display the Rules Editor:
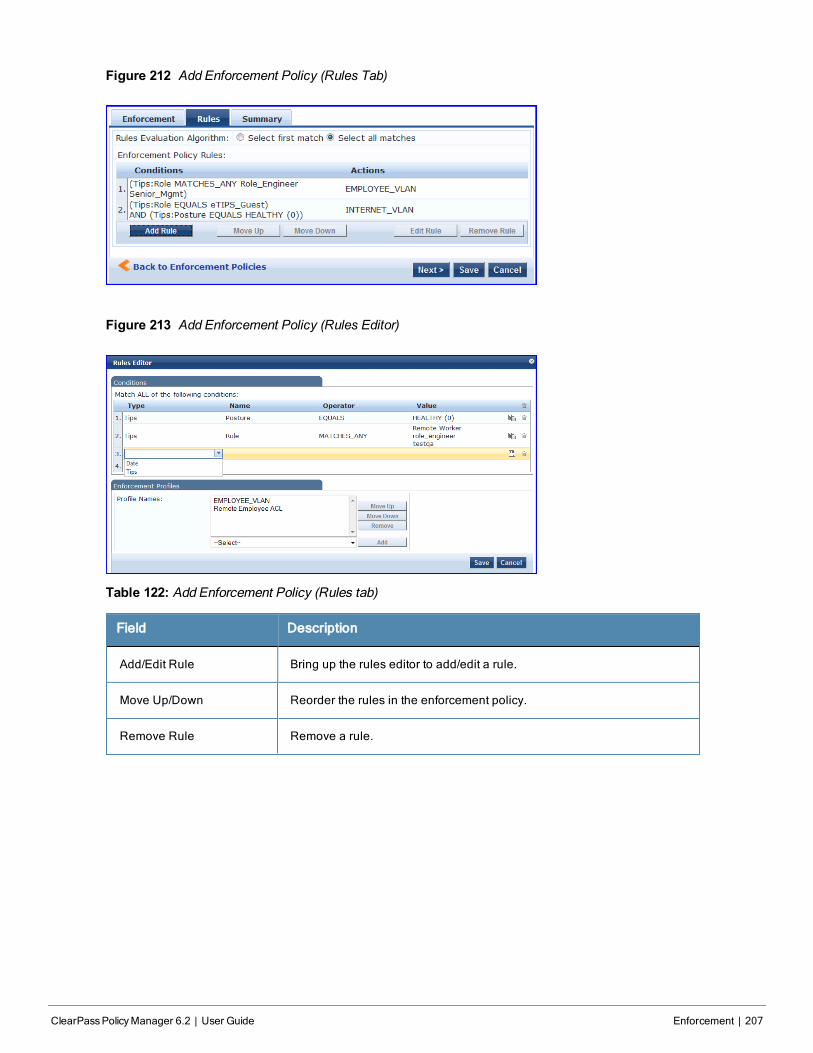
Figure 212 Add Enforcement Policy (Rules Tab)
Figure 213 Add Enforcement Policy (Rules Editor)
Table 122: Add Enforcement Policy (Rules tab)
Field Description
Add/Edit Rule Bring up the rules editor to add/edit a rule.
Move Up/Down Reorder the rules in the enforcement policy.
Remove Rule Remove a rule.
ClearPassPolicyManager 6.2 | User Guide Enforcement | 207
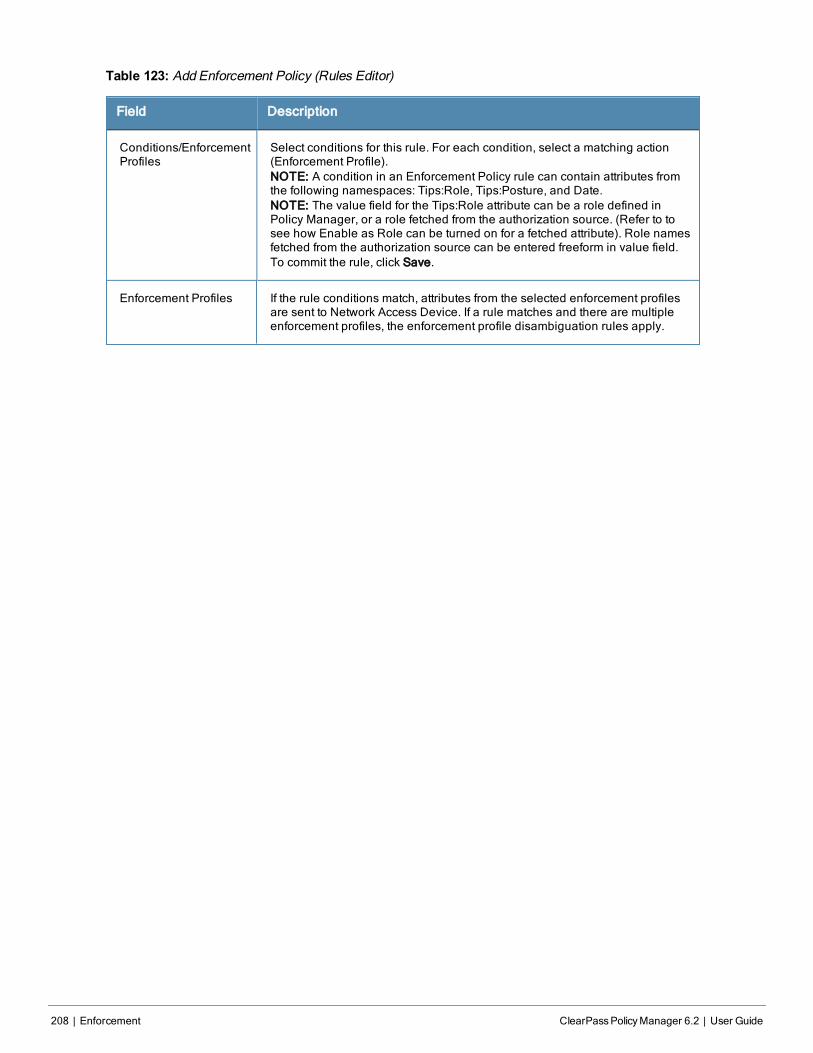
208 | Enforcement ClearPassPolicyManager 6.2 | User Guide
Table 123: Add Enforcement Policy (Rules Editor)
Field Description
Conditions/EnforcementProfiles
Select conditions for this rule. For each condition, select a matching action(Enforcement Profile).NOTE: A condition in an Enforcement Policy rule can contain attributes fromthe following namespaces: Tips:Role, Tips:Posture, and Date.NOTE: The value field for the Tips:Role attribute can be a role defined inPolicy Manager, or a role fetched from the authorization source. (Refer to tosee how Enable as Role can be turned on for a fetched attribute). Role namesfetched from the authorization source can be entered freeform in value field.To commit the rule, click Save.
Enforcement Profiles If the rule conditions match, attributes from the selected enforcement profilesare sent to Network Access Device. If a rule matches and there are multipleenforcement profiles, the enforcement profile disambiguation rules apply.
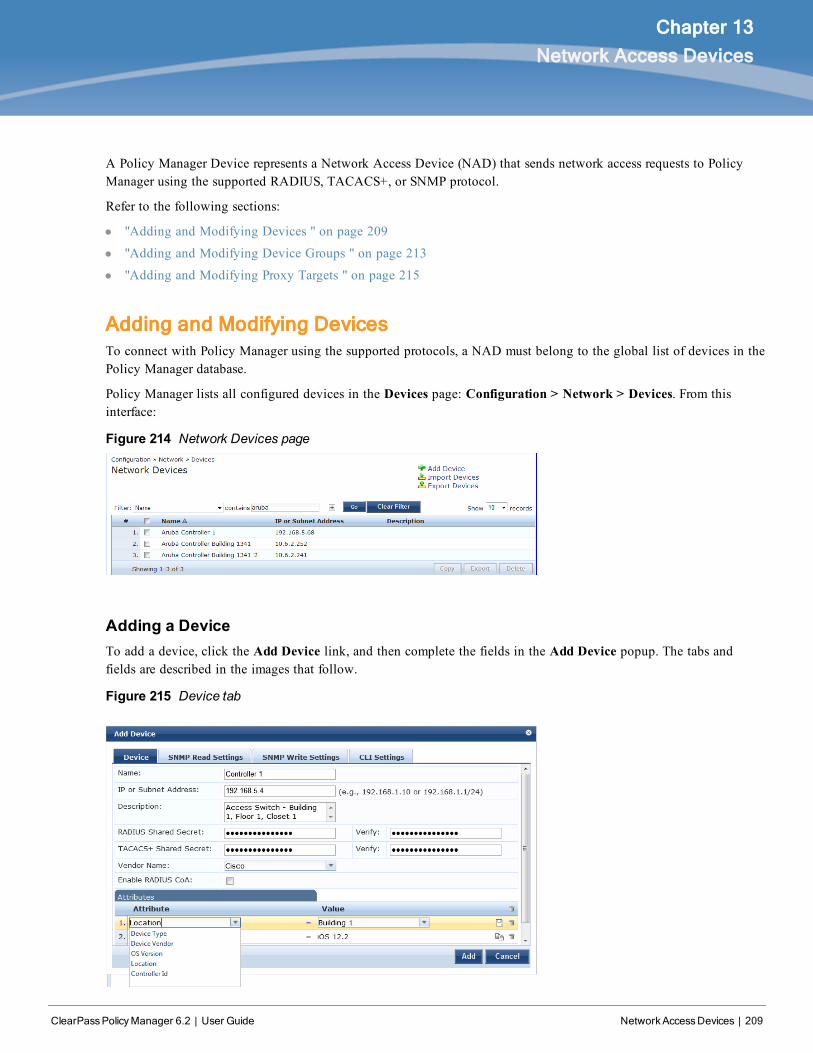
ClearPassPolicyManager 6.2 | User Guide NetworkAccessDevices | 209
Chapter 13
Network Access Devices
A Policy Manager Device represents a Network Access Device (NAD) that sends network access requests to PolicyManager using the supported RADIUS, TACACS+, or SNMP protocol.
Refer to the following sections:
l "Adding and Modifying Devices " on page 209
l "Adding and Modifying Device Groups " on page 213
l "Adding and Modifying Proxy Targets " on page 215
Adding and Modifying DevicesTo connect with Policy Manager using the supported protocols, a NAD must belong to the global list of devices in thePolicy Manager database.
Policy Manager lists all configured devices in the Devices page: Configuration > Network > Devices. From thisinterface:
Figure 214 Network Devices page
Adding a DeviceTo add a device, click the Add Device link, and then complete the fields in the Add Device popup. The tabs andfields are described in the images that follow.
Figure 215 Device tab
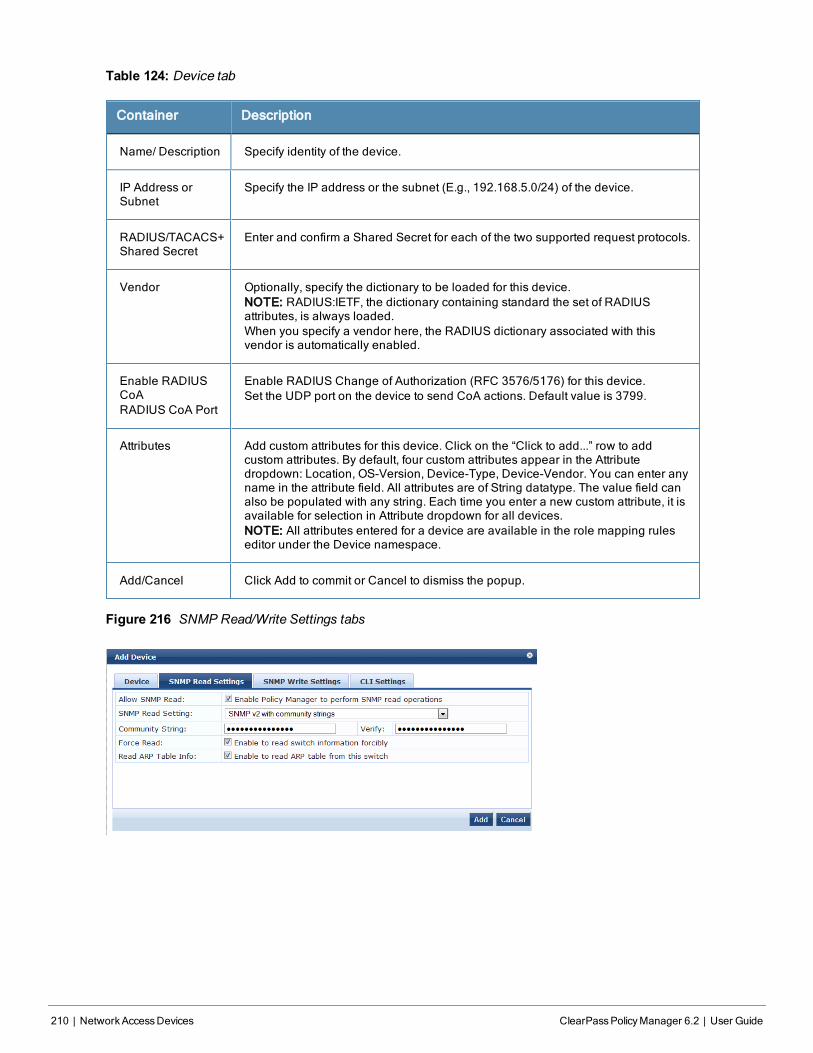
210 | NetworkAccessDevices ClearPassPolicyManager 6.2 | User Guide
Table 124: Device tab
Container Description
Name/ Description Specify identity of the device.
IP Address orSubnet
Specify the IP address or the subnet (E.g., 192.168.5.0/24) of the device.
RADIUS/TACACS+Shared Secret
Enter and confirm a Shared Secret for each of the two supported request protocols.
Vendor Optionally, specify the dictionary to be loaded for this device.NOTE: RADIUS:IETF, the dictionary containing standard the set of RADIUSattributes, is always loaded.When you specify a vendor here, the RADIUS dictionary associated with thisvendor is automatically enabled.
Enable RADIUSCoARADIUS CoA Port
Enable RADIUS Change of Authorization (RFC 3576/5176) for this device.Set the UDP port on the device to send CoA actions. Default value is 3799.
Attributes Add custom attributes for this device. Click on the “Click to add...” row to addcustom attributes. By default, four custom attributes appear in the Attributedropdown: Location, OS-Version, Device-Type, Device-Vendor. You can enter anyname in the attribute field. All attributes are of String datatype. The value field canalso be populated with any string. Each time you enter a new custom attribute, it isavailable for selection in Attribute dropdown for all devices.NOTE: All attributes entered for a device are available in the role mapping ruleseditor under the Device namespace.
Add/Cancel Click Add to commit or Cancel to dismiss the popup.
Figure 216 SNMP Read/Write Settings tabs
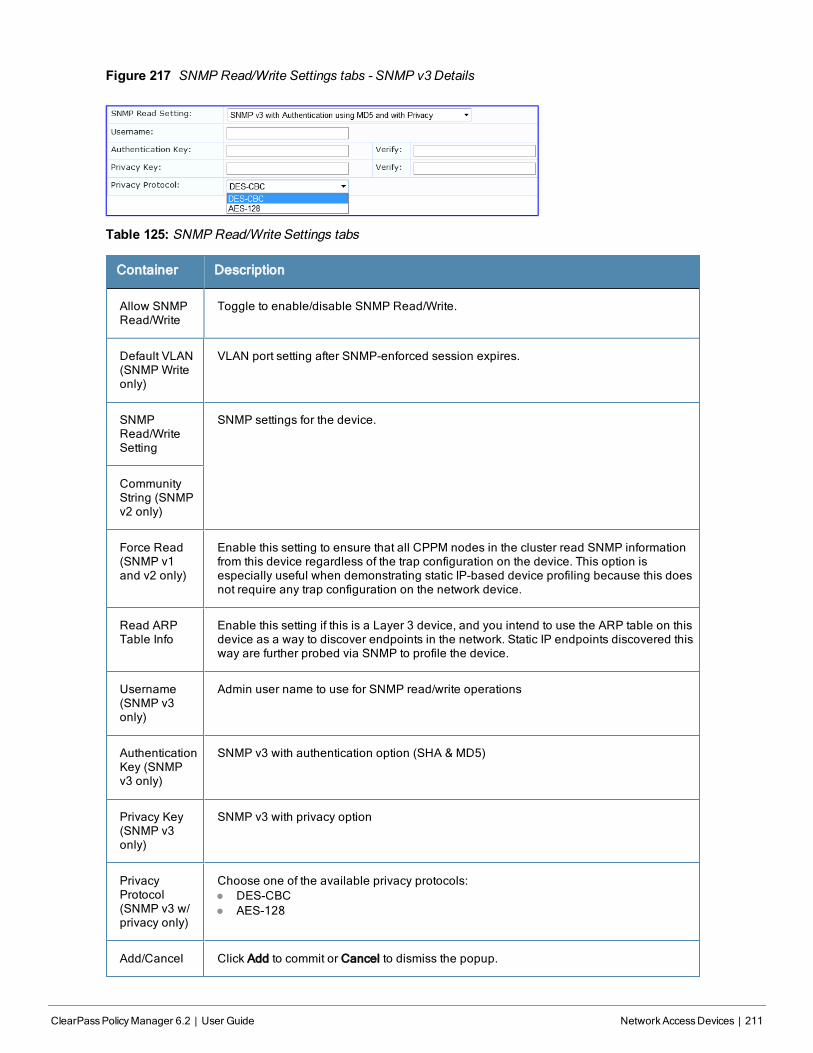
Figure 217 SNMP Read/Write Settings tabs - SNMP v3Details
Table 125: SNMP Read/Write Settings tabs
Container Description
Allow SNMPRead/Write
Toggle to enable/disable SNMP Read/Write.
Default VLAN(SNMP Writeonly)
VLAN port setting after SNMP-enforced session expires.
SNMPRead/WriteSetting
SNMP settings for the device.
CommunityString (SNMPv2 only)
Force Read(SNMP v1and v2 only)
Enable this setting to ensure that all CPPM nodes in the cluster read SNMP informationfrom this device regardless of the trap configuration on the device. This option isespecially useful when demonstrating static IP-based device profiling because this doesnot require any trap configuration on the network device.
Read ARPTable Info
Enable this setting if this is a Layer 3 device, and you intend to use the ARP table on thisdevice as a way to discover endpoints in the network. Static IP endpoints discovered thisway are further probed via SNMP to profile the device.
Username(SNMP v3only)
Admin user name to use for SNMP read/write operations
AuthenticationKey (SNMPv3 only)
SNMP v3 with authentication option (SHA & MD5)
Privacy Key(SNMP v3only)
SNMP v3 with privacy option
PrivacyProtocol(SNMP v3 w/privacy only)
Choose one of the available privacy protocols:l DES-CBCl AES-128
Add/Cancel Click Add to commit or Cancel to dismiss the popup.
ClearPassPolicyManager 6.2 | User Guide NetworkAccessDevices | 211
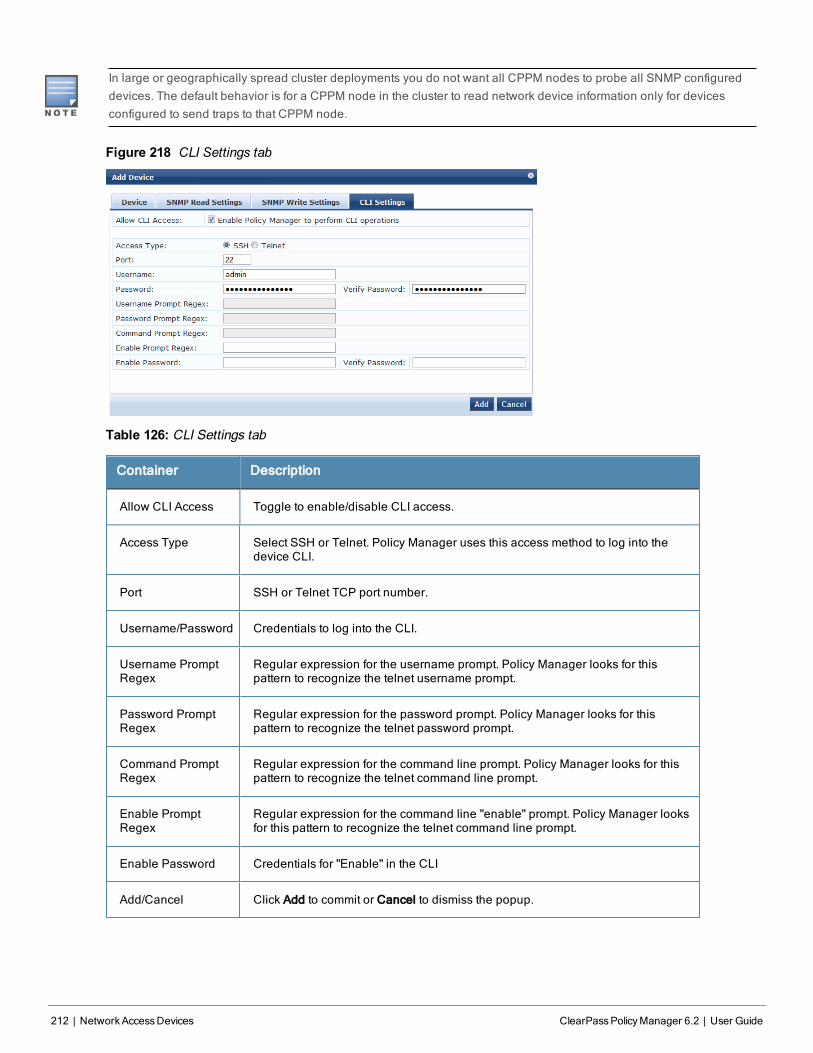
212 | NetworkAccessDevices ClearPassPolicyManager 6.2 | User Guide
In large or geographically spread cluster deployments you do not want all CPPM nodes to probe all SNMP configureddevices. The default behavior is for a CPPM node in the cluster to read network device information only for devicesconfigured to send traps to that CPPM node.
Figure 218 CLI Settings tab
Table 126: CLI Settings tab
Container Description
Allow CLI Access Toggle to enable/disable CLI access.
Access Type Select SSH or Telnet. Policy Manager uses this access method to log into thedevice CLI.
Port SSH or Telnet TCP port number.
Username/Password Credentials to log into the CLI.
Username PromptRegex
Regular expression for the username prompt. Policy Manager looks for thispattern to recognize the telnet username prompt.
Password PromptRegex
Regular expression for the password prompt. Policy Manager looks for thispattern to recognize the telnet password prompt.
Command PromptRegex
Regular expression for the command line prompt. Policy Manager looks for thispattern to recognize the telnet command line prompt.
Enable PromptRegex
Regular expression for the command line "enable" prompt. Policy Manager looksfor this pattern to recognize the telnet command line prompt.
Enable Password Credentials for "Enable" in the CLI
Add/Cancel Click Add to commit or Cancel to dismiss the popup.
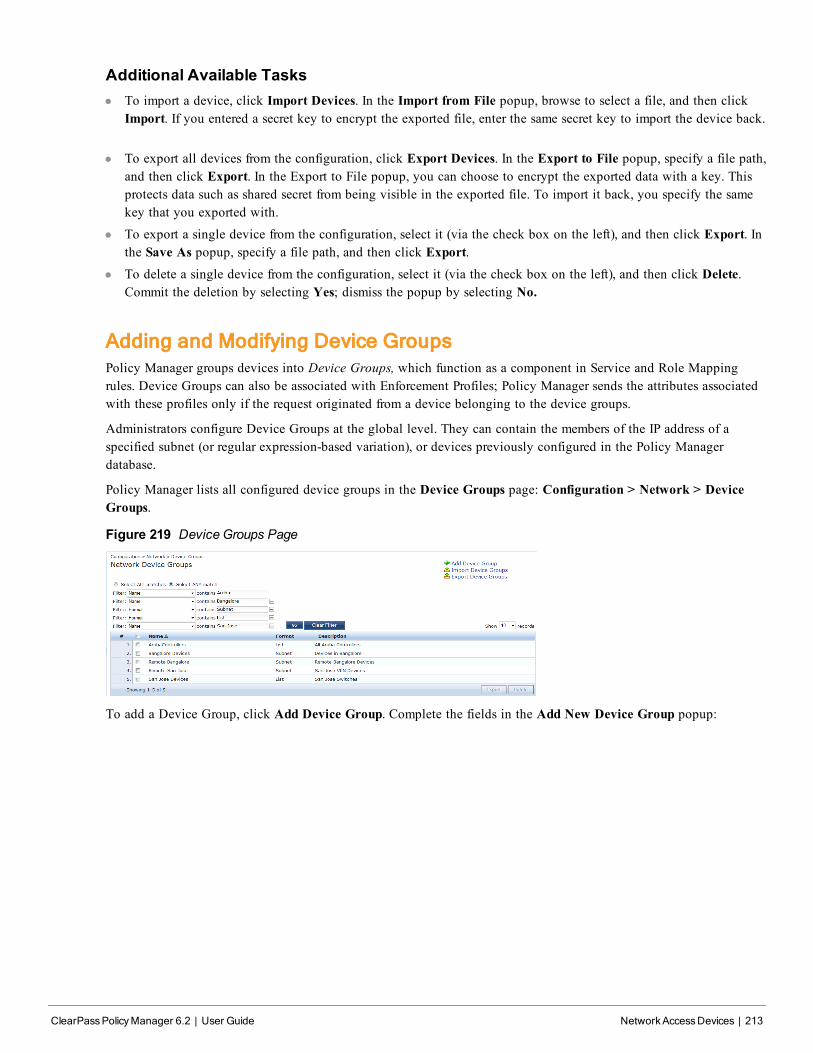
Additional Available Tasksl To import a device, click Import Devices. In the Import from File popup, browse to select a file, and then click
Import. If you entered a secret key to encrypt the exported file, enter the same secret key to import the device back.
l To export all devices from the configuration, click Export Devices. In the Export to File popup, specify a file path,and then click Export. In the Export to File popup, you can choose to encrypt the exported data with a key. Thisprotects data such as shared secret from being visible in the exported file. To import it back, you specify the samekey that you exported with.
l To export a single device from the configuration, select it (via the check box on the left), and then click Export. Inthe Save As popup, specify a file path, and then click Export.
l To delete a single device from the configuration, select it (via the check box on the left), and then click Delete.Commit the deletion by selecting Yes; dismiss the popup by selecting No.
Adding and Modifying Device GroupsPolicy Manager groups devices into Device Groups, which function as a component in Service and Role Mappingrules. Device Groups can also be associated with Enforcement Profiles; Policy Manager sends the attributes associatedwith these profiles only if the request originated from a device belonging to the device groups.
Administrators configure Device Groups at the global level. They can contain the members of the IP address of aspecified subnet (or regular expression-based variation), or devices previously configured in the Policy Managerdatabase.
Policy Manager lists all configured device groups in the Device Groups page: Configuration > Network > DeviceGroups.
Figure 219 Device Groups Page
To add a Device Group, click Add Device Group. Complete the fields in the Add New Device Group popup:
ClearPassPolicyManager 6.2 | User Guide NetworkAccessDevices | 213
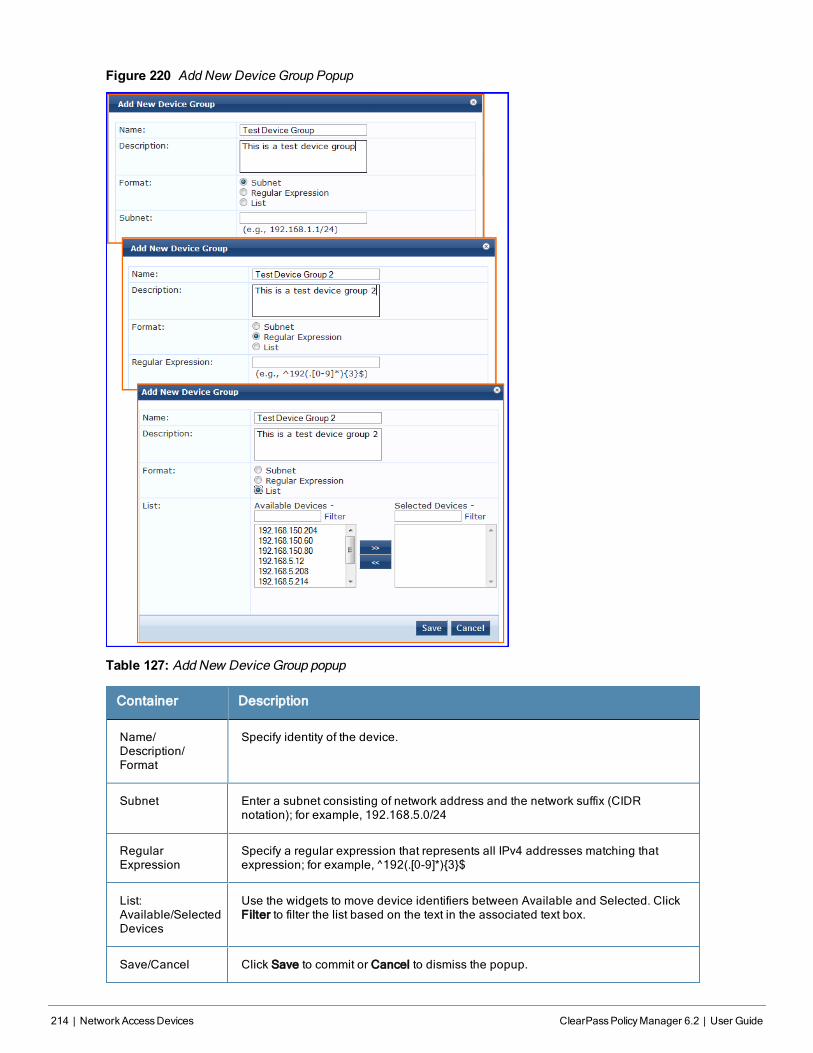
214 | NetworkAccessDevices ClearPassPolicyManager 6.2 | User Guide
Figure 220 AddNew Device Group Popup
Table 127: AddNew Device Group popup
Container Description
Name/Description/Format
Specify identity of the device.
Subnet Enter a subnet consisting of network address and the network suffix (CIDRnotation); for example, 192.168.5.0/24
RegularExpression
Specify a regular expression that represents all IPv4 addresses matching thatexpression; for example, ^192(.[0-9]*){3}$
List:Available/SelectedDevices
Use the widgets to move device identifiers between Available and Selected. ClickFilter to filter the list based on the text in the associated text box.
Save/Cancel Click Save to commit or Cancel to dismiss the popup.
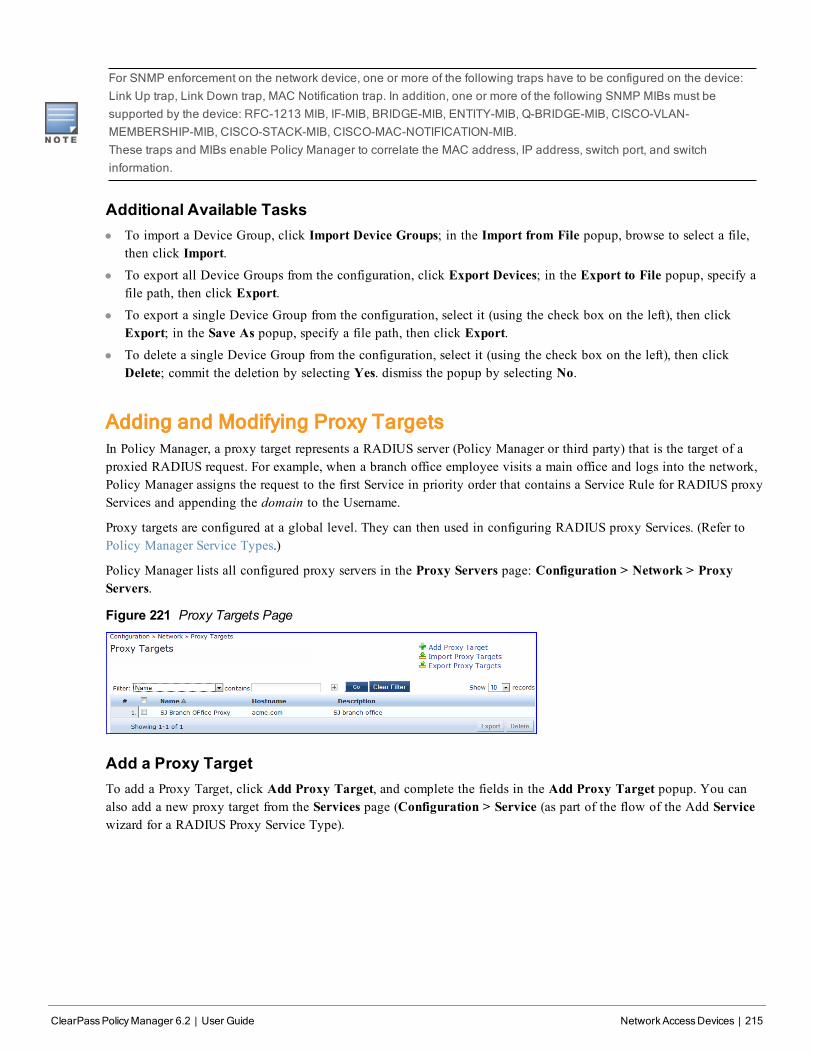
For SNMP enforcement on the network device, one or more of the following traps have to be configured on the device:Link Up trap, Link Down trap, MAC Notification trap. In addition, one or more of the following SNMP MIBs must besupported by the device: RFC-1213 MIB, IF-MIB, BRIDGE-MIB, ENTITY-MIB, Q-BRIDGE-MIB, CISCO-VLAN-MEMBERSHIP-MIB, CISCO-STACK-MIB, CISCO-MAC-NOTIFICATION-MIB.These traps and MIBs enable Policy Manager to correlate the MAC address, IP address, switch port, and switchinformation.
Additional Available Tasksl To import a Device Group, click Import Device Groups; in the Import from File popup, browse to select a file,
then click Import.l To export all Device Groups from the configuration, click Export Devices; in the Export to File popup, specify a
file path, then click Export.l To export a single Device Group from the configuration, select it (using the check box on the left), then click
Export; in the Save As popup, specify a file path, then click Export.l To delete a single Device Group from the configuration, select it (using the check box on the left), then click
Delete; commit the deletion by selecting Yes. dismiss the popup by selecting No.
Adding and Modifying Proxy TargetsIn Policy Manager, a proxy target represents a RADIUS server (Policy Manager or third party) that is the target of aproxied RADIUS request. For example, when a branch office employee visits a main office and logs into the network,Policy Manager assigns the request to the first Service in priority order that contains a Service Rule for RADIUS proxyServices and appending the domain to the Username.
Proxy targets are configured at a global level. They can then used in configuring RADIUS proxy Services. (Refer toPolicy Manager Service Types.)
Policy Manager lists all configured proxy servers in the Proxy Servers page: Configuration > Network > ProxyServers.
Figure 221 Proxy Targets Page
Add a Proxy TargetTo add a Proxy Target, click Add Proxy Target, and complete the fields in the Add Proxy Target popup. You canalso add a new proxy target from the Services page (Configuration > Service (as part of the flow of the Add Servicewizard for a RADIUS Proxy Service Type).
ClearPassPolicyManager 6.2 | User Guide NetworkAccessDevices | 215
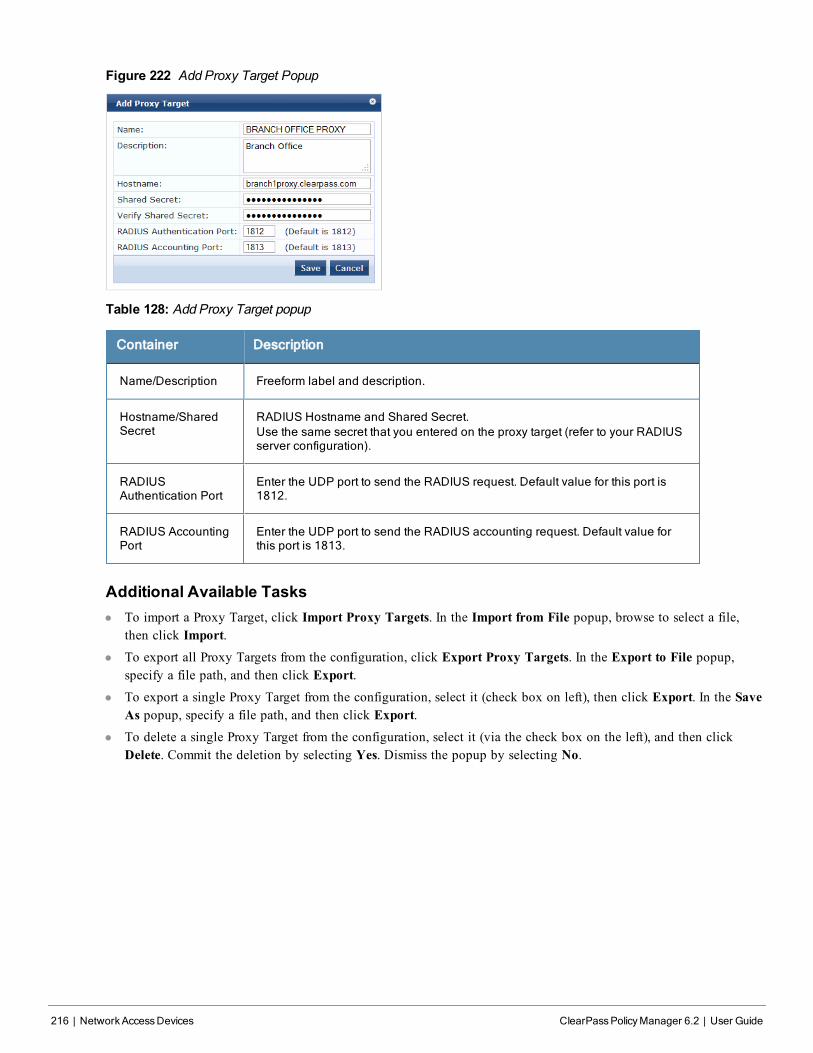
216 | NetworkAccessDevices ClearPassPolicyManager 6.2 | User Guide
Figure 222 Add Proxy Target Popup
Table 128: Add Proxy Target popup
Container Description
Name/Description Freeform label and description.
Hostname/SharedSecret
RADIUS Hostname and Shared Secret.Use the same secret that you entered on the proxy target (refer to your RADIUSserver configuration).
RADIUSAuthentication Port
Enter the UDP port to send the RADIUS request. Default value for this port is1812.
RADIUS AccountingPort
Enter the UDP port to send the RADIUS accounting request. Default value forthis port is 1813.
Additional Available Tasksl To import a Proxy Target, click Import Proxy Targets. In the Import from File popup, browse to select a file,
then click Import.l To export all Proxy Targets from the configuration, click Export Proxy Targets. In the Export to File popup,
specify a file path, and then click Export.l To export a single Proxy Target from the configuration, select it (check box on left), then click Export. In the Save
As popup, specify a file path, and then click Export.l To delete a single Proxy Target from the configuration, select it (via the check box on the left), and then click
Delete. Commit the deletion by selecting Yes. Dismiss the popup by selecting No.
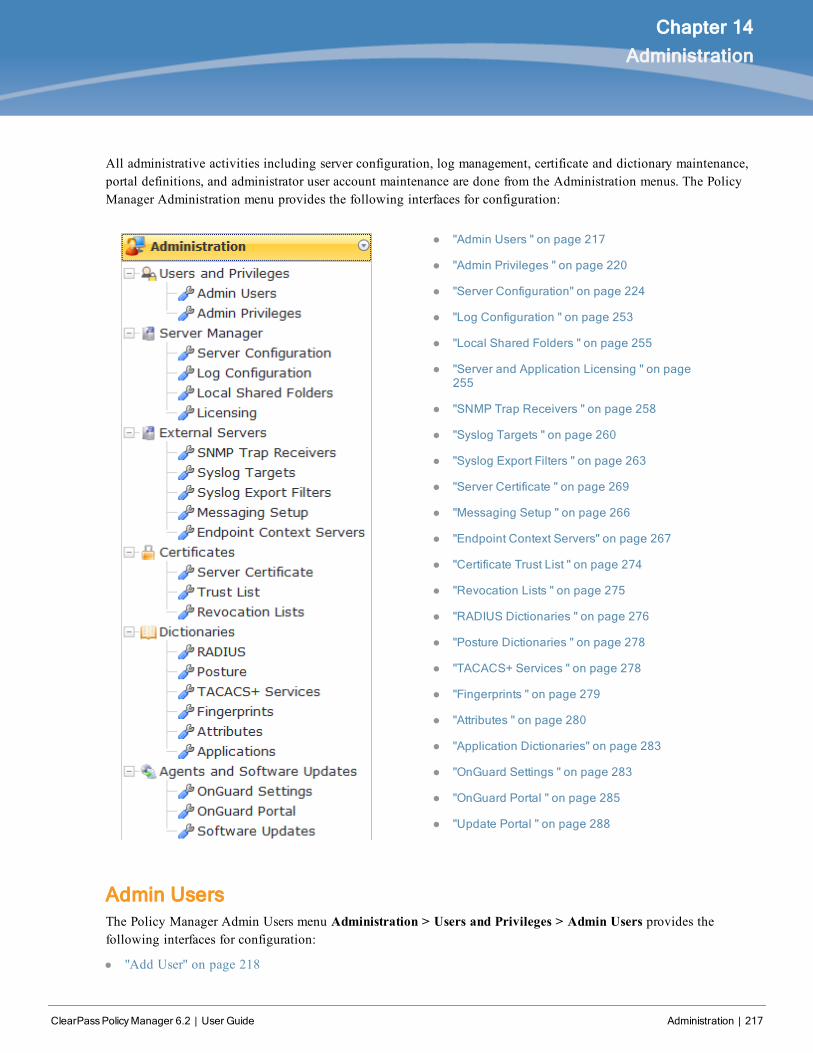
ClearPassPolicyManager 6.2 | User Guide Administration | 217
Chapter 14
Administration
All administrative activities including server configuration, log management, certificate and dictionary maintenance,portal definitions, and administrator user account maintenance are done from the Administration menus. The PolicyManager Administration menu provides the following interfaces for configuration:
l "Admin Users " on page 217
l "Admin Privileges " on page 220
l "Server Configuration" on page 224
l "Log Configuration " on page 253
l "Local Shared Folders " on page 255
l "Server and Application Licensing " on page255
l "SNMP Trap Receivers " on page 258
l "Syslog Targets " on page 260
l "Syslog Export Filters " on page 263
l "Server Certificate " on page 269
l "Messaging Setup " on page 266
l "Endpoint Context Servers" on page 267
l "Certificate Trust List " on page 274
l "Revocation Lists " on page 275
l "RADIUS Dictionaries " on page 276
l "Posture Dictionaries " on page 278
l "TACACS+ Services " on page 278
l "Fingerprints " on page 279
l "Attributes " on page 280
l "Application Dictionaries" on page 283
l "OnGuard Settings " on page 283
l "OnGuard Portal " on page 285
l "Update Portal " on page 288
Admin UsersThe Policy Manager Admin Users menu Administration > Users and Privileges > Admin Users provides thefollowing interfaces for configuration:
l "Add User" on page 218
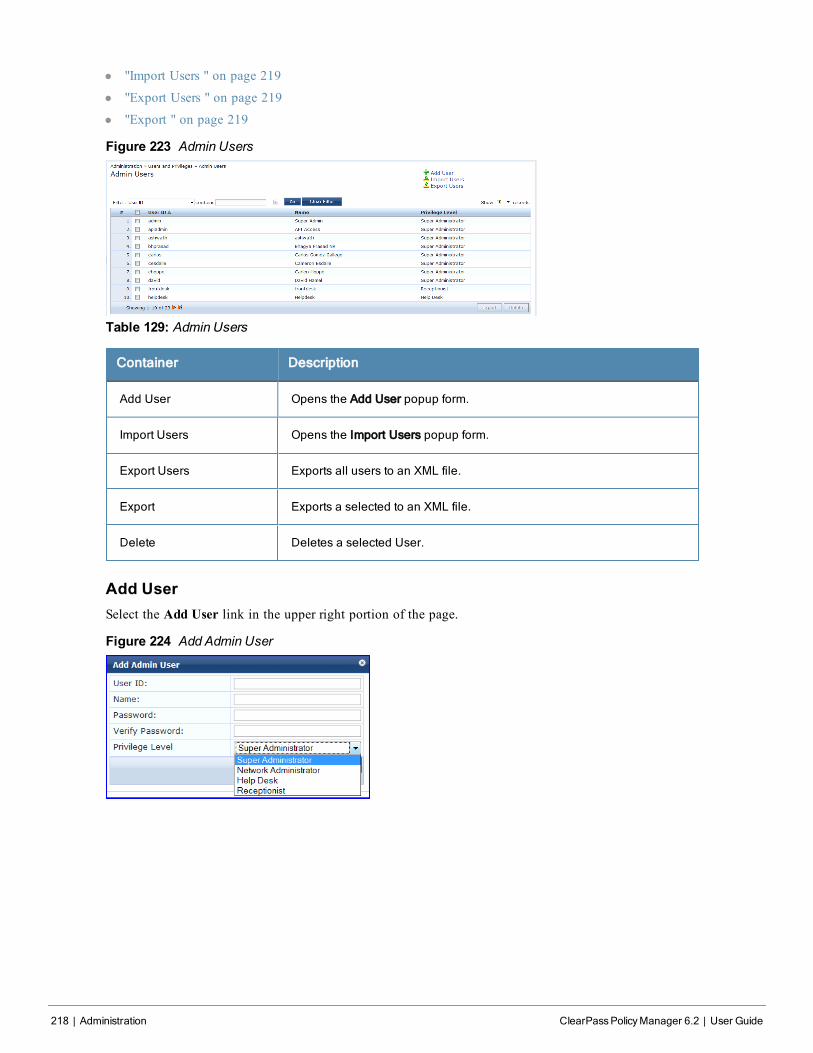
218 | Administration ClearPassPolicyManager 6.2 | User Guide
l "Import Users " on page 219
l "Export Users " on page 219
l "Export " on page 219
Figure 223 Admin Users
Table 129: Admin Users
Container Description
Add User Opens the Add User popup form.
Import Users Opens the Import Users popup form.
Export Users Exports all users to an XML file.
Export Exports a selected to an XML file.
Delete Deletes a selected User.
Add UserSelect the Add User link in the upper right portion of the page.
Figure 224 Add Admin User
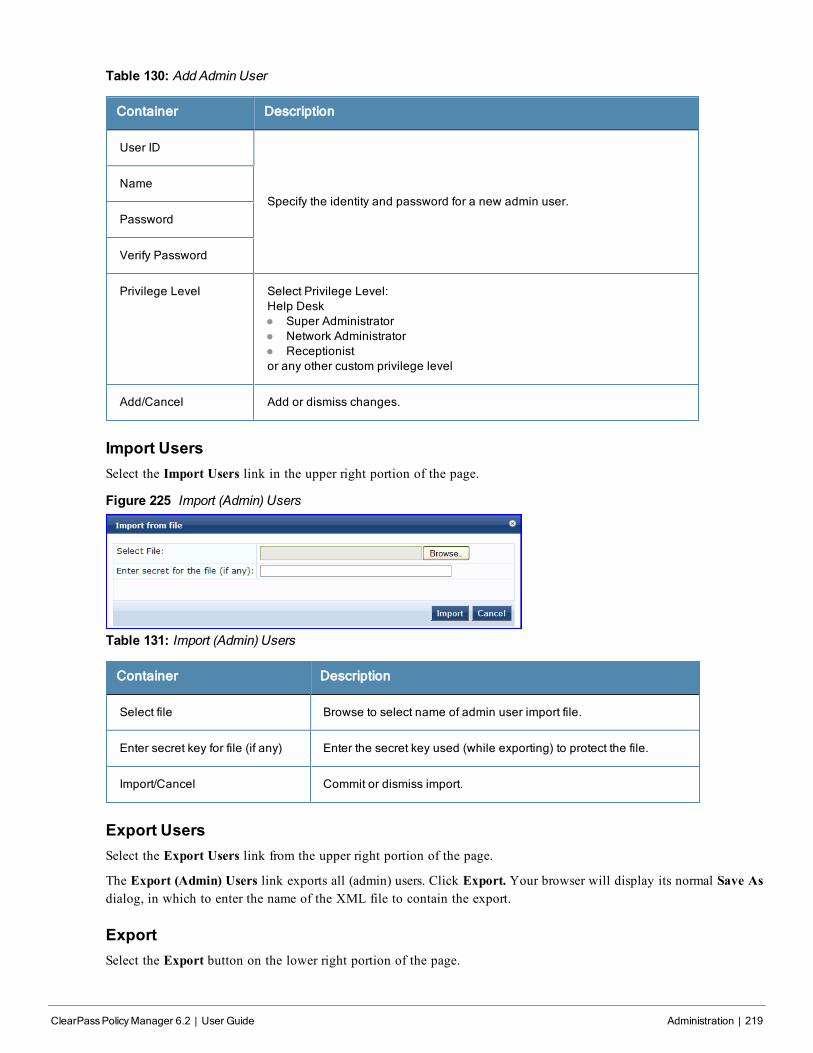
Table 130: Add Admin User
Container Description
User ID
Specify the identity and password for a new admin user.Name
Password
Verify Password
Privilege Level Select Privilege Level:Help Deskl Super Administratorl Network Administratorl Receptionistor any other custom privilege level
Add/Cancel Add or dismiss changes.
Import UsersSelect the Import Users link in the upper right portion of the page.
Figure 225 Import (Admin) Users
Table 131: Import (Admin) Users
Container Description
Select file Browse to select name of admin user import file.
Enter secret key for file (if any) Enter the secret key used (while exporting) to protect the file.
Import/Cancel Commit or dismiss import.
Export UsersSelect the Export Users link from the upper right portion of the page.
The Export (Admin) Users link exports all (admin) users. Click Export. Your browser will display its normal Save Asdialog, in which to enter the name of the XML file to contain the export.
ExportSelect the Export button on the lower right portion of the page.
ClearPassPolicyManager 6.2 | User Guide Administration | 219

220 | Administration ClearPassPolicyManager 6.2 | User Guide
To export a user, select it (check box at left) and click Export. Your browser will display its normal Save As dialog, inwhich to enter the name of the XML file to contain the export.
Admin PrivilegesTo view the available Admin Privileges, go to Administration > Users and Privileges > Admin Privileges.
Figure 226 Admin Privileges
See Custom Admin Privileges to create additional admin privileges and Exporting to export the definition of one ormore admin privileges.
Custom Admin PrivilegesWhile ClearPass Policy Manager doesn't let you change the definition of the built-in admin privileges, you can createand import custom ones. Customer admin privileges are defined in a specifically formatted XML file and then importedinto Policy Manager on the Admin Privileges page.
Create a Custom Admin PrivilegeYou will need a plain text or XML editor, not a word processor such as Microsoft Word, to create a custom adminprivilege.
To create a custom admin privilege
1. Using a plain text or XML editor (not a word processor such as Microsoft Word), create an XML file that defines aprivilege and its definition. (See the following sections for information on the XML structure, and privilegedefinitions.)
2. Go to Administration > Users and Privileges > Admin Privileges.3. Import the admin privilege file you created in step 1. See Importing for details.
The admin privilege is added to the list.
Admin Privilege XML StructureAdmin privilege files are XML files and have a very specific structure.
A header must be at the beginning of an admin privilege XML file and must be exactly:
<?xml version="1.0" encoding="UTF-8" standalone="yes"?>
The root tag is TipsContents. It is a container for the data in the XML file and should look like this:
<TipsContents xmlns="http://www.avendasys.com/tipsapiDefs/1.0">
⋮
</TipsContents>
Following the TipsContents tag is an optional TipsHeader tag.
The actual admin privileges information is defined with the AdminPrivilege and AdminTask tags. You use oneAdminPrivilege tag for each admin privilege you want to define. The AdminPrivilege tag contains twoattributes: name and description. Inside the AdminPrivilege tag are one or more AdminTask tags, each onedefining a lace within the Policy Manager application that a user with that privilege can view or change. TheAdminTask tag contains one taskid attribute and a single AdminTaskAction tag. The AdminTaskAction taghas one attribute, type, and it can contain one of two values, RO *read only) or RW (read/write) The basic structure:
<AdminPrivileges>
<AdminPrivilege name="" description="">
<AdminTask taskid="">
<AdminTaskAction type=""/>
</AdminTask>
<AdminTask taskid="">
<AdminTaskAction type=""/>
</AdminTask>
</AdminPrivilege>
</AdminPrivileges>
Admin Privileges and IDsThe following section lists the areas and sub-areas of the Policy Manager application and the associated taskid of eachone.
l Dashboard: taskId="dnd"
l Monitoring: taskId="mon"
n Live Monitoring: taskId="mon.li"
n Access Tracker: taskId="mon.li.ad"
n Accounting: taskId="mon.li.ac"
n Onguard Activity: taskId="mon.li.ag"
n Analysis and TrendingL taskId="mon.li.sp"
n Endpoint Profiles: taskId="mon.li.ep"
n SystemMonitor: taskId="mon.li.sy"
n Audit Viewer: taskId="mon.av"
n Event Viewer: taskId="mon.ev"
n Data Filters: taskId="mon.df"
l Configuration: taskId="con"
n Start Here (Services Wizard): taskId="con.sh"
n Services: taskId="con.se"
n Service Templates: taskId=”con.st”
n Authentication: taskId="con.au"
n Methods: taskId="con.au.am"
n Sources: taskId="con.au.as"
n Identity: taskId="con.id"
n Single Sign-On: taskId=”con.id.sso”
n Local Users: taskId="con.id.lu"
n Guest Users: taskId="con.id.gu"
n Onboard Devices: taskId="con.id.od"
n Endpoints: taskId="con.id.ep"
n Static Host Lists: taskId="con.id.sh"
ClearPassPolicyManager 6.2 | User Guide Administration | 221
222 | Administration ClearPassPolicyManager 6.2 | User Guide
n Roles: taskId="con.id.rs"
n RoleMappings: taskId="con.id.rm"
n Posture: taskId="con.pv"
n Posture Policies: taskId="con.pv.in
n Posture Servers: taskId="con.pv.ex"
n Audit Servers: taskId="con.pv.au"
n Enforcements: taskId="con.en"
n Policies: taskId="con.en.epo"
n Profiles: taskId="con.en.epr"
n Network: taskID="con.nw"
n Devices: taskId="con.nw.nd"
n Device Groups: taskId="con.nw.ng"
n Proxy Targets: taskId="con.nw.pr"
n Policy Simulation: taskId="con.ps"
n Profile Settings: taskId="con.prs"
l Administration: taskId="adm"
n User and Privileges: taskId="adm.us"
n Admin Users: taskId="adm.us.au"
n Admin Privileges: taskId="adm.us.ap"
n Server Manager: taskId="adm.mg"
n Server Configuration: taskId="adm.mg.sc"
n Log Configuration: taskId="adm.mg.ls"
n Local Shared Folders: taskId="adm.mg.sf"
n Licensing: taskId="adm.mg.sf"
n External Servers: taskId="adm.xs"
n SNMP Trap Receivers: taskId="adm.xs.st"
n Syslog Targets: taskId="adm.xs.es"
n Syslog Export Filters: taskId="adm.xs.sx"
n Messaging Setup: taskId="adm.xs.me"
n Certificates: taskId="adm.cm"
n Server Certificate: taskId="adm.cm.mc"
n Trust List: taskId="adm.cm.ctl"
n Revocation List: taskId="adm.cm.crl"
n Dictionaries: taskId="adm.di"
n RADIUS: taskId="adm.di.rd"
n Posture: taskId="adm.di.pd"
n TACACS+ Services: taskId="adm.di.td"
n Fingerprints: taskId="adm.di.df"
n Attributes: taskId="adm.di.at"
n Applications: taskid=”adm.di.ad”
n Agents and Software Updates: taskId="adm.po"
n Onguard Settings: taskId="adm.po.aas"
n Guest Portal: taskId="adm.po.gp"
n Software Updates: taskId="adm.po.es"
If you provide permission for an area, the same permission for all sub-areas is included by default. For example, if yougive RW permissions for Enforcements (con.en), you grant permissions for its sub-areas, in this case, Policies(con.en.epo)and Profiles (con.en.epr), and you do not have to explicitly define the same permission for those sub-areas.
Sample Admin Privilege XMLRead Only (RO) Privilege to all the sections (dnd, con, mon, adm)
<?xml version="1.0" encoding="UTF-8" standalone="yes"?>
<TipsContents xmlns="http://www.avendasys.com/tipsapiDefs/1.0">
<TipsHeader exportTime="Thu Jul 26 17:57:50 IST 2012" version="6.0"/>
<AdminPrivileges>
<AdminPrivilege name="Read-only Administrator" description="A read-only administrator is o
nly allowed to read all configuration elements">
<AdminTask taskid="con"> //Refers to Configuration
<AdminTaskAction type="RO"/>
</AdminTask>
<AdminTask taskid="dnd"> //Refers to DashBoard
<AdminTaskAction type="RO"/>
</AdminTask>
<AdminTask taskid="mon"> //Refers to Monitoring
<AdminTaskAction type="RO"/>
</AdminTask>
<AdminTask taskid="adm"> //Refers to Administration
<AdminTaskAction type="RO"/>
</AdminTask>
</AdminPrivilege>
</AdminPrivileges>
</TipsContents>
Only Read/Write access to Guest, Local and Endpoint Repository
<?xml version="1.0" encoding="UTF-8" standalone="yes"?>
<TipsContents xmlns="http://www.avendasys.com/tipsapiDefs/1.0">
<TipsHeader exportTime="Thu Jul 26 17:57:50 IST 2012" version="6.0"/>
<AdminPrivileges>
<AdminPrivilege name="Read/Write Access to Guest, Local and Endpoint Repository" descripti
on="A read-only administrator is only allowed to read all configuration elements">
<AdminTask taskid="con.id.lu"> //Refers to Local Users Section
<AdminTaskAction type="RW"/>
</AdminTask>
<AdminTask taskid="con.id.gu"> //Refers to Guest Users Section
<AdminTaskAction type="RW"/>
</AdminTask>
<AdminTask taskid="con.id.ep"> //Refers to Endpoints Section
<AdminTaskAction type="RW"/>
</AdminTask>
</AdminPrivilege>
</AdminPrivileges>
</TipsContents>
Read/Write permissions to DashBoard/ Monitoring and ReadOnly permissions to Server Configuration
<?xml version="1.0" encoding="UTF-8" standalone="yes"?>
<TipsContents xmlns="http://www.avendasys.com/tipsapiDefs/1.0">
<TipsHeader exportTime="Thu Jul 26 17:57:50 IST 2012" version="6.0"/>
<AdminPrivileges>
<AdminPrivilege name="Limited access permission" description="A read-only administrator is
only allowed to read all configuration elements">
<AdminTask taskid="dnd"> //Refers to DashBoard
ClearPassPolicyManager 6.2 | User Guide Administration | 223
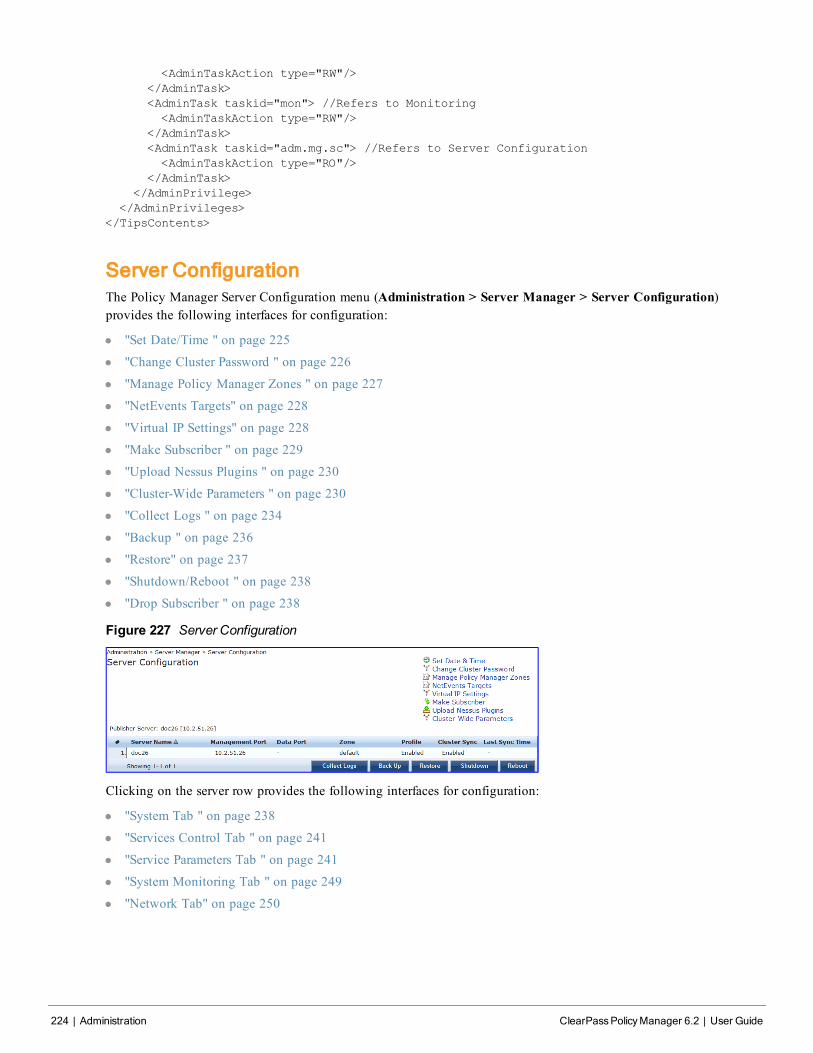
224 | Administration ClearPassPolicyManager 6.2 | User Guide
<AdminTaskAction type="RW"/>
</AdminTask>
<AdminTask taskid="mon"> //Refers to Monitoring
<AdminTaskAction type="RW"/>
</AdminTask>
<AdminTask taskid="adm.mg.sc"> //Refers to Server Configuration
<AdminTaskAction type="RO"/>
</AdminTask>
</AdminPrivilege>
</AdminPrivileges>
</TipsContents>
Server ConfigurationThe Policy Manager Server Configuration menu (Administration > Server Manager > Server Configuration)provides the following interfaces for configuration:
l "Set Date/Time " on page 225
l "Change Cluster Password " on page 226
l "Manage Policy Manager Zones " on page 227
l "NetEvents Targets" on page 228
l "Virtual IP Settings" on page 228
l "Make Subscriber " on page 229
l "Upload Nessus Plugins " on page 230
l "Cluster-Wide Parameters " on page 230
l "Collect Logs " on page 234
l "Backup " on page 236
l "Restore" on page 237
l "Shutdown/Reboot " on page 238
l "Drop Subscriber " on page 238
Figure 227 Server Configuration
Clicking on the server row provides the following interfaces for configuration:
l "System Tab " on page 238
l "Services Control Tab " on page 241
l "Service Parameters Tab " on page 241
l "System Monitoring Tab " on page 249
l "Network Tab" on page 250
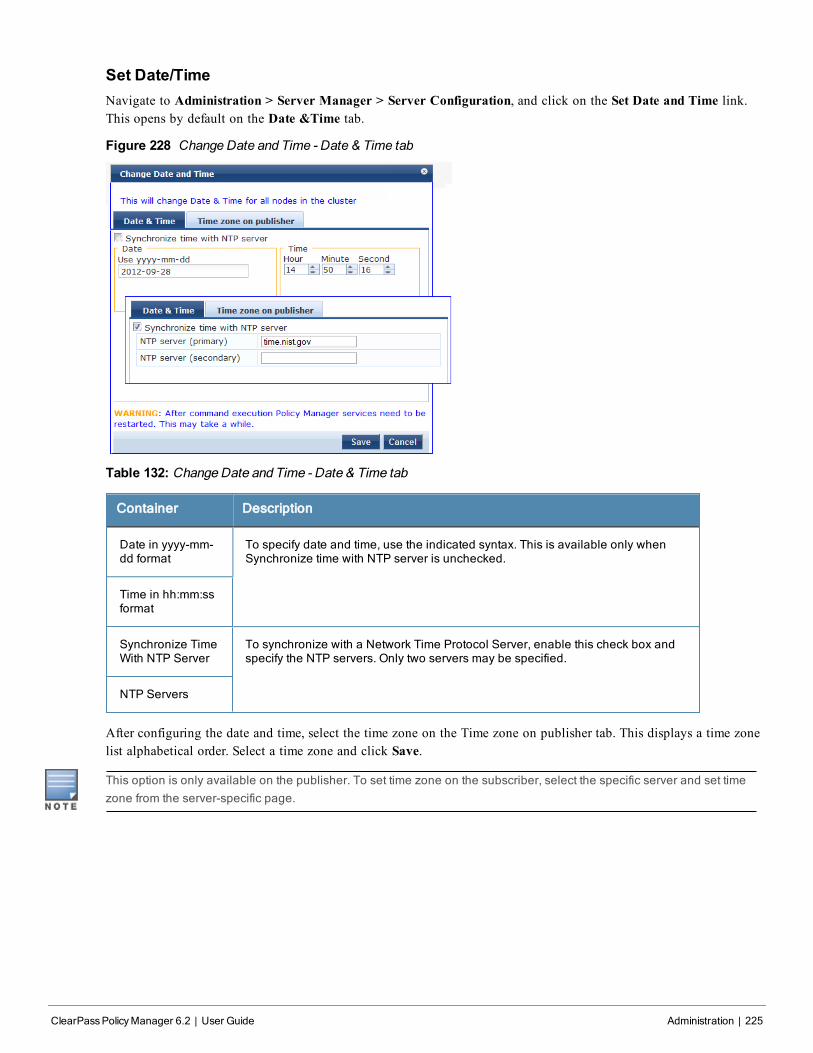
Set Date/TimeNavigate to Administration > Server Manager > Server Configuration, and click on the Set Date and Time link.This opens by default on the Date &Time tab.
Figure 228 Change Date and Time - Date & Time tab
Table 132: Change Date and Time - Date & Time tab
Container Description
Date in yyyy-mm-dd format
To specify date and time, use the indicated syntax. This is available only whenSynchronize time with NTP server is unchecked.
Time in hh:mm:ssformat
Synchronize TimeWith NTP Server
To synchronize with a Network Time Protocol Server, enable this check box andspecify the NTP servers. Only two servers may be specified.
NTP Servers
After configuring the date and time, select the time zone on the Time zone on publisher tab. This displays a time zonelist alphabetical order. Select a time zone and click Save.
This option is only available on the publisher. To set time zone on the subscriber, select the specific server and set timezone from the server-specific page.
ClearPassPolicyManager 6.2 | User Guide Administration | 225
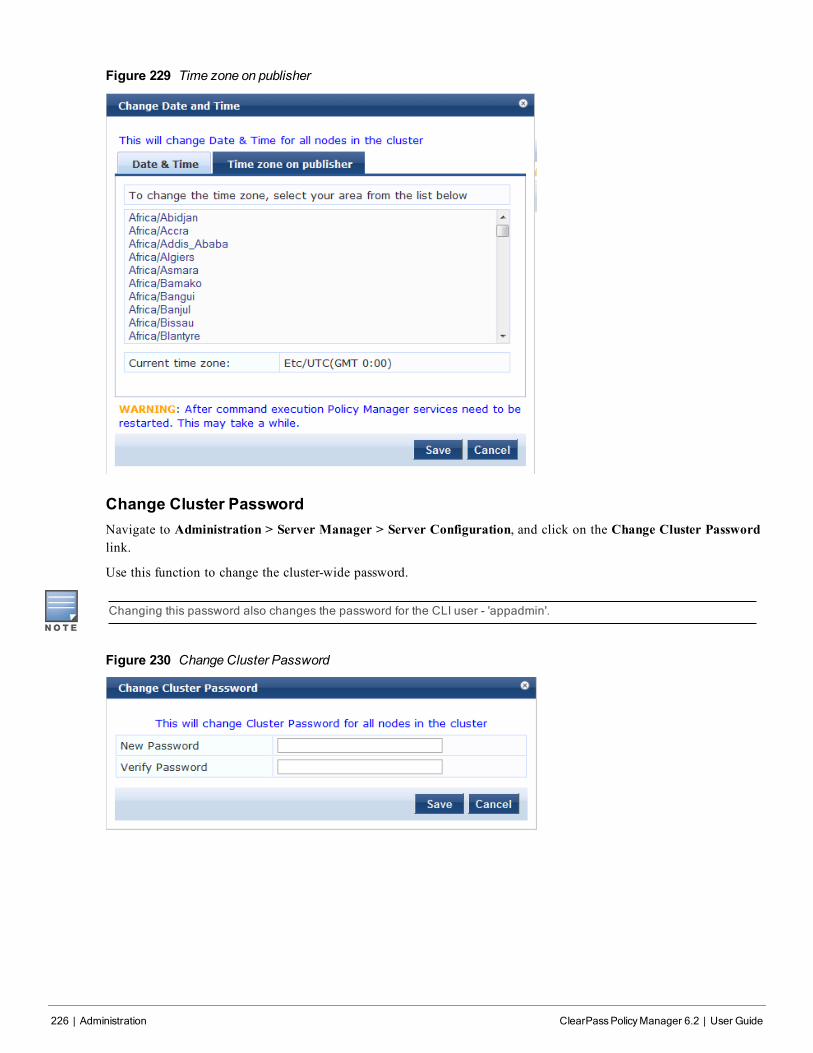
226 | Administration ClearPassPolicyManager 6.2 | User Guide
Figure 229 Time zone on publisher
Change Cluster PasswordNavigate to Administration > Server Manager > Server Configuration, and click on the Change Cluster Passwordlink.
Use this function to change the cluster-wide password.
Changing this password also changes the password for the CLI user - 'appadmin'.
Figure 230 Change Cluster Password
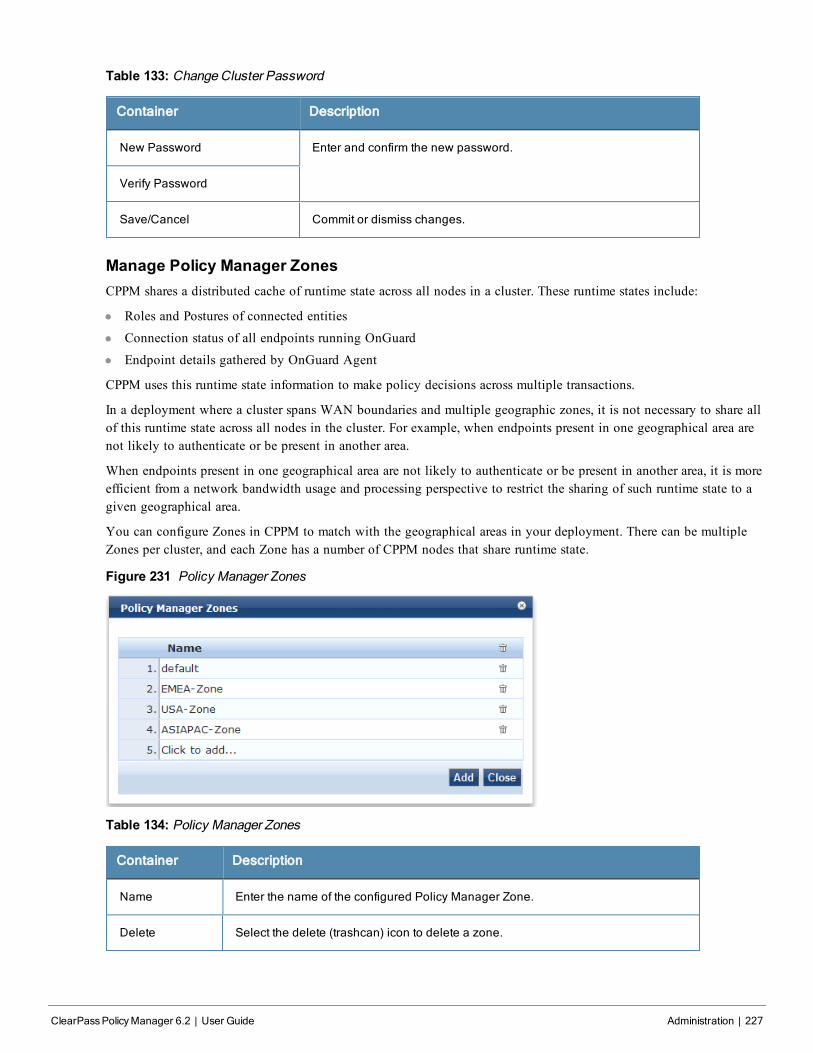
Table 133: Change Cluster Password
Container Description
New Password Enter and confirm the new password.
Verify Password
Save/Cancel Commit or dismiss changes.
Manage Policy Manager ZonesCPPM shares a distributed cache of runtime state across all nodes in a cluster. These runtime states include:
l Roles and Postures of connected entities
l Connection status of all endpoints running OnGuard
l Endpoint details gathered by OnGuard Agent
CPPM uses this runtime state information to make policy decisions across multiple transactions.
In a deployment where a cluster spans WAN boundaries and multiple geographic zones, it is not necessary to share allof this runtime state across all nodes in the cluster. For example, when endpoints present in one geographical area arenot likely to authenticate or be present in another area.
When endpoints present in one geographical area are not likely to authenticate or be present in another area, it is moreefficient from a network bandwidth usage and processing perspective to restrict the sharing of such runtime state to agiven geographical area.
You can configure Zones in CPPM to match with the geographical areas in your deployment. There can be multipleZones per cluster, and each Zone has a number of CPPM nodes that share runtime state.
Figure 231 Policy Manager Zones
Table 134: Policy Manager Zones
Container Description
Name Enter the name of the configured Policy Manager Zone.
Delete Select the delete (trashcan) icon to delete a zone.
ClearPassPolicyManager 6.2 | User Guide Administration | 227
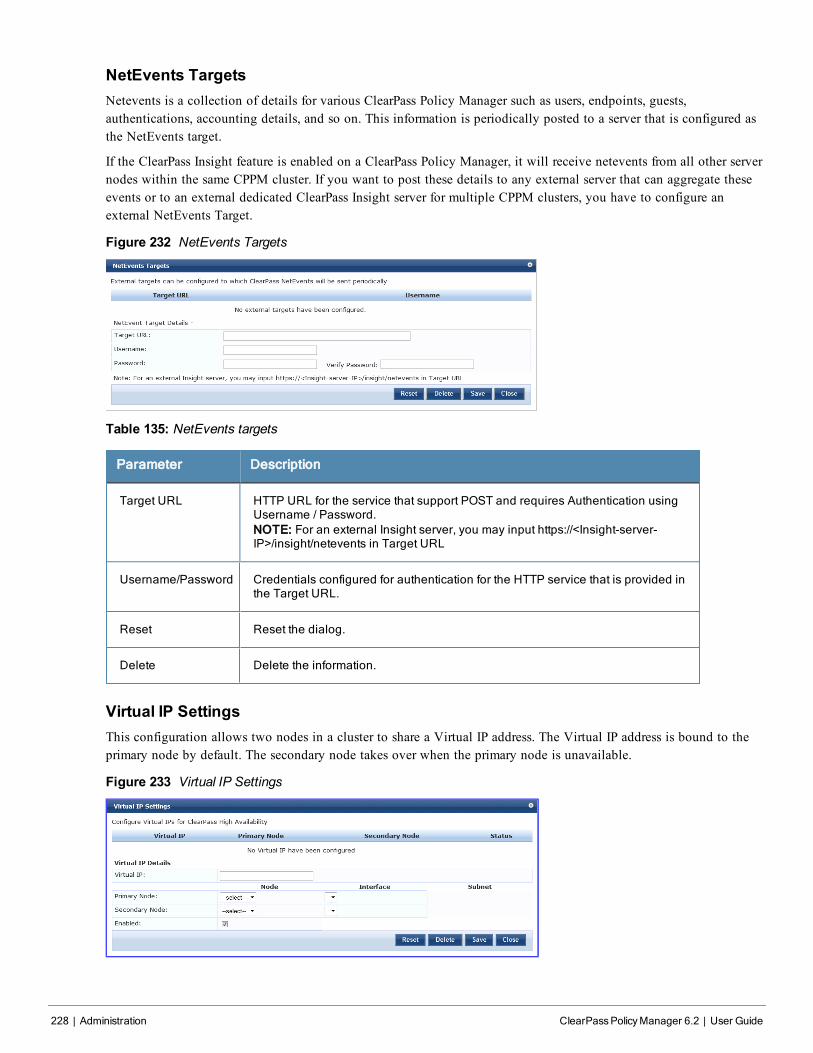
228 | Administration ClearPassPolicyManager 6.2 | User Guide
NetEvents TargetsNetevents is a collection of details for various ClearPass Policy Manager such as users, endpoints, guests,authentications, accounting details, and so on. This information is periodically posted to a server that is configured asthe NetEvents target.
If the ClearPass Insight feature is enabled on a ClearPass Policy Manager, it will receive netevents from all other servernodes within the same CPPM cluster. If you want to post these details to any external server that can aggregate theseevents or to an external dedicated ClearPass Insight server for multiple CPPM clusters, you have to configure anexternal NetEvents Target.
Figure 232 NetEvents Targets
Table 135: NetEvents targets
Parameter Description
Target URL HTTP URL for the service that support POST and requires Authentication usingUsername / Password.NOTE: For an external Insight server, you may input https://<Insight-server-IP>/insight/netevents in Target URL
Username/Password Credentials configured for authentication for the HTTP service that is provided inthe Target URL.
Reset Reset the dialog.
Delete Delete the information.
Virtual IP SettingsThis configuration allows two nodes in a cluster to share a Virtual IP address. The Virtual IP address is bound to theprimary node by default. The secondary node takes over when the primary node is unavailable.
Figure 233 Virtual IP Settings
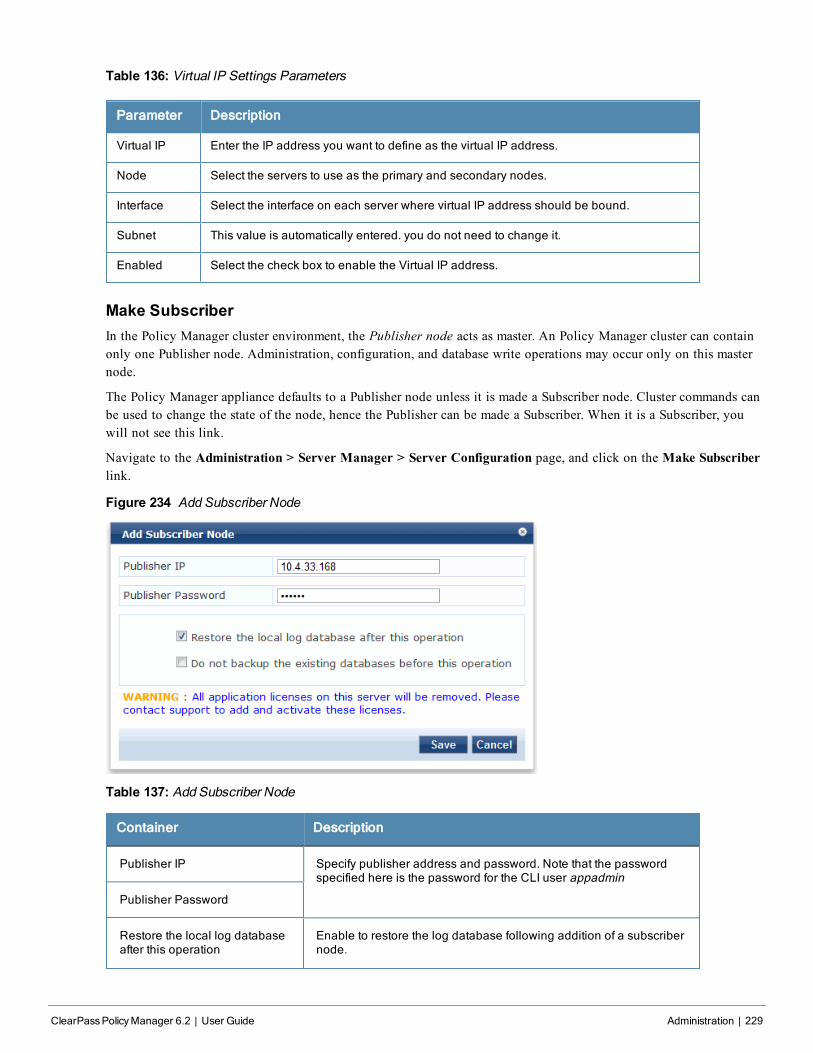
Table 136: Virtual IP Settings Parameters
Parameter Description
Virtual IP Enter the IP address you want to define as the virtual IP address.
Node Select the servers to use as the primary and secondary nodes.
Interface Select the interface on each server where virtual IP address should be bound.
Subnet This value is automatically entered. you do not need to change it.
Enabled Select the check box to enable the Virtual IP address.
Make SubscriberIn the Policy Manager cluster environment, the Publisher node acts as master. An Policy Manager cluster can containonly one Publisher node. Administration, configuration, and database write operations may occur only on this masternode.
The Policy Manager appliance defaults to a Publisher node unless it is made a Subscriber node. Cluster commands canbe used to change the state of the node, hence the Publisher can be made a Subscriber. When it is a Subscriber, youwill not see this link.
Navigate to the Administration > Server Manager > Server Configuration page, and click on the Make Subscriberlink.
Figure 234 Add Subscriber Node
Table 137: Add Subscriber Node
Container Description
Publisher IP Specify publisher address and password. Note that the passwordspecified here is the password for the CLI user appadmin
Publisher Password
Restore the local log databaseafter this operation
Enable to restore the log database following addition of a subscribernode.
ClearPassPolicyManager 6.2 | User Guide Administration | 229
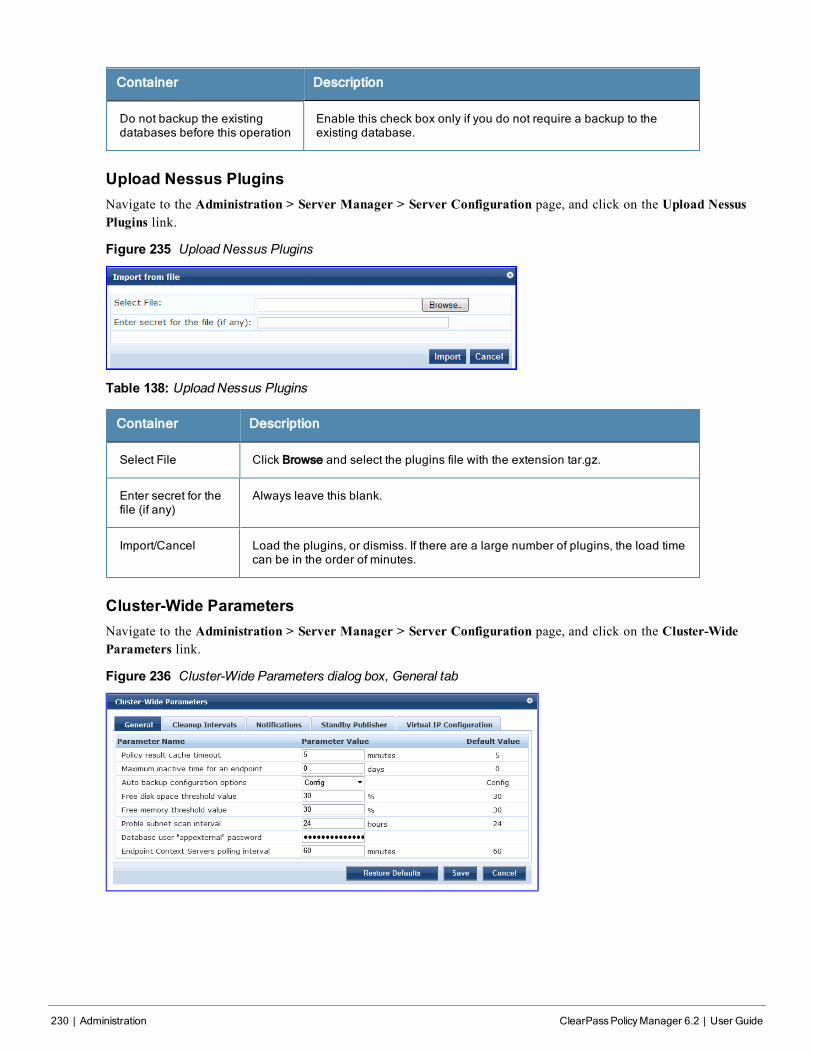
230 | Administration ClearPassPolicyManager 6.2 | User Guide
Container Description
Do not backup the existingdatabases before this operation
Enable this check box only if you do not require a backup to theexisting database.
Upload Nessus PluginsNavigate to the Administration > Server Manager > Server Configuration page, and click on the Upload NessusPlugins link.
Figure 235 Upload Nessus Plugins
Table 138: Upload Nessus Plugins
Container Description
Select File Click Browse and select the plugins file with the extension tar.gz.
Enter secret for thefile (if any)
Always leave this blank.
Import/Cancel Load the plugins, or dismiss. If there are a large number of plugins, the load timecan be in the order of minutes.
Cluster-Wide ParametersNavigate to the Administration > Server Manager > Server Configuration page, and click on the Cluster-WideParameters link.
Figure 236 Cluster-Wide Parameters dialog box, General tab
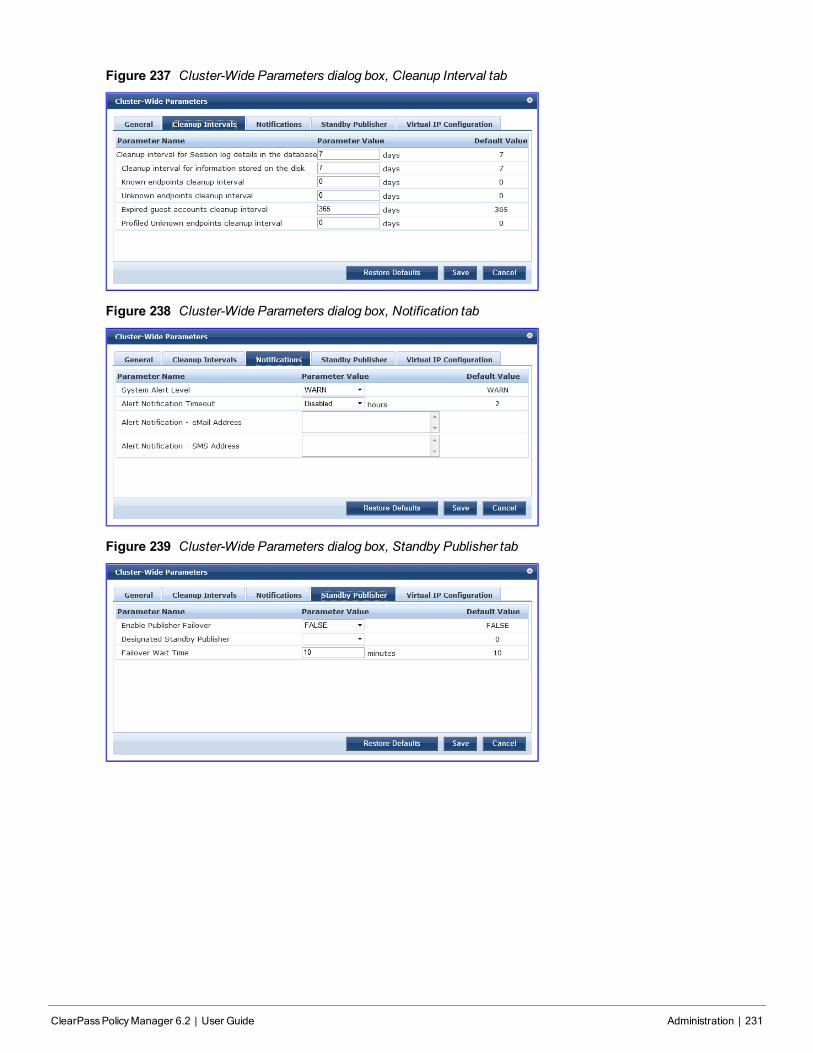
Figure 237 Cluster-Wide Parameters dialog box, Cleanup Interval tab
Figure 238 Cluster-Wide Parameters dialog box, Notification tab
Figure 239 Cluster-Wide Parameters dialog box, Standby Publisher tab
ClearPassPolicyManager 6.2 | User Guide Administration | 231

232 | Administration ClearPassPolicyManager 6.2 | User Guide
Figure 240 Cluster-Wide Parameters dialog box, Virtual IP Configuration tab
Table 139: Cluster-Wide Parameters
Parameter Description
General
Policy resultcachecleanuptimeout
The number of minutes to store the role mapping and posture results derived by thepolicy engine during policy evaluation. This result can then be used in subsequentevaluation of policies associated with a service, if “Use cached Roles and Postureattributes from previous sessions” is turned on for the service. A value of 0 disablescaching.
Maximuminactive timefor anendpoint
The number of days to keep an endpoint in the endpoints table since its lastauthentication. If the endpoint has not authenticated for this period, the entry is removedfrom the endpoint table. 0 specifies no time limit.
Auto backupconfigurationoptions
l Off - Do not perform periodic backups.l Config - Perform a periodic backup of only the configuration database.l Config|SessionInfo - Perform a backup of both the configuration database and the
session log database.
Free diskspacethresholdvalue
This controls the percentage below which disk usage warnings are issued in the PolicyManager Event Viewer. For example, a value of 30% indicates that a warning is issued ifonly 30% or below of disk space is available.
Free memorythresholdvalue
This controls the percentage below which RAM usage warnings are issued in the PolicyManager Event Viewer. For example, a value of 30% indicates that a warning is issued ifonly 30% or below of RAM is available.
Profilesubnet scaninterval
Enter a value in hours.
Databaseuser"appexternal"password
For this connection to the database, enter the password for the "appexternal" username.
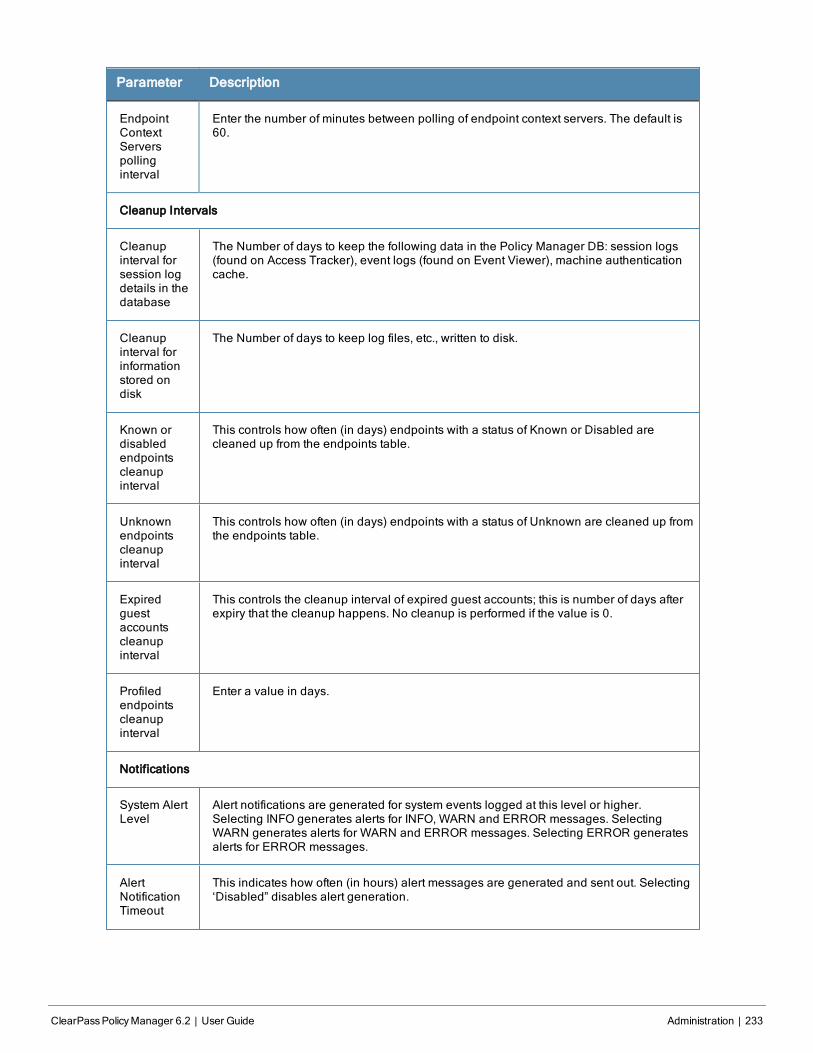
Parameter Description
EndpointContextServerspollinginterval
Enter the number of minutes between polling of endpoint context servers. The default is60.
Cleanup Intervals
Cleanupinterval forsession logdetails in thedatabase
The Number of days to keep the following data in the Policy Manager DB: session logs(found on Access Tracker), event logs (found on Event Viewer), machine authenticationcache.
Cleanupinterval forinformationstored ondisk
The Number of days to keep log files, etc., written to disk.
Known ordisabledendpointscleanupinterval
This controls how often (in days) endpoints with a status of Known or Disabled arecleaned up from the endpoints table.
Unknownendpointscleanupinterval
This controls how often (in days) endpoints with a status of Unknown are cleaned up fromthe endpoints table.
Expiredguestaccountscleanupinterval
This controls the cleanup interval of expired guest accounts; this is number of days afterexpiry that the cleanup happens. No cleanup is performed if the value is 0.
Profiledendpointscleanupinterval
Enter a value in days.
Notifications
System AlertLevel
Alert notifications are generated for system events logged at this level or higher.Selecting INFO generates alerts for INFO, WARN and ERROR messages. SelectingWARN generates alerts for WARN and ERROR messages. Selecting ERROR generatesalerts for ERROR messages.
AlertNotificationTimeout
This indicates how often (in hours) alert messages are generated and sent out. Selecting‘Disabled” disables alert generation.
ClearPassPolicyManager 6.2 | User Guide Administration | 233
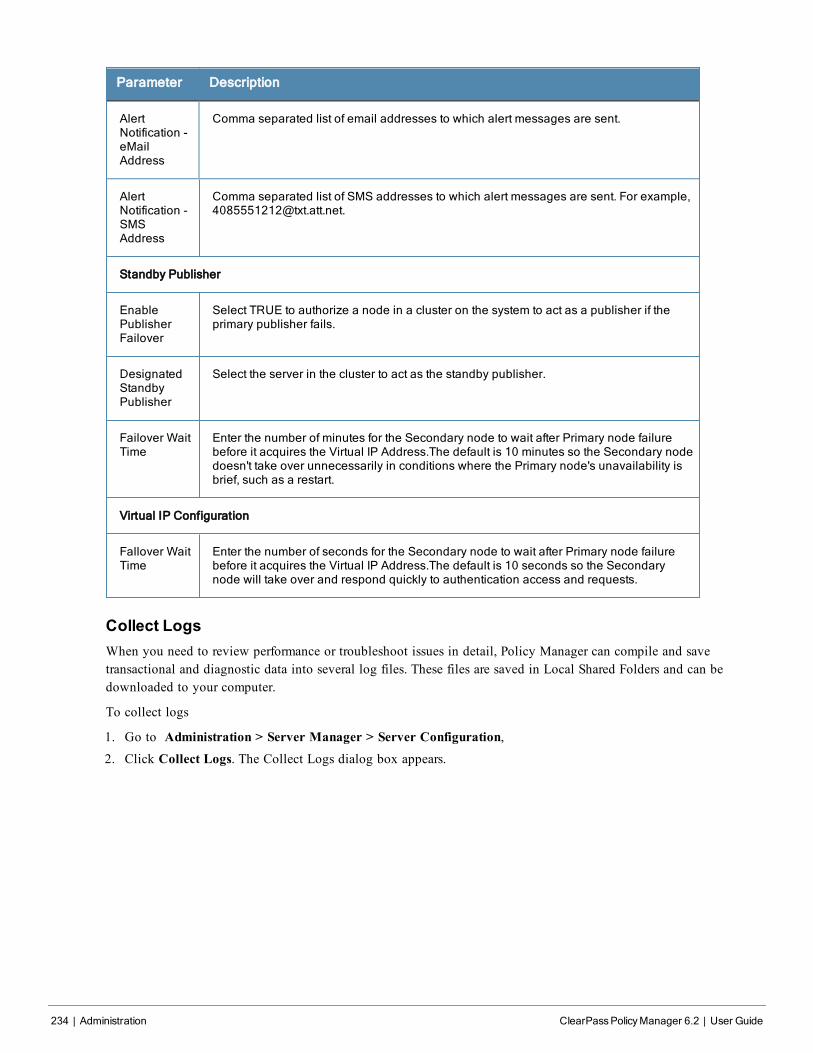
234 | Administration ClearPassPolicyManager 6.2 | User Guide
Parameter Description
AlertNotification -eMailAddress
Comma separated list of email addresses to which alert messages are sent.
AlertNotification -SMSAddress
Comma separated list of SMS addresses to which alert messages are sent. For example,[email protected].
Standby Publisher
EnablePublisherFailover
Select TRUE to authorize a node in a cluster on the system to act as a publisher if theprimary publisher fails.
DesignatedStandbyPublisher
Select the server in the cluster to act as the standby publisher.
Failover WaitTime
Enter the number of minutes for the Secondary node to wait after Primary node failurebefore it acquires the Virtual IP Address.The default is 10 minutes so the Secondary nodedoesn't take over unnecessarily in conditions where the Primary node's unavailability isbrief, such as a restart.
Virtual IP Configuration
Fallover WaitTime
Enter the number of seconds for the Secondary node to wait after Primary node failurebefore it acquires the Virtual IP Address.The default is 10 seconds so the Secondarynode will take over and respond quickly to authentication access and requests.
Collect LogsWhen you need to review performance or troubleshoot issues in detail, Policy Manager can compile and savetransactional and diagnostic data into several log files. These files are saved in Local Shared Folders and can bedownloaded to your computer.
To collect logs
1. Go to Administration > Server Manager > Server Configuration,2. Click Collect Logs. The Collect Logs dialog box appears.
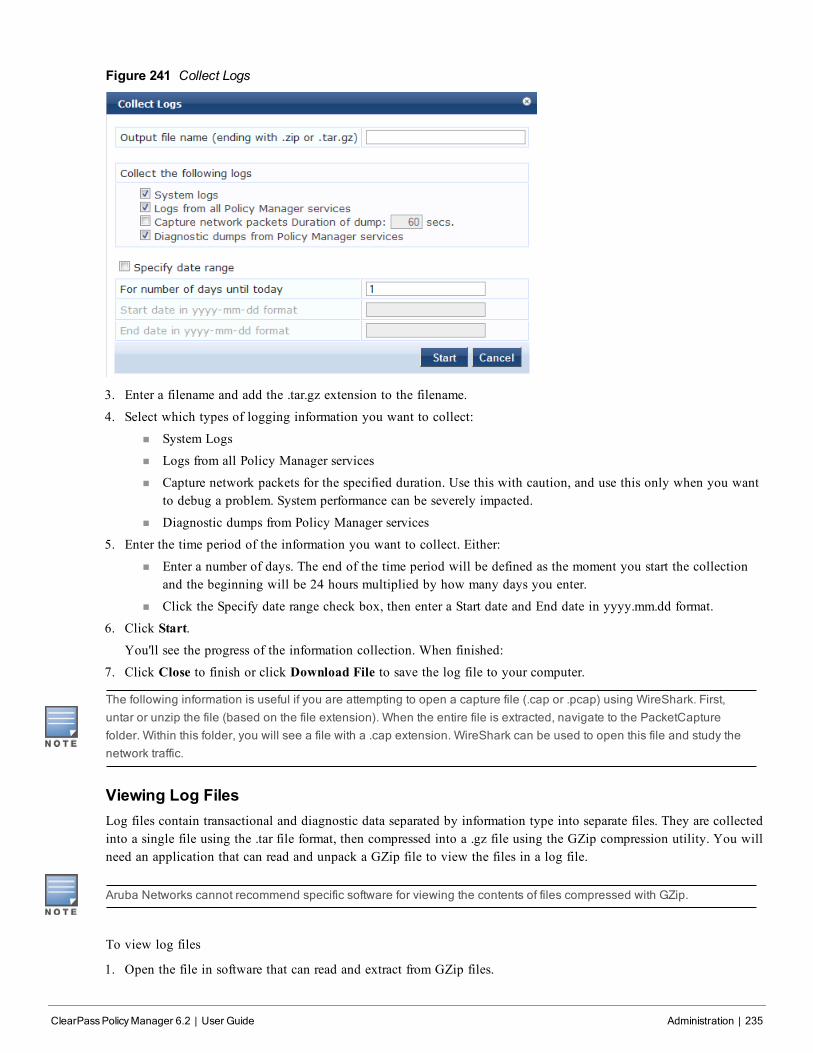
Figure 241 Collect Logs
3. Enter a filename and add the .tar.gz extension to the filename.
4. Select which types of logging information you want to collect:
n System Logs
n Logs from all Policy Manager services
n Capture network packets for the specified duration. Use this with caution, and use this only when you wantto debug a problem. System performance can be severely impacted.
n Diagnostic dumps from Policy Manager services
5. Enter the time period of the information you want to collect. Either:
n Enter a number of days. The end of the time period will be defined as the moment you start the collectionand the beginning will be 24 hours multiplied by how many days you enter.
n Click the Specify date range check box, then enter a Start date and End date in yyyy.mm.dd format.
6. Click Start.You'll see the progress of the information collection. When finished:
7. Click Close to finish or click Download File to save the log file to your computer.
The following information is useful if you are attempting to open a capture file (.cap or .pcap) using WireShark. First,untar or unzip the file (based on the file extension). When the entire file is extracted, navigate to the PacketCapturefolder. Within this folder, you will see a file with a .cap extension. WireShark can be used to open this file and study thenetwork traffic.
Viewing Log FilesLog files contain transactional and diagnostic data separated by information type into separate files. They are collectedinto a single file using the .tar file format, then compressed into a .gz file using the GZip compression utility. You willneed an application that can read and unpack a GZip file to view the files in a log file.
Aruba Networks cannot recommend specific software for viewing the contents of files compressed with GZip.
To view log files
1. Open the file in software that can read and extract from GZip files.
ClearPassPolicyManager 6.2 | User Guide Administration | 235
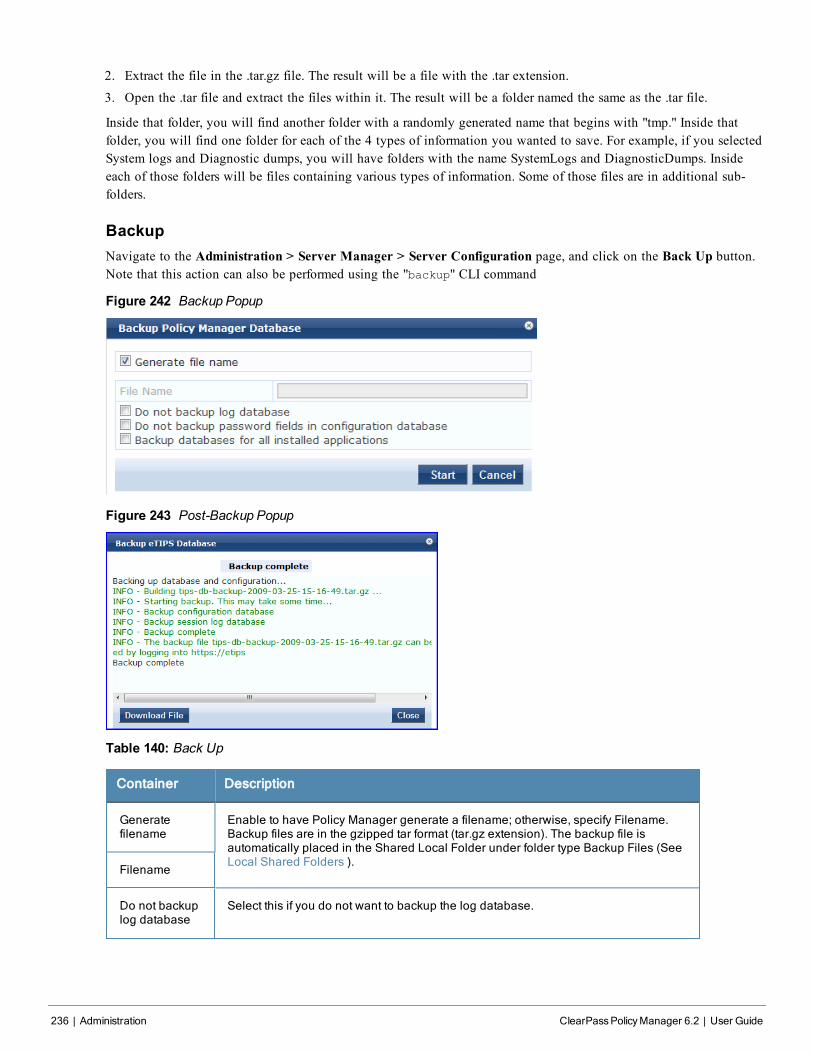
236 | Administration ClearPassPolicyManager 6.2 | User Guide
2. Extract the file in the .tar.gz file. The result will be a file with the .tar extension.
3. Open the .tar file and extract the files within it. The result will be a folder named the same as the .tar file.
Inside that folder, you will find another folder with a randomly generated name that begins with "tmp." Inside thatfolder, you will find one folder for each of the 4 types of information you wanted to save. For example, if you selectedSystem logs and Diagnostic dumps, you will have folders with the name SystemLogs and DiagnosticDumps. Insideeach of those folders will be files containing various types of information. Some of those files are in additional sub-folders.
BackupNavigate to the Administration > Server Manager > Server Configuration page, and click on the Back Up button.Note that this action can also be performed using the "backup" CLI command
Figure 242 Backup Popup
Figure 243 Post-Backup Popup
Table 140: Back Up
Container Description
Generatefilename
Enable to have Policy Manager generate a filename; otherwise, specify Filename.Backup files are in the gzipped tar format (tar.gz extension). The backup file isautomatically placed in the Shared Local Folder under folder type Backup Files (SeeLocal Shared Folders ).
Filename
Do not backuplog database
Select this if you do not want to backup the log database.
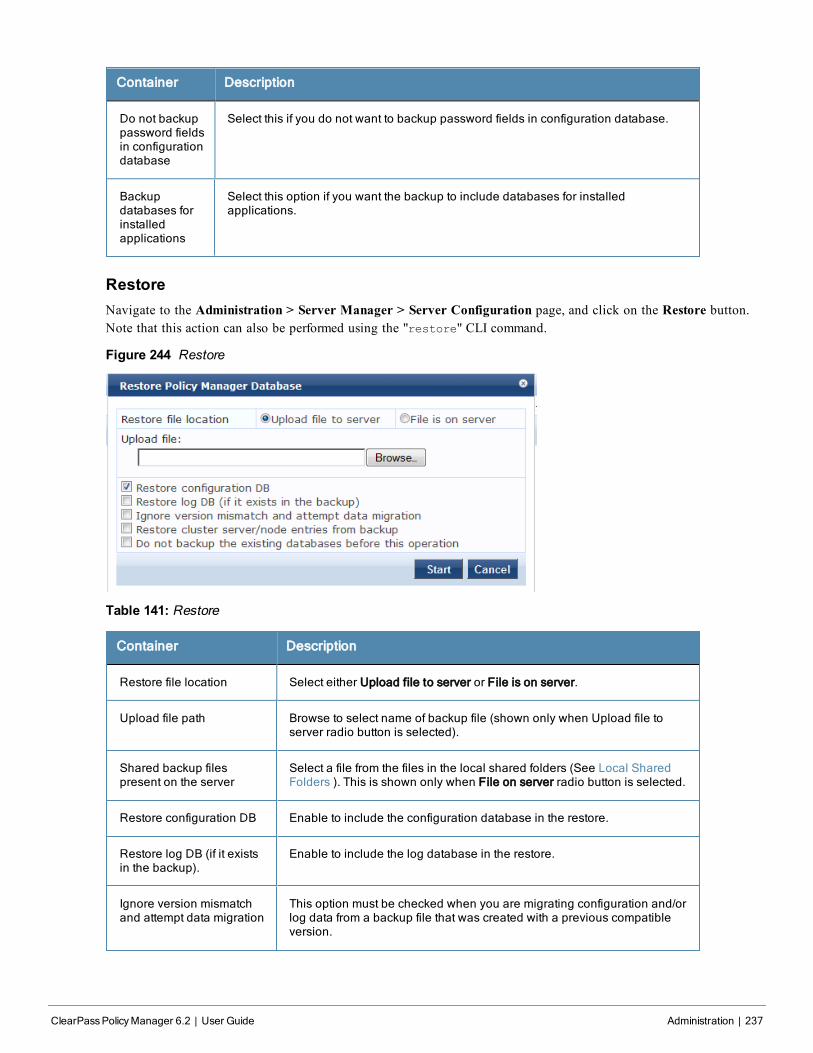
Container Description
Do not backuppassword fieldsin configurationdatabase
Select this if you do not want to backup password fields in configuration database.
Backupdatabases forinstalledapplications
Select this option if you want the backup to include databases for installedapplications.
RestoreNavigate to the Administration > Server Manager > Server Configuration page, and click on the Restore button.Note that this action can also be performed using the "restore" CLI command.
Figure 244 Restore
Table 141: Restore
Container Description
Restore file location Select either Upload file to server or File is on server.
Upload file path Browse to select name of backup file (shown only when Upload file toserver radio button is selected).
Shared backup filespresent on the server
Select a file from the files in the local shared folders (See Local SharedFolders ). This is shown only when File on server radio button is selected.
Restore configuration DB Enable to include the configuration database in the restore.
Restore log DB (if it existsin the backup).
Enable to include the log database in the restore.
Ignore version mismatchand attempt data migration
This option must be checked when you are migrating configuration and/orlog data from a backup file that was created with a previous compatibleversion.
ClearPassPolicyManager 6.2 | User Guide Administration | 237
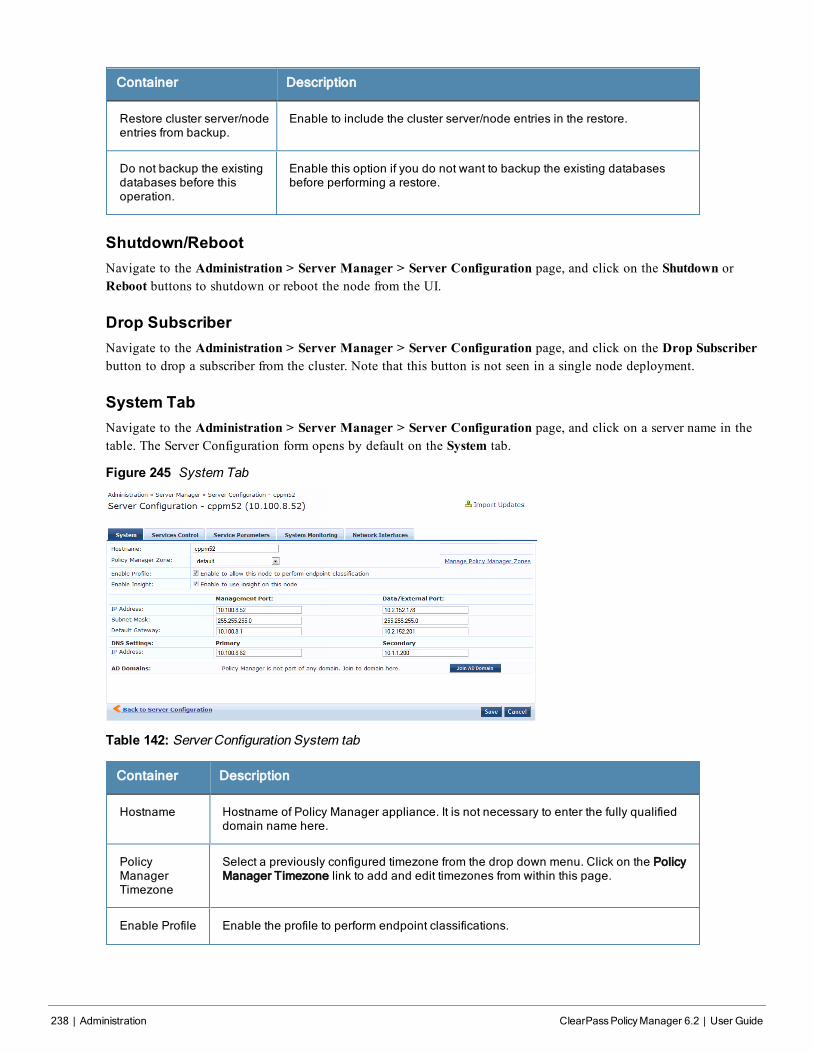
238 | Administration ClearPassPolicyManager 6.2 | User Guide
Container Description
Restore cluster server/nodeentries from backup.
Enable to include the cluster server/node entries in the restore.
Do not backup the existingdatabases before thisoperation.
Enable this option if you do not want to backup the existing databasesbefore performing a restore.
Shutdown/RebootNavigate to the Administration > Server Manager > Server Configuration page, and click on the Shutdown orReboot buttons to shutdown or reboot the node from the UI.
Drop SubscriberNavigate to the Administration > Server Manager > Server Configuration page, and click on the Drop Subscriberbutton to drop a subscriber from the cluster. Note that this button is not seen in a single node deployment.
System TabNavigate to the Administration > Server Manager > Server Configuration page, and click on a server name in thetable. The Server Configuration form opens by default on the System tab.
Figure 245 System Tab
Table 142: Server Configuration System tab
Container Description
Hostname Hostname of Policy Manager appliance. It is not necessary to enter the fully qualifieddomain name here.
PolicyManagerTimezone
Select a previously configured timezone from the drop down menu. Click on the PolicyManager Timezone link to add and edit timezones from within this page.
Enable Profile Enable the profile to perform endpoint classifications.
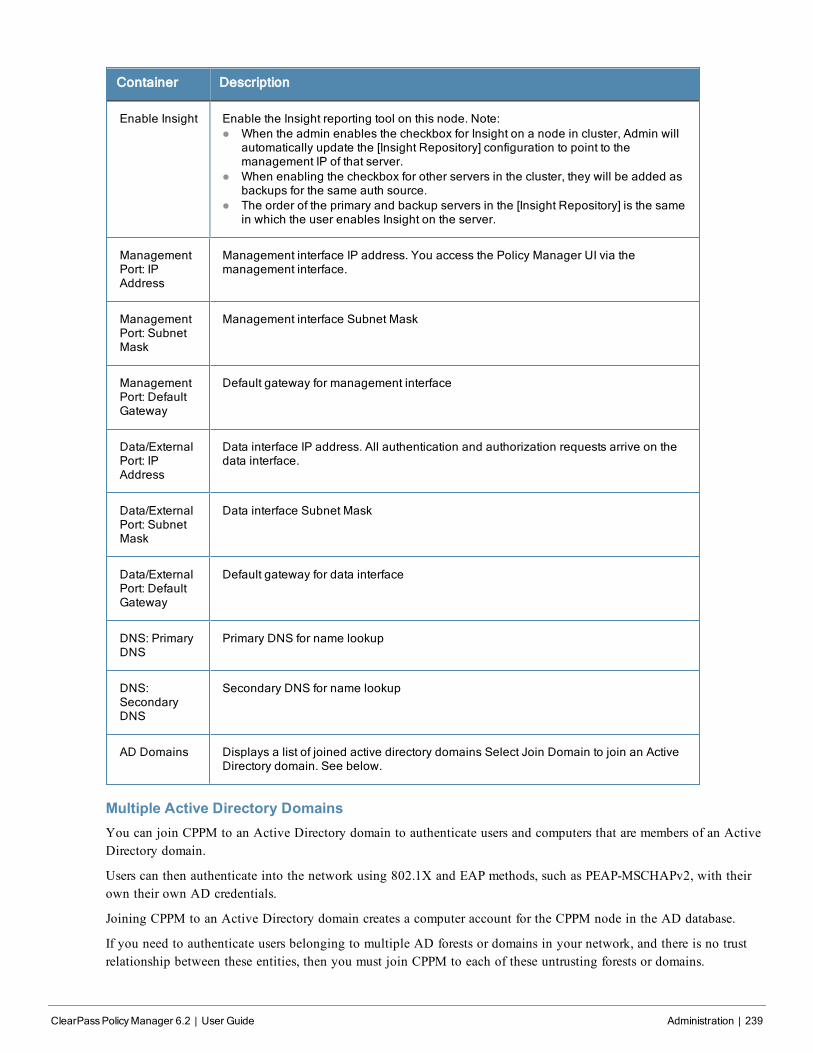
Container Description
Enable Insight Enable the Insight reporting tool on this node. Note:l When the admin enables the checkbox for Insight on a node in cluster, Admin will
automatically update the [Insight Repository] configuration to point to themanagement IP of that server.
l When enabling the checkbox for other servers in the cluster, they will be added asbackups for the same auth source.
l The order of the primary and backup servers in the [Insight Repository] is the samein which the user enables Insight on the server.
ManagementPort: IPAddress
Management interface IP address. You access the Policy Manager UI via themanagement interface.
ManagementPort: SubnetMask
Management interface Subnet Mask
ManagementPort: DefaultGateway
Default gateway for management interface
Data/ExternalPort: IPAddress
Data interface IP address. All authentication and authorization requests arrive on thedata interface.
Data/ExternalPort: SubnetMask
Data interface Subnet Mask
Data/ExternalPort: DefaultGateway
Default gateway for data interface
DNS: PrimaryDNS
Primary DNS for name lookup
DNS:SecondaryDNS
Secondary DNS for name lookup
AD Domains Displays a list of joined active directory domains Select Join Domain to join an ActiveDirectory domain. See below.
Multiple Active Directory DomainsYou can join CPPM to an Active Directory domain to authenticate users and computers that are members of an ActiveDirectory domain.
Users can then authenticate into the network using 802.1X and EAP methods, such as PEAP-MSCHAPv2, with theirown their own AD credentials.
Joining CPPM to an Active Directory domain creates a computer account for the CPPM node in the AD database.
If you need to authenticate users belonging to multiple AD forests or domains in your network, and there is no trustrelationship between these entities, then you must join CPPM to each of these untrusting forests or domains.
ClearPassPolicyManager 6.2 | User Guide Administration | 239

240 | Administration ClearPassPolicyManager 6.2 | User Guide
There is no need to join CPPM to multiple domains belong to the same AD forest because a one-way trust relationshipexists between these domains. In thsi case, you join CPPM to the root domain.
Join Domain - Click on this button to join this Policy Manager appliance to an Active Directory domain.
Leave Domain - Click on this button to disassociate this Policy Manager appliance from an Active Directory domain.
For most use cases, if you have multiple nodes in the cluster, you must join each node to the same Active Directorydomain.
Figure 246 Join Active Directory Domain
Table 143: Join AD Domain
Container Description
DomainController
Fully qualified name of the Active Directory domain controller
ShortName -NETBIOSname(optional)
The short name or NETBIOS name of the domain. Enter this value only if this is differentfrom your regular Active Directory domain name. If this is different from your domain name(usually a shorter name), enter that name here. Contact your AD administrator about theNETBIOS name.Note that if you enter an incorrect value for the NETBIOS name, you see a warningmessage in the UI. If you see this warning message, leave the domain by clicking on theLeave Domain button (which replaces the Join Domain button once you join the domain.After leaving the domain, join again with the right NETBIOS name.
DomainControllernameconflict
In some deployments (especially if there are multiple domain controllers, or if the domainname has been wrongly entered in the last step), the domain controller FQDN returned bythe DNS query can be different from what was entered. In this case, you may:l Continue to use the domain controller name that you enteredl Use the domain controller name returned by the DNS queryl Abort the Join Domain operation.
Usedefaultdomainadminuser
Check this box to use the Administrator user name to join the domain

Container Description
UserName
User ID of the domain administrator account
Password Password of the domain administrator account
Services Control TabFrom the Services Control tab, you can view a service status and control (stop or start) Policy Manager services.
Figure 247 Services Control Tab
Service Parameters TabNavigate to the Service Parameters tab to change system parameters of the services.
Figure 248 Policy Server Service Parameters
Table 144: Service Parameters tab - Policy Server
ServiceParameter
Description
MachineAuthenticationCache Timeout
This specifies the time (in seconds) for which machine authentication entries arecached by Policy Manager
AuthenticationThread Pool Size
This specifies the number of threads to use for LDAP/AD and SQL connections.
ClearPassPolicyManager 6.2 | User Guide Administration | 241
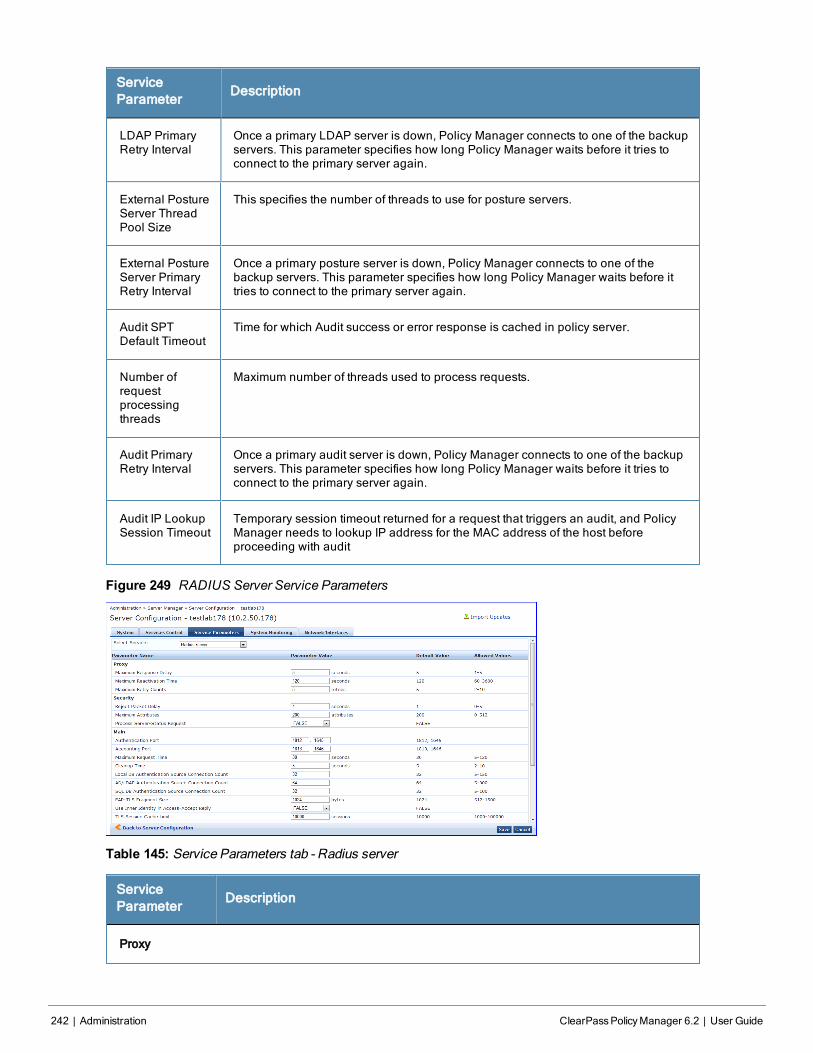
242 | Administration ClearPassPolicyManager 6.2 | User Guide
ServiceParameter
Description
LDAP PrimaryRetry Interval
Once a primary LDAP server is down, Policy Manager connects to one of the backupservers. This parameter specifies how long Policy Manager waits before it tries toconnect to the primary server again.
External PostureServer ThreadPool Size
This specifies the number of threads to use for posture servers.
External PostureServer PrimaryRetry Interval
Once a primary posture server is down, Policy Manager connects to one of thebackup servers. This parameter specifies how long Policy Manager waits before ittries to connect to the primary server again.
Audit SPTDefault Timeout
Time for which Audit success or error response is cached in policy server.
Number ofrequestprocessingthreads
Maximum number of threads used to process requests.
Audit PrimaryRetry Interval
Once a primary audit server is down, Policy Manager connects to one of the backupservers. This parameter specifies how long Policy Manager waits before it tries toconnect to the primary server again.
Audit IP LookupSession Timeout
Temporary session timeout returned for a request that triggers an audit, and PolicyManager needs to lookup IP address for the MAC address of the host beforeproceeding with audit
Figure 249 RADIUS Server Service Parameters
Table 145: Service Parameters tab - Radius server
ServiceParameter
Description
Proxy
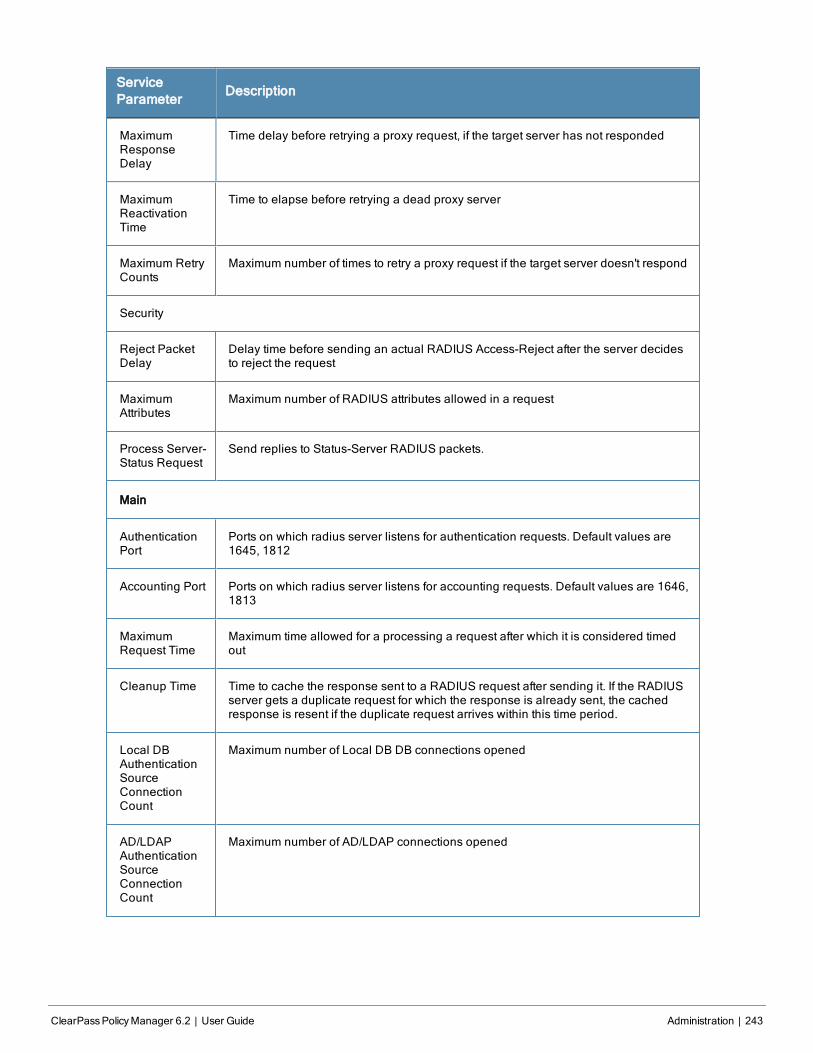
ServiceParameter
Description
MaximumResponseDelay
Time delay before retrying a proxy request, if the target server has not responded
MaximumReactivationTime
Time to elapse before retrying a dead proxy server
Maximum RetryCounts
Maximum number of times to retry a proxy request if the target server doesn't respond
Security
Reject PacketDelay
Delay time before sending an actual RADIUS Access-Reject after the server decidesto reject the request
MaximumAttributes
Maximum number of RADIUS attributes allowed in a request
Process Server-Status Request
Send replies to Status-Server RADIUS packets.
Main
AuthenticationPort
Ports on which radius server listens for authentication requests. Default values are1645, 1812
Accounting Port Ports on which radius server listens for accounting requests. Default values are 1646,1813
MaximumRequest Time
Maximum time allowed for a processing a request after which it is considered timedout
Cleanup Time Time to cache the response sent to a RADIUS request after sending it. If the RADIUSserver gets a duplicate request for which the response is already sent, the cachedresponse is resent if the duplicate request arrives within this time period.
Local DBAuthenticationSourceConnectionCount
Maximum number of Local DB DB connections opened
AD/LDAPAuthenticationSourceConnectionCount
Maximum number of AD/LDAP connections opened
ClearPassPolicyManager 6.2 | User Guide Administration | 243
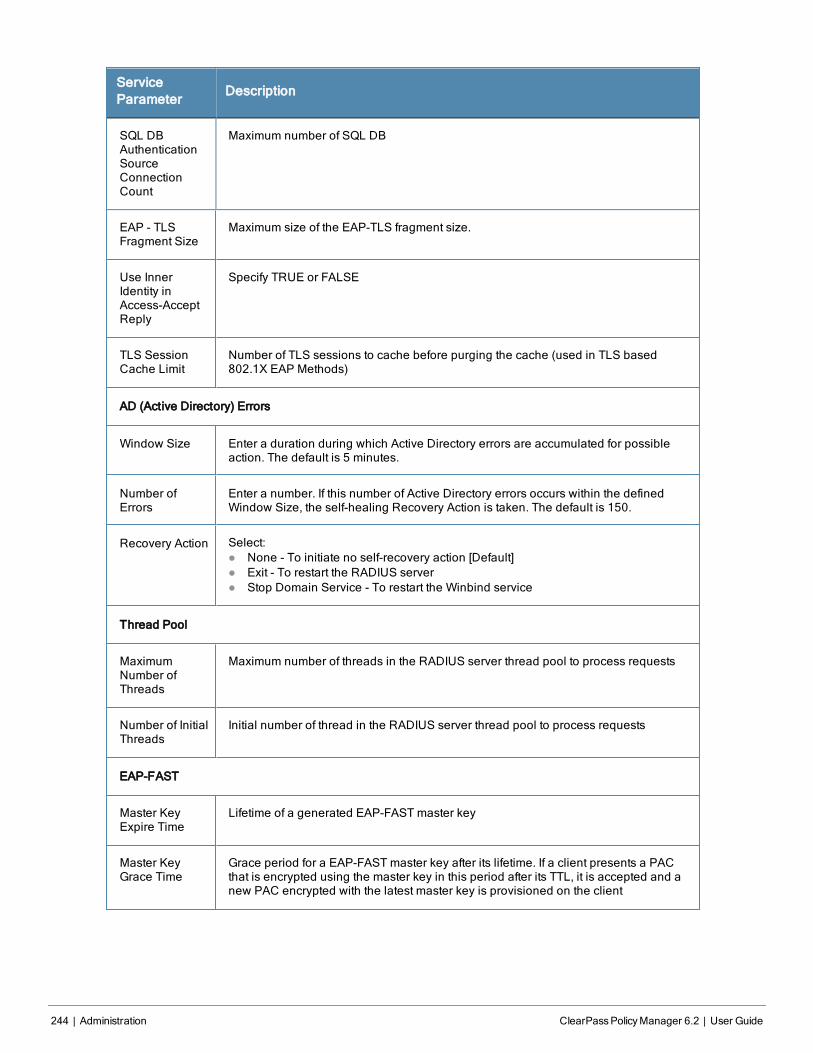
244 | Administration ClearPassPolicyManager 6.2 | User Guide
ServiceParameter
Description
SQL DBAuthenticationSourceConnectionCount
Maximum number of SQL DB
EAP - TLSFragment Size
Maximum size of the EAP-TLS fragment size.
Use InnerIdentity inAccess-AcceptReply
Specify TRUE or FALSE
TLS SessionCache Limit
Number of TLS sessions to cache before purging the cache (used in TLS based802.1X EAP Methods)
AD (Active Directory) Errors
Window Size Enter a duration during which Active Directory errors are accumulated for possibleaction. The default is 5 minutes.
Number ofErrors
Enter a number. If this number of Active Directory errors occurs within the definedWindow Size, the self-healing Recovery Action is taken. The default is 150.
Recovery Action Select:l None - To initiate no self-recovery action [Default]l Exit - To restart the RADIUS serverl Stop Domain Service - To restart the Winbind service
Thread Pool
MaximumNumber ofThreads
Maximum number of threads in the RADIUS server thread pool to process requests
Number of InitialThreads
Initial number of thread in the RADIUS server thread pool to process requests
EAP-FAST
Master KeyExpire Time
Lifetime of a generated EAP-FAST master key
Master KeyGrace Time
Grace period for a EAP-FAST master key after its lifetime. If a client presents a PACthat is encrypted using the master key in this period after its TTL, it is accepted and anew PAC encrypted with the latest master key is provisioned on the client
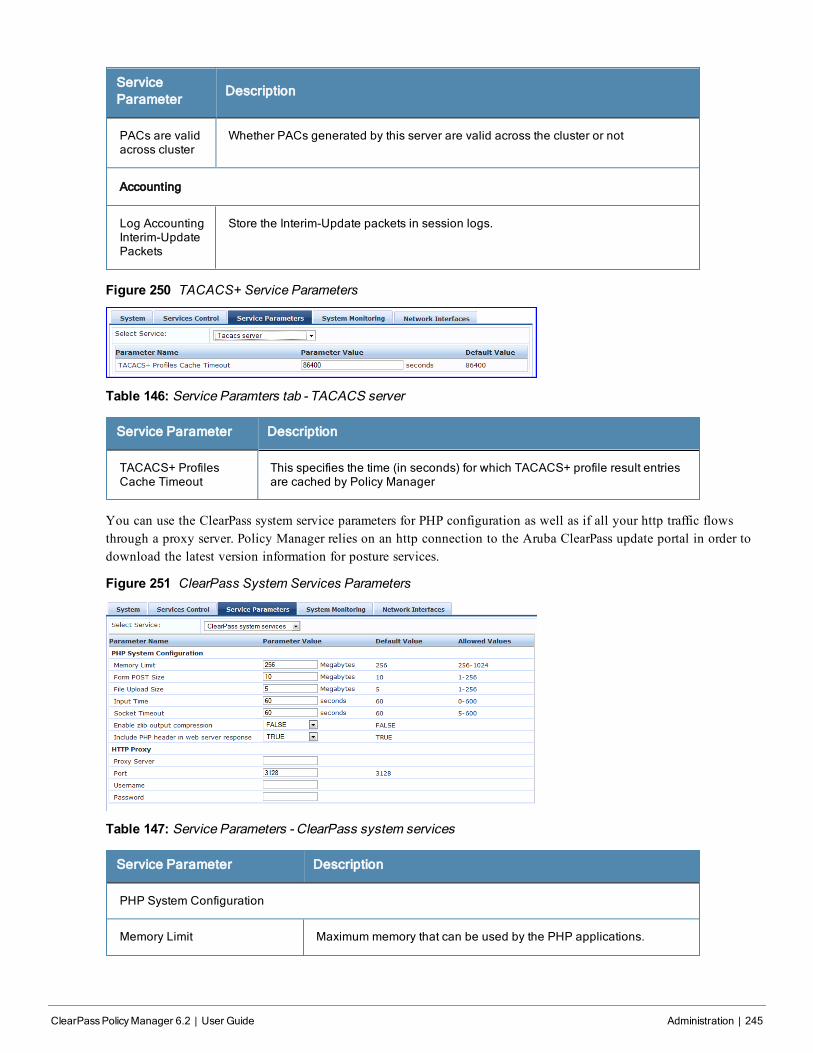
ServiceParameter
Description
PACs are validacross cluster
Whether PACs generated by this server are valid across the cluster or not
Accounting
Log AccountingInterim-UpdatePackets
Store the Interim-Update packets in session logs.
Figure 250 TACACS+ Service Parameters
Table 146: Service Paramters tab - TACACS server
Service Parameter Description
TACACS+ ProfilesCache Timeout
This specifies the time (in seconds) for which TACACS+ profile result entriesare cached by Policy Manager
You can use the ClearPass system service parameters for PHP configuration as well as if all your http traffic flowsthrough a proxy server. Policy Manager relies on an http connection to the Aruba ClearPass update portal in order todownload the latest version information for posture services.
Figure 251 ClearPass System Services Parameters
Table 147: Service Parameters - ClearPass system services
Service Parameter Description
PHP System Configuration
Memory Limit Maximum memory that can be used by the PHP applications.
ClearPassPolicyManager 6.2 | User Guide Administration | 245
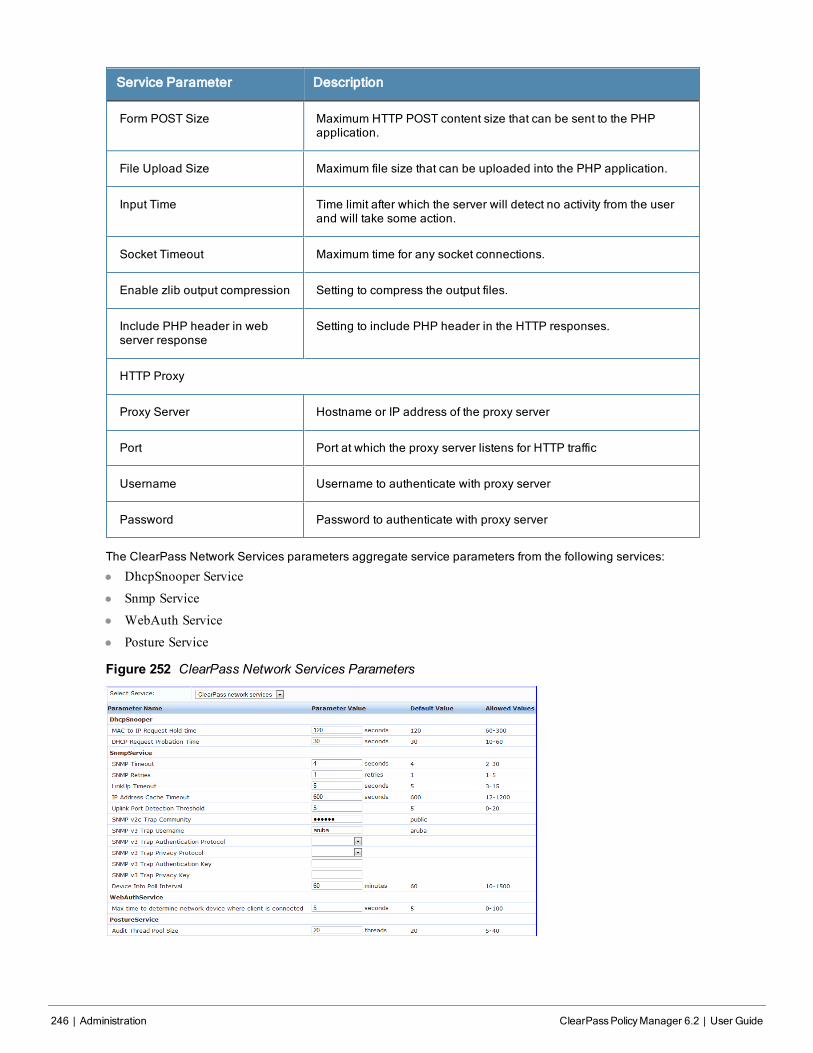
246 | Administration ClearPassPolicyManager 6.2 | User Guide
Service Parameter Description
Form POST Size Maximum HTTP POST content size that can be sent to the PHPapplication.
File Upload Size Maximum file size that can be uploaded into the PHP application.
Input Time Time limit after which the server will detect no activity from the userand will take some action.
Socket Timeout Maximum time for any socket connections.
Enable zlib output compression Setting to compress the output files.
Include PHP header in webserver response
Setting to include PHP header in the HTTP responses.
HTTP Proxy
Proxy Server Hostname or IP address of the proxy server
Port Port at which the proxy server listens for HTTP traffic
Username Username to authenticate with proxy server
Password Password to authenticate with proxy server
The ClearPass Network Services parameters aggregate service parameters from the following services:
l DhcpSnooper Service
l Snmp Service
l WebAuth Service
l Posture Service
Figure 252 ClearPass Network Services Parameters
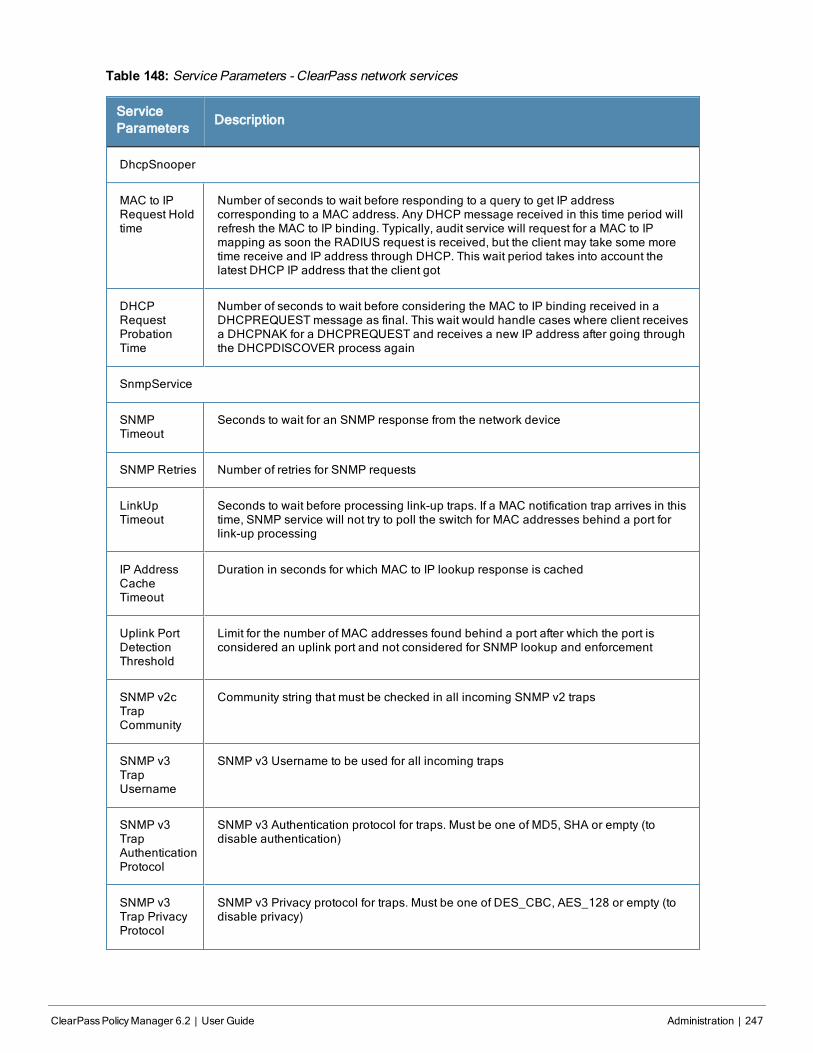
Table 148: Service Parameters - ClearPass network services
ServiceParameters
Description
DhcpSnooper
MAC to IPRequest Holdtime
Number of seconds to wait before responding to a query to get IP addresscorresponding to a MAC address. Any DHCP message received in this time period willrefresh the MAC to IP binding. Typically, audit service will request for a MAC to IPmapping as soon the RADIUS request is received, but the client may take some moretime receive and IP address through DHCP. This wait period takes into account thelatest DHCP IP address that the client got
DHCPRequestProbationTime
Number of seconds to wait before considering the MAC to IP binding received in aDHCPREQUEST message as final. This wait would handle cases where client receivesa DHCPNAK for a DHCPREQUEST and receives a new IP address after going throughthe DHCPDISCOVER process again
SnmpService
SNMPTimeout
Seconds to wait for an SNMP response from the network device
SNMP Retries Number of retries for SNMP requests
LinkUpTimeout
Seconds to wait before processing link-up traps. If a MAC notification trap arrives in thistime, SNMP service will not try to poll the switch for MAC addresses behind a port forlink-up processing
IP AddressCacheTimeout
Duration in seconds for which MAC to IP lookup response is cached
Uplink PortDetectionThreshold
Limit for the number of MAC addresses found behind a port after which the port isconsidered an uplink port and not considered for SNMP lookup and enforcement
SNMP v2cTrapCommunity
Community string that must be checked in all incoming SNMP v2 traps
SNMP v3TrapUsername
SNMP v3 Username to be used for all incoming traps
SNMP v3TrapAuthenticationProtocol
SNMP v3 Authentication protocol for traps. Must be one of MD5, SHA or empty (todisable authentication)
SNMP v3Trap PrivacyProtocol
SNMP v3 Privacy protocol for traps. Must be one of DES_CBC, AES_128 or empty (todisable privacy)
ClearPassPolicyManager 6.2 | User Guide Administration | 247
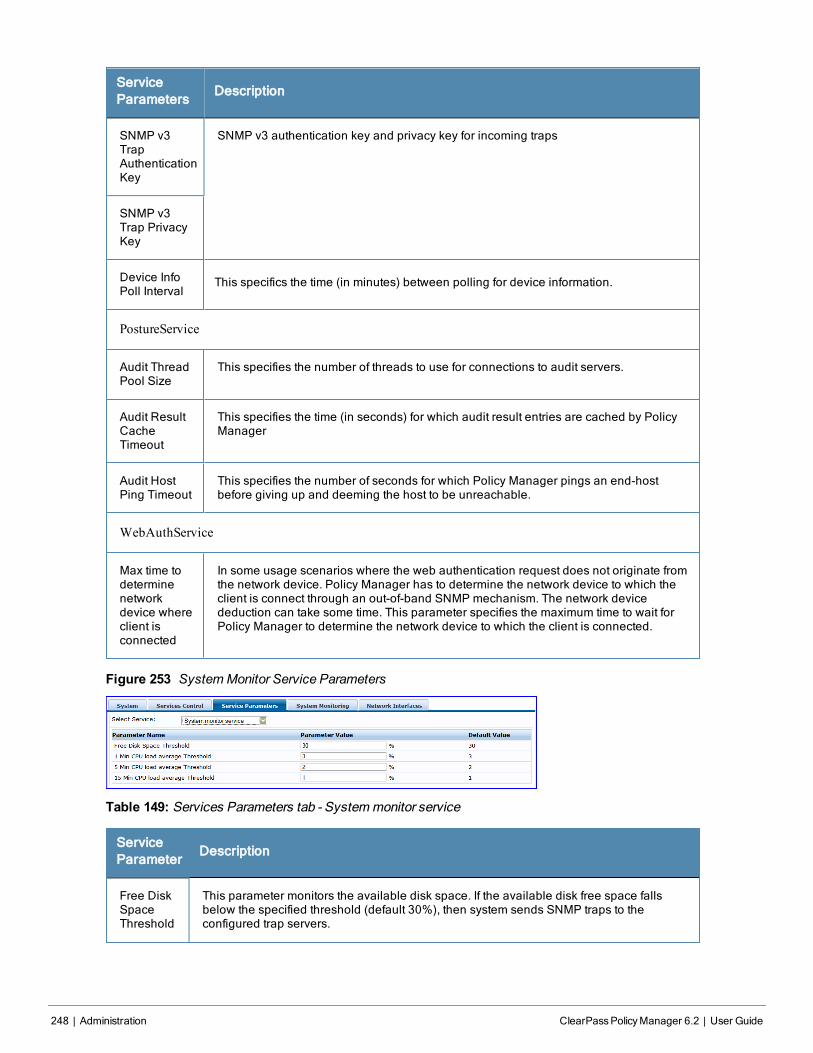
248 | Administration ClearPassPolicyManager 6.2 | User Guide
ServiceParameters
Description
SNMP v3TrapAuthenticationKey
SNMP v3 authentication key and privacy key for incoming traps
SNMP v3Trap PrivacyKey
Device InfoPoll Interval
This specifics the time (in minutes) between polling for device information.
PostureService
Audit ThreadPool Size
This specifies the number of threads to use for connections to audit servers.
Audit ResultCacheTimeout
This specifies the time (in seconds) for which audit result entries are cached by PolicyManager
Audit HostPing Timeout
This specifies the number of seconds for which Policy Manager pings an end-hostbefore giving up and deeming the host to be unreachable.
WebAuthService
Max time todeterminenetworkdevice whereclient isconnected
In some usage scenarios where the web authentication request does not originate fromthe network device. Policy Manager has to determine the network device to which theclient is connect through an out-of-band SNMP mechanism. The network devicededuction can take some time. This parameter specifies the maximum time to wait forPolicy Manager to determine the network device to which the client is connected.
Figure 253 SystemMonitor Service Parameters
Table 149: Services Parameters tab - Systemmonitor service
ServiceParameter
Description
Free DiskSpaceThreshold
This parameter monitors the available disk space. If the available disk free space fallsbelow the specified threshold (default 30%), then system sends SNMP traps to theconfigured trap servers.
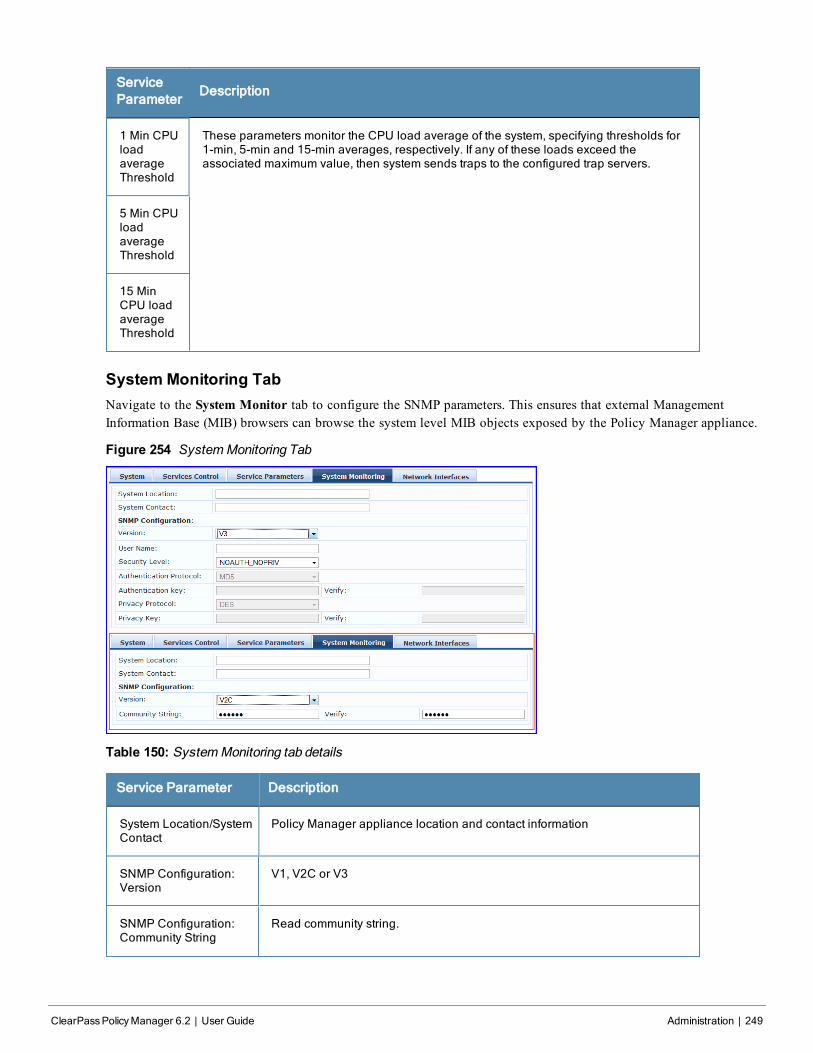
ServiceParameter
Description
1 Min CPUloadaverageThreshold
These parameters monitor the CPU load average of the system, specifying thresholds for1-min, 5-min and 15-min averages, respectively. If any of these loads exceed theassociated maximum value, then system sends traps to the configured trap servers.
5 Min CPUloadaverageThreshold
15 MinCPU loadaverageThreshold
System Monitoring TabNavigate to the System Monitor tab to configure the SNMP parameters. This ensures that external ManagementInformation Base (MIB) browsers can browse the system level MIB objects exposed by the Policy Manager appliance.
Figure 254 SystemMonitoring Tab
Table 150: SystemMonitoring tab details
Service Parameter Description
System Location/SystemContact
Policy Manager appliance location and contact information
SNMP Configuration:Version
V1, V2C or V3
SNMP Configuration:Community String
Read community string.
ClearPassPolicyManager 6.2 | User Guide Administration | 249
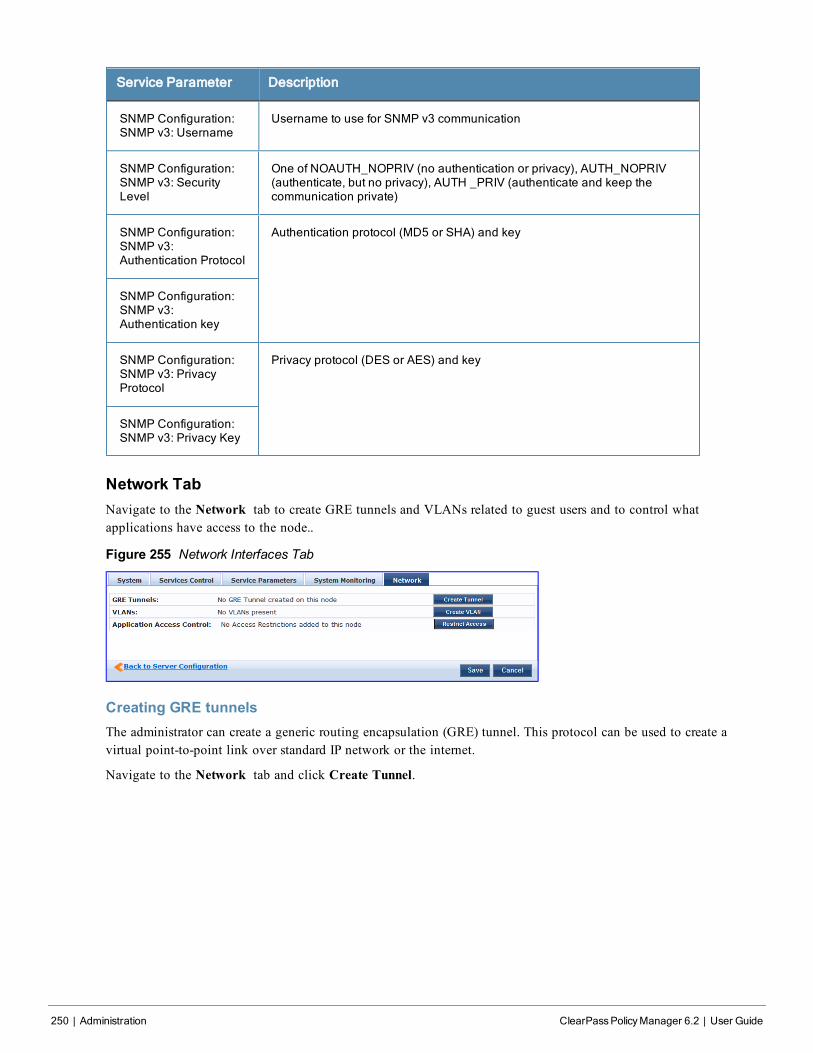
250 | Administration ClearPassPolicyManager 6.2 | User Guide
Service Parameter Description
SNMP Configuration:SNMP v3: Username
Username to use for SNMP v3 communication
SNMP Configuration:SNMP v3: SecurityLevel
One of NOAUTH_NOPRIV (no authentication or privacy), AUTH_NOPRIV(authenticate, but no privacy), AUTH _PRIV (authenticate and keep thecommunication private)
SNMP Configuration:SNMP v3:Authentication Protocol
Authentication protocol (MD5 or SHA) and key
SNMP Configuration:SNMP v3:Authentication key
SNMP Configuration:SNMP v3: PrivacyProtocol
Privacy protocol (DES or AES) and key
SNMP Configuration:SNMP v3: Privacy Key
Network TabNavigate to the Network tab to create GRE tunnels and VLANs related to guest users and to control whatapplications have access to the node..
Figure 255 Network Interfaces Tab
Creating GRE tunnelsThe administrator can create a generic routing encapsulation (GRE) tunnel. This protocol can be used to create avirtual point-to-point link over standard IP network or the internet.
Navigate to the Network tab and click Create Tunnel.
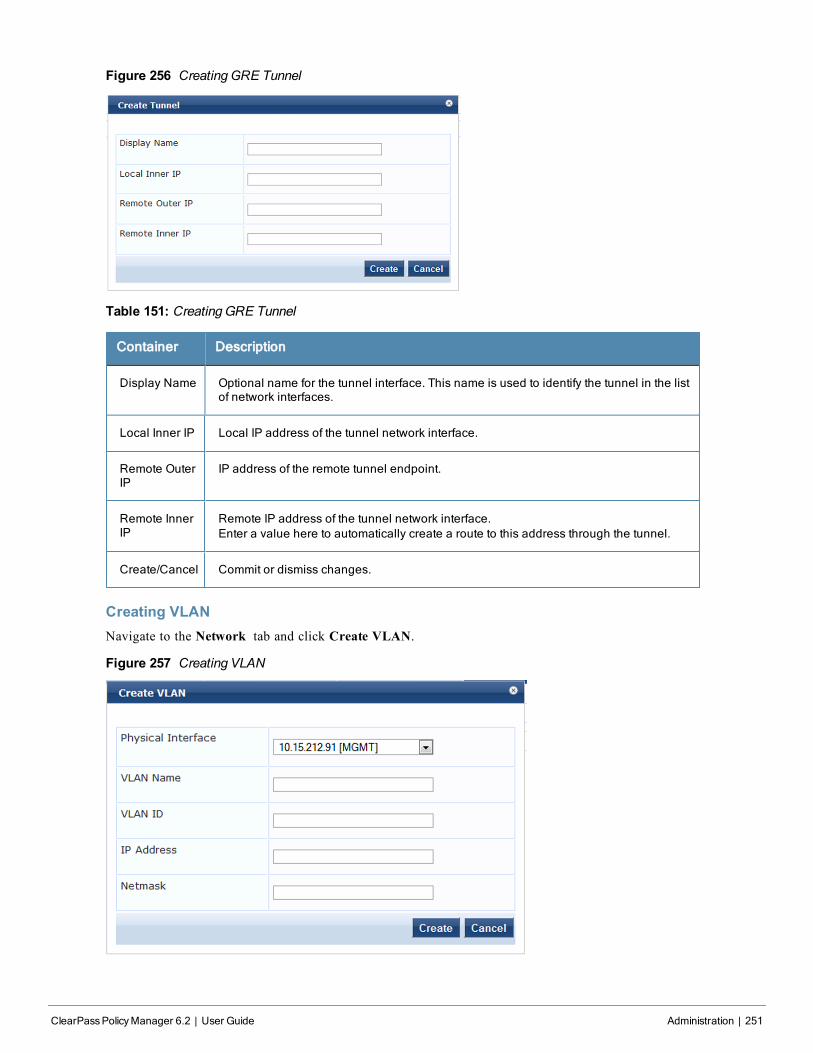
Figure 256 Creating GRE Tunnel
Table 151: Creating GRE Tunnel
Container Description
Display Name Optional name for the tunnel interface. This name is used to identify the tunnel in the listof network interfaces.
Local Inner IP Local IP address of the tunnel network interface.
Remote OuterIP
IP address of the remote tunnel endpoint.
Remote InnerIP
Remote IP address of the tunnel network interface.Enter a value here to automatically create a route to this address through the tunnel.
Create/Cancel Commit or dismiss changes.
Creating VLANNavigate to the Network tab and click Create VLAN.
Figure 257 Creating VLAN
ClearPassPolicyManager 6.2 | User Guide Administration | 251
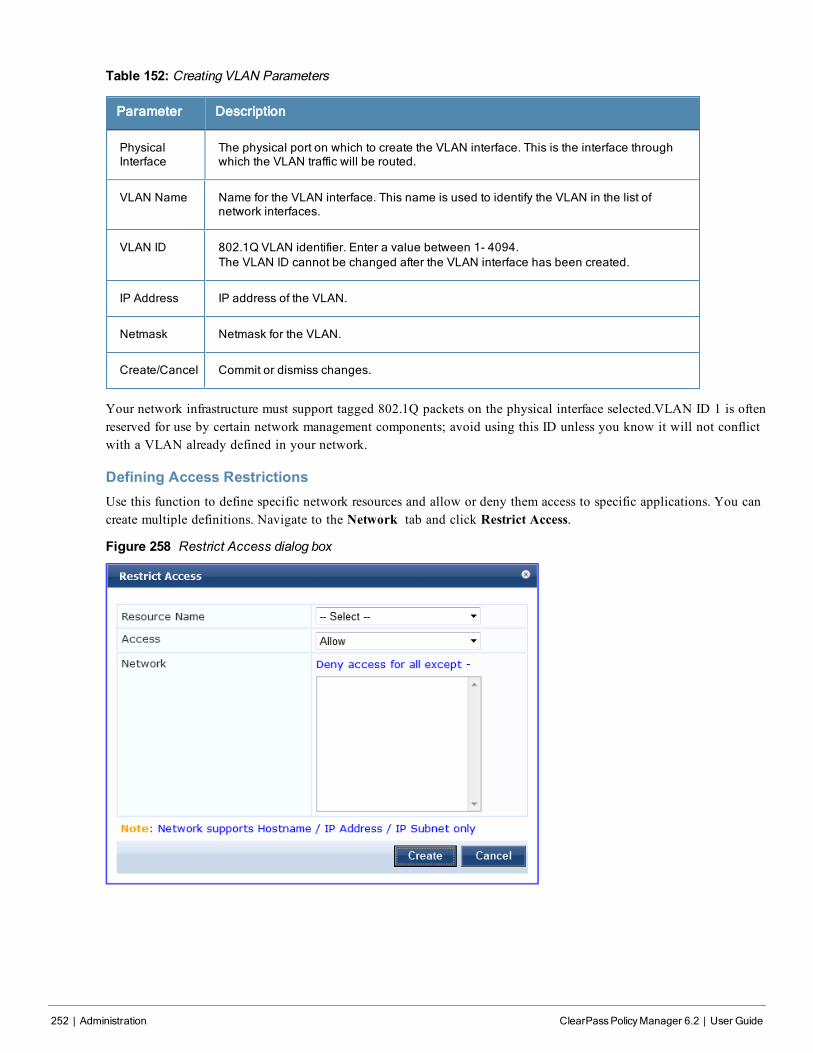
252 | Administration ClearPassPolicyManager 6.2 | User Guide
Table 152: Creating VLAN Parameters
Parameter Description
PhysicalInterface
The physical port on which to create the VLAN interface. This is the interface throughwhich the VLAN traffic will be routed.
VLAN Name Name for the VLAN interface. This name is used to identify the VLAN in the list ofnetwork interfaces.
VLAN ID 802.1Q VLAN identifier. Enter a value between 1- 4094.The VLAN ID cannot be changed after the VLAN interface has been created.
IP Address IP address of the VLAN.
Netmask Netmask for the VLAN.
Create/Cancel Commit or dismiss changes.
Your network infrastructure must support tagged 802.1Q packets on the physical interface selected.VLAN ID 1 is oftenreserved for use by certain network management components; avoid using this ID unless you know it will not conflictwith a VLAN already defined in your network.
Defining Access RestrictionsUse this function to define specific network resources and allow or deny them access to specific applications. You cancreate multiple definitions. Navigate to the Network tab and click Restrict Access.
Figure 258 Restrict Access dialog box
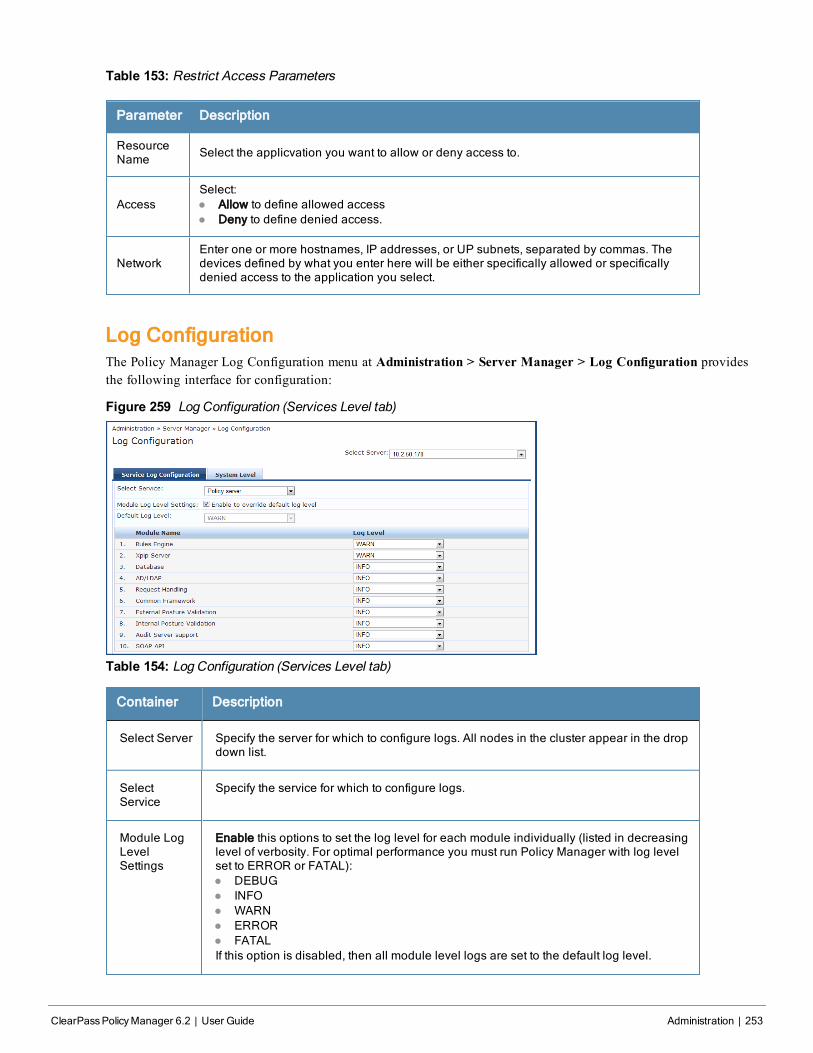
Table 153: Restrict Access Parameters
Parameter Description
ResourceName Select the applicvation you want to allow or deny access to.
AccessSelect:l Allow to define allowed accessl Deny to define denied access.
NetworkEnter one or more hostnames, IP addresses, or UP subnets, separated by commas. Thedevices defined by what you enter here will be either specifically allowed or specificallydenied access to the application you select.
Log ConfigurationThe Policy Manager Log Configuration menu at Administration > Server Manager > Log Configuration providesthe following interface for configuration:
Figure 259 Log Configuration (Services Level tab)
Table 154: Log Configuration (Services Level tab)
Container Description
Select Server Specify the server for which to configure logs. All nodes in the cluster appear in the dropdown list.
SelectService
Specify the service for which to configure logs.
Module LogLevelSettings
Enable this options to set the log level for each module individually (listed in decreasinglevel of verbosity. For optimal performance you must run Policy Manager with log levelset to ERROR or FATAL):l DEBUGl INFOl WARNl ERRORl FATALIf this option is disabled, then all module level logs are set to the default log level.
ClearPassPolicyManager 6.2 | User Guide Administration | 253

254 | Administration ClearPassPolicyManager 6.2 | User Guide
Container Description
Default LogLevel
This drop down is available if the Module Log Level Settings option is disabled. Thissets the default logging level for all modules. Available options include the following:l DEBUGl INFOl WARNl ERRORl FATALSet this option first, and then override any modules as necessary.
ModuleName & LogLevel
If the Module Log Level Settings option is enabled, select log levels for each of theavailable modules (listed in decreasing level of verbosity):l DEBUGl INFOl WARNl ERRORl FATAL
RestoreDefaults/Save
Click Save to save changes or Restore Defaults to restore default settings.
Figure 260 Log Configuration (System Level tab)
Table 155: Log Configuration (System Level tab)
Container Description
Select Server Specify the server for which to configure logs.
Number oflog files
Specify the number of log files of a specific module to keep at any given time. When alog file reaches the specified size (see below), Policy Manager rolls the log over toanother file until the specified number of log files is reached; once this log files exceedthis number, Policy Manager overwrites the first numbered file.
Limit each logfile size to
Limit each log file to this size, before the log rolls over to the next file
Syslog ServerSyslog Port
Specify the syslog server and port number. Policy Manager will send the configuredmodule logs to this syslog server.
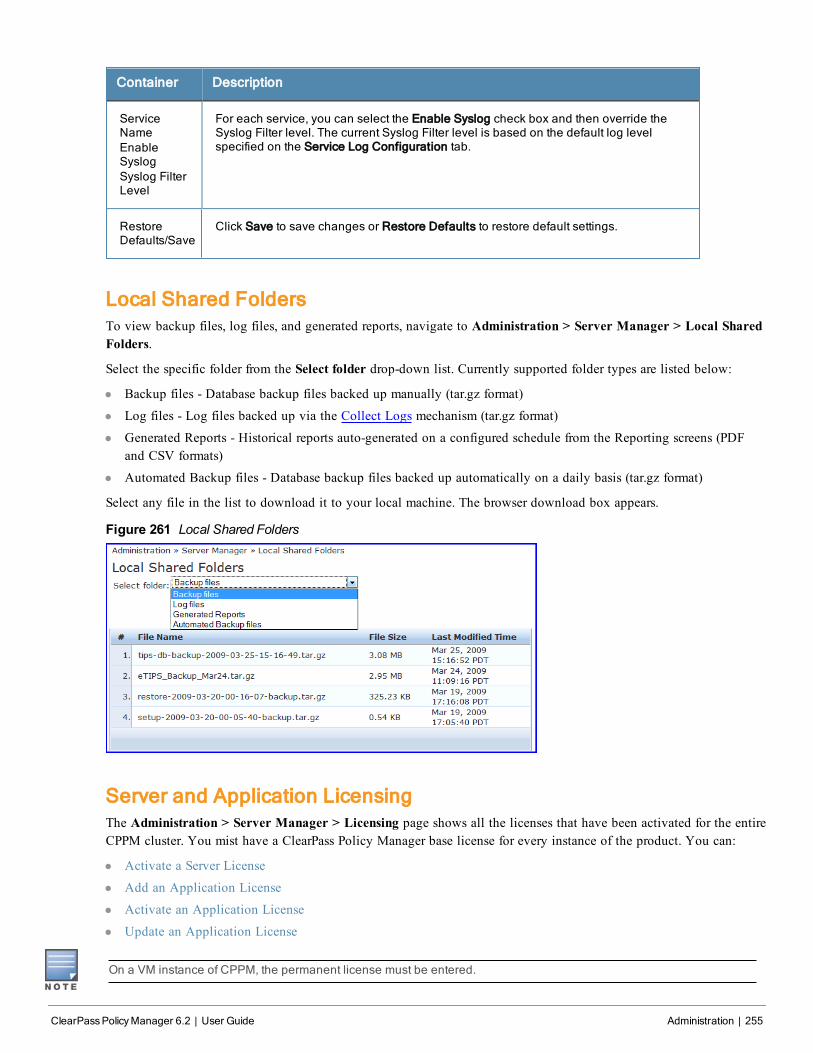
Container Description
ServiceNameEnableSyslogSyslog FilterLevel
For each service, you can select the Enable Syslog check box and then override theSyslog Filter level. The current Syslog Filter level is based on the default log levelspecified on the Service Log Configuration tab.
RestoreDefaults/Save
Click Save to save changes or Restore Defaults to restore default settings.
Local Shared FoldersTo view backup files, log files, and generated reports, navigate to Administration > Server Manager > Local SharedFolders.
Select the specific folder from the Select folder drop-down list. Currently supported folder types are listed below:
l Backup files - Database backup files backed up manually (tar.gz format)
l Log files - Log files backed up via the Collect Logs mechanism (tar.gz format)
l Generated Reports - Historical reports auto-generated on a configured schedule from the Reporting screens (PDFand CSV formats)
l Automated Backup files - Database backup files backed up automatically on a daily basis (tar.gz format)
Select any file in the list to download it to your local machine. The browser download box appears.
Figure 261 Local Shared Folders
Server and Application LicensingThe Administration > Server Manager > Licensing page shows all the licenses that have been activated for the entireCPPM cluster. You mist have a ClearPass Policy Manager base license for every instance of the product. You can:
l Activate a Server License
l Add an Application License
l Activate an Application License
l Update an Application License
On a VM instance of CPPM, the permanent license must be entered.
ClearPassPolicyManager 6.2 | User Guide Administration | 255
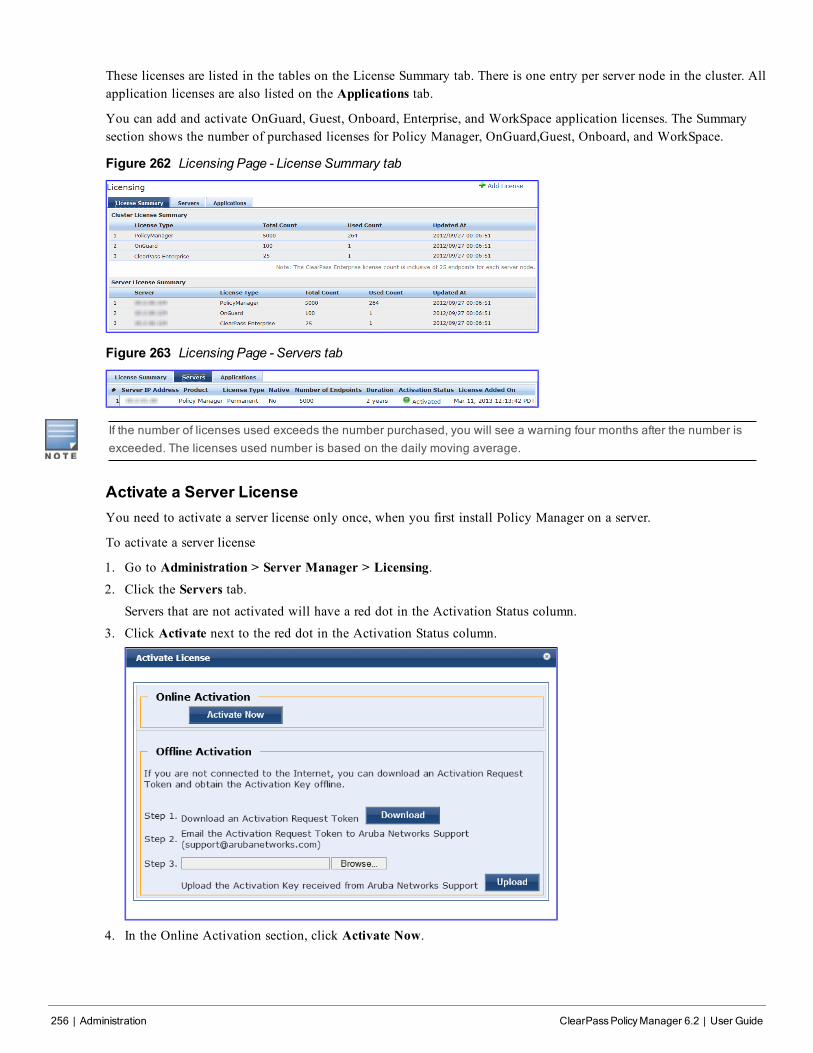
256 | Administration ClearPassPolicyManager 6.2 | User Guide
These licenses are listed in the tables on the License Summary tab. There is one entry per server node in the cluster. Allapplication licenses are also listed on the Applications tab.
You can add and activate OnGuard, Guest, Onboard, Enterprise, and WorkSpace application licenses. The Summarysection shows the number of purchased licenses for Policy Manager, OnGuard,Guest, Onboard, and WorkSpace.
Figure 262 Licensing Page - License Summary tab
Figure 263 Licensing Page - Servers tab
If the number of licenses used exceeds the number purchased, you will see a warning four months after the number isexceeded. The licenses used number is based on the daily moving average.
Activate a Server LicenseYou need to activate a server license only once, when you first install Policy Manager on a server.
To activate a server license
1. Go to Administration > Server Manager > Licensing.2. Click the Servers tab.
Servers that are not activated will have a red dot in the Activation Status column.
3. Click Activate next to the red dot in the Activation Status column.
4. In the Online Activation section, click Activate Now.
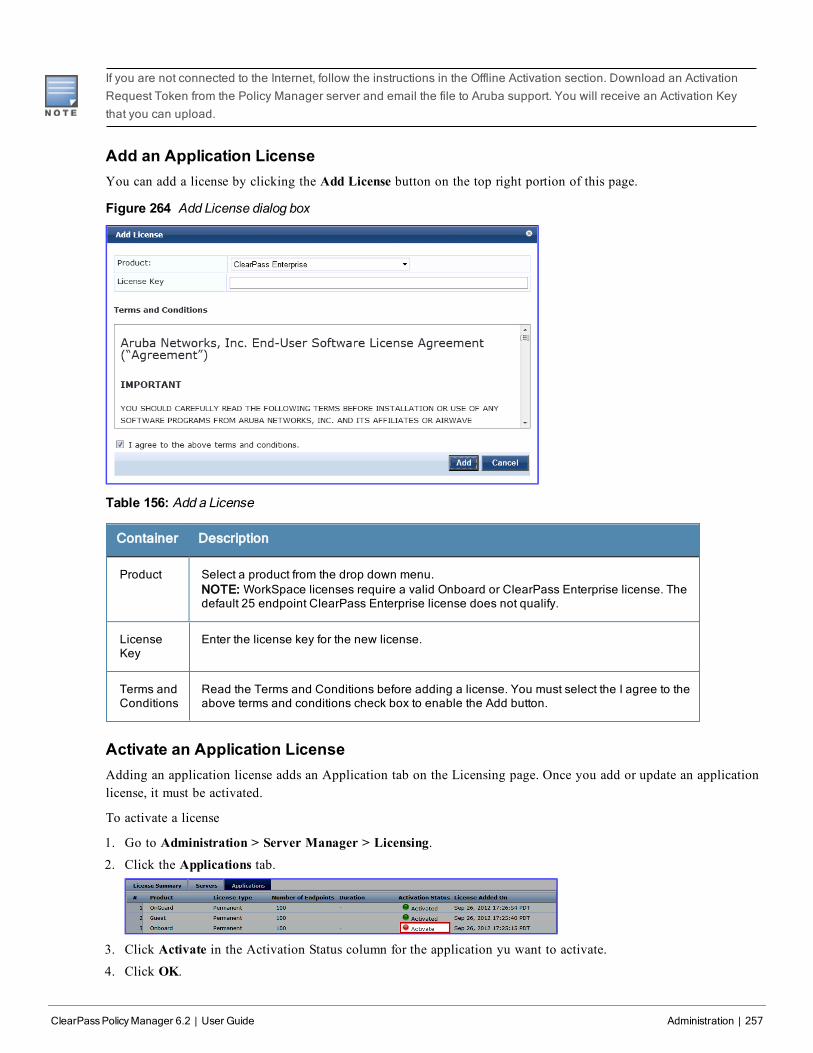
If you are not connected to the Internet, follow the instructions in the Offline Activation section. Download an ActivationRequest Token from the Policy Manager server and email the file to Aruba support. You will receive an Activation Keythat you can upload.
Add an Application LicenseYou can add a license by clicking the Add License button on the top right portion of this page.
Figure 264 Add License dialog box
Table 156: Add a License
Container Description
Product Select a product from the drop down menu.NOTE: WorkSpace licenses require a valid Onboard or ClearPass Enterprise license. Thedefault 25 endpoint ClearPass Enterprise license does not qualify.
LicenseKey
Enter the license key for the new license.
Terms andConditions
Read the Terms and Conditions before adding a license. You must select the I agree to theabove terms and conditions check box to enable the Add button.
Activate an Application LicenseAdding an application license adds an Application tab on the Licensing page. Once you add or update an applicationlicense, it must be activated.
To activate a license
1. Go to Administration > Server Manager > Licensing.2. Click the Applications tab.
3. Click Activate in the Activation Status column for the application yu want to activate.4. Click OK.
ClearPassPolicyManager 6.2 | User Guide Administration | 257
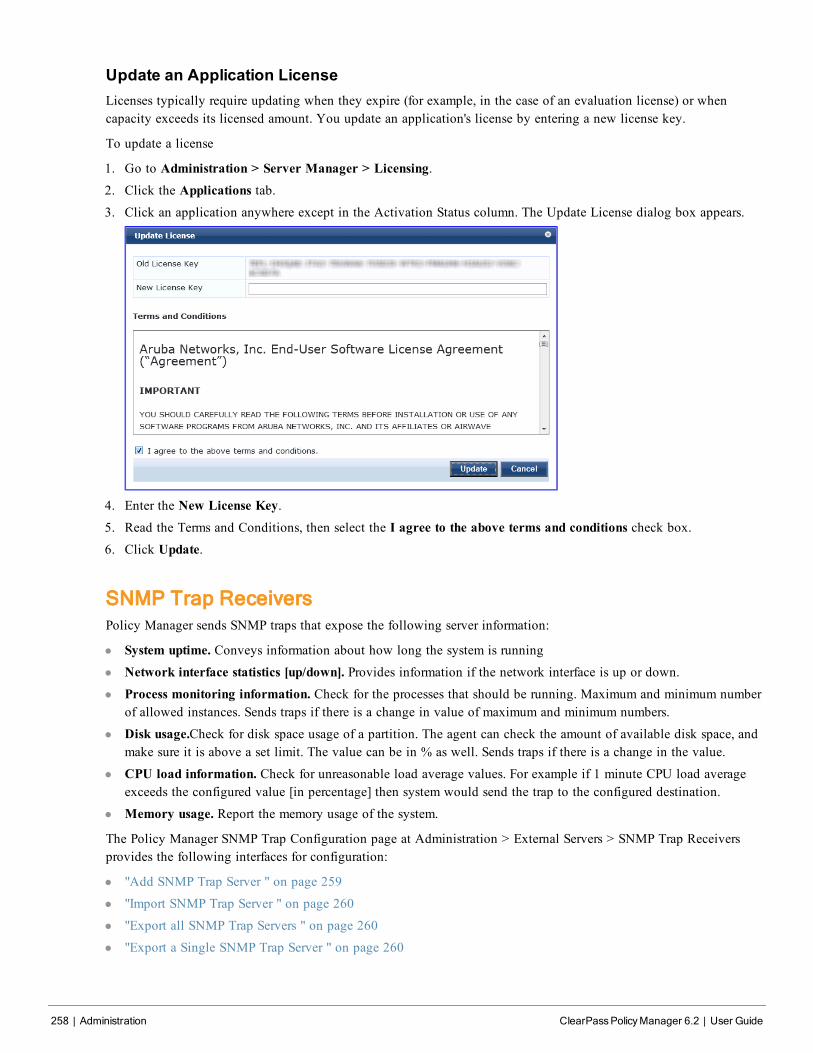
258 | Administration ClearPassPolicyManager 6.2 | User Guide
Update an Application LicenseLicenses typically require updating when they expire (for example, in the case of an evaluation license) or whencapacity exceeds its licensed amount. You update an application's license by entering a new license key.
To update a license
1. Go to Administration > Server Manager > Licensing.2. Click the Applications tab.3. Click an application anywhere except in the Activation Status column. The Update License dialog box appears.
4. Enter the New License Key.5. Read the Terms and Conditions, then select the I agree to the above terms and conditions check box.6. Click Update.
SNMP Trap ReceiversPolicy Manager sends SNMP traps that expose the following server information:
l System uptime. Conveys information about how long the system is running
l Network interface statistics [up/down]. Provides information if the network interface is up or down.l Process monitoring information. Check for the processes that should be running. Maximum and minimum number
of allowed instances. Sends traps if there is a change in value of maximum and minimum numbers.
l Disk usage.Check for disk space usage of a partition. The agent can check the amount of available disk space, andmake sure it is above a set limit. The value can be in % as well. Sends traps if there is a change in the value.
l CPU load information. Check for unreasonable load average values. For example if 1 minute CPU load averageexceeds the configured value [in percentage] then system would send the trap to the configured destination.
l Memory usage. Report the memory usage of the system.
The Policy Manager SNMP Trap Configuration page at Administration > External Servers > SNMP Trap Receiversprovides the following interfaces for configuration:
l "Add SNMP Trap Server " on page 259
l "Import SNMP Trap Server " on page 260
l "Export all SNMP Trap Servers " on page 260
l "Export a Single SNMP Trap Server " on page 260
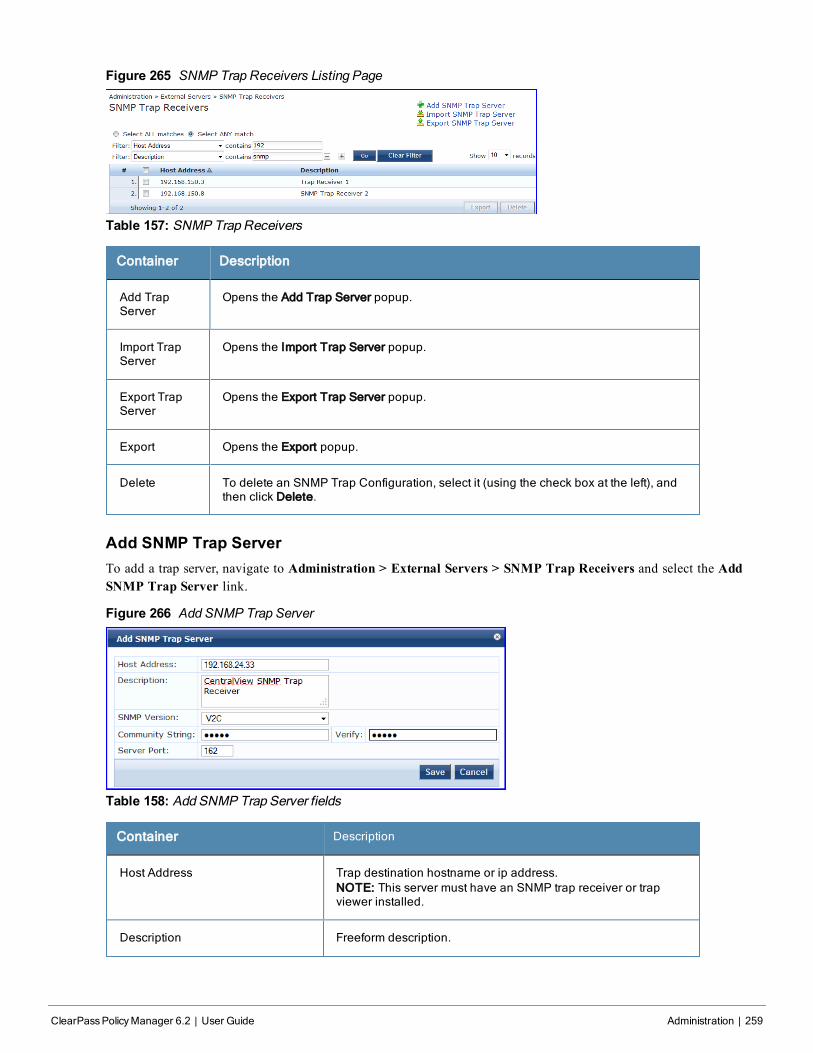
Figure 265 SNMP Trap Receivers Listing Page
Table 157: SNMP Trap Receivers
Container Description
Add TrapServer
Opens the Add Trap Server popup.
Import TrapServer
Opens the Import Trap Server popup.
Export TrapServer
Opens the Export Trap Server popup.
Export Opens the Export popup.
Delete To delete an SNMP Trap Configuration, select it (using the check box at the left), andthen click Delete.
Add SNMP Trap ServerTo add a trap server, navigate to Administration > External Servers > SNMP Trap Receivers and select the AddSNMP Trap Server link.
Figure 266 Add SNMP Trap Server
Table 158: Add SNMP Trap Server fields
Container Description
Host Address Trap destination hostname or ip address.NOTE: This server must have an SNMP trap receiver or trapviewer installed.
Description Freeform description.
ClearPassPolicyManager 6.2 | User Guide Administration | 259
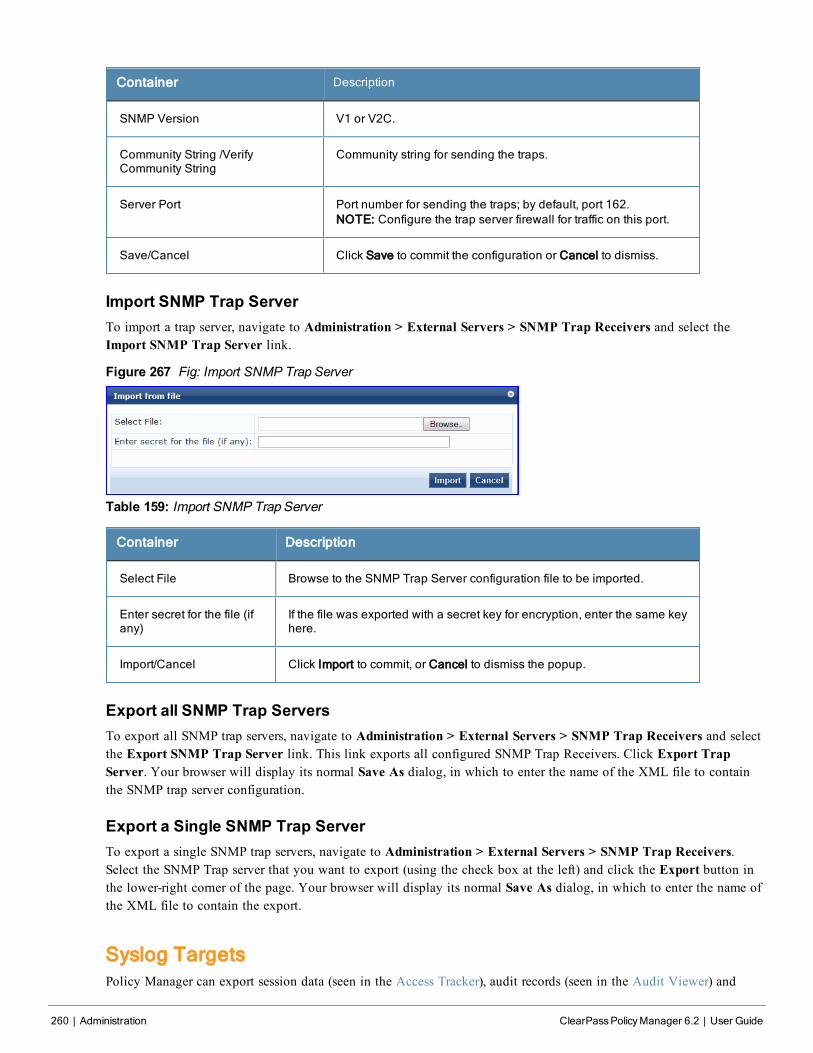
260 | Administration ClearPassPolicyManager 6.2 | User Guide
Container Description
SNMP Version V1 or V2C.
Community String /VerifyCommunity String
Community string for sending the traps.
Server Port Port number for sending the traps; by default, port 162.NOTE: Configure the trap server firewall for traffic on this port.
Save/Cancel Click Save to commit the configuration or Cancel to dismiss.
Import SNMP Trap ServerTo import a trap server, navigate to Administration > External Servers > SNMP Trap Receivers and select theImport SNMP Trap Server link.
Figure 267 Fig: Import SNMP Trap Server
Table 159: Import SNMP Trap Server
Container Description
Select File Browse to the SNMP Trap Server configuration file to be imported.
Enter secret for the file (ifany)
If the file was exported with a secret key for encryption, enter the same keyhere.
Import/Cancel Click Import to commit, or Cancel to dismiss the popup.
Export all SNMP Trap ServersTo export all SNMP trap servers, navigate to Administration > External Servers > SNMP Trap Receivers and selectthe Export SNMP Trap Server link. This link exports all configured SNMP Trap Receivers. Click Export TrapServer. Your browser will display its normal Save As dialog, in which to enter the name of the XML file to containthe SNMP trap server configuration.
Export a Single SNMP Trap ServerTo export a single SNMP trap servers, navigate to Administration > External Servers > SNMP Trap Receivers.Select the SNMP Trap server that you want to export (using the check box at the left) and click the Export button inthe lower-right corner of the page. Your browser will display its normal Save As dialog, in which to enter the name ofthe XML file to contain the export.
Syslog TargetsPolicy Manager can export session data (seen in the Access Tracker), audit records (seen in the Audit Viewer) and
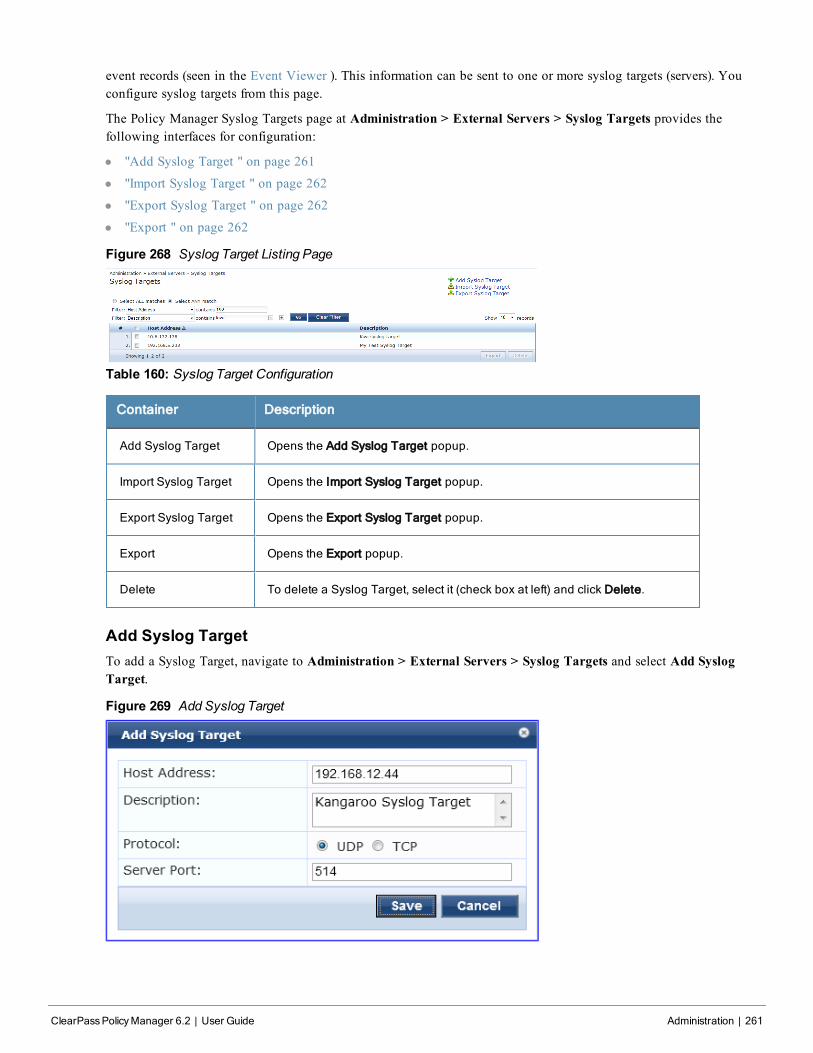
event records (seen in the Event Viewer ). This information can be sent to one or more syslog targets (servers). Youconfigure syslog targets from this page.
The Policy Manager Syslog Targets page at Administration > External Servers > Syslog Targets provides thefollowing interfaces for configuration:
l "Add Syslog Target " on page 261
l "Import Syslog Target " on page 262
l "Export Syslog Target " on page 262
l "Export " on page 262
Figure 268 Syslog Target Listing Page
Table 160: Syslog Target Configuration
Container Description
Add Syslog Target Opens the Add Syslog Target popup.
Import Syslog Target Opens the Import Syslog Target popup.
Export Syslog Target Opens the Export Syslog Target popup.
Export Opens the Export popup.
Delete To delete a Syslog Target, select it (check box at left) and click Delete.
Add Syslog TargetTo add a Syslog Target, navigate to Administration > External Servers > Syslog Targets and select Add SyslogTarget.
Figure 269 Add Syslog Target
ClearPassPolicyManager 6.2 | User Guide Administration | 261
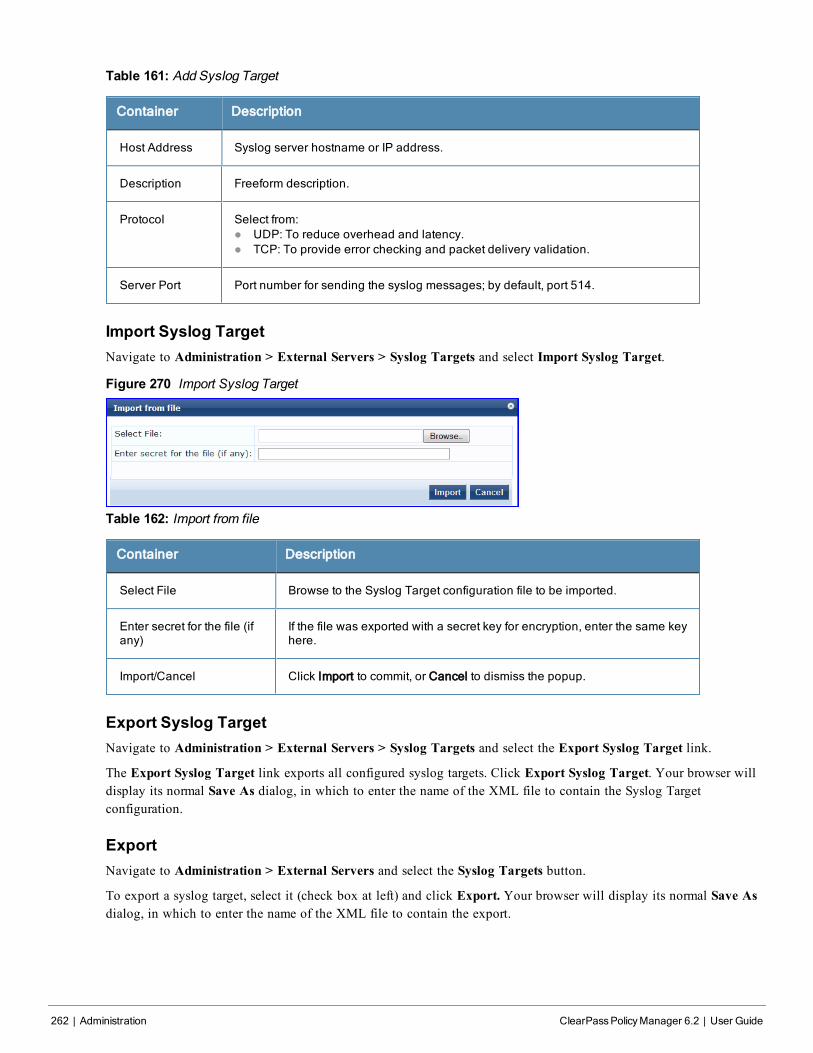
262 | Administration ClearPassPolicyManager 6.2 | User Guide
Table 161: Add Syslog Target
Container Description
Host Address Syslog server hostname or IP address.
Description Freeform description.
Protocol Select from:l UDP: To reduce overhead and latency.l TCP: To provide error checking and packet delivery validation.
Server Port Port number for sending the syslog messages; by default, port 514.
Import Syslog TargetNavigate to Administration > External Servers > Syslog Targets and select Import Syslog Target.
Figure 270 Import Syslog Target
Table 162: Import from file
Container Description
Select File Browse to the Syslog Target configuration file to be imported.
Enter secret for the file (ifany)
If the file was exported with a secret key for encryption, enter the same keyhere.
Import/Cancel Click Import to commit, or Cancel to dismiss the popup.
Export Syslog TargetNavigate to Administration > External Servers > Syslog Targets and select the Export Syslog Target link.
The Export Syslog Target link exports all configured syslog targets. Click Export Syslog Target. Your browser willdisplay its normal Save As dialog, in which to enter the name of the XML file to contain the Syslog Targetconfiguration.
ExportNavigate to Administration > External Servers and select the Syslog Targets button.
To export a syslog target, select it (check box at left) and click Export. Your browser will display its normal Save Asdialog, in which to enter the name of the XML file to contain the export.
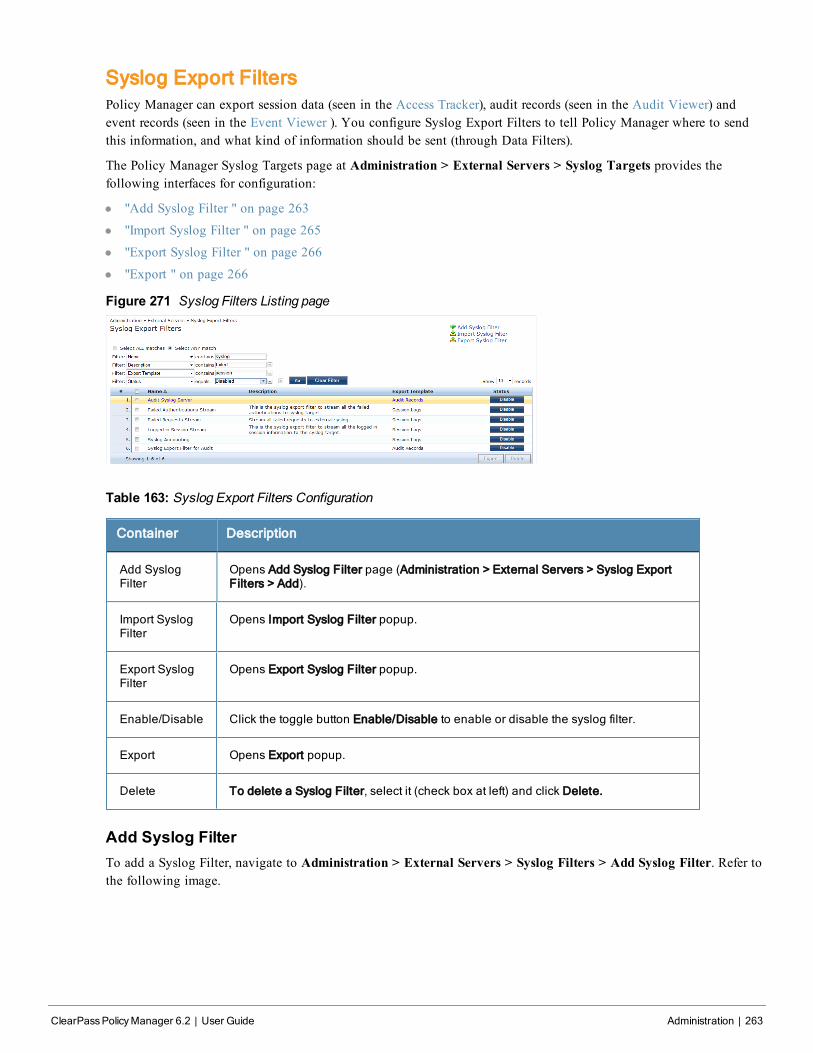
Syslog Export FiltersPolicy Manager can export session data (seen in the Access Tracker), audit records (seen in the Audit Viewer) andevent records (seen in the Event Viewer ). You configure Syslog Export Filters to tell Policy Manager where to sendthis information, and what kind of information should be sent (through Data Filters).
The Policy Manager Syslog Targets page at Administration > External Servers > Syslog Targets provides thefollowing interfaces for configuration:
l "Add Syslog Filter " on page 263
l "Import Syslog Filter " on page 265
l "Export Syslog Filter " on page 266
l "Export " on page 266
Figure 271 Syslog Filters Listing page
Table 163: Syslog Export Filters Configuration
Container Description
Add SyslogFilter
Opens Add Syslog Filter page (Administration > External Servers > Syslog ExportFilters > Add).
Import SyslogFilter
Opens Import Syslog Filter popup.
Export SyslogFilter
Opens Export Syslog Filter popup.
Enable/Disable Click the toggle button Enable/Disable to enable or disable the syslog filter.
Export Opens Export popup.
Delete To delete a Syslog Filter, select it (check box at left) and click Delete.
Add Syslog FilterTo add a Syslog Filter, navigate to Administration > External Servers > Syslog Filters > Add Syslog Filter. Refer tothe following image.
ClearPassPolicyManager 6.2 | User Guide Administration | 263
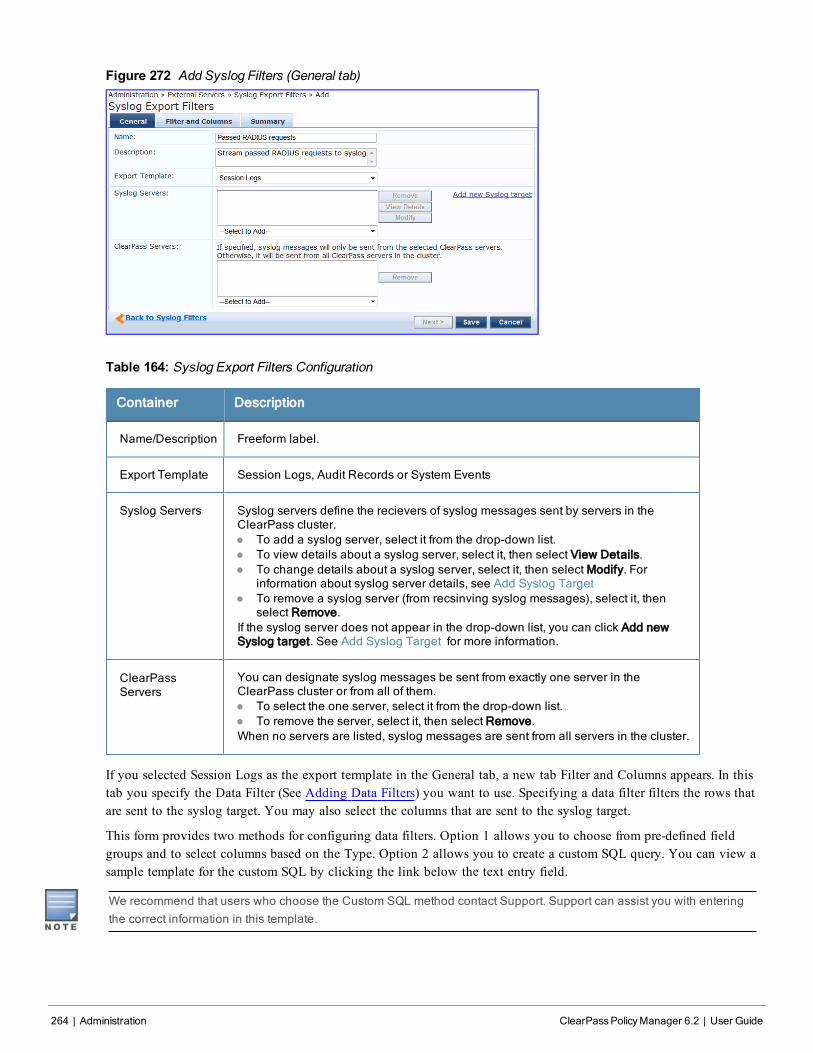
264 | Administration ClearPassPolicyManager 6.2 | User Guide
Figure 272 Add Syslog Filters (General tab)
Table 164: Syslog Export Filters Configuration
Container Description
Name/Description Freeform label.
Export Template Session Logs, Audit Records or System Events
Syslog Servers Syslog servers define the recievers of syslog messages sent by servers in theClearPass cluster.l To add a syslog server, select it from the drop-down list.l To view details about a syslog server, select it, then select View Details.l To change details about a syslog server, select it, then select Modify. For
information about syslog server details, see Add Syslog Targetl To remove a syslog server (from recsinving syslog messages), select it, then
select Remove.If the syslog server does not appear in the drop-down list, you can click Add newSyslog target. See Add Syslog Target for more information.
ClearPassServers
You can designate syslog messages be sent from exactly one server in theClearPass cluster or from all of them.l To select the one server, select it from the drop-down list.l To remove the server, select it, then select Remove.When no servers are listed, syslog messages are sent from all servers in the cluster.
If you selected Session Logs as the export termplate in the General tab, a new tab Filter and Columns appears. In thistab you specify the Data Filter (See Adding Data Filters) you want to use. Specifying a data filter filters the rows thatare sent to the syslog target. You may also select the columns that are sent to the syslog target.
This form provides two methods for configuring data filters. Option 1 allows you to choose from pre-defined fieldgroups and to select columns based on the Type. Option 2 allows you to create a custom SQL query. You can view asample template for the custom SQL by clicking the link below the text entry field.
We recommend that users who choose the Custom SQL method contact Support. Support can assist you with enteringthe correct information in this template.
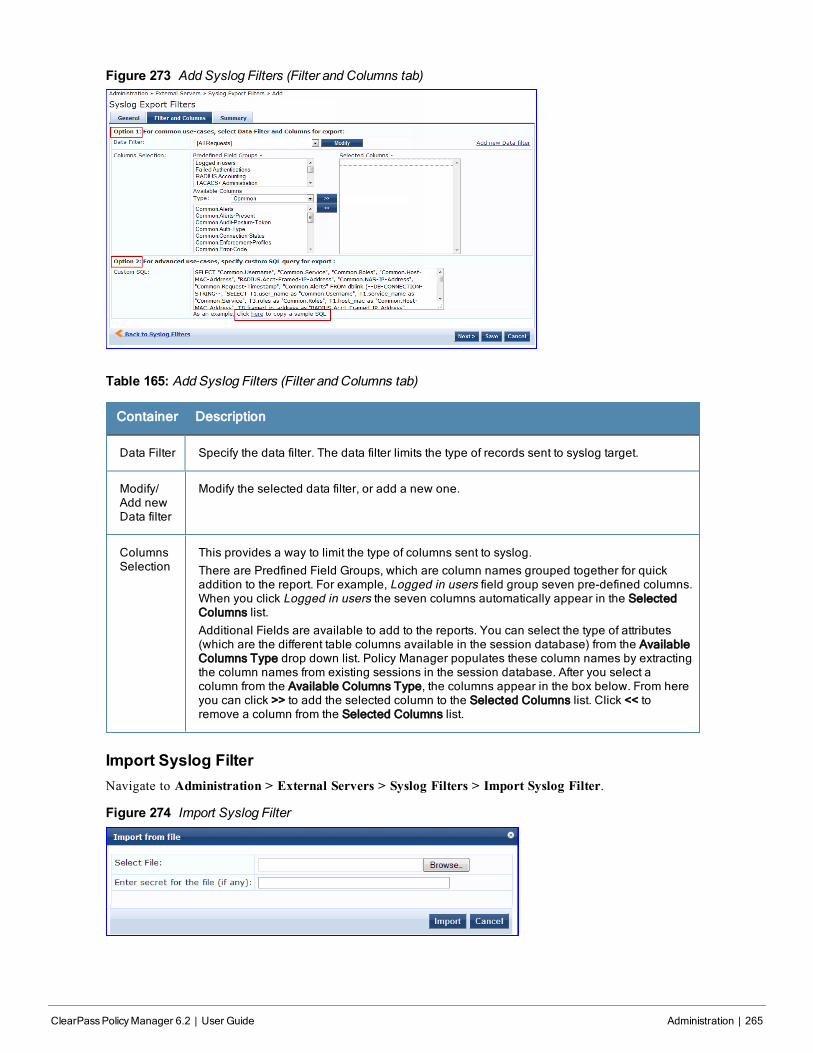
Figure 273 Add Syslog Filters (Filter and Columns tab)
Table 165: Add Syslog Filters (Filter and Columns tab)
Container Description
Data Filter Specify the data filter. The data filter limits the type of records sent to syslog target.
Modify/Add newData filter
Modify the selected data filter, or add a new one.
ColumnsSelection
This provides a way to limit the type of columns sent to syslog.There are Predfined Field Groups, which are column names grouped together for quickaddition to the report. For example, Logged in users field group seven pre-defined columns.When you click Logged in users the seven columns automatically appear in the SelectedColumns list.Additional Fields are available to add to the reports. You can select the type of attributes(which are the different table columns available in the session database) from the AvailableColumns Type drop down list. Policy Manager populates these column names by extractingthe column names from existing sessions in the session database. After you select acolumn from the Available Columns Type, the columns appear in the box below. From hereyou can click >> to add the selected column to the Selected Columns list. Click << toremove a column from the Selected Columns list.
Import Syslog FilterNavigate to Administration > External Servers > Syslog Filters > Import Syslog Filter.
Figure 274 Import Syslog Filter
ClearPassPolicyManager 6.2 | User Guide Administration | 265
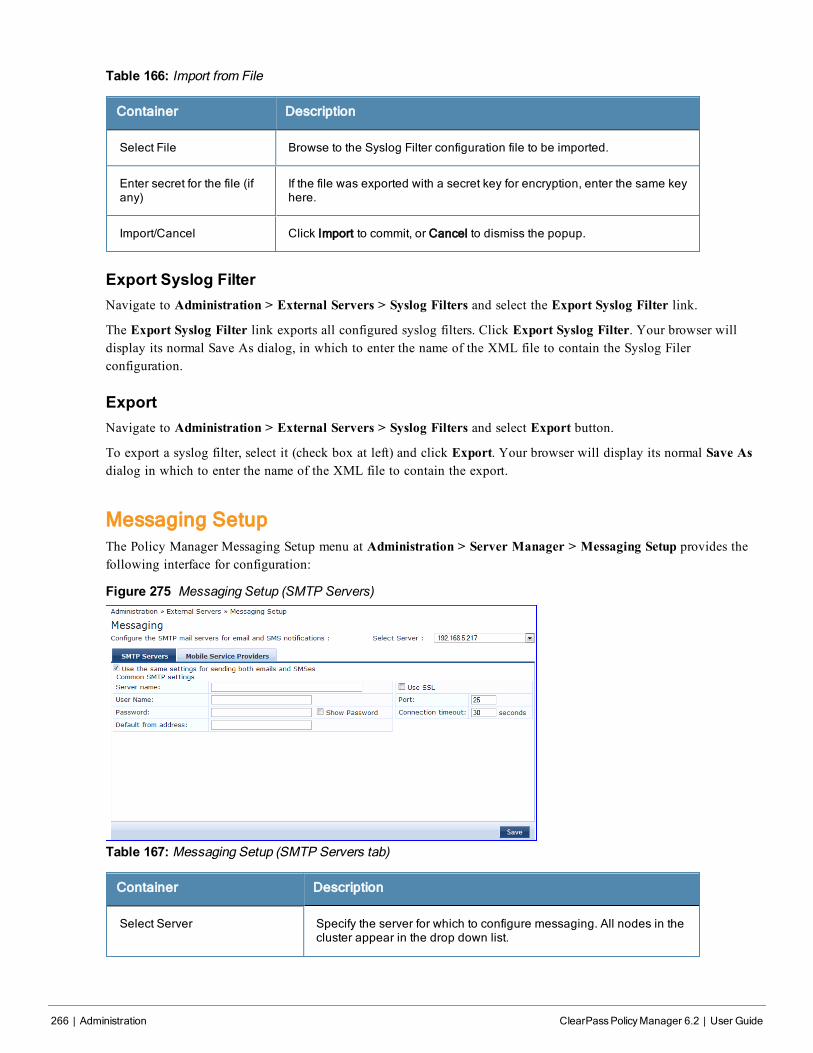
266 | Administration ClearPassPolicyManager 6.2 | User Guide
Table 166: Import from File
Container Description
Select File Browse to the Syslog Filter configuration file to be imported.
Enter secret for the file (ifany)
If the file was exported with a secret key for encryption, enter the same keyhere.
Import/Cancel Click Import to commit, or Cancel to dismiss the popup.
Export Syslog FilterNavigate to Administration > External Servers > Syslog Filters and select the Export Syslog Filter link.
The Export Syslog Filter link exports all configured syslog filters. Click Export Syslog Filter. Your browser willdisplay its normal Save As dialog, in which to enter the name of the XML file to contain the Syslog Filerconfiguration.
ExportNavigate to Administration > External Servers > Syslog Filters and select Export button.
To export a syslog filter, select it (check box at left) and click Export. Your browser will display its normal Save Asdialog in which to enter the name of the XML file to contain the export.
Messaging SetupThe Policy Manager Messaging Setup menu at Administration > Server Manager > Messaging Setup provides thefollowing interface for configuration:
Figure 275 Messaging Setup (SMTP Servers)
Table 167: Messaging Setup (SMTP Servers tab)
Container Description
Select Server Specify the server for which to configure messaging. All nodes in thecluster appear in the drop down list.
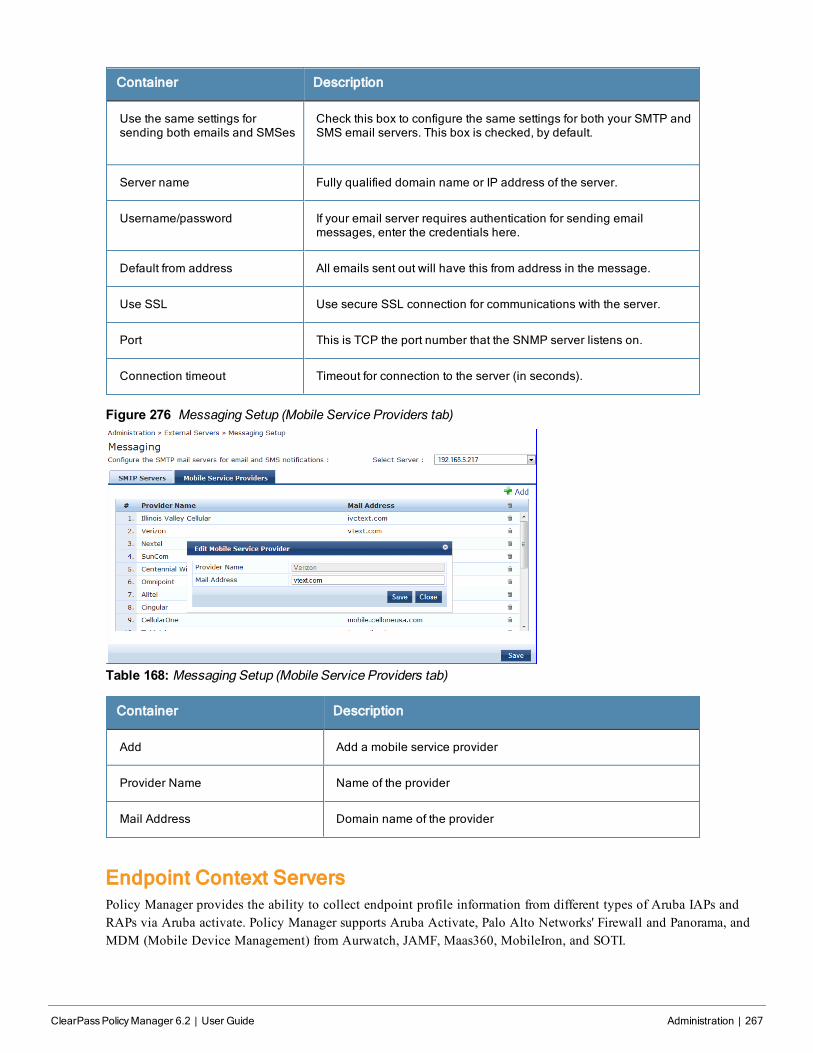
Container Description
Use the same settings forsending both emails and SMSes
Check this box to configure the same settings for both your SMTP andSMS email servers. This box is checked, by default.
Server name Fully qualified domain name or IP address of the server.
Username/password If your email server requires authentication for sending emailmessages, enter the credentials here.
Default from address All emails sent out will have this from address in the message.
Use SSL Use secure SSL connection for communications with the server.
Port This is TCP the port number that the SNMP server listens on.
Connection timeout Timeout for connection to the server (in seconds).
Figure 276 Messaging Setup (Mobile Service Providers tab)
Table 168: Messaging Setup (Mobile Service Providers tab)
Container Description
Add Add a mobile service provider
Provider Name Name of the provider
Mail Address Domain name of the provider
Endpoint Context ServersPolicy Manager provides the ability to collect endpoint profile information from different types of Aruba IAPs andRAPs via Aruba activate. Policy Manager supports Aruba Activate, Palo Alto Networks' Firewall and Panorama, andMDM (Mobile Device Management) from Aurwatch, JAMF, Maas360, MobileIron, and SOTI.
ClearPassPolicyManager 6.2 | User Guide Administration | 267
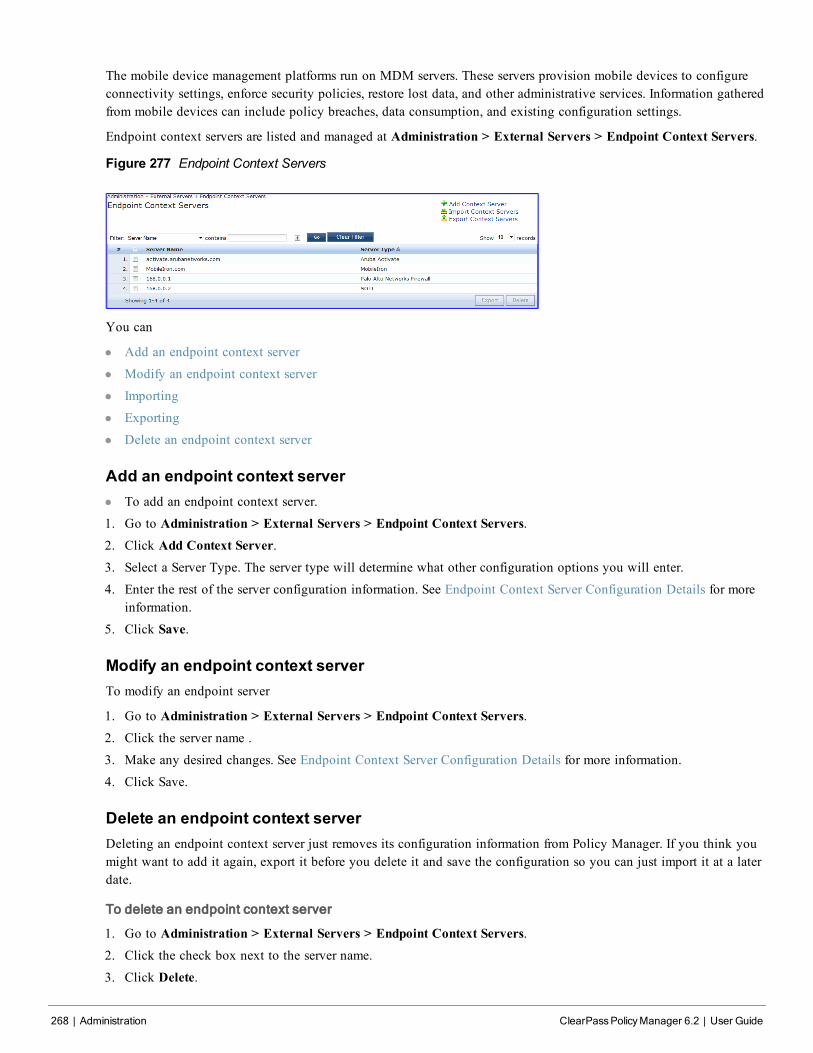
268 | Administration ClearPassPolicyManager 6.2 | User Guide
The mobile device management platforms run on MDM servers. These servers provision mobile devices to configureconnectivity settings, enforce security policies, restore lost data, and other administrative services. Information gatheredfrom mobile devices can include policy breaches, data consumption, and existing configuration settings.
Endpoint context servers are listed and managed at Administration > External Servers > Endpoint Context Servers.
Figure 277 Endpoint Context Servers
You can
l Add an endpoint context server
l Modify an endpoint context server
l Importing
l Exporting
l Delete an endpoint context server
Add an endpoint context serverl To add an endpoint context server.
1. Go to Administration > External Servers > Endpoint Context Servers.2. Click Add Context Server.3. Select a Server Type. The server type will determine what other configuration options you will enter.
4. Enter the rest of the server configuration information. See Endpoint Context Server Configuration Details for moreinformation.
5. Click Save.
Modify an endpoint context serverTo modify an endpoint server
1. Go to Administration > External Servers > Endpoint Context Servers.2. Click the server name .
3. Make any desired changes. See Endpoint Context Server Configuration Details for more information.
4. Click Save.
Delete an endpoint context serverDeleting an endpoint context server just removes its configuration information from Policy Manager. If you think youmight want to add it again, export it before you delete it and save the configuration so you can just import it at a laterdate.
To delete an endpoint context server
1. Go to Administration > External Servers > Endpoint Context Servers.2. Click the check box next to the server name.
3. Click Delete.
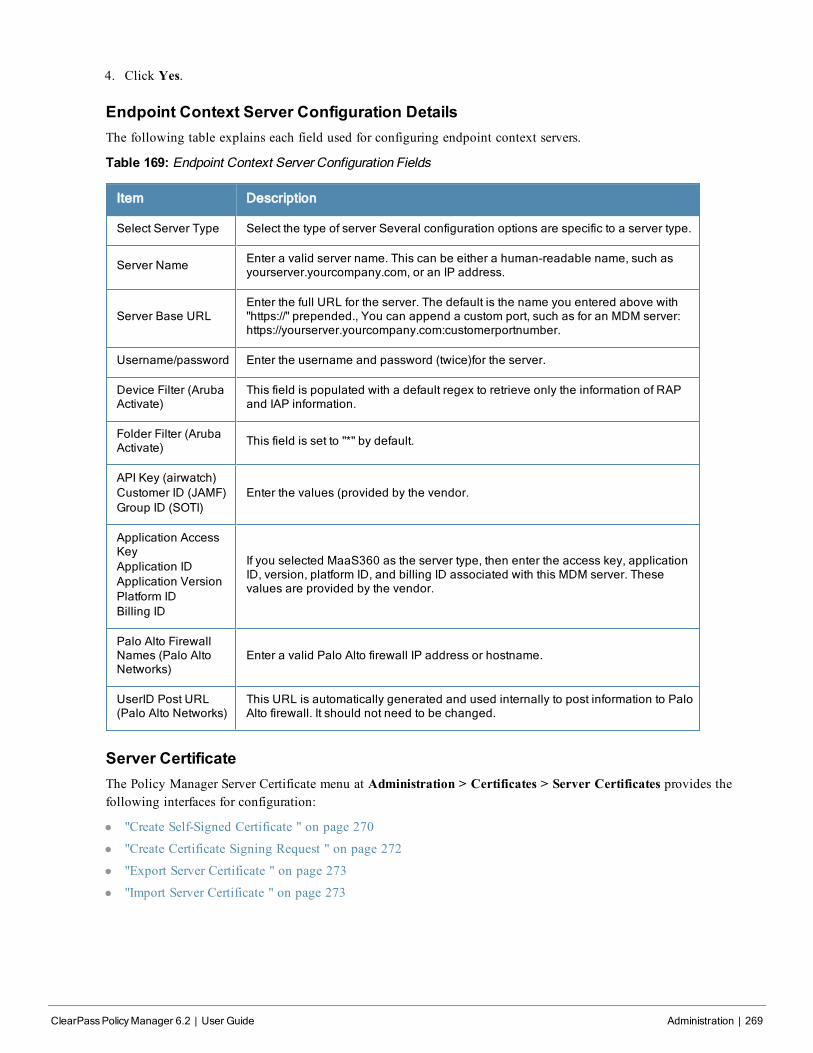
4. Click Yes.
Endpoint Context Server Configuration DetailsThe following table explains each field used for configuring endpoint context servers.
Table 169: Endpoint Context Server Configuration Fields
Item Description
Select Server Type Select the type of server Several configuration options are specific to a server type.
Server Name Enter a valid server name. This can be either a human-readable name, such asyourserver.yourcompany.com, or an IP address.
Server Base URLEnter the full URL for the server. The default is the name you entered above with"https://" prepended., You can append a custom port, such as for an MDM server:https://yourserver.yourcompany.com:customerportnumber.
Username/password Enter the username and password (twice)for the server.
Device Filter (ArubaActivate)
This field is populated with a default regex to retrieve only the information of RAPand IAP information.
Folder Filter (ArubaActivate) This field is set to "*" by default.
API Key (airwatch)Customer ID (JAMF)Group ID (SOTI)
Enter the values (provided by the vendor.
Application AccessKeyApplication IDApplication VersionPlatform IDBilling ID
If you selected MaaS360 as the server type, then enter the access key, applicationID, version, platform ID, and billing ID associated with this MDM server. Thesevalues are provided by the vendor.
Palo Alto FirewallNames (Palo AltoNetworks)
Enter a valid Palo Alto firewall IP address or hostname.
UserID Post URL(Palo Alto Networks)
This URL is automatically generated and used internally to post information to PaloAlto firewall. It should not need to be changed.
Server CertificateThe Policy Manager Server Certificate menu at Administration > Certificates > Server Certificates provides thefollowing interfaces for configuration:
l "Create Self-Signed Certificate " on page 270
l "Create Certificate Signing Request " on page 272
l "Export Server Certificate " on page 273
l "Import Server Certificate " on page 273
ClearPassPolicyManager 6.2 | User Guide Administration | 269
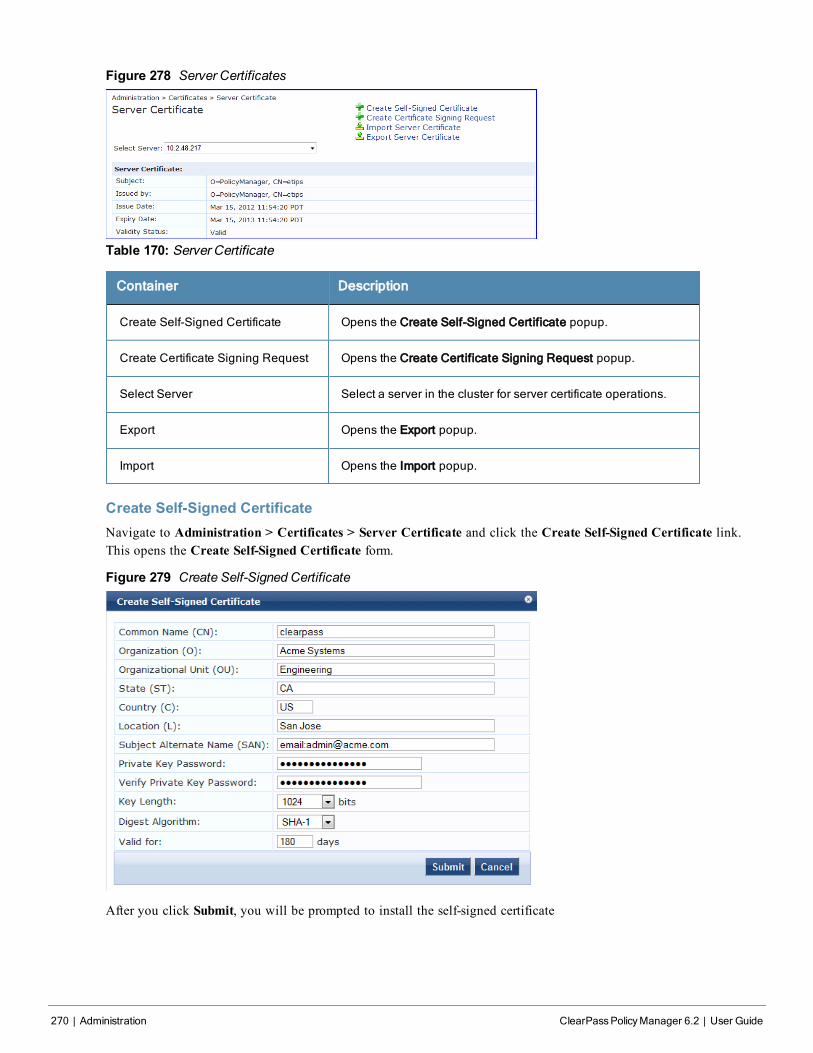
270 | Administration ClearPassPolicyManager 6.2 | User Guide
Figure 278 Server Certificates
Table 170: Server Certificate
Container Description
Create Self-Signed Certificate Opens the Create Self-Signed Certificate popup.
Create Certificate Signing Request Opens the Create Certificate Signing Request popup.
Select Server Select a server in the cluster for server certificate operations.
Export Opens the Export popup.
Import Opens the Import popup.
Create Self-Signed CertificateNavigate to Administration > Certificates > Server Certificate and click the Create Self-Signed Certificate link.This opens the Create Self-Signed Certificate form.
Figure 279 Create Self-Signed Certificate
After you click Submit, you will be prompted to install the self-signed certificate
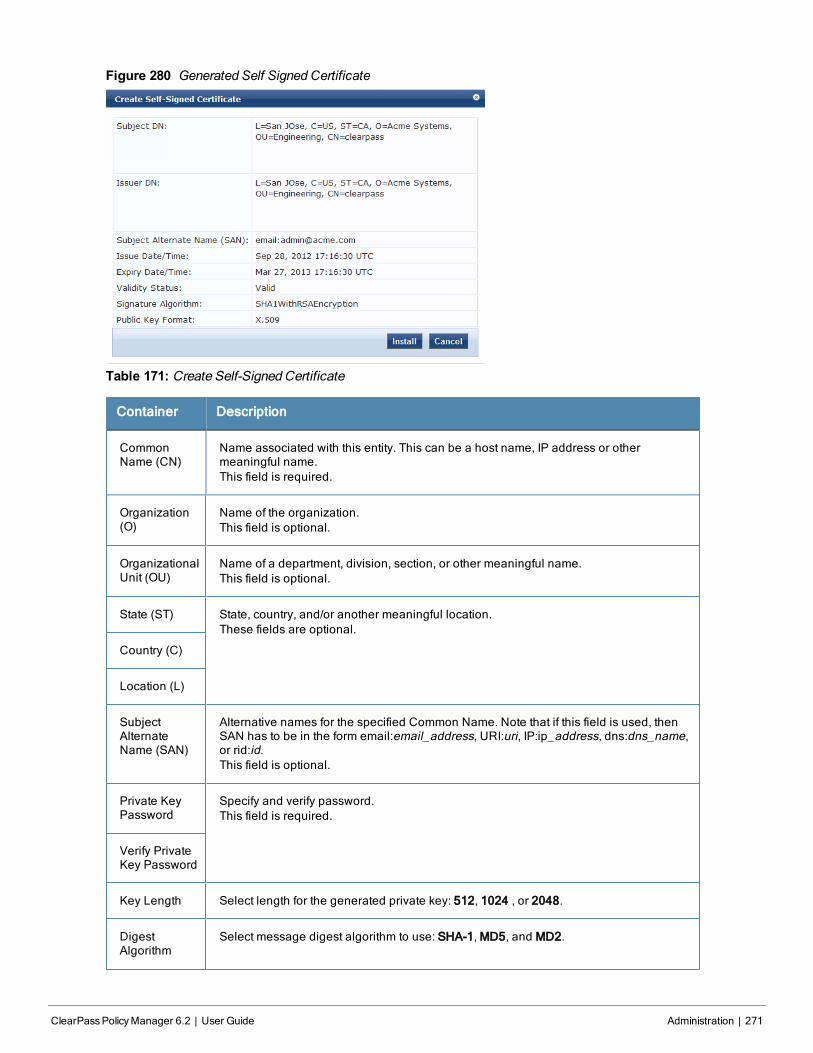
Figure 280 Generated Self Signed Certificate
Table 171: Create Self-Signed Certificate
Container Description
CommonName (CN)
Name associated with this entity. This can be a host name, IP address or othermeaningful name.This field is required.
Organization(O)
Name of the organization.This field is optional.
OrganizationalUnit (OU)
Name of a department, division, section, or other meaningful name.This field is optional.
State (ST) State, country, and/or another meaningful location.These fields are optional.
Country (C)
Location (L)
SubjectAlternateName (SAN)
Alternative names for the specified Common Name. Note that if this field is used, thenSAN has to be in the form email:email_address, URI:uri, IP:ip_address, dns:dns_name,or rid:id.This field is optional.
Private KeyPassword
Specify and verify password.This field is required.
Verify PrivateKey Password
Key Length Select length for the generated private key: 512, 1024 , or 2048.
DigestAlgorithm
Select message digest algorithm to use: SHA-1, MD5, and MD2.
ClearPassPolicyManager 6.2 | User Guide Administration | 271

272 | Administration ClearPassPolicyManager 6.2 | User Guide
Container Description
Valid for Specify duration in days.
Submit/Cancel On submit, Policy Manager generates a popup containing the self-signed certificate.Click on the Install button to install the certificate on the selected server.NOTE: All services are restarted; you must relogin into the UI to continue.
Create Certificate Signing RequestNavigate to Administration > Certificates > Server Certificates and click on the Create Certificate Signing Requestlink. This task creates a self-signed certificate to be signed by a CA.
Figure 281 Create Certificate Signing Request
A generated certificate signing request displays after you click Submit. Copy the certificate and paste it into the Webform as part of the enrollment process.
Figure 282 Generated Certificate Signing Request
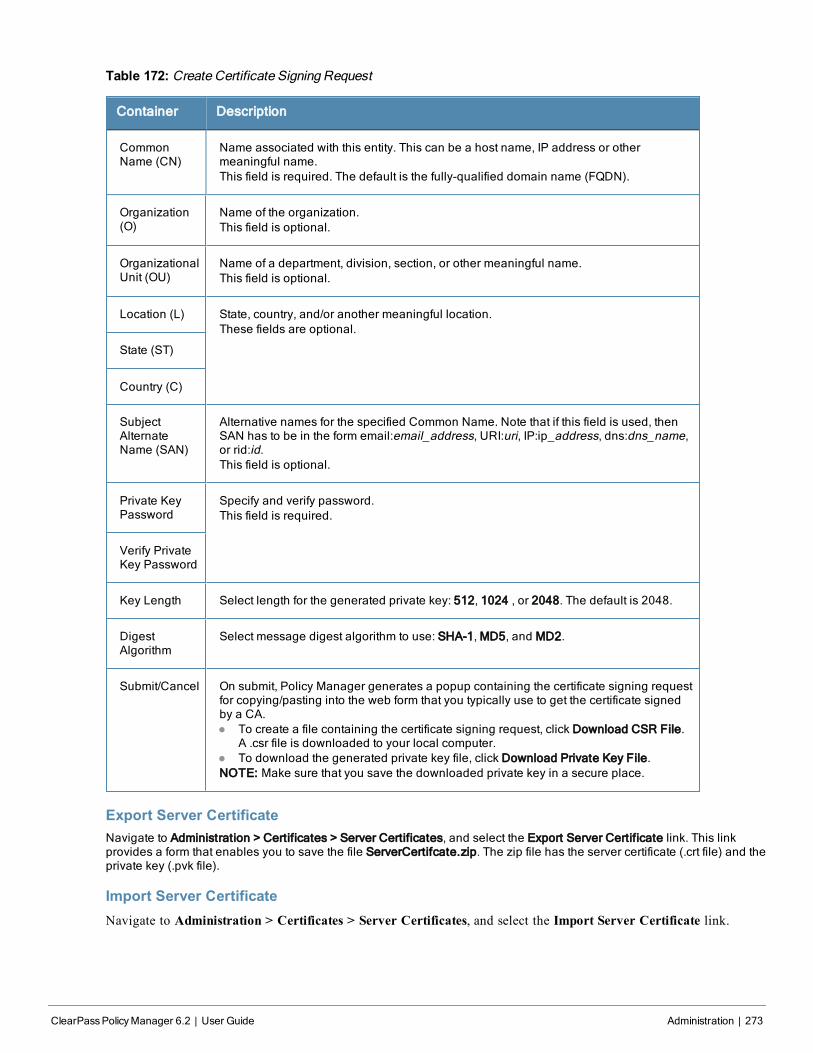
Table 172: Create Certificate Signing Request
Container Description
CommonName (CN)
Name associated with this entity. This can be a host name, IP address or othermeaningful name.This field is required. The default is the fully-qualified domain name (FQDN).
Organization(O)
Name of the organization.This field is optional.
OrganizationalUnit (OU)
Name of a department, division, section, or other meaningful name.This field is optional.
Location (L) State, country, and/or another meaningful location.These fields are optional.
State (ST)
Country (C)
SubjectAlternateName (SAN)
Alternative names for the specified Common Name. Note that if this field is used, thenSAN has to be in the form email:email_address, URI:uri, IP:ip_address, dns:dns_name,or rid:id.This field is optional.
Private KeyPassword
Specify and verify password.This field is required.
Verify PrivateKey Password
Key Length Select length for the generated private key: 512, 1024 , or 2048. The default is 2048.
DigestAlgorithm
Select message digest algorithm to use: SHA-1, MD5, and MD2.
Submit/Cancel On submit, Policy Manager generates a popup containing the certificate signing requestfor copying/pasting into the web form that you typically use to get the certificate signedby a CA.l To create a file containing the certificate signing request, click Download CSR File.
A .csr file is downloaded to your local computer.l To download the generated private key file, click Download Private Key File.NOTE: Make sure that you save the downloaded private key in a secure place.
Export Server CertificateNavigate to Administration > Certificates > Server Certificates, and select the Export Server Certificate link. This linkprovides a form that enables you to save the file ServerCertifcate.zip. The zip file has the server certificate (.crt file) and theprivate key (.pvk file).
Import Server CertificateNavigate to Administration > Certificates > Server Certificates, and select the Import Server Certificate link.
ClearPassPolicyManager 6.2 | User Guide Administration | 273
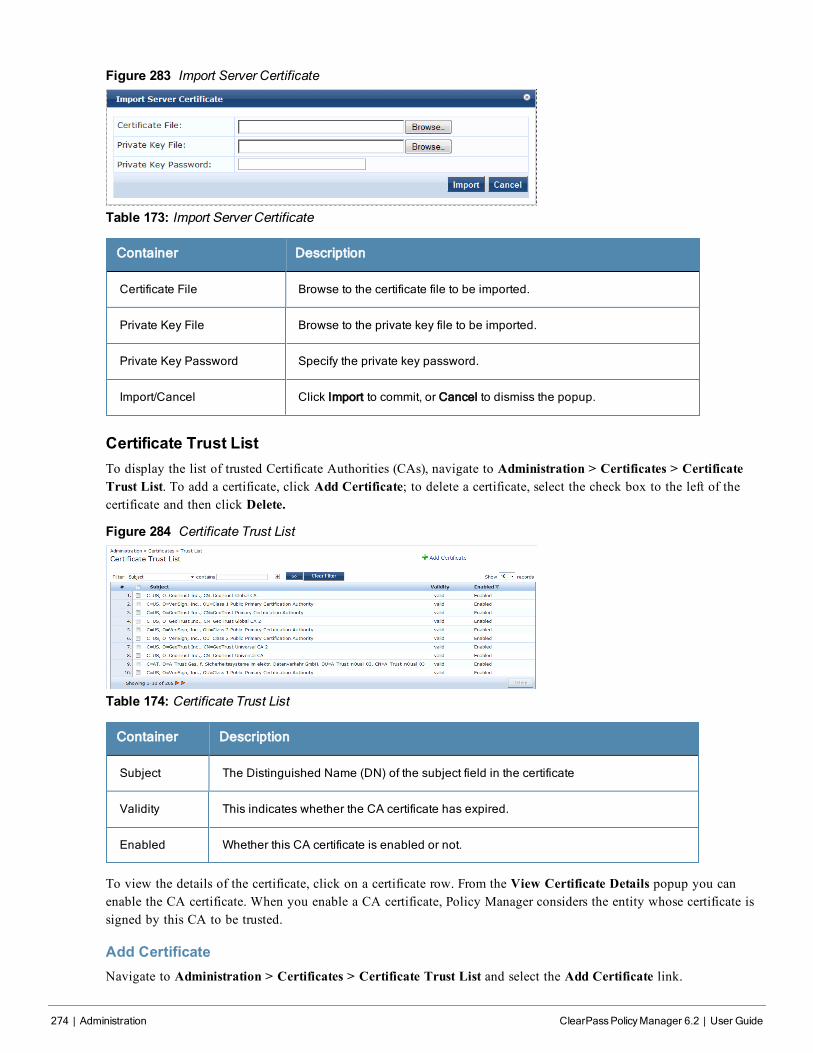
274 | Administration ClearPassPolicyManager 6.2 | User Guide
Figure 283 Import Server Certificate
Table 173: Import Server Certificate
Container Description
Certificate File Browse to the certificate file to be imported.
Private Key File Browse to the private key file to be imported.
Private Key Password Specify the private key password.
Import/Cancel Click Import to commit, or Cancel to dismiss the popup.
Certificate Trust ListTo display the list of trusted Certificate Authorities (CAs), navigate to Administration > Certificates > CertificateTrust List. To add a certificate, click Add Certificate; to delete a certificate, select the check box to the left of thecertificate and then click Delete.
Figure 284 Certificate Trust List
Table 174: Certificate Trust List
Container Description
Subject The Distinguished Name (DN) of the subject field in the certificate
Validity This indicates whether the CA certificate has expired.
Enabled Whether this CA certificate is enabled or not.
To view the details of the certificate, click on a certificate row. From the View Certificate Details popup you canenable the CA certificate. When you enable a CA certificate, Policy Manager considers the entity whose certificate issigned by this CA to be trusted.
Add CertificateNavigate to Administration > Certificates > Certificate Trust List and select the Add Certificate link.
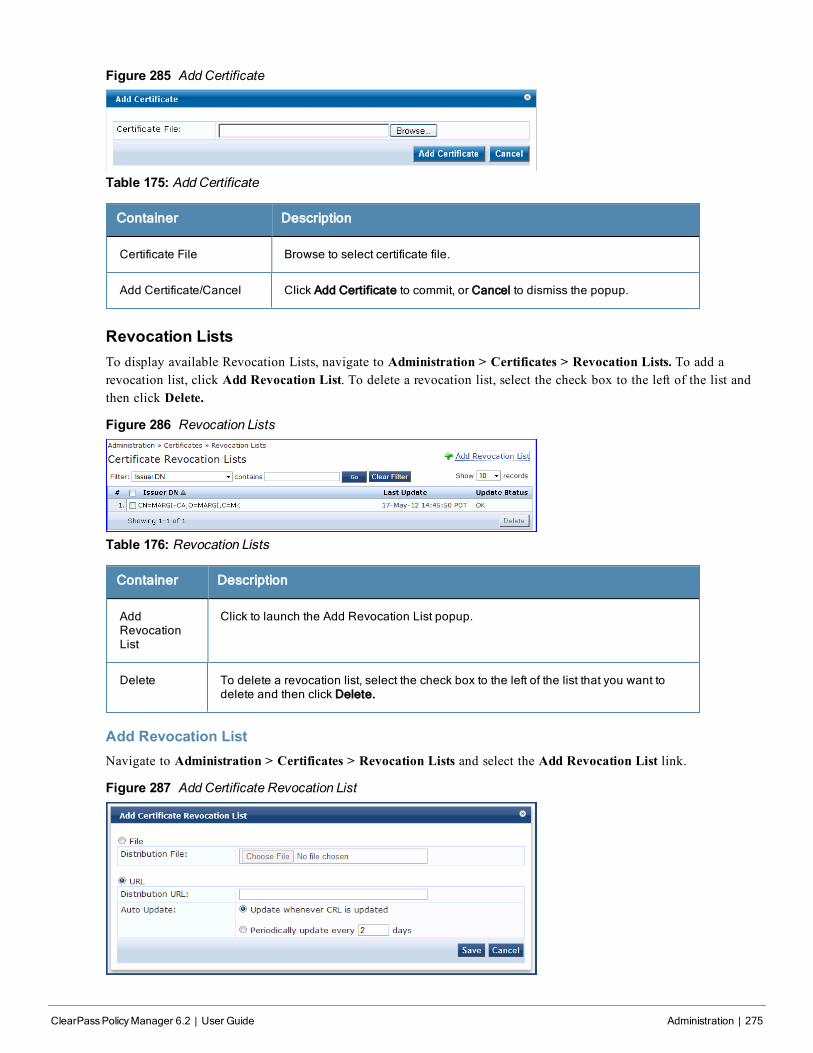
Figure 285 AddCertificate
Table 175: AddCertificate
Container Description
Certificate File Browse to select certificate file.
Add Certificate/Cancel Click Add Certificate to commit, or Cancel to dismiss the popup.
Revocation ListsTo display available Revocation Lists, navigate to Administration > Certificates > Revocation Lists. To add arevocation list, click Add Revocation List. To delete a revocation list, select the check box to the left of the list andthen click Delete.
Figure 286 Revocation Lists
Table 176: Revocation Lists
Container Description
AddRevocationList
Click to launch the Add Revocation List popup.
Delete To delete a revocation list, select the check box to the left of the list that you want todelete and then click Delete.
Add Revocation ListNavigate to Administration > Certificates > Revocation Lists and select the Add Revocation List link.
Figure 287 AddCertificate Revocation List
ClearPassPolicyManager 6.2 | User Guide Administration | 275
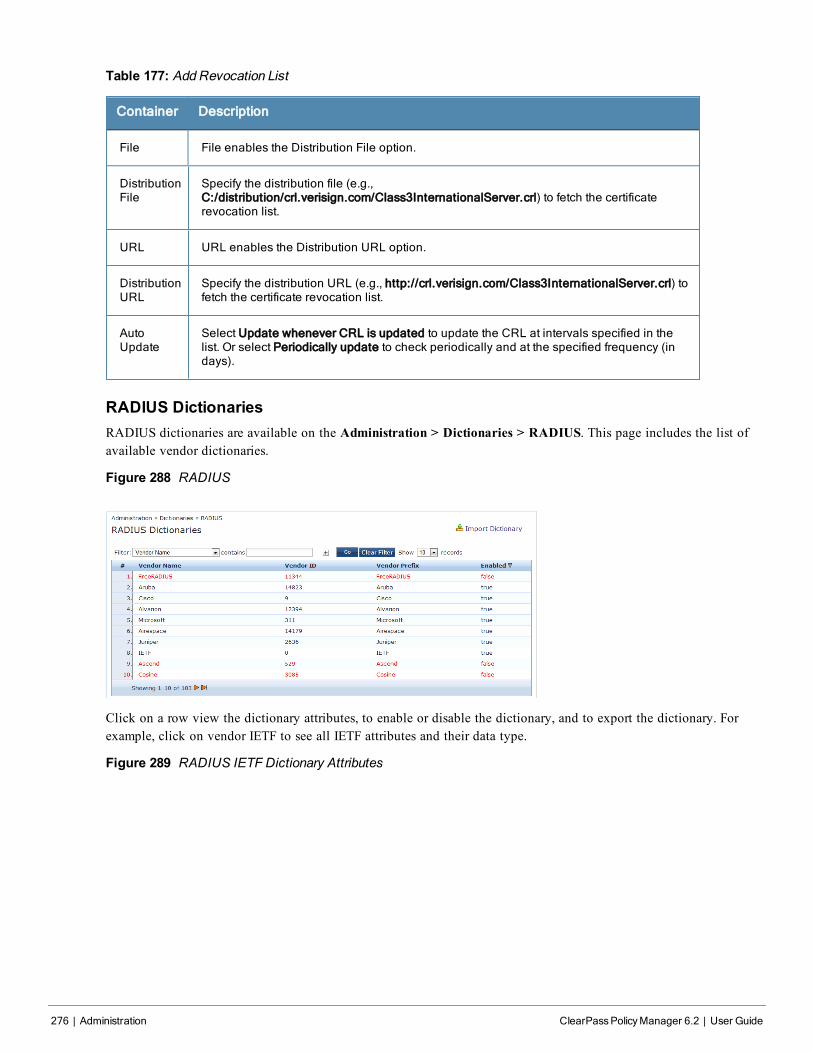
276 | Administration ClearPassPolicyManager 6.2 | User Guide
Table 177: AddRevocation List
Container Description
File File enables the Distribution File option.
DistributionFile
Specify the distribution file (e.g.,C:/distribution/crl.verisign.com/Class3InternationalServer.crl) to fetch the certificaterevocation list.
URL URL enables the Distribution URL option.
DistributionURL
Specify the distribution URL (e.g., http://crl.verisign.com/Class3InternationalServer.crl) tofetch the certificate revocation list.
AutoUpdate
Select Update whenever CRL is updated to update the CRL at intervals specified in thelist. Or select Periodically update to check periodically and at the specified frequency (indays).
RADIUS DictionariesRADIUS dictionaries are available on the Administration > Dictionaries > RADIUS. This page includes the list ofavailable vendor dictionaries.
Figure 288 RADIUS
Click on a row view the dictionary attributes, to enable or disable the dictionary, and to export the dictionary. Forexample, click on vendor IETF to see all IETF attributes and their data type.
Figure 289 RADIUS IETF Dictionary Attributes
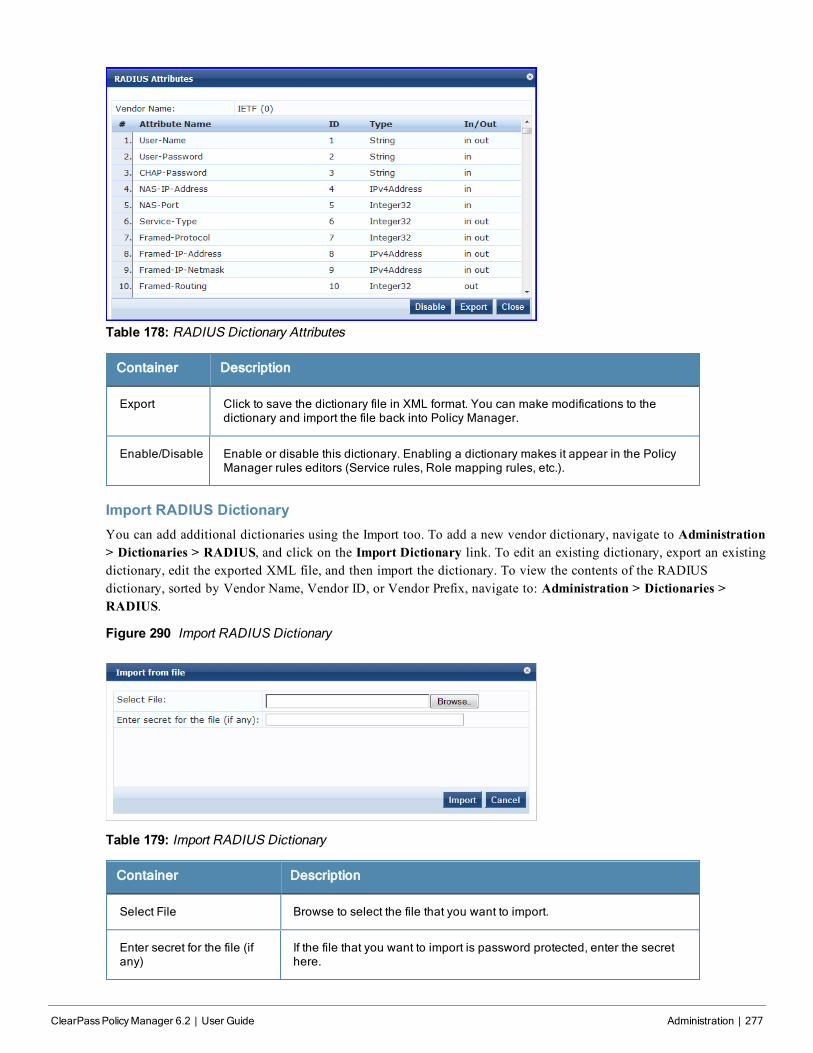
Table 178: RADIUS Dictionary Attributes
Container Description
Export Click to save the dictionary file in XML format. You can make modifications to thedictionary and import the file back into Policy Manager.
Enable/Disable Enable or disable this dictionary. Enabling a dictionary makes it appear in the PolicyManager rules editors (Service rules, Role mapping rules, etc.).
Import RADIUS DictionaryYou can add additional dictionaries using the Import too. To add a new vendor dictionary, navigate to Administration> Dictionaries > RADIUS, and click on the Import Dictionary link. To edit an existing dictionary, export an existingdictionary, edit the exported XML file, and then import the dictionary. To view the contents of the RADIUSdictionary, sorted by Vendor Name, Vendor ID, or Vendor Prefix, navigate to: Administration > Dictionaries >RADIUS.
Figure 290 Import RADIUS Dictionary
Table 179: Import RADIUS Dictionary
Container Description
Select File Browse to select the file that you want to import.
Enter secret for the file (ifany)
If the file that you want to import is password protected, enter the secrethere.
ClearPassPolicyManager 6.2 | User Guide Administration | 277
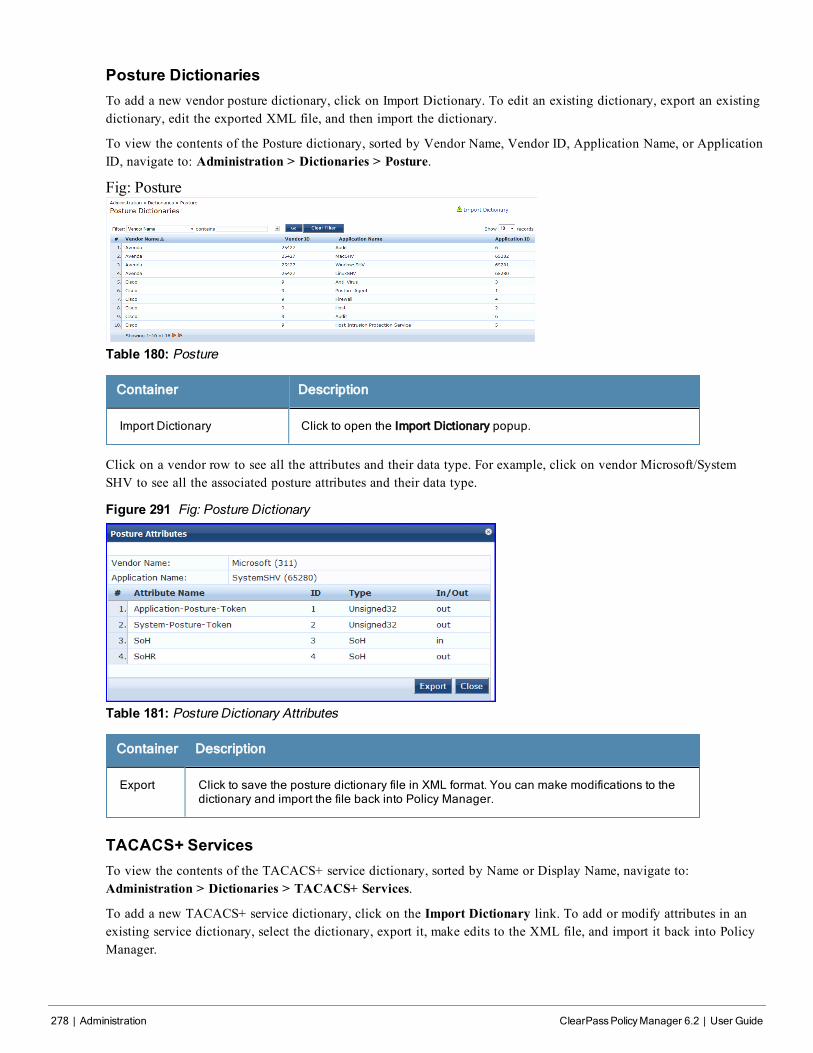
278 | Administration ClearPassPolicyManager 6.2 | User Guide
Posture DictionariesTo add a new vendor posture dictionary, click on Import Dictionary. To edit an existing dictionary, export an existingdictionary, edit the exported XML file, and then import the dictionary.
To view the contents of the Posture dictionary, sorted by Vendor Name, Vendor ID, Application Name, or ApplicationID, navigate to: Administration > Dictionaries > Posture.
Fig: Posture
Table 180: Posture
Container Description
Import Dictionary Click to open the Import Dictionary popup.
Click on a vendor row to see all the attributes and their data type. For example, click on vendor Microsoft/SystemSHV to see all the associated posture attributes and their data type.
Figure 291 Fig: Posture Dictionary
Table 181: Posture Dictionary Attributes
Container Description
Export Click to save the posture dictionary file in XML format. You can make modifications to thedictionary and import the file back into Policy Manager.
TACACS+ ServicesTo view the contents of the TACACS+ service dictionary, sorted by Name or Display Name, navigate to:Administration > Dictionaries > TACACS+ Services.
To add a new TACACS+ service dictionary, click on the Import Dictionary link. To add or modify attributes in anexisting service dictionary, select the dictionary, export it, make edits to the XML file, and import it back into PolicyManager.
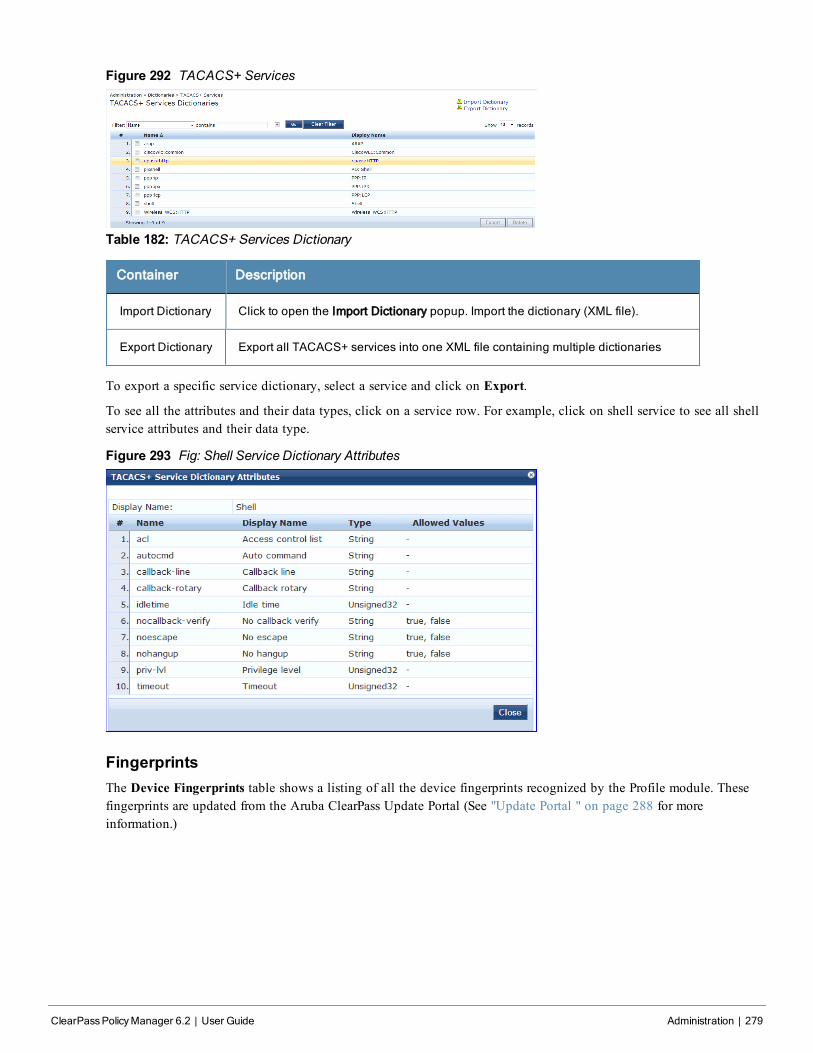
Figure 292 TACACS+ Services
Table 182: TACACS+ Services Dictionary
Container Description
Import Dictionary Click to open the Import Dictionary popup. Import the dictionary (XML file).
Export Dictionary Export all TACACS+ services into one XML file containing multiple dictionaries
To export a specific service dictionary, select a service and click on Export.
To see all the attributes and their data types, click on a service row. For example, click on shell service to see all shellservice attributes and their data type.
Figure 293 Fig: Shell Service Dictionary Attributes
FingerprintsThe Device Fingerprints table shows a listing of all the device fingerprints recognized by the Profile module. Thesefingerprints are updated from the Aruba ClearPass Update Portal (See "Update Portal " on page 288 for moreinformation.)
ClearPassPolicyManager 6.2 | User Guide Administration | 279

280 | Administration ClearPassPolicyManager 6.2 | User Guide
Figure 294 Device Fingerprints
You can click on a line in the Device Fingerprints list to drill down and view additional details about the category.
Figure 295 Fig: Device Fingerprints
AttributesThe Administration > Dictionaries > Attributes page allows you to specify unique sets of criteria for LocalUsers,GuestUsers, Endpoints, and Devices. This information can then be with role-based device policies for enablingappropriate network access.
The Attributes page provides the following interfaces for configuration:
l "Add Attribute " on page 281
l "Import Attributes" on page 282
l "Export Attributes" on page 282
l "Export " on page 282
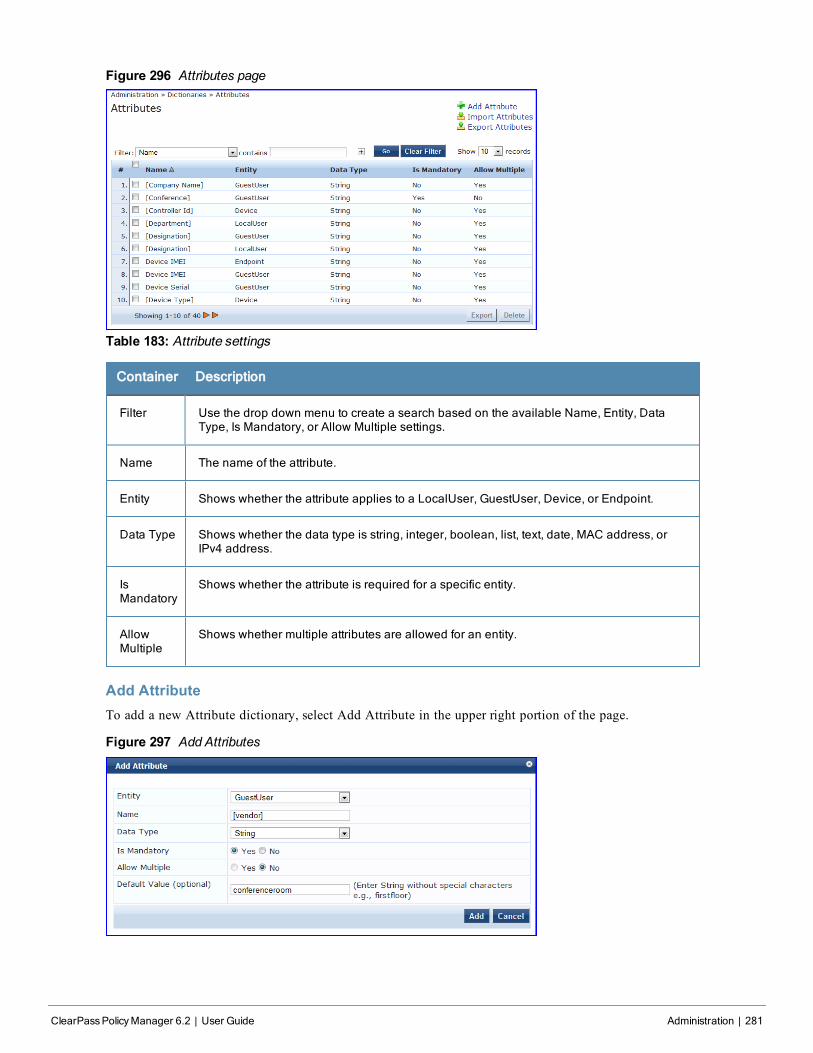
Figure 296 Attributes page
Table 183: Attribute settings
Container Description
Filter Use the drop down menu to create a search based on the available Name, Entity, DataType, Is Mandatory, or Allow Multiple settings.
Name The name of the attribute.
Entity Shows whether the attribute applies to a LocalUser, GuestUser, Device, or Endpoint.
Data Type Shows whether the data type is string, integer, boolean, list, text, date, MAC address, orIPv4 address.
IsMandatory
Shows whether the attribute is required for a specific entity.
AllowMultiple
Shows whether multiple attributes are allowed for an entity.
Add AttributeTo add a new Attribute dictionary, select Add Attribute in the upper right portion of the page.
Figure 297 Add Attributes
ClearPassPolicyManager 6.2 | User Guide Administration | 281
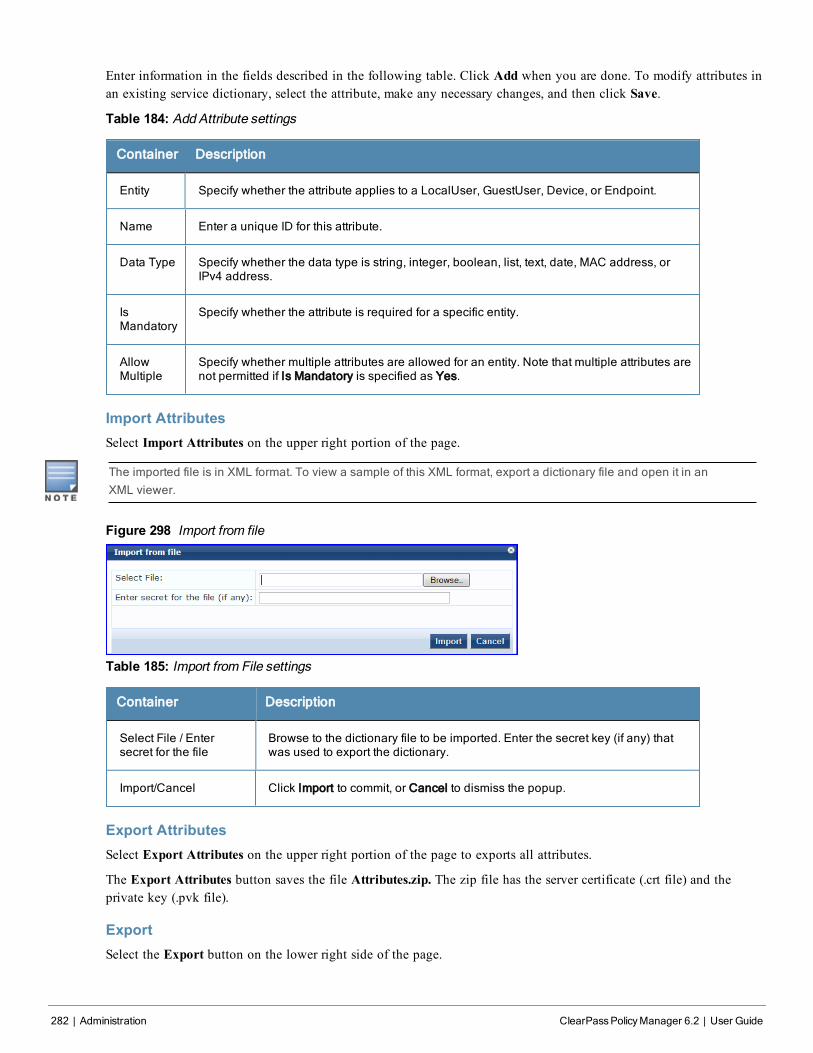
282 | Administration ClearPassPolicyManager 6.2 | User Guide
Enter information in the fields described in the following table. Click Add when you are done. To modify attributes inan existing service dictionary, select the attribute, make any necessary changes, and then click Save.
Table 184: Add Attribute settings
Container Description
Entity Specify whether the attribute applies to a LocalUser, GuestUser, Device, or Endpoint.
Name Enter a unique ID for this attribute.
Data Type Specify whether the data type is string, integer, boolean, list, text, date, MAC address, orIPv4 address.
IsMandatory
Specify whether the attribute is required for a specific entity.
AllowMultiple
Specify whether multiple attributes are allowed for an entity. Note that multiple attributes arenot permitted if Is Mandatory is specified as Yes.
Import AttributesSelect Import Attributes on the upper right portion of the page.
The imported file is in XML format. To view a sample of this XML format, export a dictionary file and open it in anXML viewer.
Figure 298 Import from file
Table 185: Import from File settings
Container Description
Select File / Entersecret for the file
Browse to the dictionary file to be imported. Enter the secret key (if any) thatwas used to export the dictionary.
Import/Cancel Click Import to commit, or Cancel to dismiss the popup.
Export AttributesSelect Export Attributes on the upper right portion of the page to exports all attributes.
The Export Attributes button saves the file Attributes.zip. The zip file has the server certificate (.crt file) and theprivate key (.pvk file).
ExportSelect the Export button on the lower right side of the page.
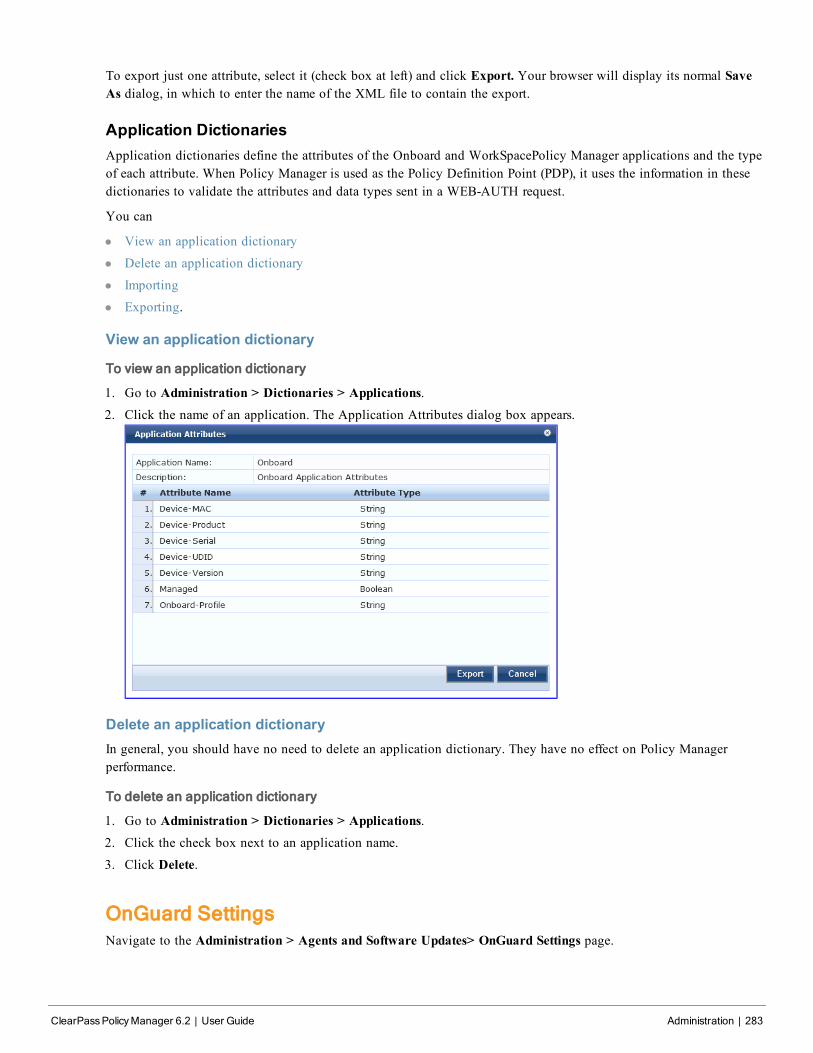
To export just one attribute, select it (check box at left) and click Export. Your browser will display its normal SaveAs dialog, in which to enter the name of the XML file to contain the export.
Application DictionariesApplication dictionaries define the attributes of the Onboard and WorkSpacePolicy Manager applications and the typeof each attribute. When Policy Manager is used as the Policy Definition Point (PDP), it uses the information in thesedictionaries to validate the attributes and data types sent in a WEB-AUTH request.
You can
l View an application dictionary
l Delete an application dictionary
l Importing
l Exporting.
View an application dictionary
To view an application dictionary
1. Go to Administration > Dictionaries > Applications.2. Click the name of an application. The Application Attributes dialog box appears.
Delete an application dictionaryIn general, you should have no need to delete an application dictionary. They have no effect on Policy Managerperformance.
To delete an application dictionary
1. Go to Administration > Dictionaries > Applications.2. Click the check box next to an application name.
3. Click Delete.
OnGuard SettingsNavigate to the Administration > Agents and Software Updates> OnGuard Settings page.
ClearPassPolicyManager 6.2 | User Guide Administration | 283
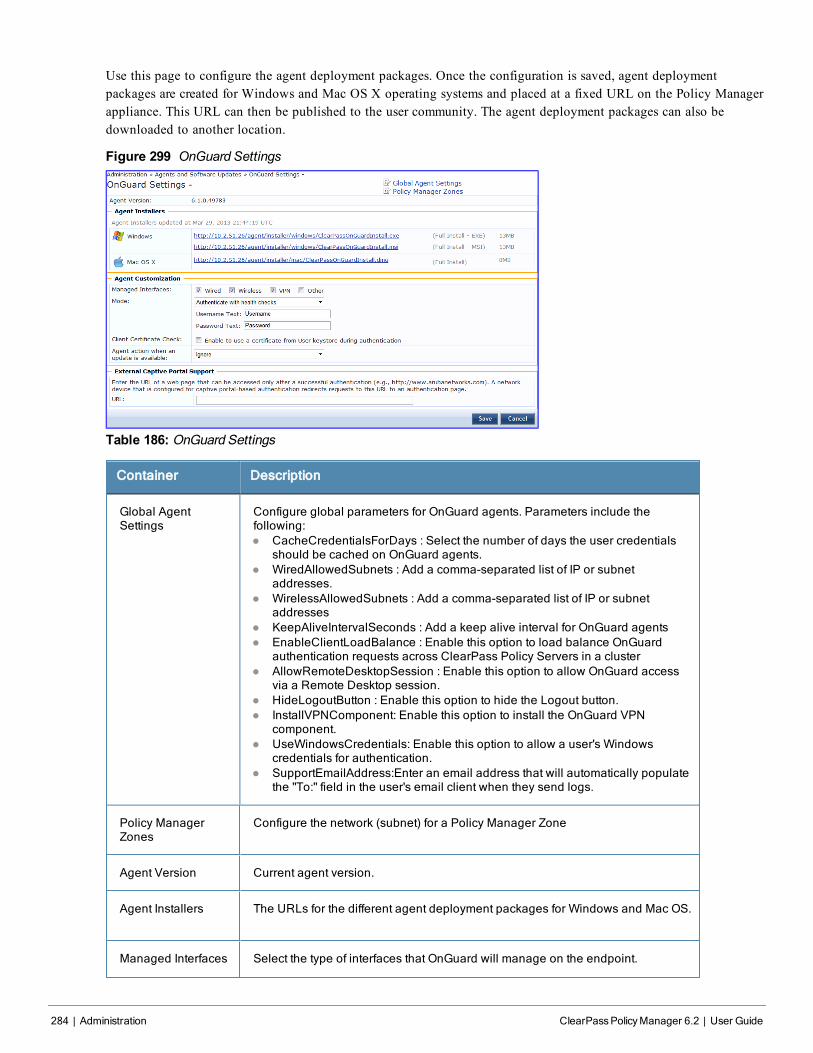
284 | Administration ClearPassPolicyManager 6.2 | User Guide
Use this page to configure the agent deployment packages. Once the configuration is saved, agent deploymentpackages are created for Windows and Mac OS X operating systems and placed at a fixed URL on the Policy Managerappliance. This URL can then be published to the user community. The agent deployment packages can also bedownloaded to another location.
Figure 299 OnGuard Settings
Table 186: OnGuard Settings
Container Description
Global AgentSettings
Configure global parameters for OnGuard agents. Parameters include thefollowing:l CacheCredentialsForDays : Select the number of days the user credentials
should be cached on OnGuard agents.l WiredAllowedSubnets : Add a comma-separated list of IP or subnet
addresses.l WirelessAllowedSubnets : Add a comma-separated list of IP or subnet
addressesl KeepAliveIntervalSeconds : Add a keep alive interval for OnGuard agentsl EnableClientLoadBalance : Enable this option to load balance OnGuard
authentication requests across ClearPass Policy Servers in a clusterl AllowRemoteDesktopSession : Enable this option to allow OnGuard access
via a Remote Desktop session.l HideLogoutButton : Enable this option to hide the Logout button.l InstallVPNComponent: Enable this option to install the OnGuard VPN
component.l UseWindowsCredentials: Enable this option to allow a user's Windows
credentials for authentication.l SupportEmailAddress:Enter an email address that will automatically populate
the "To:" field in the user's email client when they send logs.
Policy ManagerZones
Configure the network (subnet) for a Policy Manager Zone
Agent Version Current agent version.
Agent Installers The URLs for the different agent deployment packages for Windows and Mac OS.
Managed Interfaces Select the type of interfaces that OnGuard will manage on the endpoint.
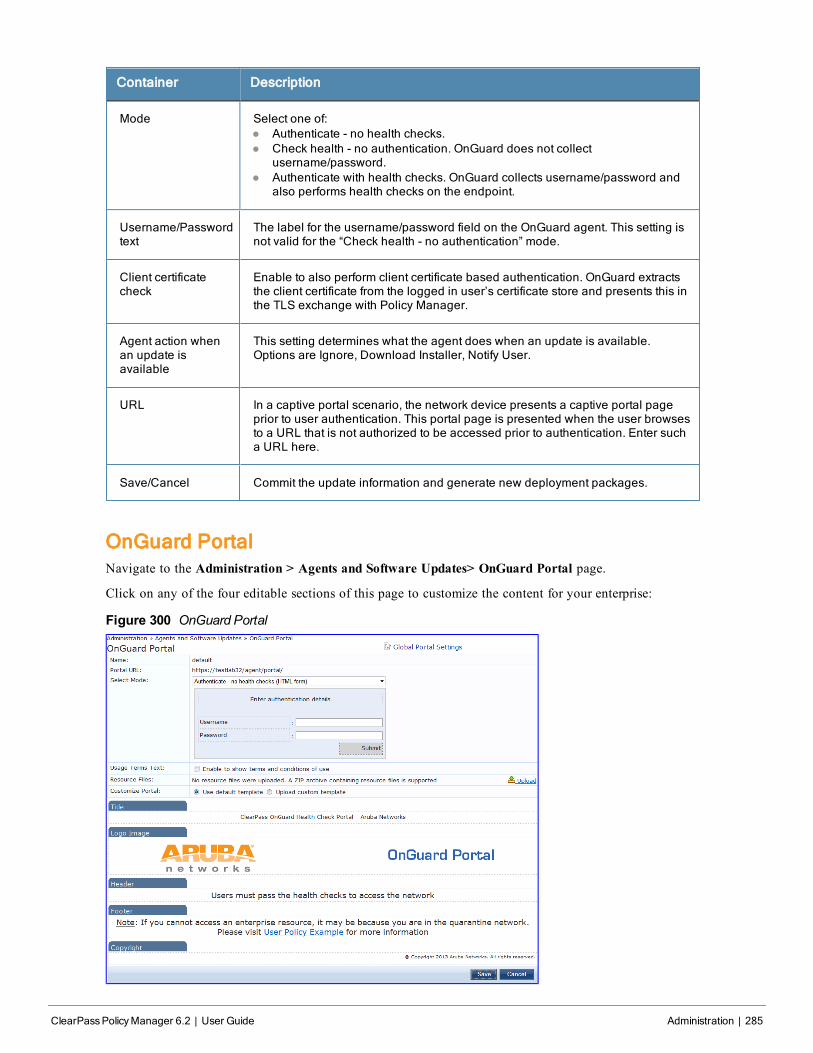
Container Description
Mode Select one of:l Authenticate - no health checks.l Check health - no authentication. OnGuard does not collect
username/password.l Authenticate with health checks. OnGuard collects username/password and
also performs health checks on the endpoint.
Username/Passwordtext
The label for the username/password field on the OnGuard agent. This setting isnot valid for the “Check health - no authentication” mode.
Client certificatecheck
Enable to also perform client certificate based authentication. OnGuard extractsthe client certificate from the logged in user’s certificate store and presents this inthe TLS exchange with Policy Manager.
Agent action whenan update isavailable
This setting determines what the agent does when an update is available.Options are Ignore, Download Installer, Notify User.
URL In a captive portal scenario, the network device presents a captive portal pageprior to user authentication. This portal page is presented when the user browsesto a URL that is not authorized to be accessed prior to authentication. Enter sucha URL here.
Save/Cancel Commit the update information and generate new deployment packages.
OnGuard PortalNavigate to the Administration > Agents and Software Updates> OnGuard Portal page.
Click on any of the four editable sections of this page to customize the content for your enterprise:
Figure 300 OnGuard Portal
ClearPassPolicyManager 6.2 | User Guide Administration | 285
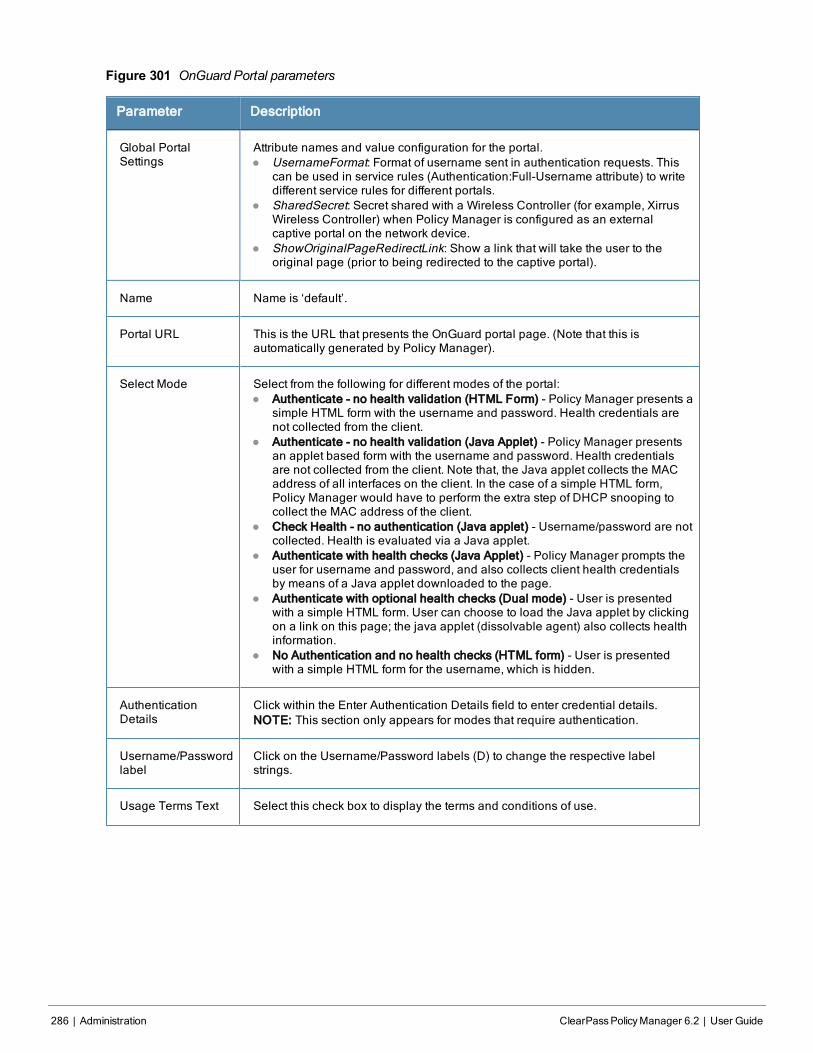
286 | Administration ClearPassPolicyManager 6.2 | User Guide
Figure 301 OnGuard Portal parameters
Parameter Description
Global PortalSettings
Attribute names and value configuration for the portal.l UsernameFormat: Format of username sent in authentication requests. This
can be used in service rules (Authentication:Full-Username attribute) to writedifferent service rules for different portals.
l SharedSecret: Secret shared with a Wireless Controller (for example, XirrusWireless Controller) when Policy Manager is configured as an externalcaptive portal on the network device.
l ShowOriginalPageRedirectLink: Show a link that will take the user to theoriginal page (prior to being redirected to the captive portal).
Name Name is ‘default’.
Portal URL This is the URL that presents the OnGuard portal page. (Note that this isautomatically generated by Policy Manager).
Select Mode Select from the following for different modes of the portal:l Authenticate - no health validation (HTML Form) - Policy Manager presents a
simple HTML form with the username and password. Health credentials arenot collected from the client.
l Authenticate - no health validation (Java Applet) - Policy Manager presentsan applet based form with the username and password. Health credentialsare not collected from the client. Note that, the Java applet collects the MACaddress of all interfaces on the client. In the case of a simple HTML form,Policy Manager would have to perform the extra step of DHCP snooping tocollect the MAC address of the client.
l Check Health - no authentication (Java applet) - Username/password are notcollected. Health is evaluated via a Java applet.
l Authenticate with health checks (Java Applet) - Policy Manager prompts theuser for username and password, and also collects client health credentialsby means of a Java applet downloaded to the page.
l Authenticate with optional health checks (Dual mode) - User is presentedwith a simple HTML form. User can choose to load the Java applet by clickingon a link on this page; the java applet (dissolvable agent) also collects healthinformation.
l No Authentication and no health checks (HTML form) - User is presentedwith a simple HTML form for the username, which is hidden.
AuthenticationDetails
Click within the Enter Authentication Details field to enter credential details.NOTE: This section only appears for modes that require authentication.
Username/Passwordlabel
Click on the Username/Password labels (D) to change the respective labelstrings.
Usage Terms Text Select this check box to display the terms and conditions of use.
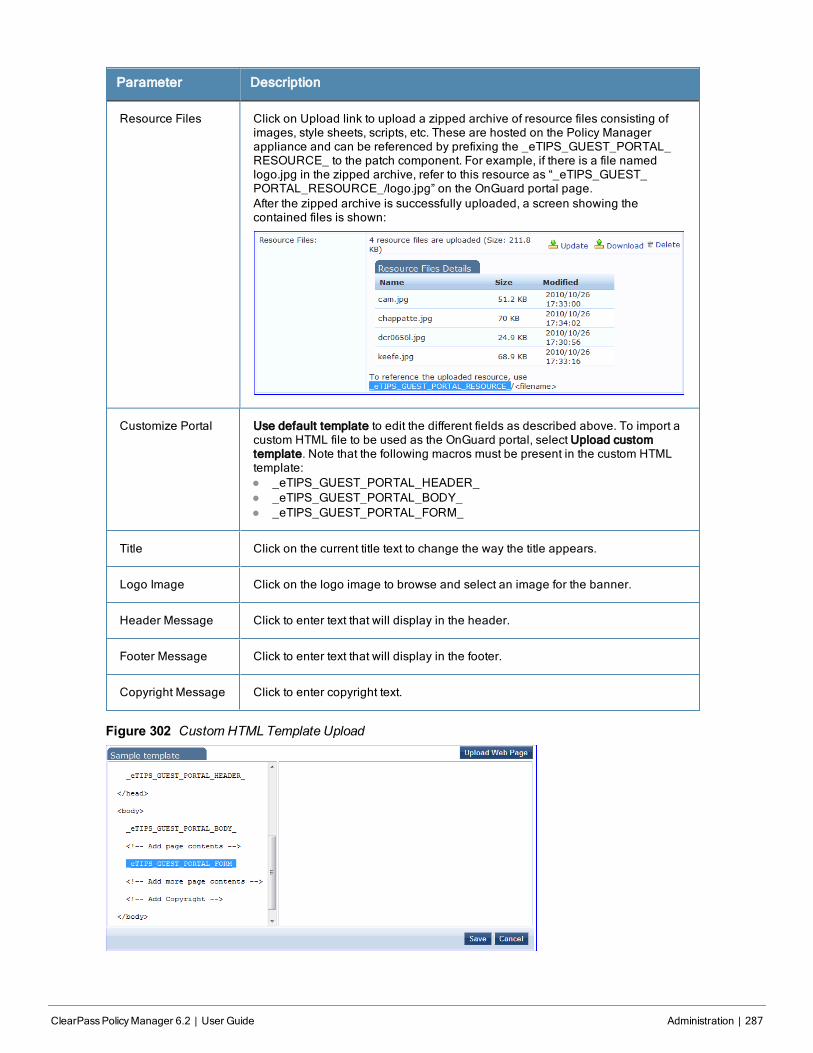
Parameter Description
Resource Files Click on Upload link to upload a zipped archive of resource files consisting ofimages, style sheets, scripts, etc. These are hosted on the Policy Managerappliance and can be referenced by prefixing the _eTIPS_GUEST_PORTAL_RESOURCE_ to the patch component. For example, if there is a file namedlogo.jpg in the zipped archive, refer to this resource as “_eTIPS_GUEST_PORTAL_RESOURCE_/logo.jpg” on the OnGuard portal page.After the zipped archive is successfully uploaded, a screen showing thecontained files is shown:
Customize Portal Use default template to edit the different fields as described above. To import acustom HTML file to be used as the OnGuard portal, select Upload customtemplate. Note that the following macros must be present in the custom HTMLtemplate:l _eTIPS_GUEST_PORTAL_HEADER_l _eTIPS_GUEST_PORTAL_BODY_l _eTIPS_GUEST_PORTAL_FORM_
Title Click on the current title text to change the way the title appears.
Logo Image Click on the logo image to browse and select an image for the banner.
Header Message Click to enter text that will display in the header.
Footer Message Click to enter text that will display in the footer.
Copyright Message Click to enter copyright text.
Figure 302 Custom HTML Template Upload
ClearPassPolicyManager 6.2 | User Guide Administration | 287
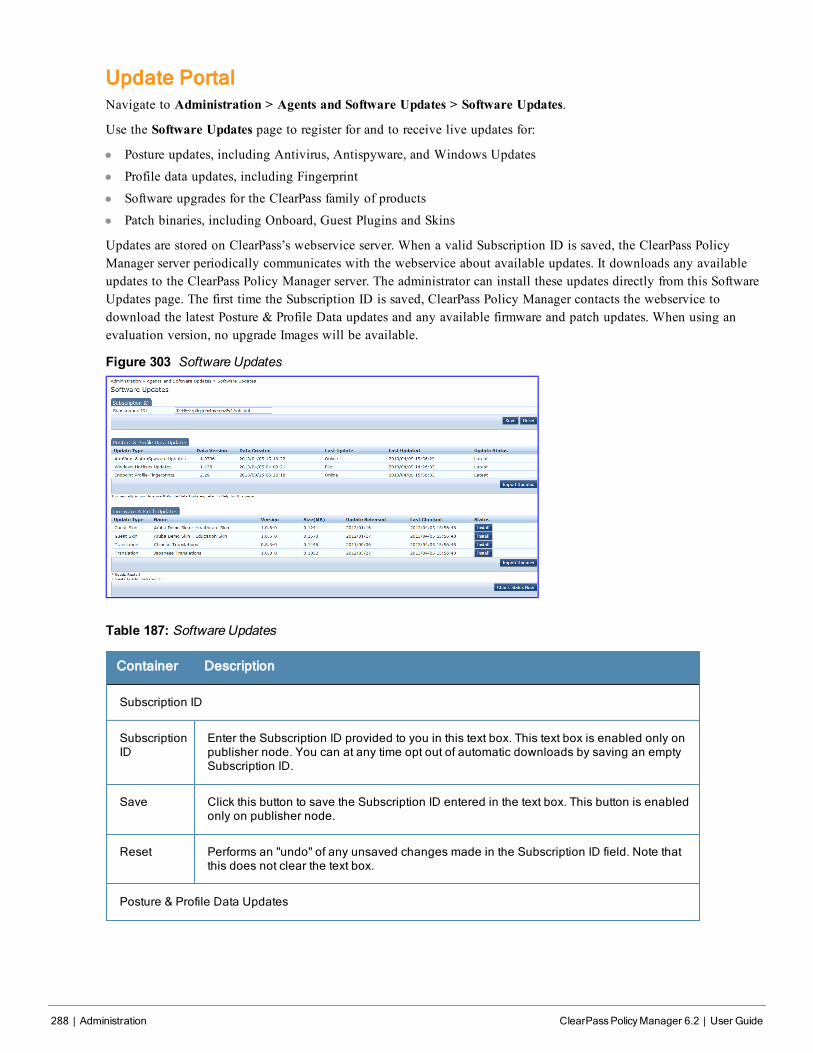
288 | Administration ClearPassPolicyManager 6.2 | User Guide
Update PortalNavigate to Administration > Agents and Software Updates > Software Updates.
Use the Software Updates page to register for and to receive live updates for:
l Posture updates, including Antivirus, Antispyware, and Windows Updates
l Profile data updates, including Fingerprint
l Software upgrades for the ClearPass family of products
l Patch binaries, including Onboard, Guest Plugins and Skins
Updates are stored on ClearPass’s webservice server. When a valid Subscription ID is saved, the ClearPass PolicyManager server periodically communicates with the webservice about available updates. It downloads any availableupdates to the ClearPass Policy Manager server. The administrator can install these updates directly from this SoftwareUpdates page. The first time the Subscription ID is saved, ClearPass Policy Manager contacts the webservice todownload the latest Posture & Profile Data updates and any available firmware and patch updates. When using anevaluation version, no upgrade Images will be available.
Figure 303 Software Updates
Table 187: Software Updates
Container Description
Subscription ID
SubscriptionID
Enter the Subscription ID provided to you in this text box. This text box is enabled only onpublisher node. You can at any time opt out of automatic downloads by saving an emptySubscription ID.
Save Click this button to save the Subscription ID entered in the text box. This button is enabledonly on publisher node.
Reset Performs an "undo" of any unsaved changes made in the Subscription ID field. Note thatthis does not clear the text box.
Posture & Profile Data Updates
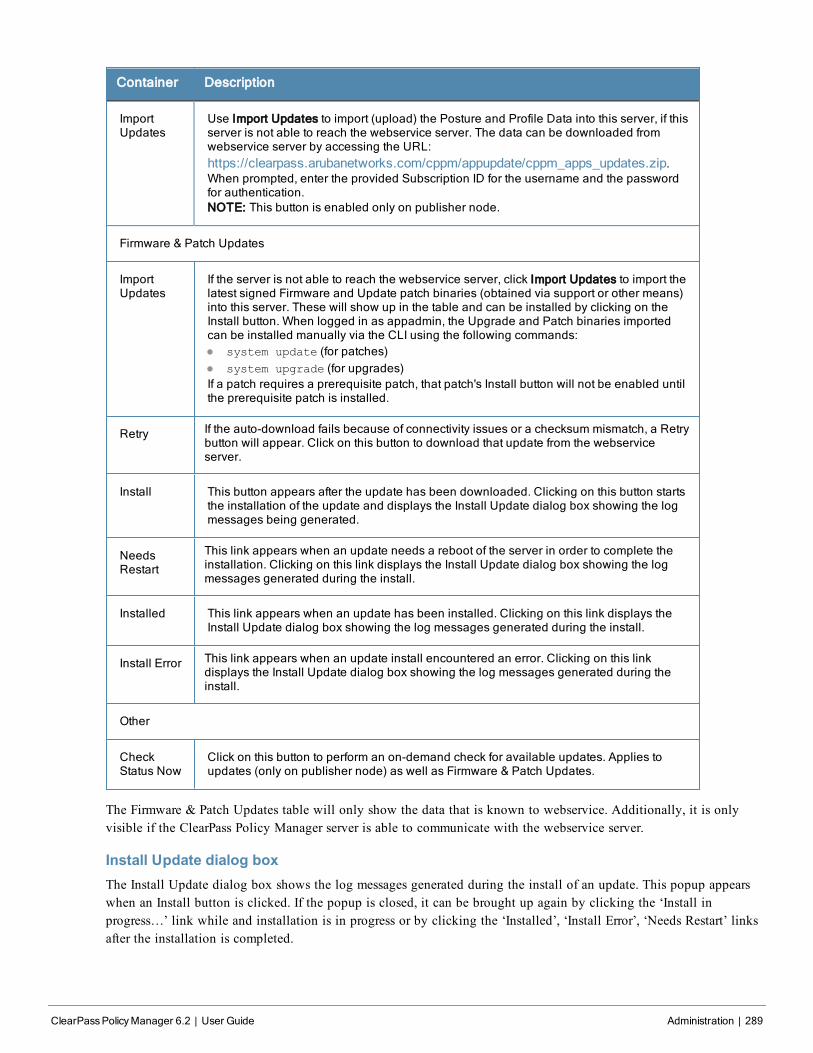
Container Description
ImportUpdates
Use Import Updates to import (upload) the Posture and Profile Data into this server, if thisserver is not able to reach the webservice server. The data can be downloaded fromwebservice server by accessing the URL:https://clearpass.arubanetworks.com/cppm/appupdate/cppm_apps_updates.zip.When prompted, enter the provided Subscription ID for the username and the passwordfor authentication.NOTE: This button is enabled only on publisher node.
Firmware & Patch Updates
ImportUpdates
If the server is not able to reach the webservice server, click Import Updates to import thelatest signed Firmware and Update patch binaries (obtained via support or other means)into this server. These will show up in the table and can be installed by clicking on theInstall button. When logged in as appadmin, the Upgrade and Patch binaries importedcan be installed manually via the CLI using the following commands:l system update (for patches)l system upgrade (for upgrades)If a patch requires a prerequisite patch, that patch's Install button will not be enabled untilthe prerequisite patch is installed.
Retry If the auto-download fails because of connectivity issues or a checksum mismatch, a Retrybutton will appear. Click on this button to download that update from the webserviceserver.
Install This button appears after the update has been downloaded. Clicking on this button startsthe installation of the update and displays the Install Update dialog box showing the logmessages being generated.
NeedsRestart
This link appears when an update needs a reboot of the server in order to complete theinstallation. Clicking on this link displays the Install Update dialog box showing the logmessages generated during the install.
Installed This link appears when an update has been installed. Clicking on this link displays theInstall Update dialog box showing the log messages generated during the install.
Install Error This link appears when an update install encountered an error. Clicking on this linkdisplays the Install Update dialog box showing the log messages generated during theinstall.
Other
CheckStatus Now
Click on this button to perform an on-demand check for available updates. Applies toupdates (only on publisher node) as well as Firmware & Patch Updates.
The Firmware & Patch Updates table will only show the data that is known to webservice. Additionally, it is onlyvisible if the ClearPass Policy Manager server is able to communicate with the webservice server.
Install Update dialog boxThe Install Update dialog box shows the log messages generated during the install of an update. This popup appearswhen an Install button is clicked. If the popup is closed, it can be brought up again by clicking the ‘Install inprogress…’ link while and installation is in progress or by clicking the ‘Installed’, ‘Install Error’, ‘Needs Restart’ linksafter the installation is completed.
ClearPassPolicyManager 6.2 | User Guide Administration | 289
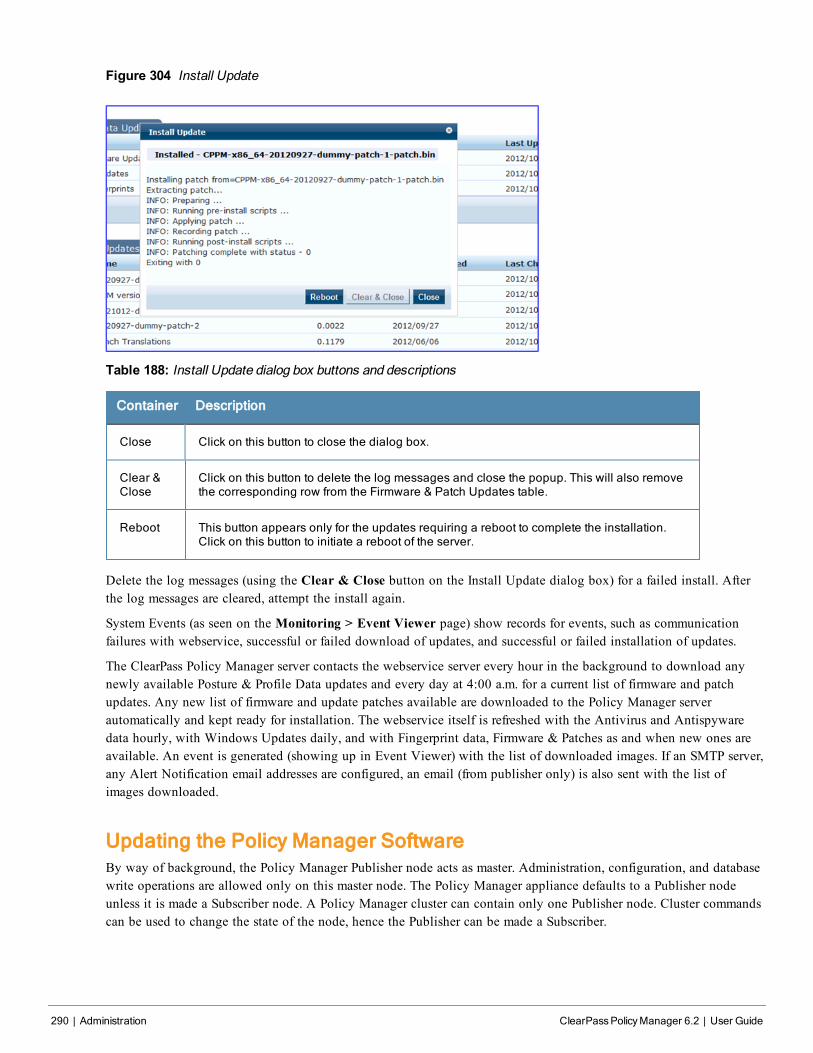
290 | Administration ClearPassPolicyManager 6.2 | User Guide
Figure 304 Install Update
Table 188: Install Update dialog box buttons and descriptions
Container Description
Close Click on this button to close the dialog box.
Clear &Close
Click on this button to delete the log messages and close the popup. This will also removethe corresponding row from the Firmware & Patch Updates table.
Reboot This button appears only for the updates requiring a reboot to complete the installation.Click on this button to initiate a reboot of the server.
Delete the log messages (using the Clear & Close button on the Install Update dialog box) for a failed install. Afterthe log messages are cleared, attempt the install again.
System Events (as seen on the Monitoring > Event Viewer page) show records for events, such as communicationfailures with webservice, successful or failed download of updates, and successful or failed installation of updates.
The ClearPass Policy Manager server contacts the webservice server every hour in the background to download anynewly available Posture & Profile Data updates and every day at 4:00 a.m. for a current list of firmware and patchupdates. Any new list of firmware and update patches available are downloaded to the Policy Manager serverautomatically and kept ready for installation. The webservice itself is refreshed with the Antivirus and Antispywaredata hourly, with Windows Updates daily, and with Fingerprint data, Firmware & Patches as and when new ones areavailable. An event is generated (showing up in Event Viewer) with the list of downloaded images. If an SMTP server,any Alert Notification email addresses are configured, an email (from publisher only) is also sent with the list ofimages downloaded.
Updating the Policy Manager SoftwareBy way of background, the Policy Manager Publisher node acts as master. Administration, configuration, and databasewrite operations are allowed only on this master node. The Policy Manager appliance defaults to a Publisher nodeunless it is made a Subscriber node. A Policy Manager cluster can contain only one Publisher node. Cluster commandscan be used to change the state of the node, hence the Publisher can be made a Subscriber.
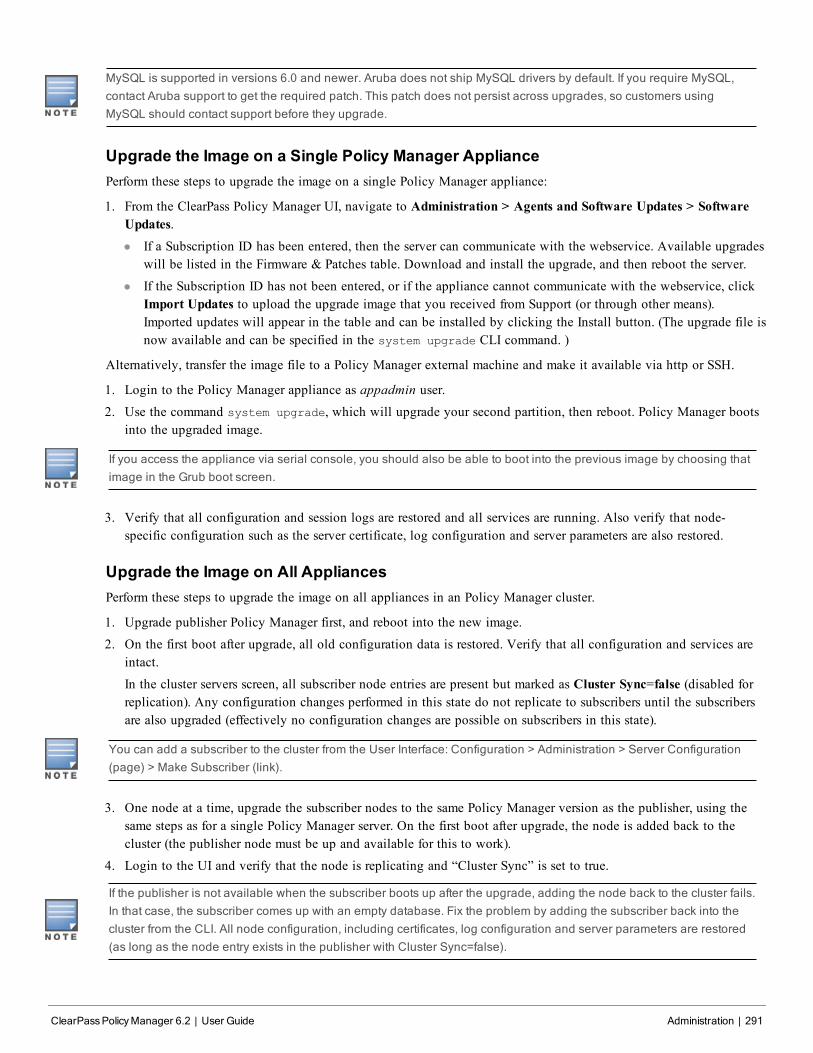
MySQL is supported in versions 6.0 and newer. Aruba does not ship MySQL drivers by default. If you require MySQL,contact Aruba support to get the required patch. This patch does not persist across upgrades, so customers usingMySQL should contact support before they upgrade.
Upgrade the Image on a Single Policy Manager AppliancePerform these steps to upgrade the image on a single Policy Manager appliance:
1. From the ClearPass Policy Manager UI, navigate to Administration > Agents and Software Updates > SoftwareUpdates.l If a Subscription ID has been entered, then the server can communicate with the webservice. Available upgrades
will be listed in the Firmware & Patches table. Download and install the upgrade, and then reboot the server.
l If the Subscription ID has not been entered, or if the appliance cannot communicate with the webservice, clickImport Updates to upload the upgrade image that you received from Support (or through other means).Imported updates will appear in the table and can be installed by clicking the Install button. (The upgrade file isnow available and can be specified in the system upgrade CLI command. )
Alternatively, transfer the image file to a Policy Manager external machine and make it available via http or SSH.
1. Login to the Policy Manager appliance as appadmin user.2. Use the command system upgrade, which will upgrade your second partition, then reboot. Policy Manager boots
into the upgraded image.
If you access the appliance via serial console, you should also be able to boot into the previous image by choosing thatimage in the Grub boot screen.
3. Verify that all configuration and session logs are restored and all services are running. Also verify that node-specific configuration such as the server certificate, log configuration and server parameters are also restored.
Upgrade the Image on All AppliancesPerform these steps to upgrade the image on all appliances in an Policy Manager cluster.
1. Upgrade publisher Policy Manager first, and reboot into the new image.
2. On the first boot after upgrade, all old configuration data is restored. Verify that all configuration and services areintact.
In the cluster servers screen, all subscriber node entries are present but marked as Cluster Sync=false (disabled forreplication). Any configuration changes performed in this state do not replicate to subscribers until the subscribersare also upgraded (effectively no configuration changes are possible on subscribers in this state).
You can add a subscriber to the cluster from the User Interface: Configuration > Administration > Server Configuration(page) > Make Subscriber (link).
3. One node at a time, upgrade the subscriber nodes to the same Policy Manager version as the publisher, using thesame steps as for a single Policy Manager server. On the first boot after upgrade, the node is added back to thecluster (the publisher node must be up and available for this to work).
4. Login to the UI and verify that the node is replicating and “Cluster Sync” is set to true.
If the publisher is not available when the subscriber boots up after the upgrade, adding the node back to the cluster fails.In that case, the subscriber comes up with an empty database. Fix the problem by adding the subscriber back into thecluster from the CLI. All node configuration, including certificates, log configuration and server parameters are restored(as long as the node entry exists in the publisher with Cluster Sync=false).
ClearPassPolicyManager 6.2 | User Guide Administration | 291

292 | Administration ClearPassPolicyManager 6.2 | User Guide
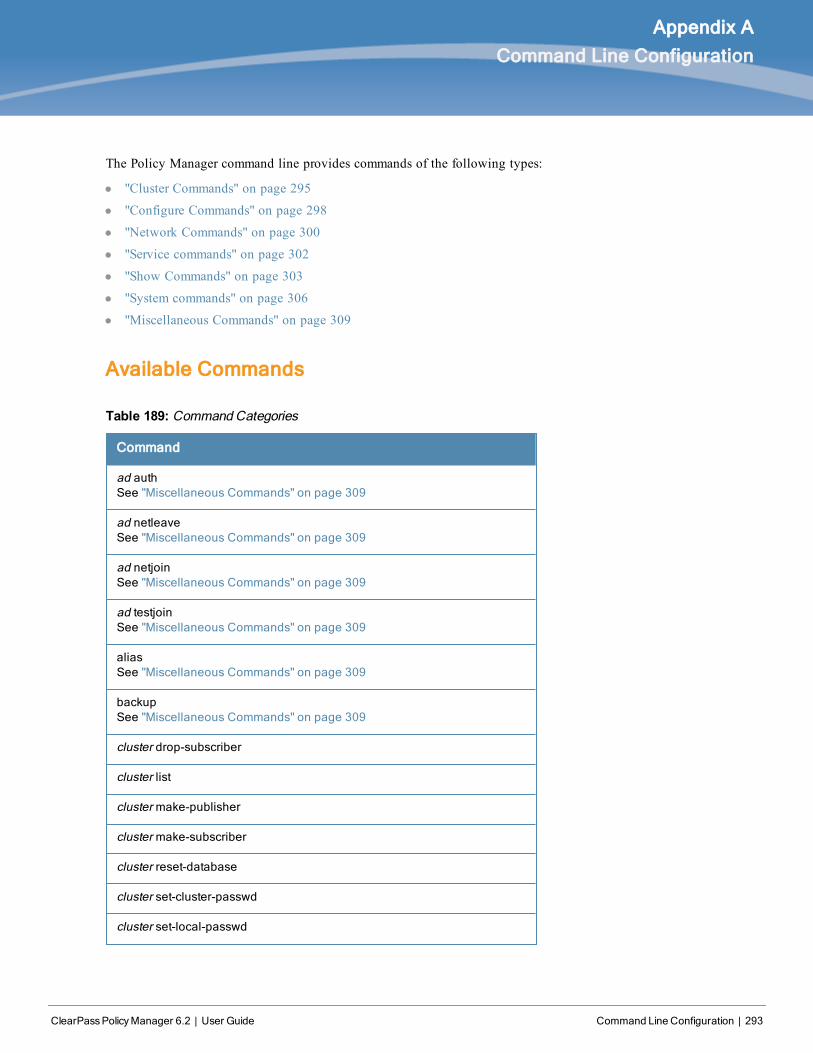
ClearPassPolicyManager 6.2 | User Guide Command Line Configuration | 293
Appendix A
Command Line Configuration
The Policy Manager command line provides commands of the following types:
l "Cluster Commands" on page 295
l "Configure Commands" on page 298
l "Network Commands" on page 300
l "Service commands" on page 302
l "Show Commands" on page 303
l "System commands" on page 306
l "Miscellaneous Commands" on page 309
Available Commands
Command
ad authSee "Miscellaneous Commands" on page 309
ad netleaveSee "Miscellaneous Commands" on page 309
ad netjoinSee "Miscellaneous Commands" on page 309
ad testjoinSee "Miscellaneous Commands" on page 309
aliasSee "Miscellaneous Commands" on page 309
backupSee "Miscellaneous Commands" on page 309
cluster drop-subscriber
cluster list
cluster make-publisher
cluster make-subscriber
cluster reset-database
cluster set-cluster-passwd
cluster set-local-passwd
Table 189: CommandCategories
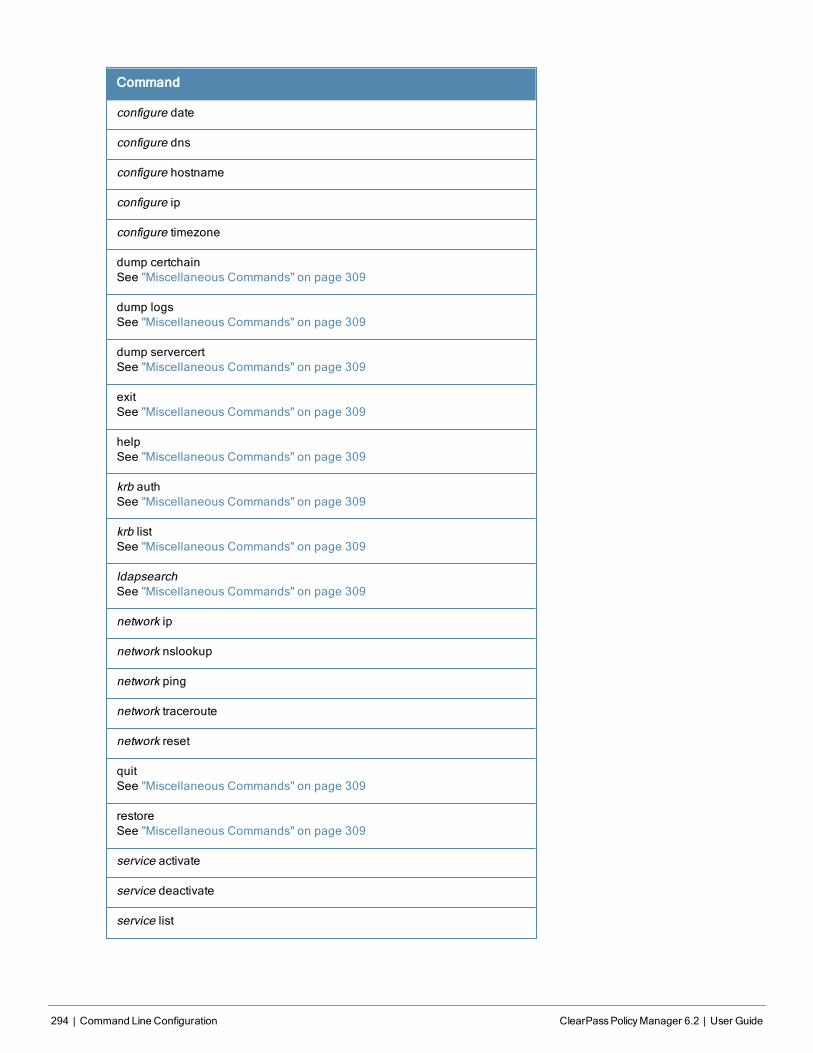
294 | Command Line Configuration ClearPassPolicyManager 6.2 | User Guide
Command
configure date
configure dns
configure hostname
configure ip
configure timezone
dump certchainSee "Miscellaneous Commands" on page 309
dump logsSee "Miscellaneous Commands" on page 309
dump servercertSee "Miscellaneous Commands" on page 309
exitSee "Miscellaneous Commands" on page 309
helpSee "Miscellaneous Commands" on page 309
krb authSee "Miscellaneous Commands" on page 309
krb listSee "Miscellaneous Commands" on page 309
ldapsearchSee "Miscellaneous Commands" on page 309
network ip
network nslookup
network ping
network traceroute
network reset
quitSee "Miscellaneous Commands" on page 309
restoreSee "Miscellaneous Commands" on page 309
service activate
service deactivate
service list
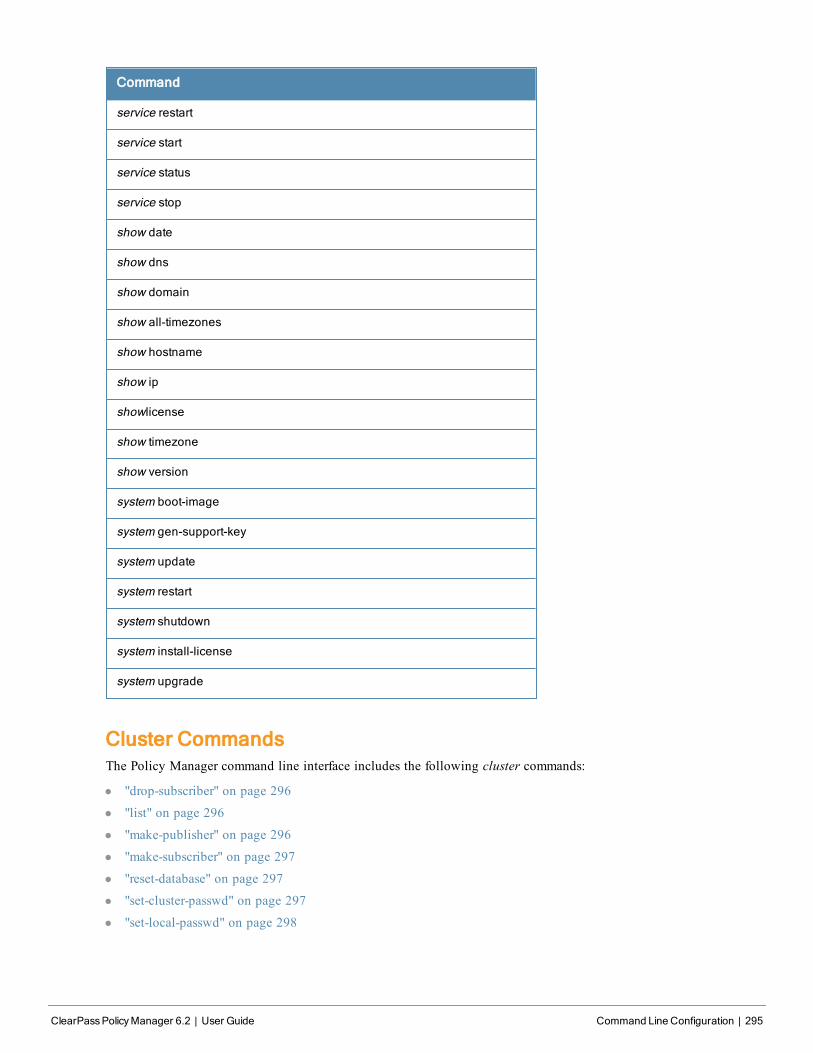
Command
service restart
service start
service status
service stop
show date
show dns
show domain
show all-timezones
show hostname
show ip
showlicense
show timezone
show version
system boot-image
system gen-support-key
system update
system restart
system shutdown
system install-license
system upgrade
Cluster CommandsThe Policy Manager command line interface includes the following cluster commands:
l "drop-subscriber" on page 296
l "list" on page 296
l "make-publisher" on page 296
l "make-subscriber" on page 297
l "reset-database" on page 297
l "set-cluster-passwd" on page 297
l "set-local-passwd" on page 298
ClearPassPolicyManager 6.2 | User Guide Command Line Configuration | 295
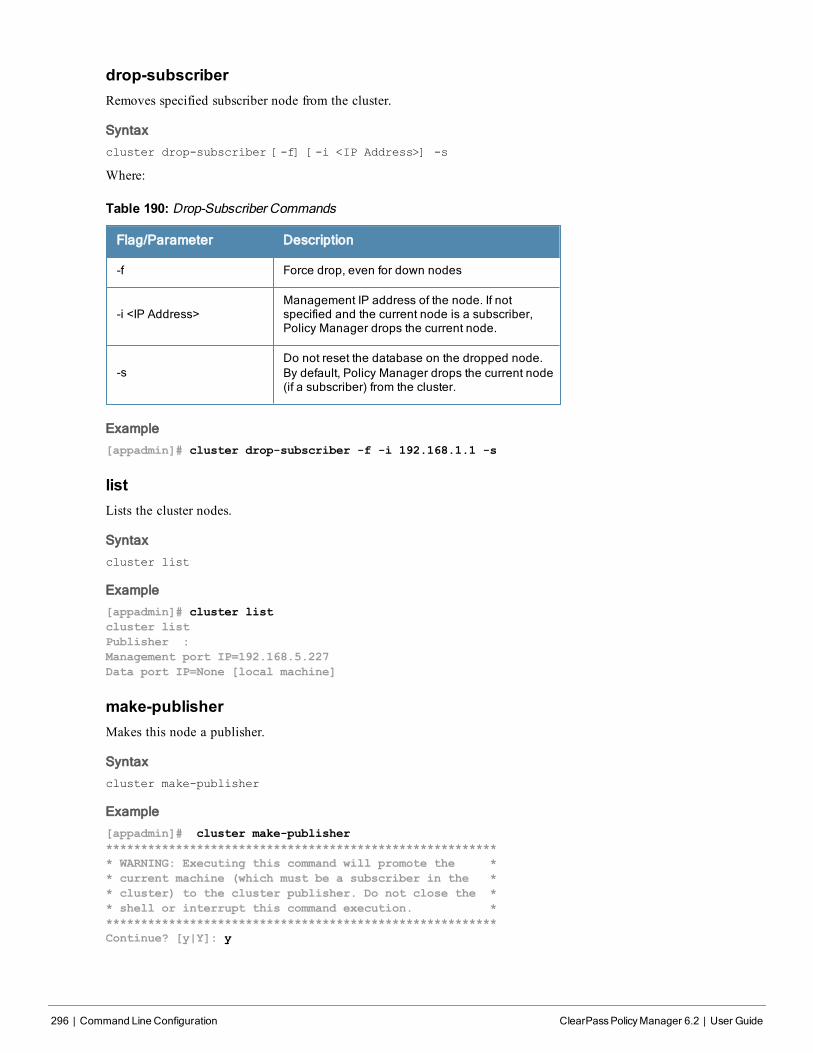
296 | Command Line Configuration ClearPassPolicyManager 6.2 | User Guide
drop-subscriberRemoves specified subscriber node from the cluster.
Syntax
cluster drop-subscriber [-f] [-i <IP Address>] -s
Where:
Flag/Parameter Description
-f Force drop, even for down nodes
-i <IP Address>Management IP address of the node. If notspecified and the current node is a subscriber,Policy Manager drops the current node.
-sDo not reset the database on the dropped node.By default, Policy Manager drops the current node(if a subscriber) from the cluster.
Table 190: Drop-Subscriber Commands
Example
[appadmin]# cluster drop-subscriber -f -i 192.168.1.1 -s
listLists the cluster nodes.
Syntax
cluster list
Example
[appadmin]# cluster list
cluster list
Publisher :
Management port IP=192.168.5.227
Data port IP=None [local machine]
make-publisherMakes this node a publisher.
Syntax
cluster make-publisher
Example
[appadmin]# cluster make-publisher
********************************************************
* WARNING: Executing this command will promote the *
* current machine (which must be a subscriber in the *
* cluster) to the cluster publisher. Do not close the *
* shell or interrupt this command execution. *
********************************************************
Continue? [y|Y]: y
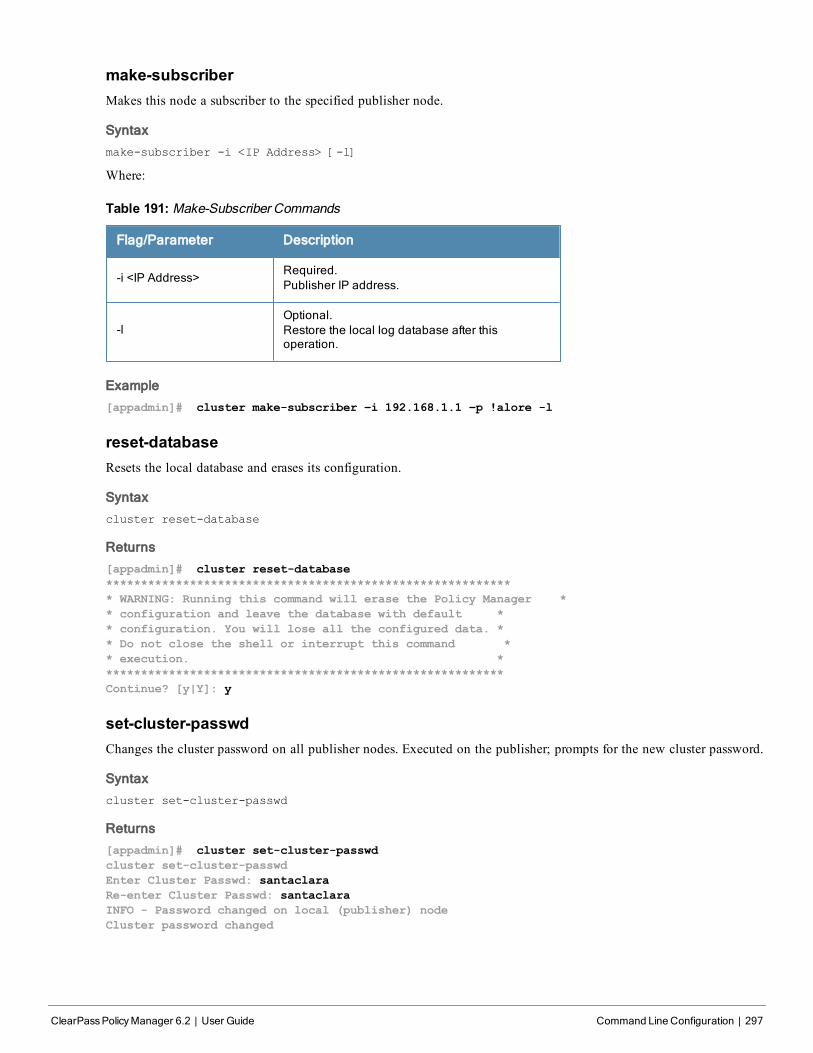
make-subscriberMakes this node a subscriber to the specified publisher node.
Syntax
make-subscriber -i <IP Address> [-l]
Where:
Flag/Parameter Description
-i <IP Address>Required.Publisher IP address.
-lOptional.Restore the local log database after thisoperation.
Table 191: Make-Subscriber Commands
Example
[appadmin]# cluster make-subscriber –i 192.168.1.1 –p !alore -l
reset-databaseResets the local database and erases its configuration.
Syntax
cluster reset-database
Returns
[appadmin]# cluster reset-database
**********************************************************
* WARNING: Running this command will erase the Policy Manager *
* configuration and leave the database with default *
* configuration. You will lose all the configured data. *
* Do not close the shell or interrupt this command *
* execution. *
*********************************************************
Continue? [y|Y]: y
set-cluster-passwdChanges the cluster password on all publisher nodes. Executed on the publisher; prompts for the new cluster password.
Syntax
cluster set-cluster-passwd
Returns
[appadmin]# cluster set-cluster-passwd
cluster set-cluster-passwd
Enter Cluster Passwd: santaclara
Re-enter Cluster Passwd: santaclara
INFO - Password changed on local (publisher) node
Cluster password changed
ClearPassPolicyManager 6.2 | User Guide Command Line Configuration | 297
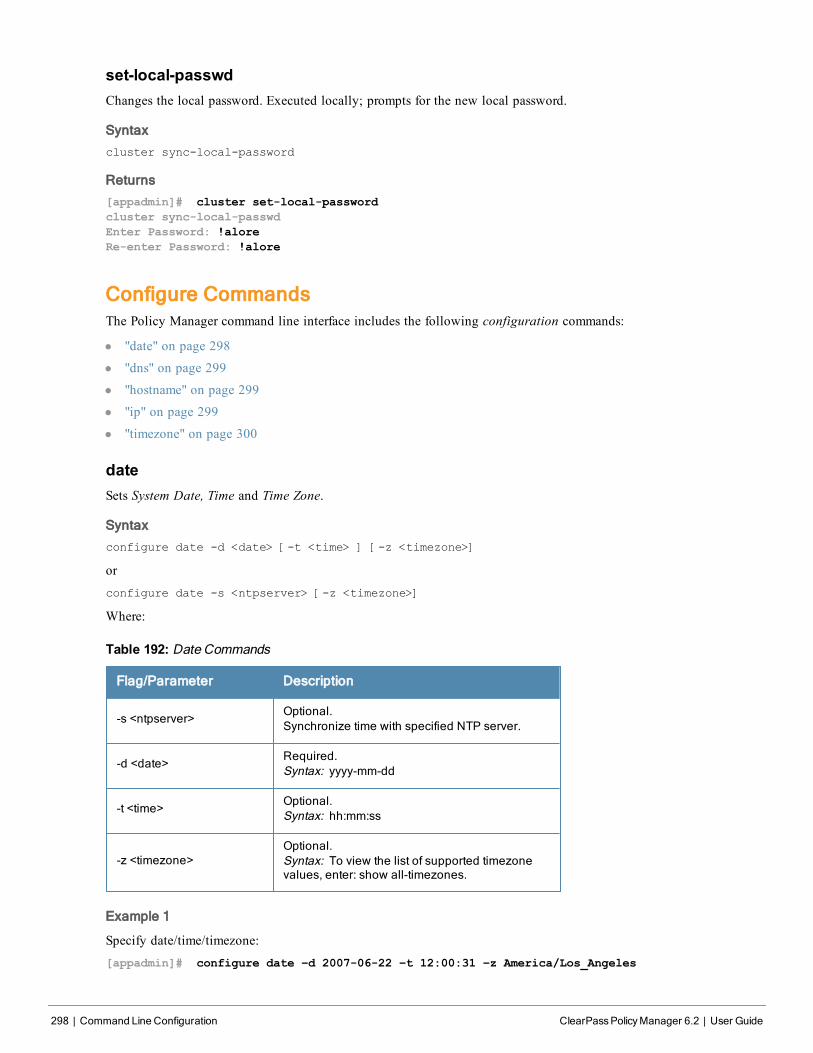
298 | Command Line Configuration ClearPassPolicyManager 6.2 | User Guide
set-local-passwdChanges the local password. Executed locally; prompts for the new local password.
Syntax
cluster sync-local-password
Returns
[appadmin]# cluster set-local-password
cluster sync-local-passwd
Enter Password: !alore
Re-enter Password: !alore
Configure CommandsThe Policy Manager command line interface includes the following configuration commands:
l "date" on page 298
l "dns" on page 299
l "hostname" on page 299
l "ip" on page 299
l "timezone" on page 300
dateSets System Date, Time and Time Zone.
Syntax
configure date -d <date> [-t <time> ] [-z <timezone>]
or
configure date -s <ntpserver> [-z <timezone>]
Where:
Flag/Parameter Description
-s <ntpserver>Optional.Synchronize time with specified NTP server.
-d <date>Required.Syntax: yyyy-mm-dd
-t <time>Optional.Syntax: hh:mm:ss
-z <timezone>Optional.Syntax: To view the list of supported timezonevalues, enter: show all-timezones.
Table 192: Date Commands
Example 1
Specify date/time/timezone:
[appadmin]# configure date –d 2007-06-22 –t 12:00:31 –z America/Los_Angeles
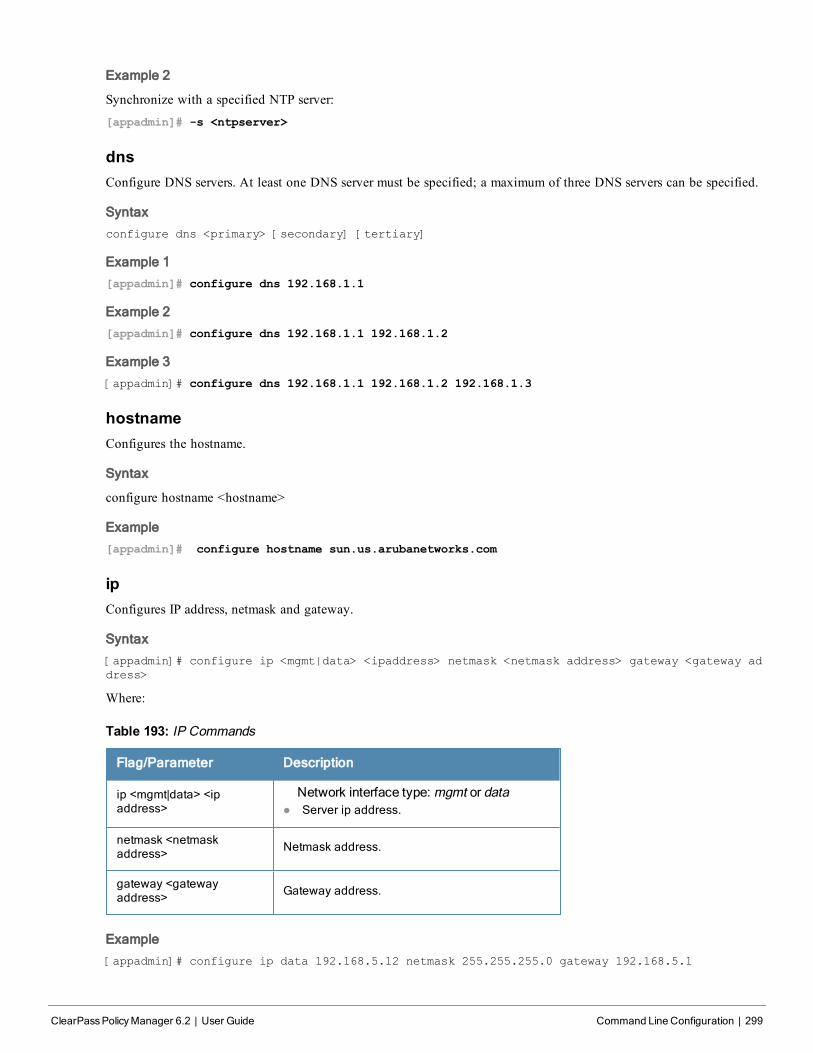
Example 2
Synchronize with a specified NTP server:
[appadmin]# -s <ntpserver>
dnsConfigure DNS servers. At least one DNS server must be specified; a maximum of three DNS servers can be specified.
Syntax
configure dns <primary> [secondary] [tertiary]
Example 1
[appadmin]# configure dns 192.168.1.1
Example 2
[appadmin]# configure dns 192.168.1.1 192.168.1.2
Example 3
[appadmin]# configure dns 192.168.1.1 192.168.1.2 192.168.1.3
hostnameConfigures the hostname.
Syntax
configure hostname <hostname>
Example
[appadmin]# configure hostname sun.us.arubanetworks.com
ipConfigures IP address, netmask and gateway.
Syntax
[appadmin]# configure ip <mgmt|data> <ipaddress> netmask <netmask address> gateway <gateway ad
dress>
Where:
Flag/Parameter Description
ip <mgmt|data> <ipaddress>
Network interface type: mgmt or datal Server ip address.
netmask <netmaskaddress> Netmask address.
gateway <gatewayaddress> Gateway address.
Table 193: IP Commands
Example
[appadmin]# configure ip data 192.168.5.12 netmask 255.255.255.0 gateway 192.168.5.1
ClearPassPolicyManager 6.2 | User Guide Command Line Configuration | 299

300 | Command Line Configuration ClearPassPolicyManager 6.2 | User Guide
timezoneConfigures time zone interactively.
Syntax
configure timezone
Example
[appadmin]# configure timezone
configure timezone
*********************************************************
* WARNING: When the command is completed Policy Manager services *
* are restarted to reflect the changes. *
*********************************************************
Continue? [y|Y]: y
Network CommandsThe Policy Manager command line interface includes the following network commands:
l "ip" on page 300
l "nslookup" on page 301
l "ping" on page 301
l "reset" on page 302
l "traceroute" on page 302
ipAdd, delete or list custom routes to the data or management interface routing table.
Syntax
network ip add <mgmt|data> [-i <id>] <[-s <SrcAddr>] [-d <DestAddr>]>
Add a custom routing rule. Where:
Flag/Parameter Description
<mgmt|data> Specify management or data interface
-i <id> id of the network ip rule. If unspecified, the system will auto-generate an id. Notethat the id determines the priority in the ordered list of rules in the routing table.
-s <SrcAddr>Optional. Specifies the ip address or network (for example, 192.168.5.0/24) or 0/0(for all traffic) of traffic originator. Only one of SrcAddr or DstAddr must bespecified.
-d <DestAddr>
Optional. Specifies the destination ip address or network (for example,192.168.5.0/24) or 0/0 (for all traffic). Only one of SrcAddr or DstAddr must bespecified.
Table 194: Network IP Add Commands
Syntax
network ip del <-i <id>>
Delete a rule. Where:
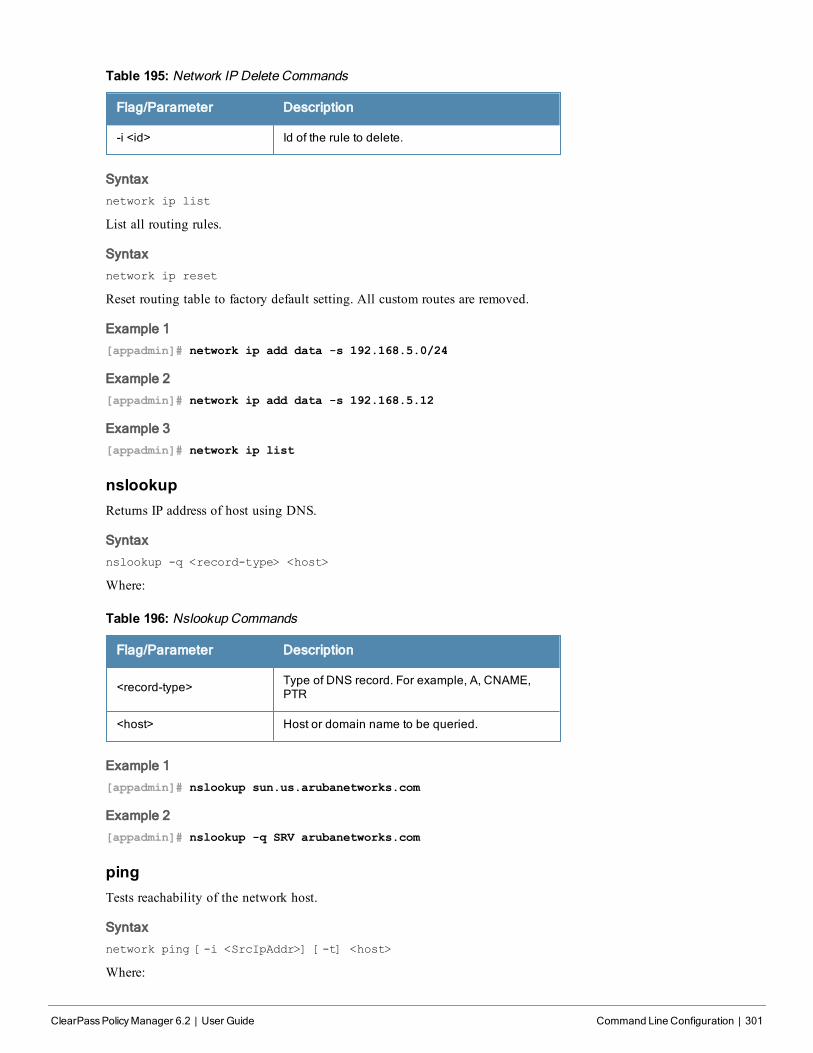
Flag/Parameter Description
-i <id> Id of the rule to delete.
Table 195: Network IP Delete Commands
Syntax
network ip list
List all routing rules.
Syntax
network ip reset
Reset routing table to factory default setting. All custom routes are removed.
Example 1
[appadmin]# network ip add data -s 192.168.5.0/24
Example 2
[appadmin]# network ip add data -s 192.168.5.12
Example 3
[appadmin]# network ip list
nslookupReturns IP address of host using DNS.
Syntax
nslookup -q <record-type> <host>
Where:
Flag/Parameter Description
<record-type> Type of DNS record. For example, A, CNAME,PTR
<host> Host or domain name to be queried.
Table 196: Nslookup Commands
Example 1
[appadmin]# nslookup sun.us.arubanetworks.com
Example 2
[appadmin]# nslookup -q SRV arubanetworks.com
pingTests reachability of the network host.
Syntax
network ping [-i <SrcIpAddr>] [-t] <host>
Where:
ClearPassPolicyManager 6.2 | User Guide Command Line Configuration | 301
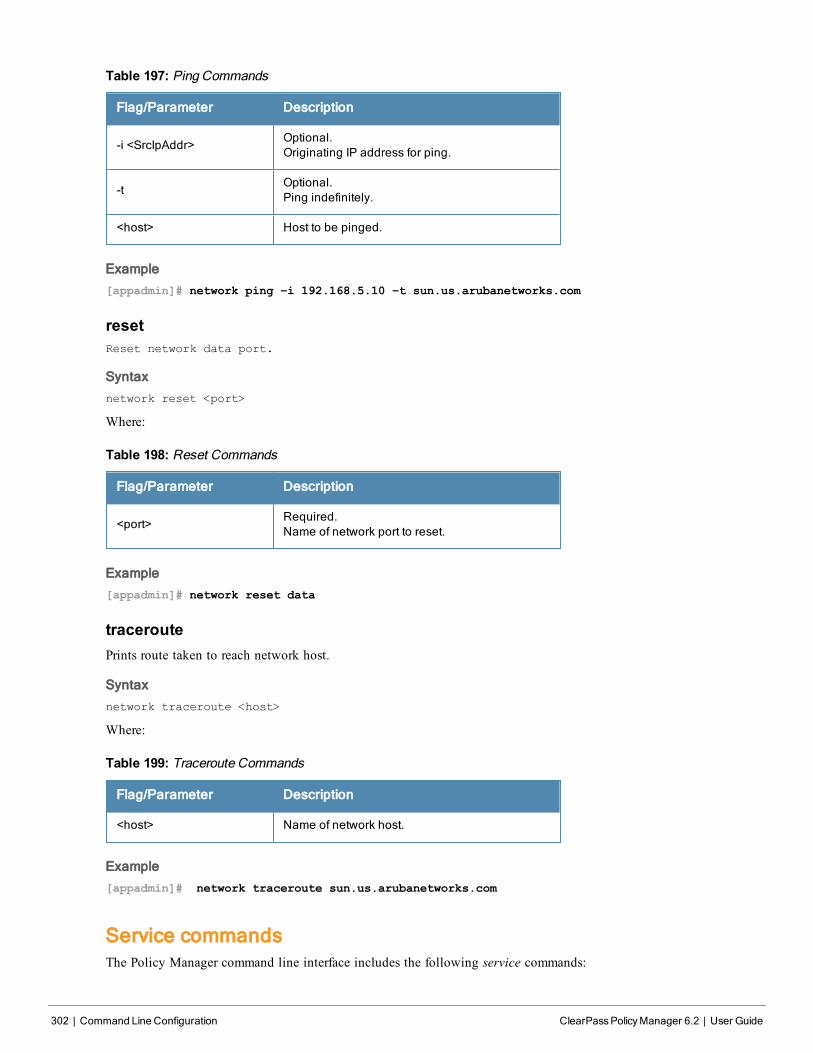
302 | Command Line Configuration ClearPassPolicyManager 6.2 | User Guide
Flag/Parameter Description
-i <SrcIpAddr>Optional.Originating IP address for ping.
-tOptional.Ping indefinitely.
<host> Host to be pinged.
Table 197: Ping Commands
Example
[appadmin]# network ping –i 192.168.5.10 –t sun.us.arubanetworks.com
resetReset network data port.
Syntax
network reset <port>
Where:
Flag/Parameter Description
<port>Required.Name of network port to reset.
Table 198: Reset Commands
Example
[appadmin]# network reset data
traceroutePrints route taken to reach network host.
Syntax
network traceroute <host>
Where:
Flag/Parameter Description
<host> Name of network host.
Table 199: Traceroute Commands
Example
[appadmin]# network traceroute sun.us.arubanetworks.com
Service commandsThe Policy Manager command line interface includes the following service commands:
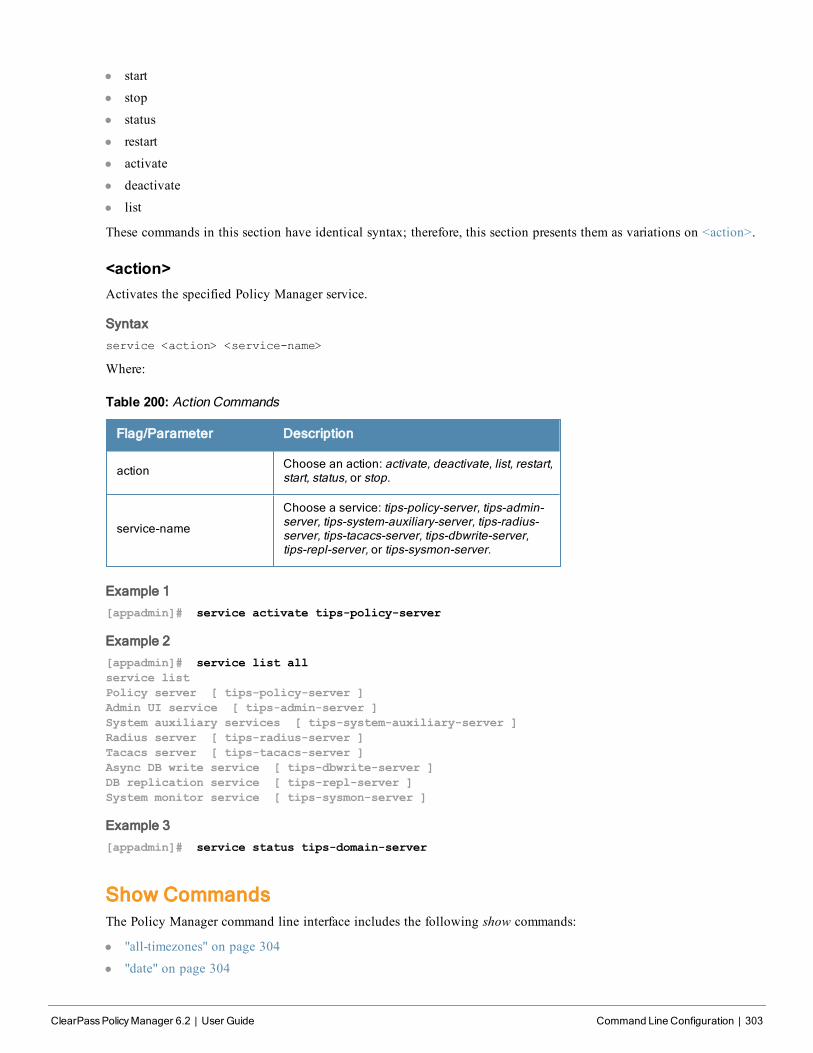
l start
l stop
l status
l restart
l activate
l deactivate
l list
These commands in this section have identical syntax; therefore, this section presents them as variations on <action>.
<action>Activates the specified Policy Manager service.
Syntax
service <action> <service-name>
Where:
Flag/Parameter Description
action Choose an action: activate, deactivate, list, restart,start, status, or stop.
service-name
Choose a service: tips-policy-server, tips-admin-server, tips-system-auxiliary-server, tips-radius-server, tips-tacacs-server, tips-dbwrite-server,tips-repl-server, or tips-sysmon-server.
Table 200: Action Commands
Example 1
[appadmin]# service activate tips-policy-server
Example 2
[appadmin]# service list all
service list
Policy server [ tips-policy-server ]
Admin UI service [ tips-admin-server ]
System auxiliary services [ tips-system-auxiliary-server ]
Radius server [ tips-radius-server ]
Tacacs server [ tips-tacacs-server ]
Async DB write service [ tips-dbwrite-server ]
DB replication service [ tips-repl-server ]
System monitor service [ tips-sysmon-server ]
Example 3
[appadmin]# service status tips-domain-server
Show CommandsThe Policy Manager command line interface includes the following show commands:
l "all-timezones" on page 304
l "date" on page 304
ClearPassPolicyManager 6.2 | User Guide Command Line Configuration | 303
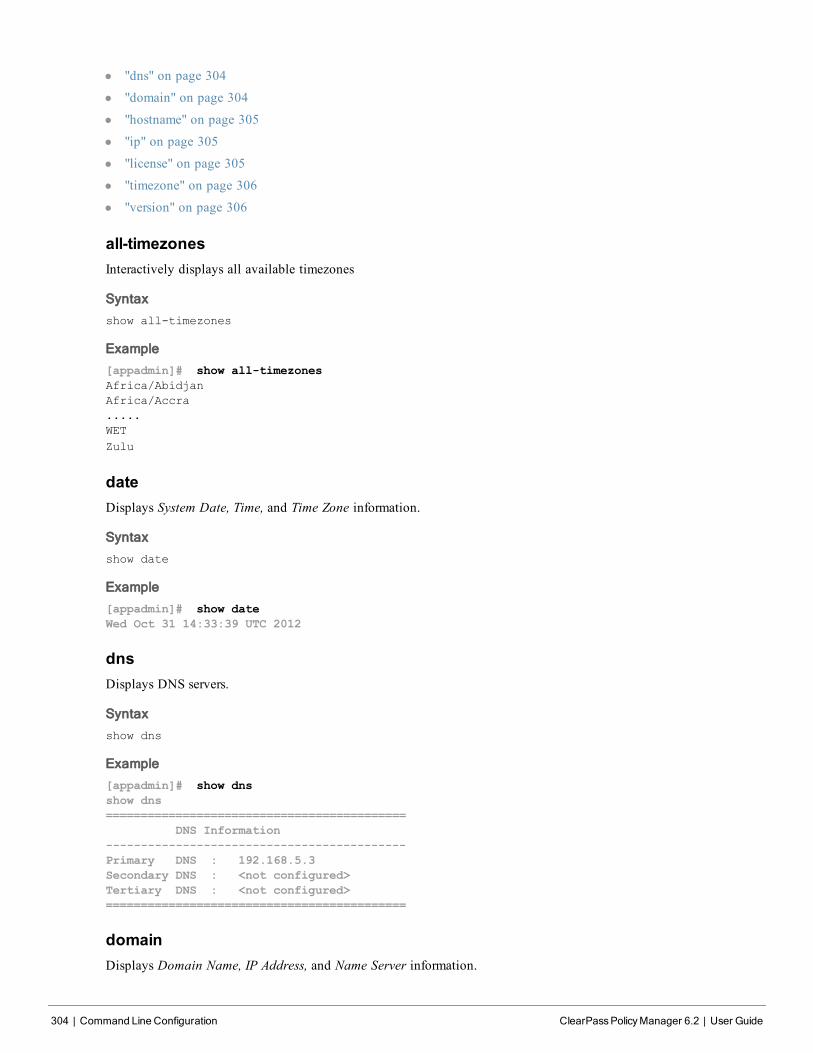
304 | Command Line Configuration ClearPassPolicyManager 6.2 | User Guide
l "dns" on page 304
l "domain" on page 304
l "hostname" on page 305
l "ip" on page 305
l "license" on page 305
l "timezone" on page 306
l "version" on page 306
all-timezonesInteractively displays all available timezones
Syntax
show all-timezones
Example
[appadmin]# show all-timezones
Africa/Abidjan
Africa/Accra
.....
WET
Zulu
dateDisplays System Date, Time, and Time Zone information.
Syntax
show date
Example
[appadmin]# show date
Wed Oct 31 14:33:39 UTC 2012
dnsDisplays DNS servers.
Syntax
show dns
Example
[appadmin]# show dns
show dns
===========================================
DNS Information
-------------------------------------------
Primary DNS : 192.168.5.3
Secondary DNS : <not configured>
Tertiary DNS : <not configured>
===========================================
domainDisplays Domain Name, IP Address, and Name Server information.

Syntax
show domain
Example
[appadmin]# show domain
hostnameDisplays hostname.
Syntax
show hostname
Example
[appadmin]# show hostname
show hostname
wolf
ipDisplays IP and DNS information for the host.
Syntax
show ip
Example
[appadmin]# show ip
show ip
===========================================
Device Type : Management Port
-------------------------------------------
IP Address : 192.168.5.227
Subnet Mask : 255.255.255.0
Gateway : 192.168.5.1
===========================================
Device Type : Data Port
-------------------------------------------
IP Address : <not configured>
Subnet Mask : <not configured>
Gateway : <not configured>
===========================================
DNS Information
-------------------------------------------
Primary DNS : 192.168.5.3
Secondary DNS : <not configured>
Tertiary DNS : <not configured>
===========================================
licenseDisplays the license key.
Syntax
show license
Example
[appadmin]# show license
show license
ClearPassPolicyManager 6.2 | User Guide Command Line Configuration | 305
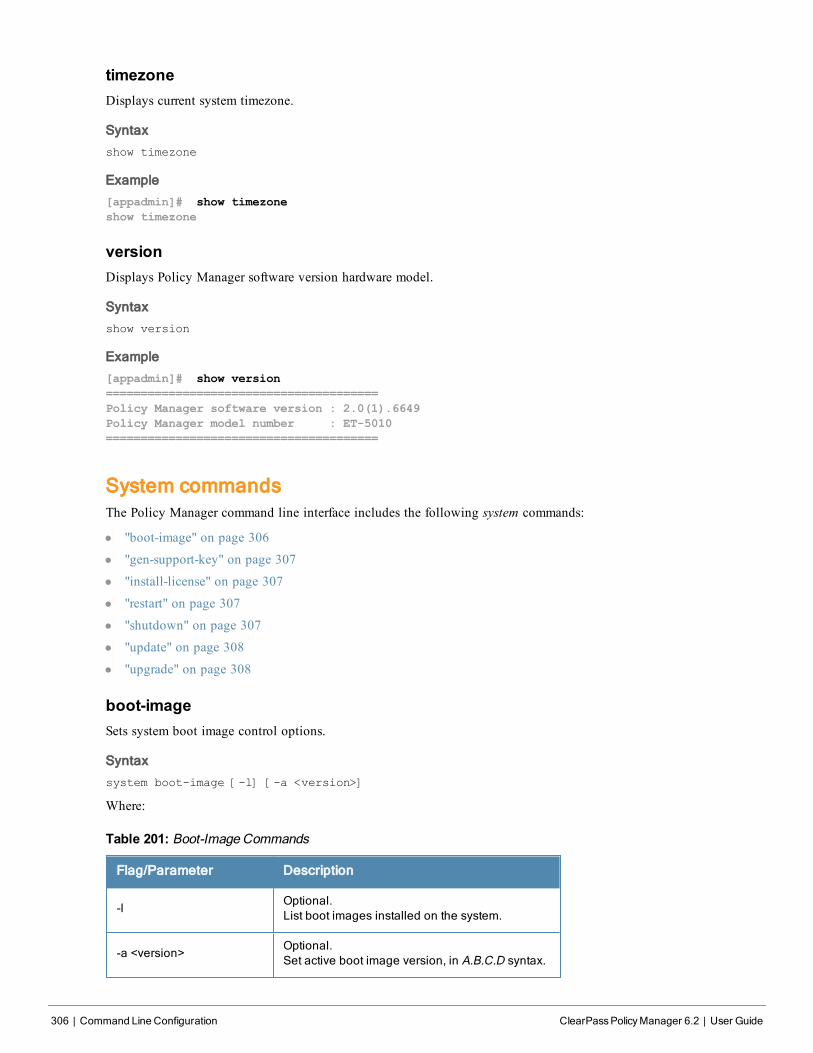
306 | Command Line Configuration ClearPassPolicyManager 6.2 | User Guide
timezoneDisplays current system timezone.
Syntax
show timezone
Example
[appadmin]# show timezone
show timezone
versionDisplays Policy Manager software version hardware model.
Syntax
show version
Example
[appadmin]# show version
=======================================
Policy Manager software version : 2.0(1).6649
Policy Manager model number : ET-5010
=======================================
System commandsThe Policy Manager command line interface includes the following system commands:
l "boot-image" on page 306
l "gen-support-key" on page 307
l "install-license" on page 307
l "restart" on page 307
l "shutdown" on page 307
l "update" on page 308
l "upgrade" on page 308
boot-imageSets system boot image control options.
Syntax
system boot-image [-l] [-a <version>]
Where:
Flag/Parameter Description
-lOptional.List boot images installed on the system.
-a <version>Optional.Set active boot image version, in A.B.C.D syntax.
Table 201: Boot-Image Commands
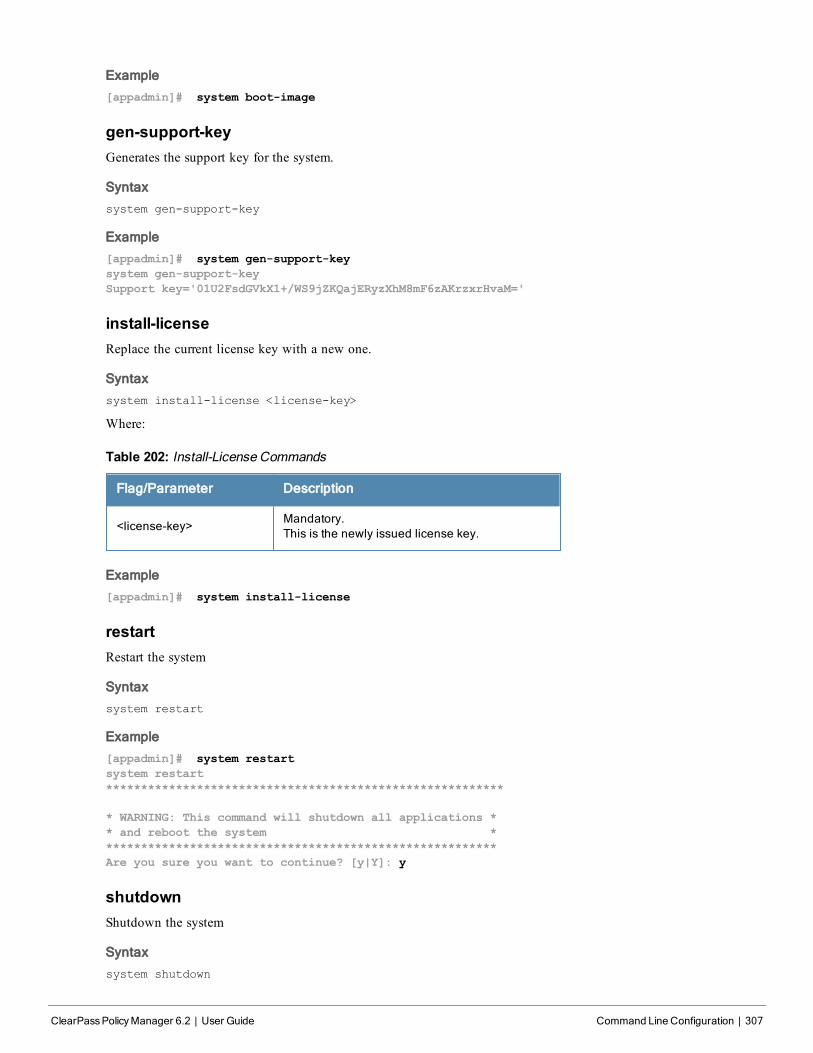
Example
[appadmin]# system boot-image
gen-support-keyGenerates the support key for the system.
Syntax
system gen-support-key
Example
[appadmin]# system gen-support-key
system gen-support-key
Support key='01U2FsdGVkX1+/WS9jZKQajERyzXhM8mF6zAKrzxrHvaM='
install-licenseReplace the current license key with a new one.
Syntax
system install-license <license-key>
Where:
Flag/Parameter Description
<license-key>Mandatory.This is the newly issued license key.
Table 202: Install-License Commands
Example
[appadmin]# system install-license
restartRestart the system
Syntax
system restart
Example
[appadmin]# system restart
system restart
*********************************************************
* WARNING: This command will shutdown all applications *
* and reboot the system *
********************************************************
Are you sure you want to continue? [y|Y]: y
shutdownShutdown the system
Syntax
system shutdown
ClearPassPolicyManager 6.2 | User Guide Command Line Configuration | 307
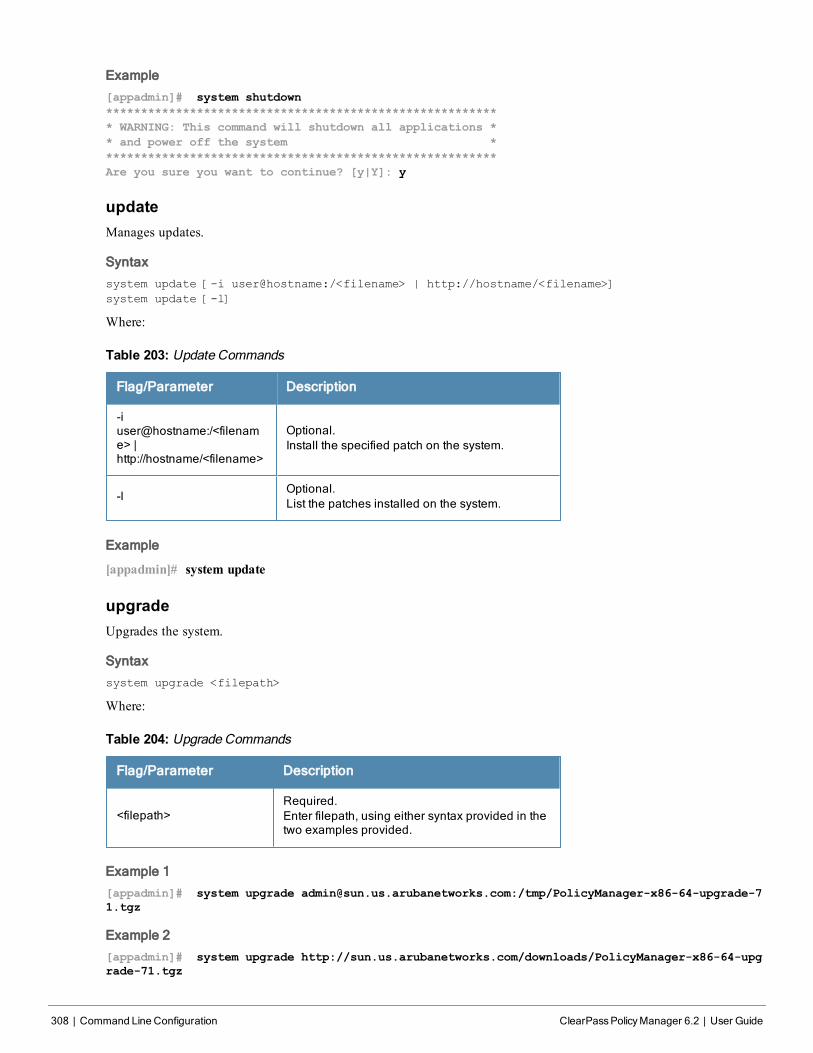
308 | Command Line Configuration ClearPassPolicyManager 6.2 | User Guide
Example
[appadmin]# system shutdown
********************************************************
* WARNING: This command will shutdown all applications *
* and power off the system *
********************************************************
Are you sure you want to continue? [y|Y]: y
updateManages updates.
Syntax
system update [-i user@hostname:/<filename> | http://hostname/<filename>]
system update [-l]
Where:
Flag/Parameter Description
-iuser@hostname:/<filename> |http://hostname/<filename>
Optional.Install the specified patch on the system.
-lOptional.List the patches installed on the system.
Table 203: Update Commands
Example
[appadmin]# system update
upgradeUpgrades the system.
Syntax
system upgrade <filepath>
Where:
Flag/Parameter Description
<filepath>Required.Enter filepath, using either syntax provided in thetwo examples provided.
Table 204: Upgrade Commands
Example 1
[appadmin]# system upgrade [email protected]:/tmp/PolicyManager-x86-64-upgrade-7
1.tgz
Example 2
[appadmin]# system upgrade http://sun.us.arubanetworks.com/downloads/PolicyManager-x86-64-upg
rade-71.tgz
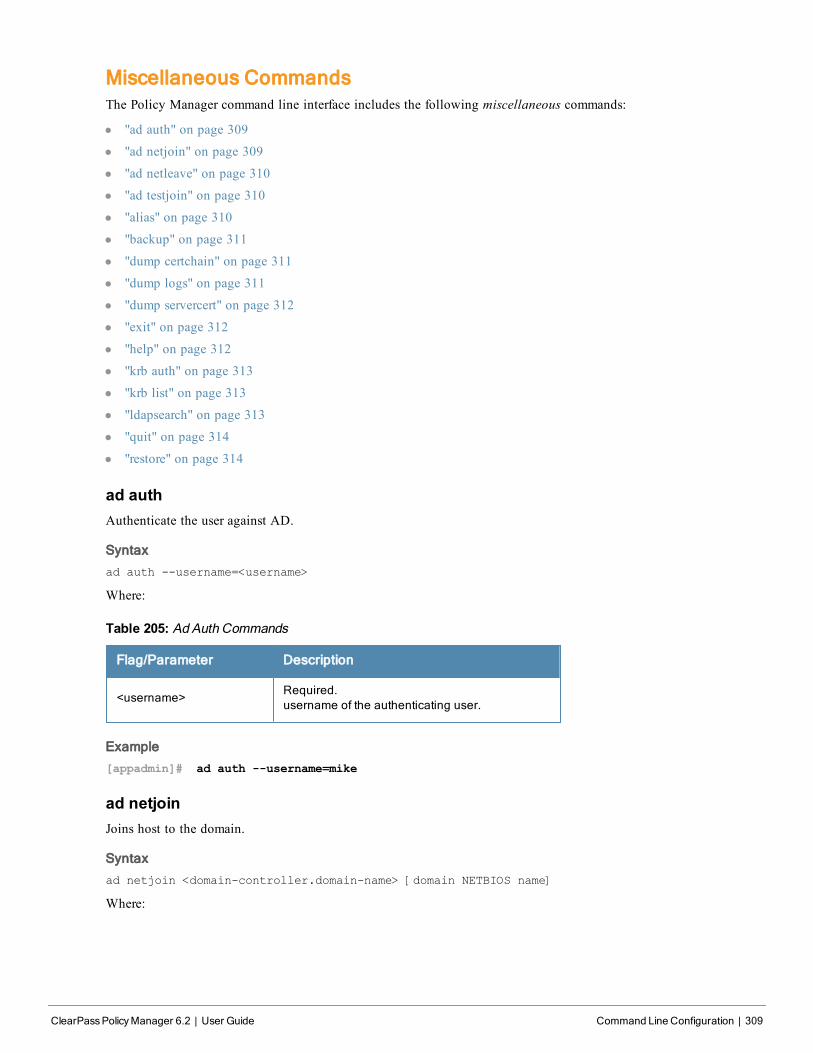
Miscellaneous CommandsThe Policy Manager command line interface includes the following miscellaneous commands:
l "ad auth" on page 309
l "ad netjoin" on page 309
l "ad netleave" on page 310
l "ad testjoin" on page 310
l "alias" on page 310
l "backup" on page 311
l "dump certchain" on page 311
l "dump logs" on page 311
l "dump servercert" on page 312
l "exit" on page 312
l "help" on page 312
l "krb auth" on page 313
l "krb list" on page 313
l "ldapsearch" on page 313
l "quit" on page 314
l "restore" on page 314
ad authAuthenticate the user against AD.
Syntax
ad auth --username=<username>
Where:
Flag/Parameter Description
<username>Required.username of the authenticating user.
Table 205: Ad Auth Commands
Example
[appadmin]# ad auth --username=mike
ad netjoinJoins host to the domain.
Syntax
ad netjoin <domain-controller.domain-name> [domain NETBIOS name]
Where:
ClearPassPolicyManager 6.2 | User Guide Command Line Configuration | 309
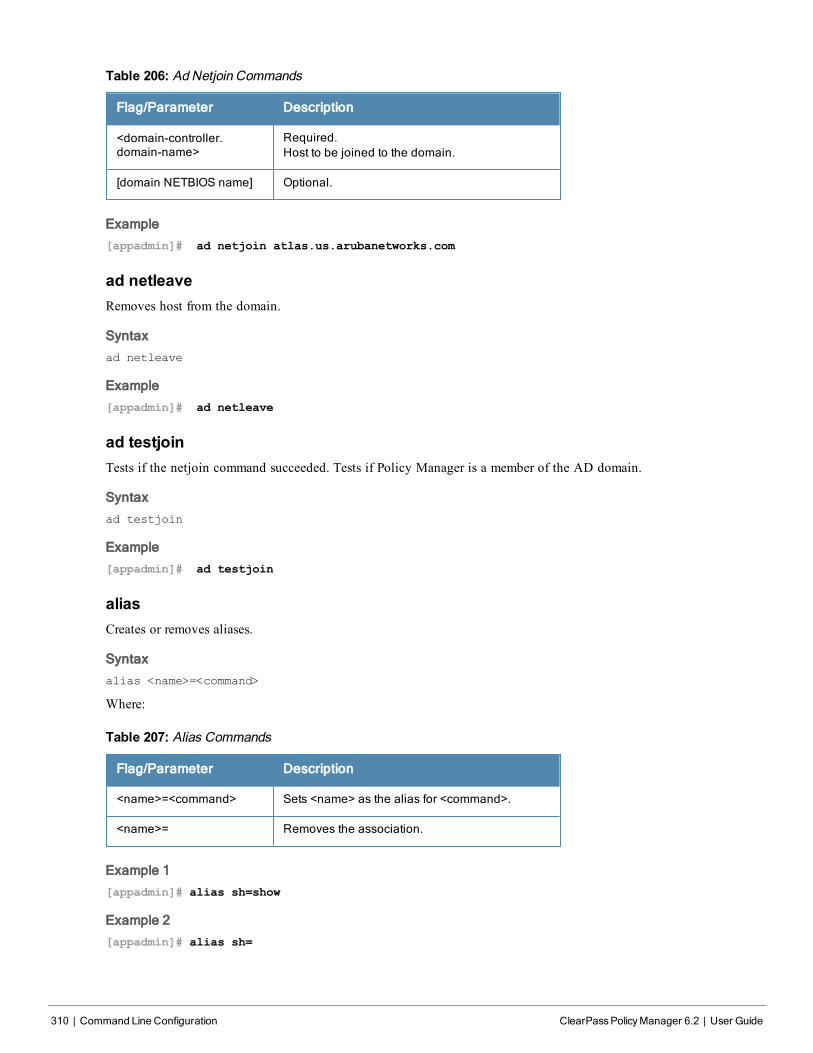
310 | Command Line Configuration ClearPassPolicyManager 6.2 | User Guide
Flag/Parameter Description
<domain-controller.domain-name>
Required.Host to be joined to the domain.
[domain NETBIOS name] Optional.
Table 206: AdNetjoin Commands
Example
[appadmin]# ad netjoin atlas.us.arubanetworks.com
ad netleaveRemoves host from the domain.
Syntax
ad netleave
Example
[appadmin]# ad netleave
ad testjoinTests if the netjoin command succeeded. Tests if Policy Manager is a member of the AD domain.
Syntax
ad testjoin
Example
[appadmin]# ad testjoin
aliasCreates or removes aliases.
Syntax
alias <name>=<command>
Where:
Flag/Parameter Description
<name>=<command> Sets <name> as the alias for <command>.
<name>= Removes the association.
Table 207: Alias Commands
Example 1
[appadmin]# alias sh=show
Example 2
[appadmin]# alias sh=
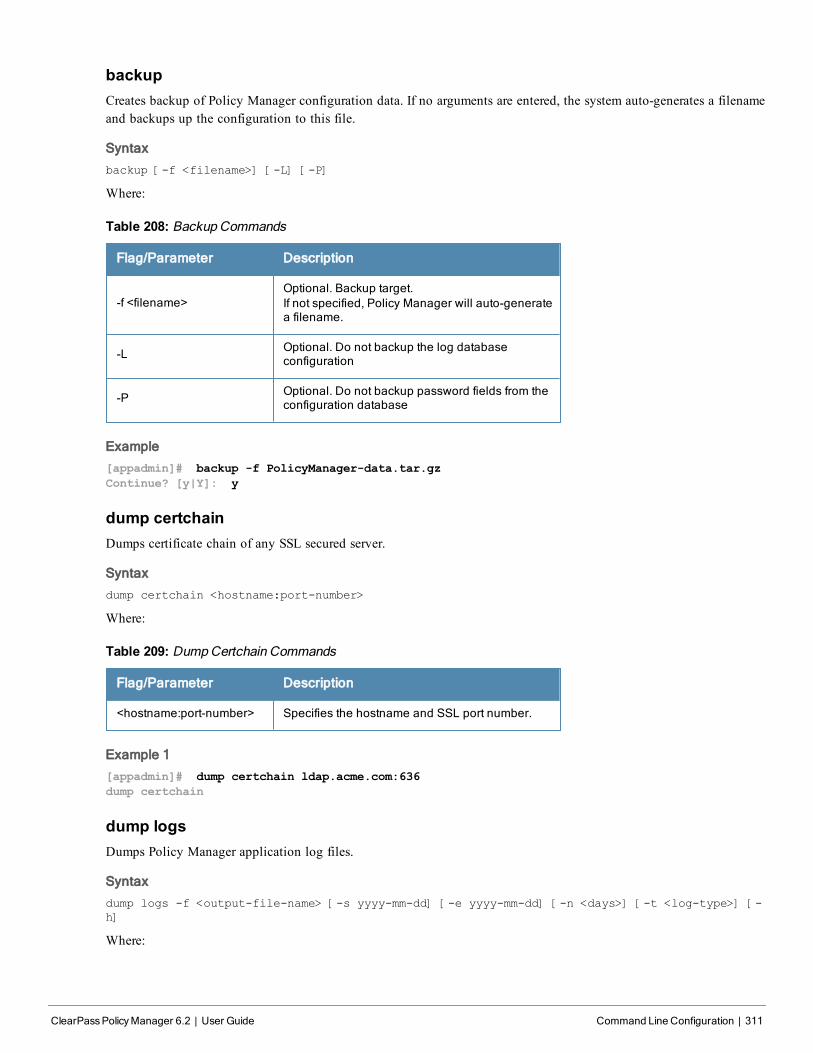
backupCreates backup of Policy Manager configuration data. If no arguments are entered, the system auto-generates a filenameand backups up the configuration to this file.
Syntax
backup [-f <filename>] [-L] [-P]
Where:
Flag/Parameter Description
-f <filename>Optional. Backup target.If not specified, Policy Manager will auto-generatea filename.
-L Optional. Do not backup the log databaseconfiguration
-P Optional. Do not backup password fields from theconfiguration database
Table 208: Backup Commands
Example
[appadmin]# backup -f PolicyManager-data.tar.gz
Continue? [y|Y]: y
dump certchainDumps certificate chain of any SSL secured server.
Syntax
dump certchain <hostname:port-number>
Where:
Flag/Parameter Description
<hostname:port-number> Specifies the hostname and SSL port number.
Table 209: DumpCertchain Commands
Example 1
[appadmin]# dump certchain ldap.acme.com:636
dump certchain
dump logsDumps Policy Manager application log files.
Syntax
dump logs -f <output-file-name> [-s yyyy-mm-dd] [-e yyyy-mm-dd] [-n <days>] [-t <log-type>] [-
h]
Where:
ClearPassPolicyManager 6.2 | User Guide Command Line Configuration | 311
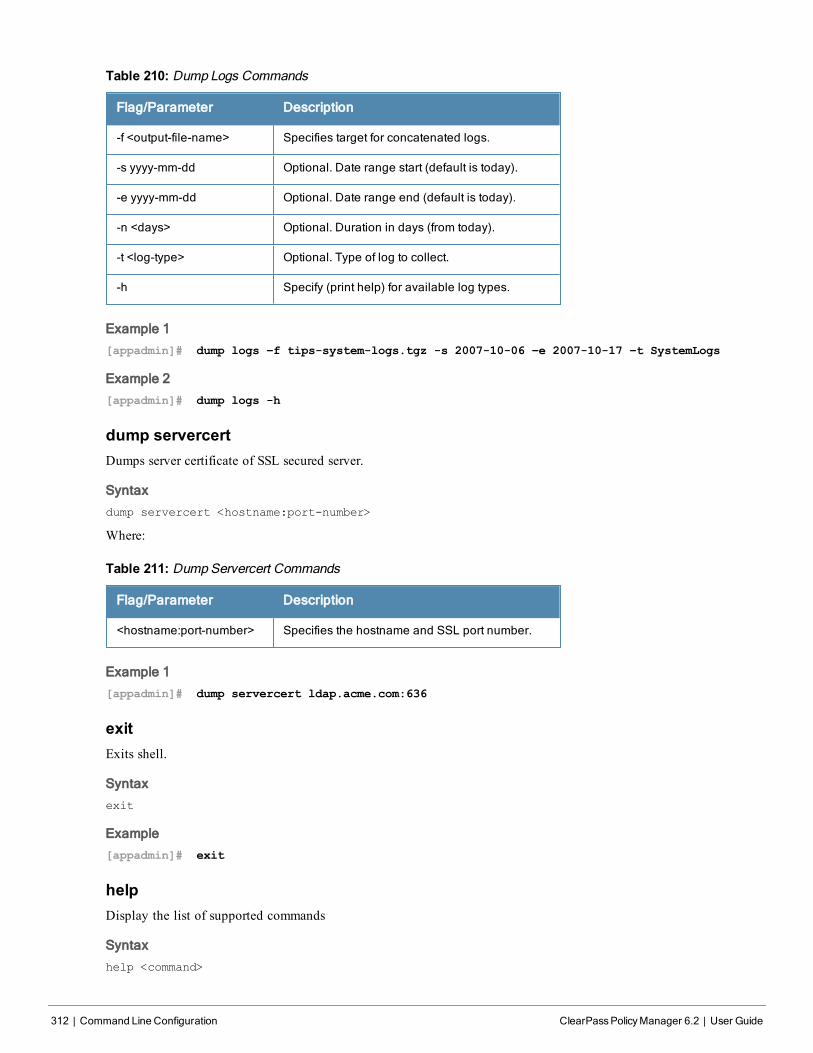
312 | Command Line Configuration ClearPassPolicyManager 6.2 | User Guide
Flag/Parameter Description
-f <output-file-name> Specifies target for concatenated logs.
-s yyyy-mm-dd Optional. Date range start (default is today).
-e yyyy-mm-dd Optional. Date range end (default is today).
-n <days> Optional. Duration in days (from today).
-t <log-type> Optional. Type of log to collect.
-h Specify (print help) for available log types.
Table 210: Dump Logs Commands
Example 1
[appadmin]# dump logs –f tips-system-logs.tgz -s 2007-10-06 –e 2007-10-17 –t SystemLogs
Example 2
[appadmin]# dump logs -h
dump servercertDumps server certificate of SSL secured server.
Syntax
dump servercert <hostname:port-number>
Where:
Flag/Parameter Description
<hostname:port-number> Specifies the hostname and SSL port number.
Table 211: DumpServercert Commands
Example 1
[appadmin]# dump servercert ldap.acme.com:636
exitExits shell.
Syntax
exit
Example
[appadmin]# exit
helpDisplay the list of supported commands
Syntax
help <command>
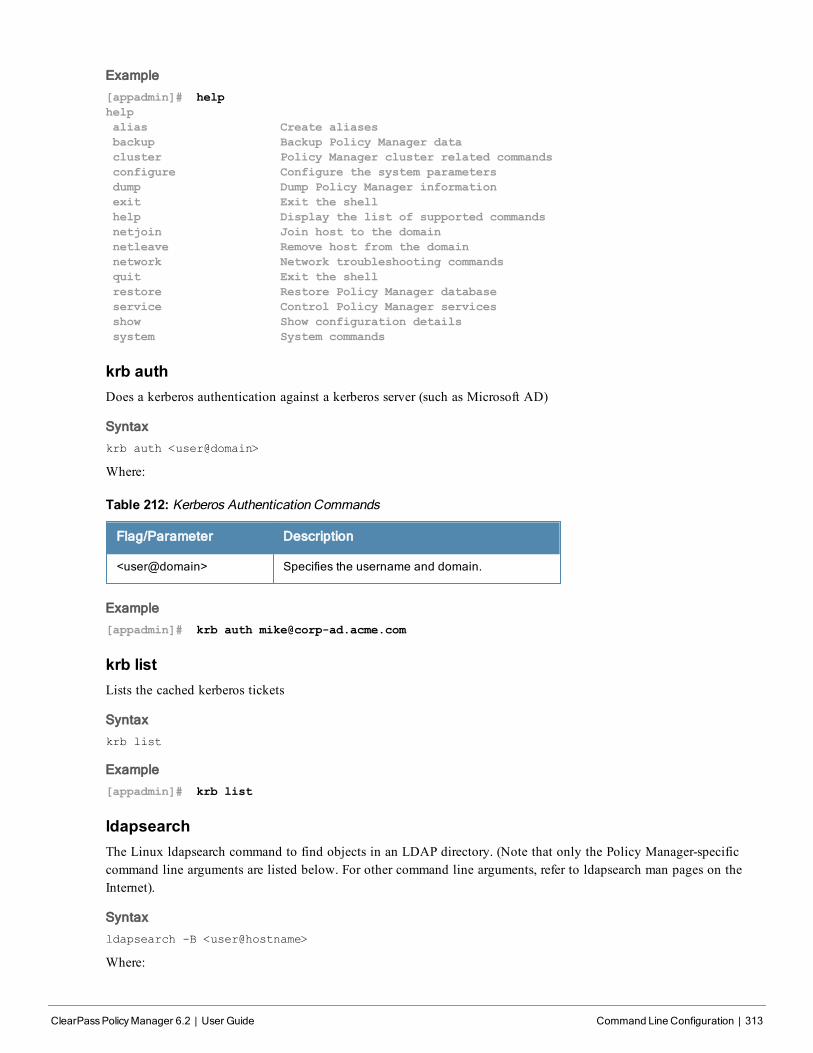
Example
[appadmin]# help
help
alias Create aliases
backup Backup Policy Manager data
cluster Policy Manager cluster related commands
configure Configure the system parameters
dump Dump Policy Manager information
exit Exit the shell
help Display the list of supported commands
netjoin Join host to the domain
netleave Remove host from the domain
network Network troubleshooting commands
quit Exit the shell
restore Restore Policy Manager database
service Control Policy Manager services
show Show configuration details
system System commands
krb authDoes a kerberos authentication against a kerberos server (such as Microsoft AD)
Syntax
krb auth <user@domain>
Where:
Flag/Parameter Description
<user@domain> Specifies the username and domain.
Table 212: Kerberos Authentication Commands
Example
[appadmin]# krb auth [email protected]
krb listLists the cached kerberos tickets
Syntax
krb list
Example
[appadmin]# krb list
ldapsearchThe Linux ldapsearch command to find objects in an LDAP directory. (Note that only the Policy Manager-specificcommand line arguments are listed below. For other command line arguments, refer to ldapsearch man pages on theInternet).
Syntax
ldapsearch -B <user@hostname>
Where:
ClearPassPolicyManager 6.2 | User Guide Command Line Configuration | 313

314 | Command Line Configuration ClearPassPolicyManager 6.2 | User Guide
Flag/Parameter Description
<user@hostname>Specifies the username and the full qualifieddomain name of the host. The -B command findsthe bind DN of the LDAP directory.
Table 213: LDAP Search commands
Example
[appadmin]# ldapsearch -B [email protected]
restoreRestores Policy Manager configuration data from the backup file
Syntax
restore user@hostname:/<backup-filename> [-l] [-i] [-c|-C] [-p] [-s]
Where:
Flag/Parameter Description
user@hostname:/<backup-filename> Specify filepath of restore source.
-c Restore configuration database (default).
-C Do not restore configuration database.
-l Optional. If it exists in the backup, restore logdatabase.
-i Optional. Ignore version mismatch errors andproceed.
-p Optional. Force restore from a backup file thatdoes not have password fields present.
-s Optional. Restore cluster server/node entries fromthe backup. (Node entries disabled on restore.)
Table 214: Restore Commands
Example
[appadmin]# restore user@hostname:/tmp/tips-backup.tgz -l -i -c -s
quitExits shell.
Syntax
quit
Example
[appadmin]# quit
ClearPassPolicyManager 6.2 | User Guide RulesEditing and Namespaces | 315
Appendix B
Rules Editing and Namespaces
In the Policy Manager administration User Interface (UI) you use the same editing interface to create different types ofobjects:
l Service rules
l Role mapping policies
l Internal user policies
l Enforcement policies
l Enforcement profiles
l Post-audit rules
l Proxy attribute pruning rules
l Filters for Access Tracker and activity reports
l Attributes editing for policy simulation
When editing all these elements, you are presented with a tabular interface with the same column headers:
l Type - Type is the namespace from which these attributes are defined. This is a drop-down list that containsnamespaces defined in the system for the current editing context.
l Name - Name is the name of the attribute. This is a drop-down list with the names of the attributes present in thenamespace.
l Operator - Operator is a list of operators appropriate for the data type of the attribute. The drop-down menu showsthe operators appropriate for data type on the left (that is, the attribute).
l Value - The value is the value of the attribute. Again, depending on the data type of the attribute, the value fieldcan be a free-form one-line edit box, a free-form multi-line edit box, a drop-down menu containing pre-definedvalues (enumerated types), or a time or date widget.
In some editing interfaces (for example, enforcement profile and policy simulation attribute editing interfaces) theoperator does not change; it is always the EQUALS operator:
Providing a uniform tabular interface to edit all these elements enables you to use the same steps while configuringthese elements. Also, providing a context-sensitive editing experience (for names, operators and values) takes theguess-work out of configuring these elements.
The following sections describe namespaces and operators in more detail.
NamespacesThere are multiple namespaces exposed in the rules editing interface. The namespaces exposed depend upon what youare editing. For example, when you are editing posture policies you work with the posture namespace; when you areediting service rules you work with, among other namespaces, the RADIUS namespace, but not the posture namespace.
Enumerated below are the namespaces you will find in the different rules editing contexts:
l RADIUS Namespace - Dictionaries in the RADIUS namespace come pre-packaged with the product. Theadministration interface does provide a way to add new dictionaries into the system (See "RADIUS Dictionaries "on page 276 for more information). RADIUS namespace has the notation RADIUS:Vendor, where Vendor is thename of the Company that has defined attributes in the dictionary. Sometimes, the same vendor has multipledictionaries, in which case the "Vendor" portion has the name suffixed by the name of device or some other uniquestring. IETF is a special vendor for the dictionary that holds the attributes defined in the RFC 2865 and other
316 | RulesEditing and Namespaces ClearPassPolicyManager 6.2 | User Guide
associated RFCs. Policy Manager comes pre-packaged with a number of vendor dictionaries. Some examples ofdictionaries in the RADIUS namespace are: RADIUS:IETF, RADIUS:Cisco, RADIUS:Juniper.
RADIUS namespace appears in the following editing contexts:
n Service rules: All RADIUS namespace attributes that can appear in a request (the ones marked with the IN orINOUT qualifier)
n RADIUS Enforcement profiles: All RADIUS namespace attributes that can be send back to a RADIUS client(the ones marked with the OUT or INOUT qualifier)
n Role mapping policies
n Policy simulation attributes
n Post-proxy attribute pruning rules
n Filter rules for Access Tracker and Activity Reports
l Posture Namespace - Dictionaries in the posture namespace come pre-packaged with the product. Theadministration interface does provide a way to add new dictionaries into the system (See "Posture Dictionaries " onpage 278 for more information.) Posture namespace has the notation Vendor:Application, where Vendor is the nameof the Company that has defined attributes in the dictionary, and Application is the name of the application forwhich the attributes have been defined. The same vendor typically has different dictionaries for differentapplications. Some examples of dictionaries in the posture namespace are: ClearPass:LinuxSHV,Microsoft:SystemSHV, Microsoft:WindowsSHV Trend:AV.
Posture namespace appears in the following editing contexts:
n Internal posture policies conditions - Attributes marked with the IN qualifier
n Internal posture policies actions - Attributes marked with the OUT qualifier
n Policy simulation attributes
n Filter rules for Access Tracker and Activity Reports
l Authorization Namespaces - Policy Manager supports a number of types of authorization sources. Authorizationsources from which values of attributes can be retrieved to create role mapping rules have their own separatenamespaces (prefixed with Authorization:). They are:
n Authorization - The authorization namespace has one attribute: sources. The values are pre-populated with theauthorization sources defined in Policy Manager. Use this to check for the authorization source(s) from whichattributes were extracted for the authenticating entity.
n AD Instance Namespace - For each instance of an Active Directory authentication source, there is an ADinstance namespace that appears in the rules editing interface. The AD instance namespace consists of all theattributes that were defined when the authentication source was created. These attribute names are pre-populatedin the UI for administrative convenience. For Policy Manager to fetch the values of attributes from ActiveDirectory, you need to define filters for that authentication source (see "Adding and Modifying AuthenticationSources " on page 108 for more information).
n LDAP Instance Namespace - For each instance of an LDAP authentication source, there is an LDAP instancenamespace that appears in the rules editing interface. The LDAP instance namespace consists of all the attributesthat were defined when the authentication source was created. These attribute names are pre-populated in the UIfor administrative convenience. For Policy Manager to fetch the values of attributes from an LDAP-compliantdirectory, you need to define filters for that authentication source (see "Adding and Modifying AuthenticationSources " on page 108 for more information).
n SQL Instance Namespace - For each instance of an SQL authentication source, there is an SQL instancenamespace that appears in the rules editing interface. The SQL instance namespace consists of attributes namesthat you have defined when you created an instance of this authentication source. The attribute names are pre-populated for administrative convenience. For Policy Manager to fetch the values of attributes from a SQL-compliant database, you need to define filters for that authentication source.
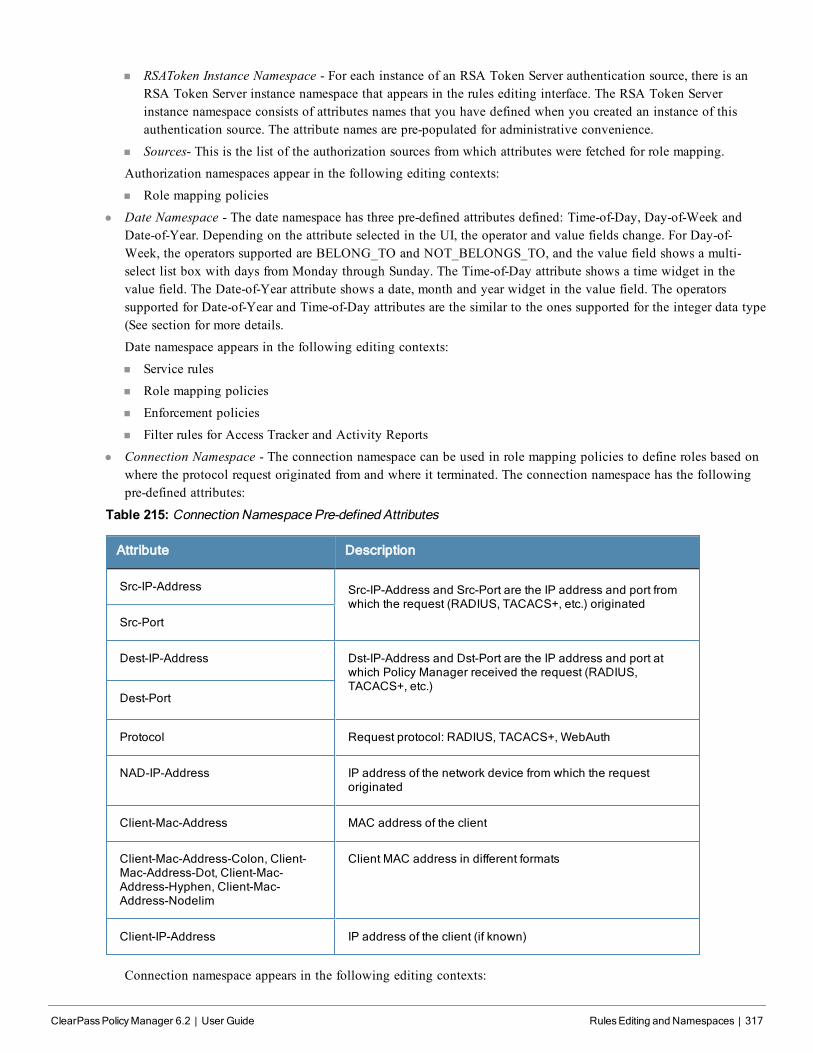
n RSAToken Instance Namespace - For each instance of an RSA Token Server authentication source, there is anRSA Token Server instance namespace that appears in the rules editing interface. The RSA Token Serverinstance namespace consists of attributes names that you have defined when you created an instance of thisauthentication source. The attribute names are pre-populated for administrative convenience.
n Sources- This is the list of the authorization sources from which attributes were fetched for role mapping.
Authorization namespaces appear in the following editing contexts:
n Role mapping policies
l Date Namespace - The date namespace has three pre-defined attributes defined: Time-of-Day, Day-of-Week andDate-of-Year. Depending on the attribute selected in the UI, the operator and value fields change. For Day-of-Week, the operators supported are BELONG_TO and NOT_BELONGS_TO, and the value field shows a multi-select list box with days from Monday through Sunday. The Time-of-Day attribute shows a time widget in thevalue field. The Date-of-Year attribute shows a date, month and year widget in the value field. The operatorssupported for Date-of-Year and Time-of-Day attributes are the similar to the ones supported for the integer data type(See section for more details.
Date namespace appears in the following editing contexts:
n Service rules
n Role mapping policies
n Enforcement policies
n Filter rules for Access Tracker and Activity Reports
l Connection Namespace - The connection namespace can be used in role mapping policies to define roles based onwhere the protocol request originated from and where it terminated. The connection namespace has the followingpre-defined attributes:
Table 215: Connection Namespace Pre-defined Attributes
Attribute Description
Src-IP-Address Src-IP-Address and Src-Port are the IP address and port fromwhich the request (RADIUS, TACACS+, etc.) originated
Src-Port
Dest-IP-Address Dst-IP-Address and Dst-Port are the IP address and port atwhich Policy Manager received the request (RADIUS,TACACS+, etc.)
Dest-Port
Protocol Request protocol: RADIUS, TACACS+, WebAuth
NAD-IP-Address IP address of the network device from which the requestoriginated
Client-Mac-Address MAC address of the client
Client-Mac-Address-Colon, Client-Mac-Address-Dot, Client-Mac-Address-Hyphen, Client-Mac-Address-Nodelim
Client MAC address in different formats
Client-IP-Address IP address of the client (if known)
Connection namespace appears in the following editing contexts:
ClearPassPolicyManager 6.2 | User Guide RulesEditing and Namespaces | 317
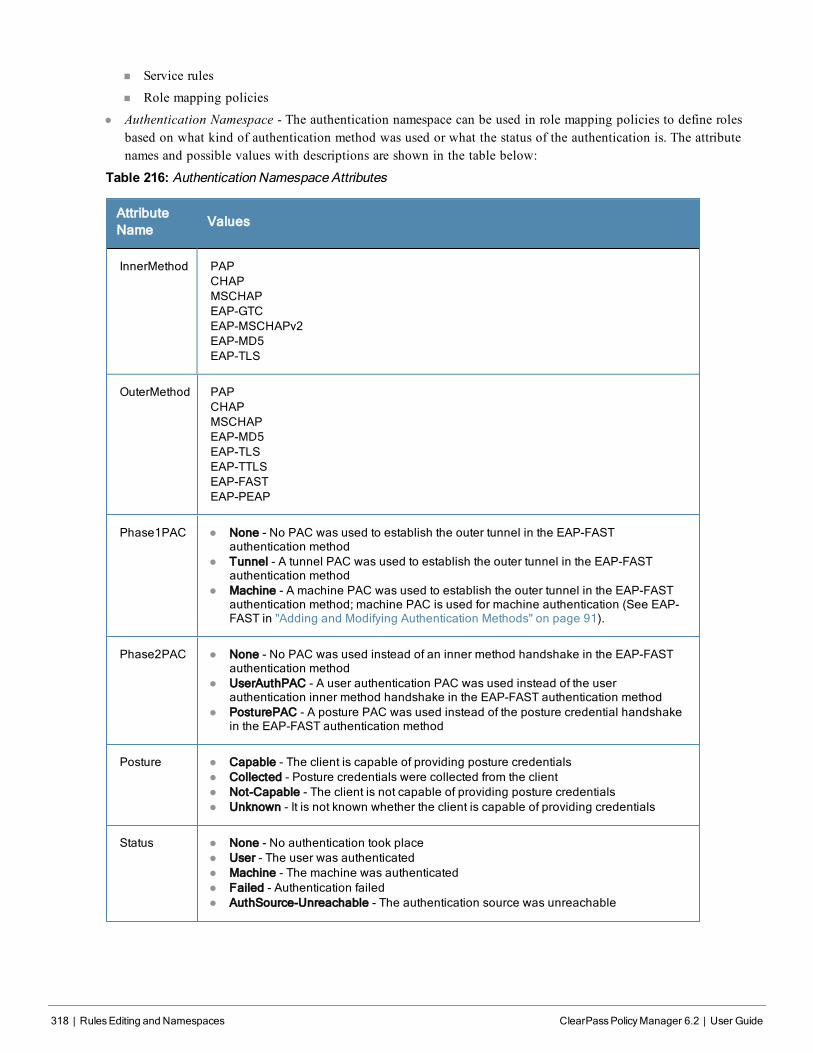
318 | RulesEditing and Namespaces ClearPassPolicyManager 6.2 | User Guide
n Service rules
n Role mapping policies
l Authentication Namespace - The authentication namespace can be used in role mapping policies to define rolesbased on what kind of authentication method was used or what the status of the authentication is. The attributenames and possible values with descriptions are shown in the table below:
Table 216: Authentication Namespace Attributes
AttributeName
Values
InnerMethod PAPCHAPMSCHAPEAP-GTCEAP-MSCHAPv2EAP-MD5EAP-TLS
OuterMethod PAPCHAPMSCHAPEAP-MD5EAP-TLSEAP-TTLSEAP-FASTEAP-PEAP
Phase1PAC l None - No PAC was used to establish the outer tunnel in the EAP-FASTauthentication method
l Tunnel - A tunnel PAC was used to establish the outer tunnel in the EAP-FASTauthentication method
l Machine - A machine PAC was used to establish the outer tunnel in the EAP-FASTauthentication method; machine PAC is used for machine authentication (See EAP-FAST in "Adding and Modifying Authentication Methods" on page 91).
Phase2PAC l None - No PAC was used instead of an inner method handshake in the EAP-FASTauthentication method
l UserAuthPAC - A user authentication PAC was used instead of the userauthentication inner method handshake in the EAP-FAST authentication method
l PosturePAC - A posture PAC was used instead of the posture credential handshakein the EAP-FAST authentication method
Posture l Capable - The client is capable of providing posture credentialsl Collected - Posture credentials were collected from the clientl Not-Capable - The client is not capable of providing posture credentialsl Unknown - It is not known whether the client is capable of providing credentials
Status l None - No authentication took placel User - The user was authenticatedl Machine - The machine was authenticatedl Failed - Authentication failedl AuthSource-Unreachable - The authentication source was unreachable
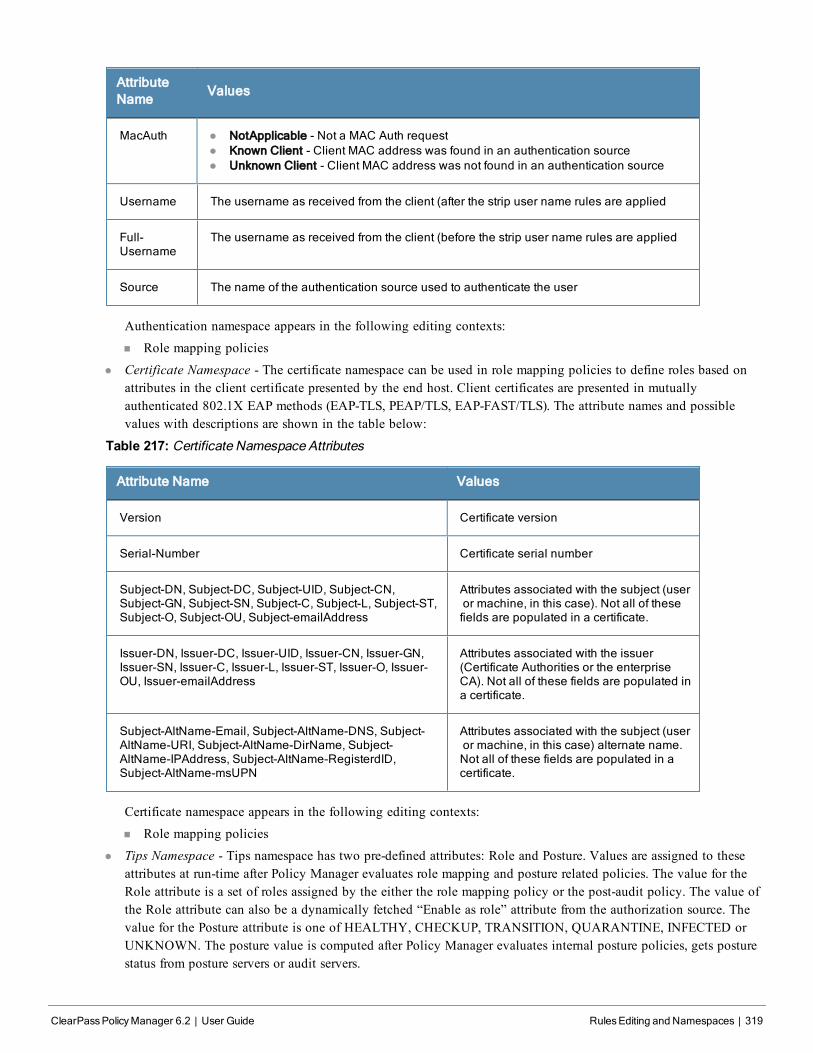
AttributeName
Values
MacAuth l NotApplicable - Not a MAC Auth requestl Known Client - Client MAC address was found in an authentication sourcel Unknown Client - Client MAC address was not found in an authentication source
Username The username as received from the client (after the strip user name rules are applied
Full-Username
The username as received from the client (before the strip user name rules are applied
Source The name of the authentication source used to authenticate the user
Authentication namespace appears in the following editing contexts:
n Role mapping policies
l Certificate Namespace - The certificate namespace can be used in role mapping policies to define roles based onattributes in the client certificate presented by the end host. Client certificates are presented in mutuallyauthenticated 802.1X EAP methods (EAP-TLS, PEAP/TLS, EAP-FAST/TLS). The attribute names and possiblevalues with descriptions are shown in the table below:
Table 217: Certificate Namespace Attributes
Attribute Name Values
Version Certificate version
Serial-Number Certificate serial number
Subject-DN, Subject-DC, Subject-UID, Subject-CN,Subject-GN, Subject-SN, Subject-C, Subject-L, Subject-ST,Subject-O, Subject-OU, Subject-emailAddress
Attributes associated with the subject (useror machine, in this case). Not all of thesefields are populated in a certificate.
Issuer-DN, Issuer-DC, Issuer-UID, Issuer-CN, Issuer-GN,Issuer-SN, Issuer-C, Issuer-L, Issuer-ST, Issuer-O, Issuer-OU, Issuer-emailAddress
Attributes associated with the issuer(Certificate Authorities or the enterpriseCA). Not all of these fields are populated ina certificate.
Subject-AltName-Email, Subject-AltName-DNS, Subject-AltName-URI, Subject-AltName-DirName, Subject-AltName-IPAddress, Subject-AltName-RegisterdID,Subject-AltName-msUPN
Attributes associated with the subject (useror machine, in this case) alternate name.Not all of these fields are populated in acertificate.
Certificate namespace appears in the following editing contexts:
n Role mapping policies
l Tips Namespace - Tips namespace has two pre-defined attributes: Role and Posture. Values are assigned to theseattributes at run-time after Policy Manager evaluates role mapping and posture related policies. The value for theRole attribute is a set of roles assigned by the either the role mapping policy or the post-audit policy. The value ofthe Role attribute can also be a dynamically fetched “Enable as role” attribute from the authorization source. Thevalue for the Posture attribute is one of HEALTHY, CHECKUP, TRANSITION, QUARANTINE, INFECTED orUNKNOWN. The posture value is computed after Policy Manager evaluates internal posture policies, gets posturestatus from posture servers or audit servers.
ClearPassPolicyManager 6.2 | User Guide RulesEditing and Namespaces | 319
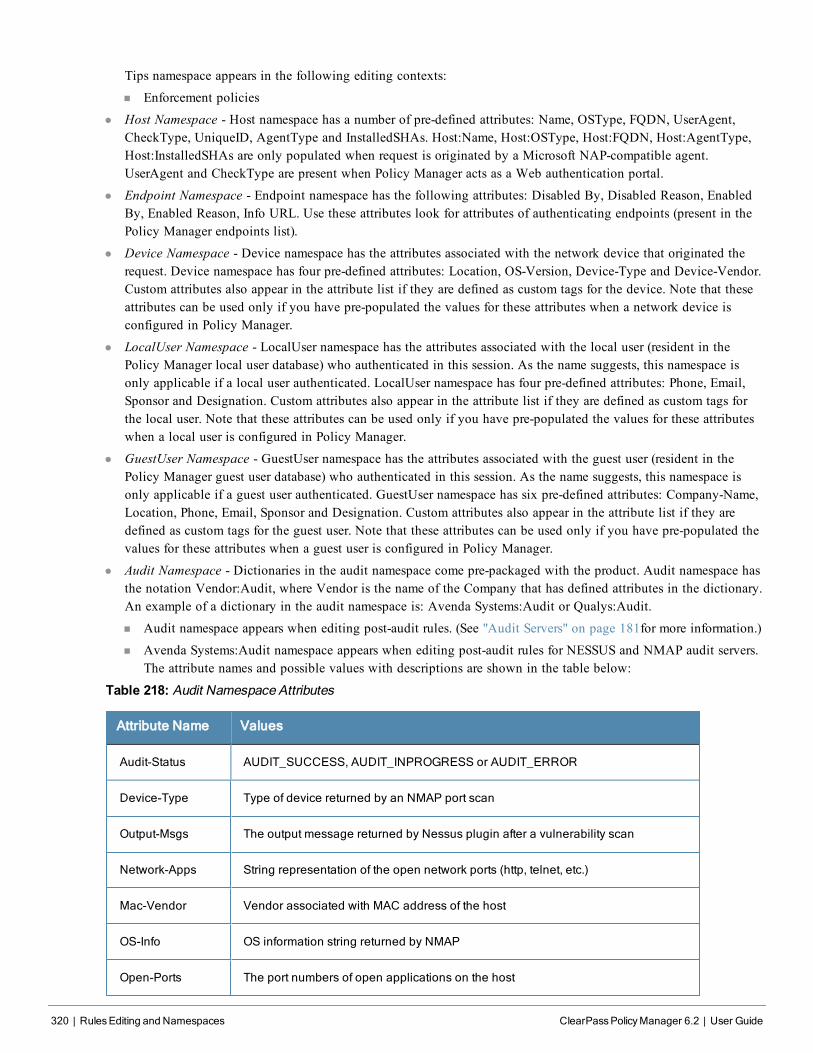
320 | RulesEditing and Namespaces ClearPassPolicyManager 6.2 | User Guide
Tips namespace appears in the following editing contexts:
n Enforcement policies
l Host Namespace - Host namespace has a number of pre-defined attributes: Name, OSType, FQDN, UserAgent,CheckType, UniqueID, AgentType and InstalledSHAs. Host:Name, Host:OSType, Host:FQDN, Host:AgentType,Host:InstalledSHAs are only populated when request is originated by a Microsoft NAP-compatible agent.UserAgent and CheckType are present when Policy Manager acts as a Web authentication portal.
l Endpoint Namespace - Endpoint namespace has the following attributes: Disabled By, Disabled Reason, EnabledBy, Enabled Reason, Info URL. Use these attributes look for attributes of authenticating endpoints (present in thePolicy Manager endpoints list).
l Device Namespace - Device namespace has the attributes associated with the network device that originated therequest. Device namespace has four pre-defined attributes: Location, OS-Version, Device-Type and Device-Vendor.Custom attributes also appear in the attribute list if they are defined as custom tags for the device. Note that theseattributes can be used only if you have pre-populated the values for these attributes when a network device isconfigured in Policy Manager.
l LocalUser Namespace - LocalUser namespace has the attributes associated with the local user (resident in thePolicy Manager local user database) who authenticated in this session. As the name suggests, this namespace isonly applicable if a local user authenticated. LocalUser namespace has four pre-defined attributes: Phone, Email,Sponsor and Designation. Custom attributes also appear in the attribute list if they are defined as custom tags forthe local user. Note that these attributes can be used only if you have pre-populated the values for these attributeswhen a local user is configured in Policy Manager.
l GuestUser Namespace - GuestUser namespace has the attributes associated with the guest user (resident in thePolicy Manager guest user database) who authenticated in this session. As the name suggests, this namespace isonly applicable if a guest user authenticated. GuestUser namespace has six pre-defined attributes: Company-Name,Location, Phone, Email, Sponsor and Designation. Custom attributes also appear in the attribute list if they aredefined as custom tags for the guest user. Note that these attributes can be used only if you have pre-populated thevalues for these attributes when a guest user is configured in Policy Manager.
l Audit Namespace - Dictionaries in the audit namespace come pre-packaged with the product. Audit namespace hasthe notation Vendor:Audit, where Vendor is the name of the Company that has defined attributes in the dictionary.An example of a dictionary in the audit namespace is: Avenda Systems:Audit or Qualys:Audit.
n Audit namespace appears when editing post-audit rules. (See "Audit Servers" on page 181for more information.)
n Avenda Systems:Audit namespace appears when editing post-audit rules for NESSUS and NMAP audit servers.The attribute names and possible values with descriptions are shown in the table below:
Table 218: Audit Namespace Attributes
Attribute Name Values
Audit-Status AUDIT_SUCCESS, AUDIT_INPROGRESS or AUDIT_ERROR
Device-Type Type of device returned by an NMAP port scan
Output-Msgs The output message returned by Nessus plugin after a vulnerability scan
Network-Apps String representation of the open network ports (http, telnet, etc.)
Mac-Vendor Vendor associated with MAC address of the host
OS-Info OS information string returned by NMAP
Open-Ports The port numbers of open applications on the host
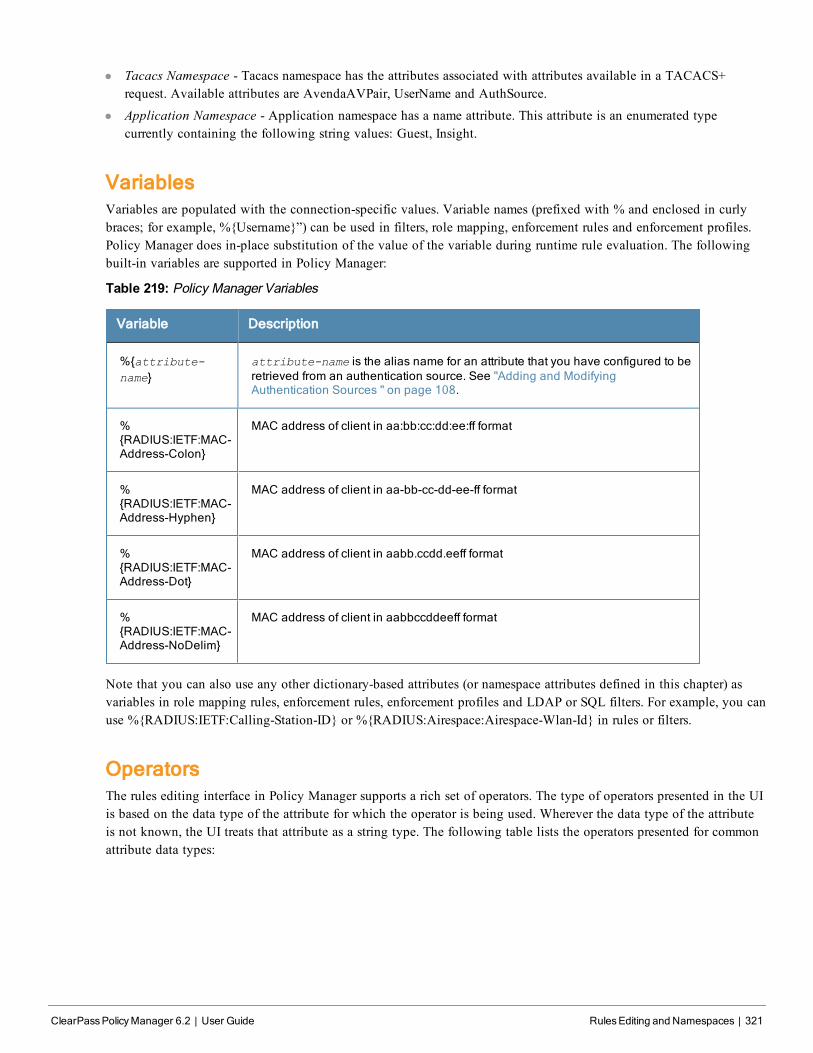
l Tacacs Namespace - Tacacs namespace has the attributes associated with attributes available in a TACACS+request. Available attributes are AvendaAVPair, UserName and AuthSource.
l Application Namespace - Application namespace has a name attribute. This attribute is an enumerated typecurrently containing the following string values: Guest, Insight.
VariablesVariables are populated with the connection-specific values. Variable names (prefixed with % and enclosed in curlybraces; for example, %{Username}”) can be used in filters, role mapping, enforcement rules and enforcement profiles.Policy Manager does in-place substitution of the value of the variable during runtime rule evaluation. The followingbuilt-in variables are supported in Policy Manager:
Table 219: Policy Manager Variables
Variable Description
%{attribute-name}
attribute-name is the alias name for an attribute that you have configured to beretrieved from an authentication source. See "Adding and ModifyingAuthentication Sources " on page 108.
%{RADIUS:IETF:MAC-Address-Colon}
MAC address of client in aa:bb:cc:dd:ee:ff format
%{RADIUS:IETF:MAC-Address-Hyphen}
MAC address of client in aa-bb-cc-dd-ee-ff format
%{RADIUS:IETF:MAC-Address-Dot}
MAC address of client in aabb.ccdd.eeff format
%{RADIUS:IETF:MAC-Address-NoDelim}
MAC address of client in aabbccddeeff format
Note that you can also use any other dictionary-based attributes (or namespace attributes defined in this chapter) asvariables in role mapping rules, enforcement rules, enforcement profiles and LDAP or SQL filters. For example, you canuse %{RADIUS:IETF:Calling-Station-ID} or %{RADIUS:Airespace:Airespace-Wlan-Id} in rules or filters.
OperatorsThe rules editing interface in Policy Manager supports a rich set of operators. The type of operators presented in the UIis based on the data type of the attribute for which the operator is being used. Wherever the data type of the attributeis not known, the UI treats that attribute as a string type. The following table lists the operators presented for commonattribute data types:
ClearPassPolicyManager 6.2 | User Guide RulesEditing and Namespaces | 321
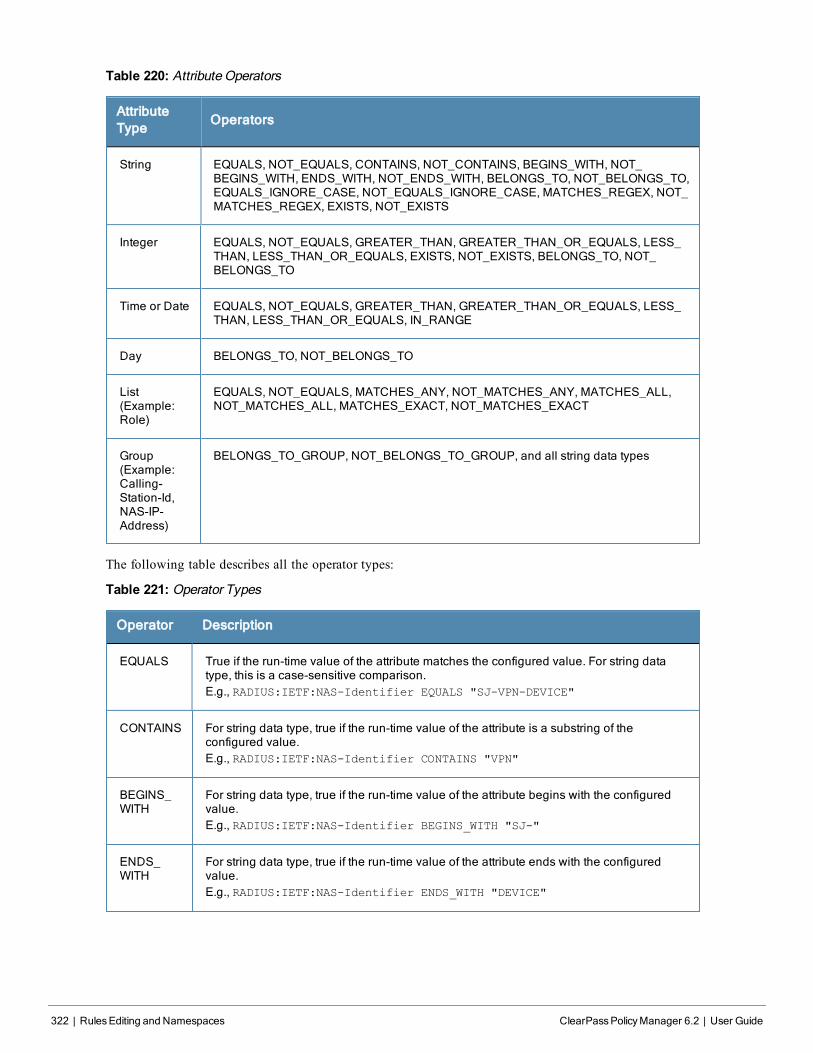
322 | RulesEditing and Namespaces ClearPassPolicyManager 6.2 | User Guide
Table 220: Attribute Operators
AttributeType
Operators
String EQUALS, NOT_EQUALS, CONTAINS, NOT_CONTAINS, BEGINS_WITH, NOT_BEGINS_WITH, ENDS_WITH, NOT_ENDS_WITH, BELONGS_TO, NOT_BELONGS_TO,EQUALS_IGNORE_CASE, NOT_EQUALS_IGNORE_CASE, MATCHES_REGEX, NOT_MATCHES_REGEX, EXISTS, NOT_EXISTS
Integer EQUALS, NOT_EQUALS, GREATER_THAN, GREATER_THAN_OR_EQUALS, LESS_THAN, LESS_THAN_OR_EQUALS, EXISTS, NOT_EXISTS, BELONGS_TO, NOT_BELONGS_TO
Time or Date EQUALS, NOT_EQUALS, GREATER_THAN, GREATER_THAN_OR_EQUALS, LESS_THAN, LESS_THAN_OR_EQUALS, IN_RANGE
Day BELONGS_TO, NOT_BELONGS_TO
List(Example:Role)
EQUALS, NOT_EQUALS, MATCHES_ANY, NOT_MATCHES_ANY, MATCHES_ALL,NOT_MATCHES_ALL, MATCHES_EXACT, NOT_MATCHES_EXACT
Group(Example:Calling-Station-Id,NAS-IP-Address)
BELONGS_TO_GROUP, NOT_BELONGS_TO_GROUP, and all string data types
The following table describes all the operator types:
Table 221: Operator Types
Operator Description
EQUALS True if the run-time value of the attribute matches the configured value. For string datatype, this is a case-sensitive comparison.E.g., RADIUS:IETF:NAS-Identifier EQUALS "SJ-VPN-DEVICE"
CONTAINS For string data type, true if the run-time value of the attribute is a substring of theconfigured value.E.g., RADIUS:IETF:NAS-Identifier CONTAINS "VPN"
BEGINS_WITH
For string data type, true if the run-time value of the attribute begins with the configuredvalue.E.g., RADIUS:IETF:NAS-Identifier BEGINS_WITH "SJ-"
ENDS_WITH
For string data type, true if the run-time value of the attribute ends with the configuredvalue.E.g., RADIUS:IETF:NAS-Identifier ENDS_WITH "DEVICE"
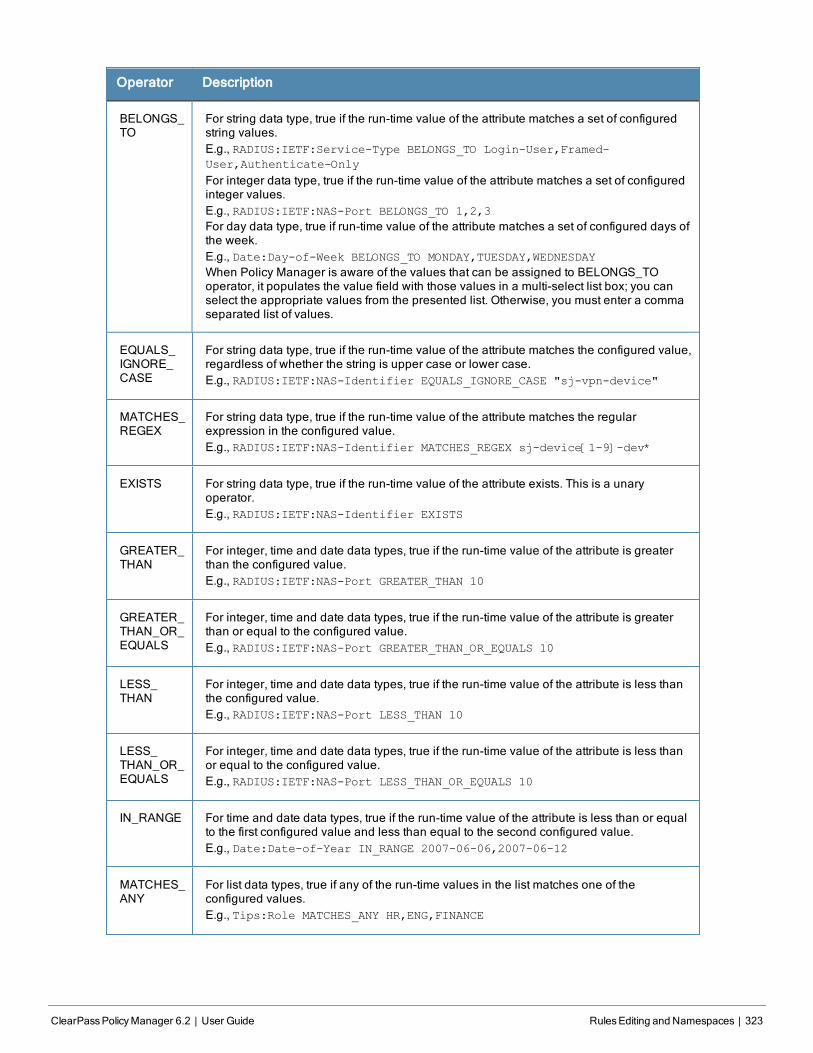
Operator Description
BELONGS_TO
For string data type, true if the run-time value of the attribute matches a set of configuredstring values.E.g., RADIUS:IETF:Service-Type BELONGS_TO Login-User,Framed-
User,Authenticate-Only
For integer data type, true if the run-time value of the attribute matches a set of configuredinteger values.E.g., RADIUS:IETF:NAS-Port BELONGS_TO 1,2,3
For day data type, true if run-time value of the attribute matches a set of configured days ofthe week.E.g., Date:Day-of-Week BELONGS_TO MONDAY,TUESDAY,WEDNESDAY
When Policy Manager is aware of the values that can be assigned to BELONGS_TOoperator, it populates the value field with those values in a multi-select list box; you canselect the appropriate values from the presented list. Otherwise, you must enter a commaseparated list of values.
EQUALS_IGNORE_CASE
For string data type, true if the run-time value of the attribute matches the configured value,regardless of whether the string is upper case or lower case.E.g., RADIUS:IETF:NAS-Identifier EQUALS_IGNORE_CASE "sj-vpn-device"
MATCHES_REGEX
For string data type, true if the run-time value of the attribute matches the regularexpression in the configured value.E.g., RADIUS:IETF:NAS-Identifier MATCHES_REGEX sj-device[1-9]-dev*
EXISTS For string data type, true if the run-time value of the attribute exists. This is a unaryoperator.E.g., RADIUS:IETF:NAS-Identifier EXISTS
GREATER_THAN
For integer, time and date data types, true if the run-time value of the attribute is greaterthan the configured value.E.g., RADIUS:IETF:NAS-Port GREATER_THAN 10
GREATER_THAN_OR_EQUALS
For integer, time and date data types, true if the run-time value of the attribute is greaterthan or equal to the configured value.E.g., RADIUS:IETF:NAS-Port GREATER_THAN_OR_EQUALS 10
LESS_THAN
For integer, time and date data types, true if the run-time value of the attribute is less thanthe configured value.E.g., RADIUS:IETF:NAS-Port LESS_THAN 10
LESS_THAN_OR_EQUALS
For integer, time and date data types, true if the run-time value of the attribute is less thanor equal to the configured value.E.g., RADIUS:IETF:NAS-Port LESS_THAN_OR_EQUALS 10
IN_RANGE For time and date data types, true if the run-time value of the attribute is less than or equalto the first configured value and less than equal to the second configured value.E.g., Date:Date-of-Year IN_RANGE 2007-06-06,2007-06-12
MATCHES_ANY
For list data types, true if any of the run-time values in the list matches one of theconfigured values.E.g., Tips:Role MATCHES_ANY HR,ENG,FINANCE
ClearPassPolicyManager 6.2 | User Guide RulesEditing and Namespaces | 323
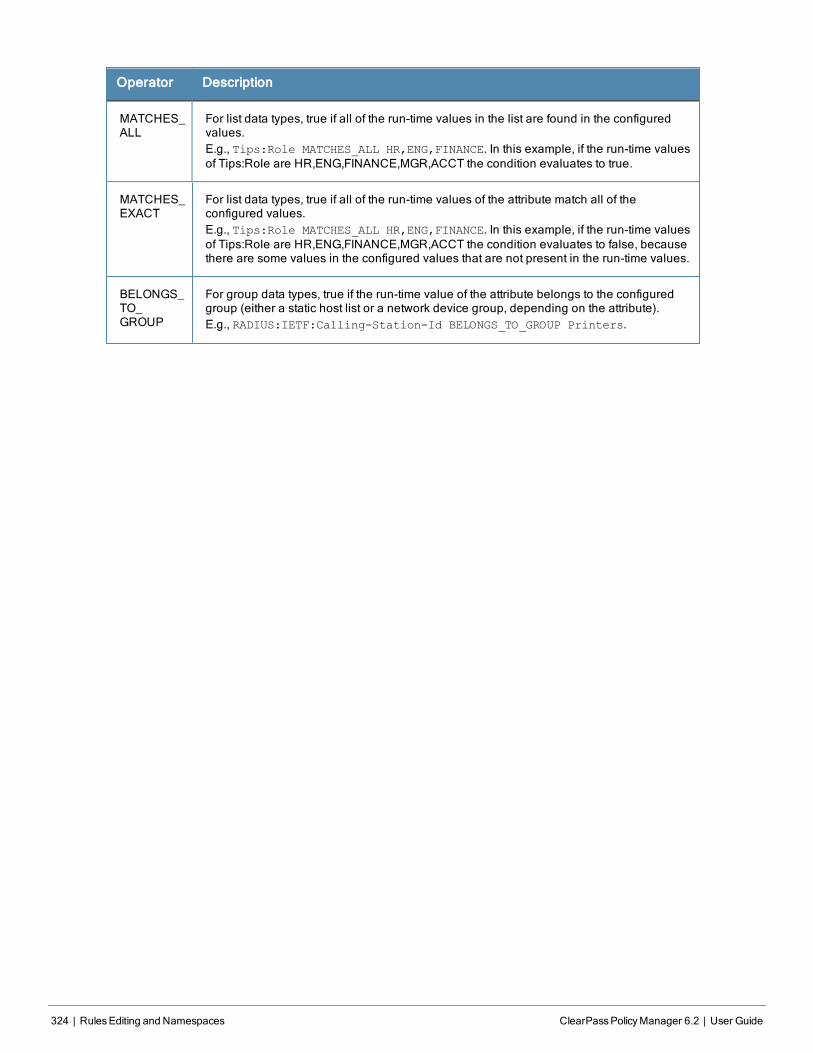
324 | RulesEditing and Namespaces ClearPassPolicyManager 6.2 | User Guide
Operator Description
MATCHES_ALL
For list data types, true if all of the run-time values in the list are found in the configuredvalues.E.g., Tips:Role MATCHES_ALL HR,ENG,FINANCE. In this example, if the run-time valuesof Tips:Role are HR,ENG,FINANCE,MGR,ACCT the condition evaluates to true.
MATCHES_EXACT
For list data types, true if all of the run-time values of the attribute match all of theconfigured values.E.g., Tips:Role MATCHES_ALL HR,ENG,FINANCE. In this example, if the run-time valuesof Tips:Role are HR,ENG,FINANCE,MGR,ACCT the condition evaluates to false, becausethere are some values in the configured values that are not present in the run-time values.
BELONGS_TO_GROUP
For group data types, true if the run-time value of the attribute belongs to the configuredgroup (either a static host list or a network device group, depending on the attribute).E.g., RADIUS:IETF:Calling-Station-Id BELONGS_TO_GROUP Printers.
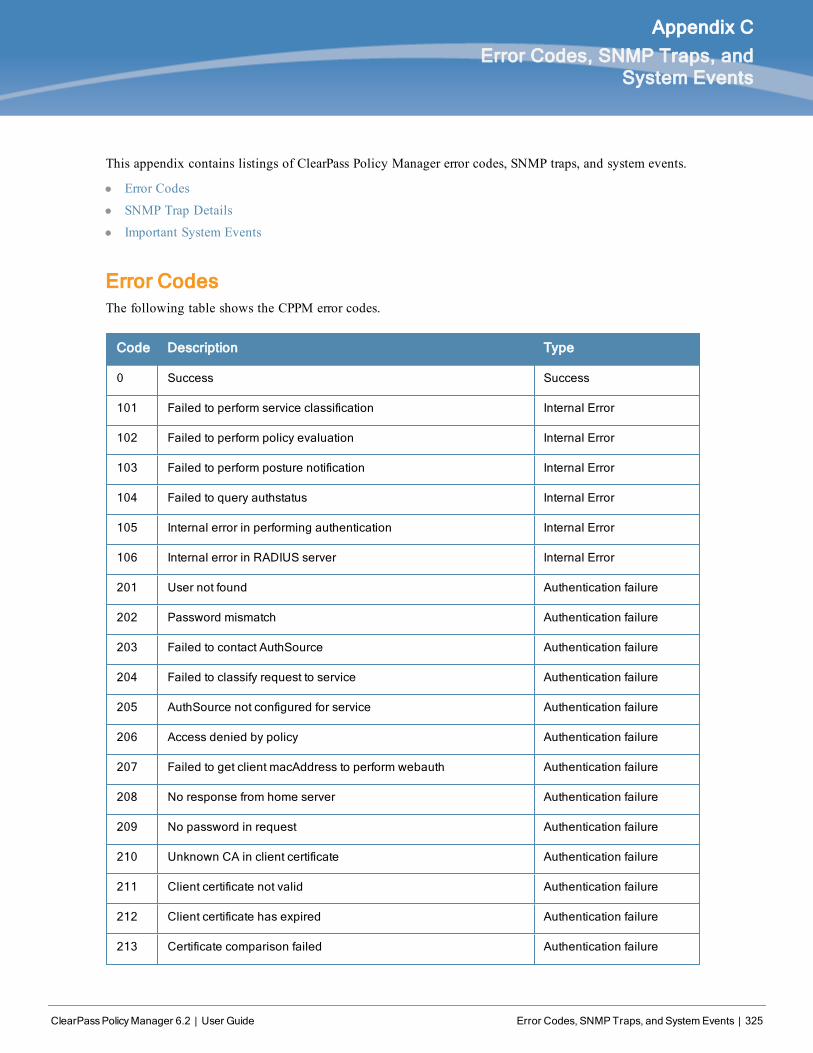
ClearPassPolicyManager 6.2 | User Guide Error Codes, SNMPTraps, and SystemEvents | 325
Appendix C
Error Codes, SNMP Traps, andSystem Events
This appendix contains listings of ClearPass Policy Manager error codes, SNMP traps, and system events.
l Error Codes
l SNMP Trap Details
l Important System Events
Error CodesThe following table shows the CPPM error codes.
Code Description Type
0 Success Success
101 Failed to perform service classification Internal Error
102 Failed to perform policy evaluation Internal Error
103 Failed to perform posture notification Internal Error
104 Failed to query authstatus Internal Error
105 Internal error in performing authentication Internal Error
106 Internal error in RADIUS server Internal Error
201 User not found Authentication failure
202 Password mismatch Authentication failure
203 Failed to contact AuthSource Authentication failure
204 Failed to classify request to service Authentication failure
205 AuthSource not configured for service Authentication failure
206 Access denied by policy Authentication failure
207 Failed to get client macAddress to perform webauth Authentication failure
208 No response from home server Authentication failure
209 No password in request Authentication failure
210 Unknown CA in client certificate Authentication failure
211 Client certificate not valid Authentication failure
212 Client certificate has expired Authentication failure
213 Certificate comparison failed Authentication failure
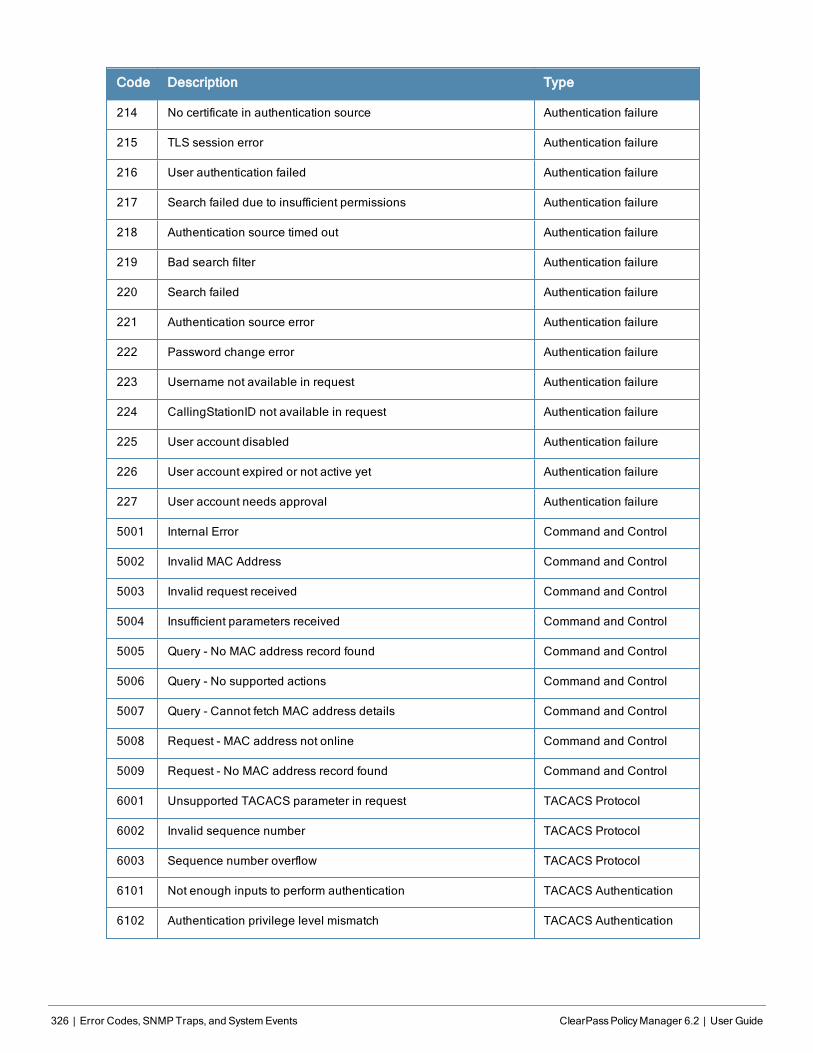
326 | Error Codes, SNMPTraps, and SystemEvents ClearPassPolicyManager 6.2 | User Guide
Code Description Type
214 No certificate in authentication source Authentication failure
215 TLS session error Authentication failure
216 User authentication failed Authentication failure
217 Search failed due to insufficient permissions Authentication failure
218 Authentication source timed out Authentication failure
219 Bad search filter Authentication failure
220 Search failed Authentication failure
221 Authentication source error Authentication failure
222 Password change error Authentication failure
223 Username not available in request Authentication failure
224 CallingStationID not available in request Authentication failure
225 User account disabled Authentication failure
226 User account expired or not active yet Authentication failure
227 User account needs approval Authentication failure
5001 Internal Error Command and Control
5002 Invalid MAC Address Command and Control
5003 Invalid request received Command and Control
5004 Insufficient parameters received Command and Control
5005 Query - No MAC address record found Command and Control
5006 Query - No supported actions Command and Control
5007 Query - Cannot fetch MAC address details Command and Control
5008 Request - MAC address not online Command and Control
5009 Request - No MAC address record found Command and Control
6001 Unsupported TACACS parameter in request TACACS Protocol
6002 Invalid sequence number TACACS Protocol
6003 Sequence number overflow TACACS Protocol
6101 Not enough inputs to perform authentication TACACS Authentication
6102 Authentication privilege level mismatch TACACS Authentication
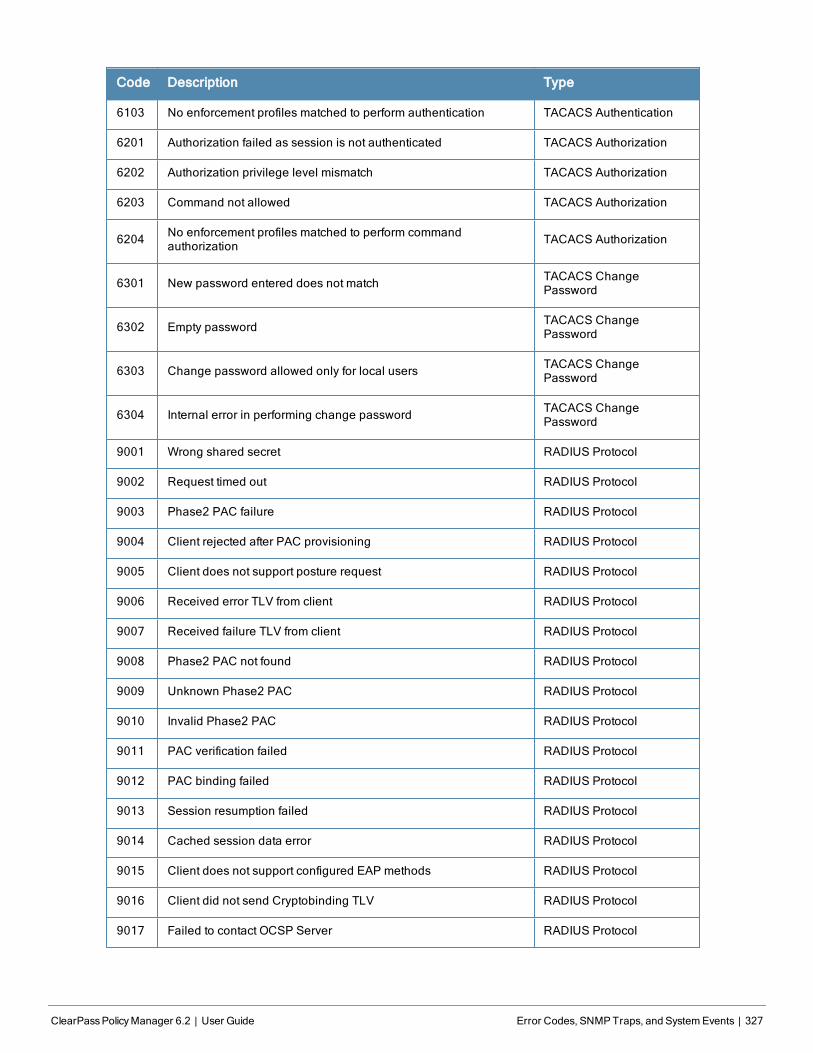
Code Description Type
6103 No enforcement profiles matched to perform authentication TACACS Authentication
6201 Authorization failed as session is not authenticated TACACS Authorization
6202 Authorization privilege level mismatch TACACS Authorization
6203 Command not allowed TACACS Authorization
6204 No enforcement profiles matched to perform commandauthorization TACACS Authorization
6301 New password entered does not match TACACS ChangePassword
6302 Empty password TACACS ChangePassword
6303 Change password allowed only for local users TACACS ChangePassword
6304 Internal error in performing change password TACACS ChangePassword
9001 Wrong shared secret RADIUS Protocol
9002 Request timed out RADIUS Protocol
9003 Phase2 PAC failure RADIUS Protocol
9004 Client rejected after PAC provisioning RADIUS Protocol
9005 Client does not support posture request RADIUS Protocol
9006 Received error TLV from client RADIUS Protocol
9007 Received failure TLV from client RADIUS Protocol
9008 Phase2 PAC not found RADIUS Protocol
9009 Unknown Phase2 PAC RADIUS Protocol
9010 Invalid Phase2 PAC RADIUS Protocol
9011 PAC verification failed RADIUS Protocol
9012 PAC binding failed RADIUS Protocol
9013 Session resumption failed RADIUS Protocol
9014 Cached session data error RADIUS Protocol
9015 Client does not support configured EAP methods RADIUS Protocol
9016 Client did not send Cryptobinding TLV RADIUS Protocol
9017 Failed to contact OCSP Server RADIUS Protocol
ClearPassPolicyManager 6.2 | User Guide Error Codes, SNMPTraps, and SystemEvents | 327
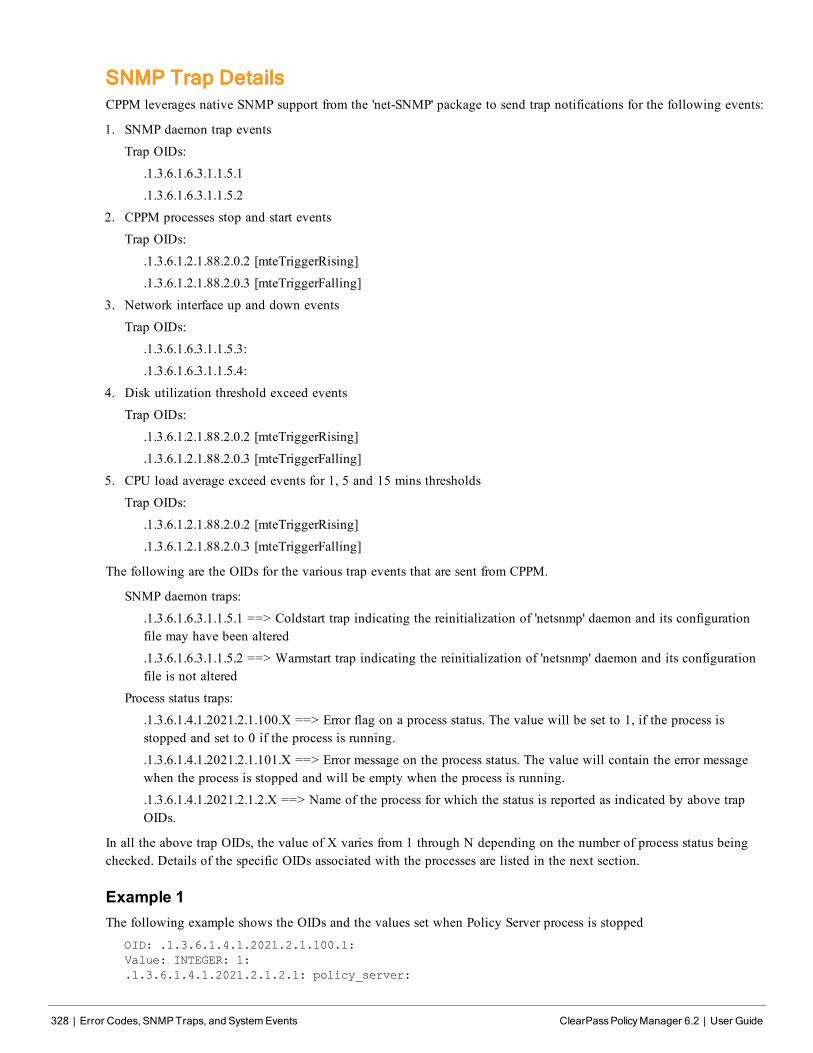
328 | Error Codes, SNMPTraps, and SystemEvents ClearPassPolicyManager 6.2 | User Guide
SNMP Trap DetailsCPPM leverages native SNMP support from the 'net-SNMP' package to send trap notifications for the following events:
1. SNMP daemon trap events
Trap OIDs:
.1.3.6.1.6.3.1.1.5.1
.1.3.6.1.6.3.1.1.5.2
2. CPPM processes stop and start events
Trap OIDs:
.1.3.6.1.2.1.88.2.0.2 [mteTriggerRising]
.1.3.6.1.2.1.88.2.0.3 [mteTriggerFalling]
3. Network interface up and down events
Trap OIDs:
.1.3.6.1.6.3.1.1.5.3:
.1.3.6.1.6.3.1.1.5.4:
4. Disk utilization threshold exceed events
Trap OIDs:
.1.3.6.1.2.1.88.2.0.2 [mteTriggerRising]
.1.3.6.1.2.1.88.2.0.3 [mteTriggerFalling]
5. CPU load average exceed events for 1, 5 and 15 mins thresholds
Trap OIDs:
.1.3.6.1.2.1.88.2.0.2 [mteTriggerRising]
.1.3.6.1.2.1.88.2.0.3 [mteTriggerFalling]
The following are the OIDs for the various trap events that are sent from CPPM.
SNMP daemon traps:
.1.3.6.1.6.3.1.1.5.1 ==> Coldstart trap indicating the reinitialization of 'netsnmp' daemon and its configurationfile may have been altered
.1.3.6.1.6.3.1.1.5.2 ==> Warmstart trap indicating the reinitialization of 'netsnmp' daemon and its configurationfile is not altered
Process status traps:
.1.3.6.1.4.1.2021.2.1.100.X ==> Error flag on a process status. The value will be set to 1, if the process isstopped and set to 0 if the process is running.
.1.3.6.1.4.1.2021.2.1.101.X ==> Error message on the process status. The value will contain the error messagewhen the process is stopped and will be empty when the process is running.
.1.3.6.1.4.1.2021.2.1.2.X ==> Name of the process for which the status is reported as indicated by above trapOIDs.
In all the above trap OIDs, the value of X varies from 1 through N depending on the number of process status beingchecked. Details of the specific OIDs associated with the processes are listed in the next section.
Example 1The following example shows the OIDs and the values set when Policy Server process is stopped
OID: .1.3.6.1.4.1.2021.2.1.100.1:
Value: INTEGER: 1:
.1.3.6.1.4.1.2021.2.1.2.1: policy_server:
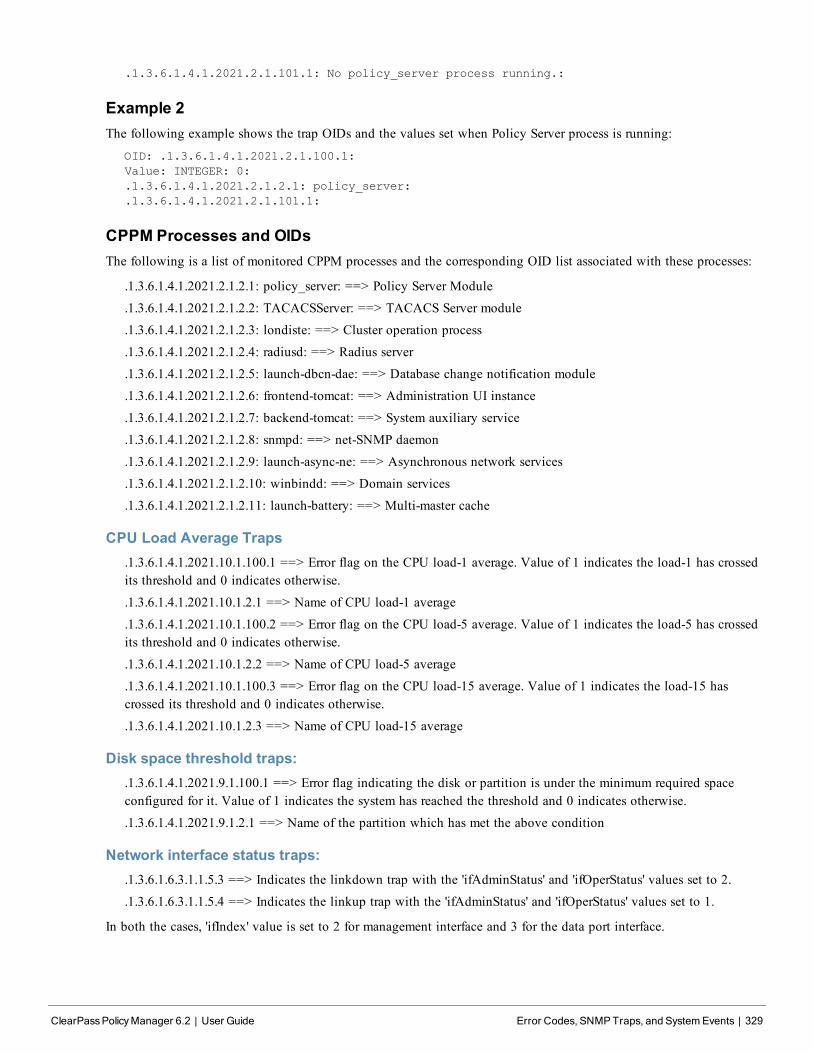
.1.3.6.1.4.1.2021.2.1.101.1: No policy_server process running.:
Example 2The following example shows the trap OIDs and the values set when Policy Server process is running:
OID: .1.3.6.1.4.1.2021.2.1.100.1:
Value: INTEGER: 0:
.1.3.6.1.4.1.2021.2.1.2.1: policy_server:
.1.3.6.1.4.1.2021.2.1.101.1:
CPPM Processes and OIDsThe following is a list of monitored CPPM processes and the corresponding OID list associated with these processes:
.1.3.6.1.4.1.2021.2.1.2.1: policy_server: ==> Policy Server Module
.1.3.6.1.4.1.2021.2.1.2.2: TACACSServer: ==> TACACS Server module
.1.3.6.1.4.1.2021.2.1.2.3: londiste: ==> Cluster operation process
.1.3.6.1.4.1.2021.2.1.2.4: radiusd: ==> Radius server
.1.3.6.1.4.1.2021.2.1.2.5: launch-dbcn-dae: ==> Database change notification module
.1.3.6.1.4.1.2021.2.1.2.6: frontend-tomcat: ==> Administration UI instance
.1.3.6.1.4.1.2021.2.1.2.7: backend-tomcat: ==> System auxiliary service
.1.3.6.1.4.1.2021.2.1.2.8: snmpd: ==> net-SNMP daemon
.1.3.6.1.4.1.2021.2.1.2.9: launch-async-ne: ==> Asynchronous network services
.1.3.6.1.4.1.2021.2.1.2.10: winbindd: ==> Domain services
.1.3.6.1.4.1.2021.2.1.2.11: launch-battery: ==> Multi-master cache
CPU Load Average Traps.1.3.6.1.4.1.2021.10.1.100.1 ==> Error flag on the CPU load-1 average. Value of 1 indicates the load-1 has crossedits threshold and 0 indicates otherwise.
.1.3.6.1.4.1.2021.10.1.2.1 ==> Name of CPU load-1 average
.1.3.6.1.4.1.2021.10.1.100.2 ==> Error flag on the CPU load-5 average. Value of 1 indicates the load-5 has crossedits threshold and 0 indicates otherwise.
.1.3.6.1.4.1.2021.10.1.2.2 ==> Name of CPU load-5 average
.1.3.6.1.4.1.2021.10.1.100.3 ==> Error flag on the CPU load-15 average. Value of 1 indicates the load-15 hascrossed its threshold and 0 indicates otherwise.
.1.3.6.1.4.1.2021.10.1.2.3 ==> Name of CPU load-15 average
Disk space threshold traps:.1.3.6.1.4.1.2021.9.1.100.1 ==> Error flag indicating the disk or partition is under the minimum required spaceconfigured for it. Value of 1 indicates the system has reached the threshold and 0 indicates otherwise.
.1.3.6.1.4.1.2021.9.1.2.1 ==> Name of the partition which has met the above condition
Network interface status traps:.1.3.6.1.6.3.1.1.5.3 ==> Indicates the linkdown trap with the 'ifAdminStatus' and 'ifOperStatus' values set to 2.
.1.3.6.1.6.3.1.1.5.4 ==> Indicates the linkup trap with the 'ifAdminStatus' and 'ifOperStatus' values set to 1.
In both the cases, 'ifIndex' value is set to 2 for management interface and 3 for the data port interface.
ClearPassPolicyManager 6.2 | User Guide Error Codes, SNMPTraps, and SystemEvents | 329
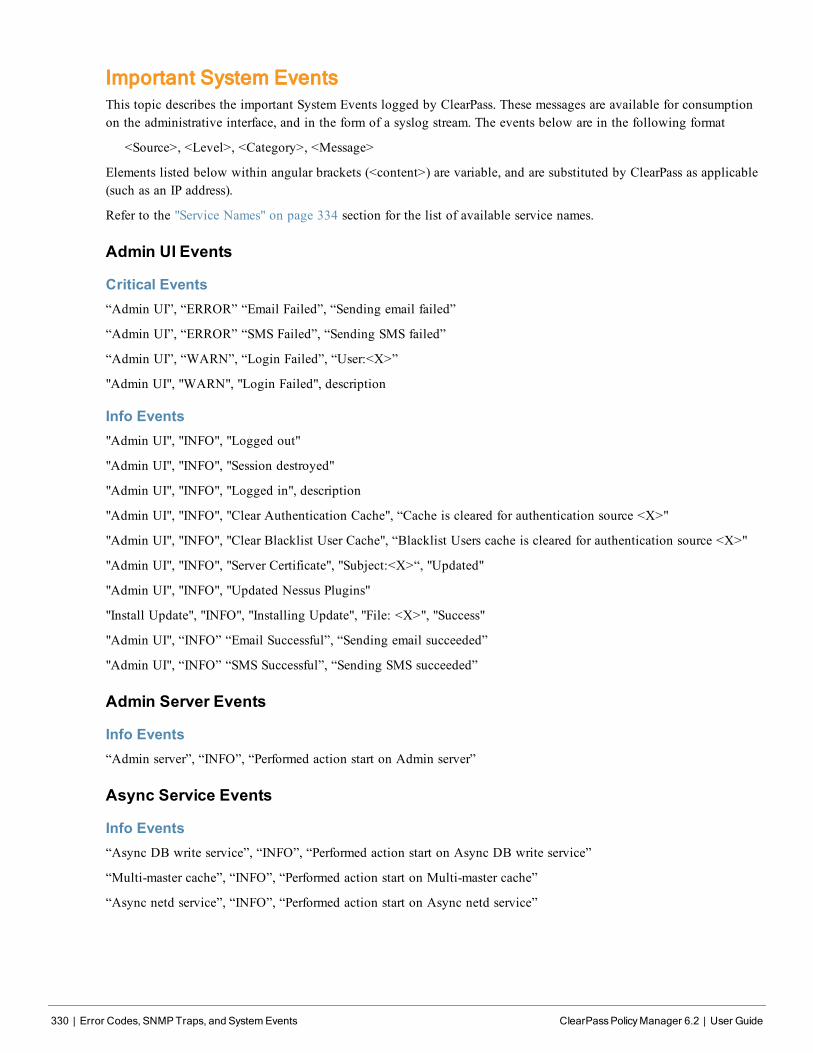
330 | Error Codes, SNMPTraps, and SystemEvents ClearPassPolicyManager 6.2 | User Guide
Important System EventsThis topic describes the important System Events logged by ClearPass. These messages are available for consumptionon the administrative interface, and in the form of a syslog stream. The events below are in the following format
<Source>, <Level>, <Category>, <Message>
Elements listed below within angular brackets (<content>) are variable, and are substituted by ClearPass as applicable(such as an IP address).
Refer to the "Service Names" on page 334 section for the list of available service names.
Admin UI Events
Critical Events“Admin UI”, “ERROR” “Email Failed”, “Sending email failed”
“Admin UI”, “ERROR” “SMS Failed”, “Sending SMS failed”
“Admin UI”, “WARN”, “Login Failed”, “User:<X>”
"Admin UI", "WARN", "Login Failed", description
Info Events"Admin UI", "INFO", "Logged out"
"Admin UI", "INFO", "Session destroyed"
"Admin UI", "INFO", "Logged in", description
"Admin UI", "INFO", "Clear Authentication Cache", “Cache is cleared for authentication source <X>"
"Admin UI", "INFO", "Clear Blacklist User Cache", “Blacklist Users cache is cleared for authentication source <X>"
"Admin UI", "INFO", "Server Certificate", "Subject:<X>“, "Updated"
"Admin UI", "INFO", "Updated Nessus Plugins"
"Install Update", "INFO", "Installing Update", "File: <X>", "Success"
"Admin UI", “INFO” “Email Successful”, “Sending email succeeded”
"Admin UI", “INFO” “SMS Successful”, “Sending SMS succeeded”
Admin Server Events
Info Events“Admin server”, “INFO”, “Performed action start on Admin server”
Async Service Events
Info Events“Async DB write service”, “INFO”, “Performed action start on Async DB write service”
“Multi-master cache”, “INFO”, “Performed action start on Multi-master cache”
“Async netd service”, “INFO”, “Performed action start on Async netd service”

ClearPass/Domain Controller Events
Critical Events“netleave”, “ERROR”, “Failed to remove <HOSTNAME> from the domain <DOMAIN_NAME>”
“netjoin”, “WARN”, “configuration”, “<HOSTNAME> failed to join the domain <DOMAIN NAME> with domaincontroller as <DOMAIN CONTROLLER>”
Info Events“Netjoin”, “INFO”, "<HOSTNAME> joined the domain <REALM>"
“Netjoin”, “INFO”, “<HOSTNAME> removed from the domain <DOMAIN_NAME>“
ClearPass System Configuration Events
Critical Events“DNS”, “ERROR”, “Failed configure DNS servers = <X>”
“datetime”, “ERROR”, “Failed to change system datetime.”
“hostname”, “ERROR”, “Setting hostname to <X> failed”
“ipaddress”, “ERROR”, “Testing cluster node connectivity failed”
“System TimeCheck “, “ WARN ,” , “Restarting CPPM services as the system detected time drift , Current systemtime= 2013-07-27 17:00:01, System time 5 mins back = 2013-01-25 16:55:01”
Info Events“Cluster”, “INFO”, “Setup”, “Database initialized”
“hostname”, “INFO”, “configuration”, “Hostname set to <X>”
“ipaddress”, “INFO”, “configuration”, Management port information updated to - IpAddress = <X>, Netmask = <X>,Gateway = <X>”
“IpAddress”, “INFO”, "Data port information updated to - IpAddress = <X>, Netmask = <Y>, Gateway = <Z>"
“DNS”, “INFO”, “configuration”, “Successfully configured DNS servers - <X>”
“Time Config”, “INFO”, “Remote Time Server”, “Old List: <X>\nNew List: <Y>”
“timezone”, “INFO”, “configuration”, “”
“datetime”, “INFO”, “configuration”, “Successfully changed system datetime.\nOld time was <X>”
ClearPass Update Events
Critical Events“Install Update”, “ERROR”, “Installing Update”, “File: <X>”, “Failed with exit status - <Y>”
“ClearPass Firmware Update Checker”, “ERROR”, “Firmware Update Checker”, “No subscription ID was supplied. Tofind new plugins, you must provide your subscription ID in the application configuration”
Info Events“ClearPass Updater”, “INFO”, “Hotfixes Updates”, “Updated Hotfixes from File”
“ClearPass Updater”, “INFO”, “Fingerprints Updates”, “Updated fingerprints from File”
“ClearPass Updater”, “INFO”, “Updated AV/AS from ClearPass Portal (Online)”
ClearPassPolicyManager 6.2 | User Guide Error Codes, SNMPTraps, and SystemEvents | 331
332 | Error Codes, SNMPTraps, and SystemEvents ClearPassPolicyManager 6.2 | User Guide
“ClearPass Updater”, “INFO”,” Updated Hotfixes from ClearPass Portal (Online)”
Cluster Events
Critical Events“Cluster”, “ERROR”, “SetupSubscriber”, “Failed to add subscriber node with management IP=<IP>“
Info Events"AddNode", “INFO”, "Added subscriber node with management IP=<IP>"
"DropNode", “INFO”, "Dropping node with management IP=<IP>, hostname=<Hostname>"
Command Line Events
Info Events"Command Line”, “INFO”, “User:appadmin"
DB Replication Services Events
Info Events"DB replication service”, “INFO”, “Performed action start on DB replication service”
"DB replication service”, “INFO”, “Performed action stop on DB replication service”
“DB change notification server”, “INFO”, “Performed action start on DB change notification server”
“DB replication service”, “INFO”, “Performed action start on DB replication service”
Licensing Events
Critical Events“Admin UI”, “WARN”, “Activation Failed”, “Action Status: This Activation Request Token is already in use byanother instance\nProduct Name: Policy Manager\nLicense Type: <X>\nUser Count: <Y>”
Info Events“Admin UI”, “INFO”, “Add License”, “Product Name: Policy Manager\nLicense Type: <X>\nUser Count: <Y>”
Policy Server Events
Info Events“Policy Server”, “INFO”, “Performed action start on Policy server”
“Policy Server”, “INFO”, “Performed action stop on Policy server”
RADIUS/TACACS+ Server Events
Critical Events“TACACSServer”, “ERROR”, “Request”, “Nad Ip=<X> not configured”
“RADIUS”, “WARN”, “Authentication”, “Ignoring request from unknown client <IP>:<PORT>”
“RADIUS”, “ERROR”, “Authentication”, “Received packet from <IP> with invalid Message-Authenticator! (Sharedsecret is incorrect.)”
“RADIUS”, “ERROR”, “Received Accounting-Response packet from client <IP Address> port 1813 with invalidsignature (err=2)! (Shared secret is incorrect.)”
“RADIUS”, “ERROR”, “Received Access-Accept packet from client <IP Address> port 1812 with invalid signature(err=2)! (Shared secret is incorrect.)”
Info Events“RADIUS”, “INFO”, “Performed action start on Radius server”
“RADIUS”, “INFO”, “Performed action restart on Radius server
“TACACS server”, “INFO”, “Performed action start on TACACS server”
“TACACS server”, “INFO”, “Performed action stop on TACACS server”
SNMP Events
Critical Events“SNMPService”, “ERROR”, “ReadDeviceInfo”, “SNMP GET failed for device <X> with error=No responsereceived\nReading sysObjectId failed for device=<X>\nReading switch initialization info failed for <X>”
"SNMPService","ERROR", "Error fetching table snmpTargetAddr. Request timed out. Error reading SNMP target tablefor NAD=10.1.1.1 Maybe SNMP target address table is not supported by device? Allow NAD update. SNMP GETfailed for device 10.1.1.1 with error=No response received Reading sysObjectId failed for device=10.1.1.1 Readingswitch initialization info failed for 10.1.1.1”
Info Events“SNMPService”, “INFO”, “Device information not read for <Ip Address> since no traps are configured to this node”
Support Shell Events
Info Events“Support Shell” , “INFO”, “User:arubasupport”
System Auxiliary Service Events
Info Events“System auxiliary service”, “INFO”, “Performed action start on System auxiliary service”
System Monitor Events
Critical Events“Sysmon”, “ERROR”, “System”, “System is running with low memory. Available memory = <X>%”
“Sysmon”, “ERROR”, “System”, “System is running with low disk space. Available disk space = <X>%”
“System TimeCheck”, “WARN”, “Restart Services”, “Restarting CPPM services as the system detected time drift.Current system time= <X>, System time 5 mins back = <Y>”
Info Events“<Service Name>”, “INFO”, “restart”, “Performed action restart on <Service Name>”
“SYSTEM”, “INFO”, “<X> restarted”, “System monitor restarted <X>, as it seemed to have stopped abruptly”
"SYSTEM", "ERROR", "Updating CRLs failed", "Could not retrieve CRL from <URL>."
ClearPassPolicyManager 6.2 | User Guide Error Codes, SNMPTraps, and SystemEvents | 333
334 | Error Codes, SNMPTraps, and SystemEvents ClearPassPolicyManager 6.2 | User Guide
“System monitor service”, “INFO”, “Performed action start on System monitor service”
"Shutdown” “INFO” system "System is shutting down" Success
Service Namesl AirGroup notification service
l Async DB write service
l Async network services
l DB change notification server
l DB replication service
l Micros Fidelio FIAS
l Multi-master cache
l Policy server
l RADIUS server
l System auxiliary services
l System monitor service
l TACACS server
l Virtual IP service
l [YOURSERVERNAME] Domain service
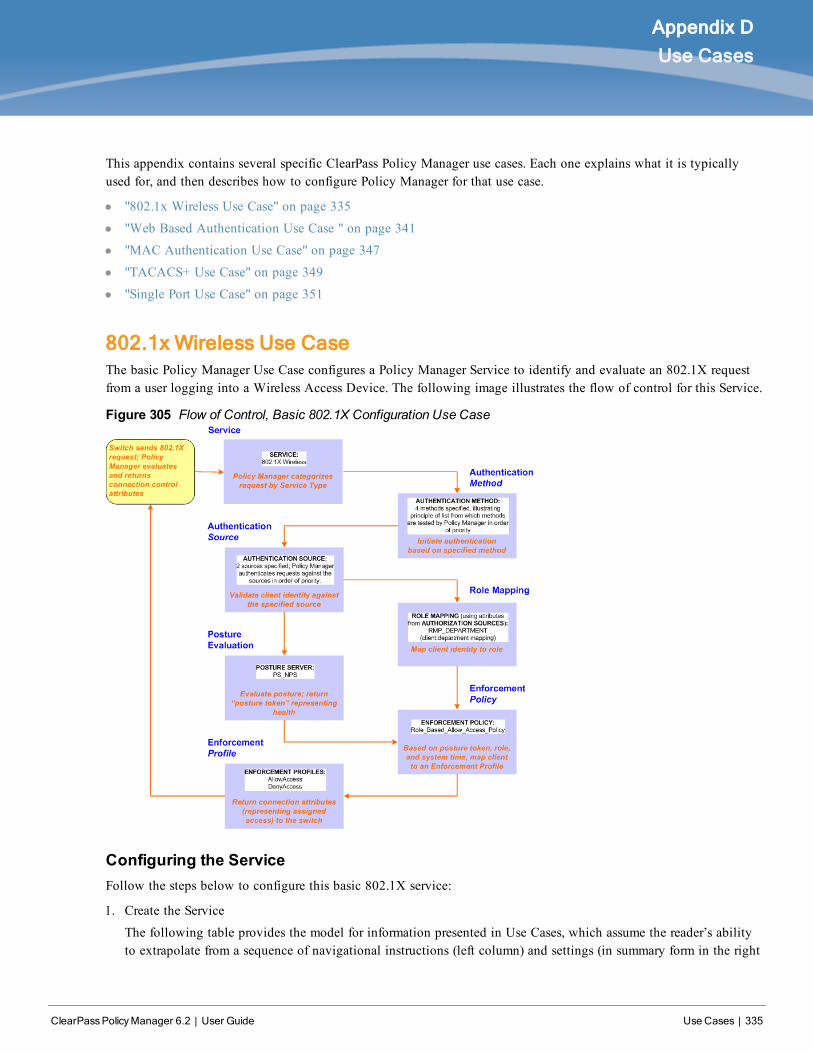
ClearPassPolicyManager 6.2 | User Guide Use Cases | 335
Appendix D
Use Cases
This appendix contains several specific ClearPass Policy Manager use cases. Each one explains what it is typicallyused for, and then describes how to configure Policy Manager for that use case.
l "802.1x Wireless Use Case" on page 335
l "Web Based Authentication Use Case " on page 341
l "MAC Authentication Use Case" on page 347
l "TACACS+ Use Case" on page 349
l "Single Port Use Case" on page 351
802.1x Wireless Use CaseThe basic Policy Manager Use Case configures a Policy Manager Service to identify and evaluate an 802.1X requestfrom a user logging into a Wireless Access Device. The following image illustrates the flow of control for this Service.
Figure 305 Flow of Control, Basic 802.1X Configuration Use Case
Configuring the ServiceFollow the steps below to configure this basic 802.1X service:
1. Create the Service
The following table provides the model for information presented in Use Cases, which assume the reader’s abilityto extrapolate from a sequence of navigational instructions (left column) and settings (in summary form in the right
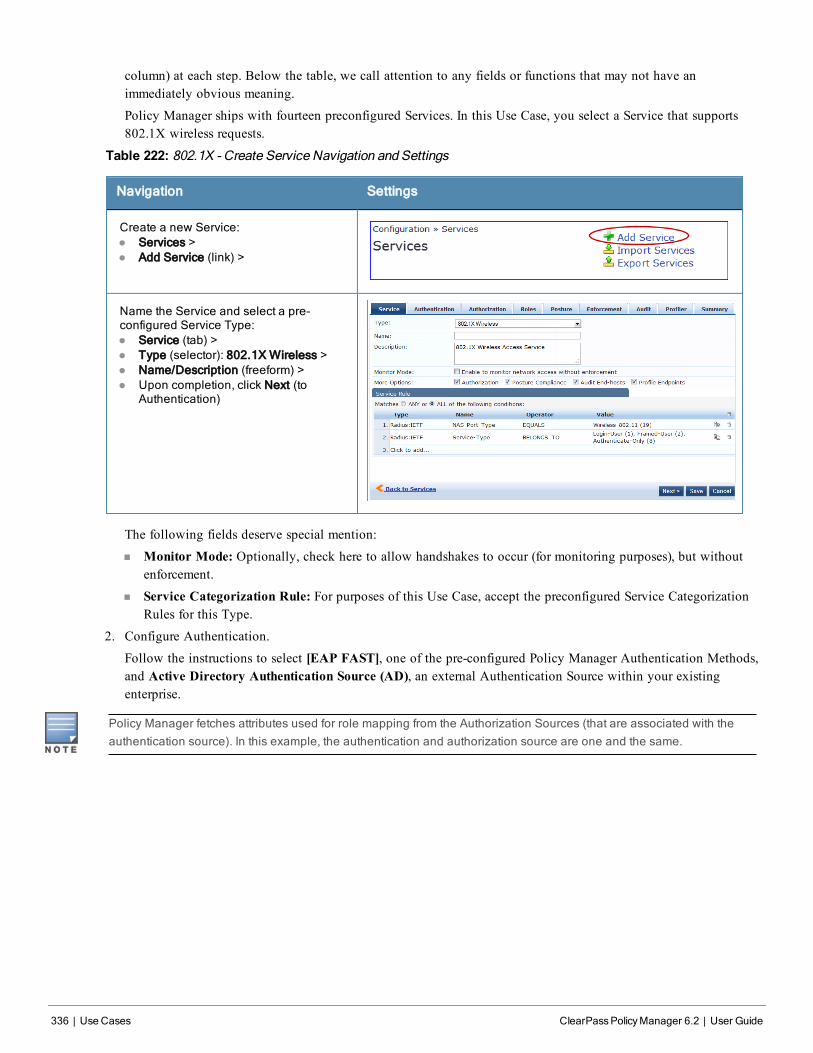
336 | Use Cases ClearPassPolicyManager 6.2 | User Guide
column) at each step. Below the table, we call attention to any fields or functions that may not have animmediately obvious meaning.
Policy Manager ships with fourteen preconfigured Services. In this Use Case, you select a Service that supports802.1X wireless requests.
Table 222: 802.1X - Create Service Navigation and Settings
Navigation Settings
Create a new Service:l Services >l Add Service (link) >
Name the Service and select a pre-configured Service Type:l Service (tab) >l Type (selector): 802.1X Wireless >l Name/Description (freeform) >l Upon completion, click Next (to
Authentication)
The following fields deserve special mention:
n Monitor Mode: Optionally, check here to allow handshakes to occur (for monitoring purposes), but withoutenforcement.
n Service Categorization Rule: For purposes of this Use Case, accept the preconfigured Service CategorizationRules for this Type.
2. Configure Authentication.
Follow the instructions to select [EAP FAST], one of the pre-configured Policy Manager Authentication Methods,and Active Directory Authentication Source (AD), an external Authentication Source within your existingenterprise.
Policy Manager fetches attributes used for role mapping from the Authorization Sources (that are associated with theauthentication source). In this example, the authentication and authorization source are one and the same.
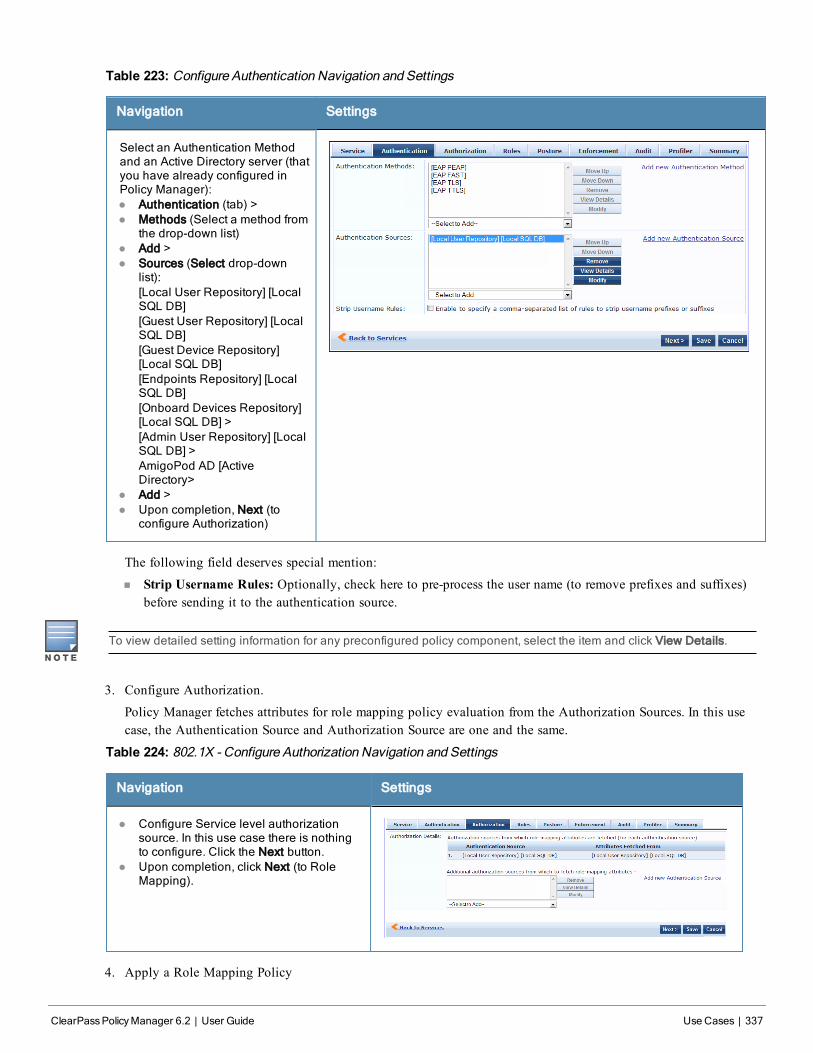
Table 223: Configure Authentication Navigation and Settings
Navigation Settings
Select an Authentication Methodand an Active Directory server (thatyou have already configured inPolicy Manager):l Authentication (tab) >l Methods (Select a method from
the drop-down list)l Add >l Sources (Select drop-down
list):[Local User Repository] [LocalSQL DB][Guest User Repository] [LocalSQL DB][Guest Device Repository][Local SQL DB][Endpoints Repository] [LocalSQL DB][Onboard Devices Repository][Local SQL DB] >[Admin User Repository] [LocalSQL DB] >AmigoPod AD [ActiveDirectory>
l Add >l Upon completion, Next (to
configure Authorization)
The following field deserves special mention:
n Strip Username Rules: Optionally, check here to pre-process the user name (to remove prefixes and suffixes)before sending it to the authentication source.
To view detailed setting information for any preconfigured policy component, select the item and click View Details.
3. Configure Authorization.
Policy Manager fetches attributes for role mapping policy evaluation from the Authorization Sources. In this usecase, the Authentication Source and Authorization Source are one and the same.
Table 224: 802.1X - Configure Authorization Navigation and Settings
Navigation Settings
l Configure Service level authorizationsource. In this use case there is nothingto configure. Click the Next button.
l Upon completion, click Next (to RoleMapping).
4. Apply a Role Mapping Policy
ClearPassPolicyManager 6.2 | User Guide Use Cases | 337
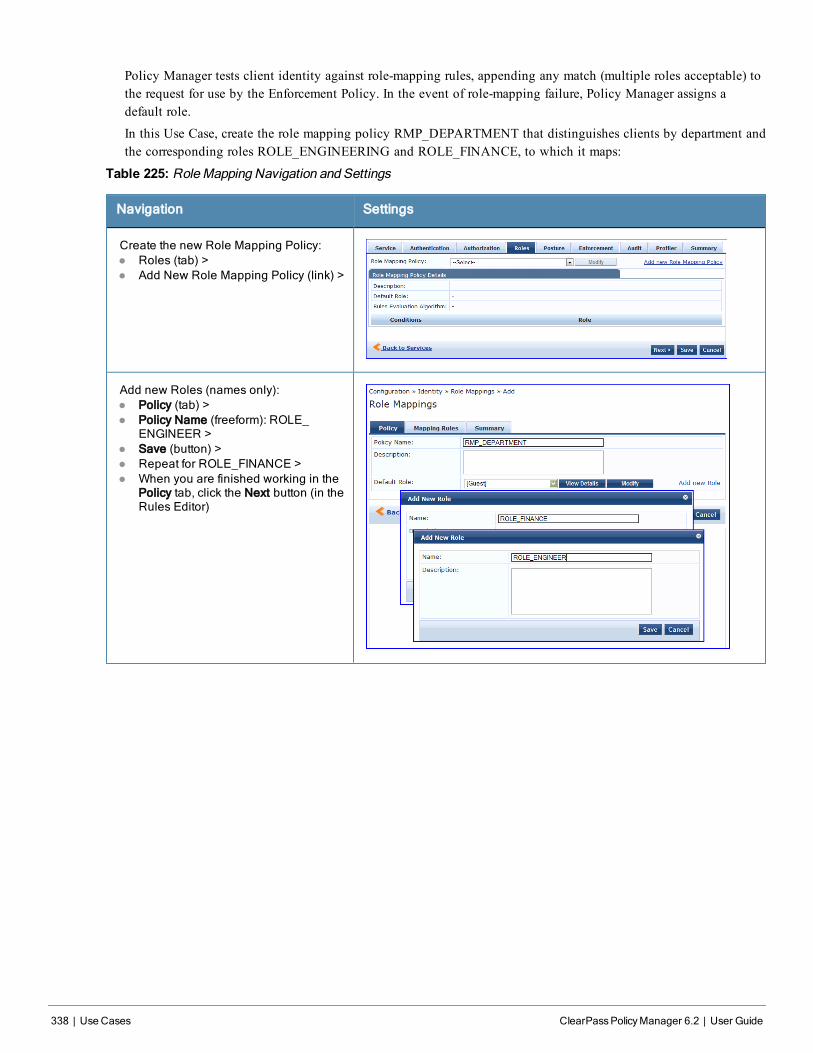
338 | Use Cases ClearPassPolicyManager 6.2 | User Guide
Policy Manager tests client identity against role-mapping rules, appending any match (multiple roles acceptable) tothe request for use by the Enforcement Policy. In the event of role-mapping failure, Policy Manager assigns adefault role.
In this Use Case, create the role mapping policy RMP_DEPARTMENT that distinguishes clients by department andthe corresponding roles ROLE_ENGINEERING and ROLE_FINANCE, to which it maps:
Table 225: RoleMapping Navigation and Settings
Navigation Settings
Create the new Role Mapping Policy:l Roles (tab) >l Add New Role Mapping Policy (link) >
Add new Roles (names only):l Policy (tab) >l Policy Name (freeform): ROLE_
ENGINEER >l Save (button) >l Repeat for ROLE_FINANCE >l When you are finished working in the
Policy tab, click the Next button (in theRules Editor)
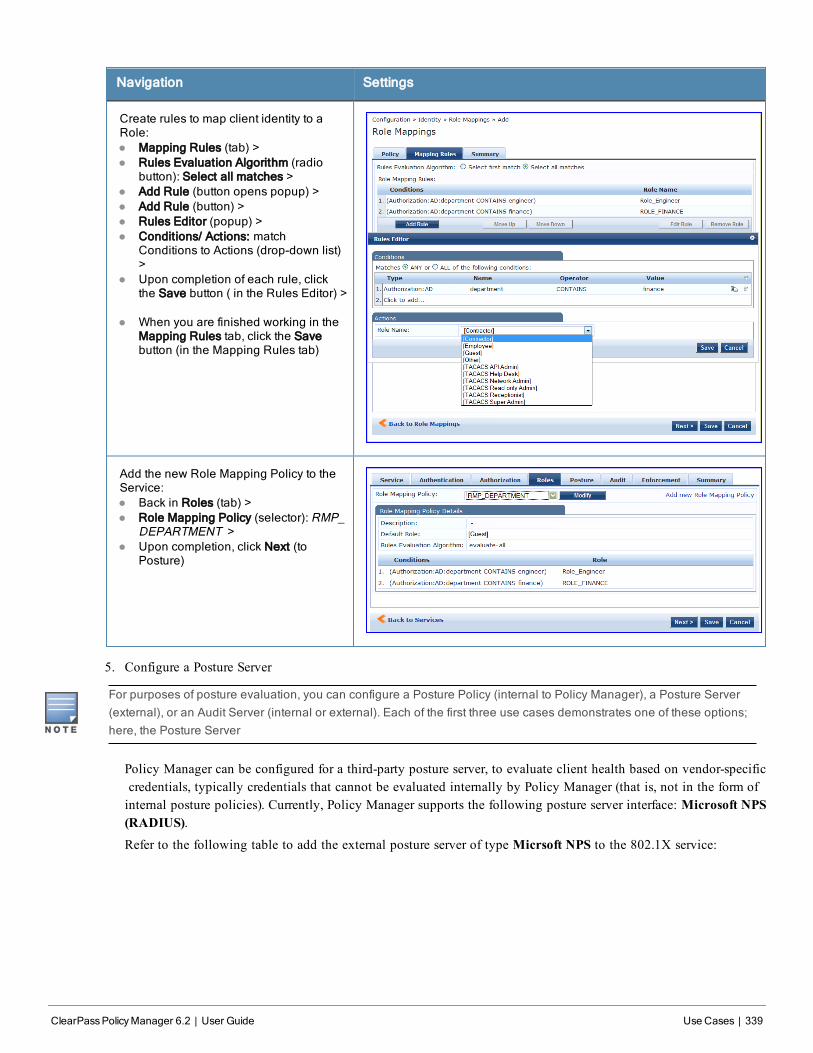
Navigation Settings
Create rules to map client identity to aRole:l Mapping Rules (tab) >l Rules Evaluation Algorithm (radio
button): Select all matches >l Add Rule (button opens popup) >l Add Rule (button) >l Rules Editor (popup) >l Conditions/ Actions: match
Conditions to Actions (drop-down list)>
l Upon completion of each rule, clickthe Save button ( in the Rules Editor) >
l When you are finished working in theMapping Rules tab, click the Savebutton (in the Mapping Rules tab)
Add the new Role Mapping Policy to theService:l Back in Roles (tab) >l Role Mapping Policy (selector): RMP_
DEPARTMENT >l Upon completion, click Next (to
Posture)
5. Configure a Posture Server
For purposes of posture evaluation, you can configure a Posture Policy (internal to Policy Manager), a Posture Server(external), or an Audit Server (internal or external). Each of the first three use cases demonstrates one of these options;here, the Posture Server
Policy Manager can be configured for a third-party posture server, to evaluate client health based on vendor-specificcredentials, typically credentials that cannot be evaluated internally by Policy Manager (that is, not in the form ofinternal posture policies). Currently, Policy Manager supports the following posture server interface: Microsoft NPS(RADIUS).Refer to the following table to add the external posture server of type Micrsoft NPS to the 802.1X service:
ClearPassPolicyManager 6.2 | User Guide Use Cases | 339
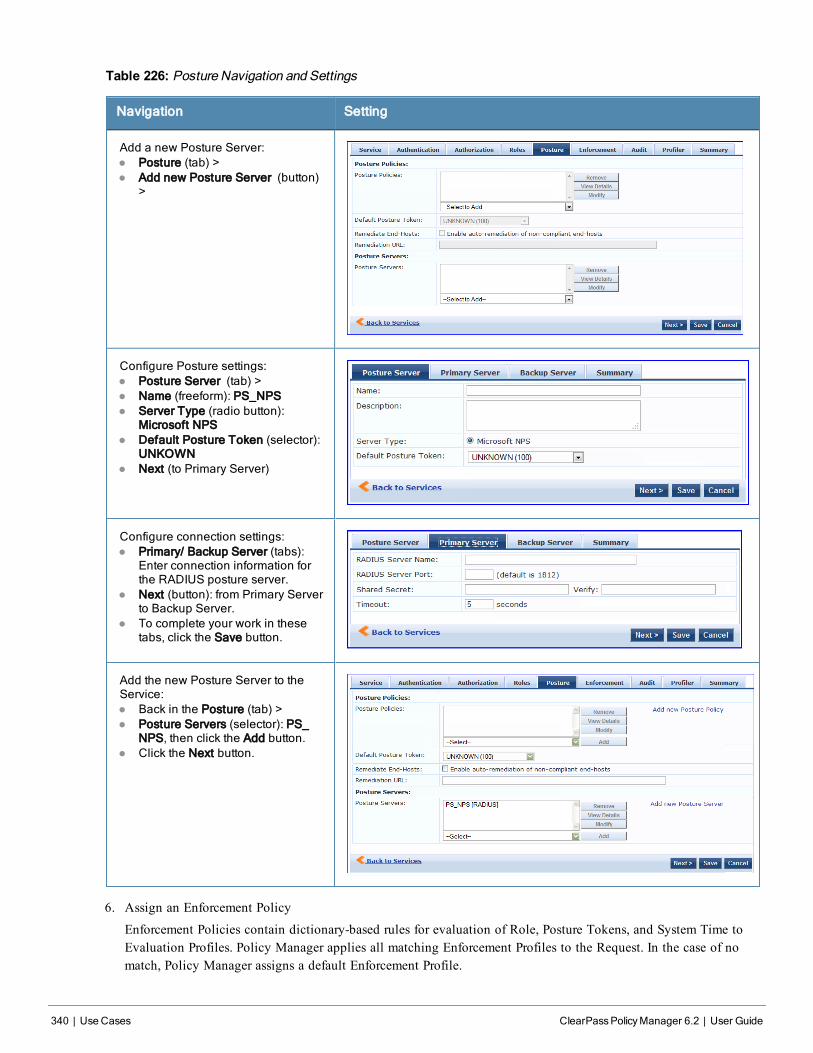
340 | Use Cases ClearPassPolicyManager 6.2 | User Guide
Table 226: Posture Navigation and Settings
Navigation Setting
Add a new Posture Server:l Posture (tab) >l Add new Posture Server (button)
>
Configure Posture settings:l Posture Server (tab) >l Name (freeform): PS_NPSl Server Type (radio button):
Microsoft NPSl Default Posture Token (selector):
UNKOWNl Next (to Primary Server)
Configure connection settings:l Primary/ Backup Server (tabs):
Enter connection information forthe RADIUS posture server.
l Next (button): from Primary Serverto Backup Server.
l To complete your work in thesetabs, click the Save button.
Add the new Posture Server to theService:l Back in the Posture (tab) >l Posture Servers (selector): PS_
NPS, then click the Add button.l Click the Next button.
6. Assign an Enforcement Policy
Enforcement Policies contain dictionary-based rules for evaluation of Role, Posture Tokens, and System Time toEvaluation Profiles. Policy Manager applies all matching Enforcement Profiles to the Request. In the case of nomatch, Policy Manager assigns a default Enforcement Profile.
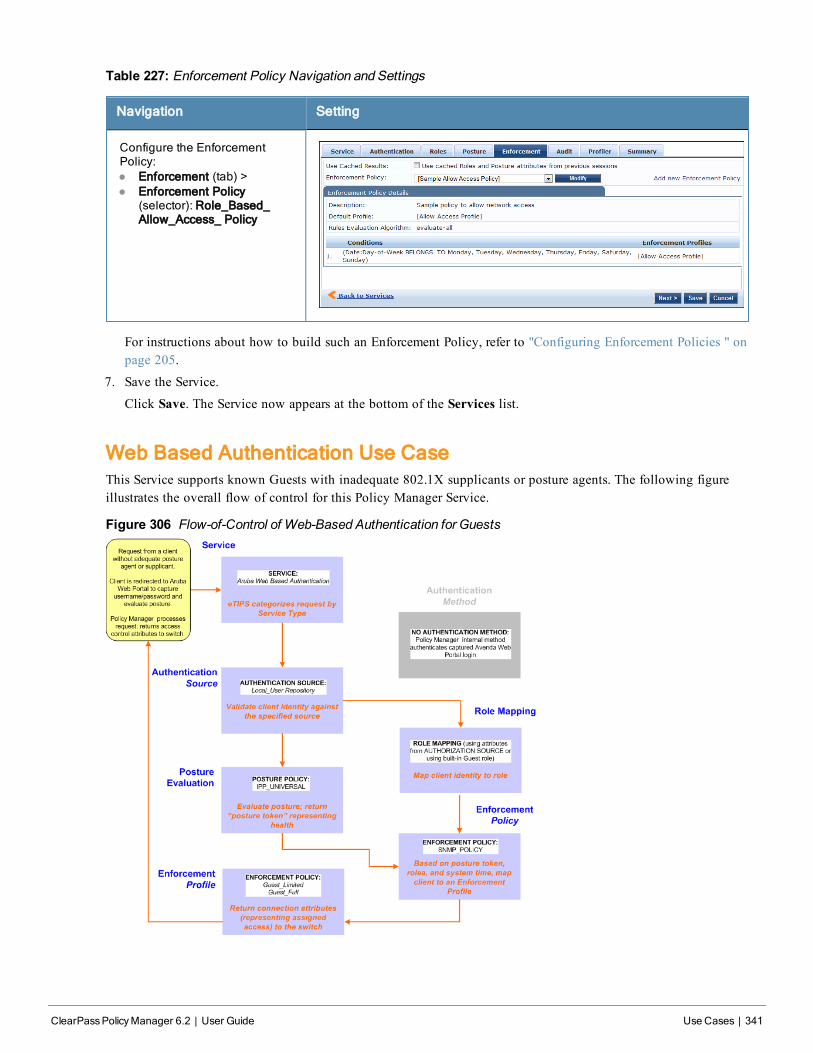
Table 227: Enforcement Policy Navigation and Settings
Navigation Setting
Configure the EnforcementPolicy:l Enforcement (tab) >l Enforcement Policy
(selector): Role_Based_Allow_Access_ Policy
For instructions about how to build such an Enforcement Policy, refer to "Configuring Enforcement Policies " onpage 205.
7. Save the Service.
Click Save. The Service now appears at the bottom of the Services list.
Web Based Authentication Use CaseThis Service supports known Guests with inadequate 802.1X supplicants or posture agents. The following figureillustrates the overall flow of control for this Policy Manager Service.
Figure 306 Flow-of-Control of Web-Based Authentication for Guests
ClearPassPolicyManager 6.2 | User Guide Use Cases | 341
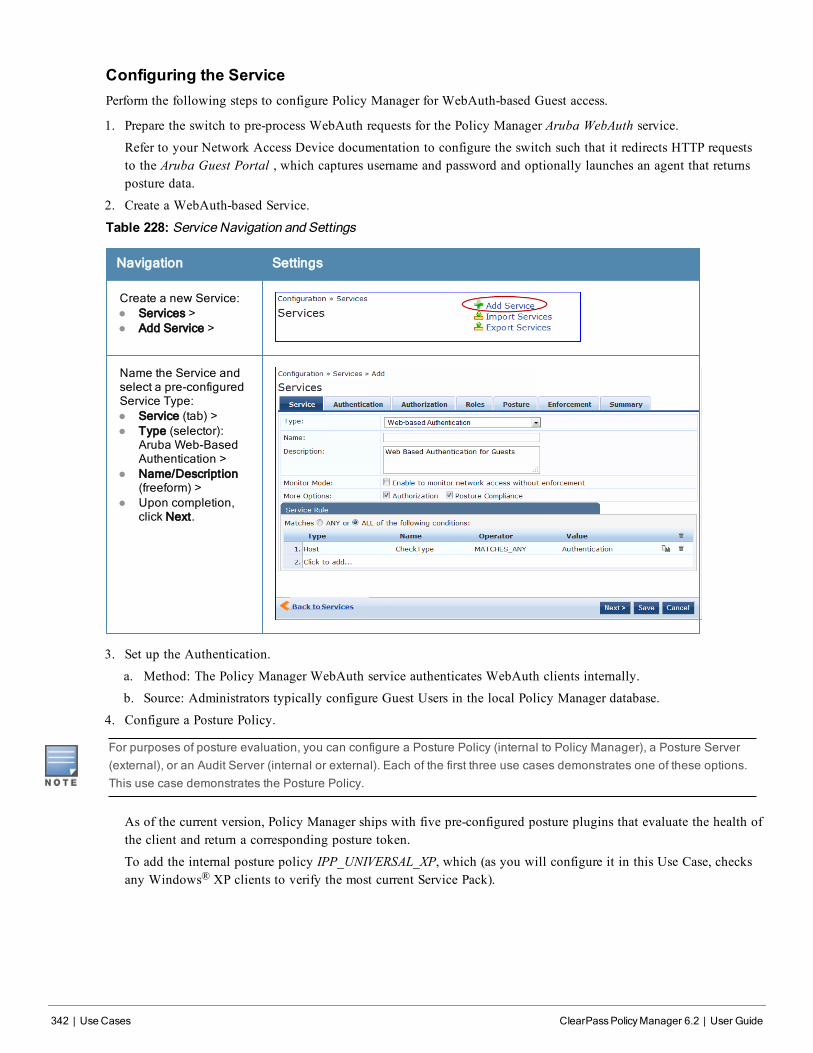
342 | Use Cases ClearPassPolicyManager 6.2 | User Guide
Configuring the ServicePerform the following steps to configure Policy Manager for WebAuth-based Guest access.
1. Prepare the switch to pre-process WebAuth requests for the Policy Manager Aruba WebAuth service.Refer to your Network Access Device documentation to configure the switch such that it redirects HTTP requeststo the Aruba Guest Portal , which captures username and password and optionally launches an agent that returnsposture data.
2. Create a WebAuth-based Service.
Table 228: Service Navigation and Settings
Navigation Settings
Create a new Service:l Services >l Add Service >
Name the Service andselect a pre-configuredService Type:l Service (tab) >l Type (selector):
Aruba Web-BasedAuthentication >
l Name/Description(freeform) >
l Upon completion,click Next.
3. Set up the Authentication.
a. Method: The Policy Manager WebAuth service authenticates WebAuth clients internally.
b. Source: Administrators typically configure Guest Users in the local Policy Manager database.
4. Configure a Posture Policy.
For purposes of posture evaluation, you can configure a Posture Policy (internal to Policy Manager), a Posture Server(external), or an Audit Server (internal or external). Each of the first three use cases demonstrates one of these options.This use case demonstrates the Posture Policy.
As of the current version, Policy Manager ships with five pre-configured posture plugins that evaluate the health ofthe client and return a corresponding posture token.
To add the internal posture policy IPP_UNIVERSAL_XP, which (as you will configure it in this Use Case, checksany Windows® XP clients to verify the most current Service Pack).
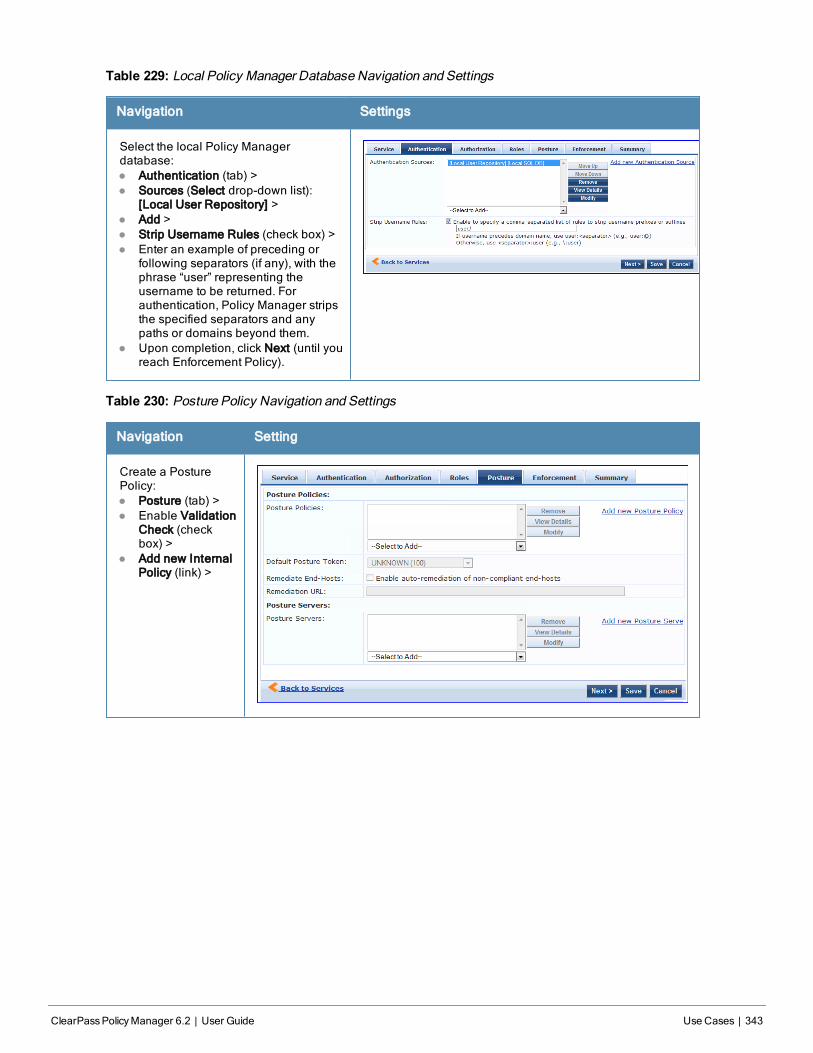
Table 229: Local Policy Manager Database Navigation and Settings
Navigation Settings
Select the local Policy Managerdatabase:l Authentication (tab) >l Sources (Select drop-down list):
[Local User Repository] >l Add >l Strip Username Rules (check box) >l Enter an example of preceding or
following separators (if any), with thephrase “user” representing theusername to be returned. Forauthentication, Policy Manager stripsthe specified separators and anypaths or domains beyond them.
l Upon completion, click Next (until youreach Enforcement Policy).
Table 230: Posture Policy Navigation and Settings
Navigation Setting
Create a PosturePolicy:l Posture (tab) >l Enable Validation
Check (checkbox) >
l Add new InternalPolicy (link) >
ClearPassPolicyManager 6.2 | User Guide Use Cases | 343
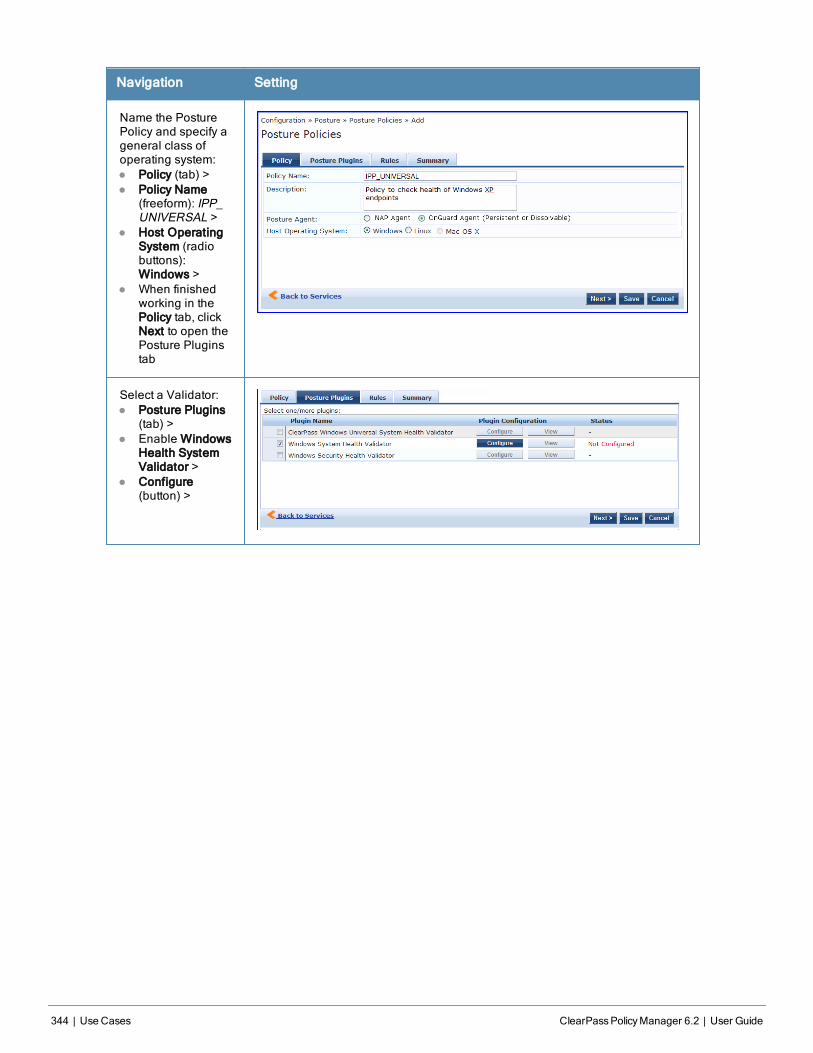
344 | Use Cases ClearPassPolicyManager 6.2 | User Guide
Navigation Setting
Name the PosturePolicy and specify ageneral class ofoperating system:l Policy (tab) >l Policy Name
(freeform): IPP_UNIVERSAL >
l Host OperatingSystem (radiobuttons):Windows >
l When finishedworking in thePolicy tab, clickNext to open thePosture Pluginstab
Select a Validator:l Posture Plugins
(tab) >l Enable Windows
Health SystemValidator >
l Configure(button) >
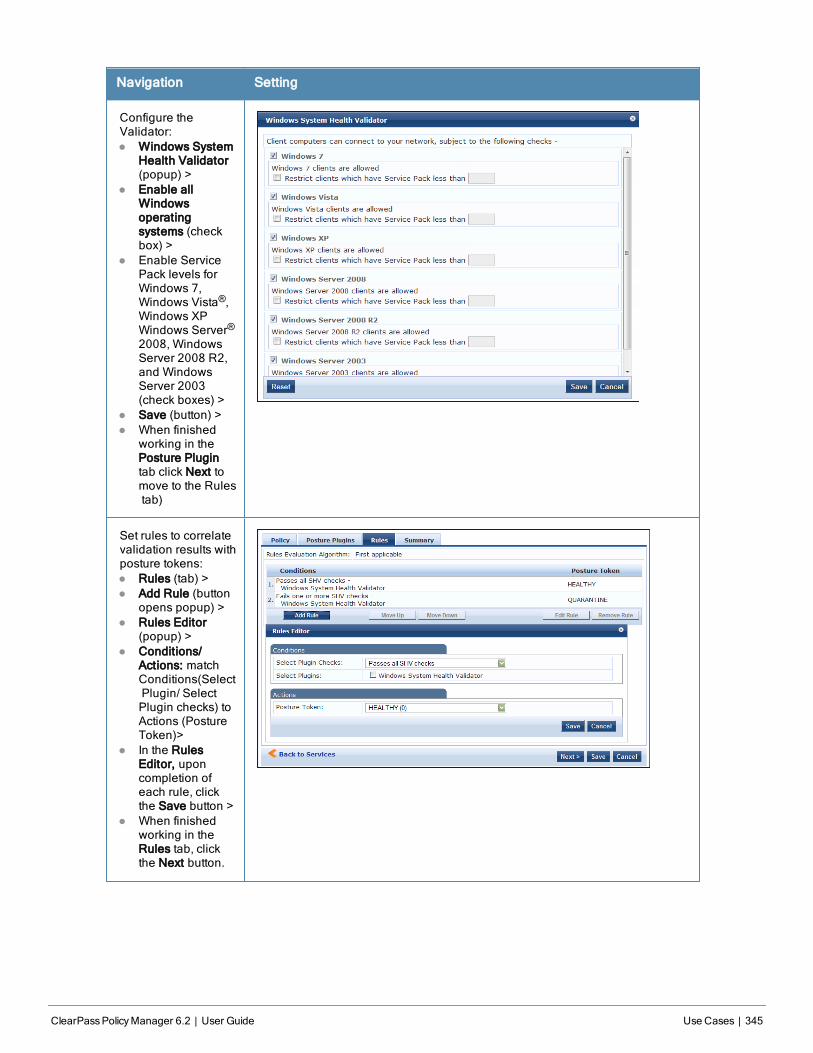
Navigation Setting
Configure theValidator:l Windows System
Health Validator(popup) >
l Enable allWindowsoperatingsystems (checkbox) >
l Enable ServicePack levels forWindows 7,Windows Vista®,Windows XPWindows Server®2008, WindowsServer 2008 R2,and WindowsServer 2003(check boxes) >
l Save (button) >l When finished
working in thePosture Plugintab click Next tomove to the Rulestab)
Set rules to correlatevalidation results withposture tokens:l Rules (tab) >l Add Rule (button
opens popup) >l Rules Editor
(popup) >l Conditions/
Actions: matchConditions(SelectPlugin/ SelectPlugin checks) toActions (PostureToken)>
l In the RulesEditor, uponcompletion ofeach rule, clickthe Save button >
l When finishedworking in theRules tab, clickthe Next button.
ClearPassPolicyManager 6.2 | User Guide Use Cases | 345
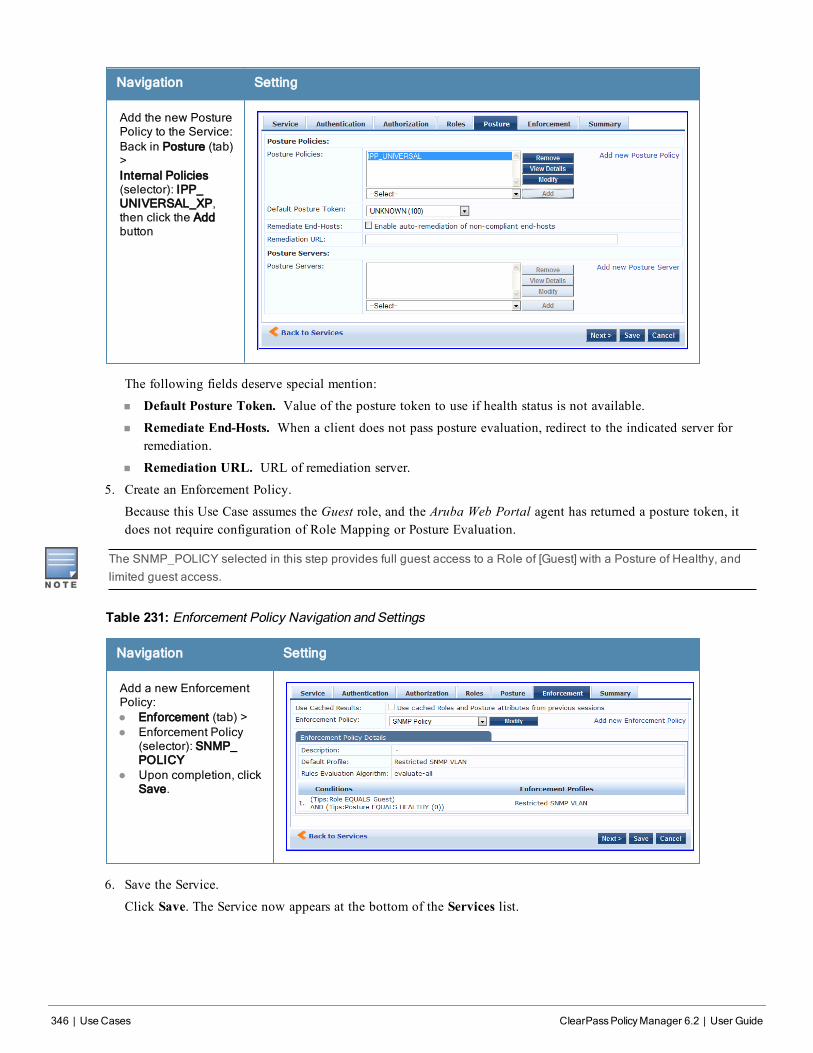
346 | Use Cases ClearPassPolicyManager 6.2 | User Guide
Navigation Setting
Add the new PosturePolicy to the Service:Back in Posture (tab)>Internal Policies(selector): IPP_UNIVERSAL_XP,then click the Addbutton
The following fields deserve special mention:
n Default Posture Token. Value of the posture token to use if health status is not available.n Remediate End-Hosts. When a client does not pass posture evaluation, redirect to the indicated server for
remediation.
n Remediation URL. URL of remediation server.
5. Create an Enforcement Policy.
Because this Use Case assumes the Guest role, and the Aruba Web Portal agent has returned a posture token, itdoes not require configuration of Role Mapping or Posture Evaluation.
The SNMP_POLICY selected in this step provides full guest access to a Role of [Guest] with a Posture of Healthy, andlimited guest access.
Table 231: Enforcement Policy Navigation and Settings
Navigation Setting
Add a new EnforcementPolicy:l Enforcement (tab) >l Enforcement Policy
(selector): SNMP_POLICY
l Upon completion, clickSave.
6. Save the Service.
Click Save. The Service now appears at the bottom of the Services list.
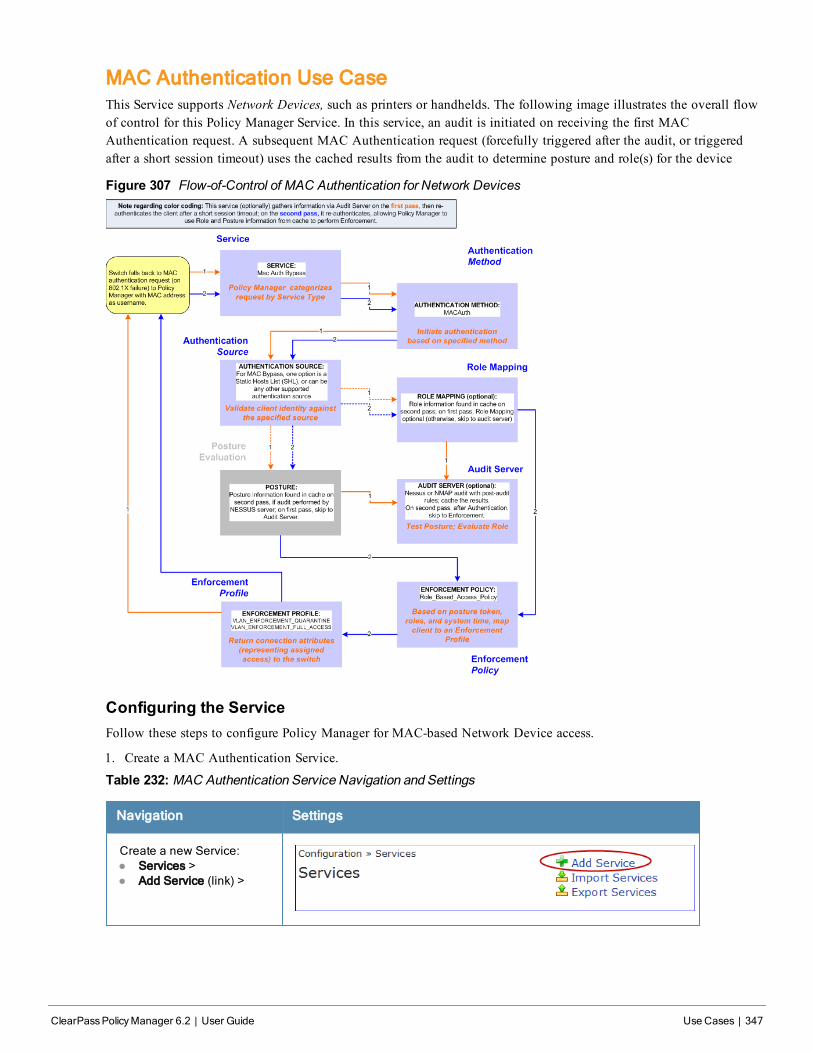
MAC Authentication Use CaseThis Service supports Network Devices, such as printers or handhelds. The following image illustrates the overall flowof control for this Policy Manager Service. In this service, an audit is initiated on receiving the first MACAuthentication request. A subsequent MAC Authentication request (forcefully triggered after the audit, or triggeredafter a short session timeout) uses the cached results from the audit to determine posture and role(s) for the device
Figure 307 Flow-of-Control of MAC Authentication for Network Devices
Configuring the ServiceFollow these steps to configure Policy Manager for MAC-based Network Device access.
1. Create a MAC Authentication Service.
Table 232: MAC Authentication Service Navigation and Settings
Navigation Settings
Create a new Service:l Services >l Add Service (link) >
ClearPassPolicyManager 6.2 | User Guide Use Cases | 347

348 | Use Cases ClearPassPolicyManager 6.2 | User Guide
Navigation Settings
Name the Service and selecta pre-configured ServiceType:l Service (tab) >l Type (selector): MAC
Authentication >l Name/Description
(freeform) >l Upon completion, click
Next to configureAuthentication
2. Set up Authentication
Note that you can select any type of authentication/authorization source for a MAC Authentication service. Only aStatic Host list of type MAC Address List or MAC Address Regular Expression shows up in the list ofauthentication sources (of type Static Host List). Refer to "Adding and Modifying Static Host Lists " on page 149for more information. You can also select any other supported type of authentication source.
Table 233: AuthenticationMethod Navigation and Settings
Navigation Settings
Select an Authentication Method andtwo authentication sources - one oftype Static Host List and the other oftype Generic LDAP server (that youhave already configured in PolicyManager):l Authentication (tab) >l Methods (This method is
automatically selected for this typeof service): [MAC AUTH] >
l Add >l Sources (Select drop-down list):
Handhelds [Static Host List] andPolicy Manager Clients White List[Generic LDAP] >
l Add >l Upon completion, Next (to Audit)
3. Configure an Audit Server.
This step is optional if no Role Mapping Policy is provided, or if you want to establish health or roles using anaudit. An audit server determines health by performing a detailed system and health vulnerability analysis(NESSUS). You can also configure the audit server (NMAP or NESSUS) with post-audit rules that enable PolicyManager to determine client identity.
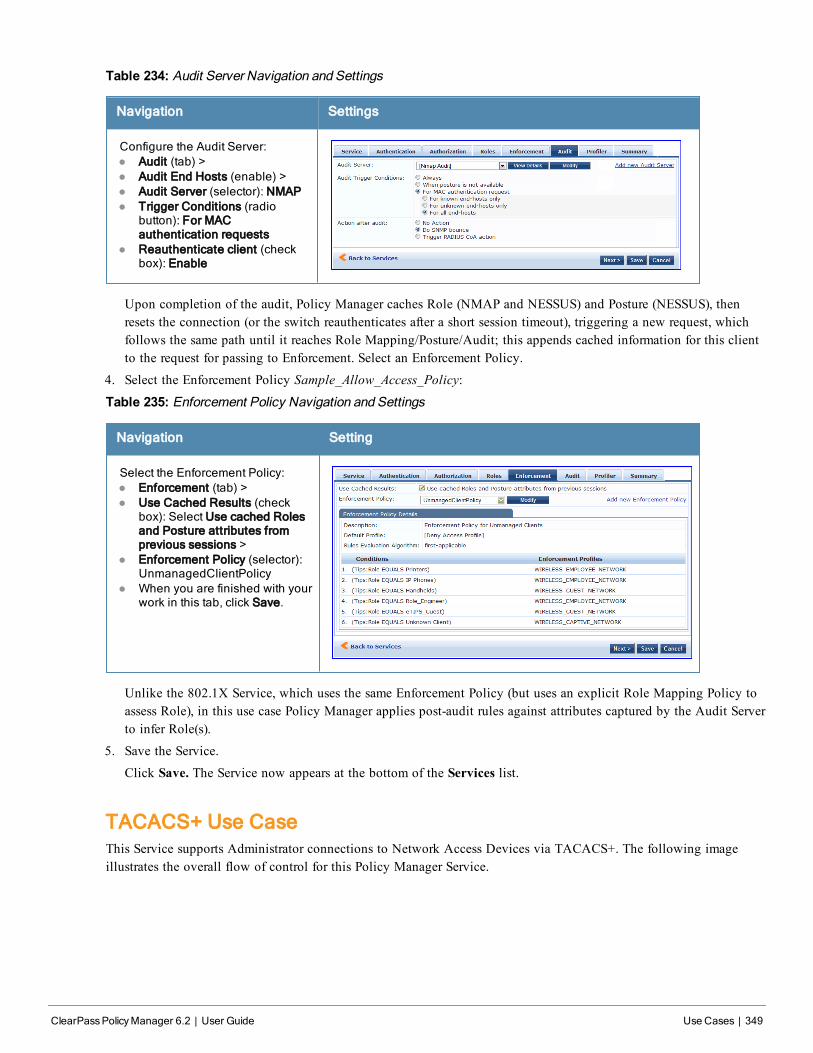
Table 234: Audit Server Navigation and Settings
Navigation Settings
Configure the Audit Server:l Audit (tab) >l Audit End Hosts (enable) >l Audit Server (selector): NMAPl Trigger Conditions (radio
button): For MACauthentication requests
l Reauthenticate client (checkbox): Enable
Upon completion of the audit, Policy Manager caches Role (NMAP and NESSUS) and Posture (NESSUS), thenresets the connection (or the switch reauthenticates after a short session timeout), triggering a new request, whichfollows the same path until it reaches Role Mapping/Posture/Audit; this appends cached information for this clientto the request for passing to Enforcement. Select an Enforcement Policy.
4. Select the Enforcement Policy Sample_Allow_Access_Policy:
Table 235: Enforcement Policy Navigation and Settings
Navigation Setting
Select the Enforcement Policy:l Enforcement (tab) >l Use Cached Results (check
box): Select Use cached Rolesand Posture attributes fromprevious sessions >
l Enforcement Policy (selector):UnmanagedClientPolicy
l When you are finished with yourwork in this tab, click Save.
Unlike the 802.1X Service, which uses the same Enforcement Policy (but uses an explicit Role Mapping Policy toassess Role), in this use case Policy Manager applies post-audit rules against attributes captured by the Audit Serverto infer Role(s).
5. Save the Service.
Click Save. The Service now appears at the bottom of the Services list.
TACACS+ Use CaseThis Service supports Administrator connections to Network Access Devices via TACACS+. The following imageillustrates the overall flow of control for this Policy Manager Service.
ClearPassPolicyManager 6.2 | User Guide Use Cases | 349
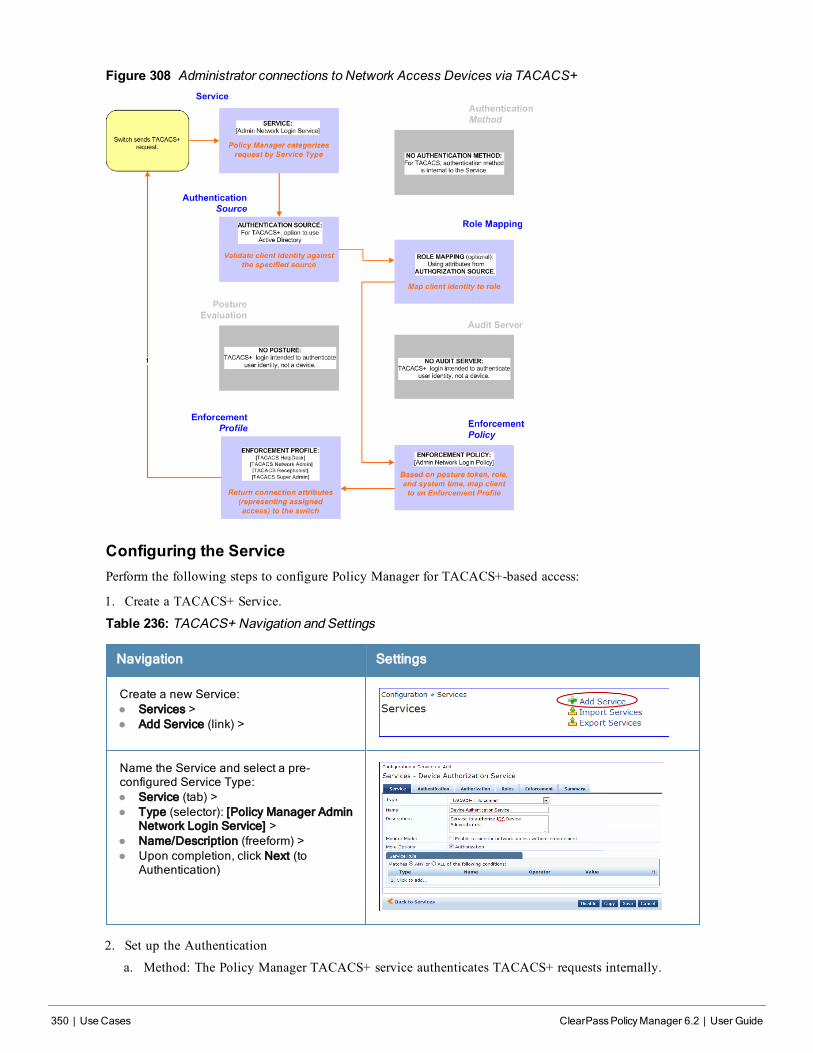
350 | Use Cases ClearPassPolicyManager 6.2 | User Guide
Figure 308 Administrator connections to Network Access Devices via TACACS+
Configuring the ServicePerform the following steps to configure Policy Manager for TACACS+-based access:
1. Create a TACACS+ Service.
Table 236: TACACS+ Navigation and Settings
Navigation Settings
Create a new Service:l Services >l Add Service (link) >
Name the Service and select a pre-configured Service Type:l Service (tab) >l Type (selector): [Policy Manager Admin
Network Login Service] >l Name/Description (freeform) >l Upon completion, click Next (to
Authentication)
2. Set up the Authentication
a. Method: The Policy Manager TACACS+ service authenticates TACACS+ requests internally.
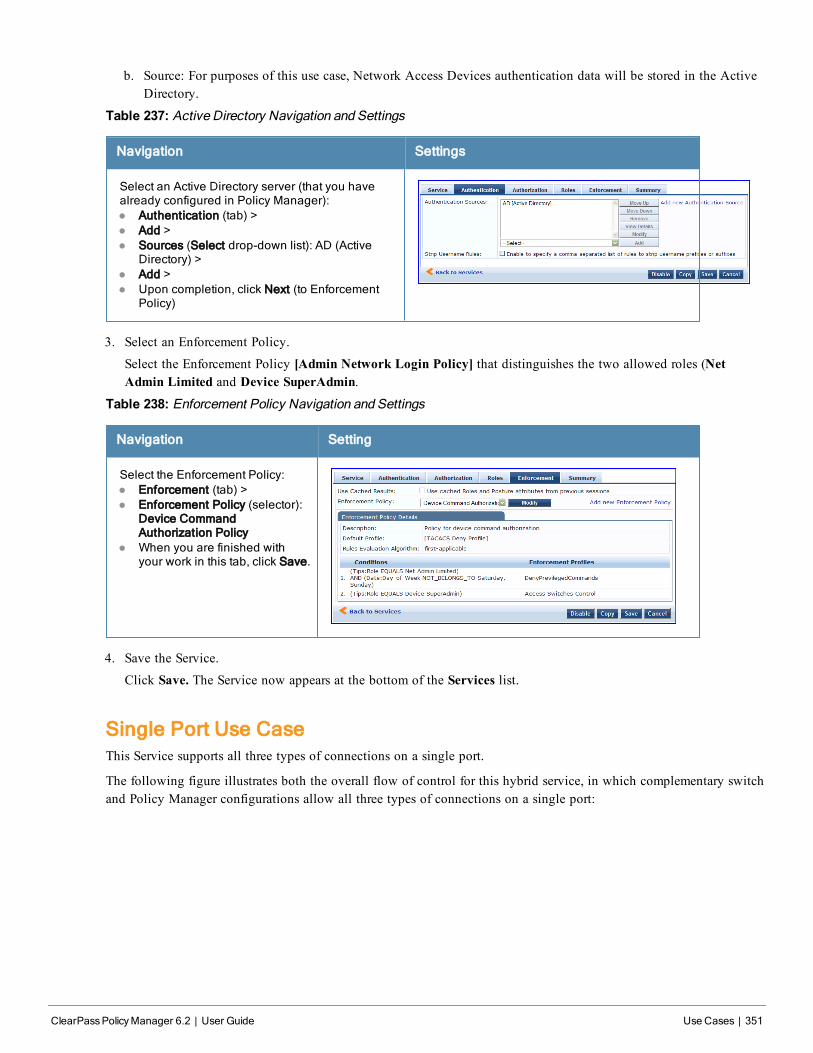
b. Source: For purposes of this use case, Network Access Devices authentication data will be stored in the ActiveDirectory.
Table 237: Active Directory Navigation and Settings
Navigation Settings
Select an Active Directory server (that you havealready configured in Policy Manager):l Authentication (tab) >l Add >l Sources (Select drop-down list): AD (Active
Directory) >l Add >l Upon completion, click Next (to Enforcement
Policy)
3. Select an Enforcement Policy.
Select the Enforcement Policy [Admin Network Login Policy] that distinguishes the two allowed roles (NetAdmin Limited and Device SuperAdmin.
Table 238: Enforcement Policy Navigation and Settings
Navigation Setting
Select the Enforcement Policy:l Enforcement (tab) >l Enforcement Policy (selector):
Device CommandAuthorization Policy
l When you are finished withyour work in this tab, click Save.
4. Save the Service.
Click Save. The Service now appears at the bottom of the Services list.
Single Port Use CaseThis Service supports all three types of connections on a single port.
The following figure illustrates both the overall flow of control for this hybrid service, in which complementary switchand Policy Manager configurations allow all three types of connections on a single port:
ClearPassPolicyManager 6.2 | User Guide Use Cases | 351
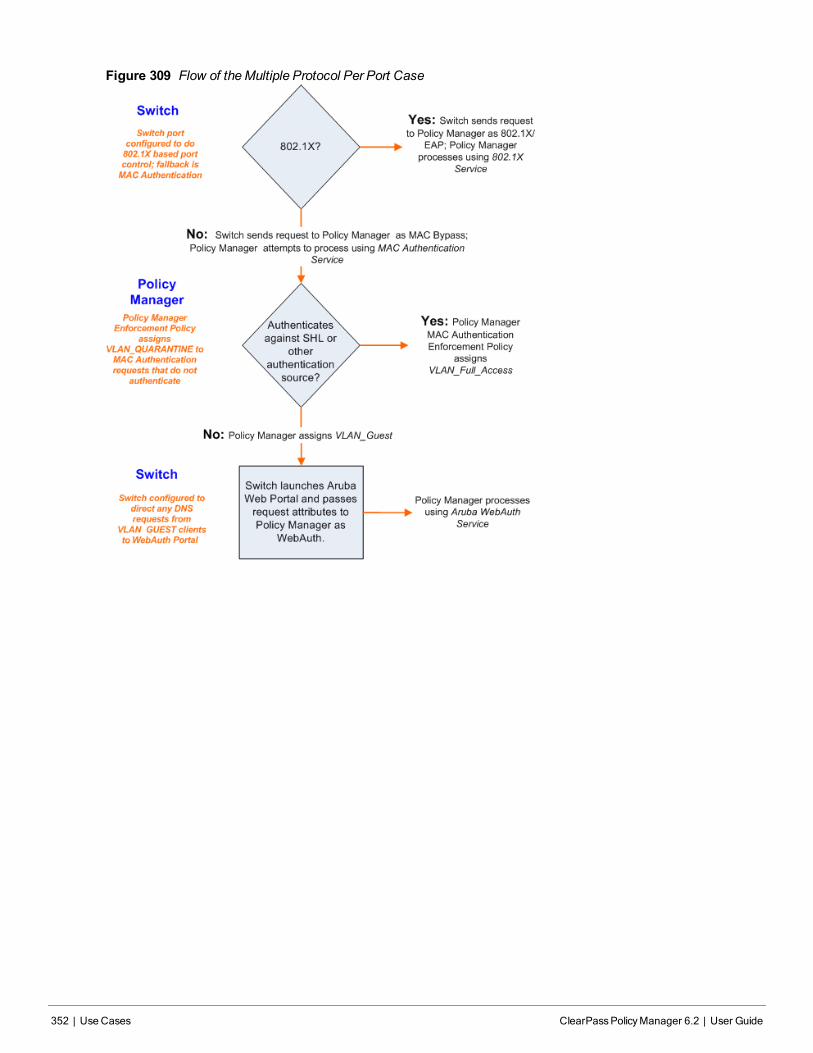
352 | Use Cases ClearPassPolicyManager 6.2 | User Guide
Figure 309 Flow of theMultiple Protocol Per Port Case
ClearPassPolicyManager 6.2 | User Guide Software Copyright and License Statements | 353
Appendix E
Software Copyright and LicenseStatements
This appendix lists the copyright notices for the binary distribution from Aruba Networks. A copy of the source codeis available for portions of the software whose copyright statement requires Aruba Networks to publish any modifiedsource code. To cover the costs of duplication and shipping, there is a nominal cost to obtain the source code material.To obtain a copy of the source code, contact [email protected].
Copyright statements for portions of software are listed below.
PostgreSQL CopyrightPostgreSQL is Copyright © 2004-2010 by the PostgreSQL Global Development Group and is distributed under theterms of the license of the University of California below.
Permission to use, copy, modify, and distribute this software and its documentation for any purpose, without fee, andwithout a written agreement is hereby granted, provided that the above copyright notice and this paragraph and thefollowing two paragraphs appear in all copies.
IN NO EVENT SHALL THE UNIVERSITY OF CALIFORNIA BE LIABLE TO ANY PARTY FOR DIRECT,INDIRECT, SPECIAL, INCIDENTAL, OR CONSEQUENTIAL DAMAGES, INCLUDING LOST PROFITS, ARISINGOUT OF THE USE OF THIS SOFTWARE AND ITS DOCUMENTATION, EVEN IF THE UNIVERSITY OFCALIFORNIA HAS BEEN ADVISED OF THE POSSIBILITY OF SUCH DAMAGE.
THE UNIVERSITY OF CALIFORNIA SPECIFICALLY DISCLAIMS ANY WARRANTIES, INCLUDING, BUT NOTLIMITED TO, THE IMPLIED WARRANTIES OF MERCHANTABILITY AND FITNESS FOR A PARTICULARPURPOSE. THE SOFTWARE PROVIDED HEREUNDER IS ON AN "AS-IS" BASIS, AND THE UNIVERSITY OFCALIFORNIA HAS NO OBLIGATIONS TO PROVIDE MAINTENANCE, SUPPORT, UPDATES,ENHANCEMENTS, OR MODIFICATIONS.
GNU LGPLVersion 2, June 1991
Copyright (C) 1991 Free Software Foundation, Inc.
51 Franklin St, Fifth Floor, Boston, MA 02110-1301, USA
Everyone is permitted to copy and distribute verbatim copies of this license document, but changing it is not allowed.
[This is the first released version of the library GPL. It is numbered 2 because it goes with version 2 of the ordinaryGPL.]
Preamble
The licenses for most software are designed to take away your freedom to share and change it. By contrast, the GNUGeneral Public Licenses are intended to guarantee your freedom to share and change free software--to make sure thesoftware is free for all its users.
This license, the Library General Public License, applies to some specially designated Free Software Foundationsoftware, and to any other libraries whose authors decide to use it. You can use it for your libraries, too.
When we speak of free software, we are referring to freedom, not price. Our General Public Licenses are designed tomake sure that you have the freedom to distribute copies of free software (and charge for this service if you wish), thatyou receive source code or can get it if you want it, that you can change the software or use pieces of it in new freeprograms; and that you know you can do these things.
354 | Software Copyright and License Statements ClearPassPolicyManager 6.2 | User Guide
To protect your rights, we need to make restrictions that forbid anyone to deny you these rights or to ask you tosurrender the rights. These restrictions translate to certain responsibilities for you if you distribute copies of the library,or if you modify it.
For example, if you distribute copies of the library, whether gratis or for a fee, you must give the recipients all therights that we gave you. You must make sure that they, too, receive or can get the source code. If you link a programwith the library, you must provide complete object files to the recipients so that they can relink them with the library,after making changes to the library and recompiling it. And you must show them these terms so they know their rights.
Our method of protecting your rights has two steps: (1) copyright the library, and (2) offer you this license which givesyou legal permission to copy, distribute and/or modify the library.
Also, for each distributor's protection, we want to make certain that everyone understands that there is no warranty forthis free library. If the library is modified by someone else and passed on, we want its recipients to know that whatthey have is not the original version, so that any problems introduced by others will not reflect on the original authors'reputations.
Finally, any free program is threatened constantly by software patents. We wish to avoid the danger that companiesdistributing free software will individually obtain patent licenses, thus in effect transforming the program intoproprietary software. To prevent this, we have made it clear that any patent must be licensed for everyone's free use ornot licensed at all.
Most GNU software, including some libraries, is covered by the ordinary GNU General Public License, which wasdesigned for utility programs. This license, the GNU Library General Public License, applies to certain designatedlibraries. This license is quite different from the ordinary one; be sure to read it in full, and don't assume that anythingin it is the same as in the ordinary license.
The reason we have a separate public license for some libraries is that they blur the distinction we usually makebetween modifying or adding to a program and simply using it. Linking a program with a library, without changingthe library, is in some sense simply using the library, and is analogous to running a utility program or applicationprogram. However, in a textual and legal sense, the linked executable is a combined work, a derivative of the originallibrary, and the ordinary General Public License treats it as such.
Because of this blurred distinction, using the ordinary General Public License for libraries did not effectively promotesoftware sharing, because most developers did not use the libraries. We concluded that weaker conditions mightpromote sharing better.
However, unrestricted linking of non-free programs would deprive the users of those programs of all benefit from thefree status of the libraries themselves. This Library General Public License is intended to permit developers of non-freeprograms to use free libraries, while preserving your freedom as a user of such programs to change the free libraries thatare incorporated in them. (We have not seen how to achieve this as regards changes in header files, but we haveachieved it as regards changes in the actual functions of the Library.) The hope is that this will lead to fasterdevelopment of free libraries.
The precise terms and conditions for copying, distribution and modification follow. Pay close attention to thedifference between a "work based on the library" and a "work that uses the library". The former contains code derivedfrom the library, while the latter only works together with the library.
Note that it is possible for a library to be covered by the ordinary General Public License rather than by this specialone.
TERMS AND CONDITIONS FOR COPYING, DISTRIBUTION AND MODIFICATION
0. This License Agreement applies to any software library which contains a notice placed by the copyright holder orother authorized party saying it may be distributed under the terms of this Library General Public License (also called"this License"). Each licensee is addressed as "you".
A "library" means a collection of software functions and/or data prepared so as to be conveniently linked withapplication programs (which use some of those functions and data) to form executables.
The "Library", below, refers to any such software library or work which has been distributed under these terms. A"work based on the Library" means either the Library or any derivative work under copyright law: that is to say, awork containing the Library or a portion of it, either verbatim or with modifications and/or translated straightforwardlyinto another language. (Hereinafter, translation is included without limitation in the term "modification".)
"Source code" for a work means the preferred form of the work for making modifications to it. For a library, completesource code means all the source code for all modules it contains, plus any associated interface definition files, plus thescripts used to control compilation and installation of the library.
Activities other than copying, distribution and modification are not covered by this License; they are outside its scope.The act of running a program using the Library is not restricted, and output from such a program is covered only if itscontents constitute a work based on the Library (independent of the use of the Library in a tool for writing it). Whetherthat is true depends on what the Library does and what the program that uses the Library does.
1. You may copy and distribute verbatim copies of the Library's complete source code as you receive it, in anymedium, provided that you conspicuously and appropriately publish on each copy an appropriate copyright notice anddisclaimer of warranty; keep intact all the notices that refer to this License and to the absence of any warranty; anddistribute a copy of this License along with the Library.
You may charge a fee for the physical act of transferring a copy, and you may at your option offer warranty protectionin exchange for a fee.
2. You may modify your copy or copies of the Library or any portion of it, thus forming a work based on the Library,and copy and distribute such modifications or work under the terms of Section 1 above, provided that you also meetall of these conditions:
a) The modified work must itself be a software library.
b) You must cause the files modified to carry prominent notices stating that you changed the files and the date of anychange.
c) You must cause the whole of the work to be licensed at no charge to all third parties under the terms of this License.
d) If a facility in the modified Library refers to a function or a table of data to be supplied by an application programthat uses the facility, other than as an argument passed when the facility is invoked, then you must make a good faitheffort to ensure that, in the event an application does not supply such function or table, the facility still operates, andperforms whatever part of its purpose remains meaningful. (For example, a function in a library to compute square rootshas a purpose that is entirely well-defined independent of the application. Therefore, Subsection 2d requires that anyapplication-supplied function or table used by this function must be optional: if the application does not supply it, thesquare root function must still compute square roots.)
These requirements apply to the modified work as a whole. If identifiable sections of that work are not derived fromthe Library, and can be reasonably considered independent and separate works in themselves, then this License, and itsterms, do not apply to those sections when you distribute them as separate works. But when you distribute the samesections as part of a whole which is a work based on the Library, the distribution of the whole must be on the terms ofthis License, whose permissions for other licensees extend to the entire whole, and thus to each and every partregardless of who wrote it.
Thus, it is not the intent of this section to claim rights or contest your rights to work written entirely by you; rather,the intent is to exercise the right to control the distribution of derivative or collective works based on the Library.
In addition, mere aggregation of another work not based on the Library with the Library (or with a work based on theLibrary) on a volume of a storage or distribution medium does not bring the other work under the scope of thisLicense.
ClearPassPolicyManager 6.2 | User Guide Software Copyright and License Statements | 355
356 | Software Copyright and License Statements ClearPassPolicyManager 6.2 | User Guide
3. You may opt to apply the terms of the ordinary GNU General Public License instead of this License to a given copyof the Library. To do this, you must alter all the notices that refer to this License, so that they refer to the ordinaryGNU General Public License, version 2, instead of to this License. (If a newer version than version 2 of the ordinaryGNU General Public License has appeared, then you can specify that version instead if you wish.) Do not make anyother change in these notices.
Once this change is made in a given copy, it is irreversible for that copy, so the ordinary GNU General Public Licenseapplies to all subsequent copies and derivative works made from that copy.
This option is useful when you wish to copy part of the code of the Library into a program that is not a library.
4. You may copy and distribute the Library (or a portion or derivative of it, under Section 2) in object code orexecutable form under the terms of Sections 1 and 2 above provided that you accompany it with the completecorresponding machine-readable source code, which must be distributed under the terms of Sections 1 and 2 above ona medium customarily used for software interchange.
If distribution of object code is made by offering access to copy from a designated place, then offering equivalentaccess to copy the source code from the same place satisfies the requirement to distribute the source code, even thoughthird parties are not compelled to copy the source along with the object code.
5. A program that contains no derivative of any portion of the Library, but is designed to work with the Library bybeing compiled or linked with it, is called a "work that uses the Library". Such a work, in isolation, is not a derivativework of the Library, and therefore falls outside the scope of this License.
However, linking a "work that uses the Library" with the Library creates an executable that is a derivative of theLibrary (because it contains portions of the Library), rather than a "work that uses the library". The executable istherefore covered by this License. Section 6 states terms for distribution of such executables.
When a "work that uses the Library" uses material from a header file that is part of the Library, the object code for thework may be a derivative work of the Library even though the source code is not. Whether this is true is especiallysignificant if the work can be linked without the Library, or if the work is itself a library. The threshold for this to betrue is not precisely defined by law.
If such an object file uses only numerical parameters, data structure layouts and accessors, and small macros and smallinline functions (ten lines or less in length), then the use of the object file is unrestricted, regardless of whether it islegally a derivative work. (Executables containing this object code plus portions of the Library will still fall underSection 6.)
Otherwise, if the work is a derivative of the Library, you may distribute the object code for the work under the terms ofSection 6. Any executables containing that work also fall under Section 6, whether or not they are linked directly withthe Library itself.
6. As an exception to the Sections above, you may also compile or link a "work that uses the Library" with the Libraryto produce a work containing portions of the Library, and distribute that work under terms of your choice, providedthat the terms permit modification of the work for the customer's own use and reverse engineering for debugging suchmodifications.
You must give prominent notice with each copy of the work that the Library is used in it and that the Library and itsuse are covered by this License. You must supply a copy of this License. If the work during execution displayscopyright notices, you must include the copyright notice for the Library among them, as well as a reference directingthe user to the copy of this License. Also, you must do one of these things:
a) Accompany the work with the complete corresponding machine-readable source code for the Library includingwhatever changes were used in the work (which must be distributed under Sections 1 and 2 above); and, if the work isan executable linked with the Library, with the complete machine-readable "work that uses the Library", as object codeand/or source code, so that the user can modify the Library and then relink to produce a modified executablecontaining the modified Library. (It is understood that the user who changes the contents of definitions files in theLibrary will not necessarily be able to recompile the application to use the modified definitions.)
b) Accompany the work with a written offer, valid for at least three years, to give the same user the materials specifiedin Subsection 6a, above, for a charge no more than the cost of performing this distribution.
c) If distribution of the work is made by offering access to copy from a designated place, offer equivalent access tocopy the above specified materials from the same place.
d) Verify that the user has already received a copy of these materials or that you have already sent this user a copy.
For an executable, the required form of the "work that uses the Library" must include any data and utility programsneeded for reproducing the executable from it. However, as a special exception, the source code distributed need notinclude anything that is normally distributed (in either source or binary form) with the major components (compiler,kernel, and so on) of the operating system on which the executable runs, unless that component itself accompanies theexecutable.
It may happen that this requirement contradicts the license restrictions of other proprietary libraries that do notnormally accompany the operating system. Such a contradiction means you cannot use both them and the Librarytogether in an executable that you distribute.
7. You may place library facilities that are a work based on the Library side-by-side in a single library together withother library facilities not covered by this License, and distribute such a combined library, provided that the separatedistribution of the work based on the Library and of the other library facilities is otherwise permitted, and providedthat you do these two things:
a) Accompany the combined library with a copy of the same work based on the Library, uncombined with any otherlibrary facilities. This must be distributed under the terms of the Sections above.
b) Give prominent notice with the combined library of the fact that part of it is a work based on the Library, andexplaining where to find the accompanying uncombined form of the same work.
8. You may not copy, modify, sublicense, link with, or distribute the Library except as expressly provided under thisLicense. Any attempt otherwise to copy, modify, sublicense, link with, or distribute the Library is void, and willautomatically terminate your rights under this License. However, parties who have received copies, or rights, from youunder this License will not have their licenses terminated so long as such parties remain in full compliance.
9. You are not required to accept this License, since you have not signed it. However, nothing else grants youpermission to modify or distribute the Library or its derivative works. These actions are prohibited by law if you donot accept this License. Therefore, by modifying or distributing the Library (or any work based on the Library), youindicate your acceptance of this License to do so, and all its terms and conditions for copying, distributing ormodifying the Library or works based on it.
10. Each time you redistribute the Library (or any work based on the Library), the recipient automatically receives alicense from the original licensor to copy, distribute, link with or modify the Library subject to these terms andconditions. You may not impose any further restrictions on the recipients' exercise of the rights granted herein. You arenot responsible for enforcing compliance by third parties to this License.
11. If, as a consequence of a court judgment or allegation of patent infringement or for any other reason (not limited topatent issues), conditions are imposed on you (whether by court order, agreement or otherwise) that contradict theconditions of this License, they do not excuse you from the conditions of this License. If you cannot distribute so as tosatisfy simultaneously your obligations under this License and any other pertinent obligations, then as a consequenceyou may not distribute the Library at all. For example, if a patent license would not permit royalty-free redistributionof the Library by all those who receive copies directly or indirectly through you, then the only way you could satisfyboth it and this License would be to refrain entirely from distribution of the Library.
If any portion of this section is held invalid or unenforceable under any particular circumstance, the balance of thesection is intended to apply, and the section as a whole is intended to apply in other circumstances.
It is not the purpose of this section to induce you to infringe any patents or other property right claims or to contestvalidity of any such claims; this section has the sole purpose of protecting the integrity of the free software distributionsystem which is implemented by public license practices. Many people have made generous contributions to the wide
ClearPassPolicyManager 6.2 | User Guide Software Copyright and License Statements | 357
358 | Software Copyright and License Statements ClearPassPolicyManager 6.2 | User Guide
range of software distributed through that system in reliance on consistent application of that system; it is up to theauthor/donor to decide if he or she is willing to distribute software through any other system and a licensee cannotimpose that choice.
This section is intended to make thoroughly clear what is believed to be a consequence of the rest of this License.
12. If the distribution and/or use of the Library is restricted in certain countries either by patents or by copyrightedinterfaces, the original copyright holder who places the Library under this License may add an explicit geographicaldistribution limitation excluding those countries, so that distribution is permitted only in or among countries not thusexcluded. In such case, this License incorporates the limitation as if written in the body of this License.
13. The Free Software Foundation may publish revised and/or new versions of the Library General Public License fromtime to time. Such new versions will be similar in spirit to the present version, but may differ in detail to address newproblems or concerns.
Each version is given a distinguishing version number. If the Library specifies a version number of this License whichapplies to it and "any later version", you have the option of following the terms and conditions either of that version orof any later version published by the Free Software Foundation. If the Library does not specify a license versionnumber, you may choose any version ever published by the Free Software Foundation.
14. If you wish to incorporate parts of the Library into other free programs whose distribution conditions areincompatible with these, write to the author to ask for permission. For software which is copyrighted by the FreeSoftware Foundation, write to the Free Software Foundation; we sometimes make exceptions for this. Our decision willbe guided by the two goals of preserving the free status of all derivatives of our free software and of promoting thesharing and reuse of software generally.
NO WARRANTY
15. BECAUSE THE LIBRARY IS LICENSED FREE OF CHARGE, THERE IS NO WARRANTY FOR THELIBRARY, TO THE EXTENT PERMITTED BY APPLICABLE LAW. EXCEPT WHEN OTHERWISE STATED INWRITING THE COPYRIGHT HOLDERS AND/OR OTHER PARTIES PROVIDE THE LIBRARY "AS IS"WITHOUT WARRANTY OF ANY KIND, EITHER EXPRESSED OR IMPLIED, INCLUDING, BUT NOT LIMITEDTO, THE IMPLIED WARRANTIES OF MERCHANTABILITY AND FITNESS FOR A PARTICULAR PURPOSE.THE ENTIRE RISK AS TO THE QUALITY AND PERFORMANCE OF THE LIBRARY IS WITH YOU. SHOULDTHE LIBRARY PROVE DEFECTIVE, YOU ASSUME THE COST OF ALL NECESSARY SERVICING, REPAIR ORCORRECTION.
16. IN NO EVENT UNLESS REQUIRED BY APPLICABLE LAW OR AGREED TO IN WRITING WILL ANYCOPYRIGHT HOLDER, OR ANY OTHER PARTY WHO MAY MODIFY AND/OR REDISTRIBUTE THELIBRARY AS PERMITTED ABOVE, BE LIABLE TO YOU FOR DAMAGES, INCLUDING ANY GENERAL,SPECIAL, INCIDENTAL OR CONSEQUENTIAL DAMAGES ARISING OUT OF THE USE OR INABILITY TOUSE THE LIBRARY (INCLUDING BUT NOT LIMITED TO LOSS OF DATA OR DATA BEING RENDEREDINACCURATE OR LOSSES SUSTAINED BY YOU OR THIRD PARTIES OR A FAILURE OF THE LIBRARY TOOPERATE WITH ANY OTHER SOFTWARE), EVEN IF SUCH HOLDER OR OTHER PARTY HAS BEENADVISED OF THE POSSIBILITY OF SUCH DAMAGES.
END OF TERMS AND CONDITIONS
GNU GPLVersion 2, June 1991
Copyright (C) 1989, 1991 Free Software Foundation, Inc.
51 Franklin Street, Fifth Floor, Boston, MA 02110-1301, USA
Everyone is permitted to copy and distribute verbatim copies
of this license document, but changing it is not allowed.
Preamble
The licenses for most software are designed to take away your freedom to share and change it. By contrast, the GNUGeneral Public License is intended to guarantee your freedom to share and change free software--to make sure thesoftware is free for all its users. This General Public License applies to most of the Free Software Foundation's softwareand to any other program whose authors commit to using it. (Some other Free Software Foundation software is coveredby the GNU Lesser General Public License instead.) You can apply it to your programs, too.
When we speak of free software, we are referring to freedom, not price. Our General Public Licenses are designed tomake sure that you have the freedom to distribute copies of free software (and charge for this service if you wish), thatyou receive source code or can get it if you want it, that you can change the software or use pieces of it in new freeprograms; and that you know you can do these things.
To protect your rights, we need to make restrictions that forbid anyone to deny you these rights or to ask you tosurrender the rights. These restrictions translate to certain responsibilities for you if you distribute copies of thesoftware, or if you modify it.
For example, if you distribute copies of such a program, whether gratis or for a fee, you must give the recipients all therights that you have. You must make sure that they, too, receive or can get the source code. And you must show themthese terms so they know their rights.
We protect your rights with two steps: (1) copyright the software, and (2) offer you this license which gives you legalpermission to copy, distribute and/or modify the software.
Also, for each author's protection and ours, we want to make certain that everyone understands that there is nowarranty for this free software. If the software is modified by someone else and passed on, we want its recipients toknow that what they have is not the original, so that any problems introduced by others will not reflect on the originalauthors' reputations.
Finally, any free program is threatened constantly by software patents. We wish to avoid the danger that redistributorsof a free program will individually obtain patent licenses, in effect making the program proprietary. To prevent this, wehave made it clear that any patent must be licensed for everyone's free use or not licensed at all.
The precise terms and conditions for copying, distribution and modification follow.
TERMS AND CONDITIONS FOR COPYING, DISTRIBUTION AND MODIFICATION
0. This License applies to any program or other work which contains a notice placed by the copyright holder saying itmay be distributed under the terms of this General Public License. The "Program", below, refers to any such program orwork, and a "work based on the Program" means either the Program or any derivative work under copyright law: that isto say, a work containing the Program or a portion of it, either verbatim or with modifications and/or translated intoanother language. (Hereinafter, translation is included without limitation in the term "modification".) Each licensee isaddressed as "you".
Activities other than copying, distribution and modification are not covered by this License; they are outside its scope.The act of running the Program is not restricted, and the output from the Program is covered only if its contentsconstitute a work based on the Program (independent of having been made by running the Program). Whether that istrue depends on what the Program does.
1. You may copy and distribute verbatim copies of the Program's source code as you receive it, in any medium,provided that you conspicuously and appropriately publish on each copy an appropriate copyright notice anddisclaimer of warranty; keep intact all the notices that refer to this License and to the absence of any warranty; andgive any other recipients of the Program a copy of this License along with the Program.
You may charge a fee for the physical act of transferring a copy, and you may at your option offer warranty protectionin exchange for a fee.
ClearPassPolicyManager 6.2 | User Guide Software Copyright and License Statements | 359

360 | Software Copyright and License Statements ClearPassPolicyManager 6.2 | User Guide
2. You may modify your copy or copies of the Program or any portion of it, thus forming a work based on the Program,and copy and distribute such modifications or work under the terms of Section 1 above, provided that you also meetall of these conditions:
a) You must cause the modified files to carry prominent notices stating that you changed the files and the date of anychange.
b) You must cause any work that you distribute or publish, that in whole or in part contains or is derived from theProgram or any part thereof, to be licensed as a whole at no charge to all third parties under the terms of this License.
c) If the modified program normally reads commands interactively when run, you must cause it, when started runningfor such interactive use in the most ordinary way, to print or display an announcement including an appropriatecopyright notice and a notice that there is no warranty (or else, saying that you provide a warranty) and that users mayredistribute the program under these conditions, and telling the user how to view a copy of this License. (Exception: ifthe Program itself is interactive but does not normally print such an announcement, your work based on the Program isnot required to print an announcement.)
These requirements apply to the modified work as a whole. If identifiable sections of that work are not derived fromthe Program, and can be reasonably considered independent and separate works in themselves, then this License, andits terms, do not apply to those sections when you distribute them as separate works. But when you distribute the samesections as part of a whole which is a work based on the Program, the distribution of the whole must be on the termsof this License, whose permissions for other licensees extend to the entire whole, and thus to each and every partregardless of who wrote it.
Thus, it is not the intent of this section to claim rights or contest your rights to work written entirely by you; rather,the intent is to exercise the right to control the distribution of derivative or collective works based on the Program.
In addition, mere aggregation of another work not based on the Program with the Program (or with a work based onthe Program) on a volume of a storage or distribution medium does not bring the other work under the scope of thisLicense.
3. You may copy and distribute the Program (or a work based on it, under Section 2) in object code or executable formunder the terms of Sections 1 and 2 above provided that you also do one of the following:
a) Accompany it with the complete corresponding machine-readable source code, which must be distributed under theterms of Sections 1 and 2 above on a medium customarily used for software interchange; or,
b) Accompany it with a written offer, valid for at least three years, to give any third party, for a charge no more thanyour cost of physically performing source distribution, a complete machine-readable copy of the corresponding sourcecode, to be distributed under the terms of Sections 1 and 2 above on a medium customarily used for softwareinterchange; or,
c) Accompany it with the information you received as to the offer to distribute corresponding source code. (Thisalternative is allowed only for noncommercial distribution and only if you received the program in object code orexecutable form with such an offer, in accord with Subsection b above.)
The source code for a work means the preferred form of the work for making modifications to it. For an executablework, complete source code means all the source code for all modules it contains, plus any associated interfacedefinition files, plus the scripts used to control compilation and installation of the executable. However, as a specialexception, the source code distributed need not include anything that is normally distributed (in either source or binaryform) with the major components (compiler, kernel, and so on) of the operating system on which the executable runs,unless that component itself accompanies the executable.
If distribution of executable or object code is made by offering access to copy from a designated place, then offeringequivalent access to copy the source code from the same place counts as distribution of the source code, even thoughthird parties are not compelled to copy the source along with the object code.
4. You may not copy, modify, sublicense, or distribute the Program except as expressly provided under this License.Any attempt otherwise to copy, modify, sublicense or distribute the Program is void, and will automatically terminate
your rights under this License. However, parties who have received copies, or rights, from you under this License willnot have their licenses terminated so long as such parties remain in full compliance.
5. You are not required to accept this License, since you have not signed it. However, nothing else grants youpermission to modify or distribute the Program or its derivative works. These actions are prohibited by law if you donot accept this License. Therefore, by modifying or distributing the Program (or any work based on the Program), youindicate your acceptance of this License to do so, and all its terms and conditions for copying, distributing ormodifying the Program or works based on it.
6. Each time you redistribute the Program (or any work based on the Program), the recipient automatically receives alicense from the original licensor to copy, distribute or modify the Program subject to these terms and conditions. Youmay not impose any further restrictions on the recipients' exercise of the rights granted herein. You are not responsiblefor enforcing compliance by third parties to this License.
7. If, as a consequence of a court judgment or allegation of patent infringement or for any other reason (not limited topatent issues), conditions are imposed on you (whether by court order, agreement or otherwise) that contradict theconditions of this License, they do not excuse you from the conditions of this License. If you cannot distribute so as tosatisfy simultaneously your obligations under this License and any other pertinent obligations, then as a consequenceyou may not distribute the Program at all. For example, if a patent license would not permit royalty-free redistributionof the Program by all those who receive copies directly or indirectly through you, then the only way you could satisfyboth it and this License would be to refrain entirely from distribution of the Program.
If any portion of this section is held invalid or unenforceable under any particular circumstance, the balance of thesection is intended to apply and the section as a whole is intended to apply in other circumstances.
It is not the purpose of this section to induce you to infringe any patents or other property right claims or to contestvalidity of any such claims; this section has the sole purpose of protecting the integrity of the free software distributionsystem, which is implemented by public license practices. Many people have made generous contributions to the widerange of software distributed through that system in reliance on consistent application of that system; it is up to theauthor/donor to decide if he or she is willing to distribute software through any other system and a licensee cannotimpose that choice.
This section is intended to make thoroughly clear what is believed to be a consequence of the rest of this License.
8. If the distribution and/or use of the Program is restricted in certain countries either by patents or by copyrightedinterfaces, the original copyright holder who places the Program under this License may add an explicit geographicaldistribution limitation excluding those countries, so that distribution is permitted only in or among countries not thusexcluded. In such case, this License incorporates the limitation as if written in the body of this License.
9. The Free Software Foundation may publish revised and/or new versions of the General Public License from time totime. Such new versions will be similar in spirit to the present version, but may differ in detail to address newproblems or concerns.
Each version is given a distinguishing version number. If the Program specifies a version number of this License whichapplies to it and "any later version", you have the option of following the terms and conditions either of that version orof any later version published by the Free Software Foundation. If the Program does not specify a version number ofthis License, you may choose any version ever published by the Free Software Foundation.
10. If you wish to incorporate parts of the Program into other free programs whose distribution conditions are different,write to the author to ask for permission. For software which is copyrighted by the Free Software Foundation, write tothe Free Software Foundation; we sometimes make exceptions for this. Our decision will be guided by the two goals ofpreserving the free status of all derivatives of our free software and of promoting the sharing and reuse of softwaregenerally.
NO WARRANTY
11. BECAUSE THE PROGRAM IS LICENSED FREE OF CHARGE, THERE IS NO WARRANTY FOR THEPROGRAM, TO THE EXTENT PERMITTED BY APPLICABLE LAW. EXCEPT WHEN OTHERWISE STATED IN
ClearPassPolicyManager 6.2 | User Guide Software Copyright and License Statements | 361
362 | Software Copyright and License Statements ClearPassPolicyManager 6.2 | User Guide
WRITING THE COPYRIGHT HOLDERS AND/OR OTHER PARTIES PROVIDE THE PROGRAM "AS IS"WITHOUT WARRANTY OF ANY KIND, EITHER EXPRESSED OR IMPLIED, INCLUDING, BUT NOT LIMITEDTO, THE IMPLIED WARRANTIES OF MERCHANTABILITY AND FITNESS FOR A PARTICULAR PURPOSE.THE ENTIRE RISK AS TO THE QUALITY AND PERFORMANCE OF THE PROGRAM IS WITH YOU. SHOULDTHE PROGRAM PROVE DEFECTIVE, YOU ASSUME THE COST OF ALL NECESSARY SERVICING, REPAIROR CORRECTION.
12. IN NO EVENT UNLESS REQUIRED BY APPLICABLE LAW OR AGREED TO IN WRITING WILL ANYCOPYRIGHT HOLDER, OR ANY OTHER PARTY WHO MAY MODIFY AND/OR REDISTRIBUTE THEPROGRAM AS PERMITTED ABOVE, BE LIABLE TO YOU FOR DAMAGES, INCLUDING ANY GENERAL,SPECIAL, INCIDENTAL OR CONSEQUENTIAL DAMAGES ARISING OUT OF THE USE OR INABILITY TOUSE THE PROGRAM (INCLUDING BUT NOT LIMITED TO LOSS OF DATA OR DATA BEING RENDEREDINACCURATE OR LOSSES SUSTAINED BY YOU OR THIRD PARTIES OR A FAILURE OF THE PROGRAM TOOPERATE WITH ANY OTHER PROGRAMS), EVEN IF SUCH HOLDER OR OTHER PARTY HAS BEENADVISED OF THE POSSIBILITY OF SUCH DAMAGES.
END OF TERMS AND CONDITIONS
Lighthttpd LicenseCopyright (c) 2004, Jan Kneschke, incremental
All rights reserved.
Redistribution and use in source and binary forms, with or without modification, are permitted provided that thefollowing conditions are met:
- Redistributions of source code must retain the above copyright notice, this list of conditions and the followingdisclaimer.
- Redistributions in binary form must reproduce the above copyright notice, this list of conditions and the followingdisclaimer in the documentation and/or other materials provided with the distribution.
- Neither the name of the 'incremental' nor the names of its contributors may be used to endorse or promote productsderived from this software without specific prior written permission.
THIS SOFTWARE IS PROVIDED BY THE COPYRIGHT HOLDERS AND CONTRIBUTORS "AS IS" AND ANYEXPRESS OR IMPLIED WARRANTIES, INCLUDING, BUT NOT LIMITED TO, THE IMPLIED WARRANTIES OFMERCHANTABILITY AND FITNESS FOR A PARTICULAR PURPOSE ARE DISCLAIMED. IN NO EVENTSHALL THE COPYRIGHT OWNER OR CONTRIBUTORS BE LIABLE FOR ANY DIRECT, INDIRECT,INCIDENTAL, SPECIAL, EXEMPLARY, OR CONSEQUENTIAL DAMAGES (INCLUDING, BUT NOT LIMITEDTO, PROCUREMENT OF SUBSTITUTE GOODS OR SERVICES; LOSS OF USE, DATA, OR PROFITS; ORBUSINESS INTERRUPTION) HOWEVER CAUSED AND ON ANY THEORY OF LIABILITY, WHETHER INCONTRACT, STRICT LIABILITY, OR TORT (INCLUDING NEGLIGENCE OR OTHERWISE) ARISING IN ANYWAY OUT OF THE USE OF THIS SOFTWARE, EVEN IF ADVISED OF THE POSSIBILITY OF SUCH DAMAGE.
Apache LicenseVersion 2.0, January 2004
http://www.apache.org/licenses/
TERMS AND CONDITIONS FOR USE, REPRODUCTION, AND DISTRIBUTION
1. Definitions.
"License" shall mean the terms and conditions for use, reproduction, and distribution as defined by Sections 1 through9 of this document.
"Licensor" shall mean the copyright owner or entity authorized by the copyright owner that is granting the License.
"Legal Entity" shall mean the union of the acting entity and all other entities that control, are controlled by, or areunder common control with that entity. For the purposes of this definition, "control" means (i) the power, direct orindirect, to cause the direction or management of such entity, whether by contract or otherwise, or (ii) ownership offifty percent (50%) or more of the outstanding shares, or (iii) beneficial ownership of such entity.
"You" (or "Your") shall mean an individual or Legal Entity exercising permissions granted by this License.
"Source" form shall mean the preferred form for making modifications, including but not limited to software sourcecode, documentation source, and configuration files.
"Object" form shall mean any form resulting from mechanical transformation or translation of a Source form, includingbut not limited to compiled object code, generated documentation, and conversions to other media types.
"Work" shall mean the work of authorship, whether in Source or Object form, made available under the License, asindicated by a copyright notice that is included in or attached to the work (an example is provided in the Appendixbelow).
"Derivative Works" shall mean any work, whether in Source or Object form, that is based on (or derived from) theWork and for which the editorial revisions, annotations, elaborations, or other modifications represent, as a whole, anoriginal work of authorship. For the purposes of this License, Derivative Works shall not include works that remainseparable from, or merely link (or bind by name) to the interfaces of, the Work and Derivative Works thereof.
"Contribution" shall mean any work of authorship, including the original version of the Work and any modifications oradditions to that Work or Derivative Works thereof, that is intentionally submitted to Licensor for inclusion in theWork by the copyright owner or by an individual or Legal Entity authorized to submit on behalf of the copyrightowner. For the purposes of this definition, "submitted" means any form of electronic, verbal, or written communicationsent to the Licensor or its representatives, including but not limited to communication on electronic mailing lists,source code control systems, and issue tracking systems that are managed by, or on behalf of, the Licensor for thepurpose of discussing and improving the Work, but excluding communication that is conspicuously marked orotherwise designated in writing by the copyright owner as "Not a Contribution."
"Contributor" shall mean Licensor and any individual or Legal Entity on behalf of whom a Contribution has beenreceived by Licensor and subsequently incorporated within the Work.
2. Grant of Copyright License. Subject to the terms and conditions of this License, each Contributor hereby grants toYou a perpetual, worldwide, non-exclusive, no-charge, royalty-free, irrevocable copyright license to reproduce, prepareDerivative Works of, publicly display, publicly perform, sublicense, and distribute the Work and such DerivativeWorks in Source or Object form.
3. Grant of Patent License. Subject to the terms and conditions of this License, each Contributor hereby grants to Youa perpetual, worldwide, non-exclusive, no-charge, royalty-free, irrevocable (except as stated in this section) patentlicense to make, have made, use, offer to sell, sell, import, and otherwise transfer the Work, where such license appliesonly to those patent claims licensable by such Contributor that are necessarily infringed by their Contribution(s) aloneor by combination of their Contribution(s) with the Work to which such Contribution(s) was submitted. If Youinstitute patent litigation against any entity (including a cross-claim or counterclaim in a lawsuit) alleging that theWork or a Contribution incorporated within the Work constitutes direct or contributory patent infringement, then anypatent licenses granted to You under this License for that Work shall terminate as of the date such litigation is filed.
4. Redistribution. You may reproduce and distribute copies of the Work or Derivative Works thereof in any medium,with or without modifications, and in Source or Object form, provided that You meet the following conditions:
1. You must give any other recipients of the Work or Derivative Works a copy of this License; and
2. You must cause any modified files to carry prominent notices stating that You changed the files; and
ClearPassPolicyManager 6.2 | User Guide Software Copyright and License Statements | 363
364 | Software Copyright and License Statements ClearPassPolicyManager 6.2 | User Guide
3. You must retain, in the Source form of any Derivative Works that You distribute, all copyright, patent, trademark,and attribution notices from the Source form of the Work, excluding those notices that do not pertain to any part of theDerivative Works; and
4. If the Work includes a "NOTICE" text file as part of its distribution, then any Derivative Works that You distributemust include a readable copy of the attribution notices contained within such NOTICE file, excluding those noticesthat do not pertain to any part of the Derivative Works, in at least one of the following places: within a NOTICE textfile distributed as part of the Derivative Works; within the Source form or documentation, if provided along with theDerivative Works; or, within a display generated by the Derivative Works, if and wherever such third-party noticesnormally appear. The contents of the NOTICE file are for informational purposes only and do not modify the License.You may add Your own attribution notices within Derivative Works that You distribute, alongside or as an addendumto the NOTICE text from the Work, provided that such additional attribution notices cannot be construed asmodifying the License.
You may add Your own copyright statement to Your modifications and may provide additional or different licenseterms and conditions for use, reproduction, or distribution of Your modifications, or for any such Derivative Works as awhole, provided Your use, reproduction, and distribution of the Work otherwise complies with the conditions stated inthis License.
5. Submission of Contributions. Unless You explicitly state otherwise, any Contribution intentionally submitted forinclusion in the Work by You to the Licensor shall be under the terms and conditions of this License, without anyadditional terms or conditions. Notwithstanding the above, nothing herein shall supersede or modify the terms of anyseparate license agreement you may have executed with Licensor regarding such Contributions.
6. Trademarks. This License does not grant permission to use the trade names, trademarks, service marks, or productnames of the Licensor, except as required for reasonable and customary use in describing the origin of the Work andreproducing the content of the NOTICE file.
7. Disclaimer of Warranty. Unless required by applicable law or agreed to in writing, Licensor provides the Work (andeach Contributor provides its Contributions) on an "AS IS" BASIS, WITHOUT WARRANTIES OR CONDITIONS OFANY KIND, either express or implied, including, without limitation, any warranties or conditions of TITLE, NON-INFRINGEMENT, MERCHANTABILITY, or FITNESS FOR A PARTICULAR PURPOSE. You are solely responsiblefor determining the appropriateness of using or redistributing the Work and assume any risks associated with Yourexercise of permissions under this License.
8. Limitation of Liability. In no event and under no legal theory, whether in tort (including negligence), contract, orotherwise, unless required by applicable law (such as deliberate and grossly negligent acts) or agreed to in writing,shall any Contributor be liable to You for damages, including any direct, indirect, special, incidental, or consequentialdamages of any character arising as a result of this License or out of the use or inability to use the Work (including butnot limited to damages for loss of goodwill, work stoppage, computer failure or malfunction, or any and all othercommercial damages or losses), even if such Contributor has been advised of the possibility of such damages.
9. Accepting Warranty or Additional Liability. While redistributing the Work or Derivative Works thereof, You maychoose to offer, and charge a fee for, acceptance of support, warranty, indemnity, or other liability obligations and/orrights consistent with this License. However, in accepting such obligations, You may act only on Your own behalfand on Your sole responsibility, not on behalf of any other Contributor, and only if You agree to indemnify, defend,and hold each Contributor harmless for any liability incurred by, or claims asserted against, such Contributor by reasonof your accepting any such warranty or additional liability.
END OF TERMS AND CONDITIONS
OpenSSL License/* ==============================================
* Copyright (c) 1998-2007 The OpenSSL Project. All rights reserved.
*
* Redistribution and use in source and binary forms, with or without
* modification, are permitted provided that the following conditions
* are met:
*
* 1. Redistributions of source code must retain the above copyright
* notice, this list of conditions and the following disclaimer.
*
* 2. Redistributions in binary form must reproduce the above copyright
* notice, this list of conditions and the following disclaimer in
* the documentation and/or other materials provided with the
* distribution.
*
* 3. All advertising materials mentioning features or use of this
* software must display the following acknowledgment:
* "This product includes software developed by the OpenSSL Project
* for use in the OpenSSL Toolkit. (http://www.openssl.org/)"
*
* 4. The names "OpenSSL Toolkit" and "OpenSSL Project" must not be used to
* endorse or promote products derived from this software without
* prior written permission. For written permission, please contact
*
* 5. Products derived from this software may not be called "OpenSSL"
* nor may "OpenSSL" appear in their names without prior written
* permission of the OpenSSL Project.
*
* 6. Redistributions of any form whatsoever must retain the following
* acknowledgment:
* "This product includes software developed by the OpenSSL Project
* for use in the OpenSSL Toolkit (http://www.openssl.org/)"
*
* THIS SOFTWARE IS PROVIDED BY THE OpenSSL PROJECT ``AS IS'' AND ANY
* EXPRESSED OR IMPLIED WARRANTIES, INCLUDING, BUT NOT LIMITED TO, THE
* IMPLIED WARRANTIES OF MERCHANTABILITY AND FITNESS FOR A PARTICULAR
* PURPOSE ARE DISCLAIMED. IN NO EVENT SHALL THE OpenSSL PROJECT OR
* ITS CONTRIBUTORS BE LIABLE FOR ANY DIRECT, INDIRECT, INCIDENTAL,
ClearPassPolicyManager 6.2 | User Guide Software Copyright and License Statements | 365
366 | Software Copyright and License Statements ClearPassPolicyManager 6.2 | User Guide
* SPECIAL, EXEMPLARY, OR CONSEQUENTIAL DAMAGES (INCLUDING, BUT
* NOT LIMITED TO, PROCUREMENT OF SUBSTITUTE GOODS OR SERVICES;
* LOSS OF USE, DATA, OR PROFITS; OR BUSINESS INTERRUPTION)
* HOWEVER CAUSED AND ON ANY THEORY OF LIABILITY, WHETHER IN CONTRACT,
* STRICT LIABILITY, OR TORT (INCLUDING NEGLIGENCE OR OTHERWISE)
* ARISING IN ANY WAY OUT OF THE USE OF THIS SOFTWARE, EVEN IF ADVISED
* OF THE POSSIBILITY OF SUCH DAMAGE.
* ==============================================
*
* This product includes cryptographic software written by Eric Young
* ([email protected]). This product includes software written by Tim
* Hudson ([email protected]).
*
*/
Original SSLeay License
-----------------------
/* Copyright (C) 1995-1998 Eric Young ([email protected])
* All rights reserved.
*
* This package is an SSL implementation written
* by Eric Young ([email protected]).
* The implementation was written so as to conform with Netscapes SSL.
*
* This library is free for commercial and non-commercial use as long as
* the following conditions are adhered to. The following conditions
* apply to all code found in this distribution, be it the RC4, RSA,
* lhash, DES, etc., code; not just the SSL code. The SSL documentation
* included with this distribution is covered by the same copyright terms
* except that the holder is Tim Hudson ([email protected]).
*
* Copyright remains Eric Young's, and as such any Copyright notices in
* the code are not to be removed.
* If this package is used in a product, Eric Young should be given attribution
* as the author of the parts of the library used.
* This can be in the form of a textual message at program startup or
* in documentation (online or textual) provided with the package.
*
* Redistribution and use in source and binary forms, with or without
* modification, are permitted provided that the following conditions
* are met:
* 1. Redistributions of source code must retain the copyright
* notice, this list of conditions and the following disclaimer.
* 2. Redistributions in binary form must reproduce the above copyright
* notice, this list of conditions and the following disclaimer in the
* documentation and/or other materials provided with the distribution.
* 3. All advertising materials mentioning features or use of this software
* must display the following acknowledgment:
* "This product includes cryptographic software written by
* Eric Young ([email protected])"
* The word 'cryptographic' can be left out if the routines from the library
* being used are not cryptographic related :-).
* 4. If you include any Windows specific code (or a derivative thereof) from
* the apps directory (application code) you must include an acknowledgment:
* "This product includes software written by Tim Hudson ([email protected]"
*
* THIS SOFTWARE IS PROVIDED BY ERIC YOUNG ``AS IS'' AND
* ANY EXPRESS OR IMPLIED WARRANTIES, INCLUDING, BUT NOT LIMITED TO, THE
* IMPLIED WARRANTIES OF MERCHANTABILITY AND FITNESS FOR A PARTICULAR PURPOSE
* ARE DISCLAIMED. IN NO EVENT SHALL THE AUTHOR OR CONTRIBUTORS BE LIABLE
* FOR ANY DIRECT, INDIRECT, INCIDENTAL, SPECIAL, EXEMPLARY, OR CONSEQUENTIAL
* DAMAGES (INCLUDING, BUT NOT LIMITED TO, PROCUREMENT OF SUBSTITUTE GOODS
* OR SERVICES; LOSS OF USE, DATA, OR PROFITS; OR BUSINESS INTERRUPTION)
* HOWEVER CAUSED AND ON ANY THEORY OF LIABILITY, WHETHER IN CONTRACT, STRICT
* LIABILITY, OR TORT (INCLUDING NEGLIGENCE OR OTHERWISE) ARISING IN ANY WAY
* OUT OF THE USE OF THIS SOFTWARE, EVEN IF ADVISED OF THE POSSIBILITY OF
* SUCH DAMAGE.
*
* The license and distribution terms for any publicly available version or
* derivative of this code cannot be changed. i.e. this code cannot simply be
* copied and put under another distribution license
* [including the GNU Public License.] */
OpenLDAP LicenseThe OpenLDAP Public License
ClearPassPolicyManager 6.2 | User Guide Software Copyright and License Statements | 367

368 | Software Copyright and License Statements ClearPassPolicyManager 6.2 | User Guide
Version 2.8, 17 August 2003
Redistribution and use of this software and associated documentation ("Software"), with or without modification, arepermitted provided that the following conditions are met:
1. Redistributions in source form must retain copyright statements and notices,
2. Redistributions in binary form must reproduce applicable copyright statements and notices, this list of conditions,and the following disclaimer in the documentation and/or other materials provided with the distribution, and
3. Redistributions must contain a verbatim copy of this document. The OpenLDAP Foundation may revise this licensefrom time to time. Each revision is distinguished by a version number. You may use this Software under terms of thislicense revision or under the terms of any subsequent revision of the license.
THIS SOFTWARE IS PROVIDED BY THE OPENLDAP FOUNDATION AND ITS CONTRIBUTORS "AS IS'' ANDANY EXPRESSED OR IMPLIED WARRANTIES,INCLUDING, BUT NOT LIMITED TO, THE IMPLIEDWARRANTIES OF MERCHANTABILITY AND FITNESS FOR A PARTICULAR PURPOSE ARE DISCLAIMED.IN NO EVENT SHALL THE OPENLDAP FOUNDATION, ITS CONTRIBUTORS, OR THE AUTHOR(S) OROWNER(S) OF THE SOFTWARE BE LIABLE FOR ANY DIRECT, INDIRECT,INCIDENTAL, SPECIAL,EXEMPLARY, OR CONSEQUENTIAL DAMAGES (INCLUDING, BUT NOT LIMITED TO, PROCUREMENT OFSUBSTITUTE GOODS OR SERVICES; LOSS OF USE, DATA, OR PROFITS; OR BUSINESS INTERRUPTION)HOWEVER CAUSED AND ON ANY THEORY OF LIABILITY, WHETHER IN CONTRACT, STRICT LIABILITY,OR TORT (INCLUDING NEGLIGENCE OR OTHERWISE) ARISING IN ANY WAY OUT OF THE USE OF THISSOFTWARE, EVEN IF ADVISED OF THE POSSIBILITY OF SUCH DAMAGE.
The names of the authors and copyright holders must not be used in advertising or otherwise to promote the sale, useor other dealing in this Software without specific, written prior permission. Title to copyright in this Software shall atall times remain with copyright holders.
OpenLDAP is a registered trademark of the OpenLDAP Foundation. Copyright 1999-2003 The OpenLDAPFoundation, Redwood City, California, USA. All Rights Reserved. Permission to copy and distribute verbatim copiesof this document is granted.
gSOAP Public LicensePortions created by gSOAP are Copyright (C) 2001-2004 Robert A. van Engelen, Genivia inc. All Rights Reserved.
THE SOFTWARE IN THIS PRODUCT WAS IN PART PROVIDED BY GENIVIA INC AND ANY EXPRESS ORIMPLIED WARRANTIES, INCLUDING, BUT NOT LIMITED TO, THE IMPLIED WARRANTIES OFMERCHANTABILITY AND FITNESS FOR A PARTICULAR PURPOSE ARE DISCLAIMED. IN NO EVENTSHALL THE AUTHOR BE LIABLE FOR ANY DIRECT, INDIRECT, INCIDENTAL, SPECIAL, EXEMPLARY, ORCONSEQUENTIAL DAMAGES (INCLUDING, BUT NOT LIMITED TO, PROCUREMENT OF SUBSTITUTEGOODS OR SERVICES; LOSS OF USE, DATA, OR PROFITS; OR BUSINESS INTERRUPTION) HOWEVERCAUSED AND ON ANY THEORY OF LIABILITY, WHETHER IN CONTRACT, STRICT LIABILITY, OR TORT(INCLUDING NEGLIGENCE OR OTHERWISE) ARISING IN ANY WAY OUT OF THE USE OF THISSOFTWARE, EVEN IF ADVISED OF THE POSSIBILITY OF SUCH DAMAGE."


