34
Business 2022/03/26 06:09 i ASCENDER Business Overview Guide ASCENDER Business Overview Guide

Business
2022/03/26 06:09 i ASCENDER Business Overview Guide
ASCENDER Business Overview Guide

Business
2022/03/26 06:09 ii ASCENDER Business Overview Guide
Business
2022/03/26 06:09 iii ASCENDER Business Overview Guide
Table of ContentsASCENDER Business Overview Guide i ................................................................................................ ASCENDER Business Overview 1 ...........................................................................................................
Login 4 ............................................................................................................................................... Login 4 .......................................................................................................................................... Change Password 5 ...................................................................................................................... Exit Application 8 .......................................................................................................................... Logout 8 ....................................................................................................................................... Incorrect Logout Method 9 ............................................................................................................
Navigation 9 ...................................................................................................................................... Dashboard 9 ................................................................................................................................. Approval Summary 10 .................................................................................................................. Menu and Tabs 13 ........................................................................................................................ Change Application 15 .................................................................................................................. Application Tabs 15 ...................................................................................................................... Change Feature 16 ....................................................................................................................... Software Version 17 ..................................................................................................................... County District 17 ......................................................................................................................... System Alerts 18 .......................................................................................................................... Provide Feedback 18 .................................................................................................................... Online Help 21 .............................................................................................................................. Session Timers 21 ........................................................................................................................
Retrieve & Maintain Data 21 .......................................................................................................... Autotab 21 .................................................................................................................................... Autosuggest 22 ............................................................................................................................ Add a Row 22 ............................................................................................................................... Delete a Row 23 ........................................................................................................................... Column Sort 23 ............................................................................................................................. Pagination 24 ................................................................................................................................ Ellipsis Icon 25 .............................................................................................................................. Spyglass Icon 26 ........................................................................................................................... Save Changes 27 ..........................................................................................................................
Reports 27 ......................................................................................................................................... Generate a Report 27 ................................................................................................................... Create a Report 29 .......................................................................................................................
Business
2022/03/26 06:09 iv ASCENDER Business Overview Guide

Business
2022/03/26 06:09 1 ASCENDER Business Overview Guide
ASCENDER Business Overview
The ASCENDER Business System is a group of web-based applications that allow you to interactwith the database using an Internet browser such as Firefox, Google Chrome, or Safari (Mac only).As the ASCENDER System evolves, the browser versions are updated.
Here are a few tips:
For adequate viewing, be sure to check your screen resolution settings. The recommendedscreen resolution setting is 1280×1024.It is recommended that you clear your Internet browser’s cache each time a release isinstalled or updated.Be sure to access the ASCENDER Browser Settings document for the most current systembrowser settings information. This document can be found in the online Help.If you experience any issues or have questions, please contact your regional EducationService Center.
About Release Notes & Known Issues:
As the ASCENDER software programs are modified, release notes are posted atresources.ascendertx.com. An ESC consultant login is required to access the ASCENDER Resourcespage.
If known issues are identified for a particular release or update, a Known Issues document is alsoposted.
System Requirements and Browser Settings:
Periodically ensure that your system and browser settings meet the minimum requirements.
For information about system requirements and recommended browser settings, see ASCENDERRecommended Browser Settings.
A link to this document can also be found in the following places:
Contents tab of the ASCENDER online Help systemSystem login pagesASCENDER Resources
ASCENDER Software Terminology:
System - The group of applications supporting a broad area of LEA or campus management, or aspecific group of applications (e.g., Business, Student, State Reporting, OCR, District Administration,System Administration).
Business
2022/03/26 06:09 2 ASCENDER Business Overview Guide
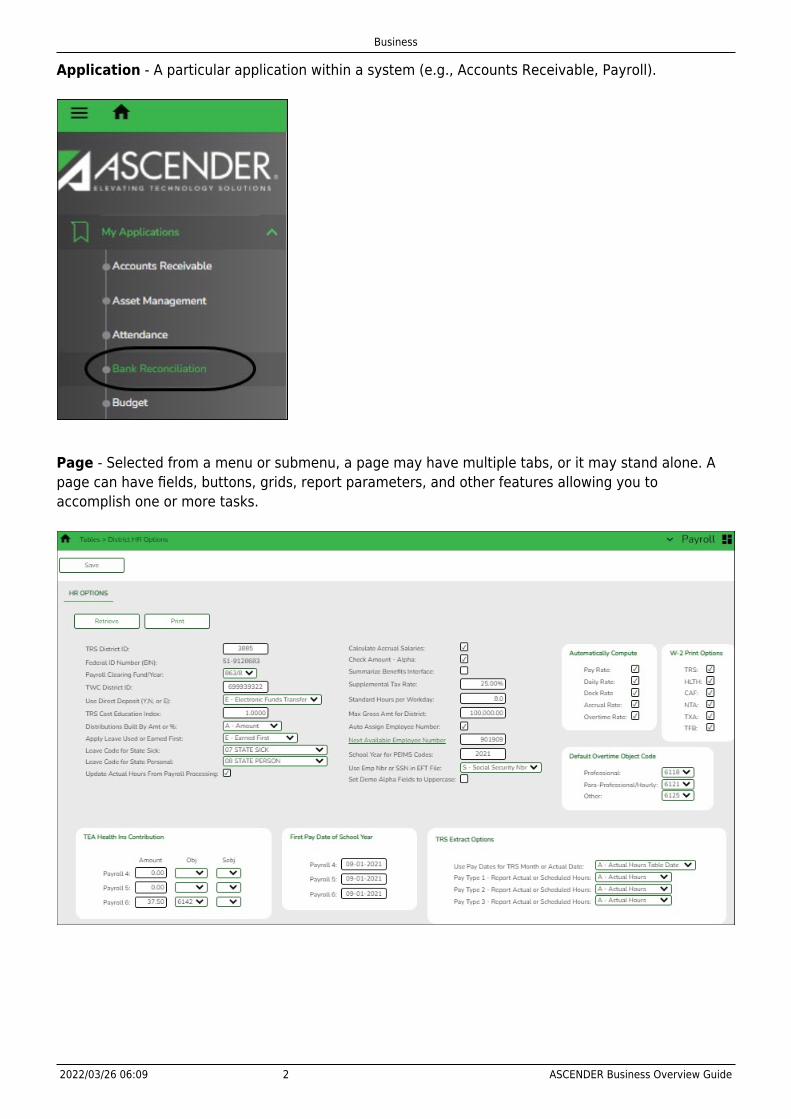
Application - A particular application within a system (e.g., Accounts Receivable, Payroll).
Page - Selected from a menu or submenu, a page may have multiple tabs, or it may stand alone. Apage can have fields, buttons, grids, report parameters, and other features allowing you toaccomplish one or more tasks.

Business
2022/03/26 06:09 3 ASCENDER Business Overview Guide
Tab - Some pages have multiple tabs allowing you to accomplish tasks that can be logically groupedtogether.
Field - A mechanism for inputting data, such as a text entry box, drop-down list, check box, or radiobutton. Each field has a label, such as the Employee Status field. Note that in ASCENDER onlineHelp and other documentation, field names are displayed in bold font.
Report Parameters - Fields that allow you to input criteria for running reports. You will notice somereport parameters are heavily bolded, which means that data input is required for that parameter.

Business
2022/03/26 06:09 4 ASCENDER Business Overview Guide
Grid - A group of records displayed in columns and rows, or empty columns and rows in which to addnew records, such as a table maintenance page.
Upon initial log on to ASCENDER Enterprise, the End User License Agreement (EULA) forASCENDER is displayed. Users must accept the agreement in order to proceed. Thisagreement must be accepted on an annual basis.
Login
Login Page:
Login
Field DescriptionUser Name Type your user ID or name provided by your local education agency
(LEA).
Business
2022/03/26 06:09 5 ASCENDER Business Overview Guide
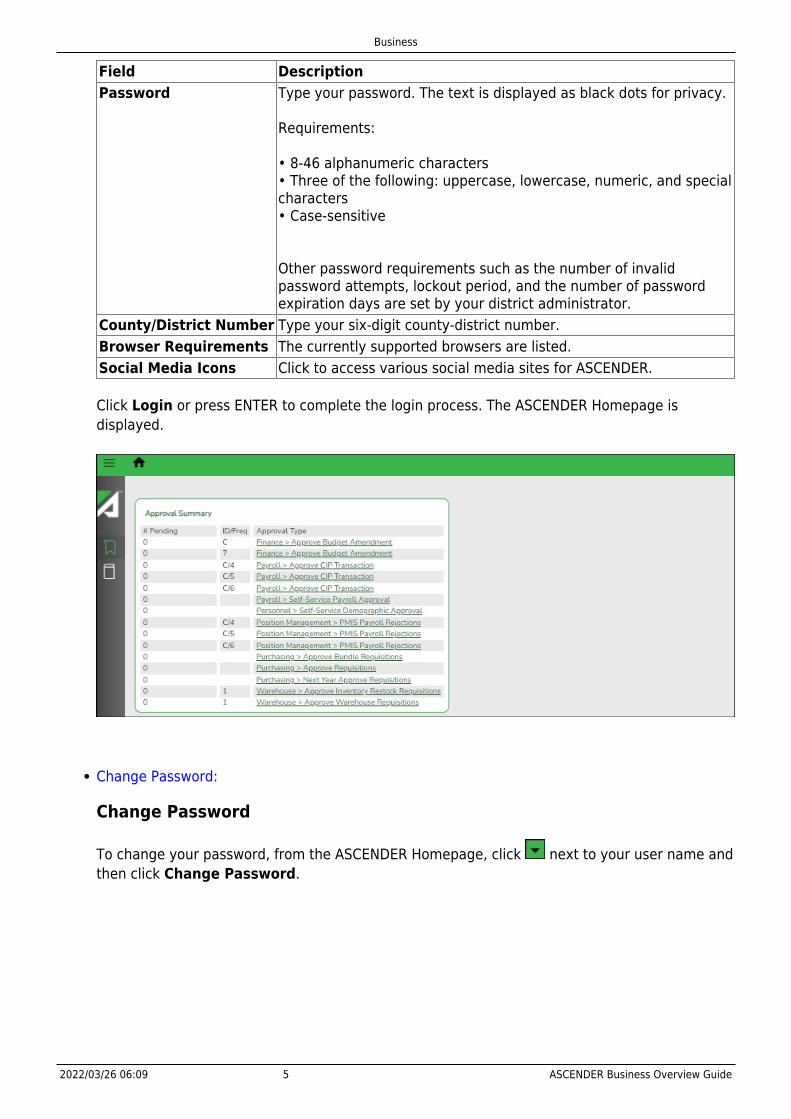
Field DescriptionPassword Type your password. The text is displayed as black dots for privacy.
Requirements:
• 8-46 alphanumeric characters• Three of the following: uppercase, lowercase, numeric, and specialcharacters• Case-sensitive
Other password requirements such as the number of invalidpassword attempts, lockout period, and the number of passwordexpiration days are set by your district administrator.
County/District Number Type your six-digit county-district number.Browser Requirements The currently supported browsers are listed.Social Media Icons Click to access various social media sites for ASCENDER.
Click Login or press ENTER to complete the login process. The ASCENDER Homepage isdisplayed.
Change Password:
Change Password
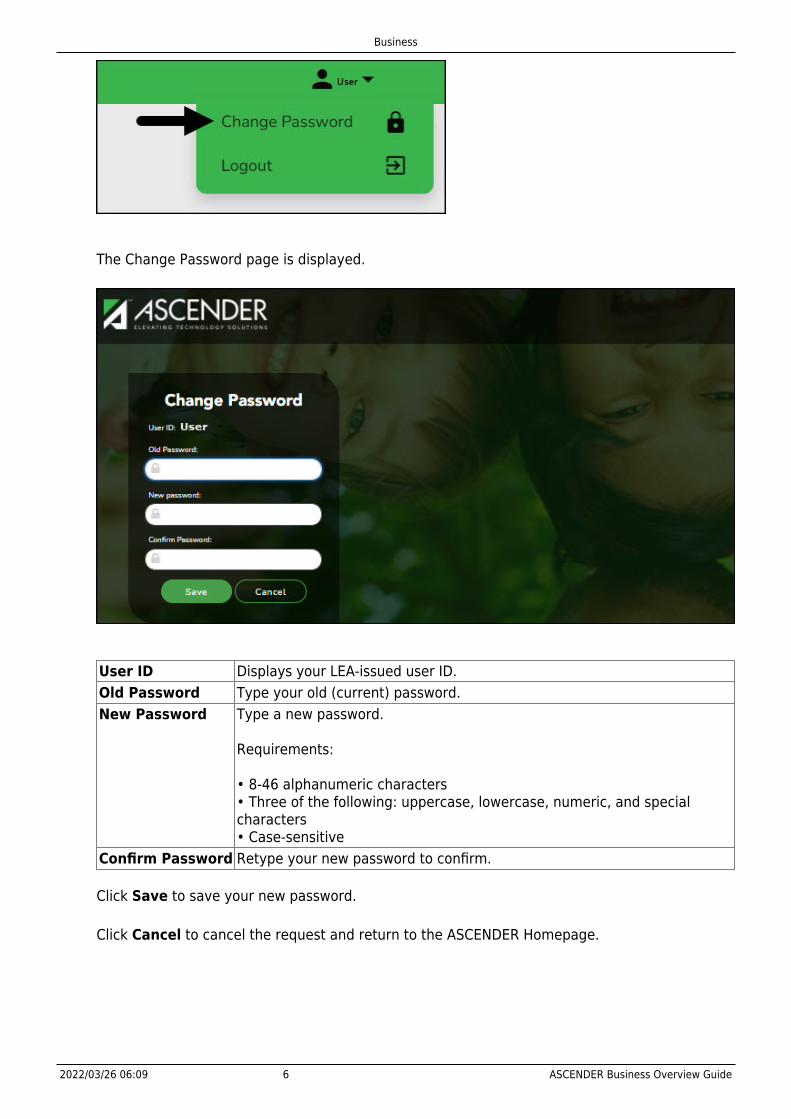
To change your password, from the ASCENDER Homepage, click next to your user name andthen click Change Password.
Business
2022/03/26 06:09 6 ASCENDER Business Overview Guide
The Change Password page is displayed.
User ID Displays your LEA-issued user ID.Old Password Type your old (current) password.New Password Type a new password.
Requirements:
• 8-46 alphanumeric characters• Three of the following: uppercase, lowercase, numeric, and specialcharacters• Case-sensitive
Confirm Password Retype your new password to confirm.
Click Save to save your new password.
Click Cancel to cancel the request and return to the ASCENDER Homepage.
Business
2022/03/26 06:09 7 ASCENDER Business Overview Guide
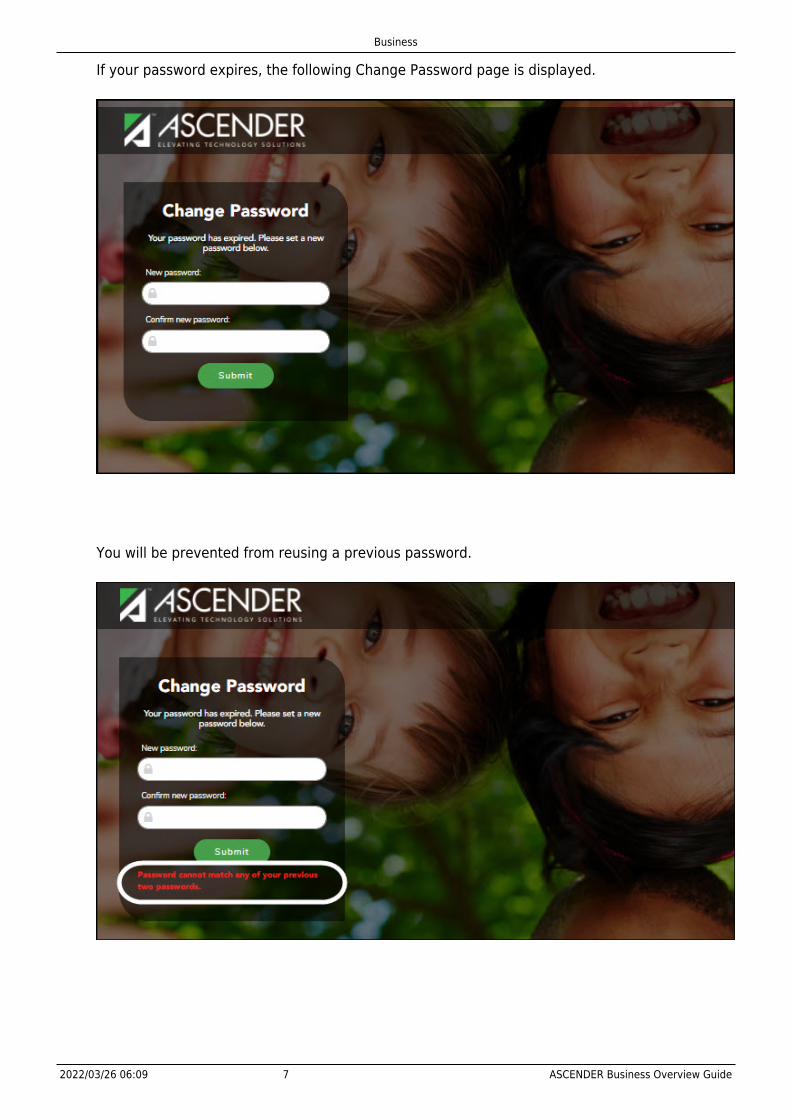
If your password expires, the following Change Password page is displayed.
You will be prevented from reusing a previous password.

Business
2022/03/26 06:09 8 ASCENDER Business Overview Guide
The following page is displayed upon successfully changing your password:
Exit & Logout:
It is important to exit and log out correctly to ensure that the software functionsproperly.
Exit Application
To exit any open application, in the top-right corner of each application next to your user name,click .
An exit application page is displayed with a message indicating that you have logged outsuccessfully and you may close the browser tab.
Logout
Business
2022/03/26 06:09 9 ASCENDER Business Overview Guide
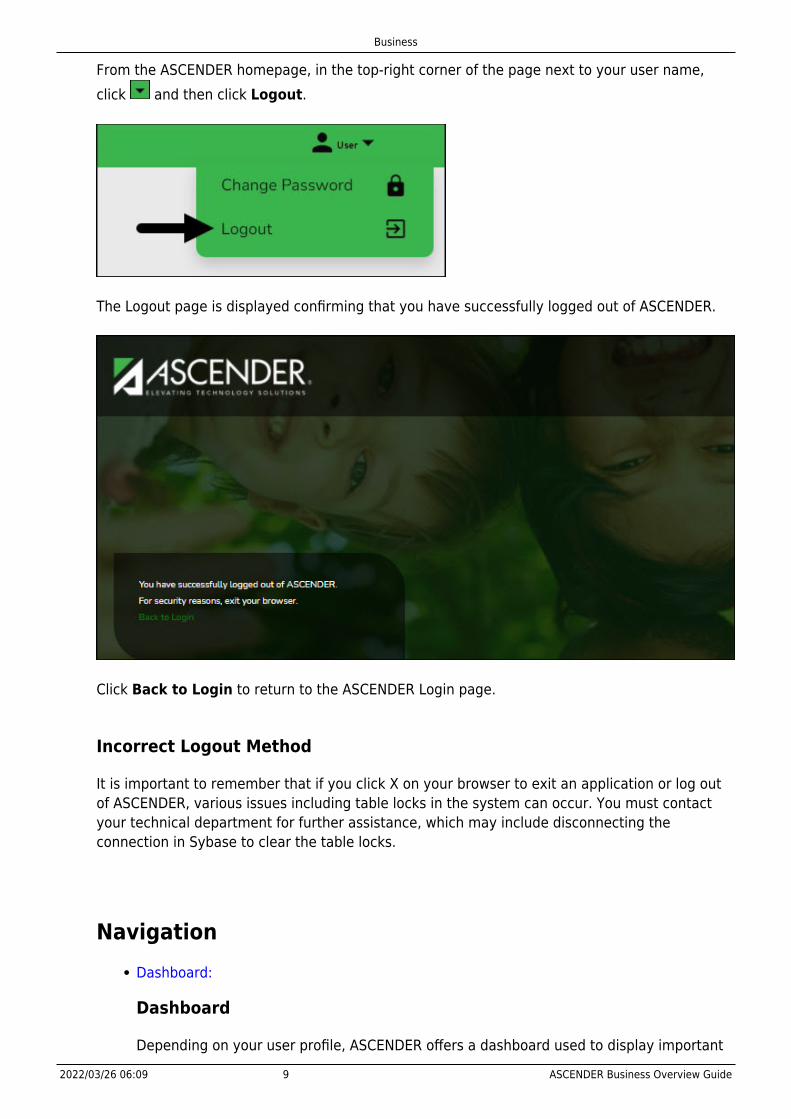
From the ASCENDER homepage, in the top-right corner of the page next to your user name,click and then click Logout.
The Logout page is displayed confirming that you have successfully logged out of ASCENDER.
Click Back to Login to return to the ASCENDER Login page.
Incorrect Logout Method
It is important to remember that if you click X on your browser to exit an application or log outof ASCENDER, various issues including table locks in the system can occur. You must contactyour technical department for further assistance, which may include disconnecting theconnection in Sybase to clear the table locks.
NavigationDashboard:
Dashboard
Depending on your user profile, ASCENDER offers a dashboard used to display important

Business
2022/03/26 06:09 10 ASCENDER Business Overview Guide
information from multiple sources into one, easy-to-access place.
Currently, there is only one dashboard element available for Business users:
Approval Summary
If you have at least one approval responsibility in ASCENDER, the Approval Summary isdisplayed on the ASCENDER homepage with a list of your assigned approval types.
Click here for a complete list of approval types that are included in the Approval Summarybased on your profile.
# Pending Displays the number of pending approval items for the correspondingapproval type.
ID/Freq Displays the ID or pay frequency tied to the pending item, if applicable.Approval Type Displays a link to the page where you have pending approval items.
In this example, the user has one pending approval item for Payroll > Approve CIPTransaction.
❏ Click the link. The selected page opens in a separate browser window.

Business
2022/03/26 06:09 11 ASCENDER Business Overview Guide
❏ Perform the necessary action to satisfy the pending item.
❏ Log out of ASCENDER and then log back in to refresh the homepage.
Notice that the count under # Pending resets to 0 after the item is approved.
Applications:
The ASCENDER homepage serves as a personalized dashboard and displays links to allASCENDER applications that are tied to your user profile.
The main menu is located on the left side of the page. In the upper-left corner, click to collapse the main menu or expand the main menu. This functionality is available on allpages in all applications. And, on some pages must be used for a more favorable view ofthe actual page.
Collapsed view - The main menu is hidden.

Business
2022/03/26 06:09 12 ASCENDER Business Overview Guide
Expanded view - The main menu is open.
Depending on your view, click or My Applications to view a list of applications towhich you have rights.

Business
2022/03/26 06:09 13 ASCENDER Business Overview Guide
All other applications are listed under Other Applications. Click to view a list of otherapplications to which you do not have rights.
Access rights for each application must be set in Security Administration by a user withaccess to that system.
If you attempt to open an application you do not have rights to, the following page isdisplayed:
Click Exit to return to the ASCENDER homepage.
Menu & Tabs:
Menu and Tabs
After you select an application from the ASCENDER homepage, the application homepageis displayed. In the below example, the Payroll application is selected.

Business
2022/03/26 06:09 14 ASCENDER Business Overview Guide
Select a main menu item (e.g., Tables, Maintenance, Inquiry, etc.). The available submenuoptions are displayed. Use the gray scroll bar to scroll up and down and view anyadditional submenu options.
Select the menu or submenu options for the page you want to display.
Many pages consist of multiple tabs. Click the tab to be displayed. You will notice adifference in font color. The tab that is currently open on the page displays in green fontand is underlined. All other tab names are black with no underline. Click another tabname to view data on a different tab.

Business
2022/03/26 06:09 15 ASCENDER Business Overview Guide
If a tab is disabled (grayed out), you may not have security permission to access the tab,the tab may not be available in the setting (year or pay frequency) to which you arelogged on, or a process on another tab may need to be performed before the tab isenabled.
For example, the Leave Balance tab is disabled when a user is logged on to the next yearpay frequency.
Change Application
From any application page, you can open a new application. At the top of the page next tothe open application name (in this case Payroll), click . A list of all ASCENDERapplications is displayed in alphabetical order. Select the application you want to open. Aseparate browser tab opens with the newly selected application homepage.
Application Tabs
Open applications are set up to display as separate browser tabs so you can easily

Business
2022/03/26 06:09 16 ASCENDER Business Overview Guide
navigate from one application to another.
If you have multiple applications open, you can navigate to an open application withoutexiting from any one application by selecting the associated browser tab located at thetop of the page.
Note: The session timer operates separately for each application, which may causeyou to receive a session timeout message from one application while you are inanother application.
Review the Session Timers section for more information about setting up sessiontimers.
Multiple pages (i.e., menu items) cannot be displayed within an application. When a newmenu selection is made, the current page is no longer displayed. If data modifications aremade on the page and the changes are not saved, an unsaved data warning message isdisplayed. You can select to leave the page without saving the changes or remain on thepage to continue making changes or save the changes on the page.
Change File ID, Accounting Period, or Payroll Frequency.
Change Feature
In the top-right corner of the page, the Change feature allows you to change the file ID,year, accounting period, payroll frequency, and warehouse ID. This feature is onlyavailable if you are logged on to the following applications:
Asset Management (file ID)Budget (file ID)Finance (year and accounting period)Payroll (year and frequency)Position Management (year and frequency)Warehouse (warehouse ID)

Business
2022/03/26 06:09 17 ASCENDER Business Overview Guide
Depending on the application to which you are logged on, click Change to enable theapplicable change fields.
Depending on the application, the drop-down field(s) are enabled. Click to view a list ofthe applicable years, file IDs, accounting periods, or payroll frequencies. Select theapplicable option(s) and click Apply. The application data changes to match yourselection.
Click Cancel to cancel the changes.
Software Version:
Software Version
The following information is displayed at the lower-left corner of the page under the mainmenu.
Version Displays the ASCENDER software version.Build Displays the ASCENDER software build number.Host Displays the software server host information.Browser Displays the browser and version details (e.g., Google Chrome Version 85.0).
County District:
County District
The following information is displayed in the lower-left corner of the page under thesoftware version details.

Business
2022/03/26 06:09 18 ASCENDER Business Overview Guide
County/District Displays the county district number to which you are logged on. Tochange this number, log out and log back in with a different number.
System Alerts & Feedback:
System Alerts
At the bottom of each page, there is an orange message line that displays any systemalerts.
Click Hide to hide the message line. The message line will remain hidden as you navigateto other tabs within the same page. The message line will show again if you navigate to anew menu item or when a record is saved.
Click Show to show the message line.
Provide Feedback
On the right side of each page, there is a blue Provide Feedback button. Thisfunctionality allows you to submit feedback about the system. The feedback is forwardedto the respective ESC for review.

Business
2022/03/26 06:09 19 ASCENDER Business Overview Guide
Click Provide Feedback to open the We value your feedback pop-up window. Completethe applicable fields and click Submit. Otherwise, click Close to close the window withoutsubmitting feedback.

Business
2022/03/26 06:09 20 ASCENDER Business Overview Guide
Online Help:

Business
2022/03/26 06:09 21 ASCENDER Business Overview Guide
Online Help
Access the ASCENDER online Help by clicking the Help button in the lower-right corner ofthe page.
The Help topic is specific to the application page. You can browse other Help topics fromthe Help window. Online Help is available for all applications and is page sensitive.Additionally, you can access a variety of process-specific guides and checklists in theOnline Help.
Review the ASCENDER Online Help page for more information.
Session Timers:
Session Timers
Across the bottom of each application page, a session timer is displayed. As each page isdisplayed, the timer resets.
Review the Session Timers Help page in District Administration for more informationabout session timers.
Retrieve & Maintain Data
From each page or tab, data can be retrieved, viewed, added, deleted, and modified using thefollowing tools:
Auto features:
Autotab
The autotab feature eliminates the need to manually click in or tab to the next field.Instead, the next defined text field automatically receives the cursor focus when themaximum number of characters in the current text field is reached.
In the example below, as you type a 20-digit account code number in nine separateboxes, you do not need to tab to each box. If you type a three-digit fund number in theFund field, the cursor focus automatically tabs to the next field and so on.

Business
2022/03/26 06:09 22 ASCENDER Business Overview Guide
When the cursor moves to a new field, all of the characters in that field will behighlighted.
If you are replacing the data, on your first keystroke of the new data, all of the old datawill be deleted, and you can type the new data.
You may also use your arrow keys to move to any specific part of the data in the field toupdate or replace the data, such as spelling or changing numbers in a sequence.
Autosuggest
The autosuggest feature allows you to type in specific data, as you type the data, a drop-down list of corresponding data is displayed. You can make a selection from the drop-down list, scroll through the drop-down list, or type new data in the field.
Depending on the field and page, press the SPACEBAR to view a list (in some caseslimited) of available options for the field.
Add and delete rows:
Add a Row
In a table or grid, click +Add to add a new data entry row. A new row is added to thebottom of the grid or list.

Business
2022/03/26 06:09 23 ASCENDER Business Overview Guide
Delete a Row
Click to delete a row. This icon is displayed next to any row that can be deleted. Therow is shaded red to indicate that it will be deleted when the record is saved.
If you do not want to delete the selected row, click again to unselect the row fordeletion.
If restrictions exist, a message is displayed indicating the reason.
Column sort:
Column Sort
When a column heading is underlined, the column can be sorted. Click the column to sortthe data in ascending order, and then click the column again to sort the data indescending order.

Business
2022/03/26 06:09 24 ASCENDER Business Overview Guide
- indicates that the column is sorted in ascending order
- indicates that the column is sorted in descending order
Pagination:
Pagination
Depending on the page, approximately 30 rows of data is displayed or can be viewed withthe use of the scroll bar. If the data exceeds the number of rows that can be displayed onthe page, the page numbers are displayed on the bottom-left side of the page.
You can view and select which pages to display from the drop down. Or, you can click thearrow icons on either side of the page numbers to move between pages.
The pagination feature on some pages includes the range of data per page. In the belowimage, the page is sorted by Fund so each page displays the fund range listed on thatpage so you can find funds 180-240 on page 1 and so on.

Business
2022/03/26 06:09 25 ASCENDER Business Overview Guide
You can navigate between pages by using the below buttons:
Click to go to the first page.Click to go back one page.Click to go forward one page.Click to go to the last page.
Ellipsis icon:
Ellipsis Icon
The ellipsis icon is displayed next to a field and remains on the page at all times. You donot have to tab into the field for it to be displayed.
Click to display a pop-up window with data that corresponds to the field.
Click the link of the option to be populated in the field.

Business
2022/03/26 06:09 26 ASCENDER Business Overview Guide
Otherwise, click Cancel or X to close the pop-up window without making a selection.
Spyglass icon:
Spyglass Icon
The spyglass icon is used on several pages to view additional details for a record.
Click to view additional details. The details are displayed in various ways depending onthe application page. On some pages, a pop-up window opens with the correspondingdetails, and on other pages, additional details might be displayed in a different grid asseen in the below example.

Business
2022/03/26 06:09 27 ASCENDER Business Overview Guide
Save changes:
Save Changes
To save changes on a page, click the Save button. You can also press ENTER on yourkeyboard to retrieve or save, depending where you are on the page.
If you are in a search area of the page, the retrieve feature is the default setting whenyou press ENTER.
If you are in the body of the page, the save feature is the default setting when you pressENTER.
Reports
Numerous reports are available in ASCENDER. Most applications also offer a Create Report pageallowing you to create customized reports.
Generate a Report:
Generate a Report
Select a report:
All available report names are displayed on the left side of the page. The list of availablereports remains displayed on the page even after you select a report name. This allowsyou to select another report within the selected reports menu without exiting the reportpage.
❏ Click a report to select it. The parameters for the selected report are displayed on theright side of the page.❏ Type or select the report options. Parameters in bold are required.❏ Use the buttons located at the top of the page to generate the report.
If the button feature does not apply to the selected report, it is disabled. For example,a certain report may not be available in the CSV format, so the CSV button will bedisabled when that report is selected.
Preview - Click to generate the HTML view of the report.PDF - Click to generate a PDF file of the report.CSV - Click to generate a CSV file of the report.Clear Options - Click to clear data from all parameter fields.
Business
2022/03/26 06:09 28 ASCENDER Business Overview Guide
Review, save and/or print the report:
Review the report using the following buttons:
Click to go to the first page of the report.Click to go back one page.Click to go forward one page.Click to go to the last page of the report.
The report can be viewed and saved in various file formats.
Click to save and print the report in PDF format.Click to save and print the report in CSV format. (This option is not available for allreports.) When a report is exported to the CSV format, the report headers may not beincluded.Click X to close the report window. Some reports may have a Close Report, Exit, orCancel button instead.
Sort and filter:
Some reports may or may not provide the sort and/or filter option.
Sort Sort report data:You can sort data to make it easier to review or find records in the reports. Not allreports allow this option.From the report window, click Sort/Filter to open the Sort/Filter window. Bydefault, the Sort Criteria section is expanded. If not, click Sort Criteria.(Left grid)ColumnsAvailable forSorting
Select the columns by which you want to sort, the columnsare highlighted blue. Click to move the selected columnsto the right side of under Sort Columns. Continue movingcolumns to the right grid as needed.
(Right grid) SortColumns
You can rearrange the columns to indicate the order inwhich you want the sort applied. Click a column name, anddrag it up or down to a new location.In the right grid, for each column, click to indicate if youwant that data sorted in ascending (e.g., A-Z, 0-9) ordescending (e.g., Z-A, 9-0) order.To remove a column from the sort, select the column, andthen click to move it back to the left grid.
Click OK to apply the selected sort criteria to the report.Click Cancel to close the window without re-sorting.
Business
2022/03/26 06:09 29 ASCENDER Business Overview Guide
Filter Filter report data:When you want to view only certain data, you may find it useful to filter the reportdata. You can use specific criteria to retrieve only the data that you want. Not allreports allow this option.From the report window, click Sort/Filter to open the Sort/Filter window. Bydefault, the Sort Criteria section is expanded. Click Filter Criteria to expandthe Filter Criteria section.If the report does not allow sorting, the Filter button is displayed instead of theSort/Filter button, and sort criterion fields are not available.Click Add Criterion to add new filter criteria. A blank row is displayed in the grid.Field DescriptionColumn Select a column by which to filter the data. The drop down lists the
columns that appear on the report.Operator Select an operator.
= Equals≠ Not equals‹ Less than≤ Less than or equal to› Greater than≥ Greater than or equal to
Value Type the value by which you want to filter. For example, if youselected a date in the Column field, type a date to view only data fora specific date.
Other functions and features:Add Criterion Add another row.
Select the logical connector (AND or OR) in the Logical field.Continue adding rows as needed.Using the AND operator limits search results, because theprogram looks only for records that contain both criterion. Usingthe OR operator expands search results, because the programlooks for records that contain either one criterion or the other, orboth.
DeleteSelected
Delete selected row.Select the row, and then click the Delete Selected button. Therow is deleted from the filter criteria.
Click OK to apply the selected filter criteria to the report.Click Cancel to close the dialog box without applying a filter.Reset Reset report data.
Click to restore the report to the original view, removing all sorting andfiltering that has been applied.
Reset Reset report data:Click to restore the report to the original view, removing all sorting and filteringthat has been applied.
User Created Report:
Create a Report
Run a report from a saved template:

Business
2022/03/26 06:09 30 ASCENDER Business Overview Guide
ReportTemplate
Begin typing all or part of the name of an existing report template, orpress the space bar to view all the templates. As you begin to type, adrop-down list displays report templates with titles that match the lettersyou have typed. From the drop-down list you can select the template. Onlytemplates you created are listed in the drop-down list.If you do not know the name of the report template, click Directory toselect a report template from the directory. From the directory, you canselect templates you created as well as public templates.
Create a new template:
ReportTemplate
Type the name of a new report template. Only alphanumeric charactersare allowed. If you type a name that is already used, it will overwrite theprevious template.
Public Select to make the report accessible to other users. All users in thedistrict who have access to this page will be able to use the template.
After entering the title and selecting the columns to include, click Save.
Create a new report:
Report Title Type a title for the report, up to 35 characters.The fields are grouped by business table. Select the fields for which you want toprint information. You can select an entire group of fields by selecting the groupname (e.g., PMIS Position Distribution).Click Create Report to generate the report.
Review, save, and/or print the report.


![Brochure livecore 2015-Officielle - Analog Way › ... › livecore-brochure-2015-bd.pdf · 2015-06-25 · LiveCoreTM series î ì í ñ E Á ] } v Ascender 48 Ascender 32 Ascender](https://static.documents.pub/doc/80x56/5f25783fd980204cdb60ea84/brochure-livecore-2015-officielle-analog-way-a-a-livecore-brochure-2015-bdpdf.jpg)


