17
X-PAQ/ACOP Network Addendum 1 of 17 ASG-NW2500-ACOP ACOP Network Communication Module User’s Guide Version 2.0.1 January, 2014

ŀX-PAQ/ACOP Network Addendum 1 of 17
ASG-NW2500-ACOP
ACOP Network Communication Module
User’s Guide Version 2.0.1
January, 2014

X-PAQ/ACOP Network Addendum 2 of 17
ASG Precision Fastening ASG-NW2500-ACOP User’s Guide
Version 2.0.1
Major Revision: January, 2014
Valid for ASG-NW2500-ACOP Firmware revision:
v3.0.5A or later
To download the latest version of this manual visit:
www.asg-jergens.com
ASG Precision Fastening
(888) 486-6163
15700 S. Waterloo Rd.
Cleveland, OH 44110
USA
© 2014 Jergens Inc.
All Rights Reserved
X-PAQ/ACOP Network Addendum 3 of 17
X-PAQ/ACOP Network Addendum
Quick Start Guide ........................................................................................................................... 4
Overview ......................................................................................................................................... 5
Device Connectivity........................................................................................................................ 5
Network Human-Machine Interface ............................................................................................... 6
Atlas Copco Open Protocol functionality ..................................................................................... 11
Bar Codes ...................................................................................................................................... 13
Serial Printer ................................................................................................................................. 16
X-PAQ/ACOP Network Addendum 4 of 17
Quick Start Guide
Setup
1. Get the network address information for this X-PAQ/ACOP unit from your network administrator. This should include:
a. IP Address b. Subnet Mask c. Gateway d. Port (if different from the default, 4545)
2. Connect the power cable and Ethernet cable (RJ45 connector) to the X-PAQ/ACOP. 3. Power up the X-PAQ/ACOP.
Network Configuration
4. On the network user interface, press ENT to go to the setup menu. 5. The unit will prompt you for a password. The default password is “0104”. 6. The first entry of the programming menu is the “IP Address”. Press ENT to change the
address.
7. Using the arrow keys, input the address provided by your network administrator and press ENT to save the new address.
8. Once the screen shows “Address Saved”, press ENT to return to the setup menu. 9. Press down to go to the “Subnet Mask”. Enter the mask provided by your network
administrator using the same process as the IP Address.
10. From the “Subnet Mask” entry of the setup menu, press down to go to the “Gateway”. Enter the gateway provided by your network administrator using the same process as the IP
Address.
11. If the Port is different from the default, press down from the “Gateway” entry of the setup menu to go to the “Port number”. Enter the port number provided by your network
administrator using the same process as the IP Address.
At this point, you should be able to connect to and use your X-PAQ/ACOP. The remainder of
the quick start describes other common first-time setup that may need to be performed.
Further Setup
The X-PAQ/ACOP acts as a server, meaning it listens for connections from other devices or
computers. By default, the X-PAQ/ACOP will allow connections to remain open indefinitely,
regardless of activity occurring on the connection. If connections should be closed when there is
no activity, you will need to set the Keep Alive appropriately.
Cycle through the options on the setup menu until you reach the “Keep Alive” setting. Use the
arrow keys to set this value to the number of seconds after which an inactive connection should
be closed. If you want to leave connections open indefinitely, set the keep alive to 120.
X-PAQ/ACOP Network Addendum 5 of 17
Overview
The X-PAQ/ACOP adds a network card that provides network connectivity to a plant floor
control network using the Atlas Copco Open Protocol. This card adds an additional human-
machine interface (LCD display and keypad) and several additional connectors used to attach to
the network or other devices.
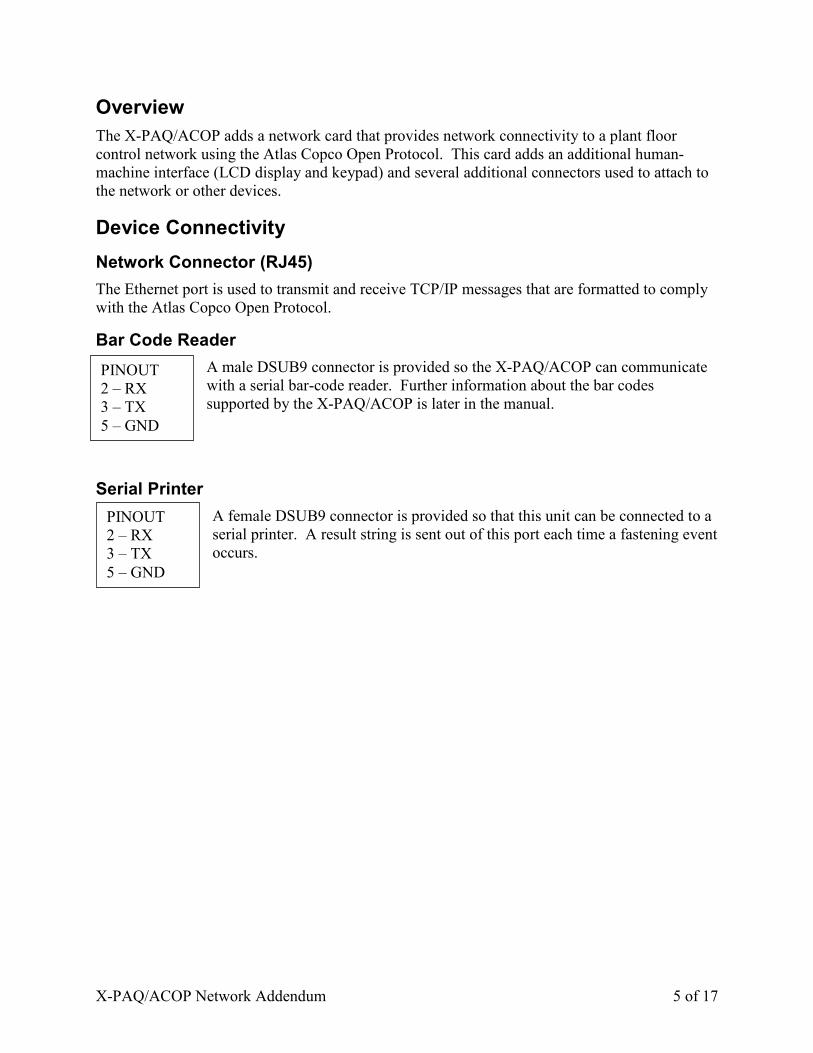
Device Connectivity
Network Connector (RJ45)
The Ethernet port is used to transmit and receive TCP/IP messages that are formatted to comply
with the Atlas Copco Open Protocol.
Bar Code Reader
A male DSUB9 connector is provided so the X-PAQ/ACOP can communicate
with a serial bar-code reader. Further information about the bar codes
supported by the X-PAQ/ACOP is later in the manual.
Serial Printer
A female DSUB9 connector is provided so that this unit can be connected to a
serial printer. A result string is sent out of this port each time a fastening event
occurs.
PINOUT
2 – RX
3 – TX
5 – GND
PINOUT
2 – RX
3 – TX
5 – GND
X-PAQ/ACOP Network Addendum 6 of 17
Network Human-Machine Interface
The X-PAQ/ACOP has two human-machine interfaces (HMI). The lower interface is used
primarily to control the network functionality and display network status. In this section, HMI
refers to the lower interface unless otherwise specified. During startup, the HMI will display the
firmware version of the network controller in the X-PAQ/ACOP.
Operating Mode
Once startup is completed, the HMI will enter Operating Mode, where it will show the current
operating status of the unit. To cycle through the various pieces of status information, use the up
and down or left and right arrows on the HMI.
Unit IP Address
The default information shown on the HMI is the unit’s IP address. This should correspond to
the value you entered during setup, as described in the Quick Start Guide at the beginning of this
document. This is the address the plant control system needs to use to communicate with this
unit.
Client IP Address
This screen shows if the unit is currently connected over the network. If no connection is active,
this screen will show “DISCONNECTED”. If a connection is active, the IP address of the
connected computer or device will be shown.
Last Rcvd MID
This screen shows the MID of the last ACOP command received by the unit.
ACOP Task
This screen shows the currently active task number. This number should also appear on the
XPAQ as the selected task.
ACOP Job
This screen shows the information about the currently active job if one is running. If no job is
running, the screen shows “No active job”. If a job is running, the screen while show:
J=07 S=01 T=03
where J is the active job number, S is the step number within the job, and T is the task number
for that step.
Setup Mode
To enter Setup Mode from Operating Mode, press ENT and enter the password for the unit. The
default password is “0104”. Once at the setup menu, you can cycle through the various menu
options using the up and down arrows. Pressing ENT will go to the editing screen for the
selected option. Pressing ESC will return to Operating Mode.
When in an editing screen, the arrow keys are used to enter the information. Screens that require
you to enter a multi-digit or character value will use the up and down arrow keys to cycle

X-PAQ/ACOP Network Addendum 7 of 17
through values for that digit or character and left and right arrow keys to move from character to
character. Screens with a fixed set of options will use any of the arrow keys to cycle through the
options. Some screens with a single number value will use the up or down arrows to add or
subtract 1 and right or left arrows to add or subtract 10. For all screens, pressing ENT will save
the entered value and pressing ESC will return to the Setup Menu without changing the value.
IP Address
This menu selects the IP address used by the X-PAQ/ACOP. Ask your network administrator
for the correct value for this setting. Each unit in the same network should have a unique IP
address.
Subnet Mask
This menu determines the subnet mask used by the X-PAQ/ACOP. Ask your network
administrator for the correct value for this setting. All units in the same network will generally
have the same subnet mask.
Gateway
This menu determines the gateway address used by the X-PAQ/ACOP. Ask your network
administrator for the correct value for this setting. All units in the same network will generally
have the same gateway address.
Port Number
This menu selects the TCP port number used for ACOP network connections. The X-
PAQ/ACOP is set to the port recommended in the protocol specification by default. Only
change this value if you are certain your network uses another port. All units in the same
network will generally have the same port number.
Message Timeout
This menu determines the number of seconds between retries for a subscription notification. If
no response to a notification is received after the specified time, the notification will be sent up
to the specified number of retries (see Resend Attempts below). If the number of retries
completes without a response, the notification failed and the network connection will be closed.
This value can be from 1 to 30 seconds.
Resend Attempts
This menu determines how many times the X-PAQ/ACOP will send a subscription notification.
If no response to a notification is received after the specified number of tries, the notification
failed and the network connection will be closed. This value can be from 1 to 10.
Keep Alive
This menu determines how long, in seconds, a X-PAQ/ACOP will keep a connection open
without any data transmissions. If this value is set to 120, the connection will never be closed
due to inactivity (unless No Msg Timeout is used). Most control systems should have an option
to send the MID 9999 Keep Alive packet. Set the Keep Alive on the X-PAQ/ACOP to at least
twice the period at which the control system sends the keep alive packet to ensure a single
X-PAQ/ACOP Network Addendum 8 of 17
missed packet does not cause a connection to be dropped. This value can be from 0 to 240
seconds with 120 meaning no timeout (unless No Msg Timeout is used).
No Msg Timeout
This menu determines how long, in minutes, a X-PAQ/ACOP will keep a connection open
without any data transmissions. This option is provided for situations where an idle connection
must be kept open longer than the normal Keep Alive settings allow. If this value is set to 0, the
connection will never be closed due to inactivity (unless Keep Alive is used). ). Most control
systems should have an option to send the MID 9999 Keep Alive packet. Set the No Msg
Timeout on the X-PAQ/ACOP to at least twice the period at which the control system sends the
keep alive packet to ensure a single missed packet does not cause a connection to be dropped.
This value can be from 1 to 20 minutes or 0 to only use the Keep Alive setting. If the Keep
Alive setting is also used, it may close the connection before this timeout is reached.
Xmit Rev/Space
This menu determines if spaces are sent in the revision portion of a MID command or response
when possible. As per the specification, this option will only affect commands sent with revision
1; any revision other than one will always be left as a number in the command string.
This option does not affect how the X-PAQ/ACOP interprets data from another device. Other
devices may send spaces or 001 for commands with revision 1 regardless of this option.
Similarly, most devices should not be affected by this option, but it is provided in case a device
requires one way or the other.
OP Cmd Enable
This menu allows you to enable or disable “Open Protocol commands”, which are a subset of the
full list of supported commands. Effectively, disabling the Open Protocol commands makes the
unit read-only from the ACOP network perspective. The full list of commands that are disabled
by this option can be seen in section 4.4 of the Atlas Copco Open Protocol specification.
Control Cell ID
This menu sets the 4 digit Cell ID reported by the X-PAQ/ACOP in ACOP result messages.
Only numbers (0-9) are allowed. You may also set the controller cell ID with a bar code
command (01).
Control Channel ID
This menu sets the 2 digit Channel ID reported by the X-PAQ/ACOP in ACOP result messages.
Only numbers (0-9) are allowed. You may also set the controller channel ID with a bar code
command (02).
Control Name
This menu sets the 25 character Controller Name reported by the X-PAQ/ACOP in ACOP result
messages. All ASCII characters from space to z are allowed [0-9, A-Z (upper and lower case),
space, -, and most punctuation marks]. You may also set the controller name with a bar code
command (03).
X-PAQ/ACOP Network Addendum 9 of 17
Serial Printer
This menu determines the baud rate of the serial printer, and if the X-PAQ/ACOP makes ACOP
connections over serial, the baud rate of the ACOP connections. The available baud rates are
9600, 19200, 38400, 57600, and 115200 baud. When the serial printer is set to “OFF”, the
ACOP connections will operate at 9600 baud.
Bar Code Reader
This menu determines the baud rate of the bar code reader. The available baud rates are 9600,
19200, 38400, 57600, and 115200 baud.
Edit Password
This menu allows you to change the password required to enter Setup Mode. Be sure to
remember the password entered or you will not be able to configure the device through the
HMI.
Edit ACOP Port
This menu determines if the X-PAQ/ACOP makes ACOP connections over Ethernet or serial.
When this option is set to serial, the serial printer connector is used. The serial printer will
continue to operate when transmitting ACOP over serial unless it is specifically disabled. The
baud rate for serial operation is determined by the Serial Printer menu. If the serial printer is
disabled, the ACOP connection operates at 9600 baud. The X-PAQ/ACOP may still appear
connected to your network when in serial mode, but it will not respond to any commands from
the network.
Pick Task
This menu allows you to select a task. You may also select tasks with a bar code (11) or ACOP
(MID 0018) command.
Task Max
This menu allows you to select the maximum task number accepted from ACOP or barcodes.
This option should be set to match the number of tasks in the XPAQ.
Pick Job
This menu allows you to begin a pre-defined job. You may also select jobs with a bar code (05)
or ACOP (MID 0038) command.
Edit Unit SERNUM
This menu sets the 10 digit controller serial number reported by the X-PAQ/ACOP in ACOP
result messages. All ASCII characters from space to Z are allowed [0-9, A-Z (uppercase), space,
-, and several punctuation marks].
Reset Defaults
This menu allows you to return some or all portions of the device to the factory defaults. Once
started, this operation cannot be undone. The options for this menu are:

X-PAQ/ACOP Network Addendum 10 of 17
• All – Resets all information in the device. This option will take several minutes to complete.
• Configuration – Resets only the configuration options set up by the setup menu. You will
have to reassign the unit’s network information before you can connect to the unit again.
• Jobs – Erases all jobs stored in the unit.
• Tasks & Jobs – Erases all tasks and jobs stored in the unit. Since jobs depend strongly on the
tasks, there is not an option to erase only tasks.
• Events – Erases all stored tightening results. This option will take several minutes to
complete.

X-PAQ/ACOP Network Addendum 11 of 17
Atlas Copco Open Protocol functionality
The X-PAQ/ACOP implements controller functionality for the Atlas Copco Open Protocol. It
supports only a single Ethernet connection at a time. Command MIDs and revisions are
implemented according to the Atlas Copco Open Protocol Specification release 1.3 revision 1.
Supported Commands
Revision lists with a ‘*’ indicate that one or more revisions of the MID is not supported.
Otherwise, the listed supported revisions are all revisions in the specification version mentioned
above.
MID Revisions Command
0001,0002 1-4 Communication start (acknowledge)
0003 1 Communication stop
0004 1 Command error
0005 1 Command accepted
0010,0011 1 Parameter set ID upload request/reply
0014-0017 1 Parameter set selected (subscribe/acknowledge/unsubscribe)
0018 1 Select Parameter set
0020 1 Reset Parameter set batch counter
0042 1 Disable tool
0043 1 Enable tool
0050 1 Vehicle ID Number download request
0051-0054 1-2 Vehicle ID Number (subscribe/acknowledge/unsubscribe)
0060-0063 1-4* Last tightening result data (subscribe/acknowledge/unsubscribe)
0064,0065 1-4* Old tightening result upload request/reply
0150 1 Identifier download request
0151-0154 1 Multiple identifier and result parts (subscribe/acknowledge/unsubscribe)
0156 1 Reset latest Identifier
0157 1 Reset all Identifiers
0420-0423 1 Open Protocol commands disabled (subscribe/acknowledge/unsubscribe)
9999 1 Keep alive message
Mapping of ACOP commands to X-PAQ inputs
The X-PAQ/ACOP card will trigger the inputs of the X-PAQ based on the commands received
from the ACOP network. The mapping will be:
1 2 3 4 5 6 7 8
Parameters Reset Halt Start
The Select Task set command (MID 0018) will change inputs 1-5. The inputs will be the binary
representation of the selected parameter number. For example:
Task # Input 1 Input 2 Input 3 Input 4 Input 5
0 L L L L L
1 H L L L L
2 L H L L L

X-PAQ/ACOP Network Addendum 12 of 17
3 H H L L L
4 L L H L L
5 H L H L L
6 L H H L L
7 H H H L L
8 L L L H L
9 H L L H L
10 L H L H L
11 H H L H L
12 L L H H L
13 H L H H L
14 L H H H L
15 H H H H L
16 L L L L H
17 H L L L H
18 L H L L H
19 H H L L H
20 L L H L H
21 H L H L H
22 L H H L H
23 H H H L H
24 L L L H H
25 H L L H H
26 L H L H H
27 H H L H H
28 L L H H H
29 H L H H H
30 L H H H H
31 H H H H H
Tasks above 12 from ACOP will be ignored when the Task Max is set to 12.
X-PAQ/ACOP Network Addendum 13 of 17
Input 6 will be activated when the Reset Parameter set batch counter command (MID 0020) is
received and will be cleared when the next ACOP command affecting this byte or batch reset
barcode is received.
Input 7 will be activated when the Disable tool command (MID 0042) is received and will be
cleared when the next ACOP command affecting this byte or batch reset barcode is received.
Input 8 will be activated when the Enable tool command (MID 0043) is received and will be
cleared when the next ACOP command affecting this byte or batch reset barcode is received.
All other commands will be entirely handled by the network card and do not affect the operation
of the X-PAQ.
Bar Codes
The bar code functionality of the X-PAQ/ACOP was developed and tested against the Symbol
LS2208 bar code reader, which uses CODE39 bar codes. This format starts and ends all bar
codes with an asterisk “*”.
The X-PAQ/ACOP further specifies a format of data within the bar code. The data is grouped
into sections, separated by a percent symbol “%”. If the bar code data does not start and end
with a percent symbol, it will be treated as a VIN number. The general structure for a command
bar code is:
*%<command>%<data>%*
A VIN bar code is:
*<VIN number>*
The following bar code commands are provided:
Cell ID
This command sets the Cell ID reported by the X-PAQ/ACOP in ACOP result messages.
Command: 01
Data length: 4 characters
Example:
*%01%7412%*
This bar code would set the Cell ID of the unit to “7412”.
Channel ID
This command sets the Channel ID reported by the X-PAQ/ACOP in ACOP result messages.
Command: 02
Data length: 2 characters
Example:
*%02%19%*
This bar code would set the Channel ID of the unit to “19”.

X-PAQ/ACOP Network Addendum 14 of 17
Controller Name
This command sets the Controller Name reported by the X-PAQ/ACOP in ACOP result
messages.
Command: 03
Data length: up to 25 characters
Example:
*%03%air - bag%*
This bar code would set the Controller name of the unit to “air - bag”.
VIN
This command sets the VIN or Identifier part 1 reported by the X-PAQ/ACOP in ACOP result
messages, the MID 0052 Vehicle ID Number, and the MID 0152 Multiple identifier and result
parts notifications.
Command: 04
Data length: up to 25 characters
Example:
*%04%VIN1234567%*
As mentioned above, a bar code is assumed to be a VIN number if the data is not in the
command format. As such, the same VIN could be provided as:
*VIN1234567*
Start Job
This command instructs the XPAQ/ACOP to begin a pre-defined job.
Command: 05
Data length: up to 2 digits specifying the job number to run (1-99)
Example:
*%05%32%*
This bar code would instruct the unit to start job number 32.
Identifier part 2
This command sets the Identifier part 2 reported by the X-PAQ/ACOP in ACOP result messages
and the MID 0152 Multiple identifier and result parts notifications.
Command: 06
Data length: up to 25 digits.
Example:
*%06%B23FJ9S3%*
X-PAQ/ACOP Network Addendum 15 of 17
Identifier part 3
This command sets the Identifier part 3 reported by the X-PAQ/ACOP in ACOP result messages
and the MID 0152 Multiple identifier and result parts notifications.
Command: 07
Data length: up to 25 digits.
Example:
*%07%GU49CN53%*
Identifier part 4
This command sets the Identifier part 4 reported by the X-PAQ/ACOP in ACOP result messages
and the MID 0152 Multiple identifier and result parts notifications.
Command: 08
Data length: up to 25 digits.
Example:
*%08%RU39CN53%*
Reset batch count
This command resets the count of the currently running batch on the X-PAQ/ACOP.
Command: 10
Data length: none
Example:
*%10%%*
Select Task
This command instructs the X-PAQ/ACOP to select a task.
Command: 11
Data length: up to 2 digits specifying the parameter number to select (1-32)
Example:
*%11%7%*
This bar code would select parameter 7.
Remote Halt
This command instructs the X-PAQ/ACOP to perform a remote halt.
Command: 42
Data length: none
Example:

X-PAQ/ACOP Network Addendum 16 of 17
*%42%%*
Remote Start
This command instructs the X-PAQ/ACOP to perform a remote start.
Command: 43
Data length: none
Example:
*%43%%*
Task Name
This command sets the name for the currently selected task to report in ACOP result messages.
Names entered with this command will be saved and used the next time the task is selected. If
no task is active, this command is ignored.
Command: 47
Data length: up to 25 characters
Example:
*%47%Side panel attachment%*
This bar code would set the name of the currently active task to “Side panel attachment”.
Serial Printer
The X-PAQ/ACOP has a “serial printer” port to which it prints data for each tightening. You
may deactivate this function or change the baud rate from the “Serial Printer” entry in the setup
menu.
Inside the Serial Printer menu, you may select the baud rate for communications with the serial
printer or disable printing. The available baud rates are 9600, 19200, 38400, 57600, and 115200
baud. The serial printer always transmits with 8 data bits, no parity, and 1 stop bit (8N1).
The serial printer prints several fields of information about each tightening on a separate line.
An example result is shown below:
Time = 132542
Date = 041113
Param = 1
Tool Type = C
Tool Name = 34251
OK/NOK = O
Result = CYCLE
Count = 2
Batch = 3
Torque Actual = 0000.00
Torque Min = 0000.00
Torque Max = 0000.00

X-PAQ/ACOP Network Addendum 17 of 17
Torque Units = I
Angle = 0
Angle Min = 0
Angle Max = 0
The time field is 24 hour time formatted as “HHmmss” and the date field is “MMddyy”. Line
endings are LF-CR (0x0A 0x0D) and some data fields may have trailing spaces.


![Arboriculture ACOP [842 KB PDF] -](https://static.documents.pub/doc/80x56/620656088c2f7b173006cd54/arboriculture-acop-842-kb-pdf-.jpg)


