Page 1 ENGLISH ENGLISH WASHER USE AND CARE GUIDE ASKO IMPORTANT! IMPORTANT! To get the best performance from To get the best performance from your your washer washer, read all operating , read all operating instructions before using it for instructions before using it for the first time. the first time. SAVE THESE INSTRUCTIONS FOR FUTURE REFERENCE CONTENTS Important Safety Instructions 2 Child Safety Features 2 ASKO Washer Features 3 Preparing the Laundry 4 The Detergent Drawer 5 Detergents 5 Fabric softeners 6 Recommended Wash Temperatures 6 Care and Cleaning Instructions 7 Common Laundry Problems 8 Fault Codes– W600/W620 9 Error Messages – W640/W660 9 Troubleshooting 10 Customizing the Preset Programs – W640/W660 11 Installation Instructions 15 ASKO Product Warranty 17 Index 18 FRAN FRAN ÇAIS ÇAIS ESP ESP AÑOL AÑOL
Transcript
Page 1
EN
GLI
SH
EN
GLI
SH
WASHERUSE AND CARE GUIDE
ASKO
IMPORTANT!
IMPORTANT!
To get the best performance fro
m
To get the best performance fro
m
your your w
asherwasher, read all operating
, read all operating
instructions before using it for
instructions before using it for
the first ti
me.
the first ti
me.
SAVE THESE INSTRUCTIONS FOR FUTURE REFERENCE
CONTENTSImportant Safety Instructions 2Child Safety Features 2ASKO Washer Features 3Preparing the Laundry 4The Detergent Drawer 5Detergents 5Fabric softeners 6Recommended Wash Temperatures 6Care and Cleaning Instructions 7Common Laundry Problems 8Fault Codes– W600/W620 9Error Messages – W640/W660 9Troubleshooting 10Customizing the Preset Programs – W640/W660 11Installation Instructions 15ASKO Product Warranty 17Index 18
FR
AN
FR
AN
ÇA
ISÇ
AIS
ES
PE
SP A
ÑO
LA
ÑO
L
Page 2
To reduce the risk of fire, electric shock, or injury topersons when using your appliance, follow basicprecautions, including the following:
♦ Read all instructions before using the appliance.
♦ Do not run appliance while you are out of the home.
♦ Do not allow children to play on or in the appliance.Close supervision of children is necessary whenthe appliance is used near children.
♦ Before the appliance is removed from service ordiscarded, remove the door to the washingcompartment.
♦ Do not reach into the appliance if the drum is moving.
♦ Do not install or store this appliance where it will beexposed to the weather.
♦ Do not tamper with controls.
♦ Do not repair or replace any part of the appliance orattempt any servicing unless specificallyrecommended in the user-repair instructions or inpublished user-repair instructions that youunderstand and have the skills to carry out.
♦ Do not add gasoline, dry-cleaning solvents, or otherflammable or explosive substances to the washwater. These substances give off vapors that couldignite or explode.
♦ Under certain conditions, hydrogen gas may beproduced in a hot water system that has not beenused for 2 weeks or more. HYDROGEN GAS ISEXPLOSIVE. If the hot water system has not been
CHILD-SAFE DETERGENT DRAWERCHILD-SAFE DETERGENT DRAWERASKO washers have a child-safety catch on the detergentdrawer that can be engaged to prevent a child fromopening the drawer and possibly coming into contactwith the detergent or fabric softener. Refer to page 5 forinstructions on how to engage the child-safe catch.
CHILD-SAFE CHILD-SAFE TEMPERATEMPERATURE KNOBTURE KNOBModels W600 and W620 have a child-safety catch thatcan be engaged to prevent children from tamperingwith the temperature knob. The catch is located belowthe temperature knob behind the edge of the controlpanel. To engage it, insert a flathead screwdriver in theslot on the catch. Press upwards as you turn the catchclockwise. When you release the catch is shouldprotrude slightly below the control panel.
Once the catch is engaged, you must hold it up as youturn the temperature knob to the desired setting.
CHILD-SAFE STCHILD-SAFE STARARTTYou can program Models W640 and W660 not to startunless the Start button is held down for three seconds.This is to prevent children from inadvertently starting
WARNING!This appliance must be properly grounded.Improper connection of the equipment groundingconductor can result in a risk of electric shock.Check with a qualified electrician or servicemanif you are in doubt as to whether the appliance isproperly grounded.
The plug must be plugged into an appliance outletthat is properly installed and grounded inaccordance with all local codes and ordinances.
used for such a period, before using a washingmachine or combination washer-dryer, turn on allwater faucets and let the water flow from each forseveral minutes. This will release any accumulatedhydrogen gas. As the gas is flammable, do notsmoke or use an open flame during this time.
MORE CHILD-SAFETY TIPSMORE CHILD-SAFETY TIPS♦ Laundry detergents are corrosive, so always keep
them out of reach of children.
♦ Should a child swallow detergent, give plenty to drinkimmediately, i.e., one or two glasses of milk or water.Do not try to induce vomiting. Seek medical adviceimmediately: 1-800-POISON1
♦ Always close the door and start the appliance assoon as you put in the detergent.
♦ Always turn the power off to the machine when it isnot in use.
♦ Always keep small children away from the machinewhen it is open. There may be some detergentresidue left inside the machine.
♦ If laundry detergent gets in someone’s eyes, rinsethem with plenty of water for at least 15 minutes.
♦ Do not allow children to use or play on or in theappliance.
Do not wash or dry articles that have beenpreviously cleaned in, washed in, soaked in, orspotted with gasoline, dry-cleaning solvents,cooking oils, other flammable or explosivesubstances because they give off vapors thatcould ignite or explode.
WARNING!
NOTE: This manual does not cover every possiblecondition and situation that may occur. Usecommon sense and caution when installing,operating, and maintaining any appliance.
the machine. Refer to page 14 for instructions on howto program this safety feature.
Page 3
EN
GLI
SH
EN
GLI
SH
Your new energy-efficient ASKO washer is designed togive you maximum cleaning performance using lesswater, energy and detergent. To make the most of thewasher’s functions and features, we recommend thatyou read this manual carefully before using yourmachine for the first time. For operating instructions,refer to the Quick Start Guide enclosed with this manual.
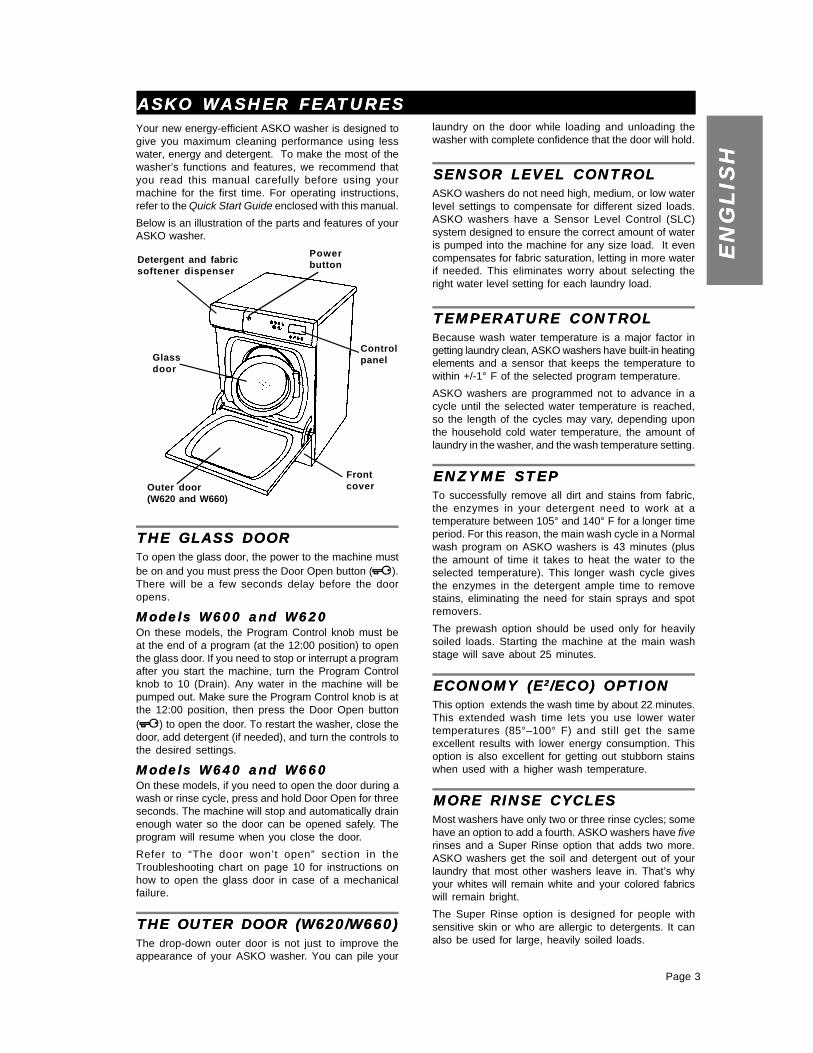
Below is an illustration of the parts and features of yourASKO washer.
THE GLASS DOORTHE GLASS DOORTo open the glass door, the power to the machine mustbe on and you must press the Door Open button ( ).There will be a few seconds delay before the dooropens.
Models W600 and W620Models W600 and W620On these models, the Program Control knob must beat the end of a program (at the 12:00 position) to openthe glass door. If you need to stop or interrupt a programafter you start the machine, turn the Program Controlknob to 10 (Drain). Any water in the machine will bepumped out. Make sure the Program Control knob is atthe 12:00 position, then press the Door Open button( ) to open the door. To restart the washer, close thedoor, add detergent (if needed), and turn the controls tothe desired settings.
Models W640 and W660Models W640 and W660On these models, if you need to open the door during awash or rinse cycle, press and hold Door Open for threeseconds. The machine will stop and automatically drainenough water so the door can be opened safely. Theprogram will resume when you close the door.
Refer to “The door won’t open” section in theTroubleshooting chart on page 10 for instructions onhow to open the glass door in case of a mechanicalfailure.
THE OUTER DOOR (W620/W660)THE OUTER DOOR (W620/W660)The drop-down outer door is not just to improve theappearance of your ASKO washer. You can pile your
ASKASKO O WWASHER FEAASHER FEATURESTURESlaundry on the door while loading and unloading thewasher with complete confidence that the door will hold.
SENSOR LEVEL CONTROLSENSOR LEVEL CONTROLASKO washers do not need high, medium, or low waterlevel settings to compensate for different sized loads.ASKO washers have a Sensor Level Control (SLC)system designed to ensure the correct amount of wateris pumped into the machine for any size load. It evencompensates for fabric saturation, letting in more waterif needed. This eliminates worry about selecting theright water level setting for each laundry load.
TEMPERATEMPERATURE CONTRTURE CONTROLOLBecause wash water temperature is a major factor ingetting laundry clean, ASKO washers have built-in heatingelements and a sensor that keeps the temperature towithin +/-1° F of the selected program temperature.
ASKO washers are programmed not to advance in acycle until the selected water temperature is reached,so the length of the cycles may vary, depending uponthe household cold water temperature, the amount oflaundry in the washer, and the wash temperature setting.
ENZYME STEPENZYME STEPTo successfully remove all dirt and stains from fabric,the enzymes in your detergent need to work at atemperature between 105° and 140° F for a longer timeperiod. For this reason, the main wash cycle in a Normalwash program on ASKO washers is 43 minutes (plusthe amount of time it takes to heat the water to theselected temperature). This longer wash cycle givesthe enzymes in the detergent ample time to removestains, eliminating the need for stain sprays and spotremovers.
The prewash option should be used only for heavilysoiled loads. Starting the machine at the main washstage will save about 25 minutes.
ECONOMY ECONOMY (E(E22/ECO) /ECO) OOPTIONPTIONThis option extends the wash time by about 22 minutes.This extended wash time lets you use lower watertemperatures (85°–100° F) and still get the sameexcellent results with lower energy consumption. Thisoption is also excellent for getting out stubborn stainswhen used with a higher wash temperature.
MORE RINSE CYMORE RINSE CYCLESCLESMost washers have only two or three rinse cycles; somehave an option to add a fourth. ASKO washers have fiverinses and a Super Rinse option that adds two more.ASKO washers get the soil and detergent out of yourlaundry that most other washers leave in. That’s whyyour whites will remain white and your colored fabricswill remain bright.
The Super Rinse option is designed for people withsensitive skin or who are allergic to detergents. It canalso be used for large, heavily soiled loads.
Detergent and fabricsoftener dispenser
Controlpanel
Outer door(W620 and W660)
Frontcover
Glassdoor
Powerbutton
Page 4
PREPPREPARING ARING THE LATHE LAUNDRUNDRYYWe believe ASKO washers clean better than any otherwasher available on the market. With proper attentionto how you prepare your laundry items for washing, yourwardrobe and linens will look like new for years.
SORSORTING TING THE CLTHE CLOOTHESTHESSort clothes by fiber content, color, amount of soil, lintshedding properties (e.g., cotton, chenille, andterrycloth), lint attracting properties (e.g., permanentpress, corduroy, velveteen, flannel and synthetics) andthose requiring a delicate cycle (e.g., washable wooland silk, nylon).
CARE LABEL INSTRCARE LABEL INSTRUCTIONSUCTIONSMost clothes and other washable items have permanentcare labels. Read these labels carefully! Care labelinstructions and warnings should be followed for thebest cleaning results.
If the care label says "Wash Separately," the fabric islikely to lose color (excess dye) for the first few washings.To minimize the possibility of the color transferring towhite or lighter colored items, wash new coloredgarments with items of similar color or separately. Brightreds and oranges on cottons are the dyes most likely totransfer colors to the wash load. Fluorescent colorsshould always be washed separately.
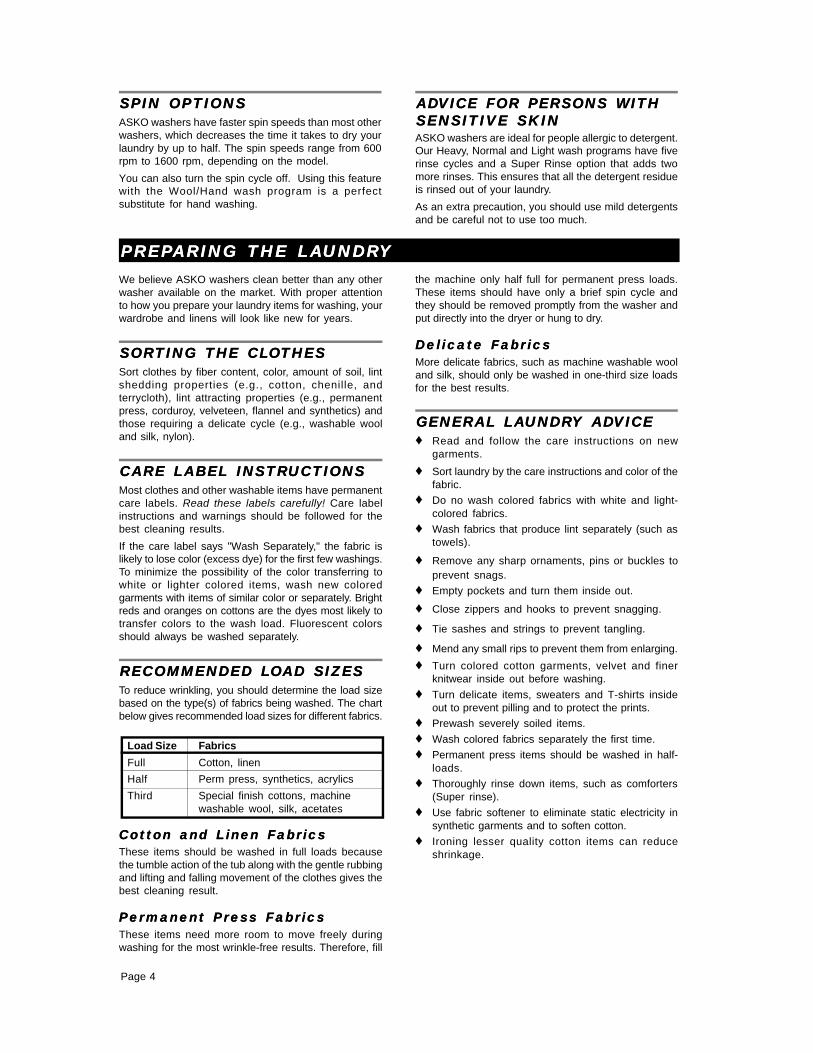
RECOMMENDED LRECOMMENDED LOOAD SIZESAD SIZESTo reduce wrinkling, you should determine the load sizebased on the type(s) of fabrics being washed. The chartbelow gives recommended load sizes for different fabrics.
Cotton and Linen FabricsCotton and Linen FabricsThese items should be washed in full loads becausethe tumble action of the tub along with the gentle rubbingand lifting and falling movement of the clothes gives thebest cleaning result.
Permanent Press FabricsPermanent Press FabricsThese items need more room to move freely duringwashing for the most wrinkle-free results. Therefore, fill
GENERAL LAGENERAL LAUNDRUNDRY Y ADADVICEVICE♦ Read and follow the care instructions on new
garments.
♦ Sort laundry by the care instructions and color of thefabric.
♦ Do no wash colored fabrics with white and light-colored fabrics.
♦ Wash fabrics that produce lint separately (such astowels).
♦ Remove any sharp ornaments, pins or buckles toprevent snags.
♦ Empty pockets and turn them inside out.
♦ Close zippers and hooks to prevent snagging.
♦ Tie sashes and strings to prevent tangling.
♦ Mend any small rips to prevent them from enlarging.
♦ Turn colored cotton garments, velvet and finerknitwear inside out before washing.
♦ Turn delicate items, sweaters and T-shirts insideout to prevent pilling and to protect the prints.
♦ Prewash severely soiled items.
♦ Wash colored fabrics separately the first time.
♦ Permanent press items should be washed in half-loads.
♦ Thoroughly rinse down items, such as comforters(Super rinse).
♦ Use fabric softener to eliminate static electricity insynthetic garments and to soften cotton.
♦ Ironing lesser quality cotton items can reduceshrinkage.
Load Size Fabrics
Full Cotton, linen
Half Perm press, synthetics, acrylics
Third Special finish cottons, machinewashable wool, silk, acetates
SPIN OPTIONSSPIN OPTIONSASKO washers have faster spin speeds than most otherwashers, which decreases the time it takes to dry yourlaundry by up to half. The spin speeds range from 600rpm to 1600 rpm, depending on the model.
You can also turn the spin cycle off. Using this featurewith the Wool/Hand wash program is a perfectsubstitute for hand washing.
the machine only half full for permanent press loads.These items should have only a brief spin cycle andthey should be removed promptly from the washer andput directly into the dryer or hung to dry.
Delicate FabricsDelicate FabricsMore delicate fabrics, such as machine washable wooland silk, should only be washed in one-third size loadsfor the best results.
ADADVICE FOR PERSONS VICE FOR PERSONS WITHWITHSENSITIVE SKINSENSITIVE SKINASKO washers are ideal for people allergic to detergent.Our Heavy, Normal and Light wash programs have fiverinse cycles and a Super Rinse option that adds twomore rinses. This ensures that all the detergent residueis rinsed out of your laundry.
As an extra precaution, you should use mild detergentsand be careful not to use too much.
Page 5
EN
GLI
SH
EN
GLI
SH
Laundry detergents are available in low-, normal- andhigh-sudsing formulas. A detergent´s ability to clean isnot relative to the amount of suds it produces. Excesssuds in a front-loading washer actually interfere withthe cleaning because they cushion the tumbling action.Also, high-sudsing detergents are more difficult tocompletely rinse out.
The use of anything other than a low-sudsing detergentcan cause severe oversudsing, which could causesuds to backup through the detergent compartment andrun down the front of the washer onto the floor. Ifoversudsing occurs, run the wash through one or morerinse programs until all items are thoroughly rinsed.Remove the laundry then run the washer through aNormal wash program to get rid of any remainingdetergent.
Should oversudsing occur, the machine will indicatean error code or message. (See page 9.)
LIQUID DETERGENTSLIQUID DETERGENTSWe don’t recommend liquid detergents because theytend to produce more suds than powder detergentswhen used in water temperatures of 150° F or higher. Ifyou should try a liquid detergent, start with a very smallamount, such as 1 to 2 tablespoons. Also, liquiddetergent can be used for all programs without prewash,so add it into the main wash compartment.
DETERGENTSDETERGENTS
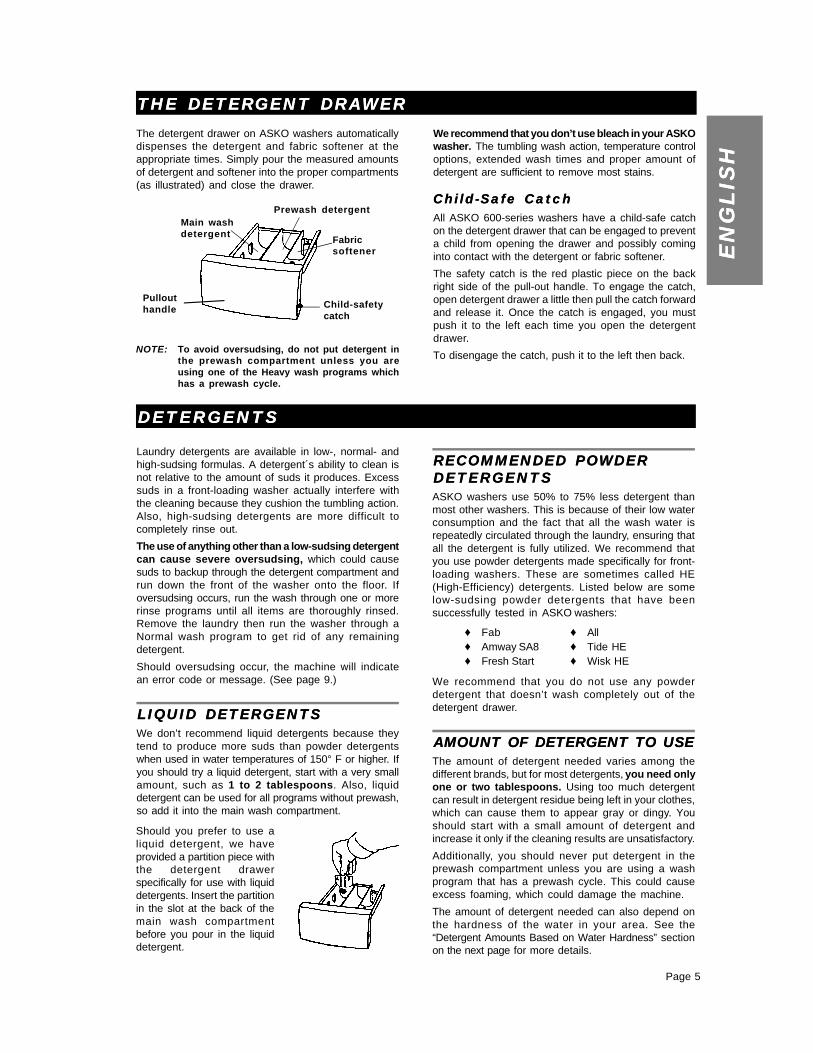
THE DETERTHE DETERGENT DRAGENT DRAWERWERThe detergent drawer on ASKO washers automaticallydispenses the detergent and fabric softener at theappropriate times. Simply pour the measured amountsof detergent and softener into the proper compartments(as illustrated) and close the drawer.
RECOMMENDED POWDERRECOMMENDED POWDERDETERGENTSDETERGENTSASKO washers use 50% to 75% less detergent thanmost other washers. This is because of their low waterconsumption and the fact that all the wash water isrepeatedly circulated through the laundry, ensuring thatall the detergent is fully utilized. We recommend thatyou use powder detergents made specifically for front-loading washers. These are sometimes called HE(High-Efficiency) detergents. Listed below are somelow-sudsing powder detergents that have beensuccessfully tested in ASKO washers:
We recommend that you do not use any powderdetergent that doesn’t wash completely out of thedetergent drawer.
AMOUNT OF DETERGENT TO USEAMOUNT OF DETERGENT TO USEThe amount of detergent needed varies among thedifferent brands, but for most detergents, you need onlyone or two tablespoons. Using too much detergentcan result in detergent residue being left in your clothes,which can cause them to appear gray or dingy. Youshould start with a small amount of detergent andincrease it only if the cleaning results are unsatisfactory.
Additionally, you should never put detergent in theprewash compartment unless you are using a washprogram that has a prewash cycle. This could causeexcess foaming, which could damage the machine.
The amount of detergent needed can also depend onthe hardness of the water in your area. See the“Detergent Amounts Based on Water Hardness” sectionon the next page for more details.
We recommend that you don’t use bleach in your ASKOwasher. The tumbling wash action, temperature controloptions, extended wash times and proper amount ofdetergent are sufficient to remove most stains.
Child-Safe CatchChild-Safe CatchAll ASKO 600-series washers have a child-safe catchon the detergent drawer that can be engaged to preventa child from opening the drawer and possibly cominginto contact with the detergent or fabric softener.
The safety catch is the red plastic piece on the backright side of the pull-out handle. To engage the catch,open detergent drawer a little then pull the catch forwardand release it. Once the catch is engaged, you mustpush it to the left each time you open the detergentdrawer.
To disengage the catch, push it to the left then back.
♦ All♦ Tide HE♦ Wisk HE
♦ Fab♦ Amway SA8♦ Fresh Start
Should you prefer to use aliquid detergent, we haveprovided a partition piece withthe detergent drawerspecifically for use with liquiddetergents. Insert the partitionin the slot at the back of themain wash compartmentbefore you pour in the liquiddetergent.
Prewash detergentMain washdetergent
Fabricsoftener
Pullouthandle Child-safety
catch
NOTE: To avoid oversudsing, do not put detergent inthe prewash compartment unless you areusing one of the Heavy wash programs whichhas a prewash cycle.
Fabric softeners are available in several concentrations.We recommend that you use only two tablespoons of
FABRIC SOFTENERSFABRIC SOFTENERSfabric softener. If more softening is desired, try addingslightly more the next time.
The amount of detergent needed can vary due todifferences in water hardness. To determine the waterhardness in your area, contact your local water utility orarea water softening company. The harder the water,the more detergent you may need. Refer to the chartbelow for the recommended detergent amounts basedon water hardness. Remember, you should adjust theamount of detergent you use by small amounts untilyou find the correct amount.
Note that 12 grains and higher is extremely hard waterand detergent alone may not be enough. You may need
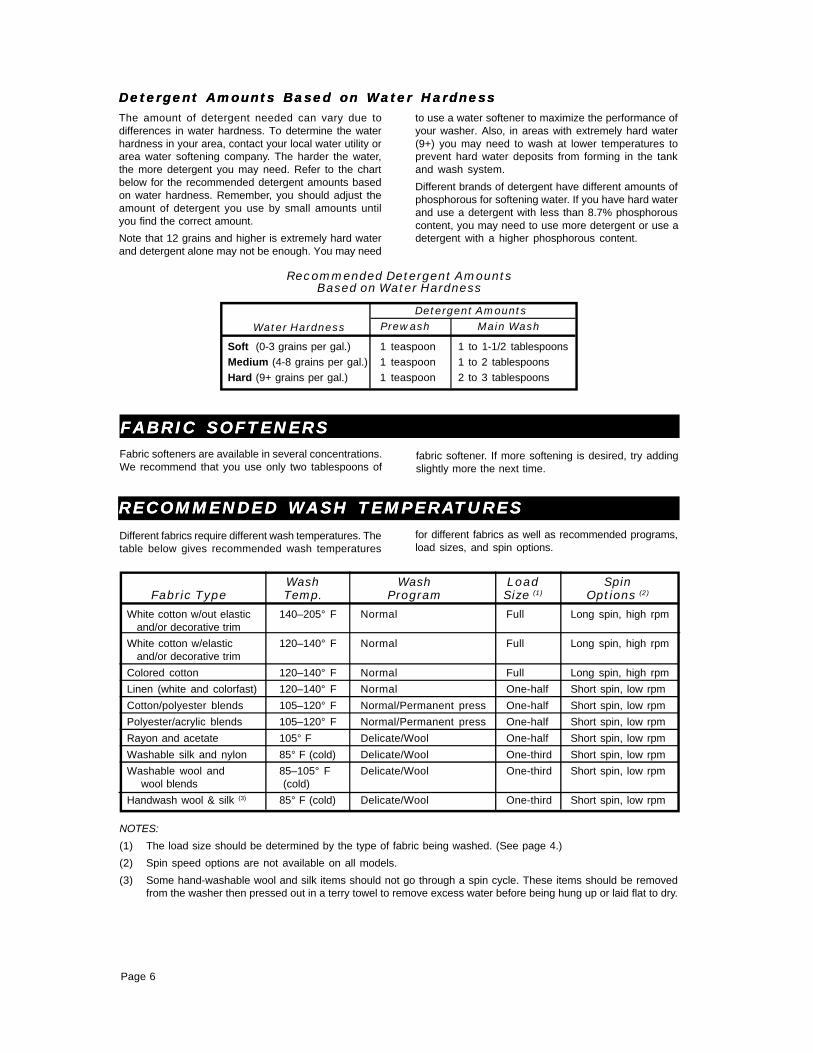
Wash Wash Load SpinFabric Type Temp. Program Size (1) Options (2)
White cotton w/out elastic 140–205° F Normal Full Long spin, high rpm and/or decorative trim
White cotton w/elastic 120–140° F Normal Full Long spin, high rpm and/or decorative trim
Colored cotton 120–140° F Normal Full Long spin, high rpm
Linen (white and colorfast) 120–140° F Normal One-half Short spin, low rpm
Cotton/polyester blends 105–120° F Normal/Permanent press One-half Short spin, low rpm
Polyester/acrylic blends 105–120° F Normal/Permanent press One-half Short spin, low rpm
Rayon and acetate 105° F Delicate/Wool One-half Short spin, low rpm
Washable silk and nylon 85° F (cold) Delicate/Wool One-third Short spin, low rpm
Washable wool and 85–105° F Delicate/Wool One-third Short spin, low rpm wool blends (cold)
Handwash wool & silk (3) 85° F (cold) Delicate/Wool One-third Short spin, low rpm
NOTES:
(1) The load size should be determined by the type of fabric being washed. (See page 4.)
(2) Spin speed options are not available on all models.
(3) Some hand-washable wool and silk items should not go through a spin cycle. These items should be removedfrom the washer then pressed out in a terry towel to remove excess water before being hung up or laid flat to dry.
to use a water softener to maximize the performance ofyour washer. Also, in areas with extremely hard water(9+) you may need to wash at lower temperatures toprevent hard water deposits from forming in the tankand wash system.
Different brands of detergent have different amounts ofphosphorous for softening water. If you have hard waterand use a detergent with less than 8.7% phosphorouscontent, you may need to use more detergent or use adetergent with a higher phosphorous content.
Recommended Detergent AmountsBased on Water Hardness
Soft (0-3 grains per gal.) 1 teaspoon 1 to 1-1/2 tablespoons
Medium (4-8 grains per gal.) 1 teaspoon 1 to 2 tablespoons
Hard (9+ grains per gal.) 1 teaspoon 2 to 3 tablespoons
Detergent AmountsWater Hardness Prewash Main Wash
for different fabrics as well as recommended programs,load sizes, and spin options.
Detergent Amounts Based on Water HardnessDetergent Amounts Based on Water Hardness
Page 7
EN
GLI
SH
EN
GLI
SH
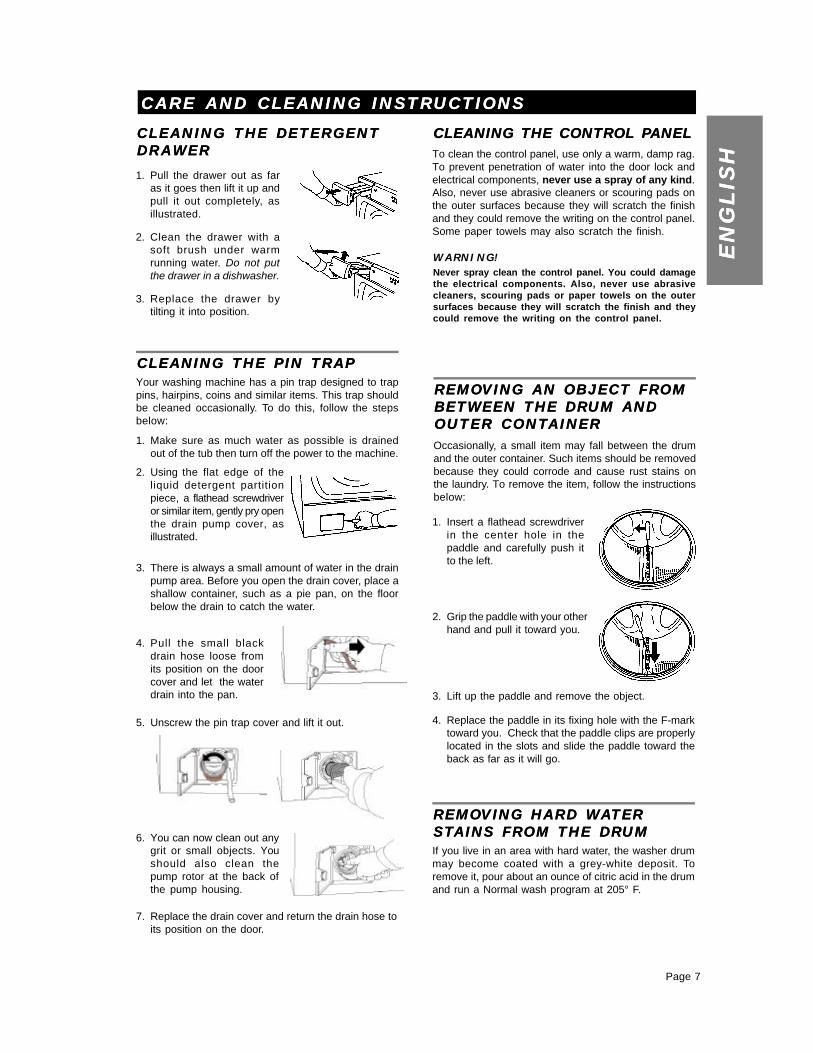
CLEANING THE PIN TRAPCLEANING THE PIN TRAPYour washing machine has a pin trap designed to trappins, hairpins, coins and similar items. This trap shouldbe cleaned occasionally. To do this, follow the stepsbelow:
1. Make sure as much water as possible is drainedout of the tub then turn off the power to the machine.
2. Using the flat edge of theliquid detergent partitionpiece, a flathead screwdriveror similar item, gently pry openthe drain pump cover, asillustrated.
4. Pull the small blackdrain hose loose fromits position on the doorcover and let the waterdrain into the pan.
7. Replace the drain cover and return the drain hose toits position on the door.
5. Unscrew the pin trap cover and lift it out.
3. There is always a small amount of water in the drainpump area. Before you open the drain cover, place ashallow container, such as a pie pan, on the floorbelow the drain to catch the water.
REMOREMOVING VING AN OBJECT FRAN OBJECT FROMOMBETWEEN BETWEEN THE DRTHE DRUM UM ANDANDOUTER CONTOUTER CONTAINERAINEROccasionally, a small item may fall between the drumand the outer container. Such items should be removedbecause they could corrode and cause rust stains onthe laundry. To remove the item, follow the instructionsbelow:
CARE CARE AND CLEANING INSTRAND CLEANING INSTRUCTIONSUCTIONSCLEANING THE DETERGENTCLEANING THE DETERGENTDRAWERDRAWER
CLEANING CLEANING THE CONTRTHE CONTROL POL PANELANELTo clean the control panel, use only a warm, damp rag.To prevent penetration of water into the door lock andelectrical components, never use a spray of any kind.Also, never use abrasive cleaners or scouring pads onthe outer surfaces because they will scratch the finishand they could remove the writing on the control panel.Some paper towels may also scratch the finish.
1. Pull the drawer out as faras it goes then lift it up andpull it out completely, asillustrated.
2. Clean the drawer with asoft brush under warmrunning water. Do not putthe drawer in a dishwasher.
3. Replace the drawer bytilting it into position.
6. You can now clean out anygrit or small objects. Youshould also clean thepump rotor at the back ofthe pump housing.
2. Grip the paddle with your otherhand and pull it toward you.
1. Insert a flathead screwdriverin the center hole in thepaddle and carefully push itto the left.
4. Replace the paddle in its fixing hole with the F-marktoward you. Check that the paddle clips are properlylocated in the slots and slide the paddle toward theback as far as it will go.
3. Lift up the paddle and remove the object.
REMOREMOVING HARD VING HARD WWAATERTERSTSTAINS FRAINS FROM OM THE DRTHE DRUMUMIf you live in an area with hard water, the washer drummay become coated with a grey-white deposit. Toremove it, pour about an ounce of citric acid in the drumand run a Normal wash program at 205° F.
Never spray clean the control panel. You could damagethe electrical components. Also, never use abrasivecleaners, scouring pads or paper towels on the outersurfaces because they will scratch the finish and theycould remove the writing on the control panel.
WARNING!
Page 8
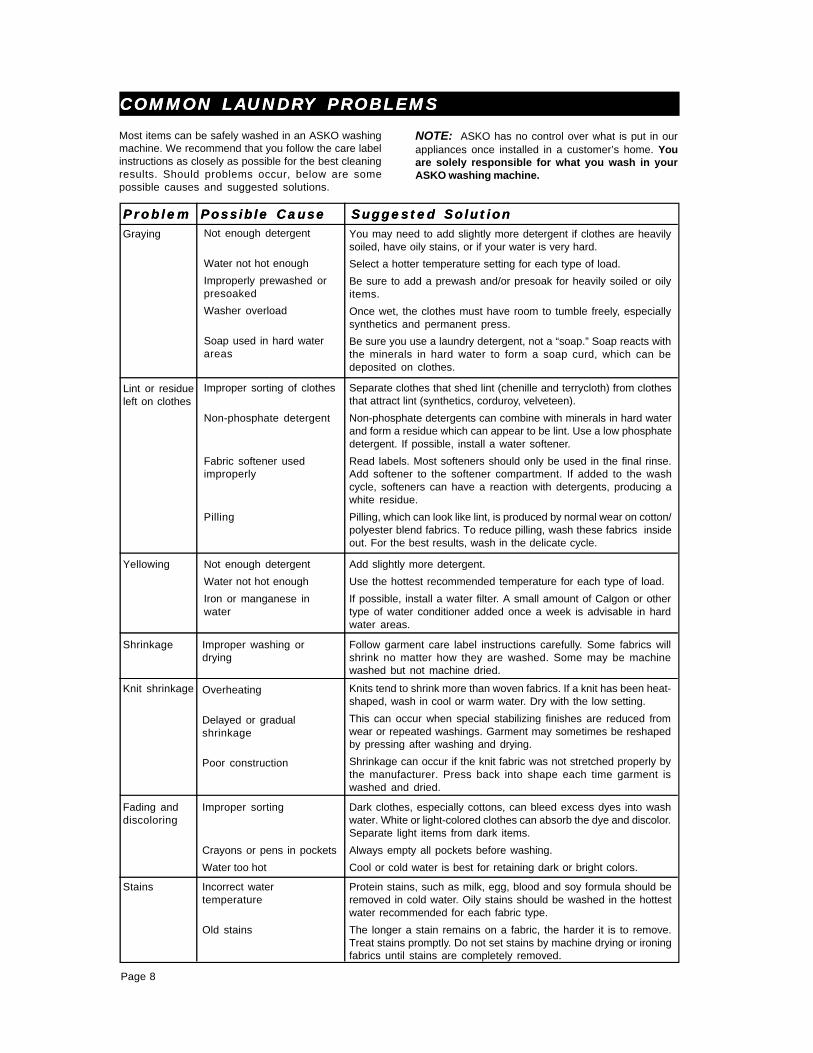
Most items can be safely washed in an ASKO washingmachine. We recommend that you follow the care labelinstructions as closely as possible for the best cleaningresults. Should problems occur, below are somepossible causes and suggested solutions.
You may need to add slightly more detergent if clothes are heavilysoiled, have oily stains, or if your water is very hard.
Select a hotter temperature setting for each type of load.
Be sure to add a prewash and/or presoak for heavily soiled or oilyitems.
Once wet, the clothes must have room to tumble freely, especiallysynthetics and permanent press.
Be sure you use a laundry detergent, not a “soap.” Soap reacts withthe minerals in hard water to form a soap curd, which can bedeposited on clothes.
ProblemProblem Possible CausePossible Cause Suggested SolutionSuggested SolutionGraying Not enough detergent
Water not hot enough
Improperly prewashed orpresoaked
Washer overload
Soap used in hard waterareas
Separate clothes that shed lint (chenille and terrycloth) from clothesthat attract lint (synthetics, corduroy, velveteen).
Non-phosphate detergents can combine with minerals in hard waterand form a residue which can appear to be lint. Use a low phosphatedetergent. If possible, install a water softener.
Read labels. Most softeners should only be used in the final rinse.Add softener to the softener compartment. If added to the washcycle, softeners can have a reaction with detergents, producing awhite residue.
Pilling, which can look like lint, is produced by normal wear on cotton/polyester blend fabrics. To reduce pilling, wash these fabrics insideout. For the best results, wash in the delicate cycle.
Lint or residueleft on clothes
Improper sorting of clothes
Non-phosphate detergent
Fabric softener usedimproperly
Pilling
Add slightly more detergent.
Use the hottest recommended temperature for each type of load.
If possible, install a water filter. A small amount of Calgon or othertype of water conditioner added once a week is advisable in hardwater areas.
Yellowing Not enough detergent
Water not hot enough
Iron or manganese inwater
Follow garment care label instructions carefully. Some fabrics willshrink no matter how they are washed. Some may be machinewashed but not machine dried.
Shrinkage Improper washing ordrying
Knits tend to shrink more than woven fabrics. If a knit has been heat-shaped, wash in cool or warm water. Dry with the low setting.
This can occur when special stabilizing finishes are reduced fromwear or repeated washings. Garment may sometimes be reshapedby pressing after washing and drying.
Shrinkage can occur if the knit fabric was not stretched properly bythe manufacturer. Press back into shape each time garment iswashed and dried.
Knit shrinkage Overheating
Delayed or gradualshrinkage
Poor construction
Dark clothes, especially cottons, can bleed excess dyes into washwater. White or light-colored clothes can absorb the dye and discolor.Separate light items from dark items.
Always empty all pockets before washing.
Cool or cold water is best for retaining dark or bright colors.
Fading anddiscoloring
Improper sorting
Crayons or pens in pockets
Water too hot
Protein stains, such as milk, egg, blood and soy formula should beremoved in cold water. Oily stains should be washed in the hottestwater recommended for each fabric type.
The longer a stain remains on a fabric, the harder it is to remove.Treat stains promptly. Do not set stains by machine drying or ironingfabrics until stains are completely removed.
Stains Incorrect watertemperature
Old stains
COMMON LACOMMON LAUNDRUNDRY PRY PROBLEMSOBLEMS
NOTE: ASKO has no control over what is put in ourappliances once installed in a customer’s home. Youare solely responsible for what you wash in yourASKO washing machine.
Page 9
EN
GLI
SH
EN
GLI
SH
COMMON LACOMMON LAUNDRUNDRY PRY PROBLEMSOBLEMS (CONTINUED) (CONTINUED)ProblemProblem Possible CausePossible Cause Suggested SolutionSuggested Solution
Empty all pockets and turn inside out before laundering.
Fasten all hooks, snaps, and zippers before laundering to avoid snags.Remove sharp buckles. Turn knits inside out.
Before washing, rinse harsh chemicals (such as battery acid, haircare chemicals, cleaning solutions, etc.) from towels and other articlesto avoid holes in fabrics. Do not allow these unrinsed items to contactother fabrics.
Mend all garments before laundering to prevent enlarging of rips.
These items may fray at edges from normal wear, not the washer.Wash only in half loads and don’t wash in the same load with heavyitems, such as towels or jeans.
Rips, snags,excess wear
Sharp objects in pockets
Hooks, snaps, zippers,buckles
Harsh chemicals
Existing rips and tears
Permanent press items
Permanent press items should be washed in half-loads to preventwrinkling. If possible, use a slower spin speed.
Use lower wash temperature settings.
Excessivewrinkling
Machine too full
Water too hot
ERRERROR MESSAOR MESSAGES – GES – W640/W660W640/W660Error messages will display in the LED window if faultsoccur while a program is in progress. The table belowdefines each possible error message.
ERRERROR MESSAOR MESSAGEGE SOLSOLUTIONUTIONWhen this symbol flashes at the lower right corner of the display it merely meansthe glass door isn’t closed securely. Close the door and try again.
0000 If this message flashes at the top right of the LED window, the machine has failedto spin. This could be because the load is out of balance. Turn the power offthen on again. Open the door and redistribute the washing. Run the Spinprogram again.
Door lock fault Call a service technician.
Foaming Run the Rinse program again.Try using less detergent and softener.Use low-sudsing detergents. (See page 5.)
Overflow Call a service Technician
Pressure sensor Call a service technician.
Temperature stop Call a service technician.
Thermistor Call a service technician.
Wash motor Call a service technician.
Water inlet Make sure the water tap is open.
Water outlet Check the pin trap for possible blockage. Make sure the outlet hose isn’t kinked.
To remove the message, turn the power off or changethe program.
FFAAULULT CODES – T CODES – W600/W620W600/W620The Program Control knobs on the W600/W620 havetwo fault codes: C and S. If the knob stops on one ofthese, the machine detected a problem.
C PositionC PositionThis indicates a problem that can probably be takencare of without calling a service technician. Here aresome possible problems:
♦ Power interruption.
♦ Water not draining out.
♦ Water not filling machine.
♦ The machine didn’t spin.
Refer to the “Troubleshooting” section on the next pagefor possible causes and solutions. If none of thesework, call a service technician.
S PositionS PositionIf the knob stops on S, this indicates a mechanicalproblem and you will probably need to call a servicetechnician.
Page 10
TRTROUBLESHOOOUBLESHOOTINGTING
The door won’t open.The door won’t open.♦ Make sure the power to the unit is on. If the power
is on and the indicator lamp is not lit, there is nopower supply. Check that the machine is properlyplugged into the electrical outlet. If it is, the fusesmay be blown. Call a service technician.
♦ Make sure all the water has drained out.
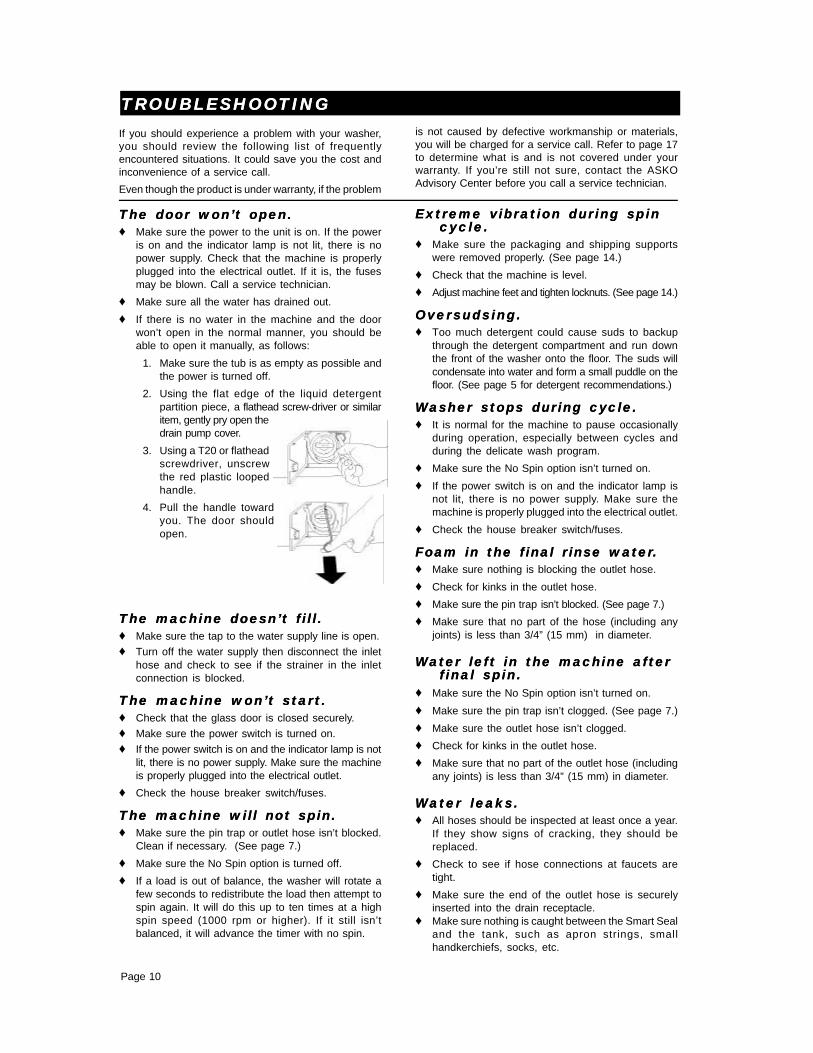
♦ If there is no water in the machine and the doorwon’t open in the normal manner, you should beable to open it manually, as follows:
1. Make sure the tub is as empty as possible andthe power is turned off.
2. Using the flat edge of the liquid detergentpartition piece, a flathead screw-driver or similaritem, gently pry open thedrain pump cover.
3. Using a T20 or flatheadscrewdriver, unscrewthe red plastic loopedhandle.
4. Pull the handle towardyou. The door shouldopen.
The machine doesn’t fill.The machine doesn’t fill.♦ Make sure the tap to the water supply line is open.
♦ Turn off the water supply then disconnect the inlethose and check to see if the strainer in the inletconnection is blocked.
The machine won’t start.The machine won’t start.♦ Check that the glass door is closed securely.
♦ Make sure the power switch is turned on.
♦ If the power switch is on and the indicator lamp is notlit, there is no power supply. Make sure the machineis properly plugged into the electrical outlet.
♦ Check the house breaker switch/fuses.
The machine will not spin.The machine will not spin.♦ Make sure the pin trap or outlet hose isn’t blocked.
Clean if necessary. (See page 7.)
♦ Make sure the No Spin option is turned off.
♦ If a load is out of balance, the washer will rotate afew seconds to redistribute the load then attempt tospin again. It will do this up to ten times at a highspin speed (1000 rpm or higher). If it still isn’tbalanced, it will advance the timer with no spin.
Extreme vibration during spinExtreme vibration during spincycle.cycle.
♦ Make sure the packaging and shipping supportswere removed properly. (See page 14.)
♦ Check that the machine is level.
♦ Adjust machine feet and tighten locknuts. (See page 14.)
Oversudsing.Oversudsing.♦ Too much detergent could cause suds to backup
through the detergent compartment and run downthe front of the washer onto the floor. The suds willcondensate into water and form a small puddle on thefloor. (See page 5 for detergent recommendations.)
Washer stops during cycle.Washer stops during cycle.♦ It is normal for the machine to pause occasionally
during operation, especially between cycles andduring the delicate wash program.
♦ Make sure the No Spin option isn’t turned on.
♦ If the power switch is on and the indicator lamp isnot lit, there is no power supply. Make sure themachine is properly plugged into the electrical outlet.
♦ Check the house breaker switch/fuses.
Foam in the final rinse water.Foam in the final rinse water.♦ Make sure nothing is blocking the outlet hose.
♦ Check for kinks in the outlet hose.
♦ Make sure the pin trap isn’t blocked. (See page 7.)
♦ Make sure that no part of the hose (including anyjoints) is less than 3/4” (15 mm) in diameter.
Water left in the machine afterWater left in the machine afterfinal spin.final spin.
♦ Make sure the No Spin option isn’t turned on.
♦ Make sure the pin trap isn’t clogged. (See page 7.)
♦ Make sure the outlet hose isn’t clogged.
♦ Check for kinks in the outlet hose.
♦ Make sure that no part of the outlet hose (includingany joints) is less than 3/4” (15 mm) in diameter.
Water leaks.Water leaks.♦ All hoses should be inspected at least once a year.
If they show signs of cracking, they should bereplaced.
♦ Check to see if hose connections at faucets aretight.
♦ Make sure the end of the outlet hose is securelyinserted into the drain receptacle.
♦ Make sure nothing is caught between the Smart Sealand the tank, such as apron strings, smallhandkerchiefs, socks, etc.
If you should experience a problem with your washer,you should review the following list of frequentlyencountered situations. It could save you the cost andinconvenience of a service call.
Even though the product is under warranty, if the problem
is not caused by defective workmanship or materials,you will be charged for a service call. Refer to page 17to determine what is and is not covered under yourwarranty. If you’re still not sure, contact the ASKOAdvisory Center before you call a service technician.
Page 11
EN
GLI
SH
EN
GLI
SH
W640/W660 – CUSTOMIZING THE PRESET PROGRAMSW640/W660 – CUSTOMIZING THE PRESET PROGRAMS
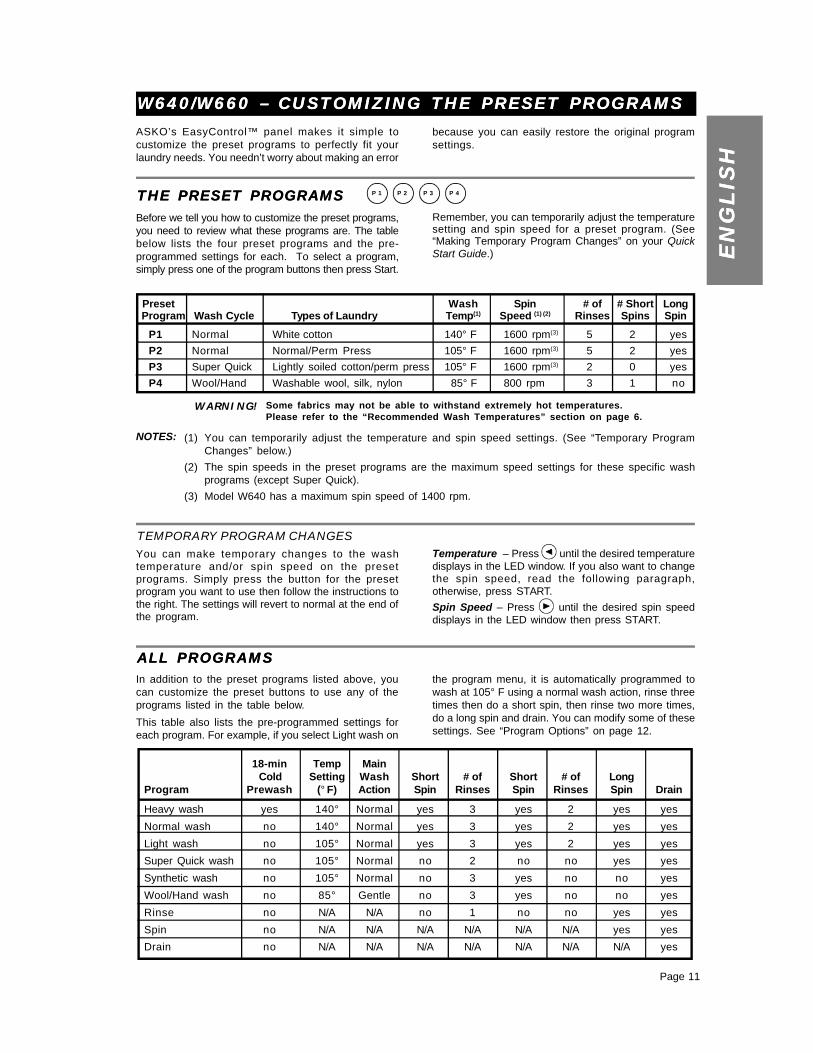
Before we tell you how to customize the preset programs,you need to review what these programs are. The tablebelow lists the four preset programs and the pre-programmed settings for each. To select a program,simply press one of the program buttons then press Start.
THE PRESET PROGRAMS THE PRESET PROGRAMS P 1 P 2 P 3 P 4
ASKO’s EasyControl™ panel makes it simple tocustomize the preset programs to perfectly fit yourlaundry needs. You needn’t worry about making an error
because you can easily restore the original programsettings.
Preset Wash Spin # of # Short Long Program Wash Cycle Types of Laundry Temp(1) Speed (1) (2) Rinses Spins Spin
P1 Normal White cotton 140° F 1600 rpm(3) 5 2 yes
P2 Normal Normal/Perm Press 105° F 1600 rpm(3) 5 2 yes
P3 Super Quick Lightly soiled cotton/perm press 105° F 1600 rpm(3) 2 0 yes
P4 Wool/Hand Washable wool, silk, nylon 85° F 800 rpm 3 1 no
NOTES: (1) You can temporarily adjust the temperature and spin speed settings. (See “Temporary ProgramChanges” below.)
(2) The spin speeds in the preset programs are the maximum speed settings for these specific washprograms (except Super Quick).
(3) Model W640 has a maximum spin speed of 1400 rpm.
WARNING! Some fabrics may not be able to withstand extremely hot temperatures.Please refer to the “Recommended Wash Temperatures” section on page 6.
Remember, you can temporarily adjust the temperaturesetting and spin speed for a preset program. (See“Making Temporary Program Changes” on your QuickStart Guide.)
In addition to the preset programs listed above, youcan customize the preset buttons to use any of theprograms listed in the table below.
This table also lists the pre-programmed settings foreach program. For example, if you select Light wash on
18-min Temp Main Cold Setting Wash Short # of Short # of Long
Super Quick wash no 105° Normal no 2 no no yes yes
Synthetic wash no 105° Normal no 3 yes no no yes
Wool/Hand wash no 85° Gentle no 3 yes no no yes
Rinse no N/A N/A no 1 no no yes yes
Spin no N/A N/A N/A N/A N/A N/A yes yes
Drain no N/A N/A N/A N/A N/A N/A N/A yes
You can make temporary changes to the washtemperature and/or spin speed on the presetprograms. Simply press the button for the presetprogram you want to use then follow the instructions tothe right. The settings will revert to normal at the end ofthe program.
Temperature – Press until the desired temperaturedisplays in the LED window. If you also want to changethe spin speed, read the following paragraph,otherwise, press START.
Spin Speed – Press until the desired spin speeddisplays in the LED window then press START.
TEMPORARY PROGRAM CHANGES
ALL PROGRAMSALL PROGRAMSthe program menu, it is automatically programmed towash at 105° F using a normal wash action, rinse threetimes then do a short spin, then rinse two more times,do a long spin and drain. You can modify some of thesesettings. See “Program Options” on page 12.
Page 12
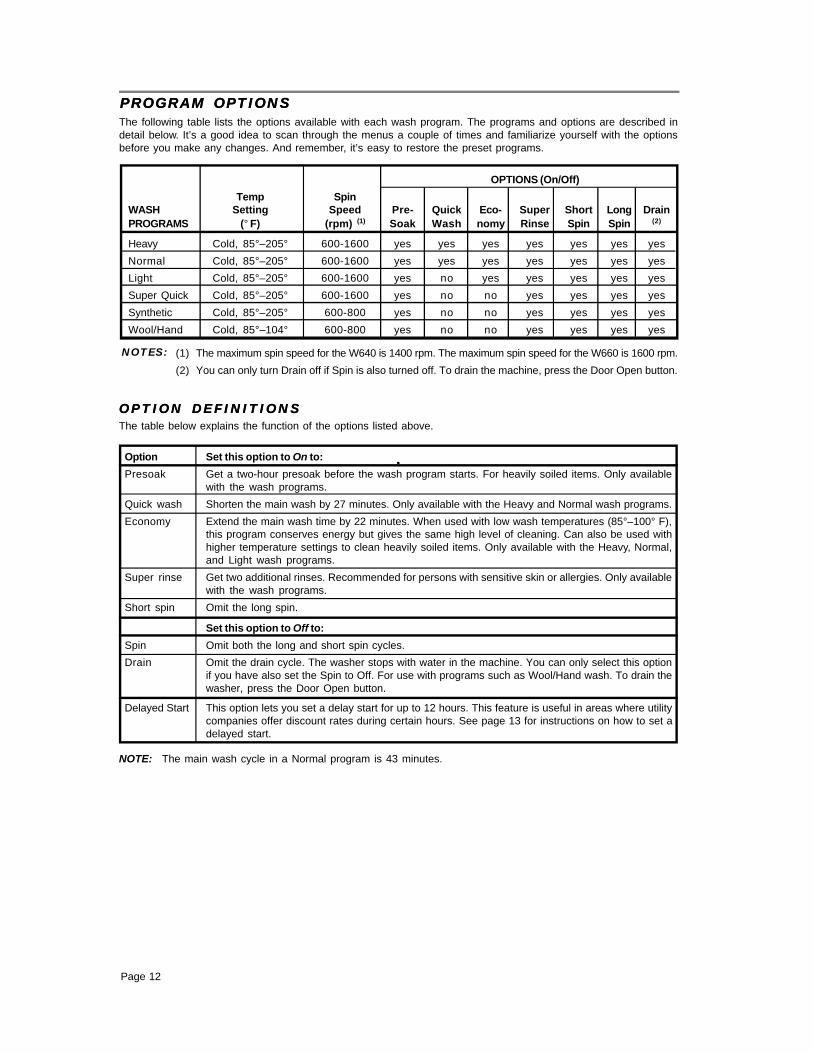
Option Set this option to On to:
Presoak Get a two-hour presoak before the wash program starts. For heavily soiled items. Only availablewith the wash programs.
Quick wash Shorten the main wash by 27 minutes. Only available with the Heavy and Normal wash programs.
Economy Extend the main wash time by 22 minutes. When used with low wash temperatures (85°–100° F),this program conserves energy but gives the same high level of cleaning. Can also be used withhigher temperature settings to clean heavily soiled items. Only available with the Heavy, Normal,and Light wash programs.
Super rinse Get two additional rinses. Recommended for persons with sensitive skin or allergies. Only availablewith the wash programs.
Short spin Omit the long spin.
Set this option to Off to:
Spin Omit both the long and short spin cycles.
Drain Omit the drain cycle. The washer stops with water in the machine. You can only select this optionif you have also set the Spin to Off. For use with programs such as Wool/Hand wash. To drain thewasher, press the Door Open button.
Delayed Start This option lets you set a delay start for up to 12 hours. This feature is useful in areas where utilitycompanies offer discount rates during certain hours. See page 13 for instructions on how to set adelayed start.
PROGRAM OPTIONSPROGRAM OPTIONSThe following table lists the options available with each wash program. The programs and options are described indetail below. It’s a good idea to scan through the menus a couple of times and familiarize yourself with the optionsbefore you make any changes. And remember, it’s easy to restore the preset programs.
NOTES: (1) The maximum spin speed for the W640 is 1400 rpm. The maximum spin speed for the W660 is 1600 rpm.
(2) You can only turn Drain off if Spin is also turned off. To drain the machine, press the Door Open button.
OPTION DEFINITIONSOPTION DEFINITIONSThe table below explains the function of the options listed above.
NOTE: The main wash cycle in a Normal program is 43 minutes.
OPTIONS (On/Off)
Temp SpinWASH Setting Speed Pre- Quick Eco- Super Short Long DrainPROGRAMS (° F) (rpm) (1) Soak Wash nomy Rinse Spin Spin (2)
Super Quick Cold, 85°–205° 600-1600 yes no no yes yes yes yes
Synthetic Cold, 85°–205° 600-800 yes no no yes yes yes yes
Wool/Hand Cold, 85°–104° 600-800 yes no no yes yes yes yes
Page 13
EN
GLI
SH
EN
GLI
SH
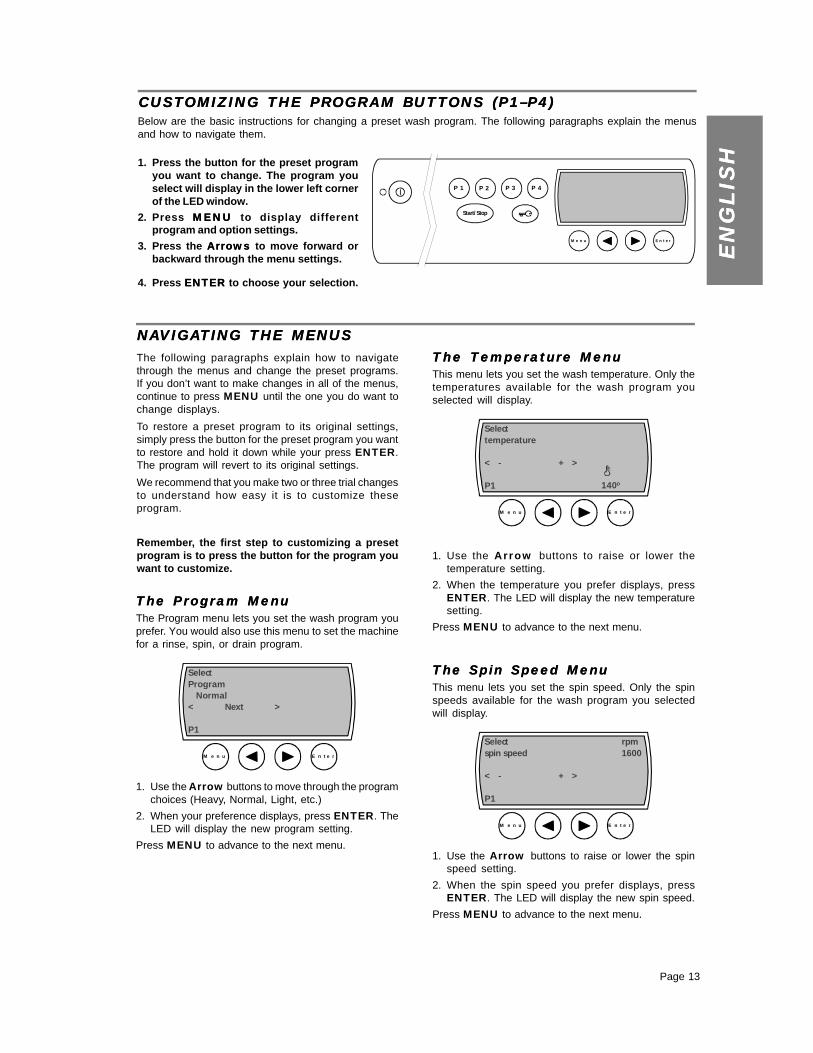
The Temperature MenuThe Temperature MenuThis menu lets you set the wash temperature. Only thetemperatures available for the wash program youselected will display.
M e n u E n t e r
Selecttemperature < - + >
P1 140o
1. Use the Arrow buttons to raise or lower thetemperature setting.
2. When the temperature you prefer displays, pressENTER. The LED will display the new temperaturesetting.
Press MENU to advance to the next menu.
The Program MenuThe Program MenuThe Program menu lets you set the wash program youprefer. You would also use this menu to set the machinefor a rinse, spin, or drain program.
M e n u E n t e r
SelectProgram Normal< Next >
P1
1. Use the Arrow buttons to move through the programchoices (Heavy, Normal, Light, etc.)
2. When your preference displays, press ENTER. TheLED will display the new program setting.
Press MENU to advance to the next menu.
The Spin Speed MenuThe Spin Speed MenuThis menu lets you set the spin speed. Only the spinspeeds available for the wash program you selectedwill display.
M e n u E n t e r
Selectspin speed < - + >
P1
rpm1600
1. Use the Arrow buttons to raise or lower the spinspeed setting.
2. When the spin speed you prefer displays, pressENTER. The LED will display the new spin speed.
Press MENU to advance to the next menu.
The following paragraphs explain how to navigatethrough the menus and change the preset programs.If you don’t want to make changes in all of the menus,continue to press MENU until the one you do want tochange displays.
To restore a preset program to its original settings,simply press the button for the preset program you wantto restore and hold it down while your press ENTER.The program will revert to its original settings.
We recommend that you make two or three trial changesto understand how easy it is to customize theseprogram.
Remember, the first step to customizing a presetprogram is to press the button for the program youwant to customize.
1. Press the button for the preset programyou want to change. The program youselect will display in the lower left cornerof the LED window.
2. Press MENUMENU to display differentprogram and option settings.
3. Press the ArrowsArrows to move forward orbackward through the menu settings.
4. Press ENTERENTER to choose your selection.
CUSTCUSTOMIZING OMIZING THE PRTHE PROGRAM BOGRAM BUTTUTTONS (P1–P4)ONS (P1–P4)Below are the basic instructions for changing a preset wash program. The following paragraphs explain the menusand how to navigate them.
Start/Stop
M e n u E n t e r
P 1 P 2 P 3 P 4
NNAAVIGAVIGATING TING THE MENUSTHE MENUS
Page 14
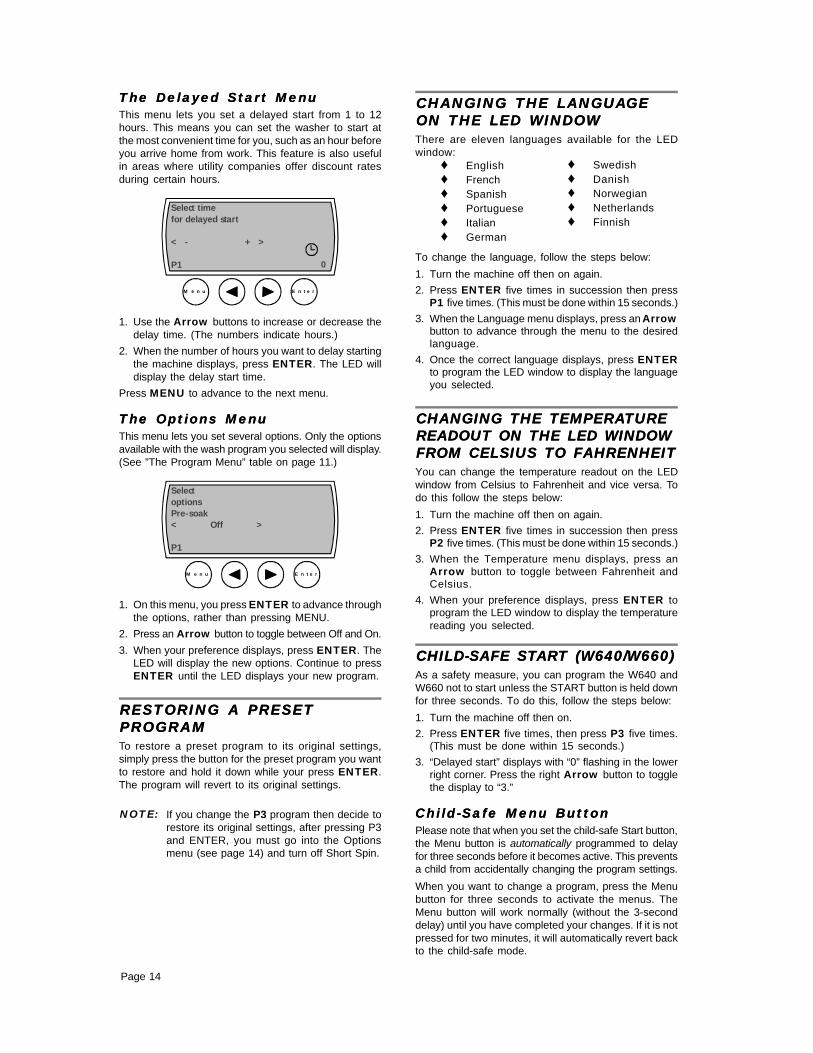
The Delayed Start MenuThe Delayed Start MenuThis menu lets you set a delayed start from 1 to 12hours. This means you can set the washer to start atthe most convenient time for you, such as an hour beforeyou arrive home from work. This feature is also usefulin areas where utility companies offer discount ratesduring certain hours.
Select timefor delayed start < - + >
P1
M e n u E n t e r
0
1. Use the Arrow buttons to increase or decrease thedelay time. (The numbers indicate hours.)
2. When the number of hours you want to delay startingthe machine displays, press ENTER. The LED willdisplay the delay start time.
Press MENU to advance to the next menu.
The Options MenuThe Options MenuThis menu lets you set several options. Only the optionsavailable with the wash program you selected will display.(See ”The Program Menu” table on page 11.)
rpm1600
0
M e n u E n t e r
SelectoptionsPre-soak< Off >
P1
1. On this menu, you press ENTER to advance throughthe options, rather than pressing MENU.
2. Press an Arrow button to toggle between Off and On.
3. When your preference displays, press ENTER. TheLED will display the new options. Continue to pressENTER until the LED displays your new program.
RESTORING A PRESETRESTORING A PRESETPROGRAMPROGRAMTo restore a preset program to its original settings,simply press the button for the preset program you wantto restore and hold it down while your press ENTER.The program will revert to its original settings.
To change the language, follow the steps below:
1. Turn the machine off then on again.
2. Press ENTER five times in succession then pressP1 five times. (This must be done within 15 seconds.)
3. When the Language menu displays, press an Arrowbutton to advance through the menu to the desiredlanguage.
4. Once the correct language displays, press ENTERto program the LED window to display the languageyou selected.
CHANGING CHANGING THE THE TEMPERATEMPERATURETUREREADOUT ON THE LED WINDOWREADOUT ON THE LED WINDOWFROM CELSIUS TO FAHRENHEITFROM CELSIUS TO FAHRENHEITYou can change the temperature readout on the LEDwindow from Celsius to Fahrenheit and vice versa. Todo this follow the steps below:
1. Turn the machine off then on again.
2. Press ENTER five times in succession then pressP2 five times. (This must be done within 15 seconds.)
3. When the Temperature menu displays, press anArrow button to toggle between Fahrenheit andCelsius.
4. When your preference displays, press ENTER toprogram the LED window to display the temperaturereading you selected.
CHILD-SAFE STCHILD-SAFE STARART (W640/W660)T (W640/W660)As a safety measure, you can program the W640 andW660 not to start unless the START button is held downfor three seconds. To do this, follow the steps below:
1. Turn the machine off then on.
2. Press ENTER five times, then press P3 five times.(This must be done within 15 seconds.)
3. “Delayed start” displays with “0” flashing in the lowerright corner. Press the right Arrow button to togglethe display to “3.”
Child-Safe Menu ButtonChild-Safe Menu ButtonPlease note that when you set the child-safe Start button,the Menu button is automatically programmed to delayfor three seconds before it becomes active. This preventsa child from accidentally changing the program settings.
When you want to change a program, press the Menubutton for three seconds to activate the menus. TheMenu button will work normally (without the 3-seconddelay) until you have completed your changes. If it is notpressed for two minutes, it will automatically revert backto the child-safe mode.
♦ English♦ French♦ Spanish♦ Portuguese♦ Italian♦ German
CHANGING CHANGING THE LANGUTHE LANGUAAGEGEON THE LED WINDOWON THE LED WINDOWThere are eleven languages available for the LEDwindow:
NOTE: If you change the P3 program then decide torestore its original settings, after pressing P3and ENTER, you must go into the Optionsmenu (see page 14) and turn off Short Spin.
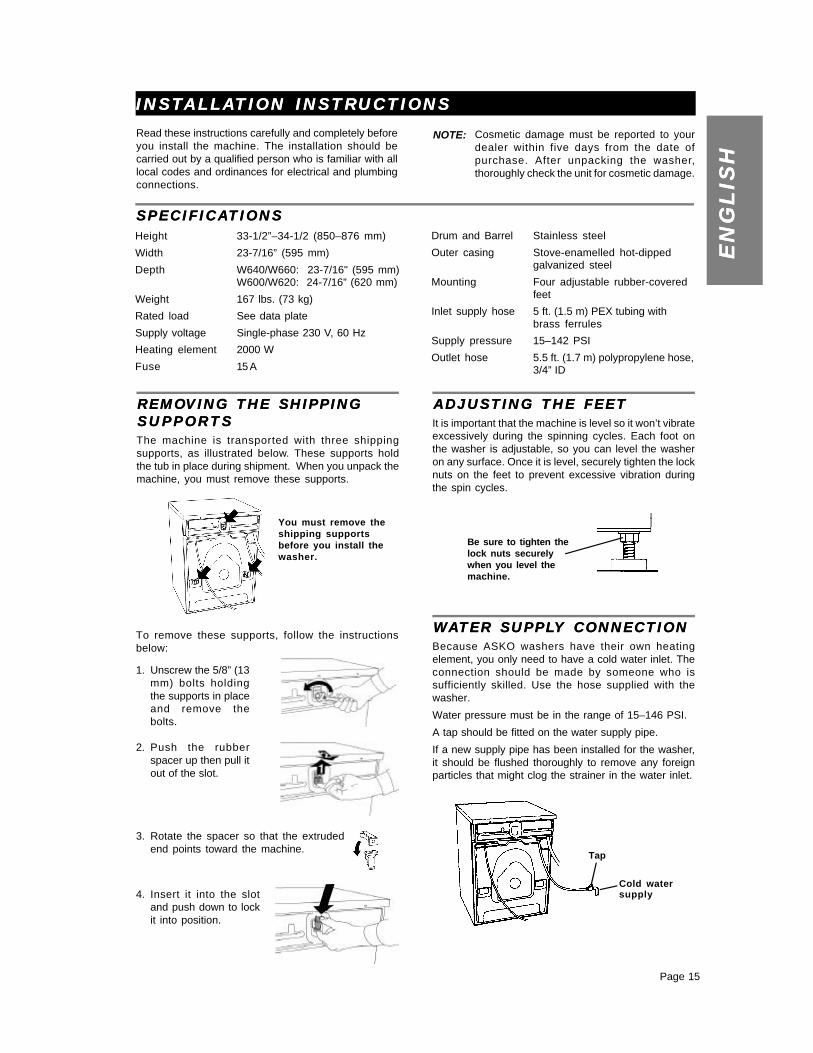
WAWATER SUPPLTER SUPPLY CONNECTIONY CONNECTIONBecause ASKO washers have their own heatingelement, you only need to have a cold water inlet. Theconnection should be made by someone who issufficiently skilled. Use the hose supplied with thewasher.
Water pressure must be in the range of 15–146 PSI.
A tap should be fitted on the water supply pipe.
If a new supply pipe has been installed for the washer,it should be flushed thoroughly to remove any foreignparticles that might clog the strainer in the water inlet.
INSTINSTALLAALLATION INSTRTION INSTRUCTIONSUCTIONSRead these instructions carefully and completely beforeyou install the machine. The installation should becarried out by a qualified person who is familiar with alllocal codes and ordinances for electrical and plumbingconnections.
NOTE: Cosmetic damage must be reported to yourdealer within five days from the date ofpurchase. After unpacking the washer,thoroughly check the unit for cosmetic damage.
SPECIFICASPECIFICATIONSTIONSDrum and Barrel Stainless steel
Inlet supply hose 5 ft. (1.5 m) PEX tubing withbrass ferrules
Supply pressure 15–142 PSI
Outlet hose 5.5 ft. (1.7 m) polypropylene hose,3/4” ID
REMOREMOVING VING THE SHIPPINGTHE SHIPPINGSUPPORTSSUPPORTSThe machine is transported with three shippingsupports, as illustrated below. These supports holdthe tub in place during shipment. When you unpack themachine, you must remove these supports.
1. Unscrew the 5/8” (13mm) bolts holdingthe supports in placeand remove thebolts.
To remove these supports, follow the instructionsbelow:
You must remove theshipping supportsbefore you install thewasher.
2. Push the rubberspacer up then pull itout of the slot.
ADJUSTING THE FEETADJUSTING THE FEETIt is important that the machine is level so it won’t vibrateexcessively during the spinning cycles. Each foot onthe washer is adjustable, so you can level the washeron any surface. Once it is level, securely tighten the locknuts on the feet to prevent excessive vibration duringthe spin cycles.
Be sure to tighten thelock nuts securelywhen you level themachine.
Cold watersupply
Tap
4. Insert it into the slotand push down to lockit into position.
3. Rotate the spacer so that the extrudedend points toward the machine.
Page 16
ELECTRICAL CONNECTIONSELECTRICAL CONNECTIONSThe machine is delivered ready-fitted with a plug and isintended for connection to an ASKO Dryer, which isequipped with a matching receptacle. The plug suppliedwith the washer can only be used with an ASKO Dryer. Ifthe washer is used separately or with another dryer, itmust be on a separate 220 V single-phase circuit.
If the machine is to be used in a wet area, the supplymust be protected by a residual current device.
As supplied: 230 V, 60 Hz2000 W heating element15 A fuse required
GROUNDING INSTRUCTIONSThis appliance must be grounded. In the event ofmalfunction or breakdown, grounding will reduce therisk of electric shock by providing a path of leastresistance for electric current. This appliance isequipped with a cord having an equipment-groundingconductor and a grounding plug. The plug must beplugged into an appropriate outlet that is properlyinstalled and grounded in accordance with all localcodes and ordinances.
WARNING! Improper connection of theequipment-grounding conductor can result in arisk of electric shock. Check with a qualifiedelectrician or serviceman if you are in doubt as towhether the appliance is properly grounded.
Do not modify the plug provided with the appliance.If it will not fit the outlet, have a proper outlet installedby a qualified electrician.
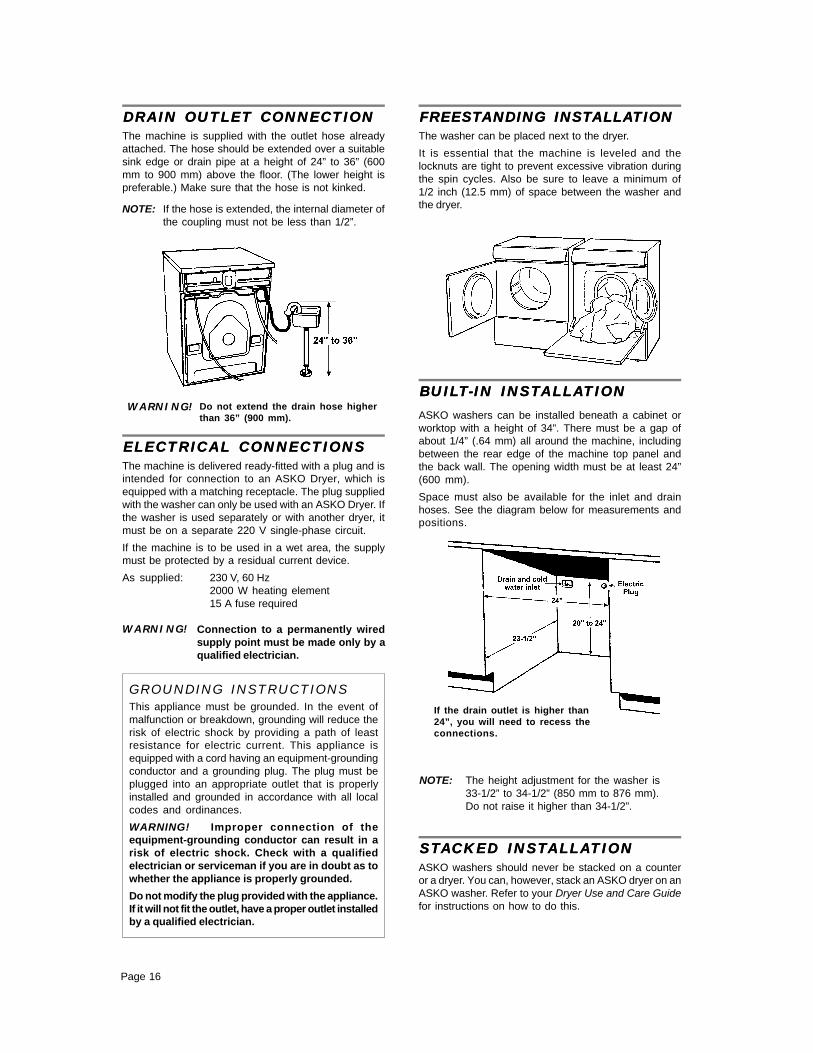
DRAIN OUTLET CONNECTIONDRAIN OUTLET CONNECTIONThe machine is supplied with the outlet hose alreadyattached. The hose should be extended over a suitablesink edge or drain pipe at a height of 24” to 36” (600mm to 900 mm) above the floor. (The lower height ispreferable.) Make sure that the hose is not kinked.
If the hose is extended, the internal diameter ofthe coupling must not be less than 1/2”.
NOTE:
WARNING! Do not extend the drain hose higherthan 36” (900 mm).
WARNING! Connection to a permanently wiredsupply point must be made only by aqualified electrician.
FREESTFREESTANDING INSTANDING INSTALLAALLATIONTIONThe washer can be placed next to the dryer.
It is essential that the machine is leveled and thelocknuts are tight to prevent excessive vibration duringthe spin cycles. Also be sure to leave a minimum of1/2 inch (12.5 mm) of space between the washer andthe dryer.
ASKO washers can be installed beneath a cabinet orworktop with a height of 34”. There must be a gap ofabout 1/4” (.64 mm) all around the machine, includingbetween the rear edge of the machine top panel andthe back wall. The opening width must be at least 24”(600 mm).
Space must also be available for the inlet and drainhoses. See the diagram below for measurements andpositions.
BBUILUILTT-IN INST-IN INSTALLAALLATIONTION
NOTE: The height adjustment for the washer is33-1/2” to 34-1/2” (850 mm to 876 mm).Do not raise it higher than 34-1/2”.
STSTAACKED INSTCKED INSTALLAALLATIONTIONASKO washers should never be stacked on a counteror a dryer. You can, however, stack an ASKO dryer on anASKO washer. Refer to your Dryer Use and Care Guidefor instructions on how to do this.
If the drain outlet is higher than24”, you will need to recess theconnections.
Page 17
EN
GLI
SH
EN
GLI
SH
Some states will not allow the exclusion or limitation of incidental or consequential damages, so this exclusion orlimitation may not apply to you. This warranty gives you specific legal rights and you may also have other rights whichvary from state to state.
For warranty service, contact the dealer from whom you purchased the unit or an authorized ASKO service outlet.Service will be provided during normal business hours. Should you have a service problem that can not be resolvedlocally write:
ASKO USA Inc.P. O. Box 851805
Richardson, Texas 75085-1805
or call ourCustomer Service Center at
800-898-1879 or 972-238-0794
IN NO EVENT SHALL ASKO USA INC. BE RESPONSIBLEFOR ANY INCIDENTAL OR CONSEQUENTIAL DAMAGES.
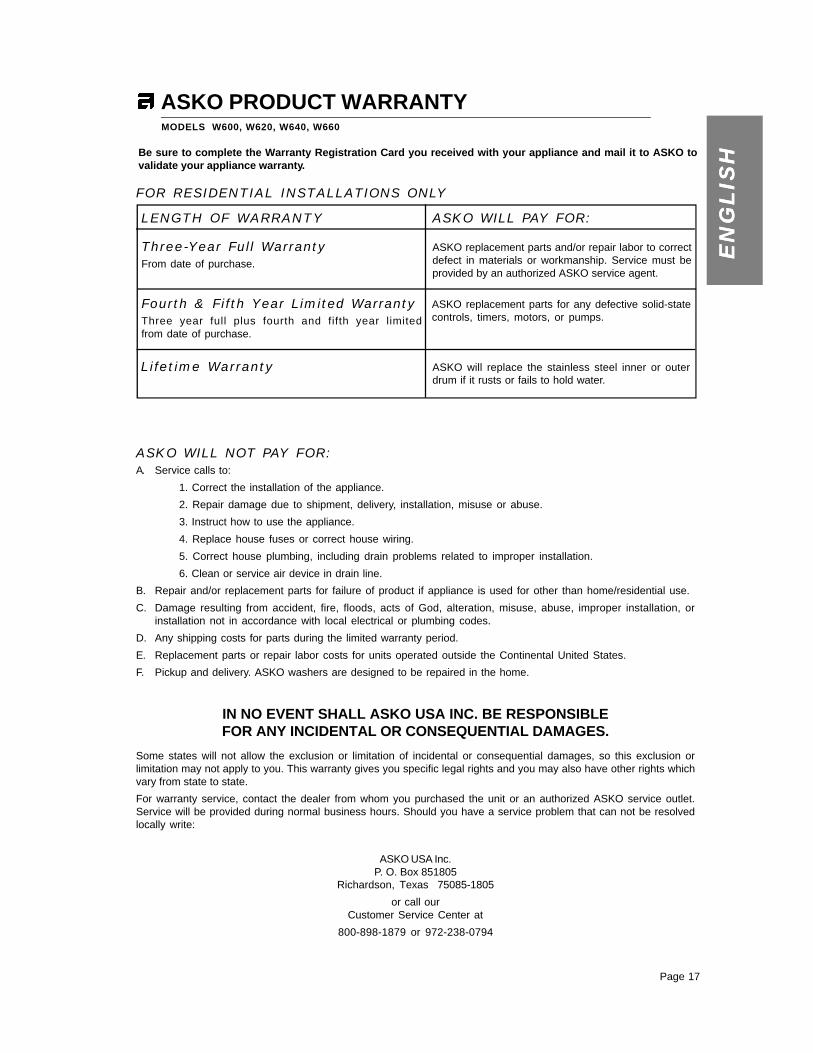
ASKO PRODUCT WARRANTYMODELS W600, W620, W640, W660
Be sure to complete the Warranty Registration Card you received with your appliance and mail it to ASKO tovalidate your appliance warranty.
ASKO WILL NOT PAY FOR:A. Service calls to:
1. Correct the installation of the appliance.
2. Repair damage due to shipment, delivery, installation, misuse or abuse.
3. Instruct how to use the appliance.
4. Replace house fuses or correct house wiring.
5. Correct house plumbing, including drain problems related to improper installation.
6. Clean or service air device in drain line.
B. Repair and/or replacement parts for failure of product if appliance is used for other than home/residential use.
C. Damage resulting from accident, fire, floods, acts of God, alteration, misuse, abuse, improper installation, orinstallation not in accordance with local electrical or plumbing codes.
D. Any shipping costs for parts during the limited warranty period.
E. Replacement parts or repair labor costs for units operated outside the Continental United States.
F. Pickup and delivery. ASKO washers are designed to be repaired in the home.
FOR RESIDENTIAL INSTALLATIONS ONLY
Three-Year Full WarrantyFrom date of purchase.
ASKO WILL PAY FOR:LENGTH OF WARRANTY
Fourth & Fifth Year Limited WarrantyThree year full plus fourth and fifth year limitedfrom date of purchase.
Lifetime Warranty
ASKO replacement parts for any defective solid-statecontrols, timers, motors, or pumps.
ASKO will replace the stainless steel inner or outerdrum if it rusts or fails to hold water.
ASKO replacement parts and/or repair labor to correctdefect in materials or workmanship. Service must beprovided by an authorized ASKO service agent.
Page 18
AAAdvisory Center Number 17Allergies 4Automatic water level control 3
BBBleach 5Built-in installation 16
CCCare and cleaning 7Care label instructions 4Changing the LED readouts 14Child Safety Features 2Child-safe catch 5Child-Safe Start (W640/W660) 2, 14Child-Safe temperature knob 2Control panel, cleaning 7Cosmetic damage 15Cottons 4, 6Customizing the preset
RRRayon and acetate 6Recommended detergents 5Recommended wash temperatures 6Removing object from behind drum 7Restoring preset programs 14Rinse cycles 3Rips 9
SSSafety instructions 2Sensitive skin, advice 4Sensor Level Control 3Service 17Shipping supports 15Shrinkage 8Silk 6Snags 9Solutions to problems 10Sorting the laundry 4
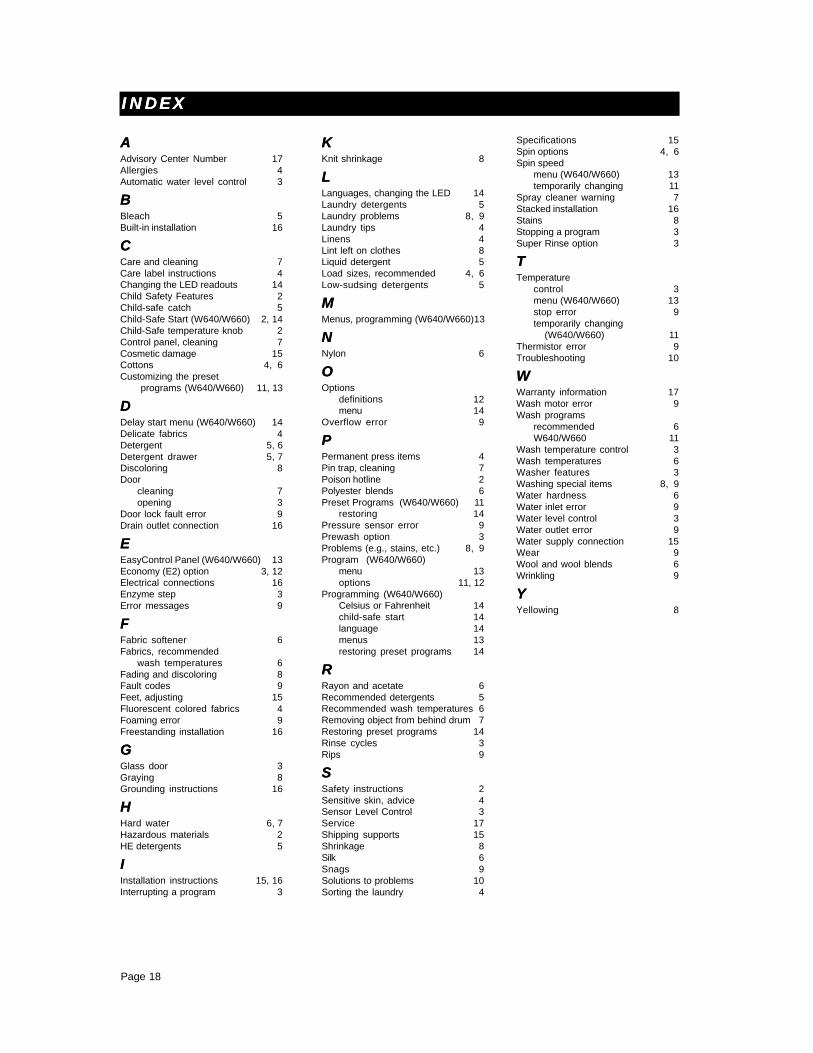
INDEXINDEX
Specifications 15Spin options 4, 6Spin speed
menu (W640/W660) 13temporarily changing 11
Spray cleaner warning 7Stacked installation 16Stains 8Stopping a program 3Super Rinse option 3
TTTemperature
control 3menu (W640/W660) 13stop error 9temporarily changing (W640/W660) 11
Thermistor error 9Troubleshooting 10
WWWarranty information 17Wash motor error 9Wash programs
recommended 6W640/W660 11
Wash temperature control 3Wash temperatures 6Washer features 3Washing special items 8, 9Water hardness 6Water inlet error 9Water level control 3Water outlet error 9Water supply connection 15Wear 9Wool and wool blends 6Wrinkling 9
YYYellowing 8
Page 1
EN
GLI
SH
EN
GLI
SH
WASHERUSE AND CARE GUIDE
ASKO
IMPORTANT!
IMPORTANT!
To get the best performance fro
m
To get the best performance fro
m
your your w
asherwasher, read all operating
, read all operating
instructions before using it for
instructions before using it for
the first ti
me.
the first ti
me.
SAVE THESE INSTRUCTIONS FOR FUTURE REFERENCE
CONTENTSImportant Safety Instructions 2Child Safety Features 2ASKO Washer Features 3Preparing the Laundry 4The Detergent Drawer 5Detergents 5Fabric softeners 6Recommended Wash Temperatures 6Care and Cleaning Instructions 7Common Laundry Problems 8Fault Codes– W600/W620 9Error Messages – W640/W660 9Troubleshooting 10Customizing the Preset Programs – W640/W660 11Installation Instructions 15ASKO Product Warranty 17Index 18
FR
AN
FR
AN
ÇA
ISÇ
AIS
ES
PE
SP A
ÑO
LA
ÑO
L
Page 2
To reduce the risk of fire, electric shock, or injury topersons when using your appliance, follow basicprecautions, including the following:
♦ Read all instructions before using the appliance.
♦ Do not run appliance while you are out of the home.
♦ Do not allow children to play on or in the appliance.Close supervision of children is necessary whenthe appliance is used near children.
♦ Before the appliance is removed from service ordiscarded, remove the door to the washingcompartment.
♦ Do not reach into the appliance if the drum is moving.
♦ Do not install or store this appliance where it will beexposed to the weather.
♦ Do not tamper with controls.
♦ Do not repair or replace any part of the appliance orattempt any servicing unless specificallyrecommended in the user-repair instructions or inpublished user-repair instructions that youunderstand and have the skills to carry out.
♦ Do not add gasoline, dry-cleaning solvents, or otherflammable or explosive substances to the washwater. These substances give off vapors that couldignite or explode.
♦ Under certain conditions, hydrogen gas may beproduced in a hot water system that has not beenused for 2 weeks or more. HYDROGEN GAS ISEXPLOSIVE. If the hot water system has not been
CHILD-SAFE DETERGENT DRAWERCHILD-SAFE DETERGENT DRAWERASKO washers have a child-safety catch on the detergentdrawer that can be engaged to prevent a child fromopening the drawer and possibly coming into contactwith the detergent or fabric softener. Refer to page 5 forinstructions on how to engage the child-safe catch.
CHILD-SAFE CHILD-SAFE TEMPERATEMPERATURE KNOBTURE KNOBModels W600 and W620 have a child-safety catch thatcan be engaged to prevent children from tamperingwith the temperature knob. The catch is located belowthe temperature knob behind the edge of the controlpanel. To engage it, insert a flathead screwdriver in theslot on the catch. Press upwards as you turn the catchclockwise. When you release the catch is shouldprotrude slightly below the control panel.
Once the catch is engaged, you must hold it up as youturn the temperature knob to the desired setting.
CHILD-SAFE STCHILD-SAFE STARARTTYou can program Models W640 and W660 not to startunless the Start button is held down for three seconds.This is to prevent children from inadvertently starting
WARNING!This appliance must be properly grounded.Improper connection of the equipment groundingconductor can result in a risk of electric shock.Check with a qualified electrician or servicemanif you are in doubt as to whether the appliance isproperly grounded.
The plug must be plugged into an appliance outletthat is properly installed and grounded inaccordance with all local codes and ordinances.
used for such a period, before using a washingmachine or combination washer-dryer, turn on allwater faucets and let the water flow from each forseveral minutes. This will release any accumulatedhydrogen gas. As the gas is flammable, do notsmoke or use an open flame during this time.
MORE CHILD-SAFETY TIPSMORE CHILD-SAFETY TIPS♦ Laundry detergents are corrosive, so always keep
them out of reach of children.
♦ Should a child swallow detergent, give plenty to drinkimmediately, i.e., one or two glasses of milk or water.Do not try to induce vomiting. Seek medical adviceimmediately: 1-800-POISON1
♦ Always close the door and start the appliance assoon as you put in the detergent.
♦ Always turn the power off to the machine when it isnot in use.
♦ Always keep small children away from the machinewhen it is open. There may be some detergentresidue left inside the machine.
♦ If laundry detergent gets in someone’s eyes, rinsethem with plenty of water for at least 15 minutes.
♦ Do not allow children to use or play on or in theappliance.
Do not wash or dry articles that have beenpreviously cleaned in, washed in, soaked in, orspotted with gasoline, dry-cleaning solvents,cooking oils, other flammable or explosivesubstances because they give off vapors thatcould ignite or explode.
WARNING!
NOTE: This manual does not cover every possiblecondition and situation that may occur. Usecommon sense and caution when installing,operating, and maintaining any appliance.
the machine. Refer to page 14 for instructions on howto program this safety feature.
Page 3
EN
GLI
SH
EN
GLI
SH
Your new energy-efficient ASKO washer is designed togive you maximum cleaning performance using lesswater, energy and detergent. To make the most of thewasher’s functions and features, we recommend thatyou read this manual carefully before using yourmachine for the first time. For operating instructions,refer to the Quick Start Guide enclosed with this manual.
Below is an illustration of the parts and features of yourASKO washer.
THE GLASS DOORTHE GLASS DOORTo open the glass door, the power to the machine mustbe on and you must press the Door Open button ( ).There will be a few seconds delay before the dooropens.
Models W600 and W620Models W600 and W620On these models, the Program Control knob must beat the end of a program (at the 12:00 position) to openthe glass door. If you need to stop or interrupt a programafter you start the machine, turn the Program Controlknob to 10 (Drain). Any water in the machine will bepumped out. Make sure the Program Control knob is atthe 12:00 position, then press the Door Open button( ) to open the door. To restart the washer, close thedoor, add detergent (if needed), and turn the controls tothe desired settings.
Models W640 and W660Models W640 and W660On these models, if you need to open the door during awash or rinse cycle, press and hold Door Open for threeseconds. The machine will stop and automatically drainenough water so the door can be opened safely. Theprogram will resume when you close the door.
Refer to “The door won’t open” section in theTroubleshooting chart on page 10 for instructions onhow to open the glass door in case of a mechanicalfailure.
THE OUTER DOOR (W620/W660)THE OUTER DOOR (W620/W660)The drop-down outer door is not just to improve theappearance of your ASKO washer. You can pile your
ASKASKO O WWASHER FEAASHER FEATURESTURESlaundry on the door while loading and unloading thewasher with complete confidence that the door will hold.
SENSOR LEVEL CONTROLSENSOR LEVEL CONTROLASKO washers do not need high, medium, or low waterlevel settings to compensate for different sized loads.ASKO washers have a Sensor Level Control (SLC)system designed to ensure the correct amount of wateris pumped into the machine for any size load. It evencompensates for fabric saturation, letting in more waterif needed. This eliminates worry about selecting theright water level setting for each laundry load.
TEMPERATEMPERATURE CONTRTURE CONTROLOLBecause wash water temperature is a major factor ingetting laundry clean, ASKO washers have built-in heatingelements and a sensor that keeps the temperature towithin +/-1° F of the selected program temperature.
ASKO washers are programmed not to advance in acycle until the selected water temperature is reached,so the length of the cycles may vary, depending uponthe household cold water temperature, the amount oflaundry in the washer, and the wash temperature setting.
ENZYME STEPENZYME STEPTo successfully remove all dirt and stains from fabric,the enzymes in your detergent need to work at atemperature between 105° and 140° F for a longer timeperiod. For this reason, the main wash cycle in a Normalwash program on ASKO washers is 43 minutes (plusthe amount of time it takes to heat the water to theselected temperature). This longer wash cycle givesthe enzymes in the detergent ample time to removestains, eliminating the need for stain sprays and spotremovers.
The prewash option should be used only for heavilysoiled loads. Starting the machine at the main washstage will save about 25 minutes.
ECONOMY ECONOMY (E(E22/ECO) /ECO) OOPTIONPTIONThis option extends the wash time by about 22 minutes.This extended wash time lets you use lower watertemperatures (85°–100° F) and still get the sameexcellent results with lower energy consumption. Thisoption is also excellent for getting out stubborn stainswhen used with a higher wash temperature.
MORE RINSE CYMORE RINSE CYCLESCLESMost washers have only two or three rinse cycles; somehave an option to add a fourth. ASKO washers have fiverinses and a Super Rinse option that adds two more.ASKO washers get the soil and detergent out of yourlaundry that most other washers leave in. That’s whyyour whites will remain white and your colored fabricswill remain bright.
The Super Rinse option is designed for people withsensitive skin or who are allergic to detergents. It canalso be used for large, heavily soiled loads.
Detergent and fabricsoftener dispenser
Controlpanel
Outer door(W620 and W660)
Frontcover
Glassdoor
Powerbutton
Page 4
PREPPREPARING ARING THE LATHE LAUNDRUNDRYYWe believe ASKO washers clean better than any otherwasher available on the market. With proper attentionto how you prepare your laundry items for washing, yourwardrobe and linens will look like new for years.
SORSORTING TING THE CLTHE CLOOTHESTHESSort clothes by fiber content, color, amount of soil, lintshedding properties (e.g., cotton, chenille, andterrycloth), lint attracting properties (e.g., permanentpress, corduroy, velveteen, flannel and synthetics) andthose requiring a delicate cycle (e.g., washable wooland silk, nylon).
CARE LABEL INSTRCARE LABEL INSTRUCTIONSUCTIONSMost clothes and other washable items have permanentcare labels. Read these labels carefully! Care labelinstructions and warnings should be followed for thebest cleaning results.
If the care label says "Wash Separately," the fabric islikely to lose color (excess dye) for the first few washings.To minimize the possibility of the color transferring towhite or lighter colored items, wash new coloredgarments with items of similar color or separately. Brightreds and oranges on cottons are the dyes most likely totransfer colors to the wash load. Fluorescent colorsshould always be washed separately.
RECOMMENDED LRECOMMENDED LOOAD SIZESAD SIZESTo reduce wrinkling, you should determine the load sizebased on the type(s) of fabrics being washed. The chartbelow gives recommended load sizes for different fabrics.
Cotton and Linen FabricsCotton and Linen FabricsThese items should be washed in full loads becausethe tumble action of the tub along with the gentle rubbingand lifting and falling movement of the clothes gives thebest cleaning result.
Permanent Press FabricsPermanent Press FabricsThese items need more room to move freely duringwashing for the most wrinkle-free results. Therefore, fill
GENERAL LAGENERAL LAUNDRUNDRY Y ADADVICEVICE♦ Read and follow the care instructions on new
garments.
♦ Sort laundry by the care instructions and color of thefabric.
♦ Do no wash colored fabrics with white and light-colored fabrics.
♦ Wash fabrics that produce lint separately (such astowels).
♦ Remove any sharp ornaments, pins or buckles toprevent snags.
♦ Empty pockets and turn them inside out.
♦ Close zippers and hooks to prevent snagging.
♦ Tie sashes and strings to prevent tangling.
♦ Mend any small rips to prevent them from enlarging.
♦ Turn colored cotton garments, velvet and finerknitwear inside out before washing.
♦ Turn delicate items, sweaters and T-shirts insideout to prevent pilling and to protect the prints.
♦ Prewash severely soiled items.
♦ Wash colored fabrics separately the first time.
♦ Permanent press items should be washed in half-loads.
♦ Thoroughly rinse down items, such as comforters(Super rinse).
♦ Use fabric softener to eliminate static electricity insynthetic garments and to soften cotton.
♦ Ironing lesser quality cotton items can reduceshrinkage.
Load Size Fabrics
Full Cotton, linen
Half Perm press, synthetics, acrylics
Third Special finish cottons, machinewashable wool, silk, acetates
SPIN OPTIONSSPIN OPTIONSASKO washers have faster spin speeds than most otherwashers, which decreases the time it takes to dry yourlaundry by up to half. The spin speeds range from 600rpm to 1600 rpm, depending on the model.
You can also turn the spin cycle off. Using this featurewith the Wool/Hand wash program is a perfectsubstitute for hand washing.
the machine only half full for permanent press loads.These items should have only a brief spin cycle andthey should be removed promptly from the washer andput directly into the dryer or hung to dry.
Delicate FabricsDelicate FabricsMore delicate fabrics, such as machine washable wooland silk, should only be washed in one-third size loadsfor the best results.
ADADVICE FOR PERSONS VICE FOR PERSONS WITHWITHSENSITIVE SKINSENSITIVE SKINASKO washers are ideal for people allergic to detergent.Our Heavy, Normal and Light wash programs have fiverinse cycles and a Super Rinse option that adds twomore rinses. This ensures that all the detergent residueis rinsed out of your laundry.
As an extra precaution, you should use mild detergentsand be careful not to use too much.
Page 5
EN
GLI
SH
EN
GLI
SH
Laundry detergents are available in low-, normal- andhigh-sudsing formulas. A detergent´s ability to clean isnot relative to the amount of suds it produces. Excesssuds in a front-loading washer actually interfere withthe cleaning because they cushion the tumbling action.Also, high-sudsing detergents are more difficult tocompletely rinse out.
The use of anything other than a low-sudsing detergentcan cause severe oversudsing, which could causesuds to backup through the detergent compartment andrun down the front of the washer onto the floor. Ifoversudsing occurs, run the wash through one or morerinse programs until all items are thoroughly rinsed.Remove the laundry then run the washer through aNormal wash program to get rid of any remainingdetergent.
Should oversudsing occur, the machine will indicatean error code or message. (See page 9.)
LIQUID DETERGENTSLIQUID DETERGENTSWe don’t recommend liquid detergents because theytend to produce more suds than powder detergentswhen used in water temperatures of 150° F or higher. Ifyou should try a liquid detergent, start with a very smallamount, such as 1 to 2 tablespoons. Also, liquiddetergent can be used for all programs without prewash,so add it into the main wash compartment.
DETERGENTSDETERGENTS
THE DETERTHE DETERGENT DRAGENT DRAWERWERThe detergent drawer on ASKO washers automaticallydispenses the detergent and fabric softener at theappropriate times. Simply pour the measured amountsof detergent and softener into the proper compartments(as illustrated) and close the drawer.
RECOMMENDED POWDERRECOMMENDED POWDERDETERGENTSDETERGENTSASKO washers use 50% to 75% less detergent thanmost other washers. This is because of their low waterconsumption and the fact that all the wash water isrepeatedly circulated through the laundry, ensuring thatall the detergent is fully utilized. We recommend thatyou use powder detergents made specifically for front-loading washers. These are sometimes called HE(High-Efficiency) detergents. Listed below are somelow-sudsing powder detergents that have beensuccessfully tested in ASKO washers:
We recommend that you do not use any powderdetergent that doesn’t wash completely out of thedetergent drawer.
AMOUNT OF DETERGENT TO USEAMOUNT OF DETERGENT TO USEThe amount of detergent needed varies among thedifferent brands, but for most detergents, you need onlyone or two tablespoons. Using too much detergentcan result in detergent residue being left in your clothes,which can cause them to appear gray or dingy. Youshould start with a small amount of detergent andincrease it only if the cleaning results are unsatisfactory.
Additionally, you should never put detergent in theprewash compartment unless you are using a washprogram that has a prewash cycle. This could causeexcess foaming, which could damage the machine.
The amount of detergent needed can also depend onthe hardness of the water in your area. See the“Detergent Amounts Based on Water Hardness” sectionon the next page for more details.
We recommend that you don’t use bleach in your ASKOwasher. The tumbling wash action, temperature controloptions, extended wash times and proper amount ofdetergent are sufficient to remove most stains.
Child-Safe CatchChild-Safe CatchAll ASKO 600-series washers have a child-safe catchon the detergent drawer that can be engaged to preventa child from opening the drawer and possibly cominginto contact with the detergent or fabric softener.
The safety catch is the red plastic piece on the backright side of the pull-out handle. To engage the catch,open detergent drawer a little then pull the catch forwardand release it. Once the catch is engaged, you mustpush it to the left each time you open the detergentdrawer.
To disengage the catch, push it to the left then back.
♦ All♦ Tide HE♦ Wisk HE
♦ Fab♦ Amway SA8♦ Fresh Start
Should you prefer to use aliquid detergent, we haveprovided a partition piece withthe detergent drawerspecifically for use with liquiddetergents. Insert the partitionin the slot at the back of themain wash compartmentbefore you pour in the liquiddetergent.
Prewash detergentMain washdetergent
Fabricsoftener
Pullouthandle Child-safety
catch
NOTE: To avoid oversudsing, do not put detergent inthe prewash compartment unless you areusing one of the Heavy wash programs whichhas a prewash cycle.
Fabric softeners are available in several concentrations.We recommend that you use only two tablespoons of
FABRIC SOFTENERSFABRIC SOFTENERSfabric softener. If more softening is desired, try addingslightly more the next time.
The amount of detergent needed can vary due todifferences in water hardness. To determine the waterhardness in your area, contact your local water utility orarea water softening company. The harder the water,the more detergent you may need. Refer to the chartbelow for the recommended detergent amounts basedon water hardness. Remember, you should adjust theamount of detergent you use by small amounts untilyou find the correct amount.
Note that 12 grains and higher is extremely hard waterand detergent alone may not be enough. You may need
Wash Wash Load SpinFabric Type Temp. Program Size (1) Options (2)
White cotton w/out elastic 140–205° F Normal Full Long spin, high rpm and/or decorative trim
White cotton w/elastic 120–140° F Normal Full Long spin, high rpm and/or decorative trim
Colored cotton 120–140° F Normal Full Long spin, high rpm
Linen (white and colorfast) 120–140° F Normal One-half Short spin, low rpm
Cotton/polyester blends 105–120° F Normal/Permanent press One-half Short spin, low rpm
Polyester/acrylic blends 105–120° F Normal/Permanent press One-half Short spin, low rpm
Rayon and acetate 105° F Delicate/Wool One-half Short spin, low rpm
Washable silk and nylon 85° F (cold) Delicate/Wool One-third Short spin, low rpm
Washable wool and 85–105° F Delicate/Wool One-third Short spin, low rpm wool blends (cold)
Handwash wool & silk (3) 85° F (cold) Delicate/Wool One-third Short spin, low rpm
NOTES:
(1) The load size should be determined by the type of fabric being washed. (See page 4.)
(2) Spin speed options are not available on all models.
(3) Some hand-washable wool and silk items should not go through a spin cycle. These items should be removedfrom the washer then pressed out in a terry towel to remove excess water before being hung up or laid flat to dry.
to use a water softener to maximize the performance ofyour washer. Also, in areas with extremely hard water(9+) you may need to wash at lower temperatures toprevent hard water deposits from forming in the tankand wash system.
Different brands of detergent have different amounts ofphosphorous for softening water. If you have hard waterand use a detergent with less than 8.7% phosphorouscontent, you may need to use more detergent or use adetergent with a higher phosphorous content.
Recommended Detergent AmountsBased on Water Hardness
Soft (0-3 grains per gal.) 1 teaspoon 1 to 1-1/2 tablespoons
Medium (4-8 grains per gal.) 1 teaspoon 1 to 2 tablespoons
Hard (9+ grains per gal.) 1 teaspoon 2 to 3 tablespoons
Detergent AmountsWater Hardness Prewash Main Wash
for different fabrics as well as recommended programs,load sizes, and spin options.
Detergent Amounts Based on Water HardnessDetergent Amounts Based on Water Hardness
Page 7
EN
GLI
SH
EN
GLI
SH
CLEANING THE PIN TRAPCLEANING THE PIN TRAPYour washing machine has a pin trap designed to trappins, hairpins, coins and similar items. This trap shouldbe cleaned occasionally. To do this, follow the stepsbelow:
1. Make sure as much water as possible is drainedout of the tub then turn off the power to the machine.
2. Using the flat edge of theliquid detergent partitionpiece, a flathead screwdriveror similar item, gently pry openthe drain pump cover, asillustrated.
4. Pull the small blackdrain hose loose fromits position on the doorcover and let the waterdrain into the pan.
7. Replace the drain cover and return the drain hose toits position on the door.
5. Unscrew the pin trap cover and lift it out.
3. There is always a small amount of water in the drainpump area. Before you open the drain cover, place ashallow container, such as a pie pan, on the floorbelow the drain to catch the water.
REMOREMOVING VING AN OBJECT FRAN OBJECT FROMOMBETWEEN BETWEEN THE DRTHE DRUM UM ANDANDOUTER CONTOUTER CONTAINERAINEROccasionally, a small item may fall between the drumand the outer container. Such items should be removedbecause they could corrode and cause rust stains onthe laundry. To remove the item, follow the instructionsbelow:
CARE CARE AND CLEANING INSTRAND CLEANING INSTRUCTIONSUCTIONSCLEANING THE DETERGENTCLEANING THE DETERGENTDRAWERDRAWER
CLEANING CLEANING THE CONTRTHE CONTROL POL PANELANELTo clean the control panel, use only a warm, damp rag.To prevent penetration of water into the door lock andelectrical components, never use a spray of any kind.Also, never use abrasive cleaners or scouring pads onthe outer surfaces because they will scratch the finishand they could remove the writing on the control panel.Some paper towels may also scratch the finish.
1. Pull the drawer out as faras it goes then lift it up andpull it out completely, asillustrated.
2. Clean the drawer with asoft brush under warmrunning water. Do not putthe drawer in a dishwasher.
3. Replace the drawer bytilting it into position.
6. You can now clean out anygrit or small objects. Youshould also clean thepump rotor at the back ofthe pump housing.
2. Grip the paddle with your otherhand and pull it toward you.
1. Insert a flathead screwdriverin the center hole in thepaddle and carefully push itto the left.
4. Replace the paddle in its fixing hole with the F-marktoward you. Check that the paddle clips are properlylocated in the slots and slide the paddle toward theback as far as it will go.
3. Lift up the paddle and remove the object.
REMOREMOVING HARD VING HARD WWAATERTERSTSTAINS FRAINS FROM OM THE DRTHE DRUMUMIf you live in an area with hard water, the washer drummay become coated with a grey-white deposit. Toremove it, pour about an ounce of citric acid in the drumand run a Normal wash program at 205° F.
Never spray clean the control panel. You could damagethe electrical components. Also, never use abrasivecleaners, scouring pads or paper towels on the outersurfaces because they will scratch the finish and theycould remove the writing on the control panel.
WARNING!
Page 8
Most items can be safely washed in an ASKO washingmachine. We recommend that you follow the care labelinstructions as closely as possible for the best cleaningresults. Should problems occur, below are somepossible causes and suggested solutions.
You may need to add slightly more detergent if clothes are heavilysoiled, have oily stains, or if your water is very hard.
Select a hotter temperature setting for each type of load.
Be sure to add a prewash and/or presoak for heavily soiled or oilyitems.
Once wet, the clothes must have room to tumble freely, especiallysynthetics and permanent press.
Be sure you use a laundry detergent, not a “soap.” Soap reacts withthe minerals in hard water to form a soap curd, which can bedeposited on clothes.
ProblemProblem Possible CausePossible Cause Suggested SolutionSuggested SolutionGraying Not enough detergent
Water not hot enough
Improperly prewashed orpresoaked
Washer overload
Soap used in hard waterareas
Separate clothes that shed lint (chenille and terrycloth) from clothesthat attract lint (synthetics, corduroy, velveteen).
Non-phosphate detergents can combine with minerals in hard waterand form a residue which can appear to be lint. Use a low phosphatedetergent. If possible, install a water softener.
Read labels. Most softeners should only be used in the final rinse.Add softener to the softener compartment. If added to the washcycle, softeners can have a reaction with detergents, producing awhite residue.
Pilling, which can look like lint, is produced by normal wear on cotton/polyester blend fabrics. To reduce pilling, wash these fabrics insideout. For the best results, wash in the delicate cycle.
Lint or residueleft on clothes
Improper sorting of clothes
Non-phosphate detergent
Fabric softener usedimproperly
Pilling
Add slightly more detergent.
Use the hottest recommended temperature for each type of load.
If possible, install a water filter. A small amount of Calgon or othertype of water conditioner added once a week is advisable in hardwater areas.
Yellowing Not enough detergent
Water not hot enough
Iron or manganese inwater
Follow garment care label instructions carefully. Some fabrics willshrink no matter how they are washed. Some may be machinewashed but not machine dried.
Shrinkage Improper washing ordrying
Knits tend to shrink more than woven fabrics. If a knit has been heat-shaped, wash in cool or warm water. Dry with the low setting.
This can occur when special stabilizing finishes are reduced fromwear or repeated washings. Garment may sometimes be reshapedby pressing after washing and drying.
Shrinkage can occur if the knit fabric was not stretched properly bythe manufacturer. Press back into shape each time garment iswashed and dried.
Knit shrinkage Overheating
Delayed or gradualshrinkage
Poor construction
Dark clothes, especially cottons, can bleed excess dyes into washwater. White or light-colored clothes can absorb the dye and discolor.Separate light items from dark items.
Always empty all pockets before washing.
Cool or cold water is best for retaining dark or bright colors.
Fading anddiscoloring
Improper sorting
Crayons or pens in pockets
Water too hot
Protein stains, such as milk, egg, blood and soy formula should beremoved in cold water. Oily stains should be washed in the hottestwater recommended for each fabric type.
The longer a stain remains on a fabric, the harder it is to remove.Treat stains promptly. Do not set stains by machine drying or ironingfabrics until stains are completely removed.
Stains Incorrect watertemperature
Old stains
COMMON LACOMMON LAUNDRUNDRY PRY PROBLEMSOBLEMS
NOTE: ASKO has no control over what is put in ourappliances once installed in a customer’s home. Youare solely responsible for what you wash in yourASKO washing machine.
Page 9
EN
GLI
SH
EN
GLI
SH
COMMON LACOMMON LAUNDRUNDRY PRY PROBLEMSOBLEMS (CONTINUED) (CONTINUED)ProblemProblem Possible CausePossible Cause Suggested SolutionSuggested Solution
Empty all pockets and turn inside out before laundering.
Fasten all hooks, snaps, and zippers before laundering to avoid snags.Remove sharp buckles. Turn knits inside out.
Before washing, rinse harsh chemicals (such as battery acid, haircare chemicals, cleaning solutions, etc.) from towels and other articlesto avoid holes in fabrics. Do not allow these unrinsed items to contactother fabrics.
Mend all garments before laundering to prevent enlarging of rips.
These items may fray at edges from normal wear, not the washer.Wash only in half loads and don’t wash in the same load with heavyitems, such as towels or jeans.
Rips, snags,excess wear
Sharp objects in pockets
Hooks, snaps, zippers,buckles
Harsh chemicals
Existing rips and tears
Permanent press items
Permanent press items should be washed in half-loads to preventwrinkling. If possible, use a slower spin speed.
Use lower wash temperature settings.
Excessivewrinkling
Machine too full
Water too hot
ERRERROR MESSAOR MESSAGES – GES – W640/W660W640/W660Error messages will display in the LED window if faultsoccur while a program is in progress. The table belowdefines each possible error message.
ERRERROR MESSAOR MESSAGEGE SOLSOLUTIONUTIONWhen this symbol flashes at the lower right corner of the display it merely meansthe glass door isn’t closed securely. Close the door and try again.
0000 If this message flashes at the top right of the LED window, the machine has failedto spin. This could be because the load is out of balance. Turn the power offthen on again. Open the door and redistribute the washing. Run the Spinprogram again.
Door lock fault Call a service technician.
Foaming Run the Rinse program again.Try using less detergent and softener.Use low-sudsing detergents. (See page 5.)
Overflow Call a service Technician
Pressure sensor Call a service technician.
Temperature stop Call a service technician.
Thermistor Call a service technician.
Wash motor Call a service technician.
Water inlet Make sure the water tap is open.
Water outlet Check the pin trap for possible blockage. Make sure the outlet hose isn’t kinked.
To remove the message, turn the power off or changethe program.
FFAAULULT CODES – T CODES – W600/W620W600/W620The Program Control knobs on the W600/W620 havetwo fault codes: C and S. If the knob stops on one ofthese, the machine detected a problem.
C PositionC PositionThis indicates a problem that can probably be takencare of without calling a service technician. Here aresome possible problems:
♦ Power interruption.
♦ Water not draining out.
♦ Water not filling machine.
♦ The machine didn’t spin.
Refer to the “Troubleshooting” section on the next pagefor possible causes and solutions. If none of thesework, call a service technician.
S PositionS PositionIf the knob stops on S, this indicates a mechanicalproblem and you will probably need to call a servicetechnician.
Page 10
TRTROUBLESHOOOUBLESHOOTINGTING
The door won’t open.The door won’t open.♦ Make sure the power to the unit is on. If the power
is on and the indicator lamp is not lit, there is nopower supply. Check that the machine is properlyplugged into the electrical outlet. If it is, the fusesmay be blown. Call a service technician.
♦ Make sure all the water has drained out.
♦ If there is no water in the machine and the doorwon’t open in the normal manner, you should beable to open it manually, as follows:
1. Make sure the tub is as empty as possible andthe power is turned off.
2. Using the flat edge of the liquid detergentpartition piece, a flathead screw-driver or similaritem, gently pry open thedrain pump cover.
3. Using a T20 or flatheadscrewdriver, unscrewthe red plastic loopedhandle.
4. Pull the handle towardyou. The door shouldopen.
The machine doesn’t fill.The machine doesn’t fill.♦ Make sure the tap to the water supply line is open.
♦ Turn off the water supply then disconnect the inlethose and check to see if the strainer in the inletconnection is blocked.
The machine won’t start.The machine won’t start.♦ Check that the glass door is closed securely.
♦ Make sure the power switch is turned on.
♦ If the power switch is on and the indicator lamp is notlit, there is no power supply. Make sure the machineis properly plugged into the electrical outlet.
♦ Check the house breaker switch/fuses.
The machine will not spin.The machine will not spin.♦ Make sure the pin trap or outlet hose isn’t blocked.
Clean if necessary. (See page 7.)
♦ Make sure the No Spin option is turned off.
♦ If a load is out of balance, the washer will rotate afew seconds to redistribute the load then attempt tospin again. It will do this up to ten times at a highspin speed (1000 rpm or higher). If it still isn’tbalanced, it will advance the timer with no spin.
Extreme vibration during spinExtreme vibration during spincycle.cycle.
♦ Make sure the packaging and shipping supportswere removed properly. (See page 14.)
♦ Check that the machine is level.
♦ Adjust machine feet and tighten locknuts. (See page 14.)
Oversudsing.Oversudsing.♦ Too much detergent could cause suds to backup
through the detergent compartment and run downthe front of the washer onto the floor. The suds willcondensate into water and form a small puddle on thefloor. (See page 5 for detergent recommendations.)
Washer stops during cycle.Washer stops during cycle.♦ It is normal for the machine to pause occasionally
during operation, especially between cycles andduring the delicate wash program.
♦ Make sure the No Spin option isn’t turned on.
♦ If the power switch is on and the indicator lamp isnot lit, there is no power supply. Make sure themachine is properly plugged into the electrical outlet.
♦ Check the house breaker switch/fuses.
Foam in the final rinse water.Foam in the final rinse water.♦ Make sure nothing is blocking the outlet hose.
♦ Check for kinks in the outlet hose.
♦ Make sure the pin trap isn’t blocked. (See page 7.)
♦ Make sure that no part of the hose (including anyjoints) is less than 3/4” (15 mm) in diameter.
Water left in the machine afterWater left in the machine afterfinal spin.final spin.
♦ Make sure the No Spin option isn’t turned on.
♦ Make sure the pin trap isn’t clogged. (See page 7.)
♦ Make sure the outlet hose isn’t clogged.
♦ Check for kinks in the outlet hose.
♦ Make sure that no part of the outlet hose (includingany joints) is less than 3/4” (15 mm) in diameter.
Water leaks.Water leaks.♦ All hoses should be inspected at least once a year.
If they show signs of cracking, they should bereplaced.
♦ Check to see if hose connections at faucets aretight.
♦ Make sure the end of the outlet hose is securelyinserted into the drain receptacle.
♦ Make sure nothing is caught between the Smart Sealand the tank, such as apron strings, smallhandkerchiefs, socks, etc.
If you should experience a problem with your washer,you should review the following list of frequentlyencountered situations. It could save you the cost andinconvenience of a service call.
Even though the product is under warranty, if the problem
is not caused by defective workmanship or materials,you will be charged for a service call. Refer to page 17to determine what is and is not covered under yourwarranty. If you’re still not sure, contact the ASKOAdvisory Center before you call a service technician.
Page 11
EN
GLI
SH
EN
GLI
SH
W640/W660 – CUSTOMIZING THE PRESET PROGRAMSW640/W660 – CUSTOMIZING THE PRESET PROGRAMS
Before we tell you how to customize the preset programs,you need to review what these programs are. The tablebelow lists the four preset programs and the pre-programmed settings for each. To select a program,simply press one of the program buttons then press Start.
THE PRESET PROGRAMS THE PRESET PROGRAMS P 1 P 2 P 3 P 4
ASKO’s EasyControl™ panel makes it simple tocustomize the preset programs to perfectly fit yourlaundry needs. You needn’t worry about making an error
because you can easily restore the original programsettings.
Preset Wash Spin # of # Short Long Program Wash Cycle Types of Laundry Temp(1) Speed (1) (2) Rinses Spins Spin
P1 Normal White cotton 140° F 1600 rpm(3) 5 2 yes
P2 Normal Normal/Perm Press 105° F 1600 rpm(3) 5 2 yes
P3 Super Quick Lightly soiled cotton/perm press 105° F 1600 rpm(3) 2 0 yes
P4 Wool/Hand Washable wool, silk, nylon 85° F 800 rpm 3 1 no
NOTES: (1) You can temporarily adjust the temperature and spin speed settings. (See “Temporary ProgramChanges” below.)
(2) The spin speeds in the preset programs are the maximum speed settings for these specific washprograms (except Super Quick).
(3) Model W640 has a maximum spin speed of 1400 rpm.
WARNING! Some fabrics may not be able to withstand extremely hot temperatures.Please refer to the “Recommended Wash Temperatures” section on page 6.
Remember, you can temporarily adjust the temperaturesetting and spin speed for a preset program. (See“Making Temporary Program Changes” on your QuickStart Guide.)
In addition to the preset programs listed above, youcan customize the preset buttons to use any of theprograms listed in the table below.
This table also lists the pre-programmed settings foreach program. For example, if you select Light wash on
18-min Temp Main Cold Setting Wash Short # of Short # of Long
Super Quick wash no 105° Normal no 2 no no yes yes
Synthetic wash no 105° Normal no 3 yes no no yes
Wool/Hand wash no 85° Gentle no 3 yes no no yes
Rinse no N/A N/A no 1 no no yes yes
Spin no N/A N/A N/A N/A N/A N/A yes yes
Drain no N/A N/A N/A N/A N/A N/A N/A yes
You can make temporary changes to the washtemperature and/or spin speed on the presetprograms. Simply press the button for the presetprogram you want to use then follow the instructions tothe right. The settings will revert to normal at the end ofthe program.
Temperature – Press until the desired temperaturedisplays in the LED window. If you also want to changethe spin speed, read the following paragraph,otherwise, press START.
Spin Speed – Press until the desired spin speeddisplays in the LED window then press START.
TEMPORARY PROGRAM CHANGES
ALL PROGRAMSALL PROGRAMSthe program menu, it is automatically programmed towash at 105° F using a normal wash action, rinse threetimes then do a short spin, then rinse two more times,do a long spin and drain. You can modify some of thesesettings. See “Program Options” on page 12.
Page 12
Option Set this option to On to:
Presoak Get a two-hour presoak before the wash program starts. For heavily soiled items. Only availablewith the wash programs.
Quick wash Shorten the main wash by 27 minutes. Only available with the Heavy and Normal wash programs.
Economy Extend the main wash time by 22 minutes. When used with low wash temperatures (85°–100° F),this program conserves energy but gives the same high level of cleaning. Can also be used withhigher temperature settings to clean heavily soiled items. Only available with the Heavy, Normal,and Light wash programs.
Super rinse Get two additional rinses. Recommended for persons with sensitive skin or allergies. Only availablewith the wash programs.
Short spin Omit the long spin.
Set this option to Off to:
Spin Omit both the long and short spin cycles.
Drain Omit the drain cycle. The washer stops with water in the machine. You can only select this optionif you have also set the Spin to Off. For use with programs such as Wool/Hand wash. To drain thewasher, press the Door Open button.
Delayed Start This option lets you set a delay start for up to 12 hours. This feature is useful in areas where utilitycompanies offer discount rates during certain hours. See page 13 for instructions on how to set adelayed start.
PROGRAM OPTIONSPROGRAM OPTIONSThe following table lists the options available with each wash program. The programs and options are described indetail below. It’s a good idea to scan through the menus a couple of times and familiarize yourself with the optionsbefore you make any changes. And remember, it’s easy to restore the preset programs.
NOTES: (1) The maximum spin speed for the W640 is 1400 rpm. The maximum spin speed for the W660 is 1600 rpm.
(2) You can only turn Drain off if Spin is also turned off. To drain the machine, press the Door Open button.
OPTION DEFINITIONSOPTION DEFINITIONSThe table below explains the function of the options listed above.
NOTE: The main wash cycle in a Normal program is 43 minutes.
OPTIONS (On/Off)
Temp SpinWASH Setting Speed Pre- Quick Eco- Super Short Long DrainPROGRAMS (° F) (rpm) (1) Soak Wash nomy Rinse Spin Spin (2)
Super Quick Cold, 85°–205° 600-1600 yes no no yes yes yes yes
Synthetic Cold, 85°–205° 600-800 yes no no yes yes yes yes
Wool/Hand Cold, 85°–104° 600-800 yes no no yes yes yes yes
Page 13
EN
GLI
SH
EN
GLI
SH
The Temperature MenuThe Temperature MenuThis menu lets you set the wash temperature. Only thetemperatures available for the wash program youselected will display.
M e n u E n t e r
Selecttemperature < - + >
P1 140o
1. Use the Arrow buttons to raise or lower thetemperature setting.
2. When the temperature you prefer displays, pressENTER. The LED will display the new temperaturesetting.
Press MENU to advance to the next menu.
The Program MenuThe Program MenuThe Program menu lets you set the wash program youprefer. You would also use this menu to set the machinefor a rinse, spin, or drain program.
M e n u E n t e r
SelectProgram Normal< Next >
P1
1. Use the Arrow buttons to move through the programchoices (Heavy, Normal, Light, etc.)
2. When your preference displays, press ENTER. TheLED will display the new program setting.
Press MENU to advance to the next menu.
The Spin Speed MenuThe Spin Speed MenuThis menu lets you set the spin speed. Only the spinspeeds available for the wash program you selectedwill display.
M e n u E n t e r
Selectspin speed < - + >
P1
rpm1600
1. Use the Arrow buttons to raise or lower the spinspeed setting.
2. When the spin speed you prefer displays, pressENTER. The LED will display the new spin speed.
Press MENU to advance to the next menu.
The following paragraphs explain how to navigatethrough the menus and change the preset programs.If you don’t want to make changes in all of the menus,continue to press MENU until the one you do want tochange displays.
To restore a preset program to its original settings,simply press the button for the preset program you wantto restore and hold it down while your press ENTER.The program will revert to its original settings.
We recommend that you make two or three trial changesto understand how easy it is to customize theseprogram.
Remember, the first step to customizing a presetprogram is to press the button for the program youwant to customize.
1. Press the button for the preset programyou want to change. The program youselect will display in the lower left cornerof the LED window.
2. Press MENUMENU to display differentprogram and option settings.
3. Press the ArrowsArrows to move forward orbackward through the menu settings.
4. Press ENTERENTER to choose your selection.
CUSTCUSTOMIZING OMIZING THE PRTHE PROGRAM BOGRAM BUTTUTTONS (P1–P4)ONS (P1–P4)Below are the basic instructions for changing a preset wash program. The following paragraphs explain the menusand how to navigate them.
Start/Stop
M e n u E n t e r
P 1 P 2 P 3 P 4
NNAAVIGAVIGATING TING THE MENUSTHE MENUS
Page 14
The Delayed Start MenuThe Delayed Start MenuThis menu lets you set a delayed start from 1 to 12hours. This means you can set the washer to start atthe most convenient time for you, such as an hour beforeyou arrive home from work. This feature is also usefulin areas where utility companies offer discount ratesduring certain hours.
Select timefor delayed start < - + >
P1
M e n u E n t e r
0
1. Use the Arrow buttons to increase or decrease thedelay time. (The numbers indicate hours.)
2. When the number of hours you want to delay startingthe machine displays, press ENTER. The LED willdisplay the delay start time.
Press MENU to advance to the next menu.
The Options MenuThe Options MenuThis menu lets you set several options. Only the optionsavailable with the wash program you selected will display.(See ”The Program Menu” table on page 11.)
rpm1600
0
M e n u E n t e r
SelectoptionsPre-soak< Off >
P1
1. On this menu, you press ENTER to advance throughthe options, rather than pressing MENU.
2. Press an Arrow button to toggle between Off and On.
3. When your preference displays, press ENTER. TheLED will display the new options. Continue to pressENTER until the LED displays your new program.
RESTORING A PRESETRESTORING A PRESETPROGRAMPROGRAMTo restore a preset program to its original settings,simply press the button for the preset program you wantto restore and hold it down while your press ENTER.The program will revert to its original settings.
To change the language, follow the steps below:
1. Turn the machine off then on again.
2. Press ENTER five times in succession then pressP1 five times. (This must be done within 15 seconds.)
3. When the Language menu displays, press an Arrowbutton to advance through the menu to the desiredlanguage.
4. Once the correct language displays, press ENTERto program the LED window to display the languageyou selected.
CHANGING CHANGING THE THE TEMPERATEMPERATURETUREREADOUT ON THE LED WINDOWREADOUT ON THE LED WINDOWFROM CELSIUS TO FAHRENHEITFROM CELSIUS TO FAHRENHEITYou can change the temperature readout on the LEDwindow from Celsius to Fahrenheit and vice versa. Todo this follow the steps below:
1. Turn the machine off then on again.
2. Press ENTER five times in succession then pressP2 five times. (This must be done within 15 seconds.)
3. When the Temperature menu displays, press anArrow button to toggle between Fahrenheit andCelsius.
4. When your preference displays, press ENTER toprogram the LED window to display the temperaturereading you selected.
CHILD-SAFE STCHILD-SAFE STARART (W640/W660)T (W640/W660)As a safety measure, you can program the W640 andW660 not to start unless the START button is held downfor three seconds. To do this, follow the steps below:
1. Turn the machine off then on.
2. Press ENTER five times, then press P3 five times.(This must be done within 15 seconds.)
3. “Delayed start” displays with “0” flashing in the lowerright corner. Press the right Arrow button to togglethe display to “3.”
Child-Safe Menu ButtonChild-Safe Menu ButtonPlease note that when you set the child-safe Start button,the Menu button is automatically programmed to delayfor three seconds before it becomes active. This preventsa child from accidentally changing the program settings.
When you want to change a program, press the Menubutton for three seconds to activate the menus. TheMenu button will work normally (without the 3-seconddelay) until you have completed your changes. If it is notpressed for two minutes, it will automatically revert backto the child-safe mode.
♦ English♦ French♦ Spanish♦ Portuguese♦ Italian♦ German
CHANGING CHANGING THE LANGUTHE LANGUAAGEGEON THE LED WINDOWON THE LED WINDOWThere are eleven languages available for the LEDwindow:
NOTE: If you change the P3 program then decide torestore its original settings, after pressing P3and ENTER, you must go into the Optionsmenu (see page 14) and turn off Short Spin.
WAWATER SUPPLTER SUPPLY CONNECTIONY CONNECTIONBecause ASKO washers have their own heatingelement, you only need to have a cold water inlet. Theconnection should be made by someone who issufficiently skilled. Use the hose supplied with thewasher.
Water pressure must be in the range of 15–146 PSI.
A tap should be fitted on the water supply pipe.
If a new supply pipe has been installed for the washer,it should be flushed thoroughly to remove any foreignparticles that might clog the strainer in the water inlet.
INSTINSTALLAALLATION INSTRTION INSTRUCTIONSUCTIONSRead these instructions carefully and completely beforeyou install the machine. The installation should becarried out by a qualified person who is familiar with alllocal codes and ordinances for electrical and plumbingconnections.
NOTE: Cosmetic damage must be reported to yourdealer within five days from the date ofpurchase. After unpacking the washer,thoroughly check the unit for cosmetic damage.
SPECIFICASPECIFICATIONSTIONSDrum and Barrel Stainless steel
Inlet supply hose 5 ft. (1.5 m) PEX tubing withbrass ferrules
Supply pressure 15–142 PSI
Outlet hose 5.5 ft. (1.7 m) polypropylene hose,3/4” ID
REMOREMOVING VING THE SHIPPINGTHE SHIPPINGSUPPORTSSUPPORTSThe machine is transported with three shippingsupports, as illustrated below. These supports holdthe tub in place during shipment. When you unpack themachine, you must remove these supports.
1. Unscrew the 5/8” (13mm) bolts holdingthe supports in placeand remove thebolts.
To remove these supports, follow the instructionsbelow:
You must remove theshipping supportsbefore you install thewasher.
2. Push the rubberspacer up then pull itout of the slot.
ADJUSTING THE FEETADJUSTING THE FEETIt is important that the machine is level so it won’t vibrateexcessively during the spinning cycles. Each foot onthe washer is adjustable, so you can level the washeron any surface. Once it is level, securely tighten the locknuts on the feet to prevent excessive vibration duringthe spin cycles.
Be sure to tighten thelock nuts securelywhen you level themachine.
Cold watersupply
Tap
4. Insert it into the slotand push down to lockit into position.
3. Rotate the spacer so that the extrudedend points toward the machine.
Page 16
ELECTRICAL CONNECTIONSELECTRICAL CONNECTIONSThe machine is delivered ready-fitted with a plug and isintended for connection to an ASKO Dryer, which isequipped with a matching receptacle. The plug suppliedwith the washer can only be used with an ASKO Dryer. Ifthe washer is used separately or with another dryer, itmust be on a separate 220 V single-phase circuit.
If the machine is to be used in a wet area, the supplymust be protected by a residual current device.
As supplied: 230 V, 60 Hz2000 W heating element15 A fuse required
GROUNDING INSTRUCTIONSThis appliance must be grounded. In the event ofmalfunction or breakdown, grounding will reduce therisk of electric shock by providing a path of leastresistance for electric current. This appliance isequipped with a cord having an equipment-groundingconductor and a grounding plug. The plug must beplugged into an appropriate outlet that is properlyinstalled and grounded in accordance with all localcodes and ordinances.
WARNING! Improper connection of theequipment-grounding conductor can result in arisk of electric shock. Check with a qualifiedelectrician or serviceman if you are in doubt as towhether the appliance is properly grounded.
Do not modify the plug provided with the appliance.If it will not fit the outlet, have a proper outlet installedby a qualified electrician.
DRAIN OUTLET CONNECTIONDRAIN OUTLET CONNECTIONThe machine is supplied with the outlet hose alreadyattached. The hose should be extended over a suitablesink edge or drain pipe at a height of 24” to 36” (600mm to 900 mm) above the floor. (The lower height ispreferable.) Make sure that the hose is not kinked.
If the hose is extended, the internal diameter ofthe coupling must not be less than 1/2”.
NOTE:
WARNING! Do not extend the drain hose higherthan 36” (900 mm).
WARNING! Connection to a permanently wiredsupply point must be made only by aqualified electrician.
FREESTFREESTANDING INSTANDING INSTALLAALLATIONTIONThe washer can be placed next to the dryer.
It is essential that the machine is leveled and thelocknuts are tight to prevent excessive vibration duringthe spin cycles. Also be sure to leave a minimum of1/2 inch (12.5 mm) of space between the washer andthe dryer.
ASKO washers can be installed beneath a cabinet orworktop with a height of 34”. There must be a gap ofabout 1/4” (.64 mm) all around the machine, includingbetween the rear edge of the machine top panel andthe back wall. The opening width must be at least 24”(600 mm).
Space must also be available for the inlet and drainhoses. See the diagram below for measurements andpositions.
BBUILUILTT-IN INST-IN INSTALLAALLATIONTION
NOTE: The height adjustment for the washer is33-1/2” to 34-1/2” (850 mm to 876 mm).Do not raise it higher than 34-1/2”.
STSTAACKED INSTCKED INSTALLAALLATIONTIONASKO washers should never be stacked on a counteror a dryer. You can, however, stack an ASKO dryer on anASKO washer. Refer to your Dryer Use and Care Guidefor instructions on how to do this.
If the drain outlet is higher than24”, you will need to recess theconnections.
Page 17
EN
GLI
SH
EN
GLI
SH
Some states will not allow the exclusion or limitation of incidental or consequential damages, so this exclusion orlimitation may not apply to you. This warranty gives you specific legal rights and you may also have other rights whichvary from state to state.
For warranty service, contact the dealer from whom you purchased the unit or an authorized ASKO service outlet.Service will be provided during normal business hours. Should you have a service problem that can not be resolvedlocally write:
ASKO USA Inc.P. O. Box 851805
Richardson, Texas 75085-1805
or call ourCustomer Service Center at
800-898-1879 or 972-238-0794
IN NO EVENT SHALL ASKO USA INC. BE RESPONSIBLEFOR ANY INCIDENTAL OR CONSEQUENTIAL DAMAGES.
ASKO PRODUCT WARRANTYMODELS W600, W620, W640, W660
Be sure to complete the Warranty Registration Card you received with your appliance and mail it to ASKO tovalidate your appliance warranty.
ASKO WILL NOT PAY FOR:A. Service calls to:
1. Correct the installation of the appliance.
2. Repair damage due to shipment, delivery, installation, misuse or abuse.
3. Instruct how to use the appliance.
4. Replace house fuses or correct house wiring.
5. Correct house plumbing, including drain problems related to improper installation.
6. Clean or service air device in drain line.
B. Repair and/or replacement parts for failure of product if appliance is used for other than home/residential use.
C. Damage resulting from accident, fire, floods, acts of God, alteration, misuse, abuse, improper installation, orinstallation not in accordance with local electrical or plumbing codes.
D. Any shipping costs for parts during the limited warranty period.
E. Replacement parts or repair labor costs for units operated outside the Continental United States.
F. Pickup and delivery. ASKO washers are designed to be repaired in the home.
FOR RESIDENTIAL INSTALLATIONS ONLY
Three-Year Full WarrantyFrom date of purchase.
ASKO WILL PAY FOR:LENGTH OF WARRANTY
Fourth & Fifth Year Limited WarrantyThree year full plus fourth and fifth year limitedfrom date of purchase.
Lifetime Warranty
ASKO replacement parts for any defective solid-statecontrols, timers, motors, or pumps.
ASKO will replace the stainless steel inner or outerdrum if it rusts or fails to hold water.
ASKO replacement parts and/or repair labor to correctdefect in materials or workmanship. Service must beprovided by an authorized ASKO service agent.
Page 18
AAAdvisory Center Number 17Allergies 4Automatic water level control 3
BBBleach 5Built-in installation 16
CCCare and cleaning 7Care label instructions 4Changing the LED readouts 14Child Safety Features 2Child-safe catch 5Child-Safe Start (W640/W660) 2, 14Child-Safe temperature knob 2Control panel, cleaning 7Cosmetic damage 15Cottons 4, 6Customizing the preset