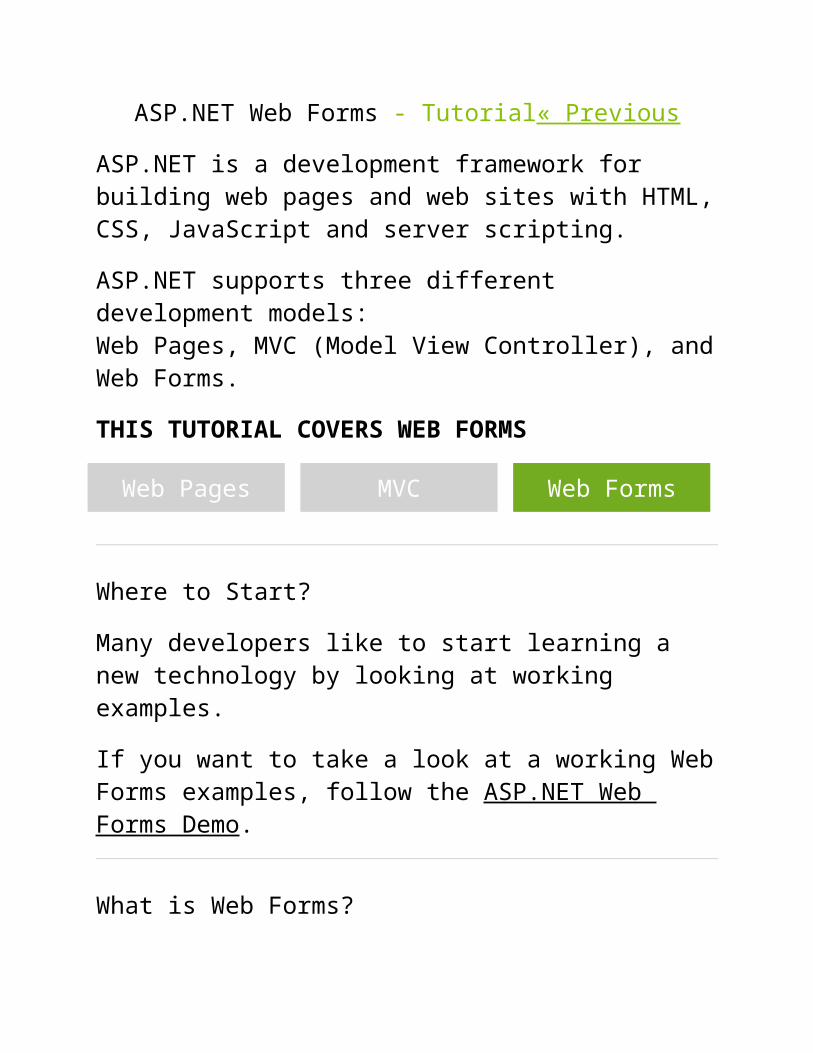
ASP.NET Web Forms - Tutorial« Previous ASP.NET is a development framework for building web pages and web sites with HTML, CSS, JavaScript and server scripting. ASP.NET supports three different development models: Web Pages, MVC (Model View Controller), and Web Forms. THIS TUTORIAL COVERS WEB FORMS Web Pages MVC Web Forms Where to Start? Many developers like to start learning a new technology by looking at working examples. If you want to take a look at a working Web Forms examples, follow the ASP.NET Web Forms Demo . What is Web Forms?
Transcript
ASP.NET Web Forms - Tutorial« Previous
ASP.NET is a development framework for building web pages and web sites with HTML, CSS, JavaScript and server scripting.
ASP.NET supports three different development models:Web Pages, MVC (Model View Controller), and Web Forms.
THIS TUTORIAL COVERS WEB FORMS
Web Pages MVC Web Forms
Where to Start?
Many developers like to start learning a new technology by looking at working examples.
If you want to take a look at a working Web Forms examples, follow the ASP.NET Web Forms Demo.
What is Web Forms?
Web Forms is one of the 3 programming models for creating ASP.NET web sites and web applications.
The other two programming models are Web Pages and MVC (Model, View, Controller).
Web Forms is the oldest ASP.NET programming model, with event driven web pages written as a combination of HTML, server controls, and server code.
Web Forms are compiled and executed on the server, which generates the HTML that displays the web pages.
Web Forms comes with hundreds of different web controls and web components to build user-driven web sites with data access.
Visual Studio Express 2012/2010
Visual Studio Express is a free version of Microsoft Visual Studio.
Visual Studio Express is a development tool tailor made for Web Forms (and MVC).
Visual Studio Express contains:
MVC and Web Forms Drag-and-drop web controls and web components A web server language (Razor using VB or C#) A web server (IIS Express) A database server (SQL Server Compact) A full web development framework (ASP.NET)
If you install Visual Studio Express, you will get more benefits from this tutorial.
If you want to install Visual Studio Express, click on one of these links:
Visual Web Developer 2012 (If you have Windows 7 or Windows 8)
Visual Web Developer 2010 (If you have Windows Vista or XP)
ASP.NET References
At the end of this tutorial you will find a complete ASP.NET reference with objects, components, properties and methods.
ASP.NET Reference
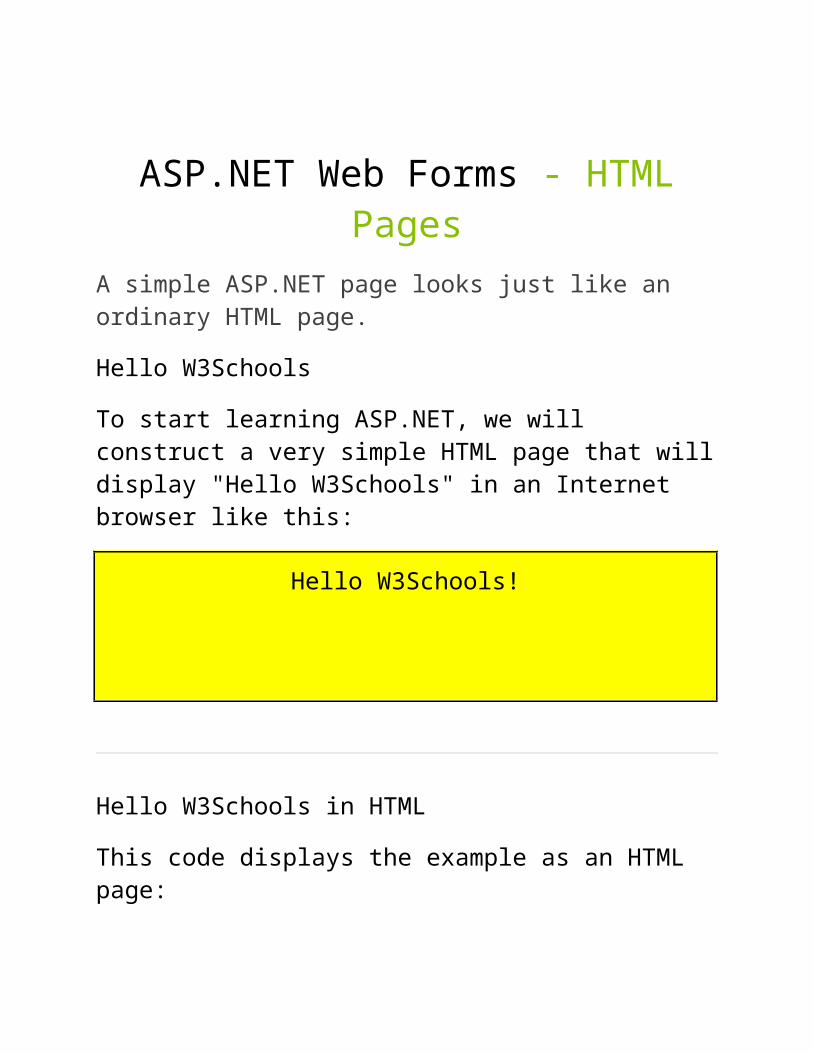
ASP.NET Web Forms - HTML PagesA simple ASP.NET page looks just like an ordinary HTML page.
Hello W3Schools
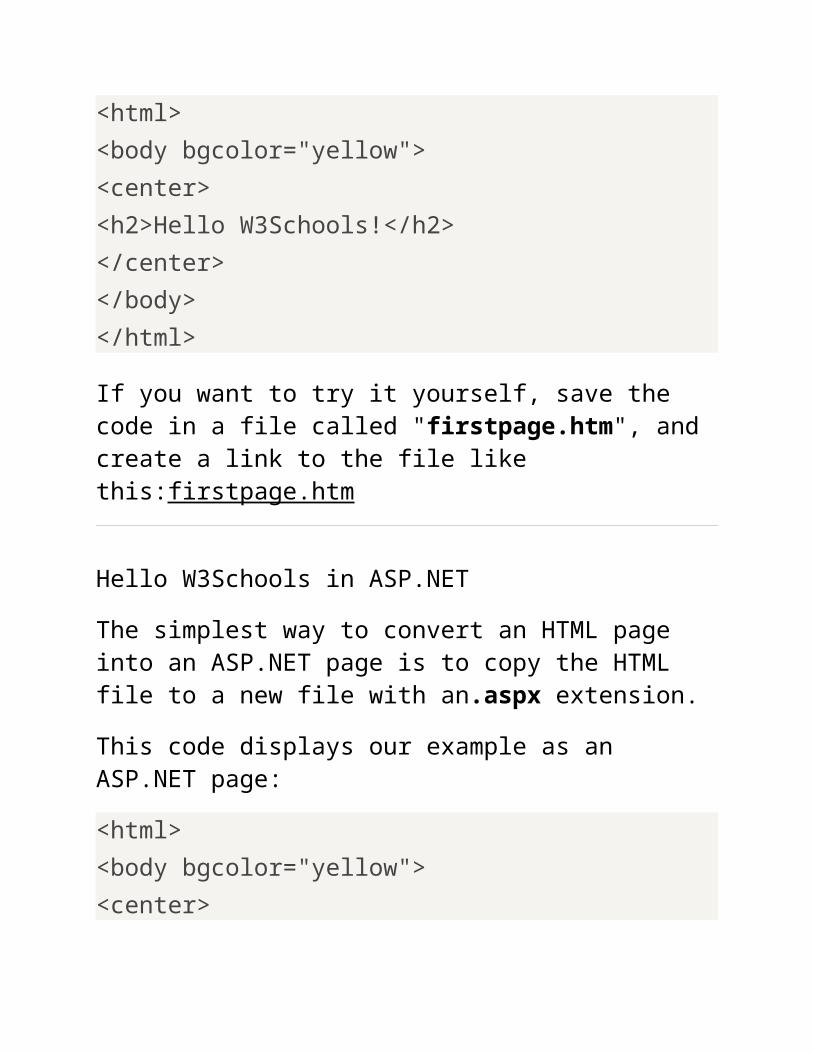
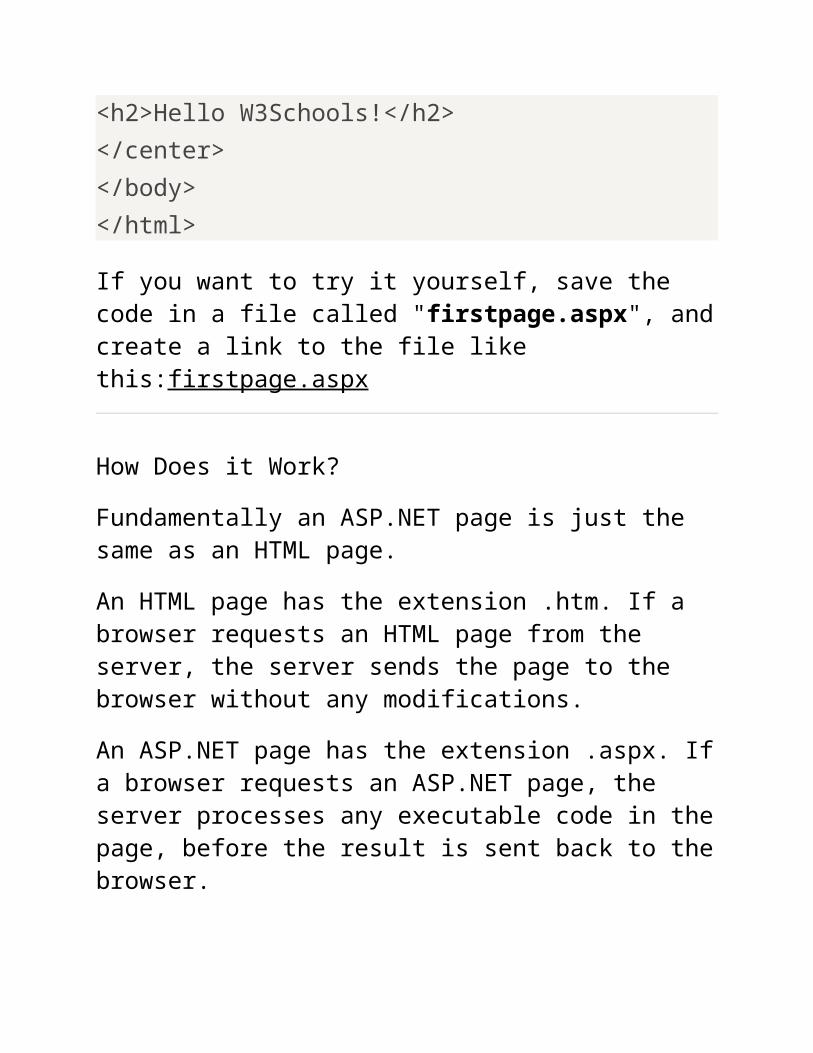
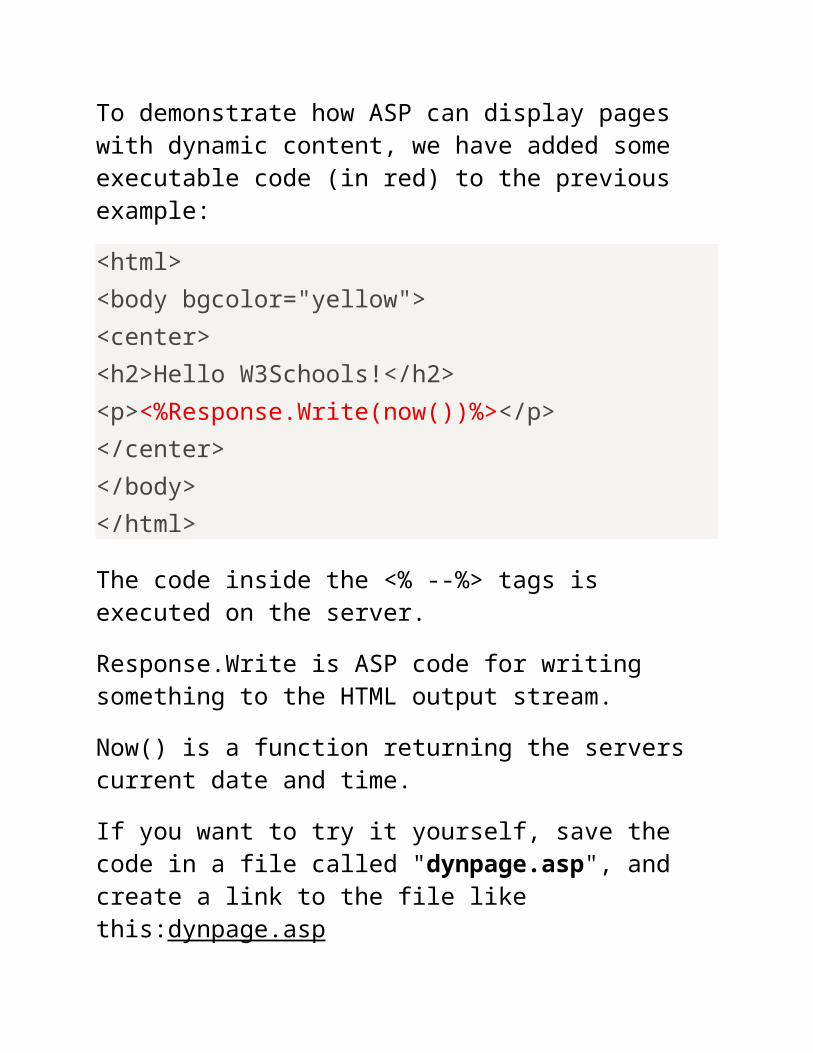
To start learning ASP.NET, we will construct a very simple HTML page that will display "Hello W3Schools" in an Internet browser like this:
An HTML page has the extension .htm. If a browser requests an HTML page from the server, the server sends the page to the browser without any modifications.
An ASP.NET page has the extension .aspx. If a browser requests an ASP.NET page, the server processes any executable code in the page, before the result is sent back to the browser.
The ASP.NET page above does not contain any executable code, so nothing is executed. In the next examples we will add some executable code to the page to demonstrate the difference between static HTML pages and dynamic ASP pages.
Classic ASP
Active Server Pages (ASP) has been around for several years. With ASP, executable code can be placed inside HTML pages.
Previous versions of ASP (before ASP .NET) are often called Classic ASP.
ASP.NET is not fully compatible with Classic ASP, but most Classic ASP pages will work fine as ASP.NET pages, with only minor changes.
If you want to learn more about Classic ASP, please visit our ASP Tutorial.
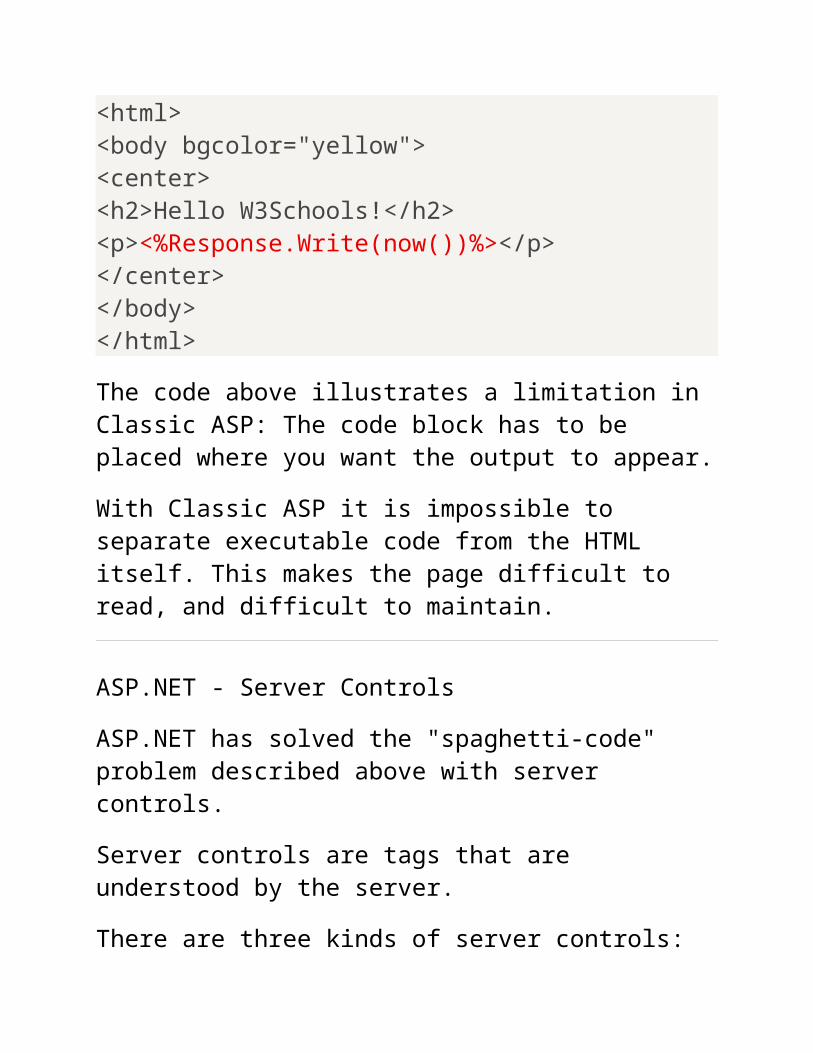
The code above illustrates a limitation in Classic ASP: The code block has to be placed where you want the output to appear.
With Classic ASP it is impossible to separate executable code from the HTML itself. This makes the page difficult to read, and difficult to maintain.
ASP.NET - Server Controls
ASP.NET has solved the "spaghetti-code" problem described above with server controls.
Server controls are tags that are understood by the server.
There are three kinds of server controls:
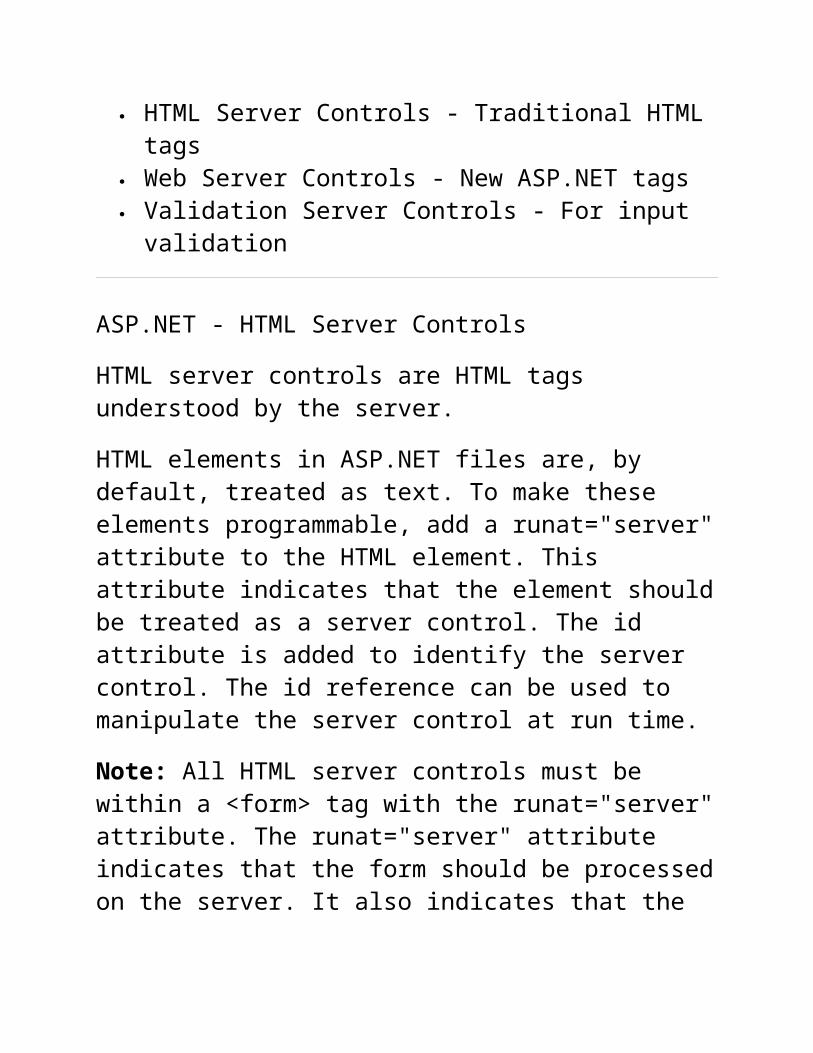
HTML Server Controls - Traditional HTML tags Web Server Controls - New ASP.NET tags Validation Server Controls - For input validation
ASP.NET - HTML Server Controls
HTML server controls are HTML tags understood by the server.
HTML elements in ASP.NET files are, by default, treated as text. To make these elements programmable, add a runat="server" attribute to the HTML element. This attribute indicates that the element should be treated as a server control. The id attribute is added to identify the server control. The id reference can be used to manipulate the server control at run time.
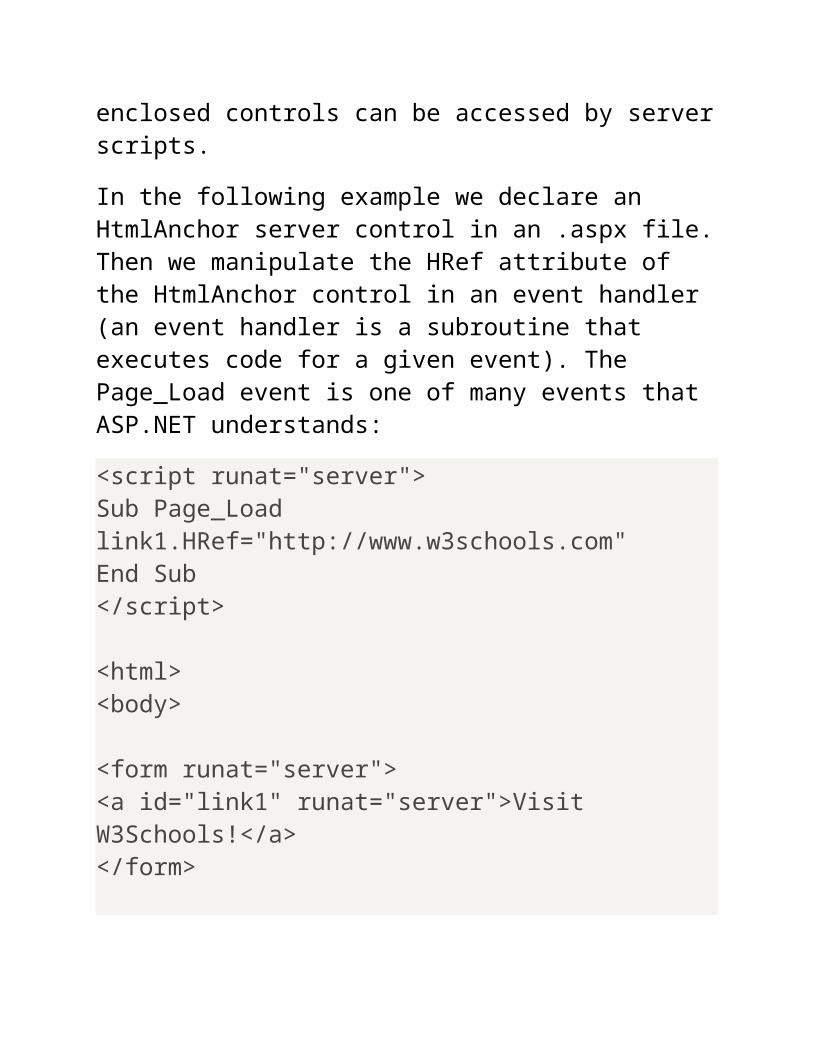
Note: All HTML server controls must be within a <form> tag with the runat="server" attribute. The runat="server" attribute indicates that the form should be processed on the server. It also indicates that the enclosed controls can be accessed by server scripts.
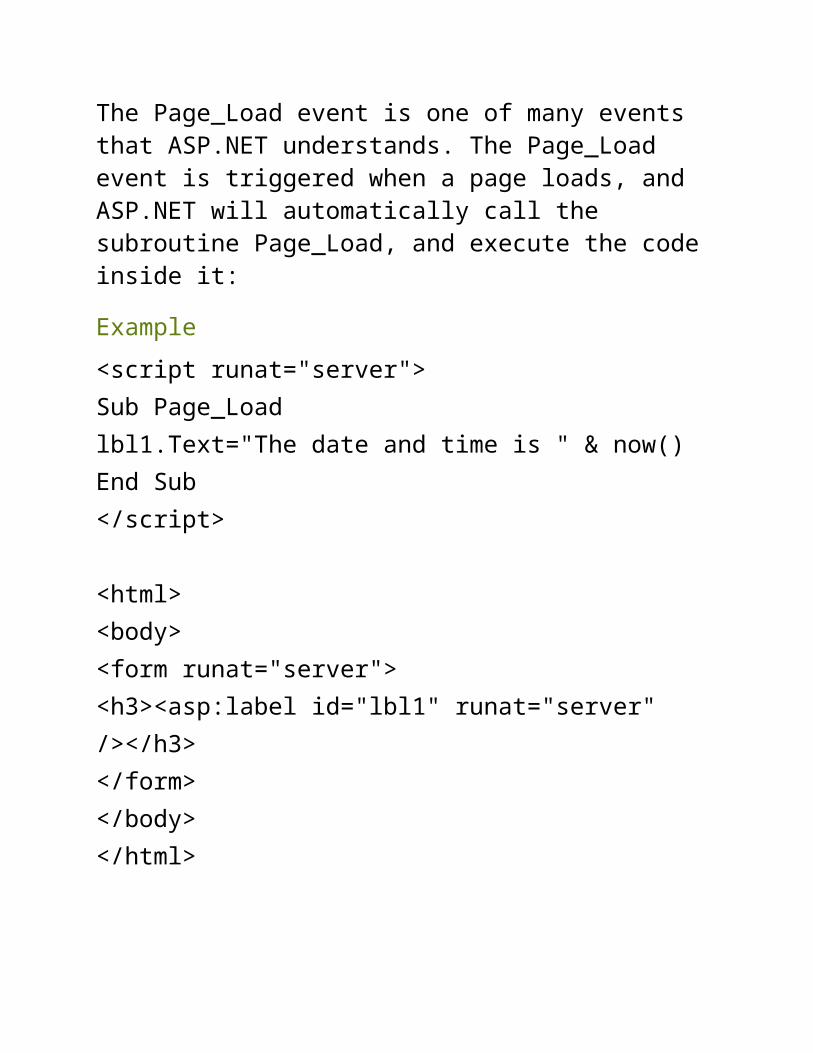
In the following example we declare an HtmlAnchor server control in an .aspx file. Then we manipulate the HRef attribute of the HtmlAnchor control in an event handler (an event handler is a subroutine that executes code for a given event). The Page_Load event is one of many events that ASP.NET understands:
The executable code itself has been moved outside the HTML.
ASP.NET - Web Server Controls
Web server controls are special ASP.NET tags understood by the server.
Like HTML server controls, Web server controls are also created on the server and they require a runat="server" attribute to work. However, Web server controls do not necessarily map to any existing HTML elements and they may represent more complex elements.
The syntax for creating a Web server control is:
<asp:control_name id="some_id" runat="server" />
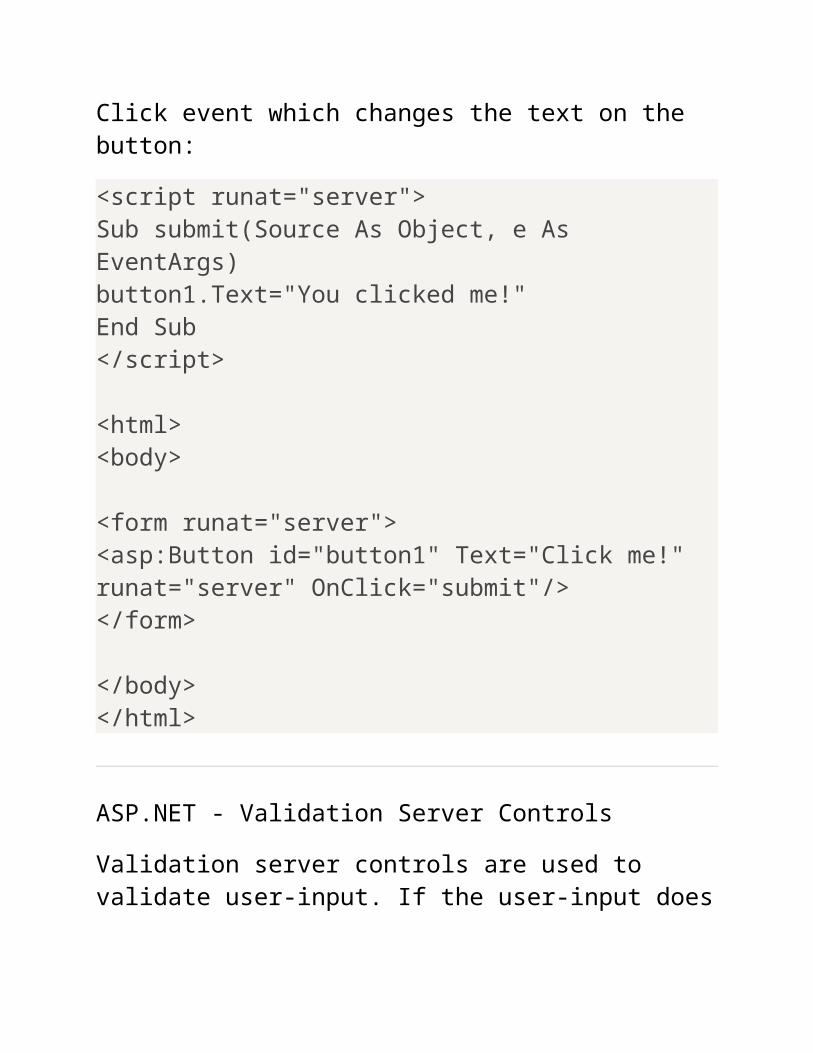
In the following example we declare a Button server control in an .aspx file. Then we create an event handler for the Click event which changes the text on the button:
<script runat="server">Sub submit(Source As Object, e As EventArgs)button1.Text="You clicked me!"End Sub</script>
Validation server controls are used to validate user-input. If the user-input does not pass validation, it will display an error message to the user.
Each validation control performs a specific type of validation (like validating against a specific value or a range of values).
By default, page validation is performed when a Button, ImageButton, or LinkButton control is clicked. You can prevent validation when a button control is clicked by setting the CausesValidation property to false.
The syntax for creating a Validation server control is:
<asp:control_name id="some_id" runat="server" />
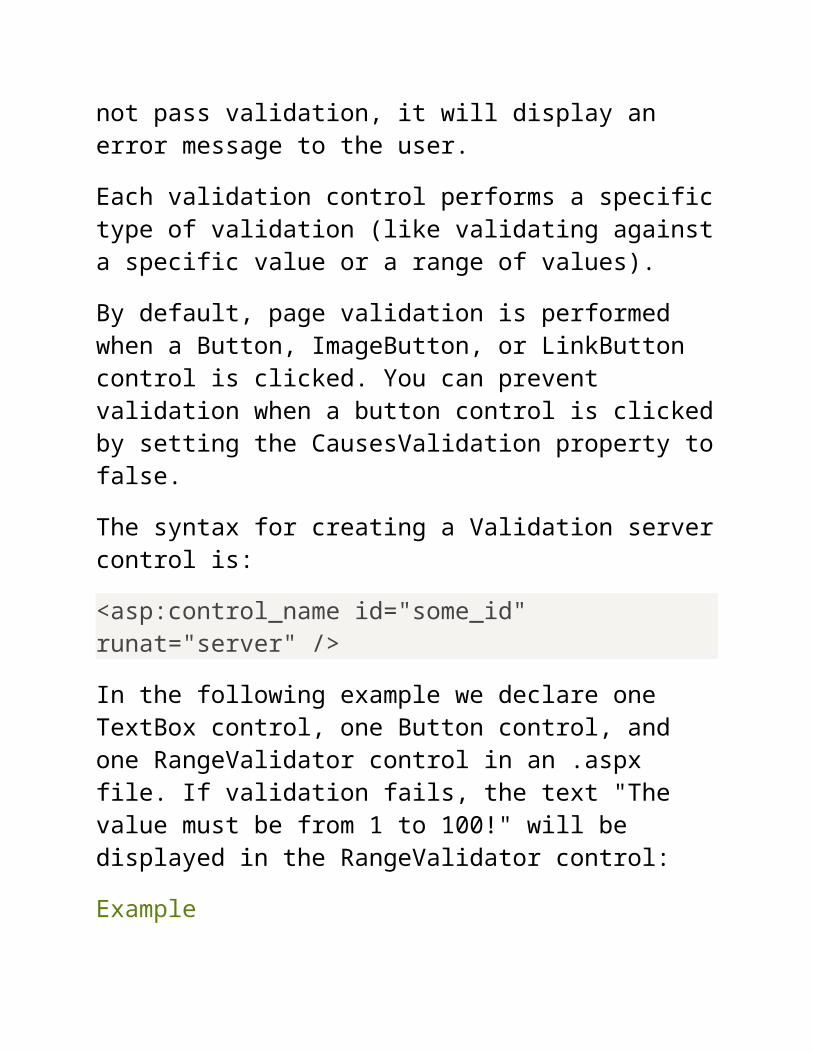
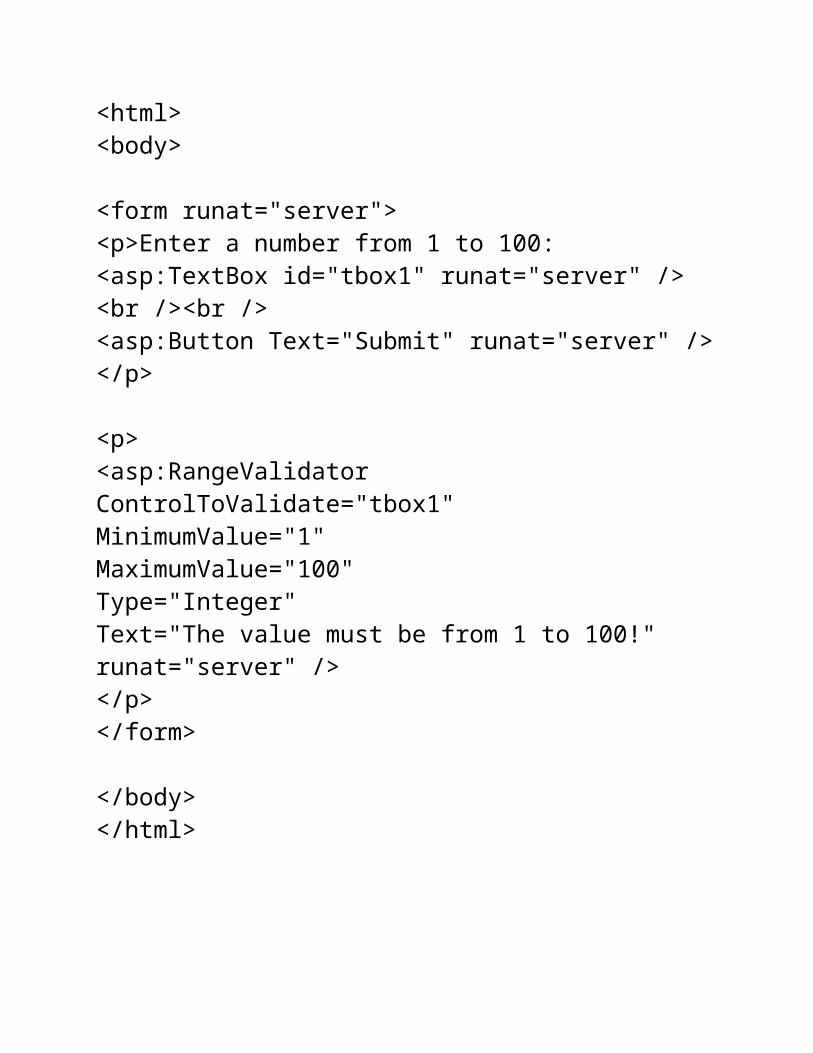
In the following example we declare one TextBox control, one Button control, and one RangeValidator control in an .aspx file. If validation fails, the text "The value must be from 1 to 100!" will be displayed in the RangeValidator control:
Example
<html><body>
<form runat="server"><p>Enter a number from 1 to 100:<asp:TextBox id="tbox1" runat="server" /><br /><br /><asp:Button Text="Submit" runat="server" /></p>
<p><asp:RangeValidatorControlToValidate="tbox1"MinimumValue="1"MaximumValue="100"Type="Integer"Text="The value must be from 1 to 100!"
runat="server" /></p></form>
</body></html>
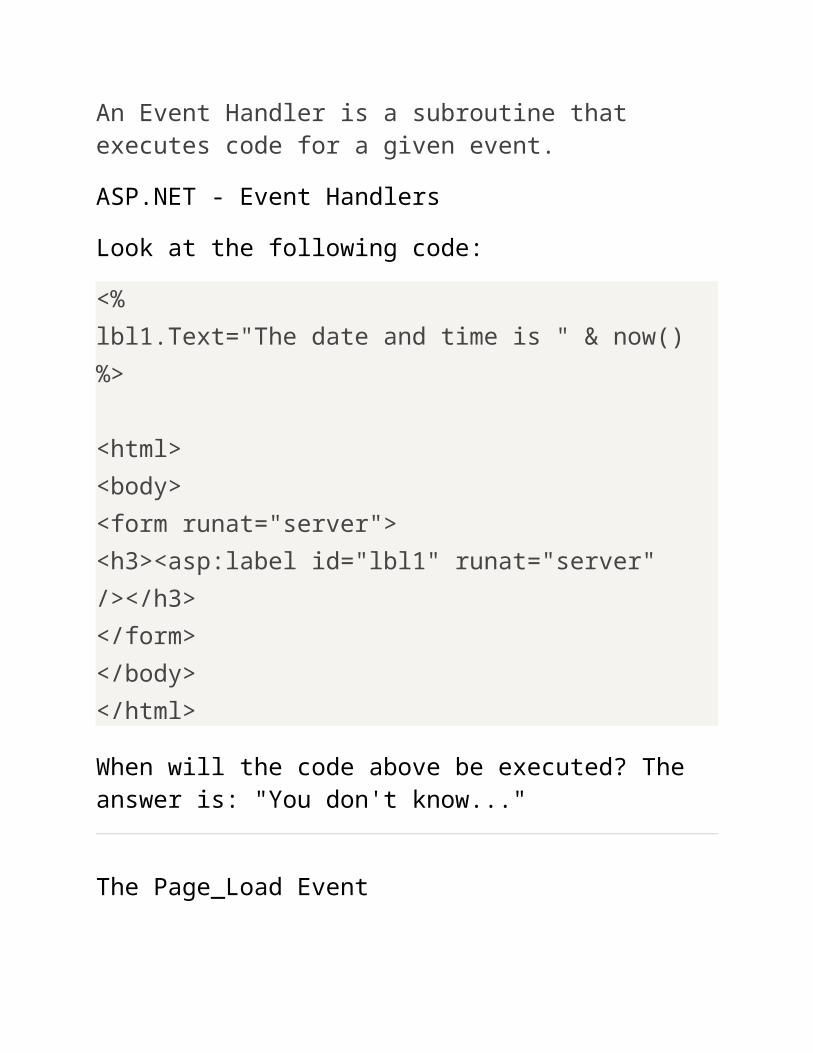
ASP.NET Web Forms - EventsAn Event Handler is a subroutine that executes code for a given event.
subroutine only the FIRST time the page is loaded, you can use the Page.IsPostBack property. If the Page.IsPostBack property is false, the page is loaded for the first time, if it is true, the page is posted back to the server (i.e. from a button click on a form):
Example
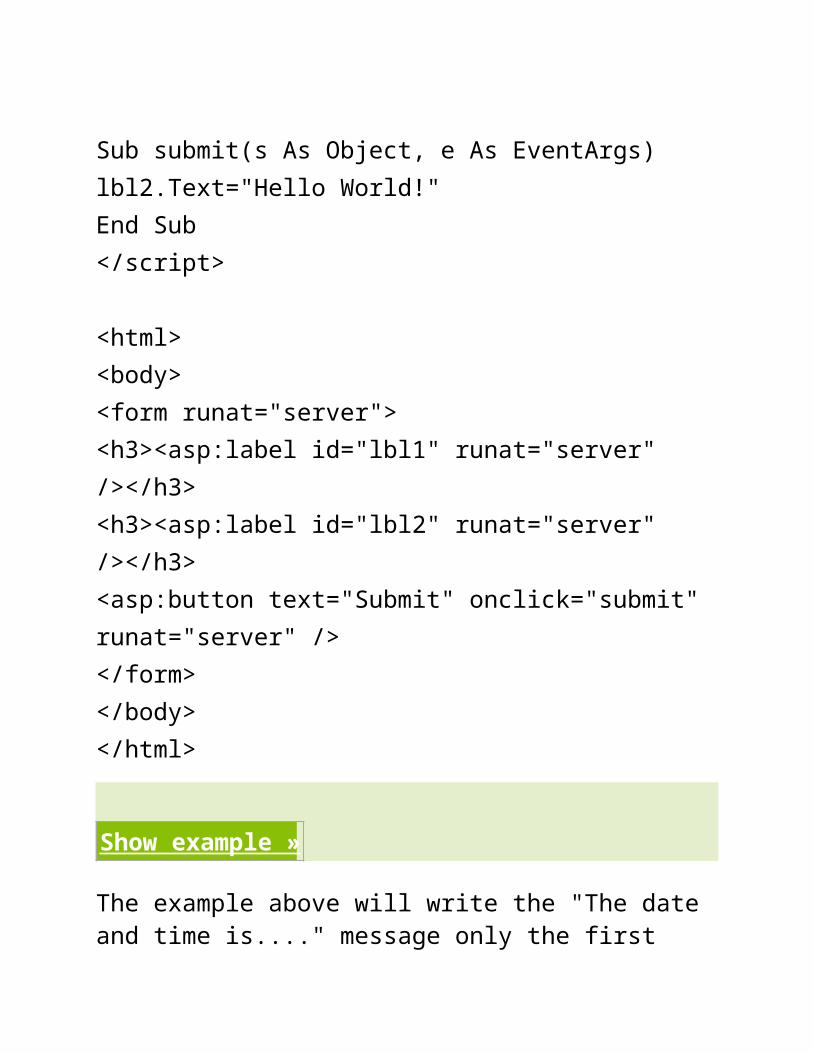
<script runat="server">Sub Page_Loadif Not Page.IsPostBack then lbl1.Text="The date and time is " & now()end ifEnd Sub
Sub submit(s As Object, e As EventArgs)lbl2.Text="Hello World!"End Sub</script>
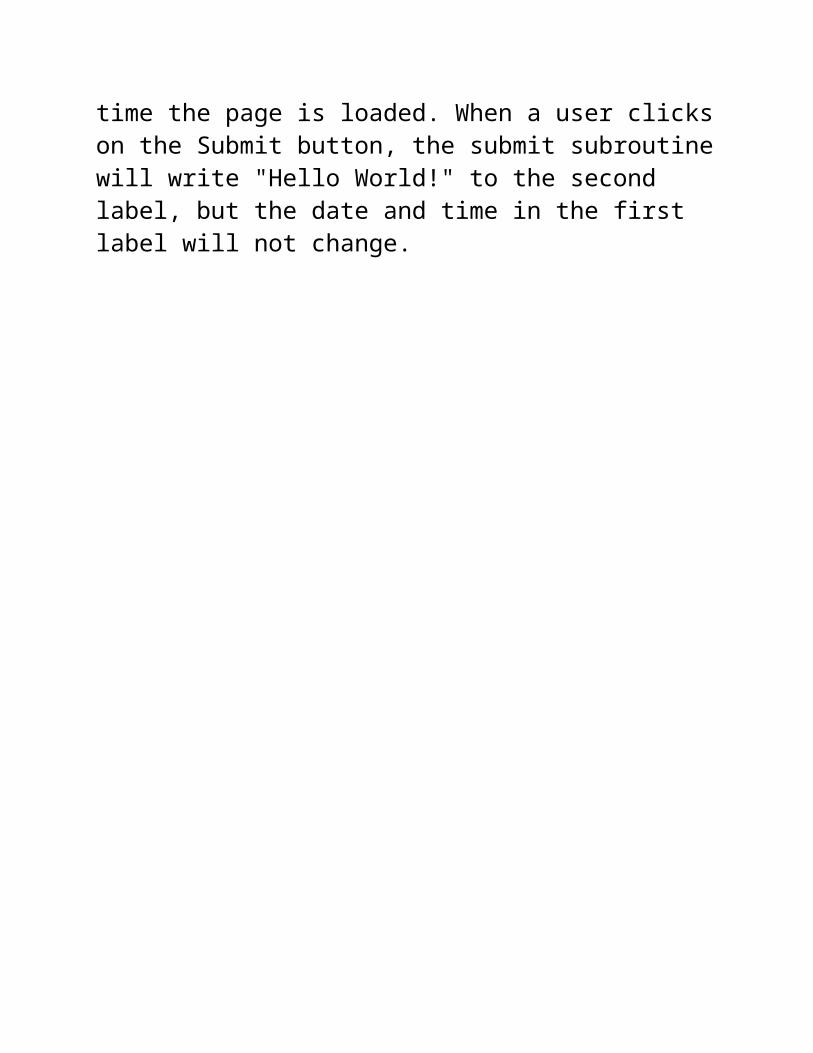
The example above will write the "The date and time is...." message only the first time the page is loaded. When a user clicks on the Submit button, the submit subroutine will write "Hello World!" to the second label, but the date and time in the first label will not change.
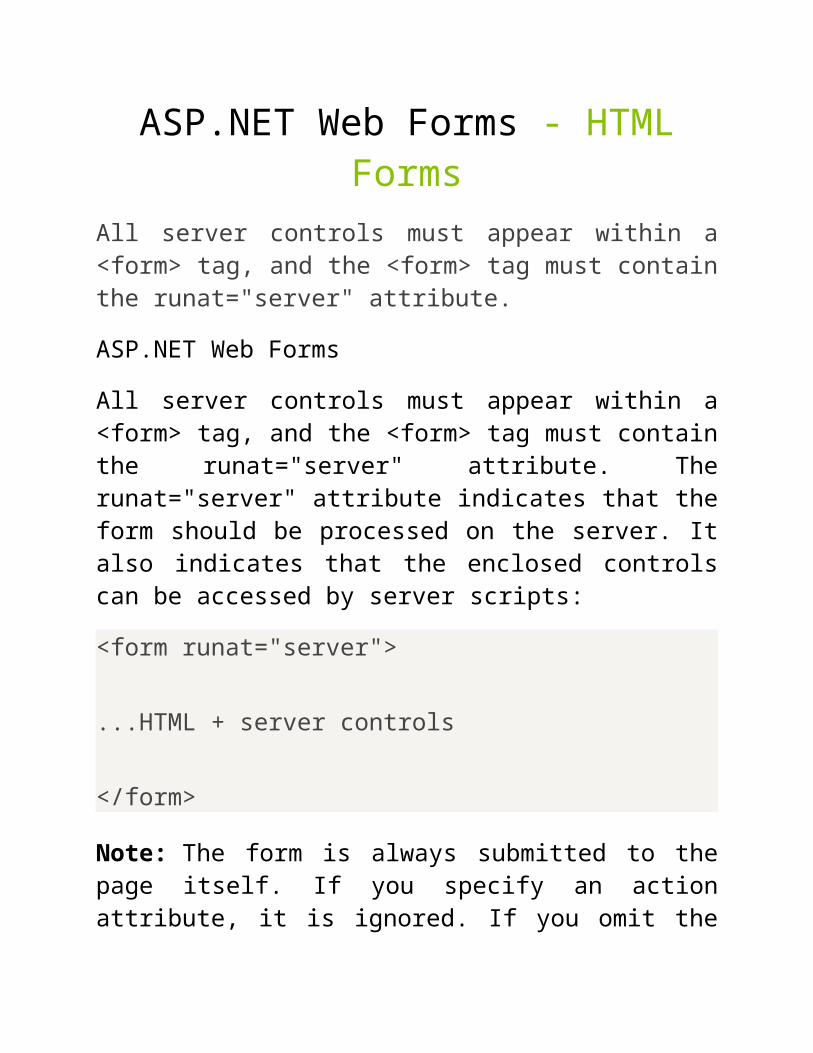
ASP.NET Web Forms - HTML FormsAll server controls must appear within a <form> tag, and the <form> tag must contain the runat="server" attribute.
ASP.NET Web Forms
All server controls must appear within a <form> tag, and the <form> tag must contain the runat="server" attribute. The runat="server" attribute indicates that the form should be processed on the server. It also indicates that the enclosed controls can be accessed by server scripts:
<form runat="server">
...HTML + server controls
</form>
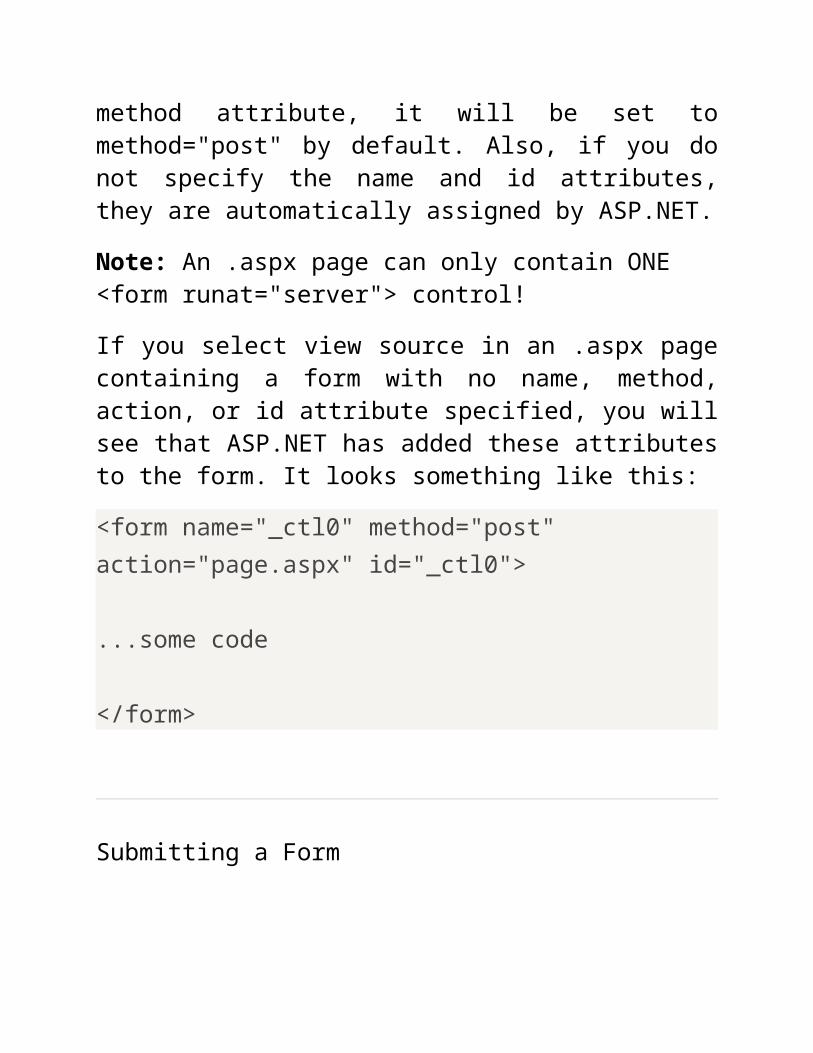
Note: The form is always submitted to the page itself. If you specify an action attribute, it is ignored. If you omit the method attribute, it will be set to method="post" by default. Also, if you do not specify the name and id attributes, they are automatically assigned by ASP.NET.
Note: An .aspx page can only contain ONE <form runat="server"> control!
If you select view source in an .aspx page containing a form with no name, method, action, or id attribute specified, you will see that ASP.NET has added these attributes to the form. It looks something like this:
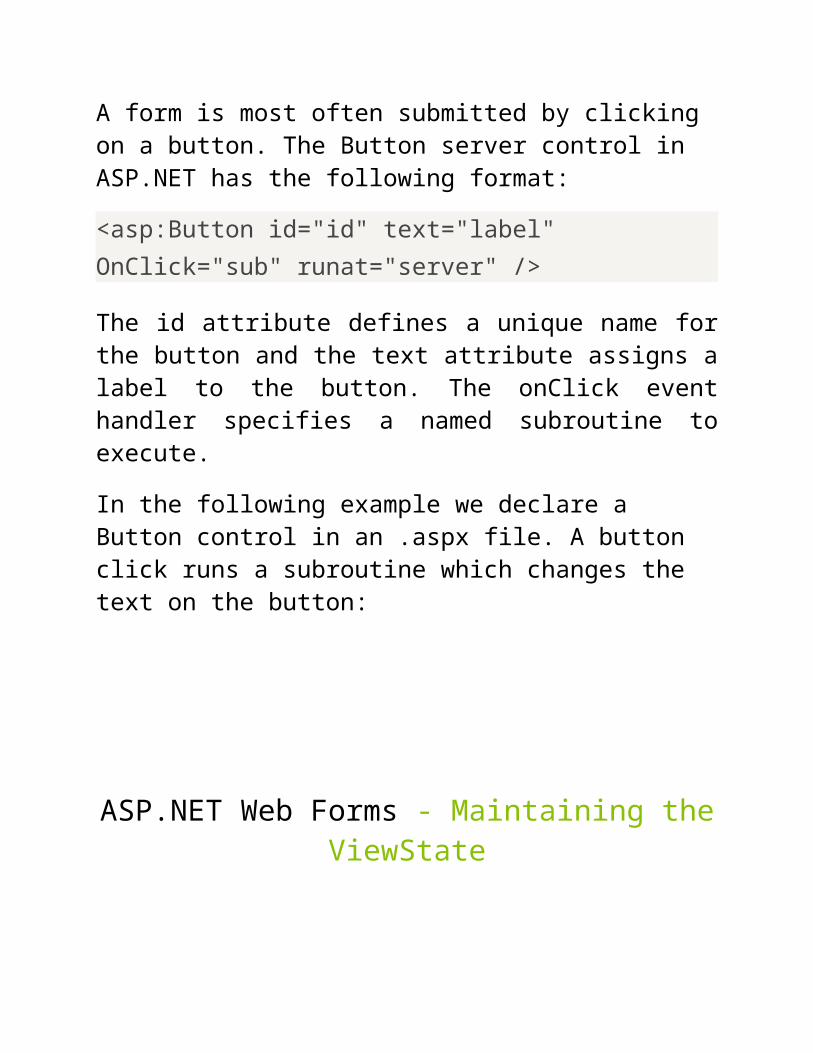
The id attribute defines a unique name for the button and the text attribute assigns a label to the button. The onClick event handler specifies a named subroutine to execute.
In the following example we declare a Button control in an .aspx file. A button click runs a subroutine which changes the text on the button:
ASP.NET Web Forms - Maintaining the ViewState
You may save a lot of coding by maintaining the ViewState of the objects in your Web Form.
Maintaining the ViewState
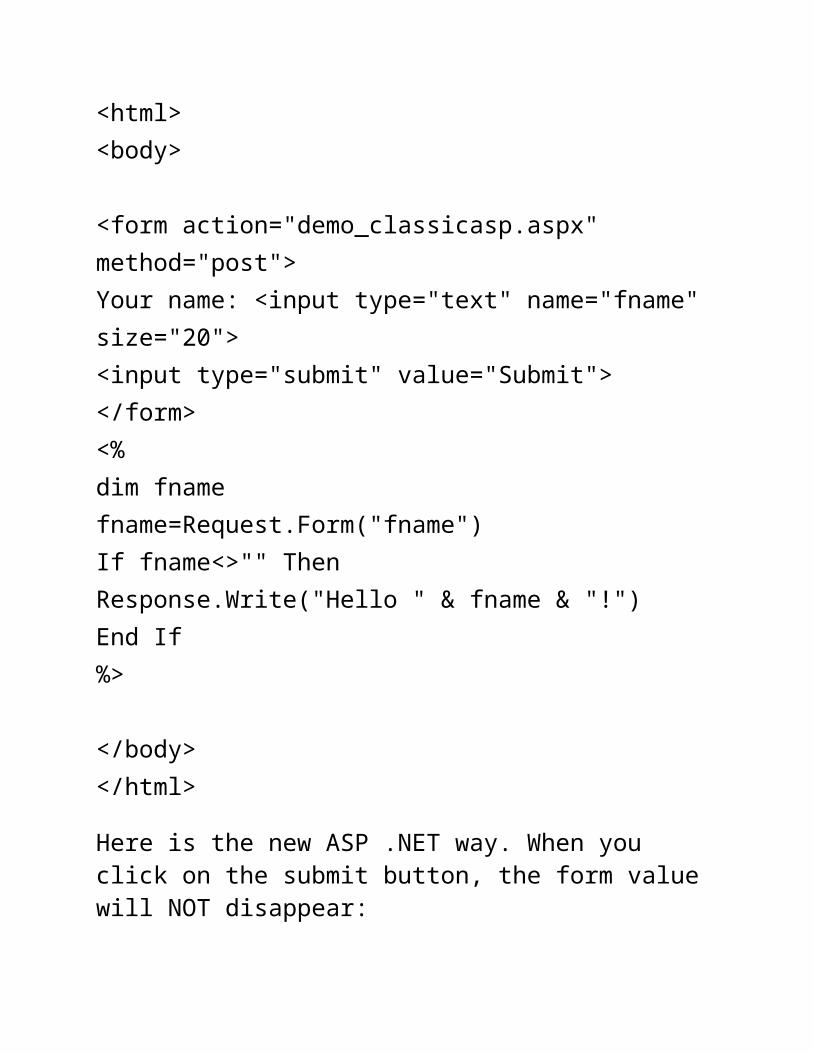
When a form is submitted in classic ASP, all form values are cleared. Suppose you have submitted a form with a lot of information and the server comes back with an error. You will have to go back to the form and correct the information. You click the back button, and what happens.......ALL form values are CLEARED, and you will have to start all over again! The site did not maintain your ViewState.
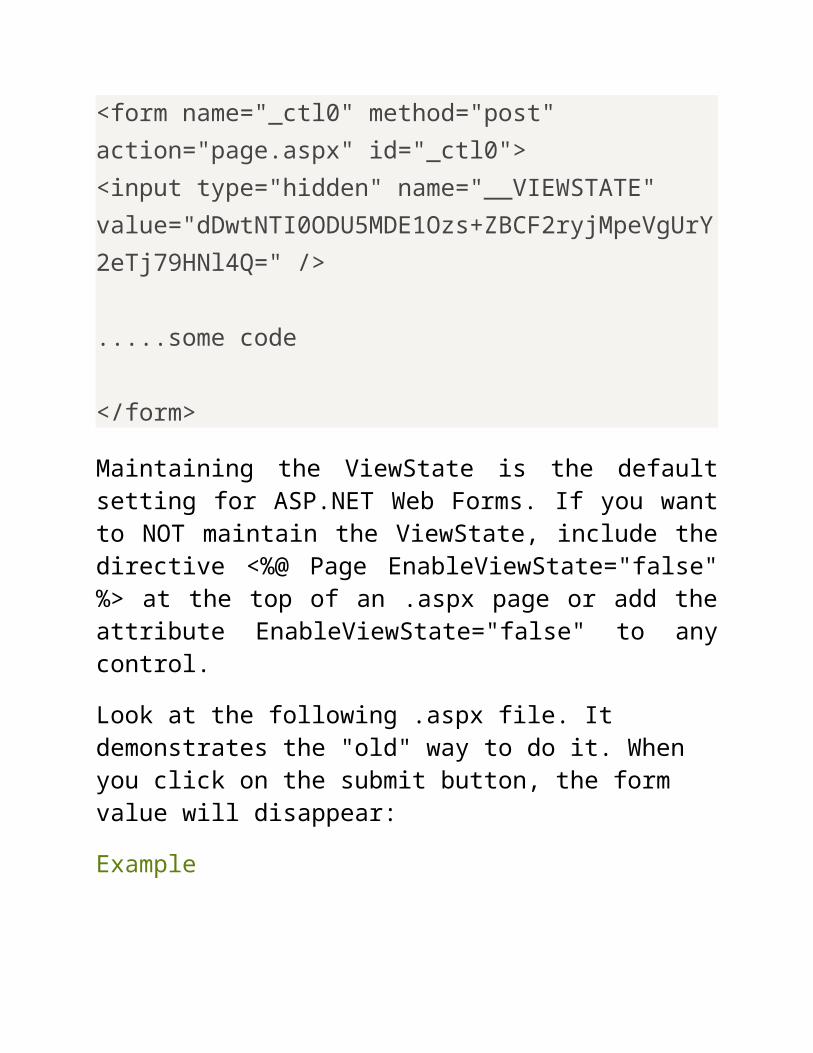
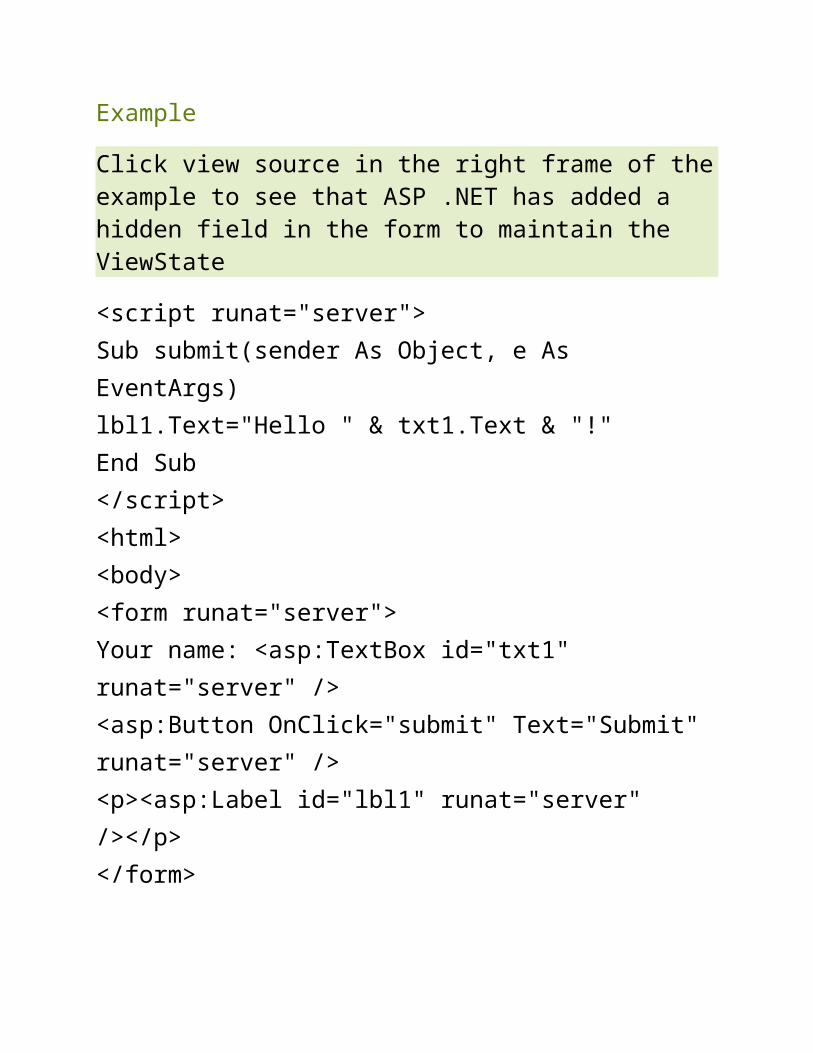
When a form is submitted in ASP .NET, the form reappears in the browser window together with all form values. How come? This is because ASP .NET maintains your ViewState. The ViewState indicates the status of the page when submitted to the server. The status is defined through a hidden field placed on each page with a <form runat="server"> control. The source could look something like this:
Maintaining the ViewState is the default setting for ASP.NET Web Forms. If you want to NOT maintain the ViewState, include the directive <%@ Page EnableViewState="false" %> at the top of an .aspx page or add the attribute EnableViewState="false" to any control.
Look at the following .aspx file. It demonstrates the "old" way to do it. When you click on the submit button, the form value will disappear:
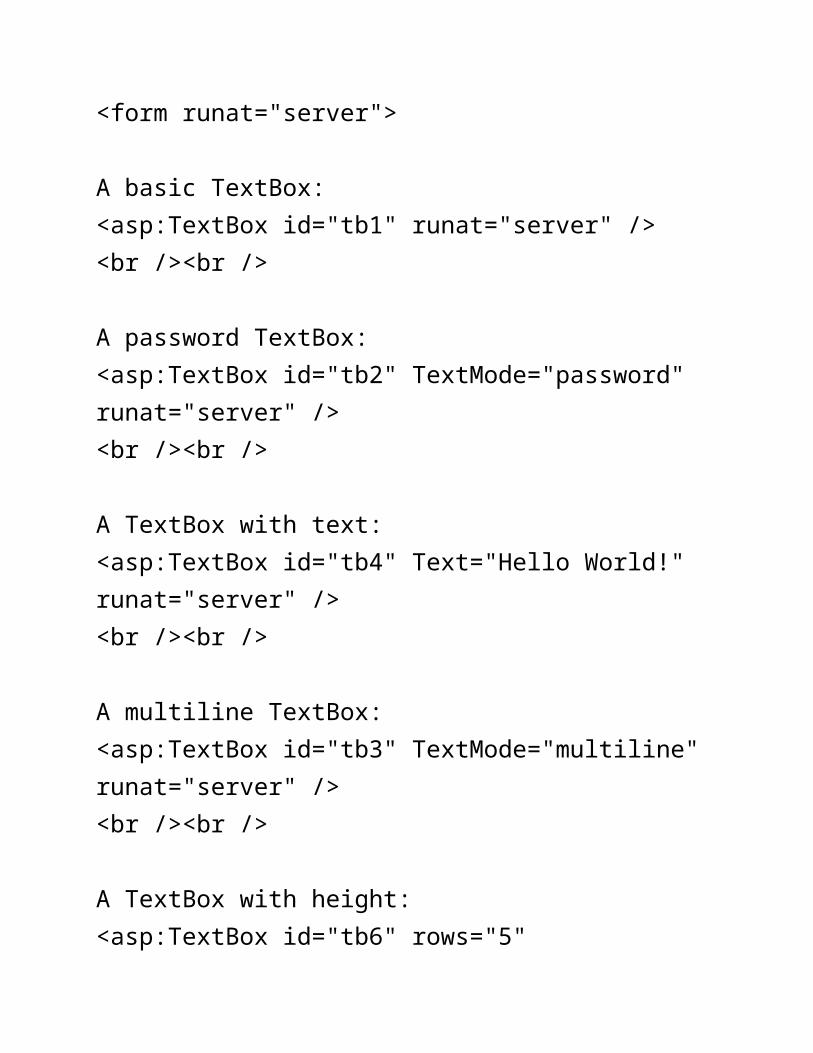
A multiline TextBox:<asp:TextBox id="tb3" TextMode="multiline" runat="server" /><br /><br />
A TextBox with height:<asp:TextBox id="tb6" rows="5" TextMode="multiline"runat="server" /><br /><br />
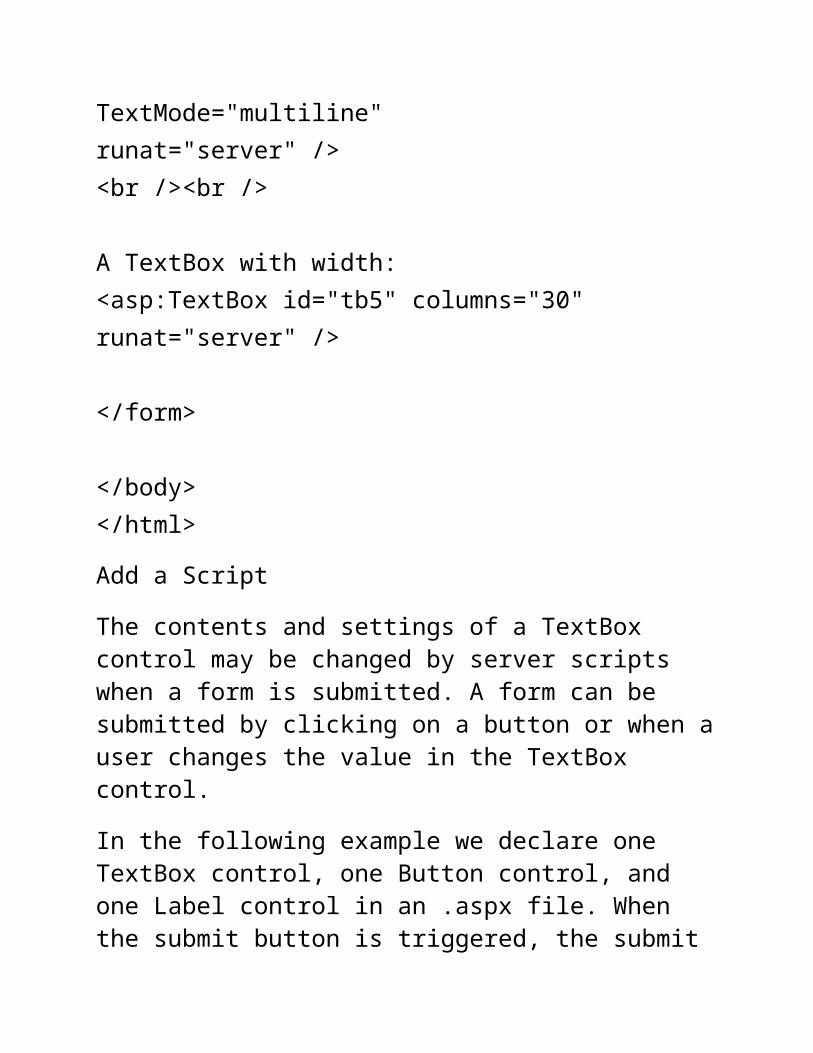
A TextBox with width:<asp:TextBox id="tb5" columns="30" runat="server" />
</form>
</body></html>
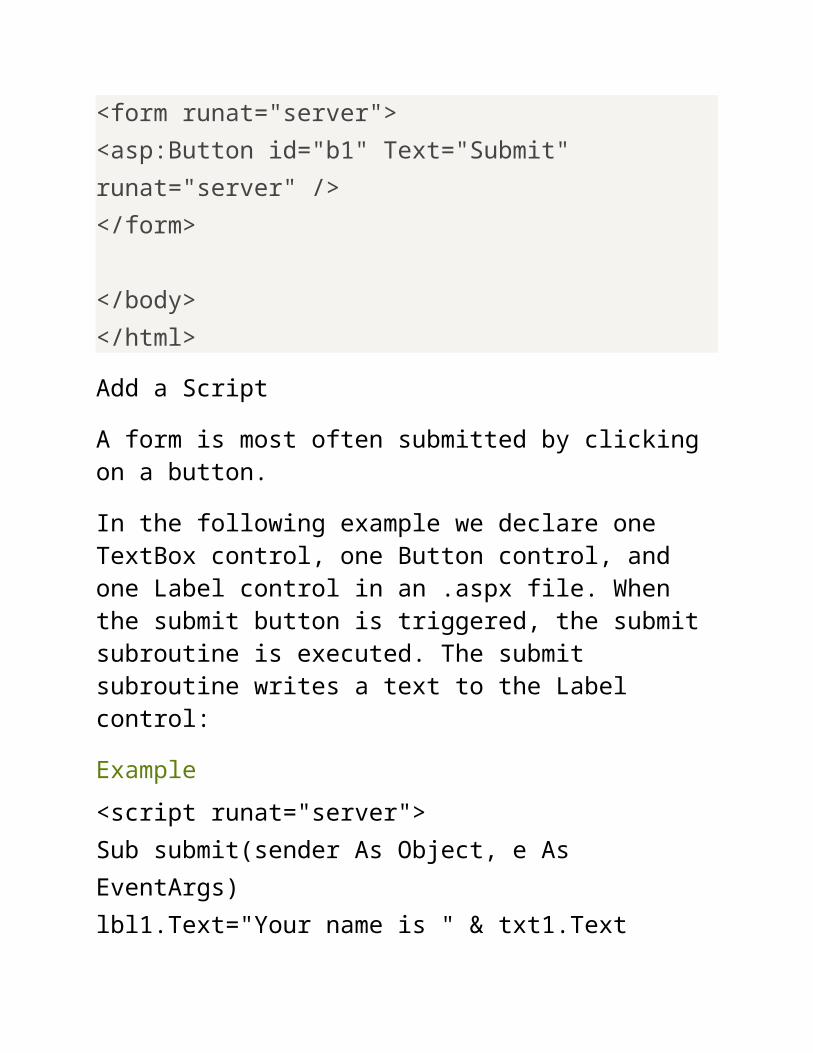
Add a Script
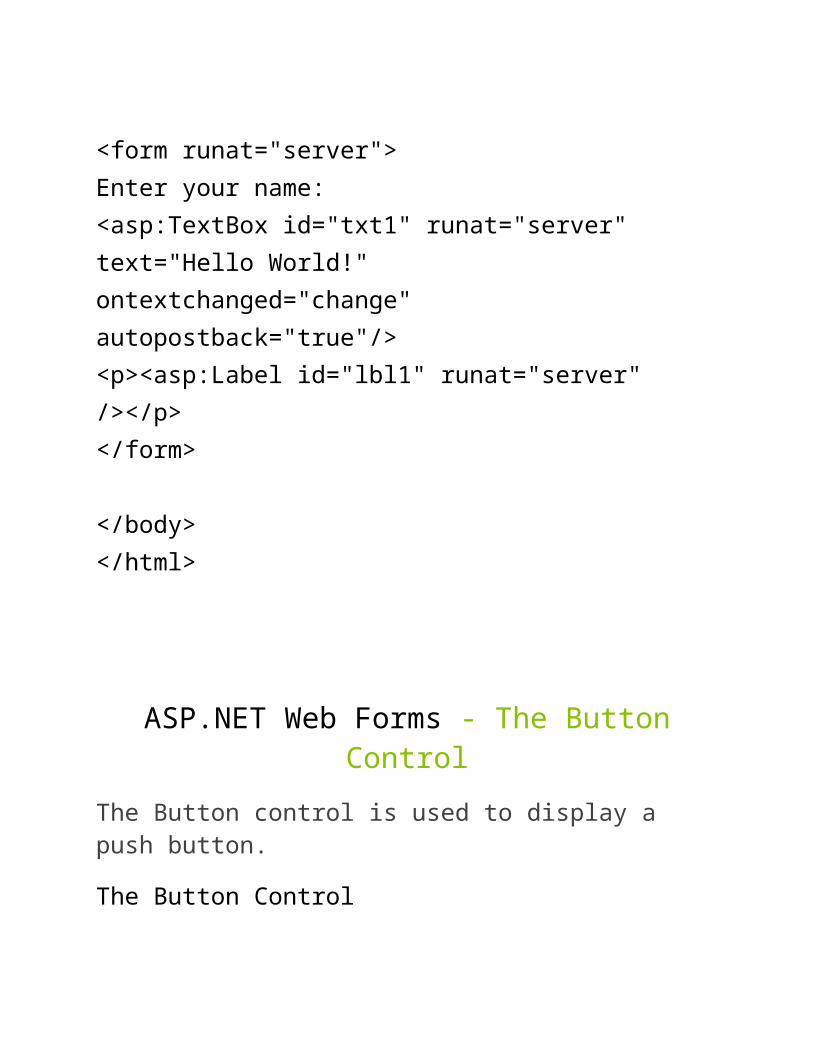
The contents and settings of a TextBox control may be changed by server scripts when a form is submitted. A form can be submitted by clicking on a button or when a user changes the value in the TextBox control.
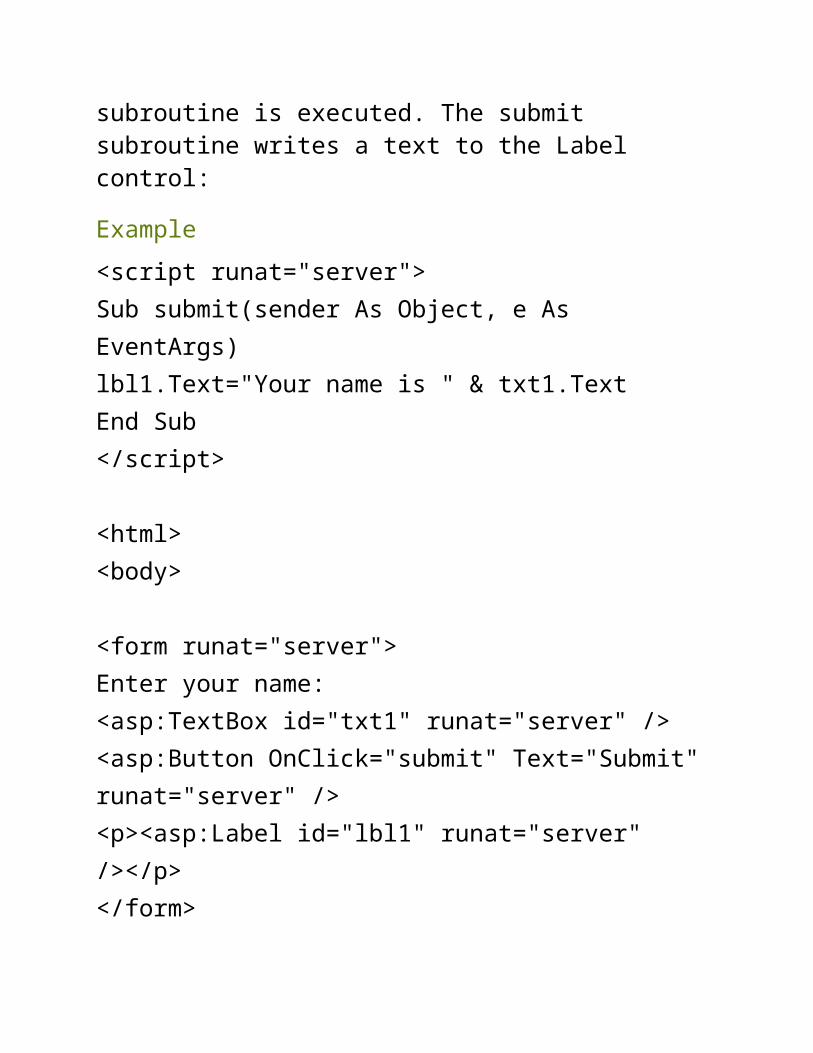
In the following example we declare one TextBox control, one Button control, and one Label control in an .aspx file. When the
submit button is triggered, the submit subroutine is executed. The submit subroutine writes a text to the Label control:
Example
<script runat="server">Sub submit(sender As Object, e As EventArgs)lbl1.Text="Your name is " & txt1.TextEnd Sub</script>
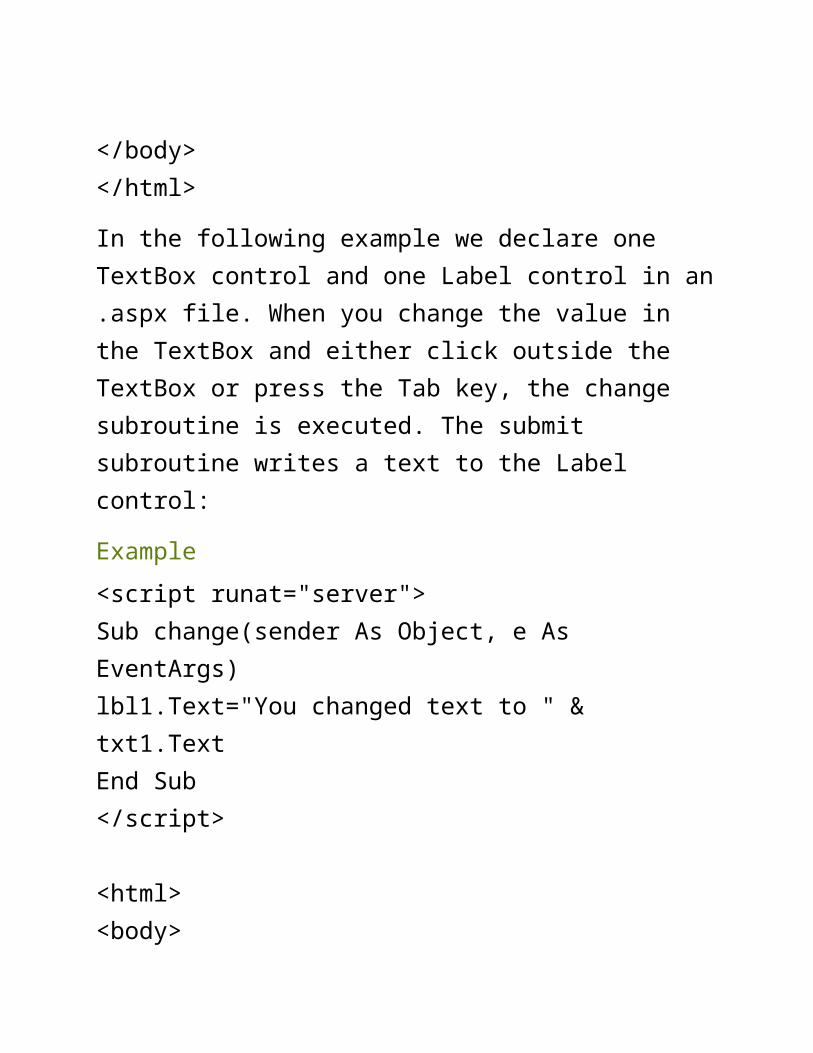
In the following example we declare one TextBox control and one Label control in an .aspx file. When you change the value in the TextBox and either click outside the TextBox or press the
Tab key, the change subroutine is executed. The submit subroutine writes a text to the Label control:
Example
<script runat="server">Sub change(sender As Object, e As EventArgs)lbl1.Text="You changed text to " & txt1.TextEnd Sub</script>
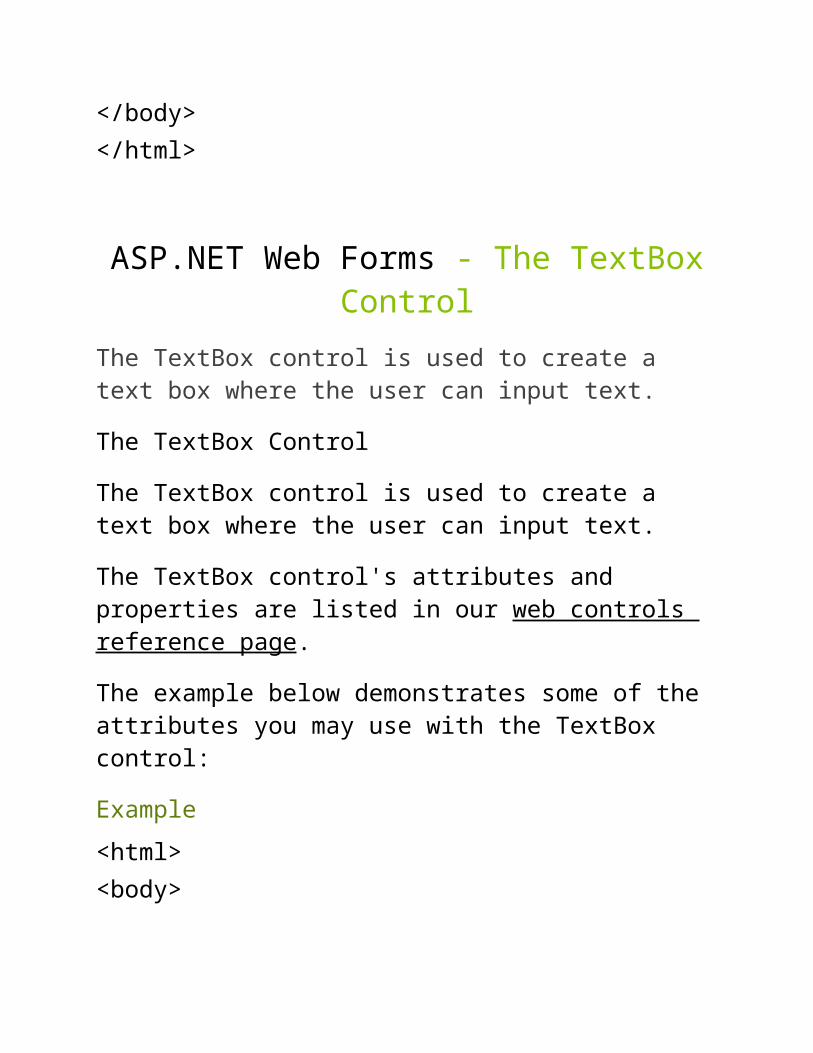
The Button control is used to display a push button.
The Button Control
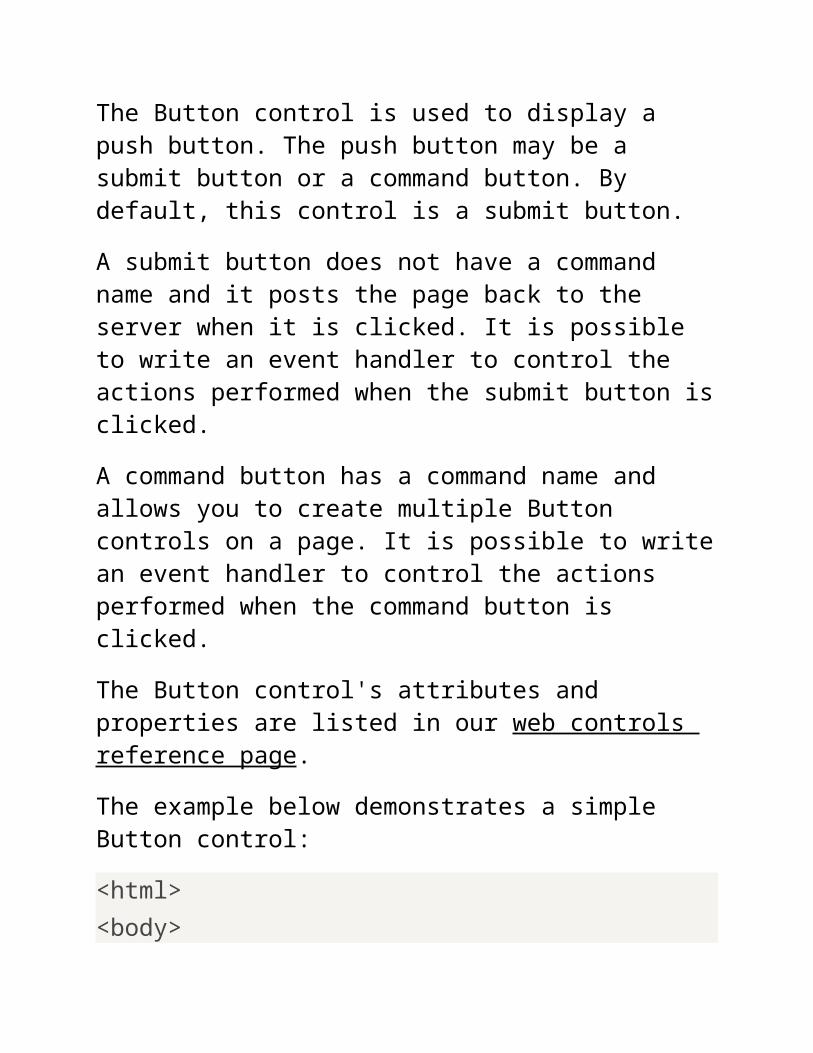
The Button control is used to display a push button. The push button may be a submit button or a command button. By default, this control is a submit button.
A submit button does not have a command name and it posts the page back to the server when it is clicked. It is possible to write an event handler to control the actions performed when the submit button is clicked.
A command button has a command name and allows you to create multiple Button controls on a page. It is possible to write an event handler to control the actions performed when the command button is clicked.
The Button control's attributes and properties are listed in our web controls reference page.
The example below demonstrates a simple Button control:
A form is most often submitted by clicking on a button.
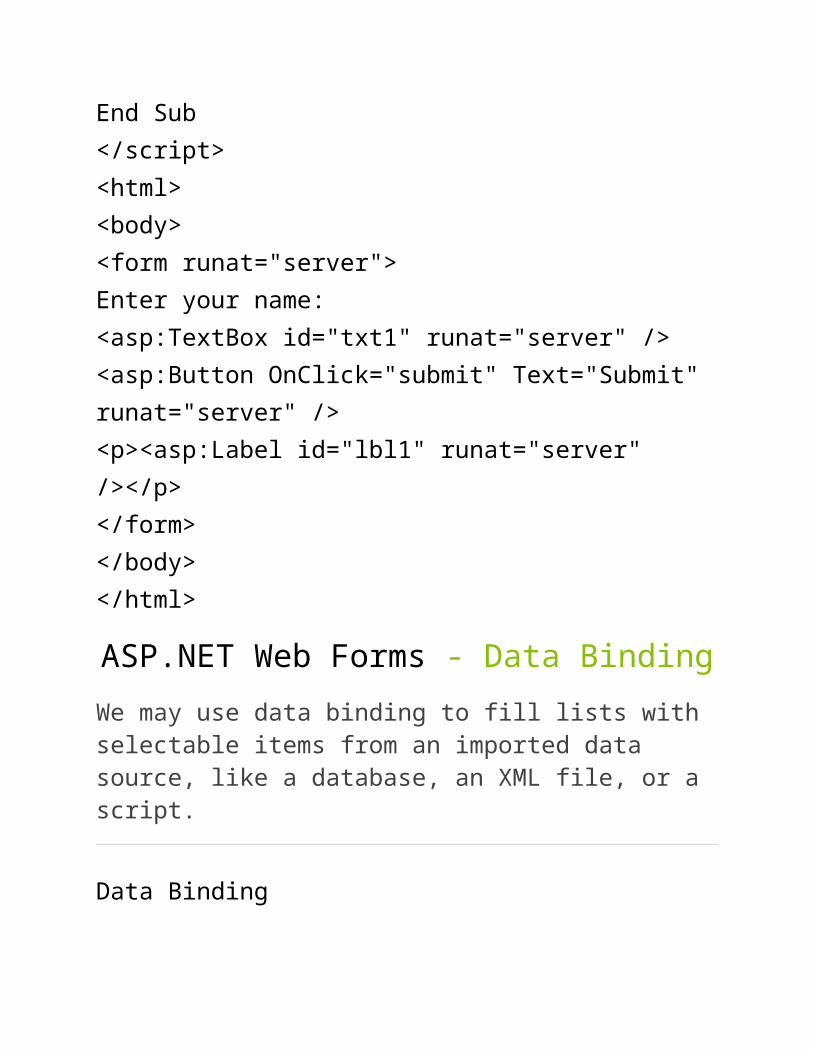
In the following example we declare one TextBox control, one Button control, and one Label control in an .aspx file. When the submit button is triggered, the submit subroutine is executed. The submit subroutine writes a text to the Label control:
Example
<script runat="server">Sub submit(sender As Object, e As EventArgs)lbl1.Text="Your name is " & txt1.TextEnd Sub</script><html><body><form runat="server">Enter your name:<asp:TextBox id="txt1" runat="server" /><asp:Button OnClick="submit" Text="Submit" runat="server" /><p><asp:Label id="lbl1" runat="server" /></p></form></body></html>
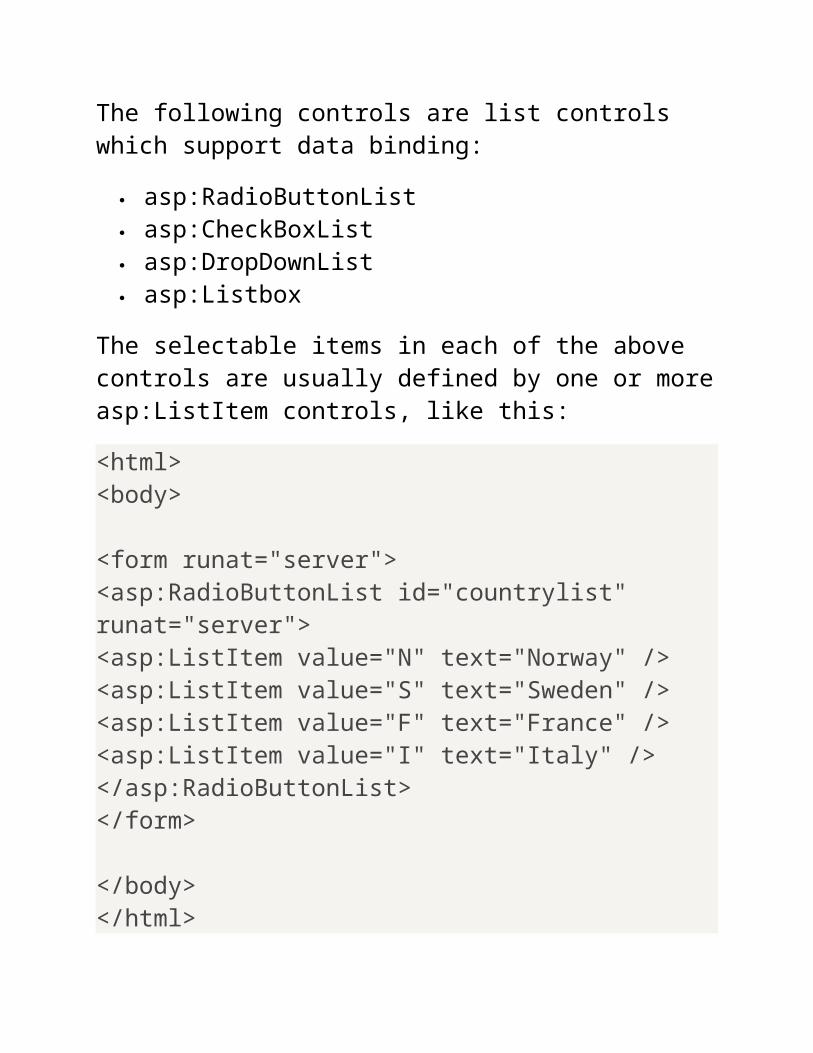
ASP.NET Web Forms - Data Binding
We may use data binding to fill lists with selectable items from an imported data source, like a database, an XML file, or a script.
Data Binding
The following controls are list controls which support data binding:
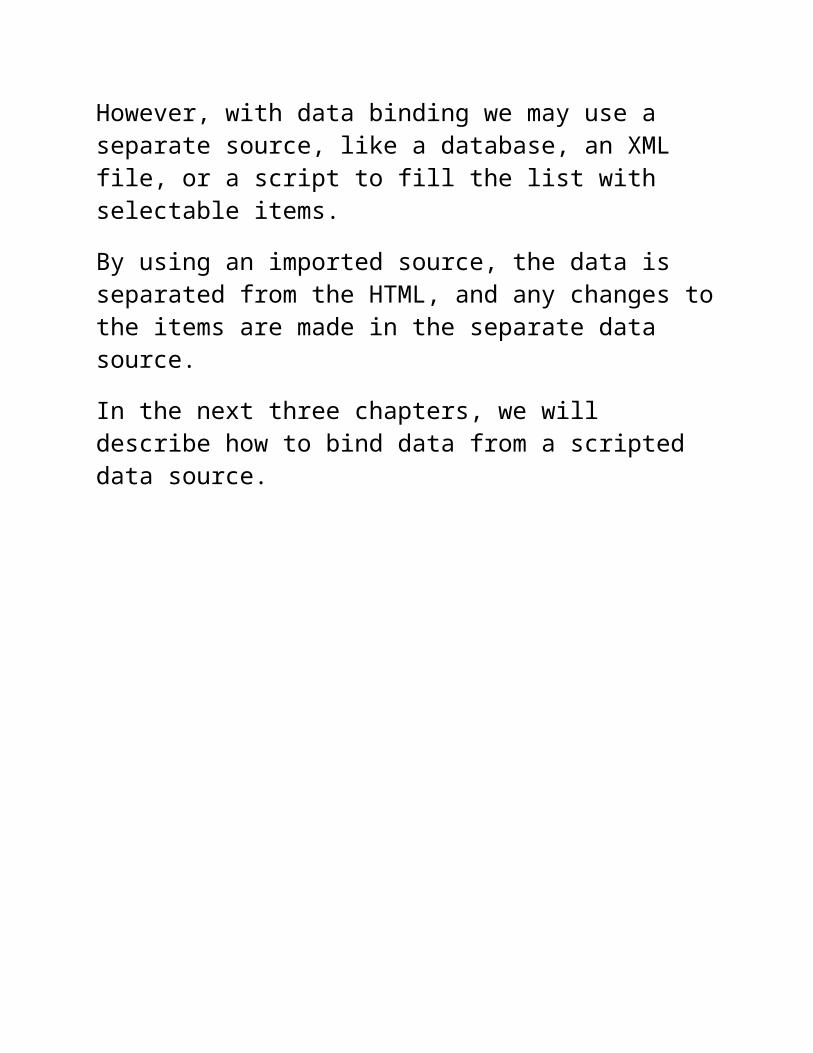
However, with data binding we may use a separate source, like a database, an XML file, or a script to fill the list with selectable items.
By using an imported source, the data is separated from the HTML, and any changes to the items are made in the separate data source.
In the next three chapters, we will describe how to bind data from a scripted data source.
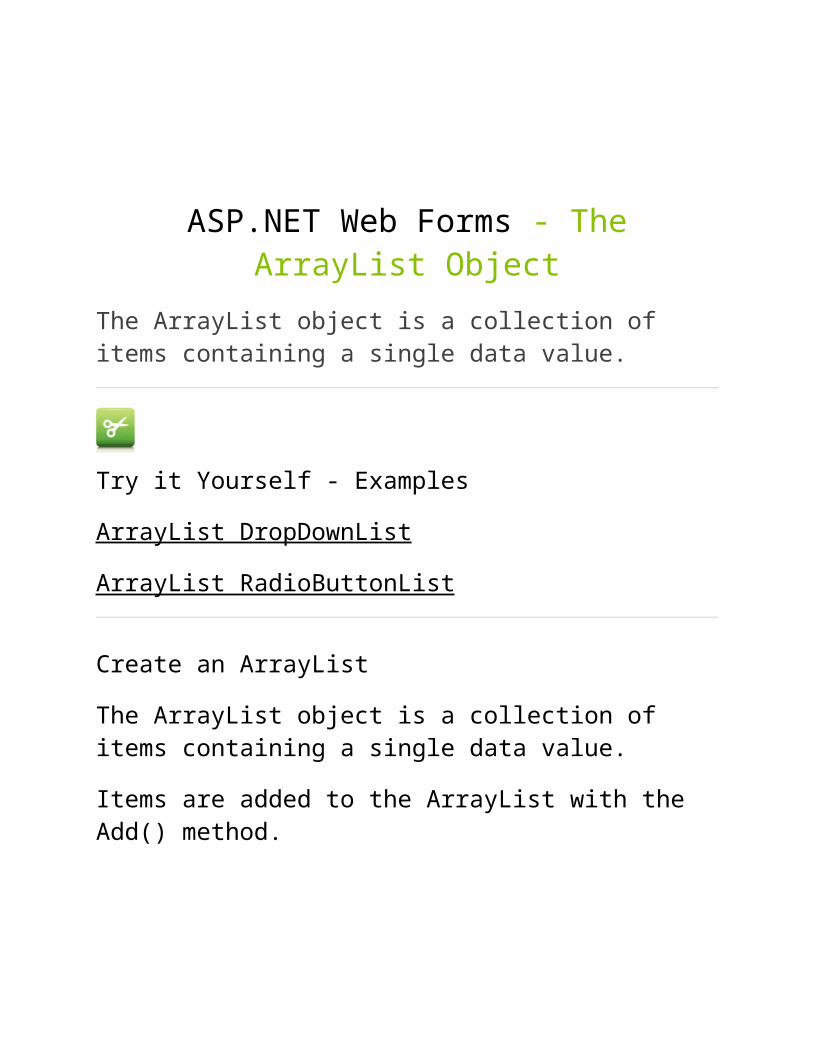
ASP.NET Web Forms - The ArrayList Object
The ArrayList object is a collection of items containing a single data value.
Try it Yourself - Examples
ArrayList DropDownList
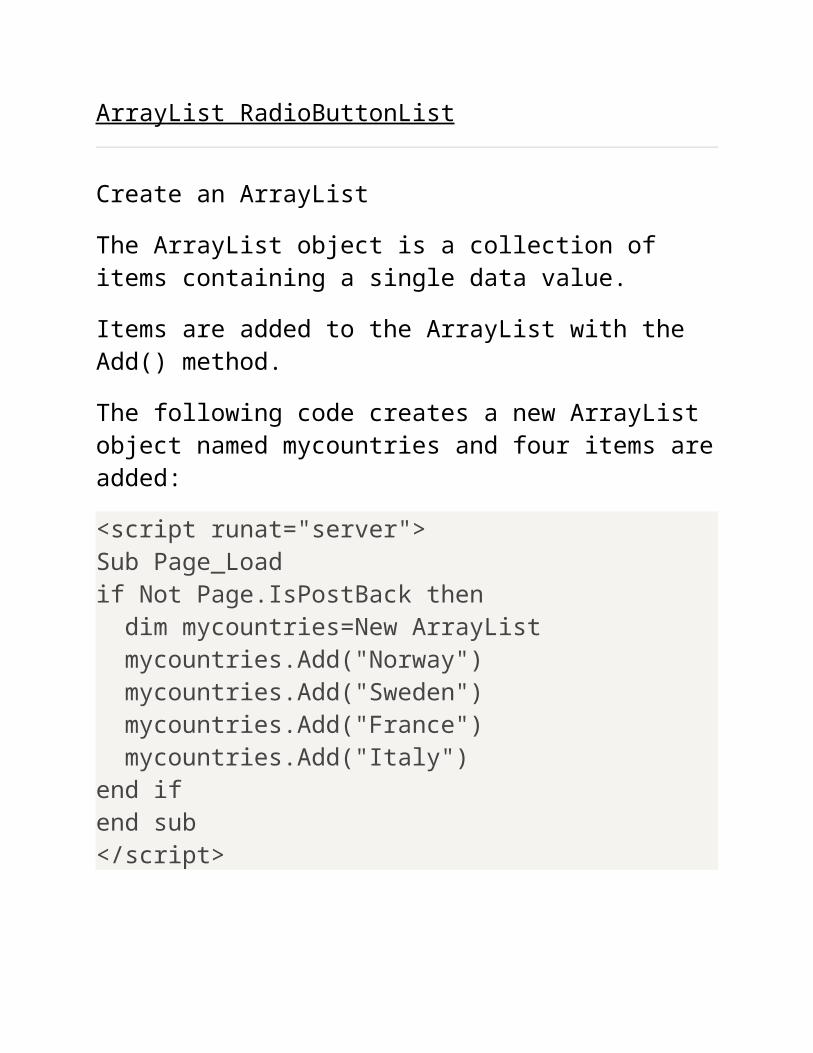
ArrayList RadioButtonList
Create an ArrayList
The ArrayList object is a collection of items containing a single data value.
Items are added to the ArrayList with the Add() method.
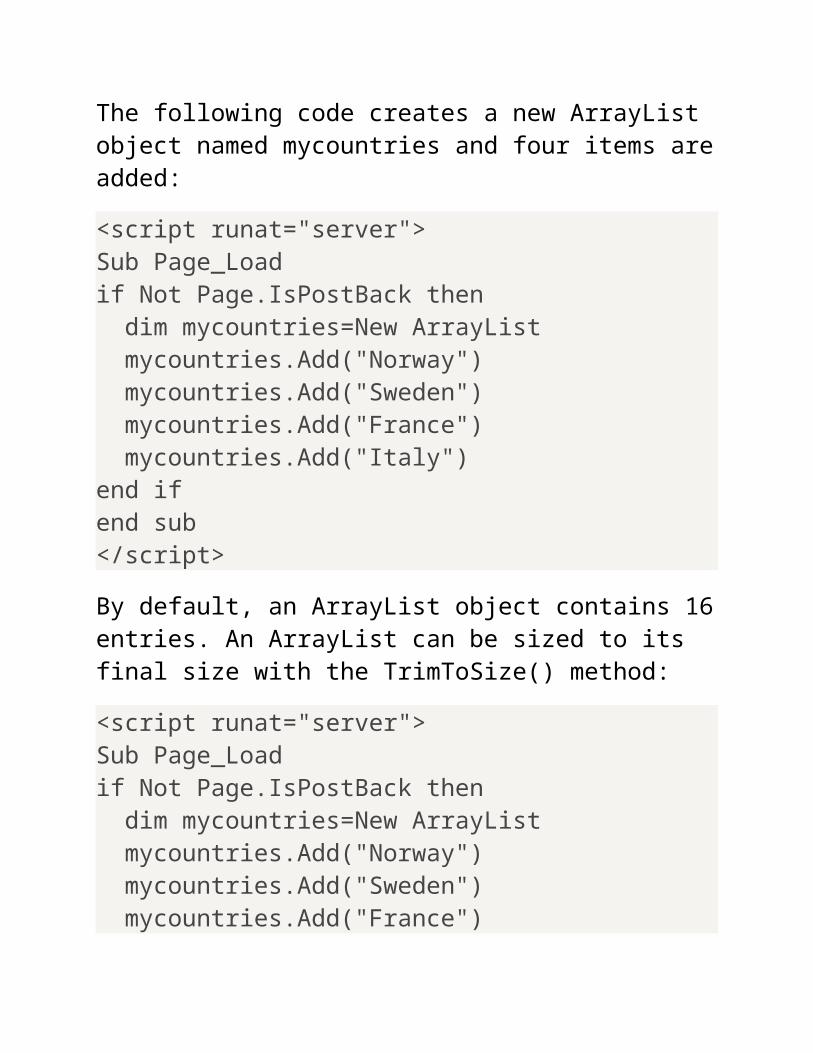
The following code creates a new ArrayList object named mycountries and four items are added:
<script runat="server">Sub Page_Loadif Not Page.IsPostBack then dim mycountries=New ArrayList mycountries.Add("Norway") mycountries.Add("Sweden") mycountries.Add("France") mycountries.Add("Italy")end ifend sub</script>
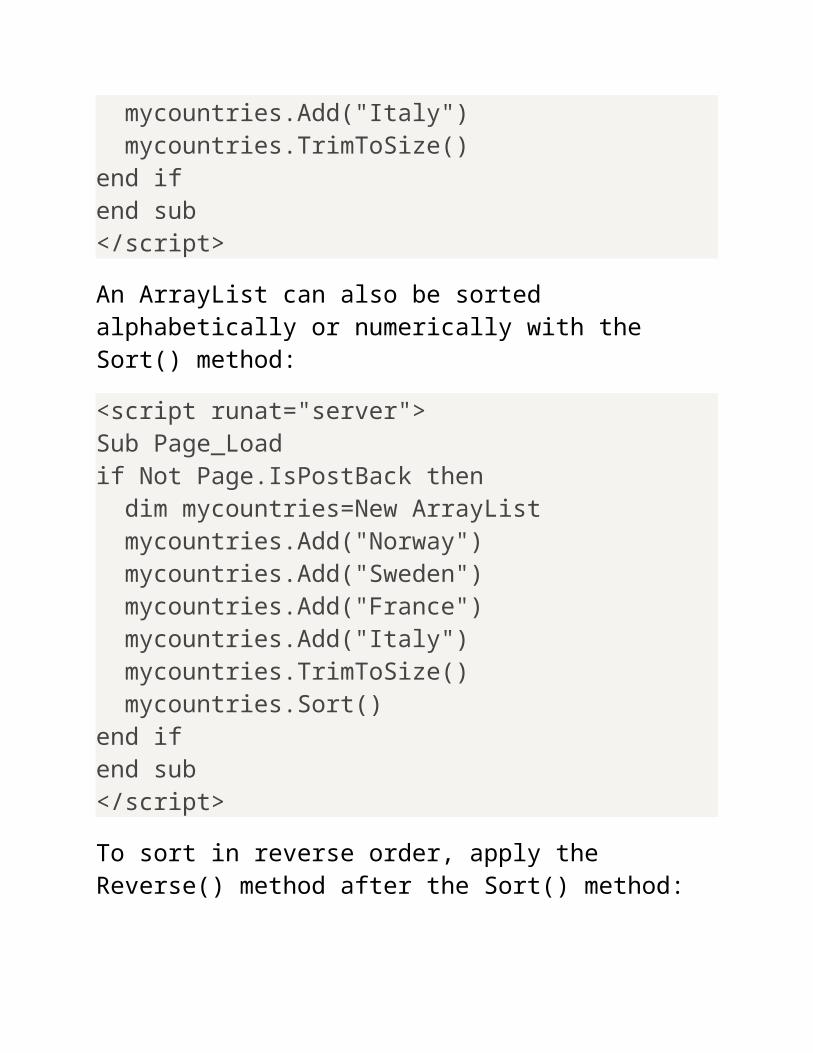
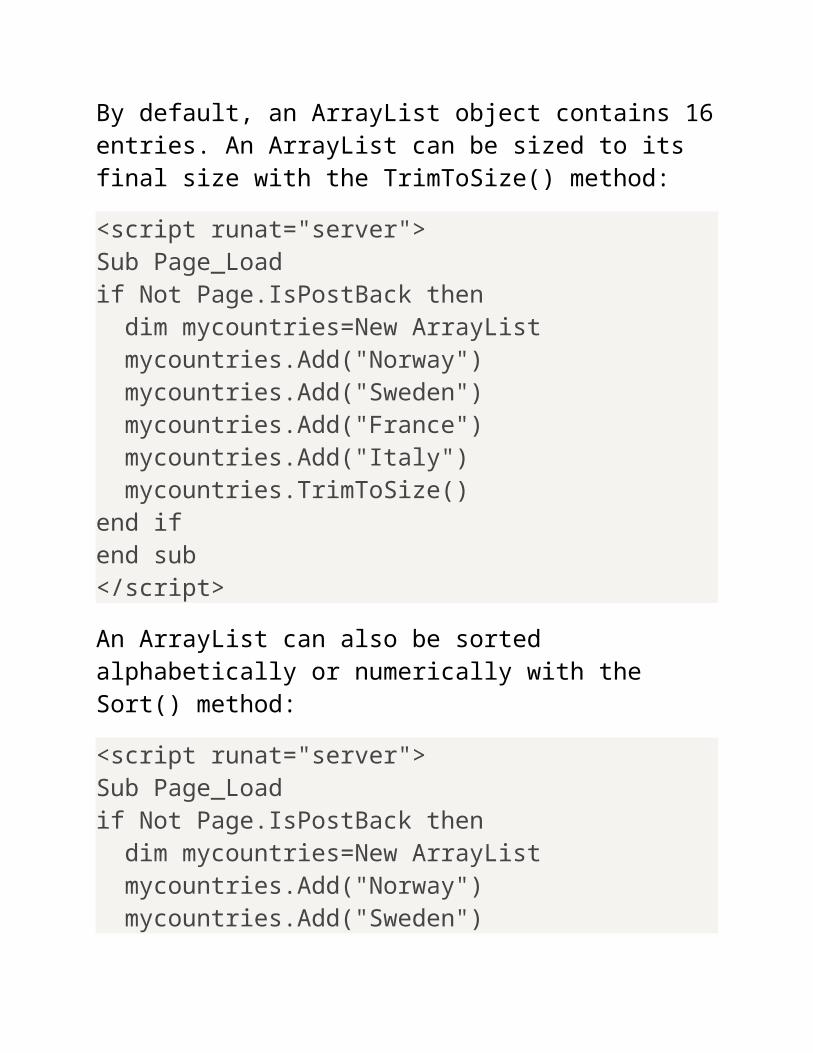
By default, an ArrayList object contains 16 entries. An ArrayList can be sized to its final size with the TrimToSize() method:
<script runat="server">Sub Page_Loadif Not Page.IsPostBack then dim mycountries=New ArrayList mycountries.Add("Norway") mycountries.Add("Sweden") mycountries.Add("France") mycountries.Add("Italy") mycountries.TrimToSize()end ifend sub</script>
An ArrayList can also be sorted alphabetically or numerically with the Sort() method:
<script runat="server">Sub Page_Loadif Not Page.IsPostBack then dim mycountries=New ArrayList mycountries.Add("Norway") mycountries.Add("Sweden") mycountries.Add("France") mycountries.Add("Italy") mycountries.TrimToSize() mycountries.Sort()end if
end sub</script>
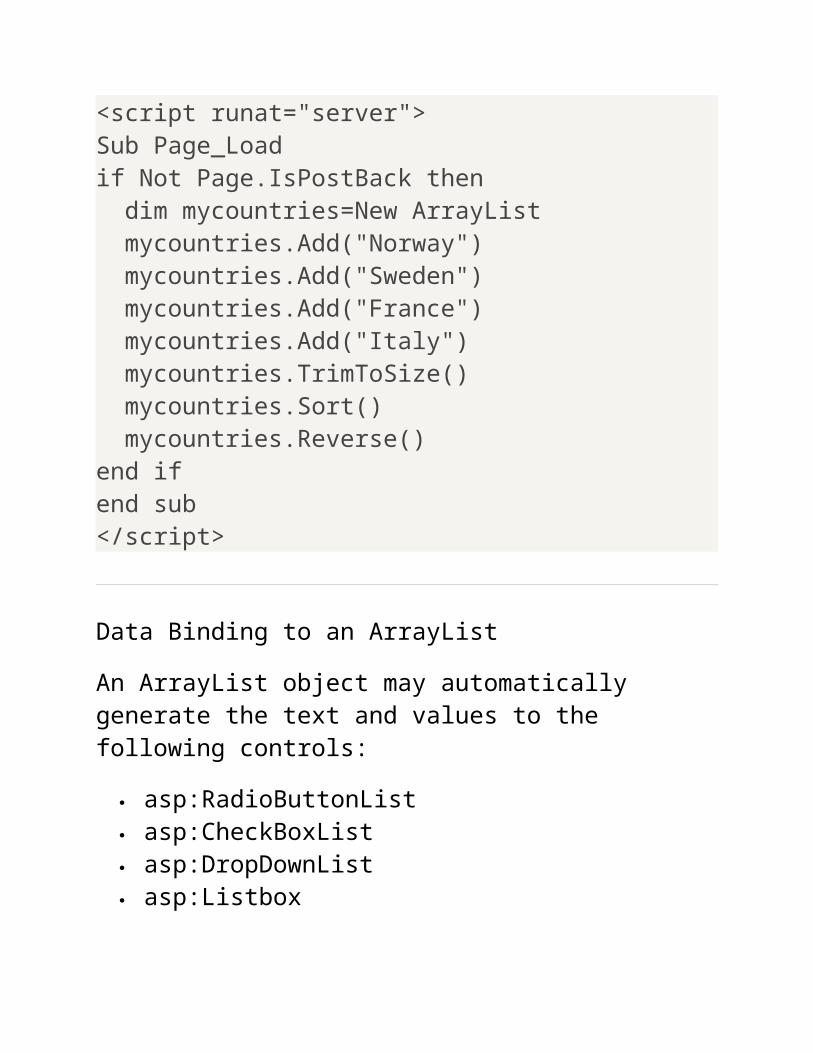
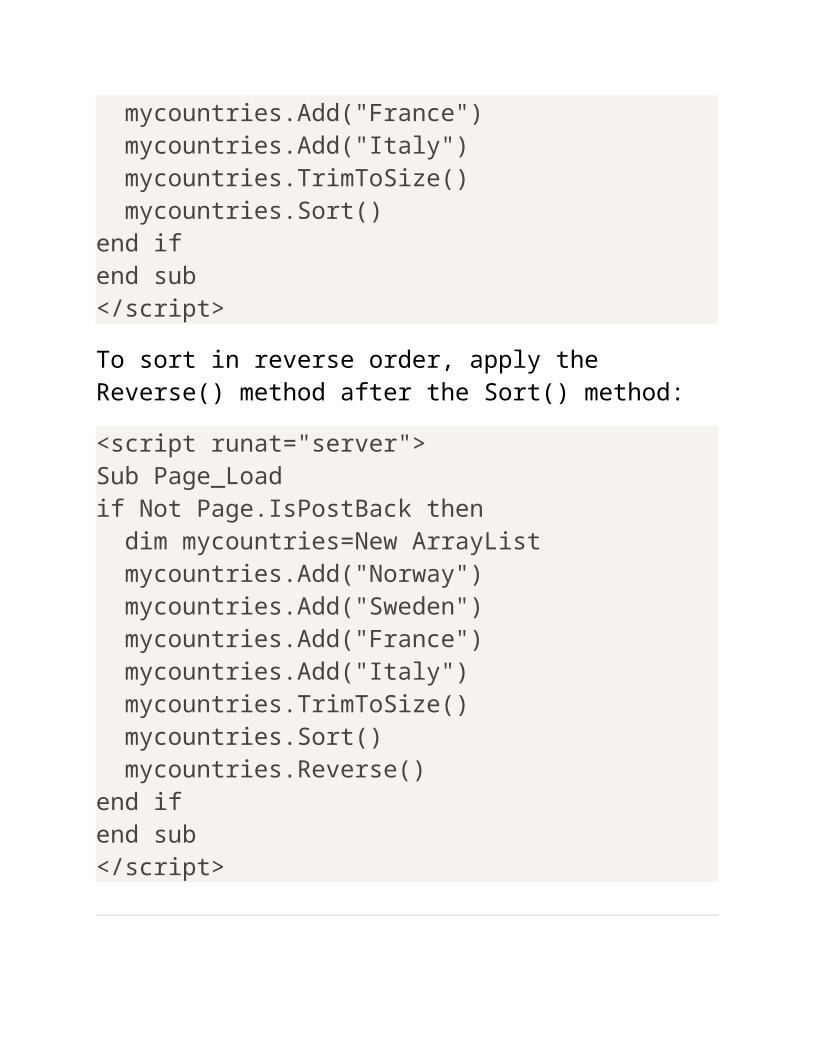
To sort in reverse order, apply the Reverse() method after the Sort() method:
<script runat="server">Sub Page_Loadif Not Page.IsPostBack then dim mycountries=New ArrayList mycountries.Add("Norway") mycountries.Add("Sweden") mycountries.Add("France") mycountries.Add("Italy") mycountries.TrimToSize() mycountries.Sort() mycountries.Reverse()end ifend sub</script>
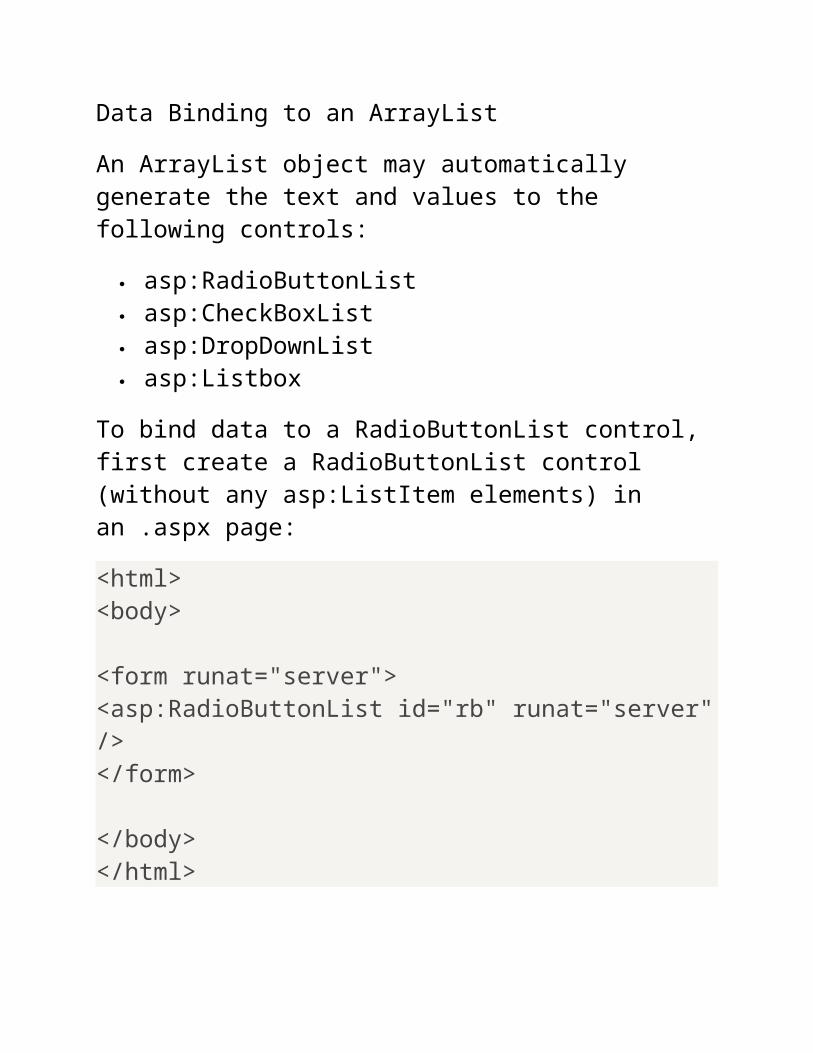
Data Binding to an ArrayList
An ArrayList object may automatically generate the text and values to the following controls:
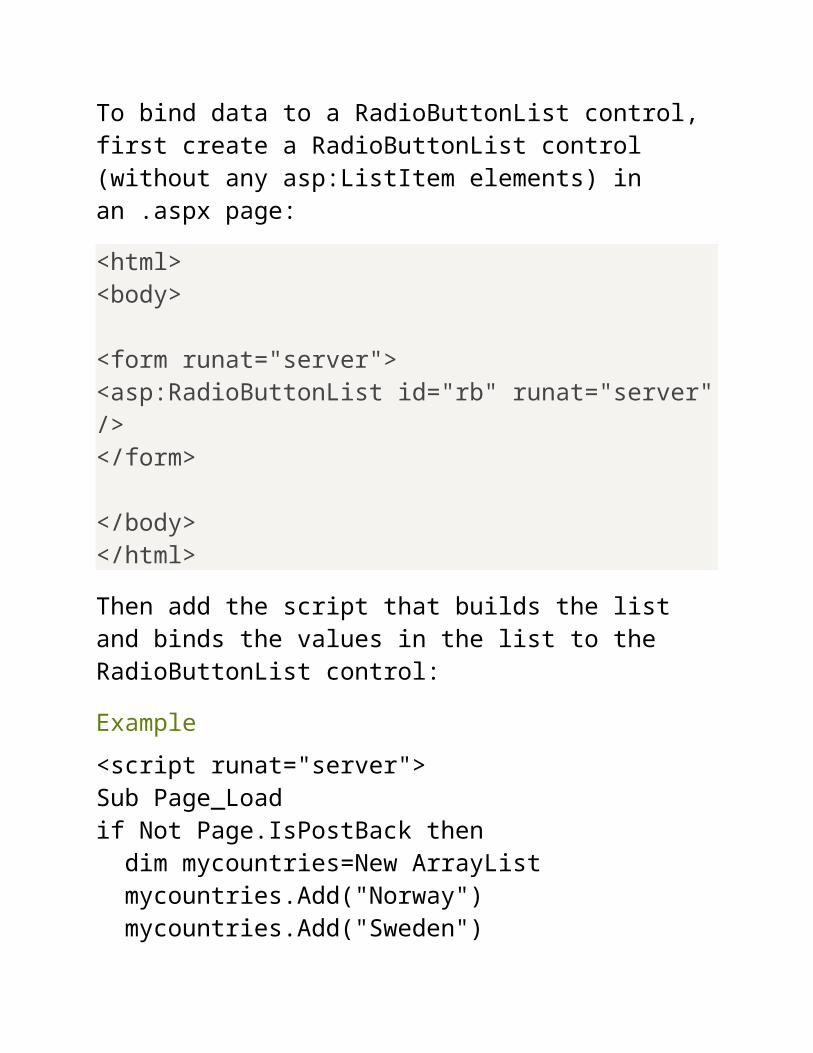
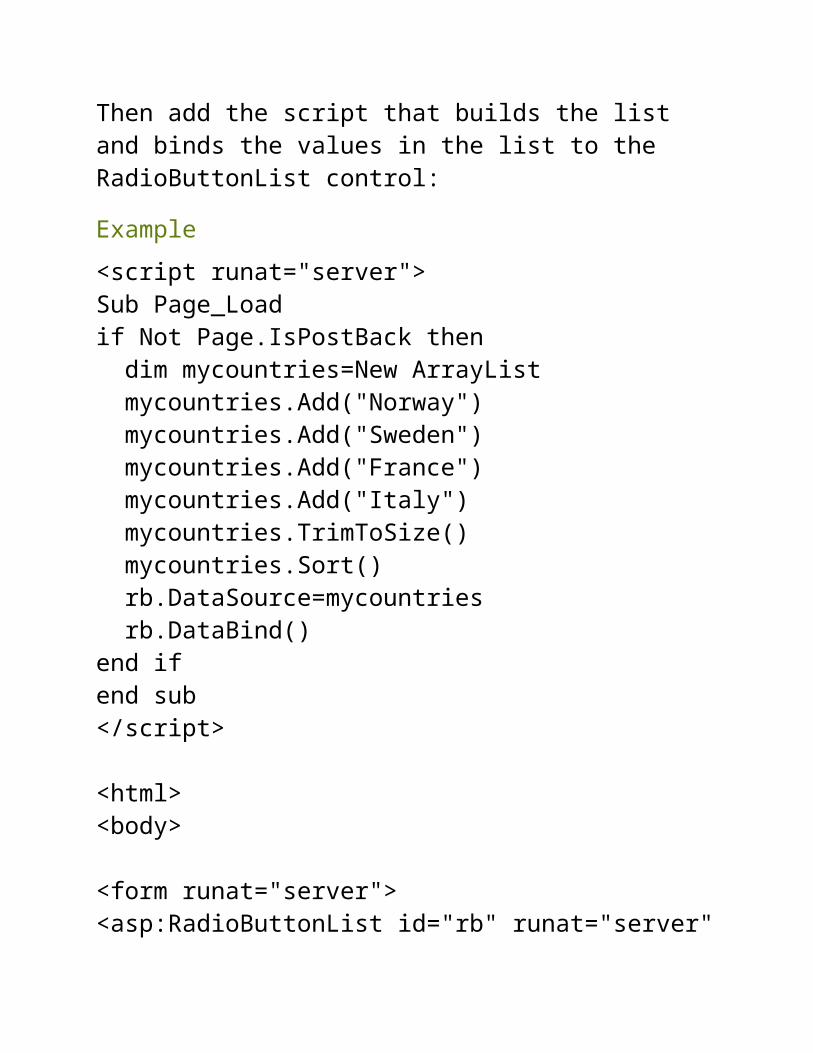
Then add the script that builds the list and binds the values in the list to the RadioButtonList control:
Example
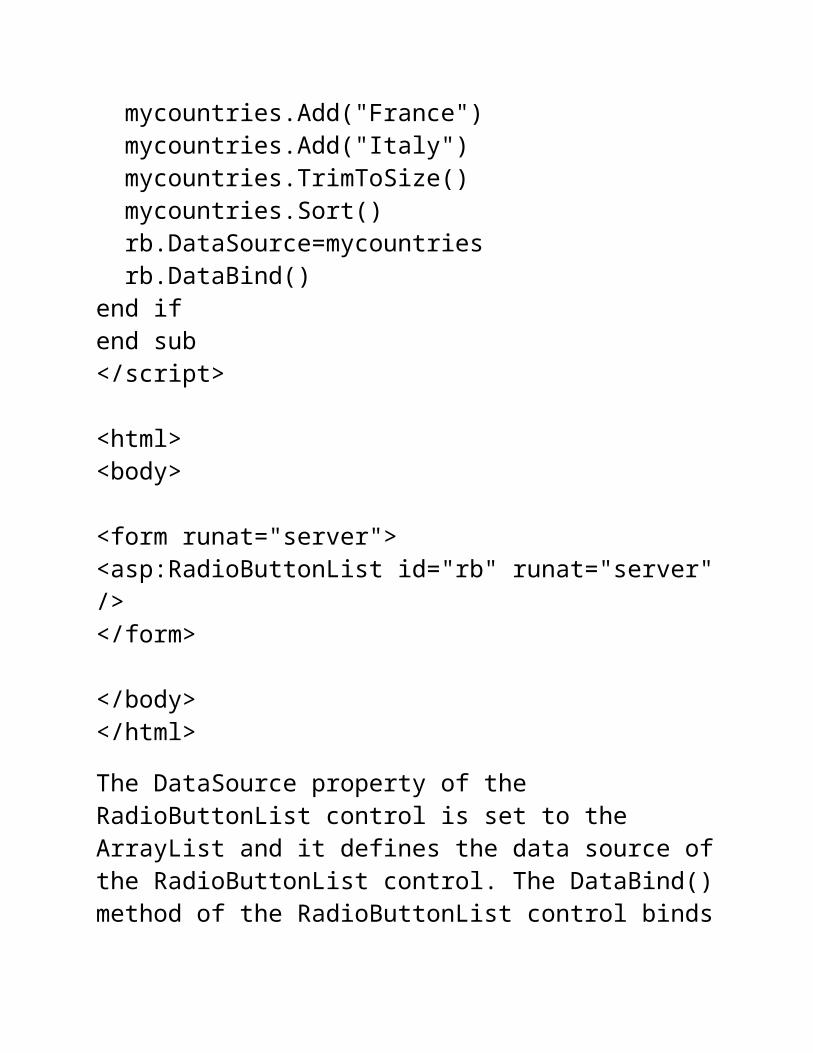
<script runat="server">Sub Page_Loadif Not Page.IsPostBack then dim mycountries=New ArrayList mycountries.Add("Norway") mycountries.Add("Sweden") mycountries.Add("France") mycountries.Add("Italy") mycountries.TrimToSize() mycountries.Sort() rb.DataSource=mycountries rb.DataBind()end if
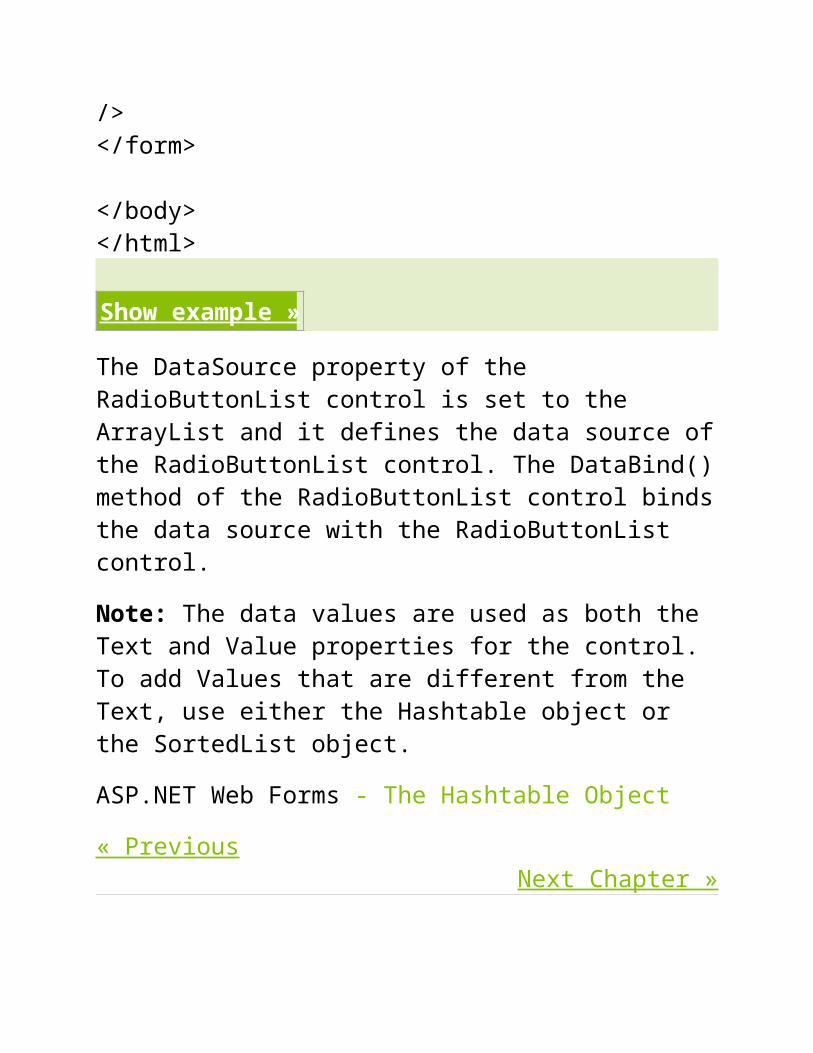
The DataSource property of the RadioButtonList control is set to the ArrayList and it defines the data source of the RadioButtonList control. The DataBind() method of the RadioButtonList control binds the data source with the RadioButtonList control.
Note: The data values are used as both the Text and Value properties for the control. To add Values that are different from the Text, use either the Hashtable object or the SortedList object.
ASP.NET Web Forms - The ArrayList Object
The ArrayList object is a collection of items containing a single data value.
Try it Yourself - Examples
ArrayList DropDownList
ArrayList RadioButtonList
Create an ArrayList
The ArrayList object is a collection of items containing a single data value.
Items are added to the ArrayList with the Add() method.
The following code creates a new ArrayList object named mycountries and four items are added:
<script runat="server">Sub Page_Loadif Not Page.IsPostBack then dim mycountries=New ArrayList mycountries.Add("Norway") mycountries.Add("Sweden") mycountries.Add("France") mycountries.Add("Italy")end ifend sub</script>
By default, an ArrayList object contains 16 entries. An ArrayList can be sized to its final size with the TrimToSize() method:
<script runat="server">Sub Page_Loadif Not Page.IsPostBack then dim mycountries=New ArrayList mycountries.Add("Norway") mycountries.Add("Sweden") mycountries.Add("France") mycountries.Add("Italy") mycountries.TrimToSize()end ifend sub</script>
An ArrayList can also be sorted alphabetically or numerically with the Sort() method:
<script runat="server">Sub Page_Loadif Not Page.IsPostBack then dim mycountries=New ArrayList mycountries.Add("Norway") mycountries.Add("Sweden") mycountries.Add("France") mycountries.Add("Italy") mycountries.TrimToSize() mycountries.Sort()end if
end sub</script>
To sort in reverse order, apply the Reverse() method after the Sort() method:
<script runat="server">Sub Page_Loadif Not Page.IsPostBack then dim mycountries=New ArrayList mycountries.Add("Norway") mycountries.Add("Sweden") mycountries.Add("France") mycountries.Add("Italy") mycountries.TrimToSize() mycountries.Sort() mycountries.Reverse()end ifend sub</script>
Data Binding to an ArrayList
An ArrayList object may automatically generate the text and values to the following controls:
Then add the script that builds the list and binds the values in the list to the RadioButtonList control:
Example
<script runat="server">Sub Page_Loadif Not Page.IsPostBack then dim mycountries=New ArrayList mycountries.Add("Norway") mycountries.Add("Sweden") mycountries.Add("France") mycountries.Add("Italy") mycountries.TrimToSize() mycountries.Sort() rb.DataSource=mycountries rb.DataBind()end if
The DataSource property of the RadioButtonList control is set to the ArrayList and it defines the data source of the RadioButtonList control. The DataBind() method of the RadioButtonList control binds the data source with the RadioButtonList control.
Note: The data values are used as both the Text and Value properties for the control. To add Values that are different from the Text, use either the Hashtable object or the SortedList object.
ASP.NET Web Forms - The Hashtable Object
« PreviousNext Chapter »
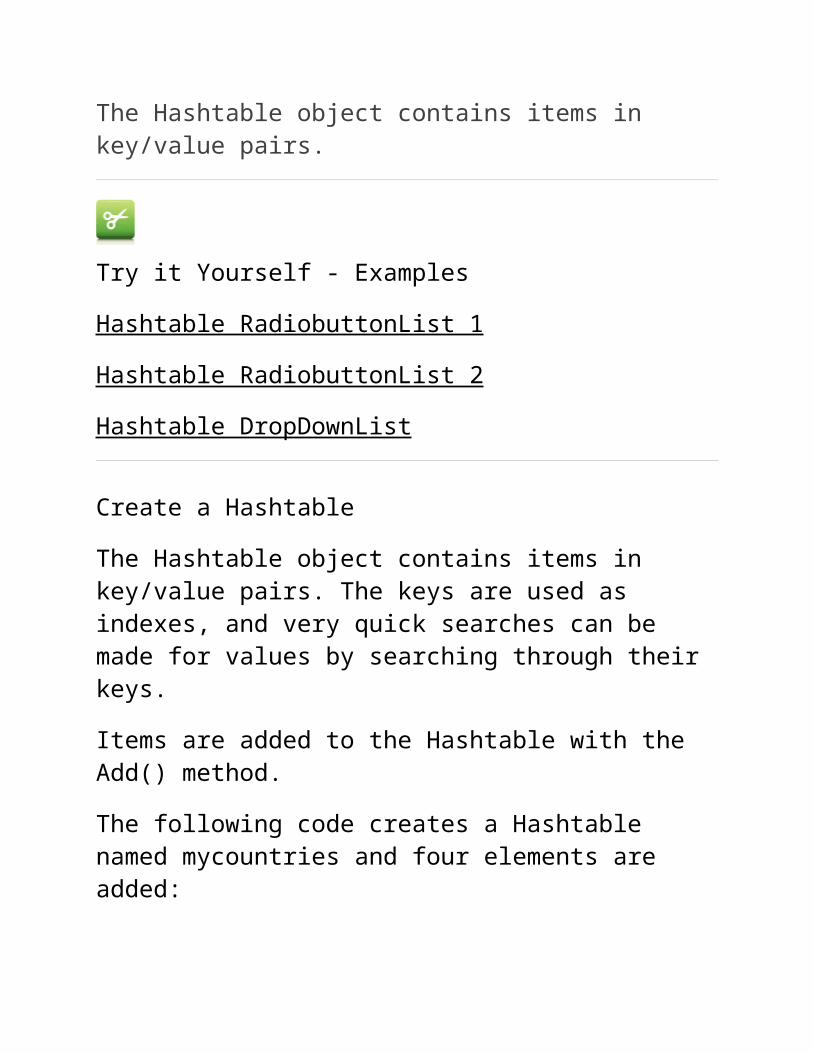
The Hashtable object contains items in key/value pairs.
Try it Yourself - Examples
Hashtable RadiobuttonList 1
Hashtable RadiobuttonList 2
Hashtable DropDownList
Create a Hashtable
The Hashtable object contains items in key/value pairs. The keys are used as indexes, and very quick searches can be made for values by searching through their keys.
Items are added to the Hashtable with the Add() method.
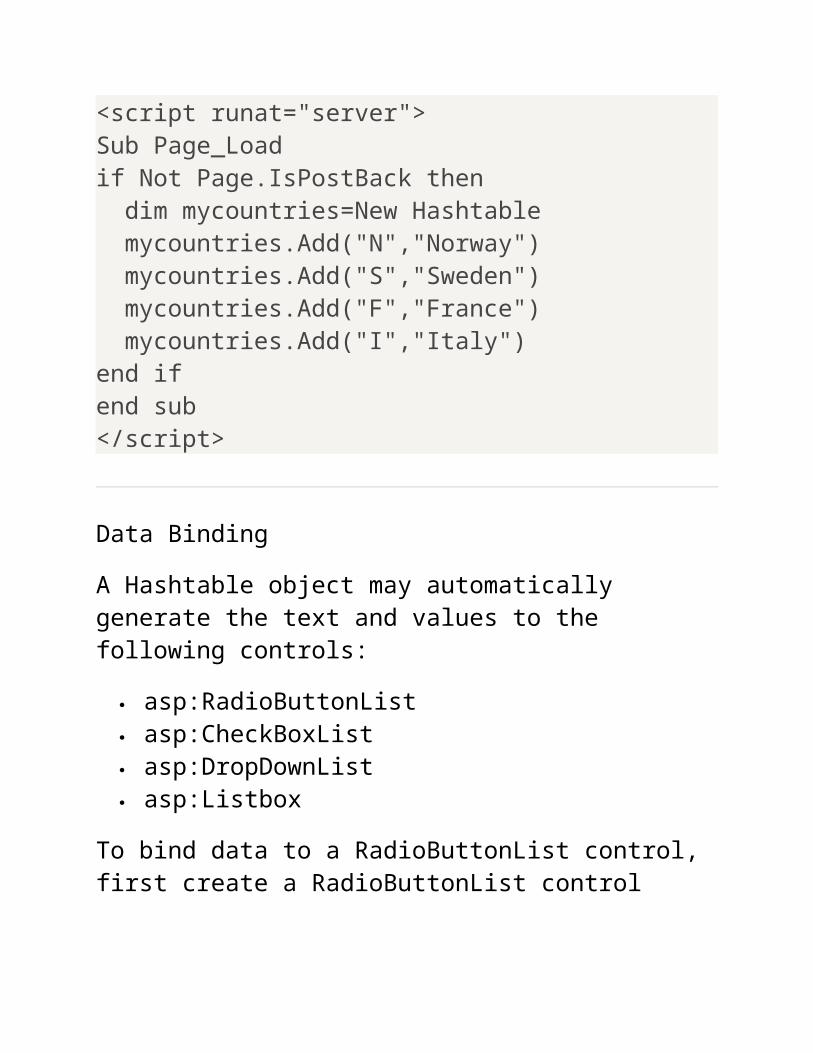
The following code creates a Hashtable named mycountries and four elements are added:
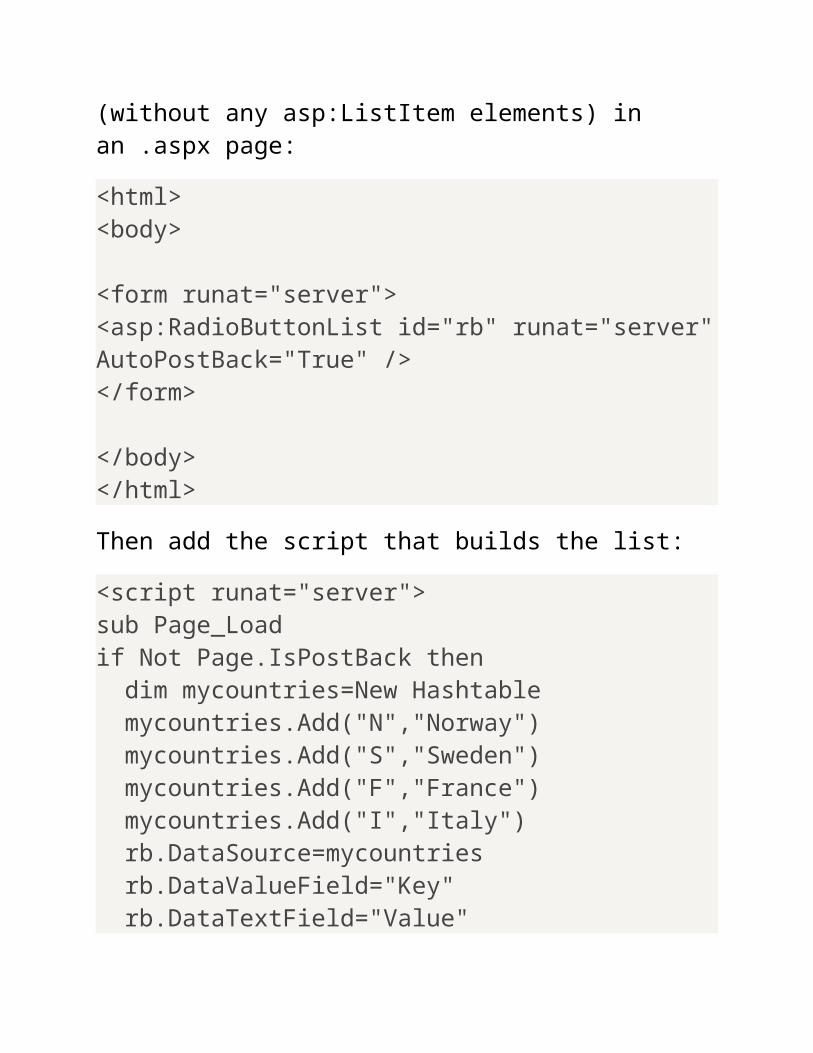
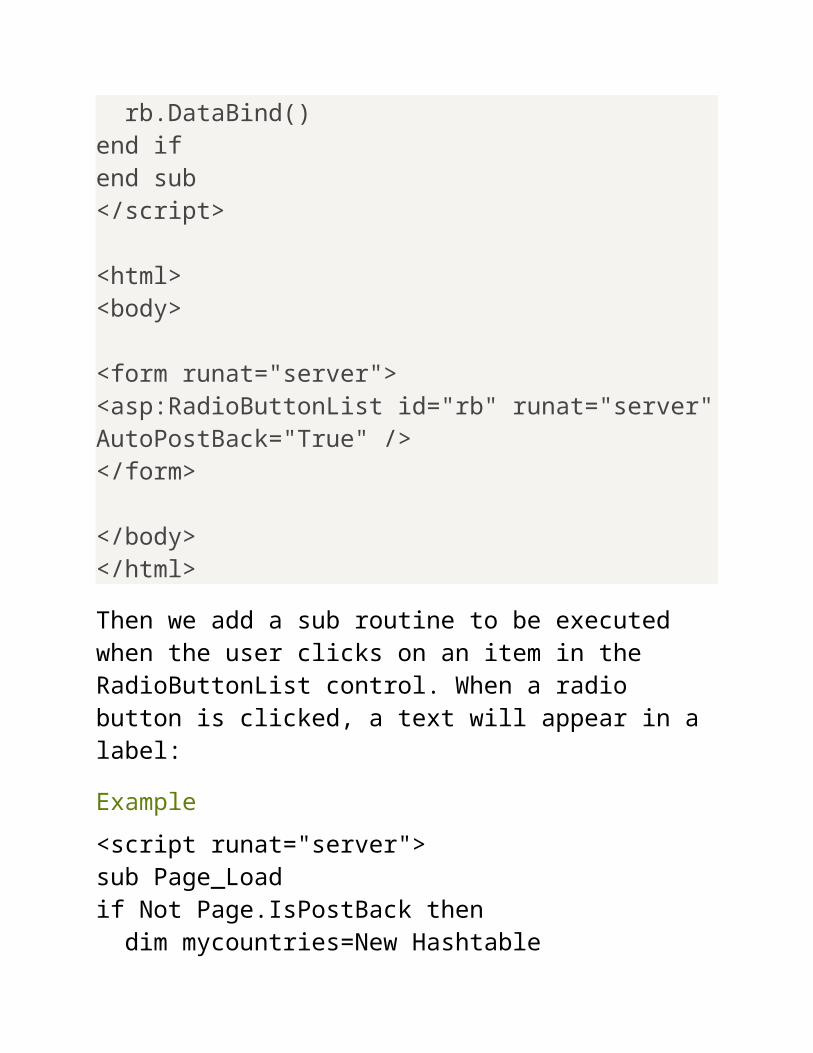
<script runat="server">Sub Page_Loadif Not Page.IsPostBack then dim mycountries=New Hashtable mycountries.Add("N","Norway") mycountries.Add("S","Sweden") mycountries.Add("F","France") mycountries.Add("I","Italy")end ifend sub</script>
Data Binding
A Hashtable object may automatically generate the text and values to the following controls:
Then we add a sub routine to be executed when the user clicks on an item in the RadioButtonList control. When a radio button is clicked, a text will appear in a label:
Example
<script runat="server">sub Page_Loadif Not Page.IsPostBack then
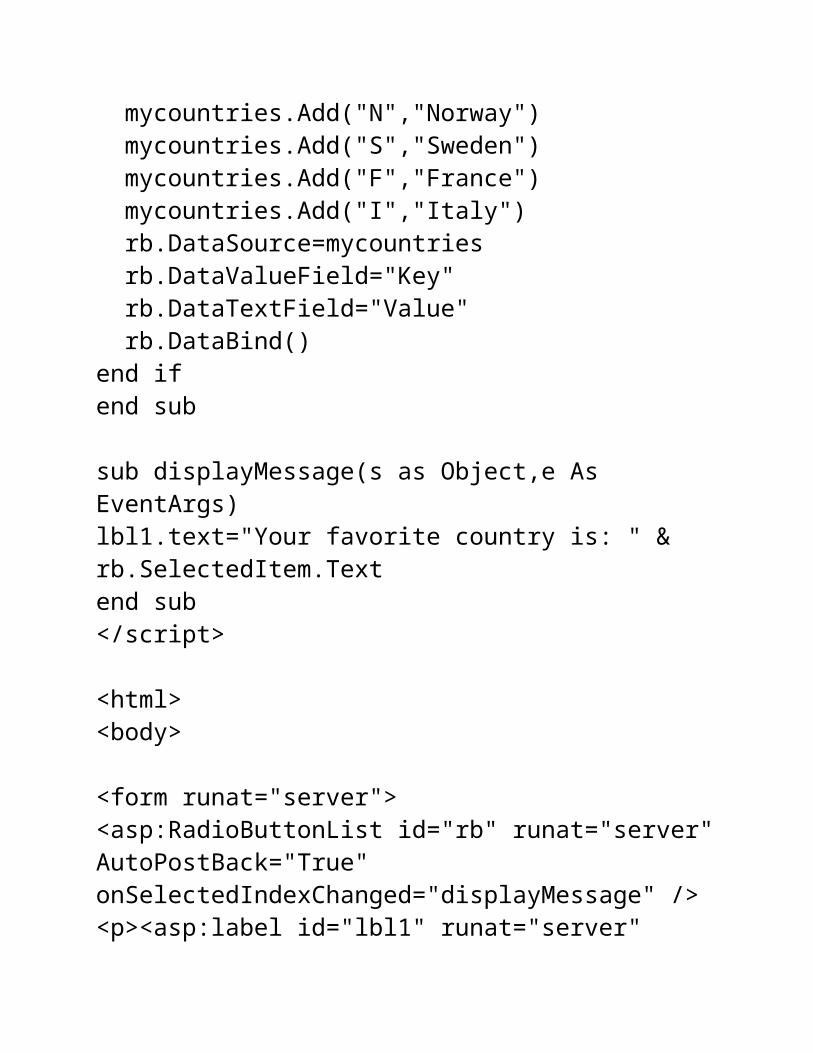
dim mycountries=New Hashtable mycountries.Add("N","Norway") mycountries.Add("S","Sweden") mycountries.Add("F","France") mycountries.Add("I","Italy") rb.DataSource=mycountries rb.DataValueField="Key" rb.DataTextField="Value" rb.DataBind()end ifend sub
sub displayMessage(s as Object,e As EventArgs)lbl1.text="Your favorite country is: " & rb.SelectedItem.Textend sub</script>
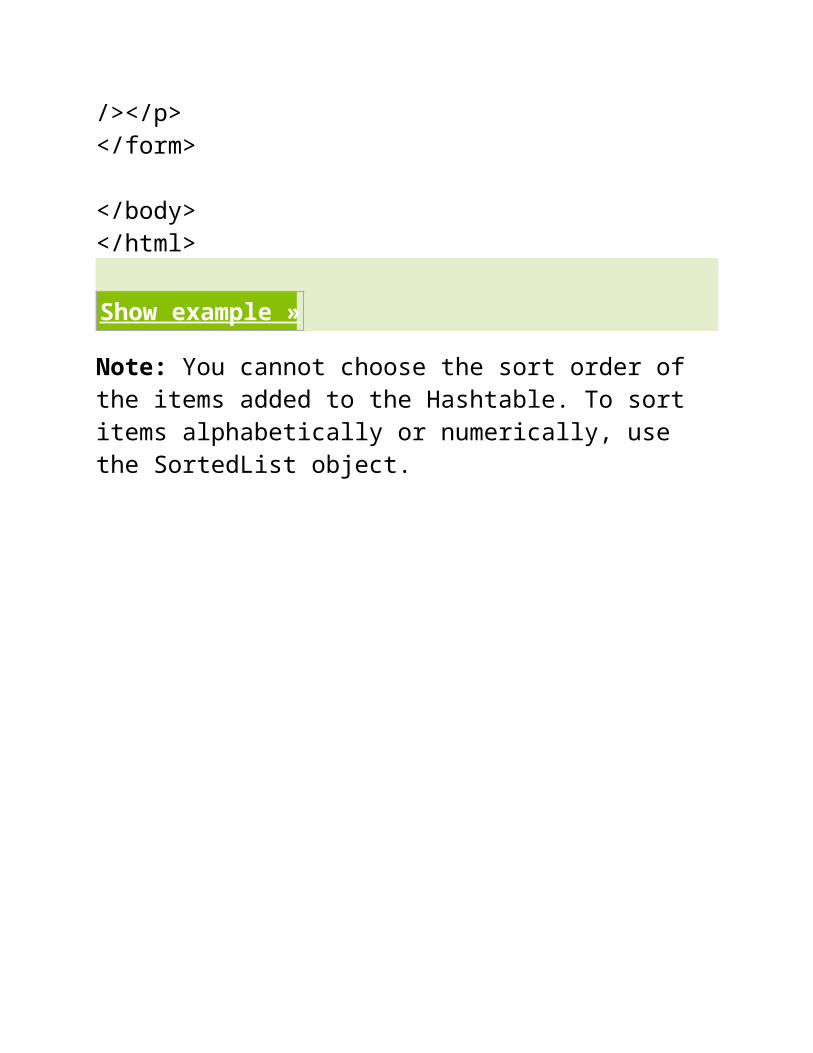
Note: You cannot choose the sort order of the items added to the Hashtable. To sort items alphabetically or numerically, use the SortedList object.
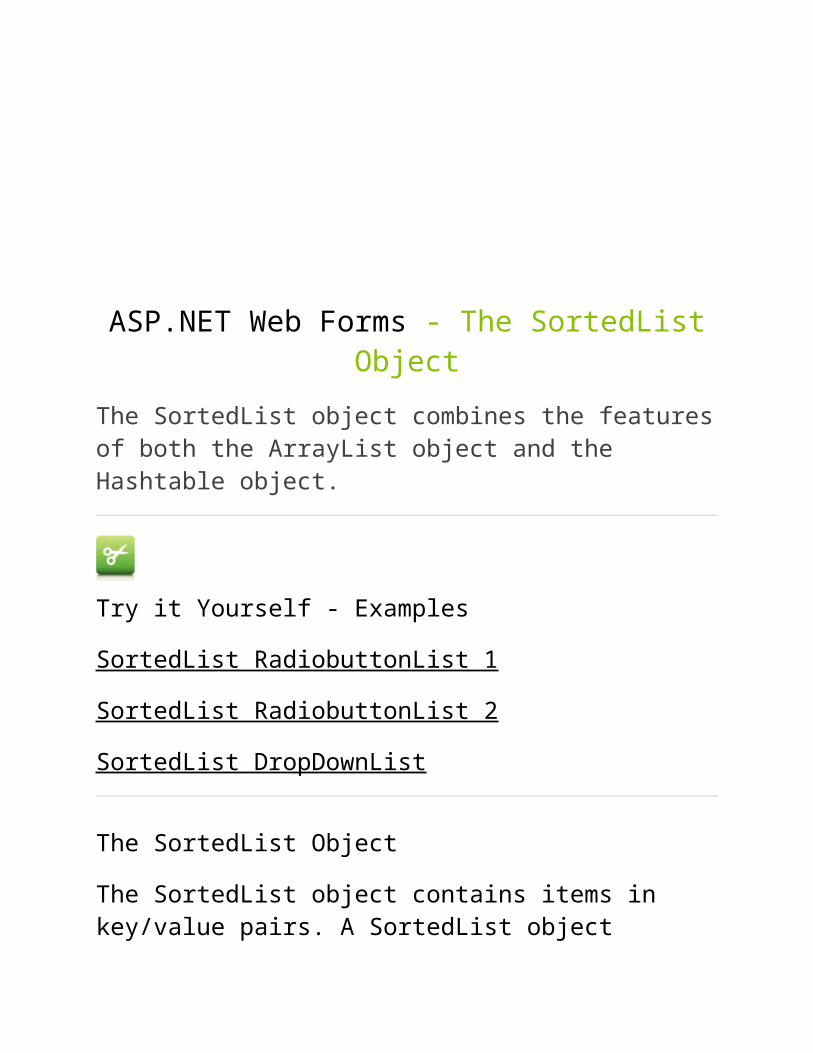
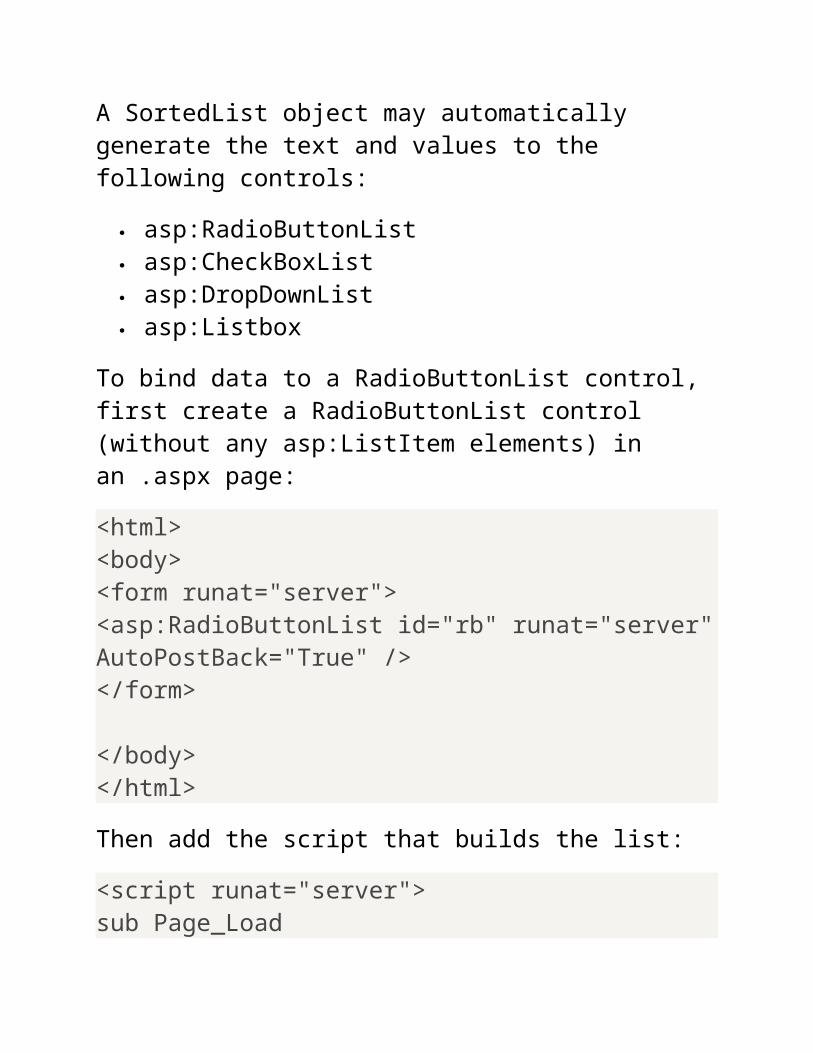
ASP.NET Web Forms - The SortedList Object
The SortedList object combines the features of both the ArrayList object and the Hashtable object.
Try it Yourself - Examples
SortedList RadiobuttonList 1
SortedList RadiobuttonList 2
SortedList DropDownList
The SortedList Object
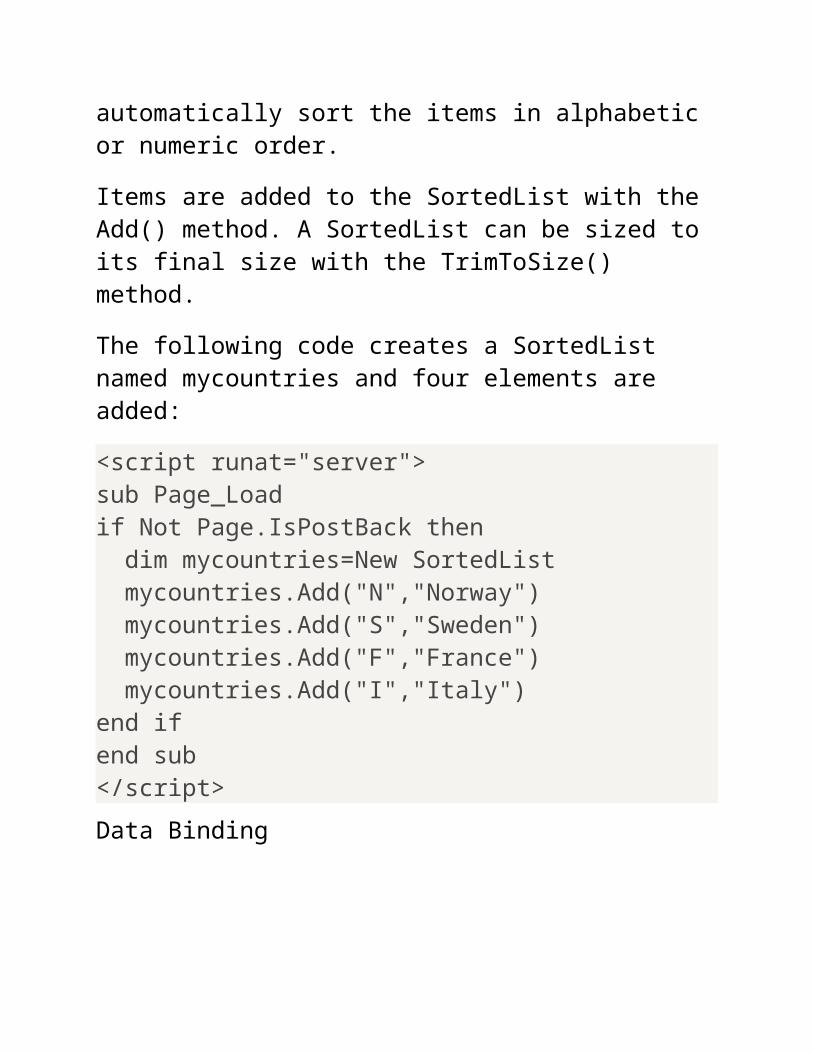
The SortedList object contains items in key/value pairs. A SortedList object automatically sort the items in alphabetic or numeric order.
Items are added to the SortedList with the Add() method. A SortedList can be sized to its final size with the TrimToSize() method.
The following code creates a SortedList named mycountries and four elements are added:
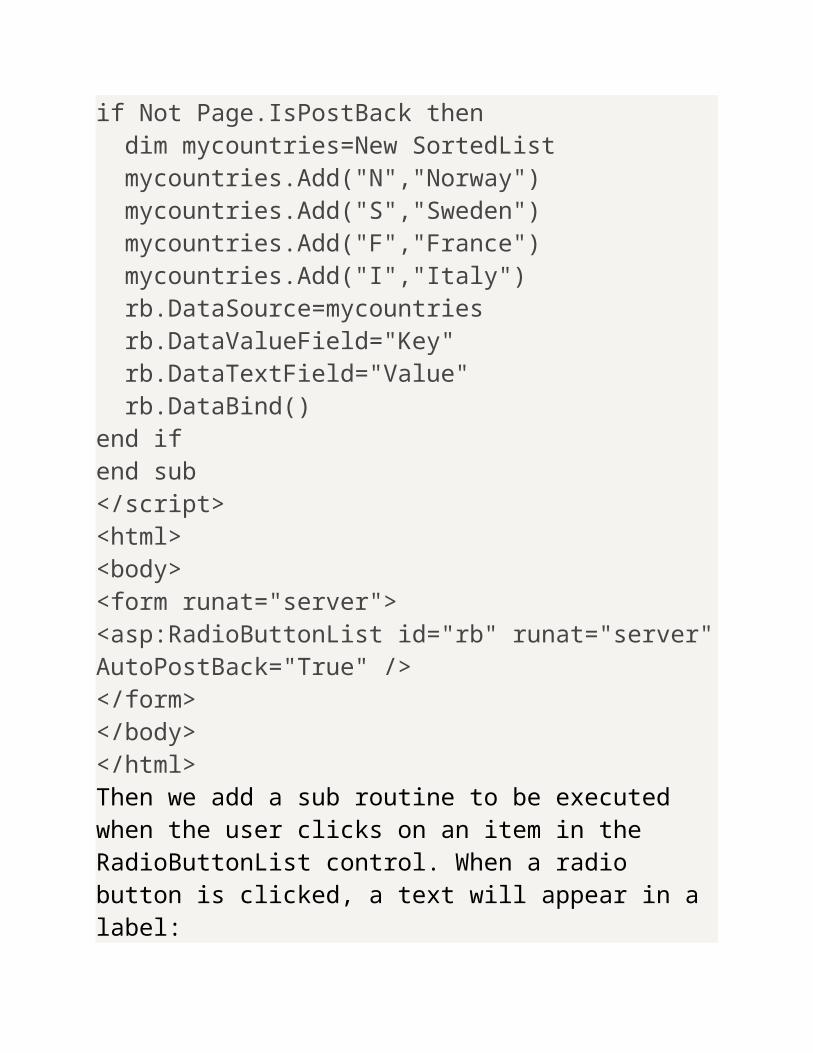
<script runat="server">sub Page_Loadif Not Page.IsPostBack then dim mycountries=New SortedList mycountries.Add("N","Norway") mycountries.Add("S","Sweden") mycountries.Add("F","France") mycountries.Add("I","Italy")end if
end sub</script>
Data Binding
A SortedList object may automatically generate the text and values to the following controls:
<script runat="server">sub Page_Loadif Not Page.IsPostBack then dim mycountries=New SortedList
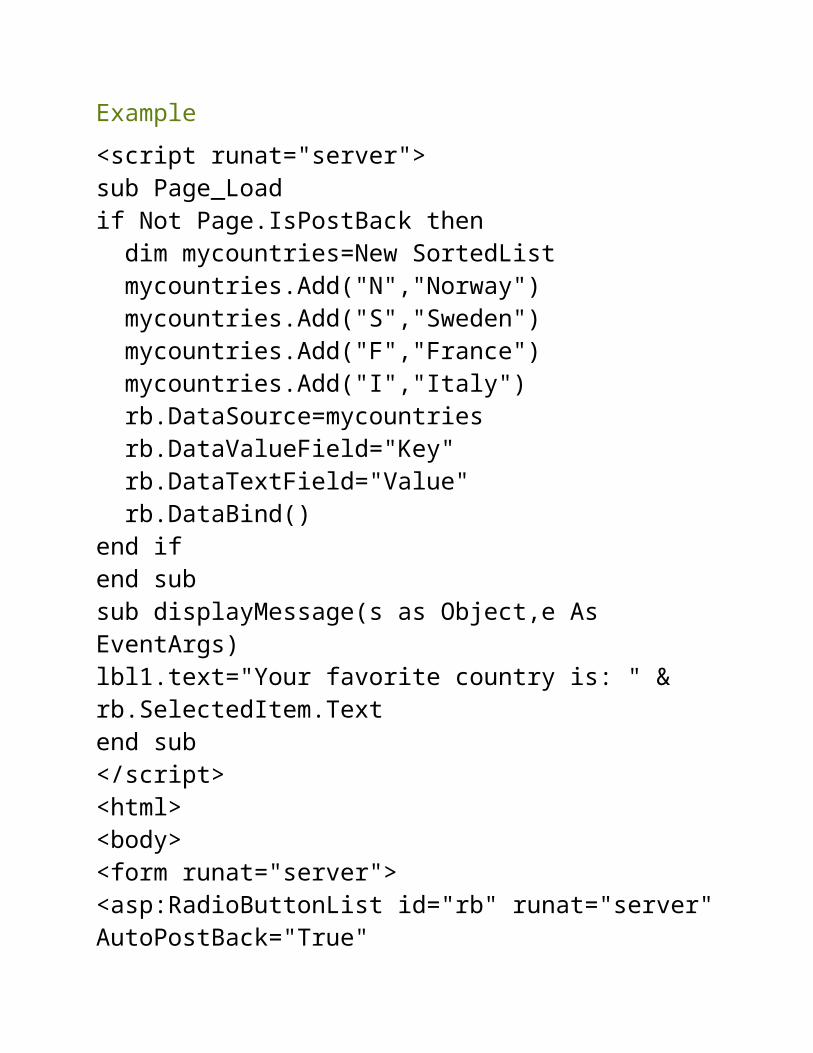
mycountries.Add("N","Norway") mycountries.Add("S","Sweden") mycountries.Add("F","France") mycountries.Add("I","Italy") rb.DataSource=mycountries rb.DataValueField="Key" rb.DataTextField="Value" rb.DataBind()end ifend sub</script><html><body><form runat="server"><asp:RadioButtonList id="rb" runat="server" AutoPostBack="True" /></form></body></html>Then we add a sub routine to be executed when the user clicks on an item in the RadioButtonList control. When a radio button is clicked, a text will appear in a label:Example
<script runat="server">sub Page_Loadif Not Page.IsPostBack then dim mycountries=New SortedList mycountries.Add("N","Norway") mycountries.Add("S","Sweden") mycountries.Add("F","France")
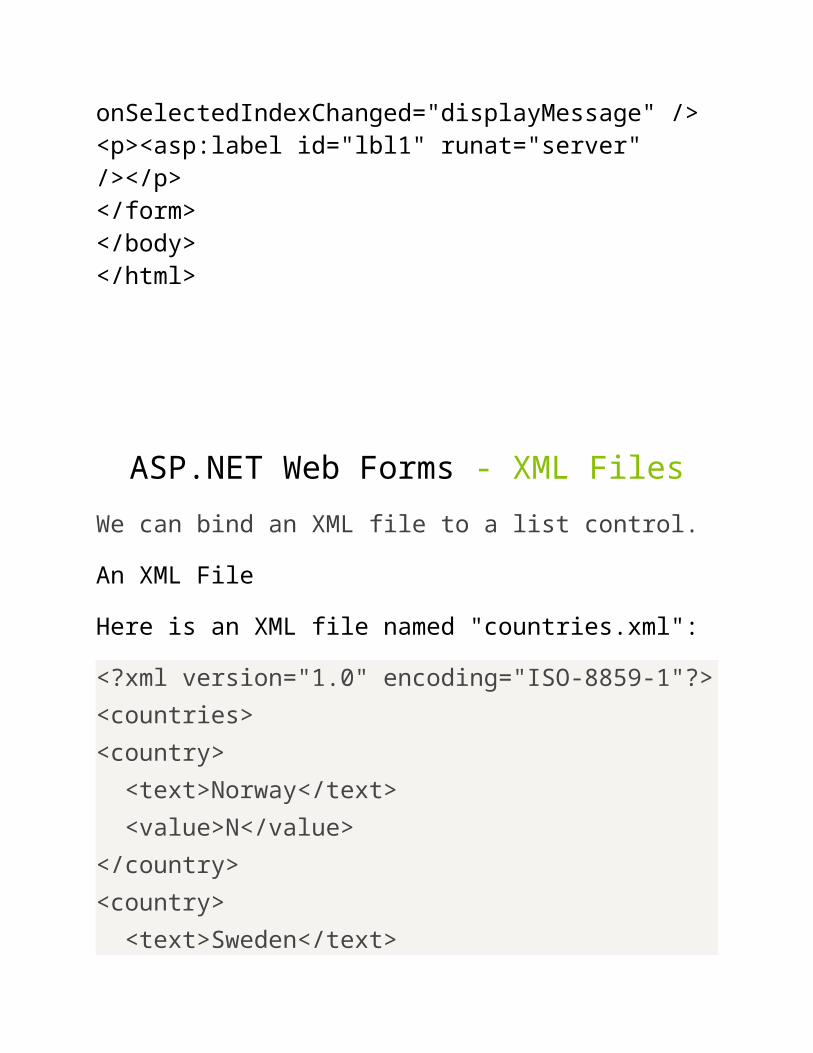
mycountries.Add("I","Italy") rb.DataSource=mycountries rb.DataValueField="Key" rb.DataTextField="Value" rb.DataBind()end ifend subsub displayMessage(s as Object,e As EventArgs)lbl1.text="Your favorite country is: " & rb.SelectedItem.Textend sub</script><html><body><form runat="server"><asp:RadioButtonList id="rb" runat="server"AutoPostBack="True" onSelectedIndexChanged="displayMessage" /><p><asp:label id="lbl1" runat="server" /></p></form></body></html>
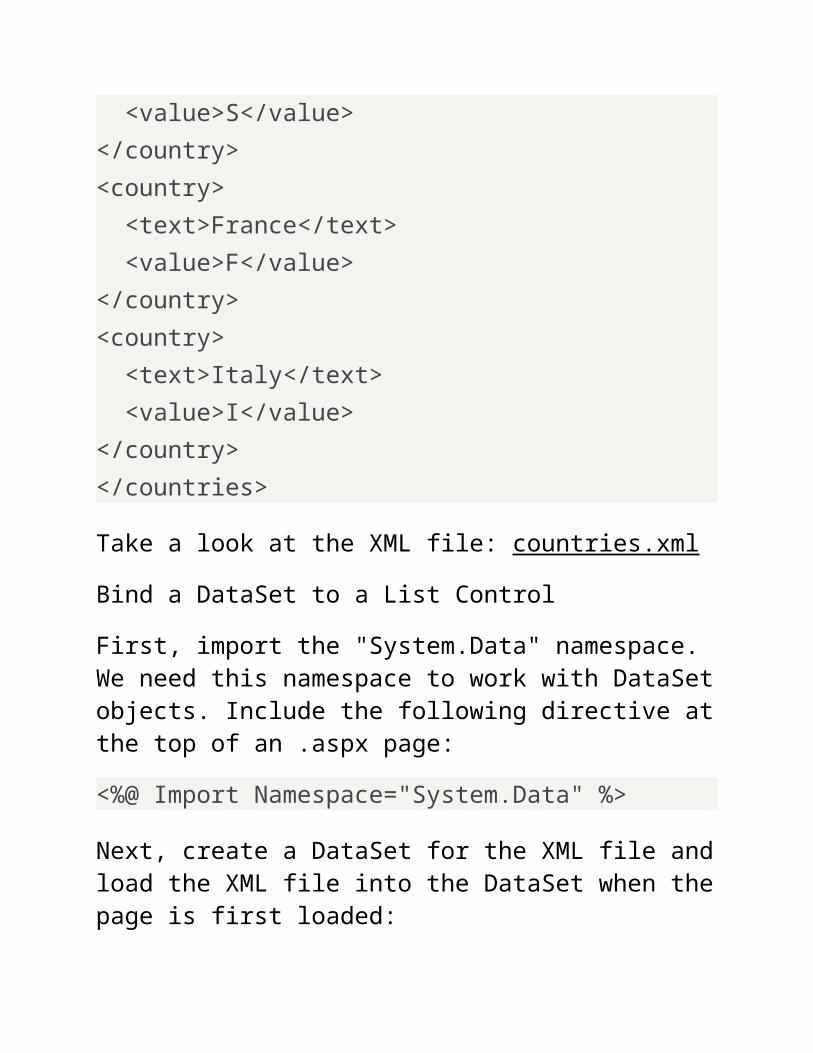
First, import the "System.Data" namespace. We need this namespace to work with DataSet objects. Include the following directive at the top of an .aspx page:
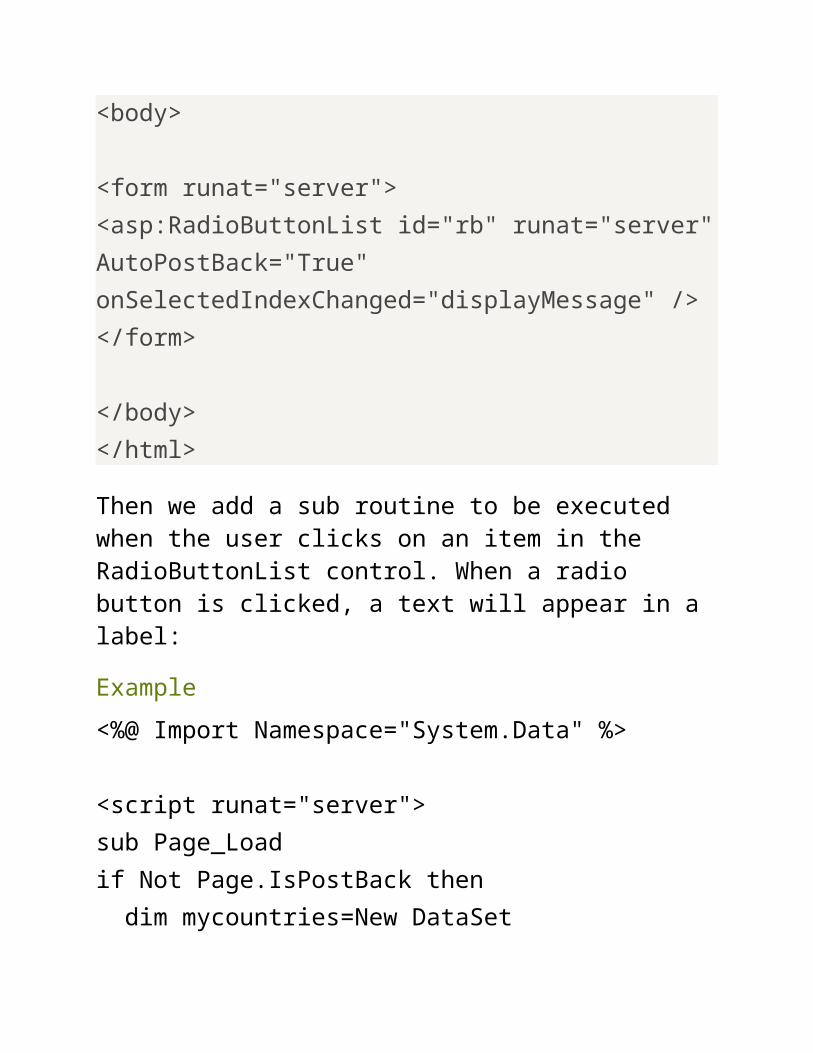
Then we add a sub routine to be executed when the user clicks on an item in the RadioButtonList control. When a radio button is clicked, a text will appear in a label:
Example
<%@ Import Namespace="System.Data" %>
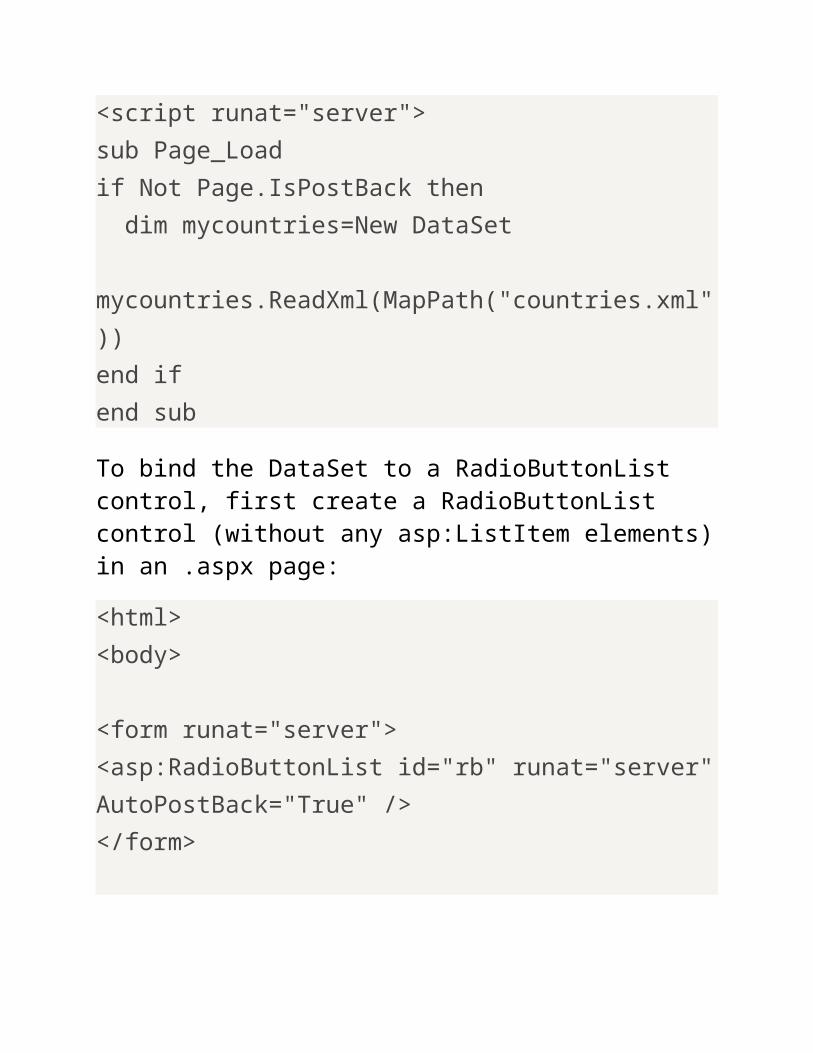
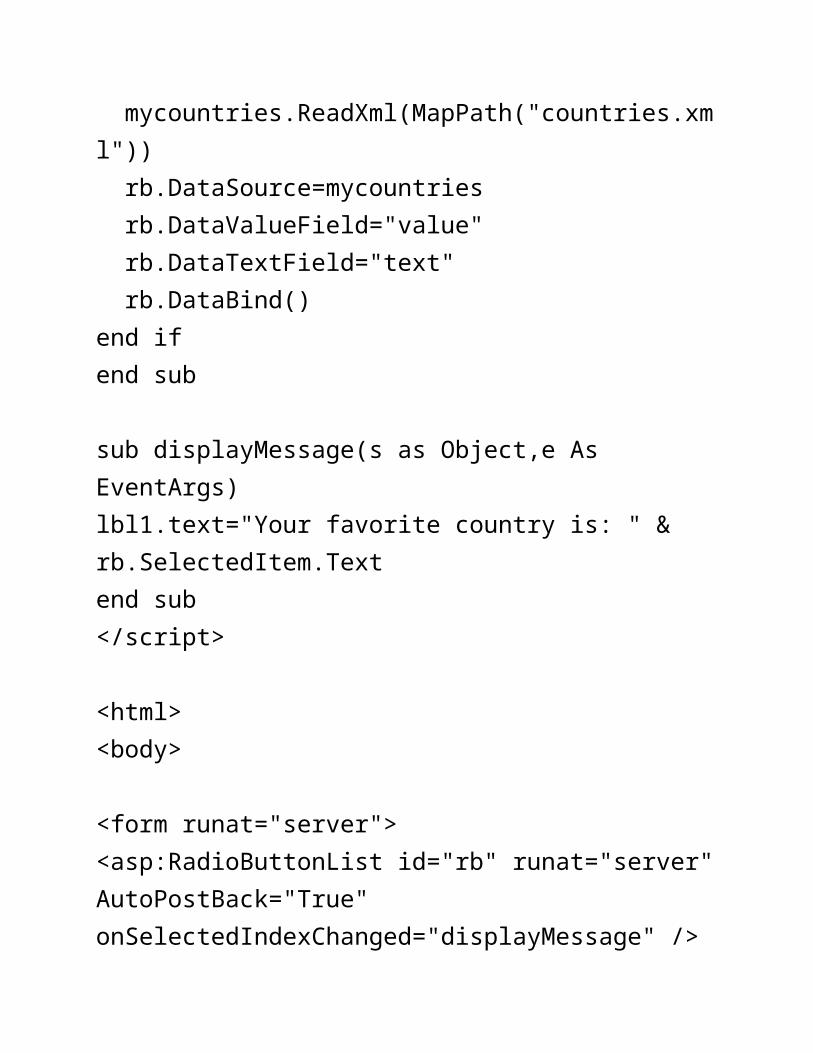
<script runat="server">sub Page_Loadif Not Page.IsPostBack then dim mycountries=New DataSet mycountries.ReadXml(MapPath("countries.xml")) rb.DataSource=mycountries rb.DataValueField="value" rb.DataTextField="text" rb.DataBind()end ifend sub
sub displayMessage(s as Object,e As EventArgs)lbl1.text="Your favorite country is: " & rb.SelectedItem.Textend sub</script>
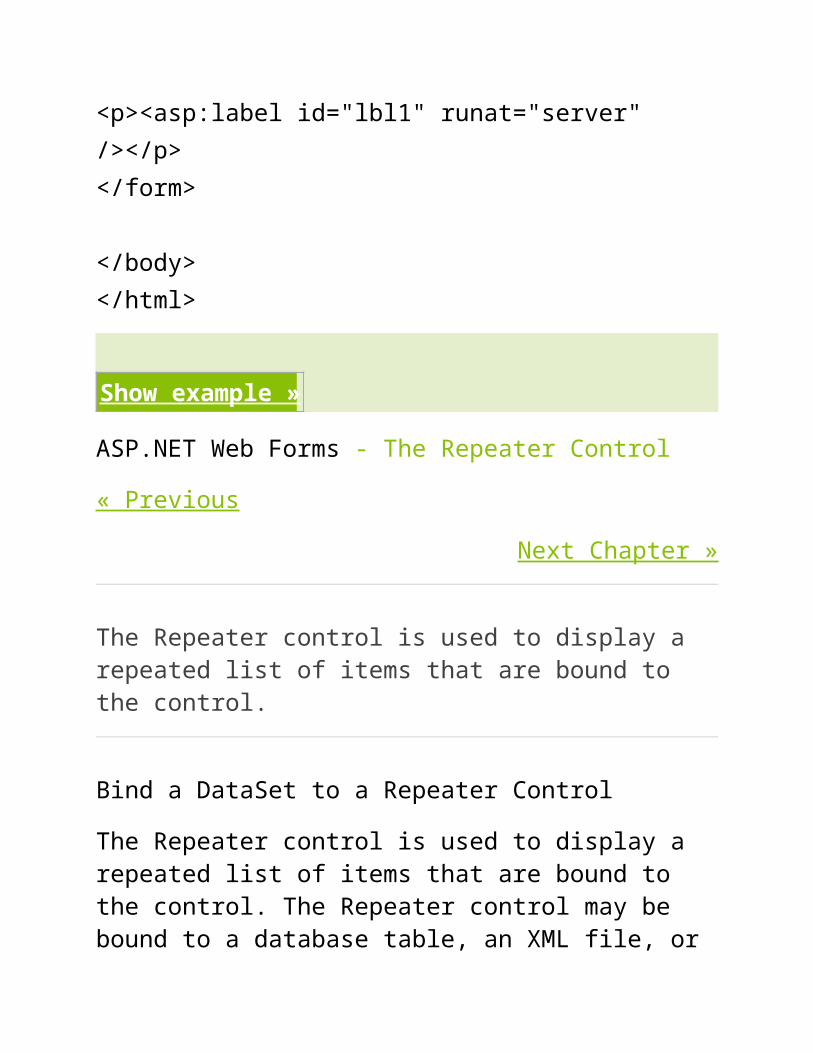
The Repeater control is used to display a repeated list of items that are bound to the control.
Bind a DataSet to a Repeater Control
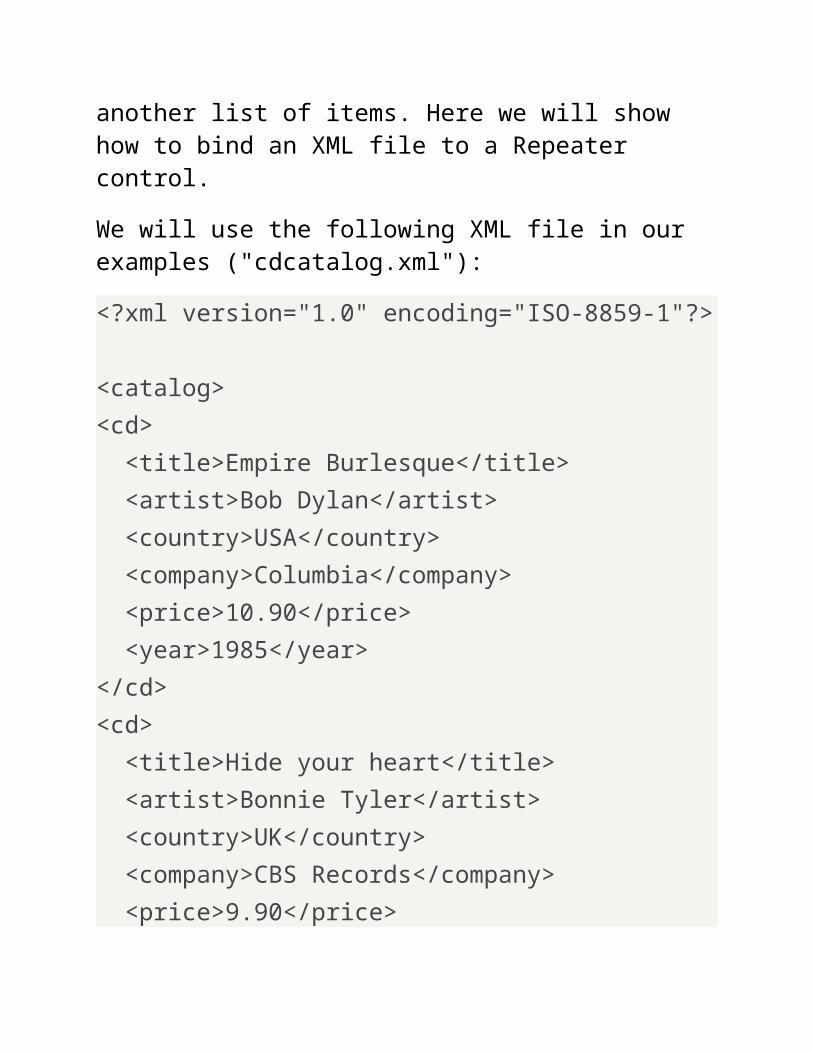
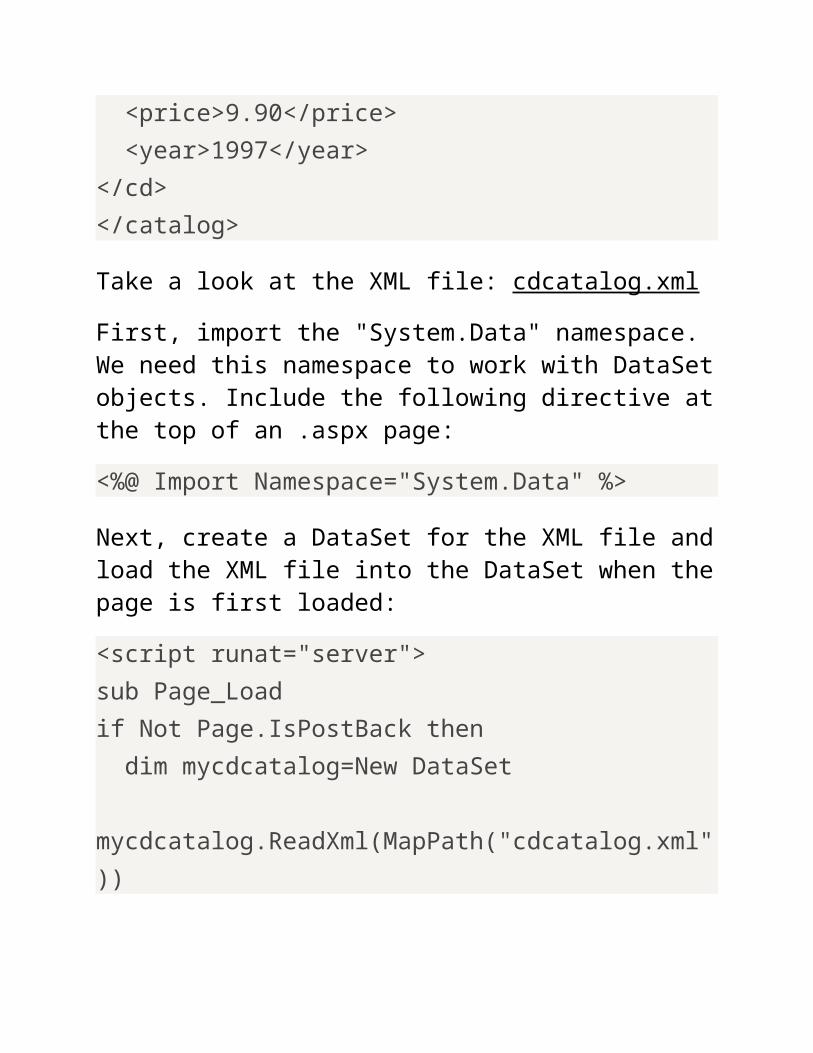
The Repeater control is used to display a repeated list of items that are bound to the control. The Repeater control may be bound to a database table, an XML file, or another list of items. Here we will show how to bind an XML file to a Repeater control.
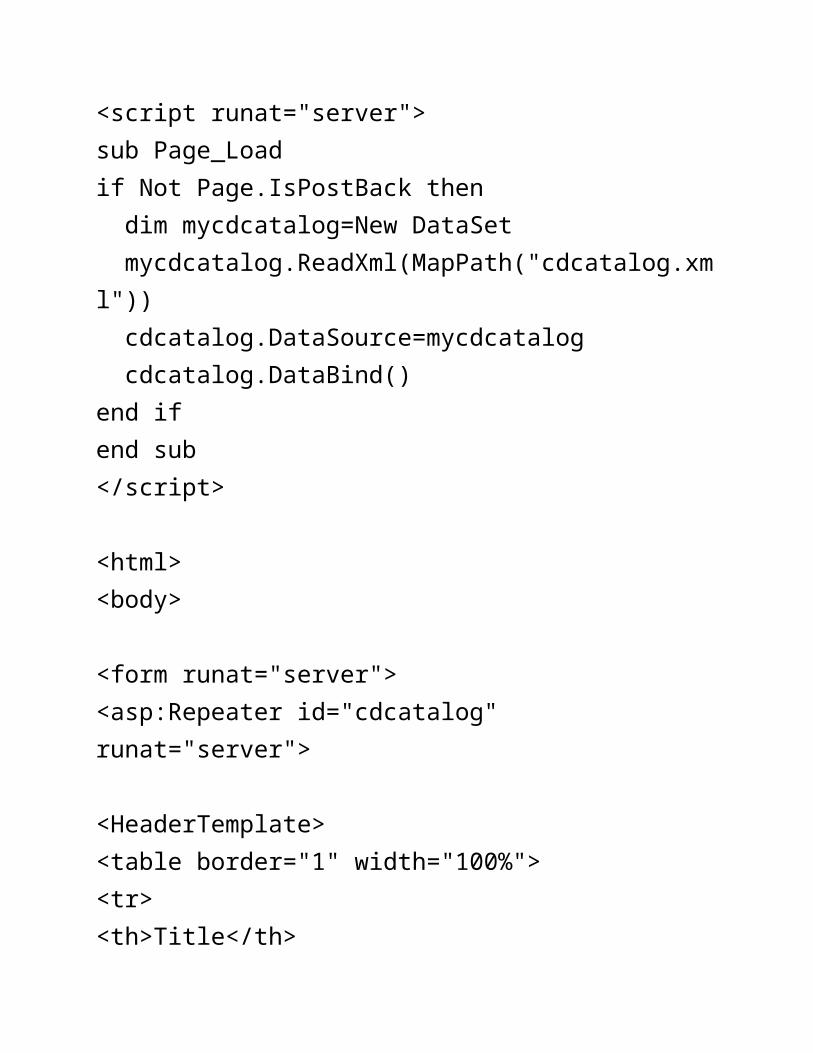
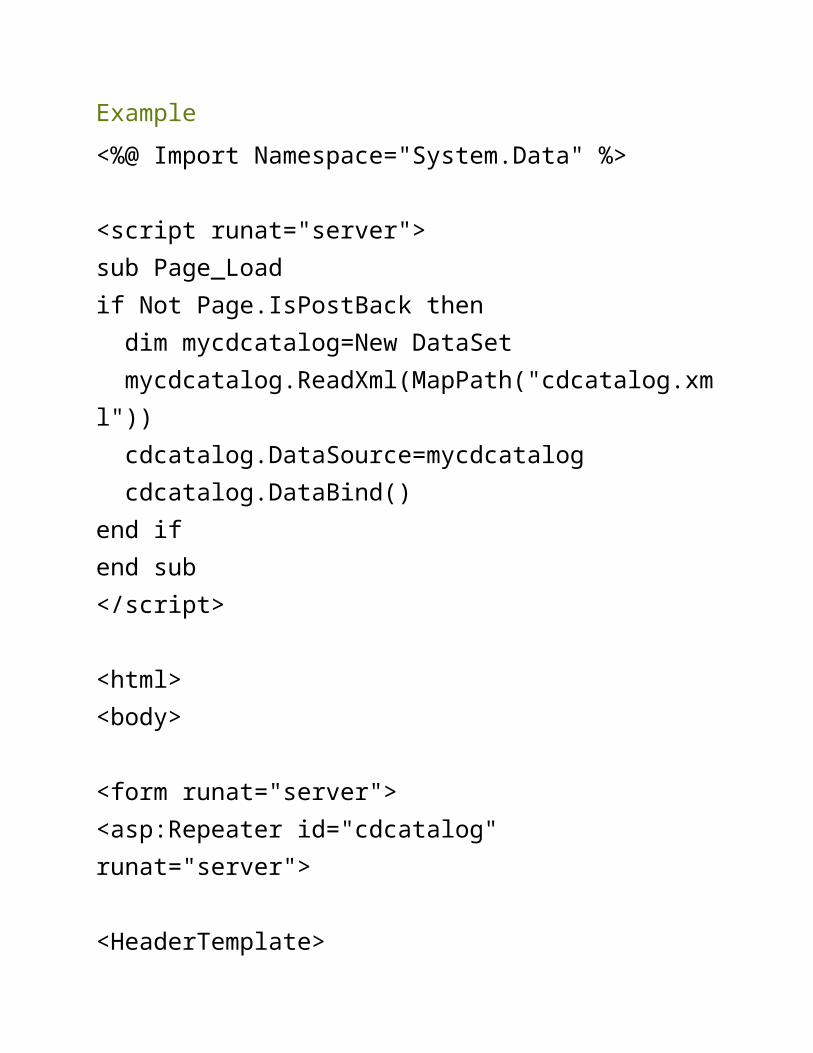
First, import the "System.Data" namespace. We need this namespace to work with DataSet objects. Include the following directive at the top of an .aspx page:
Next, create a DataSet for the XML file and load the XML file into the DataSet when the page is first loaded:
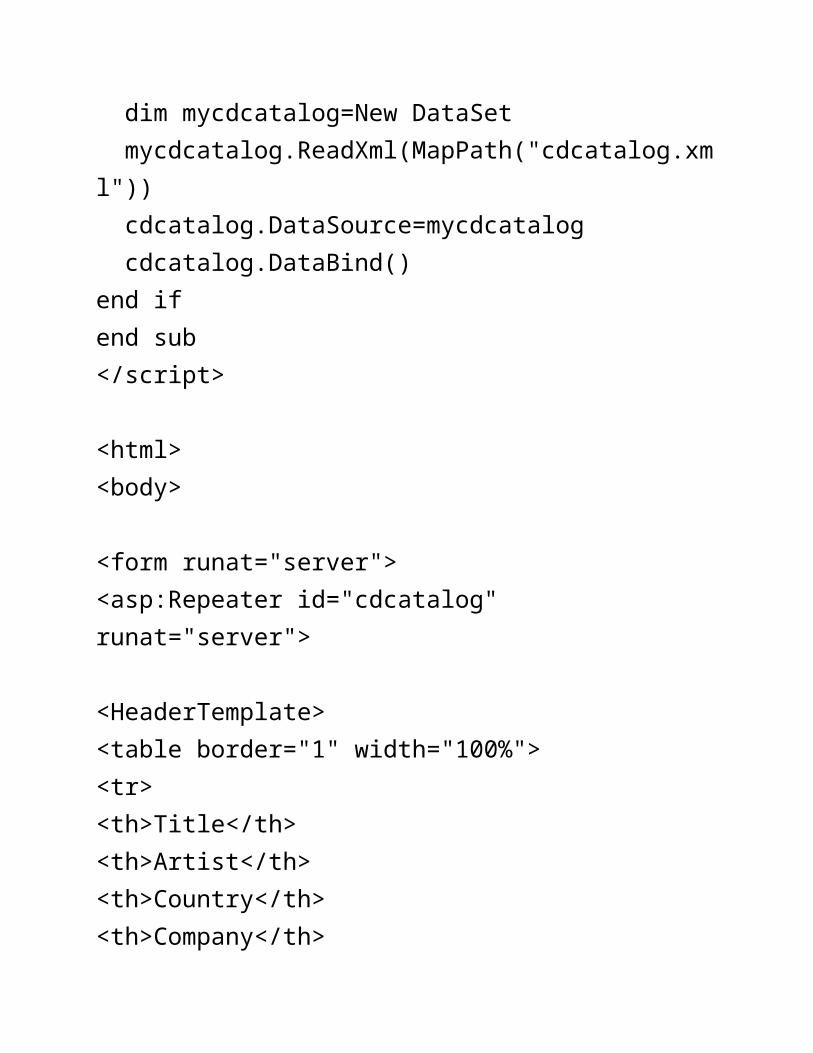
<script runat="server">sub Page_Loadif Not Page.IsPostBack then dim mycdcatalog=New DataSet mycdcatalog.ReadXml(MapPath("cdcatalog.xml"))end ifend sub
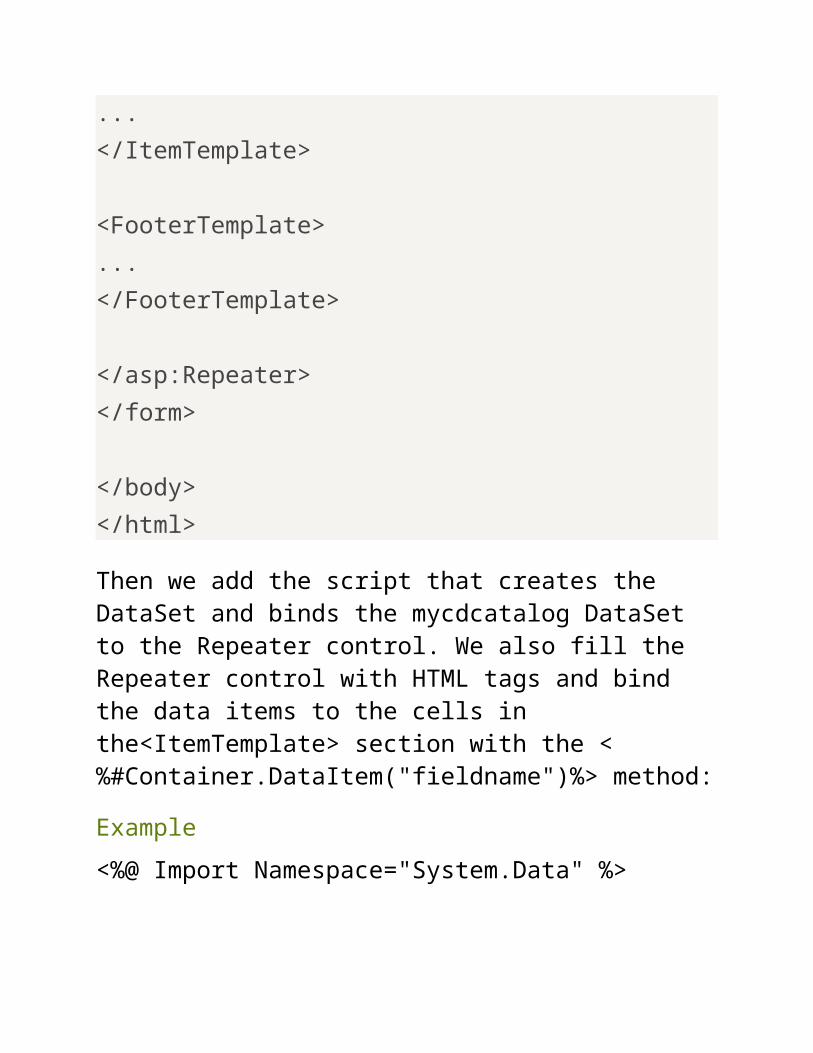
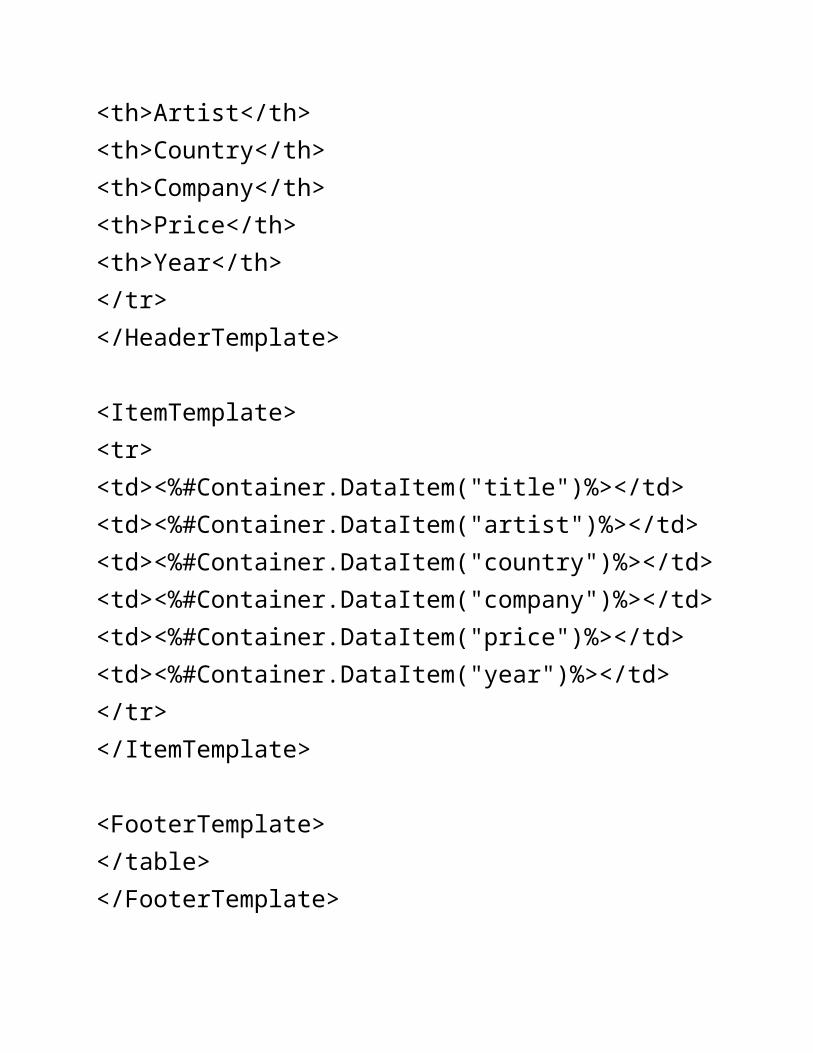
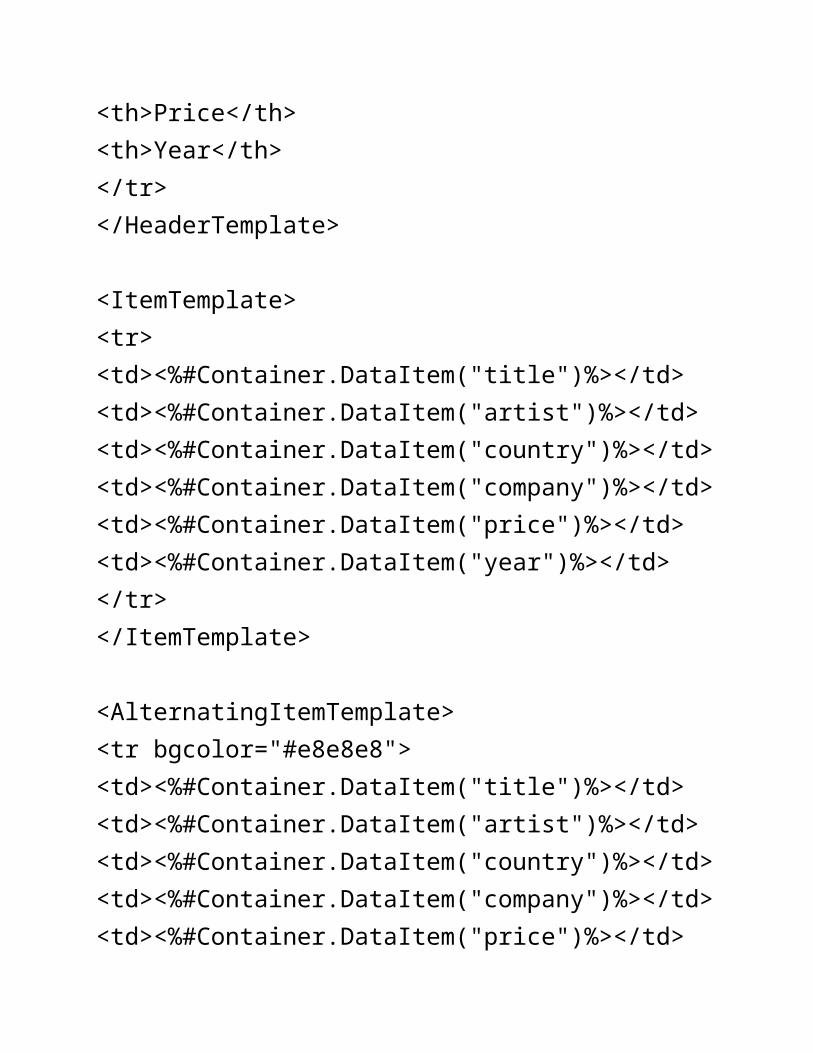
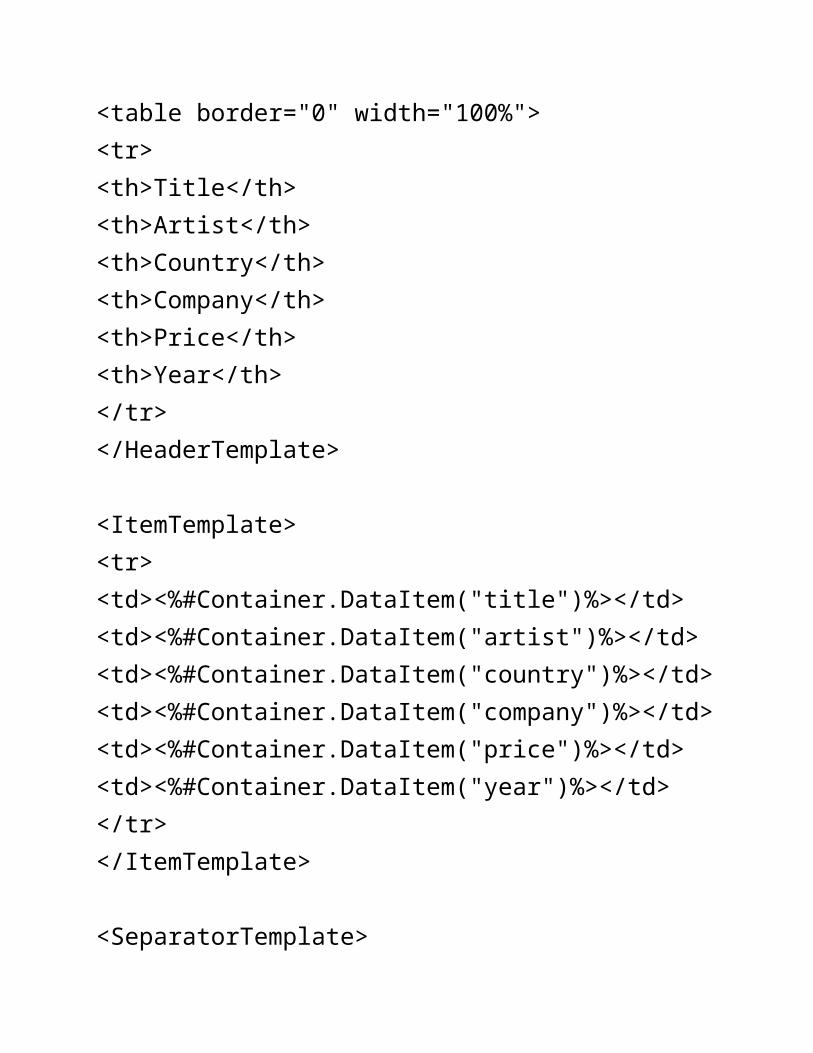
Then we create a Repeater control in an .aspx page. The contents of the <HeaderTemplate> element are rendered first and only once within the output, then the contents of the <ItemTemplate> element are repeated for each "record" in the DataSet, and last, the contents of the <FooterTemplate> element are rendered once within the output:
Then we add the script that creates the DataSet and binds the mycdcatalog DataSet to the Repeater control. We also fill the Repeater control with HTML tags and bind the data items to the cells in the<ItemTemplate> section with the <%#Container.DataItem("fieldname")%> method:
Example
<%@ Import Namespace="System.Data" %>
<script runat="server">sub Page_Loadif Not Page.IsPostBack then dim mycdcatalog=New DataSet mycdcatalog.ReadXml(MapPath("cdcatalog.xml")) cdcatalog.DataSource=mycdcatalog
You can add an <AlternatingItemTemplate> element after the <ItemTemplate> element to describe the appearance of alternating rows of output. In the following example each other row in the table will be displayed in a light grey color:
<script runat="server">sub Page_Loadif Not Page.IsPostBack then dim mycdcatalog=New DataSet mycdcatalog.ReadXml(MapPath("cdcatalog.xml")) cdcatalog.DataSource=mycdcatalog cdcatalog.DataBind()end ifend sub</script>
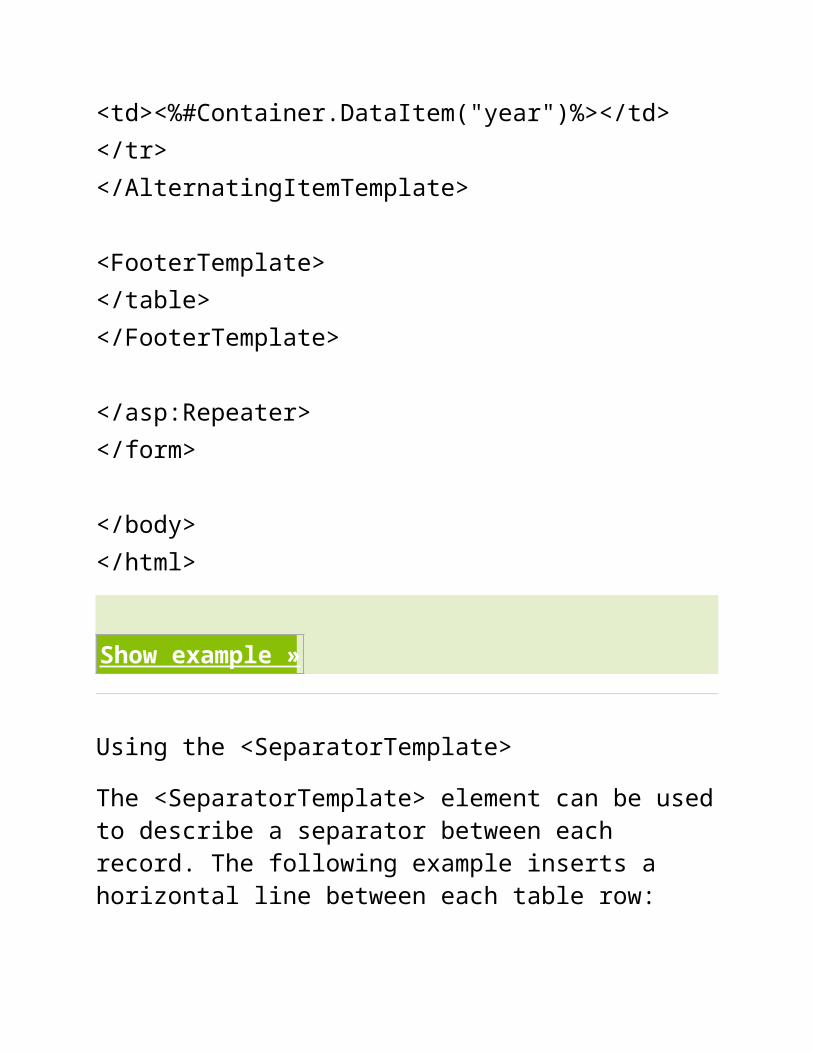
The <SeparatorTemplate> element can be used to describe a separator between each record. The following example inserts a horizontal line between each table row:
Example
<%@ Import Namespace="System.Data" %>
<script runat="server">sub Page_Loadif Not Page.IsPostBack then dim mycdcatalog=New DataSet mycdcatalog.ReadXml(MapPath("cdcatalog.xml")) cdcatalog.DataSource=mycdcatalog cdcatalog.DataBind()
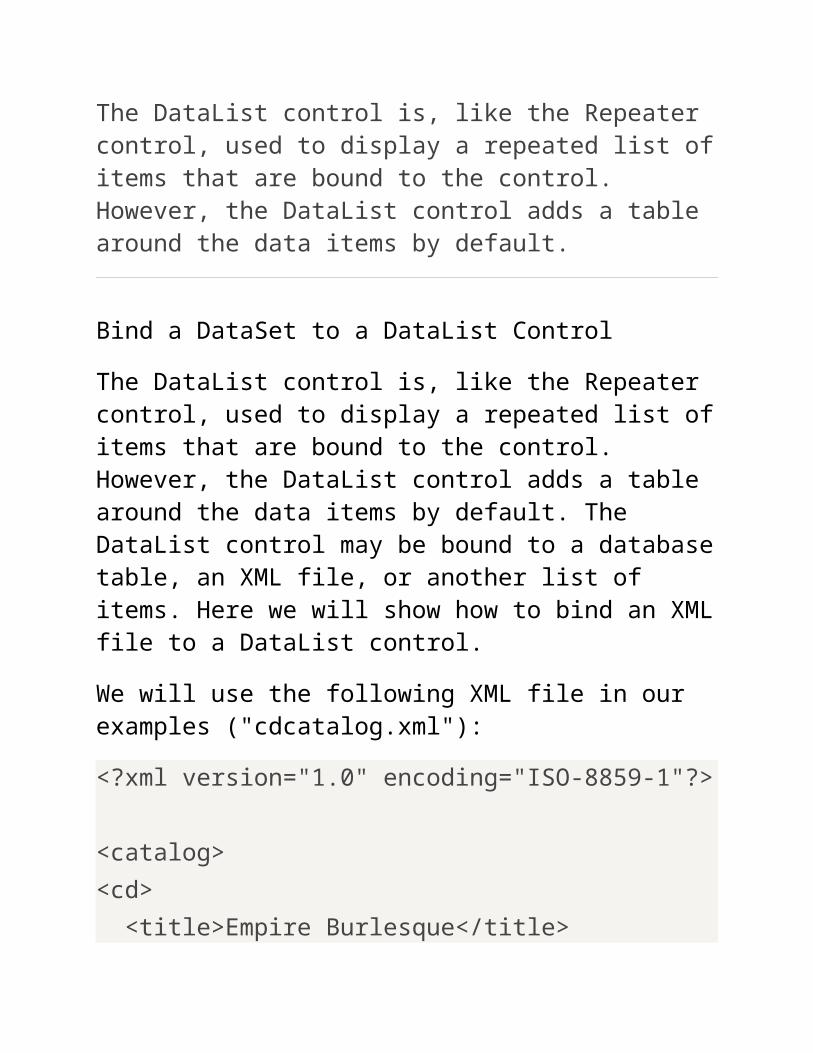
The DataList control is, like the Repeater control, used to display a repeated list of items that are bound to the control. However, the DataList control adds a table around the data items by default.
Bind a DataSet to a DataList Control
The DataList control is, like the Repeater control, used to display a repeated list of items that are bound to the control. However, the DataList control adds a table around the data items by default. The DataList control may be bound to a database table, an XML file, or another list of items. Here we will show how to bind an XML file to a DataList control.
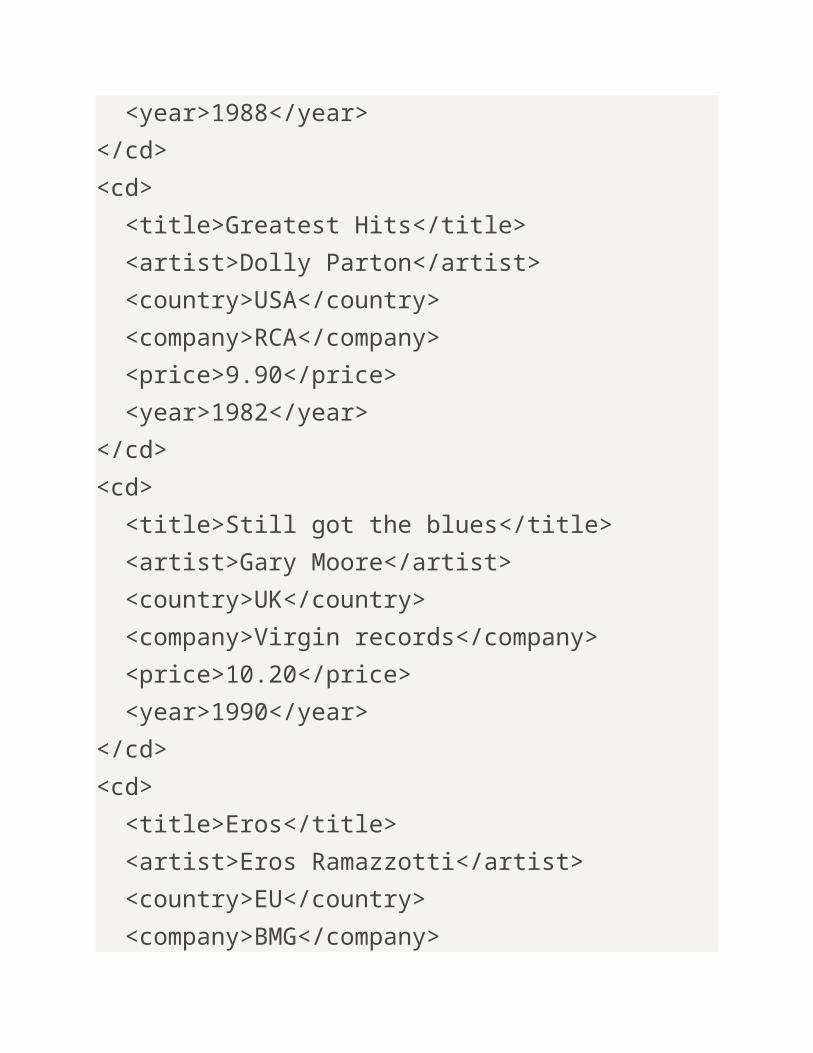
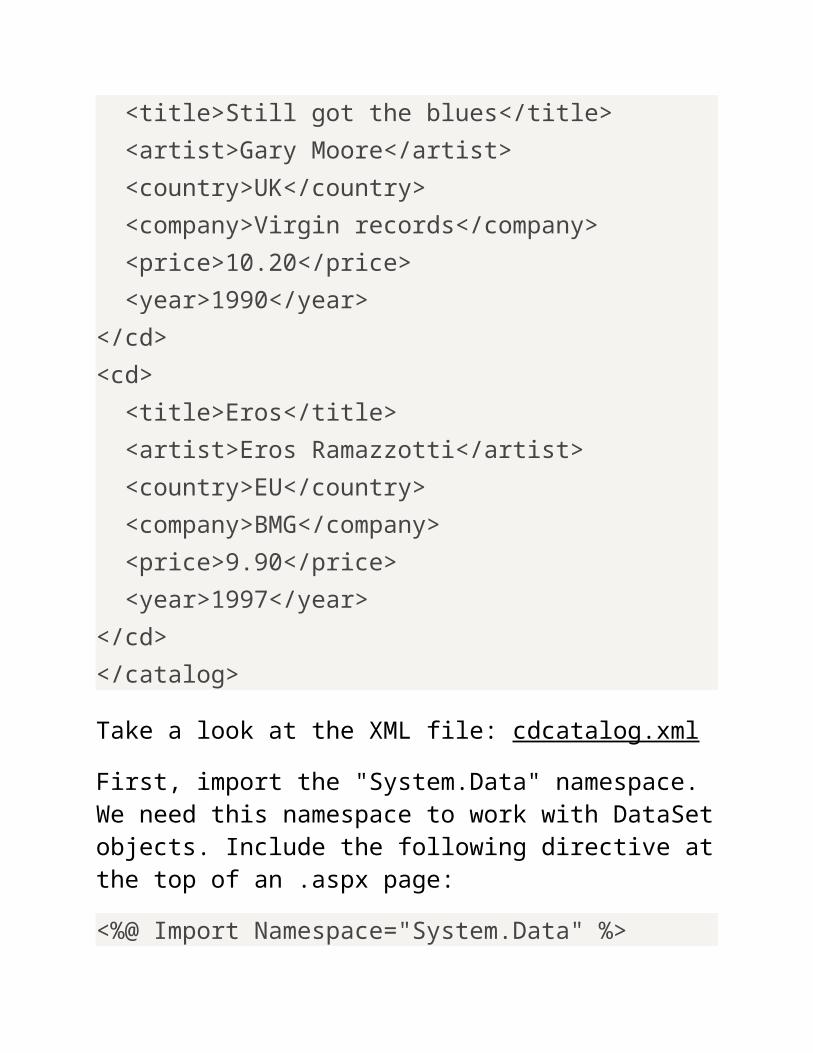
We will use the following XML file in our examples ("cdcatalog.xml"):
First, import the "System.Data" namespace. We need this namespace to work with DataSet objects. Include the following directive at the top of an .aspx page:
<%@ Import Namespace="System.Data" %>
Next, create a DataSet for the XML file and load the XML file into the DataSet when the page is first loaded:
<script runat="server">sub Page_Loadif Not Page.IsPostBack then dim mycdcatalog=New DataSet mycdcatalog.ReadXml(MapPath("cdcatalog.xml"))end ifend sub
Then we create a DataList in an .aspx page. The contents of the <HeaderTemplate> element are rendered first and only once within the output, then the contents of the <ItemTemplate> element are repeated for each "record" in the DataSet, and last,
Then we add the script that creates the DataSet and binds the mycdcatalog DataSet to the DataList control. We also fill the DataList control with a <HeaderTemplate> that contains the header of the table, an <ItemTemplate> that contains the data items to display, and a <FooterTemplate> that contains a text. Note that the gridlines attribute of the DataList is set to "both" to display table borders:
Example
<%@ Import Namespace="System.Data" %>
<script runat="server">sub Page_Loadif Not Page.IsPostBack then dim mycdcatalog=New DataSet mycdcatalog.ReadXml(MapPath("cdcatalog.xml")) cdcatalog.DataSource=mycdcatalog cdcatalog.DataBind()end ifend sub</script>
You can also add styles to the DataList control to make the output more fancy:
Example
<%@ Import Namespace="System.Data" %>
<script runat="server">sub Page_Loadif Not Page.IsPostBack then dim mycdcatalog=New DataSet mycdcatalog.ReadXml(MapPath("cdcatalog.xml")) cdcatalog.DataSource=mycdcatalog cdcatalog.DataBind()end ifend sub</script>
You can add an <AlternatingItemTemplate> element after the <ItemTemplate> element to describe the appearance of alternating rows of output. You may style the data in the <AlternatingItemTemplate> section within the DataList control:
Example
<%@ Import Namespace="System.Data" %>
<script runat="server">sub Page_Loadif Not Page.IsPostBack thendim mycdcatalog=New DataSetmycdcatalog.ReadXml(MapPath("cdcatalog.xml"))cdcatalog.DataSource=mycdcatalogcdcatalog.DataBind()end ifend sub</script>
ADO.NET is also a part of the .NET Framework. ADO.NET is used to handle data access. With ADO.NET you can work with databases.
Try it Yourself - Examples
Database connection - Bind to a DataList control
Database connection - Bind to a Repeater control
What is ADO.NET?
ADO.NET is a part of the .NET Framework ADO.NET consists of a set of classes used to handle data
access ADO.NET is entirely based on XML ADO.NET has, unlike ADO, no Recordset object
Create a Database Connection
We are going to use the Northwind database in our examples.
First, import the "System.Data.OleDb" namespace. We need this namespace to work with Microsoft Access and other OLE DB database providers. We will create the connection to the database in the Page_Load subroutine. We create a dbconn variable as a new OleDbConnection class with a connection string which identifies the OLE DB provider and the location of the database. Then we open the database connection:
Note: The connection string must be a continuous string without a line break!
Create a Database Command
To specify the records to retrieve from the database, we will create a dbcomm variable as a new OleDbCommand class. The OleDbCommand class is for issuing SQL queries against database tables:
sql="SELECT * FROM customers"dbcomm=New OleDbCommand(sql,dbconn)end sub</script>
Create a DataReader
The OleDbDataReader class is used to read a stream of records from a data source. A DataReader is created by calling the ExecuteReader method of the OleDbCommand object:
Always close both the DataReader and database connection after access to the database is no longer required:
dbread.Close()dbconn.Close()ASP.NET Web Forms - Master Pages
« Previous
Next Chapter »
Master pages provide templates for other pages on your web site.
Master Pages
Master pages allow you to create a consistent look and behavior for all the pages (or group of pages) in your web application.
A master page provides a template for other pages, with shared layout and functionality. The master page defines placeholders for the content, which can be overridden by content pages. The output result is a combination of the master page and the content page.
The content pages contain the content you want to display.
When users request the content page, ASP.NET merges the pages to produce output that combines the layout of the master page with the content of the content page.
The content page above demonstrates how .NET controls can be inserted into the content page just like an into an ordinary page.
Click to display mypage2.aspx.
ASP.NET Web Forms - Navigation
« PreviousNext Chapter »
ASP.NET has built-in navigation controls
Web Site Navigation
Maintaining the menu of a large web site is difficult and time consuming.
In ASP.NET the menu can be stored in a file to make it easier to maintain. This file is normally called web.sitemap, and is stored in the root directory of the web.
In addition, ASP.NET has three new navigation controls:
The <asp:TreeView> control in the example above is a placeholder for a server created navigation menu.
The data source of the control is defined by the DataSourceId attribute. The id="nav1" connects it to the <asp:SiteMapDataSource> control.
The <asp:SiteMapDataSource> control automatically connects to the default sitemap file (web.sitemap).
Click here to see a demo of Menu, TreeView, and SiteMapPath
SiteMapPath
The SiteMapPath control displays the trail (navigation path) to the current page. The path acts as clickable links to previous pages.
Unlike the TreeView and Menu control the SiteMapPath control does NOT use a SiteMapDataSource. The SiteMapPath control uses the web.sitemap file by default.
Tips: If the SiteMapPath displays incorrectly, most likely there is an URL error (typo) in the web.sitemap file.