Page 1
Assembly manual
Dear Customer,
Welcome to the Nacra family. We wish to thank you that you choose for Nacra Sailing.
It’s our constant endeavour to provide you with products that offer excellent performance
throughout their ownerships period. Which is why, in addition to producing great catama-
rans, we have also set up an extensive dealer network around the world.
Naturally, these Nacra Dealers knows everything there is to know about your catamaran and
provides you with the best service possible. So please find your dealer in your region on
www.nacrasailing.com for any servicing needed and make sure that only genuine spares are
used for your Nacra.
This manual will familiarize you with the operation and maintenance of your new Nacra. It
will also provide you with the important safety information which should be read and under-
stood before moving on to the assembly manual. The Assembly & operating manuals of our
catamarans can be found under the ‘after-sales’ button on our website;
www.nacrasailing.com.
If this is your first sailboat, or you are changing to a new type of sailboat you are not familiar
with? For your own comfort and safety, please ensure that you obtain handling and operating
experience before assuming control of the catamaran. Nacra Sailing or National Sailing Feder-
ations or yacht clubs will be pleased to advise you about sailing schools or competent instruc-
tors.
When you have any query, please feel free to contact your local Dealer.
Happy Sailing.
Page 2
Introduction
Welcome to the Nacra Family!
First we want to thank you for choosing one of our 4 high performance catamarans.
It’s our constant endeavor to empower sailiors with excellent catamarans that offer excellent performance throughout their
ownership period. Which is why, in addition to producing great catamarans, we have also set up an extensive dealer
network around the world.
Naturally, these Nacra Dealers knows everything there is to know about your catamaran and provides you with the best
service possible. So please find your dealer in your region on www.nacrasailing.com for any servicing needed and make sure
that genuine spares are used for your Nacra.
For assembling your catamaran the right way and for technical support a clear assembly manual is needed. In the Nacra
racing assembly manual you can find everything you need for; building your Nacra from out of the box, rigging your Nacra,
setting the sails and for further back-up information about assambling your Nacra. Please take your time to get familiarised
with all the parts and with our instruction written in the assembly manual.
The Nacra racing assembly manual is meant for:
For specified tuning check our tuning guides on www.nacrasailing.com
Happy sailing.
Page 3
Table of content
0. Tools ........................................................................................................................ 7
1. Platform assembly ................................................................................................. 8
1.1 Hull assembly ................................................................................................... 8
1.2 Front crossbar pre-bend ................................................................................. 9
1.3 Trampoline .................................................................................................... 10
1.4 Trapeze shockcord ........................................................................................ 11
1.5 Righting line ................................................................................................... 11
1.6 Mast rotation ................................................................................................. 12
1.7 Spihalyard blocks ........................................................................................... 12
1.8 Spinnaker blocks ............................................................................................ 12
1.9 Spin tack system ............................................................................................ 13
2. Mast assembly ..................................................................................................... 14
2.1 Diamond wires ............................................................................................... 14
2.2 Spreaders ....................................................................................................... 15
2.3 Diamond tension ........................................................................................... 16
2.4 Spreader rake ................................................................................................. 16
2.5 Spinhalyard .................................................................................................... 17
2.6 Main halyard .................................................................................................. 17
2.7 Fixing the stays .............................................................................................. 18
2.8 Jibhalyard ....................................................................................................... 19
2.9 Cunningham system ...................................................................................... 20
3. Rudders ................................................................................................................ 21
4. Rigging .................................................................................................................. 22
4.1 Preparation .................................................................................................... 22
4.2 Raising the mast ............................................................................................. 23
4.3 Lowering the mast ......................................................................................... 25
4.4 Snufferbag ...................................................................................................... 26
4.5 Spipole ........................................................................................................... 27
4.6 Jibsheet .......................................................................................................... 28
4.7 Tackline/ cunningham/ boom ....................................................................... 29
4.8 Mastrotation .................................................................................................. 29
4.9 Spinhalyard .................................................................................................... 30
4.10Spinsheet ....................................................................................................... 30
4.11Mainsheet 1:10 .............................................................................................. 31
Page 4
5. Setting the sails .................................................................................................... 32
5.1 Spinnaker ....................................................................................................... 32
5.2 Raising the jib ................................................................................................. 33
5.3 Lowering the jib .............................................................................................. 33
5.4 Battens ............................................................................................................ 34
5.5 Raising the mainsail ........................................................................................ 35
5.6 Lowering the mainsail .................................................................................... 36
6. Parts ...................................................................................................................... 38
6.1 arrival of parts ................................................................................................ 38
6.2 Rigbox ............................................................................................................ 39
6.3 Crossbar kit .................................................................................................... 40
6.4 Spreader attachment kit ................................................................................ 40
6.5 Diamond adjuster kit ..................................................................................... 40
6.6 1:16 cunningham kit ...................................................................................... 40
6.7 Misc kit ........................................................................................................... 41
6.8 Rigging set ...................................................................................................... 42
6.9 standard vs. Race .......................................................................................... 43
Page 5
NACRA EMPOWERING SAILORS SINS 1975
0. Tools
1. Torque wrench
socket 1/2
socket 5/16 hex
4. Wrench 17 mm
3. Wrench 9/16
5. Wrench 22 mm
6. Allen tool 3mm
7. Flat Screwdriver
8. Philips screwdriver
2. Wrench 7/16 2x
9. long nose Plier
10. Pump Plier
11. “Loose” tension gauge: fixed
12 Grease: watertight + lithium based
Page 6
NACRA EMPOWERING SAILORS SINS 1975
1. Platform assembly
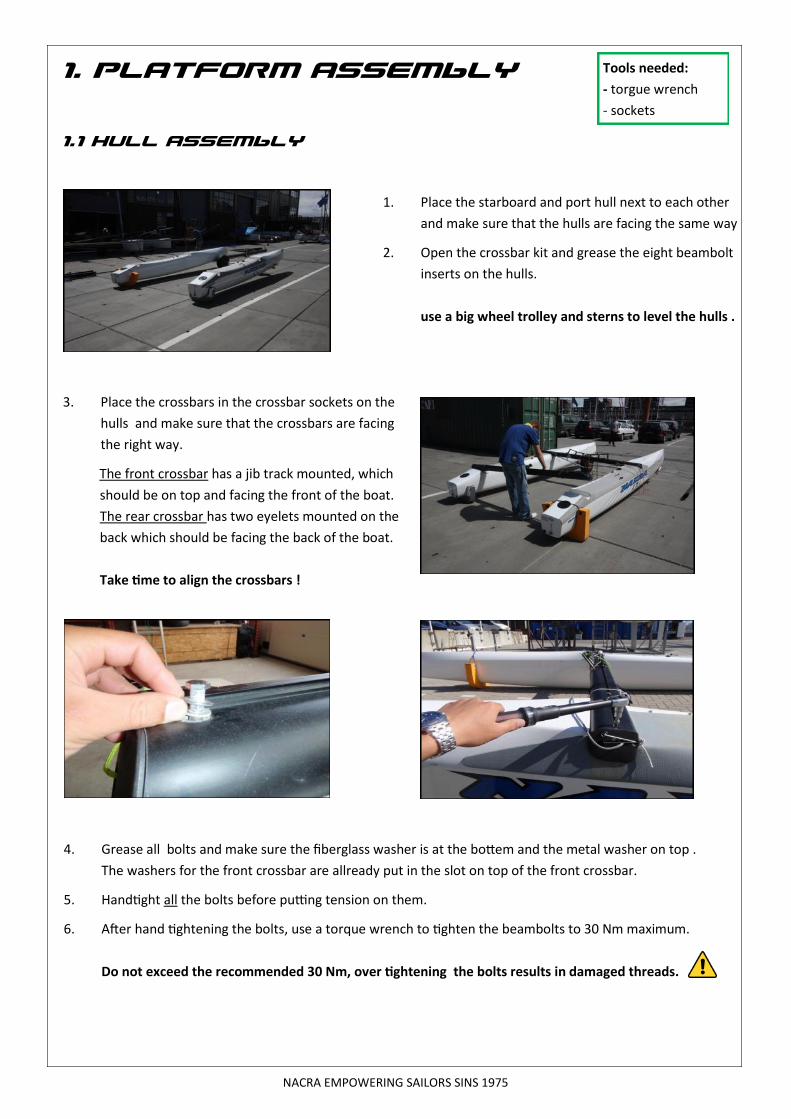
1. Place the starboard and port hull next to each other
and make sure that the hulls are facing the same way
2. Open the crossbar kit and grease the eight beambolt
inserts on the hulls.
use a big wheel trolley and sterns to level the hulls .
3. Place the crossbars in the crossbar sockets on the
hulls and make sure that the crossbars are facing
the right way.
The front crossbar has a jib track mounted, which
should be on top and facing the front of the boat.
The rear crossbar has two eyelets mounted on the
back which should be facing the back of the boat.
Take time to align the crossbars !
4. Grease all bolts and make sure the fiberglass washer is at the bottem and the metal washer on top .
The washers for the front crossbar are allready put in the slot on top of the front crossbar.
5. Handtight all the bolts before putting tension on them.
6. After hand tightening the bolts, use a torque wrench to tighten the beambolts to 30 Nm maximum.
Do not exceed the recommended 30 Nm, over tightening the bolts results in damaged threads.
1.1 Hull assembly
Tools needed:
- torgue wrench
- sockets
Page 7
NACRA EMPOWERING SAILORS SINS 1975
Grease the pre-drilled holes next to the
daggerboardcase. Screw the harken cam
cleat on the hulls using the harken screws.
Make sure the nylock nut locks the bolt, but the
staymaster must be able to pivot. As shown in
the picture.
Mount the staymasters onto the hull with the
bolt and nylock nut. The nylock nut should be
inboard.
1.2 Front crossbar pre-bend
There should always be a pre-bend on the front crossbar. This is been achieved by the tension on the
dolphinstriker.
On new beams the tension on the dolphinstriker must be reset after: -2 hours of sailing and
-10 hours of sailing!
During the season check the pre-bend regularly.
1. Release the tension on the nut located on top.
2. Release the tension on the nut located under the crossbar
3. Put grease on both nuts!
4. Measure 15mm from top crossbar to underside nut
4. screw the nut under the crossbar until both nuts are tightend.
When the mastpin starts to twist, fixade it with the pump plier
wrench. Protect the mastpin from wearing!
Tools needed:
- wrench 7/16
- philips screwdriver
Tools needed:
- wrench 22
- pump plier
Page 8
NACRA EMPOWERING SAILORS SINS 1975
3. Loop the rear lacing line through the tie
rod as shown in the picture. Start at the
port side of the trampoline!
6. Tie the rear lacing line with
half hitch knot
7. Tie the side lace line to the
loop closest to the front
crossbar. Loop the lacing
line making sure the span-
nerbands and loop look
exactly the same as shown
in the picture
8. Make a loop with the side
lacing line at the last
9. go back two spanner bands
and take the lacing line
through te loop
10. tie the lacing line with half-
hitch nut at the back of the
pre last spanner.
4. Loop the laces using the
trampoline tie buttons
5. After tightening go back
one button
Make sure the trampoline is in the middle of the catamaran.
The trampoline must
be in the middle of the
boat and in a straight
line before putting
tension on the line!!
1.3 Trampoline
1. Unscrew a beamcap on one side. Then slide the
front edge of the trampoline into the designated
slot. The hiking straps should be facing up.
2. Insert the trampoline tie-rod into the
slot in the rear of the trampoline.
Page 9
NACRA EMPOWERING SAILORS SINS 1975
Tie the footstraps using the hiking
strap ties.
Use the strapeye on the rear crossbar
to tie the footstrap in the middle.
1.4 Trapeze shockcord
1. Make a loop in the
trapeze shockcord.
2. Use the ring adjusted
in the middle of the
crossbar under the
trampoline to guide
the shockcord.
3. Tie the shockcord
on the rear lacing
line on port and
starboard side.
NOTE: F18 Infusion
The shockcord goes through the
tube in the hull.
1.5 RIghtning line
1. Tie one end of the rightning line on the
mastpin under the front crossbar, then
go through the eye in the middle of the
trampoline.
2. Tie a knot at the top of the trampoline
en put the remaining line in the
pocket.
Page 10
NACRA EMPOWERING SAILORS SINS 1975
1.6 mast rotation
Take the mast rotation
line and attach one end
to the staymaster
2. Go through the
harken cleat and
under the side
lacing line.
3. Use the grommet located in the middle
of the trampoline. Put the remaining
line in the pocket.
1.7 Spinnakerhalyard blocks
1. Tie a carbo 29mm block in the middle of
the spin halyard shockcord. Lead the
shockcord under the hiking straps
2. Use the small grommets in the trampoline
and tie both ends to the rear lacing line.
3. Mount a 29mm carbo block with the trampoline
block tie.
Make sure you do two loops!
1.8 Spinnaker blocks
Attach the 57 mm carbo ratchmatic single spinnakerblocks on
the strap eyes on the hull. Tie the spinnakerblock shockcord
between the spinnakerblocks.
Page 11
NACRA EMPOWERING SAILORS SINS 1975
1.9 Spin tack system
1. Mount the tack-releaseline. Tie a figure
8 knot on the port side underneath the
trampoline. Attach the ring 4x 25 at the
other end on the starboard side under-
neath the trampoline.
2. Feed one end of the tackline through the
block located underneath the front cross-
bar next to the mastpin. Then lead the
tackline through the ring, the cleat and the
16mm block next to the cleat.
3. After the 16mm block use the grommet
on the starboard side of the trampoline
4. Tie the tackline shockcord to the end of
the tackline and lead the shockcord
through the grommet on the starboard
side of the trampoline
5. Take the other end of the tackline shock-
cord and use the small grommet in the
middle of the V-bar to exit. Tie a loop in
the shockcord. This loop will be used to
tie onto the middle of the spinsheet.
Note:
The F18 infusion and Carbon 20 has the tackline
guided by a 29mm carbo block attached on the
staymaster.
Page 12
NACRA EMPOWERING SAILORS SINS 1975
2. Mast assembly
2.1 Diamond wires
It is preferable to place the mast on supports
while building the mast.
1. Get the brass fitting from the rigbox kit dia-
mond adjuster and the diamond wires.
2. Lead the diamond wire through the slots in
the mast. Grease the threads of the diamond
wires and fit one wire into the brass fitting.
3. To fit the other diamond wire into the brass
fitting let another person coorperate by
turning the diamond wire at the other end.
4. Grease the diamond adjuster bolt and adjust the
washers and mastbase in the order as shown on
the picture.
Place the mastbase on the mast and pull the
diamondwires further through the diamond slots
in the mast.
5. Bend the diamond wire tang away
from the mast
6. Adjust the diamondwires on the diamondwire
tang with the two clevis pins 1/4 x 1/2 from the
spreader attachment rigbox kit.
The ring must be on the outside! Tape the Ring!
Tools needed:
- long nose plier
The brassfitting is asymmetric. Make sure
the brassfitting is in the same position as
shown in the pictures!
Page 13
NACRA EMPOWERING SAILORS SINS 1975
2.2 spreaders
3. Assemble the two spreader bars using the clevis
pins 3/16 x 5/8.
Now mount the spreaders on the mast with the
spreadertip facing forward.
The splitrings must face the bottom of this
mast!
4. Take the spreader tip cover and a monel-
wire piece. Wind the wire around the
spreader arm and put the two ends
through the cover. Slide the cover over
the spreader arm
7. Twist the two ends into each other.
8. Cut off the excess monel wire and ensure it is bent
neatly onto the diamond wires to prevent the wire
from tearing the sails.
9. Use vulkanizing tape to tape the spreader ends and
the pins and rings
1. Grease the spreader tip 2. The spreadertip must be inserted at least
1cm! Lateron you can set the prefered
spreader rake.
5. Slide the diamond wires into the slots of
the spreaders.
Make sure the diamond wire is comple-
tely in the slot!
6. Twist the wire ends around each side of
the diamond wire.
Tools needed:
- long nose plier
Protect your sails, make sure no sharp wire ends
are sticking out!
Page 14
NACRA EMPOWERING SAILORS SINS 1975
2.3 diamond tension
1. Put tension on the diamond wires by tightening the mast bolt with an wrench size
17mm. Use the “loose” tension gauge to measure the tension on the diamonds.
Set the tension on 38 (280 KG/280 lbs)
2. After putting tension on the mast check if the mast is straight. Take a look along the
rail from mast base to mast top.
If the mast is bended to starboard:
Unleash the diamond tension
Detach the port diamond wire at the tang and shorten the wire with 1 full
twist clockwise.
Attach the port diamond wire at the tang and put tension on the mast bolt
again. Redo this process if necessary
If the mast is bended to port:
Unleash the diamond tension
Detach the starboard diamond wire at the tang and shorten the wire with 1
full twist clockwise.
Attach the starboard diamond wire at the tang and put tension on the mast
bolt again. Redo this process if necessary
3. Tape the rings of the diamond tang when done.
Measure the spreaderrake by putting a batten on the diamond stays next to the spreaders. Measure
to the back of the rail
2.4 spreader rake
You can easily change the spreader rake by unleashing the tension on the diamonds and
adjusting the spreader tip.
Tools needed:
- wrench 17mm
- “Loose” tension gauge
For specified tuning settings, check the
trimsheets on www.nacrasailing.com
Page 15
NACRA EMPOWERING SAILORS SINS 1975
2.5 spinaker halyard
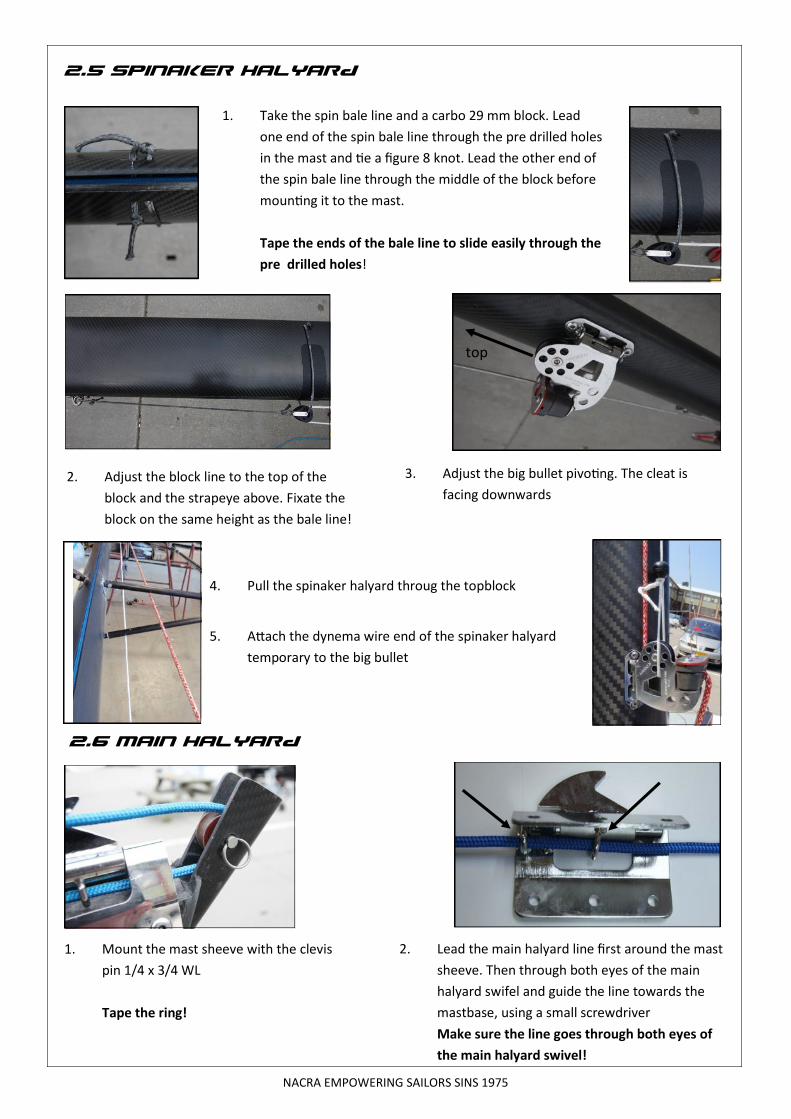
1. Take the spin bale line and a carbo 29 mm block. Lead
one end of the spin bale line through the pre drilled holes
in the mast and tie a figure 8 knot. Lead the other end of
the spin bale line through the middle of the block before
mounting it to the mast.
Tape the ends of the bale line to slide easily through the
pre drilled holes!
2. Adjust the block line to the top of the
block and the strapeye above. Fixate the
block on the same height as the bale line!
3. Adjust the big bullet pivoting. The cleat is
facing downwards
top
4. Pull the spinaker halyard throug the topblock
5. Attach the dynema wire end of the spinaker halyard
temporary to the big bullet
2.6 Main halyard
1. Mount the mast sheeve with the clevis
pin 1/4 x 3/4 WL
Tape the ring!
2. Lead the main halyard line first around the mast
sheeve. Then through both eyes of the main
halyard swifel and guide the line towards the
mastbase, using a small screwdriver
Make sure the line goes through both eyes of
the main halyard swivel!
Page 16
NACRA EMPOWERING SAILORS SINS 1975
3. Tie a figure 8 knot at the bottom
of the mast
4. Tie the other end of the main halyard line with a
figure 8 knot to the eyelet on the main halyard
ring. Tie everything temporally to the mast.
1. Take the shackle 8mm 5/16, 2 nylon washers, the
shrouds and forestay. Adjust them as shown in the
picture. The fore stay must be in the middle.
Make sure the ring of the forestay is inwards!
2. Take the shackle 6mm 1/4, 2 nylon washers and the
trapeze wires. Put the shackle through the middle
hole and adjust a trapeze wire on each side.
Tighten both shackles firmly!
2.7 Fixing the stays
3. Secure the shackle using the last monel
wire piece. Do as shown in the picture.
Cut the excess wire and bend it back
through the hole of the shackle pin before
taping it!
4. Tape the monel wire piece using the vulcani-
zing tape.
Check for sharp edges and tape if necessary!
5. Unscrew the wire-end of the staymaster and
mount it to the fork terminal of the shroud.
Use the clevis pins 1/4x5/8.
Tools needed:
- long nose plier
Page 17
NACRA EMPOWERING SAILORS SINS 1975
2.8 jibhalyard
1. Take the jibhalyard and go
through the eye of the adjusted
forestay.
TOP 2. Both ends go through the ring at the forestay
check if the ring is located at the mastside.
3. Adjust one end with a bowline at the
eyelet of the S-hook. The other end is
adjusted with a figure-8 knot using the
small hole
Page 18
NACRA EMPOWERING SAILORS SINS 1975
2.9 Cunningham system
1. Take the 1:16 cunningham
kit and tie the d12 5mm
line to the 16 mm double
blocks.
2. Loop the cunninghamline
through the blocks as
shown on the drawing.
Page 19
NACRA EMPOWERING SAILORS SINS 1975
3. rUDDERS
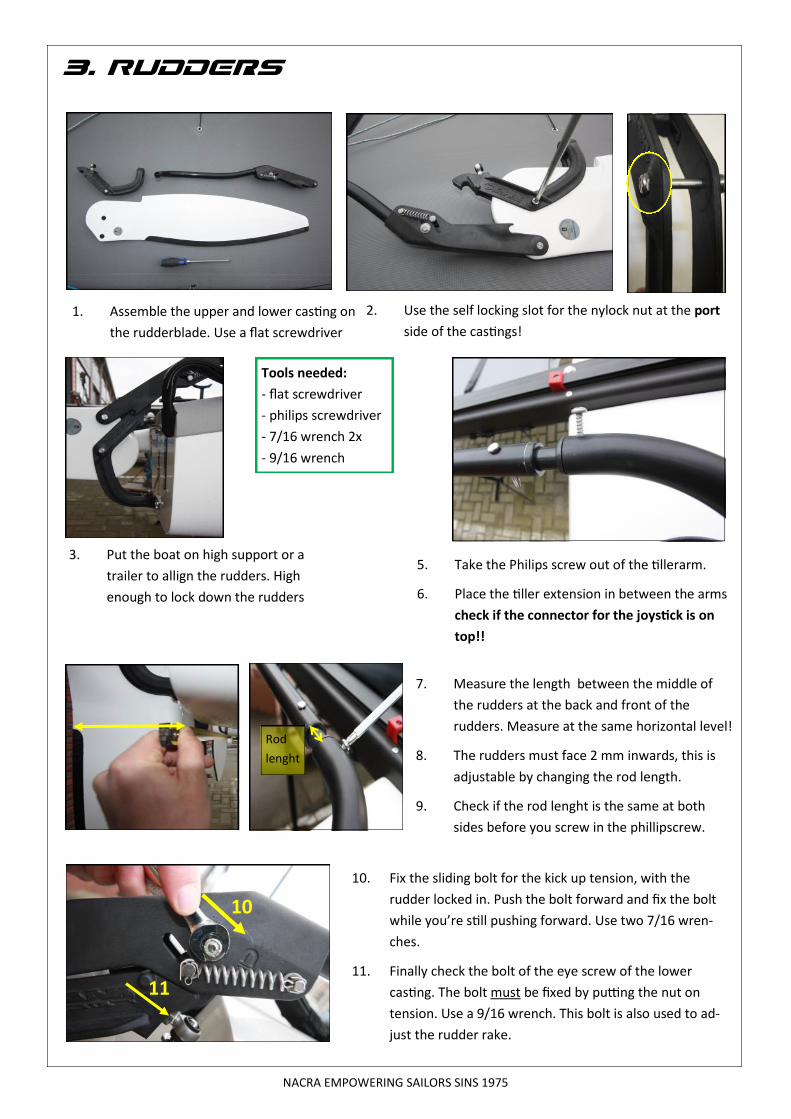
1. Assemble the upper and lower casting on
the rudderblade. Use a flat screwdriver
2. Use the self locking slot for the nylock nut at the port
side of the castings!
3. Put the boat on high support or a
trailer to allign the rudders. High
enough to lock down the rudders
7. Measure the length between the middle of
the rudders at the back and front of the
rudders. Measure at the same horizontal level!
8. The rudders must face 2 mm inwards, this is
adjustable by changing the rod length.
9. Check if the rod lenght is the same at both
sides before you screw in the phillipscrew.
5. Take the Philips screw out of the tillerarm.
6. Place the tiller extension in between the arms
check if the connector for the joystick is on
top!!
Rod
lenght
10. Fix the sliding bolt for the kick up tension, with the
rudder locked in. Push the bolt forward and fix the bolt
while you’re still pushing forward. Use two 7/16 wren-
ches.
11. Finally check the bolt of the eye screw of the lower
casting. The bolt must be fixed by putting the nut on
tension. Use a 9/16 wrench. This bolt is also used to ad-
just the rudder rake.
Tools needed:
- flat screwdriver
- philips screwdriver
- 7/16 wrench 2x
- 9/16 wrench
10
11
Page 20
NACRA EMPOWERING SAILORS SINS 1975
10
1. Mount the bridle wires, stay adjuster and
compression pole on the bridle connecti-
on fitting.
Use the clevis pins 1/2 x 1/4
2. Adjust the ring 3x20 ss under the bridle
on each side as shown in the picture.
3. Place the mast with care on the trampoline with
the masttrack down, support the back of the
mast to prevent it from scratching!
4. Check if the rigging and the shackles are
connected on the mast as have shown in the
manual.
5. Attach the schrouds to the staymaster to the
staymaster use the clevispin 1/4 x 5/8 WL .
Make sure the staymaster is at his maximum
length:10!
6. Attach the adjustable trapeze to the trapeze
wires. Check page ...how to assemble the sys-
tem.
7. Tie the adjustable trapeze wire to the trapeze
shockcords.
Check if the shrouds and trapeze wires are in
the right order before raising the mast!!
4. Rigging
4.1 preparation
Note: The F18 Infusion has no compressi-
on pole and bridle connection fitting but
a spi pole holder ring.
Page 21
NACRA EMPOWERING SAILORS SINS 1975
4.2 Raising the mast
1. Place the mastbase on the mastball.
2. 1 holds the mast up with one spreader arm facing
downwards, so the mastfoot doesn’t hit the crossbar!
2 mount the mast pin and splitrings in the mastfoot.
3. Check if all wires are in between the hulls
4. 1 walks forward lifting the mast and hand over the
mast to 2
2 holds the mast with one spreaderarm facing
downwards!
5. 1 grabs the trapezewires located on the front
WARNING!
CAUTION: Check for overhead wires and be sure the area behind the boat is clear of people! A
mast which comes in contact with electrical power lines can cause serious injury or death.
5. 1 pulls the mast by hanging easily on the trape-
zewires
2 push the mast upwards, still making sure the
mastfoot doesn’t hit the crossbar.
Before raising the mast the boat should be steady on level ground. If the surface is not level, point the bows
downhill. If the boat is on a trailer be sure it is tied down and the trailer tongue is secure to the hitch!
CAUTION: Check for overhead wires and be sure
the area behind the boat is clear of people! A mast
which comes in contact with electrical power lines
can cause serious injury or death!
1 2
1
2
1 2
Page 22
NACRA EMPOWERING SAILORS SINS 1975
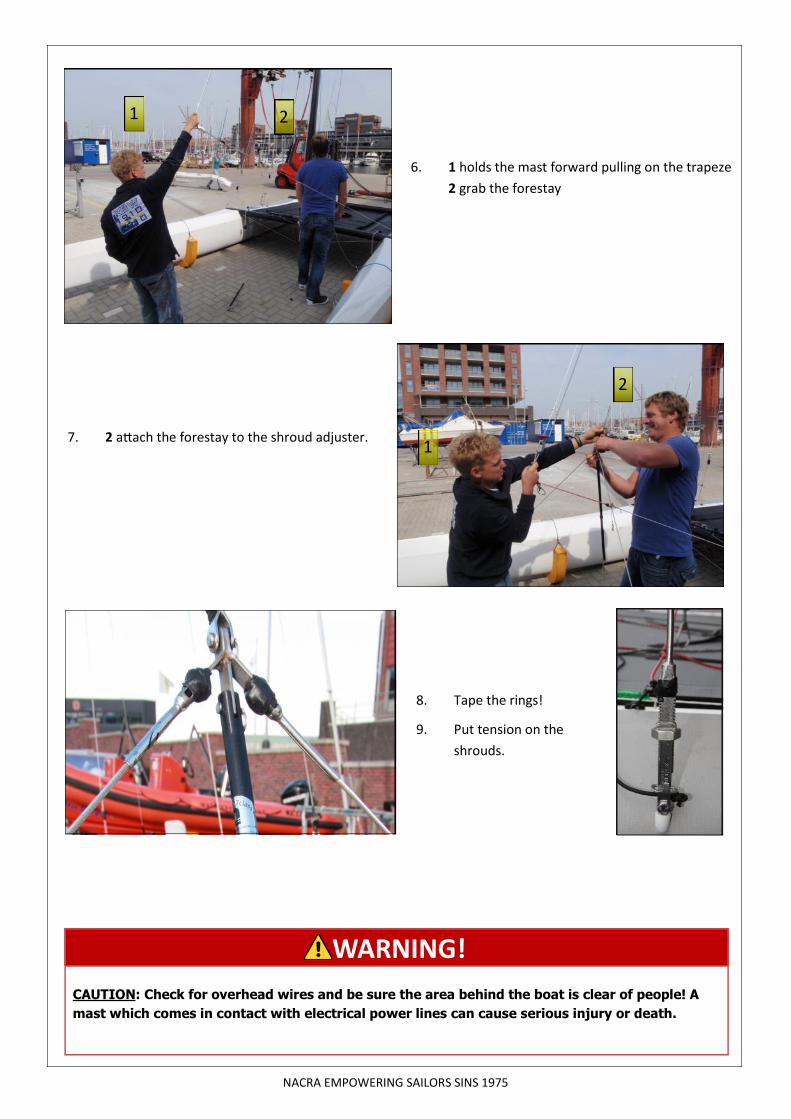
6. 1 holds the mast forward pulling on the trapeze
2 grab the forestay
7. 2 attach the forestay to the shroud adjuster.
WARNING!
CAUTION: Check for overhead wires and be sure the area behind the boat is clear of people! A
mast which comes in contact with electrical power lines can cause serious injury or death.
8. Tape the rings!
9. Put tension on the
shrouds.
1 2
1
2
Page 23
NACRA EMPOWERING SAILORS SINS 1975
4.3 Lowering the mast
Before lowering the mast the boat should be steady on level ground. If the surface is not level, point the bows
downhill. If the boat is on a trailer be sure it is tied down and the trailer tongue is secure to the hitch!
WARNING!
CAUTION: Check for overhead wires and be sure the area behind the boat is clear of people! A
mast which comes in contact with electrical power lines can cause serious injury or death.
1. Detach the spipole!
2. Check if the mast pin is in the mastfoot !!
3. Undo the tension of the staymasters. Set them
on maximum length:10
4. 1 holds the mast forward pulling on the trapeze
2 release the forestay from the stay adjuster.
10
4. 1 guides the mast by hanging easily on the
trapezewires
2 lowers the mast, twist the mast with one
spreaderarm facing downwards!! making
sure the mastfoot doesn’t hit the crossbar.
5. 1 hangs backward lowering the mast
2 lower the mast with one spreaderarm fa-
cing downwards!
6. 1 holds the mast up with one spreader arm
facing downwards, so the mastbase doesn’t
hit the crossbar!
2 pull the pin out of the mastbase and
take the mast of the mastball. Put the mast
gently on the crossbar.
1
2
1 2
1
2
1
2
Page 24
NACRA EMPOWERING SAILORS SINS 1975
4.4 snufferbag
1. Take the spipole, snuffer ring and
snufferbag and a hex ………..mm.
2. Unscrew the hexscrew out of the spi-
pole
3. Slide the snufferbag into the slot of
the snuffer ring
4. Screw the snufferring handtight on the spi-
pole,attach the snufferbag on the spipole
using the velcro band.
Page 25
NACRA EMPOWERING SAILORS SINS 1975
4.5 spipole
1. Slide the spipole over the spipole pin on the front
crossbar.
Make sure the jibsheet is on top of the spipole
2. Attach the spipole on the spipole outhol-
der
3. Push the spipole gently down in order to
attach the front spipole bridle located on
the front of the spipole on the bridle pin
with the clevispins 3/16 x 3/8.
4. Tie the snufferline in front of the snuffer-
ring. The other end must be tied on the
ring at the bridle
The line goes in the slot on the front of
the snuffer ring
5. Tie the spipole bridle line in
front of the spipole outholder.
Tie the other end to the rings
at both bridle wires.
Note: F18 infusion
First slide the spipole througt the spipole holder ring .
Page 26
NACRA EMPOWERING SAILORS SINS 1975
4.6 Jibsheet
1
2
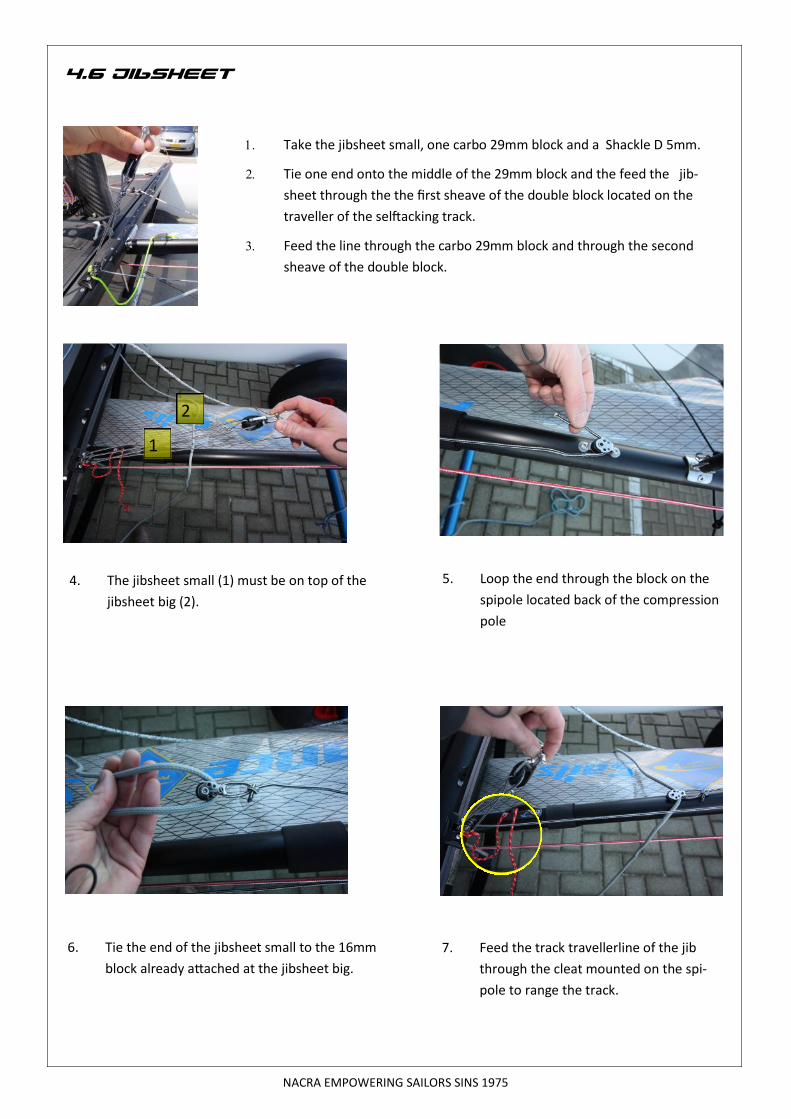
Take the jibsheet small, one carbo 29mm block and a Shackle D 5mm.
Tie one end onto the middle of the 29mm block and the feed the jib-
sheet through the the first sheave of the double block located on the
traveller of the selftacking track.
Feed the line through the carbo 29mm block and through the second
sheave of the double block.
4. The jibsheet small (1) must be on top of the
jibsheet big (2).
5. Loop the end through the block on the
spipole located back of the compression
pole
7. Feed the track travellerline of the jib
through the cleat mounted on the spi-
pole to range the track.
6. Tie the end of the jibsheet small to the 16mm
block already attached at the jibsheet big.
Page 27
NACRA EMPOWERING SAILORS SINS 1975
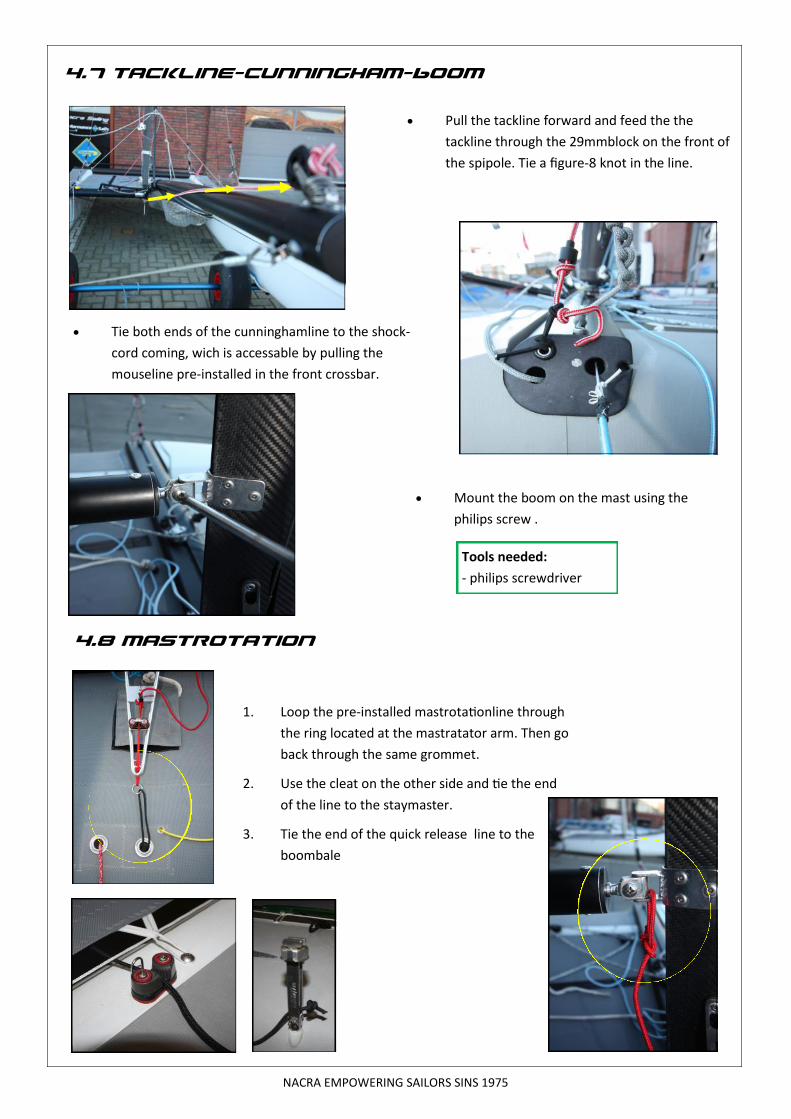
4.7 Tackline—cunningham—boom
Pull the tackline forward and feed the the
tackline through the 29mmblock on the front of
the spipole. Tie a figure-8 knot in the line.
Tie both ends of the cunninghamline to the shock-
cord coming, wich is accessable by pulling the
mouseline pre-installed in the front crossbar.
Mount the boom on the mast using the
philips screw .
4.8 mastrotation
1. Loop the pre-installed mastrotationline through
the ring located at the mastratator arm. Then go
back through the same grommet.
2. Use the cleat on the other side and tie the end
of the line to the staymaster.
3. Tie the end of the quick release line to the
boombale
Tools needed:
- philips screwdriver
Page 28
NACRA EMPOWERING SAILORS SINS 1975
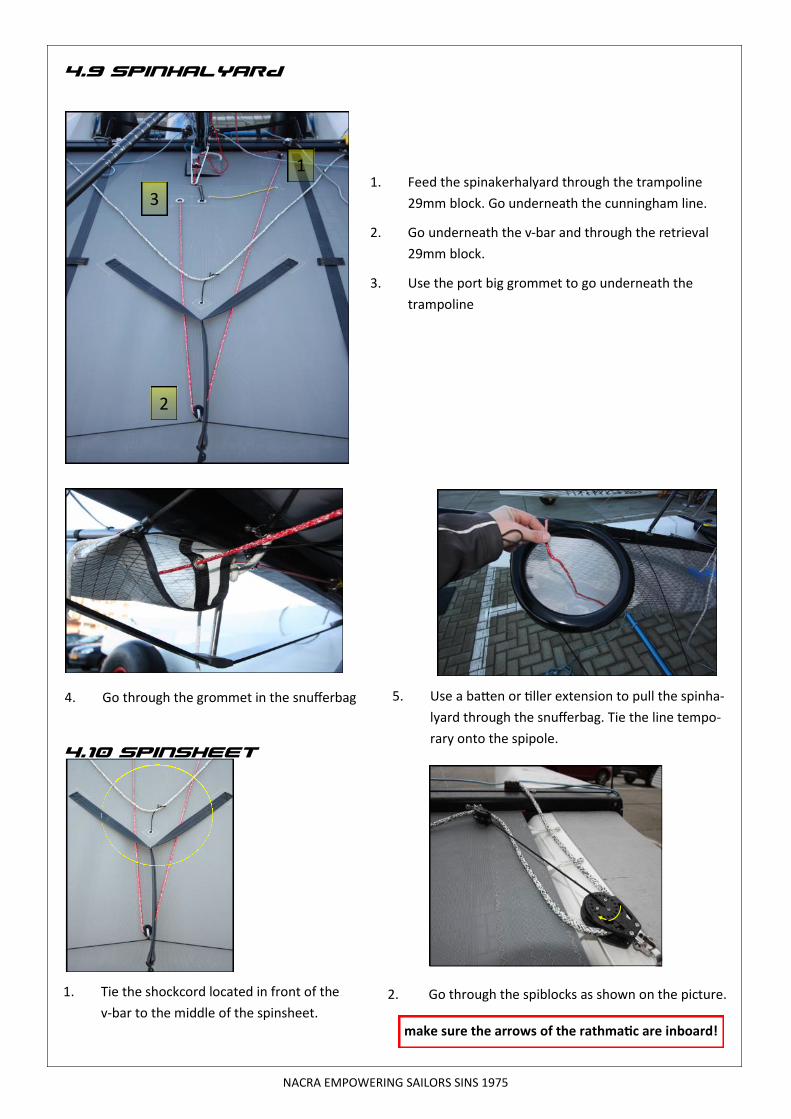
4.9 Spinhalyard
1
2
3 1. Feed the spinakerhalyard through the trampoline
29mm block. Go underneath the cunningham line.
2. Go underneath the v-bar and through the retrieval
29mm block.
3. Use the port big grommet to go underneath the
trampoline
4.10 spinsheet
1. Tie the shockcord located in front of the
v-bar to the middle of the spinsheet.
2. Go through the spiblocks as shown on the picture.
4. Go through the grommet in the snufferbag 5. Use a batten or tiller extension to pull the spinha-
lyard through the snufferbag. Tie the line tempo-
rary onto the spipole.
make sure the arrows of the rathmatic are inboard!
Page 29
NACRA EMPOWERING SAILORS SINS 1975
2
1
3
8
4.11 MAINSHEET 1:10
Page 30
NACRA EMPOWERING SAILORS SINS 1975
4. Follow the foot of the sail back to the
clew. Here you can attach both ends of
the sheet the spinsheet. Make sure the
sheets are in front of the forestay
1. Attach the tack of the spinaker to the
tackline
2. Follow the leading edge of the sail and tie
the spiakerhalyard to the head of the
spinnaker. Tie the end of the spinaker
halyard coming from the top of the mast.
3. Take the other end of the spinakerhalyard
and go through the rings and tie the end to
the loop on the 3rd patch
5.1 spinaker
5. Setting the sails
Page 31
NACRA EMPOWERING SAILORS SINS 1975
5.2 Raising the Jib
lift
pull
2. Raise the jib until the S-hook is pulled through
the ring.
3. Gently pull the jib down to lock the S-hook in
the ring.
1. Hook the jib on the S-hook. Close the
zipper while raising , with the jibhalyard
zipped in with the jibhalyard in between.
4. Feed the jibdownhall line through the 16mm-
block located on the starboard side next to the
compression pole. Go through the ring on the
tack of the sail and loop around the pole in or-
der to tie it around the ouholderbase.
5. Attach the jibsheet small to the
clew of the sail
Note: the jibdownhall is
only standard on the
1. To lower the jib release the jibdownhall and the
jibsheet small.
2. Raise the jib a bit and pull on the other line,
while keeping tension on both lines, in order to
unlock the S-hook of the ring
5.3 Lowering the jib
Page 32
NACRA EMPOWERING SAILORS SINS 1975
5.4 battens
1. Pull the two batten tension lines through the
small hole in the batten from bottom to top.
Make sure each line stays on his own side.
2. Go through the grommet in the battenpocket
from outside in.
3. Push the batten forward for tension, tie the
overhand knot at the same time. Just get rid of
the wrinkles in the sail
4. Finish tying with a square knot and tuck the loo-
se ends in the batten pocket.
Page 33
NACRA EMPOWERING SAILORS SINS 1975
5.5 Raising the mainsail
1. Roll the mainsail from the bottom to top.
3. Guide the mainsail into the
slot of the mast 4. Lift the mailsail with the mainhalyard
5. Lift the mainsail until you
reach the masthook.
6. Gently pull down to lock
the mainhalyard ring in
the masthook.
7. Slide the foot of the sail
in the mastslot.
2. Attach the mainhalyard to the sail.
The knot must be on the mast side.
Occaisionally it can happen that the sys-
tem works better with the knot on the
other side.
Page 34
NACRA EMPOWERING SAILORS SINS 1975
1 lift 2 Twist
60˚
3 pull
5.6 Lowering the mainsail
1. Pull on the mainhalyard
to raise the mainsail. 2. Twist the mast 60˚ while
still having tension on the
mainhalyard.
3. Pull the mainsail down.
4. Gently lower the mainsail
and roll the the mainsail
starting at the foot of the
sail.
Always roll your mainsail top down with the topbatten taken out
Prevent the sail from
folding!
Page 35
6.1 Arrival of parts
Description
Reference
quantity
Hull port 12058P 12059P 12048-2P 12051P 1
Hull strbd 12059S 12059S 12048-2S 12051S 1
Spipole complete w/o ring: in hullbox 31573 31622 30994 31145 1
Mast 31620 30169 31185 1
Hardwarebox 40006 40007 40004 40005 1
Front crossbar complete 31584 31607 30045 31142 1
Rear crossbar complete 31583 31610 30086 31144 1
Centerboard port 31599 31673P 31232 31156P 1
Centerboard strbd 31599 31673S 31232 31156S
Rudderblades 31600 31747 30131 30131 2
Uppercasting with hardware Port 40117 40116 40108-2 40108-2 1
Uppercasting with hardware strb 40116 40117 40107-2 40107-2 1
Lowercasting with hardware 30114-2 40100-2 30114-2 30114-2 2
Boom complete 31574 31611 31078 31260 1
Tillerbar with connection part 30137 31612 30137 31562 1
Joystick 30371 30371 30371 31173 1
Trampoline 60270-
01/02
60277-01/02 60284-01/02 60260-01/02 1
Trampoline tie rod 30291 30291 30291 31276 1
Mainsail options 60273-01 Options options 1
Jib options 60274-01 options Options 1
Spinnaker options 60275-
01/02/03
Options options 1
Spi snuffer bag 31572 31674 30924 31238 1
Spi snuffer ring 30916 30916 30916 30916 1
Owners manual
CE documents
Sailnumbers 31530
Rigbox 40017 40018 40015 40016 1
6. Parts
Page 36
NR.
Description
Reference
quantity
1 Kit crossbar 40120 40120 40120 40120 1
2 Kit misc 40129 40130 40122 40122 1
3 Kit spreader attachment 40124 40124 40124 40124 1
4 Kit diamond adjuster small 40126 40126 40126 40126 1
5 Cunningham system 1:16 31731 31731 31731 31731 1
6 Riggingset 40508 40505 40502 40503 1
7 Linepackage race 31589 31618 30682 31169 1
8 big bullet pivoting exit 31719 31719 31719 31719 1
9 vulkaniserend tape 10110 10110 10110 10110 1
10 mast base complete 40114 40111 40111 40112 1
11 compression pole 31700 31700 -------------- 31190 1
12 spreader bar aft black 30335 30335 30335 31194 2
13 spreader bar fwd black 30336 30336 30336 31193 2
14 57mm boom block 5sh 30673 30673 30673 30673 1
15 57mm ratchet block 5sh 30958 30958 30958 30958 1
16 Spipole holder ring —————- —————- 30216 ————- 1
6.2 RIgbox
1 2
3
4 5
6
7
8
9
10
11
12
13
14
15
16
Page 37
Rigbox Kit spreader attachment 40124 NR discription reference quantity
1 spreader bar screw fine 30337 2
2 clevis pin 3/16 x 5/8 WL 31624 6
3 clevis pin 1/4 x 1/2 WL 30524 2
4 Split Ring 30553 8
5 spreader tip cover 30322 2
6 Monel wire piece 31462 3
cunningham system 1:16 31731
NR discription reference quantity
1 16mm double 30649 2
2 wire block 29mm 30634 2
3 Split Ring 30553 2
4 d12 5mm 10055 2
5 bullet pivoting exit 31720 1
1 2 3 4
5 6
2
1 3
4 5 6
Rigbox Kit diamond adjuster 40126
NR discription reference quantity
1 bolt diamond adjuster 30187 1
2 brass fitting 31701 1
3 washer ss front crossbar 31117 1
4 fiberglass washer 31113 1
5 mast step pin 30356 1
6 Split Ring 30553 2
1 2 3 4
5
1 2 3
4
5 6
Rigbox kit crossbar 40120
NR discription reference quantity
1 Crossbar bolt front 30360 4
2 Crossbar bolt rear 30361 4
3 Washer ss rear crossbar 31114 4
4 Fiberglass washer 31113 4
5 Allen tool size 5/16 31456 1
6 NACRA grease 31697 1
6.3 Assembly kits
Page 38
1
2
3
4 5
6
7 8
9 10
11
12
13
14 15
16
17
18 19
20
21 22 23 24 25 26
NR discription reference quantity
1 Daggerboard holder wide (spare) 31590 2
2 Screw 4.2x25mm (spare) 31463 4
3 Staymaster 1/8” 30372 2
4 Clevis pin 1/4 x 5/8 WL (staymaster) 31077 2
5 Clevis pin 1/4 x 1/2 WL (bridle) 30524 6
6 Clevis pin 3/16 x 3/8 WL (spibridle) 30488 2
7 Clevis pin 3/16 x 5/8 WL (compression pole) 31624 2
8 Clevis pin 1/4 x 3/4 WL (Mast sheeve) 30416 1
9 Split ring 30553 13
10 Shackle 8mm 5/16 30779 1
11 Shackle 6mm 1/4 30685 1
12 Shackle washer nylon 40201 4
13 Shackle D 5mm 31458 1
14 s-hook jib 30334 1
15 Main halyard ring w/shackle 30312 1
16 Ring 4x25mm ss 30816 1
17 Carbo 29mm single fixed assymetric (1 extra for f18 inf./C20) 30640 4
18 Carbo 57 ratchmatic single 30605 2
19 Cleat harken small w/ wire fairlead 31470 2
20 Screw for harken cam cleat 31466 4
21 shroud adjuster 30326 1
22 Bridle connection fitting (Only F16/N17/C20) 31698 1
23 Shackle 6mm w/shockcord 30683 1
24 Mast sheave (spare N17) 30185 1
25 Ring 3x20mm ss 30702 2
26 Allen tool size 3 31714 1
6.4 misc kit
Page 39
NACRA EMPOWERING SAILORS SINS 1975
Nr.
Description
Reference
quantity
forestay 31728-2 31613 30218-2 31147-2 1
shroud 31581-2 31614 30696-2 31146-2 2
trapeze wire double 31582 30222 30222 31151 2
diamond wire 31578 30223 30223 31154 2
bridle wire 31577 31617 30220 31148 2
1 2 3
4 5
6.5 Riggingset
Page 40
NACRA EMPOWERING SAILORS SINS 1975
option adjustable trapeze
NR. discription reference quantity
1 Shackle D 5mm hex 31707 4
2 Clam cleat trapeze cl253 30923 4
3 Trapeze block black 30692 4
4 Trapeze ring race 30681 4
5 Trapeze stop 30938 4
6 Line package adjustable trapeze 31713 1
option can’t miss
NR. discription reference quantity
1 Trapeze ring can’t miss 30333 4
2 Trapeze height adjuster 30695 4
3 Line package standard trapeze 31712 1
6.6 Trapeze systems