Assignment 1: Introduction and Setup CS 148 Autumn 2019-2020 Due Date: Monday, 30 September 2019 by 7pm Follow the instructions carefully. If you encounter any problems in the setup, please do not hesitate to reach out to CAs on Piazza or come to office hours. Background Note that the OpenGL assignments have been modernized to use OpenGL 4.1 and (the newest version supported by Mac OSX). As such, it will be necessary to have updated compilers/operating systems/drivers. Requirements Overview This section lists the requirements for compiling OpenGL 4 code on different system platforms. In the next sections, we will go over the details for Windows, Mac OS, and Linux. • C++ Compiler with C++11 Support • OpenGL 4.1 Support • CMake 2.8+ • Git Mac OSX You will need to manually compile this library: • Open Asset Import Library You will also need to extract the SDL2 framework file (instructions below). Windows On Windows, we have provided pre-built binaries. Linux You will need to manually compile/download the following libraries from your package repository: • SDL 2 • Open Asset Import Library • FreeImage • GLEW Downloading the Code Windows: Download Git from the website: link. You can use the default options during the installation. Mac OSX: Either download Git from the website link or install the Command Line Tools for your OSX version and version of Xcode. You can find the Command Line Tools here. Linux: Install ‘git’ from your package manager. In Ubuntu you will run: sudo apt-get install git. 1
Transcript
Assignment 1: Introduction and Setup
CS 148 Autumn 2019-2020
Due Date: Monday, 30 September 2019 by 7pm
Follow the instructions carefully. If you encounter any problems in the setup, please do nothesitate to reach out to CAs on Piazza or come to office hours.
Background
Note that the OpenGL assignments have been modernized to use OpenGL 4.1 and (the newest versionsupported by Mac OSX). As such, it will be necessary to have updated compilers/operating systems/drivers.
Requirements Overview
This section lists the requirements for compiling OpenGL 4 code on different system platforms. In thenext sections, we will go over the details for Windows, Mac OS, and Linux.
• C++ Compiler with C++11 Support• OpenGL 4.1 Support• CMake 2.8+• Git
Mac OSX You will need to manually compile this library:
• Open Asset Import Library
You will also need to extract the SDL2 framework file (instructions below).
Windows On Windows, we have provided pre-built binaries.
Linux You will need to manually compile/download the following libraries from your package repository:
• SDL 2• Open Asset Import Library• FreeImage• GLEW
Downloading the Code
Windows: Download Git from the website: link. You can use the default options during the installation.Mac OSX: Either download Git from the website link or install the Command Line Tools for your OSXversion and version of Xcode. You can find the Command Line Tools here.Linux: Install ‘git’ from your package manager. In Ubuntu you will run: sudo apt-get install git.
There are Git GUI clients, but I find them to be terribly unintuitive so these instructions will be for thecommand-line version of Git only. The GitHub repository that contains the source code can be found athttps://github.com/b3h47pte/cs148opengl-public. If you decide that you want to keep your code online,make sure you do so in a PRIVATE repository. On GitHub, if you do not already have a GitHub Studentaccount, get it here (free stuff, namely a micro GitHub account which comes with free private repositories!).Gitlab and Bitbucket also provide free private repositories.
The following instructions apply whether you are on Windows, Mac, or Linux. All thefollowing instructions assume that you are in the Git Bash prompt/your terminal. The rest of this guideassumes that you have created your own repository for your project on GitHub/Gitlab/Bitbucket and thatit is empty. Make sure you do not add a LICENSE, REAMDE, or Gitignore to your project.Clone YOUR repository. On Windows, open up Explorer and right click on the folder that you want to useto store the code and select ‘Git Bash’. On Mac OSX and Linux, open up your favorite terminal emulator(the default that comes with Mac is called Terminal. You can find it in Application/Utilities) and change thedirectory to be where you want to store the code. If you are unfamiliar with the command prompt: type inthese lines (one at a time):
cd ~
mkdir cs148
cd cs148
The following image shows where you can find the Git URL for your project if you are using GitHub(Note: Use the SSH link (while logged into GitHub!) instead of the HTTPS link). Use the SSH linkfor your OWN project. Do not use the SSH link for the cs148opengl-public project under myaccount—that will not work.
Run:
git clone YOUR_URL_HERE
If you can not clone your own repository from the SSH link you may need to setup your SSH key. Youcan look at GitHub’s instructions here which should also apply to Gitlab and Bitbucket. You should see afolder with your project’s name. In this document, we will reference this folder as the “root folder” or the“root directory” for your project. Enter the folder:
cd FOLDER_NAME
Now we will grab the OpenGL framework code. Run the following commands (make sure you are insideyour project folder):
This may take awhile. It is recommended that you connect to a stable and fast internetconnection while performing this step. If you list all the files in your directory (i.e run ls), you shouldsee all the files found at the cs148opengl-public repository. In the future, should any updates/bug fixes getpushed to the public repository, all you need to run is:
git fetch source
git merge source/master
Now you can push the code to your own private repository by running:
git push origin master
If you need help on using Git, Google and Piazza are your best friends.
Mac OSX Setup
C++ Compiler Make sure you have XCode installed. If you do not have XCode installed, you can gohere to download the latest version of XCode (it will redirect you to the app store). If you wish, you can clickon ‘Additional Tools’ (or here) to find older versions of XCode. Note that if you want to use the commandline instead on Mac OSX, you will have to also install the Command Line Tools for your Mac OSX versionand your Xcode version (this is also found under ‘Additional Tools’). Note that if this is your first timedownloading XCode (or if you just upgraded XCode), you must run XCode first before running CMake.
OpenGL 4.1 Support Your system should have the OpenGL headers already once you install XCode.To see if your system supports OpenGL 4.1 look at Apple’s OpenGL capabilities table: here. To see whatgraphics card you have, you can click on the ‘Apple’ button and click on ‘About this Mac’ and in the windowthat pops up, your graphics card is displayed next to Graphics. Additionally, you’ll want to make sure yourMac OS X is updated to at least 10.9 if not 10.12 (upgrade! It’s free—10.11 should work fine as well).
CMake Download the latest CMake binaries from the CMake website: here.
SDL2 In the ‘external/SDL2/osx’ folder, there is an SDL2.dmg file. Double click it to open it and youshould see a window pop up. In that window, there should be a SDL2.framework file. You will want to dragand drop this file back into ‘external/SDL2/osx’.
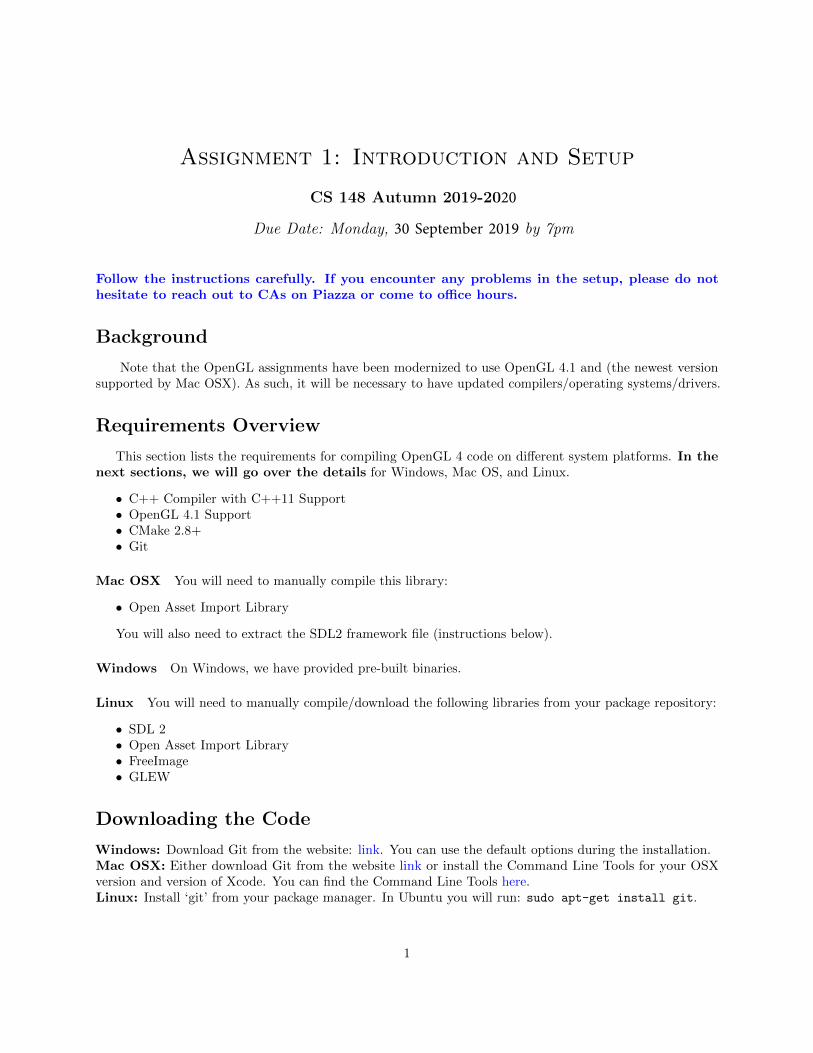
Open Asset Import Library Open up CMake (which you should have already installed) and point‘Where is the source code’ to ‘external/assimp.’ Create a folder to build (‘external/assimp/build’) and set‘Where to build the binaries’ to ‘external/assimp/build’.
Then, hit the “Configure” button. At the screen that follows, choose “XCode” when it asks you to specifythe generator for this project (feel free to choose Unix Makefiles if that is what you are comfortable with).Click “Generate” and then go to ‘external/assimp/build’ using the Finder and open “Assimp.xcodeproj.” Inthe top left, change the build target from ALL BUILD (click on ALL BUILD) and switch to “assimp”.
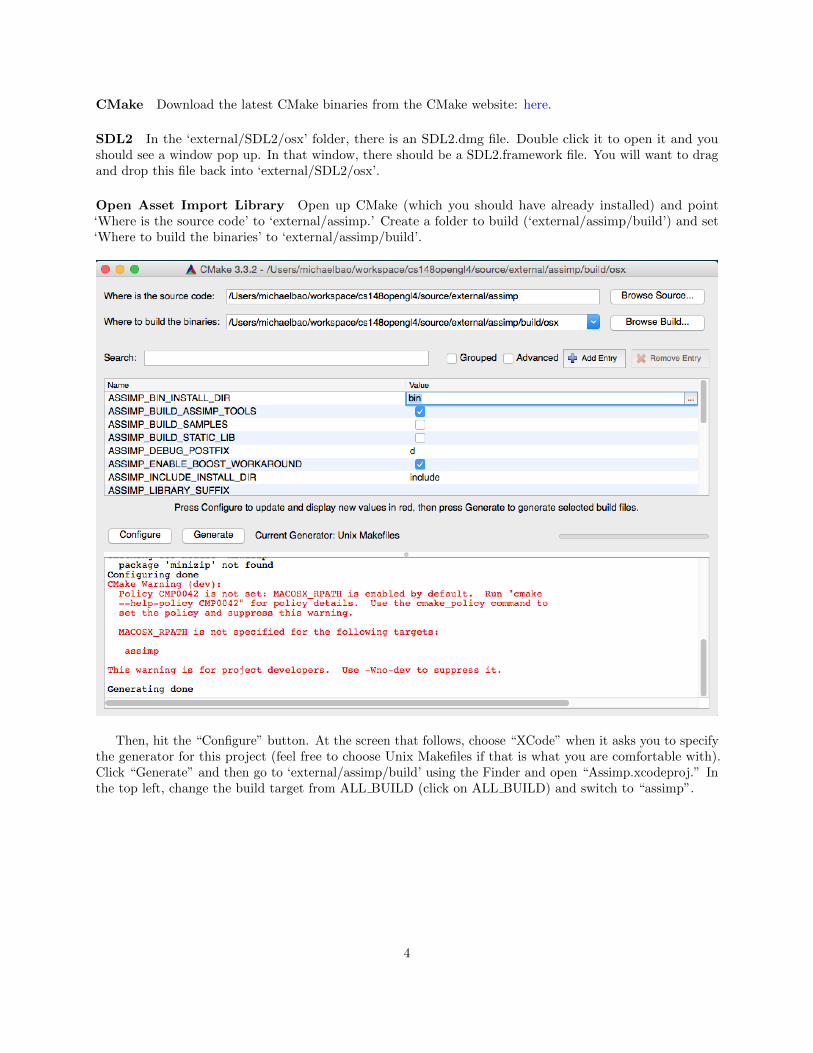
Now you want to change the Debug build to be a Release build. You can find this option by clicking on“assimp” in the top left of XCode and then clicking on “Edit Scheme...”. Under “Run” you will want to clickon the “Info” tab and change the “Build Configuration” to “Release”.
5
Now you can go to “Product”→ “Build” to compile the library. Then, assuming you are using the terminalgo into “external/assimp/build/code/Release” and copy libassimp.dylib to “external/assimp/distrib/osx”. Ifyou are using the Finder, copy libassimp.3.1.1.dylib instead and once it is in the distrib folder, rename it tolibassimp.dylib.
Windows Setup
C++ Compiler Download the latest version of Visual Studio (Community Version) for FREE: here tomake sure you have Microsoft’s latest compiler. Visual Studio does not come by default with the C++ toolsneeded so you will have to open Visual Studio and create a Visual C++ project before running CMake. Anyversion of Visual Studio after (and including) Visual Studio 2013 should also work should you already have it.
OpenGL 4.1 Support Your system should have the OpenGL headers already. Make sure your drivers areupdated from Nvidia/AMD/Intel.
CMake Download the latest CMake binaries from the CMake website: here.
Linux Setup
Note that the instructions here are tailored to Ubuntu. If you have a different distribution, the stepsshould be similar as the only major difference should be the package names. Talk to a CA if you need helpwith this.
C++ Compiler On Linux, you’ll want to be using G++ 4.6 or later. If possible, you’ll want to be usingG++ 4.8.1+. On Ubuntu you can run:
If you are on the latest version of Ubuntu (Ubuntu 16), you can instead get G++ 5:
sudo apt-get install g++-5
You will also be needing to run the ‘make’ command so generally it is recommended that you install the’build-essential’ package (on Ubuntu).
sudo apt-get install build-essential
The G++ 4.8 package is available on Ubuntu 14.04 LTS or later! If you have another distribution, check yourdistribution package manager to see what version of G++ they have. If you have any problems with anotherdistribution, contact a CA!
OpenGL 4.1 Support Make sure you have the latest drivers for your GPU. After you installed the drivers(be it open source or closed source), you can double check to make sure you have OpenGL 4.1 by installingthe “mesa-utils” package on Ubuntu (may be named “mesa-demos” on other distributions). Then in theterminal run the command below to make sure you get a version that’s greater than or equal to 4.1!
glxinfo | grep "OpenGL version"
CMake You can download the latest CMake using your package manager. On Ubuntu, you can run:
sudo apt-get install cmake
SDL 2 SDL 2 should be available in your distribution’s package repository. On Ubuntu:
sudo apt-get install libsdl2-2.0-0
sudo apt-get install libsdl2-dev
If it is not in the repository, you will have to compile manually. See a CA if you need assistance.
Open Asset Import Library We have provided the Open Asset Import library source code with theassignment framework under “external/assimp.” Create a build folder “external/assimp/build/unix”. Inyour terminal, go to the build folder and run:
cmake -G "Unix Makefiles" ../../
make -jN
Note that you should run the above commands in the “external/assimp/build/unix” folder. Where N isthe number of cores you want to use for compilation. Afterwards, in the ‘external/assimp/build/unix/code’folder, there should be shared object library files for assimp. Copy them using the following command:
Note this command assumes you are in the root folder for your project. If you are in the “external/assim-p/build/unix” folder, run:
cp code/libassimp.so* ../../distrib/unix/
FreeImage FreeImage should be available in your distribution’s package repository. On Ubuntu:
sudo apt-get install libfreeimage3
sudo apt-get install libfreeimage-dev
If it is not in the repository, you will have to compile manually. See a CA if you need assistance.
7
GLEW GLEW should be available in your distribution’s package repository. On Ubuntu:
sudo apt-get install libglew1.10
sudo apt-get install libglew-dev
Other versions of GLEW should be okay. People using Windows/OSX will be using GLEW 1.13. If it is notin the repository, you will have to compile manually. See a CA if you need assistance.
Compilation
Compiling is a two step process regardless of whether you are using the CMake GUI or the CMakeCommand-Line Interface (CLI). First you will use CMake to generate the proper build files (Visual Studio,XCode, or Makefiles) and use Visual Studio/Xcode/Makefiles to actually build the application (aptly namedcs148opengl4). This section assumes that you have the assignment code already downloaded somewhere.Before you start, make sure you create a “build” folder inside the project directory (i.e. the build foldershould be in the same folder as the “common” folder as well as the “assignment” folders). The location of the“build” folder technically does not matter; however, unless you know what you are otherwise doing, follow theinstructions as is. If you will be using the command line, we recommend also creating a “build/Release” anda “build/Debug” folder.
CMake Configuration and Generation
Special Notes for Visual Studio Solutions and XCode Projects If you are using CMake to generatefor Visual Studio or XCode, you can run CMake once (the very first time) and then use Visual Studioor Xcode to manage any new files you might add (instead of using CMake to do that for you). However,should you ever run CMake again, you will overwrite your Visual Studio solution/XCode project and loseany changes you made.
GUI (Windows, Mac OSX) Open CMake and point ‘Where is the source code’ to the root directory ofyour project located wherever you downloaded the assignment framework (i.e the parent directory of the‘build’ folder) and point ‘Where to build the binaries’ to the ‘build’ folder. If you do not have a “build” folder,create one in your project’s root directory. At this point, you can click the Configure button. You should begreeted by a screen to choose the generator for the project. On Mac OSX you will want to choose “Xcode”(or Unix Makefiles, only do this if you know what you are doing!) and on Windows you will want to choosewhatever version of Visual Studio you have. Note: On Windows, you must also choose the Win64version of Visual Studio instead of the Win32 version. Now press the Generate button—your VisualStudio solution or XCode project should exist within your previously selected build folder.
CLI (Linux, Mac OS X) Usually, you’ll only be using the CLI on Mac or Linux so we will be ignoringWindows here. If you want to generate the build files for XCode, first go into the “build” directory and thenrun:
cmake ../ -G "Xcode"
Afterwards, the file “cs148-opengl4.xcodeproj” will exist and you will be able to open it up in XCode.If you want to generate Makefiles, go into “build/Release” or “build/Debug” folder. Then you will want
In this case, CONFIG is either Release or Debug depending on which folder you are in.
8
Compile and Run
Mac OSX - XCode In the upper left corner, your build target by default should be set to ALL BUILD,change it to cs148opengl4 (click on ALL BUILD).
At this point, you can hit the ‘Play’ button and it will compile and launch the application! However, ifyou ever want to change from a Debug build to a Release build or vice versa, you will need to go same screenas before (click on cs148opengl4) and click on ‘Edit Scheme...’. In the screen that pops up, make sure on theleft, you have ‘Run’ selected and on the right, you are in the ‘Info’ tab. You should see a build configurationdropdown from which you can select the build type that you want.
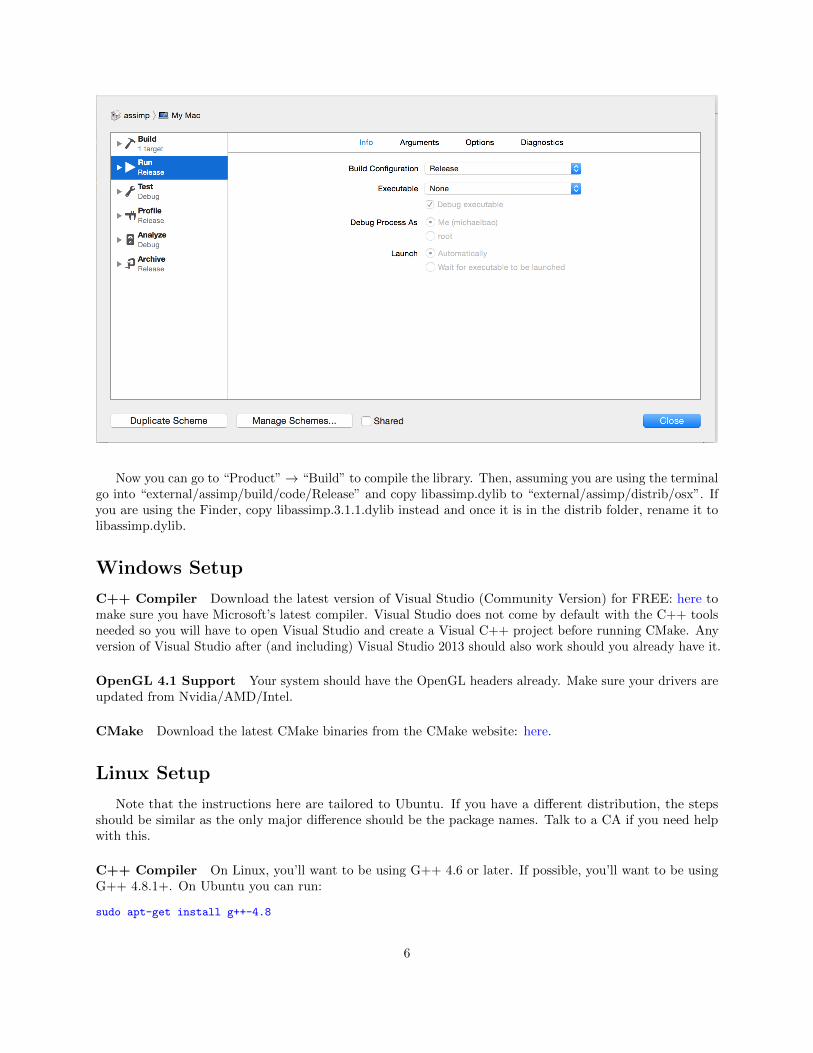
If you are running XCode 7+, you may run into an issue where it tells you that you can not runcs148opengl4 because the deployment target is too high. In that case, click on the cs148-opengl4 project,click on the cs148opengl4 target, click on ‘Build Settings’, under ‘Deployment’ find ‘OS X Deployment Target’
9
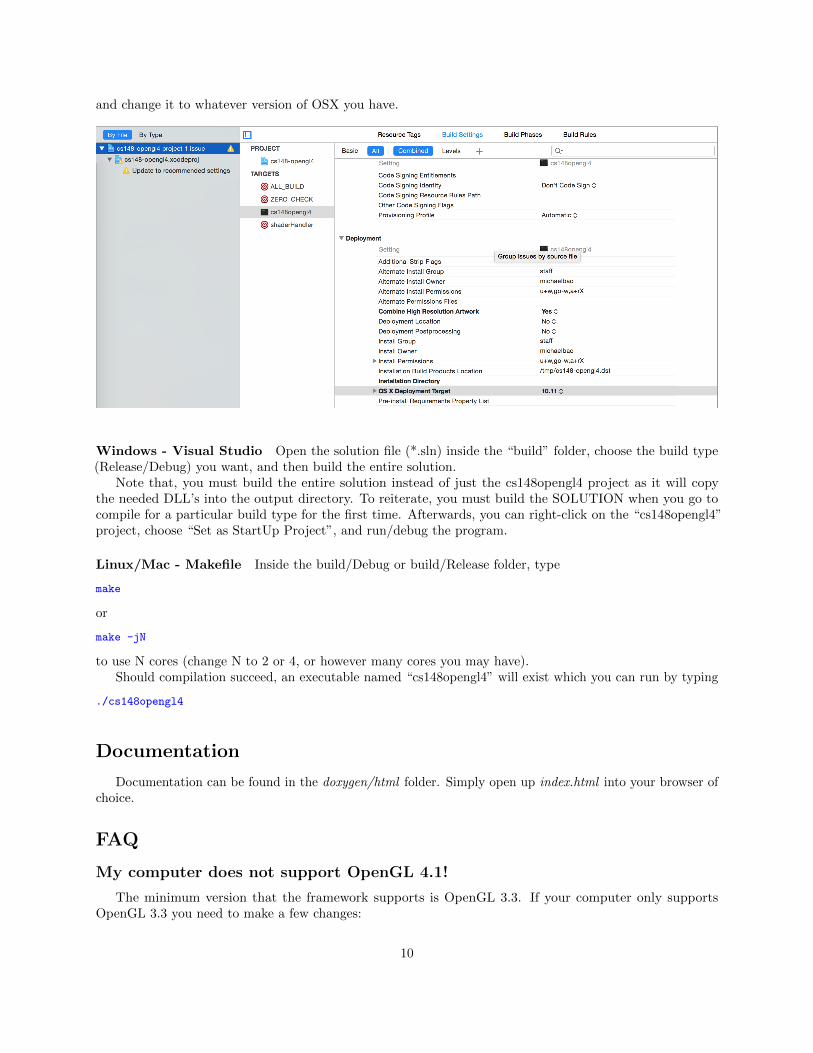
and change it to whatever version of OSX you have.
Windows - Visual Studio Open the solution file (*.sln) inside the “build” folder, choose the build type(Release/Debug) you want, and then build the entire solution.
Note that, you must build the entire solution instead of just the cs148opengl4 project as it will copythe needed DLL’s into the output directory. To reiterate, you must build the SOLUTION when you go tocompile for a particular build type for the first time. Afterwards, you can right-click on the “cs148opengl4”project, choose “Set as StartUp Project”, and run/debug the program.
Linux/Mac - Makefile Inside the build/Debug or build/Release folder, type
make
or
make -jN
to use N cores (change N to 2 or 4, or however many cores you may have).Should compilation succeed, an executable named “cs148opengl4” will exist which you can run by typing
./cs148opengl4
Documentation
Documentation can be found in the doxygen/html folder. Simply open up index.html into your browser ofchoice.
FAQ
My computer does not support OpenGL 4.1!
The minimum version that the framework supports is OpenGL 3.3. If your computer only supportsOpenGL 3.3 you need to make a few changes: