18
Module A SYSTEM INTRODUCTION & BASIC NAVIGATION Astra Schedule Training Guide

Module
A
SYSTEM INTRODUCTION & BASIC NAVIGATION
Astra ScheduleTraining Guide

Table of Contents Introduction ........................................................................................................ 1
Lesson Audience ......................................................................................................... 1 Lesson Objectives ....................................................................................................... 1 Configuration Requirements........................................................................................ 1 Common Practices ...................................................................................................... 1 Best Practices.............................................................................................................. 2 Introduction to Tool...................................................................................................... 2
How to… ............................................................................................................ 3 Lesson 1 – Introduction to Astra Schedule .................................................................. 3 Lesson 2 – Using the Grid Tabs .................................................................................. 8
Exercises / Labs............................................................................................... 13 Exercise I................................................................................................................... 13 Exercise 2.................................................................................................................. 13 Lab I .......................................................................................................................... 14 Lab 2 ......................................................................................................................... 14
Exercises / Labs - Solutions............................................................................. 15 Exercise I................................................................................................................... 15 Exercise 2.................................................................................................................. 15 Lab I .......................................................................................................................... 15 Lab 2 ......................................................................................................................... 16

M o d u l e A O v e r v i e w
Notes:
Introduction
Lesson Audience This overview of the Astra Schedule system and interface is intended as a starting point for all Astra Schedule users and administrators.
Lesson Objectives • Overview of the Astra System
• Understand the main user interface components
• Identify the upper and lower toolbars and their functions
• Customize the Astra Schedule view
Configuration Requirements • Astra Schedule Client connected to a viable database containing room
inventory information
• Completed initial import of section information for viewing purposes
• See System Administrator Guide for more information.
Common Practices • Costly conflicts and errors associated with manual scheduling
• Dual entry and errors due to SIS system / scheduling incompatibility
• Inability to support multiple users across campus-related entities
• Unavailability of a Web client resource
• Lengthy scheduling processes and unrealistic deadlines on course
scheduling
• Misuse of resources, resulting in inaccurate forecasting for growth potential
• Lack of reporting needed to influence change
1

M o d u l e A O v e r v i e w
Notes:
Best Practices • Enterprise calendaring with real-time conflict checking
• SIS integration
• Distributed scheduling capabilities
• Web-based solutions
• Optimized scheduling
• Scenario capabilities
• Resource utilization reporting
Introduction to Tool Ad Astra Information Systems evolved from The Shaver Partnership, an innovative architecture firm formed in 1915 with the original mission of educational facilities design and—beginning in the 1950’s—higher-education space-planning and analysis. After decades of helping colleges and universities with resource and scheduling issues, our president Tom Shaver chose to leverage this experience to provide solution services supported by an integrated, campus-wide scheduling system that can be configured to fit the unique needs of each institution. The result is Astra Schedule, a software package using the latest technology that helps colleges and universities manage their resources, analyze data, and plan growth like never before. Welcome to Astra Schedule. Solutions that fit.
2

M o d u l e A O v e r v i e w
Notes:
How to…
Lesson 1 – Introduction to Astra Schedule The Astra Schedule interface is similar in design to other common Windows applications. Navigation is accomplished through the use of pull-down menus and toolbar icons. The main components of the interface are described below:
Figure 1
Refer to the labeled features in Figure 1 for the following descriptions:
1. Pull-Down Menus group together common functionality across the top of the screen.
2. Upper Toolbar contains shortcuts to most commonly used functions.
3. Grid Tabs display the underlying data from Section, Event, Room and
Exam tables.
Note: Exams may not be enabled in the system and the tab may not be displayed.
4. Lower toolbar includes data navigation tools and other data utilities.
3

M o d u l e A O v e r v i e w
Notes: The toolbar icons vary with the selected Grid Tab.
5. Group By option groups the displayed records on a particular field. The
groups are displayed as tabs at the bottom of the screen. The Jump To list takes the user directly to that Group tab.
6. Term tabs filter the displayed Section information to the selected
academic term.
7. Campus Tabs display data only relevant to the selected campus.
8. Data Grid displays Section, Room, Event, or Exam data in a spreadsheet style format.
9. Group tabs group data by fields as selected from the Group By option.
Component Definition
Production Mode indicates that any changes to Section scheduling data are made to the currently loaded academic schedule.
vs.
Scenario Mode allows users to play
“what if” scheduling situations without affecting the current schedule.
The Event Cutoff Date is the last day of event meetings which users may schedule into rooms used for academic purposes, to prevent interference with future academic scheduling.
The View Dates is the filter for displayed sections and has no effect on Events or Rooms. If a term is selected to be viewed, the dates reflect the start/end of that term.
Main Toolbar The upper toolbar is located at the top of the screen directly below the drop down menus. The buttons in the upper toolbar are shortcuts to the most commonly used functions.
4
M o d u l e A O v e r v i e w
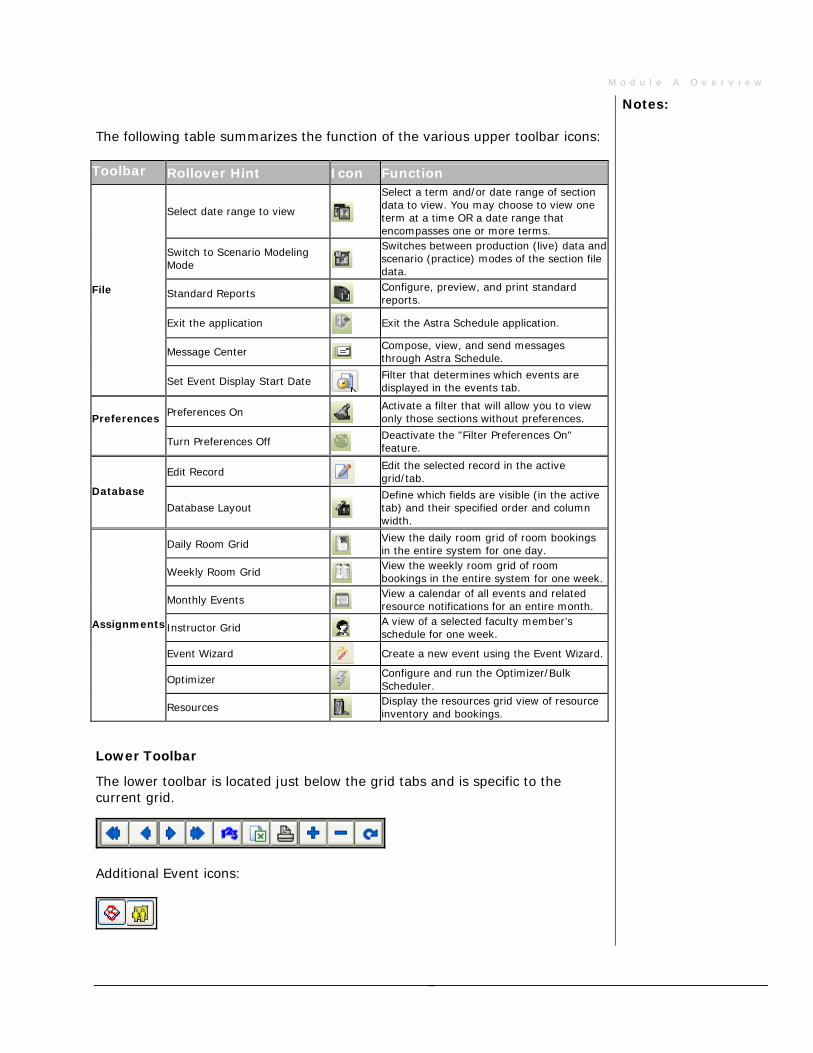
Notes: The following table summarizes the function of the various upper toolbar icons: Toolbar Rollover Hint Icon Function
Select date range to view
Select a term and/or date range of section data to view. You may choose to view one term at a time OR a date range that encompasses one or more terms. Switches between production (live) data and scenario (practice) modes of the section file data.
Switch to Scenario Modeling Mode
Configure, preview, and print standard reports.
Standard Reports
File
Exit the application Exit the Astra Schedule application.
Compose, view, and send messages through Astra Schedule.
Message Center
Filter that determines which events are displayed in the events tab.
Set Event Display Start Date
Activate a filter that will allow you to view only those sections without preferences.
Preferences On Preferences
Deactivate the "Filter Preferences On" feature.
Turn Preferences Off
Edit the selected record in the active grid/tab.
Edit Record
Database
Database Layout
Define which fields are visible (in the active tab) and their specified order and column width.
View the daily room grid of room bookings in the entire system for one day.
Daily Room Grid
View the weekly room grid of room bookings in the entire system for one week.
Weekly Room Grid
View a calendar of all events and related resource notifications for an entire month.
Monthly Events A view of a selected faculty member’s schedule for one week.
Instructor Grid Assignments
Create a new event using the Event Wizard. Event Wizard
Configure and run the Optimizer/Bulk Scheduler.
Optimizer
Display the resources grid view of resource inventory and bookings.
Resources
Lower Toolbar
The lower toolbar is located just below the grid tabs and is specific to the current grid.
Additional Event icons:
5

M o d u l e A O v e r v i e w
Notes: The following table summarizes the function of the various lower toolbar icons: Rollover Hint Icon Use it to...
Go to First Row Go to the first record in the active tab.
Previous Row
Go to the previous record in the active tab.
Next Row
Go to the next record in the active tab.
Go to Last Row Go to the last record in the active tab.
Remove Sorts
Clear sorts from all columns in the active tab.
Export data being displayed in the grid to an Excel file.
Export Grid
Print Grid Print the visible data in the active tab.
Add (Section, etc.) Create a new record in the active tab.
Delete (Section, etc.) Delete the highlighted record in the active tab.
Refresh Grid Refresh the data in the active tab.
Create a copy of the selected event. Clone Event (Event)
Combine multiple selected events into one event.
Combine Event (Event)
Database Layout Tool
The data tables displayed on the various grid tabs contain many database fields. Users may prefer to see certain fields in the grid’s initial display. Some fields, such as custom user fields, may not be used at all. The Database Layout tool is used to customize the database field display on each grid. The following steps demonstrate how to use to use the Database Layout tool:
1. From the Database pull-down menu, select Database Layout.
2. The Database Layout dialog appears (refer to Figure 2).
Figure 2
6

M o d u l e A O v e r v i e w
Notes: 3. The two checkboxes at the bottom of the form allow the user to filter
sections out of the main views based on data flags.
4. To hide a database field(s), locate the field name in the Fields Displayed area. Highlight the field(s) (use the CTRL key while picking
to select multiple fields) and click on the icon. The field now appears in the Fields not displayed area.
5. To rearrange the database field display order, select a field and hold
while dragging the field to its new location (refer to Figure 3).
Figure 3
6. To change the display label of a field, highlight the field and click on the
icon. The Display Label dialog appears (refer to Figure 4). 7. Enter a value for the Display Label and click OK.
Figure 4
Note: Changing the display level can be turned off by the system administrator in user access settings.
Toolbar Customization
To add and remove icons from the various upper toolbars, click on the small down arrow on the right of the toolbar (refer to Figure 5). The default icons for
that toolbar are listed. Icons with a button next to them are already displayed. Click anywhere on the icon description to add/remove it from the toolbar.
7

M o d u l e A O v e r v i e w
Notes:
Figure 5
Note: Toolbars can be customized with additional icons not shown in the default list and new toolbars can be created. See the Astra Schedule User’s Guide for further details. To reposition a toolbar, click on the toolbar handle, hold and drag the toolbar to its new location (refer to Figure 6). Toolbars can be oriented horizontally or vertically at the sides of the screen, or “float” above the screen contents.
Figure 6
Lesson 2 – Using the Grid Tabs
Academic Terms and View Dates
Section records are viewed on the Section Tab by a selected date range. The user can manually select the start and end dates in the Select Date Range to View dialog screen. Dates can also be defaulted in from a term in the system as well. If the selected date range crosses multiple terms, all sections crossing the date range will display in their corresponding term tab. The following steps demonstrate how to view an academic term: From the File pull-down menu, choose Select Dates. The Select Date Range dialog appears (refer to Figure 7). Select a Term to automatically set the Start and End Dates. Click OK to return to the Astra Schedule main window. Optionally, the Start and End Dates can be manually set using the calendar tools.
Note: If the specified date range spans multiple terms, all coinciding terms will appear as tabs.
8

M o d u l e A O v e r v i e w
Notes:
Figure 7
Group Tabs
The Group By option is used to group a grid tab on a specific field or combination of fields. The Groups appear as tabs along the bottom of the grid.
Figure 8
To group grid data, select a field or field combination from the Group By menu (refer to Figure 8). A row (or rows) of tabs appears below the data grid (refer to Figure 9).
Figure 9
Either select a Group tab or select a value from the Jump To menu to go directly to that tab.
Grouping Columns
To group a column by distinct values, click and hold the column heading and
9

M o d u l e A O v e r v i e w
Notes: drag into the area above the grid (refer to Figures 10 and 11).
Figure 10
Figure 11
Simple Sort
To sort the data in the active grid by a single column, click and release a column heading. The values are initially sorted in ascending order.
10

M o d u l e A O v e r v i e w
Notes: Click on the column heading again to sort in descending order (refer to Figure 12).
Tip: Shift-click on multiple columns to get multiple field sorts.
Click on the icon on the lower toolbar to remove column sorting.
Figure 12
Column Filter
Grid data can be further filtered by using the Column Filter options. Click on the black arrow next to the column heading to view the list and select a distinct field (refer to Figure 13). Data can be filtered by multiple columns and filters are customizable.
Figure 13
Click the icon to completely remove the filter. Click the to toggle the filter on and off (refer to Figure 14).
11

M o d u l e A O v e r v i e w
Notes:
Figure 14
Tip: When unable to find a specific section, be sure to check the current filters and groupings to verify that the section has not been filtered out of the grid view.
12

M o d u l e A O v e r v i e w
Exercises / Labs
Exercise I List 3 issues (pains) experienced on your campus, prior to licensing Astra Schedule:
1.
2.
3. How will you use Astra Schedule to alleviate or eliminate these issues?
1.
2.
3.
Exercise 2 Which of the following features will your school utilize?
Section Scheduling Event Scheduling Web Client Section Optimization Resource Scheduling Exam Scheduling Accounting
Which of the following features will you be responsible for?
Section Scheduling Event Scheduling Web Client Section Optimization Resource Scheduling Exam Scheduling Accounting
13

M o d u l e A O v e r v i e w
Lab I Filter the main section grid to the unscheduled sections of the most current term. Then apply the preference filter to see only the sections that still need preference information. What steps did you take?
Lab 2 Set the events tab to show the following columns in order: RESERVATION NUMBER, CUSTOMER, START DATE, END DATE, START TIME, END TIME, EVENT STATUS Now rename the EVENT STATUS column to “Status”. What steps did you take?
Completed for Certification: ________________________________ / Date: ________________ Ad Astra Training Specialist
14

M o d u l e A O v e r v i e w
Exercises / Labs - Solutions
Exercise I List 3 issues (pains) experienced on your campus, prior to licensing Astra Schedule: Our thoughts…
There are an infinite number of responses that would fit here, including all of the “Common Practice” issues listed in this module. Each user will have noticed issues specific to their job duties as well as those that plague the institution as a whole.
How will you use Astra Schedule to alleviate or eliminate these issues? Our thoughts…
Astra Schedule is software designed to support you in creating and maintaining the optimal scheduling environment for your campus. Each user will find the benefit of automated and/or optimized scheduling as it pertains to their specific job duties. With the completion of training, many benefits that might not have been easily recognized before should become apparent to the user.
Exercise 2 Which of the following features will your school utilize?
Institution specific Which of the following features will you be responsible for?
User specific
Lab I Filter the main section grid to the unscheduled sections of the most current term. Then apply the preference filter to see only the sections that still need preference information. What steps did you take?
1. Open the application and select the sections tab. 2. From the File menu, select the “Select Dates” option and set the dates by selecting the most
current term. 3. In the Group By box on the sections tab select the “Status” option and at the bottom of the
grid, select the blank tab. (These would be sections with no status, or unscheduled.) 4. Finally, use the Preferences On button on the main toolbar to filter to only the unscheduled
section that still need preferences.
15

M o d u l e A O v e r v i e w
Lab 2 Set the events tab to show the following columns in order: RESERVATION, CUSTOMER, START_DATE, END_DATE, START_TIME, END_TIME, EVENT_STATUS Now rename the EVENT_STATUS column to “Status”. What steps did you take?
1. Open the application and select the events tab. 2. From the Database menu, select the “Database Layout” option. 3. Using the arrow buttons, or drag and move the listed fields into the box on the right and all
other fields to the left box. Be sure to order them correctly. 4. Finally, use the Edit button or double-click on the EVENT_STATUS fieldname to bring up the
Display Label Dialog for editing.
16


