32
ATMOS ® i View 538.0000.B 539.0000.B 2014-08 Index:16 Operating instructions English
| Date post: | 27-Mar-2018 |
| Category: |
Documents |
| Upload: | nguyenliem |
| View: | 216 times |
| Download: | 1 times |

ATMOS® i View
538.0000.B539.0000.B
2014-08 Index:16
Ope
rati
ng in
stru
ctio
ns
English
2
Table of contents
ATMOSMedizinTechnik GmbH & Co. KGLudwig-Kegel-Straße 1679853 LenzkirchGermany
Phone +49 7653 689-0Fax: +49 7653 689-190 +49 7653 689-292 (Service Center)
E-mail: [email protected]: www.atmosmed.de
5.0 Cleaning ................................................................. 20-215.1 Instructions for cleaning and care ................................ 205.2 Cleaning the mechanical microscope surface .............. 205.3 Cleaning of lenses / eyepieces .................................... 215.3.1 Cleaning optical surfaces ............................................. 215.3.2 Optical surface of the endoscope port ......................... 215.3.3 Fogging of optical surfaces .......................................... 215.4 Hygienic plan ................................................................ 21
6.0 Maintenance and Service .......................................... 226.1 General advice ............................................................. 22
7.0 Trouble shooting ........................................................ 23
8.0 Options and Accessories .......................................... 24
9.0 Technical data............................................................. 26
10.0 Disposal ...................................................................... 27
11.0 Notes on EMC ........................................................ 28-30
ATMOS General terms and conditions
1.0 Introduction ............................................................... 3-71.1 Notes on operating instructions ...................................... 31.2 Intended use .................................................................. 41.3 Functions ........................................................................ 51.4 Explanation of pictures and symbols .............................. 61.5 Scope of supply ............................................................. 71.6 Transport and storage .................................................... 7
2.0 For your safety ............................................................. 8 3.0 Setting up and starting up ...................................... 9-133.1 Overview ....................................................................... 93.2 Assembly ...................................................................... 103.2.1 Connection to the mains supply ................................... 103.2.2 Microscope overview .................................................... 103.2.3 Operating elements at the microscope .........................113.2.4 Rear view of the control device ATMOS® i View 21 .......113.2.5 Rear view of the control device ATMOS® i View 31 .......113.3 Integration possibilities ................................................. 123.1 Mobile stand ENT ......................................................... 123.2 Wall stand ..................................................................... 123.4 Start up ......................................................................... 123.5 Operation requirements ............................................... 123.6 Starting up at a glance ................................................. 13
4.0 Operation ............................................................... 14-194.1 Microscope suspension ................................................ 144.2 Mechanical arm ............................................................ 144.3 Hand grips .................................................................... 144.3.1 T-hand grip ................................................................... 144.3.2 Lateral double hand grip .............................................. 144.4 Adjusting the interocular distance ................................ 154.5 Adjusting the eye pieces .............................................. 154.6 Exchange of lenses ...................................................... 164.7 Exchange of lenses with manual fi ne focusing ............ 164.8 Adjustment of the 5 fold magnifi cation changer ........... 164.9 Focussing ..................................................................... 174.9.1 Fine focussing .............................................................. 174.10 Exchange of lense tubes .............................................. 174.11 Pivoting colour fi lter ...................................................... 184.12 Microscope zoom and object fi eld size ........................ 184.13 Measuring scale ........................................................... 184.14 Integrated camera ........................................................ 194.15 Endoscope adapter ...................................................... 204.16 HD adapter for SONY NEX-5 ....................................... 19

3
1.0 Introduction
1.1 Notes on operating instructions
These operating instructions contain important notes on how to operate the ATMOS® i View safely, correctly and effectively. Their reading helps to avoid risks, and also to reduce repair costs and down-times. This increases, amongst other things, the reliability and service-life of the device.These operating instructions serve not only for new operating personnel to be instructed in its use, but also for use as a reference manual. Reprints (also in extracts) only with permission in written form by ATMOS.These operating instructions must always be kept available near the device.
Care and safety inspections in conjunction with professional execution provide for operational safety and readiness for use of your ATMOS® i View and are therefore a must besides regular cleaning. Repair work and safety inspections may be carried out only by expert personnel authorised by ATMOS. By applying only original spare parts you will have the guarantee that operational safety, readiness for work and the value of your ATMOS® i View will be preserved.
The product ATMOS® i View bears CE marking CE 0124 according to the EC Directive of the council for medical products 93/42/EEC and meets the basic requirements of Appendix I of the directive. The product ATMOS® i View complies with all applicable requirements of the directive 2011/65/EC restricting the use of certain hazardous substances in electrical and electronic equipment (“RoHS”). The declaration of conformity can be obtained on our website at www.atmosmed.com. The quality management system applied at ATMOS has been certified according to international standards EN ISO 9001 and EN ISO 13485. Prior to start-up please peruse chapter 2.0 „For your safety“, in order to be prepared for any possible dangerous situations.
Please keep this document for future consultation!
These operating instructions are valid for the following devices:
ATMOS® i View 21 ......................... REF 538.0000.0
ENT examination microscope with a fanless high transmission, high performance LED light source integrated into the microscope head.
ATMOS® i View 31 ......................... REF 539.0000.0
ENT examination microscope with a fanless high transmission, high performance LED light source integrated into the microscope head

4
Name: ATMOS® i View 21 ATMOS® i View 31
Main functions:Optical instrument for magnifi cation and illumination from the mouth to the pharynx, the auditory canal to the ear drum and the nasal cavities. It can be used for observation and documentation as well as for the treatment of humans.
Med. indications/ application:Standard ENT examination for visual inspection in the fi eld of ENT
Specifi cation of the main function:The application organ is illuminated by an integrated, fanless high transmission high performance LED light source, 5-step magnifi cation changer (0,4 / 0,6 / 1,0 / 1,6 / 2,5), integrated camera modules, pivoting colour fi lters and an automatic light control via tilt sensor. The light output is min. 120 kLux (200 mm), min. 80 kLux (250 mm), min. 55 kLux (300 mm), min. 30 kLux (400 mm) and a colour temperature of 5.500 K ± 10%. The illuminated organ can be visualized on a monitor if desired.
Application organ:Mouth to pharynx, auditory canal to the ear drum and the nasal cavities
Application time:Short term use on the patient (up to 30 days)
Application site:Application sites are clinics, practices and ORs for ENT doctors and phoniatrists as well as temporal bone laboratory. The examination with the microscope may only be executed by medically trained persons.The microscope may only be used in closed rooms, on the ground, on the wall, to the ceiling or on ATMOS ENT units.In ORs an appropriate protective sleeve must be used for the microscope.
Contraindications:No application in ophthalmology.
The product is: X active not active
Sterility: The microscope is no sterile product.
Single use product / reprocessing: The microscope is intended for multiple use. The device and part of the accessories are reusable, for information on reprocessing and disinfection please see the operating instructions.
1.0 Introduction
5
1.0 Introduction
1.3 Functions
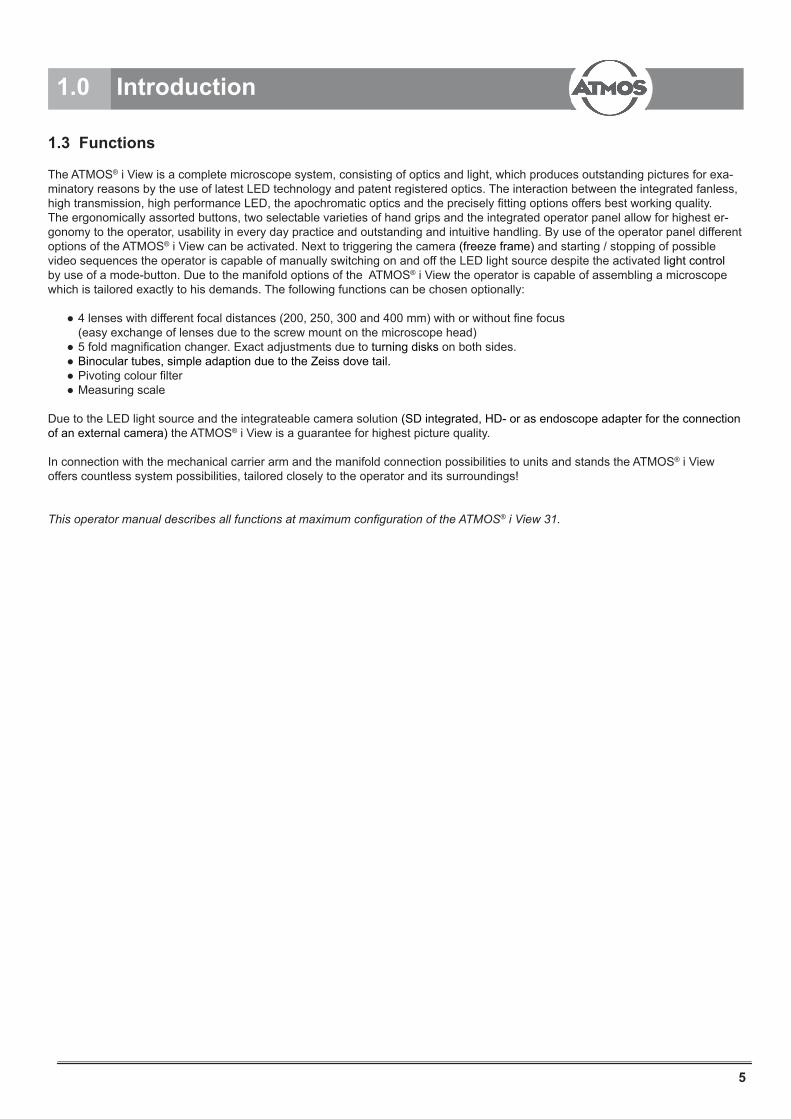
The ATMOS® i View is a complete microscope system, consisting of optics and light, which produces outstanding pictures for exa-minatory reasons by the use of latest LED technology and patent registered optics. The interaction between the integrated fanless, high transmission, high performance LED, the apochromatic optics and the precisely fi tting options offers best working quality.The ergonomically assorted buttons, two selectable varieties of hand grips and the integrated operator panel allow for highest er-gonomy to the operator, usability in every day practice and outstanding and intuitive handling. By use of the operator panel different options of the ATMOS® i View can be activated. Next to triggering the camera (freeze frame) and starting / stopping of possible video sequences the operator is capable of manually switching on and off the LED light source despite the activated light control by use of a mode-button. Due to the manifold options of the ATMOS® i View the operator is capable of assembling a microscope which is tailored exactly to his demands. The following functions can be chosen optionally:
4 lenses with different focal distances (200, 250, 300 and 400 mm) with or without fi ne focus (easy exchange of lenses due to the screw mount on the microscope head) 5 fold magnifi cation changer. Exact adjustments due to turning disks on both sides. Binocular tubes, simple adaption due to the Zeiss dove tail. Pivoting colour fi lter
Measuring scale
Due to the LED light source and the integrateable camera solution (SD integrated, HD- or as endoscope adapter for the connection of an external camera) the ATMOS® i View is a guarantee for highest picture quality.
In connection with the mechanical carrier arm and the manifold connection possibilities to units and stands the ATMOS® i View offers countless system possibilities, tailored closely to the operator and its surroundings!
This operator manual describes all functions at maximum confi guration of the ATMOS® i View 31.

6
1.4 Explanation of pictures and symbols
1.0 Introduction
!
→
clickclick
Graphic symbols contained in this manualWarning,special diligent notice!
Short cuts / symbols contained in this manual
Please press where dot indicates
Subnumeration
Numeration
General informationFollow the arrows whilst proceeding, sequence
Replace
Check
Please read, important information
Move, plug... in this direction
Engage, check cor-rect fi t
Turn, shift... in this direction
Important information
Buttons / symbols of ATMOS® i View Serial number
Order number
Manufacturing date
The CE sign shows that thisproduct meets the appropriaterequirements of the ECDirectives.
Current fuse
REF
SN
Observe operator manual!
Light on / off (independent of automatic light control) Switch between the two light modes Video (start / stopp) Freeze frame
Output of the electronical current supply of the microscope(ATMOS® i View 21)
USB port (ATMOS® i View 31)
Record function (ATMOS® i View 31)
Freeze (ATMOS® i View 31)
Output signals of the tilt sensor in the carri-er arm system (ATMOS® i View 31)
Triggering signal of ATMOS Strobo 21 LED (ATMOS® i View 31)
Foot switch (ATMOS® i View 31)
Potential equalisation acc. to IEC 60417-5021
Fuse
Microscope (ATMOS® i View 31)
S-video-output (ATMOS® i View 31)
Single use product - not for reuse.Exchange after use.2Weight adjustment for the carrier arm
The carrier arm of the mobile stand must be brought into a position suita-ble for transportDo not lean against the device.
Do not look directly into the light source of the ATMOS® i View
060.0604.0
Schild Transportst. MikolpLabel transport position Mikolp
1:1
01 9463/13 15.07.13 OEI
24.07.13 O.Eirich
Blatt(sheet) 1
Bl.1/1
(index)Zust.
(revision)Änderung Datum
(date)Name(name)
Maßstab (scale) Konstr. Nr.
Gepr.
Bearb.
Name
Erstellt
Datum
Ers.f. : Ers.d. :
Benennung (description)
Zeichnungs /Artikel-Nr.(part no.)
Alle Maße in mm/all dimensions in mmAllgemeintoleranzen /General tolerancesDIN ISO 2768 - mK
79853 Lenzkirch / Germany
ATMOS Medizin T echnik GmbH & Co. KG
Ludwig - Kegel - Str. 16
Tel: +49 7653 689 -0
Fax: +49 7653 689 -190
www.atmosmed.de
Sch
utz
verm
erk
(C
opyr
ight notic
e)
DIN
IS
O16016
A4
3M Folie7876EC+Laminat 7730FL
nicht bemaßte Radien R5
weißtransparentRAL 5005 SignalblauRAL 3001 Signalrotschwarz
02 9576/13 22.11.13 OEI
C.Reinhardt09.01.14
09.01.14 C.Reinhardt

7
1.0 Introduction
1.5 Scope of supply
Prior to dispatch, this ATMOS device was subjected to an extensive functional test and has been carefully packed. Nevertheless, please compare the contents of the shipment on completeness immediately upon receipt (see delivery note).
1.6 Transport and storage
The ATMOS® i View may only be transported in a upholstered and protective shipping box.
Please note down and report any damages which occured during shipping immediately. Please make use of the attached QD 434 delivery complaint / return shippment - form when complaining or sending back. This form can also be downloaded from our website
www.atmosmed.com service section.
After the transport of the ATMOS® i View in temperatures below 0°C it needs to be kept at room temeperature for at least six hours. If the ATMOS® i View is not acclima-tized it may not be used as damages to the electronic components may be the result.
Surrounding conditions: Transport / storage: -10...+50 °C; 30...95 % humidity no condensation at an air pressure of 500...1060 hPa
Operation: +10...+35 °C; 30...95 % humidity no condensation at an air pressure of 700...1060 hPa
Microscope
Operating instructions
Microscope arm
Protective cover

8
2.0 For your safety
!For your safety
Dispose of wrappings accordingly.
Before connecting the ATMOS® i View it needs to be checked whether the requested main voltage of the ATMOS® i View matches the mains voltage of the mains power supply.
Use correct and undamaged plugs and extension cables only.
Unplug the ATMOS® i View from the socket fi rst. Discon-nect the connection line on the ATMOS® i View after-wards only. Never touch plug or line with wet hands.
Take notice of the environmental conditions stated in the technical data (chapter 9.0).
The ATMOS® i View fully complies with the electroma-gnetic immunity requirements of standard IEC 60601-1-2 / EN 60601-1-2 „Electromagnetic compatibility - Medical Electrical Equipment“.
There are no warranty claims for damage caused by third party accessories and consumables underlie no claims on ATMOS.
ATMOS is not liable for personal injury and damage to property if • no original ATMOS parts are being used, • the advice for use in these operating instructions is not
being observed, • assembly, new settings, alterations, extensions and
repairs have been carried out by personnel not authorised by ATMOS.
These operating instructions correspond with the con-struction of the unit and with the current status of safety-related standards at the time of printing. Proprietary rights are existing for all described circuits, processes, names, software programs and units.
Unplug the device immediately if you observe fumes, sparks or weird noises.
After a longer use of the ATMOS® i View in connection with an ear speculum the patiend may feel dizzy!
With every light source a warming of tissue due to ab-sorption may occur. Please make sure to reduce durati-on of use to a minimum. Switch off the light source when not in use, check heat development if neccessary.
The ATMOS® i View may be operated only in rooms used for medical purposes, but not in areas subject to explosion hazards and in oxygen rich environments.
Consider, when setting up the microscope, that the elastic force of the arm – without microscope head – is exceedingly strong. Operate the break of the height adjustment carefully.
Please note that only PCs and monitors with IEC 60601-1/EN 60601-1/EN 60950-1 approval may be connected to the S-video outlet of the ATMOS® i View supply modu-le!
Make sure that the unit is positioned so that all the con-trols and the on/off switch are always accessible.
The ATMOS® i View is a device designed in line with IEC 60601-1-1/EN60601-1 and it is a device with protection class I. In order to avoid the RISK of electrical shock, this unit may only be connected to a mains supply with proper-ly installed earth conductor.
Power cables, accessories and access cables need to be checked for defects prior to setting up the ATMOS® i View. Defect cables need to be replaced immediately.
The ATMOS® i View may be used in supervised opera-tion by qualifi ed personnel which has been trained for operating the appliance only.
The ATMOS® i View is not designed to be used in an explosion-hazardous environment (M and G). This enviroment may be caused by the use of fl amable anaes-thetics, skin cleansing products and skin disinfectants.
If fl uids penetrated the ATMOS® i View it needs to be sent in and may only be used after the check up of an ATMOS authorised person.
After the transport of the ATMOS® i View in temperatures below 0°C it needs to be kept at room temeperature for at least six hours. If the ATMOS® i View is not acclimatised it may not be used as damages to the electronic com-ponents may be the result.
Do not plug in electric connections (plug, socket) under the use of force. If this is not possible check whether the plug fi ts the socket. If you should ascertain a defect in the connection you should have it repaired by our service.
Never look straight into the sun with lenses or eye lenses.
Always make sure that you do not blind patients with the light source! Watch out that patients do not look directly into the light source! Make sure never to look directly into the light source yourself.
> Damages to the eyes due to blinding may be the result.
An annual safety check needs to be executed.
Prior to every use the stands (all joints included) need to be checked for safe connections.
Take care that the patient is not touching the device or gets in contact with the device.
Please note that only the ATMOS® Strobo 21 LED may be connected to the strobe port of the ATMOS® i View!
Please observe the EMC guideline. Failure to follow this guideline can result in a hazard.
9
3.0 Setting up and starting up
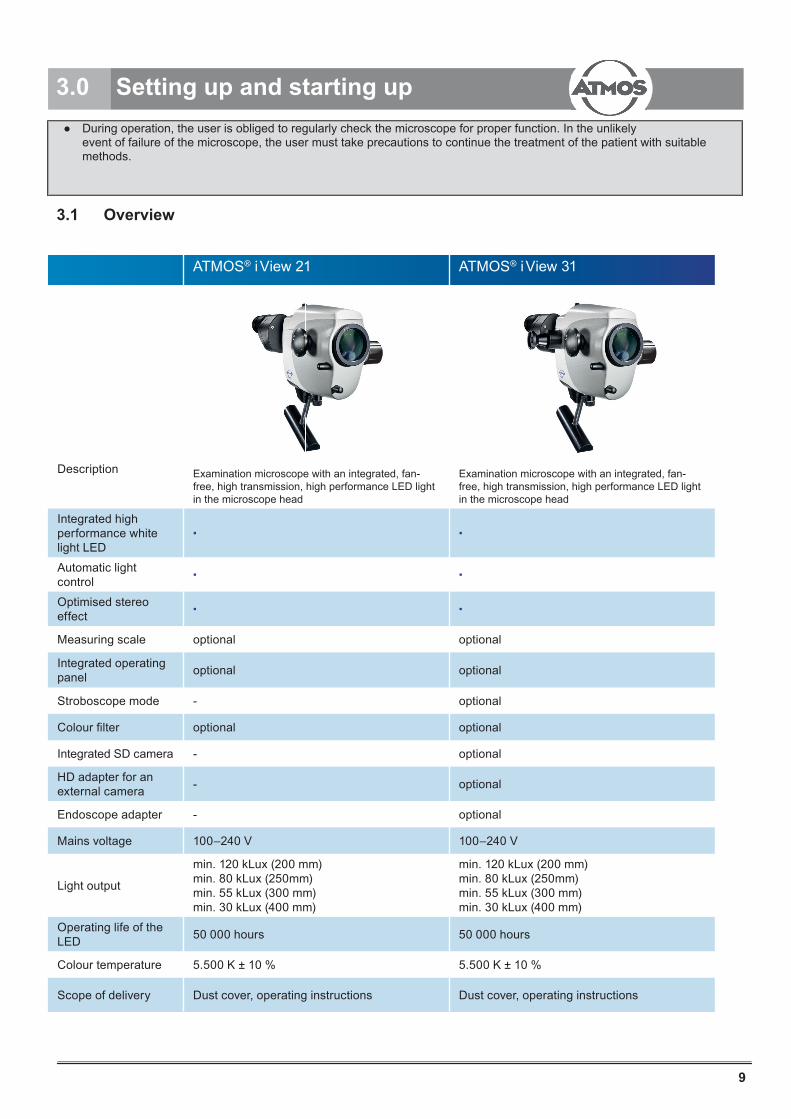
3.1 Overview
ATMOS® i View 21 ATMOS® i View 31
Description Examination microscope with an integrated, fan-free, high transmission, high performance LED light in the microscope head
Examination microscope with an integrated, fan-free, high transmission, high performance LED light in the microscope head
Integrated high performance white light LED
Automatic light control
Optimised stereo effect
Measuring scale optional optional
Integrated operating panel optional optional
Stroboscope mode - optional
Colour fi lter optional optional
Integrated SD camera - optional
HD adapter for an external camera - optional
Endoscope adapter - optional
Mains voltage 100–240 V 100–240 V
Light output
min. 120 kLux (200 mm) min. 80 kLux (250mm) min. 55 kLux (300 mm) min. 30 kLux (400 mm)
min. 120 kLux (200 mm) min. 80 kLux (250mm) min. 55 kLux (300 mm) min. 30 kLux (400 mm)
Operating life of the LED 50 000 hours 50 000 hours
Colour temperature 5.500 K ± 10 % 5.500 K ± 10 %
Scope of delivery Dust cover, operating instructions Dust cover, operating instructions
During operation, the user is obliged to regularly check the microscope for proper function. In the unlikely event of failure of the microscope, the user must take precautions to continue the treatment of the patient with suitable
methods.

10
3.0 Setting up and starting up3.2 Assembly
Please make sure that the static conditions stated by ATMOS MedizinTechnik are met (for details see the separately enclosed document „Static requirements for installing the ATMOS i View“). The fulfi lment of these requirements must be confi rmed by an authorized expert.Mains voltage and fuse:Mains voltage: 100-240 V; 50/ 60 Hz, Fuse: 2 x T 3,15 A
Please note that only PCs and monitors with IEC 606010-1/EN 60601-1 approval may be connected to the S-video outlet of the ATMOS® i View supply module!Please note that only the ATMOS® Strobo 21 LED may be connected to the strobe port of the ATMOS® i View!
3.2.1 Connection to the mains supplyIn order to safely disconnect the device from the power supply the power cable must be removed from the IEC power connector of the power supply module!Potential equalisation:The ATMOS® i View supply module has a rear connection for potential equalisation which can be connected to the potential equali-sation rail in the room if need be. Hereby safety of user or patient can be increased especially in case of a defective earth conduc-tor. For connecting the device’s potential equalisation plug with the potential equalisation rail of the room, please use the potential equalisation cord with REF 530.0030.0.
3.2.2 Microscope overviewRotating disk 5 fold magnifi cation changer
T-hand grip(optional)
Wide fi eld eye piece lenses
Binocular tube
lens
Pivoting colour fi lters
brightness control
Lateral double hand grip (optional)
Operator panel
Endoscope adapter
3.2.2 Microscope overviewRotating disk 5 fold magnifi cation changer
Wide fi eld eye piece lenses
Binocular tube
lens
Pivoting colour fi lters
brightness controlbrightness control
Lateral double hand Lateral double hand HD-Variante
Measuring scale
!
11
Ers.d. :
Zeichnungs /Artikel-Nr.(part no.)
Benennung (designation)
Werkstoff (material)
Konstr. - Nr:Mikolp-200-001.
Blatt(sheet)
Zust.(index)
Änderung(revision)
Datum(date)
Name(name)
Gepr.
Bearb.
NameDatum
Maßstab (scale)
1
Alle Maße in mmall dimensions in mmAllgemeintoleranzen /General tolerancesDIN ISO 2768 - mKüber 30 mm ±0,3
Ers.f.:
Erstellt
79853 Lenzkirch / Germany
ATMOS Medizin T echnik GmbH & Co. KG
Ludwig - Kegel - Str. 12, 14-16, 18
Tel: +49 7653 689 -0
Fax: +49 7653 689 -190
www.atmosmed.de
Sch
utz
verm
erk
DIN
IS
O 16016
-
27.03.3013 C.Reinhardt
1:1 -
Tasterfolie
060.0621.0
MODE
LED AFDSTROBO
3.0 Setting up and starting up
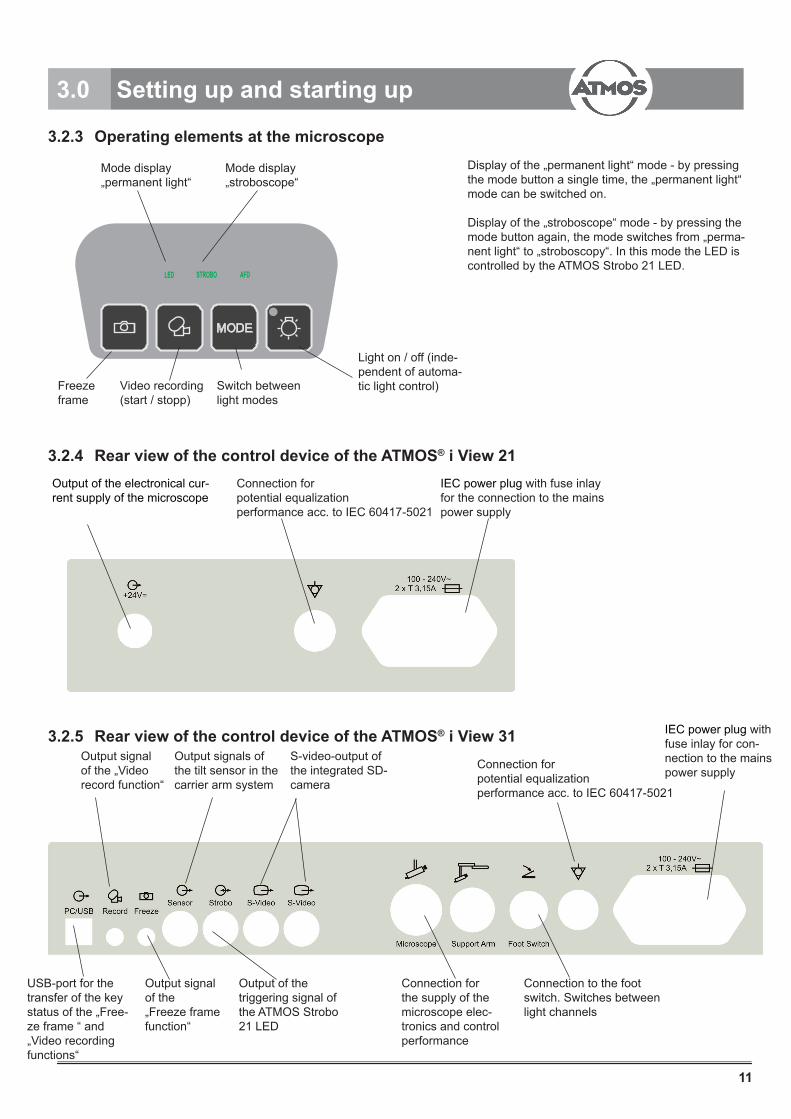
Output of the electronical cur-rent supply of the microscope
Connection forpotential equalizationperformance acc. to IEC 60417-5021
IEC power plug with fuse inlay for the connection to the mains power supply
3.2.4 Rear view of the control device of the ATMOS® i View 21
3.2.5 Rear view of the control device of the ATMOS® i View 31
USB-port for the transfer of the key status of the „Free-ze frame “ and „Video recording functions“
Output signal of the „Video record function“
Output signal of the „Freeze frame function“
Output signals of the tilt sensor in the carrier arm system
Output of the triggering signal of the ATMOS Strobo 21 LED
S-video-output of the integrated SD-camera
Connection for the supply of the microscope elec-tronics and control performance
Connection to the foot switch. Switches between light channels
3.2.3 Operating elements at the microscope
Mode display„permanent light“
Mode display„stroboscope“
Light on / off (inde-pendent of automa-tic light control)Switch between
light modesVideo recording(start / stopp)
Freezeframe
IEC power plug with fuse inlay for con-nection to the mains power supply
Display of the „permanent light“ mode - by pressing the mode button a single time, the „permanent light“ mode can be switched on.
Display of the „stroboscope“ mode - by pressing the mode button again, the mode switches from „perma-nent light“ to „stroboscopy“. In this mode the LED is controlled by the ATMOS Strobo 21 LED.
Connection forpotential equalizationperformance acc. to IEC 60417-5021

12
060.0
604.0
Schild
Tra
nsport
st. M
ikolp
La
be
l tra
nsp
ort
po
siti
on
Mik
olp
1:1
01
94
63
/13
15
.07
.13
OE
I
24
.07
.13
O.E
iric
h
Bla
tt(s
heet)
1
Bl.1
/1
(in
de
x)Z
ust
.(r
evi
sion)
Änderu
ng
Datu
m(d
ate
)N
am
e(n
am
e)
Ma
ßst
ab
(sc
ale
)K
on
str.
Nr.
Ge
pr.
Be
arb
.
Na
me
Ers
tellt
Da
tum
Ers
.f. :
Ers
.d. :
Be
ne
nn
un
g (
de
scrip
tion
)
Ze
ich
nu
ng
s /
Art
ike
l-N
r.(p
art
no
.)
Alle
Ma
ße
in m
m/
all
dim
en
sio
ns
in m
mA
llge
me
into
lera
nze
n /
Ge
ne
ral to
lera
nce
sD
IN I
SO
27
68
- m
K
79
85
3 L
en
zkirch
/ G
erm
an
y
MedizinTechnik
atm
os@
atm
osm
ed
.de
AT
MO
S M
ed
izin
T e
chn
ik G
mb
H &
Co
. KG
Lu
dw
ig -
Ke
ge
l -
Str
. 1
6
Tel:
+4
9 7
65
3 6
89
-0
Fa
x: +
49
76
53
68
9 -1
90
ww
w.a
tmo
sme
d.d
e
Schutzvermerk (Copyright notice) DIN ISO16016
A4
3M
Folie
7876E
C+
Lam
inat 7730F
L
nic
ht bem
aß
te R
adie
n R
5
weiß
transp
are
nt
RA
L 5
005 S
ignalb
lau
RA
L 3
001 S
ignalrot
schw
arz
02
95
76
/13
22
.11
.13
OE
I
C.R
ein
ha
rdt
09
.01
.14
09
.01
.14
C.R
ein
ha
rdt
3.3 Integration possibilities
For the integration into ENT examination units ATMOS® S 61 Servant ATMOS® C 21 / C 31 ATMOS® C 11 Systema ATMOS® Servant 5
Please note that a save combination of the ATMOS® i View can only be guaranteed with the above mentioned units.
3.3.1 Mobile stand ENT
Please make sure that the microscope arm is in a retracted position when moving the roller stand.
The carrier arm of the mobile stand has to brought into a position suitable for transport
Risk of injuries! Take care not to roll the mobile stand over your feet when moving the stand
When the device is placed in working position the brakes have to be locked.
Only monitors which do not exceed the following specification must be adapted to thr mobile stand.Maximal Dimensions H x B x T: 60 x 40 x 10 cm, Weight 9.8 kgFor monitors that do not match these specifications the stability of the mobile stand cannot be guaranteed.
3.3.2 Wall stand
Affix to wall by use of a guide rail. The mounting of the microscope head is height adjustableRecommendation: Please use a water level to true the Wall Stand!3.4 Start up Take the microscope out of the box. Check whether the mains current on the type label fi ts the mains power supply.
Check the scope of delivery
Peruse safety information in part 2.0 of this instruction manual before setting up the device for the fi rst time.
After the transport of the ATMOS® i View in temperatures below 0°C it needs to be kept at room temperature for at least six hours. If the ATMOS® i View is not acclimatized it may not be used as damages to the electronic components may be the result.
Consider, when setting up the microscope, that the elastic force of the arm – without microscope head – is exceedingly strong. Operate the break of the height adjustment carefully.
To activate the ATMOS® i View please use the power switch on the front side of the control device.
3.5 Operation requirements
Please notice that the following requirements must be adhered to for the further use of the device after the installation:
All joints and connection parts in use which are responsible for the safety of the device are securely fastened.
All electronic connections (cables, plugs, power cables ect.) are in immaculate condition.
The mains current noted on the microscope and the mains current of the mains power supply are identical.
The microscope is connected to a safety connection socket by the matching mains cable.
Please make sure to never blind the patient with the light source. Do never look directly into the light source.
With every light source a warming of tissue due to absorption may occur. Please make sure to reduce duration of use to a mini-mum. Switch off the light source when not in use, check heat development if neccessary.
3.0 Setting up and starting up
Integration into ATMOS S 61 Servant
!

13
060.0
604.0
Schild
Tra
nsport
st. M
ikolp
La
be
l tra
nsp
ort
po
siti
on
Mik
olp
1:1
01
94
63
/13
15
.07
.13
OE
I
24
.07
.13
O.E
iric
h
Bla
tt(s
heet)
1
Bl.1
/1
(in
de
x)Z
ust
.(r
evi
sion)
Änderu
ng
Datu
m(d
ate
)N
am
e(n
am
e)
Ma
ßst
ab
(sc
ale
)K
on
str.
Nr.
Ge
pr.
Be
arb
.
Na
me
Ers
tellt
Da
tum
Ers
.f. :
Ers
.d. :
Be
ne
nn
un
g (
de
scrip
tion
)
Ze
ich
nu
ng
s /
Art
ike
l-N
r.(p
art
no
.)
Alle
Ma
ße
in m
m/
all
dim
en
sio
ns
in m
mA
llge
me
into
lera
nze
n /
Ge
ne
ral to
lera
nce
sD
IN I
SO
27
68
- m
K
79
85
3 L
en
zkirch
/ G
erm
an
y
MedizinTechnik
atm
os@
atm
osm
ed
.de
AT
MO
S M
ed
izin
T e
chn
ik G
mb
H &
Co
. KG
Lu
dw
ig -
Ke
ge
l -
Str
. 1
6
Tel:
+4
9 7
65
3 6
89
-0
Fa
x: +
49
76
53
68
9 -1
90
ww
w.a
tmo
sme
d.d
e
Schutzvermerk (Copyright notice) DIN ISO16016
A4
3M
Folie
7876E
C+
Lam
inat 7730F
L
nic
ht bem
aß
te R
adie
n R
5
weiß
transp
are
nt
RA
L 5
005 S
ignalb
lau
RA
L 3
001 S
ignalrot
schw
arz
02
95
76
/13
22
.11
.13
OE
I
C.R
ein
ha
rdt
09
.01
.14
09
.01
.14
C.R
ein
ha
rdt
3.0 Setting up and starting up
3.6 Starting up at a glance
Adjust microscope to initial position on the microscope suspension by use of the fi xing wheel.Adjust microscope horizontally and vertically.
Adjust all the clamps on the carrier and fl oat arm to secure the movability of the arm in correspondence with the requirements.
Swing microscope into working space.
Adjust binocular lens tubes by squeezing and pulling the tubes together or apart. The interocular distance is perfectly adjusted when looking with both eyes a circular picture is perceived!
Adjustments of the eyepieces.
Persons without glasses Persons with glasses
Eyepieces remain in initial posi-tion (eyepieces are pulled out). Dioptre scale adjusted to zero
People with defective vision and glasses
People with defective vision without glasses
(refraction values known)
People with defective vision without glasses (refraction
values unknown)
Keep glasses on, push eyepieces in direction of the lens tube until they engage audibly. Adjust dioptre scale
to zero.
Take glasses off and adjust dioptre scale to matching number (eyepieces are
pulled out).
Take glasses off and adjust both eyepieces to +5 dpt.
Remove the lens tube from the microscope head and
focus on a far off object. The object looks still blured. Turn
the dioptre ring of the fi rst eyepiece slowly in clockwise
direction until the object is sharp. Keep your other eye closed while adjusting the eyepiece. Repeat this procedure for a couple of times to determine on an
average value. Adjust the se-cond eyepiece by the same procedure and reattach the
lens tubes to the microscope head with the connective
screw (eyepieces are pulled out).
Set the 5 fold magnifi cation changer unit to maximum zoom (2.5). Approach the object with the microscope (according to the chosen focal distance) until the image is sharp. If the zoom level is changed the grade of sharpness is retained.
Brightness can be adjusted by the rotary knob on the bottom of the device if neccessary.

14
4.0 Operation4.1 Microscope suspension
The microscope head is connected laterally by a corre-sponding suspension to the microscope arm. The com-plete range of cables run through the suspension - no disturbing cables are visible from the outside (with the exception of the connection to the HD adapter and direct connection to a monitor). Due to a rotating knob, which is placed on the side of the suspension, the microscope can be adjusted vertically to the demands of the operator.To fi x the microscope head turn the rotating knob towards you in a clockwise direction.To loosen the microscope head turn the rotaing knob towards you counterclockwise.Attention: Check for a secure connection of the micro-scope to the suspension prior to every use!
4.2 Mechanical arm
Recommendation: Please use a water level to true the Mechanical arm! Consider, when setting up the microscope, that the elastic force of the arm – without microscope head – is exceedingly strong. Operate the break of the height adjustment carefully.
The mechanical microscope arm can be adjusted via four set screws according to the individual demands of the operator. Choose the strength of the clamps to suit your requirements on the mobility of the arm.Turn the rotating knob in clockwise direction to fi x the arm. To loosen the arm turn counter-clockwise.
Attention:Prior to use please make sure that the brakes of the sup-port arm are set correctly.
4.3 Hand grips
At the purchase of the ATMOS i View you may choose between two versions of handles.
4.3.1 T-hand grip
(see fi gure)
4.3.2 Lateral double hand grip
The position of the lateral double hand grip can be adju-sted in steps by pulling and turning the handle at the same time.
rotating knob
set screws
15
4.0 Operation
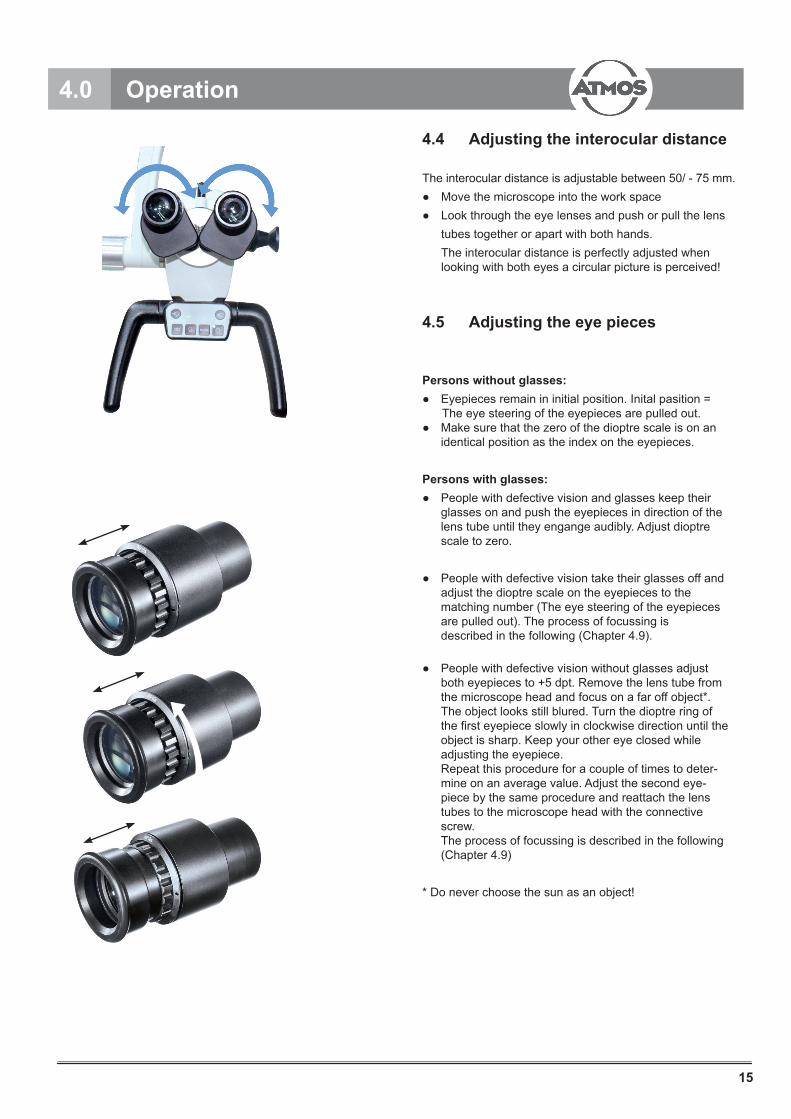
4.4 Adjusting the interocular distance
The interocular distance is adjustable between 50/ - 75 mm. Move the microscope into the work space Look through the eye lenses and push or pull the lens tubes together or apart with both hands. The interocular distance is perfectly adjusted when looking with both eyes a circular picture is perceived!
4.5 Adjusting the eye pieces
Persons without glasses: Eyepieces remain in initial position. Inital pasition = The eye steering of the eyepieces are pulled out. Make sure that the zero of the dioptre scale is on an identical position as the index on the eyepieces.
Persons with glasses: People with defective vision and glasses keep their glasses on and push the eyepieces in direction of the lens tube until they engange audibly. Adjust dioptre scale to zero.
People with defective vision take their glasses off and adjust the dioptre scale on the eyepieces to the matching number (The eye steering of the eyepieces are pulled out). The process of focussing is described in the following (Chapter 4.9).
People with defective vision without glasses adjust both eyepieces to +5 dpt. Remove the lens tube from the microscope head and focus on a far off object*. The object looks still blured. Turn the dioptre ring of the fi rst eyepiece slowly in clockwise direction until the object is sharp. Keep your other eye closed while adjusting the eyepiece. Repeat this procedure for a couple of times to deter- mine on an average value. Adjust the second eye- piece by the same procedure and reattach the lens tubes to the microscope head with the connective screw. The process of focussing is described in the following (Chapter 4.9)
* Do never choose the sun as an object!

16
4.0 Operation
4.6 Exchange of lenses
The designated thread on the microscope head allows for easy exchange and fi xation of the different lenses. Due to the integrated scew mount lenses can be taken off by turning them to the left hand side and mounted by turning them to the right.
4.7 Exchange of lenses with manual fi ne focusing
Mount lense as described above and secure it with the intermediate srewed ring.
4.8 Adjustment of the 5 fold magnifi cation changer
ATMOS‘ 5 fold magnifi cation changer enables free range zoom between 0.4x up to 2.5x. Choose desired zoom factor by using one of the
lateral rotating knobs. Pay attention that the chosen zoom factor engages
audibly with the groove. Free range between the zoom factors: 2.5 - 1.6 - 1.0
- 0.63 - 0.4. The magnifi cation that points into the direction oft he
eyepieces ist he current magnifi cation.
Lense

17
4.0 Operation
4.9 Focussing
Set the zoom to maximum (2.5) on the zoom unit. Approach the object with the microscope (according to
the chosen focal distance) until the image is sharp. If the zoom level is changed the grade of sharpness is
retained.
4.9.1 Fine focussing
The optional fi ne focussing allows for sensitive and preci-se focussing in a 17 mm range. Fine focussing is necces-sary to focus accurately while zooming in. Replace the mounted lens with the required lens with
fi ne focussing (simple mounting due to the screw mount at the microscope head. Secure with the inter-mediate screwed ring).
Focus as above mentioned. Adjust focus by use of the lateral adjusting disk.
4.10 Exchange of lense tubes
The focal distance of 160 mm of the tubes allows for a comfortable and fatigue-proof observation of the object with both eyes. Watching is easier by an exceptionally large exit pupil and a higher stereo base of 24 mm.Please adhere the lense tube while loosening the screw. Otherwise the lense tube could drop.
Undo the screw on top of the lense tubes and remove the tubes from the microscope head.
Make sure that the gudgeons and grooves of the dove tail engage and that the tubes lie fl at.
Tighten the screw again. Check for tight fi t.
Fine focussing
Undo screw
Binocular angled lens tube 45°
Binocular straight lens tube
Undo screw

18
0,5 mm 2 mm10 mm20 mm
2 mm5 mm
4.11 Pivoting colour fi lter
Enhances contrast of the microscopic picture for better visibility of vessel structures. Turn the function knob by 90° in clockwise direction to swing in the colour fi lter. By turning the knob by 90° in a counter-clockwise direction the fi lter is removed from the light path of the microscope.
4.12 Microscope zoom and object fi eld size
Lense f in mm equals the ap-proximate wor-king distance
Factor display on the zoom unit Eyepieces with lens tubesf = 160 mm
0,4 0,63 1* 1,6 2,5Total zoom / visual fi eld Ø in mm
200 3,2 / 50 5,0 / 40 8,0 / 25 12,8 / 15,6 20 / 10 10 x250 2,6 / 62,5 4,0 / 50 6,4 / 31,5 10,2 / 19,7 16 / 12,5 10 x300 2,1 / 75 3,4 / 60 5,3 / 37,5 8,5 / 23,4 13,3 / 15 10 x400 1,6 / 100 2,5 / 80 4,0 / 50 6,4 / 31,3 10 / 20 10 x
* Read off at factor 1 when using the microscope zoom without the zoom unit.
4.13 Measuring scale
Via a small turning knob beneath the lens a true to scale dimension scale can be inserted into the examination layer of the illumination light path. This documentation capable display enables the measurement of objects independently from the chosen magnifi cation – with both the 5 times magnifi cation changer and the Variozoom magnifi cation system. The scale can be dis-played in both the 3D-picture and on all camera pictures and can be faded out at any time if necessary. To insert the scale turn the knob by 45° in a clockwise direction. Via a 45° turn in counter-clockwise direction the scale can be faded out from the illumination light path.The following measures and distances have to be observed: -Distance 2 mm, -Line width 0.5 mmPlease note that these specifi cations are only correct for the following combinations:Measuring scale for 200 mm lenses, 200 mm lenses with or without fi ne focusing or wide angle eyepieces 10 x
4.0 Operation
pivoting colour fi lter
Measuring scale Not true to scale
The scale is for guidance only and may not be used for measuring absolute quantities.

19
Ers.d. :
Zeichnungs /Artikel-Nr.(part no.)
Benennung (designation)
Werkstoff (material)
Konstr. - Nr:Mikolp-200-001.
Blatt(sheet)
Zust.(index)
Änderung(revision)
Datum(date)
Name(name)
Gepr.
Bearb.
NameDatum
Maßstab (scale)
1
Alle Maße in mmall dimensions in mmAllgemeintoleranzen /General tolerancesDIN ISO 2768 - mKüber 30 mm ±0,3
Ers.f.:
Erstellt
79853 Lenzkirch / Germany
ATMOS Medizin T echnik GmbH & Co. KG
Ludwig - Kegel - Str. 12, 14-16, 18
Tel: +49 7653 689 -0
Fax: +49 7653 689 -190
www.atmosmed.de
Sch
utz
verm
erk
DIN
IS
O 16016
-
27.03.3013 C.Reinhardt
1:1 -
Tasterfolie
060.0621.0
MODE
LED AFDSTROBO
4.14 Integrated camera
Integrated SD-camera includes single hand operation at the microscope head:
After setting up the microscope (see chapter 3.4 rear view of ATMOS i View) control signals can be triggered via the buttons on the operating panel which is available on the rear side of the service module. When using the software ATMOSoft or ATMOS Med Doc the USB port has to be connected to the computer. Pictures can be saved by pressing the button. By pressing the button the recording of video sequences can be started/stopped.
For different recordings the output “Freeze” and “Record” are available. Via these the devices can be operated by the operating buttons
4.15 Endoscope adapter
The standardized endoscope adapter offers an easy connection to an external ATMOS Cam or other external endoscope or digital camera (third party products). The ATMOS Cam can be easily and swiftly attached to the endoscope adapter by means of a special clip seal. Other endoscope cameras which provide a standardised con-nection interface can also be adapted without any trouble. To attach an external digital camera a special adapter (fi tting the different cameras) is required.
4.16 HD adapter for SONY NEX
Due to the especially developed HD-adapter it is possible to connect a A digital camera with e-Mount bayonet (e.g. Sony Nex to your ATMOS® i View This camera enables you to take and archive HD resolution pictures.
By connecting an IR remote control to the power supply module the operator panel at the microscope head can also be used with the external SONY NEX camera.
At dispatch the HD adapter is covered with a cover cap.This cap is a contamination protection and has to be replaced at any time when taking off the camera or when the adapter is unused.
Please make sure that the camera connected externally to the microscope does not weight more than 300 g.
4.0 Operation

20
5.2 Cleaning the mechanical microscope surface
All mechanical surfaces of the ATMOS® i View must be wiped and disinfected after each application. Do not use aggressive or abresive cleansing agents.Remove possible remainders with a solution of identical parts of ethyl alcohol and distilled water and a gush of a standard washing-up liquid.
If liquid has penetrated the microscope it may only be used after the check-up of an authorised customer support.
Disconnect the plug from the mains current prior to cleaning and disinfecting the microscope surface.
The surfaces of the ATMOS® i View can be cleaned / wiped with the following disinfectants.
• ATMOS Green & Clean SK • Dismozon pur • Perform • Bacillol 30 Foam
For a sterile cover of the device the single use sterilization drapes may be used. Affi x the cover loosely so that there is enough space left for the microscope holder and the operation microscope. The drapes need to be especially loose around the hand grips. The surgeon must be able to use the operating elements though the cover.
Do not use
• disinfectants which contain organic or inorganic acids or bases.These may cause corrosion defects. • disinfectants which contain chloramides or phenol derivates. These may cause stress crackings in the material which is
being used for the microscope body.
When using disinfectants containing aldehyde and amine at the same object colour changes may occur.
5.0 Cleaning5.1 Instructions for cleaning and carePrior to cleaning
Medical microscopes like the ATMOS® i View need to be fail safe at any time. Therefore we recommend prior to every use:
if
required
If liquid has penetrated the microscope it may only be used after the check-up of an authorised customer support.
!
The described action relating to cleaning and disin- fection resp. sterilisation do not substitute the rele- vant instructions which must be adhered to prior to operation!
All disinfectants used for the disinfection of the
ATMOS® i View need to be approved of.
Always observe the concentration specifi cations and instructions by the respective manufacturer!

21
5.0 Cleaning
5.3 Cleaning of lenses / eyepieces
5.3.1 Cleaning optical surfacesThe multilayer T* (T-star) coating of optical components (e.g. eyepieces, lenses) results in optimum image quality. Image qua-lity is reduced even by slight contamination of the optics or by fi ngerprints. In order to protect the internal optics from dust, the instrument should never be left without a safety cover, HD adapter, lens, binocular tube and eyepieces installed when it is not in use. Always store lenses, eyepieces and accessories which are not being used in dust-free cases. The external surfaces of optical components (eye-pieces, lenses) should only be cleaned when required:• Do not use any chemical cleaning agents.• Blow off dust on the optical surfaces or remove the dust by using a clean and grease-free brush.
5.3.2 Optical surface of the endoscope portThe endoscope port is protected by an end glass plate against contamination and humidity. For cleaning and care of this glass plate, proceed in the same way as with the other optical surfaces of the ATMOS® i View.The endoscope port is protected with a cover against dirt on delivery.
5.3.3 Fogging of optical surfacesTo protect the eyepiece optics from fogging, we recommend using an anti-fogging agent.Note:Anti-fogging agents provided by eyecare professionals for use with eyeglass lenses are also suitable for ATMOS optics.• Please observe the instructions supplied with each anti-fogging agent.Anti-fogging agents do not only ensure fog-free eye piece optics. They also clean the eyepiece optics and protect them against dirt, grease, dust, fl uff and fi ngerprints.
5.4 Hygienic plan
WHAT HOW WHEN Details
C D S
after each application
daily
weekly
monthly
Body X X X Manual wiping and disinfectionLense / Optics X X X Manual wiping and disinfectionOperation parts* X X X Manual wiping and disinfectionn
Safety covers (dis-posables) X Single use product -> not for reconditioning, change after use
Hand grips X X X Manual wiping and disinfection
C= Cleaning, D= Disinfection, S= Sterilization
* Operation parts Knobs to adjust (colour fi lter, 5 fond magnifi cation exchanger, operator panel, set screws at the arm)

22
6.0 Maintenance and Service6.1 General advice
Prior to every use the microscope and microscope con-nection line need to be sight checked. Defect cables need to be replaced immediately!
Maintenance, opening and repair works may only be executed by ATMOS or their authorised partners. To technical and hygienical safety precautions and service instructions of the ATMOS® i View must be adhered to.
An annual safety-related control is required. We advise to inspect the product during this safety-related control.
For repair works this microscope can be sent directly, or via the retailer you purchased it from, to ATMOS.
Prior to shipment this microscope needs to be thoroughly cleaned and all surfaces disinfected.
ATMOS neither guarantees for fault-free operation nor for personal injuries and damage to property if
• no original ATMOS parts are being used, • the operating instructions given in this manual are
not adhered to, • assembly, new settings, alterations, extensions and
repairs have not been executed by ATMOS autho- rised personnel.
There are no warranty claims whatsoever on defects or malfunctions which arise from the use of third party accessories or consumables.
The instructions and regulations responding to the area of operation need to be observed.
6.2 Exchange of spare parts
FuseT3,15A/H 250V REF 008.0751.0
!
clickclick
+...
+...
Prior to exchanging the main fuse the system must be disconnected from the power supply.For this it is necessary to unplug the power cord from the power outlet.
Fuse exchange
Brake for star grip REF 538.2013.0

23
7.0 Trouble shooting
Description Possible causes ProcedureATMOS® i View cannot be swit-ched on
mains cable not connecteddefect fuse
plug inexchange fuse
ATMOS® i View is hot please ensure sufficient air ventilation. switch off and let cool down for 2-3 hours
ATMOS® i View overheats please contact the ATMOS service no function at all ATMOS® i View is switched off switch on at the connection box 5 fold magnification changer is defective contact the ATMOS service
arm follows
tie bar is not vertically adjusted The polyamide extensions of the set screws are worn out or are unfixed.
adjust tie bar,
exchange or fix the extensions of the set screws
too little or no light at all
ATMOS® i View moved into „parking position“ and thereby switched of the light.
pull ATMOS® i View into working position
malfunction of the LED light sourcecontact the ATMOS service
extreme decline in the LED light source light source is dimmed down too low raise brightness of the light source
Brake for star grip REF 538.2013.0

24
8.0 Options and Accessories
Microscope REF
ATMOS® i View 21 538.0000.0
ATMOS® i View 31 539.0000.0
ATM
OS
® i V
iew
21
ATM
OS
® i V
iew
31
Lenses (select at least one option) REF
Lens 200 mm 538.1000.0
Lens 250 mm 538.1100.0
Lens 300 mm 538.1200.0
Lens 400 mm 538.1300.0
Lens 200 mmwith manual fine focussing (17 mm)
539.1700.0
Lens 250 mmwith manual fine focussing (17 mm)
539.1800.0
Lens 300 mmwith manual fine focussing (17 mm)
539.1900.0
Lens 400 mmwith manual fine focussing (17 mm)
539.2000.0
Magnification changers
5 fold magnification changer (0.4/0.6/1/1.6/2.5) 538.1700.0
Lens tube
Binocular straight lens tube f = 160 mm 538.1400.0
Binocular angled lens tube 45°, f = 160 mm 606.1100.0
Eyepiece lens (select at least one option)
2 x wide field eyepiece lenses 10 fold, can be plugged in, with dioptre compensation and a spectacle wearer eyepiece lens
538.0100.0
2 x wide field eyepiece lenses 16 fold, can be plugged in, with dioptre compensation and a spectacle wearer eyepiece lens
605.0100.0

25
8.0 Options and Accessories
LED Light Accessories REF
Colour fi lter green, with pivot mechanism 539.1300.0
Visualisation
Integrated SD camera with single hand operation on the microscope headResolution: 768 x 494 pixel / Video standard: NTSC, S video output - 539.1400.0
Video cable S-video, 5 m -Endoscope adapter - 538.1800.0
HD adapter for a digital camera with a Sony E-mount bayonet connection (e.g. SONY NEX) - 538.1900.0
IR remote trigger (for a SONY NEX) for activating the SONY NEX digital cam-era via the operation panel of the microscope - 538.3000.0
Diagnostics
Measuring scale for Lens 200 mmMeasuring scale can be inserted into the illumination – independentlyfrom the chosen magnifi cation.
- 539.1200.0
Hand grips (select at least one option)
T-hand grip for the ATMOS® i View 538.1500.0
Lateral double hand grip for the ATMOS® i View, grip for the manual bracket is infi nitely adjustable in steps
538.1600.0
Microscope arm
Mechanical support shaft 538.2000.0
Stand options (select at least one option)
Wall stand 538.2800.0
Mobile stand ENT 538.2100.0
Stand for integrating the ATMOS C 11 Systema 541.2300.0
Stand for integrating the ATMOS S 61 Servant 534.0119.0
Expansion kit for the integration of the ATMOS® C 21 / C 31 with a single cabinet. Also order the microscope column for the integration of the AT-MOS® C 21 / C 31!
506.7040.0506.7826.0
Add-on kit for the integration of the ATMOS® C 21 / C 31 with a double cabi-net. Also order the microscope column for the integration of the ATMOS® C 21 / C 31!
506.7040.1506.7826.0
Monitor holder for roller stand/stand ATMOS C 21/C 31/Stand ATMOS C 11 Systema
541.2500.0
Monitor holder for wall stand 538.3200.0
Options (select at least one option)
Mandatoryselection
Option alternative options(select one option at a maxium)

26
9.0 Technical data
Current state of technical data: 06.02.2013
Voltage 100-240 V~ ± 10 %; 50/60 Hz
Power consumption max. 45 VA
Fuses
2x T3, 15A / 250 V (100A@ 250VAC / 10000A@ 125VAC)
Fuse F1: T4,0A / 250 V (40A)Fuse F2: T1,0A / 250 V (35A)Fuse F3: T200mA / 250 V (35A)Fuse F4: T200mA / 250 V (35A)
Light output min. 120 kLux (200 mm) min. 80 kLux (250mm) min. 55 kLux (300 mm) min. 30 kLux (400 mm)
Colour temperature 5.500 K ± 10 %
Operation time permanent operation
Cooling fanless/ passiv
Protective earth conductor resistanceEarth leakage currentEnclosure leakage currentPatient leakage current
max. 0,1 Ωmax. 0,5 mAmax. 0,1 mAmax. 0,1 mA
Environmental conditionstransport / storage
-10...+50°C30...95 % humidity, no condensationair pressure 500...1060 hPa
Environmental conditionsoperation
+10...+35°C30...95 % humidity, no condensationair pressure 700...1060 hPa
Weight 3.65 kg - 5.6 kg
Recurring safety controls (STK) An annual safety-related control has to be executed in accordance with the accident prevention regulations. ATMOS advices to perform an annual inspection.
Safety class (EN 60601-1) l
Safety type IP X0
Classifi cation in accordance with appendix IXEC Directive 93/42/EEC Class l (according to regulation no. 12)
CE-Marking CE
GMDN-code 35191
UMDNS-code 12-536
Suitable for operation up to an altitude above sea level of ≤ 3000m
REF 538.0000.0, 539.0000.0

27
10.0 Disposal
The ATMOS® i View does not contain any hazardous materials.
The housing is recyclable.
Please take care on a careful separation of the different materials.
Please observe national disposal regulations (e.g. waste incineration).
Disposal within the EC
The device described above is a high-quality medical product with a long service life. After its life cycle it must be disposed of professionally. According to the EC directives (WEEE and RoHS) the device may not be disposed of in domestic waste. Please observe existing national laws and rules for disposal of old devices.
Disposal within the Federal Republic of Germany
In the Federal Republic of Germany the law for electrical devices (ElektroG) rules the disposal of electrical devices. It must be assumed that such microscopes can be contaminated. Therefore, according to the regulations of the EAR (Stiftung Elektro-Altmikroskope Register) is this type of microscopes excluded from the ElektroG regulations. In order to guarantee a proper disposal of your old device, please either pass on your old device to your specialised dealer or send it directly to ATMOS MedizinTechnik for a professional disposal.
Before disposal respectively before transport, the device surface must be disinfected.

28
11.0 Notes on EMC
11.1 Guidelines and Manufacturer‘s Declaration - Emissions The ATMOS® i View is intended for use in the electromagnetic environment specifi ed below. The customer or user of the ATMOS® i View should ensure that it is used in such an environment.
Emissions Test Compliance Electromagnetic Environment - GuidanceRF Emissions CISPR 11
Group 1 The ATMOS microscope uses RF energy only for its internal function. Therefore, its RF emissions are very low and are not likely to cause any interference in nearby electronic equipment.
RF Emissions CISPR 11
Class B The ATMOS® i View is suitable for use in all esta-blishments, including domestic, and those directly connected to the public low-voltage power supply network that supplies buildings used for domestic purposes.
Harmonics IEC 61000-3-2 Class AFlicker IEC 61000-3-3
applicable
11.2 Guidelines and Manufacturer‘s Declaration - Immunity for ATMOS® i View
The ATMOS® i View is intended for use in the electromagnetic environment specifi ed below.The customer or user of the ATMOS® i View should ensure that it is used in such an environment.
Immunity Test IEC 60601- Test Level Compliance Level Electromagnetic Environ-
ment - GuidanceESD IEC 61000-4-2
± 6 kV Contact
± 8 kV Air
± 6 kV Contact
± 8 kV Air
Floors should be wood, concrete, or ceramis tile. If fl oors are synthe-tic, the relative humidity should be at least 30%.
EFTIEC 61000-4-4
± 2 kV Mains
± 1 kV I/Os
± 2 kV inapplicable for power cables± 1 kV for input and output cables
Mains power quality should be that of a typical commercial or hospital environment.
SurgesIEC 61000-4-5
± 1 kVdifferential mode
± 2 kVcommon-mode
± 1 kVdifferential mode
± 2 kVcommon-mode
Mains power quality should be that of a typical commercial or hospital environment.
Power Frequency 50/60 HzMagnetic fi eld IEC 61000-4-8
3 A/m applicable
3 A/m
Power frequency magnetic fi elds should be that of a typical com-mercial or hospital environment.
Medical electrical microscopes are subject to special precautions with regard to EMC and must be installed acc. to following EMC notes. Portable and mobile HF communication facilities can influence medical electrical equipment. The use of other accessories, other converters and cables than stated may lead to an increased emission or a reduced interference immunity of the equipment or system.

29
11.0 Notes on EMC
Immunity Test IEC 60601-Test Level
Compliance Level Electromagnetic Environ-ment - Guidance
Voltage Dips / DropoutIEC 61000-4-11
< 5 % UT (> 95 % Dip of the UT) for 0.5 Cycle
40 % UT(60% Dip of the UT) for 5 Cycles
70% UT(30 % Dip of the UT) for 25 Cycles
< 5 % UT (>95 % Dip of the UT) for 5 s
< 5 % UT (> 95 % Dip of the UT) for 0.5 Cycle
40 % UT(60% Dip of the UT) for 5 Cycles
70% UT(30 % Dip of the UT) for 25 Cycles
< 5 % UT (>95 % Dip of the UT) for 5 s
Mains power quality should be that of a typical commercial or hospital environment. If the user of the ATMOS® i View demands continued function even in case of interruptions of the energy supply, it is recommended to supply the ATMOS® i View from an uninterrup-tible current supply or a battery.
NOTE UT is the alternating mains voltage prior to application of the test levels.
11.3 Guidelines and Manufacturer‘s Declaration - Immunity The ATMOS® i View is intended for use in the electromagnetic environment specified below. The customer or user of the ATMOS® i View should ensure that it is used in such an environment.
Immunity Test IEC 60601-Test Level Compliance Level Electromagnetic Environment -
GuidanceConducted RFIEC 61000-4-6
V1 = 3 Veff150 kHz to 80 MHz 3 V Portable and mobile communications
equipment should be separated from the ATMOS® i View incl. the cables by no less than the distances calculated / listed below.
Recommended distances:d = [ 3,5 / V1] √P
d = [ 3,5 / E1 ] √P80 MHz to 800 MHz
d = [ 7,0 / E1 ] √P800 MHz to 2500 MHz
Where „P“ is the max. power in watts (W) and D is the recommended separation distance in meters (m).
Field strengths from fixed transmitters, as determined by an electromagnetic site (a) survey, should be less than the compli-ance level (b). Interference may occur in the vicinity of mi-croscopes containing the following symbol
Radiated RFIEC 61000-4-3
E1 = 3 V/m80 MHz to 2,5 GHz
3 V/m

30
11.0 Notes on EMC
11.4 Recommended safety distance between portable and mobile RF Communications equipment and the ATMOS® i View
NOTE 1 With 80 MHz and 800 MHz the higher frequency range applies.
NOTE 2 These guidelines might not be applicable in every case. The spread of electromagnetic waves is influenced by absorptions and reflections of buildings, objects and people.a The field strength of stationary transmitters, such as base stations of cellular phones and mobile terrain radio equipment, amateur radio transmitters, cbm broadcast and TV stations cannot be predestined exactly. To determine the electromagnetic environment in regard to stationary transmitters, a study of the location is to be considered. If the measured field strength at the location where the ATMOS® i View is used exceeds the above compliance level, the ATMOS® i View is to be observed to verify the intended use. If abnormal performance characteristics are noted, additional measures might be necessary, e. g. a changed arrangement or another location for the device.
b Within the frequency range of 150 kHz to 80 MHz the field strength is to be below 3 V/m.
The ATMOS® i View is intended for use in electromagnetic environment in which radiated disturbances are con-trolled. The customer or user of the ATMOS® i View can help prevent electromagnetic interference by maintai-ning a minimum distance between portable and mobile RF Communications equipment and the ATMOS® i View as recommended below, according to the maximum output power of the communications equip-ment.
Separation distance, depending on transmit-frequency mNominal output of the
transmitter
W
150 kHz to 80 MHz
d = [ 3,5 / 3] √P
80 MHz to 800 MHz
d = [ 3,5 / 3] √P
800 MHz to 2,5 GHz
d = [ 7,0 / 3] √P
0,01 0,12 0,12 0,2330,1 0,37 0,37 0,741 1,16 1,16 2,3310 3,69 3,69 7,38100 11,66 11,66 23,33
For transmitters for which the maximum nominal output is not indicated in the above table, the recommended separation distance d in meters (m) can be determined using the equation belonging to the respective column whereas P is the maximum nominal output of the transmitter in watts (W) acc. to manufacturer´s specification.
NOTE 1 With 80 MHz and 800 MHz the higher frequency range applies.
NOTE 2 These guidelines might not be applicable in any case. The propagation of electromagnetic sizes is influenced by absorptions and reflections of buildings, objects and people.

31
For your notes
MedizinTechnik
This document is copyrighted. Duplication, translations, microfilming and savings on electronic systems, particularly for commercialpurposesare illegal without prior agreement of the manufacturer. All compiled data are based on manufacturers instructions. All logos,product names and designations used in this document are property of the respective manufacturer.We do not take over any warranty and liability in the case of missing inscriptions. Subject to modifications and amendments.
1. General:Our General Standard Terms and Conditions apply exclusively. Client’s terms and conditions which are contrary to or deviate from our General Standard Terms and Conditions are not recognised unless their validity is explicitly confirmed in writing. Our General Standard Terms and Conditions also apply even if we deliver to clients without reservation, in the knowledge of the client’s contrary terms and conditions. Our General Standard Terms and Conditions also apply to all future business with that client.
2. Proposal - Order Confirmation Our proposals are subject to change without notice unless otherwise stated in our order confirmation. Each order is only accepted by us following our written order confirmation.
3. Orders Every order requires an exact description of all of our product’s details. We assume no liability for errors and damage caused by inaccurate or incomplete ordering details.
4. Prices Unless otherwise stated in the order confirmation, our prices in the order confirmation are ex factory prices and exclude packaging and value added tax. Packaging is charged separately at cost price in the invoice. Value added tax is charged separately in the invoice according to the legal rate on the invoice date. We reserve the right to change prices appropriately should price reductions or increases, especially due to wage settlements, changes in the price of materials or currency fluctuations, be incurred. Proof of such changes will be provided for the client on request.
5. Payment Conditions - Balancing Unless otherwise stated in the order confirmation, our invoices are payable with a 3% discount within 10 days (except for repair and assembly services) or within 21 days from the invoice date net cash; money receipts is decisive for complying with this term. We are entitled to charge interest after the due date at a rate 2% above the relevant basic interest rate of the German Federal Bank. Should the client have payment arrears, we are entitled to charge interest on arrears at a rate 5% above the relevant basic interest rate of the German Federal Bank. Should we be able to prove higher damages due to arrears, we are also entitled to claim these. The client only has the right to balance invoices against its own claims should such claims be confirmed in a court of law or recognised by us. The client does not have the right of retention due to disputed counterclaims.
6. Delivery Periods Fulfilment of our delivery duties requires the punctual and proper fulfilment of the client’s duties. The right to defense on the grounds of an unfulfilled contract is reserved.Should the client default in accepting the goods delivery or breach other cooperation duties, we are entitled either to withdraw from the contract or claim compensation for any increased costs incurred up to that time without setting a further deadline. The right to make further claims is reserved. Furthermore, in such cases, the risk of coin-cidental destruction or a coincidental deterioration in the quality of the delivered goods is transferred to the client in the case of default in accepting such goods or payment arrears. Acts of God or stoppages (due to insufficient supplies of material, industrial disputes etc.) entitle us either to demand an appropriate extension of delivery periods or to partly or entirely dissolve the delivery contract. This does not give the client the right to claim damages. We have fulfilled delivery periods if the delivery goods have left our factory or the client has been informed of the goods’ readiness for delivery within such delivery periods. Delivery periods stipulated by the client are not recognisedby us unless they form part of our order confirmation. We adhere to legal terms and conditions in cases where, as a result of an undue delay in the delivery for which we are liable, the client is entitled to claim that his interests in a continued fulfilment of the contract have ceased. We also adhere to legal terms and conditions should a delay in delivery be caused by deliberate or grossly negligent action by us or our representatives for which we are responsible. We are also responsible for such actions by our representatives or agents. Should the delivery delay not be caused by our deliberate infringement of contractual duties for which we are responsible, our liability is limited to damage which is regarded as typical for that case. We are liable according to the legal terms and conditions if and in so far as the delivery delay for which we are responsible is caused by an infringement of a substantial contractual duty. In such cases, our liability is also limited to damage which is regardedas typical for that
case. Should the delivery delay be caused by a culpable infringement of non-substantial contractual duties, our client is also entitled to claim a one-off damage compen-sation worth 3 percentage points of the delivery value of the goods for each week’s delay, up to a maximum which is no higher than 15 percentage points of the delivery value of the goods
7. Delivery - Familiarisation In the case of the delivery of devices for the medico-technical industry which require assembly and/or familiarisation for the final customer using specialist trade personnel (such as Ear, Nose and Throat Apparatus and Suction Units), we reserve the right to deliver the goods exclusively to the relevant specialist traders. Should the trader not carry out assembly and/or familiarisation for the final customer, this is carried out by us. In such cases, we reserve the right to charge the client for the additionally created costs. Our specialist traders operate a recording system so that, if necessary, our products can be traced to the final customer. The specialist trader undertakes to immediately report to us all events and risks which must be reported in connection with our products.
8. Passage of Risk - Packaging Unless otherwise stated in our order confirmation, delivery is agreed ex factory. The risk of the goods’ damage or loss is therefore transferred to the client as soon as the goods leave the factory or the client is in default of acceptance of the goods. This also applies to cases where we confirm prepaid carriage. Transport packaging and all other packaging according to the packaging regulations is not returnable. Our client is responsible for disposing the packaging at its own cost. Our deliveries are insured by us at the client’s expense unless explicitly otherwise agreed. No insurance is arranged in the case of goods which are collected by our clients. In the case of transport damage, claims are only handled if the client receives confirmation of any damage, reduced weight or loss by the shipping company before accepting the delivery.
9. Warranty The client is responsible for examining the delivered goods immediately after receiving them to determine any eventual deficiencies or delivery errors, and to report these immediately. Should the client fulfil this examining and reporting responsibility, and should payment conditions be fulfilled, we shall be liable to the client within the scope of legal regulations. Our period of warranty shall in all cases be two years. Our client can make use of the warranty as follows, so long as he can provide first buyer proof (in the form of an invoice or delivery note) and provided that the product still has the original, unchanged serial number: a. We choose whether to fulfil our guarantee by providing repair
services free of charge - either on the client’s premises or in our factory - or replacing the product. We can also provide these guarantee services through an authorised company;
b. Should a product be returned to us, the client agrees to send the product in its original or similar packaging, offering the same protection as the original packaging, to our address or any address notified by us.
c. Our guarantee ceases to apply if changes of any kind have been made to our product, unless such changes have been made by us or a company authorised by us, or have been previously agreed upon in writing by us. Our guarantee also ceases to apply if third parties have carried out repairs to our products or replaced parts thereof. This applies regardless of the fact whether these measures individually or collectively led to a deficiency of the product;
d. We accept no responsibility for damage defects caused by - operational wear and tear; - incorrect installation or incorrect or insufficient maintenance; - incorrect operation of the product (in contradiction to the operating instructions delivered with the product); - improper use or operating faults; - inappropriate or negligent handling and care, especially with respect to dirt, lime, suction of fluids, inappropriate cleaning and sterilisation;
- using accessories and/or replacementpartswhich are not explicitly approved; - incorrect assembly and/or initial operation by the client or third parties; - the client’s negligence in handling the product; - unacceptable operating conditions, such as humidity, temperatures, the power supply, vibrations. - accidents, acts of God, especially lightening, water, fire, public unrest and insufficient ventilation. We are not liable for damage to other objects apart from our product itself, except in thecase of any deliberate or grossly negligent actions by us or our representatives or agents. Should no deliberate breach of contract be claimed, our liability
is limited to damage which is regarded as typical for tthat case. This also applies in the case of our culpable infringement of substantial contractual duties The indispensable conditions of German Liability Law remain unaffected thereby. - For second-hand equipment, the period of warranty shall be reduced to a period of twelve months.
10. Reservation of Ownership We retain ownership of our goods until the receipt of all payments arising from the business relationship, including all demands arisingfrom installation orders, subsequent orders, repairs, accessory deliveries and replacement orders. Should we have agreed upon payment on the basis of cheque and bill transactions, the ownership reservation applies until the cheque received byus has been paid in, and does not expire through our credit upon receiving the client’s cheque. In the case of a breach of contract by the client, especially payment arrears, we are entitled to repossess our goods. Repossession of our goods repre-sents a withdrawal from the contract, unless explicitly declared in writing by us. We have the right to utilise the product after its repossession, whilst the income form such use is balanced against the client’s arrears, after deducting appropriate utilisation costs.The client is responsible for handling the goods with care. Should maintenance and inspection work be necessary, the client must carry these out punctually at his own cost. Our client is entitled to sell the goods he has bought from us in a proper sale transaction. However, he must immediately assign all outstanding claims to the value of the final invoice sum (including value added tax) of our claims to his customers or third parties. The client is entitled to collect this claim even after such assignment. Our right to collect the claim ourselves remains unaffected thereby.We undertake to release the securities to which we are entitled if requested to do so by the client should the realisable value of the our securities be more than 10 percentage points higher than the outstanding claims. We reserve the right to choose the securities to be released.
11. Plans and Illustrations We retain ownership of and copyrights to all plans, illustrations, calculations and other documents which are attached to our proposals. The client must receive explicit written permission before passing these on to third parties. Imitating our legally patented products is forbidden and will be prosecuted.
12. Jurisdiction and Place of Performance Our central office is the place of performance for all disputes in connection with these General Standard Terms and Conditions and the contracts closed with clients under them. This jurisdiction excludes other jurisdiction relating to persons or subject-matter. Furthermore, our client is not entitled to bring charges against us in another court should he file counter-charges, carry out counterbalancing or declare retention. We, however, are entitled to bring charges against our client at their general place of jurisdiction or at another relevant court recognised by German or foreign law.Unless otherwise stated in the order confirmation, our central office is the place of performance.
Lenzkirch, September 2008ATMOS MedizinTechnik GmbH & Co. KG79853 Lenzkirch/Germany
ATMOS General terms and conditions


