72
AT&T Voicemail Viewer User Guide
| Date post: | 02-Apr-2018 |
| Category: |
Documents |
| Upload: | nguyentuyen |
| View: | 217 times |
| Download: | 1 times |

AT&T Voicemail Viewer User Guide

[2]
Contents
iPhone® ............................................................................................................... 4
Requirements.................................................................................................... 4
Installation ....................................................................................................... 4
Message Notification and Message Count .............................................................. 6
Application ........................................................................................................ 8
Login ............................................................................................................ 8
Functionality Summary ................................................................................. 10
Settings ...................................................................................................... 13
BlackBerry® ....................................................................................................... 15
Requirements.................................................................................................. 15
Installation ..................................................................................................... 15
Message Notification and Message Count ............................................................ 20
Application ...................................................................................................... 21
Initial Launch ............................................................................................... 21
Configure Mailbox Access .............................................................................. 22
Configure Multiple Mailboxes .......................................................................... 24
Functionality Summary ................................................................................. 25
Settings ...................................................................................................... 30
iGoogle ............................................................................................................. 33
Requirements.................................................................................................. 33
Installation ..................................................................................................... 33
Application ...................................................................................................... 34
Login .......................................................................................................... 34
Message Inbox ............................................................................................. 35
Gadget Menu Options .................................................................................... 40
Windows® Vista Sidebar ...................................................................................... 41
Requirements.................................................................................................. 41

[3]
Installation ..................................................................................................... 42
Application ...................................................................................................... 44
Login ......................................................................................................... 44
Message Inbox ............................................................................................. 45
Gadget Menu Options .................................................................................... 51
Windows® 7 Desktop ........................................................................................... 52
Requirements.................................................................................................. 52
Installation ..................................................................................................... 52
Application ...................................................................................................... 54
Login ......................................................................................................... 54
Message Inbox ............................................................................................ 55
Gadget Menu Options .................................................................................... 60
Mac OS X Dashboard........................................................................................... 61
Requirements.................................................................................................. 61
Installation ..................................................................................................... 62
Application ...................................................................................................... 64
Login ......................................................................................................... 64
Message Inbox ............................................................................................. 64
Widget Menu Options .................................................................................... 69
Legal .......................................................................................................... 71

[4]
iPhone® Requirements
You must have an AT&T Unified MessagingSM account or an AT&T U-verse VoiceSM
account in order to use these applications. Before you use Voicemail Viewer, you will
need to be sure that you have first set up your AT&T Unified MessagingSM or AT&T U-
verse MessagingSM mailbox.
AT&T Voicemail Viewer is available for the following devices:
iPhone 4S (iOS 5.0+)
iPhone 4 (iOS 4.0+)
iPhone 3GS (iOS 3.1+)
iPhone 3G (iOS 3.1+)
iPad® (iOS 3.2+)
iPad®2 (iOS 4.3+)
iPod Touch® (iOS 3.1+)
Standard data usage charges may apply.
Installation
Before downloading, you will need your AT&T Unified MessagingSM or AT&T U-verse
MessagingSM mailbox PIN. If you forgot your PIN, instructions can be found at
att.com/vmviewer under Frequently Asked Questions. Additional information can be
found at um.att.com/vmviewer-help.
The steps for downloading the iPhone Voicemail Viewer:
1. Tap the ―App Store‖ icon (Figure 1) to bring up the App Store and tap ―Search‖
(Figure 2) to bring up the search screen.
2. Search ―AT&T Voicemail Viewer‖ (Figure 3). The AT&T Voicemail Viewer application
will be listed in the search results. You will see a Voicemail Viewer Home application
and a Work application. Select the appropriate one for your type of account (Figure
4).
3. At the App Summary screen, tap the ―Free‖ icon (Figure 5). The ―Free‖ icon will turn
into ―Install‖. Tap the ―Install‖ icon (enter iTunes password if required). Once the
app download is complete, the app icon is displayed as ―VM Viewer‖ on your iPhone
(Figure 6).

[5]
Figure 1: App Store Figure 2: Search Figure 3: Search “AT&T Voicemail Viewer”
Figure 4: Voicemail Viewer Home and Work Application
Figure 5: App Summary Screen
Figure 6: VM Viewer App

[6]

[7]
Message Notification and Message Count
When the application is installed on the device the first time, a pop-up screen will ask to
enable push notification. Click ―OK‖ to enable notification (Figure 7).
Please note that sometimes in order for this new notification to take effect, you
may need to power down the device and power it back on again.
To check if the notification is enabled:
1. Tap the ―Settings‖ icon on the device (Figure 8) and then tap ―Notifications‖ (Figure
9).
2. You should see ―VM Viewer‖ listed (Figure 10). Tap ―VM Viewer‖ and ensure the
settings on ―Sounds‖ and ―Badges‖ are set to ―ON‖ (Figure 11).
3. You will get notifications for new messages through a message count and sound. The
message count is displayed as a badge on the application icon with the number of
new messages is listed as 2 (Figure 12).
Figure 7: Enable Notification

[8]
Figure 10: Voicemail Viewer
Figure 8: Settings Icon
Figure 11: Sounds & Badges
Figure 12: Message count
Figure 9: Settings Screen

[9]
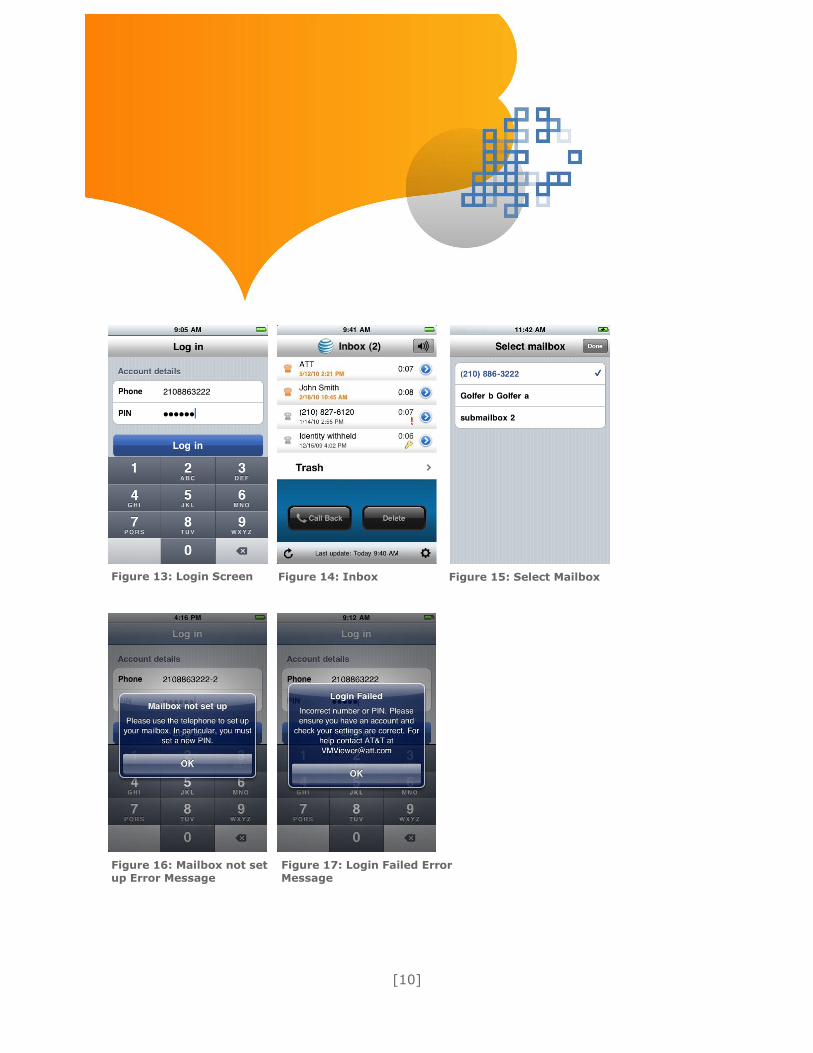
Application: Login When you access the app for the first time, you will be presented with the login screen
that asks for the home phone number and PIN. Enter the home phone number and PIN
and tap ―Log in‖ (Figure 13). If the login credentials are authenticated, you will be
logged in and presented with your Inbox (Figure 14).
If your voice mailbox has sub-mailboxes configured, a ―Select mailbox‖ screen that lists
the main mailbox and all sub-mailboxes will be presented (Figure 15). Select any of the
mailboxes listed, and tap ―Done‖ to log in to the selected mailbox.
If your voice mailbox has not been set up, you will be unable to log in to your mailbox
using Voicemail Viewer and an error message (Figure 16) will pop up. At a minimum, a
PIN needs to be set up. To set up your voice mailbox, dial your access number or *98
from your home phone.
If the correct credentials are not entered, then an error message will pop up to require
you to re-enter the login credentials (Figure 17).
[10]
Figure 13: Login Screen Figure 14: Inbox
Figure 15: Select Mailbox
Figure 16: Mailbox not set up Error Message
Figure 17: Login Failed Error Message

[11]
Application: Functionality Summary
The following functions are available with the app:
Play or listen to messages
Delete messages
Make a call back to a caller
Mark a message as Unread or Read. The function toggles between ―Mark as Unread‖
and ―Mark as Read.‖
Forward a message as email. (Note that private messages cannot be forwarded.)
Save caller information into device’s address book
The Inbox view displays a list of messages on the mailbox (Figure 18). The unheard
messages are highlighted with an orange phone icon and orange colored time stamp.
You play the messages by tapping a message and then the arrow icon on the left side of
the message (Figures 19 & 20). An urgent message is marked by ―!‖ and a private
message is marked by a key icon (Figure 21).
Figure 18: Unheard messages are indicated with orange phone symbols and time stamps
Figure 19: To play message, tap the message, then tap the arrow icon
Figure 20: Message being played
Figure 21: Urgent and private messages

[12]
By tapping on a message to highlight it, you can call the caller by tapping the ―Call
Back‖ button and delete a message by tapping the ―Delete‖ button (Figure 22). All
deleted messages will go into the ―Trash‖ folder. You have the ability to go into the
―Trash‖ folder to either restore a deleted message or permanently delete it (Figure 23).
To access other functions, tap the blue arrow icon on the right side of a message to get
to the ―Info‖ screen (Figure 24). You can toggle between ―Mark as Unread‖ and ―Mark as
Read‖ from this screen (Figures 25 & 26). You can also access ―Forward as Email‖
function from this screen (Figure 27). The voice mail message is attached as .wav file
when it’s forwarded (Figure 28).
When the blue icon is tapped and a caller is not in the device’s address book, you can
choose to save the caller information into the local address book (Figure 29).
Figure 22: “Trash” folder available in inbox view
Figure 23: Trash folder view

[13]
Figure 24: Tap to Access Other Functions
Figure 25: “Mark as Unread” function
Figure 26: “Mark as Read” function
Figure 27: “Forward as Email” function
Figure 28: Voicemail message is attached as a .wav file
Figure 29: Save caller information into address book

[14]
Application: Settings You can access settings by tapping the setting icon at the right bottom of the screen
(Figure 30).
The ―Save PIN‖ setting can be toggled between ―ON‖ and ―OFF‖ (Figures 31 & 32).
Figure 30: Setting Icon
Figure 31: Save PIN set to “ON”
Figure 32: Save PIN set to “OFF”

[15]
The number of messages saved on the device can also be set. The default setting value
is 20 (Figures 33 & 34).
You can switch to access a different mailbox by tapping the ―Reset‖ button on the
―Settings‖ screen. When tapping ―Reset,‖ you will be presented with a pop-up message
(Figure 35). By selecting ―OK‖, you will be presented with a login screen where you can
enter a different mailbox number to log in (Figure 36).
Figure 36: Login Screen
Figure 33: Number of messages to be stored
Figure 35: Reset pop-up message
Figure 34: Default setting is 20

[16]
BlackBerry® Requirements
You must have an AT&T Unified MessagingSM account or an AT&T U-verse VoiceSM
account in order to use these applications. Before you use Voicemail Viewer, you will
need to be sure that you have first set up your AT&T Unified MessagingSM or AT&T U-
verse MessagingSM mailbox. The app will be hosted on the RIM App World. You must
have App World app loaded on your device.
The AT&T Voicemail Viewer application is available for at least the following BlackBerry
smartphone models with specified software versions (collectively with the operating
system, "OS") with a compatible Internet Browser (Browser), Short Messaging Service
(SMS) from AT&T and a data plan from AT&T:
Model 9800 (OS 6.0.0.695) – BlackBerry® Torch™
Model 9700 (OS 5.0.0.405 and 6.0.0.526) – BlackBerry® Bold™
Models 9000 (OS 4.6.0.301 and OS 4.6.0.304) – BlackBerry® Bold™
Model 8820 (OS 4.5.0.110)
Model 8310 (OS 4.5.0.110) – BlackBerry® Curve™
Model 8110 (OS 4.5.0.182) – BlackBerry® Pearl
Model 9100 (OS 5.0.0.921) – BlackBerry® Pearl 3G
Model 9300 (OS 5.0.0.955) – BlackBerry® Curve™ 3G
AT&T Voicemail Viewer works only with wireless service from AT&T. Voicemail Viewer
does not work with all BlackBerry devices or all software versions.
Installation
Before downloading, you will need your AT&T Unified MessagingSM or AT&T U-verse
MessagingSM mailbox PIN. If you forgot your PIN, instructions can be found at
att.com/vmviewer under Frequently Asked Questions. Additional information can be
found at um.att.com/vmviewer-help.

[17]
The steps for downloading the BlackBerry Voicemail Viewer:
1. Click the track pad/trackball or tap the touchscreen (if device is equipped with a
touchscreen) to start the BlackBerry App World™ app (Figure 37). If not already on
your device, BlackBerry App World is available at no charge. Simply download it from
your BlackBerry® smartphone or computer and get started (Figures 38 A and B).
2. Roll the track pad/trackball to highlight ―Search‖ and click it to bring up the search
screen. Select ―Search‖ (Figure 39).
3. Input ―ATT Voicemail Viewer‖ in the search box and press the track pad/trackball.
The ―ATT Voicemail Viewer‖ app will be listed (Figures 40A and B).
4. Select the ―ATT Voicemail Viewer‖ app and press the track pad/trackball to load the
app (Figures 41 and 42).
5. Click ―Download‖ and follow the instructions. You may be asked to log in with a
BlackBerry ID before downloading. If you do not have a BlackBerry ID, you can
create one by clicking the ―Create a BlackBerry ID‖ link and follow the instructions.
Once signed in, the downloading begins (Figures 43, 44 and 45).
6. If the app is downloaded for the first time, a reboot is required to finish the
installation. Click ―OK‖ to reboot and complete the installation (Figure 46). When the
device is turned back on after the rebooting, you will be informed that the AT&T
Voicemail Viewer app is requesting changes to its application control permission. You
should click the ―View‖ button and accept the values as they are shown.
7. However, if this is not the first time that the app is being downloaded, just click ―OK‖
to acknowledge that the ―AT&T Voicemail Viewer‖ is successfully installed (Figure
47A and B).

[18]
Figure 37: App World app
Figure 38A & B: App World is loaded
Figure 39: Select “Search”

[19]
Figure 40A and B: “AT&T Voicemail Viewer” app is located
Figure 41: App Loading
Figure 42: Create BlackBerry ID Figure 43: ID Sign-in

[20]
Figure 44: App is downloading
Figure 45: App is installing
Figure 46: Reboot
Figure 47 A and B: AT&T Voicemail Viewer is now installed on the device

[21]
Message Notification and Message Count
When a new message is received, the ―AT&T Voicemail Viewer‖ app will automatically
receive a notification. A star in a red circle will appear on the app icon to indicate new
message(s). When the track pad/trackball is over the app icon, the number of new
messages is displayed in parentheses preceding the app name such as ―(1) AT&T
Voicemail Viewer‖. You are also notified by the wireless phone’s Message Waiting
Indicator — a flashing red light on the device. Once the Inbox has been accessed, the
new message symbol (i.e., the star in a red circle) will go away, but the number of
unheard messages will still be displayed in parentheses (Figures 48 and 49).
Figure 48: One new message
Figure 49: No new messages, but one unheard message

[22]
Application: Launch When you launch the app for the first time, you need to go through a few setup steps.
1. Select the ―AT&T Voicemail Viewer‖ app from BlackBerry’s Home screen to start the
application.
2. You will be presented the End User License Agreement screen. Review the
agreement and click ―Accept‖ button to continue (Figure 50).
3. You will see a pop-up notification that says you may incur data airtime charges. Click
the ―OK‖ button to continue (Figure 51).
4. You will see a final pop-up notification that says you need to configure your mailbox
details. Click ―OK‖ to continue (Figure 52).
Figure 50: Accept End User License Agreement
Figure 51: Data airtime charges
Figure 52: Configure mailbox details

[23]
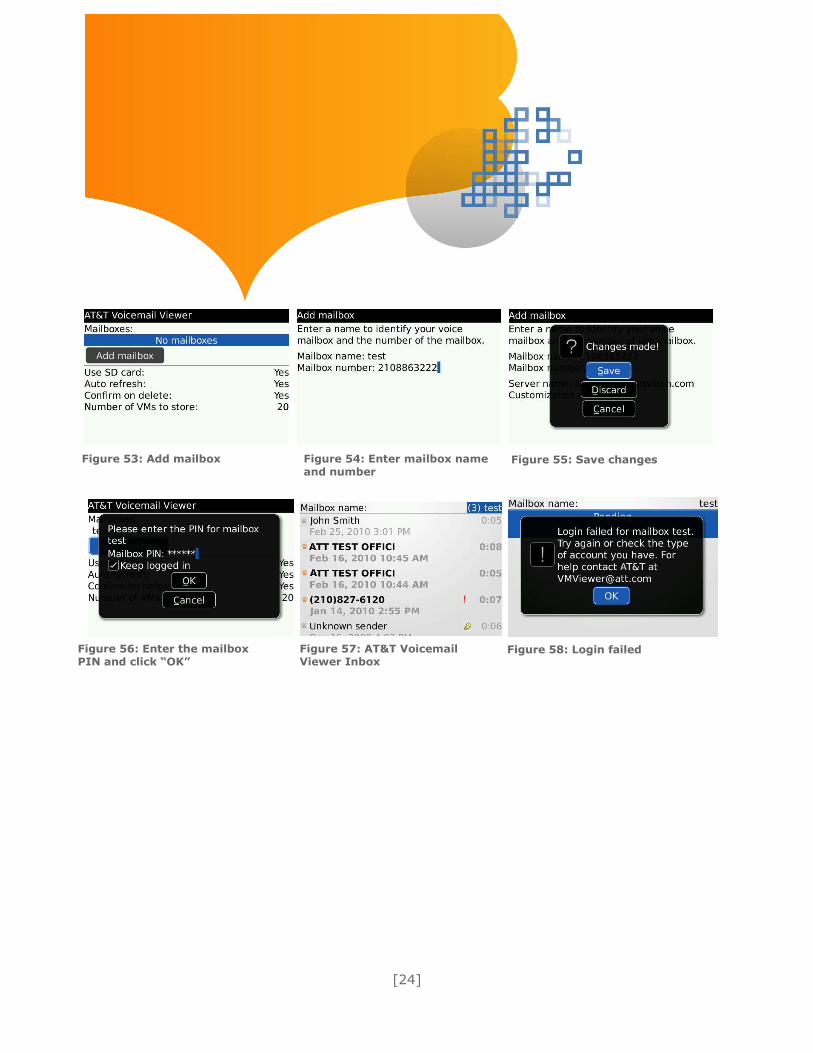
Configure Mailbox Access
After you go through the initial launching screens, you will be taken to a screen to
configure the app to access your home phone voice mailbox or mailboxes.
1. To set up access to your mailbox, click ―Add mailbox‖ (Figure 53).
2. On the ―Add mailbox‖ screen, enter a mailbox name and the mailbox number. You
choose the mailbox name, and it is only used as a reference name for this app
(Figure 54).
3. Press the Escape key (right of track pad/trackball) and then select ―Save‖ (Figure
55).
4. Enter the mailbox PIN, and click ―OK‖. The process of configuring mailbox is
complete (Figure 56).
5. Press the Escape key again, and you are presented with the AT&T Voicemail Viewer
Inbox (Figure 57).
6. If the correct credentials are not entered, then an error message will pop up. Press
―OK‖ and you will be presented with the enter PIN screen again to re-enter the PIN
(Figure 58).
[24]
Figure 53: Add mailbox
Figure 54: Enter mailbox name and number
Figure 55: Save changes
Figure 56: Enter the mailbox PIN and click “OK”
Figure 57: AT&T Voicemail Viewer Inbox
Figure 58: Login failed

[25]
Configure Multiple Mailboxes
The BlackBerry app is capable of configuring multiple mailboxes, including sub-
mailboxes.
To configure additional mailboxes or sub-mailboxes:
1. On the Inbox view, highlight the mailbox name on the top right corner (Figure 59).
2. Press the Menu key (left of track pad/trackball) and select ―Options‖ (Figure 60).
3. You will be presented with the add mailbox screen again. You can then select ―Add
mailbox‖ to configure additional mailbox access (Figure 61).
a. To configure a sub-mailbox, enter the sub-mailbox number as 2105554444-x,
where 2105554444 is the main mailbox number and x can be 1, 2, etc.
Below is an example of a Voicemail Viewer account with two mailboxes configured. One
is labeled ―mycvm‖ and the other is labeled ―test‖ (Figure 62).
Figure 59: Highlight the mailbox name
Figure 60: Options
Figure 61: Add mailbox
Figure 62: Multiple Mailboxes configured

[26]
Functionality Summary
The following functions are available with the app:
Play or listen to messages
Delete messages
Make a call to sender
Mark a message as Unheard or Heard. The function toggles between ―Mark as
unheard‖ and ―Mark as heard.‖
Forward a message as email. (Note that private messages cannot be forwarded.)
Save caller information into device’s Contact
The Inbox view displays a list of messages in the mailbox. The icon is orange and the
sender is bold for unheard messages. The currently selected mailbox is indicated at the
top right corner of the screen.
The number in parentheses indicates the number of unheard messages (Figure 63).
Figure 63: Number of unheard messages

[27]
A private message is marked by a key icon, and an urgent message is marked by an ―!‖
icon (Figure 64).
If multiple mailboxes are configured, a drop-down list is available that allows mailbox
selection. Pressing the track pad/trackball, while the mailbox is highlighted, will bring up
the drop-down list. All configured mailboxes will be shown. You can highlight the desired
mailbox and then press the track pad/trackball to go to that mailbox (Figure 65).
Figure 64: Private messages
Figure 65: Configured mailboxes
[28]
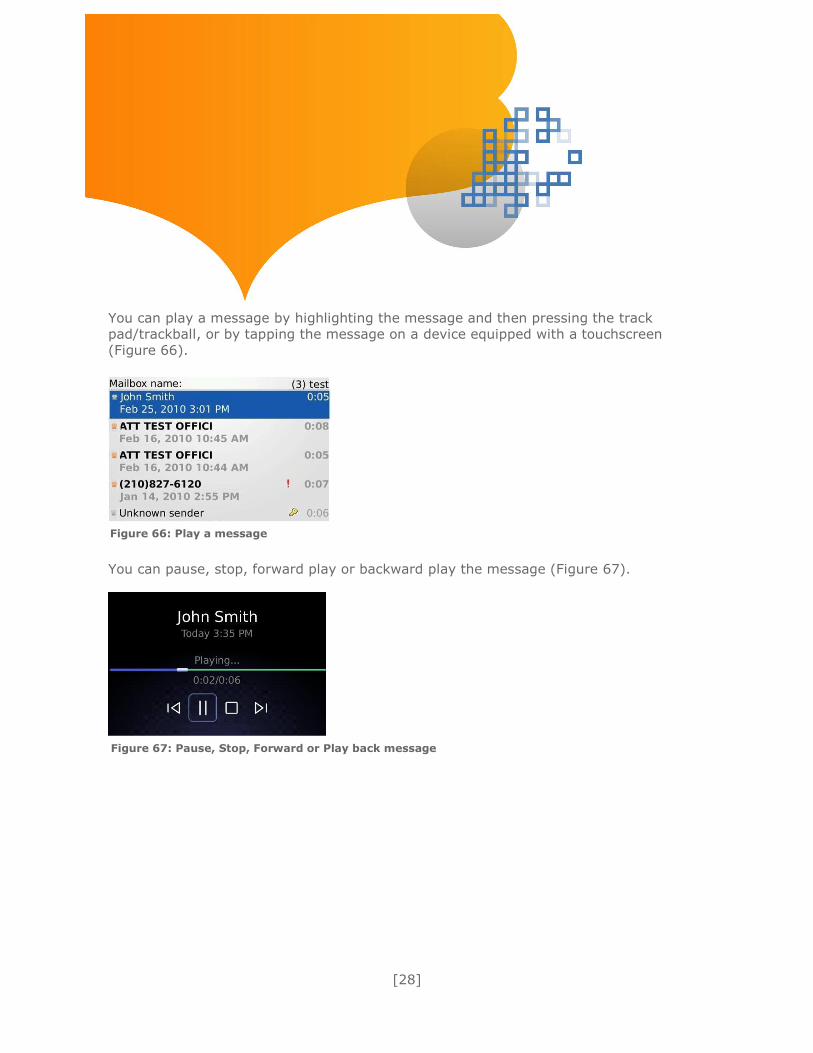
You can play a message by highlighting the message and then pressing the track
pad/trackball, or by tapping the message on a device equipped with a touchscreen
(Figure 66).
You can pause, stop, forward play or backward play the message (Figure 67).
Figure 66: Play a message
Figure 67: Pause, Stop, Forward or Play back message

[29]
To access other functions while a message is highlighted, press the Menu key on
BlackBerry device to bring up an item-specific menu. The items on this menu can be
slightly different depending on the nature of the message. The following figures show
some examples of the menu.
Below reflects the menu of a message that has already been heard, and the caller is in
the device’s address book. Notice the ―Mark unheard‖ is available, but not the ―Add
contact‖ function (Figure 68).
Below reflects the menu on a message that has not been heard and the caller is not in
the device’s address book. Notice the ―Mark heard‖ and the ―Add contact‖ functions are
available (Figure 69).
Figure 68: Message menu for a heard message
Figure 69: Message menu for an unheard message

[30]
If a message is marked as private, all forwarding and callback functions are not
permitted and hence not available on the menu (Figure 70).
Figure 70: Message menu for private messages

[31]
Settings
There are a number of setting options that you can change. They are listed below:
Use SD card Whether to use the SD card (if present) for VM messages.
The value can be set as:
Yes
No
Default is set as Yes.
Auto refresh Whether to automatically refresh the message.
The value can be set as:
Yes
No
Not when roaming
Default is set as Yes.
Confirm on
delete
Whether to display a confirmation dialog box before deleting a
message. The value can be set as:
Yes
No
Default is set to Yes.
Number of VMs
to store
Number of messages the device stores.
Value can be set as:
0
10
20
30
50
100
200
Default is set as 20.

[32]
The setting options listed on the previous page are accessible below the ―Add mailbox‖
button on initial setup mailbox screen (Figure 71).
You can also access those options later by bringing up the menu and selecting the
―Options‖ item while in the Inbox view (Figure 72).
Figure 71: Add mailbox function
Figure 72: Inbox view, select “Options”

[33]
To change the value of those options:
1. Highlight the value and then press the track pad/trackball to bring up a drop-down
list. Roll the track pad/trackball to desired value and press it (Figure 73).
2. Press Escape key, and click ―Save‖ on the confirmation screen (Figure 74).
See references below
Figure 73: Highlight “Value”
Figure 74: Confirmation screen

[34]
iGoogle Requirements
You must have an AT&T Unified MessagingSM account or an AT&T U-verse VoiceSM
account in order to use these applications. Before you use Voicemail Viewer, you will
need to be sure that you have first set up your AT&T Unified MessagingSM or AT&T U-
verse MessagingSM mailbox.
Adobe® Flash® Player is required for message playback. If you do not have Flash, go to
http://get.adobe.com/flashplayer/ to install the software on your computer.
The following operating systems and Internet browsers are compatible:
Windows XP with Internet Explorer 7 or 8 or with Firefox 3.0 and above
Windows Vista with Internet Explorer 7, 8, 9 or with Firefox 3.5 and above
Windows 7 with Internet Explorer 8, 9 or with Firefox 3.6 and above
Mac OS X 10.6 and above with Safari 5.0 and above or Firefox 3.5 and above
Installation
Before downloading, you will need your AT&T Unified MessagingSM or AT&T U-verse
MessagingSM mailbox PIN. If you forgot your PIN, instructions can be found at
att.com/vmviewer under Frequently Asked Questions. Additional information can be
found at um.att.com/vmviewer-help.
To start the installation process of the AT&T Voicemail Viewer gadget for iGoogle, open
your Internet browser and go to um.att.com/vmviewer.
―Get it now Home!‖ or ―Get it now Work!‖ is available for your AT&T Unified MessagingSM
account and ―Get it now Home‖ is available for your AT&T U-verse VoiceSM account.
To download the iGoogle home gadget:
1. Click the ―Get it now Home!‖ button in the iGoogle section (Figure 75).
2. Click the ―Add AT&T Voicemail Viewer to iGoogle‖ button (Figure 76).
See references on page 34

[35]
Application: Login Once Voicemail Viewer is installed on the iGoogle page, you are presented with the login
screen. Log in with your AT&T Unified MessagingSM AT&T U-verse VoiceSM phone number
and voice mailbox PIN. Click the ―Remember me on this computer‖ which saves your
credentials on the computer (Figure 77).
If the correct credentials are not entered, then an error message will pop up to require
you to re-enter the login credentials (Figure 78).
Figure 75: “Get it now Home!”
Figure 76: “Add AT&T Voicemail Viewer to iGoogle” button

[36]
Application: Message Inbox
Once the correct login credentials are entered, you are presented with your Inbox view.
The inbox view displays a list of messages in the mailbox. The unread (or unheard)
messages are bold. The Inbox will be automatically refreshed whenever a new message
is received in the UM mailbox.
Play a message by clicking the arrow button on the left side of a message (Figure 79).
Figure 77: Login Screen
Figure 78: Error Message
Figure 79: Play a message

[37]
You can pause and stop playing as well as skip forward and backward within a message.
The playback slider indicates progress through the message, and you can click on the
slider to select a point in the message to play from. You can also delete a message by
clicking the ―Delete‖ button while the message is being played or after the message has
been played (Figure 80).
Clicking the trash icon will display deleted messages, which can then be permanently
deleted or restored to the inbox (Figure 81).
Figure 80: Message controls & delete a message
Figure 81: Deleted messages

[38]
A private message is marked by a lock icon, an urgent message is marked by
icon, and an urgent and private message is mark by icon. The caller name is
displayed in place of the calling number if the caller name is available. If no name is
available, then the caller’s telephone number is displayed. If the caller’s telephone is
withheld, then ―Unknown‖ is displayed. A visual symbol to the left of the name indicates
from which number, Home , Work or Mobile , the message received is
displayed (Figure 82).
U-verse Messaging uses a different address book and the address book symbols are not
displayed, but the private and urgent symbols are displayed (Figure 83).
Figure 82: Message icons
Figure 83: U-verse messaging address book

[39]
If a mailbox is full or near full, a warning message will appear (Figure 84). Clicking on
the warning message will bring up a pop-up message (Figure 85).
Figure 84: Mailbox full warning
Figure 85: Mailbox Quota information pop-up message
[40]
When the gadget window is expanded, more information such as time of call and
duration of call are shown (Figures 86 and 87).
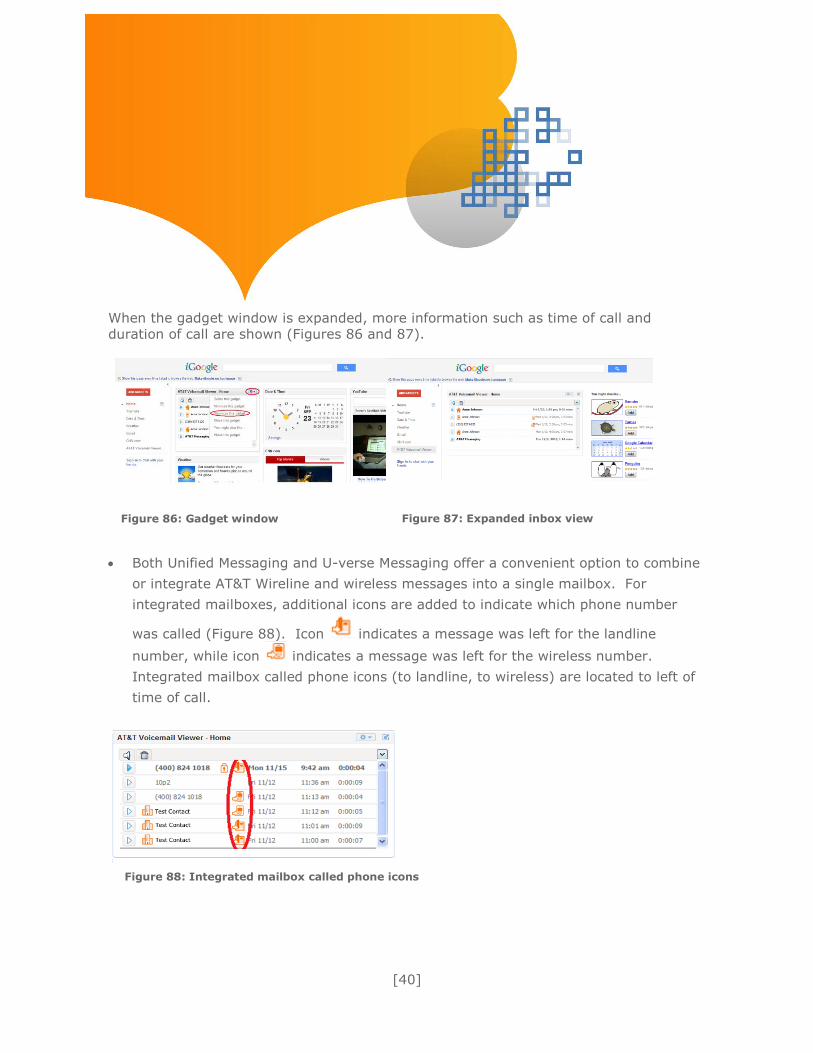
Both Unified Messaging and U-verse Messaging offer a convenient option to combine
or integrate AT&T Wireline and wireless messages into a single mailbox. For
integrated mailboxes, additional icons are added to indicate which phone number
was called (Figure 88). Icon indicates a message was left for the landline
number, while icon indicates a message was left for the wireless number.
Integrated mailbox called phone icons (to landline, to wireless) are located to left of
time of call.
Figure 86: Gadget window
Figure 87: Expanded inbox view
Figure 88: Integrated mailbox called phone icons

[41]
Hovering the mouse or placing the cursor over a message displays the called number.
Gadget Menu Options
The top right-hand corner of Voicemail Viewer has a menu that includes items Logout,
Go to AT&T Mailbox and Help information (Figure 89).
Figure 89: Menu Options

[42]
Help information includes an email address for assistance from AT&T (Figure 90).
Windows® Vista Sidebar Requirements You must have an AT&T Unified MessagingSM account or an AT&T U-verse VoiceSM
account in order to use these applications. Before you use Voicemail Viewer, you will
need to be sure that you have first set up your AT&T Unified MessagingSM or AT&T
U-verse MessagingSM mailbox.
Adobe® Flash® Player is required for message playback. If you do not have Flash, go to
http://get.adobe.com/flashplayer/ to install the software on your computer.
Voicemail Viewer for Windows Vista Sidebar requires a PC with Windows Vista operating
system and Internet Explorer or Firefox for installation.
Figure 90: AT&T Help information

[43]
Installation
Before downloading, you will need your AT&T Unified MessagingSM or AT&T U-verse
MessagingSM mailbox PIN. If you forgot your PIN, instructions can be found at
att.com/vmviewer under Frequently Asked Questions. Additional information can be
found at um.att.com/vmviewer-help.
To start the installation process of the AT&T Voicemail Viewer gadget for Vista Sidebar,
open your Internet browser and go to um.att.com/vmviewer.
―Get it now Home!‖ or ―Get it now Work!‖ is available for your AT&T Unified MessagingSM
account and ―Get it now Home‖ is available for your AT&T U-verse VoiceSM account.
To download the Windows Vista Sidebar home gadget:
1. Click the ―Get it now Home!‖ button (Figure 91).
2. Select ―Open‖ to proceed (Figure 92).
3. Select ―Allow‖ to proceed (Figure 93).
4. Select ―Install‖ to proceed (Figure 94).
5. The Voicemail Viewer gadget will be installed on the Sidebar panel (Figure 95).

[44]
Figure 91: “Get it now Home!”
Figure 92: Select “Open”
Figure 93: Select “Allow”

[45]
Application: Login Once Voicemail Viewer is installed on the Windows Vista Sidebar, you are presented with
the login screen. You will be required to log in with your home phone number and PIN.
Click ―Remember me‖ to save credentials on the computer (Figure 96).
If the correct credentials are not entered, then an error message will pop up to require
you to re-enter the login credentials (Figure 97).
Figure 94: Select “Install”
Figure 95: Sidebar panel

[46]
Application: Message Inbox
Once the correct login credentials are entered, you are presented with your Inbox
view.
The Inbox view displays a list of messages on the mailbox. The unheard messages
are bold.
The Inbox will be automatically refreshed whenever a new message is received in
the UM mailbox.
Windows Vista Sidebar has a fixed size for gadgets. As the result, only the most
important information is shown — the sender and the button to play the message
(Figure 98).
Figure 96: Login screen on sidebar panel
Figure 97: Error message

[47]
Gadgets can be detached from the Windows Vista Sidebar, in which case they have a
much larger (but still fixed) size. To detach a gadget, right click a gadget to open a
gadget menu where the menu item ―Detach from Sidebar‖ is available (Figure 99).
Figure 98: Message Inbox
Figure 99: Detach from Sidebar

[48]
The detached gadget has a much larger size to show more information to include
date/time and duration of the call.
A private message is marked by a lock icon, an urgent message is marked by
icon, and an urgent and private message is mark by icon. The caller name is
displayed in place of the calling number if the caller name is available. If no name is
available, then the caller’s telephone number is displayed. If the caller’s telephone
number is withheld, then ―Unknown‖ is displayed.
A visual symbol to the left of the name indicates from which number, Home , Work
or Mobile , the message received is displayed (Figure 100).
U-verse Messaging uses a different address book and the address book symbols are not
displayed, but the private and urgent symbols are displayed (Figure 101).
Figure 100: Detached gadget with icons
Figure 101: U-verse Messaging address book
[49]
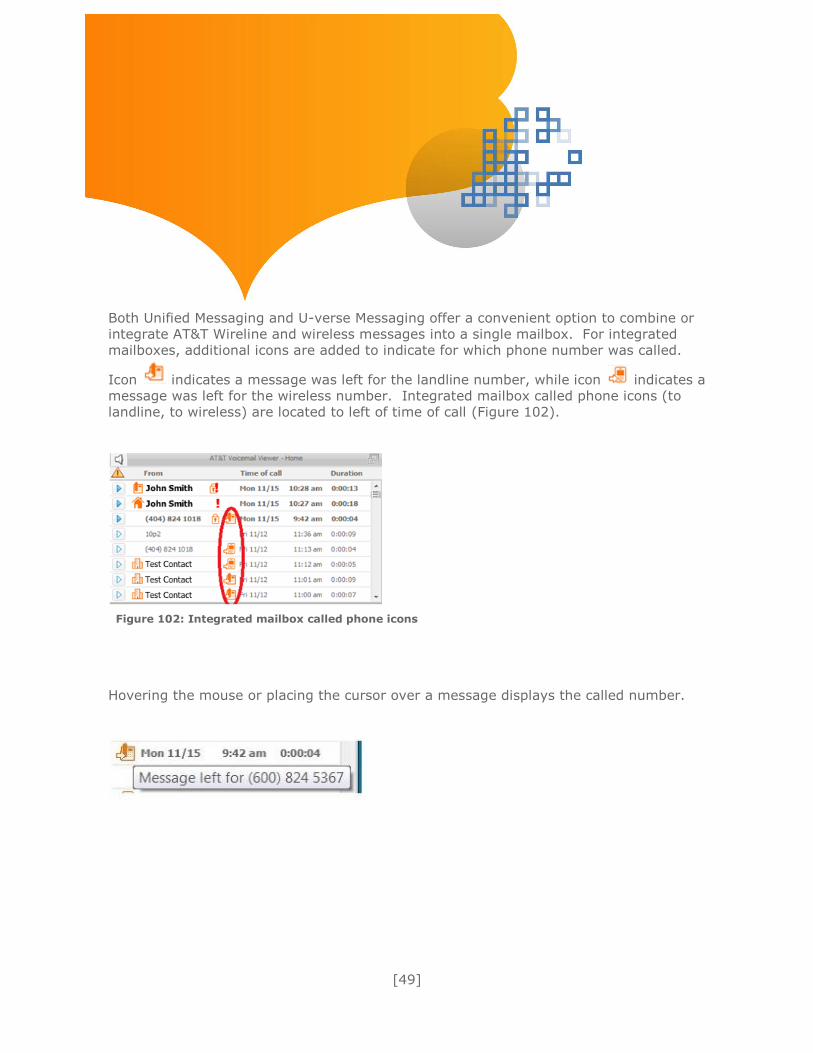
Both Unified Messaging and U-verse Messaging offer a convenient option to combine or
integrate AT&T Wireline and wireless messages into a single mailbox. For integrated
mailboxes, additional icons are added to indicate for which phone number was called.
Icon indicates a message was left for the landline number, while icon indicates a
message was left for the wireless number. Integrated mailbox called phone icons (to
landline, to wireless) are located to left of time of call (Figure 102).
Hovering the mouse or placing the cursor over a message displays the called number.
Figure 102: Integrated mailbox called phone icons

[50]
To ―dock‖ the gadget back to the Sidebar, right click the gadget again to bring up the
menu and select ―Attach to Sidebar‖ (Figure 103).
Play a message by clicking the arrow button on the left side of a message (Figure 104).
After selecting a Voicemail message to listen to, you can:
Pause and stop playing
Skip forward and backward within a message. The playback slider indicates progress
through the message, and you can click on the slider to select a point in the
message.
Delete a message by clicking the ―Delete‖ button while the message is being played,
or after the message has been played (Figure 105).
Clicking the trash icon will display deleted messages which can then be permanently
deleted or restored to the inbox (Figure 106).
Figure 103: Dock the gadget to the sidebar
Figure 104: Playing a message

[51]
If a mailbox is full or near full, a warning message will appear (Figure 107). Clicking on
the warning message will bring up a pop-up message (Figure 108).
Figure 105: Message controls & delete message
Figure 106: Trash icon
Figure 107: Warning message Figure 108: Warning message popup

[52]
Gadget Menu Options
The top right-hand corner of Voicemail Viewer has a menu that includes items Logout,
Go to AT&T Mailbox and Help information (Figure 109).
Help information includes an email address for assistance from AT&T (Figure 110).
Figure 109: Menu options
Figure 110: AT&T Help email

[53]
Windows® 7 Desktop Requirements You must have an AT&T Unified MessagingSM account or an AT&T U-verse VoiceSM
account in order to use these applications. Before you use Voicemail Viewer, you will
need to be sure that you have first set up your AT&T Unified MessagingSM or AT&T
U-verse MessagingSM mailbox.
Adobe® Flash® Player is required for message playback. If you do not have Flash, go to
http://get.adobe.com/flashplayer/ to install the software on your computer.
Voicemail Viewer for Windows 7 requires a PC with Windows 7 operating system and
Internet Explorer or Firefox for installation.
Installation
Before downloading, you will need your AT&T Unified MessagingSM or AT&T U-verse
MessagingSM mailbox PIN. If you forgot your PIN, instructions can be found at
att.com/vmviewer under Frequently Asked Questions. Additional information can be
found at um.att.com/vmviewer-help.
To start the installation process of the AT&T Voicemail Viewer gadget for Windows 7,
open your Internet browser and go to um.att.com/vmviewer.
―Get it now Home!‖ or ―Get it now Work!‖ is available for your AT&T Unified MessagingSM
and ―Get it now Home!‖ is available for your AT&T U-verse VoiceSM account.
To download the Windows 7 Desktop gadget:
1. Click ―Get it now‖ button. (Figure 111).
2. Click ―OK‖ and the following screen will appear. (Figure 112)
3. Select ―Open‖ to proceed. (Figure 113)
4. Select ―Install‖ to proceed (Figure 114).
5. The UM gadget will be installed on the desktop (Figure 115).

[54]
Figure 111: “Get it now Home!” Or “Get it now Work!”
Figure 112: To download the gadget, click “Get it now” and then click “OK”
Figure 113: Click “Open”
Figure 114: Select “Install” to proceed
[55]
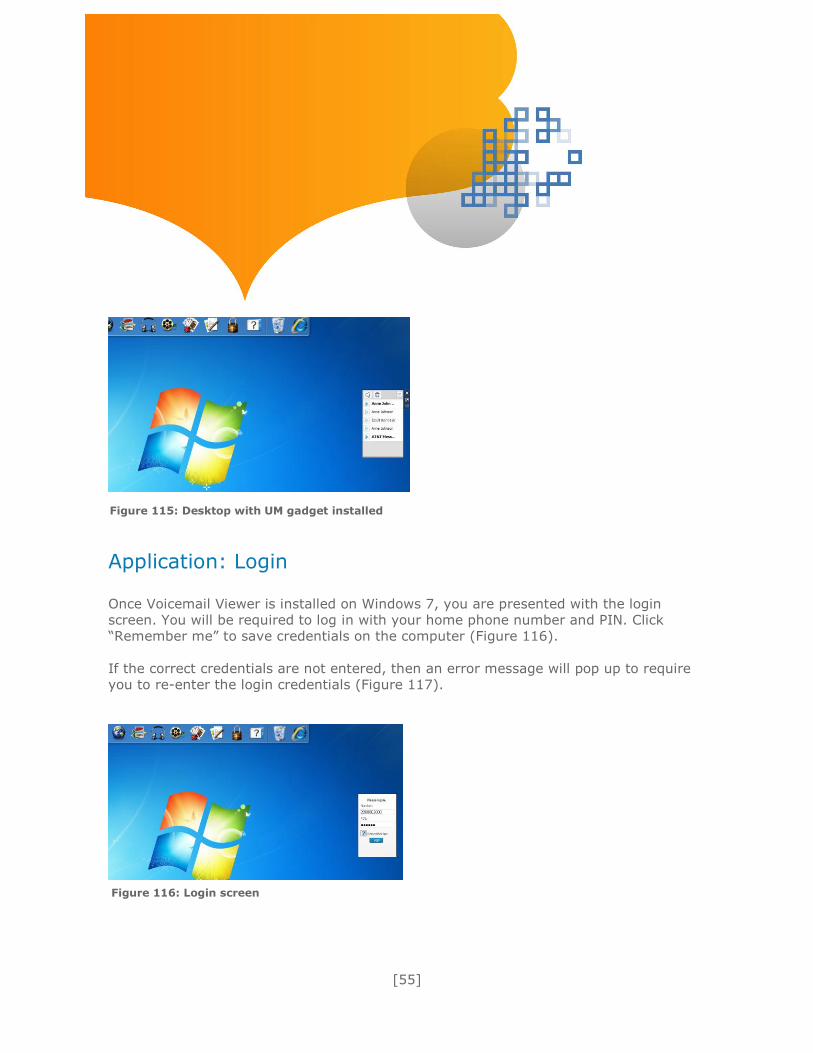
Application: Login Once Voicemail Viewer is installed on Windows 7, you are presented with the login
screen. You will be required to log in with your home phone number and PIN. Click
―Remember me‖ to save credentials on the computer (Figure 116).
If the correct credentials are not entered, then an error message will pop up to require
you to re-enter the login credentials (Figure 117).
Figure 116: Login screen
Figure 115: Desktop with UM gadget installed

[56]
Application: Message Inbox
Once the correct login credentials are entered, you are presented with your Inbox
view.
The Inbox view displays a list of messages on the mailbox. The unread unheard
messages are bold.
The Inbox will be automatically refreshed whenever a new message is received in
the UM mailbox.
Windows 7 Sidebar has a fixed size for gadgets. As the result, only the most
important information is shown — the sender and the button to play the message
(Figure 118).
Figure 117: Error message
Figure 118: Message Inbox

[57]
Gadgets can be expanded from the Windows 7 Sidebar to a larger (but still fixed) size.
To expand a gadget, right click the ―larger size‖ icon on the side of the gadget (Figure
119).
The expanded gadget has a much larger size to show more information to include
date/time and duration of the call. A private message is marked by a lock icon, an
urgent message is marked by icon, and an urgent and private message is marked by
icon. The caller name is displayed in place of the calling number if the caller name
is available. If no name is available, then the caller’s telephone number is displayed. If
the caller’s telephone number is withheld, then ―Unknown‖ is displayed.
A visual symbol to the left of the name indicates from which number, Home , Work
or Mobile , the message received is displayed (Figure 120).
Figure 119: Expand gadget

[58]
U-verse Messaging uses a different address book and the address book symbols are not
displayed but the private and urgent symbols are displayed (Figure 121).
Both Unified Messaging and U-verse Messaging offer a convenient option to combine or
integrate AT&T Wireline and wireless messages into a single mailbox. For integrated
mailboxes, additional icons are added to indicate which phone number was called. Icon
indicates a message was left for the landline number, while icon indicates a
message was left for the wireless number. Integrated mailbox called phone icons (to
landline, to wireless) are located to left of time of call (Figure 122).
Figure 120: Expanded gadget with icons
Figure 121: U-verse Messaging address book

[59]
Hovering the mouse or placing the cursor over a message displays the called number.
Play a message by clicking the arrow button on the left side of a message (Figure 123).
Figure 122: Integrated mailbox called phone icons
Figure 123: Playing a message

[60]
After selecting a Voicemail message to listen to, you can:
Pause and stop playing
Skip forward and backward within a message. The playback slider indicates progress
through the message, and you can click on the slider to select a point in the
message.
Delete a message by clicking the ―Delete‖ button while the message is being played,
or after the message has been played. (Figure 124).
Clicking the trash icon will display deleted messages, which can then be permanently
deleted or restored to the inbox (Figure 125).
If a mailbox is full or near full, a warning message will appear (Figure 126). Clicking on
the warning message will bring up a pop-up message (Figure 127).
Figure 124: Message controls and delete message
Figure 125: Trash icon
Figure 126: Warning message

[61]
Gadget Menu Options
The top right-hand corner down arrow of Voicemail Viewer has a menu that includes
items Logout, Go to AT&T Mailbox and Help information (Figure 128).
Figure 128: Link to UM’s or U-verse Home Page
Figure 127: Popup message

[62]
Help information includes an email address for assistance from AT&T (Figure 129).
Mac OS X Dashboard Requirements You must have an AT&T Unified MessagingSM account or an AT&T U-verse VoiceSM
account in order to use these applications. Before you use Voicemail Viewer, you will
need to be sure that you have first set up your AT&T Unified MessagingSM or AT&T
U-verse MessagingSM mailbox.
Adobe® Flash® Player is required for message playback. If you do not have Flash, go to
http://get.adobe.com/flashplayer/ to install the software on your computer.
Voicemail Viewer for Mac Dashboard requires a computer with Mac OS X (10.6.1 and
above) Operating System and Firefox (3.5 and above) or Safari (4.0 and above) for
installation.
Figure 129: AT&T Help information

[63]
Installation
Before downloading, you will need your AT&T Unified MessagingSM or AT&T U-verse
MessagingSM mailbox PIN. If you forgot your PIN, instructions can be found at
att.com/vmviewer under Frequently Asked Questions. Additional information can be
found at um.att.com/vmviewer-help.
To start the installation process of the AT&T Voicemail Viewer widget for Mac OS X, open
your Internet browser and go to um.att.com/vmviewer.
―Get it now Home!‖ or ―Get it now Work!‖ is available for your AT&T Unified MessagingSM
and ―Get it now Home!‖ is available for your AT&T U-verse VoiceSM account. Additional
information can be found at um.att.com/vmviewer-help.
To download the Mac OS X Dashboard widget:
1. Click the ―Get it now Home!‖ (Figure 130).
2. Select ―Install‖ to proceed (Figure 131).
3. Select ―Keep‖ to proceed (Figure 132).
4. Voicemail Viewer is installed (Figure 133).

[64]
Figure 130: “Get it now Home!” or “Get it now Work!”
Figure 131: Select “Install” to proceed
Figure 132: Select “Keep” Figure 133: Mac Dashboard with Voicemail Viewer installed

[65]
Application: Login Once Voicemail Viewer is installed on the Mac OS X Dashboard, you are presented with
the login screen. You will be required to log in with your home phone number and PIN.
Click ―Remember me‖ to save credentials on the computer (Figure 134).
If the correct credentials are not entered, then an error message will pop up to require
you to re-enter the login credentials (Figure 135).
Application: Message Inbox
Once the correct login credentials are entered, you are presented with your Inbox
view.
The Inbox view displays a list of messages on the mailbox. The unheard messages
are bold.
The Inbox will be automatically refreshed whenever a new message is received in
the UM mailbox.
Figure 134: Login screen
Figure 135: Error message

[66]
A private message is marked by a lock icon, an urgent message is marked by
icon, and an urgent and private message is marked by icon. The caller name is
displayed in place of the calling number if the caller name is available. If no name is
available, then the caller’s telephone number is displayed. If the caller’s telephone
number is withheld, then ―Unknown‖ is displayed.
A visual symbol to the left of the name indicates from which number, Home , Work
or Mobile , the message received is displayed (Figure 136).
Figure 136: Message inbox with icons

[67]
U-verse Messaging uses a different address book and the address book symbols are not
displayed, but the private and urgent symbols are displayed (Figure 137).
Both Unified Messaging and U-verse Messaging offer a convenient option to combine or
integrate AT&T Wireline and wireless messages into a single mailbox. For integrated
mailboxes, additional icons are added to indicate which phone number was called. Icon
indicates a message was left for the landline number, while icon indicates a
message was left for the wireless number. Integrated mailbox called phone icons (to
landline, to wireless) are located to left of time of call (Figure 138).
Figure 138: Integrated mailbox called phone icons
Figure 137: U-verse Messaging address book

[68]
Hovering the mouse or placing the cursor over a message displays the called number.
Play a message by clicking the arrow button on the left side of a message (Figure 139).
After selecting a Voicemail message to listen to, you can:
Pause and stop playing
Skip forward and backward within a message. The playback slider indicates progress
through the message, and you can click on the slider to select a point in the
message.
Delete a message by clicking the ―Delete‖ button while the message is being played,
or after the message has been played (Figure 140).
Clicking the trash icon will display deleted messages, which can then be permanently
deleted or restored to the inbox (Figure 141).
Figure 139: Play a message

[69]
If a mailbox is full or near full, a warning message will appear (Figure 142). Clicking on
the warning message will bring up a pop-up message (Figure 143).
Figure 140: Message controls and delete message
Figure 141: Trash icon
Figure 142: Mailbox full warning message

[70]
Widget Menu Options
The top right corner down arrow of Voicemail Viewer has a menu that includes items
Logout, Go to AT&T Mailbox and Help information (Figure 144).
Figure 143: Warning message pop-up
Figure 144: Voicemail Viewer menu

[71]
Help information includes an email address for assistance from AT&T (Figure 145).
Figure 145: AT&T Help information

[72]
Legal
This User Guide is offered as a convenience to AT&T’s customers. The specifications and
information regarding the product in this User Guide are subject to change without
notice. All statements, information and recommendations in this User Guide are believed
to be accurate but are presented without warranty of any kind, express or implied, and
are provided ―AS IS.‖ Users must take full responsibility for the application of the
specifications and information in this User Guide.
Copyright © 2011 AT&T Intellectual Property. All rights reserved. AT&T, the AT&T logo
and all other AT&T marks contained herein are trademarks of AT&T Intellectual Property
and/or AT&T affiliated companies.
Unless otherwise specified, all other trademarks are the property of their respective
owners. Screen shots are for demonstration purposes only.
Privacy Policy
http://www.att.com/gen/privacy-policy?pid=2506
v14.0-1116011
Rev. 111611


