VOLUME VII IN00946P Rev. 06/01/2010 LED Electronic Price Display System Owner/Operator Manual ATTENTION! The radio console is designed for long range communication. Use at close distances may cause inconsistent operation. As a rule, always test and/or operate at distances of 15 feet (5 meters) or greater.
Transcript
VOLUME VII IN00946P
Rev. 06/01/2010
LED Electronic Price Display System
Owner/Operator Manual
ATTENTION!The radio console is designed for long range communication. Use at close distances may cause inconsistent operation.
As a rule, always test and/or operate at distances of 15 feet (5 meters) or greater.
This is the exclusive property of Everbrite® LLC. Use or duplication of this document in any manner without the expressed written consent of Everbrite® LLC is prohibited.
The information contained in this document is subject to change without notice and should not be construed as a commitment by Everbrite® LLC.
Everbrite® LLC assumes no responsibility for any errors that may appear in this docu-ment. Nor does it make expressed or implied warranty of any kind with regard to this material, including, but not limited to, the implied warranties of merchantability and fitness for a particular purpose.
Everbrite® LLC shall not be liable for incidental or consequential damages in connec-tion with, or arising out of the furnishing, performance, or use of this document and the program material, which it describes.
Trademarks CreditsEverbrite® is a registered trademark of Everbrite LLC.
lumiDigit II® is a registered trademark of Everbrite LLC.
2
Table of Contents1. Manual Overview .............................................................................................................2
3. lumiDigit II Basic Operation............................................................................................4A. Sign Features .............................................................................................................................................4B. Console Features .......................................................................................................................................5C. Key Identification .......................................................................................................................................6
4. Sign Operation .................................................................................................................6A. Access Code ...............................................................................................................................................6B. Current Prices .............................................................................................................................................7C. System Tests ..............................................................................................................................................7D. System Setup .............................................................................................................................................7E. Sign Status ..................................................................................................................................................9F. Price Entry ...................................................................................................................................................9
7. Contact Information ....................................................................................................12
1. MANUAL OVERVIEWThis manual is intended for the user of Everbrite’s lumiDigit II Sign using the Model 6002 Console. Read this manual carefully before starting the equipment.
This manual contains important information for correct operation and maintenance of the equipment. It also contains important instructions to prevent accidents, personal injury, and/or serious damage prior to or during operation of the equipment. Familiarize yourself thoroughly with the function and operation of this equipment and strictly observe the directions given.
If you have any questions or need further details on specific aspects related to the lumiDigit II Sign, please do not hesitate to contact us. In this manual you will find three levels of flagged notes or warnings.
WARNING! ThE warnIng mEssagE Is usED whEn a LIfE ThrEaTEnIng sITuaTIon may arIsE or pErsonaL Injury Can rEsuLT.
CAUTION! The caution message is used when there is a danger of damage to the equipment, materials, or other important information, such as warranty issues.
NOTE: The note message is used to give operational information and useful tips.
3
2. SAFETY The owner of the lumiDigit II Sign is responsible for safe operation and repair. Therefore, the owner is obliged to familiarize operating personnel with the contents of this manual and make them aware of all possible hazards.
NOTE: when using this equipment, always follow the manufacturer’s instructions for safe operation. In case of emergency, please telephone Technical support or a qualified service technician.
Do not operate the sign until it is completely assembled and installed per the instructions sup-plied by Everbrite.
Everbrite recommends that your main power be installed by a licensed electrician in accordance with the local building and electrical codes.
All equipment must be grounded in accordance with the local building and electrical codes. Everbrite recommends Earth Link Ground.
If any part of the lumiDigit II Sign equipment is malfunctioning or has been damaged, stop all operation and consult with Everbrite Technical Support or qualified service technician before further use.
Use only Everbrite specified or recommended replacements parts.
WARNING! USE A LOCK OUT/TAG OUT DEVICE ON CIRCUIT BREAKERS OR “POWER ON/OFF” SWITCHES WHEN PERFORMING INSTALLATION REPAIRS, OR MAINTENANCE.
When performing repairs be mindful of the weather and work area conditions. Avoid the unit’s exposure to the elements, water and debris, or anything that may be dangerous or cause dam-age to the equipment.
warnIng! opEraTIon of ThE unIT wITh ThE ELECTrICaL CIrCuITry ExposED Is DangErous. BE surE aLL TooLs anD any oThEr maTErIaLs arE rEmovED from ThE unIT. BE surE aLL aCCEss CovErs arE rEpLaCED anD CLosED BEforE powEr Is TurnED on.
CauTIon: use of solvent cleaners or a power washer on your lumiDigit II sign may cause permanent damage.
44
lumiDigit II frame
sign Cabinet
Logo Display
face panel
3. USER MANUAL FOR lumiDigit II
A. Sign FeatureslumiDigit II is a modular LED (light emitting diode) gas price sign. Numbers that make up the prices are made using strings of LEDs, which make up 7 segments. The proper segments are combined to make all possible numbers. The LEDs are driven by electronics on the digit PCB (printed circuit board).
Information and power are sent to the Price Line Digits by a wire harness. AMP “MATE’N LOK” connectors are used to ensure good connections between digits, wiring har-nesses, light sensors, temperature sensor, controller, and power supplies.
The controller is the heart of the sign. It sends data through the harness to each price line and the digits connected. It receives and sends temperature and light level informa-tion. The console sends and receives information to and from the controller by way of radio.
The operator can control the sign by interacting with the console keypad and LCD display. The intensity levels at daytime or nighttime and the level at which the lamps turn on are all controlled by the settings the operator inputs into the console keypad. The sign feeds back information such as the % of maximum intensity for each side, temperature of the sign and sign controller, actual prices of each line, number of signs, and the vital information of each.
price Lines
5
LCD DisplayViewing screenfor program
KeypadUsed to maneuverthrough the program
LineSelect
Esc
Clear
Price
Message
1 2 3
4 5 6
7 8 9
0
ReadSign
Setup
Enter
A Product of
PowerSend
Receive
r
Antenna
RS232 Input(pos Interface)
AC Adapter Input (power supply)
Keyboard InputPlug keyboard infor LumiTextOption, must haveLumiText programming
AC AdapterTo turn on the console plug this into an outlet
AntennaSends signal toSign, must be indirect line of sight.
Top View
Front View Side View
B. Console Features
Power IndicatorRed LED indicatespower to console.
Send IndicatorGreen LED indicatessending info to sign.
Receive IndicatorAmber LED indicatesreceiving info from sign.
BlankSpace
6
Number Keys:Used to enter in gas prices, select lines, and adjust light levels
To insert a blank space in place of the digit, see “Blank Space” description.
Line Select:In the price entry screen, lets user pick a gas price
Read Sign:Loads the current prices from the sign to display them on the con-sole’s display screen
Esc/Clear:Used to go back a screen or exit
Enter:Locks in a value, or goes to the next screen
Setup:Used to go into the price sign setup screen
Price/Message:Used to alternate between the lumiDigit II sign and LumiText screens
Arrows:Used to move up or down in the lumiDigit II screens
C. Key Identification
4. SIGN OPERATION
A. Access Code
aCCEss CoDE rEQuIrED
for hELp
KEy In, ThEn EnTEr
********
800-796-7427
Power Up:Power Up, Access Code, and Current Prices screens are the first screens to display. **** Represents the version of software the program runs on.
Access Code:Only appears the very first time the console is turned on. This has an eight digit code that needs to be entered to gain access to the program. The Current Prices screen will be the normal screen shown on subse-quent power ups. Please have the information on the form on page 13 filled out before you contact Technical Support to receive your access code.
Blank SpaceWhen entering prices, a blank space may be inserted rather than a zero by pressing this button. May also be used to blank the tenths digit.
BlankSpace
7
sysTEm sETup
L BrIghT LEvEL # of sIgns # of LInEs Lamps on/off LEvEL
Price Sign Setup:
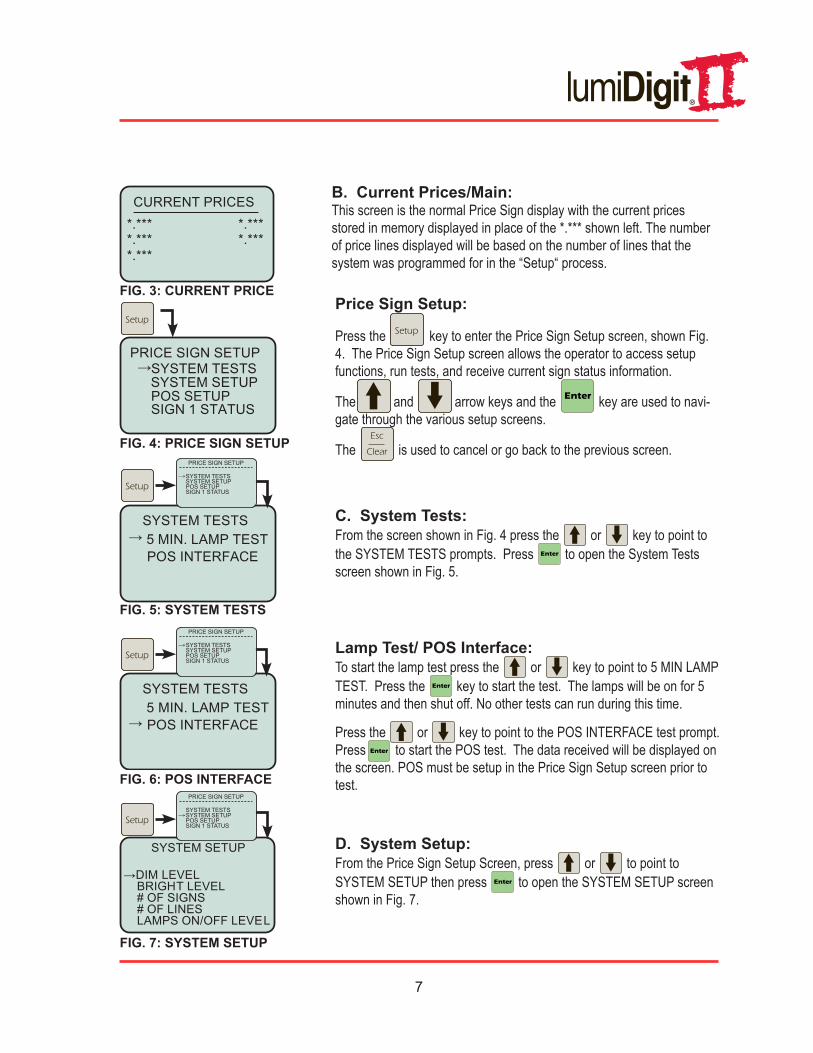
Press the Setup key to enter the Price Sign Setup screen, shown Fig. 4. The Price Sign Setup screen allows the operator to access setup functions, run tests, and receive current sign status information.
The and arrow keys and the Enter key are used to navi-gate through the various setup screens.
The Esc
Clear is used to cancel or go back to the previous screen.
C. System Tests: From the screen shown in Fig. 4 press the or key to point to the SYSTEM TESTS prompts. Press Enter to open the System Tests screen shown in Fig. 5.
D. System Setup:From the Price Sign Setup Screen, press or to point to SYSTEM SETUP then press Enter to open the SYSTEM SETUP screen shown in Fig. 7.
Lamp Test/ POS Interface:To start the lamp test press the or key to point to 5 MIN LAMP TEST. Press the Enter key to start the test. The lamps will be on for 5 minutes and then shut off. No other tests can run during this time.
Press the or key to point to the POS INTERFACE test prompt. Press Enter to start the POS test. The data received will be displayed on the screen. POS must be setup in the Price Sign Setup screen prior to test.
CurrEnT prICEs*.****.***
*.****.***
*.***
B. Current Prices/Main: This screen is the normal Price Sign display with the current prices stored in memory displayed in place of the *.*** shown left. The number of price lines displayed will be based on the number of lines that the system was programmed for in the “Setup“ process.
FIG. 3: CURRENT PRICE
FIG. 4: PRICE SIGN SETUP
FIG. 5: SYSTEM TESTS
FIG. 6: POS INTERFACE
FIG. 7: SYSTEM SETUP
prICE sIgn sETupsysTEm TEsTs
sysTEm sETuppos sETupsIgn 1 sTaTus
sysTEm TEsTs5 mIn. Lamp TEsT
s po InTErfaCE
SYSTEM TESTS5 MIN. LAMP TEST
S PO INTERFACE
Setup
Setup
prICE sIgn sETup
sysTEm TEsTs sysTEm sETup pos sETup sIgn 1 sTaTus
Setup
prICE sIgn sETup
sysTEm TEsTs sysTEm sETup pos sETup sIgn 1 sTaTus
Setup
prICE sIgn sETup
sysTEm TEsTs sysTEm sETup pos sETup sIgn 1 sTaTus
8
sysTEm sETup
DIm LEvEL =*EnTEr nEw LEvEL
sysTEm sETup
BrIghT LEvEL =*EnTEr nEw LEvEL
sysTEm sETup
#of sIgns =*EnTEr nEw LEvEL
sysTEm sETup
#of LInEs =*EnTEr nEw LEvEL
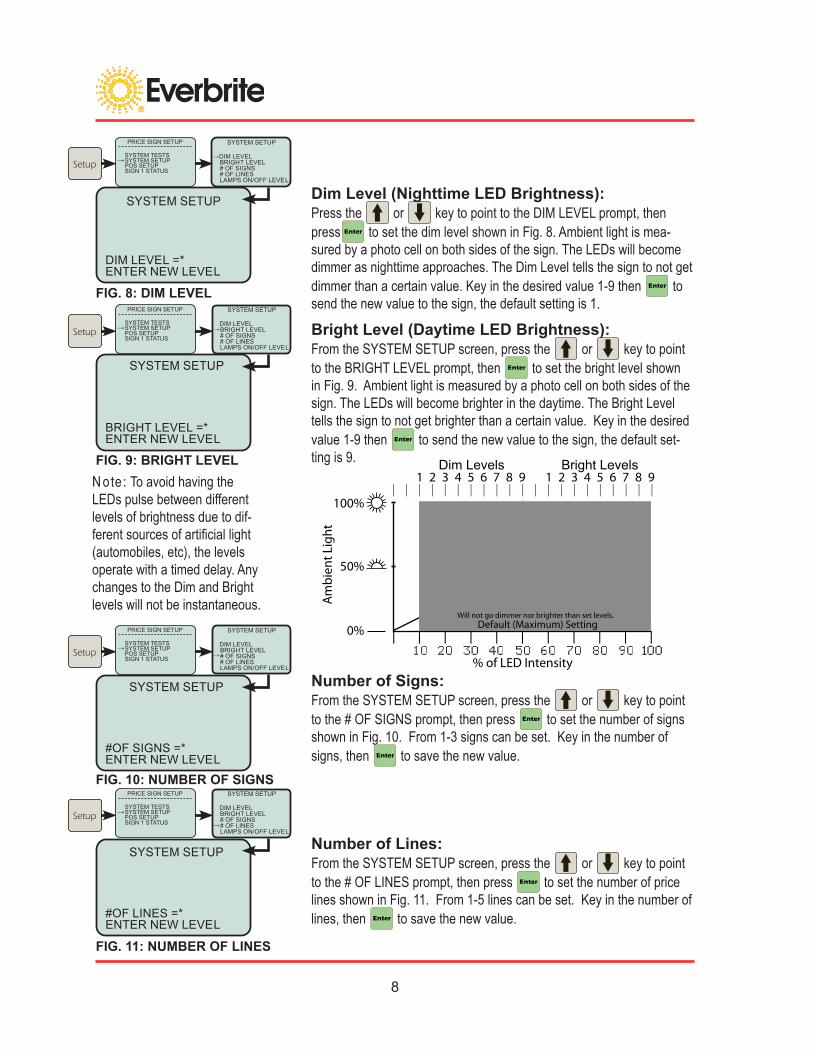
Number of Signs:From the SYSTEM SETUP screen, press the or key to point to the # OF SIGNS prompt, then press Enter to set the number of signs shown in Fig. 10. From 1-3 signs can be set. Key in the number of signs, then Enter to save the new value.
Dim Level (Nighttime LED Brightness):Press the or key to point to the DIM LEVEL prompt, then press Enter to set the dim level shown in Fig. 8. Ambient light is mea-sured by a photo cell on both sides of the sign. The LEDs will become dimmer as nighttime approaches. The Dim Level tells the sign to not get dimmer than a certain value. Key in the desired value 1-9 then Enter to send the new value to the sign, the default setting is 1.
Bright Level (Daytime LED Brightness):From the SYSTEM SETUP screen, press the or key to point to the BRIGHT LEVEL prompt, then Enter to set the bright level shown in Fig. 9. Ambient light is measured by a photo cell on both sides of the sign. The LEDs will become brighter in the daytime. The Bright Level tells the sign to not get brighter than a certain value. Key in the desired value 1-9 then Enter to send the new value to the sign, the default set-ting is 9.
Number of Lines:From the SYSTEM SETUP screen, press the or key to point to the # OF LINES prompt, then press Enter to set the number of price lines shown in Fig. 11. From 1-5 lines can be set. Key in the number of lines, then Enter to save the new value.
FIG. 8: DIM LEVEL
FIG. 9: BRIGHT LEVEL
FIG. 10: NUMBER OF SIGNS
FIG. 11: NUMBER OF LINES
50%
100%
0%
Am
bie
nt
Lig
ht
% of LED Intensity
Dim Levels1 2 3 4 5 6 7 8 9
Bright Levels1 2 3 4 5 6 7 8 9
Default (Maximum) SettingWill not go dimmer nor brighter than set levels.
Note: To avoid having the LEDs pulse between different levels of brightness due to dif-ferent sources of artificial light (automobiles, etc), the levels operate with a timed delay. Any changes to the Dim and Bright levels will not be instantaneous.
sysTEm sETup
L BrIghT LEvEL # of sIgns # of LInEs Lamps on/off LEvEL
Setup
sysTEm sETup
L BrIghT LEvEL # of sIgns # of LInEs Lamps on/off LEvEL
prICE sIgn sETup
sysTEm TEsTs sysTEm sETup pos sETup sIgn 1 sTaTus
Setup
prICE sIgn sETup
sysTEm TEsTs sysTEm sETup pos sETup sIgn 1 sTaTus
sysTEm sETup
L BrIghT LEvEL # of sIgns # of LInEs Lamps on/off LEvEL
Setup
prICE sIgn sETup
sysTEm TEsTs sysTEm sETup pos sETup sIgn 1 sTaTus
sysTEm sETup
L BrIghT LEvEL # of sIgns # of LInEs Lamps on/off LEvEL
Setup
prICE sIgn sETup
sysTEm TEsTs sysTEm sETup pos sETup sIgn 1 sTaTus
9
CurrEnT prICEs*.****.***
*.****.***
*.***PRICE =ENTER NEW VALUE
*.***
Price Entry Cont.:Key in the 4 digit price, then press Enter to send the new value to the sign. The new price will show on the display and PLEASE WAIT will appear on the screen. After a delay of about 2 seconds, PLEASE WAIT will disappear with the new price remaining on the display.
sysTEm sETup
Lamps on/off LEvEL =*EnTEr nEw LEvEL
E. Sign Status:From the PRICE SIGN SETUP screen, press or to point to the SIGN STATUS prompt, then press Enter to request the sign status information from the sign. The sign will return the information as shown in Fig. 13.
Lamps ON/OFF Level:From the SYSTEM SETUP screen, press or to point to the LAMPS ON/OFF LEVEL prompt, then Enter to set the point at which the lamps are turned ON and OFF as shown in Fig. 12. Levels 1-9 reflect the intensity of ambient light. Key in the value, then press Enter to send the new value to the sign. For example, to set the lamps to turn on ear-lier in the day (when there is more ambient light present), set the level to 9. To set the lamps later in the day (when there is less ambient light), set the level to 1. The default level is 5.
Note: To avoid having the sign turn on and off due to different sources of artificial light (automobiles, etc), the relay operates with a time delay. Any changes to the lamp settings will not be instantaneous.
CurrEnT prICEs*.****.***
*.****.***
*.***LINE # =SELECT #, THEN ENTER
G. Price Entry:From the CURRENT PRICES screen, press Line
Select key to begin the price change process. Fig. 15 will be displayed. Key in the desired price line 1-5, then press Enter . 4 digits must be entered to account for the tenths of a penny (Enter 2999 for $2.999). This screen shown in Fig. 16 will be displayed. The current price for the selected line will be displayed in the **** locations. To insert a Blank Space anywhere in the price line, press the Blank
Space key.
FIG. 12: LAMPS ON/OF
FIG. 13: SIGN STATUS
FIG. 15: CURRENT PRICES
FIG. 16: PRICE ENTRY
pos sETup
gILBarCo g-sITE vErIfonE saphIrE vErIfonE ruBy
CurrEnT pos= ruBy
FIG. 14: POS SETUP
F. POS Setup:From the PRICE SIGN SETUP screen, press or to point to the POS SETUP prompt, then press Enter . Select the correct POS system that will be connected to the input on the back of the console and press Enter . Test the POS Interface by selecting System Tests from the main SETUP menu.
Setup
LineSelect
Enternumber of Line
LineSelect
Enternumber of Line
Enter4 Digit price
prICE sIgn sETup
sysTEm TEsTs sysTEm sETup pos sETup sIgn 1 sTaTus
Setup
prICE sIgn sETup
sysTEm TEsTs sysTEm sETup pos sETup sIgn 1 sTaTus
sysTEm sETup
L BrIghT LEvEL # of sIgns # of LInEs Lamps on/off LEvEL
Setup
prICE sIgn sETup
sysTEm TEsTs sysTEm sETup pos sETup sIgn 1 sTaTus
10
PROBLEM POSSIBLE CAUSE POSSIBLE SOLUTION
Entire sign is Blank
no power to signInstallation wiring problemsign wiring problemDefective power supplies
verify the sign Circuit Breaker is on.verify that sign disconnect switch is on.Call Everbrite Technical support.
only Decimal points are Lit
0.000 prices have been entered Enter valid prices.
one side of the sign is Blank
power supply fuseDefective power supplywiring/connection problem
Call Everbrite Technical support.
sign prices will not Change
access code required. Communication problem.not in line of sight (radio) or too close to sign.Console and/or controller defective.
Contact technical support for code. Move to direct line of sight and at least 15 feet from sign. reset power to system and re-send prices.Contact Everbrite if above attempts fail.
Both sides of sign are too Dim
Dim setting is too lowBright setting is too lowsign controller problem
set dim setting to a higher value.set bright setting to a higher value Contact Everbrite Technical support
Both sides of sign are too Bright
Bright setting is too highDim setting is too highsign controller problem
set bright setting to a lower valueset dim setting to a lower valueContact Everbrite Technical support
Console LCD is BlankDefective control consoleDefective aC adapteraC receptacle problem
Check red power LED Indicator; pulsing indicates a defective aC adapter.Check aC in another outlet. Contact Everbrite Technical support.
Lamps won’t Turn on/off
setting incorrect in program, photosensor, or controller.Lamp control problem
Change lamp control on/off level by using the console.Contact Everbrite Technical support.
5. TROUBLESHOOTING
11
6 . WARRANTYTwo year Limited warranty for LumiDigit LED price signs
LumiDigit, EmC LED price signs and retrofit kits are warranted to be free from defects in material and workmanship for a period of two (2) years, from the date of shipment. During this period, replacement parts will be furnished free of charge, except for lamps and fuses, which are the responsibility of the customer. any parts found to be defective must be returned by contacting Everbrite and receiving a return goods authorization number. Items replaced under warranty will be warranted for the remainder of the original product warranty period. Contact Everbrite at 1-800-769-7427 to report any defective conditions or warranty claims.
LumiDigit retrofit kits installed into existing signs are warranted only for the components supplied by Everbrite. an existing sign’s ballasts, lamps, wiring and other components are excluded in this warranty. failure to follow retrofit installation instructions, for example, not making the sign cabinet weather-tight, will void this warranty.
If the installation was provided by Everbrite, this warranty will include labor expenses for a period of one year from the date of shipment. Everbrite must be contacted to arrange for the warranty service labor. unauthorized repairs will not be reimbursed.
If Everbrite does not provide original installation services, customer is responsible for contacting Everbrite to register and activate the sign/retrofit kit. see Instruction manual for details.
relocation of a LumiDigit sign or retrofit kit from the original address of activation voids the above warranty, unless Everbite is contacted to handle the removal and reinstallation.
all products must be installed and operated in accordance with the manufacturer’s recommended procedures and guidelines. Improper use or installation could void this warranty.
This warranty does not cover loss or damage due to accidents involving the product, acts of criminal aggression, other property disasters or acts of god. This includes but is not limited to improper installation conditions, mishandling, misapplication, faulty wiring, electrical surges, unauthorized attachments or modifications and improper maintenance.
Except for those warranties specifically and expressly set forth above, seller disclaims any and all warranties expressed, implied or statutory, including but not limited to, all warranties of merchantability and fitness for a particular purpose.
This equipment has been tested and found to comply with the limits for a class “a” digital device, pursuant to part 15 of the fCC rules. These limits are designed to provide reasonable protection against harmful interference when the equipment is operated in a commercial environment. This equipment generates, uses and can radiate radio frequency energy and, if not installed and used in accordance with the owner’s manual, may cause harmful interference to radio communications. operation of this equipment in a residential area is likely to cause harmful interference. In this case, the user is required to correct interference at their expense.
12
Please contact Everbrite Technical Support for anyproblems that may occur or cannot be resolved
through the troubleshooting steps.
Note: Installers, see retrofit installation and troubleshooting manual.
7. CONTACT INFORMATION
Technical support & Customer service: 1-800-796-7427 Everbrite pardeeville office: 1-608-429-2121