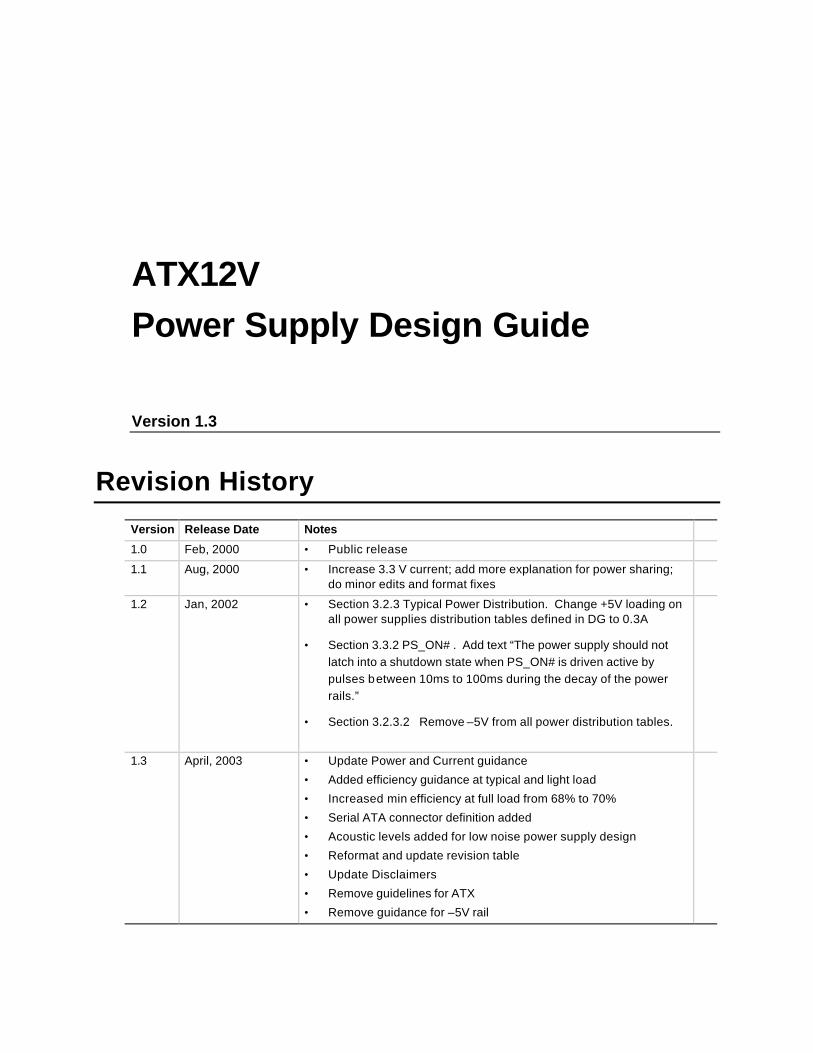
ATX12V Power Supply Design Guide Version 1.3 Revision History Version Release Date Notes 1.0 Feb, 2000 • Public release 1.1 Aug, 2000 • Increase 3.3 V current; add more explanation for power sharing; do minor edits and format fixes 1.2 Jan, 2002 • Section 3.2.3 Typical Power Distribution. Change +5V loading on all power supplies distribution tables defined in DG to 0.3A • Section 3.3.2 PS_ON# . Add text “The power supply should not latch into a shutdown state when PS_ON# is driven active by pulses between 10ms to 100ms during the decay of the power rails.” • Section 3.2.3.2 Remove –5V from all power distribution tables. 1.3 April, 2003 • Update Power and Current guidance • Added efficiency guidance at typical and light load • Increased min efficiency at full load from 68% to 70% • Serial ATA connector definition added • Acoustic levels added for low noise power supply design • Reformat and update revision table • Update Disclaimers • Remove guidelines for ATX • Remove guidance for –5V rail
Transcript
ATX12V Power Supply Design Guide
Version 1.3
Revision History
Version Release Date Notes
1.0 Feb, 2000 • Public release
1.1 Aug, 2000 • Increase 3.3 V current; add more explanation for power sharing; do minor edits and format fixes
1.2 Jan, 2002 • Section 3.2.3 Typical Power Distribution. Change +5V loading on all power supplies distribution tables defined in DG to 0.3A
• Section 3.3.2 PS_ON# . Add text “The power supply should not latch into a shutdown state when PS_ON# is driven active by pulses between 10ms to 100ms during the decay of the power rails.”
• Section 3.2.3.2 Remove –5V from all power distribution tables.
1.3 April, 2003 • Update Power and Current guidance
• Added efficiency guidance at typical and light load
• Increased min efficiency at full load from 68% to 70%
• Serial ATA connector definition added
• Acoustic levels added for low noise power supply design
• Reformat and update revision table
• Update Disclaimers
• Remove guidelines for ATX
• Remove guidance for –5V rail
ATX12V Power Supply Design Guide
Version 1.3
2
• Updated guidance for Energy Star and stand by efficiency
IMPORTANT INFORMATION AND DISCLAIMERS
INTEL CORPORATION (AND ANY CONTRIBUTOR) IS PROVIDING THIS INFORMATION AS A CONVENIENCE AND ACCORDINGLY MAKES NO WARRANTIES WITH REGARD TO THIS DOCUMENT OR PRODUCTS MADE IN CONFORMANCE WITH THIS DOCUMENT.
THIS DOCUMENT IS PROVIDED "AS IS" AND INTEL DISCLAIMS ALL EXPRESS AND IMPLIED WARRANTIES, INCLUDING THE WARRANTY OF MERCHANTABILITY AND FITNESS FOR PARTICULAR PURPOSE. IN ADDITION, INTEL (AND ANY CONTRIBUTOR) DOES NOT WARRANT OR REPRESENT THAT THIS DOCUMENT OR ANY PRODUCTS MADE IN CONFORMANCE WITH IT WILL OPERATE IN THE INTENDED MANNER, ARE FREE FROM ERRORS OR DEFECTS, OR ARE SAFE FOR USE FOR ITS INTENDED PURPOSE. ANY PERSON USING THIS DOCUMENT OR MAKING, USING, OR SELLING PRODUCTS IN CONFORMANCE WITH THIS DOCUMENT DOES SO AT HIS OR HER OWN RISK.
INTEL DISCLAIMS ALL LIABILITY ARISING FROM OR RELATED TO USE OR IMPLEMENTATION OF THE INFORMATION PROVIDED IN THIS DOCUMENT, INCLUDING LIABILITY FOR INFRINGEMENT OF ANY INTELLECTUAL PROPERTY RIGHTS RELATING TO THE INFORMATION OR THE IMPLEMENTATION OF INFORMATION IN THIS DOCUMENT. INTEL DOES NOT WARRANT OR REPRESENT THAT SUCH DEVICES OR IMPLEMENTATION WILL NOT INFRINGE SUCH RIGHTS.
INTEL IS NOT OBLIGATED TO PROVIDE ANY SUPPORT, INSTALLATION OR OTHER ASSISTANCE WITH REGARD TO THE INFORMATION OR PRODUCTS MADE IN ACCORDANCE WITH IT. THE INFORMATION IN THIS DOCUMENT IS SUBJECT TO CHANGE WITHOUT NOTICE.
THE INFORMATION REFERRED TO IN THIS DOCUMENT IS INTENDED FOR STANDARD COMMERCIAL USE ONLY. CUSTOMERS ARE SOLELY RESPONSIBLE FOR ASSESSING THE SUITABILITY OF THE INFORMATION FOR USE IN PARTICULAR APPLICATIONS. THE INFORMATION IS NOT INTENDED FOR USE IN CRITICAL CONTROL OR SAFETY SYSTEMS, MEDICAL OR LIFE SAVING APPLICATIONS, OR IN NUCLEAR FACILITY APPLICATIONS.
NO LICENSE, EXPRESS OR IMPLIED, BY ESTOPPEL OR OTHERWISE, TO ANY INTELLECTUAL PROPERTY RIGHTS IS GRANTED HEREIN.
Intel and Pentium are registered trademarks of Intel Corporation or its subsidiaries in the United States and other countries.
Copyright 2002, 2003 Intel Corporation. All rights reserved.
* Other names and brands may be claimed as the property of others.
ATX12V Power Supply Design Guide
Version 1.3
3
Contents
1. Introduction.....................................................................................................................6 1.1. Scope...........................................................................................................................6 1.2. ATX12V as Compared with ATX Power Supply..................................................................6
1.2.1. Key Changes for ATX12V Version 1.3 ..................................................................6
3. Electrical...........................................................................................................................8 3.1. AC Input........................................................................................................................8
4. Mechanical.......................................................................................................................24 4.1. Labeling / Marking..........................................................................................................24 4.2. Physical Dimensions......................................................................................................24 4.3. Airflow / Fan ..................................................................................................................27 4.4. AC Connector................................................................................................................28 4.5. DC Connectors ..............................................................................................................28
4.5.1. ATX Main Power Connector.................................................................................30 4.5.2. +12 V Power Connector......................................................................................30 4.5.3. Auxiliary Power Connector for Configurations with +3.3 VDC Output > 18 A or +5 V
Output > 24 A ...................................................................................................30 4.5.4. Peripheral Connector(s) ......................................................................................31 4.5.5. Serial ATA Power Connector ...............................................................................31 4.5.6. Floppy Drive Connector.......................................................................................31
6. Electromagnetic Compatibility ...................................................................................35 6.1. Emissions .....................................................................................................................35 6.2. Immunity.........................................................................................................................35 6.3. Input Line Current Harmonic Content and Line Flicker........................................................36 6.4. Magnetic Leakage Fields ................................................................................................36
8. Safety ................................................................................................................................37 8.1. North America ...............................................................................................................37 8.2. International...................................................................................................................38 8.3. Proscribed Materials ......................................................................................................38
ATX12V Power Supply Design Guide
Version 1.3
5
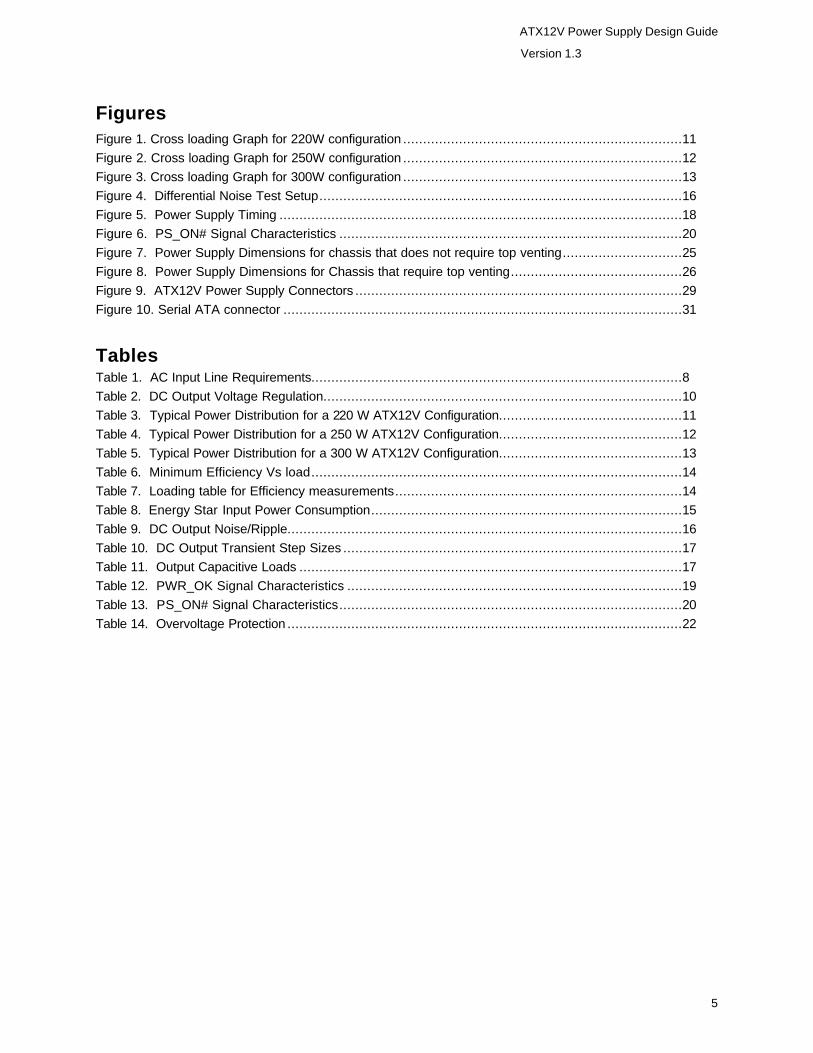
Figures Figure 1. Cross loading Graph for 220W configuration ......................................................................11 Figure 2. Cross loading Graph for 250W configuration ......................................................................12 Figure 3. Cross loading Graph for 300W configuration ......................................................................13 Figure 4. Differential Noise Test Setup...........................................................................................16 Figure 5. Power Supply Timing .....................................................................................................18 Figure 6. PS_ON# Signal Characteristics ......................................................................................20 Figure 7. Power Supply Dimensions for chassis that does not require top venting..............................25 Figure 8. Power Supply Dimensions for Chassis that require top venting...........................................26 Figure 9. ATX12V Power Supply Connectors ..................................................................................29 Figure 10. Serial ATA connector ....................................................................................................31
Tables Table 1. AC Input Line Requirements.............................................................................................8 Table 2. DC Output Voltage Regulation..........................................................................................10 Table 3. Typical Power Distribution for a 220 W ATX12V Configuration..............................................11 Table 4. Typical Power Distribution for a 250 W ATX12V Configuration..............................................12 Table 5. Typical Power Distribution for a 300 W ATX12V Configuration..............................................13 Table 6. Minimum Efficiency Vs load.............................................................................................14 Table 7. Loading table for Efficiency measurements........................................................................14 Table 8. Energy Star Input Power Consumption..............................................................................15 Table 9. DC Output Noise/Ripple...................................................................................................16 Table 10. DC Output Transient Step Sizes .....................................................................................17 Table 11. Output Capacitive Loads ................................................................................................17 Table 12. PWR_OK Signal Characteristics ....................................................................................19 Table 13. PS_ON# Signal Characteristics......................................................................................20 Table 14. Overvoltage Protection ...................................................................................................22
ATX12V Power Supply Design Guide
Version 1.3
6
1. Introduction
1.1. Scope
This document provides design suggestions and reference specifications for a family of power supplies that comply with the ATX Specification, Version 2.03† for motherboards and chassis. It includes supplementary information not expressly detailed in the ATX Specification, such as information about the physical form factor of the power supply, cooling requirements, connector configuration, and pertinent electrical and signal timing specifications.
This document is provided as a convenience only and is not intended to replace the user’s independent design and validation activity. It should not be inferred that all ATX12V power supplies must conform exactly to the content of this document. The design specifics described herein are not intended to support all possible system configurations. System power supply needs vary widely depending on factors such as the application (that is, for desktop, workstation, or server), intended ambient environment (temperature, line voltage), or motherboard power requirements.
1.2. ATX12V as Compared with ATX Power Supply
This section briefly summarizes the major changes made to this document that now defines ATX12V power supply. With the move to 12V voltage regulators for the CPU, ATX guidelines for 5V as main power are no longer provided.
1.2.1. Key Changes for ATX12V Version 1.3 Increased +12 VDC output capability. System components that use 12V are continuing to increase in power. ATX12V power supplies should be designed to accommodate these increased +12 VDC current. • Minimum Efficiency: Minimum measured efficiency and full load has been increased to 70%.
Efficiency guidelines have been added for 50% load and 20% load. • -5V removal: Guidance for –5V has been removed. This legacy voltage was in support of
ISA add-in cards. ISA cards are no longer used for a majority of the industry, but custom applications my still exist, refer to Version 1.2 for –5V recommendations.
† 2.03 is the current version of the ATX Specification as of this writing. Future references to the ATX Specification in this document imply version 2.03 or later, as applicable.
ATX12V Power Supply Design Guide
Version 1.3
7
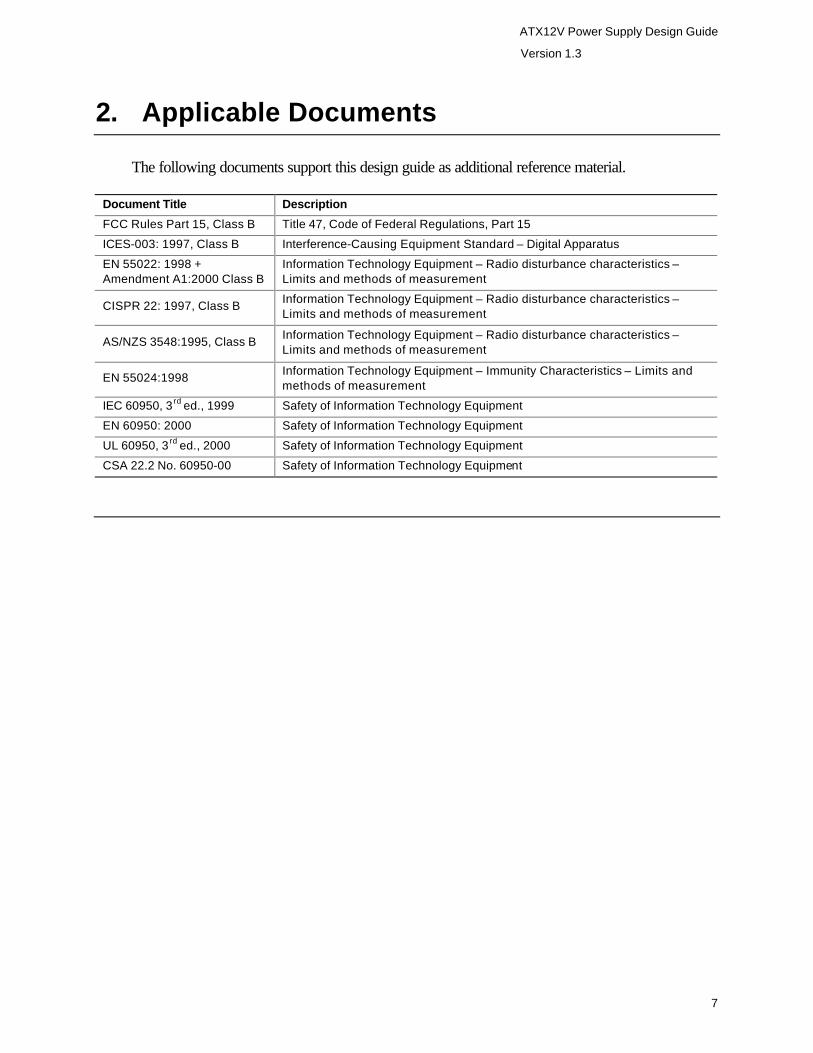
2. Applicable Documents
The following documents support this design guide as additional reference material.
Document Title Description
FCC Rules Part 15, Class B Title 47, Code of Federal Regulations, Part 15
ICES-003: 1997, Class B Interference-Causing Equipment Standard – Digital Apparatus
EN 55022: 1998 + Amendment A1:2000 Class B
Information Technology Equipment – Radio disturbance characteristics – Limits and methods of measurement
CISPR 22: 1997, Class B Information Technology Equipment – Radio disturbance characteristics – Limits and methods of measurement
AS/NZS 3548:1995, Class B Information Technology Equipment – Radio disturbance characteristics – Limits and methods of measurement
EN 55024:1998 Information Technology Equipment – Immunity Characteristics – Limits and methods of measurement
IEC 60950, 3 rd ed., 1999 Safety of Information Technology Equipment
EN 60950: 2000 Safety of Information Technology Equipment
UL 60950, 3 rd ed., 2000 Safety of Information Technology Equipment
CSA 22.2 No. 60950-00 Safety of Information Technology Equipment
ATX12V Power Supply Design Guide
Version 1.3
8
3. Electrical
The electrical requirements that follow are to be met over the environmental ranges specified in Section 5 unless otherwise noted.
3.1. AC Input
Table 1 lists AC input voltage and frequency requirements for continuous operation. The power supply shall be capable of supplying full-rated output power over two input voltage ranges rated 100-127 VAC and 200-240 VAC RMS nominal. The correct input range for use in a given environment may be either switch-selectable or auto-ranging. The power supply shall automatically recover from AC power loss. The power supply must be able to start up under peak loading at 90 VAC.
Table 1. AC Input Line Requirements
Parameter Minimum Nominal+ Maximum Unit
Vin (115 VAC) 90 115 135 VAC rms
Vin (230 VAC) 180 230 265 VAC rms
Vin Frequency 47 -- 63 Hz
+Note: Nominal voltages for test purposes are considered to be within ±1.0 V of nominal.
3.1.1. Input Over-current Protection The power supply shall incorporate primary fusing for input over-current protection to prevent damage to the power supply and meet product safety requirements. Fuses should be slow-blow–type or equivalent to prevent nuisance trips‡.
3.1.2. Inrush Current Limiting Maximum inrush current from power-on (with power on at any point on the AC sine) and including, but not limited to, three line cycles, shall be limited to a level below the surge rating of the input line cord, AC switch if present, bridge rectifier, fuse, and EMI filter components. Repetitive ON/OFF cycling of the AC input voltage should not damage the power supply or cause the input fuse to blow.
‡ . For Denmark and Switzerland international safety requirements, if the internal over-current protective devices exceed 8A for Denmark and 10A for Switzerland, then the power supply must pass international safety testing to EN 60950 using a maximum 16A over-current protected branch circuit, and this 16A (time delay fuse) branch circuit protector must not open during power supply abnormal operation (output short circuit and component fault) testing.
ATX12V Power Supply Design Guide
Version 1.3
9
3.1.3. Input Under-voltage The power supply shall contain protection circuitry such that the application of an input voltage below the minimum specified in Section 3.1, Table 1, shall not cause damage to the power supply.
3.1.4. Regulatory Both system and power supply typically must pass testing per the limits and methods described in EN 55024 specifications prior to sale in many parts of the world. Additional requirements may depend on the design, product end use, target geography, customer, and other variables. Consult your company’s Product Safety and Regulations department for more details.
3.1.5. Catastrophic Failure Protection Should a component failure occur, the power supply should not exhibit any of the following: • Flame • Excessive smoke • Charred PCB • Fused PCB conductor • Startling noise • Emission of molten material
ATX12V Power Supply Design Guide
Version 1.3
10
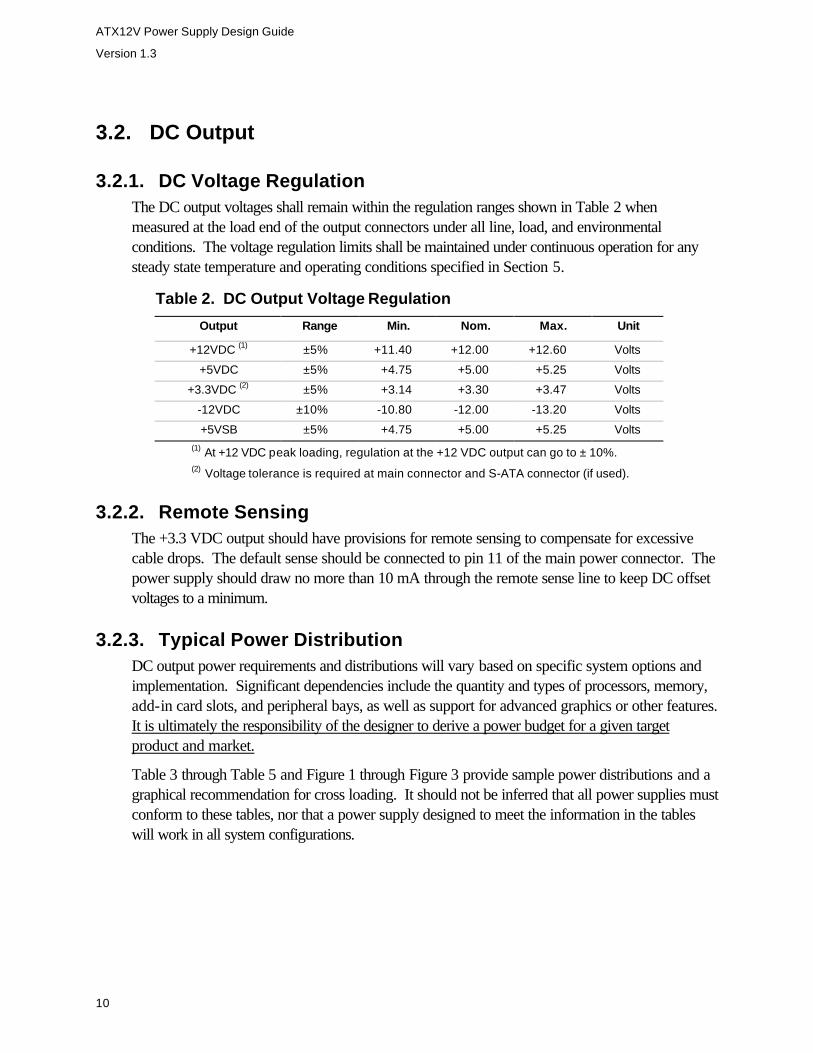
3.2. DC Output
3.2.1. DC Voltage Regulation The DC output voltages shall remain within the regulation ranges shown in Table 2 when measured at the load end of the output connectors under all line, load, and environmental conditions. The voltage regulation limits shall be maintained under continuous operation for any steady state temperature and operating conditions specified in Section 5.
Table 2. DC Output Voltage Regulation
Output Range Min. Nom. Max. Unit
+12VDC (1) ±5% +11.40 +12.00 +12.60 Volts
+5VDC ±5% +4.75 +5.00 +5.25 Volts
+3.3VDC (2) ±5% +3.14 +3.30 +3.47 Volts
-12VDC ±10% -10.80 -12.00 -13.20 Volts
+5VSB ±5% +4.75 +5.00 +5.25 Volts (1) At +12 VDC peak loading, regulation at the +12 VDC output can go to ± 10%. (2) Voltage tolerance is required at main connector and S-ATA connector (if used).
3.2.2. Remote Sensing The +3.3 VDC output should have provisions for remote sensing to compensate for excessive cable drops. The default sense should be connected to pin 11 of the main power connector. The power supply should draw no more than 10 mA through the remote sense line to keep DC offset voltages to a minimum.
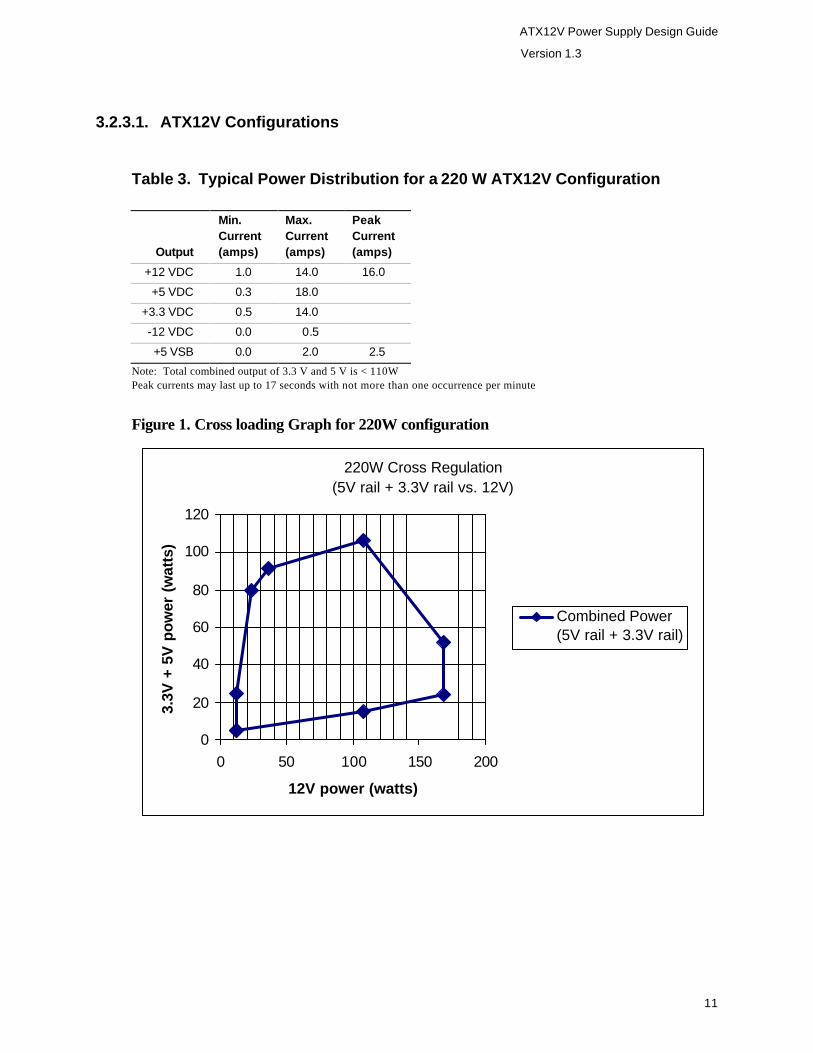
3.2.3. Typical Power Distribution DC output power requirements and distributions will vary based on specific system options and implementation. Significant dependencies include the quantity and types of processors, memory, add-in card slots, and peripheral bays, as well as support for advanced graphics or other features. It is ultimately the responsibility of the designer to derive a power budget for a given target product and market.
Table 3 through Table 5 and Figure 1 through Figure 3 provide sample power distributions and a graphical recommendation for cross loading. It should not be inferred that all power supplies must conform to these tables, nor that a power supply designed to meet the information in the tables will work in all system configurations.
ATX12V Power Supply Design Guide
Version 1.3
11
3.2.3.1. ATX12V Configurations
Table 3. Typical Power Distribution for a 220 W ATX12V Configuration
Output
Min. Current (amps)
Max. Current (amps)
Peak Current (amps)
+12 VDC 1.0 14.0 16.0
+5 VDC 0.3 18.0
+3.3 VDC 0.5 14.0
-12 VDC 0.0 0.5
+5 VSB 0.0 2.0 2.5
Note: Total combined output of 3.3 V and 5 V is < 110W Peak currents may last up to 17 seconds with not more than one occurrence per minute
Figure 1. Cross loading Graph for 220W configuration
220W Cross Regulation
(5V rail + 3.3V rail vs. 12V)
0
20
40
60
80
100
120
0 50 100 150 200
12V power (watts)
3.3V
+ 5
V p
ower
(w
atts
)
Combined Power(5V rail + 3.3V rail)
ATX12V Power Supply Design Guide
Version 1.3
12
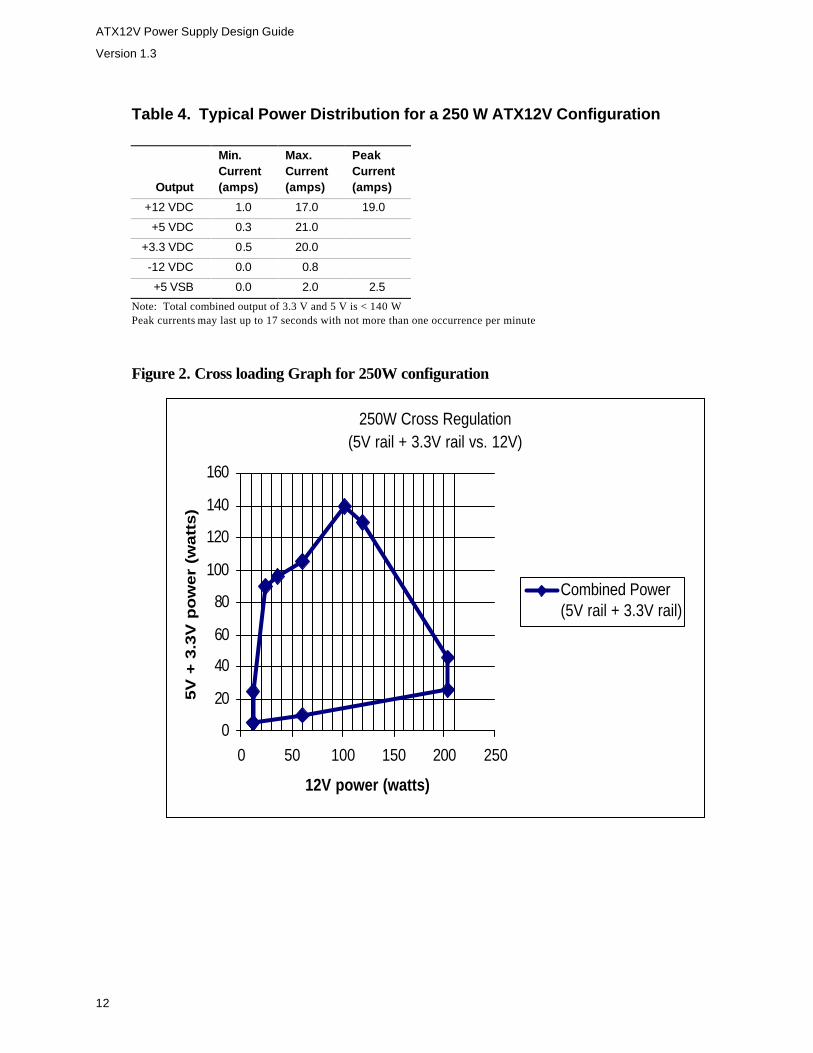
Table 4. Typical Power Distribution for a 250 W ATX12V Configuration
Output
Min. Current (amps)
Max. Current (amps)
Peak Current (amps)
+12 VDC 1.0 17.0 19.0
+5 VDC 0.3 21.0
+3.3 VDC 0.5 20.0
-12 VDC 0.0 0.8
+5 VSB 0.0 2.0 2.5
Note: Total combined output of 3.3 V and 5 V is < 140 W Peak currents may last up to 17 seconds with not more than one occurrence per minute
Figure 2. Cross loading Graph for 250W configuration
250W Cross Regulation
(5V rail + 3.3V rail vs. 12V)
0
20
40
60
80
100
120
140
160
0 50 100 150 200 250
12V power (watts)
5V
+ 3
.3V
po
wer
(watt
s)
Combined Power(5V rail + 3.3V rail)
ATX12V Power Supply Design Guide
Version 1.3
13
Table 5. Typical Power Distribution for a 300 W ATX12V Configuration
Output
Min. Current (amps)
Max. Current (amps)
Peak Current (amps)
+12 VDC 1.0 18.0 19.5
+5 VDC 0.5 26.0
+3.3 VDC 0.5 27.0
-12 VDC 0.0 0.8
+5 VSB 0.0 2.0 2.5
Note: Total combined output of 3.3 V and 5 V is < 195 W Peak currents may last up to 17 seconds with not more than one occurrence per minute
Figure 3. Cross loading Graph for 300W configuration
3.2.4. Power Limit / Hazardous Energy Levels Under normal or overload conditions, no output shall continuously provide 240 VA under any conditions of load including output short circuit, per the requirement of UL 1950/CSA 950 / EN 60950/IEC 950.
300W Cross Regulation (5V rail + 3.3V rail vs. 12V)
0
50
100
150
200
250
0 50 100 150 200 250
12V power (watts)
5V
+ 3
.3V
po
wer
(watt
s)
Combined Power(5V rail + 3.3V rail)
ATX12V Power Supply Design Guide
Version 1.3
14
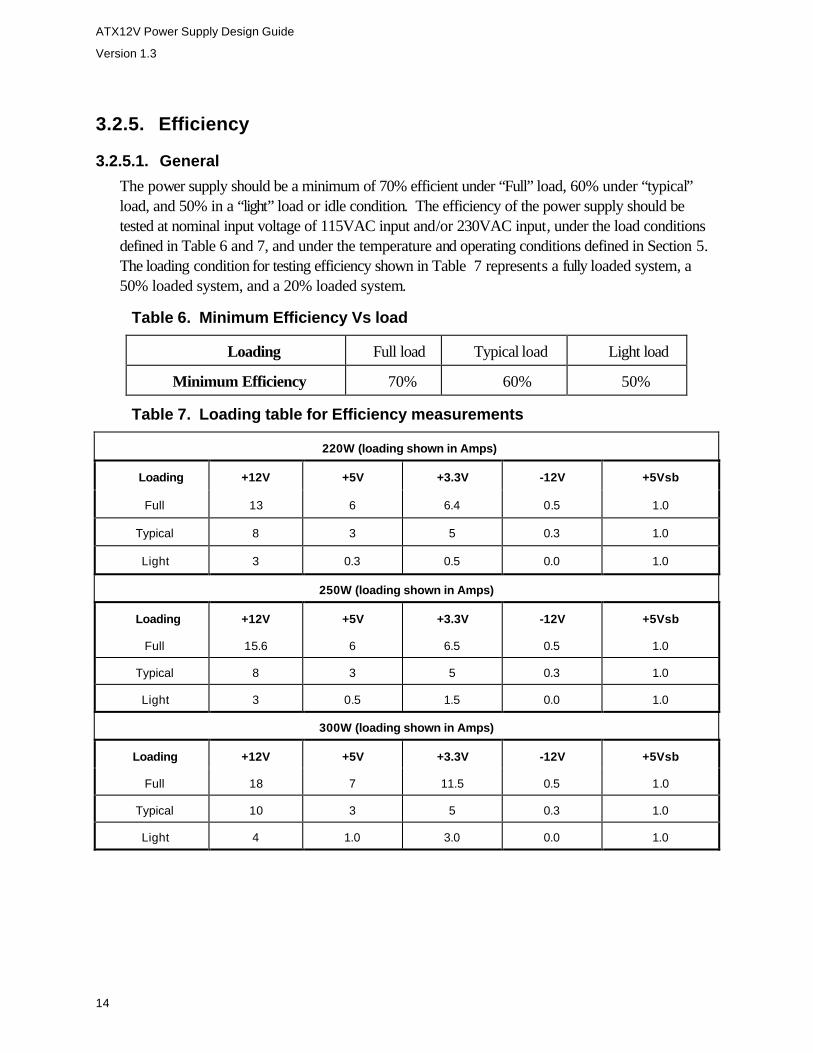
3.2.5. Efficiency
3.2.5.1. General
The power supply should be a minimum of 70% efficient under “Full” load, 60% under “typical” load, and 50% in a “light” load or idle condition. The efficiency of the power supply should be tested at nominal input voltage of 115VAC input and/or 230VAC input, under the load conditions defined in Table 6 and 7, and under the temperature and operating conditions defined in Section 5. The loading condition for testing efficiency shown in Table 7 represents a fully loaded system, a 50% loaded system, and a 20% loaded system.
Table 6. Minimum Efficiency Vs load
Loading Full load Typical load Light load
Minimum Efficiency 70% 60% 50%
Table 7. Loading table for Efficiency measurements
220W (loading shown in Amps)
Loading +12V +5V +3.3V -12V +5Vsb
Full 13 6 6.4 0.5 1.0
Typical 8 3 5 0.3 1.0
Light 3 0.3 0.5 0.0 1.0
250W (loading shown in Amps)
Loading +12V +5V +3.3V -12V +5Vsb
Full 15.6 6 6.5 0.5 1.0
Typical 8 3 5 0.3 1.0
Light 3 0.5 1.5 0.0 1.0
300W (loading shown in Amps)
Loading +12V +5V +3.3V -12V +5Vsb
Full 18 7 11.5 0.5 1.0
Typical 10 3 5 0.3 1.0
Light 4 1.0 3.0 0.0 1.0
ATX12V Power Supply Design Guide
Version 1.3
15
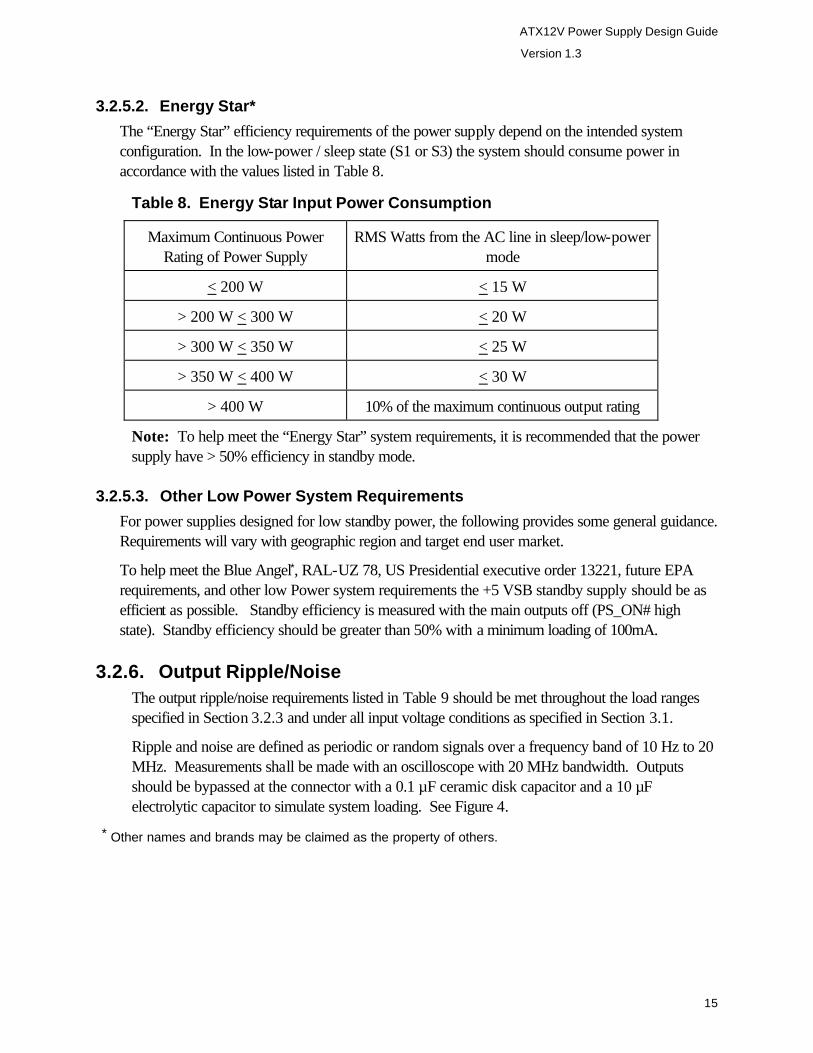
3.2.5.2. Energy Star*
The “Energy Star” efficiency requirements of the power supply depend on the intended system configuration. In the low-power / sleep state (S1 or S3) the system should consume power in accordance with the values listed in Table 8.
Table 8. Energy Star Input Power Consumption
Maximum Continuous Power Rating of Power Supply
RMS Watts from the AC line in sleep/low-power mode
< 200 W < 15 W
> 200 W < 300 W < 20 W
> 300 W < 350 W < 25 W
> 350 W < 400 W < 30 W
> 400 W 10% of the maximum continuous output rating
Note: To help meet the “Energy Star” system requirements, it is recommended that the power supply have > 50% efficiency in standby mode.
3.2.5.3. Other Low Power System Requirements
For power supplies designed for low standby power, the following provides some general guidance. Requirements will vary with geographic region and target end user market.
To help meet the Blue Angel*, RAL-UZ 78, US Presidential executive order 13221, future EPA requirements, and other low Power system requirements the +5 VSB standby supply should be as efficient as possible. Standby efficiency is measured with the main outputs off (PS_ON# high state). Standby efficiency should be greater than 50% with a minimum loading of 100mA.
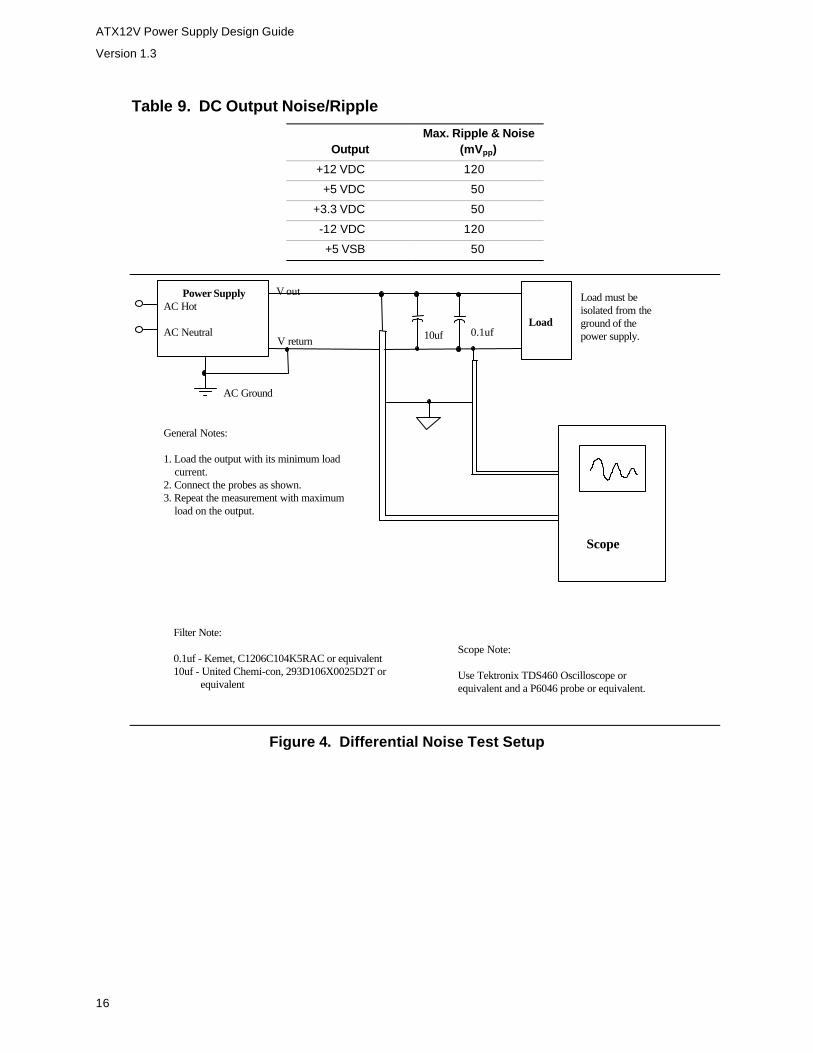
3.2.6. Output Ripple/Noise The output ripple/noise requirements listed in Table 9 should be met throughout the load ranges specified in Section 3.2.3 and under all input voltage conditions as specified in Section 3.1.
Ripple and noise are defined as periodic or random signals over a frequency band of 10 Hz to 20 MHz. Measurements shall be made with an oscilloscope with 20 MHz bandwidth. Outputs should be bypassed at the connector with a 0.1 µF ceramic disk capacitor and a 10 µF electrolytic capacitor to simulate system loading. See Figure 4.
* Other names and brands may be claimed as the property of others.
ATX12V Power Supply Design Guide
Version 1.3
16
Table 9. DC Output Noise/Ripple
Output
Max. Ripple & Noise (mVpp)
+12 VDC 120
+5 VDC 50
+3.3 VDC 50
-12 VDC 120
+5 VSB 50
Scope
Load
V out
V return
Power SupplyAC Hot
AC Neutral
AC Ground
Scope Note:
Use Tektronix TDS460 Oscilloscope orequivalent and a P6046 probe or equivalent.
Filter Note:
0.1uf - Kemet, C1206C104K5RAC or equivalent10uf - United Chemi-con, 293D106X0025D2T or equivalent
General Notes:
1. Load the output with its minimum load current.2. Connect the probes as shown.3. Repeat the measurement with maximum load on the output.
Load must beisolated from theground of thepower supply.0.1uf10uf
Figure 4. Differential Noise Test Setup
ATX12V Power Supply Design Guide
Version 1.3
17
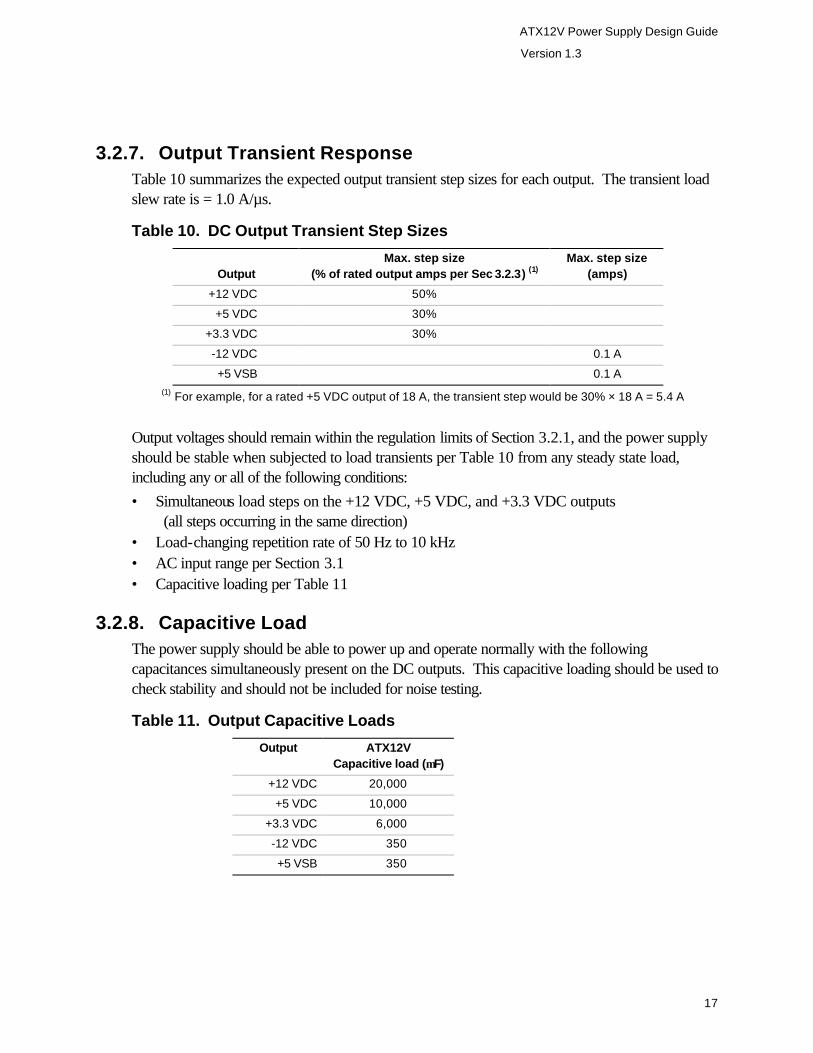
3.2.7. Output Transient Response Table 10 summarizes the expected output transient step sizes for each output. The transient load slew rate is = 1.0 A/µs.
Table 10. DC Output Transient Step Sizes
Output
Max. step size (% of rated output amps per Sec 3.2.3) (1)
Max. step size (amps)
+12 VDC 50%
+5 VDC 30%
+3.3 VDC 30%
-12 VDC 0.1 A
+5 VSB 0.1 A (1) For example, for a rated +5 VDC output of 18 A, the transient step would be 30% × 18 A = 5.4 A
Output voltages should remain within the regulation limits of Section 3.2.1, and the power supply should be stable when subjected to load transients per Table 10 from any steady state load, including any or all of the following conditions: • Simultaneous load steps on the +12 VDC, +5 VDC, and +3.3 VDC outputs
(all steps occurring in the same direction) • Load-changing repetition rate of 50 Hz to 10 kHz • AC input range per Section 3.1 • Capacitive loading per Table 11
3.2.8. Capacitive Load The power supply should be able to power up and operate normally with the following capacitances simultaneously present on the DC outputs. This capacitive loading should be used to check stability and should not be included for noise testing.
Table 11. Output Capacitive Loads
Output ATX12V Capacitive load (µF)
+12 VDC 20,000
+5 VDC 10,000
+3.3 VDC 6,000
-12 VDC 350
+5 VSB 350
ATX12V Power Supply Design Guide
Version 1.3
18
3.2.9. Closed-loop Stability The power supply shall be unconditionally stable under all line/load/transient load conditions including capacitive loads specified in Section 3.2.8. A minimum of 45 degrees phase margin and 10 dB gain margin is recommended at both the maximum and minimum loads.
3.2.10. +5 VDC / +3.3 VDC Power Sequencing The +12 VDC and +5 VDC output levels must be equal to or greater than the +3.3 VDC output at all times during power-up and normal operation. The time between the +12 VDC or +5 VDC output reaching its minimum in-regulation level and +3.3 VDC reaching its minimum in-regulation level must be ≤ 20 ms.
3.2.11. Voltage Hold-up Time The power supply should maintain output regulation per Section 3.2.1 despite a loss of input power at the low-end nominal range—115 VAC / 57 Hz or 230 VAC / 47 Hz—at maximum continuous output load as applicable for a minimum of 17 ms.
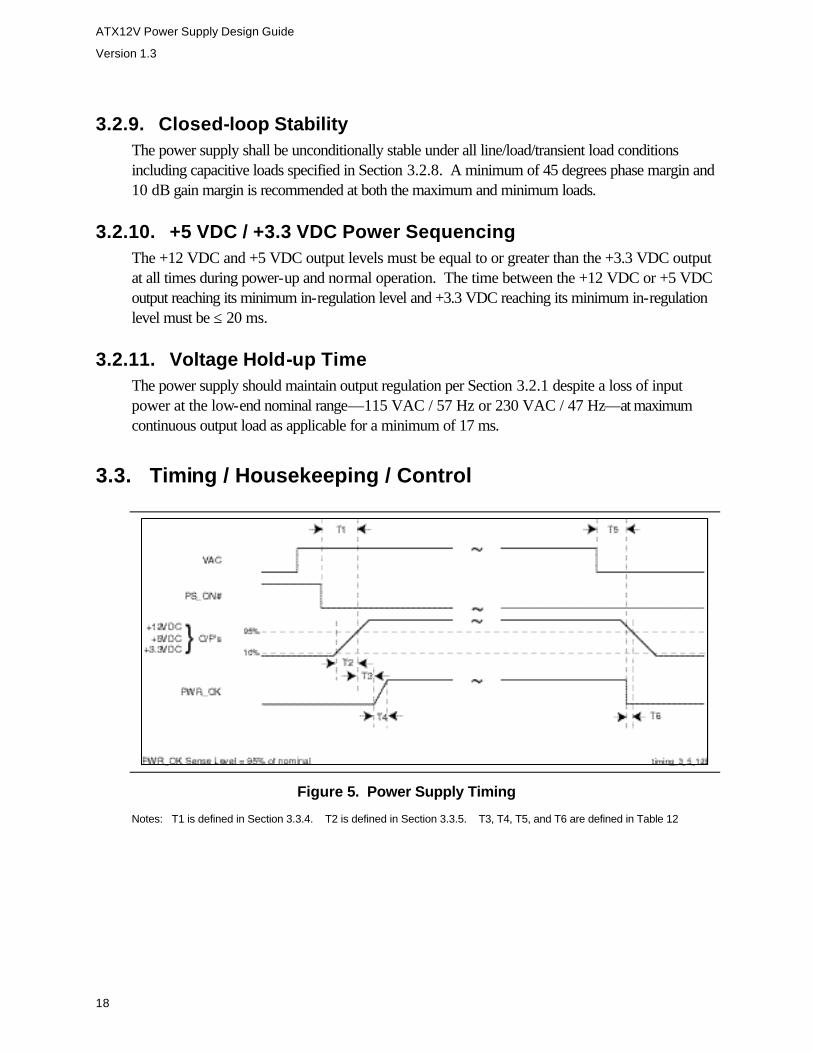
3.3. Timing / Housekeeping / Control
Figure 5. Power Supply Timing
Notes: T1 is defined in Section 3.3.4. T2 is defined in Section 3.3.5. T3, T4, T5, and T6 are defined in Table 12
ATX12V Power Supply Design Guide
Version 1.3
19
3.3.1. PWR_OK PWR_OK is a “power good” signal. It should be asserted high by the power supply to indicate that the +12 VDC, +5VDC, and +3.3VDC outputs are above the under-voltage thresholds listed in Section 3.2.1 and that sufficient mains energy is stored by the converter to guarantee continuous power operation within specification for at least the duration specified in Section 3.2.11, “Voltage Hold-up Time.” Conversely, PWR_OK should be de-asserted to a low state when any of the +12 VDC, +5 VDC, or +3.3 VDC output voltages falls below its under-voltage threshold, or when mains power has been removed for a time sufficiently long such that power supply operation cannot be guaranteed beyond the power-down warning time. The electrical and timing characteristics of the PWR_OK signal are given in Table 12 and in Figure 5.
Table 12. PWR_OK Signal Characteristics
Signal Type +5 V TTL compatible
Logic level low < 0.4 V while sinking 4 mA
Logic level high Between 2.4 V and 5 V output while sourcing 200 µA
High-state output impedance 1 kΩ from output to common
PWR_OK delay 100 ms < T3 < 500 ms
PWR_OK risetime T4 ≤ 10 ms
AC loss to PWR_OK hold-up time
T5 ≥ 16 ms
Power-down warning T6 ≥ 1 ms
3.3.2. PS_ON# PS_ON# is an active-low, TTL-compatible signal that allows a motherboard to remotely control the power supply in conjunction with features such as soft on/off, Wake on LAN*, or wake-on-modem. When PS_ON# is pulled to TTL low, the power supply should turn on the five main DC output rails: +12VDC, +5VDC, +3.3VDC, -5VDC, and -12VDC. When PS_ON# is pulled to TTL high or open-circuited, the DC output rails should not deliver current and should be held at zero potential with respect to ground. PS_ON# has no effect on the +5VSB output, which is always enabled whenever the AC power is present. Table 13 lists PS_ON# signal characteristics.
The power supply shall provide an internal pull-up to TTL high. The power supply shall also provide de-bounce circuitry on PS_ON# to prevent it from oscillating on/off at startup when activated by a mechanical switch. The DC output enable circuitry must be SELV-compliant.
The power supply shall not latch into a shutdown state when PS_ON# is driven active by pulses between 10ms to 100ms during the decay of the power rails.
ATX12V Power Supply Design Guide
Version 1.3
20
Table 13. PS_ON# Signal Characteristics
Min. Max.
VIL, Input Low Voltage 0.0 V 0.8 V
IIL, Input Low Current (Vin = 0.4 V) -1.6 mA
VIH, Input High Voltage (Iin = -200 µA) 2.0 V
VIH open circuit, Iin = 0 5.25 V
Enable
Disable
PS_ON# Voltage
0.8 2.0 5.25 = Maximum Open-Circuit Voltage
≥ 2.0 VPS is
disabled
≤ 0.8 VPS is
enabled
Hysteresis ≥ 0.3 V
Figure 6. PS_ON# Signal Characteristics
3.3.3. +5 VSB +5 VSB is a standby supply output that is active whenever the AC power is present. It provides a power source for circuits that must remain operational when the five main DC output rails are in a disabled state. Example uses include soft power control, Wake on LAN, wake-on-modem, intrusion detection, or suspend state activities.
The +5 VSB output should be capable of delivering a minimum of 2.0 A at +5 V ± 5% to external circuits. The power supply must be able to provide the required power during a "wake up" event. If an external USB device generates the event, there may be peak currents as high as 2.5A lasting no more than 500mS.
Overcurrent protection is required on the +5 VSB output regardless of the output current rating. This ensures the power supply will not be damaged if external circuits draw more current than the supply can provide.
ATX12V Power Supply Design Guide
Version 1.3
21
3.3.4. Power-on Time The power-on time is defined as the time from when PS_ON# is pulled low to when the +12 VDC, +5 VDC, and +3.3 VDC outputs are within the regulation ranges specified in Section 3.2.1. The power-on time shall be less than 500 ms (T1 < 500 ms).
+5 VSB shall have a power-on time of two seconds maximum after application of valid AC voltages.
3.3.5. Risetime The output voltages shall rise from ≤10% of nominal to within the regulation ranges specified in Section 3.2.1 within 0.1 ms to 20 ms (0.1 ms ≤ T2 ≤ 20 ms).
There must be a smooth and continuous ramp of each DC output voltage from 10% to 90% of its final set-point within the regulation band, while loaded as specified in Section 3.2.3. The smooth turn-on requires that, during the 10% to 90% portion of the rise time, the slope of the turn-on waveform must be positive and have a value of between 0 V/ms and [Vout,nominal / 0.1] V/ms. Also, for any 5 ms segment of the 10% to 90% risetime waveform, a straight line drawn between the end points of the waveform segment must have a slope ≥ [Vout,nominal / 20] V/ms.
3.3.6. Overshoot at Turn-on / Turn-off The output voltage overshoot upon the application or removal of the input voltage, or the assertion/deassertion of PS_ON#, under the conditions specified in Section 3.1, shall be less than 10% above the nominal voltage. No voltage of opposite polarity shall be present on any output during turn-on or turn-off.
3.3.7. Reset after Shutdown If the power supply latches into a shutdown state because of a fault condition on its outputs, the power supply shall return to normal operation only after the fault has been removed and the PS_ON# (or AC input) has been cycled OFF/ON with a minimum OFF time of 1 second.
3.3.8. +5 VSB at AC Power-down After AC power is removed, the +5 VSB standby voltage output should remain at its steady state value for the minimum hold-up time specified in Section 3.2.11 until the output begins to decrease in voltage. The decrease shall be monotonic in nature, dropping to 0.0 V. There shall be no other perturbations of this voltage at or following removal of AC power.
ATX12V Power Supply Design Guide
Version 1.3
22
3.4. Output Protection
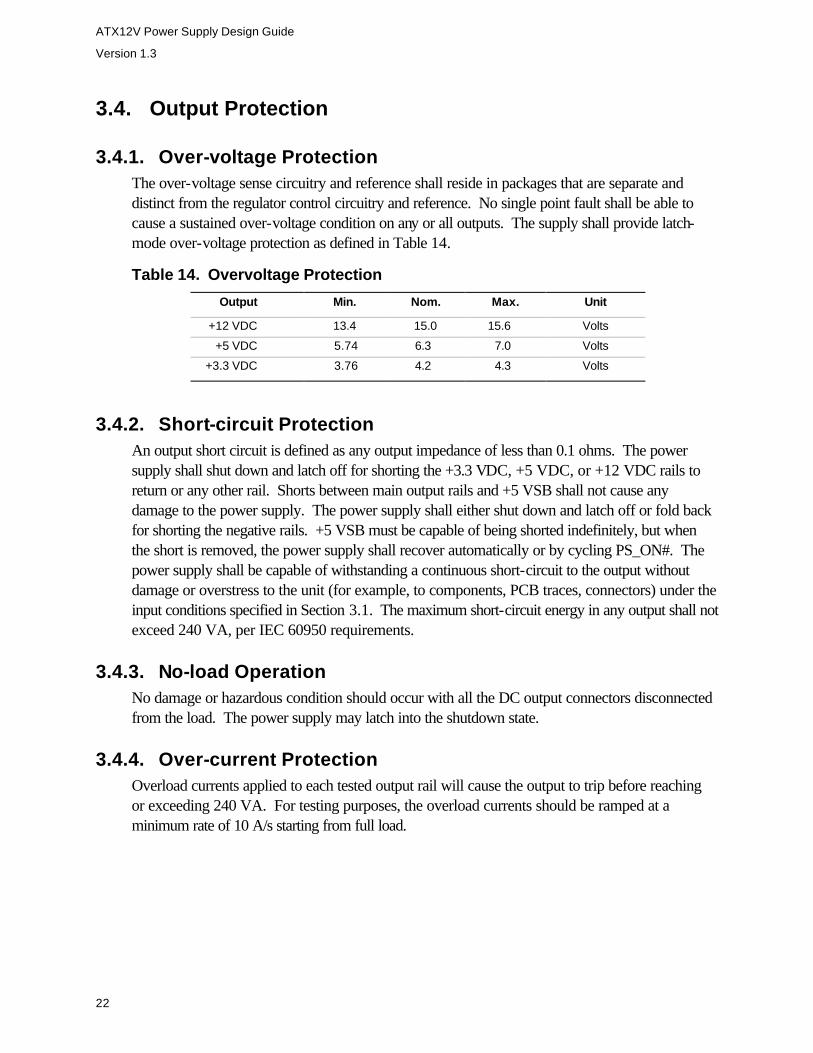
3.4.1. Over-voltage Protection The over-voltage sense circuitry and reference shall reside in packages that are separate and distinct from the regulator control circuitry and reference. No single point fault shall be able to cause a sustained over-voltage condition on any or all outputs. The supply shall provide latch-mode over-voltage protection as defined in Table 14.
Table 14. Overvoltage Protection
Output Min. Nom. Max. Unit
+12 VDC 13.4 15.0 15.6 Volts
+5 VDC 5.74 6.3 7.0 Volts
+3.3 VDC 3.76 4.2 4.3 Volts
3.4.2. Short-circuit Protection An output short circuit is defined as any output impedance of less than 0.1 ohms. The power supply shall shut down and latch off for shorting the +3.3 VDC, +5 VDC, or +12 VDC rails to return or any other rail. Shorts between main output rails and +5 VSB shall not cause any damage to the power supply. The power supply shall either shut down and latch off or fold back for shorting the negative rails. +5 VSB must be capable of being shorted indefinitely, but when the short is removed, the power supply shall recover automatically or by cycling PS_ON#. The power supply shall be capable of withstanding a continuous short-circuit to the output without damage or overstress to the unit (for example, to components, PCB traces, connectors) under the input conditions specified in Section 3.1. The maximum short-circuit energy in any output shall not exceed 240 VA, per IEC 60950 requirements.
3.4.3. No-load Operation No damage or hazardous condition should occur with all the DC output connectors disconnected from the load. The power supply may latch into the shutdown state.
3.4.4. Over-current Protection Overload currents applied to each tested output rail will cause the output to trip before reaching or exceeding 240 VA. For testing purposes, the overload currents should be ramped at a minimum rate of 10 A/s starting from full load.
ATX12V Power Supply Design Guide
Version 1.3
23
3.4.5. Over-temperature Protection The power supply may include an over-temperature protection sensor, which can trip and shut down the power supply at a preset temperature point. Such an overheated condition is typically the result of internal current overloading or a cooling fan failure. If the protection circuit is nonlatching, then it should have hysteresis built in to avoid intermittent tripping.
3.4.6. Output Bypass The output return may be connected to the power supply chassis. The return will be connected to the system chassis by the system components.
ATX12V Power Supply Design Guide
Version 1.3
24
4. Mechanical
4.1. Labeling / Marking
The following is a non-inclusive list of suggested markings for each power supply unit. Product regulation stipulations for sale into various geographies may impose additional labeling requirements. • Manufacturer information: manufacturer's name, part number, and lot date code, etc., in
human-readable text and/or bar code formats • Nominal AC input operating voltages (100-127 VAC and 200-240 VAC) and current rating
certified by all applicable safety agencies (Section 8) • DC output voltages and current ratings • Access warning text (“Do not remove this cover. Trained service personnel only. No user
serviceable components inside.”) in English, German, Spanish, French, Chinese, and Japanese with universal warning markings
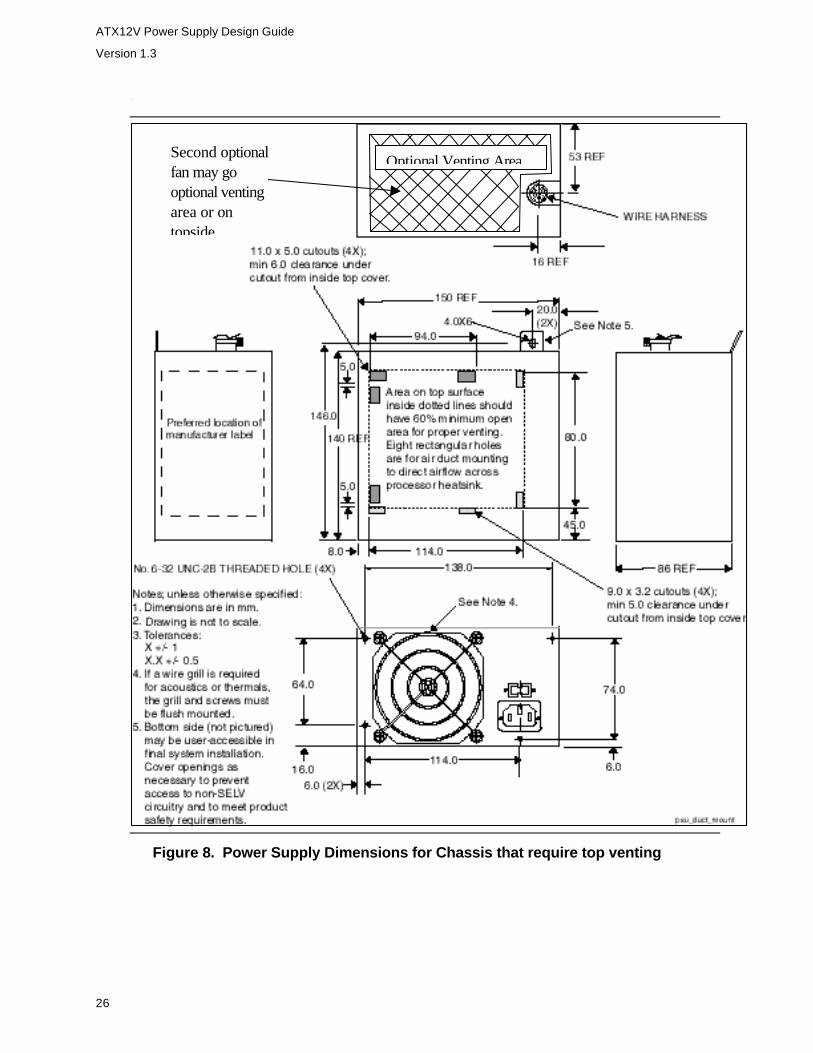
4.2. Physical Dimensions
The supply shall be enclosed and meet the physical outline shown in either Figure 7 or 8, as applicable.
ATX12V Power Supply Design Guide
Version 1.3
25
.
Figure 7. Power Supply Dimensions for chassis that does not require top venting
Second optional fan may go in this location
ATX12V Power Supply Design Guide
Version 1.3
26
.
Figure 8. Power Supply Dimensions for Chassis that require top venting
Optional Venting Area Second optional fan may go optional venting area or on topside.
ATX12V Power Supply Design Guide
Version 1.3
27
4.3. Airflow / Fan
The ATX Specification allows for numerous (and often confusing) possibilities for power supply fan location, direction, speed, and venting. The designer’s choice of a power supply cooling solution depends in part on the targeted end-use system application(s). At a minimum, the power supply design must ensure its own reliable and safe operation.
Fan location/direction. In general, exhausting air from the system chassis enclosure via a power supply fan at the rear panel is the preferred, most common, and most widely applicable system-level airflow solution. Other solutions are permitted, including fans on the topside of figure 5 and the Wire harness side of figure 4 or 5. Some system/chassis designers may choose to use other solutions to meet specific system cooling requirements.
Fan size/speed. An 80 mm or larger axial fan is typically needed to provide enough cooling airflow through an average ATX system. Exact CFM requirements vary by application and end-use environment, but 25-35 CFM is typical for the fan itself.
For consumer or other noise-sensitive applications, it is recommended that a thermally sensitive fan speed control circuit be used to balance system-level thermal and acoustic performance. The circuit typically senses the temperature of an internal heatsink and/or incoming ambient air and adjusts the fan speed as necessary to keep power supply and system component temperatures within specification. Both the power supply and system designers should be aware of the dependencies of the power supply and system temperatures on the control circuit response curve and fan size and should specify them very carefully.
The power supply fan should be turned off when PS_ON# is de-asserted (high). In this state, any remaining active power supply circuitry must rely only on passive convection for cooling.
Venting. In general, more venting in a power supply case yields reduced airflow impedance and improved cooling performance. Intake and exhaust vents should be as large, open, and unobstructed as possible so as not to impede airflow or generate excessive acoustic noise. In particular, avoid placing objects within 0.5 inches of the intake or exhaust of the fan itself. A flush-mount wire fan grill can be used instead of a stamped metal vent for improved airflow and reduced acoustic noise.
There are three caveats to the venting guidelines above:
• Openings must be sufficiently designed to meet the safety requirements described in Section 8.
• Larger openings yield decreased EMI-shielding performance (see Section 6).
• Venting in inappropriate locations can detrimentally allow airflow to bypass those areas where it is needed.
ATX12V Power Supply Design Guide
Version 1.3
28
The ATX Specification offers two options for venting between the power supply and the system interior: • The venting shown in Figure 7 provides the most effective channeled airflow for the power
supply itself, with little regard for directly cooling any system components. This venting method is nearly always used in conjunction with a fan that exhausts out the rear of the power supply.
• The venting shown in Figure 8 allows designers to more directly couple the power supply airflow to system components such as the processor or motherboard core, potentially cooling all critical components with a single fan. Both the power supply fan location and direction may vary in this case. The trade-off is usually one of reduced system cost versus narrower design applicability.
4.4. AC Connector
The AC input receptacle should be an IEC 320 type or equivalent. In lieu of a dedicated switch, the IEC 320 receptacle may be considered the mains disconnect.
4.5. DC Connectors
Figure 9 shows pinouts and profiles for typical ATX power supply DC harness connectors.
Listed or recognized component appliance wiring material (AVLV2), CN, rated min 85 °C, 300 VDC shall be used for all output wiring.
There are no specific requirements for output wire harness lengths, as these are largely a function of the intended end-use chassis, motherboard, and peripherals. Ideally, wires should be short to minimize electrical/airflow impedance and simplify manufacturing, yet they should be long enough to make all necessary connections without any wire tension (which can cause disconnections during shipping and handling). Recommended minimum harness lengths for general-use power supplies are 280 mm for the +12 V power connector and 250 mm for all other wire harnesses. Measurements are made from the exit port of the power supply case to the wire side of the first connector on the harness.
NOTE
Details of the 2x3 “Optional Power Connector” mentioned in the ATX 2.03 Specification are omitted from this design guide until such time as the signals on that connector are more rigidly defined.
ATX12V Power Supply Design Guide
Version 1.3
29
Figure 9. ATX12V Power Supply Connectors (Pin-side view, not to scale)
ATX12V Power Supply Design Guide
Version 1.3
30
4.5.1. ATX Main Power Connector
Connector: MOLEX 39-01-2200 or equivalent (Mating motherboard connector is Molex 39-29-9202 or equivalent)
18 AWG is suggested for all wires except for the +3.3 V sense return wire, pin 11 (22 AWG). For 300 W configurations, 16 AWG is recommended for all +12 VDC, +5 VDC, +3.3 VDC, and COM.
Pin Signal Color Pin Signal Color
1 +3.3VDC
Orange
11
[11]
+3.3VDC
[+3.3 V default sense]
Orange
[Brown]
2 +3.3VDC Orange 12 -12VDC Blue
3 COM Black 13 COM Black
4 +5VDC Red 14 PS_ON# Green
5 COM Black 15 COM Black
6 +5VDC Red 16 COM Black
7 COM Black 17 COM Black
8 PWR_OK Gray 18 Reserved N/C
9 +5VSB Purple 19 +5VDC Red
10 +12VDC Yellow 20 +5VDC Red
4.5.2. +12 V Power Connector
Connector: MOLEX 39-01-2040 or equivalent (Mating motherboard connector is Molex 39-29-9042 or equivalent)
Pin Signal 18 AWG Wire Pin Signal 18 AWG Wire
1 COM Black 3 +12VDC Yellow
2 COM Black 4 +12VDC Yellow
4.5.3. Auxiliary Power Connector for Configurations with +3.3 VDC Output > 18 A or +5 V Output > 24 A
Connector: MOLEX 90331-0010 (keyed pin 6) or equivalent
Pin Signal 16 AWG Wire
1 COM Black
2 COM Black
3 COM Black
4 +3.3VDC Orange
ATX12V Power Supply Design Guide
Version 1.3
31
5 +3.3VDC Orange
6 +5VDC Red
4.5.4. Peripheral Connector(s)
Connector: AMP 1-480424-0 or MOLEX 8981-04P or equivalent.
Contacts: AMP 61314-1 or equivalent.
Pin Signal 18 AWG Wire
1 +12VDC Yellow
2 COM Black
3 COM Black
4 +5VDC Red
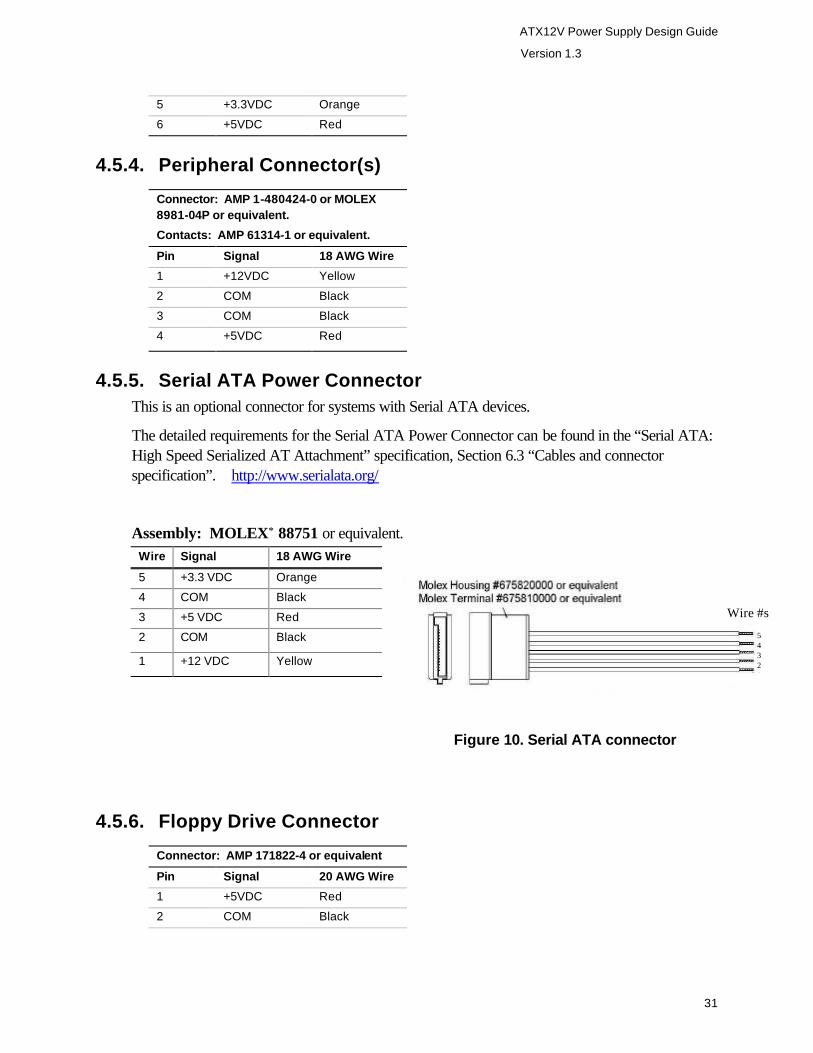
4.5.5. Serial ATA Power Connector This is an optional connector for systems with Serial ATA devices.
The detailed requirements for the Serial ATA Power Connector can be found in the “Serial ATA: High Speed Serialized AT Attachment” specification, Section 6.3 “Cables and connector specification”. http://www.serialata.org/
Assembly: MOLEX* 88751 or equivalent. Wire Signal 18 AWG Wire
5 +3.3 VDC Orange
4 COM Black
3 +5 VDC Red
2 COM Black
1 +12 VDC Yellow
Figure 10. Serial ATA connector
4.5.6. Floppy Drive Connector
Connector: AMP 171822-4 or equivalent
Pin Signal 20 AWG Wire
1 +5VDC Red
2 COM Black
5 4 3 2 1
Wire #s
ATX12V Power Supply Design Guide
Version 1.3
32
3 COM Black
4 +12VDC Yellow
5. Environmental
The following subsections define recommended environmental specifications and test parameters, based on the typical conditions to which an ATX12V power supply may be subjected during operation or shipment.
5.1. Temperature
Operating ambient +10 °C to +50 °C
(At full load, with a maximum temperature rate of change of 5 °C/10 minutes, but no more than 10 °C/hr.)
Non-operating ambient -40 °C to +70 °C
(Maximum temperature rate of change of 20 °C/hr.)
5.2. Thermal Shock (Shipping)
Non-operating -40 °C to +70 °C
15 °C/min ≤ dT/dt ≤ 30 °C/min Tested for 50 cycles; Duration of exposure to temperature extremes for each half cycle shall be 30 minutes.
5.3. Humidity
Operating To 85% relative humidity (non-condensing)
Non-operating To 95% relative humidity (non-condensing)
Note: 95% RH is achieved with a dry bulb temperature of 55 °C and a wet bulb temperature of 54 °C.
Three drops on each of six faces are applied to each sample.
ATX12V Power Supply Design Guide Version 1.3
Page 34
5.6. Random Vibration
Non-operating 0.01 g²/Hz at 5 Hz, sloping to 0.02 g²/Hz at 20 Hz, and maintaining 0.02 g²/Hz from 20 Hz to 500 Hz. The area under the PSD curve is 3.13 gRMS. The duration shall be 10 minutes per axis for all three axes on all samples.
5.7. Acoustics
For power supplies designed for low noise, the following provides some general guidance.
Guidelines Sound Power: The power supply assembly shall not produce a declared sound power level greater than 4.0 BA. Sound power determination is to be performed at 43C, 50% of maximum rated load, at sea level. This test point is chosen to represent the environment seen inside a typical system at the idle acoustic test condition, with the 43C being derived from the standard ambient assumption of 23C, with 20C added for the temperature rise within the system (what is typically seen by the inlet fan). The declared sound power level shall be measured according to ISO 7779 and reported according to ISO 9296.
Pure Tones: The power supply assembly shall not produce any prominent discrete tone determined according to ISO 7779, Annex D.
ATX12V Power Supply Design Guide Version 1.3
Page 35
6. Electromagnetic Compatibility
The following subsections outline sample product regulations requirements for a typical power supply. Actual requirements will depend on the design, product end use, target geography, and other variables. Consult your company’s Product Safety and Regulations department for more details.
6.1. Emissions
The power supply shall comply with FCC Part 15, EN55022: 1998 and CISPR 22: 1997, meeting Class B for both conducted and radiated emissions with a 4 dB margin. Tests shall be conducted using a shielded DC output cable to a shielded load. The load shall be adjusted as follows for three tests: No load on each output; 50% load on each output; 100% load on each output. Tests will be performed at 100 VAC 50Hz, 120 VAC 60 Hz, and 230 VAC 50 Hz power.
6.2. Immunity
The power supply shall comply with EN 55024:1998.
ATX12V Power Supply Design Guide Version 1.3
Page 36
6.3. Input Line Current Harmonic Content and Line Flicker
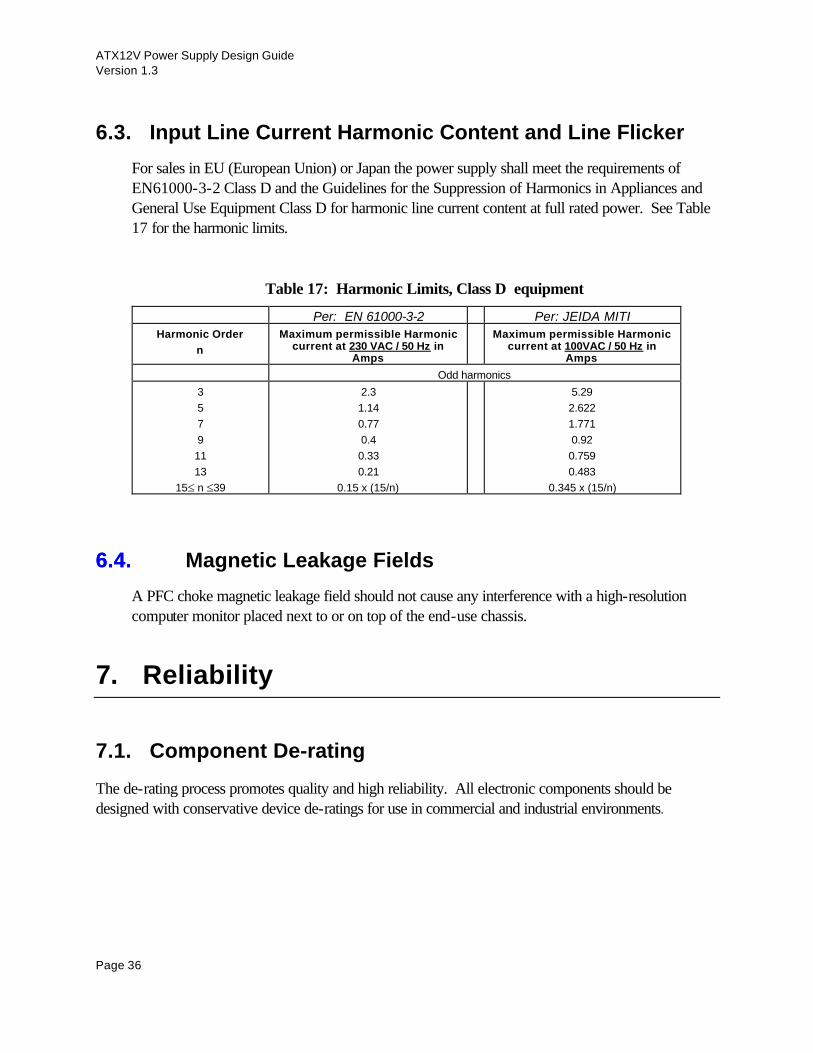
For sales in EU (European Union) or Japan the power supply shall meet the requirements of EN61000-3-2 Class D and the Guidelines for the Suppression of Harmonics in Appliances and General Use Equipment Class D for harmonic line current content at full rated power. See Table 17 for the harmonic limits.
Table 17: Harmonic Limits, Class D equipment
Per: EN 61000-3-2 Per: JEIDA MITI Harmonic Order
n Maximum permissible Harmonic
current at 230 VAC / 50 Hz in Amps
Maximum permissible Harmonic current at 100VAC / 50 Hz in
Amps
Odd harmonics
3 5 7 9 11 13
15≤ n ≤39
2.3 1.14 0.77 0.4 0.33 0.21
0.15 x (15/n)
5.29 2.622 1.771 0.92 0.759 0.483
0.345 x (15/n)
6.4.6.4. Magnetic Leakage Fields
A PFC choke magnetic leakage field should not cause any interference with a high-resolution computer monitor placed next to or on top of the end-use chassis.
7. Reliability
7.1. Component De-rating
The de-rating process promotes quality and high reliability. All electronic components should be designed with conservative device de-ratings for use in commercial and industrial environments.
ATX12V Power Supply Design Guide Version 1.3
Page 37
8. Safety
The following subsections outline sample product regulations requirements for a typical power supply. Actual requirements will depend on the design, product end use, target geography, and other variables. Consult your company’s Product Safety and Regulations department for more details.
8.1. North America
The power supply must be certified by an NRTL (Nationally Recognized Testing Laboratory) for use in the USA and Canada under the following conditions: • The supply must be recognized for use in Information Technology Equipment including
Electrical Business Equipment per UL 60950, 3rd edition, 2000. The certification must include external enclosure testing for the AC receptacle side of the power supply. (see Figures 7 and 8).
• The supply must have a full complement of tests conducted as part of the certification, such as input current, leakage current, hi-pot, temperature, energy discharge test, transformer output characterization test (open-circuit voltage, short-circuit current, and maximum VA output), and abnormal testing (to include stalled-fan tests and voltage-select–switch mismatch).
• The enclosure must meet fire enclosure mechanical test requirements per clauses 2.9.1 and 4.2 of the above-mentioned standard.
Production hi-pot testing must be included as a part of the certification and indicated as such in the certification report.
There must not be unusual or difficult conditions of acceptability such as mandatory additional cooling or power de-rating. The insulation system shall not have temperatures exceeding their rating when tested in the end product.
The certification mark shall be marked on each power supply.
The power supply must be evaluated for operator-accessible secondary outputs (reinforced insulation) that meet the requirements for SELV and do not exceed 240 VA under any condition of loading.
The proper polarity between the AC input receptacle and any printed wiring boards connections must be maintained (that is, brown=line, blue=neutral, green or green/yellow=earth/chassis).
Failure of any single component in the fan-speed control circuit shall not cause the internal component temperatures to exceed the abnormal fault condition temperatures per IEC 60950 3rd ed., 1999.
ATX12V Power Supply Design Guide Version 1.3
Page 38
8.2. International
The vendor must provide a complete CB certificate and test report to IEC 60950: 3rd ed., 1999 . The CB report must include ALL CB member country national deviations. CB report must include evaluation to EN 60950: 2000. All evaluations and certifications must be for reinforced insulation between primary and secondary circuits.
8.3. Proscribed Materials
Cadmium should not be used in painting or plating.
No quaternary salt electrolytic capacitors shall be used.
Mercury shall not be used.
The use of CFCs or HFCs shall not be used in the design or manufacturing process.