20
Document #101-0048 10/17/06 Audit Pro 2000 Operational Manual For use with C2000 v3.x, v4.x or v5.x

Document #101-0048 1 10/17/06
Audit Pro 2000Operational Manual
For use with C2000 v3.x, v4.x or v5.x
Document #101-0048 2 10/17/06
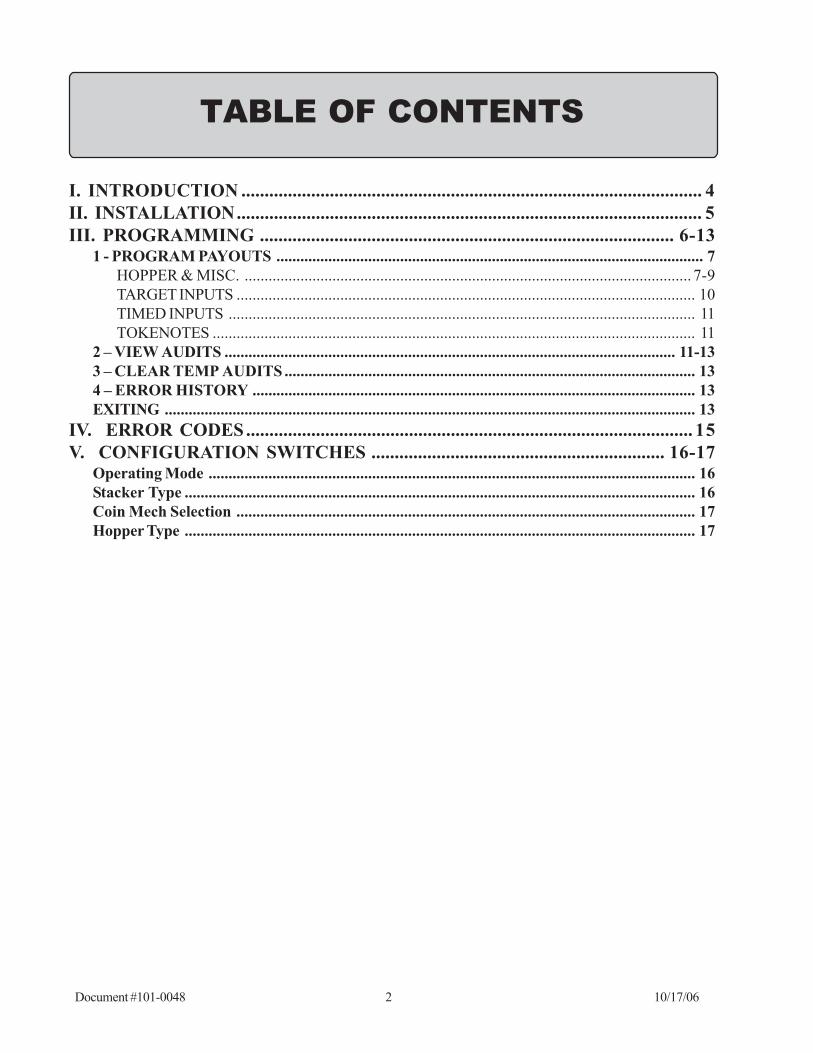
TABLE OF CONTENTS
I. INTRODUCTION ................................................................................................... 4II. INSTALLATION.................................................................................................... 5III. PROGRAMMING ......................................................................................... 6-13
1 - PROGRAM PAYOUTS ........................................................................................................... 7HOPPER & MISC. ................................................................................................................ 7-9TARGET INPUTS ................................................................................................................... 10TIMED INPUTS ..................................................................................................................... 11TOKENOTES ......................................................................................................................... 11
2 – VIEW AUDITS ................................................................................................................. 11-133 – CLEAR TEMP AUDITS ....................................................................................................... 134 – ERROR HISTORY ............................................................................................................... 13EXITING ..................................................................................................................................... 13
IV. ERROR CODES................................................................................................ 15V. CONFIGURATION SWITCHES ............................................................... 16-17
Operating Mode .......................................................................................................................... 16Stacker Type ................................................................................................................................ 16Coin Mech Selection ................................................................................................................... 17Hopper Type ................................................................................................................................ 17
Document #101-0048 3 10/17/06
ABOUT THIS MANUAL
This manual was designed to introduce the Audit Pro 2000 and to assist the operator with installation andprogramming procedures. If further assistance is needed, it can be obtained by calling Hamilton Mfg. at (800)837-5561 or (419) 867-4858.
When calling for assistance, it is important to have the serial number readily available. Please record thisnumber is the space provided.
AUDIT PRO 2000 SERIAL #_________________________________

Document #101-0048 4 10/17/06
I. INTRODUCTIONThe Hamilton Hand-held Audit Pro 2000 was developed to allow owners to program specific payouts and toview audit information from their change machine.
The Audit Pro 2000 uses a 4-line by 20 character LCD to display information. It also incorporates a 20-button keypad to accept input from the user. This system allows the user to tailor a change machine to meetspecific needs.
The Audit Pro 2000 was designed to be carried to multiple machines or back and forth from the office. It is notnecessary to leave the Audit Pro connected to the C2000. After you are finished programming payouts orviewing audits, the Audit Pro may be disconnected and taken elsewhere. THE AUDIT PRO HAND-HELDIS TEMPERATURE SENSITIVE, DO NOT LEAVE IT IN THE MACHINE!
WARNING: Do not unplug the AUDIT PRO 2000 without first exiting.The message “GOOD-BYE! OK TO DISCONNECT” should be onthe display before disconnecting the AUDIT PRO. If the AUDIT PROwas disconnected before exiting, plug it back in and press “ESC”. TheMAIN MENU should appear. Press “EXIT” at the main menu to exitfrom the AUDIT PRO 2000.

Document #101-0048 5 10/17/06
II. INSTALLATIONIf this Audit Pro 2000 was bought for use with an existing change machine, an upgraded C2000 Controller isrequired (v3.x ,v4.x or v5.x). The new Controller will have a 9-pin serial port. Plug the DB9 socket into the 9-pin serial port on the C2000. Turn the screws to hold the socket against the C2000. Now install the C2000back into the change machine cabinet and attach the main harness.
Turn on the power. The C2000’s green LED should come on as a steady light. (The LED may be flashing,indicating an error. If this happens, it is okay to proceed with the installation.) When the LED lights up, plug themodular jack into the Audit Pro 2000.

Document #101-0048 6 10/17/06
III. PROGRAMMINGBefore programming the Audit Pro 2000, check the switch settings on the Controller. Switches H and I shouldbe set to the ON position. If these switches are set to the OFF position, you will not be able to program theController. The remaining switches can be set to either position.
If you are using the 3600R Series Changer:Depending on the manufacture of the pair of Validators you are using, the A & B switches on the front of theController need to be set as follows:
Using two Mars® or two Coinco® bill acceptors:SWITCH A=ONSWITCH B=OFF
Using two Hamiton STA or HVX Validators:MASTER CONTROLLER:SWITCH A=ONSWITCH B=ON
SLAVE CONTROLLER:SWITCH A=OFFSWITCH B=ON
Master Mode is used in machines that contain two Hamilton Validators. By communicating with a secondController in the Slave Mode it controls the hopper payout for both Validators. All programming should bedone to the Master Controller.
Slave Mode controls one Hamilton Validator/Stacker and communicates the payout information to theMaster. It does not connect to any hoppers therefore programming payouts is not supported in this mode.In fact, connecting the hand-held to the Slave Controller is not necessary, however, it will allow the user toget a separate audit report for the one validator alone. The audit report from the Master will show thecombined activity of both bill acceptors.
When the Audit Pro 2000 is plugged into the modular connector, you may hear a click. At this point, thedisplay will be blank. Press the “ESC” button. The Audit Pro will briefly flash the message “CONNECTEDTO C2000 VERSION X.X” before displaying the main menu. However, if the C2000 LED was flashing whenthe Audit Pro was connected, indicating an error, the message displayed will be a description of that error. Forexample:
{1, 3} HOPPER 3EMPTY
PRESS ESC
The above message shows a 1.3 error code, indicating that hopper 3 is empty. (For a more detailed descrip-tion of error codes, refer to the C2000 Manual.)If you are using the 3600R Series Changer:

Document #101-0048 7 10/17/06
You will need to be certain that you are using a version 5.X Controller.After the version is displayed, the mode will also be shown: DUALVAL, MASTER OR SLAVE. Make surethat the A & B switches are set correctly for the pair of Validators that you are using.
When you are ready to continue, press the “ESC” button on the Audit Pro. The display should now show theMAIN MENU:
1 – PROGRAM PAYOUTS2 – VIEW AUDITS3 – CLEAR TEMP AUDITS4 – ERROR HISTORY
Each of the above menu options is described in more detail on the following pages.
1 - PROGRAM PAYOUTSTo access the Program Payouts section, press 1 while at the main menu. At this time, you will be prompted toenter your password. If you have not yet programmed your password, use the default password, which is123456. (You will be able to program a personal password once you reach the final screen in PROGRAMPAYOUTS. More information is provided on pg. 8.)
Once you have entered a password, the following SUB MENU screen will be displayed:
1-HOPPER & MISC.2-TARGET INPUTS3-TIMED INPUTS4-TOKENOTES
HOPPER & MISC.
Alternating Hopper Payout:Alternating hopper payouts occur automatically whenever two or more hoppers contain the same coin ortoken type. Alternating hopper payouts purpose is to payout an equal amount of coins from each hopper sothat all hoppers are available and receive the same wear and use. An example of alternating hopper payoutwould be if you had a three-hopper machine paying quarters out of all hoppers. If you were to run a test withthree one-dollar bills you should have the following results:
1. When the first one-dollar bill is inserted, hopper #1 will payout two quar-ters, hopper #2 would payout one quarter, while hopper #3 would payoutone quarter.
2. On the next one-dollar bill insertion, hopper #1 will payout one quarter,hopper #2 would payout two quarters, while hopper #3 would payout onequarter.
3. On the final one-dollar bill insertion, hopper #1 will payout one quarter,hopper #2 would payout one quarter, while hopper #3 would payout twoquarters.
This alternating payout allows all hoppers to remain at or near the same level.

Document #101-0048 8 10/17/06
Defaulting Hopper Operation:Defaulting hopper operation is a condition when one of the hoppers shuts down for a mechanical reason. Theworking hoppers will now payout the amount that the malfunctioning hopper was to have paid. This conditionwill continue until the reset button on the C2000 Controller is pushed. The only indication you will receive thatthe machine is operating in the defaulting hopper mode is that a hopper has not dispensed a proportionateamount of coins compared to the other hoppers. Try pushing the reset button on the controller, then see if thehopper starts to dispense coins. Contact customer service if one of the hoppers continues to malfunction.
Pressing 1 at the PROGRAM PAYOUTS Menu selects the HOPPER & MISC. category. The followingscreen will be displayed:
ENTER COIN TYPE (0-7)
HOPPER COINS0-HOPPER UNUSED
This screen specifies the contents of HOPPER 1. To choose the type of coin being used in HOPPER 1, pressthe corresponding number on the Audit Pro 2000 (0 – 7).
0 – Sets HOPPER 1 to UNUSED. (Use this setting if using a system with 1 or 2 hoppers.)1 – Sets HOPPER 1 to hold NICKELS.2 – Sets HOPPER 1 to hold DIMES.3 – Sets HOPPER 1 to hold QUARTERS.4 – Sets HOPPER 1 to hold SBAs (Susan B Anthony) or other $1.00 coins.5 - Sets HOPPER 1 to hold TOKEN A.6 - Sets HOPPER 1 to hold TOKEN B.7 - Sets HOPPER 1 to hold TOKEN C.
Press the RIGHT ARROW key to scroll to the HOPPER 2 contents. If you are using a 1 hopper changemachine, HOPPER 2 COINS should be set to zero. Press the RIGHT ARROW key again to scroll to theHOPPER 3 contents. If you are using a 1 hopper change machine, do not press 0. This is the mainhopper of any change machine, therefore, a number other than 0 must be assigned to HOPPER 3.
Press the RIGHT ARROW key to scroll to the next setting. The following screen will appear:
DEFAULT PAYOUTS Y/N
Pressing “Y” or “N” on the Audit Pro 2000 will determine whether or not the hopper(s) return change to acustomer when a target price has not been reached. Pressing “Y” will enable the hopper to default to this typeof payout. The payout will occur after 9 seconds (or the Delay time programmed) of inactivity. At least 1 non-token hopper must be in use for this feature to work. For example, a customer has inserted $2.00 for a $3.00Token. If, after 9 seconds, the customer has not inserted one more dollar, the hoppers will dispense $2.00worth of change back to the customer. If “N” was selected for the DEFAULT PAYOUTS setting, then the$2.00 will be held in escrow indefinitely.
NOTE: If you do not wish to use your machine as a changer, then thedefault setting should be set to “N”. Otherwise, the hopper(s) may be
Document #101-0048 9 10/17/06
depleted of coins more quickly than desired.
Press the RIGHT ARROW key to scroll to the next setting. The following screen will appear:
DEFAULT DELAYENTER TIME (SECONDS)BETWEEN 5 AND 30
This programs the time the Controller waits after the last activity before it attempts to pay back (the best it can)if the target price is not met. Enter the desired time in seconds between 5 and 30.
Press the RIGHT ARROW key to view the next screen:
MACHINE # 0
This screen allows you to assign a machine number, which will appear on the printout. This can be done foreach machine, making it easier to keep track of totals. Up to three numbers can be used.
To program a personal password or to change an existing password, press the RIGHT ARROW key whileviewing the above screen. The following screen will appear:
TO CHANGE PASSWORD
ENTER OLD PASSWORD:
Enter the old password to view the following screen:
TO CHANGE PASSWORD
ENTER NEW PASSWORD:
You can use up to six numbers for your personal password. Please record this number in a safe place so thatyou will not forget it. Once you have entered the new password, the following screen will be displayed:
PASSWORD CHANGED!
This screen will be displayed briefly before automatically advancing to the next screen:
CLEAR TEMP TOTALSAFTER PRINTOUT?
NO
If you wish to automatically clear all temporary totals after receiving a printout, press “Y” for YES. If you donot wish to clear these totals immediately following a printout, press “N” for NO.
When programming is completed, press the “ESC” button to return you to the SUB MENU.

Document #101-0048 10 10/17/06
TARGET INPUTSPressing 2 will select the TARGET INPUTS category. The following screen will be displayed:
ENTER TARGET INPUT 1(IN CENTS)
CENTS: 0
This is the first target price. When a target price is reached, a payout will immediately follow. The amount of thetarget price needs to be entered in cents. For example, if a payout is desired for $2.00, enter 200. When youhave entered the desired amount, press the RIGHT ARROW key to take you to the next screen.
HOPPER X COINSFOR (CENTS): XXX
COINS: 0
This screen shows how many coins will dispense from HOPPER X when the target price of XXX has beenreached. Simply type in the number of coins that you wish to dispense from HOPPER X, then press theRIGHT ARROW key. The screen will automatically show the next hopper. (If any hoppers were labeled as“UNUSED” in the ENTER COIN TYPE screen, they will not show up here.) Continue until all of the hoppershave been set, then press the RIGHT ARROW key to scroll to the next TARGET INPUT screen.EXAMPLE - To set the payout for the target price of $2.00, follow the steps below:
• TARGET INPUT: To set a payout for $2.00, enter 200• HOPPER 1 COINS: To dispense 1 coin, enter 1.• HOPPER 2 COINS: To dispense 4 coins, enter 4.• HOPPER 3 COINS: To dispense 2 coins, enter 2.
You have now programmed the Controller to payout 1 coin from hopper 1, 4 coins from hopper 2, and 2 coinsfrom hopper 3 whenever $2.00 is received as payment.
Up to nine different target inputs may be entered. Press the RIGHT ARROW key to scroll past all unusedtarget inputs. Check to make sure that the unused target inputs are set to zero as you scroll past them.
NOTE: If the amount of credit that a customer has deposited does notmatch any of the target payouts that were programmed, then theController will wait 9 seconds (or the programmed default delay) forthe customer to deposit more money. If, after 9 seconds, the customerhas not deposited more money, the Controller will payout for theclosest target price that was programmed. (This must be less than whatthe customer has deposited.) For example, $2.00, $6.00 and $10.00 areprogrammed as the target payouts. A customer deposits $7.00. After 9seconds of waiting for more money to be deposited, the Controllerpays out for the $6.00 target. The remaining $1.00 is either held inescrow, or paid back to the customer in change, depending on theDEFAULT PAYOUTS setting.
When finished, press “ESC” to return to the SUB MENU.

Document #101-0048 11 10/17/06
TIMED INPUTSPressing 3 selects the Timed Inputs category. The following screen will be displayed:
ENTER TIMED INPUT 1(IN CENTS)
CENTS: 0
Timed inputs are generally used with systems incorporating all tokens. A timed input is very similar to theDEFAULT PAYOUTS described earlier. However, with a timed input, token coins are paid back to a cus-tomer (instead of change) when a target price has not been reached. Therefore, a non-token hopper is notneeded.
There are four possible timed inputs that may be entered. After 9 seconds (or the programmed default delaytime) of inactivity, the timed inputs are checked. For example, three tokens are programmed to dispense uponreceiving $2.00. However, a customer only deposits $1.00. A timed input was programmed for $1.00 todispense one token. The Controller will wait 9 seconds for the customer to deposit another $1.00. If thecustomer does not do so, the Controller will dispense one token. To scroll through each of the four timedinputs, use the RIGHT ARROW key. When finished, press “ESC” to return to the SUB MENU.
TOKENOTESPressing 4 selects the TOKENOTES category. The following screen will be displayed:
TOKEN PAYOUT FORTOKENOTEHOPPER 1 COINSCOINS: 0
The Tokenote® category is used to program the number of token coins to be dispensed for each Tokenote®.The Audit Pro allows up to five different Tokenote® payouts. These five Tokenotes® are categorized asCOUPON 1 through COUPON 4. Audits are kept on the number of Tokenotes® received for each category.(Refer to the next section, VIEW AUDITS, for information on viewing these totals.)
NOTE: When accepting Tokenotes®, you must also dispense tokens.
Press “ESC” twice to return to the MAIN MENU.
2 – VIEW AUDITSPress 2 at the MAIN MENU to view all audit information.
The order of the audits is as follows:
NICKEL => DIME => QUARTER => $1.00 => $1 COIN => $2.00 => $2 COIN => $5.00 => $10.00=> $20.00 => HOP1 => HOP2 => HOP3 => TOKENOTE => COUPON 1 => COUPON 2 => COU-PON 3 => COUPON 4
Document #101-0048 12 10/17/06
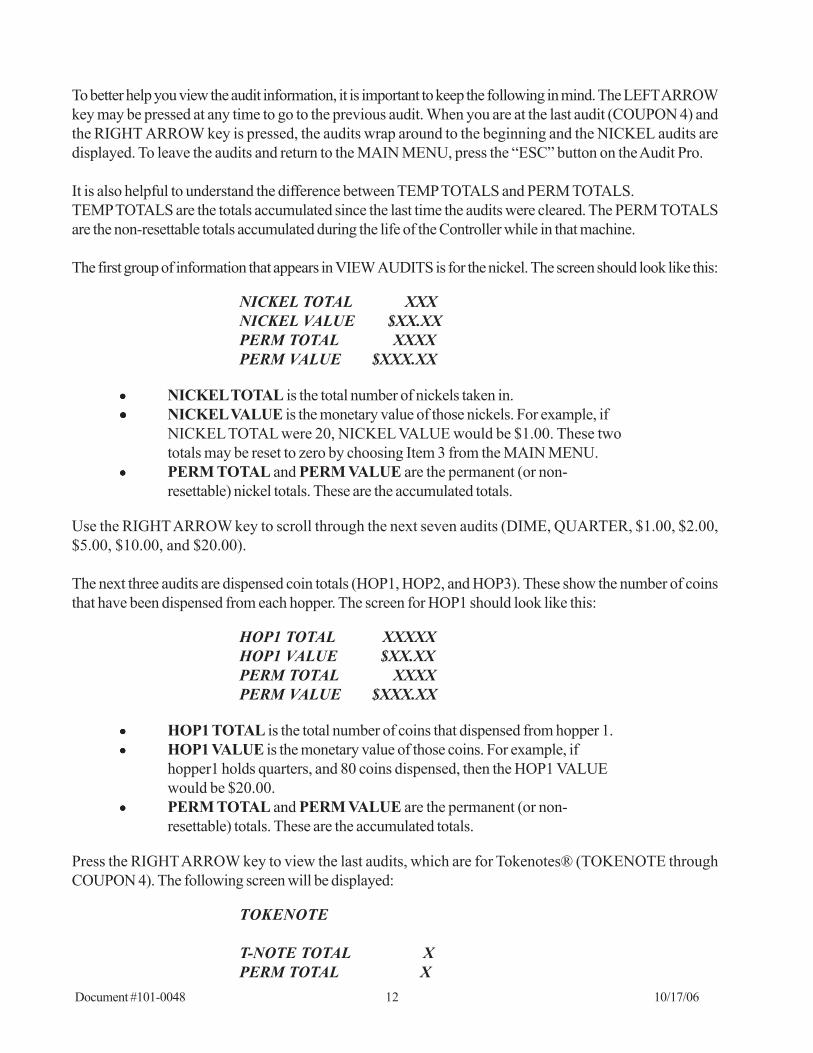
To better help you view the audit information, it is important to keep the following in mind. The LEFT ARROWkey may be pressed at any time to go to the previous audit. When you are at the last audit (COUPON 4) andthe RIGHT ARROW key is pressed, the audits wrap around to the beginning and the NICKEL audits aredisplayed. To leave the audits and return to the MAIN MENU, press the “ESC” button on the Audit Pro.
It is also helpful to understand the difference between TEMP TOTALS and PERM TOTALS.TEMP TOTALS are the totals accumulated since the last time the audits were cleared. The PERM TOTALSare the non-resettable totals accumulated during the life of the Controller while in that machine.
The first group of information that appears in VIEW AUDITS is for the nickel. The screen should look like this:
NICKEL TOTAL XXXNICKEL VALUE $XX.XXPERM TOTAL XXXXPERM VALUE $XXX.XX
••••• NICKEL TOTAL is the total number of nickels taken in.••••• NICKEL VALUE is the monetary value of those nickels. For example, if
NICKEL TOTAL were 20, NICKEL VALUE would be $1.00. These twototals may be reset to zero by choosing Item 3 from the MAIN MENU.
••••• PERM TOTAL and PERM VALUE are the permanent (or non-resettable) nickel totals. These are the accumulated totals.
Use the RIGHT ARROW key to scroll through the next seven audits (DIME, QUARTER, $1.00, $2.00,$5.00, $10.00, and $20.00).
The next three audits are dispensed coin totals (HOP1, HOP2, and HOP3). These show the number of coinsthat have been dispensed from each hopper. The screen for HOP1 should look like this:
HOP1 TOTAL XXXXXHOP1 VALUE $XX.XXPERM TOTAL XXXXPERM VALUE $XXX.XX
••••• HOP1 TOTAL is the total number of coins that dispensed from hopper 1.••••• HOP1 VALUE is the monetary value of those coins. For example, if
hopper1 holds quarters, and 80 coins dispensed, then the HOP1 VALUEwould be $20.00.
••••• PERM TOTAL and PERM VALUE are the permanent (or non-resettable) totals. These are the accumulated totals.
Press the RIGHT ARROW key to view the last audits, which are for Tokenotes® (TOKENOTE throughCOUPON 4). The following screen will be displayed:
TOKENOTE
T-NOTE TOTAL XPERM TOTAL X

Document #101-0048 13 10/17/06
••••• T-NOTE TOTAL is the total number of Tokenotes® received.••••• PERM TOTAL is the non-resettable total. This is an accumulated total.
To leave VIEW AUDITS and return to the MAIN MENU, press the “ESC” button.
3 – CLEAR TEMP AUDITSPress 3 to enter this category.You will be prompted to enter your password. After entering your password, the following screen will bedisplayed:
CLEAR TOTALS?
ARE YOU SURE? (Y/N)
Pressing “Y” on the Audit Pro will reset all of the temporary totals to zero and return you to the MAINMENU. Pressing “N” on the Audit Pro will return you to the MAIN MENU and leave the audit totals unaf-fected.
4 – ERROR HISTORYTo view the error history information, press 4 while at the MAIN MENU. The following screen will bedisplayed:
{1,1} HOPPER 1EMPTY
TOTAL: XXX
This is the total number of times that the Controller has shut down due to a 1.1 error code (hopper 1 empty).The RIGHT ARROW and LEFT ARROW keys may be used to scroll through all of the different error codes.To leave error histories and return to the MAIN MENU, press the “ESC” button on the Audit Pro.
NOTE: The error history information will mainly be used byHamilton’s repair department to help diagnose and solve Controllerproblems. The user will most likely never need this information.
EXITINGTo exit from the Audit Pro 2000, press the “EXIT” button while at the MAIN MENU. The following screenwill be displayed:
** WARNING! **SWITCHES H&I SHOULDBE TURNED BACK OFF.* PRESS ‘ESC’ *

Document #101-0048 14 10/17/06
Once the ‘ESC’ key is pressed, the following screen will be displayed:
GOOD-BYE !
OK TO DISCONNECT.
The Controller will perform a reset and any changes that were made will be in effect. The C2000 Controller’sgreen LED should go out for a couple of seconds and then come back on as a steady light. The changer is nowready to accept bills.

Document #101-0048 15 10/17/06
IV. ERROR CODESThe status of the bill changer is indicated by the green LED on the face of the Controller. When the LED is litconstantly, it is indicating that everything is normal. An LED that remain off indicates no power or a majorfailure.
When a fault is detected the green LED will begin a sequence of flashes. The sequence of flashes indicateswhich error was detected. To read an error code, watch the flashing LED. Note that there is a series of flashes,a short pause, another series of flashes, then a long pause. Wait until after the long pause, count the number offlashes, wait while the LED pauses briefly, then count the next series of flashes. The possible errors and theircodes are listed below.
NOTE: The Audit Pro will also show the error code and a brief de-scription of the error. you must connect the Audit Pro and press ‘ESC’while the Controller’s LED is flashing.
Always note the error code before attempting any service or before contacting Hamilton.
To acknowledge an error code and attempt to resume normal operation, press the Controller Reset Button onthe face of the Controller.
1 FLASH, PAUSE, 1 FLASH HOPPER 1 EMPTY
1 FLASH, PAUSE, 2 FLASHES HOPPER 2 EMPTY
1 FLASH, PAUSE, 3 FLASHES HOPPER 3 EMPTY
1 FLASH, PAUSE, 4 FLASHES ALL ALTERNATING-DEFAULTING HOPPERS ARE EMPTY
2 FLASHES, PAUSE, 1 FLASH HOPPER 1 JAMMED
2 FLASHES, PAUSE, 2 FLASHES HOPPER 2 JAMMED
2 FLASHES, PAUSE, 3 FLASHES HOPPER 3 JAMMED
3 FLASHES, PAUSE, 1 FLASH NICKEL INPUT STUCK
3 FLASHES, PAUSE, 2 FLASHES DIME INPUT STUCK
3 FLASHES, PAUSE, 3 FLASHES QUARTER INPUT STUCK
3 FLASHES, PAUSE, 4 FLASHES $1 INPUT STUCK
3 FLASHES, PAUSE, 5 FLASHES $5 INPUT STUCK
4 FLASHES, PAUSE, 1 FLASH HOPPER 1 COIN DROP STUCK
4 FLASHES, PAUSE, 2 FLASHES HOPPER 2 COIN DROP STUCK
4 FLASHES, PAUSE, 3 FLASHES HOPPER 3 COIN DROP STUCK
5 FLASHES, PAUSE, 1 FLASH UNEXPECTED HOPPER 1 PAYOUT
5 FLASHES, PAUSE 2, FLASHES UNEXPECTED HOPPER 2 PAYOUT
5 FLASHES, PAUSE, 3 FLASHES UNEXPECTED HOPPER 3 PAYOUT
6 FLASHES, PAUSE, 1 FLASH STACKER BUSY TIMEOUT
6 FLASHES, PAUSE, 2 FLASHES INVALID PAYOUT SWITCH SETTING
6 FLASHES, PAUSE, 3 FLASHES MEMORY DATA ALTERED
6 FLASHES, PAUSE, 4 FLASHES TIMEOUT FOR VALIDATOR TO ADVANCE BILL (DUAL STACKER)
6 FLASHES, PAUSE, 5 FLASHES VALIDATOR SHUT DOWN ERROR
7 FLASHES, PAUSE, 2 FLASHES POWER LOSS DURING VEND
7 FLASHES, PAUSE, 3 FLASHES INVALID TOKENOTE CODE
7 FLASHES, PAUSE, 4 FLASHES MASTER SLAVE COM ERROR
ERROR CODES

Document #101-0048 16 10/17/06
V. CONFIGURATION SWITCHESThe configuration switches are located on the underside of the Controller. These switches are set at the factoryand should not be changed unless instructed to do so by a representative of Hamilton Mfg. Corp. Theseswitches tell the Controller what equipment is connected to the system. The diagrams below show the differentoptions.
Operating Mode
Stacker Type
Off On
1
2
3
4
5
6
7
8
Off On
1
2
3
4
5
6
7
8
Off On
1
2
3
4
5
6
7
8
Off On
1
2
3
4
5
6
7
8
Normal OperatingMode
Diagnostic Mode(Never turn switch 1 on!)
Single Stacker Dual Stacker

Document #101-0048 17 10/17/06
Off On
1
2
3
4
5
6
7
8
Off On
1
2
3
4
5
6
7
8
Off On
1
2
3
4
5
6
7
8
No Coin Mechor IDX
Coinco I Coinco II Slugbuster
HSH Hopper HGP Hopper
Off On
1
2
3
4
5
6
7
8
Off On
1
2
3
4
5
6
7
8
Coin Mech Selection
Hopper Type
Off On
1
2
3
4
5
6
7
8
Document #101-0048 18 10/17/06
LIMITED WARRANTY AGREEMENTOF HAMILTON MANUFACTURING CORP.
Hamilton Manufacturing Corp., an Ohio Corporation, (“Seller”) warrants to Purchaser that all newequipment shall be free from defects in material and factory workmanship for a period of one (1) year from theoriginal shipping date. Hamilton Manufacturing Corp. further warrants if any part of said new equipment inSeller’s sole opinion, requires replacement or repair due to a defect in material or factory workmanship duringsaid period, Seller will repair or replace said new equipment. Purchaser’s remedies and the liabilities andobligations of Seller herein shall be limited to repair or replacement of the equipment as Seller may choose, andSeller’s obligation to remedy such defects shall not exceed the Purchaser’s original cost for the equipment.Purchaser EXPRESSLY AGREES this is the EXCLUSIVE REMEDY under this warranty. There are no otherexpress or implied warranties which extend beyond the face hereof. All warranty repair service must beperformed by either a Factory Trained Service Representative or HAMILTON MANUFACTURINGCORP., 1026 Hamilton Drive, Holland, Ohio 43528 PHONE (419) 867-4858 or (800) 837-5561, FAX(419) 867-4867.
The limited warranty for new equipment is conditioned upon the following:
1. The subject equipment has not, in the Seller’s sole opinion, been subjectedto: accident, abuse, misuse, vandalism, civil disobedience, riots, acts ofGod, natural disaster, acts of war or terrorism.
2. The Seller shall not be liable for any expense incurred by Purchaser inci-dental to the repair or replacement of equipment and Purchaser shallassume full responsibility for any freight or shipping charges.
3. The coverage of this warranty shall not extend to expendable parts.4. Purchaser shall have a warranty registration card on file with Seller prior to
any claim in order for warranty protection to apply.5. No warranty coverage is applicable to any equipment used for currency
other than that specified at the time of the purchase.6. Seller expressly disclaims any warranty that counterfeit currency will not
activate said equipment.7. Seller expressly disclaims any warranty for any losses due to bill manipula-
tion or theft or loss of cash under any circumstances.8. Use of the equipment for anything other than its intended and designed use
will void the Limited Warranty Agreement. Use of equipment for anythingother than its intended and designed use includes, but is not limited to,downloading software/applications not certified by Seller such as e-mail,spyware, screen savers, viruses, worms, third party software, web searchengines, cookies, spam, desktop applications, games, web surfing, etc.
Seller further warrants all repair or service work performed by a factory trained representative orHamilton Manufacturing Corp. for a period of ninety (90) days from the date the repair or service work wasperformed. Purchaser’s remedies and the liabilities and obligations of Seller herein shall be limited to repair orreplacement of equipment as Seller may choose, and Seller’s obligation to remedy such defects shall notexceed the Purchaser’s depreciated value of the equipment. Purchaser EXPRESSLY AGREES this is anEXCLUSIVE REMEDY under this warranty. There are no other express or implied warranties on repair orservice work performed by a factory trained representative or Hamilton Manufacturing Corp. which extendbeyond the face hereof.

Document #101-0048 19 10/17/06
The limited warranty for repair and service work is conditioned upon the following:
1. The subject equipment has not, in the Seller’s sole opinion, been subjectedto: accident, abuse, misuse, vandalism, civil disobedience, riots, acts ofGod, natural disaster, acts of war or terrorism.
2. The Seller shall not be liable for any expense incurred by Purchaser inciden-tal to the repair or replacement of equipment and Purchaser shall assume fullresponsibility for any freight or shipping charges.
3. The coverage of this warranty shall not extend to expendable parts.4. Purchaser shall have a warranty registration card on file with Seller prior to
any claim in order for warranty protection to apply.5. No warranty coverage is applicable to any equipment used for currency
other than that specified at the time of the purchase.6. Seller expressly disclaims any warranty that counterfeit currency will not
activate said equipment.7. Seller expressly disclaims any warranty for any losses due to bill manipula-
tion or theft or loss of cash under any circumstances.8. No person or entity other than a factory trained representative or Hamilton
Manufacturing Corp. has performed or attempted to perform the subjectrepair or service.
9. Using equipment which has been serviced or repaired for anything otherthan its intended or designed use such as downloading software applicationsnot certified by Seller will void the Limited Warranty Agreement. Thisincludes software/applications such as e-mail, spyware, screen savers,viruses, worms, third party software, web search engines, cookies, spam,desktop applications, games, web surfing, etc.
THIS AGREEMENT IS MADE WITH THE EXPRESS UNDERSTANDING THAT THERE ARENO IMPLIED WARRANTIES THAT THE EQUIPMENT SHALL BE MERCHANTABLE, OR THATTHE GOODS SHALL BE FIT FOR ANY PARTICULAR PURPOSE. PURCHASER HEREBY AC-KNOWLEDGES THAT IT IS NOT RELYING ON THE SELLER’S SKILL OR JUDGMENT TO SE-LECT OR FURNISH EQUIPMENT SUITABLE FOR ANY PARTICULAR PURPOSE AND THATTHERE ARE NO WARRANTIES WHICH EXTEND BEYOND THAT WHICH IS DESCRIBED HEREIN.
The Purchaser agrees that in no event will the Seller be liable for direct, indirect, or consequentialdamages or for injury resulting from any defective or non-conforming new, repaired or serviced equipment, orfor any loss, damage or expense of any kind, including loss of profits, business interruption, loss of businessinformation or other pecuniary loss arising in connection with this Limited Warranty Agreement, or with the useof, or inability to use the subject equipment regardless of Sellers knowledge of the possibility of the same.

Document #101-0048 20 10/17/06
1026 Hamilton DriveHolland, OH 43528
Sales Phone: (888) 723-4858 Sales Fax: (419) 867-4850Customer Service Phone: (800) 837-5561 Customer Service Fax: (419) 867-4857
Parts Phone: (866) 835-1721 Parts Fax: (419) 867-4867Website: http://www.hamiltonmfg.com
Email Addresses:[email protected]@[email protected]
Hamilton Manufacturing Corporation


