Augmented Reality in Learning - Example of Simple Solution for Night Sky Observation Michal Dobiš * , Vladimír Hlaváček, Linh Xuan Hoang, Michal Jajcaj, Dušan Lamoš Faculty of Informatics and Information Technologies Slovak University of Technolgy Bratislava / Slovakia * [email protected]Abstract Technology supported and technology based learning is a good example of advanced application for interactive computer graphics and vision. One of them is augmented reality support for learning skills or gaining knowledge. In this paper we deal with the project icPoint which has the goal to provide a simple method for cheap night sky objects identifying and learning. It uses a laser pointer mounted on user’s head, a reflection from a glass and a webcamera to pinpoint a part of the sky. Based on known calculations of sky object movements, the application can determine selected objects and offer the multimedia information about them. Combined with collaborative means to add and edit data, the system provides a new comfortable way of the sky exploring. It enables anyone to learn from everyone about new scientific information as well as local names, myths or legends specific to his/her culture. Keywords: Augmented reality, technology based learning, night sky, laser pointer 1 Introduction Computer supported and based learning, like e-learning, web, game, virtual and augmented reality (AR) supported and based learning are promising ways how to make education more effective and efficient. AR allows “educational immersion” - learning and training in the real environment enhanced by computer generated outputs, which can be simple texts and graphics (first head mounted see-through displays in pilot’s cockpit) or complex simulated dynamic 3D world. AR is sometimes called intelligence amplification, where computer is used as a tool to make a task easier and according to futurist Mike Adams belongs among the ten most important technologies for humanity. Educational immersion is caused by the possibility of presence, where people do not recognize the existence of media (however in our application it is not fully satisfactory) where something is presented through the given media and the sense of being there – feeling of being with media even when they are somewhere else. Presence has three aspects: subjective personal presence, social presence, and environmental presence. Augmented reality has several forms. The simplest one is photography or video with computer generated parts, as we can see in architectural visualizations, where architects demonstrate their projects to the investors. There are many emerging applications of AR in military aircraft navigation and targeting, maintenance and repair, medical visualization, robot path planning, entertainment and education. Among learning and training applications belong guides in museums, galleries, exhibition or archeological parks, where the enhanced display enrich information on exhibited artifacts. Mobile multimedia guides in the museum are considered as the descendant of sophisticated audio guides. One such application with notebook and built in camera (static setting) was explored in our university [2]. This system presents additional information in form of text, 3D models, video and audio sequences about small artifacts in the Slovak National Museum. There exists a project of guide in the remains of ancient Olympia, where the visitor could see virtual buildings on the real foundations. Helping hearing impaired pupils to learn finger alphabet with the help of visual feedback of real finger configurations on the monitor enhanced by the desired positions, generated by the computer was the goal of doctoral project in Comenius University in Bratislava [3]. Other applications are virtual books, where audiovisual information enhances text. Using see- through glasses, several users can explore the same virtual object and observe it from different viewing angles and at the same time to see each others gestures and face expressions. One existing collaborative application helps to understand geometry [4]. There are several projects using AR in learning guitar – one of these projects was nominated among the best in the Europrix Top Talent Award contest in 2005 [5]. In the South Korea classroom of the future project, there are several AR-based modules [6]. There exist projects with the goal that students will use full or partial simulations
Transcript
Augmented Reality in Learning - Example of Simple Solution for Night Sky Observation
Michal Dobiš*, Vladimír Hlaváček, Linh Xuan Hoang, Michal Jajcaj, Dušan Lamoš
Faculty of Informatics and Information Technologies Slovak University of Technolgy
Abstract Technology supported and technology based learning is a good example of advanced application for interactive computer graphics and vision. One of them is augmented reality support for learning skills or gaining knowledge. In this paper we deal with the project icPoint which has the goal to provide a simple method for cheap night sky objects identifying and learning. It uses a laser pointer mounted on user’s head, a reflection from a glass and a webcamera to pinpoint a part of the sky. Based on known calculations of sky object movements, the application can determine selected objects and offer the multimedia information about them. Combined with collaborative means to add and edit data, the system provides a new comfortable way of the sky exploring. It enables anyone to learn from everyone about new scientific information as well as local names, myths or legends specific to his/her culture. Keywords: Augmented reality, technology based learning, night sky, laser pointer
1 Introduction Computer supported and based learning, like e-learning, web, game, virtual and augmented reality (AR) supported and based learning are promising ways how to make education more effective and efficient. AR allows “educational immersion” - learning and training in the real environment enhanced by computer generated outputs, which can be simple texts and graphics (first head mounted see-through displays in pilot’s cockpit) or complex simulated dynamic 3D world. AR is sometimes called intelligence amplification, where computer is used as a tool to make a task easier and according to futurist Mike Adams belongs among the ten most important technologies for humanity. Educational immersion is caused by the possibility of presence, where people do not recognize the existence of media (however in our application it is not fully satisfactory) where something is presented through the given media and the sense of being
there – feeling of being with media even when they are somewhere else. Presence has three aspects: subjective personal presence, social presence, and environmental presence.
Augmented reality has several forms. The simplest one is photography or video with computer generated parts, as we can see in architectural visualizations, where architects demonstrate their projects to the investors.
There are many emerging applications of AR in military aircraft navigation and targeting, maintenance and repair, medical visualization, robot path planning, entertainment and education. Among learning and training applications belong guides in museums, galleries, exhibition or archeological parks, where the enhanced display enrich information on exhibited artifacts. Mobile multimedia guides in the museum are considered as the descendant of sophisticated audio guides. One such application with notebook and built in camera (static setting) was explored in our university [2]. This system presents additional information in form of text, 3D models, video and audio sequences about small artifacts in the Slovak National Museum. There exists a project of guide in the remains of ancient Olympia, where the visitor could see virtual buildings on the real foundations. Helping hearing impaired pupils to learn finger alphabet with the help of visual feedback of real finger configurations on the monitor enhanced by the desired positions, generated by the computer was the goal of doctoral project in Comenius University in Bratislava [3]. Other applications are virtual books, where audiovisual information enhances text. Using see-through glasses, several users can explore the same virtual object and observe it from different viewing angles and at the same time to see each others gestures and face expressions. One existing collaborative application helps to understand geometry [4]. There are several projects using AR in learning guitar – one of these projects was nominated among the best in the Europrix Top Talent Award contest in 2005 [5]. In the South Korea classroom of the future project, there are several AR-based modules [6]. There exist projects with the goal that students will use full or partial simulations
of dangerous or hard-to-do science experiments in the virtual and augmented reality.
City or museum guides are dealing with artificial environments. On the contrary using AR in natural environment is more difficult – limited possibility to use markers, more complicated objects, no stable lighting conditions, lack of the wifi or even no cell phones communication possible. At the brainstorming process of AR application in the national parks, our students suggested to use mobile devices with camera for flowers recognition. This project was not yet implemented. Mobile devices are suitable for outdoor natural and artificial environment as well as indoor applications, but the problem is in computing power of PDA and smartphones. One project presented at TTA 06 [7] used smartphone to inform users about architectural heritage in the city. User took two pictures of the building of interest and sent them like MMS to the server. Server recognized the building and sent back MMS with the information on the building. With wifi network, this process could be cheaper and faster, but in comparison with notebook based implementation and local data base it is still slow. On the other hand carrying notebook is not a good solution.
Our project dealt with observing night sky and learn to recognize stars, therefore we can tell, it belongs to the same category - with natural environment. The night sky observation brings, however, very special needs and challenges. The biggest difference is that a common web cam can not see any star so it is impossible just to add information to scanned picture. We also did not want to use any uncommon hardware such as see-thru-glasses or any device dedicated to measure the altitude. Our AR utilizes just hardware available in common household. It calculates the direction of user’s view from special points in image from a cam and displays a copy of real night sky view on the laptop’s screen. The view is focused on object observed by user and contains additional multimedia information. Following chapters speaks about similar projects and later on about project itself.
2 Related works Astronomy is popular science and many software developers aimed their effort to this field, trying to make the night sky object recognition easier. The work can be divided into two groups depending on their place of usage.
First group contains software for home usage. It is dedicated to personal computers and its input is usually based only on standard devices like a keyboard and a mouse. The most representative of this group we find the open source planetarium named Stellarium [8] that shows a realistic sky, just like it can be seen with naked eye. This means, that with given coordinates and point of view, it displays the accurate projection of the night sky on the computer screen. Here, user can zoom and rotate the view enriched with textual and image information. In very rough meaning, this can be considered as a simple
form of AR, while user can see real world image with some information added. It, however, lacks some sort of interactivity. Another representative of this laic-astronomer software group we picked in this preview is Celestia [9]. Celestia can be considered as a little bit more attractive e-learning application in the field of astronomy while it enables you to virtually leave the Earth and explore the universe from closer view. Though this might be popular while providing space-related multimedia information in interactive form, it is not very useful for average human trying to orientate in all the shining points in the night sky.
Second group of astronomic software suitable for laics moves the user out of his/her home to a dark place where a real night sky can be observed. The difference is that product of this kind utilizes some other hardware to gain the information about the direction of user’s sight and provides him/her with the information about the object he/she is looking at the moment. Very elegant but not very precise solution to this can be seen in product named VITO AstroNavigator II [10], based just on GPS receiver connected to a PDA. The simple idea is to show the part of sky according to user’s current location, time and direction of movement.
To recognize concrete point in the sky, more precise solution is needed. There exist several devices on the market that make the sky exploring easy for everyone. Good examples are mySKY [11] and SkyScout [12]. The star identification in these personal planetariums combines GPS technology, which gives location of the user, and 3 axis sensors measuring gravitational and magnetic fields to determine the true orientation to the earth. The concrete sky object at the recognized position is calculated using known astronomical algorithms.
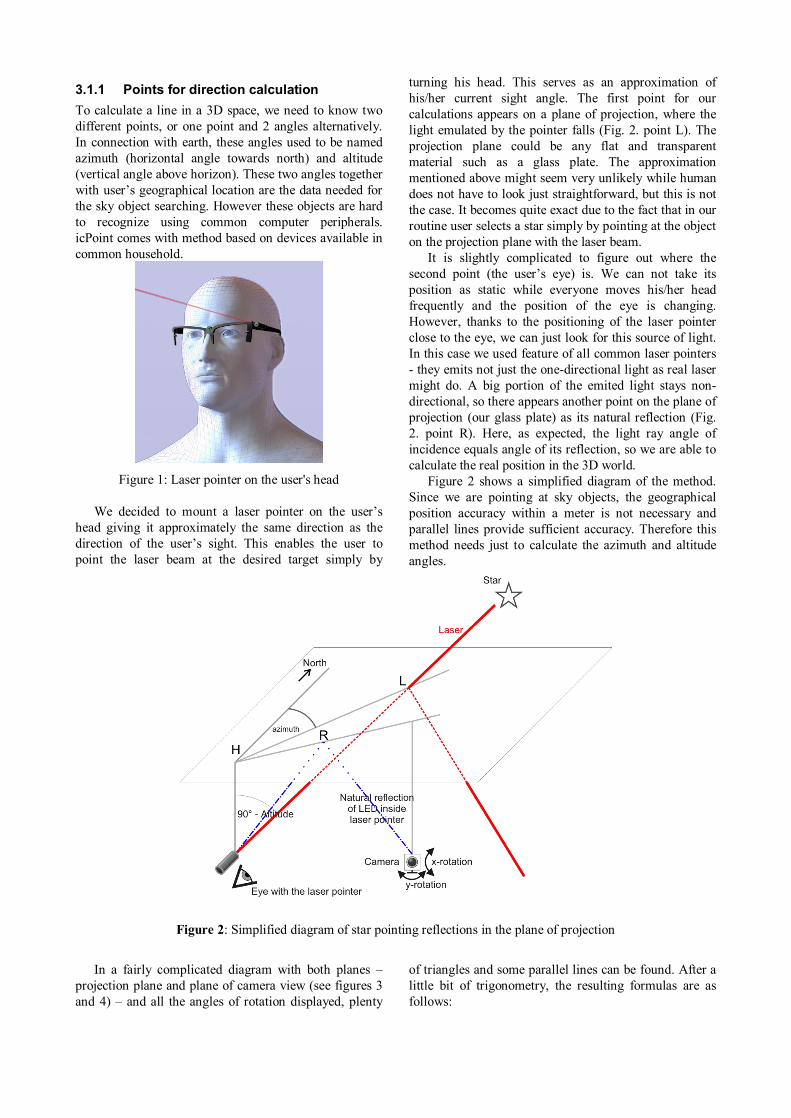
3 Our approach The purpose of the system icPoint (oronym of “I see point”) is to give people easy way to learn about the objects they can see in the night sky. The best way to get correct information about the particular sky object is to point it and let a system to tell us. Since we focused on laics – possibly just one-time astronomical fans, we looked for a method that would not require any special hardware. Our project comes out with a new idea of determining the object observed by user, using a laser pointer (Fig. 1), a web camera and image processing.
3.1 Finding the direction The procedure used to find the direction of user’s sight is crucial for the system. Since we need to get orientated in the sky, direct recognition of constellations might seem to be the simplest way. However, the problem is that common cameras are unable to see any star in the sky. When pointing current web camera to the sky, we get just black pictures. Therefore, we looked for another method to find a description of the “line of sight” in the 3D world.
3.1.1 Points for direction calculation To calculate a line in a 3D space, we need to know two different points, or one point and 2 angles alternatively. In connection with earth, these angles used to be named azimuth (horizontal angle towards north) and altitude (vertical angle above horizon). These two angles together with user’s geographical location are the data needed for the sky object searching. However these objects are hard to recognize using common computer peripherals. icPoint comes with method based on devices available in common household.
Figure 1: Laser pointer on the user's head
We decided to mount a laser pointer on the user’s
head giving it approximately the same direction as the direction of the user’s sight. This enables the user to point the laser beam at the desired target simply by
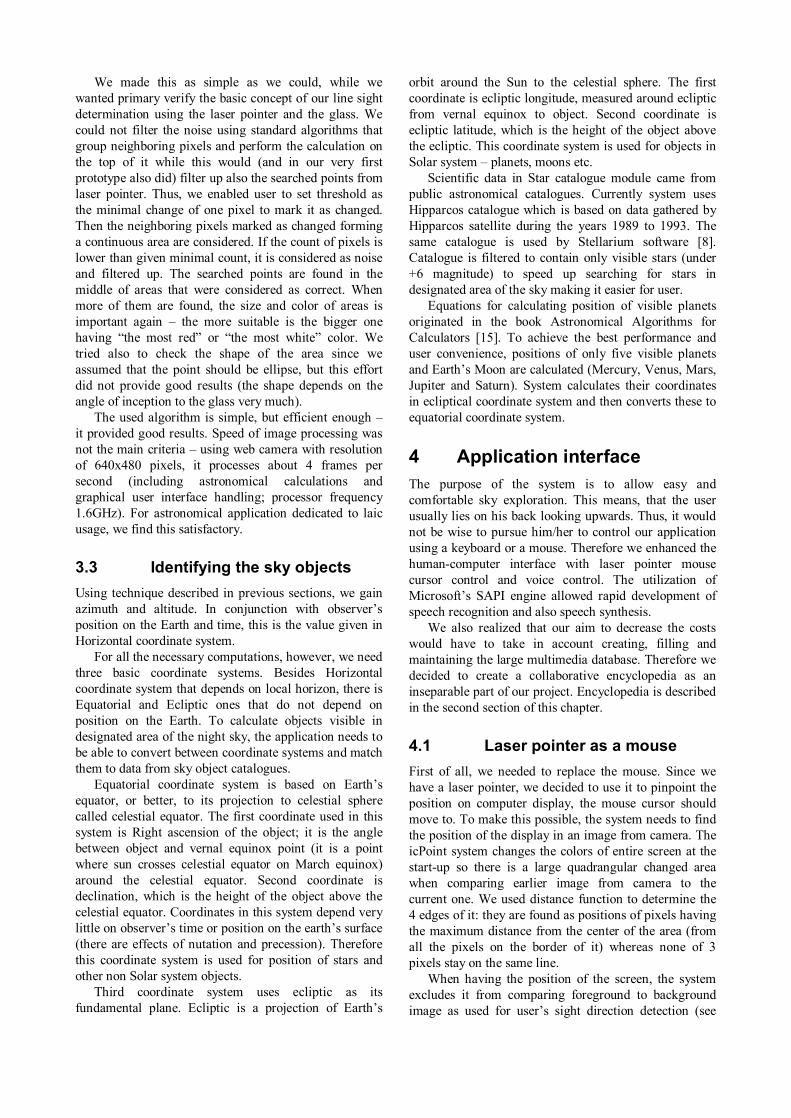
turning his head. This serves as an approximation of his/her current sight angle. The first point for our calculations appears on a plane of projection, where the light emulated by the pointer falls (Fig. 2. point L). The projection plane could be any flat and transparent material such as a glass plate. The approximation mentioned above might seem very unlikely while human does not have to look just straightforward, but this is not the case. It becomes quite exact due to the fact that in our routine user selects a star simply by pointing at the object on the projection plane with the laser beam.
It is slightly complicated to figure out where the second point (the user’s eye) is. We can not take its position as static while everyone moves his/her head frequently and the position of the eye is changing. However, thanks to the positioning of the laser pointer close to the eye, we can just look for this source of light. In this case we used feature of all common laser pointers - they emits not just the one-directional light as real laser might do. A big portion of the emited light stays non-directional, so there appears another point on the plane of projection (our glass plate) as its natural reflection (Fig. 2. point R). Here, as expected, the light ray angle of incidence equals angle of its reflection, so we are able to calculate the real position in the 3D world.
Figure 2 shows a simplified diagram of the method. Since we are pointing at sky objects, the geographical position accuracy within a meter is not necessary and parallel lines provide sufficient accuracy. Therefore this method needs just to calculate the azimuth and altitude angles.
Figure 2: Simplified diagram of star pointing reflections in the plane of projection
In a fairly complicated diagram with both planes –
projection plane and plane of camera view (see figures 3 and 4) – and all the angles of rotation displayed, plenty
of triangles and some parallel lines can be found. After a little bit of trigonometry, the resulting formulas are as follows:
Figure 3: Projections in the image
Figure 4: Projection to plane of X and vertical -axis
=cu
clazimuth arctan (1)
+=
22
1arctan
cuclaltitude (2)
where inputs are calculated using formulas:
+−
−
−+−
×=
yRotath
wLx
yRotath
wRx
cl
12arctantan
12arctantan2
(3)
×
=
2tan2
1ha
wh (4)
Formula used to calculate cu is similar to one needed for cl. The difference is only in the meaning of the inputs: - cu, cl are helping distances (CU and CL0 in Figure 3) -w is the width of camera resolution (height for cu), e.g. w = 640 pixels for cl and w = 480 pixels for cu, - h1 is a distance from camera to the middle of projection rectangular of camera view (imaginary line between K and S, figure 3), - ha is the maximal horizontal angle width of camera view (vertical for cu), - yRotat is angle the camera is rotated about y-axis = towards North (x-axis = towards surface for cu) - Rx and Lx are coordinates (in pixels) of reflected (white) and laser (red) point, which were detected in current frame of camera (x-coordinate for cl, y-
coordinate for cu). As we can see, the equations do not depend on the distance from the glass, while we assume the distances from glass to user’s eye and from glass to the camera is equal.
3.1.2 Calibration The project uses just common hardware; even the GPS module is not needed. Thus, some environment variables need to be set properly to get the system work.
The geographical position of the user can be given manually or using interactive map (precise up to few meters). When talking about the placement, we need to mention that also the surface user is lying on is important. It can not be reflective, better is rough and dull (even the concrete surface reflects rays from the laser device). Next, it is necessary to position the glass plate horizontally and the web camera under it, directed upwards. Then the rotation of the camera needs to be measured – rotation towards North and towards surface – and set to the application. User can get these values using compass and protractor or by measuring the distance from camera to glass and from vertical projection of it to the red point on the glass (see our user guide [13] for detailed instructions).
User can also set the parameters for the image
recognition – starting from color of laser pointer (in case this is not red) and ending with the threshold values. This part we find the most problematic, while we were unable to make it really simple or automatic. Problem is that we need to find small points in very noisy image (due to not very good quality of image from web camera when recording in dark). There always exist such good threshold values but it depends on weather conditions very much.
The Figure 5 shows setup of an experimental observational environment (during normal usage, the laptop is placed so that the screen is visible to user – e.g. positioned on the glass with display pointing downwards). As it shows, in spite of the setup might seem annoying and inconvenient, we were able to make the system work properly even in conditions like demonstrated in the figure, where were used boxes and just a piece of a glass. The only problem in such a constellation is that the user has not enough space to watch the output on screen of the laptop (he could just listen to it and control it using voice commands). We also discussed the effect of laser beam on user’s eyes and find out that it might be inconvenient, but is harmless. The laser pointers available at the market emit too weak light beam and can be pointed directly into an eye without damaging it.
Figure 5: Experimental usage of system (not properly positioned).
3.2 Finding the points All the parameters needed to calculate azimuth and altitude are static (described in previous section) for entire observation time except the coordinates of the lighting points emulated by the laser pointer. icPoint searches them in pictures from camera. Since there might
by some interference from a surroundings, some areas in the picture might be colored the same as the searched points. Examples of such sources are street lighting and the Moon. Therefore we decided not to search colors in the picture. Instead of that, the system compares current image to the background one, which is updated once upon a time. This means, we used known algorithm usual for tracking points to do the job [14].
We made this as simple as we could, while we wanted primary verify the basic concept of our line sight determination using the laser pointer and the glass. We could not filter the noise using standard algorithms that group neighboring pixels and perform the calculation on the top of it while this would (and in our very first prototype also did) filter up also the searched points from laser pointer. Thus, we enabled user to set threshold as the minimal change of one pixel to mark it as changed. Then the neighboring pixels marked as changed forming a continuous area are considered. If the count of pixels is lower than given minimal count, it is considered as noise and filtered up. The searched points are found in the middle of areas that were considered as correct. When more of them are found, the size and color of areas is important again – the more suitable is the bigger one having “the most red” or “the most white” color. We tried also to check the shape of the area since we assumed that the point should be ellipse, but this effort did not provide good results (the shape depends on the angle of inception to the glass very much).
The used algorithm is simple, but efficient enough – it provided good results. Speed of image processing was not the main criteria – using web camera with resolution of 640x480 pixels, it processes about 4 frames per second (including astronomical calculations and graphical user interface handling; processor frequency 1.6GHz). For astronomical application dedicated to laic usage, we find this satisfactory.
3.3 Identifying the sky objects Using technique described in previous sections, we gain azimuth and altitude. In conjunction with observer’s position on the Earth and time, this is the value given in Horizontal coordinate system.
For all the necessary computations, however, we need three basic coordinate systems. Besides Horizontal coordinate system that depends on local horizon, there is Equatorial and Ecliptic ones that do not depend on position on the Earth. To calculate objects visible in designated area of the night sky, the application needs to be able to convert between coordinate systems and match them to data from sky object catalogues.
Equatorial coordinate system is based on Earth’s equator, or better, to its projection to celestial sphere called celestial equator. The first coordinate used in this system is Right ascension of the object; it is the angle between object and vernal equinox point (it is a point where sun crosses celestial equator on March equinox) around the celestial equator. Second coordinate is declination, which is the height of the object above the celestial equator. Coordinates in this system depend very little on observer’s time or position on the earth’s surface (there are effects of nutation and precession). Therefore this coordinate system is used for position of stars and other non Solar system objects.
Third coordinate system uses ecliptic as its fundamental plane. Ecliptic is a projection of Earth’s
orbit around the Sun to the celestial sphere. The first coordinate is ecliptic longitude, measured around ecliptic from vernal equinox to object. Second coordinate is ecliptic latitude, which is the height of the object above the ecliptic. This coordinate system is used for objects in Solar system – planets, moons etc.
Scientific data in Star catalogue module came from public astronomical catalogues. Currently system uses Hipparcos catalogue which is based on data gathered by Hipparcos satellite during the years 1989 to 1993. The same catalogue is used by Stellarium software [8]. Catalogue is filtered to contain only visible stars (under +6 magnitude) to speed up searching for stars in designated area of the sky making it easier for user.
Equations for calculating position of visible planets originated in the book Astronomical Algorithms for Calculators [15]. To achieve the best performance and user convenience, positions of only five visible planets and Earth’s Moon are calculated (Mercury, Venus, Mars, Jupiter and Saturn). System calculates their coordinates in ecliptical coordinate system and then converts these to equatorial coordinate system.
4 Application interface The purpose of the system is to allow easy and comfortable sky exploration. This means, that the user usually lies on his back looking upwards. Thus, it would not be wise to pursue him/her to control our application using a keyboard or a mouse. Therefore we enhanced the human-computer interface with laser pointer mouse cursor control and voice control. The utilization of Microsoft’s SAPI engine allowed rapid development of speech recognition and also speech synthesis.
We also realized that our aim to decrease the costs would have to take in account creating, filling and maintaining the large multimedia database. Therefore we decided to create a collaborative encyclopedia as an inseparable part of our project. Encyclopedia is described in the second section of this chapter.
4.1 Laser pointer as a mouse First of all, we needed to replace the mouse. Since we have a laser pointer, we decided to use it to pinpoint the position on computer display, the mouse cursor should move to. To make this possible, the system needs to find the position of the display in an image from camera. The icPoint system changes the colors of entire screen at the start-up so there is a large quadrangular changed area when comparing earlier image from camera to the current one. We used distance function to determine the 4 edges of it: they are found as positions of pixels having the maximum distance from the center of the area (from all the pixels on the border of it) whereas none of 3 pixels stay on the same line.
When having the position of the screen, the system excludes it from comparing foreground to background image as used for user’s sight direction detection (see
section 3.1). For the purpose of finding a point from laser pointer on the screen, the searching for pixels colored similar to the laser color (mostly red color) appears to be the best solution while we can control which colors are used by the application graphical user interface. The relative position of the mouse cursor, which is determined by the position of the laser point in the camera image, is calculated as follows:
++=
ba
a
dc
ccursor , (5)
where inputs a, b, c, d are distances of the found point from top, down, left and right border of tetragon, given in coordinates of image from camera.
4.2 Collaborative encyclopedia As already mentioned, the icPoint application is capable of identifying sky objects by determining, which object is pointed by the user. But this is just a small part of the system’s functionality. Based on the selected sky object, the system is able to produce a simulated image of the corresponding part of the night sky. It also provides additional multimedia content, stored in a local database to provide further data expansion.
There are various types of possible multimedia
content, for example scientific information about stellar objects, planetary 3D images, but also historical background information (e.g. the discovery of a planet, the history of its name, ancient tales, etc.). An interesting idea might be the possibility to collect stories and tales about stellar objects coming from various cultures of the world. We realize that nobody knows everything, so we decided to enable anyone to add text and multimedia content bound to a sky object sharing it with other users of the system. The known concept to solve this problem uses collaborative encyclopedia situated on Internet such as Wikipedia.
Our goal is to build an icPoint community where all members can collect information, which they found interesting and submit it to the icPoint wiki. The submitted content is not limited to the types listed above, but can also contain videos from space probes, images and videos from telescopes. This wide range of possibilities is accessible via the icPoint main application, but also using a web interface called the icPointWiki web portal. Finally this makes the icPoint really the new AR concept – it shows projection of reality the user sees at the moment to the computer screen, while it is extended with multiple user–edited interactive multimedia information.
Figure 6: Graphical user interface - projection of night sky augmented with multimedia information
5 Conclusion Using new technology for learning is challenging problem. There exist many possibilities and open problems. Our application took this challenge and tries to bring people cost-effective (no special hardware, data created collaboratively and therefore can be considered free) solution that enables them to learn and even teach others about the universe.
In our project we focused on a new and undiscovered application of human-computer interaction using a laser pointer and image processing. Its goal is to allow star and space object recognition using compact IP or web camera and a laptop, thus everyone can learn about the night sky easily. We have proposed new way of mouse cursor control in combination with voice recognition.
Testing of our system showed that when it is good calibrated, an error in computing the coordinates of pinpointed sky object is about 2 degrees. This is satisfactory to correct detection of it. This makes our application highly usable.
In addition user can read or hear information about sky objects stored on local computer and get new through our web service. Information can be added and modified by users in collaborative encyclopedia on the Internet.
In future it is necessary to improve robustness (make it more user-friendly) – to eliminate the need of long software setup due to changed weather conditions or hardware replacement. This could be done using fixed location (each user would place it just once) or by adding some markers to the glass that could be used to calculate the orientation. We verified our concept of recognition of user’s sight direction using the laser pointer while emerging a simple image recognition algorithm – this is going to be improved in future too.
Acknowledgement We would like to thank our consultant Martin Šperka and our tutor Alena Kovárová for their time, help and advices during the project development.
[2] Tomas Toth, Augmented Reality Application in the Cultural Heritage Presentation. Master thesis, FIIT STU Bratislava, 2007
[3] Peter Gejgus, Anna Niklova, Jaroslav Placek, Martin Sperka, Interactive Learning System for Sign Language and Finger Alphabet. E-Learning and the Knowledge Society. Communication and Cognition, Gent 2004, Pages 3.8.1 – 3.8.9
[4] Hannes Kaufmann, Dieter Schmalstieg, Mathematics and Geometry Education with Collaborative Augmented Reality. Computers & Graphics. Volume 27, Issue 3, June 2003, Pages 339-345
[5] Teemu Mäki-Patola, Virtual Air Guitar. Europrix Top Talent Award 07. http://www.toptalent.europrix.org/tta07/en_projects_2005.html (visited 10.1.2008).
[6] Kye Bokyung, Investigation on the Relationships among Media Characteristics, Presence, Flow, and Learning Effects in Augmented Reality Based Learning. EADIM Academic Network Conference 2007, Graz, CD ROM with papers.
[7] MORE for Graz: Mobile Visual Object Recognizer for Cultural Environment. http://dibs009.joanneum.at/MORE/en/ (visited 10.1.2008)
[15] Pokorný, Z.: Astronomical algorithms for calculators. Observatory and planetarium of capital city Prague (Astronomické algoritmy pro kalkulátory. Hvězdárna a planetárium hl. m. Prahy), Praha, 1988