94
LSF (Platform Load Sharing Facility) Basics By Sumit Ghosh and Kumar Aakash Graduate Assistants in Research Computing Pursuing MS in Computer Science at Northeastern University
| Date post: | 12-Apr-2017 |
| Category: |
Documents |
| Upload: | sumit-ghosh |
| View: | 36 times |
| Download: | 0 times |

LSF (Platform Load Sharing Facility) Basics
By Sumit Ghosh and Kumar AakashGraduate Assistants in Research Computing
Pursuing MS in Computer Science at Northeastern University

bqueues displays information about queues

bqueues - l Displays queue information in a long multiline format.

bhostsDisplays hosts and their static and dynamic resources

bhosts <host_group>Displays hosts and their static and dynamic resources for the group

bsubSubmits a job to LSF• 2 types of jobs – batch and interactive• Batch:
• Create a submit script containing information about your job and commands to the LSF
• Submit the script to LSF using: bsub < submit_script
• Interactive:• Request LSF for allocating a node to run interactive jobs with bsub –Is –XF –n <total_no_of_cores> -q <queue_name> -R span[ptile=<no_of_cores_in_a_node>] /bin/bash• Start your interactive job in the allocated node (not on the login node)

bsubFor interactive jobs• bsub –Is –XF –n <total_no_of_cores> -q <queue_name> -R span[ptile=<no_of_cores_in_a_node>] /bin/bashWhere:• -Is : Interactive terminal/shell• -XF : X11 forwarding• -n : to specify the total number of compute cores needed• -q : to specify the queue-name from where to get the nodes• -R : Resource request specifying no. of cores in a compute node• /bin/bash : the shell to use

bsubFor interactive jobs

bjobsDisplays and filters information about LSF jobs
bjobs –w • Wide format. Displays job information without truncating fields.

bjobsDisplays and filters information about LSF jobs
bjobs –u all• Only displays jobs that have
been submitted by the specified users or user groups.
• The keyword all specifies all users.

lsload <host_name>Displays load information for hosts

nroy@discovery4 mpi4py-test]$ cat bsub_mpi4py.bash #!/bin/sh#BSUB -J JOB.1#BSUB -o output_file#BSUB -e error_file#BSUB -n 8#BSUB -q ht-10g#BSUB -cwd /home/nroy/mpi4py-test######## THIS IS A TEMPLATE FILE FOR TCP ENABLED MPI RUNS ON THE DISCOVERY CLUSTER ############ #BSUB -n has a value equal to the given value for the -np option ##### prefix for next run is entered below# file staging code is entered below
#### Enter your working directory below - this is the string returned from issuing the command #### "pwd"#### IF you stage your files this is your run directory in the high speed scratch space mounted #### across all compute nodeswork=/home/nroy/mpi4py-test
#############################################################DO NOT EDIT ANYTHING BELOW THIS LINE##############################################################cd $worktempfile1=hostlistruntempfile2=hostlist-tcpecho $LSB_MCPU_HOSTS > $tempfile1declare -a hostsread -a hosts < ${tempfile1}for ((i=0; i<${#hosts[@]}; i += 2)) ; do HOST=${hosts[$i]} CORE=${hosts[(($i+1))]} echo $HOST:$CORE >> $tempfile2done#############################################################DO NOT EDIT ANYTHING ABOVE THIS LINE#################################################################### Change only the -np option giving the number of MPI processes and the executable to use ###### with options to it###### IN the example below this would be "8", "helloworld.py" and the options for the executable ###### DO NOT CHANGE ANYTHING ELSE BELOW FOR mpirun OPTIONS###### MAKE SURE THAT THE "#BSUB -n" is equal to the "-np" number below. IN this example it is 8.
mpirun -np 8 -prot -TCP -lsf helloworld.py
#/home/nroy/mpi4py-test/helloworld.py# any clean up tasks and file migration code is entered below#############################################################DO NOT EDIT ANYTHING BELOW THIS LINE##############################################################rm $work/$tempfile1rm $work/$tempfile2#############################################################DO NOT EDIT ANYTHING ABOVE THIS LINE##############################################################[nroy@discovery4 mpi4py-test]$
Sample Submit Script for Batch jobs

Consider scenarios...• Need to submit 1000 jobs…
• Make 1000 submit scripts• Make different locations for input and output… so on…
• Need to ensure consecutive execution rather than parallel execution of jobs…
• Need to submit jobs 1 at a time… what if a large number of jobs are there??

We can AUTOMATE …. !!!

Consider scenarios...• Need to submit 1000 jobs…
• Make 1000 submit scripts• Make different locations for input and output… so on…• Script will do it 1000 times…
• Need to ensure consecutive execution rather than parallel execution of jobs…
• Need to submit jobs 1 at a time… what if a large number of jobs are there??• Script will provide dependency information…

Automating Job Submissions• Technologies used : bash, perl or python scripting languages.
• Things to take care of before automating the batch job submissions:
• How much data does your job process in 24 hours?
• How much output does your job generate in 24 hours?
• How many different jobs should you break your complete process in to complete quickly?
• Are the jobs to be run in serial (i.e the next job depends on the previous one)
• Are the jobs to be run in parallel (i.e the job does not depend on the previous one)

The submit script #!/bin/sh#BSUB -J JOB.1#BSUB -o output_file#BSUB -e error_file#BSUB -n 8#BSUB -q ht-10g#BSUB -cwd /home/nroy/mpi4py-test######## THIS IS A TEMPLATE FILE FOR TCP ENABLED MPI RUNS ON THE DISCOVERY CLUSTER ############ #BSUB -n has a value equal to the given value for the -np option ##### prefix for next run is entered below# file staging code is entered below
#### Enter your working directory below - this is the string returned from issuing the command #### "pwd"#### IF you stage your files this is your run directory in the high speed scratch space mounted #### across all compute nodeswork=/home/nroy/mpi4py-test#############################################################DO NOT EDIT ANYTHING BELOW THIS LINE##############################################################cd $worktempfile1=hostlistruntempfile2=hostlist-tcpecho $LSB_MCPU_HOSTS > $tempfile1declare -a hostsread -a hosts < ${tempfile1}for ((i=0; i<${#hosts[@]}; i += 2)) ; do HOST=${hosts[$i]} CORE=${hosts[(($i+1))]} echo $HOST:$CORE >> $tempfile2done#############################################################DO NOT EDIT ANYTHING ABOVE THIS LINE#################################################################### Change only the -np option giving the number of MPI processes and the executable to use ###### with options to it###### IN the example below this would be "8", "helloworld.py" and the options for the executable ###### DO NOT CHANGE ANYTHING ELSE BELOW FOR mpirun OPTIONS###### MAKE SURE THAT THE "#BSUB -n" is equal to the "-np" number below. IN this example it is 8.
mpirun -np 8 -prot -TCP -lsf helloworld.py
#/home/nroy/mpi4py-test/helloworld.py# any clean up tasks and file migration code is entered below#############################################################DO NOT EDIT ANYTHING BELOW THIS LINE##############################################################
• Used to submit a single job
• Options to set various parameters while job submission
-J : Specifies the job name -o : Specifies a file where the output from the job shall be stored -e : Specifies a file where the errors from the job shall be stored -n : Specifies the number of cores that the jobs needs to use -q : Specifies the queue to which the job needs to be submitted -cwd : Specifies the current working directory -work : Specifies where the input and output files need to be generated -w : Specifies to wait for another job with job name
• mpirun command : Starts jobs on several devices.
mpirun [ -np X ] [ --hostfile <filename> ] <program>
-np : Specifies the number of processes to run -hostfile : Specifies the specific hosts on which to run processes -prot : Protocol to use for the communication -lsf : Use LSF for running processes on nodes

submit.pyStart :
1. Read the number of jobs to divide the process in.
2. Create a different folder and a different submit script for each job.
3. Adds “#BSUB –w” option in each of the submit script to make a job wait for previous one to complete.
4. Submits all the jobs created in this manner.
End.

How does the automation work ?• LSF generates the input and output files in the working directory mentioned in the
submit script.• LSF recognizes each job using the job name specified in the submit script.• Automation takes advantage of these facts to create multiple jobs for a given process.• The automation may use a template submit script to build the other scripts from (the
example script does)• The –w option in the submit script allows for a job to be started based on the exit
status of another job. • Other options like –E and –K can be used to provide a conditional dependency on
another job.• In the end creating this automation is rather simple.

What we came up with ? We can do better …
import os
dir_prefix = "job_"
number_of_jobs = 5
def write_new_submit_script(job_number):
"""
Read the template.bash file line by line
and create new submit scripts.
"""
job_name = dir_prefix + str(job_number)
template = open("template.bash").readlines()
new_submit_script = open(job_name+"/"+job_name+".bash", "w");
for line in template:
newline = line
if "#BSUB -J" in line:
newline = "#BSUB -J "+ job_name +"\n"
if "#BSUB -cwd" in line:
if job_number != 0:
newline = "#BSUB -cwd "+ os.getcwd() + "/" + job_name + "\n" + "#BSUB -w "+ "done(" + dir_prefix + str(job_number - 1) + ")" + "\n"
else:
newline = "#BSUB -cwd "+ os.getcwd() + "/" + job_name + "\n"

Monitoring Jobs and Queues

Why monitor?• To understand the usage of various queues
• Better decide the queues to submit jobs to
• To observe the progress of a submitted job
• To better schedule several jobs on the same or different queues

Monitor tools The three most important commands for monitoring the jobs are:• bjobs:
Displays and filters information about LSF jobs. Specify one or more job IDs to display information about specific jobs.% bjobs -pl Display detailed information of all pending jobs of the invoker. % bjobs -ps Display only pending and suspended jobs. % bjobs -u all -a Display all jobs of all users.
• bqueues:displays information about queues.-w Displays queue information in a wide format. Fields are displayed without truncation.queue_name ... Displays information about the specified queues.
• bhosts:displays hosts and their static and dynamic resources -l Displays host information in a (long) multi-line format.

Sample Script #!/bin/bash mainpath="/scratch/altman.ro/ToricCY" esclist=`cat $mainpath/escdirs` username="altman.ro" queues=`bjobs -w -r 2>/dev/null | tail -n +2 | sed -r 's/\s+/ /g' | rev | cut -d' ' -f7 | rev | sort -u` echo "Running cores on:"for queue in $queues; do totmax=`bqueues $queue | tail -n1 | sed -r 's/\s+/ /g' | cut -d' ' -f5` totopen=`echo "$(bhosts $(bqueues -l $queue | grep "HOSTS:" | sed 's/.* \(.*\)\//\1/g') | grep ok | \
sed -r 's/\s+/ /g' | cut -d' ' -f4,5 | sed 's/\(.*\) \(.*\)/\1-\2/g' | tr '\n' '+')$(bjobs -r -sum -q $queue | tail -n1 | cut -d' ' -f1)" | bc` tot=$(($totopen<$totmax?$totopen:$totmax)) runfrac=`echo "$(echo "$(bjobs -w -r -q $queue 2>/dev/null | tail -n +2 | sed -r 's/\s+/ /g' | cut -d' ' -f6 | sed 's/\*compute-[0-9]*-[0-9]*//g' | \
sed 's/compute-[0-9]*-[0-9]*/1/g' | tr ':' '+' | tr '\n' '+')0" | bc)/$tot"` #$(bqueues $queue | tail -n1 | sed -r 's/\s+/ /g' | cut -d' ' -f5)"` printf -v runpercent "%03d" $(echo "100*$runfrac" | bc) echo "....$queue:....$runpercent%....$runfrac"doneecho ""pendfrac=`busers -w $username | tail -n +2 | sed -r 's/\s+/ /g' | cut -d" " -f5,10 | tr ' ' '/'`printf -v pendpercent "%03d" $(echo "100*$pendfrac" | bc)echo "Pending cores:....$pendpercent%...$pendfrac"echo"" dirs=`ls -d $mainpath/*/ 2>/dev/null | rev | cut -d'/' -f2 | rev`for d in $dirs; do escflag=0 for esc in $esclist; do if [ "$d" == "$esc" ]; then escflag=1 break fi done if [ "$escflag" -eq "0" ]; then $mainpath/monitorh11 $d fidone
1) Get the list of queues that are being used by your job
2) Get the total number of cores free on all the queues that your job uses.
3) Get the total number of cores on the queues
4) Get percentage of cores yet to be used.

Resources• LSF Command reference (
http://nuweb12.neu.edu/rc/wp-content/uploads/2014/03/lsf_command_ref.pdf)
• Submitting jobs on the Discovery cluster (http://nuweb12.neu.edu/rc/?page_id=18#10g)
• Software on the Discovery Cluster (http://nuweb12.neu.edu/rc/wp-content/uploads/2015/09/Discovery_Cluster_Software_Aug_2015.pdf)
• Visit the Research Computing office at 2 Ell Hall (behind the NEU bookstore) for any help/questions
• Check this for office hours (http://nuweb12.neu.edu/rc/?page_id=24)

Questions??

Contact Us
• Contact “[email protected]” if you have questions or need help at any time
• Research Computing Staff are part of Information Technology Services (ITS) located in 2 Ell Hall, 360 Huntington Avenue, Boston, MA 02115

Thank youHave a nice day ahead !!

Reference Material

Software Modules

module avail
• To see the list of available modules

module whatis <module_name>• To see information of
the module and its dependencies with other modules

module list• To see the list of your loaded modules• To load modules, use “module load ..” as shown for the particular
module• Best Idea: To add the module load statements to the .bashrc file• Note: Order of modules loaded is IMPORTANT !!!

HANDLING ZOMBIE PROCESSES ON THE DISCOVERY CLUSTER
Research Computing (ITS)Northeastern University

ZOMBIE PROCESS• Defunct processes that have not been cleaned up by the system
• Cannot be killed by using kill() system call
• Prevent similar jobs from starting
• Use up system resource
• May even corrupt user shell

HANDLING ZOMBIE PROCESSES
HOST ENUMERATE
FILE
Create the correct submit script
Create the kill-zombies script
Create the kill-user-jobs script

Modified Submit Script• Needed to find the hosts on
which your application ran (and may have created zombies !!)

Kill-Zombies Script
Fig. 2

Kill-Zombies Script• Iterates over all the different nodes used by your application and kills the zombies
created by your application
• Nodes used by the application are obtained from host-enumerate file
• The command - echo “text from fig2” > kill_zombies quickly creates the kill_zombies script from command line.
• The command - chmod +x kill_zombies gives it the permission to run
• The command ./kill_zombies runs the kill_zombies file

Kill-User-Jobs
• Needed to kill all the zombie processes left by the user application.
• Can be created using the command echo “text from fig3” > kill_user_jobs.
• The command chmod +x kill_user_jobs gives it the permission to run.
Fig. 3

Output Expected from your run …

Research Computing Seminar – Linux Fundamentals and New User Primer for Discovery Cluster Users

Linux fundamentals – commands and navigation

ls• You can list the contents of a directory with ls
• List out files and directories in current path
ls -a
• A frequently used option with ls is -a to show all files
• Showing all files means including the hidden files
• When a file name on a Unix file system starts with a dot, it is considered a hidden file and it doesn’t show up in regular file listings

ls -l
• Many times you will be using options with ls to display the contents of the directory in different formats or to display different parts of the directory
• Typing just ls gives you a list of files in the directory
• Typing ls -l gives you a long listing
ls -lh
• Another frequently used ls option is -h
• It shows the numbers (file sizes) in a more human readable format


mkdir
• You can create your own directories with mkdir
• You have to give at least one parameter to mkdir, the name of the new directory to be created
mkdir -p
• When given the option -p, then mkdir will create parent directories as needed

rmdir
• When a directory is empty, you can use rmdir to remove the directory
rmdir -p
• Similar to the mkdir -p option, you can also use rmdir to recursively remove directories

cd
• You can change your current directory with the cd command (Change Directory)
cd ~
• Just typing cd without a target directory, will put you in your home directory
• Typing cd ~ has the same effect

cd ..
• To go to the parent directory (the one just above your current directory in the directory tree), type cd ..
cd -
• Another useful shortcut with cd is to just type cd - to go to the previous directory
pwd
• The you are here sign can be displayed with the pwd command (Print Working Directory)

rm
• When you no longer need a file, use rm to remove it
• Unlike some graphical user interfaces, the command line in general does not have a waste bin or trash can to recover files
• When you use rm to remove a file, the file is gone
• Therefore, be careful when removing files!
rm -i
• To prevent yourself from accidentally removing a file, you can type rm -i

rm -rf
• By default, rm -r will not remove non-empty directories
• However rm accepts several options that will allow you to remove any directory
• The rm -rf statement will erase anything (providing that you have the permissions to do so)
• When you are logged on as root, be very careful with rm -rf (the f means force and the r means recursive) since being root implies that permissions don’t apply to you
• You can literally erase your entire file system by accident
cp
• To copy a file, use cp with a source and a target argument
• If the target is a directory, then the source files are copied to the target directory

cp -r
• To copy complete directories, use cp -r (the -r option forces recursive copying of all files in all subdirectories)
cp multiple files to directory
• You can also use cp to copy multiple files into a directory
• In this case, the last argument must be a directory

cp -i
• To prevent cp from overwriting existing files, use the -i (for interactive) option
cp -p
• To preserve permissions and time stamps from source files, use cp –p

mv
• Use mv to rename a file or to move the file to another directory
• When you need to rename only one file then mv is the preferred command to use
file ownership
user owner and group owner
• The users and groups of a system can be locally managed in /etc/passwd and /etc/group, or they can be in a NIS, LDAP, or Samba domain
• These users and groups can own files
• Actually, every file has a user owner and a group owner

• User paul owns three files, two of those are also owned by the group paul
• data.odt is owned by the group proj
• The root user owns the file stuff.txt, as does the group root
chgrp
• You can change the group ownership of a file using the chgrp command
chown
• The user owner of a file can be changed with chown command

• You can also use chown to change both the user owner and the group owner
list of special files
• When you use ls -l, for each file you can see ten characters before the user and group owner
• The first character tells us the type of file
• Regular files get a -, directories get a d, symbolic links are shown with an l, pipes get a p, character devices a c, block devices a b, and sockets as s

• Below a screenshot of a character device (the console) and a block device (the hard disk)
• Here you can see a directory, a regular file and a symbolic link
permissions
rwx
• The nine characters following the file type denote the permissions in three triplets
• A permission can be r for read access, w for write access, and x for execute
• You need the r permission to list (ls) the contents of a directory
• You need the x permission to enter (cd) a directory
• You need the w permission to create files in or remove files from a directory

three sets of rwx
• We already know that the output of ls -l starts with ten characters for each file
• This screenshot shows a regular file (because the first character is a -)
• Below is a table describing the function of all ten characters

• When you are the user owner of a file, then the user owner permissions apply to you
• The rest of the permissions have no influence on your access to the file
• When you belong to the group that is the group owner of a file, then the group owner permissions apply to you
• The rest of the permissions have no influence on your access to the file
• When you are not the user owner of a file and you do not belong to the group owner, then the others permissions apply to you
• The rest of the permissions have no influence on your access to the file

permission examples
• Some example combinations on files and directories are shown in this screenshot
• The name of the file explains the permissions
• To summarize, the first rwx triplet represents the permissions for the user owner
• The second triplet corresponds to the group owner; it specifies permissions for all members of that group
• The third triplet defines permissions for all other users that are not the user owner and are not a member of the group owner
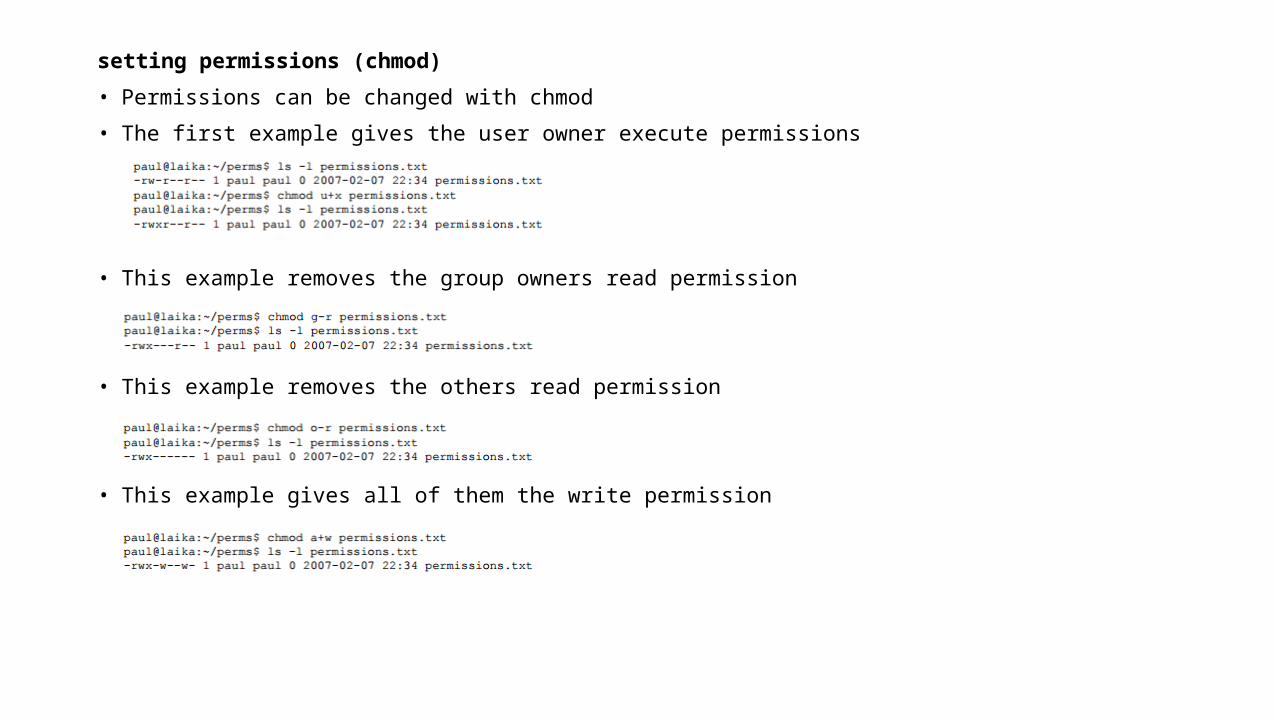
setting permissions (chmod)
• Permissions can be changed with chmod
• The first example gives the user owner execute permissions
• This example removes the group owners read permission
• This example removes the others read permission
• This example gives all of them the write permission
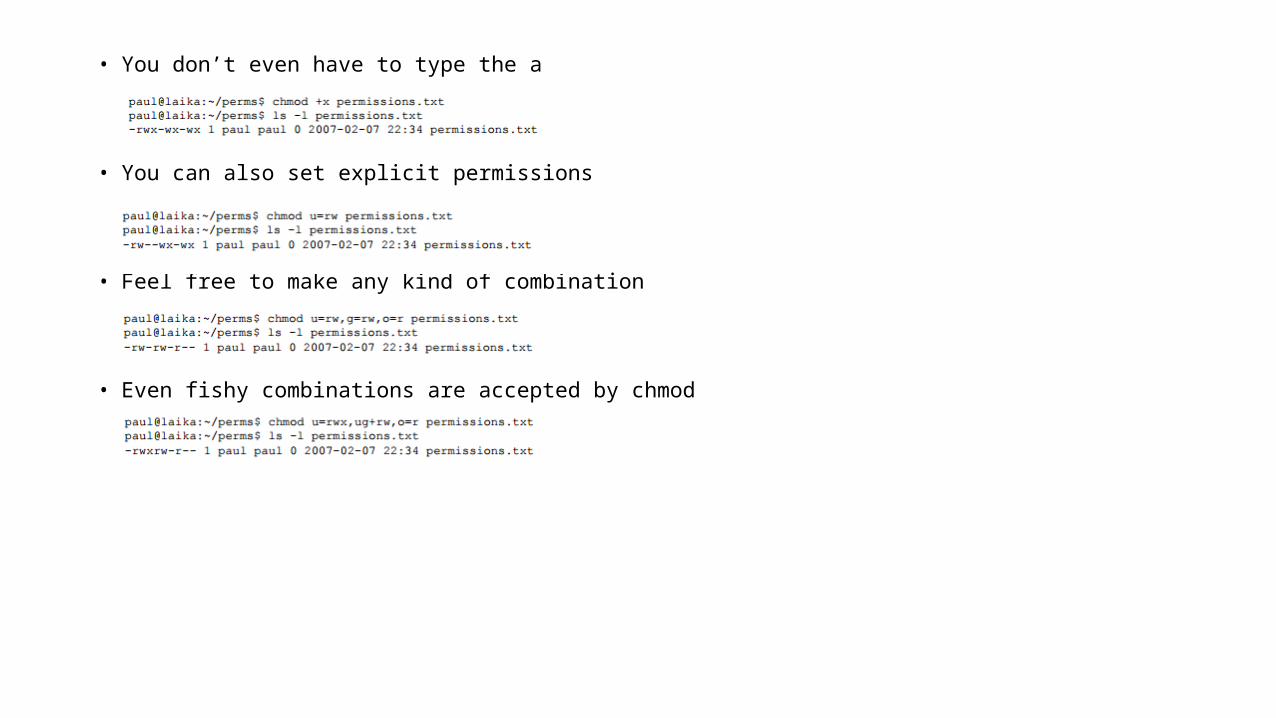
• You don’t even have to type the a
• You can also set explicit permissions
• Feel free to make any kind of combination
• Even fishy combinations are accepted by chmod

setting octal permissions
• Most Unix administrators will use the old school octal system to talk about and set permissions
• Look at the triplet bitwise, equating r to 4, w to 2, and x to 1
• This makes 777 equal to rwxrwxrwx and by the same logic, 654 means rw-r-xr--
• The chmod command will accept these numbers

mkdir –m
• When creating directories with mkdir you can use the -m option to set the mode
• This screenshot explains

hard links
creating hard links
• When we create a hard link to a file with ln, an extra entry is added in the directory
• A new file name is mapped to an existing inode
• Both files have the same inode, so they will always have the same permissions and the same owner
• Both files will have the same content
• Actually, both files are equal now, meaning you can safely remove the original file, the hardlinked file will remain
• The inode contains a counter, counting the number of hard links to itself
• When the counter drops to zero, then the inode is emptied

inodes
• An inode is a data structure that contains metadata about a file
• When the file system stores a new file on the hard disk, it stores not only the contents (data) of the file, but also extra properties like the name of the file, the creation date, its permissions, the owner of the file, and more
• All this information (except the name of the file and the contents of the file) is stored in the inode of the file
• The ls -l command will display some of the inode contents, as seen in this screenshot
• Each inode has a unique number (the inode number)
• You can see the inode numbers with the ls -li command
• These three files were created one after the other and got three different inodes (the first column)

• All the information you see with this ls command resides in the inode, except for the filename (which is contained in the directory)
inode and file contents
• Lets put some data in one of the files
• The data that is displayed by the cat command is not in the inode, but somewhere else on the disk
• The inode contains a pointer to that data

finding hard links
• You can use the find command to look for files with a certain inode
• The screenshot below shows how to search for all filenames that point to inode 817270
• Remember that an inode number is unique to its partition
symbolic links
• Symbolic links (sometimes called soft links) do not link to inodes, but create a name to name mapping
• Symbolic links are created with ln -s
• As you can see below, the symbolic link gets an inode of its own
• Permissions on a symbolic link have no meaning, since the permissions of the target apply
• Hard links are limited to their own partition (because they point to an inode), symbolic links can link anywhere

removing links
• Links can be removed with rm
find
• The find command can be very useful at the start of a pipe to search for files
• Here are some examples
• Find all files of the entire system and put the list in allfiles.txt
• Find all files in /etc and put the list in etcfiles.txt
• Find files that end in .conf in the current directory (and all subdirs)
• Find files of type file that end in .conf

• Find files of type directory that end in .bak
gzip - gunzip
• Users never have enough disk space, so compression comes in handy
• The gzip command can make files take up less space
• You can get the original back with gunzip
tar
• The tar command is used for backing up a directory

cat
• The cat command is one of the most universal tools
• All it does is copy standard input to standard output
• You can use cat to display a file on the screen
• If the file is longer than the screen, it will scroll to the end
concatenate
• cat is short for concatenate
• One of the basic uses of cat is to concatenate files into a bigger file

create files
• You can use cat to create flat text files
• Type the cat>winter.txt command as shown in the screenshot below
• Then type one or more lines, finishing each line with the enter key
• After the last line, type and hold Control (Ctrl) key and press d
• The Ctrl d key combination will send an EOF (End of File) to the running process ending the cat command

Introduction to vi
• The vi editor is installed on almost every Unix
• Linux will very often install vim (vi improved) which is similar
command mode and insert mode
• The vi editor starts in command mode
• In command mode, you can type commands
• Some commands will bring you into insert mode
• In insert mode, you can type text
• The escape key will return you to command mode

start typing
• The difference between a A i I o and O is the location where you can start typing
• a will append after the current character and A will append at the end of the line
• i will insert before the current character and I will insert at the beginning of the line
• o will put you in a new line after the current line and O will put you in a new line before the current line

replace and delete a character
• When in command mode (it doesn't hurt to hit the escape key more than once) you can use the x key to delete the current character
• The big X key (or shift x) will delete the character left of the cursor
• Also when in command mode, you can use the r key to replace one single character
• The r key will bring you in insert mode for just one key press, and will return you immediately to command mode

cut, copy and paste a line
• When in command mode, dd will cut the current line
• yy will copy the current line
• You can paste the last copied or cut line after (p) or before (P) the current line
cut, copy and paste lines
• When in command mode, before typing dd or yy, you can type a number to repeat the command a number of times
• Thus, 5dd will cut 5 lines and 4yy will copy (yank) 4 lines
• That last one will be noted by vi in the bottom left corner as "4 line yanked"

start and end of a line
• When in command mode, the 0 and the caret ^ will bring you to the start of the current line, whereas the $ will put the cursor at the end of the current line
• You can add 0 and $ to the d command, d0 will delete every character between the current character and the start of the line
• Likewise d$ will delete everything from the current character till the end of the line
• Similarly y0 and y$ will yank till start and end of the current line

join two lines and more
• When in command mode, pressing J will append the next line to the current line
• With yyp you duplicate a line and with ddp you switch two lines
words
• When in command mode, w will jump to the next word and b will move to the previous word
• w and b can also be combined with d and y to copy and cut words (dw db yw yb)
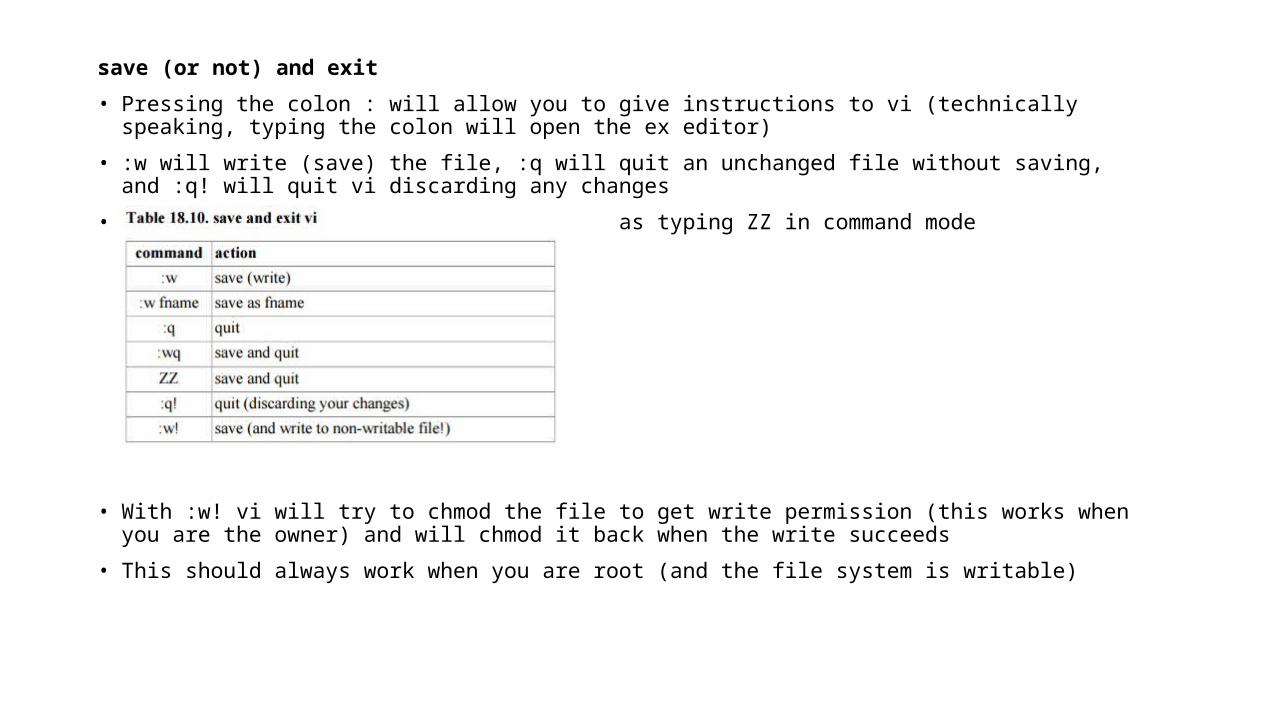
save (or not) and exit
• Pressing the colon : will allow you to give instructions to vi (technically speaking, typing the colon will open the ex editor)
• :w will write (save) the file, :q will quit an unchanged file without saving, and :q! will quit vi discarding any changes
• :wq will save and quit and is the same as typing ZZ in command mode
• With :w! vi will try to chmod the file to get write permission (this works when you are the owner) and will chmod it back when the write succeeds
• This should always work when you are root (and the file system is writable)

Connections and File Transfers

Connecting to Discovery Cluster
• http://nuweb12.neu.edu/rc/?page_id=75
• The method to connect to the Discovery cluster is via ssh (secure shell)
• ssh -X or ssh -Y ensures X11 forwarding is enabled and you can launch windows/GUI’s from Discovery login nodes
• An example login can be shown using your cluster account credentials which is your “myneu” username and password
• Discovery cluster login authentication is done via Northeastern University Active Directory and you will only be able to login after your account application is approved by ITS Research Computing and the Research Computing Committee

• To login from Windows clients directly we recommend using PuttY for ssh and Xming for X11 forwarding
• PuttY can be downloaded using the link: http://nuweb12.neu.edu/rc/wp-content/uploads/2013/08/putty.exe
• Please note this is an executable and can be run directly
• Xming can be downloaded using the link: http://nuweb12.neu.edu/rc/wp-content/uploads/2013/08/Xming-6-9-0-31-setup.exe
• This is an installation package and must be installed selecting all the default options
• Connecting using PuttY and Xming to Discovery is given in detail in the document obtained using the link: http://nuweb12.neu.edu/rc/wp-content/uploads/2013/08/Connect_Discovery_Cluster.pdf

Connecting to Discovery Cluster using ssh with X11 forwarding from Windows Clients
Assuming you have PuttY and Xming installed follow the steps shown below:
1) Start Xming:

2) If you see any message from your firewall or antivirus select allow and the Xming icon will appear on the task bar. If you hover your mouse over it you see: “Xming Server:0.0”.
3) Start PuttY:

4) For Host Name enter discovery.neu.edu and the word Discovery in the Saved Session test box as shown in 3) above.
5) Next select SSH and X11 from the Category pane. This is shown below and make sure Enable X11 forwarding is checked.

6) Go back to the Session in Category pane and select Save so that the profile is saved. You will see Discovery added to the Saved Sessions below Default Setting.

7) Now exit Putty and restart it. Select Discovery and click Load. Then click Open. You will get the login shell as shown below. Accept any certificate that is sent. Then login in with your user name and password. You will be logged into one of Discovery login nodes on a round-robin basis.

8) Test X11 forwarding works by starting a GUI like gedit for example as shown below:

9) You may launch as many instances of PuttY. Each one will give you one terminal session.
10) When done logout from the Discovery login and you connection will exit.
11) Finally shut Xming down by right clicking on the Xming icon on the task bar on your Windows client and selecting Exit. You will be asked to confirm exit.

• On Windows Desktops rather than using a windows ssh client like Putty and XMing (for X11 windows forwarding) it is recommended that Linux be installed using Oracle VM Virtual Box
• To transfer files and folders to and from the cluster use either “sFtp” or “rsync”
• “rsync” is the preferred method as it uses secure encoding and can restart if connection is broken
• You can also use a free sFtp Windows or Linux Utility like FileZilla
• The port to use is 22
• It can be downloaded from https://filezilla-project.org/ – ensure you get the “FileZilla Client” for install
• For Host use “discovery.neu.edu”, for Username and Password use your myneu credentials
• Then click “Quickconnect”
• If you get a warning check the box to update keys and proceed


• If you have issues using “discovery.neu.edu” when you ssh into the cluster you can directly opt for a login node
• In this case replace “discovery.neu.edu” with “discovery2.neu.edu” or “discovery4.neu.edu” that will take you directly to a login node without using round-robin DNS
• If you see warning messages like “DNS SPOOFING DETECTED” or “REMOTE HOST IDENTIFICATION HAS CHANGED” do one of the following:
(a) Delete the “known_hosts” file in your “.ssh” folder in the home directory of the machine from which you are logging into the Discovery Cluster
(b) If you do not want to do the above every time you see the warning message and want something more permanent then do the following:

• Delete the “known_hosts” file in your “.ssh” folder in the home directory of the machine from which you are logging into the Discovery Cluster
• Login first to “discovery2.neu.edu” and logout. Then login to “discovery4.neu.edu” and log out
• Now in your “known_hosts” file you will see two entries similar to what is as shown below:discovery2.neu.edu,129.10.0.22 ssh-rsa m4KOOPWpxnTUqLdqAy7PCfG+FDZADOwNSaIkJ251CCv2IV6FI9i6FUFh/ZwYEivLmLFbXLacLwU4Cgv5fiEyAQISsqYyw==discovery4.neu.edu,129.10.0.24 ssh-rsa /W4XdXCzJ1cmJQXa2qnzj3VaZ+87gM97EtdzGtZe3egDoEkoYACwUzdApCUiF8oivNjtRbEkqyYCElevPWfY6g+1dy6ow==
• Copy both and replace “discovery2.neu.edu,129.10.0.22 ssh-rsa” and “discovery4.neu.edu,129.10.0.24 ssh-rsa” with “discovery.neu.edu ssh-rsa”
• Remove the ip address in each case
• The file will now look like:discovery2.neu.edu,129.10.0.22 ssh-rsa m4KOOPWpxnTUqLdqAy7PCfG+FDZADOwNSaIkJ251CCv2IV6FI9i6FUFh/ZwYEivLmLFbXLacLwU4Cgv5fiEyAQISsqYyw==discovery4.neu.edu,129.10.0.24 ssh-rsa W4XdXCzJ1cmJQXa2qnzj3VaZ+87gM97EtdzGtZe3egDoEkoYACwUzdApCUiF8oivNjtRbEkqyYCElevPWfY6g+1dy6ow==discovery.neu.edu ssh-rsa +m4KOOPWpxnTUqLdqAy7PCfG+FDZADOwNSaIkJ251CCv2IV6FI9i6FUFh/ZwYEivLmLFbXLacLwU4Cgv5fiEyAQISsqYyw==discovery.neu.edu ssh-rsa W4XdXCzJ1cmJQXa2qnzj3VaZ+87gM97EtdzGtZe3egDoEkoYACwUzdApCUiF8oivNjtRbEkqyYCElevPWfY6g+1dy6ow==
• Save the “known_hosts” file
• Now when you ssh using “discovery.neu.edu” you will never see the warning messages