36
WM 7335 W Automatic washing machine

WM 7335 W
Automaticwashing machine

This appliance’s packaging material is recyclable. Help recycle it and protect the environment by dropping it off in the municipal receptacles provided for this purpose. Your appliance also contains a great amount of recyclable material. It is marked with this label to indicate the used appliances that should not be mixed with other waste. This way, the appliance recycling organised by your manufacturer will be done under the best possible conditions, in compliance with European Directive 2002/96/EC on Waste Electrical and Electronic Equipment. Contact your town hall or your retailer for the used appliance collection points closest to your home. We thank you doing your part to protect the environment.
Please read this manual first!Dear Customer,We hope that your product which has been manufactured in modern facilities and passed through a strict quality control procedure will give you the best results.Therefore, we advise you to read through this manual carefully before using your product and keep it for future reference.
This operation manual will… …help you use your machine in a fast and safe way. •PleasereadtheOperationManualbeforeinstallingandstartingyourmachine. •Particularlyfollowtheinstructionsrelatedtosafety. •KeepthisOperatingManualwithineasyreach.Youmayneeditinthefuture. •Pleasereadalladditionaldocumentssuppliedwiththismachine.PleasenotethatthisOperatingManualmaybeapplicableforseveralothermodels.Differences between models will be identified in the manual.
Explanation of symbolsThroughoutthisOperationManualthefollowingsymbolsareused:C Important information or useful hints about usage.A Warning for hazardous situations with regard to life and property.B Warning for supply voltage.
2820
5210
34_E
N/1
8060
9.07
44

EN3
1 Your Washing Machine 4Overview . . . . . . . . . . . . . . . . . . . . . . .4Specifications . . . . . . . . . . . . . . . . . . .5
2 Warnings 6General Safety. . . . . . . . . . . . . . . . . . .6First Use . . . . . . . . . . . . . . . . . . . . . . .6Intended use . . . . . . . . . . . . . . . . . . . .6Safety instructions . . . . . . . . . . . . . . . .6If there are children in your house... . . .7Electrical connection . . . . . . . . . . . . . .7
3 Installation 9Removing packaging reinforcement. . .9Openingthetransportationlocks . . . . .9Appropriate installation location . . . . . .9Adjusting the feet. . . . . . . . . . . . . . . . .9Connecting to the water supply. . . . .10Connecting to the drain . . . . . . . . . . .10Electrical connection . . . . . . . . . . . . .11Destroying the packaging material . . .11Disposing of the old machine. . . . . . .11
4 Initial preparations for washing 12Sorting the laundry . . . . . . . . . . . . . .12Preparingclothesforwashing . . . . . .12Correct load capacity . . . . . . . . . . . .12Loading door. . . . . . . . . . . . . . . . . . .13Detergents and softeners . . . . . . . . .13
5 Selecting a Programme and operating your machine 15Control panel . . . . . . . . . . . . . . . . . . .15Turning the machine on . . . . . . . . . . .16Programmeselection. . . . . . . . . . . . .16MainProgrammes . . . . . . . . . . . . . .16AdditionalProgrammes . . . . . . . . . .16SpecialProgrammes . . . . . . . . . . . . .17
Spin speed selection . . . . . . . . . . . . .17Programmeselectionand consumption table. . . . . . . . . . . . . . .18Auxiliary functions . . . . . . . . . . . . . . .19Time display . . . . . . . . . . . . . . . . . . .19StartingtheProgramme . . . . . . . . . .20ProgressofProgramme. . . . . . . . . . .20Changing the selections after the Programmehasstarted . . . . . . . . . . .20Child-proof lock . . . . . . . . . . . . . . . . .20EndingtheProgrammethroughcanceling. . . . . . . . . . . . . . . . . . . . . .21
6 Quick instructions for daily use 22
7 Cleaning and care 23Detergent drawer. . . . . . . . . . . . . . . .23The door and the drum . . . . . . . . . . .23Outercabinetandcontrolpanel. . . . .23Inlet water filters. . . . . . . . . . . . . . . . .23Draining any remaining water and cleaning the pump filter . . . . . . . . . . .24
8 Solution suggestions for problems 26
9 Guarantee 31
10 Service 32
TABLE OF CONTENTS

EN4
1 - Detergent Drawer
2 - Door
3 - Top Lid
4-ControlPanel
5 - Filter Cap
6 - Height-adjustable feet
Overview
1 Your Washing Machine
4
5
6
3
1
2

EN5
Specifications
Specifications of this appliance may change without notice to improve the quality of the product. Figures in this manual are schematic and may not match your product exactly. Values stated on the machine labels or in the documentation accompanying it are obtained in laboratory in accordance with the relevant standards. Depending on operational and environmental conditions of the appliance, values may vary.
Models
Maximumdrylaundrycapacity(kg)
Height(cm)
Width(cm)
Depth(cm)
NetWeight(kg)
Electricity(V/Hz.)
TotalCurrent(A)
TotalPower(W)
Spinningcycle(rpmmax.)
WM7335W
7
84
60
54
72
230 V / 50Hz
10
2200
1300

EN6
Pleasereadthefollowinginformation.Otherwise,theremaybetheriskofpersonal injury or material damage. Moreover,anywarrantyandreliabilitycommitment will become void.
General Safety• Neverplaceyourmachineona
carpetcoveredfloor.Otherwise,lackof airflow from below your machine may cause electrical parts to overheat. This may cause problems with your washing machine.
• Ifthepowercableormainsplugisdamaged you must call Authorized Service for repair.
• Checkwaterhosesforwear.Donot use old/used water inlet hoses. These may cause stains on your laundry.
• Fitthedrainhoseintothewastewater system securely to prevent any water leakage and to allow machine to take in and discharge water as required. It is very important that the water intake and drain hoses are not folded, squeezed, or broken when the appliance is pushed into place after it is installed or cleaned.
• Yourwashingmachineisdesignedto continue operating when the power restores after a power interruption. You cannot cancel any programme by pressing the “On/Offbutton.”Themachinewillresume its programme when the powerrestores.Pressthe“Start/Pause/Cancel”buttonfor3secondstocanceltheprogramme(See,CancellingaProgramme)
• Theremaybesomewaterinyourmachine when you receive it. This is from the quality control process and is normal. It is not harmful to your machine.
• Someproblemsyoumayencountermay be caused by the software.
2 Warnings
Press“Start/Pause/Cancel”button for 3 seconds to cancel the programme set in your machine before calling the authorized service.
First Use• Toprepareyourmachinefor
washing, carry out your first washing process without loading your machine and with detergent under “Cottons90°C”programme.
• Ensurethatthecoldwaterconnections has been made correctly when installing your machine.
• Ifthecurrentfuseorcircuitbreakeris less than 15 Amperes, please have a qualified electrician install a 15 Ampere fuse or circuit breaker.
• Tomakeyourmachinereadyforuse, please be sure that the tap water supply and water drainage systems are appropriate before calling the authorized service. If they are not, call a qualified plumber to have any necessary arrangements carried out.
Intended use• Thisproducthasbeendesignedfor
home use.• Theappliancemayonlybeusedfor
washing and rinsing of textiles that are marked accordingly.
• Onlydetergents,softenersandsupplements suitable for washing machines may be used.
• Observethecareinstructionslabelled on textile products and any other instructions given by companies that produce detergents for your machine.
Safety instructions• Thisappliancemustbeconnected
to an earthed outlet protected by a fuse of suitable capacity.
• Thesupplyanddraininghosesmust

EN7
always be securely fastened and remain in an undamaged state.
• Fitthedraininghosetoawashbasinor waste system securely before starting up your machine. There may be a risk of being scalded due to high washing temperatures!
• Neveropenthedoororremovethefilter while there is still water in the drum.Otherwise,theremaybetherisk of flooding and possible injury due to the hot water.
• Neverforceopenthelockeddoor!The door will be ready to open just a few minutes after the washing cycle comes to an end.
• Unplugthemachinewhenitisnotinuse.
• Neverwashdowntheappliancewith a water hose! There is the risk of electric shock! Always disconnect from the mains by unplugging before cleaning.
• Nevertouchtheplugwithwethands. Never unplug by pulling on the cable, always pull out from the plug only. Do not operate the machine if the power cord or plug is damaged.
• Neverattempttorepairthemachineyourself.Otherwise,youmaybeputting yours and other’s lives in danger.
• Formalfunctionsthatcannotbe solved by information in the operatingmanual:
Turn off the machine, unplug it, turn off the water tap and contact an authorized service agent.
If there are children in your house...• Electricalappliancesmaybe
dangerousforthechildren.Keepchildren away from the machine when it is operating. Do not let them tamper with the machine.
• Closethedoorwhenyouleavethearea where the machine is located.
• Storealldetergentsinasafeplace
out of reach of the children.• UseChild/Keylocktoprevent
children altering the settings
Electrical connectionMakesurethatyouhaveanearthedpower outlet socket rated at 13 amps (minimum).Attention!If you place your machine under a worktop, the socket must be reachable after installation, or a separate switch (whichcandisconnectthetwopoles)must be used in the installation. Connect the power cord to the appropriate electrical socket with an equivalent current rating indicated on the rating plate at the front of the machine behind the kick plate.After removing the plug from its transit position, please insert the plug seal to prevent water spillage entering the machine.
Electrical requirements Before you insert the plug into the wall socket make sure that the voltage and the frequency shown in the rating label corresponds to your electricity supply.We recommend that this appliance be connected to the mains supply via a suitable switched and fused socket in a readily accessible position.Should the mains lead of the appliance become damaged or need replacing at any time, it must be replaced by a special purpose made mains lead which can only be obtained from a Authorised Service Agent.
B This appliance must be earthed
If the fitted moulded plug is not suitable for your socket, then the plug should be cut off and an appropriate plug fitted.Destroy the old plug, which is cut off as a plug with a bared cord could cause a shock hazard if inserted into a socket elsewhere in the house.The moulded plug on this appliance incorporates a 13A fuse. Should the

EN8
fuse need to be replaced an ASTA approved BS1362 fuse of the same rating must be used. Do not forget to refit the fuse cover. In the event of losing the fuse cover, the plug must not be used until a replacement fuse cover has been fitted. Colour of the replacement fuse cover must be the same colour as that visible on the pin face of the plug. Fuse covers are available from any good electrical store.
ImportantFitting a different plugAs the colours of the wires in the mains lead of this appliance may not correspond with the coloured markings identifying the terminals on your plug, proceedasfollows:1 Connect the green - yellow or green
(earth)wiretotheterminalintheplug marked ‘E’ or with the symbol f or coloured green and yellow or green.
2 Connecttheblue(neutral)wiretothe terminal in the plug marked ‘N’ or coloured black.
3 Connectthebrown(live)wiretotheterminal in the plug marked ‘L’ or coloured red.
With the alternative plugs a 13A fuse must be fitted either in the plug or adaptor or in the main fuse box. If in doubt contact a qualified electrician.
EN9
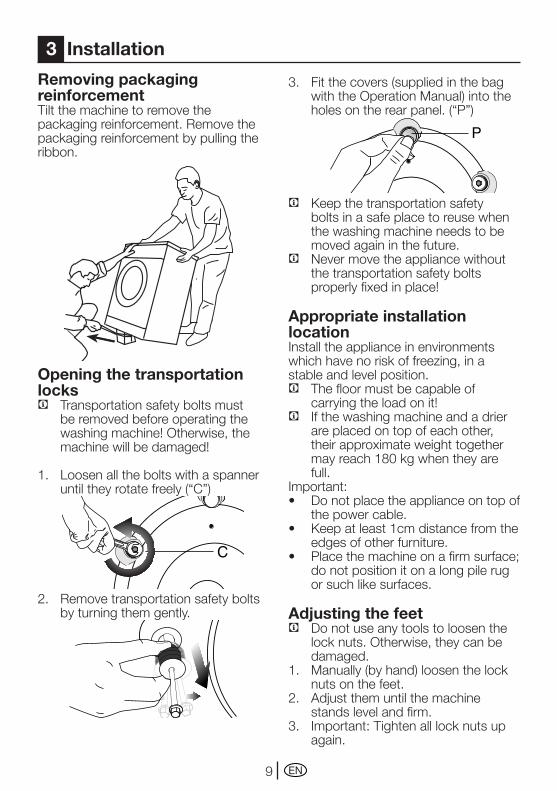
Removing packaging reinforcementTilt the machine to remove the packaging reinforcement. Remove the packaging reinforcement by pulling the ribbon.
Opening the transportation locksC Transportation safety bolts must
be removed before operating the washingmachine!Otherwise,themachine will be damaged!
1. Loosen all the bolts with a spanner untiltheyrotatefreely(“C”)
2. Remove transportation safety bolts by turning them gently.
3 Installation
3. Fitthecovers(suppliedinthebagwiththeOperationManual)intotheholesontherearpanel.(“P”)
C Keepthetransportationsafetybolts in a safe place to reuse when the washing machine needs to be moved again in the future.
C Never move the appliance without the transportation safety bolts properly fixed in place!
Appropriate installation locationInstall the appliance in environments which have no risk of freezing, in a stable and level position.C The floor must be capable of
carrying the load on it!C If the washing machine and a drier
are placed on top of each other, their approximate weight together may reach 180 kg when they are full.
Important:• Donotplacetheapplianceontopof
the power cable.• Keepatleast1cmdistancefromthe
edges of other furniture.• Placethemachineonafirmsurface;
do not position it on a long pile rug or such like surfaces.
Adjusting the feetC Do not use any tools to loosen the
locknuts.Otherwise,theycanbedamaged.
1. Manually(byhand)loosenthelocknuts on the feet.
2. Adjust them until the machine stands level and firm.
3. Important:Tightenalllocknutsupagain.

EN10
Connecting to the water supply.Important:• Thewatersupplypressurerequired
to run the machine must be 1-10 bar(0,1–1MPa).(Practically,itisnecessarytohave10–80litersof water flowing from the tap in one minute to have your machine runsmoothly.)Attachapressure-reducing valve if the water pressure is higher.
• Connectthespecialhosesuppliedwith the machine to the water intake valves on the machine.
• Inordertopreventwaterleakagethat may occur at the connection points,therearerubberseals(4seals for the models with double water inlet and 2 seals for other models)attachedtothehoses.These seals should be used at the tap and machine connection ends of the hoses. The plain end of the hose fitted with a filter must be attached to the tap and the elbowed end must be attached to the machine. Tighten the nuts of the hose well by hand;neverusewrenchestotightenthe nuts.
• Openthetapscompletelyaftermaking the hose connection to check if there is any water leakage at the connection points. Turn off the tap and remove the nut in case of any leakage. Retighten the nut carefully after checking the seal. To prevent any water leakage and any other damage to be caused by it, keep the taps closed when the machine is not in use.
• Modelswithasinglewaterinletshould not be connected to the hot water tap. Laundry may be damaged or the appliance may switch to protection mode and not work.
When returning the appliance to its place after maintenance or cleaning, care should be taken not to fold, squeeze or block the hoses.
Connecting to the drainThe water discharge hose can be attached to the edge of a washbasin or waste water system. The drain hose should be firmly fitted into the drain as to not loosen in its housing.
Important:• Theendofthedrainhosecan
be directly connected to the wastewater drain or to the washbasin. The fitting must be secured in all types of connections. Your house may be flooded if the hose falls out of its housing during water discharging.
• Thehoseshouldbeattachedtoaheight of at least 40 cm, and 100 cm at most.

EN11
• Incasethehoseiselevatedafter laying it on the floor level or closetotheground(lessthan40cmabovetheground),waterdischarge becomes more difficult and the laundry may come out wet. Therefore, the heights described in the figure should be followed.
• Topreventdirtywaterrefillingthemachine, and to allow for easy discharge, the end of the hose must not be submerged in the drain water. The end of the hose must be able to take in air. The hose should be pushed into the drainage for more than 15 cm. If it is too long you may have it shortened.
• Theendofthehoseshouldnotbebent, it should not be stepped on and it must not be folded between the drain and the machine.
• Thelengthofthehoseistooshort,you may add an extension hose to the original section. The length of the hose must not be longer than 3.2 m after coming out of the machine. To avoid water leakage failures, the connection between the extension hose and the drain hose of the product must be fitted well with an appropriate clamp as not to come off and leak.
Electrical connection Connect the machine to an earthed outlet protected by a fuse of suitable capacity.Important:• Connectionshouldcomplywith
national regulations.• Powercordplugmustbewithin
easy reach after installation.• Thevoltageandtheallowedfuse
protection are specified in the section“TechnicalSpecifications”.
• Thespecifiedvoltagemustbeequalto your mains voltage.
• Connectionviaextensioncordsormulti-plugs should not be made.
B A damaged power cable must be replaced by a qualified electrician.
B A faulty appliance must not be operated whilst faulty until it has been repaired! There is the risk of electric shock!
Destroying the packaging materialPackagingmaterialcanbedangeroustochildren.Keepthepackagingmaterialsout of reach of children or dispose them by classifying according to waste directives. Do not dispose of them together with normal domestic waste.Packagingmaterialsofyourmachinearemanufactured from recyclable materials.
Disposing of the old machineDispose of your old appliance in an environmental friendly manner.• Youmayrefertoyourlocalagentor
solid waste collection center in your municipality to learn how to dispose of your machine.
Before disposing of your old washing machine, cut off the mains plug and make the door lock unusable.

EN12
Sorting the laundry• Sortthelaundryaccordingtotype
of fabric, color, and degree of soiling and permissible water temperature.
Always follow the advice on the garment labels.
Suitable for rier
o not dry ith drier
an be ironed ith hot iron
Can be ironed with
arm iron
Dry on a anger
o not iron
Washing water emperature
Do not use leach
Bleach can be sed
Non machine ashable
Hang without pinning
o not ry-clean
Dry orizontally
o not wash
ry-cleanable
Wash with sensitive, short programmes.
Preparing clothes for washingLaundry items with metal attachments such as, bras, belt buckles and metal buttons will damage the machine. Remove metal attachments or place the items in a clothing bag, pillow case, or something similar.
• Emptypocketsandremoveallforeign objects such as coins, pens and paper clips. If possible, turn pockets out and brush.
• Placesmallitemslikeinfants’socks and nylon stockings, etc. in a laundry bag, pillow case or something similar. This will also save your laundry from getting lost.
• Placecurtainsinthemachinewithcare. Remove curtain rails and pullers.
• Fastenzippers,sewloosebuttonsand mend rips and tears.
• Wash“machinewashable”or“handwashable”labelledproductsonlywith an appropriate programme.
• Donotwashcoloursandwhitestogether. New, dark coloured cottons may release a lot of dye. Wash them separately.
• Toughstainsmustbetreatedproperly before washing. If you are not sure, check with a dry cleaner.
• Useonlydyes/colourchangersandlime removers suitable for machine wash. Always follow the instructions on the packaging.
• Washtrousersanddelicateclothesturned inside out.
• KeeplaundryitemsmadeofAngorawool in the freezer for a few hours before washing. This will reduce pilling.
Correct load capacity• Themaximumloadcapacity
depends on the type of laundry, the degree of soiling and the washing programme you wish to use.
C The machine adjusts the amount of water according to the amount of laundry placed inside.
C Pleasefollowtheinformationinthe"ProgrammeSelectionTable".Washing results will degrade when the machine is overloaded.
4 Initial preparations for washing

EN13
Following weights are given as examples. Laundry type Weight(gr.)Bathrobe 1200Napkin 100Duvet cover 700Bed Sheet 500Pillowcase 200Tablecloth 250Towel 200Evening gown 200Underclothing 100Men’soveralls 600Men’sshirt 200Men’spyjamas 500Blouse 100
Loading doorThe door is locked during programme operation. The door can be opened after some time following the programme end.• Openthedoor.• Placelaundryitemslooselyinthe
machine.• Pushthedooruntilitclicksinto
place tightly. Ensure that no items are caught in the door.
Detergents and softenersDetergent drawerThe detergent drawer is composed of threecompartments:The detergent dispenser may be in two different types according to the model of your machine.-(I)forprewash-(II)formainwash-(III)siphon–( )forsoftener
Detergent, softener and other cleaning agentsAdd detergent and softener before starting the washing programme.Never open the detergent dispenser drawer while the washing programme is running!When using a programme without pre-wash, no detergent should be put into the pre-wash compartment (Compartmentno.I).A programme without pre-wash should be selected if a detergent bag or a dispensing ball is going to be used. You can place the detergent bag or the dispensing ball directly among the laundry in your machine.
Choosing the detergent typeThe type of detergent to be used depends on the type and colour of fabric.• Usedifferentdetergentsforcoloured
and white clothes.• Washwoolenswithaspecial
detergent specifically for woolens.• Useonlydetergentsmanufactured
specifically for automatic washing machines.
Detergent quantityThe amount of washing detergent to be used depends on the amount of laundry, the degree of soiling and water hardness.
• Donotuseamountsexceedingthe quantities recommended on the package to avoid problems of excessive foam, poor rinsing, financial savings and finally, environmental protection.
• Usesmallamountsofdetergentatasuitable measure for small amounts of laundry or for only slightly soiled laundry.
• Useexactmeasuresforhighlyconcentrated detergents.

EN14
Detergent quantity
for prewashing 1/2 measurefor main washing 1 measure
with hard water an additional 1/2 measure
SoftenerPutthesoftenerintothesoftenercompartment of the detergent dispenser.• Usetheproportionsrecommended
on the packet.• Neverexceedthe(>max<)level
marking;otherwise,thesoftenerwillbe wasted without being used.
• Ifthesoftenerhaslostitsfluidity,dilute dense softener with water before placing it in the detergent drawer.
Liquid detergentWhen using liquid or gel washing detergents,pleasenotethefollowing:• Theliquiddetergentmayleave
stains on your laundry if time delay feature is selected.
• Donotuseliquiddetergentifyouwant to wash using the time delay feature.
• Donotuseliquiddetergentforthemain wash in a cycle with pre-wash.
• Usethedetergentmanufacturer’smeasuring cup and follow the instructions on the package.
Starch• Addliquidstarch,powderstarch
or the fabric dye into the softener compartment as instructed on the package.
• Neverusefabricsoftenerandstarchtogether in the same washing cycle.
• Wipetheinsideofthedrumafterusing starch.
Eliminating lime formation• Whenrequired,useonlyappropriate
lime removers developed specifically for washing machines and always
follow the instructions on the package.
EN15
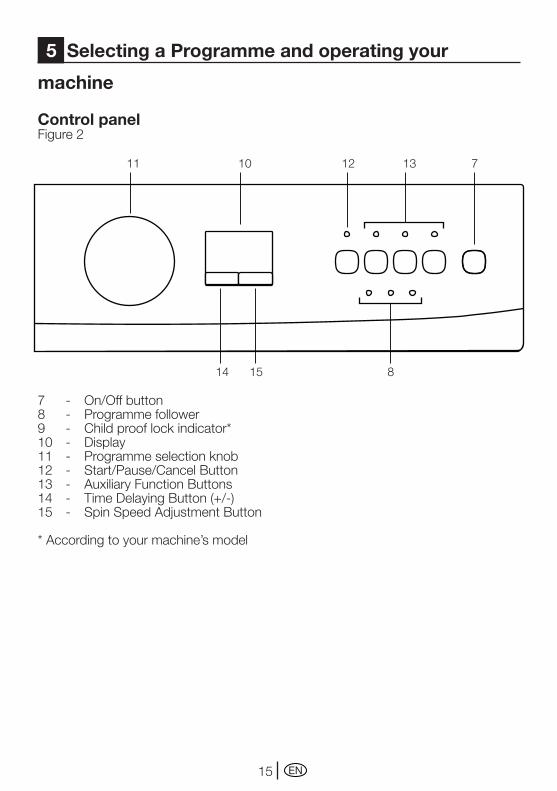
7 - On/Offbutton8 - Programmefollower9 - Child proof lock indicator*10 - Display11 - Programmeselectionknob12 - Start/Pause/CancelButton13 - Auxiliary Function Buttons14 - TimeDelayingButton(+/-)15 - Spin Speed Adjustment Button
* According to your machine’s model
machine
Control panelFigure 2
5 Selecting a Programme and operating your
11 10 1312
814 15
7

EN16
Turning the machine onPluginyourmachine.Turnthetaponcompletely. Check if the hoses are connectedtightly.Placethelaundryin the machine. Add detergent and softener.Pressthe“On/Off”button.
Programme selectionSelecttheappropriateProgrammefromtheProgrammetableandthefollowingwashing temperature table according to type, amount and degree of soiling of the laundry.
90˚C
Normally soiled, white cottonsandlinens.(Ex.:coffee table covers, tablecloths, towels, bed sheets)
60˚C
Normally soiled, fade proof colored linens, cottons or synthetic clothes(Ex.:shirts,nightgowns,pajamas)andlightly soiled white linen clothes(Ex.:underwear)
40˚C-30°C-Cold
For delicate clothes (Ex.:lacecurtains),blended clothes including synthetics and woolens.
SelectthedesiredProgrammewiththeProgrammeselectionbutton.C Programmesarelimitedwiththe
highest spin speed appropriate for that particular type of cloth.
Main Programmes Depending on the type of textile, thefollowingmainProgrammesareavailable:EachofthesemainProgrammescomprise of a complete washing process, including washing, rinsing and, if required, spin cycles.C Sort the laundry according to type
of fabric, color, degree of soiling and permissible water temperature when
choosingaProgramme.C Always select the lowest required
temperature. Higher temperature means higher power consumption.
C ForfurtherProgrammedetails,see,“ProgrammeSelectionTable”
• CottonsYou can wash your durable clothes withthisProgramme.Yourlaundrywill be washed with vigorous washing movements during a longer washing cycle. It is recommended for your cottonitems(suchasbedsheets,duvet and pillowcase sets, bathrobes, underclothing,etc.).• SyntheticsYou can wash your less durable clothes onthisProgramme.Gentlerwashingmovements and a shorter washing cycle isusedcomparedtothe“Cottons”Programme.Itisrecommendedforyoursyntheticclothes(suchasshirts,blouses, synthetic/cotton blended garments,etc.).Forcurtainsandlace,the“Synthetic(duo)40”Programmewithpre-wash and anti-creasing functions selected is recommended. Detergent should not be put in the pre-wash compartment. Less detergent should be put in the main wash compartment as looseknitfabrics(lace)foamtoomuchdue to its meshed structure.• WoollensYou can wash your machine-washable woolengarmentsonthisProgramme.Wash by selecting the proper temperature according to the labels of your clothes. It is recommended to use appropriate detergents for woolens. Additional Programmes For special cases, there are also extra Programmesavailable:C AdditionalProgrammesmaydiffer
according to the model of your machine.
• Baby+Toddler ClothingIncreased hygiene is provided by a longer heating period and an additional rinse cycle. It is recommended for baby clothes and clothes worn by allergic

EN17
people.• Delicates 30You can wash your delicate clothes on thisProgramme.Ithasmoresensitivewashing movements and does not make intermediate spinning compared to“Synthetic”Programme.Itmustbeused for clothes for which sensitive washing is recommended.• Hand Wash/Silk 30You can wash your woolen/delicate clothes that bear “not machine- washable”labelsforwhichhandwashisrecommendedonthisProgramme.It washes the laundry with very tender washing movements without damaging your clothes.• Mini 30ThisProgrammeisusedtoquicklywash(30minutes)asmallamountoflightlysoiled cotton garments.• A Class 40ThisProgrammewashesforalonger period at 40°C and gives the same result as the "Cottons 60°C" Programme,thusitsavesenergy.Itissuitable for clothes for which you cannot usethe"Cottons60°C"Programme.• Shirts 40YoucanusethisProgrammetowashcottons and synthetics together. There is no need to sort them.• Sports 40ThisProgrammeissuitableforclothesthat are normally worn for a short time such as sportswear. It is used to quickly wash a small amount of cotton/synthetic blended clothes.Special ProgrammesFor specific applications, you can select anyofthefollowingProgrammes:• RinseThisProgrammeisusedwhenyouwantto rinse or starch separately.• Drain+SpinThisProgrammeisusedtoapplyanadditional spin cycle for the laundry or to drain the water in the machine.BeforestartingthisProgramme,selectthe desired spin sped and press "Start/Pause/Cancel"button.Yourmachine
drains the water after spinning at the set spin speed.If you only want to drain the water without spinning your laundry, select “SpinandPump”Programme,andthenselect no spin function with spin speed selectionbutton.Press“Start/Pause/Cancel”button.A You should use a lower spin speed
for delicate laundries.Spin speed selectionWheneveranewProgrammeisselected, the maximum spin speed of theselectedProgrammeisdisplayedonthe spin speed indicator.To decrease the spin speed, press the “Spin”button.Spinspeeddecreasesgradually. Then, rinse hold and no spin options are shown respectively.Rinse hold is shown with “ ”andnospin is shown with “ ”symbols.
If you do not want to unload your clothesimmediatelyafterProgramme,you may use rinse hold function in order to prevent your clothes become wrinkled in anhydrous conditions. With this function, your laundry is kept in the final rinsing water. If you want to spin yourlaundrythatyouleftinwater:- Adjust the spin speed.-Press“Start/Pause/Cancel”button.Programmeresumes.Yourmachinesdrains the water and spins your laundry.You can use no spin function in order to drain the water without spinning at the endoftheProgramme.

EN18
Programme selection and consumption table
•:Selectable*:Automaticallyselected,notcancellable.**:EnergyLabelProgramme(EN60456)WaterandpowerconsumptionandProgrammedurationmaydifferfromthetableshown, subject to changes in water pressure, water hardness and temperature, ambient temperature, type and amount of laundry, selection of auxiliary functions, and fluctuations in the supply voltage.
C The auxiliary functions in the table may differ according to the model of your machine.
C Programmedurationwillbedisplayedonthescreenofyourmachineaccordingto your selection.
EN 2 Auxiliary functions
Programme
Max
. Loa
d (k
g)
Wat
er C
onsu
mpt
ion
(l)
Ene
rgy
Con
sum
ptio
n (k
Wh)
Pre
was
h
Qui
ck W
ash
Ext
ra R
inse
Ant
i-Cre
asin
g
Rin
se H
old
No
Hea
t
Plu
s w
ater
Hygiene 90 7 52 2.72 • • • • • • •
Cottons 60** 7 52 1.19 • • • • • • •
Cottons 40 7 52 0.78 • • • • • • •
A Class 40 40 7 52 0.84 •
Baby&Toddler Clothing 60 7 73 1.40 * • • •
Sports 40 40 3.5 44 0.40 • • • • • • •
Synthetics 60 3 52 0.88 • • • • • • •
Synthetics/duo 40 3 52 0.66 • • • • • • •
Shirts 40 40 3.5 47 0.38 • • • • • •
Delicates 30 30 2 47 0.23 • • • • •
Woollens 40 1.5 47 0.19 • • • •
Hand Wash/Silk 30 30 1 35 0.18 •
Mini 30 30 2.5 36 0.17 •

EN19
Auxiliary functionsAuxiliary Function Selection ButtonsSelect the required auxiliary functions beforestartingtheProgramme.C Some combinations cannot be
selectedtogether.(Ex.:Pre-washand Quick Wash.
Warning signal on the selected auxiliary function will light up.
Auxiliary function selectionIf an auxiliary function that should not be selected together with a previously selected function is chosen, the first selected function will be cancelled and the last auxiliary function selection will remain active.(Ex.:Ifyouwanttoselectpre-washfirstand then quick wash, pre-wash will be cancelled and quick wash will remain active.Auxiliary function that is not compatible withtheProgrammecannotbeselected.(see,“ProgrammeSelectionTable”)C Auxiliary function buttons may differ
according to the model of your machine.
• PrewashA pre-wash is only worthwhile for heavily soiled laundry. Without pre-wash you save energy, water, detergent and time.C Pre-washwithoutdetergentis
recommended for lace and curtains.
Quick WashThisfunctioncanbeusedfor“Cottons”and“Synthetics”Programmes.Itdecreases the washing times for lightly soiled laundries and also the number of rinsing steps.
• Extra RinseWith this function, you can increase the number of current rinsing steps. Thus, sensitive skins’ risk of being affected by the remainder detergent on the clothes will be decreased.
• Anti-CreasingWith this function, drum movement will
be lessened to prevent creasing and spinning speed is limited. In addition, washing is carried out at a higher water level.C Use this function for delicate
laundries that crease easily.C Whenever you select this auxiliary
function, load your machine with half of the maximum laundry specified in theProgrammetable.
• No HeatIf you wish to wash your clothes in cold water,youcanusethisProgramme.
Time displayThe display shows the time remaining fortheProgrammetocompletewhileaProgrammeisrunning.Timeisdisplayedinhoursandminutesas“01:30”.C Programmedurationmaydiffer
from the values in the consumption table subject to the changes in the water pressure, water hardness and temperature, ambient temperature, type and amount of laundry, auxiliary functions selected, and changes in the supply voltage.
Time delayWiththe“Timedelay”functionyoucandelaytheProgrammestartupto24hours. Time delay can be set with steps of one hour for the first three hours and with steps of three hours for the remainder(1,2,3,6,9,…24).C Do not use liquid detergent when
you set time delay! There is the risk of staining of the clothes.
1.Opentheloadingdoor,placethelaundry inside and fill detergent drawer.2.SetthewashingProgramme,spinspeed and, if required, select the auxiliary functions.3.Pres“TimeDelay”buttontoadjustthedesired time.4.Press“Start/Pause/Cancel”button.The time delay will start to count down. The“:”inthemiddleofthedisplayedtime delay will start flashing.
EN 2 Auxiliary functions
Programme
Max
. Loa
d (k
g)
Wat
er C
onsu
mpt
ion
(l)
Ene
rgy
Con
sum
ptio
n (k
Wh)
Pre
was
h
Qui
ck W
ash
Ext
ra R
inse
Ant
i-Cre
asin
g
Rin
se H
old
No
Hea
t
Plu
s w
ater
Hygiene 90 7 52 2.72 • • • • • • •
Cottons 60** 7 52 1.19 • • • • • • •
Cottons 40 7 52 0.78 • • • • • • •
A Class 40 40 7 52 0.84 •
Baby&Toddler Clothing 60 7 73 1.40 * • • •
Sports 40 40 3.5 44 0.40 • • • • • • •
Synthetics 60 3 52 0.88 • • • • • • •
Synthetics/duo 40 3 52 0.66 • • • • • • •
Shirts 40 40 3.5 47 0.38 • • • • • •
Delicates 30 30 2 47 0.23 • • • • •
Woollens 40 1.5 47 0.19 • • • •
Hand Wash/Silk 30 30 1 35 0.18 •
Mini 30 30 2.5 36 0.17 •

EN20
C Morelaundrymaybeloadedduringthe time delay period.
5.Attheendofcountdownprocess,“:”willlightupcontinuously,“Ready”lightwillgooffandtherelevantProgrammefollow-up light will come on according to theselectedProgramme.
Changing the delay timeIf you want to change the time during thecountdown:1.Press“Start/Pause/Cancel”button.“:”inthemiddleofthescreenwillstopflashing.2.Pres“TimeDelay”buttontoadjustthe desired time delay.3.Press“Start/Pause/Cancel”button.4.The“:”inthemiddleofthedisplayedtime delay will start flashing.
Canceling the time delayIf you want to cancel the time delay countdownandstarttheProgramme:1.Press“Start/Pause/Cancel”button.The“:”inthemiddleofthedisplayedtime delay will stop flashing.2.Pres“TimeDelay”buttontodecreasethetimedelay.“0:00”willappearonthedisplay.3.Press"Start/Pause/Cancel"buttontostarttheProgramme.
Starting the Programme1.Press"Start/Pause/Cancel"buttontostarttheProgramme.2.Programmefollow-uplampshowingthestartupoftheProgrammewilllightup.
Progress of ProgrammeProgressofarunningProgrammeisshownthroughtheProgrammefollow-up indicator. At the beginning ofeveryProgrammestep,therelevantindicator lamp will light up and light of the completed step will turn off. The indicator that is lit up at the far right of the series of indicator indicates the step that is being carried out.C If the machine is not spinning,
theProgrammemaybeinrinse
hold mode or the automatic spin correction system has been activated due to an excessive unbalanced distribution of laundry in the machine.
Changing the selections after the Programme has startedTurningtheProgrammeknobwhiletheProgrammeisinanormalflowwillnotchangetheProgramme.
Switching the machine to standby modePress“Start/Pause/Cancel”buttonmomentarily to switch your machine tothestandbymode.“Start/Pause/Cancel”lampwillstartflashingtoindicate that the machine is switched to standby mode.
Selecting or canceling an auxiliary function in standby modeAuxiliary functions can be cancelled or selected in accordance with the step the Programmeisat.
Adding/removing laundry in standby modeThe door can be opened if the water levelissuitable.“Ready”lampwillflash until the door is allowed to open. “Ready”lampwilllightupcontinuouslywhen the door is allowed to open. Laundry may be added / taken out by openingthedoor.“Ready”lampgoesoff it he front door is not allowed to open for safety reasons.
Door lockThe loading door can not be opened yet duetosafetyreasonswhilethe“Ready”lamp is flashing. The loading door can beopenedoncethe“Ready”lampstarts lighting up continuously.
Child-proof lockThis function protects the appliance from being tampered by children. In this case, all of the buttons are inactive

EN21
exceptOn/Offbutton;byOn/Offbuttonyoucanwhetherstoporresume(whilechild-lockon)theProgrammeofyourmachine.The machine is switched to child-lock by pressing the 1st and 2nd auxiliary functionsfor3sec.“Con”(Childlockisactivated)labelappearsonthescreen.
The same symbol will also be displayed whenever any button is pressed while the machine is child-locked. Child-proof locklampontheProgrammefollow-upindicator will light up when the child-proof lock is activated. To deactivate the child-proof lock, press the 1st and 2nd auxiliary function buttons for 3 sec. “C OFF”(Child-prooflockisdeactivated)symbol appears on the screen.
Child-proof lock lamp on the Programmefollow-upindicatorwillgo off when the child-proof lock is deactivated.
Ending the Programme through canceling“Start/Pause/Cancel”buttonispressedfor3secondstocanceltheProgramme.“Ready”warninglampflashesduringcancelingand“End”willappearonthedisplay.

EN22
Preparation1. Turn the tap on completely. Check if
the hoses are connected tightly.2. Placethelaundryinthemachine.3. Add detergent and softener.Starting1. Pressthe“On/Off”button.2. Select the programme and the
temperature.3. Ifrequired:– selectanyauxiliaryfunction,– adjustthespinspeed,– setthetimedelay,4. Close the loading door.5. Press“Start/Pause/Cancel”
button. The display shows the time remaining for the program to complete if time delay is not set.
6. Check if the program follow-up indicator on the screen lights up.
Canceling a program1. Pressandholdthe`Start/Pause/
Cancel`buttonforabout3seconds;the“Ready”lightwillstartflashing.
2. The machine can drain all the water or can take in water for 3 times at most to cool down the clothes and complete draining process.
Adding more laundry• Thisisonlypossibleunderthe
followingconditions:1. during time delay,C You may add or remove laundry
duringthetimedelay(untiltheprogramstarts).
2. At the beginning of a washing cycle, C Machineallowsaddingmorelaundry
during a future step only if the water level is low enough to open the loading door or if the temperature in the machine is low
In order to add laundry after the start-up oftheprogram:1. Press“Start/Pause/Cancel”
button. Wait for the safety lock to open. "Ready" lamp will light up continuously.
2. Opentheloadingdoorandputinmore laundry.
3. Close the loading door.4. Press“Start/Pause/Cancel”button.Program is in rinse hold modeC This process is shown with the
flashing " " symbol. If you wish to spin when the machine is inthismode:1. Adjust the spin speed.2. Press“Start/Pause/Cancel”button.
Programresumes.Yourmachinedrains the water and spins your laundry.
If you want to drain the water without spinning:Press“Start/Pause/Cancel”button.Theprogram continues and only drains the water.Re-spinning the laundryThe control system for an unbalanced load can pause the spinning in cases when the distribution of the laundry in the drum is not balanced.Ifyouwanttore-spintheclothes:1. Rearrange the previously placed
clothes in machine.2. Select the spin program.3. Adjust the spin speed.After the program is finishedProgramindicatorlightsonthescreenremain lighted up after the program is finished.1. “End”willappearonthescreen
when“ready”lamplightsupintheprogramfollow-upindicator.Openthe loading door and remove the laundry.
2. Pressthe“On/Off”button.3. Turn off the water tap.4. Eliminate any folding of the rubber
seal on the loading door and check for impurities.
5. Leave the loading door and detergent drawer open to dry.
6 Quick instructions for daily use

EN23
Detergent drawerRemove any powder residue buildup in thedrawer.Todothis;1. Pressthedottedpointonthe
siphon in the softener compartment and pull towards you until the compartment is removed from the machine.
C If more than a normal amount of water and softener mixture starts to gather in the softener compartment, the siphon must be cleaned.
2. Wash the dispenser drawer and the siphon with plenty of lukewarm water in a washbasin. Wear protective gloves or use an appropriate brush to avoid touching the residues in the drawer when cleaning.
3. Replace the drawer into its housing after cleaning. Check if the siphon is in its original location.
The door and the drumAftereachwash:• Checkifthereareanyforeign
substances in the drum.• Opentheholeinthebellowwiththe
aid of a toothpick if it is clogged.
C Foreign metal substances in your machine can cause rust stains. In suchcases:
Clean the drum with a stainless steel cleaning agent. Never use steel wool or wire wool.
Outer cabinet and control panelWhennecessary:• Wipetheexteriorpanelsofyour
machine with soapy water or mild detergent. Dry it with a soft cloth.
• Useonlyasoftanddampclothtoclean the control panel.
C Never use a sponge or scrubbing material. These will damage the painted and plastic parts.
Inlet water filtersThere is a filter at the end of each water intake valve at the back side of the machine and also at the end of each water intake hose where they are connected to the tap. These filters prevent the foreign substances and dirt in the water to enter into the machine. Filters should be cleaned as they get dirty.• Closethetaps.
• Removethenutsofthewaterintakehoses to clean the surfaces of the filters on the water intake valves with an appropriate brush.
7 Cleaning and care

EN24
• Ifthefiltersareverydirty,youcanpull them out by means of pliers and clean them.
• Takeoutthefiltersontheflatends of the water intake hoses together with the gaskets and clean thoroughly under streaming water.
• Replacethegasketsandfilterscarefully and tighten the hose nuts by hand.
Draining any remaining water and cleaning the pump filterFilter system in your machine prevents solid items such as buttons, coins and fabric fibers clogging the pump propeller during discharging of the washing water.• Ifyourmachinefailstodrainthe
water, the pump filter may be clogged. You may have to clean it every 2 years or whenever it is blocked plugged. Water must be drained off to clean the pump filter.
In addition, water may have to be drained off completely in the following cases:• beforetransportingthemachine
(e.g.whenmovinghouse)• whenthereisthedangeroffrostIn order to clean the dirty filter and dischargethewater;1- Disconnect or unplug the machine from the power supply.A There may be water at 90°C in the
machine. Therefore, the filter must be cleaned only after the inside water is cooled down to avoid hazard of scalding.
2-Openthefiltercap.Thefiltercapiscomposed of one piece, hold it from both sides and open it by pulling out.
3- An emergency drain hose is supplied withsomeofourmodels.Othersarenotsupplied with this item.
If your product is supplied with an emergency drain hose, do the following asshowninthefigurebelow:
• Pulloutthepumpoutlethosefromits housing.
• Placealargecontainerattheendofthe hose. Drain the water off into the container by pulling out the plug at the end of the hose. If the amount of water to be drained off is greater than the volume of the container, replace the plug, pour the water out, then resume the draining process.
• Afterdrainingprocessiscompleted,replace the plug into the end of the hose and fit the hose back into its place.
If your product is not supplied with an emergency drain hose, do the following asshowninthefigurebelow:
• Placealargecontainerinfrontofthefilter to receive water flowing from the filter.
• Loosenpumpfilter(anticlockwise)until water starts to flow out of it. Direct the flowing water into the container you have placed in front of the filter. You can use a piece of cloth to absorb any spilled water.

EN25
• Whenthereisnowaterleft,turnthepump filter until it is completely loose and remove it.
• Cleananyresiduesinsidethefilteras well as fibers, if any, around the propeller region.
• Ifyourproducthasawaterjetfeature, be sure to fit the filter into its housing in the pump. Never force the filter while replacing it into its housing. Fit the filter fully into its housing;otherwise,watermayleakfrom the filter cap.
4- Close the filter cap of your product by fitting the tabs on the bottom into their positions and pushing the upper part of it.

EN26
Cause Explanation / SuggestionProgrammecannotbestartedorselected.
Machinemayhaveswitchedtoselfprotection mode due to an infrastructure problem(suchaslinevoltage,waterpressure,etc.).
Bring your machine to factory settings by turning the programmeselectionknob.(see,Endingtheprogrammethroughcanceling)
Water in the machine.There may be some water in your machine when you receive it. This is from the quality control process and is normal.
It is not harmful to your machine.
There is water coming from the bottom of the machine.
There might be problems with hoses or the pump filter.
-Makesurethatthesealsofthewaterinlethosesaresecurely fitted.- Tightly attach the drain hose to the tap.-Makesurethatthepumpfilteriscompletelyclosed.
Machinedoesnotfillwithwater
- Tap may be turned off.- Water inlet hose might be bent.- Water inlet filter might be clogged.- The loading door may be ajar.
-Opentheinletwatertapsfully.- Flatten the water intake hose.- Clean the water intake filter.- Close the loading door.
Machinedoesnotdischargewater.
- Water outlet hose might be clogged or twisted.-Pumpfiltermaybeclogged.
- Clean or flatten the hose.- Clean the pump filter.
Machinevibratesorshakes.
-Machinefeetmightnotbeadjusted.- Transportation safety bolts might have not been removed.- There may be a small amount of laundry in the machine.- The machine may be overloaded or the clothes may be distributed unevenly.- There machine might be touching a solid surface.
- Adjust the machine feet.- Remove the transportation safety bolts.- Add more laundry to the machine.- Reduce the amount of laundry in the machine or balance the load by hand.- Ensure that nothing touches the machine.
Machinestopsshortlyaftertheprogrammestarts.
Machinecanstoptemporarilyduetolowvoltage.
It will resume operating when the voltage is back to the normal level.
The water being taken in is directly discharged.
Improper position of the drain hose. Connect the water draining hose as described in the operation manual.
No water can be seen in the machine during washing.
This is not a problem. The water level is not visible from the outside of the machine.
8 Solution suggestions for problems

EN27
The door is jammed.
- Water level might be above the lower level of the door.-Machinemightbeheatingupthewaterorit may be at the spinning cycle.- Due to an electrical mechanism, the door can only be opened a few minutes after the programme has stopped.
-Runeitherthe“Pump”or“Spin”programme.- Wait until the process is over.- Wait until the process is over.
Machinefillswithwaterwhenaprocessiscancelled.
Inside of machine may be hot. For safety reasons, water should be cycled in and out a couple times.
Itcontinuouslyspins.Remainingtimedoesnotcountdown.(Onmodelswithdisplay)
There may be an imbalance of laundry in the machine.
- The automatic spin correction system might have been activated due to the unbalanced distribution of the laundry in the drum.-Thelaundryinthedrummaybeclustered(bundledlaundryinabag).Laundryshouldberearrangedandre-spun.- No spinning is performed when the laundry is not evenly distributed in the drum to prevent any damage to the machine and to its environment.
Washing time takes longer than the time specified in the manual
- Water pressure may be low.- Supply voltage may be low.- Input temperature of water may be low.- There may be an imbalance of laundry in the machine.- Number of rinses and/or amount of rinse water might have increased.
- The machine will wait until there is sufficient amount of water, which will lengthen the washing time to avoid poor washing results due to insufficient water.- Washing time is extended to avoid poor washing results when the supply voltage is low.- Cycle time is extended to heat up the water when the input water is cold. Also, washing time can be lengthened to avoid poor washing results.- The automatic spin correction system might have been activated due to the unbalanced distribution of the laundry in the drum.-Thelaundryinthedrummaybeclustered(bundledlaundryinabag).- Laundry should be rearranged and re-spun.- No spinning is performed when the laundry is not evenly distributed in the drum to prevent any damage to the machine and to its environment.- Water amount is increased to obtain a better rinse and a rinse cycle is added when necessary.
EN28
It continuously washes. Remaining time does not count down.
In the case of a paused countdown while takinginwater:- Timer will not countdown until the machine isfilledwiththecorrectamountofwater.(Onmodelswithdisplay)- Time might have gotten stuck during heatingstep.(Onmodelswithdisplay)
In the case of a paused countdown at the spinningstep:There may be an imbalance of laundry in the machine.(Onmodelswithdisplay)
- The machine will wait until there is sufficient amount of water to avoid poor washing results due to lack of water. Then the timer will start to count down.- Time will not count down until the selected temperature for the programme is attained.- The automatic spin correction system might have been activated due to the unbalanced distribution of the laundry in the drum.-Thelaundryinthedrummaybeclustered(bundledlaundryinabag).Laundryshouldberearrangedandre-spun.- No spinning is performed when the laundry is not evenly distributed in the drum to prevent any damage to the machine and to its environment.
It did not spin.
- There may be an imbalance of laundry in the machine. Therefore, the programme might have been completed without spinning.- The machine will not spin if the water has not completely drained.
- The automatic spin correction system might have been activated due to the unbalanced distribution of the laundry in the drum.-Thelaundryinthedrummaybeclustered(bundledlaundryinabag).Laundryshouldberearrangedandre-spun.- No spinning is performed when the laundry is not evenly distributed in the drum to prevent any damage to the machine and to its environment. - Check the filter. - Check the drain hose.
Washingperformanceispoor:Laundryturnsgrey - Using insufficient amount of detergent for a long time, - Washing at low temperatures for a long time, - Using insufficient amount of detergent for hardwaters(soilcansticktothelaundry), - Using excessive amount of detergent (detergentcansticktothelaundry).
- Use the recommended amount of detergent appropriate for water hardness and the laundry. - Select the proper temperature for the laundry to be washed. - If the water hardness is high, using an insufficient amount of detergent can cause laundry to turn grey over time. - It is difficult to eliminate such greyness once it occurs.
Washingperformanceispoor:Staincouldnotberemoved,notcleaned.Laundrycouldnotbewhitened.
- Insufficient amount of detergent used.- Excessive laundry loaded into machine- Wrong programme and temperature might have been selected.- Improper detergent may have been used.- Wrong type of detergent used.
- Use recommended amount of detergent appropriate for the laundry.- Do not load the machine in excess.- Select the proper programme and temperature for the laundry to be washed.-Putthedetergentinthecorrectcompartment.- Do not mix detergent with bleaching agents.

EN29
-Washingperformanceispoor:Oilystainsappearonlaundry.-Washingperformanceispoor:Badodour
-Oilyaccumulationsonthedrummayhavestuck to the laundry.-Oilyaccumulationsonthedrummayhavestuck to the laundry.
- Such odours and bacteria layers are formed on the drum as a result of continuous washing at lower temperatures and/or in short programmes.- Leave the detergent dispenser drawer as well as the loading door of the machine ajar after each washing. Thus, a humid environment favorable for bacteria cannot be created inside the machine.-Machinemustbeoperatedemptyeitherat60°Cor90°C programme with detergent every 6 months.
Colour of the clothes faded.
- Excessive laundry loaded into machine.- Detergent may have gotten damp.- A higher temperature might have been selected.
- Do not load the machine in excess- Store detergent in a closed and dry location.- Do not keep them under high temperatures.- Select the proper programme and temperature according to the type and soiling degree of the laundry.
It does not rinse well.
- The amount, brand and storage conditions of the detergent used might not be appropriate.- Detergent might have been put in the wrong compartment.-Machinefiltermaybeclogged.- Drain hose may be folded.- Intermediate spins may be skipped.
- Store detergent in a closed and dry location. Do not keep them under high temperatures.- If detergent is put in the prewash compartment although prewash cycle is not selected, machine can take this detergent during rinsing or softener step.- Check the filter.- Check the drain hose.- There may be an imbalance of laundry in the machine.-Thelaundryinthedrummaybeclustered(bundledlaundryinabag).Laundryshouldberearrangedandre-spun.- No spinning is performed when the laundry is not evenly distributed in the drum to prevent any damage to the machine and to its environment.
Clothes stiffened.
- Insufficient amount of detergent used.- The detergent may have been placed into thewrongcompartment;thedetergentmaybe mixed with the softener.
- If the water hardness is higher, using insufficient amount of detergent can cause the laundry to become stiff in time. Use appropriate amount of detergent according to the water hardness.- If detergent is put in the prewash compartment although prewash cycle is not selected, machine can take this detergent during rinsing or softener step.- Do not mix the softener with detergent when putting in the compartment.- Wash and clean the drawer with hot water.

EN30
Clothes do not smell like the softener.
- Insufficient amount of detergent used.- The detergent was placed into the wrong compartment;thedetergentwasmixedwiththe softener.
- If the water hardness is higher, using insufficient amount of detergent can cause the laundry to become stiff in time. Use appropriate amount of detergent according to the water hardness.- If detergent is put in the prewash compartment although prewash cycle is not selected, machine can take this detergent during rinsing or softener step.Do not mix the softener with detergent when putting in the compartment.Wash and clean the drawer with hot water.
Detergent residue in the dispensing drawer.
- Detergent may have been put in wet dispenser drawer.- Detergent may have gotten damp.- Water pressure might be low- The detergent in the main wash compartment might have gotten wet while taking in the prewash water..- Detergent might be mixed with the bleaching agent.
- Dry the detergent drawer before putting in detergent.- Store detergent in a closed and dry location.- Do not keep them under high temperatures.-Thedetergentdispenseroutlet(holes)mayhaveaproblem. - There might be problems with the detergent dispenser valves.- Do not mix the softener with detergent when putting in the compartment.
There is detergent left on the laundry.
- Excessive laundry loaded into machine.- Wrong programme and temperature might have been selected.- Wrong detergent may have been used.
- Do not load the machine in excess.- Select the proper programme and temperature for the laundry to be washed.- Use wool detergents for woolens.
There is too much foam
.- You may not be using proper detergent for automatic washing machines.- Excessive amount of detergent may have been used.- Too much detergent may have been used for a small amount of lightly soiled laundry.- Detergent may have been stored improperly.-Typeofmaterialbeingwashed(laceitemswill cause excessive foam due to their meshedstructure).- Detergent might have been put in the wrong compartment.- Softener being released early.
- Use only automatic washing machine detergents in your washing machine.- Use only sufficient amount of detergent.- Use only sufficient amount of detergent.- Store detergent in a closed and dry location.- Do not store in excessively hot places.- Use smaller amounts of detergent for lace items.- If you put detergent in the prewash compartment although you have not selected a prewash cycle, the machine can take this detergent during rinsing or softener step.- Too much softener was put in. The detergent dispenser is problematic. Water is siphoned(pullingthesoftenerintothewasherearly)during the fill or rinse cycles. Valves are problematic.

EN31
9 GuaranteeYour new Beko product is guaranteed against the cost of breakdown repairs for twelve months from the date of the original purchase.
What is covered?• Repairsnecessaryasaresult
of faulty materials, defective components or manufacturing defect.
• Thecostoffunctionalreplacementparts, but excluding consumable items.
• ThelabourcostsofaBekoapproved repairer to carry out the repair.
What is not covered?• Transit,deliveryoraccidental
damage or misuse and abuse.• Cabinetorappearanceparts,
including knobs, flaps, handles or container lids.
• Accessoriesorconsumableitemsincluding but not limited to, ice trays, scrapers, cutlery baskets, filters and light bulbs.
• Repairsrequiredasaresultofunauthorised repair or inexpert installation that fails to meet the requirements contained in the user instruction book.
• Repairstoproductsusedoncommercial or non-residential household premises.
• Lossoffrozenfoodinfreezersorfridge/freezers.(Foodlossinsurance is often included within your household contents insurance policy, or may be available separatelyfromyourretailer).
Important notes.• YourBekoproductisdesignedand
built for domestic household use only.
• Theguaranteewillbevoidiftheproduct is installed or used in commercial or non-residential
domestic household premises.• Theproductmustbecorrectly
installed, located and operated in accordance with the instructions contained in the User Instructions Booklet provided.
• Professionalinstallationbyaqualified Electrical Domestic Appliance Installer is recommended forallWashingMachines,Dishwashers and Electric Cookers
• GasCookersmustonlybeinstalledbyaCORGI(orBORDGAIS)registered Gas Installer.
• Theguaranteeisgivenonlywithinthe boundaries of the United KingdomandtheRepublicofIreland.
• Theguaranteeisapplicableonlytonew products and is not transferable if the product is resold.
• Bekodisclaimsanyliabilityforincidental or consequential damages.
• Theguaranteedoesnotinanywaydiminish your statutory or legal rights.
Should you experience any difficulty in obtaining service please contact the Beko Customer Help-Line. Tel:08456004911e-mail:[email protected]

Pleasekeepyourpurchasereceiptor other proof of purchase in a safe place;youwillneedtohaveitshouldthe product require attention under guarantee.
You should also complete the details below;itwillhelpusassistyouwhenrequestingservice.(Themodelnumberis printed on the Instruction Booklet and the serial number is printed on the RatingLabelaffixedtotheappliance)
ModelNo:SerialNo:Retailer:Dateofpurchase:
For service under guarantee simply telephone the appropriate number below
UK Mainland & Northern IrelandFridges & Freezers 0845 600 4903Electric Cookers 0845 600 4902Gas & 0845 600 4905Dual Fuel Cookers
WashingMachines& 08456004906Dishwashers
Republic of IrelandAll Refrigeration, 01 862 3411All Cookers WashingMachines&Dishwashers
Before requesting service please check the trouble-shooting guide in the OperatingInstructionsasachargemaybe levied where no fault is found even though your product may still be under guarantee.
Service once the manufacturers guarantee has expired.
If you have purchased an extended guarantee please refer to the instructions contained within the extended guarantee
agreementdocument.Otherwisepleasecall the appropriate number above where service can be obtained at a charge.
Should you experience any difficulty in obtaining service please contact the Beko Customer Help-Line. Tel:08456004911e-mail:[email protected]
10 Service
EN32


