August 2006 Automating DB2 HADR Failover on Linux using Tivoli System Automation for Multiplatforms Authors: Steve Raspudic, IBM Toronto Lab Melody Ng, IBM Toronto Lab Chris Felix, IBM Toronto Lab
Transcript
August 2006
Automating DB2 HADR Failover on Linux using Tivoli System Automation for Multiplatforms
Authors: Steve Raspudic, IBM Toronto Lab Melody Ng, IBM Toronto Lab Chris Felix, IBM Toronto Lab
2
Table of Contents 1. Introduction and Overview........................................................3 2. Before You Begin.....................................................................3
2.1 Knowledge Requirements...................................................3 2.2 Software Configuration Used ..............................................3 2.3 Hardware Configuration Used .............................................4
3. Overview of Important Concepts ...............................................4
3.1 Typical HADR Topology......................................................4 3.2 Typical HADR Topology with TSA.........................................5
4. Steps to Set Up Topology .........................................................7
4.1 Basic Network Setup .........................................................7 4.2 RSH Setup.......................................................................8 4.3 Install DB2 UDB ...............................................................9 4.4 Install TSA..................................................................... 10 4.5 Prepare TSA Cluster ........................................................ 11 4.6 Prepare Nodes to Host Primary and Standby Instances......... 11 4.7 Create Primary and Standby Instances .............................. 12 4.8 Set Up Highly Available (HA) IP Addresses ......................... 13 4.9 Register Instances with TSA for Management ..................... 14 4.10 Create a DB2 HADR Database........................................... 16 4.11 Register HADR with TSA for Automatic Management ............ 21
5. Testing Topology Response to Common Failures ........................ 22
Appendix A: Understanding How TSA Works ................................. 28
3
1. Introduction and Overview
This paper will guide you through the implementation of an automated IBM® DB2® Universal Database™ (DB2 UDB) failover solution. The solution will be based on a combination of the high availability disaster recovery (HADR) feature in DB2 UDB V8.2 and IBM Tivoli® System Automation for Multiplatforms (IBM Tivoli SAM). The setup described in this paper focuses on the Linux® operating system.
Target Audience for this White Paper • DB2 UDB database administrators • Linux system administrators
2. Before You Begin Below you will find information on knowledge requirements, as well as hardware and software configurations used to set up the topology depicted in this paper. It is important that you read this section prior to beginning any setup. 2.1 Knowledge Requirements
• Basic knowledge of DB2 UDB and HADR* • Basic understanding of TSA cluster manager software** • Basic understanding of Linux operating system concepts
*Information on DB2 HADR can be found here: http://publib.boulder.ibm.com/infocenter/db2help/index.jsp?topic=/com.ibm.db2.udb.doc/core/c0011585.htm
**Information on TSA can be found here: http://www.ibm.com/software/tivoli/products/sys-auto-linux/
2.2 Software Configuration Used
The minimum software requirement for running DB2 UDB on Linux is listed here: http://www.ibm.com/db2/linux/validate. For information about software requirements for running TSA, refer to:
Listed below are the actual software configuration used to set up the environment for this paper:
• Operating system : SUSE Linux Enterprise Server 9 Support Package 1 (kernel version 2.6.5-7.139-default)
• DB2 UDB product : DB2 UDB Enterprise Server Edition (ESE) Version 8.2.3 • Tivoli product : TSA V1.2 at Fixpak 6 level • glibc : glibc-2.3.3
4
2.3 Hardware Configuration Used
The minimum hardware requirements for implementing the solution described in this paper are the same as those documented below: For DB2 UDB, refer to: http://www.ibm.com/db2/udb/sysreqs.html. For TSA, refer to: http://www.ibm.com/software/tivoli/products/sys-auto-linux/platforms.html. Listed below is the actual hardware configuration used to set up the environment for this paper: Two machines, each with the following configuration: • Processors used : Intel® Xeon® 2 CPU 2.80 GHz • Memory : 512 MB • Network adapters : Two Intel PRO/100 Ethernet Adapters One machine with the following configuration: • Processors used : Intel Xeon 2 CPU 2.80 GHz • Memory : 512 MB • Network adapters : One Intel PRO/100 Ethernet Adapters
3. Overview of Important Concepts 3.1 Typical HADR Topology
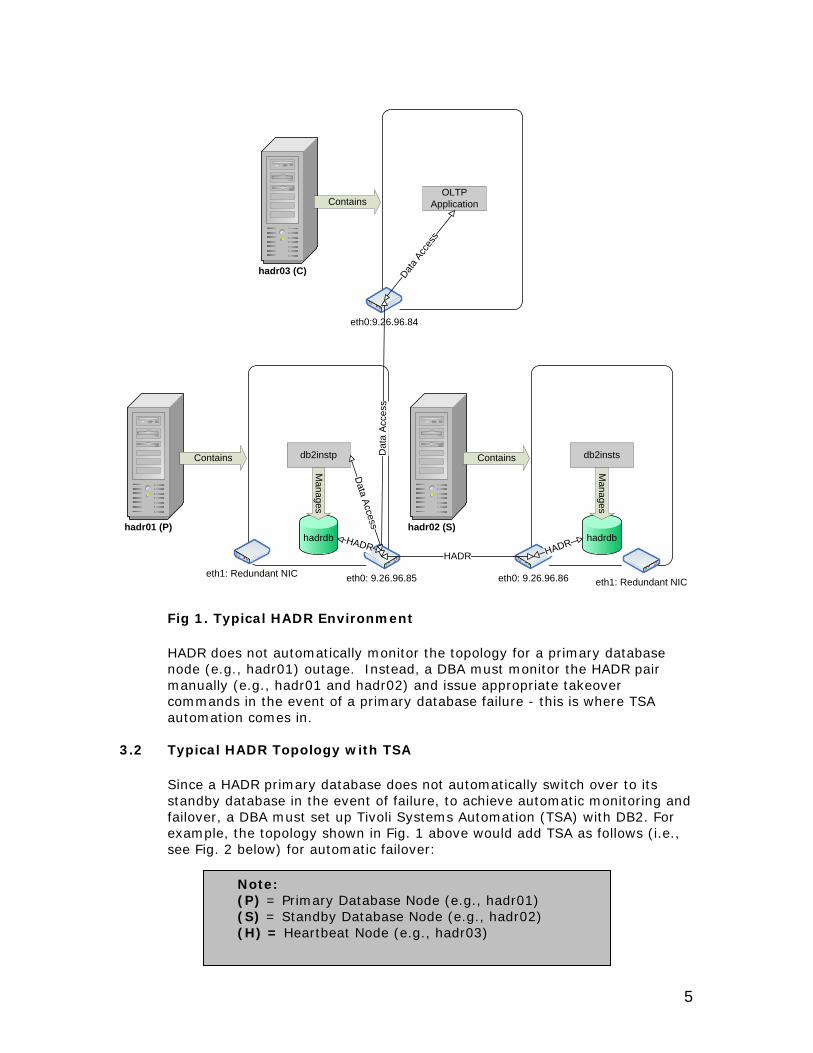
HADR, or High availability disaster recovery, is a new standard feature in DB2 UDB V8.2 ESE. It allows a database administrator (DBA) to have one “hot standby” copy of any DB2 UDB database, such that, in the event of a primary database failure, a DBA can quickly switch over to the “hot standby” with minimal interruption to database clients. (See Fig. 1 below for a typical HADR environment.)
Fig 1. Typical HADR Environment HADR does not automatically monitor the topology for a primary database node (e.g., hadr01) outage. Instead, a DBA must monitor the HADR pair manually (e.g., hadr01 and hadr02) and issue appropriate takeover commands in the event of a primary database failure - this is where TSA automation comes in.
3.2 Typical HADR Topology with TSA
Since a HADR primary database does not automatically switch over to its standby database in the event of failure, to achieve automatic monitoring and failover, a DBA must set up Tivoli Systems Automation (TSA) with DB2. For example, the topology shown in Fig. 1 above would add TSA as follows (i.e., see Fig. 2 below) for automatic failover:
In Fig. 2, TSA now monitors the HADR pair for primary database failure, and will issue appropriate takeover commands on the standby database in the event of a primary database failure. Also, in addition to being an application server, hadr03 acts as a heartbeat node. That is, TSA on hadr03 will provide quorum between the primary and standby nodes, so as to prevent the scenario of having two primary databases (also known as the “split-brain” syndrome) in the event of simple network communications problems between hadr01 and hadr02. Note that for TSA cluster domains that are running TSA v2.1 or later, it is possible to use a network tiebreaker to provide quorum support. In this environment, only nodes P and S are required, with quorum support provided by a network tiebreaker resource, which can be created by following the chapter on “Protecting your resources – quorum support” in the document IBM Tivoli System Automation for Multiplatforms Base Component User’s Guide. To gain a better understanding of how TSA works, read Appendix A at the end of this paper.
7
4. Steps to Set Up Topology
The following section documents a three-node topology, in which one node (e.g., hadr01) hosts the primary database (e.g., hadrdb) and a second node (e.g., hadr02) hosts its standby. The third node will host the client application, as well as provide quorum between the primary and standby nodes. After completing the following 11 steps, you will have succeeded in setting up the topology depicted in Fig. 2 above.
4.1 Basic Network Setup
Make sure that all three nodes (e.g., hadr01, hadr02, and hadr03) will be able to communicate with each other via TCP/IP protocol.
1. Set up the network using either Static IP or DHCP (e.g., we use static IP in Fig. 2 with a subnet mask of 255.255.255.0 for each node).
2. If you chose to use static IP addresses (e.g., Fig. 2), then add the appropriate IP address to the hostname mappings in the /etc/hosts file of each node (P), (S), and (H):
Notes: 1. Your topology does not have to include redundant NICs (e.g., eth1
in Fig. 2 above). Redundant NICs allow for recovery from simple outages caused by primary NIC failure (e.g., eth0). For example, if eth0 on hadr01 in Fig. 2 went down for some reason, then the IP address that it was hosting (i.e., 9.26.96.85) could be taken over by eth1. In fact, there is an opportunity in Step 8 to make each DB2 instance’s (e.g., db2instp and db2insts) IP address highly available with TSA.
2. The letters in front of a command in the following steps designate on which node(s) a command is to be issued to properly set up the topology shown in Fig. 2 above. The order of the letters also designates the order that you should issue a command on each node:
3. The parameters given for commands in this paper are based on
the topology shown in Fig. 2 above. Change the parameters accordingly to match your specific environment. Also, a “\” in a command designates that the command text continues on the next line (i.e., do not include the “\” when you issue the command).
8
Sample content of /etc/hosts on (P), (S), and (H):
Adding static IP address to hostname mappings to the hosts file removes the systems’ DNS servers as a single point of failure. Should DNS fail, the cluster systems can still resolve the addresses of the other machines via the hosts file. Note that adding this information on the client is not recommended because of the maintenance overhead of updating all clients’ hosts files should the mappings change.
3. Test that you can ping from each node to all other nodes successfully using the following commands:
Many of the TSA commands that you will be issuing in the following steps require RSH to be set up on all three nodes. RSH allows a user from one node to run commands on another remote node.
1. Find out if rsh and rsh-server packages are installed on each node by logging in as root and issuing the following commands:
If rsh and rsh-server are not installed, you can use YaST in SLES9 to select and install these packages, or you can install the packages directly from one of the Linux installation CDs by issuing the following commands as root:
Sample contents of /etc/securetty on (P), (S), and (H):
3. Start RSH on each node by restarting the internet daemon (i.e., inetd) or extended internet daemon (i.e., xinetd), depending on your Linux distribution, as follows:
(P)(S)(H) # cd /etc/init.d (P)(S)(H) # inetd restart or (P)(S)(H) # xinetd restart
4. Verify that RSH service is indeed started by issuing the following
command as root:
(P)(S)(H) # chkconfig –list | grep rsh You shoud see output similar to the following:
(P)(S)(H) # chkconfig –list | grep rsh rsh: on
5. Configure RSH to allow the root user to issue remote commands on
each node by adding the following lines to the file /root/.rhosts:
On (P), (S), and (H): hadr01 root hadr02 root hadr03 root
6. Verify that RSH is working by issuing the following commands as root.
If you see the directory listing of /root on the node you are rsh-ing into, then rsh is working:
(P)(S)(H) # rsh hadr01 ls (P)(S)(H) # rsh hadr02 ls (P)(S)(H) # rsh hadr03 ls
4.3 Install DB2 UDB
Install DB2 UDB V8.2.3 ESE (also known as V8.1 at Fixpak 10 level) on the primary and standby nodes (e.g., hadr01 and hadr02). Do not create instances at this step.
1. As root, go to the directory where the DB2 UDB installation code exists:
(P)(S) # cd /<directory_containing_DB2_install_code>
Console Vc/1 … tty11 rsh
10
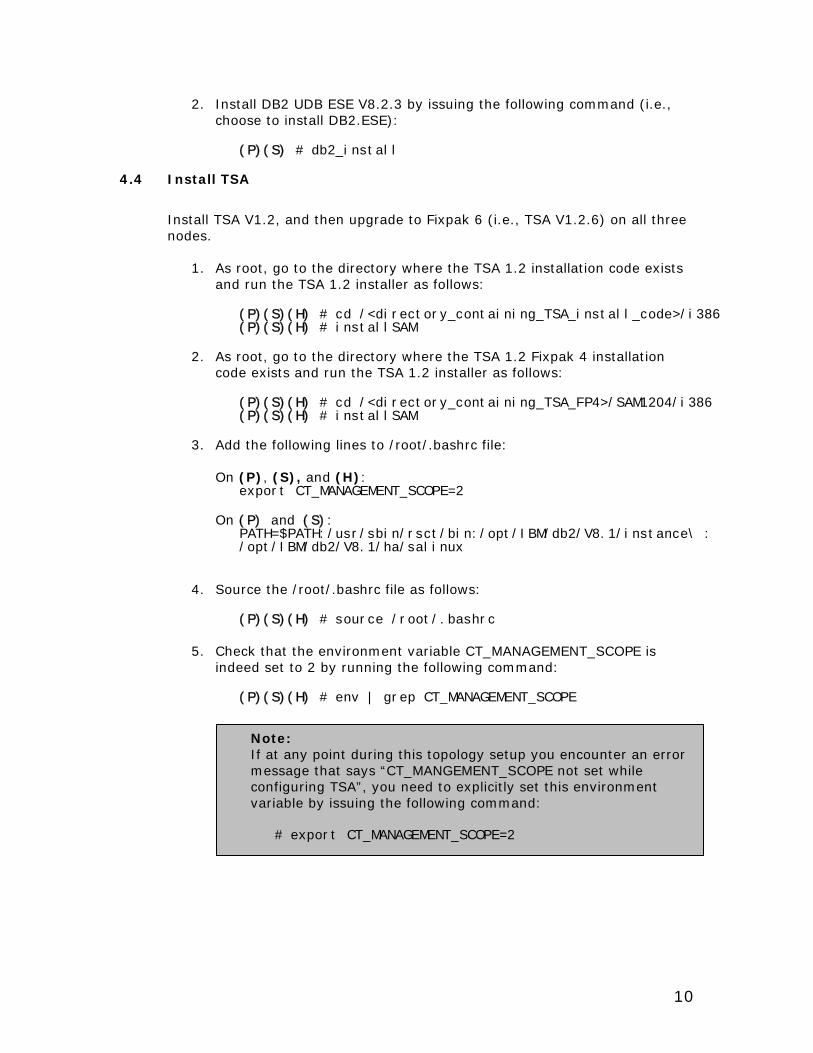
2. Install DB2 UDB ESE V8.2.3 by issuing the following command (i.e., choose to install DB2.ESE):
(P)(S) # db2_install
4.4 Install TSA
Install TSA V1.2, and then upgrade to Fixpak 6 (i.e., TSA V1.2.6) on all three nodes.
1. As root, go to the directory where the TSA 1.2 installation code exists and run the TSA 1.2 installer as follows:
(P)(S)(H) # cd /<directory_containing_TSA_install_code>/i386 (P)(S)(H) # installSAM
2. As root, go to the directory where the TSA 1.2 Fixpak 4 installation
code exists and run the TSA 1.2 installer as follows:
(P)(S)(H) # cd /<directory_containing_TSA_FP4>/SAM1204/i386 (P)(S)(H) # installSAM
5. Check that the environment variable CT_MANAGEMENT_SCOPE is indeed set to 2 by running the following command:
(P)(S)(H) # env | grep CT_MANAGEMENT_SCOPE
Note: If at any point during this topology setup you encounter an error message that says “CT_MANGEMENT_SCOPE not set while configuring TSA”, you need to explicitly set this environment variable by issuing the following command:
# export CT_MANAGEMENT_SCOPE=2
11
4.5 Prepare TSA Cluster
Make sure that all TSA installations in your topology know about one another, and can communicate with one another in what is referred to as a TSA cluster domain. This is essential for management of HADR by TSA.
1. Run the following command as root to prepare the proper security environment between the TSA nodes:
(P)(S)(H) # preprpnode hadr01 hadr02 hadr03
2. Issue the following command to create the cluster domain:
(P) # mkrpdomain hadr_domain hadr01 hadr02 hadr03
3. Now start the cluster domain as follows. (Note: all future TSA commands will be run relative to this active domain):
(P) # startrpdomain hadr_domain
4. Ensure that hadr_domain is online by issuing the following command:
(P) # lsrpdomain Output similar to the following lines should be displayed:
Name OpState RSCTActiveVersion MixedVersions TSPort hadr_domain Online 2.3.3.1 No 12347
5. Ensure that all nodes are online in the domain as follows:
(P) # lsrpnode
Output similar to the following lines should be displayed:
4.6 Prepare Nodes to Host Primary and Standby Instances
Create appropriate groups and users to manage DB2 UDB on the primary and standby nodes, respectively. Remember to create passwords for all users created below.
1. As root, create the following groups for instance management:
(P)(S) # groupadd –g 999 db2iadm1
2. Create a group for fenced users:
(P)(S) # groupadd –g 998 db2fadm1
12
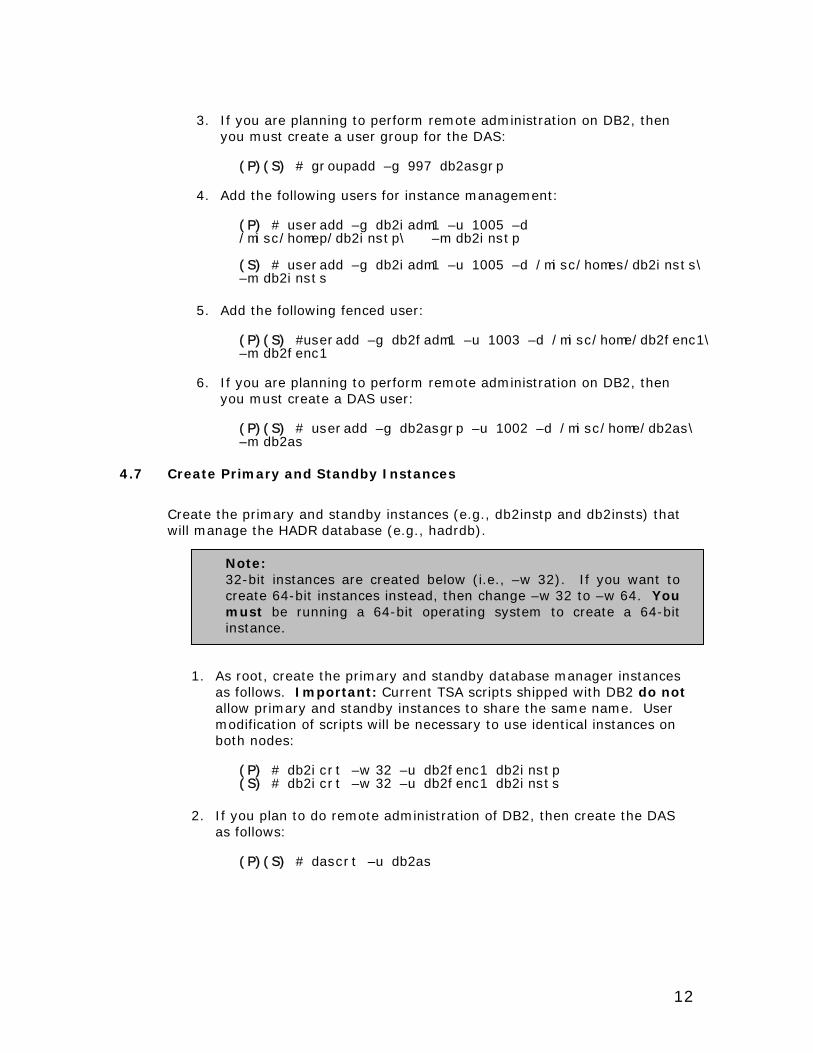
3. If you are planning to perform remote administration on DB2, then
you must create a user group for the DAS:
(P)(S) # groupadd –g 997 db2asgrp
4. Add the following users for instance management:
Create the primary and standby instances (e.g., db2instp and db2insts) that will manage the HADR database (e.g., hadrdb).
1. As root, create the primary and standby database manager instances as follows. Important: Current TSA scripts shipped with DB2 do not allow primary and standby instances to share the same name. User modification of scripts will be necessary to use identical instances on both nodes:
2. If you plan to do remote administration of DB2, then create the DAS
as follows:
(P)(S) # dascrt –u db2as
Note: 32-bit instances are created below (i.e., –w 32). If you want to create 64-bit instances instead, then change –w 32 to –w 64. You must be running a 64-bit operating system to create a 64-bit instance.
13
3. Configure RSH to allow instance users to issue remote commands by adding the following lines to the file /root/.rhosts:
On (P), (S), and (H): hadr01 db2instp hadr02 db2insts
4.8 Set Up Highly Available (HA) IP Addresses
Making an IP address highly available involves telling TSA of redundant network interface cards (NICs) (e.g., eth1) that you want to make equivalent to the primary NIC (e.g., eth0). Doing this allows TSA to restart an instance’s failing IP address on one of the equivalent redundant NICs.
1. As root, find redundant NICs on the primary node (e.g., hadr01) that
you want to make equivalent to the primary NIC on that node (e.g., eth0). Then, do the same on the standby node (e.g., hadr02). For example, on our machine, we use the following command:
(P)(S) # ifconfig –a | egrep ‘eth|Mask’ You should see output similar to the following lines:
eth0 Link encap:Ethernet inet addr:9.26.96.84 Bcast:9.26.97.255 Mask:255.255.255.0 eth1 Link encap:Ethernet inet addr:9.26.96.99 Bcast:9.26.97.255 Mask:255.255.255.0
In this case, we will choose to create an equivalency group with both NICs eth0 and eth1. Note that if there is only one NIC present on your own system, you will create an equivalency group of only this single adapter.
2. Choose any number of NICs on a node for the members of the NIC equivalency group. Note that for a NIC equivalency group with N members, N-1 NICs may fail and the IP address will be transparently moved to one of the surviving NICs in the group. Should the last (or only) NIC in the equivalency group fail, the node will be brought down (automatically by TSA) and any HADR resource groups will then be hosted at the surviving node.
3. Create an equivalency between the chosen NICs as follows (this first
example assumes that eth0 and eth1 are active and equivalent on each cluster machine): (P) # mkequ –D “(Name like ‘eth0’ | Name like ‘eth1’) \ & NodeNameList=’hadr01’” virpubnic_hadr01 \ IBM.NetworkInterface (S) # mkequ –D “(Name like ‘eth0’ | Name like ‘eth1’) \ & NodeNameList=’hadr02’” virpubnic_hadr02 \ IBM.NetworkInterface
14
For machines with only an eth0 active, create the equivalency relationships as follows: (P) # mkequ –D “Name like ‘eth0’ \ & NodeNameList=’hadr01’ “ \ virpubnic_hadr01 IBM.NetworkInterface (S) # mkequ –D “Name like ‘\ & NodeNameList=’hadr02’ “ \ virpubnic_hadr02 IBM.NetworkInterface Note that for your own equivalency definitions, replace the actual primary node name for hadr01 wherever it appears in the above examples, and replace the actual standby node name for hadr02 wherever it appears in the above example. For more details on creating the network equivalencies, consult the chapter on “Setting up a high available network” in the document IBM Tivoli System Automation for Multiplatforms Base Component User’s Guide.
4. Validate that you have correctly created the equivalencies in step 3 above by issuing the following command:
(P) # lsequ
Output similar to the following lines should be seen:
Displaying Equivalencies:
virpubnic_hadr01
virpubnic_hadr02
Choose unused IP addresses for the primary and standby instances (e.g., 9.26.96.90 and 9.26.96.91, respectively) that share the same net mask as the IP addresses of the base adapters. These will be the parameters passed to the registration script in the next section.
4.9 Register Instances with TSA for Management
In this step, you register the instances (e.g., db2instp and db2insts) so that TSA will be able to manage the instances, and later, HADR.
1. Register the instances (e.g., db2instp and db2insts) with TSA as
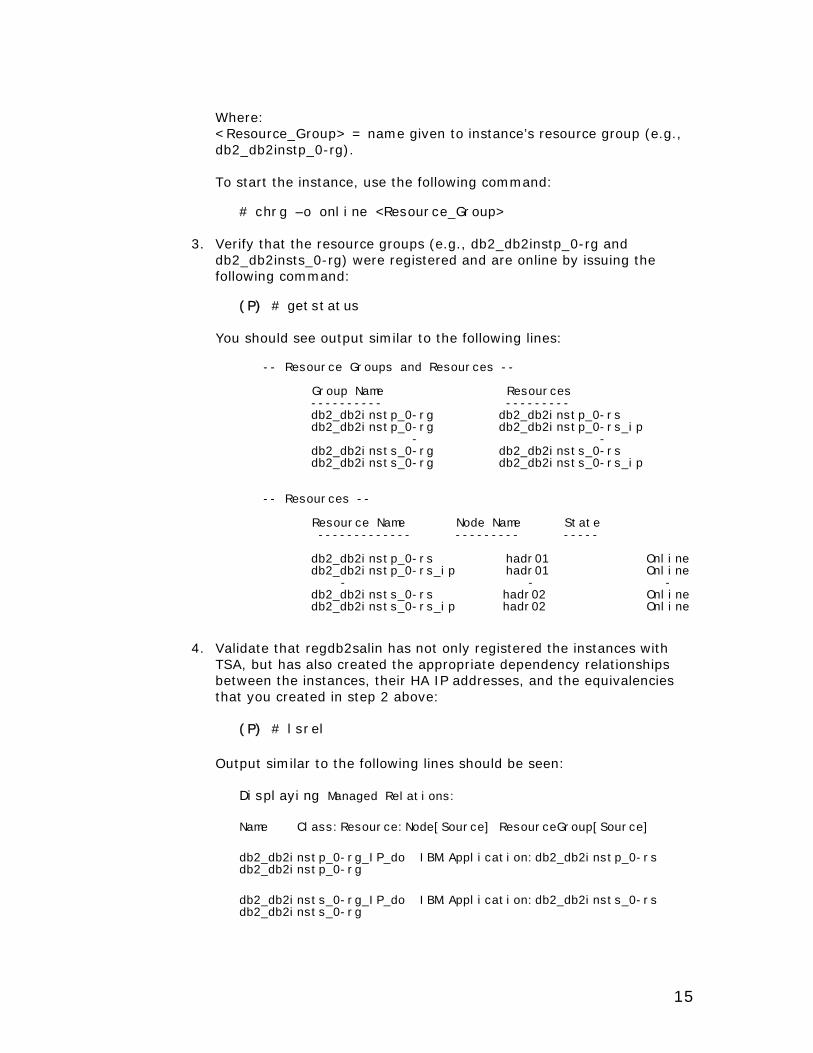
4. Validate that regdb2salin has not only registered the instances with TSA, but has also created the appropriate dependency relationships between the instances, their HA IP addresses, and the equivalencies that you created in step 2 above:
(P) # lsrel
Output similar to the following lines should be seen:
Displaying Managed Relations:
Name Class:Resource:Node[Source] ResourceGroup[Source]
Now that you have created the primary and standby instances (e.g., db2instp and db2insts, respectively), you need to create a database (e.g., hadrdb) that you will make highly available (HA) through HADR.
1. As root, make sure that the database manager instance is started as follows. Remember, do not issue db2start as the instance is now controlled by TSA:
Group Name Resources ---------- --------- db2_db2instp_0-rg db2_db2instp_0-rs db2_db2instp_0-rg db2_db2instp_0-rs_ip - - db2_db2insts_0-rg db2_db2insts_0-rs db2_db2insts_0-rg db2_db2insts_0-rs_ip
-- Resources -- Resource Name Node Name State ------------- --------- ----- db2_db2instp_0-rs hadr01 Online - - - db2_db2instp_0-rs_ip hadr01 Online - - -
db2_db2insts_0-rs hadr02 Online - - -
db2_db2insts_0-rs_ip hadr02 Online
2. As primary instance owner (e.g., db2instp), create the database (e.g.,
hadrdb) that you will later make highly available with HADR as follows. Important: Since the DB2 TSA scripts for HADR require distinct names for the primary and standby instances, it is recommended that absolute container path names not contain the instance name as part of the path, as that increases the possibilities of error in managing database storage in a HADR environment. For example, use “ALTER TABLESPACE TSPACE1 ADD (FILE '/data/hadrdb/tspace1/cont2' 2000)” where the path /data/hadrdb/tspace1 needs to exist on both the primary and standby nodes. Avoid using “ALTER TABLESPACE TSPACE1 ADD (FILE '/misc/homep/db2instp/cont2' 2000)” where the path /misc/homep/db2instp needs to exist on both the primary and standby.
Note: To gain a better understanding of how HADR works, you can view the following Flash demo at: http://demos.dfw.ibm.com/on_demand/Demo/IBM_Demo_DB2_HADR-Jan05.html?S=index&S=DC
17
Relative path names can be used as usual: e.g., “ALTER TABLESPACE TSPACE1 ADD (FILE 'cont2' 2000)”
(P) % db2 create database hadrdb\ on <database_directory_path>
Where: <database_directory_path> = any valid path on the primary node (e.g., /misc/homep/db2instp).
3. For HADR to work, you must change the database’s (e.g., hadrdb) default Circular Logging to Archive Logging by issuing the following command:
(P) % db2 update db cfg for hadrdb using LOGRETAIN ON
4. Now we must create a backup copy of the primary database (e.g., hadrdb) that will later be restored on the standby instance, and act as the standby database of the HADR pair. The backup image will be written to the instance owner’s home directory (e.g., /misc/homep/db2instp):
(P) % db2 backup database hadrdb
5. Transfer the backup image of the primary database (e.g., hadrdb) to
the standby instance owner’s home directory (e.g., /misc/homes/db2insts). An example that uses scp (i.e., secure copy) is shown below:
Where: <backup_image_name> = the name of the backup image file.
6. As standby instance owner (e.g., db2insts), create the standby database on the standby node (e.g., hadr02) as follows:
(S) % db2 restore database hadrdb replace history file
7. Allow TCP/IP communication to both the primary and standby instance
(e.g., db2instp and db2insts, respectively) as follows. Important: “DB2_db2instp 60000/tcp” should be in the /etc/services file on the primary node (e.g., hadr01), and “DB2_db2insts 60000/tcp” should be in the /etc/services file on the standby node (e.g., hadr02) before issuing the following commands:
(P)(S) % db2set DB2COMM=tcpip (P) % db2 update dbm cfg using SVCENAME DB2_db2instp (S) % db2 update dbm cfg using SVCENAME DB2_db2insts
18
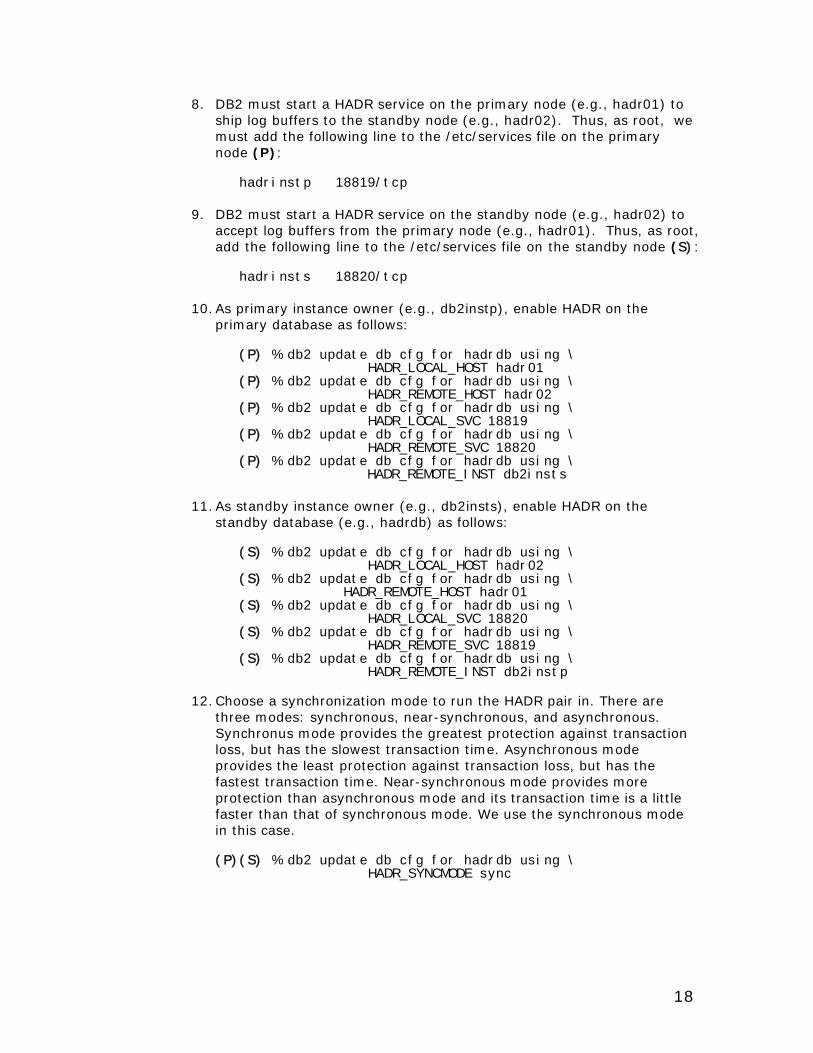
8. DB2 must start a HADR service on the primary node (e.g., hadr01) to ship log buffers to the standby node (e.g., hadr02). Thus, as root, we must add the following line to the /etc/services file on the primary node (P):
hadrinstp 18819/tcp
9. DB2 must start a HADR service on the standby node (e.g., hadr02) to
accept log buffers from the primary node (e.g., hadr01). Thus, as root, add the following line to the /etc/services file on the standby node (S):
hadrinsts 18820/tcp
10. As primary instance owner (e.g., db2instp), enable HADR on the
primary database as follows:
(P) % db2 update db cfg for hadrdb using \ HADR_LOCAL_HOST hadr01 (P) % db2 update db cfg for hadrdb using \ HADR_REMOTE_HOST hadr02 (P) % db2 update db cfg for hadrdb using \ HADR_LOCAL_SVC 18819 (P) % db2 update db cfg for hadrdb using \ HADR_REMOTE_SVC 18820 (P) % db2 update db cfg for hadrdb using \ HADR_REMOTE_INST db2insts
11. As standby instance owner (e.g., db2insts), enable HADR on the
standby database (e.g., hadrdb) as follows:
(S) % db2 update db cfg for hadrdb using \ HADR_LOCAL_HOST hadr02 (S) % db2 update db cfg for hadrdb using \ HADR_REMOTE_HOST hadr01 (S) % db2 update db cfg for hadrdb using \ HADR_LOCAL_SVC 18820 (S) % db2 update db cfg for hadrdb using \ HADR_REMOTE_SVC 18819 (S) % db2 update db cfg for hadrdb using \ HADR_REMOTE_INST db2instp
12. Choose a synchronization mode to run the HADR pair in. There are
three modes: synchronous, near-synchronous, and asynchronous. Synchronus mode provides the greatest protection against transaction loss, but has the slowest transaction time. Asynchronous mode provides the least protection against transaction loss, but has the fastest transaction time. Near-synchronous mode provides more protection than asynchronous mode and its transaction time is a little faster than that of synchronous mode. We use the synchronous mode in this case.
(P)(S) % db2 update db cfg for hadrdb using \ HADR_SYNCMODE sync
19
13. Specify the amount of time (in seconds) that the HADR process waits before considering a communication attempt to have failed. Important: Only modify this parameter if you are certain that performance will be improved as a result.
(P)(S) % db2 update db cfg for hadrdb using \ HADR_TIMEOUT 30
14. As instance owner, verify that you have set the database configuration parameters correctly in steps 10 and 11 above:
(P)(S) % db2 get db cfg for hadrdb
15. As primary instance owner (e.g., db2instp), update the alternate
server for the primary database (e.g., hadrdb) as follows:
(P) % db2 update alternate server for database hadrdb\ using hostname <instance_hostname> port 60000
Where: <instance_hostname> = IP address used in the registration of the standby DB2 instance (in our example, 9.26.96.91).
16. As standby instance owner (e.g., db2insts), update the alternate
server for the standby database (e.g., hadrdb) as follows:
(S) % db2 update alternate server for database hadrdb\ using hostname <instance_hostaname> port 60000
Where: <instance_hostname> = IP address used in the registration of the primary DB2 instance (in our example, 9.26.96.90).
17. As standby instance owner (e.g., db2insts), start HADR on the standby
node (e.g., hadr02) as follows. Ignore the message, “Logindex build was not enabled before HADR was started”. Important: Make sure that you keep the following points in mind:
i. Always start HADR on the standby before starting HADR
on the primary. ii. At each client ensure that the primary node (e.g.,
hadr01) is cataloged. An example is provided below:
Note: For more information on the various HADR synchronization modes, you can view the following paper: http://publib.boulder.ibm.com/infocenter/db2help/index.jsp?topic=/com.ibm.db2.udb.doc/admin/r0011445.htm
20
iii. Each client must connect to the primary instance at least
once, so as to pick up alternate server info. Also, clients must connect through a TCP/IP node entry, not through a local node entry. If you want to connect through a local node entry (e.g., the client resides on the same node as the database), then you must create a TCP/IP catalog entry that references the local instance (i.e., a loop back entry).
iv. If using Java Database Connectivity (JDBC) type 4 clients, client reroute information will not be picked up from the local db directory; applications need to be designed to store and recover the alternate server information in a text file.
(S) % db2 start hadr on db hadrdb as standby
18. As primary instance owner (e.g., db2instp), start HADR on the primary
node (e.g., hadr02) as follows.
(P) % db2 start hadr on db hadrdb as primary
19. As instance owner (e.g., db2instp), ensure that the HADR pair is in “Peer” state as follows:
(P)(S) % db2 get snapshot for db on hadrdb
You should see output similar to the following lines on the primary node (e.g., hadr01):
HADR Status Role = Primary State = Peer Synchronization mode = sync Connection state = Connected,07/08/2004 13:50:19.620630 Heartbeats missed = 0 Local host = hadr01 Local service = 18819 Remote host = hadr02 Remote service = 18820 Remote instance = db2insts timeout (seconds) = 30 Primary log position(file, page, LSN) = S0000000.LOG, 0, 00000000007D0000 Standby log position(file, page, LSN) = S0000000.LOG, 0, 00000000007D0000
You should see output similar to the following lines on the standby node (e.g., hadr02):
HADR Status Role = Standby State = Peer Synchronization mode = sync Connection status = Connected,07/08/2004 13:50:19.620630 Heartbeats missed = 0
4.11 Register HADR with TSA for Automatic Management
In this step, we will enable TSA to automatically monitor and manage the HADR pair. We will do this by registering the HADR pair as a resource group with TSA. Do not manually issue DB2 “Takeover” commands after registering HADR as a resource group with TSA. Instead, use the following command to manually restart HADR:
# chrg –o online <resource_group_name> Where: <resource_group_name> = name TSA gives to HADR resource group (e.g., db2hadr_hadrdb-rg). For operator controlled failover, issue the following command only:
# rgreq –o move –n <node> <resource_group_name> Where: <node> = node (e.g. hadr01) at which the database (e.g., hadrdb) has “Primary” HADR role <resource_group_name> = name TSA gives to HADR resource group (e.g., db2hadr_hadrdb-rg).
1. As root on the primary node (e.g., hadr01), create a resource group
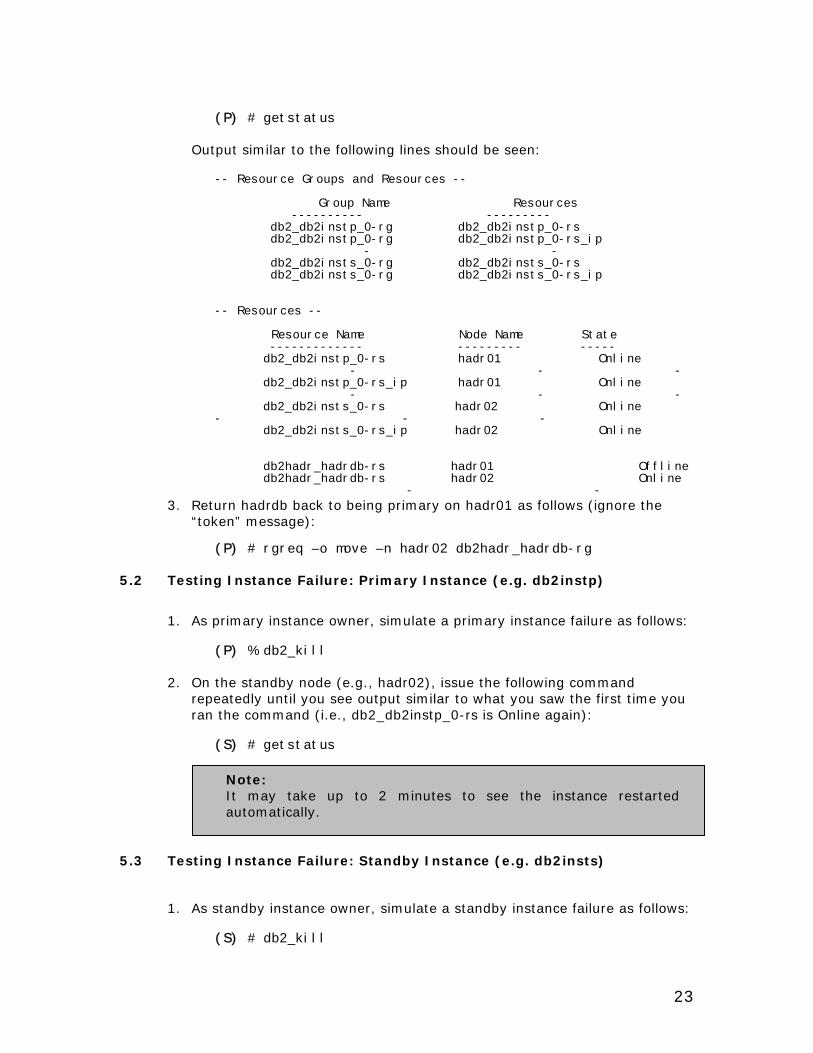
1. As root, move “db2hadr_hadrdb-rs” resource from the primary node (e.g., hadr01) to the standby node (e.g., hadr02); in other words, perform a controlled failover as follows (ignore the “token” message):
(P) # rgreq –o move –n hadr01 db2hadr_hadrdb-rg
2. As root, check that the primary database (e.g., hadrdb) has successfully
failed over to the standby node (e.g., hadr02) as follows:
Note: The node at which the HADR resource is online (e.g., db2hadr_hadrdb-rs), is the node at which the database is in “Primary" mode.
Note: For all of the following test cases, it is assumed that hadrdb is primary on hadr01, and all of the instance resource groups are online. The following lines explain the meaning of the states that you see after issuing the getstatus command: For instance resources: Online = instance is up Offline = instance is down Unknown = the state of the instance is unknown For HADR resources: Online = HADR database is primary at the node name Offline = HADR database is standby at the node name Unknown = HADR database is not in peer state or HADR database is down
23
(P) # getstatus
Output similar to the following lines should be seen:
-- Resource Groups and Resources --
Group Name Resources ---------- --------- db2_db2instp_0-rg db2_db2instp_0-rs db2_db2instp_0-rg db2_db2instp_0-rs_ip - - db2_db2insts_0-rg db2_db2insts_0-rs db2_db2insts_0-rg db2_db2insts_0-rs_ip
-- Resources -- Resource Name Node Name State ------------- --------- ----- db2_db2instp_0-rs hadr01 Online - - - db2_db2instp_0-rs_ip hadr01 Online - - -
1. As standby instance owner, simulate a standby instance failure as follows:
(S) # db2_kill
Note: It may take up to 2 minutes to see the instance restarted automatically.
24
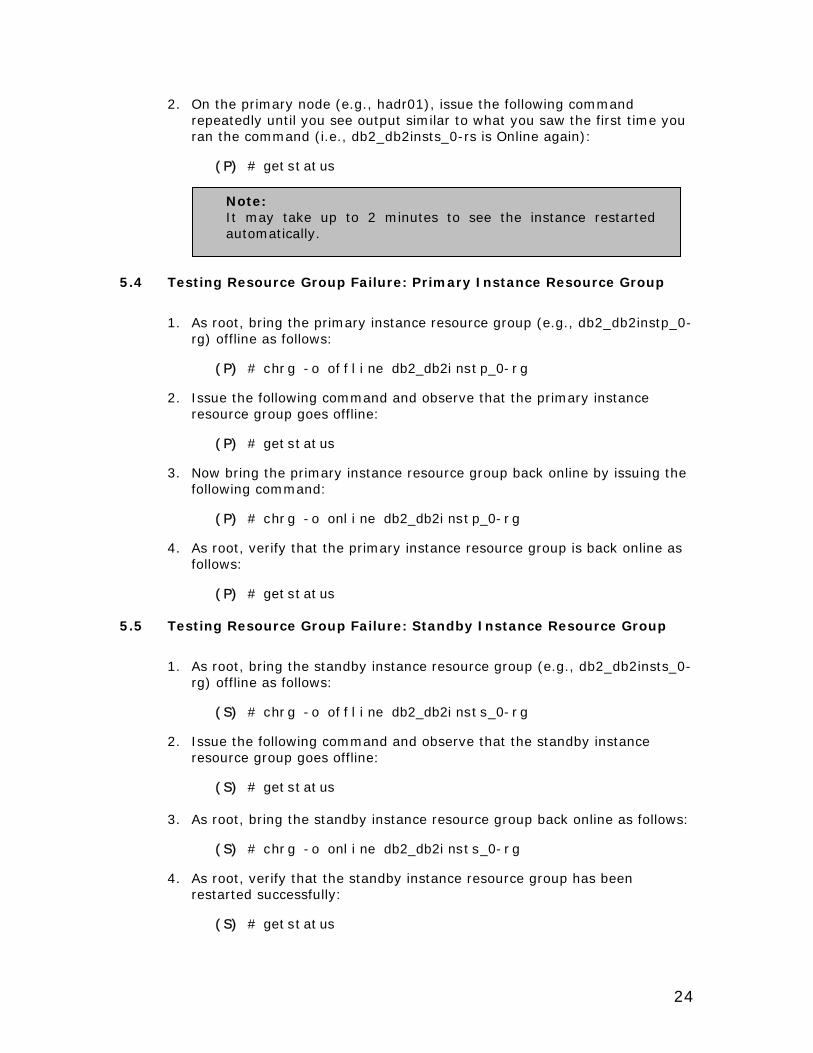
2. On the primary node (e.g., hadr01), issue the following command repeatedly until you see output similar to what you saw the first time you ran the command (i.e., db2_db2insts_0-rs is Online again):
(P) # getstatus
5.4 Testing Resource Group Failure: Primary Instance Resource Group
1. As root, bring the primary instance resource group (e.g., db2_db2instp_0-
rg) offline as follows:
(P) # chrg -o offline db2_db2instp_0-rg
2. Issue the following command and observe that the primary instance resource group goes offline:
(P) # getstatus
3. Now bring the primary instance resource group back online by issuing the
following command:
(P) # chrg -o online db2_db2instp_0-rg
4. As root, verify that the primary instance resource group is back online as follows:
(P) # getstatus
5.5 Testing Resource Group Failure: Standby Instance Resource Group
1. As root, bring the standby instance resource group (e.g., db2_db2insts_0-
rg) offline as follows:
(S) # chrg -o offline db2_db2insts_0-rg
2. Issue the following command and observe that the standby instance resource group goes offline:
(S) # getstatus
3. As root, bring the standby instance resource group back online as follows:
(S) # chrg -o online db2_db2insts_0-rg
4. As root, verify that the standby instance resource group has been restarted successfully:
(S) # getstatus
Note: It may take up to 2 minutes to see the instance restarted automatically.
25
5.6 Testing Network Adapter Failure (e.g. eth0)
1. Pull the cable on the NIC that is currently hosting the primary instance’s
IP address (e.g., eth0). You should see a brief interruption in service while the IP address fails over to another adapter in the equivalency group (e.g., eth1). Note that should the cable from the only Ethernet adapter on the box, or the cable to the last surviving Ethernet adapter on the box be pulled, the system behavior will be identical to that described in the “Node Failure” test that follows this one;.
2. Check that the topology has returned to its original state before the cable
was pulled:
(S) # getstatus
Output similar to the following lines should be seen:
-- Resource Groups and Resources -- Group Name Resources ---------- --------- db2_db2instp_0-rg db2_db2instp_0-rs db2_db2instp_0-rg db2_db2instp_0-rs_ip - - db2_db2insts_0-rg db2_db2insts_0-rs db2_db2insts_0-rg db2_db2insts_0-rs_ip
-- Resources -- Resource Name Node Name State ------------- --------- ----- db2_db2instp_0-rs hadr01 Online - - - db2_db2instp_0-rs_ip hadr01 Online - - -
1. For this test case to work, you must “uncomment” (remove the comment
marks from) the following line on (P) and (S) in /opt/IBM/db2/V8.1/ha/salinux/hadr_start.ksh. You must do this in order to allow TAKEOVER BY FORCE if the HADR pair drops out of Peer state before TSA can issue a failover to the standby database. Important: If HADR is not operating in synchronization mode = sync, uncommenting the following line may cause the standby database to take over as primary at a time when it is not in sync with the primary database that failed. If this is the case, then later reintegration of the HADR pair may fail, and the standby database may have to be re-established via a backup image of the current primary database:
26
On (P) and (S) uncomment the following line in /opt/IBM/db2/V8.1/ha/salinux/hadr_start.ksh:
#su - ${instance_to_start?} -c "db2 takeover hadr on db\ ${DB2HADRDBNAME?} by force >> $temp_log_file" > /dev/null
2. First, check that the status of all resources is normal as follows:
(S) # getstatus Output similar to the following lines should be seen:
-- Resource Groups and Resources -- Group Name Resources ---------- --------- db2_db2instp_0-rg db2_db2instp_0-rs db2_db2instp_0-rg db2_db2instp_0-rs_ip - - db2_db2insts_0-rg db2_db2insts_0-rs db2_db2insts_0-rg db2_db2insts_0-rs_ip
-- Resources -- Resource Name Node Name State ------------- --------- ----- db2_db2instp_0-rs hadr01 Online - - - db2_db2instp_0-rs_ip hadr01 Online - - -
Verify that the HADR database is now primary on node hadr02 via the DB2 GET SNAPSHOT command.
% db2 get snapshot for db on hadrdb
5. Once the old primary machine (i.e. hadr01) comes back online, you can re-establish the HADR pair as follows:
As the original primary instance owner, db2instp:
(P) % db2 start hadr on db hadrdb as standby
6. The HADR pair should now be re-established (you can issue a getstatus to check if you like). To bring the primary database back to hadr01, issue the following (ignore the "token" message):
(P) # rgreq -o move -n hadr02 db2hadr_hadrdb-rg
7. Check that HADR has returned to its original state before the primary
node failure:
(P) # getstatus
Output similar to the following lines should be seen:
-- Resource Groups and Resources -- Group Name Resources ---------- --------- db2_db2instp_0-rg db2_db2instp_0-rs db2_db2instp_0-rg db2_db2instp_0-rs_ip - - db2_db2insts_0-rg db2_db2insts_0-rs db2_db2insts_0-rg db2_db2insts_0-rs_ip
-- Resources -- Resource Name Node Name State ------------- --------- ----- db2_db2instp_0-rs hadr01 Online - - - db2_db2instp_0-rs_ip hadr01 Online - - -
IBM Tivoli System Automation for Multiplatforms (IBM Tivoli SAM) provides a framework to automatically manage the availability of what are known as resources. Examples of resources are:
• Any piece of software for which start, monitor, and stop scripts can be written to control.
• Any network interface card (NIC) to which TSA has been granted access. That is, TSA will manage the availability of any IP address that a user wants to use by floating that IP address amongst NICs that it has been granted access to.
For example, both a DB2 instance, and HADR itself, have start, stop, and monitor commands. Therefore, TSA scripts can be written to automatically manage these resources. In fact, you can find these scripts by changing the directory to the following as root after installing DB2 UDB:
(P)(S) cd /opt/IBM/db2/V8.1/ha/salinux/ Scripts, as well as other attributes of a resource, are needed by TSA to manage that resource. TSA stores a resource’s attributes in an object container, much like the attributes of a Java™ class. In fact, TSA manages a resource by instantiating a class for that resource. Examples of classes that TSA instantiates to manage different resources are*:
• IBM.Application - a resource class for applications (e.g., DB2 instance) • IBM.ServiceIP – a resource class that has special attributes to define an IP
address and a net mask (e.g., IP address of a DB2 instance) • IBM.Equivalency – a resource class that defines equivalent NICs to host an HA
IP address (e.g., eth0 and eth1 could be made equivalent to host the IP address of db2instp).
*For more information on these and other resource classes, refer to http://www-306.ibm.com/software/tivoli/products/sys-auto-linux/. TSA also allows related resources to be managed in what are known as resource groups. TSA guarantees that all resources within a given resource group will be online at one and only one physical node at any point in time. Also, all of those resources will reside on the same physical node.
Examples of resource groups (i.e., related resources) are:
• A DB2 instance, its IP address, and all of the databases that it manages (e.g., hadrdb)
29
Finally, TSA provides high availability (HA), for any resource group that it manages, by restarting all of its resources if it fails. The resource group will be restarted on an appropriate node in the currently online cluster domain. An appropriate node must contain a copy of all of the resources that are defined in the failing resource group, to be selected as a node to restart on. The following examples show “dialogs” that would occur between TSA nodes, in Fig. 2 Typical HADR Environment with TSA, in the event of various failures/user actions. Note: For each dialog, assume that hadr01 is the primary database node and hadr02 is the standby database node: Standby Node Loses Network Communication to Primary Node:
TSA on hadr02: Hey, TSA on hadr03, I can’t talk to TSA on hadr01 anymore. Is it OK for me to tell hadrdb, managed by db2insts, to become primary? TSA on hadr03: No, I am still receiving a heartbeat from TSA on hadr01, so hadrdb managed by db2insts cannot become primary. TSA on hadr02: OK then.
Primary Node Fails:
TSA on hadr02: Hey, TSA on hadr03, I can’t talk to TSA on hadr01 anymore. Is it OK for me to tell hadrdb, managed by db2insts to become primary? TSA on hadr03: Yes, I am not receiving a heartbeat from TSA on hadr01 either, so hadrdb managed by db2insts can become primary. Don’t worry, if hadr01 comes back online, I will make sure that DB2 is not started so that we will not have two primary databases. TSA on hadr02: OK then. Hey, db2insts, have hadrdb take over by force as primary. db2insts: Done.
Switch HADR Roles Manually:
User types on hadr01: rgreq –o move –n hadr01 db2hadr_hadrdb-rg TSA on hadr01: OK, I will move the HADR resource group (i.e., db2hadr_hadrdb-rg) off hadr01 and onto hadr02. I will shut down the resource group now. Hey, db2instp, make hadrdb switch roles. At the same time, I want you TSA on hadr02 to bring online the resource group called db2hadr_hadrdb-rg. db2instp: OK, done. TSA on hadr2: OK, done.