208
Avaya Aura ® Agent Desktop Release 6.4 44400-114 Issue 05.03 December 2014
Avaya Aura® Agent Desktop
Release 6.444400-114
Issue 05.03December 2014
© 2014 Avaya Inc.
All Rights Reserved.
NoticeWhile reasonable efforts have been made to ensure that theinformation in this document is complete and accurate at the time ofprinting, Avaya assumes no liability for any errors. Avaya reservesthe right to make changes and corrections to the information in thisdocument without the obligation to notify any person or organizationof such changes.
Documentation disclaimer“Documentation” means information published by Avaya in varyingmediums which may include product information, operatinginstructions and performance specifications that Avaya may generallymake available to users of its products and Hosted Services.Documentation does not include marketing materials. Avaya shall notbe responsible for any modifications, additions, or deletions to theoriginal published version of documentation unless suchmodifications, additions, or deletions were performed by Avaya. EndUser agrees to indemnify and hold harmless Avaya, Avaya's agents,servants and employees against all claims, lawsuits, demands andjudgments arising out of, or in connection with, subsequentmodifications, additions or deletions to this documentation, to theextent made by End User.
Link disclaimerAvaya is not responsible for the contents or reliability of any linkedwebsites referenced within this site or documentation provided byAvaya. Avaya is not responsible for the accuracy of any information,statement or content provided on these sites and does notnecessarily endorse the products, services, or information describedor offered within them. Avaya does not guarantee that these links willwork all the time and has no control over the availability of the linkedpages.
WarrantyAvaya provides a limited warranty on Avaya hardware and software.Refer to your sales agreement to establish the terms of the limitedwarranty. In addition, Avaya’s standard warranty language, as well asinformation regarding support for this product while under warranty isavailable to Avaya customers and other parties through the AvayaSupport website: http://support.avaya.com or such successor site asdesignated by Avaya. Please note that if You acquired the product(s)from an authorized Avaya Channel Partner outside of the UnitedStates and Canada, the warranty is provided to You by said AvayaChannel Partner and not by Avaya.
LicensesTHE SOFTWARE LICENSE TERMS AVAILABLE ON THE AVAYAWEBSITE, HTTP://SUPPORT.AVAYA.COM/LICENSEINFO ORSUCH SUCCESSOR SITE AS DESIGNATED BY AVAYA, AREAPPLICABLE TO ANYONE WHO DOWNLOADS, USES AND/ORINSTALLS AVAYA SOFTWARE, PURCHASED FROM AVAYA INC.,ANY AVAYA AFFILIATE, OR AN AVAYA CHANNEL PARTNER (ASAPPLICABLE) UNDER A COMMERCIAL AGREEMENT WITHAVAYA OR AN AVAYA CHANNEL PARTNER. UNLESSOTHERWISE AGREED TO BY AVAYA IN WRITING, AVAYA DOESNOT EXTEND THIS LICENSE IF THE SOFTWARE WASOBTAINED FROM ANYONE OTHER THAN AVAYA, AN AVAYAAFFILIATE OR AN AVAYA CHANNEL PARTNER; AVAYARESERVES THE RIGHT TO TAKE LEGAL ACTION AGAINST YOUAND ANYONE ELSE USING OR SELLING THE SOFTWAREWITHOUT A LICENSE. BY INSTALLING, DOWNLOADING ORUSING THE SOFTWARE, OR AUTHORIZING OTHERS TO DO SO,YOU, ON BEHALF OF YOURSELF AND THE ENTITY FOR WHOMYOU ARE INSTALLING, DOWNLOADING OR USING THESOFTWARE (HEREINAFTER REFERRED TOINTERCHANGEABLY AS “YOU” AND “END USER”), AGREE TOTHESE TERMS AND CONDITIONS AND CREATE A BINDINGCONTRACT BETWEEN YOU AND AVAYA INC. OR THEAPPLICABLE AVAYA AFFILIATE (“AVAYA”).
Avaya grants You a license within the scope of the license typesdescribed below, with the exception of Heritage Nortel Software, forwhich the scope of the license is detailed below. Where the orderdocumentation does not expressly identify a license type, theapplicable license will be a Designated System License. The
applicable number of licenses and units of capacity for which thelicense is granted will be one (1), unless a different number oflicenses or units of capacity is specified in the documentation or othermaterials available to You. “Software” means computer programs inobject code, provided by Avaya or an Avaya Channel Partner,whether as stand-alone products, pre-installed on hardware products,and any upgrades, updates, patches, bug fixes, or modified versionsthereto. “Designated Processor” means a single stand-alonecomputing device. “Server” means a Designated Processor thathosts a software application to be accessed by multiple users.“Instance” means a single copy of the Software executing at aparticular time: (i) on one physical machine; or (ii) on one deployedsoftware virtual machine (“VM”) or similar deployment.
License type(s)Concurrent User License (CU). End User may install and use theSoftware on multiple Designated Processors or one or more Servers,so long as only the licensed number of Units are accessing and usingthe Software at any given time. A “Unit” means the unit on whichAvaya, at its sole discretion, bases the pricing of its licenses and canbe, without limitation, an agent, port or user, an e-mail or voice mailaccount in the name of a person or corporate function (e.g.,webmaster or helpdesk), or a directory entry in the administrativedatabase utilized by the Software that permits one user to interfacewith the Software. Units may be linked to a specific, identified Serveror an Instance of the Software.
Heritage Nortel Software“Heritage Nortel Software” means the software that was acquired byAvaya as part of its purchase of the Nortel Enterprise SolutionsBusiness in December 2009. The Heritage Nortel Software currentlyavailable for license from Avaya is the software contained within thelist of Heritage Nortel Products located at http://support.avaya.com/LicenseInfo under the link “Heritage Nortel Products” or suchsuccessor site as designated by Avaya. For Heritage NortelSoftware, Avaya grants You a license to use Heritage NortelSoftware provided hereunder solely to the extent of the authorizedactivation or authorized usage level, solely for the purpose specifiedin the Documentation, and solely as embedded in, for execution on,or for communication with Avaya equipment. Charges for HeritageNortel Software may be based on extent of activation or useauthorized as specified in an order or invoice.
CopyrightExcept where expressly stated otherwise, no use should be made ofmaterials on this site, the Documentation, Software, Hosted Service,or hardware provided by Avaya. All content on this site, thedocumentation, Hosted Service, and the product provided by Avayaincluding the selection, arrangement and design of the content isowned either by Avaya or its licensors and is protected by copyrightand other intellectual property laws including the sui generis rightsrelating to the protection of databases. You may not modify, copy,reproduce, republish, upload, post, transmit or distribute in any wayany content, in whole or in part, including any code and softwareunless expressly authorized by Avaya. Unauthorized reproduction,transmission, dissemination, storage, and or use without the expresswritten consent of Avaya can be a criminal, as well as a civil offenseunder the applicable law.
Third Party Components“Third Party Components” mean certain software programs orportions thereof included in the Software or Hosted Service maycontain software (including open source software) distributed underthird party agreements (“Third Party Components”), which containterms regarding the rights to use certain portions of the Software(“Third Party Terms”). As required, information regarding distributedLinux OS source code (for those products that have distributed LinuxOS source code) and identifying the copyright holders of the ThirdParty Components and the Third Party Terms that apply is availablein the products, Documentation or on Avaya’s website at: http://support.avaya.com/Copyright or such successor site as designatedby Avaya. You agree to the Third Party Terms for any such ThirdParty Components.
Preventing Toll Fraud“Toll Fraud” is the unauthorized use of your telecommunicationssystem by an unauthorized party (for example, a person who is not acorporate employee, agent, subcontractor, or is not working on your
company's behalf). Be aware that there can be a risk of Toll Fraudassociated with your system and that, if Toll Fraud occurs, it canresult in substantial additional charges for your telecommunicationsservices.
Avaya Toll Fraud interventionIf You suspect that You are being victimized by Toll Fraud and Youneed technical assistance or support, call Technical Service CenterToll Fraud Intervention Hotline at +1-800-643-2353 for the UnitedStates and Canada. For additional support telephone numbers, seethe Avaya Support website: http://support.avaya.com or suchsuccessor site as designated by Avaya. Suspected securityvulnerabilities with Avaya products should be reported to Avaya bysending mail to: [email protected].
Downloading DocumentationFor the most current versions of Documentation, see the AvayaSupport website: http://support.avaya.com, or such successor site asdesignated by Avaya.
Contact Avaya SupportSee the Avaya Support website: http://support.avaya.com for productor Hosted Service notices and articles, or to report a problem withyour Avaya product or Hosted Service. For a list of support telephonenumbers and contact addresses, go to the Avaya Support website: http://support.avaya.com (or such successor site as designated byAvaya), scroll to the bottom of the page, and select Contact AvayaSupport.
TrademarksAvaya, the Avaya logo, Avaya one-X® Portal, Avaya Aura®
Communication Manager, Avaya Aura® Experience Portal, AvayaAura® Orchestration Designer, Avaya Aura® Session Manager, AvayaAura® System Manager, and Application Enablement Services areeither registered trademarks or trademarks of Avaya Inc. in theUnited States of America and/or other jurisdictions.
All non-Avaya trademarks are the property of their respective owners.Linux® is the registered trademark of Linus Torvalds in the U.S. andother countries.
Contents
Chapter 1: Introduction.......................................................................................................... 12Prerequisites......................................................................................................................... 12Related resources................................................................................................................. 13
Viewing Avaya Mentor videos........................................................................................... 13Support................................................................................................................................ 14
Chapter 2: New in this release............................................................................................... 15Features............................................................................................................................... 15
Advanced Screen pops.................................................................................................... 15After Call Work Item codes .............................................................................................. 16Agent Desktop configurable home page............................................................................ 16Agent Desktop Dashboard............................................................................................... 16Call Join support............................................................................................................. 16Force Agent Log out and Change Agent State................................................................... 17Improved Activity Codes ................................................................................................. 17Monitoring of non-skillset calls.......................................................................................... 17Proactive Outreach Manager............................................................................................ 18Simplified voice contact Observe process ......................................................................... 18Social Networking Contact Type....................................................................................... 18Supervisor approval of email messages............................................................................ 18Third Line Appearance support......................................................................................... 18Windows 8.1 Support....................................................................................................... 19
Chapter 3: Agent Desktop User Interface............................................................................. 20Work Item paradigm.............................................................................................................. 20Top bar................................................................................................................................. 21Work list window................................................................................................................... 22Action bar............................................................................................................................. 23User preferences................................................................................................................... 24Screen pops on Agent Desktop.............................................................................................. 25Customize Agent Desktop window settings.............................................................................. 25Agent Desktop system tray icon.............................................................................................. 26Shortcut keys in Agent Desktop.............................................................................................. 26Agent Desktop Dashboard..................................................................................................... 27
Chapter 4: Using your Agent Desktop.................................................................................. 29Installing Agent Desktop........................................................................................................ 29Starting Agent Desktop.......................................................................................................... 29Creating a shortcut to Agent Desktop...................................................................................... 31Logging on to Agent Desktop when using a desktop phone...................................................... 31Logging on to Agent Desktop when using the softphone........................................................... 32Logging on to Agent Desktop for Call Center Elite Telephony.................................................... 33
4 Avaya Aura® Agent Desktop December 2014Comments? [email protected]
Logging on to Agent Desktop for Microsoft OCS or Microsoft Lync............................................ 35Logging on to Agent Desktop for Avaya Presence Services...................................................... 36Changing your password....................................................................................................... 37Using the Agent Desktop configurable home page................................................................... 38Setting the Work Item Display................................................................................................ 38Swapping Panels in Agent Desktop........................................................................................ 39Viewing shortcut keys on Agent Desktop................................................................................. 39Muting and unmuting when using the softphone....................................................................... 40Changing the audio settings for softphone............................................................................... 40Configuring the audio devices for softphone............................................................................ 41Monitoring the audio quality and VoIP traffic............................................................................ 41Changing your status to Ready............................................................................................... 42Changing your status to Not Ready......................................................................................... 43Changing your status to Not Ready when on a contact............................................................. 44Collecting and uploading log files from the Agent Desktop Dashboard....................................... 45Checking the network connection in the Agent Desktop Dashboard........................................... 46Recording a video of your agent desktop actions..................................................................... 46Changing the Agent Desktop Dashboard log settings............................................................... 47Accessing online help............................................................................................................ 47Closing contacts if you receive a force log out message........................................................... 48Understanding supervisor changes to your Ready status.......................................................... 48Logging off from Agent Desktop.............................................................................................. 48
Chapter 5: Telephony............................................................................................................. 50Accepting a call..................................................................................................................... 51Declining a call...................................................................................................................... 52Entering an Activity code........................................................................................................ 52Entering an After Call Work Item Code.................................................................................... 53Placing a call on hold............................................................................................................. 53Releasing a call on hold......................................................................................................... 54Accepting a CDN call by placing a DN call on hold................................................................... 54Transferring a call.................................................................................................................. 54Conferencing in another agent................................................................................................ 55Conferencing in a supervisor.................................................................................................. 56Ending a call......................................................................................................................... 56Calling your supervisor.......................................................................................................... 56Making a call......................................................................................................................... 57Using DTMF digits................................................................................................................. 57Using the Emergency key...................................................................................................... 57Observing a voice contact or non-skillset call........................................................................... 58Barging-in on a voice contact or non-skillset call...................................................................... 59Observing a second voice contact or non-skillset call......................................................... 60Joining two voice calls........................................................................................................... 61Joining a call that you are monitoring with another call............................................................. 61
Contents
December 2014 Avaya Aura® Agent Desktop 5Comments? [email protected]
Making a call while on an existing voice call ............................................................................ 62Accepting an inbound voice call while on an existing skillset voice call ...................................... 62Calling an agent using Contacts Presence............................................................................... 63Searching for a contact in Phonebook..................................................................................... 63Calling an agent using Phonebook.......................................................................................... 64Filtering contacts using Phonebook......................................................................................... 64Tagging a contact in Phonebook............................................................................................. 65Configuring the display of columns in Phonebook.................................................................... 65Adding a custom contact........................................................................................................ 66Editing a custom contact........................................................................................................ 67Deleting a custom contact...................................................................................................... 68Using the Call History tab....................................................................................................... 68
Chapter 6: Call Center Elite Telephony................................................................................. 70Accepting a call..................................................................................................................... 71Declining a call...................................................................................................................... 71Entering an activity code........................................................................................................ 72Placing a call on hold............................................................................................................. 73Releasing a call on hold......................................................................................................... 73Transferring a call.................................................................................................................. 73Conferencing in another agent................................................................................................ 74Ending a call......................................................................................................................... 74Making a call......................................................................................................................... 75Using DTMF digits................................................................................................................. 75Searching for a contact in Phonebook..................................................................................... 75Calling an agent using Phonebook.......................................................................................... 76Filtering contacts using Phonebook......................................................................................... 76Tagging a contact in Phonebook............................................................................................. 77Configuring the display of columns in Phonebook.................................................................... 78Adding a custom contact........................................................................................................ 79Editing a custom contact........................................................................................................ 80Deleting a custom contact...................................................................................................... 80Using the Call History tab....................................................................................................... 81
Chapter 7: Proactive Outreach Manager.............................................................................. 83Prerequisites......................................................................................................................... 85Logging on to Agent Desktop for POM.................................................................................... 85Handling a Predictive or Progressive call................................................................................. 86Handling a Preview call.......................................................................................................... 86Releasing and dispositioning a call......................................................................................... 87Transferring a call.................................................................................................................. 88Conferencing in another agent................................................................................................ 89Ending and leaving a conference call...................................................................................... 90Rescheduling a call............................................................................................................... 90Redialing a customer............................................................................................................. 92
Contents
6 Avaya Aura® Agent Desktop December 2014Comments? [email protected]

Chapter 8: Outbound calls and callbacks............................................................................ 93Accepting an outbound contact............................................................................................... 94Declining an outbound contact................................................................................................ 94Placing an outbound call........................................................................................................ 94Using a script........................................................................................................................ 95Recording the result.............................................................................................................. 96Ending the call...................................................................................................................... 96Scheduling a callback............................................................................................................ 97Calling the customer manually................................................................................................ 97
Chapter 9: Predictive Outbound............................................................................................ 99Prerequisites for Predictive Outbound................................................................................... 100Changing to Ready status.................................................................................................... 100Changing to Not Ready status.............................................................................................. 102Changing to Not Ready status when on a contact.................................................................. 102Handling a Predictive or Progressive call............................................................................... 102Handling a Paced call.......................................................................................................... 103Handling a Preview call........................................................................................................ 103Handling a manual call......................................................................................................... 104Cancelling a call.................................................................................................................. 104Transferring a call................................................................................................................ 105Conferencing in another agent.............................................................................................. 106Hanging-up and leaving a conference call............................................................................. 107Ending a contact................................................................................................................. 108Originating a call................................................................................................................. 109Scheduling a callback.......................................................................................................... 109Handling a standard callback call.......................................................................................... 111Handling a non-standard callback call................................................................................... 112Handling a closed zone or priority callback call...................................................................... 113
Chapter 10: Email.................................................................................................................. 114Supervisor approval of email messages................................................................................ 117Accepting an incoming email message.................................................................................. 118Declining an incoming email message................................................................................... 118Verifying customer information............................................................................................. 119Resetting customer password .............................................................................................. 119Replying to an email message.............................................................................................. 120Creating an email message.................................................................................................. 121Using the address book to reply to a contact.......................................................................... 122Removing a name from the recipient list................................................................................ 123Creating a template response............................................................................................... 123Defining your default template folder..................................................................................... 124Using a template response................................................................................................... 124Defining your default attachment folder................................................................................. 124Adding an attachment to your email response........................................................................ 125
Contents
December 2014 Avaya Aura® Agent Desktop 7Comments? [email protected]
Viewing email attachments................................................................................................... 125Removing an attachment from an email response.................................................................. 126Adding inline images........................................................................................................... 126Using the spelling checker................................................................................................... 127Closing the email contact..................................................................................................... 128Postponing work on a contact............................................................................................... 128Following up on a contact..................................................................................................... 129Transferring a contact within the Contact Center.................................................................... 129Transferring a contact outside the Contact Center.................................................................. 130Printing contact details......................................................................................................... 130Sending an email message to an agent using Phonebook...................................................... 130Approving email messages.................................................................................................. 131Rejecting an email message sent for approval....................................................................... 132Redrafting a rejected email message.................................................................................... 133
Chapter 11: Fax message..................................................................................................... 135Prerequisites....................................................................................................................... 135Accepting an incoming fax message..................................................................................... 135Declining an incoming fax message...................................................................................... 136Reviewing a fax message.................................................................................................... 136Replying to a fax message................................................................................................... 136Closing a fax message......................................................................................................... 137Transferring a fax message.................................................................................................. 137
Chapter 12: Scanned document.......................................................................................... 139Prerequisites....................................................................................................................... 139Accepting an incoming scanned document message.............................................................. 139Declining an incoming scanned document message............................................................... 140Reviewing a scanned document message............................................................................. 140Replying to a scanned document message............................................................................ 140Closing a scanned document message................................................................................. 141Transferring a scanned document......................................................................................... 141
Chapter 13: Voice mail messages....................................................................................... 143Prerequisites....................................................................................................................... 143Accepting an incoming voice mail message........................................................................... 143Declining an incoming voice mail message............................................................................ 144Listening to a voice mail message........................................................................................ 144Replying to a voice mail message......................................................................................... 144Closing a voice mail message.............................................................................................. 145Transferring a voice mail message........................................................................................ 145
Chapter 14: Short Message Service text message............................................................ 146Prerequisites....................................................................................................................... 146Accepting an incoming SMS text message............................................................................ 146Declining an incoming SMS text message............................................................................. 147Replying to an SMS text message........................................................................................ 147
Contents
8 Avaya Aura® Agent Desktop December 2014Comments? [email protected]
Using the spelling checker................................................................................................... 148Closing an SMS text message contact.................................................................................. 149Transferring an SMS text message....................................................................................... 149
Chapter 15: Social Networking............................................................................................ 150Accepting a new social networking contact............................................................................ 151Declining an incoming Social Networking contact................................................................... 152Placing a Social Networking contact on hold.......................................................................... 152Releasing a Social Networking contact on hold...................................................................... 152Responding to a Social Networking contact........................................................................... 152Transferring a Social Networking contact............................................................................... 154Closing a Social Networking contact..................................................................................... 154
Chapter 16: Web communications...................................................................................... 156Accepting a Web communications contact............................................................................. 156Customizing a tab name...................................................................................................... 157Declining a Web communications contact.............................................................................. 158Sending a chat message...................................................................................................... 158Adding an auto-phrase to a chat message............................................................................. 159Pushing a Web page to a customer...................................................................................... 159Performing a Web Communications transfer to a skillset......................................................... 160Transferring a chat session.................................................................................................. 160Conferencing a chat session................................................................................................ 161Observing a Web Communications contact........................................................................... 162Barging-in on a Web Communications contact....................................................................... 163Ending the Text Chat session............................................................................................... 163Sending the chat log in an email message............................................................................. 164
Chapter 17: Instant Messaging............................................................................................ 165Prerequisites for instant messaging...................................................................................... 166Accepting an instant message.............................................................................................. 166Declining an instant message............................................................................................... 167Sending an instant message................................................................................................ 167Using an auto-phrase.......................................................................................................... 167Using suggested Web pages................................................................................................ 168Using spelling checker in an instant message........................................................................ 168Viewing personnel using Contacts Presence......................................................................... 169Contacting experts using Contacts Presence......................................................................... 171Adding a new contact in Contacts Presence.......................................................................... 171Deleting a contact from Contacts Presence........................................................................... 172Sending an instant message using Contacts Presence........................................................... 173Transferring an instant message using Contacts Presence..................................................... 173Consulting on an instant message using Contacts Presence................................................... 174Conferencing an instant message using Contacts Presence................................................... 174Transferring an instant message using the work item control.................................................. 175Consulting on an instant message using the work item control................................................ 176
Contents
December 2014 Avaya Aura® Agent Desktop 9Comments? [email protected]
Conferencing an instant message using the work item control................................................. 176Ending an instant message.................................................................................................. 177
Chapter 18: Using Agent Greeting...................................................................................... 178Logging on to the Agent Greeting recording application.......................................................... 178Changing your Agent Greeting password.............................................................................. 179Recording your default greeting............................................................................................ 179Recording the Time of Day greetings.................................................................................... 180Recording skillset-specific greetings...................................................................................... 180Deleting skillset-specific greetings........................................................................................ 181Identify skillset IDs to record skillset tags............................................................................... 181Recording skillset tags......................................................................................................... 182Playing back a greeting........................................................................................................ 183Re-recording a greeting....................................................................................................... 183Interrupting a greeting.......................................................................................................... 184
Chapter 19: High Availability............................................................................................... 185Handling desktop phone loss of call control .......................................................................... 185Handling softphone loss of call control ................................................................................. 186Handling multimedia contact refreshes during a switchover.................................................... 186Handling server communication issues................................................................................. 187Handling configuration issues when launching Avaya Aura® Agent Desktop............................. 188
Chapter 20: Agent Statistics................................................................................................ 189Prerequisites for Agent Statistics.......................................................................................... 190Accessing the Agent Statistics tab........................................................................................ 190Viewing the Skillset statistic chart......................................................................................... 190Viewing the Agent statistic chart........................................................................................... 191Changing the Agent statistic chart properties......................................................................... 191Enabling Service Level alerts............................................................................................... 192Using the Statistics Ticker.................................................................................................... 192
Chapter 21: Customer and contact details......................................................................... 193Prerequisites for working with customer and contact details.................................................... 193Creating a customer record.................................................................................................. 194Searching for a customer..................................................................................................... 194Adding or editing customer information................................................................................. 195Setting the barred status for a customer phone number.......................................................... 196Clearing the barred status for a customer phone number........................................................ 196Viewing an intrinsic.............................................................................................................. 197Copying an intrinsic............................................................................................................. 197Viewing User to User Information.......................................................................................... 197Modifying User to User Information....................................................................................... 198Viewing customer contact intrinsics....................................................................................... 198Launching an intrinsic-associated application manually.......................................................... 198Searching for a contact........................................................................................................ 199Printing search results......................................................................................................... 200
Contents
10 Avaya Aura® Agent Desktop December 2014Comments? [email protected]

Viewing a contact................................................................................................................ 200Opening a contact............................................................................................................... 201Closing contacts.................................................................................................................. 201
Contents
December 2014 Avaya Aura® Agent Desktop 11Comments? [email protected]
Chapter 1: Introduction
Avaya Aura® Agent Desktop is a single-interface client application used to interact with customers.You can respond to customer contacts through a variety of media, including phone, outboundcontacts, email, Web communication, instant messaging, fax, scanned documents, and ShortMessage Service (SMS) text messages. Agent Desktop provides automation for customerresponses to eliminate repetitive actions, such as typing a common response in an email message.
Agent Desktop supports the following contact types:
• Voice contacts
• Email messages
• Outbound contacts
• Web communications contacts
• Instant Messages
• SMS text messages
• Fax messages
• Scanned documents
• Voice mail messages
• Social Networking
Your administrator determines which type of contacts you can handle.
Agent Desktop uses Microsoft .NET Framework 4.0 Click Once Deployment technology, whichmeans that you can install and start the application by entering a URL address in Windows Exploreror Internet Explorer.
PrerequisitesProcedure
• Ensure that you review the Contact Center installation procedures.
• Supported Operating Systems:
- Windows XP Professional SP2 or later
- Windows Vista SP2 or later
12 Avaya Aura® Agent Desktop December 2014Comments? [email protected]
- Windows 7 (32 bit and 64 bit) Professional, Ultimate, and Enterprise editions
- Windows 8.1 (32 bit and 64 bit)
Note:
Windows 8.1 environment does not support the My Computer mode in Agent Desktop,since embedded phone operation is not supported in Windows 8.1.
• Ensure that the following are installed on the client machine. Administrative rights are requiredto install the following applications:
- Microsoft Internet Explorer 7.0, 8.0, 9.0, or 10.0.
- Microsoft .NET Framework 4.0
- Windows Installer 4.5 Redistributable
- Microsoft Visual C++ 2005 SP1 Redistributable Package (x86)
- Microsoft Visual C++ 2008 SP1 Redistributable Package (x86)
Related resources
Viewing Avaya Mentor videosAvaya Mentor videos provide technical content on how to install, configure, and troubleshoot Avayaproducts.
About this taskVideos are available on the Avaya Support website, listed under the video document type, and onthe Avaya-run channel on YouTube.
Procedure• To find videos on the Avaya Support website, go to http://support.avaya.com and perform one
of the following actions:
- In Search, type Avaya Mentor Videos to see a list of the available videos.
- In Search, type the product name. On the Search Results page, select Video in theContent Type column on the left.
• To find the Avaya Mentor videos on YouTube, go to www.youtube.com/AvayaMentor andperform one of the following actions:
- Enter a key word or key words in the Search Channel to search for a specific product ortopic.
- Scroll down Playlists, and click the name of a topic to see the available list of videos postedon the website.
Related resources
December 2014 Avaya Aura® Agent Desktop 13Comments? [email protected]
Note:
Videos are not available for all products.
SupportGo to the Avaya Support website at http://support.avaya.com for the most up-to-datedocumentation, product notices, and knowledge articles. You can also search for release notes,downloads, and resolutions to issues. Use the online service request system to create a servicerequest. Chat with live agents to get answers to questions, or request an agent to connect you to asupport team if an issue requires additional expertise.
Introduction
14 Avaya Aura® Agent Desktop December 2014Comments? [email protected]
Chapter 2: New in this release
The following sections detail what is new in Avaya Aura® Agent Desktop Release 6.4.
FeaturesSee the following sections for information about feature changes:
• Advanced Screen pops on page 15• After Call Work Item codes on page 16• Agent Desktop configurable home page on page 16• Agent Desktop Dashboard on page 16• Call Join support on page 16• Force Agent Log out and Change Agent State on page 17• Improved Activity Codes on page 17• Monitoring of non-skillset calls on page 17• Proactive Outreach Manager on page 18• Simplified voice contact Observe process on page 18• Social Networking Contact Type on page 18• Supervisor approval of email messages on page 18• Third Line Appearance support on page 18• Windows 8.1 Support on page 19
Advanced Screen popsA screen pop is a third-party application that administrators configure using the MultimediaAdministration tool. Agent Desktop displays screen pops when a contact alerts or is answered.Administrators can configure these screen pops to display relevant information about the alerting oranswered contact based on the intrinsics, such as Skillset, To Address, and DNIS associated withthe contact. For more information, see Screen pops on Agent Desktop on page 25.
Administrators can use Advanced Screen pops to configure individual screen pops to open onspecific intrinsic triggers, which provide administrators with more range and flexibility with respect to
December 2014 Avaya Aura® Agent Desktop 15Comments? [email protected]
conditions and triggers for opening a screen pop. For information about configuring AdvancedScreen pops, see Avaya Aura® Contact Center Server Administration (44400-610).
After Call Work Item codesYou must enter After Call Work Item (ACW) codes to perform post call processing work such asadding contact information to a CRM system.
You can use a new control Set ACW Code, which is available on the Agent Desktop Top bar menuto track ACW time.
Important:
In a Multimedia Complement for Elite solution, the Set ACW Code is not available on AgentDesktop and therefore Agent Desktop does not support this after call work functionality. AgentDesktop reason codes work in the same way as previous releases.
For more information, see Entering an After Call Work Item Code on page 53.
Agent Desktop configurable home pageAdministrators can set up an Agent Desktop configurable home page to open a screen pop whenyou start Agent Desktop. The screen pop displays a Web page that the administrators configure. Formore information, see Using the Agent Desktop configurable home page on page 38.
Agent Desktop DashboardThe Agent Desktop Dashboard allows you to easily collect all Agent Desktop logs and relatedscreen captures. You can upload this information directly to the Contact Center Multimedia (CCMM)server with a single click. This feature makes it easier for support staff to quickly gather all theinformation they need to debug issues on Agent Desktop. The Agent Desktop Dashboard alsodisplays the status of the network connection between your desktop PC and the Contact Centerservers.
Call Join supportYou can use Call Join to conference together two previously unrelated voice calls. If you are activeon a call and have one or two other unrelated calls on hold, you can join two calls together and addparties to the conference until there are six parties live on the conference. You must use your deskphone to drop calls from the conference. The surviving call after a call join has taken place is theoldest call.
New in this release
16 Avaya Aura® Agent Desktop December 2014Comments? [email protected]
Avaya Aura® Contact Center and Avaya Aura® Agent Desktop support Call Join. If you are usingAvaya Aura® Agent Desktop with Proactive Outreach Manager (POM), then Call Join is notsupported.
For more information about using Call Join, see Joining two voice calls on page 61.
Force Agent Log out and Change Agent StateThe Force Agent Log out and Change Agent State features allow a supervisor to log out an agent,or change an agent’s state to Ready or Not Ready, from the Contact Center Real-Time Displays.
When a supervisor logs out an agent or changes their state, Agent Desktop displays a message tothe agent informing them of the change and the supervisor who made it.
Improved Activity CodesAn activity code is a number that you can enter on a phone or on Agent Desktop to track time spenton activities and service areas, not ready reasons, and after call work.
A supervisor or system administrator configures activity codes. Activity codes can be alphanumeric.
In Contact Center Release 6.4, administrators provide all newly entered codes with a discrete typeso that Agent Desktop displays the codes under three separate controls:
• Activity codes
• Not Ready Reason codes
• After Call Work Item (ACW) codes
For more information see, Entering an Activity code on page 52.
Monitoring of non-skillset callsIn a SIP-enabled contact center based on a Communication Manager PABX, Contact Center allowssupervisor-agents to observe and barge-in to non-skillset calls.
The administrator can configure beep tones for both observe and barge-in events. The administratorcan configure Agent Desktop so that it displays an indicator to the agent on any work item that asupervisor/agent is monitoring.
For more information about monitoring non-skillset calls, see Observing a voice contact or non-skillset call on page 58 and Barging-in on a voice contact or non-skillset call on page 59.
Features
December 2014 Avaya Aura® Agent Desktop 17Comments? [email protected]

Proactive Outreach ManagerAvaya Aura® Contact Center 6.4 now supports integration with Avaya Proactive Outreach Manager(POM). This integration provides agents with a single desktop experience for inbound and outboundcontacts. POM launches calls in anticipation of the agent becoming imminently available, whichallows Contact Centers to efficiently contact large volumes of customers.
Simplified voice contact Observe processAgent Desktop provides a simplified Observe process for inbound voice contacts. Agent supervisorsperform fewer steps to listen to agent voice contacts. For more information about the simplifiedObserve feature, see Observing a voice contact or non-skillset call on page 58.
Social Networking Contact TypeContact Center Release 6.4 introduces a new Social Networking contact type. The SocialNetworking contact type provides close integration with Avaya Social Media Manager (SMM).Previous releases of Contact Center integrated with SMM using a standard email contact.
For more information about working with the Social Networking contact type, see SocialNetworking on page 150.
Supervisor approval of email messagesSupervisors can approve or reject the email messages that agents send to customers, before theemail reaches the customers. The approver of the email messages is the supervisor assigned to theapproval skillset of the contacts that the agent handles. For more information, see Supervisorapproval of email messages on page 117.
For information about configuring supervisor approval of email messages, see Avaya Aura® ContactCenter Server Administration (44400-610).
Third Line Appearance supportAvaya Aura® Contact Center supports up to three lines on each Agent Desktop. The third line isreserved for outgoing calls. You cannot use the third line to receive a personal call; but you can useit to originate a call.
For more information about using Third Line Appearance, see Accepting an inbound voice call whileon an existing skillset voice call on page 62 and Making a call while on an existing voice call onpage 62.
New in this release
18 Avaya Aura® Agent Desktop December 2014Comments? [email protected]
Windows 8.1 SupportAgent Desktop is now supported on Microsoft Windows 8.1 operating system.
Features
December 2014 Avaya Aura® Agent Desktop 19Comments? [email protected]
Chapter 3: Agent Desktop User Interface
Use Agent Desktop to handle voice, email, outbound, Web communications, instant messaging,voice mail, fax, scanned documents, social networking, and SMS text message contacts. Use AgentDesktop in the following situations:
• to handle voice contacts in a voice-only contact solution
• to handle voice contacts, outbound contacts (voice calls from you to customers), emailmessages, or Web communications contacts in a voice and multimedia contact solution
• to work with Avaya Aura® Presence Services server, Microsoft Office Communications Server,or Microsoft Lync to handle instant messaging in a SIP-enabled Contact Center
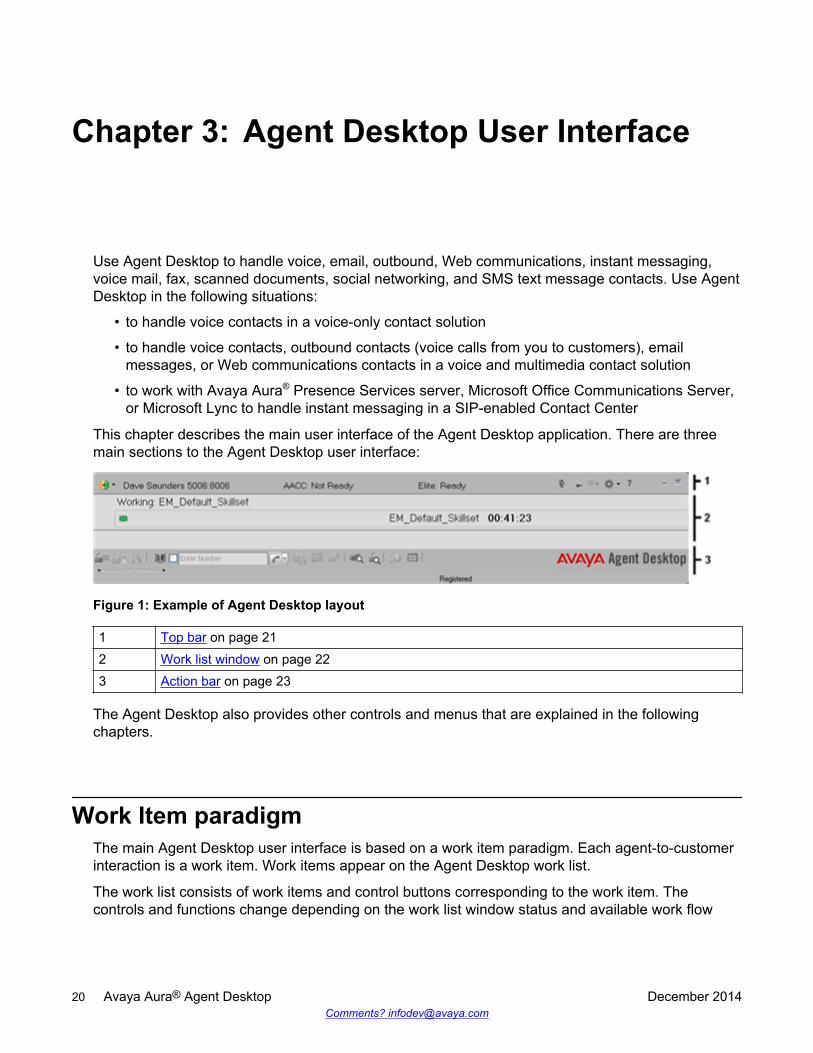
This chapter describes the main user interface of the Agent Desktop application. There are threemain sections to the Agent Desktop user interface:
Figure 1: Example of Agent Desktop layout
1 Top bar on page 212 Work list window on page 223 Action bar on page 23
The Agent Desktop also provides other controls and menus that are explained in the followingchapters.
Work Item paradigmThe main Agent Desktop user interface is based on a work item paradigm. Each agent-to-customerinteraction is a work item. Work items appear on the Agent Desktop work list.
The work list consists of work items and control buttons corresponding to the work item. Thecontrols and functions change depending on the work list window status and available work flow
20 Avaya Aura® Agent Desktop December 2014Comments? [email protected]
options. When a new contact arrives, Agent Desktop adds the new contact as a work item to thework list.
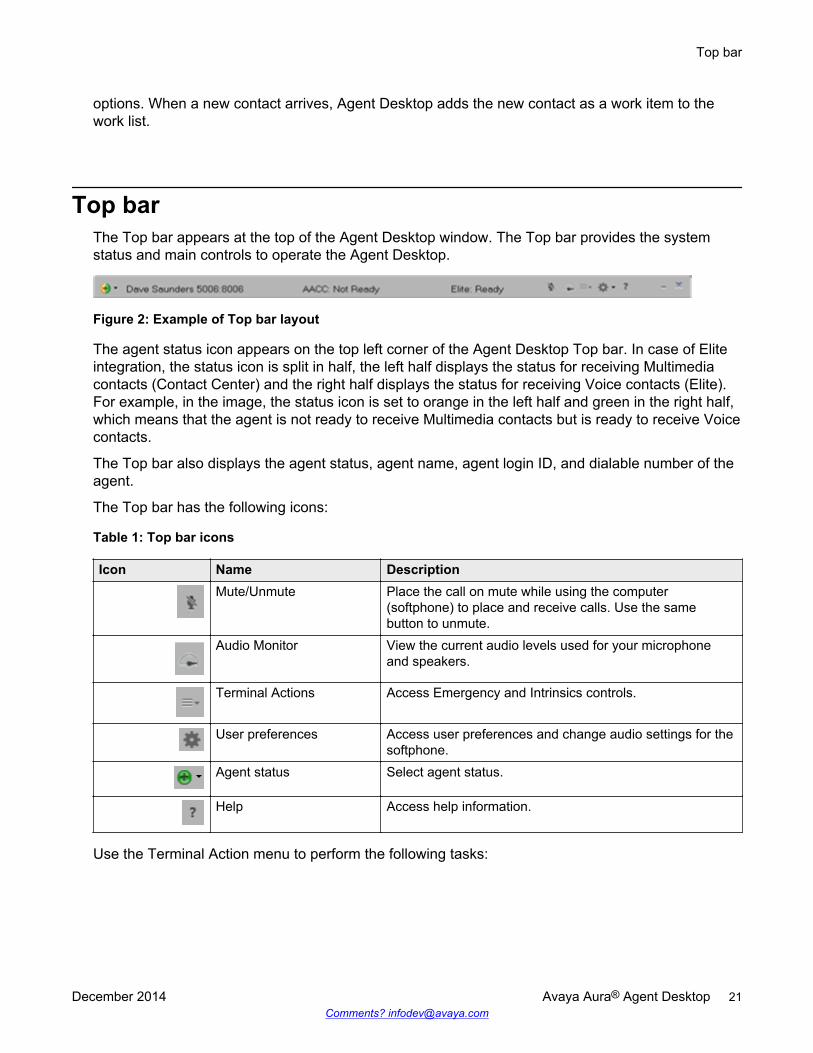
Top barThe Top bar appears at the top of the Agent Desktop window. The Top bar provides the systemstatus and main controls to operate the Agent Desktop.
Figure 2: Example of Top bar layout
The agent status icon appears on the top left corner of the Agent Desktop Top bar. In case of Eliteintegration, the status icon is split in half, the left half displays the status for receiving Multimediacontacts (Contact Center) and the right half displays the status for receiving Voice contacts (Elite).For example, in the image, the status icon is set to orange in the left half and green in the right half,which means that the agent is not ready to receive Multimedia contacts but is ready to receive Voicecontacts.
The Top bar also displays the agent status, agent name, agent login ID, and dialable number of theagent.
The Top bar has the following icons:
Table 1: Top bar icons
Icon Name DescriptionMute/Unmute Place the call on mute while using the computer
(softphone) to place and receive calls. Use the samebutton to unmute.
Audio Monitor View the current audio levels used for your microphoneand speakers.
Terminal Actions Access Emergency and Intrinsics controls.
User preferences Access user preferences and change audio settings for thesoftphone.
Agent status Select agent status.
Help Access help information.
Use the Terminal Action menu to perform the following tasks:
Top bar
December 2014 Avaya Aura® Agent Desktop 21Comments? [email protected]
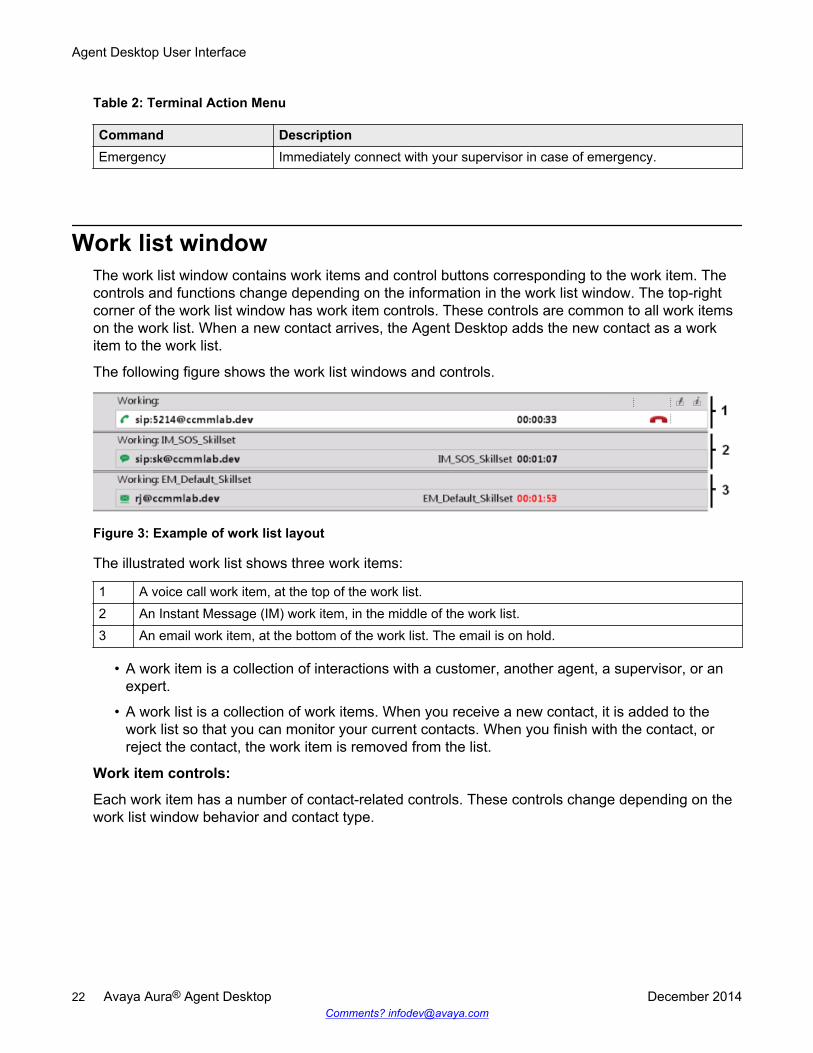
Table 2: Terminal Action Menu
Command DescriptionEmergency Immediately connect with your supervisor in case of emergency.
Work list windowThe work list window contains work items and control buttons corresponding to the work item. Thecontrols and functions change depending on the information in the work list window. The top-rightcorner of the work list window has work item controls. These controls are common to all work itemson the work list. When a new contact arrives, the Agent Desktop adds the new contact as a workitem to the work list.
The following figure shows the work list windows and controls.
Figure 3: Example of work list layout
The illustrated work list shows three work items:
1 A voice call work item, at the top of the work list.2 An Instant Message (IM) work item, in the middle of the work list.3 An email work item, at the bottom of the work list. The email is on hold.
• A work item is a collection of interactions with a customer, another agent, a supervisor, or anexpert.
• A work list is a collection of work items. When you receive a new contact, it is added to thework list so that you can monitor your current contacts. When you finish with the contact, orreject the contact, the work item is removed from the list.
Work item controls:
Each work item has a number of contact-related controls. These controls change depending on thework list window behavior and contact type.
Agent Desktop User Interface
22 Avaya Aura® Agent Desktop December 2014Comments? [email protected]
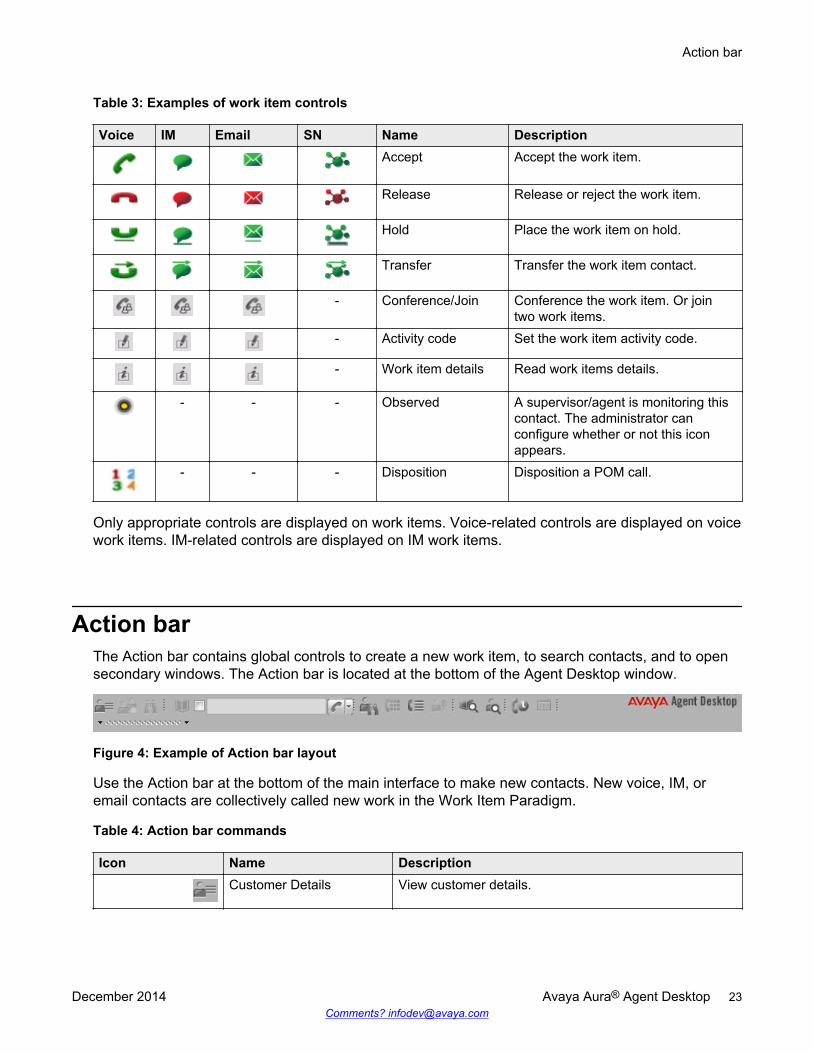
Table 3: Examples of work item controls
Voice IM Email SN Name DescriptionAccept Accept the work item.
Release Release or reject the work item.
Hold Place the work item on hold.
Transfer Transfer the work item contact.
- Conference/Join Conference the work item. Or jointwo work items.
- Activity code Set the work item activity code.
- Work item details Read work items details.
- - - Observed A supervisor/agent is monitoring thiscontact. The administrator canconfigure whether or not this iconappears.
- - - Disposition Disposition a POM call.
Only appropriate controls are displayed on work items. Voice-related controls are displayed on voicework items. IM-related controls are displayed on IM work items.
Action barThe Action bar contains global controls to create a new work item, to search contacts, and to opensecondary windows. The Action bar is located at the bottom of the Agent Desktop window.
Figure 4: Example of Action bar layout
Use the Action bar at the bottom of the main interface to make new contacts. New voice, IM, oremail contacts are collectively called new work in the Work Item Paradigm.
Table 4: Action bar commands
Icon Name DescriptionCustomer Details View customer details.
Action bar
December 2014 Avaya Aura® Agent Desktop 23Comments? [email protected]
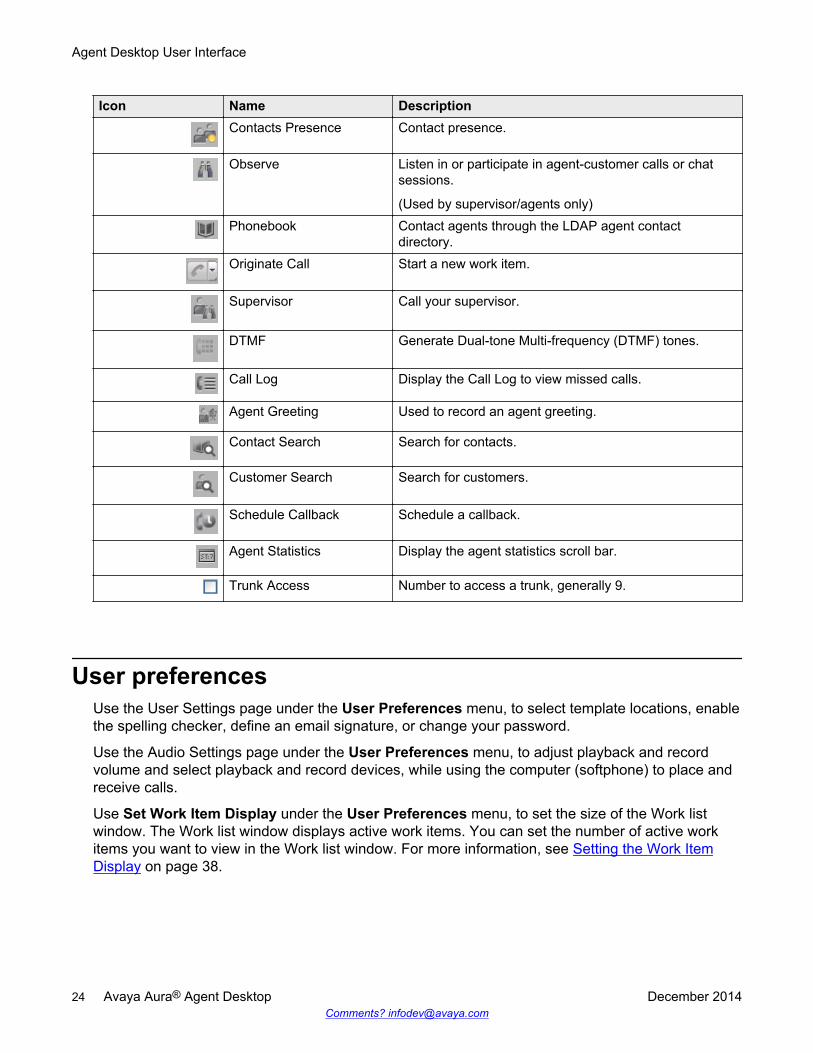
Icon Name DescriptionContacts Presence Contact presence.
Observe Listen in or participate in agent-customer calls or chatsessions.
(Used by supervisor/agents only)Phonebook Contact agents through the LDAP agent contact
directory.Originate Call Start a new work item.
Supervisor Call your supervisor.
DTMF Generate Dual-tone Multi-frequency (DTMF) tones.
Call Log Display the Call Log to view missed calls.
Agent Greeting Used to record an agent greeting.
Contact Search Search for contacts.
Customer Search Search for customers.
Schedule Callback Schedule a callback.
Agent Statistics Display the agent statistics scroll bar.
Trunk Access Number to access a trunk, generally 9.
User preferencesUse the User Settings page under the User Preferences menu, to select template locations, enablethe spelling checker, define an email signature, or change your password.
Use the Audio Settings page under the User Preferences menu, to adjust playback and recordvolume and select playback and record devices, while using the computer (softphone) to place andreceive calls.
Use Set Work Item Display under the User Preferences menu, to set the size of the Work listwindow. The Work list window displays active work items. You can set the number of active workitems you want to view in the Work list window. For more information, see Setting the Work ItemDisplay on page 38.
Agent Desktop User Interface
24 Avaya Aura® Agent Desktop December 2014Comments? [email protected]
Screen pops on Agent DesktopA screen pop is a third-party application that administrators configure using the MultimediaAdministration tool. Agent Desktop displays screen pops when a contact alerts or is answered.Administrators can configure these screen pops to display relevant information about the alerting oranswered contact based on the intrinsics, such as Skillset, To Address, and DNIS associated withthe contact.
Note:
In an AML-based Contact Center, intrinsics on voice calls are set for CDN calls only. In a SIP-enabled Contact Center, intrinsics on voice calls are set for both CDN and personal calls.
Administrators can use the CCMM Administration utility to configure the following types of screenpops:
• Basic Screen pops
• Advanced Screen pops
Administrators can configure a maximum of 20 basic screen pops and 50 advanced screen pops.However, administrators can configure a maximum of five screen pops to open for alerting contactsand up to a maximum of five screen pops to open for active contacts. Administrators must set adisplay order which is used to choose the five screen pops to launch per event.
As administrators can configure multiple screen pops to open on a work item and assign differentsettings to different screen pops the behavior of screen pops varies between contact centers. Formore information, see Avaya Aura® Contact Center Server Administration (44400-610).
Administrators can configure screen pops to open in the following three ways:
• as tabs within Agent Desktop
• external to Agent Desktop within a web browser
• as applications external to Agent Desktop
Customize Agent Desktop window settingsYou can customize the following window settings of Agent Desktop:
• Window size and position.
• Window state (maximized or minimized).
• Splitter position.
• Multimedia panel state (expanded or collapsed).
• Maximum number of work items you want the Work Items panel to display. If the number ofWork Items is more than the maximum you have set, Agent Desktop displays the Work Itemsusing a scroll bar. For more information, see Setting the Work Item Display on page 38.
Screen pops on Agent Desktop
December 2014 Avaya Aura® Agent Desktop 25Comments? [email protected]

• Panel swapping, that is, moving the Left Pane of Agent Desktop to the right side of AgentDesktop and vice versa. For more information about panel swapping, see Swapping Panels inAgent Desktop on page 39.
Once you close and reopen Agent Desktop, the system restores the window settings of AgentDesktop.
In a multiple screen setup, once you close and reopen Agent Desktop, Agent Desktop opens on thescreen that Agent Desktop was last open on.
The system saves these window settings according to your Contact Center configuration. In case ofa multimedia solution, the system stores the information in the Contact Center Multimedia database,and in case of a voice-only solution, the system stores the information in the local XML configurationfile.
Agent Desktop system tray iconYou can add the Avaya Aura Agent Desktop icon to the Windows system tray.
Important:
The system does not display the Avaya Aura Agent Desktop system tray icon by default. Toadd the Avaya Aura Agent Desktop system tray icon, you must expand the Windows SystemTray, select Customize and then select Show icon and notifications.
The Avaya Aura Agent Desktop system tray icon has a context menu that you can use to changeyour state in Agent Desktop to Go Ready, Go Not Ready, After Call Work, or Logged Out. WhenAgent Desktop is minimized, the Avaya Aura Agent Desktop system tray icon provides informationabout the state of the agent. The Avaya Aura Agent Desktop icon displays the state of the agentusing the following icon colors: amber for Not Ready, green for Ready, blue for After Call Work, andwhite for Logged Out.
You can also close Agent Desktop, set After Work Codes or Not Ready Reason codes, andconfigure settings for Agent Desktop using the Avaya Aura Agent Desktop system tray icon.
Note:
The Avaya Aura Agent Desktop icon is available only in an Avaya Aura® Contact Centerenvironment and not in a Call Center Elite environment.
Shortcut keys in Agent DesktopShortcut keys are added to Agent Desktop to increase the accessibility compliance of AgentDesktop. Shortcut keys also decrease that time that agents take to perform common tasks.
Agent Desktop User Interface
26 Avaya Aura® Agent Desktop December 2014Comments? [email protected]
You can use shortcut keys on Agent Desktop to perform actions such as, Go Ready, Go Not Ready,minimize or maximize Agent Desktop, release an active call, and answer an alerting call.
Agent Desktop displays the list of the shortcut keys in a tab on the Preferences control. For moreinformation, see Viewing shortcut keys on Agent Desktop on page 39.
Administrators configure shortcut keys in the CCMM Administration utility. For more information, seeAvaya Aura® Contact Center Server Administration (44400-610).
Agent Desktop DashboardThe Agent Desktop Dashboard enables you to collect and upload log files or videos to the CCMMserver. You can also use the Dashboard to check the network connectivity of Agent Desktop withthe Contact Center servers. This feature assists with troubleshooting if you experience a problemwhile using Agent Desktop. Depending on settings configured by the contact center administrator,use of the Agent Desktop Dashboard can be password protected. You normally use this feature onlyon request, and under the guidance of support staff.
Agent Desktop Dashboard
December 2014 Avaya Aura® Agent Desktop 27Comments? [email protected]
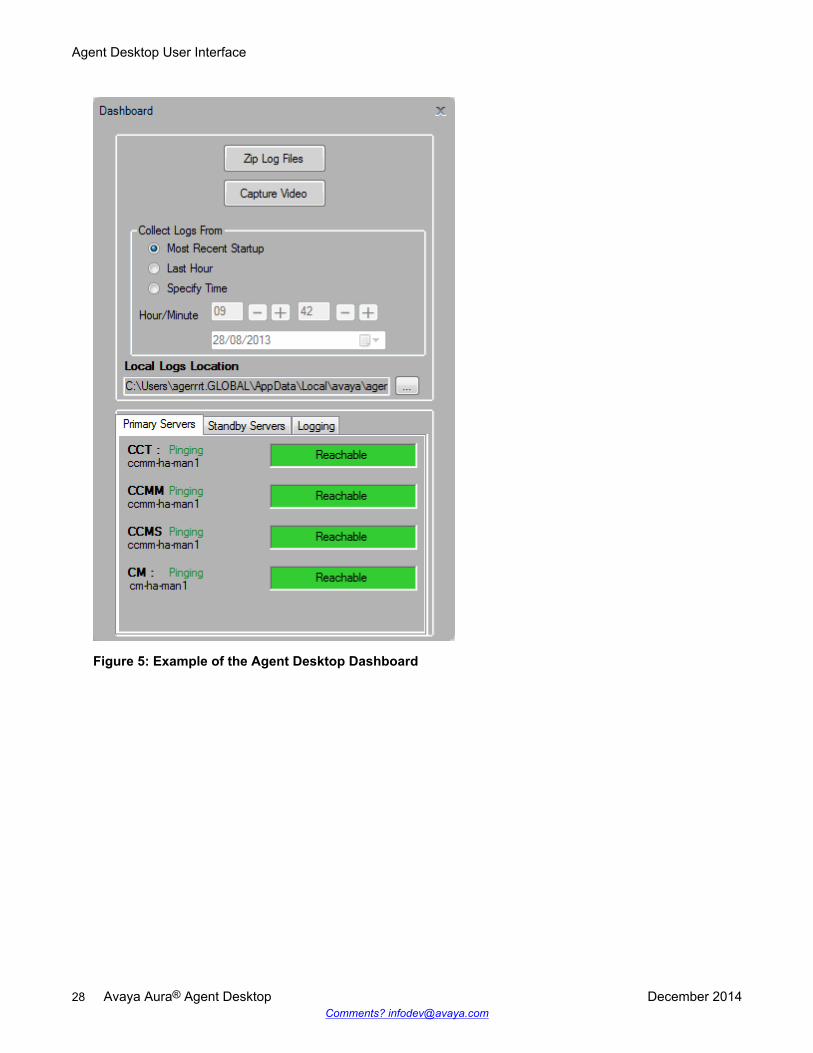
Figure 5: Example of the Agent Desktop Dashboard
Agent Desktop User Interface
28 Avaya Aura® Agent Desktop December 2014Comments? [email protected]
Chapter 4: Using your Agent Desktop
This chapter describes how to install, configure, and use Agent Desktop.
Installing Agent DesktopBefore you begin
• Ensure that the administrator has configured your Windows User ID in Communication ControlToolkit (CCT) and that you have a valid user ID, password, and domain to use with AgentDesktop. You must also ensure that the client is joined to the appropriate domain before youuse Agent Desktop.
About this taskInstall Agent Desktop if you are starting the application for the first time, or if you are starting theapplication following installation of an upgrade or a patch.
Procedure1. In Windows Explorer or Internet Explorer, type the HTTP address (URL) provided by your
system administrator.
The URL format is <Contact Center MultiMedia Servername>/agentdesktop.
2. Click Launch.
Starting Agent DesktopBefore you begin
• Ensure that you install Agent Desktop. See Installing Agent Desktop on page 29.• Ensure that the administrator has configured your Windows User ID in Communication Control
Toolkit (CCT) and that you have a valid user ID, password, and domain for use with AgentDesktop.
December 2014 Avaya Aura® Agent Desktop 29Comments? [email protected]
Important:If your contact center uses an Avaya Aura® Communication Manager, Avaya Aura® AgentDesktop client computers do not support the following applications running concurrently withAvaya Aura® Agent Desktop:
• Avaya one-X® Communicator• IP Agent• IP Softphone• Any other non-Avaya softphone applications• Avaya one-X® Agent. In a Multimedia-only Contact Center deployment, where the Contact
Center agents are configured for Multimedia contact types only, running Avaya Aura®
Agent Desktop concurrently with Avaya one-X® Agent on a client computer is supported.
Note:In a SIP-enabled Contact Center, ensure no call is present on the deskphone when you launchand log on to Agent Desktop.
About this taskStart Agent Desktop when you are ready to open the application.
Procedure1. In Windows Explorer or Internet Explorer, type the HTTP address (URL) provided by your
system administrator.
The URL format is <Contact Center MultiMedia Servername>/agentdesktop.
2. Click Launch.
OR
Click Start > Programs > Avaya > Avaya Aura Agent Desktop 6.0.
The Agent Desktop toolbar appears. If a CCT Connection Failure message appears statingthe automatic login to CCT using your Windows logon identity failed, your Windows User IDis not configured on CCT. Click Retry to enter valid User Credentials or click Cancel to exitthe application.
Procedure job aidIf you log on to the Agent Desktop to handle Predictive Outbound contacts, a delay can occur beforeyou can log on to the required applications. If the delay occurs after the agent logs on to ContactCenter Manager Server or Contact Center Multimedia, and before logging on to the PredictiveOutbound skillset, ensure that CPSEE Application server name is in the hosts file of the clientmachine.
Using your Agent Desktop
30 Avaya Aura® Agent Desktop December 2014Comments? [email protected]

Creating a shortcut to Agent DesktopAbout this taskCreate a shortcut to Agent Desktop to quickly access the application without manually entering theURL.
Procedure1. Click Start > Programs > Avaya.
2. Right-click Avaya Aura Agent Desktop.
3. Select Send To > Desktop (create shortcut).
Logging on to Agent Desktop when using a desktop phoneAbout this taskLog on to the Agent Desktop after you start the Agent Desktop application. While you log on, youcan choose between a desktop phone and a softphone (if the softphone option is available). Thesystem automatically configures your status to Not Ready. Change your status to Ready to indicatethat you are available to handle all media types for which you are licensed and configured. If you areassigned to a skillset for a particular contact type, you can receive and create contacts in thatcontact type.
Note:You must be logged on to the desktop phone before you log on to Agent Desktop.
Procedure1. Start the Agent Desktop.
2. If you have Hot Desking enabled, type your workstation name at the prompt. Workstationbased Hot Desking is supported only in Avaya Communication Server 1000 AML-basedsolutions.
3. On the Agent Desktop Top bar, from the Status list, select Login.
4. Click the Telephony tab, if available.
5. Select Desktop Phone from the Place and receive calls using drop-down list.
A logon prompt does not appear. Your logon ID is automatically filled in based on theCommunication Control Toolkit implementation for your Contact Center. The system verifiesyour logon ID and automatically logs you on to the Agent Desktop application.
6. If you are configured to handle Multimedia contacts (such as email), in the Multimedia tab,type your ID and Password.
7. Click Login.
Creating a shortcut to Agent Desktop
December 2014 Avaya Aura® Agent Desktop 31Comments? [email protected]
The status icon changes to Not Ready. You must be logged on to the desktop phone tohandle customer calls. If you are not logged on to the desktop phone, when a customer callarrives, your agent state changes to Not Ready.
Variable definitionsName DescriptionID (Multimedia) Your logon ID appears in the ID box, based on your
Communication Control Toolkit configuration.Password (Multimedia) Initially, for multimedia agents, your password is the
same as your Agent Logon ID. You must changeyour password using the steps in Changing yourpassword on page 37. The system verifies yourpassword and logs you on to the Agent Desktopapplication. The Logged Out button changes toLogged In.
Logging on to Agent Desktop when using the softphoneAbout this taskLog on to the Agent Desktop after you start the Agent Desktop application. While you log on, youcan choose between a desktop phone and a softphone (if the softphone option is available). Thesystem automatically configures your status to Not Ready. Change your status to Ready to indicatethat you are available to handle all media types for which you are licensed and configured. If you areassigned to a skillset for a particular contact type, you can receive and create contacts in thatcontact type.
Important:If an audio device (such as a headset or microphone) is added while Agent Desktop is running,you must restart the Agent Desktop to start using the new audio device.
Procedure1. Start the Agent Desktop.
2. If you have Hot Desking enabled, type your workstation name at the prompt.
3. On the Agent Desktop Top bar, from the Status list, select Login.
4. Click the Telephony tab, if available.
5. Select My Computer from the Place and receive calls using drop-down list.
6. If you are configured to handle Multimedia contacts (such as email), in the Multimedia tab,type your ID and Password.
7. Click Login.
Using your Agent Desktop
32 Avaya Aura® Agent Desktop December 2014Comments? [email protected]
The status icon changes to Not Ready and a My Computer (softphone) Registered messageappears on the Action bar of the Agent Desktop. The Registered message means that youcan now place and receive calls using your computer (softphone). Call control on thecomputer (softphone) is exactly the same as using a desktop phone.
Variable definitionsName DescriptionExtension The extension number appears in the Extension box,
based on your configuration.Password The password for the extension.Server Address The server address of the telephony switch. The
server IP address must be configured in the ContactCenter Manager Administration.
License Type The Contact Center license type.ID (Multimedia) Your logon ID appears in the ID box, based on your
Communication Control Toolkit configuration.Password (Multimedia) Initially, for multimedia agents, your password is the
same as your Agent Logon ID. You must changeyour password using the steps in Changing yourpassword on page 37. The system verifies yourpassword and logs you on to the Agent Desktopapplication. The Logged Out button changes toLogged In.
Logging on to Agent Desktop for Call Center EliteTelephony
About this taskLog on to the Agent Desktop after you start the Agent Desktop application. When you log on, thesystem automatically configures your status to Not Ready. Change your status to Ready to indicatethat you are available to handle all media types for which you are licensed. If you are assigned to askillset for a particular contact type, you can receive and create contacts in that contact type.
Procedure1. Start the Agent Desktop.
The Agent Desktop Profile window appears.
2. Type Agent ID and Password.
3. Select the appropriate Profile.
Logging on to Agent Desktop for Call Center Elite Telephony
December 2014 Avaya Aura® Agent Desktop 33Comments? [email protected]
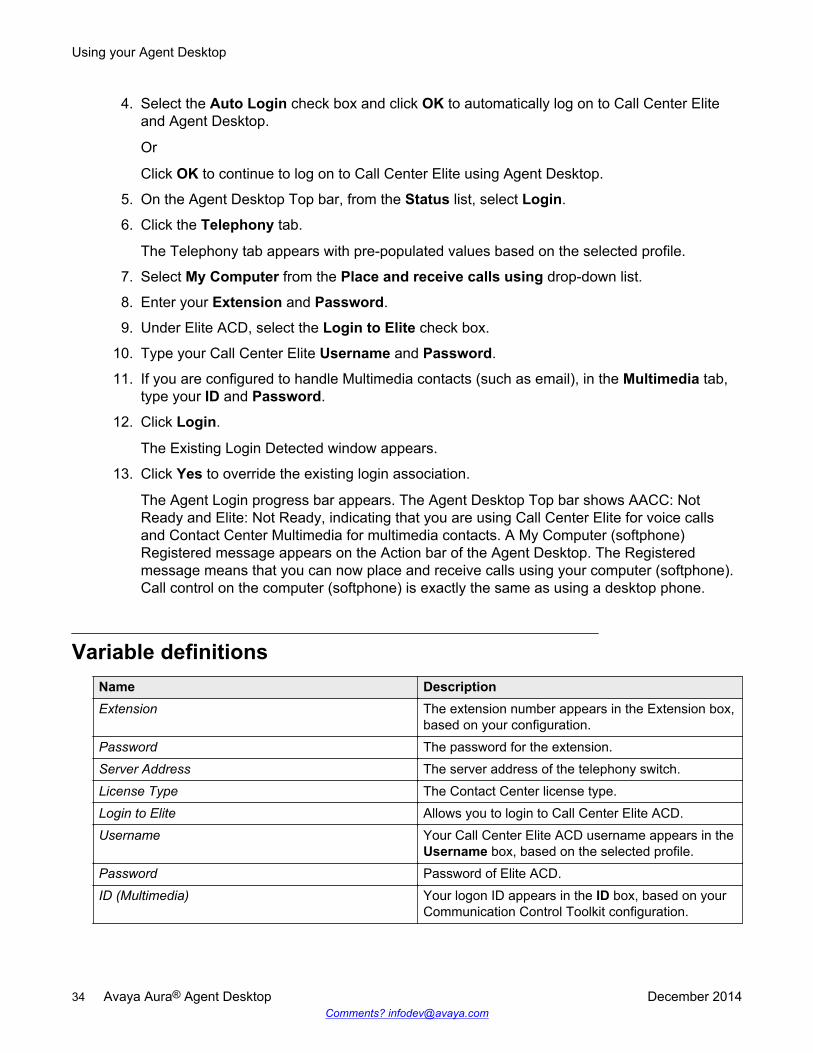
4. Select the Auto Login check box and click OK to automatically log on to Call Center Eliteand Agent Desktop.
Or
Click OK to continue to log on to Call Center Elite using Agent Desktop.
5. On the Agent Desktop Top bar, from the Status list, select Login.
6. Click the Telephony tab.
The Telephony tab appears with pre-populated values based on the selected profile.
7. Select My Computer from the Place and receive calls using drop-down list.
8. Enter your Extension and Password.
9. Under Elite ACD, select the Login to Elite check box.
10. Type your Call Center Elite Username and Password.
11. If you are configured to handle Multimedia contacts (such as email), in the Multimedia tab,type your ID and Password.
12. Click Login.
The Existing Login Detected window appears.
13. Click Yes to override the existing login association.
The Agent Login progress bar appears. The Agent Desktop Top bar shows AACC: NotReady and Elite: Not Ready, indicating that you are using Call Center Elite for voice callsand Contact Center Multimedia for multimedia contacts. A My Computer (softphone)Registered message appears on the Action bar of the Agent Desktop. The Registeredmessage means that you can now place and receive calls using your computer (softphone).Call control on the computer (softphone) is exactly the same as using a desktop phone.
Variable definitionsName DescriptionExtension The extension number appears in the Extension box,
based on your configuration.Password The password for the extension.Server Address The server address of the telephony switch.License Type The Contact Center license type.Login to Elite Allows you to login to Call Center Elite ACD.Username Your Call Center Elite ACD username appears in the
Username box, based on the selected profile.Password Password of Elite ACD.ID (Multimedia) Your logon ID appears in the ID box, based on your
Communication Control Toolkit configuration.
Using your Agent Desktop
34 Avaya Aura® Agent Desktop December 2014Comments? [email protected]
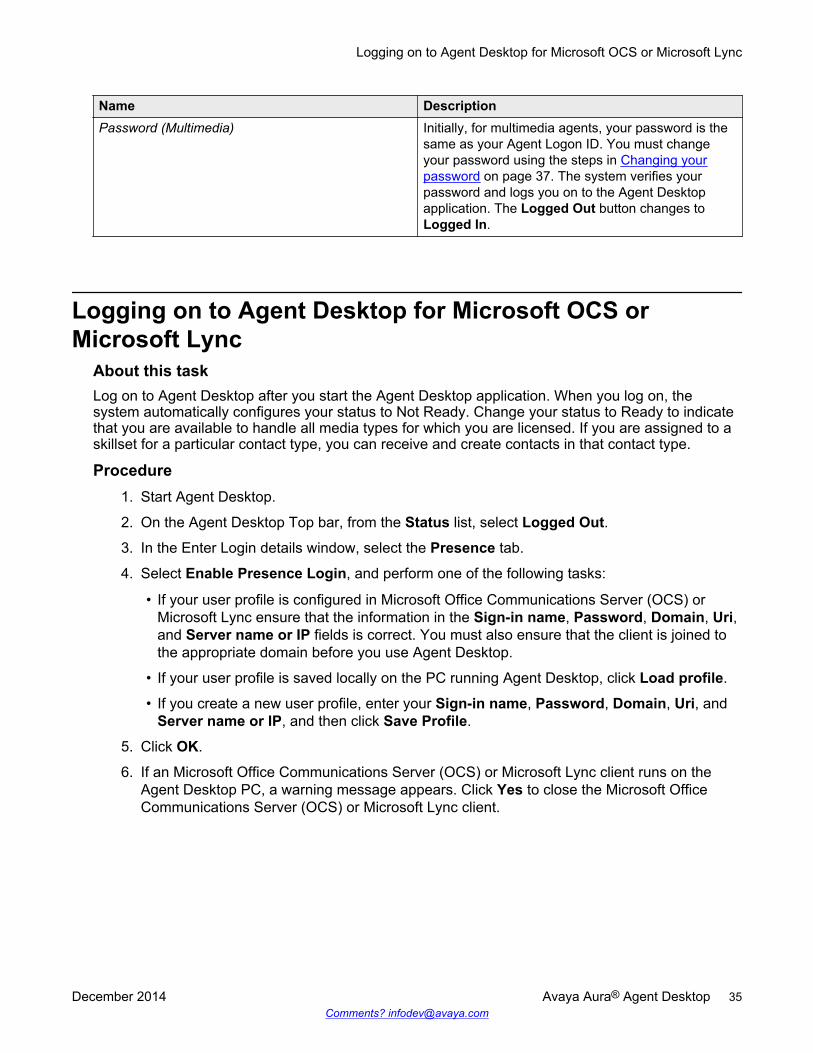
Name DescriptionPassword (Multimedia) Initially, for multimedia agents, your password is the
same as your Agent Logon ID. You must changeyour password using the steps in Changing yourpassword on page 37. The system verifies yourpassword and logs you on to the Agent Desktopapplication. The Logged Out button changes toLogged In.
Logging on to Agent Desktop for Microsoft OCS orMicrosoft Lync
About this taskLog on to Agent Desktop after you start the Agent Desktop application. When you log on, thesystem automatically configures your status to Not Ready. Change your status to Ready to indicatethat you are available to handle all media types for which you are licensed. If you are assigned to askillset for a particular contact type, you can receive and create contacts in that contact type.
Procedure1. Start Agent Desktop.
2. On the Agent Desktop Top bar, from the Status list, select Logged Out.
3. In the Enter Login details window, select the Presence tab.
4. Select Enable Presence Login, and perform one of the following tasks:
• If your user profile is configured in Microsoft Office Communications Server (OCS) orMicrosoft Lync ensure that the information in the Sign-in name, Password, Domain, Uri,and Server name or IP fields is correct. You must also ensure that the client is joined tothe appropriate domain before you use Agent Desktop.
• If your user profile is saved locally on the PC running Agent Desktop, click Load profile.
• If you create a new user profile, enter your Sign-in name, Password, Domain, Uri, andServer name or IP, and then click Save Profile.
5. Click OK.
6. If an Microsoft Office Communications Server (OCS) or Microsoft Lync client runs on theAgent Desktop PC, a warning message appears. Click Yes to close the Microsoft OfficeCommunications Server (OCS) or Microsoft Lync client.
Logging on to Agent Desktop for Microsoft OCS or Microsoft Lync
December 2014 Avaya Aura® Agent Desktop 35Comments? [email protected]
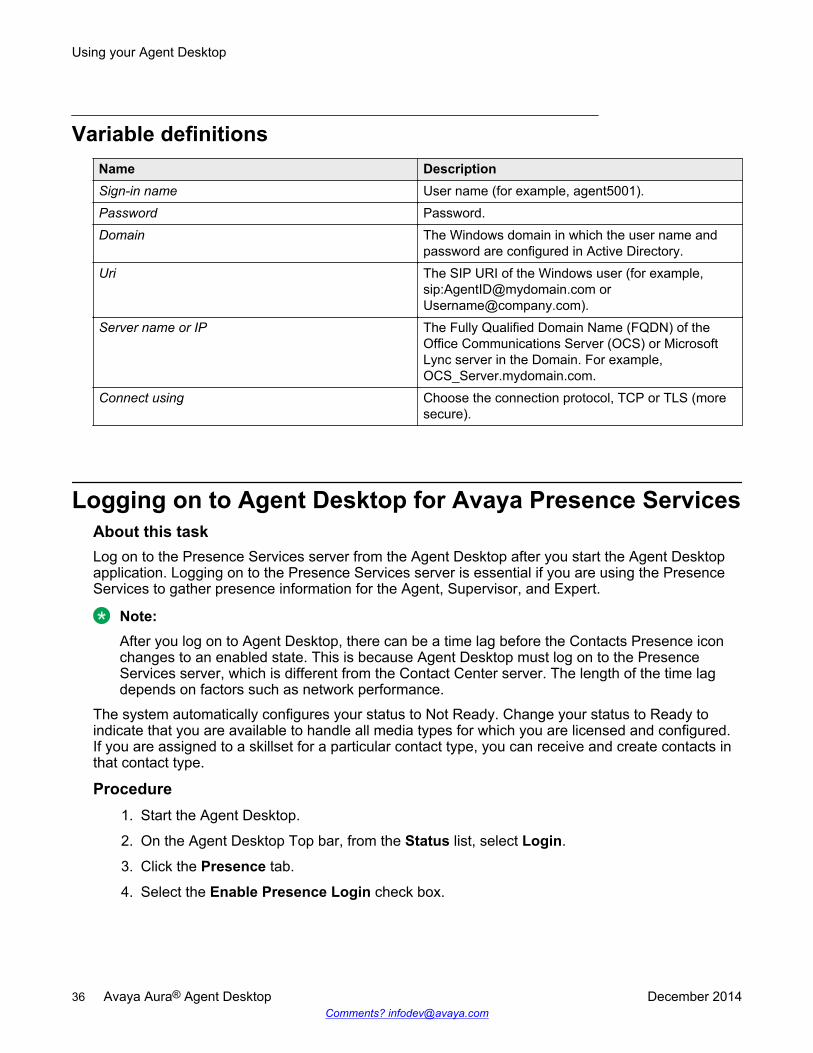
Variable definitionsName DescriptionSign-in name User name (for example, agent5001).Password Password.Domain The Windows domain in which the user name and
password are configured in Active Directory.Uri The SIP URI of the Windows user (for example,
sip:[email protected] [email protected]).
Server name or IP The Fully Qualified Domain Name (FQDN) of theOffice Communications Server (OCS) or MicrosoftLync server in the Domain. For example,OCS_Server.mydomain.com.
Connect using Choose the connection protocol, TCP or TLS (moresecure).
Logging on to Agent Desktop for Avaya Presence ServicesAbout this taskLog on to the Presence Services server from the Agent Desktop after you start the Agent Desktopapplication. Logging on to the Presence Services server is essential if you are using the PresenceServices to gather presence information for the Agent, Supervisor, and Expert.
Note:After you log on to Agent Desktop, there can be a time lag before the Contacts Presence iconchanges to an enabled state. This is because Agent Desktop must log on to the PresenceServices server, which is different from the Contact Center server. The length of the time lagdepends on factors such as network performance.
The system automatically configures your status to Not Ready. Change your status to Ready toindicate that you are available to handle all media types for which you are licensed and configured.If you are assigned to a skillset for a particular contact type, you can receive and create contacts inthat contact type.
Procedure1. Start the Agent Desktop.
2. On the Agent Desktop Top bar, from the Status list, select Login.
3. Click the Presence tab.
4. Select the Enable Presence Login check box.
Using your Agent Desktop
36 Avaya Aura® Agent Desktop December 2014Comments? [email protected]
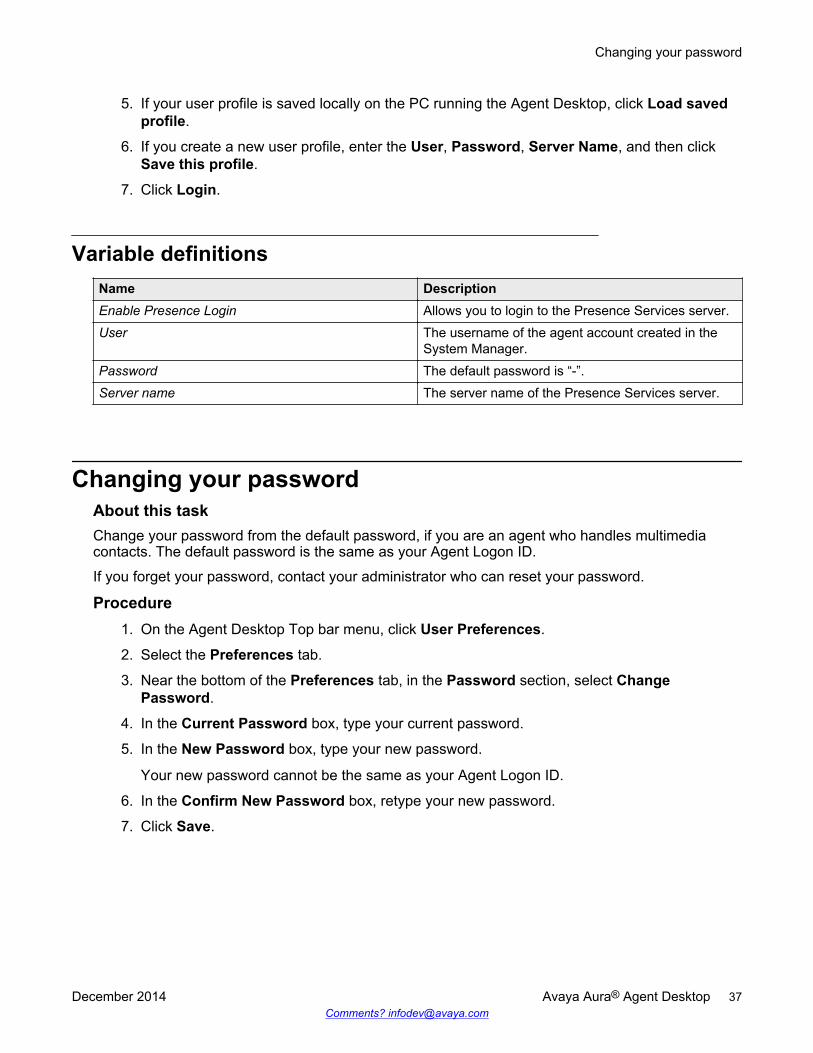
5. If your user profile is saved locally on the PC running the Agent Desktop, click Load savedprofile.
6. If you create a new user profile, enter the User, Password, Server Name, and then clickSave this profile.
7. Click Login.
Variable definitionsName DescriptionEnable Presence Login Allows you to login to the Presence Services server.User The username of the agent account created in the
System Manager.Password The default password is “-”.Server name The server name of the Presence Services server.
Changing your passwordAbout this taskChange your password from the default password, if you are an agent who handles multimediacontacts. The default password is the same as your Agent Logon ID.
If you forget your password, contact your administrator who can reset your password.
Procedure1. On the Agent Desktop Top bar menu, click User Preferences.
2. Select the Preferences tab.
3. Near the bottom of the Preferences tab, in the Password section, select ChangePassword.
4. In the Current Password box, type your current password.
5. In the New Password box, type your new password.
Your new password cannot be the same as your Agent Logon ID.
6. In the Confirm New Password box, retype your new password.
7. Click Save.
Changing your password
December 2014 Avaya Aura® Agent Desktop 37Comments? [email protected]
Using the Agent Desktop configurable home pageAbout this taskAdministrators can set up an Agent Desktop configurable home page to open a screen pop whenyou start Agent Desktop. The screen pop displays a Web page that the administrators configure.Agents can use this Web page to perform their work efficiently. For example, the Web page canopen the latest sales or marketing campaign that the company is running at that time, or the Webpage can include the default agent script that the agent uses while talking to a customer.
Procedure1. Start Agent Desktop.
Agent Desktop opens a screen pop containing a Web page that the administrators configure.
2. Right-click the screen pop tab to close the screen pop.
3. Click the Home Page button on the Agent Desktop toolbar to reopen the screen pop.
Setting the Work Item DisplayAbout this taskThe Work list window displays the active work items. Use Set Work Item Display to set the numberof active work items that you want to view in the Work list window.
For example, if you set the work item display to the maximum of two and the number of active workitems is three, then the Work list window displays two active work items. You can use scroll bars tothe right of the Work list window to view the third active work item. The Work list window displaysthe order of the work items as hover text. The hover text for the first work item is 1/3, and so on.
Procedure1. On the Agent Desktop Top bar menu, click User Preferences.
2. From the User Preferences menu, select Set Work Item Display.
3. From the Set Work Item Display menu, select the maximum number of active work itemsthat you want the Work list window to display. You can choose from the following options:
• Size to show all
• Show maximum of 1
• Show maximum of 2
• Show maximum of 3
• Show maximum of 4
• Show maximum of 5
By default, Set Work Item Display is set to Size to show all.
Using your Agent Desktop
38 Avaya Aura® Agent Desktop December 2014Comments? [email protected]
The Set Work Item Display setting is saved in the agent profile after you log off from AgentDesktop. When you log back on to Agent Desktop the setting is reset to the saved value.
Swapping Panels in Agent DesktopBefore you begin
• Ensure that the administrators have enabled Allow Agent Desktop Panel Swap in the CCMMAdministration utility.
• Log on to Agent Desktop.
About this taskYou can move the Left Pane of Agent Desktop to the right side of Agent Desktop and vice-versa.
A Swap Grip bar has been added to the top of the left panel in Agent Desktop. You can drag anddrop the Swap Grip Bar onto the Swap button to perform the panel swap.
The system saves the panel position information according to your Contact Center configuration. Incase of a multimedia solution, the system stores the information in the Contact Center Multimediadatabase, and in case of a voice-only solution, the system stores the information in the local XMLconfiguration file.
Procedure1. On the Left Pane, click the Swap Grip bar.
When you hover over the Swap Grip bar, the system displays the following tooltip: Dragand drop onto swap button to switch panels.
2. To perform the panel swap, drag and drop the Swap Grip bar onto the Swap button.
The Left Pane moves to the right side of Agent Desktop.
Viewing shortcut keys on Agent DesktopBefore you beginLog on to Agent Desktop.
About this taskYou can use shortcut keys on Agent Desktop to perform common tasks, such as Go Ready, Go NotReady, minimize Agent Desktop, release an active call, and answer an alerting call.
Procedure1. On Agent Desktop, click User Preferences > Preferences.
2. Click the Shortcut Keys tab.
Swapping Panels in Agent Desktop
December 2014 Avaya Aura® Agent Desktop 39Comments? [email protected]
The system displays the list of shortcut keys.
3. To disable shortcut keys, clear the Enable Shortcut Keys check box.
By default, the Enable Shortcut Keys check box is selected on Agent Desktop.
Muting and unmuting when using the softphoneAbout this taskUse the mute function when you want to prevent other parties from listening to your conversation orto avoid the background noise during an active call.
Note:The mute function is available only for the My Computer mode.
ProcedureOn an active call or during a conference, perform any one of the following actions:
• To mute a call, in the Top bar, click Mute.
The Mute button changes to Unmute, and other parties present on the call cannot hear you speakand cannot hear any background noise.
• To unmute a call, in the Top bar, click Unmute.
The Unmute button changes to Mute, and other parties present on the call can hear you speaking.
Changing the audio settings for softphoneAbout this taskYou can adjust the audio settings for recording and playback, if you are using your computer(softphone) to place and receive calls.
Procedure1. On the Agent Desktop Top bar menu, click User Preferences > Audio Settings.
2. In the Audio Settings tab, in the Volume section, adjust the Playback slider to set thevolume for all sound output through your computer speakers or headphones.
3. Select the Playback Mute check box to eliminate any sound output through your computerspeakers or headphones.
4. Adjust the Record slider to set the recording volume of all sound transmitted through amicrophone to your computer.
Using your Agent Desktop
40 Avaya Aura® Agent Desktop December 2014Comments? [email protected]

5. Select the Record Mute check box to eliminate any sound being sent to your computerthrough the microphone.
Configuring the audio devices for softphoneAbout this taskYou can configure the audio playback and recording hardware, if you are using your computer(softphone) to place and receive calls.
Procedure1. On the Agent Desktop Top bar menu, click User Preferences > Audio Settings.
2. In the Audio Settings tab, in the Audio Devices section, select the audio playbackhardware on your local system from the Playback Device list.
3. Select the audio recording hardware on your local system from the Record Device list.
4. Click Save Audio Devices.
Monitoring the audio quality and VoIP trafficAbout this taskThe Audio Monitor window helps you in verifying the statistics of microphone, speaker, and Voice-over-IP (VoIP) traffic information. Use the Audio Monitor dialog box to determine the audio quality ifthe quality of your VoIP communications degrades. This procedure applies only when you are usingAgent Desktop in My Computer mode.
Procedure1. On the Agent Desktop Top bar menu, click Audio Monitor.
The system displays the status of audio quality of volume and VoIP traffic information for thecorresponding voice call.
2. During an active call, if you do not want Agent Desktop to transmit audio when you are notspeaking, select Silence Suppression enabled in the Audio Status section.
3. Click Close.
Configuring the audio devices for softphone
December 2014 Avaya Aura® Agent Desktop 41Comments? [email protected]
Variable definitionsName DescriptionMicrophone Strength of the audio quality connected to your
personal computer.Speaker Strength of the speaker quality connected to your
personal computer.Destination IP address of the call destination.Codec A device or a computer program that converts binary
signals transmitted on digital networks to analogsignals converted on their analog networks.
Traffic Amount of congestion in the network.Discarded Packets that were received but discarded.Dropped Packets that were not received.Jitter Buffer Packet buffer size in milliseconds (ms).
The jitter buffer temporarily stores the incoming datapackets in order to minimize delay variations andsends the voice packets to the voice processor inevenly spaced intervals. There can be variations inpacket arrival time due to congestion in network, driftin timing, or change in routing.
Ping Delay Time spent by the batch file waiting between twoconsecutive pings until a timeout.
Perceived Delay Network delay in receiving packets in milliseconds.Quality Percentage of packet loss for receiving packets.Silence Suppression enabled Select the Silence Suppression enabled check box
in the Audio Status section, if you do not wantAgent Desktop to transmit audio when you are notspeaking. By doing so, the system reduces the totalamount of data that is sent through your networkconnection.
Changing your status to ReadyAbout this taskChange your status to Ready when you are available to create and receive contacts. In a CallCenter Elite environment, you can change your status to Ready to receive Voice contacts,Multimedia contacts, or both types of contacts. This is available only for agents who use Call CenterElite Telephony.
Using your Agent Desktop
42 Avaya Aura® Agent Desktop December 2014Comments? [email protected]

When you change your status to Ready in a SIP-enabled Contact Center, your Contacts Presencestatus automatically changes to Available.
Procedure1. On the Agent Desktop Top bar menu, click the Status icon.
2. Select Go Ready to create or receive both Voice and Multimedia contacts.
In an Elite environment, select Go Ready — Voice to create or receive only Voice contacts.
or
Select Go Ready— Multimedia to create or receive only Multimedia contacts.
The Agent Desktop places you in the following states:
• If you select Go Ready: The status icon changes to green. In a Call Center Eliteenvironment, the Top bar displays AACC: Ready and Elite: Ready.
• If you select Go Ready — Voice: The left-hand side of the status icon changes to orangeand the right-hand side of the status icon changes to green. The Top bar displays AACC:Not Ready and Elite: Ready.
• If you select Go Ready— Multimedia: The left-hand side of the status icon changes togreen and the right-hand side of the status icon changes to orange. The Top bar displaysAACC: Ready and Elite: Not Ready.
Changing your status to Not ReadyAbout this taskChange your status to Not Ready when you are unavailable to receive contacts. In a Call CenterElite environment, you can change your status to Not Ready so that you do not receive Voicecontacts, Multimedia contacts, or both types of contacts. This is available only for agents who useCall Center Elite Telephony.
If your administrator has configured Not Ready Reason codes, you can select a code when youchange your status to Not Ready.
When you change your status to Not Ready in a SIP-enabled Contact Center, your ContactsPresence status automatically changes to Do Not Disturb.
Your supervisor or administrator configures codes for Not Ready Reasons. Administrators defineNot Ready Reason codes in Contact Center Manager Server. Not Ready Reason codes can bealphanumeric. Agent Desktop displays the Not Ready Reason codes list.
Procedure1. On the Agent Desktop Top bar menu, click the Status icon.
2. To receive neither Voice nor Multimedia contacts, click Go Not Ready.
In an Elite environment, select Go Not Ready — Voice to create and receive onlyMultimedia contacts.
Changing your status to Not Ready
December 2014 Avaya Aura® Agent Desktop 43Comments? [email protected]
Or
Select Go Not Ready— Multimedia to create and receive only Voice contacts.
Using Agent Desktop you can choose one of the following states:
• If you select Go Not Ready, the status icon changes to orange. In the Call Center Eliteenvironment, the Top bar displays AACC: Not Ready and Elite: Not Ready.
• If you select Go Not Ready — Voice, the left-hand side of the status icon changes togreen and the right-hand side of the status icon changes to orange. In the Call CenterElite environment, the Top bar displays AACC: Ready and Elite: Not Ready.
• If you select Go Not Ready— Multimedia, the left-hand side of the status icon changes toorange and the right-hand side of the status icon changes to green. In the Call CenterElite environment, the Top bar displays AACC: Not Ready and Elite: Ready.
3. From the Select or type a N/R Reason Code drop-down list, select the Not Ready Reasoncode.
Changing your status to Not Ready when on a contactAbout this taskChange your status to Not Ready while active on a contact to indicate that you are not ready toaccept contacts when the current contact is complete. If your administrator allows, you can select aNot Ready Reason code when you change your status to Not Ready.
Procedure1. While active on a contact, on the Agent Desktop Top bar menu click the Status icon.
2. Click Go Not Ready.
3. From the Select or type a N/R Reason Code drop-down list, select the Not Ready Reasoncode.
The agent status changes to Not Ready on the Top bar.
Note:
You can also go Not Ready without selecting a Not Ready Reason code. If you go NotReady without selecting a Not Ready Reason code, depending on the configuration setby your administrator, the agent status changes either to a Not Ready state or an ACWstate.
Using your Agent Desktop
44 Avaya Aura® Agent Desktop December 2014Comments? [email protected]
Collecting and uploading log files from the Agent DesktopDashboard
About this taskThe Agent Desktop Dashboard assists support staff by gathering all Agent Desktop logs and ascreen capture of the Windows desktop. The Dashboard saves these logs in a .ZIP file which youcan upload to the Contact Center server. Use this feature if a member of support staff requests thelogs from your desktop PC. If your Agent Desktop Dashboard is password protected, contact youradministrator for the password.
Procedure1. On the Agent Desktop Top bar menu, click User Preferences.
2. Click Open Dashboard.
3. If you want to collect log events for a specific time period, in the Collect Logs From section,select the check box for the appropriate time period .
If you select Specify Time, complete the Hour/Minute fields.
4. On the Dashboard window, click ZIP Log Files.
The Dashboard window relocates to bottom corner of the screen, so it does not interferewith the screen capture. The ZIP Log Files button changes to Upload Log Files. WhenAgent Desktop completes creating the .ZIP file, it displays the Dashboard Message screen,identifying the folder to which it saved the log files.
5. Click Upload Log Files.
Agent Desktop uploads the .ZIP file directly to the server.
Variable definitionsName DescriptionMost Recent Startup Select this check box to extract and upload only log
events generated since the most recent launch ofAgent Desktop.
Last Hour Select this check box to extract and upload only logevents generated in the last hour.
Specify Time Select this check box to specify a time and date fromwhich you want to extract and upload log events.
If you select this option, complete the Hour/Minutefield and, optionally, specify a date.
Collecting and uploading log files from the Agent Desktop Dashboard
December 2014 Avaya Aura® Agent Desktop 45Comments? [email protected]
Checking the network connection in the Agent DesktopDashboard
About this taskThe Dashboard shows the status of the connection between Agent Desktop and the Contact Centerservers. You can use this when troubleshooting, to determine whether you have an issue with yournetwork connection. If your contact center has High Availability configured, Agent DesktopDashboard has an additional tab for the Contact Center standby servers.
Procedure1. On the Agent Desktop Top bar menu, click User Preferences.
2. Click Open Dashboard.
3. Select Primary Servers.
4. On the Primary Servers tab, review the status of the listed servers.
The Dashboard shows the different servers configured in the contact center, the IP addressor server name of each, and the status of each network connection with Agent Desktop.
Recording a video of your agent desktop actionsAbout this taskYou can record a sequence of screen captures from Agent Desktop to assist with troubleshootingAgent Desktop problems. When you start the Capture Video function, the Dashboard startsrecording one screen capture per second. When you finish recording, the Dashboard saves thesescreen captures in a .ZIP file which you can upload to the Contact Center server.
Use this feature if a member of support staff wants to know the actions you took that resulted in anissue you encountered. If your Agent Desktop Dashboard is password protected, contact youradministrator for the password.
Procedure1. On the Agent Desktop Top bar menu, click User Preferences.
2. Click Open Dashboard.
3. On the Dashboard, click Capture Video.
The Dashboard window relocates to bottom corner of the screen, so it does not interferewith the video capture. The button label changes to Finish Recording, and the buttonchanges color to red.
4. Complete the actions required to reproduce the error.
5. Click Finish Recording.
Using your Agent Desktop
46 Avaya Aura® Agent Desktop December 2014Comments? [email protected]
Agent Desktop displays the Dashboard Message screen, identifying the folder to which itsaved the log files.
6. Click Upload Video to upload the video .ZIP file to the server.
Changing the Agent Desktop Dashboard log settingsBefore you beginLog on to Agent Desktop.
About this taskFollow this procedure to change the Agent Desktop logging settings. Change these settings onlyunder the guidance of the system administrator or support staff.
Procedure1. On the Agent Desktop Top bar menu, click User Preferences.
2. Click Open Dashboard.
3. Select Logging.
4. On the Logging tab, check additional logging options that you want to enable.
Important:
The settings on this tab can lead to additional disk space usage and processor overheadon your desktop computer. Change these settings only with the guidance of theadministrator or of support staff.
Accessing online helpAbout this taskAccess online help when you need immediate help to perform tasks. Agent Desktop includes onlinehelp for both agents and supervisors.
ProcedureOn the Agent Desktop Top bar menu, click Help > Show Help.
Or
Press the F1 key to display the online help.
Changing the Agent Desktop Dashboard log settings
December 2014 Avaya Aura® Agent Desktop 47Comments? [email protected]
Closing contacts if you receive a force log out messageSupervisors can use the Force Agent Log out feature to remotely log out an agent who forgets to logout at the end of their shift.
Normally a supervisor does not force log out an agent who is active on Agent Desktop. However, itis possible that a supervisor can make an error and force log out an active agent.
If this happens, Agent Desktop displays a State Change Alert dialog identifying the supervisor whoperformed the force log out. Agent Desktop closes 60 seconds after it displays this message.
Clear the message and close any open contacts you have as quickly as possible. Before logging inagain, contact your supervisor.
If you were away from your desk, and a supervisor used the Force Agent Log out feature to log youout of Agent Desktop, Agent Desktop displays a message the first time you log on again, to informyou that this happened.
Understanding supervisor changes to your Ready statusYour supervisor can change your agent status, to toggle it between Ready and Not Ready. Whenthey change an agent status to Not Ready, a supervisor has the option to enter a Not ReadyReason code for the agent. The following scenarios describe situations in which a supervisorchanges an agent’s status:
• A trainee agent goes Not Ready, entering a reason code of At_Lunch. They return from lunchbut forget to reset their status to Ready. Their supervisor can see that they are at their desk,and also that they show Not Ready on the Real-Time Display (RTD). The supervisor uses theChange State button to make the agent ready.
• A trainee agent leaves their desk for lunch, but forgets to set their status to Not Ready.Contacts continue to alert on their Agent Desktop. The supervisor notices that the agent is notat their desk, and that they show Ready on the RTD. The supervisor uses the Change Statebutton to make the agent not ready.
When a supervisor changes your status, Agent Desktop displays a notification informing you of thestatus change and the supervisor who made it.
Logging off from Agent DesktopBefore you begin
• Ensure that you do not have a contact open. If a contact is open, you must close the contactbefore you log off of the application.
Using your Agent Desktop
48 Avaya Aura® Agent Desktop December 2014Comments? [email protected]
About this taskLog off from Agent Desktop when you are ready to exit the application.
A warning message appears asking you to confirm that you want to close the Agent Desktop andlog off.
Procedure1. On the Agent Desktop Top bar menu, click the Status icon.
2. Click Log Out.
Agent Desktop logs you off. The status icon changes to red and the Top bar displays theLogged Out status.
Logging off from Agent Desktop
December 2014 Avaya Aura® Agent Desktop 49Comments? [email protected]

Chapter 5: Telephony
This chapter describes how to use Avaya Aura® Agent Desktop to handle incoming telephone callsfrom customers.
You can use Agent Desktop to perform the following telephony tasks:
• Accept and decline incoming contacts
• Enter an Activity code
• Enter an After Work Call Item code
• Place and release a call on hold
• Accept a CDN call by placing a DN call on hold
• Transfer a call to another party
• Conference a call
• Join two calls (if available)
• End a call
• Call a supervisor
• Make a call
• Enter DTMF Digits
• Handle an emergency
• Observe and barge-in on a voice contact or non-skillset call (supervisor/agents only)
• Call an agent using Contacts Presence
• Call an agent using the Phonebook
Although you can use your phone to perform certain tasks, Avaya recommends that you use AgentDesktop to perform all telephony tasks, such as logging on or off, changing your status to Ready orNot Ready, accepting or rejecting a call, placing a customer on hold, transferring a customer, callinga supervisor, and releasing a call.
The Customer Details window shows a history of all past voice calls for a contact. The History tablists the voice calls in reverse chronological order, that is the latest calls appear higher in the call list.
In a SIP-enabled Contact Center there are some telephony tasks that are not available on youragent phones. You must perform the following telephony tasks only using Agent Desktop:
• Enter activity codes
50 Avaya Aura® Agent Desktop December 2014Comments? [email protected]
• Call a supervisor
• Observe and barge-in on a voice contact or non-skillset call (supervisor/agents only)
Important:
You must not use your desktop phone or Agent Desktop to phone, transfer a call, or conferencea call to a phone number that is:
• routed to a CDN (Route Point). For example, a Virtual Directory Number (VDN) routed to aCDN (Route Point).
• converted to a CDN (Route Point). For example, when using digit manipulation on the callserver.
• call forwarded to a CDN (Route Point).
You can use your desktop phone or Agent Desktop to transfer a call, conference or phonedirectly to a CDN (Route Point).
Desktop phone behaviorAgents using Agent Desktop to handle voice contacts can also have a desktop phone at theirworkstation. The desktop phone displays information when a call presents to the agent. Typically,this information includes:
• The Contact Center CDN number as the calling party.• The name of the skillset that queued the call.
Accepting a callBefore you begin
• Ensure that you have set your status to either Go Ready or Go Ready — Voice.• Ensure that you are assigned to a skillset for handling telephone calls.
About this taskAccept and work with telephone calls. The relevant work item controls become active and the calltimer appears on the work item.
If your administrator has configured your Contact Center to run in the Call Force Delay mode, youmust handle all contacts presented to you.
ProcedureOn the Agent Desktop, select the new alerting work item and click the Accept work item control.
The top pane of the Agent Desktop shows the customer details and history of all past calls with thecontact.
Accepting a call
December 2014 Avaya Aura® Agent Desktop 51Comments? [email protected]
Declining a callBefore you begin
• Ensure that you have a skillset designated to handle telephone calls.
About this taskDecline a call if you want to reject the contact and place the contact back in the queue. The contactis then queued to another agent and your status becomes Not Ready. You cannot receive newincoming contacts until you change your status to Ready.
ProcedureOn the Agent Desktop, select the new work item and click Reject.
Entering an Activity codeAbout this taskYou can enter one or more Activity codes during calls by using the Agent Desktop Top bar activityinline command. Activity codes provide a method to track the time that agents spend on varioustypes of calls. For example, you can enter a Sales activity code in Agent Desktop during a sales-related call.
Your supervisor or system administrator configures Activity codes. Administrators define Activitycodes in Contact Center Manager Server. Activity codes can be alphanumeric. Agent Desktopdisplays the Activity codes list.
Agent Desktop displays the Activity Code box on the work item based on your Contact Centerconfiguration. Administrators can configure activity codes that correspond to a contact type and askillset. Therefore, Activity codes are filtered on a contact type and skillset basis. For example, if youare handling email contacts, Agent Desktop populates the Activity Code list both with activity codesthat correspond to the email contact type and with activity codes that map to the skillset.
Procedure1. Select the work item.
2. Click the Activity Code work item inline command.
3. From the Select or type an Activity Code drop-down list, select or type the activity code.
Telephony
52 Avaya Aura® Agent Desktop December 2014Comments? [email protected]
Entering an After Call Work Item CodeAbout this taskYou must enter After Call Work Item (ACW) codes when you perform post call processing work,such as adding contact information to a Customer Relationship Management (CRM) system. You donot receive any contacts after you select Set ACW Code.
Supervisors or administrators configure ACW codes. If the administrator has configured ACWcodes, you must select a code after you select Set ACW Code.
You can enter ACW codes for post call processing work related to the contact that you have justreleased. In a multiplicity environment, the ACW code applies to the last contact that you release.Depending on the settings configured by the administrator, the system can place you automaticallyinto the ACW state, using the default ACW code 00000 immediately upon completion of the contact.
You can enter ACW codes either while working on a contact, which prevents Agent Desktop frompresenting any new contacts to you, or after releasing the contact and before Agent Desktoppresents a new contact to you, or you go into the Not Ready state.
In an AML environment, you can use a phone to enter a code. However, if you want to enter anACW code while you are working on a contact, you must use Agent Desktop and not a phone. If youuse a phone and enter a non-ACW code, the time is not reported as ACW time or Post CallProcessing time. Also, entering an ACW code or Not Ready code, while active on a contact mightnot be reflected correctly in reporting.
Procedure1. On the Agent Desktop Top bar menu, click the Status icon.
2. To perform post call processing work and not receive any contacts, click Set ACW Code.
3. From the Select or type an ACW Code drop-down list, select or type the After Call WorkItem code.
Placing a call on holdAbout this taskPlace a call on hold to interrupt your current call. When you want to speak to the caller again,release the call from hold.
The call timer on the work item changes to orange characters while the work item is on hold.
Procedure1. Select the work item.
2. Click Hold.
Entering an After Call Work Item Code
December 2014 Avaya Aura® Agent Desktop 53Comments? [email protected]
Releasing a call on holdAbout this taskTake a call off hold when you want to speak to the caller again.
Procedure1. Select the work item.
2. Click Unhold.
The call is released from hold and the status bar color changes to green.
Accepting a CDN call by placing a DN call on holdAbout this taskPlace a Directory Number (DN) call on hold to interrupt your current call and accept an incomingControlled Directory Number (CDN) call.
Note:You must change your status to Not Ready and then change your status back to Ready in orderto get the CDN call. You can get CDN calls while you are on a DN call only if the administratorassigned you a call presentation class with Answer By Placing DN Call On Hold.
Procedure1. On the DN work item, click Hold.
2. Change your status to Not Ready and then change your status back to Ready.
3. On the Agent Desktop, select the new alerting CDN work item and click the Accept workitem control.
Transferring a callAbout this taskYou can transfer a call to another agent using a supervised transfer or a blind transfer. In asupervised transfer, the call is placed on hold, and you speak to the third party before you completethe transfer. In a blind transfer, which is the default option, you transfer the call without speaking tothe third party.
Note:The blind transfer option on Agent Desktop toolbar is disabled in a SIP-enabled Contact Center.However, you can complete the transfer before the third party answers the call (perform a blind
Telephony
54 Avaya Aura® Agent Desktop December 2014Comments? [email protected]
transfer) using the steps in this procedure. Alternatively, you can transfer the call from the maintoolbar using the phone icons (this is a supervised transfer only).
Note:If you are transferring a call to a voice mail system, you must ensure that the correct DTMFtones are transferred to the voice mail system.
Procedure1. On the work item, click Transfer.
2. In the Transfer window, Supervised Transfer is automatically selected.
3. Select Enter Value and type the number to which you want to transfer the call.
Or
Select Phonebook to open Phonebook and transfer the call using the click-to-transferfeature of Phonebook.
The active call is placed on hold and the call is placed to a third party. While you speak withthe third party, both the Transfer and Hold buttons on the phone flash to indicate that youhave a customer on hold and that you must complete the transfer.
4. Before the third party answers the call, click OK.
The call is transferred to the third party and is dropped from your phone.
Conferencing in another agentAbout this taskYou can conference another agent, if you want the agent to join your current call.
Procedure1. On the work item, click Conference to place the customer on hold and open the Conference
window.
2. In the Conference window, select Enter Value and type the number of the agent toconference into the call.
Or
Select Phonebook to open Phonebook and conference in another agent using the click-to-conference feature of Phonebook.
3. Click Conference Contact to begin the conference.
4. Speak with the agent, if necessary, before you conference in the customer.
5. Click Conference again to take the customer off hold and conference in the customer andthe other agent.
Conferencing in another agent
December 2014 Avaya Aura® Agent Desktop 55Comments? [email protected]
Conferencing in a supervisorAbout this taskYou can conference your supervisor, if you want the supervisor to join your current call.
Procedure1. On the Agent Desktop Action bar menu, click Supervisor to place the customer on hold and
conference in your supervisor.
2. Speak to your supervisor, if necessary, before you conference in the customer.
3. Click Conference again to take the customer off hold and conference in the customer andyour supervisor.
Ending a callAbout this taskEnd a call when a call is completed. If your status was Ready before the call, your status isautomatically set to Ready, when you terminate the call. If you require time to perform call wrap-uptasks, before you accept another call, select Set ACW Code and enter the After Call Work Item(ACW) code in the Code field of the Top bar. If you require to change your status to Not Ready andenter a Not Ready Reason Code in the Code field of the Top bar. The administrator defines NotReady Reason and ACW codes.
ProcedureOn the work item, click Release.
Calling your supervisorAbout this taskYou can call your supervisor, if you are currently not handling a call.
To call a supervisor when you are on a call, see Conferencing in a supervisor on page 56.
ProcedureOn the Agent Desktop Action bar menu, click Supervisor.
Telephony
56 Avaya Aura® Agent Desktop December 2014Comments? [email protected]
Making a callAbout this taskMake a call using Agent Desktop. Ensure that you follow the steps based on the type of phonenumber you want to call:
• the default phone number• a new external phone number• a new internal phone number
Procedure1. On the Agent Desktop Action bar menu, from the drop-down list click Initiate Call.
2. In the Originate Call text box, enter the phone number to dial.
3. Click the Originate Call icon.
The phone number is dialed. A new work item is added to the work list and the call timer onthe work item starts to increment.
4. Click Release when you complete the call.
Using DTMF digitsAbout this taskUse the DTMF feature if you need to navigate through a Contact Center menu or dial numbers toaccess voice messages during a call.
Procedure1. On the Agent Desktop Action bar menu, click DTMF.
2. Enter the numbers on the keypad that appears.
Using the Emergency keyAbout this taskUse the Emergency key if you require immediate assistance from your supervisor while handling acall. For example, if a customer suddenly threatens you while you are on a call, you can add yoursupervisor to the call immediately. The caller is not placed on hold during an emergency conference.
Note:Emergency key is not supported in Avaya Aura® Call Center Elite Telephony.
Making a call
December 2014 Avaya Aura® Agent Desktop 57Comments? [email protected]
ProcedureOn the Agent Desktop Top bar menu, click Emergency.
Your supervisor is immediately added to the call and joins the conference with you and thecustomer.
Observing a voice contact or non-skillset callBefore you begin
• Ensure that you log on to Agent Desktop.• Ensure that you have supervisor/agent privileges.
Note:Observing a voice contact or non-skillset call is possible only in a SIP-enabled Contact CenterContact Center.
About this taskIn a SIP-enabled Avaya Aura® Contact Center, you must be a supervisor/agent to use the Observefunction to listen in on a voice contact or call.
You can observe Avaya Aura® Contact Center voice contacts and non-skillset calls, except forProactive Outreach Manager (POM) contacts. The call you want to observe must be under CTIcontrol. That is, the agent is using Agent Desktop or a custom CTI application for handling the call.You cannot observe calls if the agent logs on only to their desktop telephone. The administratormust configure CCMA permissions to allow you to observe non-skillset calls.
Using the Observe function, you can listen in on a voice call without being heard. Using the Barge-infunction, you can participate in a voice call. For more information, see Barging-in on a voice contactor non-skillset call on page 59.
Your actions do not affect the original voice call or the normal connect and disconnect actions of theagent and customer conversation.
For voice contacts, by default the agent or the customer hears a tone when you join or leave thecontact. They also hear a tone repeatedly at regular intervals. The contact center administrator cancustomize these settings. For non-skillset calls, by default there are no observe tones. However, theadministrator can configure these tones if required. Agents see an icon on Agent Desktop when youare observing their call.
When you are observing a voice contact, only the agent already interacting with the contact can setan activity code for that contact.
Important:Many jurisdictions have legal requirements concerning observing calls: ensure you observecalls only in compliance with national and local legislation. You must familiarize yourself withand comply with all applicable laws, rules and regulations before using observe features.
Telephony
58 Avaya Aura® Agent Desktop December 2014Comments? [email protected]
Procedure1. On the Agent Desktop Top bar menu, click Observe.
The Agent Desktop displays the Supervisor Observe window.
2. Under Filter, select Contact Type from the Item list.
3. Select Voice from the Value list.
4. Select a voice call and click Observe.
Agent Desktop presents a new voice contact to you. You do not need to be Ready to receivethis contact. The contact connects you to the selected voice call.
If you are using telecommuter mode, you have to accept the call on your phone before youcan observe the voice call.
5. Click Release to finish observing the voice call.
The observation session ends when either the agent, the customer, or the supervisor/agentreleases the voice contact.
Barging-in on a voice contact or non-skillset callBefore you begin
• Ensure that you log on to Agent Desktop.• Ensure that you have supervisor/agent privileges.• Ensure that you are observing an agent’s voice contact or non-skillset call.
Note:Observing and Barging-in on a voice contact or non-skillset call is possible only in a SIP-enabled Contact Center.
About this taskYou can observe and barge-in on Avaya Aura® Contact Center voice contacts and non-skillset calls,except for POM contacts. The call you want to observe must be under CTI control: that is, the agentis using Agent Desktop or a custom CTI application for handling the call. You cannot observe andbarge-in on calls if the agent logs on only to their desktop telephone. The administrator mustconfigure CCMA permissions to allow you to barge-in on non-skillset calls.
You can barge-in on a voice call if you are observing a voice call that needs immediate supervisorattention. Using the Barge-in function, you can participate in a voice call between the agent and acustomer or other caller.
Your actions do not affect the original voice call or the normal connect and disconnect actions of theagent and customer conversation.
For voice contacts, by default the agent and the customer hear a tone before you barge-in on thecontact. For non-skillset calls, by default there is no tone; however, the administrator can configure atone if required.
Barging-in on a voice contact or non-skillset call
December 2014 Avaya Aura® Agent Desktop 59Comments? [email protected]
When you barge-in on a voice contact, only the agent already interacting with the contact can set anactivity code for that contact.
Procedure1. In the Supervisor Observe window, click Barge-in.
2. Click Release when your conversation is complete.
The voice call continues until either the agent or the customer releases the call.
Observing a second voice contact or non-skillset callBefore you begin
• Ensure that you have supervisor/agent privileges.• Ensure that you log on to Agent Desktop.• Observe an agent’s voice contact or non-skillset call.
About this taskIf you have three call appearances on your telephone, you can observe two calls at the same time.You can listen to only one of these calls at a time, but you can readily toggle between them. Whenyou are observing two calls, the agents are not aware of whether you are actively listening in ontheir call or not.
It is possible to barge-in to both calls; however one call is always on hold. You can participate inonly one call at a time.
Procedure1. In the Supervisor Observe window, under Filter, select Contact Type from the Item list.
2. Select Voice from the Value list.
3. Select a second voice call and click Observe.
Agent Desktop places the call you are observing on hold, and presents a new voice contactto you. This contact connects you to the second voice call.
If you are using telecommuter mode, you must accept the call on your phone before you canobserve the voice call.
4. To switch between the two calls, select the work item for the call you are not currentlyobserving, and click Unhold.
You can listen to only one call at a time.
5. If you want to leave a call, switch to the work item for the call, ensure you are not on hold,and click Release.
Telephony
60 Avaya Aura® Agent Desktop December 2014Comments? [email protected]
Joining two voice callsAbout this taskIf available, you can use call join to conference together two previously unrelated calls. Call join issupported only when the unrelated calls to be joined are already present on Agent Desktop.
If you have a main call, a consult call, and an unrelated call, on the unrelated outgoing call, you canjoin to either the main call or the consult call.
Procedure1. Answer the first inbound voice call (from caller A).
2. Answer the second inbound voice call (from caller B).
3. On the active call (from caller B), click the Conference/Join button, and select the held oractive call from the list.
This action joins the first call and second call. Caller A and Caller B can now speak with eachother.
Joining a call that you are monitoring with another callBefore you begin
• Ensure that you have supervisor/agent privileges.• Ensure that you log on to Agent Desktop.• Monitor an agent’s voice contact or non-skillset call.
About this taskYou can join a call that you are monitoring with another call. For example, you are observing atrainee agent, and you think a technical expert can help the agent with the call. You call the expert,barge into the agents’ call, and then join the expert to the agent’s call.
Before joining the calls, you must barge-in to the call you are monitoring. If you join a call you areobserving with another call, your observe session terminates and you are not included in the joinedcall.
Procedure1. On the Action Bar, dial the number of the person to whom you want to join the monitored
call.
Agent Desktop places your monitored call on hold. Wait until the person you are callinganswers.
2. If you are observing the monitored call, In the Supervisor Observe window, select themonitored call and click Barge-in.
Joining two voice calls
December 2014 Avaya Aura® Agent Desktop 61Comments? [email protected]
3. On the work item for the monitored call , click Conference/Join, and select the other callfrom the list.
This action joins the monitored call to the second call.
4. If you want to leave the call, click Release.
The agent and the other caller that you joined can stay in the call until one of them releasesthe call.
Making a call while on an existing voice callAbout this taskMake a new voice call while you already have an existing voice call on Agent Desktop. The existingcall (work item) is automatically put on hold. You can work on one voice call at a time; the other callsare placed on hold.
Procedure1. On the Agent Desktop Action bar menu, click Originate Call.
2. In the Originate Call text box, enter the phone number to dial.
3. Click Originate Call again. The phone number is dialed. A new work item is added to thework list and the call timer on the work item starts to increment.
After the second call or optionally a third call is originated, each call appears on AgentDesktop individually. Agent Desktop automatically puts the existing call on hold.
Accepting an inbound voice call while on an existingskillset voice call
About this taskAccept and work with a second telephone call. The relevant work item controls become active andthe call timer appears on the work item.
ProcedureOn the Agent Desktop, select the new alerting work item and click the Accept work item control.
The existing call (work item) is automatically put on hold. You can work on one voice call at a time;the other calls are placed on hold.
Telephony
62 Avaya Aura® Agent Desktop December 2014Comments? [email protected]
Calling an agent using Contacts PresenceAbout this taskCall an agent’s default phone number after you confirm that the person is available by usingContacts Presence.
Procedure1. On the Agent Desktop, click Contacts Presence.
2. To call an agent from your list, click the My Contacts tab.
Or
To call an agent from an Instant Experts group, click the CC Contacts tab.
3. Select the name of the person you want to call, after confirming that they are available.
4. Click the Click-to-call icon or right-click the name of the person and click Call, and then clickthe default phone number.
The default phone number is dialed.
5. Click Release when you complete the call.
Searching for a contact in PhonebookAbout this taskYou can use Phonebook to search the LDAP directory for a contact.
Procedure1. On the Agent Desktop, click Phonebook.
The system displays the Phonebook tab. The Phonebook tab displays a list of entries fromthe LDAP agent contact directory.
2. Select the column name by which you want to search for a contact.
For example, if you want to search by First Name, select First Name from the drop-downlist.
The system displays all the visible columns of the Phonebook in the drop-down list.
3. In the search text input box, type the search text that corresponds to the field selected in thedrop-down list.
For example, if you select First Name, type John in the search input text box. The systemdisplays all the entries with the value John in the First Name column.
Calling an agent using Contacts Presence
December 2014 Avaya Aura® Agent Desktop 63Comments? [email protected]
Calling an agent using PhonebookAbout this taskYou can use Phonebook to contact agents through the LDAP agent contact directory.
Procedure1. On the Agent Desktop, click Phonebook.
The system displays the Phonebook tab. The Phonebook tab displays a list of entries fromthe LDAP agent contact directory.
2. Search for a contact.
For more information about searching for a contact, see Searching for a contact inPhonebook on page 63.
3. Select a name, and click the Click to call icon under the Phone column.
The system dials the phone number stored in LDAP.
4. Click Release when you complete the call.
Filtering contacts using PhonebookAbout this taskYou can use Phonebook to filter contacts in the LDAP directory.
The LDAP directory contains a lot of contacts. You can filter contacts based on the following threetypes of users:
• Favorites• Speed Dials• Custom Contacts
You can tag a contact as favorite or add a contact to the speed dial list. For more information, see Tagging a contact in Phonebook on page 65.
Custom contacts are contacts that you add to Phonebook. For more information, see Adding acustom contact on page 66.
Procedure1. On the Agent Desktop, click Phonebook.
The system displays the Phonebook tab. The Phonebook tab displays a list of entries fromthe LDAP agent contact directory.
2. From the Filter drop-down list, select the type of contact based on which you want to filterthe contacts.
Telephony
64 Avaya Aura® Agent Desktop December 2014Comments? [email protected]
You can choose from the following types:
• Favorite
• Speed Dial
• Custom Contacts
The system displays the list of contacts based on the type of contact you choose.
3. Click Reset to clear the filter and return to the unfiltered Phonebook list of contacts.
Tagging a contact in PhonebookAbout this taskYou can tag a contact in Phonebook as Favorite or Speed Dial. Use tagged contacts to filter andsearch for contacts effectively. Administrators set the maximum number of contacts that you canadd as favorites or add to the speed dial list.
Procedure1. On the Agent Desktop Top bar menu, click the Phonebook icon.
The system displays the Phonebook tab. The Phonebook tab displays a list of entries fromthe LDAP agent contact directory.
2. In the Phonebook grid, select the row for the contact that you want to tag and right-click therow.
3. Select Favorite or Speed Dial.
If you select Favorite, the system adds a star icon to the contact. The system displays thestar icon in the Tagged column.
If you select Speed Dial, the system adds a dial pad icon to the contact. The systemdisplays the dial pad icon in the Tagged column.
If you select Favorite and Speed Dial, the system adds the star and the dial pad icons to thecontact. The system displays the star and the dial pad icons in the Tagged column.
Configuring the display of columns in PhonebookAbout this taskYou can configure the display of your Phonebook by selecting the columns that you want to displayin the Phonebook grid. You can order and sort the columns. You can also decide how many recordsyou want to view per page in the phonebook.
Tagging a contact in Phonebook
December 2014 Avaya Aura® Agent Desktop 65Comments? [email protected]
Procedure1. On the Agent Desktop, click Phonebook.
The system displays the Phonebook tab. The Phonebook tab displays a list of entries fromthe LDAP agent contact directory.
2. To select the columns that you want to display in Phonebook, right-click the columnheadings row and select Configure Columns in the Phonebook grid.
The system displays the Column Configuration window.
3. To add a column to the list that is displayed in the Phonebook grid, select the column titlefrom the Available list.
4. Click Add >.
The column title moves to the Displayed list.
5. To remove a column from the list that is displayed in the Phonebook grid, select the columntitle from the Displayed list.
6. Click < Remove.
The column title moves to the Available list.
7. To arrange the columns in the Phonebook grid, select the column title under the Displayedlist and click Move Up or Move Down in the Column Configuration window.
You can also arrange the columns in the Phonebook by dragging the column in thePhonebook grid.
8. Click Save.
The system saves the settings and displays the Phonebook grid based on your settings.
9. To sort the columns in the Phonebook grid, click the column heading.
For example, if you click the Display Name column header, the system sorts the contactsalphabetically according to the display name.
10. To change the number of records that are displayed per page in Phonebook select thenumber of records from the Records per page drop-down list.
By default, the system displays 20 records per page.
11. To navigate through the pages of Phonebook, click the arrows on the bottom-right of thePhonebook grid to move to the Next, Previous, First, and Last page.
Adding a custom contactBefore you beginYou can create custom contacts only if administrators have enabled creating custom contacts.
Telephony
66 Avaya Aura® Agent Desktop December 2014Comments? [email protected]
About this taskCustom contacts are contacts that you require, which are not present in the LDAP directory. Thenumber of contacts that you can add to Phonebook depends on the number that administratorsallow.
Procedure1. On the Agent Desktop Top bar menu, click the Phonebook icon.
The system displays the Phonebook tab. The Phonebook tab displays a list of entries fromthe LDAP agent contact directory.
2. Right-click on any cell in the Phonebook grid.
3. Select New Contact.
The system displays the New Contact dialog box.
4. Fill in the details for the new contact.
The Display Name field is mandatory. You can also set the new contact as favorite or addthe new contact to your speed dial list by selecting the Favorite or Speed Dial check box.
5. Click Save.
The system adds the new contact in the Phonebook grid.
Editing a custom contactAbout this taskYou can edit the details of only the contacts that you have added to Phonebook.
Note:You cannot edit an LDAP contact.
Procedure1. On the Agent Desktop Top bar menu, click the Phonebook icon.
The system displays the Phonebook tab. The Phonebook tab displays a list of entries fromthe LDAP agent contact directory.
2. Right-click on any cell in the Phonebook grid.
3. Select Edit Contact.
The system displays the Edit Contact dialog box.
4. Update the details that you need to change for the custom contact.
5. Click Save.
Editing a custom contact
December 2014 Avaya Aura® Agent Desktop 67Comments? [email protected]
Deleting a custom contactAbout this taskYou can delete only the contacts that you add to Phonebook.
Note:You cannot delete an LDAP contact.
Procedure1. On the Agent Desktop Top bar menu, click the Phonebook icon.
The system displays the Phonebook tab. The Phonebook tab displays a list of entries fromthe LDAP agent contact directory.
2. Right-click on any cell in the Phonebook grid.
3. Select Delete Contact.
The system displays a Delete dialog box.
4. Click Yes to confirm the deletion of the contact.
Note:
You can also delete a custom contact by selecting the row and pressing Delete on thekeyboard.
Using the Call History tabBefore you begin
• You can view and delete the call history only if administrators allow you to.
About this taskYou can view the call history for the calls that you have made, received and missed in the CallHistory tab of Phonebook. The number of calls that you can view in the Call History tab dependson the number set by administrators.
The Call History tab lists the name, number, date, time and duration of the call. By default, the CallHistory tab displays the calls in the descending order based on time. Therefore, the Call Historytab displays the last call first.
The Call History tab also displays the type of call. Outbound calls, inbound calls, and missed callsare the three types of calls. The Call History tab displays the type of call using icons in the firstcolumn of the Phonebook data grid.
If agents miss calls, the Call Log icon on the Agent Desktop Action bar displays a red-circular iconwith the number of calls that the agent has missed. The number increases for every missed call.Agents can log out of Agent Desktop or click the Call Log icon and open the Call History tab toclear the missed-call indicator.
Telephony
68 Avaya Aura® Agent Desktop December 2014Comments? [email protected]
Procedure1. On the Agent Desktop Action bar menu, click the Call Log icon.
Or
On the Agent Desktop Action bar menu, click the Phonebook icon and then click the CallHistory tab.
2. To filter calls based on the type, select the call type from the drop-down list present at thetop of the Call History grid.
Select one of the following:
• Inbound
• Missed
• Outbound
3. To sort the columns in the Phonebook grid, click the column heading.
For example, if you click the Name column header, the system sorts the contactsalphabetically according to the name of the contact.
4. To create a custom contact, click the Add a Custom Contact (+) icon.
The system displays the New Contact dialog box with the Display Name and the Phonefields prepopulated.
For more information, see Adding a custom contact on page 66.
5. To make a call directly from the Call History tab, select a name and click the Click to callicon under the Phone column.
The system dials the phone number stored in LDAP.
For more information, see Calling an agent using Phonebook on page 64.
6. To erase the call history, click Erase Call History.
7. To delete individual calls from the log either right-click on the call and select Delete.
Or
Select a call and press Delete on the keyboard.
Using the Call History tab
December 2014 Avaya Aura® Agent Desktop 69Comments? [email protected]
Chapter 6: Call Center Elite Telephony
This chapter describes how to use Agent Desktop to handle incoming telephone calls from CallCenter Elite.
Avaya Aura® Contact Center provides a single-interface client application to handle voice calls fromCall Center Elite through a desktop phone, softphone or other phone (other phone used forTelecommuter mode only). To log on to Agent Desktop for Call Center Elite Telephony inTelecommuter mode, see Avaya Aura® Offsite Agent User Guide (44400-120). The Call Center Eliteintegration does not support Supervisor functions.
This allows you to handle voice calls and multimedia contacts from a single integrated AgentDesktop.
You can use Agent Desktop to perform the following telephony tasks:
• Accept incoming calls
• Enter an activity code
• Place and release a call on hold
• Transfer a call to another party
• Conference a call
• End a call
• Make a call
• Use DTMF digits
• Call an agent using the Phonebook
Although you can use your phone to perform certain tasks, Avaya recommends that you use theAgent Desktop to perform all telephony tasks, such as logging on or off, changing your status toReady or Not Ready, accepting a call, placing a customer on hold, transferring a customer, andreleasing a call. Do not use Feature Access Codes (FAC) on your desktop phone.
Call Center Elite agents using Agent Desktop have a pending logout status. This status occurs whenan you initiate a logout while active on a call. During this pending logout status, the you retain callcontrol on the active call, but you cannot initiate calls. When the active call ends, your statuschanges to Logged Out.
70 Avaya Aura® Agent Desktop December 2014Comments? [email protected]
Important:
You must not use your desktop phone or Agent Desktop to call, transfer a call, or conference acall to a phone number that is:
• routed to a CDN (Route Point). For example, a Virtual Directory Number (VDN) routed to aCDN (Route Point).
• converted to a CDN (Route Point). For example, when using digit manipulation on the callserver.
• call forwarded to a CDN (Route Point).
You can use your desktop phone or Agent Desktop to transfer a call, conference a call, or calldirectly to a CDN (Route Point).
Accepting a callBefore you begin
• Ensure that you have set your status to either Go Ready or Go Ready — Voice.• Ensure that you are assigned to a skillset for handling telephone calls.
About this taskAccept and work with telephone calls. The relevant work item controls become active and the calltimer appears on the work item.
If your administrator has configured your Contact Center to run in the Call Force Delay mode, youmust handle all contacts presented to you.
ProcedureOn the Agent Desktop, select the new alerting work item and click the Accept work item control.
Declining a callBefore you begin
• Ensure that you have a skillset designated to handle telephone calls.
About this taskDecline a call if you want to reject the contact and place the contact back in the queue. The contactis then queued to another agent and your status becomes Not Ready. You cannot receive newincoming contacts until you change your status to Ready.
Accepting a call
December 2014 Avaya Aura® Agent Desktop 71Comments? [email protected]
Note:In an Elite integration, the status icon is split in half, the left half displays the status for receivingMultimedia contacts (Contact Center) and the right half displays the status for receiving Voicecontacts (Elite). If you reject a voice call, your voice status changes to Not Ready and yourmultimedia status is not affected. If you reject a multimedia contact in an Elite integration, yourmultimedia status changes to Not Ready and your voice status is not affected.
ProcedureOn the Agent Desktop, select the new work item and click Reject.
Entering an activity codeAbout this taskYou can enter activity codes during your calls by using the Activity Code icon that appears on eachwork item. Activity codes provide a method to track the time you spend on various types of calls. Forexample, you can use an activity code to track sales calls by entering that activity code in the AgentDesktop during sales-related calls.
Your supervisor or system administrator provides activity codes. You can use alphanumeric codes.Activity codes that are defined in Contact Center Manager Administration appear on the AgentDesktop list. If a new activity code is added while you are logged on to the Agent Desktop, you mustlog off the Agent Desktop and log on again before you can select the new code from the list.
Activity codes are also used to enter Not Ready and Log Out reason codes. You can go Not Readyfor either multimedia contacts, voice contacts, or both. You use the Agent Desktop Top bar AgentStatus icon to select the relevant reason codes. When you select your status as not ready to handlemultimedia contacts, the Agent Desktop Top bar shows “AACC: Not Ready (<Activity Codeselected>)”. When you select your status as not ready to handle voice contacts, the Agent DesktopTop bar shows “Elite: Not Ready (<Activity Code selected>)”. When you are logging out, select therelevant Log Out reason.
The Activity Code icon appears on each work item, based on your Contact Center configuration.You use the Activity Code icon to set Work reason Activity codes. When selected, the Work reasonactivity code appears on the Work item.
Procedure1. To enter a Work Reason code, select the work item.
2. Click on the Activity Code icon that appears on the work item.
3. In the Activity Code tree view, select the relevant Activity Code option.
4. To enter a Not Ready reason code, click the Agent Status icon on the Agent Desktop Topbar.
5. In the Agent Status tree view select Go Not Ready and the relevant Activity Code option.For example, if you are not ready to handle voice contacts select Go Not Ready > Voiceand select the relevant activity code.
Call Center Elite Telephony
72 Avaya Aura® Agent Desktop December 2014Comments? [email protected]

6. To enter a Log Out reason code, click the Agent Status icon on the Agent Desktop Top bar.
7. In the Agent Status tree view select Log Out and the relevant Activity Code option.
Placing a call on holdAbout this taskPlace a call on hold to interrupt your current call. When you want to speak to the caller again,release the call from hold.
The call timer on the work item changes to orange characters while the work item is on hold.
Procedure1. Select the work item.
2. Click Hold.
Releasing a call on holdAbout this taskRelease a call that you placed on hold when you want to speak to the caller again.
Procedure1. Select the work item.
2. Click Unhold.
The call is released and the status bar color changes to green.
Transferring a callAbout this taskYou can transfer a call to another agent using a blind transfer. In a blind transfer, you transfer thecall without speaking to the third party.
Note:The blind transfer option on Agent Desktop toolbar is disabled in a SIP-enabled Contact Center.However you can complete the transfer before the third party answers the call (perform a blindtransfer) using the steps in this procedure.
Placing a call on hold
December 2014 Avaya Aura® Agent Desktop 73Comments? [email protected]
Note:If you are transferring a call to a voice mail system, you must ensure that the correct DTMFtones are transferred to the voice mail system.
Procedure1. On the work item, click Transfer.
2. Select Enter Value and type the number to which you want to transfer the call in the Actionbar text box.
The active call is placed on hold and a call is placed to a third party. While you speak withthe third party, both the Transfer and Hold buttons on the phone flash to indicate that youhave a customer on hold and that you must complete the transfer.
3. Before the third party answers the call, click OK.
The call is transferred to the third party and is dropped from your phone.
Conferencing in another agentAbout this taskYou can conference another agent, if you want the agent to join your current call.
Procedure1. On the work item, click Conference.
2. Select Enter Value and type the number of the agent to conference into the call in theAction bar text box.
3. Speak with the agent, if necessary, before you conference in the customer.
4. Click Conference and select the extension number again to take the customer off hold andconference in the customer and the other agent.
Ending a callAbout this taskEnd a call when a call is completed. If your status was Ready before the call, your status isautomatically set to Ready when you terminate the call. If you require time to perform call wrap-uptasks, before you accept another call, change your status to Not Ready and enter a Not ReadyReason Code in the Code field of the Top bar. Not Ready Reason codes are defined by theadministrator.
Call Center Elite Telephony
74 Avaya Aura® Agent Desktop December 2014Comments? [email protected]
ProcedureOn the work item, click Release.
Making a callAbout this taskMake a call using Agent Desktop. Ensure that you follow the steps based on the type of phonenumber you want to call:
• the default phone number• a new external phone number• a new internal phone number
Procedure1. On the Agent Desktop Action bar menu, click Originate Call.
2. In the Originate Call text box, enter the phone number to dial.
3. Click Originate Call again.
The phone number is dialed. A new work item is added to the work list and the call timer onthe work item starts to increment.
4. Click Release when you complete the call.
Using DTMF digitsAbout this taskUse the DTMF feature if you need to navigate through a Contact Center menu or dial numbers toaccess voice messages during a call.
Procedure1. On the Agent Desktop Action bar menu, click DTMF.
2. Enter the numbers on the keypad that appears.
Searching for a contact in PhonebookAbout this taskYou can use Phonebook to search the LDAP directory for a contact.
Making a call
December 2014 Avaya Aura® Agent Desktop 75Comments? [email protected]
Procedure1. On the Agent Desktop, click Phonebook.
The system displays the Phonebook tab. The Phonebook tab displays a list of entries fromthe LDAP agent contact directory.
2. Select the column name by which you want to search for a contact.
For example, if you want to search by First Name, select First Name from the drop-downlist.
The system displays all the visible columns of the Phonebook in the drop-down list.
3. In the search text input box, type the search text that corresponds to the field selected in thedrop-down list.
For example, if you select First Name, type John in the search input text box. The systemdisplays all the entries with the value John in the First Name column.
Calling an agent using PhonebookAbout this taskYou can use Phonebook to contact agents through the LDAP agent contact directory.
Procedure1. On the Agent Desktop, click Phonebook.
The system displays the Phonebook tab. The Phonebook tab displays a list of entries fromthe LDAP agent contact directory.
2. Search for a contact.
For more information about searching for a contact, see Searching for a contact inPhonebook on page 75.
3. Select a name, and click the Click to call icon under the Phone column.
The system dials the phone number stored in LDAP.
4. Click Release when you complete the call.
Filtering contacts using PhonebookAbout this taskYou can use Phonebook to filter contacts in the LDAP directory.
Call Center Elite Telephony
76 Avaya Aura® Agent Desktop December 2014Comments? [email protected]
The LDAP directory contains a lot of contacts. You can filter contacts based on the following threetypes of users:
• Favorites• Speed Dials• Custom Contacts
You can tag a contact as favorite or add a contact to the speed dial list. For more information, see Tagging a contact in Phonebook on page 77.
Custom contacts are contacts that you add to Phonebook. For more information, see Adding acustom contact on page 79.
Procedure1. On the Agent Desktop, click Phonebook.
The system displays the Phonebook tab. The Phonebook tab displays a list of entries fromthe LDAP agent contact directory.
2. From the Filter drop-down list, select the type of contact based on which you want to filterthe contacts.
You can choose from the following types:
• Favorite
• Speed Dial
• Custom Contacts
The system displays the list of contacts based on the type of contact you choose.
3. Click Reset to clear the filter and return to the unfiltered Phonebook list of contacts.
Tagging a contact in PhonebookAbout this taskYou can tag a contact in Phonebook as Favorite or Speed Dial. Use tagged contacts to filter andsearch for contacts effectively. Administrators set the maximum number of contacts that you canadd as favorites or add to the speed dial list.
Note:The system saves information about tagged contacts according to your Contact Centerconfiguration. In case of a multimedia solution, the system stores the information in the ContactCenter Multimedia database and in case of a voice-only solution, the system stores theinformation in a local XML file.
Procedure1. On the Agent Desktop Top bar menu, click the Phonebook icon.
Tagging a contact in Phonebook
December 2014 Avaya Aura® Agent Desktop 77Comments? [email protected]
The system displays the Phonebook tab. The Phonebook tab displays a list of entries fromthe LDAP agent contact directory.
2. In the Phonebook grid, select the row for the contact that you want to tag and right-click therow.
3. Select Favorite or Speed Dial.
If you select Favorite, the system adds a star icon to the contact. The system displays thestar icon in the Tagged column.
If you select Speed Dial, the system adds a dial pad icon to the contact. The systemdisplays the dial pad icon in the Tagged column.
If you select Favorite and Speed Dial, the system adds the star and the dial pad icons to thecontact. The system displays the star and the dial pad icons in the Tagged column.
Configuring the display of columns in PhonebookAbout this taskYou can configure the display of your Phonebook by selecting the columns that you want to displayin the Phonebook grid. You can order and sort the columns. You can also decide how many recordsyou want to view per page in Phonebook.
Note:The system saves the changes that you make to the Phonebook display setting according toyour Contact Center configuration. In case of a multimedia solution, the system stores theinformation in the Contact Center Multimedia database and in case of a voice-only solution, thesystem stores the information in the local XML file.
Procedure1. On the Agent Desktop, click Phonebook.
The system displays the Phonebook tab. The Phonebook tab displays a list of entries fromthe LDAP agent contact directory.
2. To select the columns that you want to display in Phonebook, right-click the columnheadings row and select Configure Columns in the Phonebook grid.
The system displays the Column Configuration window.
3. To add a column to the list that is displayed in the Phonebook grid, select the column titlefrom the Available list.
4. Click Add >.
The column title moves to the Displayed list.
5. To remove a column from the list that is displayed in the Phonebook grid, select the columntitle from the Displayed list.
Call Center Elite Telephony
78 Avaya Aura® Agent Desktop December 2014Comments? [email protected]
6. Click < Remove.
The column title moves to the Available list.
7. To arrange the columns in the Phonebook grid, select the column title under the Displayedlist and click Move Up or Move Down in the Column Configuration window.
You can also arrange the columns in the Phonebook by dragging the column in thePhonebook grid.
8. Click Save.
The system saves the settings and displays the Phonebook grid based on your settings.
9. To sort the columns in the Phonebook grid, click the column heading.
For example, if you click the Display Name column header, the system sorts the contactsalphabetically according to the display name.
10. To change the number of records that are displayed per page in Phonebook select thenumber of records from the Records per page drop-down list.
By default, the system displays 20 records per page.
11. To navigate through the pages of Phonebook, click the arrows that are present on thebottom-right of the Phonebook grid to move to the Next, Previous, First, and Last page.
Adding a custom contactBefore you beginYou can create custom contacts only if administrators have enabled creating custom contacts in theCCMM Administration utility.
About this taskCustom contacts are contacts that you require, which are not present in the LDAP directory. Thenumber of contacts that you can add to Phonebook depends on the number that administratorsconfigure in the CCMM Administration Utility.
Note:The system saves information about custom contacts according to your Contact Centerconfiguration. In case of a multimedia solution, the system stores the information in the ContactCenter Multimedia database and in case of a voice-only solution, the system stores theinformation in the local XML configuration file.
Procedure1. On the Agent Desktop Top bar menu, click the Phonebook icon.
The system displays the Phonebook tab. The Phonebook tab displays a list of entries fromthe LDAP agent contact directory.
2. Right-click on any cell in the Phonebook grid.
Adding a custom contact
December 2014 Avaya Aura® Agent Desktop 79Comments? [email protected]
3. Select New Contact.
The system displays the New Contact dialog box.
4. Fill in the details for the new contact.
The Display Name field is mandatory. You can also set the new contact as favorite or addthe new contact to your speed dial list by selecting the Favorite or Speed Dial check box.
5. Click Save.
The system adds the new contact in the Phonebook grid.
Editing a custom contactAbout this taskYou can edit the details of only the contacts that you have added to Phonebook.
Note:You cannot edit an LDAP contact.
Procedure1. On the Agent Desktop Top bar menu, click the Phonebook icon.
The system displays the Phonebook tab. The Phonebook tab displays a list of entries fromthe LDAP agent contact directory.
2. Right-click on any cell in the Phonebook grid.
3. Select Edit Contact.
The system displays the Edit Contact dialog box.
4. Update the details that you need to change for the custom contact.
5. Click Save.
Deleting a custom contactAbout this taskYou can delete only the contacts that you add to Phonebook.
Note:You cannot delete an LDAP contact.
Call Center Elite Telephony
80 Avaya Aura® Agent Desktop December 2014Comments? [email protected]
Procedure1. On the Agent Desktop Top bar menu, click the Phonebook icon.
The system displays the Phonebook tab. The Phonebook tab displays a list of entries fromthe LDAP agent contact directory.
2. Right-click on any cell in the Phonebook grid.
3. Select Delete Contact.
The system displays a Delete dialog box.
4. Click Yes to confirm the deletion of the contact.
Note:
You can also delete a custom contact by selecting the row and pressing Delete on thekeyboard.
Using the Call History tabBefore you begin
• You can view the call history only if administrators have enabled call logging in the CCMMAdministration utility.
• You can delete the call history only if administrators have enabled Allow Agents to erase theCall Log in the CCMM Administration utility.
About this taskYou can view the call history for the calls that you have made, received and missed in the CallHistory tab of Phonebook. The number of calls that you can view in the Call History tab dependson the number set by administrators in the CCMM Administration utility.
The Call History tab lists the name, number, date, time and duration of the call. By default, the CallHistory tab displays the calls in the descending order based on time. Therefore, the Call Historytab displays the last call first.
The Call History tab also displays the type of call. Outbound calls, inbound calls, and missed callsare the three types of calls. The Call History tab displays the type of call using icons in the firstcolumn of the Phonebook data grid.
If agents miss calls, the Call Log icon on the Agent Desktop toolbar displays a red-circular icon withthe number of calls that the agent has missed. The number increases for every missed call. Agentscan log out of Agent Desktop or click the Call Log icon and open the Call History tab to clear themissed-call indicator.
Note:The system saves the call history information according to your Contact Center configuration. Incase of a multimedia solution, the system stores the information in the Contact Center
Using the Call History tab
December 2014 Avaya Aura® Agent Desktop 81Comments? [email protected]
Multimedia database and in case of a voice-only solution, the system stores the information inthe local XML configuration file.
Procedure1. On the Agent Desktop Top bar menu, click the Call Log icon.
Or
On the Agent Desktop Top bar menu, click the Phonebook icon and then click the CallHistory tab.
2. To filter calls based on the type, select the call type from the drop-down list present at thetop of the Call History grid.
Select one of the following:
• Inbound
• Missed
• Outbound
3. To sort the columns in the Phonebook grid, click the column heading.
For example, if you click the Name column header, the system sorts the contactsalphabetically according to the name of the contact.
4. To create a custom contact, click the Add a Custom Contact (+) icon.
The system displays the New Contact dialog box with the Display Name and the Phonefields prepopulated.
For more information, see Adding a custom contact on page 66.
5. To make a call directly from the Call History tab, select a name and click the Click to callicon under the Phone column.
The system dials the phone number stored in LDAP.
For more information, see Calling an agent using Phonebook on page 64.
6. To erase the call history, click Erase Call History.
7. To delete individual calls from the log either right-click on the call and select Delete.
Or
Select a call and press Delete on the keyboard.
Call Center Elite Telephony
82 Avaya Aura® Agent Desktop December 2014Comments? [email protected]
Chapter 7: Proactive Outreach Manager
This chapter describes how to handle Proactive Outreach Manager contacts using Avaya Aura®
Agent Desktop.
Avaya Aura® Contact Center supports integration with Avaya Proactive Outreach Manager (POM) toprovide agents with a single desktop experience for inbound and outbound contacts. Integration withPOM also provides blending and reporting of outbound activities.
POM provides a capability to dynamically predict the availability of a Contact Center agent and topace outbound calls accordingly. This type of dialing can be used in Contact Centers where there isa requirement to efficiently contact large volumes of customers. A predictive dialer uses acombination of current information and historical statistics to determine how frequently an agentbecomes available within the Contact Center. Based on this, POM launches calls in anticipation ofthe agent becoming imminently available. Calls are connected to the agent only when a customeranswers a call.
When you log on to Agent Desktop, POM initiates a voice path (or nail-up) call to the agentsextension. Agent Desktop automatically answers this nail-up call. If you accidentally release the nail-up call, POM detects this and automatically reestablishes the nail-up call.
You can use POM to perform the following tasks on Agent Desktop:
• Accept incoming contacts
• Reject incoming contacts
• Preview contacts
• Place a call on hold
• Transfer a contact
• Conference a contact
• Release a contact
• Disposition a contact
• Schedule a callback
• Redial a customer
The presentation of POM contacts on Avaya Aura® Agent Desktop depends on the dialing mode ofthe POM campaign. POM supports Predictive, Progressive, and Preview dialing modes.
Predictive/Progressive dialing modeContacts dialed predicatively or progressively present to the agent on Agent Desktop in a similarway. The Customer Details pane displays customer information, and populates before the POM
December 2014 Avaya Aura® Agent Desktop 83Comments? [email protected]
campaign script loads. This script is Web-based and is hosted on the POM server - the URL ispassed as a parameter of the contact. The actions available to an agent while on a contact dependon the POM configuration when sending the contact. For example, call transfer or agent conferencemight not be available depending on POM configuration.
In Predictive dialing mode, POM does not display the customer details and campaign script onAgent Desktop until the customer is successfully dialed. By this time, the agent is active on the voicecall. In Progressive dialing mode, POM reserves the agent until the customer is successfully dialed.Progressive dialing prevents the system from dialing calls that exceed the number of idle agents. Atthis point, the agent experience is similar to a predictatively dialed contact - the agent is alerted tothe contact and the customer details and campaign script are displayed. During the POMreservation period, the agent experiences idle time.
Preview dialing modeIn Preview dialing mode, Agent Desktop presents a dialog box to the agent before the contact ispresented to the agent. The dialog box lists the available contact numbers on the customer record,with the default number highlighted. If configured on the preview campaign, the dial time alsoappears on the dialog box. If the campaign is configured without dial time, the agent can select thenumber to dial and can cancel the dial attempt. There is no time limit imposed on the agent.
Preview contacts with dial time present to the agent by first displaying the customer information andcampaign script. A dialog box appears listing all phone numbers associated with the customer. Thedefault phone number is highlighted. The agent can highlight an alternate number for dialing. If thetimer expires, POM dials the highlighted number and agents cannot change the highlighted numberor cancel the dial attempt. Depending on the POM campaign configuration, agents can reject thecontact before the dial attempt is made.
Preview contacts without dial time also present to the agent by first displaying the customerinformation and campaign script. A dialog box also appears listing all phone numbers associatedwith the customer. The default phone number is highlighted. The agent dials the number at the timeof their choosing and, depending on the POM campaign configuration, agents can reschedule orreject the contact.
Agent blendingBlending allows agents to move from outbound to inbound activities (and back again), if configured.Agent Desktop notifies agents, by means of a message box, that they are moving to Inboundactivities. If the agent is on an Inbound call and they are selected to blend back to Outboundactivities, their status changes to Not Ready. After the Inbound call is released, the agentimmediately blends back to Outbound and their status automatically changes to Ready.
Note:You must use Agent Desktop to perform all telephony tasks, such as conference and transfer.
Proactive Outreach Manager
84 Avaya Aura® Agent Desktop December 2014Comments? [email protected]
PrerequisitesProcedure
• Configure the hardware and software required to use the POM feature. For more information,see Avaya Aura® Contact Center — Proactive Outreach Manager integration guide(44400-515).
• Ensure you assign all POM agents to POM skillsets.
• If Microsoft Internet Explorer Enhanced Security is enabled on your computer, you must addthe POM server to the list of trusted sites.
Logging on to Agent Desktop for POMAbout this taskLog on to Agent Desktop for POM after you start Agent Desktop. While you log on, you can choosebetween a desktop phone and a softphone based on your usage mode. The system automaticallyconfigures your status to Not Ready. Change your status to Ready to indicate that you are availableto handle all media types for which you are licensed and configured.
Procedure1. Start Agent Desktop.
2. If you have Hot Desking enabled, type your workstation name at the prompt.
3. On the Agent Desktop Top bar, from the Status list, select Login.
4. Click the Telephony tab.
5. Select Desktop Phone or My Computer from the Place and receive calls using drop-down list.
6. Click the Multimedia tab.
7. Type your ID and Password.
8. From the Zone list, select the appropriate zone to log on to.
Note:
Ask your supervisor what the appropriate Zone is.
9. Click Login.
The status icon changes to Not Ready.
Prerequisites
December 2014 Avaya Aura® Agent Desktop 85Comments? [email protected]
Handling a Predictive or Progressive callBefore you begin
• Ensure your status is Ready.
About this taskAgents handle Predictive and Progressive calls in a similar way. Predictive and Progressive callsare presented on Agent Desktop automatically. The customer call is active and the customer detailsand campaign script appears on your Agent Desktop.
In Progressive dialing mode, POM reserves the agent until the customer is successfully dialed.During this reservation period, the agent experiences idle time. When the reservation periodfinishes, Agent Desktop presents the contact as described above.
ProcedureRespond to the customer call when Agent Desktop presents it to you.
Handling a Preview callBefore you begin
• Ensure your status is Ready.
About this taskCalls in Preview mode allow you to preview a call before you or the system dials the customernumber. There is a predefined time period, configured by the POM administrator, in which you needto preview the contact information. Before this time period expires, you can select which customerphone number to dial, enter an alternative phone number to dial, reschedule the contact, or cancelthe contact. You can also extend the time period. The availability of these options depends on thesettings defined by the POM administrator
When the preview time period expires, the system dials the customer's number and Agent Desktoppresents the contact to you.
Procedure1. Preview the customer details and the campaign script that appears on Agent Desktop.
At this point, your agent status is Preview. On the Preview dialog box, the Time Remainingbegins to expire.
2. You can perform one of the following actions, if the administrator allows:
• Select one of the customer's phone numbers from the Preview dialog box, and click Dialto call the customer.
• In the Number to dial box, type an alternative customer phone number to dial, and clickDial.
• Click Cancel to cancel the contact.
Proactive Outreach Manager
86 Avaya Aura® Agent Desktop December 2014Comments? [email protected]
• Click Reschedule to schedule a callback. For more information, see Rescheduling acall on page 90.
• Respond to the call when the Preview time period expires and Agent Desktop presentsthe call to you.
Releasing and dispositioning a callAbout this taskWhen you release a customer call, your status changes to Wrapup and you can disposition the callusing the Disposition Form. You have a certain period of time (determined by the administrator) inwhich to complete your after-call work. If you do not disposition the call in the specified period oftime, the call is dispositioned with a default disposition code (defined by the POM administrator).
Procedure1. On the customer call on Agent Desktop, click Release.
The customer call is disconnected and the agent status changes to Wrapup.
2. To request additional time (additional to the time already allowed) to complete your after-callwork after you release the call, on the Agent Desktop work list window, click Change WorkCompletion > Request more time.
Additional time, defined by the POM administrator, is allowed for after-call work. You canrequest more time once only.
3. To disposition a customer call, on the Agent Desktop work list window, click Disposition.
The Disposition Form appears.
Note:
If you click Disposition while active on a customer call, the customer call isdisconnected, the agent status changes to Wrapup, and the Disposition Form appears.
4. On the Disposition Form, under Disposition Code, select a disposition code and clickDisposition.
All information related to the previous call clears from Agent Desktop and the agent statuschanges to Ready.
Note:
The Extend button on the Disposition Form performs the same action as clickingChange Work Completion > Request more time on the work list window.
Releasing and dispositioning a call
December 2014 Avaya Aura® Agent Desktop 87Comments? [email protected]
Transferring a callBefore you begin
• Ensure the agent to whom you want to transfer a call can handle a POM call.
About this taskOn an active customer call, you can transfer the call to another user. When the agents clicksTransfer, a Transfer dialog box appears. You can select an agent or a phone number and clickConsult. This places the customer call on hold and sends a request to connect to the agent (orphone number).
Note:If you select Agent as the transfer type, the list includes only agents that are logged in, Ready,and currently have a nail-up call.
Procedure1. On the Agent Desktop work item, click Transfer.
The Transfer dialog box appears.
2. Under Options, select Agent or Phone, and select the agent to transfer the call to.
OR
Type a valid agent phone number in the Number to Dial field.
3. Click Consult.
If the requested agent is available, a Consult work item appears on both work list windowsand a voice connection is established between the originating agent and the consultedagent. The customer is placed on hold. Both agents are Ready.
If the requested agent is on a customer call, the originating agent’s customer call is placedon hold and a Pending Consult work item appears on both work list windows. When therequested agent completes the Active call, the Pending Consult work item automaticallychanges to Consult and a voice connection is established between the originating agent andthe consulted agent. Both agents are Ready.
4. Speak to the consulted agent and provide any information needed before transferring thecall.
5. Click Transfer.
The transfer is completed. If the call is transferred to another agent, the originating agent'sstatus is set to Ready and the consulted agent status is set to Active.
Proactive Outreach Manager
88 Avaya Aura® Agent Desktop December 2014Comments? [email protected]
Conferencing in another agentBefore you begin
• Ensure the agent to whom you want to conference into a call can handle a POM call.
About this taskOn an active customer call, you can conference in another user. When the agents clicksConference, a Conference dialog box appears. You can select an agent or a phone number andclick Consult. This places the customer call on hold and sends a request to connect to the agent (orphone number).
Note:If you select Agent as the conference type, the list includes only agents that are logged in,Ready, and currently have a nail-up call.
Procedure1. On the Agent Desktop work item, click Conference.
The Conference dialog box appears.
2. Under Options, select Agent or Phone, and select the agent to conference into the call.
Important:
You must select the agent from the agent list. Do not type the agent’s number in theNumber to dial field.
3. Click Consult.
If the requested agent is available, a Consult work item appears on both work list windowsand a voice connection is established between the originating agent and the consultedagent. The customer is placed on hold. Both agents are Ready.
If the requested agent is on a customer call, the originating agent’s customer call is placedon hold and a Pending Consult work item appears on both work list windows. When therequested agent completes the Active call, the Pending Consult work item automaticallychanges to Consult and a voice connection is established between the originating agent andthe consulted agent. Both agents are Ready.
4. Speak to the consulted agent and provide any information needed before adding thecustomer to the conference call.
5. Click Conference.
The conference call is active. The status of the originating agent is set to Conference(Owner) and the consulted agent’s status is set to Conference (Participant). Both agents canview the customer details and campaign script on Agent Desktop. The Conference Ownercan place a conference call on hold. If the Conference Owner clicks Hold while on aconference call, the customer is placed on hold. The Conference Owner and ConferenceParticipant remain active on the call.
Conferencing in another agent
December 2014 Avaya Aura® Agent Desktop 89Comments? [email protected]
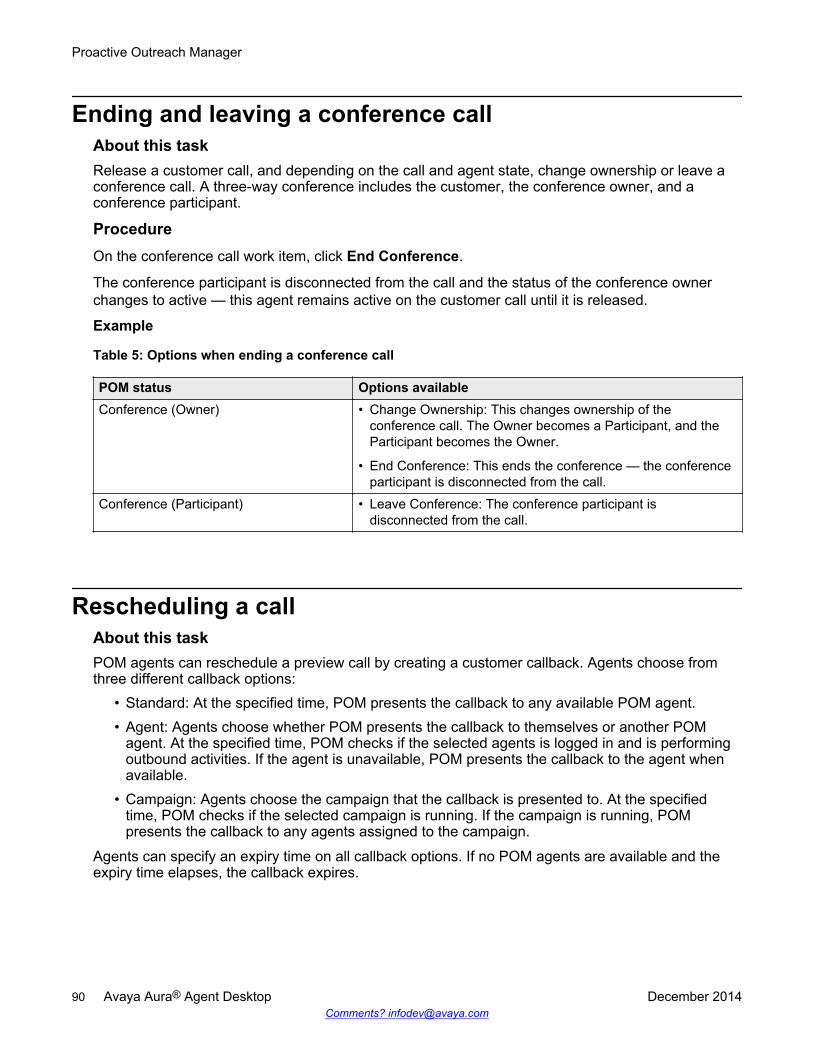
Ending and leaving a conference callAbout this taskRelease a customer call, and depending on the call and agent state, change ownership or leave aconference call. A three-way conference includes the customer, the conference owner, and aconference participant.
ProcedureOn the conference call work item, click End Conference.
The conference participant is disconnected from the call and the status of the conference ownerchanges to active — this agent remains active on the customer call until it is released.
Example
Table 5: Options when ending a conference call
POM status Options availableConference (Owner) • Change Ownership: This changes ownership of the
conference call. The Owner becomes a Participant, and theParticipant becomes the Owner.
• End Conference: This ends the conference — the conferenceparticipant is disconnected from the call.
Conference (Participant) • Leave Conference: The conference participant isdisconnected from the call.
Rescheduling a callAbout this taskPOM agents can reschedule a preview call by creating a customer callback. Agents choose fromthree different callback options:
• Standard: At the specified time, POM presents the callback to any available POM agent.• Agent: Agents choose whether POM presents the callback to themselves or another POM
agent. At the specified time, POM checks if the selected agents is logged in and is performingoutbound activities. If the agent is unavailable, POM presents the callback to the agent whenavailable.
• Campaign: Agents choose the campaign that the callback is presented to. At the specifiedtime, POM checks if the selected campaign is running. If the campaign is running, POMpresents the callback to any agents assigned to the campaign.
Agents can specify an expiry time on all callback options. If no POM agents are available and theexpiry time elapses, the callback expires.
Proactive Outreach Manager
90 Avaya Aura® Agent Desktop December 2014Comments? [email protected]

Note:POM presents all callbacks in Preview dialing mode.
Procedure1. On the Preview dialog box of the customer call you want to reschedule, click Reschedule.
The Schedule Callback dialog box appears.
2. On the Schedule Callback dialog box:
• From the Phone list, select a customer phone number to call.
OR
• In the Number box, type the customer phone number to call.
3. From the Timezone list, select the timezone of the scheduled callback.
4. Select Agent Local Time to schedule the callback in your own local time, or selectCustomer Time to schedule in the customer’s time.
5. Under Callback Start, from the Date list, select the date of the scheduled callback.
6. In the Time box, enter the time of the scheduled callback.
7. Under Callback Expiry, from the Date list, select the expiry date of the scheduled callback.
8. In the Time box, enter the expiry time of the scheduled callback.
Note:
The default expiry time is set to 30 minutes after the scheduled callback time. You canchange this default time.
9. Under Type, select the type of callback to schedule.
10. If you select Standard:
a. In the Memo box, type an optional callback description.
b. Skip to Step 13 on page 91.
11. If you select Agent:
a. Select one of the available POM agents to present the callback to.
b. In the Memo box, type an optional callback description.
c. Skip to Step 13 on page 91.
12. If you select Campaign:
a. Select one of the available POM campaigns to present the callback to.
b. In the Memo box, type an optional callback description.
c. Skip to Step 13 on page 91.
13. Click OK.
Rescheduling a call
December 2014 Avaya Aura® Agent Desktop 91Comments? [email protected]
Redialing a customerAbout this taskRedial a customer if a call is unexpectedly disconnected. When a call is unexpectedly disconnected,the agent is in an after-call work period.
Procedure1. To redial a customer, after the call is disconnected, click the Originate Call button.
The Select Destination dialog box appears with the disconnected customers contact detailslisted.
2. On the Select Destination dialog box, perform one of the following actions:
• Select one of the customer's phone numbers from the Destination list, and click Dial tocall the customer.
• In the Number to Dial box, type an alternative customer phone number to dial, and clickDial.
Note:
If the redial attempt fails, Agent Desktop restarts the after-call work timer.
Proactive Outreach Manager
92 Avaya Aura® Agent Desktop December 2014Comments? [email protected]
Chapter 8: Outbound calls and callbacks
This chapter describes how to handle outbound calls and callbacks using the Agent Desktop.
The campaign administrator creates Outbound campaigns. When a campaign runs, the systempushes outbound contacts to your desktop in the same way that the system presents voice ormultimedia contacts. When you accept an outbound contact, you are actively working on a call.
When you accept an outbound contact, the Agent Desktop displays the customer information andany other information related to the campaign. Some campaigns include a script that you need tofollow, during the call.
If the campaign administrator selects manual agent dial, you can call the customer after you reviewthe customer and campaign information. If the campaign administrator selects auto dial, the systemautomatically places the call for you after a defined number of seconds.
You use the Agent Desktop interface to perform the following outbound tasks:
• Accept and decline the incoming contact
• Make an outbound call
• Follow a script
• Review and update customer information
• End a call and assign a disposition code
• Schedule a callback
• Call the customer
You can also use Agent Desktop to create a callback. Both customers and agents can createscheduled callbacks. If your Contact Center is licensed for Web communications, a customer canrequest a call from an agent through a Customer Interface Web site. From the Web site, thecustomer can specify the reason they are requesting the callback, as well as a date and time for thecall.
An agent can schedule a callback to a customer using the Schedule Callback button. TheSchedule Callback feature is available only if your Contact Center is licensed for outbound contacts.However, a scheduled callback is not associated with an outbound campaign.
At the specified date and time, Agent Desktop presents the contact to an agent with the appropriateskillsets. To perform a callback, a supervisor must assign an agent the skillset to handle outboundcontacts.
December 2014 Avaya Aura® Agent Desktop 93Comments? [email protected]
Accepting an outbound contactBefore you begin
• Ensure that you have set your status to Ready.• Ensure that you have a skillset designated to handle outbound contacts.
About this taskUse the Agent Desktop interface to accept and handle outbound campaigns, one call at a time.
Your outbound administrator can configure the outbound calls in the following ways:
• Place the call immediately after you accept a call• Place the call after a specified number of seconds• Enable the agent to make the call
Administrators can configure Agent Desktop to give audio and visual alerts when a contact ispresented.
ProcedureOn the Agent Desktop work item, click Accept.
When you accept an outbound contact, you connect to the customer. Agent Desktop displays thecustomer details and the defined script for the call. The call is dialed according to the settings in theoutbound campaign, and the call timer appears on the status bar.
Declining an outbound contactAbout this taskYou can decline an outbound contact if you want to reject the contact. Change your status to NotReady if you are unavailable to handle contacts.
ProcedureOn the Agent Desktop work item, click Reject.
Placing an outbound callBefore you begin
• Understand how to use a script.• Understand how to record the result of a call.
About this taskYou must accept or open an outbound contact before you place an outbound call. After accepting oropening an outbound contact, you can then review the customer details and the outbound contact
Outbound calls and callbacks
94 Avaya Aura® Agent Desktop December 2014Comments? [email protected]
script. Your outbound administrator can configure outbound calls to be made immediately after youaccept a call, or specify a number of seconds before the call is placed.
After you accept or open an outbound contact, you can call the customer and perform the followingtasks:
• Verify customer information. After you successfully place the call, confirm that you havereached the correct customer by reviewing the contact information with the customer.
• Follow the script or complete the questionnaire, if applicable.• Complete the call and assign a disposition code. Schedule a callback if required, enter
applicable notes, and save the call results.
Procedure1. On the Agent Desktop Action bar menu, click the Initiate Call button.
2. In the Enter Destination window, click the Originate Call icon to dial the default customertelephone number.
3. If you get to speak with the customer, proceed with the call using a script, if applicable.
4. If you do not get to speak with the customer, record the result of the call to update thecontact with the appropriate disposition code, reschedule the call, and add applicable notes,if required.
5. Verify the customer information and update customer contact fields, if required.
Using a scriptAbout this taskUse a script if the campaign administrator has assigned an agent script to the outbound campaign.The content of the agent script depends on the campaign. The script can contain an introduction, aconclusion, and a number of questions or suggested phrases. As you progress through the script,you can record your answers or comments directly on the Call Script tab. The customer responsesare saved automatically.
Note:If the campaign administrator does not assign an agent script to the outbound campaign, theCall Script tab does not appear.
Procedure1. On the Agent Desktop, click the Call Script tab.
2. Read the introduction to the customer.
3. Read each question present in the script to the customer.
Using a script
December 2014 Avaya Aura® Agent Desktop 95Comments? [email protected]
4. Record the customer responses by using one of the three methods defined on the CallScript tab (the customer responses are saved automatically):
• Select an option from the list. Depending on the outbound campaign, you can read theoptions to your customer and then select the option based on the customer's response.
• Select an option.
• Type the customer comments in a text box.
5. To disconnect from the call, click Release.
Recording the resultAbout this taskRecord the result of a call by selecting a disposition code at the end of each outbound call. Thecampaign administrator defines disposition codes to use for each campaign. The disposition codescan be different for every campaign.
Some disposition codes indicate that the call was completed (for example, Not Interested or SaleMade), while other disposition codes indicate that the call was not completed (for example, NoAnswer or Number Busy). If the call was not completed, or if the customer requests for callback, youcan schedule a callback.
Procedure1. Click the Disposition codes tab.
2. Select the disposition code that most accurately reflects the result of your call.
Ending the callAbout this taskEnd the call after you verify the customer details, answer all the questions in the outbound script,and record a disposition code.
The script questions and answers are saved in the multimedia database, if the disposition code isconfigured to do the same. Contact your supervisor or administrator for more information aboutwhich disposition codes to select.
If the call is incomplete, or the customer requests a callback, you can schedule a callback.
ProcedureClick Finish.
Outbound calls and callbacks
96 Avaya Aura® Agent Desktop December 2014Comments? [email protected]
Scheduling a callbackBefore you begin
• Identify a customer for a scheduled callback.
About this taskSchedule a callback if you made a call from your desktop and the customer was not available. Youcan also schedule a callback in response to an email message or telephone request from acustomer. A scheduled callback outbound contact is not pegged against an outbound campaign.
Note:If you schedule a callback to occur less than 10 minutes after the original call, in certainscenarios the callback does not occur precisely at the scheduled time. The callback occurs afew minutes after the scheduled time.
Procedure1. Click Schedule Callback.
2. In the Schedule Callback window, select a skillset from the list to direct the contact to theagent with the most appropriate skills.
3. Select either an active agent for the call, or choose a specific agent from a list of all agents.
4. In the Subject box, type a subject for the callback.
5. In the Time box, select the time to perform the callback.
6. In the Date box, select the date to perform the callback.
The dates appear according to the configuration set by your administrator.
7. In the Reason box, type additional information about the contact or the customer. Onlyagents and supervisors can view the information in the Reason box.
8. Click Send.
The scheduled callback is entered into the database, ready to be routed when the selecteddate and time occurs. The scheduled callback is presented to the same agent whogenerates the callback.
Calling the customer manuallyBefore you begin
• Ensure that you are assigned to an outbound skillset.
About this taskWith an outbound campaign contact, your administrator can configure the call to be automaticallydialed when you accept the contact. However, a scheduled callback contact cannot be configured tobe dialed automatically. You must manually place the call after you review the contact information.
Scheduling a callback
December 2014 Avaya Aura® Agent Desktop 97Comments? [email protected]

Procedure1. When the contact is presented to your desktop, click Accept.
2. On the Agent Desktop Action bar menu, click Initiate Call to dial the default customertelephone number, which is displayed in the text box beside the Initiate Call button.
3. In the Enter Destination dialog box, click the Originate Call icon to dial the default customertelephone number.
4. When you complete the call, click Release.
5. If required by your supervisor, enter an activity code in the Activity Code box, and thenpress Enter.
Outbound calls and callbacks
98 Avaya Aura® Agent Desktop December 2014Comments? [email protected]
Chapter 9: Predictive Outbound
This chapter describes how to handle Predictive Outbound contacts using the Avaya Aura® AgentDesktop.
Administrators create Outbound campaigns using the customer database, custom scripts, andPredictive Outbound settings that determine how calls are presented to agents with Predictiveskillsets. Based on how the Administrator configures the campaign, calls can be dialed by thesystem or by the agent and presented to the agent either immediately or with a specified amount oftime during which the agent can preview the contact.
The Predictive Outbound feature requires additional hardware and software.
You can use the Predictive Outbound features to perform the following telephone tasks:
• Accept incoming contacts
• Cancel incoming contacts
• Place a call on hold
• Transfer a call to another party
• Transfer a contact to another agent, skillset or work session
• Conference a contact (call and data)
• End a contact (call and data)
• Schedule a callback
There are five dialing options in Predictive Outbound for delivering contacts to the Agent Desktop.The dialing option used is determined by the administrator during configuration of the campaign androuting the contact to the Agent Desktop. The five dialing options are as follows:
• Predictive: Contact Center sends a record to the dialer for automatic outbound processing. Thecontact is displayed on the Agent Desktop and the customer simultaneously receives the call.The agent cannot cancel the contact or dial the number.
• Paced: Contact Center presents a record to the agent for review while the customer's numberis being dialed. The agent cannot cancel the contact or dial the number.
• Preview: Contact Center presents a record to the agent for review. After a configured period oftime passes, the system dials the default number for the customer. The agent can cancel thecontact or manually dial the number, before the configured period of time expires.
• Progressive: Similar to the Predictive dialing option, Contact Center sends a record to thedialer for automatic outbound processing. The contact is displayed on the Agent Desktop andthe customer simultaneously receives the call. The agent cannot cancel the contact or dial the
December 2014 Avaya Aura® Agent Desktop 99Comments? [email protected]
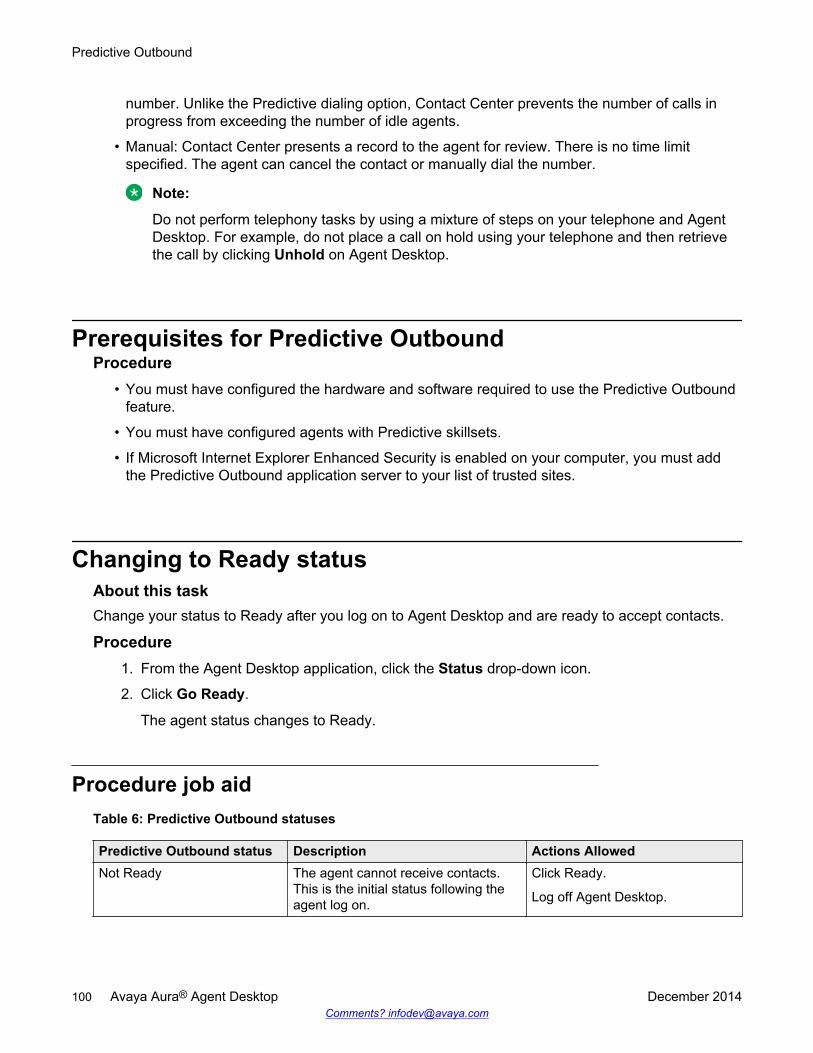
number. Unlike the Predictive dialing option, Contact Center prevents the number of calls inprogress from exceeding the number of idle agents.
• Manual: Contact Center presents a record to the agent for review. There is no time limitspecified. The agent can cancel the contact or manually dial the number.
Note:
Do not perform telephony tasks by using a mixture of steps on your telephone and AgentDesktop. For example, do not place a call on hold using your telephone and then retrievethe call by clicking Unhold on Agent Desktop.
Prerequisites for Predictive OutboundProcedure
• You must have configured the hardware and software required to use the Predictive Outboundfeature.
• You must have configured agents with Predictive skillsets.
• If Microsoft Internet Explorer Enhanced Security is enabled on your computer, you must addthe Predictive Outbound application server to your list of trusted sites.
Changing to Ready statusAbout this taskChange your status to Ready after you log on to Agent Desktop and are ready to accept contacts.
Procedure1. From the Agent Desktop application, click the Status drop-down icon.
2. Click Go Ready.
The agent status changes to Ready.
Procedure job aidTable 6: Predictive Outbound statuses
Predictive Outbound status Description Actions AllowedNot Ready The agent cannot receive contacts.
This is the initial status following theagent log on.
Click Ready.
Log off Agent Desktop.
Predictive Outbound
100 Avaya Aura® Agent Desktop December 2014Comments? [email protected]
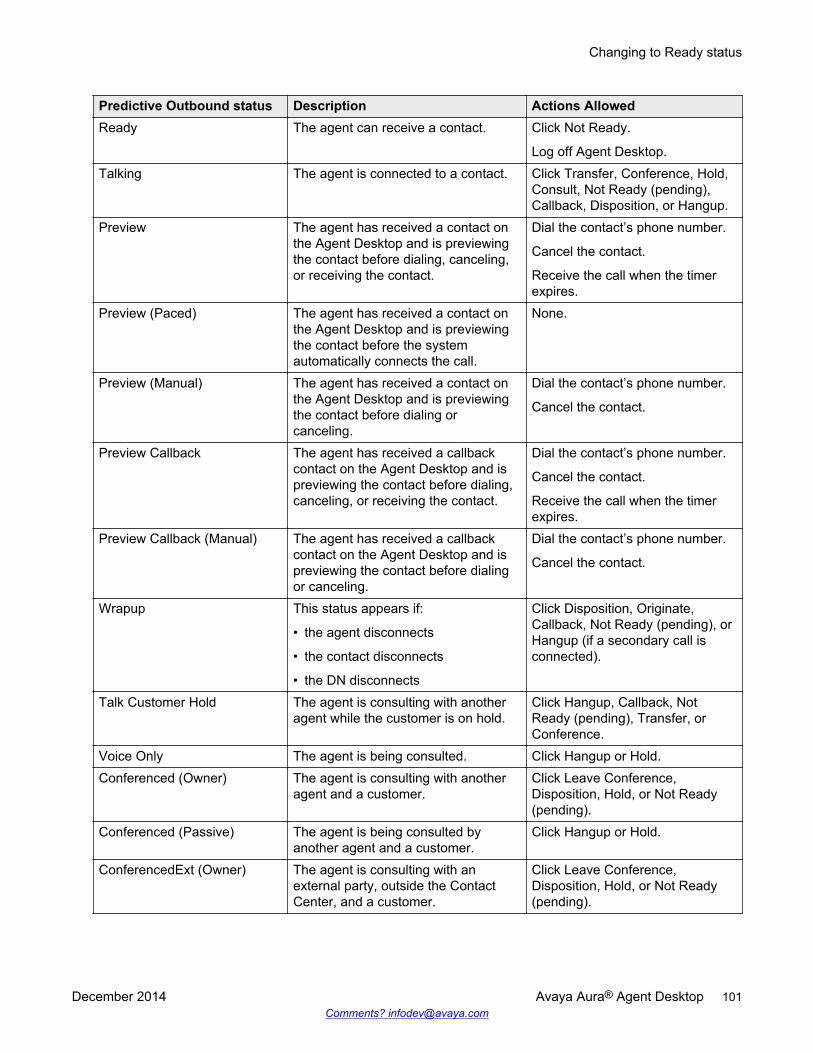
Predictive Outbound status Description Actions AllowedReady The agent can receive a contact. Click Not Ready.
Log off Agent Desktop.Talking The agent is connected to a contact. Click Transfer, Conference, Hold,
Consult, Not Ready (pending),Callback, Disposition, or Hangup.
Preview The agent has received a contact onthe Agent Desktop and is previewingthe contact before dialing, canceling,or receiving the contact.
Dial the contact’s phone number.
Cancel the contact.
Receive the call when the timerexpires.
Preview (Paced) The agent has received a contact onthe Agent Desktop and is previewingthe contact before the systemautomatically connects the call.
None.
Preview (Manual) The agent has received a contact onthe Agent Desktop and is previewingthe contact before dialing orcanceling.
Dial the contact’s phone number.
Cancel the contact.
Preview Callback The agent has received a callbackcontact on the Agent Desktop and ispreviewing the contact before dialing,canceling, or receiving the contact.
Dial the contact’s phone number.
Cancel the contact.
Receive the call when the timerexpires.
Preview Callback (Manual) The agent has received a callbackcontact on the Agent Desktop and ispreviewing the contact before dialingor canceling.
Dial the contact’s phone number.
Cancel the contact.
Wrapup This status appears if:
• the agent disconnects
• the contact disconnects
• the DN disconnects
Click Disposition, Originate,Callback, Not Ready (pending), orHangup (if a secondary call isconnected).
Talk Customer Hold The agent is consulting with anotheragent while the customer is on hold.
Click Hangup, Callback, NotReady (pending), Transfer, orConference.
Voice Only The agent is being consulted. Click Hangup or Hold.Conferenced (Owner) The agent is consulting with another
agent and a customer.Click Leave Conference,Disposition, Hold, or Not Ready(pending).
Conferenced (Passive) The agent is being consulted byanother agent and a customer.
Click Hangup or Hold.
ConferencedExt (Owner) The agent is consulting with anexternal party, outside the ContactCenter, and a customer.
Click Leave Conference,Disposition, Hold, or Not Ready(pending).
Changing to Ready status
December 2014 Avaya Aura® Agent Desktop 101Comments? [email protected]
Changing to Not Ready statusBefore you begin
• Ensure that you have no active contact.
About this taskChange your status Not Ready to indicate that you are not ready to accept contacts.
Procedure1. From the Agent Desktop application, click the Status drop-down icon.
2. Click Go Not Ready.
The agent status changes to Not Ready.
Changing to Not Ready status when on a contactBefore you begin
• Ensure that you have an active contact.
About this taskChange your status to Not Ready, while still on a contact to indicate that you are not ready to acceptcontacts when the current contact is completed.
Procedure1. From the Agent Desktop application, click the Status drop-down icon.
2. Click Go Not Ready.
The button changes to Not Ready and Not Ready appears in title bar.
Handling a Predictive or Progressive callBefore you begin
• Ensure that your status is set to Ready.
About this taskAgents use the same procedure for handling a Predictive or Progressive call. However, theadministrator can use Progressive calls to prevent the system from dialing calls that exceed thenumber of idle agents.
Predictive and Progressive calls are delivered to your Agent Desktop automatically. The customer ison the line and the customer details and call script appears on your Agent Desktop.
Predictive Outbound
102 Avaya Aura® Agent Desktop December 2014Comments? [email protected]
ProcedureRespond to the call when it is presented to you.
Your agent status is Talking.
Handling a Paced callBefore you begin
• Ensure that your status is set to Ready.
About this taskHandling a paced call enables you to preview a call while it is being dialed by the system. Youcannot cancel the call or dial the customer’s phone number.
Procedure1. Preview the customer details and the call script that appear on the Agent Desktop.
Your agent status is set to Preview (Paced).
2. Respond to the call when it is presented to you.
Your agent status is Talking.
Handling a Preview callBefore you begin
• Ensure that your status is set to Ready.
About this taskHandling a Preview call enables you to preview a call before you or the system dials the customer’sphone number. You have a predefined time period in which you need to preview the contactinformation. Before this time period expires, you can dial the customer’s phone number or cancelthe contact. When the preview time period expires, the system dials the customer's number andpresents the contact to you.
Procedure1. Preview the customer details and the call script that appears on the Agent Desktop.
Your agent status is set to Preview. The count down of the Preview time begins and the timeremaining is displayed in the Preview Contact dialog box.
2. Choose one of the following actions:
• Select one of the customer's phone numbers from the Preview Contact dialog box, andclick Dial to call the customer.
Handling a Paced call
December 2014 Avaya Aura® Agent Desktop 103Comments? [email protected]
• Click Cancel to cancel the contact.• Respond to the call when the Preview time period expires and the system automatically
presents the call to you.
If you or the system dials the customer, your agent status is set to Talking. If you cancel thecontact, your agent status is set to Ready.
Handling a manual callBefore you begin
• Ensure that you have set your status to Ready.
About this taskHandling a manual call uses a procedure similar to handling a preview call. However, a manual callis handled through the phone switch and not through the Predictive Outbound features.
Procedure1. Preview the customer details and the call script that appears on the Agent Desktop.
Your agent status is set to Preview (Manual).
2. Choose one of the following actions:
• Select the phone number of one of the customer's that appears in the Preview Contactdialog box, and click Dial to call the customer.
• Click Cancel to cancel the contact.
If you dial the customer, your agent status is Talking. If you Cancel the contact, your agentstatus is Ready.
Cancelling a callBefore you begin
• Ensure that your status is set to Ready.• Ensure that you have a Predictive skillset designated for handling telephone calls.
About this taskCancel a call if you want to reject a contact and place the contact back in the queue.
You can cancel only Preview or Manual Predictive Outbound calls.
Procedure1. Preview the customer details and the call script that appears on the Agent Desktop.
Your agent status is Preview or Preview (Manual).
Predictive Outbound
104 Avaya Aura® Agent Desktop December 2014Comments? [email protected]
2. In the Preview Contact dialog box, click Cancel.
The contact is returned to the queue.
Transferring a callBefore you begin
• Ensure that the agent to whom you want to transfer a call has a Predictive skillset designatedfor handling telephone calls.
• Ensure that the agent to whom you want to transfer a call has the status set to Ready.
About this taskYou can transfer a call to another agent in your Contact Center. Transferring a call requires severalsteps, particularly if the agent to whom you want to transfer a call does not have the status set toReady, when the initial request is made. When you select an agent (or skillset, work session, orphone) and click Consult, a request to connect to the agent is generated. Following the request,one of the following events occur:
• If the requested agent is not logged on, the consult attempt fails immediately. The originatingagent can try to transfer the call to another agent or can click Close to cancel the request.
• If the requested agent is logged on, but does not have the status set to Ready, the consultattempt fails immediately. The originating agent can try to transfer the call to another agent orcan click Close to cancel the request.
• If the requested agent is logged on, but does not have the status set to Ready, and does notbecome available after 60 seconds, the request gets timed out. The originating agent can try totransfer the call to another agent or can click Close to cancel the request.
• At any time while the request is being made, the originating agent can click Cancel to cancelthe request. All other buttons on the Transfer dialog box are disabled while the request is beingmade.
An agent with Predictive Outbound skillsets can encounter the following scenario during a calltransfer:
• If an agent in a Predictive Outbound skillset performs a supervised transfer to an invalid orbusy phone number, the agent hears a busy signal. To avoid a call disconnect, the agent mustnot complete the transfer if there is a busy signal. The agent must confirm that the third party isavailable before completing the transfer.
Procedure1. On the Agent Desktop Predictive Outbound Voice Path work item, click Transfer.
2. In the Transfer dialog box, select whether to transfer the call by Skillset, Agent, WorkSession, or Phone number, and then select the party to whom you want to transfer the callfrom the updated list of available options.
OR
Type a phone number in the Number to Dial field.
Transferring a call
December 2014 Avaya Aura® Agent Desktop 105Comments? [email protected]
Note:
In the Manual mode, if you press the Transfer/Conference buttons on the phone, theTransfer/Conference dialog box does not appear on the Agent Desktop as it does forother modes of Predictive Outbound.
3. Click Consult.
If the requested agent is available, Consult changes to Transfer. A voice connection isestablished between the originating agent and the consulted agent. The customer is placedon hold. The originating agent’s status is set to Talk Customer Hold. The consulted agent’sstatus is set to Voice Only.
4. Speak to the consulted agent and provide any information needed before completing thetransfer.
5. Click Transfer.
The transfer is completed. If the call is transferred to another agent, the originating agent'sstatus is set to Ready and the consulted agent status is set to Talking. If the call istransferred to an external party, the originating agent's status is set to Wrapup.
Conferencing in another agentBefore you begin
• Ensure that the agent to whom you want to transfer a call has a Predictive skillset designatedfor handling telephone calls.
• Ensure that the agent to whom you want to transfer a call has the status set to Ready.
About this taskYou can conference in another agent in your Contact Center. Conferencing in another agentinvolves several steps, particularly if the agent you want to conference with does not have the statusset to Ready, when you make the initial request. When you select an agent (or skillset, worksession, or phone) and click Consult, a request to connect to the agent is generated. Following therequest, one of the following events occur:
• If the requested agent is not logged on, the consult attempt fails immediately. The originatingagent can try to transfer the call to another agent or can click Close to cancel the request.
• If the requested agent is logged on, but does not have the status set to Ready, the consultattempt fails immediately. The originating agent can try to transfer the call to another agent orcan click Close to cancel the request. The originating agent can add the customer to the calland begin the conference by clicking the Conference button. The originating agent’s status isset to Conferenced (Owner). The consulted agent’s status is set to Conferenced (Passive).
• If the requested agent is logged on, but does not have the status set to Ready, and does notbecome available after 60 seconds, the request gets timed out. The originating agent can try totransfer the call to another agent or can click Close to cancel the request.
Predictive Outbound
106 Avaya Aura® Agent Desktop December 2014Comments? [email protected]
• At any time while the request is made, the originating agent can click Cancel to cancel therequest. All other buttons on the Conference dialog box are disabled while the request is beingmade.
If an agent with a Predictive Outbound skillset initiates a conference call to an invalid or busy phonenumber, the agent hears a busy signal. To avoid a call disconnect, the agent must not complete aconference call if there is a busy signal. The agent must confirm that the third party is availablebefore completing a conference call.
Procedure1. On the Agent Desktop work item, click Conference.
2. In the Conference dialog box, select whether to conference the agent by Skillset, Agent,Work Session, or Phone number, and then select the party you want to conference in fromthe updated list of available options.
OR
Type a phone number in the Number to Dial field.
Note:
In the Manual mode, if you press the Transfer/Conference buttons on the phone, theTransfer/Conference dialog box does not appear on the Agent Desktop as it does forother modes of Predictive Outbound.
3. Click Consult.
If the requested agent is available, Consult changes to Conference. A voice connection isestablished between the originating agent and the consulted agent. The customer is placedon hold. The originating agent’s status is set to Talk Customer Hold. The consulted agent’sstatus is set to Voice Only.
4. Speak to the consulted agent and provide any information needed before adding thecustomer to the conference call.
5. Click Conference.
The conference call is active. The status of both the originating agent and the consultedagent is set to Talking.
Hanging-up and leaving a conference callAbout this taskHang up on a call with the customer, and depending on the call and agent state, leave a conferencecall with another agent.
ProcedureOn the Agent Desktop, Predictive Outbound voice path work item, click hangup/leave conference.
Hanging-up and leaving a conference call
December 2014 Avaya Aura® Agent Desktop 107Comments? [email protected]
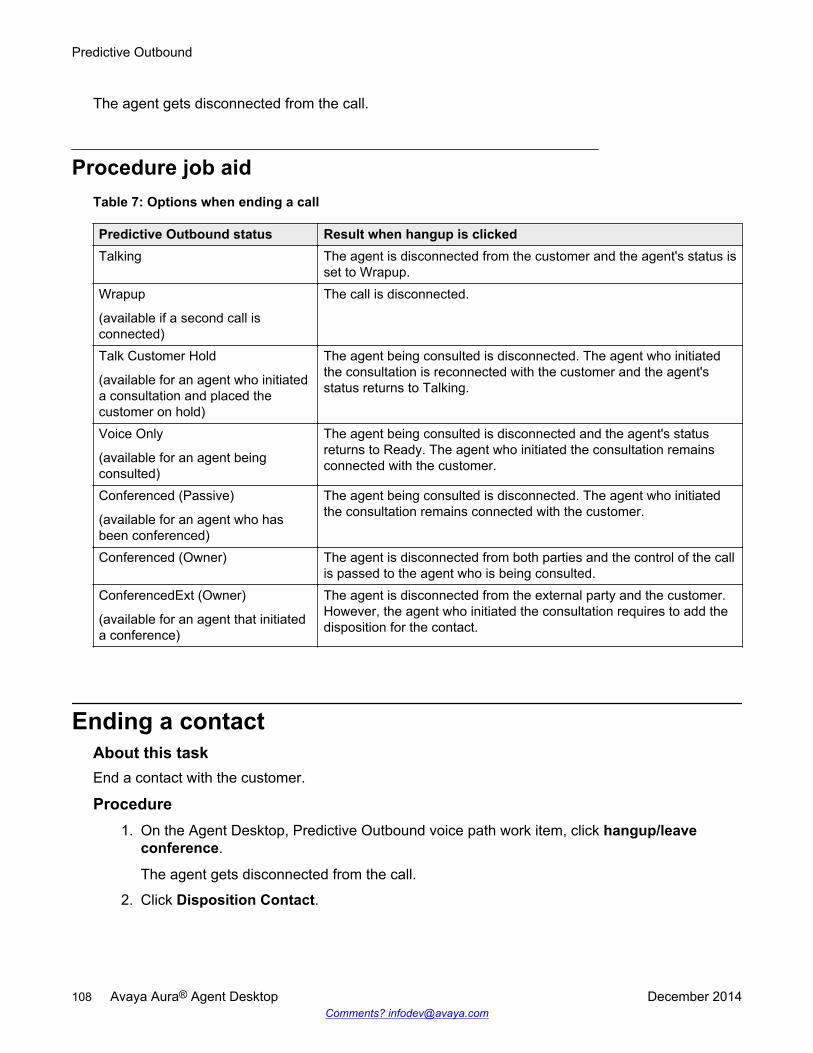
The agent gets disconnected from the call.
Procedure job aidTable 7: Options when ending a call
Predictive Outbound status Result when hangup is clickedTalking The agent is disconnected from the customer and the agent's status is
set to Wrapup.Wrapup
(available if a second call isconnected)
The call is disconnected.
Talk Customer Hold
(available for an agent who initiateda consultation and placed thecustomer on hold)
The agent being consulted is disconnected. The agent who initiatedthe consultation is reconnected with the customer and the agent'sstatus returns to Talking.
Voice Only
(available for an agent beingconsulted)
The agent being consulted is disconnected and the agent's statusreturns to Ready. The agent who initiated the consultation remainsconnected with the customer.
Conferenced (Passive)
(available for an agent who hasbeen conferenced)
The agent being consulted is disconnected. The agent who initiatedthe consultation remains connected with the customer.
Conferenced (Owner) The agent is disconnected from both parties and the control of the callis passed to the agent who is being consulted.
ConferencedExt (Owner)
(available for an agent that initiateda conference)
The agent is disconnected from the external party and the customer.However, the agent who initiated the consultation requires to add thedisposition for the contact.
Ending a contactAbout this taskEnd a contact with the customer.
Procedure1. On the Agent Desktop, Predictive Outbound voice path work item, click hangup/leave
conference.
The agent gets disconnected from the call.
2. Click Disposition Contact.
Predictive Outbound
108 Avaya Aura® Agent Desktop December 2014Comments? [email protected]
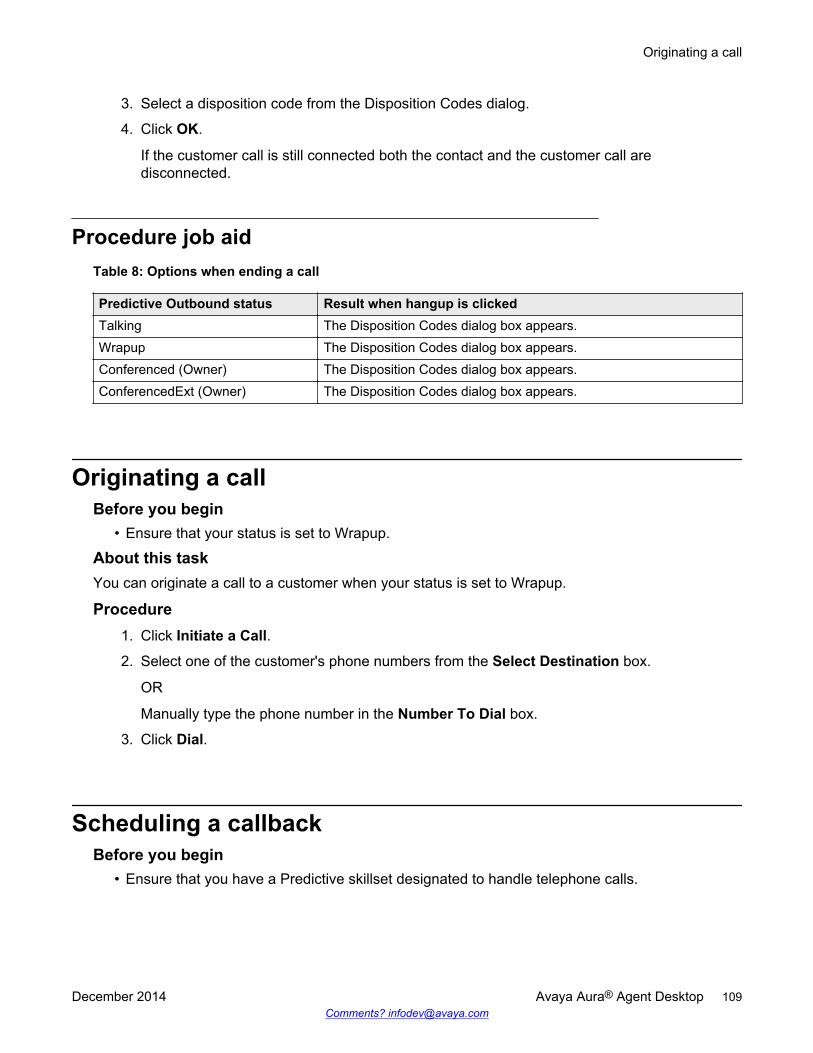
3. Select a disposition code from the Disposition Codes dialog.
4. Click OK.
If the customer call is still connected both the contact and the customer call aredisconnected.
Procedure job aidTable 8: Options when ending a call
Predictive Outbound status Result when hangup is clickedTalking The Disposition Codes dialog box appears.Wrapup The Disposition Codes dialog box appears.Conferenced (Owner) The Disposition Codes dialog box appears.ConferencedExt (Owner) The Disposition Codes dialog box appears.
Originating a callBefore you begin
• Ensure that your status is set to Wrapup.
About this taskYou can originate a call to a customer when your status is set to Wrapup.
Procedure1. Click Initiate a Call.
2. Select one of the customer's phone numbers from the Select Destination box.
OR
Manually type the phone number in the Number To Dial box.
3. Click Dial.
Scheduling a callbackBefore you begin
• Ensure that you have a Predictive skillset designated to handle telephone calls.
Originating a call
December 2014 Avaya Aura® Agent Desktop 109Comments? [email protected]
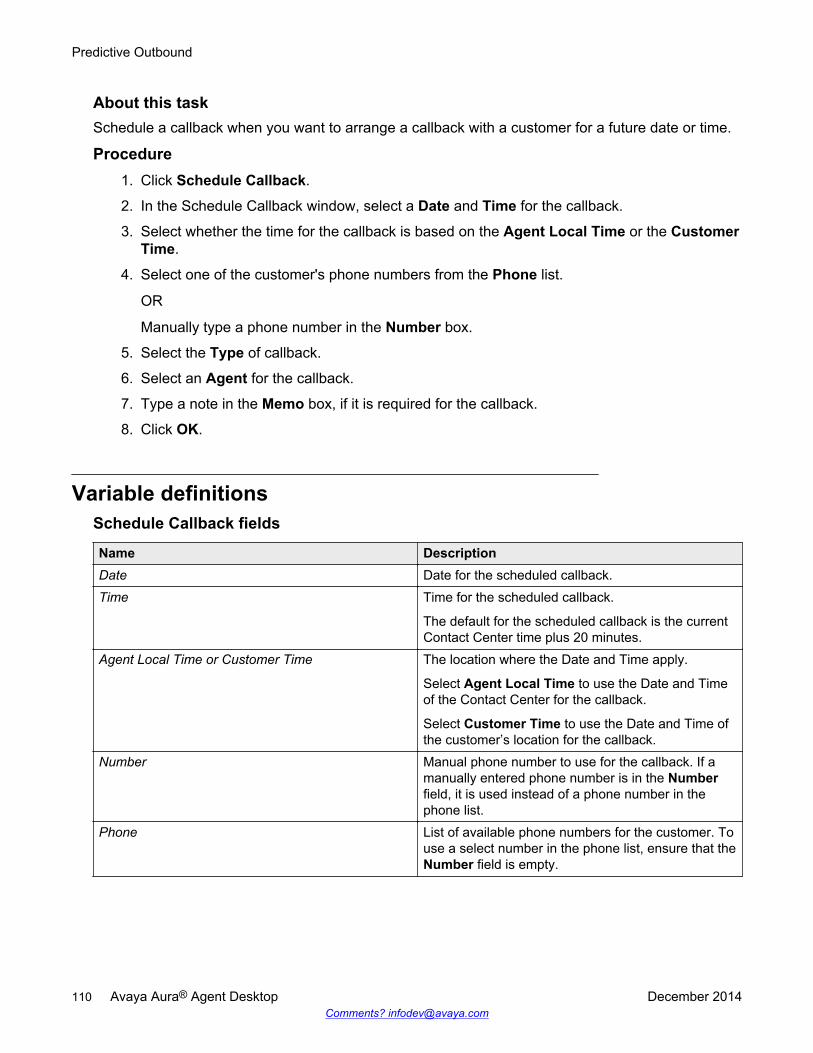
About this taskSchedule a callback when you want to arrange a callback with a customer for a future date or time.
Procedure1. Click Schedule Callback.
2. In the Schedule Callback window, select a Date and Time for the callback.
3. Select whether the time for the callback is based on the Agent Local Time or the CustomerTime.
4. Select one of the customer's phone numbers from the Phone list.
OR
Manually type a phone number in the Number box.
5. Select the Type of callback.
6. Select an Agent for the callback.
7. Type a note in the Memo box, if it is required for the callback.
8. Click OK.
Variable definitionsSchedule Callback fields
Name DescriptionDate Date for the scheduled callback.Time Time for the scheduled callback.
The default for the scheduled callback is the currentContact Center time plus 20 minutes.
Agent Local Time or Customer Time The location where the Date and Time apply.
Select Agent Local Time to use the Date and Timeof the Contact Center for the callback.
Select Customer Time to use the Date and Time ofthe customer’s location for the callback.
Number Manual phone number to use for the callback. If amanually entered phone number is in the Numberfield, it is used instead of a phone number in thephone list.
Phone List of available phone numbers for the customer. Touse a select number in the phone list, ensure that theNumber field is empty.
Predictive Outbound
110 Avaya Aura® Agent Desktop December 2014Comments? [email protected]

Name DescriptionType Type of callback or Predictive Outbound campaign.
The type selected determines the Agent and Teamnames that you can select. The callback types are:
• Standard: The callback goes to any available agentin the original Predictive Outbound campaign type.
• Personal: The callback goes to the agentscheduling the callback, regardless of thePredictive Outbound campaign type or Teamassigned.
• Enterprise Campaign: The callback goes to thenext available agent, if the agent scheduling thecallback is not available.
• Private Campaign: The callback goes to the agentscheduling the callback.
• Enterprise Team: The callback goes to the nextavailable agent in the assigned team.
• Private Team: The callback waits for the agentscheduling the callback to be assigned to the team.
Agent Agent for the callback. The team selecteddetermines the agent names that can be selected.
Team Team for the callback. The type of callbackdetermines the Team names that can be selected.
Memo Memo text entered by the agent scheduling thecallback appears at the bottom of the call script whenthe callback contact is presented to an agent.
Handling a standard callback callBefore you begin
• Ensure that your status is set to Ready.• Ensure that the work session on CPSEE Application server is active.
About this taskHandling a Standard callback call is similar to handling a normal call in each mode of predictiveoutbound calling (Manual, Paced, Preview, Progressive and Predictive) apart from memo text. Acontact is presented to an agent as a result of a scheduled Standard callback type.
A Standard callback call is automatically delivered to your Agent Desktop. The customer details andcall script (including any memo notes entered when the scheduled callback was created) appear onyour Agent Desktop.
Handling a standard callback call
December 2014 Avaya Aura® Agent Desktop 111Comments? [email protected]
You can preview, cancel or dial the customer's phone number, if the contact presented to you is aPreview or manual contact.
ProcedureRespond to the call when it is presented to you.
Your agent status is set to Talking.
Handling a non-standard callback callBefore you begin
• Ensure that your status is set to Ready.
About this taskHandling a non-Standard callback call is similar to handling a Preview call. A contact is presented toan agent as a result of a scheduled callback of any of the following types:
• Personal• Enterprise campaign• Private campaign• Enterprise team• Private team
For any of these callback call types you can preview a call before you or the system dials thecustomer’s phone number. You have a predefined time period in which you need to preview thecontact information. Before this time period expires, you can dial the customer’s phone number orcancel the contact. When the preview time period expires, the system dials the customer's numberand presents the contact to you.
Procedure1. Preview the customer details and the call script that appears on the Agent Desktop.
Your agent status is set to Preview Callback. The count down of the Preview time beginsand the time remaining is displayed in the Preview Contact dialog box.
2. Choose one of the following actions:
• Select one of the customer's phone numbers from the Preview Contact dialog box, andclick Dial to call the customer.
• Click Cancel to cancel the contact.
• Respond to the call when the Preview time period expires and the system automaticallypresents the call to you.
If you or the system dials the customer's number, your agent status is set to Talking. If youcancel the contact, your agent status is set to Ready.
Predictive Outbound
112 Avaya Aura® Agent Desktop December 2014Comments? [email protected]
Handling a closed zone or priority callback callAbout this taskA contact is presented to an agent as a result of a closed zone or priority callback. A closed zone orpriority callback call is automatically delivered to your Agent Desktop. The customer details and callscript (including any memo notes entered when the callback was created) appear on your AgentDesktop. You can preview, reschedule or dial the customer's phone number.
Handling a closed zone or priority callback call is similar to handling a Preview call. However, thereare differences:
• The call can contain memo text.• The call includes a reschedule option to reschedule the callback for a later date.• The call does not have a cancel option.• The call does not have a preview time.
ProcedureRespond to the call when it is presented to you.
Your agent status is set to Talking.
Handling a closed zone or priority callback call
December 2014 Avaya Aura® Agent Desktop 113Comments? [email protected]
Chapter 10: Email
Use Agent Desktop to perform the following tasks when you handle an email message:
• Accept or decline the incoming email contact
• Review and update customer information
• Send a reply
• Add an attachment
• Add inline images into an email message
• Insert a template or auto signature
• Forward an email message
• Finish an email message
• Spell check an email message
• Postpone work on a contact
• Follow up on a contact
• Transferring a contact
• Print contact details
• Send an email message to an agent using the Phonebook
• Approve or reject an email (if assigned to approval skillsets)
• Redrafting an email (rejected email messages)
You can also use Agent Desktop to create a new email message.
Important:
Contact Center limits the To, CC, and BCC fields to 4096 characters. If you exceed this limit,Agent Desktop truncates the address fields.
114 Avaya Aura® Agent Desktop December 2014Comments? [email protected]
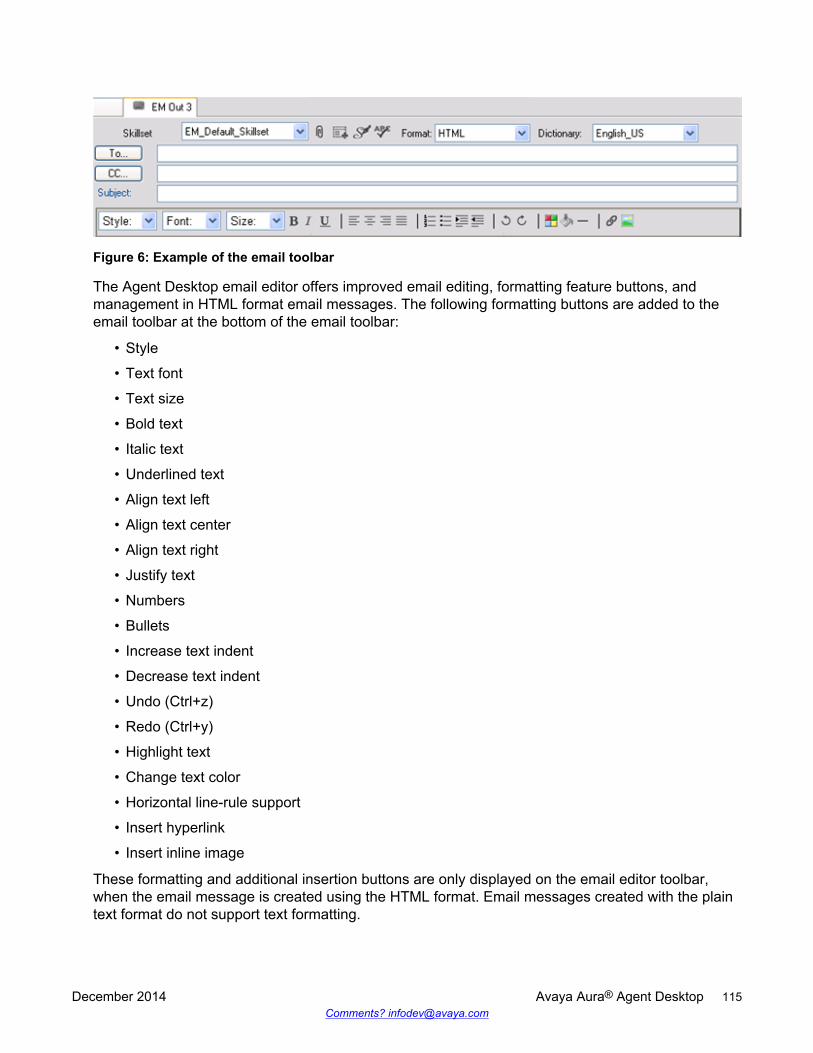
Figure 6: Example of the email toolbar
The Agent Desktop email editor offers improved email editing, formatting feature buttons, andmanagement in HTML format email messages. The following formatting buttons are added to theemail toolbar at the bottom of the email toolbar:
• Style
• Text font
• Text size
• Bold text
• Italic text
• Underlined text
• Align text left
• Align text center
• Align text right
• Justify text
• Numbers
• Bullets
• Increase text indent
• Decrease text indent
• Undo (Ctrl+z)
• Redo (Ctrl+y)
• Highlight text
• Change text color
• Horizontal line-rule support
• Insert hyperlink
• Insert inline image
These formatting and additional insertion buttons are only displayed on the email editor toolbar,when the email message is created using the HTML format. Email messages created with the plaintext format do not support text formatting.
December 2014 Avaya Aura® Agent Desktop 115Comments? [email protected]
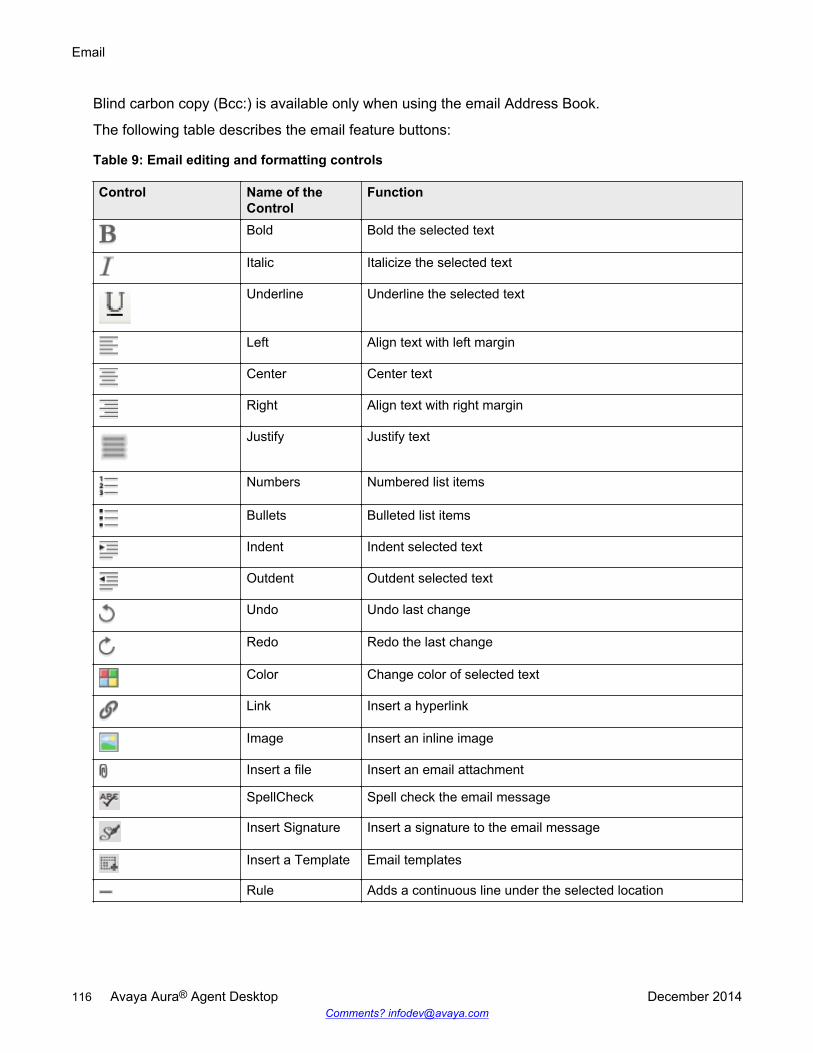
Blind carbon copy (Bcc:) is available only when using the email Address Book.
The following table describes the email feature buttons:
Table 9: Email editing and formatting controls
Control Name of theControl
Function
Bold Bold the selected text
Italic Italicize the selected text
Underline Underline the selected text
Left Align text with left margin
Center Center text
Right Align text with right margin
Justify Justify text
Numbers Numbered list items
Bullets Bulleted list items
Indent Indent selected text
Outdent Outdent selected text
Undo Undo last change
Redo Redo the last change
Color Change color of selected text
Link Insert a hyperlink
Image Insert an inline image
Insert a file Insert an email attachment
SpellCheck Spell check the email message
Insert Signature Insert a signature to the email message
Insert a Template Email templates
Rule Adds a continuous line under the selected location
116 Avaya Aura® Agent Desktop December 2014Comments? [email protected]
Control Name of theControl
Function
Highlight Highlights selected text with a color chosen from the colorpalette
Supervisor approval of email messagesBefore an email message reaches a customer, supervisors can approve or reject the emailmessages that agents send to customers. The approver of the email messages is the supervisorassigned to the approval skillset of the contacts that the agent handles.
The approval process applies to email contacts only and does not apply to other contact types suchas Fax, Scanned Documents, and SMS.
Based on your quality assurance requirements, regulatory requirements or agent trainingrequirements, some or all of the email messages are sent to supervisors for approval beforesending email messages to a customer. Administrators can configure email messages targeted forapproval from supervisors on a per skillset basis or per agent basis.
Agent Desktop follows the following process for approval of email messages from supervisors:
• When an agent sends an email message, the system marks the email message for approvaland returns the email message to a predetermined skillset in the queue for approval.Supervisors who review the email message that the agent sends to the customer must beassigned to the approval skillset. This process is exactly the same as the current process of anagent sending an email message. The agent has no indication that the contact the agent ishandling is a part of an approval process.
Agents cannot request approval of email messages. Administrators cannot configure keywordsto trigger the approval process.
For more information, see Creating an email message on page 121 or Replying to an emailmessage on page 120.
• If the supervisor approves the email message, the system marks the email message to be sentto the customer or returns the email message to the queue if the email message requiresfurther approval. If the email message requires further approval, the system targets the emailmessage to the next approval skillset in the hierarchy. For more information, see Approvingemail messages on page 131.
• If the supervisor rejects the email message, the system marks the email message as rejectedand returns the email message to the queue targeted to the previous skillset. The supervisorcan add review comments so that the originator can redraft the email message: theadministrator can configure whether to make comments for email approval mandatory or not.The email message flows through the rejection hierarchy until the email message reaches theoriginator for redrafting.
Only the originator of the email message can edit or redraft the email message. Supervisors atall levels can only add review comments.
Supervisor approval of email messages
December 2014 Avaya Aura® Agent Desktop 117Comments? [email protected]
For more information, see Rejecting an email message sent for approval on page 132 and Redrafting a rejected email message on page 133.
The system does not move email messages through the approval hierarchy in the followingsituations:
• Administrators delete a skillset that is part of the supervisor approval chain and the contact isalready in queue waiting for that skillset to come into service
• Administrators delete the original agent and a supervisor rejects the email message
• Administrators delete the supervisor who must approve the email message
In order to handle such contacts, agents must use Agent Desktop to pull contacts.
Accepting an incoming email messageAbout this taskAccept an incoming email message, when you are ready to receive the customer's email, displaycustomer details and begin contact with a customer. The Agent Desktop displays the customerdetails and the call timer appears on the work item. The new incoming email message is presentedas a new work item in the Work List window.
ProcedureOn the Agent Desktop, click Accept.
The email message opens in the E-mail Display panel.
The customer details associated with the email message appears in the bottom left-hand corner ofthe Customer Details panel.
Declining an incoming email messageAbout this taskDecline an incoming email message if you cannot handle the email message. The new incomingemail message disappears from your work list.
ProcedureOn the Agent Desktop, click Reject.
The contact returns to the queue and your status is set to Not Ready.
118 Avaya Aura® Agent Desktop December 2014Comments? [email protected]
Verifying customer informationAbout this taskVerify customer information by reviewing the information that is displayed in the left side of theCustomer Details window. The Customer Details window displays information such as the customerdetails and the history of recent customer interactions.
If you accept a contact, or choose to read a contact, a maximum of 15 contacts appear before yourselection and a maximum of 15 contacts appear after your selection on the History tab. Use thenavigation arrow buttons to scroll through the contacts that appear in the customer history. A pageshows a maximum of 31 contacts. The status bar indicates the contacts you are viewing and thetotal number of contacts in the history list.
You can use the Customer Details — History pane to view the details of previous interactions withthe customer, including automatic responses sent and the content of previous email messages.
Procedure1. On the Agent Desktop, in the Customer Details window, click the Details tab to verify
customer contact information.
2. Click the History tab to view the details of previous interactions with the customer for all theMultimedia types.
3. Click the CI Details tab to view the Customer Interface Web site details.
Resetting customer passwordAbout this taskYou can reset the customer password, if a customer requests for a change of password.
Procedure1. On the Agent Desktop Action bar, click Customer Search.
2. Type a name in the Search field in the last name, first name format.
The search field is not case-sensitive.
3. Click Search.
The list scrolls to the appropriate name or the closest match.
4. Select the customer whose password you want to change.
5. Click the CI Details tab and select Reset Password.
Verifying customer information
December 2014 Avaya Aura® Agent Desktop 119Comments? [email protected]
Replying to an email messageBefore you begin
• Ensure that you understand how to use the address book to reply to a contact. See Using theaddress book to reply to a contact on page 122.
• Ensure that you understand how to create a template response. See Using a templateresponse on page 124.
• Ensure that you understand how to add attachments to an email message. See Adding anattachment to your email response on page 125.
• Ensure that you understand how to use the spell check feature. See Using the spellingchecker on page 127.
About this taskReply to an email message when a customer sends an email message to the Contact Centerrequesting a response. Create a response to a customer in the same format as the original request.
You can use several features (present in the following list) on the Agent Desktop interface to helpyou to create your email response in HTML or plain text:
• Auto suggestions• the address book• one or more response templates• an automatic signature• an attached file• the spelling checker
You can also add a comment to an email message in the Agent Note box as a reference for latercommunications with the customer. The customer does not see the information present in the AgentNote box.
Procedure1. On the Agent Desktop, in the Email window, click Reply.
2. In the E-mail Response window, accept the default To email address. The default emailaddress is the address from which the message was sent.
Or
Click To to add a email address of the customer, which is other than the default emailaddress.
Or
Click Cc to add other email addresses from the corporate address book or multimediadatabase.
3. In the Subject box, either accept the subject currently displayed or edit the subject.
4. Add text to the reply using one or both of the following methods:
• Type the message text.
120 Avaya Aura® Agent Desktop December 2014Comments? [email protected]

• Add a template response.
5. If you use the HTML format for creating the email message, and you want to make the textbold, underline, or italics, select the text, and click the appropriate button to apply formatting.
You cannot format a plain text email message.
6. To change the text size, select the text and click the up arrow to increase the font size, orclick the down arrow to decrease the font size.
7. To perform a spell check, click the SpellCheck icon.
8. To insert an automatic signature to the email message, click the Insert Signature icon.
9. To add an attachment to the email response, click Insert a file.
10. In the Agent Note box, type additional information about the contact or the customer, ifrequired.
Only agents and supervisors can view the information in the Agent Note box.
11. Click Send.
12. Close the contact.
If required, select a reason for closing the contact.
Creating an email messageBefore you begin
• Ensure that you are assigned to an email skillset.
About this taskCreate an email message to send to a customer.
Procedure1. On the Agent Desktop Action bar, select Initiate Email.
2. In the To box, enter the email address of the customer.
If additional addresses are required add them to the Cc box.
3. Click Create Email.
4. In the Subject box, type the subject of the message.
5. In the body text box, add the email response. You can add the response using one or both ofthe following methods:
• Type the message text.
• Add a template response.
6. To attach a file to the email message, click Insert a file.
Creating an email message
December 2014 Avaya Aura® Agent Desktop 121Comments? [email protected]
7. Select the appropriate skillset from the Skillset list.
8. In the Agent Note box, type additional information about the contact or the customer, ifrequired.
Only agents and supervisors can view the information in the Agent Note box.
9. Click Send.
The system searches the database for the customer's email address. If the customer doesnot exist in the database, the system creates a new customer record, as well as a newcontact and response record. The contact closes automatically.
Using the address book to reply to a contactAbout this taskUse the address book to search for an email address in the corporate address book or in thecustomer database, when you use email to reply to a customer or transfer a contact. You cansearch for addresses to add to the To, carbon copy (Cc), or blind carbon copy (Bcc) fields of youremail message. The address book can contain information from an external directory, a localdirectory, or a customer database.
Procedure1. In the email window, click To or Cc.
2. In the Select Names dialog box, from the Search for records from box, select the databaseto search for customer address. Select either Customers or LDAP.
3. If you select Customers:
a. Define your search criteria and type a name in the Search field. The Search field is notcase-sensitive.
b. Click Search.
c. Select a name from the results list and click To, Cc, or Bcc to add the name to theappropriate recipient list.
Note:
Alternatively, you can type a name in the Manually Insert Address box and clickTo, Cc, or Bcc to add the name to the appropriate recipient list.
4. If you select LDAP:
Select a name from the list, and then click To, Cc, or Bcc to add the name to theappropriate recipient list.
Note:
Alternatively, you can type a name in the Manually Insert Address box and clickTo, Cc, or Bcc to add the name to the appropriate recipient list.
122 Avaya Aura® Agent Desktop December 2014Comments? [email protected]
5. After you select all the required recipients for the email message, click OK.
Removing a name from the recipient listAbout this taskRemove a name from the recipient list if you do not want to send the email message to thatparticular contact.
Note:Removing a name from the recipient list does not remove the name from your address book ordatabase.
ProcedureSelect the name from the To, Cc, or Bcc field, and then press Delete on your keyboard.
Creating a template responseAbout this taskCreate and store your own templates to use predefined email messages or responses to standardcustomer queries. You can use a part of or all of the template text as your email response.
Note:Agent Desktop supports only text and HTML template files. You can use any editor to create atemplate file, but ensure that you save the template file as a .txt or an .html file.
Procedure1. Create the response message in a text editor, such as Notepad.
2. Click Save As.
3. Name the file using a descriptive name and ensure that the file name has a .txt or an .htmlextension. For example, WarrantyURL.txt.
4. Navigate to the appropriate folder to store the template response file.
5. Save the file.
Removing a name from the recipient list
December 2014 Avaya Aura® Agent Desktop 123Comments? [email protected]

Defining your default template folderAbout this taskDefine the location of the default template folder, if you want to use a template in an email response.
Procedure1. On the Agent Desktop Top bar, click User Preferences.
2. Select the Preferences tab.
3. In the Default Template Location box, type the complete path to the template folder.
Or
Click Change to select a new folder location.
4. Click Save.
Using a template responseAbout this taskUse a template response that you previously created for responses to standard customer queries.
Procedure1. In the email window, click Insert a Template.
2. Navigate to the template folder.
If you have defined a template folder in the user settings, the default template folderautomatically appears.
3. Select the template file, and then click Open to display the template text.
4. Edit the text in the body of the email message, if necessary.
Defining your default attachment folderAbout this taskDefine a default attachment folder in which to store files to add as attachments to email messages.You can add a file from the Shared Files folder that your administrator creates, or you can attachfiles by navigating to any other directory, folder, or subfolder on your computer.
Note:You must save file attachments with UTF-8 encoding.
124 Avaya Aura® Agent Desktop December 2014Comments? [email protected]
Procedure1. On the Agent Desktop Top bar, click User Preferences.
2. Select the Preferences tab.
3. In the Default Attachment Location box, type the complete path to the folder containing theattachment.
Or
Click Change to change the current folder location.
4. Click Save.
Adding an attachment to your email responseAbout this taskYou can add one or more file attachments to an email message that you send to a customer.
Procedure1. In the email window, click Insert a File.
2. Click Attach.
If you have defined an attachment folder in the user settings, the default attachment folderautomatically appears.
3. To add a file from a different location, navigate to the appropriate directory or folder.
4. Locate and select the file to attach.
5. Click Open.
Viewing email attachmentsAbout this taskUse the Contact Details window to view email attachments. The attachments can be based on theaccepted contact types (voice mail, fax, or scanned document).
Note:Some browsers do not support some attachment formats.
Procedure1. In the Contact Details window, click the History tab.
2. Double-click Attachments to view attachments in a new browser window.
Adding an attachment to your email response
December 2014 Avaya Aura® Agent Desktop 125Comments? [email protected]
Removing an attachment from an email responseAbout this taskYou can remove one or more attachments from an email response to a contact.
Procedure1. In the email window, click Remove.
2. In the Select Attachment(s) to remove list, select the attachment you want to delete.
Use Ctrl+click to select multiple attachments.
3. Click OK.
Adding inline imagesAbout this taskYou can add one or more inline images to an email message that you send to a customer.
Inline attachments display complete information within the body of the email. This makes theinformation easily accessible to customers, even without explicitly opening the attachment. Forexample, you can add a company logo as an inline image to increase brand awareness.
Note:The inline image formats supported are .gif, .bmp, .jpg, and .png.
Procedure1. On the email toolbar, click the Image icon.
2. In the body text box, position your cursor where you want to add your image.
3. Click Browse to locate and select the image.
Or
Type the path for the image in the Image Address (URL) box.
4. Optionally, enter the Alternate text for the image.
5. Select the appropriate alignment option, for the image, from the Align drop-down list.
6. Optionally, enter the Border value to create a border around the image.
7. Optionally, enter the Margin value to insert a margin around the image.
8. Click Insert Image.
The image is inserted at the cursor position.
126 Avaya Aura® Agent Desktop December 2014Comments? [email protected]
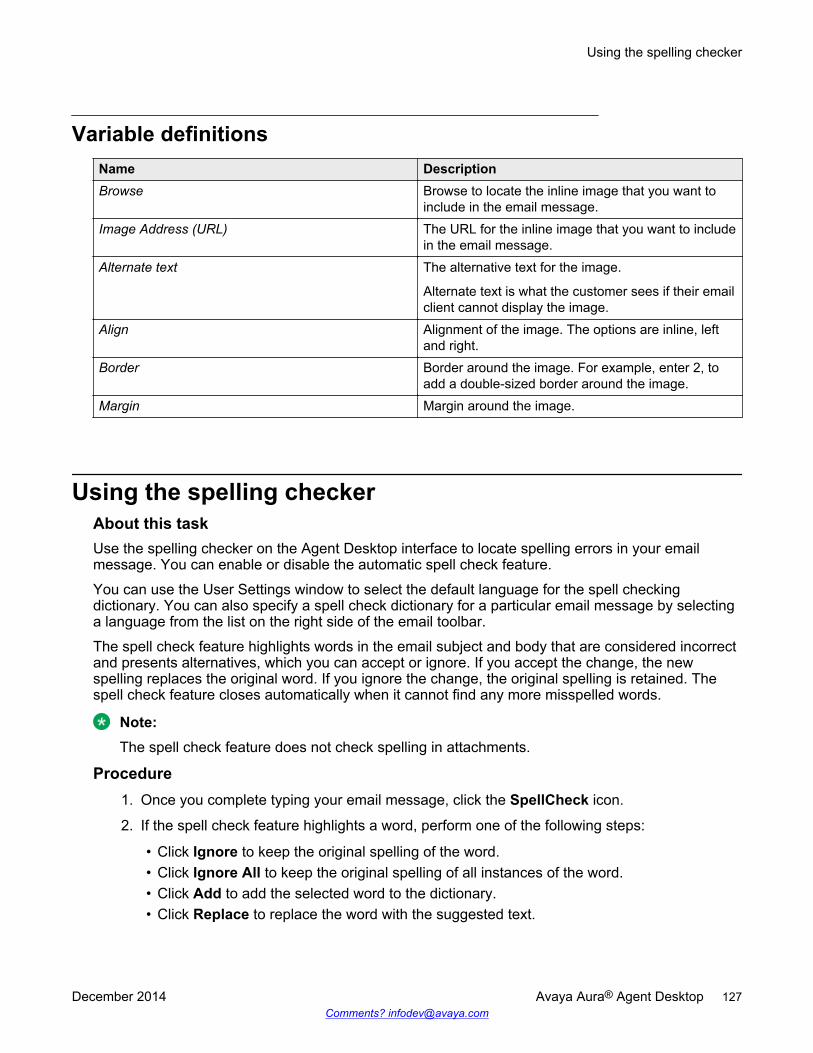
Variable definitionsName DescriptionBrowse Browse to locate the inline image that you want to
include in the email message.Image Address (URL) The URL for the inline image that you want to include
in the email message.Alternate text The alternative text for the image.
Alternate text is what the customer sees if their emailclient cannot display the image.
Align Alignment of the image. The options are inline, leftand right.
Border Border around the image. For example, enter 2, toadd a double-sized border around the image.
Margin Margin around the image.
Using the spelling checkerAbout this taskUse the spelling checker on the Agent Desktop interface to locate spelling errors in your emailmessage. You can enable or disable the automatic spell check feature.
You can use the User Settings window to select the default language for the spell checkingdictionary. You can also specify a spell check dictionary for a particular email message by selectinga language from the list on the right side of the email toolbar.
The spell check feature highlights words in the email subject and body that are considered incorrectand presents alternatives, which you can accept or ignore. If you accept the change, the newspelling replaces the original word. If you ignore the change, the original spelling is retained. Thespell check feature closes automatically when it cannot find any more misspelled words.
Note:The spell check feature does not check spelling in attachments.
Procedure1. Once you complete typing your email message, click the SpellCheck icon.
2. If the spell check feature highlights a word, perform one of the following steps:
• Click Ignore to keep the original spelling of the word.• Click Ignore All to keep the original spelling of all instances of the word.• Click Add to add the selected word to the dictionary.• Click Replace to replace the word with the suggested text.
Using the spelling checker
December 2014 Avaya Aura® Agent Desktop 127Comments? [email protected]

• Click Replace All to replace all instances of the word with the suggested text.
• Click Options to configure conditions for the spell check feature, such as ignoring wordswith digits, words in uppercase, and words with HTML tags.
• Click Cancel to terminate the spell check.
Closing the email contactAbout this taskClose the email contact when the contact is complete. When you close a contact, select a ClosedReason code. The Closed Reason codes that appear are applicable to the contact type beingclosed.
Procedure1. Click Close to complete the contact.
2. Select one of the configured Closed Reason codes that best describes the reason youclosed your email contact.
Postponing work on a contactAbout this taskYou can postpone work on a contact after you have started to compose a reply. For example,postpone a contact if you need to wait for further information before replying to the contact. Whenyou postpone the contact, you reschedule it for Contact Center re-present it at a future time anddate.
If you postpone an email for less than 10 minutes, in certain scenarios the email does not reopenprecisely at the scheduled time. The email reopens a few minutes after the scheduled time.
Important:If you have started composing a reply and you postpone the contact, Contact Center does notsave the content of the reply. Before clicking Reschedule, copy and save text from the reply ifyou want it for when presents it to you again.
Procedure1. On an open email contact, click Finish.
Agent Desktop displays the Disposition screen.
2. Click Reschedule.
3. In the Present Contact at dialog box, enter the time and date to reopen the contact.
Contact Center resets the contact to present to you at the time you specify.
128 Avaya Aura® Agent Desktop December 2014Comments? [email protected]
4. In the Agent Note field, add a note to remind yourself why you rescheduled the contact.
5. Click Save.
You still own the contact and can continue to work on the contact when Contact Centerpresents it to you again. You can view the pending contact in the History tab.
Following up on a contactAbout this taskFollow up on a contact after you complete a contact but want to perform a follow-up action, forexample, to transfer a contact to another agent.
Procedure1. Click Follow-up.
The email display control appears.
2. Perform the necessary follow-up action.
Transferring a contact within the Contact CenterAbout this taskTransfer a contact to another skillset or to a specific agent within the Contact Center.
When you transfer a contact to a skillset or an agent, you also transfer ownership of the contact.The system automatically forwards the entire contact, including any attachments, to the new agent.You can also add additional information for the contact.
Procedure1. Click Transfer.
2. Click the Skillset tab to assign the contact to any agent with a particular skillset.
Or
Click the User tab to assign the contact to a specific agent.
3. Select the skillset or agent to which you want to transfer the contact.
4. In the Agent Note box, type additional information about the reason for the transfer.
5. Click Transfer.
Following up on a contact
December 2014 Avaya Aura® Agent Desktop 129Comments? [email protected]
Transferring a contact outside the Contact CenterAbout this taskTransfer a contact to an email address outside the Contact Center for consultation.
When you transfer a contact to an external email address, you must manually add any attachmentsyou want to send with the email message.
Procedure1. Click Transfer.
2. Click the External tab.
3. Enter the email address to which you want to transfer the contact.
Or
Click To to select an address from the corporate address book.
4. In the Agent Note box, type additional information about the reason for the transfer.
5. To add an attachment, click Attach.
6. Click Transfer.
Printing contact detailsAbout this taskPrint a summary of the interaction with a contact. All information that is displayed in the bottom-leftof the email or Outbound contact window gets printed. Print Preview is also supported.
ProcedureClick Print Contact.
Sending an email message to an agent using PhonebookAbout this taskYou can use Phonebook to send an email message to an agent through the LDAP agent contactdirectory.
The LDAP directory can contain a lot of contacts. You can filter contacts based on the followingthree types of users:
• Favorites• Speed Dials• Custom Contacts
130 Avaya Aura® Agent Desktop December 2014Comments? [email protected]
Once you filter contacts, it becomes easier to search for the contact and send an email message tothat contact. For more information, see Filtering contacts using Phonebook on page 64.
Procedure1. On the Agent Desktop, click Phonebook.
The system displays the Phonebook tab. The Phonebook tab displays a list of entries fromthe LDAP agent contact directory.
2. Search for a contact.
For more information about searching for a contact, see Searching for a contact inPhonebook on page 63.
3. Select a name, and click the Click to email icon under the Email column.
The systems displays the email window with the default address of the agent in the Toaddress field.
4. In the Subject box, type the subject of the email message.
5. In the Body text box, type the message text.
6. To add a file to the email message, click Insert a file.
7. Click Send.
Approving email messagesBefore you begin
• Ensure that administrators have assigned supervisors to the approval skillset of contacts thatthe agent handles.
Note:Agents can belong to the skillset that approves email messages. Therefore, administratorsmust configure the approval process in a way that restricts agents from approving emailmessages.
• Ensure that the administrators have configured the approval hierarchy for email messages. Formore information, see Avaya Aura® Contact Center Server Administration (44400-610).
About this taskA supervisor receives an email message for approval when an agent replies to a contact or sendsan email message. The email message is marked for approval and returned to the queue to a pre-determined skillset for approval. The agent has no indication that the contact the agent is handling ispart of an approval process.
Note:Agents cannot request approval of email messages. Administrators cannot configure keywordsto trigger the approval process.
Approving email messages
December 2014 Avaya Aura® Agent Desktop 131Comments? [email protected]
Agent Desktop presents the supervisor with the option to approve or reject the email message.Supervisors can view existing review comments and enter additional review comments.
Procedure1. Accept the incoming email message. See Accepting an incoming email message on
page 118.
2. Review the email message under the Proposed Email section.
3. In the Customer Details window, click the Review tab to view previously entered reviewcomments.
In the Review tab, you can also view the ID and the name of the previous supervisors, thetime of approval, and the hierarchy level.
4. In the Review Comments field, add your comments for the email message.
5. Click Approve.
The email is either marked for sending to the customer, or returned to the queue marked forapproval and targeted to the next approval skillset in the hierarchy, depending on theapproval hierarchy set up by the administrator.
The system displays the Approval Confirmation dialog box.
6. Click Yes.
Rejecting an email message sent for approvalBefore you begin
• Ensure that administrators have assigned supervisors to the approval skillset of contacts thatthe agent handles.
Note:Agents can belong to the skillset that approves email messages. Therefore, administratorsmust configure the approval process in a way that restricts agents from approving emailmessages.
• Ensure that the administrators have configured the rejection hierarchy for email messages. Formore information, see Avaya Aura® Contact Center Server Administration (44400-610).
About this taskA supervisor can reject an email message that is sent for approval.
Procedure1. Accept the incoming email message. See Accepting an incoming email message on
page 118.
2. Review the email message under the Proposed Email section.
132 Avaya Aura® Agent Desktop December 2014Comments? [email protected]

3. In the Customer Details window, click the Review tab to view previously entered reviewcomments.
In the Review tab, you can also view the ID and the name of the previous supervisors, thetime of approval or rejection, and the hierarchy level.
4. In the Review Comments field, add your comments for the email message.
5. Click Reject.
The email is marked as rejected and returned either to the originator or to the queue targetedto the previous skillset depending on the rejection hierarchy set up by the administrator. Theemail message is sent through the rejection hierarchy to the originator for a redraft of theemail message. If a rejection hierarchy is set up by your administrator, supervisors at eachlevel must approve the rejection.
The system displays the Rejection Confirmation dialog box.
6. Click Yes.
Redrafting a rejected email messageAbout this taskThe agent (originator of the email message) receives the rejected email message. The agent mustredraft the email message and resubmit the email for approval. Agents can redraft the emailmessage based on the comments added by the supervisors. The agent can also add additionalcomments for supervisors. After the agent redrafts the email message, the email must go throughthe complete approval hierarchy.
Note:Only the originator of the email message can edit or redraft the email message. Supervisors atall levels can add review comments to the email message only.
Procedure1. Accept the incoming email message. See Accepting an incoming email message on
page 118.
2. In the Customer Details window, click the Review tab to review the comments added by thesupervisors.
In the Review tab, you can also view the ID and the name of the supervisor, the time ofrejection, and the hierarchy level.
3. Under Proposed Email, click Redraft to rewrite the email message based on the commentsadded by the supervisors.
4. (Optional) In the Agent Note field, type additional information about the contact or thecustomer.
Only agents and supervisors can view the information in the Agent Note box.
Redrafting a rejected email message
December 2014 Avaya Aura® Agent Desktop 133Comments? [email protected]

5. In the Review Comments field, add your comments for the supervisors.
6. Click Send.
7. Click Close.
The email is returned to the queue marked for approval and targeted to the next approvalskillset in the hierarchy, depending on the approval hierarchy set up by the administrator.
134 Avaya Aura® Agent Desktop December 2014Comments? [email protected]
Chapter 11: Fax message
This chapter describes how to perform fax message tasks. Use Agent Desktop to perform thefollowing tasks when you handle a fax message:
• Accept or decline the incoming fax message
• Review the fax message
• Send a reply
• Close a fax message
• Transfer a fax message
Fax messages from customers are forwarded by a fax server to an email address within the ContactCenter. The fax is sent to an appropriate skillset queue. If you are assigned to this skillset, then thefax message is presented to you. You reply to the fax message by sending an email message backto the fax server. The fax server then sends the reply fax to the customer.
PrerequisitesProcedure
• Ensure that your status is set to Ready.
• Ensure that you are assigned to a skillset for handling fax messages.
Accepting an incoming fax messageAbout this taskAccept an incoming fax message to view the message. The Agent Desktop presents this new faxmessage as a new work item in the Work List window.
ProcedureOn the Agent Desktop work list, select the new fax message work item, and click Accept.
The fax message opens in the fax display panel.
December 2014 Avaya Aura® Agent Desktop 135Comments? [email protected]

Declining an incoming fax messageAbout this taskDecline an incoming fax message if you cannot handle the fax message. The new incoming faxmessage disappears from your work list.
ProcedureOn the Agent Desktop, select the new fax message work item and click Reject.
The contact returns to the queue and your status is set to Not Ready.
Reviewing a fax messageBefore you begin
• Ensure that you have accepted a fax message and opened it in the fax viewer.
About this taskUse the Agent Desktop fax viewer to review a fax message.
Procedure1. On the Agent Desktop fax viewer, click Navigate to view all the pages of the fax message.
2. Click Rotation to rotate the fax message.
3. Click Zoom to magnify the fax message.
Replying to a fax messageBefore you begin
• Ensure that you understand how to use the spell check feature. See Using the spellingchecker on page 127.
About this taskReply to a fax message when a customer sends a fax message to the Contact Center requesting aresponse. You reply to a fax message by sending an email message to a fax server. The fax serverthen sends the reply fax back to the customer.
Procedure1. After you review the customer contact, click Reply.
2. In the Fax Response window, accept the default email address that appears in the To box.
The default email address is the same email address from which the message was sent.
Fax message
136 Avaya Aura® Agent Desktop December 2014Comments? [email protected]
3. In the Subject box, either accept the subject currently displayed or edit the subject.
4. Type the reply in the email editor text box.
5. If you use the HTML format for creating the email message, and you want to make the textbold, underline, or italics, select the text, and click the appropriate button to apply formatting.
You cannot format email messages that are created in plain text.
6. To perform a spell check, click the SpellCheck icon.
7. To insert an automatic signature to the fax message, click the Insert Signature icon.
8. In the Agent Note box, type additional information about the contact or the customer.
Only agents and supervisors can view the information in the Agent Note box.
9. Click Send.
10. Close the contact.
If required, select a reason for closing the contact.
Closing a fax messageAbout this taskClose a fax message when the contact is complete. When you close a contact, select a ClosedReason code. The Closed Reason codes that appear are applicable to the contact type beingclosed.
Procedure1. Click Finish to complete the fax message.
2. Select one of the configured Closed Reason codes that best describes the reason youclosed your fax message.
Transferring a fax messageAbout this taskTransfer a fax message to another skillset or to a specific agent in the Contact Center. When youtransfer a fax message to a skillset or agent, you also transfer the ownership of the contact.
Procedure1. Click Transfer.
2. Click the Skillset tab to assign the contact to any agent with a particular skillset.
Or
Closing a fax message
December 2014 Avaya Aura® Agent Desktop 137Comments? [email protected]
Click the User tab to assign the fax message to a specific agent.
3. Select the skillset or agent to which you want to transfer the contact.
4. In the Agent Note box, type additional information about the reason for the transfer.
5. Click Transfer.
Fax message
138 Avaya Aura® Agent Desktop December 2014Comments? [email protected]
Chapter 12: Scanned document
This chapter describes how to perform tasks to handle scanned documents. Use Agent Desktop toperform the following tasks when you handle a scanned document message:
• Accept or decline an incoming scanned document
• Review the scanned document
• Reply to a scanned document
• Close the scanned document
• Transfer a scanned document
A scanned document is an electronic version of a printed page or document. Scanned documentsare forwarded in the TIFF format, in a Contact Center, by a document imaging server to an emailaddress. You can reply to the scanned document by sending an email message to a printer. Theprinted email message is then sent back to the customer.
PrerequisitesProcedure
• Ensure that your status is set to Ready.
• Ensure that you are assigned to a skillset for handling scanned documents.
Accepting an incoming scanned document messageAbout this taskAccept an incoming scanned document message to view the message. The Agent Desktoppresents this new scanned document as a new work item in the Work List window.
ProcedureOn the Agent Desktop work list, select the new scanned document work item, and click Accept.
The scanned document opens in the document display panel.
December 2014 Avaya Aura® Agent Desktop 139Comments? [email protected]
Declining an incoming scanned document messageAbout this taskDecline an incoming scanned document message if you cannot handle the message. The newincoming scanned document message disappears from your work list.
ProcedureOn the Agent Desktop, select the new scanned document work item and click Reject.
The contact returns to the queue and your status is set to Not Ready.
Reviewing a scanned document messageBefore you begin
• Ensure that you have accepted a scanned document and opened it in the document viewer.
About this taskUse the Agent Desktop document viewer to review a scanned document message.
Procedure1. On the Agent Desktop document viewer, click Navigate to view all the pages of the
document.
2. Click Rotation to rotate the scanned document.
3. Click Zoom to magnify the scanned document.
Replying to a scanned document messageBefore you begin
• Ensure that you understand how to use the spell check feature. See Using the spellingchecker on page 127.
About this taskReply to an scanned document message when a customer sends a scanned document to theContact Center requesting a response. You can reply to the scanned document by sending an emailmessage to a printer. The printed email message is then sent back to the customer.
Procedure1. After you review the customer contact, click Reply.
2. In the Response window, accept the default email address that appears in the To box.
Scanned document
140 Avaya Aura® Agent Desktop December 2014Comments? [email protected]
The default email address is the same email address from which the message was sent.
3. In the Subject box, either accept the subject currently displayed or edit the subject.
4. Type the reply in the email editor text box.
5. If you use the HTML format for creating the email message, and you want to make the textbold, underline, or italics, select the text, and click the appropriate button to apply formatting.
You cannot format email messages that are created in plain text.
6. To perform a spell check, click the SpellCheck icon.
7. To insert an automatic signature to the message, click the Insert Signature icon.
8. In the Agent Note box, type additional information about the contact or the customer.
Only agents and supervisors can view the information in the Agent Note box.
9. Click Send.
10. Close the contact.
If required, select a reason for closing the contact.
Closing a scanned document messageAbout this taskClose the scanned document message when the contact is complete. When you close a contact,select a Closed Reason code. The Closed Reason codes that appear are applicable to the contacttype being closed.
Procedure1. Click Finish to complete the scanned document message.
2. Select one of the configured Closed Reason codes that best describes the reason youclosed your scanned document message.
Transferring a scanned documentAbout this taskTransfer a scanned document to another skillset or to a specific agent within the Contact Center.When you transfer a scanned document to a skillset or agent, you also transfer ownership of thecontact.
Procedure1. Click Transfer.
Closing a scanned document message
December 2014 Avaya Aura® Agent Desktop 141Comments? [email protected]
2. Click the Skillset tab to assign the contact to any agent with a particular skillset.
Or
Click the User tab to assign the scanned document to a specific agent.
3. Select the skillset or agent to which you want to transfer the contact.
4. In the Agent Note box, type additional information about the reason for the transfer.
5. Click Transfer.
Scanned document
142 Avaya Aura® Agent Desktop December 2014Comments? [email protected]
Chapter 13: Voice mail messages
This chapter describes how to perform tasks to handle voice mail messages. Use Agent Desktop toperform the following tasks when you handle a voice mail message:
• Accept or decline the incoming voice mail message
• Listen to a voice mail message
• Reply to a voice mail message
• Close a voice mail message
• Transfer a voice mail message
In the Contact Center voice mail messages are forwarded by a voice mail server to an emailaddress as a .wav attachment. The voice mail message is then sent to an appropriate skillsetqueue. If you are assigned to the skillset that handles voice mail message, then the voice mailmessage is presented to you.
PrerequisitesProcedure
• Ensure that your status is set to Ready.
• Ensure that you are assigned to a skillset for handling voice mail messages.
Accepting an incoming voice mail messageAbout this taskAccept an incoming voice mail message to view the message. The Agent Desktop presents this newvoice mail message as a new work item in the Work List window.
ProcedureOn the Agent Desktop work list, select the new voice mail message work item, and click Accept.
The voice mail message opens in the email display panel. The voice mail is a .wav attachmentpresent in this email.
December 2014 Avaya Aura® Agent Desktop 143Comments? [email protected]
Declining an incoming voice mail messageAbout this taskDecline an incoming voice mail message if you cannot handle the voice mail message. The newincoming voice mail message disappears from your work list.
ProcedureOn the Agent Desktop, select the new voice mail message work item and click Reject.
The contact returns to the queue and your status is set to Not Ready.
Listening to a voice mail messageBefore you begin
• Ensure that you have accepted a voice mail message and opened it in the email viewer.• Ensure you have a media player that supports .wav file format audio files.
About this taskUse the default Windows Media player to listen to a voice mail message.
Procedure1. On the Agent Desktop email viewer, under Attachments, double-click the .wav attachment
to open it in your default media player.
2. Listen to the voice mail message.
Replying to a voice mail messageBefore you begin
• Ensure that you obtain the customer's contact details from the voice mail or from the CustomerDetails panel.
About this taskReply to an voice mail message when a customer sends a voice mail message to the ContactCenter requesting a response. You reply to a voice mail message by calling back the customer.
Procedure1. On the Agent Desktop Action bar menu, click Initiate Call.
2. In the text box to the left of Initiate Call, enter the phone number to dial.
3. Click Initiate Call again.
Voice mail messages
144 Avaya Aura® Agent Desktop December 2014Comments? [email protected]

The phone number is dialed. A new work item is added to the work list and the call timer onthe work items starts to increment.
4. Click Release when you complete the call.
5. If required by your supervisor, type an activity code in the Activity Code box, and then pressEnter.
Closing a voice mail messageAbout this taskClose the voice mail message when the contact is complete. When you close a contact, select aClosed Reason code. The Closed Reason codes that appear are applicable to the contact typebeing closed.
Procedure1. Click Finish to complete the voice message.
2. Select one of the configured Closed Reason codes that best describes the reason youclosed your voice mail message.
Transferring a voice mail messageAbout this taskTransfer a voice mail message to another skillset or to a specific agent within the Contact Center.When you transfer a voice mail message to a skillset or an agent, you also transfer ownership of thecontact.
Procedure1. Click Transfer.
2. Click the Skillset tab to assign the contact to any agent with a particular skillset.
Or
Click the User tab to assign the voice mail message to a specific agent.
3. Select the skillset or agent to which you want to transfer the contact.
4. In the Agent Note box, type additional information about the reason for the transfer.
5. Click Transfer.
Closing a voice mail message
December 2014 Avaya Aura® Agent Desktop 145Comments? [email protected]
Chapter 14: Short Message Service textmessage
This chapter describes how to perform tasks to handle Short Message Service (SMS) text messagetasks. Use Agent Desktop to perform the following tasks when you handle an SMS text message:
• Accept or decline the incoming SMS text message• Send a reply• Check the spelling of an SMS text message• Close an SMS text message contact• Transfer an SMS text message
SMS text messages from customers are forwarded by an SMS gateway to an email address withinthe Contact Center. The SMS text message is then sent to an appropriate skillset queue. If you areassigned to the skillset that handles SMS text messages, then the SMS text message is presentedto you.
PrerequisitesProcedure
• Ensure that your status is set to Ready.• Ensure that you are assigned to a skillset for handling SMS text messages.
Accepting an incoming SMS text messageAbout this taskAccept an incoming SMS text message to display customer details and begin contact with acustomer. The Agent Desktop displays the customer details and the call timer appears on the workitem. The new incoming SMS text message is presented as a new work item in the Work Listwindow.
ProcedureOn the Agent Desktop work list, select the new SMS text message work item, and click Accept.
146 Avaya Aura® Agent Desktop December 2014Comments? [email protected]
The SMS text message opens in the display panel.
The customer details for the SMS text message appears in the bottom-left hand corner of theCustomer Details panel.
Declining an incoming SMS text messageAbout this taskDecline an incoming SMS text message if you cannot handle the message.
ProcedureOn the Agent Desktop, select the new SMS text message work item and click Reject.
The SMS text message work item is removed from the work list. The contact returns to the queueand your status is set to Not Ready.
Replying to an SMS text messageAbout this taskReply to an SMS text message when a customer sends an SMS text message to the ContactCenter requesting a response. Create a response to a customer in the same format as the originalrequest.
You can use several features on the Agent Desktop interface to help you to create your response:
• one or more response templates• the spelling checker
You can add a comment to the message in the Agent Note box to provides reference for latercommunications with the customer. The customer does not see the content of the Agent Note box.
Procedure1. After you review the customer contact, click Reply.
2. In the E-mail Response window, accept the default To email address, with the same emailaddress from which the message was sent.
Or
Click To, Cc to add other email addresses from the corporate address book or multimediadatabase.
3. In the Subject box, accept the subject currently displayed or edit the subject.
4. Add text to the reply using one or both of the following methods:
• Type the message text.
Declining an incoming SMS text message
December 2014 Avaya Aura® Agent Desktop 147Comments? [email protected]
• Add a template response.
5. To perform a spell check, click the SpellCheck icon.
6. In the Agent Note box, type additional information about the contact or the customer.
Only agents and supervisors can view the information in the Agent Note box.
7. Click Send.
8. Close the contact.
If required, select a reason for closing the contact.
Using the spelling checkerAbout this taskUse the spell check feature on the Agent Desktop interface to locate spelling errors in yourmessage. You can enable or disable the automatic spell check feature.
You can use the User Settings window to select a default language for the spell check dictionary.You can also specify a spell check dictionary for a particular email message by selecting a languagefrom the list on the right side of the toolbar.
The spell check feature highlights words in the SMS text message subject and body that areconsidered incorrect and presents alternatives, which you can accept or ignore. If you accept thechange, the new spelling replaces the original word. If you ignore the change, the original spelling isretained. The spell check feature closes automatically when it cannot find any more misspelledwords.
Procedure1. Once you complete typing your SMS text message, click the SpellCheck icon.
2. If the spell check feature highlights a word, perform one of the following steps:
• Click Ignore to keep the original spelling of the word.
• Click Ignore All to keep the original spelling of all instances of the word.
• Click Add to add the selected word to the dictionary.
• Click Replace to replace the word with the suggested text.
• Click Replace All to replace all instances of the word with the suggested text.
• Click Options to configure conditions for the spell check feature, such as ignoring wordswith digits or words in uppercase.
• Click Cancel to terminate the spell check.
Short Message Service text message
148 Avaya Aura® Agent Desktop December 2014Comments? [email protected]

Closing an SMS text message contactAbout this taskClose the SMS text message when the contact is complete. When you close a contact, select aClosed Reason code. The Closed Reason codes that appear are applicable to the contact typebeing closed.
Procedure1. Click Finish to complete the contact.
2. Select one of the configured Closed Reason codes that best describes the reason youclosed your SMS text message.
Transferring an SMS text messageAbout this taskTransfer an SMS text message to another skillset or to a specific agent within the Contact Center.
When you transfer an SMS text message to a skillset or an agent, you also transfer ownership of thecontact.
Procedure1. Click Transfer.
2. Click the Skillset tab to assign the contact to any agent with a particular skillset.
Or
Click the User tab to assign the contact to a specific agent.
3. Select the skillset or agent to which you want to transfer the SMS text message.
4. Select the External tab if you want to transfer the SMS text message outside the ContactCenter for consultation.
5. In the Agent Note box, type additional information about the reason for the transfer.
6. Click Transfer.
Closing an SMS text message contact
December 2014 Avaya Aura® Agent Desktop 149Comments? [email protected]

Chapter 15: Social Networking
Use the Avaya Aura® Agent Desktop to perform the following tasks when you handle a SocialNetworking (SN) contact:
• accept or decline the incoming SN contact
• hold and unhold an SN contact that you accepted
• transfer an SN contact to another agent or an outside expert
• connect to the Social Media Manager (SMM) agent interface to reply to the social mediamessage for the SN contact
In Agent Desktop, a Social Networking contact appears similar to an email contact, but has anAvaya Social Media Manager header. There is no toolbar, because your agent actions on an SNcontact happen in a link to the SMM agent interface.
After accepting an SN contact, you can preview basic details such as the time of the original post,the mailbox to which SMM sent the contact, and the SMM user analysis. Agent Desktop displays alink to the SMM contact. When you click the link, Agent Desktop displays a pop up to allow you tolog on directly to the SMM agent interface and work on the contact. Your Contact Center agentlogon is not synchronized with the SMM logon, so you must have an SMM logon to process SNcontacts.
You can only accept, hold, unhold, transfer, and release an SN contact. You cannot perform aconference on an SN contact, nor can a supervisor agent observe or barge in on an SN contact.
When you finish processing a Social Networking contact, you must first close the contact in SMM,and then separately close the SN contact in Agent Desktop. You do not enter a Closed Reasoncode when you close an SN contact.
150 Avaya Aura® Agent Desktop December 2014Comments? [email protected]
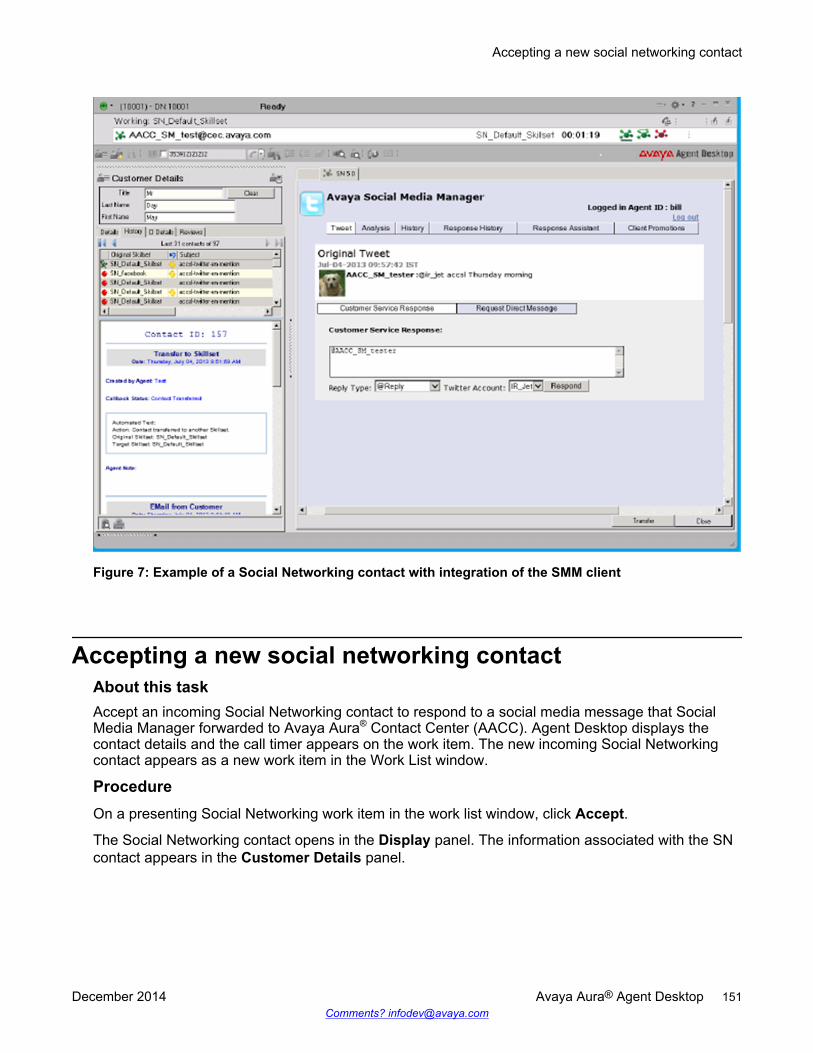
Figure 7: Example of a Social Networking contact with integration of the SMM client
Accepting a new social networking contactAbout this taskAccept an incoming Social Networking contact to respond to a social media message that SocialMedia Manager forwarded to Avaya Aura® Contact Center (AACC). Agent Desktop displays thecontact details and the call timer appears on the work item. The new incoming Social Networkingcontact appears as a new work item in the Work List window.
ProcedureOn a presenting Social Networking work item in the work list window, click Accept.
The Social Networking contact opens in the Display panel. The information associated with the SNcontact appears in the Customer Details panel.
Accepting a new social networking contact
December 2014 Avaya Aura® Agent Desktop 151Comments? [email protected]
Declining an incoming Social Networking contactAbout this taskDecline an incoming Social Networking contact if you cannot handle the contact at this time. Thenew incoming SN contact disappears from your work list.
ProcedureOn the Agent Desktop, click Reject.
The contact returns to the queue and your status is set to Not Ready.
Placing a Social Networking contact on holdAbout this taskPlace a Social Networking contact on hold if you do not want to work on it immediately.
Procedure1. Select the Social Networking work item.
2. Click Hold.
Releasing a Social Networking contact on holdAbout this taskRelease a Social Networking contact that you placed on hold when you want to resume working onit.
Procedure1. Select the Social Networking work item.
2. Click Unhold.
The contact becomes active and the status bar color changes to green.
Responding to a Social Networking contactBefore you begin
• Ensure you are familiar with the Social Media Manager agent interface for responding to socialnetworking contacts.
Social Networking
152 Avaya Aura® Agent Desktop December 2014Comments? [email protected]
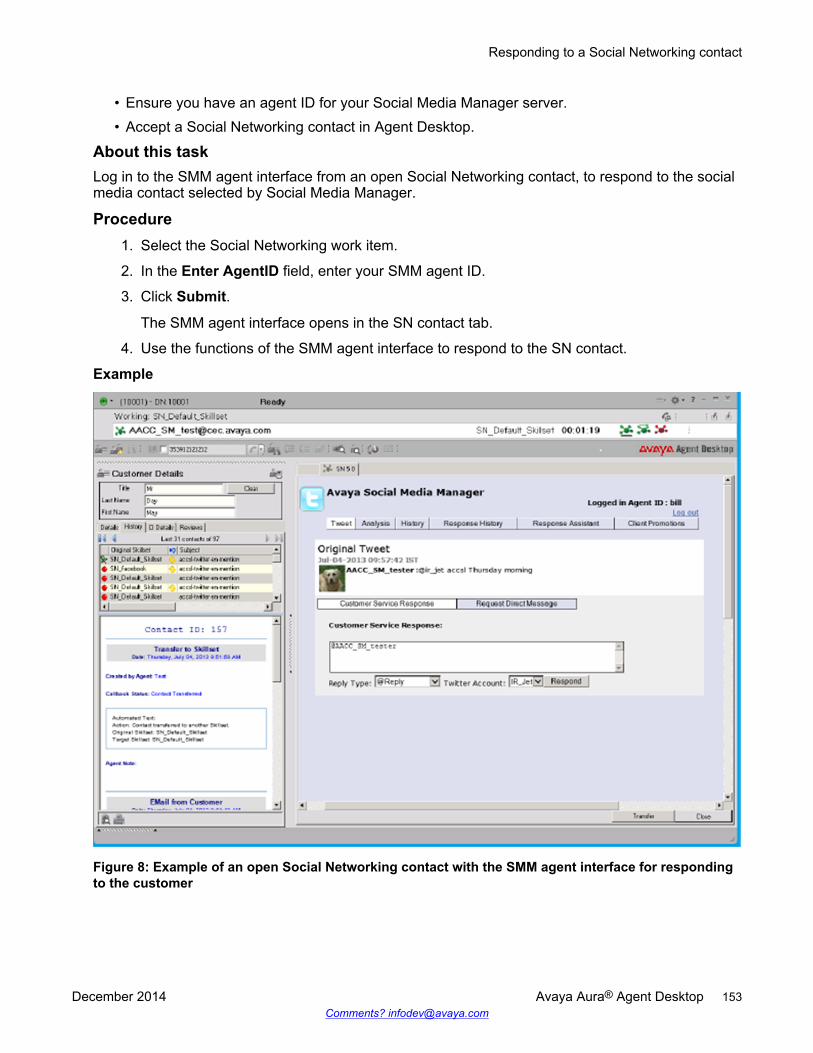
• Ensure you have an agent ID for your Social Media Manager server.• Accept a Social Networking contact in Agent Desktop.
About this taskLog in to the SMM agent interface from an open Social Networking contact, to respond to the socialmedia contact selected by Social Media Manager.
Procedure1. Select the Social Networking work item.
2. In the Enter AgentID field, enter your SMM agent ID.
3. Click Submit.
The SMM agent interface opens in the SN contact tab.
4. Use the functions of the SMM agent interface to respond to the SN contact.
Example
Figure 8: Example of an open Social Networking contact with the SMM agent interface for respondingto the customer
Responding to a Social Networking contact
December 2014 Avaya Aura® Agent Desktop 153Comments? [email protected]
Transferring a Social Networking contactAbout this taskTransfer a contact to another skillset, to a specific agent within the Contact Center, or to an externalemail address.
Procedure1. Select the Social Networking work item.
2. Click Transfer.
Agent Desktop displays the Transfer To screen.
3. To transfer the contact to an agent:
a. Click the User tab.b. Select the agent to whom you want to transfer the contact.c. In the Agent Note field, type a note on the reason for transferring the contact.d. Click Transfer.
4. To transfer the contact to a skillset:
a. Click the Skillset tab.b. Select the skillset to which you want to transfer the contact.c. In the Agent Note field, type a note on the reason for transferring the contact.d. Click Transfer.
5. To transfer the contact to an external email address:
a. Click the External tab.b. Complete the details for the external email.c. Click Transfer.
Closing a Social Networking contactBefore you begin
• Accept and respond to an SN contact.
About this taskClose a Social Networking contact after you have responded to it in the Social Media Managerinterface. You do not enter a Closed Reason code when you close an SN contact.
Procedure1. In the SN contact tab, complete your response to the customer using the SMM agent
interface.
Social Networking
154 Avaya Aura® Agent Desktop December 2014Comments? [email protected]
2. Click Close.
Closing a Social Networking contact
December 2014 Avaya Aura® Agent Desktop 155Comments? [email protected]
Chapter 16: Web communications
This chapter describes how to perform the tasks to handle Web communications contacts. Itdescribes how to use the following Web communications features to communicate directly withcustomers in real time over the Internet using Agent Desktop:
• Accept or decline an incoming contact
• Customize a tab name
• Review and update customer information
• Send an automated response
• Push a Web page
• Transfer a chat session
• Conference a chat session
• Observe a Web Communications contact (supervisor/agent only)
• Barge-in on a Web Communications contact (supervisor/agent only)
• Check whether the customer’s browser is still connected
• Check the time of the most recent customer action and whether the customer is currentlytyping a message
• Respond to the customer (email or voice) if more information or clarification is needed
• End a chat session
• Send the chat log in an email message
Accepting a Web communications contactBefore you begin
• Ensure that your status is set to Ready.• Ensure that you are assigned to a skillset for handling Web communications.
About this taskAccept a Web communications contact to communicate privately with a customer in real time overthe Internet. An agent and a customer can use the text chat component of the Agent Desktop toconduct a two-way conversation by exchanging messages.
156 Avaya Aura® Agent Desktop December 2014Comments? [email protected]
A customer requests a chat session by clicking the Text Chat icon on the Web site. The customer ispresented with a form to fill in and select the appropriate skillset, subject, and objective for their chatsession. The customer is then placed into Web-on-hold, or a similar treatment configured in yourContact Center, while waiting for an agent to accept their chat request.
The text chat frame displays a complete record of the conversation as well as any URLs that youpreviewed or pushed to the customer. Each chat message can contain up to 4045 characters.
The Agent Desktop can be configured to give audio and visual alerts when a contact is presented.These features are configured by an administrator, using the Contact Center MultimediaAdministration tool.
After you accept the contact, you can view the customer details and a history of all past interactionswith the Contact Center in the left pane, such as the most recent message sent by the customer,whether the customer’s browser is still connected to the session, and whether the customer iscurrently typing a message. The right pane of the Agent Desktop shows the tools used for Webcommunications:
• Send the Message — Add the comments from the Chat box to the Conversation frame.• Push the URL — Send a selected URL to the customer’s browser.• Add the selected auto-phrase — Add the selected auto-phrase to the Conversation frame.• Select the text alignment — Change the alignment of text from left to right to right to left and
vice versa.• E-mail chat log — Select this check box to email a copy of the chat log to the customer.
ProcedureOn the work item, click Accept.
Note:
Your site administrator configures the maximum number of additional contacts you can manage.
Customizing a tab nameAbout this taskIf you have multiple Web communications contacts, you can customize the tab name to identify thereceived contact.
Procedure1. On the Agent Desktop right panel, double-click the required tab.
2. Type the <contact name>.
Customizing a tab name
December 2014 Avaya Aura® Agent Desktop 157Comments? [email protected]

Variable definitionsName Description<contact name> The keyword you use to identify the customer. For
example, the first name or the last name.
Declining a Web communications contactAbout this taskDecline a Web communications contact when you are not available to chat with a customer and youwant to return the contact to the queue.
ProcedureOn the work item, click Reject.
The contact returns to the queue and into Web-on-hold. Your status is set to Not Ready.
Note:
If two or more Web communications contacts are simultaneously presenting to the agent onAgent Desktop and one Web communications contact is rejected, all contacts are rejected.
Sending a chat messageAbout this taskSend a chat message to communicate privately with a customer in real time over the Internet.
Procedure1. Type the message.
2. Click the Send the Message icon.
Your name or agent label appears in the Conversation frame, followed by your message.
Web communications
158 Avaya Aura® Agent Desktop December 2014Comments? [email protected]
Adding an auto-phrase to a chat messageAbout this taskAdd an automatic phrase to a chat message when you want to select a commonly-used phrase froma configured list.
Procedure1. Select the Add the selected auto-phrase icon.
2. Select the auto-phrase to use from the list.
The automatic phrase is added to the Chat text box. When the chat message is completedand saved, the automatic phrase is added to the Conversation frame and the text chat log.
Pushing a Web page to a customerAbout this taskPush a Web page to a customer’s browser, if you decide that a Web page can assist with thecontact. Use the Page Push feature to push a Web page. The customer can also push a Web pageto your browser.
Page Push has the following limitations:
• Some Web pages do not appear the same when pushed to another person’s browser. Forexample, in case of Web pages that can be personalized to display weather or news, eachperson sees their own version of the page.
• Dynamic pages that are customized through the use of cookies can appear differently sinceyou and the customer both have separate cookies. Cookies are never shared by you or thecustomer.
• Framed pages cannot be pushed completely. The URL defining the frameset is pushed, but theindividual URLs in each frame are not pushed.
• After a page is pushed, if either you or the customer follows a link to another page, the otherperson does not see that change.
• If you and the customer both click the Push the selected web page icon at approximately thesame time, you both see the form that was pushed last. However, both URLs appear in the textchat log.
Procedure1. Select the Push the selected web page icon.
2. Type the URL you want to send.
3. Select the URL to send.
OR
Select a predefined URL to send.
Adding an auto-phrase to a chat message
December 2014 Avaya Aura® Agent Desktop 159Comments? [email protected]
The page is pushed to the customer’s browser and the URL is added to the Conversationframe and the text chat log.
Performing a Web Communications transfer to a skillsetAbout this taskYou can transfer a Web Communications (WC) contact to a skillset, if your administrator allows.
The agent who answers the transferred contact views all the messages that were previously sent bythe customer and the previous agent. The agent can also view the transfer details such as:
• the agent who transferred the contact• the skillset from which the contact is transferred• the skillset to which the contact is transferred• the reason for transferring (if the agent who transferred the contact provides the reason)
Important:You cannot transfer a contact to a skillset that does not have active agents.
Procedure1. Click Consult/Transfer.
2. In the left pane, under Transfer to, select the skillset from the drop-down list.
3. Optionally, enter the reason for transfer under Transfer Reason.
The agent that answers the transferred contact can view the transfer details, including thereason for the transfer.
4. Click Transfer.
Agent Desktop refreshes the list of agents active on the selected skillset and queues thecontact to the selected skillset.
Transferring a chat sessionAbout this taskTransfer a chat session to another available agent. You can transfer a chat session only once.
Procedure1. Click Consult.
2. In the left pane, under Transfer to, select the skillset from the drop-down list.
3. Click the appropriate agent name.
Web communications
160 Avaya Aura® Agent Desktop December 2014Comments? [email protected]
4. Click Consult.
The Conversation window splits into two. In the Consult Text Chat window, you can informthe agent about the reason for the transfer.
Note:
The conversation between the agent and the customer is visible to the consulted agent.
5. Click Complete Transfer.
The chat session is now transferred to the other agent and it is no longer displayed on yourAgent Desktop. Your status is set to Ready.
Conferencing a chat sessionAbout this taskConference a chat session to another available agent. You can conference only one agent into achat session.
Procedure1. Click Consult.
2. In the left pane, under Transfer to, select the skillset from the drop-down list.
3. Click the appropriate agent name.
4. Click Consult.
The Conversation window splits into two. In the Consult Text Chat window, you can informthe agent about the reason for the conference.
Note:
The conversation between the agent and the customer is visible to the consulted agent.
5. Click Complete Conference.
The Consult Text Chat window closes and the original Conversation window reappears.When the agent who was added to the conference begins typing, it is visible to all threeparticipants.
Note:
On Agent Desktop, for the agent who initiated the conference, the Consult button is notvisible for the entire duration of the Web communications contact. The agent cannotinitiate another consult during this period.
6. When you want to leave the conference, click Close.
A message appears in the Conversation window that indicates when a participant leaves theconference.
Conferencing a chat session
December 2014 Avaya Aura® Agent Desktop 161Comments? [email protected]
Observing a Web Communications contactBefore you begin
• Ensure that you log on to the Agent Desktop.• Ensure that you have supervisor/agent privileges.
About this taskAn supervisor/agent can observe an agent-customer Web Communications contact. When ansupervisor/agent starts observing a Web Communications contact, the agent receives a notificationthat an supervisor/agent is observing the contact. The agent can continue the conversation withoutinterference from the supervisor/agent. The customer does not receive a notification and is notaware that an supervisor/agent is observing the contact.
Note:You must log on to the Agent Desktop to observe a Web Communications contact.
When you are observing a contact, only the agent already interacting with the contact can set anactivity code for that contact.
Procedure1. On the Agent Desktop Top bar menu, click Observe.
The Agent Desktop displays the Supervisor Observe window.
2. Under Filter, select the Item as Contact Type with the Value as Webcomms.
In the Contacts list, the red flag indicates the contacts whose intrinsic values are exceedingthe threshold defined by your administrator in the CCMM Administration tool.
3. Click the contact to view the intrinsics for that contact.
The intrinsics are assigned with priority 1 to 5. Contacts exceeding threshold limits for highpriority intrinsics, appear higher in the Contacts list.
Note:
Administrators must configure intrinsic priorities in the CCMM Administration tool.
4. Select a Web Communications contact and click Observe.
The Agent Desktop displays the Customer Text Chat window.
Note:
When using the Observe function, you cannot participate in the Web Communicationscontact. Use the barge-in function to participate in the Web Communications contact.See Barging-in on a Web Communications contact on page 163.
5. Click Close when you finish observing the Web Communications contact.
Web communications
162 Avaya Aura® Agent Desktop December 2014Comments? [email protected]
Barging-in on a Web Communications contactBefore you begin
• Ensure that you log on to the Agent Desktop.• Ensure that you have supervisor/agent privileges.• Ensure that you are observing a Web Communications contact between an agent and a
customer.
About this taskAn supervisor/agent can participate in an agent-customer Web Communications contact.
Note:You must log on to the Agent Desktop to barge-in on a Web Communications contact. You canbarge-in on a Web Communications contact only after you have observed that WebCommunications contact.
When you barge-in on a contact, only the agent already interacting with the contact can set anactivity code for that contact.
Procedure1. In the Supervisor Observe window, click Barge-in, to barge-in on a Web Communications
contact you are observing.
Note:
The Barge-in button for an agent is enabled only after you observe the agent’s WebCommunications contact. To observe a Web Communications contact, see Observing aWeb Communications contact on page 162.
The Agent Desktop displays the Customer Text Chat window.
2. In the Text box, type your message to the customer.
3. Click Send.
Your name or agent label appears before your message in the Conversation frame.
4. Click Close when your conversation is complete.
The agent-customer Web Communications contact continues until all the agents or thesupervisor/agents have left the Web Communications contact or the customer leaves theWeb Communications contact.
Ending the Text Chat sessionAbout this taskEnd the text chat session when the contact is completed. The text chat history is savedautomatically and can be printed.
Barging-in on a Web Communications contact
December 2014 Avaya Aura® Agent Desktop 163Comments? [email protected]
Procedure1. Click Finish.
2. In the Notes box, type additional information about the contact.
3. If Closed Reasons are required, select one of the configured Closed Reason codes thatbest describes the reason you closed your text chat session.
4. Click Close.
5. Repeat step 1 to step 4 to close each additional Web communications contact.
Sending the chat log in an email messageAbout this taskIf your Contact Center is licensed for email, you can send a copy of the completed text chat log byemail to the customer.
ProcedureBelow the Conversation window, select the Envelop icon or the check box next to it, to email thechat log to the customer.
Web communications
164 Avaya Aura® Agent Desktop December 2014Comments? [email protected]
Chapter 17: Instant Messaging
Use the Avaya Aura® Agent Desktop Instant Message (IM) window to communicate with customersover the Internet in real time. You can use the Instant Message window to perform the followingtasks:
• Accept an instant message
• Decline an instant message
• Send an instant message
• Use an auto-phrase
• Use suggested Web pages
• Check the spelling of an instant message
• View personnel using Contacts Presence
• Add or delete a contact from Contacts Presence
• Send an instant message using Contacts Presence
• Consult on an instant message
• Conference an instant message
• Transfer an instant message
• End an instant message
To perform any task with an agent, select an agent from your contacts list in the My Contacts tab oran agent from an Instant Experts group in the CC Contacts tab.
When you request a Consult, Conference, or Transfer with another agent, the text that you typeappears in a separate conversation window that is not visible to the customer. During the request,you can change a Consult or a Transfer to a Conference, or you can Close the request. When theother agent accepts a Conference or Transfer request, the conversation resumes in the AgentDesktop Conversation window.
Using Contacts Presence you can view all or a subset of the personnel in your Contact Center,according to their current status (for example, Available, Busy, Online, Do Not Disturb, Inactive,Offline, or Away). Presence information is provided either by the Presence Services server,Microsoft Office Communications Server, Microsoft Lync server.
December 2014 Avaya Aura® Agent Desktop 165Comments? [email protected]
Note:
Busy status is available only when using Microsoft Office Communications Server or MicrosoftLync. Online status is available only when using Presence Services.
Prerequisites for instant messagingProcedure
• Ensure that your Contact Center is SIP-enabled.
• Ensure that both you and the customer use Web browsers that work with JavaScript andframes.
Note:
Support is not available for microbrowsers or portable devices.
Accepting an instant messageBefore you begin
• Ensure that you work with the Presence Services server, Microsoft Office CommunicationsServer, or Microsoft Lync in your Contact Center.
• Ensure that your status is set to Ready.• Ensure that you are assigned to a skillset for handling instant messages.
About this taskAccept an instant message request to communicate with a customer. When an instant messagecontact is routed to you, it appears in the Telephony toolbar. The Accept and Reject buttons flash.
Note:When you work with a Call Force Presentation Class, Agent Desktop accepts contactsautomatically, except in case of Instant Message (IM) contacts. You always must manuallyaccept IM contact types.
ProcedureOn the new IM work item, click Accept.
The top pane of the Agent Desktop shows the customer details and history of all past interactionsbetween the customer and the Contact Center. The bottom pane shows the text window and thetools available for instant messages.
Instant Messaging
166 Avaya Aura® Agent Desktop December 2014Comments? [email protected]
Declining an instant messageAbout this taskDecline an instant message request when you are not able to handle the IM request.
ProcedureOn the work item, click Reject.
The contact returns to the queue and your status is set to Not Ready.
Sending an instant messageAbout this taskSend a response to an instant message that you accepted from a customer.
Procedure1. In the text box, type your message to the customer.
2. Review your messages before you send them by using the scroll bars, if necessary.
3. Click Send.
Your name or agent label appears before your message in the Conversation frame.
Using an auto-phraseAbout this taskUse an automatic phrase to add commonly used text to an instant message. The administratordefines automatic phrases using the Contact Center Multimedia Administrator.
Procedure1. In the Conversation window, click Suggest Phrase.
2. Click the automatic phrase to use from the list.
The automatic phrase is added to the Conversation preview window.
3. Edit the text if necessary.
4. Click Send.
Declining an instant message
December 2014 Avaya Aura® Agent Desktop 167Comments? [email protected]
Using suggested Web pagesAbout this taskUse a suggested Web page to add a commonly used Web page URL to an instant message. Theadministrator defines suggested Web pages using the Contact Center Multimedia Administrator.
Procedure1. In the Conversation window, click Suggest Web Page.
2. Click the Web page you want to use from the list.
The Web page is added to the Conversation preview window.
3. Click Send.
Using spelling checker in an instant messageAbout this taskUse the spelling checker to check spelling before you send an instant message.
Procedure1. In the Conversation window, click the SpellCheck icon.
2. If the spelling checker highlights a word that is not found in the dictionary, perform one of thefollowing steps:
• Click Ignore to keep the original spelling of the word.
• Click Ignore All to keep the original spelling of all instances of the word.
• Click Add to add the selected word to the dictionary.
• Click Replace to replace the word with the suggested text.
• Click Replace All to replace all instances of the word with the suggested text.
• Click Options to configure conditions for the spell check feature, such as ignoring wordswith digits or words in uppercase.
• Click Cancel to terminate the spell check.
3. When the spell check is complete, click Send.
Instant Messaging
168 Avaya Aura® Agent Desktop December 2014Comments? [email protected]
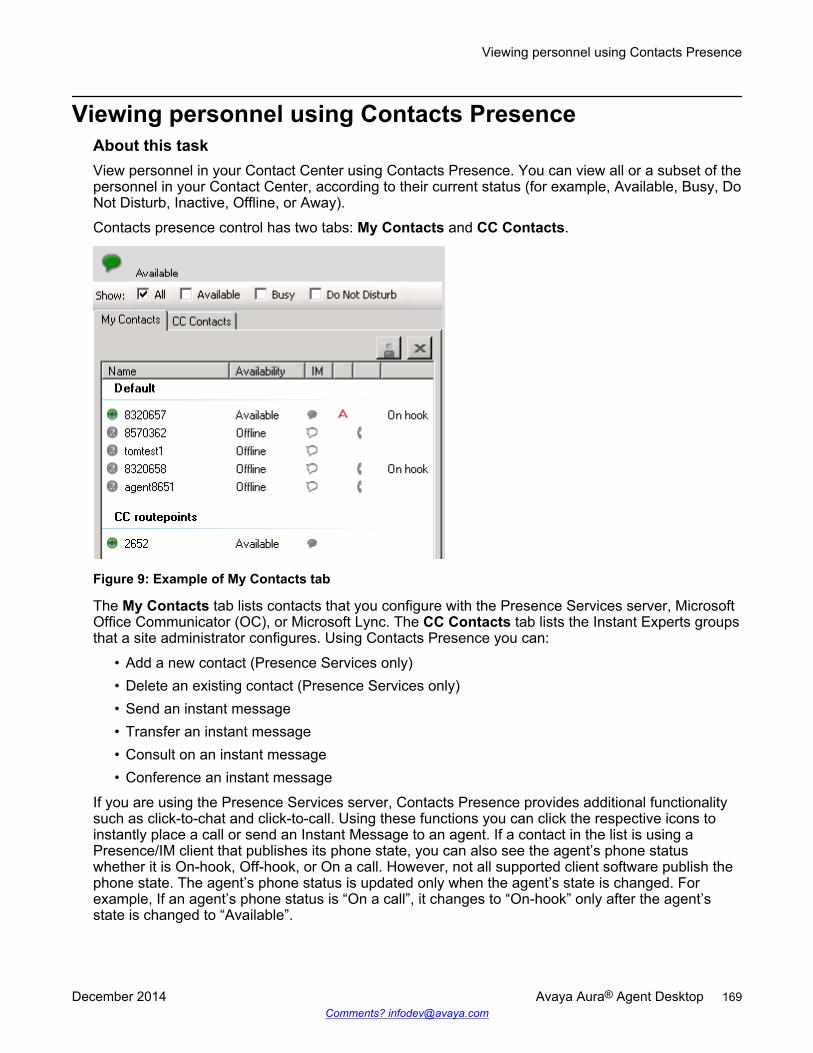
Viewing personnel using Contacts PresenceAbout this taskView personnel in your Contact Center using Contacts Presence. You can view all or a subset of thepersonnel in your Contact Center, according to their current status (for example, Available, Busy, DoNot Disturb, Inactive, Offline, or Away).
Contacts presence control has two tabs: My Contacts and CC Contacts.
Figure 9: Example of My Contacts tab
The My Contacts tab lists contacts that you configure with the Presence Services server, MicrosoftOffice Communicator (OC), or Microsoft Lync. The CC Contacts tab lists the Instant Experts groupsthat a site administrator configures. Using Contacts Presence you can:
• Add a new contact (Presence Services only)• Delete an existing contact (Presence Services only)• Send an instant message• Transfer an instant message• Consult on an instant message• Conference an instant message
If you are using the Presence Services server, Contacts Presence provides additional functionalitysuch as click-to-chat and click-to-call. Using these functions you can click the respective icons toinstantly place a call or send an Instant Message to an agent. If a contact in the list is using aPresence/IM client that publishes its phone state, you can also see the agent’s phone statuswhether it is On-hook, Off-hook, or On a call. However, not all supported client software publish thephone state. The agent’s phone status is updated only when the agent’s state is changed. Forexample, If an agent’s phone status is “On a call”, it changes to “On-hook” only after the agent’sstate is changed to “Available”.
Viewing personnel using Contacts Presence
December 2014 Avaya Aura® Agent Desktop 169Comments? [email protected]
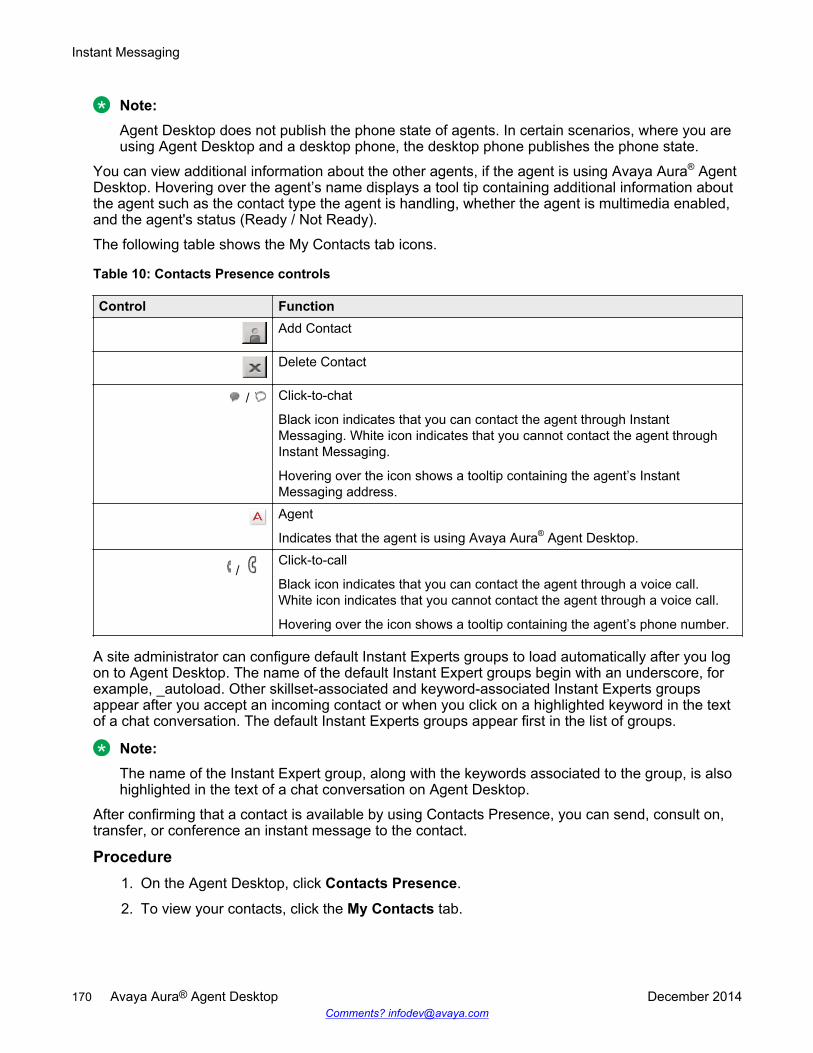
Note:Agent Desktop does not publish the phone state of agents. In certain scenarios, where you areusing Agent Desktop and a desktop phone, the desktop phone publishes the phone state.
You can view additional information about the other agents, if the agent is using Avaya Aura® AgentDesktop. Hovering over the agent’s name displays a tool tip containing additional information aboutthe agent such as the contact type the agent is handling, whether the agent is multimedia enabled,and the agent's status (Ready / Not Ready).
The following table shows the My Contacts tab icons.
Table 10: Contacts Presence controls
Control FunctionAdd Contact
Delete Contact
/ Click-to-chat
Black icon indicates that you can contact the agent through InstantMessaging. White icon indicates that you cannot contact the agent throughInstant Messaging.
Hovering over the icon shows a tooltip containing the agent’s InstantMessaging address.Agent
Indicates that the agent is using Avaya Aura® Agent Desktop.
/ Click-to-call
Black icon indicates that you can contact the agent through a voice call.White icon indicates that you cannot contact the agent through a voice call.
Hovering over the icon shows a tooltip containing the agent’s phone number.
A site administrator can configure default Instant Experts groups to load automatically after you logon to Agent Desktop. The name of the default Instant Expert groups begin with an underscore, forexample, _autoload. Other skillset-associated and keyword-associated Instant Experts groupsappear after you accept an incoming contact or when you click on a highlighted keyword in the textof a chat conversation. The default Instant Experts groups appear first in the list of groups.
Note:The name of the Instant Expert group, along with the keywords associated to the group, is alsohighlighted in the text of a chat conversation on Agent Desktop.
After confirming that a contact is available by using Contacts Presence, you can send, consult on,transfer, or conference an instant message to the contact.
Procedure1. On the Agent Desktop, click Contacts Presence.
2. To view your contacts, click the My Contacts tab.
Instant Messaging
170 Avaya Aura® Agent Desktop December 2014Comments? [email protected]
3. To view Instant Experts groups, click the CC Contacts tab.
Contacting experts using Contacts PresenceAbout this taskYou can use an Avaya Aura® Presence Services server, Microsoft Office Communications Server(OCS), or Microsoft Lync server to contact experts and get your queries answered.
Procedure1. On the Agent Desktop, click Contacts Presence.
2. Click the CC Contacts tab.
3. To display all the IM expert groups that administrators have configured, click the Keywordsbutton.
The system displays the Groups and Keywords window.
Or
Type the first letter of the IM expert group in the Keywords field. The system displays all thematches. You can add more letters to refine the search and the list scrolls to the appropriatename or the closest match. Select the IM expert group that you want to add to the CCContacts tab and click Go.
4. Select the IM expert group that you want to add to the CC Contacts tab.
Or
Select Check/Uncheck to either add or clear all the IM expert groups from the CC Contactstab.
Note:
The system displays the Always-on groups even if you clear all the IM expert groupsfrom the CC Contacts tab.
5. Click Apply.
6. To display only the Always-on groups, click the Reset button on the CC Contacts tab.
Adding a new contact in Contacts PresenceAbout this taskIf you are using an Avaya Aura® Presence Services server, you can add a contact to the MyContacts list.
Contacting experts using Contacts Presence
December 2014 Avaya Aura® Agent Desktop 171Comments? [email protected]
Procedure1. On the Agent Desktop, click Contacts Presence.
2. Click the My Contacts tab.
3. To add a new contact, click the Add Contact icon.
You can add contacts only if the IM contacts in your Contact List are below the maximumthreshold value of IM contacts set by administrators. The system disables the Add Contacticon if you have reached the threshold.
The system displays the Add a contact window.
4. In the ID field, enter the user name of the agent account created in System Manager.
5. From the Group combo box, select an existing group name to add the new contact to anexisting group in the My Contacts tab.
Or
Enter a new group name in the Group combo box to create a new group in the My Contactstab and add the new contact to that new group.
Note:
Leave the Group field blank to add the new contact to the default group.
6. Click Add.
Deleting a contact from Contacts PresenceAbout this taskIf you are using Presence Services server, you can delete a contact from the My Contacts list.
Procedure1. On the Agent Desktop, click Contacts Presence.
2. Click the My Contacts tab.
3. Click the appropriate contact from the My Contacts list.
4. Click the Delete Contact icon to delete the contact.
Instant Messaging
172 Avaya Aura® Agent Desktop December 2014Comments? [email protected]
Sending an instant message using Contacts PresenceAbout this taskSend an instant message to a person after you confirm that the person is available by usingContacts Presence.
Procedure1. On the Agent Desktop, click Contacts Presence.
2. To send a message to an agent from your list, click the My Contacts tab.
Or
To send a message to an agent from an Instant Experts group, click the CC Contacts tab.
3. Select the name of the person you want to send the instant message to, after confirming thatthey are available.
4. Click the Click-to-chat icon or right-click the name of the person and click Send an InstantMessage.
A new Conversation window appears.
5. In the text box, type your message to the agent.
6. Click Send.
Your name or agent label appears before your message in the Conversation frame.
Transferring an instant message using Contacts PresenceAbout this taskTransfer an instant message to another person, after you confirm that the person is available byusing Contacts Presence.
Procedure1. On the Agent Desktop, click Contacts Presence.
2. To transfer a message to an agent from your list, click the My Contacts tab.
Or
To transfer a message to an agent from an Instant Experts group, click the CC Contactstab.
3. Select the name of the person you want to send the instant message to, after confirming thatthey are available.
4. Right-click the name of the person and click Transfer.
Sending an instant message using Contacts Presence
December 2014 Avaya Aura® Agent Desktop 173Comments? [email protected]
The person you want to transfer the instant message to must click Accept. The currentinstant message text then appears in that person’s Conversation window.
5. Click Complete Transfer.
The instant message is now transferred to the person and it is no longer displayed on yourAgent Desktop.
Consulting on an instant message using ContactsPresence
About this taskConsult on an instant message with another person after you confirm that the person is available byusing Contacts Presence.
Procedure1. On the Agent Desktop, click Contacts Presence.
2. To consult an agent from your contacts list, click the My Contacts tab.
Or
To consult an agent from an Instant Experts group, click the CC Contacts tab.
3. Select the name of the person you want to send the instant message to, after confirming thatthey are available.
4. Right-click the name of the person, and then click Consult.
The person you want to consult must click Accept. The current instant message text thenappears in that person’s Conversation window.
5. When your consultation is complete, click Close.
Conferencing an instant message using ContactsPresence
About this taskConference an instant message with another person after you confirm that the person is availableby using Contacts Presence.
Procedure1. On the Agent Desktop, click Contacts Presence.
2. To conference with an agent from your contacts list, click the My Contacts tab.
Instant Messaging
174 Avaya Aura® Agent Desktop December 2014Comments? [email protected]
Or
To conference with an agent from an Instant Experts group, click the CC Contacts tab.
3. Determine the person with whom you want to have a conference with, and confirm that theyare available.
4. Right-click the name of the person, and click Conference.
A new Conversation window appears.
5. Click Complete Conference.
The new Conversation window closes and the original Conversation window reappears.When the person who you have added to the conference begins typing, the participant listabove the text displays updated contact information for all participants in the conference.
6. To leave the conference, click Close.
A message in blue appears in the Conversation window, which indicates when a participantleaves the conference. The departure is added as an Action to the Contact History.
Transferring an instant message using the work itemcontrol
About this taskTransfer an instant message to another available agent using the work item control.
Procedure1. On the work item, click the Transfer control.
2. Select the name of the person you want to send the instant message to, after confirming thatthey are available.
3. Right-click the name of the person and click Transfer.
The person you want to transfer the instant message to must click Accept. The currentinstant message text then appears in that person’s Conversation window.
4. Click Complete Transfer.
The instant message is now transferred to the person and it is no longer displayed on yourAgent Desktop. Your status is set to Ready.
Transferring an instant message using the work item control
December 2014 Avaya Aura® Agent Desktop 175Comments? [email protected]
Consulting on an instant message using the work itemcontrol
About this taskConsult on an instant message with another available person using the work item control.
Procedure1. On the work item, click the Conference control.
2. Select the name of the person you want to send the instant message to, after confirming thatthey are available.
3. Right-click the name of the person and then click Consult.
The person you want to consult with must click Accept. The current instant message textthen appears in that person’s Conversation window.
4. When your conversation is complete, click Close.
Conferencing an instant message using the work itemcontrol
About this taskConference an instant message to another available agent using the work item control.
Procedure1. On the work item, click the Conference control.
2. Select the name of the person you want to send the instant message to, after confirming thatthey are available.
3. Right-click the name of the person and click Conference.
A new Conversation window appears.
4. Click Complete Conference.
The new Conversation window closes and the original Conversation window reappears.When the person who you have added to the conference begins typing, the participant listabove the text displays updated contact information for all participants in the conference.
5. When you want to leave the conference, click Close.
A message in blue appears in the Conversation window, which indicates when a participantleaves the conference. The departure is added as an Action to the Contact History.
Instant Messaging
176 Avaya Aura® Agent Desktop December 2014Comments? [email protected]

Ending an instant messageAbout this taskEnd an instant message when the contact is complete.
ProcedureClick Close.
Ending an instant message
December 2014 Avaya Aura® Agent Desktop 177Comments? [email protected]
Chapter 18: Using Agent Greeting
The Agent Greeting feature allows you to pre-record greetings. The system plays the greetingautomatically when you answer a call.
Agent Greeting has the following additional benefits:
• your greeting is consistent for all callers• you get time to prepare for the call
Administrators can configure all agents, in the Contact Center, to be on mute during agent greetingplayback. Additionally, agents can go on mute using the mute button on their telephones. However,if agents mute their telephones, no party to the call can hear the agent greeting playback. Therefore,agents must not mute their telephones during agent greeting playback.
Note:
Agent Greeting applies only to SIP-enabled Contact Centers.
Logging on to the Agent Greeting recording applicationBefore you begin
• Check with your administrator that you have access to the Agent Greeting application.
About this taskLog on to the Agent Greeting recording application to record your default greeting. You can use theAgent Desktop softphone to log in to Agent Greeting.
Using Agent Desktop, press the Agent Greeting button, which automatically makes a call to theAgent Greeting recording application. Alternatively, you can type the Agent Greeting recordingnumber and invoke the Originate Call option. If you use Agent Desktop to make calls, you canenter your login ID and password by using the DTMF option on Agent Desktop.
Note:Agent Desktop does not support transferring or conferencing the Agent Greeting recording call.
Procedure1. On your telephone, dial the number of the Agent Greeting application (If you do not know this
number, ask your Contact Center administrator).
The Agent Greeting application plays a welcome prompt and prompts you for your agent ID.
178 Avaya Aura® Agent Desktop December 2014Comments? [email protected]
2. Using your telephone keys, enter your agent ID followed by pound (#).
The Agent Greeting application prompts you for your password.
3. Using your telephone keys, enter your agent password followed by (#).
The application plays the main menu.
Changing your Agent Greeting passwordBefore you begin
• Log on to the Agent Greeting application.
About this taskThis procedure describes how you can change your Agent Greeting password.
Procedure1. From the Agent Greeting main menu, select 8 to reach the Password Change menu.
2. When the application prompts you, enter your old password using your telephone keys.
3. When the application prompts you, enter your new password using your telephone keys.
4. When the application prompts you, enter your new password again using your telephonekeys.
The application plays back a message confirming that your password has been changed.
Recording your default greetingBefore you begin
• Log on to the Agent Greeting application.
About this taskRecord your default greeting, which the system plays to voice contacts on skillsets for which youhave not recorded a skillset-specific greeting. You must record a default greeting before the systemallows you to record skillset-specific greetings.
The first time you log in to Agent Greeting, the application automatically prompts you to record yourdefault greeting.
Procedure1. From the Agent Greeting main menu, select 2 to reach the default greeting option.
2. When the application prompts you to record your default greeting, select 1.
3. Record your greeting.
Changing your Agent Greeting password
December 2014 Avaya Aura® Agent Desktop 179Comments? [email protected]
4. Select (#) to return to the main menu.
If you want to change your recording, you can record it again. See Re-recording agreeting on page 183.
Recording the Time of Day greetingsBefore you begin
• Log on to the Agent Greeting application.
Note:You can set Time of Day greetings only in a Contact Center Manager Administrationconfiguration.
About this taskThe Time of Day greeting recording menu allows you to select the time of day greeting you want torecord, delete, or playback.
Procedure1. From the Agent Greeting main menu, select 1 to record the Time of Day greeting.
2. Select 1 to review your morning greeting.
Or
Select 2 to review your afternoon greeting.
Or
Select 3 to review your evening greeting.
After you have selected the Time of Day greeting, the application presents the standardgreeting menu with options to record, playback, or delete (if the greeting is already recorded)a greeting.
3. Select (#) to return to the main menu.
Recording skillset-specific greetingsBefore you begin
• Log on to the Agent Greeting application.
Using Agent Greeting
180 Avaya Aura® Agent Desktop December 2014Comments? [email protected]
About this taskSkillset-specific greetings are played back when you answer calls specific to a skillset. If yoursupervisor has not recorded skillset tags for your skillsets, then the Agent Greeting recordingapplication identifies the skillsets by the skillset ID number.
Procedure1. From the Agent Greeting main menu, select 4 or 6 to navigate to the skillset.
2. Select 2 when you reach the required skillset.
3. Select 1 to record a new greeting.
4. Record your greeting.
5. Select (#) to return to the main menu.
If you want to change your recording, you can record it again. See Re-recording agreeting on page 183.
Deleting skillset-specific greetingsBefore you begin
• Log on to the Agent Greeting application.
About this taskFollow this procedure to delete a skillset-specific greeting.
Procedure1. From the Agent Greeting main menu, select 4 or 6 to navigate to the skillset.
2. Select 2 to choose the greeting.
3. Select 76 on your phone to delete the greeting.
4. Select (#) to return to the main menu.
Identify skillset IDs to record skillset tagsBefore you beginEnsure that you have a license for the Report Creation Wizard.
About this taskYou must identify the skillset IDs before you can record skillset tags for those skillset IDs.
Deleting skillset-specific greetings
December 2014 Avaya Aura® Agent Desktop 181Comments? [email protected]
You can obtain these from the Contact Center Manager Administration Historical Reports. Thereport is Sample Reports – SIP_CC – Voice Skillset Name ID Mapping.rpt.Procedure
1. Log on to Contact Center Manager Administration.
2. From the Launchpad, click Historical Reporting.
3. In the left pane, click the Contact Center Manager Server on which to create, edit, or viewthe Report Creation Wizard report.
4. From the Report menu, select Report Creation Wizard.
5. Click Import to Historical Reporting.
6. In the Import window, in the Report Title box, type the name for the report.
The name appears in Historical Reporting.
7. Click Browse.
8. In the Open RCW Report dialog box, browse to and select the Sample Reports –SIP_CC – “Voice Skillset Name ID Mapping.rpt report to import.
9. Click the Report Options header.
10. From the Report Group list, select the standard report folder into which you import thereport. For private reports, you import the report into your private folder.
11. In the Select Server list, select the servers to which to import the report.
12. Click Import.
13. Navigate through the reports till you find the Sample Reports – SIP_CC – “VoiceSkillset Name ID Mapping.rpt report.
14. Click Run Now.
The report runs and you can look for the required voice skillset name ID mapping.
Recording skillset tagsBefore you begin
• Log on to the Agent Greeting application.• Find out the skillset IDs for which you want skillset tags. See Identify skillset IDs to record
skillset tags on page 181.
Note:You must be a supervisor or an supervisor/agent to record skillset tags.
Using Agent Greeting
182 Avaya Aura® Agent Desktop December 2014Comments? [email protected]
About this taskSupervisor/agents can record skillset tags to provide agents with a skillset name when they browsethe skillset in the Agent Greeting Recording application.
If the supervisor does not record tags, the Agent Greeting application plays back only the skillset IDin the Record Skillset menu. If the skillset tag is recorded, the agents hear the skillset namerecorded by the supervisor instead of the skillset ID number.
Supervisors can record the skillset tags for all skillsets.
Supervisor/agents can record the skillset tags only for the skillsets assigned to that supervisor/agent.
Procedure1. From the Agent Greeting main menu, select 4 or 6 to navigate to the skillset.
2. Select 3 when you reach the required skillset.
3. Select 1 to record a new skillset tag.
4. Record your greeting.
5. Select (#) to return to the main menu.
If you want to change your recording, you can record it again. See Re-recording agreeting on page 183.
Playing back a greetingBefore you begin
• Log on to the Agent Greeting application.
About this taskThis procedure describes how you can play back a greeting.
Procedure1. Navigate to a particular skillset, Time of Day, or default greeting option.
2. Select 2 to listen to your greeting.
3. Select (#) to return to the main menu.
Re-recording a greetingBefore you begin
• Ensure you have a recorded greeting.
Playing back a greeting
December 2014 Avaya Aura® Agent Desktop 183Comments? [email protected]
About this taskThis procedure describes how you can re-record a greeting.
Procedure1. Delete the skillset-specific recorded greeting. See Deleting skillset-specific greetings on
page 181.
2. Record your greeting again. See Recording your default greeting on page 179 and Recording skillset-specific greetings on page 180.
Interrupting a greetingBefore you begin
• Ensure that your status is set to Ready.• Ensure that Agent Greeting is enabled and you have greetings recorded.• Ensure that Contact Center Manager Administration is configured to allow an agent to interrupt
greeting.
About this taskWhile a greeting is being played back for a call, you can interrupt the greeting. The greeting stopsplaying and you can start talking with the customer.
Important:If Call Force Answer (CFA) Zip Tone is enabled, agents can also interrupt the silence periodfollowing the zip tone using the procedure below. If agents interrupt the silence period followingthe zip tone being played, the greeting is also interrupted. Subsequently any greeting queued toplay following the silence period is not played.
Procedure1. On the Agent Desktop, the Playing Agent Greeting message appears when an agent
greeting is being played for an incoming call. Select the work item and click the Accept workitem control.
Note:
If Call Force Answer (CFA) Zip Tone is enabled, the Playing Agent Greetingmessage appears when the zip tone is being played.
2. While the agent greeting is being played, enter 83 on your phone or Agent Desktop DTMFkeypad, to interrupt the greeting.
Using Agent Greeting
184 Avaya Aura® Agent Desktop December 2014Comments? [email protected]
Chapter 19: High Availability
Avaya Aura® Agent Desktop supports High Availability for fault tolerant and resilient contact centersolutions. In High Availability contact centers, Avaya Aura® Agent Desktop connects to multipleContact Center servers. If one of the Contact Center servers fails or is shut down for maintenance,your Agent Desktop software switches over to the remaining Contact Center servers and continuesworking.
Normally, you do not notice a server switchover, you remain logged on and you continue handlingcustomer phone calls without interruption. The Agent Desktop multimedia contacts list refreshesduring a server switchover and this causes a short delay before new multimedia contacts arrive. Inlimited circumstances, Agent Desktop experiences a short delay during server switchover and if thisoccurs you must log on again after the switchover. Phone calls in progress with a customer are notaffected by a switchover.
The following procedures describe how to handle Avaya Aura® Agent Desktop in a High Availabilitycontact center.
Handling desktop phone loss of call controlAbout this taskNormally you use Avaya Aura® Agent Desktop software to control your desktop phone and to handlecustomer phone calls. If Agent Desktop is unable to control your desktop phone, use your desktopphone to continue handling customer phone calls. Do not attempt to use Agent Desktop to handlecustomer phone calls. When Agent Desktop regains control of your desktop phone, a message boxappears to inform you that Agent Desktop can now be used again for telephony operations.
Procedure1. If Agent Desktop displays a Please use your phone for telephony operations. A
message will appear when AAAD control returns message box, show the message toyour supervisor.
2. On the message box, click OK.
3. Continue to handle customer phone calls using your desktop phone. Do not attempt to useAgent Desktop to handle customer phone calls.
4. When the AAAD can now be used again for telephony operations message box appears,click OK and use Agent Desktop to handle customer phone calls.
December 2014 Avaya Aura® Agent Desktop 185Comments? [email protected]
Handling softphone loss of call controlAbout this taskNormally you use the Avaya Aura® Agent Desktop embedded softphone to handle customer phonecalls. If you have a desktop phone, and if the Agent Desktop embedded softphone is unable tohandle your customer phone calls, use your desktop phone to handle the customer calls. During asystem outage, do not attempt to use Agent Desktop to handle customer phone calls. When AgentDesktop regains call control, a message box appears to inform you that the Agent Desktopembedded softphone can now be used again for telephony operations.
Note:Agents that use Agent Desktop in the “My Computer” embedded softphone mode without adesktop phone, cannot handle customer calls during an Application Enablement Servicesoutage or switchover.
Procedure1. If Agent Desktop displays a Please use your phone for telephony operations. A
message will appear when AAAD control returns message box, show the message toyour supervisor.
2. On the message box, click OK.
3. If you have a desktop phone, continue to handle customer phone calls using your desktopphone. Do not attempt to use Agent Desktop to handle customer phone calls.
4. When the AAAD can now be used again for telephony operations message box appears,click OK and use Agent Desktop to handle customer phone calls.
5. You might need to restart Avaya Aura® Agent Desktop to regain embedded softphone callcontrol.
Note: If you complete a transfer during an Application Enablement Services outage orswitchover, your Real Time Display (RTD) might incorrectly show your status as on a callalthough you are now idle. No new calls are presented to you until the main call between thecustomer and contact center is disconnected.
Handling multimedia contact refreshes during aswitchover
About this taskAvaya Aura® Agent Desktop software supports multimedia contacts such as email, web chat, andfax messages. Agent Desktop also supports a licensed multiplicity feature. Multiplicity is the ability tohandle multiple concurrent contacts. At any one time you can be active on both a voice andmultimedia contact. However, when one contact is active; the others are automatically placed onhold.
High Availability
186 Avaya Aura® Agent Desktop December 2014Comments? [email protected]
If a Contact Center server switchover occurs, you might notice that all of your Agent Desktopcontacts refresh; they are removed and recreated in Agent Desktop after the switchover. Thiscontact refreshing can take a few seconds, depending on the number of contacts you have open.During the contact refreshing period you cannot use Agent Desktop to handle multimedia contacts,but you can continue to handle customer voice calls using your desktop phone. When the contactshave refreshed, the contact open time is correct and typed contact information is still present. If youwere typing an email reply when the switchover occurred, your unfinished email is preserved andyou can continue typing from where you were interrupted. You can continue to handle customercontacts using Agent Desktop as normal.
Note:High Availability does not support Instant Message (IM) contact types. If a Contact Centerserver switchover occurs, IM contacts are lost.
Procedure1. If Agent Desktop starts to refresh the contacts in your Work Item list, do not use Agent
Desktop. Stop typing and allow Agent Desktop to completely refresh the contacts Work Itemlist.
2. If you are handling a customer voice contact, continue to handle the phone call using yourdesktop phone.
3. When the contacts Work Item list has fully refreshed, confirm that all your contacts are stillopen and continue handling multimedia and voice contacts using Agent Desktop.
Handling server communication issuesAbout this taskAvaya Aura® Agent Desktop connects to multiple Contact Center servers. In the event that theconnection to the servers is lost, Agent Desktop repeatedly attempts to reconnect. If you are forcedto exit Agent Desktop as a result of server communication issues, all multimedia contacts such asemail, Web chats and IM are lost. You can continue to handle phone calls using your desktop phonewhile server communication is lost.
Procedure1. If Agent Desktop shows a CCT Session Disconnected message box, show the message to
your Supervisor.
2. On the message box, click Dismiss and continue to handle phone calls using your desktopphone.
3. If Agent Desktop shows a Server Error - Failed to connect to the CCMM Server messagebox, show the message to your Supervisor.
4. On the message box, click Dismiss and continue to handle voice contacts.
5. Agent Desktop continues attempting to reconnect with the server. On successful reconnectyou might need to login again.
Handling server communication issues
December 2014 Avaya Aura® Agent Desktop 187Comments? [email protected]
6. If Agent Desktop repeatedly fails to reconnect with the server, speak with your Supervisorand if necessary click Exit Application.
Handling configuration issues when launching AvayaAura® Agent Desktop
About this taskAgent Desktop is downloaded from and connects to one or more Contact Center Multimedia(CCMM) servers.
When launched, Agent Desktop attempts to connect to the default server and download theconfiguration file. In High Availability solutions, if Agent Desktop is unable to access theconfiguration file on the default server it attempts to access the configuration files on the otherservers. If Agent Desktop can access the configuration files on another server it displays a messagebox. The agent can choose to accept the configuration settings for that server or choose to attemptto connect to another server.
Procedure1. If Agent Desktop displays a Configuration Settings Error message box, show the message
to your Supervisor.
2. If you wish to accept the configuration settings from the server specified, on theConfiguration Settings Error message box click OK.
3. If you do not wish to accept the configuration settings for the server specified, on theConfiguration Settings Error message box click Cancel.
4. In the CCMM Server Error message box a list of available servers is displayed. Choosewhich server you want to connect to and click Connect.
5. If the problem persists, speak with your Supervisor.
High Availability
188 Avaya Aura® Agent Desktop December 2014Comments? [email protected]

Chapter 20: Agent Statistics
Agent Desktop displays live skillset-related statistics. Agents can display assigned skillset statisticsin a pie or a bar chart format. Supervisors can display statistics for all skillsets. This chapterdescribes how to use the Statistics tab.
Agent Desktop Statistics are generated by accessing the Contact Center Web Statistics (CCWS) onContact Center Manager Server (CCMS).
The main Statistics tab parts are:
• Control: Used to select charts types• Skillsets: Used to display and select skillsets• Charts: Used to display charts
Control:
• Refresh: Reloads and resets the skillsets list in the skillset area.• Sort: Alphabetical sort of skillset icons. Due to contact type prefixes on the skillsets names the
skillsets are also sorted by contact type.• Pie/Bar: Dynamically changes between pie and bar charts in the chart display area.• Agents Available: Displays the number of agents available.• Agents Not Ready: Displays the number of agents not ready.• Max Wait Time: Displays the maximum time (in seconds) the customer has to wait before being
connected to an agent.• Calls Waiting: Displays the number of waiting calls.• Alerts: Activate or de-activate Outlook style alerts for skillsets, whose Service Level falls below
the threshold defined in Contact Center Manager Administration.
Skillsets:
Displays a skillset icon for each available or assigned skillset. Supervisors in a multimediaenvironment see all skillsets. Selecting a skillset icon updates the chart with the latest statistics forthat skillset.
The percentage figures on the skillset icons represent the current Service Level for the skillset. Theicons change to red if the current Service Level falls below the threshold defined in Contact CenterManager Administration.
Charts:
The chart area displays a pie or bar chart.
December 2014 Avaya Aura® Agent Desktop 189Comments? [email protected]
Prerequisites for Agent StatisticsProcedureAsk your supervisor to ensure that the Contact Center Web Statistics are enabled on the CCMSserver.
Accessing the Agent Statistics tabBefore you begin
• Ensure that your status is set to Logged on.
About this taskAccess the Agent Statistic tab to define and view agent and skillset charts.
Procedure1. On the Agent Desktop Top bar, click User Preferences.
2. Select the Statistics tab, to display the Agent Statistics tab and controls.
Viewing the Skillset statistic chartBefore you begin
• Ensure the agent is a member of all necessary skillsets.
About this taskView the skillset statistics chart to monitor statistics for the current skillset.
Procedure1. On the Agent Desktop Statistics tab, select Contacts.
2. In the Skillset control, select the skillset to see the statistics.
A chart is displayed in the chart area showing the statistics.
3. You can toggle between a pie chart and a bar chart by clicking the Pie/Bar button on themain Statistics tab.
Agent Statistics
190 Avaya Aura® Agent Desktop December 2014Comments? [email protected]
Viewing the Agent statistic chartAbout this taskView the agent statistics chart to monitor statistics for agents in a skillset.
Procedure1. On the Agent Desktop Statistics tab, select Agents.
2. In the Skillset control, select the skillset for which you want to see the agent-relatedstatistics.
A chart is displayed in the chart area showing the statistics.
3. You can toggle between a pie chart and a bar chart by clicking the Pie/Bar button on themain Statistics tab.
Changing the Agent statistic chart propertiesAbout this taskUse the VuStats window to change the display interval and refresh interval for Agent statistic charts.
Procedure1. Launch the Agent Desktop and log into Elite.
2. Click on Agent Statistics to launch the VuStats window.
3. Click the Settings icon.
4. Type the number of seconds in the Display Interval box.
5. Type the number of seconds in the Refresh Interval box.
6. Click Save Settings.
The system saves the settings for this agent session only.
Variable definitionsName DescriptionRefresh Interval Use the Refresh Interval box to define the refresh
interval for each VuStats information before itchanges the focus from the last line of display in thelist to the first line.
Display Interval Use the Display Interval box to define the interval todisplay each VuStats before the VuStats Monitor
Viewing the Agent statistic chart
December 2014 Avaya Aura® Agent Desktop 191Comments? [email protected]
Name Descriptionchanges focus from one VuStats line of display tothe next one in the list.
Enabling Service Level alertsAbout this taskActivate Outlook style alerts for skillsets, whose Service Level falls below the threshold defined inContact Center Manager Administration.
ProcedureOn the Agent Desktop, Statistics tab, click the Alerts check box to enable Service Level alerts.
If the Service Level for a skillset falls below the threshold defined in Contact Center ManagerAdministration, an alert message box appears in the bottom right-hand side of the screen. Click thisalert box to automatically open the Statistics tab on the Agent Desktop.
Using the Statistics TickerAbout this taskThe Agent Desktop Action bar contains an Agent Statistics Ticker. The Agent Statistics Tickerdisplays assigned skillsets, contacts waiting (in square brackets), and skillset name on a scrollingdisplay that loops every 10 seconds.
Procedure1. On the Agent Desktop Action bar, click Agent Statistics to show or hide the Agent
Statistical Ticker.
2. On the Agent Statistical Ticker, click the > icon to advance to the next skillset.
3. On the Agent Statistical Ticker, click on any item in the Ticker box to display the AgentDesktop Statistics page.
4. To show or hide the Agent Statistical Ticker, click the button that appears to the left of theAgent Statistical Ticker.
Agent Statistics
192 Avaya Aura® Agent Desktop December 2014Comments? [email protected]

Chapter 21: Customer and contact details
Use the Multimedia component to create, search, view, and edit customer and contact details. WithAvaya Aura® Agent Desktop, you can perform the following tasks:
• Create a customer record
• Search for a customer
• Add or edit customer information
• Set or clear the barred status for a customer phone number
• View or copy a CCT intrinsic
• View or modify User to User Information
• View customer contact intrinsics
• Run a CCT intrinsic-associated application
• Search for a contact
• Print search results
• View a contact
• Open a contact
• Close contacts (supervisors only)
On the Customer Details tab, you can view Communication Control Toolkit (CCT) intrinsics.
Note:
Voice Contact intrinsics are supported in both SIP-enabled and AML-based contact centers.However, in AML-based contact centers intrinsics on voice calls are set for CDN calls only,whereas in SIP-enabled contact centers intrinsics on voice calls are set for both CDN andpersonal calls.
Prerequisites for working with customer and contactdetails
Procedure• Ensure that you have permission to handle multimedia contacts.
December 2014 Avaya Aura® Agent Desktop 193Comments? [email protected]
• Ensure that you have supervisor privileges, if you want to close multiple contacts.
Creating a customer recordBefore you begin
• Ensure that you do not have any customer records open.
About this taskCreate a customer record if the multimedia database does not currently have information about acustomer. You can type the information directly into the dialog box, or you can copy text from anopen contact into the customer details information.
Note:You must enter either a telephone number, email address, or SIP URI for a valid customerrecord. Entering only a customer name does not create a customer record in the database.
Procedure1. In the Customer Details window, click Create.
2. In the Title box, select a salutary title for the customer.
3. In the Last Name box, type the surname of the customer.
4. In the First Name box, type the given name for the customer.
5. In the E-mail Address box, type an email address for the customer.
Note:
If you add more than one email address for a customer, you must select a default emailaddress to use when you begin a contact with the customer.
6. In the SIPUri box, enter a SIP URI for the customer.
7. In the Phone Type box, select the type of phone number.
8. In the remaining telephone number boxes, type the international code, area code, andtelephone number.
9. Click Save.
Searching for a customerBefore you begin
• Ensure that the Action bar is visible.
Customer and contact details
194 Avaya Aura® Agent Desktop December 2014Comments? [email protected]
About this taskSearch for a customer to view or edit customer details, if you want to create or review a customercontact.
You can search for a customer based on one or more of the following criteria:
• First name• Last name• Preferred agent (the agent who typically handles the contacts for the customer, based on who
created the customer record, who handled the first contact by the customer, or who clickedTake Ownership of the customer record)
• Address• Phone number• Email address• SIP URI
Procedure1. Click Customer Search.
2. In the first column, select the criteria to use for the search (for example, last name or phonenumber).
3. In the second column, select the logical operators for the search criteria (for example, is or isnot).
4. In the third column, type your search value (for example, Smith).
5. Click Search.
6. To sort the search results based on a field, click the column heading of the field by which youwant to sort.
7. Double-click the customer record to open.
Adding or editing customer informationBefore you begin
• Ensure that you do not have any customer records open.
About this taskAdd or edit customer information when a change to a customer record is required.
Procedure1. Click the Details tab in the Customer Details pane.
2. Click Edit to change the customer information.
Or
Adding or editing customer information
December 2014 Avaya Aura® Agent Desktop 195Comments? [email protected]
Click Add to add new information to the customer details.
3. Select the information to add or change.
4. Copy and paste the information from the text of a contact, or type the information into thefield.
5. If you add additional telephone numbers or email addresses, ensure that you select one asthe default.
6. Click Save.
Setting the barred status for a customer phone numberAbout this taskBar a customer phone number, if the customer has requested for the Do Not Call (DNC) facility.
Procedure1. Click the Details tab in the Customer Details pane.
2. Click Edit to change the customer information.
3. Select the phone number for which the bar status needs to set.
4. Select the Barred check box to tag the phone number as barred.
This phone number cannot be called.
Clearing the barred status for a customer phone numberBefore you begin
• Ensure that the customer phone number is barred.
About this taskClear a customer phone number of its barred status.
Procedure1. Click the Details tab in the Customer Details pane.
2. Click Edit to change the customer information.
3. Select the phone number to be cleared off its barred status.
4. Clear the Barred check box to tag the phone number as not-barred.
This phone number can be called.
Customer and contact details
196 Avaya Aura® Agent Desktop December 2014Comments? [email protected]
Viewing an intrinsicBefore you begin
• You must accept a contact.
About this taskView an intrinsic to copy the intrinsic or start an associated application.
Procedure1. On the Agent Desktop window, click Customer Details.
2. In the Custom Fields section, click the Intrinsic tab.
The intrinsics appear.
Copying an intrinsicAbout this taskCopy an intrinsic to use the intrinsic in another application.
Procedure1. On the Agent Desktop window, click Customer Details.
2. In the Custom Fields section, click the Intrinsics tab.
3. Right-click the required intrinsic.
4. Click Copy.
Viewing User to User InformationAbout this taskView the User to User Information (UUI) associated with a work item.
Note:User to User Information is not supported when you use Agent Desktop to log on to AvayaAura® Call Center Elite.
ProcedureOn the work item, click Work Item Details.
The User to User Info appears on the work item.
Viewing an intrinsic
December 2014 Avaya Aura® Agent Desktop 197Comments? [email protected]
Modifying User to User InformationAbout this taskModify the User to User Information (UUI) associated with a work item.
Note:User to User Information is not supported when you use Agent Desktop to log on to AvayaAura® Call Center Elite.
Procedure1. On the work item, click Work Item Details.
The User to User Info appears on the work item.
2. Double click User to User Info.
The UUI data appears on the work item in an text box.
3. Modify the UUI data and press Enter to associate it with the work item.
Viewing customer contact intrinsicsBefore you begin
• You must accept a contact.
About this taskYou can view customer contact intrinsics to identify which default application starts after you accepta contact.
Procedure1. On the Agent Desktop, click Customer Details.
2. In the Custom Fields section, click the Intrinsics tab.
The default application appears with a check mark, in the Screen Pops section.
3. When you are finished viewing customer contact intrinsics, right-click on the window onwhich you are viewing the details.
Launching an intrinsic-associated application manuallyBefore you begin
• You must accept a contact.
Customer and contact details
198 Avaya Aura® Agent Desktop December 2014Comments? [email protected]
About this taskIf you need an application to manage a contact, run an intrinsic-associated application.
Procedure1. On the Agent Desktop window, click Customer Details.
2. In the Custom Fields section, click the Intrinsics tab.
3. Right-click the required intrinsic value.
4. Select the required application.
Agent Desktop displays the screen pop.
Searching for a contactBefore you begin
• Ensure that the Action bar is visible.
About this taskSearch for a contact to create or review a customer contact.
You can search for a contact based on one or more of the following criteria:
• Agent (is, is not)• Last action (is, is not)• ID (less than, equal to, greater than)• Subject (contains, begins with, ends with)• Status (is, is not)• Closed reason (is, is not) activity code• Closed date (before, on, after)• Skillset (is, is not)• Type (is, is not) of contact• Disposition code (is, is not)• Mail To (contains, begins with, ends with)• Mail From (contains, begins with, ends with)• Arrival date (before, on, after)
The search results displays the agent who worked most recently on the contact.
If the search, results in more contacts than one page can show, use the arrows to move to the Next,Previous, First, and Last page of the search results.
Procedure1. Click Contact Search.
Searching for a contact
December 2014 Avaya Aura® Agent Desktop 199Comments? [email protected]
2. In the first column, select the criteria to use for the search (for example, Status or Skillset).
3. In the second column, select the logical operators for the search criteria (for example, is or isnot).
4. In the third column, type your search value (for example, Closed).
5. Click Search.
6. To sort the search results based on a field, click the column heading of the field by which youwant to sort.
7. Double-click the contact to open.
Printing search resultsBefore you begin
• Ensure that you have a printer set up and that you know the correct printer settings to select.
About this taskYou can print the search results of either a customer or contact search.
Procedure1. Generate the search results for a customer or contact search.
2. Click Print.
3. Select the correct settings for your printer.
Viewing a contactBefore you begin
• Ensure that your status is set to Not Ready.
About this taskView a contact if you want to review information for a contact, for example, to see how an agenthandled a particular contact.
You cannot change information in the contact since the contact is not open.
Procedure1. On the History tab of the Customer Details window, select the contact to open.
2. Right-click and select Read-only Contact.
You can also double-click a contact to open the contact details.
Customer and contact details
200 Avaya Aura® Agent Desktop December 2014Comments? [email protected]

3. View the contact details on the right pane of the Agent Desktop window.
Opening a contactBefore you begin
• Ensure that your status is set to Not Ready.• Ensure that no other agent is currently working on the contact.
About this taskPull and open a contact to add or edit information, to complete an outbound call, or to send a replyto an email message.
You can pull and open a contact only if you have ownership of the customer on the contact.
Procedure1. On the History tab of the Customer Details window, select the contact to open.
2. If Take Ownership appears on the Contact History tab, another agent currently owns thecustomer and you cannot open this contact. If necessary, click Take Ownership to own thecustomer and click Yes to confirm.
3. Right-click the contact and select Pull Contact.
If the Pull Contact item is not available, another agent currently has the contact open andyou can only view the contact.
4. Click Yes to open the contact.
The Agent Desktop automatically changes your status to Ready, answers the pulled contact,and then automatically changes your status to Not Ready again.
5. View the contact details on the right pane of the Agent Desktop window.
You can now complete an outbound call, reply to an email message, or add an attachment toan email message.
Closing contactsBefore you begin
• Ensure that you are a supervisor.• Ensure that no agent is currently working on any contact that you want to close.
About this taskSupervisors can close contacts, if they want to remove a single contact or a group of contacts, bychanging the contact status from Open to Closed.
Opening a contact
December 2014 Avaya Aura® Agent Desktop 201Comments? [email protected]
You must enter a reason for closing contacts.
Procedure1. Select the contact to close or select multiple contacts by pressing the Ctrl key while you
click each contact.
Selected contacts are highlighted in blue.
2. Right-click and select Close All.
3. In the Close Contact Details window, type the reason for closing the selected contacts.
4. Click Close.
Customer and contact details
202 Avaya Aura® Agent Desktop December 2014Comments? [email protected]
Index
Aactive contact
changing to not ready ................................................... 44activity code
enter ....................................................................... 52, 72activity codes
improvements ............................................................... 17add
custom contact ....................................................... 66, 79add new contact
Contacts Presence ..................................................... 171after call work item ...............................................................16
code ..............................................................................53Agent Desktop ..................................................................... 29
action bar ......................................................................23configurable home page ............................................... 16creating a shortcut ........................................................ 31customer contact intrinsics ........................................... 25home page ....................................................................38install ............................................................................ 29log off ............................................................................48screen pop ....................................................................25shortcut keys ................................................................ 26start ...............................................................................29system tray icon ............................................................26top bar .......................................................................... 21user interface ................................................................20user preferences ...........................................................24
Agent Desktop dashboard ....................................... 27, 45, 46logging .......................................................................... 47video ............................................................................. 46
Agent Desktop window settingsswapping panels ...........................................................39
Agent Greeting ...................................................................178change password ....................................................... 179default greeting ...........................................................179identify skillset IDs ...................................................... 181interrupt greeting ........................................................ 184play back .................................................................... 183re-record ..................................................................... 183skillset-specific greetings ............................................180skillset tags ......................................................... 181, 182time of day greetings .................................................. 180
Agent Greeting recording applicationlog on ..........................................................................178
Agent statistic chartchange properties .......................................................191view ............................................................................ 191
Agent Statistics .................................................................. 189prerequisites ............................................................... 190
Agent Statistics tabaccess ........................................................................ 190
approvalemail messages ..........................................................117
approve email messages ...................................................131audio devices
softphone ......................................................................41audio quality
variable definitions ........................................................42auto-phrase ........................................................................167
Bbarge-in
voice call .......................................................................59web communications contact ..................................... 163
Ccall
accepting ................................................................ 51, 71CDN ..............................................................................54decline .................................................................... 52, 71end ....................................................................56, 74, 96make .......................................................................57, 75originate ......................................................................109outbound .......................................................................93release ....................................................................54, 73supervisor ..................................................................... 56transfer ........................................................... 54, 73, 105unhold .....................................................................54, 73
callbackschedule ....................................................................... 97
Call Center Elite Telephonylogging on to Agent Desktop ........................................ 33
calling you supervisor .......................................................... 56call join ...........................................................................16, 61call on hold .....................................................................53, 73call transfer
POM ............................................................................. 88cancel a call ....................................................................... 104Change Agent State ............................................................ 48change password .................................................................37change properties
Agent statistic chart .................................................... 191changing the Agent statistic chart properties
variable definitions ......................................................191changing to not ready
active contact ................................................................44chat message
add auto-phrase ......................................................... 159send ............................................................................158
clearing the barred status .................................................. 196closed zone or priority callback call
handling ...................................................................... 113
December 2014 Avaya Aura® Agent Desktop 203Comments? [email protected]
collecting log filesvariable definitions ........................................................45
conferenceanother agent ................................................. 55, 74, 106supervisor ..................................................................... 56
conference callhanging-up ..................................................................107hanging-up job aid ...................................................... 108leaving ........................................................................ 107leaving job aid .............................................................108releasing ....................................................................... 90
conference instant messageContacts Presence ..................................................... 174work item control ........................................................ 176
configuration issues when launching Agent Desktophandling ...................................................................... 188
configure displayPhonebook ............................................................. 65, 78
Consult on instant messageContacts Presence ..................................................... 174work item control ........................................................ 176
contactend ..............................................................................108follow up ..................................................................... 129open ............................................................................201postpone work ............................................................ 128reply using address book ............................................122search .........................................................................199view ............................................................................ 200
contact details ....................................................................193prerequisites ............................................................... 193print .............................................................................130
contact expertsContacts Presence ..................................................... 171
contact refresheshandling ...................................................................... 186
contactssupervisor closing .......................................................201
Contacts Presenceadd new contact ......................................................... 171call agent ...................................................................... 63conference instant message .......................................174Consult on instant message ....................................... 174contact experts ........................................................... 171deleting a contact ....................................................... 172send instant message .................................................173transfer an instant message ....................................... 173view personnel ............................................................169
custom contactadd ..........................................................................66, 79delete ......................................................................68, 80edit ..........................................................................67, 80
customerpush web page ........................................................... 159search .........................................................................194
customer contact intrinsics .................................................. 25view ............................................................................ 198
customer details .................................................................193prerequisites ............................................................... 193
customer informationadding .........................................................................195clearing the barred status ........................................... 196editing ......................................................................... 195setting the barred status ............................................. 196
customer password ............................................................119customer record
create ..........................................................................194
Ddefault attachment folder
define ..........................................................................124default template folder
define ..........................................................................124delete
custom contact ....................................................... 68, 80deleting a contact
Contacts Presence ..................................................... 172desktop phone
logging on to Agent Desktop ........................................ 31display
work items window ....................................................... 38disposition
POM ............................................................................. 87DTMF digits ................................................................... 57, 75
Eedit
custom contact ....................................................... 67, 80email .................................................................................. 114
accept ......................................................................... 118supervisor approval ...................................................... 18
email attachmentsview ............................................................................ 125
email contactclose ........................................................................... 128
email messageadd attachment ...........................................................125create ..........................................................................121remove attachment .....................................................126reply ............................................................................120send the chat log ........................................................ 164send using phonebook ............................................... 130
email messagesapproval ......................................................................117
Emergency key .................................................................... 57end contact ........................................................................ 108
job aid ......................................................................... 109
Ffax message ...................................................................... 135
Index
204 Avaya Aura® Agent Desktop December 2014Comments? [email protected]
fax message (continued)accept ......................................................................... 135close ........................................................................... 137prerequisites ............................................................... 135reply ............................................................................136review ......................................................................... 136transfer ....................................................................... 137
filter contactsphonebook ..............................................................64, 76
Force Agent Log out ............................................................ 48
Hhandling
closed zone or priority callback call ............................ 113configuration issues when launching Agent Desktop . 188contact refreshes ........................................................ 186loss of phone control .................................................. 186manual call ................................................................. 104non-standard callback call .......................................... 112Paced call ................................................................... 103POM predictive/progressive call ................................... 86POM preview call ..........................................................86Predictive call ............................................................. 102Preview call ................................................................ 103Progressive call .......................................................... 102server communication issues ..................................... 187standard callback call ................................................. 111
hanging-upconference call ........................................................... 107
High Availability ................................................................. 185hold ................................................................................ 53, 73
Iincoming contact
decline ........................................................................ 118incoming fax message
decline ........................................................................ 136incoming scanned document message
decline ........................................................................ 140incoming SMS text message
decline ........................................................................ 147incoming voice mail message
decline ........................................................................ 144inline images
add ..............................................................................126variable definitions ......................................................127
installAgent Desktop .............................................................. 29
instant messageaccept ......................................................................... 166decline ........................................................................ 167end ..............................................................................177send ............................................................................167spell checker ...............................................................168
instant messaging ..............................................................165
prerequisites ............................................................... 166intrinsic
copy ............................................................................ 197view ............................................................................ 197
intrinsic-associated application .......................................... 198introduction .......................................................................... 12
prerequisites ................................................................. 12
Jjob aid
hanging-up conference call ........................................ 108leaving conference call ............................................... 108starting the Agent Desktop ........................................... 30
Lleaving
conference call ........................................................... 107leaving conference ...............................................................90log files .................................................................................45logging on to Agent Desktop
Call Center Elite Telephony ..........................................33Call Center Elite Telephony variable definitions ........... 34desktop phone .............................................................. 31desktop phone variable definitions ............................... 32POM ............................................................................. 85SIP—enabled Contact Center variable definitions ....... 36softphone ......................................................................32softphone variable definitions ....................................... 33
Logging on to Agent Desktoppresence .......................................................................35
logging on to Presence Services serverSIP—enabled Contact Center variable definitions ....... 37
log onAgent Greeting recording application ......................... 178
loss of phone controlhandling ...................................................................... 186
Mmanual call
handling ...................................................................... 104monitor
audio qualityVoIP traffic .............................................................41
monitor audio quality ............................................................41monitor VoIP traffic .............................................................. 41mute softphone .................................................................... 40
NNew features ........................................................................15New in this release .............................................................. 15non-standard callback call
handling ...................................................................... 112
Index
December 2014 Avaya Aura® Agent Desktop 205Comments? [email protected]
Not Ready status ................................................................. 43on a contact ................................................................ 102
Oobserve
voice call .......................................................................58observing
web communications contact ..................................... 162online help
access .......................................................................... 47oubound calls
call customer ................................................................ 97outbound call ....................................................................... 94outbound callbacks .............................................................. 93outbound calls ......................................................................93
recording the result .......................................................96outbound contact
accept ........................................................................... 94decline .......................................................................... 94
PPaced call
handling ...................................................................... 103panels
swapping ...................................................................... 39panel swapping
Agent Desktop .............................................................. 25phonebook
call agent ...................................................................... 64filter contacts .......................................................... 64, 76search for a contact ................................................ 63, 75send email message ...................................................130viewing contact history ........................................... 68, 81
Phonebookcall agent ...................................................................... 76configure display .....................................................65, 78
POMcall transfer ................................................................... 88disposition .....................................................................87logging on to Agent Desktop ........................................ 85prerequisites ................................................................. 85transferring a call .......................................................... 89
POM callrescheduling ................................................................. 90
POM predictive/progressive callhandling ........................................................................ 86
POM preview callhandling ........................................................................ 86
post call processingcode ..............................................................................53
Predictive callhandling ...................................................................... 102
Predictive Outbound ............................................................ 99conference another agent ...........................................106Not Ready status ........................................................ 102
prerequisites ............................................................... 100Ready status ...............................................................100schedule callback ....................................................... 109schedule callback variable definitions ........................ 110transferring a call ........................................................ 105
prerequisitesAgent Statistics ...........................................................190contact details .............................................................193customer details ......................................................... 193instant messaging .......................................................166introduction ................................................................... 12Predictive Outbound ................................................... 100scanned document ..................................................... 139sms text message .......................................................146voice mail message .................................................... 143
presenceLogging on to Agent Desktop ....................................... 35
Preview callhandling ...................................................................... 103
printcontact details .............................................................130search results ............................................................. 200
Proactive Outreach Manager ...............................................18Progressive call
handling ...................................................................... 102
RReady status ........................................................................42
job aid ......................................................................... 100recipient list
remove name ..............................................................123record
default greeting ...........................................................179skillset-specific greetings ............................................180skillset tags ......................................................... 181, 182time of day greetings .................................................. 180
redialcustomer .......................................................................92
redraftrejected email messages ............................................133
redraft email messages ..................................................... 133rejected email messages
redraft ......................................................................... 133reject email messages ....................................................... 132releasing
conference call ............................................................. 90reply
email message ........................................................... 120fax message ............................................................... 136scanned document message ......................................140SMS text message ..................................................... 147voice mail message .................................................... 144
reschedulingPOM call ....................................................................... 90
reset ...................................................................................119resetting customer password .............................................119
Index
206 Avaya Aura® Agent Desktop December 2014Comments? [email protected]
reviewfax message ............................................................... 136scanned document message ......................................140
Sscanned document ............................................................ 139
close ........................................................................... 141prerequisites ............................................................... 139
scanned document messageaccept ......................................................................... 139reply ............................................................................140review ......................................................................... 140transfer ....................................................................... 141
screen popAgent Desktop .............................................................. 25
screen popsadvanced ...................................................................... 15
script .................................................................................... 95search
contact ........................................................................ 199customer .....................................................................194
search for a contactphonebook ..............................................................63, 75
search resultsprint .............................................................................200
second voice callobserve .........................................................................60
sendchat message ............................................................. 158instant message ......................................................... 167
server communication issueshandling ...................................................................... 187
Service Level alertsenable .........................................................................192
setting the barred status .................................................... 196set work item display
user preferences ...........................................................38shortcut keys
Agent Desktop .............................................................. 26using ............................................................................. 39
skillset-specific greetingsdelete ..........................................................................181
skillset statistic chartview ............................................................................ 190
sms text message ..............................................................146accept ......................................................................... 146close ........................................................................... 149prerequisites ............................................................... 146transfer ....................................................................... 149
SMS text messagereply ............................................................................147
Social Networkdecline ........................................................................ 152
Social Networking .............................................................. 150accept ......................................................................... 151close ........................................................................... 154
on hold ........................................................................152releasing on hold ........................................................ 152respond .......................................................................152transfer ....................................................................... 154
softphoneaudio settings ............................................................... 40logging on to Agent Desktop ........................................ 32mute
unmute .................................................................. 40spell checker ......................................................................127standard callback call
handling ...................................................................... 111Statistics Ticker ..................................................................192suggested web pages ........................................................168supervisor
approve email messages ............................................131reject email messages ................................................132
supervisor approval ............................................................. 18support .................................................................................14swapping
panels ........................................................................... 39switchover ..........................................................................186system tray icon
Agent Desktop .............................................................. 26
Ttab name
customize ................................................................... 157variable definitions ......................................................158
tag contactfavorites .................................................................. 65, 77speed dial ............................................................... 65, 77
telephony ............................................................................. 50template response ............................................................. 124
create ..........................................................................123Text Chat session
end ..............................................................................163third call appearance line .....................................................62third line appearance ........................................................... 18three call appearance buttons ............................................. 18three call appearance lines ..................................................62transfer
an instant message using Contacts Presence ........... 173an instant message using work item control ...............175call .................................................................. 54, 73, 105contact outside the Contact Center ............................ 130contact within the Contact Center ...............................129fax message ............................................................... 137scanned document message ......................................141sms text message .......................................................149voice mail message .................................................... 145web communications .................................................. 160
transferring a callPOM ............................................................................. 89
Index
December 2014 Avaya Aura® Agent Desktop 207Comments? [email protected]
Uunmute softphone ................................................................ 40use
Agent Desktop configurable home page ...................... 38user preferences
set work item display .................................................... 38user to user information
modify ......................................................................... 198view ............................................................................ 197
usingshortcut keys ................................................................ 39
Vvariable definitions
audio qualityVoIP traffic .............................................................42
changing the Agent statistic chart properties ..............191collecting and uploading log files ..................................45logging on to Agent Desktop for Call Center EliteTelephony .....................................................................34logging on to Agent Desktop of SIP—enabled ContactCenter ...........................................................................36logging on to Agent Desktop using desktop phone ...... 32logging on to Agent Desktop using softphone .............. 33logging on to Presence Services server of a SIP—enabled Contact Center ................................................37
verify customer information ................................................119videos .................................................................................. 13view
Agent statistic chart .................................................... 191contact ........................................................................ 200customer contact intrinsics ......................................... 198email attachments ...................................................... 125intrinsic ....................................................................... 197personnel using Contacts Presence ...........................169skillset statistic chart ...................................................190
viewing contact historyphonebook ..............................................................68, 81
voice callbarge-in ........................................................................ 59observe .........................................................................58observe a second ......................................................... 60
voice mail message ........................................................... 143accept ......................................................................... 143close ........................................................................... 145listen ........................................................................... 144prerequisites ............................................................... 143reply ............................................................................144transfer ....................................................................... 145
VoIP trafficvariable definitions ........................................................42
Wweb communications ......................................................... 156
accept ......................................................................... 156conference ..................................................................161transfer ....................................................................... 160transfer to skillset ........................................................160
web communications contactbarge-in ...................................................................... 163observing .................................................................... 162
Web communications contactdecline ........................................................................ 158
window settingsAgent Desktop .............................................................. 25
window size and positionAgent Desktop ........................................................ 25, 26
work item controlconference instant message .......................................176Consult on instant message ....................................... 176transfer an instant message ....................................... 175
work item paradigm ............................................................. 20work list window ...................................................................22
Index
208 Avaya Aura® Agent Desktop December 2014Comments? [email protected]


