Avaya Aura® Contact Center Release 7.0.3.0 Release Notes This document contains information on software lineup, known issues and workarounds specific to this release of Avaya Aura®Contact Center.
Transcript
Avaya Aura® Contact Center Release 7.0.3.0
Release Notes
This document contains information on software lineup, known issues and workarounds specific to this release of Avaya Aura®Contact Center.
Avaya Aura® Contact Center 7.0.3.0
Release Notes
Page 1
TABLE OF CONTENTS Purpose ................................................................................................................................................... 3
Publication History .................................................................................................................................. 3
Software Information .............................................................................................................................. 4
Known Issues ......................................................................................................................................... 44
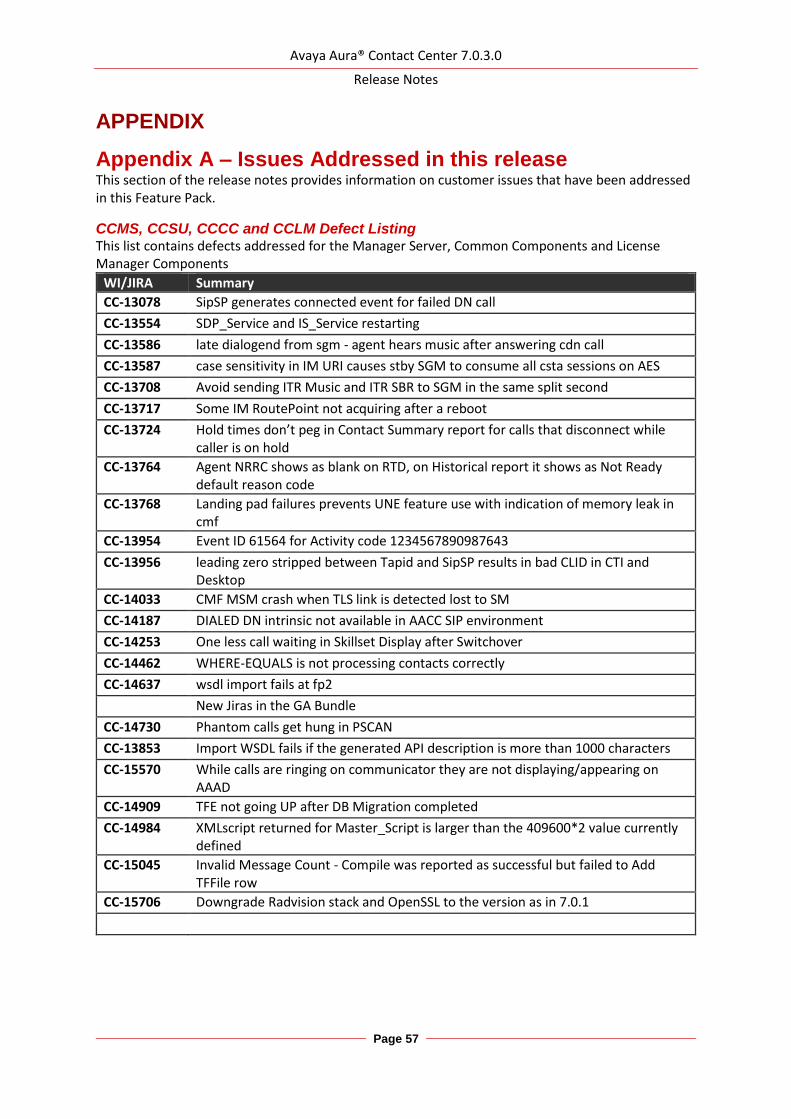
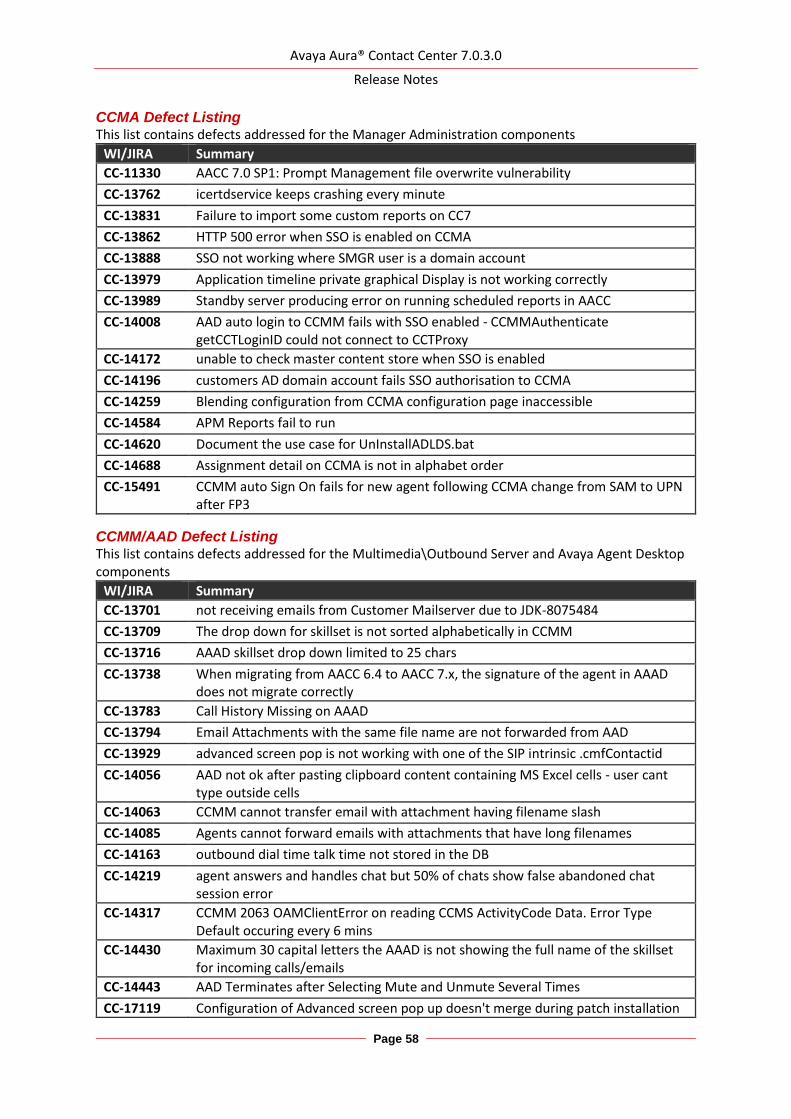
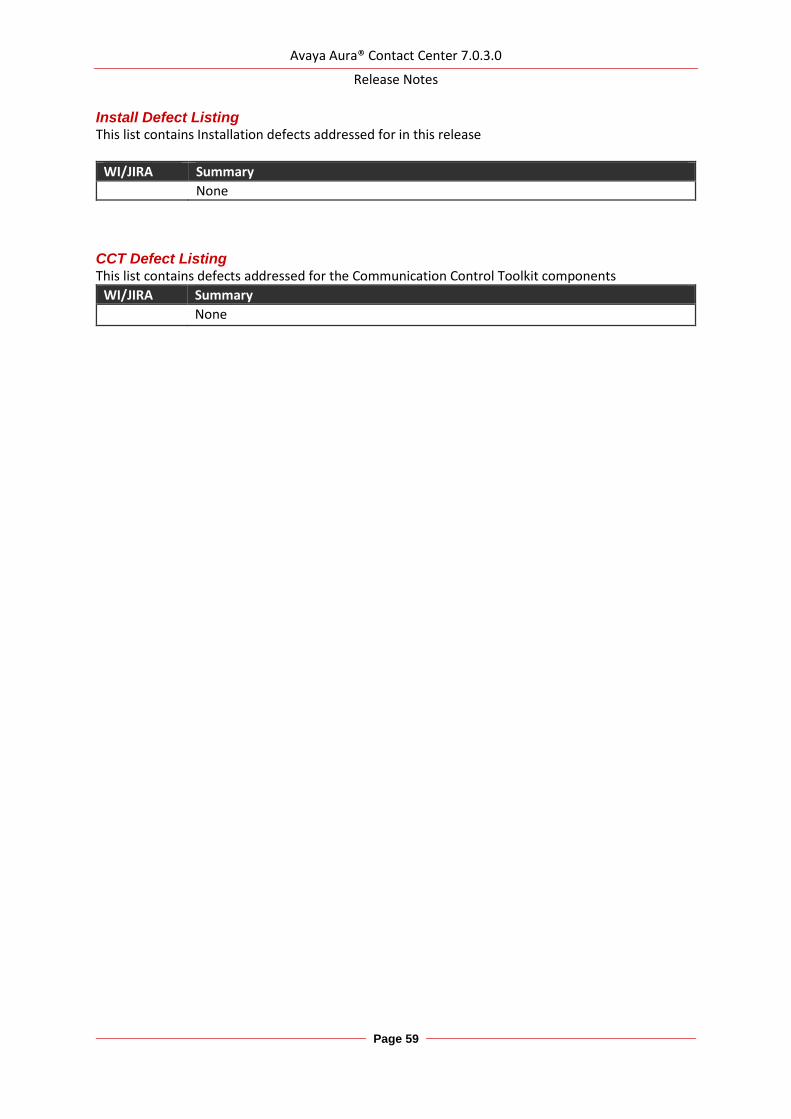
Appendix A – Issues Addressed in this release ................................................................................. 57
Appendix B – Additional Security Information .................................................................................. 61
Avaya Aura® Contact Center 7.0.3.0
Release Notes
Page 3
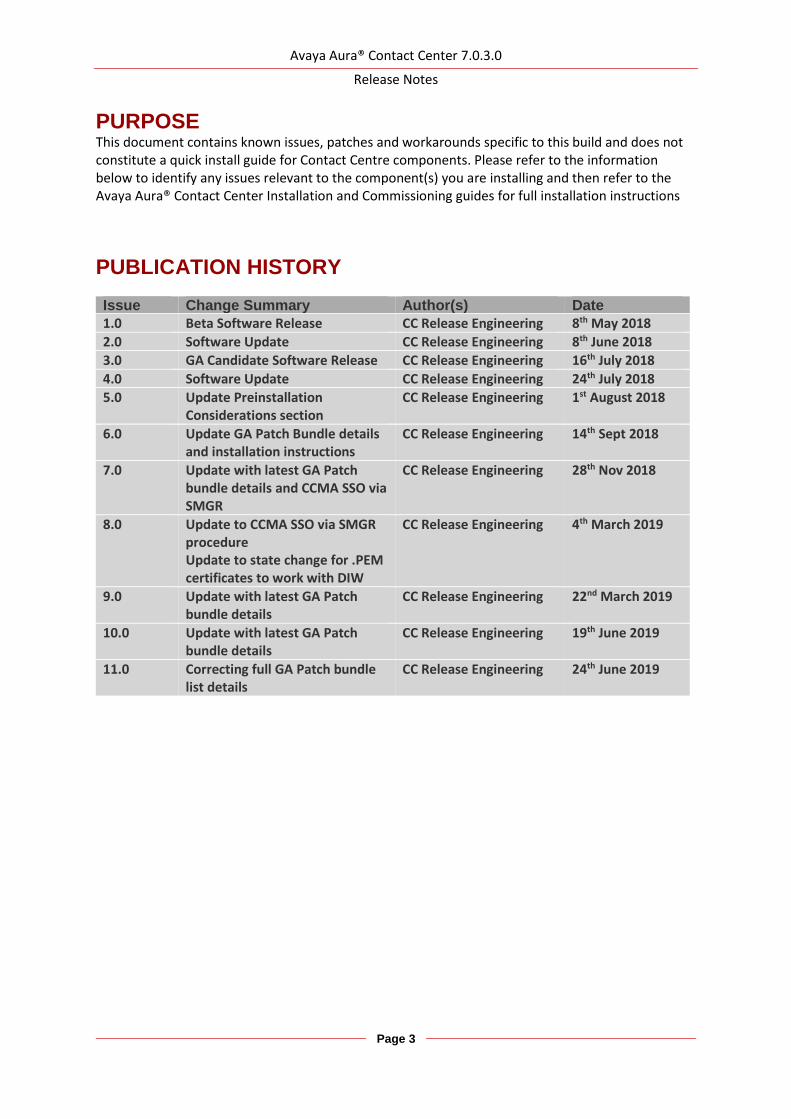
PURPOSE This document contains known issues, patches and workarounds specific to this build and does not constitute a quick install guide for Contact Centre components. Please refer to the information below to identify any issues relevant to the component(s) you are installing and then refer to the Avaya Aura® Contact Center Installation and Commissioning guides for full installation instructions
PUBLICATION HISTORY Issue Change Summary Author(s) Date
1.0 Beta Software Release CC Release Engineering 8th May 2018
2.0 Software Update CC Release Engineering 8th June 2018
3.0 GA Candidate Software Release CC Release Engineering 16th July 2018
4.0 Software Update CC Release Engineering 24th July 2018
5.0 Update Preinstallation Considerations section
CC Release Engineering 1st August 2018
6.0 Update GA Patch Bundle details and installation instructions
CC Release Engineering 14th Sept 2018
7.0 Update with latest GA Patch bundle details and CCMA SSO via SMGR
CC Release Engineering 28th Nov 2018
8.0 Update to CCMA SSO via SMGR procedure Update to state change for .PEM certificates to work with DIW
CC Release Engineering 4th March 2019
9.0 Update with latest GA Patch bundle details
CC Release Engineering 22nd March 2019
10.0 Update with latest GA Patch bundle details
CC Release Engineering 19th June 2019
11.0 Correcting full GA Patch bundle list details
CC Release Engineering 24th June 2019
Avaya Aura® Contact Center 7.0.3.0
Release Notes
Page 4
SOFTWARE INFORMATION
Hardware Appliance There are no software downloads associated with the Hardware Appliance deployment.
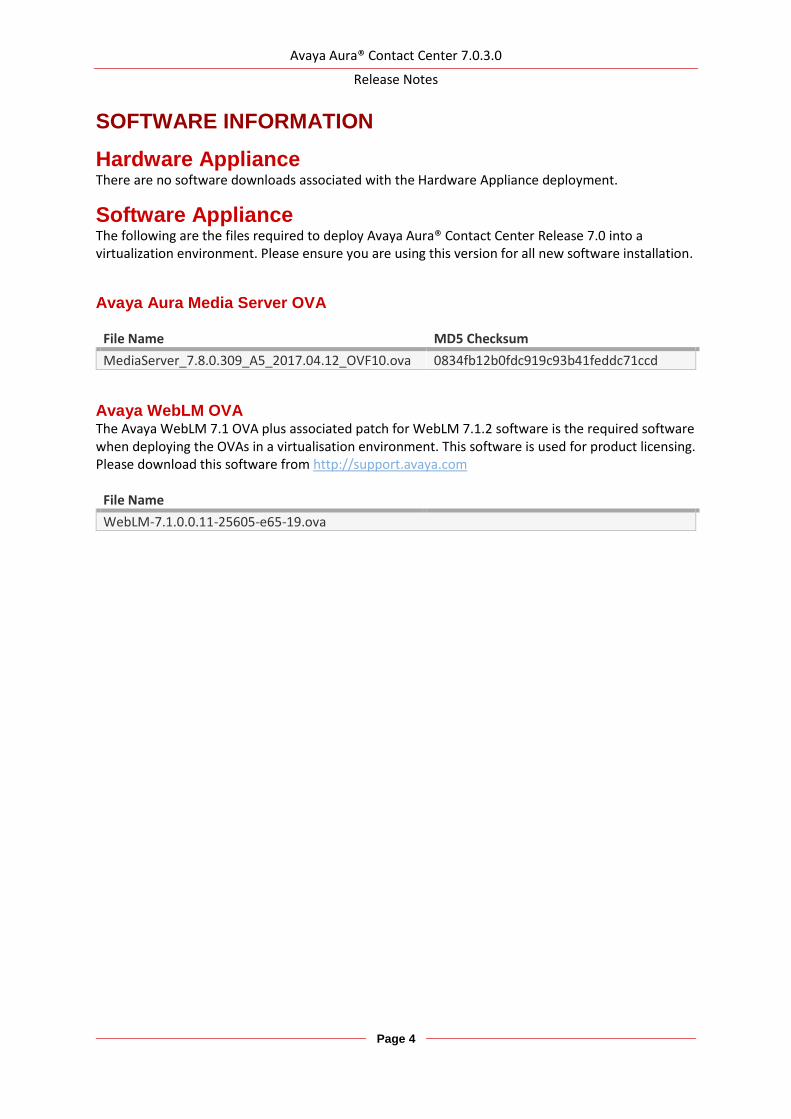
Software Appliance The following are the files required to deploy Avaya Aura® Contact Center Release 7.0 into a virtualization environment. Please ensure you are using this version for all new software installation.
Avaya WebLM OVA The Avaya WebLM 7.1 OVA plus associated patch for WebLM 7.1.2 software is the required software when deploying the OVAs in a virtualisation environment. This software is used for product licensing. Please download this software from http://support.avaya.com
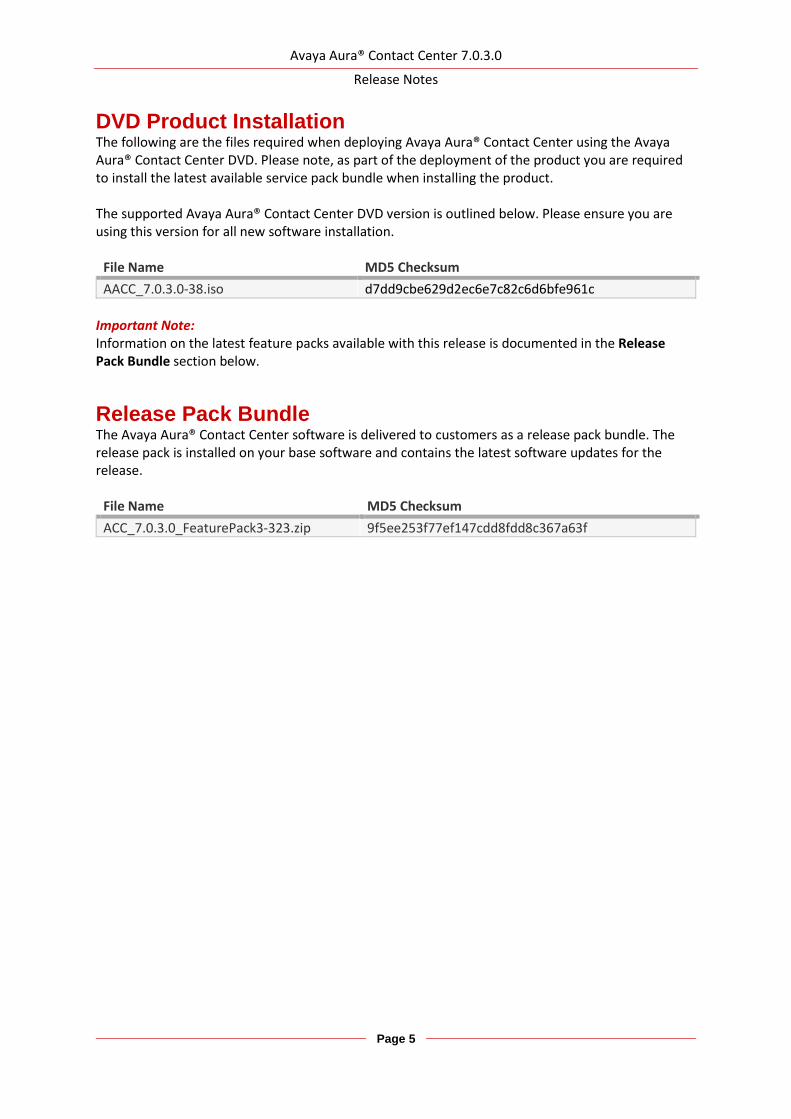
DVD Product Installation The following are the files required when deploying Avaya Aura® Contact Center using the Avaya Aura® Contact Center DVD. Please note, as part of the deployment of the product you are required to install the latest available service pack bundle when installing the product. The supported Avaya Aura® Contact Center DVD version is outlined below. Please ensure you are using this version for all new software installation.
Important Note: Information on the latest feature packs available with this release is documented in the Release Pack Bundle section below.
Release Pack Bundle The Avaya Aura® Contact Center software is delivered to customers as a release pack bundle. The release pack is installed on your base software and contains the latest software updates for the release.
Avaya Aura® Contact Center Server The following are additional Avaya Aura® Contact Center updates containing critical fixes that must be applied to your system.
You must download all files listed. Please verify the MD5 checksums after download to ensure all files have been downloaded successfully
Avaya Aura Media Server OVA and Hyper-V Upgrade The AAMS OVA version is: 7.8.0.309 with System Layer Version 6. Both need to be upgraded to the latest version. The Media Server needs to be updated to 7.8.0.393 and the System layer needs to be updated to 15. This is accomplished by downloading the two ISO files:
ASG Plugin The ASG Plugin is a serviceability application which enables secure access to the server when installed using a challenge-response mechanism. This update removes the presence of unnecessary accounts which are given permission to access the files in the applications directory. This effectively restricts access to the applications files to administrator users only. The ASG Plugin currently placed on the server, not installed, does not have this patch and if required this version can be downloaded and placed on the server instead of the incumbent version. This is optional in that only if you wish to install and use this plugin should it be installed; otherwise it is not required for normal Contact Center operations.
SNMP Trap Configuration File An SNMP Trap Configuration File (.cnf) is delivered containing the Avaya recommended events for SNMP capture. The configuration file can be imported into the SNMP Event Translator that is available after installing SNMP on the Windows Server 2012 R2. SNMP traps will be automatically generated and forwarded to the configured NMS system for all Event Viewer events that have a match in the configuration file. The SNMP Trap Configuration File can be imported into the SNMP Event Translator using evntcmd.exe from the command prompt. A restart of the SNMP service is required after which the file content can be viewed using the SNMP Event Translator GUI (evntwin.exe). Exact details for the procedure are available in Windows Server 2012 R2 documentation. The SNMP Trap Configuration File is available for download from the support site. This is optional in that it should only be imported if you wish to forward SNMP traps to an NMS system for treatment or monitoring. Otherwise it is not required for normal Contact Center operations. Note: As detailed in the AACC deployment guide, SNMP should be installed on the Windows Server 2012 R2 prior to deployment of the AACC application.
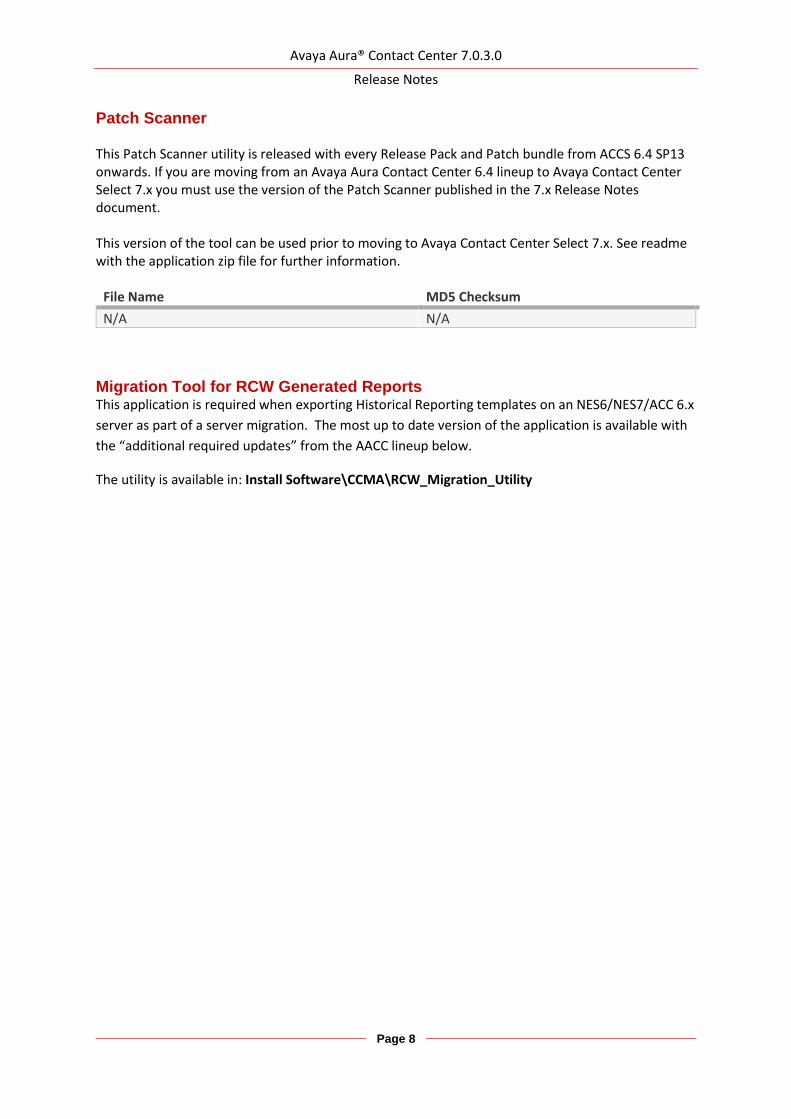
Patch Scanner This Patch Scanner utility is released with every Release Pack and Patch bundle from ACCS 6.4 SP13 onwards. If you are moving from an Avaya Aura Contact Center 6.4 lineup to Avaya Contact Center Select 7.x you must use the version of the Patch Scanner published in the 7.x Release Notes document. This version of the tool can be used prior to moving to Avaya Contact Center Select 7.x. See readme with the application zip file for further information.
File Name MD5 Checksum
N/A N/A
Migration Tool for RCW Generated Reports This application is required when exporting Historical Reporting templates on an NES6/NES7/ACC 6.x
server as part of a server migration. The most up to date version of the application is available with
the “additional required updates” from the AACC lineup below.
The utility is available in: Install Software\CCMA\RCW_Migration_Utility
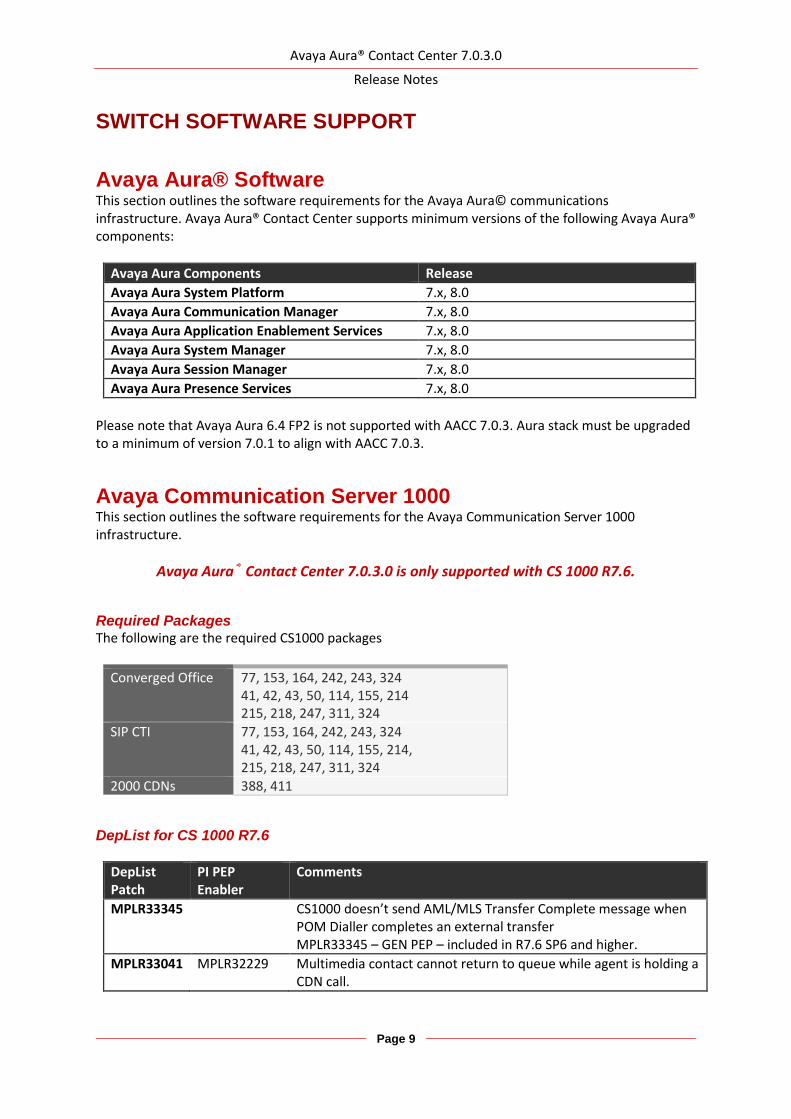
Please note that Avaya Aura 6.4 FP2 is not supported with AACC 7.0.3. Aura stack must be upgraded to a minimum of version 7.0.1 to align with AACC 7.0.3.
Avaya Communication Server 1000 This section outlines the software requirements for the Avaya Communication Server 1000 infrastructure.
Avaya Aura® Contact Center 7.0.3.0 is only supported with CS 1000 R7.6.
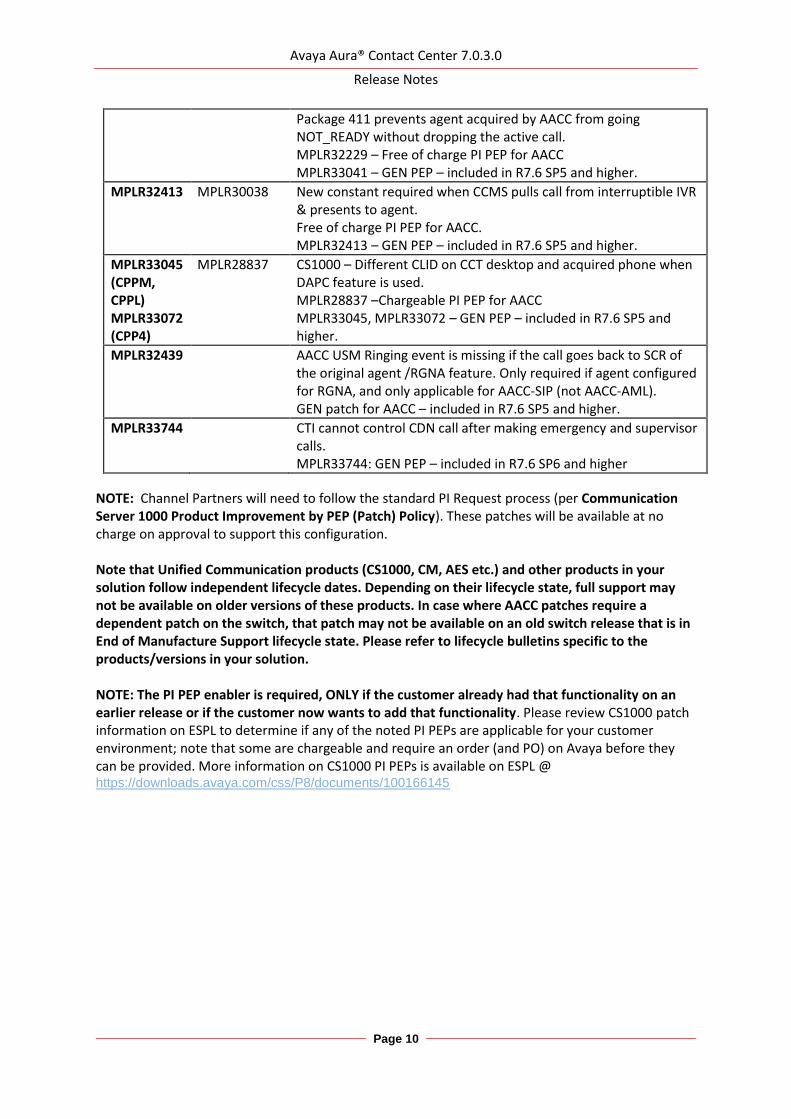
Required Packages The following are the required CS1000 packages
MPLR33345 CS1000 doesn’t send AML/MLS Transfer Complete message when POM Dialler completes an external transfer MPLR33345 – GEN PEP – included in R7.6 SP6 and higher.
MPLR33041 MPLR32229 Multimedia contact cannot return to queue while agent is holding a CDN call.
Avaya Aura® Contact Center 7.0.3.0
Release Notes
Page 10
Package 411 prevents agent acquired by AACC from going NOT_READY without dropping the active call. MPLR32229 – Free of charge PI PEP for AACC MPLR33041 – GEN PEP – included in R7.6 SP5 and higher.
MPLR32413 MPLR30038 New constant required when CCMS pulls call from interruptible IVR & presents to agent. Free of charge PI PEP for AACC. MPLR32413 – GEN PEP – included in R7.6 SP5 and higher.
MPLR33045 (CPPM, CPPL) MPLR33072 (CPP4)
MPLR28837 CS1000 – Different CLID on CCT desktop and acquired phone when DAPC feature is used. MPLR28837 –Chargeable PI PEP for AACC MPLR33045, MPLR33072 – GEN PEP – included in R7.6 SP5 and higher.
MPLR32439 AACC USM Ringing event is missing if the call goes back to SCR of the original agent /RGNA feature. Only required if agent configured for RGNA, and only applicable for AACC-SIP (not AACC-AML). GEN patch for AACC – included in R7.6 SP5 and higher.
MPLR33744 CTI cannot control CDN call after making emergency and supervisor calls. MPLR33744: GEN PEP – included in R7.6 SP6 and higher
NOTE: Channel Partners will need to follow the standard PI Request process (per Communication Server 1000 Product Improvement by PEP (Patch) Policy). These patches will be available at no charge on approval to support this configuration. Note that Unified Communication products (CS1000, CM, AES etc.) and other products in your solution follow independent lifecycle dates. Depending on their lifecycle state, full support may not be available on older versions of these products. In case where AACC patches require a dependent patch on the switch, that patch may not be available on an old switch release that is in End of Manufacture Support lifecycle state. Please refer to lifecycle bulletins specific to the products/versions in your solution. NOTE: The PI PEP enabler is required, ONLY if the customer already had that functionality on an earlier release or if the customer now wants to add that functionality. Please review CS1000 patch information on ESPL to determine if any of the noted PI PEPs are applicable for your customer environment; note that some are chargeable and require an order (and PO) on Avaya before they can be provided. More information on CS1000 PI PEPs is available on ESPL @ https://downloads.avaya.com/css/P8/documents/100166145
Hardware Requirements For Single Server deployments (Voice and Multimedia with Avaya Media Server on a physical platform) a Gigabit Network Adapter is required that supports Receive Side Scaling (RSS) with 4 RSS queues. Single Server deployments (Voice and Multimedia with Avaya Media Server) are supported on physical mid-range to high-end servers only, as defined in Avaya Aura Contact Center Overview and Specification document. Lab and customer deployments must adhere to the minimum RAM requirements. Failure to do so can result in Avaya Aura Media Server being unable to launch. Single Server deployments (Voice and Multimedia with Avaya Aura Media Server) now deploy AAMS as a Hyper-V Linux virtual machine. A hardware requirement is that CPU Virtualization / Virtualization Technology is enabled in the host Windows Server BIOS. The available virtualization settings vary by hardware provider and BIOS version. Read your hardware provider's documents covering virtualization support to determine which settings to configure. This is commonly found in BIOS System Settings -> Processor settings.
Recommended Network Adapter The following RSS capable Gigabit Network adapter has been tested successfully with Single Server deployments – Intel(R) Gigabit 4P I350-t Adapter
Avaya Aura® Contact Center 7.0.3.0
Release Notes
Page 12
OPERATING SYSTEM & VIRTUALIZATION
Operating System All Avaya Aura® Contact Center server applications are supported on the following operating systems:
• Windows Server 2012 R2 Standard ( 64-bit Edition )
• Windows Server 2012 R2 Data Center ( 64-bit Edition )
This release no longer supports the Avaya Aura Media Server (AAMS) installed co-resident with AACC on a Windows Server 2012 R2 platform. A single box solution where AACC and AAMS are running on the same physical server is achieved by deploying the AAMS OVA as a virtual server on the Windows 2012 Hyper-V manager. This is applied in both fresh installations and upgrades. AAMS is supported on Red Hat Enterprise Linux (RHEL) 6.x 64-bit OS. It is not supported 32-bit RHEL. It is not supported on any other version of Linux.
Microsoft Service Packs None.
Microsoft Hotfixes Before deploying any new Windows Security Patches and Hotfixes – you must confirm that any Windows patches are listed as supported in the Avaya Aura® Contact Center Security Hotfixes and Compatibility listing – published every month on support.avaya.com. At this time, please do not install KB4340558 (specifically sub component KB4338419) or KB4340006 (specifically sub component KB4338605) on your Avaya Aura® Contact Center Server. Refer to Avaya Aura® Contact Center Security Hotfixes and Compatibility listing for updates relating to KB4340558 or KB4340006. Additionally, please install all required Microsoft Operating System updates listed in the Microsoft Operating System Updates section of this document. Please ensure that you do not enable Automatic Updates on your Avaya Aura® Contact Center Server or Client PCs. All Windows Security patches and hotfixes must be manually deployed after consulting the supported Avaya Aura® Contact Center Security Hotfixes and Compatibility listing
Red Hat Enterprise Linux Updates AAMS is only supported on Red Hat Enterprise Linux (RHEL) 6.x 64-bit servers. For an AAMS installed on a customer installed RHEL 6.x 64-bit server, it is mandatory to register the RHEL OS with Red Hat Networks (RHN) and to apply all of the latest updates. AAMS is tested regularly against all the latest RHEL updates. The AAMS VMWare OVA and Hyper-V installations ship with the all the most recent RHEL security updates as of GA. Avaya supplies RHEL updates as an AAMS System Update ISO file that is uploaded and applied using AAMS Element Manager. AAMS System updates are released as part of a Service Pack release. The OVA or Hyper-V AAMS do not need to register with Red Hat Networks.
Avaya Aura® Contact Center 7.0.3.0
Release Notes
Page 13
Microsoft Operating System Updates The section outlines additional Microsoft Updates that must be applied to your system. Click on the link below to bring you directly to the KB article on the update.
Update ID Summary
KB3100956 You may experience slow logon when services are in start-pending state in Windows Server 2012 R2
Important Notes:
1. Important If you install a language pack after you install this update, you must reinstall this update. Therefore, we recommend that you install any language packs that you need before you install this update. For more information, see Add language packs to Windows.
Update ID Summary
KB2973337 SHA512 is disabled in Windows when you use TLS 1.2
Important Notes:
1. This KB is contained in the August 2014 update rollup KB2975719 listed below and does not need to be installed individually if the rollup is applied.
2. Important Do not install a language pack after you install this update. If you do, the language-specific changes in the update will not be applied, and you will have to reinstall the update. For more information, see Add language packs to Windows.
Update ID Summary
KB2975719 August 2014 update rollup for Windows RT 8.1, Windows 8.1, and Windows Server 2012 R2
Important Notes:
1. Important When you install this update (2975719) from Windows Update, updates 2990532, 2979582, 2993100, 2993651, and 2995004 are included in the installation.
Update ID Summary
KB3101694 "0x000000D1" Stop error in Pacer.sys when there's heavy QoS
traffic in Windows Server 2012 R2
Important Notes:
1. Important If you install a language pack after you install this hotfix, you must reinstall this hotfix. Therefore, we recommend that you install any language packs that you need before you install this hotfix. For more information, see Add language packs to Windows. 2. Important This KB should only be applied to servers which include Avaya Aura Media Server
on Windows Server 2012 R2, i.e. where AACC and AAMS have been installed co-resident on
a single physical server. It is not required on any deployment which does not include Avaya
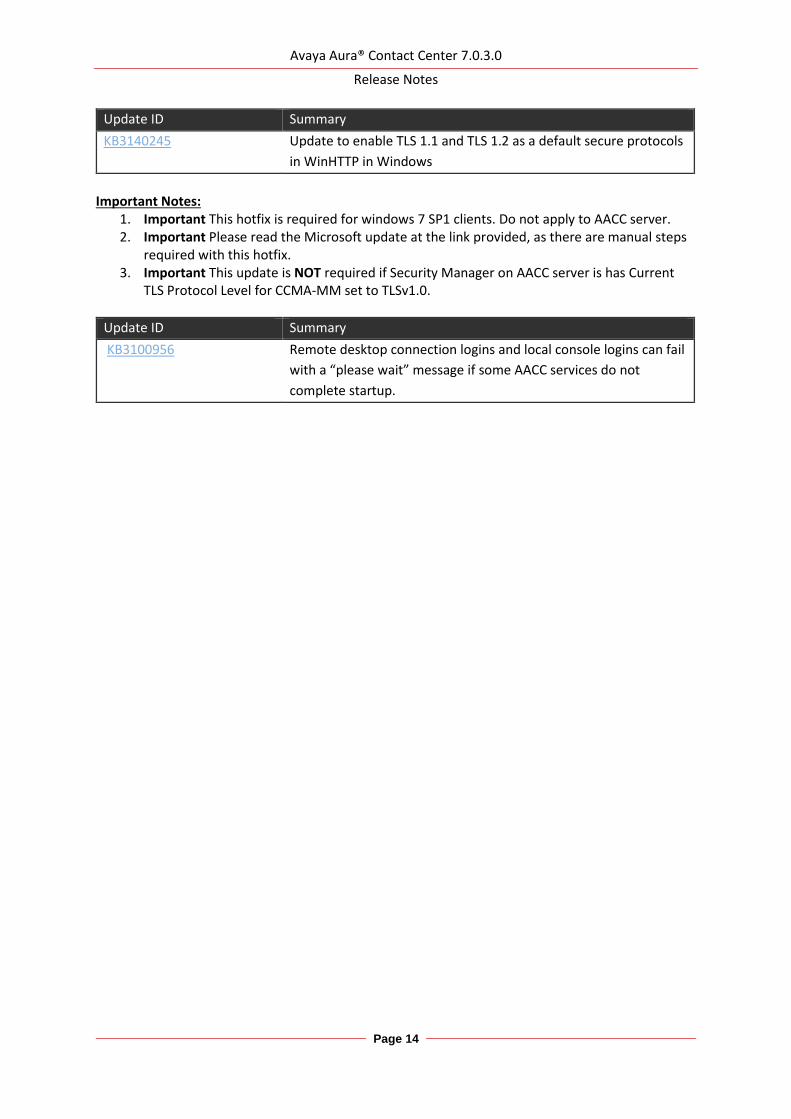
KB3140245 Update to enable TLS 1.1 and TLS 1.2 as a default secure protocols
in WinHTTP in Windows
Important Notes:
1. Important This hotfix is required for windows 7 SP1 clients. Do not apply to AACC server. 2. Important Please read the Microsoft update at the link provided, as there are manual steps
required with this hotfix. 3. Important This update is NOT required if Security Manager on AACC server is has Current
TLS Protocol Level for CCMA-MM set to TLSv1.0.
Update ID Summary
KB3100956 Remote desktop connection logins and local console logins can fail
with a “please wait” message if some AACC services do not
Internet Explorer Support Element Manager and CCMA require that Internet Explorer 10.0 and Internet Explorer 11.0 be configured to run the web sites in “Compatibility Mode”. Microsoft support indicates that some websites might not display correctly in Windows Internet Explorer 9. For example, portions of a webpage might be missing, information in a table might be in the wrong locations, or colors and text might be incorrect. Some webpages might not display at all. If a portion of the webpage doesn't display correctly, try one or more of the following procedures:
Note: IE Compatibility Mode must be enabled on IE 10.0 and IE 11.0.
To turn on Compatibility View
1. Open Internet Explorer by clicking the Start button
2. In the search box, type Internet Explorer, and then, in the list of results, click Internet
Explorer
3. From the Tools menu select the Compatibility View settings option and add the relevant
website address to the list of websites
The supported browser is Microsoft Internet Explorer 10.0 or later (32 Bit only – 64 Bit not
supported).
NOTE: If Avaya Agent Desktop (AAD) is used on a client desktop then individual websites for
CCMA and Element Manager should be added to compatibility view. The “Display all websites
in Compatibility View” setting in IE should not be used on these clients.
The Avaya Agent Desktop (AAD) embedded browser defaults to IE 10 on clients with IE 10.0 or later.
Microsoft .NET Framework Support AACC 7.0.3 contact center is not dependent on a specific version of .NET. AACC 7.0.3 supports .NET 4.6.2 through 4.7.x
Avaya Aura® Contact Center 7.0.3.0
Release Notes
Page 16
VMware VMware vSphere 6.5 is supported for the 7.0.3 release.
ESXi/vCenter 6.5 Limitations
Deploying OVA’s to an ESXi 6.5 host using the desktop vSphere Client is not supported by VMware and the vSphere Web Client or Host Client must be used instead. It is recommended that you use vSphere Web Client (https://FQDN-or-IP-Address-of-VC/vsphere–client) when deploying new OVA’s since there are known issues with the Host Client (https://FQDN-or-IP-Address-of-ESXi-host/UI).
The following issues exist when using the Host Client to deploy OVA:
During deployment you are not prompted to select a profile. To work around this you will need to manually edit the VM Virtual Hardware settings before powering the VM on.
Properties specified when deploying OVA are ignored and they must be re-entered during the first boot process. Drop-down lists are not provided and property defaults are not populated.
Tools for extracting software It is advised that you utilize the latest versions of your preferred tools for unpacking the Avaya Aura® Contact Center software.
Removal of Default Out-of-box Certificates Default out-of-box certificates will be removed during the installation of the Contact Center 7.0.3.0 Release. Custom certificates must be applied to your system before upgrade begins, or after upgrade completion, using the Security Manager application. Failure to create custom security certificates prior or during the upgrade to 7.0.3 will result in the loss of functionality, specifically the SIP-CTI link to AES on Avaya Aura Contact Center. As well as the loss of functionality any previously secure connections will now not be secure until custom security certificates are put in place. Removal of default certificates from the Contact Center server will result in additional configuration on other services that make up the solution, such as AES, as they will have to be setup to accept the new custom certificates.
Windows Automatic Maintenance Windows Server 2012 R2 provides a centralized mechanism for maintaining the operating system. This feature is called Automatic Maintenance, and is used to carry out tasks such as hard disk defragmentation and application of Microsoft Windows updates among others. This mechanism can sometimes interfere with the deployment of Contact Center software, resulting in failed installations. It is recommended that this feature be disabled for the duration of Contact Center software installs. To disable Automatic Maintenance:
1. Start – Run ‘Taskschd.msc’ 2. In the Task Scheduler Library browse to Microsoft – Windows – TaskScheduler 3. Select the Idle Maintenance task, right-click and choose ‘Disable’ 4. Select the Regular Maintenance task, right-click and choose ‘Disable’ 5. Alternatively, modify the properties of the Regular Maintenance task and ensure it is not set
to run during your installation maintenance window.
After installation is complete you may re-enable Automatic Maintenance To enable Automatic Maintenance:
1. Start – Run ‘Taskschd.msc’ 2. In the Task Scheduler Library browse to Microsoft – Windows – TaskScheduler
Important - Default Out-of-Box Certificate Removal
Avaya Aura® Contact Center 7.0.3.0
Release Notes
Page 18
3. Select the Idle Maintenance task, right-click and choose ‘Enable’ 4. Select the Regular Maintenance task, right-click and choose ‘Disable’
.PEM certificates will no longer work with DIW
.PEM certificates will no longer work with DIW in AACC 7.0.3, they must be renamed as .CER for adding to DIW
Changes to Universal Networking in AACC 7.x The new 10.1 version of Gigaspaces deployed with AACC 7.x is not compatible with the version deployed in AACC 6.x. This impacts the Universal Networking feature (UNE). It will not function between AACC 7.x and AACC 6.x without the deployment of a UNE alignment patch on 6.x which adds UNE Web Services. Before adding AACC 7.x to an existing AACC 6.x network or upgrading a networked deployment to AACC 7.x, the network must first be upgraded with the UNE alignment patch using the following steps:
- If customer are on AACC 6.4 SP14 or earlier they need to contact Avaya Support to request an alignment patch
- For customers on AACC 6.4 SP15 1. Install the UNE alignment patch on each 6.x node. Patch name is
AvayaAura_CCCC_6.4.215.208 2. Proceed with adding or upgrading AACC 7.x nodes as required.
- For customer on AACC 6.4 SP16 no additional steps are required.
Migrating Report Creation Wizard Reports from pre AACC 6.4 SP15 Systems The migration procedure for Report Creation Wizard based reports on an AACC system requires that the server hosting CCMA be at the AACC 6.4 SP14, SP15 or SP16 patch level prior to the report export step. The MigrationRPTToRCWX.exe utility has a dependency on the version of Crystal Reports and is only compatible with the version on the AACC 6.4 SP14, SP15 or SP16 lineup.
Avaya Equinox is Not Supported for use as an Agent Softphone Equinox is not supported for use as a Contact Center Agent Softphone
POM Support AACC 7.0.3.0 supports POM 3.1 or later. No prior version of POM is supported with AACC 7.0.3.0. If AACC site is operating with POM then site must upgrade to POM 3.1 or later before upgrading to AACC 7.0.3.0 (7.0 Feature Pack 3). Note: POM 3.1 requires Experience Portal (EP) 7.2.x.
Avaya Aura® Contact Center 7.0.3.0
Release Notes
Page 19
Voice & Multimedia Contact Server with Avaya Aura Media Server This release of AACC no longer supports the Avaya Aura Media Server (AAMS) installed co-resident with AACC on a Windows Server 2012 R2 platform. This release achieves a single box solution where AACC and AMS are running on the same physical server by deploying the AAMS OVA as a virtual server on the Windows Server 2012 Hyper-V Manager. This is applied in both fresh installations and upgrades scenarios. Hardware considerations:
• CPU Virtualization / Virtualization Technology must be enabled in the host Windows Server BIOS. The available virtualization settings vary by hardware provider and BIOS version. Read your hardware provider's documents covering virtualization support to determine which settings to configure. This is commonly found in BIOS System Settings -> Processor settings
• The Hyper-V deployment of Linux AAMS 7.8 is only supported on physical mid-range to high-end servers as defined in Avaya Aura Contact Center Overview and Specification document. Lab & site deployments must adhere to the minimum RAM requirements
Software considerations:
• As in previous releases, you cannot deploy a Voice and Multimedia Contact Server with AAMS in a virtual environment. This will be blocked by the Universal Installer and Avaya Release Pack Installer applications
• The AAMS should be upgraded or patched following the AAMS procedures for virtual deployments as outlined in product documentation. Once deployed and configured the co-resident Linux based AAMS Hyper-V image will not be upgraded or downgraded using the Avaya Release Pack Installer.
Orchestration Designer Scripts Before upgrading you must ensure that all scripts are validated and compile successfully in Orchestration Designer.
Avaya Aura® Contact Center 7.0.3.0
Release Notes
Page 20
Installation
New Installations
Install-time Patching Install-time patching is mandatory for Avaya Aura Contact Center software deployments using the provided DVD media.
Mandatory Execution of Ignition Wizard – Patch Deployments After deployment of the AACC software using the DVD installer, if the Ignition Wizard process is deferred, it will not be possible to install Patches (DPs) either via Update Manager or manually (double-clicking on the installer file). Successful execution of the Ignition Wizard prior to applying Patches to the system is mandatory. This does not affect the removal or reinstallation of AACC Service Packs, only AACC Patches (DPs).
System Backup after Ignition (IMPORTANT) A full AACC backup must be taken after the ignition process has completed and before the system is commissioned or used. This is important for systems that will be used as migration targets. The CCMA data can only be migrated to a system that does not contain any customer data. The CCMA migration will fail if the system is found to contain data other than what was injected by the Ignition Wizard. If the CCMA migration fails in this way, the solution is to go back to the post-ignition backup or re-install the system.
Avaya Aura® Contact Center 7.0.3.0
Release Notes
Page 21
Upgrades
Avaya Release Pack Installer A new application is provided within the Avaya Aura® Contact Center Release Pack bundle called the Avaya Release Pack Installer (ARPI). This application provides an automated method of updating existing Avaya Aura® Contact Center 7.x software and must be used when upgrading to this software release. The application will perform the following actions
1. remove all installed AACC 7.0.1.x/7.0.2.x Product Updates (Feature Pack/ Service Packs and Patches)
2. remove all unwanted AACC Third Party software 3. install required Third Party Software for the release 4. install the latest AACC software from within the release pack bundle
Application Location: The Avaya Release Pack Installer is contained within the Release Pack bundle in folder ‘AvayaReleasePackInstaller’. The application supports the installation of Generally Available Patch bundle content. Please note, the Avaya Release Pack Installer is run via the setup.exe and NOT the AvayaReleasePackInstaller.exe. Reboot Prompts Before running the Avaya Release Pack Installer application, if the operating system or other installed software display prompts for a reboot, please reboot your system. If additional reboots are required during execution of the Avaya Release Pack Installer application, a prompt will be displayed to the user. All reboot prompts should be actioned – failure to reboot when requested will adversely affect the installation of software. Generally Available Patch Bundle Installation – Patch Bundle 356 When the setup.exe is launched, if you wish to install Generally Available Patch Bundle 356 content, you should select the appropriate radio button option. If you choose to proceed without installing GA Patch Bundle 356, the Update Manager application must be used to install this patch content later. To install GA Patch bundle 356 using the Avaya Release Pack Installer application, the complete ProductUpdates folder from within the GA Patch bundle must be copied locally. The contents of this folder should not be modified e.g. the ReleasePackManifest.xml must not be moved to another location.
Important: Direct upgrades from 7.0.0.0 and 7.0.0.1 to 7.0.3.0 are not supported.
You must upgrade to 7.0.1.x first, before upgrading to 7.0.3.0
Avaya Aura® Contact Center 7.0.3.0
Release Notes
Page 22
Instructions: 1. Download the AACC Release Pack Bundle to your local system and unzip 2. Download GA Patch Bundle 356 to your local system 3. Unzip GA Patch bundle 356 into a folder reflecting the patch bundle zip name 4. Launch the Avaya Release Pack Installer setup.exe from folder ‘AvayaReleasePackInstaller’
which is located within the Release Pack bundle extracted in step 1 above 5. When available, choose the option to install GA Patches and browse to the extracted Patch
Bundle folder from step 3 above 6. Continue installation…
Installation of Additional GA Patch Bundles After the installation of GA Patch Bundle 356 using the Avaya Release Pack Installer application, the Update Manager application must be used to install subsequent GA Patch Bundles e.g. Ga Patch Bundle 360 Limited Patch Installation The Avaya Release Pack Installer application does not support the installation of limited patches. To deploy limited patches the Update Manager application must be used.
Note: If upgrading, the Avaya Aura Contact Center Update Manager application resident on the
system will fail to install the AACC 7.0.3.0 Release Pack software. This is due to third party software
changes between AACC 7.0.1.x, 7.0.2.0 and AACC 7.0.3.0
Note: It is not possible to install Generally Available patch (DP) content until the Ignition Wizard has
been run successfully.
Update Configurator A new application is provided within the Avaya Aura® Contact Center Release Pack bundle called the
Update Configurator. This application is applicable only for co-resident Voice and Multimedia
Contact Center with AAMS and provides an automated mechanism to deploy and configure the
Linux Hyper-V AAMS upgrade. This application will launch automatically after the Avaya Release
Pack Installer reboot has completed.
1. After the Avaya Release Pack Installer reboot, on a co-resident Voice and Multimedia Server with AAMS, the new Update Configurator application will launch
2. When available, input the IP address of the new AAMS. The IP address must be a unique and available IP address on the same subnet as the AACC server.
3. Input the new password for AAMS. The password must meet the following criteria: - Minimum 6 characters - Include mix of upper-case and lower-case characters - Include minimum one numerical value - Must not be similar to existing password - Must not include 3 or more neighboring characters regardless of case e.g. abc, Abc,
123 - Must not be based on a dictionary word
4. Click Configure to start the configuration of the AAMS and reboot when prompted on completion
Avaya Aura® Contact Center 7.0.3.0
Release Notes
Page 23
Downgrades
Avaya Release Pack Installer To downgrade to an earlier 7.0.1.x release, you must use the Avaya Release Pack Installer which accompanies that target release. E.g. if the downgrade target is release 7.0.1.1, you must download the complete 7.0.1.1 release bundle from the support site. Instructions: Refer to the Release Notes for the target Release for downgrade instructions.
High Availability Maintenance Utility Following a downgrade certain High Availability and Configuration information is lost. It is therefore necessary to run the High Availability Maintenance Utility to restore this information. This utility should be run after ARPI has been run for the downgrade, but before the Server has been rebooted. Application Location: The High Availability Maintenance Utility is installed with this release of the software and can be found in the following location: D:\Avaya\Contact Center\Common Components\HighAvailabilityMaintenance\HAMaintenance.exe Instructions:
1. Launch the HAMaintenance.exe from the above location. 2. Use the Browse button to select the correct file to import.
a. The correct file will be in the D:\Avaya\Cache\Cachesys folder and will be named SYSDataExport-YYYY-MM-DD-ttttt.xml where “YYYY-MM-DD-ttttt” are a date/time stamp of when the file was created.
b. If there are multiple files with this naming format then the newest one should be selected.
3. Once a file has been selected, click the Import button. 4. Progress will be indicated on the screen and a message box will be presented to the user
when the import has completed. The Import should take no longer than 5 minutes.
Avaya Aura Media Server For co-resident Voice and Multimedia Contact Center with AAMS it is not possible to downgrade the Linux Hyper-V AAMS once it has been deployed and configured. The newly upgraded Hyper-V AAMS 7.8 can be maintained and is supported with AACC 7.0.2 onwards.
Important: Direct downgrades from 7.0.3.0 to 7.0.0.0 or 7.0.0.1 are not supported. You must downgrade from 7.0.3.0 to 7.0.1.x first, before downgrading to 7.0.0.x
Avaya Aura® Contact Center 7.0.3.0
Release Notes
Page 24
Post Installation Configuration
Avaya Aura Media Server
Avaya Aura Media Server Configuration The following configuration must be carried out on all AAMS servers (PVI Linux, VMWare OVA and Hyper-V). 1. Launch AAMS Element Manager and browse to System Configuration >> Network Settings >>
General Settings >> Connection Security 2. Un-tick “Verify Host Name” setting and hit the “Save” button followed by “Confirm”. 3. If using TLS SRTP media security then skip to step 6. 4. Browse to: System Configuration >> Media Processing>>Media Security 5. Change Security Policy from BEST EFFORT to SECURITY DISABLED and hit the “Save” button. 6. Browse to System Configuration >> Network Settings >> General Settings >> SOAP 7. Add AACC IP Address into SOAP Trusted Nodes. If HA, add AACC Active, Standby and Managed IP
Address. 8. Hit the “Save” button followed by “Confirm” 9. Browse to System Configuration >> Signalling Protocols >> SIP >> Nodes and Routes 10. Add AACC IP Address into SIP Trusted Nodes. If HA, add AACC Active, Standby and Managed IP
Address. 11. Ensure that AAMS can resolve both the hostname and Fully Qualified Domain Name (FQDN) of
the CCMA server by pinging the CCMA hostname and FQDN from the AAMS.
• Name resolution can be achieved either by using a DNS server or editing the hosts file on the AAMS.
• The AAMS OVA and Hyper-V deployments do not allow root ssh access, so the ability to edit the hosts file is provided in Element Manager:
• On EM navigate to System Configuration > Network Settings > Name Resolution and enter the hostname and FQDN name resolution of the CCMA server.
• On PVI AAMS running on customer supplied Red Hat servers, EM does not provide Name Resolution functionality. Host and FQDN resolution need to be added to /etc/hosts file on Red Hat server.
Avaya Aura Media Server - Upgrade - License If the AAMS Element Manager -> Element Status is displaying "Media Server instance is not licensed" then the following configuration steps must be carried out to update the AAMS license: 1. On AACC launch SCMU and navigate to LM tab 2. Shut down License Manager 3. Start License Manager
Avaya Aura Media Server - Upgrade - Service Status If the AAMS Element Manager -> Element Status -> Service Status is displaying Stopped state, and it is not possible to Start AAMS via Element Manager then the following configuration steps must be carried out to update the Service Status: 1. Open an SSH session to the AAMS e.g. using putty 2. Login with cust and <custpw> entered during configuration. 3. At the prompt enter 'reboot' and 'y' to confirm 4. Allow time for the AAMS to restart and verify the state is Started in Element Manager -> Element
Status -> Service Status
Avaya Aura® Contact Center 7.0.3.0
Release Notes
Page 25
PVI AAMS Installed on Red Hat Enterprise Linux Servers The following configuration must be carried out on all servers with AAMS installed on Red Hat Enterprise Linux Servers. Note: This configuration is not required for the AAMS OVA or Hyper-V.
1. Install firewall (iptables) policy file and enable firewall 2. Create AAMS Element Manager User account Group: susers Account: cust 3. Configure and enable Network Time Protocol (NTP)
A RHEL shell script has been provided on the AACC DVD that applies all of the above configuration steps. The script name is sysconfig.sh and is located at: Install Software\AMS\Linux Run the following steps on PVI RHEL Installed AAMS servers (Not required for co-resident Windows or OVA)
1. Copy the following file from the AACC DVD to the /tmp directory on the AAMS server: Install Software\AMS\Linux|sysconfig.sh
2. Log onto the AAMS server command line with root privileges (e.g. using putty), execute the following commands and then follow the prompts: cd /tmp chmod +x sysconfig.sh ./sysconfig.sh
Agent Greeting Recorder commissioning when CCMA managing Multiple CCMS Servers In AACC 7.0, the Agent Greeting recorder application is always installed on the AACC Tomcat server that is co-resident with CCMS. By default, it will assume that CCMA is also installed on the same host. In cases where the CCMA instance managing CCMS is hosted elsewhere, the Agent Greeting recorder needs to be made aware of the remote CCMA address in order to operate correctly. There is no GUI mechanism for updating this Agent Greeting recorder configuration. To set the CCMA address, edit the following file and update the ccma.address entry from its default value of 127.0.0.1 to the appropriate IP address: D:\Avaya\Contact Center\apache-tomat\conf\agentgreeting.properties
EWC – Server name change procedure: Steps when removing CCMM patches This section is only applicable to systems running Enterprise Web Chat (EWC). EWC is a licensed feature introduced in AACC 7.0 offering an alternative to the traditionally available Web Communications. EWC uses a new chat engine and because of this additional steps are required when performing a server name change on the CCMM server. These steps are fully documented in the Avaya Aura Contact Center Server Administration document. In the event that CCMM patches are removed from the CCMM server after a server name change operation has occurred, it will be necessary to reapply the EWC specific name change steps again. These steps are outlined below and should be run after CCMM patches have been removed/re-applied. Before you begin
Shut down the CCMM services using SCMU. Procedure
1. Log on to the Multimedia Contact Server 2. Right-click Start. 3. Select Run. 4. Type cmd. 5. Click OK.
Avaya Aura® Contact Center 7.0.3.0
Release Notes
Page 26
6. In the command line window, enter CD D:\Avaya\Contact Center\EnterpriseWebChat\eJabberd 7. Enter update_hostname.bat <CCMM_servername> where <CCMM_servername> is the new Multimedia Contact Server name. 8. Restart the CCMM server to apply changes 9. Ensure CCMM services have started OR use SCMU to start CCMM services.
Agent Controls Browser Application – Mandatory certificate with IOS 9 and later From IOS9 any IOS device running the Agent Controls Browser Application to connect to AACC will be required to provide a certificate.
SIP Networking in an Environment with pre-AACC 7 Nodes In a networking configuration, every node in the network must have a unique Home Location Code (HLOC). The unique HLOC guarantees that call IDs are unique across the network. Prior to AACC 7, unique HLOCs for each SIP node were manually configured. AACC 7 introduced the automatic configuration of the unique HLOC for a node. Automatically configured HLOCs begin at 10001. In a network with manually configured nodes ensure that the manually configured nodes do not conflict with the automatically configured HLOCs. Configuration of HLOC is only applicable in a networking setup.
Multimedia Prerequisites for server migration
This is only applicable to users migrating to new servers and keeping the same server names:
In this scenario users must select the same Multimedia Database Drive during the AACC 7.0 install as contained in Backup. If post install, users migrate a database backup from a previous version of AACC and the Multimedia Database drive defined in the backup does not match the Multimedia Database drive selected during the 7.0 install users will be unable to open attachments that were restored from the backup.
WebLM WebLM provides Contact Center licensing in an Aura deployment. A WebLM instance is available as part of AACC. This instance is called Local WebLM. Alternatively, an independent WebLM can be deployed using the WebLM OVA. The independent WebLM is called Remote WebLM. Local WebLM and Remote WebLM are supported on all AACC deployment platforms and all AACC deployment configurations. WebLM generate a unique ID to identify the WebLM instance. The ID is called Host ID. The Host ID is used to lock a license file to the customer deployment. The Host ID is generated by WebLM and is published as a server property in the Web License Manager web application. For Local WebLM, the web application can be accessed from https://localhost:8444/WebLM. For Remote WebLM, the web application can be accessed from https://[HOST]:52233/WebLM. The Host ID generated by WebLM for a virtualized deployment is a function of the IP address and the VMware UUID. To guarantee a constant Host ID is generated by WebLM in High Availability deployments, configure the managed IP address lower than both the active and standby IP addresses. Managed IP address configuration is effected using the High Availability configuration utility.
CCMA SSO via SMGR If any customer is enabling SSO for CCMA via SMGR, they need to disable and enable SSO again.
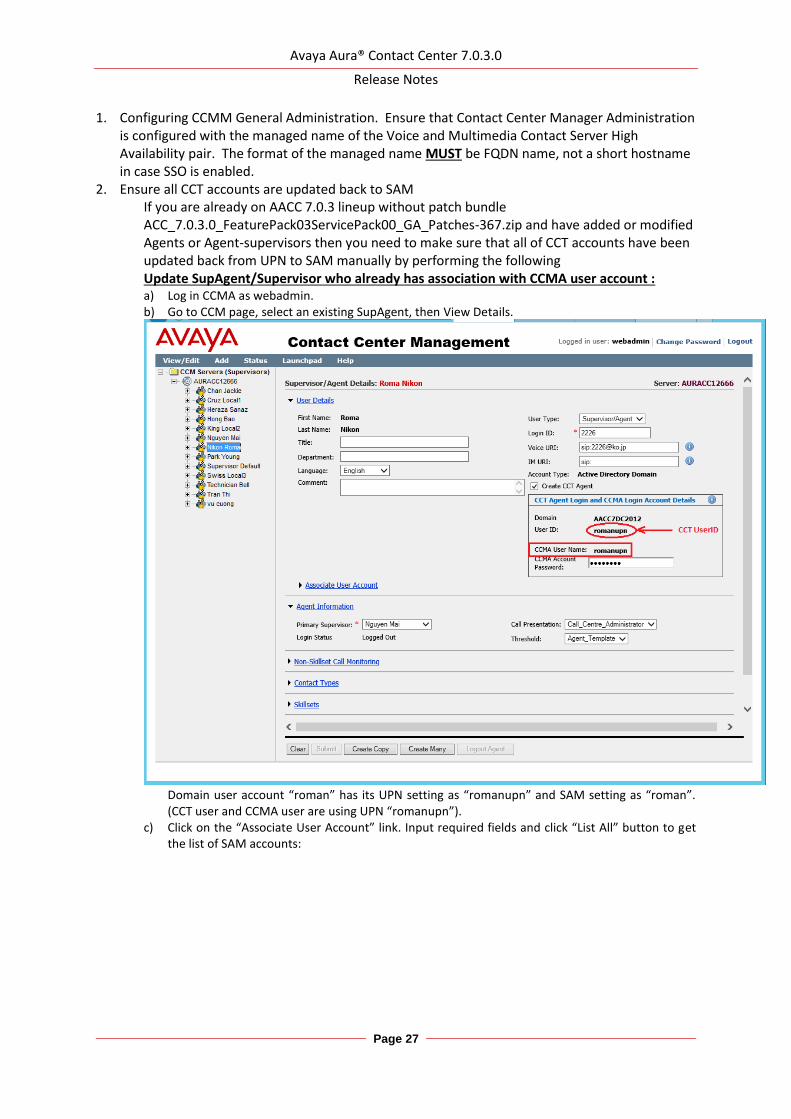
1. Configuring CCMM General Administration. Ensure that Contact Center Manager Administration is configured with the managed name of the Voice and Multimedia Contact Server High Availability pair. The format of the managed name MUST be FQDN name, not a short hostname in case SSO is enabled.
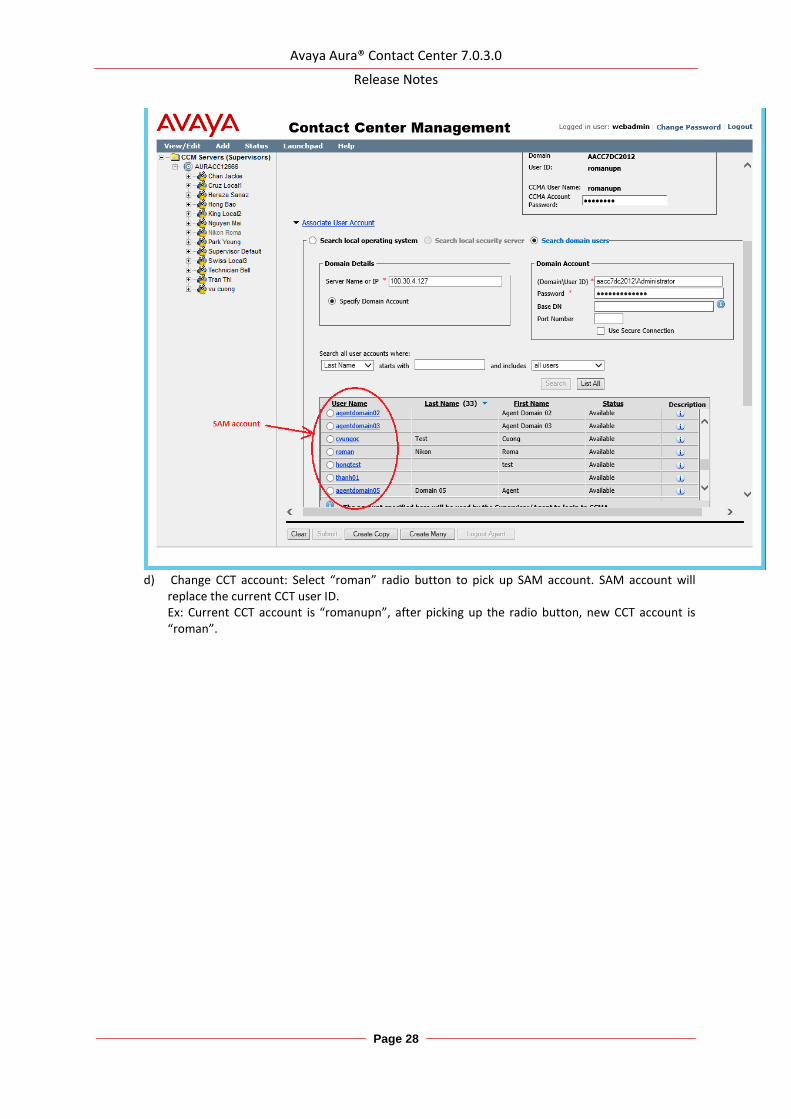
2. Ensure all CCT accounts are updated back to SAM If you are already on AACC 7.0.3 lineup without patch bundle ACC_7.0.3.0_FeaturePack03ServicePack00_GA_Patches-367.zip and have added or modified Agents or Agent-supervisors then you need to make sure that all of CCT accounts have been updated back from UPN to SAM manually by performing the following Update SupAgent/Supervisor who already has association with CCMA user account : a) Log in CCMA as webadmin. b) Go to CCM page, select an existing SupAgent, then View Details.
Domain user account “roman” has its UPN setting as “romanupn” and SAM setting as “roman”. (CCT user and CCMA user are using UPN “romanupn”).
c) Click on the “Associate User Account” link. Input required fields and click “List All” button to get the list of SAM accounts:
Avaya Aura® Contact Center 7.0.3.0
Release Notes
Page 28
d) Change CCT account: Select “roman” radio button to pick up SAM account. SAM account will
replace the current CCT user ID. Ex: Current CCT account is “romanupn”, after picking up the radio button, new CCT account is “roman”.
Avaya Aura® Contact Center 7.0.3.0
Release Notes
Page 29
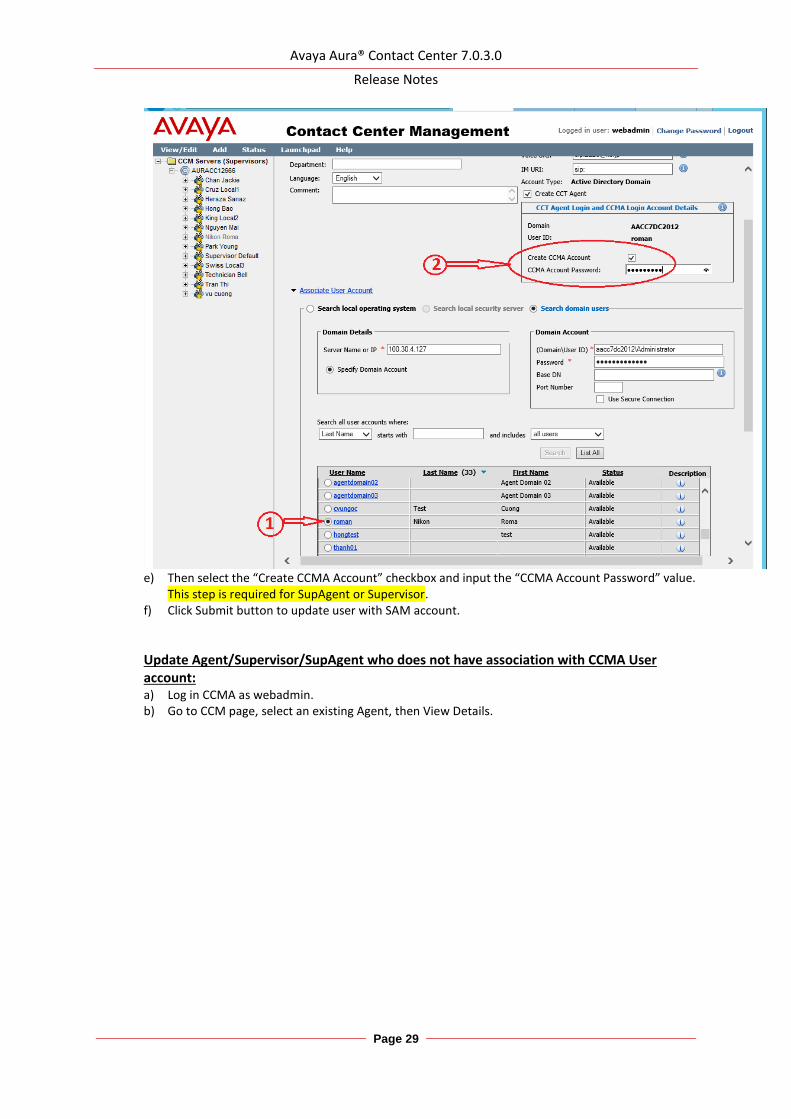
e) Then select the “Create CCMA Account” checkbox and input the “CCMA Account Password” value.
This step is required for SupAgent or Supervisor. f) Click Submit button to update user with SAM account.
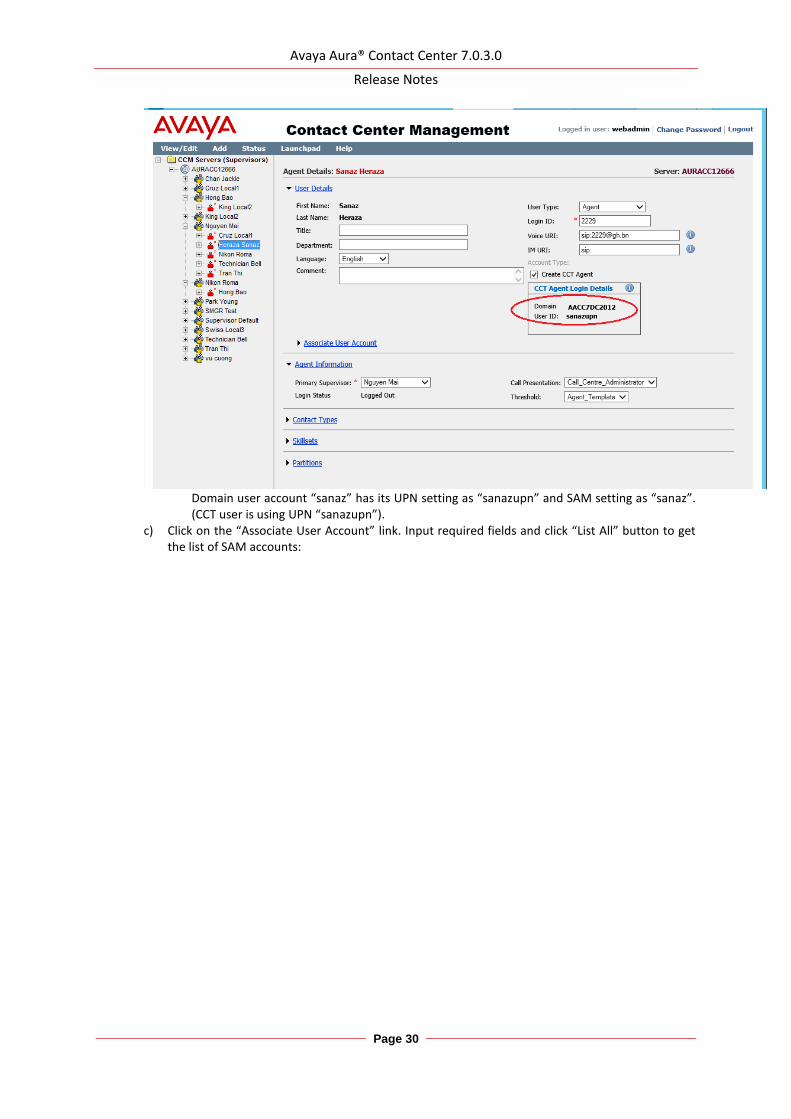
Update Agent/Supervisor/SupAgent who does not have association with CCMA User account: a) Log in CCMA as webadmin. b) Go to CCM page, select an existing Agent, then View Details.
Avaya Aura® Contact Center 7.0.3.0
Release Notes
Page 30
Domain user account “sanaz” has its UPN setting as “sanazupn” and SAM setting as “sanaz”. (CCT user is using UPN “sanazupn”).
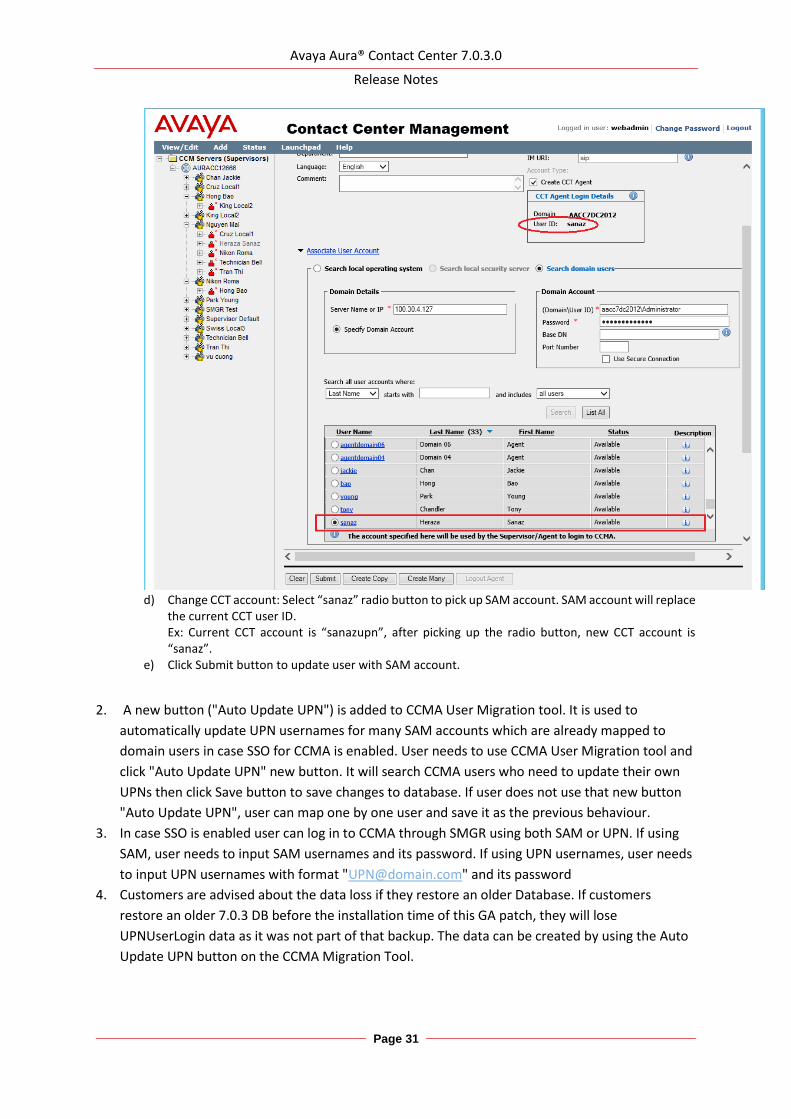
c) Click on the “Associate User Account” link. Input required fields and click “List All” button to get the list of SAM accounts:
Avaya Aura® Contact Center 7.0.3.0
Release Notes
Page 31
d) Change CCT account: Select “sanaz” radio button to pick up SAM account. SAM account will replace
the current CCT user ID. Ex: Current CCT account is “sanazupn”, after picking up the radio button, new CCT account is “sanaz”.
e) Click Submit button to update user with SAM account.
2. A new button ("Auto Update UPN") is added to CCMA User Migration tool. It is used to
automatically update UPN usernames for many SAM accounts which are already mapped to
domain users in case SSO for CCMA is enabled. User needs to use CCMA User Migration tool and
click "Auto Update UPN" new button. It will search CCMA users who need to update their own
UPNs then click Save button to save changes to database. If user does not use that new button
"Auto Update UPN", user can map one by one user and save it as the previous behaviour. 3. In case SSO is enabled user can log in to CCMA through SMGR using both SAM or UPN. If using
SAM, user needs to input SAM usernames and its password. If using UPN usernames, user needs
to input UPN usernames with format "[email protected]" and its password 4. Customers are advised about the data loss if they restore an older Database. If customers
restore an older 7.0.3 DB before the installation time of this GA patch, they will lose
UPNUserLogin data as it was not part of that backup. The data can be created by using the Auto
5. Before installing the GA bundle, SAM usernames is always shown in User ID.
After the GA bundle is installed and SSO is enabled, UPN is shown (if it is not empty) in User ID
from APM page. 6. If user is unable to access CCMA component intermittently after enabling SSO, please follow the
work-around of CC-14606 in the 7.0.3 Release Notes.
The workaround is to restart IIS service using Manager Administration Configuration -> Security
Settings -> Advanced -> Restart Service. User also can reset IIS by doing iisreset command.
SECURITY INFORMATION
From Avaya Aura® Contact Center release 7.0.2, fresh installations Out of The Box (OTB) security store and AES specific security certificates are no longer provided. From release 7.0.3.0 fresh installations of the solution will not provide the default security store with default security certificates for AACC and the AES.
Fresh installations For fresh installs the customer will have to create a custom security store for the server during the Ignition Wizard security configuration stage to enable the On by Default and secure the server and services as was provided automatically in previous releases. If the Ignition Wizard security configuration is not completed fully then upon completion of the Ignition Wizard phase and reboot of the server the services will not be secure and the SIP-CTI link to AES will not be operational as it supports secure connection only. Ignition Wizard has been enhanced to allow the creation and population of the contact center security store during the configuration phase. If this is skipped then warnings will be given and Security Manager (previously Security Manager) can be used to complete the creation and/or population of the security store.
From Avaya Aura® Contact Center release 7.0.3, upgrades to 7.0.3 will remove OTB or default store if detected.
Upgrades In 7.0.3, if the OTB store is being used and is on the server it will be actively removed by the installer. From 7.0.3.0 all existing deployments will be required to have implemented custom security configuration. Prior to upgrading to 7.0.3.0 please put in place custom security certificates and security store via the Security Manager, this is the application on the server to create a custom security store.
Avaya Aura® Contact Center 7.0.3.0
Release Notes
Page 33
Avaya Aura® Contact Center security certificate migration considerations
Migration from 6.4 to 7.x Due to the changes made in AACC 7.0 release regarding improved security stance, migration of the AACC 6.4 certificate store to AACC 7.x or higher is not possible. The only path available when moving to AACC 7.x from AACC 6.4 is the creation of a new store on the AACC 7.x system, the signing of the certificate signing request (CSR) by a selected Certificate Authority and the importing of these new security certificates into the new store. No elements of the security store from AACC 6.4 can be migrated to AACC 7.x The following sections are applicable to migrations from 7.x to later versions only. Note: AACC 7.X come with the default store as standard and as such does not need to be migrated from previous releases. Please be advised this default store is not to be used in a production environment and is designed to be used in a test/configuration only situation.
Migrating AACC Security Store from AACC 7.0 to 7.x.x The following sections are applicable to migrations from 7.0 to later versions only. Note: AACC 7.0 and AACC 7.0.1 come with the default store as standard and as such does not need to be migrated from previous releases. Please be advised this default store is not to be used in a production environment and is designed to be used in a test/configuration only situation.
Name of Server is important When intending to reuse existing security certificates on a new system then the receiving system will have to have the exact name as the donor system otherwise the security certificate will not match the underlying server. If the security certificate and underlying server name do not match, then warnings and errors will be presented to the user, when attempting to use this security certificate to establish a secure connection. Note
The recommendation is that, if possible, new security certificates be generated for the new system rather than reuse security certificates from another system.
Restoring Certificate store to a new system If the decision to reuse the security certificates then the migration of security certificates is a manual process and requires that the security certificate store on the server be backed up using the Security Manager Backup feature. This will back up the necessary files required to be imported back in on the new system using the Security Manager Restore feature. The receiving system name must be the same as the donor system otherwise errors will occur when attempting to use the security certificates to establish a secure connection. Note
The backed up files will be modified if coming from a release prior to 7.0 during the restore process so it is recommended that you keep a copy of the original backed up files.
See Appendix C – Store Maintenance for details on backing up and restoring the certificate store.
Avaya Aura® Contact Center 7.0.3.0
Release Notes
Page 34
TLS v1.2 as default level for TLS communication
Fresh installations On fresh installations only, the default TLSv1 level enforced is TLS v1.2. This means that TLS v1.0 and TLS v1.1 protocol levels are disabled and are not available to be used in the solution or on the underlying Windows 2012 R2 operating system.
Migrations Migrations can be considered in the same area as fresh installations in that the default TLSv1 level enforced is TLS v1.2.
Upgrades On an upgrade where the feature pack is applied on an existing 7.0 release then there is no enforcement of TLS v1.2 on the server. This is relevant only to the Windows operating system level support of TLS versions. For SIP traffic and Event Broker web services the enforcement of TLS v1.2 still applies and if these levels need to be modified then please refer to the section “Resetting TLSv1 Levels”. In 7.0.1 the default TLSv1 level enforced is TLS v1.2. This means that TLS v1.0 and TLS v1.1 protocol levels are disabled and are not available to be used in the solution or on the underlying Windows 2012 R2 operating system.
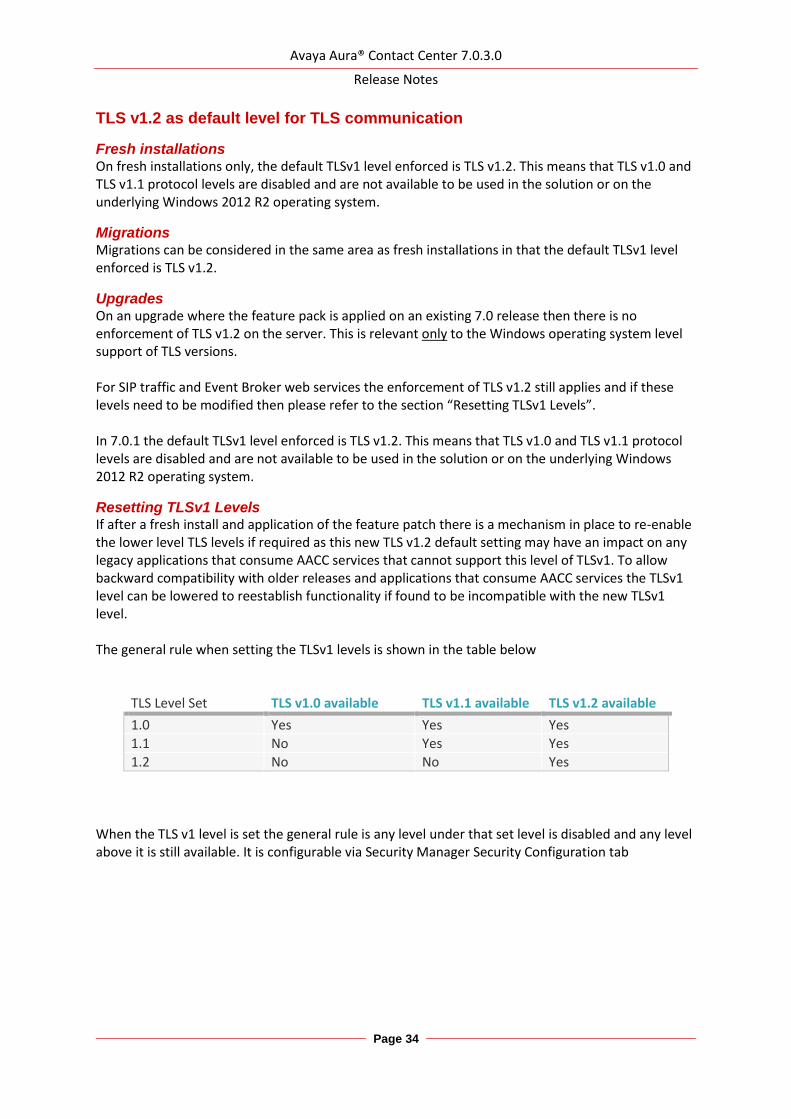
Resetting TLSv1 Levels If after a fresh install and application of the feature patch there is a mechanism in place to re-enable the lower level TLS levels if required as this new TLS v1.2 default setting may have an impact on any legacy applications that consume AACC services that cannot support this level of TLSv1. To allow backward compatibility with older releases and applications that consume AACC services the TLSv1 level can be lowered to reestablish functionality if found to be incompatible with the new TLSv1 level. The general rule when setting the TLSv1 levels is shown in the table below
TLS Level Set TLS v1.0 available TLS v1.1 available TLS v1.2 available
1.0 Yes Yes Yes
1.1 No Yes Yes
1.2 No No Yes
When the TLS v1 level is set the general rule is any level under that set level is disabled and any level above it is still available. It is configurable via Security Manager Security Configuration tab
Avaya Aura® Contact Center 7.0.3.0
Release Notes
Page 35
How to change the TLSv1 levels The new TLSv1 level settings can all be changed in the Security Manager application which can be launched from the AACC server. In the Security Configuration Tab of the Security Manager application there are three drop boxes which allow the user to lower the TLSv1 levels for the following application and services outlined in the next section.
Services and Applications covered by new TLSv1 setting The three main areas where this new setting covers are
• Windows operating system
• Web Traffic
• SIP Traffic
Windows operating system This covers all of the windows operating system and any Microsoft based applications, such as IIS for example. This can be lowered to TLS v1.0 or TLS v1.1 if required via the Security Manager application. If TLS v1.0 is set as default for example, then TLS v1.1 and TLS v1.2 is still available.
Web Traffic
IIS This is covered with the changes made to the underlying Windows Operating system. Which is also the same setting configurable via the Security Manager Security Configuration tab.
Tomcat This web server is set to use TLS v1.2 only. It is currently not configurable. All known applications that use Tomcat can operate at TLS v1.2 and thus no need to have an option to enable lower protocols.
Lightweight/framework web application servers Event Broker Web Service TLS v1 level can be set on the Security Manager application.
SIP Traffic This covers all SIP traffic to and from the AACC server. For AACC systems the SIP-CTI link is always TLS, the rest are configurable. This is configurable via Security Manager Security Configuration tab. AACC has one permanent TLS connection, SIP-CTI and the following compatibility matrix shows below the supported TLS v1 levels when connecting to older AES’s. If your deployment has an older version shown in the matrix below then lowering the TLSv1 level will reestablish a secure link.
Avaya Aura® Contact Center 7.0.3.0
Release Notes
Page 36
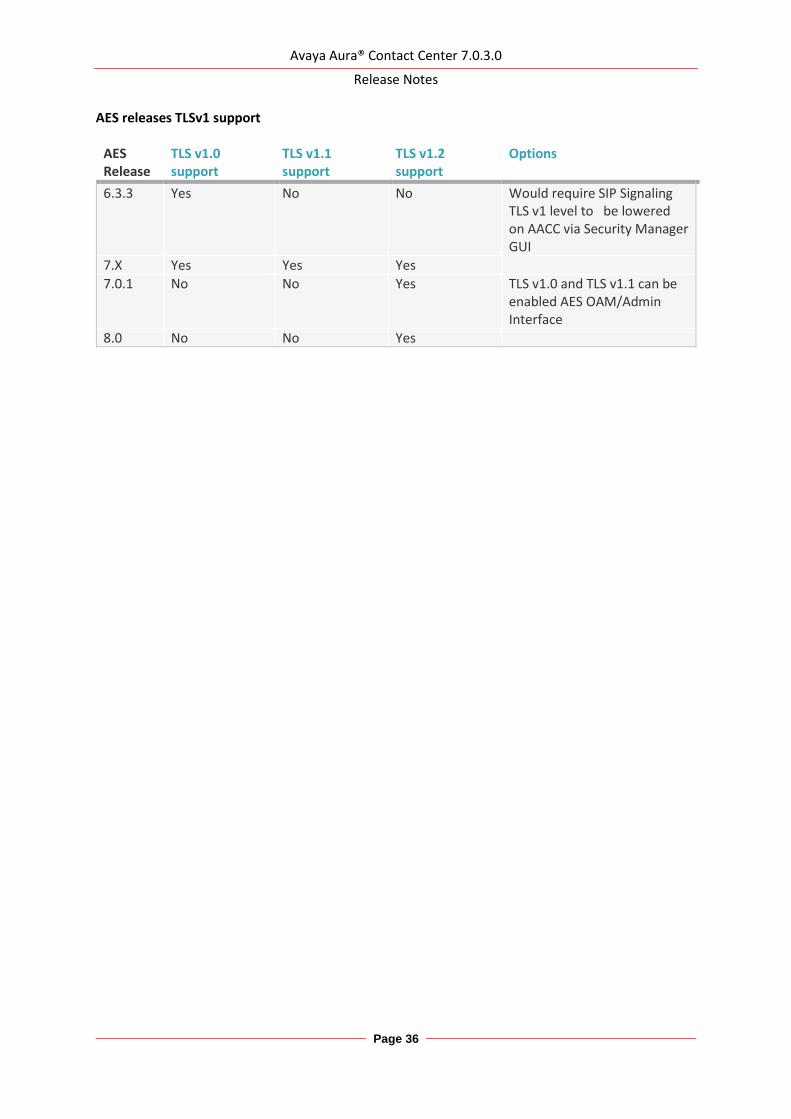
AES releases TLSv1 support
AES Release
TLS v1.0 support
TLS v1.1 support
TLS v1.2 support
Options
6.3.3 Yes No No Would require SIP Signaling TLS v1 level to be lowered on AACC via Security Manager GUI
7.X Yes Yes Yes
7.0.1 No No Yes TLS v1.0 and TLS v1.1 can be enabled AES OAM/Admin Interface
8.0 No No Yes
Avaya Aura® Contact Center 7.0.3.0
Release Notes
Page 37
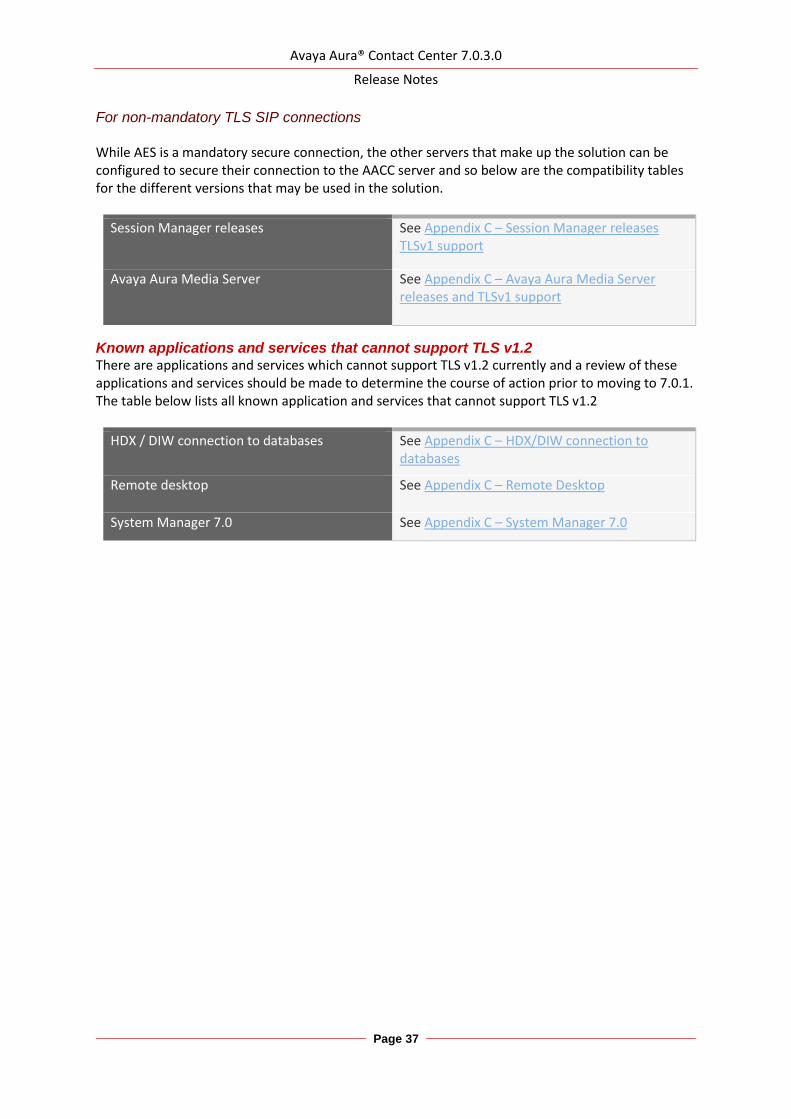
For non-mandatory TLS SIP connections While AES is a mandatory secure connection, the other servers that make up the solution can be configured to secure their connection to the AACC server and so below are the compatibility tables for the different versions that may be used in the solution.
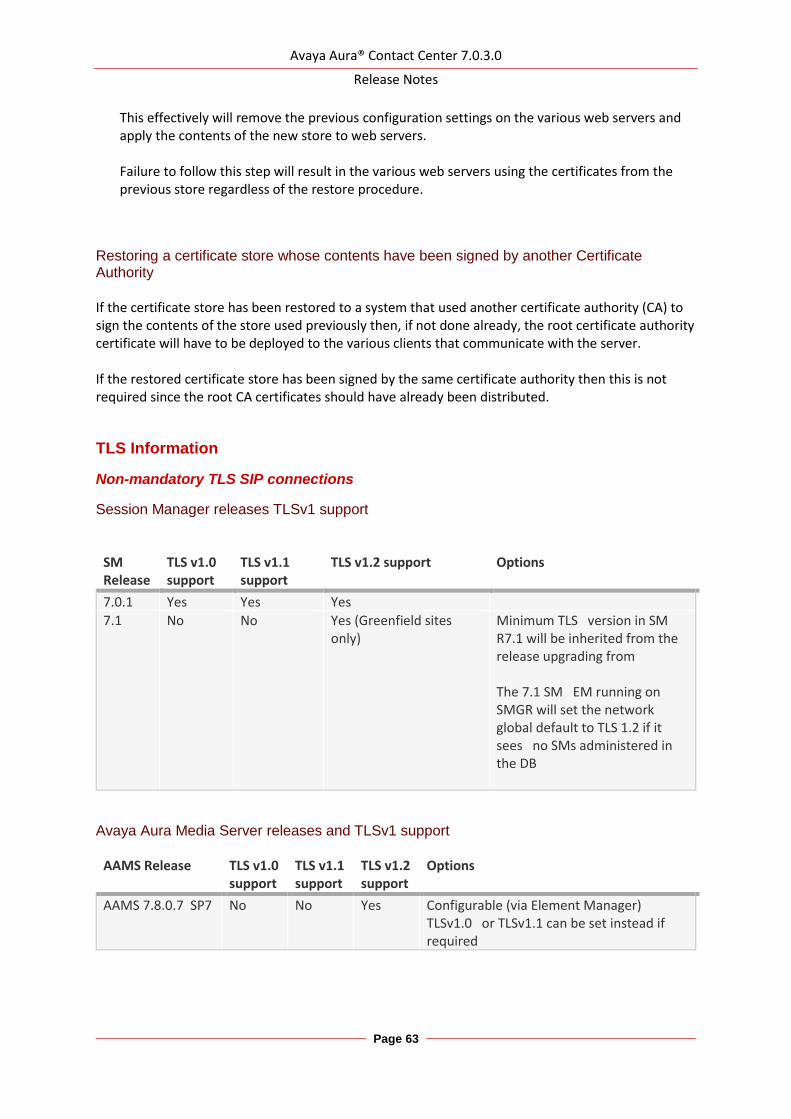
Session Manager releases See Appendix C – Session Manager releases TLSv1 support
Avaya Aura Media Server See Appendix C – Avaya Aura Media Server releases and TLSv1 support
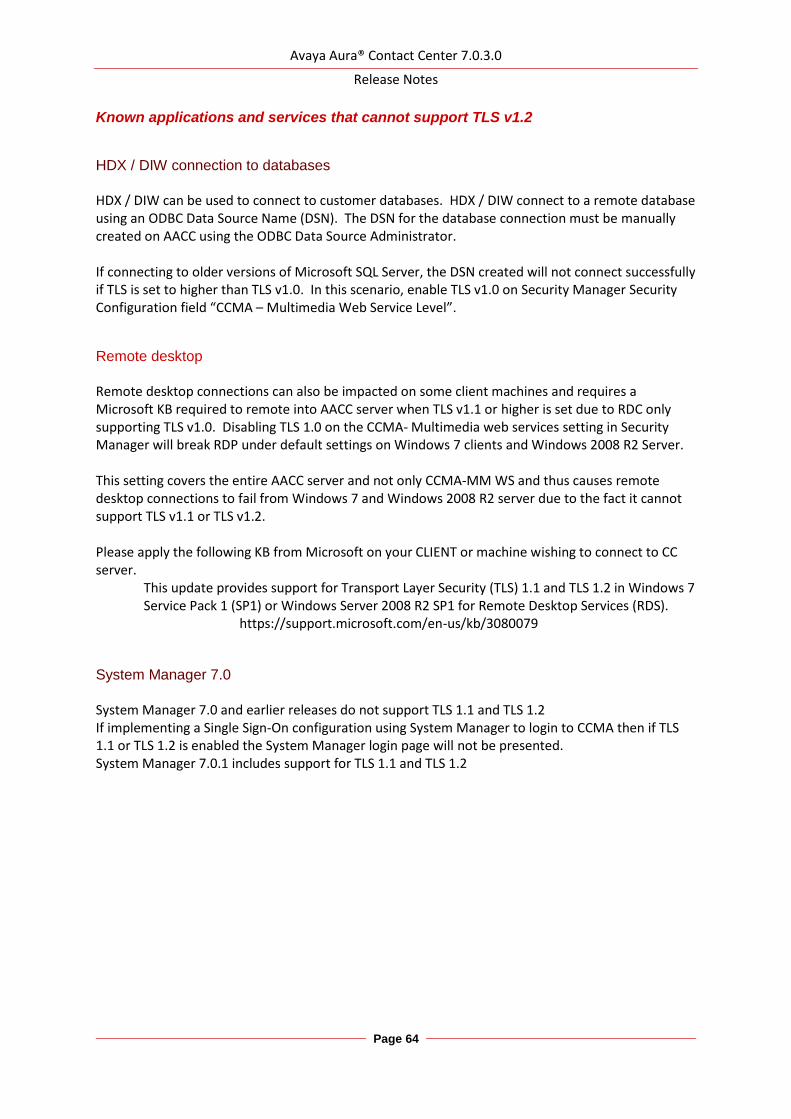
Known applications and services that cannot support TLS v1.2 There are applications and services which cannot support TLS v1.2 currently and a review of these applications and services should be made to determine the course of action prior to moving to 7.0.1. The table below lists all known application and services that cannot support TLS v1.2
HDX / DIW connection to databases See Appendix C – HDX/DIW connection to databases
Remote desktop See Appendix C – Remote Desktop
System Manager 7.0 See Appendix C – System Manager 7.0
Avaya Aura® Contact Center 7.0.3.0
Release Notes
Page 38
LOCALIZATION Avaya Aura Contact Center 7.0 Feature Pack 2 (7.0.2) Avaya Agent Desktop (AAD), Outbound Campaign Management Tool (OCMT), Contact Center Manager Administration (CCMA) and Web Agent Controls UI and online Help is localized into French, German, LA Spanish, Simplified Chinese, Brazilian Portuguese, Russian, Japanese, Traditional Chinese, Korean and Italian.
Overview of I18N and L10N Products & Components Components that are used by Contact Center agents or by Contact Center supervisors performing non-specialized functions are localized. Interfaces to support administration or specialized functions (for example, creating routing applications) are not localized. All AACC 7.0.2 products and components support Internationalization (I18n). The following table lists all AACC 7.0.2 products and components that support Localization (L10n):
AACC 7.0.2 Products Component
CCT Web Agent Controls
CCT Web Agent Controls online help
CCMA Contact Center Management
CCMA Access and Partition Management
CCMA Real-Time Reporting
CCMA Historical Reporting
CCMA Configuration
CCMA Emergency Help
CCMA Outbound
CCMA Historical Report Templates
CCMA Agent Desktop Display
CCMA Online Help
CCMM AAD Client
CCMM AAD online Help
CCMM OCMT Client
CCMM OCMT online Help
Refer to Chapter 17: Language support fundamentals in the Avaya Aura Contact Center Server Administration guide for supported languages.
Localized Components (CCMA and CCMM) The following table lists the compatibility between the CCMA/CCMM language patches and the operating system language family. Only compatible languages can be enabled on the server. Supported Languages
CCMA CCMM
OS
Lan
guag
e
FR DE ES PT-BR IT ZH-CN ZH-TW JA RU KO English Y Y Y Y Y N N N N N Y
Any 1 Latin1 language Y Y Y Y Y N N N N N Y
Simplified Chinese N N N N N Y N N N N Y
Trad. Chinese N N N N N N Y N N N Y
Japanese N N N N N N N Y N N Y
Russian N N N N N N N N Y N Y
Korean N N N N N N N N N Y Y
Avaya Aura® Contact Center 7.0.3.0
Release Notes
Page 39
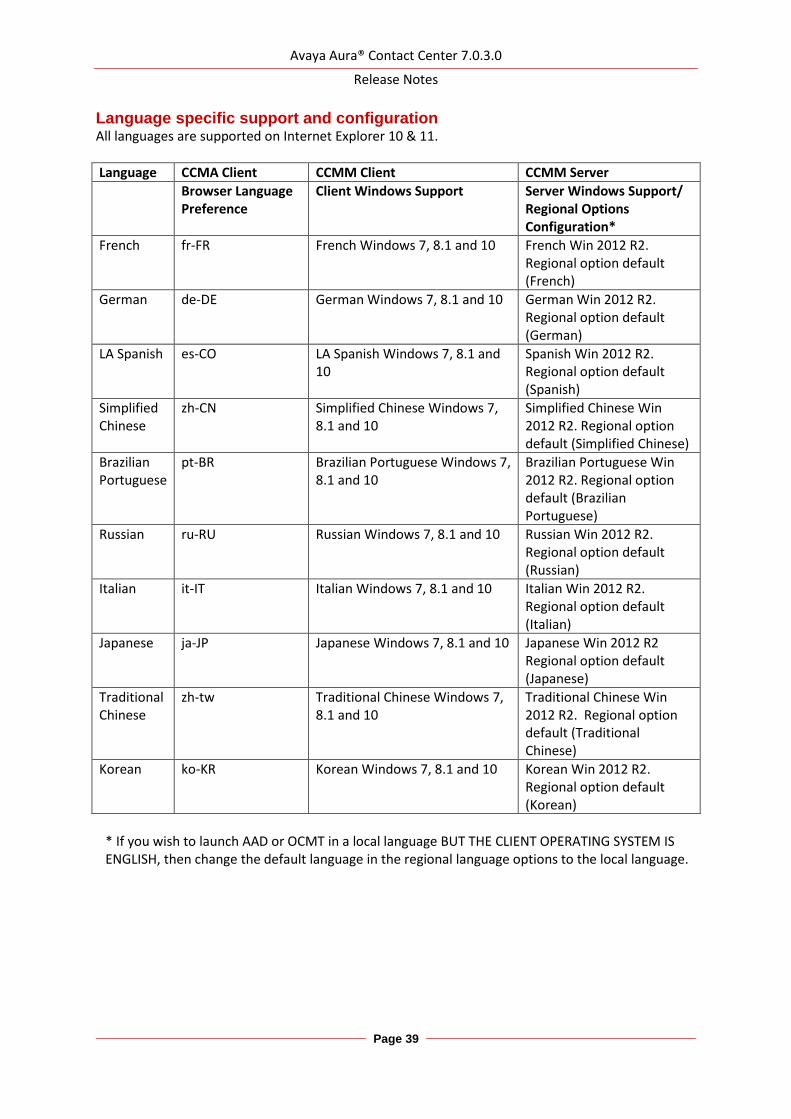
Language specific support and configuration All languages are supported on Internet Explorer 10 & 11.
Language CCMA Client CCMM Client CCMM Server
Browser Language Preference
Client Windows Support Server Windows Support/ Regional Options Configuration*
French fr-FR French Windows 7, 8.1 and 10 French Win 2012 R2. Regional option default (French)
German de-DE German Windows 7, 8.1 and 10 German Win 2012 R2. Regional option default (German)
Russian ru-RU Russian Windows 7, 8.1 and 10 Russian Win 2012 R2. Regional option default (Russian)
Italian it-IT Italian Windows 7, 8.1 and 10 Italian Win 2012 R2. Regional option default (Italian)
Japanese ja-JP Japanese Windows 7, 8.1 and 10 Japanese Win 2012 R2 Regional option default (Japanese)
Traditional Chinese
zh-tw Traditional Chinese Windows 7, 8.1 and 10
Traditional Chinese Win 2012 R2. Regional option default (Traditional Chinese)
Korean ko-KR Korean Windows 7, 8.1 and 10 Korean Win 2012 R2. Regional option default (Korean)
* If you wish to launch AAD or OCMT in a local language BUT THE CLIENT OPERATING SYSTEM IS ENGLISH, then change the default language in the regional language options to the local language.
Avaya Aura® Contact Center 7.0.3.0
Release Notes
Page 40
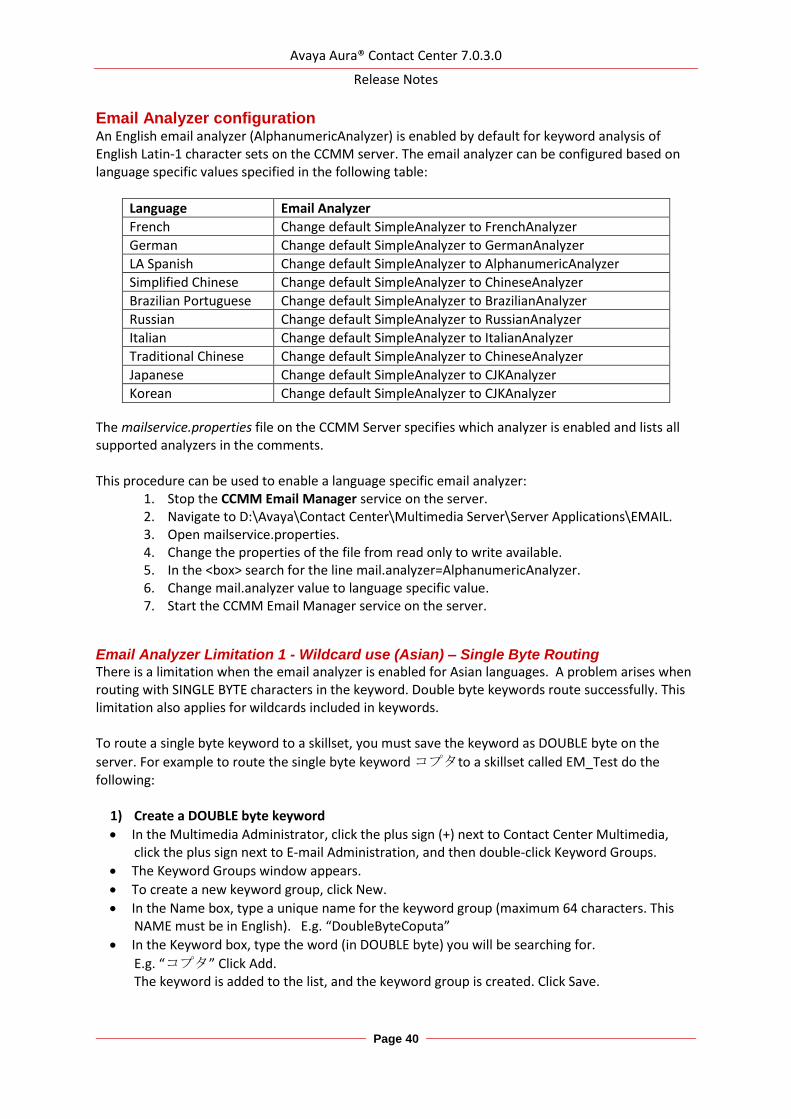
Email Analyzer configuration An English email analyzer (AlphanumericAnalyzer) is enabled by default for keyword analysis of English Latin-1 character sets on the CCMM server. The email analyzer can be configured based on language specific values specified in the following table:
Language Email Analyzer
French Change default SimpleAnalyzer to FrenchAnalyzer
German Change default SimpleAnalyzer to GermanAnalyzer
LA Spanish Change default SimpleAnalyzer to AlphanumericAnalyzer
Simplified Chinese Change default SimpleAnalyzer to ChineseAnalyzer
Brazilian Portuguese Change default SimpleAnalyzer to BrazilianAnalyzer
Russian Change default SimpleAnalyzer to RussianAnalyzer
Italian Change default SimpleAnalyzer to ItalianAnalyzer
Traditional Chinese Change default SimpleAnalyzer to ChineseAnalyzer
Japanese Change default SimpleAnalyzer to CJKAnalyzer
Korean Change default SimpleAnalyzer to CJKAnalyzer
The mailservice.properties file on the CCMM Server specifies which analyzer is enabled and lists all supported analyzers in the comments. This procedure can be used to enable a language specific email analyzer:
1. Stop the CCMM Email Manager service on the server. 2. Navigate to D:\Avaya\Contact Center\Multimedia Server\Server Applications\EMAIL. 3. Open mailservice.properties. 4. Change the properties of the file from read only to write available. 5. In the <box> search for the line mail.analyzer=AlphanumericAnalyzer. 6. Change mail.analyzer value to language specific value. 7. Start the CCMM Email Manager service on the server.
Email Analyzer Limitation 1 - Wildcard use (Asian) – Single Byte Routing There is a limitation when the email analyzer is enabled for Asian languages. A problem arises when routing with SINGLE BYTE characters in the keyword. Double byte keywords route successfully. This limitation also applies for wildcards included in keywords. To route a single byte keyword to a skillset, you must save the keyword as DOUBLE byte on the
server. For example to route the single byte keyword コプタto a skillset called EM_Test do the following:
1) Create a DOUBLE byte keyword
• In the Multimedia Administrator, click the plus sign (+) next to Contact Center Multimedia, click the plus sign next to E-mail Administration, and then double-click Keyword Groups.
• The Keyword Groups window appears.
• To create a new keyword group, click New.
• In the Name box, type a unique name for the keyword group (maximum 64 characters. This NAME must be in English). E.g. “DoubleByteCoputa”
• In the Keyword box, type the word (in DOUBLE byte) you will be searching for.
E.g. “コプタ” Click Add. The keyword is added to the list, and the keyword group is created. Click Save.
Avaya Aura® Contact Center 7.0.3.0
Release Notes
Page 41
2) Create a Rule to route the keyword to a skillset
• Start the Rule Configuration Wizard.
• On the Rule Configuration Wizard – Input Criteria window, under Available Keyword Groups, select a keyword group you want to use for this rule. E.g. “DoubleByteCoputa”
• Click the black arrow to insert the keyword group name into the selection box.
• Click Next.
• In the Rule box, type the name for your rule. E.g. “DoubleByteCoputaRule”
• In the Skillset box, select a skillset for your rule. . E.g. “EM_Test”
• Click Save.
• Click Finish. Your rule is created with the keyword group. Note: This is a limitation of the 3rd party creator of the analyzer, Lucene.
Email Analyzer Limitation 2 - Wildcard use (Asian) - Wildcard * and ? string position There is a limitation when the email analyzer is enabled for Asian languages. Wildcard ‘?’ or ‘*’ can only be used at the end of a keyword.
e.g. Wildcard use たば* is correct. Wildcard use た*た is not correct. Note: To route the wildcard keyword successfully, the ‘*’ can be entered in either full-width or half width. The ‘?’ can be entered in full-width only.
Avaya Aura® Contact Center 7.0.3.0
Release Notes
Page 42
Start Localized AAD Client
Pre-installation steps
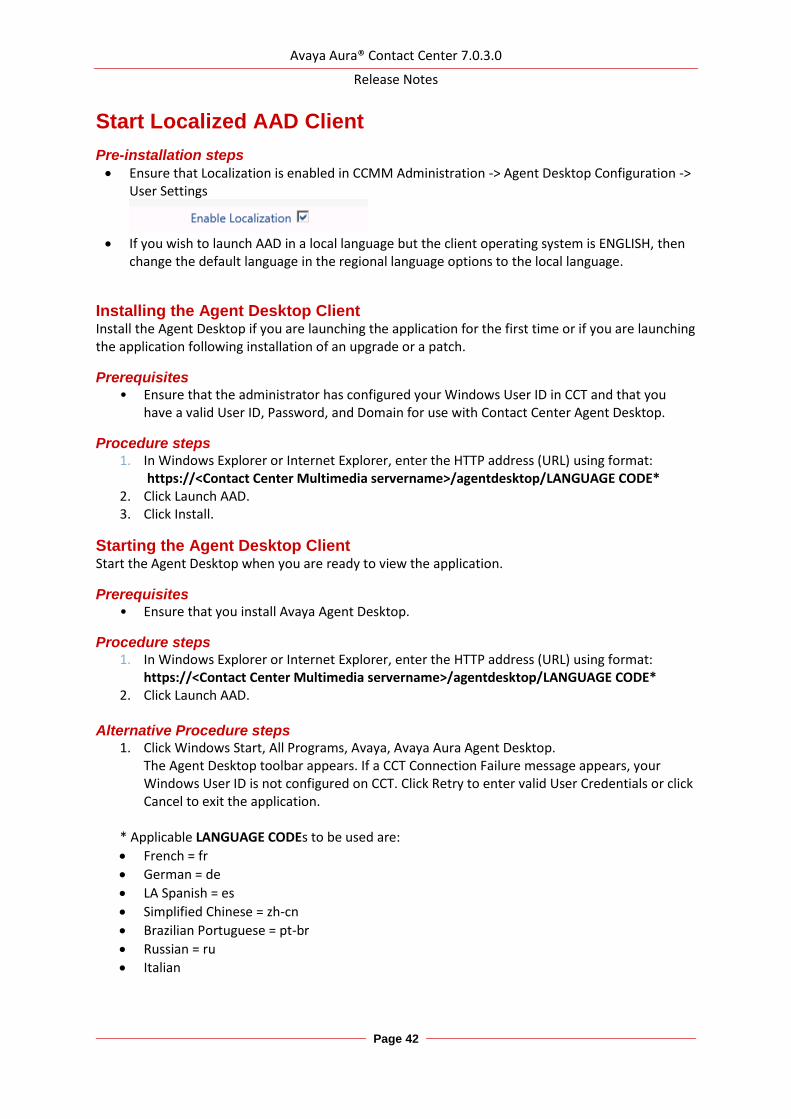
• Ensure that Localization is enabled in CCMM Administration -> Agent Desktop Configuration -> User Settings
• If you wish to launch AAD in a local language but the client operating system is ENGLISH, then
change the default language in the regional language options to the local language.
Installing the Agent Desktop Client Install the Agent Desktop if you are launching the application for the first time or if you are launching the application following installation of an upgrade or a patch.
Prerequisites • Ensure that the administrator has configured your Windows User ID in CCT and that you
have a valid User ID, Password, and Domain for use with Contact Center Agent Desktop.
Procedure steps 1. In Windows Explorer or Internet Explorer, enter the HTTP address (URL) using format:
Starting the Agent Desktop Client Start the Agent Desktop when you are ready to view the application.
Prerequisites • Ensure that you install Avaya Agent Desktop.
Procedure steps 1. In Windows Explorer or Internet Explorer, enter the HTTP address (URL) using format:
https://<Contact Center Multimedia servername>/agentdesktop/LANGUAGE CODE* 2. Click Launch AAD.
Alternative Procedure steps
1. Click Windows Start, All Programs, Avaya, Avaya Aura Agent Desktop. The Agent Desktop toolbar appears. If a CCT Connection Failure message appears, your Windows User ID is not configured on CCT. Click Retry to enter valid User Credentials or click Cancel to exit the application.
* Applicable LANGUAGE CODEs to be used are:
• French = fr
• German = de
• LA Spanish = es
• Simplified Chinese = zh-cn
• Brazilian Portuguese = pt-br
• Russian = ru
• Italian
Avaya Aura® Contact Center 7.0.3.0
Release Notes
Page 43
Troubleshooting
Detecting latest Language files In case that client runs the English AAD and OCMT applications and does not pick up the language files, then these files are now stored in the GAC (.Net cache) on the client PC. The .Net cache (GAC) therefore, needs to be emptied on the client PC so the latest English and language files can be taken from the server. Note: If you install an updated Service pack or Design patch, the client still runs applications with cached language files. The .Net cache (GAC) must be emptied, so the latest language files can be taken from the server.
Emptying the .Net cache on the client PC running AAD and OCMT Procedures such as uninstalling application and emptying the .Net cache require administrator rights.
1. Close AAD and OCMT. 2. Click Add/Remove Programs. 3. Remove Avaya/Avaya Agent Desktop. 4. Navigate to C:\Documents and Setting\USERNAME\local settings\apps\ . 5. Delete the 2.0 folder. 6. Note: This folder may be hidden. If so, open Windows Explorer and click on Tools, Folder
options. Choose the View tab. Under Files and folders or Hidden files and folders, choose to show hidden files and folders. Click Apply and click OK.
7. Start AAD to download the latest AAD files from the CCMM server. 8. Start OCMT from CCMA to download the latest OCMT files from the CCMM server.
Avaya Aura® Contact Center 7.0.3.0
Release Notes
Page 44
KNOWN ISSUES
Hardware Appliance None
Software Appliance None
Application\Features
Release Pack Installer – Cannot install multiple Generally Available Patch Bundles
Tracking Number CC-15042
Application Release Pack Installer
Description The Release Pack Installer application is used to upgrade Contact Center software to this latest release. This application supports the installation of Generally Available (GA) Patch content at the same time as Feature Pack software. For this release, the Release Pack Installer application does not support the installation of multiple GA Patch bundles. The existing GA Patch Bundle #356 can be installed via the Release Pack Installer application but subsequent GA Patch Bundles e.g. #360 must be installed using the Update Manager application.
Impact When upgrading to this release using the Release Pack Installer application, a user cannot install GA Patch Bundles 356 and 360 at same time. GA Patch Bundle 356 can be installed as part of the upgrade process using the Release Pack Installer but Patch Bundle 360 (and subsequent GA Patch bundles) must be installed using Update Manager.
Workaround Use the Update Manager application to install GA Patch Bundle 360 and any subsequent GA Patch Bundles
Configuration Ignition Wizard – Error message displayed for setup.exe
Tracking Number CC-13608
Application Configuration Ignition Wizard
Description The Ignition Wizard tries to set the launch URL on the boot-strap setup.exe for the click-once applications: AAAD, OCMT and CCMM Admin. On successful completion of the system configuration process, a permissions problem intermittently causes one or more exception message to pop up indicating that the setup file is in use. One or both of the following error messages may appear: Title: setup.exe Text: Unable to modify 'D:\Avaya\Contact Center\Multimedia Server\Server Applications\WEBADMIN\setup.exe'. The file may be read-only or locked.
Avaya Aura® Contact Center 7.0.3.0
Release Notes
Page 45
Text: Unable to modify 'D:\Avaya\Contact Center\Multimedia Server\Outbound Client\setup.exe'. The file may be read-only or locked.
Impact No impact. The setup.exe launch URL has been updated correctly. Simply press OK to close this dialog message.
Workaround None
AAMS Media Services displayed incorrectly as not started in EM after AACC licenses AAMS
Tracking Number CC-14420
Application Avaya Aura Media Server
Description If an AAMS is not licensed and AACC licenses the AAMS then the AAMS Element Manager can sometimes display the AAMS Media Services as “Not Running” when it is up and running. The Start Button in AAMS EM Element Status will be selectable and the Stop button will be grayed out.
Impact There is no impact on AACC as AAMS is up and running fully. The AAMS is displaying the wrong state in EM.
Workaround Reboot the AAMS by logging into ssh terminal and running “reboot”
Update Configurator – Hyper-V role not present and Avaya Aura Media Server configuration blocked
Tracking Number CC-14623
Application Update Configurator
Description During the upgrade of the Contact Center software the Update Configurator application reports that Windows Hyper-V role is not present.
Impact The Update Configurator blocks the configuration of AAMS as the Windows Hyper-V role is essential for the deployment and configuration of the Linux Hyper-V AAMS.
Workaround If this occurs, please manually install the Hyper-V role and associated features via the Windows Server Manager as follows:
- Launch Server Manager and select Manage->Add Roles and Features
- Follow the on-screen instructions and select Hyper-V at the Roles screen
- If prompted to install associated Hyper-V Features accepting the defaults and follow the on-screen instructions to completion
- Once the Windows Hyper-V role has been successfully installed re-launch the Update Configurator application from Windows Start->Programs and configure the relevant AAMS settings
If the Windows Server Manager fails to install the Hyper-V role then it may be necessary to disable any Antivirus and verify that the Administrator logged in has full admin privileges, before repeating the above steps. Please contact Avaya support if the manual installation of Hyper-V role continues to fail.
Avaya Aura® Contact Center 7.0.3.0
Release Notes
Page 46
Remote desktop connection fails due to service stuck in starting
Tracking Number CC-2435
Application Windows Server 2012 R2
Description Under certain error conditions, i.e. misconfiguration, some AACC services will not complete startup. While in this error state remote desktop connection logins and local console logins can fail with a “please wait” message.
Impact Inability to login through RDC of local console to AACC server.
Workaround If this error condition is experienced a connection to the console should be attempted. In the case of a physical sever deployment this would be the physical keyboard and monitor connection to the server. In the case of virtualized environments the equivalent to the physical console should be used. If a connection is successful on the console the service which is stuck in starting should be identified and normal trouble shooting performed to determine why the service is not completing startup. If the connection to the console is not successful a power cycle of the server will be required. A connection should be attempted, either through the console or through RDC, as soon as possible after the power cycle is performed.
Solution This issue is resolved by applying the following Microsoft fix (KB3100956) mentioned in the Microsoft Operating System Updates section.
Agent Greeting not working on AACC due to Apache Tomcat 8081 port conflict
Tracking Number CC-9938
Application Agent Greeting and CCT Console
Description Installing Avaya Aura Contact Center installs Apache Tomcat Server. The default port number for Apache Tomcat is 8081. If you need to change the port number to avoid conflicts with third-party software, see your Apache Tomcat documentation. If the Tomcat port is changed then refer to section: “Adding Communication Control Toolkit to CCMA” in the commissioning guide to change the CCT Console port used. McAfee Agent Common Services (macmnsvc.exe) or McAfee Framework Service (FrameworkService.exe) are the services that can use port 8081. If these services are required, then the Apache Tomcat port must be changed. Refer to If these services are not required then they can be stopped and configured not to run on startup in Windows Services.
Impact If a conflict occurs, then both AACC Agent Greeting and CCT Console will be impacted. McAfee Anti-Virus could potentially be one of the third party applications that conflicts with port 8081.
Workaround If you need to change the port number to avoid conflicts with third-party software, see your Apache Tomcat documentation. If the Tomcat port is changed then refer to section: “Adding Communication Control Toolkit to CCMA” in the commissioning guide to change the CCT Console port used.
Some fields are not aligned when Agent Performance report exported to .pdf file,
Tracking Number CC-3856
Application Contact Center Manager Administration
Description AACC7.0 HR- Export Agent Performance report to .pdf file, some fields are not aligned.
Impact A number of reports within AACC are larger than a standard A4 page and as a result appear misaligned when exported to pdf. They also span pages when printed.
Workaround None
Report Creation Wizard – Some sample reports do not work
Tracking Number CC-5035
Application Contact Center Manager Administration
Description The following sample reports do not work in this release: BillingByAddress SkillsetOutboundDetails Voice Skillset Name ID Mapping Network Consolidated Skillset Performance ICPCSRSample MMCSRStat
Impact These samples cannot be used as a starting point for new reports
Workaround None
Unable to login to CCMA using System Manager 7.0 or earlier with TLS 1.1 or TLS 1.2 enabled
Tracking Number CC-9923
Application Contact Center Manager Administration
Description Unable to login to CCMA using System Manager 7.0 or earlier when TLS 1.1 or TLS 1.2 is enabled. System Manager 7.0 and earlier versions do not support TLS 1.1 or 1.2
Impact Unable to login to CCMA
Workaround 1. System Manager 7.0.1 supports TLS 1.1 and TLS 1.2
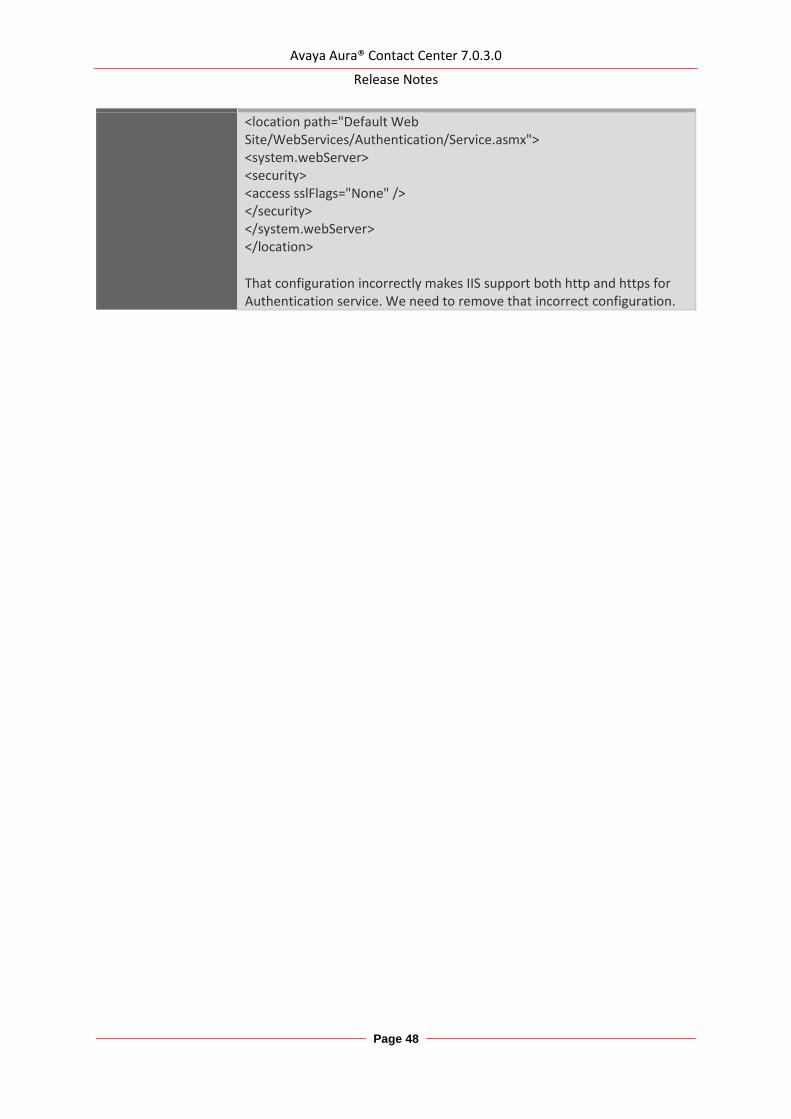
One instance of Agent greetings and Voice recording not working “A Serious Error has occurred – Exiting”
Tracking Number CC-13218
Application Contact Center Manager Administration
Description When security is ON, CCMA Authentication web service only supports HTTPS request, not HTTP request from clients. If the client requests HTTP, it will return an error code 403 (HTTP 403) to the client. However in the case of CC-13218, the client requests HTTP, CCMA Authentication web service still works when security is ON.
Impact Agent greetings and Voice recording do not work. CCMA Authentication is not secure.
Workaround The following Authentication web service configuration was found in IIS config file, applicationHost.config located at C:\Windows\System32\inetsrv\config folder.
That configuration incorrectly makes IIS support both http and https for Authentication service. We need to remove that incorrect configuration.
Avaya Aura® Contact Center 7.0.3.0
Release Notes
Page 49
Install wrong .NET Framework version from installing pre-requisites on CCMA Dashboard
Tracking Number CC-13274 (CC-9825)
Application Contact Center Manager Administration
Description Cannot launch Dashboard report from Real-Time Report page
Impact Unable to use CCMA Dashboard
Workaround 1. Install .NET FW 4.5.2 from FP2 DVD for the client machine. 2. Apply "SchUseStrongCrypto" value for the client machine. Create a text file named strongcrypto35-enable.reg that contains the following text: Windows Registry Editor Version 5.00 [HKEY_LOCAL_MACHINE\SOFTWARE\Microsoft\.NETFramework\v4.0.30319] "SchUseStrongCrypto"=dword:00000001 [HKEY_LOCAL_MACHINE\SOFTWARE\Wow6432Node\Microsoft\.NETFramework\v4.0.30319] "SchUseStrongCrypto"=dword:00000001 Run regedit.exe In Registry Editor, click the File menu and then click Import. Navigate to and select the strongcrypto35-enable.reg file that you created in the first step. Click Open and then click OK Exit Registry Editor. 3. For Windows 7 SP1, the client needs to install the update https://support.microsoft.com/en-us/kb/3140245 4. Restart the client.
With SSO enabled prior to upgrade, SCT Tool and OD are failed to connect CCMA after upgrading to new release
Tracking Number CC-13655
Application Contact Center Manager Administration
Description For users who have already configured SSO and enabled SSO - When they upgrade their system to 7.0.3 GA, SCT and OD will fail to connect CCMA
Impact SCT and OD fail to connect CCMA
Workaround The workaround is to disable SSO and re-enable SSO from Security Details dialog. Steps:
- Open Manager Administrator Configuration - Open Security Settings - Click Disable button - Click Yes button from the confirmation dialog - Click OK button from the information dialog - Click Enable button - Click Yes button from the confirmation dialog - Click OK button from the information dialog
With SSO enabled, POM client fails to retrieve skillsets
Tracking Number CC-13683
Application Contact Center Manager Administration
Description With SSO enabled, POM client fails to retrieve skillsets. The issue lies with POM (OUTREACH-8526)
Impact POM client fails with SSO enabled in CCMA
Workaround The workaround is to disable SSO.
CCMA- All texts in Attribute in JSON variables showed “ERROR: Could not get text: Index = 9040, Language = en-us!” for upgraded lab from 7.0.1
Tracking Number CC-13468
Application Contact Center Manager Administration
Description From Scripting, open JSON variable (JSON Object, JSON String, JSON Pair), the text string shows the error “ERROR: Could not get text: Index = 9040, Language = en-us!”
Impact Text does not explain the guidelines around JSON variable
Workaround We need to run the command "AccessToInterSystems.exe -install ALLTEXT" at D:\Avaya\Contact Center\Manager Administration\Server\bin folder. Steps:
- Open a cmd - Change the folder to D:\Avaya\Contact Center\Manager
Unable to access CCMA component intermittently after enabling SSO
Tracking Number CC-14606
Application Contact Center Manager Administration
Description After enabling SSO via Security Settings snap-in, unable to access CCMA component intermittently, the page is stuck at loading…
Impact Customer Impact: Cannot configure data from CCMA
Workaround The workaround is to restart IIS service using Manager Administration Configuration -> Security Settings -> Advanced -> Restart Service.
Document the use case for UnInstallADLDS.bat
Tracking Number CC-14620
Application Contact Center Manager Administration
Description Customers migrating from AACC 6.x to CC7 will restore the ADLDS instance but it is not always auto removed.
Impact Customer Impact: ADLDS exists on the system and some Windows ADLDS events are displayed
Workaround Users need to manually remove the ADLDS instance by running the following bat file: UnInstallADLDS.bat located in D:\Avaya\Contact Center\Manager Administration\Apps\Sysops\NESRestore
Avaya Aura® Contact Center 7.0.3.0
Release Notes
Page 51
AAD launch fails from IE on some clients
Tracking Number CC-14738
Application Contact Center Manager Administration
Description The launch address of AAD doesn’t seem to work correctly. For example, if the user enters https://<FQDN>/agentdesktop/ where FQDN is the AACC server, the user cannot launch AAD
Impact AAD
Workaround User needs to clear IE browsing history and try it again or use the MSI to install AAD
Installing CCMS Patch on a very large database can take 20+ minutes
Tracking Number CC-5140
Application Contact Center Manager Server
Description Installing a CCMS database patch on very large databases can take 20+ minutes. This is due to re-indexing of the CCMS database tables with volume of data in the order of few million rows.
Impact Longer CCMS patch install time.
Workaround None
Agent Greeting not working when extended characters used in Skillset name.
Tracking Number CC-12057
Application Agent Greeting
Description Agent Greeting experiences the following issues when extended characters (non-US-ASCII) used in Skillset name. Agent Greeting Recorder will drop the call when trying to record an Agent Greeting for a Skillset with extended characters.
Impact Agent cannot record an Agent Greeting for Skillset with non-ASCII characters.
Workaround None
Agent Greeting Recording not playing Welcome message or other messages as AAMS is unable to fetch wav files from AACC when security is disabled on upgraded system.
Tracking Number CC-14728
Application Agent Greeting
Description Agent Greeting Recording not playing Welcome message or other messages as AAMS is unable to fetch wav files from AACC when security is disabled on upgraded system
Impact Agent cannot hear any instructions after dialing into Agent Greeting Recorder. i.e. Welcome message, Please enter your Agent ID etc…
Workaround 1. Launch AACC Security Manager. 2. Select Security Configuration tab 3. Select Security On radio button and hit Apply button 4. Select Security Off radio button and hit Apply button
This adds the parameter: sendReasonPhrase=”true” to apache-tomcat server.xml HTTP connector: <Connector connectionTimeout="20000" port="8081" protocol="HTTP/1.1" redirectPort="8445" sendReasonPhrase="true"/>
Avaya Aura® Contact Center 7.0.3.0
Release Notes
Page 52
Agent Controls Browser Application – Online help not available when using Chrome browser
Tracking Number CC-9849
Application Agent Controls Browser Application
Description Online help feature is not working when using Chrome browser.
Impact Online documentation not available with this browser type.
Workaround Online help may be accessed using another browser.
CCT services keep restarting if no resources configured on CS1000 platform
Tracking Number CC-11144
Application Communication Control Toolkit
Description In CS1K voice only deployments which do not use CCT clients, AAAD or custom CCT clients, it is possible to not have any CCT terminals configured. This leads to a scenario where some CCT services will restart continually, these being ACDPROXYService and NCCT TAPI Connector Service.
Impact Some CCT services will restart continually, these being ACDPROXYService and NCCT TAPI Connector Service. AACC server operation may become negatively impacted if the services are allowed to keep restarting. It is therefore recommended to make the configuration changes outlined below as soon as possible.
Workaround To avoid the CCT services from continually restarting it is necessary to have at least one CCT terminal configured. To avoid warnings being logged a valid address should also be created and mapped to the terminal. Ensure CCT has been started as the NCCTDALS service is required for configuration. Following the steps documented in "Avaya Aura® Contact Center Client Administration": 1. section "Adding an address" to add a valid address 2. section "Adding a terminal" to add a valid terminal. 3. While creating the new terminal a mapping to the address/addresses created in the first step should be added. This is done by using the "Address assignments" section of the “Update Terminal” screen. The "Update Terminal" screen is available when creating or editing a terminal. When the address and terminal, with address terminal mappings, has been successfully saved a restart of CCT is required. The restart should be performed as follows: 1. Using SCMU "Shut down CCT" button 2. Wait for all of the services to successfully stop 3. Using SCMU "Start CCT" button 4. All of the CCT service should now start successfully and stay running.
Avaya Aura® Contact Center 7.0.3.0
Release Notes
Page 53
Agent Controls not working in Firefox Browser
Tracking Number CC-11673
Application Agent Controls Application
Description The agent controls application will not connect to the Integration Portal web socket when launched from Mozilla Firefox browser.
Impact It is not possible to use Agent Controls Application with Mozilla Firefox browser.
Workaround Use another browser, for example Internet Explorer.
On one particular deployment CCMS IS_Service fails to start
Tracking Number CC-13554
Application Contact Center Manager Server
Description On one particular deployment CCMS IS_Service fails to start.
Impact Intrinsics in scripting do not have valid data.
Solution There is no workaround. However, the problem usually disappears after a server restart.
AAD dashboard unable to zip log files from most recent startup
Tracking Number CC-14479
Application Agent Desktop
Description Cannot create log Zip file when collect logs from ‘Most Recent Startup’ option is selected in AAD dashboard
Impact Unable to use the collect logs from ‘Most Recent Startup’ option
Workaround Use ‘Last hour’ or ‘Specify Time and Date’ options to collect logs.
AAD does not display Agent Statistics when security is on
Tracking Number CC-13431
Application Agent Desktop
Description AAD will fail to display Agent Statistics if the following conditions exist: 1) Security is turned on in Security Manager (formerly known as Certificate Manager) 2) The server signed cert has SAN’s configured, ie for MCHA deployments the managed name should be configured as a SAN 3) The hostname configured within CCMM Administration for CC Web Stats matches one of these SAN names. Ie in MCHA the managed name is configured
Impact If the conditions described above exist then Agent Statistics will not display in AAD
Solution The work around is to configure (Agent Statistics) CC Web Stats to use an IP address instead of a hostname or FQDN. 1) Through CCMA launch the CCMM Administration client 2) Navigate to: General Administration -> Server Settings 3) With Server Settings selected on the left hand pane, a list of host names should be present on the right hand pane.
Avaya Aura® Contact Center 7.0.3.0
Release Notes
Page 54
4) Under Server Type find an entry called CC Web Stats and change the Hostname entry to use the relevant IP address instead of a hostname or FQDN 5) In HA environments this should be the managed IP address, in all other environments this should be the CCMS server IP address
For large Contact Centers, Agent RTD may fail to load agents
Tracking Number CC-13860
Application Contact Center Manager Administration
Description For a Contact Center with a very large number of configured agents, the time to load the agent records from the database may exceed the configured timeout. If the timeout is exceeded, the Agent RTD will not display the agents.
Impact The Agent RTD will not display the agents.
Workaround Increase the OAM Timeout to allow more time to load the agent records from the database. 1. From Start Menu, launch Manager Administration Configuration. 2. Select RTR Registry Settings. 3. Change OAM Timeout to 300000 milliseconds. 4. Accept the ICERtdService restart.
Grace Licensing can happen if managed IP address is greater that physical address
Tracking Number CC-14537
Application Contact Center Manager Server
Description In a HA deployment using Local WebLM, the WebLM HostID can resolve to the managed IP address. In this case the system will enter Grace Licensing.
Impact No immediate impact. However, the licensing must be resolved before the 30 days Grace Licensing expires.
Solution Using the HA configuration utility, configure the managed IP address lower than both the active and standby IP addresses.
Server Configuration shows warning dialog box when stating Avaya Media Server is unreachable
Tracking Number CC-9949
Application Server Configuration
Description On making changes in Server Configuration a warning dialog box is displayed stating “The Domain name was not updated in Avaya Media Server. Avaya Media Server is unreachable. Please ensure that the Avaya Media Server is started and configured correctly”
Impact If the Domain Name changes in Server Configuration then it tries to change the AAMS Content Store Namespace to match this value.
Workaround If you have changed the Domain Name in Server Configuration, then logon to AAMS Element Manager and change the namespace in the content store to match the Domain name.
Avaya Aura® Contact Center 7.0.3.0
Release Notes
Page 55
Using secure Web Services with DIW in HA configurations
Tracking Number CC-14655 / CC-14649
Application Database Integration Wizard
Description When Database Integration Wizard is used with secure Web Services in a High Availability configuration, the Web Service integration only works on the server where the Web Service was first imported. The integration does not work on the standby or RGN nodes.
Impact An imported secure Web Service will not work on the standby or RGN nodes.
Workaround In a switchover scenario, use DIW to delete the secure Web Service package. Then import the package again. A Designer Patch is available AvayaCC_CCCC_7.0.3.0.12, please contact Avaya Support if you need this patch.
Creating a Prepared Response generates an error dialog popup
Tracking Number CC-14815
Application CCMM Administration
Description When a user saves a new Prepared Response in CCMM Admin, a dialog pops up saying that “Prepared response body could not be updated”. However the prepared response is generated successfully.
Impact The user is given incorrect feedback on the operation
Workaround Generate the prepared response as normal and ignore the erroneous popup.
Avaya Aura® Contact Center 7.0.3.0
Release Notes
Page 56
Localization issues
Internationalization issues or common across all languages and require a base fix
Avaya Aura® Contact Center 7.0.3.0
Release Notes
Page 57
APPENDIX
Appendix A – Issues Addressed in this release This section of the release notes provides information on customer issues that have been addressed in this Feature Pack.
CCMS, CCSU, CCCC and CCLM Defect Listing This list contains defects addressed for the Manager Server, Common Components and License Manager Components
WI/JIRA Summary
CC-13078 SipSP generates connected event for failed DN call
CC-13554 SDP_Service and IS_Service restarting
CC-13586 late dialogend from sgm - agent hears music after answering cdn call
CC-13587 case sensitivity in IM URI causes stby SGM to consume all csta sessions on AES
CC-13708 Avoid sending ITR Music and ITR SBR to SGM in the same split second
CC-13717 Some IM RoutePoint not acquiring after a reboot
CC-13724 Hold times don’t peg in Contact Summary report for calls that disconnect while caller is on hold
CC-13764 Agent NRRC shows as blank on RTD, on Historical report it shows as Not Ready default reason code
CC-13768 Landing pad failures prevents UNE feature use with indication of memory leak in cmf
CC-13954 Event ID 61564 for Activity code 1234567890987643
CC-13956 leading zero stripped between Tapid and SipSP results in bad CLID in CTI and Desktop
CC-14033 CMF MSM crash when TLS link is detected lost to SM
CC-14187 DIALED DN intrinsic not available in AACC SIP environment
CC-14253 One less call waiting in Skillset Display after Switchover
CC-14462 WHERE-EQUALS is not processing contacts correctly
CC-14637 wsdl import fails at fp2
New Jiras in the GA Bundle
CC-14730 Phantom calls get hung in PSCAN
CC-13853 Import WSDL fails if the generated API description is more than 1000 characters
CC-15570 While calls are ringing on communicator they are not displaying/appearing on AAAD
CC-14909 TFE not going UP after DB Migration completed
CC-14984 XMLscript returned for Master_Script is larger than the 409600*2 value currently defined
CC-15045 Invalid Message Count - Compile was reported as successful but failed to Add TFFile row
CC-15706 Downgrade Radvision stack and OpenSSL to the version as in 7.0.1
Avaya Aura® Contact Center 7.0.3.0
Release Notes
Page 58
CCMA Defect Listing This list contains defects addressed for the Manager Administration components
CC-13762 icertdservice keeps crashing every minute
CC-13831 Failure to import some custom reports on CC7
CC-13862 HTTP 500 error when SSO is enabled on CCMA
CC-13888 SSO not working where SMGR user is a domain account
CC-13979 Application timeline private graphical Display is not working correctly
CC-13989 Standby server producing error on running scheduled reports in AACC
CC-14008 AAD auto login to CCMM fails with SSO enabled - CCMMAuthenticate getCCTLoginID could not connect to CCTProxy
CC-14172 unable to check master content store when SSO is enabled
CC-14196 customers AD domain account fails SSO authorisation to CCMA
CC-14259 Blending configuration from CCMA configuration page inaccessible
CC-14584 APM Reports fail to run
CC-14620 Document the use case for UnInstallADLDS.bat
CC-14688 Assignment detail on CCMA is not in alphabet order
CC-15491 CCMM auto Sign On fails for new agent following CCMA change from SAM to UPN after FP3
CCMM/AAD Defect Listing This list contains defects addressed for the Multimedia\Outbound Server and Avaya Agent Desktop components
WI/JIRA Summary
CC-13701 not receiving emails from Customer Mailserver due to JDK-8075484
CC-13709 The drop down for skillset is not sorted alphabetically in CCMM
CC-13716 AAAD skillset drop down limited to 25 chars
CC-13738 When migrating from AACC 6.4 to AACC 7.x, the signature of the agent in AAAD does not migrate correctly
CC-13783 Call History Missing on AAAD
CC-13794 Email Attachments with the same file name are not forwarded from AAD
CC-13929 advanced screen pop is not working with one of the SIP intrinsic .cmfContactid
CC-14056 AAD not ok after pasting clipboard content containing MS Excel cells - user cant type outside cells
CC-14063 CCMM cannot transfer email with attachment having filename slash
CC-14085 Agents cannot forward emails with attachments that have long filenames
CC-14163 outbound dial time talk time not stored in the DB
CC-14219 agent answers and handles chat but 50% of chats show false abandoned chat session error
CC-14317 CCMM 2063 OAMClientError on reading CCMS ActivityCode Data. Error Type Default occuring every 6 mins
CC-14430 Maximum 30 capital letters the AAAD is not showing the full name of the skillset for incoming calls/emails
CC-14443 AAD Terminates after Selecting Mute and Unmute Several Times
CC-17119 Configuration of Advanced screen pop up doesn't merge during patch installation
Avaya Aura® Contact Center 7.0.3.0
Release Notes
Page 59
Install Defect Listing This list contains Installation defects addressed for in this release
WI/JIRA Summary
None
CCT Defect Listing This list contains defects addressed for the Communication Control Toolkit components
WI/JIRA Summary
None
Avaya Aura® Contact Center 7.0.3.0
Release Notes
Page 60
CCMA ActiveX Control MSI – Content and Versions
File Name File Size (bytes) Version
ChartWrapperCtrl.ocx 64312 1.0.0.1
DTPWrapperCtrl.ocx 97080 8.0.0.0
hrctrl.dll 113464 8.0.0.4
iceemhlpcontrol.dll 129848 8.0.0.2
icertdcontrol.dll 854840 9.0.0.2
iemenu.ocx 65648 4.71.115.0
ntzlib.dll 65080 1.1.4.0
olch2x8.ocx 2102448 8.0.20051.51
rope.dll 248632 1.0.0.4
rsclientprint.dll 594432 2011.110.3128.0
sstree.ocx 337120 1.0.4.20
WSEColorText.ocx 179000 6.0.0.15
xerces-c_2_7.dll 1893832 12.5.0.1190
Avaya Aura® Contact Center 7.0.3.0
Release Notes
Page 61
Appendix B – Additional Security Information
Store Maintenance – backup and restore
Backing up the Certificate Store 1) Ensure all services are stopped 2) Launch Security Manager 3) Go to Store Maintenance Tab 4) In the Backup and Restore Certificate Store section choose a location in which to create the
backups. NOTE: do not choose a Contact Center directory structure 5) Press the Backup button to back up the store and its associated files 6) Check your chosen backup location and verify the following files are present in the directory:
Restoring the Certificate Store 1) Ensure all service are stopped 2) Launch Security Manager 3) Go to Store Maintenance Tab 4) Select the location where your backups are stored, in the Backup and Restore Certificate
Store section 5) Press Restore button to restore the store and associated files 6) Close Security Manager 7) Open Security Manager and confirm store has the correct content 8) Start Services
After restoring Certificate Store – Reset Security Level if previously set to ON If the certificate store has been restored onto a system that contained another store and had the security level set to ON then the following steps have to be followed to apply the new stores certificates to the various web servers otherwise the previous stores certificates will remain in effect. This procedure is only if the previous security setting was set to ON while using the previous store and the store has been restored.
1) Ensure all services are stopped. 2) Launch Security Manager. 3) Go to Security Configuration Tab. 4) Check Security level – If ON then turn OFF and then ON again. 5) Hit Apply button. This effectively will remove the previous configuration settings on the various web servers and apply the contents of the new store to web servers. Failure to follow this step will result in the various web servers using the certificates from the previous store regardless of the restore procedure.
Avaya Aura® Contact Center 7.0.3.0
Release Notes
Page 62
Restoring a certificate store whose contents have been signed by another Certificate Authority If the certificate store has been restored to a system that used another certificate authority (CA) to sign the contents of the store used previously then, if not done already, the root certificate authority certificate will have to be deployed to the various clients that communicate with the server. If the restored certificate store has been signed by the same certificate authority then this is not required since the root CA certificates should have already been distributed.
Backing up the Certificate Store
1) Ensure all services are stopped 2) Launch Security Manager 3) Go to Store Maintenance Tab 4) In the Backup and Restore Certificate Store section choose a location in which to create the
backups. NOTE: do not choose a Contact Center directory structure 5) Press the Backup button to back up the store and its associated files 6) Check your chosen backup location and verify the following files are present in the directory:
9) Ensure all service are stopped 10) Launch Security Manager 11) Go to Store Maintenance Tab 12) Select the location where your backups are stored, in the Backup and Restore Certificate
Store section 13) Press Restore button to restore the store and associated files 14) Close Security Manager 15) Open Security Manager and confirm store has the correct content 16) Start Services
After restoring Certificate Store – Reset Security Level if previously set to ON If the certificate store has been restored onto a system that contained another store and had the security level set to ON then the following steps have to be followed to apply the new stores certificates to the various web servers otherwise the previous stores certificates will remain in effect. This procedure is only if the previous security setting was set to ON while using the previous store and the store has been restored.
1) Ensure all services are stopped. 2) Launch Security Manager. 3) Go to Security Configuration Tab. 4) Check Security level – If ON then turn OFF and then ON again. 5) Hit Apply button.
Avaya Aura® Contact Center 7.0.3.0
Release Notes
Page 63
This effectively will remove the previous configuration settings on the various web servers and apply the contents of the new store to web servers. Failure to follow this step will result in the various web servers using the certificates from the previous store regardless of the restore procedure.
Restoring a certificate store whose contents have been signed by another Certificate Authority If the certificate store has been restored to a system that used another certificate authority (CA) to sign the contents of the store used previously then, if not done already, the root certificate authority certificate will have to be deployed to the various clients that communicate with the server. If the restored certificate store has been signed by the same certificate authority then this is not required since the root CA certificates should have already been distributed.
TLS Information
Non-mandatory TLS SIP connections
Session Manager releases TLSv1 support
SM Release
TLS v1.0 support
TLS v1.1 support
TLS v1.2 support Options
7.0.1 Yes Yes Yes
7.1 No No Yes (Greenfield sites only)
Minimum TLS version in SM R7.1 will be inherited from the release upgrading from The 7.1 SM EM running on SMGR will set the network global default to TLS 1.2 if it sees no SMs administered in the DB
Avaya Aura Media Server releases and TLSv1 support
AAMS Release TLS v1.0 support
TLS v1.1 support
TLS v1.2 support
Options
AAMS 7.8.0.7 SP7 No No Yes Configurable (via Element Manager) TLSv1.0 or TLSv1.1 can be set instead if required
Avaya Aura® Contact Center 7.0.3.0
Release Notes
Page 64
Known applications and services that cannot support TLS v1.2
HDX / DIW connection to databases HDX / DIW can be used to connect to customer databases. HDX / DIW connect to a remote database using an ODBC Data Source Name (DSN). The DSN for the database connection must be manually created on AACC using the ODBC Data Source Administrator. If connecting to older versions of Microsoft SQL Server, the DSN created will not connect successfully if TLS is set to higher than TLS v1.0. In this scenario, enable TLS v1.0 on Security Manager Security Configuration field “CCMA – Multimedia Web Service Level”.
Remote desktop Remote desktop connections can also be impacted on some client machines and requires a Microsoft KB required to remote into AACC server when TLS v1.1 or higher is set due to RDC only supporting TLS v1.0. Disabling TLS 1.0 on the CCMA- Multimedia web services setting in Security Manager will break RDP under default settings on Windows 7 clients and Windows 2008 R2 Server. This setting covers the entire AACC server and not only CCMA-MM WS and thus causes remote desktop connections to fail from Windows 7 and Windows 2008 R2 server due to the fact it cannot support TLS v1.1 or TLS v1.2. Please apply the following KB from Microsoft on your CLIENT or machine wishing to connect to CC server.
This update provides support for Transport Layer Security (TLS) 1.1 and TLS 1.2 in Windows 7 Service Pack 1 (SP1) or Windows Server 2008 R2 SP1 for Remote Desktop Services (RDS).
https://support.microsoft.com/en-us/kb/3080079
System Manager 7.0 System Manager 7.0 and earlier releases do not support TLS 1.1 and TLS 1.2 If implementing a Single Sign-On configuration using System Manager to login to CCMA then if TLS 1.1 or TLS 1.2 is enabled the System Manager login page will not be presented. System Manager 7.0.1 includes support for TLS 1.1 and TLS 1.2