110
Avaya Extension to Cellular and Off-PBX Station (OPS) Installation and Administration Guide Release 3.0 210-100-500 Version 6.0 Issue 9 June 2005
| Date post: | 30-May-2018 |
| Category: |
Documents |
| Upload: | vuongkhuong |
| View: | 232 times |
| Download: | 0 times |
Avaya Extension to Cellular andOff-PBX Station (OPS)Installation and Administration GuideRelease 3.0
210-100-500Version 6.0
Issue 9June 2005

Copyright 2005, Avaya Inc.All Rights Reserved
NoticeEvery effort was made to ensure that the information in this document was complete and accurate at the time of printing. However, information is subject to change.
WarrantyAvaya Inc. provides a limited warranty on this product. Refer to your sales agreement to establish the terms of the limited warranty. In addition, Avaya’s standard warranty language as well as information regarding support for this product, while under warranty, is available through the following Web site: http://www.avaya.com/support.
Preventing Toll Fraud"Toll fraud" is the unauthorized use of your telecommunications system by an unauthorized party (for example, a person who is not a corporate employee, agent, subcontractor, or is not working on your company's behalf). Be aware that there may be a risk of toll fraud associated with your system and that, if toll fraud occurs, it can result in substantial additional charges for your telecommunications services.
Avaya Fraud InterventionIf you suspect that you are being victimized by toll fraud and you need technical assistance or support, in the United States and Canada, call the Technical Service Center's Toll Fraud Intervention Hotline at1-800-643-2353.
DisclaimerAvaya is not responsible for any modifications, additions or deletions to the original published version of this documentation unless such modifications, additions or deletions were performed by Avaya. Customer and/or End User agree to indemnify and hold harmless Avaya, Avaya's agents, servants and employees against all claims, lawsuits, demands and judgments arising out of, or in connection with, subsequent modifications, additions or deletions to this documentation to the extent made by the Customer or End User.
How to Get HelpFor additional support telephone numbers, go to the Avaya support Web site: http://www.avaya.com/support. If you are:
• Within the United States, click the Escalation Management link. Then click the appropriate link for the type of support you need.
• Outside the United States, click the Escalation Management link. Then click the International Services link that includes telephone numbers for the international Centers of Excellence.
Providing Telecommunications SecurityTelecommunications security (of voice, data, and/or video communications) is the prevention of any type of intrusion to (that is, either unauthorized or malicious access to or use of) your company's telecommunications equipment by some party.Your company's "telecommunications equipment" includes both this Avaya product and any other voice/data/video equipment that could be accessed via this Avaya product (that is, "networked equipment").
An "outside party" is anyone who is not a corporate employee, agent, subcontractor, or is not working on your company's behalf. Whereas, a "malicious party" is anyone (including someone who may be otherwise authorized) who accesses your telecommunications equipment with either malicious or mischievous intent.
Such intrusions may be either to/through synchronous (time-multiplexed and/or circuit-based), or asynchronous (character-, message-, or packet-based) equipment, or interfaces for reasons of:
• Utilization (of capabilities special to the accessed equipment)• Theft (such as, of intellectual property, financial assets, or toll
facility access)• Eavesdropping (privacy invasions to humans)• Mischief (troubling, but apparently innocuous, tampering)• Harm (such as harmful tampering, data loss or alteration,
regardless of motive or intent)
Be aware that there may be a risk of unauthorized intrusions associated with your system and/or its networked equipment. Also realize that, if such an intrusion should occur, it could result in a variety of losses to your company (including but not limited to, human/data privacy, intellectual property, material assets, financial resources, labor costs, and/or legal costs).
Responsibility for Your Company’s Telecommunications SecurityThe final responsibility for securing both this system and its networked equipment rests with you - Avaya’s customer system administrator, your telecommunications peers, and your managers. Base the fulfillment of your responsibility on acquired knowledge and resources from a variety of sources including but not limited to:
• Installation documents• System administration documents• Security documents• Hardware-/software-based security tools• Shared information between you and your peers• Telecommunications security experts
To prevent intrusions to your telecommunications equipment, you and your peers should carefully program and configure:
• Your Avaya-provided telecommunications systems and their interfaces
• Your Avaya-provided software applications, as well as their underlying hardware/software platforms and interfaces
• Any other equipment networked to your Avaya products
TCP/IP FacilitiesCustomers may experience differences in product performance, reliability and security depending upon network configurations/design and topologies, even when the product performs as warranted.
Standards ComplianceAvaya Inc. is not responsible for any radio or television interference caused by unauthorized modifications of this equipment or the substitution or attachment of connecting cables and equipment other than those specified by Avaya Inc. The correction of interference caused by such unauthorized modifications, substitution or attachment will be the responsibility of the user. Pursuant to Part 15 of the Federal Communications Commission (FCC) Rules, the user is cautioned that changes or modifications not expressly approved by Avaya Inc. could void the user’s authority to operate this equipment.
Product Safety StandardsThis product complies with and conforms to the following international Product Safety standards as applicable:Safety of Information Technology Equipment, IEC 60950, 3rd Edition, or IEC 60950-1, 1st Edition, including all relevant national deviations as listed in Compliance with IEC for Electrical Equipment (IECEE) CB-96A.Safety of Information Technology Equipment, CAN/CSA-C22.2No. 60950-00 / UL 60950, 3rd Edition, or CAN/CSA-C22.2 No. 60950-1-03 / UL 60950-1.
Safety Requirements for Information Technology Equipment, AS/NZS 60950:2000.
One or more of the following Mexican national standards, as applicable: NOM 001 SCFI 1993, NOM SCFI 016 1993, NOM 019 SCFI 1998.
The equipment described in this document may contain Class 1 LASER Device(s). These devices comply with the following standards:
• EN 60825-1, Edition 1.1, 1998-01• 21 CFR 1040.10 and CFR 1040.11.
The LASER devices used in Avaya equipment typically operate within the following parameters:
Luokan 1 LaserlaiteKlass 1 Laser Apparat
Use of controls or adjustments or performance of procedures other than those specified herein may result in hazardous radiation exposures. Contact your Avaya representative for more laser product information.
Typical Center Wavelength Maximum Output Power
830 nm - 860 nm -1.5 dBm
1270 nm - 1360 nm -3.0 dBm
1540 nm - 1570 nm 5.0 dBm

Electromagnetic Compatibility (EMC) StandardsThis product complies with and conforms to the following international EMC standards and all relevant national deviations:Limits and Methods of Measurement of Radio Interference of Information Technology Equipment, CISPR 22:1997, EN55022:1998, and AS/NZS 3548.
Information Technology Equipment - Immunity Characteristics - Limits and Methods of Measurement, CISPR 24:1997 and EN55024:1998, including:
• Electrostatic Discharge (ESD) IEC 61000-4-2• Radiated Immunity IEC 61000-4-3• Electrical Fast Transient IEC 61000-4-4• Lightning Effects IEC 61000-4-5• Conducted Immunity IEC 61000-4-6• Mains Frequency Magnetic Field IEC 61000-4-8• Voltage Dips and Variations IEC 61000-4-11
Power Line Emissions, IEC 61000-3-2: Electromagnetic compatibility (EMC) - Part 3-2: Limits - Limits for harmonic current emissions.
Power Line Emissions, IEC 61000-3-3: Electromagnetic compatibility (EMC) - Part 3-3: Limits - Limitation of voltage changes, voltage fluctuations and flicker in public low-voltage supply systems.
Federal Communications Commission Statement
Part 15:
Part 68: Answer-Supervision SignalingAllowing this equipment to be operated in a manner that does not provide proper answer-supervision signaling is in violation of Part 68 rules. This equipment returns answer-supervision signals to the public switched network when:
• answered by the called station,• answered by the attendant, or• routed to a recorded announcement that can be administered
by the customer premises equipment (CPE) user.
This equipment returns answer-supervision signals on all direct inward dialed (DID) calls forwarded back to the public switched telephone network. Permissible exceptions are:
• A call is unanswered.• A busy tone is received.• A reorder tone is received.
Avaya attests that this registered equipment is capable of providing users access to interstate providers of operator services through the use of access codes. Modification of this equipment by call aggregators to block access dialing codes is a violation of the Telephone Operator Consumers Act of 1990.
REN Number
For MCC1, SCC1, CMC1, G600, and G650 Media Gateways:This equipment complies with Part 68 of the FCC rules. On either the rear or inside the front cover of this equipment is a label that contains, among other information, the FCC registration number, and ringer equivalence number (REN) for this equipment. If requested, this information must be provided to the telephone company.
For G350 and G700 Media Gateways:This equipment complies with Part 68 of the FCC rules and the requirements adopted by the ACTA. On the rear of this equipment is a label that contains, among other information, a product identifier in the format US:AAAEQ##TXXXX. The digits represented by ## are the ringer equivalence number (REN) without a decimal point (for example, 03 is a REN of 0.3). If requested, this number must be provided to the telephone company.
For all media gateways:The REN is used to determine the quantity of devices that may be connected to the telephone line. Excessive RENs on the telephone line may result in devices not ringing in response to an incoming call. In most, but not all areas, the sum of RENs should not exceed 5.0. To be certain of the number of devices that may be connected to a line, as determined by the total RENs, contact the local telephone company.REN is not required for some types of analog or digital facilities.
Means of ConnectionConnection of this equipment to the telephone network is shown in the following tables.
For MCC1, SCC1, CMC1, G600, and G650 Media Gateways:
For G350 and G700 Media Gateways:
For all media gateways:If the terminal equipment (for example, the media server or media gateway) causes harm to the telephone network, the telephone company will notify you in advance that temporary discontinuance of service may be required. But if advance notice is not practical, the telephone company will notify the customer as soon as possible. Also, you will be advised of your right to file a complaint with the FCC if you believe it is necessary.The telephone company may make changes in its facilities, equipment, operations or procedures that could affect the operation of the equipment. If this happens, the telephone company will provide advance notice in order for you to make necessary modifications to maintain uninterrupted service.
If trouble is experienced with this equipment, for repair or warranty information, please contact the Technical Service Center at1-800-242- 2121 or contact your local Avaya representative. If the equipment is causing harm to the telephone network, the telephone company may request that you disconnect the equipment until the problem is resolved.
Note: This equipment has been tested and found to comply with the limits for a Class A digital device, pursuant to Part 15 of the FCC Rules. These limits are designed to provide reasonable protection against harmful interference when the equipment is operated in a commercial environment. This equipment generates, uses, and can radiate radio frequency energy and, if not installed and used in accordance with the instruction manual, may cause harmful interference to radio communications. Operation of this equipment in a residential area is likely to cause harmful interference in which case the user will be required to correct the interference at his own expense.
Manufacturer’s PortIdentifier
FIC Code SOC/REN/A.S. Code
Network Jacks
Off premises station OL13C 9.0F RJ2GX, RJ21X, RJ11C
DID trunk 02RV2-T 0.0B RJ2GX, RJ21X
CO trunk 02GS2 0.3A RJ21X
02LS2 0.3A RJ21X
Tie trunk TL31M 9.0F RJ2GX
Basic Rate Interface 02IS5 6.0F, 6.0Y RJ49C
1.544 digital interface 04DU9-BN 6.0F RJ48C, RJ48M
04DU9-IKN 6.0F RJ48C, RJ48M
04DU9-ISN 6.0F RJ48C, RJ48M
120A4 channel service unit
04DU9-DN 6.0Y RJ48C
Manufacturer’s PortIdentifier
FIC Code SOC/REN/A.S. Code
Network Jacks
Ground Start CO trunk 02GS2 1.0A RJ11C
DID trunk 02RV2-T AS.0 RJ11C
Loop Start CO trunk 02LS2 0.5A RJ11C
1.544 digital interface 04DU9-BN 6.0Y RJ48C
04DU9-DN 6.0Y RJ48C
04DU9-IKN 6.0Y RJ48C
04DU9-ISN 6.0Y RJ48C
Basic Rate Interface 02IS5 6.0F RJ49C

A plug and jack used to connect this equipment to the premises wiring and telephone network must comply with the applicable FCC Part 68 rules and requirements adopted by the ACTA. A compliant telephone cord and modular plug is provided with this product. It is designed to be connected to a compatible modular jack that is also compliant. It is recommended that repairs be performed by Avaya certified technicians.The equipment cannot be used on public coin phone service provided by the telephone company. Connection to party line service is subject to state tariffs. Contact the state public utility commission, public service commission or corporation commission for information.
This equipment, if it uses a telephone receiver, is hearing aid compatible.
Canadian Department of Communications (DOC) Interference InformationThis Class A digital apparatus complies with Canadian ICES-003.
Cet appareil numérique de la classe A est conforme à la normeNMB-003 du Canada.
This equipment meets the applicable Industry Canada Terminal Equipment Technical Specifications. This is confirmed by the registration number. The abbreviation, IC, before the registration number signifies that registration was performed based on a Declaration of Conformity indicating that Industry Canada technical specifications were met. It does not imply that Industry Canada approved the equipment.
Installation and RepairsBefore installing this equipment, users should ensure that it is permissible to be connected to the facilities of the local telecommunications company. The equipment must also be installed using an acceptable method of connection. The customer should be aware that compliance with the above conditions may not prevent degradation of service in some situations.
Repairs to certified equipment should be coordinated by a representative designated by the supplier. Any repairs or alterations made by the user to this equipment, or equipment malfunctions, may give the telecommunications company cause to request the user to disconnect the equipment.
Declarations of ConformityUnited States FCC Part 68 Supplier’s Declaration of Conformity (SDoC)
Avaya Inc. in the United States of America hereby certifies that the equipment described in this document and bearing a TIA TSB-168 label identification number complies with the FCC’s Rules and Regulations 47 CFR Part 68, and the Administrative Council on Terminal Attachments (ACTA) adopted technical criteria.
Avaya further asserts that Avaya handset-equipped terminal equipment described in this document complies with Paragraph 68.316 of the FCC Rules and Regulations defining Hearing Aid Compatibility and is deemed compatible with hearing aids.Copies of SDoCs signed by the Responsible Party in the U. S. can be obtained by contacting your local sales representative and are available on the following Web site: http://www.avaya.com/support.
All Avaya media servers and media gateways are compliant with FCC Part 68, but many have been registered with the FCC before the SDoC process was available. A list of all Avaya registered products may be found at: http://www.part68.org by conducting a search using "Avaya" as manufacturer.
European Union Declarations of Conformity
Avaya Inc. declares that the equipment specified in this document bearing the "CE" (Conformité Europeénne) mark conforms to the European Union Radio and Telecommunications Terminal Equipment Directive (1999/5/EC), including the Electromagnetic Compatibility Directive (89/336/EEC) and Low Voltage Directive (73/23/EEC).Copies of these Declarations of Conformity (DoCs) can be obtained by contacting your local sales representative and are available on the following Web site: http://www.avaya.com/support.
JapanThis is a Class A product based on the standard of the Voluntary Control Council for Interference by Information Technology Equipment (VCCI). If this equipment is used in a domestic environment, radio disturbance may occur, in which case, the user may be required to take corrective actions.
To order copies of this and other documents:Call: Avaya Publications Center
Voice 1.800.457.1235 or 1.207.866.6701FAX 1.800.457.1764 or 1.207.626.7269
Write: Globalware Solutions200 Ward Hill AvenueHaverhill, MA 01835 USAAttention: Avaya Account Management
E-mail: [email protected] the most current versions of documentation, go to the Avaya support Web site: http://www.avaya.com/support.
Issue 9 June 2005 5
About this document . . . . . . . . . . . . . . . . . . . . . . . . . . . . 9Purpose. . . . . . . . . . . . . . . . . . . . . . . . . . . . . . . . . . . . . . . . . 9
Intended audiences . . . . . . . . . . . . . . . . . . . . . . . . . . . . . . . . . . 9
Reason for reissue. . . . . . . . . . . . . . . . . . . . . . . . . . . . . . . . . . . 9
How to use this document . . . . . . . . . . . . . . . . . . . . . . . . . . . . . . 9
Conventions used . . . . . . . . . . . . . . . . . . . . . . . . . . . . . . . . . . . 10
Admonishments . . . . . . . . . . . . . . . . . . . . . . . . . . . . . . . . . . . . 11
Trademarks. . . . . . . . . . . . . . . . . . . . . . . . . . . . . . . . . . . . . . . 11
Related documentation . . . . . . . . . . . . . . . . . . . . . . . . . . . . . . . . 12
How to obtain Avaya books on the Web . . . . . . . . . . . . . . . . . . . . . . . 12
How to order documentation . . . . . . . . . . . . . . . . . . . . . . . . . . . . . 12
How to comment on this book . . . . . . . . . . . . . . . . . . . . . . . . . . . . 13
How to get help . . . . . . . . . . . . . . . . . . . . . . . . . . . . . . . . . . . . 13
Chapter 1: Overview of Avaya Extension to Cellularand Off-PBX Stations . . . . . . . . . . . . . . . . . . . . . 15
Introduction . . . . . . . . . . . . . . . . . . . . . . . . . . . . . . . . . . . . . . 15Terms . . . . . . . . . . . . . . . . . . . . . . . . . . . . . . . . . . . . . . . . 15Extension to Cellular . . . . . . . . . . . . . . . . . . . . . . . . . . . . . . . 16Outboard Proxy SIP (OPS) . . . . . . . . . . . . . . . . . . . . . . . . . . . . 16Seamless Converged Communications Across Network (SCCAN) . . . . . . 16Cellular Service Provider (CSP). . . . . . . . . . . . . . . . . . . . . . . . . . 17
What’s new in Extension to Cellular . . . . . . . . . . . . . . . . . . . . . . . . . 17Customer configurations . . . . . . . . . . . . . . . . . . . . . . . . . . . . . 18Platforms . . . . . . . . . . . . . . . . . . . . . . . . . . . . . . . . . . . . . . 18Phones supported . . . . . . . . . . . . . . . . . . . . . . . . . . . . . . . . . 18Extension to Cellular versions and Communication Manager . . . . . . . . . 19System access terminal (SAT) screens . . . . . . . . . . . . . . . . . . . . . 20
Feature description . . . . . . . . . . . . . . . . . . . . . . . . . . . . . . . . . . 20Feature Name Extensions (FNE) . . . . . . . . . . . . . . . . . . . . . . . . . 20Extension to Cellular, security codes, and console permissions . . . . . . . 21Call waiting, call identification, and voice mail . . . . . . . . . . . . . . . . . 21
ARS/AAR routing . . . . . . . . . . . . . . . . . . . . . . . . . . . . . . . . . . . 22
Call filtering . . . . . . . . . . . . . . . . . . . . . . . . . . . . . . . . . . . . . . 23Call filtering and mapped stations . . . . . . . . . . . . . . . . . . . . . . . . 23
Capacity limitations . . . . . . . . . . . . . . . . . . . . . . . . . . . . . . . . . . 23
Contents

Contents
6 Installation and Administration Guide
Feature operation . . . . . . . . . . . . . . . . . . . . . . . . . . . . . . . . . . . 24Receiving calls . . . . . . . . . . . . . . . . . . . . . . . . . . . . . . . . . . . 24Making calls . . . . . . . . . . . . . . . . . . . . . . . . . . . . . . . . . . . . 25
User scenarios . . . . . . . . . . . . . . . . . . . . . . . . . . . . . . . . . . . . . 25
Feature interactions . . . . . . . . . . . . . . . . . . . . . . . . . . . . . . . . . . 26Attendant . . . . . . . . . . . . . . . . . . . . . . . . . . . . . . . . . . . . . 26Call coverage. . . . . . . . . . . . . . . . . . . . . . . . . . . . . . . . . . . . 26Cellular service provider voice mail . . . . . . . . . . . . . . . . . . . . . . . 27Class of Restriction (COR) . . . . . . . . . . . . . . . . . . . . . . . . . . . . 27Distributed Communication System (DCS) . . . . . . . . . . . . . . . . . . . 27Distinctive alerting. . . . . . . . . . . . . . . . . . . . . . . . . . . . . . . . . 28Extension to Cellular enable and disable . . . . . . . . . . . . . . . . . . . . 28Extension to Cellular with office caller IDcalling another Extension to Cellular user . . . . . . . . . . . . . . . . . . . 28
Feature access codes (FAC) . . . . . . . . . . . . . . . . . . . . . . . . . . . 28Feature name extensions (FNE) . . . . . . . . . . . . . . . . . . . . . . . . . 29Message waiting indication . . . . . . . . . . . . . . . . . . . . . . . . . . . . 29“Notify me” under Unified Messenger for MS Exchange . . . . . . . . . . . . 29Originating CDR on calls . . . . . . . . . . . . . . . . . . . . . . . . . . . . . 29QSIG . . . . . . . . . . . . . . . . . . . . . . . . . . . . . . . . . . . . . . . . 30
Chapter 2: Installation and planning . . . . . . . . . . . . . . . . . . . . 31Installation . . . . . . . . . . . . . . . . . . . . . . . . . . . . . . . . . . . . . . . 31
Configuration/environment requirements . . . . . . . . . . . . . . . . . . . . 31Customer options . . . . . . . . . . . . . . . . . . . . . . . . . . . . . . . . . 31
Administration planning. . . . . . . . . . . . . . . . . . . . . . . . . . . . . . . . 32Planning requirements . . . . . . . . . . . . . . . . . . . . . . . . . . . . . . 32Security codes . . . . . . . . . . . . . . . . . . . . . . . . . . . . . . . . . . . 33Enabling and disabling feature access codes . . . . . . . . . . . . . . . . . . 33
Chapter 3: Administration . . . . . . . . . . . . . . . . . . . . . . . . . 35Introduction . . . . . . . . . . . . . . . . . . . . . . . . . . . . . . . . . . . . . . 35
Displaying the customer options for Extension to Cellular . . . . . . . . . . . . 35Field descriptions . . . . . . . . . . . . . . . . . . . . . . . . . . . . . . . . . 37
Station administration . . . . . . . . . . . . . . . . . . . . . . . . . . . . . . . . . 40Mapping a host phone with an Extension to Cellular phone . . . . . . . . . . 40Mapping modes . . . . . . . . . . . . . . . . . . . . . . . . . . . . . . . . . . 45
Calls terminating to a cell phone or SIP phone . . . . . . . . . . . . . . . 45Calls originating from a cell phone or SIP phone . . . . . . . . . . . . . . 45

Contents
Issue 9 June 2005 7
Calls both to and from a cell phone or SIP phone . . . . . . . . . . . . . 45No calls to or from a cell phone or SIP phone . . . . . . . . . . . . . . . 46
Calls allowed . . . . . . . . . . . . . . . . . . . . . . . . . . . . . . . . . . . . 46Internal . . . . . . . . . . . . . . . . . . . . . . . . . . . . . . . . . . . . . 46External . . . . . . . . . . . . . . . . . . . . . . . . . . . . . . . . . . . . . 46All . . . . . . . . . . . . . . . . . . . . . . . . . . . . . . . . . . . . . . . . 46None . . . . . . . . . . . . . . . . . . . . . . . . . . . . . . . . . . . . . . 46
Setting up the Self Administration Feature (SAFE) Access Code . . . . . . . 47Setting up Feature Name Extensions (FNE) . . . . . . . . . . . . . . . . . . . 47Office caller ID . . . . . . . . . . . . . . . . . . . . . . . . . . . . . . . . . . . 49
Sending 10-digit caller identification for locally-originated calls. . . . . . . . . . 50
Setting up Special Digit Conversion (SDC) . . . . . . . . . . . . . . . . . . . . . 50
Call filtering administration . . . . . . . . . . . . . . . . . . . . . . . . . . . . . 51
Setting up the Extension to Cellular access number . . . . . . . . . . . . . . . . 52
Setting up the Extension to Cellular enable/disable feature access codes . . . . 53
Setting up multiple applications on one phone . . . . . . . . . . . . . . . . . . . 54
Voice mail administration . . . . . . . . . . . . . . . . . . . . . . . . . . . . . . . 55Cellular Voice Mail Avoidance . . . . . . . . . . . . . . . . . . . . . . . . 55Using timing to route calls . . . . . . . . . . . . . . . . . . . . . . . . . . 57
Using corporate voice mail to receive messages . . . . . . . . . . . . . . . . 58Preventing messages from automatically going to cellular voice mail . . . . 59“Notify me” under Unified Messenger for MS Exchange . . . . . . . . . . . . 60
Administering the barge-in tone . . . . . . . . . . . . . . . . . . . . . . . . . . . 60
Call Detail Recording (CDR). . . . . . . . . . . . . . . . . . . . . . . . . . . . . . 61Changing configuration sets . . . . . . . . . . . . . . . . . . . . . . . . . . . 64Generating two CDR records . . . . . . . . . . . . . . . . . . . . . . . . . . . 68
Creating a feature access code to change station security codes . . . . . . . . . 68
Administering Extension to Cellularfeature access buttons on the office phone . . . . . . . . . . . . . . . . . . . . 70
Enable/Disable with timer . . . . . . . . . . . . . . . . . . . . . . . . . . . . . 70Enabling and disabling Extension to Cellular . . . . . . . . . . . . . . . . . . 72Extend Call feature button . . . . . . . . . . . . . . . . . . . . . . . . . . . . 74View feature buttons and button labels . . . . . . . . . . . . . . . . . . . . . 75
Creating a Wireless Service Manager (WSM) route pattern. . . . . . . . . . . . . 76
Redirect on OPTIM Failure (ROOF) procedures . . . . . . . . . . . . . . . . . . . 77
Chapter 4: Installation and administration test . . . . . . . . . . . . . . 79Introduction . . . . . . . . . . . . . . . . . . . . . . . . . . . . . . . . . . . . . . 79
Test procedures . . . . . . . . . . . . . . . . . . . . . . . . . . . . . . . . . . . . 79

Contents
8 Installation and Administration Guide
Chapter 5: Maintenance . . . . . . . . . . . . . . . . . . . . . . . . . . . 81Introduction . . . . . . . . . . . . . . . . . . . . . . . . . . . . . . . . . . . . . . 81
About maintenance commands. . . . . . . . . . . . . . . . . . . . . . . . . . . . 81
System Capacity screen . . . . . . . . . . . . . . . . . . . . . . . . . . . . . . . 81
Status screens . . . . . . . . . . . . . . . . . . . . . . . . . . . . . . . . . . . . . 82General Status screen . . . . . . . . . . . . . . . . . . . . . . . . . . . . . . . 82Off-PBX Telephone Status for Station screen . . . . . . . . . . . . . . . . . . 84
List screens . . . . . . . . . . . . . . . . . . . . . . . . . . . . . . . . . . . . . . 84Extension Type screen . . . . . . . . . . . . . . . . . . . . . . . . . . . . . . 85List Usage Report screen . . . . . . . . . . . . . . . . . . . . . . . . . . . . . 86
Display errors/alarms . . . . . . . . . . . . . . . . . . . . . . . . . . . . . . . . . 86
Chapter 6: Troubleshooting. . . . . . . . . . . . . . . . . . . . . . . . . 87Introduction . . . . . . . . . . . . . . . . . . . . . . . . . . . . . . . . . . . . . . 87
Users cannot receive Extension to Cellular calls on their cell phones . . . . 87Error conditions table . . . . . . . . . . . . . . . . . . . . . . . . . . . . . . . 88
Appendix A: Upgrades from prior versions . . . . . . . . . . . . . . . . 97Upgrade from Extension to Cellular Version 5. . . . . . . . . . . . . . . . . . . . 97
Upgrade from Extension to Cellular Version 4 . . . . . . . . . . . . . . . . . . . 98
Upgrade from Extension to Cellular Version 3 . . . . . . . . . . . . . . . . . . . 99
Upgrade from Extension to Cellular Version 2 . . . . . . . . . . . . . . . . . . . 100
Upgrade from Extension to Cellular Version 1 . . . . . . . . . . . . . . . . . . . 101
Glossary . . . . . . . . . . . . . . . . . . . . . . . . . . . . . . . . . . 103
Index . . . . . . . . . . . . . . . . . . . . . . . . . . . . . . . . . . 107
Issue 9 June 2005 9
About this document
PurposeThis guide describes the installation, administration, maintenance, and troubleshooting tasks necessary to install and set up Avaya Extension to Cellular.
Intended audiencesThis guide is intended for a company’s system administrators. In addition, software specialists and Avaya technical personnel may find the information helpful.
Reason for reissueThis guide has been reissued to provide information supporting Extension to Cellular Version 6 based on Avaya Communication Manager, Release 3.0.
How to use this documentThe document is organized as follows:
Chapter 1: Overview of Avaya Extension to Cellular and Off-PBX Stations provides an overview of features, capacity considerations, hardware/software requirements and security.
Chapter 2: Installation and planning provides information on installation of Extension to Cellular, as well as planning tasks to be performed before Extension to Cellular extensions are administered.
Chapter 3: Administration provides detailed instructions on administering stations for Extension to Cellular implementation.
Chapter 4: Installation and administration test provides basic test procedures for Extension to Cellular.
Chapter 5: Maintenance provides details on Extension to Cellular maintenance considerations.

10 Installation and Administration Guide
Chapter 6: Troubleshooting provides errors conditions, causes, and resolutions that may occur with Extension to Cellular operation.
Appendix A: Upgrades from prior versions provides an overview of how to upgrade from previous Extension to Cellular releases 5, 4, 3, 2, or 1.
Conventions usedBecome familiar with the following terms and conventions. They help you use this book with Communication Manager.
● Names of screens are printed in bold as follows: screen name.
A “screen” is the display of fields and prompts that appear on a computer or terminal monitor. See Figure 1: Optional Features screen, page 1 on page 36 for an example of a screen and how it is shown in this book.
● Keys on a keyboard, buttons that appear on a screen, and text that you need to type are printed in bold as follows: Key.
● Commands are printed in bold as follows: command.
We show complete commands in this book, but you can usually type an abbreviated version of the command. For example, list configuration station can be typed as list config sta.
● Command variables are printed in bold italic as follows: command variable.
● Anything that displays on a screen in response to a command or other input is shown in a constant width font as follows: Command successfully completed.
● To move to a certain field, you can use the Tab key, arrow keys, or the Enter key (the Enter key may appear as the Return key or the Submit key on your keyboard).
● We show commands and screens from the most recent release of Communication Manager and refer to the most current books. Please substitute the appropriate commands for your system and refer to the manuals you have available.
● When a procedure requires you to press Enter to save your changes, the screen you were working on clears and the cursor returns to the command prompt.
The message line shows “Command successfully completed” to indicate that the system accepted your changes.

Issue 9 June 2005 11
● If you need help constructing a command or completing a field entry, remember to use Help.
- When you press Help at any point on the command line, a list of available commands appears.
- When you press Help with your cursor in a field on a screen, a list of valid entries for that field appears.
● The status line or message line can be found near the bottom of your monitor display. This is where the system displays messages for you. Check the message line to see how the system responds to your input. Write down the message if you need to call our helpline.
AdmonishmentsAdmonishments in this book have the following meanings:
Note:Note: Draws attention to information that you must heed.
! CAUTION:CAUTION: Denotes possible harm to software, possible loss of data, or possible service
interruptions.
! WARNING:WARNING: Denotes possible harm to hardware or equipment.
! DANGER:DANGER: Denotes possible harm or injury to your body.
! SECURITY ALERT:SECURITY ALERT: Indicates when system administration may leave your system open to toll fraud.
TrademarksAll trademarks identified by ® or ™ are registered trademarks or trademarks, respectively, of Avaya, Inc. All other trademarks are the property of their respective owners.

12 Installation and Administration Guide
Related documentationAvaya Extension to Cellular User’s Guide, Issue 8, April 2005 (document number210-100-700)
Administrator Guide for Avaya Communication Manager, Issue 1, April 2005 (document number 03-300509)
Avaya Unified Messenger® Telephone User Interface Online Guide, accessed through the Avaya support Web site: http://www.avaya.com/support.
Avaya SCCAN Total Solution Guide, Issue 2.0, April 2005 (document number 21-300041)
How to obtain Avaya books on the WebIf you have internet access, you can view and download the latest version of Avaya documentation products. To view any book, you must have a copy of Adobe Acrobat Reader.
Note:Note: If you don’t have Acrobat Reader, you can get a free copy at http://
www.adobe.com.
For example, to access an electronic version of this book:
1. Access the Avaya Web site at http://www.avaya.com/support/.
2. Click in the Search text box.
3. Type the document number 210-100-500 in the Search text box, and then click the arrow button.
4. In the resulting list, locate the latest version of the document, and then click the document title to view the latest version of the book.
How to order documentationIn addition to this book, other description, installation and test, maintenance, and administration books are available.
This document and any other Avaya documentation can be ordered directly from the Avaya Publications Center toll free at 1-800-457-1235 (voice) and 1-800-457-1764 (fax). Customers outside the United States should use +1-410-568-3680 (voice) and +1-410-891-0207 (fax).

Issue 9 June 2005 13
How to comment on this bookAvaya welcomes your feedback. Contact us through:
● e-mail: [email protected]
● fax: 1-303-538-1741
● Contact your Avaya representative
Mention this document’s name and number, Avaya Extension to Cellular Installation and Administration Guide, 210-100-500.
Your comments are of great value and help improve our documentation.
How to get helpIf you suspect that you are being victimized by toll fraud and you need technical assistance or support in the United States and Canada, call the Technical Service Center's Toll Fraud Intervention Hotline at 1-800-643-2353.
If you need additional help, the following resources are available. You may need to purchase an extended service agreement to use some of these resources. See your Avaya representative for more information.
Go to the Avaya Web site at http://www.avaya.com/support:
● If you are within the United States, click the Escalation Contacts link. Then click the appropriate link for the type of support you need.
● If you are outside the United States, click the Escalation Contacts link. Then click International Services, which includes phone numbers for the international Centers of Excellence. Or contact your local Avaya authorized dealer for any additional help and questions.

14 Installation and Administration Guide

Issue 9 June 2005 15
Chapter 1: Overview of Avaya Extension to Cellularand Off-PBX Stations
IntroductionAvaya Extension to Cellular provides users with the capability to have one administered phone that supports Avaya Communication Manager features for both an office phone and one outside phone. Extension to Cellular allows users to receive and place office calls anywhere, any time. People calling into an office phone can reach users even if they are not in the office. Users could receive the call on their cell phone, for example. This added flexibility also allows them to use certain Communication Manager features from a phone that is outside the phone network.
This administration guide describes the high-level functions of Extension to Cellular, hardware and software requirements for implementation, and the installation, administration, and maintenance tasks necessary to set up and maintain Extension to Cellular.
Its companion document, Avaya Extension to Cellular User’s Guide, 210-100-700, provides basic information for Extension to Cellular users.
Terms
For ease of reference, the remainder of this document refers to the following terms:
● The term “Extension to Cellular” refers to the set of features offered with Release 2.0 and higher of Avaya Communication Manager. It is the combination of features for both Extension to Cellular (cell phone) use, and features for Session Initiation Protocol (SIP) phones.
● The term “Extension to Cellular” by itself refers to the set of features offered for cell phone use only. (For more information, see Extension to Cellular on page 16.)
● The terms “host phone” and “office phone” mean the same thing, and refer to a phone that is directly under the control of Communication Manager – like the desk phone in an office.
● The term “SIP phone” refers to an IP phone that uses the Session Initiation Protocol (SIP) to handle calls, and is not directly under the control of Communication Manager.
● The term “cell phone” refers specifically to a cell or wireless phone.
Note:Note: Extension to Cellular works with any type of wireless or cellular service.
16 Installation and Administration Guide
Extension to Cellular
Previous versions of Extension to Cellular allowed for office calls to be extended to a user’s cell phone. Also, calls from the cell phone would appear as if the call originated from the user’s office phone when calling another phone on the same call server. Certain features within Communication Manager are available from the cell phone. These features are still available.
In prior releases of Extension to Cellular, cell phones had to be administered as XMOBILE stations. This is no longer necessary after Communication Manager Release 2.0.
If you had administered Extension to Cellular in earlier releases of Communication Manager, you do not have to change the administration to continue using Extension to Cellular features. It still works. However, users would not have the full range of features that are now possible with Extension to Cellular.
If you want to take full advantage of the Extension to Cellular features, you must change the administration from a previous version of Extension to Cellular. See Appendix A: Upgrades from prior versions.
Outboard Proxy SIP (OPS)
Outboard Proxy SIP (OPS) application type is used to administer a SIP phone. OPS cannot be disabled using the Extension to Cellular enable/disable feature button.
Note:Note: A 4602 SIP phone must register with the SIP proxy regardless of whether OPS is
administered.
The Extension to Cellular application allows for many of the parameters used for the original Extension to Cellular application to be ported onto one of several DCP and IP station types. From a call processing perspective, Extension to Cellular is in fact dealing with a multi-function phone, whereas the previous Extension to Cellular implementation utilized one or two XMOBILE stations that behaved like analog station types. For more information about configuring and using SIP, see the SIP Personal Information Manager, 03-300441.
Seamless Converged Communications Across Network (SCCAN)
The Seamless Converged Communications Across Network (SCCAN) application type offers voice and data access from a single SCCAN handset integrated with a desktop phone across the corporate Wireless Local Area Network (WLAN) and public Global System for Mobile communication (GSM) and cellular networks. The SCCAN solution allows a wireless user to access the features of Avaya Communication Manager and extends those features outside to the wide area cellular network. For more information about seamless converged communications, see the Seamless Communication Total Solution Guide, 21-300041.
Issue 9 June 2005 17
Cellular Service Provider (CSP)
Cellular service providers who resell the Extension to Cellular service use the Cellular Service Provider (CSP) application type. CSP supports ISDN, H323, and SIP trunks. CSP is essentially the same as the Extension to Cellular application. CSP is already enabled when a user receives this service. Unlike Extension to Cellular, CSP is always enabled and cannot be disabled by a user. The CSP application type uses the Extension to Cellular license fees.
What’s new in Extension to CellularIn addition to features in previous releases of Communication Manager and Extension to Cellular, Extension to Cellular enhancements for Release 3.0 include the following:
● The Self Administration Feature (SAFE) Access Code allows users to self-administer their cell phone number. Users can add or change their cell phone number through this feature access code. An administrator can still enter or change cell phone numbers.
● A barge-in tone increases security for Extension to Cellular calls. The tone alerts parties on an active Extension to Cellular call when another person joins the call on the Extension to Cellular associated office phone. The barge-in tone works only when the exclusion feature is not activated.
● Calls are redirected by ROOF (Redirect on OPTIM Failure) procedures if a call terminates to an Extension to Cellular user cell phone (of any application type) that does not have an associated office phone (or other method of terminating to a physical phone) or the office phone is out of order and Communication Manager receives a disconnect prior to the call being answered. The procedure redirects the call so that the caller does not hear ringback forever. In general, the ROOF procedures apply to busy treatment.
● Three new Feature Name Extensions have been added:
- Automatic Call Back allows a user to choose whether they want an extension to automatically call them back. Users are called back when they place a call to a busy or unanswered telephone and after the called telephone becomes available to receive a call.
- Call Pickup Extended Group allows a user to answer calls that were directed to another call pickup group.
- Whisper Page Activation allows a user to make whisper pages. A whisper page is a low volume message. Users can send a whisper page when they want only one person on a conference call to hear a message.
18 Installation and Administration Guide
Customer configurations
Extension to Cellular is dependent upon ISDN PRI/BRI facilities to the PSTN. The customer must have ISDN PRI/BRI enabled and have the appropriate circuit packs and service from the PSTN. This application is supported on any call processing server platform.
Extension to Cellular provides the ability to operate a cell phone as a standard, caller ID-enabled phone connected directly to the Avaya server running Communication Manager. SIP phones are connected to a Converged Communications Server, and through the server, to Communication Manager.
This configuration allows for administration that causes an office caller ID to be sent to calls on the switch from the Extension to Cellular cell phone. A variation on this implementation would be to map only one call appearance on the cell phone to the office number.
In cases where a user does not require a physical office number, the cell phone can be mapped to an administration without hardware (AWOH) extension on the Avaya server running Communication Manager. This configuration gives the user an enterprise presence for incoming business calls through the cell phone. An Extension to Cellular cell phone can be administered to allow office caller ID to be sent when the user calls into the switch from that Extension to Cellular cell phone.
Platforms
Extension to Cellular is available on any Avaya server running Communication Manager. Any capacity differences are due to differences in the numbers of stations, trunks, circuit packs or media modules supported on the different platforms.
Phones supported
The following phone types may be administered as the “host phone” using Extension to Cellular:
2402 4606 4630 6408D
2410 4610 6402 6408D+
2420 4612 6402D 6416D+
4601 4620 6408 6424D+
4602 4624 6408+
Issue 9 June 2005 19
Extension to Cellular versions and Communication Manager
Following are the versions of Extension to Cellular that correspond to releases of Avaya Communication Manager (formerly known as MultiVantage™ Software):
Table 1: Communication Manager-to-Extension to Cellular mapping
Communication Manager / MultiVantage™ release
Extension to Cellular version
Communication Manager Release 3.0 Self Administration Feature Access Code, barge-in tone, call redirection by Redirect on OPTIM Failure procedures, and three new feature name extensions, automatic call back, call pickup extension group, and whisper page, introduced. Extension to Cellular Version 6.0.
Communication Manager Release 2.2 Cellular Service Provider application type, Special Digit Conversion and increased trunk capacity through Wireless Service Manager introduced. Extension to Cellular Version 5.2
Communication Manager Release 2.1 Cellular Voice Mail Avoidance and feature name extensions for Off-PBX Enable and Off-PBX Disable introduced. Extension to Cellular Version 5.1
Communication Manager Release 2.0 OPS feature introduced. Extend call button and feature name extensions (FNE) introduced. Extension to Cellular Version 5.0.
Communication Manager Release 1.3 Extension to Cellular Version 4.1
MultiVantage™ Software Release 1.2 (load 110.x)
Extension to Cellular Version 4
MultiVantage™ Software Release 1.1.2 (load 65.x)
Extension to Cellular Version 4
MultiVantage™ Software Release 1.1.1 (load 60.x)
Extension to Cellular Version 3
20 Installation and Administration Guide
System access terminal (SAT) screens
The screens in this guide may not exactly match the version that exists on the system access terminal (SAT) for your Avaya server running Communication Manager. However, all fields described here as essential for Extension to Cellular setup and administration can be found on all versions of the terminals, regardless of any variation in field layouts.
Feature descriptionExtension to Cellular allows a cell phone to be treated as if it were an extension on the Avaya server running Communication Manager. This is accomplished by mapping the phone to the user’s main office phone. All other types of calls, such as direct calls to and from the published cell phone number, are unaffected by Extension to Cellular. The user’s cell phone performs exactly as it did prior to enabling it for Extension to Cellular.
When Extension to Cellular is administered and active, a call towards the office phone's extension alerts both the office phone and the outside phone simultaneously. This allows users to receive work-related calls wherever they are and whenever they need to.
Additionally, the outside phone can be administered so that when a user calls into the office, the user’s name and office phone number appear in the caller ID display of the phone being called. The user also has the option of picking up an ongoing Extension to Cellular cell phone call on the office phone upon entering the office.
The cell phone user receives the same features and capabilities for incoming calls as a caller ID-enabled analog phone connected directly to the Avaya server running Communication Manager. Extension to Cellular provides this capability regardless of the cell phone’s cellular service provider or the cellular standard in use.
Feature Name Extensions (FNE)
Once connected, a cell phone or SIP phone user has the ability to activate certain Communication Manager features by dialing a feature name extension (FNE). You, as the administrator, create these phone extensions on a new screen (see Figure 6: Extensions to Call which Activate Features By Name screen, page 1 on page 48). On the screen, you map these phone extensions to specific features in Communication Manager. The phone extensions must comply with your dial plan and are administered system-wide.
This capability adds to the current capability to invoke certain features through feature access codes (FAC).

Issue 9 June 2005 21
Extension to Cellular, security codes, and console permissions
While security codes are available to protect activation of this feature, you do not need to set security codes if you have console permissions as set on the Class of Service (COS) screen.
● If you have console permissions, you do not need a security code to activate Extension to Cellular.
● If you do not have console permissions, you need a security code to activate Extension to Cellular.
Extension to Cellular makes use of station security codes to ensure that users have control over who is enabling and disabling their extensions.
Note:Note: The exception is the ability to enable and disable Extension to Cellular and to, if
so configured, enable an Extension to Cellular timer from an administered feature button on the office phone. Security codes are not required to use an administered feature button on a office phone.
While using an Extension to Cellular cell phone on a business call, the user may hear a beep tone (if Conference Tone and Barge-In Tone are administered) indicating someone has picked up the office number and is listening in on the call. Avaya provides that beep tone for security purposes. If a user suspects unauthorized use of the office number or an enabled Extension to Cellular cell phone, the call should be ended immediately and the user’s station security codes should be changed immediately. See Chapter 5: Maintenance, and Chapter 6: Troubleshooting, for more information on handling this situation.
If additional security is required, administer one of Avaya’s exclusion features.
Call waiting, call identification, and voice mail
Extension to Cellular allows use of standard cellular features such as incoming call waiting and caller ID.
● If the cell phone (and network) supports calling number identification, the Avaya server running Communication Manager delivers the calling number to the cell phone. For internally-originated calls, the calling number may be presented in either the national numbering plan format (ten digits), or as an extension fewer than ten digits depending upon how calling number identification is administered. Some cellular phone networks only pass calling number information in the national format, while others are more flexible.
● If the cell phone (and network) supports call waiting, Extension to Cellular can be administered to deliver a second call to the cell phone while it is busy on another call. The cell phone features (for example, swapping calls or conferencing calls) may be used to answer the second call and manipulate the two calls through the cell phone.

22 Installation and Administration Guide
Since the cell phone is treated as a local extension on the Avaya server running Communication Manager, it can be completely integrated with the corporate voice messaging system while retaining its own cellular service provider voice mail.
● The office number retains the primary extension on the Avaya server running Communication Manager.
● Calls to the office number simultaneously ring the office number and the cell phone. If neither answer then standard coverage arrangements take effect.
● As needed, Extension to Cellular can be disabled when not in use in order to ensure the use of the corporate voice messaging system.
The system administrator can control in-service and out-of-service status of the mapped extensions through a busy-out and release maintenance capability.
ARS/AAR routing Extension to Cellular builds on a Communication Manager feature that allows extensions to be remotely connected over an ISDN trunk. Unlike traditional off-premises extensions, the stations are not tied to fixed channels on the T1/E1 interface. Instead, channels are allocated dynamically with each new call, allowing significantly more efficient usage of the T1/E1 interfaces through traffic engineering.
Routing of Extension to Cellular extended calls takes the following path:
1. ARS (or AAR) digit conversion is applied to the administered dial prefix and cell phone number.
2. ARS (or AAR) analysis is applied to the result of Step 1.
3. The ARS (or AAR) analysis chooses a routing pattern.
Each entry in the routing pattern is tried in order. However, if the trunk group for a particular entry is non-ISDN or non-IP (which includes SIP), it is skipped.
4. A trunk group is chosen for the Extension to Cellular call and the call is sent.
If no trunk is available, the Extension to Cellular call is not extended. However, the original call is not affected. The caller continues to receive ringback until the call covers or the caller abandons it.

Issue 9 June 2005 23
Call filtering Call filtering allows you to manage cell phone costs by limiting the type of calls extended to the cell phone. Call filtering is based on the type of incoming call received at the cell phone. You can choose to deliver (on a per-user basis) external calls, internal calls, all calls, or no calls.
Internal call filtering allows the switch to extend Extension to Cellular calls for all internal originated calls. External call filtering does the same for all public-network incoming calls.
Extension to Cellular calls are not extended when the Calls Allowed field is set to none (see Figure 5: Stations with Off-PBX Telephone Integration screen, page 2 on page 43). When call filtering does not allow a call, the Extension to Cellular call is not delivered. The call may be forwarded, go to coverage, or apply busy treatment for the calling party.
Call filtering provides the system administrator with control over the type of incoming calls that Extension to Cellular users receive on their cell phones. With Extension to Cellular call filtering, the system administrator can restrict cell phone calls based on the incoming call type received by the office phone.
Call filtering and mapped stations
Communication Manager calls the cell phone when the office phone receives an incoming call. Calls are delivered to the cell phone based on the screening of internal and external calls. Screening applies after the called party restriction of the Extension to Cellular station’s assigned Class of Restriction (COR), the station’s Extension to Cellular state, and the Extension to Cellular station mapping are evaluated.
Capacity limitations Extension to Cellular applications are allocated on a per station basis. Additional constraints are placed on the number of station records if customers encounter situations where a single user would be utilizing more than one Extension to Cellular application.
Note:Note: See System Capacity screen on page 81 for how to access station usage
information for your system. Traffic engineering is needed to ensure that there are enough trunks available to handle the traffic sent to the cell phones.
There would be large impact to trunk utilization if a large percentage of the switch users were Extension to Cellular users. In many cases, the outbound trunk calls may not actually complete since the user may answer at the Extension to Cellular station. In Communication Manager 2.2, the station capacity for Extension to Cellular matches the maximum station capacity for the platform.

24 Installation and Administration Guide
The number of simultaneous call terminations towards the off-PBX station is limited to the maximum number of call appearances for each extension on the switch. That maximum number is 10. This number may be administratively limited to less than 10 on a application-user basis. For example, Extension to Cellular users would normally want the call limit at 2, since most cell phones can handle only two calls at a time.
Feature operationWhen Extension to Cellular is administered, the cell phone is initially in a disabled state. Users need to enable their cell phones before they can begin to use the Extension to Cellular solution.
Receiving calls
Extension to Cellular is a solution for delivering office calls to a cell phone or SIP phone through the Avaya server running Communication Manager.
With Extension to Cellular, when a call is made to an office number with a mapped phone, the call is extended out of the Avaya server running Communication Manager to alert the outside phone. When the Extension to Cellular user has the Extension to Cellular Calls Allowed field set to none (see Figure 5: Stations with Off-PBX Telephone Integration screen, page 2 on page 43), Extension to Cellular calls are not delivered.
If the Avaya server running Communication Manager is administered to send calling number information, that information is presented to the outside phone. When the outside phone answers the call, Communication Manager treats it like a local answer of a physically-connected station, and the following is true:
● Status of the station shows both the Extension to Cellular status and the regular station status. It shows both the port used on the outbound trunk group and the other connected port.
● Any office number busy indicators tracking the station light up to show that it is busy.
● Any other station linked to the call as part of a bridge or temporary bridge is able to bridge on to that call.

Issue 9 June 2005 25
Making calls
Calls can be made to any number from the Extension to Cellular cell phone. Depending on how the Extension to Cellular station is administered, the Extension to Cellular cell phone can function both as a standard cell phone and as an office extension when the calls are made into the user’s office switch. Administering an Extension to Cellular cell phone to send office caller ID allows the Extension to Cellular cell phone call to the switch to appear as a local extension on the switch.
The Mapping Mode field on the Stations with Off-PBX Telephone Integration screen (see Figure 5: Stations with Off-PBX Telephone Integration screen, page 2 on page 43) for administration controls whether an Extension to Cellular cell phone is administered to gain the identity of the office phone (sends the office caller ID).
If the Mapping Mode field entry is set to both or origination, the Extension to Cellular call into the switch acts as if it originated from the station with the following results:
● The General Status screen (see Figure 25: General Status screen on page 83) shows both the port used on the inbound group and the other connected port.
- The Service State of the host station is in-service/on-hook.
- When there is no active call, the Service State of the Extension to Cellular station is in-service/idle.
- When there is an active call, the Service State of the Extension to Cellular station is in-service/active.
● Any office number busy indicators tracking the station light up to show that it is busy.
● Any other station linked to the call as part of a bridge or temporary bridge is able to bridge on to that call.
● The office name and number associated with the station appears as the caller ID.
User scenariosExtension to Cellular allows a user the ability to invoke non-display Communication Manager endpoint features on any cell phone that is mapped as an EC500 endpoint. Features are invoked by dialing feature name extensions (FNE). Each FNE must be a direct inward dialed (DID) extension that matches your dial plan. All feature name extensions are used system-wide.
A user, while active on a call, would place the call on hold and dial the FNE for the desired feature.
● For a feature that makes a call such as Last Number Dialed, the user would hear call progress tones. The user would then connect to the last party that was called from either the office phone, or the last party to have the identity of the office phone (meaning

26 Installation and Administration Guide
Extension to Cellular calls made at the cell phone). If a call is originated from the office phone and another call is originated at the cell phone, the last number dialed is the call that is truly the last number dialed.
● For a feature that gives you dial tone, like Call Forwarding, or where the user selects an idle call appearance, the user would hear dial tone, dial the destination, and then hear confirmation tone.
To move an active call on a user’s office phone to a cell phone, the user may do either:
● From the office phone, the user must press a dedicated feature button that is assigned to a new Extension to Cellular feature called “Extend Call”.
● From the cell phone, the user must dial the Select Active Call FNE.
To move an active call on a user's cell phone to the office phone:
● When the user selects the active call appearance on the office phone, the user may pick up the active call. The user can then disconnect from the cell phone, saving cell phone minutes.
Note:Note: This is possible as long as the Exclusion feature is not active.
Feature interactions
Attendant
If the Calls Allowed field on the Stations with Off-PBX Telephone Integration screen (see Figure 5: Stations with Off-PBX Telephone Integration screen, page 2 on page 43) is internal, attendant-originated and attendant-extended calls are not delivered.
Call coverage
If you want to ensure that unanswered calls go to office voice mail (rather than the cell phone’s voice mail) make sure the value in the Number of Rings field on the Coverage Path screen for the office phone is set to a lower number than the voice mail coverage setting on the corresponding cell phone. See Voice mail administration on page 55.

Issue 9 June 2005 27
Cellular service provider voice mail
While stations may have standard Avaya server running Communication Manager voice mail coverage (for example, AUDIX®), cell phones usually have voice mail coverage from the cellular service provider. There are now two ways to coordinate the two systems.
First, you can administer Avaya Communication Manager Extended Access Cellular Voice Mail Avoidance. The Cellular Voice Mail Avoidance feature is designed to reduce the uncertainty as to where unanswered Extension to Cellular calls are sent. An unanswered call terminates either at your system voice mail (for example, at your office telephone), or at your cellular service provider (CSP) voice mail system.
Avaya Communication Manager will detect when the cell phone is not the entity answering the call and bring the call back to the server. The call will then be treated as a normal call on the phone with Extension to Cellular enabled. The call will then be processed with the normal number of rings set on your call coverage.
Second, you can set up the number of “don’t answer” rings so that one or the other always answer first. However, there are coverage options in both the Avaya server running Communication Manager (busy, active, send-all-calls) and the network (cell phone unavailable, network congested) that causes a call to immediately go to the respective voice mail. Users should realize that an unanswered call might result in a voice mail message in either mailbox.
Class of Restriction (COR)
For calls toward an Extension to Cellular station, COR restrictions are applied normally for a call terminating to a station. In particular, if the station is mapped, then the office phone’s COR applies. Any restrictions imposed by call filtering are applied after those imposed by the COR. Calling party restrictions pertaining to trunks (outward, tac-toll, and all-toll) have no affect on the launching of Extension to Cellular calls.
Distributed Communication System (DCS)
Inter-switch calls on distributed communications system (DCS) trunks are treated as internal calls.
● When an Extension to Cellular user has the Calls Allowed field on the Stations with Off-PBX Telephone Integration screen (see Figure 5: Stations with Off-PBX Telephone Integration screen, page 2 on page 43) set to internal or all, DCS calls are delivered to the cell phone.
● When an Extension to Cellular user has the Calls Allowed field set to external or none, DCS calls are not delivered.

28 Installation and Administration Guide
Distinctive alerting
Cell phones may or may not receive distinct rings for different types of calls. Check with your cellular service provider.
Extension to Cellular enable and disable
Extension to Cellular calls (calls extended to a cell phone) can be enabled or disabled. Users can enable or disable Extension to Cellular calls using either Extension to Cellular enable and disable Feature Access Codes, or using the enable and disable feature status button.
Users who receive their Extension to Cellular service through their cellular service provider (CSP) cannot enable or disable their Extension to Cellular calls. Through CSP, Extension to Cellular is always enabled.
Extension to Cellular with office caller IDcalling another Extension to Cellular user
Incoming calls from other Extension to Cellular users are internal calls if office caller ID is enabled for the station associated with the cell phone.
● When an Extension to Cellular user has the Calls Allowed field set to internal or all, the Extension to Cellular calls are delivered.
● When an Extension to Cellular user has the Calls Allowed field set to external or none, then calls from other Extension to Cellular users are not delivered.
Feature access codes (FAC)
A user can activate Communication Manager features through feature access codes (FAC). A user can access a FAC by one of these three methods:
● dialing the telecommuter number
● dialing the remote access number
● dialing the “Select Idle” FNE
After hearing dial tone, the user enters the FAC.
Issue 9 June 2005 29
Feature name extensions (FNE)
When Extension to Cellular is enabled, a user can activate a Communication Manager feature through dialing a feature name extension (FNE) from their cell phone or SIP phone. Feature name extensions correspond to a direct inward dialing (DID) number for each feature. Each FNE must match your dial plan, and are administered system-wide.
For a list of supported features that can be accessed using an FNE, see Figure 6: Extensions to Call which Activate Features By Name screen, page 1 on page 48.
Message waiting indication
The cell phones cannot receive any screen of message waiting indication directly from the Avaya server running Communication Manager.
“Notify me” under Unified Messenger for MS Exchange
Users with access to the “notify me” feature of Unified Messenger® for Microsoft Exchange® (Version 4.0 or later), are notified of messages in the corporate voice mailbox through the cell phone’s display. For more information on using this feature, see “Setting Notify Me” in the Unified Messenger Telephone User Interface Online Guide, accessed through http://www.avaya.com/support.
Note:Note: The user’s cell phone must support text messaging to use this feature.
Originating CDR on calls
If a cell phone originates a call through its mapped extension – for example, through a SIP telephone or a cell phone call – a Call Detail Recording (CDR) record is generated for that call. For this feature to work, incoming trunk CDR must be turned on. The system does not generate a CDR if the user dials a feature name extension (FNE) that does not result in a call.
30 Installation and Administration Guide
QSIG
Inter-PBX calls on QSIG trunks are treated as internal calls.
● When an Extension to Cellular user has the Calls Allowed field set to internal or all, QSIG calls are delivered.
● When an Extension to Cellular user has the Calls Allowed field set to external or none, QSIG calls are not delivered.

Issue 9 June 2005 31
Chapter 2: Installation and planning
InstallationThis section describes installation and settings that must be in place before you can administer the Extension to Cellular.
Configuration/environment requirements
Avaya Extension to Cellular is available on Avaya servers running Avaya Communication Manager, Release 2.0 or later. Any capacity differences are due to differences in the numbers of stations, trunks, and circuit packs supported on the different Avaya servers running Communication Manager.
Customer options
A customer’s license file with Extension to Cellular has the following options set on the Optional Features screen. To review these options, use the system-parameters customer-options command. See Displaying the customer options for Extension to Cellular on page 35 for more information on these settings. Page number references refer to the screen page number.
Note:Note: If any of these options are not set as described, you need a new license file.
Contact your Avaya representative.
● G3 Version must be set to V12 or later (page 1).
● Either the Maximum Off-PBX Telephones - EC500 field, the Maximum Off-PBX Telephones - OPS field, or the Maximum Off-PBX Telephones - SCCAN field must be greater than zero (page 1). These fields should be set to the number of stations that are to be used for Extension to Cellular.
Note:Note: For legacy systems, the Maximum Off-PBX Telephones - SCCAN field does not
appear.
● ARS must be set to y (page 3).
● Enhanced EC500 must be set to y (page 4).
32 Installation and Administration Guide
Note:Note: The G3 Version field, plus either the Maximum Off-PBX Telephones - EC500
field, the Maximum Off-PBX Telephones - OPS field, or the Maximum Off-PBX Telephones - SCCAN field must be set as described above before the Enhanced EC500 field can be set to y.
● Extended Cvg/Fwd Admin must be set to y (page 4). This allows access to the Telecommuting Access screen where you set the Extension to Cellular access code.
● ISDN-PRI must be set to y (page 4).
Administration planningIn a typical Extension to Cellular configuration, the station that is mapped to the cell phone is the principal published number, which is usually a user’s office number.
Planning requirements
Extension to Cellular users expect to receive the following information from you, the system administrator:
● The station security code associated with the office number.
● The “change station security code” feature access code (FAC).
● The self administration feature access code (SAFE FAC).
● Extension to Cellular “enable” and “disable” feature access codes (Extension to Cellular Activation/Deactivation on the system administration terminal).
● The Avaya Extension to Cellular access number (as set in the Telecommuting Access Extension field on the Telecommuting Access screen).
In support of these requirements, also specify the following:
● An extension number for the Avaya Extension to Cellular access number.
● Extension to Cellular activation and deactivation codes to enable and disable Extension to Cellular (only).
● A feature access code for changing the station security code.
● A list of all the feature name extensions (FNE) that you set up, and the features that they are mapped to.
Issue 9 June 2005 33
Security codes
Select an Avaya Extension to Cellular access number that is accessible externally as well as internally. This is set in the Telecommuting Access Extension field on the Telecommuting Access screen. See Chapter 3: Administration.
Select station security codes for the office phone.
Also, select a “station security code change” feature access code. When a new station is added, it needs to be given a default security code. Users should ultimately set their own office number security code using the “station security code change” feature access code.
Enabling and disabling feature access codes
Select the Extension to Cellular “enable” and “disable” feature access codes. These are set in the Feature Access Codes (FAC) screen in the system administration terminal.

34 Installation and Administration Guide

Issue 9 June 2005 35
Chapter 3: Administration
IntroductionThis chapter provides instructions for setting up and administering:
● Station administration
- Extension to Cellular cell phones to send office caller ID (see Sending 10-digit caller identification for locally-originated calls on page 50)
- Call filtering (see Call filtering administration on page 51)
● Call detail recording enhancements (see CDR for Calls to EC500 Destination on page 62)
● A “change station security code” feature access code for the user to change the phone number station security code (see Creating a feature access code to change station security codes on page 68)
● The Extension to Cellular access number for external access to Communication Manager features (see Setting up the Extension to Cellular access number on page 52)
● The Extension to Cellular “enable” and “disable” feature access codes (see Setting up the Extension to Cellular enable/disable feature access codes on page 53)
● Voice mail coordination between the office and the cell phones (see Voice mail administration on page 55)
Most Extension to Cellular administration tasks are accomplished through the System Administration Terminal (SAT). The SAT screens in this guide are meant to be examples and may not match exactly with the version that exists on the system administration terminal for your Avaya server running Communication Manager.
However, all fields described here as essential for Extension to Cellular set-up and administration can be found on all versions of the terminals, regardless of the variations in field layouts. In the screens shown here, the essential fields are indicated in bold-face type.
Displaying the customer options for Extension to Cellular Before you can administer the Extension to Cellular extensions, the following settings must be enabled for your system, as determined by your installed license file. You can review these settings on the Optional Features screen.

36 Installation and Administration Guide
Note:Note: If any of these options are not set as described, you need a new license file.
Contact your Avaya representative.
To make sure the system is set up to administer Extension to Cellular extensions:
1. Type display system-parameters customer-options.
2. Press Enter.
The Optional Features screen appears (Figure 1).
Figure 1: Optional Features screen, page 1
On page 1 of the Optional Features screen:
● The G3 Version field must be set to V12 or later.
● The Maximum Off-PBX Telephones - EC500 field, the Maximum Off-PBX Telephones - OPS field, or the Maximum Off-PBX Telephones - SCCAN field must be greater than zero. These fields should be set to the number of stations that are to be used for Extension to Cellular.
display system-parameters customer-options Page 1 of 10 OPTIONAL FEATURES
G3 Version: V12 RFA System ID (SID)
Location: 2 RFA Module ID (MID) Platform: 2
USEDMaximum Ports: 300 174
Maximum XMOBILE Stations: 30 28Maximum Off-PBX Telephones - EC500: 1200 0Maximum Off-PBX Telephones - OPS: 1200 0Maximum Off-PBX Telephones - SCCAN: 1200 0
(NOTE: You must logoff & login to effect the permission changes.)

Issue 9 June 2005 37
Field descriptions
Maximum Off-PBX Telephones - EC500 - This field has the following parameters (“EC500” refers to the Extension to Cellular feature):
To be usable, the system must also have the IP Trunks, ISDN-BRI Trunks, or ISDN-PRI field enabled. See page 4 of the Optional Features screen (Figure 3).
Maximum Off-PBX Telephones - OPS - This field has the following parameters:
To be usable, the system must also have the IP Trunks, ISDN-BRI Trunks, or ISDN-PRI field enabled. See page 4 of the Optional Features screen (Figure 3).
On page 3 of the Optional Features screen (Figure 2), the ARS field must be set to y.
Valid entries Usage
0 to license max
Default = 0. A number greater than zero should appear in either this field or the Maximum Off-PBX Telephones - OPS field.The “license max” value is defined as follows:
● On legacy systems, the upper limit is 1/2 of the maximum number of administrable stations.
● On S8300, S8500, and S8700 systems, the upper limit is the maximum number of administrable stations.
Stations that are administered for any Extension to Cellular application count against this limit.
Valid entries Usage
0 to license max
Default = 0. A number greater than zero should appear in either this field or the Maximum Off-PBX Telephones - EC500 field.The “license max” value is defined as follows:
● On legacy systems, the upper limit is 1/2 of the maximum number of administrable stations. Note: Legacy platforms do not support SIP trunks.
● On S8300, S8500, and S8700 systems, the upper limit is the maximum number of administrable stations.
Stations that are administered for any Extension to Cellular application count against this limit.

38 Installation and Administration Guide
Maximum Off-PBX Telephones - SCCAN - This field has the following parameters:
To be usable, the system must also have the IP Trunks field enabled. See page 4 of the Optional Features screen (Figure 3).
Figure 2: Optional Features screen, page 3
On page 4 of the Optional Features screen (Figure 3):
● The Enhanced EC500 field must be set to y. “EC500” refers to the Extension to Cellular feature.
Valid entries Usage
0 to license max
Default = 0. The “license max” value is defined as follows:
● SCCAN is only available on S8300, S8500, and S8700 systems. The upper limit is the maximum number of administrable stations.
Stations that are administered for any Extension to Cellular application count against this limit.
display system-parameters customer-options Page 3 of 10 OPTIONAL FEATURES
Abbreviated Dialing Enhanced List? n Audible Message Waiting? y Access Security Gateway (ASG)? n Authorization Codes? y Analog Trunk Incoming Call ID? y CAS Branch? y A/D Grp/Sys List Dialing Start at 01? y CAS Main? yAnswer Supervision by Call Classifier? y Change COR by FAC? n ARS? y Computer Telephony Adjunct Links? y ARS/AAR Partitioning? y Co-Res DEFINITY LAN Gateway? n ARS/AAR Dialing without FAC? n Cvg Of Calls Redirected Off-net? y ASAI Link Core Capabilities? y DCS (Basic)? y ASAI Link Plus Capabilities? y DCS Call Coverage? y Async. Transfer Mode (ATM) PNC? y DCS with Rerouting? n Async. Transfer Mode (ATM) Trunking? n ATM WAN Spare Processor? n Digital Loss Plan Modification? y ATMS? y DS1 MSP? n Attendant Vectoring? n DS1 Echo Cancellation? y
(NOTE: You must logoff & login to effect the permission changes.)
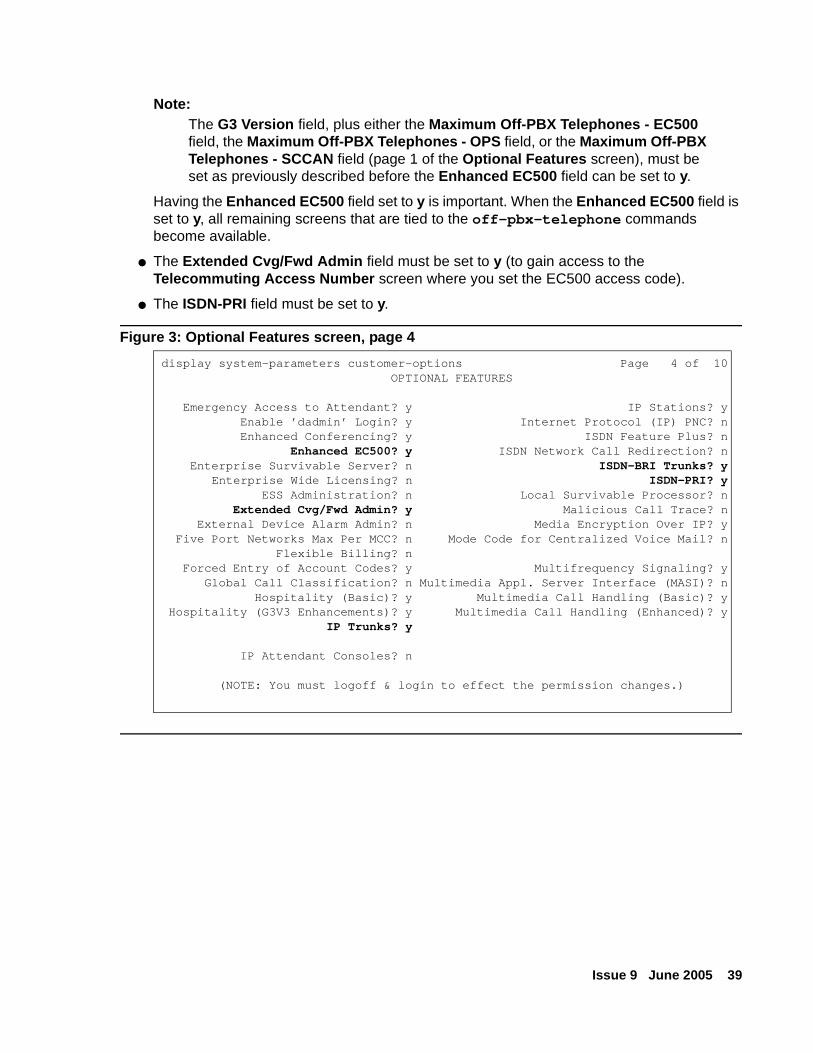
Issue 9 June 2005 39
Note:Note: The G3 Version field, plus either the Maximum Off-PBX Telephones - EC500
field, the Maximum Off-PBX Telephones - OPS field, or the Maximum Off-PBX Telephones - SCCAN field (page 1 of the Optional Features screen), must be set as previously described before the Enhanced EC500 field can be set to y.
Having the Enhanced EC500 field set to y is important. When the Enhanced EC500 field is set to y, all remaining screens that are tied to the off-pbx-telephone commands become available.
● The Extended Cvg/Fwd Admin field must be set to y (to gain access to the Telecommuting Access Number screen where you set the EC500 access code).
● The ISDN-PRI field must be set to y.
Figure 3: Optional Features screen, page 4
display system-parameters customer-options Page 4 of 10 OPTIONAL FEATURES
Emergency Access to Attendant? y IP Stations? y Enable ’dadmin’ Login? y Internet Protocol (IP) PNC? n Enhanced Conferencing? y ISDN Feature Plus? n Enhanced EC500? y ISDN Network Call Redirection? n
Enterprise Survivable Server? n ISDN-BRI Trunks? yEnterprise Wide Licensing? n ISDN-PRI? y
ESS Administration? n Local Survivable Processor? nExtended Cvg/Fwd Admin? y Malicious Call Trace? n
External Device Alarm Admin? n Media Encryption Over IP? y Five Port Networks Max Per MCC? n Mode Code for Centralized Voice Mail? n Flexible Billing? n Forced Entry of Account Codes? y Multifrequency Signaling? y Global Call Classification? n Multimedia Appl. Server Interface (MASI)? n Hospitality (Basic)? y Multimedia Call Handling (Basic)? y Hospitality (G3V3 Enhancements)? y Multimedia Call Handling (Enhanced)? y IP Trunks? y
IP Attendant Consoles? n
(NOTE: You must logoff & login to effect the permission changes.)

40 Installation and Administration Guide
Station administrationA person’s outside phone number, like a cell phone, is mapped to an office phone in Communication Manager. The station may be a standard office number (presumably the user’s primary extension), or may be an AWOH (administration without hardware) station.
Note:Note: When the Extension to Cellular is administered, the initial state of the cell phone
is disabled. You must enable the Extension to Cellular in order to receive calls from the Avaya server running Communication Manager.
Mapping a host phone with an Extension to Cellular phone
The Stations with Off-PBX Telephone Integration screen is where you map a user’s office (host) phone to an Extension to Cellular phone (for example, a user’s cell phone).
To map a user’s office phone to an Extension to Cellular phone:
1. Type add off-pbx-telephone station-mapping.
2. Press Enter.
The Stations with Off-PBX Telephone Integration screen appears (Figure 4).
Figure 4: Stations with Off-PBX Telephone Integration screen, page 1
add off-pbx-telephone station-mapping Page 1 of 2STATIONS WITH OFF-PBX TELEPHONE INTEGRATION
Station Application Dial Phone Number Trunk ConfigurationExtension Prefix Selection Set43001 EC500 ____ - 9736831204 ars 143005 EC500 ____ - 6093451298 ars 143007 OPS ____ - 12345 ars 143009 OPS ____ - 67890 aar 243011 CSP ____ - 6095343211 ars 343013 SCCAN ____ - 9738765432 ars 4/1_______ ______ ____ - _______________ ____ _________ ______ ____ - _______________ ____ _________ ______ ____ - _______________ ____ _________ ______ ____ - _______________ ____ _________ ______ ____ - _______________ ____ _________ ______ ____ - _______________ ____ _________ ______ ____ - _______________ ____ _________ ______ ____ - _______________ ____ _________ ______ ____ - _______________ ____ _________ ______ ____ - _______________ ____ __

Issue 9 June 2005 41
Valid parameters
● The add off-pbx-telephone station-mapping command displays a blank screen of two pages. It allows for the addition of sixteen station-extension-to-external-phone-number associations. For each Station Extension, the remaining fields on the first page (except for the Dial Prefix field) must be filled in. The Station Extension fields on the second page are read only and are based upon the values entered for the first page.
● The change off-pbx-telephone station-mapping <station extension> command displays a screen of two pages. It allows you to change one station-extension-to-external-phone-number association. The first line contains the information for the station extension you entered as the command variable. Additional entries may be added after the changed one. The table is filled in and validated as described for the add command.
If the specified station is a valid type, but has not been previously administered for Extension to Cellular, then the screen is blank except for the first Station Extension field.
● The display off-pbx-telephone station-mapping <station extension> command displays a screen of two pages. It lists up to sixteen entries, starting with the station extension you entered as the command variable. If this extension is not administered for Extension to Cellular, the display starts with the first administered Extension to Cellular extension following it.
The extension may be omitted, in which case the display starts with the first extension administered for Extension to Cellular.
● The list off-pbx-telephone station-mapping <variable> command shows, on a single line, information about the association between a station and an external phone number. The command variable specifies the phone number or numbers of interest. The command variable may be:
- a complete phone number
- a partial phone number followed by an asterisk (acting as a “wildcard” character)
- blank
Action Object Qualifier
add off-pbx-telephone station-mapping
change off-pbx-telephone station-mapping
<station extension>
display off-pbx-telephone station-mapping
<station extension>
list off-pbx-telephone station-mapping
<variable>
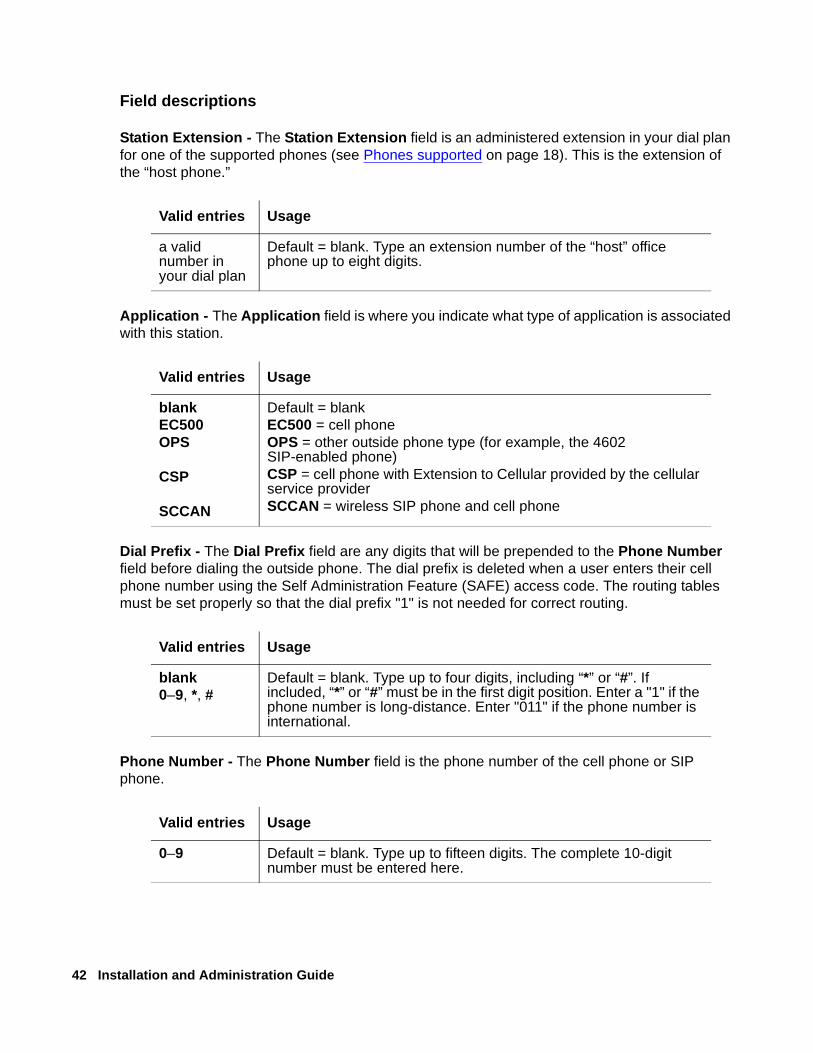
42 Installation and Administration Guide
Field descriptions
Station Extension - The Station Extension field is an administered extension in your dial plan for one of the supported phones (see Phones supported on page 18). This is the extension of the “host phone.”
Application - The Application field is where you indicate what type of application is associated with this station.
Dial Prefix - The Dial Prefix field are any digits that will be prepended to the Phone Number field before dialing the outside phone. The dial prefix is deleted when a user enters their cell phone number using the Self Administration Feature (SAFE) access code. The routing tables must be set properly so that the dial prefix "1" is not needed for correct routing.
Phone Number - The Phone Number field is the phone number of the cell phone or SIP phone.
Valid entries Usage
a valid number in your dial plan
Default = blank. Type an extension number of the “host” office phone up to eight digits.
Valid entries Usage
blankEC500OPS
CSP
SCCAN
Default = blankEC500 = cell phoneOPS = other outside phone type (for example, the 4602 SIP-enabled phone)CSP = cell phone with Extension to Cellular provided by the cellular service providerSCCAN = wireless SIP phone and cell phone
Valid entries Usage
blank0–9, *, #
Default = blank. Type up to four digits, including “*” or “#”. If included, “*” or “#” must be in the first digit position. Enter a "1" if the phone number is long-distance. Enter "011" if the phone number is international.
Valid entries Usage
0–9 Default = blank. Type up to fifteen digits. The complete 10-digit number must be entered here.
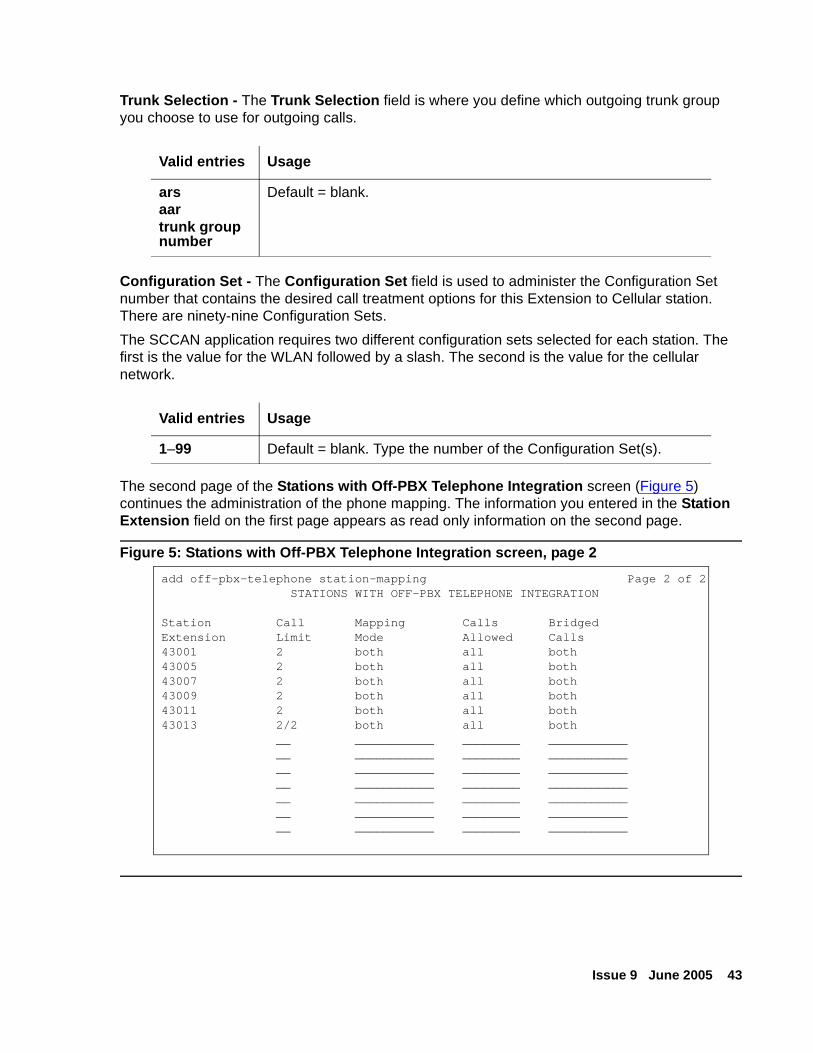
Issue 9 June 2005 43
Trunk Selection - The Trunk Selection field is where you define which outgoing trunk group you choose to use for outgoing calls.
Configuration Set - The Configuration Set field is used to administer the Configuration Set number that contains the desired call treatment options for this Extension to Cellular station. There are ninety-nine Configuration Sets.
The SCCAN application requires two different configuration sets selected for each station. The first is the value for the WLAN followed by a slash. The second is the value for the cellular network.
The second page of the Stations with Off-PBX Telephone Integration screen (Figure 5) continues the administration of the phone mapping. The information you entered in the Station Extension field on the first page appears as read only information on the second page.
Figure 5: Stations with Off-PBX Telephone Integration screen, page 2
Valid entries Usage
arsaartrunk group number
Default = blank.
Valid entries Usage
1–99 Default = blank. Type the number of the Configuration Set(s).
add off-pbx-telephone station-mapping Page 2 of 2STATIONS WITH OFF-PBX TELEPHONE INTEGRATION
Station Call Mapping Calls BridgedExtension Limit Mode Allowed Calls43001 2 both all both43005 2 both all both43007 2 both all both43009 2 both all both43011 2 both all both43013 2/2 both all both
__ ___________ ________ _____________ ___________ ________ _____________ ___________ ________ _____________ ___________ ________ _____________ ___________ ________ _____________ ___________ ________ _____________ ___________ ________ ___________

44 Installation and Administration Guide
Call Limit - The Call Limit field sets the maximum number of Extension to Cellular calls that may be simultaneously active at the station.
Mapping Mode - The Mapping Mode field contains the mode of operation in which the off-PBX phone operates. See Mapping modes on page 45 for information on the possible entries.
Calls Allowed - The Calls Allowed field is used to identify the call filter type for an Extension to Cellular station. See Calls allowed on page 46 for information on the possible entries.
Bridged Calls - The Bridged Calls field is used to determine if bridged call appearances, that may be administered on this Stations with Off-PBX Telephone Integration screen, should also be extended to the Extension to Cellular phone. See Mapping modes on page 45 for information on the possible entries.
Valid entries Usage
blank1–10
Default = 2.
Valid entries Usage
terminationoriginationbothnone
Default = both (if the Phone Number field has not been previously administered for another extension with a Mapping Mode of both or origination. Otherwise, the default = termination).
Valid entries Usage
internalexternalallnone
Default = all.
Valid entries Usage
terminationoriginationbothnone
Default = both.
Issue 9 June 2005 45
Mapping modes
There are four modes in which an Extension to Cellular phone can be mapped to the user’s main office phone.
● termination
● origination
● both
● none
These modes are used to control the degree of integration between a user’s cell phone or SIP phone, and the main office number. The modes are valid for Extension to Cellular calls only.
● calls to the user’s main office number when Extension to Cellular is enabled
● calls from the user’s cell phone or SIP phone into the user’s switch when Extension to Cellular is enabled
Mapping modes are administered on the second page of the Stations with Off-PBX Telephone Integration screen (Figure 5).
Calls terminating to a cell phone or SIP phone
The termination mode is enabled by setting the Mapping Mode field on the second page of the Stations with Off-PBX Telephone Integration screen to termination. In termination mode, the Extension to Cellular phone may only be used to terminate (receive) calls from its associated host phone. The Extension to Cellular phone may not be used to originate calls from its associated host phone.
Calls originating from the same cell phone are completely independent of Extension to Cellular, and behave exactly as before enabling Extension to Cellular.
Calls originating from a cell phone or SIP phone
The origination mode is enabled by setting the Mapping Mode field on the second page of the Stations with Off-PBX Telephone Integration screen to origination. In origination mode, the Extension to Cellular phone may only be used to originate calls from its associated host phone. The Extension to Cellular phone may not be used to terminate (receive) calls from its associated host phone.
Calls both to and from a cell phone or SIP phone
This mode is enabled by setting the Mapping Mode field on the second page of the Stations with Off-PBX Telephone Integration screen to both. In this mode, the Extension to Cellular phone may be used to originate calls and to terminate (receive) calls from its associated host phone.

46 Installation and Administration Guide
No calls to or from a cell phone or SIP phone
This mode is enabled by setting the Mapping Mode field on the second page of the Stations with Off-PBX Telephone Integration screen to none. In this mode, the Extension to Cellular phone may not be used to originate calls or to terminate (receive) calls from its associated host phone.
Calls allowed
There are four values to define what kind of calls can be associated with the Extension to Cellular phone.
● internal
● external
● all
● none
These entries are used to filter the calls to the Extension to Cellular phone.
The Calls Allowed field is administered on the second page of the Stations with Off-PBX Telephone Integration screen (Figure 5).
Internal
When internal is chosen as the call filter type, the Extension to Cellular phone receives only internal calls. External calls are not delivered to the Extension to Cellular phone.
External
When external is chosen as the call filter type, the Extension to Cellular phone receives only external calls. Internal calls are not delivered to the Extension to Cellular phone.
All
When all is chosen as the call filter type, the Extension to Cellular phone receives both internal and external calls.
None
When none is chosen as the call filter type, the Extension to Cellular phone does not receive Extension to Cellular calls.

Issue 9 June 2005 47
Setting up the Self Administration Feature (SAFE) Access Code
You must set up a user’s office phone extension to accept an Extension to Cellular phone number before the user can self administer their phone number using SAFE.
To prepare an extension for a user to administer their cell phone number using SAFE:
1. Map the user’s office phone extension to a blank Extension to Cellular phone (see Mapping a host phone with an Extension to Cellular phone).
2. On the Stations with Off-PBX Telephone Integration screen (Figure 4), leave the phone number field blank.
The user calls the SAFE access code and enters their cell phone number. The administration sequence differs based on what phone is used to access SAFE. The cell phone number may then be displayed in the Stations with Off-PBX Telephone Integration screen (Figure 4). The dial prefix remains blank in this screen. Therefore, the administrative routes must be able to route a call correctly without a dial prefix. A user can also change an existing cell phone number using SAFE.
To administer the SAFE access code:
1. Type change feature-access codes.
2. Press Enter.
The Features Access Code (FAC) screen appears.
3. Press Next Page to advance to page 2 (Figure 10).
4. Set the access code in accordance with your dial plan for the EC500 Self Administration Access Code field.
5. Press Enter.
Setting up Feature Name Extensions (FNE)
The Extensions to Call which Activate Features By Name screen is where you map a dialed extension to a feature within Communication Manager. These are called feature name extensions (FNE). You, as the administrator, must set up all the FNE mapping. All extensions must fit your dial plan, and are implemented system-wide.
These extensions are paired with feature access codes (FAC). When the extension is called, the feature access code is activated.
Note:Note: The feature access codes are administered on the Feature Access Code (FAC)
screen (Figure 10: Feature Access Code (FAC) screen, page 2 on page 53).
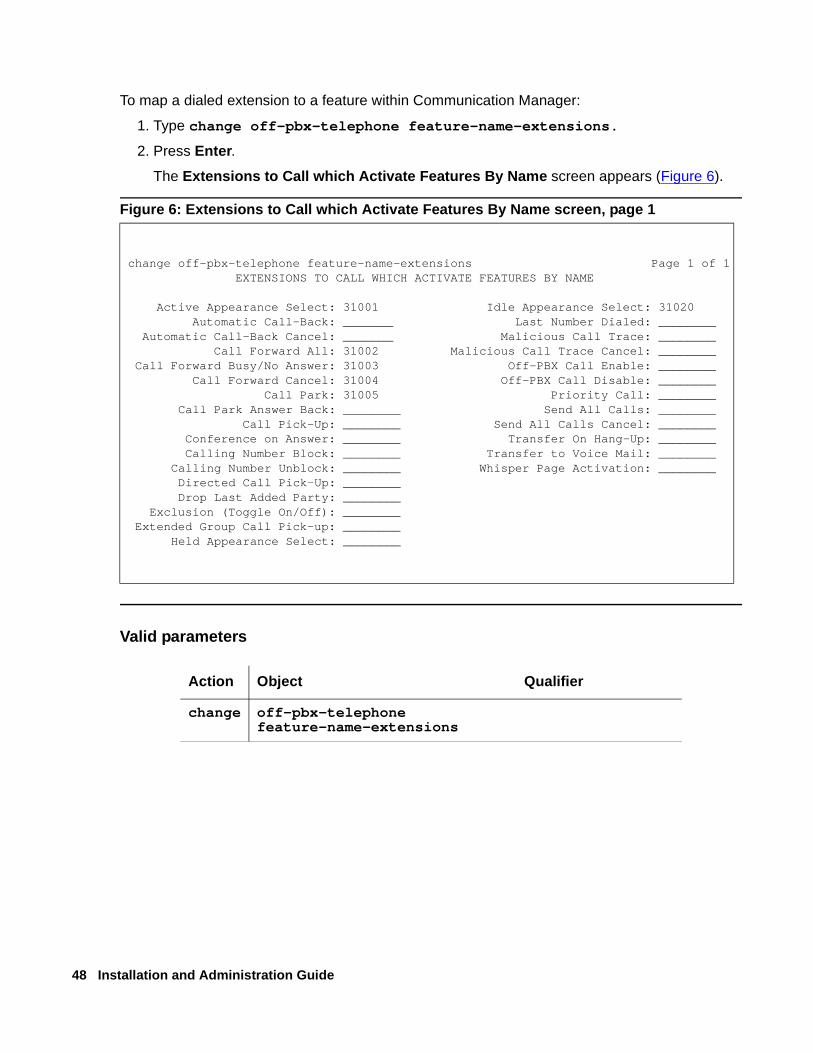
48 Installation and Administration Guide
To map a dialed extension to a feature within Communication Manager:
1. Type change off-pbx-telephone feature-name-extensions.
2. Press Enter.
The Extensions to Call which Activate Features By Name screen appears (Figure 6).
Figure 6: Extensions to Call which Activate Features By Name screen, page 1
Valid parameters
change off-pbx-telephone feature-name-extensions Page 1 of 1EXTENSIONS TO CALL WHICH ACTIVATE FEATURES BY NAME
Active Appearance Select: 31001 Idle Appearance Select: 31020Automatic Call-Back: _______ Last Number Dialed: ________
Automatic Call-Back Cancel: _______ Malicious Call Trace: ________Call Forward All: 31002 Malicious Call Trace Cancel: ________
Call Forward Busy/No Answer: 31003 Off-PBX Call Enable: ________Call Forward Cancel: 31004 Off-PBX Call Disable: ________
Call Park: 31005 Priority Call: ________Call Park Answer Back: ________ Send All Calls: ________
Call Pick-Up: ________ Send All Calls Cancel: ________Conference on Answer: ________ Transfer On Hang-Up: ________Calling Number Block: ________ Transfer to Voice Mail: ________
Calling Number Unblock: ________ Whisper Page Activation: ________Directed Call Pick-Up: ________Drop Last Added Party: ________
Exclusion (Toggle On/Off): ________Extended Group Call Pick-up: ________
Held Appearance Select: ________
Action Object Qualifier
change off-pbx-telephone feature-name-extensions
Issue 9 June 2005 49
Field descriptions
Extension - Each Extension field is an extension that matches your dial plan. A user would dial the extension from their Extension to Cellular phone, thereby activating a Feature Access Code administered for that feature.
Office caller ID
Depending on how the station is administered, the Extension to Cellular phone gains the identity of the user’s office extension when calling into the office switch. For example, when an Extension to Cellular user is administered to send the office caller ID and calls into the office, the person receiving the call sees the office name and number of the caller, not the cell phone caller ID. This type of administration provides in-house caller identification at the destination phone, and allows the user to map onto the office phone.
When the Extension to Cellular cell phone is administered to send office caller ID, it doesn’t matter if the Extension to Cellular cell phone is enabled or disabled.
An Extension to Cellular phone that is administered to gain the identity of the office phone has the following functionality:
● When calling a number on the office switch, the user’s name and office phone extension appear as caller ID on the destination phone.
● Because of the mapping administration that causes the Extension to Cellular cell phone to gain the identity of the office phone, the user can initiate a call to the office on the Extension to Cellular cell phone, and pick up that same call in progress on the office phone.
● When calling into the same office switch on which Extension to Cellular is administered, the Extension to Cellular cell phone keypad functions as if it were an office phone extension. For example:
- When a user calls into corporate voice messaging system, Extension to Cellular behaves as an extension on the switch. The extension is recognized by the voice messaging system as such.
- When a user calls into the Extension to Cellular access number from an Extension to Cellular cell phone that sends office caller ID, then invokes the feature access code to enable or disable Extension to Cellular, the cell phone behaves as if it were an extension on the switch.
Valid entries Usage
blank0–9
Default = blank. Type an extension number, up to seven digits, of the Communication Manager feature you want to be able to access from the Extension to Cellular phone.

50 Installation and Administration Guide
Sending 10-digit caller identification for locally-originated calls
Most cell phones require a 10-digit number as the calling number. The Avaya server running Communication Manager must be administered to provide this for locally-originated calls. This procedure is for cell phone use only.
To administer this for stations associated with either ISDN or IP trunks:
1. Type change public-unknown-numbering.
2. Press Enter.
The Numbering – Public/Unknown Format screen appears (Figure 7).
Figure 7: Numbering – Public/Unknown Format screen
3. Create an entry (as above) to add a prefix to extensions to create a 10-digit calling number.
- Ext Len – extension length between 0 and 7.
- Ext Code – the starting digit(s) of the extension.
- Trk Grp(s) – leaving this blank means that it applies to all trunks in the system.
4. Press Enter.
Setting up Special Digit Conversion (SDC) This feature is applicable only to SCCAN. The Special Digit Conversion (SDC) should be enabled to ensure that all calls to an Extension to Cellular cell phone are mapped to the correct office extension. A caller can call a cell phone and dial fewer than the 10-digit number or not dial a prefix and still get routed correctly through the Special Digit Conversion (SDC).
change public-unknown-numbering Page 1 of 8 NUMBERING - PUBLIC/UNKNOWN FORMAT
Total Total Ext Ext Trk CPN CPN Ext Ext Trk CPN CPN Len Code Grp(s) Prefix Len Len Code Grp(s) Prefix Len
4 1 732817 10
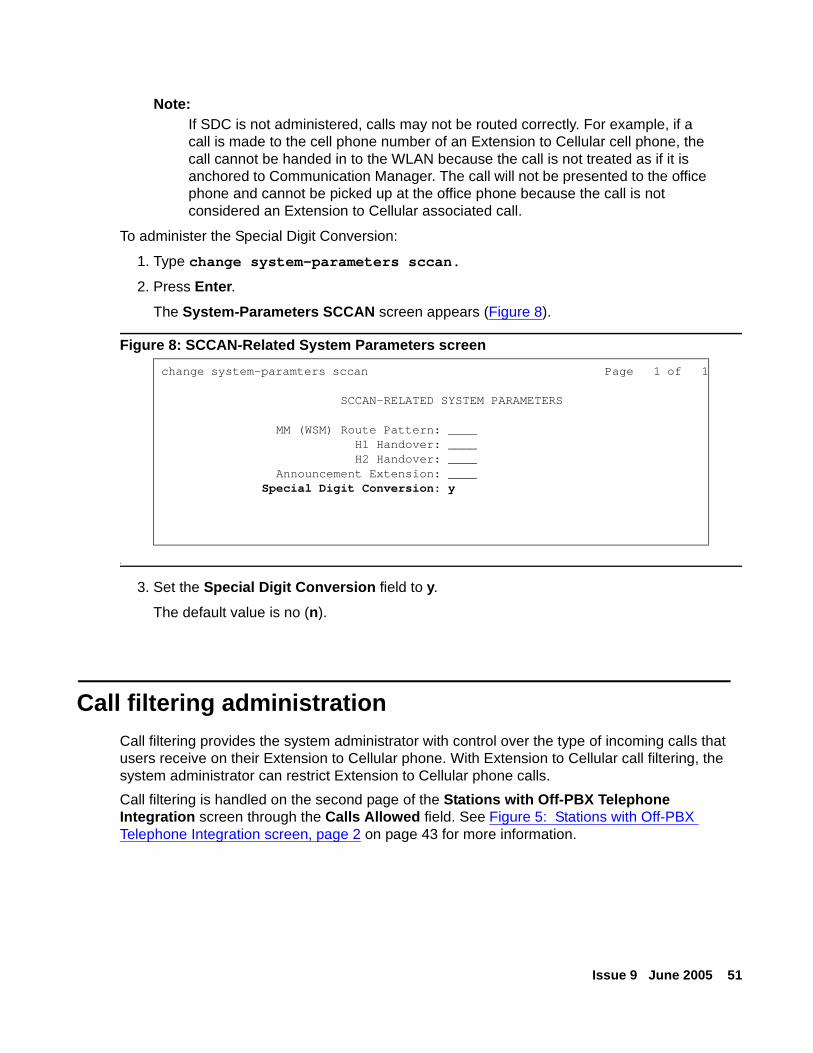
Issue 9 June 2005 51
Note:Note: If SDC is not administered, calls may not be routed correctly. For example, if a
call is made to the cell phone number of an Extension to Cellular cell phone, the call cannot be handed in to the WLAN because the call is not treated as if it is anchored to Communication Manager. The call will not be presented to the office phone and cannot be picked up at the office phone because the call is not considered an Extension to Cellular associated call.
To administer the Special Digit Conversion:
1. Type change system-parameters sccan.
2. Press Enter.
The System-Parameters SCCAN screen appears (Figure 8).
Figure 8: SCCAN-Related System Parameters screen
s
3. Set the Special Digit Conversion field to y.
The default value is no (n).
Call filtering administration Call filtering provides the system administrator with control over the type of incoming calls that users receive on their Extension to Cellular phone. With Extension to Cellular call filtering, the system administrator can restrict Extension to Cellular phone calls.
Call filtering is handled on the second page of the Stations with Off-PBX Telephone Integration screen through the Calls Allowed field. See Figure 5: Stations with Off-PBX Telephone Integration screen, page 2 on page 43 for more information.
change system-paramters sccan Page 1 of 1
SCCAN-RELATED SYSTEM PARAMETERS
MM (WSM) Route Pattern: ____H1 Handover: ____H2 Handover: ____
Announcement Extension: ____Special Digit Conversion: y
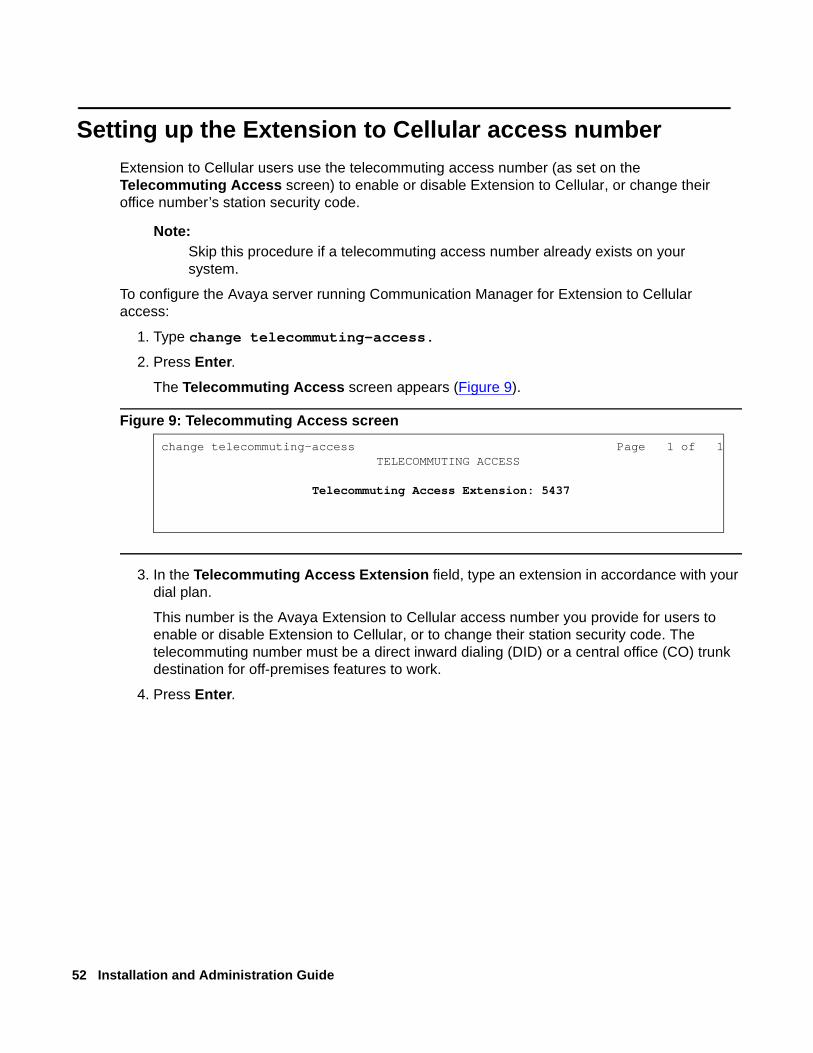
52 Installation and Administration Guide
Setting up the Extension to Cellular access numberExtension to Cellular users use the telecommuting access number (as set on the Telecommuting Access screen) to enable or disable Extension to Cellular, or change their office number’s station security code.
Note:Note: Skip this procedure if a telecommuting access number already exists on your
system.
To configure the Avaya server running Communication Manager for Extension to Cellular access:
1. Type change telecommuting-access.
2. Press Enter.
The Telecommuting Access screen appears (Figure 9).
Figure 9: Telecommuting Access screen
3. In the Telecommuting Access Extension field, type an extension in accordance with your dial plan.
This number is the Avaya Extension to Cellular access number you provide for users to enable or disable Extension to Cellular, or to change their station security code. The telecommuting number must be a direct inward dialing (DID) or a central office (CO) trunk destination for off-premises features to work.
4. Press Enter.
change telecommuting-access Page 1 of 1 TELECOMMUTING ACCESS
Telecommuting Access Extension: 5437

Issue 9 June 2005 53
Setting up the Extension to Cellular enable/disable feature access codes
To administer the Extension to Cellular “enable” and “disable” feature access codes:
1. Type change feature-access-codes.
2. Press Enter.
The Feature Access Code (FAC) screen appears.
3. Press Next Page to advance to page 2 (Figure 10).
Figure 10: Feature Access Code (FAC) screen, page 2
4. Set an access code in accordance with your dial plan for the following fields.
● In the Enhanced EC500 Activation field, type a feature access code number (*81 in this example) to be used for remote activation of Extension to Cellular.
● In the Enhanced EC500 Deactivation field, type a feature access code number (#81 in this example) to be used for remote deactivation of Extension to Cellular.
5. Press Enter.
change feature-access-codes Page 2 of 8 FEATURE ACCESS CODE (FAC)
Data Origination Access Code:Data Privacy Access Code:
Directed Call Pickup Access Code:Emergency Access to Attendant Access Code: *11
EC500 Self Administration Access Code:Enhanced EC500 Activation: *81 Deactivation:#81
Extended Call Fwd Activate Busy D/A: *23 All: *24 Deactivation:#23 Extended Group Call Pickup Access Code: Facility Test Calls Access Code: Flash Access Code: *88 Group Control Restrict Activation: *15 Deactivation: #15 Hunt Group Busy Activation: *81 Deactivation: #81 ISDN Access Code: Last Number Dialed Access Code: *54 Leave Word Calling Message Retrieval Lock: *48 Leave Word Calling Message Retrieval Unlock: #45 Leave Word Calling Send A Message: *60 Leave Word Calling Cancel A Message: #60 Malicious Call Trace Activation: Deactivation:
Meet-me Conference Access Code Change:
54 Installation and Administration Guide
Note:Note: If so administered, users also have the option to activate and deactivate
Extension to Cellular through a feature button on their office phone.
Setting up multiple applications on one phoneMultiple applications on one phone (square bridging) is used when more than one Avaya Communication Manager Extended Access application (OPS, EC500, CSP, SCCAN) should be applied to a desk phone or AWOH. Currently only one application can be supported on an Extended Access station, but square bridging provides a way around this restriction. Square bridging requires an extra license. A user cannot extend a call to a cell phone if their phone is square bridges.
Two scenarios for setting up square bridging.
Scenario 1: A customer wants two different cell phones to ring when a desk phone is called. The following administration is required.
1. Station 1 is the principal desktop phone. Administer Station 1 on the Station Form and on the off-PBX-telephone station-mapping form.
2. On the off-PBX-telephone station-mapping form, map Cell phone 1 to Station 1.
3. On the Station Form, administer Station 2 as an AWOH.
4. On the off-PBX-telephone station-mapping form, map Cell phone 2 to Station 2.
5. On the Station Form, administer all of the call appearances for Station 2 as bridged appearances for Station 1.
When Station 1 receives a call both Cell 1 and Cell 2 ring. No calls can be made to Station 2 since all its call appearances are bridged to Station 1.
Scenario 2: A customer wants Extension to Cellular on an OPS SIP desk phone. The following administration is required.
1. On the Station Form, administer Station 1 as an unregistered IP phone.
2. On the off-PBX-telephone station-mapping form, map OPS phone 1 to Station 1 and select the OPS application type.
3. On the Station form, administer Station 2 as an AWOH.
4. On the off-PBX-telephone station-mapping form, map Cell phone 1 to Station 2 as EC500.
5. On the Station Form, administer all of the call appearances for Station 2 as bridged appearances for Station 1.
Issue 9 June 2005 55
6. You should administer a button, e.g., enable EC500 on/off on the OPS station. The FNU is Off-PBX Call FNU. Download this button information to the OPS phone from the PPM. Send notification to the OPS phone when the status changes.
The OPS phone user can enable Extension to Cellular by dialing the FNE.
When the EC500 status is checked for the OPS phone, the status will match whether Extension to Cellular is enabled or not.
Voice mail administration
Cellular Voice Mail Avoidance
Avaya Communication Manager Extended Access Cellular Voice Mail Avoidance is designed to reduce the uncertainty as to where unanswered Avaya Communication Manager Extended Access calls may be sent. An unanswered call either terminates at the corporate voice mail system or at the cellular service provider’s (CSP) voice mail system. The amount of control over the terminating voice mail system is limited. Administrating the number of ring cycles before a call goes to the corporate voice mail system is used to select the destination voice mailbox. Cellular Voice Mail Avoidance will be available for Extension to Cellular applications.
How calls are routed to voice mail
If the user does not quickly answer a ringing call or if the cell phone is in a bad coverage area, the cellular network will route the call to cellular voice mail. The speed of this may depend on network utilization. Also, if the cell phone has been turned off while in contact with the network, the call will go almost immediately to the cellular voice mail. This leaves customers with a number of problems. Calls may end up on either the corporate voice mail or the CSP’s voice mail. A quick response from the cellular voice mail may prevent a customer from answering a call on their principal desk set. The call is seized by the cellular voice mail before the customer can respond to the ringing.
The Avoidance feature prevents calls from being routed to cellular voice mail
The customer can prevent this by requesting their CSP to turn off their cellular voice mail, but that then affects all calls to the cell phone, many of which may not be routed through the call server. The Avoidance feature is designed to improve this problem. The call server will detect when the cell phone is not the entity answering the call (when, presumably, the Cellular Voice Mail is answering the call) and bring the call back into the call server. It can then be treated as a normal call to the desk set, ringing it the appropriate number of times before going to coverage.
56 Installation and Administration Guide
How the Avoidance feature works
There are two strategies that will be followed to accomplish this. Both require ISDN or H.323 trunks. SIP trunks are not supported. First, some cellular services, e.g., GSM, return an indication within the CONNECT message telling the switch that the call is not an end-to-end ISDN call (a person did not answer the call). This enables the switch to determine that a non-ISDN point has answered the call. It can then bring the call back to the switch. This method is not foolproof as a cellular voice mail system could conceivably be an ISDN endpoint, or a cell phone might not be one. It is believed that this method will work with GSM systems.
Many Cellular Service Providers do not return this message. The second method, which should be reasonably effective when the cell phone is not in contact with the cellular system, is by timing. If the cell phone cannot be contacted, the CSP immediately sends the call to voice mail. This saves using network capacity on a call that cannot be completed. If the call is routed out on the network and the cell phone rings, there must be a several second delay before it is answered. Therefore, calls answered in less than the pre-determined time (e.g., 4 seconds) are assumed to be going to Cellular Voice Mail. Consequently by starting a customer selectable timer when the call is launched, and pulling back calls answered prior to its expiration, this should result in most unanswerable calls going to the switch’s coverage. If the cell phone rings and the call is unanswered, then the call will probably go to the switch’s coverage.
This feature will work with the AAR/ARS Avaya Communication Manager Extended Access call routing feature developed for MultiVantage Release 1.1.2. It will also work with the older loop back trunk configuration.
To administer Cellular Voice Mail Avoidance:
1. Type change xmobile configuration-set n (where n is the number assigned with a coverage path).
or
Type change off-pbx telephone configuration-set n (where n is the number assigned with a coverage path).
2. Press Enter.
The Configuration Set screen appears (Figure 11).
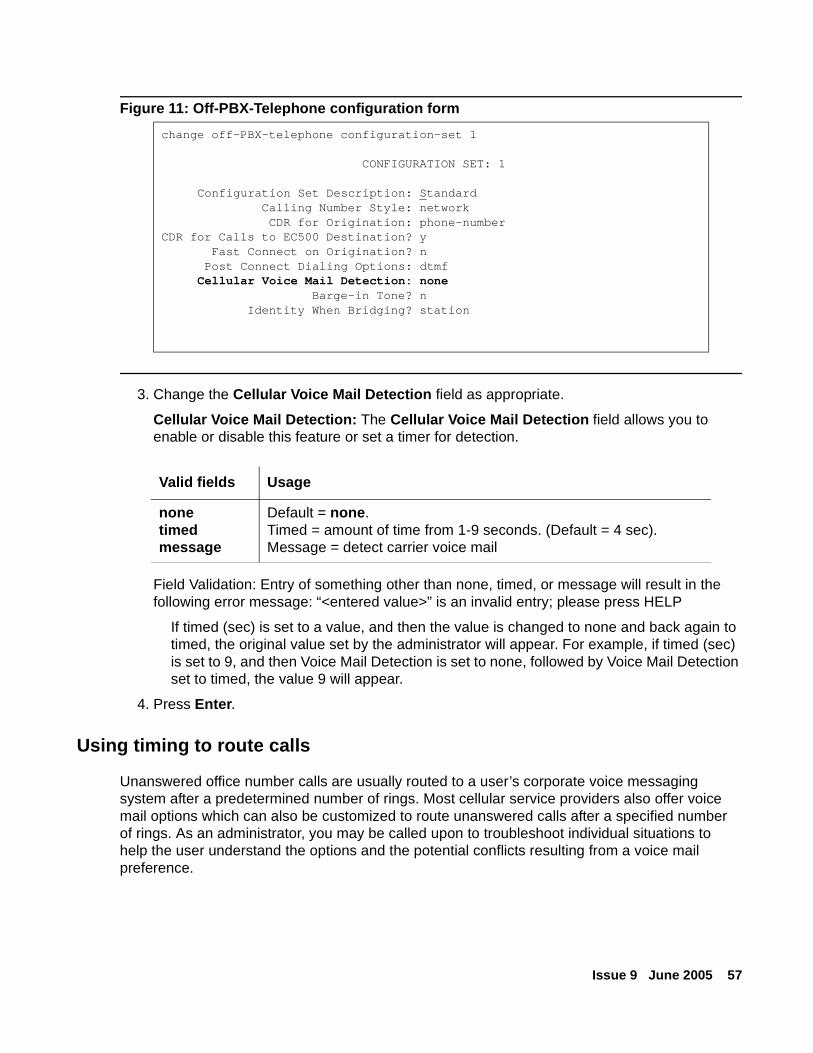
Issue 9 June 2005 57
Figure 11: Off-PBX-Telephone configuration form
3. Change the Cellular Voice Mail Detection field as appropriate.
Cellular Voice Mail Detection: The Cellular Voice Mail Detection field allows you to enable or disable this feature or set a timer for detection.
Field Validation: Entry of something other than none, timed, or message will result in the following error message: “<entered value>” is an invalid entry; please press HELP
If timed (sec) is set to a value, and then the value is changed to none and back again to timed, the original value set by the administrator will appear. For example, if timed (sec) is set to 9, and then Voice Mail Detection is set to none, followed by Voice Mail Detection set to timed, the value 9 will appear.
4. Press Enter.
Using timing to route calls
Unanswered office number calls are usually routed to a user’s corporate voice messaging system after a predetermined number of rings. Most cellular service providers also offer voice mail options which can also be customized to route unanswered calls after a specified number of rings. As an administrator, you may be called upon to troubleshoot individual situations to help the user understand the options and the potential conflicts resulting from a voice mail preference.
change off-PBX-telephone configuration-set 1
CONFIGURATION SET: 1
Configuration Set Description: StandardCalling Number Style: networkCDR for Origination: phone-number
CDR for Calls to EC500 Destination? yFast Connect on Origination? nPost Connect Dialing Options: dtmfCellular Voice Mail Detection: none
Barge-in Tone? nIdentity When Bridging? station
Valid fields Usage
nonetimedmessage
Default = none.Timed = amount of time from 1-9 seconds. (Default = 4 sec).Message = detect carrier voice mail
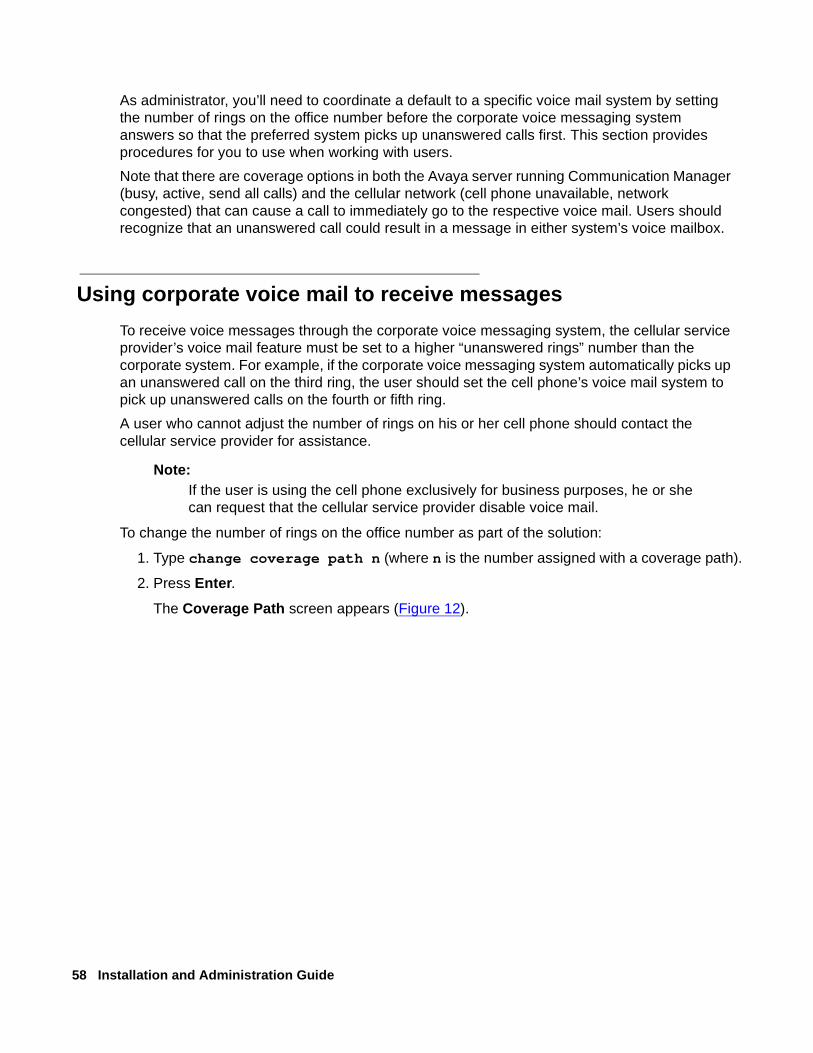
58 Installation and Administration Guide
As administrator, you’ll need to coordinate a default to a specific voice mail system by setting the number of rings on the office number before the corporate voice messaging system answers so that the preferred system picks up unanswered calls first. This section provides procedures for you to use when working with users.
Note that there are coverage options in both the Avaya server running Communication Manager (busy, active, send all calls) and the cellular network (cell phone unavailable, network congested) that can cause a call to immediately go to the respective voice mail. Users should recognize that an unanswered call could result in a message in either system’s voice mailbox.
Using corporate voice mail to receive messages
To receive voice messages through the corporate voice messaging system, the cellular service provider’s voice mail feature must be set to a higher “unanswered rings” number than the corporate system. For example, if the corporate voice messaging system automatically picks up an unanswered call on the third ring, the user should set the cell phone’s voice mail system to pick up unanswered calls on the fourth or fifth ring.
A user who cannot adjust the number of rings on his or her cell phone should contact the cellular service provider for assistance.
Note:Note: If the user is using the cell phone exclusively for business purposes, he or she
can request that the cellular service provider disable voice mail.
To change the number of rings on the office number as part of the solution:
1. Type change coverage path n (where n is the number assigned with a coverage path).
2. Press Enter.
The Coverage Path screen appears (Figure 12).
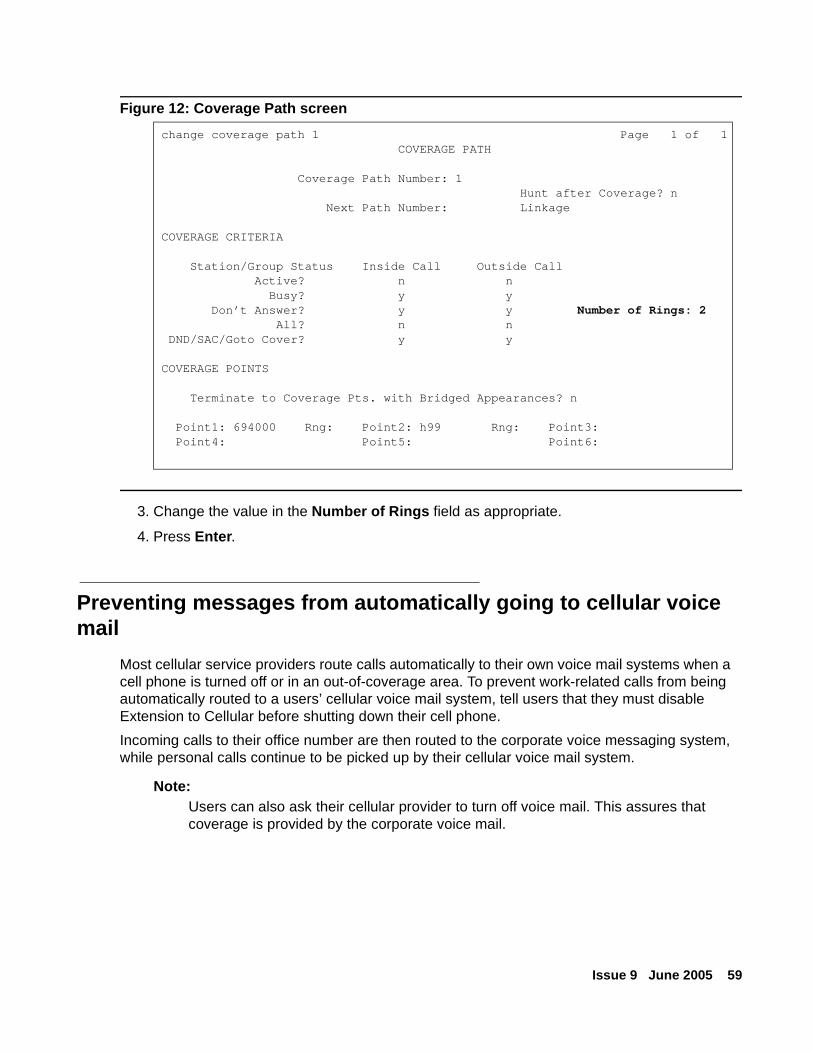
Issue 9 June 2005 59
Figure 12: Coverage Path screen
3. Change the value in the Number of Rings field as appropriate.
4. Press Enter.
Preventing messages from automatically going to cellular voice mail
Most cellular service providers route calls automatically to their own voice mail systems when a cell phone is turned off or in an out-of-coverage area. To prevent work-related calls from being automatically routed to a users’ cellular voice mail system, tell users that they must disable Extension to Cellular before shutting down their cell phone.
Incoming calls to their office number are then routed to the corporate voice messaging system, while personal calls continue to be picked up by their cellular voice mail system.
Note:Note: Users can also ask their cellular provider to turn off voice mail. This assures that
coverage is provided by the corporate voice mail.
change coverage path 1 Page 1 of 1 COVERAGE PATH
Coverage Path Number: 1 Hunt after Coverage? n Next Path Number: Linkage
COVERAGE CRITERIA
Station/Group Status Inside Call Outside Call Active? n n Busy? y y Don’t Answer? y y Number of Rings: 2 All? n n DND/SAC/Goto Cover? y y
COVERAGE POINTS
Terminate to Coverage Pts. with Bridged Appearances? n
Point1: 694000 Rng: Point2: h99 Rng: Point3: Point4: Point5: Point6:

60 Installation and Administration Guide
“Notify me” under Unified Messenger for MS Exchange
If users have access to the “Notify Me” feature of Unified Messenger for Microsoft (MS) Exchange Version 4.0 or later, they are notified of messages in their corporate voice mailbox through their cell phone’s display. For more information on using this feature see “Setting Notify Me” in the Unified Messenger Telephone User Interface Online Guide, accessed through http://www.avaya.com/support.
Note:Note: The cell phone must support text messaging to use this feature.
Administering the barge-in toneThe barge-in tone adds security to Extension to Cellular. If a user is on an active Extension to Cellular call and another person joins the call from the Extension to Cellular enabled office phone, all parties on the call will hear the barge-in tone. This feature works only when the exclusion feature is not enabled.
All parties on a call hear a conference tone if all of the following are true:
● the barge-in tone is enabled on the Configuration Set screen,
● the conference tone is administered in the country form,
● Extension to Cellular is enabled,
● the exclusion feature is not enabled,
● a user is active on their cell phone, and
● another user tries to join this call on the Extension to Cellular-associated desk phone.
To administer the barge-in tone:
1. Type change off-pbx-telephone configuration-set n (where n is the number assigned with a coverage path).
2. Press Enter.
The Configuration Set screen appears (Figure 13).
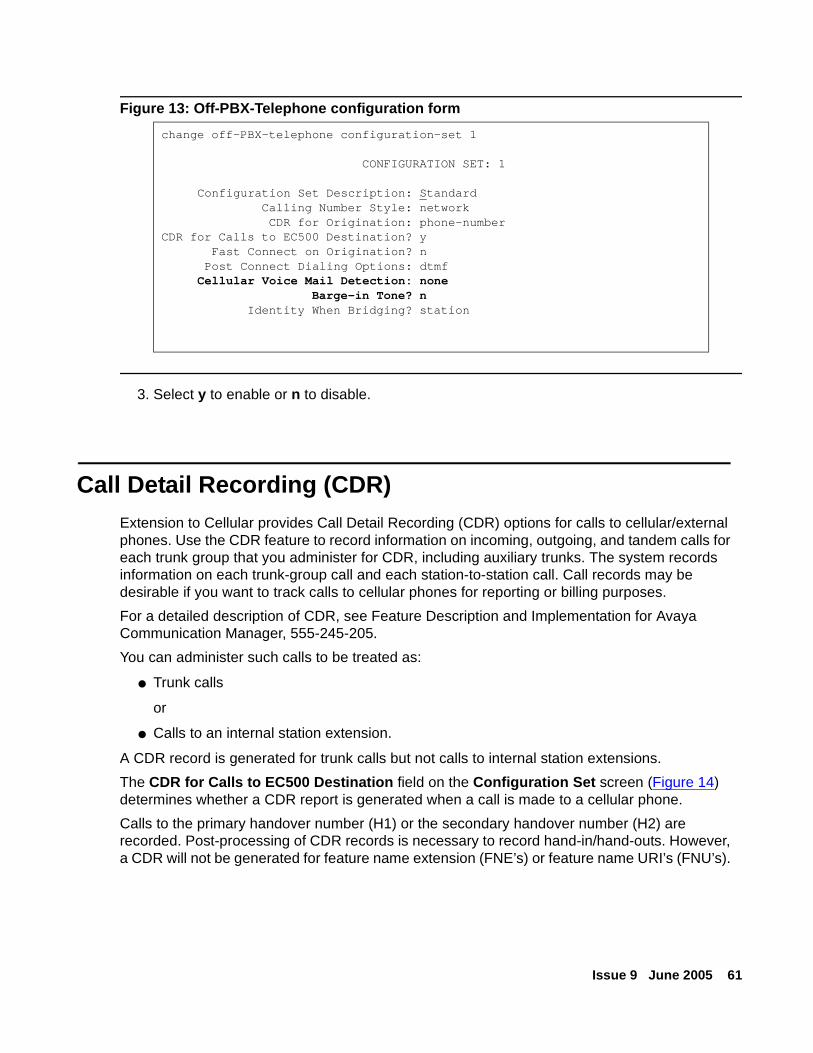
Issue 9 June 2005 61
Figure 13: Off-PBX-Telephone configuration form
3. Select y to enable or n to disable.
Call Detail Recording (CDR)Extension to Cellular provides Call Detail Recording (CDR) options for calls to cellular/external phones. Use the CDR feature to record information on incoming, outgoing, and tandem calls for each trunk group that you administer for CDR, including auxiliary trunks. The system records information on each trunk-group call and each station-to-station call. Call records may be desirable if you want to track calls to cellular phones for reporting or billing purposes.
For a detailed description of CDR, see Feature Description and Implementation for Avaya Communication Manager, 555-245-205.
You can administer such calls to be treated as:
● Trunk calls
or
● Calls to an internal station extension.
A CDR record is generated for trunk calls but not calls to internal station extensions.
The CDR for Calls to EC500 Destination field on the Configuration Set screen (Figure 14) determines whether a CDR report is generated when a call is made to a cellular phone.
Calls to the primary handover number (H1) or the secondary handover number (H2) are recorded. Post-processing of CDR records is necessary to record hand-in/hand-outs. However, a CDR will not be generated for feature name extension (FNE’s) or feature name URI’s (FNU’s).
change off-PBX-telephone configuration-set 1
CONFIGURATION SET: 1
Configuration Set Description: StandardCalling Number Style: networkCDR for Origination: phone-number
CDR for Calls to EC500 Destination? yFast Connect on Origination? nPost Connect Dialing Options: dtmfCellular Voice Mail Detection: none
Barge-in Tone? nIdentity When Bridging? station

62 Installation and Administration Guide
To administer CDR reports:
1. Type change off-pbx telephone configuration-set n (where n is the number assigned with a coverage path).
2. Press Enter.
The Configuration Set screen appears (Figure 14).
Figure 14: Configuration Set screen
This screen allows you flexibility in billing or tracking calls to phones that are mapped to extensions.
3. Change the CDR for Calls to EC500 Destination field as appropriate.
CDR for Calls to EC500 Destination field:
4. Press Enter.
CDR for Calls to EC500 Destination
When the option is y, an outgoing trunk CDR report is created for each Extension to Cellular call, but only if the selected trunk has the CDR option enabled. The originating extension of the call is either the principal office phone to which the Extension to Cellular station is mapped, or the station itself, if stand-alone.
Extension to Cellular phones are tagged on an intra-call CDR report when the call originates from an Extension to Cellular phone. The tag reads" EC500".
change off-PBX-telephone configuration-set 55
CONFIGURATION SET: 55
Configuration Set Description: StandardCalling Number Style: networkCDR for Origination: phone-number
CDR for Calls to EC500 Destination? yFast Connect on Origination? nPost Connect Dialing Options: dtmfCellular Voice Mail Detection: none
Barge-in Tone: nIdentity When Bridging? station
Valid entries Usage
y or n Default = y

Issue 9 June 2005 63
All Extension to Cellular CDR reports have an account code consisting of all 8s (for example, 8888) up to the maximum administered length of the CDR Account Code.
For additional information on Call Detail Recording, see the Avaya Administrator’s Guide for Avaya Communication Manager, 555-233-506.
- Type y to track calls to cell phones for reporting or billing purposes.
If you type y, the configuration set administered on the Station screen determines whether a CDR record is generated.
- Type n if you want to treat the Extension to Cellular cell phones as totally internal stations and don’t require CDR reporting.
If you type n, and the extension is stand-alone, you must type it on the Intra-Switch CDR screen in order to get CDR reports. These do not show any trunk information.
If the principal station is being tracked in the Intra-Switch CDR report, a CDR record is generated for the station-side of the call. The CDR record contains the calling and called parties. This is in addition to the CDR report for the Extension to Cellular call if the CDR for Calls to the EC500 Destination field on the Configuration Set screen is y.
Thus, two CDR reports may be generated for each Extension to Cellular call:
- The trunk CDR record containing the cell phone number
- The principal and the intra-switch CDR record containing the principal and the original calling party
When an intra-switch call and a trunk call originate at an Extension to Cellular phone, only the trunk call gets reported in the CDR.
Note:Note: In the case of a stand-alone Extension to Cellular cell phone, its station number is
the principal. If it is mapped to another station, then that station’s number is the principal. See Table 2 for additional information.
CDR reporting for Extension to Cellular calls relies on the CDR Reports field on the Trunk Group screen.
To access the Trunk Group screen:
1. Type add trunk-group next.
2. Press Enter.
The Trunk Group screen appears (Figure 15).

64 Installation and Administration Guide
Figure 15: Trunk Group screen, page 1
3. Change the CDR Reports field as appropriate.
CDR Reports: The CDR Reports field is where you can enable or disable CDR reporting.
4. Press Enter.
Changing configuration sets
A configuration set defines a number of call treatment options for Extension to Cellular cell phone calls. Extension to Cellular administration allows for the use of up to 10 configuration sets that are already defined in the system using default values. Each set is administered on a different screen.
Since there are 10 configuration sets available, multiple combinations of the options can be administered, thus accommodating requirements for a variety of cellular service providers.
add trunk-group next Page 1 of 21 TRUNK GROUP
Group Number: 3 Group Type: isdn CDR Reports: y Group Name: OUTSIDE CALL COR: 1 TN: 1 TAC: 103 Direction: two-way Outgoing Display? n PRI/BRI: Dial Access? n Busy Threshold: 255 Night Service:Queue Length: 0 Country: 1 Incoming Destination: Comm Type: voice Auth Code? n Digit Absorption List: Prefix-1? y Trunk Flash? n Toll Restricted? y
TRUNK PARAMETERS Trunk Type: Outgoing Dial Type: tone Cut-Through? n Trunk Termination: rc Disconnect Timing(msec): 500
Auto Guard? n Call Still Held? n Sig Bit Inversion: none Analog Loss Group: 6 Digital Loss Group: 11 Trunk Gain: high
Disconnect Supervision - In? y Out? n Answer Supervision Timeout: 10 Receive Answer Supervision? n
Valid entries Usage
y or n Default = n. If this field is set to n, CDR reports will not be generated even if the CDR for Calls to EC500 Destination field on the Configuration Set screen is y.

Issue 9 June 2005 65
To customize a configuration set:
1. Type change off-pbx-telephone configuration-set n (where n is the number assigned to a configuration set).
2. Press Enter.
The Configuration Set screen appears (Figure 16).
Figure 16: Configuration Set screen
3. Change or type values in the following fields as appropriate:
- Configuration Set: The Configuration Set field is where you describe the purposes of the configuration set. For example, you can type "Extension to Cellular handsets."
- Calling Number Style: The Calling Number Style field determines the format of the caller ID for calls from a local switch extension to an Extension to Cellular cell phone. Using the default value network causes the system to use the 10-digit calling identification information established on the ISDN public-unknown numbering screen. See Sending 10-digit caller identification for locally-originated calls on page 50. The pbx value allows a cell phone caller ID display of fewer than 10-digits such as an extension.
change off-pbx-telephone configuration-set 1 Page 1 of 1
CONFIGURATION SET: 1
Configuration Set Description: Calling Number Style: networkCDR for Origination: phone-number
CDR for Calls to EC500 Destination? yFast Connect on Origination? nPost Connect Dialing Options: dtmfCellular Voice Mail Detection: none
Barge-in Tone: nIdentity When Bridging? station
Valid entries Usage
free text Type up to 20 characters, free-screen text
Valid entries Usage
networkpbx
Default = network

66 Installation and Administration Guide
- CDR for Origination
If a cell phone is allowed to originate calls through its mapped Extended Access Calls extension (i.e., a SIP phone or a cell phone call), a CDR record will be generated for the call. Incoming trunk cdr must be turned on.
CDR will disregard Feature Name Extensions (FNEs).
The Options on incoming CDR are as follows:
● Either provides the calling number that came in over the trunk (e.g., cell phone number) or the station extension or none
● Record destination phone number
If a configuration-set is administered on the change off-pbx telephone station form, a CDR record will be generated for call origination from mapped phones e.g., cell phones through the ACM, based on the option chosen on the “CDR for origination” field on the “configuration-set” form. Since there are various CDR report formats, and some of them allow for 10-digit calling party field while others allow for only the internal extension format (currently 5 digits maximum), the option on the “CDR for origination” field must chosen to suit the CDR output device.
The calling party on the record is based on the option chosen on the “CDR for origination” field on the configuration-set administered on the change off-pbx telephone station form. If the “extension” option is chosen, the internal Extended Access extension is reported as the calling party. If the “phone number” option is chosen, the 10-digit cell phone is reported on the CDR report; if “none” there will be no originating CDR record.
- Fast Connect on Origination: The Fast Connect on Origination field determines whether some additional processing will occur on the switch prior to connecting a call. This option may be used in the future for capabilities provided by the cell phone provider. Currently the default value of n is recommended.
Valid entries Usage
phone-numberextensionnone
Default = phone-number
Valid entries Usage
y or n Default = n

Issue 9 June 2005 67
- Post Connect Dialing Options: The Post Connect Dialing Options field determines whether additional capabilities, beyond standard ISDN dialing, are available for those incoming ISDN trunk calls that are mapped into Extension to Cellular stations. Use the default value, dtmf (dual tone multiple frequencies).
4. Press Enter.
5. As needed, use the change off-pbx-telephone configuration-set n command to change additional configuration sets.
Valid entries Usage
dtmfbandbothnone
Default = dtmf
Table 2: CDR output for Extension to Cellular calls
“CDR Report” field on the Trunk Group screen
“CDR for Calls to EC500 Destination” field on the Configuration Set screen
Principal in mapping set-up in the Intra-Switch CDR screen
Type of CDR records (Trunk or Intra-switch)
Contents of Interest
Yes Yes No Trunk CDR record
Cell phone number + principal + Extension to Cellular ID
Yes Yes Yes 2 CDR records (Trunk and Intra)
Cell phone number + principal + Extension to Cellular IDPrincipal + calling party
Yes No No No CDR N/A
Yes No Yes Intra CDR record
Principal + calling party
No Yes No No CDR N/A
No Yes Yes Intra CDR record
Principal + calling party
No No No No CDR N/A
No No Yes Intra CDR record
Principal + calling party

68 Installation and Administration Guide
Generating two CDR records
To generate two CDR records:
1. Type change system-parameters cdr and press Enter.
The CDR System Parameters screen appears (not shown).
2. Set the Intra-Switch CDR field to y.
3. Press Enter to save your changes.
4. Log off and log back into the switch.
5. Type change intra-switch-cdr and press Enter.
The Intra-Switch CDR screen appears (not shown).
6. Type any extension you want to track with this screen.
7. Press Enter to save your changes.
Creating a feature access code to change station security codes
When users are enabling and disabling Extension to Cellular, they need to know the Station Security Code (SSC) associated with their office number. You must be sure to administer these station security codes for the principal Extension to Cellular office numbers.
Extension to Cellular allows users to enable or disable all mapped extensions at once, using the station security code for their principal phone (an office number or an AWOH extension set up on the Avaya server running Communication Manager).
Station security codes provide security to station users by preventing other users from accessing functions associated with the user’s station. Each station user can change his or her own SSC if the user knows the station’s current settings. You must create a system-wide SSC change feature access code (FAC) that users can invoke to change their SSC. You must also administer and provide their individual SSCs to users. A user cannot change a blank SSC.
To create a system-wide SSC change feature access code:
1. Type change feature-access-codes and press Enter.
The Feature Access Code (FAC) screen appears.
2. Continue to press Next Page until the page with the Station Security Code Change Access Code field appears (Figure 17).

Issue 9 June 2005 69
Figure 17: Feature Access Code (FAC) screen
3. Type a code valid for your dial plan (for example, #5) in the Station Security Code Change Access Code field. This sets the access codes for this feature.
4. Press Enter.
The Command prompt appears.
5. Type change system-parameters security and press Enter.
The Security-Related System Parameters screen appears.
Press Next Page to advance to page 2 of the Security-Related System Parameters screen (Figure 18).
change feature-access-codes Page 3 of 8 FEATURE ACCESS CODE (FAC) PASTE (Display PBX data on Phone) Access Code: 410
Personal Station Access (PSA) Associate Code: Dissociate Code: Per Call CPN Blocking Code Access Code: Per Call CPN Unblocking Code Access Code:
Priority Calling Access Code: 0142 Program Access Code: 0143
Refresh Terminal Parameters Access Code: 0144 Remote Send All Calls Activation: Deactivation: Self Station Display Activation: #1 Send All Calls Activation: *4 Deactivation: *5 Station Firmware Download Access Code: Station Lock Activation: Deactivation: Station Security Code Change Access Code: #5 Station User Admin of FBI Assign: Remove: Station User Button Ring Control Access Code: Terminal Dial-Up Test Access Code: 0151
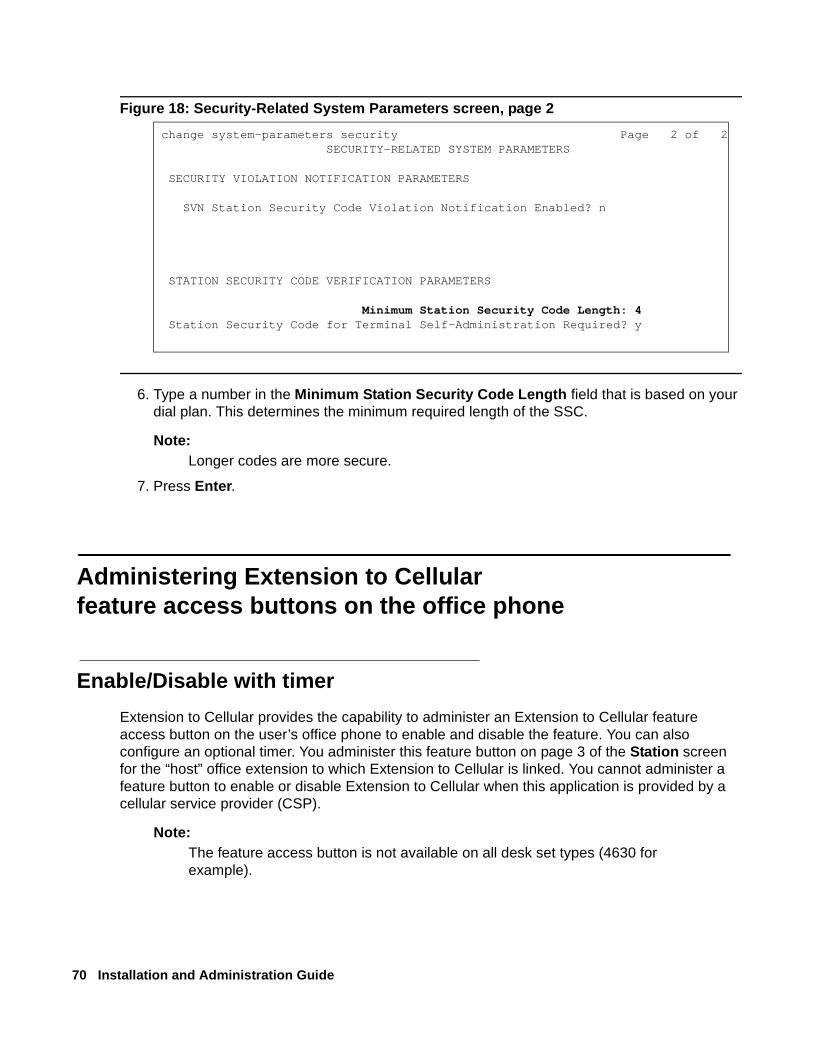
70 Installation and Administration Guide
Figure 18: Security-Related System Parameters screen, page 2
6. Type a number in the Minimum Station Security Code Length field that is based on your dial plan. This determines the minimum required length of the SSC.
Note:Note: Longer codes are more secure.
7. Press Enter.
Administering Extension to Cellularfeature access buttons on the office phone
Enable/Disable with timer
Extension to Cellular provides the capability to administer an Extension to Cellular feature access button on the user’s office phone to enable and disable the feature. You can also configure an optional timer. You administer this feature button on page 3 of the Station screen for the “host” office extension to which Extension to Cellular is linked. You cannot administer a feature button to enable or disable Extension to Cellular when this application is provided by a cellular service provider (CSP).
Note:Note: The feature access button is not available on all desk set types (4630 for
example).
change system-parameters security Page 2 of 2 SECURITY-RELATED SYSTEM PARAMETERS
SECURITY VIOLATION NOTIFICATION PARAMETERS
SVN Station Security Code Violation Notification Enabled? n
STATION SECURITY CODE VERIFICATION PARAMETERS
Minimum Station Security Code Length: 4 Station Security Code for Terminal Self-Administration Required? y

Issue 9 June 2005 71
The process described below explains how to administer an Extension to Cellular feature button and include the optional Extension to Cellular timer. The Extension to Cellular feature button is available on phones which support administrable feature buttons.
To set up an Extension to Cellular feature button with optional timer:
1. Type change station n (where n is the extension of an Extension to Cellular-enabled station – in this example, 1034) and press Enter.
The Station screen appears.
2. Press the Next Page button twice to display page 3 of the Station screen (Figure 19).
Figure 19: Station screen, page 3
3. Select an available feature button under the Button Assignments header (button 4 was used in this example) and type ec500 (lower case) to administer an Extension to Cellular feature button on the office phone.
4. Press Enter.
Note:Note: The Timer subfield displays, and defaults to n. Leaving the default setting of n
excludes the timer state.
change station 1034 Page 3 of 4 STATION SITE DATA Room: Headset? n Jack: Speaker? n Cable: Mounting: d Floor: Cord Length: 0 Building: Set Color:
ABBREVIATED DIALING List1: List2: List3:
BUTTON ASSIGNMENTS 1: call-appr 5: 2: call-appr 6: 3: call-appr 7: 4: ec500 Timer? y 8:

72 Installation and Administration Guide
5. Set the optional Timer subfield to y to include an Extension to Cellular timer state for the administered feature button.
When the timer state is included, the Extension to Cellular user can activate a one-hour timer to temporarily disable Extension to Cellular through this administered feature button.
6. Press Enter.
The corresponding feature button on the office phone is now administered for Extension to Cellular.
Note:Note: The feature status button on the office phone indicates the current state of
Extension to Cellular regardless of whether the feature was enabled remotely or directly from the office phone.
Enabling and disabling Extension to Cellular
A user can only enable and disable Extension to Cellular. You can enable and disable Extension to Cellular from:
● An administered feature button on the office phone
● Feature Access Codes (FAC) administered for the office phone
● Feature name extensions (FNE) administered for the cell phone
● Any other touch-tone station on the switch
● Any remote touch-tone phone (cell or otherwise) in the external network, through the trunk interface to the switch through an Extension to Cellular access number (as set in the Telecommuting Access Extension field on the Telecommuting Access screen).
Security codes are available for this feature to protect the phone from unwanted tampering.
Note:Note: Security codes do not protect enabling/disabling through an administered feature
access button on the office phone.
You can display the enabled/disabled status for an Extension to Cellular cell phone using the status station command. See Off-PBX Telephone Status for Station screen on page 84 for more information. If the Extension to Cellular feature status button has been administered, you can also tell the current Extension to Cellular status by viewing the corresponding feature status button lamp on the linked office phone.
The administration of Extension to Cellular to send the office caller ID remains in effect whether Extension to Cellular is enabled or disabled.
Note:Note: The initial state of an Extension to Cellular-administered extension is always
disabled.
Issue 9 June 2005 73
A typical user disables and enables all cell phone-mapped Extension to Cellular stations at once using his or her office number and the station security code associated with that office number. In order to enable and disable individual extensions, the user needs to have the extension number and station security code for each cell phone-mapped station.
Individual extensions can be enabled and disabled in the following ways:
● A user wants to enable or disable the cell phone-mapped Extension to Cellular station at an internal extension. The user enters the following in sequence:
1. The Extension to Cellular “enable” or “disable” feature access code.
2. The extension number of the cell phone mapped-station, followed by #.
3. The station security code assigned to the mapped station.
4. A final #.
The user receives either a confirmation or an intercept tone depending upon the success or failure of the procedure.
● A user wants to enable or disable cell phone-mapped Extension to Cellular stations from any phone in the external network. Whether it’s the user’s cell phone or another phone does not matter. The user enters the following in sequence:
1. The Avaya Extension to Cellular access number (as set in the Telecommuting Access Extension field on the Telecommuting Access screen).
The user should receive a dial tone.
2. The Extension to Cellular “enable” or “disable” feature access code.
3. The extension number of the cell phone-mapped station, followed by #.
4. The station security code assigned to the mapped station.
5. A final #.
The user receives either a confirmation or an intercept tone depending upon the success or failure of the procedure.
These procedures must be repeated for each cell phone-mapped station that the user wishes to enable or disable.

74 Installation and Administration Guide
Extend Call feature button
Users can take an Extension to Cellular call on their office phone, and then move it to their cell phone. This is done through an administrable feature button on the office phone called Extend Call.
To set up an Extend Calls feature button:
1. Type change station n (where n is the extension of an Extension to Cellular-enabled station – in this example, 1034) and press Enter.
The Station screen appears.
2. Press the Next Page button twice to display page 3 of the Station screen (Figure 20).
Figure 20: Station screen, page 3
3. Select an available feature button under the Button Assignments header (button 5 was used in this example) and type extnd-call (all lower case) to administer an Extension to Cellular feature button on the office phone.
4. Press Enter.
The corresponding feature button on the office phone is now administered for Extension to Cellular.
change station 1034 Page 3 of 4 STATION SITE DATA Room: Headset? n Jack: Speaker? n Cable: Mounting: d Floor: Cord Length: 0 Building: Set Color:
ABBREVIATED DIALING List1: List2: List3:
BUTTON ASSIGNMENTS 1: call-appr 5:extnd-call 2: call-appr 6: 3: call-appr 7: 4: ec500 Timer? y 8:

Issue 9 June 2005 75
View feature buttons and button labels
To view the feature buttons:
1. Type change display-messages view-buttons and press Enter.
The Language Translations screen appears (Figure 21).
Figure 21: Language Translation screen
Note:Note: The EC500 button refers to the Extension to Cellular status button (enabling and
disabling).
To view the button labels for the feature buttons:
1. Type change display-messages button-labels and press Enter.
The Language Translations screen appears (Figure 22).
change display-messages view-buttons Page 9 of 9LANGUAGE TRANSLATIONS
English Translation
1. Station Lock 1. ************************2. License Error 2. ************************3. Conference Display 3. ************************4. Conf/Trans Toggle-Swap 4. ************************5. Far End Mute 5. ************************6. Paging 1st Link Alarm 6. ************************7. Paging 2nd Link Alarm 7. ************************8. EC500 8. ************************9. No Hold Conference 9. ************************
10. Posted Messages 10. ************************11. Audix Recording 11. ************************12. Extend Call 12. ************************
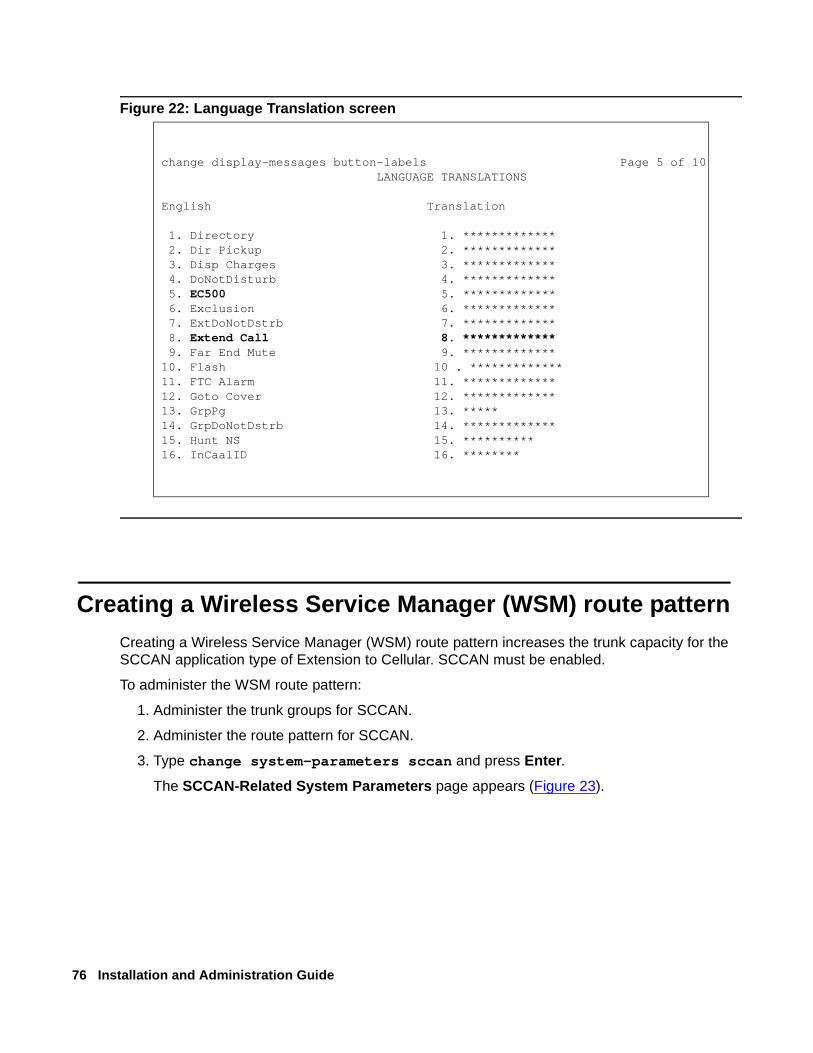
76 Installation and Administration Guide
Figure 22: Language Translation screen
Creating a Wireless Service Manager (WSM) route patternCreating a Wireless Service Manager (WSM) route pattern increases the trunk capacity for the SCCAN application type of Extension to Cellular. SCCAN must be enabled.
To administer the WSM route pattern:
1. Administer the trunk groups for SCCAN.
2. Administer the route pattern for SCCAN.
3. Type change system-parameters sccan and press Enter.
The SCCAN-Related System Parameters page appears (Figure 23).
change display-messages button-labels Page 5 of 10LANGUAGE TRANSLATIONS
English Translation
1. Directory 1. *************2. Dir Pickup 2. *************3. Disp Charges 3. *************4. DoNotDisturb 4. *************5. EC500 5. *************6. Exclusion 6. *************7. ExtDoNotDstrb 7. *************8. Extend Call 8. *************9. Far End Mute 9. *************
10. Flash 10 . *************11. FTC Alarm 11. *************12. Goto Cover 12. *************13. GrpPg 13. *****14. GrpDoNotDstrb 14. *************15. Hunt NS 15. **********16. InCaalID 16. ********

Issue 9 June 2005 77
Figure 23: SCCAN-Related System Parameters screen
4. Enter a route pattern number that is SCCAN enabled.
● Only regular routing patterns are allowed. Do not enter partition-route-table indexes, RHNPA indexes, deny or nodes. If you enter any of these values, the following error message appears:
"<entered value>" is an invalid entry; please press HELP.
● Only SCCAN enabled routing patterns are allowed. Do not enter a route pattern that is not SCCAN enabled. If you enter this invalid route pattern, the following error message appears:
"<entered value> Route pattern must be SCCAN enabled
Redirect on OPTIM Failure (ROOF) proceduresRedirect on OPTIM Failure (ROOF) procedures apply busy treatment in general. No additional administration is necessary for ROOF.
ROOF procedures only apply when:
● a looped call is detected, or
● a call disconnects before it is answered.
change system-paramters sccan Page 1 of 1
SCCAN-RELATED SYSTEM PARAMETERS
MM (WSM) Route Pattern: 231H1 Handover: ____H2 Handover: ____
Announcement Extension: ____Special Digit Conversion: ____
Valid entries Usage
blank1–999
Default = blank. Type a route pattern that is SCCAN enabled. Partition route patterns are not allowed.
● For an S3800, the number can be between 1 and 254.
● For an S8500 or S8700, the number can be between 1 and 999.

78 Installation and Administration Guide
Effects on the user
Some customers who do not have an in service desk set companion may notice a change in behavior. The following list summarizes noticeable changes due to ROOF procedures.
● The caller now hears delayed ringback. But under normal circumstances, the delay is too short to notice.
● The caller does not hear ringback forever and no tones or feedback are applied. On an ISDN or H.323 trunk, ringback is delayed until the CALL PROCEEDING message is received. On a SIP trunk, ringback delays until 180 Ringing is received.
● When a call disconnects due to loop detection for an Extension to Cellular phone without a companion desk set, the call is treated as busy.
● When a call is prematurely disconnected, the call is treated as busy.
- If the user’s calls go to coverage when the phone is busy, the call goes immediately to coverage (without waiting for the do not answer interval).
- If the user’s calls to do not go to coverage when the phone is busy, the caller hears a busy tone or reorder tone instead of ringback. The type of tone depends on the disconnect cause such as congestion on the trunk if all of the trunk channels are being used.
● The caller might hear a short period of ringback prior to a busy tone if the user’s call does not go to coverage.
Parallel Answering Groups
ROOF procedures apply to parallel answering groups only if a member of a group does not have a physical local station. Softphones act as regular in service stations. ROOF procedures attempt to deliver a call to each sequential member of a hunt group or station hunting chain if a member:
● experiences a ROOF timer expiry,
or
● receives a final response over a SIP trunk,
or
● receives a RELEASE, RELEASE COMPLETE, or DISCONNECT message.
Each individual member of a parallel answering group is subject to ROOF procedures. However, ROOF procedures do not affect the group as a whole unless there are no longer any alerting members. Note that the group receives coverage treatment, not individual members.
Issue 9 June 2005 79
Chapter 4: Installation and administration test
IntroductionOnce Extension to Cellular has been administered, use the installation test procedures in this chapter to ensure that the Extension to Cellular solution performs as expected. These tests are for Extension to Cellular cell phone use only.
The Extension to Cellular installation test and customer acceptance procedures follow the same guidelines used for testing a new station added to the switch. However, a review of the basic test procedures is provided in this chapter.
Test proceduresWhen performing these tests, it may be necessary to place several calls to the Extension to Cellular cell phone.
1. Using any other touch-tone phone, dial the user’s office phone number.
Ensure simultaneous ringing of the user’s office number and the Extension to Cellular cell phone.
2. Once the cell phone begins to ring, check the following:
a. Check the cell phone’s display panel to ensure 10 digit ANI is passed.
b. Do not answer the call, but do verify that the call covers to the user’s primary voice mail account (usually the corporate office voice mail box).
- If the call doesn’t cover properly, the Avaya installation team, or technician, needs to review the coverage path number of rings and setup for corporate voice mail coverage.
- It also may be necessary to experiment with the number of rings set at the cellular service provider and in the office number coverage path to get the desired voice mail coverage. See Chapter 3: Administration, for information about sending office caller ID, voice mail administration, and call forwarding.
3. Test whether the cell phone’s second call appearance is in service.
a. Using a touch-tone phone, dial the user’s office phone number.
b. Begin your "test" conversation by answering the call ringing on the cell phone.
80 Installation and Administration Guide
c. With the test conversation in place and active, place another call to the user’s primary extension.
The call should ring at the second call appearance on the private extension, as well as at the cell phone. Also, the cell phone’s display screen should show the second incoming call.
d. Using the cellular service provider’s call waiting feature, answer the second call.
If any of the test procedures fail, the installation team needs to verify that all administration entries were input correctly. If they are administered correctly, see Chapter 6: Troubleshooting, for further problem resolution procedures.

Issue 9 June 2005 81
Chapter 5: Maintenance
IntroductionThis chapter provides procedures for using a variety of maintenance tools to manage and support your Extension to Cellular implementation. Information is also provided on display error/alarms and system restarts.
Key maintenance tools are:
● Display capacities – the ability to display the number of used and unused stations, as well as the number of stations assigned to any particular type.
● List commands – the ability to list Extension to Cellular stations by complete or partial cell phone number(s).
● Status commands – fields that shows Extension to Cellular enabled or disabled status.
No maintenance testing is performed when Extension to Cellular stations are active on a call.
About maintenance commandsUnless explicitly stated otherwise, command sequences described in this chapter refer to commands entered through a System Administration Terminal (SAT). Referenced screens are system administration screens. The screens shown reflect the terminal emulation interface, rather than the GEDI interface.
System Capacity screen You perform the administration to display system capacities for stations on page 8 of the System Capacity screen. You can view the following Extension to Cellular-related information:
● The number of administered stations (Used)
● The number of unadministered stations (Available)
● The number of stations assigned to Extension to Cellular types (Off-PBX Telephones)
● The number of stations
The number of Extension to Cellular types equals the number of stations used.

82 Installation and Administration Guide
To display station usage information:
1. Type display capacity [‘print’ or ‘schedule’] and press Enter.
The System Capacity screen, page 1, appears.
2. Press Next Page until you reach page 8 of the System Capacity screen.
The System Capacity screen, page 8, displays the station usage (Figure 24).
Figure 24: System Capacity screen, page 9
Note:Note: For legacy systems, the Off-PBX Telephone - SCCAN field does not appear.
Status screens
General Status screen
Use the status station n maintenance command to view the service state of the station. The Extension to Cellular state is shown on the General Status screen.
display capacity Page 9 of 12 SYSTEM CAPACITY
TOTAL SUBSCRIBED PORTS System Used Available Limit ----------------------- Station and Trunk Ports: 212 2588 2800 Radio Controllers: 0 0 0 Wireless Terminals: 0 0 0 XMOBILE Stations: 4 196 200 EC500: 4
Off-PBX Telephone - EC500: 20 40 60Off-PBX Telephone - OPS: 20 40 60Off-PBX Telephone - SCCAN: 0 0 0
Off-PBX Telephone Memory (units): 6% 94% 16200

Issue 9 June 2005 83
To check on the service state of a particular station:
1. Type status station n (where n is the extension number you want to check) and press Enter. For this example, we use the extension 22004.
The General Status screen appears (Figure 25).
Figure 25: General Status screen
● When Extension to Cellular is disabled, two asterisks (**) are displayed in the CF Destination Ext field, and the EC500 Status field displays the value disabled.
Note:Note: The ** are shown only for mapped extensions. If using the Extension to Cellular
with the UCC Scheduler to disable the Extension to Cellular station, then the primary extension number appears.
● When Extension to Cellular is enabled, the CF Destination Ext field is blank, and the EC500 status field displays the value enabled.
● When a new Extension to Cellular station is added, the station comes up in the disabled state.
2. Press Enter when finished.
status station 22004 Page 1 of 4 GENERAL STATUS Administered Type: 4630 Service State: in-service/on-hook Connected Type: 4630 Download Status: complete Extension: 22004 SAC Activated? no Port: S01985 User Cntrl Restr: none Call Parked? no Group Cntrl Restr: none Ring Cut Off Act? no CF Destination Ext:Active Coverage Option: 1
EC500 Status: enabled Off-PBX Service State: in-service/idle Message Waiting: Connected Ports:
HOSPITALITY STATUS Awaken at: User DND: not activated Group DND: not activated Room Status: non-guest room

84 Installation and Administration Guide
Off-PBX Telephone Status for Station screen
Use the status off-pbx-telephone station n maintenance command to view the service state of the off-PBX station. The General Status screen (Figure 25) shows only those ports that are connected to the physical station. The connected ports of Extension to Cellular stations are shown on the Off-PBX Telephone Status for Station screen.
To check on the service state of a particular Extension to Cellular station:
1. Type status off-pbx-telephone station n (where n is the extension number you want to check). For this example, we use the extension 43005.
2. Press Enter.
The Off-PBX Telephone Status for Station screen appears (Figure 26).
Figure 26: Off-PBX Telephone Status for Station screen
Note:Note: If there is no active outside call, the message: No trunks associated with this
off-pbx telephone station appears.
3. Press Enter when finished.
List screens Extension to Cellular allows for administering multiple stations to the same phone number. These mappings are administered on the Stations with Off-PBX Telephone Integration screens (see Mapping a host phone with an Extension to Cellular phone on page 40).
status off-pbx-telephone station 43005 Page 1 of 2OFF-PBX TELEPHONE STATUS FOR STATION 43005
Trunk/Member Port Connected PortsGroup
0001/001 01C1601 05C0509

Issue 9 June 2005 85
Extension Type screen
The Extension Type screen displays a list of stations associated with the feature name extensions (see Setting up Feature Name Extensions (FNE) on page 47).
To display a list of extension types:
1. Type list extension-type n, where n can be entered with one of the following options:
- <extension number> – up to 15 digits for one cell phone number. This provides a list of all stations associated with this particular cell phone number. Do not include the dial prefix.
- <partial string*> – Type a partial string of a cell phone number followed by an asterisk (as a wildcard). This provides a list of all cell phone numbers that begin with the partial string, along with their associated stations. This function is useful when searching for all numbers in a particular area code.
- <all> – This provides a list of all Extension to Cellular administered cell phone numbers, along with their associated stations.
2. Press Enter.
The Extension Type screen appears (Figure 27).
Figure 27: Extension Type screen
3. Press Enter when finished.
list extension-type 90000 Count 1
EXTENSION TYPECOR/ Cv1
Ext. Type Name COS TN Cv2--- ---- ---- --- -- ---90001 feature-name-extension Exclusion (Toggle On/Off) 1
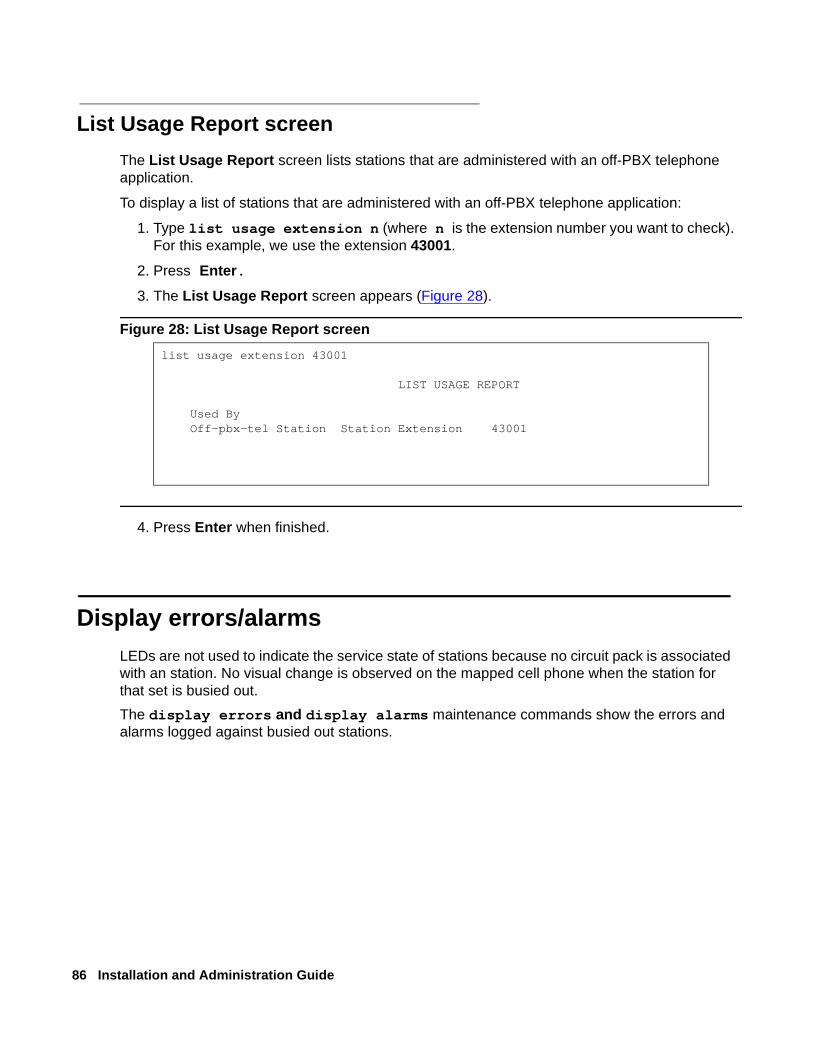
86 Installation and Administration Guide
List Usage Report screen
The List Usage Report screen lists stations that are administered with an off-PBX telephone application.
To display a list of stations that are administered with an off-PBX telephone application:
1. Type list usage extension n (where n is the extension number you want to check). For this example, we use the extension 43001.
2. Press Enter.
3. The List Usage Report screen appears (Figure 28).
Figure 28: List Usage Report screen
4. Press Enter when finished.
Display errors/alarmsLEDs are not used to indicate the service state of stations because no circuit pack is associated with an station. No visual change is observed on the mapped cell phone when the station for that set is busied out.
The display errors and display alarms maintenance commands show the errors and alarms logged against busied out stations.
list usage extension 43001
LIST USAGE REPORT
Used ByOff-pbx-tel Station Station Extension 43001
Issue 9 June 2005 87
Chapter 6: Troubleshooting
IntroductionThis chapter describes problems that may occur during operation of the Extension to Cellular solution and possible ways of resolving these problems.
Most problems reported by users of Extension to Cellular are likely not to be problems with Extension to Cellular itself. In most cases, they are caused by unexpected interaction between the cellular service provider and Extension to Cellular features.
Below is a recommended troubleshooting procedure to follow when users cannot receive Extension to Cellular calls on their cell phones. In addition, Table 3: Error conditions in the operation of Extension to Cellular on page 88 identifies other possible problems that might be encountered during operation of Extension to Cellular. See Chapter 4: Installation and administration test, for test procedures to verify the connection to the cell phone.
Users cannot receive Extension to Cellular calls on their cell phones
If an Extension to Cellular user is not able to receive calls on the cell phones, follow these procedures in the suggested order to isolate and fix the problem. After each step, you may want to verify that the problem has been fixed by making an Extension to Cellular call to the mapped cell phone.
1. Verify that you can call the cell phone from the switch. This also verifies that the user’s service contract with the cellular service provider (CSP) is active, and that the user gets good coverage in that area.
Check this by making a direct call to the cell phone’s published number. When making this test call, wait until the call rings the cell phone (which verifies that there is coverage), or until the call goes to the CSP’s voice mail (which verifies that the service is provided but there may not be good coverage).
2. Use the status station command for the principal number that the Extension to Cellular phone is mapped to, and verify that SAC or Call Forwarding has not been activated on the principal extension.
3. For the Extension to Cellular extension, use the status station <extension> command to check the following:
● The service state is “in service/idle.” If not, use the release <extension> command to put it back in the active state.
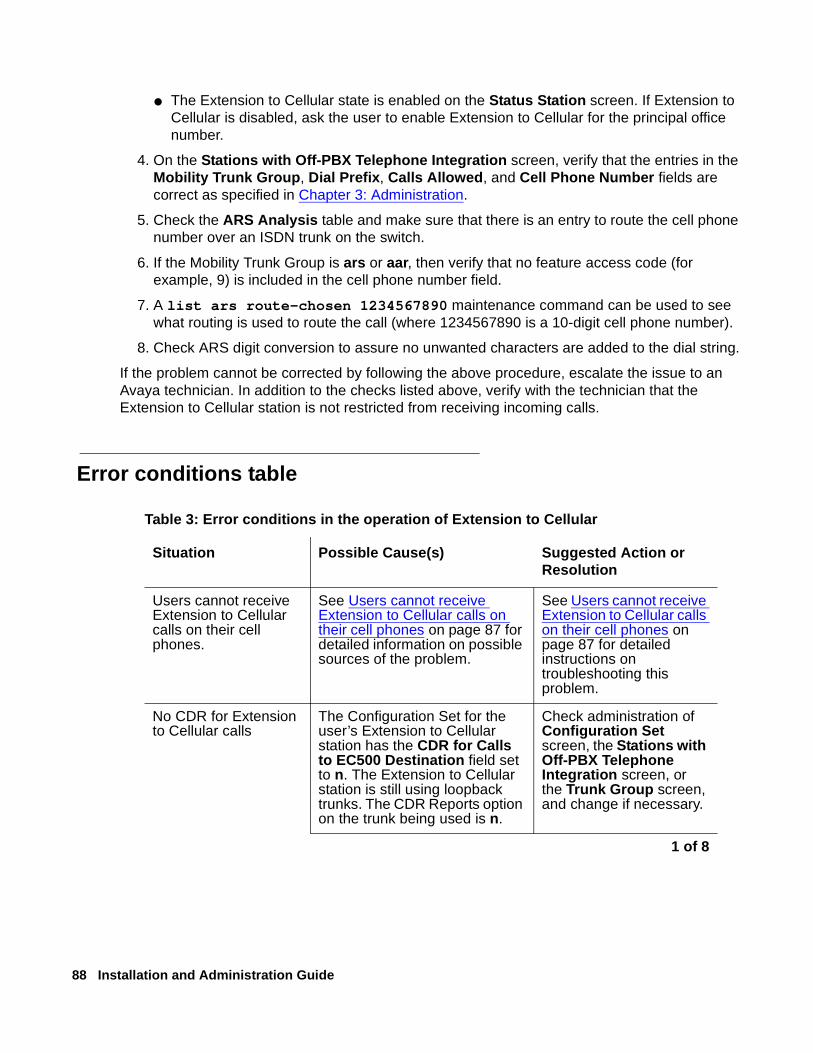
88 Installation and Administration Guide
● The Extension to Cellular state is enabled on the Status Station screen. If Extension to Cellular is disabled, ask the user to enable Extension to Cellular for the principal office number.
4. On the Stations with Off-PBX Telephone Integration screen, verify that the entries in the Mobility Trunk Group, Dial Prefix, Calls Allowed, and Cell Phone Number fields are correct as specified in Chapter 3: Administration.
5. Check the ARS Analysis table and make sure that there is an entry to route the cell phone number over an ISDN trunk on the switch.
6. If the Mobility Trunk Group is ars or aar, then verify that no feature access code (for example, 9) is included in the cell phone number field.
7. A list ars route-chosen 1234567890 maintenance command can be used to see what routing is used to route the call (where 1234567890 is a 10-digit cell phone number).
8. Check ARS digit conversion to assure no unwanted characters are added to the dial string.
If the problem cannot be corrected by following the above procedure, escalate the issue to an Avaya technician. In addition to the checks listed above, verify with the technician that the Extension to Cellular station is not restricted from receiving incoming calls.
Error conditions table
Table 3: Error conditions in the operation of Extension to Cellular
Situation Possible Cause(s) Suggested Action or Resolution
Users cannot receive Extension to Cellular calls on their cell phones.
See Users cannot receive Extension to Cellular calls on their cell phones on page 87 for detailed information on possible sources of the problem.
See Users cannot receive Extension to Cellular calls on their cell phones on page 87 for detailed instructions on troubleshooting this problem.
No CDR for Extension to Cellular calls
The Configuration Set for the user’s Extension to Cellular station has the CDR for Calls to EC500 Destination field set to n. The Extension to Cellular station is still using loopback trunks. The CDR Reports option on the trunk being used is n.
Check administration of Configuration Set screen, the Stations with Off-PBX Telephone Integration screen, or the Trunk Group screen, and change if necessary.
1 of 8

Issue 9 June 2005 89
No CDR for Extension to Cellular calls (continued).
Neither the principal station or other station extension is administered in the intra-switch-cdr form.
Add one or both extensions in the intra-switch-cdr form.
Call drops when user answers a cell phone.
Cellular Voice Mail Avoidance timeout is too long.
Shorten timeout. Train user to wait before answering cell phone. Remove user from Cellular Voice Mail Avoidance.
FNEs not working. Misadministration. Check that the phone number on off-pbx station-mapping form is 10-digits.
Cellular Voice Mail Avoidance works poorly, many call are going to cellular voice mail.
Cellular Avoidance message option is not appropriate for cellular service provider.
Change user’s option to timeout.
If using message option, cellular voice mail may be ISDN.
Change user’s option to timeout.
If using timeout option, timeout may be set too short.
Lengthen timeout.
Table 3: Error conditions in the operation of Extension to Cellular continued
Situation Possible Cause(s) Suggested Action or Resolution
2 of 8
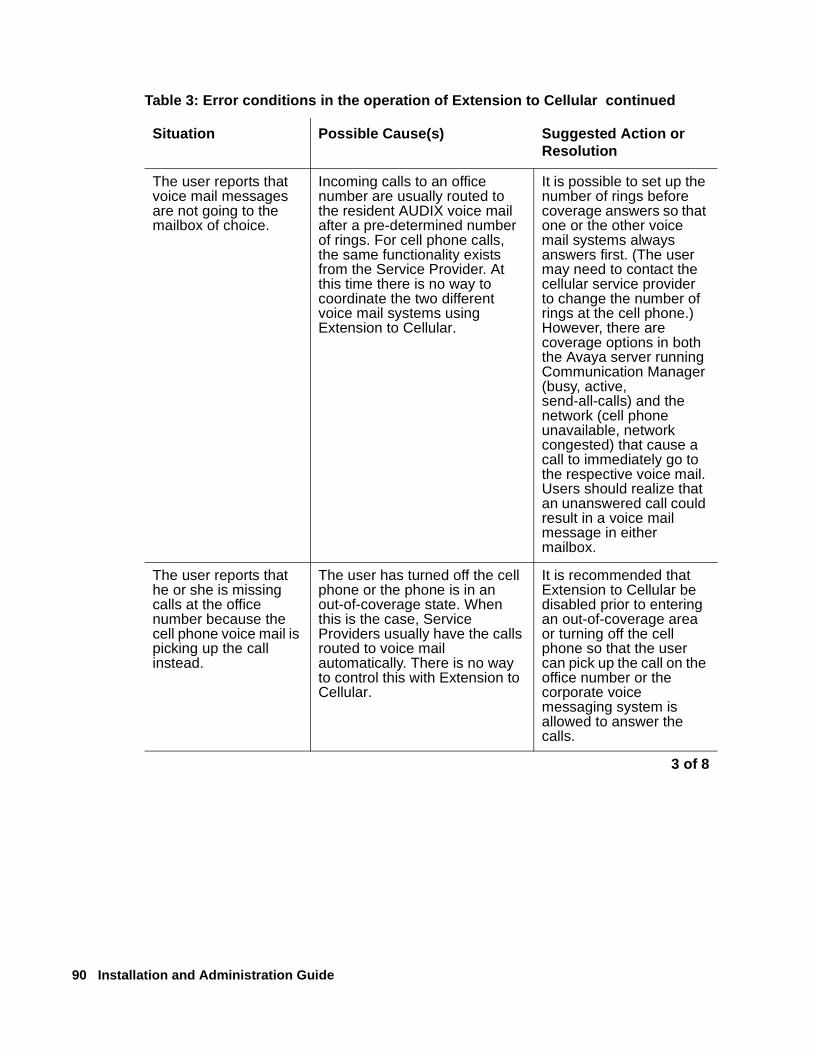
90 Installation and Administration Guide
The user reports that voice mail messages are not going to the mailbox of choice.
Incoming calls to an office number are usually routed to the resident AUDIX voice mail after a pre-determined number of rings. For cell phone calls, the same functionality exists from the Service Provider. At this time there is no way to coordinate the two different voice mail systems using Extension to Cellular.
It is possible to set up the number of rings before coverage answers so that one or the other voice mail systems always answers first. (The user may need to contact the cellular service provider to change the number of rings at the cell phone.) However, there are coverage options in both the Avaya server running Communication Manager (busy, active, send-all-calls) and the network (cell phone unavailable, network congested) that cause a call to immediately go to the respective voice mail. Users should realize that an unanswered call could result in a voice mail message in either mailbox.
The user reports that he or she is missing calls at the office number because the cell phone voice mail is picking up the call instead.
The user has turned off the cell phone or the phone is in an out-of-coverage state. When this is the case, Service Providers usually have the calls routed to voice mail automatically. There is no way to control this with Extension to Cellular.
It is recommended that Extension to Cellular be disabled prior to entering an out-of-coverage area or turning off the cell phone so that the user can pick up the call on the office number or the corporate voice messaging system is allowed to answer the calls.
Table 3: Error conditions in the operation of Extension to Cellular continued
Situation Possible Cause(s) Suggested Action or Resolution
3 of 8

Issue 9 June 2005 91
The user reports that the cell phone is not receiving caller identification numbers for calls from the Avaya server running Communication Manager, while the office number that the cell phone is mapped to does.
The Avaya server running Communication Manager has not been administered properly for sending 10-digit caller identification numbers. Most cellular service providers require a 10-digit number.
Recheck the outbound trunk screen to make sure the Send Calling field is set to y.
External trunks serving the cell phone are using a non-ISDN trunk.
Change the routing administration to route over an ISDN trunk.
The user reports that the person being calling is receiving the incorrect caller ID.
The Configuration Set screen has the Calling Number Style field set to PBX.
Change the Calling Number Style field on the Configuration Set screen to network.
There is an incorrect entry on the ISDN public-unknown numbering screen.
Verify that the entries on the ISDN public-unknown numbering screen are correct.
The user reports that the cell phone is receiving a switch default caller identification number for calls from the Avaya server running Communication Manager.
The ISDN Service Provider (SP) is replacing the caller identification with a fixed caller ID.
Escalate the issue to your Telecom Manager who may contact your ISDN SP to request that this be fixed or find an alternate ISDN SP that allows the caller identification to pass.
The switch is blocking the outgoing caller identification and is passing a default caller ID.
Change your switch administration to allow caller identification to go outside the switch.
Table 3: Error conditions in the operation of Extension to Cellular continued
Situation Possible Cause(s) Suggested Action or Resolution
4 of 8

92 Installation and Administration Guide
The user hears a beep while on a call originating from the Avaya server running Communication Manager, but is not able to use the call waiting feature on the cell phone to switch to the other call.
Most likely the user is hearing the tone provided by the Avaya server running Communication Manager when call waiting is enabled at the switch.
You have two possibilities:1) Communicate to the user that when a call waiting indication is heard, but the user can’t switch the call, he or she needs to hang up on the first call in order to receive the second call,
OR 2) Disable call waiting at the switch level and the regular call waiting capability provided by the cellular service provider then handles the call waiting feature.
The user can't access feature name extensions by dialing the corresponding FNE.
There is no corresponding number administered on the off-pbx-telephone feature-name-extension form or the mapping mode is not origination or both.
Administer an extension on the off-pbx-telephone feature-name-extension form and/or change the mapping mode to origination or both.
The Extension to Cellular cell phone call into the office switch fails to provide the office caller ID.
The Cell Phone Number field administered for the Extension to Cellular station does not have the required entry.
Type the full caller ID number in the Cell Phone Number field.
The Mapping Mode field administered for the Extension to Cellular station does not contain origination or both.
Type origination or both in the Mapping Mode field.
The external inbound call is not entering into the switch over an ISDN trunk.
Contact the ISDN Service Provider to ensure that inbound calls come into the switch through an ISDN trunk.
Table 3: Error conditions in the operation of Extension to Cellular continued
Situation Possible Cause(s) Suggested Action or Resolution
5 of 8

Issue 9 June 2005 93
The Extension to Cellular cell phone call into the office switch fails to provide the office caller ID (continued).
The external inbound call does not come into the switch on which the Extension to Cellular cell phone’s station is administered.
Create a station for the Extension to Cellular cell phone with the proper mapping on the switch that the call enters.
The calling number is manipulated on the Inbound Trunk screen.
Administer the Extension to Cellular station’s Cell Phone Number field to match the modified calling number.
The cellular service provider does not send the calling number.
Call the cellular service provider to allow the caller ID to be sent.
Someone else happened to be on a call at the same time on the user’s desk phone and on the same line appearance as the originating Extension to Cellular cell phone call.
Move the mapped line appearance to a button unlikely to be used by another phone call.
The Avaya server running Communication Manager does not allow a default entry of extensions, that is, instead of entering the extension followed by the # key, just entering # alone.
The cell phone number is not properly mapped.
See The Extension to Cellular cell phone call into the office switch fails to provide the office caller ID. in this table.
An intercept tone is received when attempting to enable/disable Extension to Cellular (that is, when you type the feature access code, #, station security code, and #).
The user has used the station security code of the Extension to Cellular extension and it is different from that of the principal.
The user must type the code of the principal extension.
The station security code is blank for the principal.
The station security code for the principal must be administered.
Table 3: Error conditions in the operation of Extension to Cellular continued
Situation Possible Cause(s) Suggested Action or Resolution
6 of 8

94 Installation and Administration Guide
When attempting to enable/disable Extension to Cellular, an intercept tone is received.
The Status Extension field administered on the Stations with Off-PBX Telephone Integration screen for the Extension to Cellular station is not EC500.
Change the Status Extension field on the Stations with Off-PBX Telephone Integration screen for the Extension to Cellular station to EC500.
The Status Extension field administered on the Stations with Off-PBX Telephone Integration screen for the Extension to Cellular station is EC500, but the Configuration Set is not administered for DTMF.
Access the associated Configuration Set screen and ensure that the entry in the Post Connect Dialing Option field is DTMF.
The office caller ID is that of the origination mapped Extension to Cellular station and not of the host extension.
The Extension to Cellular station is not mapped to the host phone.
Map the Extension to Cellular station to the host extension.
The administered Extension to Cellular feature button on the office phone flashed for two seconds at the broken flutter rate.
The Extension to Cellular administration somehow got corrupted.
Disable, then re-enable, Extension to Cellular.
User cannot “engage” the Extension to Cellular timer through the administered feature button on the office phone.
The optional Extension to Cellular timer was not configured.
Configure the optional Extension to Cellular timer on the Station screen. See Figure 19: Station screen, page 3 on page 71, and the related steps identifying how to set the timer.
Table 3: Error conditions in the operation of Extension to Cellular continued
Situation Possible Cause(s) Suggested Action or Resolution
7 of 8

Issue 9 June 2005 95
The user receives the error Contact System Administrator when trying to enable/disable Extension to Cellular through the administered feature button on the office phone.
The Station screen was not correctly administered.
Verify that all required information, in the correct format, is included on the Station screen.
An Extension to Cellular station is mapped to a principal station, and the principal station subsequently adds a configured Extension to Cellular feature access button.
● The status station command for the principal station shows that Extension to Cellular is disabled.
● The status station command for the mapped Extension to Cellular station shows that Extension to Cellular is enabled.
A previously-administered and enabled Extension to Cellular station has been mapped to a principal station that does not have an Extension to Cellular feature access button configured.
● Configure an Extension to Cellular feature access button on the principal station. (The principal station must support configurable feature buttons.) See Administering Extension to Cellular feature access buttons on the office phone on page 70.
● Once configured, press the Extension to Cellular feature access button to enable Extension to Cellular.This synchronizes the enable/disable state between the principal station and its mapped Extension to Cellular station.
Table 3: Error conditions in the operation of Extension to Cellular continued
Situation Possible Cause(s) Suggested Action or Resolution
8 of 8

96 Installation and Administration Guide

Issue 9 June 2005 97
Appendix A: Upgrades from prior versions
Extension to Cellular is available only with Communication Manager Release 1.3 or later. All of the Extension to Cellular releases can be administered and operated concurrently on the same Avaya server running Communication Manager. You can continue to support users with Extension to Cellular releases 1 through 4.1, or you may choose to upgrade all users to the latest version as part of Avaya Communication Manager, Release 3.0.
No matter what previous version you are converting from, if you want to update to the latest version as part of Communication Manager Version 6.0:
1. Set the XMOBILE Mapping Mode to none. This is done on page 1 of the Station screen (use the change station n command, where n is the station you want to change).
This assures that all previous mapping of XMOBILE stations – the way Extension to Cellular used to be administered – will not interfere with Extension to Cellular.
2. Set up the new office-phone-to-outside-phone mapping as described in this book.
3. Test the system.
4. If it works, remove the XMOBILE station records.
This last step frees up stations that go toward the maximum number of stations allowed.
Upgrade from Extension to Cellular Version 5The following administration tasks are new in Extension to Cellular Version 6.
● Set up the Self Administration Feature (SAFE) Access Code so users can enter and change their own cell phone number. See Setting up the Self Administration Feature (SAFE) Access Code on page 47.
● Administer the barge-in tone for added security. See Administering the barge-in tone on page 60.
● Map dialed extensions to the new feature name extensions (Automatic Call Back, Call Pickup Extended Group, and Whisper Page Activation). See Setting up Feature Name Extensions (FNE) on page 47.
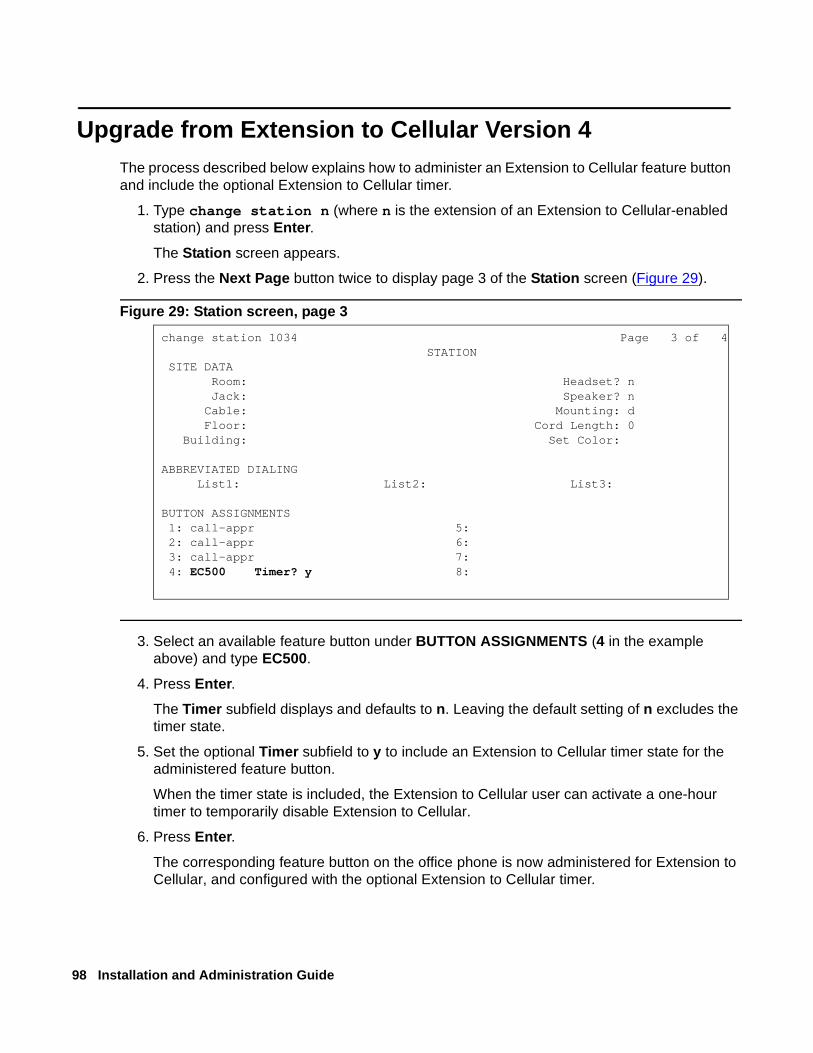
98 Installation and Administration Guide
Upgrade from Extension to Cellular Version 4 The process described below explains how to administer an Extension to Cellular feature button and include the optional Extension to Cellular timer.
1. Type change station n (where n is the extension of an Extension to Cellular-enabled station) and press Enter.
The Station screen appears.
2. Press the Next Page button twice to display page 3 of the Station screen (Figure 29).
Figure 29: Station screen, page 3
3. Select an available feature button under BUTTON ASSIGNMENTS (4 in the example above) and type EC500.
4. Press Enter.
The Timer subfield displays and defaults to n. Leaving the default setting of n excludes the timer state.
5. Set the optional Timer subfield to y to include an Extension to Cellular timer state for the administered feature button.
When the timer state is included, the Extension to Cellular user can activate a one-hour timer to temporarily disable Extension to Cellular.
6. Press Enter.
The corresponding feature button on the office phone is now administered for Extension to Cellular, and configured with the optional Extension to Cellular timer.
change station 1034 Page 3 of 4 STATION SITE DATA Room: Headset? n Jack: Speaker? n Cable: Mounting: d Floor: Cord Length: 0 Building: Set Color:
ABBREVIATED DIALING List1: List2: List3:
BUTTON ASSIGNMENTS 1: call-appr 5: 2: call-appr 6: 3: call-appr 7: 4: EC500 Timer? y 8:

Issue 9 June 2005 99
Note:Note: The feature status button on the office phone indicates the current state of
Extension to Cellular regardless of whether the feature was enabled remotely or directly from the office phone.
Upgrade from Extension to Cellular Version 3 The following process is to change the Extension to Cellular configuration to work without the loopback trunks. Let’s eliminate the loopback connections for station 5462.
Eliminating the loopback trunks is optional and should be accompanied by changing the Mobility Trunk Group field on the Station screen to ars.
1. Eliminate the DS1 or IP loopback trunks associated with Extension to Cellular Version 2.0 or 3.0.
This includes removing the loopback trunks and signaling groups through switch administration as well as physically from the switch.
Loopback trunk configuration can coexist with the Extension to Cellular R4 if you choose to do so. If you decide to eliminate the loopback trunks, the removed equipment can be reused for other trunking solutions. You can change gradually over to a total loopback elimination. If you decide to have the loopback and non-loopback configurations coexist, you must remember there are capacity restrictions when using the DS1.
2. Type change station 5462 and press Enter.
The Station screen for extension 5462 displays (Figure 30).

100 Installation and Administration Guide
Figure 30: Station screen, page 3
3. In the Mobility Trunk Group field, type ars.
It should be changed to ars for loopback elimination.
4. Press Enter to save your changes.
Things to watch out for:
If the Dial Prefix field contains the ars feature access code, then remove it (for example, 9).
See the Administrator Guide for Avaya Communication Manager for more information.
Upgrade from Extension to Cellular Version 2 Implement changes as described for upgrade from Extension to Cellular Version 3.
Starting with Version 3, there is a field on the Station screen called Mapping Mode. See Station administration on page 40 for more information. There is a command, list xmobile mapping, that makes it easy to find out the XMOBILE extensions and primary extension associated with a cell phone number. See List screens on page 84 for more information. The status station command now explicitly shows the Extension to Cellular state: enabled or disabled.
change station 5462 Page 1 of 4
STATION Extension: 5462 Lock Messages? n BCC: 0 Type: XMOBILE Security: * TN: 1 Coverage Path 1: COR: 1 Name: John Doe Coverage Path 2: COS: 1 Hunt-to Station:
STATION OPTIONS XMOBILE Type: EC500 Message Lamp Ext: 5462 Display Module? n Message Waiting Type: none Mobility Trunk Group: ars Configuration Set: 1 Calls Allowed: all
CELL PHONE NUMBER MAPPING Dial Prefix: Cell Phone Number: 732-123-4567 Mapping Mode: termination

Issue 9 June 2005 101
To implement office caller ID for an existing Extension to Cellular user:
1. Identify the station bridged to the second call appearance of the user’s primary extension.
The list bridged-extensions <primary ext> command provides this information.
2. Change the Station screen (change station <xmobile ext>) and press Enter.
3. Change the Mapping Mode field to both.
4. Press Enter to save your changes.
Note:Note: If the Cell Phone Number field contains a dial prefix (such as 1 for long
distance), re-administer the cell phone number and place the prefix (for instance, 1) in the Dial Prefix field. Also make sure that the full number, including area code, is in the Cell Phone Number field. This is necessary for office caller ID to function.
For information on installation and administration of Version 2 of Extension to Cellular, see Avaya EC500 Extension to Cellular Installation and Administration Guide, Issue 2, July, 2001.
Upgrade from Extension to Cellular Version 1 Starting with Version 2, cell phone numbers can be administered on the Station screen. There are three fields related to administration of the cell phone number:
● Dial Prefix
● Cell Phone Number
● Mapping Mode
See Station administration on page 40 for more information. Pre-existing stations may continue to use ARS digit conversion to convert the extension to a cell number or they may be changed to use the new fields on the Station screen.
To add the cell phone number to an station:
1. Change the Station screen (change station <xmobile ext>) and press Enter.
2. Type each dial prefix, if any (for example, 1 for long distance, but not 9 for external access) in the Dial Prefix field.
3. Type the full cell phone number (including area code) in the Cell Phone Number field.
4. Type termination in the Mapping Mode field (see above for when both may be entered).
5. Press Enter to save your changes.
Implement changes are described for upgrade from Extension to Cellular Version 2.

102 Installation and Administration Guide
For information on installation and administration of Version 1 of Extension to Cellular, see Avaya EC500 Extension to Cellular Installation/Administration Guide, Issue 1, February 8, 2001.
Issue 9 June 2005 103
Glossary
A
AAR See Automatic Alternate Routing.
ACS See Avaya Communications Server.
administration without hardware (AWOH)
A station that is administered without a dedicated, physical set.
ARS See Automatic Route Selection.
ATM-CES Asynchronous Transfer Mode - Circuit Emulation Service. This is a trunk capability that supports the equivalent of 8 ISDN interfaces over a single facility. Each interface may have as many as 30 channels.
Automatic Alternate Routing
A table-based routing feature used to select a trunk for private network routing. An administered FAC is used to activate the feature.
Automatic Route Selection
A table-based routing feature used to select a trunk for public network routing. An administered FAC is used to activate the feature.
Avaya Communications Server (ACS)
Avaya server running Communication Manager (formerly called MultiVantage™ software) includes the DEFINITY® ECS and the S8100 Media Server with Avaya G600 Media Gateway.
Avaya Extension to Cellular access number
The telecommuting access number used to dial into the Avaya server running Communication Manager to allow enabling/disabling Extension to Cellular and changing the station security code. This number is set in the Telecommuting Access Extension field on the Telecommuting Access screen.
Avaya Extension to Cellular call
Call to an extension on the Avaya server running Communication Manager (either the host extension or the Extension to Cellular station that maps to a cell phone or SIP phone) that results in alerting the associated phone.
Avaya Extension to Cellular
The feature that allows integration of cell phones under the control of a public cell phone service provider, or SIP-enabled phones, with the Avaya server running Communication Manager.
AWOH See administration without hardware.
B
Basic Rate Interface (BRI)
A digital message-based protocol intended primarily for the control of advanced phone sets although it is also used in some countries for trunking.
C
calling number style The way a caller’s identity is displayed to the called party by either a 10-digit number or a pbx extension.

104 Installation and Administration Guide
Class of Restrictions (COR)
A group of attributes that affect the calling capabilities of stations and trunks.
configuration set A set of call treatment options used to customize an XMOBILE station session when placing Extension to Cellular calls.
corporate voice mail The voice mail system provided by the user’s employer. Typically this will be AUDIX. There is no current way to coordinate this voice mail with the service provider’s voice mail.
D
DEFINITY An Avaya phone system, commonly referred to as a switch or PBX.
dial prefix Any number that might be required for dialing besides the cell phone number itself. For example, 1 for U.S. domestic long distance, or 011 for international cell phone numbers.
direct inward dialing (DID)
A feature whereby extensions are associated with numbers in the national numbering plan so that they may be directly dialed from outside of the Avaya ECS.
disable Deactivate Avaya Extension to Cellular using the Extension to Cellular “disable” feature access code, or, if so administered, by using a feature button on the office phone.
dtmf Dual Tone Multiple Frequency. This is another name for touch-tones which are commonly used for transmitting digits (including * and #) over voice lines.
E
Extension to Cellular
See Avaya Extension to Cellular.
enable Activate Avaya Extension to Cellular using the Extension to Cellular “enable” feature access code, or, if so administered, by using a feature button on the office phone.
F
fast-connect on origination
Used to determine whether additional processing will occur prior to sending the CONNECT message. This option may be utilized in the future for capabilities provided by the cell phone provider.
feature access code (FAC)
A pre-administered dial sequence that performs a feature operation.
feature name extension (FNE)
An extension that fits your dial plan that you can dial from an outside Extension to Cellular phone in order to active a Communication Manager feature. The FNEs must be set up by the administrator, and communicated to the user so the user knows what extension activates what feature in Communication Manager.
I
Issue 9 June 2005 105
I
in-service A station has been administered and is in normal operation mode.
Internet Protocol (IP)
A suite of information exchanged message sets widely used for data transmission and increasingly used for transmission of voice.
ISDN trunk This is a trunk (group) that uses a screen of message-based signaling (Q.931) over a dedicated control channel. There are different types of ISDN trunks that are distinguished by the type of carrier medium used: PRI/BRI, IP, or ATM-CES.
M
MultiVantage™ Former product name of the DEFINITY® switching software application. Now called Avaya Communication Manager.
O
out-of-service The station is out of service due to a busy-out action issued by a system technician/system administrator. No calls can be placed or received while in this state.
P
Personal Handy-phone Service
This is a widely-used standard for mobile telephony in Japan used in public and business offers. It is supported as an X-Mobility special application on the Avaya ECS.
PHS See Personal Handy-phone Service.
PRI See Primary Rate Interface.
Primary Rate Interface
A digital message-based protocol intended primarily for the control of advanced digital trunks although it is also used for end points requiring high bandwidth.
principal extension In a bridging arrangement, the station whose extension is primary and identifies the entire bridge.
S
SAFE See self administration feature access code
SAT See system access terminal
SCCAN The Seamless Converged Communications Across Networks (SCCAN) solution offers voice and data access from a single SCCAN handset integrated with a deskset phone across the corporate Wireless Local Area Network (WLAN) and public Global System for Mobile communication (GSM) and cellular networks.
SDC See special digit conversion.

106 Installation and Administration Guide
self administration feature access code
This feature access code allows you to self-administer your cell phone to Extension to Cellular. You can add or change your Extension to Cellular cell phone number.
service provider A company that supplies cell phone service to a particular area. Extension to Cellular is Service Provider independent.
SIP Session Initiation Protocol. SIP is an IP protocol for setting up, maintaining, and tearing down phone calls carried over the internet.
Special Digit Conversion
Special digit conversion (SDC) is used to ensure that a call to an Extension to Cellular cell phone is routed properly even if the caller dials fewer than 10-digits or does not use a dial prefix.
station security code
The security code assigned to each station for enabling and disabling Extension to Cellular. The system administrator supplies this number.
system access terminal
Sometimes “system administration terminal.” At one time this referred to a physical terminal from which system administration occurred. Now, it usually refers to the screens (accessed through a terminal emulator or Avaya Site Administration) through which system administration is accomplished.
T
telecommuting access number
The access number used to dial into the Avaya server running Communication Manager to allow enabling/disabling Extension to Cellular and changing the station security code. This number is set in the Telecommuting Access Extension field on the Telecommuting Access screen.
text messaging A facility provided in many cell phones which allows the user to receive short text messages on the phone’s display. The receipt of the message is often accompanied by an audible alert; the user can then display, delete, or save the message. This facility is sometimes referred to as Short Message Services (SMS).
U
UCC Unified Communications Center
Unified Messenger® for MS Exchange
A software application that consolidates voice, e-mail and fax messages into one mailbox. When combined with Extension to Cellular, provides a text message through the cell (or other remote) phone’s display screen to notify users of messages in their Corporate voice messaging system. Applies only to Extension to Cellular users with Unified Messenger’s “Notify Me” feature installed on their office phone system.
user Any person who uses a cell or other remote phone as an Extension to Cellular bridge to the Avaya server running Communication Manager.

Issue 9 June 2005 107
Index
Aaccess number . . . . . . . . . . . . . . . . . . 32Adminisering Cellular Voice Mail Avoidance . . . . . 56administration
Extension to Cellular feature access button. . . . 70of call filtering. . . . . . . . . . . . . . . . . . 51of CDR options . . . . . . . . . . . . . . . . . 63of voice mail . . . . . . . . . . . . . . . . . . 55planning . . . . . . . . . . . . . . . . . . . . 32tasks. . . . . . . . . . . . . . . . . . . . . . 35testing . . . . . . . . . . . . . . . . . . . . . 79
administration without hardware (AWOH) . . . . 18, 103admonishments
caution. . . . . . . . . . . . . . . . . . . . . .11danger . . . . . . . . . . . . . . . . . . . . . .11note . . . . . . . . . . . . . . . . . . . . . . .11security alert . . . . . . . . . . . . . . . . . . .11warning . . . . . . . . . . . . . . . . . . . . .11
alarms . . . . . . . . . . . . . . . . . . . . . . 86ARS analysis table . . . . . . . . . . . . . . . . . 88ARS field . . . . . . . . . . . . . . . . . . . .31, 37ARS/AAR routing . . . . . . . . . . . . . . . . . 22Avaya Communications Server (ACS) . . . . . . . . 103AWOH. See administration without hardware (AWOH)
Bbarge-in tone . . . . . . . . . . . . . . . . . .17, 60
Ccall detail recording (CDR) . . . . . . . . . . . . . 61call filtering . . . . . . . . . . . . . . . . . . . . 23
administration . . . . . . . . . . . . . . . . . 51mapped stations . . . . . . . . . . . . . . . . 23
call identification . . . . . . . . . . . . . . . . . . 21call origination . . . . . . . . . . . . . . . . . . . 25call waiting . . . . . . . . . . . . . . . . . . . . 21caller ID . . . . . . . . . . . . . . . . . . . 21, 49, 50Calling Number Style field . . . . . . . . . . . . . 65capacity limitations . . . . . . . . . . . . . . . . . 23caution, admonishment meaning of . . . . . . . . . .11CDR For Avaya Communication Manager
Extended Access Calls . . . . . . . . . . . . . . 66CDR for Calls to EC500 Destination field . . . . . . 62
CDR for Extended Access calls originated on cell or SIP phone . . . . . . . . . . . . . . . . . . . 66
CDR optionsadministering . . . . . . . . . . . . . . . . . . 63
CDR recording enhancements. . . . . . . . . . . . 61CDR System Parameters screen . . . . . . . . . . 68CDR. See call detail recording (CDR)cell phone
initial state . . . . . . . . . . . . . . . . . . . 40cellular service provider . . . . . . . . . . . . . . . 17cellular service provider voice mail. . . . . . . . . . 27Cellular Voice Mail Avoidance . . . . . . . . . . 27, 55change feature access code for station security code . 68change station security code feature access code . . 32changing configuration sets . . . . . . . . . . . . . 64class of restriction . . . . . . . . . . . . . . . . . 27command
display alarms. . . . . . . . . . . . . . . . . . 86display errors . . . . . . . . . . . . . . . . . . 86
comment on this book . . . . . . . . . . . . . . . 13configuration requirements . . . . . . . . . . . . . 31Configuration Set screen . . . . . . . . . . . . 61, 65configuration sets. . . . . . . . . . . . . . . . . . 64configurations . . . . . . . . . . . . . . . . . . . 18COR. . . . . . . . . . . . . . . . . . . . . . . . 27creating Wireless Service Manager route pattern . . . 76CSP. See cellular service provider (CSP). . . . . . . 17customer configurations. . . . . . . . . . . . . . . 18customer options . . . . . . . . . . . . . . . . . . 31
displaying . . . . . . . . . . . . . . . . . . . . 35
Ddanger, admonishment meaning of . . . . . . . . . 11DCS. See distributed communications system (DCS)description of features . . . . . . . . . . . . . . . 20disabling and enabling
Extension to Cellular. . . . . . . . . . . . . . . 72display alarms . . . . . . . . . . . . . . . . . . . 86display alarms command . . . . . . . . . . . . . . 86display errors. . . . . . . . . . . . . . . . . . . . 86display errors command. . . . . . . . . . . . . . . 86displaying customer options . . . . . . . . . . . 31, 35distinctive alerting . . . . . . . . . . . . . . . . . 28distributed communications system (DCS) . . . . . . 27

108 Installation and Administration Guide
EEC500 Status field . . . . . . . . . . . . . . . . . 83enabling and disabling
Extension to Cellular . . . . . . . . . . . . . . 72feature access code (FAC) . . . . . . . . . . . 53
Enhanced EC500 field . . . . . . . . . . . . 31, 38, 39enhancements. . . . . . . . . . . . . . . . . . . 17environment requirements . . . . . . . . . . . . . 31error conditions . . . . . . . . . . . . . . . . . . 87errors . . . . . . . . . . . . . . . . . . . . . . . 86Extend Call feature access button. . . . . . . . . . 74Extended Cvg/Fwd Admin field . . . . . . . . . .32, 39Extension to Cellular . . . . . . . . . . . . . . . . 16
access number . . . . . . . . . . . . . . . .32, 52enable and disable . . . . . . . . . . . . . . . 28enable/disable feature access code (FAC) . . . . 53enabling and disabling . . . . . . . . . . . . . 72feature access button, administering . . . . . . . 70installation . . . . . . . . . . . . . . . . . . . 31routing . . . . . . . . . . . . . . . . . . . . . 22
Extension Type screen . . . . . . . . . . . . . . . 85Extensions to Call which Activate Features By
Name screen. . . . . . . . . . . . . . . . . . . 47
FFast Connect on Origination field . . . . . . . . . . 66feature access button
administering . . . . . . . . . . . . . . . . . . 70Extend Call. . . . . . . . . . . . . . . . . . . 74
feature access code (FAC) . . . . . . . . . . . .28, 53feature description . . . . . . . . . . . . . . . . . 20feature interactions. . . . . . . . . . . . . . . . . 26
attendant. . . . . . . . . . . . . . . . . . . . 26call coverage . . . . . . . . . . . . . . . . . . 26cellular service provider voice mail . . . . . . . . 27class of restriction . . . . . . . . . . . . . . . 27DCS . . . . . . . . . . . . . . . . . . . . . . 27distinctive alerting. . . . . . . . . . . . . . . . 28Extension to Cellular enable and disable . . . . . 28Extension to Cellular with office caller ID calling
another Extension to Cellular user . . . . . . . 28feature access code (FAC) . . . . . . . . . . . 28feature name extension (FNE) . . . . . . . . . . 29message waiting indication . . . . . . . . . . . 29QSIG . . . . . . . . . . . . . . . . . . . . . 30Unified Messenger . . . . . . . . . . . . . . . 29
feature name extension (FNE) . . . . . . . . 20, 29, 47FNE. See feature name extension (FNE)
GG3 Version field . . . . . . . . . . . . . . . . 31, 36General Status screen . . . . . . . . . . . . . . . 82generating two CDR records . . . . . . . . . . . . 68
Hhardware checks . . . . . . . . . . . . . . . . . . 87help, numbers to call . . . . . . . . . . . . . . . . 13
Iinstallation . . . . . . . . . . . . . . . . . . . . . 31
testing . . . . . . . . . . . . . . . . . . . . . 79Intra-Switch CDR screen . . . . . . . . . . . . . . 68ISDN-PRI field . . . . . . . . . . . . . . . . . 32, 39
LLanguage Translations screen. . . . . . . . . . . . 75list mappings . . . . . . . . . . . . . . . . . . . . 84List Usage Report screen . . . . . . . . . . . . . . 86loopback trunk elimination. . . . . . . . . . . . . . 99
Mmaintenance . . . . . . . . . . . . . . . . . . . . 81making calls . . . . . . . . . . . . . . . . . . . . 25mapped stations
call filtering . . . . . . . . . . . . . . . . . . . 23mapping a host phone with an Extension to
Cellular/OPS phone . . . . . . . . . . . . . . . . 40Mapping Mode field. . . . . . . . . . . . . . . . . 25mapping modes . . . . . . . . . . . . . . . . 45, 46
both . . . . . . . . . . . . . . . . . . . . . . 45none . . . . . . . . . . . . . . . . . . . . . . 46origination . . . . . . . . . . . . . . . . . . . 45termination . . . . . . . . . . . . . . . . . . . 45
Maximum Off-PBX Telephones field . . . . . . . 31, 36message waiting indication . . . . . . . . . . . . . 29Multiple applications on one phone . . . . . . . . . 54
Nnote, admonishment meaning of . . . . . . . . . . . 11Numbering – Public/Unknown Format screen. . . . . 50
Issue 9 June 2005 109
Ooffice caller ID . . . . . . . . . . . . . . . . . . . 49Off-PBX Telephone Status for Station screen . . . . 84OPS. See Outboard Proxy SIP(OPS)Optional Features screen. . . . . . . . . . . . . . 35Originating CDR on calls . . . . . . . . . . . . . . 29origination . . . . . . . . . . . . . . . . . . . . . 45Outboard Proxy SIP (OPS) . . . . . . . . . . . . . 16
Pphones supported . . . . . . . . . . . . . . . . . 18planning. . . . . . . . . . . . . . . . . . . . . . 32
enabling and disabling feature access codes . . . 33requirements . . . . . . . . . . . . . . . . . . 32
platforms . . . . . . . . . . . . . . . . . . . . . 31supported . . . . . . . . . . . . . . . . . . . 18
Post Connect Dialing Options field . . . . . . . . . 67
QQSIG . . . . . . . . . . . . . . . . . . . . . . . 30
Rreceiving calls . . . . . . . . . . . . . . . . . . . 24redirect on OPTIM failure (ROOF). . . . . . . . .17, 77Release 1 upgrade. . . . . . . . . . . . . . . . . 101Release 2 upgrade. . . . . . . . . . . . . . . . . 100Release 3 upgrade. . . . . . . . . . . . . . . . . 99Release 4 upgrade. . . . . . . . . . . . . . . .97, 98ROOF (see redirect on OPTIM failure) . . . . . .17, 77routing for Extension to Cellular . . . . . . . . . . . 22
SSAFE (see self administration feature access code)17, 47SAT screens. . . . . . . . . . . . . . . . . . . . 20SCCAN . . . . . . . . . . . . . . . . . . . . . . 16screens . . . . . . . . . . . . . . . . . . . . . . 10
CDR System Parameters . . . . . . . . . . . . 68Configuration Set . . . . . . . . . . . . . . .61, 65Extension Type . . . . . . . . . . . . . . . . . 85Extensions to Call which Activate Features By Name47General Status . . . . . . . . . . . . . . . . . 82Intra-Switch CDR . . . . . . . . . . . . . . . . 68Language Translation . . . . . . . . . . . . . . 75List Usage Report . . . . . . . . . . . . . . . 86Numbering – Public/Unknown Format . . . . . . 50
screens, (continued)Off-PBX Telephone Status for Station. . . . . . . 84Optional Features . . . . . . . . . . . . . . . . 35Security-Related System Parameters . . . . . . . 69Station . . . . . . . . . . . . . . . . . . . 71, 74Stations with Off-PBX Telephone Integration . . . 40System Capacity . . . . . . . . . . . . . . . . 81Telecommuting Access . . . . . . . . . . . . . 52Trunk Group . . . . . . . . . . . . . . . . . . 63
SDC. See Special Digit Conversion (SDC) . . . . . . 50seamless converged communications across
network. . . . . . . . . . . . . . . . . . . . . . 16security . . . . . . . . . . . . . . . . . . . . . . 68security alert, admonishment meaning of. . . . . . . 11security codes . . . . . . . . . . . . . . . . . 33, 72
Avaya Extension to Cellular access number . . . . 33station security codes
change feature access code . . . . . . . . . 33Security-Related System Parameters screen . . . . . 69self administration feature access code (SAFE). . 17, 47Session Initiation Protocol (SIP) . . . . . . . . . . . 15SIP. See Session Initiation Protocol (SIP)Special Digit Conversion . . . . . . . . . . . . . . 50SSC. See Station Security Code (SSC)station administration . . . . . . . . . . . . . . . . 40Station screen . . . . . . . . . . . . . . . . . 71, 74station security code . . . . . . . . . . . . . . 32, 68Station Security Code (SSC) . . . . . . . . . . . . 68Stations with Off-PBX Telephone Integration screen . 40status station command. . . . . . . . . . . . . . . 87supported phones . . . . . . . . . . . . . . . . . 18supported platforms . . . . . . . . . . . . . . 18, 31system access terminal (SAT) . . . . . . . . . . . . 20system administration terminal screens . . . . . . . 20System Capacity screen . . . . . . . . . . . . . . 81
Ttable
Communication Manager-to-Extension to Cellular mapping. . . . . . . . . . . . . . . . . . . . 19
Extension to Cellular error conditions . . . . . . . 88Telecommuting Access Extension field. . . . . . . . 32telecommuting access number . . . . . . . . . 32, 52Telecommuting Access screen . . . . . . . . . . . 52termination . . . . . . . . . . . . . . . . . . . . . 25termination mode . . . . . . . . . . . . . . . . . . 45test procedures. . . . . . . . . . . . . . . . . . . 79trademarks. . . . . . . . . . . . . . . . . . . . . 11traffic engineering . . . . . . . . . . . . . . . . . 23troubleshooting . . . . . . . . . . . . . . . . . . . 87Trunk Group screen . . . . . . . . . . . . . . . . 63

110 Installation and Administration Guide
Uupgrades
from Release 1 . . . . . . . . . . . . . . . . . 101from Release 2 . . . . . . . . . . . . . . . . . 100from Release 3 . . . . . . . . . . . . . . . . . 99from Release 4 . . . . . . . . . . . . . . . .97, 98
Vvoice mail . . . . . . . . . . . . . . . . . . . . . 21
administration . . . . . . . . . . . . . . . . . 55
Wwarning, admonishment meaning of . . . . . . . . . .11what’s new in this release . . . . . . . . . . . . . 17WSM . . . . . . . . . . . . . . . . . . . . . . . 76
XXMOBILE stations . . . . . . . . . . . . . . . . . 16


