348
Avaya Proactive Contact Release 4.0 Using Avaya Proactive Contact Supervisor January 2008
Avaya Proactive ContactRelease 4.0Using Avaya Proactive Contact Supervisor
January 2008
©2008 Avaya Inc. All Rights Reserved.
NoticeWhile reasonable efforts were made to ensure that the information in this document was complete and accurate at the time of printing, Avaya Inc. can assume no liability for any errors. Changes and corrections to the information in this document might be incorporated in future releases.
Documentation disclaimerAvaya Inc. is not responsible for any modifications, additions, or deletions to the original published version of this documentation unless such modifications, additions, or deletions were performed by Avaya. Customer and/or End User agree to indemnify and hold harmless Avaya, Avaya's agents, servants and employees against all claims, lawsuits, demands and judgments arising out of, or in connection with, subsequent modifications, additions or deletions to this documentation to the extent made by the Customer or End User.
Link disclaimerAvaya Inc. is not responsible for the contents or reliability of any linked Web sites referenced elsewhere within this documentation, and Avaya does not necessarily endorse the products, services, or information described or offered within them. We cannot guarantee that these links will work all the time and we have no control over the availability of the linked pages.
WarrantyAvaya Inc. provides a limited warranty on this product. Refer to your sales agreement to establish the terms of the limited warranty. In addition, Avaya’s standard warranty language, as well as information regarding support for this product, while under warranty, is available through the Avaya Support Web site:http://www.avaya.com/support
LicenseUSE OR INSTALLATION OF THE PRODUCT INDICATES THE END USER'S ACCEPTANCE OF THE TERMS SET FORTH HEREIN AND THE GENERAL LICENSE TERMS AVAILABLE ON THE AVAYA WEB SITE http://support.avaya.com/LicenseInfo/ ("GENERAL LICENSE TERMS"). IF YOU DO NOT WISH TO BE BOUND BY THESE TERMS, YOU MUST RETURN THE PRODUCT(S) TO THE POINT OF PURCHASE WITHIN TEN (10) DAYS OF DELIVERY FOR A REFUND OR CREDIT.Avaya grants End User a license within the scope of the license types described below. The applicable number of licenses and units of capacity for which the license is granted will be one (1), unless a different number of licenses or units of capacity is specified in the Documentation or other materials available to End User. "Designated Processor" means a single stand-alone computing device. "Server" means a Designated Processor that hosts a software application to be accessed by multiple users. "Software" means the computer programs in object code, originally licensed by Avaya and ultimately utilized by End User, whether as stand-alone Products or pre-installed on Hardware. "Hardware" means the standard hardware Products, originally sold by Avaya and ultimately utilized by End User.
License type(s)Designated System(s) License (DS). End User may install and use each copy of the Software on only one Designated Processor, unless a different number of Designated Processors is indicated in the Documentation or other materials available to End User. Avaya may require the Designated Processor(s) to be identified by type, serial number, feature key, location or other specific designation, or to be provided by End User to Avaya through electronic means established by Avaya specifically for this purpose.Concurrent User License (CU). End User may install and use the Software on multiple Designated Processors or one or more Servers, so long as only the licensed number of Units are accessing and using the Software at any given time. A "Unit" means the unit on which Avaya, at its sole discretion, bases the pricing of its licenses and can be, without limitation, an agent, port or user, an e-mail or voice mail account in the name of a person or corporate function (e.g., webmaster or helpdesk), or a directory entry in the administrative database utilized by the Product that permits one user to interface with the Software. Units may be linked to a specific, identified Server.Database License (DL). Customer may install and use each copy of the Software on one Server or on multiple Servers provided that each of the Servers on which the Software is installed communicate with no more than a single instance of the same database. CPU License (CP). End User may install and use each copy of the Software on a number of Servers up to the number indicated by Avaya provided that the performance capacity of the Server(s) does not exceed the performance capacity specified for the Software. End User may not re-install or operate the Software on Server(s) with a larger performance capacity without Avaya's prior consent and payment of an upgrade fee. Named User License (NU). Customer may: (i) install and use the Software on a single Designated Processor or Server per authorized Named User (defined below); or (ii) install and use the Software on a Server so long as only authorized Named Users access and use the Software. "Named User," means a user or device that has been expressly authorized by Avaya to access and
use the Software. At Avaya's sole discretion, a "Named User" may be, without limitation, designated by name, corporate function (e.g., webmaster or helpdesk), an e-mail or voice mail account in the name of a person or corporate function, or a directory entry in the administrative database utilized by the Product that permits one user to interface with the Product. Shrinkwrap License (SR). With respect to Software that contains elements provided by third party suppliers, End User may install and use the Software in accordance with the terms and conditions of the applicable license agreements, such as "shrinkwrap" or "clickwrap" license accompanying or applicable to the Software ("Shrinkwrap License"). The text of the Shrinkwrap License will be available from Avaya upon End User’s request (see “Third-party Components" for more information).
Copyright Except where expressly stated otherwise, the Product is protected by copyright and other laws respecting proprietary rights. Unauthorized reproduction, transfer, and or use can be a criminal, as well as a civil, offense under the applicable law.
Third-party componentsCertain software programs or portions thereof included in the Product may contain software distributed under third party agreements ("Third Party Components"), which may contain terms that expand or limit rights to use certain portions of the Product ("Third Party Terms"). Information identifying Third Party Components and the Third Party Terms that apply to them is available on the Avaya Support Web site:http://support.avaya.com/ThirdPartyLicense/
Preventing toll fraud"Toll fraud" is the unauthorized use of your telecommunications system by an unauthorized party (for example, a person who is not a corporate employee, agent, subcontractor, or is not working on your company's behalf). Be aware that there can be a risk of toll fraud associated with your system and that, if toll fraud occurs, it can result in substantial additional charges for your telecommunications services.
Avaya fraud interventionIf you suspect that you are being victimized by toll fraud and you need technical assistance or support, call Technical Service Center Toll Fraud Intervention Hotline at +1-800-643-2353 for the United States and Canada. For additional support telephone numbers, see the Avaya Support Web site:http://www.avaya.com/support
TrademarksAvaya and the Avaya logo are either registered trademarks or trademarks of Avaya Inc. in the United States of America and/or other jurisdictions.All other trademarks are the property of their respective owners.
Downloading documentsFor the most current versions of documentation, see the Avaya Support Web site:http://www.avaya.com/support
Avaya supportAvaya provides a telephone number for you to use to report problems or to ask questions about your product. The support telephone number is 1-800-242-2121 in the United States. For additional support telephone numbers, see the Avaya Support Web site:http://www.avaya.com/support
January 2008 2
Purpose. . . . . . . . . . . . . . . . . . . . . . . . . . . . . . . . . . . . . . . 14Audience . . . . . . . . . . . . . . . . . . . . . . . . . . . . . . . . . . . . . . 14What’s New In This release . . . . . . . . . . . . . . . . . . . . . . . . . . . . 14
Related documents . . . . . . . . . . . . . . . . . . . . . . . . . . . . . . . . . . 16
Chapter 1: Introduction . . . . . . . . . . . . . . . . . . . . . . . . . . . . . . . . . . 18Avaya Proactive Contact environment . . . . . . . . . . . . . . . . . . . . . . . . 19
Dialer functions . . . . . . . . . . . . . . . . . . . . . . . . . . . . . . . . . . 19Multiple dialers. . . . . . . . . . . . . . . . . . . . . . . . . . . . . . . . . . . 20Pods . . . . . . . . . . . . . . . . . . . . . . . . . . . . . . . . . . . . . . . . 20Calling lists. . . . . . . . . . . . . . . . . . . . . . . . . . . . . . . . . . . . . 20
Using Calling lists . . . . . . . . . . . . . . . . . . . . . . . . . . . . . . . . . . . 23Modify an existing calling list . . . . . . . . . . . . . . . . . . . . . . . . . . . 23Create a new calling list . . . . . . . . . . . . . . . . . . . . . . . . . . . . . . 23Data Import . . . . . . . . . . . . . . . . . . . . . . . . . . . . . . . . . . . . . 24Data Export. . . . . . . . . . . . . . . . . . . . . . . . . . . . . . . . . . . . . 25Upload To Host . . . . . . . . . . . . . . . . . . . . . . . . . . . . . . . . . . 26Upload Dictionary . . . . . . . . . . . . . . . . . . . . . . . . . . . . . . . . . 29Map . . . . . . . . . . . . . . . . . . . . . . . . . . . . . . . . . . . . . . . . . 30Download From Host . . . . . . . . . . . . . . . . . . . . . . . . . . . . . . . 32Download Dictionary . . . . . . . . . . . . . . . . . . . . . . . . . . . . . . . 34Map . . . . . . . . . . . . . . . . . . . . . . . . . . . . . . . . . . . . . . . . . 35Processing . . . . . . . . . . . . . . . . . . . . . . . . . . . . . . . . . . . . . 37Convert Sample . . . . . . . . . . . . . . . . . . . . . . . . . . . . . . . . . . 37Do not Call Groups (DNC) . . . . . . . . . . . . . . . . . . . . . . . . . . . . . 37Calling List Reports . . . . . . . . . . . . . . . . . . . . . . . . . . . . . . . . 38
Using Agent Keys . . . . . . . . . . . . . . . . . . . . . . . . . . . . . . . . . . . 40Create a new Agent Key Set . . . . . . . . . . . . . . . . . . . . . . . . . . . 40Supported Features . . . . . . . . . . . . . . . . . . . . . . . . . . . . . . . . 41Versions . . . . . . . . . . . . . . . . . . . . . . . . . . . . . . . . . . . . . . 42Using Version Data . . . . . . . . . . . . . . . . . . . . . . . . . . . . . . . . 42Saving Version Data . . . . . . . . . . . . . . . . . . . . . . . . . . . . . . . . 42Using Deleted Configuration Files . . . . . . . . . . . . . . . . . . . . . . . . 43
Using Schedule . . . . . . . . . . . . . . . . . . . . . . . . . . . . . . . . . . . . 44Types of Dialer Activities . . . . . . . . . . . . . . . . . . . . . . . . . . . . . 44Schedule Reports . . . . . . . . . . . . . . . . . . . . . . . . . . . . . . . . . 51
Security Overview . . . . . . . . . . . . . . . . . . . . . . . . . . . . . . . . . . . 53Communication Encryption . . . . . . . . . . . . . . . . . . . . . . . . . . . . 53Identity Authentication . . . . . . . . . . . . . . . . . . . . . . . . . . . . . . 54 . . . . . . . . . . . . . . . . . . . . . . . . . . . . . . . . . . . . . . . . . . . Certificate
Contents
Contents
3 Using Avaya Proactive Contact 4.0 Supervisor
Generation Signing and Maintenance. . . . . . . . . . . . . . . . . . . . . . 54List of Secured Services . . . . . . . . . . . . . . . . . . . . . . . . . . . . . 54 . . . . . . . . . . . . . . . . . . . . . . . . . . . . . . . . . . . . . . . . . . . Secured Telnet and ftp . . . . . . . . . . . . . . . . . . . . . . . . . . . . . . . . . . . 55
Encryption Algorithm . . . . . . . . . . . . . . . . . . . . . . . . . . . . . . . 55Database Security . . . . . . . . . . . . . . . . . . . . . . . . . . . . . . . . . 55Client Password Aging . . . . . . . . . . . . . . . . . . . . . . . . . . . . . . 56Role-Based Authorization For Administrators. . . . . . . . . . . . . . . . . . 56Password Rotation . . . . . . . . . . . . . . . . . . . . . . . . . . . . . . . . 57Secured Agent . . . . . . . . . . . . . . . . . . . . . . . . . . . . . . . . . . . 57
Licensing . . . . . . . . . . . . . . . . . . . . . . . . . . . . . . . . . . . . . . . . 59Types of Licenses . . . . . . . . . . . . . . . . . . . . . . . . . . . . . . . . . 60License Server Setup . . . . . . . . . . . . . . . . . . . . . . . . . . . . . . . 60Dialer Configuration . . . . . . . . . . . . . . . . . . . . . . . . . . . . . . . . 60Grace Period . . . . . . . . . . . . . . . . . . . . . . . . . . . . . . . . . . . . 61Start Enforcer . . . . . . . . . . . . . . . . . . . . . . . . . . . . . . . . . . . 61Stop Enforcer . . . . . . . . . . . . . . . . . . . . . . . . . . . . . . . . . . . 61
Proactive Contact and IR Integration . . . . . . . . . . . . . . . . . . . . . . . . 62IR/Proactive Contact Interface Processes . . . . . . . . . . . . . . . . . . . . 62The dialer_conn process . . . . . . . . . . . . . . . . . . . . . . . . . . . . . 63The ivr_conn process . . . . . . . . . . . . . . . . . . . . . . . . . . . . . . . 63The ivr_supr process . . . . . . . . . . . . . . . . . . . . . . . . . . . . . . . 63The agent process . . . . . . . . . . . . . . . . . . . . . . . . . . . . . . . . . 64The sim_agt process . . . . . . . . . . . . . . . . . . . . . . . . . . . . . . . 64Integration scenarios . . . . . . . . . . . . . . . . . . . . . . . . . . . . . . . 64
AES Dialer Integration . . . . . . . . . . . . . . . . . . . . . . . . . . . . . . . . . 65Lightweight Directory Access Protocol . . . . . . . . . . . . . . . . . . . . . 65Setting Up LDAP on Primary Dialer . . . . . . . . . . . . . . . . . . . . . . . 65Setting up LDAP on Secondary Dialer . . . . . . . . . . . . . . . . . . . . . . 66
Avaya Proactive Contact users . . . . . . . . . . . . . . . . . . . . . . . . . . . . 68Types of users . . . . . . . . . . . . . . . . . . . . . . . . . . . . . . . . . . . 68Logins and permissions. . . . . . . . . . . . . . . . . . . . . . . . . . . . . . 69
Log in to Supervisor . . . . . . . . . . . . . . . . . . . . . . . . . . . . . . . . . . 71
Chapter 2: Understanding Editor settings . . . . . . . . . . . . . . . . . . . . . . . . 72Enable or disable multi-dialer commands . . . . . . . . . . . . . . . . . . . . . . 73Save options . . . . . . . . . . . . . . . . . . . . . . . . . . . . . . . . . . . . . . 74Set refresh options . . . . . . . . . . . . . . . . . . . . . . . . . . . . . . . . . . 75
Contents
January 2008 4
Chapter 3: Customize Editor . . . . . . . . . . . . . . . . . . . . . . . . . . . . . . . 76Understanding Editor . . . . . . . . . . . . . . . . . . . . . . . . . . . . . . . . . 77
Editor window description . . . . . . . . . . . . . . . . . . . . . . . . . . . . 77Editor screen layout and usage. . . . . . . . . . . . . . . . . . . . . . . . . . 77
Navigate among the Tool applications . . . . . . . . . . . . . . . . . . . . . . . 79Move within Contact Management . . . . . . . . . . . . . . . . . . . . . . . . . . 80View icons in the button group . . . . . . . . . . . . . . . . . . . . . . . . . . . 81Refresh a view . . . . . . . . . . . . . . . . . . . . . . . . . . . . . . . . . . . . . 82
Chapter 4: Phone strategy . . . . . . . . . . . . . . . . . . . . . . . . . . . . . . . . 84Understanding phone strategy . . . . . . . . . . . . . . . . . . . . . . . . . . . . 85
Phone strategy preparation . . . . . . . . . . . . . . . . . . . . . . . . . . . . 85Phone strategy settings . . . . . . . . . . . . . . . . . . . . . . . . . . . . . . 86
Using phone strategies . . . . . . . . . . . . . . . . . . . . . . . . . . . . . . . . 89Create a phone strategy . . . . . . . . . . . . . . . . . . . . . . . . . . . . . 89Copy a phone strategy . . . . . . . . . . . . . . . . . . . . . . . . . . . . . . 91View phone strategy settings . . . . . . . . . . . . . . . . . . . . . . . . . . 91Edit a phone strategy . . . . . . . . . . . . . . . . . . . . . . . . . . . . . . . 91Delete a phone strategy . . . . . . . . . . . . . . . . . . . . . . . . . . . . . 92
Maintaining phone strategies . . . . . . . . . . . . . . . . . . . . . . . . . . . . . 93List all phone strategies on a selected dialer . . . . . . . . . . . . . . . . . . 93Append a phone strategy row . . . . . . . . . . . . . . . . . . . . . . . . . . 93Insert an initial phone in a phone strategy . . . . . . . . . . . . . . . . . . . 94Delete a row in a phone strategy . . . . . . . . . . . . . . . . . . . . . . . . . 94Select all rows in a phone strategy . . . . . . . . . . . . . . . . . . . . . . . 94Unselect all rows in a phone strategy . . . . . . . . . . . . . . . . . . . . . . 95
Chapter 5: Record selection . . . . . . . . . . . . . . . . . . . . . . . . . . . . . . . 96Understanding record selection . . . . . . . . . . . . . . . . . . . . . . . . . . . 97
Specify time zones. . . . . . . . . . . . . . . . . . . . . . . . . . . . . . . . . 97Specify completion codes. . . . . . . . . . . . . . . . . . . . . . . . . . . . . 97Specify goals. . . . . . . . . . . . . . . . . . . . . . . . . . . . . . . . . . . . 98
Record selection use . . . . . . . . . . . . . . . . . . . . . . . . . . . . . . . . . 99Understand the Selections settings . . . . . . . . . . . . . . . . . . . . . . . 99Understand the Selection Reports settings . . . . . . . . . . . . . . . . . . . 102
Using a record selection . . . . . . . . . . . . . . . . . . . . . . . . . . . . . . . 104Open and view a record selection . . . . . . . . . . . . . . . . . . . . . . . . 104Complete the Detail tab . . . . . . . . . . . . . . . . . . . . . . . . . . . . . . 105Complete the Records tab . . . . . . . . . . . . . . . . . . . . . . . . . . . . 105Complete the Time Zones tab . . . . . . . . . . . . . . . . . . . . . . . . . . 106
Contents
5 Using Avaya Proactive Contact 4.0 Supervisor
Complete the Results tab . . . . . . . . . . . . . . . . . . . . . . . . . . . . . 106Complete the Recalls tab (optional) . . . . . . . . . . . . . . . . . . . . . . . 106Complete the Sort tab (optional) . . . . . . . . . . . . . . . . . . . . . . . . . 107Create a record selection . . . . . . . . . . . . . . . . . . . . . . . . . . . . . 107Save a record selection . . . . . . . . . . . . . . . . . . . . . . . . . . . . . . 108Edit a record selection . . . . . . . . . . . . . . . . . . . . . . . . . . . . . . 108Delete a record selection . . . . . . . . . . . . . . . . . . . . . . . . . . . . . 109Verify a record selection . . . . . . . . . . . . . . . . . . . . . . . . . . . . . 109Run a record selection . . . . . . . . . . . . . . . . . . . . . . . . . . . . . . 109Save and print a Record Selections report . . . . . . . . . . . . . . . . . . . 109
Maintaining a record selection . . . . . . . . . . . . . . . . . . . . . . . . . . . . 111Copy a record selection . . . . . . . . . . . . . . . . . . . . . . . . . . . . . 111List all record selections on a selected dialer . . . . . . . . . . . . . . . . . 111View selection reports . . . . . . . . . . . . . . . . . . . . . . . . . . . . . . 112View record selection settings . . . . . . . . . . . . . . . . . . . . . . . . . . 112Append record selection rows . . . . . . . . . . . . . . . . . . . . . . . . . . 112Insert a row in a record selection . . . . . . . . . . . . . . . . . . . . . . . . 113Delete a row in a record selection . . . . . . . . . . . . . . . . . . . . . . . . 113Move a row up in a record selection . . . . . . . . . . . . . . . . . . . . . . . 114Move a row down in a record selection . . . . . . . . . . . . . . . . . . . . . 114Select all rows in a record selection . . . . . . . . . . . . . . . . . . . . . . . 114Unselect all rows in a record selection . . . . . . . . . . . . . . . . . . . . . 115Record Selection for Multiple Dialers . . . . . . . . . . . . . . . . . . . . . . 115
Understanding jobs . . . . . . . . . . . . . . . . . . . . . . . . . . . . . . . . . . 117Job types . . . . . . . . . . . . . . . . . . . . . . . . . . . . . . . . . . . . . 117Outbound jobs . . . . . . . . . . . . . . . . . . . . . . . . . . . . . . . . . . . 118Call pacing . . . . . . . . . . . . . . . . . . . . . . . . . . . . . . . . . . . . . 119
Understanding job settings . . . . . . . . . . . . . . . . . . . . . . . . . . . . . 122Basic settings . . . . . . . . . . . . . . . . . . . . . . . . . . . . . . . . . . . 122Call pacing settings . . . . . . . . . . . . . . . . . . . . . . . . . . . . . . . . 123Files settings . . . . . . . . . . . . . . . . . . . . . . . . . . . . . . . . . . . . 125Job Type settings . . . . . . . . . . . . . . . . . . . . . . . . . . . . . . . . . 127Inbound Processing settings . . . . . . . . . . . . . . . . . . . . . . . . . . . 127Labels settings. . . . . . . . . . . . . . . . . . . . . . . . . . . . . . . . . . . 128Managed Dialing settings . . . . . . . . . . . . . . . . . . . . . . . . . . . . . 129Outbound Processing settings . . . . . . . . . . . . . . . . . . . . . . . . . . 130Post Processing settings . . . . . . . . . . . . . . . . . . . . . . . . . . . . . 131Quota Settings . . . . . . . . . . . . . . . . . . . . . . . . . . . . . . . . . . . 131Recall settings . . . . . . . . . . . . . . . . . . . . . . . . . . . . . . . . . . . 131Service Level settings . . . . . . . . . . . . . . . . . . . . . . . . . . . . . . . 132
Contents
January 2008 6
Wait Queues settings . . . . . . . . . . . . . . . . . . . . . . . . . . . . . . . 132Interactive Voice Response settings . . . . . . . . . . . . . . . . . . . . . . . 133
Using jobs . . . . . . . . . . . . . . . . . . . . . . . . . . . . . . . . . . . . . . . 134Create a job . . . . . . . . . . . . . . . . . . . . . . . . . . . . . . . . . . . . 134View job settings . . . . . . . . . . . . . . . . . . . . . . . . . . . . . . . . . 135Save a job . . . . . . . . . . . . . . . . . . . . . . . . . . . . . . . . . . . . . 135Save a job as another name or on a different dialer . . . . . . . . . . . . . . 135Start a job on one or more dialers . . . . . . . . . . . . . . . . . . . . . . . . 136Start multiple jobs on currently selected dialer . . . . . . . . . . . . . . . . . 136Share a List or a Job. . . . . . . . . . . . . . . . . . . . . . . . . . . . . . . . 136
Maintaining jobs . . . . . . . . . . . . . . . . . . . . . . . . . . . . . . . . . . . . 138Copy a job . . . . . . . . . . . . . . . . . . . . . . . . . . . . . . . . . . . . . 138Edit a job . . . . . . . . . . . . . . . . . . . . . . . . . . . . . . . . . . . . . . 138Verify a job on one or more dialers . . . . . . . . . . . . . . . . . . . . . . . 139Verify multiple jobs on the currently selected dialer . . . . . . . . . . . . . . 139Delete a job on one or more dialers . . . . . . . . . . . . . . . . . . . . . . . 139Delete multiple jobs on the currently selected dialer . . . . . . . . . . . . . . 139List all jobs on a selected dialer . . . . . . . . . . . . . . . . . . . . . . . . . 140
Understanding Editor system dialog boxes . . . . . . . . . . . . . . . . . . . . . 141Options dialog box . . . . . . . . . . . . . . . . . . . . . . . . . . . . . . . . 141Screens dialog box . . . . . . . . . . . . . . . . . . . . . . . . . . . . . . . . 142
Chapter 7: Messages and scripts. . . . . . . . . . . . . . . . . . . . . . . . . . . . . 144Understanding messages . . . . . . . . . . . . . . . . . . . . . . . . . . . . . . . 145
Plan messages . . . . . . . . . . . . . . . . . . . . . . . . . . . . . . . . . . . 145Telephony file . . . . . . . . . . . . . . . . . . . . . . . . . . . . . . . . . . . 146Record messages . . . . . . . . . . . . . . . . . . . . . . . . . . . . . . . . . 146Define and create message text . . . . . . . . . . . . . . . . . . . . . . . . . 146
Using messages . . . . . . . . . . . . . . . . . . . . . . . . . . . . . . . . . . . . 148Messages pane . . . . . . . . . . . . . . . . . . . . . . . . . . . . . . . . . . 148Start Messages. . . . . . . . . . . . . . . . . . . . . . . . . . . . . . . . . . . 148Create message folders . . . . . . . . . . . . . . . . . . . . . . . . . . . . . . 149Add or update messages . . . . . . . . . . . . . . . . . . . . . . . . . . . . . 149Verify a message. . . . . . . . . . . . . . . . . . . . . . . . . . . . . . . . . . 150
Maintaining messages. . . . . . . . . . . . . . . . . . . . . . . . . . . . . . . . . 151Remove a message . . . . . . . . . . . . . . . . . . . . . . . . . . . . . . . . 151Rename a message folder. . . . . . . . . . . . . . . . . . . . . . . . . . . . . 151Remove a folder . . . . . . . . . . . . . . . . . . . . . . . . . . . . . . . . . . 152
Understanding scripts . . . . . . . . . . . . . . . . . . . . . . . . . . . . . . . . . 153Types of scripts . . . . . . . . . . . . . . . . . . . . . . . . . . . . . . . . . . 153
Contents
7 Using Avaya Proactive Contact 4.0 Supervisor
Script actions . . . . . . . . . . . . . . . . . . . . . . . . . . . . . . . . . . . 154Script examples . . . . . . . . . . . . . . . . . . . . . . . . . . . . . . . . . . 154
Using scripts . . . . . . . . . . . . . . . . . . . . . . . . . . . . . . . . . . . . . . 156Scripts pane . . . . . . . . . . . . . . . . . . . . . . . . . . . . . . . . . . . . 156Start Scripts . . . . . . . . . . . . . . . . . . . . . . . . . . . . . . . . . . . . 156Add or update scripts . . . . . . . . . . . . . . . . . . . . . . . . . . . . . . . 157Define a script . . . . . . . . . . . . . . . . . . . . . . . . . . . . . . . . . . . 157
Maintaining scripts . . . . . . . . . . . . . . . . . . . . . . . . . . . . . . . . . . 159Change a script action . . . . . . . . . . . . . . . . . . . . . . . . . . . . . . 159Remove a script action . . . . . . . . . . . . . . . . . . . . . . . . . . . . . . 159Change a script . . . . . . . . . . . . . . . . . . . . . . . . . . . . . . . . . . 160Remove a script . . . . . . . . . . . . . . . . . . . . . . . . . . . . . . . . . . 160
Understanding Messages and Scripts dialog boxes . . . . . . . . . . . . . . . . 161Delete dialog box . . . . . . . . . . . . . . . . . . . . . . . . . . . . . . . . . 161Rename Folder dialog box . . . . . . . . . . . . . . . . . . . . . . . . . . . . 161
Chapter 8: Monitor settings . . . . . . . . . . . . . . . . . . . . . . . . . . . . . . . 162Understanding Monitor . . . . . . . . . . . . . . . . . . . . . . . . . . . . . . . . 163
Monitor window description . . . . . . . . . . . . . . . . . . . . . . . . . . . 163Using Monitor settings . . . . . . . . . . . . . . . . . . . . . . . . . . . . . . . . 164
Set the default hierarchy . . . . . . . . . . . . . . . . . . . . . . . . . . . . . 164Set time range . . . . . . . . . . . . . . . . . . . . . . . . . . . . . . . . . . . 165Set multi-dialer views . . . . . . . . . . . . . . . . . . . . . . . . . . . . . . . 165Set agent states to display . . . . . . . . . . . . . . . . . . . . . . . . . . . . 166Set the view set . . . . . . . . . . . . . . . . . . . . . . . . . . . . . . . . . . 166Set save on exit settings . . . . . . . . . . . . . . . . . . . . . . . . . . . . . 167Set alert monitoring . . . . . . . . . . . . . . . . . . . . . . . . . . . . . . . . 167
Chapter 9: Customize Monitor . . . . . . . . . . . . . . . . . . . . . . . . . . . . . . 168Navigate among the Tool menu applications . . . . . . . . . . . . . . . . . . . . 169Using a Monitor view . . . . . . . . . . . . . . . . . . . . . . . . . . . . . . . . . 170
View icons in the button bar . . . . . . . . . . . . . . . . . . . . . . . . . . . 170Open a standard view . . . . . . . . . . . . . . . . . . . . . . . . . . . . . . . 170Open a view or view set from another location . . . . . . . . . . . . . . . . . 171Open a view about a specific agent . . . . . . . . . . . . . . . . . . . . . . . 171
Customizing Monitor views . . . . . . . . . . . . . . . . . . . . . . . . . . . . . . 172Create a custom view . . . . . . . . . . . . . . . . . . . . . . . . . . . . . . . 172Save current view . . . . . . . . . . . . . . . . . . . . . . . . . . . . . . . . . 172Save as a view set . . . . . . . . . . . . . . . . . . . . . . . . . . . . . . . . . 173Save view set with a new name . . . . . . . . . . . . . . . . . . . . . . . . . . 173
Contents
January 2008 8
Managing custom views. . . . . . . . . . . . . . . . . . . . . . . . . . . . . . . . 175Delete a view set . . . . . . . . . . . . . . . . . . . . . . . . . . . . . . . . . . 175Add a view to the Custom button group . . . . . . . . . . . . . . . . . . . . . 175Refresh a view . . . . . . . . . . . . . . . . . . . . . . . . . . . . . . . . . . . 175
Chapter 10: Use Monitor views . . . . . . . . . . . . . . . . . . . . . . . . . . . . . . 176Understanding view windows. . . . . . . . . . . . . . . . . . . . . . . . . . . . . 177
Types of views . . . . . . . . . . . . . . . . . . . . . . . . . . . . . . . . . . . 177View toolbar . . . . . . . . . . . . . . . . . . . . . . . . . . . . . . . . . . . . 178
Using views . . . . . . . . . . . . . . . . . . . . . . . . . . . . . . . . . . . . . . 180Dialer Status view . . . . . . . . . . . . . . . . . . . . . . . . . . . . . . . . . 180Dialer Agents view . . . . . . . . . . . . . . . . . . . . . . . . . . . . . . . . . 182Dialer Lines view. . . . . . . . . . . . . . . . . . . . . . . . . . . . . . . . . . 183Dialer History view. . . . . . . . . . . . . . . . . . . . . . . . . . . . . . . . . 184Job Status view . . . . . . . . . . . . . . . . . . . . . . . . . . . . . . . . . . 185Job Agents view . . . . . . . . . . . . . . . . . . . . . . . . . . . . . . . . . . 186Job Detail view . . . . . . . . . . . . . . . . . . . . . . . . . . . . . . . . . . . 188Job Call Handling view . . . . . . . . . . . . . . . . . . . . . . . . . . . . . . 190Job Completion Codes view . . . . . . . . . . . . . . . . . . . . . . . . . . . 191Job Wait Queues view . . . . . . . . . . . . . . . . . . . . . . . . . . . . . . 192Job History view . . . . . . . . . . . . . . . . . . . . . . . . . . . . . . . . . . 194Completion Code Detail by Agent view . . . . . . . . . . . . . . . . . . . . . 196Job Quality view . . . . . . . . . . . . . . . . . . . . . . . . . . . . . . . . . . 197Supervisor Agents view . . . . . . . . . . . . . . . . . . . . . . . . . . . . . . 199Find Agent view . . . . . . . . . . . . . . . . . . . . . . . . . . . . . . . . . . 200Agent Detail view . . . . . . . . . . . . . . . . . . . . . . . . . . . . . . . . . 201Agent Completion Codes view . . . . . . . . . . . . . . . . . . . . . . . . . . 203Agent History view. . . . . . . . . . . . . . . . . . . . . . . . . . . . . . . . . 204
Chapter 11: Monitor view controls . . . . . . . . . . . . . . . . . . . . . . . . . . . . 206Understanding view controls . . . . . . . . . . . . . . . . . . . . . . . . . . . . . 207
View control toolbar . . . . . . . . . . . . . . . . . . . . . . . . . . . . . . . . 207Understand scope selectors examples . . . . . . . . . . . . . . . . . . . . . 208
Using view controls . . . . . . . . . . . . . . . . . . . . . . . . . . . . . . . . . . 210Filter data in a view . . . . . . . . . . . . . . . . . . . . . . . . . . . . . . . . 210Select a performance code . . . . . . . . . . . . . . . . . . . . . . . . . . . . 210Set scope selectors . . . . . . . . . . . . . . . . . . . . . . . . . . . . . . . . 211Select a time range . . . . . . . . . . . . . . . . . . . . . . . . . . . . . . . . 212Select a hierarchy . . . . . . . . . . . . . . . . . . . . . . . . . . . . . . . . . 212
Maintaining Monitor views . . . . . . . . . . . . . . . . . . . . . . . . . . . . . . 213Hide or show columns . . . . . . . . . . . . . . . . . . . . . . . . . . . . . . 213
Contents
9 Using Avaya Proactive Contact 4.0 Supervisor
Select Table View or Graphical View . . . . . . . . . . . . . . . . . . . . . . . 213Save a view as HTML . . . . . . . . . . . . . . . . . . . . . . . . . . . . . . . 213
Chapter 12: Job control functions . . . . . . . . . . . . . . . . . . . . . . . . . . . . 216Understanding job control functions. . . . . . . . . . . . . . . . . . . . . . . . . 217Using job control functions . . . . . . . . . . . . . . . . . . . . . . . . . . . . . . 218
Stop a job . . . . . . . . . . . . . . . . . . . . . . . . . . . . . . . . . . . . . 218Link to job . . . . . . . . . . . . . . . . . . . . . . . . . . . . . . . . . . . . . 219Set the minimum hit rate . . . . . . . . . . . . . . . . . . . . . . . . . . . . . 219Set the Expert Calling Ratio . . . . . . . . . . . . . . . . . . . . . . . . . . . 220
Maintaining job control functions . . . . . . . . . . . . . . . . . . . . . . . . . . 221Adjust Inbound settings . . . . . . . . . . . . . . . . . . . . . . . . . . . . . 221Reassign lines . . . . . . . . . . . . . . . . . . . . . . . . . . . . . . . . . . . 221Set a managed dialing job . . . . . . . . . . . . . . . . . . . . . . . . . . . . 222Select and sort time zones . . . . . . . . . . . . . . . . . . . . . . . . . . . . 222Set up a unit work list . . . . . . . . . . . . . . . . . . . . . . . . . . . . . . . 223Set and modify a quota . . . . . . . . . . . . . . . . . . . . . . . . . . . . . . 223Set the detection mode . . . . . . . . . . . . . . . . . . . . . . . . . . . . . . 224Set the alternate initial phone . . . . . . . . . . . . . . . . . . . . . . . . . . 224Set recalls . . . . . . . . . . . . . . . . . . . . . . . . . . . . . . . . . . . . . 225Find a text string . . . . . . . . . . . . . . . . . . . . . . . . . . . . . . . . . . 225
Chapter 13: Agent control functions . . . . . . . . . . . . . . . . . . . . . . . . . . . 228Understanding agent control functions . . . . . . . . . . . . . . . . . . . . . . . 229
Hierarchies . . . . . . . . . . . . . . . . . . . . . . . . . . . . . . . . . . . . . 229Using wildcard characters . . . . . . . . . . . . . . . . . . . . . . . . . . . . 229
Using agent control functions . . . . . . . . . . . . . . . . . . . . . . . . . . . . 231Find an agent. . . . . . . . . . . . . . . . . . . . . . . . . . . . . . . . . . . . 231Transfer an agent to another job . . . . . . . . . . . . . . . . . . . . . . . . . 231Send message to an agent . . . . . . . . . . . . . . . . . . . . . . . . . . . . 232Monitor agent line . . . . . . . . . . . . . . . . . . . . . . . . . . . . . . . . . 232Remove an agent from a job . . . . . . . . . . . . . . . . . . . . . . . . . . . 232Show an agent view . . . . . . . . . . . . . . . . . . . . . . . . . . . . . . . . 233
Chapter 14: Understanding Monitor dialog boxes. . . . . . . . . . . . . . . . . . . . 234View control dialog boxes. . . . . . . . . . . . . . . . . . . . . . . . . . . . . . . 235
Options dialog box . . . . . . . . . . . . . . . . . . . . . . . . . . . . . . . . 235Customize Status Bar dialog box. . . . . . . . . . . . . . . . . . . . . . . . . 237Find dialog box . . . . . . . . . . . . . . . . . . . . . . . . . . . . . . . . . . 237Filter Data dialog box . . . . . . . . . . . . . . . . . . . . . . . . . . . . . . . 237
Job control dialog boxes . . . . . . . . . . . . . . . . . . . . . . . . . . . . . . . 239
Contents
January 2008 10
Stop Job dialog box . . . . . . . . . . . . . . . . . . . . . . . . . . . . . . . . 239Link to Job dialog box. . . . . . . . . . . . . . . . . . . . . . . . . . . . . . . 240Minimum Hit Rate dialog box . . . . . . . . . . . . . . . . . . . . . . . . . . . 240Expert Calling Ratio dialog box . . . . . . . . . . . . . . . . . . . . . . . . . 240Inbound Settings dialog box . . . . . . . . . . . . . . . . . . . . . . . . . . . 241Managed Dialing dialog box . . . . . . . . . . . . . . . . . . . . . . . . . . . 241Time Zones dialog box . . . . . . . . . . . . . . . . . . . . . . . . . . . . . . 242Unit Work Lists dialog box . . . . . . . . . . . . . . . . . . . . . . . . . . . . 242Quota dialog box. . . . . . . . . . . . . . . . . . . . . . . . . . . . . . . . . . 243Alternate Initial Phones dialog box . . . . . . . . . . . . . . . . . . . . . . . . 244Detection Modes dialog box . . . . . . . . . . . . . . . . . . . . . . . . . . . 244Recalls dialog box . . . . . . . . . . . . . . . . . . . . . . . . . . . . . . . . . 245Lines dialog box . . . . . . . . . . . . . . . . . . . . . . . . . . . . . . . . . . 245
Agent control dialog boxes . . . . . . . . . . . . . . . . . . . . . . . . . . . . . . 247Find Agent dialog box . . . . . . . . . . . . . . . . . . . . . . . . . . . . . . . 247Transfer Agent dialog box . . . . . . . . . . . . . . . . . . . . . . . . . . . . 248Send Message dialog box . . . . . . . . . . . . . . . . . . . . . . . . . . . . . 248Monitor Agent dialog box . . . . . . . . . . . . . . . . . . . . . . . . . . . . . 248Performance Completion Code dialog box . . . . . . . . . . . . . . . . . . . 248
Chapter 15: Alerts . . . . . . . . . . . . . . . . . . . . . . . . . . . . . . . . . . . . . 250Understanding alerts . . . . . . . . . . . . . . . . . . . . . . . . . . . . . . . . . 251
Alerts uses . . . . . . . . . . . . . . . . . . . . . . . . . . . . . . . . . . . . . 251Alert examples . . . . . . . . . . . . . . . . . . . . . . . . . . . . . . . . . . . 252Alert settings . . . . . . . . . . . . . . . . . . . . . . . . . . . . . . . . . . . . 253
Using alerts . . . . . . . . . . . . . . . . . . . . . . . . . . . . . . . . . . . . . . 255Create an alert . . . . . . . . . . . . . . . . . . . . . . . . . . . . . . . . . . . 255Edit an alert . . . . . . . . . . . . . . . . . . . . . . . . . . . . . . . . . . . . 256Remove an alert . . . . . . . . . . . . . . . . . . . . . . . . . . . . . . . . . . 256
Maintaining alerts . . . . . . . . . . . . . . . . . . . . . . . . . . . . . . . . . . . 257Enable and disable alerts . . . . . . . . . . . . . . . . . . . . . . . . . . . . . 257Check the status of each alert . . . . . . . . . . . . . . . . . . . . . . . . . . 257
Understanding Alert dialog boxes . . . . . . . . . . . . . . . . . . . . . . . . . . 258Alert Viewer dialog box . . . . . . . . . . . . . . . . . . . . . . . . . . . . . . 258Alert Editor, Alert Definition tab . . . . . . . . . . . . . . . . . . . . . . . . . 259Alert Editor, Scope tab . . . . . . . . . . . . . . . . . . . . . . . . . . . . . . 259Alert Editor, Notifications tab . . . . . . . . . . . . . . . . . . . . . . . . . . . 260
Chapter 16: Analyst navigation and personalization . . . . . . . . . . . . . . . . . . 262Window arrangement overview . . . . . . . . . . . . . . . . . . . . . . . . . . . . 263
Contents
11 Using Avaya Proactive Contact 4.0 Supervisor
Navigate among the Tool menu applications . . . . . . . . . . . . . . . . . . . . 264Use large icons or small icons in the button bar . . . . . . . . . . . . . . . . . . 265
Chapter 17: Avaya Proactive Contact Analyst . . . . . . . . . . . . . . . . . . . . . . 266Understanding Analyst . . . . . . . . . . . . . . . . . . . . . . . . . . . . . . . . 267Using Analyst . . . . . . . . . . . . . . . . . . . . . . . . . . . . . . . . . . . . . 269
Create a new report configuration . . . . . . . . . . . . . . . . . . . . . . . . 269Delete a report configuration . . . . . . . . . . . . . . . . . . . . . . . . . . . 270Change a report configuration . . . . . . . . . . . . . . . . . . . . . . . . . . 270Preview a report . . . . . . . . . . . . . . . . . . . . . . . . . . . . . . . . . . 271Print a report . . . . . . . . . . . . . . . . . . . . . . . . . . . . . . . . . . . 271Export report data . . . . . . . . . . . . . . . . . . . . . . . . . . . . . . . . . 272Schedule a report . . . . . . . . . . . . . . . . . . . . . . . . . . . . . . . . . 273
Chapter 18: PC Analysis Telnet . . . . . . . . . . . . . . . . . . . . . . . . . . . . . . 276Understanding PC Analysis Telnet . . . . . . . . . . . . . . . . . . . . . . . . . . 277
PC Analysis . . . . . . . . . . . . . . . . . . . . . . . . . . . . . . . . . . . . 277PC Analysis Telnet features. . . . . . . . . . . . . . . . . . . . . . . . . . . . 277
Using PC Analysis Telnet . . . . . . . . . . . . . . . . . . . . . . . . . . . . . . . 279Start PC Analysis Telnet . . . . . . . . . . . . . . . . . . . . . . . . . . . . . 279Transfer PC Analysis extract output files . . . . . . . . . . . . . . . . . . . . 280FTP Client dialog box . . . . . . . . . . . . . . . . . . . . . . . . . . . . . . . 280
Chapter 19: Completion Code Manager . . . . . . . . . . . . . . . . . . . . . . . . . 282Understanding completion codes . . . . . . . . . . . . . . . . . . . . . . . . . . 283
Completion codes . . . . . . . . . . . . . . . . . . . . . . . . . . . . . . . . . 283Completion code attributes . . . . . . . . . . . . . . . . . . . . . . . . . . . . 284Completion code categories . . . . . . . . . . . . . . . . . . . . . . . . . . . 285Multi-dialer environment . . . . . . . . . . . . . . . . . . . . . . . . . . . . . 285
Using Completion Codes . . . . . . . . . . . . . . . . . . . . . . . . . . . . . . . 287Completion Code window . . . . . . . . . . . . . . . . . . . . . . . . . . . . . 287Start Completion Code Manager . . . . . . . . . . . . . . . . . . . . . . . . . 288Create a completion code . . . . . . . . . . . . . . . . . . . . . . . . . . . . . 288Assign a completion code to a category . . . . . . . . . . . . . . . . . . . . . 288
Maintaining completion codes . . . . . . . . . . . . . . . . . . . . . . . . . . . . 290Assign or reassign a completion code to a category . . . . . . . . . . . . . . 290Change a completion code . . . . . . . . . . . . . . . . . . . . . . . . . . . . 290Filter the completion codes to view . . . . . . . . . . . . . . . . . . . . . . . 291Save the completion code information to a file . . . . . . . . . . . . . . . . . 291

Contents
January 2008 12
Chapter 20: Hierarchy Manager . . . . . . . . . . . . . . . . . . . . . . . . . . . . . 292Understanding Hierarchy Manager . . . . . . . . . . . . . . . . . . . . . . . . . . 293
Agent hierarchies . . . . . . . . . . . . . . . . . . . . . . . . . . . . . . . . . 293Job hierarchies . . . . . . . . . . . . . . . . . . . . . . . . . . . . . . . . . . 294Dialer hierarchies . . . . . . . . . . . . . . . . . . . . . . . . . . . . . . . . . 294
Using Hierarchy Manager . . . . . . . . . . . . . . . . . . . . . . . . . . . . . . . 295Start Hierarchy Manager . . . . . . . . . . . . . . . . . . . . . . . . . . . . . 295Create a hierarchy . . . . . . . . . . . . . . . . . . . . . . . . . . . . . . . . . 295Open a hierarchy to view or change . . . . . . . . . . . . . . . . . . . . . . . 296Add a level to a hierarchy . . . . . . . . . . . . . . . . . . . . . . . . . . . . . 296Add a data item to a hierarchy . . . . . . . . . . . . . . . . . . . . . . . . . . 297
Maintaining Hierarchy Manager. . . . . . . . . . . . . . . . . . . . . . . . . . . . 298Move a level or item within a hierarchy . . . . . . . . . . . . . . . . . . . . . 298Rename a hierarchy level . . . . . . . . . . . . . . . . . . . . . . . . . . . . . 298Remove a level from a hierarchy . . . . . . . . . . . . . . . . . . . . . . . . . 299Remove a data item from a hierarchy . . . . . . . . . . . . . . . . . . . . . . 299Rename a hierarchy . . . . . . . . . . . . . . . . . . . . . . . . . . . . . . . . 300Delete a hierarchy . . . . . . . . . . . . . . . . . . . . . . . . . . . . . . . . . 300
Chapter 21: System Telnet . . . . . . . . . . . . . . . . . . . . . . . . . . . . . . . . 302Understanding System Telnet. . . . . . . . . . . . . . . . . . . . . . . . . . . . . 303
System Telnet . . . . . . . . . . . . . . . . . . . . . . . . . . . . . . . . . . . 303System Telnet features . . . . . . . . . . . . . . . . . . . . . . . . . . . . . . 303
Using System Telnet . . . . . . . . . . . . . . . . . . . . . . . . . . . . . . . . . 305
Chapter 22: Agent Blending . . . . . . . . . . . . . . . . . . . . . . . . . . . . . . . 306Understanding Agent Blending . . . . . . . . . . . . . . . . . . . . . . . . . . . . 307
Agent Blending overview . . . . . . . . . . . . . . . . . . . . . . . . . . . . . 307Predictive Agent Blending . . . . . . . . . . . . . . . . . . . . . . . . . . . . 308Proactive Agent Blending . . . . . . . . . . . . . . . . . . . . . . . . . . . . . 308Supported ACDs and switch terminology . . . . . . . . . . . . . . . . . . . . 309Domains . . . . . . . . . . . . . . . . . . . . . . . . . . . . . . . . . . . . . . 313Domain groups. . . . . . . . . . . . . . . . . . . . . . . . . . . . . . . . . . . 314
Using Agent Blending . . . . . . . . . . . . . . . . . . . . . . . . . . . . . . . . . 318Start the Agent Blending tool . . . . . . . . . . . . . . . . . . . . . . . . . . 318Create a domain group . . . . . . . . . . . . . . . . . . . . . . . . . . . . . . 318Create a domain . . . . . . . . . . . . . . . . . . . . . . . . . . . . . . . . . . 319Edit domain group settings . . . . . . . . . . . . . . . . . . . . . . . . . . . . 319Edit domain settings. . . . . . . . . . . . . . . . . . . . . . . . . . . . . . . . 320Delete a domain group . . . . . . . . . . . . . . . . . . . . . . . . . . . . . . 320
Contents
13 Using Avaya Proactive Contact 4.0 Supervisor
Delete a domain . . . . . . . . . . . . . . . . . . . . . . . . . . . . . . . . . . 320Maintaining Agent Blending . . . . . . . . . . . . . . . . . . . . . . . . . . . . . 321
Move a domain to a different group . . . . . . . . . . . . . . . . . . . . . . . 321Stop the blend engine . . . . . . . . . . . . . . . . . . . . . . . . . . . . . . . 321Start the blend engine . . . . . . . . . . . . . . . . . . . . . . . . . . . . . . . 322Reset the blend engine . . . . . . . . . . . . . . . . . . . . . . . . . . . . . . 322Resynch the blend engine . . . . . . . . . . . . . . . . . . . . . . . . . . . . 322View ACD statistics . . . . . . . . . . . . . . . . . . . . . . . . . . . . . . . . 323View alerts . . . . . . . . . . . . . . . . . . . . . . . . . . . . . . . . . . . . . 323View transactions . . . . . . . . . . . . . . . . . . . . . . . . . . . . . . . . . 323
Chapter 23: Pattern matching rules . . . . . . . . . . . . . . . . . . . . . . . . . . . 324Understanding default pattern syntax . . . . . . . . . . . . . . . . . . . . . . . . 325Using supported syntaxes . . . . . . . . . . . . . . . . . . . . . . . . . . . . . . 327
January 2008 14
Preface
This section contains the following topics:
● Purpose on page 14
● Audience on page 14
● What’s New In This release on page 14
● Related documents on page 16
PurposeThe purpose of this guide is to provide detailed information about Avaya Proactive Contact 4.0 Supervisor.
AudienceThis guide is for personnel who configure jobs, select records, and define phone strategies. The Avaya Proactive Contact Supervisor also provides monitoring and reporting of real time and historical operations.
What’s New In This releaseAvaya Proactive Contact 4.0 is a new major release, featuring substantial advances in core functionality, new deployment options, and updates to the underlying platform technology.
Avaya Proactive Contact 4.0 provides you with three system deployment options tailored to meet your specific call center requirements:
● Avaya Proactive Contact with Application Enablement Services
● Avaya Proactive Contact with Avaya PG230 Proactive Contact Gateway (available with an Avaya-provided server)
● Avaya Proactive Contact system (with the traditional system cabinet)
This release supports simple migrations between the different deployments allowing you to start small and easily upgrade to a larger system.
All configurations use the same robust Avaya Proactive Contact core predictive dialing application and the same client suite called Avaya Proactive Contact Supervisor. The application suite includes Monitor, Editor, Analyst, and a Health Manager application designed
Preface
15 Using Avaya Proactive Contact 4.0 Supervisor
to help you monitor and administer system functions. Changes were also made to provide a more robust, simplified version of the existing feature set, as well as simplified configuration and installation of the system. Powerful tools such as Hierarchy Manager and Completion Code Manager continue to be supported.
Avaya Proactive Contact 4.0 already includes an updated predictive dialing algorithm with a revolutionary operating mode called Cruise Control, which allows you to achieve even higher operational efficiencies than were previously possible with Avaya PDS version 12.0.
Related documents
January 2008 16
Related documents● Planning and Prerequisites for Avaya Proactive Contact
● Installing and Configuring Avaya Proactive Contact
● Administering Avaya Proactive Contact (Linux-based Interface)
● Using Avaya Proactive Contact Analyst
● Avaya Proactive Contact Safety and Regulatory Information
● Avaya Proactive Contact Documentation Library (CD-ROM)
● Avaya WebLM Release 4.5 for Core Services 3.2 Administration Guide

Preface
17 Using Avaya Proactive Contact 4.0 Supervisor
January 2008 18
Chapter 1: Introduction
Avaya Proactive Contact consists of software, hardware, and networked components. The system is comprised of the system cabinet, supervisor workstation, agent workstations, printer, and modem.
Avaya Proactive Contact is available with increased capacities for the Avaya Proactive Contact large cabinet and PG230 systems (Application Enablement Services implementations will remain at the previous capacity levels). Capacities for both concurrent agents and outbound trunks have been significantly increased to almost double the current capacities of 240 agents and 480 trunks. Actual agent and trunk maximum capacities differ based upon trunk configuration parameters.
As a system supervisor, you use the supervisor workstation and the Supervisor applications to set up, monitor, modify, and report on your calling activities. Agents use the agent workstations to handle inbound and outbound phone calls.
This section contains the following topics:
● Avaya Proactive Contact environment on page 19
● Avaya Proactive Contact users on page 68
● Log in to Supervisor on page 71
Introduction
19 Using Avaya Proactive Contact 4.0 Supervisor
Avaya Proactive Contact environmentThe dialer works with your call center’s equipment and operations to perform call center tasks.
Your installation can include more than one dialer.
This section contains the following topics:
● Dialer functions on page 19
● Multiple dialers on page 20
● Pods on page 20
● Calling lists on page 20
● Using Calling lists on page 23
● Using Agent Keys on page 40
● Using Schedule on page 44
● Security Overview on page 53
● Licensing on page 59
Dialer functionsThe following list describes the main functions of the dialer:
● Receives customer records from the call center’s host computer
● Selects and sorts customer records based on your call center’s business goals
● Allows agents to update customer information on an agent screen or on the host, depending on your configuration
● Passes only specific call types to agents
● Adjusts the calling pace to meet the call center’s requirements
● Monitors ACD inbound traffic and predicts when to acquire and release ACD agents for outbound calling on Avaya Proactive Contact with Agent Blending
● Supports outbound, inbound, and blend jobs
● Generates a variety of reports, including job, agent, and system reports
● Uploads record information to the host (optional)
Avaya Proactive Contact environment
January 2008 20
Multiple dialersYour Avaya Proactive Contact system can include multiple dialers. You can connect up to four dialers through a middle-tier structure.
An Avaya Proactive Contact system that is connected through a middle-tier structure is a pod.
Your Avaya Proactive Contact system can also have a distributed architecture. The system can use dialers in the following architecture:
● Multiple stand alone dialers
● One or more pods of dialers
● Multiple stand alone dialers and multiple pods of dialers
Multiple stand alone dialers allow you to manage multiple jobs simultaneously, each with its own calling list. If a dialer shuts down, the remaining dialers continue to operate.
PodsA multiple dialer office environment that uses a pod increases your company's outreach capacity. A pod allows you to manage large-scale outreach programs from one administration and Supervisor interface.
A pod provides additional benefits including the follow features:
● Calling lists
● Jobs
● Phone strategies
● Record selections
● Completion codes
● Logins
From one Supervisor application, you can run one job on multiple dialers and monitor the calling activities on each dialer.
Calling listsA calling list is a file that contains customer records. Avaya Proactive Contact uses two types of calling lists, one for outbound calling and one for inbound calling on Intelligent Call Blending systems.
Introduction
21 Using Avaya Proactive Contact 4.0 Supervisor
The host system creates the download file of customer records for the outbound calling list. The download file contains the records and fields you defined as necessary to your outbound call activities.
Avaya Proactive Contact processes the host file and prepares it for the calling activities. When the calling activities end, the system prepares the calling list to be uploaded to the host.
Process calling lists
After the host downloads the customer records, Avaya Proactive Contact completes the following tasks to create a calling list:
● Checks for and flags duplicate records and invalid telephone numbers
● Identifies and marks records that have been on the system more than a specified number of days
● Recalls the name of the last agent to speak to the customer
● Stores the result of the last call attempt as recorded by the agent
● Verifies the following statistics:
- Name of the last agent to speak with the customer
- Date and time of the last call attempt
- Result of the last call attempt as recorded by the agent on the system
- Number of days the record has been on the system
- Record status
- If configured, data listed is the data that is carried forward from the previous calling list
After calling activities and at a scheduled time, Avaya Proactive Contact completes the following tasks to upload the file to the host:
● Converts the customer records in a specific calling list to a format or the specified for your host computer
● Converts sample file from fixed length or CSV format to sample calling list binary
● Creates an upload file.The host then updates your customer database with the data in the converted calling list
Note:Note: Use Editor > Calling list application features for TFORM,DFORM to setup
download make 2 digit to 3 digit and vice versa for upload.
Avaya Proactive Contact environment
January 2008 22
Environment
The calling list environment is responsible for the following activities:
● Create the files required to convert host computer data to the Avaya Proactive Contact calling list format.
● Prepare the calling list for the calling activities.
● Prepare the calling list for extracting data to send back to the host after calls have been made.
Introduction
23 Using Avaya Proactive Contact 4.0 Supervisor
Using Calling listsThe Calling List feature helps you to modify an existing calling list, create a new calling list, Import Data, Export Data, Do not Call Groups, and Calling List Reports, as explained in detail in the subsequent sections.
This section consists of the following topics:
● Modify an existing calling list on page 23
● Create a new calling list on page 23
● Data Import on page 24
● Data Export on page 25
● Upload To Host on page 26
● Upload Dictionary on page 29
● Download From Host on page 32
● Download Dictionary on page 34
● Do not Call Groups (DNC) on page 37
● Calling List Reports on page 38
Modify an existing calling listUse the following procedure to modify an existing calling list:
1. In Editor, select File > Save As.
The Save As dialog box appears.
2. Select the Version.
3. Enter a New Name for the calling list.
4. Enter a Description for the calling list.
5. Click OK to modify an existing calling list.
Create a new calling listUse the following procedure to create a new calling list:
1. In the Editor button bar, select New.
Using Calling lists
January 2008 24
2. Click Next when the New Calling List Wizard appears. You can define the following information:
● The type of activity that the calling list will support.
● The name of the calling list.
● A brief description for the new calling list.
Note:Note: You can also run the Data Import Wizard from the New Calling List Wizard by
selecting the Launch Import Wizard check box. For more information on steps of Data Import, refer to the Data Import on page 24.
3. Follow the steps in the Calling List Wizard. The wizard adds the new calling list to the list of calling lists in the Feature Panel and displays the details of the calling list in the Feature Detail pane.
Data ImportThe Data Import Wizard takes a sample host data file, analyzes the file, and creates a download dictionary and a calling list dictionary.
The download dictionary is empty if you do not launch the Data Import option.
You can import data for calling by identifying the record format that you want to use. The data that you wish to import must satisfy the following criteria:
● The sample data file must contain 10-50 records.
● The sample data file must be fixed width or CSV format.
Note:Note: The fixed width format and CSV format allows you to import text and character
separated values respectively.
● Verify the analysis of the data import wizard and modify, if required.
Import a Data File
Use the following procedure to import a data file:
1. Right-click the specific list and select Download From Host.2. In the right-hand pane, right-click anywhere on the blank section of the screen and select
Create New Set.3. Click Next when the Data Import Wizard appears.
4. Select the Data Type.
Introduction
25 Using Avaya Proactive Contact 4.0 Supervisor
Note:Note: If you select Fixed width as the data type, you have to specify the Record
Length. The maximum supported record length is 4096.
5. Select Browse to locate your sample file.
6. Verify that the record length has been analyzed correctly.
7. Click Next.8. Click the specific character in the field length section to define the character length of each
field.
Note:Note: For Example: If you have clicked the number 10 as the character for a specific
field, a vertical line automatically appears as the field length. You can also drag the line to specify a different character length as a field length. To remove the vertical line, click the line again.
9. Click Next.10. Click on each column header to change the length of the field or fields.
11. Click Finish to import the sample file.
If you select Delimited as the Data Type for import, follow steps 1 to 5, and continue from step 13.
12. Click Next.The Records and Field Delimiters appear automatically.
13. Click Next.14. Click Finish to import the sample file.
Data ExportThe Data Export Wizard helps you to prepare for uploading calling list data to the host computer. Specifically, the wizard prompts you to select which records and fields should be exported. Based on your responses, as well as information from the associated download (data import), the wizard creates a new upload definition and completes the Upload to Host, Upload Dictionary, Upload Map, and Select records tabs.
The use of this wizard is to quickly create a data export definition that fulfills the needs of most customers. Thus, it supports straightforward implementations. If you have more complex requirements, the wizard may be used to create the basic definition and then you can refine the definition using the full user interface.
Using Calling lists
January 2008 26
Export a Data File
To export a data file, you have to define the following fields:
● Define the records you want to export
● Identify the fields of the calling list from which you want to export the data
● Define the fields that will be uploaded to the host
You can export a data file, using any of the following two ways:
Use the following procedure to export a data file:
1. Right-click the specific list and select Upload To Host.2. Click Yes to export the data.
The Data Export Wizard appears.
Note:Note: If you click No the Upload Dictionary tab will appear as empty. You can open the
Data Export Wizard by using the steps 1 and 2 mentioned after step 7.
3. Click Next.4. Select the appropriate Records, Date, Results, Field, and Field Value.
5. Click Next.6. Select the fields that you want to export by selecting the specific check boxes.
7. Click Finish.
If you have selected the No option, at step 2 and you want to export the data at a later stage you can do so by following these steps:
1. Click Upload Dictionary tab.
2. Right-click and select Create New Set.The Data Export Wizard appears.
Follow steps from 3 to 7 to finish exporting the data.
Upload To HostThe Upload to Host feature displays the configuration data associated with upload data from the dialer to the host. This information includes the transfer method, the transfer schedule, the format of the host data, and directions for handling certain types of file data.
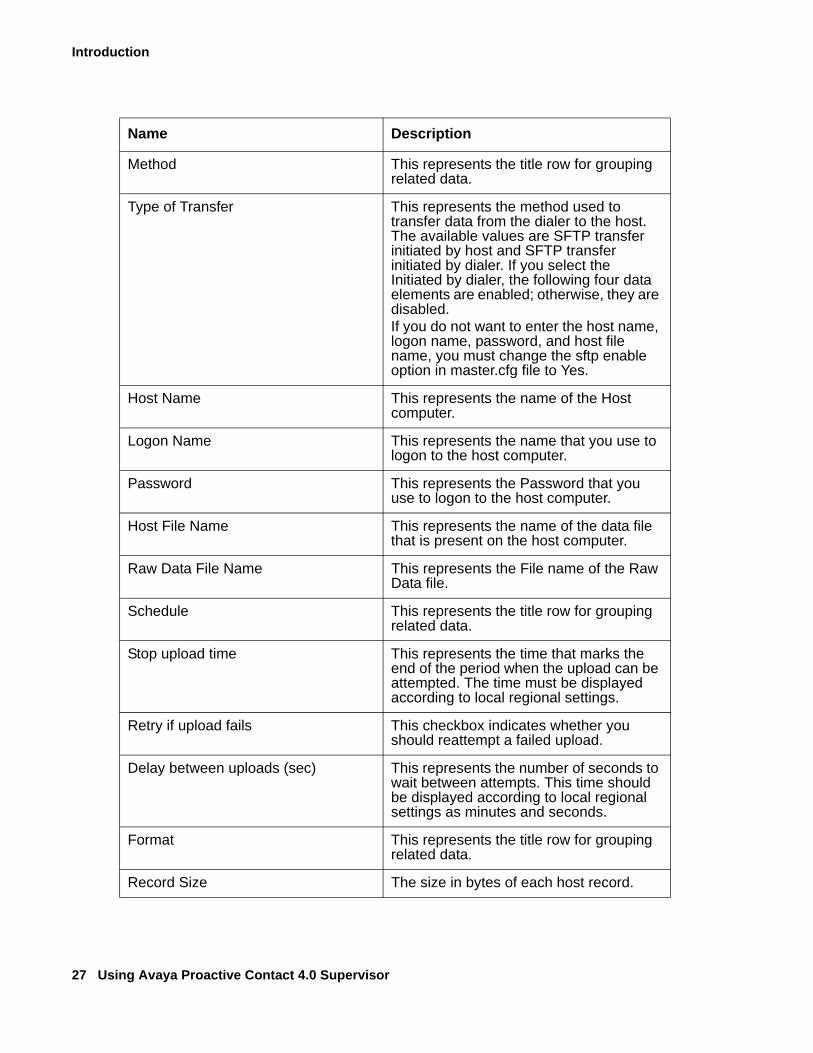
The following table displays the name and description of the rows available in the upload to host tab:
Introduction
27 Using Avaya Proactive Contact 4.0 Supervisor
Name Description
Method This represents the title row for grouping related data.
Type of Transfer This represents the method used to transfer data from the dialer to the host. The available values are SFTP transfer initiated by host and SFTP transfer initiated by dialer. If you select the Initiated by dialer, the following four data elements are enabled; otherwise, they are disabled. If you do not want to enter the host name, logon name, password, and host file name, you must change the sftp enable option in master.cfg file to Yes.
Host Name This represents the name of the Host computer.
Logon Name This represents the name that you use to logon to the host computer.
Password This represents the Password that you use to logon to the host computer.
Host File Name This represents the name of the data file that is present on the host computer.
Raw Data File Name This represents the File name of the Raw Data file.
Schedule This represents the title row for grouping related data.
Stop upload time This represents the time that marks the end of the period when the upload can be attempted. The time must be displayed according to local regional settings.
Retry if upload fails This checkbox indicates whether you should reattempt a failed upload.
Delay between uploads (sec) This represents the number of seconds to wait between attempts. This time should be displayed according to local regional settings as minutes and seconds.
Format This represents the title row for grouping related data.
Record Size The size in bytes of each host record.

Using Calling lists
January 2008 28
Block Size This represents the size in bytes of each block.
Blocks Read This represents the number of blocks read at a time.
Text case The options available for selection of text case are Uppercase, Lowercase, and Title case.
Record Format The options available for record format are Fixed Length and Character Separated Values (CSV). If CSV is chosen, the next two rows are enabled; otherwise, the rows are disabled.
Record delimiter This represents the character that marks the boundary between one record and the next.
Field delimiter This represents the character that marks the boundary between one field and the next.
Preparation This represents the title row for grouping related data.
Add Carriage Returns This checkbox indicates that carriage returns should be added to the end of each record when the new host data is created for upload.
Add Line Feeds This checkbox indicates that line feeds should be added to the end of each record when the new host data is created for upload.
Remove duplicate records from upload
This checkbox indicates whether duplicate records should be removed and not included in the upload.
Unique field This represents a list of calling list fields. You must pick a field that contains unique data, that is, the data is unique to each record.
Extraction field The process of identifying duplicate records involves storing each record's status in a calling list field. The dropdown offers a list of calling list fields.
Extraction Value All records with this value in the Extraction field will be included in the upload.
Name Description
Introduction
29 Using Avaya Proactive Contact 4.0 Supervisor
Upload DictionaryThe Upload Dictionary tab displays a list of all the fields in the upload data file.
Following is a brief description of the columns of the Upload Dictionary tab:
● Field - The name of an upload field.
Note:Note: The field name has to be in all caps, for example: ACCTNUM represents the
account number.
● Data Type - This field represents the type of data contained in the field. The dropdown lists all the available data types.
● Length - This field represents the length of the data.
Note:Note: The overall length of the record is displayed as a subtotal at the top of the grid
and the data is not-editable.
● Same Start - This is a checkbox to indicate that the field has the same starting position as the previous field.
● Start - This is a non-editable field that displays the character position in the file where the field starts. Normally this is calculated as the start position of the previous field and the length of the previous field. If you select the Same Start checkbox, this is calculated as the start position of the previous field.
● End - This is a non-editable field that displays the character position that marks the end of the field. This is calculated by adding the field's length to the field's start.
● Description - This field allows you to enter a user-defined description of the field.
Using Calling lists
January 2008 30
MapThe Map tab is available in the Calling List menu and is used to configure how the host data is transformed into the calling list data on a field-by-field basis.
Upload Map
The Upload Map tab allows you to configure how calling list data is transformed into upload data on a field-by-field basis. You can create a new transformation and also edit and delete existing transformations.
Create a new Upload Map
Follow these steps to create a new upload map transformation of calling list data:
1. Select the specific Calling List.
2. Right-click and select Upload to Host.3. In the Map tab, select New.
The Upload Map dialog box appears.
The Upload Map dialog allows you to choose the ways of transforming host data using one of the following methods:
1. Transform - The transform tab is a transformation that allows you change one value into another value based on regular expressions. All the records that match a specific regular expression are transformed to a specified value. This transformation allows a specified host value to be translated into a specific calling list value.
2. Fill - The Fill tab is a transformation that allows you to fill a host data field with a specific character.
3. Format - The Format tab is a transformation that allows you to change a host format into another format for the calling list.
4. Translate - The Translate tab is a transformation that allows you to change one value into another value based on regular expressions.
Note:Note: One or more calling list fields can be added to form a new field.
Edit an Upload Map
Follow these steps to edit an existing upload map transformation of calling list data:
1. Select the specific Calling List.
2. Right-click and select Upload to Host.
Introduction
31 Using Avaya Proactive Contact 4.0 Supervisor
3. In the Map tab, select Edit.The Download Map dialog box appears.
Following is a brief explanation of each of the transformations:
● Fill - You use the Fill tab to apply a fill function to the mapped field. The text you enter in the Fill With field will appear in the Download Data column and the transformation type is Fill.
Format - You use the Format tab to define the format of the download field. You can select and map the host field with the dialer field.
Delete an Upload Map
Follow these steps to delete an existing upload map transformation of calling list data:
1. Select the specific Calling List.
2. Right-click and select Upload to Host.3. In the Map tab, select Delete.
The specific upload map transformation is deleted.
Select Records
The Select Record tab allows you to select records based on date, call result, and field to export. You can identify which records to export based on field criteria.
You can set the selection criteria by choosing records with specific values in specific fields. For example, you may choose to upload all records that were called today and have a CODE2, CODE3, or CODE4 in the CODE field.
You can also enter multiple criteria and join them together using logical operators (And, Or)
The Select records screen allows you to select the following:
1. Date - The Date field allows you to pick a date. All records with the selected date in the Date field will be selected for export. The options available for selection are:
● Records called today - Use this field to display the records called today.
● Records called yesterday - Use this field to display the records called yesterday.
● Records called on this date - Use this field to display the calendar and select the specific date from the calendar for which you want to see all the records.
2. Call Results - Use this field to select one or more call results from the dropdown list.
3. Field - Use this field to select specific fields and enter the field values that you want to export.
Using Calling lists
January 2008 32
Download From HostThe Download From Host feature displays the configuration data associated with download data from the host to the dialer. This information includes the transfer method, the transfer schedule, the format of the host data, and directions for handling certain types of file data.
The following table displays the name and description of the rows available in the Download From Host tab:
Name Description
Method This represents the title row for grouping related data.
Type of Transfer This represents the method used to transfer data from the host to the dialer. The acceptable values are SFTP transfer initiated by host and SFTP transfer initiated by dialer. If you select the Initiated by dialer option, the following four data elements are enabled; otherwise, they are disabled.
Host Name This represents the name of the Host computer.
Logon Name This represents the name that you use to logon to the host computer.
Password This represents the Password that you use to logon to the host computer.
Host File Name This represents the name of the data file that is present on the host computer.
Raw Data File Name This represents the File name of the Raw Data file.
Schedule This represents the title row for grouping related data.
Stop download time This represents the time that marks the end of the period when the download can be attempted. The time must be displayed according to local regional settings.
Retry if download fails This checkbox indicates whether you should reattempt a failed download.
Introduction
33 Using Avaya Proactive Contact 4.0 Supervisor
Delay between downloads (sec) This represents the number of seconds to wait between attempts. This time should be displayed according to local regional settings as minutes and seconds.
Format This represents the title row for grouping related data.
Record Size The size in bytes of each host record.
Block Size This represents the size in bytes of each block.
Blocks Read This represents the number of blocks read at a time.
Skip Records This represents the number of records to skip before starting to convert the host data.
Records to read This represents the total number of records to read from the host.
Do not verify record length This checkbox indicates whether the verification process should be run during download.
Text case The options available for selection of text case are Uppercase, Lowercase, and Title case.
Record Format The options available for record format are Fixed Length and Character Separated Values (CSV). If CSV is chosen, the next two rows are enabled; otherwise, the rows are disabled.
Record delimiter This represents the character that marks the boundary between one record and the next.
Field delimiter This represents the character that marks the boundary between one field and the next.
Preparation This represents the title row for grouping related data.
Append records to calling list This checkbox indicates that the records in this download must be appended to the existing records instead of overwriting the records.
Name Description

Using Calling lists
January 2008 34
Download DictionaryThis screen displays a list of all fields in the download data file.
Following is a brief description of the columns of the Upload Dictionary tab:
● Field - The name of an download field.
Note:Note: The field name has to be in all caps, for example: SYSNUM.
● Data Type - This field represents the type of data contained in the field. The dropdown lists all the available data types.
● Length - This field represents the length of the data.
Remove Carriage Returns This checkbox indicates that carriage returns should be removed to the end of each record when the new host data is created for download.
Remove Line Feeds This checkbox indicates that line feeds must be removed to the end of each record when the new host data is created for download.
Remove duplicate records from upload
This checkbox indicates whether duplicate records should be removed and not included in the upload.
Run custom process at beginning of download
This allows you to select your own custom scripts at the beginning of a download. You can have more than one custom script. For example: If you want to copy your raw data file name and you have created a custom backup script, you can enter the script name in this field.
Run custom process after download This allows you to select your own custom scripts after download. You can have more than one custom script.
Switch Year This represents the year. The year that marks when 20 should prefix or added at the beginning to represent a 2-digit year data. Before this year, 19 is prefixed. The default is 70.
Name Description
Introduction
35 Using Avaya Proactive Contact 4.0 Supervisor
Note:Note: The overall length of the record is displayed as a subtotal at the top of the grid
and the data is not-editable.
● Same Start - Is a checkbox to indicate that the field has the same starting position as the previous field.
● Start - This field displays the character position in the file where the field starts. Normally this is calculated as the start position of the previous field and the length of the previous field. If you select the Same Start checkbox, this is calculated as the start position of the previous field.
● End - This is a non-editable field that displays the character position that marks the end of the field. This is calculated by adding the field's length to the field's start.
● Description - This field allows you to enter a user-defined description of the field.
● Host Only Field - This is the associated Host Field name in the calling list.
MapThe Map tab is used to configure how host data is transformed into calling list data on a field-by-field basis.
Download Map
The Download Map tab allows you to configure how calling list data is transformed into download data on a field-by-field basis. You can create a new transformation and also edit and delete existing transformations.
Create a new Download Map
Follow these steps to create a new download map transformation of calling list data:
1. Select the specific Calling List.
2. Right-click and select Download to Host.3. In the Map tab, select New.
The Download Map dialog box appears.
The Download Map dialog allows you to choose the ways of transforming host data using one of the following:
1. Merge - The Merge option allows you to Merge one or more host fields to form a new field. You can also specify the order of the fields. You can also use the Move Up and Move Down buttons to move the highlighted items in the Merged list up one row or down one row, respectively.
Using Calling lists
January 2008 36
2. Transform - The Transform option allows you to choose from three different types of available transformations. The available transformations are Fill, Format, and Translate.
Following is a brief explanation of each of the transformations:
● Fill - You use the Fill tab to apply a fill function to the mapped field.
● Format - You use the Format tab to define the format of the download field and the mapped field.
● Translate - You use the Translate tab to convert specific strings in the download field to specific strings in the mapped field.
3. RSM - The RSM option represents Record Specific Messaging. This option allows you to specify a new name for the RSM field and associate a source field to the specific default message. You can also define a message by entering the host data and associating the host data to the specific message. You can also add and remove rows in the Define Message section.
Edit a Download Map
Follow these steps to edit an existing download map transformation of calling list data:
1. Select the specific Calling List.
2. Right-click and select Download to Host.3. In the Map tab, select Edit.
The Download Map dialog box appears.
Following is a brief explanation of each of the transformations:
● Fill - You use the Fill tab to apply a fill function to the mapped field. The text you enter in the Fill With field will appear in the Download Data column and the transformation type is Fill.
● Format - You use the Format tab to define the format of the download field. You can select and map the appropriate host field with the appropriate dialer field.
● Translate - You use the Translate tab to convert specific strings in the download field to specific strings in the mapped field. Select the Append and Remove buttons to add or remove a row respectively.
For Translate functions, this field displays the data that will be placed in the host data field if the current data matches the criteria in Download Data.
For Format functions, this field displays the format of the data as it will appear in the calling list field. You must be able to enter free form data in this field, but also provide a dropdown list of common formats.
For Merge and Fill functions, this field is empty.
Introduction
37 Using Avaya Proactive Contact 4.0 Supervisor
Delete a Download Map
Follow these steps to delete an existing download map transformation of calling list data:
1. Select the specific Calling List.
2. Right-click and select Download to Host.3. In the Map tab, select Delete.
The specific download map transformation is deleted.
ProcessingThe processing tab displays a list of processes that run on the downloaded data as part of the process of converting the data into a calling list.
The processes are listed in the order in which they are run.
The process, Set timezones by default, is the first process to be run and cannot be moved or deleted.
You can change the order of the process by right-clicking on a process, then selecting either Move Up or Move Down from the popup menu.
Convert SampleThe Convert Sample option allows you to view the contents of the binary file that will be created out of the sample file that you provide.
This is similar to the Fdict dump. To use convert sample, you will require the sample file and the definition of the sample file.
Do not Call Groups (DNC)Do Not Call Group allows you to mark a specific record as unavailable for calling. Once a request is made to be added to the Do Not Call list, the agent must ensure that the current job as well as the other jobs include these recipients in the call records as part of the do not call list.
You can configure a new or existing application to support Do Not Call by adding the list to a new or an existing Do Not Call group.
The Do Not Call Groups screen displays a list of all the Do Not Call groups defined on the dialer. When you click the Do Not Call Groups item from the Calling List button bar, the application displays a list of Do Not Call Groups in the Feature Pane.
Using Calling lists
January 2008 38
You can view the details by selecting a group in the Feature Pane. The detail appears to the right in the Feature Detail Pane.
! Important:Important: To activate the DNC feature, you must select the Index calling list for quick
sorting and searching and Index calling list for Do not Call processing from the Processing tab available on the right-hand pane in Calling List. You must also map the Index calling list for quick sorting and searching items with any of the key fields available below the Index calling list for quick sorting and searching field. When you select the key field the same key field is automatically mapped with the Index calling list for Do not Call processing.
You can create one or more DNC groups and use this UI to add calling lists to them. No additional configuration is required through the calling list editor.
Create a new do not call Group
The Do Not Call Groups wizard is designed to help you create a new DNC group. You can create one or more DNC groups and associate the DNC group or groups to calling lists.
Use the following procedure to create a new do not call group:
1. In the Editor button bar, select File > New.
The New Do Not Call Group Wizard appears.
2. Enter a Name for the new do not call group.
3. Select a Version.
4. Select a Initial Calling List.5. Click Add. The wizard adds the new group to the list of groups in the Feature Panel and
displays the details of the group in the Feature Detail pane.
Calling List ReportsWhen you select a report, you can then view the full report in the Feature Detail pane at the right side of the window.
Status Reports
This report displays a list of all calling lists. It is very similar to the list that normally appears in the Feature pane, but also includes the Type, Status, and Change Date (Date and Time).
Introduction
39 Using Avaya Proactive Contact 4.0 Supervisor
Note:Note: The Change Date field represents the date and time that the calling list entered
this status. For a Pending list, this represents the date and time that the calling list definition was written to the dialer in the directory that holds the files that will be activated on the next restart. For a deleted list, this is the date and time the list was deleted. A Deleted calling list is stored for a period of 30 days in a backup directory. You can only retrieve the list during this period.
You can sort and resize the size settings for each column. The sessions of the size settings that you resize will be stored.
Using Agent Keys
January 2008 40
Using Agent KeysAgent Keys perform actions that are available on your system, such as releasing a call, transferring a call, displaying an agent screen, and logging an agent out of a job.
The Agent Keys display a list of agent keys files, including the name of the file, the type, the file version, and a brief description.
Use Agent Keys Wizard to add or edit keys to meet your contact center’s changing needs. Agent keys are F1 through F12, depending on the type of keyboard. In addition to the function keys, you can assign key combinations to increase the number of available keys. For example, the agent can press and hold the Ctrl key or Shift key or the Alt key while pressing the function key.
The Agent Keys feature helps you to modify an existing calling list, create a new Agent Key Set, and select Job features, as explained in detail in the subsequent sections.
This section consists of the following topics:
● Create a new Agent Key Set on page 40
● Supported Features on page 41
Create a new Agent Key SetThe Agent Keys screen displays the names of all agent key sets defined on the selected dialer.
You can view the individual key assignments defined in the agent keys set by selecting a key set in the Feature Pane. The key assignments appear to the right in the Feature Detail pane.
Use the following procedure to create a new agent key set:
1. In the Editor button bar, select New.
The New Agent Keys Wizard appears.
2. Click Next.3. Enter a Name for the Agent Key set.
4. Enter a brief Description for the Agent Key set.
5. Click Next.6. Select the Type of Job that will use this Agent Key set.
Note:Note: If you select the Any Type of Job option, continue from step 7 to 10.
7. Click Next.
Introduction
41 Using Avaya Proactive Contact 4.0 Supervisor
8. Select the check boxes on the Supported Features Page that should be supported in the new agent key set that you are defining. For more information, refer to Supported Features on page 41.
9. Click Next.10. Click Finish.
The Agent Keys screen displays the names of all agent keys sets defined on the selected dialer. When the user clicks the Agent Keys icon in the Button Bar, the application requests a list of the agent key files or sets from the selected dialer and displays them in the Feature Pane.
Note:Note: The Avaya Proactive Contact Agent does not honor all key assignments entered
in a key file. If you are using the Avaya Proactive Contact Agent, the only key assignments that will be accepted are those related to release codes and automated messages.
A user can display the individual key assignments defined in the agent key set by selecting a key set in the Feature Pane. The key assignments appear to the right in the Feature Detail pane.
Supported FeaturesThe Supported Features Page in the Agent Keys Set Wizard allows the user to select the job features that you want to support in this agent key set. The job features that allows the agent to perform specific functions are listed as follows:
● Managed Dialing - This job feature allows agents to preview account information and cancel calls before they are made. It also allows them to specify the keys needed to support the user to control the pace and outcome of managed dialing. Specifically, when an agent is previewing a record, the agent may choose to cancel the call and move to the next record or the agent may choose to go ahead and dial the record immediately.
● Sales Verification - This job feature automatically creates a second calling campaign to confirm sales or commitments obtained in a prior campaign. This also allows you to choose the keys needed to support a sales job in a sales verification scenario. When Sales Verification is used, agents use a specific code to release records that resulted in a successful sale. These records are automatically fed to a second verification job. In this job, each record is called and a supervisor verifies that the person at the other end of the line agrees to a sale.
● Native Voice and Data Transfer - This job feature allows you to define the keystrokes for transferring a call to another agent or to a supervisor. One keystroke will immediately transfer the call and allow the agent to receive a new call. The other keystroke allows the agent to stay on the line with the customers until the other agent answers.
● Do Not Call - This job feature allows you to choose the keys needed to support the Do Not Call feature. When an agent uses the defined key combination, the record is released and
Using Agent Keys
January 2008 42
marked as Do Not Call. This will prevent the dialer from calling the customer at this number for any reason in the future.
VersionsThe Version feature allows you to set privileges.
For example: an user with sysadm privileges has the ability to create and edit configuration data in each of the defined versions, such as Active, Pending, and In Progress. Access to configuration data in the various stages is accomplished in one of two ways, depending on the type of configuration data.
Note:Note: Deleted is also a version
For data that is always saved to the same file - completion codes, schedules, telephony scripts, and voice messages - a message appears when you try to edit the data. This message gives you the option of choosing the version that exists in any of the stages.
Using Version DataIf you have sysadm privileges you may want to use data that is Pending or In Progress during the configuration of another type of file. For example, you may want to create a calling list application with upload configuration that depends on a completion code that is Pending. Change this, if you want to create a new telephony script with a voice message that is Pending.
If there are configuration changes in Pending or In Progress, the Configuration Version dialog box appears, the first time you attempt to edit a file. In the above example, the Save As dialog appears as soon as you select New on the Calling List menu.
When you select a version, the configuration data associated with that version is used throughout the editing session. If, for example, you choose to use completion code definitions that are in Pending, the Pending completion codes are loaded into the application and are used in all cases where the user interface offers you a choice of codes.
Once you have chosen a configuration version, the same will remain active until the application is closed or until you choose to change the configuration version by selecting Options - Configuration Version from the main menu.
Saving Version DataThe configuration data can be saved to the dialer and immediately become active; it may be saved to a Pending directory and will not become active until dialer services are restarted; or it may be saved indefinitely to an In Progress directory.
Introduction
43 Using Avaya Proactive Contact 4.0 Supervisor
This feature, the ability to save data based on its state of readiness or completeness, is implemented through the UI by prompting the user for the state when the data is saved.
Using Deleted Configuration FilesTo work with deleted files, you can recover the files that are placed in special directories and may be available for retrieval by users with sysadm privileges. These files are listed in the Versions dialog and in the feature pane. To work with these files, you must open the file in Deleted, then save the file into another version, either Pending or In Progress.
Using Schedule
January 2008 44
Using ScheduleThe Schedule feature provides the flexibility to automatically schedule activities, create a new dialer activity, and view schedule reports.
Avaya Proactive Contact provides the ability to define and manage schedules.
When you select Activities from the Schedule feature, calendar is displayed that lists all the scheduled activities. When you select the Schedules icon in the Button Bar, the application requests a list of all scheduled activities from the dialer and displays them in the Feature Pane.
You can display further detail for a particular activity by selecting the activity in the Feature Pane. The detailed information appears to the right in the Feature Detail pane.
Individual activities are not saved as changes are made to activities, but the entire schedule is saved at once.
During a single editing session, you can create new activities and change or delete existing activities. You can then save all changes and end the session. The resulting changes will not be immediately available on the dialer, but are stored in a staging area. The data is moved from the staging area into the active cron the next time the dialer is restarted.
This section consists of the following topics:
● Types of Dialer Activities on page 44
● Using Recurrence Pattern on page 51
● Schedule Reports on page 51
Types of Dialer ActivitiesYou use the New Schedule Activity Wizard to schedule the dialer activities such as Backup, Backup MidTier, Backup Calling List for Late List, Campaign Update, Custom Script, File Transfer, MTS Maintenance, Proactive Contact Maintenance, run a Job, Run a Selection, and Restart Proactive Contact. The activity details of the new activity are stored as part of the crontab command entry.
Following is a brief explanation of each type of activity supported by the dialer:
● Backup - The Backup activity type allows you to schedule a backup for the new activity. You can also perform the following functions:
- You can take a Full Backup or an Incremental Backup. Full and Incremental Backup includes the complete system including OS, PC Configuration files and calling lists, PC only, and PC System configuration files.
- You can backup the data to a file or to a device. The device available for storing backup data is DDS.
Introduction
45 Using Avaya Proactive Contact 4.0 Supervisor
- You can schedule the date and time for the new activity and set a recurrence pattern for None, Daily, Weekly, Monthly, and Yearly. For more information on recurrence pattern, refer to Using Recurrence Pattern on page 51.
Schedule a Backup Activity Type
Use the following procedure to create a new Backup Activity Type:
1. In the Schedule button bar, select New.
The New Dialer Activity Wizard appears.
2. Click Next.3. Select Backup as the activity type.
4. Enter a brief Description for the backup.
5. Select the Type of backup.
6. Select the File or Device for backup.
Note:Note: If you select File, you must specify the name of the file which will store the details
of the new activity. The file will be saved in \tmp directory.
Note:Note: If you select Device, the available device for selection is DDS that represents
backup on a DVD.
7. Click Next.8. Select the Start Date and Time on the Recurrence page of the wizard to schedule the new
activity.
9. Select the Recurrence pattern.
10. Click Next.11. Click Finish.
The new Backup activity that you scheduled appears in the Scheduled list of activities.
Schedule a Backup MidTier Activity Type
The Backup MidTier activity type allows you to backup or restore the MidTier database using the Backup_db script.
You can also schedule the date and time for the new activity and set a recurrence pattern for None, Daily, Weekly, Monthly, and Yearly.
Use the following procedure to create a new Backup MidTier Activity Type:
1. In the Schedule button bar, select New.
The New Dialer Activity Wizard appears.
Using Schedule
January 2008 46
2. Click Next.3. Select Backup MidTier as the activity type.
4. Enter a brief Description for the backup.
5. Select the Recurrence pattern.
6. Click Next.7. Click Finish.
The new Backup MidTier activity that you scheduled appears in the Scheduled list of activities.
Schedule a Backup calling list for latelist
Latelist allows data from previous day’s calling list to be set to move to the current calling list as records are downloaded from the host on previous days.The Backup calling list for latelist activity type allows you to backup your latelist. To save on idle time during the time of dialer maintenance, it is advisable that you schedule a backup calling list for latelist.
The backup is taken using the database manager script. You can schedule the date and time for the new activity and set a recurrence pattern for None, Daily, Weekly, Monthly, and Yearly.
Use the following procedure to create a new Backup MidTier Activity Type:
1. In the Schedule button bar, select New.
The New Dialer Activity Wizard appears.
2. Click Next.3. Select Backup calling list for latelist as the activity type.
4. Enter a brief Description for the backup.
5. Select the Recurrence pattern.
6. Click Next.7. Click Finish.
The new Backup MidTier activity that you scheduled appears in the Scheduled list of activities.
Schedule a Campaign Update
The Campaign Update activity type allows you to schedule a campaign update feature for a calling list. To use this feature you must enable the Campaign Update by selecting the Campaign Update option available in the Features tab, under Calling List. In the Update Mode option, you must select the batch campaign update as the update mode.
● Batch campaign update allows you to periodically send updates to a calling list throughout the day to note the records that should no longer be called. The batch campaign update uses the rec_update binary to update the calling list records as non-callable.
Introduction
47 Using Avaya Proactive Contact 4.0 Supervisor
Note:Note: You should never run the Batch campaign update process for more than fifteen
minutes. For large lists, the time interval needs to be even longer.
Note:Note: This feature is only supported for calling lists in active or pending versions.
● Real-time campaign update will allow the results of a call to be transferred to the same record. Real-time campaign update will mark the outbound record as not-callable on the basis of unique ID, completion code, and job parameters. For example: There are times when inbound calls are received from customers whose accounts have crossed the due date. In such a scenario, the real-time update will allow this call result to be transferred to the same record on an outbound list so that the customer does not receive additional calls.
! Important:Important: The unique ID field from your outbound calling list must be included in the
inbound calling list.
Use the following procedure to schedule a new Campaign Update:
1. In the Schedule button bar, select New.
The New Dialer Activity Wizard appears.
2. Click Next.3. Select Campaign Update as the activity type.
4. Enter a brief Description for the campaign update.
5. Select the Calling List.6. Select the Recurrence pattern.
7. Click Next.8. Click Finish.
The new Campaign Update activity that you scheduled appears in the Scheduled list of activities.
Schedule a Custom Script
The Custom Script activity type allows you to create a script and define arguments for the script. You can define your own specific scripts that you would like to be scheduled. You must place the scripts in the customs directory.
Use the following procedure to schedule a new Custom Script:
1. In the Schedule button bar, select New.
The New Dialer Activity Wizard appears.
2. Click Next.3. Select Custom Script as the activity type.
Using Schedule
January 2008 48
4. Enter a brief Description for the custom script.
5. Select the Script Name.
6. Select the Argument checkbox if you have defined arguments.
7. Click Next.8. Select the Recurrence pattern.
9. Click Next.10. Click Finish.
The new Custom Script activity that you scheduled appears in the Scheduled list of activities.
Schedule a File Transfer
The File Transfer activity type allows you to download calling list data from a host system to a dialer and upload the results of calling from a dialer to the host system. You can schedule the date and time for the new activity and set a recurrence pattern for None, Daily, Weekly, Monthly, and Yearly backup.
Use the following procedure to schedule a File Transfer:
1. In the Schedule button bar, select New.
The New Dialer Activity Wizard appears.
2. Click Next.3. Select File Transfer as the activity type.
4. Enter a brief Description for the backup.
5. Select the Download option if you want to download the calling list data to the dialer or select the Upload option if you want to upload the results of calling from the dialer to the host system.
6. Select the Calling List.7. Click Next.8. Select the Recurrence pattern.
9. Click Next.10. Click Finish.
Schedule MTS Maintenance
The MTS maintenance activity type allows you to schedule the date, time, and the recurrence pattern for MidTier Maintenance. The MTS Maintenance script performs the following functions:
● Starts MTS
Introduction
49 Using Avaya Proactive Contact 4.0 Supervisor
● Clears all the data
● Stop MTS
Use the following procedure to schedule a MTS Maintenance:
1. In the Schedule button bar, select New.
The New Dialer Activity Wizard appears.
2. Click Next.3. Select MTS Maintenance as the activity type.
4. Enter a brief Description for MTS Maintenance.
5. Click Next.6. Select the Recurrence pattern.
7. Click Next.8. Click Finish.
Schedule Proactive Contact Maintenance
The Proactive Contact maintenance activity type allows you to schedule the date, time, and the recurrence pattern for Proactive Contact Maintenance.
Use the following procedure to schedule a Proactive Contact Maintenance:
1. In the Schedule button bar, select New.
The New Dialer Activity Wizard appears.
2. Click Next.3. Select Proactive Contact Maintenance as the activity type.
4. Enter a brief Description for Proactive Contact Maintenance.
5. Click Next.6. Select the Recurrence pattern.
7. Click Next.8. Click Finish.
Schedule Run a Selection
The Run a Selection activity type allows you to schedule running a selection by selecting a strategy from the available strategies such as autovunit, autov, all, verify, and virtual. You must also select the calling list that you want to run for scheduling the selection.
You can also schedule the date and time for the new activity and set a recurrence pattern for None, Daily, Weekly, Monthly, and Yearly.
Using Schedule
January 2008 50
Use the following procedure to schedule a Run a selection:
1. In the Schedule button bar, select New.
The New Dialer Activity Wizard appears.
2. Click Next.3. Select Run a Selection as the activity type.
4. Enter a brief Description for Running a Selection.
5. Select the type of Strategy.
6. Select a Calling List.7. Click Next.8. Select the Recurrence pattern.
9. Click Next.10. Click Finish.
Schedule Run a Job
The Run a Job activity type allows you to select the job type that you require to be scheduled. The available job types for selection are blend, inbound, managed, outbound, verify, and virtual. You can schedule the date and time for the new activity and set a recurrence pattern for None, Daily, Weekly, Monthly, and Yearly.
Use the following procedure to schedule a Run a Job:
1. In the Schedule button bar, select New.
The New Dialer Activity Wizard appears.
2. Click Next.3. Select Run a Job as the activity type.
4. Enter a brief Description for Running a Job.
5. Select the type of Job.
6. Click Next.7. Select the Recurrence pattern.
8. Click Next.9. Click Finish.
Schedule Restart Proactive Contact
The Restart Proactive Contact activity type allows you to schedule when you would like to restart Proactive Contact.
Introduction
51 Using Avaya Proactive Contact 4.0 Supervisor
You can schedule the date and time to schedule a restart of Proactive Contact and set a recurrence pattern for None, Daily, Weekly, Monthly, and Yearly.
Use the following procedure to schedule a Restart of Proactive Contact:
1. In the Schedule button bar, select New.
The New Dialer Activity Wizard appears.
2. Click Next.3. Select Restart Proactive Contact as the activity type.
4. Enter a brief Description for Running a Job.
5. Click Next.6. Select the Recurrence pattern.
7. Click Next.8. Click Finish.
Using Recurrence Pattern
Recurrence pattern represents a set of controls that help you to schedule an activity to occur repeatedly at set intervals. You can choose between None, Daily, Weekly, Monthly, and Yearly.
Depending on the type of pattern you choose, one or more additional controls appear.
- If you select the default selection, None, no additional controls appear and the Start Time (date) control is enabled.
- If you select Daily recurrence, additional controls let you choose between repeating the activity every n number of days, repeating the activity on every weekday, and repeating the activity every weekend day.
- If you select the Weekly pattern, you can choose to repeat the activity every week on specific days.
- If you select the Monthly pattern, you can choose to repeat the activity on the nth day of every month.
- If you select the Yearly pattern, you can choose to repeat the activity on a specific month and day.
Schedule ReportsThe Schedule Reports screen displays a list of all the available reports related to Schedules. When you select the Report item in the ButtonBar's Schedules button group, the application displays a list of available reports in the Feature Pane.

Using Schedule
January 2008 52
You can view the full report by selecting a report in the Feature Pane. The report appears to the right in the Feature Detail Pane.
Introduction
53 Using Avaya Proactive Contact 4.0 Supervisor
Security OverviewAll the exposed communications to and from the Avaya Proactive Contact 4.0 systems are secured at the highest security level.
The enhanced security covers three areas:
● All the exposed socket-based communications are changed to SSL
● All the CORBA IIOP-based communications are changed to SSLIOP-based CORBA connections where SSLIOP represents the SSL
● All the Telnet and ftp sessions from supervisor workstations to PC servers are changed to SSH and SFTP.
This section consists of the following topics:
● Communication Encryption on page 53
● Identity Authentication on page 54
● Certificate Generation Signing and Maintenance on page 54
● List of Secured Services on page 54
● Secured Telnet and ftp on page 55
● Encryption Algorithm on page 55
● Database Security on page 55
● Client Password Aging on page 56
● Role-Based Authorization For Administrators on page 56
● Password Rotation on page 57
● Secured Agent on page 57
● Certificates on page 54
Communication EncryptionAvaya Proactive Contact 4.0 adopts a secure protocol called SSL for all its communications. SSL fulfills requirements that make it acceptable for use in the transmission of even the most sensitive of transactions, such as credit card information, medical records, legal documents, and e-commerce applications.
SSL encrypts data before it is sent. the receiver decrypts it after it is delivered. The encryption mechanisms are only known to the sender and the receiver.
Security Overview
January 2008 54
Identity AuthenticationIn addition to operating system, password-based authentication, Avaya Proactive Contact 4.0 also validates incoming client certificates. Servers (Agent/ Enserver /List Server) receives client’s certificates during the SSL handshake. Based on the server configuration, it validates the client if the certificate is valid and signed by trusted Certificate Authority (CA).
Certificate Generation Signing and MaintenanceCurrently, OpenSSL CA and EJBCA are the types of CAs evaluated. EJBCA is the Avaya Proactive Contact 4.0 certificate management tool. EJBCA is a fully functional CA built in Java and based on J2EE standards.
OpenSSL CA is an open source CA distributed from http://openssl.org. It is a minimal CA application. It signs certificate requests in a variety of forms and generate CRLs. It also maintains a text database of issued certificates and their status.
Avaya Proactive Contact 4.0 systems have a set of default certificates for all the services and internal clients. The Avaya Proactive Contact 4.0 SDK provides default certificates for external clients. SDK.
The certificates can be generated in several ways:
● A single certificate is shared by all the services
● A single certificate is shared by all the internal clients. A certificate is generated for each service or internal client. All these options are designated in a configuration file.
Also in the configuration file, it will provide information on whether both servers and clients have certificates, or only servers have certificates.
Certificates
Following is a list of certificates that are required by the Avaya Proactive Contact Agent:
● Certificate Key File: This file stores the agent client certificate key.
● Certificate File: This file stores the agent client certificate.
CA Certificate: This certificate is stored in Microsoft Certificate Store and is used to authenticate server certificate.
List of Secured ServicesThe list of Secured CORBA Services in Avaya Proactive Contact systems including but not limited to the following services:
Introduction
55 Using Avaya Proactive Contact 4.0 Supervisor
● Event Service
● Command and Control Service
● Dialer Command and Control Service
● Logging Service
● Service Monitor
● Real Time Data Service
● System Health Service
● DataPump - HDCC
● StatsPump
● History Data Service - HDSC
The exposed tcp socket based interfaces are as follows:
● List Server
● Agent API
Secured Telnet and ftpThe telnet and ftp operations from Supervisor workstations to Avaya Proactive Contact 4.0 systems will be replaced with SSH and SFTP.
It will use the following tools for doing this activity:
WEONLYDO’s FTPDLX
WEONLYDO’s TelnetDLX
Encryption AlgorithmFor storing all sensitive information on disk, Avaya Proactive Contact 4.0 uses the AES 128 Encryption algorithm available in the library libcrypto from openssl A.00.09.07.
Database SecurityThe application specific database users are:
● avayadba - application specific schema owner
● statspump - used for statspump process connection to the database and update real-time statistics for monitoring.
Security Overview
January 2008 56
● datapump - used for datapump process connection to the database and update historical statistics for reporting.
● dsc - real-time data reporter, used by Real Time Data Server (rtdatasvr process) and Data Services Component (DSC) to report real-time data to the Supervisor. This user is also responsible for hierarchy operations (create/update/read/delete).
● reporter - used by Avaya Proactive Contact 4.0 Supervisor for historical data retrieval.
Avaya Proactive Contact 4.0 enables database security. For Oracle, Oracle Advanced Security is enabled to use TCPS instead of TCP. Oracle manages certificates (client/server/trusted CA) with wallets. Avaya Proactive Contact 4.0 will supply default wallets using certificates signed by the Certificate Authority.
Avaya Proactive Contact 4.0 will also use password management for database users, using a menu which allows the user to change the passwords for all database users, with the exception of avayadba. The avayadba user password will be maintained by Avaya Support.
Client Password AgingThe Avaya Proactive Contact 4.0 server authenticates the clients with a password in addition to the certificates and private keys. The clients mentioned here can be internal clients or external clients from the third party. The passwords can be set to expire if necessary.
Since there are certain clients who are invoked from the background, Avaya Proactive Contact 4.0 will have a programmable password change mechanism so that clients can set the new password without human intervention.
Because Avaya Proactive Contact 4.0 requires certain passwords to age, certain users have been created which are used only internally.
Role-Based Authorization For Administrators● To meet security requirements, each administrator should only see the view of
administration based on his or her assigned role. In Avaya Proactive Contact 4.0, there are three types of administrator roles: Auditor This is a new role which needs to be added into the system.
Main Menu includes the role Auditor. A separate menu for Auditor will be created. The role Auditor can create new users, and audit system security like bad logins, job operations like job settings during run-time.
● Security Administrator this role will provide for the administration of users and passwords.
● Backup Administrator This is an existing role. A separate menu was created based on new backup-restore methodology
Introduction
57 Using Avaya Proactive Contact 4.0 Supervisor
Password RotationThe password rotation feature provides the following benefits:
● All the CORBA services user names are added with the dialerID. For Example: The User name of SM is smntr10 (where 10 is dialerID)s.
● Use the manage_corba_users command to add all the users in the /etc/passwd directory or to reset the user(s) password.
● To add all the CORBA users, execute the following command:
$ manage_corba_users –D 10 –A
● To reset the user password, execute the following command:
$ manage_corba_users –U smntr10
● All services use their default password to log into respective servers
● In case of password expiry, the specific Service sets a new password (a combination of 2 char seeds + current timestamp) into the system (/etc/passwd). This password is stored in encrypted form (using AES128) format in /opt/avaya/pds/config/ <username>.pass file for next time login.
● Services will decrypt respective .pass file using AES 128 algorithm when they require the password.
Tip:Tip: When you get the error "Getting an error UNKNOWN USER: PAM Authentication
failed". The resolution for this means that you need to add users in /etc/passwd. So before doing anything, check /etc/passwd file and verify that the username is added with the dialerID specified in the master.cfg file.
Tip:Tip: If you get an error message "Invalid password in the account file", the problem is
that this user password got mismatched. In this case, you can run manage_corba_users with reset option. Please ensure that the respective .pass file in /opt/avaya/pds/config directory got deleted when you run manage_corba_users.
WARNING: Do not delete the *pass files for DB users.
Secured AgentThe Agent application is secured that offers the following benefits:
● Communicates using Secure Socket Layer (SSL).

Security Overview
January 2008 58
● Data Transmission is encrypted.
● Certificates are used for client and server authentication.
● Security Settings are saved in PDSAgent.ini file.
Introduction
59 Using Avaya Proactive Contact 4.0 Supervisor
LicensingThe licensing feature provides licensing of various dialer entities using the Avaya standard RFA and Web-based License Manager (WebLM) licensing software. WebLM is a standalone Web-based license manager that runs on both Windows and Linux systems. WebLM is designed to support any Avaya software product that needs licensing capabilities.
In a standalone WebLM, a WebLM server is used to support one or more licensed application instances. In this model, an administrator can perform the following tasks through the WebLM server:
● Install a license file on the WebLM server
● Manage WebLM users
● Track feature licenses acquired by licensed applications
● Generate a usage report for the feature licenses
This feature does not replace any of the required configurable limits that are used to limit the capacity of an individual dialer due to hardware limitations or dialer performance.
Licensing is in addition to dialer capacity checks. The licensing feature is not intended to be used for role restriction. The capacities and potential roles of an application will be determined prior to a request for a license.
All the dialer components that use licensing must provide a two day grace period that allows access for 48 hours in the case of the failure of WebLM server.
This feature consists of the following topics:
● Types of Licenses on page 60
● License Server Setup on page 60
● Dialer Configuration on page 60
● Grace Period on page 61
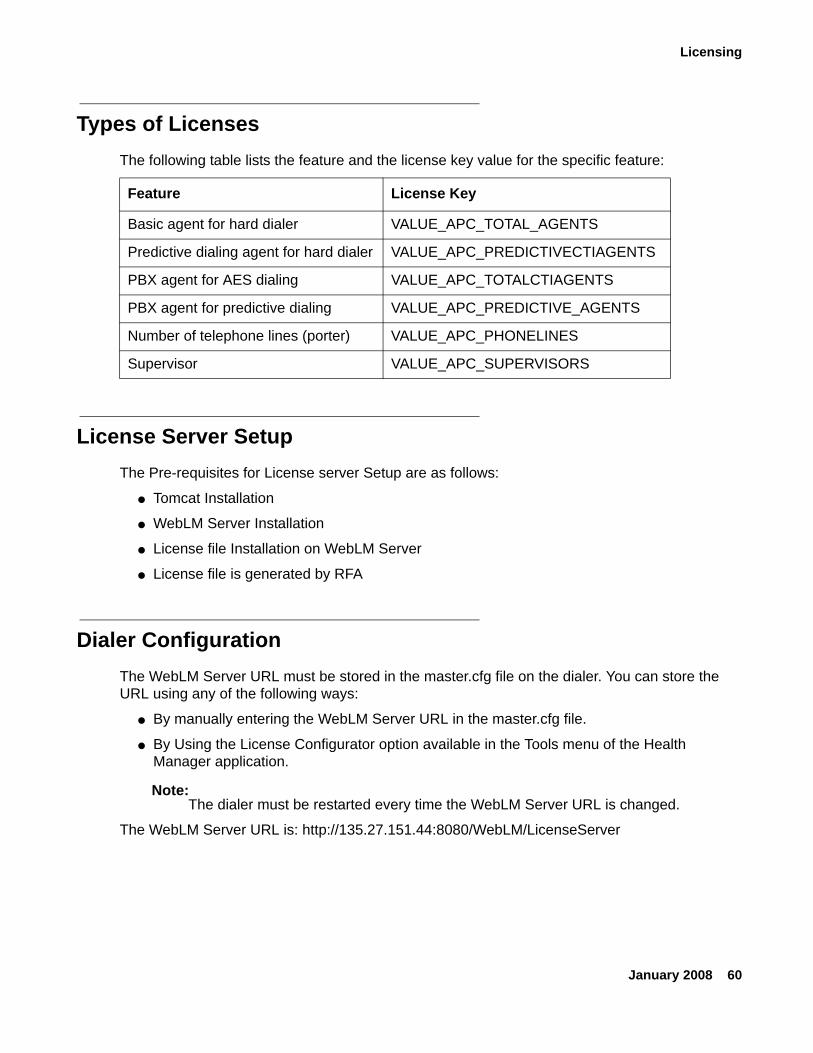
Licensing
January 2008 60
Types of LicensesThe following table lists the feature and the license key value for the specific feature:
License Server SetupThe Pre-requisites for License server Setup are as follows:
● Tomcat Installation
● WebLM Server Installation
● License file Installation on WebLM Server
● License file is generated by RFA
Dialer ConfigurationThe WebLM Server URL must be stored in the master.cfg file on the dialer. You can store the URL using any of the following ways:
● By manually entering the WebLM Server URL in the master.cfg file.
● By Using the License Configurator option available in the Tools menu of the Health Manager application.
Note:Note: The dialer must be restarted every time the WebLM Server URL is changed.
The WebLM Server URL is: http://135.27.151.44:8080/WebLM/LicenseServer
Feature License Key
Basic agent for hard dialer VALUE_APC_TOTAL_AGENTS
Predictive dialing agent for hard dialer VALUE_APC_PREDICTIVECTIAGENTS
PBX agent for AES dialing VALUE_APC_TOTALCTIAGENTS
PBX agent for predictive dialing VALUE_APC_PREDICTIVE_AGENTS
Number of telephone lines (porter) VALUE_APC_PHONELINES
Supervisor VALUE_APC_SUPERVISORS
Introduction
61 Using Avaya Proactive Contact 4.0 Supervisor
Grace PeriodWhen the dialer is unable to connect to the WebLM Server and refresh the licenses, then the system goes into a grace period.
The dialer can run into the grace period for 30 days. During the grace period, the Supervisor application will receive grace period messages every 30 minutes indicating the time left for the grace period to expire.
When the connection is re-established with the WebLM server, all licenses are acquired again.
After the expiry of the grace period, the system will restart.
Start EnforcerYou can start Enforcer either using the Start All Services option from the Action Menu of the Health Manager application or start the Enforcer manually from the CUI menu using the enforcer $NS command.
Stop EnforcerYou can stop Enforcer using the Stop All Services option from the Action Menu of the Health Manager application or you can stop the Enforcer manually from the CUI menu using the kill-15 enforcerpid.
Proactive Contact and IR Integration
January 2008 62
Proactive Contact and IR IntegrationAvaya Proactive Contact and Avaya IR Integration is a software that integrates the functionality of the Avaya IR and the Dialer. The Integration provides a subset of Avaya Proactive Contact commands for the Avaya IR system, which allows the Avaya IR to act as agents attached to the Dialer.
These commands can be used as external functions in IVR Designer applications to add outbound functionality to the Avaya IR system. This integration allows the Avaya Proactive Contact to make an outbound call and pass that voice and data to the Avaya IR. The Avaya IR then processes that call as it would any other inbound call. The flexibility of the Avaya IR allows the IVR Designer application to provide a high level of complexity to the subsequent caller interaction. When the call is complete, certain information related to the call is passed back to the Avaya Proactive Contact so the record in the calling list is updated.
Avaya Proactive Contact 4.0 (soft dialer) and Interactive response (IR) Integration includes the following benefits:
● Outbound dialing is done on Avaya Communication Manager (CM).
● There is no continuous connection on IR channel. IR channel receives events from CM for incoming call or hangup. In case of hangup, event execution of script stops.
● Use of AES 4.1 to communicate between Avaya Proactive Contact and Avaya Communication Manager (CM).
● IR channel receives incoming call event on channel, on such event it will execute the application/scrip assigned to it by sim_agt.
IR/Proactive Contact Interface ProcessesThe Dialer and the Avaya IR communicate with each other on an administrative level through a socket connection between a process on each machine. On the Avaya IR, dialer_conn acts as the server, and on the Dialer, ivr_conn acts as the client. Through this interface, initial connections are set up and administrative commands are processed.
The Dialer and the Avaya IR also communicate with each other on an individual agent level through a socket connection between another process on each machine. On the Avaya IR, sim_agt acts as the client, and on the Dialer, agent acts as the server. Through this interface, the Dialer commands required by the Virtual Agent script are processed. The sim_agt process uses the Dialer's Agent API to send and receive commands to and from the Dialer.
There is one other process on the Dialer that serves as the interface between the character-based (CUI) menus on the Dialer and the ivr_conn process. This process, called ivr_supr, acts as a client and ivr_conn acts as the server.
Introduction
63 Using Avaya Proactive Contact 4.0 Supervisor
The dialer_conn processThe dialer_conn process is a permanent process on the Avaya IR that is started when the Voice System starts. It listens to a specific port and waits for a socket connection to be established by the ivr_conn process on a Dialer.
When a connection is established, the dialer_conn process sends a list of scripts to the Dialer. Then, in response to a command from the Dialer, it starts a sim_agt process for each channel configured as an agent. The dialer_conn process, in response to a command from the Dialer, will also stop each sim_agt process.
The ivr_conn processThe ivr_conn process is a permanent process on the Dialer that is started when the Dialer system starts. It listens to a specific port waiting for a socket connection to be established by the command interface process, ivr_supr. When a connection is established, the ivr_conn process acts according to the commands given.
If the command is a CONNECT command, a socket connection to the dialer_conn process on the specified Avaya IR is established. This initiates the download of script names from the Avaya IR, the starting of a job on the Dialer and the logging in of virtual agents from the Avaya IR (sim_agt processes).
If the command is a DISCONNECT command, the agents are logged off, the job is shut down and the socket connection disconnected.
If the command is a GET_SCRIPTS command, a request for an updated list of scripts is sent to the dialer_conn process.
The ivr_supr processThe ivr_supr process is invoked from the CUI menus on the Dialer to send commands to the ivr_conn process. When invoked, the ivr_supr process establishes a socket connection to a specific port being listened to by the ivr_conn process. Once established, it sends the specified command, disconnects and then terminates. The possible commands are CONNECT, DISCONNECT and GET_SCRIPTS (see The ivr_conn process).
Proactive Contact and IR Integration
January 2008 64
The agent processThe agent process serves as the command interface between the Dialer and any Agent API application such as sim_agt. The communication of the sim_agt process is through secure sockets layer. This process is started on the Dialer when the system is started and runs as a permanent process. In its permanent state, the agent process simply listens to a specific port waiting for a socket connection to be established in this case by sim_agt.
When a connection is established, the agent process creates a copy of itself. This copy becomes the individual agent process associated with the particular copy of sim_agt that established the connection. The individual agent process handles all interaction between the Dialer and the Virtual Agent script. When the sim_agt process executes a logout command, the socket connection between the agent process and the sim_agt process is dropped and the associated individual agent process is terminated.
The sim_agt processThe sim_agt process is the Agent API application that serves as the interface between the agent process on the Dialer and the Virtual Agent script on the Avaya IR. It is started and stopped by the dialer_conn process in response to commands from the Dialer. The communication of the sim_agt process is through secure sockets layer.
Integration scenariosThere are three scenarios supported by the Avaya Proactive Contact and IR Integration solution. In all three, the dialer first makes a call to a customer on the calling list. After that, one of these three general call flows occurs:
● The call is passed to a Virtual Agent on the Avaya IR and is completely handled there.
● The call is first passed to a live agent on the dialer who then passes it to the Virtual Agent on the Avaya IR. The call is completed on the Avaya IR.
● The call is first passed to a Virtual Agent on the Avaya IR and is then transferred to a live agent on the Dialer. The call is completed on the dialer.

Introduction
65 Using Avaya Proactive Contact 4.0 Supervisor
AES Dialer IntegrationFollowing are the advantages of using AES dialer integration:
● Ideal for pursuing customer loyalty enhancement market
● Aimed at the enterprise customers with moderate dialing needs
● Re-use the existing contact center infrastructure
● Co-resident Application Enablement Service
● Avaya CM for inbound/ outbound dialing
● Scheduled calling lists with advanced list segmentation
● Blending for maximum agent productivity
Lightweight Directory Access ProtocolThis section contains the following topics:
● Setting Up LDAP on Primary Dialer on page 65
● Setting up LDAP on Secondary Dialer on page 66
Setting Up LDAP on Primary DialerFollow these steps to setup LDAP on Primary Dialer:
1. On Primary Install all the packages that consists of OS, dialer, midtier, and db.
2. Check for the following entry in the path /etc/hosts file
127.0.0.1 localhost
3. Check for the following entry in the path /etc/hosts.allow file
slapd = <ip of primary dialer>
4. LDAP should be installed on Primary dialer
Note:Note: The tools modifydbusers, createop and manage_corba_users will only run on the
primary dialer
5. On all the dialers, change the value of LDAP in master.cfg file to YES
6. On the Primary type su sroot and then run the LdapServerInstall.sh script to install the LDAP server
AES Dialer Integration
January 2008 66
7. The LdapServerInstall.sh script requires an argument as domain name or company name.
8. Enter the domain name as -D or company name as Avaya.
9. Type Yes to Setup password policy.
10. Type the number of days for Password Expiry duration.
11. Type Yes if you want to force change password after the first login
After you have answered all the questions, the installation script will install the following:
● Install openssl
● Install BarclayDB
● Install openLdap
● Add basic user configuration to LDAP database
● Migrate all the PC4.0 default users (admin,sysadm)
● Setup the system for auto start of LDAP (add startup scripts and create links, as required)
12. The Same script will add the basic configurations to ldap (no user inputs required)
13. After installation is completed, run ps -ef command to verify that slapd is running
14. Run the authconfig command on the primary dialer by selecting the following in the Authentication Configuration Screen:
● From User Information, select Use LDAP.
● From Configuration select Use MD5 Passwords, Use Shadow Passwords, and Use LDAP Authentication.
15. Click Next.16. Enter LDAP Server information as follows:
● Server - 135.27.151.87
● Base DN - dc=avaya, dc=com
17. Run manage_corba_users -D <dialer ID> -A to add all the system accounts needed for CORBA sub systems
18. Repeat the same steps for all the dialer id's in the POD.
Setting up LDAP on Secondary DialerFollow these steps to setup LDAP on Secondary Dialer:
1. Install the secondary dialer.
2. Check the LDAP parameter in master.cfg.
Introduction
67 Using Avaya Proactive Contact 4.0 Supervisor
3. Check the Primary Dialer entry in the path /etc/hosts file.
4. Install LDAP client.
5. run the auth config command on the Secondary Dialer by selecting the following in the Authentication Configuration Screen:
● From User Information, select Use LDAP.
● From Configuration select Use MD5 Passwords, Use Shadow Passwords, and Use LDAP Authentication.
6. Click Next.7. Enter LDAP Server information as follows:
● Server - 135.27.151.87
● Base DN - dc=avaya, dc=com
Avaya Proactive Contact users
January 2008 68
Avaya Proactive Contact usersYour contact center manages the personnel who use Avaya Proactive Contact and the components that each person can use.
This section discusses the following topics:
● Types of users on page 68
● Logins and permissions on page 69
Types of usersContact Center personnel who use Avaya Proactive Contact include the following users:
Administrators - Set up and maintain the Avaya Proactive Contact system including the following tasks:
● Set up user accounts.
● Start and stop dialers.
● Define and download calling lists.
● Monitor the health of the system.
● Define audio messages and scripts.
Supervisors - Set up and monitor the contact center calling activities including the following tasks:
● Create and maintain phone strategies.
● Create and maintain record selections.
● Create jobs that define the calling activities.
● Start and stop jobs.
● Monitor and maintain calling activities.
Agents - Handle inbound and outbound calling activities. Throughout the day, agents work on outbound and blend jobs. Agents can also receive inbound calls that customers place to the contact center.
Introduction
69 Using Avaya Proactive Contact 4.0 Supervisor
Logins and permissionsIn Avaya Proactive Contact, your login determines the applications you can use and the features you can use in the application. For example:
Administrator login and password - Allows you to use the administrative features and the supervisor features in the Linux-based application and in Supervisor. Administrators also use Health Manager to monitor and manage the operation of Avaya Proactive Contact.
Supervisor login and password - Allows you to use supervisor features in the Linux-based application and in Supervisor, and Avaya Proactive Contact Agent application.
Agent login and password - Allows you to use the Avaya Proactive Contact Agent application. The type of calling activities an agent can handle depends on the agent type that the agent selects when logging in.
This section contains the following topics:
● Agent types on page 69
● Agent logins on page 70
Agent types
When agents log in, each agent selects an agent type that is set up for your system. The agent type determines the types of calls the agent can handle.
Agents can log in to the Avaya Proactive Contact and select one of the following agent types:
Outbound agent - Outbound agents handle outbound calls only. Outbound agents can join the following types of outbound jobs:
● Cruise Control
● Unit work list
● Sales Verification
● Infinite
Managed agent - Managed agents only handle outbound calls during an outbound job set up as a Managed Dialing job.
Inbound agent - Inbound agents handle only inbound calls. They can join inbound or blend jobs. The system receives calls directly from customers or through an ACD.
Blend agent - Blend agents handle both outbound and inbound calls. They join blend jobs and can handle customer records on outbound and inbound calling screens.

Avaya Proactive Contact users
January 2008 70
Person to Person agent - Person to Person agents handle outbound calls when outbound agents are not available.
ACD agent - ACD agents handle outbound calls on the Avaya Proactive Contact and handle inbound calls on the ACD.
Agent logins
Basic login - The following table describes the agent logins used, regardless of the blending configuration on your system.
Agent Blending login - If your system is configured with Agent Blending, the following table describes the agent logins used.
Intelligent Call Blending login - If your system is configured with Intelligent Call Blending, the following table describes the agent login used.
Agent type Login Joins job Handles calls
Managed m outbound Outbound calls on Avaya Proactive Contact
Outbound o outbound or blend Outbound calls on Avaya Proactive Contact
Person to Person p outbound Outbound calls on Avaya Proactive Contact
Agent type Login Joins job Handles calls
ACD a outbound Outbound calls on the dialer and inbound calls on ACD
Agent type Login Joins job Handles calls
Inbound i inbound or blend Inbound calls on Avaya Proactive Contact
Blend b blend Inbound and outbound calls on Avaya Proactive Contact
Introduction
71 Using Avaya Proactive Contact 4.0 Supervisor
Log in to SupervisorAvaya Proactive Contact uses the Supervisor application to interface with the hardware and software that is included with the system.
The system allows you to access Monitor, Editor, or Analyst with one password.
After you log in to one application, you can access the others without entering another user name and password. Use the following procedure to log in to any Supervisor application.
1. Select Start > All Programs > Avaya > Avaya Proactive Contact 4.0 > Supervisor > Monitor, Editor, or Analyst.
2. Enter your log in name with at least 3 characters and password, and then click OK.
Tip:Tip: If you exit all applications, you will need to log in again.
To display the online help, select Help > Contents, or press F1.
Note:Note: You might see a message that Internet Explorer restricted the help system from
showing active content.
To display the help, complete the following procedure:
1. In Internet Explorer, select Tools > Internet Options > Advanced tab.
2. Navigate to the section labeled Security.
3. Select the Allow active content to run in files on My Computer check box.
4. Click OK.
January 2008 72
Chapter 2: Understanding Editor settings
Editor allows you to see large amounts of information in a single window. The buttons on the left-hand pane filter the type of information you see.
Strategies - Lists the existing phone strategies on the right-hand pane in the window. If you select a phone strategy in the list, the settings appear on the tabs. You can add rows and modify phone strategy settings.
Selections - Lists the existing record selections. If you select a record selection, the settings appear on the tabs. To modify the record selection settings, select the fields in the tree structure.
Selections Reports - Lists the record selections that were previously run. Selection Reports contains summary information that you do not modify.
Jobs - Displays a tree structure on the right-hand pane of the window. The tree structure lists the settings for the selected job. To modify the job settings, select the fields in the tree structure.
In Editor, Avaya Proactive Contact allows you to enable or disable multi-dialer commands and set your Save and Refresh options.
This section contains the following topics:
● Enable or disable multi-dialer commands on page 73
● Save options on page 74
● Set refresh options on page 75
Understanding Editor settings
73 Using Avaya Proactive Contact 4.0 Supervisor
Enable or disable multi-dialer commandsUse the following procedure to enable or disable multi-dialer commands:
1. In Editor, select Settings > Options.
2. In the Options dialog box, click the Multi-dialer tab.
3. Select Enable to enable multi-dialer commands. Select Disable to disable multi-dialer commands. For more information, see the following topics:
● Options, Multi-dialer tab on page 141
● Multiple dialers on page 20
● Pods on page 20
4. Select the dialer you want to use.
5. Click Apply to save your changes.
6. Click OK to save your changes and close the dialog box.
Save options
January 2008 74
Save optionsThe Save option allows you to display or not to display a confirmation prompt when you select File > Save As to save changes to an exiting file.
Use the following procedure to set Save options:
1. In Editor, select Settings > Options.
2. In the Options dialog box, click the Save tab.
3. Select Prompt before overwrite to receive a prompt before saving. Select Overwrite without asking to save without receiving a prompt. For more information, see Options, Save tab on page 141.
4. Click Apply to save your changes.
5. Click OK to save your changes and close the dialog box.
Understanding Editor settings
75 Using Avaya Proactive Contact 4.0 Supervisor
Set refresh optionsUse the following procedure to set how often Editor refreshes the data displayed on your screen:
1. In Editor, select Settings > Options.
2. In the Options dialog box, click the Refresh tab.
3. Select the interval at which you want Editor to refresh. For more information, see Options, Refresh tab on page 141.
4. Click Apply to save your changes.
5. Click OK to save your changes and close the dialog box.
January 2008 76
Chapter 3: Customize Editor
The Avaya Proactive Contact allows you to customize the appearance of your Editor windows to help you navigate within Editor.
This section contains the following topics:
● Understanding Editor on page 77
● Navigate among the Tool applications on page 79
● Move within Contact Management on page 80
● View icons in the button group on page 81
● Refresh a view on page 82
Customize Editor
77 Using Avaya Proactive Contact 4.0 Supervisor
Understanding EditorThis section provides information that will help you use Editor to create and maintain phone strategies, record selections, and jobs.
This section contains the following topics:
● Editor window description on page 77
● Editor screen layout and usage on page 77
Editor window descriptionThe Contact Management button group in Editor allows you to move among Strategies, Selections, Selection Reports, and Jobs. Each feature has a very similar look and feel.
Editor screen layout and usageEditor contains two panes with the button group displayed to the left. The left-hand pane contains either summary information or a list of titles or files. The right-hand pane contains a tree with settings that you define and modify.
To display settings in the right-hand pane, select a field in the left-hand pane.
This section contains the following topics:
● Button group on page 77
● Sort on page 78
● Resize columns on page 78
● Resize panes on page 78
Button group
The button group expands and contracts to display additional buttons. When you click the button group, buttons appear. You can resize the buttons.
Depending on your login, you see the Contact Management, and Messages and Scripts buttons.
Use the Contact Management group to move between the following features:
● Strategies
● Selections
Understanding Editor
January 2008 78
● Selection Reports
● Jobs
Use the Messages and Scripts group to move between the following features:
● Messages
● Scripts
Use the Calling Lists group to move between the following features:
● Calling Lists
● Do Not Call Groups
● Reports
Use the Agent Keys group to move between the following features:
● Agent Keys
● Reports
Use the Schedule group to move between the following features:
● Activities
● Reports
Sort
You can click most column headings to sort the contents of the column.
When you click a heading, you see a small arrow appear alongside the heading. A small arrow that points up indicates that the data is in ascending order. A small arrow that points down indicates that the data is in descending order.
Resize columns
You can resize any column in a view by hovering your cursor between the heading titles until a double-arrow appears. Press the left mouse button while you drag the cursor to the left or to the right.
Resize panes
You can resize the panes by hovering your cursor on the divider line that separates the panes. until a double-arrow appears. Press the left mouse button while you drag the cursor to the left or to the right.
Customize Editor
79 Using Avaya Proactive Contact 4.0 Supervisor
Navigate among the Tool applicationsEditor comes with tool applications that you access from the Tools menu. Use the following procedure to start Tool menu applications:
1. Select Start > All Programs > Avaya Proactive Contact 4.0 > Supervisor > Editor.2. To start a tool, select its name from the Tools menu.
While you use the tool, Editor remains open in the background so you can navigate back to it when you are finished using the tool.

Move within Contact Management
January 2008 80
Move within Contact ManagementUse the Strategies, Selections, Selection Reports, and Jobs buttons on the button bar to move within the Contact Management features. Editor prompts you to save your work when changing to another feature. When prompted, you can choose not to save your work, too.
Use the following procedure to select a Contact Management feature:
1. Select Start > All Programs > Avaya Proactive Contact 4.0 > Supervisor > Editor.2. Click the Contact Management button group.
3. Click the following buttons:
● Strategies to launch the phone strategy editor
● Selections to launch the record selection editor
● Selection Reports to launch the record selection reports editor
● Jobs to launch the job editor
Customize Editor
81 Using Avaya Proactive Contact 4.0 Supervisor
View icons in the button groupYou can view large or small buttons on the button group. Use the following procedure to switch between large and small icons in the button group:
1. On the button group, click to expand the button group whose icon size you want to change.
2. Right-click, and then select either Large Icons or Small Icons.
A check mark next to the menu command indicates which view you are currently using.

Refresh a view
January 2008 82
Refresh a viewTo refresh an open view, press the F5 key.

Customize Editor
83 Using Avaya Proactive Contact 4.0 Supervisor
January 2008 84
Chapter 4: Phone strategy
Avaya Proactive Contact uses phone strategies during jobs to place phone calls to customers more effectively.
A phone strategy is a set of instructions that tells the system when and how to place calls to customers, which customer phone number to dial, and the frequency of calls.
This section contains the following topics:
● Understanding phone strategy on page 85
● Using phone strategies on page 89
● Maintaining phone strategies on page 93
Phone strategy
85 Using Avaya Proactive Contact 4.0 Supervisor
Understanding phone strategyThe system receives and prepares the host data file and creates a calling list. The system places phone calls based on a phone strategy. The phone strategy specifies the phone numbers to dial during a job and how to place the calls.
This section contains the following topics:
● Phone strategy preparation on page 85
● Phone strategy settings on page 86
Phone strategy preparationBefore you create a new phone strategy, identify the following values for each phone strategy:
● The phone number to call first
● The number of rings to allow before disconnecting the call
● The time to wait before retrying a phone number that was busy, unanswered, or disconnected
● The phone number to dial if the first phone number is not answered
● The number of times to retry a busy phone number
● The number of times to dial a phone number before switching to an alternate phone number
● The types of calls to pass to an agent when the dialer detects an answer
You can create wildcard expressions to define a range of values. Each wildcard expression specifies a wildcard character and a value. A value can be a number or letter.
Wildcard characters include the following symbols:
Wildcard character Description
= is equal to
<> or ~ is not equal to
> is greater than
< is less than
>= is greater than or equal to
<= is less than or equal to
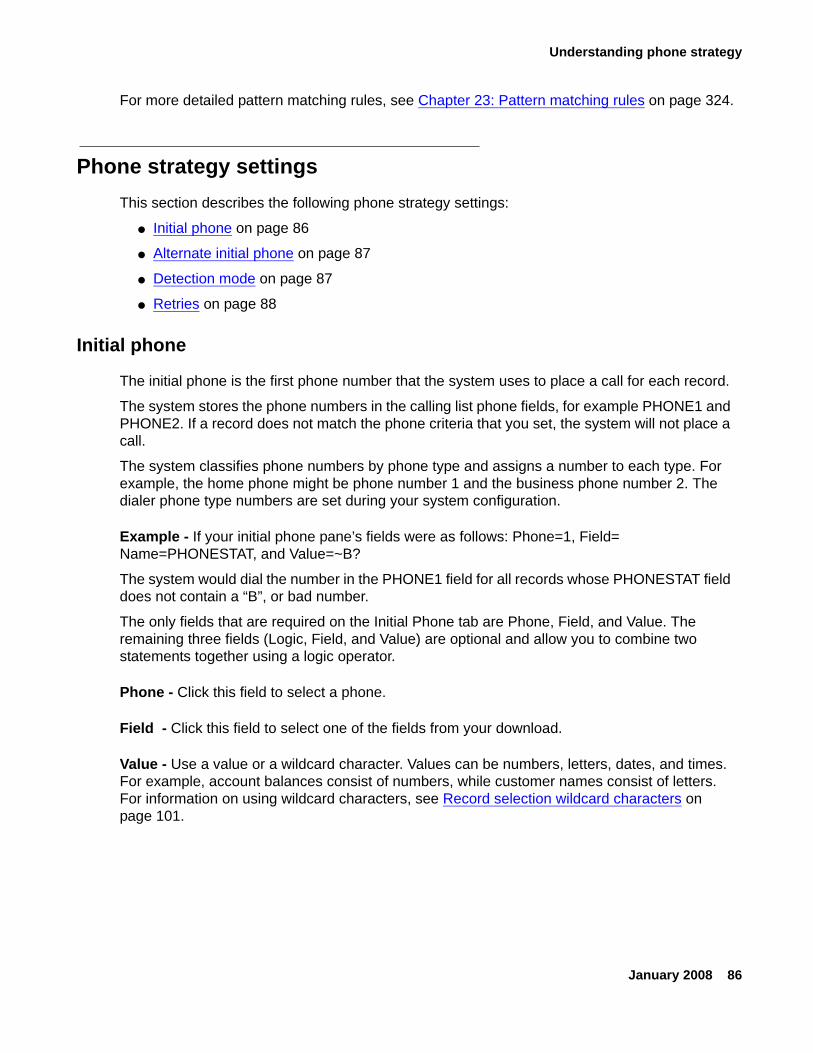
Understanding phone strategy
January 2008 86
For more detailed pattern matching rules, see Chapter 23: Pattern matching rules on page 324.
Phone strategy settingsThis section describes the following phone strategy settings:
● Initial phone on page 86
● Alternate initial phone on page 87
● Detection mode on page 87
● Retries on page 88
Initial phone
The initial phone is the first phone number that the system uses to place a call for each record.
The system stores the phone numbers in the calling list phone fields, for example PHONE1 and PHONE2. If a record does not match the phone criteria that you set, the system will not place a call.
The system classifies phone numbers by phone type and assigns a number to each type. For example, the home phone might be phone number 1 and the business phone number 2. The dialer phone type numbers are set during your system configuration.
Example - If your initial phone pane’s fields were as follows: Phone=1, Field= Name=PHONESTAT, and Value=~B?
The system would dial the number in the PHONE1 field for all records whose PHONESTAT field does not contain a “B”, or bad number.
The only fields that are required on the Initial Phone tab are Phone, Field, and Value. The remaining three fields (Logic, Field, and Value) are optional and allow you to combine two statements together using a logic operator.
Phone - Click this field to select a phone.
Field - Click this field to select one of the fields from your download.
Value - Use a value or a wildcard character. Values can be numbers, letters, dates, and times. For example, account balances consist of numbers, while customer names consist of letters. For information on using wildcard characters, see Record selection wildcard characters on page 101.
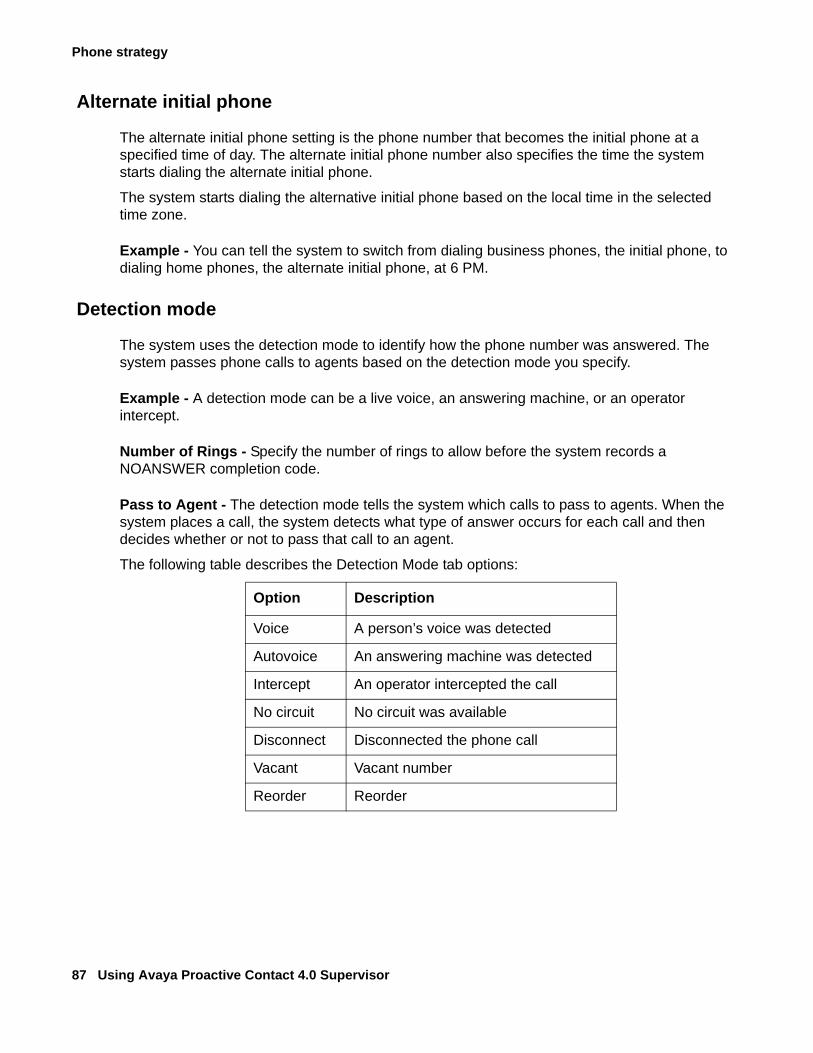
Phone strategy
87 Using Avaya Proactive Contact 4.0 Supervisor
Alternate initial phone
The alternate initial phone setting is the phone number that becomes the initial phone at a specified time of day. The alternate initial phone number also specifies the time the system starts dialing the alternate initial phone.
The system starts dialing the alternative initial phone based on the local time in the selected time zone.
Example - You can tell the system to switch from dialing business phones, the initial phone, to dialing home phones, the alternate initial phone, at 6 PM.
Detection mode
The system uses the detection mode to identify how the phone number was answered. The system passes phone calls to agents based on the detection mode you specify.
Example - A detection mode can be a live voice, an answering machine, or an operator intercept.
Number of Rings - Specify the number of rings to allow before the system records a NOANSWER completion code.
Pass to Agent - The detection mode tells the system which calls to pass to agents. When the system places a call, the system detects what type of answer occurs for each call and then decides whether or not to pass that call to an agent.
The following table describes the Detection Mode tab options:
Option Description
Voice A person’s voice was detected
Autovoice An answering machine was detected
Intercept An operator intercepted the call
No circuit No circuit was available
Disconnect Disconnected the phone call
Vacant Vacant number
Reorder Reorder
Understanding phone strategy
January 2008 88
Tip:Tip: To increase your hit rate, decide which detection modes to use. With each
additional criteria you select, your agents can handle more calls rather than the system.
Retries
The system uses the retries setting to place another phone call for the same record.
The system applies the following criteria based on the result of the initial call:
● How long the system waits before dialing the number again
● How many times the system dials the same phone number
● Which phone number the system dials next
Example - You can tell the system to retry the call in 15 minutes when the initial call result is busy and to stop dialing that phone number if there is no answer after three retries.
Tip:Tip: It is important to understand the difference between a system retry and a
customer recall.
● A system retry is a computer generated phone call attempt. If the system detects a busy signal on the first call attempt, the system dials the phone number based on the retry parameters in the phone strategy.
● Agents set up customer recalls. An agent can set either an Agent Owned Recall or a general recall. For an agent owned recall, the system routes the phone call to the agent who set the phone call. For a general recall, the system dials the phone number and routes the phone call to any available agent.
Phone strategy
89 Using Avaya Proactive Contact 4.0 Supervisor
Using phone strategiesThis section contains procedures that you can use to create, edit, and use phone strategies:
● Create a phone strategy on page 89
● Copy a phone strategy on page 91
● View phone strategy settings on page 91
● Edit a phone strategy on page 91
● Delete a phone strategy on page 92
Create a phone strategyUse the following procedure to create a phone strategy:
1. Select Start > All Programs > Avaya > Proactive Contact 4.0 > Supervisor > Editor.2. If necessary, log in to Supervisor. For more information, see Log in to Supervisor on
page 71.
3. From the drop down list, select the dialer where you want your phone strategy to reside.
Tip:Tip: You can save the phone strategy to other dialers or delete the phone strategy
from this dialer at a later time.
4. Click Strategy on the button group.
5. Select File > New.
6. On Detail tab, select a calling list.
7. Select File > Save.
a. In the Save As dialog box, select another dialer if you want to save the phone strategy to a different dialer.
b. Enter a file name for your strategy, and then click OK.
Editor displays the phone strategy tabs in the right-hand pane.
8. On the Initial Phone tab, complete the following settings:
a. Right-click and select Append Row.
b. Click the Phone field and select a phone.
c. Click the Field field and select a field from the download to use base how the system selects phone numbers to place telephone calls.
Using phone strategies
January 2008 90
d. (Optional) Complete the Logic, Field, and Value fields to specify your restrictions. For documentation on wild card characters, see Phone strategy preparation on page 85.
Examples:
● To exclude bad numbers, select PHONESTAT in the Field list and Enter ~B? in the Value field to specify or not equal to bad numbers.
● To place a call to all records, Enter an asterisk (*) in the Value field.
9. (Optional) On the Alternate Initial tab, specify alternate initial phone settings.
a. Right-click and select Append Row.
b. Click the Time field to specify the time that you want to switch from the initial phone to the alternate initial phone.
The system bases the decision to switch phone numbers on the time in the time zone (not the system time).
c. Select the time zone(s) as appropriate.
● Right-click and select Select All to select all time zones.
● Right-click and select Unselect All to clear all options.
10. On the Detection Mode tab, click the Number of Rings field and then use the list to select a number.
Select the check boxes to specify which types of calls to pass to agents.
11. On the Retries tab, select the call results that the system will retry. For example, if the system detects a busy signal on the first call attempt, it will retry based on your “Busy signal” values on this pane.
For each result you select, enter a value in the Retry Interval (minutes), Attempts, and Next Phone columns.
12. Select File > Save.
If multi-dialer is enabled, you can copy the strategy to additional dialers.
a. In the Save As dialog box, select another dialer if you want to save the phone strategy to a different dialer.
b. Enter a file name for your strategy, and then click OK.
Avaya Proactive Contact automatically saves the file to the selected dialer.
Phone strategy
91 Using Avaya Proactive Contact 4.0 Supervisor
Copy a phone strategyYou can copy a phone strategy to another dialer. If the multi-dialer is not enabled, see Enable or disable multi-dialer commands on page 73 to enable the feature.
Use the following procedure to copy a phone strategy.
1. Click the phone strategy you want to copy.
2. Select File > Save As.
If multi-dialer is enabled, you can copy the strategy to additional dialers.
a. In the Save As dialog box, select another dialer if you want to save the phone strategy to a different dialer.
b. Enter a file name for your strategy, and then click OK.
Avaya Proactive Contact automatically copies the file to the selected dialer.
View phone strategy settingsUse the following procedure to view phone strategy settings:
1. Click the phone strategy you want to open.
The phone strategy settings appear in the right-hand pane.
2. To navigate through the phone strategy settings, click a tab.
Edit a phone strategyChange phone strategy settings when doing so will help your system dial more efficiently. Changes take affect the next time a job that uses the strategy is started.
If you select a different calling list for a phone strategy, you might need to redefine certain phone strategy settings:
● If the newly selected calling list contains the same number of phone fields with the same field names as the original list, the system retains all the phone strategy settings.
● If the newly selected calling list has a different number of phones or the phone field names are different, the system retains the initial phone and alternate initial phone settings, but does not retain the original detection modes and retries settings.
Use the following procedure to edit a phone strategy:
1. Click the phone strategy you want to edit.
Using phone strategies
January 2008 92
2. Click a tab to make the necessary edits in the right-hand pane.
Refer to the Create a phone strategy on page 89 for detailed information.
3. Select File > Save, and then click OK.
Delete a phone strategyUse the following procedure to delete a phone strategy:
1. Click the phone strategy you want to delete.
2. Select File > Delete.
3. When asked if you really want to do this, click OK.
4. If the multi-dialer option is enabled, the Multiple dialer command dialog box appears.
If the check boxes are grayed out, select Settings > Options to enable the multi-dialer settings.
a. Click to clear the check boxes of the dialers from which you do not want to delete the strategy.
b. Click OK.
Phone strategy
93 Using Avaya Proactive Contact 4.0 Supervisor
Maintaining phone strategiesThis section contains the following procedures you can use to maintain phone strategies:
● List all phone strategies on a selected dialer on page 93
● Append a phone strategy row on page 93
● Insert an initial phone in a phone strategy on page 94
● Delete a row in a phone strategy on page 94
● Select all rows in a phone strategy on page 94
● Unselect all rows in a phone strategy on page 95
List all phone strategies on a selected dialerUse the following procedure to view a list of all phone strategies on a selected dialer:
1. From the drop down list, select the dialer for which you want to list the phone strategies.
If you logged in as a supervisor, the Contact Management button displays in the left-hand pane. If you logged in as an administrator, the following buttons display:
● Contact Management● Messages and Scripts
2. Click Contact Management.3. Click Strategies.
Append a phone strategy rowAppending a row adds a row beneath the bottom row on the Initial Phone and Alternative Initial Phone tabs.
Use the following procedure to append a row:
1. On the Editor button bar, click Contact Management.2. Click Strategies.
3. Click the phone strategy you want to edit.
4. In the right-hand pane, click the following tabs to append an initial or alternate initial phone:
● Initial Phone ● Alternate Phone
Maintaining phone strategies
January 2008 94
5. Select Edit > Append Row.
Insert an initial phone in a phone strategyInserting a row adds a row directly above the row you select on the Initial Phones or Alternate Initial tabs.
Use the following procedure to insert a row in your phone strategy:
1. On the Editor button bar, click Contact Management.2. Click Strategies.
3. Click the phone strategy you want to edit.
4. In the right-hand pane, click the Initial Phone or Alternate Initial Phone tabs for the settings you want to edit.
5. Select the row that the new row will appear above.
6. Select Edit > Insert Row.
Delete a row in a phone strategyUse the following procedure to delete a row on the Initial Phones or Alternate Initial tabs.from your phone strategy:
1. On the Editor button bar, click Contact Management.2. Click Strategies.
3. Click the phone strategy you want to edit.
4. In the right-hand pane, click the Initial Phone or Alternate Initial Phone tabs for the settings you want to edit.
5. Select the row you want to delete.
6. Select Edit > Delete Row.
7. Select the row to move.
8. Select Edit > Move Up.
Select all rows in a phone strategyUse the following procedure to select all rows that have a check box on the Alternate Initial, Phone, Detection, and Retires tabs:
1. On the Editor button bar, click Contact Management.
Phone strategy
95 Using Avaya Proactive Contact 4.0 Supervisor
2. Click Strategies.
3. Click the phone strategy you want to edit.
4. In the right-hand pane, click one of the following tab:
● Alternate Initial Phone● Detection● Retries
5. Select Edit > Select All.Editor selects each check box.
Unselect all rows in a phone strategyUse the following procedure to clear all rows that have a check box on the Alternate Initial, Phone, Detection, and Retires tabs:
1. On the Editor button bar, click Contact Management.2. Click Strategies.
3. Click the phone strategy you want to edit.
4. In the right-hand pane, click one of the following tab:
● Alternate Initial Phone● Detection● Retries
5. Select Edit > Unselect All.Editor clears each check box.
January 2008 96
Chapter 5: Record selection
Avaya Proactive Contact uses record selections to determine which records to use to place phone calls during a job.
In Editor, you can create, edit, and view existing record selections or view only the record selections that have been run.
A record selection contains rules or selection criteria. For example, a record selection can place phone calls and select only customers who meet the following criteria:
● Have a balance of less than $5,000
● Live in California
You can use record selections that you saved on more than one job.
This section contains the following topics:
● Understanding record selection on page 97
● Record selection use on page 99
● Using a record selection on page 104
● Maintaining a record selection on page 111
● Record Selection for Multiple Dialers on page 115
Record selection
97 Using Avaya Proactive Contact 4.0 Supervisor
Understanding record selectionA record selection contains the set of instructions that tells Avaya Proactive Contact which customer records to select from a calling list.
A record selection consists of selection criteria and a phone strategy. Each job uses the results of a record selection to place calls to customers.
When a record selection starts, Avaya Proactive Contact selects records based on the following criteria:
● Calling list fields
● Time zones
● Previous calling results
● Agent set recalls
● Phone strategy settings
You can verify a record selection before you start a job to determine the number of records that were selected.
This section contains the following topics:
● Specify time zones on page 97
● Specify completion codes on page 97
● Specify goals on page 98
Specify time zonesYou can use a record selection to specify time zones such as Eastern, Central, or Pacific. Avaya Proactive Contact places phone calls to only the records whose addresses are in the specific time zones. If time zones are not specified, Avaya Proactive Contact defaults to a “follow the sun” method. Dialers place calls to customers in the east and proceed to the west.
Specify completion codesYou can use a record selection to specify completion codes such as BUSY, NOANSWER, or SIT, special information tones. For example, if you specify the SIT completion code, the record selection looks for phone numbers that are disconnected, redirected, or no longer in service.

Understanding record selection
January 2008 98
Specify goalsYou can use a record selection to specify goals, such as the following goals:
● Accounts more than 30 days overdue
● Accounts with a balance over $2,000, or records in a particular state.
Record selection
99 Using Avaya Proactive Contact 4.0 Supervisor
Record selection useIn Editor, you can create, edit and view existing record selections or view only the record selections that have been run.
This section discusses the following buttons for record selections:
● Understand the Selections settings on page 99
● Understand the Selection Reports settings on page 102
Understand the Selections settingsUse Selections to do the following tasks:
● Create a new record selection
● Edit an existing record selection
● View all existing record selections
Click Selections on the button bar to list the existing record selections. Click a record selection name to divide the window into the following panes:
● The left-hand pane lists the record selections.
● The right-hand side contains tabs that you use to edit settings for the record selection.
This section discusses the following topics:
● Selections tabs on page 100
● Record selection wildcard characters on page 101
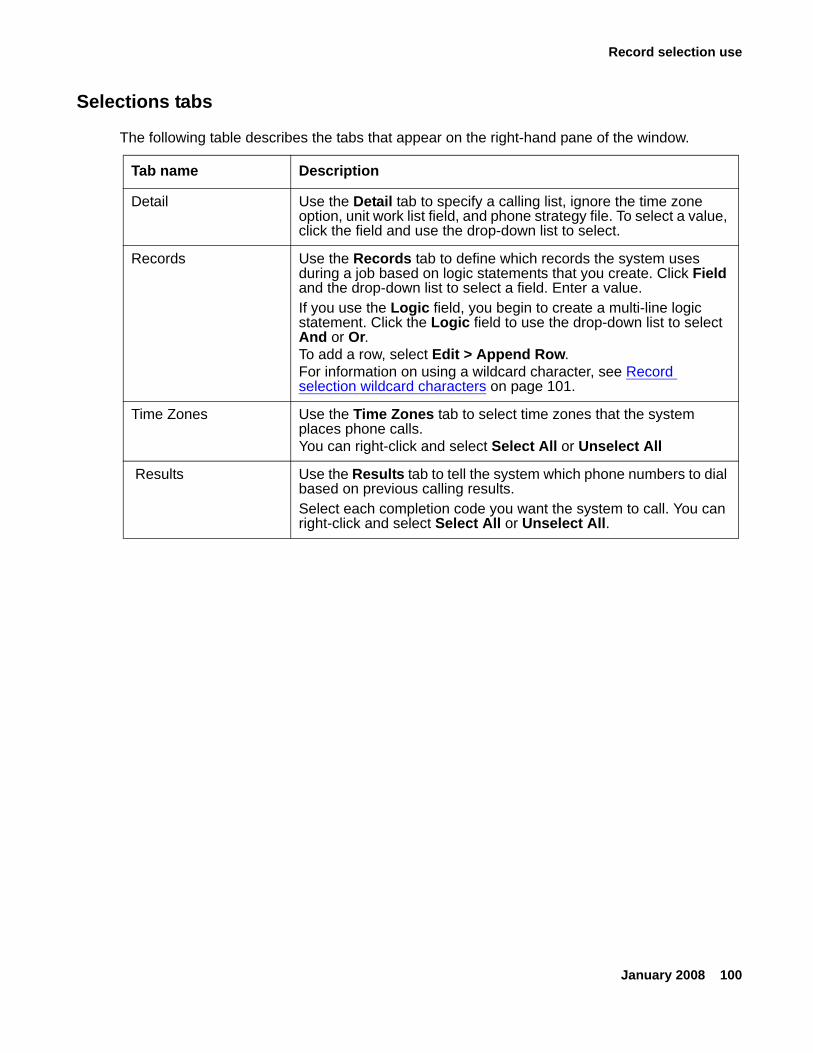
Record selection use
January 2008 100
Selections tabs
The following table describes the tabs that appear on the right-hand pane of the window.
Tab name Description
Detail Use the Detail tab to specify a calling list, ignore the time zone option, unit work list field, and phone strategy file. To select a value, click the field and use the drop-down list to select.
Records Use the Records tab to define which records the system uses during a job based on logic statements that you create. Click Field and the drop-down list to select a field. Enter a value. If you use the Logic field, you begin to create a multi-line logic statement. Click the Logic field to use the drop-down list to select And or Or.To add a row, select Edit > Append Row. For information on using a wildcard character, see Record selection wildcard characters on page 101.
Time Zones Use the Time Zones tab to select time zones that the system places phone calls.You can right-click and select Select All or Unselect All
Results Use the Results tab to tell the system which phone numbers to dial based on previous calling results.Select each completion code you want the system to call. You can right-click and select Select All or Unselect All.
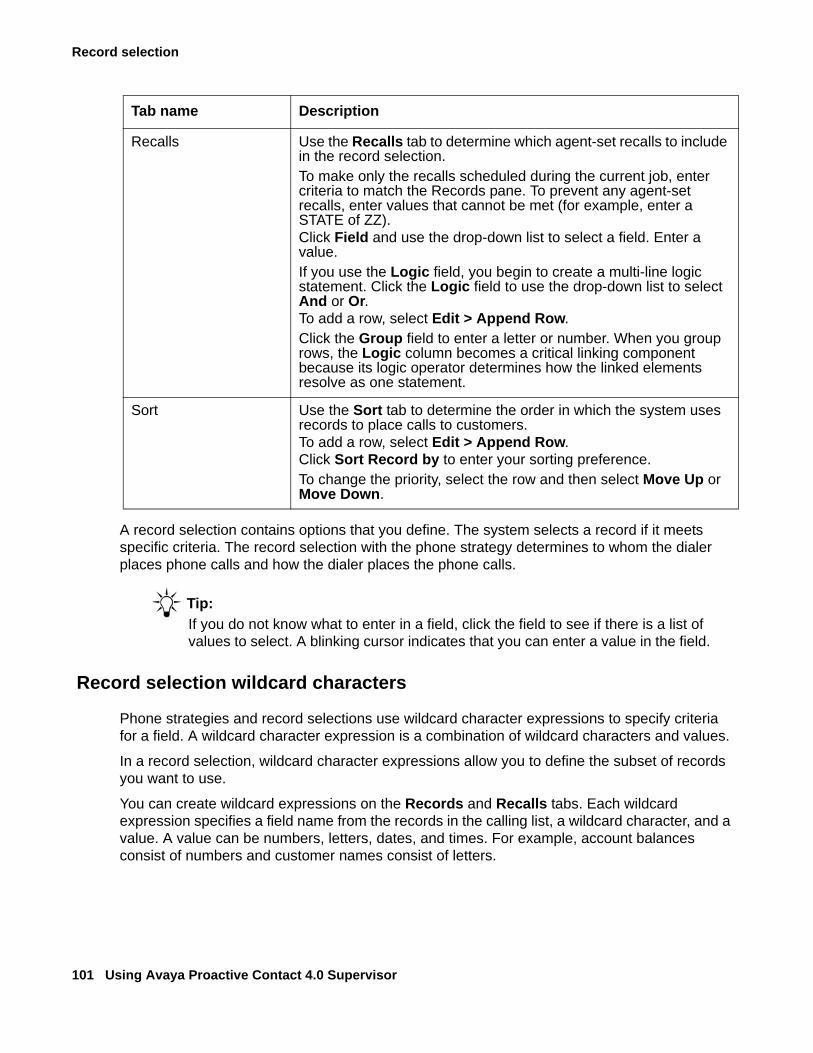
Record selection
101 Using Avaya Proactive Contact 4.0 Supervisor
A record selection contains options that you define. The system selects a record if it meets specific criteria. The record selection with the phone strategy determines to whom the dialer places phone calls and how the dialer places the phone calls.
Tip:Tip: If you do not know what to enter in a field, click the field to see if there is a list of
values to select. A blinking cursor indicates that you can enter a value in the field.
Record selection wildcard characters
Phone strategies and record selections use wildcard character expressions to specify criteria for a field. A wildcard character expression is a combination of wildcard characters and values.
In a record selection, wildcard character expressions allow you to define the subset of records you want to use.
You can create wildcard expressions on the Records and Recalls tabs. Each wildcard expression specifies a field name from the records in the calling list, a wildcard character, and a value. A value can be numbers, letters, dates, and times. For example, account balances consist of numbers and customer names consist of letters.
Recalls Use the Recalls tab to determine which agent-set recalls to include in the record selection. To make only the recalls scheduled during the current job, enter criteria to match the Records pane. To prevent any agent-set recalls, enter values that cannot be met (for example, enter a STATE of ZZ).Click Field and use the drop-down list to select a field. Enter a value. If you use the Logic field, you begin to create a multi-line logic statement. Click the Logic field to use the drop-down list to select And or Or.To add a row, select Edit > Append Row. Click the Group field to enter a letter or number. When you group rows, the Logic column becomes a critical linking component because its logic operator determines how the linked elements resolve as one statement.
Sort Use the Sort tab to determine the order in which the system uses records to place calls to customers.To add a row, select Edit > Append Row.Click Sort Record by to enter your sorting preference.To change the priority, select the row and then select Move Up or Move Down.
Tab name Description
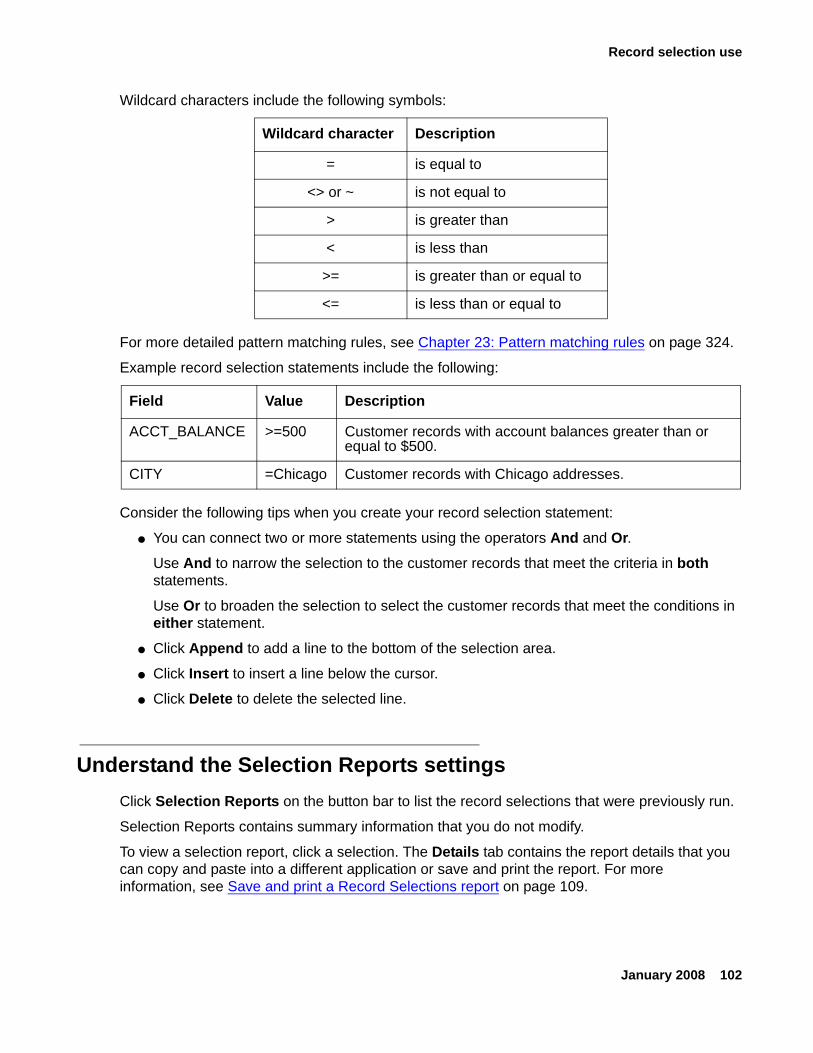
Record selection use
January 2008 102
Wildcard characters include the following symbols:
For more detailed pattern matching rules, see Chapter 23: Pattern matching rules on page 324.
Example record selection statements include the following:
Consider the following tips when you create your record selection statement:
● You can connect two or more statements using the operators And and Or.Use And to narrow the selection to the customer records that meet the criteria in both statements.
Use Or to broaden the selection to select the customer records that meet the conditions in either statement.
● Click Append to add a line to the bottom of the selection area.
● Click Insert to insert a line below the cursor.
● Click Delete to delete the selected line.
Understand the Selection Reports settingsClick Selection Reports on the button bar to list the record selections that were previously run.
Selection Reports contains summary information that you do not modify.
To view a selection report, click a selection. The Details tab contains the report details that you can copy and paste into a different application or save and print the report. For more information, see Save and print a Record Selections report on page 109.
Wildcard character Description
= is equal to
<> or ~ is not equal to
> is greater than
< is less than
>= is greater than or equal to
<= is less than or equal to
Field Value Description
ACCT_BALANCE >=500 Customer records with account balances greater than or equal to $500.
CITY =Chicago Customer records with Chicago addresses.
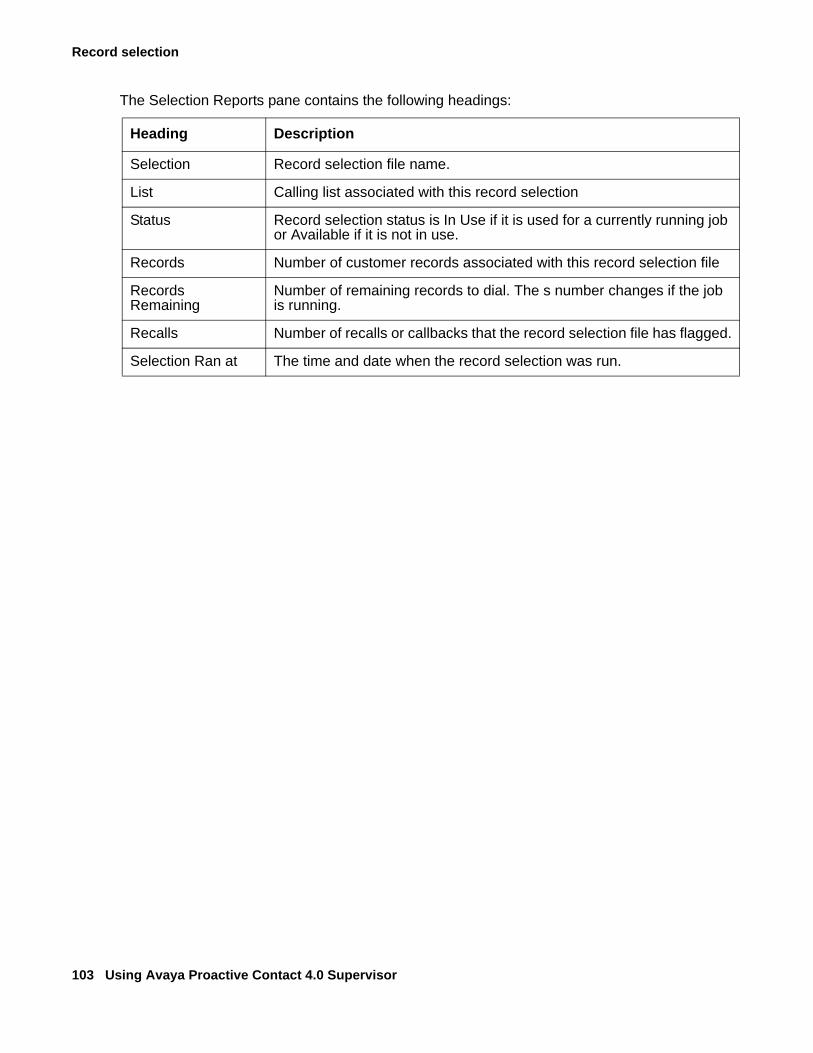
Record selection
103 Using Avaya Proactive Contact 4.0 Supervisor
The Selection Reports pane contains the following headings:
Heading Description
Selection Record selection file name.
List Calling list associated with this record selection
Status Record selection status is In Use if it is used for a currently running job or Available if it is not in use.
Records Number of customer records associated with this record selection file
Records Remaining
Number of remaining records to dial. The s number changes if the job is running.
Recalls Number of recalls or callbacks that the record selection file has flagged.
Selection Ran at The time and date when the record selection was run.
Using a record selection
January 2008 104
Using a record selectionThis section contains the following topics to help you create a record selection:
● Open and view a record selection on page 104
● Complete the Detail tab on page 105
● Complete the Records tab on page 105
● Complete the Time Zones tab on page 106
● Complete the Results tab on page 106
● Complete the Recalls tab (optional) on page 106
● Complete the Sort tab (optional) on page 107
● Create a record selection on page 107
● Save a record selection on page 108
● Edit a record selection on page 108
● Delete a record selection on page 109
● Verify a record selection on page 109
● Run a record selection on page 109
● Save and print a Record Selections report on page 109
Open and view a record selectionUse the following procedure to open and view a record selection.
1. Select Start > All Programs > Avaya > Supervisor > Editor.2. On the button bar, click Selections.
The list of selections for the selected dialer appear.
3. To see record selections that have been defined for a different dialer, click the name of the dialer on the button bar, and then click Selections for that dialer.
4. Click a record selection title to display the selection settings in the right-most pane.
5. Click a tab to move through the settings.
Record selection
105 Using Avaya Proactive Contact 4.0 Supervisor
Complete the Detail tabUse the following procedure to modify the fields on the Details tab.
1. Click the List field to use the drop-down list. Select a calling list.
2. Click the Ignore Time Zone check box to ignore time zones and to follow the sun. Clear the check box to use time zones.
3. Click the Strategy field to use the drop-down list.
Select a phone strategy file that you have already created.
It is beneficial to create a phone strategy, record selection and then job, in that order.
4. Click the Unit Field field and select a unit work list.
5. Click the Selection Type field and select Infinite, Verify, or blank.
Blank is an empty, blank option; in this case it indicates that you want neither Infinite nor Verify.
Select Infinite if your job is an infinite job; select Verify if your job is a verification job.
Complete the Records tabUse the Records tab to define your record selection statement.
1. Click the Records tab.
2. Click the Field field to use the drop-down list. Select a field (for example, BALANCE).
3. Double-click the Value field to enter a value (for example, >3000).
4. (Optional) If you use the Logic field, you begin to create a multi-line logic statement. Click the Logic field to use the drop-down list to select And or Or.
5. Click the Group field to enter a letter or number.
For example, if you enter a “1” in the Group column for the first row and a “1” in the Group column for the second row, then you have just grouped the first two rows into a group named “1.” When you group rows, the Logic column becomes a critical linking component because its logic operator determines how the linked elements resolve as one statement.
6. To add a row, select Edit > Append Row.
7. Repeat steps 2 through 6 for each selection criteria.
Using a record selection
January 2008 106
Complete the Time Zones tabUse the following procedure to select which time zones the system will call.
1. Select the time zones you want to call.
To select all time zones, right-click and select Select All.2. Clear the each time zone you do not want to include.
To clear all time zones, right-click and select Unselect All.
Complete the Results tabUse the following procedure to complete the Results tab.
1. Select the completion code you want the system to call.
Select File > Select All or right-click and select Select All.2. Clear each completion code you do not want to call.
Select File > Select All or right-click and select Unselect All to clear all of the completion codes.
Tip:Tip: New records that have not been called yet are assigned a “Record not yet called”
code. You will almost always select the “Record not yet called” box because you have never attempted to call that customer before.
Complete the Recalls tab (optional)The Recalls tab is optional. Use the Recalls tab to filter which agent-set recall records that dialer will use to place calls.
To dial all scheduled agent-set recalls, do not complete this tab.
To make only the recalls scheduled during the current job, enter criteria to match the Records tab.
To prevent any agent-set recalls, enter values that cannot be met so that no records can qualify for recall. For example, select the STATE field and enter ZZ (no records will have a STATE value of ZZ, so no records can be selected for recall).
Use the following procedure to complete the Recalls tab:
1. If the Recalls tab has no visible rows, select Edit > Append Row or right-click and select Append Row.
Record selection
107 Using Avaya Proactive Contact 4.0 Supervisor
2. Click the Field field to select a field (for example, BALANCE).
3. Double-click the Value field to enter a value (for example, >3000).
4. (Optional) If you use the Logic field, you begin to create a multi-line logic statement. Click the Logic field to use the drop-down list to select And or Or.
5. Double-click the Group field to enter a letter or number.
For example, if you enter a “1” in the Group column for the first row and a “1” in the Group column for the second row, then you have just grouped the first two rows into a group named “1.” When you group rows, the Logic column becomes a critical linking component because its logic operator determines how the linked elements resolve as one statement.
Complete the Sort tab (optional)The Sort tab is optional.
Use the following procedure to tell the system how to sort the selected records:
1. If the Sort tab has no visible rows, select Edit > Append Row or right-click and select Append Row.
2. To change the priority, select the Edit menu or right-click the row and then select Move Up or Move Down.
3. Click the Sorts Records By field to use the drop-down list and select a field.
4. Click the Order field to use the drop-down list and select Ascending or Descending.
Tip:Tip: You can set up to 10 sorts.
Create a record selectionUse the following procedure to create a record selection:
1. Select the name of the dialer where you want your record selection to reside. (You can save it to additional dialers or delete it from this dialer later.)
2. On the button bar, click Selections.
3. Select File > New. The right-hand pane populates.
4. In the right-hand pane, click the List field and select a calling list.
5. Click a tab to complete the settings. For more information, see the following topics:
● Complete the Detail tab on page 105
● Complete the Records tab on page 105
Using a record selection
January 2008 108
● Complete the Time Zones tab on page 106
● Complete the Results tab on page 106
● Complete the Recalls tab (optional) on page 106
● Complete the Sort tab (optional) on page 107
6. When finished, select File > Save.
a. The record selection is automatically saved to the dialer you selected.
In a multi-dialer environment, select the dialers you want to save the record selection.
If the additional dialers were unavailable, select Settings > Options to change your multi-dialer settings. For more information, see Options, Multi-dialer tab on page 141.
b. Enter a file name, and then click OK.
Save a record selectionYou can save a record selection to another dialer. If the multi-dialer is not enabled, see Enable or disable multi-dialer commands on page 73 to enable the feature.
1. Use the following procedure to save a record selection:
2. When you finish defining settings for a record selection, select File > Save.
3. Select File > Save.
If multi-dialer is enabled, you can save the record selection to additional dialers.
a. In the Save As dialog box, select another dialer if you want to save the phone strategy to a different dialer.
b. Enter a file name for your strategy, and then click OK.
Avaya Proactive Contact automatically saves the file to the selected dialer.
Edit a record selectionUse the following procedure to edit a record selection:
1. Click on the record selection you want to edit.
2. Make the necessary edits on the tabs.
3. Select File > Save to save the changes.
Record selection
109 Using Avaya Proactive Contact 4.0 Supervisor
Delete a record selectionUse the following procedure to delete a record selection:
1. Select the record selection you want to delete.
2. Select File > Delete.
3. When asked if you are sure, click Yes if you are sure.
Verify a record selectionUse the following procedure to verify that the settings for a particular record selection are complete and that the record selection will run when started.
Avaya Proactive Contact displays a message if an error occurs.
You should review the tabs before verifying a record selection. You cannot verify a record selection until you have saved your work.
1. Select the record selection you want to verify.
2. Select File > Verify, and then click OK.
Run a record selectionUse the following procedure to run a record selection:
1. Click the record selection you want to run.
2. Select File > Run, and then click OK.
Tip:Tip: You do not need to run a record selection before you start a job. You can,
however, run a record selection to check to determine how many records are selected. When you start a job, the system first verifies the record selection, and then starts the job.
Save and print a Record Selections reportUse the following procedure to save a Record Selections report as an HTML file:
1. Click Selections Report in the left-hand pane.
Using a record selection
January 2008 110
2. Select a selections report in the Record Selections window.
The report appears in the right-hand pane.
3. Select File > Save As HTML.
The Save As dialog opens in your preference directory.
4. Enter a file name and click OK.
5. Click Yes to display the report.
Internet Explore displays the report ready for you to print.
6. Select File > Print to print the report.
Record selection
111 Using Avaya Proactive Contact 4.0 Supervisor
Maintaining a record selectionThis section contains the following topics to help you maintain a record selection:
● Copy a record selection on page 111
● List all record selections on a selected dialer on page 111
● View selection reports on page 112
● View record selection settings on page 112
● Append record selection rows on page 112
● Insert a row in a record selection on page 113
● Delete a row in a record selection on page 113
● Move a row up in a record selection on page 114
● Move a row down in a record selection on page 114
● Select all rows in a record selection on page 114
● Unselect all rows in a record selection on page 115
Copy a record selectionUse the following procedure to copy a record selection:
1. Select the record selection you want to copy.
2. Select File > Save As.
In a multi-dialer environment, select the dialers you want to save the record selection. If the multi-dialer is not enabled, see Enable or disable multi-dialer commands on page 73 to enable the feature.
3. Enter a name for the copied record selection, and then click OK.
List all record selections on a selected dialerUse the following procedure to view a list of all record selections on a selected dialer:
1. Select the name of the dialer whose record selections you want to list.
2. Click Selection Files. The record selections for the selected dialer appear.
Maintaining a record selection
January 2008 112
View selection reportsIn the button bar, you see both Selections and Selection Reports. The difference between these two is that Selections displays all of the record selections that you have created and Selection Reports displays all of the record selections that you have run.
Selection Reports provides detailed information about the results of the record selection.
Use the following procedure to view selection reports.
1. On the button bar, select the dialer whose record selection reports you want to view.
2. Click Selection Reports.
The right-hand pane list the selection reports.
3. Click the selection report you want to open. The right-hand pane populates with your selection report.
4. If you want to copy and paste the report to a different application, right-click and select Select All. Then, right-click and select Copy.
View record selection settingsUse the following procedure to view record selection settings:
1. On the Editor button bar, click Selections.
2. Click the record selection you want to open.
The record selection settings will appear in the right hand pane.
3. Click a tab to navigate through all of the record selection settings.
Append record selection rowsAppending a row adds a row beneath the bottom row.
Use the following procedure to append a row in your record selection:
1. On the Editor button bar, click Contact Management.2. Click Selections.
3. Click the record selection you want to edit.
4. In the right-hand pane, click the following tabs to append a row to the record selection settings:
● Records
Record selection
113 Using Avaya Proactive Contact 4.0 Supervisor
● Recalls● Sort
5. Select Edit > Append Row.
Insert a row in a record selectionInserting a row adds a row directly above the row you select.
Use the following procedure to insert a row to your record selection:
1. On the Editor button bar, click Contact Management.2. Click Selections.
3. Click the record selection you want to edit.
4. Click one of the following tabs:
● Records● Recall● Sort
5. Select the row that the new row will appear directly above.
6. Select Edit > Insert Row.
Delete a row in a record selectionUse the following procedure to delete a row from your record selection:
1. On the Editor button bar, click Contact Management.2. Click Selections.
3. Click the record selection you want to edit.
4. Click one of the following tabs:
● Records● Recall● Sort
5. Select the row that the new row will appear directly above.
6. Select Edit > Insert Row.
7. Select the row you want to delete.
8. Select Edit > Delete Row.
Maintaining a record selection
January 2008 114
Move a row up in a record selectionYou can change the sort order by moving the row up or down on the Sort tab.
Use the following procedure to move a row up in you record selection:
1. On the Editor button bar, click Contact Management.2. Click Selections.
3. Click the record selection you want to edit.
4. Click the Sort tab.
5. Select the row you want to move.
6. Select Edit > Move Up.
Move a row down in a record selectionYou can change the sort order by moving the row up or down on the Sort tab.
Use the following procedure to move a row down in your record selection:
1. On the Editor button bar, click Contact Management.2. Click Selections.
3. Click the record selection you want to edit.
4. Click the Sort tab.
5. Select the row you want to move.
6. Select Edit > Move Down.
Select all rows in a record selectionUse the following procedure to select all rows that have a check box on the Time Zones and Results tabs:
1. On the Editor button bar, click Contact Management.2. Click Selections.
3. Click the record selection you want to edit.
4. Click one of the following tabs:
● Time Zones● Results
Record selection
115 Using Avaya Proactive Contact 4.0 Supervisor
5. Select Edit > Select All.
Unselect all rows in a record selectionUse the following procedure to clear all rows that have a check box on the Time Zones and Results tabs:
1. On the Editor button bar, click Contact Management.2. Click Selections.
3. Click the record selection you want to edit.
4. Click one of the following tabs:
● Time Zones● Results
5. Select Edit > Unselect All.
Record Selection for Multiple DialersWhen a record selection is run for multiple dialers, it will execute on the Proactive Contact that contains the list. However for many dialers it is needed for how many actual call selections are run. They run simultaneously, but if there is calling being done on the same records that are being selected, the records selected may not match 100%. Avaya Proactive Contact that holds the list will then "push" the indexes to the remote system via a socket connection of listserver. You will see a "callsel (for remote)" message in the account log on the PDS containing the list (one callsel message for each call selection run for remote systems). The time stamp for the "callsel (for remote)" account log entry will be in local time of the remote system, which can look odd as it will likely be off from the other times of the nearby messages in that account log.
Once the job has been started on the remote system listserver will "fetch" each record to the job, once the call is completed it will "push" the record back to the list.
Run Record Selections From Command Line
Record Selections can be run from the command line using md_callsel:
md_callsel redlab06-list1 xyz
Record Selections can run locally on remote list with callsel by using the callsel -l redlab03-list1 -s xyz -x command.
January 2008 116
Chapter 6: Jobs
A job contains all the information that Avaya Proactive Contact needs to place phone calls to customers. A job integrates a calling list, phone strategy, record selection, and other settings to place outbound calls and receive inbound calls.
There can be a maximum of 20 jobs running on your installation, including the agent owned recall and linked jobs.
This section contains the following topics:
● Understanding jobs on page 117
● Understanding job settings on page 122
● Using jobs on page 134
● Maintaining jobs on page 138
● Understanding Editor system dialog boxes on page 141
117 Using Avaya Proactive Contact 4.0 Supervisor
Understanding jobsA job contains all the information the system needs to place phone call to customers. The type of job you set up determines the type of calling activities that agents handle.
This section contains the following topics to help you create and run jobs:
● Job types on page 117
● Outbound jobs on page 118
● Call pacing on page 119
Job typesDepending on your system configuration, a job can conduct the following types of calling activities:
● Make outbound calls
● Receive inbound calls
● Verify a sale
You can start more than one job at one time.
If you have an Agent Blending system, you can use Editor to set up outbound jobs.
If you have an Intelligent Call Blending system, you can use Editor to set up the following types of jobs:
Outbound jobs - During outbound jobs, the system uses a calling list, phone strategy, record selection, and other settings to place outbound calls to customers. For more information, see Understanding job settings on page 122.
Inbound jobs - An inbound job is a job on an Intelligent Call Blending system where the system automatically routes inbound calls to agents.
An Agent Blending system does not have inbound jobs. The ACD controls inbound calling activity rather than the system. The agents on the ACD handle the inbound calls.
Blend jobs - A blend job is a job on an Intelligent Call Blending system where the system moves agents between outbound and inbound calling activities. Blend agents receive inbound calls during peak inbound activity and outbound calls when inbound activity decreases.
In Avaya Proactive Contact, a blend job handles both inbound and outbound calls on an Intelligent Call Blending system.
Understanding jobs
January 2008 118
Outbound jobsDuring outbound jobs, the system automatically dials phone numbers and routes calls to agents. Depending on your system configuration, the system monitors the phone calls to ensure that agents do not receive phone calls that result in the following connections:
● Answering machines
● Phone operator intercepts
● Busy signals
● Interactive Voice Response systems (IVRs)
● No answers
This section contains the following topics:
● When a job stops on page 118
● Types of outbound jobs on page 118
When a job stops
Avaya Proactive Contact uses quotas as a means to complete a certain number of outbound calls based on a selected outcome.
A quota is a maximum number of releases for a particular completion code. When the job reaches the quota for a unit, no more calls are placed.
In Avaya Proactive Contact, a job can stop when the following occurs:
● The job reaches the Latest Time to Stop setting.
● You stop the job manually.
● The system placed a call to all initial phones at least once.
● The system placed a call to all recalls at least once.
● The system placed a call to all scheduled recalls, but stops dialing after placing a call to all initial phones at least once.
In Editor, you set and modify a quota that the system applies to the job when the job starts. In Monitor, you set and modify a quota that affects the current job while that job runs.
Types of outbound jobs
An outbound job uses settings to place calls to customers.
Depending on the configuration for an Intelligent Call Blending system, you can create or modify the following types of jobs:
119 Using Avaya Proactive Contact 4.0 Supervisor
● A Unit Work List job divides customer records into work lists or subsets. Agents work with records only in their assigned work lists.
● A Managed Dialing job allows agents to preview or cancel a customer record before the dialer places the call the customer. Depending on your system setup, you can adjust the maximum preview time and allow agents to cancel calls.
● A Sales Verification job verifies a transaction or commitment that the customer made. Use the Sales Verification record selection when starting a Sales Verification job.
● An Infinite job uses a special record selection to add records for calling to an existing calling list while the job is active. Use the Infinite record selection when starting an Infinite job. An infinite job runs until you stop it manually.
● A Virtual Agent job allows the system to run a job without agents. When the system detects a customer or an answering machine, the system plays a recorded message.
In Editor Job Wizard, you define Unit Work List, Managed, Sales Verification, and Virtual jobs on the second screen. The job you select determines the type of additional jobs you can select to create. For example:
● If you select Virtual, you cannot select any other type of job.
● If you select Managed, you can select only Unit Work List.
Call pacingAvaya Proactive Contact has two methods to pace outbound dialing during an outbound job: Cruise Control and Expert Calling Ratio.
When you define a job in Editor, you set the call pacing method based on the type of calling activity you want to complete. For example:
● If you want to limit abandoned or nuisance calls while maximizing agents handling calls, select Cruise Control.
● If you want to pace calling activities based on time in a wait queue or time agents spend handling calls, select Expert Calling Ratio.
You can link a job that uses Cruise Control to a job that uses either the Cruise Control or Expert Calling Ratio method.
Note:Note: The same job name on different dialers in a pod can use a different call pacing
method. To ensure consistent monitoring and reporting, use the same settings for the same job name on each dialer.
This section contains the following topics:
● Cruise Control on page 120
● Expert Calling Ratio on page 120
Understanding jobs
January 2008 120
Cruise Control
Use Cruise Control for outbound jobs when any of the following dialing conditions are important:
● The job is subject to government regulations prohibiting abandoned calls, nuisance calls, or silent calls.
● You want to provide a high level of customer service to the contacted parties.
● You want to supervise agents and calling activities rather than manually supervising the predictive dialing process.
● The number of agents on an outbound job is small or may change. The Cruise Control feature requires at least eight outbound agents to be logged into a job to function correctly.
● Agents perform other activities such as handing inbound calls during the job.
Cruise control automatically maintains the service level of outbound dialing during a job and connects the calls to agents within a specified period of time. During the job, you do not have to monitor or modify the call pacing settings.
When you set up an outbound job that uses Cruise Control, you must define the Desired service level and the Time to connect tolerance settings. The system uses these settings to do the following:
● Predict when to automatically dial phone numbers
● Distribute phone calls within the tolerable time period that you set
Once you start a job that uses Cruise Control, you do not have to change the settings. If you want to change the settings, you must stop the job. To resume calling activities with the new settings, restart the job.
Expert Calling Ratio
Use Expert Calling Ratio for any type of outbound job when the following objectives are important:
● Optimize the use of agents during the job.
● Manage and change call handling time during the job.
● Place as many calls as possible during the job.
Expert Calling Ratio allows you to change the way the system determines when to place the next call while a job is running.
When you set up an outbound job that uses Expert Calling Ratio, you select the following settings:
● The method that the system uses to monitor calling activities
● A value that sets the pace at which the system places phone calls
The Expert Calling Ratio method tells the dialer when to place calls based on one of the following values:

121 Using Avaya Proactive Contact 4.0 Supervisor
● The number of phone calls in the wait queue and the agents waiting for a phone call
● The total time agents spend handling the phone call and customer record
● The time agents spend updating customer records after releasing the phone line
Once you start a job that uses Expert Calling Ratio, you can change the settings in Monitor without stopping the job.
Understanding job settings
January 2008 122
Understanding job settingsAfter double-clicking a job or selecting the New command, a tree structure appears on the Job Detail tab. Use this tree to modify your job settings. Click the fields located in the Setting column.
There are several settings that you define for each job. The settings on your system depends on your system configuration.
Job settings appear in the following groups:
● Basic settings on page 122
● Call pacing settings on page 123
● Files settings on page 125
● Job Type settings on page 127
● Inbound Processing settings on page 127
● Labels settings on page 128
● Managed Dialing settings on page 129
● Outbound Processing settings on page 130
● Post Processing settings on page 131
● Quota Settings on page 131
● Recall settings on page 131
● Service Level settings on page 132
● Wait Queues settings on page 132
● Interactive Voice Response settings on page 133
Basic settingsBasic settings are for every type of job: outbound, inbound, and blend.
The following settings are listed in the Basic group:
● Job description on page 123
● Line type(s) for use on job on page 123
● Earliest start time on page 123
● Latest stop time on page 123
● Calling party number (ANI) on page 123

123 Using Avaya Proactive Contact 4.0 Supervisor
● Require unit ID for agent login on page 123
● Transaction completion code on page 123
Job description - Select the field to enter a description of the job. For example, type a description that reflects the goal of the job such as 30-day Accounts.
Line type(s) for use on job - Select the group of lines that the system uses for a job.
Earliest start time - Select the field to set the time that you want the system to start dialing customer phone numbers and receiving inbound calls. Enter numbers only.
The system is preset with recommended start and stop times for different time zones. If you enter a time that is earlier than the recommended start time, the dialer does not dial phone numbers until the system clock reaches the recommended time.
Latest stop time - Select the field to set the time that you want the dialer to stop dialing customer phone numbers and receiving customer inbound calls. Enter numbers only.
Calling party number (ANI) - Identifies the party that placed the phone call. Displays the phone number of your contact center on the phone of the party that received the phone call.
Require unit ID for agent login - Select the field to require an agent to enter a unit work list when the agent logs in to Avaya Proactive Contact Agent.
Transaction completion code - Select the field to enter the call completion code to indicate the need to verify the transaction by the Sales Verification job.
Call pacing settingsCall pacing settings are for outbound and blend jobs.
Note:Note: The same job name on different dialers in a pod can use a different call pacing
method. To ensure consistent monitoring and reporting, use the same settings for the same job name on each dialer. For more information, see Call pacing on page 119.
The following settings are listed in the Call Pacing group:
● Call Pacing method on page 124
● Initial hit rate on page 124
● Minimum hit rate on page 125
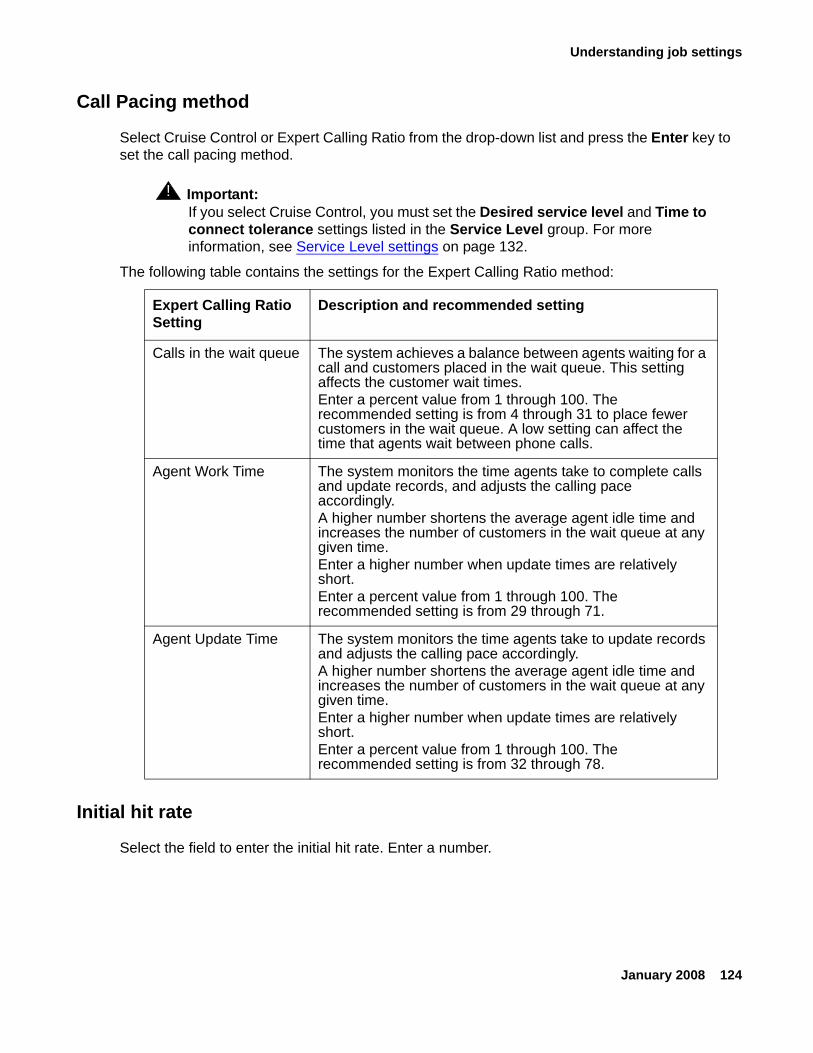
Understanding job settings
January 2008 124
Call Pacing method
Select Cruise Control or Expert Calling Ratio from the drop-down list and press the Enter key to set the call pacing method.
! Important:Important: If you select Cruise Control, you must set the Desired service level and Time to
connect tolerance settings listed in the Service Level group. For more information, see Service Level settings on page 132.
The following table contains the settings for the Expert Calling Ratio method:
Initial hit rate
Select the field to enter the initial hit rate. Enter a number.
Expert Calling Ratio Setting
Description and recommended setting
Calls in the wait queue The system achieves a balance between agents waiting for a call and customers placed in the wait queue. This setting affects the customer wait times.Enter a percent value from 1 through 100. The recommended setting is from 4 through 31 to place fewer customers in the wait queue. A low setting can affect the time that agents wait between phone calls.
Agent Work Time The system monitors the time agents take to complete calls and update records, and adjusts the calling pace accordingly.A higher number shortens the average agent idle time and increases the number of customers in the wait queue at any given time.Enter a higher number when update times are relatively short. Enter a percent value from 1 through 100. The recommended setting is from 29 through 71.
Agent Update Time The system monitors the time agents take to update records and adjusts the calling pace accordingly. A higher number shortens the average agent idle time and increases the number of customers in the wait queue at any given time.Enter a higher number when update times are relatively short. Enter a percent value from 1 through 100. The recommended setting is from 32 through 78.
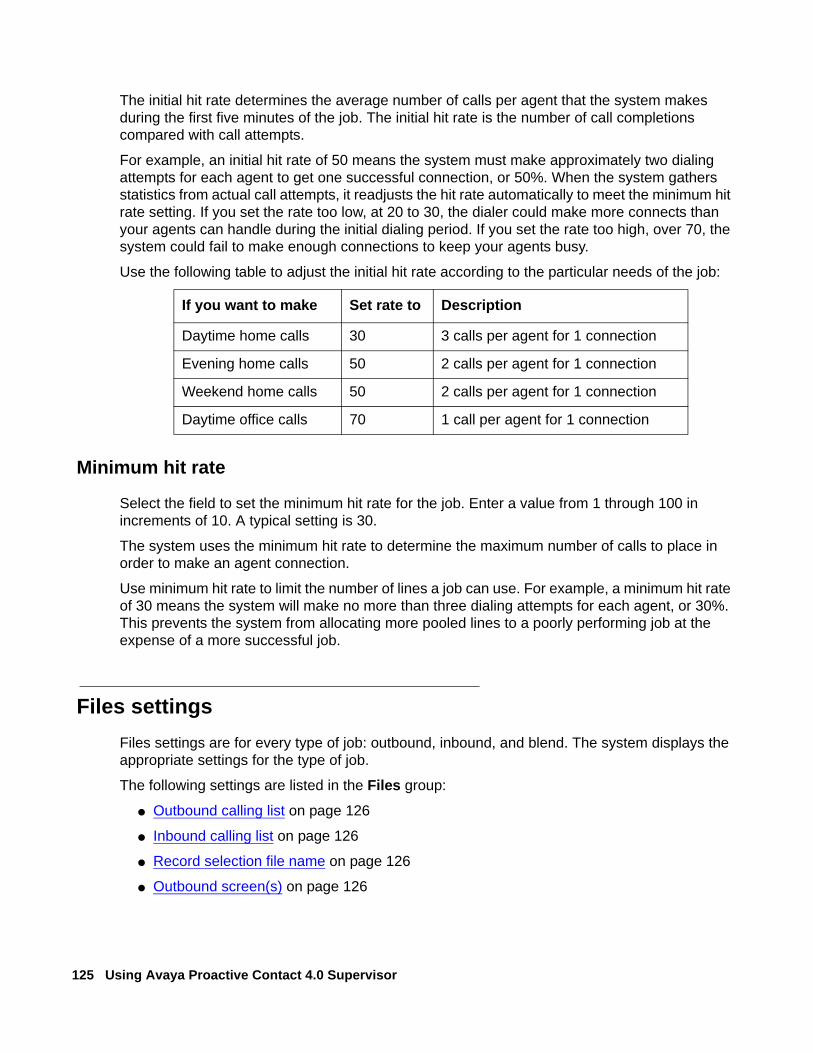
125 Using Avaya Proactive Contact 4.0 Supervisor
The initial hit rate determines the average number of calls per agent that the system makes during the first five minutes of the job. The initial hit rate is the number of call completions compared with call attempts.
For example, an initial hit rate of 50 means the system must make approximately two dialing attempts for each agent to get one successful connection, or 50%. When the system gathers statistics from actual call attempts, it readjusts the hit rate automatically to meet the minimum hit rate setting. If you set the rate too low, at 20 to 30, the dialer could make more connects than your agents can handle during the initial dialing period. If you set the rate too high, over 70, the system could fail to make enough connections to keep your agents busy.
Use the following table to adjust the initial hit rate according to the particular needs of the job:
Minimum hit rate
Select the field to set the minimum hit rate for the job. Enter a value from 1 through 100 in increments of 10. A typical setting is 30.
The system uses the minimum hit rate to determine the maximum number of calls to place in order to make an agent connection.
Use minimum hit rate to limit the number of lines a job can use. For example, a minimum hit rate of 30 means the system will make no more than three dialing attempts for each agent, or 30%. This prevents the system from allocating more pooled lines to a poorly performing job at the expense of a more successful job.
Files settingsFiles settings are for every type of job: outbound, inbound, and blend. The system displays the appropriate settings for the type of job.
The following settings are listed in the Files group:
● Outbound calling list on page 126
● Inbound calling list on page 126
● Record selection file name on page 126
● Outbound screen(s) on page 126
If you want to make Set rate to Description
Daytime home calls 30 3 calls per agent for 1 connection
Evening home calls 50 2 calls per agent for 1 connection
Weekend home calls 50 2 calls per agent for 1 connection
Daytime office calls 70 1 call per agent for 1 connection
Understanding job settings
January 2008 126
● Inbound screen(s) on page 126
● Agent keys definition file name on page 126
● Do Not Call group name on page 126
● Name of next job on page 126
● Transfer to inbound job name on page 127
Outbound calling list - Select a calling list name from the drop-down list. The calling list description, if any, appears to the right of the calling list name.
The job uses the outbound calling list to place calls to customers during outbound and blend jobs. The calling list name includes the host dialer name where the list is stored.
Inbound calling list - Select a calling list name from the drop-down list. The calling list description, if any, appears to the right of the calling list name.
The job uses the inbound calling list to identify the calls that customers placed during inbound and blend jobs. The calling list name includes the host dialer name where the list is stored.
Record selection file name - Select the name of the record selection from the drop-down list. The record selection defines which records the dialer uses to place phone calls during outbound and blend jobs. The record selection contains the phone strategy for the job.
Outbound screen(s) - Select one or more outbound screens from the window. This setting determines the outbound screens that agents see on their workstations and the order in which the screens display. Select outbound screens for outbound and blend jobs.
Inbound screen(s) - Select one or more inbound screens from the window. This setting determines the inbound screens that agents see on their workstations and the order in which the screens display. Select inbound screens for inbound and blend jobs.
Agent keys definition file name - Select the agent keys file name to use during a job from the drop-down list. An agent keys file is configured during installation. The file lists the sets of functions for keys used during types of jobs.
Do Not Call group name - Select the name of the Do Not Call group file from the drop-down list.
The system adds customer information to the file when a customer requests to be added to the Do Not Call List.
Name of next job - Select the field to select the next outbound or blend job to start from the drop-down list. The system automatically starts the job when the agent on the current job completes the last call and releases the record. The system displays a message telling the agents that they are changing jobs.
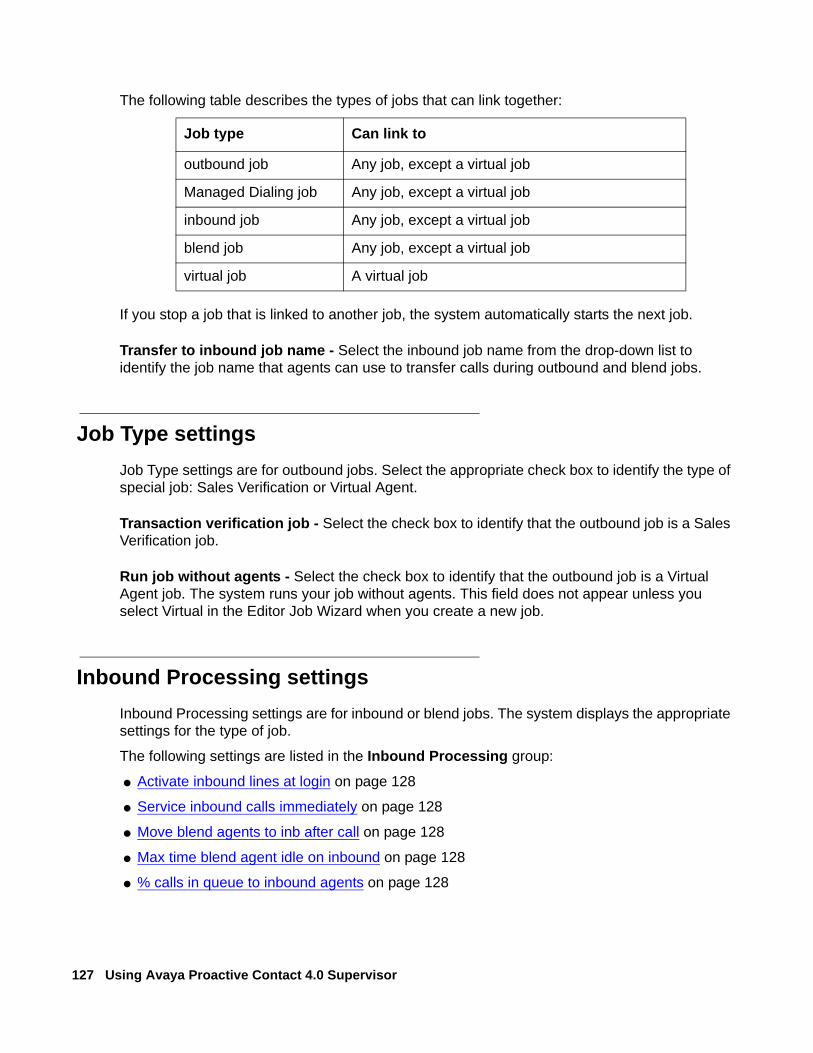
127 Using Avaya Proactive Contact 4.0 Supervisor
The following table describes the types of jobs that can link together:
If you stop a job that is linked to another job, the system automatically starts the next job.
Transfer to inbound job name - Select the inbound job name from the drop-down list to identify the job name that agents can use to transfer calls during outbound and blend jobs.
Job Type settingsJob Type settings are for outbound jobs. Select the appropriate check box to identify the type of special job: Sales Verification or Virtual Agent.
Transaction verification job - Select the check box to identify that the outbound job is a Sales Verification job.
Run job without agents - Select the check box to identify that the outbound job is a Virtual Agent job. The system runs your job without agents. This field does not appear unless you select Virtual in the Editor Job Wizard when you create a new job.
Inbound Processing settingsInbound Processing settings are for inbound or blend jobs. The system displays the appropriate settings for the type of job.
The following settings are listed in the Inbound Processing group:
● Activate inbound lines at login on page 128
● Service inbound calls immediately on page 128
● Move blend agents to inb after call on page 128
● Max time blend agent idle on inbound on page 128
● % calls in queue to inbound agents on page 128
Job type Can link to
outbound job Any job, except a virtual job
Managed Dialing job Any job, except a virtual job
inbound job Any job, except a virtual job
blend job Any job, except a virtual job
virtual job A virtual job
Understanding job settings
January 2008 128
● Maximum time call can spend in wait queue (seconds) on page 128
Activate inbound lines at login - elect the check box to activate the inbound lines when agents log in to the inbound or blend job.
Service inbound calls immediately - Select the check box to handle the inbound calls immediately during the inbound or blend job.
Move blend agents to inb after call - Select the check box to have blend agents handle inbound calls after handling the outbound call during the blend job.
Max time blend agent idle on inbound - Select the field to enter the maximum number of seconds that the blend agent can be idle between inbound calls during the blend job. When the time exceeds the setting, the system moves the agent to handle outbound calls.
% calls in queue to inbound agents - Select the field to enter the upper percentage limit of the calls waiting to be passed to inbound agents during the inbound or blend job.
Maximum time call can spend in wait queue (seconds) - Select the field to enter the longest time in seconds that calls can be held in the wait queue during the inbound or blend job.
Labels settingsFiles settings are for every type of job: outbound, inbound, and blend. The system displays the appropriate settings for the type of job.
! Important:Important: The changes you make to a script become available for use the next time you
restart the system. You can set up a job with a new script but cannot run the job until you restart the system.
The following settings are listed in the Labels group:
● Script label for call on page 128
● Script label for answer on page 129
● Main data processing label on page 129
● Transfer wait queue label on page 129
Script label for call - Select the script label from the drop-down list. The script label is the name of the script used during the outbound job.
The message script is the message or string of messages customers hear. Jobs can use different wait queue messages.
129 Using Avaya Proactive Contact 4.0 Supervisor
Script label for answer - Select the script label from the drop-down list. The script label is the name of the script used during the inbound job.
The message script is the message or string of messages customers hear. Jobs can use different wait queue messages.
Main data processing label - Select the correct main data processing label from the drop-down list. The main data process label instructs the system to begin job processing and tells the system what to display on the agent screens.
Select the appropriate data process label for the job. Select virtual for a virtual job, verify for a sales verification job, and generic for an outbound job.
Transfer wait queue label - Select the correct transfer wait queue label from the drop-down list. The transfer queue label is the name of the transfer script used during the inbound or blend job.
Managed Dialing settingsDuring a managed job, an agent can preview a customer record before placing or cancelling the call.
Managed job settings are for outbound jobs.
The following settings are listed in the Managed Dialing group:
● Managed (preview) dialing on page 129
● Allow agents to cancel call on page 129
● Time limit (seconds) for preview on page 130
● Display empty record at preview on page 130
● Allow dialing from deleted record on page 130
● Method for record search type at preview on page 130
● Key field for LIS record search on page 130
Managed (preview) dialing - Select the check box to allow an agent to look at a customer record before the dialer places the phone call.
Allow agents to cancel call - When you enable Managed preview dialing, you can allow an agent to cancel a Managed Dialing call.
Select the check box to allow an agent to cancel the managed dialing call. Clear the check box to prevent agents from cancelling a managed dialing call.
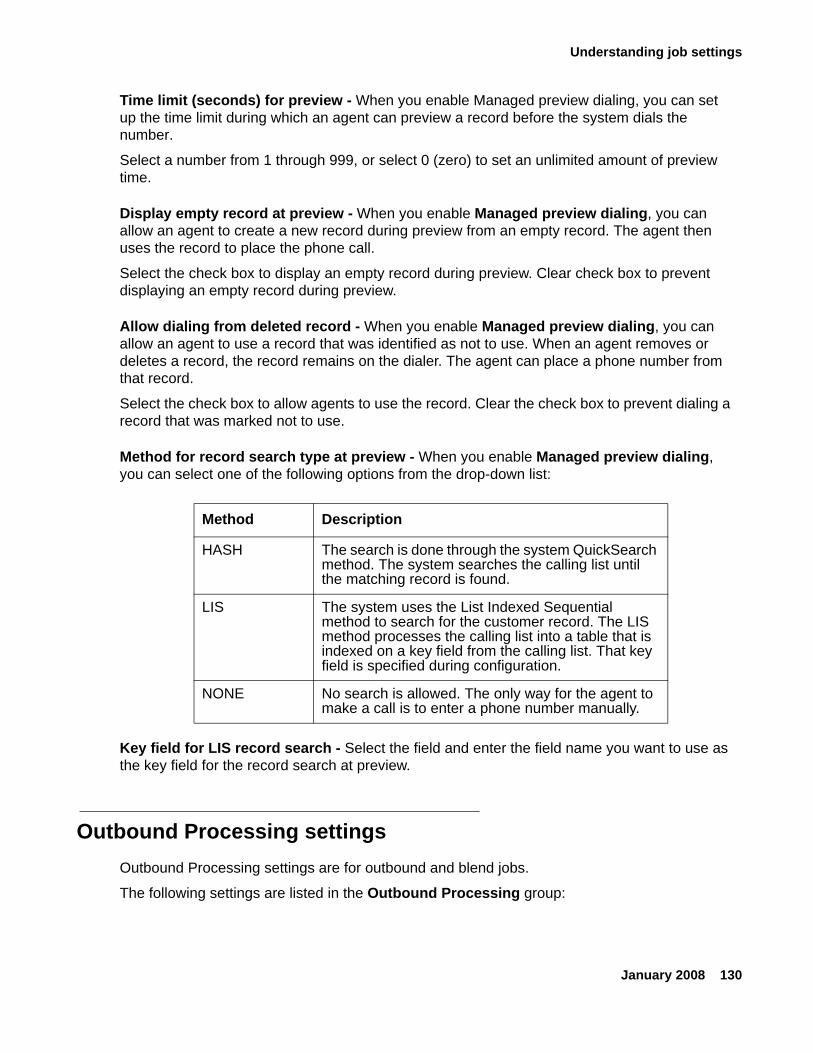
Understanding job settings
January 2008 130
Time limit (seconds) for preview - When you enable Managed preview dialing, you can set up the time limit during which an agent can preview a record before the system dials the number.
Select a number from 1 through 999, or select 0 (zero) to set an unlimited amount of preview time.
Display empty record at preview - When you enable Managed preview dialing, you can allow an agent to create a new record during preview from an empty record. The agent then uses the record to place the phone call.
Select the check box to display an empty record during preview. Clear check box to prevent displaying an empty record during preview.
Allow dialing from deleted record - When you enable Managed preview dialing, you can allow an agent to use a record that was identified as not to use. When an agent removes or deletes a record, the record remains on the dialer. The agent can place a phone number from that record.
Select the check box to allow agents to use the record. Clear the check box to prevent dialing a record that was marked not to use.
Method for record search type at preview - When you enable Managed preview dialing, you can select one of the following options from the drop-down list:
Key field for LIS record search - Select the field and enter the field name you want to use as the key field for the record search at preview.
Outbound Processing settingsOutbound Processing settings are for outbound and blend jobs.
The following settings are listed in the Outbound Processing group:
Method Description
HASH The search is done through the system QuickSearch method. The system searches the calling list until the matching record is found.
LIS The system uses the List Indexed Sequential method to search for the customer record. The LIS method processes the calling list into a table that is indexed on a key field from the calling list. That key field is specified during configuration.
NONE No search is allowed. The only way for the agent to make a call is to enter a phone number manually.

131 Using Avaya Proactive Contact 4.0 Supervisor
Shutdown job when no more calls remain - Select the check box if you want the system to end jobs when each customer has been called at least once.
Clear the check box if you want the system to end jobs after all calls are completed, including recalls.
Make alternative phone lowest priority in selecting next record - Select the field to place calls that are first attempts, retries, and recalls before placing a phone call that uses the alternative phone.
Order calling of records by time zone - Select the check box if you want the system to order calls by times zones. The dialer places phone calls “following the sun” from east to west.
With either choice, time zone laws are still applied.
Post Processing settingsThe following setting in the Post Processing group is for every type of job: outbound, inbound, and blend:
Automatically start Update mode on customer hang up - Select the check box to enable the setting. The system starts to record the time an agent takes to complete the after call work when the customer disconnects the phone call.
Quota SettingsThe following settings in the Quota Settings group are for outbound or blend jobs.
Quota setting (completion code, quota) - Select the field in the drop-down list to select a completion code. Select a quota for the completion code. The system stops the job automatically when the number of completion codes reaches the quota.
Quota settings file name - Select the field to enter a name for the file that saves the quota settings.
Save quota setting when the job ends - Select this option to save the quota setting when the jobs ends. The system continues to use the quota setting the next time the job starts.
Recall settingsThe following settings in the Recall group are for outbound or blend jobs.
Understanding job settings
January 2008 132
Recall reschedule interval (minutes) - If your system uses Agent Owned Recall, this field is visible. Select the field to enter the minimum number of minutes that must elapse before the system tries to pass the agent a recall.
Recall notification time (minutes) - If your system uses Agent Owned Recall, this field is visible. Select the field to enter the time in minutes during which the system looks for the agent who set up the recall on the job and is available for a call.
Number of recall attempts - If your system uses Agent Owned Recall, this field is visible. Select the field to enter the number of times to look for the agent that set up the recall.
Service Level settingsThe following settings in the Service Level group are for outbound, inbound, and blend jobs.
! Important:Important: If you select Cruise Control in the Call Pacing group, you must set the Desired
service level and Time to connect tolerance settings. For more information, see Call pacing settings on page 123.
Avaya Proactive Contact uses the Desired Service Level and Time to connect tolerance settings for real-time monitoring and reporting of outbound, inbound, and blend jobs.
For jobs that use Cruise Control, Avaya Proactive Contact uses the Desired service level and Time to connect tolerance settings to predict when to automatically dial phone numbers and distribute the calls within the tolerable time period.
Desired service level (percentage) - The target percentage of serviced calls that you want the system to maintain.Enter percent value that is from 70 through 99. The default value is 99.
Time to connect tolerance (seconds) - The number of seconds that you will allow a phone call to be delayed waiting for an agent before the system designates the call as a nuisance call. Typically you want to allow a minimum time delay before the system sends the phone call to an agent.
Enter a number from 0 (zero) through 9.The default value is 1.
Wait Queues settingsThe following settings in the Wait Queues group are for outbound, inbound, and blend jobs. The system displays the appropriate settings for the job.
133 Using Avaya Proactive Contact 4.0 Supervisor
Total wait delay (seconds) - Select the field to enter the number of seconds from 0 to 999 that the customer can wait in the wait queue before the system ends the call.
Inbound wait queue limit (seconds) - Select the field to enter the number of seconds from 0 to 999 that the customer can wait in the inbound wait queue before the system ends the call.
Transfer on hold message number - Select the field to enter the number of the message that users hear during the call-transfer process.
Interactive Voice Response settingsThe following settings in the Interactive Voice Response group are for outbound, inbound, and blend jobs.
IVR identifier - Select the field to enter the IVR identifier.
Script to run on the IVR - Select the field to enter the script that customers hear when they answer an IVR phone call.
IVR agents - Select the field to allow IVR agents to join the job
IVR initial script - Select the field to enter the script agents hear when joining an IVR job.
Using jobs
January 2008 134
Using jobsThis section contains the following topics that help you create and use jobs:
● Create a job on page 134
● View job settings on page 135
● Save a job on page 135
● Save a job as another name or on a different dialer on page 135
● Start a job on one or more dialers on page 136
● Start multiple jobs on currently selected dialer on page 136
● Share a List or a Job on page 136
Create a jobIn a pod, the same job name can exist on each dialer.
To ensure consistent monitoring and reporting, use the same settings for the same job name on each dialer. For more information, see Outbound jobs on page 118.
Use the following procedure to create a job:
1. In the Editor button bar, select a dialer, and then click Jobs.
2. Select File > New.
3. Click Next when the Editor Job Wizard appears.
4. Select settings to specify the type of job you want to create, the appropriate outbound or inbound calling list, and the job options you want to use:
● Sales Verification
● Unit Work List
● Virtual
● Managed
5. When you finish the wizard, the default tree structure for your job type (inbound, outbound, blend, etc.) appears in the right-hand pane.
6. Use the Setting and Value columns to select and edit values.
135 Using Avaya Proactive Contact 4.0 Supervisor
View job settingsUse the following procedure to view job settings:
1. Select the job you want to view.
The job settings appear in the right-hand pane.
Save a jobIn a pod, the same job name can exist on each dialer.
To ensure consistent monitoring and reporting, use the same settings for the same job name on each dialer. For more information, see Outbound jobs on page 118.
Use the following procedure to save a job:
1. Select File > Save to save the job.
If needed, provide a name.
2. Click OK.
Save a job as another name or on a different dialerUse the following procedure to save a job as another name or on a different dialer:
1. Select the job you want to save.
2. Select File > Save As.
If the multi-dialer option is enabled, select additional dialers to which you want to save the job.
If the dialer check boxes are unavailable and you want to enable them, select Settings > Options. For more information, see Enable or disable multi-dialer commands on page 73.
3. Enter a name for your job, and then click OK.
The job is saved to the dialer you selected in the button bar and it to any additional dialers you selected.
Using jobs
January 2008 136
Start a job on one or more dialersYou are not required to run a record selection before starting a job. Editor automatically executes the record selection if needed, and starts the job. If the job verification passes, you are offered a choice of starting the job or cancelling the action.
Use the following procedure to start a job on one or more dialers:
1. Select the job you want to start.
2. Select File > Run.
If the multi-dialer option is enabled, you are asked if you want to run the job on additional dialers. Select additional dialers on which you want to start the job.
3. Click OK.
Start multiple jobs on currently selected dialerUse the following procedure to start multiple jobs on the currently selected dialer:
1. Select the jobs you want to start.
2. Select File > Run, and then click OK.
Share a List or a JobThere are two basic categories for what functionality List Sharing includes:
● Shared Calling List (commonly referred to as list sharing) and
● Shared Campaigns (commonly referred to as job sharing)
Shared Calling List - This feature provides you the ability for any dialer in a pod to use a calling list that physically resides on another dialer CPU's Hard Drive. This allows one Dialer Application Server to house a single calling list which 3 other dialer applications in the pod can access and use for calling in their own jobs.
Job sharing goes one step further and effectively allows all dialer applications in a pod to concurrently run the same job on the same call selection (This allows a much larger number of agents spread across multiple systems to call the same records). In actuality, each dialer will have it's own job, with a unique job number and a unique call selection index, but as long as all systems are calling on the campaign, the indexes will keep updating each other so that each system knows which records have already been called and will pick the next available record.
Shared Campaigns - This feature allows you to share a campaign across 2 or more dialer Applications in a POD.
137 Using Avaya Proactive Contact 4.0 Supervisor
This feature can only be used in the GUI (Graphical User Interface), CUI (Character User Interface) does not support this feature, nor will it be added in the future.
You must have "Multi-Dialer" option enabled in CD software. From the CE menu Settings ' Options ' Multi-Dialer tab. Click enable in "Multi-dialer settings" and then check the box for each system you wish to control in "Multi-dialer.
With Multi-dialer settings enabled, when a Proactive Contact Supervisor saves their Phone Strategy, Record Selection, and Job configurations, they will be prompted to save the changes to the file to one or more systems.
You will need to save any changes to all dialers which will be sharing the job to ensure that job files amongst the systems are the same. If any configurations in the strategy, selection, or jobs are mismatched in any way, the job sharing feature can result in displaying odd behavior.
When using Shared Campaigns the following configuration files must be the same on all Proactive Contact systems:
● locale.cfg
● timezone.cfg
● telephny.* scripts (telephny.spt, telephny.labels, telephny.alljobs.dat
● postupdate files (if used), there must be PU* .cfg files that specify the - of each remote list.
● ORDERBYZONES must be set to the same on all jobs, either YES or NO
Note:Note: If a single campaign is different than the others, the jobs will compete for records.
Maintaining jobs
January 2008 138
Maintaining jobsThis section contains the following topics that help your maintain jobs:
● Copy a job on page 138
● Edit a job on page 138
● Verify a job on one or more dialers on page 139
● Verify multiple jobs on the currently selected dialer on page 139
● Delete a job on one or more dialers on page 139
● Delete multiple jobs on the currently selected dialer on page 139
● List all jobs on a selected dialer on page 140
Copy a jobUse the following procedure to copy a job:
1. Select the job you want to copy.
2. Select File > Save As.
If the multi-dialer option is enabled, select the dialer where you want to copy a job.
3. Enter a name for the job, and then click OK.
Edit a jobUse the following procedure to edit a job:
1. Select File > Open.
2. Select the job you want to edit, and then make the necessary edits in the right-hand pane.
3. Select File > Save to save the job.
If the multi-dialer option is enabled, select the additional dialers to save the job to.
4. Enter a name for the job, and then click OK.
139 Using Avaya Proactive Contact 4.0 Supervisor
Verify a job on one or more dialersUse the following procedure to verify a job on one or more dialers:
1. Select the job you want to verify.
2. Select File > Verify.
3. If the multi-dialer option is enabled, you are prompted to select whether or not to verify the job on additional dialers. Specify your preferences, and then click OK.
The results of the verification, including any settings that are in error, appear in a separate window.
4. Review the results and click OK.
Verify multiple jobs on the currently selected dialerUse the following procedure to verify multiple jobs on the currently selected dialer:
1. Control-click to select all the jobs you want to verify.
2. Select File > Verify.
Delete a job on one or more dialersUse the following procedure to delete a job on one or more dialers:
1. Select the job you want to delete.
2. Select File > Delete.
If the multi-dialer option is enabled, you are prompted to specify whether or not to delete the job from additional dialers. Make your selections, and then click OK.
3. When prompted, click Yes to delete the job.
Delete multiple jobs on the currently selected dialerUse the following procedure to delete multiple jobs on the currently selected dialer:
1. Control-click to select the jobs you want to delete.
2. Select File > Delete.
If the multi-dialer option is enabled, you are prompted to specify whether or not to delete the job from additional dialers. Make your selections, and then click OK.
Maintaining jobs
January 2008 140
3. When prompted, click Yes to delete the jobs.
List all jobs on a selected dialerUse the following procedure to list all jobs on a selected dialer:
1. Select the dialer name on the button bar.
2. Click Jobs. A list of jobs on the selected dialer appears.
141 Using Avaya Proactive Contact 4.0 Supervisor
Understanding Editor system dialog boxesThis section describes the dialog boxes you use in Editor.
This section contains the following topics:
● Options dialog box on page 141
● Screens dialog box on page 142
Options dialog boxThe Options dialog box contains the following tabs:
● Options, Multi-dialer tab on page 141
● Options, Save tab on page 141
● Options, Refresh tab on page 141
Options, Multi-dialer tab
The Multi-dialer tab allows you to customize Editor’s interaction with your various dialers.
Multi-dialer settings, Enable or disable multi-dialer commands - Select Enable to enable multi-dialer commands. Select Disable to disable multi-dialer commands.
Multi-dialer commands apply to - From the list, select the dialer you want to use.
Options, Save tab
This Save tab allows you to customize how the Save command behaves.
When saving to an existing filename - Select Prompt before overwrite to receive a prompt before saving. Select Overwrite without asking to save without receiving a prompt.
Options, Refresh tab
The Refresh tab allows you to specify your Refresh rate preferences.
How often should data be refreshed on the screen - Select the interval at which you want Editor to refresh.
Understanding Editor system dialog boxes
January 2008 142
Screens dialog boxThe Screens dialog box allows you to select screens to use during a job.
Available screens - Lists the agent screens defined for the system.
Screens (in order) - Lists the selected screens in the sequence that a job will use them.
Selection buttons - Move one or more selected screens between lists.
Tip:Tip: You can also use the up and down arrow keys to change the order in which the
screens appear.
Button Description
> Moves a selected screen in the Available screens list to the Screens (in order) list.
>> Moves all the screens from the Available screens list to the Screens (in order) list.
< Moves a selected screen from the Screens (in order) list to the Available screens list.
<< Moves all the screens from the Screens (in order) list to the Available screens list.

143 Using Avaya Proactive Contact 4.0 Supervisor
January 2008 144
Chapter 7: Messages and scripts
Messages are the recordings that are played to customers when they are on hold, waiting for an agent, or when an agent plays a message. Scripts are a series of messages that customers hear in the inbound, outbound, and transfer wait queues.
Messages provide the following functions:
● Assure customers that their calls remain connected
● Prepare customers for the upcoming transaction, asking them to have credit cards and order numbers ready
● Answer frequently asked questions
● Promote the business
● Advertise new products and services
You can create messages and scripts if you have administrative privileges. The Messages and Scripts button bar appears in the left-hand pane of Editor.
This section contains the following topics:
● Understanding messages on page 145
● Using messages on page 148
● Maintaining messages on page 151
● Understanding scripts on page 153
● Using scripts on page 156
● Maintaining scripts on page 159
● Understanding Messages and Scripts dialog boxes on page 161
Messages and scripts
145 Using Avaya Proactive Contact 4.0 Supervisor
Understanding messagesMessages are the recordings that are played to customers when they are on hold, waiting for an agent, or when an agent plays a message.
On Avaya Proactive Contact with PG230, your recorded voice messages must be digitized for Avaya Proactive Contact to use them. You choose message files when you set up jobs on the system. Later you can add and remove the messages.
Avaya Proactive Contact provides a wizard to help you add messages to the system and organize them in folders.
Later you can add and remove the messages and folders.
This section contains the following topics:
● Plan messages on page 145
● Telephony file on page 146
● Messages pane on page 148
● Record messages on page 146
● Define and create message text on page 146
Plan messagesIn Avaya Proactive Contact, you can store up to 1970 digitized messages. Each message can be up to one minute in duration. Avaya Proactive Contact can store up to 35 minutes of recorded messages.
Before you record and digitize messages, it is helpful to compose and print the message text.
Consider the following times before you create a message:
● The purpose and use of the message
● The message text
● The male or female voice that delivers the message
● The current number of messages stored in Avaya Proactive Contact
● The category that best identifies the use for the message
● The languages that deliver the message
Understanding messages
January 2008 146
Telephony fileThe telephny.spt files stores scripts. The telephny.spt file on the dialer can not exceed 1500 lines.
! Important:Important: If the number of lines exceed 1500, you receive an error. You cannot save scripts
when the number of lines exceed the 1500.
If the number of lines exceed 1500, Avaya Proactive Contact might do one of the following:
● Not start jobs
● Start jobs but not deliver messages beyond line 1500
To reduce the number of lines in the telephny.spt file, do one or more of the following:
● Remove scripts and messages that you no longer use.
● Contact your Avaya Proactive Contact vendor for assistance.
Record messagesBefore you use Messages Wizard, you must define, record, and digitize audio messages. You have several options for recording audio messages.
For the Avaya Proactive Contact and Avaya Proactive Contact with PG230 systems, you can do the following to record messages:
● Record the audio messages yourself and have a third party digitize the messages.
● Use a service bureau to record and digitize the message.
● Use third party software that records and digitizes the messages.
For the Avaya Proactive Contact with Application Enablement Services, the ACD stores the recorded messages. Refer to the ACD documentation for information on recording voice messages.
When the message is ready for use, save the audio file in a location that is readily accessible to the supervisor workstation. From this workstation, you can assign the digitized audio to a message file in Editor and to a dialer.
Define and create message textMessages Wizard helps you complete the following tasks in Avaya Proactive Contact:
● Add audio messages to Avaya Proactive Contact with PG230 systems.
Messages and scripts
147 Using Avaya Proactive Contact 4.0 Supervisor
● Update existing messages on Avaya Proactive Contact with PG230 systems.
● Identify details about the message, such as is it a male voice, female voice, or music.
Although it is not mandatory, most companies have a written record of the message text.
Using messages
January 2008 148
Using messagesMessage Wizard is available to help you do the following tasks:
● Add a message.
● Add an updated audio portion of an message to Avaya Proactive Contact.
● Store these messages in folders for easy access.
This section contains the following topics:
● Messages pane on page 148
● Start Messages on page 148
● Create message folders on page 149
● Add or update messages on page 149
● Verify a message on page 150
Messages paneThe Messages pane provides a means to add and maintain the messages that customers hear.
Editor displays a tree view that contains folders for script names and descriptions.
● If messages do not display, click the plus symbol to the left of the message name.
● If a plus symbol does not display, there are no messages assigned to the category.
! Important:Important: You use the right-click menu in the right-hand pane to change, or remove
messages and folders.
Start MessagesYou start Messages from Editor if you have administrative privileges.
Use the following procedure to start Messages.
1. Select Start > All Programs > Avaya > Proactive Contact 4.0 > Supervisor > Editor.2. Log in to Editor using your user name and password.
3. Click the Messages and Scripts button group.
Messages and scripts
149 Using Avaya Proactive Contact 4.0 Supervisor
4. Click Messages.
The Messages window appears.
Create message foldersYou can create one or more folders to organize messages.
Use the following procedure to create a folder:
1. Click Messages.
The Messages pane appears.
2. In the right-hand pane, right-click and select New > Folder.Editor adds a folder in the messages tree and selects the row.
3. Right-click the row and select Rename Folder.The Rename Folder dialog box appears.
4. In the New Name field, type a name for the folder and click OK.
Add or update messagesMessages Wizard helps you add a message or update the audio portion of an existing message to the system.
Use the following procedure to start the Messages Wizard:
1. Click Messages.
The Messages pane appears.
2. Select a folder or a message in the Messages pane.
3. Select File > New.
Editor opens Message Wizard. You can define the following information:
● Location of the audio file
● File name
● Type of message: voice or music, and male or female voice
● Folder to store the message
4. Complete the wizard instructions to add or update audio message files to the system.
Use a maximum of eight characters for the file name and three characters for the file extension. When you name the file in the wizard, use a name that clearly identifies the type
Using messages
January 2008 150
of message. For example, "fwait1" can identify the first female message played in a wait queue. "Inmwait1" can identify the first male message playing in an inbound wait queue.
Editor adds the message to the Messages folder.
5. Select File > Save.
Verify a messageUse the following procedure to verify that a message is available on the system:
1. Click Messages.
The Messages pane appears.
2. Select a folder or a message in the Messages pane.
3. Select File > Verify.
Editor opens the Results dialog box.
4. Click OK.
Messages and scripts
151 Using Avaya Proactive Contact 4.0 Supervisor
Maintaining messagesYou can change or remove a message or folder.
This section contains the following topics:
● Add or update messages on page 149
● Remove a message on page 151
● Rename a message folder on page 151
● Remove a folder on page 152
Remove a messageBefore you remove a message, verify that a script does not use the message.
Use the following procedure to remove a message from the Messages pane:
1. Click Messages.
The Messages pane appears.
2. Click the plus sign to expand the folder that contains the message.
3. Select a message.
Editor selects the row.
4. Right-click the row and select Remove.
The Delete dialog box lists the selected message.
5. Verify that the message is the one you want to remove and click OK.
Editor removes the message from the folder. Editor deletes the message when you save messages.
Rename a message folderYou can rename a folder to organize messages.
Use the following procedure to rename a folder:
1. Click Messages.
The Messages pane appears.
2. Select a message folder.
Editor selects the row.
Maintaining messages
January 2008 152
3. Right-click the row and select Rename Folder.The Rename Folder dialog box appears.
4. In the New Name field, enter a name for the folder and click OK.
Remove a folderYou can remove an empty folder from the Messages pane.
Use the following procedure to remove a folder:
1. Click Messages.
The Messages pane appears.
2. Click the plus sign to expand the folder you want to remove.
3. Remove each message from the folder.
For more information, see Remove a message on page 151.
4. Select a message folder.
Editor selects the row.
5. Right-click the row and select Remove Folder.Editor removes the folder.

Messages and scripts
153 Using Avaya Proactive Contact 4.0 Supervisor
Understanding scriptsScripts define how customers hear messages during the following occasions:
● While waiting in inbound, outbound, or transfer queues
● When customers answer a call placed by a virtual agent
● When an agent presses a function key
You designate the order in which Avaya Proactive Contact plays messages. You can choose to play music or have silence between messages.
This section contains the following topics:
● Types of scripts on page 153
● Script actions on page 154
● Script examples on page 154
Types of scriptsAfter you add messages to the system, you create scripts. To create a script, you complete the following tasks:
● Assign messages to a category when the script runs.
● Assign actions to messages.
The following table describes the categories of when scripts run:
Script Description
Automated Messages Messages that agents play to customers when the agent presses any function key.
Inbound Wait Queue Messages that the system plays to customers while waiting for an agent in inbound wait queues.
Outbound Wait Queue Messages that the system plays to customers while waiting for an agent in outbound wait queues and or when an answering machines receives the call.
Transfer Wait Queue Messages that the system plays to customers while waiting to be transferred.
Virtual Wait Queue Messages that the system plays to customers during Virtual Agent jobs. A virtural agent job delivers messages without agent intervention.

Understanding scripts
January 2008 154
Script actionsScript actions define a script. Depending on the script you select in the Scripts left-hand pane, you can do the following when defining a script:
● Select to play the script when an answering machine or voice answers the phone call.
● Assign actions that play additional messages.
The following actions appear in the right-hand pane.
Play message - Plays a recorded message. You select the name of the message file. The file may contain voice or music.
Pause - Specifies how long to wait between messages in inbound, outbound or transfer wait queues. You select the amount of silent delay in seconds.
Start Looping - Instructs the system to repeat the wait queue actions that follow in inbound, outbound or transfer wait queues. You must follow this command with a Play statement. When you set up a job, you can set the maximum time a caller can stay in the queue.
Voice Response - Instructs the system to wait for a voice response in inbound or outbound wait queues. The dialer verifies that the person who placed or received the call is still on the line. If not, the system disconnects the line.
Script examplesThis section provides the following examples of how you can create scripts.
● Outbound wait queue on page 154
● Inbound wait queue on page 155
● Automated message on page 155
Outbound wait queue
The following example shows how you can combine messages in a script.
1. Hold the line please. I have a very important call for you from company name.
2. 5 second pause.
3. Start Looping.
This loop begins with line four. The system repeats all lines below the start looping statement for the length of time listed in Editor.
Messages and scripts
155 Using Avaya Proactive Contact 4.0 Supervisor
4. Sorry to keep you waiting. I am still trying to connect.
5. 5 second pause.
6. Still trying, hold please.
7. 5 second pause.
8. Still trying to connect. Thank you for waiting.
9. 8 second pause.
Inbound wait queue
The following example shows how you can combine messages in a script.
1. Thank you for calling company name. A representative will be with you shortly.
2. 5 second pause.
3. Your call is important to us. Please hold for the next available representative.
4. 7 second pause.
5. Please continue to hold. A representative will be with you momentarily.
6. 7 second pause.
7. Start Looping.
This loop begins with line eight. The system repeats all lines below the start looping statement for the length of time listed in Jobs.
8. Thank you for waiting, please continue to hold.
9. Music.
Automated message
The following script consists of a single message that the system plays when an agent presses a function key.
1. Please call your sales representative for information about a special offer.

Using scripts
January 2008 156
Using scriptsAvaya Proactive Contact provides a Message Script wizard to help you create a message script.
This section contains the following topics:
● Scripts pane on page 156
● Start Scripts on page 156
● Add or update scripts on page 157
● Define a script on page 157
Scripts paneThe Scripts pane provides a means to create and maintain message scripts that play the messages customers hear.
Left-hand pane - Editor displays a tree view organizes script names and descriptions into categories of when the system runs the script.
● If scripts do not display, click the plus symbol to the left of the script name.
● If a plus symbol does not display, there are no scripts assigned to the category.
Right-hand pane - The right-hand pane appears when you select a script. The Detail tab lists the actions for the script. Depending on the when the script runs, you can assign actions that tells Avaya Proactive Contact how to play messages.
Tip:Tip: You can use the right-click menu in the right-hand pane to add, change, or
remove actions.
Start ScriptsYou start Scripts from Editor.
Use the following procedure to start Scripts:
1. Select Start > All Programs > Avaya > Proactive Contact 4.0 > Supervisor > Editor.2. Click the Messages and Scripts button group.
Messages and scripts
157 Using Avaya Proactive Contact 4.0 Supervisor
3. Click Scripts.
The Scripts pane appears.
Add or update scriptsMessage Scripts Wizard helps you create and update a message script. Scripts define one or more messages that customers can hear.
! Important:Important: The changes you make to a script become available for use the next time you
restart the dialer.
You can use the right-click menu in the right-hand pane to add, change, or remove actions.
Use the following procedure to start the Messages Script Wizard:
1. Click Scripts.
The Scripts pane appears.
2. Select File > New.
Editor opens Message Script Wizard.
3. Complete the wizard instructions to add or update scripts to Avaya Proactive Contact.
Tip:Tip: The is a time limit that you can leave a file open for editing. Depending on your
system configuration, the default value is 60 minutes. We recommend that you save each new script after you add or update the script.
4. Select File > Save.
Define a scriptWhen you define a script, you can assign one or more of the following actions to the script:
● Play a message
● Pause
● Start a loop
● Wait for a response
Use the following procedure to define a script:
1. Click Scripts.
The Scripts pane appears.
Using scripts
January 2008 158
2. Select a script in the left-hand pane.
Depending on the script you select, you can play the script when an answering machine and voice answers the phone call.
3. Select If a machine answers... or While a person is waiting for an agent.4. Right-click the response and select Add an Action.
Tip:Tip: You can also select a location in the script, then drag and drop an action icon to a
location in the script.
Editor displays the Message Script Wizard.
5. Complete the wizard instructions to add an action to the script.
Editor adds the action below the response. Depending on the script you can select additional actions.
6. To add another action to the response, repeat step 5 or right-click and select Add an Action.
7. To add actions to the other response, repeat steps 3, 4, and 5.
8. Select File > Save.
Messages and scripts
159 Using Avaya Proactive Contact 4.0 Supervisor
Maintaining scriptsYou can change or remove a script action and script.
Tip:Tip: You can also use the right-click menu in the right-hand pane to add, change, or
remove actions.
This section contains the following topics:
● Change a script action on page 159
● Remove a script action on page 159
● Change a script on page 160
● Remove a script on page 160
Change a script actionUse the following procedure to change an action for a script:
1. Click Scripts.
The Scripts pane appears.
2. Click the action you want to change.
3. Right-click the action and select Change an Action.
Editor displays the Message Script Wizard.
4. Complete the wizard instructions to change an action or message to play.
5. To change another action, repeat steps 2, 3, and 4.
6. Select File > Save.
Remove a script actionUse the following procedure to remove an action from a script:
1. Click Scripts.
The Scripts pane appears.
2. Click the action you want to change.
Maintaining scripts
January 2008 160
3. Right-click the action and select Remove an Action.
Editor removes the action from the response.
4. To remove actions for another response, repeat steps 2 and 3.
5. Select File > Save.
Change a scriptYou can change the name and description of a script.
Use the following procedure the change a script:
1. Click Scripts.
The Scripts pane appears.
2. Select a script from a category.
3. Right-click and select Change.
Editor opens the Message Script Wizard window.
4. Complete the wizard instructions to change the script.
5. Select File > Save.
Remove a scriptYou can remove a script that you or another person created. You cannot remove a script that is reserved by Avaya Proactive Contact.
Use the following procedure the remove a script:
1. Click Scripts.
The Scripts pane appears.
2. Click the plus sign to expand the category that contains the message.
3. Select a script from a category.
Editor selects the row.
4. Right-click the row and select Remove.
Editor removes the script from the category.
Messages and scripts
161 Using Avaya Proactive Contact 4.0 Supervisor
Understanding Messages and Scripts dialog boxesThis section contains the following topics:
● Delete dialog box on page 161
● Rename Folder dialog box on page 161
Delete dialog boxThe Delete dialog box allows you to remove selected message from Avaya Proactive Contact.
Rename Folder dialog boxThe Rename Folder dialog box allows you to name or give the folder another name.
January 2008 162
Chapter 8: Monitor settings
Avaya Proactive Contact allows you to monitor real time calling activities.
Monitor allows you to define how to view real time calling activities.
You can define how to monitor calling activities in the following ways:
● Arrange data
● Specify the time range
● Change a job as the job runs
● Customize a view according to completion code
● Customize a view according to an agent’s state
● Determine the refresh rate and the preferred saving method
You can modify the Monitor default settings during a job from the Monitor toolbar. You can also save the changes to a custom view for use the next time you use Monitor.
Monitor applies the default settings to the view when you open Monitor. To use the customized settings, select the custom view from the button bar.
The button groups on the left pane filter the type of information you see by the following views:
● View set
● Dialer
● Job
● Supervisor
● Agent
● Custom
The buttons in each view set display detailed information about that view.
This section contains the following topics:
● Understanding Monitor on page 163
● Using Monitor settings on page 164

Monitor settings
163 Using Avaya Proactive Contact 4.0 Supervisor
Understanding MonitorMonitor allows you to define how to view real time calling activities.
This section contains the following topic:
● Monitor window description on page 163
Monitor window descriptionMonitor has a button bar on the left-hand side of the screen and an area on the right-hand side to display various windows or views.
A view is a window that displays when you click a button in the button bar. In each view, you can filter information and customize how you monitor the calling activities, including sorting data and resizing columns.
Button group - Expands and contracts to display buttons associated with the group. Click a button to display a view.
Views - Display data based on the type of calling activity and specific criteria. You can use the toolbar options in each view to modify and create views. Monitor lists views that you create in the Custom group.
To sort the contents of a view, click a column heading.
Tip:Tip: An arrow appears in the column heading to indicate the sort order. An up arrow
identifies that the data is in ascending order. A down arrow point identifies that the data is in descending order.
To resize columns in a view:
1. Hover your cursor between the heading titles until a double-arrow appears.
2. Hold down the left mouse button and drag the cursor to resize the columns.
For more information on views, see the following topics:
● To customize individual views using the toolbar, see Create a custom view on page 172.
● To learn more about the various Monitor views and how to customize each view, see the Using view controls on page 210.
Using Monitor settings
January 2008 164
Using Monitor settingsYou can modify the Monitor default settings during a job from the Monitor toolbar. You can also save the changes to a custom view for use the next time you use Monitor.
Monitor applies the default settings when you open Monitor. To use the customized settings, select the custom view from the button bar.
This section contains the following topics:
● Set the default hierarchy on page 164
● Set time range on page 165
● Set multi-dialer views on page 165
● Set agent states to display on page 166
● Set the view set on page 166
● Set save on exit settings on page 167
● Set alert monitoring on page 167
Set the default hierarchyThe default hierarchy is set in the Options dialog box.
The Scope tab affects the options you see in a view’s toolbar.
Note:Note: You must create a custom or an agent/supervisor hierarchy before you can select
a hierarchy from the Scope tab.
For example, on the Scope tab, you select a hierarchy from the agent/supervisor list, then, when a view is opened and you select agent/supervisor hierarchy from the list that appears when you click the Hierarchy Manager toolbar icon, the hierarchy defined on the Scope tab is used.
Use the following procedure to set the default hierarchy:
3. In Monitor, select Settings > Options.
4. In the Options dialog box, select the Scope tab. For more information, see Options, Scope tab on page 235.
5. Under How should data be arranged, select a hierarchy from the following drop-down lists:
● Select a hierarchy from he Agent/supervisor list to use as the default view when you select the Use the agent/supervisor hierarchy option in any view.
Monitor settings
165 Using Avaya Proactive Contact 4.0 Supervisor
Note:Note: If you select Use custom Hierarchy, you need to have previously created
hierarchies using the Hierarchy Manager tool.
● Select a custom hierarchy from the Custom Hierarchy list to use as the default view when you select the Use custom hierarchy option in any view.
6. Click OK or Apply.
Set time rangeThe time range is set in the Options dialog box. The preferences that you specify in the Options dialog box’s Scope tab dynamically affect the Time Scope button on all of your views’ toolbars.
Use the following procedure to set the time range:
1. In Monitor, select Settings > Options.
2. In the Options dialog box, select the Scope tab. For more information, see Options dialog box on page 235.
3. Under What time range should views support, select Show data for both active and recent jobs if you want to see data for both currently running jobs and jobs that have run today but have since shutdown.
Set multi-dialer viewsUse the Multi-Dialer tab to choose which dialers you can execute commands against.
Use the following procedure to set mulit-dialer views:
1. In Monitor, select Settings > Options.
2. In the Options dialog box, select the Multi-Dialer tab. For more information, see Options, Multi-Dialer Control tab on page 236.
3. To set up how to apply the job changes, complete one of the following steps:
a. To apply job changes to all dialers, select Apply job changes to all selected dialers.
OR
b. To apply job changes to specific dialers, select the name of each dialer in the Dialer list to which you want to apply job changes.
c. Click OK.
Using Monitor settings
January 2008 166
Set agent states to displayUse the Agent States tab to choose which agent states to display. For example, the “state” of an agent might include any of the following agent states:
● Talk
● Update a record
● Idle
● ACD
● Logging off
● Off job
● Offline
● Not Available
Use the following procedure to display agent states:
1. In Monitor, select Settings > Options.
2. In the Options dialog box, select the Agent States tab. For more information, see Options, Agent States tab on page 236.
3. Select which states to display, and then click OK.
Set the view setUse the Appearance tab to set the view set and refresh rate.
Use the following procedure to set the view and refresh rate:
1. In Monitor, select Settings > Options.
2. In the Options dialog box, select the Appearance tab. For more information, see Options, Appearance tab on page 236.
3. Enter the view set to use, or select Browse to locate your view set.
4. Click the up or down arrow to set the refresh interval, in seconds, for your views.
5. Click OK.
Monitor settings
167 Using Avaya Proactive Contact 4.0 Supervisor
Set save on exit settingsUse the Feedback tab to choose how to save changes to views and view sets when the application closes.
1. In Monitor, select Settings > Options.
2. In the Options dialog box, select the Feedback tab.
3. Below each choice, select when to save changes, and then click OK.
Set alert monitoringUse the Alerts tab to start alert monitoring automatically and to disable email alert notifications.
Use the following procedure to set alert monitoring:
1. In Monitor, select Settings > Options.
2. In the Options dialog box, select the Alerts tab.
3. Select each of the following check boxes that you want to apply to alerts:
● Start alert monitoring automatically● Disable e-mail notifications
January 2008 168
Chapter 9: Customize Monitor
Avaya Proactive Contact allows you to navigate among the tool applications and customize the Monitor views.
This section contains the following topics:
● Navigate among the Tool menu applications on page 169
● Using a Monitor view on page 170
● Customizing Monitor views on page 172
● Managing custom views on page 175
Customize Monitor
169 Using Avaya Proactive Contact 4.0 Supervisor
Navigate among the Tool menu applicationsMonitor comes with tool applications that you access from the Tools menu.
Use the following procedure to start Tools menu applications:
1. Select Start > All Programs > Avaya > Proactive Contact 4.0> Supervisor > Monitor.2. To start a tool, select the tool option from the Tools menu.
While you use the tool, Monitor remains open in the background so that you can navigate back to Monitor when you are finished using the tool.
Using a Monitor view
January 2008 170
Using a Monitor viewMonitor comes with tool applications that you access from the Tools menu.
This section contains the following topics to help you open a view:
● View icons in the button bar on page 170
● Open a standard view on page 170
● Open a view or view set from another location on page 171
● Open a view about a specific agent on page 171
View icons in the button barYou can view large or small buttons on the button bar.
Use the following procedure to switch between large and small icons in the button bar:
1. On the button bar, click a group name to expand the button bar whose icon size you want to change.
2. Right-click, and then select either Large Icons or Small Icons.
A check mark next to the menu command indicates which view you are currently using.
Open a standard viewUse the following procedure to open a standard view in Monitor:
1. On the Monitor button bar, click one of the following group of views:
● View Set● Dialer● Job● Supervisor● Agent● Custom
2. Click the view you want to open.
The view opens as a new window in the right-hand pane.
Customize Monitor
171 Using Avaya Proactive Contact 4.0 Supervisor
Open a view or view set from another locationUse the following procedure to open a view or view set from another location:
1. In Monitor, select File > Open.
2. Locate and select the view or view set you want to open, or type the file name in the File name field, and then click Open.
The view or view set opens as a new window in the right-hand pane.
Open a view about a specific agentYou can display the following views to list information about a specific agent:
● Agent Detail
● Agent Completion Codes
● Agent History
Use the following procedure to open a view about a specific agent:
1. Display a view that lists agents, for example Dialer Agents or Job Agents.
2. Select an agent in the view.
3. Select Tools, and then a view.
Customizing Monitor views
January 2008 172
Customizing Monitor viewsIn Monitor, you can customize and save a view. You can also save multiple views as a view set. The Monitor wizard helps you customize how you monitor calling activities for the contact center and specific jobs.
This section contains the following topics to help you customize a view:
● Create a custom view on page 172
● Save current view on page 172
● Save as a view set on page 173
● Save view set with a new name on page 173
Create a custom viewUse the following procedure to create a custom view:
1. In Monitor, select File > New.
The New View Wizard opens.
2. Follow the steps in the View Wizard to create your custom view.
Save current viewUse the following procedure to save a current view:
1. On the Monitor button bar, click one of the following group of views:
● View Set● Dialer● Job● Supervisor● Agent● Custom
2. Click the button for the view you want to open.
3. Alter the view using the view’s toolbar.
4. When you have the view set up the way you want, select File > Save.
The next time you select the view, your saved preferences appear.
Customize Monitor
173 Using Avaya Proactive Contact 4.0 Supervisor
Save as a view setIn Monitor, you can open one or more views and save the views as set for use later from the View Set button bar.
Use the following procedure to save a view set:
1. On the Monitor button bar, click one of the following group of views:
● View Set● Dialer● Job● Supervisor● Agent● Custom
2. Select the button for the view you want to open.
The view opens as a new window in the right-hand pane
3. Repeat steps 1 and 2 until you have all necessary views open.
4. Select File > Save All As.
5. Browse to the location where you want to save the view set, enter a name, and then click OK.
6. In the Add a Custom View dialog, enter the name for the view set, and then click OK.
A button for the view set appears in the View Set group.
Save view set with a new nameUse the following procedure to save a view set with a new name:
1. On the Monitor button bar, click one of the following views:
● View Set● Dialer● Job● Supervisor● Agent● Custom
2. Click the button for the view set you want to open. The view set opens.

Customizing Monitor views
January 2008 174
3. Select File > Save All As.
4. Enter the name you want to give your view set, and then click OK. The view set’s new name appears in the View Set button bar.
Customize Monitor
175 Using Avaya Proactive Contact 4.0 Supervisor
Managing custom viewsThis section contains the following topics to help you manage custom views:
● Delete a view set on page 175
● Add a view to the Custom button group on page 175
● Refresh a view on page 175
Delete a view setUse the following procedure to delete a view set:
1. On the Monitor button bar, click View Set.2. Right-click the view set you want to delete, and then select Remove View Set.
Add a view to the Custom button groupTo create a button, you must have a view open in the main pane.
Use the following procedure to add a view to the Custom button group:
1. Open a view that you would like to have as a button.
2. Select File > Save As.
3. Enter a name and then click OK.
The view automatically appears in the Custom button group.
Refresh a viewTo refresh an open view, press the F5 key.
January 2008 176
Chapter 10: Use Monitor views
Monitor uses the button bar in the left-hand side of the window as the primary navigation point for opening views. Monitor displays views in window on right-hand side of your screen.
You can do the following tasks from the Monitor button bar:
● Open and save favorite views
● Display views according to completion codes
● Display views according to agent and supervisor relationships
● Configure alerts so that you can receive notifications from the Avaya Proactive Contact.
This section contains the following topics
● Understanding view windows on page 177
● Using views on page 180
Use Monitor views
177 Using Avaya Proactive Contact 4.0 Supervisor
Understanding view windowsA view displays information about dialers, jobs, agents, and completion codes in a separate window.
In Monitor, you can create views, save the view when you exit Monitor, and then restore the views. This allows you to use the same views without recreating specific views.
Use the button bar to access and organize the available views. Use the View toolbar to modify how the view displays data.
This section contains the following topics:
● Types of views on page 177
● View toolbar on page 178
Types of viewsUse the Monitor button bar to display the following types group of views:
View Set - Displays the set of views that you create and save.
Dialer - Lists views that display calling activity data about dialers.
● Dialer Status - Displays the job, agent, and line resources used on a dialer. For view details, see Dialer Status view on page 180.
● Dialer Agents - Displays the agents logged in to one or more dialers. For view details, see Dialer Agents view on page 182.
● Dialer Lines - Displays line assignments and activity levels for each job. For view details, see Dialer Lines view on page 183.
● Dialer History - Displays dialer activity over time. For view details, see Dialer History view on page 184.
Job - Lists views that display calling activity data about jobs:
● Job Status - Displays the job, agent, and line resources used on a dialer grouped and totaled by the job. For view details, see Job Status view on page 185.
● Job Agents - Displays the agents who are joined to jobs. For view details, see Job Agents view on page 186.
● Job Detail - Displays detailed information about the performance of a job, including connect, RPC, and closure rates. For view details, see Job Detail view on page 188.
Understanding view windows
January 2008 178
● Job Call Handling - Displays how much time each agent spends talking to customers, updating records, and waiting for the next call. For view details, see Job Call Handling view on page 190.
● Job Completion Codes - Displays completion codes used during the job. For view details, see Job Completion Codes view on page 191.
● Job Wait Queues - Displays information about calls directed to the wait queue during a job, including the number of calls currently in queue, the number abandoned, and the average wait time for each call. For view details, see Job Wait Queues view on page 192.
● Job History - Displays dialer activity over time grouped by job. For view details, see Job History view on page 194.
● Job Performance - Compares agent performance on a selected completion code.For view details, see Completion Code Detail by Agent view on page 196
● Job Quality - Displays information about the quality of service that dialers achieve during a job. For view details, see Job Quality view on page 197.
Supervisor - Displays information about Supervisor Agents. For view details, see Supervisor Agents view on page 199.
Displays the agents active on one or more dialers grouped by job.
Agent - Displays information about. Agent data for a job and allows you to find an agent. For view details, see Find Agent view on page 200.
Custom - Displays the customized views that you create.
You can display a view about a specific agent from any view that lists agents from the Tools menu. For more information see, Open a view about a specific agent on page 171.
View toolbarYou can use the view toolbar to display the information in the following formats:
Table view - Displays the data without icons. Table View is enabled if the view has two presentation modes.
Graphic View - Displays the data with icons. Graphic View is enabled if the view has two presentation modes.
Filter Data - Allows you to filter the data in the view according to one selected criteria.
Performance Code - In the Job Performance View only, you can select which completion code to use when monitoring job performance.
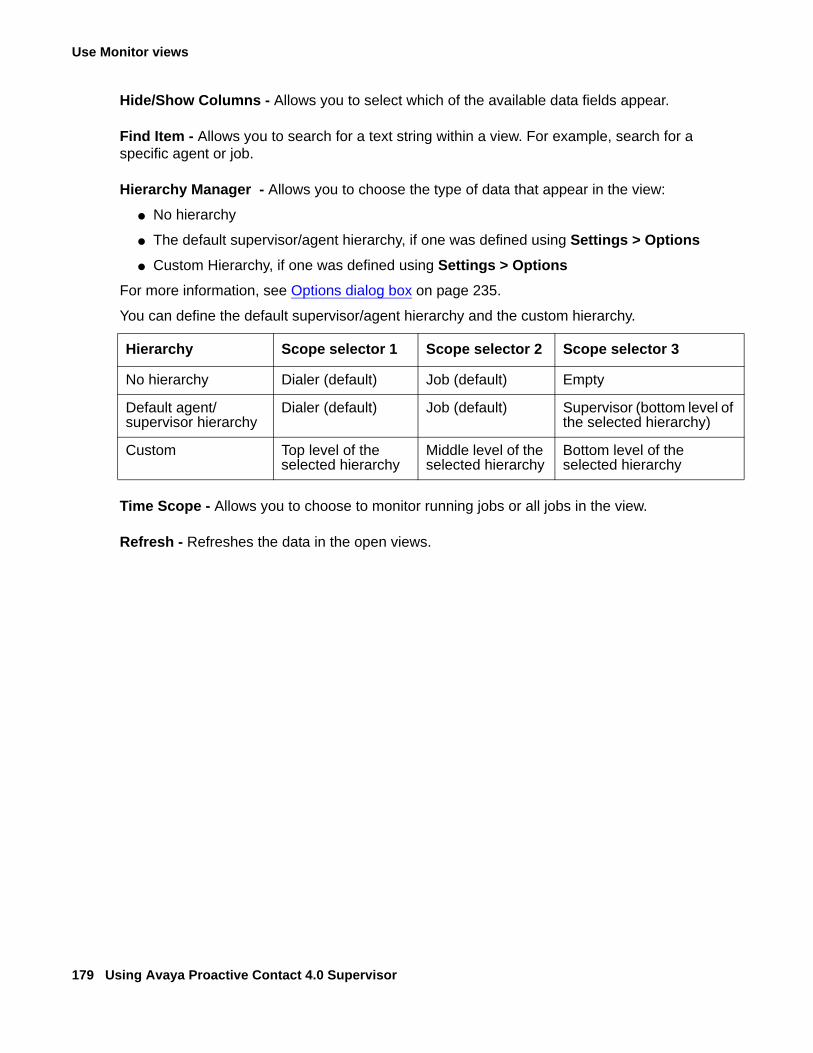
Use Monitor views
179 Using Avaya Proactive Contact 4.0 Supervisor
Hide/Show Columns - Allows you to select which of the available data fields appear.
Find Item - Allows you to search for a text string within a view. For example, search for a specific agent or job.
Hierarchy Manager - Allows you to choose the type of data that appear in the view:
● No hierarchy
● The default supervisor/agent hierarchy, if one was defined using Settings > Options● Custom Hierarchy, if one was defined using Settings > Options
For more information, see Options dialog box on page 235.
You can define the default supervisor/agent hierarchy and the custom hierarchy.
Time Scope - Allows you to choose to monitor running jobs or all jobs in the view.
Refresh - Refreshes the data in the open views.
Hierarchy Scope selector 1 Scope selector 2 Scope selector 3
No hierarchy Dialer (default) Job (default) Empty
Default agent/supervisor hierarchy
Dialer (default) Job (default) Supervisor (bottom level of the selected hierarchy)
Custom Top level of the selected hierarchy
Middle level of the selected hierarchy
Bottom level of the selected hierarchy
Using views
January 2008 180
Using viewsMonitor provides a variety of views that allow you to monitor calling activities for the following components and users:
● Dialers
● Jobs
● Supervisors
● Agents
This section contains the following topics:
● Dialer Status view on page 180
● Dialer Agents view on page 182
● Dialer Lines view on page 183
● Dialer History view on page 184
● Job Status view on page 185
● Job Detail view on page 188
● Job Agents view on page 186
● Job Call Handling view on page 190
● Job Completion Codes view on page 191
● Job Wait Queues view on page 192
● Job History view on page 194
● Completion Code Detail by Agent view on page 196
● Job Quality view on page 197
● Supervisor Agents view on page 199
● Find Agent view on page 200
● Agent Detail view on page 201
● Agent Completion Codes view on page 203
● Agent History view on page 204
Dialer Status viewThe Dialer Status view displays the job, agent, and line resources used on a dialer. The view shows the following data:
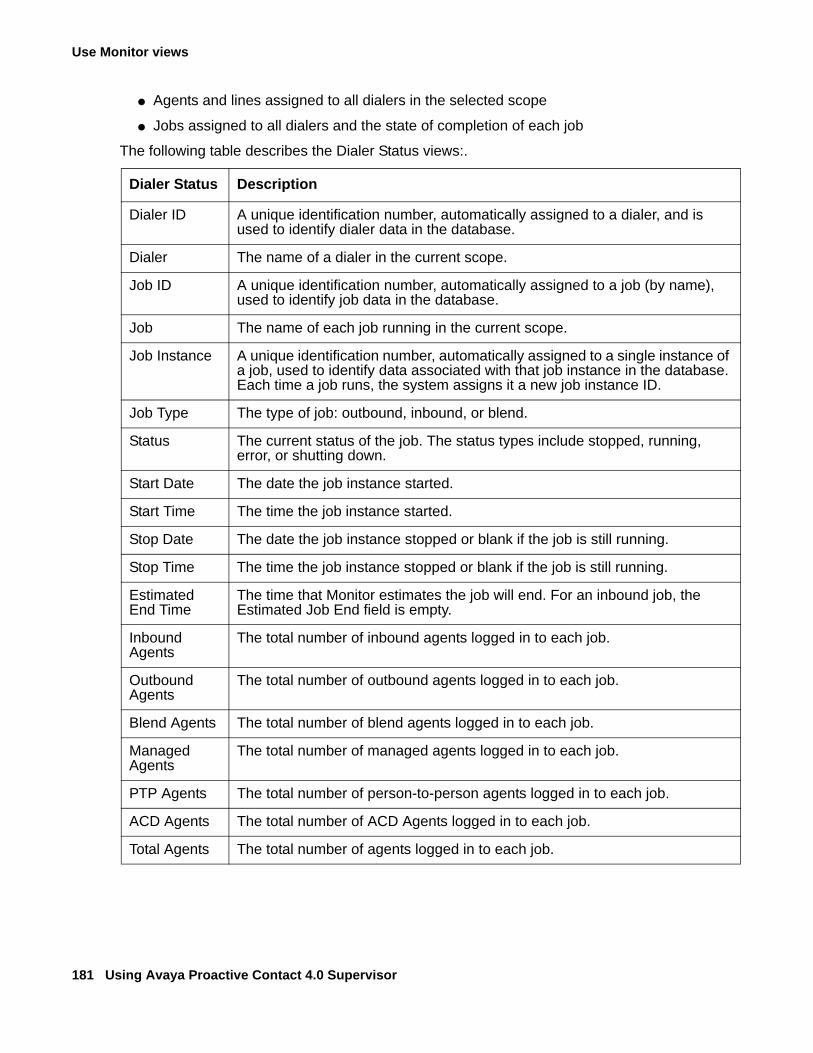
Use Monitor views
181 Using Avaya Proactive Contact 4.0 Supervisor
● Agents and lines assigned to all dialers in the selected scope
● Jobs assigned to all dialers and the state of completion of each job
The following table describes the Dialer Status views:.
Dialer Status Description
Dialer ID A unique identification number, automatically assigned to a dialer, and is used to identify dialer data in the database.
Dialer The name of a dialer in the current scope.
Job ID A unique identification number, automatically assigned to a job (by name), used to identify job data in the database.
Job The name of each job running in the current scope.
Job Instance A unique identification number, automatically assigned to a single instance of a job, used to identify data associated with that job instance in the database. Each time a job runs, the system assigns it a new job instance ID.
Job Type The type of job: outbound, inbound, or blend.
Status The current status of the job. The status types include stopped, running, error, or shutting down.
Start Date The date the job instance started.
Start Time The time the job instance started.
Stop Date The date the job instance stopped or blank if the job is still running.
Stop Time The time the job instance stopped or blank if the job is still running.
Estimated End Time
The time that Monitor estimates the job will end. For an inbound job, the Estimated Job End field is empty.
Inbound Agents
The total number of inbound agents logged in to each job.
Outbound Agents
The total number of outbound agents logged in to each job.
Blend Agents The total number of blend agents logged in to each job.
Managed Agents
The total number of managed agents logged in to each job.
PTP Agents The total number of person-to-person agents logged in to each job.
ACD Agents The total number of ACD Agents logged in to each job.
Total Agents The total number of agents logged in to each job.
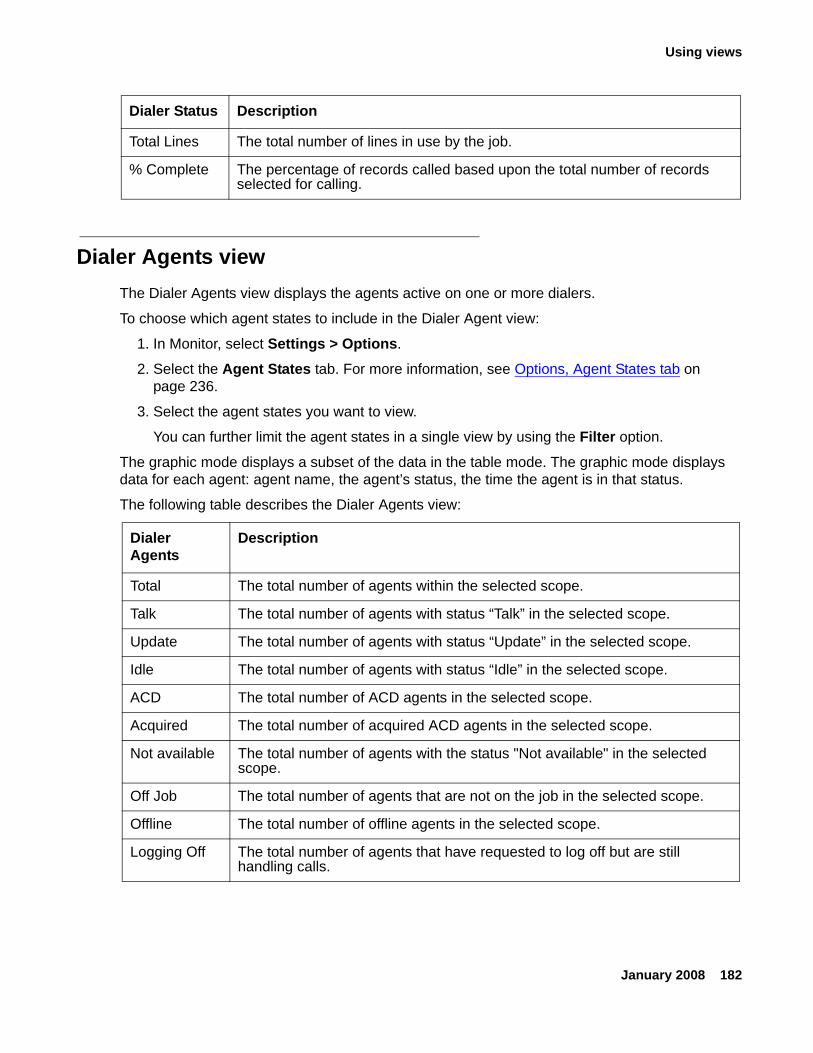
Using views
January 2008 182
Dialer Agents viewThe Dialer Agents view displays the agents active on one or more dialers.
To choose which agent states to include in the Dialer Agent view:
1. In Monitor, select Settings > Options.
2. Select the Agent States tab. For more information, see Options, Agent States tab on page 236.
3. Select the agent states you want to view.
You can further limit the agent states in a single view by using the Filter option.
The graphic mode displays a subset of the data in the table mode. The graphic mode displays data for each agent: agent name, the agent’s status, the time the agent is in that status.
The following table describes the Dialer Agents view:
Total Lines The total number of lines in use by the job.
% Complete The percentage of records called based upon the total number of records selected for calling.
Dialer Status Description
Dialer Agents
Description
Total The total number of agents within the selected scope.
Talk The total number of agents with status “Talk” in the selected scope.
Update The total number of agents with status “Update” in the selected scope.
Idle The total number of agents with status “Idle” in the selected scope.
ACD The total number of ACD agents in the selected scope.
Acquired The total number of acquired ACD agents in the selected scope.
Not available The total number of agents with the status "Not available" in the selected scope.
Off Job The total number of agents that are not on the job in the selected scope.
Offline The total number of offline agents in the selected scope.
Logging Off The total number of agents that have requested to log off but are still handling calls.
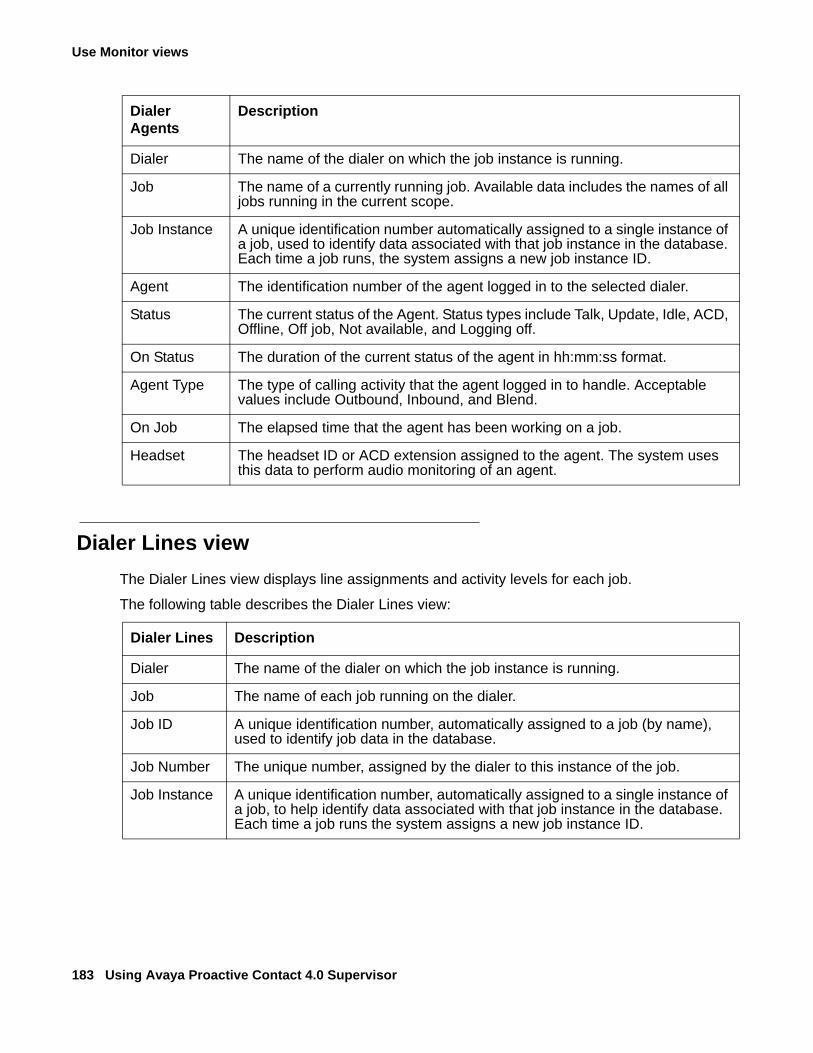
Use Monitor views
183 Using Avaya Proactive Contact 4.0 Supervisor
Dialer Lines viewThe Dialer Lines view displays line assignments and activity levels for each job.
The following table describes the Dialer Lines view:
Dialer The name of the dialer on which the job instance is running.
Job The name of a currently running job. Available data includes the names of all jobs running in the current scope.
Job Instance A unique identification number automatically assigned to a single instance of a job, used to identify data associated with that job instance in the database. Each time a job runs, the system assigns a new job instance ID.
Agent The identification number of the agent logged in to the selected dialer.
Status The current status of the Agent. Status types include Talk, Update, Idle, ACD, Offline, Off job, Not available, and Logging off.
On Status The duration of the current status of the agent in hh:mm:ss format.
Agent Type The type of calling activity that the agent logged in to handle. Acceptable values include Outbound, Inbound, and Blend.
On Job The elapsed time that the agent has been working on a job.
Headset The headset ID or ACD extension assigned to the agent. The system uses this data to perform audio monitoring of an agent.
Dialer Agents
Description
Dialer Lines Description
Dialer The name of the dialer on which the job instance is running.
Job The name of each job running on the dialer.
Job ID A unique identification number, automatically assigned to a job (by name), used to identify job data in the database.
Job Number The unique number, assigned by the dialer to this instance of the job.
Job Instance A unique identification number, automatically assigned to a single instance of a job, to help identify data associated with that job instance in the database. Each time a job runs the system assigns a new job instance ID.
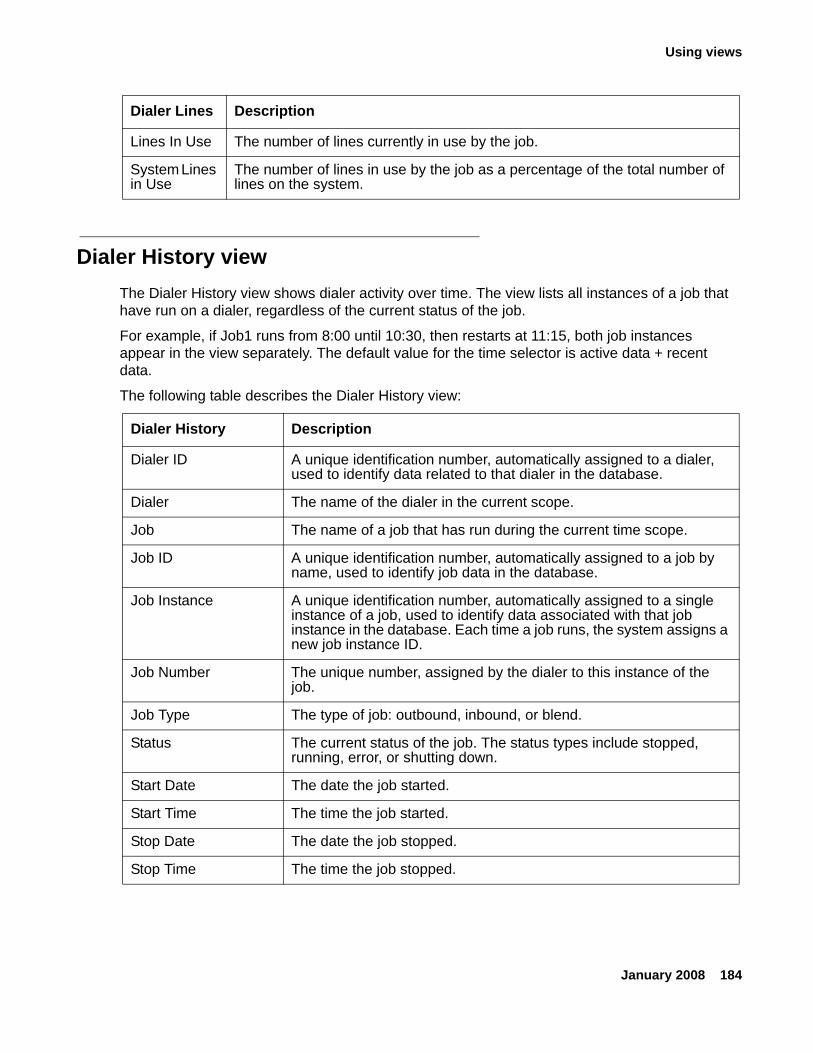
Using views
January 2008 184
Dialer History viewThe Dialer History view shows dialer activity over time. The view lists all instances of a job that have run on a dialer, regardless of the current status of the job.
For example, if Job1 runs from 8:00 until 10:30, then restarts at 11:15, both job instances appear in the view separately. The default value for the time selector is active data + recent data.
The following table describes the Dialer History view:
Lines In Use The number of lines currently in use by the job.
System Lines in Use
The number of lines in use by the job as a percentage of the total number of lines on the system.
Dialer Lines Description
Dialer History Description
Dialer ID A unique identification number, automatically assigned to a dialer, used to identify data related to that dialer in the database.
Dialer The name of the dialer in the current scope.
Job The name of a job that has run during the current time scope.
Job ID A unique identification number, automatically assigned to a job by name, used to identify job data in the database.
Job Instance A unique identification number, automatically assigned to a single instance of a job, used to identify data associated with that job instance in the database. Each time a job runs, the system assigns a new job instance ID.
Job Number The unique number, assigned by the dialer to this instance of the job.
Job Type The type of job: outbound, inbound, or blend.
Status The current status of the job. The status types include stopped, running, error, or shutting down.
Start Date The date the job started.
Start Time The time the job started.
Stop Date The date the job stopped.
Stop Time The time the job stopped.

Use Monitor views
185 Using Avaya Proactive Contact 4.0 Supervisor
Job Status viewThe Job Status view displays the same data as the Dialer Status view, but is grouped and totaled by job.
The following table displays the Job Status view:
Estimated End Date The date that Monitor estimates the job will end. For an inbound job, this field is empty
Estimated Job End The time that Monitor estimates the job will end. For an inbound job, this field is empty.
Connects The total number of connects, both inbound and outbound, for each job instance. A subtotal appears for each job and each dialer.
RPCs The total number of calls released as right-party contacts (RPCs) for each job instance. A subtotal appears for each job and each dialer.
Closures The total number of calls released as closures for each job instance. A subtotal appears for each job and each dialer.
Abandons The total number of calls released as abandoned for each job instance. A subtotal appears for each job and each dialer.
Elapsed Time The total time since the job instance started.
Agent Hours The total number of hours agents have joined to a job instance over the course of the job. A subtotal appears for each job and each dialer.
Total Records The total number of records selected for the job. For inbound jobs, this field is always zero.
Dialed The total number of records used to call during the course of the job. A subtotal appears for each job and each dialer.
Dialer History Description
Job Status Description
DialerID A unique identification number, automatically assigned to a dialer, used to identify data related to that dialer in the database.
Dialer The name of a dialer in the current scope.
Job ID A unique identification number, automatically assigned to a job by name, used to identify job data in the database.
Job The job name appears in the window title bar.
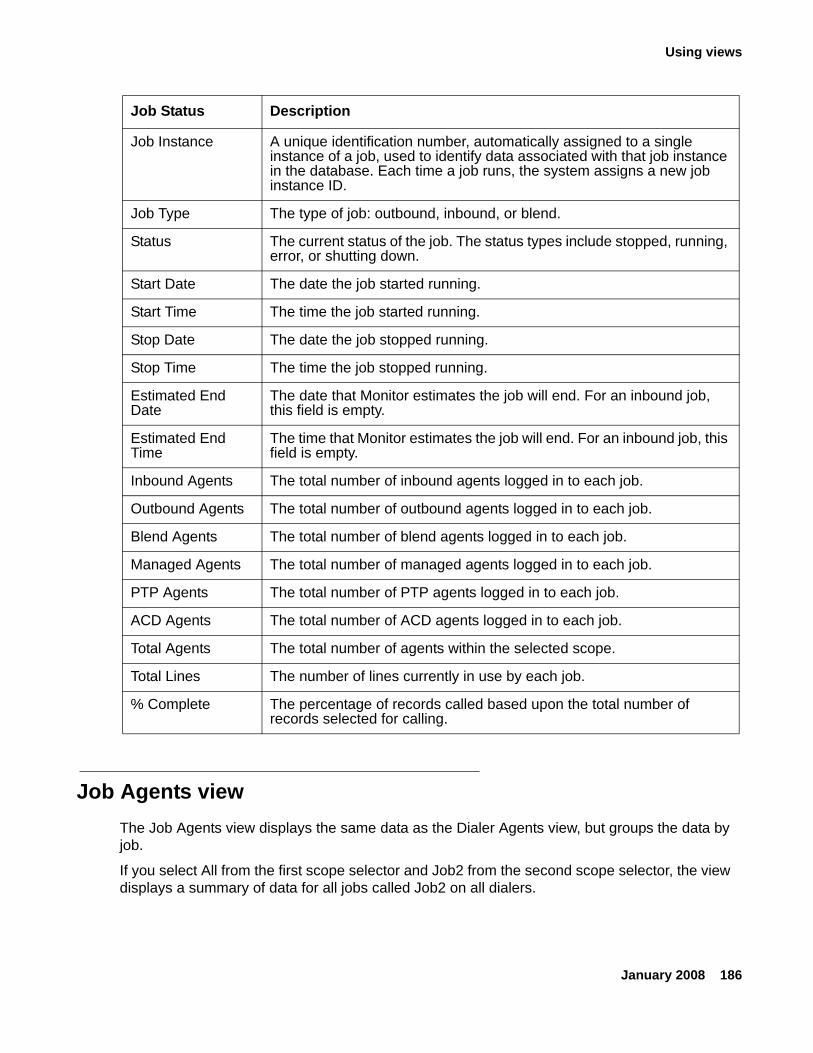
Using views
January 2008 186
Job Agents viewThe Job Agents view displays the same data as the Dialer Agents view, but groups the data by job.
If you select All from the first scope selector and Job2 from the second scope selector, the view displays a summary of data for all jobs called Job2 on all dialers.
Job Instance A unique identification number, automatically assigned to a single instance of a job, used to identify data associated with that job instance in the database. Each time a job runs, the system assigns a new job instance ID.
Job Type The type of job: outbound, inbound, or blend.
Status The current status of the job. The status types include stopped, running, error, or shutting down.
Start Date The date the job started running.
Start Time The time the job started running.
Stop Date The date the job stopped running.
Stop Time The time the job stopped running.
Estimated End Date
The date that Monitor estimates the job will end. For an inbound job, this field is empty.
Estimated End Time
The time that Monitor estimates the job will end. For an inbound job, this field is empty.
Inbound Agents The total number of inbound agents logged in to each job.
Outbound Agents The total number of outbound agents logged in to each job.
Blend Agents The total number of blend agents logged in to each job.
Managed Agents The total number of managed agents logged in to each job.
PTP Agents The total number of PTP agents logged in to each job.
ACD Agents The total number of ACD agents logged in to each job.
Total Agents The total number of agents within the selected scope.
Total Lines The number of lines currently in use by each job.
% Complete The percentage of records called based upon the total number of records selected for calling.
Job Status Description
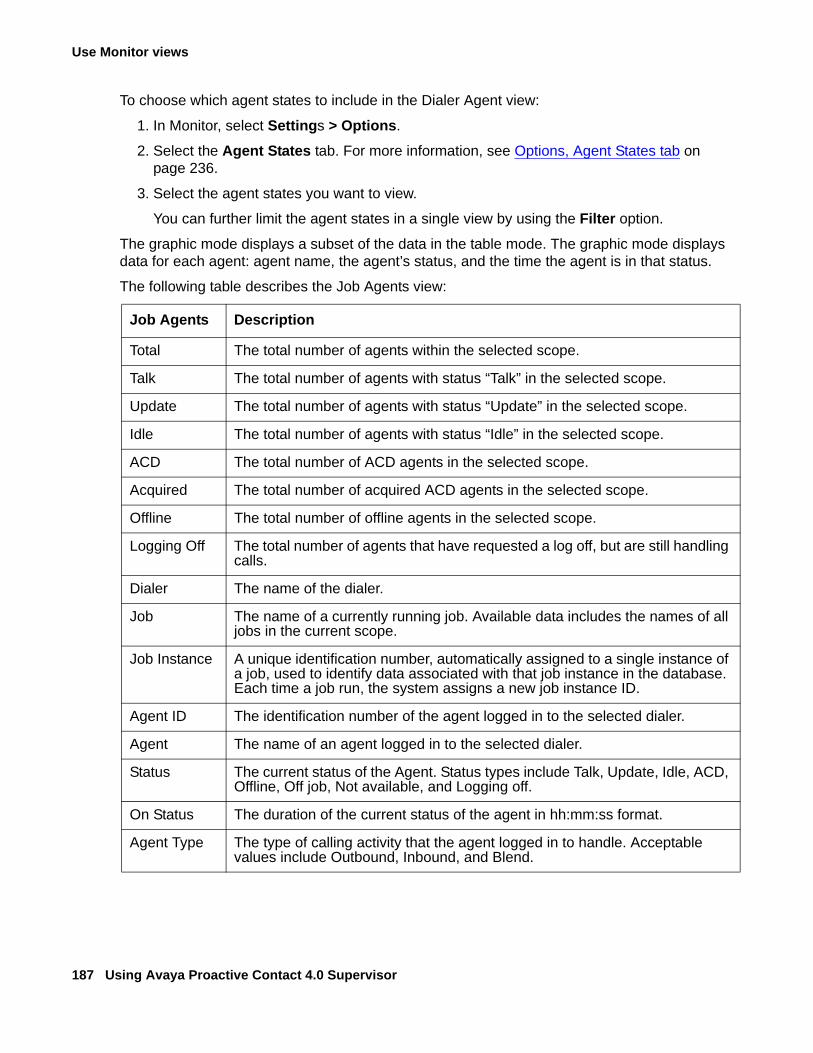
Use Monitor views
187 Using Avaya Proactive Contact 4.0 Supervisor
To choose which agent states to include in the Dialer Agent view:
1. In Monitor, select Settings > Options.
2. Select the Agent States tab. For more information, see Options, Agent States tab on page 236.
3. Select the agent states you want to view.
You can further limit the agent states in a single view by using the Filter option.
The graphic mode displays a subset of the data in the table mode. The graphic mode displays data for each agent: agent name, the agent’s status, and the time the agent is in that status.
The following table describes the Job Agents view:
Job Agents Description
Total The total number of agents within the selected scope.
Talk The total number of agents with status “Talk” in the selected scope.
Update The total number of agents with status “Update” in the selected scope.
Idle The total number of agents with status “Idle” in the selected scope.
ACD The total number of ACD agents in the selected scope.
Acquired The total number of acquired ACD agents in the selected scope.
Offline The total number of offline agents in the selected scope.
Logging Off The total number of agents that have requested a log off, but are still handling calls.
Dialer The name of the dialer.
Job The name of a currently running job. Available data includes the names of all jobs in the current scope.
Job Instance A unique identification number, automatically assigned to a single instance of a job, used to identify data associated with that job instance in the database. Each time a job run, the system assigns a new job instance ID.
Agent ID The identification number of the agent logged in to the selected dialer.
Agent The name of an agent logged in to the selected dialer.
Status The current status of the Agent. Status types include Talk, Update, Idle, ACD, Offline, Off job, Not available, and Logging off.
On Status The duration of the current status of the agent in hh:mm:ss format.
Agent Type The type of calling activity that the agent logged in to handle. Acceptable values include Outbound, Inbound, and Blend.
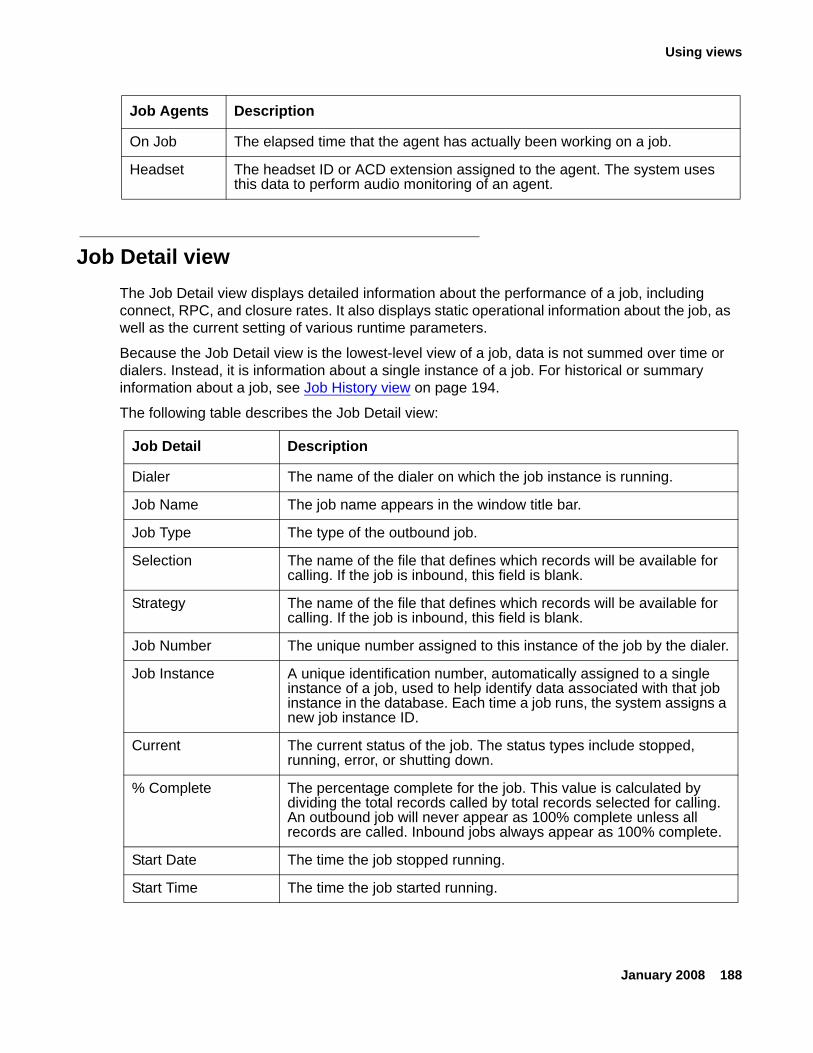
Using views
January 2008 188
Job Detail viewThe Job Detail view displays detailed information about the performance of a job, including connect, RPC, and closure rates. It also displays static operational information about the job, as well as the current setting of various runtime parameters.
Because the Job Detail view is the lowest-level view of a job, data is not summed over time or dialers. Instead, it is information about a single instance of a job. For historical or summary information about a job, see Job History view on page 194.
The following table describes the Job Detail view:
On Job The elapsed time that the agent has actually been working on a job.
Headset The headset ID or ACD extension assigned to the agent. The system uses this data to perform audio monitoring of an agent.
Job Agents Description
Job Detail Description
Dialer The name of the dialer on which the job instance is running.
Job Name The job name appears in the window title bar.
Job Type The type of the outbound job.
Selection The name of the file that defines which records will be available for calling. If the job is inbound, this field is blank.
Strategy The name of the file that defines which records will be available for calling. If the job is inbound, this field is blank.
Job Number The unique number assigned to this instance of the job by the dialer.
Job Instance A unique identification number, automatically assigned to a single instance of a job, used to help identify data associated with that job instance in the database. Each time a job runs, the system assigns a new job instance ID.
Current The current status of the job. The status types include stopped, running, error, or shutting down.
% Complete The percentage complete for the job. This value is calculated by dividing the total records called by total records selected for calling. An outbound job will never appear as 100% complete unless all records are called. Inbound jobs always appear as 100% complete.
Start Date The time the job stopped running.
Start Time The time the job started running.

Use Monitor views
189 Using Avaya Proactive Contact 4.0 Supervisor
Estimated End Date The date that Monitor estimates the job will end. For an inbound job, this field is empty.
Estimated End Time The time that Monitor estimates the job will end. For an inbound job, this field is empty.
Time Left The estimated time remaining to complete calling for the job. For an inbound job, this field is empty.
Pacing The call pacing defined for the job.
Cruise Control Displays the current values for the Desired service level and Time to connect tolerance settings.If the job uses the Expert Calling Ratio method, this field is blank.If the job is inbound, this field is blank.
Running Hit Rate The overall hit rate (percentage of call completions measured against call attempts) for the job calculated from job start to the present.
Current Hit Rate The hit rate for the job over the last five to ten minutes. The dialer uses this figure to make adjustments in the Expert Calling Ratio.
Expert Calling Ratio The Expert Calling Ratio defined for the job. If the job uses the Cruise Control method, this field is blank.If the job is inbound, this field is blank.
Total Connects The total number of inbound and outbound connects for the job.
Inbound Connects The total number of inbound calls connected.
Inbound Connects per Hr
The average number of inbound connects per hour. The value is calculated by dividing the total number of inbound connects by the total Online Time (Online Time is the elapsed time since the job instance began).
Outbound Connects The total number of outbound calls connected.
Outbound Connects per Hr
The average number of outbound connects per hour. The value is calculated by dividing the total number of outbound connects by the total Online Time.
Abandons per hour The total number of calls released as abandoned per hour for each job instance.
Dials The total number of records called during the course of the job.
Total Records The total number of records selected for calling. For inbound jobs, this field is always zero.
Total Calls The total number of calls made or handled for the job, including both inbound and outbound calls.
Job Detail Description
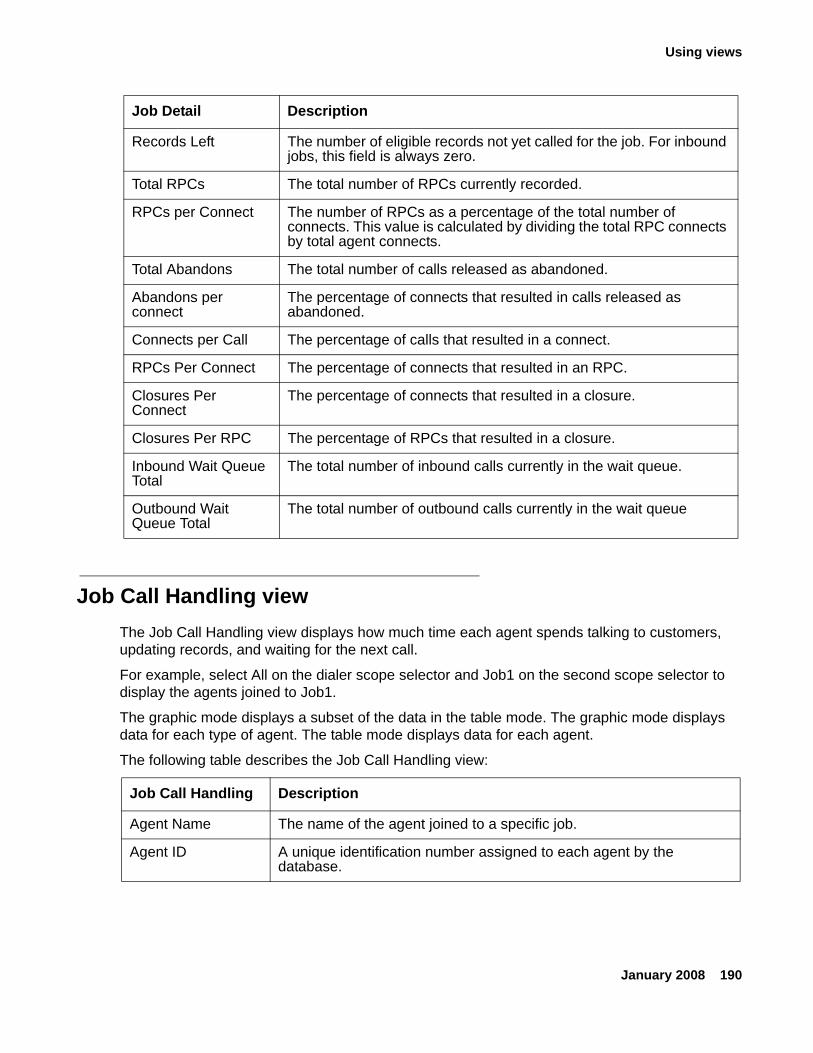
Using views
January 2008 190
Job Call Handling viewThe Job Call Handling view displays how much time each agent spends talking to customers, updating records, and waiting for the next call.
For example, select All on the dialer scope selector and Job1 on the second scope selector to display the agents joined to Job1.
The graphic mode displays a subset of the data in the table mode. The graphic mode displays data for each type of agent. The table mode displays data for each agent.
The following table describes the Job Call Handling view:
Records Left The number of eligible records not yet called for the job. For inbound jobs, this field is always zero.
Total RPCs The total number of RPCs currently recorded.
RPCs per Connect The number of RPCs as a percentage of the total number of connects. This value is calculated by dividing the total RPC connects by total agent connects.
Total Abandons The total number of calls released as abandoned.
Abandons per connect
The percentage of connects that resulted in calls released as abandoned.
Connects per Call The percentage of calls that resulted in a connect.
RPCs Per Connect The percentage of connects that resulted in an RPC.
Closures Per Connect
The percentage of connects that resulted in a closure.
Closures Per RPC The percentage of RPCs that resulted in a closure.
Inbound Wait Queue Total
The total number of inbound calls currently in the wait queue.
Outbound Wait Queue Total
The total number of outbound calls currently in the wait queue
Job Detail Description
Job Call Handling Description
Agent Name The name of the agent joined to a specific job.
Agent ID A unique identification number assigned to each agent by the database.
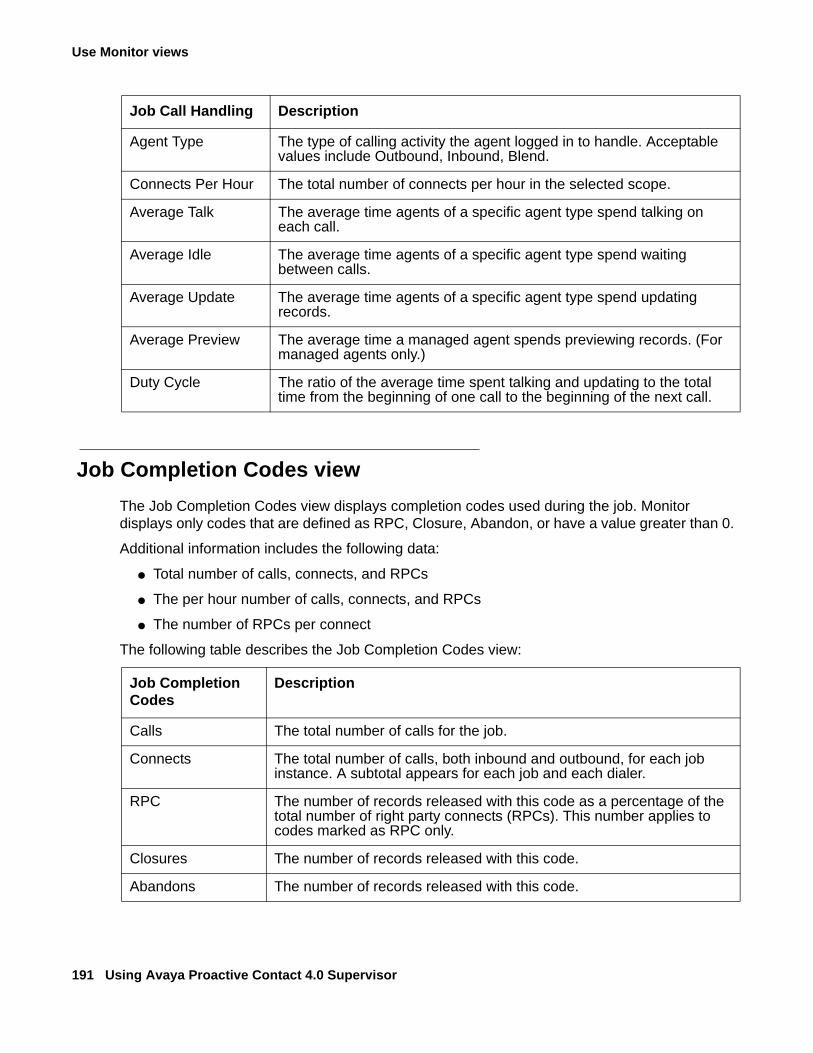
Use Monitor views
191 Using Avaya Proactive Contact 4.0 Supervisor
Job Completion Codes viewThe Job Completion Codes view displays completion codes used during the job. Monitor displays only codes that are defined as RPC, Closure, Abandon, or have a value greater than 0.
Additional information includes the following data:
● Total number of calls, connects, and RPCs
● The per hour number of calls, connects, and RPCs
● The number of RPCs per connect
The following table describes the Job Completion Codes view:
Agent Type The type of calling activity the agent logged in to handle. Acceptable values include Outbound, Inbound, Blend.
Connects Per Hour The total number of connects per hour in the selected scope.
Average Talk The average time agents of a specific agent type spend talking on each call.
Average Idle The average time agents of a specific agent type spend waiting between calls.
Average Update The average time agents of a specific agent type spend updating records.
Average Preview The average time a managed agent spends previewing records. (For managed agents only.)
Duty Cycle The ratio of the average time spent talking and updating to the total time from the beginning of one call to the beginning of the next call.
Job Call Handling Description
Job Completion Codes
Description
Calls The total number of calls for the job.
Connects The total number of calls, both inbound and outbound, for each job instance. A subtotal appears for each job and each dialer.
RPC The number of records released with this code as a percentage of the total number of right party connects (RPCs). This number applies to codes marked as RPC only.
Closures The number of records released with this code.
Abandons The number of records released with this code.
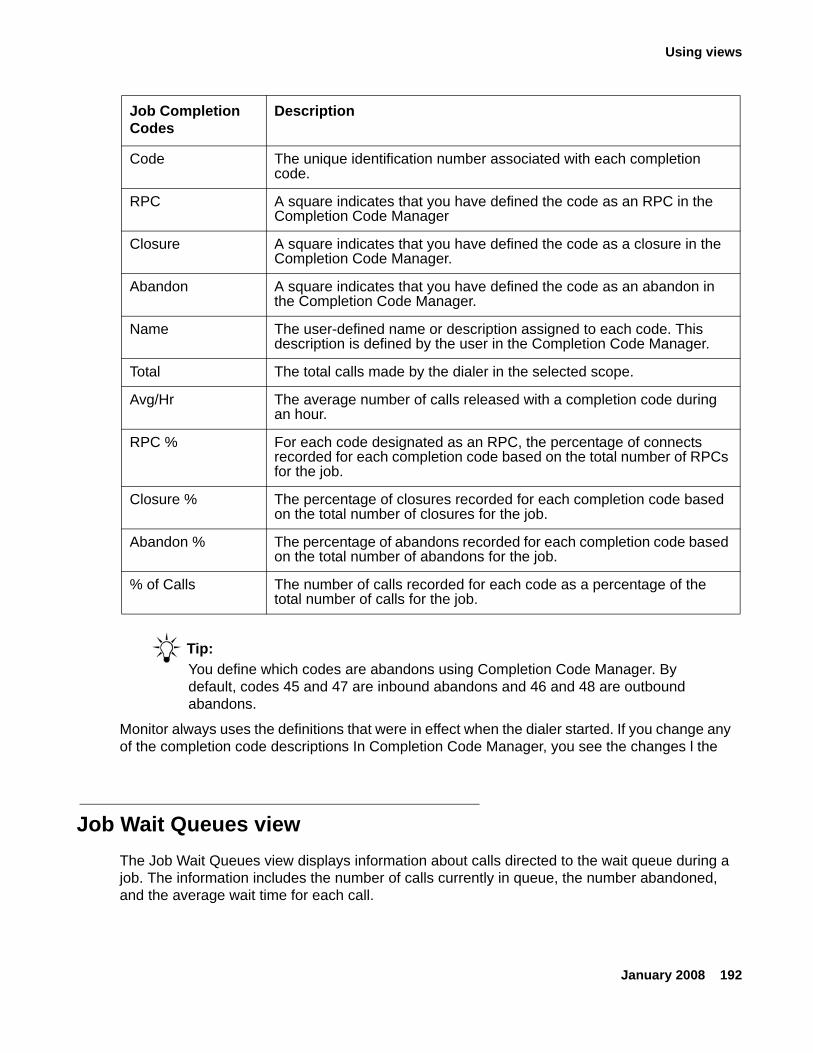
Using views
January 2008 192
Tip:Tip: You define which codes are abandons using Completion Code Manager. By
default, codes 45 and 47 are inbound abandons and 46 and 48 are outbound abandons.
Monitor always uses the definitions that were in effect when the dialer started. If you change any of the completion code descriptions In Completion Code Manager, you see the changes l the
Job Wait Queues viewThe Job Wait Queues view displays information about calls directed to the wait queue during a job. The information includes the number of calls currently in queue, the number abandoned, and the average wait time for each call.
Code The unique identification number associated with each completion code.
RPC A square indicates that you have defined the code as an RPC in the Completion Code Manager
Closure A square indicates that you have defined the code as a closure in the Completion Code Manager.
Abandon A square indicates that you have defined the code as an abandon in the Completion Code Manager.
Name The user-defined name or description assigned to each code. This description is defined by the user in the Completion Code Manager.
Total The total calls made by the dialer in the selected scope.
Avg/Hr The average number of calls released with a completion code during an hour.
RPC % For each code designated as an RPC, the percentage of connects recorded for each completion code based on the total number of RPCs for the job.
Closure % The percentage of closures recorded for each completion code based on the total number of closures for the job.
Abandon % The percentage of abandons recorded for each completion code based on the total number of abandons for the job.
% of Calls The number of calls recorded for each code as a percentage of the total number of calls for the job.
Job Completion Codes
Description
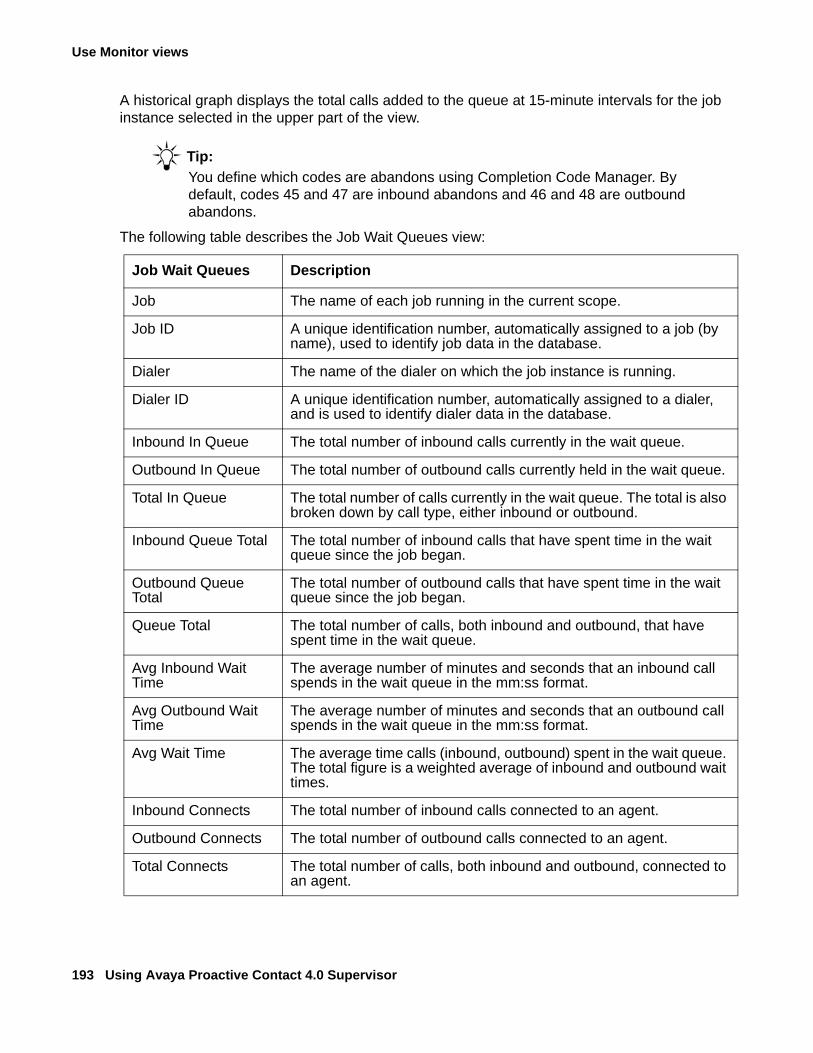
Use Monitor views
193 Using Avaya Proactive Contact 4.0 Supervisor
A historical graph displays the total calls added to the queue at 15-minute intervals for the job instance selected in the upper part of the view.
Tip:Tip: You define which codes are abandons using Completion Code Manager. By
default, codes 45 and 47 are inbound abandons and 46 and 48 are outbound abandons.
The following table describes the Job Wait Queues view:
Job Wait Queues Description
Job The name of each job running in the current scope.
Job ID A unique identification number, automatically assigned to a job (by name), used to identify job data in the database.
Dialer The name of the dialer on which the job instance is running.
Dialer ID A unique identification number, automatically assigned to a dialer, and is used to identify dialer data in the database.
Inbound In Queue The total number of inbound calls currently in the wait queue.
Outbound In Queue The total number of outbound calls currently held in the wait queue.
Total In Queue The total number of calls currently in the wait queue. The total is also broken down by call type, either inbound or outbound.
Inbound Queue Total The total number of inbound calls that have spent time in the wait queue since the job began.
Outbound Queue Total
The total number of outbound calls that have spent time in the wait queue since the job began.
Queue Total The total number of calls, both inbound and outbound, that have spent time in the wait queue.
Avg Inbound Wait Time
The average number of minutes and seconds that an inbound call spends in the wait queue in the mm:ss format.
Avg Outbound Wait Time
The average number of minutes and seconds that an outbound call spends in the wait queue in the mm:ss format.
Avg Wait Time The average time calls (inbound, outbound) spent in the wait queue. The total figure is a weighted average of inbound and outbound wait times.
Inbound Connects The total number of inbound calls connected to an agent.
Outbound Connects The total number of outbound calls connected to an agent.
Total Connects The total number of calls, both inbound and outbound, connected to an agent.
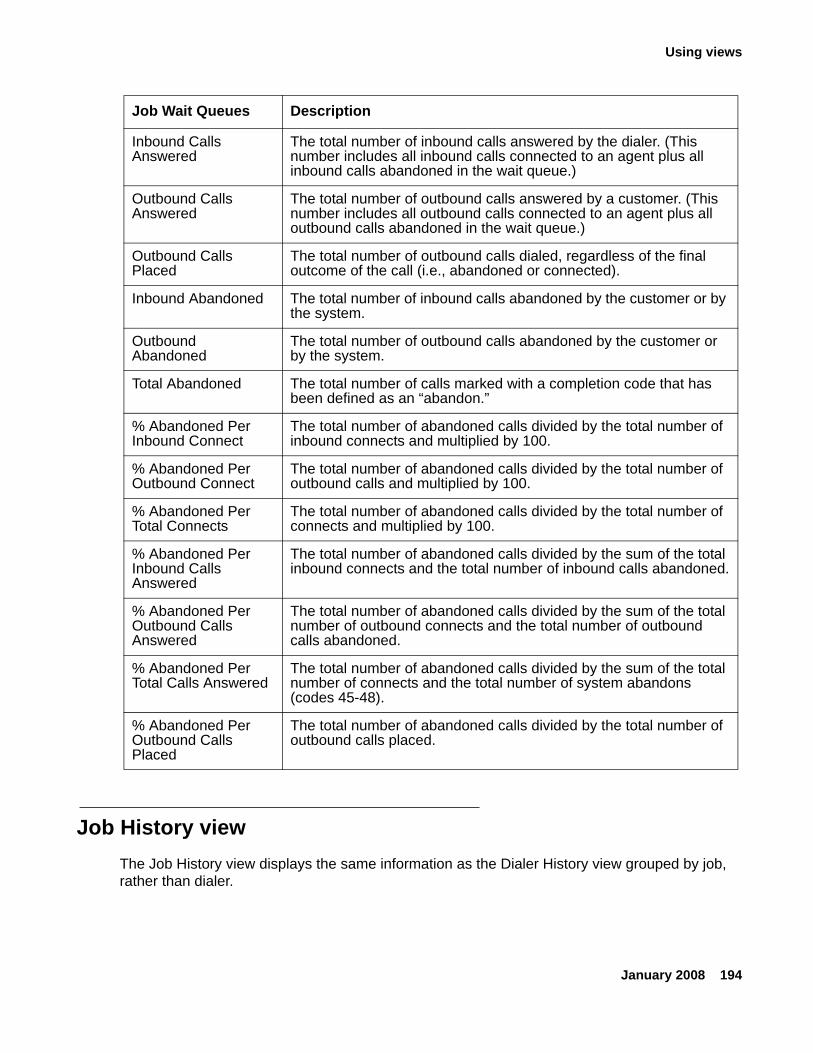
Using views
January 2008 194
Job History viewThe Job History view displays the same information as the Dialer History view grouped by job, rather than dialer.
Inbound Calls Answered
The total number of inbound calls answered by the dialer. (This number includes all inbound calls connected to an agent plus all inbound calls abandoned in the wait queue.)
Outbound Calls Answered
The total number of outbound calls answered by a customer. (This number includes all outbound calls connected to an agent plus all outbound calls abandoned in the wait queue.)
Outbound Calls Placed
The total number of outbound calls dialed, regardless of the final outcome of the call (i.e., abandoned or connected).
Inbound Abandoned The total number of inbound calls abandoned by the customer or by the system.
Outbound Abandoned
The total number of outbound calls abandoned by the customer or by the system.
Total Abandoned The total number of calls marked with a completion code that has been defined as an “abandon.”
% Abandoned Per Inbound Connect
The total number of abandoned calls divided by the total number of inbound connects and multiplied by 100.
% Abandoned Per Outbound Connect
The total number of abandoned calls divided by the total number of outbound calls and multiplied by 100.
% Abandoned Per Total Connects
The total number of abandoned calls divided by the total number of connects and multiplied by 100.
% Abandoned Per Inbound Calls Answered
The total number of abandoned calls divided by the sum of the total inbound connects and the total number of inbound calls abandoned.
% Abandoned Per Outbound Calls Answered
The total number of abandoned calls divided by the sum of the total number of outbound connects and the total number of outbound calls abandoned.
% Abandoned Per Total Calls Answered
The total number of abandoned calls divided by the sum of the total number of connects and the total number of system abandons (codes 45-48).
% Abandoned Per Outbound Calls Placed
The total number of abandoned calls divided by the total number of outbound calls placed.
Job Wait Queues Description
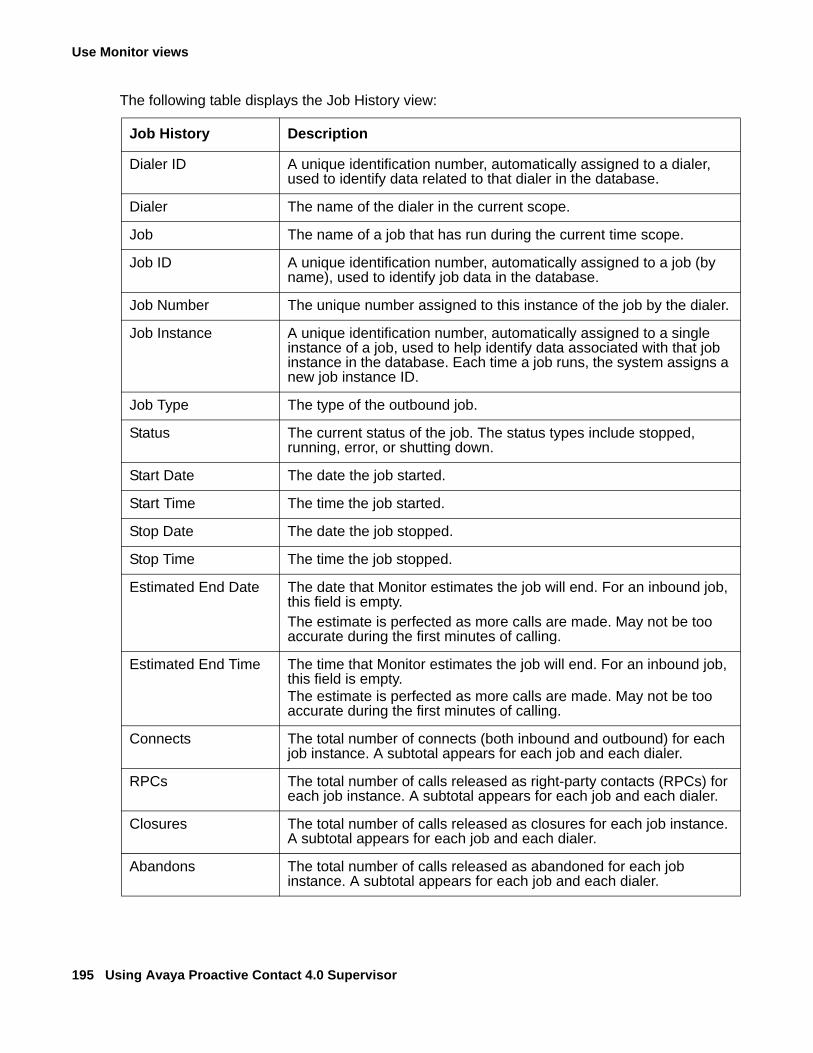
Use Monitor views
195 Using Avaya Proactive Contact 4.0 Supervisor
The following table displays the Job History view:
Job History Description
Dialer ID A unique identification number, automatically assigned to a dialer, used to identify data related to that dialer in the database.
Dialer The name of the dialer in the current scope.
Job The name of a job that has run during the current time scope.
Job ID A unique identification number, automatically assigned to a job (by name), used to identify job data in the database.
Job Number The unique number assigned to this instance of the job by the dialer.
Job Instance A unique identification number, automatically assigned to a single instance of a job, used to help identify data associated with that job instance in the database. Each time a job runs, the system assigns a new job instance ID.
Job Type The type of the outbound job.
Status The current status of the job. The status types include stopped, running, error, or shutting down.
Start Date The date the job started.
Start Time The time the job started.
Stop Date The date the job stopped.
Stop Time The time the job stopped.
Estimated End Date The date that Monitor estimates the job will end. For an inbound job, this field is empty.The estimate is perfected as more calls are made. May not be too accurate during the first minutes of calling.
Estimated End Time The time that Monitor estimates the job will end. For an inbound job, this field is empty.The estimate is perfected as more calls are made. May not be too accurate during the first minutes of calling.
Connects The total number of connects (both inbound and outbound) for each job instance. A subtotal appears for each job and each dialer.
RPCs The total number of calls released as right-party contacts (RPCs) for each job instance. A subtotal appears for each job and each dialer.
Closures The total number of calls released as closures for each job instance. A subtotal appears for each job and each dialer.
Abandons The total number of calls released as abandoned for each job instance. A subtotal appears for each job and each dialer.
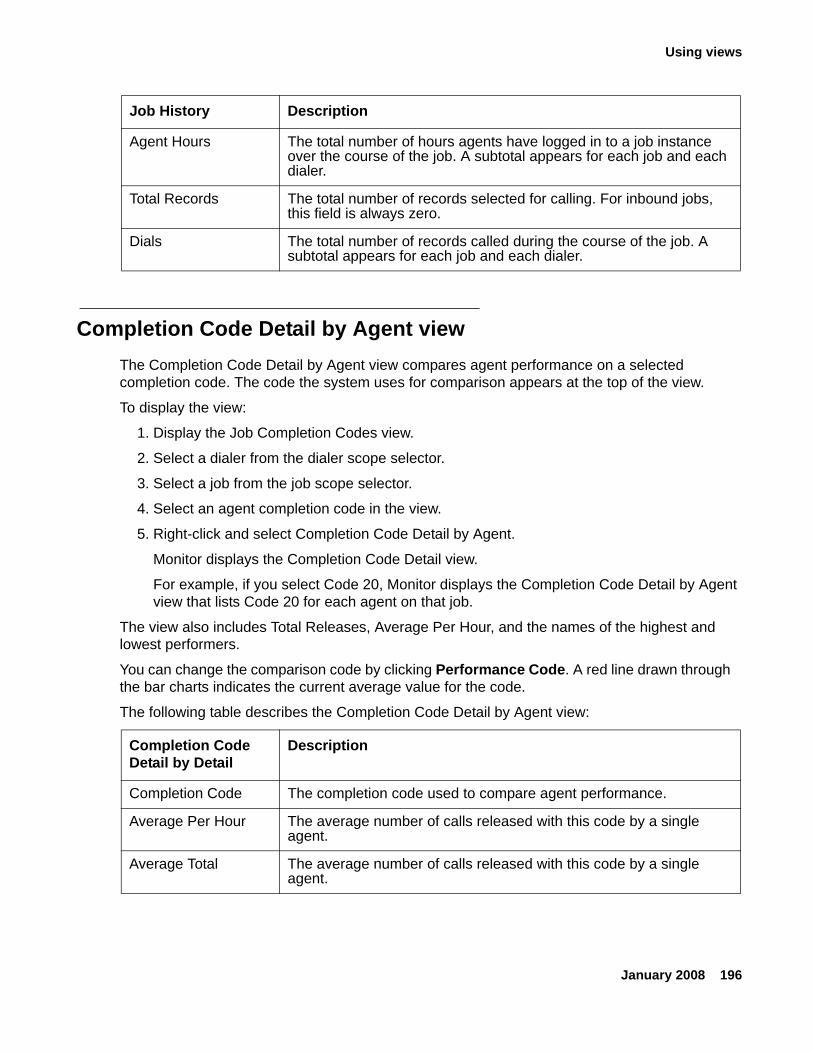
Using views
January 2008 196
Completion Code Detail by Agent viewThe Completion Code Detail by Agent view compares agent performance on a selected completion code. The code the system uses for comparison appears at the top of the view.
To display the view:
1. Display the Job Completion Codes view.
2. Select a dialer from the dialer scope selector.
3. Select a job from the job scope selector.
4. Select an agent completion code in the view.
5. Right-click and select Completion Code Detail by Agent.
Monitor displays the Completion Code Detail view.
For example, if you select Code 20, Monitor displays the Completion Code Detail by Agent view that lists Code 20 for each agent on that job.
The view also includes Total Releases, Average Per Hour, and the names of the highest and lowest performers.
You can change the comparison code by clicking Performance Code. A red line drawn through the bar charts indicates the current average value for the code.
The following table describes the Completion Code Detail by Agent view:
Agent Hours The total number of hours agents have logged in to a job instance over the course of the job. A subtotal appears for each job and each dialer.
Total Records The total number of records selected for calling. For inbound jobs, this field is always zero.
Dials The total number of records called during the course of the job. A subtotal appears for each job and each dialer.
Job History Description
Completion Code Detail by Detail
Description
Completion Code The completion code used to compare agent performance.
Average Per Hour The average number of calls released with this code by a single agent.
Average Total The average number of calls released with this code by a single agent.

Use Monitor views
197 Using Avaya Proactive Contact 4.0 Supervisor
Job Quality viewThe Job Quality view displays calling activity information for a job.
The view describes the quality of service that dialers achieve during a job. The information includes data for call pacing, nuisance calls, and information about phone calls that were in the wait queue or were abandoned.
The following table describes the Job Quality view:
Highest Performer The name of the agent with the best performance.
Lowest Performer The name of the agent with the lowest performance.
Agent The name of the agent. This list of agents includes all of the agents assigned to the job.
Agent ID A unique identification number assigned to each agent by the database.
Total The total number of calls released with this code by an agent.
Per Hour The average number of calls released with this code in an hour by this agent.
Completion Code Detail by Detail
Description
Job Quality Description
DialerID A unique identification number, automatically assigned to a dialer, and is used to identify dialer data in the database.
Dialer The name of the dialer on which the job instance is running.
JobID A unique identification number, automatically assigned to a job (by name), used to identify job data in the database.
Job The name of each job running in the current scope.
Job Instance A unique identification number, automatically assigned to a single instance of a job, used to help identify data associated with that job instance in the database. Each time a job runs, the system assigns a new job instance ID.
Job Type The type of job: outbound, Managed, Cruise Control, inbound, or blend.
Status The current status of the job. The status types include stopped, running, error, or shutting down.
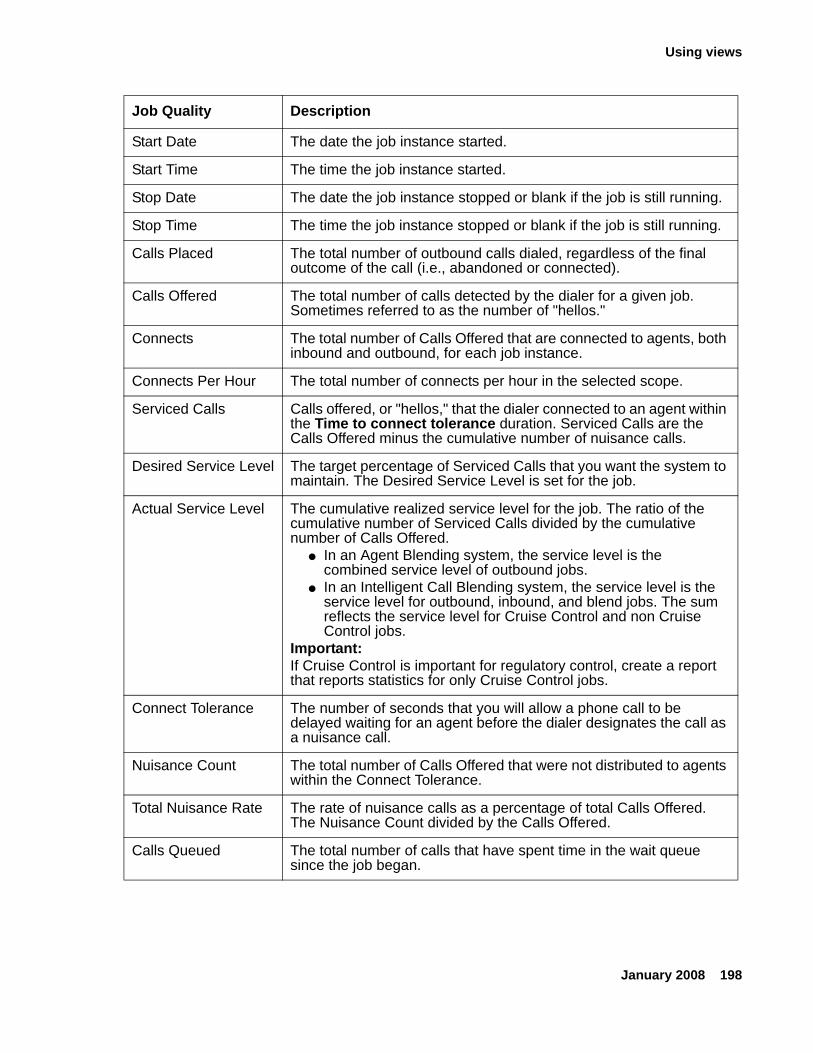
Using views
January 2008 198
Start Date The date the job instance started.
Start Time The time the job instance started.
Stop Date The date the job instance stopped or blank if the job is still running.
Stop Time The time the job instance stopped or blank if the job is still running.
Calls Placed The total number of outbound calls dialed, regardless of the final outcome of the call (i.e., abandoned or connected).
Calls Offered The total number of calls detected by the dialer for a given job. Sometimes referred to as the number of "hellos."
Connects The total number of Calls Offered that are connected to agents, both inbound and outbound, for each job instance.
Connects Per Hour The total number of connects per hour in the selected scope.
Serviced Calls Calls offered, or "hellos," that the dialer connected to an agent within the Time to connect tolerance duration. Serviced Calls are the Calls Offered minus the cumulative number of nuisance calls.
Desired Service Level The target percentage of Serviced Calls that you want the system to maintain. The Desired Service Level is set for the job.
Actual Service Level The cumulative realized service level for the job. The ratio of the cumulative number of Serviced Calls divided by the cumulative number of Calls Offered.
● In an Agent Blending system, the service level is the combined service level of outbound jobs.
● In an Intelligent Call Blending system, the service level is the service level for outbound, inbound, and blend jobs. The sum reflects the service level for Cruise Control and non Cruise Control jobs.
Important:If Cruise Control is important for regulatory control, create a report that reports statistics for only Cruise Control jobs.
Connect Tolerance The number of seconds that you will allow a phone call to be delayed waiting for an agent before the dialer designates the call as a nuisance call.
Nuisance Count The total number of Calls Offered that were not distributed to agents within the Connect Tolerance.
Total Nuisance Rate The rate of nuisance calls as a percentage of total Calls Offered. The Nuisance Count divided by the Calls Offered.
Calls Queued The total number of calls that have spent time in the wait queue since the job began.
Job Quality Description
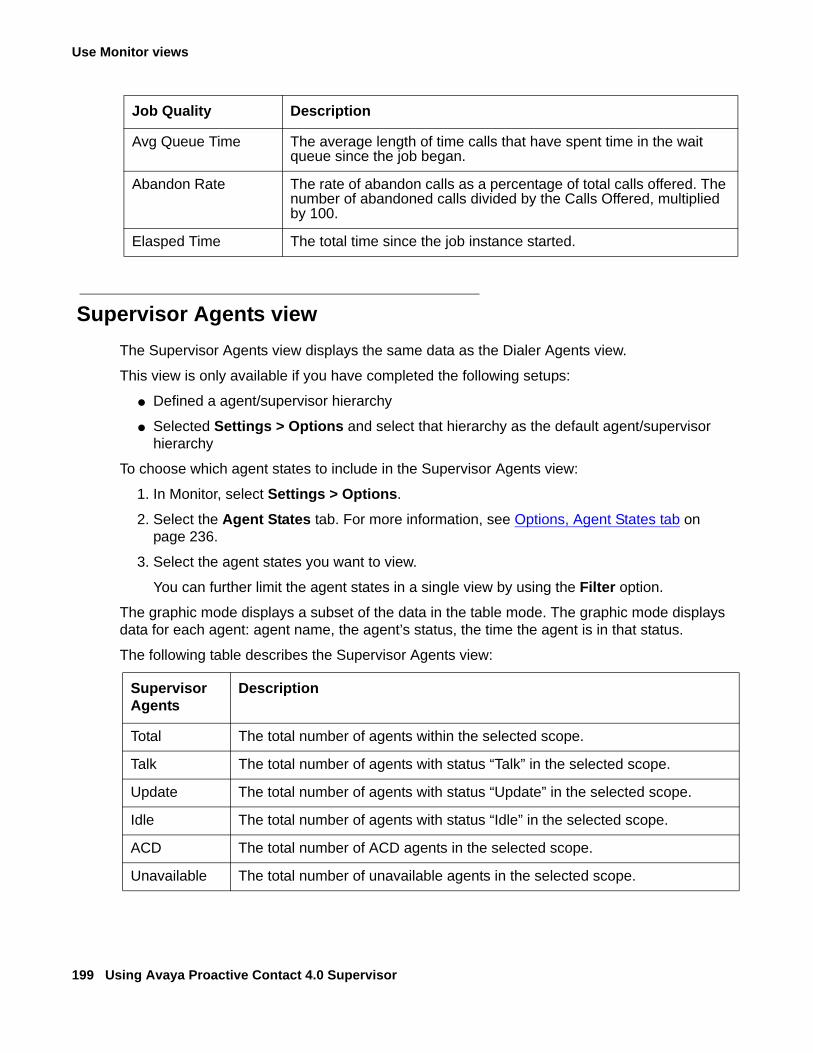
Use Monitor views
199 Using Avaya Proactive Contact 4.0 Supervisor
Supervisor Agents viewThe Supervisor Agents view displays the same data as the Dialer Agents view.
This view is only available if you have completed the following setups:
● Defined a agent/supervisor hierarchy
● Selected Settings > Options and select that hierarchy as the default agent/supervisor hierarchy
To choose which agent states to include in the Supervisor Agents view:
1. In Monitor, select Settings > Options.
2. Select the Agent States tab. For more information, see Options, Agent States tab on page 236.
3. Select the agent states you want to view.
You can further limit the agent states in a single view by using the Filter option.
The graphic mode displays a subset of the data in the table mode. The graphic mode displays data for each agent: agent name, the agent’s status, the time the agent is in that status.
The following table describes the Supervisor Agents view:
Avg Queue Time The average length of time calls that have spent time in the wait queue since the job began.
Abandon Rate The rate of abandon calls as a percentage of total calls offered. The number of abandoned calls divided by the Calls Offered, multiplied by 100.
Elasped Time The total time since the job instance started.
Job Quality Description
Supervisor Agents
Description
Total The total number of agents within the selected scope.
Talk The total number of agents with status “Talk” in the selected scope.
Update The total number of agents with status “Update” in the selected scope.
Idle The total number of agents with status “Idle” in the selected scope.
ACD The total number of ACD agents in the selected scope.
Unavailable The total number of unavailable agents in the selected scope.
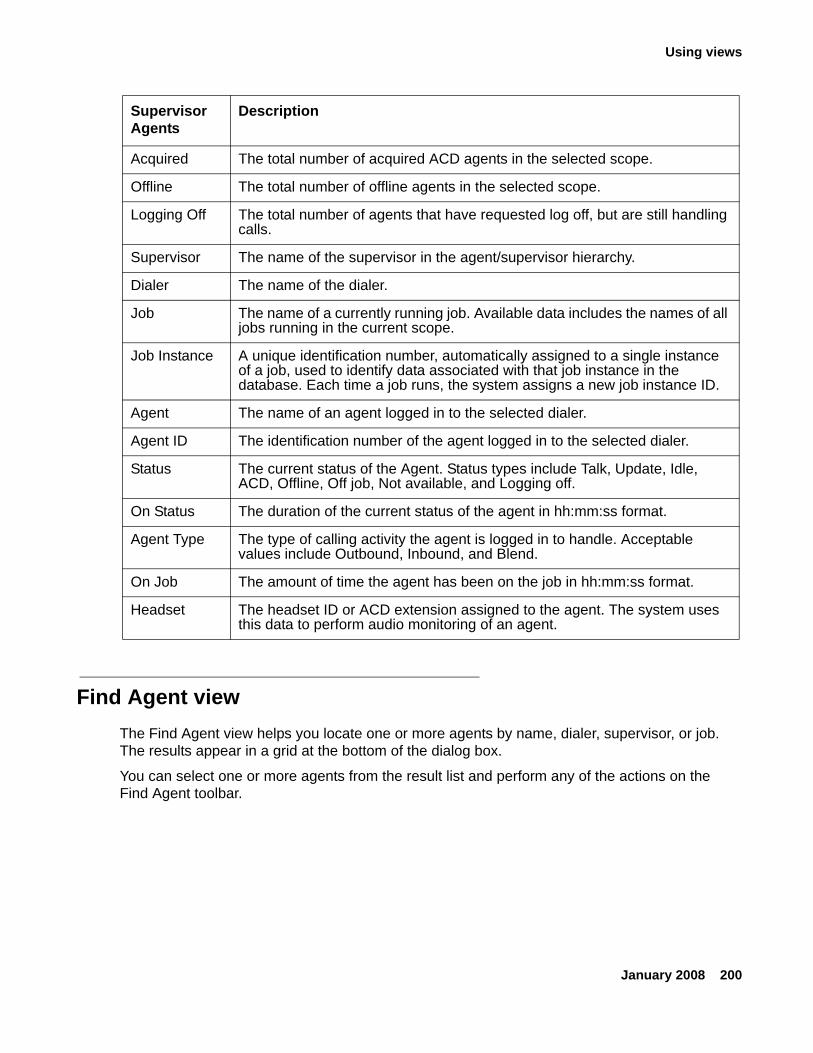
Using views
January 2008 200
Find Agent viewThe Find Agent view helps you locate one or more agents by name, dialer, supervisor, or job. The results appear in a grid at the bottom of the dialog box.
You can select one or more agents from the result list and perform any of the actions on the Find Agent toolbar.
Acquired The total number of acquired ACD agents in the selected scope.
Offline The total number of offline agents in the selected scope.
Logging Off The total number of agents that have requested log off, but are still handling calls.
Supervisor The name of the supervisor in the agent/supervisor hierarchy.
Dialer The name of the dialer.
Job The name of a currently running job. Available data includes the names of all jobs running in the current scope.
Job Instance A unique identification number, automatically assigned to a single instance of a job, used to identify data associated with that job instance in the database. Each time a job runs, the system assigns a new job instance ID.
Agent The name of an agent logged in to the selected dialer.
Agent ID The identification number of the agent logged in to the selected dialer.
Status The current status of the Agent. Status types include Talk, Update, Idle, ACD, Offline, Off job, Not available, and Logging off.
On Status The duration of the current status of the agent in hh:mm:ss format.
Agent Type The type of calling activity the agent is logged in to handle. Acceptable values include Outbound, Inbound, and Blend.
On Job The amount of time the agent has been on the job in hh:mm:ss format.
Headset The headset ID or ACD extension assigned to the agent. The system uses this data to perform audio monitoring of an agent.
Supervisor Agents
Description
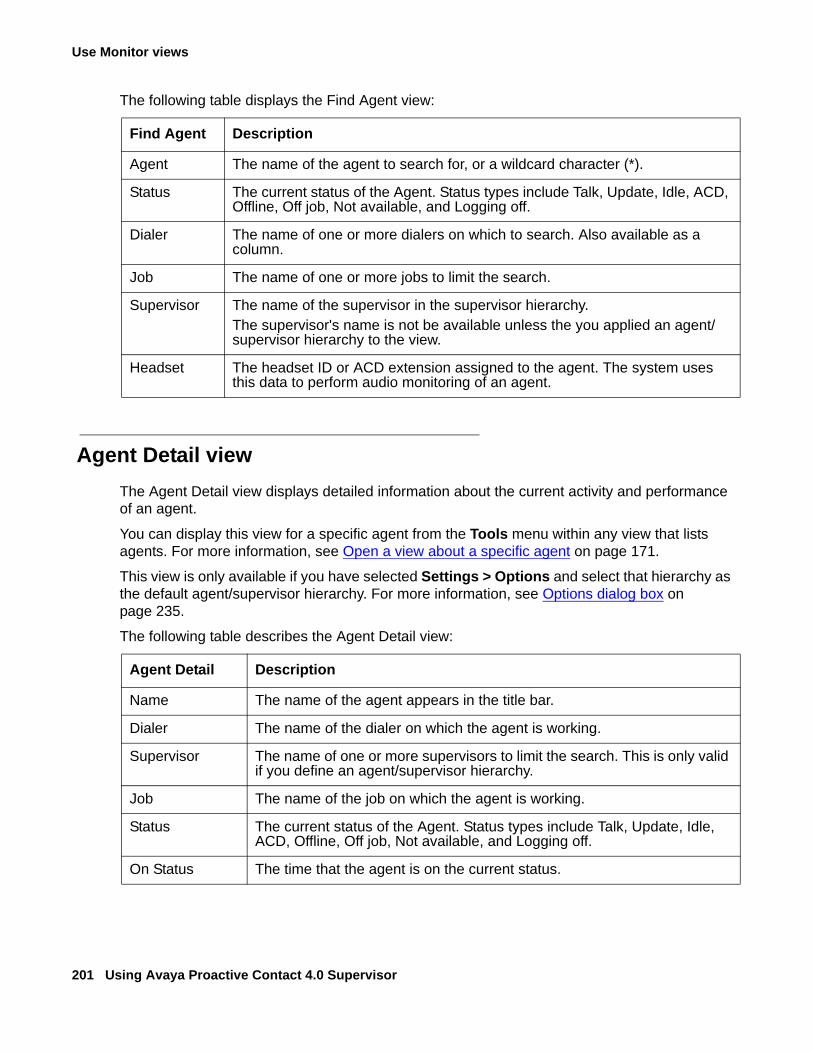
Use Monitor views
201 Using Avaya Proactive Contact 4.0 Supervisor
The following table displays the Find Agent view:
Agent Detail viewThe Agent Detail view displays detailed information about the current activity and performance of an agent.
You can display this view for a specific agent from the Tools menu within any view that lists agents. For more information, see Open a view about a specific agent on page 171.
This view is only available if you have selected Settings > Options and select that hierarchy as the default agent/supervisor hierarchy. For more information, see Options dialog box on page 235.
The following table describes the Agent Detail view:
Find Agent Description
Agent The name of the agent to search for, or a wildcard character (*).
Status The current status of the Agent. Status types include Talk, Update, Idle, ACD, Offline, Off job, Not available, and Logging off.
Dialer The name of one or more dialers on which to search. Also available as a column.
Job The name of one or more jobs to limit the search.
Supervisor The name of the supervisor in the supervisor hierarchy.The supervisor's name is not be available unless the you applied an agent/supervisor hierarchy to the view.
Headset The headset ID or ACD extension assigned to the agent. The system uses this data to perform audio monitoring of an agent.
Agent Detail Description
Name The name of the agent appears in the title bar.
Dialer The name of the dialer on which the agent is working.
Supervisor The name of one or more supervisors to limit the search. This is only valid if you define an agent/supervisor hierarchy.
Job The name of the job on which the agent is working.
Status The current status of the Agent. Status types include Talk, Update, Idle, ACD, Offline, Off job, Not available, and Logging off.
On Status The time that the agent is on the current status.
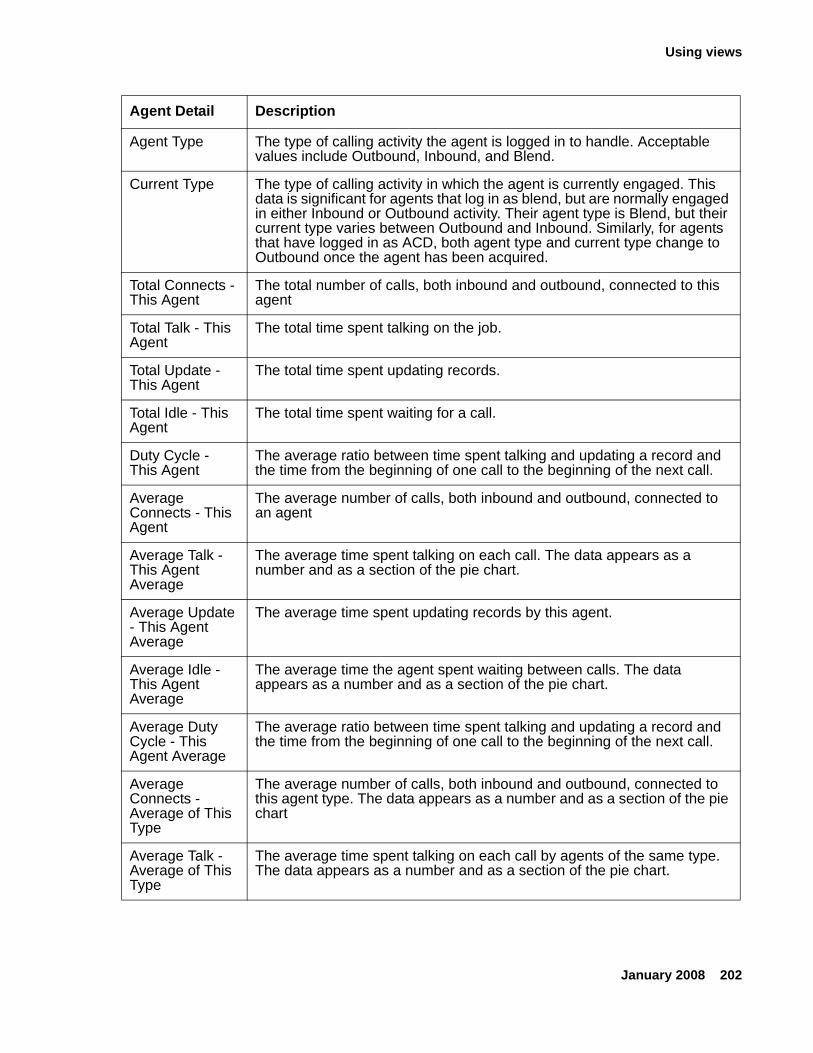
Using views
January 2008 202
Agent Type The type of calling activity the agent is logged in to handle. Acceptable values include Outbound, Inbound, and Blend.
Current Type The type of calling activity in which the agent is currently engaged. This data is significant for agents that log in as blend, but are normally engaged in either Inbound or Outbound activity. Their agent type is Blend, but their current type varies between Outbound and Inbound. Similarly, for agents that have logged in as ACD, both agent type and current type change to Outbound once the agent has been acquired.
Total Connects - This Agent
The total number of calls, both inbound and outbound, connected to this agent
Total Talk - This Agent
The total time spent talking on the job.
Total Update - This Agent
The total time spent updating records.
Total Idle - This Agent
The total time spent waiting for a call.
Duty Cycle - This Agent
The average ratio between time spent talking and updating a record and the time from the beginning of one call to the beginning of the next call.
Average Connects - This Agent
The average number of calls, both inbound and outbound, connected to an agent
Average Talk - This Agent Average
The average time spent talking on each call. The data appears as a number and as a section of the pie chart.
Average Update - This Agent Average
The average time spent updating records by this agent.
Average Idle - This Agent Average
The average time the agent spent waiting between calls. The data appears as a number and as a section of the pie chart.
Average Duty Cycle - This Agent Average
The average ratio between time spent talking and updating a record and the time from the beginning of one call to the beginning of the next call.
Average Connects - Average of This Type
The average number of calls, both inbound and outbound, connected to this agent type. The data appears as a number and as a section of the pie chart
Average Talk - Average of This Type
The average time spent talking on each call by agents of the same type. The data appears as a number and as a section of the pie chart.
Agent Detail Description

Use Monitor views
203 Using Avaya Proactive Contact 4.0 Supervisor
Agent Completion Codes viewThe Agent Completion Codes view displays the calling results in terms of completion codes.
Additional information includes the following data:
● Total number of calls, connects, and RPCs
● The per hour number of calls, connects, and RPCs
● The number of RPCs per connect
You can display this view for a specific agent from the Tools menu within any view that lists agents. For more information see, Open a view about a specific agent on page 171.
The following table displays the Agent Completion Codes view:
Average Update - Average of This Type
The average time spent updating records by agents of the same type.
Average Idle - Average of This Type
The average time spent waiting between calls by agents of the same type. The data appears as a number and as a section of the pie chart.
Average Duty Cycle - Average of This Type
The average ratio between time spent talking and updating a record and the time from the beginning of one call to the beginning of the next call for agents of this type
Agent Detail Description
Agent Completion Codes
Description
Connects The total number of connects for this agent.
RPCs The total number of RPCs for this agent.
Closures The total number of closures for this agent.
Code The unique identification number associated with each completion code.
RPC A square indicates the code is an RPC.
Closure A square indicates the code is a closure.
Name The user-defined name or description assigned to each code.
Total The total number of calls released with each completion code.
Avg/Hr The average number of calls released with a completion code during an hour.
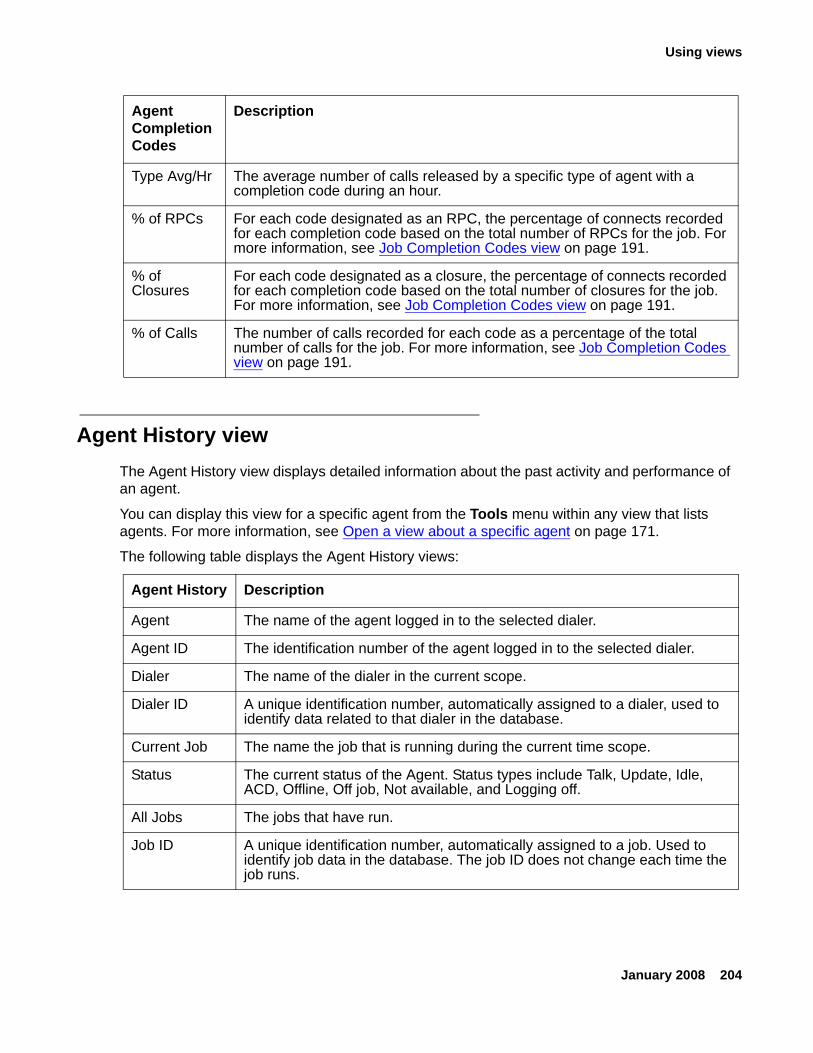
Using views
January 2008 204
Agent History viewThe Agent History view displays detailed information about the past activity and performance of an agent.
You can display this view for a specific agent from the Tools menu within any view that lists agents. For more information, see Open a view about a specific agent on page 171.
The following table displays the Agent History views:
Type Avg/Hr The average number of calls released by a specific type of agent with a completion code during an hour.
% of RPCs For each code designated as an RPC, the percentage of connects recorded for each completion code based on the total number of RPCs for the job. For more information, see Job Completion Codes view on page 191.
% of Closures
For each code designated as a closure, the percentage of connects recorded for each completion code based on the total number of closures for the job. For more information, see Job Completion Codes view on page 191.
% of Calls The number of calls recorded for each code as a percentage of the total number of calls for the job. For more information, see Job Completion Codes view on page 191.
Agent Completion Codes
Description
Agent History Description
Agent The name of the agent logged in to the selected dialer.
Agent ID The identification number of the agent logged in to the selected dialer.
Dialer The name of the dialer in the current scope.
Dialer ID A unique identification number, automatically assigned to a dialer, used to identify data related to that dialer in the database.
Current Job The name the job that is running during the current time scope.
Status The current status of the Agent. Status types include Talk, Update, Idle, ACD, Offline, Off job, Not available, and Logging off.
All Jobs The jobs that have run.
Job ID A unique identification number, automatically assigned to a job. Used to identify job data in the database. The job ID does not change each time the job runs.
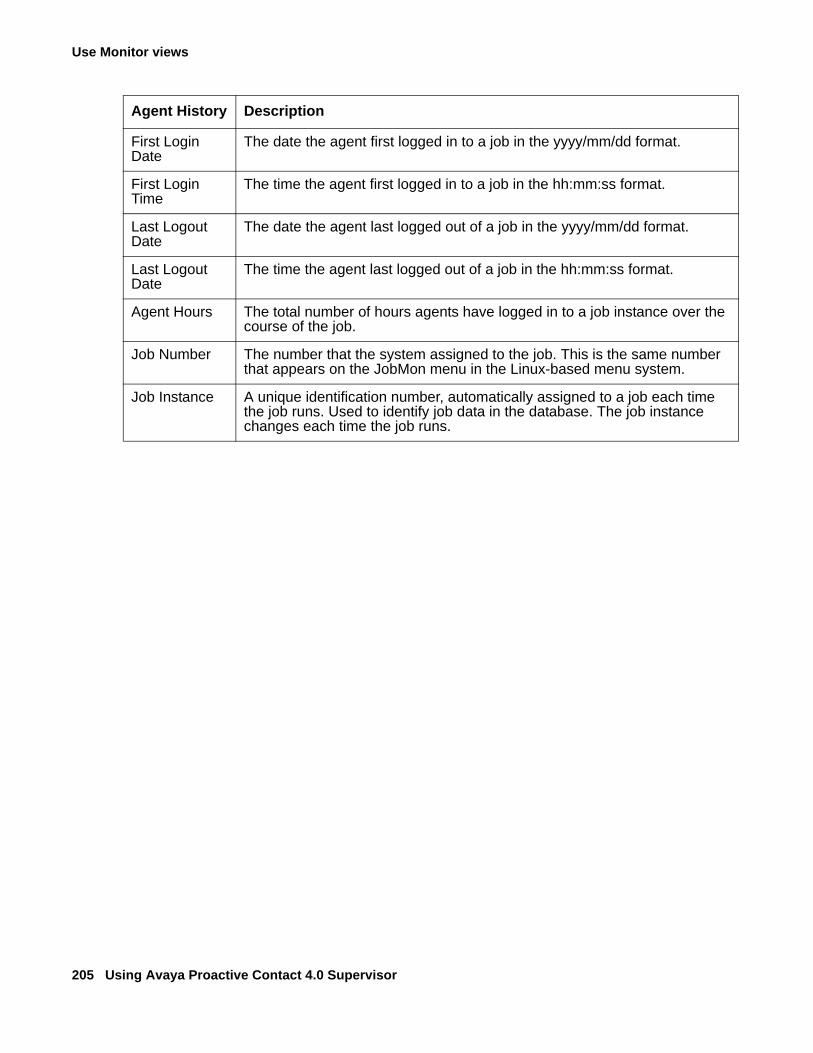
Use Monitor views
205 Using Avaya Proactive Contact 4.0 Supervisor
First Login Date
The date the agent first logged in to a job in the yyyy/mm/dd format.
First Login Time
The time the agent first logged in to a job in the hh:mm:ss format.
Last Logout Date
The date the agent last logged out of a job in the yyyy/mm/dd format.
Last Logout Date
The time the agent last logged out of a job in the hh:mm:ss format.
Agent Hours The total number of hours agents have logged in to a job instance over the course of the job.
Job Number The number that the system assigned to the job. This is the same number that appears on the JobMon menu in the Linux-based menu system.
Job Instance A unique identification number, automatically assigned to a job each time the job runs. Used to identify job data in the database. The job instance changes each time the job runs.
Agent History Description
January 2008 206
Chapter 11: Monitor view controls
A view is the name of the window that appears in the right-hand pane. Monitor displays the view after you click a button on the button bar. This section describes how to use views in Monitor.
This section contains the following topics:
● Understanding view controls on page 207
● Using view controls on page 210
● Maintaining Monitor views on page 213
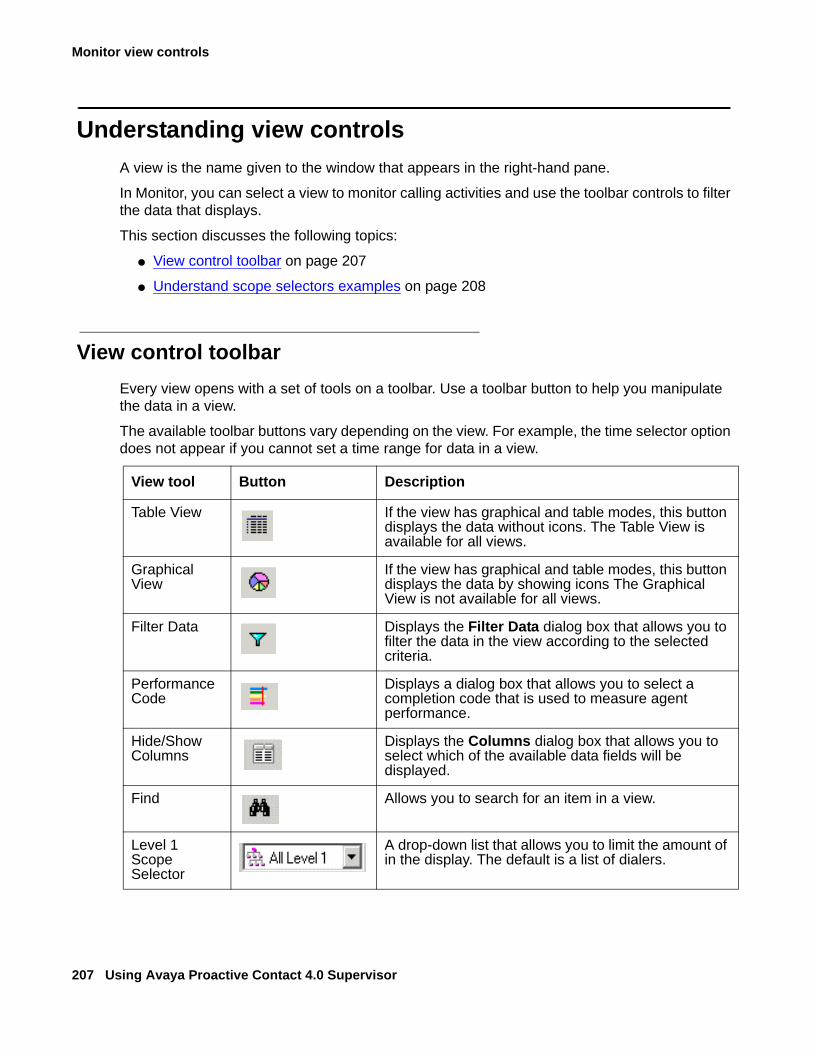
Monitor view controls
207 Using Avaya Proactive Contact 4.0 Supervisor
Understanding view controlsA view is the name given to the window that appears in the right-hand pane.
In Monitor, you can select a view to monitor calling activities and use the toolbar controls to filter the data that displays.
This section discusses the following topics:
● View control toolbar on page 207
● Understand scope selectors examples on page 208
View control toolbarEvery view opens with a set of tools on a toolbar. Use a toolbar button to help you manipulate the data in a view.
The available toolbar buttons vary depending on the view. For example, the time selector option does not appear if you cannot set a time range for data in a view.
View tool Button Description
Table View If the view has graphical and table modes, this button displays the data without icons. The Table View is available for all views.
Graphical View
If the view has graphical and table modes, this button displays the data by showing icons The Graphical View is not available for all views.
Filter Data Displays the Filter Data dialog box that allows you to filter the data in the view according to the selected criteria.
Performance Code
Displays a dialog box that allows you to select a completion code that is used to measure agent performance.
Hide/Show Columns
Displays the Columns dialog box that allows you to select which of the available data fields will be displayed.
Find Allows you to search for an item in a view.
Level 1 Scope Selector
A drop-down list that allows you to limit the amount of in the display. The default is a list of dialers.
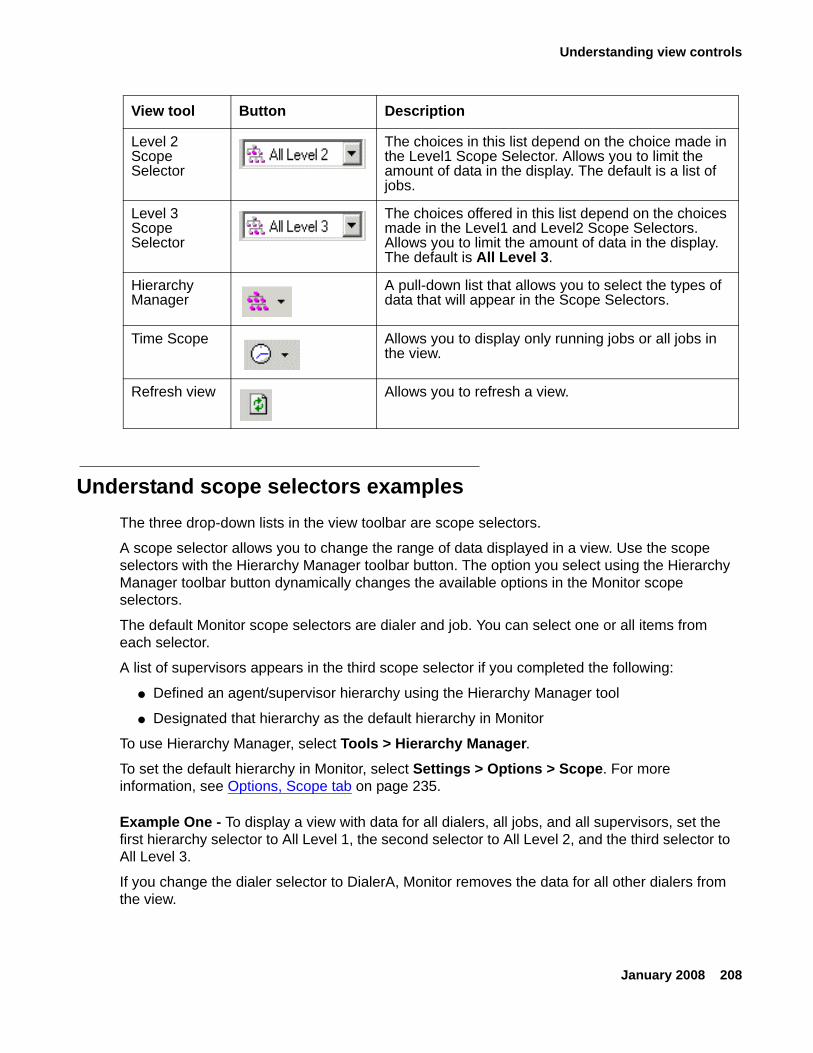
Understanding view controls
January 2008 208
Understand scope selectors examplesThe three drop-down lists in the view toolbar are scope selectors.
A scope selector allows you to change the range of data displayed in a view. Use the scope selectors with the Hierarchy Manager toolbar button. The option you select using the Hierarchy Manager toolbar button dynamically changes the available options in the Monitor scope selectors.
The default Monitor scope selectors are dialer and job. You can select one or all items from each selector.
A list of supervisors appears in the third scope selector if you completed the following:
● Defined an agent/supervisor hierarchy using the Hierarchy Manager tool
● Designated that hierarchy as the default hierarchy in Monitor
To use Hierarchy Manager, select Tools > Hierarchy Manager. To set the default hierarchy in Monitor, select Settings > Options > Scope. For more information, see Options, Scope tab on page 235.
Example One - To display a view with data for all dialers, all jobs, and all supervisors, set the first hierarchy selector to All Level 1, the second selector to All Level 2, and the third selector to All Level 3.
If you change the dialer selector to DialerA, Monitor removes the data for all other dialers from the view.
Level 2 Scope Selector
The choices in this list depend on the choice made in the Level1 Scope Selector. Allows you to limit the amount of data in the display. The default is a list of jobs.
Level 3 Scope Selector
The choices offered in this list depend on the choices made in the Level1 and Level2 Scope Selectors. Allows you to limit the amount of data in the display. The default is All Level 3.
Hierarchy Manager
A pull-down list that allows you to select the types of data that will appear in the Scope Selectors.
Time Scope Allows you to display only running jobs or all jobs in the view.
Refresh view Allows you to refresh a view.
View tool Button Description
Monitor view controls
209 Using Avaya Proactive Contact 4.0 Supervisor
Example Two - To display data for all jobs named 30Day regardless of the dialer on which the jobs reside, set the first selector to All Level 1 and the second selector to 30Day.
Using view controls
January 2008 210
Using view controlsThis section discusses the following topics to help you use the Monitor view controls:
● Filter data in a view on page 210
● Select a performance code on page 210
● Set scope selectors on page 211
● Select a time range on page 212
● Select a hierarchy on page 212
Filter data in a viewUse the following procedure to filter data in a view:
1. With a view open, click Filter Data. The Filter Data dialog box appears. For more information, see Filter Data dialog box on page 237.
2. Select a column from the list. The options in this list are the column headings for the selected view.
3. From the Operator list, select an operator.
4. In the Value box, type a value.
5. Click OK.
Select a performance codeThe performance code option is available only from the Job Performance view.
Use the following procedure to select a performance code:
1. From the Job Performance view, click Performance Code.
The Performance Completion Code dialog box lists a set of completion codes with a description. For each code, the system displays the completion code category that was assigned to the code when the job started.For more information, see Performance Completion Code dialog box on page 248.
2. Select a code.
3. Click OK.
Monitor uses the selected code to measure agent performance.
Monitor view controls
211 Using Avaya Proactive Contact 4.0 Supervisor
Set scope selectorsSet the scope using the three drop-down lists that are available from any view toolbar.
The Hierarchy Manager settings and the default hierarchy selections on the Monitor Scope tab which hierarchy options you can select for the view.
The default Monitor scope selectors are dialer and job. You can select one or all items from each selector.
Use the following procedure to set scope selectors:
1. With a view open, click the Hierarchy Manager icon on the view toolbar.
2. Select either No hierarchy, Agent/supervisor hierarchy, or Custom hierarchy.
The options coordinate with the Agent/supervisor hierarchy and Custom hierarchy lists on the Scope tab.
Additionally, the option that you select in the Hierarchy Manager list affects the three scope selectors in the drop-down lists in your view.
For example, if you select MySuperAgentHierarchy on the Scope tab’s Agent/supervisor hierarchy list and then select Agent/supervisor hierarchy from the Hierarchy Manager list, your scope selectors will populate with data from MySuperAgentHierarchy.
Tip:Tip: The hierarchy selected on the Scope tab becomes the default hierarchy that
populates your views.
3. From the first scope selector, select an item. By default, a list of dialer names appear.
If you selected Use custom hierarchy, the top-level items of the selected hierarchy appear in this list.
The item you select in the first scope selector typically reduces the options available in the second scope selector. You can select All Level 1, which does not narrow your view’s scope.
4. From the second scope selector, select an item. By default, a list of job names appear.
If you selected Use custom hierarchy, the middle-level items of the selected hierarchy appear in this list.
The item you select typically narrows the options available in the third scope selector. You can select All Level 2, which does not narrow your view’s scope.
5. From the third scope selector, select an item. By default, the third scope selector contains no options except All Level 3.
If you selected either Use default hierarchy or Use custom hierarchy, the bottom-level items of the selected hierarchy appear in this list. The All Level 3 value does not narrow your view’s scope.
Using view controls
January 2008 212
Select a time rangeYou can expand the default time to view data on only the jobs that are running or for all jobs.
For example, you can change the time range to display a view showing right party contacts for all instances of Job1 that have run during a single day.
Time selection is limited to views and data fields where summing makes sense. For example, non-numerical data is not summed. Similarly, data whose value is transient, such as the minimum hit rate, is not summed.
Use the following procedure to select a time range:
1. With a view open, click the Time Scope icon.
2. From the list, select or clear Show Running Jobs Only.
When you select Show Running Jobs Only your view will only display data for currently running jobs. When you clear Show Running Jobs Only your view will display data for currently running jobs.
Select a hierarchyAfter you create a hierarchy in Hierarchy Manager and use the Scope tab in Monitor to select the hierarchy, you can apply the hierarchy to any view.
1. With a view open, click the Hierarchy Manager icon.
A list appears.
2. From the list, select No Hierarchy, Agent/supervisor hierarchy, or Custom hierarchy.
The No Hierarchy option sets the scope selectors back to their default settings. The first scope selector lists dialers, the second scope selector lists jobs, and the third scope selector contains no items except All Level 3.
Agent/supervisor hierarchy and Custom hierarchy coordinate with the Agent/supervisor hierarchy and Custom hierarchy lists seen on the Scope tab.
The option that you select in the Hierarchy Manager list affects the three scope selectors in your view.
For example, if you select MySuperAgentHierarchy in the Scope tab Agent/supervisor hierarchy list and then select Agent/supervisor hierarchy from the Hierarchy Manager list, your scope selectors will populate with data from MySuperAgentHierarchy.
The options you select in the scope selectors can change the scope of the data displayed in your views.
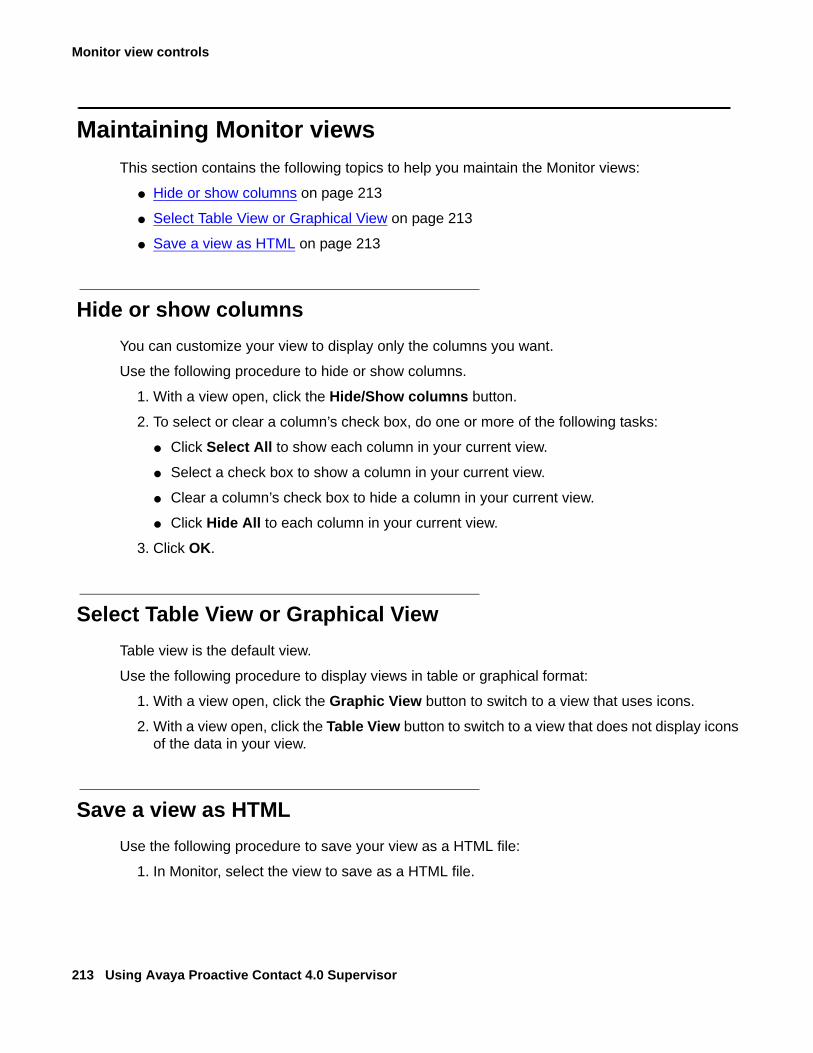
Monitor view controls
213 Using Avaya Proactive Contact 4.0 Supervisor
Maintaining Monitor viewsThis section contains the following topics to help you maintain the Monitor views:
● Hide or show columns on page 213
● Select Table View or Graphical View on page 213
● Save a view as HTML on page 213
Hide or show columnsYou can customize your view to display only the columns you want.
Use the following procedure to hide or show columns.
1. With a view open, click the Hide/Show columns button.
2. To select or clear a column’s check box, do one or more of the following tasks:
● Click Select All to show each column in your current view.
● Select a check box to show a column in your current view.
● Clear a column’s check box to hide a column in your current view.
● Click Hide All to each column in your current view.
3. Click OK.
Select Table View or Graphical ViewTable view is the default view.
Use the following procedure to display views in table or graphical format:
1. With a view open, click the Graphic View button to switch to a view that uses icons.
2. With a view open, click the Table View button to switch to a view that does not display icons of the data in your view.
Save a view as HTMLUse the following procedure to save your view as a HTML file:
1. In Monitor, select the view to save as a HTML file.

Maintaining Monitor views
January 2008 214
2. Select File > Save as HTML.
Monitor opens a new window with the HTML output.
3. Select File > Save As, browse to a location, and select Save.

Monitor view controls
215 Using Avaya Proactive Contact 4.0 Supervisor
January 2008 216
Chapter 12: Job control functions
Avaya Proactive Contact allows you to adjust job settings while a job is running. You make these adjustments through the Monitor Tools menu. The adjusted settings revert to the default settings when the job ends.
This section contains the following topics:
● Understanding job control functions on page 217
● Using job control functions on page 218
● Maintaining job control functions on page 221
Job control functions
217 Using Avaya Proactive Contact 4.0 Supervisor
Understanding job control functionsAvaya Proactive Contact allows you to adjust job settings while a job is running. You make these adjustments through the Monitor Tools menu. The adjusted settings expire when the job ends.
Note:Note: When a job uses the Cruise Control feature, you cannot change the call pacing
settings.
Job controls are available from any view that displays a list of jobs, such as the Job Status view or the Job Wait Queue view.
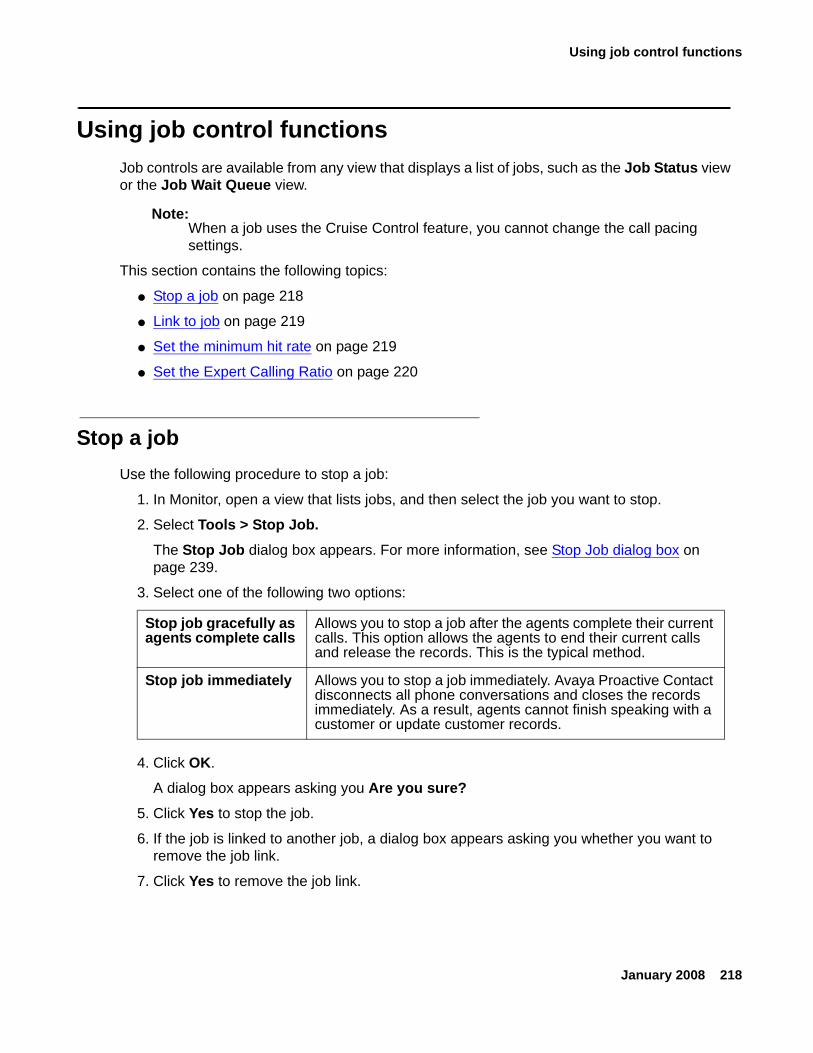
Using job control functions
January 2008 218
Using job control functionsJob controls are available from any view that displays a list of jobs, such as the Job Status view or the Job Wait Queue view.
Note:Note: When a job uses the Cruise Control feature, you cannot change the call pacing
settings.
This section contains the following topics:
● Stop a job on page 218
● Link to job on page 219
● Set the minimum hit rate on page 219
● Set the Expert Calling Ratio on page 220
Stop a jobUse the following procedure to stop a job:
1. In Monitor, open a view that lists jobs, and then select the job you want to stop.
2. Select Tools > Stop Job.The Stop Job dialog box appears. For more information, see Stop Job dialog box on page 239.
3. Select one of the following two options:
4. Click OK.
A dialog box appears asking you Are you sure?5. Click Yes to stop the job.
6. If the job is linked to another job, a dialog box appears asking you whether you want to remove the job link.
7. Click Yes to remove the job link.
Stop job gracefully as agents complete calls
Allows you to stop a job after the agents complete their current calls. This option allows the agents to end their current calls and release the records. This is the typical method.
Stop job immediately Allows you to stop a job immediately. Avaya Proactive Contact disconnects all phone conversations and closes the records immediately. As a result, agents cannot finish speaking with a customer or update customer records.
Job control functions
219 Using Avaya Proactive Contact 4.0 Supervisor
Link to jobUse the Job Link option to identify a job to start automatically when the current job completes. When you link a job, the system transfers agents to the next job as the agents complete their last calls and release the records. The system displays a message telling the agents that they are changing jobs. For rules regarding linking jobs, see Basic settings on page 122.
Use the following procedure to link to job:
1. Open a Monitor view that lists jobs.
2. Select a job, and then select Tools > Job Link. For more information, see Link to Job dialog box on page 240.
3. Select a job, and then click OK.
Note:Note: It was assumed that the job linking feature would work for campaign share the
same way that it does on a single system that is where a series of selections can be run for the linked jobs prior to the first job starting. After that the follow on jobs would start automatically as the previous job in the link ran out of records and shutdown. During this process the agents are also automatically move from one job to the next. This is not the case in a shared campaign.The jobs have to be monitored and the next linked job and selection have to be run manually near the end of the current job.
Set the minimum hit rateThe minimum hit rate prevents Avaya Proactive Contact from allocating more pooled lines to a poorly performing job at the expense of a more successful job.
The minimum hit rate designates the lowest perceived probability of a call attempt that results in a request for an agent. The value of this parameter can reduce the number of call attempts that Avaya Proactive Contact initiates. For example, a job using a minimum hit rate of 30% means the system makes no more than three dialing attempts for each agent that.
Use the following procedure to set the minimum hit rate:
1. Open a Monitor view that lists jobs.
2. Select a job, and then select Tools > Minimum Hit Rate. For more information, see Minimum Hit Rate dialog box on page 240.
3. Use the slider or type a value from 0 to 100 in increments of 10, and then click OK.
Using job control functions
January 2008 220
Set the Expert Calling RatioAvaya Proactive Contact provides two methods for predicting when to make the next phone call: Cruise Control and Expert Calling Ratio. If the job uses Expert Calling Ratio, you can change the Expert Calling Mode in Monitor. You cannot change the Cruise Control settings.
Expert Calling Ratio changes the way Avaya Proactive Contact predicts when to make the next call. You can select any of the following three ratios:
● Callers in the wait queue
● Agent Work Time
● Agent Update Time
Tip:Tip: If you are currently experiencing a high abandonment rate, you may want to
lower the percentage; if your agents are experiencing large amounts of idle time you may want to increase the percentage. This rule is true using any of the three ratios.
Use the following procedure to set the Expert Calling Ratio:
1. Open a Monitor view that lists jobs.
2. Select a job, and then select Tools > Expert Calling Ratio. For more information, see Expert Calling Ratio dialog box on page 240.
3. Click the Expert Calling Mode field and select either Callers in the wait queue, Agent update time, or Agent work time.
4. Select the Value field to enter a value from 0 through 100 in increments of 10, and then click OK.
Tip:Tip: Wait at least 15 minutes before changing your Expert Calling Ratio again
because your changes will not be noticeable to you for at least that long.
Job control functions
221 Using Avaya Proactive Contact 4.0 Supervisor
Maintaining job control functionsThis section contains the following topics:
● Adjust Inbound settings on page 221
● Reassign lines on page 221
● Set a managed dialing job on page 222
● Select and sort time zones on page 222
● Set up a unit work list on page 223
● Set and modify a quota on page 223
● Set the detection mode on page 224
● Set the alternate initial phone on page 224
● Set recalls on page 225
● Find a text string on page 225
Adjust Inbound settingsUse the following procedure to adjust your inbound settings:
1. Open a Monitor view that lists jobs.
2. Select an inbound or blend job, and then select Tools > Inbound Settings. For more information, see Inbound Settings dialog box on page 241.
3. Select the Value field to enter settings, and then click OK.
Reassign linesWhen you reassign lines, you alleviate congestion on certain Avaya Proactive Contact lines so that your jobs run more quickly.
Use the following procedure to reassign lines:
1. Open a Monitor view that lists jobs.
2. Select a job, and then select Tools > Lines. For more information, see Lines dialog box on page 245.
3. A check indicates that the line group is in use.
4. To use line groups, complete one of the following actions:
Maintaining job control functions
January 2008 222
● Select the appropriate check box.
● Click the Activate All button to select all of the line groups.
● Click the Deactivate All button to clear all of the line groups.
5. Click OK
Set a managed dialing jobManaged dialing jobs allow agents to preview a customer’s record prior to beginning their conversation with the customer. For more information on Managed Dialing settings, see Managed Dialing settings on page 129.
Use the following procedure to set the managed dialing job:
1. Open a Monitor view that lists jobs.
2. Select a Managed Dialing job from the list, and then select Tools > Managed Dialing. For more information, see Managed Dialing dialog box on page 241.
3. To modify agents’ preview time, enter a different value in the Time Limit box.
4. Select Allow agent to cancel calls to immediately allow agents to cancel calls.
5. Click OK.
Select and sort time zonesUse the following procedure to select time zones and sort calls by time zones:
1. Open a Monitor view that lists jobs.
2. Select a job, and then select Tools > Time Zones. For more information, see Time Zones dialog box on page 242.
3. Select the Call records in order by time zone check box to sort calls by times zones.
4. To place calls to a time zone, complete one of the following actions:
● Select the time zone fields where you want to place calls.
● Clear the time zone fields where you do not want to place calls.
● Click Activate All to select all time zones.
● Click Deactivate All to clear all time zones.
5. Click OK.
Job control functions
223 Using Avaya Proactive Contact 4.0 Supervisor
Set up a unit work listA unit work list creates a sub-list in a job so that certain agents can be assigned to a unit work list and, therefore, receive only certain calls.
You can enable a unit work list for the job before you start the job. During the job, you can enable or disable units. When the job completes the unit work list, the system stops the job.
For example: A job calls potential customers to set up appointments with sales people. You can enable the unit work list named sales group for the job. As the dialer places phone calls, agents make appointments for sales people in the sales group. When the sales people's schedules are full, the dialer stops placing calls for appointments.
Use the following procedure to set up a unit work list:
1. Open a Monitor view that lists jobs.
2. Select a job, and then select Tools > Unit Work Lists. For more information, see Unit Work Lists dialog box on page 242.
3. To change a work list ID, complete one of the following actions:
● Select the Unit ID names that you want to use.
● Clear the Unit ID names that you do not want to use.
● Click Activate All to select all Unit ID names.
● Click Deactivate All to clear Unit ID names.
4. Click OK.
Set and modify a quotaAvaya Proactive Contact uses quotas to complete a specified number of outbound calls based on a selected outcome.
A quota is a maximum number of releases for a particular completion code. When the system reaches the quota for a completion code, the dialer stops placing phone calls and the system stops the job.
In Editor, you set and modify a quota that the system applies when the job starts.
In Monitor, you set and modify a quota that affects the current job while the job runs.
To understand how Avaya Proactive Contact uses quotas, it helps to understand when a job stops. For more information on when a job stops, see When a job stops on page 118.
Use the following procedure to change the quota value during calling activities:
1. Start Monitor.
Maintaining job control functions
January 2008 224
2. Select a job, and then select Tools > Quotas. The Quota dialog box appears. For more information, see Quota dialog box on page 243.
3. Select the Unit ID field and type a Unit ID.
4. Select the Completion Code field to select a completion code.
5. Select the Quota field to enter a number greater than 0.
6. Click OK.
Set the detection modeUse the Detection Mode option to determine the types of calls Avaya Proactive Contact passes to agents. For more information on detection modes, see Phone strategy settings on page 86.
Use the following procedure to set the detection mode:
1. Open a Monitor view that lists jobs.
2. Select a job, and then select Tools > Detection Modes. For more information, see Detection Modes dialog box on page 244.
3. Click the Phone field to select a phone.
4. Select the Rings field to enter a different number of rings
5. Select the Pass to Agents field to select the type of connections to pass to an agent.
6. To add a phone, click Add Phone and repeat steps 3 and 4 to edit the fields.
7. To remove a phone, select the phone you want to delete, click Remove Phone, and then click OK.
Set the alternate initial phoneThe alternate initial phone replaces the initial phone as the first phone number to call at a particular time of day. The system begins to call the alternate initial phone number at the time you specify in the alternate initial phone settings. For more information, see Phone strategy settings on page 86.
Use the following procedure to set the alternate initial phone:
1. Open a Monitor view that lists jobs.
2. Select a job, and then select Tools > Alternate Initial. For more information, see Alternate Initial Phones dialog box on page 244.
3. Click the Phone field to select a phone.
4. Click the Local Time field to edit the time. To toggle between AM and PM, select it, and then use your up and down arrows.
Job control functions
225 Using Avaya Proactive Contact 4.0 Supervisor
5. Click the Time Zones field, and then click the button to display the list of time zones. Select the time zones you want to call.
6. Click Add Phone to append a row, and then configure the new alternate initial phone’s settings. To remove a phone, select the phone you want to remove, and then click Remove Phone.
7. Click OK.
Set recallsUse the recalls setting to determine how long Avaya Proactive Contact waits before recalling a number, how many times it recalls the same phone number, and which phone it calls next.
Use the following procedure to set recalls:
1. Open a Monitor view that lists jobs.
2. Select a job, and then select Tools > Recalls. For more information, see Recalls dialog box on page 245.
3. Select the various fields in the Recalls dialog box to edit the recalls currently configured.
The Result column indicates the calling result of the call. The Retry Interval values are displayed in minutes.
4. To change a recall, select the appropriate row, then complete one of the following actions:
● Click Add Recall to insert a row where you can edit a new recall.
● Click Remove Recall to delete a recall.
5. Click OK.
Find a text stringUse the following procedure to search for a text string in a view:
1. Open a Monitor view that lists jobs.
2. Select a job, and then select Tools > Find. For more information, see Find dialog box on page 237.
3. Enter the text string of the item you want to find in the current view.
4. To refine your search, select one or both of the following check boxes:
● Match case
● Find whole words only5. Click Find Next to continue the search.

Maintaining job control functions
January 2008 226
6. Click OK to end the search.

Job control functions
227 Using Avaya Proactive Contact 4.0 Supervisor
January 2008 228
Chapter 13: Agent control functions
During calling activities, you can use Monitor to find one or more agents and take an action for that agent.
This section contains the following topics:
● Understanding agent control functions on page 229
● Using agent control functions on page 231
Agent control functions
229 Using Avaya Proactive Contact 4.0 Supervisor
Understanding agent control functionsDuring calling activities, you can use Monitor to find one or more agents and take the following actions to manage agents:
● Transfer one or more agents to another job
● Send a message to one or more agents
● Monitor an agent line
● Remove an agent from a job
Before performing any of these tasks, you must first find an agent.
This section contains the following topics to help you find agents:
● Hierarchies on page 229
● Using wildcard characters on page 229
HierarchiesYou can find agents in several ways. If you know the exact agent login, you can search for a single agent.
Use the following hierarchy groups to search for a single agent or a group of agents.
Job - Search all agents in a job.
Supervisor - Search all agents reporting to a supervisor.
Dialer - Search all agents on a dialer.
Tip:Tip: An agent must be set up within the supervisor hierarchy in order for the agent to
be found using this function. Set up hierarchies using Hierarchy Manager.
Using wildcard charactersIn addition to finding a single agent, you can use wildcard characters to search for multiple agents.
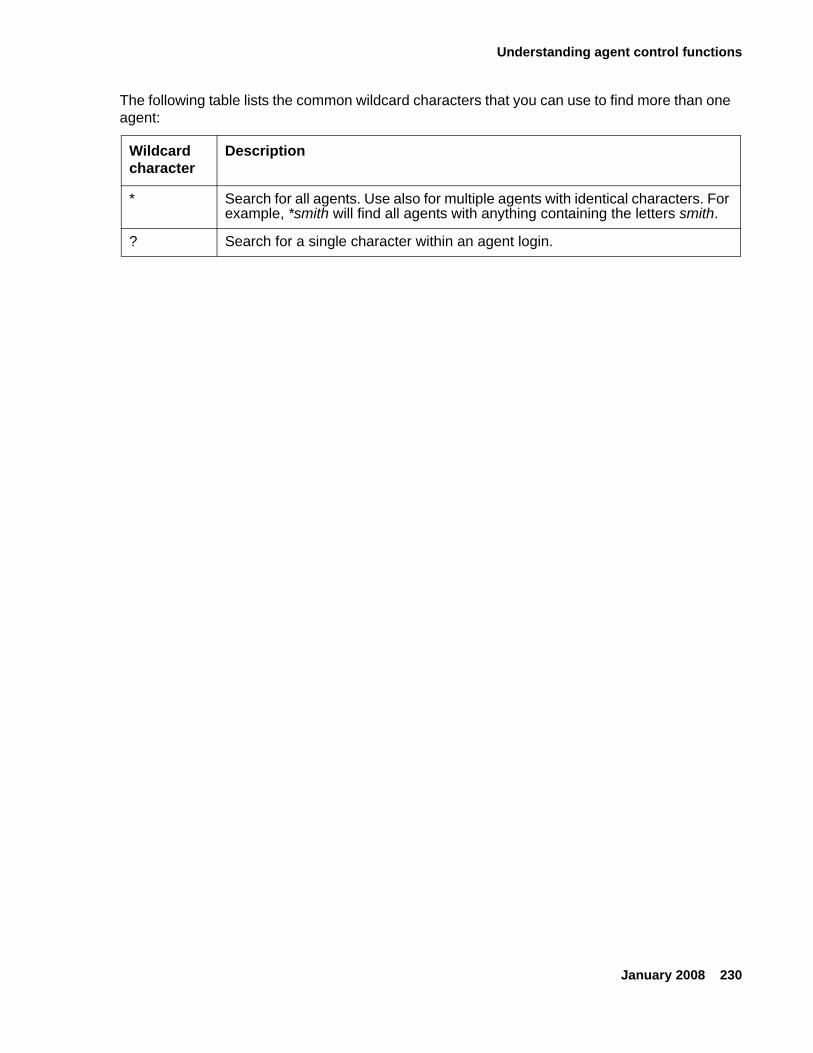
Understanding agent control functions
January 2008 230
The following table lists the common wildcard characters that you can use to find more than one agent:
Wildcard character
Description
* Search for all agents. Use also for multiple agents with identical characters. For example, *smith will find all agents with anything containing the letters smith.
? Search for a single character within an agent login.

Agent control functions
231 Using Avaya Proactive Contact 4.0 Supervisor
Using agent control functionsAfter you find one or more agents, you can use the Monitor agent control functions to take the following actions to manage agents:
● Transfer one or more agents to another job
● Send a message to one or more agents
● Monitor an agent line
● Remove an agent from a job
This section contains the following topics to help you manage agents during a job:
● Find an agent on page 231
● Transfer an agent to another job on page 231
● Send message to an agent on page 232
● Monitor agent line on page 232
● Remove an agent from a job on page 232
● Show an agent view on page 233
Find an agentUse the following procedure to find an agent:
1. On the Monitor button bar, click Agent, and then click Find Agent. The Find Agent view appears. For more information, see Find Agent dialog box on page 247.
2. Type the name of an agent or use wildcard characters to select multiple agents.
3. Use the Dialer, Job, and Supervisor drop-down lists to select a hierarchy to filter the information.
4. Click Find.
Agent names appear in the lower section of the Find Agent view.
Transfer an agent to another jobUse the following procedure to transfer an agent to another job:
1. On the Monitor button bar, click Agent, and then click Find Agent.
Using agent control functions
January 2008 232
2. Select one or more agents in the Find Agent dialog box. For more information, see Find Agent dialog box on page 247.
3. Right-click and select Transfer Agent. A list of currently running jobs appears.
4. Select the job to transfer the agent to, and then click OK.
Tip:Tip: You may not see the agent transfer immediately. Factors such as agent talk time
and update time may affect how quickly the agent transfers.
Send message to an agentUse the following procedure to send a message to an agent:
1. On the Monitor button bar, click Agent, and then click Find Agent. 2. Select one or more agents in the Find Agent dialog box. For more information, see Find
Agent dialog box on page 247.
3. Right-click and select Send Message.
The Send Message dialog box appears.
4. Type the message to send to an agent, and then click OK.
Monitor agent lineUse the following procedure to monitor an agent line on an Avaya Proactive Contact with G230 system:
1. On the Monitor button bar, click Agent, and then click Find Agent. 2. Select the agent in the Find Agent dialog box. For more information, see Find Agent dialog
box on page 247.
3. Right-click and select Monitor Agent. A dialog box appears.
4. Enter headset ID number, and then click OK.
Remove an agent from a jobYou can remove an agent from a job in emergencies when the agent cannot use a normal disconnect method.
Agent control functions
233 Using Avaya Proactive Contact 4.0 Supervisor
Remove Agent immediately removes the agent from the job and logs the agent out of the Avaya Proactive Contact.
Use the following procedure to immediately disconnect an agent from a call:
1. On the Monitor button bar, click Agent, and then click Find Agent. 2. Select one or more agents in the Find Agent dialog box. For more information, see Find
Agent dialog box on page 247.
3. Right-click and select Remove Agent.A dialog box appears.
4. Click OK.
Show an agent viewAfter you find an agent, you can display an agent view for a selected agent.
Use the following procedure to display an agent view for a selected agent:
1. On the Monitor button bar, click Agent, and then click Find Agent. 2. Select an agents in the Find Agent dialog box. For more information, see Find Agent dialog
box on page 247.
3. Right-click and select one of the following views: Agent Detail, Agent Completion Codes, or Agent History.
4. Click OK.
The selected view for the selected agent appears.
January 2008 234
Chapter 14: Understanding Monitor dialog boxes
This section contains the following topics that describe the dialog boxes that you use in Monitor:
● View control dialog boxes on page 235
● Job control dialog boxes on page 239
● Agent control dialog boxes on page 247
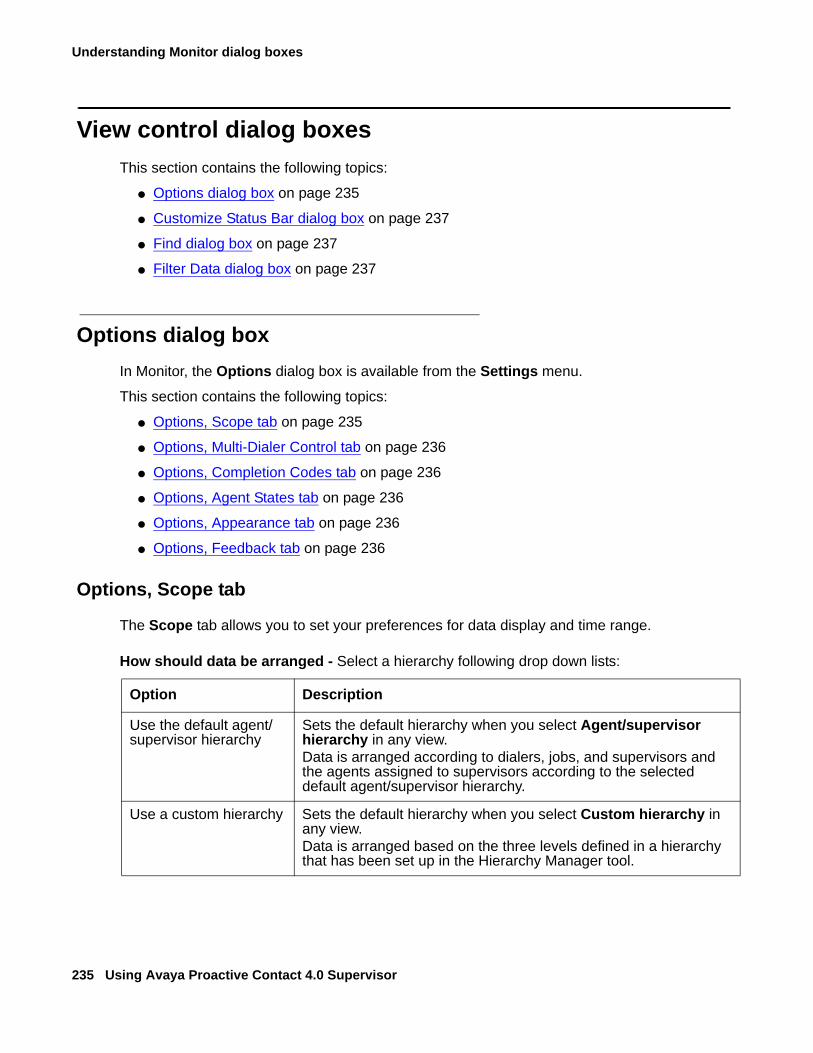
Understanding Monitor dialog boxes
235 Using Avaya Proactive Contact 4.0 Supervisor
View control dialog boxesThis section contains the following topics:
● Options dialog box on page 235
● Customize Status Bar dialog box on page 237
● Find dialog box on page 237
● Filter Data dialog box on page 237
Options dialog boxIn Monitor, the Options dialog box is available from the Settings menu.
This section contains the following topics:
● Options, Scope tab on page 235
● Options, Multi-Dialer Control tab on page 236
● Options, Completion Codes tab on page 236
● Options, Agent States tab on page 236
● Options, Appearance tab on page 236
● Options, Feedback tab on page 236
Options, Scope tab
The Scope tab allows you to set your preferences for data display and time range.
How should data be arranged - Select a hierarchy following drop down lists:
Option Description
Use the default agent/supervisor hierarchy
Sets the default hierarchy when you select Agent/supervisor hierarchy in any view.Data is arranged according to dialers, jobs, and supervisors and the agents assigned to supervisors according to the selected default agent/supervisor hierarchy.
Use a custom hierarchy Sets the default hierarchy when you select Custom hierarchy in any view.Data is arranged based on the three levels defined in a hierarchy that has been set up in the Hierarchy Manager tool.
View control dialog boxes
January 2008 236
What time range should views support?Gives you the option to select Show data for all jobs run since the last dialer restart, if applicable.
Options, Multi-Dialer Control tab
The Multi-Dialer Control tab allows you to choose which of the available dialers you want included in your view.
Apply job changes to all selected dialers - Lets you choose to select all dialers to appear in Monitor views.
Dialers - Lists individual dialers that you can select to include in Monitor views.
Options, Completion Codes tab
The Completion Codes tab allows you to choose which completion codes to view.
Show these call completion codes - Lets you select All codes or Active codes only.
Options, Agent States tab
This tab allows you to choose which agents states to display.
Display agents with these states - Lets you select which states to display in Monitor views.
Options, Appearance tab
The Appearance tab allows you to use a particular view as the appearance for future views and also allows you to set the refresh rate for all views.
Use this view set - Lets you select a default view set to use in Monitor.
Default refresh rate - Lets you define the number of seconds to wait between each data refresh.
Options, Feedback tab
You can choose how changes to views and view sets are saved when the application closes: always save, prompt to save changes, or do not save.
When a view closes - Lists save options to apply when a view closes.
Understanding Monitor dialog boxes
237 Using Avaya Proactive Contact 4.0 Supervisor
When the application closes - Lists save options to apply when Monitor closes.
When a command is initiated - Lists save options to apply when a command is initiated.
Customize Status Bar dialog boxUse the Customize Status Bar dialog box to choose what information you want to see in the Monitor status bar.
Available status panels - Lists the different options that you can have Monitor display in the status bar.
Find dialog boxUse the Find dialog box to search for an item in a view. For example, in a view that lists more agents than you can view on the screen, you can quickly locate a specific agent.
Find what - Type what you want to search for.
Match case - Select Match case if you want Monitor to search for items that exactly match the case (upper or lower) that you type. For example, if you type Chris and select Match case, Monitor does not include chris in the find results.
Find whole words only - Select Find whole words only to force Monitor to conduct a literal search based on what you type. For example, if you type chris and select Find whole words only, Monitor includes only chris as a valid search result. Christy, christine, and christopher, for example, would not be valid search results.
Filter Data dialog boxThe Filter Data dialog box lets you filter the amount of data you see in a view based on a data field contained in the view. For example, in the Dialer History view, you can filter data based on the Status column. The filter statement, "Status Is Finished," causes Monitor to display job data for completed job instances only. Currently running instances of the jobs are not included in the view.
Column - Lists the column headings of the selected view.
Operator - Lists available operators (Is, Is Not, Is Less Than, and Is Greater Than).

View control dialog boxes
January 2008 238
Value - Lists available values based on the selected column.
Understanding Monitor dialog boxes
239 Using Avaya Proactive Contact 4.0 Supervisor
Job control dialog boxesThis section contains the following topics:
● Stop Job dialog box on page 239
● Link to Job dialog box on page 240
● Minimum Hit Rate dialog box on page 240
● Expert Calling Ratio dialog box on page 240
● Inbound Settings dialog box on page 241
● Managed Dialing dialog box on page 241
● Time Zones dialog box on page 242
● Unit Work Lists dialog box on page 242
● Quota dialog box on page 243
● Alternate Initial Phones dialog box on page 244
● Detection Modes dialog box on page 244
● Recalls dialog box on page 245
● Lines dialog box on page 245
Stop Job dialog boxThe Stop Job dialog box lets you stop a job.
Shut down gracefully as agents complete calls - Allows you to stop a job after the agents complete their current calls. This option allows the agents to end their current calls and release the records.
Stop job immediately - Allows you to stop a job immediately. The system disconnects all phone conversations and closes the records immediately. As a result, agents cannot finish speaking with a customer or update customer records.
Apply changes to all dialers under multi-dialer control - Available only when multi-dialer control is enabled. Allows you to stop a job with the same name on more than one dialer.
Job control dialog boxes
January 2008 240
Link to Job dialog boxThe Link to Job dialog box allows you to connect jobs so that a new job automatically begins when one job ends.
When you link a job, the system transfers each agent to the next job after the agent completes the last call and releases the record. The system displays a message telling the agents that they are changing jobs.
Current link - Identifies the job currently scheduled to start when the current job ends.
New link - Lists the jobs to which the current job can link.
Apply changes to all dialers under multi-dialer control - Available only when multi-dialer control is enabled. Allows you to change the job link for the same job on multiple dialers.
Minimum Hit Rate dialog boxMinimum hit rate prevents the dialer from allocating more lines to a poorly performing job at the expense of a more successful job. For example, a minimum hit rate of 30% means the dialer will make no more than three dialing attempts for each agent.
Minimum hit rate - The minimum hit rate determines the maximum number of calls the dialer will make as it attempts to make an agent connection. Enter a value from 0 through 100 in increments of 10, or use the slider bar to set a minimum hit rate value. A typical setting is 30.
Apply changes to all dialers under multi-dialer control - Available only when multi-dialer control is enabled. Allows you to change the minimum hit rate for the same job on multiple dialers.
Expert Calling Ratio dialog boxThe Expert Calling Ratio affects the wait queue and the calling pace. The dialer achieves a balance between agents waiting for a call and customers placed in the wait queue.
Expert Calling Mode - Identifies the current mode (Calls in the wait queue, Agent Work Time, or Agent Update Time) with which the dialer calculates the Expert Calling ratio. Select a different option in this field to change the mode.
Value - Displays the current Expert Calling ratio value. Type a percent value from 1 through 100 to change the Expert Calling ratio.
Understanding Monitor dialog boxes
241 Using Avaya Proactive Contact 4.0 Supervisor
Apply changes to all dialers under multi-dialer control - Available only when multi-dialer control is enabled. Allows you to change the Expert Calling ratio for the same job on multiple dialers.
Inbound Settings dialog boxInbound settings control the way the dialer transfers blend agents between inbound and outbound calling activities.
Reassign agents to inbound - Determines the maximum time a call can be in the wait queue before the system transfers a blend agent to take inbound calls. Decrease agent wait time if you want to emphasize call center productivity. The Percentage of clients waiting exceeds setting overrides the Client wait exceeds setting.
For Client wait exceeds, type a maximum amount of time, in seconds from 0 to 999, that a call can be in the wait queue before the system transfers a blend agent to take inbound calls.
For Percentage of clients waiting exceeds, type a number from 100 to 200 to represent the maximum percentage of calls to be in the wait queue. The dialer compares the number of wait queue calls to the number of inbound and blend agents. For example, two blend agents and three inbound agents are on a job. If the Percentage of clients waiting exceeds value is 100, five calls (100% of combined inbound and blend agents) must be in the wait queue before the system moves a blend agent to take inbound calls.
Reassign agents to outbound - Allows you to set a maximum time, in seconds, that a blend agent taking inbound calls can be idle before the system transfers an agent to take outbound calls. The recommended setting is 20.
Apply changes to all dialers under multi-dialer control - Available only when multi-dialer control is enabled. Allows you to change the inbound settings for the same job on multiple dialers.
Managed Dialing dialog boxThe Managed Dialing dialog box allows you to change managed job preferences.
Preview length - Sets the time that an agent can preview a record before the dialer dials the number. Enter a value (in seconds) from 1 through 999 in the Time limit field. Select No limit to set an unlimited amount of preview time.
Allow agents to cancel call - Lets you choose whether agents can cancel a Managed Dialing call.
Job control dialog boxes
January 2008 242
Apply changes to all dialers under multi-dialer control - Available only when multi-dialer control is enabled. Allows you to change the Managed Dialing settings for the same job on multiple dialers.
Time Zones dialog boxSelect the time zones you want to call.
Call records in order by time zone - Lets you choose to have the dialer attempt to call all records in one time zone before moving to the next time zone. If you clear this option, the system attempts calls across all selected and available time zones.
Time Zone - Lists all time zones. Selected time zones are preceded by a check mark.
Start Time - Recommended start time for each time zone.
Stop Time - Recommended stop time for each time zone.
Records - The total number of records selected for calling in each time zone.
Available - The current number of records that are eligible to call at the current time for each time zone.
Recalls - The current number of records set for recall in each time zone.
Active totals - Displays totals for the Records, Available, and Recalls columns.
Apply changes to all dialers under multi-dialer control - Available only when multi-dialer control is enabled. Allows you to change the time zone settings for the same job on multiple dialers.
Activate All - Selects all time zones.
Deactivate All - Clears all time zones.
Unit Work Lists dialog boxIf you want a job to have a sub-area so that certain agents can log into a special area and work with certain customers, you can set up a Unit Work List for a job.
Unit ID - Lists all available Unit IDs. Selected units are preceded by a check mark. An Allid Unit ID indicates that the job is not set up for Unit Work Lists.
Understanding Monitor dialog boxes
243 Using Avaya Proactive Contact 4.0 Supervisor
Records - The total number of records selected for each Unit ID.
Available - The current number of records that are eligible to call for each Unit ID.
Recalls - The current number of records set for recall for each Unit ID.
Active totals - Displays totals for the Records, Available, and Recalls columns.
Apply changes to all dialers under multi-dialer control - Available only when multi-dialer control is enabled. Allows you to change the Unit Work List settings for the same job on multiple dialers.
Note:Note: Unit Work Lists must only be used with outbound jobs, and blend jobs would be
supported. However, there is a manual workaround that will allow you to use Unit Work Lists and achieve almost the same results.Follow the instructions below to configure Unit Work Lists to work with blend jobs.
When you set unit work lists to run on a blend job in the Job Run Verification Screen on Avaya Proactive Contact, you will get the following error messages:
2006/09/27!10.58.44!S28407!caller!caller.c!690!PID(28464)!Job blend startup (Pid=28464, Index=157, Number=105)
2006/09/27!10.58.45!LISTOPS!caller!!0!PID(28464)!Inbound with unshared account ownership is not permitted
2006/09/27!10.58.45!E28416!caller!caller.c!3374!PID(28464)!Caller - FATAL_ERROR: VL_ERR_JBLST_BAD
2006/09/27!10.58.55!E28408!nuisance!nuisance.c!260!PID(10700)!105 - Failed to get job number
2006/09/27!10.58.55!S28413!caller!caller.c!3586!PID(28464)!Job blend finished, setup error
The system has to be set to allocate all agents to the units, the parameter in the job file is "LOGONUNIT:Require unit ID for agent login" needs to be set to NO . This rule is enforced in the code due to the fact that the system cannot easily identify which agent to shift to inbound due to the small pool of agents assigned to each unit; this would result in nuisance calls.
An alternative would be to use agent blending, allowing agents to logon to campaigns by units. This solution works, but is not as efficient as a outbound only campaign without agent blending.
Quota dialog boxA quota is a maximum number of releases defined for a particular completion code. When the quota for a unit is reached, no more records are dialed.
Unit ID - Lists all Unit IDs. For non-Unit Work List jobs, Allid is the only Unit ID.
Job control dialog boxes
January 2008 244
Completion Code - Identifies the selected completion code to track.
Quota - Displays the quota limit for the selected completion code. Enter a number greater than 0.
Apply changes to all dialers under multi-dialer control - Available only when multi-dialer control is enabled. Allows you to change the quota settings for the same job on multiple dialers.
Alternate Initial Phones dialog boxThe alternate initial phone replaces the initial phone as the first phone number to call at a particular time of day.
Phone - Select the phone to use as the alternate initial phone.
Local Time - Displays the time that the system starts calling the alternate initial phone based on the local time in the selected time zone. Enter the time of day to switch to the alternate phone.
Time Zones - Lists the selected time zones for the selected alternate phone.
Add Phone - Adds a row for a new alternate initial phone.
Remove Phone - Removes the selected alternate initial phone.
Apply changes to all dialers under multi-dialer control - Available only when multi-dialer control is enabled. Allows you to change the alternate initial phone settings for the same job on multiple dialers.
Detection Modes dialog boxDetection Mode refers to the types of calls you want the system to pass to agents.
Phone - Identifies the phone field to which the system applies the detection modes settings.
Rings - Displays the number of rings to allow before the system records a NOANSWER completion code.
Pass to Agent - Lists the call detection modes that you can choose to pass to agents. For example, you might select Human Voice and Answering Machine as the types of calls that agents should handle.
Understanding Monitor dialog boxes
245 Using Avaya Proactive Contact 4.0 Supervisor
Apply changes to all dialers under multi-dialer control - Available only when multi-dialer control is enabled. Allows you to change the detection modes settings for the same job on multiple dialers.
Add Phone - Adds a new row to define detection modes settings for another phone.
Remove Phone - Removes the selected phone and detection modes settings.
Recalls dialog boxRecall settings tell the system how to handle system-set recalls.
Call This Phone - Lists phones for which recall settings are currently active.
Result - Defines the call result for which the system attempts recalls.
Retry Interval - Defines the number of minutes between recall attempts.
Attempts - Defines the maximum number of call attempts that the system places for each result.
Next Phone - Defines the next phone that the system calls when it has completed the defined number of attempts.
Apply changes to all dialers under multi-dialer control - Available only when multi-dialer control is enabled. Allows you to change the recall settings for the same job on multiple dialers.
Add Recall - Adds a new row to set up new recall parameters.
Remove Recall - Removes a selected row from the Recalls dialog box.
Lines dialog boxReassign lines when you feel that certain jobs could use a more lines and when certain jobs do not need as many lines.
Line Group Name - Lists the line groups set up for the system. Active line groups are preceded by a check mark.
Type - Identifies the type of lines, such as outbound or inbound, in each line group.

Job control dialog boxes
January 2008 246
Apply changes to all dialers under multi-dialer control - Available only when multi-dialer control is enabled. Allows you to change the line assignments for the same job on multiple dialers.
Activate All - Selects all line groups for the job.
Deactivate All - Clears all line groups from the job.
Understanding Monitor dialog boxes
247 Using Avaya Proactive Contact 4.0 Supervisor
Agent control dialog boxesThis section contains the following topics:
● Find Agent dialog box on page 247
● Transfer Agent dialog box on page 248
● Send Message dialog box on page 248
● Monitor Agent dialog box on page 248
● Performance Completion Code dialog box on page 248
Find Agent dialog boxThe Find Agent dialog box lets you search for one or more agents. You can then do the following:
● Send selected agents a message
● Remove them from a job
● Transfer them to another job
● Monitor them
Name - Enter the name of an agent or use wildcard characters to select multiple agents.
Dialer, Supervisor, Job - Use hierarchies to filter information based on dialer, job, or supervisor (if supervisor hierarchy is set up).
Send a message to agents - Sending instant messages lets you communicate directly with agents. Agents see your messages through their Proactive Contact Agent screen. Agents can receive these instant messages even when they are on a call with a customer.
After finding an agent, click the Send Message button.
Remove agent - Lets you end an agent’s session on a job. Use this option only for emergencies when the agent cannot use a normal disconnect. The agent is immediately removed from the job and logged out of the Avaya Proactive Contact.
After finding an agent, click the Remove Agent button.
Transfer agent - Lets you place an agent on a different calling job.
After finding an agent, click the Transfer Agent button.
Monitor agent - Lets you listen in on an agent’s conversation with a customer.
Agent control dialog boxes
January 2008 248
After finding an agent, click the Monitor Agent button.
Show an agent view - Lets you choose to display the Agent Detail view, Agent Completion Codes view, or Agent History view for the selected agent(s).
After finding an agent, click the Agent Detail button.
Transfer Agent dialog boxSelect a job to which the dialer will transfer the agent.
Available Jobs - Lists the jobs to which you can transfer an agent.
Send Message dialog boxLets you type the message you want to send to agents.
Message text - Type a message that you want to send to the selected agents.
Monitor Agent dialog boxThe Monitor Agent dialog box settings allow you to listen to the selected agent’s conversation with a customer.
Headset ID - Lets you specify your headset ID to allow you to listen to an agent’s conversation.
After finding an agent, click the Monitor Agent button.
Performance Completion Code dialog boxUse the Performance Completion Code dialog box to select a completion code to use to measure agent performance.
Code - Lists the number associated with the call completion code.
RPC - Identifies whether this completion code was designated as an RPC in Completion Code Manager at the start of the job.
Closure - Identifies whether this completion code was designated as a Closure in Completion Code Manager at the start of the job.
Understanding Monitor dialog boxes
249 Using Avaya Proactive Contact 4.0 Supervisor
Description - Displays the current completion code description from Completion Code Manager.
January 2008 250
Chapter 15: Alerts
Avaya Proactive Contact uses alerts to signal to supervisors the end of a job, a goal is met, and other events.
This section contains the following topics:
● Understanding alerts on page 251
● Using alerts on page 255
● Maintaining alerts on page 257
● Understanding Alert dialog boxes on page 258
Alerts
251 Using Avaya Proactive Contact 4.0 Supervisor
Understanding alertsAn alert provides a notification when job or agent performance, system or job status, or line usage varies beyond predetermined levels. This capability allows you to identify and correct potential problems before they escalate.
An alert can be the following notifications:
● An audio cue
● A visual cue
● A log file
● An email
● A pager signal
This section contains the following topics:
● Alerts uses on page 251
● Alert examples on page 252
● Alert settings on page 253
Alerts usesYou can define up to 10 alerts that notifies you when the following varies beyond predetermined levels:
● Job or agent performance
● System or job status
● Line usage varies
You can set the following types of alerts to identify and correct potential problems before they escalate:
● Audio cues
● Visual cues
● Log files
● Emails
● Pager signal
For example, you might want to know when an agent handles a call for longer than five minutes or when the hit rate on a job is less than 30%.
Understanding alerts
January 2008 252
You can also set an alert to tell you when the system needs attention, for example, a job is approaching completion.
To access alerts, start Monitor and select Settings > Alerts.
Tip:Tip: Monitor must be open in order for you to receive a notification of an alert. After
you receive an alert notification, you must enable the alert again.
To enable an alert, open the Alert Viewer and select Enabled.
Alert examplesAvaya Proactive Contact can alert you for many reasons. The following is a sample list:
Average Idle Time - The average time that all agents or a specific agent are idle, not talking or updating.
Average Talk Time - The average time that all agents or a specific agent spend talking.
Average Update Time - The average update time that all agents or a specific agent spend updating a customer record.
Current Talk Time - The talk time for all agents or a specific agent. Current Talk Time is shown as talking in real-time rather than an average over multiple calls.
Current Update Time - The update time for all agents or a specific agent. Current Update TIme is shown as updating in real-time rather than an average over multiple calls.
Total Idle Time - The total idle time for all agents or a specific agent, as idle time added over the course of a single job.
Total Talk Time - The total talk time for all agents or a specific agent, as talk time added over the course of a single job.
Total Update Time - The total update time for all agents or a specific agent, as update time added over the course of a single job.
Line Utilization - The percentage of lines in use. For example, you might want to know when 95% of your lines are used so that you can free some line. Otherwise, when 100% of the lines are used, the dialer automatically places customers in a wait queue when they dial in.
Current Hit Rate - The ratio or percentage of call connects to call attempts.
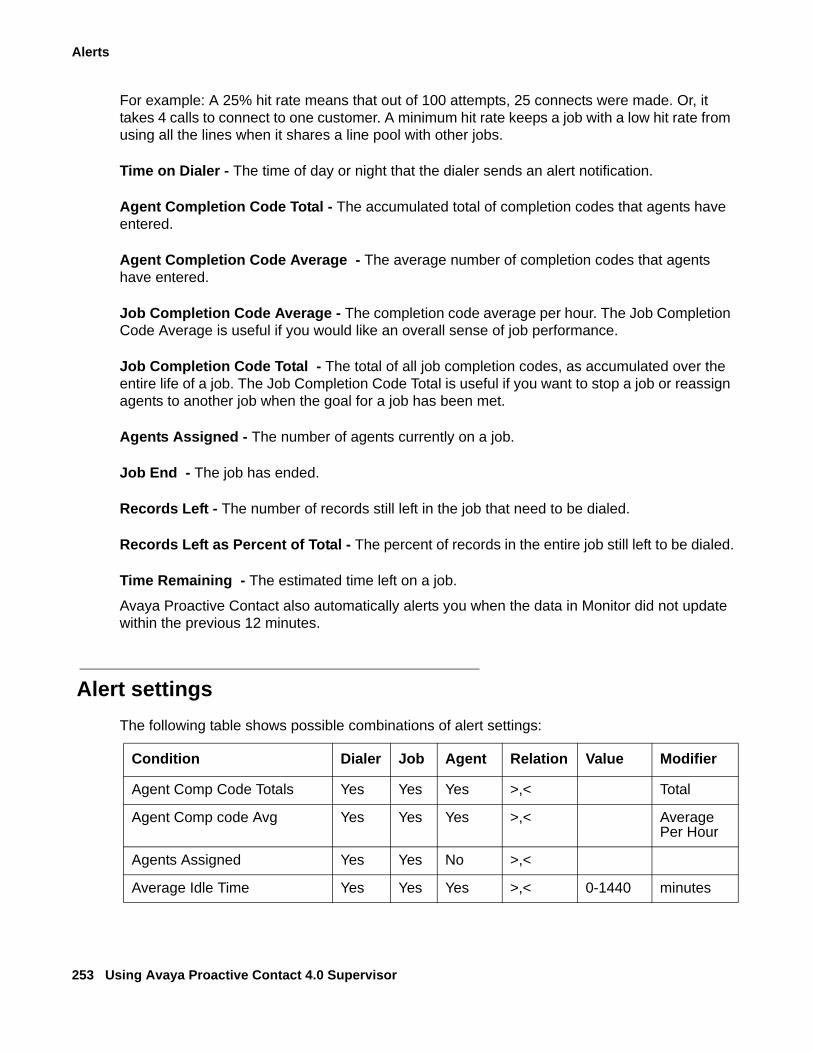
Alerts
253 Using Avaya Proactive Contact 4.0 Supervisor
For example: A 25% hit rate means that out of 100 attempts, 25 connects were made. Or, it takes 4 calls to connect to one customer. A minimum hit rate keeps a job with a low hit rate from using all the lines when it shares a line pool with other jobs.
Time on Dialer - The time of day or night that the dialer sends an alert notification.
Agent Completion Code Total - The accumulated total of completion codes that agents have entered.
Agent Completion Code Average - The average number of completion codes that agents have entered.
Job Completion Code Average - The completion code average per hour. The Job Completion Code Average is useful if you would like an overall sense of job performance.
Job Completion Code Total - The total of all job completion codes, as accumulated over the entire life of a job. The Job Completion Code Total is useful if you want to stop a job or reassign agents to another job when the goal for a job has been met.
Agents Assigned - The number of agents currently on a job.
Job End - The job has ended.
Records Left - The number of records still left in the job that need to be dialed.
Records Left as Percent of Total - The percent of records in the entire job still left to be dialed.
Time Remaining - The estimated time left on a job.
Avaya Proactive Contact also automatically alerts you when the data in Monitor did not update within the previous 12 minutes.
Alert settingsThe following table shows possible combinations of alert settings:
Condition Dialer Job Agent Relation Value Modifier
Agent Comp Code Totals Yes Yes Yes >,< Total
Agent Comp code Avg Yes Yes Yes >,< Average Per Hour
Agents Assigned Yes Yes No >,<
Average Idle Time Yes Yes Yes >,< 0-1440 minutes
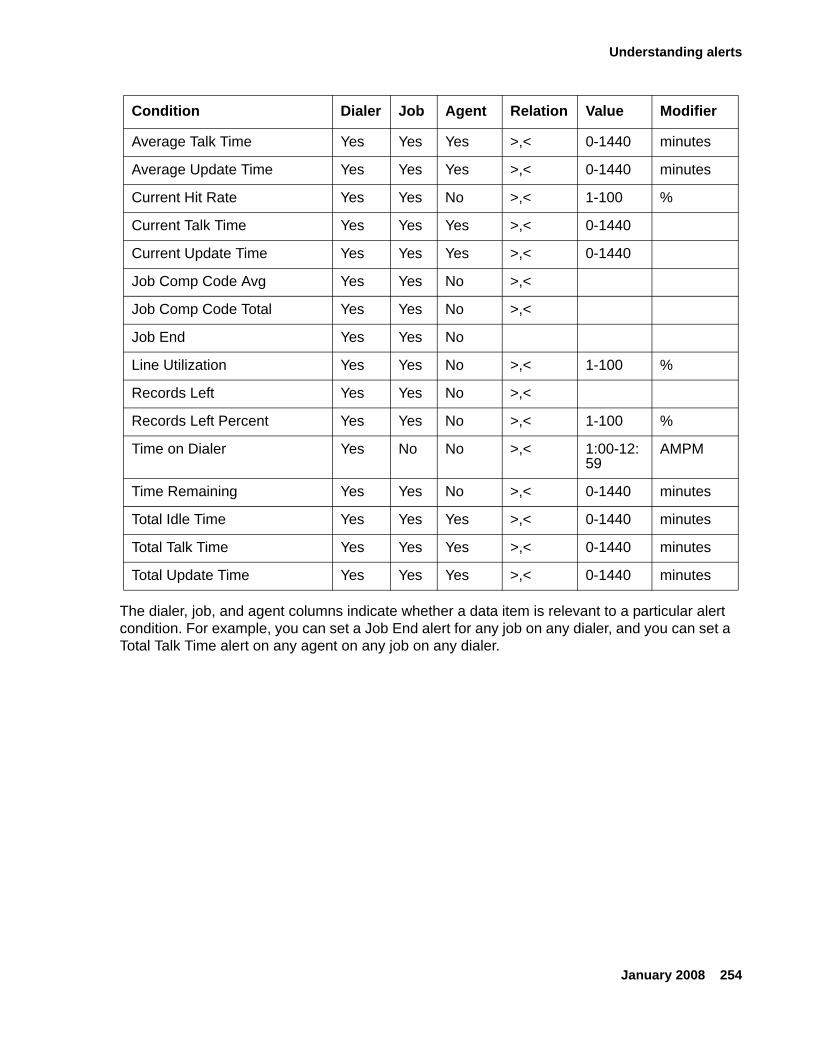
Understanding alerts
January 2008 254
The dialer, job, and agent columns indicate whether a data item is relevant to a particular alert condition. For example, you can set a Job End alert for any job on any dialer, and you can set a Total Talk Time alert on any agent on any job on any dialer.
Average Talk Time Yes Yes Yes >,< 0-1440 minutes
Average Update Time Yes Yes Yes >,< 0-1440 minutes
Current Hit Rate Yes Yes No >,< 1-100 %
Current Talk Time Yes Yes Yes >,< 0-1440
Current Update Time Yes Yes Yes >,< 0-1440
Job Comp Code Avg Yes Yes No >,<
Job Comp Code Total Yes Yes No >,<
Job End Yes Yes No
Line Utilization Yes Yes No >,< 1-100 %
Records Left Yes Yes No >,<
Records Left Percent Yes Yes No >,< 1-100 %
Time on Dialer Yes No No >,< 1:00-12:59
AMPM
Time Remaining Yes Yes No >,< 0-1440 minutes
Total Idle Time Yes Yes Yes >,< 0-1440 minutes
Total Talk Time Yes Yes Yes >,< 0-1440 minutes
Total Update Time Yes Yes Yes >,< 0-1440 minutes
Condition Dialer Job Agent Relation Value Modifier
Alerts
255 Using Avaya Proactive Contact 4.0 Supervisor
Using alertsIn Monitor, you can create, change or remove an alert.
This section contains the following topics:
● Create an alert on page 255
● Edit an alert on page 256
● Remove an alert on page 256
Create an alertYou create alerts in Alerts Viewer, which is a available in Monitor.
Use the following procedure to create an alert:
1. Select Start > Programs > Avaya > Proactive Contact 4.0 > Supervisor > Monitor.2. Select Settings > Alerts. For more information, see Alert Viewer dialog box on page 258.
If an email configuration wizard appears, either complete it or cancel out of it.
3. In the Alerts Viewer dialog box, click Add.
The Alert Editor dialog box appears.
4. On the Alert Definition tab, select the condition you want to monitor and complete the conditional statement.
5. On the Scope tab, narrow your alert condition.
Tip:Tip: You can skip this tab if you do not want to narrow your alert criteria.
6. On the Notifications tab, select the following options to specify how Avaya Proactive Contact notifies you:
● Display an alert to open a pop-up alert dialog on your screen
● Sound an alert to hear an audible sound
● Send e-mail to receive an email with an alert notification.
If Send e-mail is unavailable, configure your default email client on your PC.
If Send e-mail is available and you want to receive an email alert notification, type your email address in the To... box.
7. Click OK.
The alert name and summary information appear in the Alerts Viewer dialog box.
Using alerts
January 2008 256
Edit an alertUse the following procedure to edit an alert:
1. Use the following procedure to edit an alert:
2. In Monitor, select Settings > Alerts.
The Alert Viewer dialog box appears.
3. Select the alert you want to edit, and then click Edit. The Alert Editor dialog box appears.
4. Use the Alert Definition, Scope, and Notifications tabs to modify the alert.
For more information, see Alert Editor, Alert Definition tab on page 259, Alert Editor, Scope tab on page 259, and Alert Editor, Notifications tab on page 260.
5. Click OK.
Remove an alertUse the following procedure to remove an alert:
1. In Monitor, select Settings > Alerts.
The Alert Viewer dialog box appears. For more information, see Alert Viewer dialog box on page 258.
2. Select the alert you want to delete, and then click Remove.
3. Click Close.
Alerts
257 Using Avaya Proactive Contact 4.0 Supervisor
Maintaining alertsIn Monitor, you can view and modify alerts to inform you about your calling activities.
This section contains the following topics:
● Enable and disable alerts on page 257
● Check the status of each alert on page 257
Enable and disable alertsIn Alert Viewer, you have the option to disable alerts, which tells Avaya Proactive Contact not to notify you about an alert.
For example: You usually monitor agent Doe everyday because he is a new hire. If agent Doe calls in sick for a day, clear the check box next to the agent Doe alert to disable the alert. When agent Doe returns to work, select the agent Doe alert to reactivate it.
The Enabled check box tells you whether or not Avaya Proactive Contact is actively checking the alert’s condition. A check mark indicates that Avaya Proactive Contact is monitoring the condition.
Job Ended, Current Talk Time, and Current Update Time automatically reactivate after their condition is met, but all other alerts require that you re-enable them in Alerts Viewer.
Use the following procedure to enable and disable alerts:
1. In Monitor, select Settings > Alerts.
2. Select or clear the Enabled field.
● Select the Enabled field to activate monitoring of the alert condition.
● Clear Enabled to deactivate the alert.
Check the status of each alertIn Alert Viewer, you can check the status of your alerts.
● If an alert condition has not been met, its status is On.
● If an alert condition has been met, its status is Off.Use the following procedure to check the status of each alert:
1. In Monitor, select Settings > Alerts.
2. Notice whether the Status column has an On or Off status.
Understanding Alert dialog boxes
January 2008 258
Understanding Alert dialog boxesThis section contains the following topics:
● Alert Viewer dialog box on page 258
● Alert Editor, Alert Definition tab on page 259
● Alert Editor, Scope tab on page 259
● Alert Editor, Notifications tab on page 260
Alert Viewer dialog boxYou can define up to 10 alerts to provide audio cues, visual cues, log files, e-mails, or pager signals when job or agent performance, system or job status, or line usage varies beyond predetermined levels. This information lets you identify and correct potential problems before they escalate.
The Alert Viewer dialog box contains summary information about existing alerts. If you want to edit an alert’s settings, click Edit. If you want to add an alert, click Add.
You can receive alerts only when Monitor is running at the time the alert’s condition is met.
Enabled - Indicates if an alert is enabled. If you do not want the system to monitor an alert’s condition, clear the check box located in the Enabled field.
Alerts using the Job Ended, Current Talk Time, and Current Update Time conditions automatically re-enable themselves after their condition is met, but all other alerts require that you manually re-enable them.
Status - Displays the current status for each alert. If an alert’s condition has been met, its status is Off.
Condition - Displays the condition, such as Average Talk Time or Line Utilization, defined for each alert. Click Edit to set or change a condition (Alert Editor, Alert Definition tab).
Value - Displays the value associated with the condition for each alert. Click Edit to set or change a condition (Alert Editor, Alert Definition tab).
Scope - Displays the scope settings for each alert. You can narrow the target of an alert by selecting a specific dialer, job, or agent. Narrowing the scope for an alert is optional.
Add - Lets you define a new alert.
Edit - Opens the Alert Editor dialog box in which you set up and change alert settings.
Alerts
259 Using Avaya Proactive Contact 4.0 Supervisor
Remove - Removes the selected alert from the list of alerts.
Alert Editor, Alert Definition tabThe Alert Definition tab is used to create your alert condition statement. Use the Condition list to select the condition you wish to monitor (for example, Current Talk Time). Use the Completion Code, Operator, and Value fields to complete your alert’s conditional statement (for example, =15 minutes). The Completion Code list is available based on the Condition selection.
Condition - Lists the available conditions that you can set an alert to monitor.
Completion Code - Lists completion codes from which you select if your alert condition calls for monitoring a specific completion code.
Operator - Lists available logic operators. A logic operator, such as > (greater than), < (less than), or = (equal to), is used to build your conditional statement.
Value - Identifies the value for the conditional statement. Enter the value that you want the system to test for when evaluating the conditional statement. For example, in this conditional statement: “Current Talk Time > 5 minutes”, the value is 5.
Alert Editor, Scope tabThe Scope tab allows you to narrow the breadth of what the dialer monitors. For example, if you only want your alert to track a specific agent, use the Scope tab to tell the dialer which agent to monitor.
Dialer - Lists the dialers against which you can set an alert. Select Any Dialer (the Avaya Proactive Contact monitors all dialers) or a specific dialer from the list.
Job - Lists the jobs against which you can set an alert. Select Any Job (theAvaya Proactive Contact monitors all jobs) or a specific job from the list.
Agent - Lists the agents against whom you can set an alert. Select All Agents (the Avaya Proactive Contact monitors all agents) or a specific agent from the list.
Understanding Alert dialog boxes
January 2008 260
Alert Editor, Notifications tabThe Notifications tab allows you to specify how you want the dialer to alert you. The dialer can alert you only when Monitor running at the time the alert condition is met.
Display alert - Displays a pop-up dialog box on your computer screen to notify you.
Sound alert - Plays an audible sound from your computer to notify you.
Send e-mail - Sends you an e-mail message. If this option is unavailable, open Microsoft Outlook and set it as your default e-mail client. If Send e-mail is available and you want to receive an e-mail notification, type your email address in the To... box.

Alerts
261 Using Avaya Proactive Contact 4.0 Supervisor

January 2008 262
Chapter 16: Analyst navigation and personalization
Avaya Proactive Contact allows you to customize the display of Analyst windows and navigate among the various tool applications that you can launch from Analyst.
This section contains the following topics to help you use Analyst:
● Window arrangement overview on page 263
● Navigate among the Tool menu applications on page 264
● Use large icons or small icons in the button bar on page 265
Analyst navigation and personalization
263 Using Avaya Proactive Contact 4.0 Supervisor
Window arrangement overviewThe Analyst window displays report configurations and summary information of the options that were selected in the Reports Wizard.
This section contains the following topics:
● Analyst window layout and usage on page 263
● Button bar on page 263
● Sort on page 263
● Resize columns on page 263
Analyst window layout and usage - By default, your Analyst window is divided into a button bar on the left and a main pane on the right. Nothing will display in the main pane until you click a selection in the button bar. The Analyst button bar contains report categories; by clicking the buttons under the button group headings, you can quickly move among the various reports.
Button bar - The button bar works like an accordion: it expands and contracts. In other words, whenever you click the heading of a button group, you expand the group so that its buttons are visible. You are able to resize the button bar.
Sort - You can click most column headings to sort the contents of the column. When you click a heading, you see a small arrow appear alongside the heading; if the small arrow is pointing up, you are sorting the column in ascending order. If the small arrow is pointing down, then you are sorting in descending order.
Resize columns - You can resize any column in the main pane by hovering your cursor between the heading titles until a double-arrow appears. Hold down your left mouse button while you drag your cursor to resize the columns.
Navigate among the Tool menu applications
January 2008 264
Navigate among the Tool menu applicationsAnalyst comes with tool applications that you access from the Tools menu. Use the following procedure to start Tools menu applications:
1. Select Start > All Programs > Avaya Proactive Contact 4.0 > Supervisor > Analyst.2. To start a tool, select its name from the Tools menu. While you use the tool, Analyst
remains open in the background so that you can navigate back to it when you are finished using the tool.
Analyst navigation and personalization
265 Using Avaya Proactive Contact 4.0 Supervisor
Use large icons or small icons in the button barYou can view large or small buttons on the button bar. Use the following procedure to switch between large and small icons in the button bar:
1. On the button bar, click to expand the button group whose icon size you want to change.
2. Right-click, and then select either Large Icons or Small Icons. A check mark next to the menu option indicates which view you are currently using.
January 2008 266
Chapter 17: Avaya Proactive Contact Analyst
Avaya Proactive Contact Analyst generates call management reports with job, agent, and system details that are based on Avaya Proactive Contact activity.
This section contains the following topics:
● Understanding Analyst on page 267
● Using Analyst on page 269
Avaya Proactive Contact Analyst
267 Using Avaya Proactive Contact 4.0 Analyst
Understanding AnalystAnalyst provides reports containing statistical information that you can use to evaluate your jobs. For example, reports can show:
● How agents spend their time.
● Which completion codes are most frequently used.
● The amount of time a particular job ran.
● The hierarchy of managers and agents.
In Analyst, reports are grouped into seven categories:
● Agent
● Job
● Time of Day
● Administrative
● Agent Monthly
● Job Monthly
● Time of Day Monthly
For each category, Analyst provides several reports. For example, the Agent category includes reports about agent activity, performance summary, and completion code summary. For each report, Analyst provides several variations or configurations. The different configurations sort, group, and filter data differently.
In Analyst, report categories appear on the button bar in the left pane. For each category, the reports are listed. When you select a report, the report configurations appear in the right pane.
The right pane displays five columns:
● Title
● Group 1
● Group 2
● Group 3
● Criteria
The last four columns display the options that were selected for the report configuration. There are many configurations for each report. You might compare the configurations to find one that most accurately meets your needs.
You might experiment with the New and Change features. You can use these features to create customized report configurations. After you create and save a configuration, the saved configuration appears with the existing configurations for that report.

Understanding Analyst
January 2008 268
You can use the Schedule feature to instruct Analyst to automatically generate reports from a specific configuration at a specific time. When you set up a report schedule, you specify the exact time that Avaya Proactive Contact sends the report to your printer.
Avaya Proactive Contact Analyst
269 Using Avaya Proactive Contact 4.0 Analyst
Using AnalystThis section describes the tasks you can perform using Avaya Proactive Contact Analyst.
This section contains the following topics:
● Create a new report configuration on page 269
● Delete a report configuration on page 270
● Change a report configuration on page 270
● Preview a report on page 271
● Print a report on page 271
● Export report data on page 272
● Schedule a report on page 273
Create a new report configurationWhen you create a new report configuration, you specify:
● Grouping: the indentation and the hierarchical layout of the report data.
● Time frame: the desired time period of the report.
● Filtering: the specific information to include in your report.
● Title: the report identifier in the list of report configurations.
● Completion codes: completion code information included in Completion Code Summary reports. This option is available only for Completion Code Summary reports in these categories:
- Agent
- Job
- Time of Day
- Agent Monthly
- Job Monthly
- Time of Day Monthly
To create a new report configuration:
1. Select a report category on the button bar.
2. Select a report.
Using Analyst
January 2008 270
3. Select Reports > New.
The system displays the Analyst Report Wizard. The Report Wizard guides you through the configuration process.
Tip:Tip: You can only have one Report Wizard running at a time.
4. Read the Welcome screen.
5. Complete the wizard, noting the following:
● In the Data Group page, if you select a hierarchy branch as a grouping criteria, you must select the hierarchy name on the Additional Report Criteria page.
● In the Additional Report Criteria pages, if you leave these settings blank the report data is not filtered.
● Select up to 14 completion codes for Completion Code Summary reports.
The system displays your report configuration as the last item in the list of report configurations.
Delete a report configurationUse the following procedure to delete an Analyst report configuration:
1. Select a report category on the button bar.
2. Select a report.
3. Select a report configuration.
4. Select Reports > Delete.
5. Click Yes to delete the report configuration, or click No to close the dialog box without deleting the report configuration.
Change a report configurationIf there is an existing report configuration that you need to modify, use the Change command to alter the configuration.
1. Select a report category on the button bar.
2. Select a report.
3. Select a report configuration.
Avaya Proactive Contact Analyst
271 Using Avaya Proactive Contact 4.0 Analyst
4. Select Reports > Change.
The system displays the Analyst Report Wizard, pre-populated with the existing report criteria.
5. Follow the instructions in the Report Wizard to change the report criteria.
Preview a reportTo preview a report:
1. Select a report category on the button bar.
2. Select a report in the report category.
3. Select a report configuration.
4. Select Reports > Preview.
Analyst displays the report in a new window. From this window you can:
● Print the report
● Set the printer properties
● Refresh the report data
● Export the report data
● Toggle the group tree outline
For more information about printing, see Print a report on page 271.
For more information about exporting data, see Export report data on page 272.
Print a reportYou have two options for printing an Analyst report: from the menu or from the preview window.
From the menu
Use this procedure to print an report from the menu:
1. Select a report category on the button bar.
2. Select a report in the category.
3. Select a report configuration.
4. Select Reports > Print.5. Select the number of copies you want to print.

Using Analyst
January 2008 272
6. Click OK.
The system prints the report to your default printer.
Tip:Tip: Before printing a report, ensure that the printer properties, like portrait or
landscape orientation, are set correctly.
From the preview window
Use this procedure to print a report from the preview window:
1. Click the Printer Setup icon.
The system displays the Print Setup dialog for your default printer.
2. Click Properties... 3. Verify the settings for your printer.
4. Click OK.
5. Click OK again.
6. Click the Print icon.
7. Select the page range, number of copies, and collation option.
8. Click OK.
The system prints the file to your default printer.
Export report dataExport report data to use or view in a different application:
1. Select a report category on the button bar.
2. Select a report in the category.
3. Select a report configuration.
4. Select Reports > Preview.
Analyst displays the report in a new window.
5. Click Export In the report window.
6. From the Format list, select a format.
7. From the Destination list, select a destination.
Avaya Proactive Contact Analyst
273 Using Avaya Proactive Contact 4.0 Analyst
8. Click OK.
Depending on the format and destination chosen, the system displays a series of dialog boxes containing options for exporting the report data.
9. In each dialog box, verify the correct information is selected.
10. Click OK to move to the next dialog box, until the data is exported.
Schedule a reportUse the following procedure to schedule a time to print a report automatically:
1. Select a report category on the button bar.
2. Select a report in the category.
3. Select a report configuration.
4. Select Reports > Scheduler.5. In the Scheduler dialog box, select the frequency option that corresponds with how often
you want to print the report.
Note:Note: If you select Weekly or Monthly, the report prints on Monday only. Use Task
Scheduler, available from the Windows Control Panel, to select a different day of the week. The settings you specify in Task Scheduler override the Analyst schedule settings.
6. Select a start time.
7. Click OK.
Tip:Tip: After you have scheduled a report, you can look in the Windows Task Scheduler
to view your scheduled reports: Start > Settings > Control Panel > Scheduled Tasks.

Using Analyst
January 2008 274

Avaya Proactive Contact Analyst
275 Using Avaya Proactive Contact 4.0 Analyst

January 2008 276
Chapter 18: PC Analysis Telnet
PC Analysis Telnet is a tool that allows you to access the Linux-based PC Analysis menus.
PC Analysis is a reporting and troubleshooting tool included with the Avaya Proactive Contact. You can also use PC Analysis to define and generate extract output files to a network location. You can use the extract files in third party reporting, spreadsheet, and word processing packages.
This section contains the following topics:
● Understanding PC Analysis Telnet on page 277
● Using PC Analysis Telnet on page 279
PC Analysis Telnet
277 Using Avaya Proactive Contact 4.0 Supervisor
Understanding PC Analysis TelnetThe PC Analysis Telnet tool allows you to access the Linux-based PC Analysis menus. You can also use PC Analysis Telnet to move PC Analysis extract output files from the Avaya Proactive Contact to a network location.
PC Analysis Telnet is available from the Analyst Tools menu only.
Note:Note: If access to Supervisor is not available, you need to use a third-party telnet tool to
access Avaya Proactive Contact menu system and PC Analysis.
This section contains the following topics:
● PC Analysis on page 277
● PC Analysis Telnet features on page 277
PC AnalysisUse PC Analysis to create reports, charts, and spreadsheets of Avaya Proactive Contact data in third-party spreadsheet, word processing, and reporting applications.
In PC Analysis, you define extract files, generate extract output files, and transfer the extract output files to third-party applications. You can extract files the following formats: *.cfg, *. prn, and *. txt.
PC Analysis Telnet featuresUse the PC Analysis Telnet tool to navigate to the Linux-based menus and PC Analysis screens.
The PC Analysis Telnet features appear on the toolbar, File menu, and Tools menu.
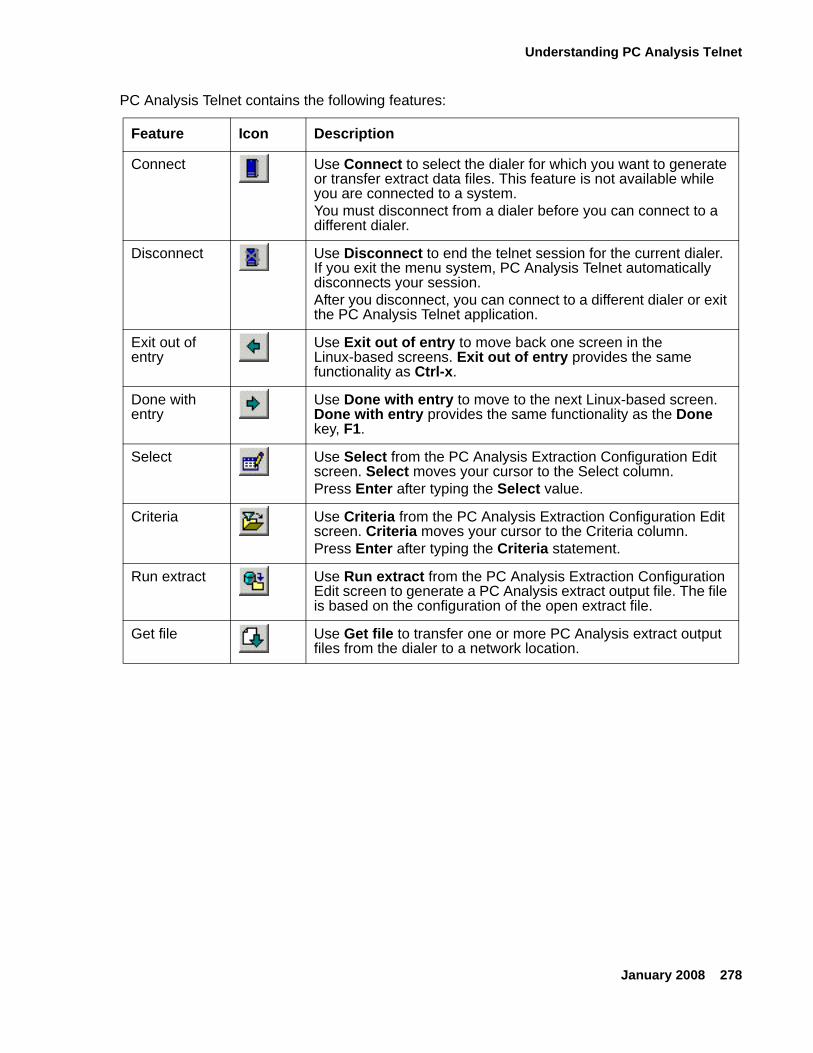
Understanding PC Analysis Telnet
January 2008 278
PC Analysis Telnet contains the following features:
Feature Icon Description
Connect Use Connect to select the dialer for which you want to generate or transfer extract data files. This feature is not available while you are connected to a system. You must disconnect from a dialer before you can connect to a different dialer.
Disconnect Use Disconnect to end the telnet session for the current dialer. If you exit the menu system, PC Analysis Telnet automatically disconnects your session. After you disconnect, you can connect to a different dialer or exit the PC Analysis Telnet application.
Exit out of entry
Use Exit out of entry to move back one screen in the Linux-based screens. Exit out of entry provides the same functionality as Ctrl-x.
Done with entry
Use Done with entry to move to the next Linux-based screen. Done with entry provides the same functionality as the Done key, F1.
Select Use Select from the PC Analysis Extraction Configuration Edit screen. Select moves your cursor to the Select column. Press Enter after typing the Select value.
Criteria Use Criteria from the PC Analysis Extraction Configuration Edit screen. Criteria moves your cursor to the Criteria column. Press Enter after typing the Criteria statement.
Run extract Use Run extract from the PC Analysis Extraction Configuration Edit screen to generate a PC Analysis extract output file. The file is based on the configuration of the open extract file.
Get file Use Get file to transfer one or more PC Analysis extract output files from the dialer to a network location.
PC Analysis Telnet
279 Using Avaya Proactive Contact 4.0 Supervisor
Using PC Analysis TelnetThe PC Analysis Telnet tool allows you to access the Linux-based PC Analysis menus.
PC Analysis Telnet is available from the Analyst Tools menu only.
Note:Note: If access to Supervisor is not available, you need to use a third-party telnet tool to
access Avaya Proactive Contact menu system and PC Analysis.
For information on how to use the Linux-based PC Analysis menus, see Administering Avaya Proactive Contact (Linux-based Interface).
This section contains the following topics for the PC Analysis Telnet tool:
● Start PC Analysis Telnet on page 279
● Transfer PC Analysis extract output files on page 280
● FTP Client dialog box on page 280
Start PC Analysis TelnetThe PC Analysis Telnet tool allows you to access the Linux-based PC Analysis menus.
Use the following procedure to start PC Analysis Telnet.
1. Select Start > All Programs > Avaya > Proactive Contact 4.0 > Supervisor > Analyst.2. Select Tools > PC Analysis Telnet.
The PC Analysis Telnet window appears.
3. Select File > Connect. The Connect to Proactive Contact dialog box appears.
4. From the Name list, select the name of the dialer to which you want to connect, and then click OK.
The dialer login: prompt appears in the Telnet window.
5. Use your system or PC Analysis login to access the PC Analysis menus.
6. Enter your key code and press Enter.
Using PC Analysis Telnet
January 2008 280
Transfer PC Analysis extract output filesUse the following procedure to transfer generated PC Analysis extract output files from Avaya Proactive Contact to a network location or to a personal computer.
1. Start PC Analysis Telnet.2. Connect to a dialer.
3. Select Tools > Get File(s). The FTP Client dialog box appears. The name of the system to which you are connected appears in the dialog box title.
4. Select one or more extract output files to transfer, and then click Get file.
The Save As dialog box appears.
5. Browse to the location where you want to transfer the selected extract output file, and then click Save.
The system saves the file to the selected location. If you selected more than one extract output file to transfer, the Save As dialog box appears for the next file.
6. Repeat step 5 for each extract output file you selected to transfer.
After you click save for the last output file, the FTP Client dialog box appears. For more information, see FTP Client dialog box on page 280.
7. Click Cancel to close the FTP Client dialog box.
FTP Client dialog boxThe FTP Client dialog box allows you to transfer PC Analysis extract files from Avaya Proactive Contact to a network location, such as a personal computer.
File Name - Lists the PC Analysis extract files that currently exist on the selected dialer. Extract files typically have a .prn extension (for example, list1.prn).
Size - Lists the file size of each extract file.
Date - Identifies the date that the extract file was generated.
Get File - Click Get File to transfer one or more selected extract files. The Save As dialog box appears, which lets you choose where you want to save the file.

PC Analysis Telnet
281 Using Avaya Proactive Contact 4.0 Supervisor
January 2008 282
Chapter 19: Completion Code Manager
Completion Codes is a tool that helps you create, categorize, and maintain completion codes. The changes you make are available the next time the dialers restart.
A completion code identifies the result of a phone call. Either the system or an agent assigns a completion code to each phone call. The system uses completion codes to select records for placing calls, to monitor calling activities, and to select records for reports.
This section contains the following topics:
● Understanding completion codes on page 283
● Using Completion Codes on page 287
● Maintaining completion codes on page 290
Completion Code Manager
283 Using Avaya Proactive Contact 4.0 Supervisor
Understanding completion codesThis section discusses the following topics to help you use completion codes:
● Completion codes on page 283
● Completion code attributes on page 284
● Completion code categories on page 285
● Multi-dialer environment on page 285
Completion codesA completion code identifies the result of a phone call. Either the system or an agent assigns a completion code to each phone call.
The system assigns a completion code when the dialer does not pass the phone call to an agent. The only successful call attempts that the system identifies are during Virtual jobs.
An agent assigns a completion code based on the result of a phone call that the dialer passed to the agent.
Examples of completion codes that the system can assign include the following codes:
● BUSY when the dialer detects a busy signal
● SIT when the dialer detects a Standard Information Tone that identifies a disconnected number or busy circuits
● NOANSWER when a party does not answer the phone call within the specified time number of rings
Tip:Tip: You can change the number of times the system attempts to call the customer on
the Retries tab in Strategies.
Examples of completion codes that agents can assign include the following codes:
● RECALL to tell the dialer to place the phone call at a later time
● PROMISE when the customer agrees to make a payment
● AUTOVOICE when the job is set up to pass agents phone calls that connect to an answering machine
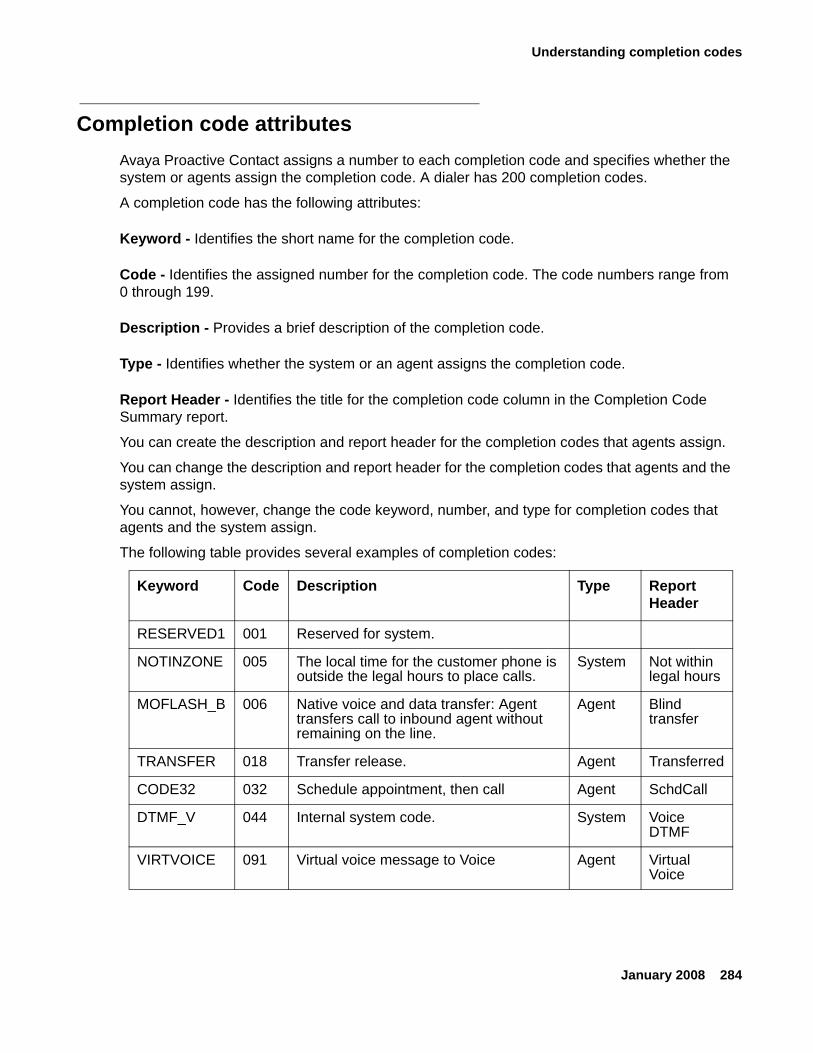
Understanding completion codes
January 2008 284
Completion code attributesAvaya Proactive Contact assigns a number to each completion code and specifies whether the system or agents assign the completion code. A dialer has 200 completion codes.
A completion code has the following attributes:
Keyword - Identifies the short name for the completion code.
Code - Identifies the assigned number for the completion code. The code numbers range from 0 through 199.
Description - Provides a brief description of the completion code.
Type - Identifies whether the system or an agent assigns the completion code.
Report Header - Identifies the title for the completion code column in the Completion Code Summary report.
You can create the description and report header for the completion codes that agents assign.
You can change the description and report header for the completion codes that agents and the system assign.
You cannot, however, change the code keyword, number, and type for completion codes that agents and the system assign.
The following table provides several examples of completion codes:
Keyword Code Description Type Report Header
RESERVED1 001 Reserved for system.
NOTINZONE 005 The local time for the customer phone is outside the legal hours to place calls.
System Not within legal hours
MOFLASH_B 006 Native voice and data transfer: Agent transfers call to inbound agent without remaining on the line.
Agent Blind transfer
TRANSFER 018 Transfer release. Agent Transferred
CODE32 032 Schedule appointment, then call Agent SchdCall
DTMF_V 044 Internal system code. System Voice DTMF
VIRTVOICE 091 Virtual voice message to Voice Agent Virtual Voice
Completion Code Manager
285 Using Avaya Proactive Contact 4.0 Supervisor
Completion code categoriesDuring a job, agents assign a completion code to a phone call to indicate the result of a call. In Completion Code Manager, you can organize completion codes into four categories for monitoring and reporting purposes.
Tip:Tip: You can associate a completion code with more than one category.
For example, an agent placed a call to confirm an order and left a message on the answering machine. The job is set up to pass phone calls that are answered by an answering machine to agents. The agent assigned the answering machine completion code to the customer record. The answering machine completion code can belong to both the Right Party Contacts and Closures categories.
Right Party Contacts (RPCs) - Indicates that the agent talked with the correct party.
Closures - Indicates that the agent talked with a party and completed the purpose of the phone call. A closure can represent a variety of outcomes, including the following examples:
● Balance paid in full
● Bankruptcy
● Deceased
● Sale verified and completed
Abandons - Indicates that a phone call was abandoned and that the dialer disconnected the phone call. An abandon can be result of several events, including the following examples:
● A customer who placed a call to the call center hung up while in the inbound wait queue.
● A customer hung up while in the outbound wait queue.
● A phone call that was held in wait queue for the maximum time allowed.
Recalls - Indicates that the phone call did not connect to a customer and that another phone call attempt can be made. The dialer places another phone call to the customer based on the settings you define on the Retries tab in Strategies.
Multi-dialer environmentIn Completion Code Manager, you can create and change the completion code description and report header text for completion codes that agents assign. You can also assign completion codes to categories.

Understanding completion codes
January 2008 286
If your system uses multiple dialers, the completion codes that you create and change in Completion Code Manager belong to the primary dialer. When you save the codes in Completion Code Manager, Avaya Proactive Contact saves the changes to each dialer in the pod. This ensures a consistent set of codes for reporting and monitoring.
Completion Code Manager
287 Using Avaya Proactive Contact 4.0 Supervisor
Using Completion CodesYou can use Completion Codes to create and manage completion codes. You can do the following tasks:
● View the system and agent assigned completion codes.
● Create and maintain completion codes that agents can assign.
● Assign completion codes to categories for monitor and reporting activities.
The changes you make are available the next time the dialers restart.
The following topics discuss Completion Code Manager and the procedures you can use to categorize completion codes:
● Completion Code window on page 287
● Start Completion Code Manager on page 288
● Create a completion code on page 288
● Assign a completion code to a category on page 288
Completion Code windowThe Completion Code window provides a means to create, categorize, and maintain completion codes for monitor and reporting activities.
Right-hand pane - The right-hand pane contains a complete list of completion codes for the dialer. For each code, Completion Code lists the keyword, code number, description, whether the system or agent assigns the completion code, and the report column text.
Tip:Tip: You can use the right-click menu in the right-hand pane to select menu options
that are available on the Edit and View menus.
The Right-hand pane also displays the following categories:
● RPCs (Right Party Contacts) - Is used to specify that the person contacted was the appropriate person to talk with.
● Closures - Is used to indicate that some form of closure was reached with the contacted party.
● Abandon - Is used to indicate the system abandoned the call after connecting with a person at the called number.
● Recall - Is used to indicate whether or not this completion code can be used to specify that a record can be recalled.
Using Completion Codes
January 2008 288
Start Completion Code ManagerCompletion Code Manager is available from the View menu.
Note:Note: The changes you make in Completion Codes are available the next time the
dialers restart.
Use the following procedure to start Completion Codes:
1. Select Start > All Programs > Avaya > Proactive Contact 4.0 > Supervisor > Editor.2. Select Completion Codes.
The Version dialog appears. Select the version that you want to Edit. The default is the Active version. For more information, see Versions on page 42. A list of all the active completion codes appears. For more information, see Completion Code window on page 287.
Create a completion codeYou can assign the code to the Right Party Contact and Closure categories, and include the code in the Completion Codes Summary report.
Later, you can assign the completion code to the Abandon and Recall categories.You can also change the description and report header text directly on the right-hand pane.
Use the following procedure to create a completion code.
1. Right-click and Select New OR click the New icon.
The Completion Code Wizard window opens.
2. Complete the wizard by defining the new code, setting attributes for the code, and verifying the new code entities.
For more information, see the following topics:
● Change a completion code on page 290.
● Assign a completion code to a category on page 288.
Assign a completion code to a categoryYou can assign a completion code to the following categories:
● RPC (Right Party Contact)
● Closure
● Abandon
Completion Code Manager
289 Using Avaya Proactive Contact 4.0 Supervisor
● Recall
Use the following procedure to assign a completion code to a category from the list of completion codes in the right-hand pane:
1. Select one or more completion codes.
2. Select the specific option from the available category.
3. Click Save.
Completion Code Manager dialog box appears.
4. Click Yes to save a copy in a different version OR click No to Cancel.
Avaya Proactive Contact saves the completion codes on each dialer in a pod.
Maintaining completion codes
January 2008 290
Maintaining completion codesThis section discusses the procedures you can use to maintain completion codes:
● Assign or reassign a completion code to a category on page 290
● Change a completion code on page 290
● Filter the completion codes to view on page 291
● Save the completion code information to a file on page 291
Assign or reassign a completion code to a categoryUse the following procedure to remove a completion code from the following categories:
● Right Party Contact
● Closure
● Abandon
● Recall
1. From the list of completion codes in the right-hand pane, select the completion code that you want to remove from the category.
2. Right-click and select Remove.
The Delete confirmation dialog box appears.
3. Click OK to remove the completion code from the list of completion codes.
Change a completion codeUse the following procedure to change a completion code description and report header text:
1. From the list of completion codes in the right-hand pane of the window, select the completion code that you want to change.
2. Right-click and select Change Description or Change Report Header.3. Type the new description or report header text, and then press Enter.
Tip:Tip: The report column width is limited to 23 characters in length. You can adjust the
text until the report meets your requirements
Completion Code displays the new information.
Completion Code Manager
291 Using Avaya Proactive Contact 4.0 Supervisor
Filter the completion codes to viewYou can display system completion codes, agent completion codes, or all completion codes.
Use the following procedure to display the type of completion codes that you want to view:
1. Select View.
2. Select the type of completion code you want to view.
Completion Code displays the type of codes you selected.
Save the completion code information to a fileUse the following procedure to save the completion code attributes and category information to an HTML file:
1. Select Code > Save as HTML.
2. In the Save As dialog box, browse to the location where you want to save the Completion Code Configuration file.
You can change the name of the file.
3. Click Save.

January 2008 292
Chapter 20: Hierarchy Manager
Hierarchy Manager is a tool that helps you group and organize data.
Hierarchy Manager allows you to create agent, job, or dialer hierarchies to reflect your company’s or business’ organization. For example, you can create relationships between the Avaya Proactive Contact agents and the management structure of your company.
In Monitor, you can also use hierarchies to adjust the scope of data to view.
In Analyst, you can use hierarchies to group data in reports.
This section contains the following topics:
● Understanding Hierarchy Manager on page 293
● Using Hierarchy Manager on page 295
● Maintaining Hierarchy Manager on page 298
Hierarchy Manager
293 Using Avaya Proactive Contact 4.0 Supervisor
Understanding Hierarchy ManagerA hierarchy contains one or more branches. Each branch contains three hierarchy levels: top, middle, and bottom.
Each branch can contain more than one middle level. Each middle level can contain one or more bottom levels. You can assign one or more data items to the bottom level
For example: A job hierarchy contains two branches. Each branch follows this structure:
● Top level is Portfolio, such as Loans or Savings.
● Middle level is Account Type, such as Car, Mortgage or Certificate Deposits.
● Bottom level is Term, the length of the loan or savings account such as 60 months, 30 years. The data items in the bottom level data items are job names.
After you add a job or an agent to Avaya Proactive Contact, the job or agent is available for use in Hierarchy Manager. Agents, jobs, and dialers are available in Hierarchy Manager until data in the database expires. This allows for historical reporting.
For example: When you remove an agent login from Avaya Proactive Contact, the database still contains data for that agent. As a result, the agent name appears in the Hierarchy Manager list of available agents.
Hierarchy Manager supports three hierarchy types:
● Agent hierarchies on page 293
● Job hierarchies on page 294
● Dialer hierarchies on page 294
Agent hierarchiesAn agent hierarchy creates statistical relationships for individual agent activity and performance data that Avaya Proactive Contact collects during calling activities. Activity and performance data examples include Talk Time, Idle Time, and Connects per Hour.
Agent hierarchies are most effective when monitoring agent views in Monitor and when grouping data in Analyst agent reports.
For example, an agent hierarchy can represent the management structure of a company. Top, middle, and bottom levels represent directors, managers, and supervisors, respectively. Agents are assigned to each supervisor. Monitor can use this hierarchy to group agent activity and performance data by supervisor.
Understanding Hierarchy Manager
January 2008 294
Job hierarchiesA job hierarchy creates statistical relationships for individual job activity data that Avaya Proactive Contact collects during calling activities. Examples of job activity data include Calls Placed, Connects per Hour, and Time in Wait Queue.
Job hierarchies are most effective in Monitor to monitor job views in Monitor and in Analyst to group data in Analyst job reports.
In a multi-dialer environment, job hierarchies apply to all jobs across all dialers unless you create the following environment:
● Create all jobs unique across all dialers
● Create a dialer-job relationship outside of Hierarchy Manager.
For example, when you create a job, include a reference to the dialer in the job name such as job1_dialer1.
Dialer hierarchiesA dialer hierarchy creates relationships for individual dialer activity data that Avaya Proactive Contact collects during calling activities. Dialer activity includes all available job and agent activity and performance data.
Dialer hierarchies are effective to group data by department and dialer.
For example: In a four-dialer pod environment, the collections and marketing departments use the following dialers:
● Collections uses dialer1 and dialer2
● Marketing department uses dialer3 and dialer4
A hierarchy branch could contain a level for department with individual dialers assigned to the level.
Hierarchy Manager
295 Using Avaya Proactive Contact 4.0 Supervisor
Using Hierarchy ManagerHierarchy Manager is available from the Tools menu in Analyst or Monitor.
This section contains the following topics:
● Start Hierarchy Manager on page 295
● Create a hierarchy on page 295
● Open a hierarchy to view or change on page 296
● Add a level to a hierarchy on page 296
Start Hierarchy ManagerUse the following procedure to start Hierarchy Manager:
1. Select Start > Programs > Avaya Proactive Contact 4.0 > Supervisor > Monitor or Analyst.
2. Select Tools > Hierarchy Manager. The Hierarchy Manager window appears.
Create a hierarchyYou can create an agent, job, or dialer hierarchy based on the hierarchy type you select. When you create a new hierarchy, you add top, middle, and bottom hierarchy levels and assign data items to the bottom hierarchy.
Note:Note: If you name two like levels the same under one parent level, Hierarchy Manager
combines the two like levels into one level.
For example: A hierarchy middle level contains two bottom levels named Supervisor. Hierarchy Manager combines all data items assigned to both Supervisor levels and removes the duplicate level.
Use the following procedure to create a hierarchy:
1. On the button bar, click Agent Hierarchies, Job Hierarchies, or Dialer Hierarchies depending on the type of hierarchy you want to create.
2. Select File > New.
Hierarchy Manager displays a new hierarchy including a default structure. The Available list contains agent, job, or dialer names depending on which hierarchy type you selected.
Using Hierarchy Manager
January 2008 296
3. Add hierarchy levels.
a. Right-click the level above where you want to add a level.
b. Click Add Level. Hierarchy Manager inserts a level named New Level.
4. Rename the new level.
Right-click New Level, select Rename, enter a new name up to 20 characters, and then press Enter.
5. Repeat steps 3 and 4 for each level you want to add to the hierarchy.
6. Add data items.
Drag and drop an item from the Available list onto the bottom level of the branch to which you want to add it.
After an item is added to the hierarchy, Hierarchy Manager moves the data item from the Available list to the Allocated list.
7. Select File > Save to save the hierarchy settings.
Hierarchy Manager does not save branches that do not contain data items. Empty branches will no longer appear in the hierarchy after you close and restart Hierarchy Manager.
8. In the Save As dialog box, name for the hierarchy.
Enter a name up to 64 characters, and then click OK.
Hierarchy Manager saves the hierarchy settings.
Open a hierarchy to view or changeUse the following procedure to open a hierarchy that you want to view or change:
1. On the button bar, click Agent Hierarchies, Job Hierarchies, or Dialer Hierarchies depending on the type of hierarchy you want to open.
A list of hierarchies appears in the button bar for the selected hierarchy type.
2. Select a hierarchy. The selected hierarchy appears.
Add a level to a hierarchyTo build your organizational structure in Hierarchy Manager, you add levels to a hierarchy. Each branch in a hierarchy contains three levels: top, middle, and bottom.
When you add a level, Hierarchy Manager adds a level below the selected level. For example: If you add a level to a top level item, Hierarchy Manager adds a middle level item. To add a top level item, add a level to the hierarchy name.
Hierarchy Manager
297 Using Avaya Proactive Contact 4.0 Supervisor
Use the following procedure to add a level to a hierarchy:
1. Open the hierarchy that you want to change.
2. Right-click the level above where you want to add a level, and then click Add Level.Hierarchy Manager inserts a level named New Level.
3. Right-click New Level, and then select Rename.
4. Enter a new name up to 20 characters, and then press Enter.
Add a data item to a hierarchyHierarchy Manager lets you add data items to only the bottom-most levels of the hierarchy.
Use the following procedure to add data items to a hierarchy.
1. Open the hierarchy to which you want to add data items.
2. Select one or more items in the Available list, and then drag the items to the appropriate level.
After an item is added to the hierarchy, Hierarchy Manager moves the data item from the Available list to the Allocated list.
Tip:Tip: To select two or more adjacent items in the Available list, click the first item, and
then hold down Shift and click the last item. To select two or more nonadjacent items, click the first item, and then hold down Ctrl and click additional items.
Maintaining Hierarchy Manager
January 2008 298
Maintaining Hierarchy ManagerAs your organization changes, you might need to rearrange elements in a hierarchy, rename levels or remove levels in a hierarchy to reflect your organizational changes. This section provides the following topics:
● Move a level or item within a hierarchy on page 298
● Rename a hierarchy level on page 298
● Remove a level from a hierarchy on page 299
● Remove a data item from a hierarchy on page 299
● Rename a hierarchy on page 300
● Delete a hierarchy on page 300
Move a level or item within a hierarchyAs your organization changes, you might need to rearrange elements in a hierarchy to reflect the changes.
You can move data items from one bottom level to another. For example: In an agent hierarchy, you can move an agent from one supervisor to another.
You can also move a level within a hierarchy. Items and levels that you move must maintain their same level in the hierarchy. For example: A bottom level cannot be moved to a middle level position.
Use the following procedure to move a level or a data item within a hierarchy:
1. Open the hierarchy that you want to change.
2. Select the level or data item that you want to move, and then drag it to the hierarchy level above where you want the level or item to be listed.
3. Repeat step 2 for each level or item that you want to move.
Rename a hierarchy levelHierarchy Manager lets you rename levels in a hierarchy to reflect organizational changes.
Note:Note: If you name two like levels the same under one parent level, Hierarchy Manager
combines the two like levels into one level.
Hierarchy Manager
299 Using Avaya Proactive Contact 4.0 Supervisor
For example: A hierarchy middle level contains two bottom levels named Supervisor. Hierarchy Manager combines all data items assigned to both Supervisor levels and removes the duplicate level.
Use the following procedure to rename a hierarchy level:
1. Open the hierarchy in which you want to rename a level.
2. Right-click the hierarchy level name that you want to change, and then select Rename.
3. Type a new name for the level (up to 20 characters), and then press Enter.
Remove a level from a hierarchyAs your organization changes, you can use Hierarchy Manager to reflect those changes in your hierarchies.
You can remove a level from your hierarchy to better represent your organization.
To remove a top or middle hierarchy level that contains a bottom level with data items, you must first delete the bottom level (and data items).
Use the following procedure to remove a level from a hierarchy:
1. Open the hierarchy from which you want to remove a level.
2. Right-click the level that you want to remove, and then select Delete. If the level you select to remove contains data items, Hierarchy Manager asks you if you want to delete the selected level and all the agents associated with that level.
3. Click Yes to delete the level. Hierarchy Manager removes the level and moves the data items from the Allocated list to the Available list.
Remove a data item from a hierarchyRemove a data item from a hierarchy when the item no longer meets your organizational needs. You can remove individual data items as described in the following procedure. You can also remove all the data items assigned to a bottom level by removing the bottom level.
1. Open the hierarchy from which you want to remove one or more data items.
2. Right-click a data item that you want to remove, and then select Delete. Hierarchy Manager removes the data item from the hierarchy, and moves the data item from the Allocated list to the Available list.
3. Repeat step 2 for each data item you want to remove.
Maintaining Hierarchy Manager
January 2008 300
Rename a hierarchyUse the following procedure to rename a hierarchy:
1. Open the hierarchy that you want to change.
2. Select File > Save As.
3. In the Save As dialog box, enter a unique name for the hierarchy.
A hierarchy name can contain up to 64 characters and can include the following special characters: parentheses ( ), comma (,), hyphen (-), dollar sign ($), and the pound sign (#).
4. Click OK.
Hierarchy Manager saves the hierarchy settings with the new name.
Delete a hierarchyAs your organization changes, you might decide to no longer use a particular hierarchy. You can delete a hierarchy from Hierarchy Manager.
1. Open the hierarchy that you want to change.
2. Select Hierarchy > Delete. Hierarchy Manager asks you to confirm the delete action.
3. Click Yes to delete the hierarchy. Hierarchy Manager removes the selected hierarchy.

Hierarchy Manager
301 Using Avaya Proactive Contact 4.0 Supervisor
January 2008 302
Chapter 21: System Telnet
System Telnet is a tool that allows you access to the Avaya Proactive Contact Linux-based menus.
This section contains the following topics:
● Understanding System Telnet on page 303
● Using System Telnet on page 305
System Telnet
303 Using Avaya Proactive Contact 4.0 Supervisor
Understanding System TelnetSystem Telnet tool allows you to access the Linux-based Supervisor and Administrative menus.
This section contains the following topics:
● System Telnet on page 303
● System Telnet features on page 303
System TelnetUse the Linux-based Supervisor and Administrative menus to do the following:
● Manage user accounts
● Check calling list status
● Manage agent job lists
● Access some Monitor and Editor features
System Telnet is available from the Tools menu in Analyst, Editor, or Monitor.
Note:Note: If access to Supervisor is not available, you will need to use a third-party telnet
tool to access Avaya Proactive Contact menu system and PC Analysis.
To access the PC Analysis menus, use the PC Analysis Telnet tool in Analyst.
System Telnet featuresUse the System Telnet window to navigate to the Linux-based menus.
The System Telnet features appear on the System Telnet toolbar, File menu and Tools menu.
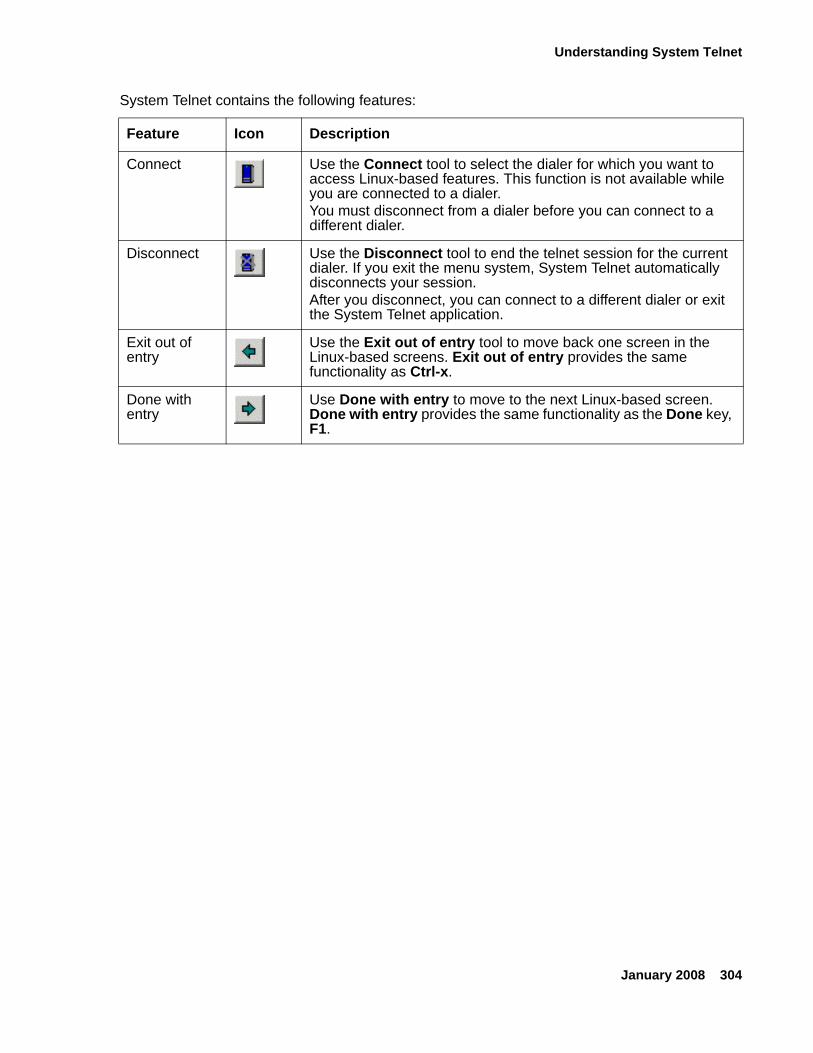
Understanding System Telnet
January 2008 304
System Telnet contains the following features:
Feature Icon Description
Connect Use the Connect tool to select the dialer for which you want to access Linux-based features. This function is not available while you are connected to a dialer. You must disconnect from a dialer before you can connect to a different dialer.
Disconnect Use the Disconnect tool to end the telnet session for the current dialer. If you exit the menu system, System Telnet automatically disconnects your session. After you disconnect, you can connect to a different dialer or exit the System Telnet application.
Exit out of entry
Use the Exit out of entry tool to move back one screen in the Linux-based screens. Exit out of entry provides the same functionality as Ctrl-x.
Done with entry
Use Done with entry to move to the next Linux-based screen. Done with entry provides the same functionality as the Done key, F1.
System Telnet
305 Using Avaya Proactive Contact 4.0 Supervisor
Using System Telnet Use the following procedure to access the Avaya Proactive Contact Linux-based menus:
1. Select Start > All Programs > Avaya > Proactive Contact > Supervisor > Analyst, Editor, or Monitor.
2. Select Tools > System Telnet. A System Telnet window appears.
3. Select File > Connect. The Connect to Proactive Contact dialog box appears.
4. From the Name list, select the name of the dialer to which you want to connect, then click OK.
The dialer login: prompt appears in the Telnet window.
5. Type one of the following login and password combinations:
● System login and password to access the system menus
● Administrator login and password to access the administrative menus
The Linux-based menu system associated with your user name appears in the Telnet window.
January 2008 306
Chapter 22: Agent Blending
Agent Blending is a tool that integrates outbound calling activities on your Avaya Proactive Contact system with inbound calling activities on your ACD.
This section contains the following topics:
● Understanding Agent Blending on page 307
● Using Agent Blending on page 318
● Maintaining Agent Blending on page 321
Agent Blending
307 Using Avaya Proactive Contact 4.0 Supervisor
Understanding Agent BlendingAgent Blending integrates outbound calling activities on your Avaya Proactive Contact system with inbound calling activities on your ACD.
The Agent Blending tool allows you to manage the ACD domains and domain groups. A domain is an ACD call queue. Every domain is a member of a domain group.
This section contains the following topics:
● Agent Blending overview on page 307
● Predictive Agent Blending on page 308
● Proactive Agent Blending on page 308
● Supported ACDs and switch terminology on page 309
● Domains on page 313
● Domain Groups on page 314
Agent Blending overviewAgent Blending integrates outbound calling activities on your Avaya Proactive Contact with inbound calling activities on your ACD. Avaya Proactive Contact provides two types of Agent Blending: Predictive Agent Blending and Proactive Agent Blending.
Both types of Agent Blending systems use a pool of ACD blend agents for outbound calling. The ACD agents log in to the dialer and the ACD. Agent Blending monitors the activity on the ACD to determine when to move agents between inbound and outbound calling activities.
The dialer acquires the pooled agents for outbound calling when the inbound calling activity decreases. The dialer releases the pooled agents to inbound calling when the inbound calling activity increases. The movement between inbound and outbound calling keeps the ACD blend agents busy and the ACD service level within your prescribed limits.
Use Predictive Agent Blending if your priority is servicing your inbound customers and your inbound volume is fairly high.
Use Predictive Agent Blending if your call center has the following amount of work:
● Moderate to heavy inbound traffic
● More than 25 agents in an inbound pool
Understanding Agent Blending
January 2008 308
Predictive Agent BlendingUse Predictive Agent Blending if your priority is servicing your inbound customers and your inbound volume is fairly high.
Predictive Agent Blending focuses on the inbound mission. Predictive Agent Blending uses events from the ACD to forecast call volume and determine when to move ACD agents between inbound and outbound calling. The dialer predicts when too many agents receive inbound calls. The dialer then acquires agents from the ACD to handle outbound calls until the inbound volume increases.
The system acquires agents for outbound calls when either the settings for the Average Speed to Answer or Service Level domain groups are above the desired value.
To configure Predictive Agent Blending, set up an Average Speed to Answer or a Service Level domain group that contains one or more acquire domains and at least one inbound domain.
Average Speed to Answer (ASA) - This domain group type uses the target ASA field (MAAS) to calculate when to acquire and release agents.
● The dialer acquires agents for outbound calls when the average speed to answer for all inbound domains in the group is less than or equal to the targeted value.
● The dialer releases agents when the value rises above the target.
Service Level (SL) - This domain group type uses the Service Criterion (SC, seconds), Desired Service Level (DSL, %), and Abatement Service Level (ASL, %) fields for calculating when to acquire and release agents.
● The dialer acquires agents for outbound calls when the percentage of inbound calls answered within the Service Criterion is greater than or equal to the Desired Service Level percentage.
● The dialer no longer acquires agents when the actual service level reaches the Abatement Service Level value.
● The dialer releases agents to inbound when the service level falls below the desired value.
The actual service level is calculated using all inbound domains in the group.
Proactive Agent BlendingUse Proactive Agent Blending if your focus is on outbound calling, but you need to service a low volume of inbound customers.
Proactive Agent Blending focuses on outbound calls and releases agents to inbound only when an inbound calls enters a monitored queue on the ACD.
Agent Blending
309 Using Avaya Proactive Contact 4.0 Supervisor
When an ACD agent logs in, the system immediately acquires the agent for outbound calling. When an inbound call arrives in the ACD queue, the dialer releases the agent to handle the call. If inbound calls continue to arrive, the dialer continues to release agents. When the queue is empty, the dialer acquires agents for outbound calls.
Note:Note: For each OB_ONLY domain group, you configure the number of queued calls
before agents release to inbound.
Supported ACDs and switch terminologyEach ACD switch has unique settings and terminology. For each supported ACD, the dialer uses domains and domain groups to control Agent Blending.
This section defines the switch terminology for the following ACDs:
● Aspect CallCenter on page 309
● Avaya Communication Manager on page 310
● Rockwell Spectrum on page 310
● Northern Telecom Meridian on page 312
● PINNACLE on page 312
● Siemens ROLM 9751, Release 900 on page 312
Note:Note: The Planning and Prerequisites for Avaya Proactive Contact 4.0 contains a full
description of the requirements for each supported switch.
Aspect CallCenter
Agent group - A set of agents handling similar types of calls. Agents log in to an agent group when they log on to the Aspect CallCenter. Agent groups may be part of an agent super group.
Agent groups correspond to Agent Blending domains. Agent Blending monitors events for domains configured on the system as inbound or acquire.
Agent Super Group - A collection of two or more agent groups. Aspect CallCenter simultaneously selects all agent groups in the agent super group. It delivers a call to the agent in the super group who has been available the longest. Agents do not log on to agent super groups.
If you set up the super group as a domain onAvaya Proactive Contact, Agent Blending monitors the activity in the super group
Call Control Tables (CCTs) - Part of the Aspect CallCenter database. CCTs control call routing, queuing, and messaging for agent groups and agent super groups. You can view, set
Understanding Agent Blending
January 2008 310
up, edit, or delete CCTs from Aspect CallCenter management workstation. There can be multiple CCTs for each agent group and agent super group.
Data System Interlink Table - Part of the Aspect CallCenter database. The table controls communication between the Aspect CallCenter and the dialer. You can view the Data System Interlink Table and set application parameters using the Aspect CallCenter management workstation. However, only an Aspect representative can set system-level parameters.
Avaya Communication Manager
Expert Agent Selection (EAS) - An optional Avaya Communication Manager feature. Expert Agent Selection allows skill types to be assigned to a call type or Vector Directory Number (VDN).
Hunt group - An agent queue on an ACD configured without EAS. The ACD hunts for the next available agent in each hunt group. It uses the hunt method defined on the ACD.
Skill - Skill types provide a method for call center managers to match the needs of a caller to the talents of the agents. A skill designates a work category such as sales or collections. Skills enable the ACD to route types of calls to queues. Administrators can assign up to four skills or sets of skills to each agent login ID.
Skill hunt group - Replaces ACD splits when the ACD is configured with EAS. The ACD can be queued to up to three different skill hunt groups at one time.
Split - An ACD split is a hunt group that is designed for a high volume of similar calls. Members of a split are called agents. At any one time, an agent can be logged in to a maximum of three splits.
Vector - Vector settings determine how the switch handles incoming calls based on the number dialed. When the Avaya Communication Manage is configured with EAS, the vector directs the incoming call to a split, a hunt group, or a skill hunt group.
Vector Directory Number - The extension number that accesses a vector. Agent Blending uses the Vector Directory Number for the domain address and domain extension.
Rockwell Spectrum
Agent Group - A collection of one or more agents, based on equivalent skills or a specific call center need. In Spectrum, agents may have a primary and a secondary group assignment. However, the dialer requires that agents belong to only one group.
In addition to the agent’s skill level, you must assign agents to groups as inbound or acquire. Inbound agents take only inbound calls. Acquire agents take inbound and outbound calls, or they can be outbound-only.
Agent Blending
311 Using Avaya Proactive Contact 4.0 Supervisor
Application - The system treats applications as domains. In Spectrum, incoming calls are routed to applications. An application is a type or category of call that you want handled in a similar way. Applications can include:
● Company functions, for example, Customer Service, Accounts Payable
● Special skill groups, for example, bilingual or technical troubleshooters
● Types of products, for example, Savings, Checking Accounts, Mortgages. For each application, the Spectrum tracks performance data such as average speed to answer, number of calls offered, and average handling time.
You associate each application with an Application Telescript. The telescript contains a set of instructions for handling calls. For Agent Blending, the transcript queues agent groups, places calls in wait queues, and allows the dialer to track the call while it is on the Spectrum.
Application Directory Number (DN) - You assign an Application Directory Number in Applications Parameters when you create the Spectrum application. When dialed, this number calls the application. The Application Directory Number is used as the domain extension in Agent Blending.
Application Number (also called the Application ID) - You assign an Application Number in Applications Parameters when you create the Spectrum application. The Application Number is used as the domain address in Agent Blending.
Class of Service - A collection of attributes associated with agents and devices within the Spectrum. One of the class of service attributes is the Host Transaction feature. Host Transaction controls whether or not the Spectrum generates call progress messages on the Transaction Link for the associated agent or device. Agent Blending requires that you enable the Host Transaction feature.
Host - The host for the Spectrum is Avaya Proactive Contact.
Provisioning - A set of actions that add, alter, or delete system parameters. In the Avaya Proactive Contact documentation, “configuring” has the same meaning as “provisioning” in Spectrum documentation.
Telescript - A user-programmable sequence of steps associated with various call routing points within the Spectrum. During inbound call routing, error processing, and call queuing, the Spectrum invokes Routing, Intercept, and Application Telescripts. Feature Telescripts operate as subroutines for the other telescript types.
Configuring an Application Telescript to route to the desired agent groups is key to making Agent Blending work with Spectrum.
Transaction Link - The Spectrum name for the Application Enablement Services link. Transaction Link is a communications channel between the Spectrum and the dialer. It is operated over an X.25 or TCP/IP transport facility.
Understanding Agent Blending
January 2008 312
Trunk Group - A collection of trunk ports that have common processing characteristics, such as ANI and DNIS. One of the characteristics is the Host Transaction Link feature. It controls whether Spectrum generates call progress messages for calls associated with the trunk group members.
You must enable this feature to allow the dialer to monitor calls on Spectrum.
Northern Telecom Meridian
ACD-DN (directory number) - The ACD address for a call queue. The ACD-DN is the Agent Blending domain address.
ACD Agent Position ID - The number that identifies an agent’s telephone extension. Agent Blending agents log in to Avaya Proactive Contact as ACD agents using their ACD Agent Position ID as the ACD extension. During calling operations, managers can assign agents to Agent Blending domains by assigning agent positions to call queues, or agents can log in to call queues that are Agent Blending domains.
Multiple queue assignment - A Meridian option that allows agents to log in to multiple call queues.
The domains and domain groups you define and how your agents log into call queues depends on whether your Meridian uses multiple queue assignment.
PINNACLE
Call queue - A destination for call routing, defined by an ACD address. A call queue can be an Agent Blending domain.
Queue ID - The ACD address associated with a call queue. Queue IDs are Agent Blending domain addresses.
Queue pilot number - The ACD extension associated with an ACD address. Queue pilot numbers are Agent Blending domain extensions.
Serving Team - A group of agent identifiers for agents who will work on the same task. PINNACLE can route calls to the serving team for a call queue. Agent Blending inbound agents belong to an inbound serving team. Agent Blending outbound and blend agents belong to an acquire serving team.
Siemens ROLM 9751, Release 900
ACD group or agent group - A group of agent extensions that receives calls from the same pilot number. Each ACD group has telephones and members.
Agent Blending
313 Using Avaya Proactive Contact 4.0 Supervisor
Call-progress event - Any change in a call’s state in ROLM 9005. CallBridge passes call-progress event messages from ROLM 9005 to CallPath. Call-progress event messages provide the information Agent Blending needs to acquire and release agents.
Class of service - A code indicating the features, extensions, and trunk access available to an ACD address. Agent Blending uses agent groups with the CallPath class of service.
Directory Number (DN) - An ACD address or extension associated with an ACD-defined group or with a device such as a telephone or a Voice Response Unit (VRU) port. An ACD-defined group can be an agent group or a hunt group.
Dummy hunt group - A hunt group with no members defined on ROLM 9005. It unconditionally forwards calls to an agent group. Agent Blending requires dummy hunt groups to collect call-progress event messages. It uses the dummy hunt group’s pilot number as the auxiliary domain’s extension number.
Pilot number - A directory number associated with a group of extension numbers that comprise one ACD group. Agent Blending uses pilot numbers as the domain address. Agent Blending uses the dummy hunt group’s pilot number as the domain extension.
DomainsThe dialer requires domains and domain groups for each type of switch. Domains are the ACD call queues that are defined on the ACD and on the dialer.
Each domain is a member of a domain group. Agent Blending collects calling events for each domain and totals them by domain group for statistic calculation.The dialer uses the statistics to determine when to move ACD agents between inbound and outbound calling. The dialer does not do the following activities:
● Total statistics across domain groups
● Monitor activity in call queues that are not part of a domain group
This section contains the following topics:
● Types of domains on page 313
● Agent assignments to domains on page 314
Types of domains
The types of domains that you configure depend upon the ACD. The two main domain types are inbound and acquire. All Agent Blending systems must have an acquire domain.
Agent Blending uses inbound domains to determine agent availability by monitoring and analyzing the traffic.The dialer uses acquire domains to acquire agents for outbound calling.
Understanding Agent Blending
January 2008 314
In addition to inbound and acquire domains, the dialer recognizes two additional domains. Some ACDs use auxiliary domains to monitor all calling activity in a domain group. Meridian switches without multiple queues assignment (MQA) use transient domains to temporarily hold agents who are moving between inbound and outbound.
Agent assignments to domains
After your system is installed, assign your agents to domains based on a skill set. For example, you might divide agents into three sets:
● Agents who handle only credit card customers
● Agents who handle consumer loan customers
● Agents with skills to handle both credit card customers and consumer loan customers
Domain groupsDefine each domain group with one of the following four configurations:
● Outbound without inbound domain, which uses the OB_ONLY control method.
● Predictive-Average Speed to Answer, which uses the ASA control method.
● Predictive-Service Level, which uses the SL control method.
● Outbound with inbound domain, which uses the Proactive Blend OB_ONLY control method.
This section contains the following topics:
● Outbound Agent Blend on page 314
● Domain Groups on page 314
Outbound Agent Blend
Outbound Agent Blending acquires ACD agents to handle outbound calls as soon as they log in to the system and the ACD.
Since there is no inbound domain in the OB_ONLY domain group, agents who are assigned to an Outbound domain will not be released to handle inbound calls.
Domain Groups
During site preparation, you identify which domains you want grouped. A domain group contains one or more domains. A domain can belong to only one domain group. There are three domain group Control Methods: Outbound Only, Average Speed to Answer, and Service
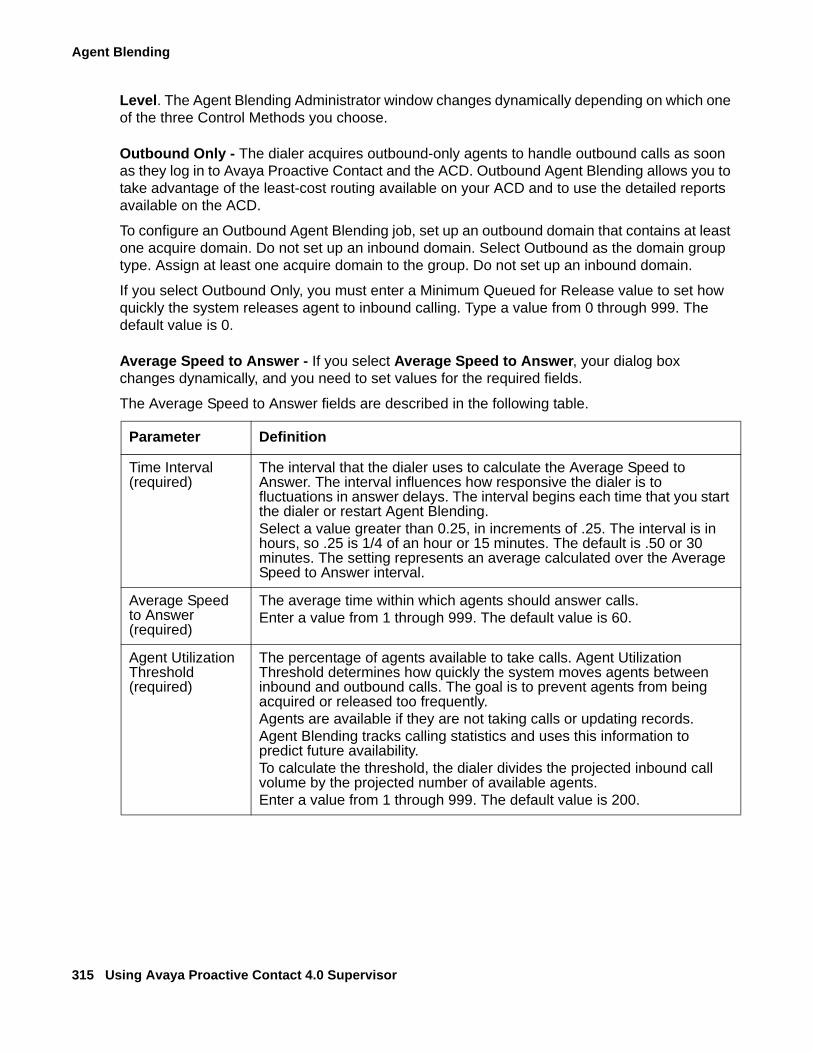
Agent Blending
315 Using Avaya Proactive Contact 4.0 Supervisor
Level. The Agent Blending Administrator window changes dynamically depending on which one of the three Control Methods you choose.
Outbound Only - The dialer acquires outbound-only agents to handle outbound calls as soon as they log in to Avaya Proactive Contact and the ACD. Outbound Agent Blending allows you to take advantage of the least-cost routing available on your ACD and to use the detailed reports available on the ACD.
To configure an Outbound Agent Blending job, set up an outbound domain that contains at least one acquire domain. Do not set up an inbound domain. Select Outbound as the domain group type. Assign at least one acquire domain to the group. Do not set up an inbound domain.
If you select Outbound Only, you must enter a Minimum Queued for Release value to set how quickly the system releases agent to inbound calling. Type a value from 0 through 999. The default value is 0.
Average Speed to Answer - If you select Average Speed to Answer, your dialog box changes dynamically, and you need to set values for the required fields.
The Average Speed to Answer fields are described in the following table.
Parameter Definition
Time Interval (required)
The interval that the dialer uses to calculate the Average Speed to Answer. The interval influences how responsive the dialer is to fluctuations in answer delays. The interval begins each time that you start the dialer or restart Agent Blending. Select a value greater than 0.25, in increments of .25. The interval is in hours, so .25 is 1/4 of an hour or 15 minutes. The default is .50 or 30 minutes. The setting represents an average calculated over the Average Speed to Answer interval.
Average Speed to Answer (required)
The average time within which agents should answer calls. Enter a value from 1 through 999. The default value is 60.
Agent Utilization Threshold (required)
The percentage of agents available to take calls. Agent Utilization Threshold determines how quickly the system moves agents between inbound and outbound calls. The goal is to prevent agents from being acquired or released too frequently.Agents are available if they are not taking calls or updating records.Agent Blending tracks calling statistics and uses this information to predict future availability. To calculate the threshold, the dialer divides the projected inbound call volume by the projected number of available agents. Enter a value from 1 through 999. The default value is 200.
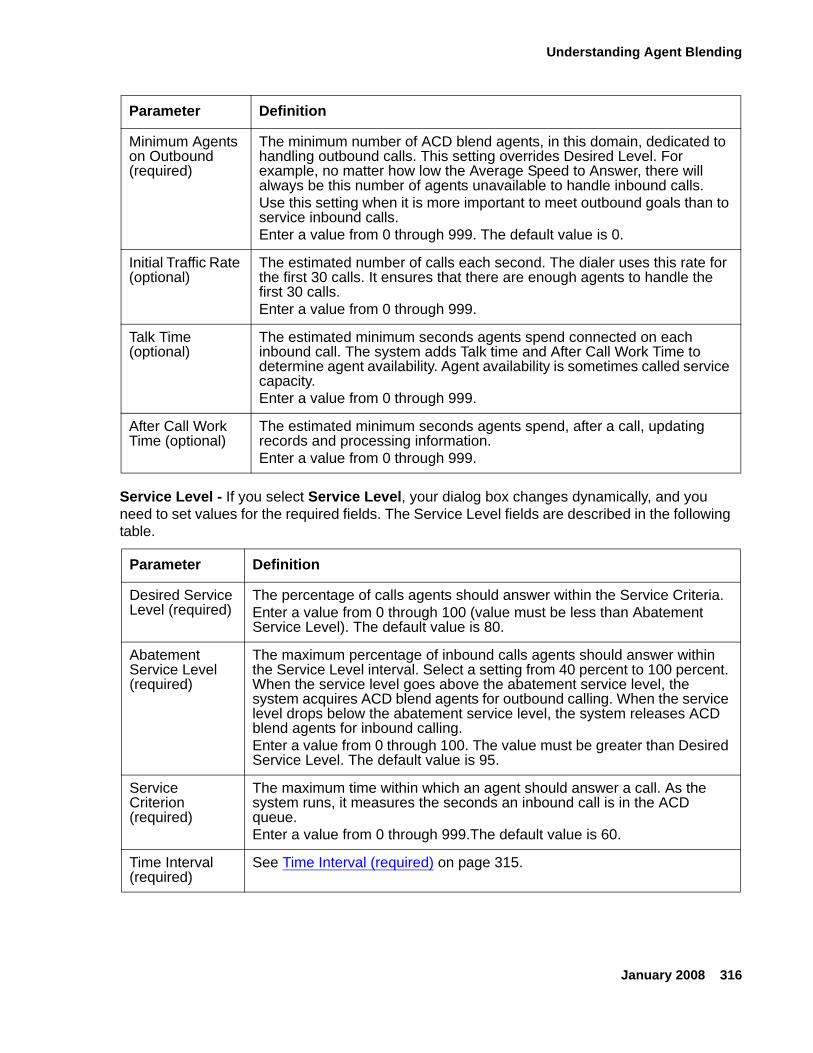
Understanding Agent Blending
January 2008 316
Service Level - If you select Service Level, your dialog box changes dynamically, and you need to set values for the required fields. The Service Level fields are described in the following table.
Minimum Agents on Outbound (required)
The minimum number of ACD blend agents, in this domain, dedicated to handling outbound calls. This setting overrides Desired Level. For example, no matter how low the Average Speed to Answer, there will always be this number of agents unavailable to handle inbound calls. Use this setting when it is more important to meet outbound goals than to service inbound calls. Enter a value from 0 through 999. The default value is 0.
Initial Traffic Rate (optional)
The estimated number of calls each second. The dialer uses this rate for the first 30 calls. It ensures that there are enough agents to handle the first 30 calls. Enter a value from 0 through 999.
Talk Time (optional)
The estimated minimum seconds agents spend connected on each inbound call. The system adds Talk time and After Call Work Time to determine agent availability. Agent availability is sometimes called service capacity. Enter a value from 0 through 999.
After Call Work Time (optional)
The estimated minimum seconds agents spend, after a call, updating records and processing information. Enter a value from 0 through 999.
Parameter Definition
Desired Service Level (required)
The percentage of calls agents should answer within the Service Criteria. Enter a value from 0 through 100 (value must be less than Abatement Service Level). The default value is 80.
Abatement Service Level (required)
The maximum percentage of inbound calls agents should answer within the Service Level interval. Select a setting from 40 percent to 100 percent. When the service level goes above the abatement service level, the system acquires ACD blend agents for outbound calling. When the service level drops below the abatement service level, the system releases ACD blend agents for inbound calling. Enter a value from 0 through 100. The value must be greater than Desired Service Level. The default value is 95.
Service Criterion (required)
The maximum time within which an agent should answer a call. As the system runs, it measures the seconds an inbound call is in the ACD queue. Enter a value from 0 through 999.The default value is 60.
Time Interval (required)
See Time Interval (required) on page 315.
Parameter Definition
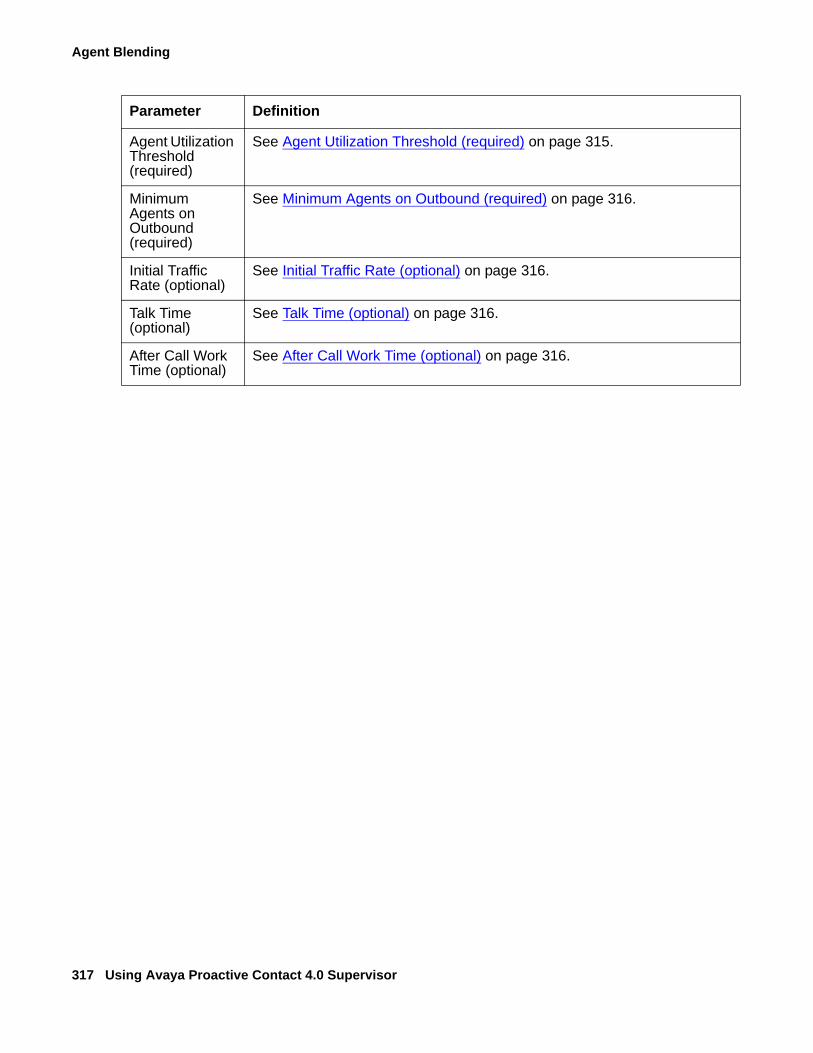
Agent Blending
317 Using Avaya Proactive Contact 4.0 Supervisor
Agent Utilization Threshold (required)
See Agent Utilization Threshold (required) on page 315.
Minimum Agents on Outbound (required)
See Minimum Agents on Outbound (required) on page 316.
Initial Traffic Rate (optional)
See Initial Traffic Rate (optional) on page 316.
Talk Time (optional)
See Talk Time (optional) on page 316.
After Call Work Time (optional)
See After Call Work Time (optional) on page 316.
Parameter Definition
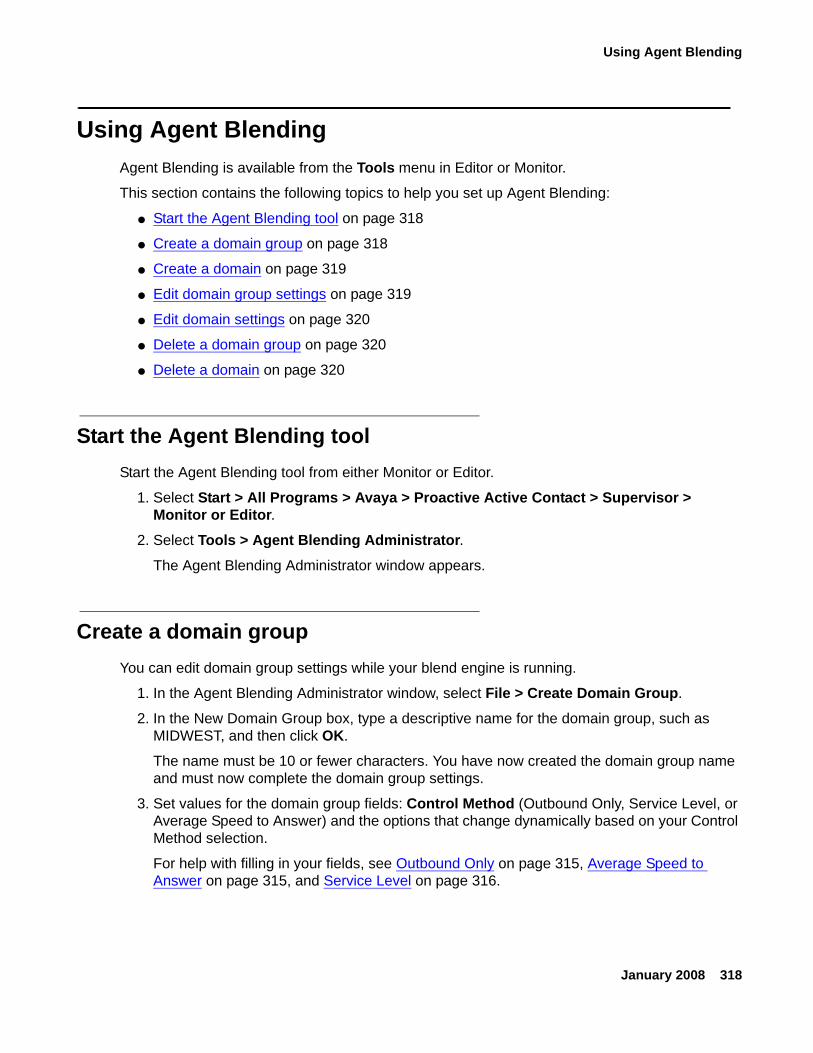
Using Agent Blending
January 2008 318
Using Agent BlendingAgent Blending is available from the Tools menu in Editor or Monitor.
This section contains the following topics to help you set up Agent Blending:
● Start the Agent Blending tool on page 318
● Create a domain group on page 318
● Create a domain on page 319
● Edit domain group settings on page 319
● Edit domain settings on page 320
● Delete a domain group on page 320
● Delete a domain on page 320
Start the Agent Blending toolStart the Agent Blending tool from either Monitor or Editor.
1. Select Start > All Programs > Avaya > Proactive Active Contact > Supervisor > Monitor or Editor.
2. Select Tools > Agent Blending Administrator. The Agent Blending Administrator window appears.
Create a domain groupYou can edit domain group settings while your blend engine is running.
1. In the Agent Blending Administrator window, select File > Create Domain Group.
2. In the New Domain Group box, type a descriptive name for the domain group, such as MIDWEST, and then click OK.
The name must be 10 or fewer characters. You have now created the domain group name and must now complete the domain group settings.
3. Set values for the domain group fields: Control Method (Outbound Only, Service Level, or Average Speed to Answer) and the options that change dynamically based on your Control Method selection.
For help with filling in your fields, see Outbound Only on page 315, Average Speed to Answer on page 315, and Service Level on page 316.
Agent Blending
319 Using Avaya Proactive Contact 4.0 Supervisor
Create a domainYou must stop your blend engine in order to create a domain. For more information, see Stop the blend engine on page 321.
1. The Create Domain option is not available until you select the name of a domain group. The domain will be added to the domain group that you select.
2. In the Agent Blending Administrator window, click the domain group to which you want the new domain to belong, and then, select File > Create Domain.
3. In the New Domain dialog box, type the address of the domain.
Typical values for this box are 5-digit addresses, such as 20601, and must match your PBX ID exactly to communicate with the PBX.
4. Click OK.
You have created the domains name and must now define in the domain settings.
5. Define the domain settings: Domain Type (Inbound, Transient Acquire, Team Acquire, and Overflow), Phone Number, Gateway ID, Application ID, and PBX ID.
For help with filling in your fields, see the following topics:
● Supported ACDs and switch terminology on page 309
● Domains on page 313
● Domain groups on page 314
Edit domain group settingsYou must stop your blend engine in order to edit domain group settings. For more information, see Stop the blend engine on page 321.
1. In the Agent Blending Administrator window, select the domain group you want to edit.
2. Click the Control Method field to select Outbound Only, Service Level, or Average Speed to Answer.
The domain group fields change dynamically depending on which Control Method option you select.
3. Set values for the options.
For help with filling in your fields, see Outbound Only on page 315, Average Speed to Answer on page 315, and Service Level on page 316.
To determine whether the field has a drop-down list or an editable value for you to use, click the field.
4. Save your work.
Using Agent Blending
January 2008 320
Edit domain settingsYou must stop your blend engine in order to edit domain settings. For more information, see Stop the blend engine on page 321.
1. In the Agent Blending Administrator window, select the domain you want to edit.
2. Click the Domain Type field. Select Inbound, Transient Acquire, Team Acquire, or Overflow.
3. For descriptions of these options, see Domain groups on page 314.
4. Type values for the Phone Number, Gateway ID, Application ID, and PBX ID fields.
For descriptions of these options, see Domain groups on page 314.
Delete a domain groupYou must stop your blend engine in order to delete a domain group. For more information, see Stop the blend engine on page 321.
1. In the Agent Blending Administrator window, select the domain group you want to delete.
2. Select File > Delete Domain Group, and then save your work.
Delete a domainYou must stop your blend engine in order to delete a domain. For more information, see Stop the blend engine on page 321.
1. In the Agent Blending Administrator window, select the domain you want to delete.
2. Select File > Delete Domain, and then save your work.
Agent Blending
321 Using Avaya Proactive Contact 4.0 Supervisor
Maintaining Agent BlendingAgent Blending is available from the Tools menu in Editor or Monitor.
This section contains the following topics to help you maintain Agent Blending:
● Move a domain to a different group on page 321
● Stop the blend engine on page 321
● Start the blend engine on page 322
● Resynch the blend engine on page 322
● Resynch the blend engine on page 322
● View ACD statistics on page 323
● View alerts on page 323
● View transactions on page 323
Move a domain to a different groupYou must stop your blend engine in order to move a domain to a different domain group. For more information, see Stop the blend engine on page 321.
Moving a domain is possible by deleting the domain and then adding it to a different domain. Remember to write down its existing settings so that you can recreate them when you add the domain to the new domain group.
1. In the Agent Blending Administrator window, select the domain you want to move (write down its settings first, if necessary), and then, select File > Delete Domain.
2. Select the domain group to which you want to add the new domain, and then select File > Create Domain.
3. In the New Domain dialog box, type the domain address, such as 20601, and then click OK.
4. Complete the domain settings.
Stop the blend engineThe Stop button shuts down all but two of the Blend processes on a dialer; cbamain and cbauser remain up. This state is also called configure-only mode. It is required for editing or deleting domains. You stop the blend engine by clicking Stop in the Agent Blending
Maintaining Agent Blending
January 2008 322
Administrator dialog box. (You must have a dialer selected in the tree view for the Stop button to be visible. The dialers are located at the top-most level in the tree view.)
1. Open Monitor or Editor and select Tools > Agent Blending.
The Agent Blending Administrator window appears.
2. In the tree view, select a dialer.
3. Select Blend Engine > Stop.
Start the blend engineThe Start button starts the Blend processes that were killed with the Stop command on a dialer.
You start the blend engine by clicking Start in the Agent Blending Administrator dialog box. (You must have a dialer selected in the tree view for the Start button to be visible. The dialers are located at the top-most level in the tree view.)
1. Open Monitor or Editor and select Tools > Agent Blending. The Agent Blending Administrator window appears.
2. In the tree view, select a dialer.
3. Select Blend Engine > Start.
Reset the blend engineThe Reset button stops and restarts the Blend processes on a dialer. If Blend is not running, the Reset button starts the processes on a dialer.
1. Open Monitor or Editor and select Tools > Agent Blending.
The Agent Blending Administrator window appears.
2. In the tree view, select a dialer.
3. Select Blend Engine > Reset.
Resynch the blend engineThe Resynch button updates the dialer with the current ACD agent queue assignments. Use Resynch after a supervisor uses the ACD to reassign agents to different inbound queues.
1. Open Monitor or Editor and select Tools > Agent Blending.
The Agent Blending Administrator window appears.
2. In the tree view, select a dialer.
Agent Blending
323 Using Avaya Proactive Contact 4.0 Supervisor
3. Select Blend Engine > Resynch.
View ACD statisticsUse the following procedure to view ACD statistics.
1. In the Agent Blending Administrator window, select Statistics under the domain group for which you want to view statistics.
View alertsYou are able to view alerts by clicking Alerts in the tree view.
1. In the Agent Blending Administrator window, select Alerts under the domain group for which you want to view alerts.
View transactionsUse the following procedure to view transactions.
1. In the Agent Blending Administrator window, select Transactions under the domain group for which you want to view transactions.
January 2008 324
Chapter 23: Pattern matching rules
Avaya Proactive Contact supports pattern matching syntax including wildcard characters. In Editor, you use basic pattern matching syntaxes when creating and editing phone strategies and record selections. You can also use more complex pattern matching syntaxes.
Avaya Proactive Contact also supports the following pattern matching syntaxes:
● Integer
● Floating point
● Date
● Time
● String
● Shell-style
● Extended regular expression-style
This section contains the following topics:
● Understanding default pattern syntax on page 325
● Using supported syntaxes on page 327
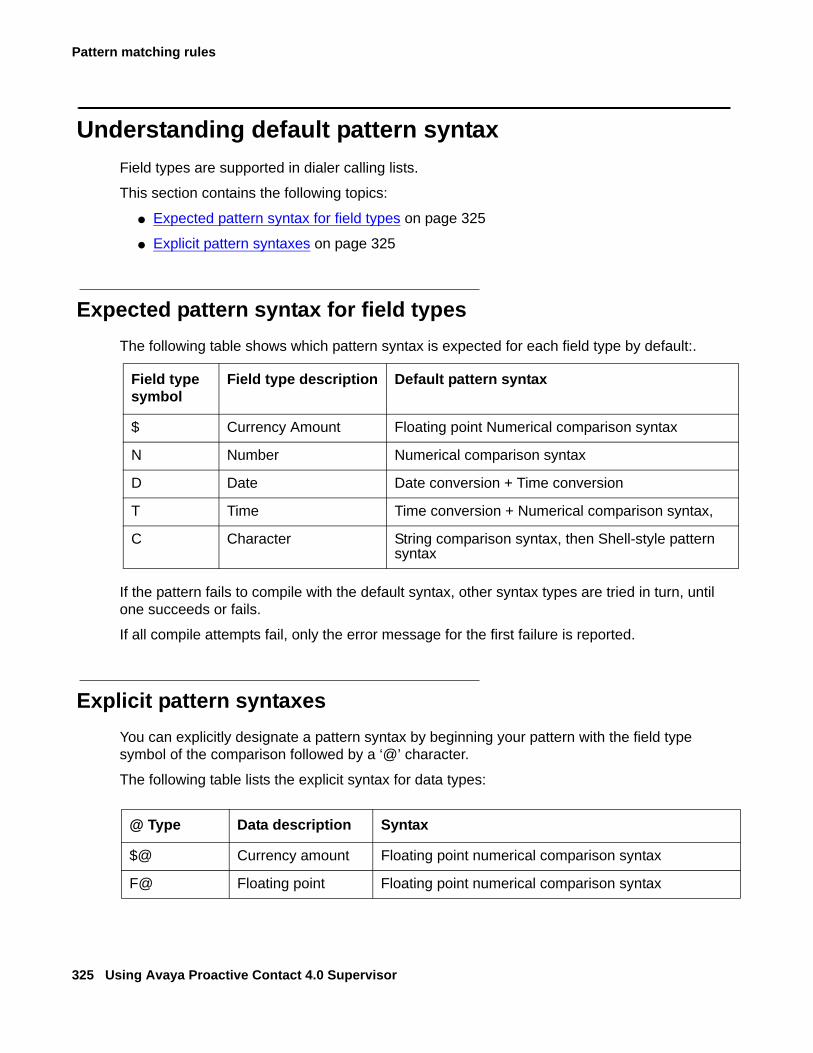
Pattern matching rules
325 Using Avaya Proactive Contact 4.0 Supervisor
Understanding default pattern syntaxField types are supported in dialer calling lists.
This section contains the following topics:
● Expected pattern syntax for field types on page 325
● Explicit pattern syntaxes on page 325
Expected pattern syntax for field typesThe following table shows which pattern syntax is expected for each field type by default:.
If the pattern fails to compile with the default syntax, other syntax types are tried in turn, until one succeeds or fails.
If all compile attempts fail, only the error message for the first failure is reported.
Explicit pattern syntaxesYou can explicitly designate a pattern syntax by beginning your pattern with the field type symbol of the comparison followed by a ‘@’ character.
The following table lists the explicit syntax for data types:
Field type symbol
Field type description Default pattern syntax
$ Currency Amount Floating point Numerical comparison syntax
N Number Numerical comparison syntax
D Date Date conversion + Time conversion
T Time Time conversion + Numerical comparison syntax,
C Character String comparison syntax, then Shell-style pattern syntax
@ Type Data description Syntax
$@ Currency amount Floating point numerical comparison syntax
F@ Floating point Floating point numerical comparison syntax
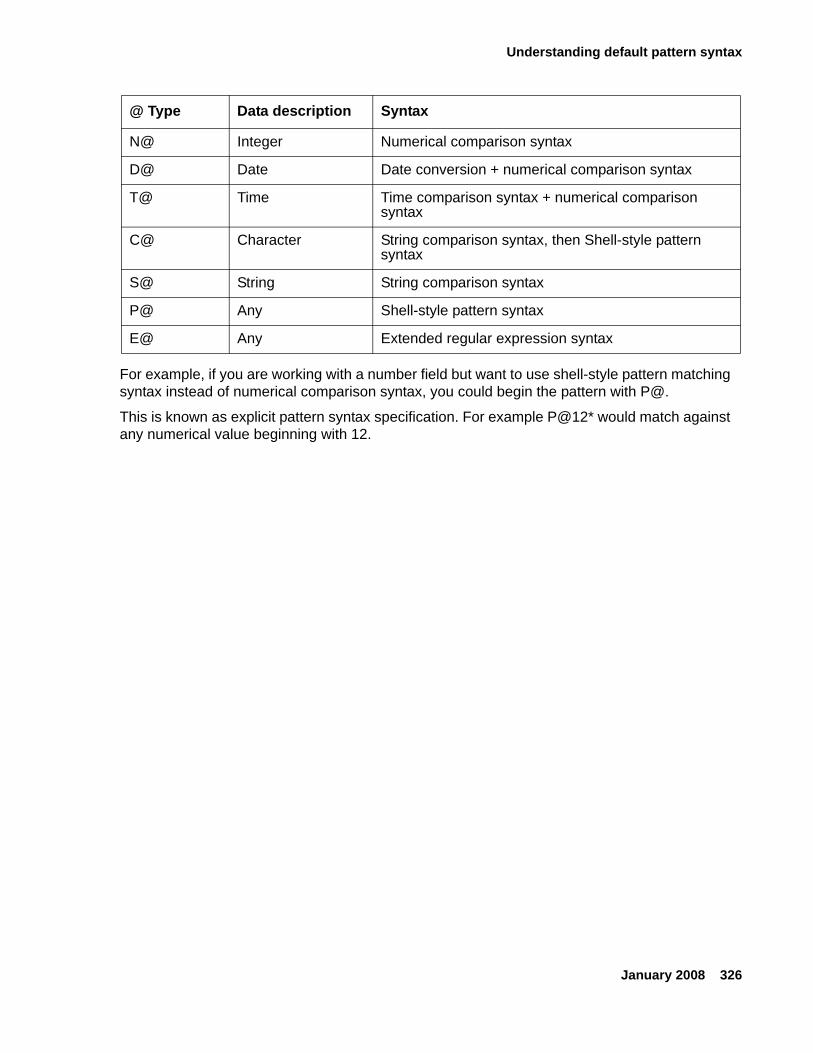
Understanding default pattern syntax
January 2008 326
For example, if you are working with a number field but want to use shell-style pattern matching syntax instead of numerical comparison syntax, you could begin the pattern with P@.
This is known as explicit pattern syntax specification. For example P@12* would match against any numerical value beginning with 12.
N@ Integer Numerical comparison syntax
D@ Date Date conversion + numerical comparison syntax
T@ Time Time comparison syntax + numerical comparison syntax
C@ Character String comparison syntax, then Shell-style pattern syntax
S@ String String comparison syntax
P@ Any Shell-style pattern syntax
E@ Any Extended regular expression syntax
@ Type Data description Syntax
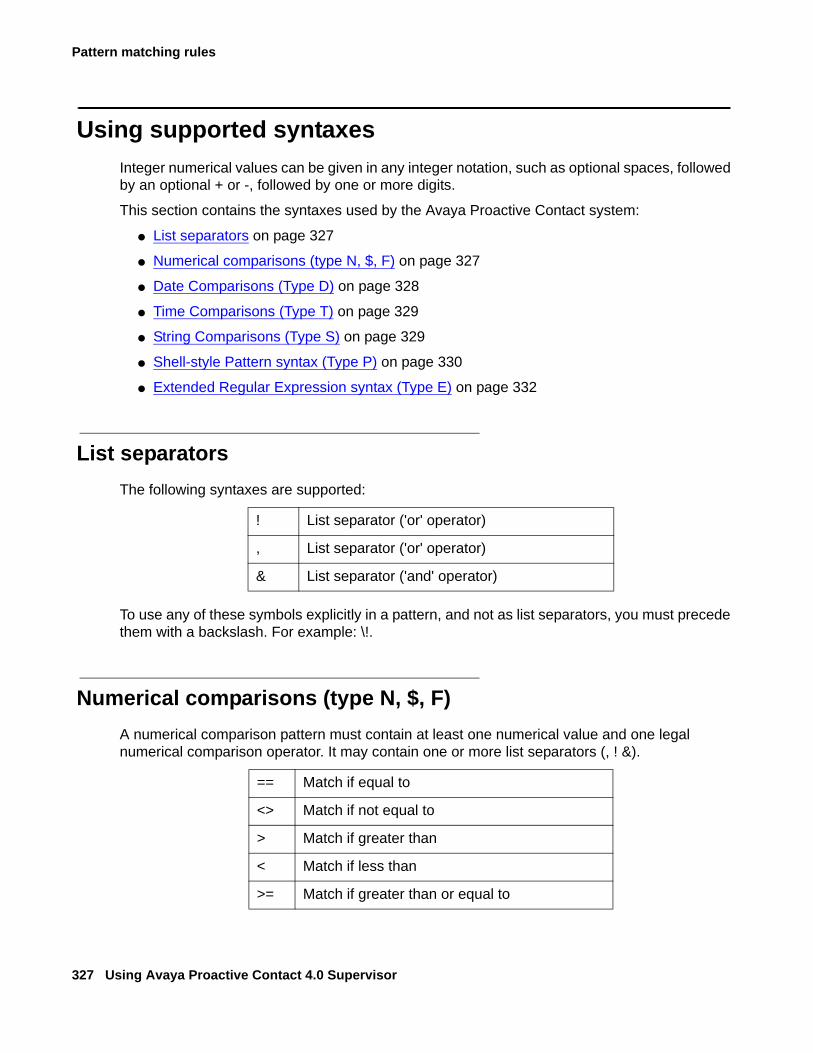
Pattern matching rules
327 Using Avaya Proactive Contact 4.0 Supervisor
Using supported syntaxesInteger numerical values can be given in any integer notation, such as optional spaces, followed by an optional + or -, followed by one or more digits.
This section contains the syntaxes used by the Avaya Proactive Contact system:
● List separators on page 327
● Numerical comparisons (type N, $, F) on page 327
● Date Comparisons (Type D) on page 328
● Time Comparisons (Type T) on page 329
● String Comparisons (Type S) on page 329
● Shell-style Pattern syntax (Type P) on page 330
● Extended Regular Expression syntax (Type E) on page 332
List separatorsThe following syntaxes are supported:
To use any of these symbols explicitly in a pattern, and not as list separators, you must precede them with a backslash. For example: \!.
Numerical comparisons (type N, $, F)A numerical comparison pattern must contain at least one numerical value and one legal numerical comparison operator. It may contain one or more list separators (, ! &).
! List separator ('or' operator)
, List separator ('or' operator)
& List separator ('and' operator)
== Match if equal to
<> Match if not equal to
> Match if greater than
< Match if less than
>= Match if greater than or equal to
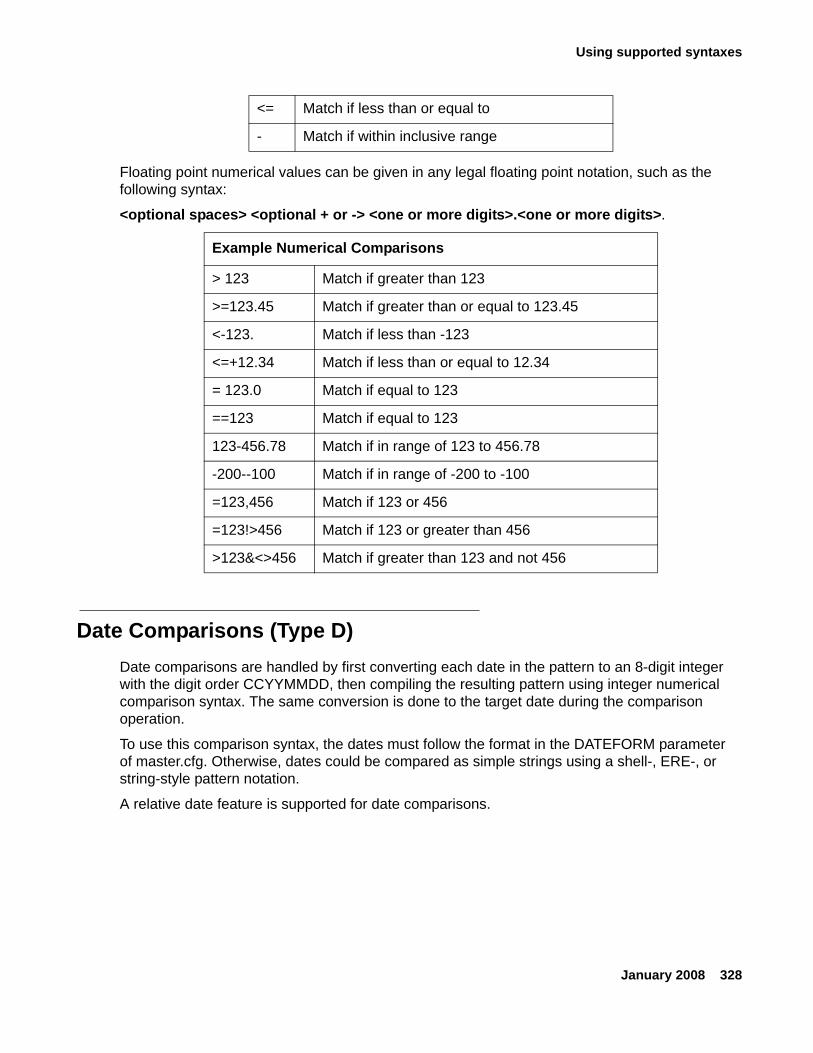
Using supported syntaxes
January 2008 328
Floating point numerical values can be given in any legal floating point notation, such as the following syntax:
<optional spaces> <optional + or -> <one or more digits>.<one or more digits>.
Date Comparisons (Type D)Date comparisons are handled by first converting each date in the pattern to an 8-digit integer with the digit order CCYYMMDD, then compiling the resulting pattern using integer numerical comparison syntax. The same conversion is done to the target date during the comparison operation.
To use this comparison syntax, the dates must follow the format in the DATEFORM parameter of master.cfg. Otherwise, dates could be compared as simple strings using a shell-, ERE-, or string-style pattern notation.
A relative date feature is supported for date comparisons.
<= Match if less than or equal to
- Match if within inclusive range
Example Numerical Comparisons
> 123 Match if greater than 123
>=123.45 Match if greater than or equal to 123.45
<-123. Match if less than -123
<=+12.34 Match if less than or equal to 12.34
= 123.0 Match if equal to 123
==123 Match if equal to 123
123-456.78 Match if in range of 123 to 456.78
-200--100 Match if in range of -200 to -100
=123,456 Match if 123 or 456
=123!>456 Match if 123 or greater than 456
>123&<>456 Match if greater than 123 and not 456
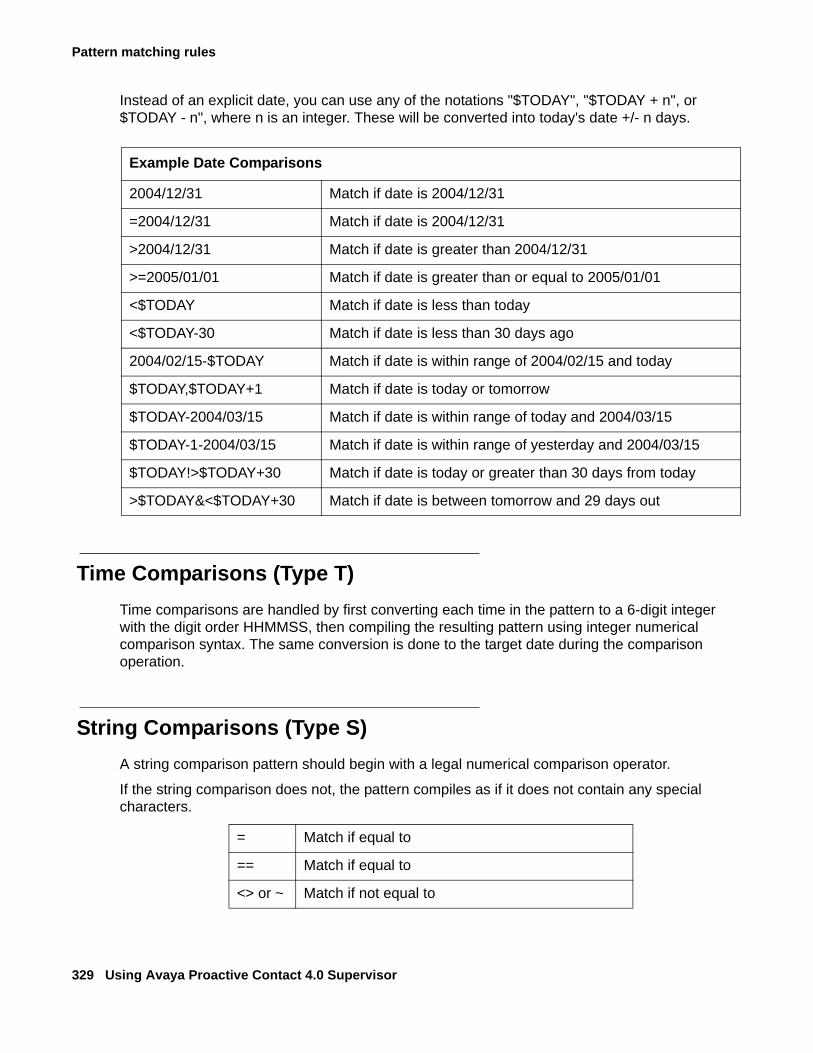
Pattern matching rules
329 Using Avaya Proactive Contact 4.0 Supervisor
Instead of an explicit date, you can use any of the notations "$TODAY", "$TODAY + n", or $TODAY - n", where n is an integer. These will be converted into today's date +/- n days.
Time Comparisons (Type T)Time comparisons are handled by first converting each time in the pattern to a 6-digit integer with the digit order HHMMSS, then compiling the resulting pattern using integer numerical comparison syntax. The same conversion is done to the target date during the comparison operation.
String Comparisons (Type S)A string comparison pattern should begin with a legal numerical comparison operator.
If the string comparison does not, the pattern compiles as if it does not contain any special characters.
Example Date Comparisons
2004/12/31 Match if date is 2004/12/31
=2004/12/31 Match if date is 2004/12/31
>2004/12/31 Match if date is greater than 2004/12/31
>=2005/01/01 Match if date is greater than or equal to 2005/01/01
<$TODAY Match if date is less than today
<$TODAY-30 Match if date is less than 30 days ago
2004/02/15-$TODAY Match if date is within range of 2004/02/15 and today
$TODAY,$TODAY+1 Match if date is today or tomorrow
$TODAY-2004/03/15 Match if date is within range of today and 2004/03/15
$TODAY-1-2004/03/15 Match if date is within range of yesterday and 2004/03/15
$TODAY!>$TODAY+30 Match if date is today or greater than 30 days from today
>$TODAY&<$TODAY+30 Match if date is between tomorrow and 29 days out
= Match if equal to
== Match if equal to
<> or ~ Match if not equal to
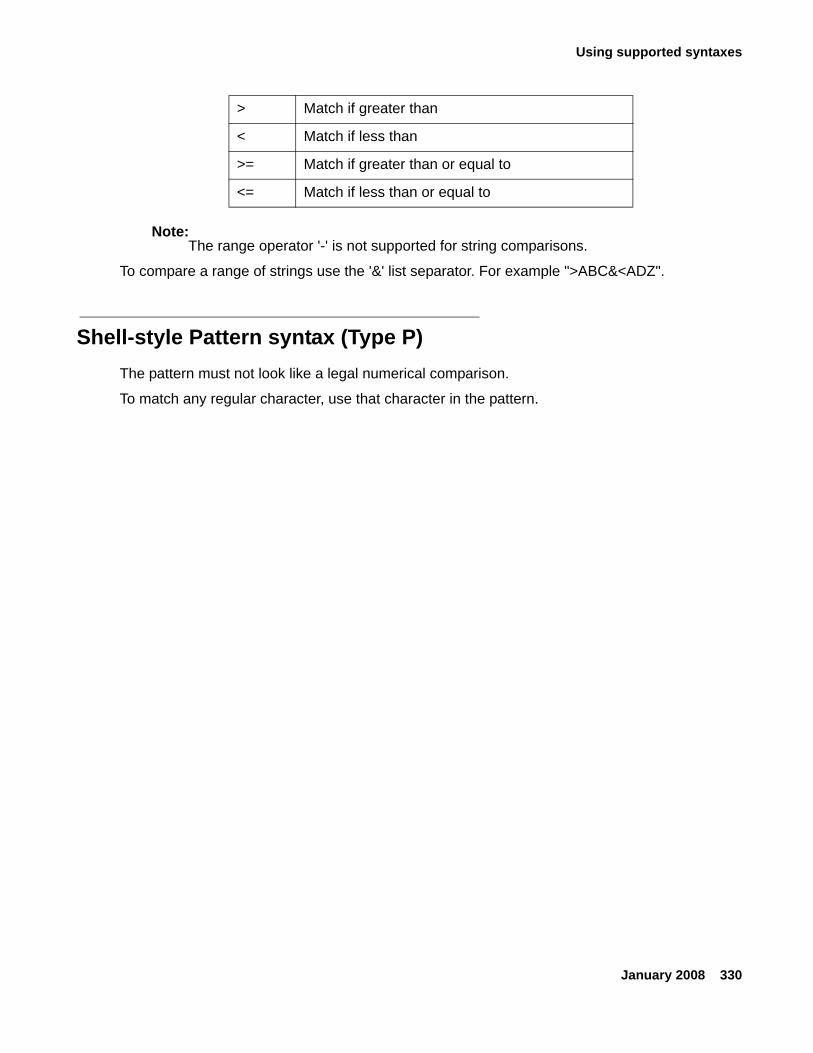
Using supported syntaxes
January 2008 330
Note:Note: The range operator '-' is not supported for string comparisons.
To compare a range of strings use the '&' list separator. For example ">ABC&<ADZ".
Shell-style Pattern syntax (Type P)The pattern must not look like a legal numerical comparison.
To match any regular character, use that character in the pattern.
> Match if greater than
< Match if less than
>= Match if greater than or equal to
<= Match if less than or equal to

Pattern matching rules
331 Using Avaya Proactive Contact 4.0 Supervisor
To match any special character (~ ? + * , ! & | [ ] { } ( ) - ^ $) precede the character with a backslash.
Character Class Shorthand Notation
* Match anything (wildcard)
? Match any single character
\a Match any single alphabetic character
\c Match any single control character
\d Match any single digit
\l Match any single lowercase character
\p Match any single punctuation character
\s Match any single space (space, tab, nl) character
\u Match any single uppercase character
\w Match any single word (alphanumeric) character
\A Match any single character not matched by \a
\C Match any single character not matched by \c
\D Match any single character not matched by \d
\L Match any single character not matched by \l
\P Match any single character not matched by \p
\S Match any single character not matched by \s
\U Match any single character not matched by \u
\W Match any single character not matched by \w
Modifiers
~ Match everything except what pattern matches (must be first character in pattern)
[ ] Match any single character or character range in set
[^] Match any single character or character range not in set
- Character range (sets only)
{ } Subset (subsets can be nested)
| List separator ('or' operator)
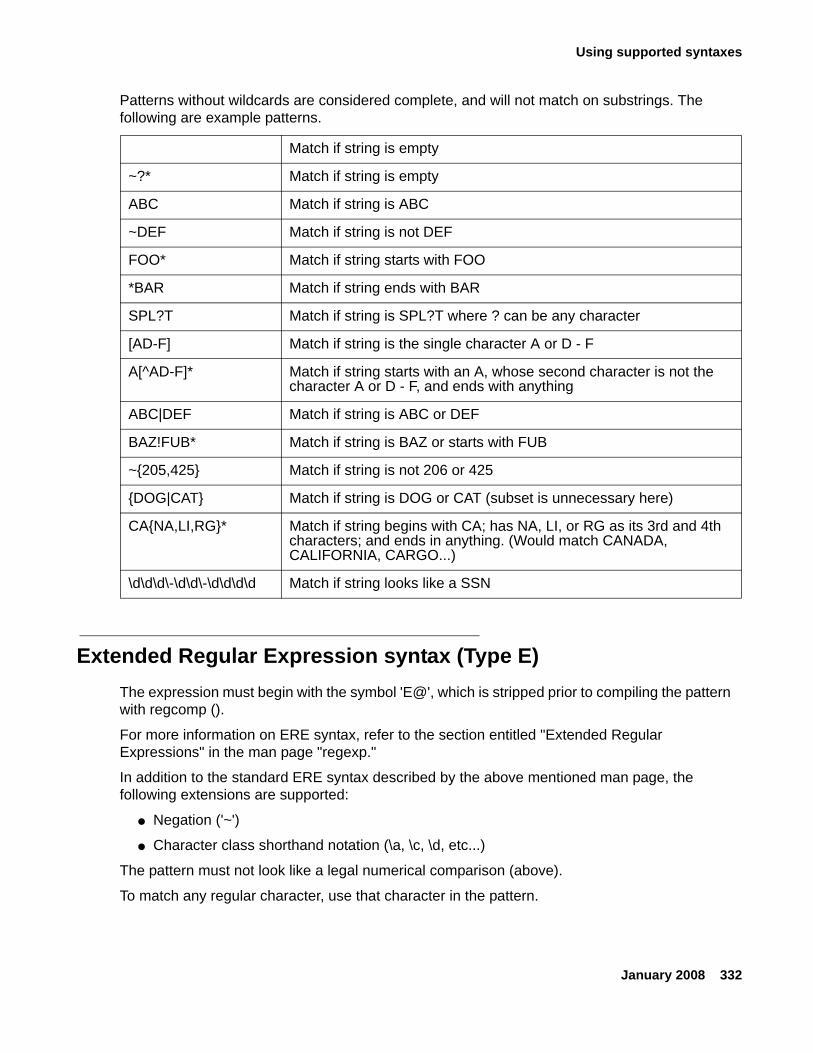
Using supported syntaxes
January 2008 332
Patterns without wildcards are considered complete, and will not match on substrings. The following are example patterns.
Extended Regular Expression syntax (Type E)The expression must begin with the symbol 'E@', which is stripped prior to compiling the pattern with regcomp ().
For more information on ERE syntax, refer to the section entitled "Extended Regular Expressions" in the man page "regexp."
In addition to the standard ERE syntax described by the above mentioned man page, the following extensions are supported:
● Negation ('~')
● Character class shorthand notation (\a, \c, \d, etc...)
The pattern must not look like a legal numerical comparison (above).
To match any regular character, use that character in the pattern.
Match if string is empty
~?* Match if string is empty
ABC Match if string is ABC
~DEF Match if string is not DEF
FOO* Match if string starts with FOO
*BAR Match if string ends with BAR
SPL?T Match if string is SPL?T where ? can be any character
[AD-F] Match if string is the single character A or D - F
A[^AD-F]* Match if string starts with an A, whose second character is not the character A or D - F, and ends with anything
ABC|DEF Match if string is ABC or DEF
BAZ!FUB* Match if string is BAZ or starts with FUB
~{205,425} Match if string is not 206 or 425
{DOG|CAT} Match if string is DOG or CAT (subset is unnecessary here)
CA{NA,LI,RG}* Match if string begins with CA; has NA, LI, or RG as its 3rd and 4th characters; and ends in anything. (Would match CANADA, CALIFORNIA, CARGO...)
\d\d\d\-\d\d\-\d\d\d\d Match if string looks like a SSN

Pattern matching rules
333 Using Avaya Proactive Contact 4.0 Supervisor
To match any special character (~ ? + * , ! & | [ ] { } ( ) - ^ $) precede it with a backslash.
Character Class Shorthand Notation
. Match any single character
\a Match any single alphabetic character
\c Match any single control character
\d Match any single digit
\l Match any single lowercase character
\p Match any single punctuation character
\s Match any single space (space, tab, nl) character
\u Match any single uppercase character
\w Match any single word (alphanumeric) character
\A Match any single character not matched by \a
\C Match any single character not matched by \c
\D Match any single character not matched by \d
\L Match any single character not matched by \l
\P Match any single character not matched by \p
\S Match any single character not matched by \s
\U Match any single character not matched by \u
\W Match any single character not matched by \w
\n Where n is a number, match previously matched subset number n
Modifiers
~ Match everything except what pattern matches (must be first character in pattern after '@'),
^ Anchor pattern to beginning. For example, the pattern must match from the beginning of the string.
$ Anchor pattern to end. For example, the pattern must match from the end of the string.
* Match preceding character 0 or more times,
+ Match preceding character 1 or more times,
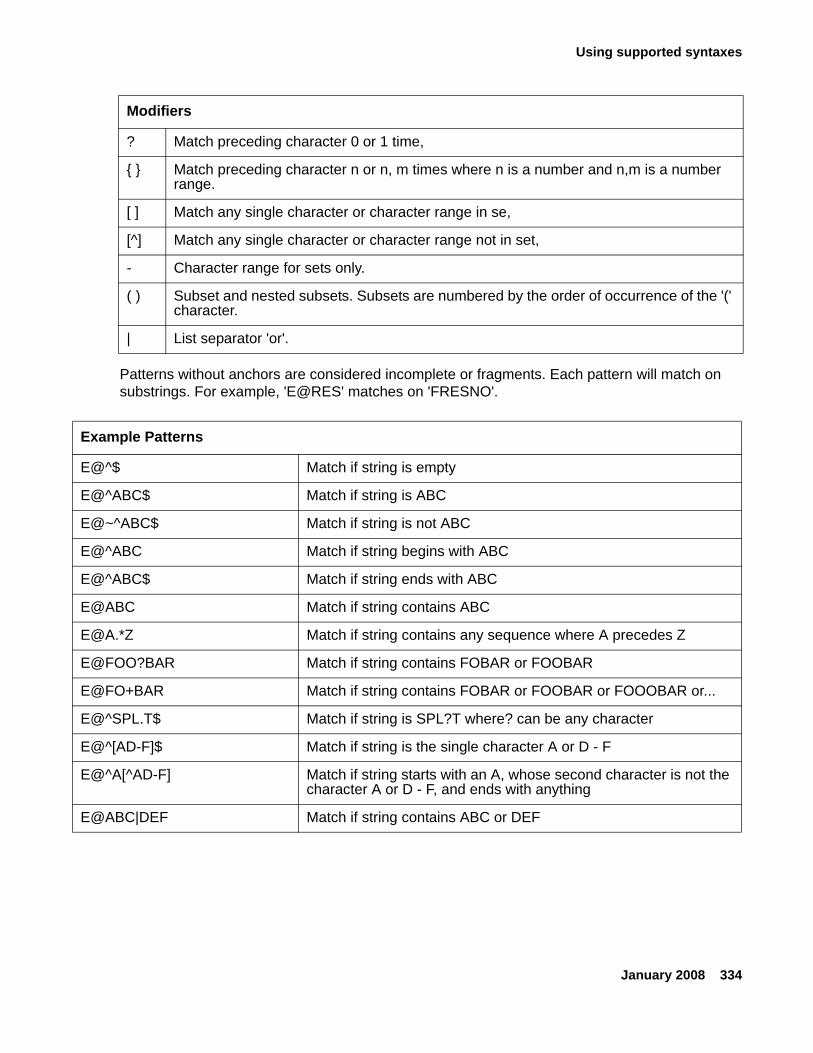
Using supported syntaxes
January 2008 334
Patterns without anchors are considered incomplete or fragments. Each pattern will match on substrings. For example, 'E@RES' matches on 'FRESNO'.
? Match preceding character 0 or 1 time,
{ } Match preceding character n or n, m times where n is a number and n,m is a number range.
[ ] Match any single character or character range in se,
[^] Match any single character or character range not in set,
- Character range for sets only.
( ) Subset and nested subsets. Subsets are numbered by the order of occurrence of the '(' character.
| List separator 'or'.
Modifiers
Example Patterns
E@^$ Match if string is empty
E@^ABC$ Match if string is ABC
E@~^ABC$ Match if string is not ABC
E@^ABC Match if string begins with ABC
E@^ABC$ Match if string ends with ABC
E@ABC Match if string contains ABC
E@A.*Z Match if string contains any sequence where A precedes Z
E@FOO?BAR Match if string contains FOBAR or FOOBAR
E@FO+BAR Match if string contains FOBAR or FOOBAR or FOOOBAR or...
E@^SPL.T$ Match if string is SPL?T where? can be any character
E@^[AD-F]$ Match if string is the single character A or D - F
E@^A[^AD-F] Match if string starts with an A, whose second character is not the character A or D - F, and ends with anything
E@ABC|DEF Match if string contains ABC or DEF
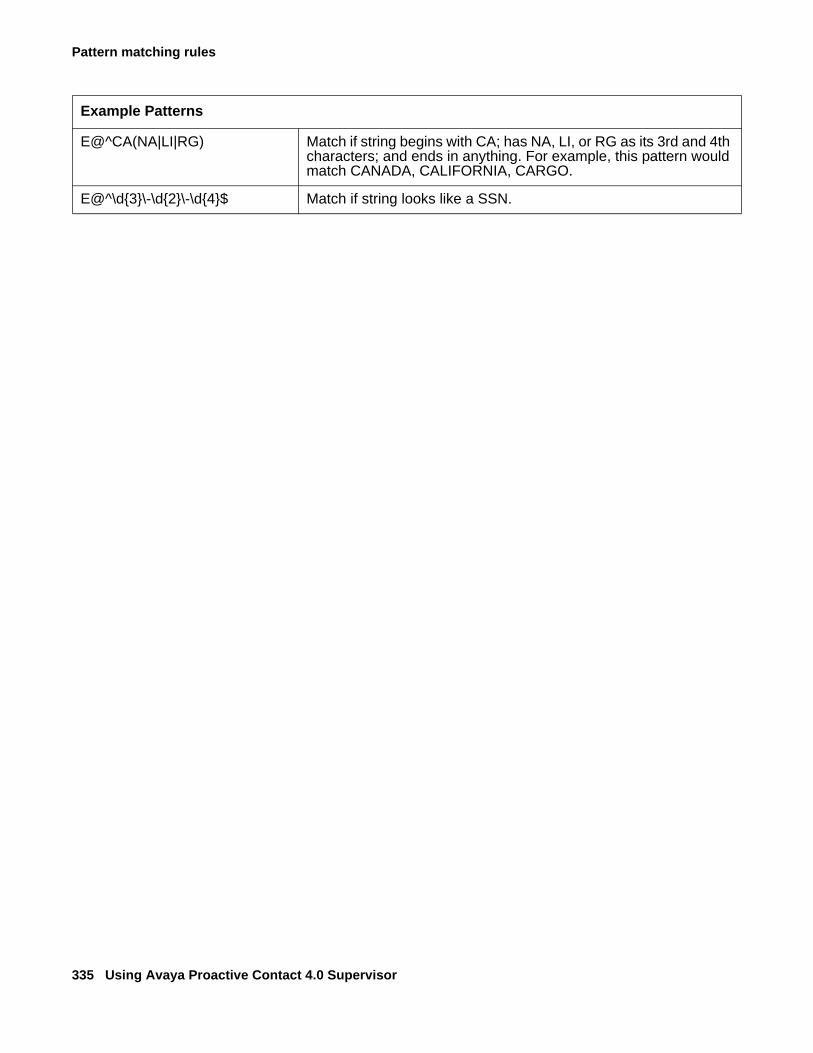
Pattern matching rules
335 Using Avaya Proactive Contact 4.0 Supervisor
E@^CA(NA|LI|RG) Match if string begins with CA; has NA, LI, or RG as its 3rd and 4th characters; and ends in anything. For example, this pattern would match CANADA, CALIFORNIA, CARGO.
E@^\d{3}\-\d{2}\-\d{4}$ Match if string looks like a SSN.
Example Patterns
January 2008 336
Index
Index
Aabandons, completion code category . . . . . . . . 285Abatement Service Level
Agent Blending control method parameter . . . . 316Service Level . . . . . . . . . . . . . . . . . . 308
ACDagent . . . . . . . . . . . . . . . . . . . . . 70Agent Blending . . . . . . . . . . . . . . . . . 309agent state . . . . . . . . . . . . . . . . . . . 166Aspect CallCenter . . . . . . . . . . . . . . . 309Avaya Communication Manager . . . . . . . . . 310blend agents . . . . . . . . . . . . . . . . . . 316handle outbound calls . . . . . . . . . . . . . . 314Northern Telecom Meridian . . . . . . . . . . . 312PINNACLE . . . . . . . . . . . . . . . . . . . 312Rockwell Spectrum . . . . . . . . . . . . . . . 310Siemens ROLM . . . . . . . . . . . . . . . . 312
agentdisplay a view for an agent . . . . . . . . . . . 171find . . . . . . . . . . . . . . . . . . . . . . 231hierarchy . . . . . . . . . . . . . . . . . . . . 293logins . . . . . . . . . . . . . . . . . . . . . 70manage in Monitor . . . . . . . . . . . . . . . 229monitor line. . . . . . . . . . . . . . . . . . . 232remove from a job in Monitor . . . . . . . . . . 232remove from job . . . . . . . . . . . . . . . . 233rename Monitor view set . . . . . . . . . . . . 173reporting to a supervisor, find . . . . . . . . . . 229resources view . . . . . . . . . . . . . . . . . 200save as Monitor view set . . . . . . . . . . . . 173save current Monitor views . . . . . . . . . . . 172standard Monitor views . . . . . . . . . . . . . 170states . . . . . . . . . . . . . . . . . . . . . 166transfer . . . . . . . . . . . . . . . . . . . . 231types of . . . . . . . . . . . . . . . . . . . . 69
Agent Blending . . . . . . . . . . . . . . . . . . 306create a domain . . . . . . . . . . . . . . . . 319create domain group . . . . . . . . . . . . . . 318delete a domain group . . . . . . . . . . . . . 320delete domain . . . . . . . . . . . . . . . . . 320described . . . . . . . . . . . . . . . . . . . 307domain group. . . . . . . . . . . . . . . . . . 314domain groups . . . . . . . . . . . . . . . . . 314domain types . . . . . . . . . . . . . . . . . . 313domains . . . . . . . . . . . . . . . . . . . . 313edit a domain . . . . . . . . . . . . . . . . . . 320edit a domain group. . . . . . . . . . . . . . . 319login . . . . . . . . . . . . . . . . . . . . . . 70
move a domain . . . . . . . . . . . . . . . . 321New Domain dialog box . . . . . . . . . . . . 319Outbound . . . . . . . . . . . . . . . . . . . 314Predictive Agent Blend. . . . . . . . . . . . . 308Proactive Agent Blend . . . . . . . . . . . . . 308reset the blend engine . . . . . . . . . . . . . 322resynch the blend engine . . . . . . . . . . . 322start . . . . . . . . . . . . . . . . . . . . . 318start the blend engine . . . . . . . . . . . . . 322stop the blend engine . . . . . . . . . . . . . 321supported ACDs. . . . . . . . . . . . . . . . 309tool . . . . . . . . . . . . . . . . . . . . 307, 318uses pooled ACD agents for outbound calling . . 307view ACD statistics . . . . . . . . . . . . . . 323view alerts . . . . . . . . . . . . . . . . . . 323view transactions . . . . . . . . . . . . . . . 323
Agent Completion Codes . . . . . . . . . . . . . 203Agent Completion Codes, Monitor view . . . . 171, 203agent controls
Find Agent . . . . . . . . . . . . . . . . . . 247functions . . . . . . . . . . . . . . . . . 229, 231Monitor Agent . . . . . . . . . . . . . . . . . 248Performance Completion Code dialog box . . . 248Send Message . . . . . . . . . . . . . . . . 248Transfer Agent . . . . . . . . . . . . . . . . 248
Agent Detail . . . . . . . . . . . . . . . . . . . 201Monitor view . . . . . . . . . . . . . . . . . 171view . . . . . . . . . . . . . . . . . . . . . 201
Agent History. . . . . . . . . . . . . . . . . . . 204Agent History, Monitor view . . . . . . . . . . 171, 204agent keys definition file name. . . . . . . . . . . 126agent resources view . . . . . . . . . . .201, 203, 204Agent Update Time . . . . . . . . . . . . . . . . 124Agent view
defined . . . . . . . . . . . . . . . . . . . . 178display . . . . . . . . . . . . . . . . . . . . 233
Agent Work Time . . . . . . . . . . . . . . . . . 124Alert Editor
Alert Definition tab. . . . . . . . . . . . . . . 259Notifications tab . . . . . . . . . . . . . . . . 260Scope tab. . . . . . . . . . . . . . . . . . . 259
Alert Viewer . . . . . . . . . . . . . . . . . . . 256check alert status . . . . . . . . . . . . . . . 257create alerts. . . . . . . . . . . . . . . . . . 255dialog box. . . . . . . . . . . . . . . . . . . 258
alertsAlert Editor . . . . . . . . . . . . . . . . 259, 260Alert Viewer dialog box . . . . . . . . . . . . 258check status . . . . . . . . . . . . . . . . . 257control . . . . . . . . . . . . . . . . . . . . 167
337 Using Avaya Proactive Contact 4.0 Supervisor
Index
create . . . . . . . . . . . . . . . . . . . . . 255disable . . . . . . . . . . . . . . . . . . . . . 257edit . . . . . . . . . . . . . . . . . . . . . . 256enable . . . . . . . . . . . . . . . . . . . . . 257examples . . . . . . . . . . . . . . . . . . . 252log . . . . . . . . . . . . . . . . . . . . . . . 256purpose . . . . . . . . . . . . . . . . . 250, 251remove. . . . . . . . . . . . . . . . . . . . . 256start monitoring . . . . . . . . . . . . . . . . . 167types. . . . . . . . . . . . . . . . . . . . . . 251use . . . . . . . . . . . . . . . . . . . . . . 251view in Agent Blending . . . . . . . . . . . . . 323
Allow agents to cancel call . . . . . . . . . . . . . 129Allow dialing from deleted record . . . . . . . . . . 130alternate initial
phone . . . . . . . . . . . . . . . . . . . . . 94alternate initial phone . . . . . . . . . . . . . . . 87
dialog box . . . . . . . . . . . . . . . . . . . 244phone strategy . . . . . . . . . . . . . . . . . 87set in Monitor . . . . . . . . . . . . . . . . . . 224tab. . . . . . . . . . . . . . . . . . . . . . . 90
alternative phone . . . . . . . . . . . . . . . . . 131Analyst
change a report. . . . . . . . . . . . . . . . . 270create a report . . . . . . . . . . . . . . . . . 269defined. . . . . . . . . . . . . . . . . . . . . 267delete a report . . . . . . . . . . . . . . . . . 270export a report . . . . . . . . . . . . . . . . . 272overview . . . . . . . . . . . . . . . . . . . . 266preview a report . . . . . . . . . . . . . . . . 271print a report . . . . . . . . . . . . . . . . . . 271report categories . . . . . . . . . . . . . . . . 267schedule a report . . . . . . . . . . . . . . . . 273
ANI . . . . . . . . . . . . . . . . . . . . . . . . 123append
record seleciton row . . . . . . . . . . . . . . 112row in phone strategy . . . . . . . . . . . . . . 93
ASAsee Average Speed to Answer. . . . . . . . . . 308
Aspect CallCenter . . . . . . . . . . . . . . . . . 309automated messages . . . . . . . . . . . . . . . 153Avaya Communication Manager, Agent Blending . . 310Avaya Proactive Contact
overview . . . . . . . . . . . . . . . . . . . . 19PG230 . . . . . . . . . . . . . . . . . . . . . 146PG230 messages. . . . . . . . . . . . . . . . 146with Avaya Communication Manager. . . . . . . 146
Avaya Proactive Contact Analyst . . . . . . . . . . 266Average Speed to Answer
Agent Blending control method . . . . . . . . . 315domain group. . . . . . . . . . . . . . . . . . 308
Bblend agent . . . . . . . . . . . . . . . . . . . . 69
blend jobs . . . . . . . . . . . . . . . . . . . . .117blending . . . . . . . . . . . . . . . . . . . . . 318branch, hierarchy tree. . . . . . . . . . . . . . . 293button
bar . . . . . . . . . . . . . . . . . . . . . . 163change icon size . . . . . . . . . . . . . . . 265Custom group . . . . . . . . . . . . . . . . . 175large or small icons . . . . . . . . . . . . . . 170
Ccall detection mode . . . . . . . . . . . . . . . . . 87call pacing . . . . . . . . . . . . . . . .119, 123, 124
Expert Calling Ratio . . . . . . . . . . . . . . 124initial hit rate . . . . . . . . . . . . . . . . . 125methods . . . . . . . . . . . . . . . . . . . 124minimum hit rate . . . . . . . . . . . . . . . 125
calling listdownload . . . . . . . . . . . . . . . . . . . . 20overview . . . . . . . . . . . . . . . . . . . . 20
calling list reports . . . . . . . . . . . . . . . . . . 38calling lists
overview . . . . . . . . . . . . . . . . . . . . 65calling party number (ANI) . . . . . . . . . . . . 123calling results tab . . . . . . . . . . . . . . . . . 106calls in the wait queue . . . . . . . . . . . . . . 124category
assign a completion code . . . . . . . . . . . 288remove a completion code . . . . . . . . . . . 290
changecompletion code. . . . . . . . . . . . . . . . 290Monitor default settings . . . . . . . . . . . . 162
Change a report . . . . . . . . . . . . . . . . . 270characters, wildcard . . . . . . . . . . . . . . . 101clear
all rows in a phone strategy . . . . . . . . . . . 95record seleciton row . . . . . . . . . . . . . . .115
closures, completion code category . . . . . . . . 285completion code
assign a code to a category . . . . . . . . . . 288assign to category . . . . . . . . . . . . . . . 288attributes . . . . . . . . . . . . . . . . . . . 284categories . . . . . . . . . . . . . . . . . . 285change . . . . . . . . . . . . . . . . . . . . 290code . . . . . . . . . . . . . . . . . . . . . 284defined . . . . . . . . . . . . . . . . . . . . 283description . . . . . . . . . . . . . . . . . . 284examples . . . . . . . . . . . . . . . . . . . 283keyword . . . . . . . . . . . . . . . . . . . 284record selection . . . . . . . . . . . . . . . . . 97remove from category . . . . . . . . . . . . . 290save as HTML . . . . . . . . . . . . . . . . 291save configuration . . . . . . . . . . . . . . . 291type . . . . . . . . . . . . . . . . . . . . . 284
Completion Code Detail by Agent view. . . . . . . 196

January 2008 338
Index
Completion Code Manager . . . . . . . . . . . . . 282assign code to a category . . . . . . . . . . . . 288change a code . . . . . . . . . . . . . . . . . 290Completion Code Wizard . . . . . . . . . . . . 288multi-dialers . . . . . . . . . . . . . . . . . . 285remove a code from a category . . . . . . . . . 290save a completion code . . . . . . . . . . . . . 291saves codes as HTML . . . . . . . . . . . . . 291start . . . . . . . . . . . . . . . . . . . . . . 288Tools menu . . . . . . . . . . . . . . . . . . 288window. . . . . . . . . . . . . . . . . . . . . 287
Completion Code Wizard . . . . . . . . . . . . . . 288copy record selection. . . . . . . . . . . . . . . . 111create
Agent Blending domain . . . . . . . . . . . . . 319alerts . . . . . . . . . . . . . . . . . . . . . 255Analyst report . . . . . . . . . . . . . . . . . 269hierarchy . . . . . . . . . . . . . . . . . . . . 295job . . . . . . . . . . . . . . . . . . . . . . . 134message script . . . . . . . . . . . . . . . . . 156Monitor button . . . . . . . . . . . . . . . . . 175
Create a new report configuration . . . . . . . . . 269Cruise Control . . . . . . . . . . . . . . . . . . . 69
benefits . . . . . . . . . . . . . . . . . . . . 120call pacing method . . . . . . . . . . . . 119, 124Desired Service Level . . . . . . . . . . . . . . 132required settings . . . . . . . . . . . . . . . . 132Time to Connect Tolerance . . . . . . . . . . . 132
Custombutton group . . . . . . . . . . . . . . . . . . 175rename Monitor view set . . . . . . . . . . . . 173save as Monitor view set . . . . . . . . . . . . 173save current Monitor views . . . . . . . . . . . 172standard Monitor views . . . . . . . . . . . . . 170view, defined . . . . . . . . . . . . . . . . . . 178views, see View . . . . . . . . . . . . . . . . 163
customizeMonitor. . . . . . . . . . . . . . . . . . . . . 163Monitor windows . . . . . . . . . . . . . . . . 168Status Bar, Monitor dialog box . . . . . . . . . . 237view . . . . . . . . . . . . . . . . . . . . . . 172
Ddata export . . . . . . . . . . . . . . . . . . . . 25data import . . . . . . . . . . . . . . . . . . . . 24database security . . . . . . . . . . . . . . . . . 55date
comparison. . . . . . . . . . . . . . . . . . . 328pattern matching . . . . . . . . . . . . . . . . 324
deleteAgent Blending domain . . . . . . . . . . . . . 320Agent Blending domain group . . . . . . . . . . 320Analyst report . . . . . . . . . . . . . . . . . 270custom Monitor view . . . . . . . . . . . . . . 175
hierarchy . . . . . . . . . . . . . . . . . . . 300hierarchy data item . . . . . . . . . . . . . . 299hierarchy level . . . . . . . . . . . . . . . . 299job . . . . . . . . . . . . . . . . . . . . . . 139Monitor view set . . . . . . . . . . . . . . . . 175mulitple jobs . . . . . . . . . . . . . . . . . 139record seleciton row . . . . . . . . . . . . . . .113record selection . . . . . . . . . . . . . . . . 109
Delete a report configuration . . . . . . . . . . . 270Desired Service Level. . . . . . . . . . . . . . . 132
Agent Blending control method parameter . . . 316Service Level . . . . . . . . . . . . . . . . . 308
Detail tab . . . . . . . . . . . . . . . . . . . . 105Detection Mode
dialog box. . . . . . . . . . . . . . . . . . . 244set in Monitor . . . . . . . . . . . . . . . . . 224Strategies. . . . . . . . . . . . . . . . . . . . 87tab . . . . . . . . . . . . . . . . . . . . . . . 90
dialer . . . . . . . . . . . . . . . . . . . . . 93, 111Agents view. . . . . . . . . . . . . . . . . . 182hierarchy . . . . . . . . . . . . . . . . . . . 294hierarchy, find agents . . . . . . . . . . . . . 229History view. . . . . . . . . . . . . . . . . . 184in your views . . . . . . . . . . . . . . . . . 165Lines view . . . . . . . . . . . . . . . . . . 183multi-dialer commands. . . . . . . . . . . . . . 73rename Monitor view set . . . . . . . . . . . . 173resources view . . . . . . . . . . . .180, 183, 184save as Monitor view set . . . . . . . . . . . . 173save current Monitor views. . . . . . . . . . . 172standard Monitor views . . . . . . . . . . . . 170Status view . . . . . . . . . . . . . . . . . . 180view, defined . . . . . . . . . . . . . . . . . 177
dialog boxAlert Viewer. . . . . . . . . . . . . . . . . . 258Alternate Initial Phone . . . . . . . . . . . . . 244Detection Mode . . . . . . . . . . . . . . . . 244Expert Calling Ratio . . . . . . . . . . . . . . 240Filter Data . . . . . . . . . . . . . . . . . . 237Find . . . . . . . . . . . . . . . . . . . . . 237Find Agent . . . . . . . . . . . . . . . . 247, 248FTP Client . . . . . . . . . . . . . . . . . . 280in Monitor . . . . . . . . . . . . . . . . . . . 234Inbound Settings . . . . . . . . . . . . . . . 241Lines . . . . . . . . . . . . . . . . . . . . . 245Link to Job . . . . . . . . . . . . . . . . . . 240Managed Dialing . . . . . . . . . . . . . . . 241Minimum hit rate . . . . . . . . . . . . . . . 240Monitor Agent . . . . . . . . . . . . . . . . . 248New Domain . . . . . . . . . . . . . . . . . 319Options . . . . . . . . . . . . . . . . . . . . 141Performance Completion Code . . . . . . . . . 248Quota . . . . . . . . . . . . . . . . . . . . 243Recalls . . . . . . . . . . . . . . . . . . . . 245Screens . . . . . . . . . . . . . . . . . . . 142
339 Using Avaya Proactive Contact 4.0 Supervisor
Index
Stop Job . . . . . . . . . . . . . . . . . . . . 239Time Zones . . . . . . . . . . . . . . . . . . 242Transfer Agent . . . . . . . . . . . . . . . . . 248Unit Work Lists . . . . . . . . . . . . . . . . . 242
digitized messages, See messages . . . . . . . . . 145disable an alert . . . . . . . . . . . . . . . . . . 257display
agent view . . . . . . . . . . . . . . . . . . . 233empty record at preview. . . . . . . . . . . . . 130
Do Not Call . . . . . . . . . . . . . . . . . . . . 126group name . . . . . . . . . . . . . . . . . . 126
do not call groups . . . . . . . . . . . . . . . . . 37domain . . . . . . . . . . . . . . . . . . . . . . 313
create . . . . . . . . . . . . . . . . . . . . . 319delete . . . . . . . . . . . . . . . . . . . . . 320edit . . . . . . . . . . . . . . . . . . . . . . 320group in Agent Blending. . . . . . . . . . . . . 314move . . . . . . . . . . . . . . . . . . . . . 321types. . . . . . . . . . . . . . . . . . . . . . 313
domain groupAgent Blending . . . . . . . . . . . . . . . . . 314Average Speed to Answer. . . . . . . . . . . . 308configurations . . . . . . . . . . . . . . . . . 314control methods . . . . . . . . . . . . . . . . 314create . . . . . . . . . . . . . . . . . . . . . 318create in Agent Blending . . . . . . . . . . . . 318delete . . . . . . . . . . . . . . . . . . . . . 320edit . . . . . . . . . . . . . . . . . . . . . . 319OB_ONLY . . . . . . . . . . . . . . . . . . . 309one or more domains . . . . . . . . . . . . . . 314Service Level . . . . . . . . . . . . . . . . . . 308
download . . . . . . . . . . . . . . . . . . . . . 21calling lists . . . . . . . . . . . . . . . . . . . 20
EEarliest start time . . . . . . . . . . . . . . . . . 123edit
alerts . . . . . . . . . . . . . . . . . . . . . 256Analyst report . . . . . . . . . . . . . . . . . 270domain group in Agent Blending . . . . . . . . . 319domain in Agent Blending . . . . . . . . . . . . 320job . . . . . . . . . . . . . . . . . . . . . . . 138record selection . . . . . . . . . . . . . . . . 108
EditorJob Wizard . . . . . . . . . . . . . . . . . . . 134Messages and Scripts . . . . . . . . . . . . . 144Selection Reports. . . . . . . . . . . . . 102, 112Selections . . . . . . . . . . . . . . . . . 96, 104Strategies . . . . . . . . . . . . . . . . . . . 85
email, send alert notifications . . . . . . . . . . . . 167enable an alert. . . . . . . . . . . . . . . . . . . 257end jobs. . . . . . . . . . . . . . . . . . . . . . 131environment . . . . . . . . . . . . . . . . . . . . 22eport
Analyst report . . . . . . . . . . . . . . . . . 272example scripts. . . . . . . . . . . . . . . . . . 154Expert Calling Ratio . . . . . . . . . . .120, 124, 131
Agent Update Time . . . . . . . . . . . . . . 124Agent Work Time . . . . . . . . . . . . . . . 124call pacing method . . . . . . . . . . . . 119, 124change in Monitor . . . . . . . . . . . . . . . 220dialog box. . . . . . . . . . . . . . . . . . . 240wait queue . . . . . . . . . . . . . . . . . . 124
export a report . . . . . . . . . . . . . . . . . . 272extended regular expression . . . . . . . . . 324, 332
Ffavorite view . . . . . . . . . . . . . . . . . . . 176Feedback Options dialog box tab . . . . . . . . . 236files . . . . . . . . . . . . . . . . . . . . . . . 125
agent keys definition file name . . . . . . . . . 126Do Not Call . . . . . . . . . . . . . . . . . . 126inbound calling list . . . . . . . . . . . . . . . 126inbound screen(s) . . . . . . . . . . . . . . . 126names . . . . . . . . . . . . . . . . . . . . 126outbound calling list . . . . . . . . . . . . . . 126outbound screen(s) . . . . . . . . . . . . . . 126record selection file name . . . . . . . . . . . 126tranfer to inbound job . . . . . . . . . . . . . 127
filterData . . . . . . . . . . . . . . . . . . . . . 207Filter Data . . . . . . . . . . . . . . . . . . 178Filter Data in Monitor . . . . . . . . . . . . . 237
Filter Data . . . . . . . . . . . . . . . . . . . . 210Find . . . . . . . . . . . . . . . . . . . . . . . 207
Agent. . . . . . . . . . . . . . . . . . . . . 200Monitor dialog box. . . . . . . . . . . . . . . 237search for a text string in Monitor . . . . . . . . 225
Find Agent . . . . . . . . . . . . . . . . . . 228, 231dialog box. . . . . . . . . . . . . . . . . . . 247view . . . . . . . . . . . . . . . . . . . . . 200
Find Item, View toolbar . . . . . . . . . . . . . . 179floating point . . . . . . . . . . . . . . . . . . . 328
pattern matching . . . . . . . . . . . . . . . 324FTP Client dialog box . . . . . . . . . . . . . . . 280
Ggrace period . . . . . . . . . . . . . . . . . . . . 61Graphic View. . . . . . . . . . . . . . . . . . . 207
in Monitor . . . . . . . . . . . . . . . . . . . 213View toolbar. . . . . . . . . . . . . . . . . . 178
Group field . . . . . . . . . . . . . . . . . . . . 105
Hhide or show columns. . . . . . . . . . . . . . . 207
January 2008 340
Index
in Monitor . . . . . . . . . . . . . . . . . . . 213View toolbar . . . . . . . . . . . . . . . . . . 179
hierarchy . . . . . . . . . . . . . . . . 164, 212, 293add a level . . . . . . . . . . . . . . . . . . . 296add data items to bottom branch . . . . . . . . . 297delete . . . . . . . . . . . . . . . . . . . . . 300find agents in a job . . . . . . . . . . . . . . . 229find agents on a dialer . . . . . . . . . . . . . 229find agents reporting to a supervisor . . . . . . . 229move a level . . . . . . . . . . . . . . . . . . 298move elements . . . . . . . . . . . . . . . . . 298remove a data item . . . . . . . . . . . . . . . 299remove a level . . . . . . . . . . . . . . . . . 299rename . . . . . . . . . . . . . . . . . . . . 300rename a level . . . . . . . . . . . . . . . . . 298set default in Monitor . . . . . . . . . . . . . . 208tree branches. . . . . . . . . . . . . . . . . . 293
Hierarchy Manager. . . . . . . . . . . . . . . . . 208add a level . . . . . . . . . . . . . . . . . . . 296add data items . . . . . . . . . . . . . . . . . 297agent hierarchy . . . . . . . . . . . . . . . . . 293create a hierarchy . . . . . . . . . . . . . . . 295delete a hierarchy. . . . . . . . . . . . . . . . 300dialer hierarchy . . . . . . . . . . . . . . . . . 294icon on View toolbar . . . . . . . . . . . . . . 179job hierarchy . . . . . . . . . . . . . . . . . . 294move a hierarchy level . . . . . . . . . . . . . 298move elements . . . . . . . . . . . . . . . . . 298open a hierarchy . . . . . . . . . . . . . . . . 296overview . . . . . . . . . . . . . . . . . . . . 292remove a data item . . . . . . . . . . . . . . . 299remove a hierarchy level . . . . . . . . . . . . 299rename a hierarchy . . . . . . . . . . . . . . . 300rename a hierarchy level . . . . . . . . . . . . 298start . . . . . . . . . . . . . . . . . . . . . . 295
hit rate . . . . . . . . . . . . . . . . . . . . . . 124HTML . . . . . . . . . . . . . . . . . . . . . . . 213
Record Selections report . . . . . . . . . . . . 109
Iicons on views toolbar . . . . . . . . . . . . . . . 178idle agent state . . . . . . . . . . . . . . . . . . 166inbound
agent . . . . . . . . . . . . . . . . . . . . . 69calling list . . . . . . . . . . . . . . . . . . . 126jobs . . . . . . . . . . . . . . . . . . . . . . 117screen(s) . . . . . . . . . . . . . . . . . . . . 126settings . . . . . . . . . . . . . . . . . . . . 221settings dialog box . . . . . . . . . . . . . . . 241wait queue limit . . . . . . . . . . . . . . . . . 133
inbound processing settings . . . . . . . . . . . . 127inbound wait queue . . . . . . . . . . . . . . . . 153infinite job . . . . . . . . . . . . . . . . . . . . . 119
record selection . . . . . . . . . . . . . . . . 105
initial. . . . . . . . . . . . . . . . . . . . . . . . 89hit rate . . . . . . . . . . . . . . . . . . 124, 125phone . . . . . . . . . . . . . . . . . . . 86, 94
insert record seleciton row . . . . . . . . . . . . .113integer pattern matching . . . . . . . . . . . . . 324Intelligent Call Blending login . . . . . . . . . . . . 70Interactive Voice Response
See IVR . . . . . . . . . . . . . . . . . . . 133Interactive Voice Response job settings . . . . . . 127IVR settings . . . . . . . . . . . . . . . . . . . 133
Jjob. . . . . . . . . . . . . . . . . . . . . . . . 128
adjust while running . . . . . . . . . . . . 216, 217agent keys definition file name . . . . . . . . . 126Alllow agents to cancel call. . . . . . . . . . . 129alternative phone lowest priority . . . . . . . . 131basic settings . . . . . . . . . . . . . . . . . 122blend . . . . . . . . . . . . . . . . . . . . . .117call pacing settings . . . . . . . . . . . . . . 123Calling party number (ANI) . . . . . . . . . . . 123change inbound settings in Monitor . . . . . . . 221completion code detail view . . . . . . . . . . 196Connect Tolerance . . . . . . . . . . . . . . 132controls . . . . . . . . . . . . . . . . . . . . 218copy . . . . . . . . . . . . . . . . . . . . . 138create . . . . . . . . . . . . . . . . . . . . 134defined . . . . . . . . . . . . . . . . . . . . .116delete . . . . . . . . . . . . . . . . . . . . 139delete multiple jobs . . . . . . . . . . . . . . 139Desired Service Level . . . . . . . . . . . . . 132Do Not Call . . . . . . . . . . . . . . . . . . 126Earliest start time . . . . . . . . . . . . . . . 123edit . . . . . . . . . . . . . . . . . . . . . . 138Editor Job Wizard . . . . . . . . . . . . . . . 134end. . . . . . . . . . . . . . . . . . . . . . 131files. . . . . . . . . . . . . . . . . . . . . . 125hierarchy . . . . . . . . . . . . . . . . . . . 294inbound. . . . . . . . . . . . . . . . . . . . .117inbound calling list . . . . . . . . . . . . . . . 126Inbound processing settings . . . . . . . . . . 127inbound screen(s) . . . . . . . . . . . . . . . 126inbound wait queue limit . . . . . . . . . . . . 133Infinite . . . . . . . . . . . . . . . . . . . . .119initial hit rate . . . . . . . . . . . . . . . . . 124initial hit rate settings . . . . . . . . . . . . . 124IVR settings. . . . . . . . . . . . . . . . . . 133Job description . . . . . . . . . . . . . . . . 123Latest stop time . . . . . . . . . . . . . . . . 123Line type(s) for use on job . . . . . . . . . . . 123link a job . . . . . . . . . . . . . . . . . . . 219link to job . . . . . . . . . . . . . . . . . . . 126list . . . . . . . . . . . . . . . . . . . . . . 140main data processing label . . . . . . . . . . . 129
341 Using Avaya Proactive Contact 4.0 Supervisor
Index
managed. . . . . . . . . . . . . . . . . . . . 129Managed Dialing . . . . . . . . . . . . . 119, 129messages . . . . . . . . . . . . . . . . . . . 144minimum hit rate . . . . . . . . . . . . . . . . 125number of recall attempt . . . . . . . . . . . . 132on Intelligent Call Blending system. . . . . . . . 117Options dialog box . . . . . . . . . . . . . . . 141order calls by time zone . . . . . . . . . . . . . 131outbound. . . . . . . . . . . . . . . . . .117, 118outbound calling list . . . . . . . . . . . . . . . 126outbound processing settings . . . . . . . . . . 130outbound screen(s) . . . . . . . . . . . . . . . 126overview . . . . . . . . . . . . . . . . . . . . 117post processing settings. . . . . . . . . . . . . 131quota for completion code . . . . . . . . . . . . 131quota settings . . . . . . . . . . . . . . . . . 131recall notification time . . . . . . . . . . . . . . 132recall schedule interval . . . . . . . . . . . . . 132recall settings. . . . . . . . . . . . . . . . . . 131record selection file name . . . . . . . . . . . . 126rename Monitor view set . . . . . . . . . . . . 173Require unit ID for agent login . . . . . . . . . . 123resources view185, 186, 188, 190, 191, 192, 194, 197Sales Verification . . . . . . . . . . . . . . . . 119save . . . . . . . . . . . . . . . . . . . . . . 135save as . . . . . . . . . . . . . . . . . . . . 135save as Monitor view set . . . . . . . . . . . . 173save current Monitor views . . . . . . . . . . . 172save on different dialer . . . . . . . . . . . . . 135Screens dialog box . . . . . . . . . . . . . . . 142Script label for answer . . . . . . . . . . . . . 129script label for answer. . . . . . . . . . . . . . 129script label for call . . . . . . . . . . . . . . . 128scripts . . . . . . . . . . . . . . . . . . . . . 144service level settings . . . . . . . . . . . . . . 132settings . . . . . . . . . . . . . . . . . . . . 122standard Monitor views . . . . . . . . . . . . . 170start on multiple dialers . . . . . . . . . . . . . 136start on selected dialer . . . . . . . . . . . . . 136stop a job . . . . . . . . . . . . . . . . . . . 218stop gracefully . . . . . . . . . . . . . . . . . 218stop immediately . . . . . . . . . . . . . . . . 218stop in Monitor . . . . . . . . . . . . . . . . . 218stop when meets quota . . . . . . . . . . . . . 118total wait delay . . . . . . . . . . . . . . . . . 133Transaction completion code . . . . . . . . . . 123Transaction verification job . . . . . . . . . . . 127transfer on hold message number . . . . . . . . 133transfer to inbound job . . . . . . . . . . . . . 127transfer to inbound job name . . . . . . . . . . 127transfer wait queue . . . . . . . . . . . . . . . 129transfer wait queue label . . . . . . . . . . . . 129types. . . . . . . . . . . . . . . . . . . . 69, 117unit work list . . . . . . . . . . . . . . . 119, 223verify. . . . . . . . . . . . . . . . . . . . . . 139
view settings . . . . . . . . . . . . . . . . . 135Virtual Agent . . . . . . . . . . . . . . . 119, 127wait queue settings . . . . . . . . . . . . . . 132
Job Agents Status . . . . . . . . . . . . . . . . 186Job Agents view . . . . . . . . . . . . . . . . . 186Job Call Handling view . . . . . . . . . . . . . . 190Job Completion Codes view . . . . . . . . . . . . 191Job Detail view . . . . . . . . . . . . . . . . . . 188Job hierarchy, find agents in a job . . . . . . . . . 229Job History view . . . . . . . . . . . . . . . . . 194Job Link . . . . . . . . . . . . . . . . . . . . . 219job performance
See Completion Code Detail by Agent view . . . 196Job Quality view . . . . . . . . . . . . . . . . . 197Job Status view . . . . . . . . . . . . . . . 185, 218Job view . . . . . . . . . . . . . . . . . . . . . 177Job Wait Queue view . . . . . . . . . . . . . 192, 218
Llabel
main data processing . . . . . . . . . . . . . 129script label for answer . . . . . . . . . . . . . 129script label for call . . . . . . . . . . . . . . . 128transfer wait queue . . . . . . . . . . . . . . 129
label settings . . . . . . . . . . . . . . . . . . . 128Latest stop time . . . . . . . . . . . . . . . . . 123LDAP . . . . . . . . . . . . . . . . . . . . . . . 65Level 1 Scope Selector . . . . . . . . . . . . . . 207Level 2 Scope Selector . . . . . . . . . . . . . . 208Level 3 Scope Selector . . . . . . . . . . . . . . 208licensing . . . . . . . . . . . . . . . . . . . . . . 59Line type(s) for use on job. . . . . . . . . . . . . 123lines
dialog box. . . . . . . . . . . . . . . . . . . 245reassign . . . . . . . . . . . . . . . . . . . 221
link to job . . . . . . . . . . . . . . . . . . 126, 219dialog box. . . . . . . . . . . . . . . . . . . 240
listall record selections . . . . . . . . . . . . . . . 111jobs . . . . . . . . . . . . . . . . . . . . . 140
list separator . . . . . . . . . . . . . . . . . . . 327logging off, agent state . . . . . . . . . . . . . . 166Logic field . . . . . . . . . . . . . . . . . . . . 105login
agent . . . . . . . . . . . . . . . . . . . . . . 70agent blending . . . . . . . . . . . . . . . . . 70Intelligent Call Blending . . . . . . . . . . . . . 70Supervisor . . . . . . . . . . . . . . . . . . . 71
logs, alert . . . . . . . . . . . . . . . . . . . . 256looping. . . . . . . . . . . . . . . . . . . . . . 154
Mmain data processing label . . . . . . . . . . . . 129
January 2008 342
Index
Make alternative phone lowest priority. . . . . . . . 131manage
agents . . . . . . . . . . . . . . . . . . . . . 229custom views. . . . . . . . . . . . . . . . . . 175
managed agent . . . . . . . . . . . . . . . . . . 69Managed dialing . . . . . . . . . . . . . . . 119, 129
Alllow agents to cancel call . . . . . . . . . . . 129Allow dialing from deleted record . . . . . . . . 130dialog box . . . . . . . . . . . . . . . . . . . 241display empty record at preview . . . . . . . . . 130Method for record search type at preview. . . . . 130preview . . . . . . . . . . . . . . . . . . . . 129Time limit (sec.) for preview . . . . . . . . . . . 130
managed jobs . . . . . . . . . . . . . . . . . . . 129change settings in Monitor. . . . . . . . . . . . 222
Meridian. . . . . . . . . . . . . . . . . . . . . . 312messages . . . . . . . . . . . . . . . . . . . . . 146
assignments . . . . . . . . . . . . . . . . . . 153create . . . . . . . . . . . . . . . . . . . . . 149create a script . . . . . . . . . . . . . . . . . 156defined. . . . . . . . . . . . . . . . . . 144, 145in automated scripts . . . . . . . . . . . . . . 153in inbound wait queue scripts . . . . . . . . . . 153in outbound wait queue scripts. . . . . . . . . . 153in transfer wait queue scripts . . . . . . . . . . 153in virtual wait queue scripts . . . . . . . . . . . 153maximum . . . . . . . . . . . . . . . . . . . 145on Avaya Proactive Contact PG230 . . . . . . . 146remove. . . . . . . . . . . . . . . . . . . . . 151remove folder. . . . . . . . . . . . . . . . . . 152rename folder . . . . . . . . . . . . . . . . . 151send to an agent . . . . . . . . . . . . . . . . 232start . . . . . . . . . . . . . . . . . . . . . . 148tasks. . . . . . . . . . . . . . . . . . . . . . 148verify. . . . . . . . . . . . . . . . . . . . . . 150wizard . . . . . . . . . . . . . . . . . . 145, 146
Messages and ScriptsEditor . . . . . . . . . . . . . . . . . . . . . 144start . . . . . . . . . . . . . . . . . . . . . . 148
Messages wizard . . . . . . . . . . . . . . . . . 149Method for record search type at preview . . . . . . 130minimum hit rate . . . . . . . . . . . . . . . . . . 125
change in Monitor. . . . . . . . . . . . . . . . 219dialog box . . . . . . . . . . . . . . . . . . . 240
Monitor . . . . . . . . . . . . . . . . . 164, 165, 231adjust job while running . . . . . . . . . . 216, 217agent completion codes . . . . . . . . . . . . . 203agent control dialog box . . . . . . . . . . 247, 248agent detail view . . . . . . . . . . . . . . . . 201Agent dialog box . . . . . . . . . . . . . . . . 248agent history view . . . . . . . . . . . . . . . 204agent line . . . . . . . . . . . . . . . . . . . 232agent states . . . . . . . . . . . . . . . . . . 166Agent States tab, Options dialog box. . . . . . . 236Alternate Initial Phone dialog box . . . . . . . . 244
Appearence tab, Options dialog box . . . . . . 236change default settings . . . . . . . . . . . . 162change Expert Calling Ratio . . . . . . . . . . 220change managed jobs settings . . . . . . . . . 222change minimum hit rate . . . . . . . . . . . . 219Completion Code Detail by Agent view . . . . . 196Completion Codes tab, Options dialog box . . . 236create Custom button group . . . . . . . . . . 175customize a view . . . . . . . . . . . . . . . 172Customize Status Bar dialog box . . . . . . . . 237customize views. . . . . . . . . . . . . . . . 168delete view set . . . . . . . . . . . . . . . . 175Detection Mode dialog box . . . . . . . . . . . 244Dialer History view. . . . . . . . . . . . . . . 184Dialer Lines view . . . . . . . . . . . . . . . 183Dialer Status view . . . . . . . . . . . . . . . 180dialer views . . . . . . . . . . . . . . . . . . 165dialog boxes . . . . . . . . . . . . . . . . . 234display a view for an agent . . . . . . . . . . . 171display an agent view . . . . . . . . . . . . . 233Expert Calling Ratio . . . . . . . . . . . . . . 240Feedback tab, Options dialog box . . . . . . . 236Filter Data dialog box . . . . . . . . . . . . . 237filter view data. . . . . . . . . . . . . . . . . 210Find Agent dialog box . . . . . . . . . . . . . 247find agents . . . . . . . . . . . . . . . . . . 228find an agent view . . . . . . . . . . . . . . . 200Find dialog box . . . . . . . . . . . . . . . . 237find text string . . . . . . . . . . . . . . . . . 225hide or show columns . . . . . . . . . . . . . 213inbound settings. . . . . . . . . . . . . . . . 221Inbound Settings dialog box . . . . . . . . . . 241Job agents view . . . . . . . . . . . . . . . . 186Job call handling view . . . . . . . . . . . . . 190Job completion code view . . . . . . . . . . . 191job control dialog box239, 240, 241, 242, 243, 244, 245Job detail view . . . . . . . . . . . . . . . . 188Job history view . . . . . . . . . . . . . . . . 194job performance . . . . . . . . . . . . . . . . 196Job quality view . . . . . . . . . . . . . . . . 197Job status view . . . . . . . . . . . . . . . . 185Job wait queue view . . . . . . . . . . . . . . 192large or small icons . . . . . . . . . . . . . . 170Lines dialog box . . . . . . . . . . . . . . . . 245link to a job . . . . . . . . . . . . . . . . . . 219Link to Job dialog box . . . . . . . . . . . . . 240manage agents . . . . . . . . . . . . . . . . 229manage custom views . . . . . . . . . . . . . 175Managed Dialing dialog box . . . . . . . . . . 241Minimum Hit Rate dialog box . . . . . . . . . . 240Monitor Agent dialog box. . . . . . . . . . . . 248Multi-Dialer tab, Options dialog box . . . . . . . 236navigate . . . . . . . . . . . . . . . . . . . 170open a view . . . . . . . . . . . . . . . . 171, 173Options dialog box. . . . . . . . . . . . . . . 235

343 Using Avaya Proactive Contact 4.0 Supervisor
Index
overview . . . . . . . . . . . . . . . . . 162, 163Performance Completion Code dialog box . . . . 248Quota dialog box . . . . . . . . . . . . . . . . 243reassign lines. . . . . . . . . . . . . . . . . . 221Recalls dialog box . . . . . . . . . . . . . . . 245refresh a view . . . . . . . . . . . . . . . . . 175remove agent from a job . . . . . . . . . . . . 232save a view as a HTML file . . . . . . . . . . . 213save changes to views . . . . . . . . . . . . . 167save current view . . . . . . . . . . . . . . . . 172save view as HTML . . . . . . . . . . . . . . . 173Scope tab, Options dialog box . . . . . . . . . . 235select a performance code . . . . . . . . . . . 210select the hierarchy . . . . . . . . . . . . . . . 212Send Message dialog box . . . . . . . . . . . . 248set a default view . . . . . . . . . . . . . . . . 213set alerts . . . . . . . . . . . . . . . . . . . . 167set alternate initial phone . . . . . . . . . . . . 224set Detection Mode . . . . . . . . . . . . . . . 224set or change a quota . . . . . . . . . . . . . . 223set recalls . . . . . . . . . . . . . . . . . . . 225set the default hierarchy. . . . . . . . . . . . . 208set the scope . . . . . . . . . . . . . . . . . . 211set up a uniti work list . . . . . . . . . . . . . . 223sort calls by time zone . . . . . . . . . . . . . 222standard views . . . . . . . . . . . . . . . . . 170start alert monitoring automatically . . . . . . . . 167Stop Job . . . . . . . . . . . . . . . . . . . . 218Stop Job dialog box. . . . . . . . . . . . . . . 239Stop job immediately . . . . . . . . . . . . . . 218Supervisor Agents view . . . . . . . . . . . . . 199Table View or Graphical View . . . . . . . . . . 213time range . . . . . . . . . . . . . . . . . . . 212Time Zones dialog box . . . . . . . . . . . . . 242toobar, Filter Data . . . . . . . . . . . . . . . 207toobar, Find . . . . . . . . . . . . . . . . . . 207toobar, Graphical view . . . . . . . . . . . . . 207toobar, Hide/Show Columns . . . . . . . . . . . 207toobar, Hierarchy Manager . . . . . . . . . . . 208toobar, Level 1 Scope Selector . . . . . . . . . 207toobar, Level 2 Scope Selector . . . . . . . . . 208toobar, Level 3 Scope Selector . . . . . . . . . 208toobar, Performance Code . . . . . . . . . . . 207toobar, Refresh view . . . . . . . . . . . . . . 208toobar, Table View . . . . . . . . . . . . . . . 207toobar, Time Scope . . . . . . . . . . . . . . . 208Transfer Agent dialog box . . . . . . . . . . . . 248Unit Work Lists dialog box . . . . . . . . . . . . 242use of wildcard characters. . . . . . . . . . . . 229use Tools applications . . . . . . . . . . . . . 169user interface. . . . . . . . . . . . . . . . . . 163view control dialog box . . . . . . . . 235, 236, 237view defined . . . . . . . . . . . . . . . . . . 206view set . . . . . . . . . . . . . . . . . 166, 173view time range. . . . . . . . . . . . . . . . . 212
view toolbar . . . . . . . . . . . . . . . . . . 207view, defined . . . . . . . . . . . . . . . . . 163views . . . . . . . . . . . . . . . . .163, 177, 178
monitor an agent line . . . . . . . . . . . . . . . 232move
Agent Blending domain . . . . . . . . . . . . 321record seleciton row . . . . . . . . . . . . . . .114
multi-dialercommands . . . . . . . . . . . . . . . . . . . 73Completion Code Manager. . . . . . . . . . . 285control . . . . . . . . . . . . . . . . . . . . 165
Nname of next job . . . . . . . . . . . . . . . . . 126navigate in Monitor . . . . . . . . . . . . . . . . 169Northern Telecom Meridian . . . . . . . . . . . . 312not available agent state . . . . . . . . . . . . . 166number of recall attempts . . . . . . . . . . . . . 132numerical comparison . . . . . . . . . . . . . . 327
OOB_ONLY domain group . . . . . . . . . . . . . 309off job agent state . . . . . . . . . . . . . . . . 166offline agent state. . . . . . . . . . . . . . . . . 166open hierarchy . . . . . . . . . . . . . . . . . . 296Options
Agent States . . . . . . . . . . . . . . . . . 236dialog box. . . . . . . . . . . . . . . . . 141, 235
outboundAgent Blending . . . . . . . . . . . . . . . . 314calling list . . . . . . . . . . . . . . . . . . . 126Outbound Only . . . . . . . . . . . . . . . . 315processing settings . . . . . . . . . . . . . . 130screen(s) . . . . . . . . . . . . . . . . . . . 126wait queue . . . . . . . . . . . . . . . . . . 153
outbound job . . . . . . . . . . . . . . . . . 117, 118Infinite . . . . . . . . . . . . . . . . . . . . .119Managed Dialing . . . . . . . . . . . . . . . .119Sales Verification . . . . . . . . . . . . . . . .119script label for call . . . . . . . . . . . . . . . 128special types . . . . . . . . . . . . . . . . . .118Unit Work List . . . . . . . . . . . . . . . . . .119Virtual Agent . . . . . . . . . . . . . . . 119, 127
Ppattern matching
date comparison . . . . . . . . . . . . . . . 328explicitly designate syntax . . . . . . . . . . . 325extended regular expression . . . . . . . . 324, 332field type syntax . . . . . . . . . . . . . . . . 325floating point . . . . . . . . . . . . . . . . . 328
January 2008 344
Index
list separator . . . . . . . . . . . . . . . . . . 327numerical comparison. . . . . . . . . . . . . . 327phone strategy . . . . . . . . . . . . . . . . . 324record selection . . . . . . . . . . . . . . . . 324shell-style . . . . . . . . . . . . . . . . 324, 330string . . . . . . . . . . . . . . . . . . . . . 324string comparisons . . . . . . . . . . . . . . . 329syntaxes . . . . . . . . . . . . . . . . . 324, 327time comparisons . . . . . . . . . . . . . . . . 329
pause . . . . . . . . . . . . . . . . . . . . . . . 154PC Analysis
FTP Client dialog box . . . . . . . . . . . . . . 280Telnet tool . . . . . . . . . . . . . . . . . . . 276telnet, defined . . . . . . . . . . . . . . . . . 277telnet, start . . . . . . . . . . . . . . . . . . . 279telnet, transfer PC Analysis extract output file. . . 280transfer extract file . . . . . . . . . . . . . . . 280
performance code . . . . . . . . . . . . 178, 207, 210View toolbar . . . . . . . . . . . . . . . . . . 178
Performance Completion Code dialog box . . . . . . 248person-to-person agent . . . . . . . . . . . . . . 70phone strategy
alternate initial phone . . . . . . . . . . . . . . 87append a row. . . . . . . . . . . . . . . . . . 93call detection mode . . . . . . . . . . . . . . . 87clear all rows . . . . . . . . . . . . . . . . . . 95copy . . . . . . . . . . . . . . . . . . . . . . 91create . . . . . . . . . . . . . . . . . . . . . 89delete . . . . . . . . . . . . . . . . . . . . . 92delete an alternate initial phone . . . . . . . . . 94delete an initial phone. . . . . . . . . . . . . . 94edit . . . . . . . . . . . . . . . . . . . . . . 91Editor . . . . . . . . . . . . . . . . . . . . . 85initial phone . . . . . . . . . . . . . . . . . . 86insert an alternate initial phone . . . . . . . . . 94insert an initial phone . . . . . . . . . . . . . . 94list all on the dialer . . . . . . . . . . . . . . . 93overview . . . . . . . . . . . . . . . . . . . . 84pattern matchning . . . . . . . . . . . . . . . 324retries . . . . . . . . . . . . . . . . . . . . . 88select all rows . . . . . . . . . . . . . . . . . 94view settings . . . . . . . . . . . . . . . . . . 91
phone, tab. . . . . . . . . . . . . . . . . . . . . 89PINNACLE
Agent Blending . . . . . . . . . . . . . . . . . 312play message . . . . . . . . . . . . . . . . . . . 154pod, definition . . . . . . . . . . . . . . . . . . . 20post processing job settings . . . . . . . . . . . . 131Predictive Agent Blend . . . . . . . . . . . . . . . 308
Service Level . . . . . . . . . . . . . . . . . . 308Preview a report . . . . . . . . . . . . . . . . . . 271Print a report . . . . . . . . . . . . . . . . . . . 271print Analyst report . . . . . . . . . . . . . . . . . 271Proactive Agent Blend . . . . . . . . . . . . . . . 308Proactive Contact with Avaya Communication Manager146
Qquota . . . . . . . . . . . . . . . . . . . . . . 131
defined . . . . . . . . . . . . . . . . . . . . .118dialog box. . . . . . . . . . . . . . . . . . . 243job settings . . . . . . . . . . . . . . . . . . 131set or change in Monitor . . . . . . . . . . . . 223stop an outbound job . . . . . . . . . . . . . .118
Rreassign . . . . . . . . . . . . . . . . . . . . . 221reassign lines . . . . . . . . . . . . . . . . . . 221recall
job settings . . . . . . . . . . . . . . . . . . 131recall notification time . . . . . . . . . . . . . . . 132
in minutes. . . . . . . . . . . . . . . . . . . 132Recall reschedule interval (min.) . . . . . . . . . . 132recalls . . . . . . . . . . . . . . . . . . . . . . 106
completion code category . . . . . . . . . . . 285dialog box. . . . . . . . . . . . . . . . . . . 245set in Monitor . . . . . . . . . . . . . . . . . 225tab . . . . . . . . . . . . . . . . . . . . . . 106
record selection . . . . . . . . . . . . . . . .97, 126append row . . . . . . . . . . . . . . . . . . .112clear rows. . . . . . . . . . . . . . . . . . . .115copy . . . . . . . . . . . . . . . . . . . . . .111create . . . . . . . . . . . . . . . . . . . . 107delete . . . . . . . . . . . . . . . . . . . . 109delete row . . . . . . . . . . . . . . . . . . .113Detail tab . . . . . . . . . . . . . . . . . . . 105edit . . . . . . . . . . . . . . . . . . . . . . 108field, Group . . . . . . . . . . . . . . . . . . 105insert row . . . . . . . . . . . . . . . . . . . .113list . . . . . . . . . . . . . . . . . . . . . . .111list all on dialer . . . . . . . . . . . . . . . . .111Logic field. . . . . . . . . . . . . . . . . . . 105move row . . . . . . . . . . . . . . . . . . . .114open . . . . . . . . . . . . . . . . . . . . . 104pattern matching . . . . . . . . . . . . . . . 324Recalls tab . . . . . . . . . . . . . . . . . . 106Records tab. . . . . . . . . . . . . . . . . . 105Resuts tab . . . . . . . . . . . . . . . . . . 106run . . . . . . . . . . . . . . . . . . . . . . 109select rows . . . . . . . . . . . . . . . . . . .114specify completion codes . . . . . . . . . . . . 97specify goals . . . . . . . . . . . . . . . . . . 98specify time zones. . . . . . . . . . . . . . . . 97Time Zones tab . . . . . . . . . . . . . . . . 106Value field . . . . . . . . . . . . . . . . . . 105verify . . . . . . . . . . . . . . . . . . . . . 109view reports . . . . . . . . . . . . . . . . . . .112view selections . . . . . . . . . . . . . . . . .112
Record Selections report, HTML file . . . . . . . . 109
345 Using Avaya Proactive Contact 4.0 Supervisor
Index
recordsoverview . . . . . . . . . . . . . . . . . . . . 65
Records tab in Selections . . . . . . . . . . . . . 105refresh . . . . . . . . . . . . . . . . . . . . . . 75
view . . . . . . . . . . . . . . . . . . . 175, 208View toolbar . . . . . . . . . . . . . . . . . . 179
removeagent . . . . . . . . . . . . . . . . . . . . . 233alerts . . . . . . . . . . . . . . . . . . . . . 256alserts . . . . . . . . . . . . . . . . . . . . . 256completion code from a category . . . . . . . . 290
renamehierarchy . . . . . . . . . . . . . . . . . . . . 300hierarcy level . . . . . . . . . . . . . . . . . . 298
reports . . . . . . . . . . . . . . . . . . . . . . 267Require unit ID for agent login . . . . . . . . . . . 123reset blend engine . . . . . . . . . . . . . . . . . 322resize columns . . . . . . . . . . . . . . . . . . 163Results tab . . . . . . . . . . . . . . . . . . . . 106resynch blend engine . . . . . . . . . . . . . . . 322retries . . . . . . . . . . . . . . . . . . . . . . . 88
tab. . . . . . . . . . . . . . . . . . . . . . . 90Right Party Contacts, completion code category . . . 285Rockwell Spectrum . . . . . . . . . . . . . . . . 310
Agent Blending . . . . . . . . . . . . . . . . . 310ROLM, see Siemens ROLM . . . . . . . . . . . . 312
SSales Verification . . . . . . . . . . . . . . . . . 119save . . . . . . . . . . . . . . . . . . . . . . . 74
changes to views . . . . . . . . . . . . . . . . 167completion code HTML file . . . . . . . . . . . 291job settings . . . . . . . . . . . . . . . . . . . 135Monitor view as HTML . . . . . . . . . . . . . 173view as a HTML file in Monitor . . . . . . . . . . 213
Schedule a report . . . . . . . . . . . . . . . . . 273schedule Analyst report . . . . . . . . . . . 268, 273schedules,download and load . . . . . . . . . . . 21Scope
Appearance tab . . . . . . . . . . . . . . . . 236Completion Codes tab . . . . . . . . . . . . . 236Multi-Dialer Control tab . . . . . . . . . . . . . 236Options dialog box tab . . . . . . . . . . . . . 235Selector . . . . . . . . . . . . . . . . . . . . 207
scope selectordefined. . . . . . . . . . . . . . . . . . . . . 208examples . . . . . . . . . . . . . . . . . . . 208set . . . . . . . . . . . . . . . . . . . . . . . 211
Screens dialog box. . . . . . . . . . . . . . . . . 142script
actions . . . . . . . . . . . . . . . . . . . . . 154automated messages . . . . . . . . . . . . . . 153change. . . . . . . . . . . . . . . . . . . . . 160create . . . . . . . . . . . . . . . . . . . . . 156
create message script . . . . . . . . . . . . . 157defined . . . . . . . . . . . . . . . . . . 144, 153Delete dialog box . . . . . . . . . . . . . . . 161examples . . . . . . . . . . . . . . . . . . . 154hear in wait queue. . . . . . . . . . . . . . . 144inbound wait queues. . . . . . . . . . . . . . 153label for answer . . . . . . . . . . . . . . . . 129label for call . . . . . . . . . . . . . . . . . . 128loop message . . . . . . . . . . . . . . . . . 154maximum . . . . . . . . . . . . . . . . . . . 146outbound wait queues . . . . . . . . . . . . . 153pane . . . . . . . . . . . . . . . . . . . . . 156pause message . . . . . . . . . . . . . . . . 154plane message . . . . . . . . . . . . . . . . 154remove . . . . . . . . . . . . . . . . . . . . 160Rename Folder dialog box . . . . . . . . . . . 161start . . . . . . . . . . . . . . . . . . . . . 148start Scripts . . . . . . . . . . . . . . . . . . 156telephny.spt . . . . . . . . . . . . . . . . . . 146transfer wait queues . . . . . . . . . . . . . . 153types . . . . . . . . . . . . . . . . . . . . . 153virtual wait queues. . . . . . . . . . . . . . . 153voice response message. . . . . . . . . . . . 154wizard . . . . . . . . . . . . . . . . . . 156, 157
security . . . . . . . . . . . . . . . . . . . . . . 53select
all rows in a phone strategies . . . . . . . . . . 94hierachy . . . . . . . . . . . . . . . . . . . 212hierarchy in Monitor . . . . . . . . . . . . . . 212performance code in Monitor . . . . . . . . . . 210record seleciton row . . . . . . . . . . . . . . .114
Selection Reports. . . . . . . . . . . . . . . . . 102Editor . . . . . . . . . . . . . . . . . . . . . .112overview of tabs . . . . . . . . . . . . . . . . 103view . . . . . . . . . . . . . . . . . . . . . .112
Selectionsappend row . . . . . . . . . . . . . . . . . . .112button . . . . . . . . . . . . . . . . . . . . 104clear rows. . . . . . . . . . . . . . . . . . . .115delete row . . . . . . . . . . . . . . . . . . .113Detail tab . . . . . . . . . . . . . . . . . . . 105Editor . . . . . . . . . . . . . . . . . . . . . . 96Group field . . . . . . . . . . . . . . . . . . 105infinite job. . . . . . . . . . . . . . . . . . . 105insert row . . . . . . . . . . . . . . . . . . . .113Logic field. . . . . . . . . . . . . . . . . . . 105move row . . . . . . . . . . . . . . . . . . . .114overview . . . . . . . . . . . . . . . . . . . . 97Recalls tab . . . . . . . . . . . . . . . . . . 106Records tab. . . . . . . . . . . . . . . . . . 105Results tab . . . . . . . . . . . . . . . . . . 106select rows . . . . . . . . . . . . . . . . . . .114tabs . . . . . . . . . . . . . . . . . . . . . 100Time Zones tab . . . . . . . . . . . . . . . . 106Value field . . . . . . . . . . . . . . . . . . 105
January 2008 346
Index
verification job . . . . . . . . . . . . . . . . . 105view record selections . . . . . . . . . . . . . 112
Send Message dialog box . . . . . . . . . . . . . 248Service Criterion . . . . . . . . . . . . . . . . . . 308Service Level
Abatement, Agent Blending . . . . . . . . . . . 316Agent Blending control method . . . . . . . . . 316Desired, Agent Blending . . . . . . . . . . . . 316job settngs . . . . . . . . . . . . . . . . . . . 132Predictive Agent Blend . . . . . . . . . . . . . 308Service Criterion . . . . . . . . . . . . . . . . 308
setdefault hierarchy . . . . . . . . . . . . . . . . 164scope in Monitor . . . . . . . . . . . . . . . . 211time range . . . . . . . . . . . . . . . . . . . 165
settings, job . . . . . . . . . . . . . . . . . . . . 122shell-style . . . . . . . . . . . . . . . . . . 324, 330Siemens ROLM . . . . . . . . . . . . . . . . . . 312
Agent Blending . . . . . . . . . . . . . . . . . 312SL
see Service Level. . . . . . . . . . . . . . . . 308sort . . . . . . . . . . . . . . . . . . . . . 107, 163
calls by time zones . . . . . . . . . . . . . . . 222tab. . . . . . . . . . . . . . . . . . . . . . . 107
special characters . . . . . . . . . . . . . . . . . 101specify goals, record selection . . . . . . . . . . . 98start
Agent Blending . . . . . . . . . . . . . . . . . 318alert monitoring . . . . . . . . . . . . . . . . . 167blend engine . . . . . . . . . . . . . . . . . . 322Completion Code Manager . . . . . . . . . . . 288Hierarchy Manager . . . . . . . . . . . . . . . 295job on multiple dialers . . . . . . . . . . . . . . 136job on selected dialer . . . . . . . . . . . . . . 136PC Analysis Telnet . . . . . . . . . . . . . . . 279System Telnet . . . . . . . . . . . . . . . . . 305
stopblend engine . . . . . . . . . . . . . . . . . . 321job gracefully . . . . . . . . . . . . . . . . . . 218job immediately in Monitor. . . . . . . . . . . . 218job in Monitor . . . . . . . . . . . . . . . . . . 218Stop Job dialog box. . . . . . . . . . . . . . . 239
Strategiesalternate initial phone . . . . . . . . . . . . . . 87create . . . . . . . . . . . . . . . . . . . . . 89initial phone . . . . . . . . . . . . . . . . . . 86overview . . . . . . . . . . . . . . . . . . . . 84retries . . . . . . . . . . . . . . . . . . . . . 88specify completion codes . . . . . . . . . . . . 97specify goals . . . . . . . . . . . . . . . . . . 98specify time zones . . . . . . . . . . . . . . . 97
string . . . . . . . . . . . . . . . . . . . . . . . 324comparisons . . . . . . . . . . . . . . . . . . 329
Supervisorrename Monitor view set . . . . . . . . . . . . 173
save as Monitor view set . . . . . . . . . . . . 173save current Monitor views. . . . . . . . . . . 172standard Monitor views . . . . . . . . . . . . 170
Supervisor Agents view . . . . . . . . . . . . . . 199Supervisor hierarchy
find agents reporting to a supervisor . . . . . . 229supervisor resources view. . . . . . . . . . . . . 199Supervisor view, defined . . . . . . . . . . . . . 178supported features . . . . . . . . . . . . . . . . . 41supported syntaxes . . . . . . . . . . . . . . . . 327syntax
explict pattern matching . . . . . . . . . . . . 325field type patten matching . . . . . . . . . . . 325list separator . . . . . . . . . . . . . . . . . 327supported . . . . . . . . . . . . . . . . . . . 327
System Telnet . . . . . . . . . . . . . . . . 302, 305defined . . . . . . . . . . . . . . . . . . . . 303features. . . . . . . . . . . . . . . . . . . . 303start . . . . . . . . . . . . . . . . . . . . . 305
System Telnet tool . . . . . . . . . . . . . . . . 303
TTable View . . . . . . . . . . . . . . . . . . . . 207
toolbar . . . . . . . . . . . . . . . . . . . . 178Table view
View toolbar. . . . . . . . . . . . . . . . . . 178Table View in Monitor . . . . . . . . . . . . . . . 213talk, agent state . . . . . . . . . . . . . . . . . 166telephny.spt . . . . . . . . . . . . . . . . . . . 146telephone lines . . . . . . . . . . . . . . . . . . 221telnet
PC Analysis . . . . . . . . . . . . . . . . . . 279System . . . . . . . . . . . . . . . . . . . . 305
timecomparisons, pattern matching . . . . . . . . . 329pattern matching . . . . . . . . . . . . . . . 324
Time limit (sec.) for preview . . . . . . . . . . . . 130time range . . . . . . . . . . . . . . . . . . . . 165
set in Monitor . . . . . . . . . . . . . . . . . 212view . . . . . . . . . . . . . . . . . . . . . 212
Time Scope . . . . . . . . . . . . . . . . . . . 208Time selector, View toolbar . . . . . . . . . . . . 179Time to connect tolerance. . . . . . . . . . . . . 132time zones . . . . . . . . . . . . . . . . . . 131, 222
dialog box. . . . . . . . . . . . . . . . . . . 242record selection . . . . . . . . . . . . . . . . . 97select to sort calls . . . . . . . . . . . . . . . 222tab . . . . . . . . . . . . . . . . . . . . . . 106
toolbarbutton in a view . . . . . . . . . . . . . . . . 207within a view . . . . . . . . . . . . . . . . . 178
ToolsAgent Blending . . . . . . . . . . . . . . . . 307Completion Code Manager. . . . . . . . . . . 282
347 Using Avaya Proactive Contact 4.0 Supervisor
Index
Hierarchy Manager . . . . . . . . . . . . . . . 292menu . . . . . . . . . . . . . . . . . . . . . 264PC Analysis Telnet . . . . . . . . . . . . . . . 276System Telnet . . . . . . . . . . . . . . . . . 302
Total wait delay . . . . . . . . . . . . . . . . . . 133Transaction
completion code . . . . . . . . . . . . . . . . 123verification job . . . . . . . . . . . . . . . . . 127view in Agent Blending . . . . . . . . . . . . . 323
Transfer Agent, dialog box . . . . . . . . . . . . . 248transfer an agent. . . . . . . . . . . . . . . . . . 231Transfer on hold message number . . . . . . . . . 133Transfer to inbound job name. . . . . . . . . . . . 127transfer wait queue. . . . . . . . . . . . . . . . . 153
label for job. . . . . . . . . . . . . . . . . . . 129Transfer wait queue label. . . . . . . . . . . . . . 129
UUnderstanding Analyst . . . . . . . . . . . . . . . 267Unit Work List . . . . . . . . . . . . . . . . . . . 119
dialog box . . . . . . . . . . . . . . . . . . . 242set up . . . . . . . . . . . . . . . . . . . . . 223
updatedialer with ACD queue assignments . . . . . . . 322record for the agent state . . . . . . . . . . . . 166
upload . . . . . . . . . . . . . . . . . . . . . . 21using agent keys. . . . . . . . . . . . . . . . . . 40Using Analyst . . . . . . . . . . . . . . . . . . . 269using calling lists. . . . . . . . . . . . . . . . . . 23using schedule . . . . . . . . . . . . . . . . . . 44
Vverification job, record selection. . . . . . . . . . . 105verify
job . . . . . . . . . . . . . . . . . . . . . . . 139mulitple jobs . . . . . . . . . . . . . . . . . . 139record selection . . . . . . . . . . . . . . . . 109
view. . . . . . . . . . . . . . . . . . . . . . . . 163ACD statistics . . . . . . . . . . . . . . . . . 323alert log . . . . . . . . . . . . . . . . . . . . 256Analyst report . . . . . . . . . . . . . . . . . 271categories . . . . . . . . . . . . . . . . . . . 177custom. . . . . . . . . . . . . . . . . . 172, 176defined. . . . . . . . . . . . . . . . . . . . . 206definition of. . . . . . . . . . . . . . . . 163, 177in Monitor . . . . . . . . . . . . . . . . . . . 163job settings . . . . . . . . . . . . . . . . . . . 135open in Monitor . . . . . . . . . . . . . . . . . 171overview . . . . . . . . . . . . . . . . . . . . 177save as a HTML file. . . . . . . . . . . . . . . 213save in Monitor . . . . . . . . . . . . . . . . . 172set . . . . . . . . . . . . . . . . . . . . . . . 166standard views . . . . . . . . . . . . . . . . . 170
toolbar . . . . . . . . . . . . . . . . . . 178, 207toolbar icons . . . . . . . . . . . . . . . . . 178using . . . . . . . . . . . . . . . . . . . . . 210
View Setdefined . . . . . . . . . . . . . . . . . . . . 177rename Monitor view set . . . . . . . . . . . . 173save as Monitor view set . . . . . . . . . . . . 173save current Monitor views. . . . . . . . . . . 172standard Monitor views . . . . . . . . . . . . 170
View toolbar . . . . . . . . . . . . . . . . . 178, 179Virtual Agent . . . . . . . . . . . . . . . . . 119, 127virtual wait queue. . . . . . . . . . . . . . . . . 153voice response . . . . . . . . . . . . . . . . . . 154
Wwait delay in seconds . . . . . . . . . . . . . . . 133wait queue
scripts . . . . . . . . . . . . . . . . . . . . 144settings . . . . . . . . . . . . . . . . . . . . 133
wait queues settings . . . . . . . . . . . . . . . 132when to use Cruise Control . . . . . . . . . . . . 120when to use Expert Calling Ratio . . . . . . . . . 120wildcard characters . . . . . . . . . . . . . . . . 101
use to find one or more agent . . . . . . . . . 229wizard . . . . . . . . . . . . . . . . . . . . . . 146
add messages to dialer . . . . . . . . . . . . 146messages tasks . . . . . . . . . . . . . . . . 146script . . . . . . . . . . . . . . . . . . . 156, 157


