1 Timeline Enterprise for Microsoft Dynamics CRM Install and Config Revision B Issued November 2013 AvePoint Timeline Enterprise 1.0.2 for Microsoft Dynamics® CRM Installation and Configuration Guide
Transcript
1
Timeline Enterprise for Microsoft Dynamics CRM Install and Config
Revision B Issued November 2013
AvePoint Timeline Enterprise 1.0.2 for Microsoft Dynamics® CRM
Installation and Configuration Guide
2
Timeline Enterprise for Microsoft Dynamics CRM Install and Config Guide
Table of Contents
About AvePoint Timeline Enterprise ............................................................................................................. 3
Overview of Installation and Configuration .................................................................................................. 5
Importing the Timeline Enterprise Solution ................................................................................................. 6
Registering a License ................................................................................................................................... 11
Creating a Profile......................................................................................................................................... 14
Helpful Notes for Profiles ........................................................................................................................ 14
Configuring the Security Role ..................................................................................................................... 17
Installing Timeline on a Windows 7 Operating System .............................................................................. 19
Configuring “Star” and “Open in Timeline” Settings .................................................................................. 21
The Star Functionality ............................................................................................................................. 21
The Open in Timeline Functionality ........................................................................................................ 22
The Starred Records Bulk Delete Job .......................................................................................................... 23
Using AvePoint Timeline Enterprise............................................................................................................ 25
Notices and Copyright Information ............................................................................................................ 26
3
Timeline Enterprise for Microsoft Dynamics CRM Install and Config
About AvePoint Timeline Enterprise AvePoint Timeline Enterprise for Microsoft Dynamic CRM empowers business users to be more productive when preparing for customer interaction on the go. Timeline displays all activities in a consolidated interface, providing quick and easy ways to add annotation and display a combined view of relevant information pertaining to any Account, Lead, Contact, Campaign, Case, and Opportunity.
AvePoint Timeline Enterprise supports Microsoft Dynamics CRM 2013 (Online and On-Premises) and Microsoft Dynamics CRM 2011 (Online and On-Premises).
4
Timeline Enterprise for Microsoft Dynamics CRM Install and Config Guide
Required Permissions To install and use Timeline Enterprise Solution properly, ensure that the permission requirements are met:
• The user who imports Timeline Enterprise Solution to Microsoft Dynamics CRM has the System Administrator security role for Microsoft Dynamics CRM.
• The user who uses Timeline for Microsoft Dynamics CRM has the AvePoint Timeline Enterprise User Account security role for Microsoft Dynamics CRM.
• The user who manages AvePoint Timeline Profiles has the permissions below:
o Read permission to Entity, Field, Relationship, System Form, View, and Web Resource.
o Read and Write permissions to AvePoint Timeline Configuration.
o Create, Read, Write, Delete, Assign, and Share permissions to AvePoint Timeline Profile.
o Create, Read, Write, Delete, and Append permissions to AvePoint Timeline Starred Record.
5
Timeline Enterprise for Microsoft Dynamics CRM Install and Config
Overview of Installation and Configuration To properly install and configure AvePoint Timeline Enterprise for Microsoft Dynamics CRM, the following steps must be performed in this order. Click the link to jump to the corresponding section.
1. Importing the Timeline Enterprise Solution
2. Registering a License
3. Creating a Profile
4. Editing Profile
5. Configuring the Security Role
6. Install Timeline on your desired devices (iPhone, iPad, Android ™ phone, Windows 7 Operating System, or Windows 8 Operating System).
• For installation onto a Windows 7 system, see Installing Timeline on a Windows 7 Operating System.
• You can install Timeline on the iPhone, iPad, Android phone, and Windows 8 Operating Systems through your system or device app store.
After you complete the steps above, Timeline will use the AvePoint Timeline Profile you configured in Dynamics and load the entities and activities. If the steps above are not configured, Timeline will use its default settings.
The following steps are optional:
1. [Optional] If desired, configure the Star and Open in Timeline settings. Refer to the Configuring “Star” and “Open in Timeline” Settings section for details.
2. [Optional] You can modify the recurrence of Starred Records Bulk Delete jobs. Refer to The Starred Records Bulk Delete Job section for details.
6
Timeline Enterprise for Microsoft Dynamics CRM Install and Config Guide
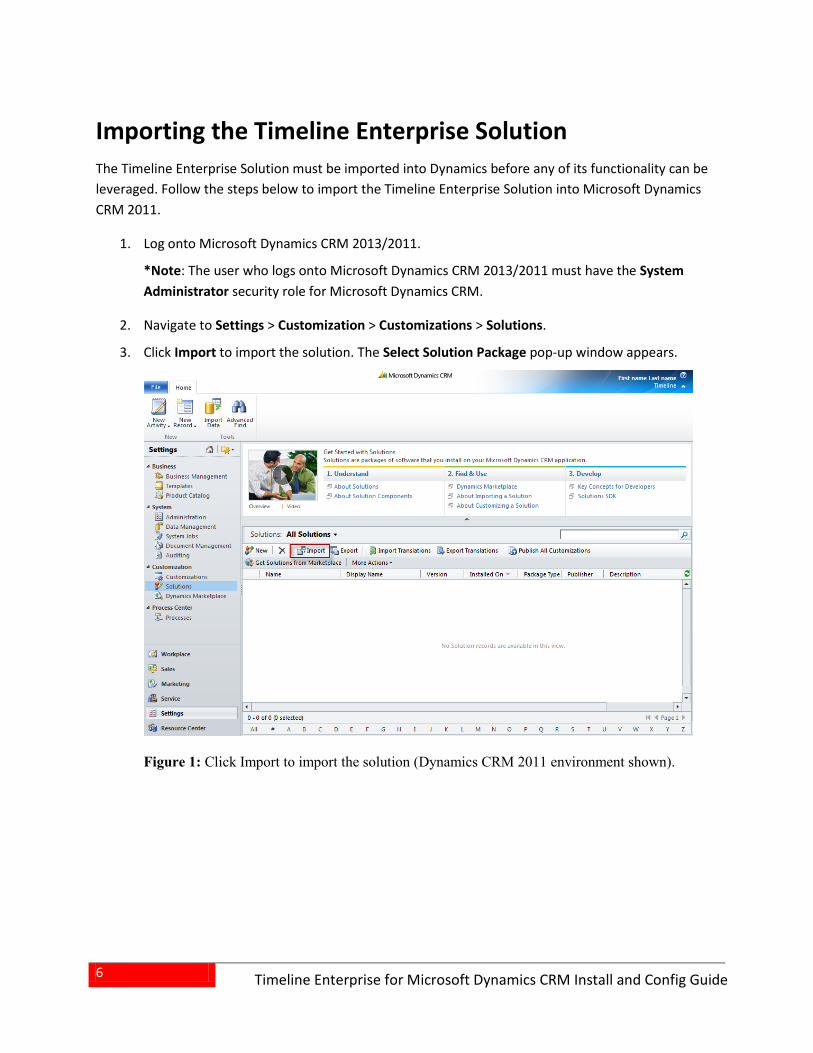
Importing the Timeline Enterprise Solution The Timeline Enterprise Solution must be imported into Dynamics before any of its functionality can be leveraged. Follow the steps below to import the Timeline Enterprise Solution into Microsoft Dynamics CRM 2011.
1. Log onto Microsoft Dynamics CRM 2013/2011.
*Note: The user who logs onto Microsoft Dynamics CRM 2013/2011 must have the System Administrator security role for Microsoft Dynamics CRM.
2. Navigate to Settings > Customization > Customizations > Solutions.
3. Click Import to import the solution. The Select Solution Package pop-up window appears.
Figure 1: Click Import to import the solution (Dynamics CRM 2011 environment shown).
7
Timeline Enterprise for Microsoft Dynamics CRM Install and Config
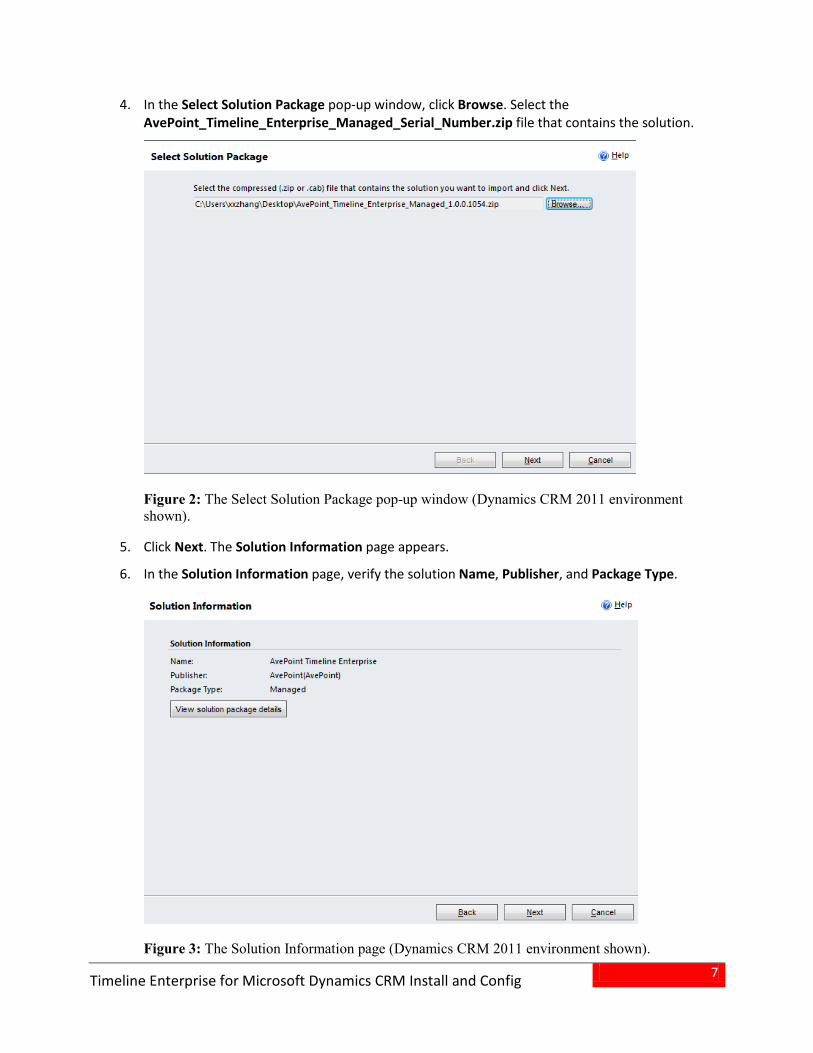
4. In the Select Solution Package pop-up window, click Browse. Select the AvePoint_Timeline_Enterprise_Managed_Serial_Number.zip file that contains the solution.
5. Click Next. The Solution Information page appears.
6. In the Solution Information page, verify the solution Name, Publisher, and Package Type.
Figure 3: The Solution Information page (Dynamics CRM 2011 environment shown).
8
Timeline Enterprise for Microsoft Dynamics CRM Install and Config Guide
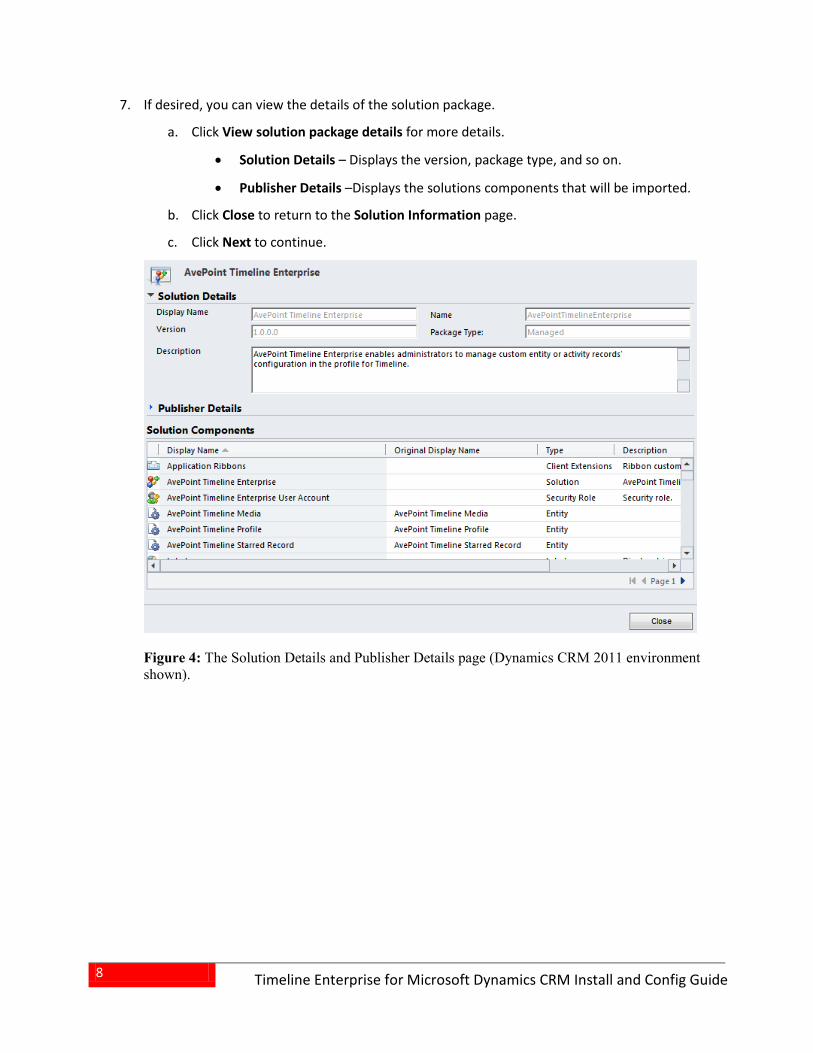
7. If desired, you can view the details of the solution package.
a. Click View solution package details for more details.
• Solution Details – Displays the version, package type, and so on.
• Publisher Details –Displays the solutions components that will be imported.
b. Click Close to return to the Solution Information page.
c. Click Next to continue.
Figure 4: The Solution Details and Publisher Details page (Dynamics CRM 2011 environment shown).
9
Timeline Enterprise for Microsoft Dynamics CRM Install and Config
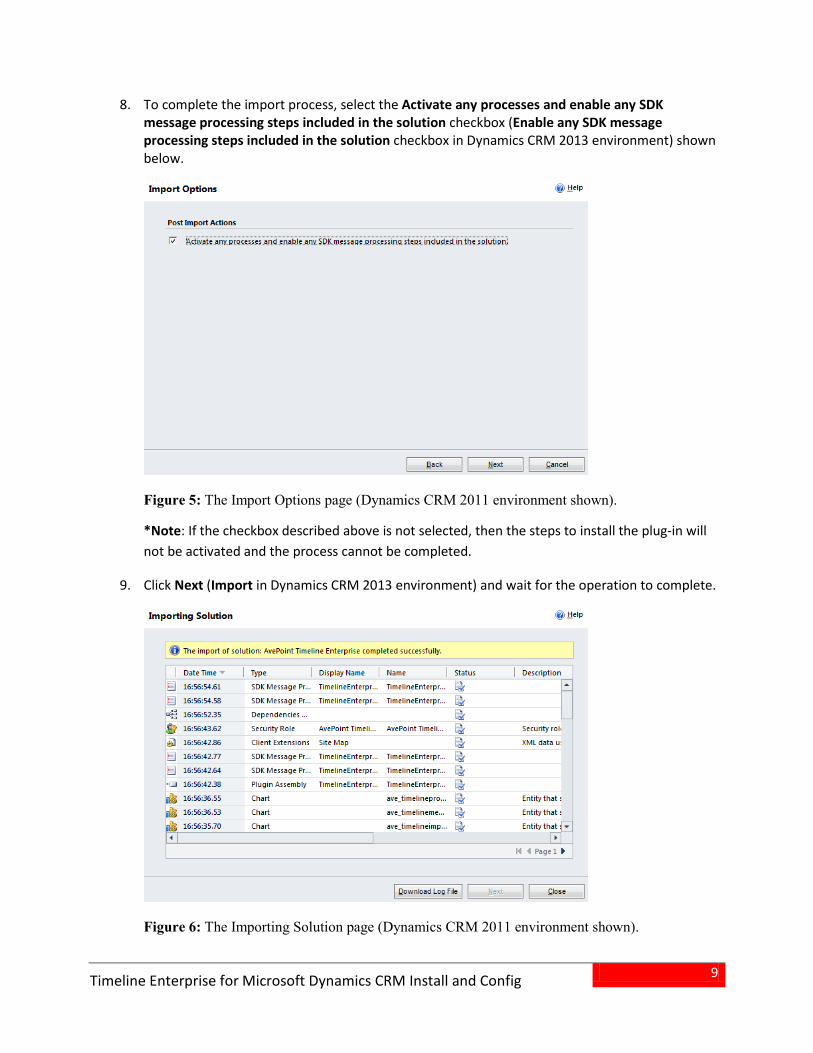
8. To complete the import process, select the Activate any processes and enable any SDK message processing steps included in the solution checkbox (Enable any SDK message processing steps included in the solution checkbox in Dynamics CRM 2013 environment) shown below.
*Note: If the checkbox described above is not selected, then the steps to install the plug-in will not be activated and the process cannot be completed.
9. Click Next (Import in Dynamics CRM 2013 environment) and wait for the operation to complete.
Timeline Enterprise for Microsoft Dynamics CRM Install and Config Guide
10. After the solution imports successfully, click Close to close the Importing Solution page.
11. Verify that the AvePointTimelineEnterprise solution is displayed in the All Solutions list.
Figure 7: The AvePointTimelineEnterprise solution (Dynamics CRM 2011 environment shown).
11
Timeline Enterprise for Microsoft Dynamics CRM Install and Config
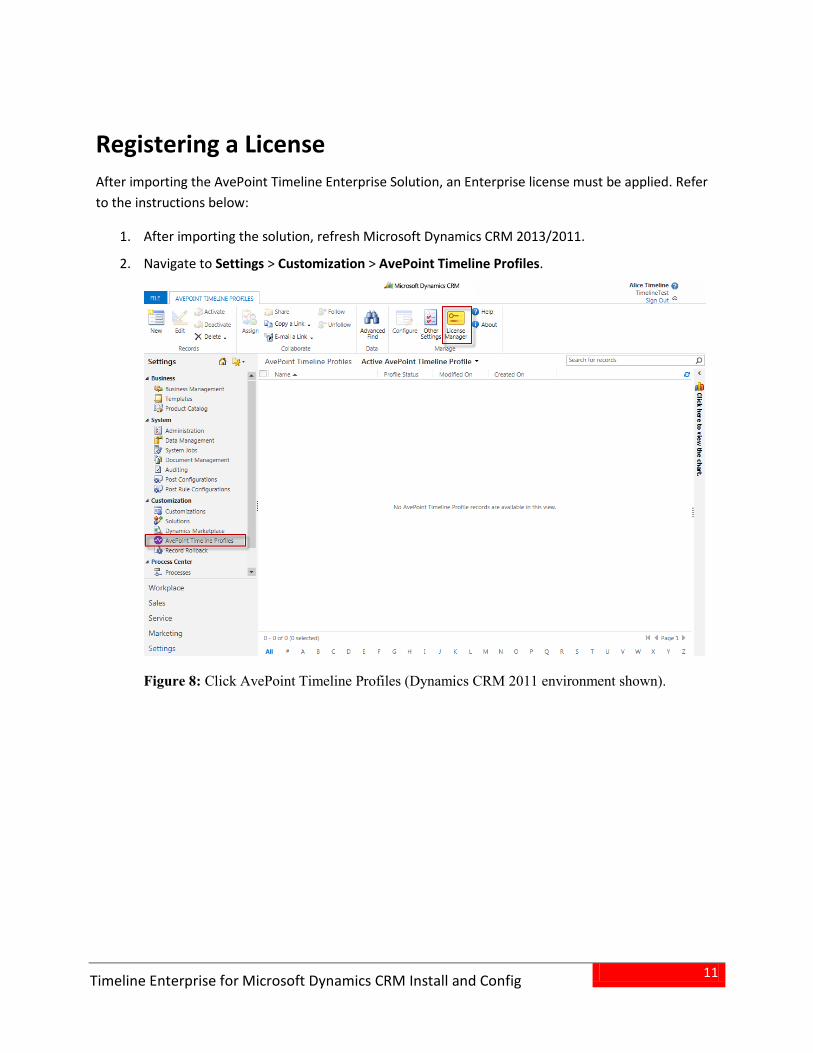
Registering a License After importing the AvePoint Timeline Enterprise Solution, an Enterprise license must be applied. Refer to the instructions below:
1. After importing the solution, refresh Microsoft Dynamics CRM 2013/2011.
2. Navigate to Settings > Customization > AvePoint Timeline Profiles.
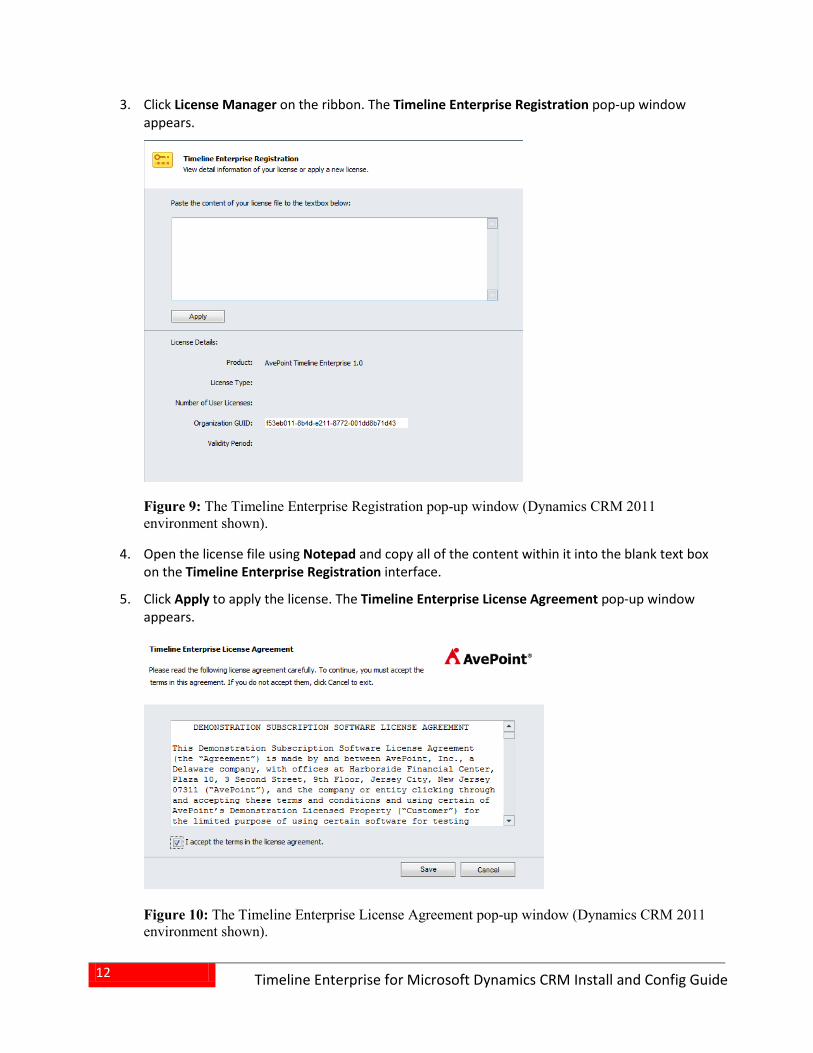
4. Open the license file using Notepad and copy all of the content within it into the blank text box on the Timeline Enterprise Registration interface.
5. Click Apply to apply the license. The Timeline Enterprise License Agreement pop-up window appears.
Timeline Enterprise for Microsoft Dynamics CRM Install and Config
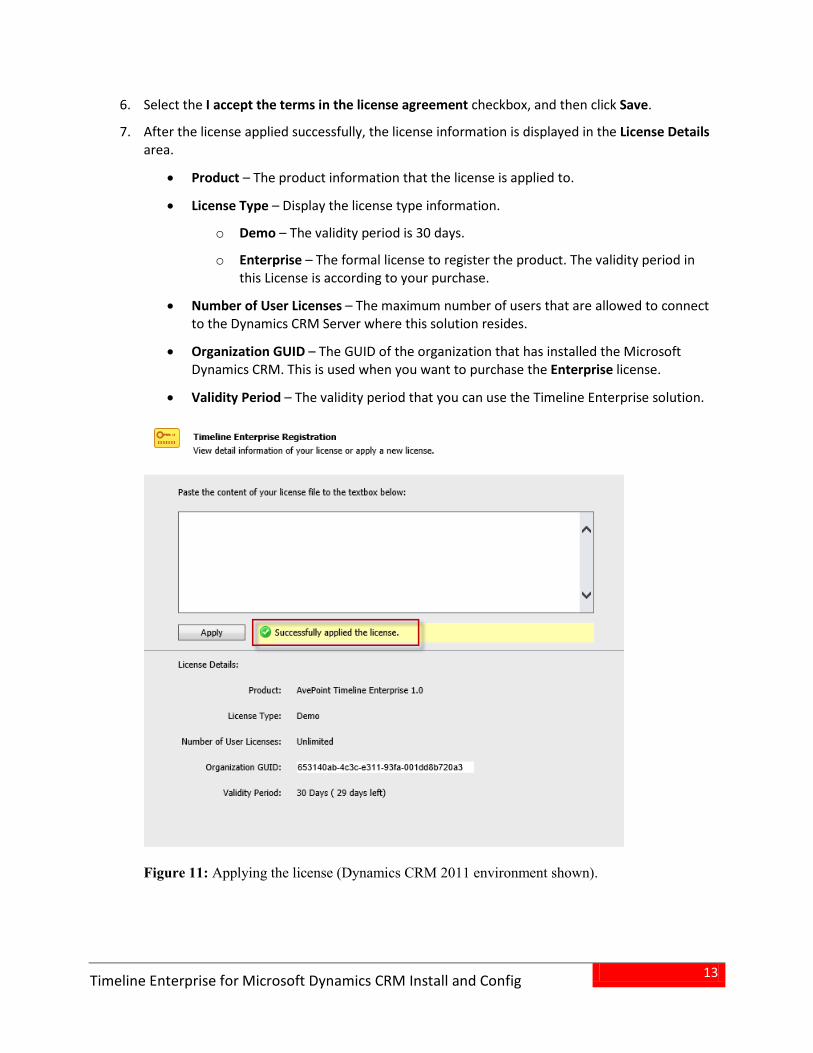
6. Select the I accept the terms in the license agreement checkbox, and then click Save.
7. After the license applied successfully, the license information is displayed in the License Details area.
• Product – The product information that the license is applied to.
• License Type – Display the license type information.
o Demo – The validity period is 30 days.
o Enterprise – The formal license to register the product. The validity period in this License is according to your purchase.
• Number of User Licenses – The maximum number of users that are allowed to connect to the Dynamics CRM Server where this solution resides.
• Organization GUID – The GUID of the organization that has installed the Microsoft Dynamics CRM. This is used when you want to purchase the Enterprise license.
• Validity Period – The validity period that you can use the Timeline Enterprise solution.
Figure 11: Applying the license (Dynamics CRM 2011 environment shown).
14
Timeline Enterprise for Microsoft Dynamics CRM Install and Config Guide
Creating a Profile To create a new AvePoint Timeline Profile, refer to the instructions below:
1. In the AvePoint Timeline Profiles tab, click New on the ribbon.
2. In the pop-up window, configure the following settings:
a. Name – Enter a name for the profile you are about to create.
b. Owner – Specify an owner for this profile. The default owner is the login user of Dynamics. Click the icon to select another user or team to own the profile.
c. Profile Status – Specify a status for this profile.
o Publish to Owner – The profile can only be used by the owner.
o Publish to Everyone – The profile can be used by other users of Dynamics.
d. Description – Enter an optional description for this profile.
3. Click Save to save the newly-created profile.
Helpful Notes for Profiles The following situations explain when and which AvePoint Timeline Profile will be used by Timeline.
• Only the Publish to Owner profiles exist in Dynamics
o If the user that logs into Timeline is the owner of one of the profiles, the profile whose owner is this user will be used by Timeline.
o If the user that logs into Timeline is the owner of more than one profile, the profile whose owner is this user and modified time is the latest will be used by Timeline.
o If the user that logs into Timeline is not the owner of the Publish to Owner profiles, the default settings will be used to load the specified entities and activities in Timeline.
• If only Publish to Everyone profiles exist in Dynamics, the profile with the latest modified time will be used by Timeline.
• Both the Publish to Owner and Publish to Everyone profiles exist in Dynamics
o If the user that logs into Timeline is the owner of more than one Publish to Owner profile, the Publish to Owner profile whose owner is this user and modified time is the latest will be used by Timeline.
o If the user that logs into Timeline is the owner of one of the Publish to Owner profiles, the profile whose owner is this user will be used by Timeline.
15
Timeline Enterprise for Microsoft Dynamics CRM Install and Config
o If the user that logs into Timeline is not the owner of the Publish to Owner profile, the Publish to Everyone profile that has the latest modified time will be used by Timeline.
• If neither Publish to Owner nor Publish to Everyone profile exists in Dynamics, the default settings will be used to load the specified entities and activities in Timeline.
Editing Profiles You can edit your created profiles by clicking Configure on the Manage group. The Edit Profile pop-up window appears. In the Edit Profile window, configure the settings below:
• Entity Page – Specify the roles and the entities of each role that you want to use in Timeline.
o Role Category – Specify the roles that you want to use in Timeline and specify the corresponding entities of each role. The default roles are: Sales, Marketing, and Service. You can view and manage the information of the roles in Timeline.
Manage roles – Click to add a new role. Click next to each role to edit the corresponding role. Click next to each role to remove the corresponding role, and the removed role will be restored to the Entity Explorer.
Manage entities – Add an entity by dragging one from the Entity Explorer and place the entity to the desired place in the Entities of … area. To remove entities from a role, select the entity, and then click Remove upper right-hand corner of the Edit Profile interface.
Click Sketch Map to view the corresponding locations of the specified roles in Timeline. You can change the platform of Timeline by clicking Windows 8, iPad, iPhone, or Android. *Note: At least one entity is required for the specified roles, or you will not be able to advance to the next page, even after clicking Next.
o Entity View – The entities selected in the Role Category step will be listed in the Entity field. Specify the views for each entity. Add a view by dragging one from the View Explorer and place the view to the desired place in the … View area. Click each view in the View Explorer. The Entity Tile Preview of the view appears under the view.
Click Sketch Map to view the corresponding locations of the specified entities in Timeline. You can change the platform of Timeline by clicking Windows 8, iPad, iPhone, or Android.
• Timeline Page – Specify the filter types, activity priority, activity details, milestone, and contact details that you want to use in Timeline.
o Filter Types – Specify the activity filter information. View different activities by selecting different filters in Timeline. There are two kinds of filter types: General
16
Timeline Enterprise for Microsoft Dynamics CRM Install and Config Guide
Type and Others. Add a filter by dragging one from the Activity & Note Explorer and place the filter to the desired place. Click Remove to remove the selected filter. And the removed filter will be restored to the explorer.
Click Sketch Map to view the corresponding locations of the specified filters in Timeline. You can change the platform of Timeline by clicking Windows 8, iPad, iPhone, or Android.
o Activity Priority – Specify the priority of the activity or note. The activities or notes are displayed according to different priorities in Timeline. There are five priorities: Open, Completed, Canceled, Scheduled, and Default. The default priority is the Default priority. Add a field to the priority by dragging one from the Field Explorer. Click Remove to remove the selected field.
Click Sketch Map to view the corresponding locations of the specified priorities in Timeline. You can change the platform of Timeline by clicking Windows 8, iPad, iPhone, or Android. *Note: Only one field can be added to each priority.
o Activity Details – Specify the detailed information of each activity. The activity will be configured by the specified fields in Timeline. Overview is the default view of activities displayed in Timeline. Only two fields can be added to Overview. Detailed Header and Detailed Body are displayed in the detailed information of an activity in Timeline. Add a field by dragging one from the Field Explorer and place the field to the desired place. Click Remove to remove the selected field.
Click Sketch Map to view the corresponding locations of the specified activity details in Timeline. You can change the platform of Timeline by clicking Windows 8, iPad, iPhone, or Android.
o Milestone – Specify the milestone information of the entities. The milestone will be displayed in the time line when you enter an entity in Timeline.
Click Sketch Map to view the corresponding locations of the specified milestones in Timeline. You can change the platform of Timeline by clicking Windows 8, iPad, iPhone, or Android.
o Contact Details – Specify the detailed information of each activity of Contacts. The activity’s information will be displayed in the Contacts interface of Timeline. Add a field by dragging one from the Field Explorer and place the field to the desired place. Click Remove to remove the selected field. And the removed field will be restored to the explorer.
Click Sketch Map to view the corresponding locations of the specified Contact details in Timeline. You can change the platform of Timeline by clicking Windows 8, iPad, iPhone, or Android.
After editing the profile, click Save to save changes to this profile.
17
Timeline Enterprise for Microsoft Dynamics CRM Install and Config
Configuring the Security Role After the AvePoint Timeline Enterprise solution is imported into Dynamics, the AvePoint Timeline Enterprise User Account role will be automatically created in Dynamics. Only users who have this security role or a security role that has higher permissions than the AvePoint Timeline Enterprise User Account can use AvePoint Timeline Profile in Timeline. Users who do not have sufficient permissions will use the default profile in Timeline. Refer to the instructions below to assign security roles to users.
*Note: Users who have the System Administrator security role can assign security roles to other users.
1. Navigate to Settings > System > Administration > Users/Teams.
2. Click a user/team in the User tab, or select a user/team and click Edit on the ribbon.
3. In the detailed information page of the selected user/team, click Security Roles under the Common title.
4. Click Mange Roles. The Manage Team Roles or Manage User Roles pop-up window appears.
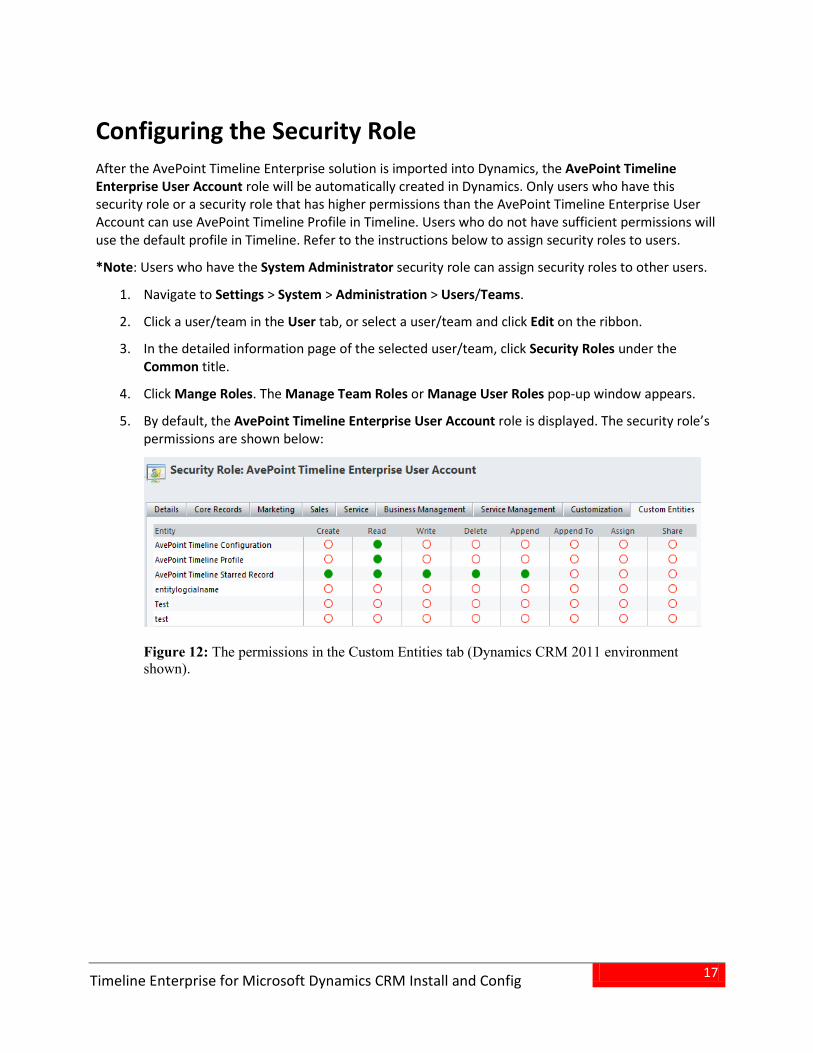
5. By default, the AvePoint Timeline Enterprise User Account role is displayed. The security role’s permissions are shown below:
Figure 12: The permissions in the Custom Entities tab (Dynamics CRM 2011 environment shown).
18
Timeline Enterprise for Microsoft Dynamics CRM Install and Config Guide
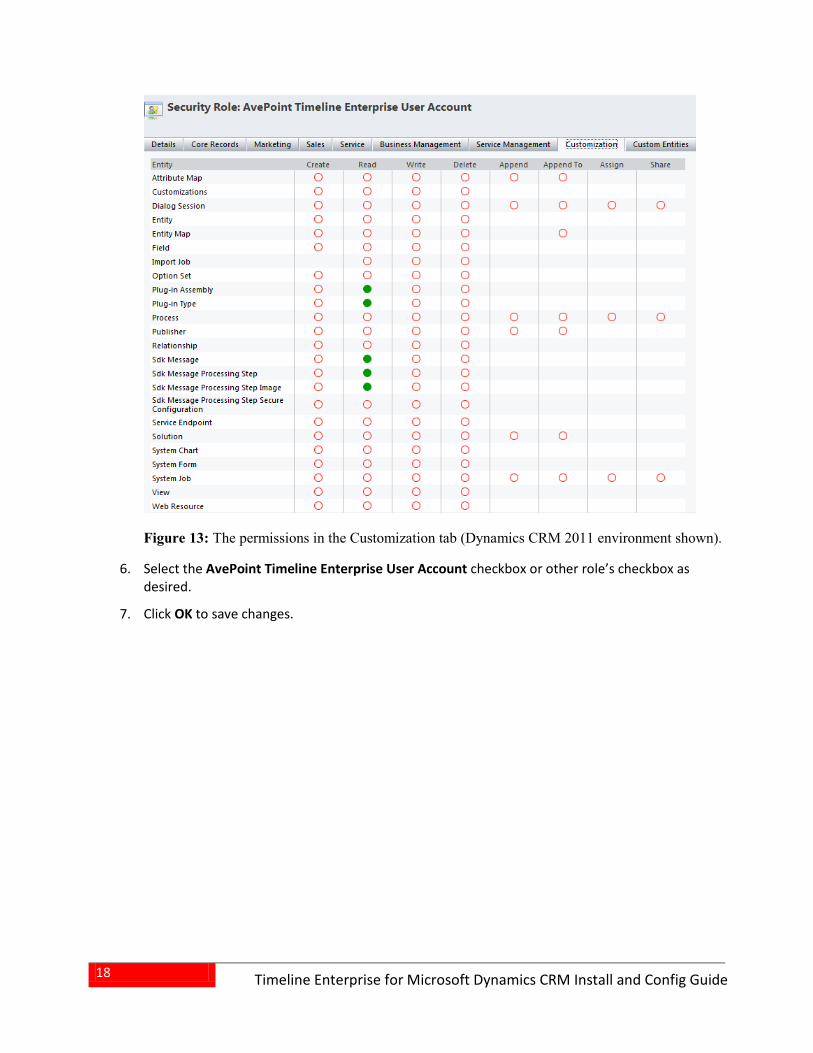
Figure 13: The permissions in the Customization tab (Dynamics CRM 2011 environment shown).
6. Select the AvePoint Timeline Enterprise User Account checkbox or other role’s checkbox as desired.
7. Click OK to save changes.
19
Timeline Enterprise for Microsoft Dynamics CRM Install and Config
Installing Timeline on a Windows 7 Operating System To install Timeline on a Windows 7 Operating System, follow the instructions below:
*Note: The server where you install Timeline must have.Net Framework 4.0 or above installed.
1. Download the AvePoint_Timeline_for_CRM_Serial_Number.msi file by contacting an AvePoint representative for links to the package.
2. Copy the .msi file to the server that has the Windows 7 operating system installed.
3. Double-click the AvePoint_Timeline_for_CRM_Serial_Number.msi file on the server.
*Note: You can manage Group Policy for your Windows 7 Operating System installation using the .msi file.
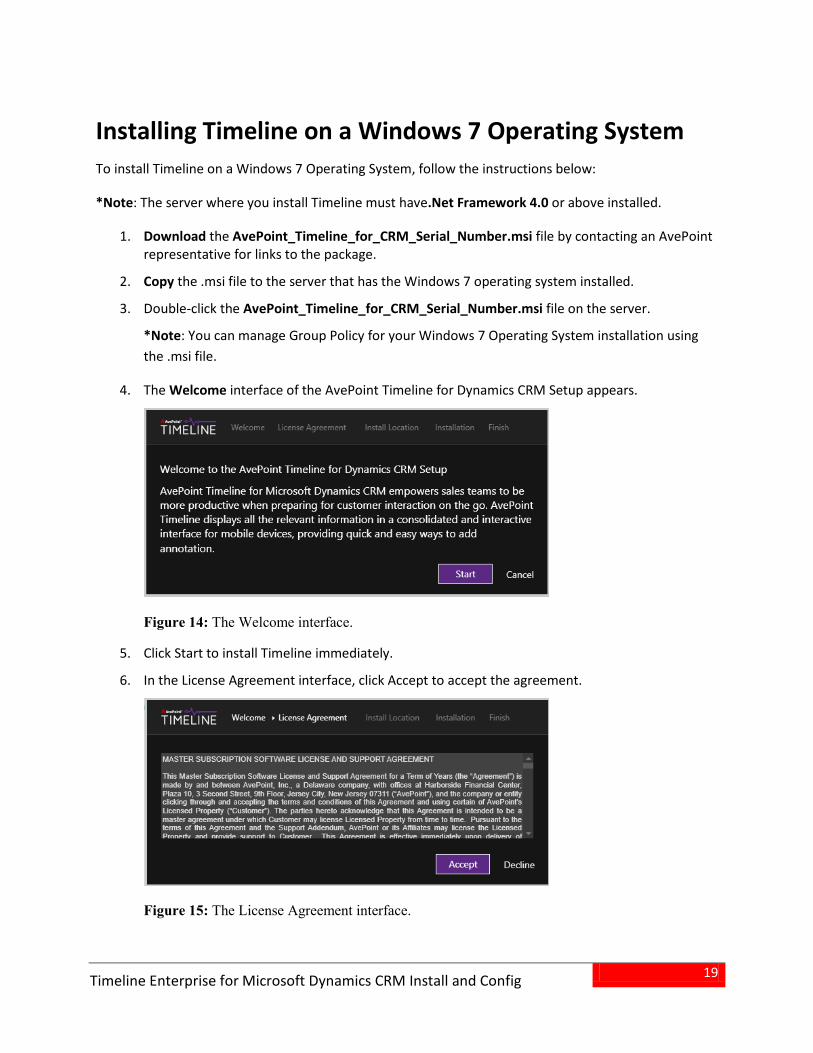
4. The Welcome interface of the AvePoint Timeline for Dynamics CRM Setup appears.
Figure 14: The Welcome interface.
5. Click Start to install Timeline immediately.
6. In the License Agreement interface, click Accept to accept the agreement.
Figure 15: The License Agreement interface.
20
Timeline Enterprise for Microsoft Dynamics CRM Install and Config Guide
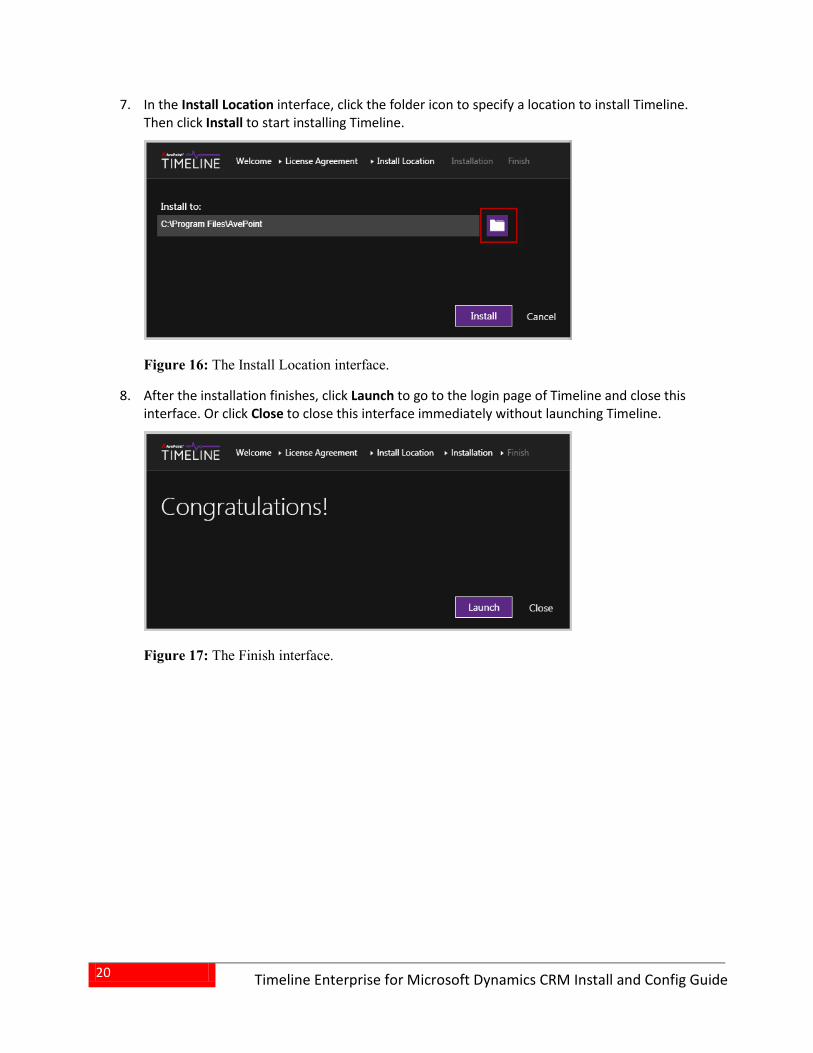
7. In the Install Location interface, click the folder icon to specify a location to install Timeline. Then click Install to start installing Timeline.
Figure 16: The Install Location interface.
8. After the installation finishes, click Launch to go to the login page of Timeline and close this interface. Or click Close to close this interface immediately without launching Timeline.
Figure 17: The Finish interface.
21
Timeline Enterprise for Microsoft Dynamics CRM Install and Config
Configuring “Star” and “Open in Timeline” Settings The Star and Open in Timeline settings are configured automatically after the AvePoint Timeline Enterprise solution is imported into Microsoft for Dynamics CRM. If desired, you can manually configure these settings. Refer to the instructions below:
1. In the AvePoint Timeline Profiles tab, click Other Settings on the ribbon.
2. In the Other Settings pop-up window, configure the settings below:
• Open in Timeline – Specify the entities that you want to open in Timeline from Dynamics CRM. Add an entity by dragging one from the Entity Explorer and place the entity to the desired place in the Entity area. The Activities option is also regarded as an entity in this interface. Click Remove to remove the selected entity and restore the entity to the explorer.
• Star – Specify the entities that you want to enable the Star functionality. Add an entity by dragging one from the Entity Explorer and place the entity to the desired place in the Entity area. The Activities option is also regarded as an entity in this interface. Click Remove to remove the selected entity and restore the removed entity to the explorer.
3. After configuring the settings, click Save to save changes.
The Star Functionality Use the Star function to tag entity records and records as important records both in Dynamics and Timeline. All starred records are synchronized between Dynamics and Timeline. Filter the starred records by using the Starred filter in Timeline. To configure the Star setting, refer to the instructions below:
• Access the entity that has enabled the Star functionality, select one or more records and click Star in the Timeline group on the ribbon, and then select the Star option from the drop-down list. The selected records will be marked with star in Timeline. Select the UnStar option from the drop-down list, the selected records will be cancelled the mark.
• Access a record of the entity that has enabled the Star functionality, and click Star in the Timeline group on the ribbon. This record will be marked with star in Timeline.
• Access the activity whose related entity has enabled the Star functionality, and click Star in the Timeline group on the ribbon. The record of this activity will be marked with star in Timeline.
22
Timeline Enterprise for Microsoft Dynamics CRM Install and Config Guide
The Open in Timeline Functionality Use the Open in Timeline function to launch the selected Timeline interface when you open an entity record or activity record. To configure the Open in Timeline setting, refer to the instructions below:
• Access the entity that has enabled the Open in Timeline functionality, select one record and click Open in Timeline in the Timeline group on the ribbon. The interface of the selected record in Timeline will pop up.
• Access a record of the entity that has enabled the Open in Timeline functionality, and click Open in Timeline in the Timeline group on the ribbon. The interface of this record in Timeline will pop up.
• Access the activity whose related entity has enabled the Open in Timeline functionality, and click Open in Timeline in the Timeline group on the ribbon. The interface of this activity in Timeline will pop up.
23
Timeline Enterprise for Microsoft Dynamics CRM Install and Config
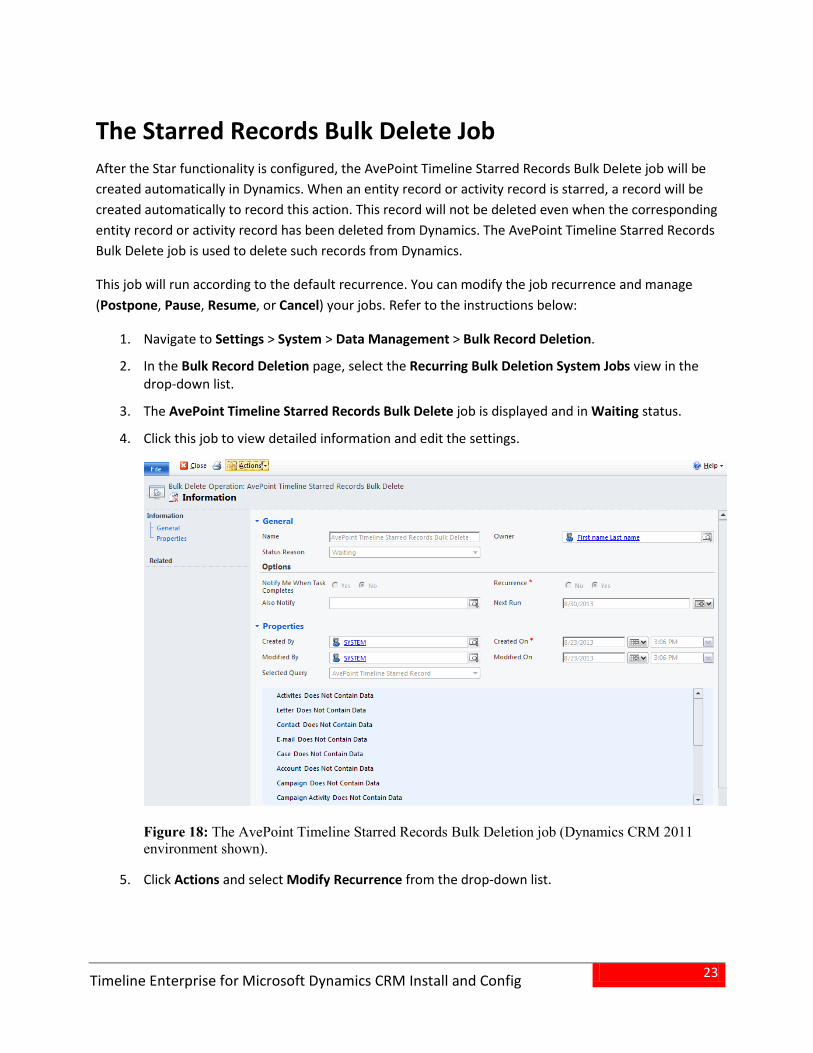
The Starred Records Bulk Delete Job After the Star functionality is configured, the AvePoint Timeline Starred Records Bulk Delete job will be created automatically in Dynamics. When an entity record or activity record is starred, a record will be created automatically to record this action. This record will not be deleted even when the corresponding entity record or activity record has been deleted from Dynamics. The AvePoint Timeline Starred Records Bulk Delete job is used to delete such records from Dynamics.
This job will run according to the default recurrence. You can modify the job recurrence and manage (Postpone, Pause, Resume, or Cancel) your jobs. Refer to the instructions below:
1. Navigate to Settings > System > Data Management > Bulk Record Deletion.
2. In the Bulk Record Deletion page, select the Recurring Bulk Deletion System Jobs view in the drop-down list.
3. The AvePoint Timeline Starred Records Bulk Delete job is displayed and in Waiting status.
4. Click this job to view detailed information and edit the settings.
Figure 18: The AvePoint Timeline Starred Records Bulk Deletion job (Dynamics CRM 2011 environment shown).
5. Click Actions and select Modify Recurrence from the drop-down list.
24
Timeline Enterprise for Microsoft Dynamics CRM Install and Config Guide
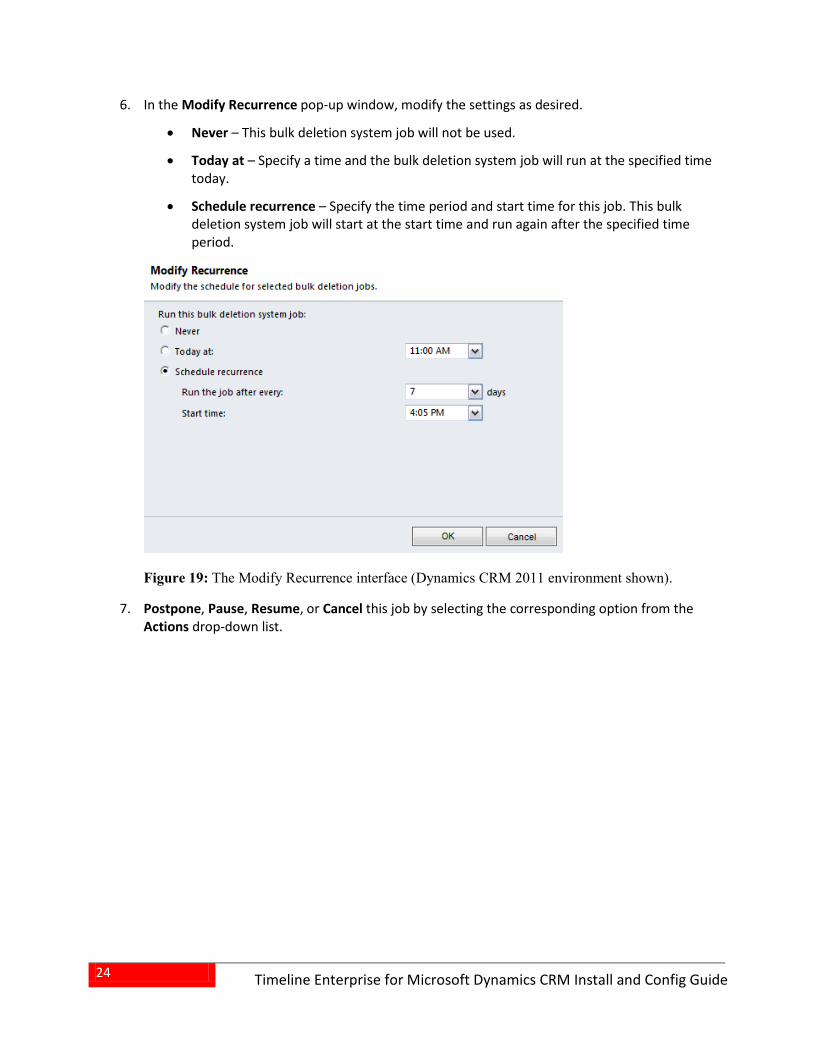
6. In the Modify Recurrence pop-up window, modify the settings as desired.
• Never – This bulk deletion system job will not be used.
• Today at – Specify a time and the bulk deletion system job will run at the specified time today.
• Schedule recurrence – Specify the time period and start time for this job. This bulk deletion system job will start at the start time and run again after the specified time period.
7. Postpone, Pause, Resume, or Cancel this job by selecting the corresponding option from the Actions drop-down list.
25
Timeline Enterprise for Microsoft Dynamics CRM Install and Config
Using AvePoint Timeline Enterprise You can use AvePoint Timeline Enterprise for thirty days for free. After that, contact an AvePoint representative for assistance with purchasing an Enterprise license.
For more information on how to use AvePoint Timeline Enterprise, refer to the AvePoint demo video site here: http://www.avepoint.com/resources/etutorials/
Timeline Enterprise for Microsoft Dynamics CRM Install and Config Guide
Notices and Copyright Information Notice The materials contained in this publication are owned or provided by AvePoint, Inc. and are the property of AvePoint or its licensors, and are protected by copyright, trademark and other intellectual property laws. No trademark or copyright notice in this publication may be removed or altered in any way.
Trademarks AvePoint®, DocAve®, the AvePoint logo, and the AvePoint Pyramid logo are registered trademarks of AvePoint, Inc. with the United States Patent and Trademark Office. These registered trademarks, along with all other trademarks of AvePoint used in this publication are the exclusive property of AvePoint and may not be used without prior written consent.
Microsoft, MS-DOS, Internet Explorer, Microsoft Office SharePoint Servers 2007/2010/2013, SharePoint Portal Server 2003, Windows SharePoint Services, Windows SQL server, and Windows are either registered trademarks or trademarks of Microsoft Corporation.
Adobe Acrobat and Acrobat Reader are trademarks of Adobe Systems, Inc.
All other trademarks contained in this publication are the property of their respective owners and may not be used without such party’s consent.
Changes The material in this publication is for information purposes only and is subject to change without notice. While reasonable efforts have been made in the preparation of this publication to ensure its accuracy, AvePoint makes no representation or warranty, expressed or implied, as to its completeness, accuracy, or suitability, and assumes no liability resulting from errors or omissions in this publication or from the use of the information contained herein. AvePoint reserves the right to make changes in the Graphical User Interface of the AvePoint software without reservation and without notification to its users.
AvePoint, Inc. Harborside Financial Center, Plaza 10 3 Second Street, 9th Floor Jersey City, New Jersey 07311 USA